

Sony PM0794 Users Manual

About the User Guide
Thank-you for purchasing this product.
Before Using This Product
ê
Descriptions in the User Guide
ê
Screenshots & Key Labels
ê
Other Notations
ê
Before Using This Product
Read "Safety Precautions" and this guide thoroughly beforehand for proper usage.
Accessible services may be limited by subscription contract conditions.
Descriptions in the User Guide
In the User Guide, most operation descriptions are based on handset at time of purchase.
Unless noted otherwise, descriptions are for Home Screen. Some operation descriptions may be
simplified.
Screenshots & Key Labels
Screenshots in the User Guide may differ in appearance with actual Display. Key labels in the User
Guide are simplified for description purposes and differ with actual Display.
Other Notations
In the User Guide, the product is referred to as "handset."
n microSD
TM
/microSDHCTM/microSDXCTM Card is referred to as "SD Card."
1
Accessing Instructions on Handset
Use Guide application to learn touch operations or making settings.
Launching Guide
ê
Showing Status Bar Indicator
ê
Launching Guide from Notifications Window
ê
Using Guide
ê
Launching Guide
In Home Screen, (SoftBank) (Guide)
Smartphone Guide top window opens.
n If using Smartphone Guide for the first time, Usage notes and Auto Update confirmation appear.
Follow onscreen instructions.
2

Setting Auto Update
In Smartphone Guide top screen, Auto Update on/off Back
Showing Status Bar Indicator
Set to show the indicator on Status Bar to launch Smartphone Guide.
In Home Screen, (SoftBank) (Guide)
Smartphone Guide top window opens.
n If confirmation appears, follow onscreen instructions.
Indicator
3
on Back
Setting is complete.
4

Launching Guide from Notifications Window
Show Smartphone Guide indicator on Status Bar to check functions quickly from Notifications
Window.
Drag Status Bar down
Notifications Window opens.
Tap here for Guide
5

Smartphone Guide top window opens.
Checking Operations from Notifications Window
For some applications/functions, operation description appears by launching
Smartphone Guide from Notifications Window while the application/function is activated.
n Set to show the Guide indicator on Status Bar beforehand.
n If operation does not appear, Smartphone Guide top window opens instead.
6
Using Guide
Item
Description
Enter Keyword
Search for Smartphone Guide.
search is also available.
FAQ
Check FAQ. Or access FAQ mobile web page.
Open Guide Check operations for usage purpose. Voice
7
Part
Description
calling.
available headphones.
voice here.
while charging.
Front Camera
Capture yourself.
call.
Display.
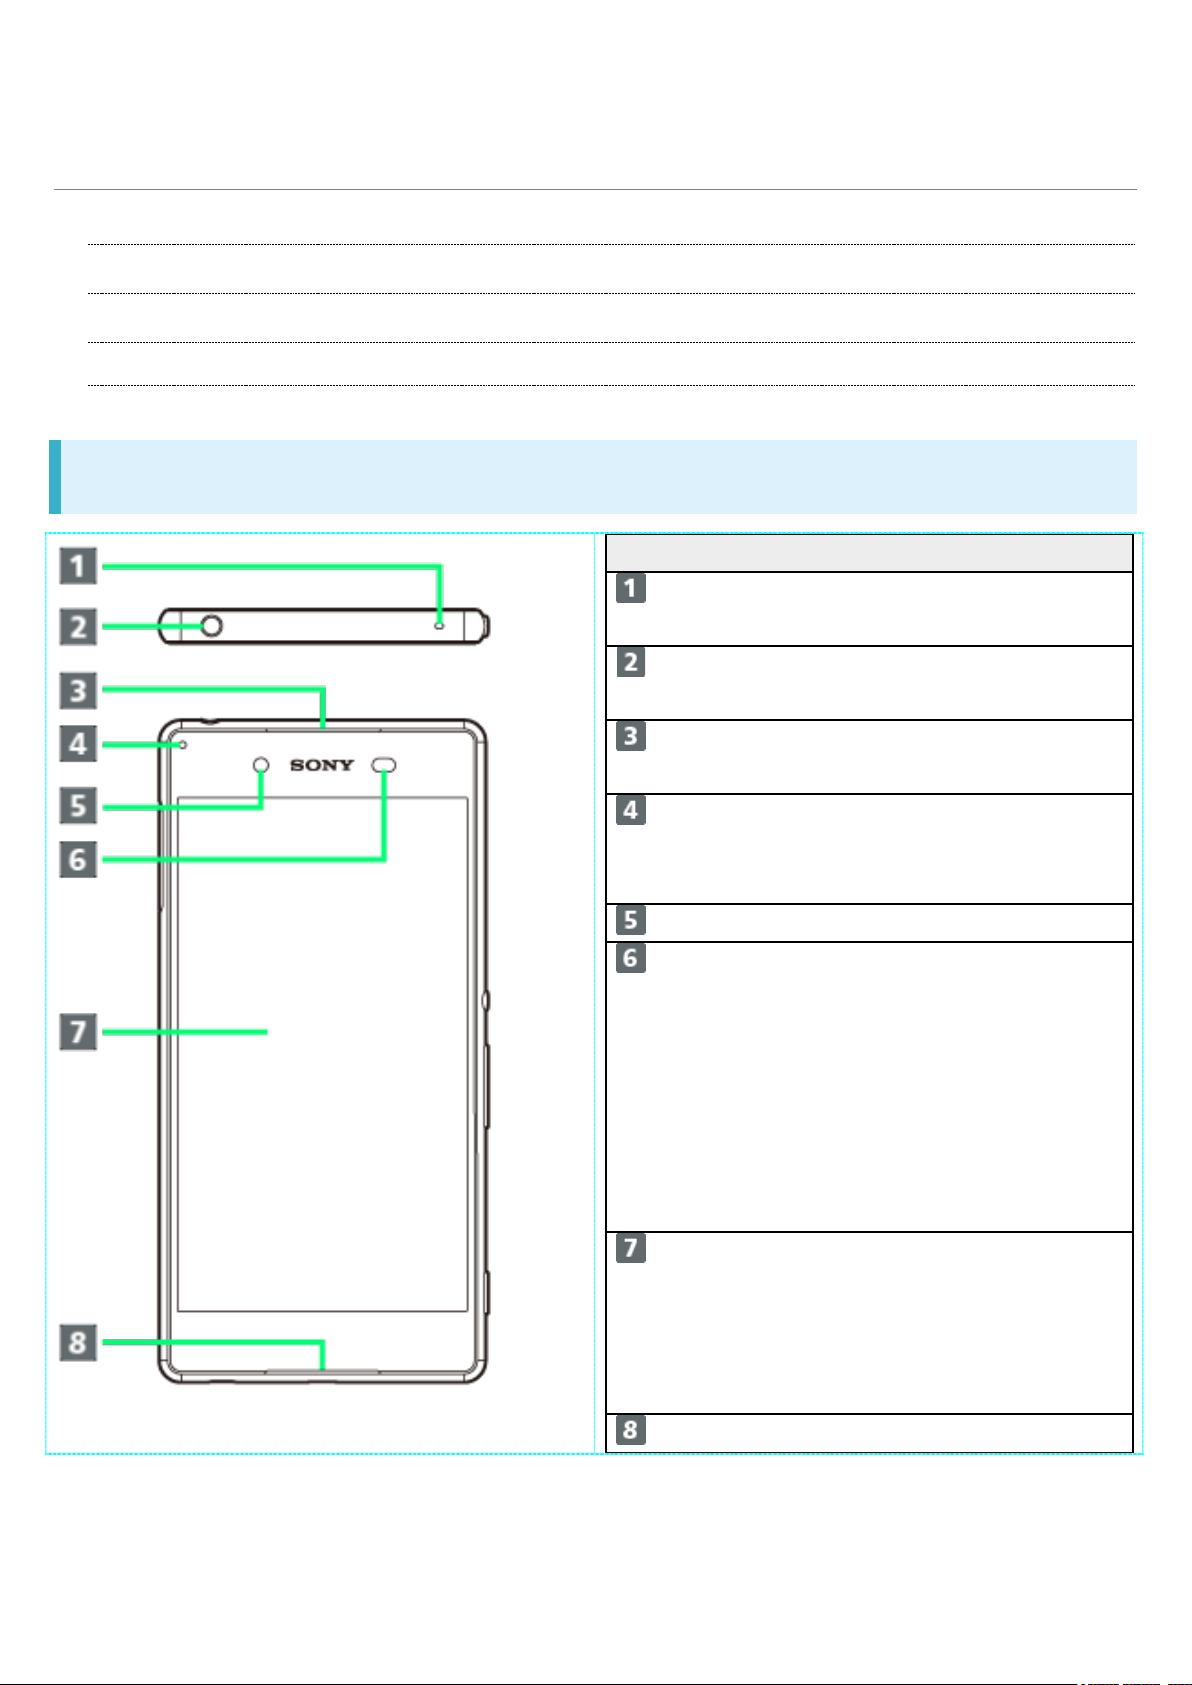
Mic/Speaker
Speak here.
Parts & Functions
Handset
ê
Keys
ê
Desktop Holder
ê
Handset
Second Mic Reduces noise for
Headphone Port Connect commercially
Earpiece Hear the other party's
Notification Lamp Flashes for incoming
transmissions. Lights
Proximity Sensor Detects surrounding
brightness to
automatically adjust
Display or backlight
and prevent
Touchscreen
misoperation during a
1
Display Handset uses a
touchscreen-type
Display. Operate with
your fingers on
Part
Description
and videos.
a dark place.
feature.
Antenna A rea
Wi-Fi and Bluetooth®.
GPS.
remove nameplate.
Area
Wi-Fi.
communication.
Slot
Card.
Cable etc.
Strap Hole
Attach strap.
Camera Capture still images
Flash/Photo Light Use as camera flash in
NFC Mark Hold mark up to
reader/writer to use
NFC/Osaifu-Keitai®
Wi-Fi/Bluetooth®
Internal
Antenna/GPS
Antenna A rea
Nameplate CE mark, FCC ID,
Wi-Fi Antenna
Internal Antenna
Area
Internal Antenna for
Internal Antenna for
calls, data
communication, and
IMEI information
printed sticker is
attached. Do not
Internal Antenna for
Internal Antenna for
call and data
2
SIM Card/SD Card
External Device
Port
Insert SIM Card/SD
Connect commercially
available Micro USB

Part
Description
( )
Key
Ke y ( )
Long Press to launch Camera.
Part
Description
with Desktop Holder.
Desktop Holder.
Magnet Contact
Connect handset.
Attachment.
accessory).
Attachment 45B
Charge
Keys
Power
Key/Screen
Lock Key
Volume/Zoo
m Up/Down
Camera
Long Press for power on/off.
Press for sleep mode on/off.
Adjust Volume.
Adjust Zoom while using
Camera.
Use as Camera shutter.
Desktop Holder
Attachment 45A Use when charging
Terminals Contact with handset
Charging Terminal for
Recess Use for removing
Charging Port Connect plug of AC
Charger (optional
3

Holder.
cover-attached
handset with Desktop
CE mark and FCC ID
Open the slot cover, and insert a fingernail into the hook at the edge of the label tray,
then pull it out straight.
4
SIM Card
SIM Card is an IC card containing phone number and other customer information.
Handling SIM Card
ê
Inserting SIM Card
ê
Removing SIM Card
ê
Handling SIM Card
n Customer is responsible for any damage caused by inserting SIM Card in an IC card reader, etc.
of another brand.
n SoftBank Mobile Corp. is not responsible in such case.
n Always keep the IC chip clean.
n Avoid applying labels. May damage SIM Card.
n See instructions included with SIM Card for handling.
n SIM Card is the property of SoftBank Mobile Corp.
n SIM is replaceable (at cost) in case of loss/damage.
n Return SIM Card to SoftBank Mobile Corp. when canceling subscription.
n Returned SIM Cards are recycled for environmental purposes.
n Note that SIM Card specifications and performance may change without notice.
n It is recommended that you keep a separate copy of information that is stored on SIM Card.
SoftBank Mobile Corp. is not responsible for damages from stored information that is lost.
n Always follow emergency procedures to suspend service if your SIM Card or handset (SIM Card
inserted) is lost/stolen. For details, contact Customer Service.
n Always power off handset before inserting/removing SIM Card.
5
①
IC chip
Inserting SIM Card
Always power off beforehand.
Open Slot Cover using groove
Draw Tray out using the tab
6
Set SIM Card into Tray with IC chip facing up
n Check SIM Card orientation by notch.
Insert Tray with SIM Card into handset
n Pay attention to Tray orientation.
Close Slot Cover and press it down where indicated ○, and make sure there are no
7
gaps
Removing SIM Card
Always power off beforehand.
Open Slot Cover using groove
Draw Tray out using the tab
8

Remove SIM Card from Tray
Insert Tray into handset
9
n Pay attention to Tray orientation.
Close Slot Cover and press it down where indicated ○, and make sure there are no
gaps
10
Internal Memory and SD Card
Save data to handset memory or SD Card.
Handset supports SD Cards up to 128 GB. Some SD Cards may not operate properly.
Inserting SD Card
ê
Unmounting SD Card
ê
Removing SD Card
ê
Formatting SD Card
ê
SD Card Cautions
Data
Information stored on SD Card can become lost or changed accidentally or as a result of damage. It is
recommended that you keep a separate copy of important data. SoftBank Mobile Corp. is not
responsible for damages from data that is lost or changed.
Reading/Writing Data
Never power off while reading or writing data.
Battery Level
A low battery charge may prevent reading/writing to SD Card.
Handling SD Card
Use/store SD Cards away from the reach of infants. May cause choking if swallowed.
Inserting SD Card
Open Slot Cover using groove
11
Slowly insert SD Card straight with metal chip facing down until it clicks
n Insert only SD Cards.
Close Slot Cover and press it down where indicated ○, and make sure there are no
gaps
12
Unmounting SD Card
Always unmount SD Card before removing.
In Home Screen, (Settings)
13
Storage
Unmount SD card OK
Item name changes from Unmount SD card to Mount SD card. SD Card is unmounted.
14

Removing SD Card
Always unmount SD Card beforehand.
Open Slot Cover using groove
Push SD Card until it clicks and pull it out
15
Close Slot Cover and press it down where indicated ○, and make sure there are no
gaps
Formatting SD Card
When using a new SD Card for the first time, always format it on handset.
n Formatting erases all data on SD Card. Carefully check any SD Card that was used on another
device before formatting.
n Charge Battery while formatting, or format with adequate battery charge.
In Home Screen, (Settings)
16

Storage
17

Erase SD card
Erase SD card
18

Erase everything
All data on SD Card is erased.
19
Charging Battery
Charging with AC Charger
ê
Charging with Desktop Holder
ê
Removing Adapter Attachment
ê
Charging with AC Charger
AC Charger is an optional accessory. Use specified AC Charger (Micro USB 1.0A) (ZTDAC1) or AC
Charger (Micro USB 1.8A) (ZTDAD1).
For other devices, see the SoftBank Mobile Web page.
Open External Device Port Cover using gap
Insert Micro USB connector of AC Charger straight into External Device Port
20
n Pay attention to connector orientation. Forcible connection may cause damage.
Raise power plug of AC Charger to plug into power outlet
Notification Lamp on handset lights up when charging starts.
When charging is complete, unplug AC Charger and remove straight from handset
21

Close Slot Cover and press it down firmly, and make sure there are no gaps
Charging with Desktop Holder
Use included Desktop Holder (SOEAB1) and specified AC Charger (Micro USB 1.0A) (ZTDAC1) or
AC Charger (Micro USB 1.8A) (ZTDAD1).
For other devices, see the SoftBank Mobile Web page.
Insert Micro USB connector of AC Charger into the charging port on back side of
Desktop Holder
n Pay attention to connector orientation. Forcible connection may cause damage.
Raise power plug of AC Charger to plug into power outlet
22

Place handset in Desktop Holder and move left or right until it clicks
Once correctly placed, Notification Lamp lights.
When charging is complete, lift handset while holding Desktop Holder and remove it
Unplug AC Charger and remove from Desktop Holder
23
 Loading...