

Page 1
Startup guide
Xperia™ T2 Ultra
D5303/D5306
Sony Mobile Communications AB
SE-221 88 Lund, Sweden
www.sonymobile.com
1279-8618.1
Welcome
Important Information
Before you use your device, please read the
Important
Information
provided in your device regarding warranty,
safety and handling information.
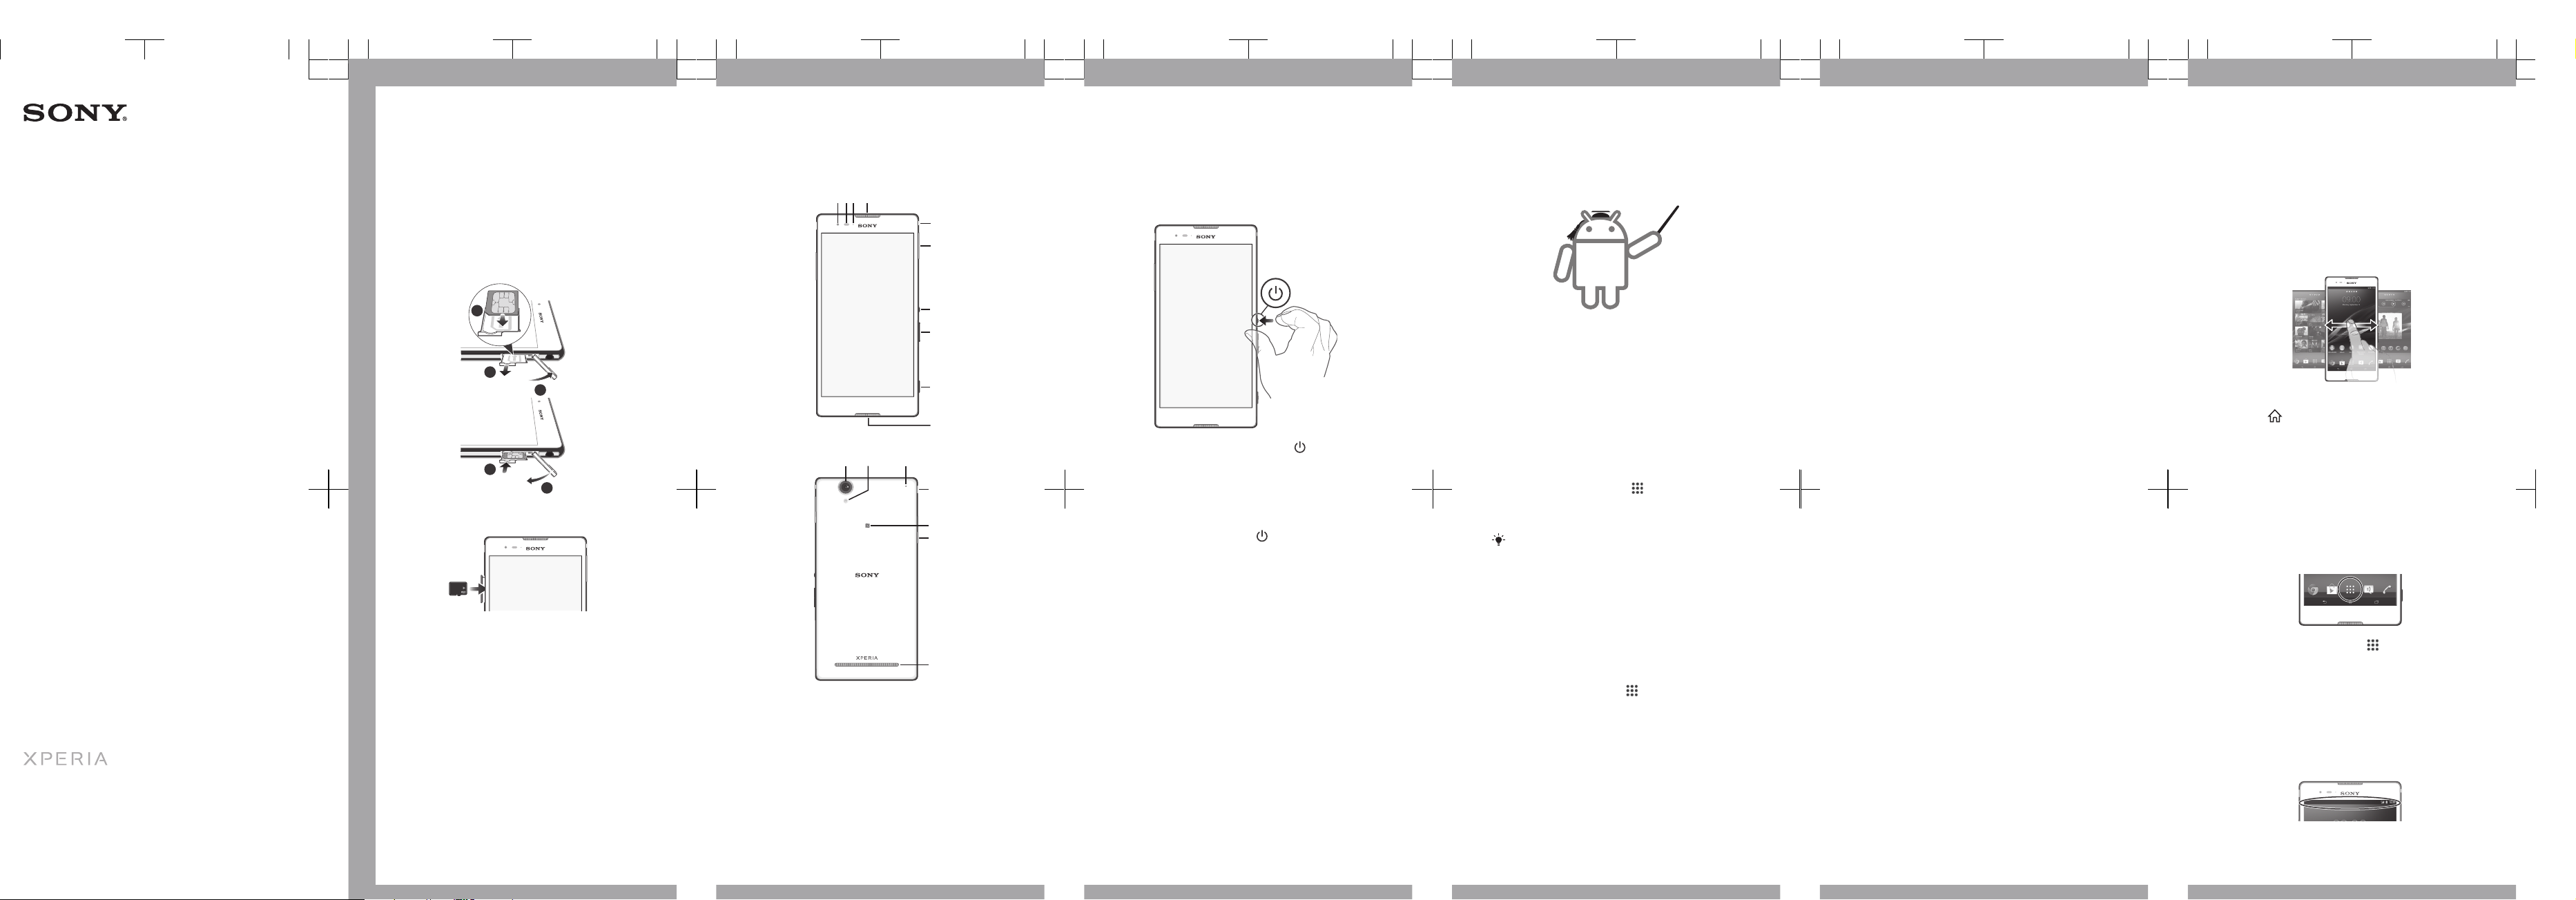
Assembly
To insert the micro SIM card
1
2
3
5
4
To insert a memory card
Basics
Overview
14
5
8
9
10
2
7
6
3
11 1312
17
16
15
14
1. Front camera lens
2. Proximity sensor/
Light sensor
3. Charging light/
Notification light
4. Speaker
5. Headset jack
6. Micro SIM card slot
cover
7. Power key
8. Volume/Zoom key
9. Camera key
10. Microphone
11. Main camera lens
12. Camera light
13. Second microphone
14. Charger/USB port cover
15. NFC™ detection area
16. Memory card slot cover
17. Loudspeaker
Turning on the device
Make sure that the battery is charged for at least 30
minutes before you turn on the device for the first time.
To turn on the device
1
Press and hold down the power key until the
device vibrates.
2
Wait a while for the device to start.
Waking up the screen
To activate the screen
•
Briefly press the power key .
To unlock the screen
•
Place a finger on the lower part of the screen and
swipe up or down.
Setting up your
device
What is Android™?
Android is your device's operating system. Since
Android is developed by Google™, your device is
preloaded with several Google™ services, such as
Google Maps™ and Google™ web search. To use
some of the services provided by Google™, you need
a Google account.
Google™ account
With a Google™ account, you can use Gmail™ to send
emails, Hangouts™ to chat with friends, and Google
Play™ to download applications and games, music,
movies and books.
To set up a Google™ account on your device
1
From your Home screen, tap
.
2
Find and tap Settings > Add account > Google.
3
Follow the registration wizard to create a Google™
account, or sign in if you already have an account.
You can also sign in to or create a Google™
account from the setup guide the first time you
start your device. Or you can go online and create
an account at
www.google.com/accounts
.
Basic settings
The first time you start your device, a setup guide
explains basic device functions and helps you enter
essential settings. You can also access the setup guide
later.
To access the setup guide manually
1
From the Home screen, tap
.
2
Tap Settings > Setup guide.
Transferring your
contacts
Xperia™ Transfer and Contacts Setup are applications
within the PC Companion and the Sony™ Bridge for
Mac computer programs that help you to collect
contacts from your old device and transfer them to
your new device. These applications support several
device brands, including iPhone, Samsung, HTC,
BlackBerry, LG, Motorola and Nokia.
You need:
•
An Internet-connected computer.
•
A USB cable for your old device.
•
A USB cable for your new Android™ device.
•
Your old device.
•
Your new Android™ device.
To install PC Companion on a PC
1
Make sure the Install software checkbox under
Settings > Xperia™ Connectivity > USB
Connectivity is marked.
2
Connect your device to a PC using a USB cable.
3
Device: Tap Install.
4
Computer: The PC Companion installer starts
automatically after a few seconds. Follow the onscreen instructions to install PC Companion.
To install Sony™ Bridge for Mac on an Apple
®
Mac® computer
1
Make sure the Install software checkbox under
Settings > Xperia™ Connectivity > USB
Connectivity is marked.
2
Connect your device to an Apple® Mac® computer
using a USB cable.
3
Device: Tap Install.
4
Computer: The Sony™ Bridge for Mac installer starts
automatically after a few seconds. Follow the onscreen instructions to complete the installation.
To transfer contacts to your new device
1
Make sure that PC Companion is installed on the PC
or that Sony™ Bridge for Mac is installed on the
Apple® Mac® computer.
2
Open the PC Companion application or the Sony™
Bridge for Mac application, then click
Xperia™
Transfer
or
Contacts Setup
and follow the
instructions to transfer your contacts.
Finding your way
Home screen
The Home screen is the starting point for using your
device. You can customise it with applications,
widgets, shortcuts, folders, themes, and wallpaper.
You can also add extra panes.
The Home screen extends beyond the regular screen
display width, so you need to flick left or right to view
content in all of the Home screen's panes.
To go to the Home screen
•
Press .
Application screen
The Application screen, which you open from your
Home screen, contains the applications that come preinstalled on your device as well as the applications you
download.
The Application screen extends beyond the regular
screen width, so you need to flick left and right to view
all content.
To open the Application screen
•
From your Home screen, tap .
To open an application
•
From your Home screen or the Application screen,
tap the application.
Status and notifications
The status bar at the top of your screen shows what's
going on in your device. For example, new message
and calendar notifications appear here.
Page 2

Checking notifications and ongoing
activities
You can drag down the status bar to open the
Notification panel and get more information. For
example, you can use the panel to open a new
message or view a calendar event. You can also open
some applications that run in the background, such as
the music player.
To open the Notification panel
•
Drag the status bar downwards.
Using the keys
Back
•
Go back to the previous screen
•
Close the on-screen keypad, a dialog box,
an options menu, the Notification panel, or
an application
Home
•
Go to the Home screen
Task
•
Tap to open a window showing your most
recently used applications and a small apps
bar
More basics
Calling
To make a call by dialling
1
From your Home screen, tap .
2
Find and tap Phone.
3
Enter the number of the recipient and tap .
To end a call
•
Tap
.
To answer a call
•
Drag to the right across the screen.
Multimedia and text
messaging
To create and send a message
1
From your Home screen, tap
, then find and tap
.
2
Tap
.
3
Tap
, then tap Add recipient and select a contact
from the Contacts list. If the recipient is not listed as
a contact, enter the recipient's number manually and
tap
.
4
When you are finished adding recipients, tap Done.
5
Tap Write message and enter your message text.
6
If you want to add a media file, tap
and select an
option.
7
To send the message, tap Send.
Settings menu
View and change settings for your device from the
Settings menu.
To access your device settings
1
From your Home screen, tap
.
2
Find and tap Settings.
Troubleshooting
My device is not responding
If your device hangs, or if you cannot restart it
normally, you can force the device to shut down.
To force the device to shut down
1
2
1
Detach the cover of the micro SIM card slot.
2
Using the tip of a pen or a similar object, press and
hold down the OFF button until the device shuts
down.
Do not use overly sharp objects that could damage
the OFF button.
Legal information
SonyD5303/D5306
Google Play™ is not available in all countries. Some of the services and
features described in this Startup guide are not supported in all countries/
regions or by all networks and/or service providers in all areas. Without
limitation, this applies to the GSM International Emergency Number 112.
Please contact your network operator or service provider to determine
availability of any specific service or feature and whether additional access or
usage fees apply.
This Startup guide is published by Sony Mobile Communications AB or its
local affiliated company, without any warranty. Improvements and changes to
this Startup guide necessitated by typographical errors, inaccuracies of
current information, or improvements to programs and/or equipment, may be
made by Sony Mobile Communications AB at any time and without notice.
Such changes will, however, be incorporated into new editions of this Startup
guide.
© 2014 Sony Mobile Communications AB. All rights reserved.
Publication number: 1279-8618.1
Your device has the capability to download, store and forward additional
content, e.g. ringtones. The use of such content may be restricted or
prohibited by rights of third parties, including but not limited to restriction
under applicable copyright laws. You, and not Sony, are entirely responsible
for additional content that you download to or forward from your device. Prior
to your use of any additional content, please verify that your intended use is
properly licensed or is otherwise authorized. Sony does not guarantee the
accuracy, integrity or quality of any additional content or any other third party
content. Under no circumstances will Sony be liable in any way for your
improper use of additional content or other third party content.
This Startup guide may reference services or applications provided by third
parties. Use of such programming or services may require separate
registration with the third party provider and may be subject to additional
terms of use. For applications accessed on or through a third-party website,
please review such websites’ terms of use and applicable privacy policy in
advance. Sony does not warrant or guarantee the availability or performance
of any third-party websites or offered services.
See regulatory information such as the CE mark in the label tray of the
device.
All product and company names mentioned herein are the trademarks or
registered trademarks of their respective owners. Any rights not expressly
granted herein are reserved. All other trademarks are property of their
respective owners.
Visit
www.sonymobile.com
for more information.
All illustrations are for illustration only and may not accurately depict the
actual device.
This product is protected by certain intellectual property rights of Microsoft.
Use or distribution of such technology outside of this product is prohibited
without a license from Microsoft.
Product compliance: This product has been manufactured by or on behalf of
Sony Mobile Communications, Mobilvägen, SE-221 88 Lund, Sweden.
Inquiries related to product compliance based on national legislation shall be
addressed to Sony Mobile Quality Officer, Sony Mobile Communications AB,
Mobilvägen, SE-221 88 Lund, Sweden. For any service or guarantee matters,
please refer to the contact details provided in the separate service or
guarantee documents.
FCC Caution: Your device can only connect to an FCC approved access
point when using 5 GHz WLAN for indoor and outdoor operation. This is
because operation in the 5.15 GHz to 5.25 GHz frequency band is only
permitted for indoor use.
To view the CE mark and the FCC ID
2
1
3
4
2
1
Make sure your device is turned off, then detach the
cover of the micro SIM card slot.
2
Remove the micro SIM card and the card holder.
3
Insert a sharp object (such as a pen with a fine tip)
into the hole in the label tray, then drag the tray out
gently at an upwards angle. The FCC ID is now
viewable.
4
To view the CE mark, turn the label tray over and
peel away the label.
The FCC ID is not available in all markets.
Our support to you –
Xperia™ Care
User guide
A User guide for your device is available at
www.sonymobile.com/support
.
Support in your device
Get user support directly in your device using the
Support application.
To access the Support application
1
From your Application screen, find and tap
.
2
Find and tap the required support item.
Support on the web
Visit
www.sonymobile.com/support
to access a range
of support and get the most from your device.
Customer support
Customer support – if all else fails. Access the relevant
support number at
www.sonymobile.com
by clicking
the Contact us link at the bottom of the page.
Learn more
Learn more about how we can support you with
Xperia™ Care at
www.sonymobile.com/support
.
www.sonymobile.com
 Loading...