

Page 1

Add-on
Application
Guide
4-664-966-11(1)
Chapter 1
PictureGear Pocket
Chapter 2
PhotoStand
Chapter 3
CLIÉ Paint
Chapter 4
gMovie player
Chapter 5
World Alarm Clock
Personal Entertainment Organizer
PEG-SL10/PEG-SJ20/PEG-SJ30
© 2002 Sony Corporation
Chapter 6
Memory Stick Autorun
Chapter 7
Memory Stick Import/
Export
Chapter 8
Additional information
Page 2

RECYCLING LITHIUM-ION BATTERIES
Lithium-Ion batteries are
recyclable.
You can help preserve our
environment by returning
your used rechargeable
batteries to the collection and recycling
location nearest you.
For more information regarding
recycling of rechargeable batteries, call
toll free 1-800-822-8837, or visit
http://www.rbrc.org/
Caution: Do not handle damaged or
leaking lithium-ion batteries.
On the supplied software
• Copyright laws prohibit reproducing
the software or the software manual in
whole or in part, or renting the software
without the permission of the copyright
holder.
• In no event will SONY be liable for any
financial damage or loss of profits,
including claims made by third parties,
arising out of the use of the software
supplied with this player.
• In the event a problem occurs with this
software as a result of defective
manufacturing, SONY will replace it at
SONY’s option or issue a refund.
However, SONY bears no other
responsibility.
• The software provided with this player
cannot be used with equipment other
than that which it is designated for use
with.
• Please note that, due to continued
efforts to improve quality, the software
specifications may be changed without
notice.
• The software library incorporated in
CLIÉ™ handheld is based in part on the
work of the Independent JPEG Group.
Program © 2002 Sony Corporation, © 2002
Palm, Inc., or its subsidiaries. All rights
reserved.
Documentation © 2002 Sony Corporation
Sony, Memory Stick, the Memory Stick logo,
Jog Dial, OpenMG, and PictureGear are
trademarks of Sony Corporation.
Graffiti, HotSync, and Palm OS are
registered trademarks, and the HotSync logo
and Palm are trademarks of Palm, Inc. or its
subsidiaries.
IBM and PC/AT are registered trademarks
of International Business Machines
Corporation.
Microsoft, Windows, Windows NT, Outlook
and the Windows 98 logo are registered
trademarks of Microsoft Corporation.
MMX and Pentium are registered
trademarks of Intel Corporation.
Pumatech, the Pumatech logo, Intellisync
and Intellisync Lite are trademarks of
Pumatech, Inc. that may be registered in
some jurisdictions.
Adobe and Adobe Acrobat Reader are
trademarks of Adobe Systems Incorporated.
QuickTime and the QuickTime logo are
trademarks used under license. QuickTime
is registered in the U.S. and other countries.
This product includes fonts owned by
TypeBank Co., Ltd. under license.
All other trademarks are trademarks of their
respective owners.
CAUTION
Please contact your nearest Sony dealer
regarding the problem you are experiencing
with your Sony product.
2
Page 3

Table of Contents
About the manuals...........................5
Manuals supplied with your CLIÉ
handheld ........................................... 5
About the models described in the
supplied manuals .............................. 6
Chapter 1
Viewing image files
(PictureGear Pocket)
What you can do with
PictureGear Pocket .......................... 8
Installing .......................................... 9
Installing the PictureGear 4.6Lite
software on your computer ............... 9
Viewing image files stored in
your CLIÉ handheld ........................ 10
Transferring image files to
your CLIÉ handheld..........................10
Viewing image files with
your CLIÉ handheld..........................12
Viewing image files stored in
Memory Stick media ...................... 16
Copying image files ....................... 18
Saving image files stored on your CLIÉ
handheld to Memory Stick media
(Export)............................................18
Saving image files stored on a
Memory Stick media to your CLIÉ
handheld (Import)............................19
Beaming image files ........................ 20
Managing Image files .................... 21
Categorizing image files .................. 21
Attaching comments to
image files ....................................... 22
Deleting image files .........................22
Viewing sample image files ...........23
PictureGear Pocket menu items..... 24
Photo list screen .............................. 24
Image file screen ............................. 25
Chapter 2
Displaying image files one after
another (PhotoStand)
What you can do with
PhotoStand .................................... 28
Using PhotoStand .......................... 29
Making a PhotoStand setting .......... 29
Starting PhotoStand ........................ 31
PhotoStand menu items................. 32
Chapter 3
Drawing on image files
(CLIÉ Paint)
What you can do with CLIÉ Paint ... 34
Starting CLIÉ Paint ......................... 35
Drawing with CLIÉ Paint ................ 36
Elements of the edit screen ............. 36
Painting with the tools .................... 38
Saving edited images .................... 40
Saving edited image files on
your CLIÉ handheld..........................40
Chapter 4
Playing a movie (gMovie player)
What you can do with
gMovie player ................................ 42
Installing ........................................ 43
Installing the PictureGear 4.6Lite
software on your computer ............. 43
Playing movies with your CLIÉ
handheld ........................................ 44
Transferring movies to your CLIÉ
handheld ......................................... 44
Playing movies.................................46
Continued on next page
3
Page 4

Table of Contents
Playing sample movie files ............ 49
gMovie menu items ....................... 50
Media list screen ............................. 50
Movie file screen ............................. 50
Chapter 5
Viewing the World Alarm Clock
(World Alarm Clock)
What you can do with
World Alarm Clock ......................... 52
Using the World Alarm Clock ......... 53
Viewing world time ......................... 53
Setting the clock alarm ....................54
Stopping the alarm .......................... 57
World Alarm Clock menu items...... 58
Chapter 6
Setting the Memory Stick
automatic start function
(Memory Stick Autorun)
What you can do with
Memory Stick Autorun ...................60
Setting Auto-run for
an application ................................ 61
Setting Auto-run for an application
on the CLIÉ handheld ...................... 61
Setting Auto-run for an application
in Memory Stick media ....................62
Setting Auto-run for an application
specifying its database files in
Memory Stick media ........................62
Using the auto-run function........... 64
Changing the auto-run setting ...... 65
Memory Stick Autorun
menu items .................................... 66
Chapter 7
Copying the data to the Memory
Stick media on your CLIÉ handheld
(Memory Stick Import/Export)
What you can do with Memory Stick
Import/Export................................. 68
Installing ........................................ 69
Installing the Memory Stick Export
software on your computer ............. 69
Installing CLIÉ applications using
Memory Stick Import/Export ......... 70
Using your CLIÉ handheld as a
removable disk .............................. 72
Memory Stick Import
menu items .................................... 73
Chapter 8
Additional information
Index .............................................. 76
4
Page 5

About the manuals
Welcome to the Sony Personal Entertainment Organizer (referred to as
the “Sony CLIÉ Handheld” or “CLIÉ handheld” in this manual).
Your Sony CLIÉ Handheld comes with three manuals:
Manuals supplied with your CLIÉ handheld
Read This First
The Read This First manual gives you an overview of your CLIÉ
handheld’s features, hardware and software setup, installation
instructions, and other important details. Before reading the other
manuals, read the Read This First manual.
Operating Instructions
The Operating Instructions manual describes all you need to know
about how to use your CLIÉ handheld and the Personal Information
Management (PIM) applications that come with it.
This manual shows you how to:
■ Turn on and off your CLIÉ handheld, reset the CLIÉ handheld, and
enter data in greater detail (Chapter 1)
■ Use the Personal Information Management applications: Date
Book, Address Book, To Do List, Memo Pad, and Calculator
(Chapter 2)
■ Perform a HotSync operation with your computer (Chapter 3)
■ Exchange data with another handheld using beaming or Memory
Stick media (Chapter 4)
■ Personalize your CLIÉ handheld with your own preferences
settings (Chapter 5)
■ Back-up data or transfer data into a different CLIÉ handheld,
maintain your CLIÉ handheld and use the Troubleshooting guide
and other technical information (Chapter 6)
Continued on next page
5
Page 6

About the manuals
Add-on Applications Guide (this manual)
The Add-on Applications Guide describes how to install and use the
supplied add-on applications, including;
■ PictureGear
■ PhotoStand
■ CLIÉ Paint
■ gMovie
■ World Alarm Clock
■ Memory Stick Autorun
■ Memory Stick Import and Memory Stick Export
™
Pocket and PictureGear 4.6Lite
™
and PictureGear 4.6Lite
About the models described in the supplied manuals
Three supplied manuals all describe the operations for three models of
the CLIÉ handheld (PEG-SL10, PEG-SJ20, and PEG-SJ30).
Following are the major differences of these models:
PEG-SL10
• Two AAA (LR03) batteries
• Monochrome LCD
PEG-SJ20
• Built-in rechargeable battery
• Monochrome LCD
PEG-SJ30
• Built-in rechargeable battery
• Color LCD
Illustrations used in the manuals
All illustrations of the unit and the screen images are of PEG-SJ30
unless specified otherwise. Points of difference among the three
models are described in the relevant sections of the supplied manuals.
Note
Some models described in the supplied manuals are unavailable in some areas.
6
Page 7

Chapter 1
Viewing image files
(PictureGear Pocket)
This chapter describes how to view image files
on your CLIÉ handheld.
Chapter 1
Page 8

What you can do with PictureGear Pocket
PictureGear Pocket is a picture album application for your CLIÉ
handheld.
View and manage still images anytime, anywhere
You can store still image files from various sources, including those
taken with a digital camera or downloaded from the Internet to your
CLIÉ handheld, using the PictureGear Pocket application. The images
can either be stored on your CLIÉ handheld or Memory Stick media,
and you can copy the image files between them as well.
All image files can be sorted into categories, which you can
personalize. You also can add comments to each image.
Use PictureGear Pocket as a photo stand or a clock
Using the PhotoStand function, you can display image files one after
another and may choose to display the current time during the
operation on your CLIÉ handheld screen.
For details, see Chapter 2.
Beam image files
Using IR (Infrared) communication, you can exchange image files
easily with other CLIÉ handheld users. You cannot beam image files to
other Palm OS based devices.
Paste image files to address entries
You can paste images to address entries.
For details, refer to the Operating Instructions manual.
Jump to editing application
The PictureGear Pocket application lets you jump easily to the CLIÉ
Paint application to draw on the image files.
8
Page 9

Installing
You do not have to install the PictureGear Pocket application on
your CLIÉ handheld
The PictureGear Pocket application is pre-installed at the factory. This
section describes how to install the PictureGear 4.6Lite software.
Installing the PictureGear 4.6Lite software on your computer
You can convert the image files stored in your computer using the
PictureGear 4.6Lite software. To view image files or movies with your
CLIÉ handheld, use the PictureGear Pocket application or the gMovie
player.
Insert the Installation CD-ROM into your computer’s CD-
1
ROM drive.
The installation launcher window appears.
Select the model of your CLIÉ handheld (PEG-SL10, PEG-
2
SJ20, or PEG-SJ30).
Click Install CLIÉ Utilities.
3
Click Install CLIÉ Image software.
4
Click Install PictureGear Lite.
5
The PictureGear 4.6Lite software installation starts.
Follow the onscreen instructions to complete the installation.
Chapter 1
PictureGear Pocket
Click Exit.
6
To start the PictureGear software
From the Start Menu, click Programs (All Programs in
Windows® XP), PictureGear 4.6Lite, and PictureGear 4.6Lite.
For details on how to use the PictureGear 4.6Lite software, see the
Help files of the PictureGear 4.6Lite software.
If you already have the PictureGear 5.x software installed on
your computer
Click Install CLIÉ Plug-in for PictureGear 5.x instead of clicking
PictureGear 4.6Lite in step 5 above.
9
Page 10

Viewing image files stored in your CLIÉ handheld
You can transfer image files taken by a digital still camera or
downloaded from the Internet, etc. to your CLIÉ handheld. These
items can be managed using the PictureGear 4.6Lite software on your
computer. You can also optimize the photos for displaying them on
your CLIÉ handheld using PictureGear 4.6Lite software before
transferring them to your CLIÉ handheld.
For details on how to save image files in the format supported by
PictureGear 4.6Lite software, refer to the instruction manual of the
devices or imaging software you are using.
Transferring image files to your CLIÉ handheld
Prepare and format the image files you want to display on your CLIÉ
handheld with the PictureGear 4.6Lite software, and then transfer
them to your CLIÉ handheld.
Note
In PictureGear 5.x and above, it is recommended that the CLIÉ file transfer
options found under the Utility menu be used instead of those under the File
menu.
Start the PictureGear 4.6Lite software.
1
See page 9 for details.
10
Select the image file you want to send.
2
You can also select multiple images by holding down the Ctrl or
Shift keys while clicking.
From the File menu, select Output services and then
3
Install the image during the next HotSync.
The User name dialog box appears.
Note
When transferring images to the CLIÉ handheld using the PictureGear 5.x
software, click Utility instead of File, then click Reserve to install to CLIÉ.
Click the arrow V to the right of the text box, and then
4
select a user name.
If necessary, click “Still settings” and set the size and compression
for the image file you want to send in the Settings for PictureGear
dialog box.
Page 11
Click OK.
5
The image file you want to send and the user name are registered in
PictureGear software.
Connect your CLIÉ handheld to the computer with the
6
supplied USB cable.
On your CLIÉ handheld, rotate the Jog Dial™ navigator to
7
select HotSync and then press the Jog dial navigator. Or,
tap the HotSync icon on the Application Launcher
screen.
The HotSync screen appears on your CLIÉ handheld.
Tap the HotSync icon.
8
The registered image file(s) are automatically sent to your CLIÉ
handheld during the HotSync operation.
To save an image file to a Memory Stick media
You can also transfer image files directly to a Memory Stick media.
Install the Memory Stick Export software on your computer
beforehand (page 69).
Connect your CLIÉ handheld to the computer with the
1
Memory Stick Export software installed, using the
supplied USB cable.
Chapter 1
PictureGear Pocket
Insert a Memory Stick media into your CLIÉ handheld.
2
On the Application Launcher screen of your CLIÉ
3
handheld, rotate the Jog Dial navigator to select MS
Import and press the Jog Dial navigator. Or, tap the MS
Import icon on the Application Launcher screen.
The Memory Stick Import application starts.
Start the PictureGear 4.6Lite software on your computer.
4
Select the desired image on the PictureGear 4.6Lite
5
software.
Continued on next page
11
Page 12
Viewing image files stored in your CLIÉ handheld
From the File menu on the same screen, click Output
6
services, then select “Output CLIE Handheld format file
to MemoryStick.”
The “Output CLIE Handheld format file to MemoryStick” dialog
box appears.
Note
When transferring images to a Memory Stick media using the PictureGear
5.x software, click Utility instead of File, then click Output to Memory Stick
for CLIÉ.
From the list next to Save into drive, select the Memory
7
Stick drive.
Click OK.
8
Viewing image files with your CLIÉ handheld
On the Application Launcher screen, rotate the Jog Dial
1
navigator to select PG Pocket and then press the Jog Dial
navigator. Or, tap the PG Pocket icon on the Application
Launcher screen.
12
The PictureGear Pocket application starts.
Page 13
Tap the arrow V on the top center of the screen to select
2
Internal.
Rotate the Jog Dial navigator to display the desired
3
image file, then press the Jog Dial navigator. Or, tap the
desired image.
The selected image appears.
Chapter 1
PictureGear Pocket
When you want to hide icons displayed at the bottom of
4
your CLIÉ handheld screen, tap (hide icons).
When you want to display them again, tap the screen, or press the
Jog Dial navigator or the BACK button.
When you want to show another image file, rotate the
5
Jog Dial navigator.
Another image file appears.
To return to the photo list screen, tap , or press the
6
BACK button.
To return from the detailed information screen to the image file list
screen, tap Close on the lower right of the screen or press the BACK
button.
13
Page 14
Viewing image files stored in your CLIÉ handheld
Viewing detailed information for the image file
Tap (detailed) while the image file is displayed.
Detailed information for the image file appears.
Magnifying image files
Tap while the image file is displayed.
1
Rotate the Jog Dial navigator to magnify the image file.
2
When you press the Jog Dial navigator, the image file is
automatically magnified on the screen.
If you rotate the Jog Dial navigator counter-clockwise, the image is
magnified. If you rotate the Jog Dial navigator clockwise, the image
is reduced.
If part of the image is outside the bounds of the screen,
3
you can pan by dragging on the screen with your stylus.
To return to the photo list screen, press the BACK
4
button.
Drawing on image files (CLIÉ Paint)
You can draw and paint on a PGP-format image file stored on your
CLIÉ handheld with the CLIÉ Paint application. To start the CLIÉ
Paint application, tap
on the CLIÉ Paint application, see pages 33-40.
while the image file is displayed. For details
14
Page 15
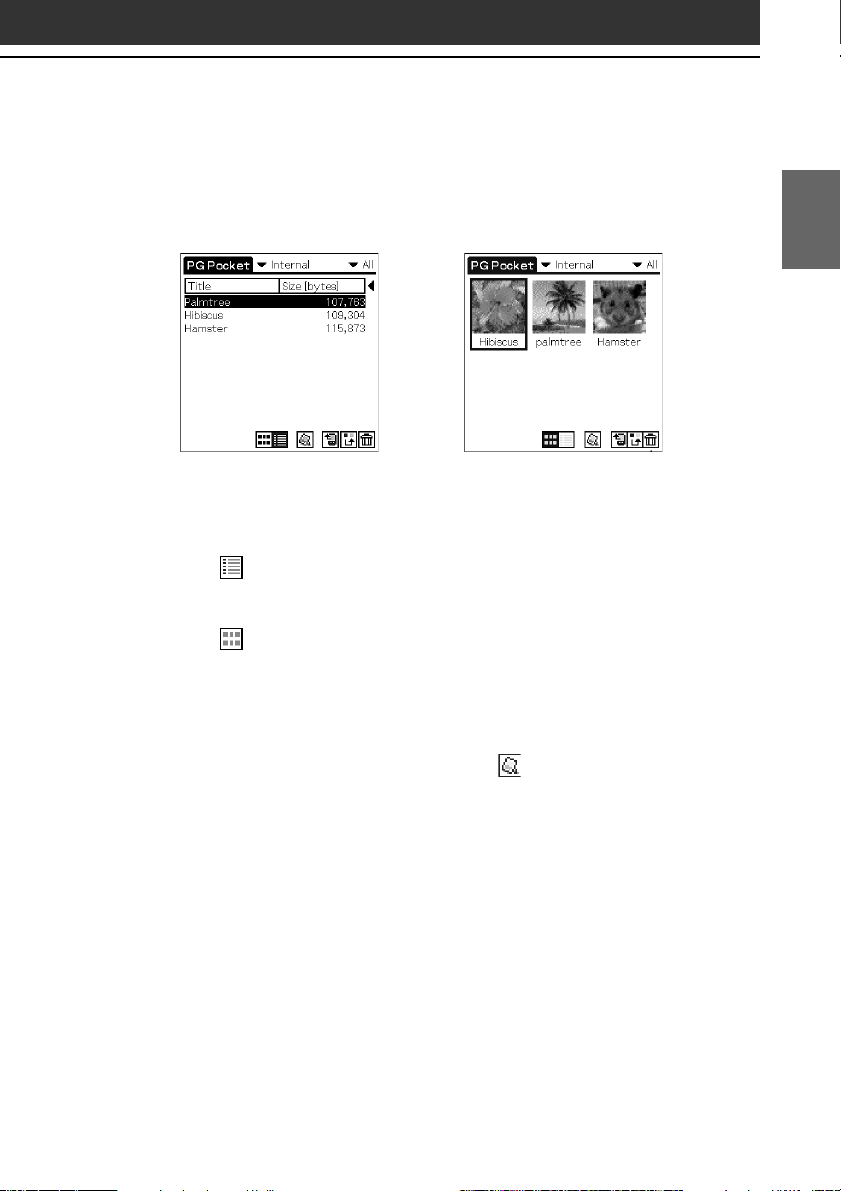
Changing the image file list screen
You can change the image file list screen to display items by name and
date, or by thumbnail image.
Chapter 1
PictureGear Pocket
By name and date
(List mode)
By thumbnail image
(Preview mode)
To display the image file list by name and date (List mode)
Tap .
To display the image file list by thumbnail image (Preview mode)
Tap .
Displaying image files one after another (PhotoStand)
You can make a PhotoStand setting to display the PGP-format image
file stored on your CLIÉ handheld. Tap
select the image file(s) which you want to display with the PhotoStand
application. To start the PhotoStand application, tap PhotoStand and
make your settings. For details on settings and other informations, see
pages 27-32.
in the photo list screen and
15
Page 16
Viewing image files stored in Memory Stick media
Image files shot by a digital still camera or a digital video camera
recorder and recorded on a Memory Stick media are stored in the DCF
(Design rule for Camera File system) format. This format differs from
the PGP format which is the standard for the PictureGear Pocket
application.
You can view both PGP-format image files and DCF-format image files
using the PictureGear Pocket application. In addition, you can convert
DCF-format image files into PGP-format image files, and save them to
your CLIÉ handheld or Memory Stick media.
DCF-format images must be saved on a Memory Stick media as they
cannot be saved on your CLIÉ handheld.
On the Application Launcher screen, rotate the Jog Dial
1
navigator to select PG Pocket and press the Jog Dial
navigator. Or, tap the PG Pocket icon on the Application
Launcher screen.
The PictureGear Pocket application starts.
Insert the Memory Stick media into the Memory Stick
2
slot.
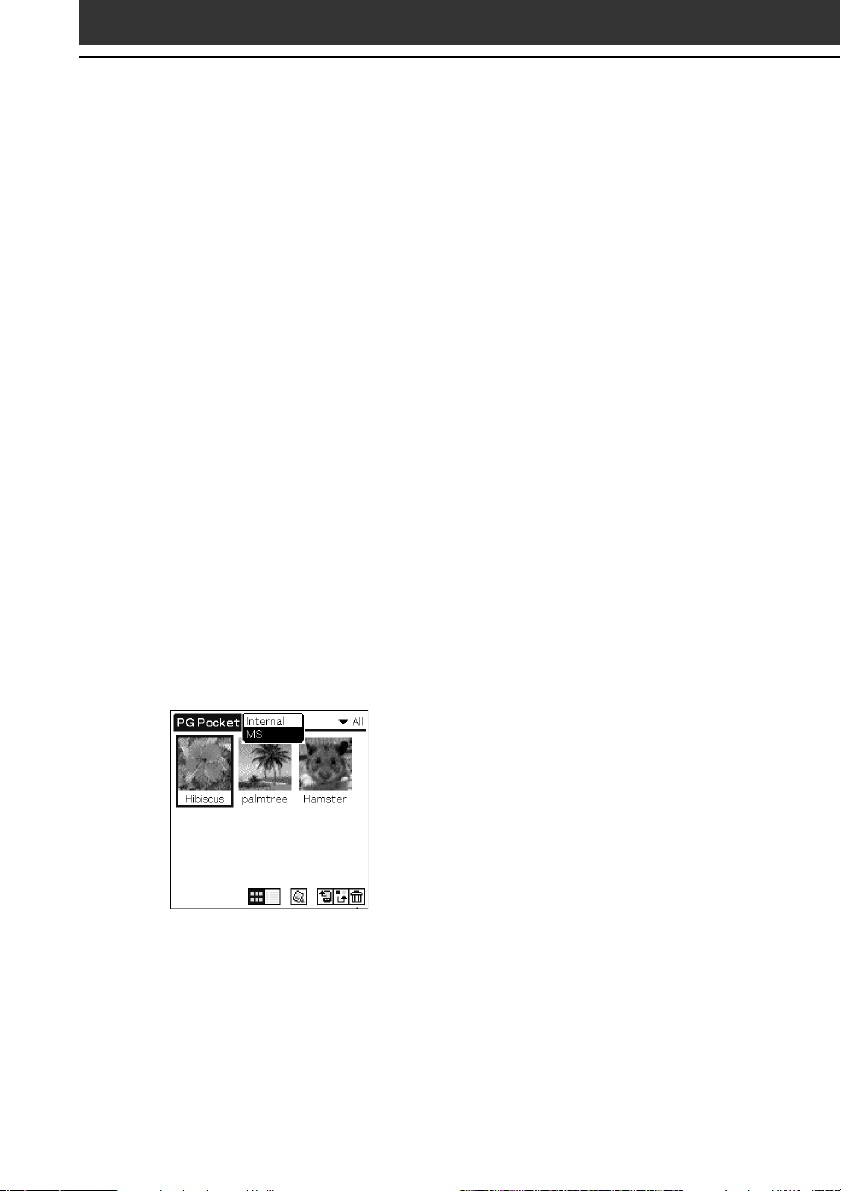
Tap the arrow V on the top center of the screen to select
3
MS.
16
Page 17
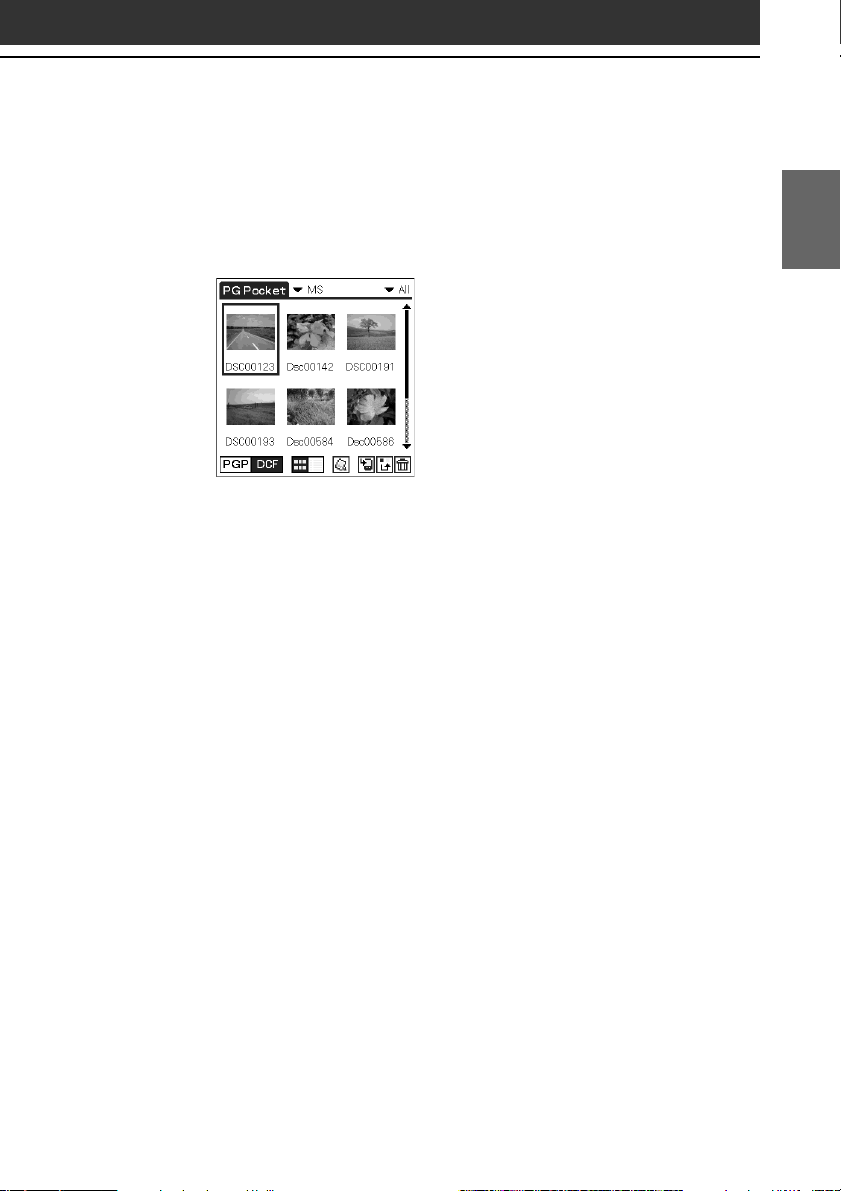
If you want to view DCF image files taken by digital still
4
cameras or etc., tap DCF.
If you want to view image files converted by the PictureGear Pocket
application or the PictureGear 4.6Lite software, tap PGP.
Notes on DCF-format image files
• DCF (Design rule for Camera File system) is an industry standard format for
storing image files established by JEIDA (Japan Electronic Industry
Development Association).
• Using the PictureGear Pocket application, you cannot view image files shot by
a device that does not support the DCF format such as the Sony digital video
camera recorder DCR-TRV9000 or Sony digital still camera DSC-D700/D770.
• DCF-format image files are stored in the DCIM directory of the Memory Stick
media.
• You cannot move, copy, or transfer DCF-format image files using the Memory
Stick Gate application. However, you can convert them into PGP-format image
files using the PictureGear Pocket application, and save them to your CLIÉ
handheld.
• DCF-format image files may take more time to be displayed than PGP-format
image files.
Chapter 1
PictureGear Pocket
17
Page 18
Copying image files
Saving image files stored on your CLIÉ handheld to Memory Stick media (Export)
Display the image file that you want to save (page 12).
1
Tap (Import/Export).
2
The Import/Export dialog box appears.
• Format: Select the format (PGP or DCF) to save the image in.
• Category: To change the category of the image files, tap the
arrow V and select the desired category.
• Delete the original image: To delete the original image file
stored on your CLIÉ handheld, tap to select this check box.
• Print setting (DPOF): To print the image with a DPOF (Digital
Print Order Format)-compatible printer, select DCF format, then
tap to select Print setting (DPOF). The selected image file will be
saved on Memory Stick media in DPOF.
Tap OK.
3
The selected image file is saved to the Memory Stick media.
Note
If you save images marked in DPOF to the Memory Stick media, all DPOF
settings for image files previously stored on the Memory Stick media will be
overwritten and cleared.
To cancel the operation
Tap Cancel in step 3 above.
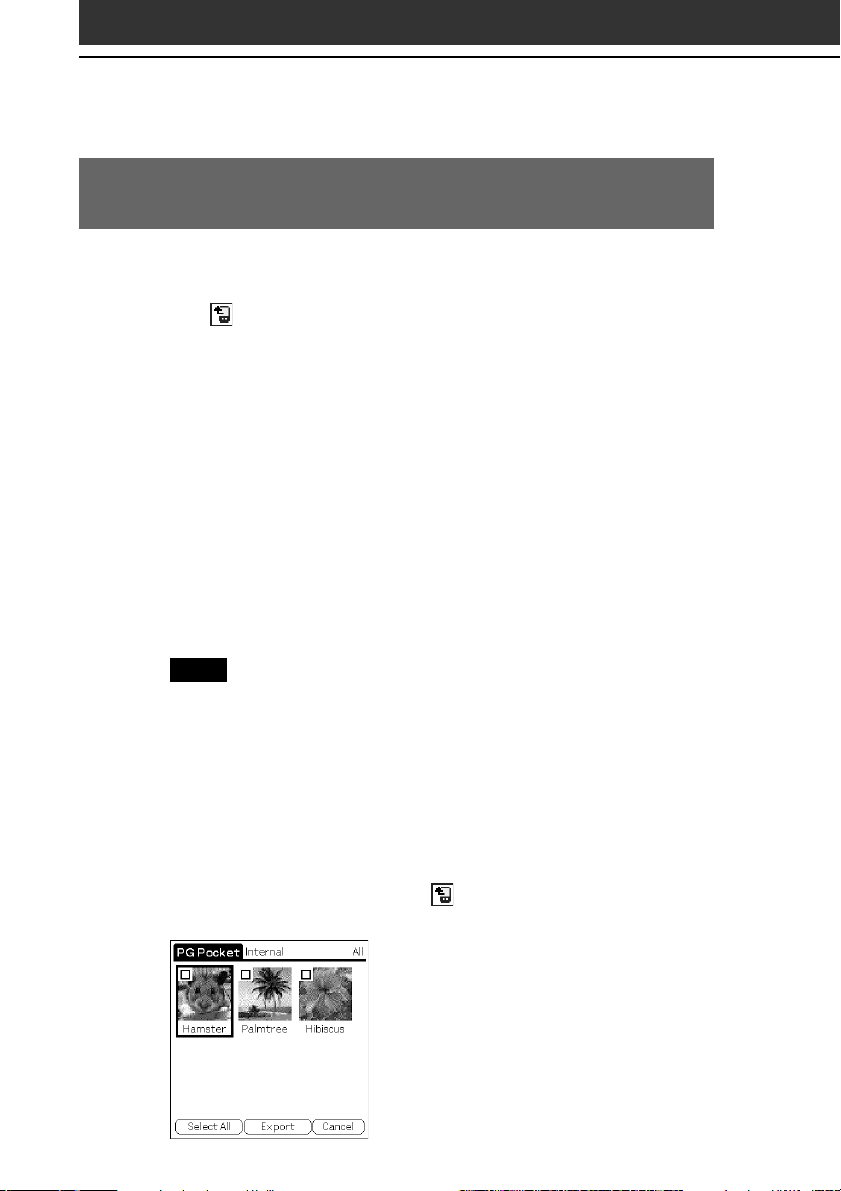
Saving multiple image files to Memory Stick media at once
In the photo list screen, tap (Import/Export).
1
The check boxes used for selecting the image files appear.
18
Page 19

Tap the check boxes to select the image files you want
2
to save.
Tap Export.
3
The Import/Export dialog box appears.
Tap OK.
4
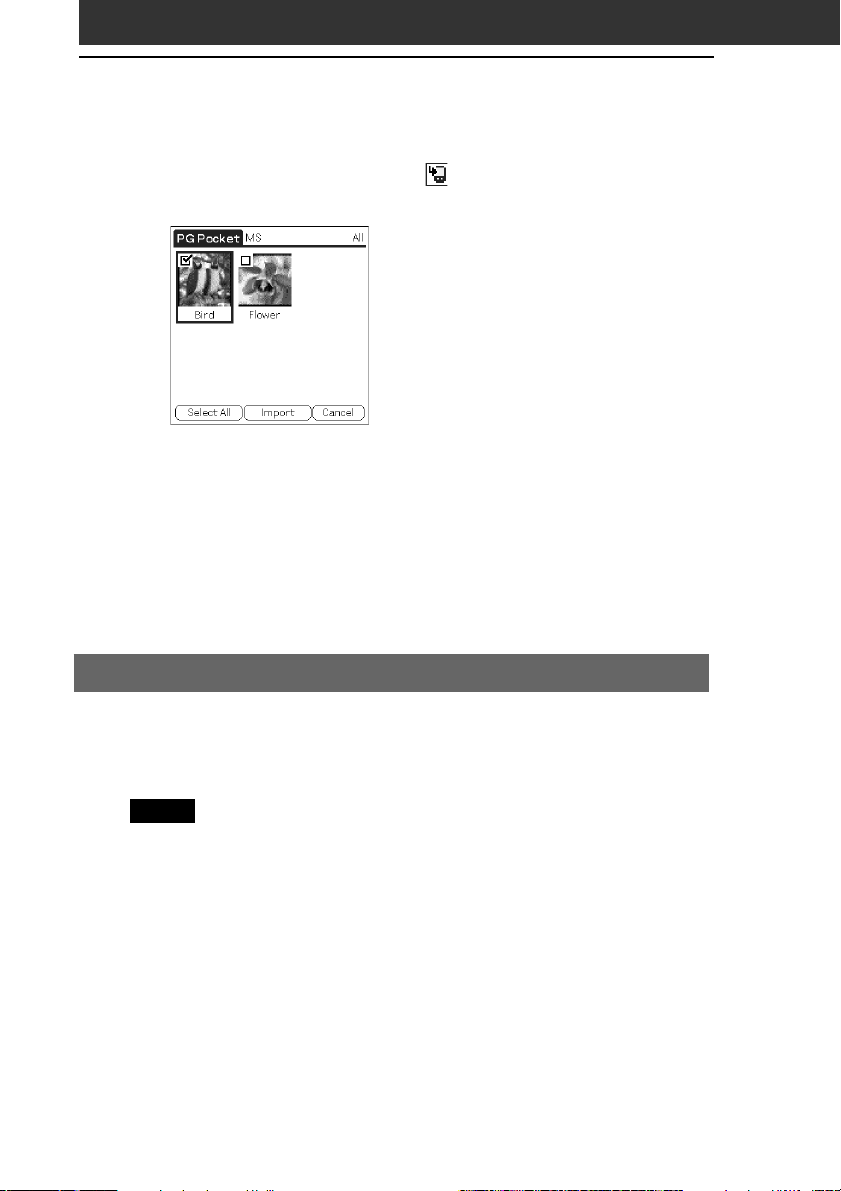
Saving image files stored on a Memory Stick media to your CLIÉ handheld (Import)
With the Import feature, DCF-format image files (for example, images
taken with a digital camera) will be automatically converted into PGP
format when saved on your CLIÉ handheld.
Display the image file in the Memory Stick media that
1
you want to save (page 16).
Tap (Import/Export).
2
The Import/Export dialog box appears.
• Category: To change the category of the image files, tap the
arrow V and select the desired category.
• Delete the original image: To delete the original image file
stored on the Memory Stick media, tap to select this check box.
• Color: Select the color option from 16 bit color (65,536 colors), or
8 bit color (256 colors). This option only appears when the
selected image is in DCF format.
Chapter 1
PictureGear Pocket
Tap OK.
3
If the selected image file is in DCF format, it is converted to the PGP
format and saved to the CLIÉ handheld. Depending on the image
file, this may take a few seconds.
To cancel the operation
Tap Cancel in step 3 above.
Saving multiple image files to your CLIÉ handheld at once
You can copy both DCF- and PGP-format image files from a Memory
Stick media to your CLIÉ handheld with the following procedure. The
DCF image files will be automatically converted into PGP format.
Continued on next page
19
Page 20
Copying image files
In the photo list screen, tap (Import/Export).
1
The check boxes used for selecting the image files appear.
Tap the check boxes to select the image files you want
2
to save.
Tap Import.
3
The Import/Export dialog box appears.
Tap OK.
4
The selected image files are saved to the CLIÉ handheld. Depending
on the image file, this may take a few seconds.
Beaming image files
You can beam PGP-format image files stored on your CLIÉ handheld
or the inserted Memory Stick media to another Palm OS PDA. (You
cannot beam DCF-format image files.)
Notes
• If Beam Receive in the Preferences menu is set to Off, you cannot receive data
using the beaming feature. Before beaming data, make sure to set Beam
Receive to On.
• You can only beam one image file at a time.
• Do not beam a 16-bit image file to a CLIÉ handheld with PictureGear Pocket
Ver.1.x installed, as it is not compatible with 16-bit image files. If you do, the
screen of the receiving handheld goes blank; in such cases, tap the screen to
recover to the state before beaming.
Display the image file that you want to beam (page 12
1
or 16).
Follow the steps in “Beaming Information” in the
2
Operating Instructions manual.
20
Page 21

Managing Image files
Categorizing image files
You can manage image files using categories such as Business or
Personal. You can also create personalized categories.
Tap in the image file list screen.
1
The check boxes used for selecting the image files appear.
Tap the check boxes to select the image file(s) you want
2
to categorize.
Tap Categorize.
3
The confirmation dialog box appears.
Tap the arrow V, and select the desired category.
4
Tap OK.
5
Personalizing categories
Select Edit Categories in step 4 above. The Edit Categories screen is
displayed. Tap New, and enter a name for the new category. You can
always rename the categories by tapping Rename instead of tapping
New.
To delete a category
Select the category you want to delete in the Edit Categories screen,
and tap Delete.
Chapter 1
PictureGear Pocket
21
Page 22

Managing Image files
Attaching comments to image files
You can attach comments to PGP-format image files stored on your
CLIÉ handheld.
Note
You cannot attach comments to image files stored on a Memory Stick media.
Display the image file that you want to enter a comment
1
(page 12).
Tap (details).
2
The Details screen is displayed.
Enter your comment in the Comment field.
3
Tap Close.
4
If you wish to enter comments to other image files, you can tap Prev
or Next here to go to other image files in the same category.
Deleting image files
Tap in the image file list screen and then tap the
1
check boxes to select the image file(s) you want to
delete. Or, tap while the image file is displayed.
Tap Delete.
2
The confirmation dialog box appears.
Tap OK.
3
To cancel deleting
Tap Cancel in step 3 above.
22
Page 23

Viewing sample image files
You can view sample image files installed on your computer.
Install the Palm Desktop for CLIÉ software to your hard disk using the
supplied CD-ROM and then connect your CLIÉ handheld to your
computer using the supplied USB cable.
Double-click the Palm Desktop for CLIÉ icon on the
1
Windows desktop.
The Palm Desktop for CLIÉ software starts.
Click Install.
2
The Install Tool dialog box appears.
Select a user name from the user list.
3
Click Add.
4
Make sure that the Add-on folder is selected.
If the Add-on folder is not selected, select the folder manually.
At the default setup, Add-on folder is stored in the Sony Handheld
folder of the Program Files folder.
Double-click the PGPocket Samples folder.
5
Double-click the sample image file you want to view on
6
the screen of your CLIÉ handheld.
The selected image file name is added to the File Name list.
If you want to view other sample images, repeat this step.
Chapter 1
PictureGear Pocket
Click Done.
7
On your CLIÉ handheld, rotate the Jog Dial™ navigator to
8
select HotSync and then press the Jog dial navigator. Or,
tap the HotSync icon on the Application Launcher
screen.
The HotSync screen appears on your CLIÉ handheld.
Tap the HotSync icon.
9
The selected sample image files will be installed on your CLIÉ
handheld.
Start the PictureGear Pocket application.
10
For details, see page 9.
23
Page 24

PictureGear Pocket menu items
The following items appear when you tap the MENU icon.
This section describes the menu commands specific to the PictureGear
Pocket application.
Photo list screen
View menu
List
Changes the view of the photo list screen.
PhotoStand
Starts the PhotoStand application.
Image menu
Import/Export
Shows the import/export screen.
Tap the check boxes to select the image file(s) you want to import/
export. For details, see “Copying image files” on page 18.
Delete
Shows the Delete screen.
Tap to select the image file(s) you want to delete.
Categorize
Shows the Categorize screen.
Tap to select the image file(s) you want to categorize.
Options menu
Preference (available only when you view image files stored in
the Memory Stick media)
Shows the Preference screen.
• Default Display Format of the Memory Stick: If you want to
choose the default display for viewing images stored in Memory
Stick media, select PGP or DCF.
About PictureGear Pocket
Shows the version information for the PictureGear Pocket application.
24
Page 25

Image file screen
View menu
Chapter 1
Back
Returns to the photo list screen.
Details
Shows detailed information for the image file.
Zoom
Magnifies the image file. For details, see “Magnifying image files” on
page 14.
First Image
Shows the first image file.
Prev Image
Shows the previous image file.
Next Image
Shows the next image file.
Last Image
Shows the last image file.
Hide tool bar
Hides the tool bar at the bottom of the screen. Tap the image to show
the hidden tool bar.
PictureGear Pocket
Continued on next page
25
Page 26

Copying image files
Image menu
Import/Export
Imports/exports the currently selected image file. For details, see
“Copying image files” on page 18.
Delete
Deletes the currently selected image file.
Beam
Beams the currently selected image file to another CLIÉ handheld.
CLIÉ Paint
Starts the CLIÉ Paint application.
Options menu
Preference
Shows the Preference screen.
• Display Loop: If you want to cycle through the image file list using
the Jog Dial navigator with the first image and the last image coming
back-to-back, tap to select this check box.
About PictureGear Pocket
Shows the version information for the PictureGear Pocket application.
26
Page 27

Chapter 2
Displaying image files one after another
(PhotoStand)
This chapter describes how to display image files one
after another.
Chapter 2
Page 28

What you can do with PhotoStand
PhotoStand is an application to display image files that are created on
a computer or taken with a digital camera.
Use PhotoStand as a clock
You can use your CLIÉ handheld as a clock by displaying the current
time on your CLIÉ handheld screen.
You do not have to install the PhotoStand application on
your CLIÉ handheld
The PhotoStand application is pre-installed at the factory.
28
Page 29

Using PhotoStand
Making a PhotoStand setting
On the Application Launcher screen, rotate the Jog Dial
1
navigator to select PhotoStand and then press the Jog
Dial navigator. Or, tap the PhotoStand icon on the
Application Launcher screen.
The PhotoStand application starts.
Tap New to create a PhotoStand title.
2
Photo list screen appears, showing the available image files.
Tap to select the image file(s) which you want to display.
3
Tap OK.
4
The PhotoStand settings screen appears.
Chapter 2
PhotoStand
Continued on next page
29
Page 30

Using PhotoStand
Make your settings.
5
• Title: Enter the desired PhotoStand title.
• Sort By: Select the order in which to display the image files.
• Effect: Select the transition effect to be used between images or
choose the clock type.
• Display Interval: Set an interval to determine the length of time
an individual image file will be displayed.
• Loop: If you do not want to repeat image files automatically
from the start, tap to clear this check box.
• Show the icon on Home Screen: To not have each PhotoStand
file’s icon appear on the Application Launcher screen, tap to
clear this check box.
• Autorun:
automatically when you insert the Memory Stick media into your
CLIÉ handheld, tap to select this check box. This option appears
only if you select the images stored on the Memory Stick media for
the PhotoStand.
Tap Save.
6
The image files that you selected in step 2 and the settings you
made in step 4 are saved with a PhotoStand title.
If you want the PhotoStand application to start
Note
Do not copy the Photostand settings between the Memory Stick media and your
CLIÉ handheld. A malfunction may occur.
30
Page 31

Starting PhotoStand
Tap to select a PhotoStand title that you want to play on
1
the PhotoStand title list screen.
Tap Play.
2
Image files in the selected category appear one after another.
To exit PhotoStand
Press the Jog Dial navigator or tap the screen.
To start the PhotoStand titles stored on the Memory Stick media
Tap the arrow V on the top right-hand corner of the screen to select
MS in step 1 above.
Chapter 2
PhotoStand
31
Page 32

PhotoStand menu items
The following items appear when you tap the MENU icon.
This section describes the menu commands specific to the PhotoStand
application.
Options menu
About PhotoStand
Shows version information for the PhotoStand application.
32
Page 33

Chapter 3
Drawing on image files
(CLIÉ Paint)
This chapter describes how to draw on image files
on your CLIÉ handheld.
Chapter 3
Page 34

What you can do with CLIÉ Paint
CLIÉ Paint is a drawing tool application used to draw on images.
Draw on an image file or on a white background
Using the CLIÉ Paint application, you can draw and paint on a PGP
format image file stored on your CLIÉ handheld or on a white
background.
Notes
• The CLIÉ Paint application is compatible with the 16-bit-color PictureGear
Pocket format (PGPF), and is not compatible with 8 bit color formats.
• Images in color will be displayed in monochrome for the monochrome display
models.
You do not have to install the CLIÉ Paint application on your
CLIÉ handheld
The CLIÉ Paint application is pre-installed at the factory.
34
Page 35

Starting CLIÉ Paint
You can choose to draw on a white background or on a PGP image.
On the Application Launcher screen, rotate the Jog Dial
1
navigator to select CLIÉ Paint, and then press the Jog
Dial navigator. Or, tap the CLIÉ Paint icon on the
Application Launcher screen.
Select what to work with.
2
• To work on a white background:
Tap to select the screen size of your drawing (320✕320, 320✕240,
160✕160, and 160✕120).
A white drawing area (canvas) of the selected size is displayed.
• To work on a PGP-format image:
Tap Load Image.
The PictureGear Pocket application’s image file list screen is
displayed. Tap to select the desired image file, then tap the CLIÉ
Paint icon.
Chapter 3
CLIÉ Paint
You cannot choose images stored on a Memory Stick media
If you tap while you are viewing images stored on the Memory
Stick media with the PictureGear Pocket application, a message
appears and the CLIÉ Paint application does not start.
If the image file you wish to edit is stored on the Memory Stick media,
you must import it to the CLIÉ handheld using the PictureGear Pocket
application before starting the CLIÉ Paint application. For details on
how to import the image files, see page 19.
3535
Page 36

Drawing with CLIÉ Paint
Elements of the edit screen
1 Menu Button
Displays the menu screen.
• New Image: Displays a new white background to draw on.
• Load Image: Imports a PGP-format image stored on the CLIÉ
handheld to the CLIÉ Paint application.
• Over-write: Over-writes the former image with the edited one
(the former image will not remain).
• Save As: Saves the edited image under a new name (the image
before editing will remain).
• Cancel: Returns to the edit screen.
•
: Shows the version information for the CLIÉ Paint
application.
2 UNDO/REDO
36
Cancels the last operation (UNDO), or when tapped right after
UNDO, recovers the cancelled operation (REDO).
Page 37

3 Color palette
Shows the color or a grayscale shade for drawing letters or objects.
PEG-SL10 and PEG-SJ20: Choose the shade from the displayed 16-
step grayscale.
PEG-SJ30: Choose the color/shade from the palette. The bottom left
tab of the palette shows the presently selected color/shade
(including color/shade sampled with the color sampler tool).
To edit the selected color/shade, tap the bottom left tab. Tapping it
displays the color-picker and the RGB color level bars. Select a color
or adjust the color level and tap OK to change the color. To return to
the palette without changing the color/shade, tap Cancel.
Chapter 3
4 Tool switch bar
Switches the displayed tool icons with the three boxes on the bar.
5 Tool icons
Shows the tools to draw shapes, patterns, and letters.
For details on how to use each tool, see page 38.
CLIÉ Paint
3737
Page 38

Drawing with CLIÉ Paint
Painting with the tools
On the edit screen, tap the box on the Tool switch bar
1
until the tool of your choice is displayed.
Tap a palette tab to select a color/shade.
2
Tap to select the tool icon and draw on the image or the
3
white background.
• Pen tool: Creates a free-hand line in the selected color/
shade.
•
Eraser tool: Erases an object drawn with a tool (pen, line,
ellipse, rectangle, rounded rectangle, letter, stamp, spray, blur,
mosaique).
Note
You cannot erase details of the original image file. You also cannot erase
the performed edits once it is saved.
• Color sampler tool: Samples a color/shade from the original
image file to the color palette.
•
Scroll tool: Scrolls the image when you are editing a 320 ✕
320 image.
•
Line tool: Creates straight lines in the selected color/shade.
• Ellipse tool (no fill/ solid fill): Creates ellipses in the
selected color/shade.
•
Rectangle tool (no fill/ solid fill): Creates rectangles in
the selected color/shade.
•
Rounded rectangle tool (no fill/ solid fill): Creates
rectangles with round-corners in the selected color/shade.
•
Letter tool: Select to draw letters on the image using the
onscreen keyboard or Graffiti
After you enter the letters and tap OK, the entered letters are
displayed with a dotted border around it. In this state, you can
drag it with the stylus and change its location on the image.
Tap anywhere outside the dotted border to place it.
®
writing.
38
Page 39

• Pattern stamp tool: Lets you stamp various patterns on the
image.
After you tap to select the pattern, the selected pattern is
displayed with a dotted border around it. In this state, you can
drag it with the stylus and change its location on the image.
Tap anywhere outside the dotted border to place it.
•
Spray tool: Gives a sprayed effect in the selected color/
shade.
•
Blur tool: Gives a blurred, soft-focus effect where you trace
with the stylus.
•
Mosaique tool: Gives a mosaique effect where you select
with the stylus.
Changing the stroke width, letter size, or spray size
Tap to select one of the four stroke icons or spray size icons.
With the stroke icon, you can change the stroke width for the following
tools: pen, eraser, line, ellipse (no fill), rectangle (no fill), rounded
rectangle (no fill), and blur. You can also change the letter size for the
letter tool with the stroke icons.
The spray size icon changes the spray size for the spray tool.
Chapter 3
CLIÉ Paint
Stroke icons
Spray size icons
Quitting the edits
If you wish to quit editing without saving the edits, tap any
application button or Home
appears, tap OK. The application switches and the edited image will
not be saved. To return to the CLIÉ Paint application edit screen, tap
Cancel.
. When a confirmation dialog box
3939
Page 40

Saving edited images
Saving edited image files on your CLIÉ handheld
When you finish the editing, tap .
1
The Menu dialog box appears.
Tap Over-write or Save As.
2
• Over-write: Replaces the former image with the edited one. The
former image will not remain in memory.
• Save As: Saves the edited image under a new name (the image
before editing will remain in memory). You must enter a new
name for the edited image.
Tap OK.
3
The edited image file is converted to the PGP format and is saved
on the CLIÉ handheld.
Notes
• Files processed in monochrome models (PEG-SL10 and PEG-SJ20) are saved as
a monochrome image even if the original image file is in color.
• The edited images will not be saved on a Memory Stick media.
To delete a saved image
Start PictureGear Pocket and tap to select the image file you want to
delete. Tap Menu
, Image, and then tap Delete.
40
Page 41

Chapter 4
Playing a movie (gMovie player)
This chapter describes how to play a movie on your CLIÉ
handheld.
Chapter 4
Page 42

What you can do with gMovie player
gMovie is an application which allows you to display or play back
movie file created with Windows
4.6Lite, on your CLIÉ handheld.
®
applications such as PictureGear
Play movies on your CLIÉ handheld
You can play a movie that has been converted to the proper format
and then transferred from your computer, or stored in the Memory
Stick media. You can enjoy your favorite movies anytime and
anywhere.
42
Page 43

Installing
You do not have to install gMovie player on your CLIÉ handheld
The gMovie player is pre-installed at the factory.
Installing the PictureGear 4.6Lite software on your computer
Install the PictureGear 4.6Lite software on your computer according to
the instructions on page 9.
Chapter 4
gMovie player
4343
Page 44

Playing movies with your CLIÉ handheld
You can transfer to your CLIÉ handheld movies that are shot by a
digital still camera or downloaded from the Internet, etc., and that are
managed by the PictureGear 4.6Lite on your computer. You will need
to optimize the movies on your CLIÉ handheld by the PictureGear
4.6Lite software before transferring the movies.
For details on how to save the movies in the format supported by the
PictureGear 4.6Lite software, refer to the online Help of the
PictureGear 4.6Lite software.
Transferring movies to your CLIÉ handheld
Prepare and format the items you want to display on your CLIÉ
handheld with the PictureGear 4.6Lite software, and then transfer
them to your CLIÉ handheld.
Start the PictureGear 4.6Lite software.
1
See page 9 for details.
Select the movie you want to send.
2
You can also select multiple movies by holding down the Ctrl or
Shift keys while clicking.
44
From the File menu, select Output services and then
3
Install the image during the next HotSync.
The User name dialog box appears.
Click the arrow V to the right of the text box, and then
4
select a user name.
If necessary, click Movie settings and set the size and compression
for the image you want to send in the “Settings for Movies on CLIE
Handheld” dialog box.
Click OK.
5
The images you want to send and the user name are registered in
the PictureGear software.
Connect your CLIÉ handheld to your computer using the
6
supplied USB cable.
Page 45

On your CLIÉ handheld, rotate the Jog Dial™ navigator to
7
select HotSync and then press the Jog dial navigator. Or,
tap the HotSync icon on the Application Launcher
screen.
The HotSync screen appears on your CLIÉ handheld.
Tap the HotSync icon.
8
The registered images are automatically sent to your CLIÉ handheld
during the HotSync operation.
To save a movie to the Memory Stick media
You can also transfer movie files directly to a Memory Stick media.
Install the Memory Stick Export software on your computer
beforehand (page 69).
Connect your CLIÉ handheld to a computer with the
1
Memory Stick Export software installed, using the
supplied USB cable.
Insert a Memory Stick media in your CLIÉ handheld.
2
On the Application Launcher screen of your CLIÉ
3
handheld, rotate the Jog Dial navigator to select MS
Import and press the Jog Dial navigator. Or, tap the MS
Import icon on the Application Launcher screen.
The Memory Stick Import application starts.
Chapter 4
gMovie player
Start the PictureGear 4.6Lite software on your computer.
4
Select the desired movie on the PictureGear 4.6Lite
5
software.
From the File menu on the same screen, click Output
6
services, then select “Output CLIE Handheld format file
to MemoryStick.”
The “Output CLIE Handheld format file to MemoryStick” dialog
box appears.
From the list next to Save into drive, select the Memory
7
Stick drive.
Click OK.
8
4545
Page 46

Playing movies with your CLIÉ handheld
Playing movies
On the Application Launcher screen, rotate the Jog Dial
1
navigator to select gMovie and then press the Jog Dial
navigator. Or, tap the gMovie icon on the Application
Launcher screen.
The gMovie player starts and the movie list screen appears.
Movie list:
is displayed for movies stored in the
inserted Memory Stick media.
displays the detail of the movie.
Information column:
“Audio+video” indicates that this movie
has recorded audio. A movie without
audio is indicated as “video.”
46
Movie title
Display switch icons:
Tap to switch the type of information
displayed in the information column.
: Shows the movie types.
: Shows the screen size in pixels.
: Shows the running time*.
: Shows the file size.
* If the movie has many frames per second,
the actual running time may be longer
than indicated.
Page 47

Tap the movie you want to play. Or, rotate the Jog Dial
2
navigator, and press to play a movie.
Playback starts.
To stop playback
Tap (Stop).
To resume playback, tap
(Play).
To locate the starting point of the movie
Tap (Locate).
To return to the movie list screen
Tap (Return) at the upper-right corner of the screen.
To play the next movie
Tap (Next) at the upper-right corner of the screen.
To play movies one after another (continuous playback)
Tap and hold (Next) at the upper-right corner of the screen for a few
seconds.
The icon changes into
handheld are played one after another.
To return to the normal playback, tap and hold
few seconds.
(Continuous) and movies stored in your CLIÉ
(Continuous) for a
Chapter 4
gMovie player
4747
Page 48

Playing movies with your CLIÉ handheld
To delete a movie
Display the movie you want to delete, and then tap
1
Menu .
Tap Delete.
2
Tap OK.
3
The selected movie is deleted, and then the movie list screen
appears.
48
Page 49

Playing sample movie files
You can view sample movie files installed on your computer.
Install the Palm Desktop for CLIÉ software to your hard disk using the
supplied CD-ROM and then connect your CLIÉ handheld to your
computer using the supplied USB cable.
Double-click the Palm Desktop for CLIÉ icon on the
1
Windows desktop.
The Palm Desktop for CLIÉ software starts.
Click Install.
2
The Install Tool dialog box appears.
Select a user name from the user list.
3
Click Add.
4
Make sure that the Add-on folder is selected.
If the Add-on folder is not selected, select the folder manually.
At the default setup, Add-on folder is stored in the Sony Handheld
folder of the Program Files folder.
Double-click the gMovie Samples folder.
5
Double-click the sample movie file you want to play on
6
the screen of your CLIÉ handheld.
The selected movie file name is added to the File Name list.
If you want to view other sample movies, repeat this step.
Chapter 4
gMovie player
Click Done.
7
On your CLIÉ handheld, rotate the Jog Dial™ navigator to
8
select HotSync and then press the Jog dial navigator. Or,
tap the HotSync icon on the Application Launcher
screen.
The HotSync screen appears on your CLIÉ handheld.
Tap the HotSync icon.
9
The selected sample movie files will be installed on your CLIÉ
handheld.
Start the gMovie player application.
10
For details, see page 46.
4949
Page 50

gMovie menu items
The following items appear when you tap the MENU icon.
This section describes the menu commands specific to gMovie player.
Media list screen
Media menu
About gMovie
Shows version information for the gMovie application.
Movie file screen
Media menu
Details
Shows detailed information of the current media.
Beam Media
Transfers the data contained in the current media to another CLIÉ
handheld via the IR port. For details about beaming, see the Operating
Instructions manual supplied with the CLIÉ handheld.
Delete
Deletes the current media. Tap OK in the Delete Media dialog box to
perform deletion. Tap Cancel to cancel deletion.
Preferences
Displays the available options for movie playback:
• Loop movie playback: If you want to play the current movie file
repeatedly, tap to select this check box.
When this check box is cleared, movies will no longer play
continuously.
About gMovie
Shows version information for the gMovie application.
50
Page 51

Chapter 5
Viewing the World Alarm Clock
(World Alarm Clock)
This chapter describes how to use your CLIÉ handheld as an
alarm clock showing the world time and date.
Chapter 5
Page 52

What you can do with World Alarm Clock
The World Alarm Clock is an application that you can install on your
CLIÉ handheld and that provides you with an additional clock, which
can give you the local time, the time around the world, and also work
as an alarm clock.
As a clock showing local time
You can view the present local time on your World Alarm Clock
application, and also set the clock to show Daylight Saving Time.
As a world clock showing the time around the world
In addition to the local time of your area, you can also view on your
World Alarm Clock application the local time of up to three other areas
of your choice around the world in a single time line, and the date of
each area. The world clock time line enables you to see whether you
are ahead or behind of a certain area in time and date, and can thus
help you in communicating with your business partners worldwide.
As an alarm clock
You can set several alarms on your World Alarm Clock application
either in LED (only for PEG-SJ20 and PEG-SJ30) or sound for a certain
time or day of the week. The sound for the alarm can be selected from
the pre-installed sound files.
You do not have to install the World Alarm Clock application
on your CLIÉ handheld
The World Alarm Clock application is pre-installed at the factory.
52
Page 53

Using the World Alarm Clock
Viewing world time
On the Application Launcher screen, rotate the Jog Dial
1
navigator to select WA Clock and then press the Jog Dial
navigator. Or, tap the WA Clock icon on the Application
Launcher screen.
The World Alarm Clock application starts and the clock screen is
displayed.
Elements of the clock screen
The clock with the time
and date of your present
time zone (all of which you
set for your CLIÉ handheld)
The clock for different time
zones
(To select the time zones
you wish to view here, see
“Selecting other time zones
to be displayed” on page
54.)
Set Alarm icon:
If an alarm is set, the
icon will be marked
black.
Time line with the date
Daylight Saving Time icon:
Tap to change the indicated time to
daylight saving time (the color or
shade of the icon changes). Tap
again to return to former
indication.
™
Chapter 5
World Alarm Clock
Note
The World Alarm Clock application displays the time according to the time
setting for the CLIÉ handheld. Make sure you set the correct date and time in the
CLIÉ handheld’s Date & Time Preferences screen. For details, refer to Chapter 5
of the Operating Instructions manual.
53
Page 54

Using the World Alarm Clock
Selecting other time zones to be displayed
You can select up to three areas to be displayed other than your
present location. The time and date for these other areas will be
displayed on the lower half of the clock screen.
On the clock screen, tap the area name (the default
1
setting is “USA (Pacific)”) for the smaller clock on the
lower half of the screen.
The Set Time Zone screen appears.
Tap to select the time zone, and tap OK.
2
Previewing the future time and date
You can preview the time and date ahead of the present time with the
Jog Dial navigator. Rotate the Jog Dial navigator to preview the future
time for all time zones in 15 minute units.
To return to the present time view, wait ten seconds or press the BACK
button.
Setting the clock alarm
You can set up to five alarms. To set an alarm for other days or days of
the week, set an alarm within the Date Book. See “Editing Date Book
events” in the Operating Instructions manual for details.
On the clock screen, tap the Set Alarm icon next to
1
the Alarm mark.
The Set Alarm screen appears. If you already have an alarm set on
the selected number, the Set Alarm screen for the last set alarm will
be displayed.
Set Alarm icon
54
Page 55

Tap the arrow V next to Off, and select On.
2
On the Comment line, enter a note that you would like
3
to attach to the alarm.
When the alarm goes off, the comment entered here is displayed on
screen.
Tap the Time box.
4
The Set Time screen appears.
Set the time.
5
1 Tap the hour box and tap the arrow v or V to set the hour.
2 Tap the minute box and tap the arrow v or V to set the minute.
3 Tap to select AM or PM.
Tap OK.
6
The display returns to the Set Alarm screen.
Tap the numbered/lettered box to set a one-time or
7
repeating alarm.
• 1: Sets a one-time alarm.
• E: Sets a daily repeating alarm.
• S, M, T, W, T, F, S: Sets a weekly repeating alarm. You can select
more than one day of the week.
Chapter 5
World Alarm Clock
Set the alarm type.
8
1 Tap the check boxes to select the type of alarm from Sound or
LED (only for PEG-SJ20 and PEG-SJ30).
A combination of two will work as well.
2 If you selected Sound in 1: Select the tone of the alarm. Tap the
arrow V beneath the Sound check box to select from the dropdown list.
Continued on next page
55
Page 56

Using the World Alarm Clock
3 If you selected Sound in 1: Select the way you want the alarm
to sound.
• Crescendo: Tap the check box to select this if you want the
alarm to increase its volume while it sounds.
• Duration: Tap the arrow V next to this item to select the length
of time the alarm will go on when left alone. The choices are 5,
10, 15, 30 or 45 seconds.
Notes
• If the alarm volume is low, Crescendo may not function.
• Be sure to set the time length in Duration so that it is more than
twice the length of the sound file, or else Crescendo will not
function.
Select the repeating options.
9
• Remind Me: Select how many times the alarm repeats itself. The
choices are Once, Twice, 3 Times, 5 Times, or 10 Times.
• Play Every: Select how often the alarm repeats itself. The choices
of interval are 1, 3, 5, 10, 15, 20, or 30 minutes.
Tap OK.
10
The display returns to the clock screen.
The Set Alarm icon for the active alarms will be marked black ( ).
Changing the alarm setting
On the clock screen, tap the Set Alarm icon of the
1
alarm you wish to change.
The Set Alarm screen for that alarm appears.
Make the changes in the Set Alarm screen.
2
Tap OK.
3
Tip
To clear the set setting, tap Default in the Set Alarm screen. The setting for that
alarm number will return to the default setting.
56
Page 57

Cancelling a set alarm
You can deactivate an alarm without deleting its setting.
On the clock screen, tap the Set Alarm icon of the
1
alarm you wish to cancel.
The Set Alarm screen for that alarm appears.
Tap the arrow V next to On, and select Off from the
2
drop-down list.
The alarm will be deactivated while the setting remains.
The deactivated alarms will have no black dots in their circle.
Note
If you select Off for Alarm Sound/LED Alarm (only for PEG-SJ20 and PEGSJ30) in the General Preferences screen, the sound/LED of the alarm will be
deactivated even if you have selected Alarm On here.
Stopping the alarm
When the alarm goes off, a dialog screen appears.
To turn off the alarm and close the screen, tap OK. To have the alarm
stop and go off again after a few minutes, tap Snooze.
If you do not turn off the alarm
The alarm goes off again according to what you set for Remind Me in
step 9 on page 56.
If you tap Snooze
An alarm goes off approximately every 5 minutes until you stop the
alarm.
Chapter 5
World Alarm Clock
57
Page 58

World Alarm Clock menu items
The following item appears when you tap the MENU icon.
This section describes the menu command specific to the World Alarm
Clock application.
Options menu
Day Color
Set a different color for each day of the week.
The color is displayed in monochrome for monochrome models.
About World Alarm Clock
Shows version information for the World Alarm Clock application.
58
Page 59

Chapter 6
Setting the Memory Stick automatic start
function (Memory Stick Autorun)
This chapter describes how to set the Memory Stick
automatic start function on your CLIÉ handheld.
If you want to start an application in the Memory Stick
media from the Application Launcher screen, refer to the
Operating Instructions manual.
Chapter 6
Page 60

What you can do with
Memory Stick Autorun is an application which allows your CLIÉ
handheld to copy and start a specified application automatically when
Memory Stick media is inserted into the CLIÉ handheld. Removing the
Memory Stick media automatically deletes the application copy from
the memory of the CLIÉ handheld. Memory Stick Autorun functions as
a virtual memory to effectively utilize the memory of the CLIÉ
handheld.
Note
It is not recommended that you use the Memory Stick Autorun application with
the Address Book, Date Book, To Do List, Memo Pad, Calculator, or Mail
applications. Problems may occur if the data of these applications do not reside
on your CLIÉ handheld when you perform a HotSync operation.
Memory Stick
Autorun
Starting an application (.prc) on the CLIÉ handheld automatically
If you use a digital still camera that is compatible with Memory Stick
media, you can view your images by inserting the Memory Stick media
into the CLIÉ handheld. In such a case, you would use the auto-run setting
to start the PictureGear Pocket application on your CLIÉ handheld.
Starting an application (.prc) in a Memory Stick media
automatically
This setting is for automatically starting an application which does not
access any data, such as game applications, or an application which
accesses data in the CLIÉ handheld (not in the Memory Stick media).
Starting an application (.prc) using related database files
(.pdb, .prc) in a Memory Stick media
You can have the CLIÉ handheld automatically display a specific
image or file with an application such as an image viewer or a
document reader. You can set Auto-run when both the application
its database files are on a Memory Stick media, and also when the
application is located on the CLIÉ handheld and the corresponding
database files are located on Memory Stick media. The desired data is
automatically displayed by inserting the Memory Stick media into your
CLIÉ handheld.
You do not have to install the Memory Stick Autorun
application on your CLIÉ handheld
The Memory Stick Autorun application is pre-installed at the factory.
60
and
Page 61

Setting Auto-run for an application
Setting Auto-run for an application on the CLIÉ handheld
To automatically start a certain application (installed on your CLIÉ
handheld) when you insert a certain Memory Stick media, perform the
following procedure.
Install an application you want to start automatically on
1
the CLIÉ handheld.
Insert the Memory Stick media for which you want to set
2
the auto-run function to into the Memory Stick slot.
For example, to set the PictureGear Pocket application to start
automatically, a Memory Stick media containing still images must
be inserted to the CLIÉ handheld.
On the Application Launcher screen, rotate the Jog Dial
3
navigator to select MSAutorun and then press the Jog
Dial navigator. Or, tap the MSAutorun icon on the
Application Launcher screen.
The Memory Stick Autorun application starts, and the list of
applications in your CLIÉ handheld appears.
Tap the application you want to set the auto-run
4
function.
Tap Set.
5
The setting is stored in the Memory Stick media, and the
confirmation dialog box appears.
Tap OK.
6
The auto-run setting is completed.
Tap Home to return to the Application Launcher
7
screen.
Remove the Memory Stick media.
8
Chapter 6
Memory Stick Autorun
61
Page 62

Setting Auto-run for an application
Setting Auto-run for an application in Memory Stick media
Install the application on a Memory Stick media, and insert the
Memory Stick media in the Memory Stick slot. Perform steps 3 to 8 in
“Setting Auto-run for an application on the CLIÉ handheld.”
When installing applications/database files on the Memory Stick
media, be sure to install them on the PALM/Launcher folder.
Setting Auto-run for an application specifying its database files in Memory Stick media
You can set Auto-run for specific images or files (an application’s
database files) in Memory Stick media. The application using the
database files can either be on the CLIÉ handheld or Memory Stick
media.
Install an application (.prc) on the CLIÉ handheld, or on
1
the Memory Stick media in which the related database
files (.pdb) are installed.
To move applications/database files in the CLIÉ handheld to
Memory Stick media, use the Memory Stick Gate application (see
the Operating Instructions manual for details).
When installing applications/database files on the Memory Stick
media, be sure to install them on the PALM/Launcher folder.
62
Insert the Memory Stick media in the Memory Stick slot.
2
From the Application Launcher screen, start the Memory
3
Stick Autorun application.
The list of applications in the Memory Stick media appears.
For applications installed on the Memory Stick media,
4
skip this step. For applications installed on the CLIÉ
handheld, press the Jog Dial navigator.
A list of applications in the CLIÉ handheld appears.
Page 63

From the displayed list, tap the application you want to
5
set the auto-run function.
Tap the arrow V next to Select launch app, and tap
6
Select install DBs.
The list of applications and data files appears.
From the displayed list, tap the desired database file(s).
7
Perform steps 5 to 8 on page 61.
8
Note
Data in the Memory Stick media is not automatically updated when you remove
the Memory Stick media.
Chapter 6
63
Memory Stick Autorun
Page 64

Using the auto-run function
When the Application Launcher screen is displayed, insert
the Memory Stick media with the auto-run setting into your
CLIÉ handheld.
The application set for auto-run starts automatically. If you remove the
Memory Stick media, the auto-run application quits automatically and
the Application Launcher screen appears.
Notes
• The auto-run function does not work when the Memory Stick Gate application
or the Memory Stick Autorun application is running.
• The specified application may not start automatically depending on the
application in use when you insert the Memory Stick media into your CLIÉ
handheld. In this case, return to the Application Launcher screen, and then
reinsert the Memory Stick media.
• Data in the Memory Stick media is not updated when the Memory Stick media
is removed.
64
Page 65

Changing the auto-run setting
To change the auto-run setting
Start the Memory Stick Autorun application from the Application
Launcher screen. Insert the Memory Stick media which you want to
change the auto-run setting. Tap the arrow V next to Select launch app,
and tap Select install DBs. Tap the files you want to select or deselect,
and tap Set. Then, tap OK.
To cancel the auto-run function
Start the Memory Stick Autorun application from the Application
Launcher screen. Tap Menu
Disable checkbox. Then, tap OK.
To delete the auto-run setting
Start the Memory Stick Autorun application from the Application
Launcher screen. Insert the Memory Stick media from which you want
to delete the auto-run setting and tap Menu
Delete autorun setting. Then, tap OK.
Tip
You can also delete the auto-run setting with your computer, by deleting a file
named “\PALM\DEFAULT.ARN” from the Memory Stick media.
, tap Preferences, and tap to select the
. Tap Tools and tap
65
Chapter 6
Memory Stick Autorun
Page 66

Memory Stick Autorun menu items
The following items appear when you tap the MENU icon.
This section describes the menu commands specific to the Memory
Stick Autorun application.
Options menu
Display log
When Memory Stick media is inserted into or removed from your
CLIÉ handheld, a history log is created. From the Options menu, you
can view this information by tapping Display log.
Tools
The following buttons appear in the Tools dialog box:
• Recover:
This button is displayed if the auto-run function is performed and
the Memory Stick Autorun application is started without removing
the Memory Stick media. You can delete the application and
database files copied into your CLIÉ handheld.
• Delete autorun setting:
This button is displayed if the auto-run setting file is stored in the
inserted Memory Stick media. You can delete the auto-run setting in
the Memory Stick media.
Preferences
Displays the Preferences dialog box.
The following items appear on this dialog box:
•Autorun:s Disable:
You can temporarily cancel the auto-run function.
• MS List:
You can switch the format of the list of data in Memory Stick media.
About MS Autorun
Shows version information for the Memory Stick Autorun application.
66
Page 67

Chapter 7
Copying the data to the Memory Stick media
on your CLIÉ handheld (Memory Stick
Import/Export)
This chapter describes how to copy the data on your
computer to the Memory Stick media on your CLIÉ handheld
directly without performing a HotSync operation.
Chapter 7
Page 68

What you can do with Memory Stick Import/Export
Both Memory Stick Import and Memory Stick Export are applications
designed to help you copy the data on your computer to the Memory
Stick media on your CLIÉ handheld directly without performing a
HotSync operation.
Notes
• When copying the data on your computer, you have to use both the Memory
Stick Import application for your CLIÉ handheld and the Memory Stick Export
software for your computer at the same time.
• The Memory Stick Import application is already installed on your CLIÉ
handheld, but you have to install the Memory Stick Export software to your
computer (page 69).
Installing CLIÉ applications without performing a HotSync
operation
Using the Memory Stick Import/Export applications, you can install
application files (.prc or .pdb) to the Memory Stick media in your CLIÉ
handheld without performing a HotSync operation.
Using your CLIÉ handheld as a removable disk
The Memory Stick Import/Export applications enable you to use the
Memory Stick media inserted in your CLIÉ handheld as another
removable disk drive on your computer. Like other removable drives,
you can copy and move files between your CLIÉ handheld and your
computer using the Windows
®
Explorer.
68
Page 69

Installing
You do not need to install the Memory Stick Import
application on your CLIÉ handheld
The Memory Stick Import application is pre-installed at the factory.
This section describes how to install the Memory Stick Export
software.
Installing the Memory Stick Export software on your computer
Install the Memory Stick Export software on your computer using the
supplied Installation CD-ROM.
Insert the installation CD-ROM into the CD-ROM drive of
1
your computer.
The setup program starts automatically.
Select the model of your CLIÉ handheld (PEG-SL10, PEG-
2
SJ20, or PEG-SJ30).
Click Install CLIÉ Utilities.
3
Click Install Memory Stick Export.
4
The installation starts.
Follow the instructions displayed on the screen.
After the installation is completed, the installation screen reappears.
Memory Stick Import/Export
Click Finish.
5
The installation of Memory Stick Export software ends.
Chapter 7
69
Page 70

Installing CLIÉ applications using Memory Stick Import/Export
You can install applications for your CLIÉ handheld into the Memory
Stick media without performing HotSync operation, if you use the
Memory Stick Import/Export applications.
Connect your CLIÉ handheld to the computer with the
1
Memory Stick Export software installed, using the
supplied USB cable.
Insert the Memory Stick media into your CLIÉ handheld.
2
On the Application Launcher screen, rotate the Jog Dial
3
navigator to select MS Import and then press the Jog
Dial navigator. Or, tap the MS Import icon on the
Application Launcher screen.
The Memory Stick Import application starts.
Note
The CLIÉ handheld may not operate when there is not enough
memory available. Be sure to maintain sufficient memory space.
Drag and drop add-on application files (.prc or .pdb) to
4
the MS Export shortcut icon on your Windows desktop.
These files are automatically copied to the appropriate folders.
If the application file type could not be recognized by the
Memory Stick Export
The Entry Form dialog box appears.
In this case, enter the application name and destination folder to
which the application will be copied.
When you finish, tap Disconnect or tap Home .
5
Note
Do not remove the Memory Stick media while your CLIÉ handheld is connected
to your computer.
If your computer is Windows 2000/Windows Me
A warning message appears when you tap Disconnect on your CLIÉ
handheld.
Click OK, and then continue operations.
70
Page 71

Confirming the contents of the Memory Stick media after
copying the application
Restart Memory Stick Export software, then click the Memory Stick
Drive tab of the Memory Stick Export software.
Note
You cannot copy applications by dragging them to the Memory Stick Drive
window of the Memory Stick Export software.
Memory Stick Import/Export
71
Chapter 7
Page 72

Using your CLIÉ handheld as a removable disk
Connect your CLIÉ handheld to the computer with the
1
Memory Stick Export software installed, using the
supplied USB cable.
Insert the Memory Stick media in your CLIÉ handheld.
2
On the Application Launcher screen, rotate the Jog Dial
3
navigator to select MS Import and then press the Jog
Dial navigator. Or, tap the MS Import icon on the
Application Launcher screen.
Memory Stick Import application starts.
Operate the desired file or data using Windows Explorer,
4
etc.
Not only can you copy or delete data stored in the Memory Stick
media, you can also write data in your computer to the Memory
Stick media.
Note
When you copy the application to the PALM/Launcher folder of the
Memory Stick media, some applications on your CLIÉ handheld may not
display the file list of the Memory Stick media appropriately.
When you finish the operation, tap Disconnect or tap
5
Home .
Note
Do not remove the Memory Stick media while your CLIÉ handheld is connected
to your computer.
If your computer is Windows 2000/Windows Me
A warning message appears when you tap Disconnect on your CLIÉ
handheld.
Click OK, and then continue with the operations.
72
Page 73

Memory Stick Import menu items
The following item appears when you tap the MENU icon.
This section describes the menu command specific to the Memory Stick
Import application.
Options menu
About MS Import
Shows version information for the Memory Stick Import application.
Memory Stick Import/Export
73
Chapter 7
Page 74

Page 75

Chapter 8
Additional information
This chapter includes the index.
Chapter 8
Page 76

Index
B
Beam ............................................... 20
C
CLIÉ Paint
Elements of the edit screen .......... 36
Painting with the tools .................38
Saving edited image files on your
CLIÉ handheld .............................. 40
Starting CLIÉ Paint........................ 35
What you can do with CLIÉ Paint ..
34
G
gMovie player
Playing movies ............................. 46
Playing sample movie files ........... 49
Menu items .................................. 50
Transferring movies to your CLIÉ
handheld ...................................... 44
What you can do with
gMovie player .............................. 42
I
Install
Memory Stick Export .................... 69
PictureGear 4.6Lite ......................... 9
M
Memory Stick media
Saving image files stored on a
Memory Stick media to your CLIÉ
handheld (Import) ........................ 19
Saving image files stored on your
CLIÉ handheld to a Memory Stick
media (Export) .............................. 18
Setting the Memory Stick
automatic start function
(Memory Stick Autorun) ..................
Viewing image files stored in
Memory Stick media..................... 16
Menu items
gMovie ......................................... 50
Memory Stick Autorun.................. 66
Memory Stick Import ....................73
PhotoStand................................... 32
PictureGear Pocket .......................24
World Alarm Clock ........................ 58
Memory Stick Autorun
Changing the auto-run setting ..... 65
Menu items .................................. 66
Setting Auto-run for an application
in Memory Stick media ................. 62
Setting Auto-run for an application
on the CLIÉ handheld ................... 61
Setting Auto-run specifying the
database files ............................... 62
Using the auto-run function ......... 64
What you can do with
Memory Stick
Autorun ..................
Memory Stick Import/Export
Installing CLIÉ applications using
Memory Stick Import/Export ......... 70
Menu items .................................. 73
Using your CLIÉ handheld as a
removable disk ............................. 72
What you can do with
Memory Stick Import/Export ......... 68
59
60
76
Page 77

P
V
PhotoStand
Making a PhotoStand setting .......29
Menu items .................................. 32
Starting PhotoStand ..................... 31
What you can do with
PhotoStand................................... 28
PictureGear Pocket
Attaching comments to image files . 22
Beaming image files........................ 20
Categorizing image files ................. 21
Deleting image files ........................ 22
Menu items .................................. 24
Saving image files stored on a
Memory Stick media to your CLIÉ
handheld (Import) ........................ 19
Saving image files stored on your
CLIÉ handheld to a Memory Stick
media (Export) .............................. 18
Transferring image files to your
CLIÉ handheld .............................. 10
Viewing image files stored in
Memory Stick media..................... 16
Viewing image files stored with
your CLIÉ handheld ...................... 12
Viewing image files with your CLIÉ
handheld ...................................... 10
Viewing sample image files .......... 23
What you can do with
PictureGear Pocket .........................8
Playing movie files
See “gMovie player”
Viewing image files
See “PictureGear Pocket”
Viewing world time
See “World Alarm Clock”
W
Windows 2000 .......................... 70, 72
Windows Me ............................. 70, 72
Windows XP ...................................... 9
World Alarm Clock
Menu items .................................. 58
Setting the clock alarm................. 54
Stopping the alarm ....................... 57
Viewing world time ...................... 53
What you can do with
World Alarm Clock ........................ 52
Additional information
Chapter 8
77
Page 78

78
Page 79

79
Additional information
Chapter 8
Page 80

For the latest support information,
check our official Sony CLIÉ Web site
http://www.sony.com/clie/
For information on accessories
http://www.sonystyle.com/micros/
clie/accessories/index.html
 Loading...