

Page 1

User Guide
Page 2

Intellisync Lite
Copyright Notice
No part of this publication may be reproduced, transmitted, transcribed, stored in a
retrieval system, or translated into any computer language, in any form or by any means,
without the express written permission of Pumatech, Inc.
This computer program is protected by copyright law and international treaties.
Unauthorized reproduction or distribution of this program, or any portion of it, is both a
civil and criminal offense, punishable by law.
Pumatech, the PUMATECH logo, Intellisync and the Intellisync logo are trademarks of
Pumatech, Inc., that may be registered in some jurisdictions.
All other company and product names are trademarks of their respective owners.
United States Patent Nos. 5,392,390, 5,666,553, 5,684,990, 5,701,423, 5,943,676,
6,044,381, and 6,141,664. Other patents pending.
Page ii
Manual Copyright: 2001 Pumatech, Inc. All rights reserved.
Program Copyright: 2001 Intellisync Lite, Pumatech, Inc. All rights reserved.
Pumatech, Inc., 2550 North First Street, Suite 500, San Jose, CA 95131
Page 3

Table of Contents
CHAPTER 1: BEFORE YOU BEGIN ....................................................5
INTRODUCTION TO INTELLISYNC LITE ................................................5
Intellisync System Requirements................................................5
The Intellisync Icons...................................................................7
The HotSync® Manager .............................................................8
CHAPTER 2: QUICK START ...............................................................9
USING INTELLISYNC: A TUTORIAL .....................................................9
Synchronizing Data.....................................................................9
Re-Running the Operation........................................................14
CHAPTER 3: THE INTELLISYNC DIALOGS......................................15
THE CONFIGURATION & CHOOSE TRANSLATOR DIALOGS ...............15
The Configuration Dialog.........................................................15
The Choose Translator Dialog..................................................16
Configuring Multiple Handheld Applications..........................17
Dialog Buttons..........................................................................18
THE ADVANCED SETTINGS DIALOG BOX...........................................19
The Date Range Tab .................................................................20
The To Do List Tab ..................................................................21
The Conflict Resolution Tab ....................................................22
THE FIELD MAPPING DIALOG ...........................................................26
CHAPTER 4: SPECIAL TOPICS .........................................................29
MULTI-USER SUPPORT......................................................................30
Adding a User Name.................................................................30
SYNCHRONIZATION AND HISTORY FILES..........................................32
THE SAME RECORD CHANGED AND DELETED DIALOG ....................33
REMOTE SYNCHRONIZATION ............................................................34
To Prepare Your PC..................................................................34
Remote vs. Local Synchronization...........................................35
IMPORTING AND EXPORTING DATA ..................................................36
VIRTUAL FIELDS ...............................................................................37
Virtual Fields in the Date Book and To Do List ......................37
Virtual Phone and Email Fields................................................38
Page iii
Page 4

Intellisync Lite
Editing and Adding Virtual Fields in the Handheld................. 39
CHAPTER 5: FREQUENTLY ASKED QUESTIONS............................. 41
GENERAL...........................................................................................41
LOTUS ORGANIZER ...........................................................................44
APPENDIX: LOG FILES ....................................................................45
GLOSSARY ........................................................................................47
INDEX................................................................................................51
Notice: The contents of this manual reflect the Intellisync program at press-
time. For information on changes to the software (or system support) that
may have occurred since the manual was printed, refer to the Readme file or
Help.
Page iv
Page 5

Chapter 1: Before You Begin
Introduction to Intellisync Lite
Before You Begin
ntellisync Lite (Intellisync) software enables you to synchronize
your Palm OS
applications. This means that if you want to maintain the same
data in your handheld and on your desktop, there’s an easy way to
ensure that each system contains the same up-to-date information.
• With one press of the HotSync
data of different formats between your handheld and your PC. But
it does more than simply translate data and transfer it between
your two systems. Intellisync compares the records in your
handheld to the records in your PC. It then makes whatever
changes are necessary in each system to keep them both up-to-
date, and “in sync.”
Note: Intellisync can also perform one-way imports and exports of
data between your handheld and supported PC applications. Refer
to “Importing and Exporting Data” in Chapter 4 for more
information.
®
handheld with a host of popular Windows
®
button, Intellisync can transfer
Intellisync System Requirements
Before you install the Intellisync software, you must have the Palm
Desktop installed on your PC. In addition, your PC must meet the
following minimum requirements:
Windows 95/98 or Windows NT 4.0 Workstation
• 486 processor or higher
• 30 MB available hard disk space
• 16 MB RAM
• VGA monitor or better, 640 x 480 resolution
• CD-ROM drive
• One available serial port (requires serial cradle)
• HotSync 3.0 installed
Page 5
Page 6

Intellisync Lite
Windows 2000 Professional Edition
• 133 MHz Pentium-compatible processor or higher
• 30 MB available hard disk space
• 64 MB RAM
• VGA monitor or better, 640 x 480 resolution
• CD-ROM drive
• One available USB or serial port
• HotSync 3.0 installed
System Requirements for Windows Me
• 150-MHz Pentium-compatible processor or higher
• 480 MB to 645 MB free hard-disk space
• 32 MB of RAM or better
• VGA or higher resolution monitor
• CD-ROM drive
• One available USB or serial port
• HotSync 3.0 installed
Page 6
All systems
Internet access with Internet Explorer 4.x or Netscape 3.x and higher
(suggested).
®
In addition, you will need a Palm OS
handheld and a docking cradle.
Page 7
To access Help
specific to the PC
application you are
using, click Supported
Systems in the Help
Contents screen and
select your application
from the list of
supported systems.
Before You Begin
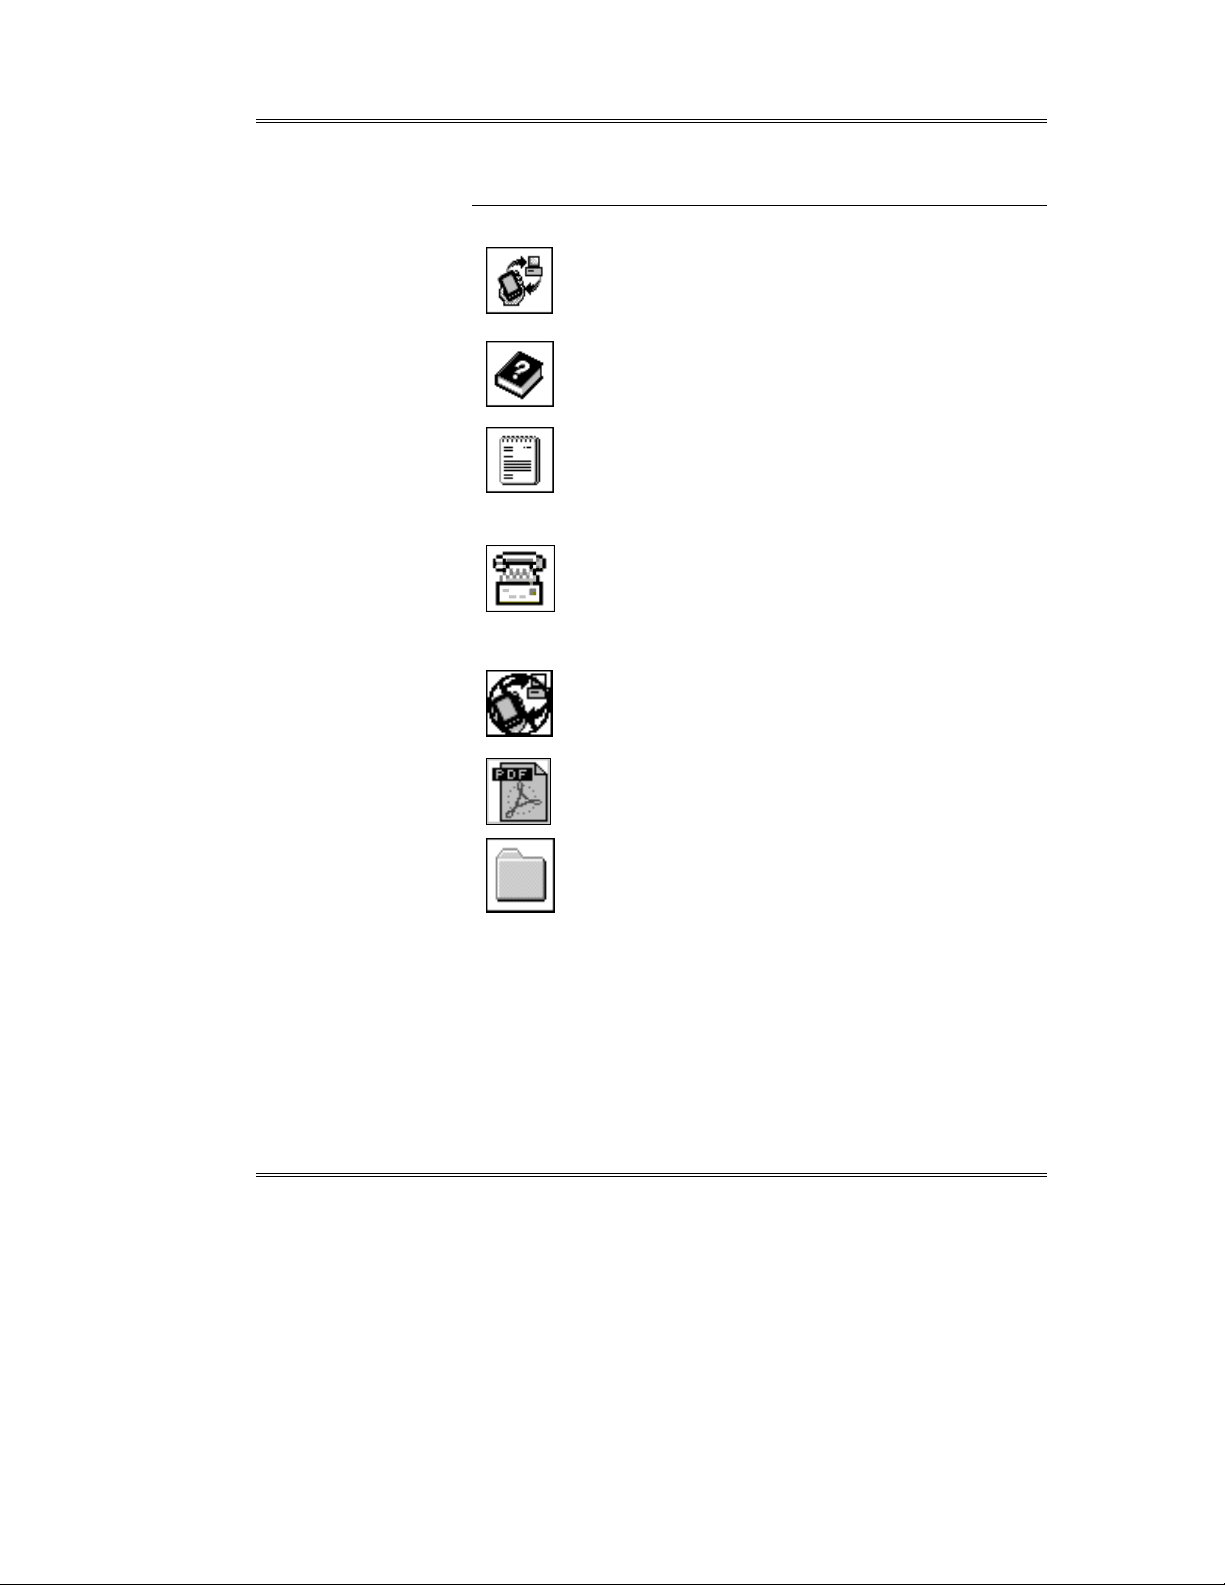
The Intellisync Icons
These are the icons as they appear in the Intellisync Program Group:
The Intellisync Configure icon accesses the
Intellisync Configuration dialog—the main dialog
used to configure Intellisync operations.
The Intellisync Help icon accesses the Intellisync
Lite Online Help system.
The Intellisync Readme icon displays a text file
containing last-minute information not included in the
manual or Online Help. It’s advisable to read this
information before you start using Intellisync.
The Intellisync Support Tool icon displays a tabbed
dialog that provides information on various supportrelated topics and links to our web site for upgrades
and registration.
The Intellisync Uninstall icon can be used to remove
the Intellisync program from your system.
The Intellisync User Guide icon accesses the
Intellisync Lite User guide in PDF format.
The Favorites Folder icon has web page links to
allow you to easily access timely information on
Intellisync promotions, technical issues, FAQs and
products featured on Mobile Resource Central site.
In addition to the Intellisync icons, two shortcut icons for the HotSync
Manager and Palm Install Tool applications are included in the
program group for your convenience.
Page 7
Page 8

Intellisync Lite
The HotSync® Manager
In order to use Intellisync Lite, you must already have Palm Desktop
installed on your PC. Installing Palm Desktop installs HotSync
manager in the Startup group on your PC. This application—which
runs in the background, and which is activated by pressing the
HotSync button on the handheld cradle—coordinates all
communications between your handheld and your PC, including
Intellisync synchronizations.
Installing Intellisync on your PC effectively takes over the HotSync
Manager application. That is, when you press the HotSync button on
the handheld cradle, the HotSync Manager initiates the
synchronization configured in the Intellisync Configuration dialog.
If you want to use HotSync to synchronize a Palm OS
application with Palm Desktop after Intellisync is installed, you must
select Palm Desktop in the Intellisync Choose Translator dialog.
HotSync Notes:
• Once you have configured an Intellisync operation, you can
synchronize any time by simply pressing the HotSync button on
the handheld cradle. The HotSync Manager automatically runs the
most recently configured Intellisync operation.
• You can synchronize a Palm OS handheld application with Palm
Desktop, by selecting Palm Desktop in the Intellisync Choose
Translator dialog. Note, however, that the operation performed
will be a Palm Desktop operation (filtering, and Intellisync
settings like Conflict Resolution do not apply).
®
handheld
Page 8
Page 9

Chapter 2: Quick Start
Using Intellisync: A Tutorial
Make sure you read
“The HotSync
Manager” in Chapter
1 before beginning
this tutorial.
See Chapter 3 for
complete information
on Intellisync settings.
®
This tutorial is for users who want to start synchronizing immediately.
For more complete information on synchronization—including details
on all the Intellisync settings and processes that affect
synchronization—refer to “The Intellisync Dialogs,” and “Special
Topics” in Chapters 3 and 4.
Synchronizing Data
Synchronizing the data stored in your Palm
your desktop is basically a one-button operation. When you press the
HotSync button on the handheld cradle, synchronization starts
immediately.
How does Intellisync know what to synchronize? That information is
stored in a set of Intellisync dialogs. These dialogs specify the data you
want to synchronize, and contain special settings affecting the
operation.
Quick Start
®
OS
handheld with data on
Page 9
Once you have settings in these dialogs configured the way you want
them, you need never access them again unless you want to change
specifications.
Note: For simplicity, this tutorial guides you through the process of
configuring and running a synchronization. However, these
instructions apply to importing and exporting as well. The only
difference between configuring a synchronization and setting up a oneway transfer of data is in the selection of the operation in the Choose
Translator dialog. For information specific to one-way data transfers,
see “Importing and Exporting Data” in Chapter 4.
Page 10

Intellisync Lite
Selecting Palm
Desktop in the
Choose Translator
dialog instructs the
HotSync Manager to
perform a Palm
Desktop operation
instead of an
Intellisync operation.
See “The HotSync
Manager” in Chapter
1 for more information
on the HotSync
Manager.
Follow these steps to configure and perform your first
synchronization:
1. Click on the Intellisync Configure shortcut, or the Intellisync
Configure icon in the Intellisync Lite program group. This
displays the Intellisync Configuration dialog box.
2. In the Configuration dialog box, click on the handheld application
you want to synchronize. Then click the Choose button to display
the Choose Translator dialog box.
Page 10
Page 11
Before You Begin
3. In the Choose Translator dialog box, select the PC application you
want to synchronize. If you select Lotus Organizer, a File Name
box and Browse button appear, use Browse to select the file you
want to synchronize.
Notes:
• Check Apply to all applications to have the selected application
and file (or folder) synchronize with all applicable handheld
applications.
• Some PC applications do not require you to specify a filename. If
this is the case, the “active” or last-used file is used by default, and
the File Name text box is not present in the Choose Translator
dialog box.
• Using the Browse button to locate your data file prevents you
from making typographical errors when specifying a filename.
4. If you selected MS Outlook the Options button is enabled, click it
and make sure the correct user profile is selected. Then click OK
to return to the Choose Translator dialog box.
5. Click the OK button to return to the Configuration dialog box.
Now the PC application you selected appears next to the handheld
application name, and a two-sided arrow appears between the handheld
and PC application names.
Page 11
Page 12
Intellisync Lite
Note the check box adjacent to the handheld application name. By
default, this check box is checked, indicating that the data is activated
for synchronization. (If you clear this box, the application data is not
synchronized.)
6.
To review or alter settings affecting synchronization, select the
Advanced button to access the Advanced Settings dialog.
(Intellisync provides default values for all settings.)
Page 12
7. When settings are configured as you want them, click OK to
return to the Configuration dialog.
8. If necessary, repeat the above procedure for each of the handheld
applications you want to synchronize. Then click the OK button to
save specifications and exit the Configuration dialog.
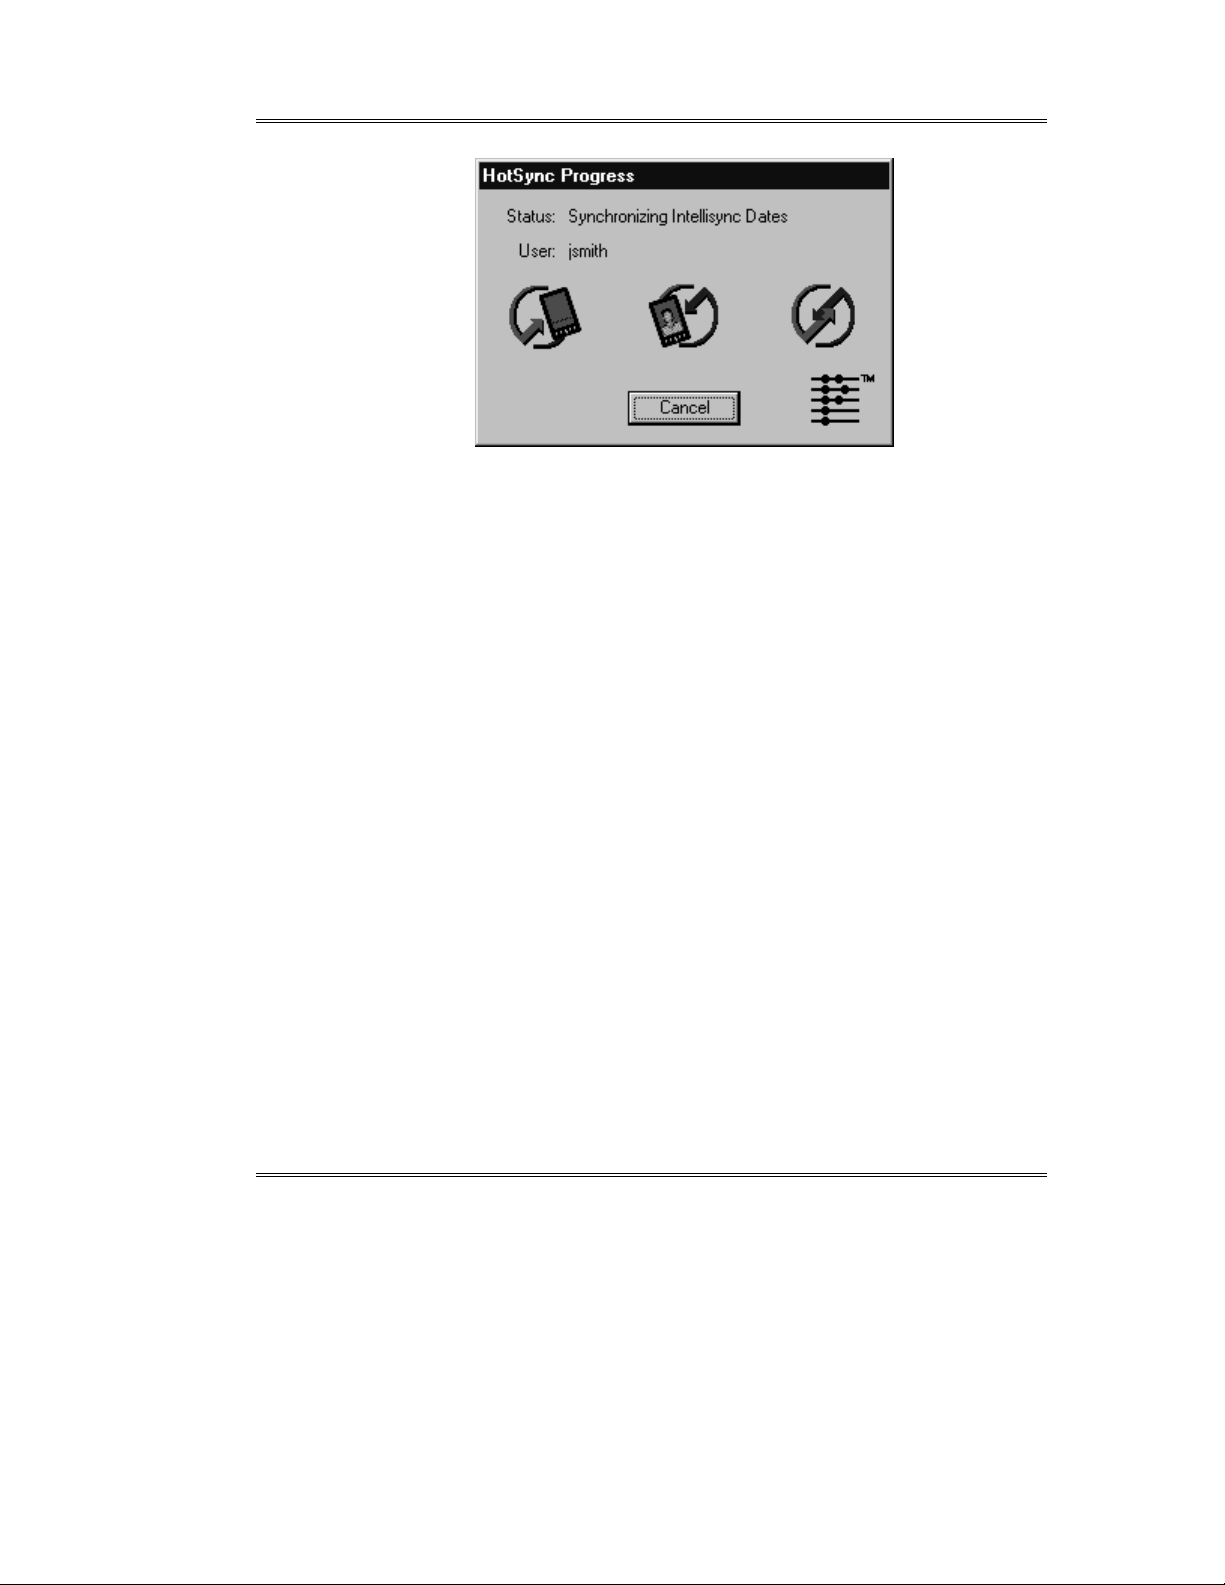
9. With your handheld in the handheld cradle and the cradle
connected to the appropriate COM port on your PC, press the
HotSync button on the handheld cradle. The synchronization
process begins, and a progress dialog appears.
Note that pressing the Cancel button on the progress dialog does
not stop the synchronization until the section being synchronized
has been completed.
Page 13
If you have not
already done so, read
“The HotSync
Manager” in Chapter
1 for important details
on the HotSync
Manager application.
Before You Begin
10. If a Conflict Resolution dialog box appears, resolve “data
conflicts” (see note below).
When the operation is complete, your handheld will display the
message HotSync complete.
If any errors are reported during the operation, click the HotSync Log
button on the handheld when the operation is finished. This will
display information on the errors.
Notes:
For each set of data you synchronize, a history file is used to
determine the changes that must be made in each of your systems
to achieve synchronization. This file is created by the first
synchronization of the data. Therefore, a first run synchronization
is different from (and may take longer than) subsequent
synchronizations.
First run synchronizations simply merge your handheld and PC
data, and a Conflict Resolution setting is used to resolve data
conflicts.
See “The Conflict Resolution Tab” in Chapter 3 for information
on data conflicts and the Conflict Resolution setting.
For information on how history files are used in the process of
synchronization, refer to “Synchronization and History Files” in
Chapter 4.
Page 13
Page 14

Intellisync Lite
Re-Running the Operation
Now that you have configured a synchronization, re-executing the
operation is basically a one step operation.
Simply press the HotSync button on the cradle (with the handheld
in the cradle and the cradle connected to your PC), and
synchronization begins.
You’ll only need to access the Intellisync dialogs again if you want to
change the nature of the operation.
Refer to “Frequently
Asked Questions” in
Chapter 5 if you have
any trouble running a
successful
synchronization. The
problem you’re having
may be addressed
there.
Synchronization Notes:
• In order to run an Intellisync synchronization, your handheld
must communicate with your PC. For this to occur, your
handheld must be properly fitted into the handheld cradle, and
the cradle serial cable must be securely attached to an available
serial port on your PC. For complete details on connecting your
handheld to your PC, refer to your handheld handbook.
• Be sure to read the Supported Systems Help topic for the PC
application(s) you are using. Supported Systems topics contain
important information on how Intellisync works with each of the
PC applications it supports.
• Data can be transferred between records in your handheld and PC
applications because fields in the two systems are “mapped”
(linked). Intellisync provides default “field mapping,” but you
can alter mapping to re-direct (or prevent) the flow of data during
data transfers. Refer to “The Field Mapping Dialog” in Chapter 3
for details.
• When you synchronize a handheld application, it is automatically
synchronized with all sections in the selected PC application that
are compatible with the handheld application. For example, if
you select the handheld Date Book application and Lotus
Organizer, handheld Date Book records are synchronized with
records in the Lotus Organizer Anniversary, Calendar, and
Planner sections.
Page 14
Page 15

The Intellisync Dialogs
Chapter 3: The Intellisync Dialogs
The Configuration & Choose Translator Dialogs
The Intellisync Configuration and Choose Translator dialogs are
where you specify the handheld and PC applications you want to
synchronize.
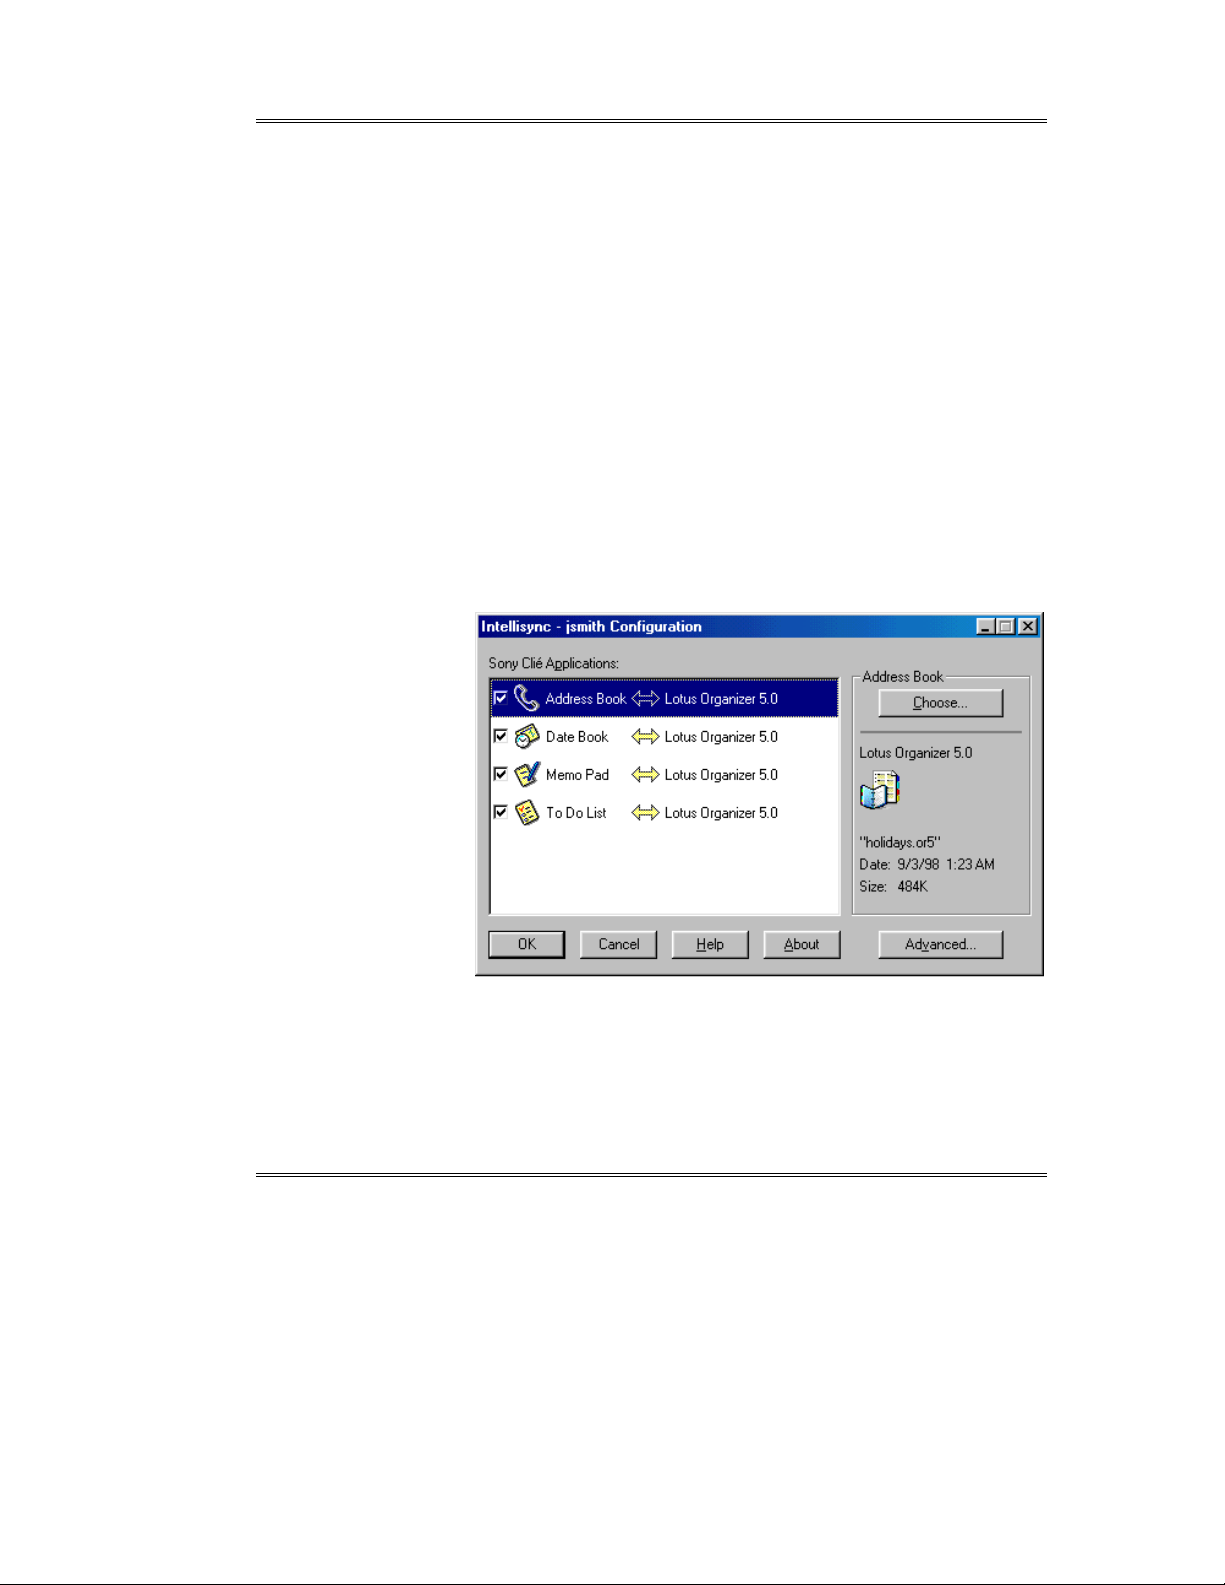
The Configuration Dialog
To open the Intellisync Configuration dialog,
select the Intellisync Configure icon from the
™
Intellisync for Palm
or from a desktop shortcut icon.
handhelds program group
Page 15
This dialog contains an “Applications” list containing each of the
handheld applications.
• To select a handheld application in this dialog, click on it.
• To link the handheld application with a PC file for
synchronization, click the Choose button. This displays the
Choose Translator dialog.
Page 16
Intellisync Lite
The Choose
Translator dialog
contains an Options
button that is enabled
if you select MS
Outlook. Refer to the
Supported Systems
section of Online Help
for information on
Options dialog
settings that apply to
the PC application
you use.
Refer to “Importing
and Exporting Data”
in Chapter 4 for
information on the
Operation buttons in
this dialog.
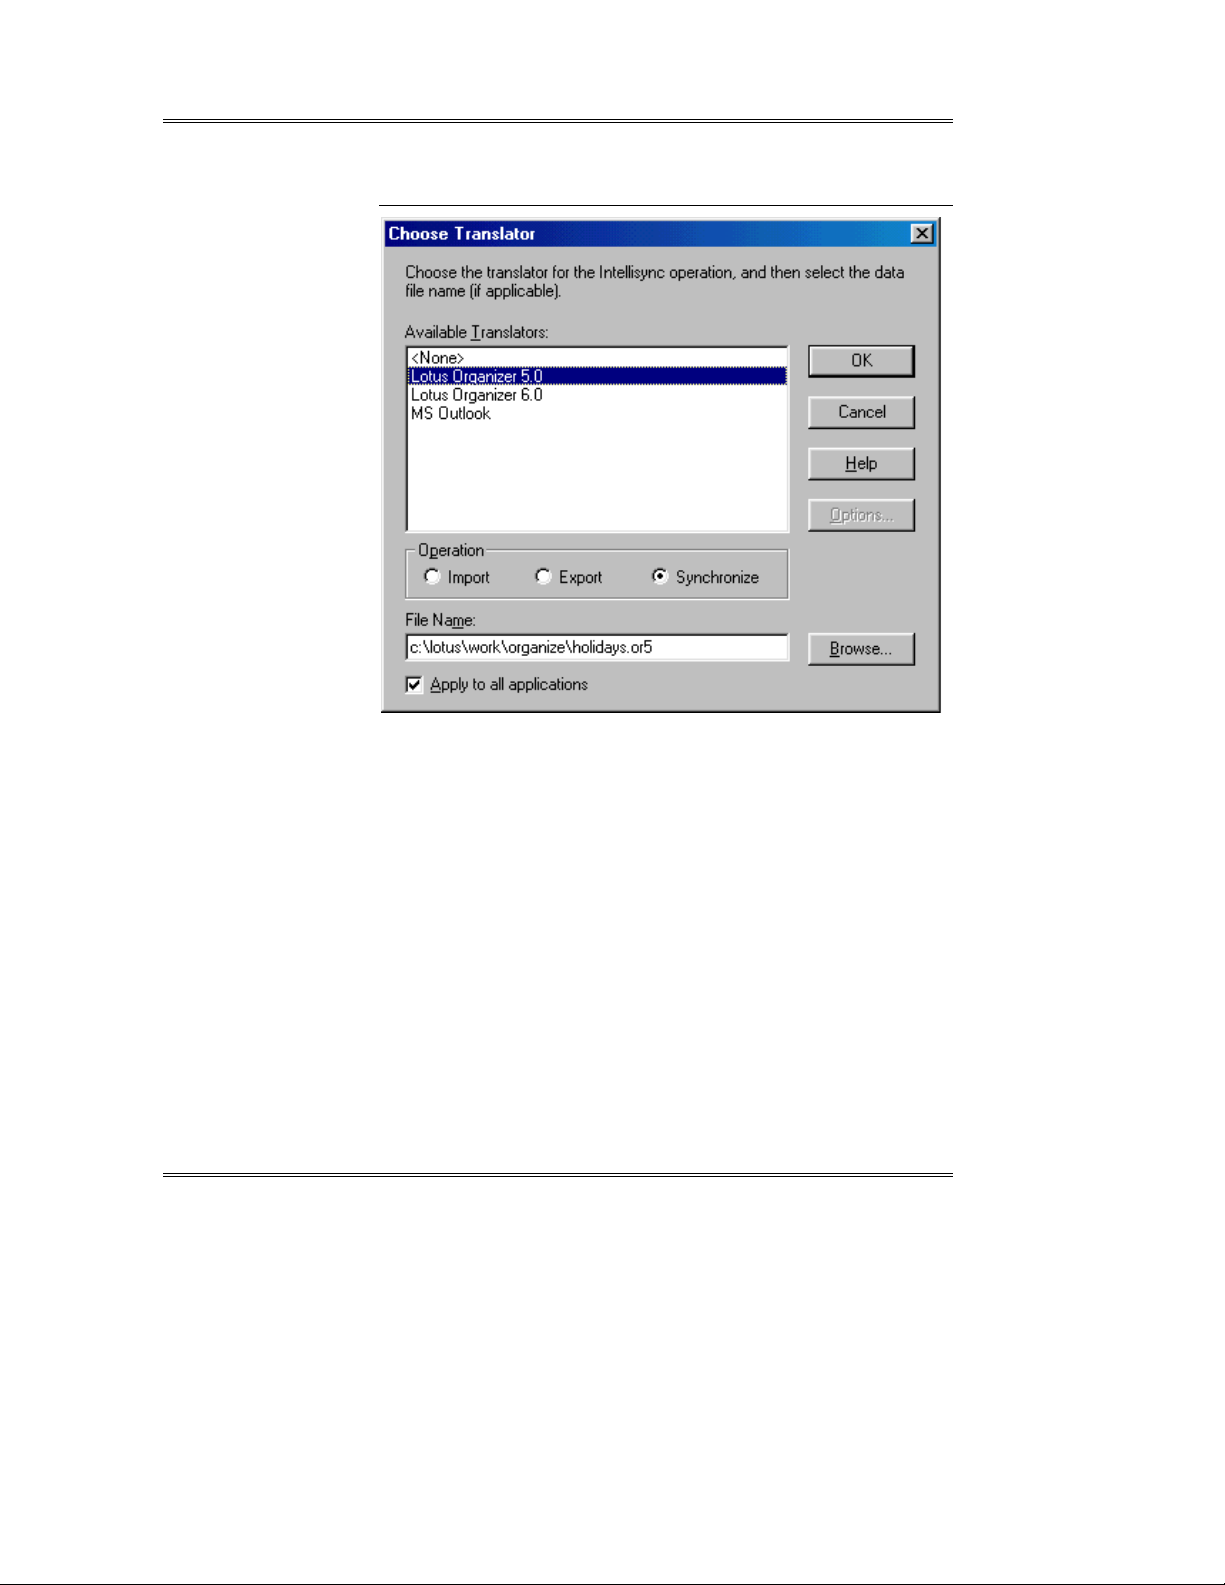
The Choose Translator Dialog
Select a PC application. If you selected Lotus Organizer, use the
Browse button to select the data file.
Page 16
Apply to All Applications
When enabled, you can check the Apply to all applications check box
at the bottom of the Choose Translator dialog box to configure all
compatible handheld applications with the PC application and file (or
folder) you selected. If all of the data you want to synchronize is in a
single file or folder, use this option to configure all of your handheld
applications at once.
• When you’ve finished in the Choose Translator dialog box, click
the OK button to return to the Configuration dialog box.
Page 17

The Intellisync Dialogs
Now the PC application you selected appears next to the highlighted
handheld application name, and the check box adjacent to the
handheld application name is checked. In addition, a two-way arrow
(for synchronization) appears between the handheld and PC
application names.
Clearing a check box next to an application excludes that application
from synchronization.
To access settings or field mapping for the highlighted applications,
select the Advanced button at the bottom of the Configuration dialog.
Note: For information on Intellisync settings and field mapping, see
The Advanced Settings dialog box and The Field Mapping dialog box
later in this chapter.
Configuring Multiple Handheld Applications
In a single operation, you can synchronize as many handheld
applications as you like.
Simply repeat the described procedure for every handheld application
you want included in the operation.
Once a synchronization is configured, clicking the HotSync button on
the handheld cradle starts the operation.
Page 17
Page 18

Intellisync Lite
Refer to the “Quick-Start” tutorial in Chapter 2 for more specific
instructions.
Dialog Buttons
The Configuration and Choose Translator dialogs contain the
following buttons:
• Advanced: Accesses the tabbed Advanced Settings dialog. Note
that this button is only enabled when you have configured a
handheld and PC application for synchronization, and the
applications are selected in the Configuration dialog.
• Browse: Opens a file selection dialog.
• Choose: Opens the Choose Translator dialog.
• Options: Displays the Options dialog, when available.
• OK: Saves specifications and exits the dialog.
• Cancel: Cancels changes and exits Intellisync.
• Help: Opens the Intellisync Online Help system.
• About: Displays information about this version of Intellisync.
Page 18
Notes:
• If you select Palm Desktop in the Choose Translator dialog, the
selected handheld application will be synchronized with Palm
Desktop when you press the HotSync button. Note that the
operation will be a Palm Desktop operation, which may differ
significantly from the same type of Intellisync operation. For
example, Palm Desktop Imports and Exports delete data in the
target system before importing or exporting records. Intellisync
Imports and Exports merge source and target records.
• For information on Intellisync Import and Export operations,
refer to “Importing and Exporting Data” in Chapter 4.
Page 19

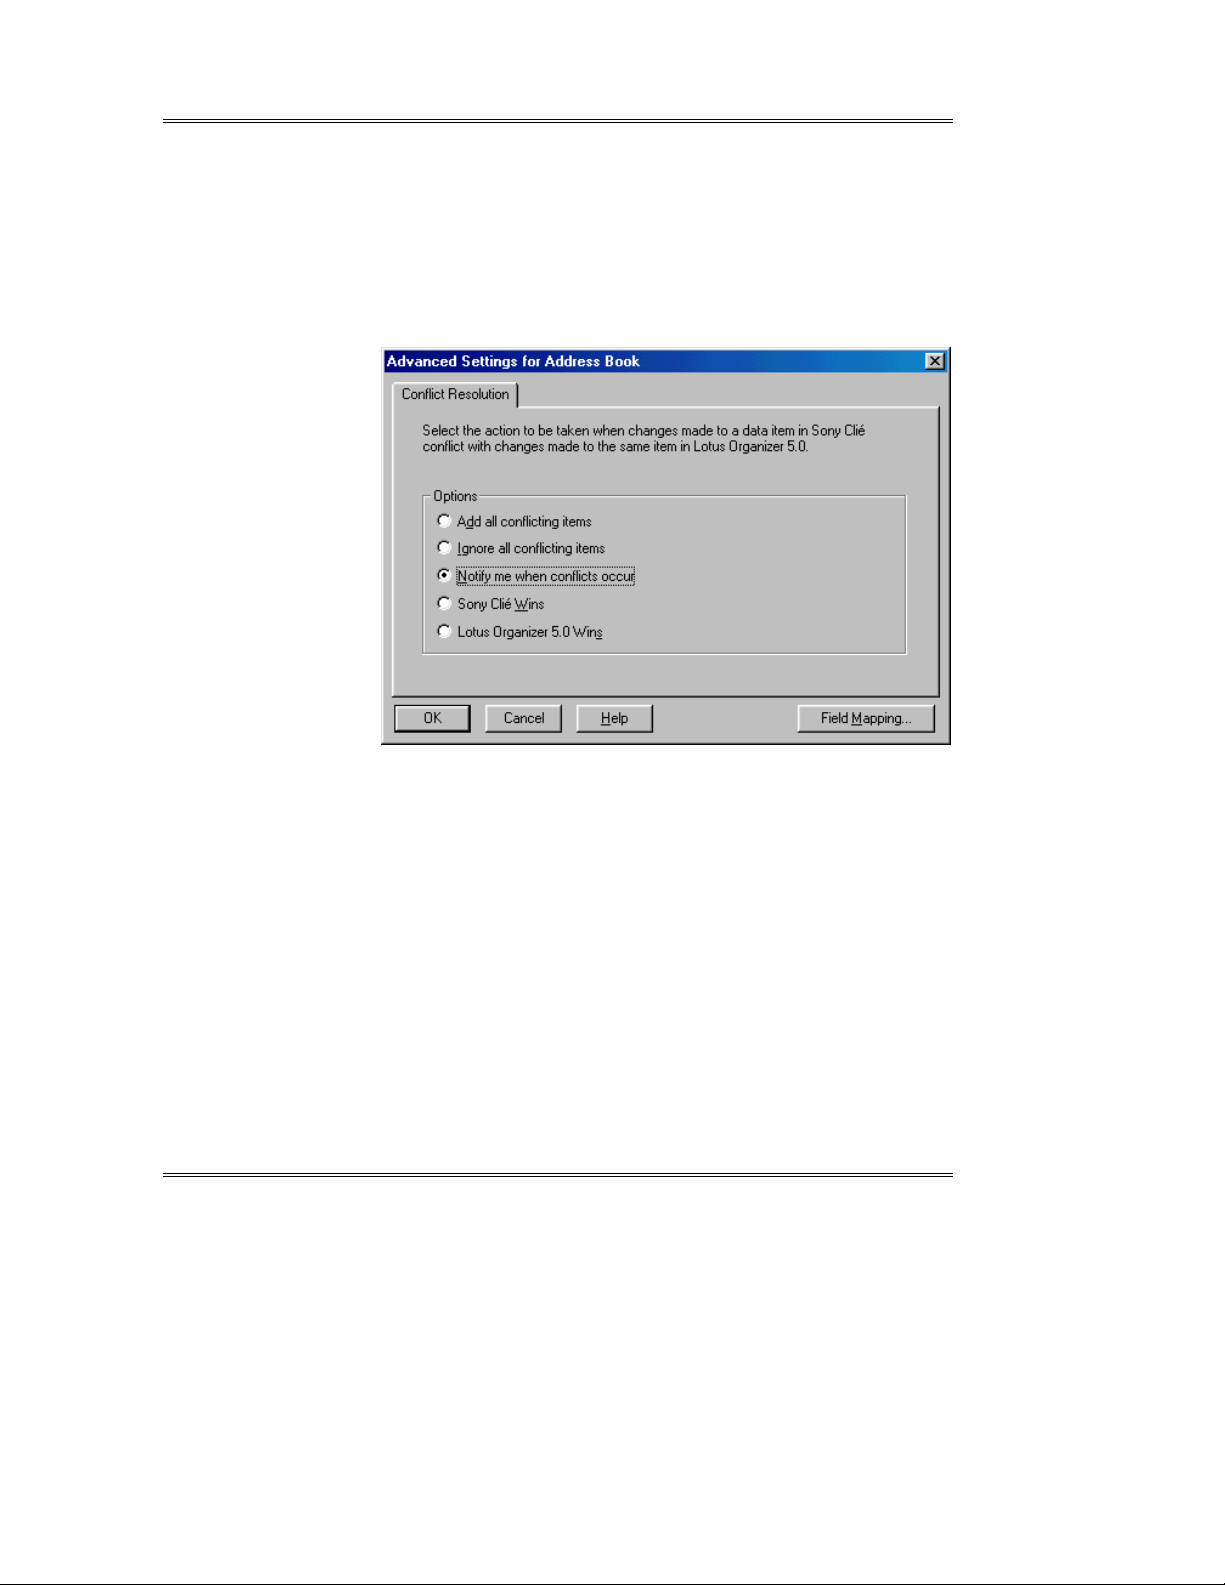
The Advanced Settings dialog box
When you select the Advanced button in the Configuration dialog, the
Advanced Settings dialog appears.
This tabbed dialog contains one or more of the following settings and
features.
The Intellisync Dialogs
• Date Range: Determines the range of Date Book items that are
included in an operation.
• To Do List: Determines if all To Do items, or only pending To
Do items are included in an operation.
• Conflict Resolution: Determines how data conflicts are resolved
if they are detected during a synchronization.
The Advanced button is only enabled when a handheld and a PC
application are configured for synchronization. The settings accessed
by the Advanced button only apply to the currently selected
application.
If an Advanced setting isn’t applicable to the handheld application
selected in the Configuration dialog, the associated tab is not
presented.
Page 19
Page 20

Intellisync Lite
The Date Range Tab
The setting in this tab determines the range of Date Book items that
will be included in a synchronization. Transfer Only Future Items is
the default Date Range setting.
• Transfer All Scheduled Items: Includes all dated items.
• Transfer only Future Items: Synchronizes future items.
• Transfer Items within a Range of Days: Synchronizes a
specified number of days before and after “today.”
To specify a Date Range, select the radio button next to the option you
want. The Transfer items within range of Days option lets you set a
date range that is always relative to the current date.
Page 20
Note: When you run a synchronization, items that were included in the
previous synchronization are synchronized whether or not they fall
within the currently specified date range. (Intellisync identifies these
items by looking at the history file for the previous synchronization.)
Note, however, that only those items that fall within the currently
specified date range are included in the update of the history file.
Page 21

The Intellisync Dialogs
The To Do List Tab
The To Do List setting in this tab determines which To Do items are
processed when you run a synchronization.
Transfer Only Pending Items is the default setting at installation.
• If you accept Transfer Only Pending Items, To Do items
marked “completed” are not synchronized.
• If you select Transfer All Items, all To Do items, including those
marked “completed,” are synchronized.
Notes:
• When a repeating To Do item is transferred to your handheld, it is
fanned to a maximum of 3 items in the handheld To Do List
application.
• Deleting an instance of a repeating To Do item on your handheld
deletes the equivalent instance from the PC application on the next
synchronization.
• Deleting all instances of a repeating To Do item from your
handheld deletes the equivalent instances from the PC application
and brings any additional instances on the PC side over to your
handheld on the next synchronization.
Page 21
Page 22

Intellisync Lite
The Conflict Resolution Tab
When a data conflict occurs during a data transfer, and Intellisync
can’t resolve it using the normal synchronization process, the Conflict
Resolution setting selected in this tab is used to resolve it.
At installation, Notify me when conflicts occur is selected. This is the
only setting that display a dialog when a data conflict is found, letting
you decide which values should be used in each record.
Page 22
What is a Data Conflict?
A data conflict exists when records that should be equivalent contain
conflicting data in one or more mapped fields. Mapped fields are fields
that are linked for transfer in the Field Mapping dialog. See The Field
Mapping Dialog in this chapter for information on field mapping.
More specifically, a data conflict exists when two records contain the
same key field values, but different values in other mapped fields.
Key Fields
Fields designated as key are those that are the most fundamental to a
particular record. For example, name fields are key fields in Address
Book records.
Page 23

The Intellisync Dialogs
The use of key fields in detecting data conflicts is premised on the
following: When key fields in a handheld record match the key fields
in a PC application record, other mapped fields in the two records
should also match. For example, if both of your systems have an
address record for Ron Smith, the values in Title, Company, etc.
should match. If they do not, a data conflict exists.
Letter case counts in key fields. If you have a record for Diana
VanWinkle in your PC application, and one for Diana Vanwinkle in
your handheld, Intellisync does not recognize the names as equivalent.
Synchronization causes both records to occur in each system.
See Key Fields in Help for information on which fields are key fields
for each data type.
The occasions when the Conflict Resolution setting is needed to
resolve data conflicts are as follows:
• First run synchronizations.
• When new records have been added to each system since the last
synchronization, and those records conflict. (For example, if you
have added an address record for Brian Sawyer to each of your
systems, but the City fields don’t match.)
• When mapped fields have been edited in both systems since the
last synchronization, but edited differently. (For example, if you
have updated Brian’s home phone number in both records, but
made a typographical error in one of them.)
Conflict Resolution options work as follows:
• Add All Conflicting Items: Creates a new record in each system
containing mapped values from the record in the other system.
• Ignore All Conflicting Items: Makes no change to either system.
• Notify me when conflicts occur: Displays a dialog box each time
a data conflict occurs, letting you decide which data to use on a
case by case basis. (If you run a remote synchronization with this
setting selected, the “Add” option is used in its place.)
• Handheld Wins: Uses handheld data when conflicts occur. Use
this option when you’re confident that your handheld contains the
most accurate information.
Page 23
Page 24

Intellisync Lite
A check box labeled
Apply to all conflicts
is located below the
action list box. If you
check this box, the
action you choose for
the current conflict will
be applied
automatically to any
other conflicts
detected for the
handheld application
currently being
synchronized.
• Other Application Wins: Uses PC data when conflicts occur.
Use this option when you’re confident that your PC application
contains the most accurate information.
The Conflict Resolution Dialog Box
When “Notify” is the Conflict Resolution setting, a dialog is presented
each time Intellisync needs help resolving a conflict.
This dialog contains a table containing the conflicting fields from both
systems. The field name is displayed in the left column. The PC field
value is in the center. The handheld value is on the right.
Page 24
A box labeled “Item” contains key field values. This helps identify the
conflicting record.
If a record in one system conflicts with more than one record in the
other system, a box to the right of the Item box will say 1 of 2, or 1 of
3, etc., and left and right arrow controls will let you switch between
conflicts.
You can take the following actions to resolve a data conflict.
• Add: Adds a new record to each system. The original conflicting
records remain intact.
• Ignore: Lets the conflict stand, making no change to either record.
If you select the Ignore option, you will be prompted to resolve
the conflict again the next time you run a synchronization.
Page 25

The Intellisync Dialogs
• Update: Updates one or both records (as necessary) with the
value or values highlighted in the grid.
Conflict Resolution Dialog Buttons
The Conflict Resolution dialog box also contains the following
buttons:
• OK: Initiates the chosen action and continues the operation.
• Stop: Takes no action and terminates the synchronization.
• View: Displays a dialog showing the full contents of the selected
field(s) for both systems. Use this to display complete values when
lengthy values are truncated in the Conflict Resolution dialog box.
• Help: Displays Online Help text.
Conflict Resolution Notes:
• Except for first run synchronizations, the Conflict Resolution
setting is not normally needed to resolve data conflicts. In most
cases, Intellisync knows how to edit records to achieve
synchronization. Refer to “Synchronization and History Files” in
Chapter 4 for more information.
• Refer to “The Same Record Changed and Deleted Dialog” in
Chapter 4 for information on what happens if Intellisync discovers
a record that has been changed in one system and deleted in the
other since the last synchronization.
• Overlapping appointments are not treated as data conflicts during
synchronizations. (Note: Conflicts generated by repeating items
are not always detected during one-way data transfers.)
• Do not leave Last Name fields blank in address records. Since
Last Name fields are key fields, leaving them blank can generate
false data conflicts.
• If you don’t have a name to enter into an address record—for
example, if you have address data for a company, but you don’t
have a contact name—place some other value in the Last Name
field. For example, enter the company name in the Last Name
field as well as in the Company field. Or, if you have only a
contact’s first name, place the first name in the Last Name and the
First Name fields.
Page 25
Page 26

Intellisync Lite
The Field Mapping Dialog
Fields that are not
linked in the Field
Mapping dialog are
not transferred during
synchronizations.
When a handheld
application is
compatible with more
than one section in
your PC application, it
is automatically
synchronized with
each of them.
In order for data to be transferred between your handheld and your PC
application file, corresponding fields in each application must be
mapped to one another. Intellisync provides default field mapping,
which links equivalent fields in your two systems. But you can edit
mapping to re-direct (or prevent) the flow of data as needed.
To access field mapping for selected applications, click the Field
Mapping button at the bottom of the Advanced Settings dialog. This
displays the Intellisync Field Mapping dialog.
Page 26
Note: Some PC applications have multiple data type sections that are
compatible with the selected handheld application. When this is the
case, a list box labeled Section appears over the right column. Select
from this list to specify the section for which you want to display field
mapping.
Page 27

The Intellisync Dialogs
As you can see, the Field Mapping dialog lists handheld fields on the
left, and PC fields on the right. Two-way arrows appear between fields
that are “mapped,” or linked, for synchronization.
• To un-map mapped fields: Click on the arrow (or highlight the
PC application field name and double-click or press the
Spacebar).
• To map adjacent fields: Click between the fields (or highlight the
PC application field name and double-click or press the
Spacebar). An arrow will appear to indicate that the fields are
mapped.
• To map non-adjacent fields: Drag the field in the right-hand
column and drop it next to the field in the left-hand column.
• To reinstate default field mapping: Select the Reset button.
Field Mapping Dialog Buttons
At the bottom of the Field Mapping dialog, the buttons work as
follows:
• OK: Saves changes made to field mapping and re-displays the
Advanced Settings dialog.
• Cancel: Cancels changes made to field mapping.
• Help: Opens the Intellisync Online Help system.
• Reset: Resets field mapping to the installation default
configuration.
Page 27
Page 28

Intellisync Lite
Field Mapping Notes:
• Before you edit field mapping, scroll up and down the field list to
see the available fields. They may not be organized as you’d
expect.
• If you change field mapping after data has been synchronized, the
next synchronization will be, in effect, a first run
synchronization.
• When data is transferred between fields in your handheld and
your PC application, data may be truncated in the target field if
the source data is too lengthy to be accommodated. It is not wise
to edit truncated data. If you do, the data in the other system will
be truncated after the next synchronization. Refer to Chapter 5,
“Frequently Asked Questions,” for a workaround that allows you
to edit truncated text.
• Intellisync enforces certain field mapping rules. For example,
you cannot map date fields to time fields. If you attempt to map
incompatible field types, an error message is displayed.
• Field names marked with asterisks in the Field Mapping dialog
must be mapped (or one or more of their multi-line sub-fields
must be mapped). If marked fields are not mapped, an error
message appears when you try to exit the Field Mapping dialog.
Page 28
• Though Intellisync provides default field mapping, it’s advisable
to review field mapping to make sure that it’s set up to best suit
your applications.
• Check the Supported Systems Online Help topic for the PC
application(s) you’re using to see if any special field mapping
rules apply. For example, if your application allows for the
creation of custom fields, the Help topic for that system will tell
you how to map custom fields.
Page 29

Chapter 4: Special Topics
This chapter is devoted to explaining in detail some
aspects of Intellisync that have only been touched
upon in previous chapters.
Topics include:
• Multi-User Support
• Synchronization and History Files
• The Same Record Changed and Deleted dialog box
• Remote Synchronization
• Importing and Exporting Data
• Virtual Fields
Special Topics
Page 29
Page 30

Intellisync Lite
Multi-User Support
Intellisync can be used to synchronize multiple handhelds. A separate
operation can be configured for each.
However, before you can configure an operation for a second (or third,
etc.) handheld, a User name for that handheld must be added to the
™
Palm
Desktop Software User list. Instructions for adding User names
are provided below.
When more than one User name has been added to the Palm Desktop
Software User list, Intellisync prompts you to select a User name each
time you configure (or re-configure) an Intellisync operation.
You are normally not prompted for a User name when you run a
synchronization. The HotSync
the cradle and automatically runs the operation currently configured
for that User name.
®
Manager recognizes the handheld in
“Owner names”
specified in the
handheld are not the
same as User names.
User names can only
be defined in Palm
Desktop Software.
Adding a User Name
1. Open Palm Desktop.
2. Open the Tools menu and select Users.
3. Click the New button in the dialog that displays. When the New
User dialog appears, enter a User name (maximum, 15 characters).
4. Click OK to save the name.
5. Run the Intellisync Configure operation and, when prompted,
select the User name you added.
6. After you have configured an operation, place the handheld in its
cradle and press the HotSync button. When prompted, select the
new User name and press OK. This transfers the User name to the
handheld and starts the synchronization.
Page 30
Page 31

Special Topics
Notes on Multi-User Support:
• You may be prompted to select a User name the very first time
you run an Intellisync synchronization.
• The handheld “owner name” is not the same as a User name.
User names can only be defined in Palm Desktop.
• If more than one User name is defined in the Palm Desktop User
list, you are prompted for a User name each time you run the
Intellisync Configure program.
• Intellisync saves configuration information for multiple
handhelds in separate directories (based on user names).
Page 31
Page 32

Intellisync Lite
Synchronization and History Files
An understanding of
history files and how
synchronization works
is not mandatory.
However, you may
find this information
helpful.
A separate history file
is created for each set
of configured
applications.
During a synchronization, Intellisync compares records in your
handheld to records in your PC application, and makes whatever
changes are necessary in each system to ensure that they both contain
the same information.
If a record has been added to one system and not the other, that record
is added to the incomplete system. If a record has been deleted from
one system and not the other, Intellisync deletes the record from the
other system. If a record has been edited in one system and not the
other, Intellisync edits the record in the other system. Intellisync knows
how records have changed since the last synchronization because a
“history file” is used in comparing records.
The first time a particular set of data is synchronized, there is no
history file. Data from the two locations are simply merged, and
conflicts between the two systems are resolved using the Conflict
Resolution setting.
However, this initial operation creates the history file that will be used
for subsequent synchronizations.
How does the history file work? At the end of each synchronization,
a history file matching the two synchronized systems is created. When
the systems are next synchronized, Intellisync compares the two
synchronized systems to each other, and to the history file. If a record
in the history file matches one system, but not the other, Intellisync
knows that the “conflicting” record has been changed since the last
synchronization. It therefore applies the change to the other system and
to the history file.
Page 32
In cases where changes have been applied to both systems, and those
changes conflict (for example, if you have added address records for
the same name to each system, but the phone numbers don’t match),
the Conflict Resolution setting is used to resolve the discrepancy.
Page 33

Special Topics
The Same Record Changed and Deleted Dialog
This dialog appears
only when Notify me
when conflicts
occur is the selected
Conflict Resolution
setting. If any other
setting is selected, a
change always
overrides a delete—
that is, the changed
record is added to the
system from which the
record was deleted.
If you select the
Ignore option, you will
be prompted to
resolve the conflict
again the next time
you run a
synchronization.
If, during a synchronization, Intellisync discovers that a previously
synchronized record has been changed in one system and deleted in
the other since the last synchronization, a special dialog is displayed.
The Same Record Changed and Deleted dialog alerts you to the
deletion of the record in one system, and shows you the record as it has
been changed in the other. A list of options allows you to decide
between the following actions:
• Add: Adds the item back into the system from which it was
deleted.
• Delete: Deletes the record from the other system.
• Ignore: Lets each system remain as it is.
Use the View button at the bottom of this dialog to see the complete
value of the highlighted field when it is too long to be displayed in the
grid.
Page 33
Page 34

Intellisync Lite
Remote Synchronization
Once you have configured a synchronization, Intellisync can
synchronize remotely, via modem. This topic outlines what must be
done prior to running a remote synchronization, and describes
differences between remote and local operations.
Consult your Palm OS
on how to set up HotSync, your handheld, and your Palm modem for
remote synchronization.
Tip! Synchronize your handheld and PC application before leaving
your office. You can not change your Intellisync configuration
settings remotely.
To Prepare Your PC
In order to run a remote synchronization, your PC must be turned on.
You must a have a modem correctly installed and connected to an
outside line.
Your PC should be disconnected from any Online services (e.g.,
America Online, CompuServe, etc.).
®
handheld-compatible manuals for instructions
Page 34
The PC application with which you are synchronizing may have
requirements for data transfer. In some cases, for instance, an
application must be running or data files must be closed. See the Data
Transfer Requirements section of the Supported Systems topic for the
PC application you are using.
Page 35

Special Topics
Remote vs. Local Synchronization
When you run a synchronization locally, you are sometimes prompted
for information. For example, if the “Notify” Conflict Resolution
setting is selected, you may be prompted to resolve data conflicts.
Since interaction with Intellisync is not possible when you synchronize
via modem, remote synchronizations entail a number of limitations.
(Under some circumstances, synchronization is not possible.)
Limitations when synchronizing via modem are as follows:
• If “Notify” is the selected Conflict Resolution setting, the “Add”
setting is used in its place.
• PC applications that require a password for access cannot be
synchronized remotely.
• Regardless of the “Confirmation” setting, synchronizations take
place without confirmation. However, if a synchronization would
result in the deletion of all records from a system, the operation
cancels.
Page 35
Page 36

Intellisync Lite
Importing and Exporting Data
In addition to synchronizing your handheld with PC applications,
Intellisync can also perform imports and exports of data from one
system to the other.
The same procedures that are involved in configuring and performing a
synchronization are used for importing and exporting. That is, you
have to set up the Configuration and Choose Translator dialogs, and, if
necessary, adjust settings in the Advanced Settings, Options, and Field
Mapping dialogs. Once things are set up, the HotSync button on the
handheld cradle starts the operation. The only difference is in the
choice of the operation in the Choose Translator dialog.
• To transfer data from a PC application to your handheld, select
Import.
• To transfer data to a PC application from your handheld, select
Export.
Notes:
• When you perform an Import or Export, Intellisync doesn’t
duplicate records that already exist in the target system. However,
Conflict Resolution is applied if Intellisync discovers data
conflicts between records in your two systems.
• When Conflict Resolution is used during imports or exports,
Intellisync may add or change target records, but records are never
deleted.
• In a single operation, you can perform different types of data
transfers. For example, in one operation, you can import into the
handheld Address Book, export Date Book information, and
synchronize your To Do’s. It’s simply a matter of which operation
you choose for each type of data.
Page 36
Page 37

Virtual Fields
Special Topics
Sometimes the handheld does not have fields corresponding to
important PC application fields. For example, a PC application's To
Do records might have Contact and Company fields which the
handheld To Do List records do not.
To solve this problem, Intellisync sometimes creates “virtual”
handheld fields. Virtual fields appear in the Field Mapping dialog.
When these are mapped, values in corresponding PC application fields
are transferred to the handheld as appendages to other fields. For
example, virtual fields are appended to the Note field of Date Book
and To Do List records.
Virtual Fields in the Date Book and To Do List
For the handheld Date Book and To Do List applications, some virtual
fields are mapped by default. For example, if you were to configure the
handheld To Do List application for synchronization, you might see
the following mapping in the Field Mapping dialog:
Handheld PC Application
Contact Name:
Contact Company:
This mapping transfers the values in the PC Application Contact and
Company fields to the Note field of the handheld To Do List record.
Contact
Company
The values would appear in the handheld’s Note field like this:
Contact Name: Bob Moore
Contact Company: Mid-East Translations
Page 37
Page 38

Intellisync Lite
Virtual Phone and Email Fields
Virtual Phone and Email fields can be used to increase the number of
phone numbers and email addresses that can be entered into handheld
Address records.
Unlike virtual fields in the Date Book and To Do List applications,
these virtual fields are never mapped by default. To use a virtual field
in the Address Book application, you must edit field mapping.
Virtual phone and email fields appear below “normal” fields in the
Field Mapping dialog. Map them in the typical manner if you need
them.
Work
Alternate
Assistant
Home
Alternate
Home
Fax
Home Fax
Alternate Fax
E-mail
E-mail 2
E-mail 3
When virtual phone and email fields are transferred to your handheld,
they are displayed in the handheld below the actual field they are
associated with, like this:
Work: 603 555-1213
Alternate: 603 555-1214
Assistant: 603 555-2564
Page 38
Page 39

Special Topics
Editing and Adding Virtual Fields in the Handheld
You can both edit and add virtual field values in handheld records. But
you must adhere to the following rules:
• When adding virtual field names, use the exact spelling and letter
case used in the Field Mapping dialog. For example, when adding
a virtual Alternate Home phone field to your handheld, use
Alternate Home, not alternate.
• Place the virtual field on a line separate from any other field text.
• In Note fields, place virtual fields before Note text.
• Place a colon and a space between the field name and field value.
• Make sure the virtual field is mapped in the Field Mapping dialog.
An Example
Follow these steps to add a virtual Assistant field to the handheld
Work (phone) field:
1. With the cursor in the Work phone field, and to the right of any
existing data, tap Enter in the on-screen keyboard.
The cursor is now on a new line in the Work field.
2. Enter Assistant: xxx xxx-xxxx (replace the x’s with the correct
phone number).
3. Tap the Done button.
4. Map the Assistant field to the appropriate PC field in the Field
Mapping dialog.
When you run the next synchronization, the Assistant phone value you
added to your handheld will transfer to your PC application.
Page 39
Page 40

Page 41

Frequently Asked Questions
Chapter 5: Frequently Asked Questions
General
I received the message “Wrong version of Windows,”
but I am using a Windows application that is
supported by Intellisync.
This message appears if Palm™ Desktop is not already installed on
your PC when you attempt to install Intellisync Lite.
To stop the error from occurring, install Palm Desktop on your system.
Then install Intellisync.
After I ran a synchronization, some of the data in my
application was truncated.
See
“Synchronization
and History Files” in
Chapter 4 for an
explanation of how
synchronization
works.
When data is transferred between fields in your handheld and your PC
application, data may be truncated in the target field if the source data
is too lengthy to be accommodated.
If you edit the truncated data, the original data in the other system is
truncated during the next synchronization. If you want to edit truncated
data, there is a workaround—as follows:
Any time you edit truncated data, you should also go in and edit the
corresponding record in the other system. (It can be the same change
you made in the shortened record, or a trivial edit of no consequence.
The important thing is that a change is registered in that record). Make
sure the Notify Conflict Resolution setting is selected. Then, during
the next synchronization, when the Conflict Resolution dialog box is
displayed for that record, select Ignore. This will prevent the truncated
data from overwriting the data in your other system.
Page 41
Note: If you select Ignore, as recommended, you will be
prompted to resolve the conflict again the next time you run a
synchronization. If this is not acceptable, you can highlight the
original (non-truncated) text in the Conflict Resolution dialog and
choose Update. Note, however, that Update will overwrite the
edit that caused the conflict in the first place.
Page 42

Intellisync Lite
For information on
another way to restore
corrupted data, refer
to “Full ReSynchronization” in
Chapter 4.
During synchronization, I am losing the connection
between my handheld and PC.
If your handheld and PC are hooked up correctly, your batteries are
not run down, and the COM port setting is accurate, try synchronizing
with the Palm Desktop.
If synchronizing with Palm Desktop does work, your problem may be
that the baud rate is set too high in Palm Desktop. (This can be an
issue especially in cases where you are accessing your PC application
over a network.) Try lowering the speed like this:
Go into Palm Desktop (Start/Programs/Palm Desktop/Palm Desktop)
and select HotSync
and lower the speed in the Speed box.
®
from the Palm Desktop menu. Then select Setup
Why isn’t data being transferred when I run a
synchronization?
Sometimes a synchronization will fail because data in your PC
application is corrupted. One thing you can do to find out if this is the
problem is to create a new file in your PC application and run another
synchronization using that file. If the operation succeeds, your PC
application data is probably corrupted. If this is the case, you might be
able to restore the data from a backup file for your application. If not,
you may need to contact technical support for that software
application.
Page 42
Why is my handheld timing-out before my
synchronization is complete?
Time-outs may occur when you attempt to synchronize large volumes
of data.
Follow these steps to run a synchronization using a “Developer’s
Backdoor” workaround, which places the handheld in “wait-forever”
mode:
1. Turn on your handheld.
2. Press the Applications button on the left of the handheld.
3. Press the HotSync icon.
4. Hold down both the up and down scroll buttons (in the middle of
the handheld) while tapping in the upper right corner of the screen
(several taps may be necessary).
Page 43

Frequently Asked Questions
5. This displays the Developer’s Backdoor window. DL Server Wait
Forever is ON. Press OK.
6. Press the HotSync button on the cradle to start a synchronization.
Your handheld will remain in the “wait-forever” mode until the
synchronization is completed or canceled. (If a Cancel causes your
handheld to hang, execute a soft-reset. Refer to your handheld manual
for instructions.)
Note: You may need to use this workaround each time you
synchronize your data. However, since first run synchronizations
take longer than subsequent synchronizations, it may only be
necessary the first time you synchronize your data.
Page 43
Page 44

Intellisync Lite
Lotus Organizer
When I try to synchronize my handheld with Lotus
Organizer, I get the message “Unable to access data
file; verify that the file is closed or not in use.”
When synchronizing with Lotus Organizer, the application can be
running, but the file must be closed. If the file you are synchronizing is
open (or in the “Open File” box under Organizer Preferences, and
Intellisync is starting Lotus during the operation) the synchronization
may fail.
To synchronize successfully, either close the file or remove it from the
Open File box.
When I synchronize my addresses, some of my
handheld addresses are not transferred to the correct
location in my Lotus Organizer Address Book.
More than likely, some of the last names in your handheld begin with
lower case letters. If you do not use upper case letters when entering a
last name into a handheld Address Book record, the record may be
transferred to the wrong location in the Lotus Address Book. If you
look through your Lotus address records, you will probably find the
missing addresses under the wrong letter tabs (they are usually located
under the tabs preceding the correct ones).
Page 44
To successfully transfer the handheld records to Lotus, use the
handheld Keyboard function to change the lower case letters to upper
case. Delete improperly located records from your Lotus Organizer
Address Book, and then re-run the synchronization.
Page 45

Appendix: Log Files
Appendix
Log files can be a
good source of
information if you call
for technical
assistance.
For each handheld application that is synchronized during an
Intellisync operation, a “Log” file is created. Log files contain a
detailed accounting of what occurred during the synchronization.
It is not normally necessary to read log files after a synchronization.
However, if errors were reported, they may be a useful source of
information.
To view a sync log file
To locate and view log files, look in the Available Logs window,
located on the View Logs tab of the Intellisync Support Tool. Log files
are assigned the following names, based on the handheld application
names:
ADDRBOOK.LOG
EXPENSE.LOG
DATEBOOK.LOG
NOTEPAD.LOG
TODOLIST.LOG
Log files identify the records that were transferred from one system to
the other, and indicate the exact action that was taken for each record.
Field Mapping is also specified in log files.
Reading a Log File
Before any actions are taken during a synchronization, records from
each system are read (looked at). You will see the term READ used in
the log files to indicate this process.
Page 45
After reading records in each of the systems, Intellisync compares the
records in both systems, as indicated in a section labeled Summary of
Data Analysis. Here you will see phrases like “Unchanged on Both
Systems,” “Changed on First System,” “Deleted from Second System,”
and so forth.
The next section of the Log file lists the actions that were taken in your
“First System” (handheld) and “Second System” (PC application) to
achieve synchronization of the two systems.
Page 46

Intellisync Lite
The following actions may be noted:
ADD: The record was added.
DELETE: The record was deleted.
FAIL RANGE: The item was excluded from the operation.
IGNORE: The record was ignored.
REPLACE: The record was deleted and replaced with a record from
the other system.
SKIP: The record was skipped because the data transferred was of a
different type.
UPDATE: The record was updated with a value or values from the
other system.
To save a particular log file:
Each time you run an operation, sync log files are overwritten. If you
want to save a particular log file, rename the file before running
another operation.
Log files are located in your user name sub-directory (Intellisync gets
this information from the Palm
™
Desktop application).
Page 46
Page 47

Glossary
Boldfaced text
identifies additional
terms defined in this
glossary.
See “The Conflict
Resolution Tab”
under “The
Advanced Settings
Dialog” in Chapter 3
for more information
on Conflict Resolution
and data conflicts.
Glossary
Conflict Resolution
A process (controlled by a setting in the Conflict Resolution tab of the
Advanced Settings dialog) that is sometimes used by Intellisync to
determine how to resolve data conflicts during synchronizations. See
Data Conflict, below.
Data Conflict
A data conflict occurs when records in both systems have matching
key field values but conflicting data in other mapped fields. (For
example, if both systems have address records in which the First and
Last Name values are identical, but the Address values differ.)
The very first time a set of data is synchronized, (and any time you
Import or Export) the Conflict Resolution setting is used to resolve all
such conflicts. Upon subsequent synchronizations of the same data
(after the history file has been created), the Conflict Resolution setting
is needed only under the following conditions:
Page 47
• When records with the same key fields have been added to both
systems since the last synchronization, but they have conflicts in
other mapped fields.
• When mapped fields in previously synchronized records (with
matching key fields) have been edited since the last
synchronization, but edited differently.
Export
A one-way transfer of data. The Intellisync Export command (selected
in the Choose Translator dialog) exports records from a selected
handheld application to a selected PC application.
Field
The location of a single data element. Each application is organized
into sets of fields (records). For example, handheld Address Book
records consist of the fields Last Name, First Name, Title, Company,
etc.
Page 48

Intellisync Lite
Field Mapping
The linkage that directs the comparison and transfer of handheld and
PC data during synchronizations. Field mapping is contained (and can
be edited) in the Intellisync Field Mapping dialog.
To access the Field Mapping dialog, select the Field Mapping button
in the Advanced Settings dialog.
History File
A file that is created by a first run synchronization and updated after
every subsequent synchronization. During a synchronization, this file
aids Intellisync in determining which data to use when there are
discrepancies between the handheld and PC systems. See
“Synchronization and History Files” in Chapter 4 for more complete
information.
HotSync® Button
Located on the HotSync® cradle, this button initiates a
synchronization using settings currently in place in the Intellisync
dialogs. Note that in order for this button to work, the HotSync
Manager application must be loaded in memory, and the handheld
cradle must be connected to a valid PC COM port. See also, HotSync
Manager.
Page 48
HotSync Manager
An application that is placed in your Windows Startup group when you
install Palm
background, coordinates communications between your handheld and
your PC. When you have configured an Intellisync synchronization,
pressing the HotSync button on the handheld cradle directs the
HotSync Manager to execute the operation.
™
Desktop. This application, which runs in the
Import
A one-way transfer of data. The Intellisync Import command (selected
in the Choose Translator dialog) imports records from a selected PC
application to a selected handheld application.
Key Field
A field specially defined to detect data conflicts during
synchronizations. During an operation, Intellisync compares the values
of mapped fields in handheld and PC records. When “key” values
match, but other mapped values differ, a data conflict exists. For
Page 49

Glossary
example, in Address records, if Last Name and First Name (key)
values match, but Address values differ, this is a data conflict. See also
Data Conflict.
Mapped Fields
Handheld and PC application fields that are linked for synchronization
in the Intellisync Field Mapping dialog.
Section
A type, or category, of data contained in a PC application. For
example, Addresses, Notepad, and Schedule are sections contained in
some of the PC applications supported by Intellisync. In the handheld,
sections are referred to as applications.
Synchronization
The Intellisync operation that compares the records in a handheld
application to the records in a PC application file, and makes whatever
changes are necessary in either system to make sure that they both
contain the same data.
Page 49
Page 50

Page 51

Index
A
Address records
and Last Name fields, 27
Advanced button, 19
Advanced Settings dialog box, 21
Conflict Resolution tab, 24
Date Range tab, 22
To Do List tab, 23
Glossary
data sections, 51
data truncation, 43
Date Range tab, 22
dialog boxes
options, 13
E
exporting data from your
handheld, 38
C
Cancel button, 20
Choose Button, 12
Choose Translator dialog box, 13,
18
and Palm Desktop, 20
Completed To Do Items, 23
Configuration Dialog, 12
Configuration dialog box
Advanced button, 19
Configure Icon, 8
Configuring a Synchronization,
12
conflict resolution
and remote synchronization, 25
and the Notify setting, 26
Conflict Resolution dialog box,
26
arrow controls in, 26
buttons in, 27
Item box in, 26
options in, 26
Conflict Resolution tab, 24
D
data conflict, 49
data conflicts
defined, 24
F
field mapping, 50
Field Mapping dialog box, 28
buttons in, 29
filenames
entering, 13
first run synchronization, 15
H
handhelds
losing connection, 44
timing out, 44
Help button, 20
Help Icon, 8
history file, 50
history files, 34
HotSync button, 16, 50
HotSync cradle, 16
HotSync Manager, 9
and Palm Desktop, 9
I
importing data to your handheld,
38
Installing Intellisync, 7
Intellisync
Page 51
Page 52

Intellisync Lite
import and export operations,
38
installing the software, 6
uninstalling, 8
Intellisync dialog box buttons, 20
Intellisync dialog boxes
Advanced Settings, 21
Choose Translator, 18
Intellisync Program Group, 7
Intellisync Support Tool, 8
K
key field, 51
key fields, 25
L
log files, 47
locating and viewing, 47
reading, 48
Lotus Organizer
addresses not transferring, 46
unable to access data file, 46
M
mapped fields, 51
mapping and un-mapping fields,
29
multiple configurations, 32, 33
multi-user support, 32
P
Palm Desktop, 32, 50
synchronizing after installing
Intellisync, 9
Palm Desktop operations
compared to Intellisync
operations, 20
Pending To Do Items, 23
R
Readme File, 8
Readme Icon, 8
remote synchronization
and Notify Conflict Resolution
setting, 37
limitations, 37
vs. local synchronization, 37
S
Same Record Changed and
Deleted dialog box, 35
sections, 51
serial communication, 16
Startup Group, 50
synchronization
and multiple compatible
sections, 16
Synchronization
how does it work?, 34
synchronizing
multiple applications, 19
synchronizing data, 16
synchronizing multiple
handhelds, 32
T
To Do List tab, 23
U
Uninstall Icon, 8
user names
adding, 32
V
virtual fields
phone and email, 40
user-mapped, 40
Page 52
Page 53

Index
W
Wrong version of Windows error
message
Palm Desktop not installed, 43
Page 53
 Loading...