

Page 1
3-256-434-11 (1)
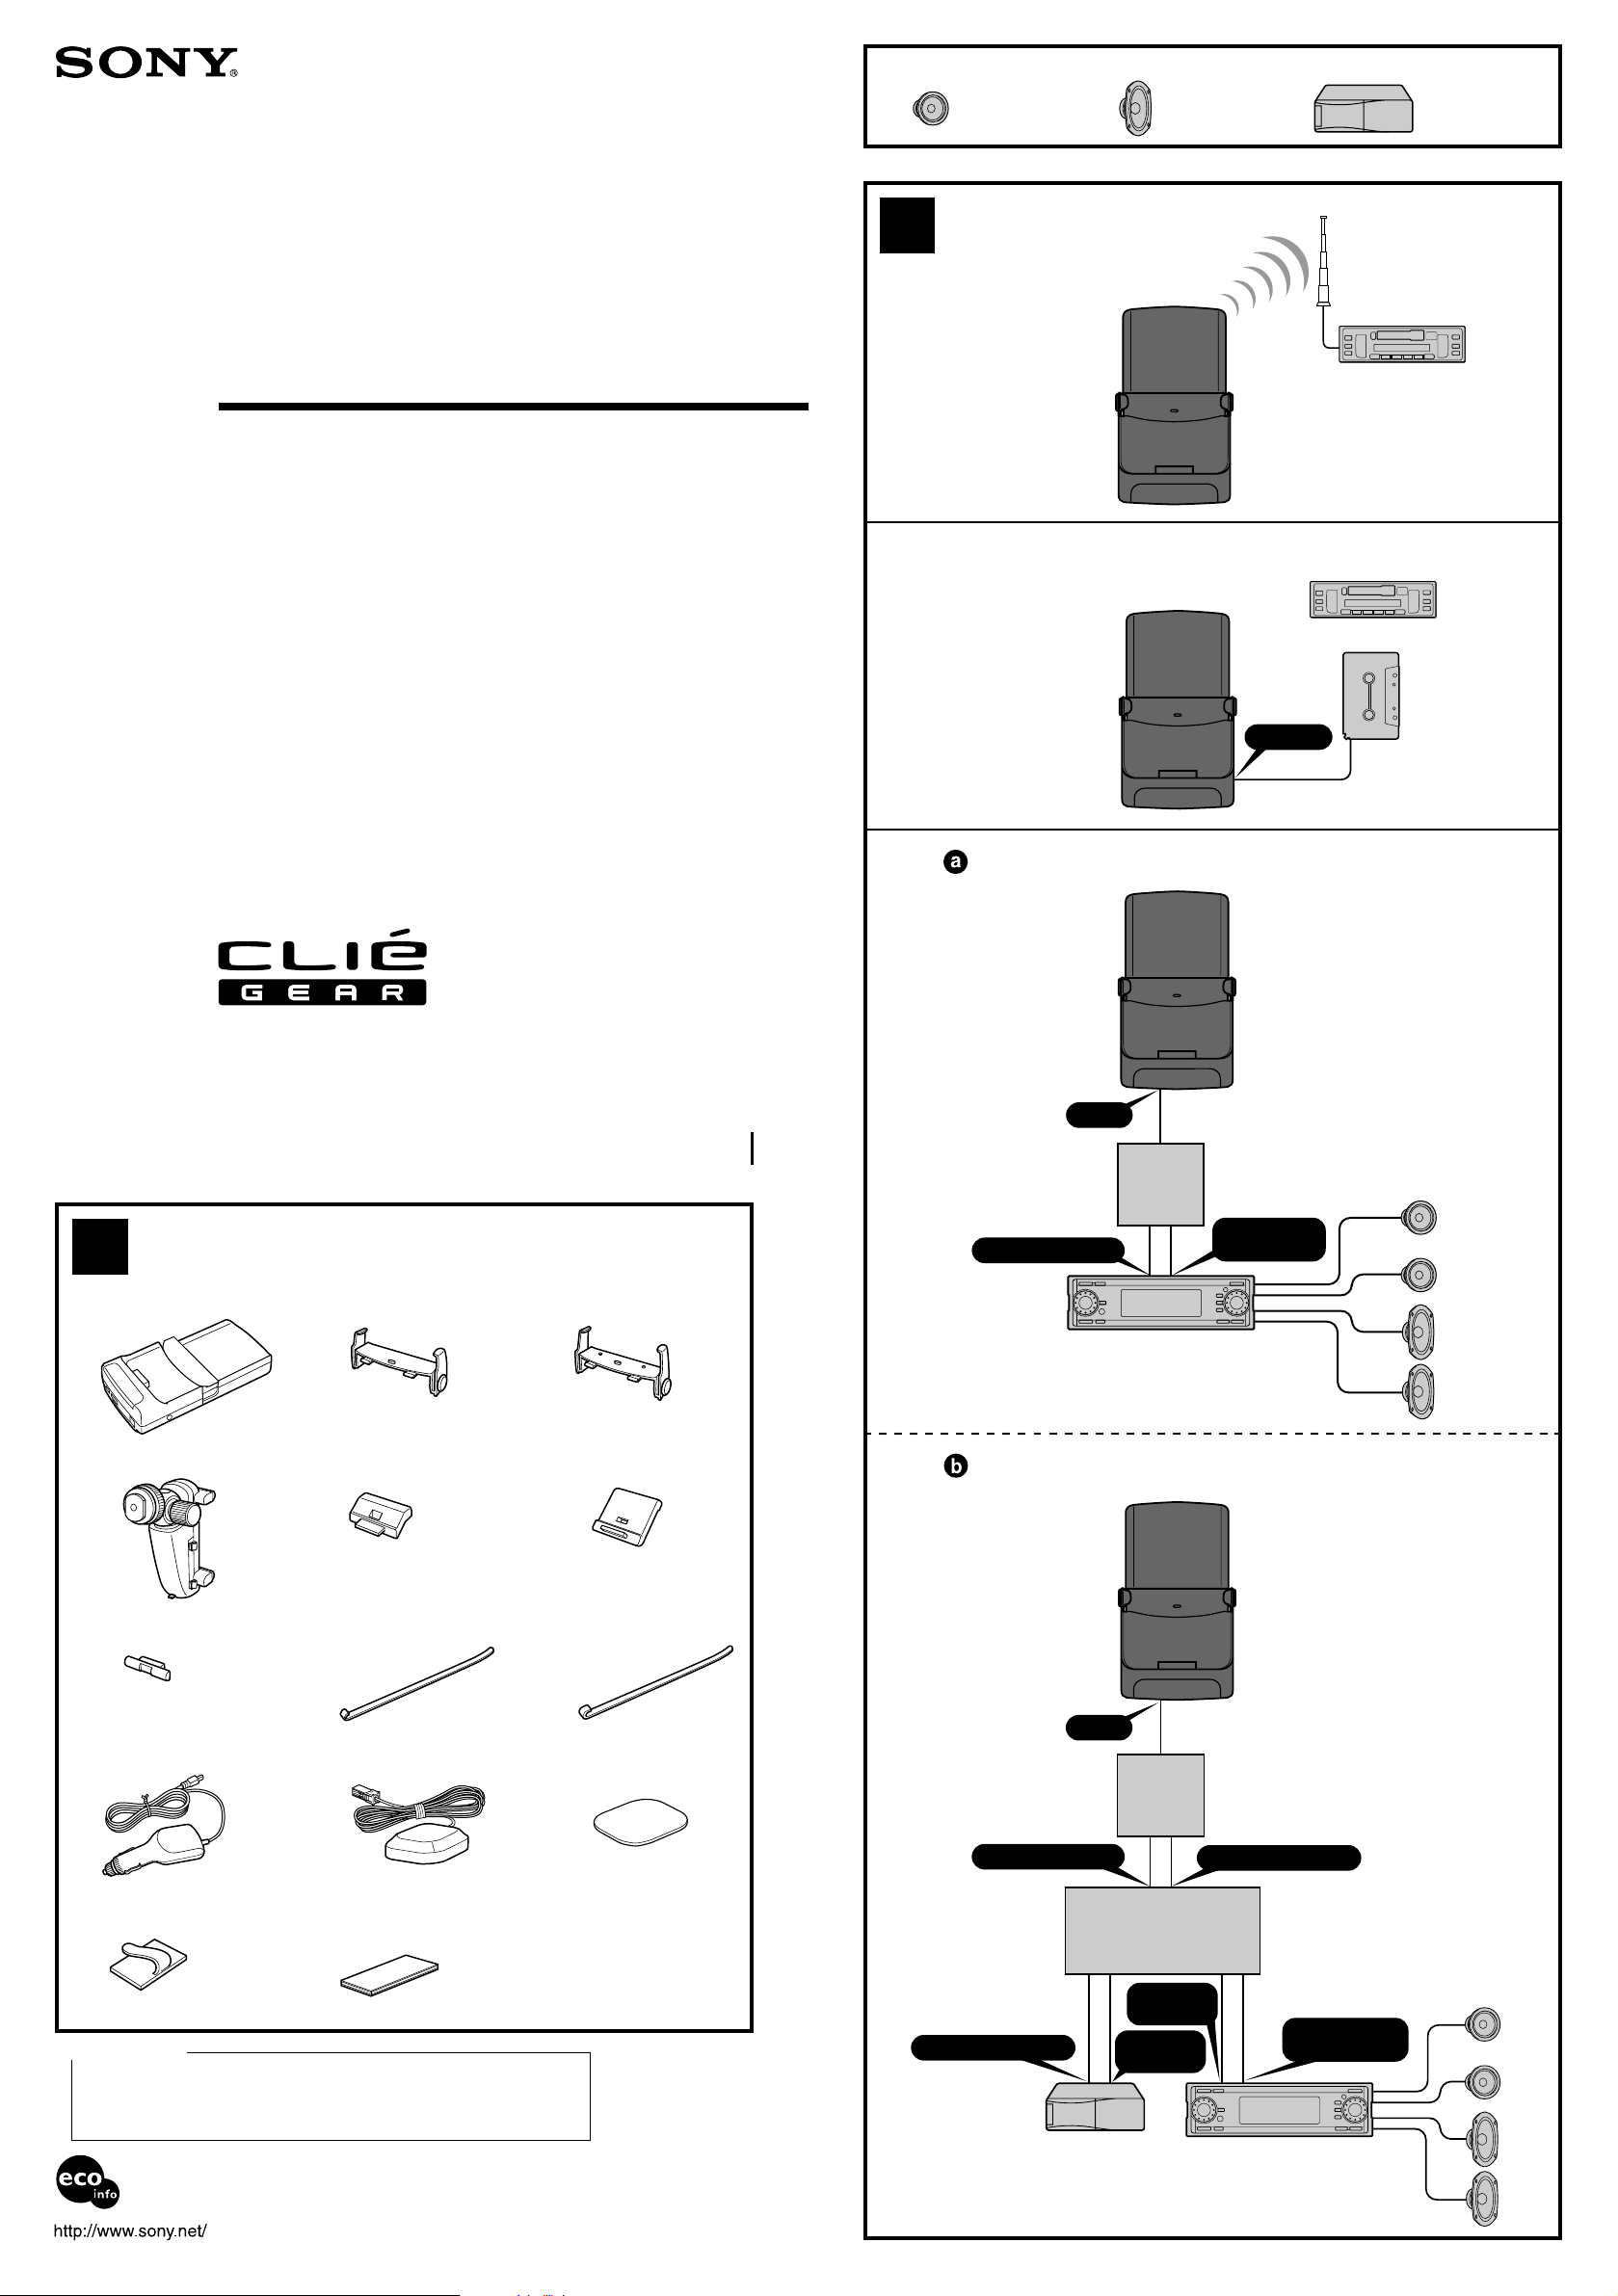
Equipment used in illustrations (not supplied)
Car Cradle
Installation/Connections
2
A
B
Front speaker
Rear speaker
Connection example
FM transmitter operation
Car cassette adapter connection
CD/MD changer
FM car audio
Car audio cassette player
1
Parts Iist
PEGA-CC5
© 2003 Sony Corporation Printed in Japan
C
LINE OUT
Sony BUS compatible car audio connection
I/O
Connection
adapter
XA-CC1
(optional)
BUS
BUS AUDIO IN
CONTROL IN
Car connecting
pack
CPA-9C (optional)
1 car cradle
4 mounting attachment
7 rubber block
× 2
0 car battery adapter qz GPS antenna qs base sheet for
1 m
2 holding arm (S)
5 support arm (S)
× 3
8 holding clip (S)
3 m
3 holding arm (L)
6 support arm (L)
9 holding clip (L)
GPS antenna
Sony BUS compatible car
audio
Sony BUS compatible car audio and
Sony BUS compatible CD/MD changer connection
I/O
Connection
adapter
XA-CC1
(optional)
BUS AUDIO IN BUS CONTROL IN
qd cord clamp
× 10
Customer Support
For the latest support information, check our official Sony CLIÉ Web site
Customers in USA
http://www.ita.sel.sony.com/support/clie/access/
Contents of this manual are printed on chlorine-free paper
using VOC (Volatile Organic Compound)-free vegetable-oilbased ink.
qf two-sided tape
× 2
BUS CONTROL OUT
Sony BUS
compatible CD/
MD changer
Source selector
XA-C30
(optional)
BUS AUDIO
IN
BUS AUDIO
OUT
Sony BUS compatible car
audio
BUS
CONTROL IN
Page 2
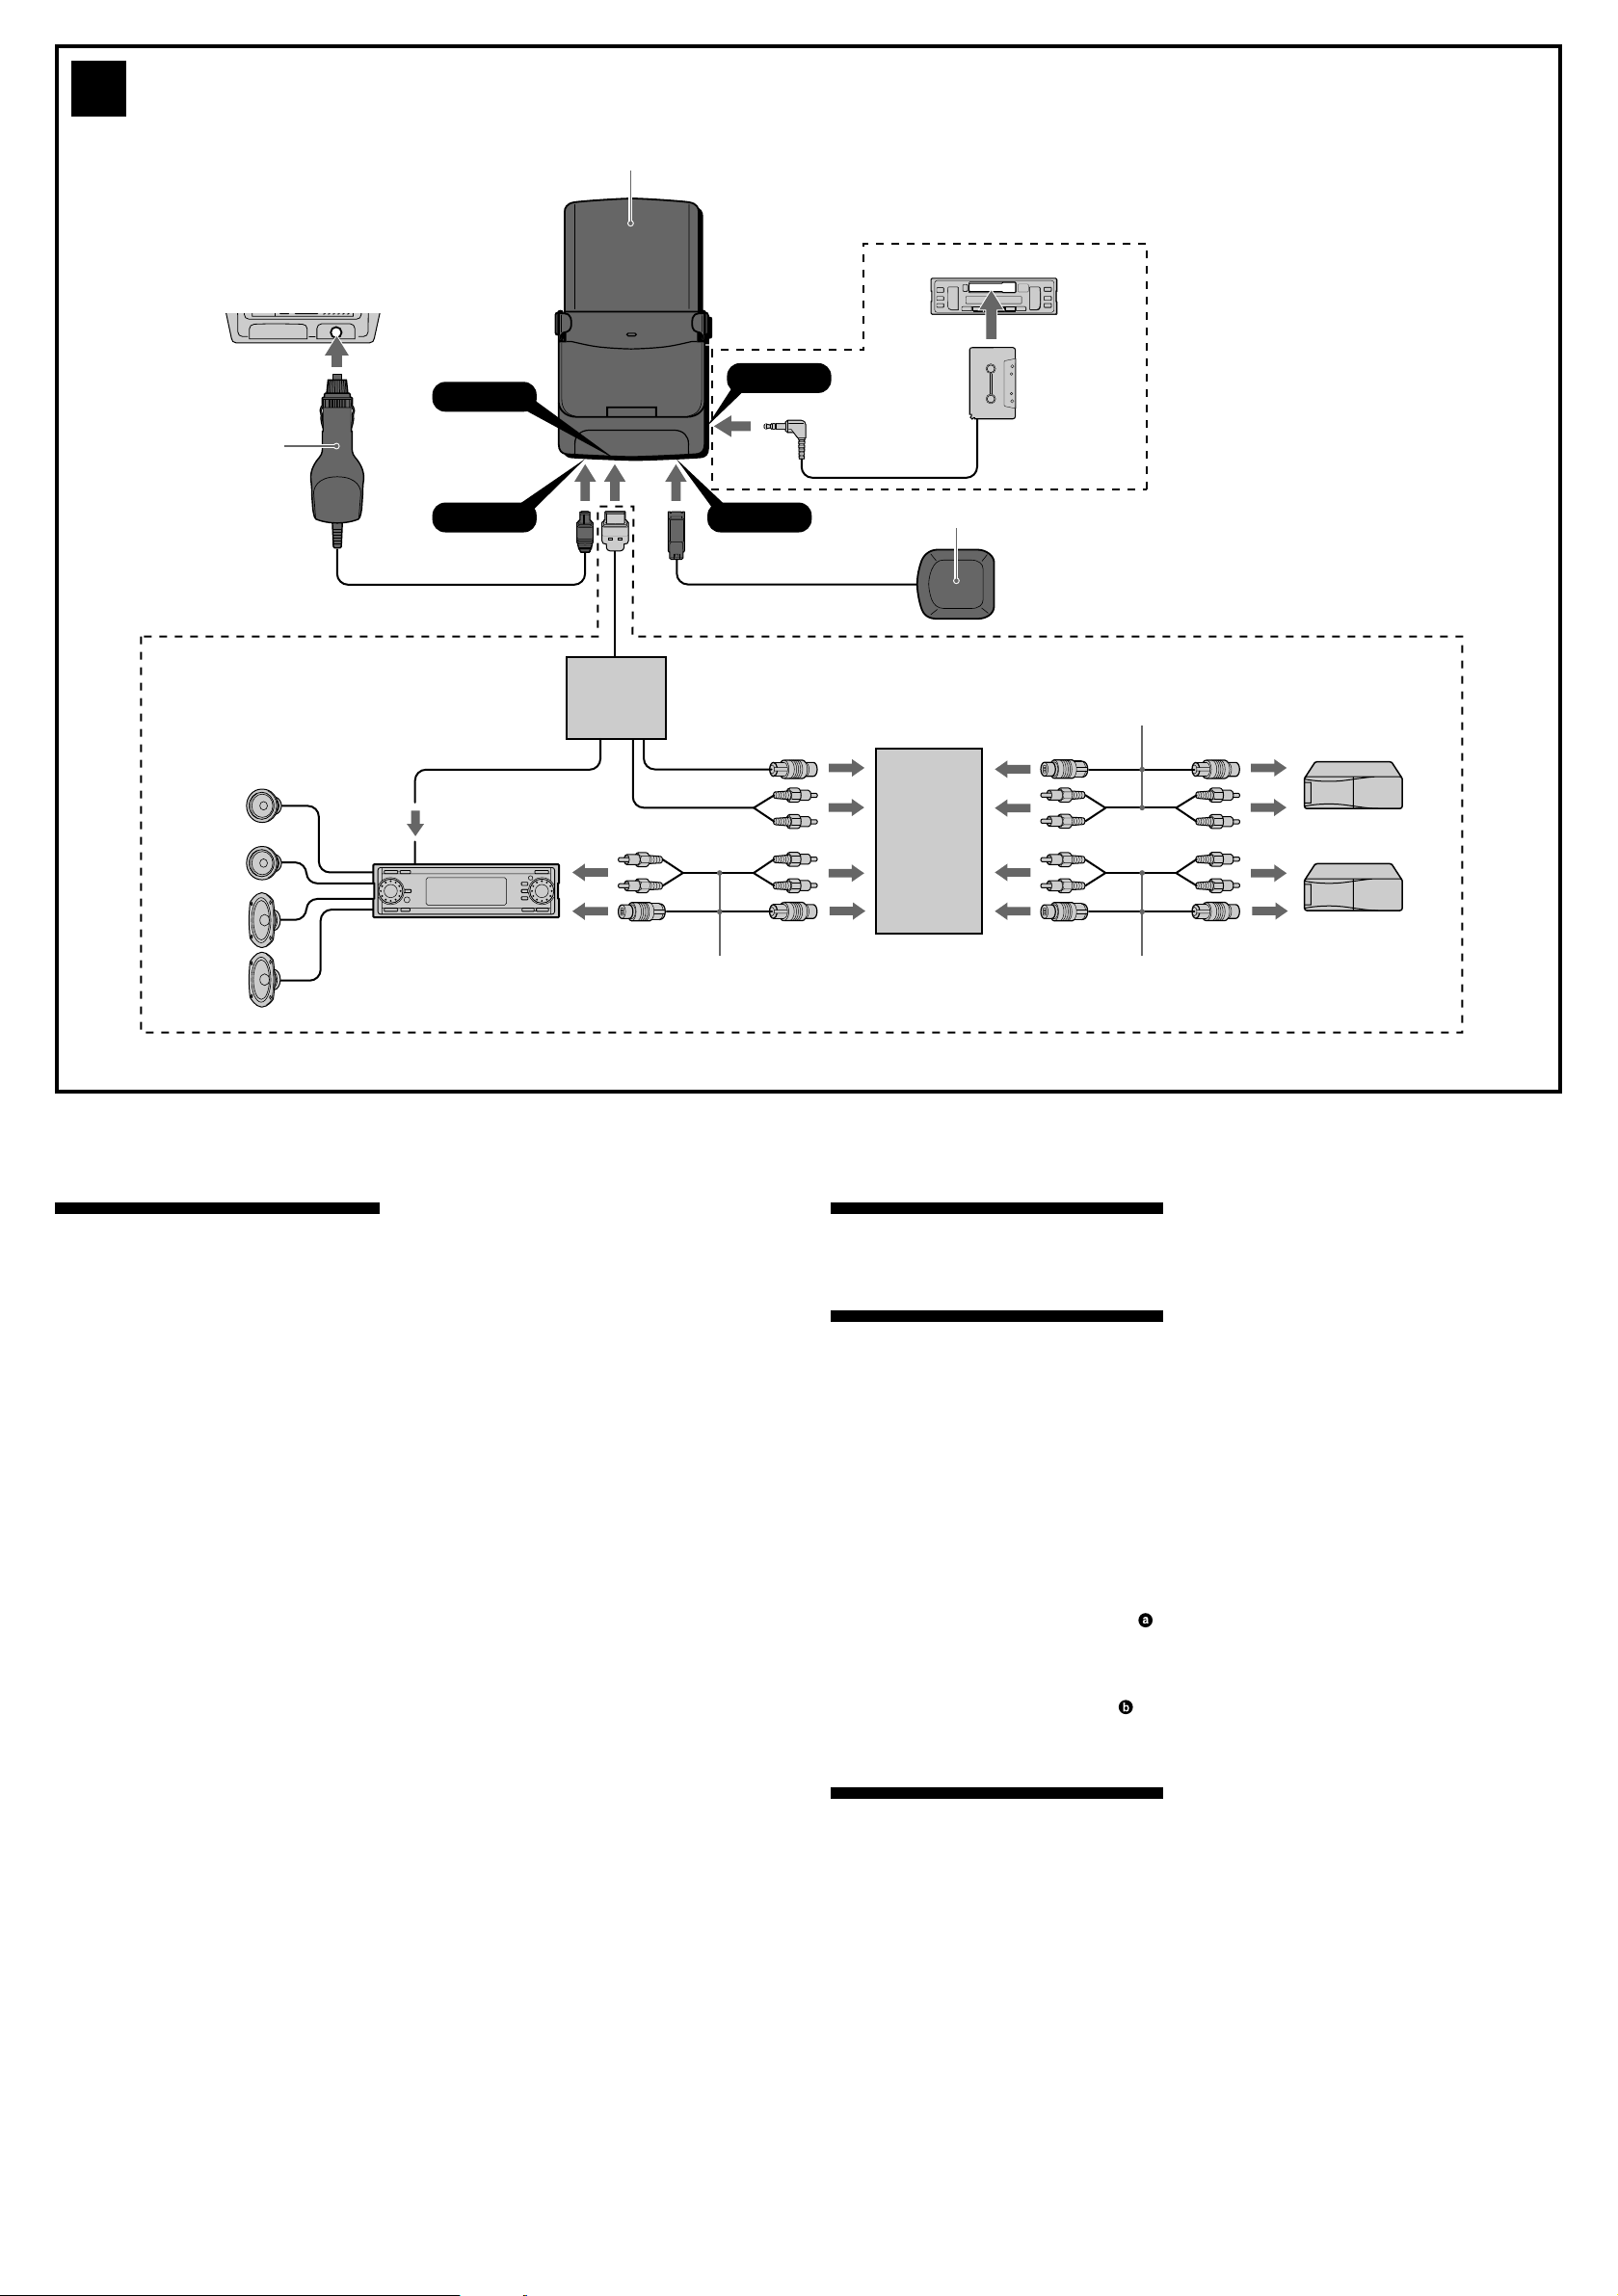
Connection diagram
3
0
cigarette
lighter socket
I/O
1
LINE OUT
car audio cassette player
Car connecting
pack
CPA-9C (optional)
Front speaker
Rear speaker
DC 5.2V
Light blue
ATT
ATT
Sony BUS compatible
car audio
Connection
Adapter
XA-CC1
(optional)
GPS ANT
Supplied with the XA-C30
qa
Supplied with the CD/MD changer
Sony BUS compatible
CD/MD changer
Source selector
XA-C30
(optional)
Sony BUS compatible
CD/MD changer
Supplied with the CD/MD changer
Cautions
•This unit is designed for 12 V DC negative
ground operation only.
•To prevent fire or shock hazard, do not expose
the unit to rain or moisture.
•To avoid electrical shock, do not disassemble the
unit. Refer servicing to qualified personnel only.
•Position the unit at a location that does not
obstruct the operation of passenger-side airbag.
•While the unit is not in use, always disconnect it
from the cigarette lighter socket.
•Do not place your CLIÉTM handheld on an
uneven surface while the car is moving.
Otherwise, your CLIÉ handheld may drop,
resulting in possible damage.
On installation
•Before installing the unit, please check your local
traffic laws and regulations.
•Make sure to install the unit properly according
to the installation manual. Improper installation
may result in a fire or an electric shock.
•Before installation, be sure to turn the ignition
switch to the OFF position or take out the key
out. Installing the unit with the ignition on may
cause battery drain or a short circuit.
•For information about the polarity, battery
voltage and location of the airbag of your car,
please consult your car dealer.
•Do not damage any pipes, tubes, the fuel tank or
electric wiring when installing the unit, as a fire
or accident may result. If you drill a hole in car
panels, make sure that any hidden car parts will
not be damaged.
•Do not use any nuts or bolts for critical devices
such as steering linkage, fuel supply or braking
systems. This can cause a fire or an accident.
•Take care to prevent the cords and wires from
getting tangled or crimped in the moving
portion of a seat rail.
•Do not use any car battery adapter other than
the one supplied.
Notes on using car battery adapter
•Do not subject the unit to:
– Extreme heat or cold
– Dust, dirt, or sand
– High humidity
– Vibration
– Strong magnetic fields
– Mechanical shock
– Direct sunlight (for extended periods of time)
•Do not drop the unit.
•Disconnect the car battery adapter from the
cigarette lighter socket when the engine is turned
off.
•Be sure that nothing metallic comes into contact
with the metal parts of this unit. If this happens, a
short circuit may occur and the unit may be
damaged.
•Do not operate the unit if it has a damaged cord or
if it has been dropped or damaged.
•Always keep the metal contacts clean.
•Do not disassemble or convert the unit.
•While the unit is in use, it gets warm. This is
normal.
On cleaning
Clean the unit with a soft, dry cloth or a soft cloth
lightly moistened with a mild detergent solution. Do
not use any type of solvent, such as alcohol or
benzine, which may damage the finish.
Parts Iist (see fig.1)
The numbers in the list refer to those in the
instructions.
Connection example (see fig.2)
Car Cradle Ready Sony car audio units are;
•Units with CD/MD Changer Control from 2003
forward
•Following units
MEX-5DI,CDX-MP70, CDX-MP30,CDX-M730,
CDX-M630,CDX-CA900X,CDX-CA720X,CDXCA700X,CDX-CA705M,XR-CA630X,XR-CA430X
FM transmitter operation (A)
A car audio unit with an FM tuner is required to
receive transmission from the FM transmitter.
Car cassette adapter connection (B)
The car audio cassette player is necessary.
Sony BUS compatible car audio connection (C- )
For connecting, the XA-CC1 connection adapter
(optional) is necessary.
Sony BUS compatible car audio and Sony BUS
compatible CD/MD changer connection (C- )
For connecting, the XA-CC1 connection adapter
(optional) and the XA-C30 source selector (optional)
are necessary.
Connection diagram (see fig.3)
Note on car battery adapter connection
Insert the car battery adapter in the cigarette lighter
socket only after all installation/connections have been
done.
Installing location
•Do not install the car cradle where:
– It will obstruct the driver’s view when the car
cradle is mounted in the car, or your CLIE
handheld is in the car cradle.
– It will obstruct the operation of the airbag
system.
– It will obstruct the operation of the vehicle,
especially the steering wheel, shift lever, or
brake pedal.
– It will be subjected to heat/high temperature
(on a dashboard etc).
•Please consult qualified technician or service
personnel if you cannot attach the car cradle to
the car securely.
Page 3

RELEASE
Attaching condition
RELEASE
4
less than 80 mm
AB
Dashboard section
more than 8 mm
parallel fin
C
5
Mounting support arm
and rubber blocks
6-
*
4
6
air vent
section
5
7
7
5
7
A B
Installing the mounting attachment
1
side fin
less then 5 mm thick
5
7
6
*qf
4
7
more than 6 mm
5
6
5
7
2
Mounting exampleCombination example
7
12
4
5
7
Removing the mounting attachment
qf
2
holding clip
5
3
7
2 holding arm (S)
9
8
Attaching the holding arms
RELEASE
SIZE S
>ABS<
3 holding arm (L)
RELEASE
SIZE L
>ABS<
8
or 9
1
1
2
*qf
1
8 or 9
2
1
2 or 3
2
1
2
2
1
3
Detaching the
holding arms
8
11
Mounting the car cradle to
the mounting attachment
2
1
Attaching a GPS antenna
Attaching to the inside of a car
A
passenger-side
qa
airbag
qs
Attaching your CLIÉTM handheld
9
1
Attaching to the outside of a car
B
Roof A
qa
qd
c
GPS antenna cord
2
Roof B
qa
10
qa
Adjusting the angle
qd
qd
qd
qd
qd
Page 4

12
Connecting the car
battery adapter
2
You can also fix the cord of the GPS
antenna or the car battery adapter to
the hooks on both sides of the
mounting attachment.
13
Detaching your CLIÉ handheld
2
1
qd
1
0
Precautions
•Choose the installation location carefully, such
that the unit will not interfere with normal
driving operations.
•Avoid installing the unit in areas subject to dust,
dirt, excessive vibration or high temperatures,
such as in direct sunlight or near heater ducts
under the floor carpet.
•Use only the supplied mounting hardware for a
safe and secure installation.
Attaching condition (see fig.4)
This unit is attached to the dashboard of a car, and
side fin of the air vent.
The mounting attachment can be attached to an
air vent whose dimensions and shape meet
both conditions A and B.
This unit cannot be attached to a circular air
vent as in condition C.
Mounting support arm and
rubber blocks (see fig.5)
Combining the support arm 5 and the support
arm 6 with rubber blocks 7, attach them to the
mounting attachment 4.
Depending on the dimensions and shape of the
dashboard and the air vent, choose the support
arms so that the rubber blocks 7 are placed on the
top and bottom outer edges of the air vent.
Notes
• Choose a combination of rubber blocks 7, the
support arm 5 and the support arm 6 so that the
rubber blocks 7 do not block the air vent.
• Depending on the dimensions and shape of the dash
board and the air vent, the mounting attachment 4
can sometimes be attached without the support arm
5 or the support arm 6.
Installing the mounting
attachment (see fig.6)
A Mounting the mounting attachment.
Choose either the holding clip (S) 8 or the
holding clip (L) 9, depending on the width of
the side fin of the air vent.
1 1 Insert the holding clip into the air
vent and hook the holding clip on
the side fin.
2 Adjust the attachment position so that
the holding clip does not touch the
back fin. If you insert the holding clip
forcibly, the back fin may be damaged.
Note
Setting the holding clip and the side fin parallel,
attach the mounting attachment.
2 With the holding clip hooked on the side fin
of the air vent, feed the holding clip into the
hole on the back of the mounting attachment,
and pull the holding clip until the mounting
attachment becomes stable.
Tip (6-*)
If the rubber blocks 7 of the car cradle slip and the car
cradle cannot be attached to the dashboard securely,
attach it using the two-sided tape qf between the
rubber blocks 7 and the dashboard. The two-sided
tape qf can be cut. Cut it to a size larger than the
rubber block 7 itself. The two-sided tape qf is
ineffective if it is cut too small.
Please consult qualified technician or service personnel
if you cannot attach the car cradle to the car securely.
Notes
• If you pull the holding clip too firmly, the fin of the
air vent may be damaged.
• If the air vent fin is set to swing automatically, stop it
before mounting the mounting attachment.
• By doing the following, make sure that the
mounting attachment and the holding clip are
attached securely and do not vibrate.
– Pull the mounting attachment lightly and push
it up and down.
– Push and pull the mounting attachment against
the air vent.
cord
hook
B Removing the mounting attachment
1 1 Press the lever on the bottom of the
mounting attachment.
2 loosen the holding clip by pulling the
mounting attachment forward.
2 1 Press the mounting attachment to the air
vent.
2 Twist the mounting attachment slightly.
3 Pull the mounting attachment off towards
you.
Attaching the holding arms
(see fig.7)
Depending on the type of the CLIÉ handheld(short
screen or long screen), choose either the holding
arm 2 or the holding arm 3.
Short screen type
“Size S” is marked on the back of
the holding arm 2.
Long screen type
“Size L” is marked on the back of
the holding arm 3.
SIZE S
>ABS<
SIZE L
>ABS<
1 Remove the sheet attached to the car cradle.
When removing the sheet, be careful not to let
any objects get into the slots of the car cradle.
2 Attach the holding arms chosen according to
the type of CLIÉ handheld.
1 Insert the holding arms’ tab into the car
cradle.
2 Pull both sides of the holding arms outwards
and insert the tab .
Detaching the holding arms
When replacing the holding arms 2 with the
holding arms 3 to use the different type of CLIÉ
handheld, etc., insert the tip of a slotted
screwdriver into the slot for the tab and release
the lock of the tab. There are two tabs: one on the
left and one on the right.
Mounting the car cradle to the
mounting attachment (see fig.8)
1 Slide the tip of the mounting attachment
along the slit on the back of the car cradle to
mount it.
2 Rotate the dial to fix the car cradle.
Attaching your CLIÉ handheld
(see fig.9)
Mounting
1 Mount your CLIÉ handheld on the connector of
the car cradle.
2 Tilt back your CLIÉ handheld rest in the car
cradle.
Note
Do not mount your CLIÉ handheld while driving.
Adjusting the angle (see fig.0)
Adjust the angle of the car cradle by dial of the
mounting attachment.
Attaching a GPS antenna (see fig.qa)
Dashboard Roof B
Roof A
A Attaching to the inside of a car
•Install the GPS antenna on the dashboard.
•Install the GPS antenna on a flat surface to keep it
horizontal.
•Choose the attachment position where the best
reception is achieved. Also, choose the position
where no obstacle blocks the reception from the
GPS satellite.
Note
Some types of front windshield do not let the radio
wave from a GPS satellite pass.
If the reception of the radio wave is poor when the GPS
antenna is attached to the inside, attach it to the
outside of the car roof.
Before attachment
• Make sure that the GPS antenna has good
reception and not hidden behind car ornaments,
the windscreen wiper, etc.
• Make sure that the GPS antenna does not disturb
operation of car equipment.
• Clean the mounting surface.
1 Remove the release-coated paper from the
surface of the base sheet qs, and then place
the GPS antenna qa on the center of the base
sheet qs.
qa
Place the GPS
antenna on the
center of the base
sheet.
qs
2 Remove the release-coated paper from the
back surface of the base sheet qs, and stick
the base sheet qs to the mounting surface.
To mounting surface
Notes
• Fix the cord to the position that does not obstruct the
operation of passenger-side airbag.
• Fix the cord of the GPS antenna using the cord clamps
qd if necessary, to prevent the cord from disturbing
driving. If the cord tangles up the gearshift, etc., it is
extremely dangerous.
• Attach the cord clamps qd after cleaning the
mounting surface.
B Attaching to the outside of a car
•Attach the GPS antenna horizontally in a place
where GPS satellite reception is not blocked by
the car roof.
•The GPS antenna is attached by a magnet.
When attaching it on the car, place it carefully, so
as not to harm the car’s body surface.
When attaching to a car of aluminum or FRP
body
Since the magnet will not stick to aluminum or
FRP, attach the GPS antenna to the inside of the
car.
Before attachment
Clean the mounting surface.
1 Attach the GPS antenna to the roof.
Clean the mounting surface before attaching.
qa
1
2 Place cord.
Roof A
Pass the GPS antenna cord over the roof,
passing the windshield pillar, fender and
molding, and then pull it inside of the car.
Note
Secure the cord with the cord clamps in the form of
a U-shape to prevent rain water from entering the
car along the cord.
Roof B
Pass the GPS antenna cord over the roof,
passing the center pillar,windshield pillar inner
side and dashboard, and then pull it into the
car.
Notes
• Do not place the cord on the inside of the car if
the car uses a curtain-type side airbag that spreads
from the windshield pillar over the center pillar,
or a shock-absorbing structure for its interior.
• Secure the cord using the cord clamps to make the
cord form U-shape so that rain water does not
enter into the car along the cord.
Notes on GPS antenna
• Do not allow the cord to slack outside of the car.
• Depending on the car, the antenna cord may not be
long enough to reach the roof. In this case, attach the
GPS antenna to the inside of the car.
• Secure the cord of the GPS antenna with the cord
clamps qd if necessary, to prevent the cord from
disturbing driving.
• When detaching the GPS antenna, do not pull the
cord. since the magnetic power is strong, the cord
may detach.
• When washing your car by an automatic car-washing
machine, detach the GPS antenna. Otherwise, the
antenna may be detached during washing, and
damage your car.
• GPS signals and DC power are flowing through the
GPS antenna cord. When attaching the GPS antenna,
be careful that the cord is not caught in any moving
parts of the car. A damaged cord results in
malfunction of the GPS antenna and the car cradle.
• Do not place the cord on the inside of the car if the
car uses a curtain-type side airbag that spreads from
the windshield pillar over the center pillar, or a shockabsorbing structure for its interior.
For details, please consult qualified technician or
service personnel.
On painting of the GPS antenna
The GPS antenna can be painted to match the car’s
body color. However, do not use metallic paint, as
it may cause poor reception or reception error.
Also, when painting, do not dismantle the antenna.
Connecting the car battery
adapter (see fig.qs)
Connect the car battery adapter 0 to the DC 5.2V
connector of car cradle (1), and connect the car
battery adapter into the cigarette lighter socket
(2).
Notes
• Do not plug the car battery adapter into the cigarette
lighter socket immediately after using the cigarette
lighter. First allow the socket to cool down.
• To fix the cord of the car battery adapter, use the
cord clamps qd if necessary.
Clean the mounting surface before attaching the cord
clamps.
Detaching your CLIÉ handheld
(see fig.qd)
Detaching
1 Squeeze both RELEASE buttons simultaneously
with one hand.
2 Pull out the CLIÉ handheld towards you from
the top with your other hand.
Notes
• Do not detach your CLIÉ handheld from the car cradle
with one hand, it may cause a malfunction.
• Do not detach your CLIÉ handheld while driving.
 Loading...