

Page 1
SONY PDX10
Workshop Handbook
Community Media Grantees 2005
Writer, Designer and Editor
Ann Theis
Contributing Editors
Director of Production
Revised for PDX10
Version 1
Manhattan Neighborhood Network
Ivettza Sanchez, Jay Dedman
Cyrille Phipp
Community Media Dept
June 2005
Page 2
SONY PDX10 Workshop Manual
Index
Quick Start
Powering Up..............................................................3
Removing the Lens Cap............................................3
Inserting Tape............................................................4
The Power Switch..................................................... 5
Auto Focus................................................................ 6
The LCD Screen....................................................... 7
Auto Lock.................................................................. 7
Power Zoom..............................................................7
Headphones............................................................. 7
Edit Search................................................................7
Advanced Manual Features and Functions
Manual Focus............................................................8
Manual White Balance.............................................. 8
Manual Shutter Speed.............................................. 8
Manual Exposure.......................................................8
Zebra and Color Bars................................................9
Playback....................................................................9
Microphone................................................................9
Additional Information
All About Microphones.............................................. 10
Recording Onto Digital Tape......................................11
Time Code, Pre-&Post Roll and Edit Search...........12
Batteries and Charging............................................. 13
Tripod vs. Handheld................................................. 14
Camera Composition.................................................15
Camera Angles..........................................................17
Camera Movements..................................................18
Interviewing Techniques............................................ 19
Sample Treatment.....................................................20
Production Stages & Planning.................................. 21
The Logging and EDL Processes............................. 23
Logging Sheet .........................................................24
Appendixes
A. All About White Balancing.................................... 25
B. Setting Manual Sound Levels...............................28
C. Suggested Menu Settings.................................... 29
D. Tape Formats and Tape Care...............................30
SONY PDX10 Handbook page 2
Page 3
Quick Start Instructions For The Sony PDX-10
Follow the next Five Steps for a quickstart to recording.
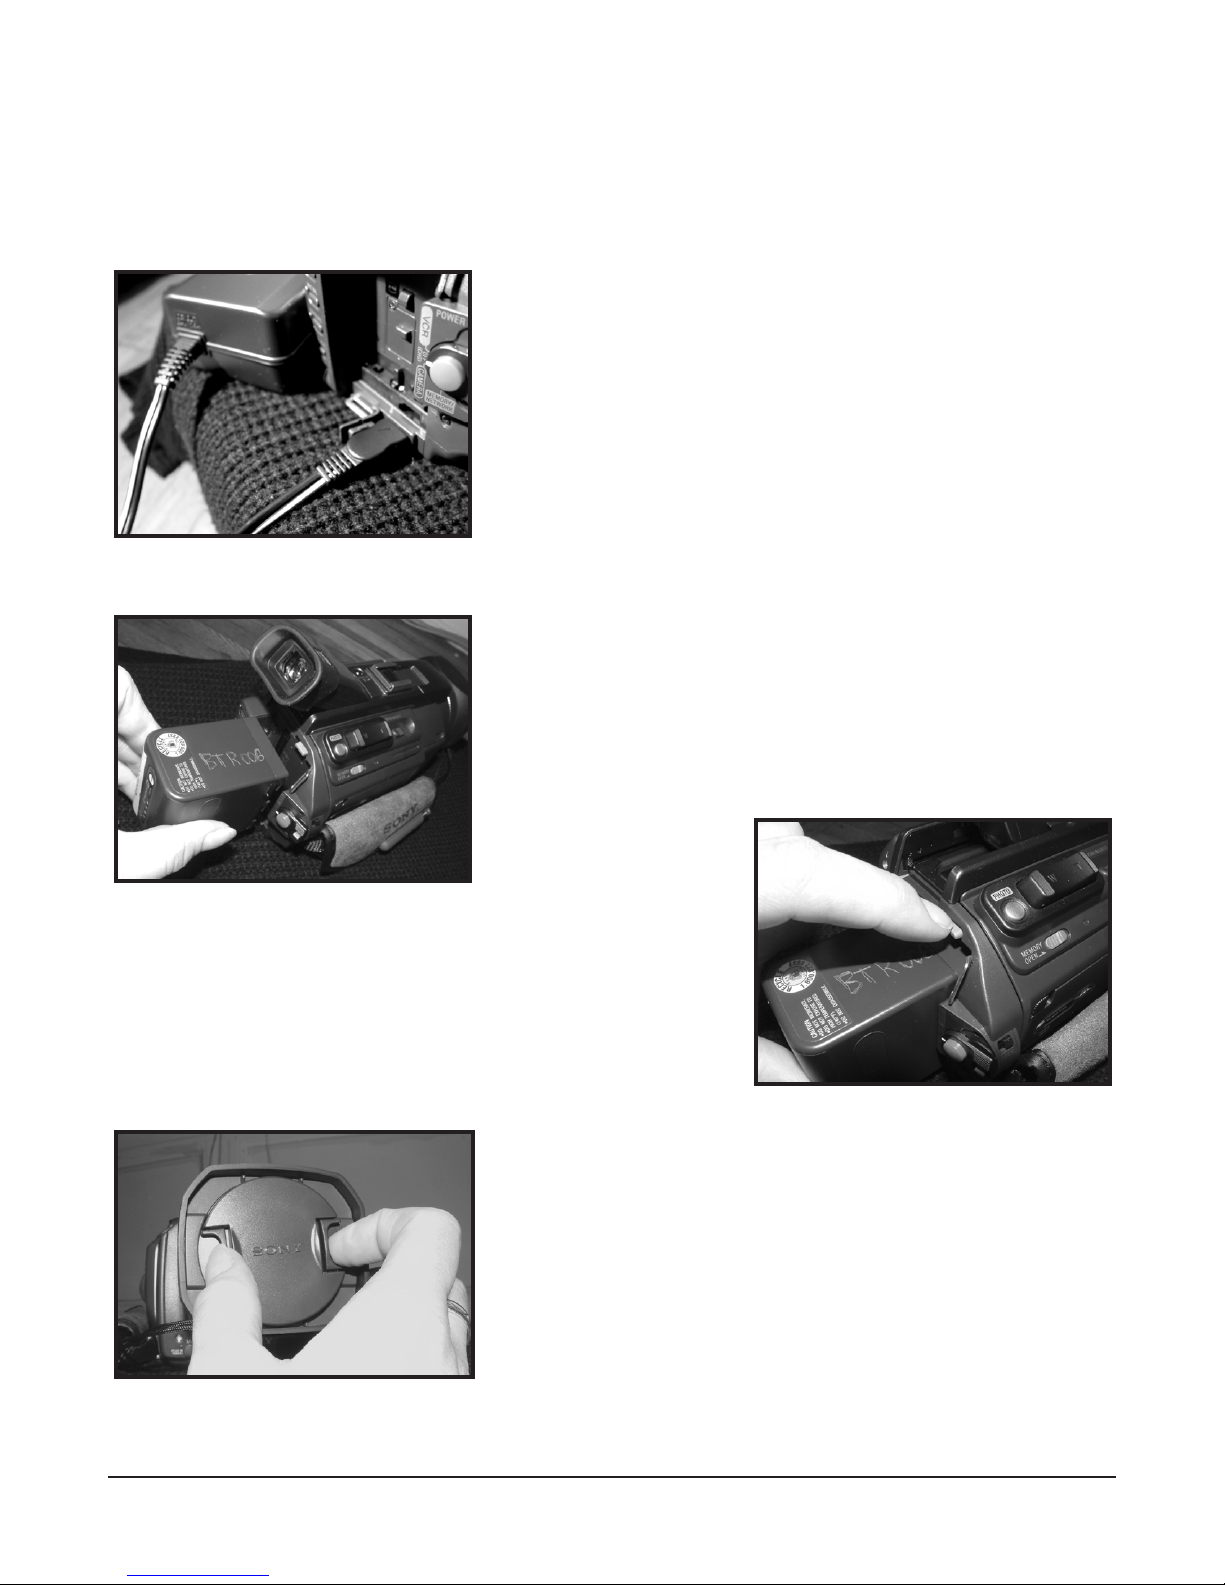
1.USING THE POWER CORD
1. Open the DC cover located at the rear of the camera
(below the battery compartment).
2. Connect the DC end (small connector) of the power supply
to the DC input.
3. Connect the AC power cord to the power supply.
4. Connect to AC wall outlet.
2.USING THE BATTERY
1. Lift the viewfinder.
2. Slide the battery in a downward motion until you hear it
click into place.
For more information on
batteries see page 15
1. Lift the viewfinder
2. Press down the BATT tab (located just above the battery
compartment) and at the same time slide the battery upwards.
3.REMOVE THE LENS CAP
1. Locate the lens cap in front of the camera.
2. Squeeze gently on the tabs on either side of the lens cap
and pull off.
3. Secure cap to the hand strap on the side of the camera.
4. When finished taping place lens cap back over lens.
REMOVING THE BATTERY
SONY PDX10 Handbook page 3
Page 4
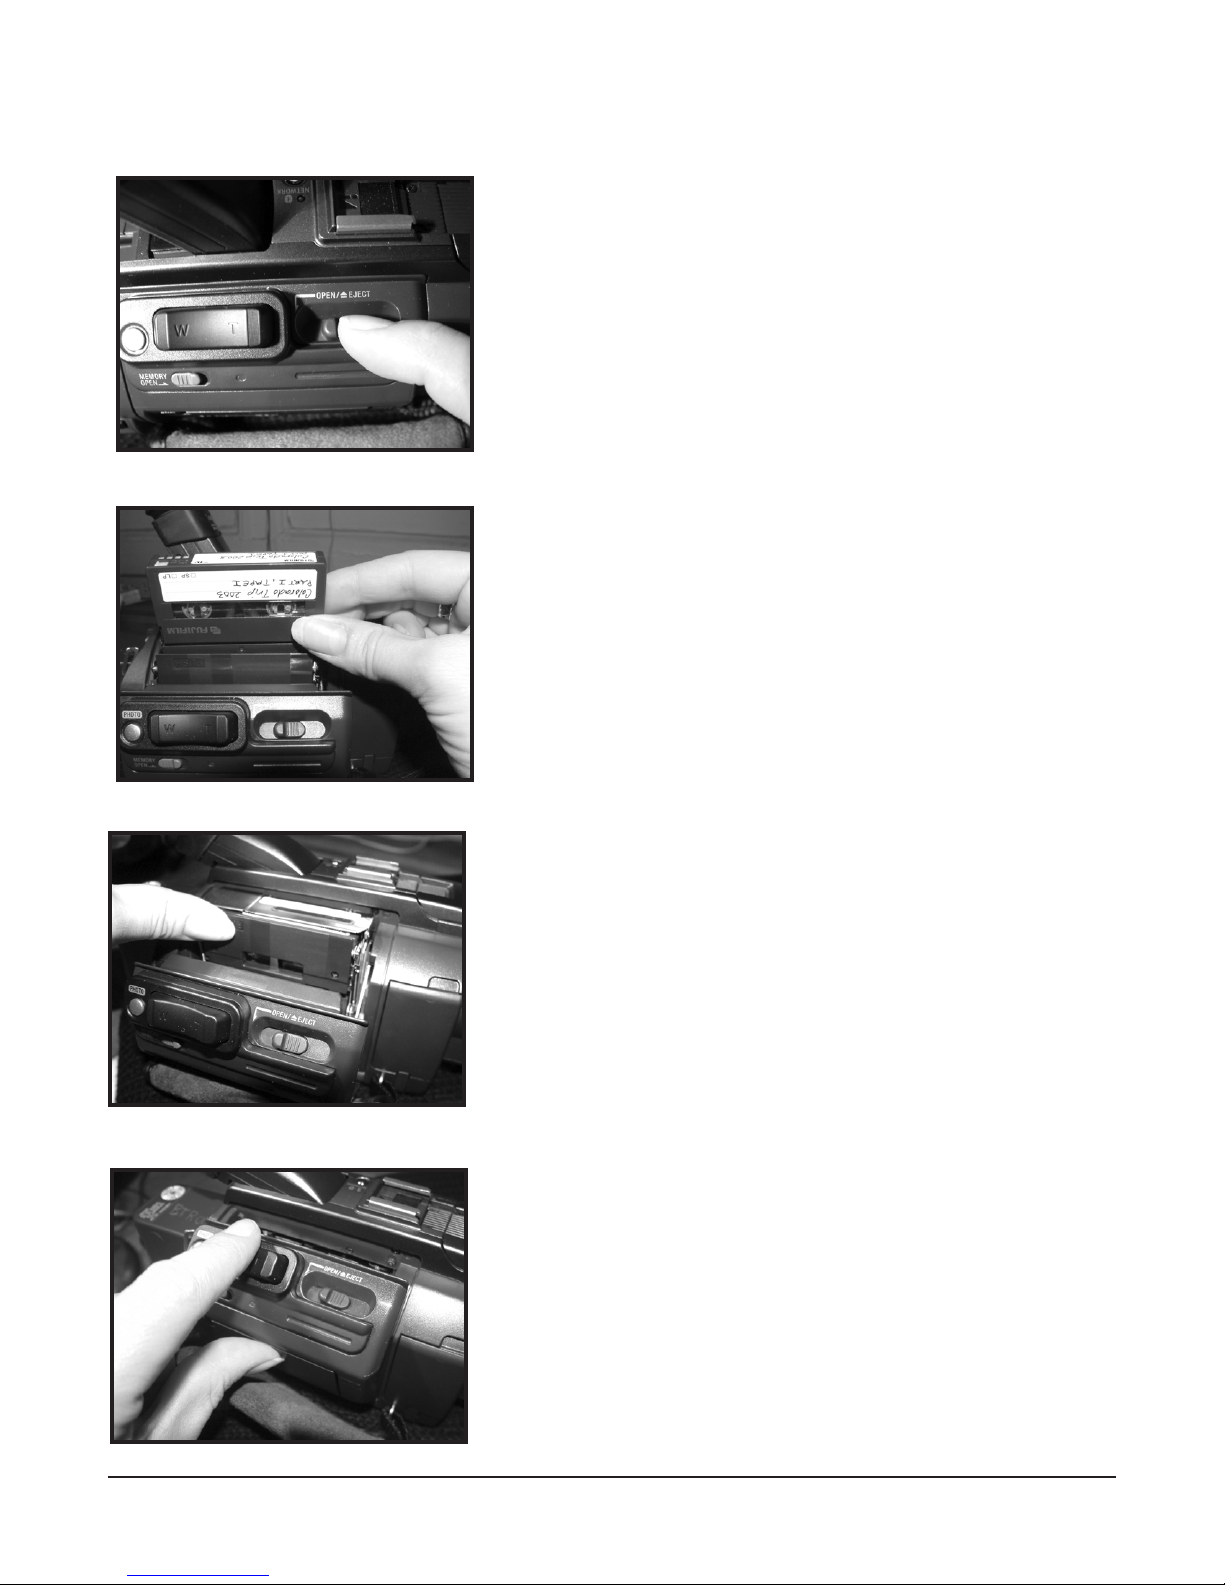
4.INSERTING A TAPE*
*To perform the following the camera does not have to be
‘on’ but either the battery or power supply have to be
attached.
1. Slide the OPEN/EJECT button in the direction of the arrow
to open the tape compartment.
2. Insert the tape straight as far as possible into the cassette
compartment with the window facing out and the
write-protect tab facing up.
3. First close the inner cassette compartment where it says
PUSH.
4. After cassette compartment goes down completely, close
the lid until it clicks.
SONY PDX10 Handbook page 4
Page 5
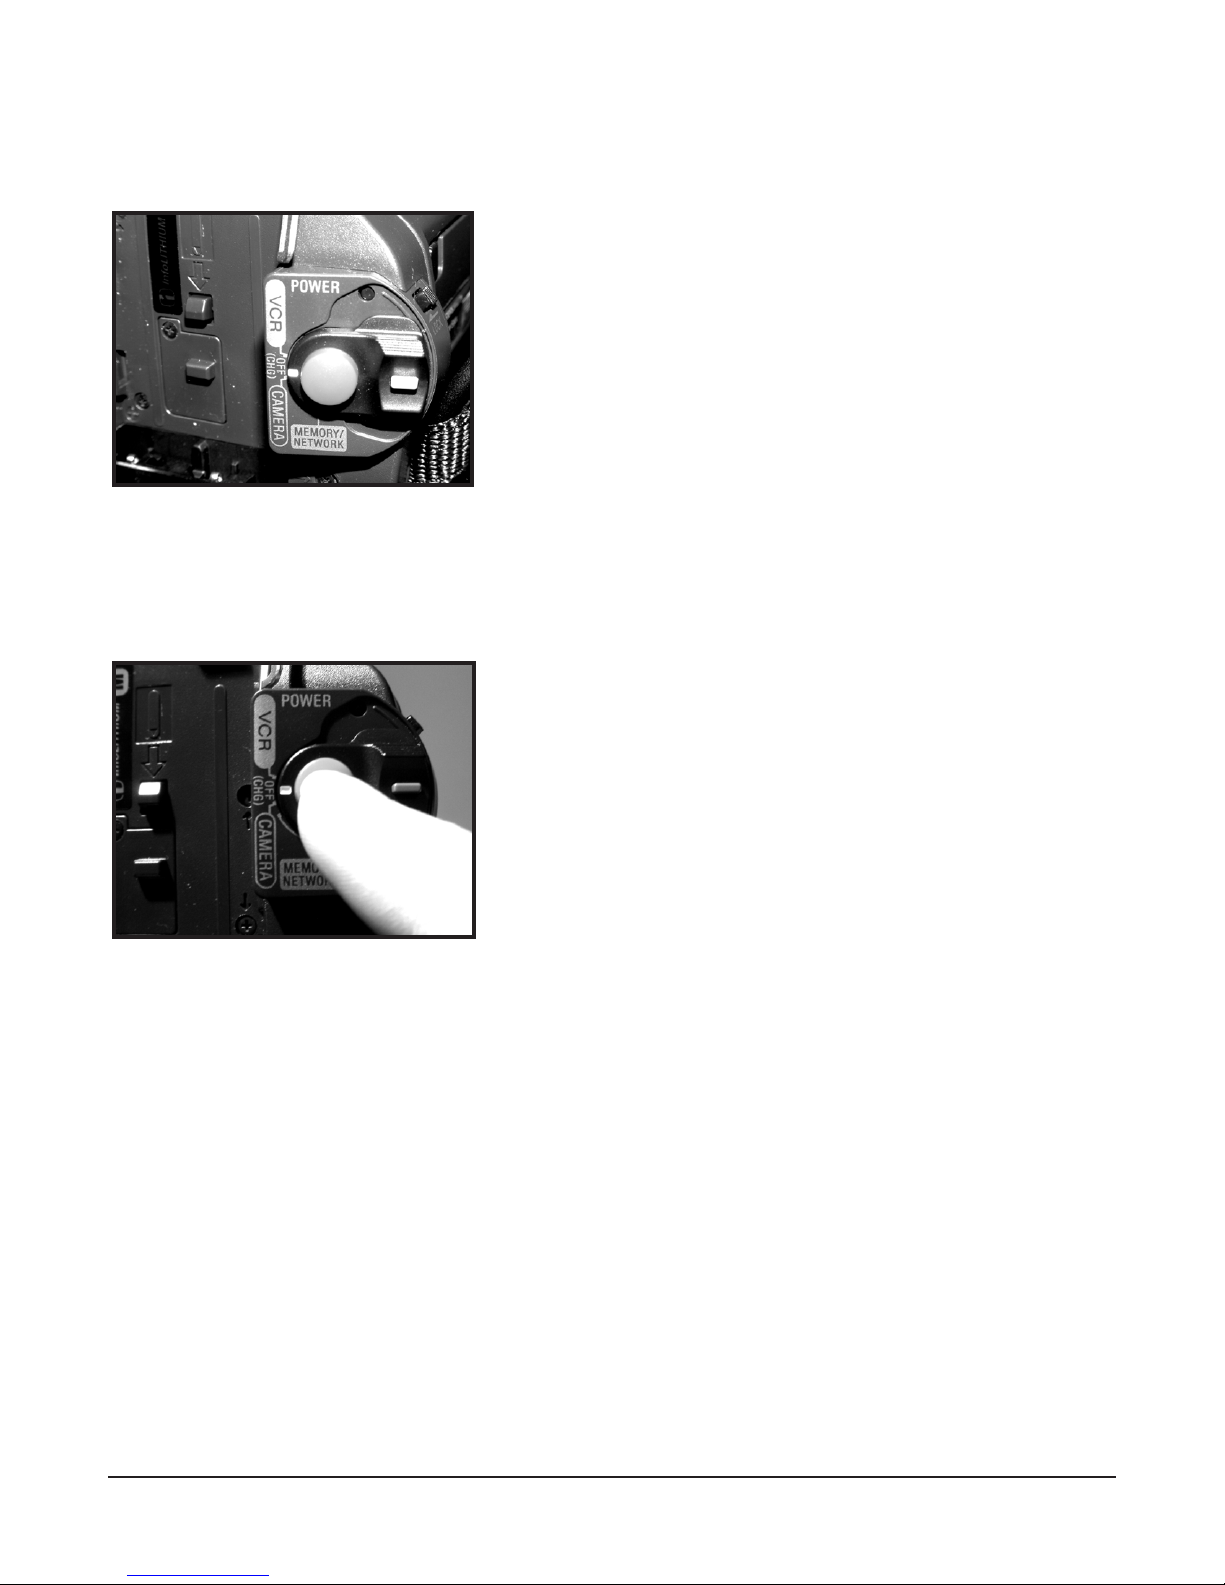
5. POWER SWITCH - under the right thumb when the camera is hand held
Camera modes
The power switch has four positions…
1. Press in the small green button and then rotate the power
switch to VCR. The camera should beep and the transport
controls illuminate - you can use the player/recorder to review
your tapes by operating the STOP, REWIND, PLAY, FAST
FORWARD and PAUSE buttons.
2. OFF (CHG) is the power off position and used to save battery. You should also use this position when charging a battery.
3. Press in the small green button and then rotate the power
switch to CAMERA. You should now see a picture and will
be able to record footage and operate camera functions
4. MEMORY - select when recording information to the
memory stick for taking digital stills.
Start / Stop
This is a red button with the power switch control around it.
TO START RECORDING - Press the red button, the message
REC will appear in the viewfinder
TO STOP RECORDING -Press the red button again, the mes-
sage STBY will appear in the viewfinder.
* If you are trying to record but cannot and you see a flashing
yellow icon in the center of the viewfinder/LCD screen check
that you are not in the memory mode instead of camera mode.
A few extra tips:
Remember to make sure the camera is secure and steady either in your hands or on a tripod.
Don’t forget to take off your lens cap and to use the viewfinder or LCD screen to frame your shot!
If you leave the camera on but are not recording the camera will automatically go into standby after
five minutes. Simply, return the POWER switch to STANDBY then back to CAMERA.
Make sure to never point the camera at the sun or to expose the camera to long periods in extreme
sunlight/heat or cold and rain.
Don’t touch the lens! Only clean the lens with lens tissue.
SONY PDX10 Handbook page 5
Page 6
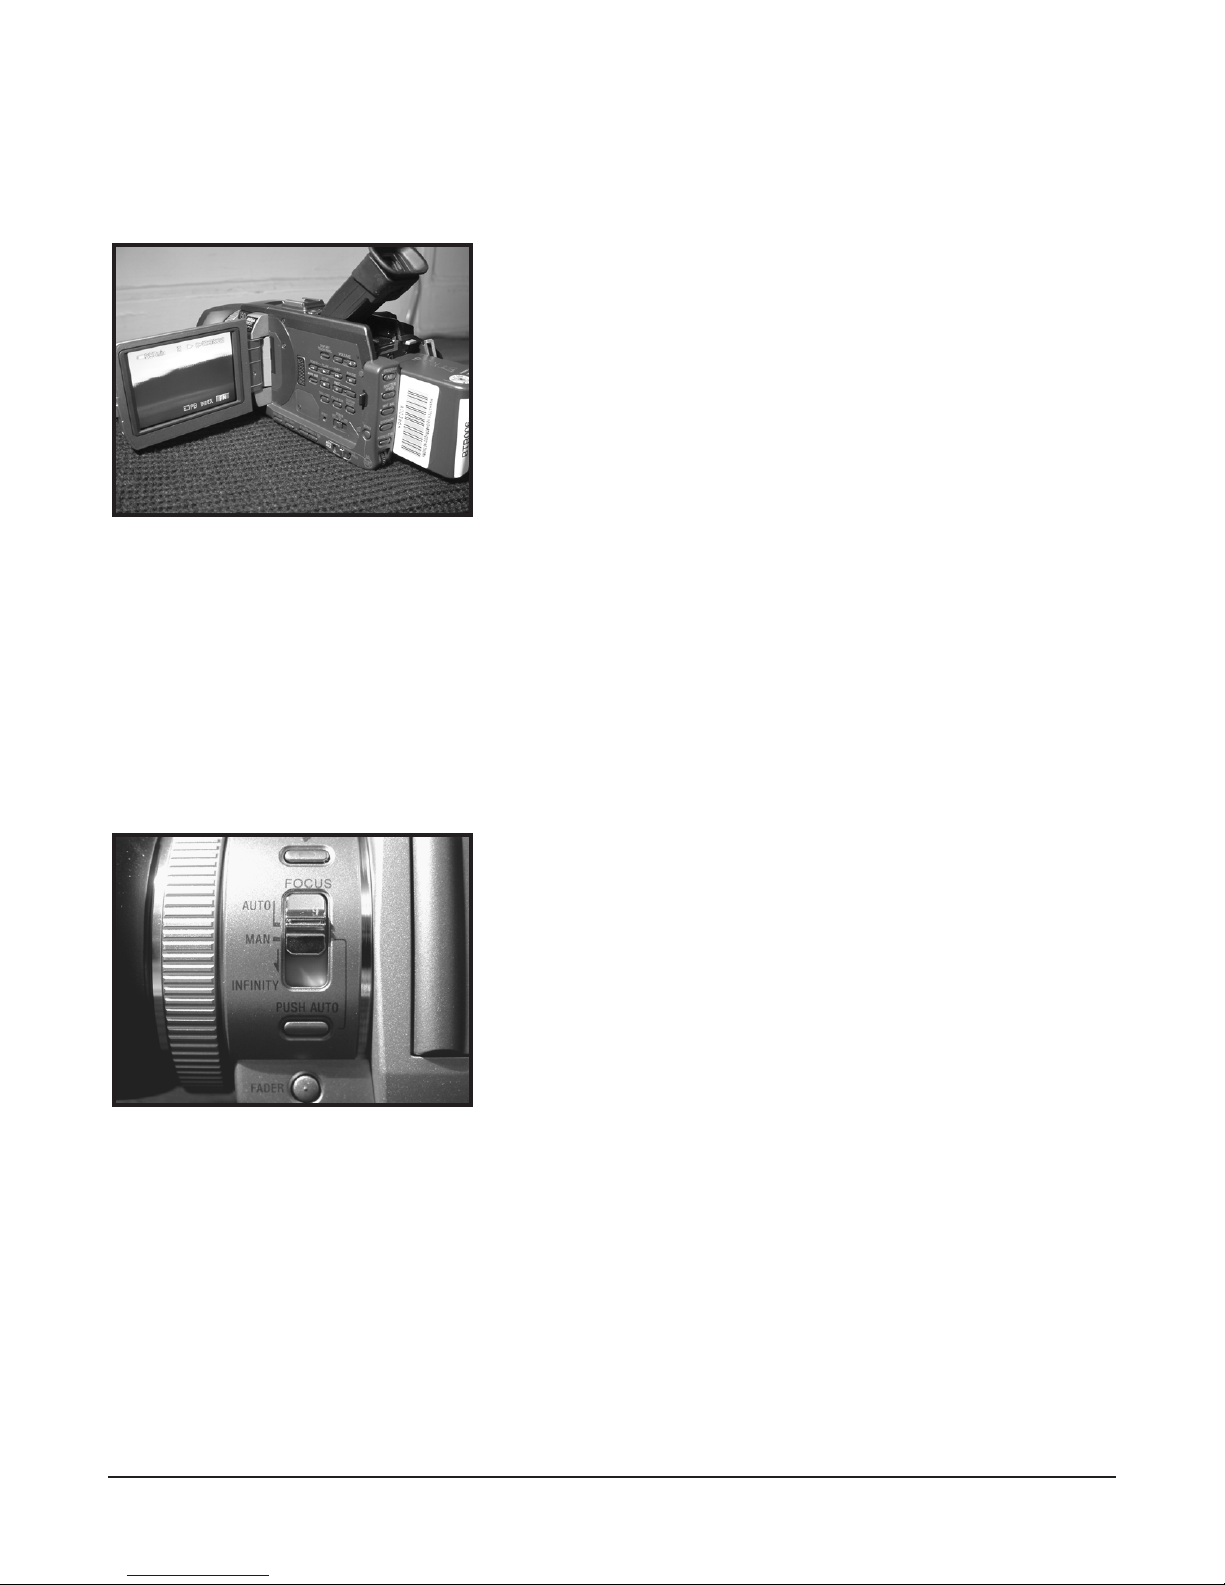
Camera Features and Functions
THE LCD SCREEN
1. Once you pull out the LCD screen the viewfinder is automatically switched off.
2. However, the Viewfinder and LCD will be on together when
the screen is turned through 180 degrees.
3. Once the LCD screen is re-housed into the side of the camera the viewfinder becomes operational.
4. When screen is turned through 180 degrees (to be in in
front of camera without a camera person) it drops into "mirror
mode".
5. Using the LCD screen will drain your batteries much faster
than the viewfinder. If you need to be conservative with your
batteries power then you use the viewfinder.
Take care of the LCD screen...
1. Do not touch the surface of the screen unless using the provided stylus.
2. Do not lift the camera by the viewfinder or screen.
3. Exposing the screen to sunlight for extended periods may damage it.
AUTO/MANUAL FOCUS
1. With the FOCUS switch set to AUTO the camera will
automatically focus for you.
2. Set the switch to MANUAL to take control of focusing and
a little hand appears in the viewfinder. (see page 10 for more)
3. The PUSH AUTO button below will automatically focus
the camera on whatever is in the center of the picture. When
you release the button it will revert to the manual mode.
4. When the camera is in INFINITY mode you will see a little
mountain appear. INFINITY gives you the greatest range of
focus and is generally used for landscapes or when shooting
distant objects.
The TROUBLE with auto focus ... is that it doesn't work well under the following conditions:
* When the subject is not in the center of the picture (particularly when there are moving objects)
* In low light conditions or if there is a bright light behind the subject (e.g. a window)
* When the subject is bright (e.g. a car with its head lamps on)
* When the subject is of low contrast - walls, the sky
* If the subject is made up of fine repetitive patterns
* If the subject is behind vertical bars or a chain link fence
* When another subject passes between the camera and the point of interest
SONY PDX10 Handbook page 6
Page 7
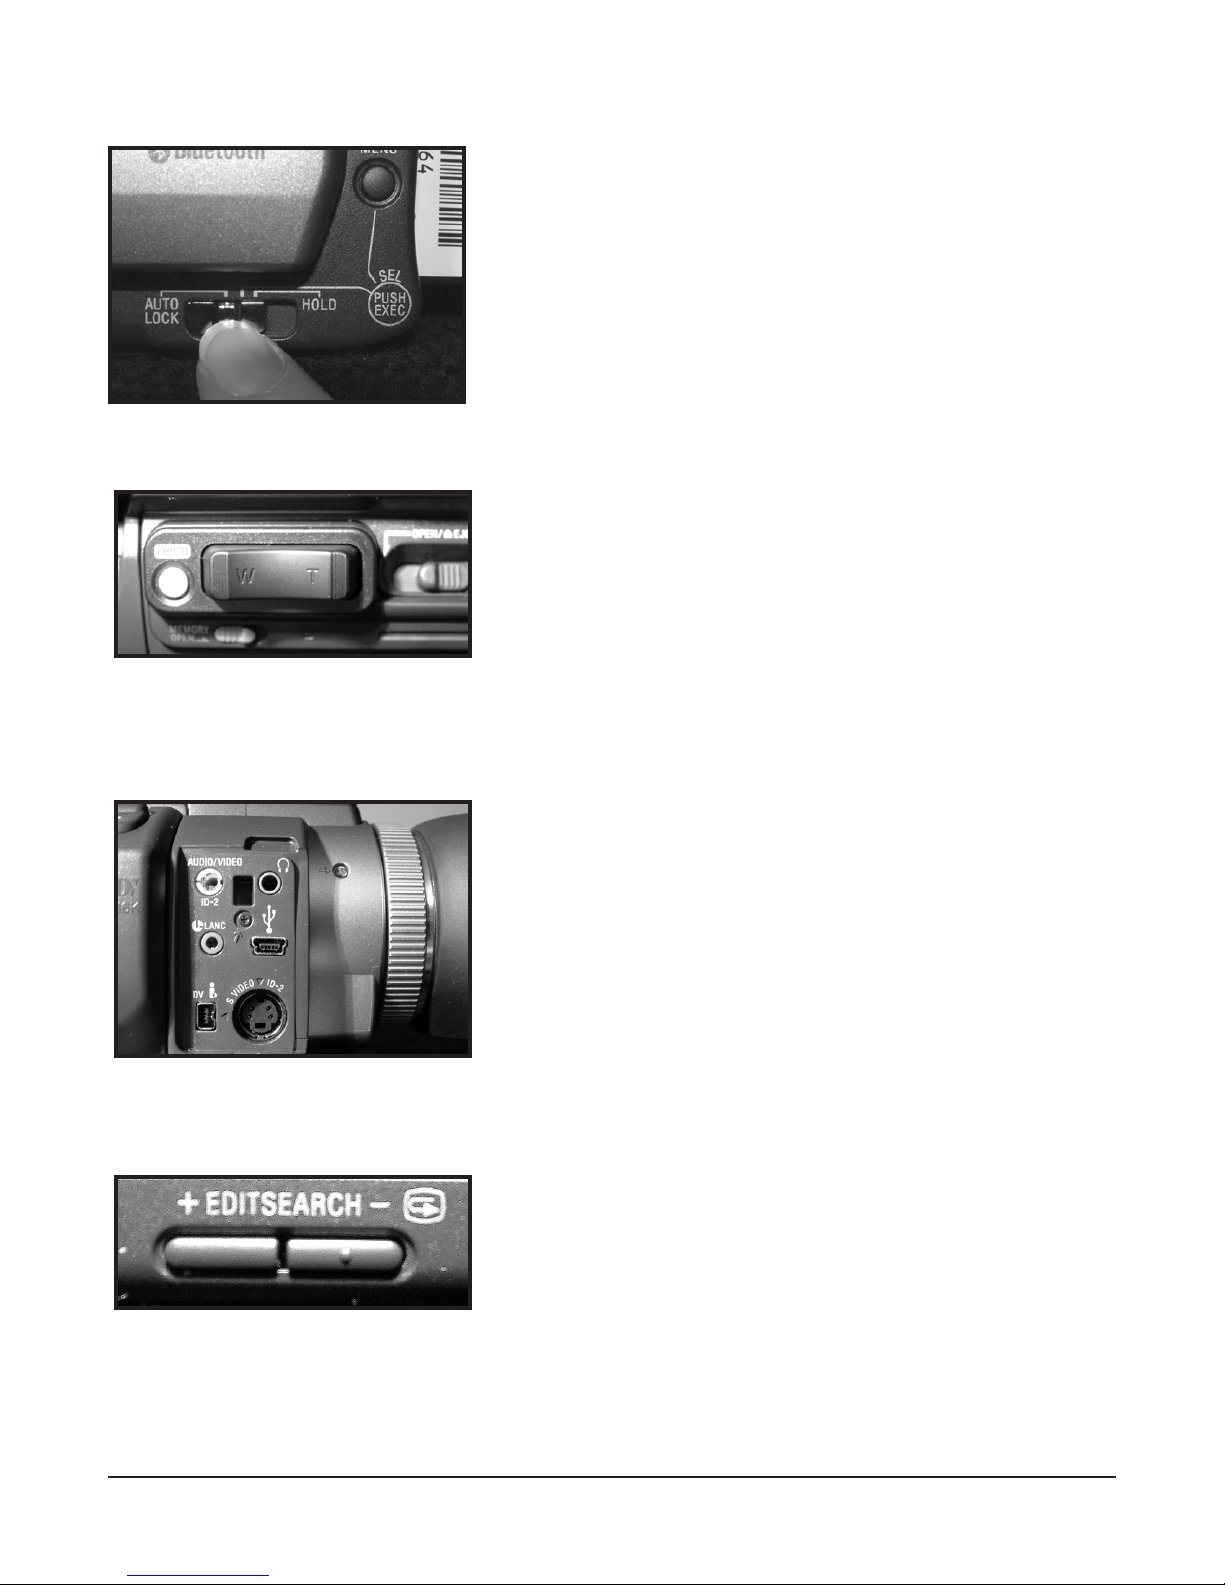
AUTO LOCK/HOLD
POWER ZOOM
1. When the HOLD/AUTO LOCK switch is in AUTO LOCK
position - the camcorder will automatically adjust the
EXPOSURE, SHUTTER SPEED and WHITE BALANCE.
2. With the HOLD/AUTO LOCK turned to the middle position you have the choice of operating the above features
manually or on auto.
3. To retain the settings you have adjusted manually, place in
the HOLD position.
1. The 'T' stands for TELEPHOTO and will zoom the lens in.
The subject appears closers.
2.The 'W' stands for WIDE-ANGLE and will zoom the lens
out. The subject appears further away.
Press the zoom controller gently for a slow zoom speed and
press harder for a faster zoom speed. Practice gently pressing
these buttons while continually framing your shot in order to
achieve effective and more professional looking shots.
HEADPHONES
EDIT SEARCH/REC REVIEW
DON’T FORGET TO USE HEADPHONES!
Plug in mini headphone connector into the mini jack on the
side of the camera next to the Audio/Video jacks.
If you want to ensure quality sound you must use headphones.
Looking at the sound levels (covered on next page) is not
enough. Sound level only show you how high or low the
sound is, not the quality of it. Check for clear, full sound free
of buzzing, cut outs, and other unwanted noises.
To search for the next recording point:
1. Set the POWER switch is set to STANDBY.
2. Open the LCD and locate the Edit search + and - buttons.
(+ button to go forward and - to go backward)
3. Hold down the EDIT SEARCH in STANDBY.
The recorded portion is played back.
Release the EDIT SEARCH to stop playback. If you press the
START/STOP button from the point you released the EDIT
SEARCH (make sure you have TIME CODE and you will
record seamless TIME CODE.
SONY PDX10 Handbook page 7
Page 8
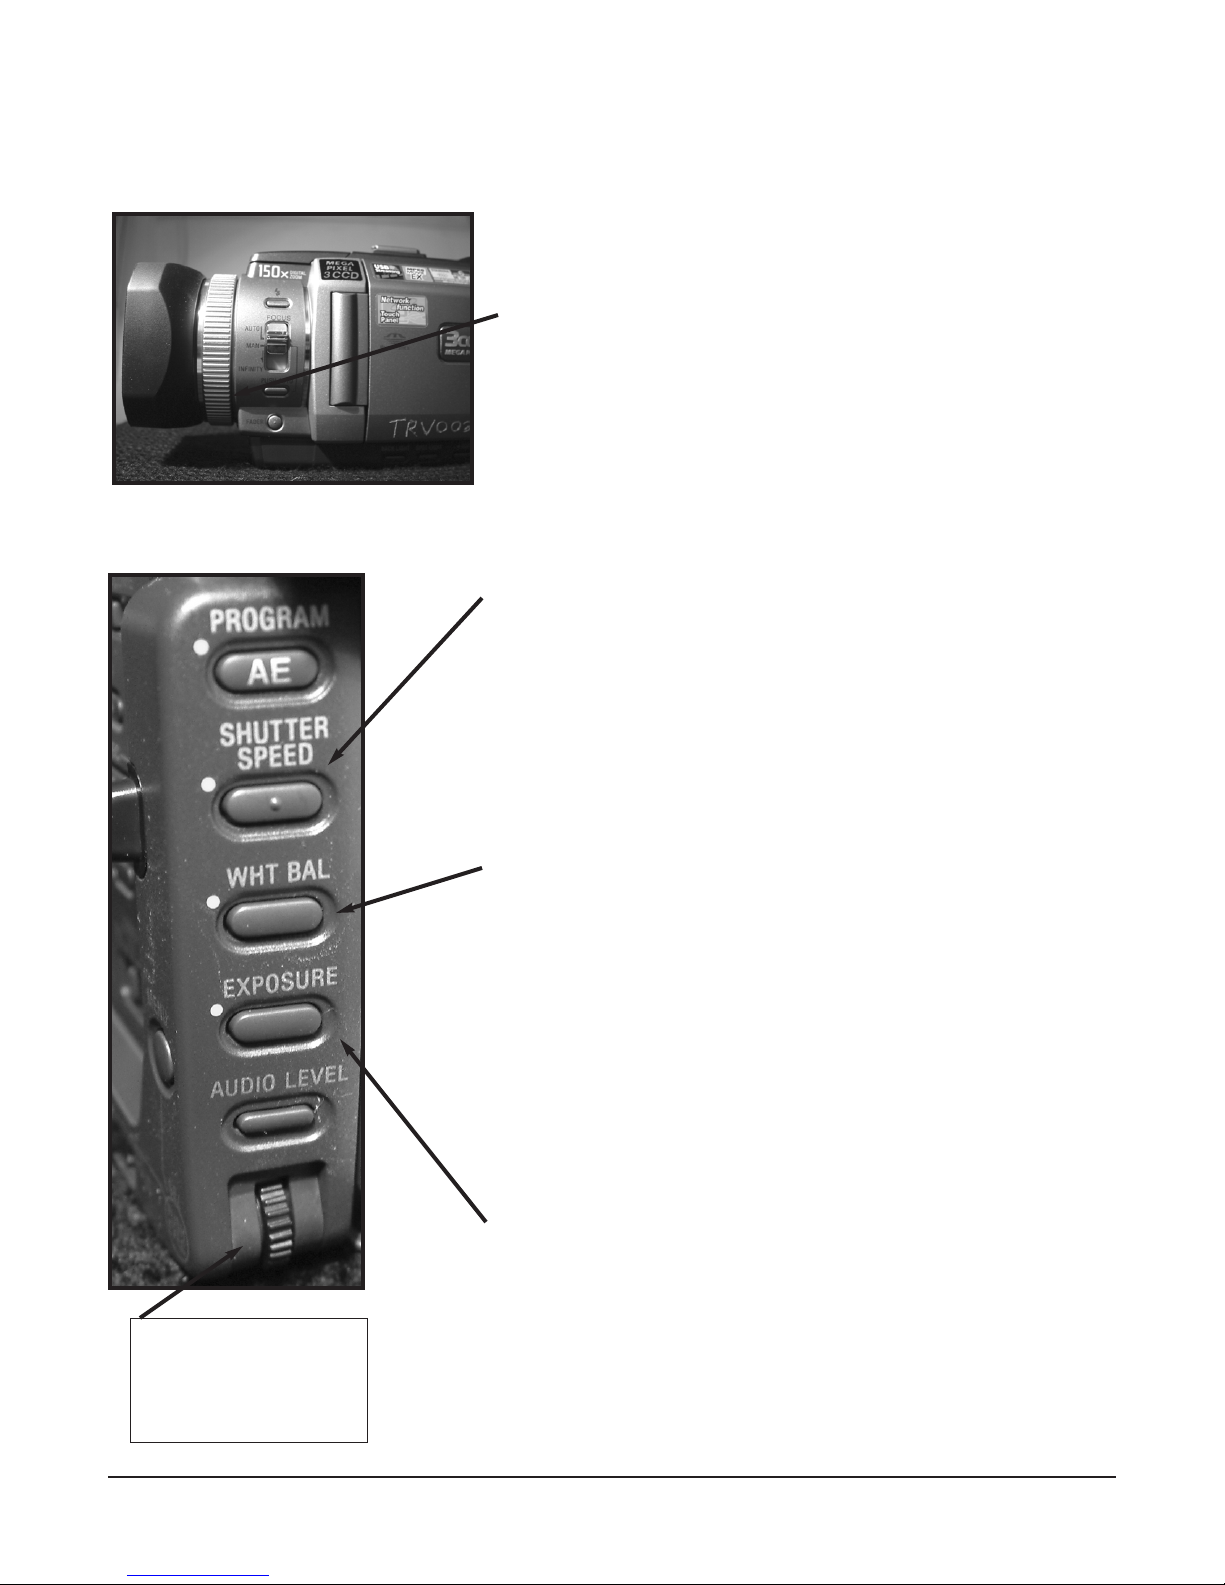
Advanced Manual Features
MANUAL FOCUS
1. Locate the Manual/Auto Focus selector on side of camera.
2. Select Manual Focus
3. Locate the Zoom button and Zoom into your shot (eyes).
4. Locate Focus Ring, at front of camera and turn until image
is sharp and in focus.
5. Zoom back out to your desired shot.
MANUAL SHUTTER SPEED
Adjusting the shutter speed allows you to adjust the video to
make fast action clearer or objects in the dark more visible.
1. Press the SHUTTER SPEED button in the rear of the camera.
2. Turn the SEL/Push EXEC dial to select either the appropriate
speed-higher for action or darker, lower for brighter or slowish
look.
3. If needed make other manual adjustments and set HOLD.
Push/EXEC Dial
Use dial to scroll
through options and
then push in to select.
MANUAL WHITE BALANCE (see appendix A for more info)
Adjusting the white balance make colors look natural no matter
the type of lighting, whether sunlight, fluorescent, or candle light.
1. Press the WHT BAL button in the rear of the camera.
2. Turn the SEL/Push EXEC dial to select either outdoor-
(sun), indoor-(bulb) or manual WB. Select Manual WB.
3. Focus and set your frame fully on a White Card.
4. Press SEL/Push EXEC and hold until blinking symbol stops.
5. You should notice the white of the card adjust its color
temperature to match the light source.
6. If needed make other manual adjustments and set the
AUTO LOCK/HOLD to HOLD
MANUAL EXPOSURE
Adjusting the exposure allows you to adjust between the lightness
and darkness of the video.
1. Press the EXPOSURE button in the rear of the camera.
2. Turn the SEL/Push EXEC dial to select either the appropriate
F-Stop-Lower allows more light in (brighter), Higher for
allows in less light (darker)
3. If needed make other manual adjustments and set HOLD.
SONY PDX10 Handbook page 8
Page 9
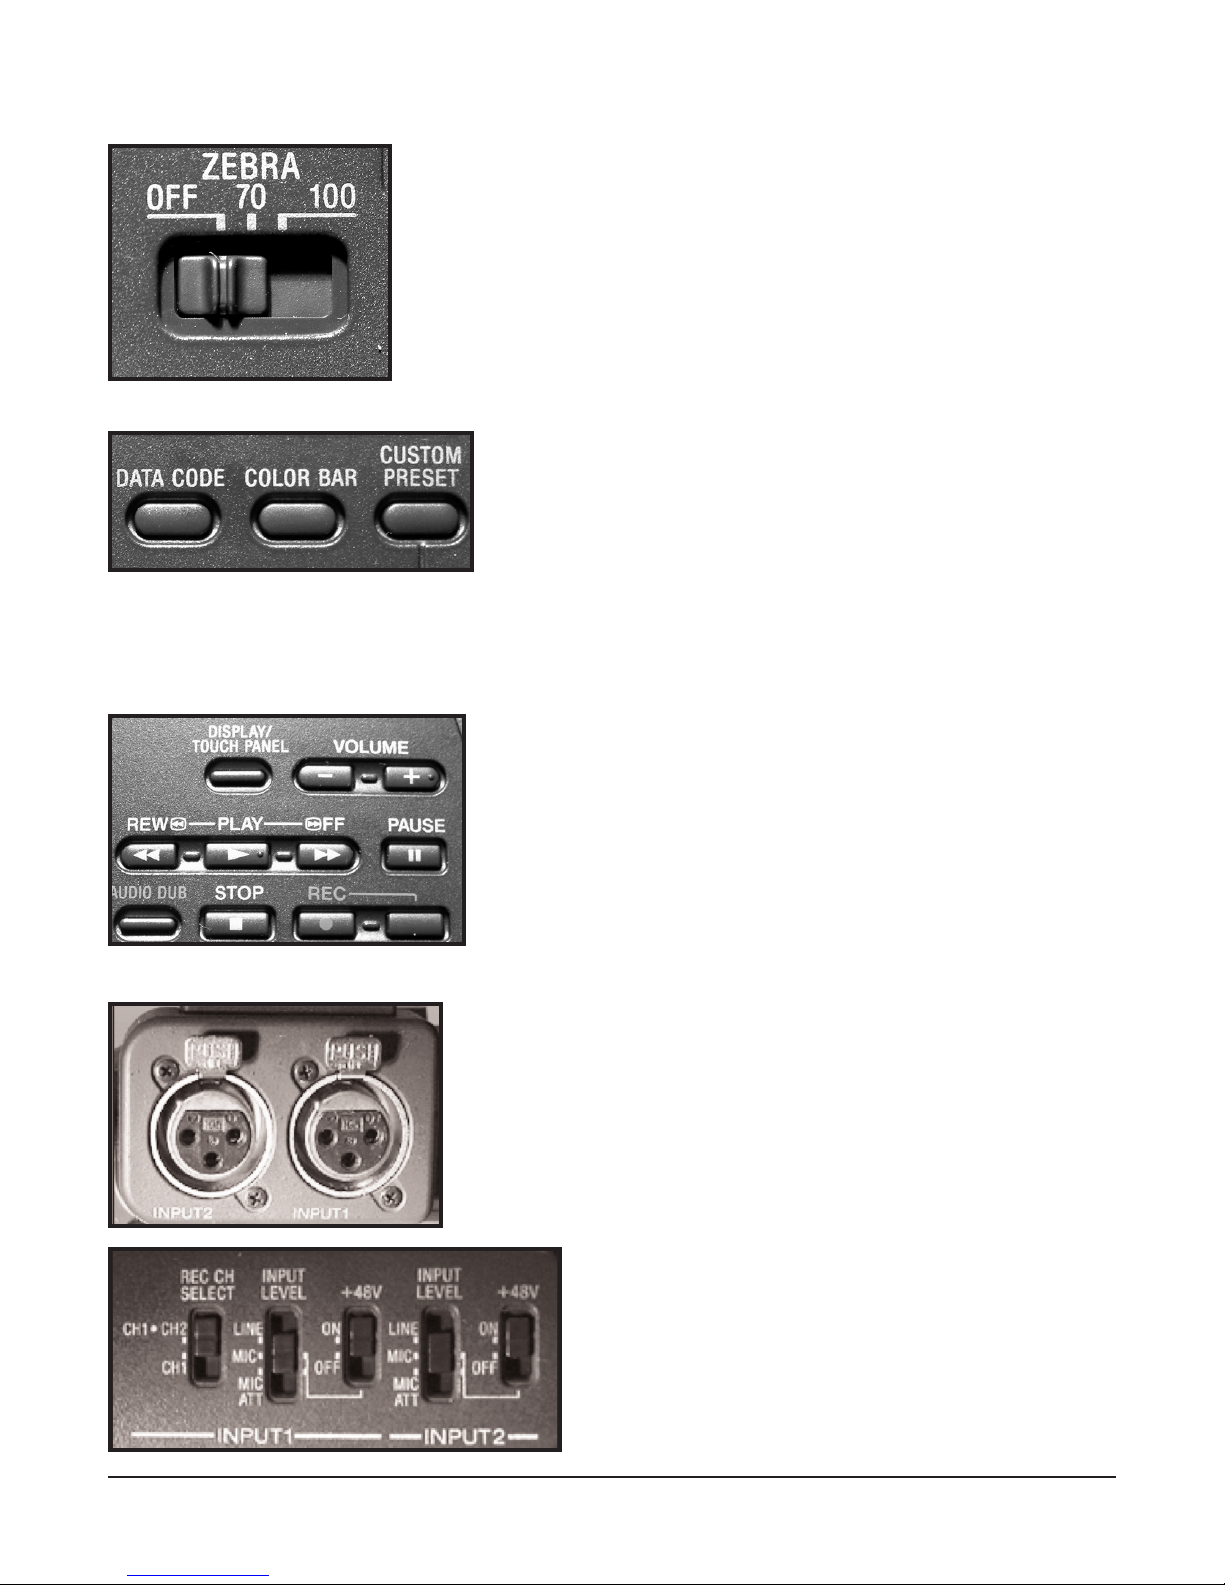
ZEBRA
COLOR BARS
PLAYBACK
Adjusting between the exposure and the shutter speed allows you
to adjust between the lightness and darkness of the video. The
Zebra function creates a zebra-like pattern over areas that are
exposed at the level of either 70 or 100 IREs, depending on the
setting you choose. This is useful to whether lighting is too hot - it
is for visual reference only and does not effect recording.
*100 IRE and over is considered to be over exposed.
*70 IRE is generally considered to be a good level of exposure.
It is always a good idea to record a minute of color at the
beginning of a tape. For checking color later on and most
importantly for safeguarding your footage. The first minute
of tape is the most used and gets stretched out more easily.
1. Open the LCD.
2. Locate and press the COLOR BARS button.
3. Record for minute.
4. Press the COLOR BARS button again to return to camera.
To view what you have recorded:
MICROPHONE JACKS
1. Set the POWER switch button to VCR
2. Open the LCD and press the Rewind, Play, Fast forward, or
Stop buttons on the side of the camera. If functions like a
normal VCR.
3. When finished be sure to return the tape back to the
position to continue recording.
4. Return the POWER switch to OFF or CAMERA.
The PDX10 comes with two XLR microphone connectors .
In normal operation, the camera mic is connected to INPUT 1
and the REC CH switch is set to CH1•CH2 (this records the
mic audio onto both channels). When using two mics, this
switch should be set to CH1 so that each mic records to a different channel. The recording levels of each mic can be controlled independently through the menus/audio level (see
Appendix B).
Select the appropriate INPUT LEVEL when using a
mic. Use LINE if you are connecting directly into a PA
or mixer to receive program audio. Use MIC when
using microphones. The +48v switch refers to
‘Phantom power’ and should be turned on when using
microphones that normally require batteries (if you use
phantom power - remove all mic batteries).
Always monitor audio with headphones!
SONY PDX10 Handbook page 9
Page 10
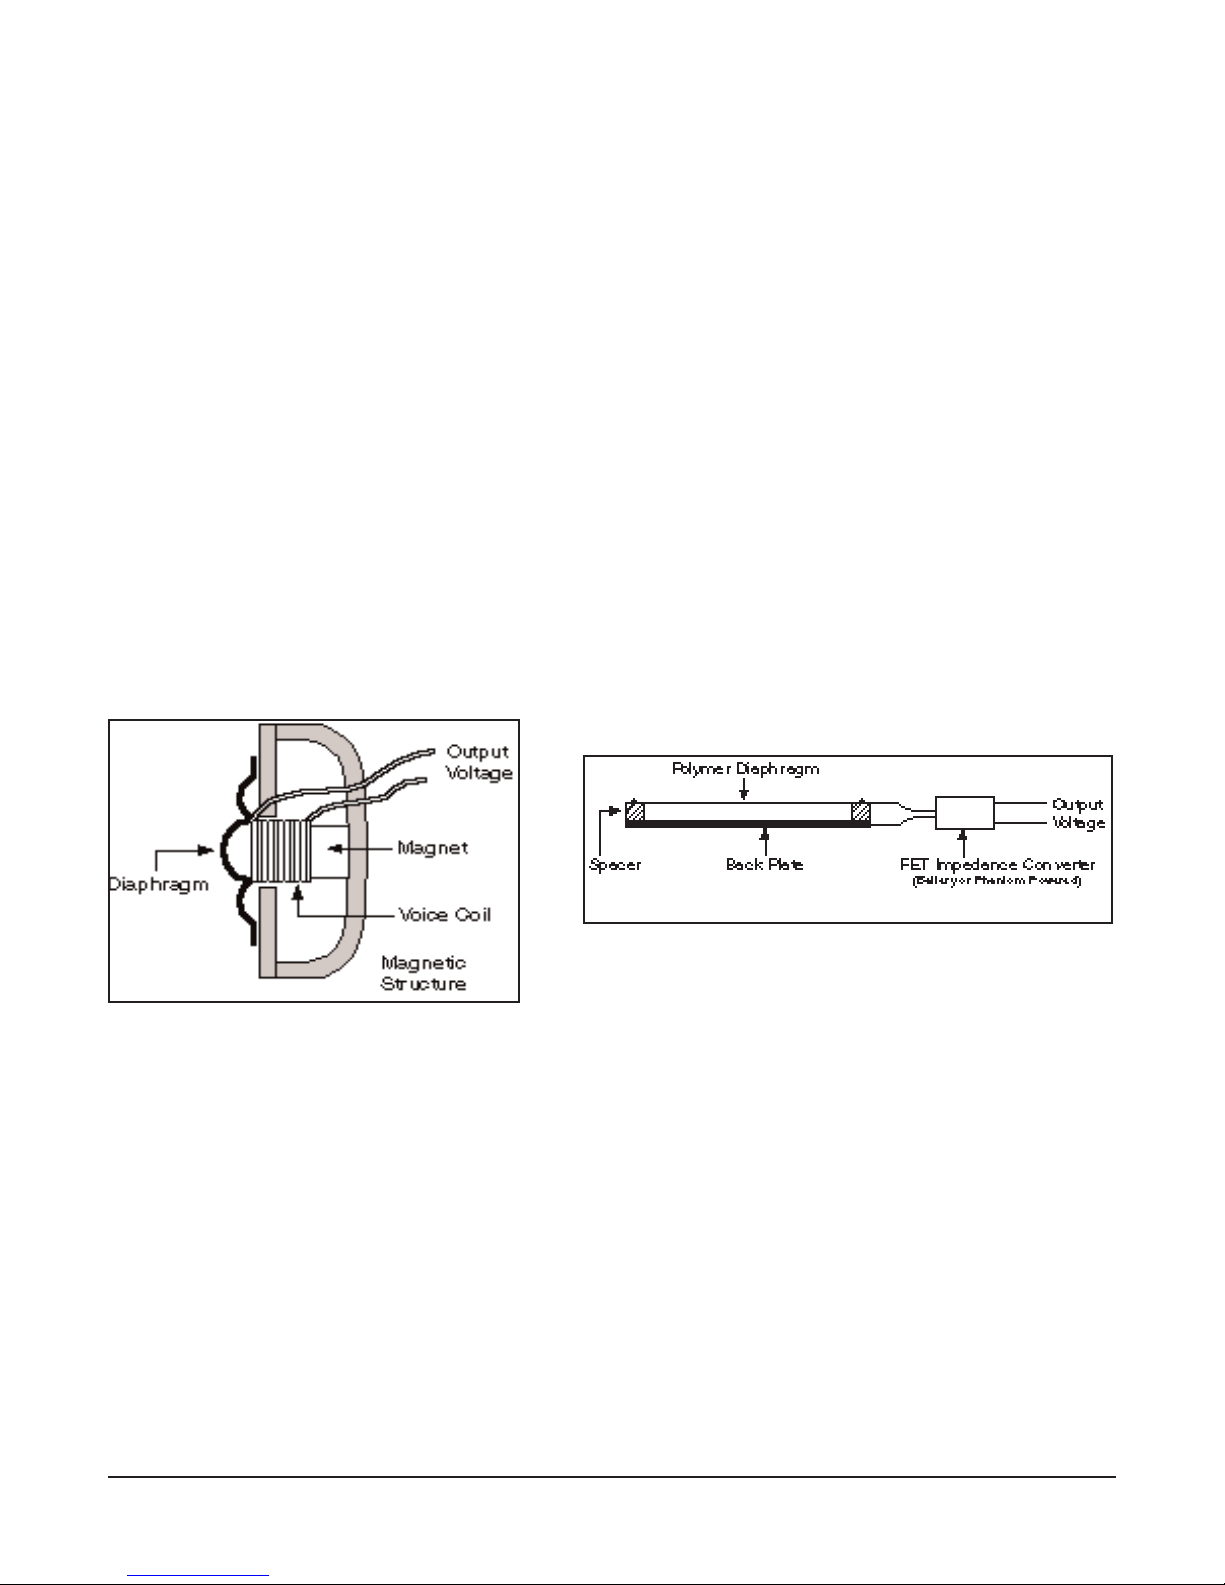
ALL ABOUT MICROPHONES
A microphone is a tool that changes vibrations in the air (sound) into electrical energy. Microphones
are often used to amplify or record a sound source. They come in a bewildering array of shapes sizes
and types each one introducing a different effect or tone on the sound source.
The effect of a particular microphone depends on 3 factors:
* Microphone design and characteristics
* Where the microphone is placed in relation to the sound source
* The environment that the sound source and microphone are within
Types Of Microphones
There are two main categories of microphone – DYNAMIC and CONDENSER.
Dynamic mics
The most common type of dynamic mic is the moving coil microphone. Its construction is similar to
that of a speaker. A thin diaphragm of plastic, mylar or aluminum picks up vibrations in the air and
moves a coil of wire up and down across a magnet creating an electric current.
* This type of microphone does not require a battery or any other power source.
Condenser Microphone Element
Dynamic Microphone Element
Condenser mics
Condenser mics are constructed from two very thin metal plates, one movable and one fixed. These
plates form a capacitor (a capacitor is an electrical device capable of storing an electrical charge).
When air vibrations make the plates move small voltage changes are created which are picked up by
the circuitry within the microphone.
* These microphones often require a power supply to operate either through a battery or through a
48 volt phantom power supply coming from a mixing board or the PDX10.
Microphone Placement
Distant Microphone Placement (over 40 inches away from the sound source).
- Picks up a wide area and the sounds and reverb of the environment.
Close Placement (under 6 inchs away from the sound source)
- Picks up just the sound source and not much of the surrounding environment.
SONY PDX10 Handbook page 10
Page 11
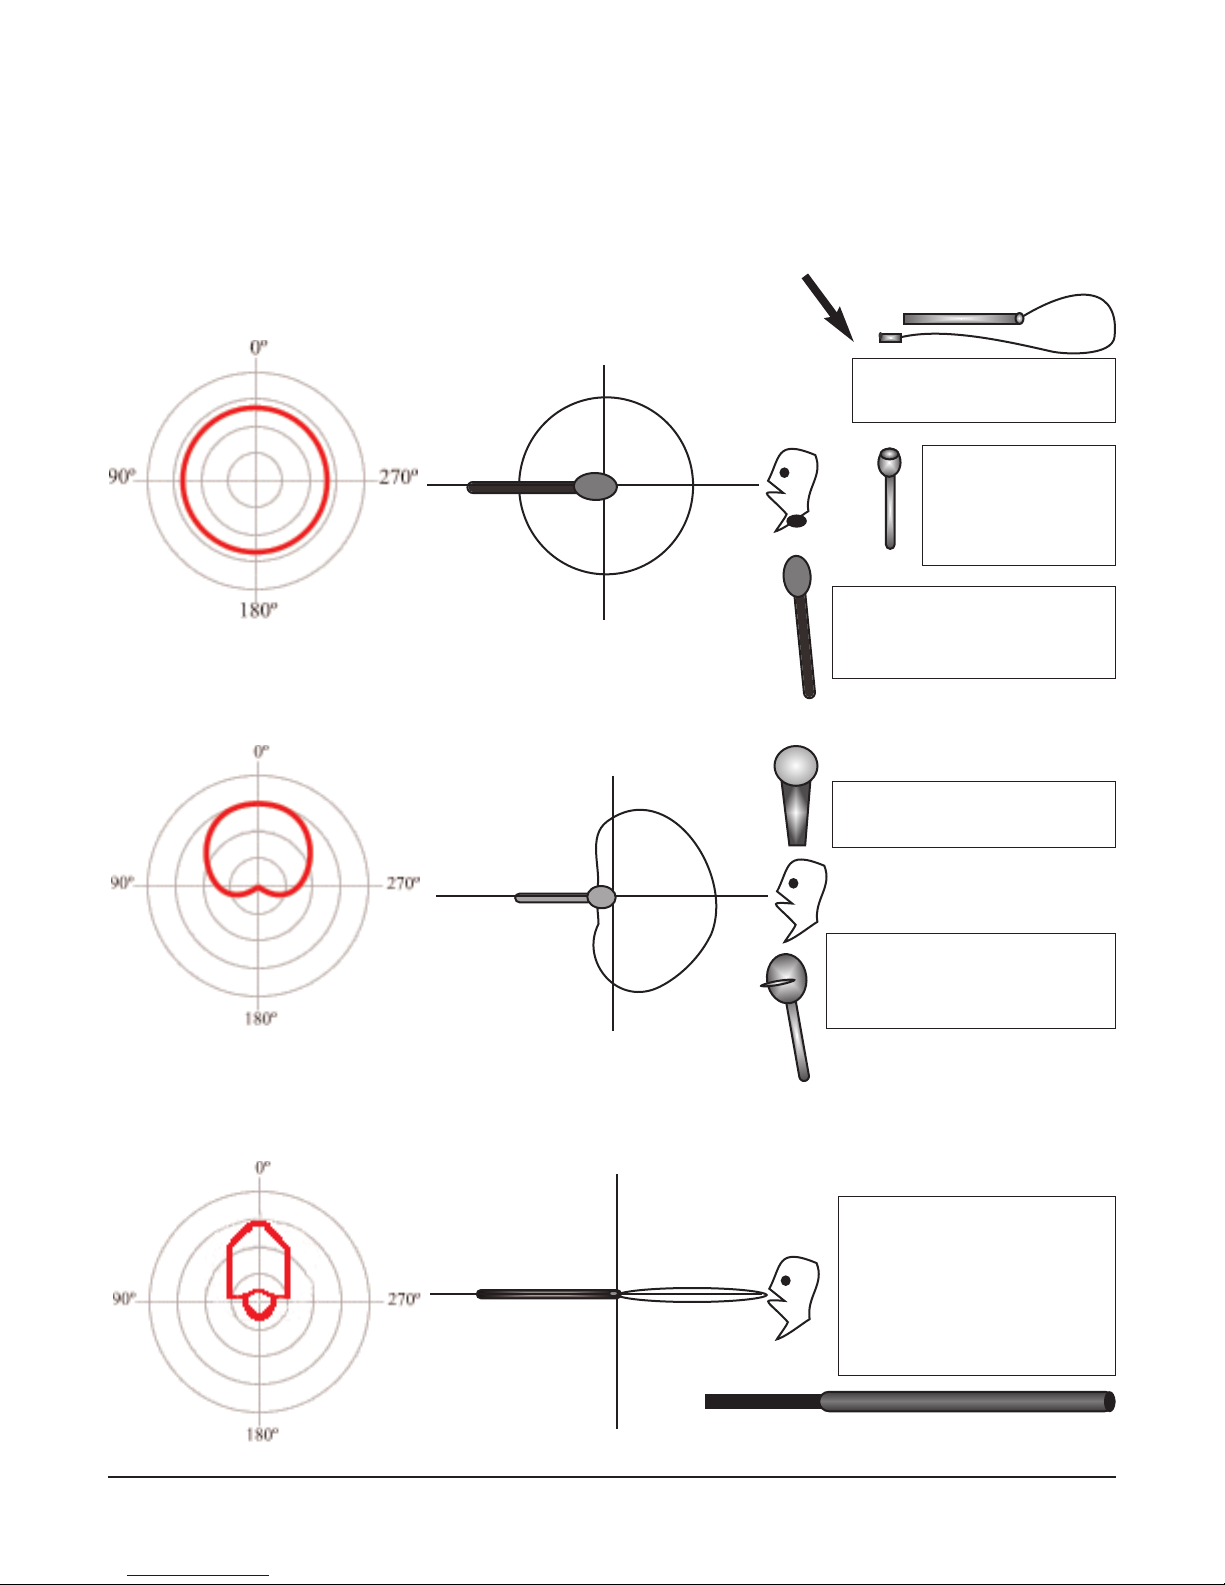
MICROPHONES: PICK-UP AND POLAR PATTERNS
Every type of mic has a different sensitivity to the direction the sound is coming from. Some mics only pick
up the sound in front of it, others pick up all sounds from all directions. This sensitivity, when plotted on a
graph, is called its polar pattern. Polar patterns help us choose the right mic for the job.
Omni-directional
This type of mic will pick up sound from all directions.
90°
180°
Omni-directional
90°
Cardioid
Picks up sound only from in front of the microphone.
90°
Microphones available at MNN
Lavalier (Condenser Mic)
Used for Interviews
0°
635A Handheld
(Dynamic Mic)
Used for Street
Interviews or Music
BeyerDynamic (Dynamic Mic)
Used for Street Interviews or
Musical Instruments
Shure SM58 (Dynamic Mic)
Used for Singing and Music
180°
0°
RE11 (Dynamic Mic)
Best for use in a Mic Stand for
interview/ singing/music
Cardioid or Uni-directional
90°
Hypercardioid
Variations on the cardioid patterns that pick up in a very focused area in front of the microphone.
90°
Shotgun (Condenser Mic)
Best for use with a Boom
180°
0°
Pole or on camera-hot shoe
mount for dialogue/interviews/sound fx/longer range
sounds.
Hyper-cardioid
90°
SONY PDX10 Handbook page 11
Page 12

Recording on Your Digital Tape
Pre-roll
Before you call action, start your interview or begin your slow dolly shot make sure that you press the
record button on the camera at least 10 seconds before you begin, this is called “rolling the camera.”
There are two important reasons for this:
1. The camera doesn’t start recording the exact moment you press the record button and you don’t want
to make the mistake of cutting off a great move or a statement your subject makes.
2. Editing systems require a few extra seconds of footage before it can line up the in and out points of
the footage you want to use in your final edited project.
Post-Roll
When you are finished with your shot, action or interview you should call or think “cut” but that does
not mean you should stop the recording just yet. You should wait, count to ten and then stop the camera from recording. The reasons are the same two reasons as above.
So remember: Roll Camera, Action, Cut, Stop Camera!
What is TIME CODE?
If you wanted to order an enlargement of a holiday photo you had taken on film you could easily identify the picture to the chemist because it has a number printed alongside the negative. Each number
positively identifies each picture.
On videotape it is time code which identifies every frame you have recorded, it is “burned” into the tape. Time-code
time is presented as a 24 hour clock at 30 counts/frames per second (i.e. TV frame rate). Each frame is
therefore numbered in HOURS : MINUTES : SECONDS : FRAMES (i.e. 01:23:16:24).
This is different from analog recording, or control track recording. When you record control track you
are laying down a sync pulse, a generic electronic “mark” for each frame of video. When playing back
this type of recording the machine reading the tape “counts” each “mark” for each frame of video.
This allows the machine to keep a total running time when you start at the beginning of a tape with the
counter set to zero. If you eject the tape or hit reset the machine will lose count.
In playing back, TIME CODE is not counted, but only reads what is already “burned” on each frame of
video once the signal (the video) is recorded. While a tape is being recorded it is laying not only audio
and/or video but also a channel of TIME CODE.
Use Edit Search to Avoid Time Code Breaks
Because consistent TIME CODE is so important (starting your tape at 00:00:00:00 and ending you tape
after 60 minutes as 01:00:00:00 or 1 hour and having all the corresponding numbers in between most
Sony cameras have the Edit Search function so that whenever you stop the camera and look at what
you did or after you’ve taken the tape out of the camera, you can line it back up to continue recording
consistent TIME CODE numbers.It is important not to leave gaps between recording scenes since the
timecode will reset and begin at “0”. This poses problems later in the digitizing process.
1. Momentarily holding down the
seconds of the last picture you recorded.
2. By holding down the "+" or "-" side of the edit search you can forward or rewind through the tape.
EDIT SEARCH function will help you do this.
EDIT SEARCH rocker marked "-" allows you to look at the last two
The
EDIT SEARCH button will take you to the end of the last recorded section. The camera rewinds or
fast forwards the tape until it finds the last picture frame - it will play the last five seconds of your
pictures and park, ready to record the next scene.
SONY PDX10 Handbook page 12
Page 13
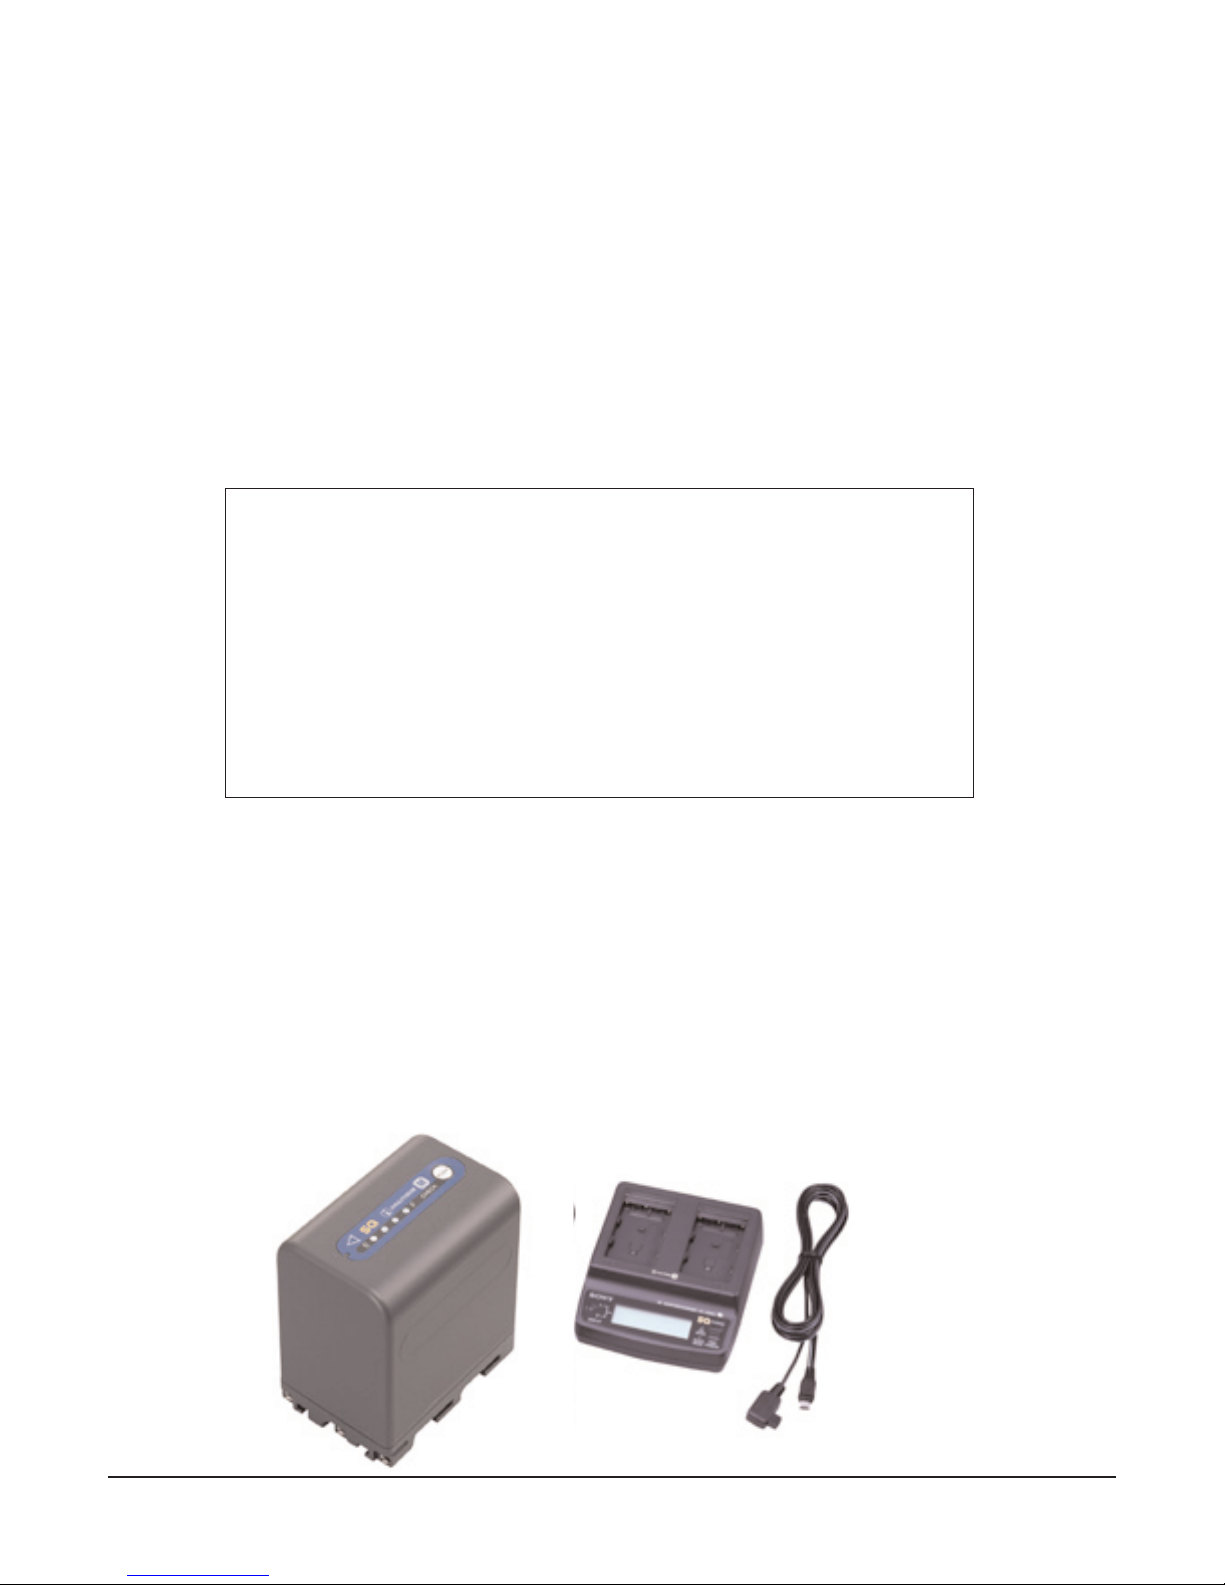
BATTERIES AND RECHARGING
The camera is powered by Sony's rechargeable "LITHIUM" batteries. To connect the battery to the
camera - lift up the viewfinder and insert the battery in the direction of the arrow until it locks into
place. To remove the battery from the camera - press the BATT RELEASE button.
These Lithium Ion batteries can be "topped off" or given an additional charge without having to first
drain the battery completely. To see approximately how many minutes the battery has available look in
the the upper left hand corner of the LCD or viewfinder. Remember: the more camera functions you
use, such as the LCD screen, the more quickly the battery drains.
To charge one or two batteries at a time, use the charger. To charge with the camera, put the battery on
the camera, plug the AC adapter into the back of the camera and turn the power switch to OFF (CHG).
RECHARGING TIME and BATTERY LIFE
Battery Type Operating Time
NP-FM90 380 mins of typical use without LCD screen
140 minutes to fully recharge
Providing up to 380 minutes of continuous recording time, this InfoLithium
M Series Battery features SQ technology, allowing you to recharge the
battery in 140 minutes (requires AC-SQ950D Battery Charger). It even
includes a power level display which, with a single touch, displays the
power level remaining on the battery.
Taking care of the batteries...
* Batteries work best between 32°F and +90°F so try to keep them in a warm place when working in
cold conditions.
* Keep batteries away from intense heat (+ 140° F).
* Protect from vibration, do not drop them.
* Do not immerse in water, expose them to heavy rain, steam or high humidity. If they do get wet
remove any excess water and allow to dry naturally.
* Do not put batteries in a pocket or bag with your keys, coins or any other metal objects.
Keys touching the metal contacts of the battery can get hot and you may set your pants on fire!
SONY PDX10 Handbook page 13
Page 14

SHOOTING HANDHELD VS. TRIPOD
STEADY SHOT
Hand held work takes a lot of practice and is easier for professional camera operators as the extra
weight of the broadcast camera gives it some stability. The very light domestic cameras are easily
affected by body movements, such as breathing in and out! However, there will be times when it is
impractical to use the tripod e.g. in a crowded area, a march, etc. Always use the steady shot feature.
Steady shots are essential to make your pictures look professional and keep you friendly with the picture editor. Wobbly pictures limit the editors choice of usable shots and are difficult to edit into and out
of. Plus if you intend to shoot for web broadcasting you'll find steady shots are easier to compress to a
small file size.
With the Pro-sumer cameras you have the STEADY SHOT facility which compensates for camera
shake but does not eliminate it.
The steady shot feature does NOT replace the usefulness of a tripod.
WITH A TRIPOD YOU CAN...
* Take steadier shots every time, especially at the narrow angle end of the lens.
* Ensure smoother camera movement (panning, tilting and pivoting).
* Keep the camera level by use of the balance level (bubble).
The disadvantage is that it will take you a little longer to set up the equipment, but your shots will look
better for extra effort.
TIPS ON USING THE TRIPOD
* Make sure the legs of the tripod are spread out as far as they will go. This makes it as stable as possible.
* However, for safety you can use a tripod as a monopod by bringing all the legs up together. This
way no-one will trip over it but be sure to keep yours hands on it at all times.
* Check the balance level (the bubble) every time you move the tripod.
* Set the pan and tilt friction’s so that they are about equal.
* How much friction is personal preference - However, too little and shots will still wobble - too
much and you'll be fighting with your tripod for control of the shot!
* Adjust the panning handle so that it is comfortable for you to use. Again personal preference - but
usually just on the droopy side of horizontal.
IF YOU HAVE TO USE THE CAMERA HAND HELD...
* Use the wider lens angles whenever possible-Zoom Out. (Narrow angle shots will accentuate
camera shake)
* Try and brace yourself against a solid object like a wall, street lamp or a car.
* Stand with your feet slightly apart to steady yourself and hold your arms in a triangle shape against
your chest to form a sort of human tripod.
* When panning or tilting, move your
NEVER move the camera with just your arms or hands.
* Breath slowly and gently.
whole body from the center to ensure smoother movements,
SONY PDX10 Handbook page 14
Page 15
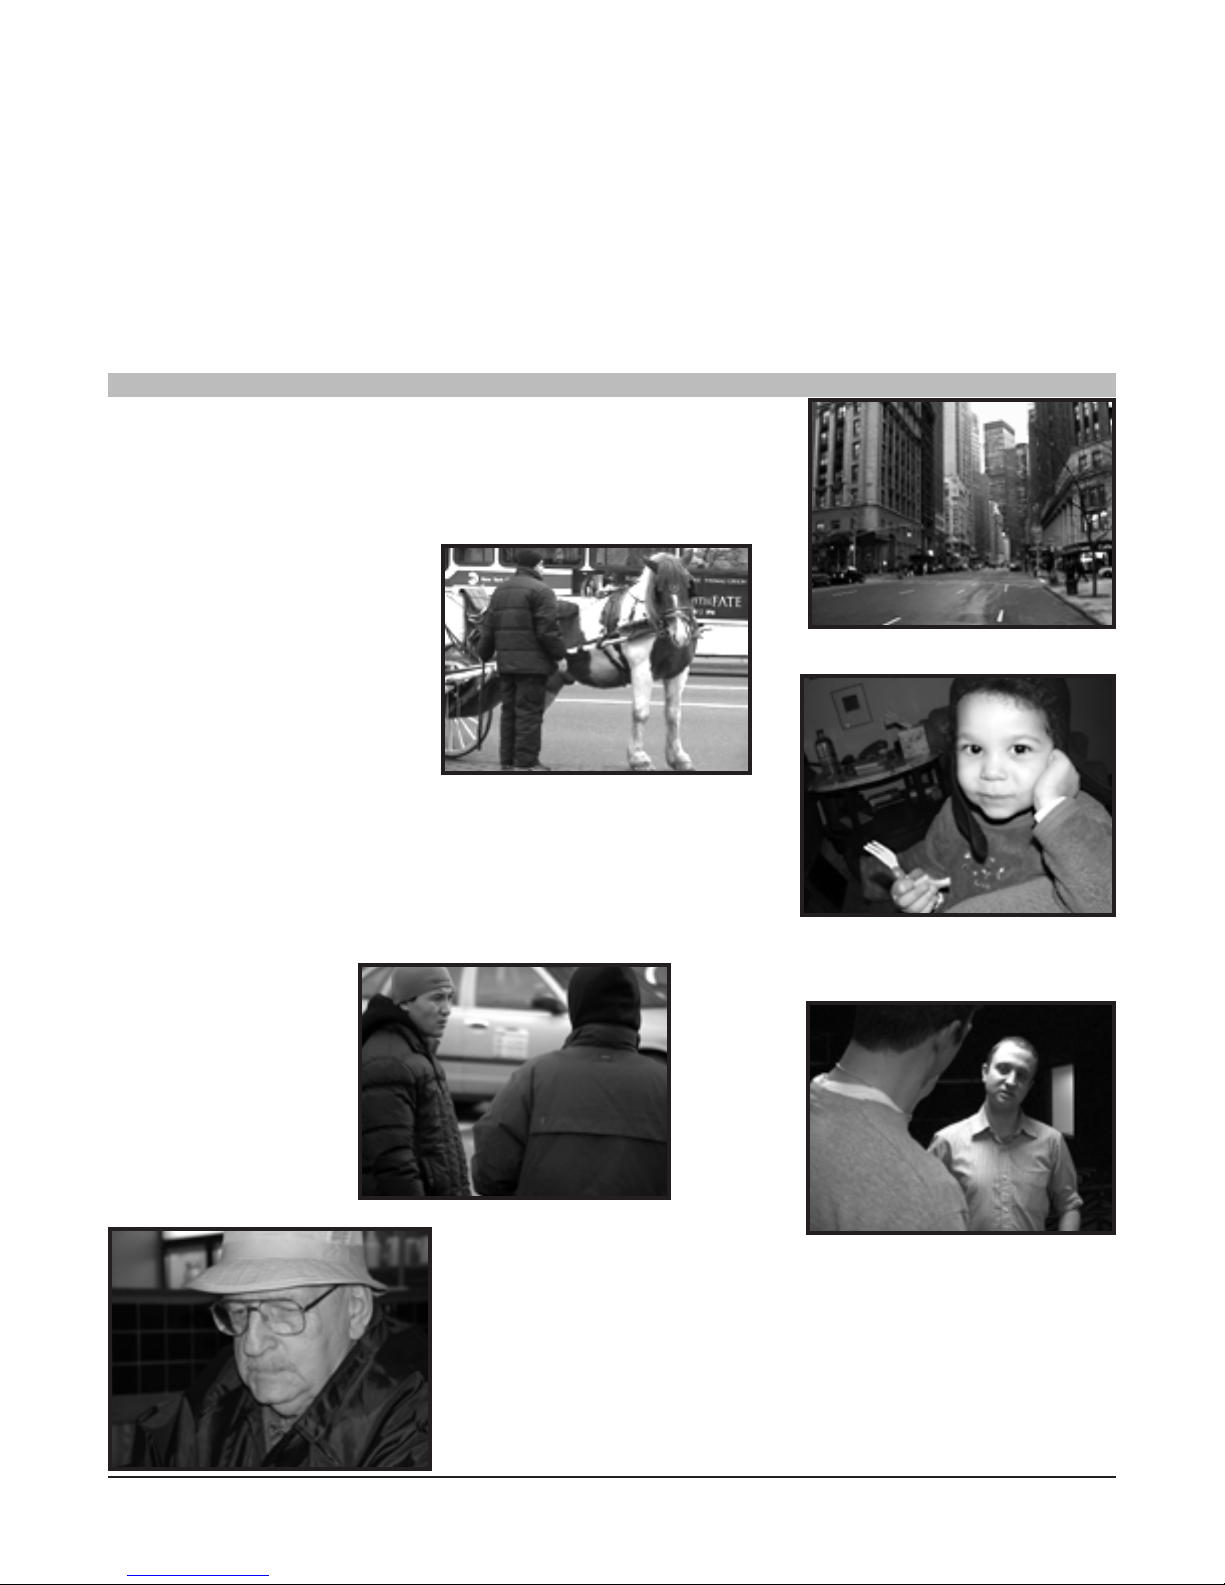
CAMERA COMPOSITION
When describing camera angles, or creating them yourself, you have to think about three important factors:
The FRAMING or the LENGTH of shot
The ANGLE of the shot
If there is any MOVEMENT involved
When describing different cinematic shots, different terms are used to indicate the amount of subject
matter contained within a frame, how far away the camera is from the subject, and the perspective of
the viewer. Each different shot has a different purpose and effect.
CAMERA FRAMING
1. Extreme Long Shot-XLS
Generally used as a scene-setting, establishing
shot, normally showing an EXTERIOR, eg
the outside of a building, or a landscape.
2. Long Shot-LS
This category includes the
FULL SHOT showing the
entire human body, with the
head near the top of the frame
and the feet near the bottom.
3. Medium Shots-MS
Contains a figure from the waist up and is normally used
for dialogue scenes, or to show some detail of action.
Variations on the Medium Shot:
TWO SHOT
(two figures from the
waist up) and the
THREE SHOT (3 figures from waist up)-any
more than three figures
and the shot tends to
become a long shot.
OVER-THE-SHOULDER-SHOTS
Positions
the
camera
behind one
figure,
revealing
the other
figure, and
part of the
first figure's back, head and shoulder.
4. Medium Close-up- MCU
In between the Close-Up and Medium shots this frame is generally a “bust” shot. Works well for getting in close without the intensity of a close-up.
SONY PDX10 Handbook page 15
Page 16
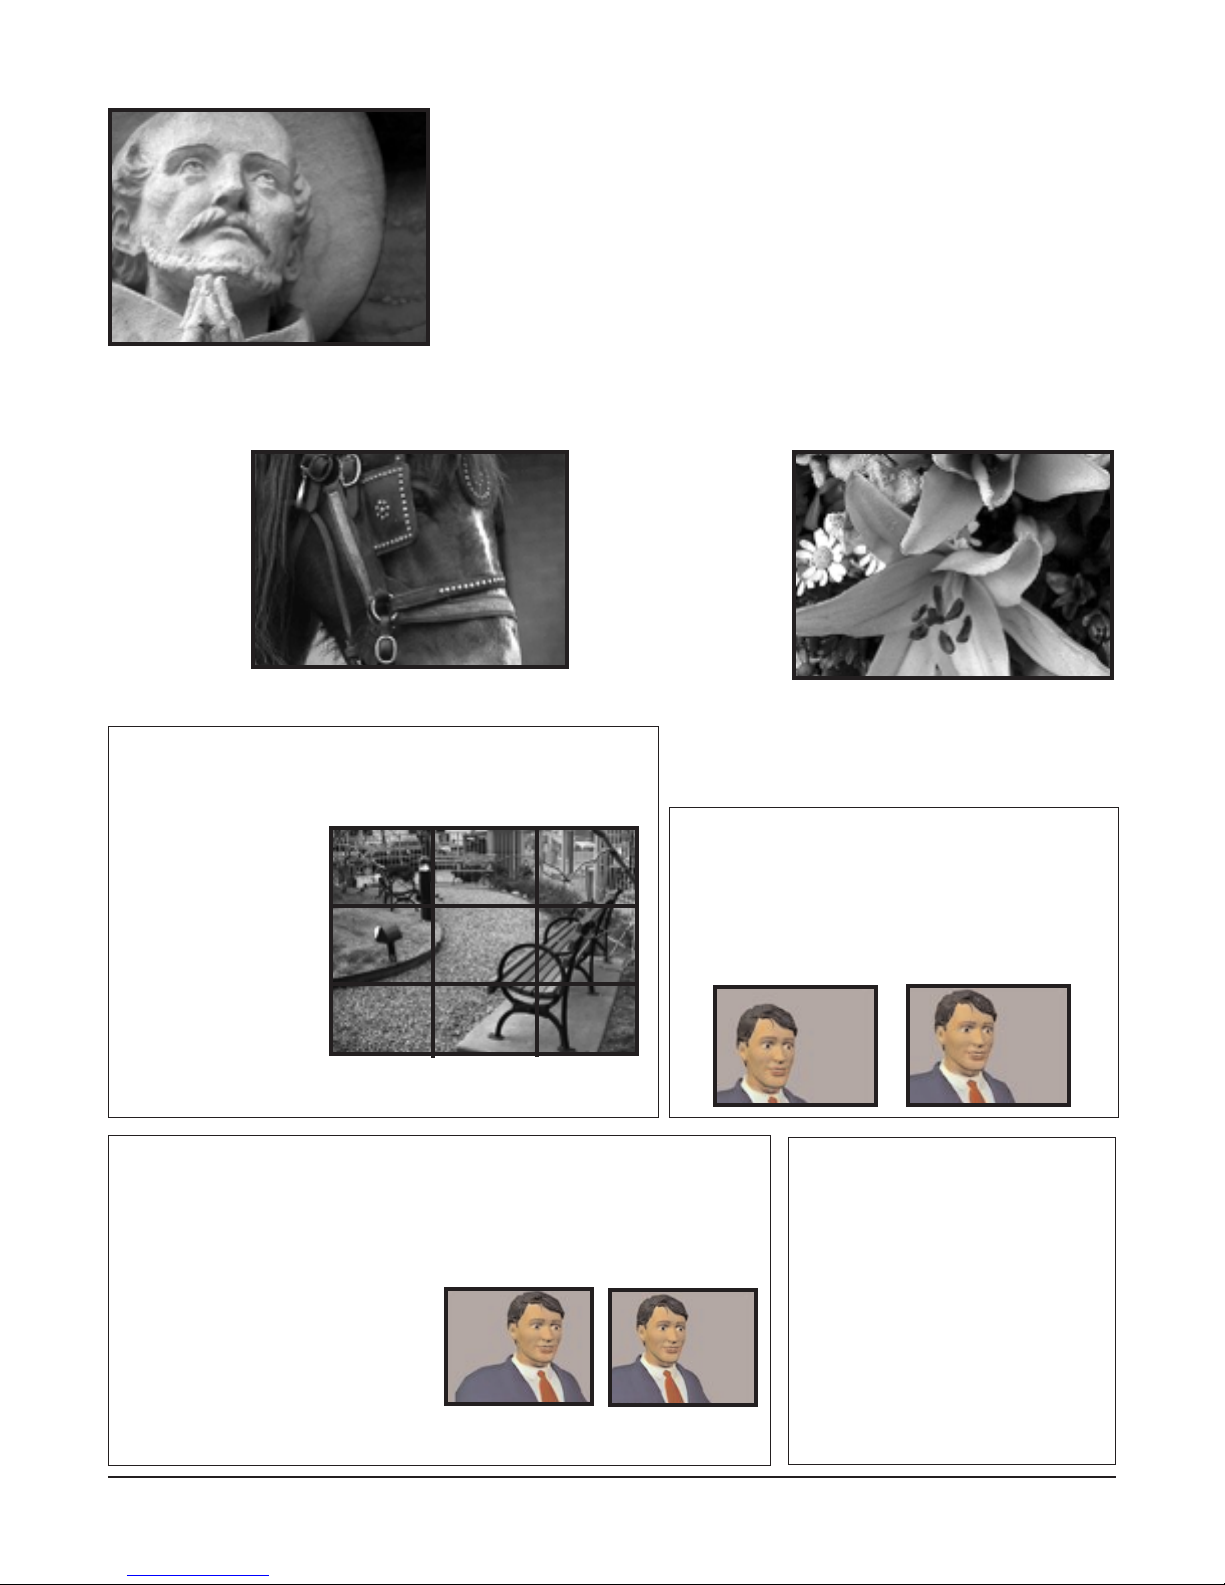
5. Close-Up-CU
Concentrates on either a face, or a detail of mise en scene, it magnifies
the object and shows the importance of things, be it words written on
paper, or the expression on someone's face. The close-up takes us into
the mind of a character. In reality, we only let people that we really trust
get THAT close to our face, so a close up of a face is a very intimate
shot. A film-maker may use this to make us feel extra comfortable or
extremely uncomfortable about a character.
6. Extreme Close-Up-XCU
As its name suggests, an extreme version of
the close up,
generally
magnifying
beyond what
the human
eye would
experience in
reality, ie. a
tight face shot.
Rule of Thirds
You can use the rule of thirds as a guide in the off-center
placement of your subjects. Imagine your picture area
divided into thirds both
horizontally and vertically. The intersections
of these imaginary
lines suggest four
options for placing the
center of interest for
good composition and
balance with in the
picture.
7. Macro
Another type of extreme close-up, usually for
small
objects,
flowers,
coins, print
etc. Zoom
out to the
widest shot
and physically move
the camera to the subject until the subject and
the lens are right next to each other. Focus.
This will give you a much more detailed and
clear picture then by zooming in.
Head Room
Poor head room (left) gives viewers the
impression of relative weakness, compared
with the strength of less head room (right).
Head room refers to the space between the top
of the subject's head and the top of the frame.
Nose room aka Lead Room
The subject on the left "feels" cramped because he is too
close to the right side of the frame--there is no room for his
gaze. The subject on the right has plenty of "nose" room for
his gaze or gesture. If the subject is looking towards the
right frame, leave more room
at the right. If the subject is
gesturing towards the left
frame, leave more room at the
left. If the subject is moving
towards the right frame, leave them more room at the right.
Continuity-Director’s Line
Be sure to keep the talent on the
same side of the frame throughout all the shots...for example if
the host is on the left looking
right towards the guest in a wide
shot, then when cut to a close-up
of the host he/she should also be
on the left looking right.
SONY PDX10 Handbook page 16
Page 17
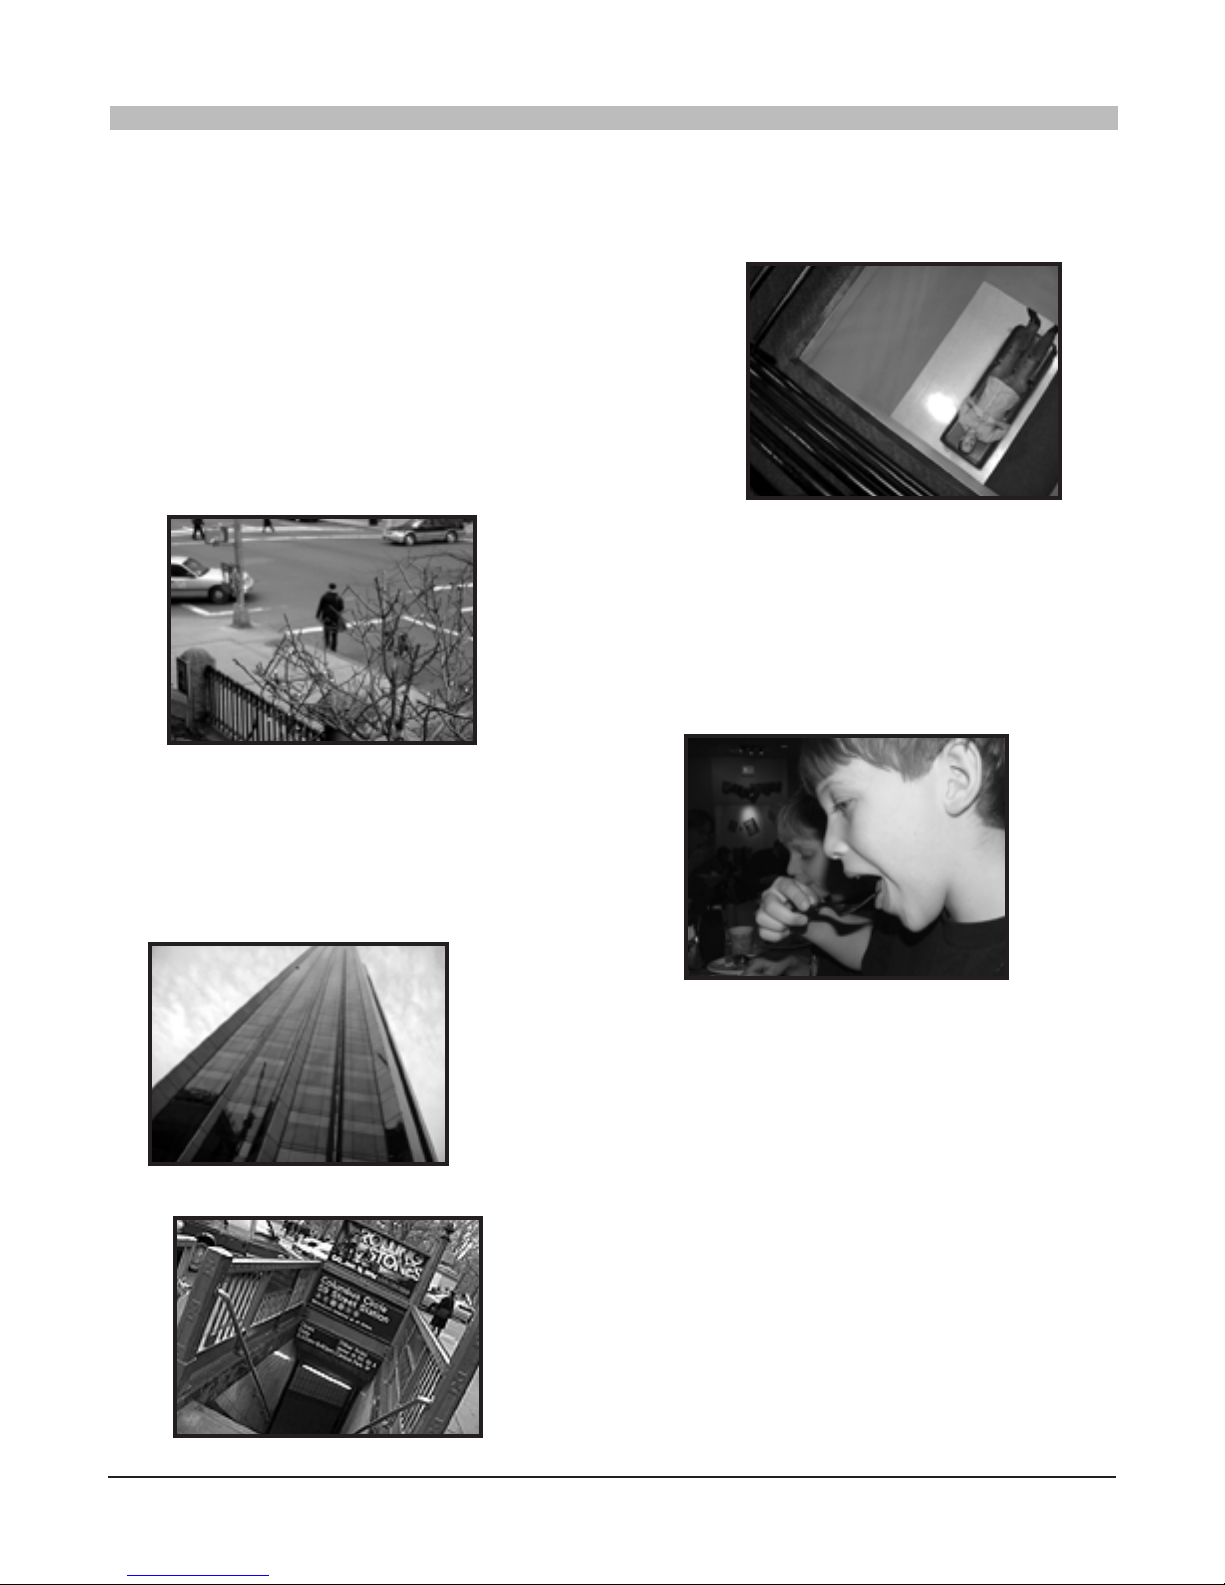
CAMERA ANGLES
The relationship between the camera and the object being photographed (ie the ANGLE) gives emotional
information to an audience, and guides their judgment about the character or object in shot. The more
extreme the angle (ie the further away it is from eye left), the more symbolic and heavily-loaded the shot.
1. The Bird's-Eye view
This shows a scene from directly overhead, a very
unnatural and strange angle. Familiar objects viewed
from this angle might seem totally unrecognizable at
first (umbrellas in a crowd, dancers' legs). This shot
does, however, put the audience in a godlike position,
looking down on the action. People can be made to look
insignificant, ant-like, part of a wider scheme of things.
2. High Angle
Not so extreme as a bird's eye view. The camera is
elevated above the action using a crane to give a
general overview. High angles make the object
photographed seem smaller, and less significant (or
scared). The object or character often gets swallowed up by their setting - they become part of a
wider picture.
3. Eye Level
A fairly neutral shot; the camera is positioned as
though it is a human actually observing a scene, so
that the camera lens is eye level to the subject.
4. Low Angle
The background of a low angle shot will tend to be just sky
or ceiling, the lack of detail about the setting adding to the
disorientation of the viewer. The added height of the object
may make it inspire fear and insecurity in the viewer, who
sees the subject as a dominating, powerful figure.
Sometimes the camera is tilted (ie is not placed horizontal to floor level), to suggest imbalance, transition
and instability (Titanic!!). This technique is used to
suggest Point-of-View shots (ie when the camera
becomes the 'eyes' of one particular character, seeing
what they see).
SONY PDX10 Handbook page 17
Page 18
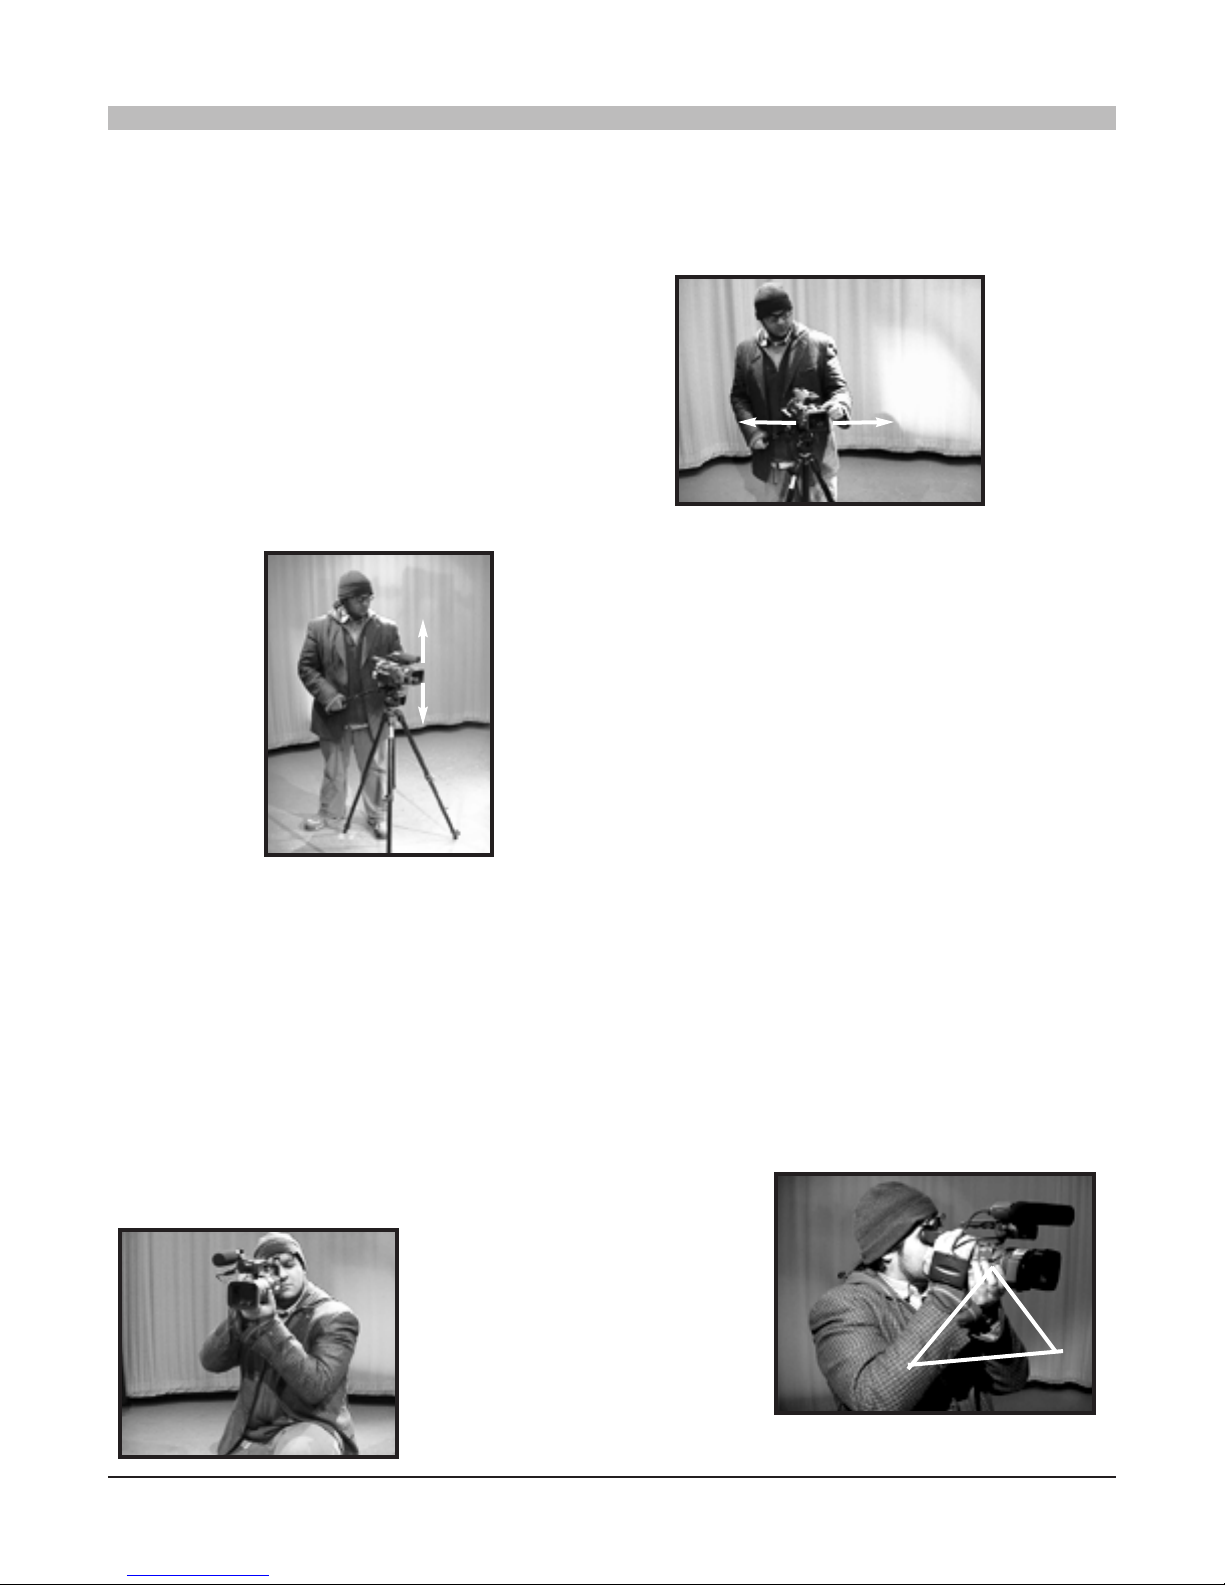
CAMERA MOVEMENTS
A director may choose to move action along by telling the story as a series of cuts, going from one shot
to another, or they may decide to move the camera with the action. Moving the camera often takes a
great deal of time, and makes the action seem slower, as it takes several seconds for a moving camera
shot to be effective.
1. Pans
A movement which scans a scene horizontally.
The camera is placed on a tripod, which operates as a stationary axis point as the camera is
turned, often to follow a moving object which
is kept in the middle of the frame.
2. Tilts
A movement which scans a scene vertically,
otherwise similar to a pan.
3. Dolly Shots
Sometimes called TRUCKING or TRACKING shots. The camera is placed on a moving vehicle and
moves alongside the action, generally following a moving figure or object. A dolly shot may be a
good way of portraying movement, the journey of a character for instance, or for moving from a long
shot to a close-up, gradually focusing the audience on a particular object or character.
4. Hand-held shots
The hand-held camera (despite its name, a heavy, awkward piece of machinery which is attached to its
operator by a harness) was invented in the 1950s to allow the
camera operator to move in and out of scenes with greater speed.
It gives a jerky, ragged effect, totally at odds with the organized
smoothness of a dolly shot, and is
favored by filmmakers looking for
a gritty realism.
*When shooting handheld
remember to brace the camera by forming a tripod with your arms.
SONY PDX10 Handbook page 18
Page 19

Interviewing Techniques
by Ann Theis
Interviews are the most important component of a documentary. The people you get to interview are
what makes or breaks your project. In most types of documentaries you will need to find people who
will either support, contradict or frame the questions you want to present in the project. These people
can come in the form of "experts" i.e. professors, members of an organization, or anybody working in
the field of interest. They can also come in the form of "vox pop" a.k.a. "person on the street" interviews which means you are getting the opinion of the general public. In many cases it is good to get
both forms of interviews, in other words to get the expert opinion and then support or contradict it with
the thoughts of the public, or vice versa.
The sound you get from an interview is more important than the video. Of course you want good
video but if don’t get good audio no one will hear the point you are tying to make. So, if you aren’t
going to bother to make sure you will get the best possible sound, don’t bother making a documentary.
In most situations the best sound you will get in an interview will be with a lavalier, or lapel microphone. A lavalier enables you and your interviewee to be hands-free and the mike will stay in a fixed
position. A lavalier is a condenser mike so don’t forget the battery! Also it is generally a good idea to
mike the interviewer as well as the interviewee, in case you need the questions in the edited piece.
As for the video, place the camera on a tripod at the eye-level of the subject. The interviewer should be
seated next to the camera so the subject looks toward the camera but not directly into the camera.
When setting up the camera and composing the shot look for a visually interesting location that provides depth and a sense of space. Avoid white walls and objects that will look like they are growing
out of the subject’s head. When moving to different shots wait until the interviewer is asking a question, avoid moving the camera while a question is being answered you’ll be grateful in the editing
process. And always make sure you white balance.
Before the interview you should have done some research on the person you are interviewing and what
they can contribute to the project. Write up the questions on note cards so you don’t forget to cover
everything, you don’t want to bother them a second time because of your errors. During the interview
maintain good eye contact. Listen carefully to what the person is saying. Listen to their answers so
you will be able to lead in to the next question or to ask them another question based on their answer.
If they hit upon the right notion ask them for specific examples and detail. Be very gracious and make
sure that you get the correct spelling of their name and title. If you use ‘release forms’ (highly recommended), make sure that they are signed.Alternatively, you can shoot the release, ask the person on
camera if they give permission for their image and voice to be used in your production, also ask their
name and correct spelling.
SONY PDX10 Handbook page 19
Page 20

Sample Treatment
Thesis: NYC parks and public green spaces positively affect communities by supplying the space for
cultural get-togethers, social functions and traditional festivals.
The Story: My neighborhood has arguable the best park in NYC. The abundant trees, lakes, streams,
picnic areas, playgrounds, hiking trails, boat rides, horse rentals, insects, animals, and not to mention
the adjacent zoo and botanic garden make it the perfect place to spend time with family and friends.
My neighborhood also has tons of apartment buildings with very few houses and yard space. This park
serves as a backyard for the whole community. Better than a single backyard it allows for people to
share in each others space and for different groups to experience the traditions, festivals, and activities
of different cultures.
Interviews: Residents of the neighborhood from different cultural backgrounds who share the use of
the park: Mrs. Jones, Mr. Rodriquez, and Jenni Martin.
Shots:
- Wide Shot of the Park and Lake picnic area
- Low angle of kids playing and running around the playground
- Close-up of the many different types of food being cooked
- Macro shots of the various plant and animal life
- Medium shots of the various families and neighbors enjoying the festivities
- Pan across bikers, horse riders and joggers
- Extreme Close-up on hand pushing dominoes around
- Close-ups of decorations
- Tilt up from the ground filled with drummers and dancers to the tree tops and the building beyond
- Medium Wide shot of a young boy of girl receiving their Quinceanero party with a Mariachi Band
for all to enjoy
Ambient Sounds:
- Laughter of adults and children
- Meat sizzling on the grill
- Drum beats
- Bike chains
- Horse hoofs clopping
Interview Questions:
1. Why do you come to the park?
2. What do you use the space for?
3. Where would you hold your festivities or activities if there was no park?
4. How do you feel having all these other people around while you are having your own party?
5. Who uses the park?
5. What do you notice about people who come from different cultures sharing the same space for their
various festivities and get-togethers?
6. What types of activities, functions and festivities have you seen here?
7. What do you think would happen to the community if the park was bought up and used for
development?
SONY PDX10 Handbook page 20
Page 21

Pre-production planning
Writing a Treatment
The purpose of writing a treatment is to give the reader a clear idea of your project. The treatment talks
about your project as a whole. Who is the audience? What is the tone or point of the view you will be
taking? What format you will be working in? In one sentence, describe the planned program, like a thesis statement.
Write the treatment as if you are speaking to your audience. Describe what they will see and what they
will hear, including music and sound effects (leave out any directorial comments or technical information). Keep your one sentence description in mind, and then write a paragraph about how the show
opens, how the title appears and each sequence or section.The point of this is that you will start to
make many content and creative decisions well ahead of actually shooting.
Next Steps
- Write up interview questions: Make sure your interview questions are OPEN ENDED questions. In
other words, don’t ask questions that would result in yes or no answer. You want them to elaborate
on your questions but also keep them focused on the topic.
- Make arrangements for the interviews: remember when setting up interview time to account for
setting up and breaking down equipment.
- Contact crew to inform them of the date.
- Think of the type of music that would help add another dimension to your story.
Production-Shooting the Project
- Organize all need equipment (camera, tape, charged batteries, mics, cables, tripod and lights if
needed). Two people can manage and carry this equipment, three is a plus.
- With your crew (crew is not mandatory but will be very helpful) do the shooting, interviewing and
audio recording.
- Set up your equipment. Check audio sound and levels. Make sure your shot is composed well, and
you have the interviewee in frame with proper headroom and lead room.
- Record: Be sure to leave pre-roll and post-roll when shooting (start recording 10 seconds before you
actually begin the shot and leave the camera recording 10 seconds after the shot).
*When shooting the interview you should limit the total time to 30 minutes. That means that each
interview should be around 10 minutes. Remember the final project is only a 4-6 minute piece so
you will have to select only the best 1-2 minutes of what each person said.
SONY PDX10 Handbook page 21
Page 22
Post-Production Planning
The Logging Process
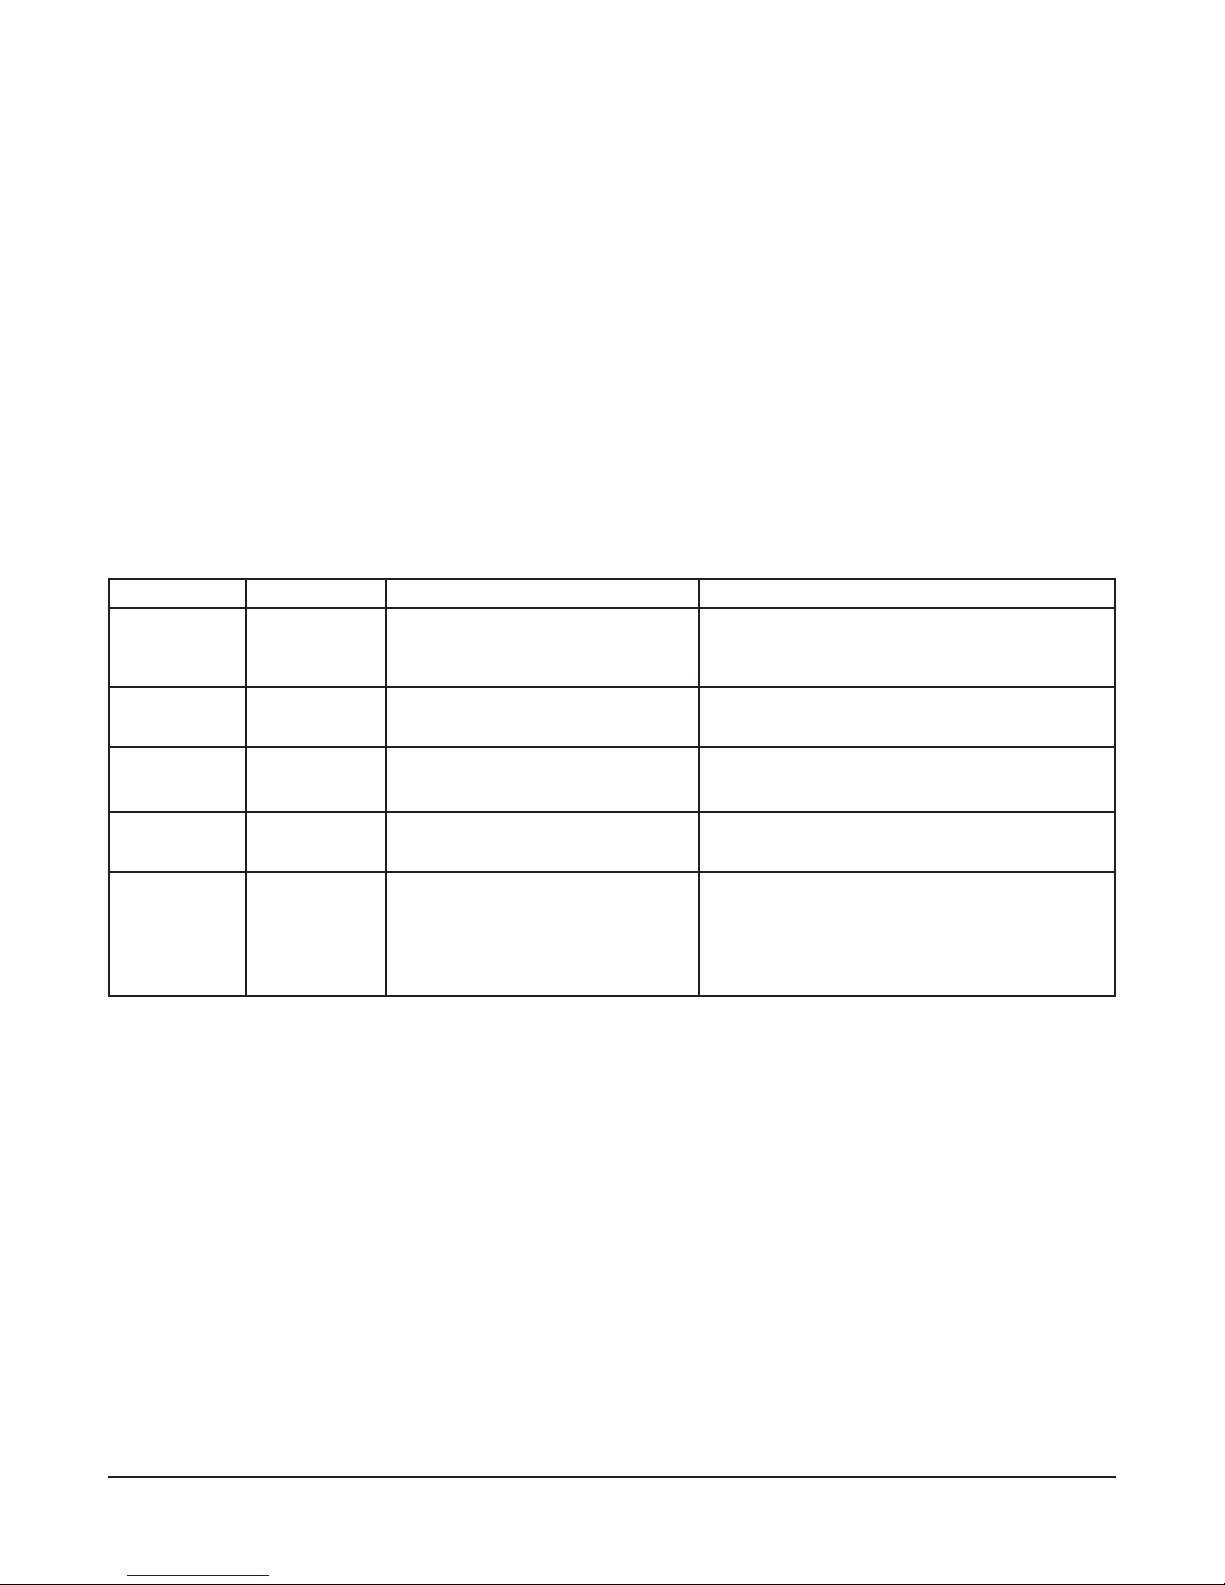
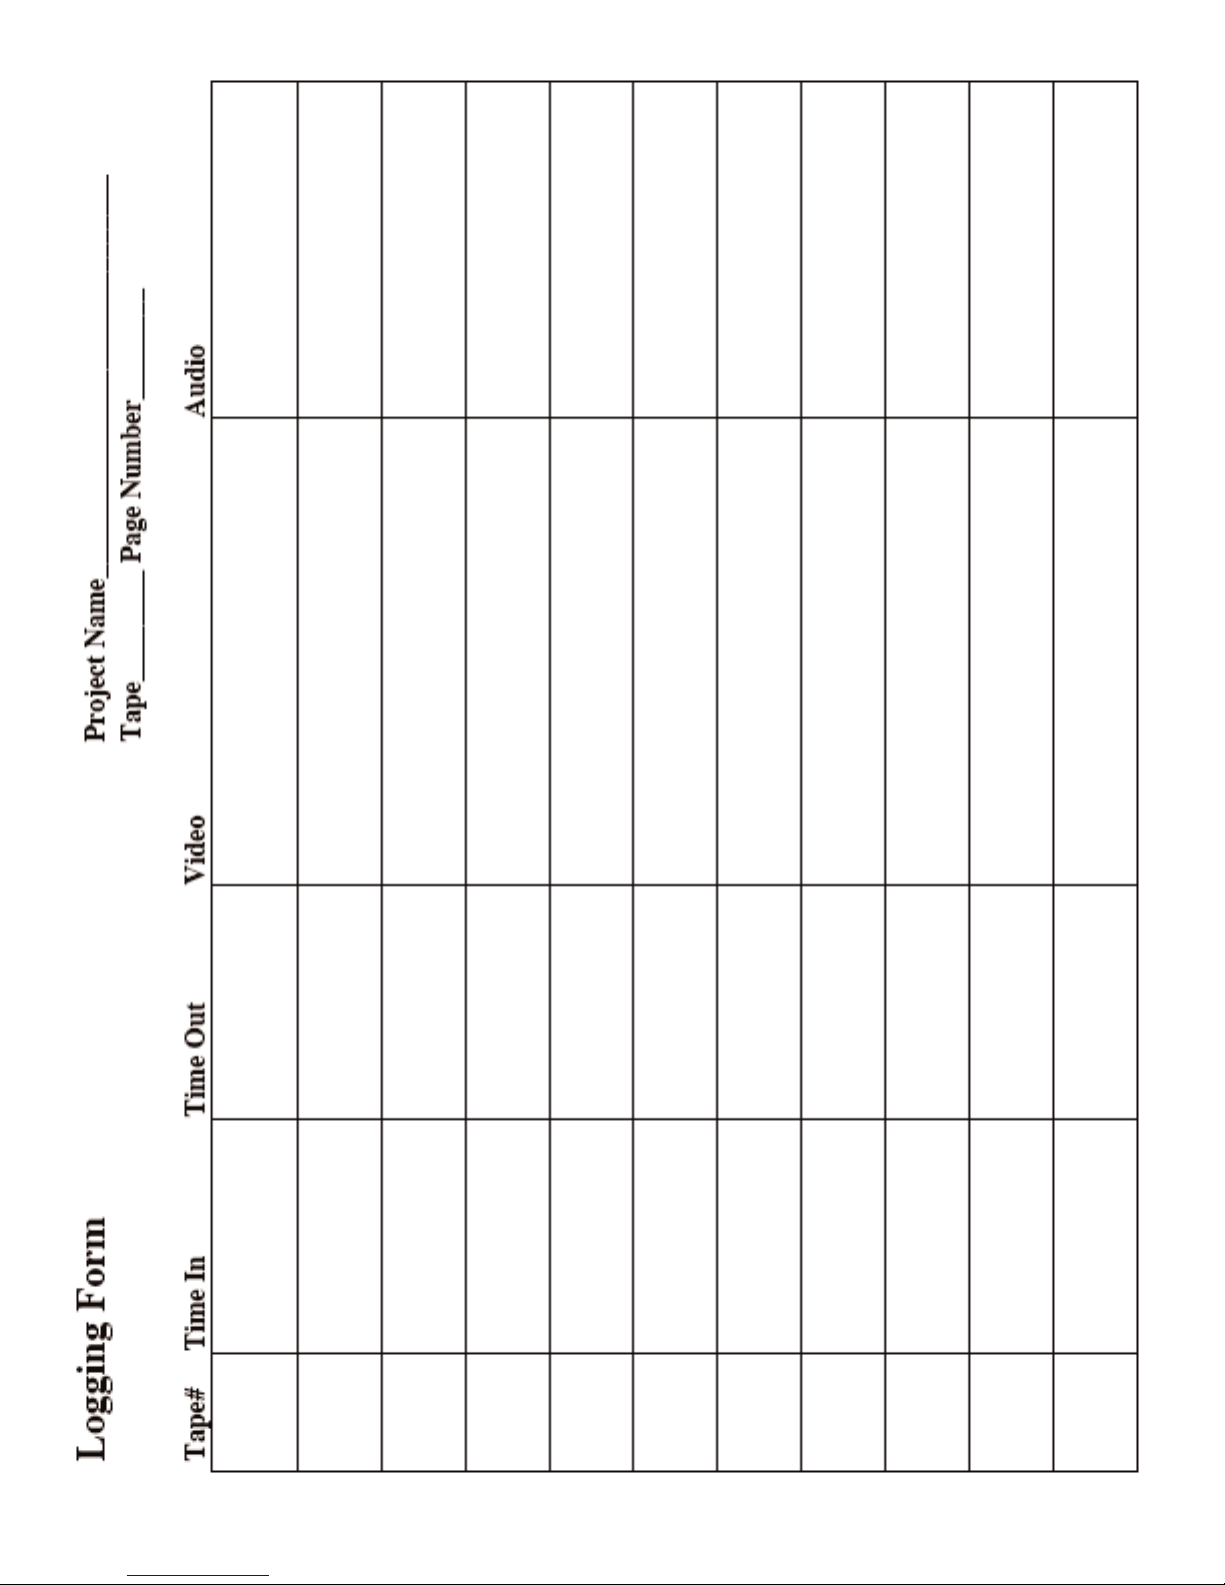
A log is a written record of the images and sounds recorded during production. The log should include
descriptions of the video, a transcription of the audio and a reference to where the images exist on the
tape. This reference is noted (when ever possible) by recording the time code appearing at the sequence
beginning and end (“Time In and Time Out”). The In and out times will give you the overall duration
of the sequence. This is helpful when you are trying to calculate the total running time of your program.
If you have recorded an interview, an excerpt of the interview should be placed in the Audio column of
the log sheet. However; when logging b-roll or non-interview footage, the sounds recorded simultaneously with the image of the tape should be placed in the Audio column. The time you spend making a
detailed log is time liberated for creativity in the editing process. The following log is an example from
a shoot with an interview. You will see transcription excerpts in the Audio column.
Sample Log
Time In Time Out Video Audio
00:00:00;00 00:02:15;15 Jose’s dance class warmsupSounds of feet tapping,
people talking
00:02:15;15 00:05:40;10 Jose demonstrates “Running
Man” choreography
00:00:00;00 00:08:04;10 Class executes “Running
Man”
00:10:09;15 00:12:22;08 Jose walks room corrects
mis-steps
00:12:38;05 00:15:25;10 Interview with Jose Joaquin Our group has been fighting with that
The Edit Decision List
The Edit Decision List or EDL (also known as a Paper Edit) is your post-production road map. You
begin to sketch out the ideas, which will come together in the editing process. Using paper and pen (or
computer) you write out what images and sounds come first, second, third and so on. Referencing
your tape logs, the elements you will be using to create your EDL will be transcripts of your interviews, shot descriptions, CD audio and graphics. This process enables you, the editor to find the structure and tone of your project. The purpose of the EDL is to collect and arrange all program elements to
effectively communicate your message. The EDL also makes the digitizing process more efficient.
Feet tapping, hands clapping, people
chanting “one, two, three”
Feet tapping, “one, two, three”
People talking, clapping, “one, two,
three”
use of “Hip-Hop theater.” As opposed
to American Theater. That’s basically
what it is.
Determine and place the concepts in the order that is most logical for presentation of your idea. Do not
include anything that does not directly relate to the concept under development. Whenever any idea is
raised, or reference made, viewers assume that it is part of the main argument and that the program is
now headed in that direction. Search your log to find ways to eliminate all verbal distractions. The
first and last sentences of a passage are the most influential and memorable. Viewers expect the first
sentence to introduce the concept and the last sentence to encompass it in the whole. Look for material
to end each passage with something concise and poignant.
SONY PDX10 Handbook page 22
Page 23
THE EDL PROCESS
- Log your footage
- As you are logging, note good footage (clips you are sure you’ll want to use in the edited piece)
- When finished logging, review your notes and using different colored highlighters, highlight the good
parts by theme; for example, if your were doing a documentary on MNN you could highlight all the
sections that have to do with the history of public access green, and all the sections that deal with the
types of equipment MNN has blue and all the sections that are about the different types of programs on
MNN orange; and continue this until all your main themes are colored coded.
- Either transfer the parts of the log you really like (and that you have color coded) to colored note
cards or cut out the parts of your log that you’ve highlighted.
- Play with the pieces. Try to arrange them in a way that tells the story that your want to tell. You’ll
have to fit them together like a jig saw puzzle. This will be your EDL (Edit Decision List).
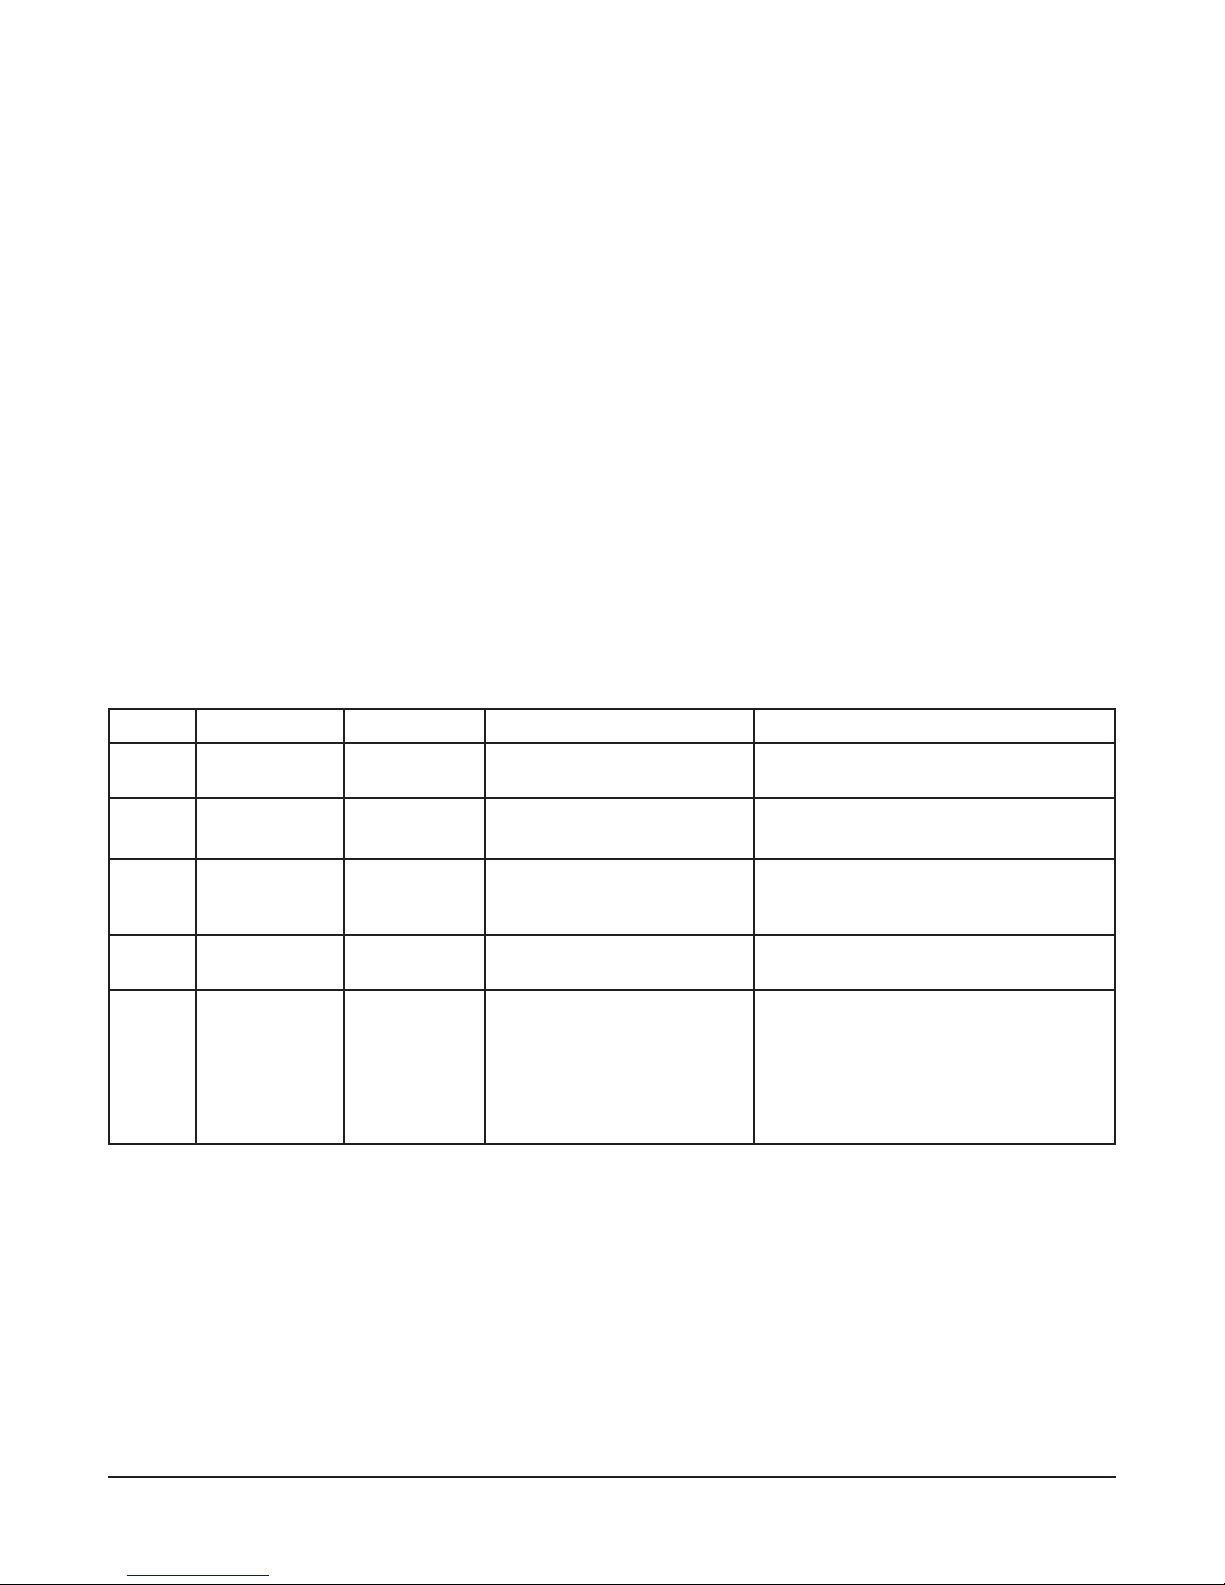
- Now you have your EDL. An EDL is a list of the clips of the video, audio and time code you will use
when transferring your footage to the computer to edit your project.
Sample Edit Decision List
Tape# In Point Out Point Video Audio
1 00:02:15;15 00:05:40;10 Rubi Theater performing Opening PS190
1 00:06:23;09 00:08:04;10 PS190
Three women
1 00:10:09;15 00:12:22;08 RT performing monkeys Never put dead monkeys in the
5 00:12:38;05 00:15:25;10 RT rehearsal Jose counting off choreography
2 00:03:23;05 00:05:16;10 Interview with Jose
Joaquin
What you’ll be doing in the editing stage:
Digitizing your footage
Editing the project (audio and video)
Adding music
Adding titles and credits
They had no ink
refrigerator
Our group has been fighting with
that use of “Hip-Hop theater.” As
opposed to American Theater.
That’s basically what it is.
*Keep in mind that most media makers shoot 10 times the amount of footage that will end in the
final project. Don’t worry about leaving footage on the cutting room floor.
SONY PDX10 Handbook page 23
Page 24
SONY PDX10 Handbook page 24
Page 25

APPENDIX A
ALL ABOUT WHITE BALANCING
Light bulbs, fluorescent tubes and the sun - we all see these sources of light as white light . But our
eyes are deceiving us, these sources of light vary considerably in their color. Our brains are very good
at performing a white balance without us really noticing. However the camera has to be told what type
of light it is working in - so that it can correctly reproduce what our eyes see.
To understand the need to white balance you first have to understand
If I put a poker in a fire it will start to glow "red hot" - if I put it in a furnace and really heat it up it
will look as if it is "white hot". As the temperature of the poker rises the color of light it emits
changes. Red hot is pretty hot while white hot is very hot. There is a definite connection between the
temperature of the metal and the color of light it emits. This "color temperature" connection is a way
of scientifically quantifying the color of the light source.
Ok now think about a light bulb - inside is a filament (made of tungsten metal). When you switch on
the electricity, a large current flows through a small filament, it gets hot and starts to glow. The color
temperature of tungsten light usually lies at around 3,200 Kelvin. It is actually a reddish orange light.
The sun is another main source of light. As you'd expect it is hotter than a light bulb! The temp on the
surface of the sun is 5800°K and at its core, it reaches millions of degrees. However, the light that it
produces passes through its own atmosphere and the earth’s atmosphere before it reaches earth's surface.
So, daylight consists of a mixture of the light that comes directly from the Sun with the indirect light
that comes from diffusion and reflection, caused by earth's atmosphere and clouds. This makes color
temperature on the ground pretty variable from as low as 2,000 Kelvin up to 20,000 Kelvin. The table
below shows the range of temperature possible for daylight and the conditions that effect it (along with
some other light sources).
LIGHTSOURCE & COLOR TEMPERATURE (Kelvins)
Candle 1,930
Sunlight at sunset 1,900 - 2,400
Domestic tungsten light bulbs 2,600 - 2,900
TVstudio tungsten lighting (2000 Watts) 3,275
TVstudio tungsten lighting (5000 Watts) 3,380
Sunrise, Sunset 2,000 -3,000
Fluorescent tube 4,800
Noonday sun 5,000 - 5,600
HMI and MSR lights 5600K
In shade ( light only from hazy sky) 7,500 - 8,400
In shade ( light only from Blue sky) 12,000 - 20,000
color temperature.
WHY IS WHITE BALANCING IMPORTANT?
Well, we have to tell the camera what color of light it is working in so that the picture it records looks
something similar to what our eyes see. To do this we need to do a white balance. When the camera
does a white balance - it analyzes the spectrum of colors hitting a white piece of
paper. It juggles these until the white looks white.
SONY PDX10 Handbook page 25
Page 26

APPENDIX A (cont)
To make white objects appear white to the camera we do a WHITE BALANCE. To do a manual white
balance the camera must be shown something white (usually a piece of paper) lit by the light source
you will be working in. Beware of white balancing in the wrong light source e.g. by a window and
then shooting the interview in a corner of the room lit by tungsten light. Whatever light falls on your
subject should also fall on the white paper you use to perform a white balance.
WHEN SHOULD YOU PERFORM AMANUALWHITE BALANCE?
• In mixed light (e.g. in a tungsten lit room with daylight coming through a window).
• When shooting subjects lit by fluorescent light.
• If light conditions are changing quickly (i.e. at sunrise and sunset when you want the shots to match).
• Every time you move from one source of light (e.g. outdoors) to another source (i.e.indoors).
HOW TO DO A MANUAL WHITE BALANCE
1. Set the AUTO LOCK switch to the middle position.
2. Press the WHITE BAL. button.
3. Turn the SEL/PUSH EXEC dial until this
symbol appears in the LCD/viewfinder screen.
4. Point the camera at a white piece of paper and this time press the SEL/PUSH EXEC dial. The
symbol will flash rapidly while the camera is calculating the correct white balance.
5. When the symbol stops flashing the white balance is complete.
6. If the symbol continues to flash slowly - try again - try again in auto iris mode - or go to auto white
balance mode.
WHITE BALANCE TROUBLE SHOOTING - HELP!
The camera won't white balance manually!
There are several possible reasons why your camera won't white balance:
1. Are the surroundings too bright or too dark?
If it is very bright the camera is getting too much information - if it is dark, not enough. Change
lighting, if you have control of it. Otherwise try auto exposure and then a manual white balance.
2. Under or overexposed in decent lighting conditions?
Similar to the above - try auto exposure and then a manual white balance
3. Ambient color temperature is too high or too low for the electronics to work with...
To make a decent attempt at a white balance the camera needs light that has a smattering of all the
colors in the visible spectrum. Again try auto white balance.
WHITE BALANCE QUESTIONS
Q- Should a white card be pure white ? I shot the card and it appears to have a slight blue tint to it.
A- It should be as white as possible. But, grey will do too - because grey is just "dark white".
If you want to do some cheap effects you can white balance on almost any colour.. Just experiment
and see what results you get.
SONY PDX10 Handbook page 26
Page 27

APPENDIX A (cont)
Q- Should I white balance before every shot?
A- Not really. But, for example - If all your shots are outdoors then one white balance would probably
do, unless the lighting situation changes. But, if you shoot some stuff indoors then go outdoors -
you'll need to do a WB for each location.
Q- How much does brightness affect WB?
A- Brightness doesn't effect WB that much. Although shade and full sun do have different color
temperatures (shade is bluer).
DIFFICULT LIGHTING SITUATIONS
SUN LIGHT
• Remember - you have no control over the sun (and clouds) - sun light levels can change dramatically
- keep your finger on the exposure dial and be ready to change the setting!
• Sun light can be soft (when it is cloudy overhead) or hard (under direct sun).
• Soft light can reduce wrinkles! but it will make shots look flat and boring.
• Hard light can give harsh (unflattering) shadows on peoples faces - but all photographers agree that
you will probably take your best shots when you have some shadow to play around with.
MIXED LIGHT
• When you work in an area lit with more than one source of light e.g. a room lit with light bulbs and
with daylight coming through a window - you need to give the situation some thought when white
balancing.
• Always do a manual white balance when working in mixed light or your pictures could end up with a
strange color cast, which you won't find out about until it is too late. Take a white card and position it
so that it is lit with the same mix of light that your subject will be lit by.
• Carry a few pieces of half-blue gel. You can place this over tungsten light in order to convert it to
daylight. Now you don't have mixed light anymore.
LOW LIGHT CONDITIONS
The camera is capable of producing pictures in very low light conditions. To be able to do this the picture signal is electronically boosted, which results in noisy, grainy, pictures. To prevent this loss in picture quality you need to find some way of increasing the light hitting your subject.
• Ask yourself is it essential to do an interview indoors or can it be done outside in daylight?
• Look carefully at the location, is it gloomy and under lit? Ask if there is a better lit room
• Sit your subject near to available light sources.
• Don't be afraid to rearrange furniture, standard lamps and table lamps to ensure your subject is lit.
Angle poise lamps can be particularly useful.
• Sit your subject beside or facing a window to use the natural light coming into the room.
• NEVER sit your subject with their back to a window. If you do, your subject will be in silhouette
There is also a BACKLIGHT button that will adjust exposure to help in these situations, but it is best
to avoid them from the start.
SONY PDX10 Handbook page 27
Page 28

APPENDIX B
SETTING MANUAL SOUND LEVELS
The recorded sound can be adjusted by the AUTOMATIC GAIN CONTROL (AGC) to a predetermined level. But, AGC does have problems - if your subject is talking - the level will be set by the
camera, when they stop talking the camera will then raise the background sound level. This raising
and lowering of the background sound every time your subject stops then starts talking is called pumping and it is at its most objectionable when the background sound is noisy e.g. a crowd at a football
match or by a busy road. You will have more control over sound levels if you adjust them manually.
To Switch to manual levels, irst you must go into the menus...
• Switch the camera on
• Press the MENU button
• Turn the SEL/PUSH EXEC dial until you find TAPESET( the cassette icon will be highlighted in
yellow)
• Push the SEL/PUSH EXEC dial in to select the TAPESET sub menu
• Turn the SEL/PUSH EXEC dial until the words XLR SETis highlighted
• Push the SEL/PUSH EXEC dial in to select the XLR SET options
• choose CH1 - set to MANUAL
• choose CH2 - set to MANUAL
• Push the SEL/PUSH EXEC dial in to select the mode option (MANUAL)
• choose MAN GAIN - set to SEPARATE for two mics, LINKED for one mic.
• You have now selected manual sound
To adjust the sound levels....
• Press the AUDIO LEVEL button (at the rear of the camera). The viewfinder/LCD will show the
recording levels.
• You can adjust the incoming sound levels using the SEL/PUSH EXEC dial.
• Use the headphones – (the headphone own volume level can be adjusted using the controls on the
edge of the LCD screen.)
• Peak levels should not exceed minus -12dB voice levels should be around minus 20dB
• Generally, it is better to record slightly too low than way too high.
• To clear the display (so you can see your shot!) just press the silver AUDIO LEVEL button.
HINTS AND TIPS
• Use headphones. It is the only way of really knowing if the sound is being recorded at the right
level/any level!.
• Get the microphone as close as possible to the sound source - this may mean the microphone will be
in shot.
• If you have time, at each location record 30 seconds of 'atmosphere' i.e. the natural background
sounds of the location.
• If you must record in a noisy area (e.g. beside a busy road or in a factory) make sure you have a shot
of the source of the noise. Viewers will put up loud background noise if they know where the sound
is coming from.
• When working outdoors on a windy day use a wind gag over the microphone to reduce wind noise.
SONY PDX10 Handbook page 28
Page 29

APPENDIX C
Suggested SONY PDX-10 Menu Default Settings
1) TC/UB Set
TC Preset: 01:00:00:00
UB Preset: 00:00:00:00
TC Format: DF
TC Run: Rec. Run
TC Make:Regen
UB Time: Off
2) Manual Set
Auto Shtr:Off
Setup: 0%
3) Camera Set
D. Zoom: Off
16:9 Wide: Off
Steady Shot:On
Frame Rec.: Off
Int. Rec.: Off
4) LCD/VF Set
LCD Color: Middle
VF B.L: BRT Normal
Guideframe: Off
5) Tape Set
Rec. Mode: DV SP
Audio Mode: FS48K
Remain: Auto
Mic NR: Off
Audio Set:
6) Others
World Time: 0 Hr.
Beep: OFF
Commander:On
Display: LCD
Date Rec.: Off
Rec. Lamp: On
SONY PDX10 Handbook page 29
Page 30

APPENDIX D
Tape Formats and Care.
DV OR DVCAM
This camera will record in SP or DVCAM mode. In DVCAM mode the camera spools the tape at a
faster speed. So, a 60-minute mini DVtape will record 60 mins in SP mode, but only 40 mins of material in DVCAM mode. As DVCAM gives a shorter recording time compared to DE mode, why record
in DVCAM format? DVCAM is more robust, reliable, gives improved error correction. Nonetheless,
we find that recording in SP yields an excellent image and saves on tape costs..
To select between DV SP or DVCAM mode you have to enter the MENU...
• Switch the camera on
• Press the MENU button
• Turn the SEL/PUSH EXEC dial until the cassette icon TAPE SET is highlighted
• Push the SEL/PUSH EXEC dial in to select the TAPE SET sub menu
• Turn the SEL/PUSH EXEC dial until the words REC MODE is highlighted
• Push the SEL/PUSH EXEC dial in to select the REC MODE options
• choose either DVCAM or DVSP mode on
• Push the SEL/PUSH EXEC dial in to select the mode options
• Turn the dial to the return option to get out of the menu options
MIXING TAPE MANUFACTURERS
Loitering round the various camera forums, one important thing we've learned about DV tapes is not to
mix your manufacturers. Different tape manufacturers use different tape lubricants. By swapping and
changing tapes, residues start to mix and stick to your record heads - the result is dropout. This is
important because you won't see the dropout until you review your tapes and by then it may be too late
to redo the shot. Remember this is advice from other users not from the manufacturers (who have a
vested interest in your brand loyalty). We suggest Sony Premium tapes.
CARE FOR YOUR TAPES: DON'T LEAVE TAPES:
• in the sun, on radiators or near car windows on hot days
• in a cold place then move them somewhere warm as moisture will condense on the tape
• near a magnetic field (e.g. hi-fi speakers and electric motors)
• near mobile phones. If the phone receives a call it can affect the pictures on your tape
• where they'll get wet
• where they'll get dusty or dirty
• in the player for long periods of time
SONY PDX10 Handbook page 30
 Loading...