

Page 1

Page 2

Notice to Users
© 1999 Sony Electronics Inc. All rights
reserved. This manual and the software
described herein, in whole or in part, may not
be reproduced, translated, or reduced to any
machine-readable form without prior written
approval.
SONY ELECTRONICS INC. PROVIDES NO
W ARRANTY WITH REGARD TO THIS
MANUAL, THE SOFTWARE, OR OTHER
INFORMA TION CONTAINED HEREIN
AND HEREBY EXPRESSL Y DISCLAIMS
ANY IMPLIED WARRANTIES OF
MERCHANTABILITY OR FITNESS FOR
ANY PARTICULAR PURPOSE WITH
REGARD TO THIS MANUAL, THE
SOF TWARE, OR SUCH OTHER
INFORMATION. IN NO EVENT SHALL
SONY ELECTRONICS INC. BE LIABLE
FOR ANY INCIDENTAL,
CONSEQUENTIAL, OR SPECIAL
DAMAGES, WHETHER BASED ON TORT,
CONTRACT , OR OTHERWISE, ARISING
OUT OF OR IN C ONNE CTI ON WI TH TH IS
MANUAL, THE SOFTWARE, OR OTHER
INFORMA TION CONT AINED HEREIN OR
THE USE THEREOF.
Sony Electronics Inc. reserves the right to
make any modification to this manual or the
information contained herein at any time
without notice. The software described
herein may also be governed by the terms of
a separate user license agreement.
Sony, VAIO, VAIO Digital Studio and the
V AIO logo ar e trademarks of Sony. Microsoft,
Windows, and the W indows 98 logo are
register ed trad ema rks of Microsoft
Corporation. Intel is a trademark of Intel
Corporation. K56flex is a trademark of
Lucent Technologies Inc. and Rockwell
International. All other trademarks are
trademarks of their respective owners.
Safety Information
Owner’s Record
The model number and serial number are
located on the back of your VAIO computer.
Record the serial number in the space
provided here. Refer to the model and serial
number when you call your Sony Se rvice
Center.
Model Number: PCV-R532DS
Serial Number:________________________
WARNING
❑ To prevent fire or shock hazard, do
not expose your VAIO computer to
rain or moisture.
❑ Never install mod e m or telephone
wiring during a lightning storm.
❑ Never install telephon e jac ks in we t
locations unless the jack is specifically
designed for wet locations
❑ Never touch uninsulated telephone
wire or terminals unless the telephone
line has been disconnected at the
network interface.
❑ Use caution when installing or
modifying telephone lines.
❑ Avoid using the modem during an
electrical storm.
❑ Do not use the modem or a telephone
to report a gas leak in the vicinity of
the leak.
!
The use of optical instruments
with this product will increase eye
hazard.
Page 3

Regulatory Information
Declaration of Conformity
Trade Name: SONY
Model No.: PCV-R532DS
Responsible Party:
Sony Electronics Inc.
Address:
1 Sony Drive
Park Ridge, NJ 07656
Telephone No: 201-930-6970
This device complies with Part 15 of
FCC Rules. Operation is subject to
the two following conditions: (1)
This device may not cause harmful
interference, and (2) this device
must accept any interference
received, including interference that
may cause undesired operation.
This equipment has been tested and found
to comply with the limits for a Class B
digital device, pursuant to Part 15 of the
Rules. These limits are designed to
provide reasonable protection against
harmful interference in a residential
installation. This equipment generates,
uses, and can radiate radio frequency
energy and, if not installed and used in
accordance with the instructions, may
cause harmful interference to radio
communications. However, there is no
guarantee that interference will not occur
in a particular installation. If this
equipment does cause harmful
interference to radio or television
reception, which can be determined by
turning the equipment off and on, the user
is encouraged to try to correct the
interference by one or more of the
following measures:
❑ Reorient or relocate the receiving
antenna.
❑ Increase the separation betw een the
equipment and the receiver.
❑ Connect the equipment into an
outlet on a circuit different from
that to which the receiver is
connected.
❑ Consult the dealer or an
experienced radio/TV technician
for help.
Y o u ar e cautioned that any changes or
modifications not expressly approved in
this manual could void your authority to
operate this equipment.
Only peripherals (computer input/output
devices, terminals, printers, etc.) that
comply with FCC Class B limits may be
attached to this computer product.
Operation with non-compliant peripherals
is likely to result in interference to radio
and television reception.
All cables used to connect peripherals
must be shielded and grounded.
Operation with cables, connected to
peripherals, that are not shielded and
grounded, may result in interference to
radio and television reception.
Page 4

FCC Part 68
This equipment complies with Part 68 of the
FCC rules. The r ing er equi va len ce nu mbe r
(REN) and the FCC registration number are
printed on the modem board. If requested,
this information must be supplied to the
telephone company .
The REN is used to determine the qua ntity of
devices which may be connected to the
phone line. Excessive REN's on the telephone
line may result in the devices not ringing in
response to an incoming call. In most, but not
all areas, the sum of the REN's should not
exceed five (5.0). To be certain of the number
of devices that may be connected to the line,
as determined by the total REN's, contact the
telephone company to determine the
maximum REN for the calling area.
This modem uses the U SOC RJ- 11 telephone
jack.
If this equipment causes harm to the
telephone network, the telephone company
will, when practical, notify you in advance
that temporary discontinuance of service
may be req u i red. If advan ce n o ti ce isn't
practical, the telephone company will notify
you as soon as possible. Also, you will be
advised of your right to file a complaint with
the FCC if you believe it is necessary.
The telephone company may make ch anges
in its facilities, equipment, operations or
procedures that could affect the operations of
the equipment. If this happens, the telephone
company will notify you in advance, in order
for you to make the necessary modifications
in order to maintain uninterrupted service.
If trouble is experienced with this modem,
for repair or warranty information, please
contact 1-888-4SONYPC, or write to the Sony
Customer Information Center, One Sony
Drive, Park Ridge, NJ 07656.
This equipment cannot be used on
telephone-company-provided coin service.
Connection to Party Line Service is subject to
state tariffs.
Repair of the modem should be made only
by a Sony Service Center or Sony authorized
agent. For the Sony Service Center nearest
you, call 1-800-222-SONY (1-800-222-7669).
Telephone Consumer Protection Act of 1991
The T elephone Consumer Protection Act of
1991 makes it unlawful for any person to use
a computer or other electronic device to send
any message via a telephone facsimile
machine unless such message clearly
contains, in a margin at the top or bottom of
each transmitted page or on the first page of
the transmission, the date and time it is sent
and an identification of the business, other
entity, or individual sending the message,
and the telephon e nu mber of th e sen din g
machine or such business, other entity, or
individual.
In order to program this information into
your facsimile, see your fax software
documentation.
✍ You are cautioned that any changes or
modifications not expressly approved in
this manual could void your authority to
operate this equipment.
Page 5

Contents
Notice to Users .................................................................................... ii
Safety Information.............................................................................. ii
Regulatory Information.................... ..... ...... ......................................iii
FCC Part 68 ......................................................................................... iv
Telephone Consumer Protection Act of 1991................................. iv
Chapter 1 — Identifying Components
Front View ...................................................................................................2
Drives .................................................................................. ..... ...... ......3
Buttons and Switches .........................................................................4
Indicators ..............................................................................................5
Connectors ...........................................................................................6
Rear View ....................................................................................................7
Icons .....................................................................................................8
I/O Connectors ..................................................................................10
Expansion Slots ..................................................................................14
Chapter 2 — Configuring Your System
Accessing the BIOS Setup Utility............................................................16
Changing the Display's Power Management Settings.........................17
Configuring the System Board ...............................................................19
v
Page 6

vi
VAIO Digital Studio Reference Manual
Chapter 3 — Removing, Installing, and Replacing
Components
Removing the Cover ............. ............................................. ...... ...... ..........22
Removing the Front Panel .......................................................................24
Replacing the Front Panel........................................................................25
Replacing the Cover .................................................................................26
Installing an Add-In Card .......................................................................28
Removing an Add-in Card .....................................................................29
Replacing the Lithium Battery ...............................................................31
Installing System Memory ......................................................................34
Removing a Memory Module ................................................................37
Removing a Slot Cover.............................................................................39
Covering an Open I/O Slot ....................................................................40
Installing a 3½” Internal Hard Disk Drive ............................................41
Installing a 5¼” Internal Hard Disk Drive ............................................45
Removing the Power Supply...................................................................48
Replacing the Power Supply ...................................................................51
Chapter 4 — System Board
Connectors..................................................................................................54
Front Panel Header (J25)...................................................................54
Diskette Drive Connector ................................................................55
Memory Module (DIMM) Connectors ...........................................56
PCI Slot Connectors...........................................................................57
IDE Connectors .................................................................................58
Power Connector ...............................................................................58
KEYBOARD and MOUSE Connectors ..........................................59
USB Connectors .................................................................................60
SERIAL 1, PRINTER, and MONITOR Connectors.......................61
Fan Connectors ..................................................................................64
GAME Connector...............................................................................65
HEADPHONES, LINE IN, MIC Connectors .................................66
CD-IN Connector....... ............................................. ..... ...... ................67
Modem Connector.......... ...... ...... .......................................................68
AUX-IN Connector............................................................................69
Configuration Jumper .............................................................................70
Page 7

Chapter 5 — Fax/Modem Card
Chapter 6 — i.LINK® Card
Chapter 7 — CMOS Setup Options
Main Screen ...............................................................................................77
Advanced Screen ......................................................................................79
Power Screen..............................................................................................85
Boot Screen ................................................................................................87
Exit Screen..................................................................................................88
Chapter 8 — Miscellaneous Technical Information
About User and Supervisor Passwords ................................................90
Beep Code Error Messages .....................................................................91
PCI Configuration Status and Error Messages ....................................92
DMA Channel Assignments ...................................................................94
System I/O Address Map ......................................................................95
Memory Map ............................................................................................97
IRQ Settings ..............................................................................................98
vii
Chapter 9 — Specifications
Processor ...................................................................................................99
Chipset ......................................................................................................99
PCI Bus ......................................................................................................99
Memory Modules (DIMMs) ..................................................................99
DIMM Configurations ...........................................................................100
L2 Cache ..................................................................................................100
Graphics ..................................................................................................100
Audio .......................................................................................................101
Communications .............................. .....................................................101
I/O and Expansion Slots .......................................................................101
Drives and Controllers ........................................................................ ..102
System BIOS ...........................................................................................102
Page 8

viii
Page 9

Chapter 1
Identifying Components
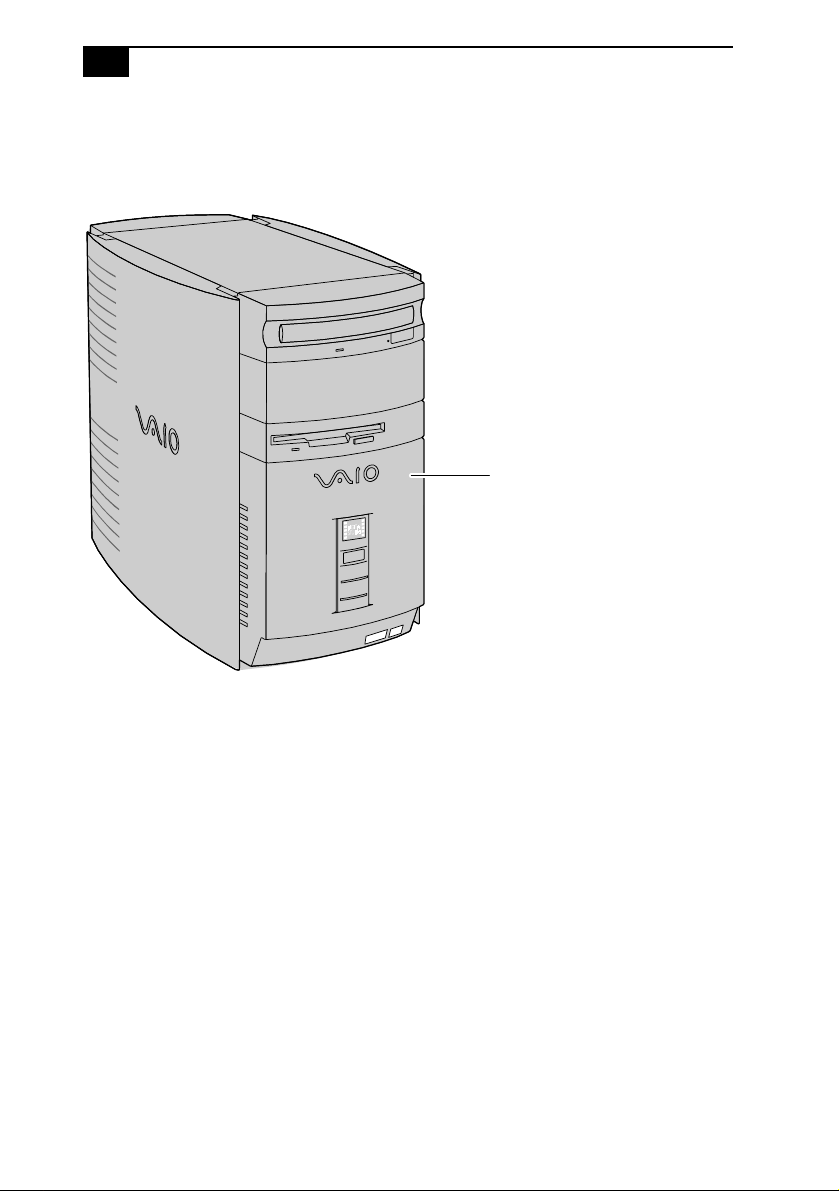
The following sections identify and describe each component that is
visible from the exterior of the VAIO Digital Studio™ Computer. Internal
components are identified in the appropriate section of this manual.
1
Page 10
2
VAIO Digital Studio Reference Manual
Front View
Front panel
OM04694X.VSD
Page 11
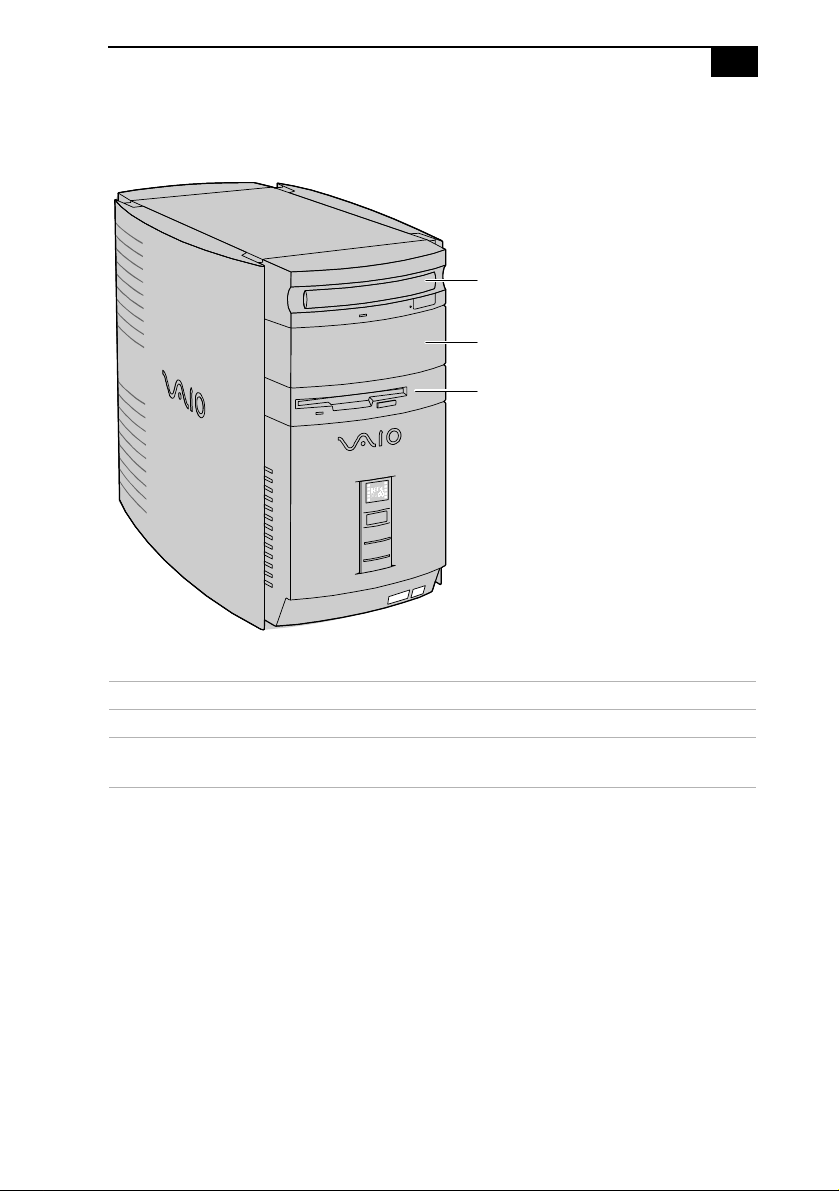
Drives
Identifying Components
DVD-ROM
5.25" drive bay (open)
Diskette drive
3
FRNTPNLA.VSD
Drive Description
Diskette drive 3.5-inch, 1.44 Mbyte.
DVD-ROM drive
DVD-ROM read: 8X (maximum perf ormance).
*
CD-ROM read : 40X (maximum performance).
* Data on a DVD-ROM is read at a variable transfer rate, ranging from 3.3X at the innermost track to 8X at
the outermost track (the data transfer standard 1X rate is 1385 kbytes/s). The average data transfer rate is
5.6X (7634 kbytes/s). Data on a CD-ROM is read at a variable transfer rate, ranging from 17.2X at the
innermost track to 40X at the outermost track (the data transfer standard 1X rate is 150 kbytes/s). The
average data transfer rate is 28.6X (4293 kbytes/s).
Page 12

4
VAIO Digital Studio Reference Manual
Buttons and Switches
Optical disc eject
Diskette eject
Power/Standby
FRNTPNLB.VSD
Button or switch Description
Power/Standby switch Turns system power on, off, or into standby mode.
Diskette eject button Ejects a diskette.
Optical disc eject button
Automatically opens and closes the optical drive
tray.
Page 13

Indicators
Identifying Components
Optical drive access
Diskette drive access
Power/Standby
Hard disk drive access
5
FRNTPNLC.VSD
Indicator Description
Power/Standby indicator Standby (a mber) indica tes the computer is
in standby mode.
On (green) indicates the computer is out
of standby mode, ready to use.
Off (no color) indicates the computer is
turned off.
Diskette drive access indicator On (green) indicates diskette drive
activity.
Optical drive access indicator On (orange) indicates CD-ROM activity.
Hard disk drive access indicator On (orange) indicates hard disk drive
activity.
Page 14
6
D
VAIO Digital Studio Reference Manual
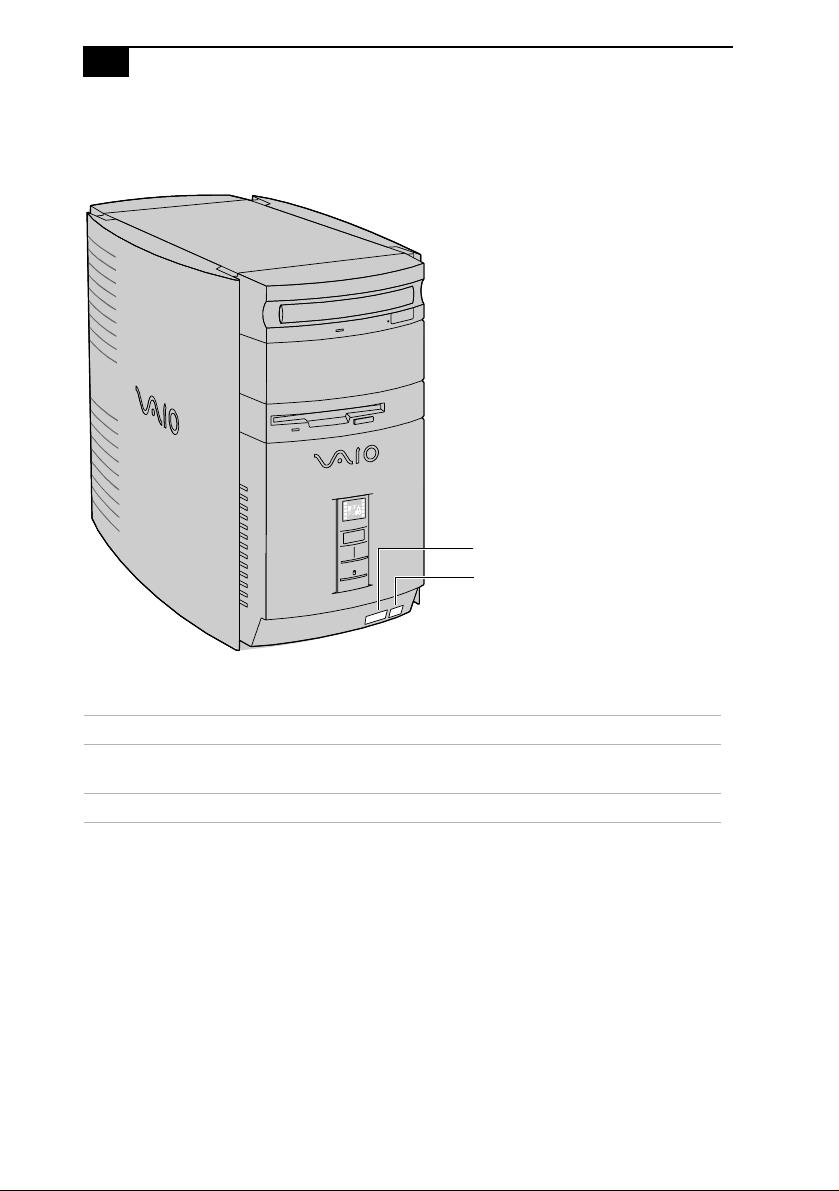
Connectors
USB
i.LINK
FRNTPNLD.VS
Connector Description
i.LINK® (IEEE-1394)
*
Connects to a digital device that has a 4-pin i.LINK
connector.
USB Connects to USB devices.
* To connect to a 6-pin i.LINK device, use the i.LINK connector on the back of the system. A 6-pin i.LINK
connector can supply power from the computer to the device if the device also has a 6-pin i.LINK
connector. A 4-pin i.LINK connector cannot supply power to the device.
Page 15

Rear View
MOUSE
Identifying Components
7
KEYBOARD
USB
SERIAL
PRINTER
MONITOR
GAME/MIDI
HEADPHONES
LINE IN
MIC
i.LINK (IEEE-1394)
LINE
Power
TELEPHONE
KY0001.VSD
Page 16

8
D
VAIO Digital Studio Reference Manual
Icons
Icon Description
MOUSE connector
KEYBOARD connector
Icon label area
OM04692X.VS
USB (Universal Serial Bus) connector
SERIAL conne ct o r
PRINTER connector
GAME/MIDI connector
HEADPHONES connector
LINE IN jack (audio)
MIC (microphone) jack
MONITOR connector
LINE (for telephone line from primary service jack)
Page 17

Icon Description
TELEPHONE (for phone)
i.LINK (IEEE-1394)
Identifying Components
9
Page 18
10
S
S
VAIO Digital Studio Reference Manual
I/O Connectors
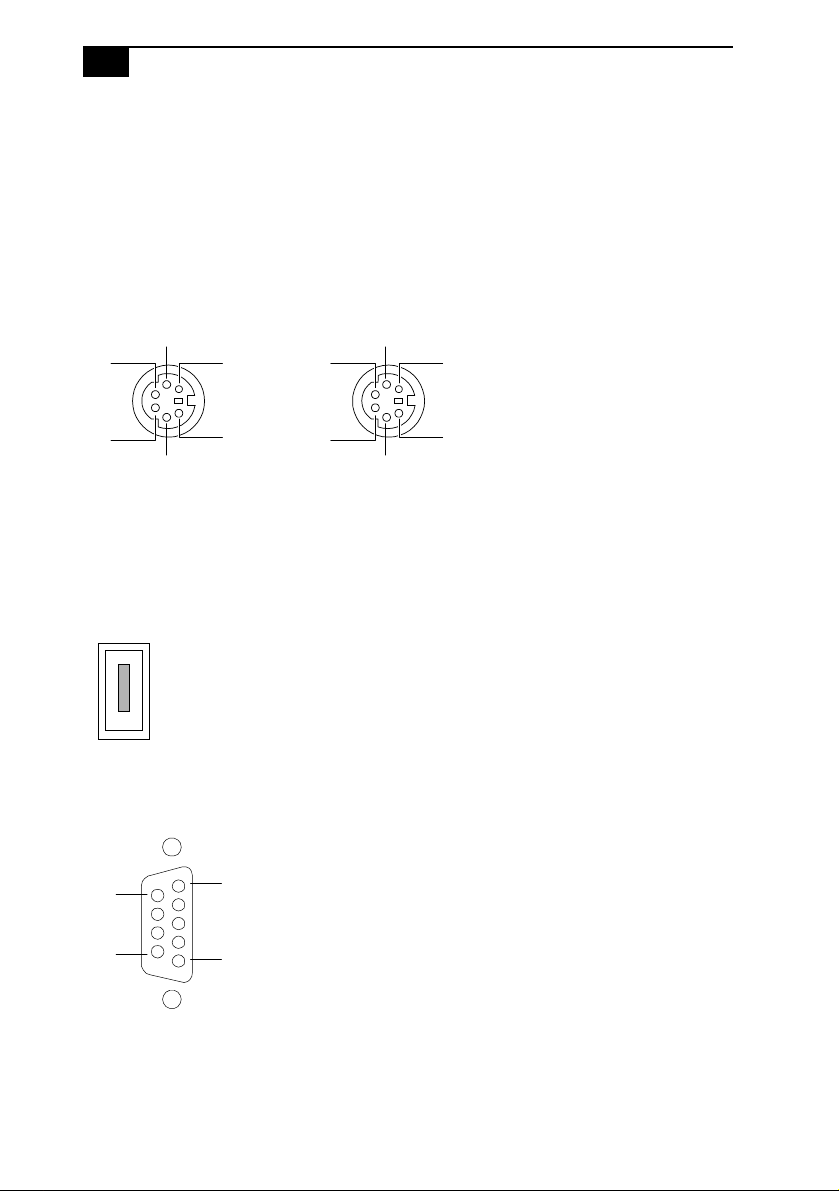
The following section identifies the various I/O connectors.
KEYBOARD and MOUSE
The KEYBOARD and MOUSE connectors are physically identical and
have the same pinout. They are standard 6-pin PS/2
connectors.
KEYBOARD MOUSE
2
3
1
3
2
1
®
-type fema le
4
5
6
4
5
6
KY0002.V
USB Connectors
The USB connectors are standar d 4-pin US B conne ctors. A USB connector
is located at the front and rear of the system.
KY0003.V
SERIAL Connector
The SERIAL connector is a standard 9-pin DB-9 male connector.
9
6
5
1
KY0057.VSD
Page 19

Identifying Components
PRINTER Connector
The PRINTER connector is a standard 25-pin DB-25 female connector.
11
25
14
13
1
KY0005.VSD
MONITOR
The MONITOR connector is a standard 15-pin female high-density VGAtype connector.
10
15
11
6
5
1
KY0004.VSD
Page 20

12
D
VAIO Digital Studio Reference Manual
GAME Connector
The GAME connector is a standard 15-p in DB-15 female connector. The
GAME connector is also used to connect MIDI devices.
15
9
8
1
KY0012.VSD
MIC, LINE IN, and HEADPHONES
The MIC, LINE IN, and HEADPHONES jacks are physically identical,
but have different connections. They are standard 3.5 mm stereo minijacks.
HEADPHONES LINE IN MIC
KY0013.VS
Connector Description
HEADPHONES 1.0 Vrms (typical).
MIC Electrolet condenser microphone input.
LINE IN 1.0 Vrms (typical), 10 Kohm impe dance.
Page 21

Identifying Components
13
TELEPHONE and LINE
The TELEPHONE and LINE jacks are physically identical and have
identical connections. They are standard RJ-11 female phone jacks.
However, the LINE jack is for connecting to a telephone line that comes
from the wall, and the TELEPHONE jack is for connecting the computer
to a telephone.
Line Telephone
KY0014.VSD
✍ Accidentally plugging a phone line from the wall into the modem’s TELEPHONE jack, and
a telephone into the LINE jack, will not damage the modem card or telephone
equipment. However, the modem will not work correctly.
i.LINK® (IEEE-1394) Connectors
The 6-pin i.LINK connector on the back of the system can supply power
from the computer to a device if the device also has a 6-pin i.LINK
connector. The 6-pin connector supplies 10V to 12V and a maximum
power of 6 watts.
The 4-pin i.LINK connector at the bottom of the front panel does not
supply power.
6-pin i.LINK
(IEEE-1394)
On back of
system
4-pin i.LINK
(IEEE-1394)
At bottom of
front panel
KY0087.VSD
Page 22

14
VAIO Digital Studio Reference Manual
Expansion Slots
There are four PCI slots, two of which a re available for expansion (PCI #1
and PCI #2). The other two PCI slots are occupied by the i.LINK card
(PCI #3) and the fax/modem card (PCI #4).
PCI #1
PCI #2
PCI #3
PCI #4
OM04577B.VSD
Page 23

Chapter 2
Configuring Your System
This chapter contains information on configuring your system.
Configuring your system can consi st of the following:
❑ Making changes to the BIOS settings
❑ Making changes to the display's po wer management settings
❑ Changing the system board jumper position
15
Page 24

16
VAIO Digital Studio Reference Manual
Accessing the BIOS Setup Utility
You must access the BIOS Setup Utility to make changes to the BIOS
settings (see “CMOS Setup Options” on page 75 for information on BIOS
settings).
! Before rebooting the syst em, save any open files and exit the Microsoft
Windows
®
operating system.
®
1 R eboot the system.
2 Wh en the Sony logo appears, press F3. The following message
appears at the bottom of the screen.
Press <F2> for setup.
3 Press F2.
Each menu presents options for modifying the system configuration.
Use the left and right arrow keys to select a menu from the menu bar .
Use the up and down arrow keys to select items within a menu. Once
an item is highlighted, use the plus/minus (+/-) keys to modify a
setting.
If an item has a triangle ( ) to its left, this indicates that a sub-menu of
options is available. Press ENTER to access a sub-menu. If a submenu contains items with a triangle, there is another layer of options
from which to select.
4 Once you select an option, press ESC to back out of each menu until
you reach the top level, where the menu bar appears.
5 To exit the BIOS setup utility, press ESC from any top-level scr een an d
follow the prompts.
Page 25

Configuring Your System
17
Changing the Display's Power Management Settings
A display that has power management capability is designed to operate
on reduced power or shut itself off after the system has been idle for a
specified period of time.
1 From the Start menu, point to Settings, then click Control Panel.
2 Double-click the Display icon.
3 Click the Screen Saver tab.
If your display is Energy-Star compliant or has other energy-saving
features, the Energy saving featur es of the monitor dialog box appear.
Otherwise, the options in the dialog box are grayed out.
4 Click Settings.
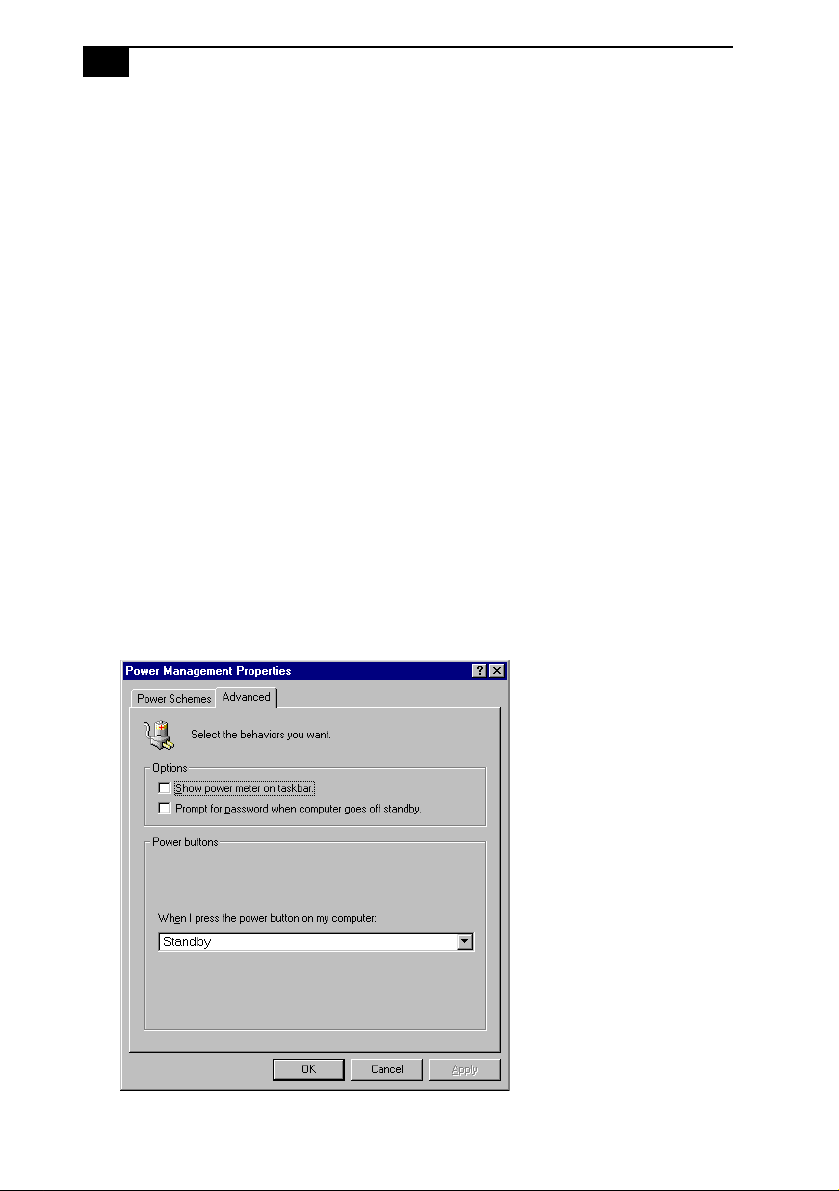
The Power Management Properties dialog box opens, with the Power
Schemes tab displayed.
Page 26
18
VAIO Digital Studio Reference Manual
5 Select the power scheme that is most appropriate for the way you use
your computer.
To change a power scheme, change the settings for System standby,
Turn off monitor, and Turn off hard disks.
The System standby option allows you to specify the period of
inactivity (in minutes) that you want to elapse before your computer
goes on standby when your computer is running on AC power.
Power is reactivated when you click the left mouse button or press a
key.
The Turn off monitor option allows you to specify the period of
inactivity (in minutes) that you want to elapse before your monitor
turns off when your computer is running on AC power. The display
reactivates when you move the mouse or press a key.
The Turn off hard disks option allows you to specify the period of
inactivity (in minutes) that you want to elapse before your hard disks
turn off when your computer is running on AC power.
6 To save a new power scheme, first modify the settings, click Save As,
type a descriptive name, and then click
OK.
7 Click the Advanced tab.
8 Select the desired settings, and then click OK.
Page 27

Configuring Your System
19
Configuring the System Board
The system board contains a CMOS Clear configuration jumper, and two
sets of reserved jumper blocks (do not change).
The CMOS and Non-Volatile RAM (NVRAM) settings are only cleared if
the checksum test returns false. Access to specific setup fields is
controlled by a supervisor password or user password.
The Clear CMOS mode removes the passwor d that is stor ed in CMOS. No
other parameters are cleared.
✍
The configuration jumpers should never need changing unless otherwise directed by a
technical support or service technician.
! Before opening the system, save any open files, exit the Microsoft
Windows
®
operating system, turn off the power of the computer and all
®
attached peripherals, and unplug the power cord.
1 Remove the cover (see “Removing the Cover” on page 22).
2 Set the jumpers as directed by a service technician (also see
“Configuration Jumper” on page 70).
13
2
Reserved (do not change)
Reserved (do not change)
CMOS CLR
= default jumper
CMOS Clear
1-2
Normal
2-3
Clear
3 Reinstall the cover (see “Replacing the Cover” on page 26).
OM04588.VSD
4 Reinstall the front panel (see “Replacing the Front Panel” on page 25 ).
Page 28

20
Page 29

Chapter 3
Removing, Installing, and
Replacing Components
This chapter describes removing, installing, and replacing major
components for upgrading, reconfiguring, and troubleshooting the
components.
! Before opening the system unit, save any open files, exit the Windows
operating system, turn off the power of the computer and all attached
peripherals, and th en unplug the power cord.
®
21
Page 30

22
VAIO Digital Studio Reference Manual
Removing the Cover
You must remove the cover to access the system board, add-in cards,
power supply, battery, memory, and internal drives.
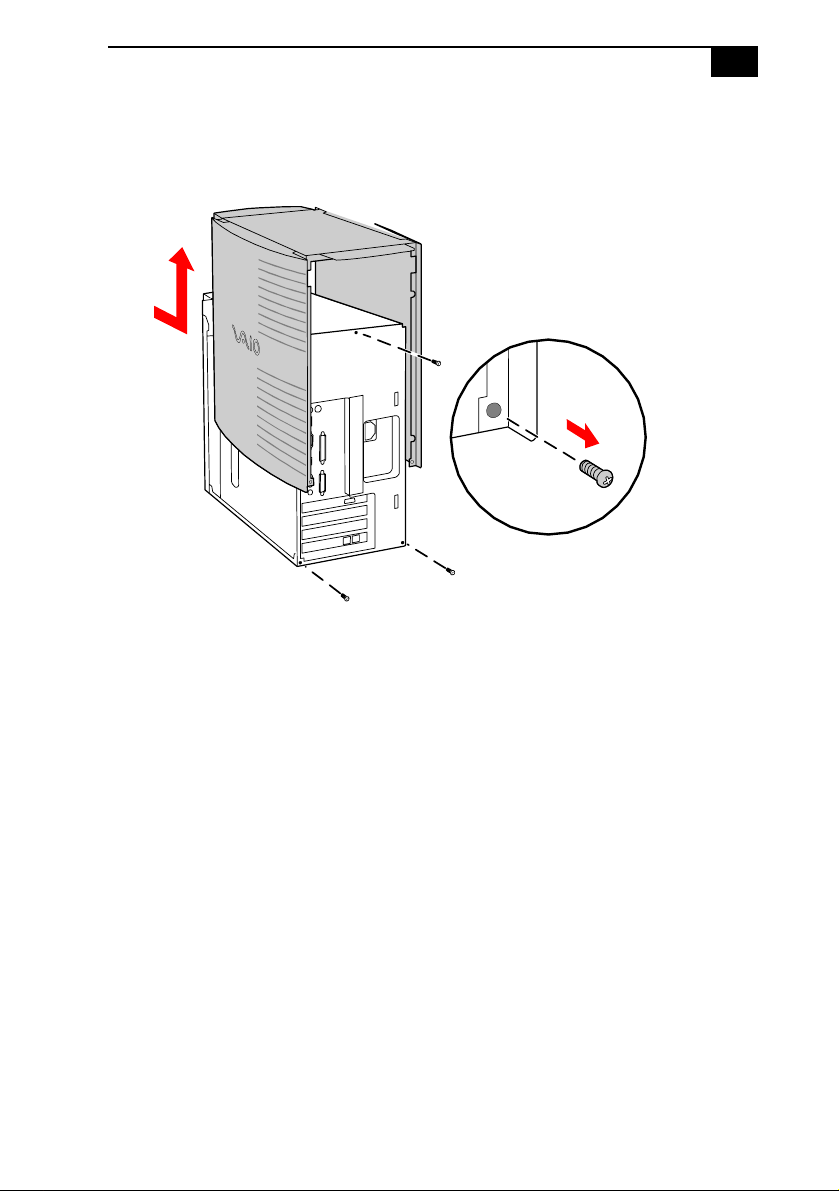
1 From the rear of the unit, press the two tabs on the right side.
2 Remove the frame from the unit by gently pulling it from left to right.
KY0064B.VSD
3 Remove the three screws from the metal back plate. The screws are
located at the top center, and the lower left and right corners.
Page 31
Removing, Installing, and Replacing Components
23
4 Lift the three-sided outer panel up and over the unit by pulling up on
the large tab that extends from the top rear.
KY0064A.VSD
Page 32
24
VAIO Digital Studio Reference Manual
Removing the Front Panel
You must remove the front panel to install a 5¼” device.
1 Remove the cover (see “Removing the Cover” on page 22).
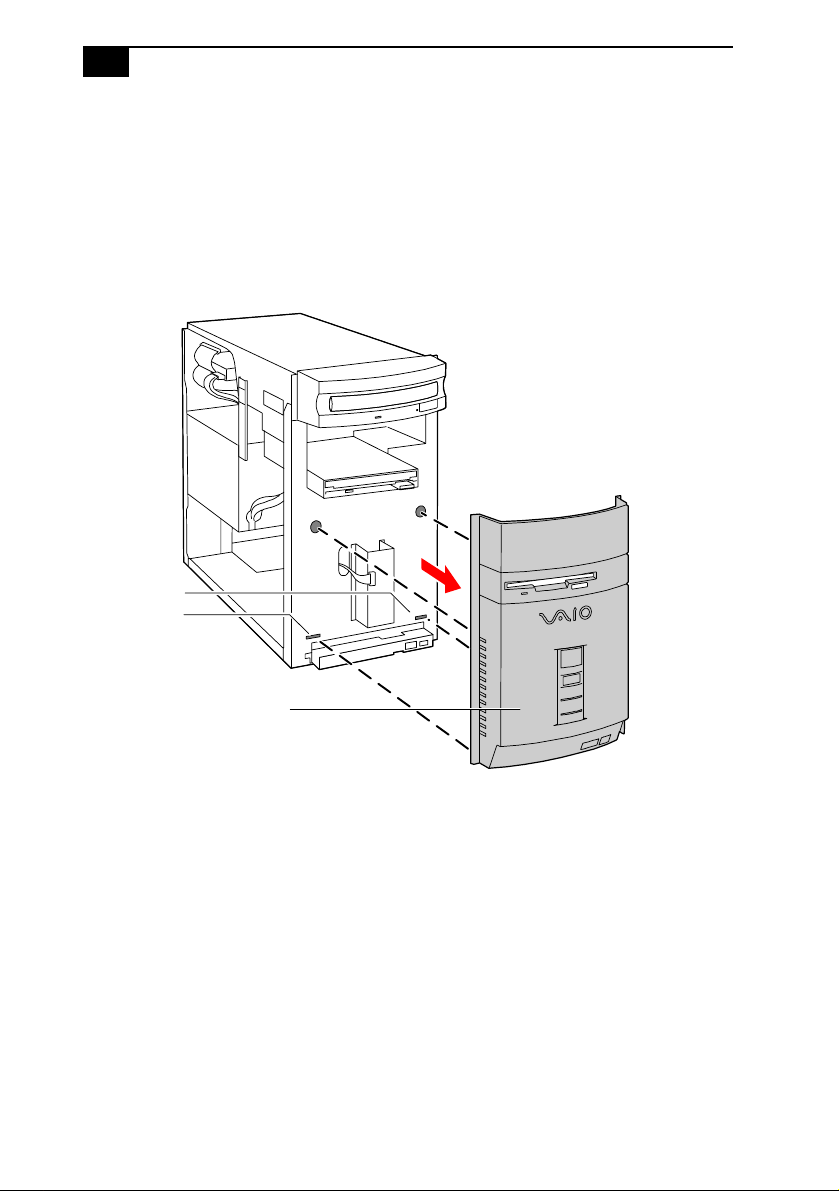
2 Push down and out on the two plastic tabs from inside the bottom of
the chassis to release the bottom end of the front panel.
Slots for
plastic tabs
Front panel
3 Pull out the top end of the front panel to remove it.
KY0091.VSD
Page 33
Removing, Installing, and Replacing Components
25
Replacing the Front Panel
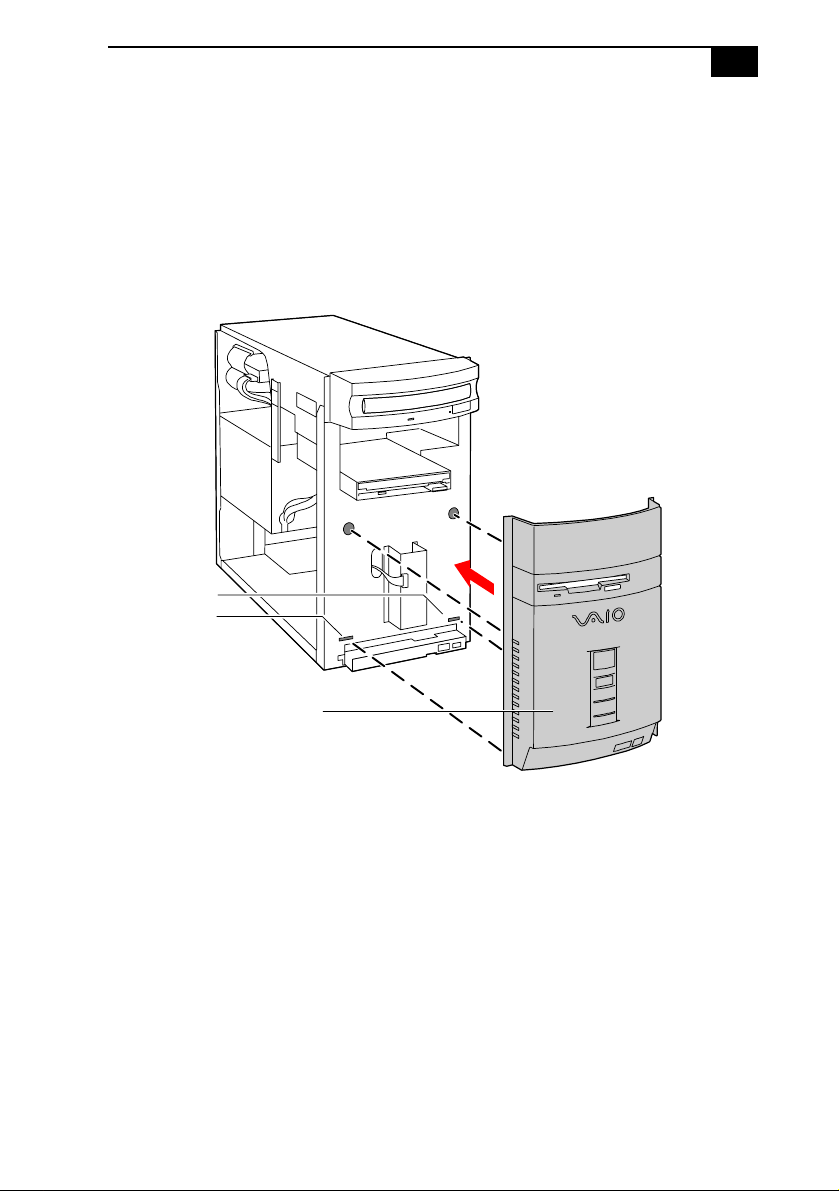
1 Insert the two plastic tabs (located on the bottom of the front panel)
into the slots at the bottom of the cha ssis.
2 Push the bottom of the front panel in until the tabs snap into place.
3 Push the top of the front panel in until it is flush with th e chassis .
Slots for
plastic tabs
Front panel
KY0093.VSD
Page 34
26
VAIO Digital Studio Reference Manual
Replacing the Cover
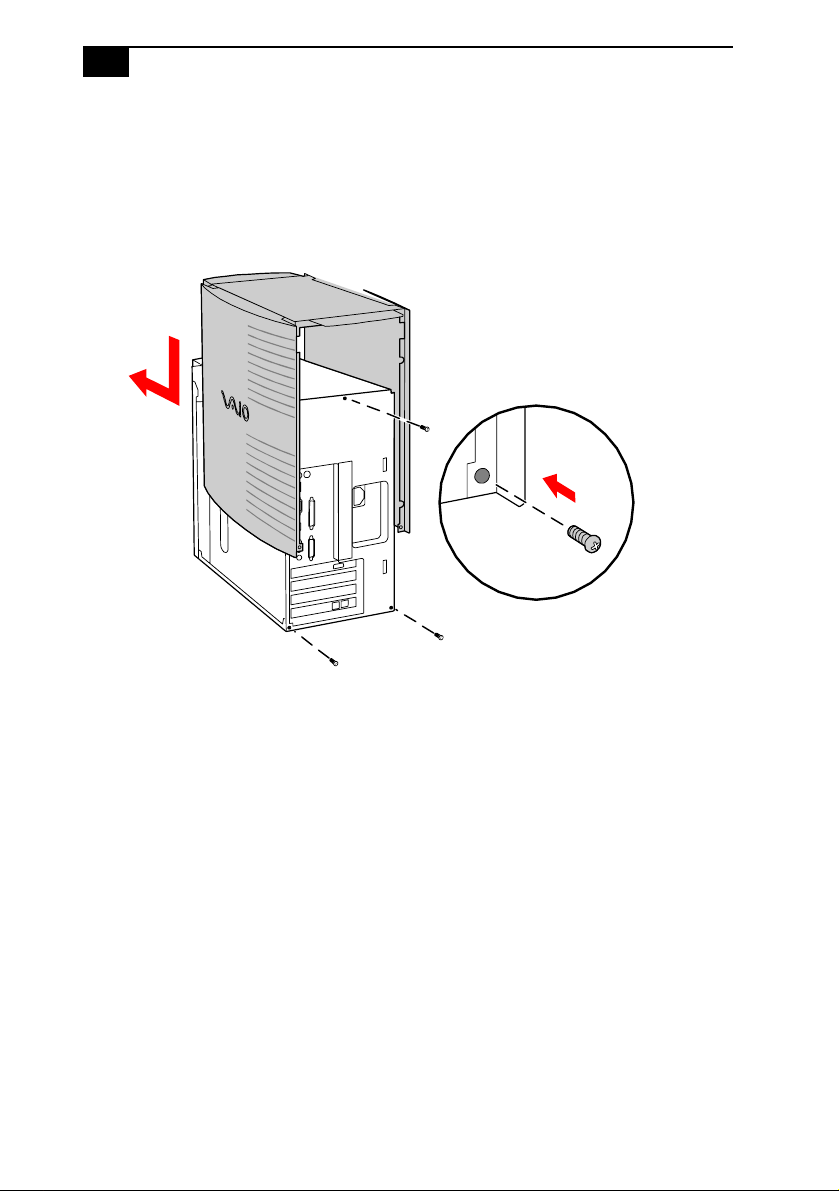
1 Alig n the three-sided outer panel over the chassis and lower it onto
the unit so that the tabs slip into the lips on the unit.
2 Insert the three screws (removed earlier) to secure the panel.
KY0067.VSD
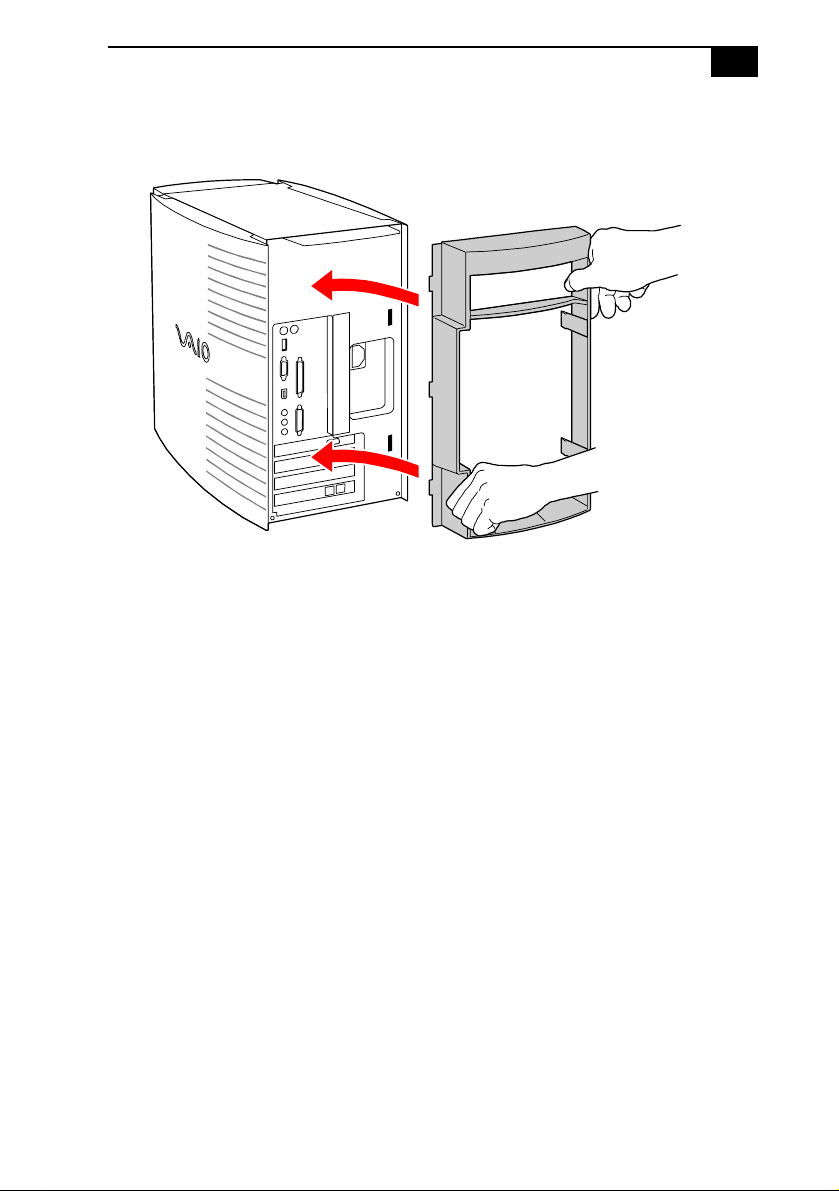
3 Insert the three small tabs on the frame into the slots on the left side of
the unit.
4 Slip the two larger tabs on the frame into the slots on the right side of
the unit.
Page 35
Removing, Installing, and Replacing Components
5 Gently press the frame in until it clicks into position.
27
KY0068.VSD
Page 36
28
VAIO Digital Studio Reference Manual
Installing an Add-In Card
! Before opening the system unit, save any open files, exit Windows, turn off
the power of the computer and all attached peripherals, and then unplug the
power cord.
1 Remove the cover (see “Removing the Cover” on page 22).
2 Locate an available expansion slot connector.
3 Remove the slot cover adjacent to the selected slot connector (see
“Removing a Slot Cover” on page 39).
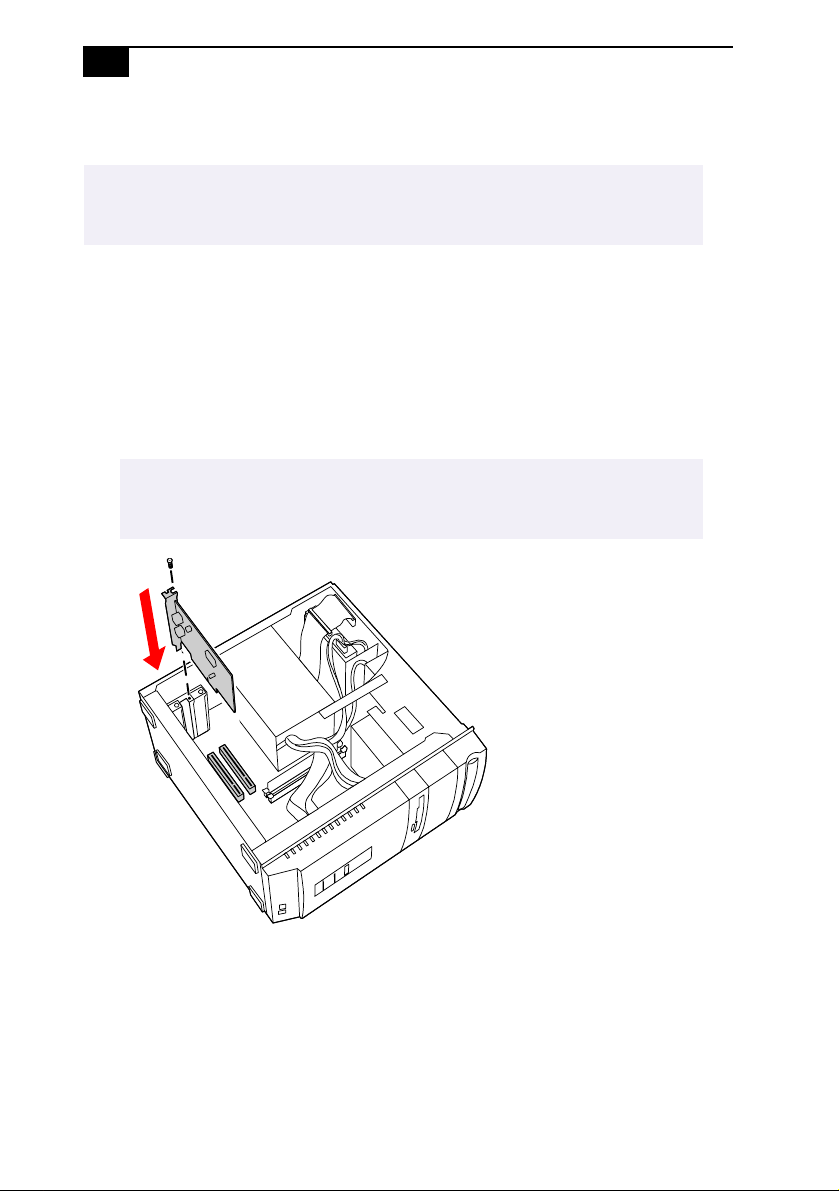
4 Insert the add-in card into the PCI slot connector. Use a gentle rocking
motion, pressing down until the card is fully seated.
✍
Align the card's bracket so that the bottom of the bracket fits into the slot at the
bottom of the chassis. Assure that the top of the bracket fits snugly against the
chassis lip after the card is fully inserted.
KY0070.VSD
5 Replace the screw that secures the card.
6 Attach any necessary cables to the card (see the instructions that came
with the add-in card).
7 Replace the cover (see “Replacing the Cover” on page 26).
8 Turn on the computer and follow any instructions that came with the
add-in card.
Page 37
Removing, Installing, and Replacing Components
Removing an Add-in Card
29
! Before opening the system unit, save any open files, exit the Windows
operating system, turn off the power of the computer and all attached
peripherals, and th en unplug the power cord.
®
1 Remove the cover (see “Removing the Cover” on page 22).
2 Disconnect any cables attached to the add-in card you want to
remove.
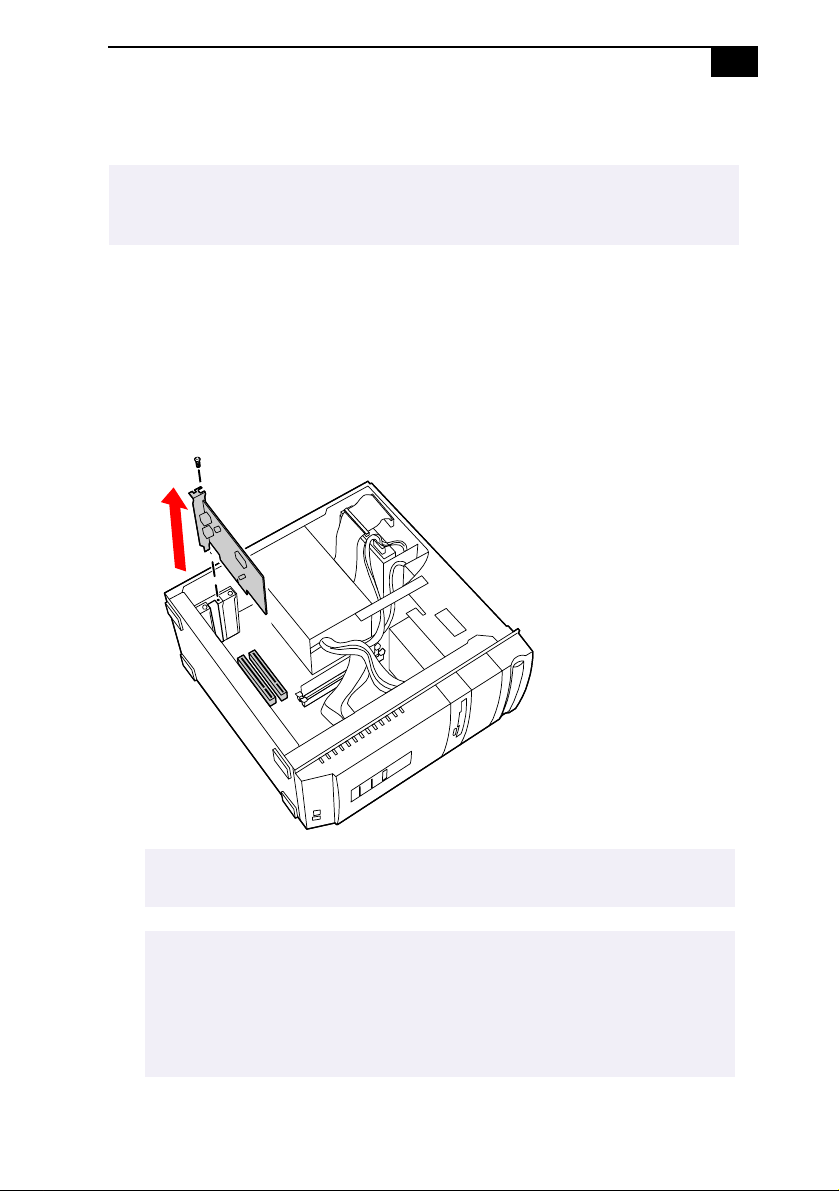
3 Remove the screw that secures the add-in card to the chassis.
4 Rem ove the add-in card from the PCI slot connector and store the
card in an anti-static wrapper for future use.
✍
Grasp the card with one hand on each end, and gently pull up as you rock the card
from side to side.
! Hold the add-in card by its edges and do not touch any components or
connector contacts on the card. Static electricity in your body may
damage sensitive components on the card. As a precaution, touch any
exposed metal part on the metal chassis (preferably the metal part on
the power supply) before handling an add-in card to discharge any static
electricity in your body.
KY0071.VSD
Page 38

30
VAIO Digital Studio Reference Manual
5 If you do not replace the card or install another add-in card, install a
slot cover over the vacant slot at the rear of the chassis (see “Covering
an Open I/O Slot” on page 40).
6 Replace the cover (see “Replacing the Cover” on page 26).
Page 39

Removing, Installing, and Replacing Components
31
Replacing the Lithium Battery
You may need to replace the lithium battery if your computer consistently
loses the date or time settings after turning it off. The lithium battery has
a typical life of three years, after which the battery may be too weak to
power the CMOS memory.
! When you remove the lithium battery, all values stored in the CMOS memory
(BIOS setup values and Plug and Play values) may be lost. Although the
computer can hold the charge for a short time while replacing the battery, it
is safer to assum e t hat th e se ttings wil l be lost . W hen t he v alue s ar e lo st, th e
BIOS values revert to their factory-default settings (see “Accessing the BIOS
Setup Utility” on page 16).
Do not handle damaged or leaking batteries.
The lithium battery may explode if mistreated. Do not disassemble it or
dispose of it in fire.
1 Reboot your computer by selecting Shut Down... from the Start
menu, and then selecting Restart the computer.
2 If the error message “Error: Check date and time settings”appears
during the reboot sequence, press F2 during the reboot process to
access the BIOS Setup Utility. Otherwise it is not necessary to replace
the battery at this time, and you can skip all remaining steps.
3 Compare all the BIOS options to their default settings (see “CMOS
Setup Options” on page 75). Make a list of all the BIOS options that
are different from their default values. You will refer to this list when
you restore the BIOS settings later.
4 Sel e ct Exit Discarding Changes from the main menu using the right
arrow key.
5 Press Enter, type Y when prompted to discard changes, then press
Enter to exit the BIOS Setup Utility.
6 Turn off the computer and unplug the power cord.
7 Remove the cover (see “Removing the Cover” on page 22).
Page 40
32
VAIO Digital Studio Reference Manual
8 If necessary, remove any add-in cards (see “Removing an Add-in
Card” on page 29) to gain access to the battery. You may also need to
disconnect some cables.
! Touch any exposed metal part of chassis to discharge static electricity in
your body before handling an add-in card or other sensitive electronic
component.
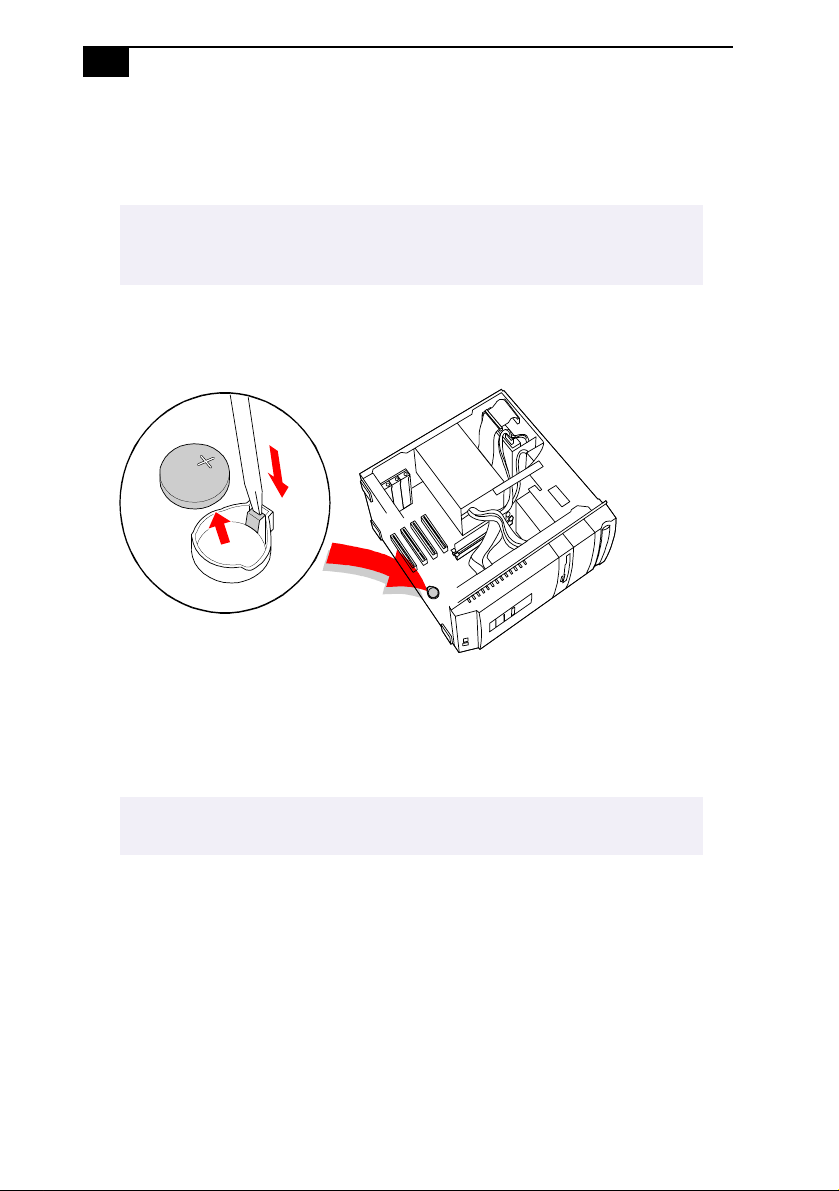
9 Insert a small flathead screwdriver into the small space at the top of
the battery holder.
KY0072.VSD
10 Gently pry the battery out and dispose of it according to the
instructions that came with the new battery.
11 Insert the new battery into the battery holder, with the plus (+) side
up.
✍
The Sony CR2032 battery is recommended. Using a type of battery other than a
CR2032 may present a risk of fire or explosion.
12 Replace any add-in cards that were removed.
13 Reconnect any cables that were disconnected.
14 Replace the cover (see “Replacing the Cover” on page 26).
15 Reconnect the power cord and turn on the computer.
Page 41

Removing, Installing, and Replacing Components
33
16 If the error message “Error: Check date and time settings.” appears
during the reboot sequence, press F2 during the reboot process to
access the BIOS Setup Utility. If no error message displays, the
computer’s BIOS settings were retained during the battery
replacement and you can skip the remaining steps.
17 Refer to the list you made in step 3 and restore any non-default BIOS
settings (see “CMOS Setup Options” on page 75).
18 Select Exit Saving Changes from the main menu using the right arrow
key.
19 Press Enter, type Y when prompted to discard changes, then press
Enter to exit the BIOS Setup Utility.
The computer’s BIOS settings are now restored.
Page 42

34
VAIO Digital Studio Reference Manual
Installing System Memory
! Before opening the system unit, save any open files, exit Windows, turn off
the power of the computer and all attached peripherals, and then unplug the
power cord.
1 If necessary, remove the memory module you wish to replace (see
“Removing a Memory Module” on page 37).
2 Remove the new memory module(s) from its anti-static package.
Hold the memory module only by its edges to prevent staticelectricity damage.
3 Choose the size of the memory module and configuration as shown
in the following table. Memory modules can vary in size and speed
between sockets. The minimum memory size is 8 MB; the maximum
memory size is 256 MB. The BIOS automatically detects the type, size
and speed of the memory modules.
Memory module configurations (MB)
DIMM1 DIMM2
0, 8, 16, 32, 64, 128 0, 8, 16, 32, 64, 128
* The PCV-R532DS ships with 64 MB. SDRAM is e xpandable t o 256 MB .
*
! Touch any exposed metal part of the chassis to discharge static electricity in
your body before handling a memory module.
✍
Use only 100 MHz FSB-supported memory. Do not mix 66 MHz memory with 100 MHz
memory. Supports SDRAM memory. Does not support EDO memory or buffered DIMM
memory.
4 Disconnect the power cord from the computer.
5 Remove the cover (see “Removing the Cover” on page 22).
6 R e move the power supply (see “Removing the Power Supply” on
page 48).
Page 43
Removing, Installing, and Replacing Components
35
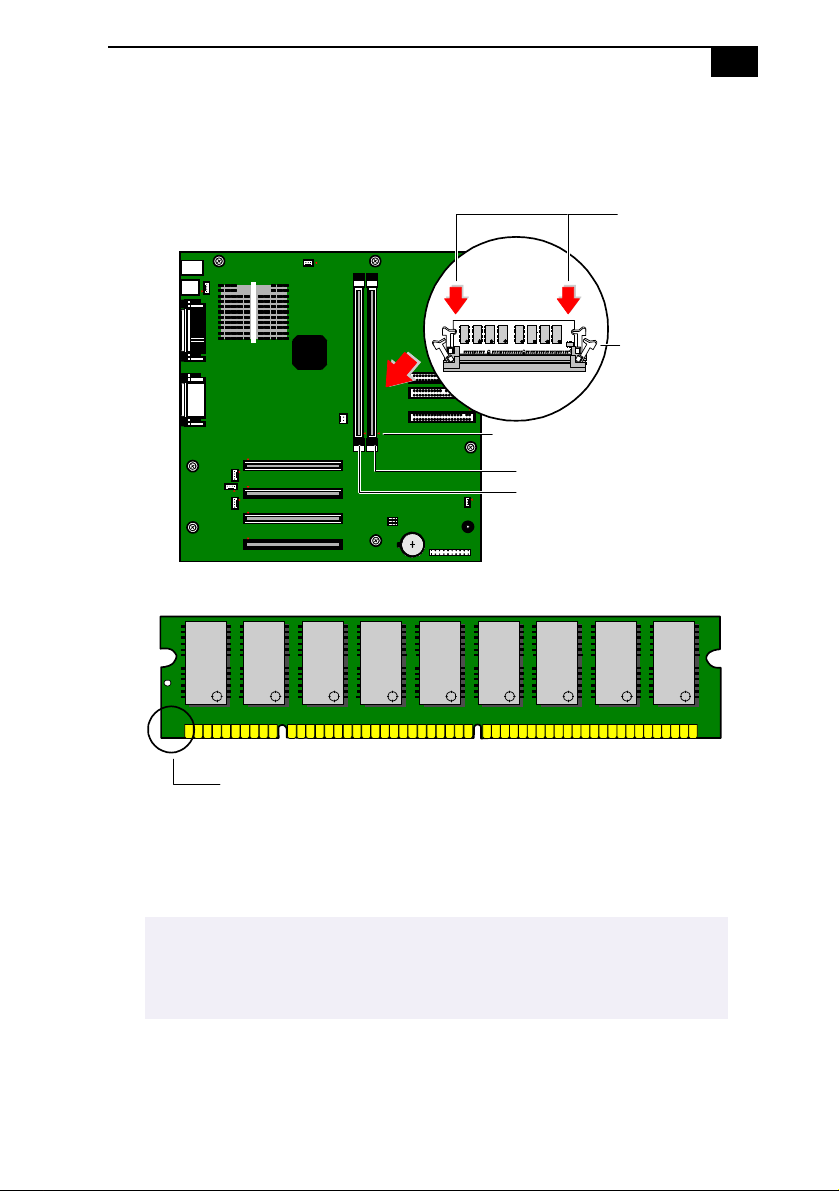
7 Align the module over the appropriate socket, noting the location of
pin 1 on the module and pin 1 on the socket.
Press down
here
Handles
Pin 1 side
DIMM2
DIMM1
Memory module (DIMM)
1
Indicates pin 1
OM04586.VSD
8 Carefully but firmly insert the edge of the module into the socket.
9 Press down firmly and evenly at both corners until the module is
fully seated.
✍
When the module is fully seated, the handles on each side are straight up and
locked into the slot on each side of the module. If the handles are not totally
straight upright, continue to press down on each side of the module until the
handles lock into place.
10 Replace the power supply (see “Replacing the Power Supply” on
page 51).
11 Replace the cover (see “Replacing the Cover” on page 26).
Page 44

36
VAIO Digital Studio Reference Manual
12 Reconnect the power cord and turn on the computer.
Your com puter automatically recognizes the extra memory and will
configure itself accordingly when you turn on the computer. No further
action is required.
Page 45
Removing, Installing, and Replacing Components
D
37
Removing a Memory Module
You may need to remove a memory module if you change the memory
configuration or replace a bad module.
! Before opening the system unit, save any open files, exit the Windows
operating system, turn off the power of the computer and all attached
peripherals, and th en unplug the power cord.
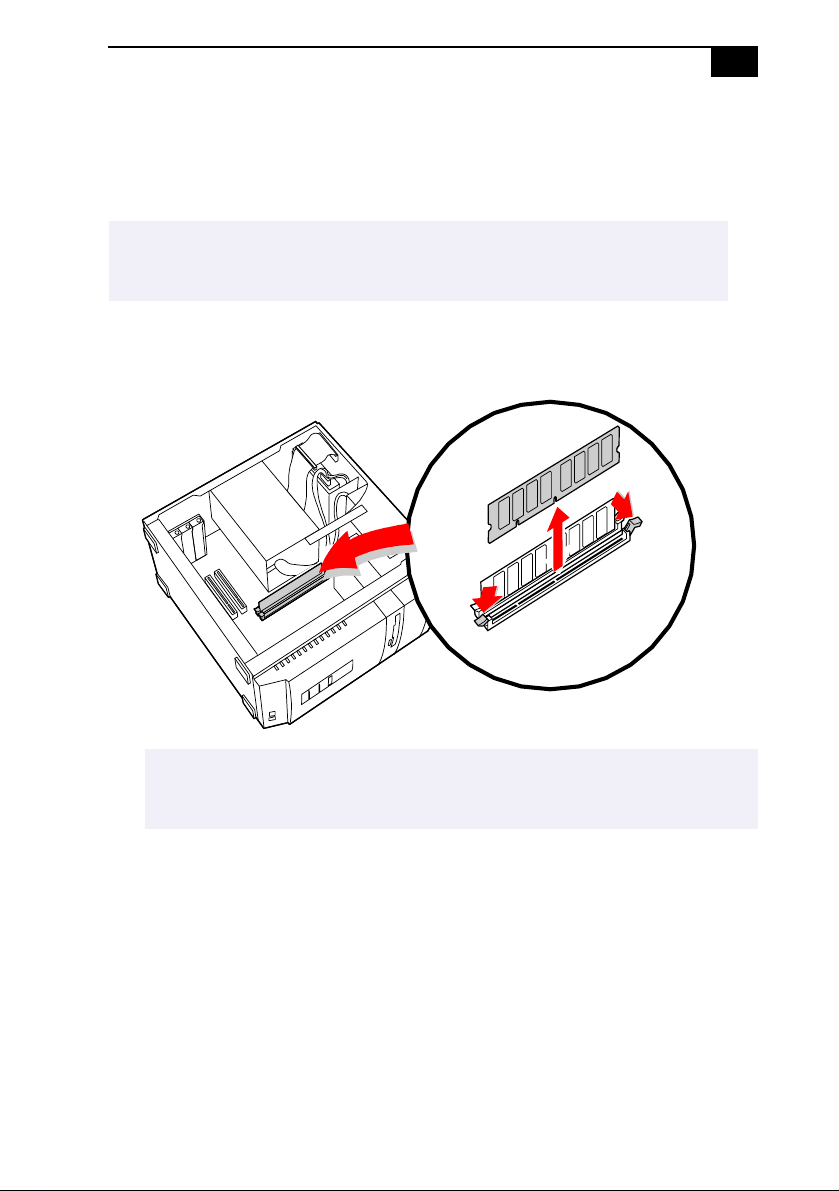
13 Remove the cover (see “Removing the Cover” on page 22).
14 Locate the memory module you wish to remove.
✍ The memory modules are located beneath the power supply. You
do not need to remove the power supply to reach the memory
modules.
®
KY0073.VS
Page 46
38
VAIO Digital Studio Reference Manual
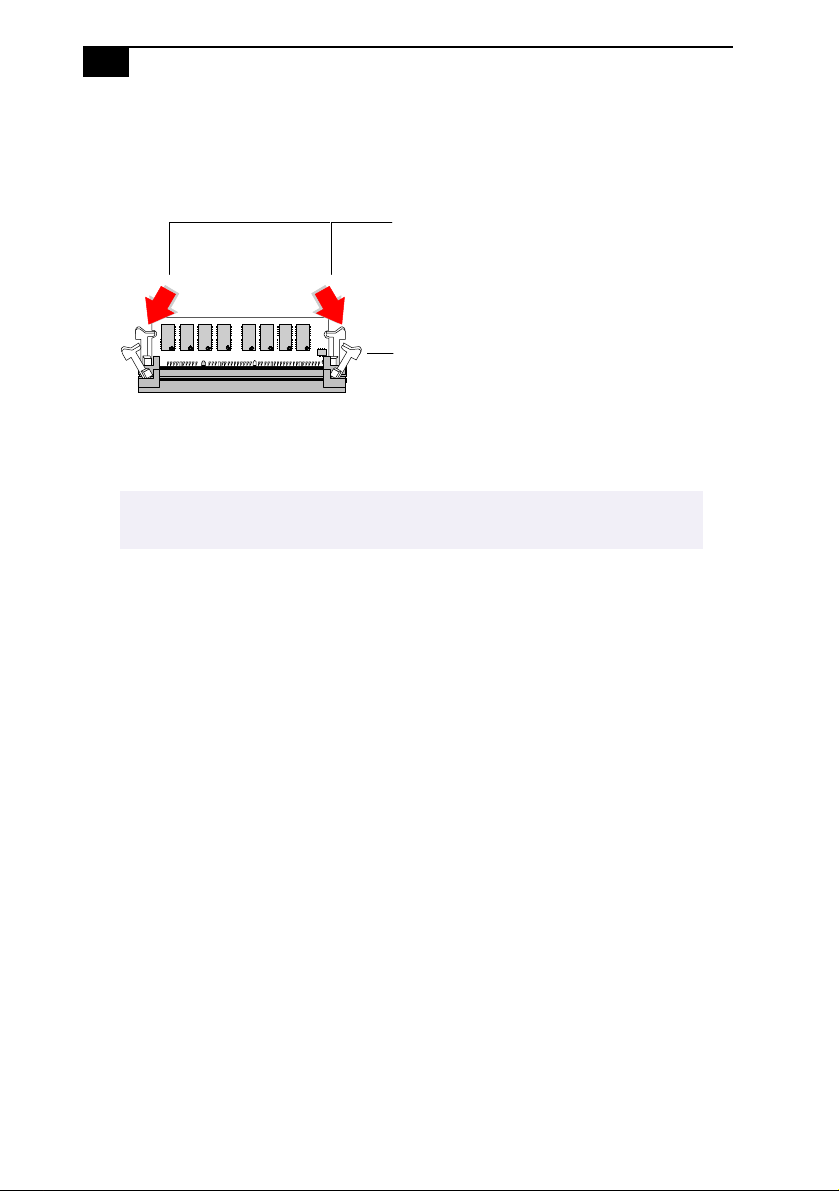
15 Reach around each side of the power supply and push down the
handle on each side of the memory module to eject the module from
its socket.
Push out
Handles
KY0042.VSD
16 Grasp one edge of the memory module and lift out. Store the module
in a static-free bag.
! Touch any exposed metal part of the chassis to discharge static
electricity in your body before handling the memory module.
Page 47
Removing, Installing, and Replacing Components
39
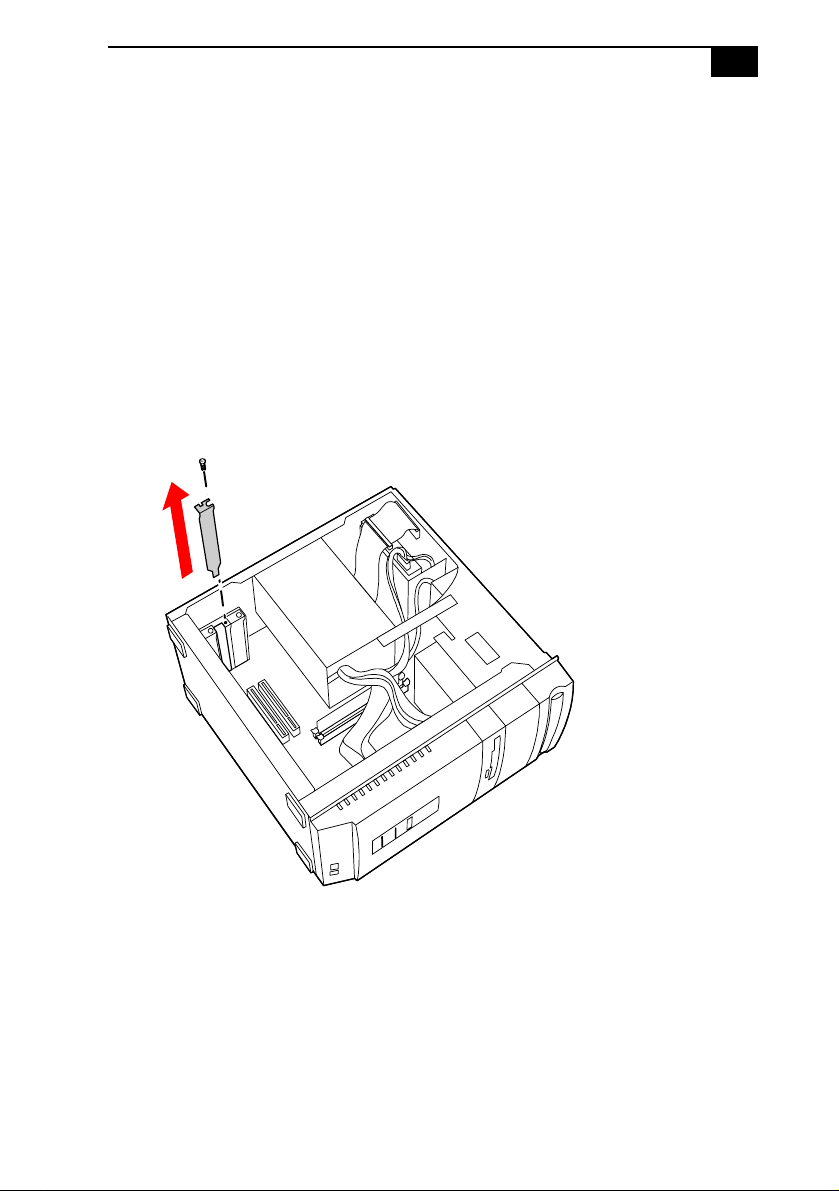
Removing a Slot Cover
You remove a slot cover when you install an add-in card that occupies a
previously-empty slot.
1 Disconnect the power cord from the computer.
2 Remove the cover (see “Removing the Cover” on page 22).
3 Locate the slot whose cover you want to remove.
4 Lay the system on its side.
5 Remove the screw from the slot cover.
6 Remove the loose slot cover and retain it for future use.
KY0069.VSD
Page 48
40
VAIO Digital Studio Reference Manual
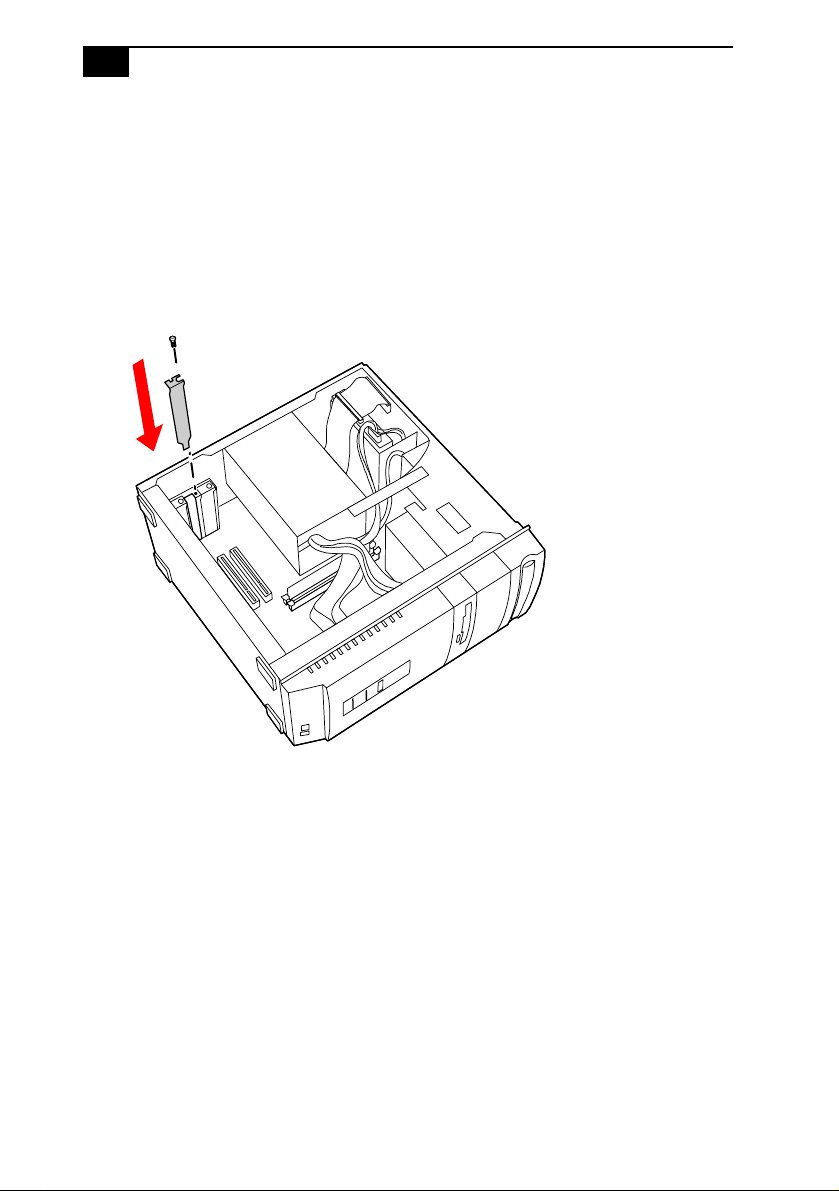
Covering an Open I/O Slot
Slot covers prevent air from escaping through the empty hole. If air
escapes, the components inside the computer cannot be properly cooled.
This may damage some components, especially the main processor
(which generates the most heat).
1 Slide the tip of the slot cover (removed earlier) between the chassis
and system board.
KY0076.VSD
2 Push the slot cover down until it rests firmly on the lip in the chassis.
All add-in card brackets and slot covers rest on this lip.
3 Replace the screw (removed earlier) to secure the I/O slot cover.
Page 49
Removing, Installing, and Replacing Components
41
Installing a 3½” Internal Hard Disk Drive
Your system comes with an available bay to hold an additional 3½” hard
disk drive. The drive you install must not require front panel access. The
hard disk drive access light blinks when either internal drive is active.
! Before opening the system unit, save any open files, exit Windows, turn off
the power of the computer and all attached peripherals, and then unplug the
power cord.
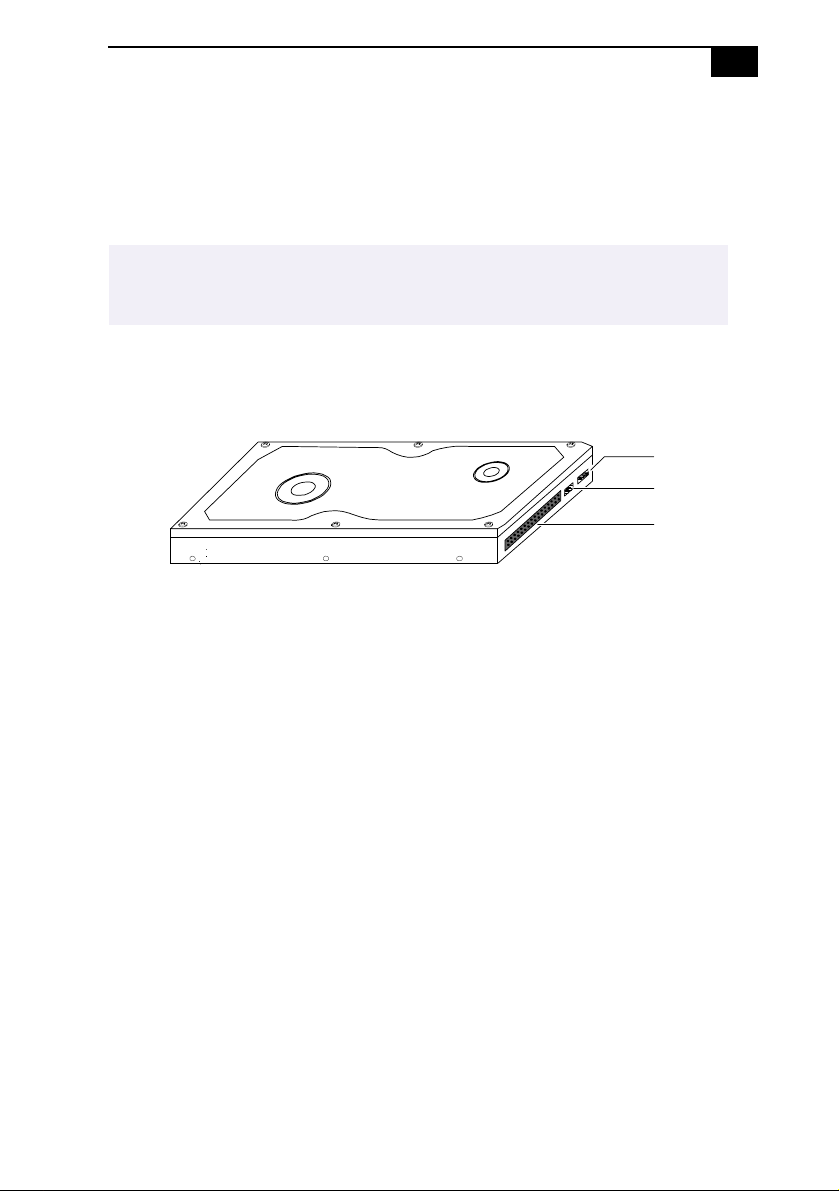
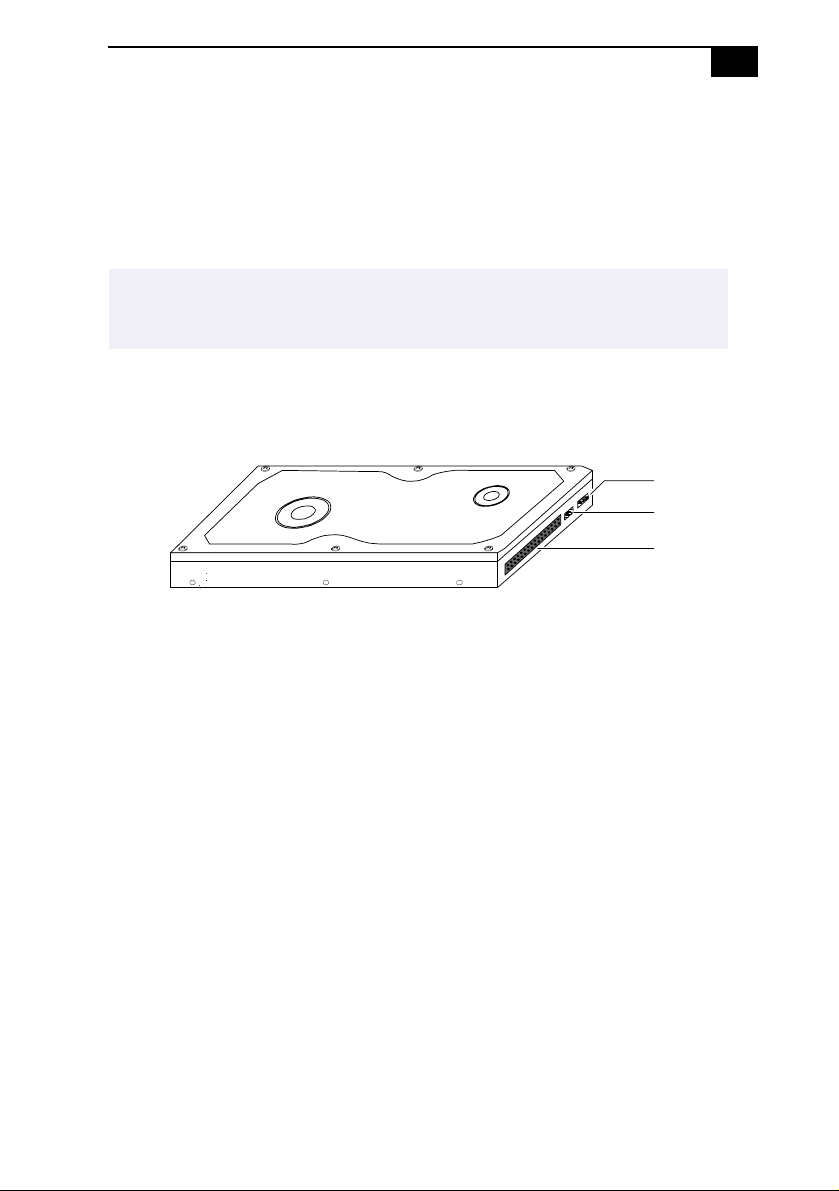
1 Configure the jumpers on the new drive as a primary slave (see your
drive’s documentation for configuration instructions).
Power connector
Jumpers
Drive connector
KY0084.VSD
2 Disconnect the power cord from the computer.
3 Remove the cover (see “Removing the Cover” on page 22).
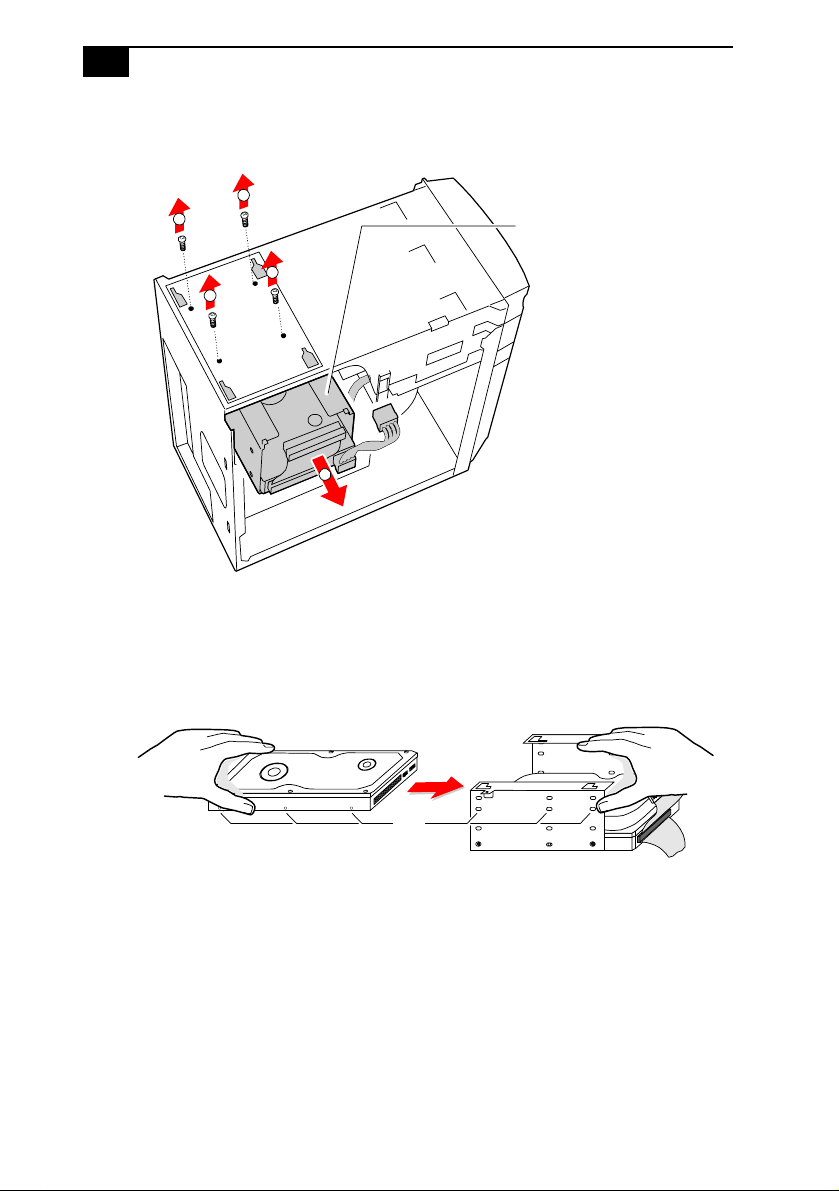
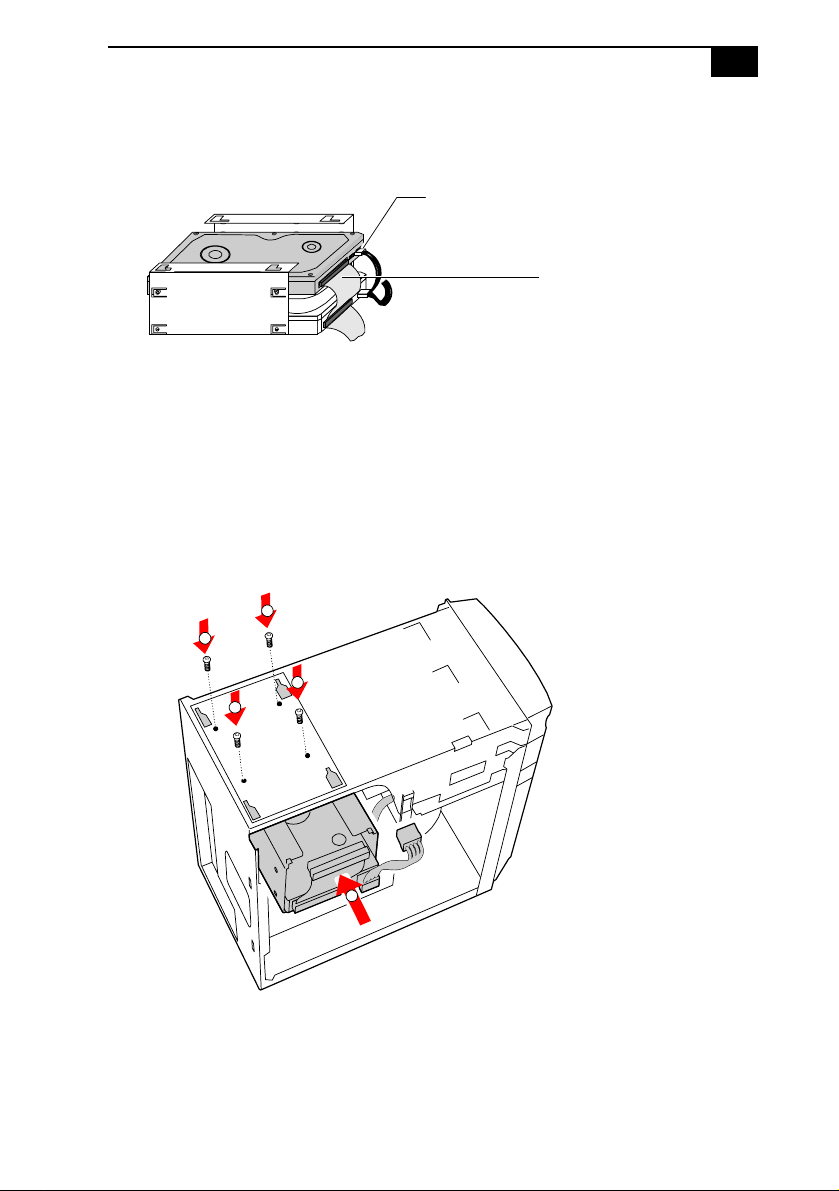
4 Remove the four screws (A in next diagram) that secure the drive
holder to the top of the chassis.
Page 50
42
VAIO Digital Studio Reference Manual
5 Slide the drive holder forward (B), and then out.
A
A
A
A
B
Disk drive holder
6 Pl ace the drive holder on top of the power supply.
KY0081.VSD
7 Slide the new drive into the drive holder and align the holes on each
side of the drive holder.
Align
holes
KY0083.VSD
8 Secure the drive to the drive holder using the two holes on each side
of the drive holder (screws are provided with the new drive). Do not
overtighten the screws.
9 Connect the second drive connector to the new drive (see next
diagram).
Page 51
Removing, Installing, and Replacing Components
43
10 Connect the second power connector to the new drive.
Second power connector
Second drive connector
KY0085.VSD
11 Make sure the drive connector is connected securely to the
motherboard.
12 Lower the drive holder down and slide it back into the chassis (A in
next diagram). Be sure to align all four slots on the drive holder with
the tabs on top of the chassis.
13 Slide the drive holder back so that the tabs slip into the notches.
B
B
B
B
A
KY0086.VSD
14 Replace the four screws (B) that secure the drive holder to the chassis.
15 Replace the cover (see “Replacing the Cover” on page 26).
Page 52

44
VAIO Digital Studio Reference Manual
16 Reconnect the power cord and then turn on your computer.
Your computer automatically recognizes the new drive and configures
itself accordingly when you turn it on. Format and partition the new
drive following the instructions provided with the drive.
Page 53
Removing, Installing, and Replacing Components
45
Installing a 5¼” Internal Hard Disk Drive
Your system comes with an available 5¼” bay to hold an additional 3½”
or 5¼” hard disk drive. The drive you install can access the front panel.
The hard disk drive access light blinks when either internal drive is
active.
! Before opening the system unit, save any open files, exit the Windows
operating system, turn off the power of the computer and all attached
peripherals, and th en unplug the power cord.
®
1 Configure the jumpers on the new drive as a secondary slave (see
your drive’s documentation for conf iguration instructions).
Power connector
Jumpers
Drive connector
KY0084.VSD
2 Disconnect the power cord from the computer.
3 Remove the cover (see “Removing the Cover” on page 22).
4 Remove the front panel (see “Removing the Fr ont Panel” on page 24).
5 Lay the system on its side (see following diagram).
Page 54
46
VAIO Digital Studio Reference Manual
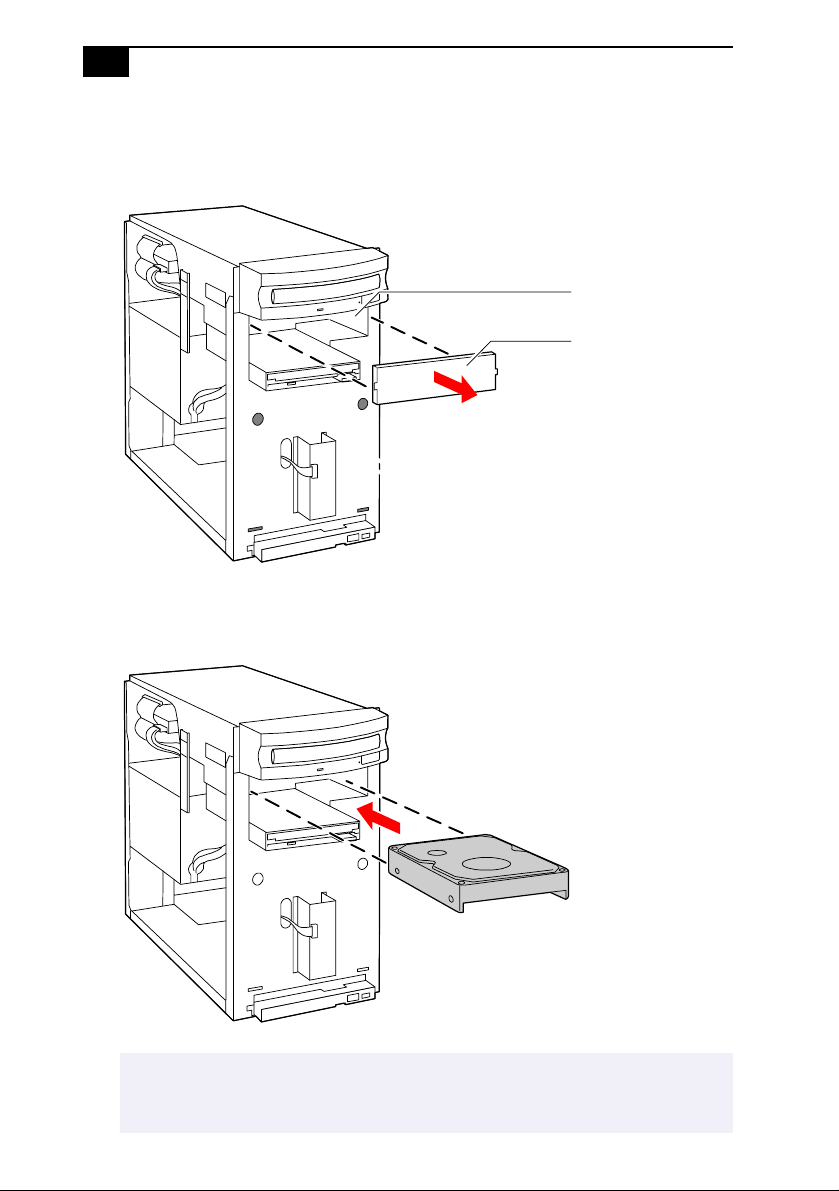
6 R e move the drive bay cover (shiny and silver) by pushing it from
behind (use a long object or your finger). Store for future use.
Drive bay
Drive bay cover
KY0092.VSD
7 Slide the drive into the drive bay until the holes on each side of the
drive align with the holes on each side of the chassis.
✍
If the drive you are installing is a 3½” drive, you must attach conversion brackets so that
the 3½” drive can fit inside of a 5¼” bay. See the instructions that came with your new
drive.
KY0094.VSD
Page 55
Removing, Installing, and Replacing Components
47
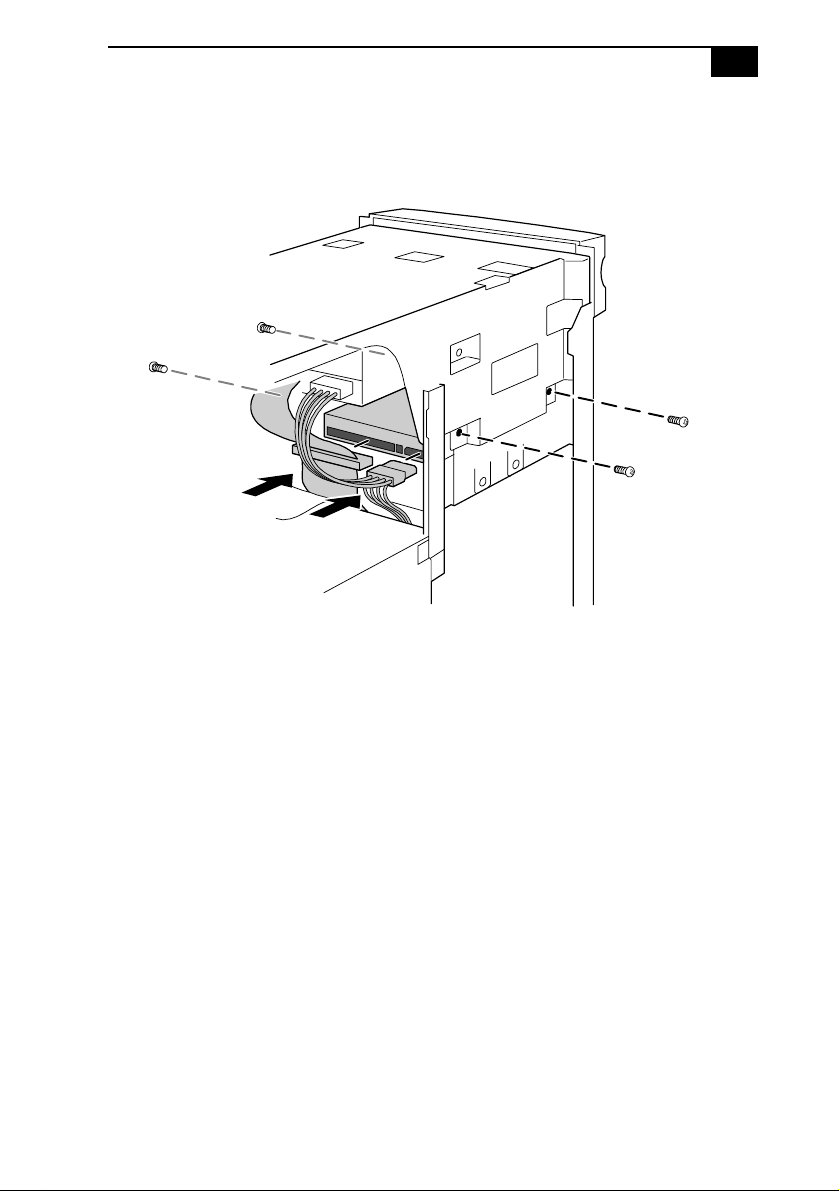
8 Secure the drive with four screws (provided with new drive). Do not
overtighten the screws.
KY0095.VSD
9 Attach the drive connector and power cable to the drive. Make sure
the drive connector is connected securely to the motherboard.
10 Replace the cover (see “Replacing the Cover” on page 26).
11 Replace the front panel (see “Replacing the Front Panel” on page 25).
12 Reconnect the power cord and then turn on your computer.
Your computer automatically recognizes the new drive and configures
itself accordingly when you turn it on. Format and partition the new
drive following the instructions provided with the drive.
Page 56
48
VAIO Digital Studio Reference Manual
Removing the Power Supply
You remove the power supply when you insert a memory module (see
“Installing System Memory” on page 34).
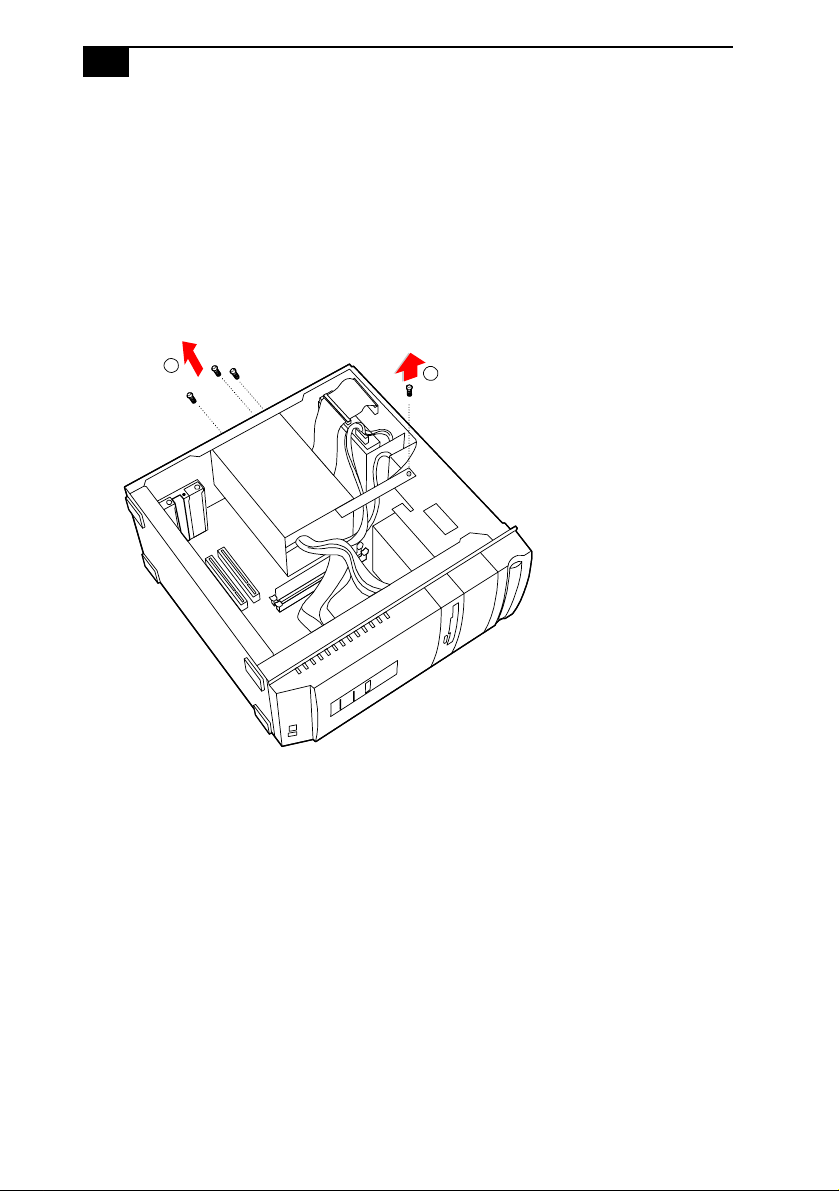
1 Remove the three screws (A in next diagram) from the rear of the
chassis.
2 Remove the screw (B) from the power supply bracket.
A
B
KY0096.VSD
Page 57
Removing, Installing, and Replacing Components
49
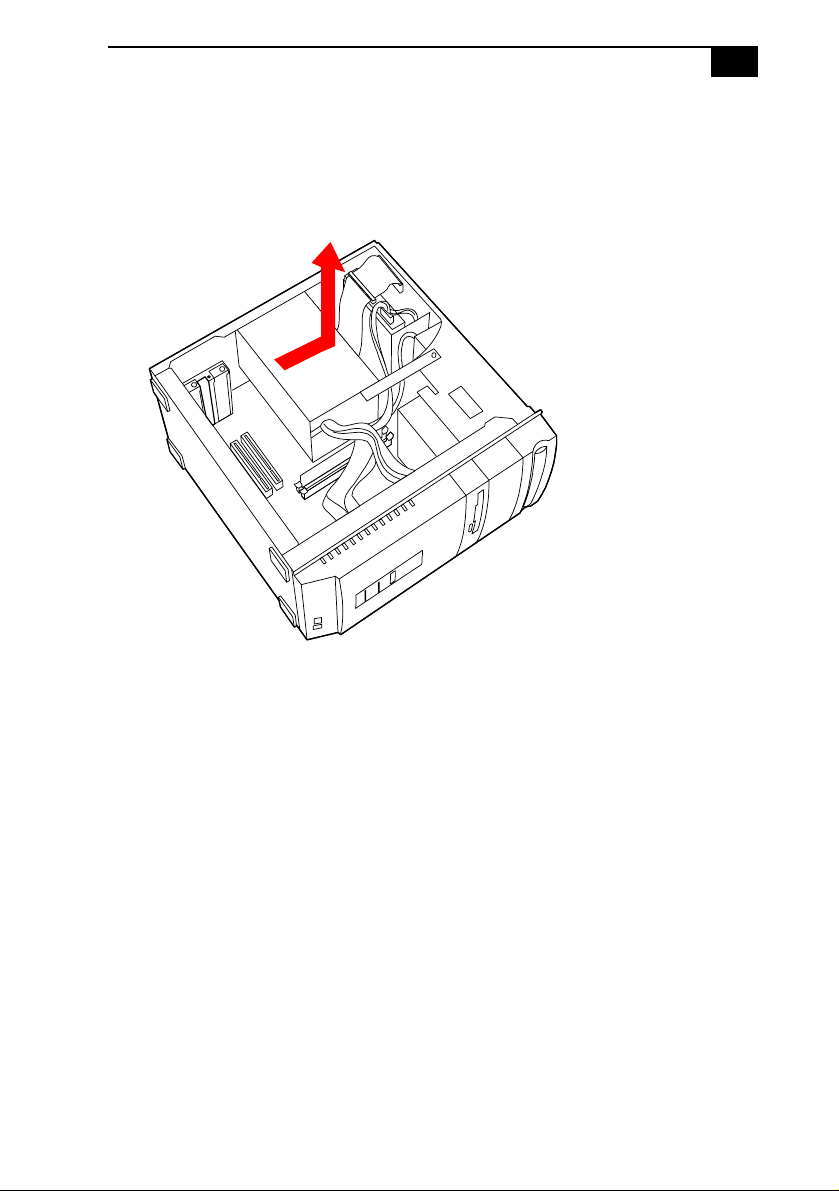
3 Slide the power supply back (towards the 3½” drive bay) about ½”
(or until the power supply detaches from the chassis tabs), then lift
up until the power supply clears the chassis lip.
KY0097.VSD
Page 58
50
VAIO Digital Studio Reference Manual
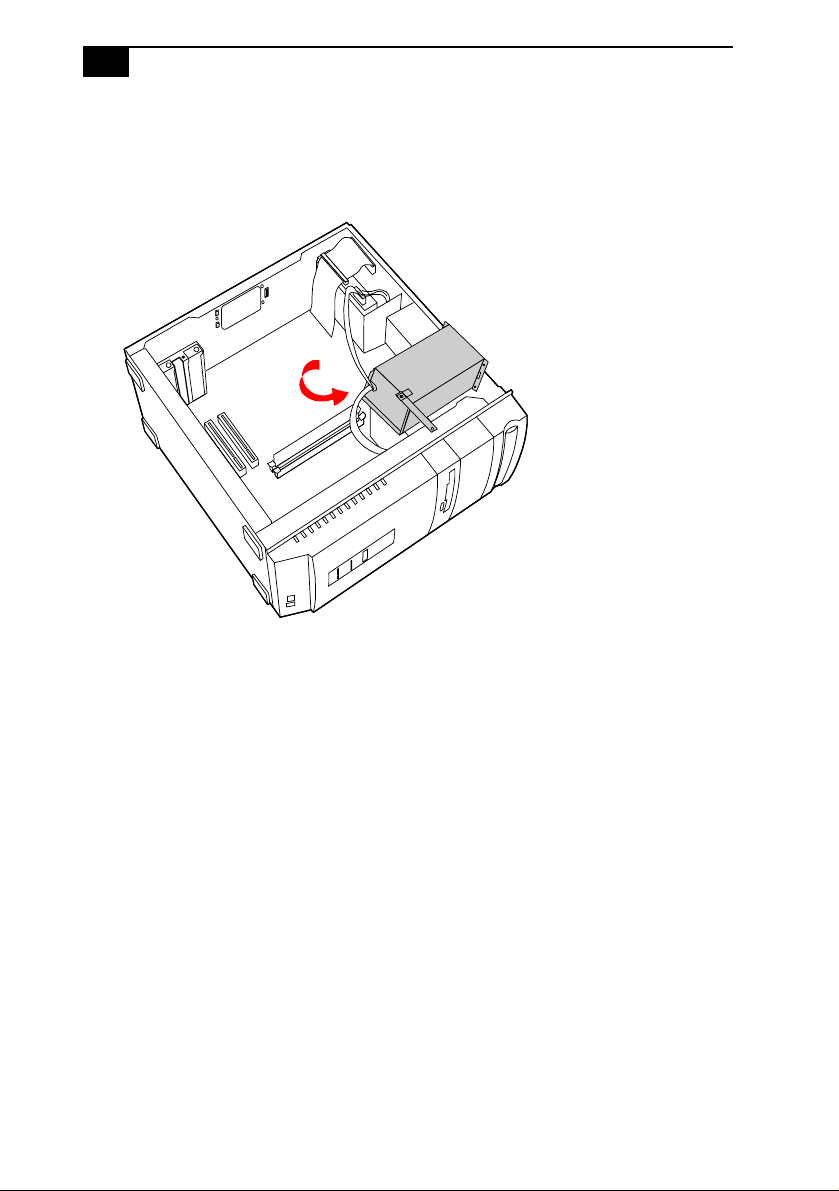
4 Rotate the power supply horizontally by 180 degrees
counterclockwise and rest it on top of the chassis where the CDROM/DVD-ROM drive is located.
KY0098.VSD
Page 59

Removing, Installing, and Replacing Components
51
Replacing the Power Supply
1 Rotate the power supply horizontally by 180 degrees clockwise and
lower it into the chassis until it is flush against the square hole at the
rear of the chassis.
2 Slide the power supply forward (away from the 3½” drive bay) until
the power supply latches onto the chassis tabs.
3 Replace the three screws that secure the power supply to the rear of
the chassis.
4 Replace the screen that secures the power supply bracket to the
chassis.
Page 60

52
Page 61
Chapter 4
System Board
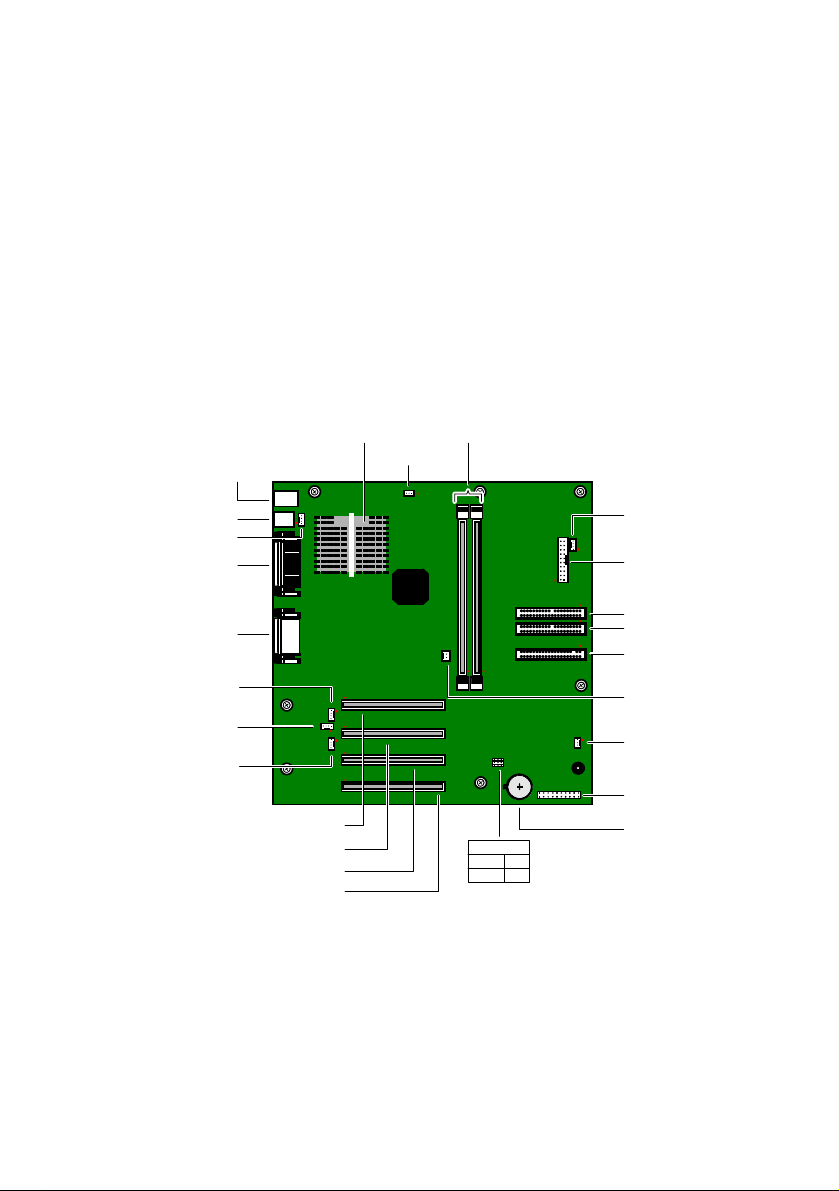
This chapter identifies each component on the system board and provides
a detailed description of each connector, jumper, and switch on the
system board.
Processor Memory
Keyboard, Mouse
CPU Fan
USB1
USB Header
COM1, Monitor,
Printer
Mic In, Line In,
Line Out, Game
CD-In
(to DVD-ROM drive)
Modem
Aux-In
Slot 1 (PCI)
Slot 2 (PCI)
Slot 3 (PCI)
Slot 4 (PCI)
CMOS Clear
Normal 1-2
Clear
Power Supply Fan
Power Supply
Secondary IDE
Primary IDE
Diskette
1394 Power
CHA Fan
Front panel header
Battery
2-3
OM04581.VSD
53
Page 62
54
VAIO Digital Studio Reference Manual
Connectors
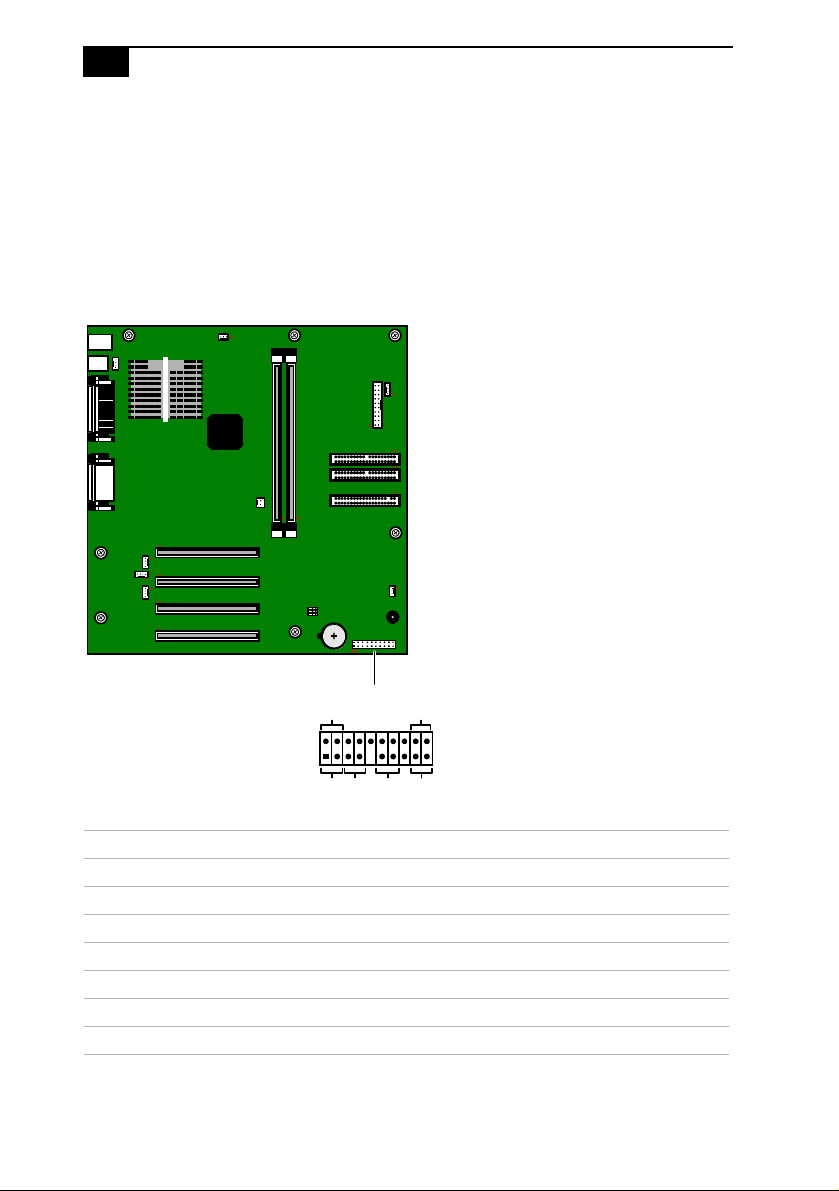
Front Panel Header (J25)
The front panel header is a 20-pin header (1 pin is removed for the key)
that provides connections to various front panel functions. A 20-pin
connector with only eight wires is used to interface the system board to
the front panel.
Front panel header
MSG
LED
PWR
LED
SPKR
(not used)
HD
RESET
PWR
LED
KY0031.VSD
Name Description
SPEAKER (not used)
PWR LED Connects to the power-on indicator light on the front panel
HD LED Connects to the hard disk drive access light on the front panel
SLEEP (not used)
PWR Connects to the power-on switch on the front panel
RESET (not used)
MSG LED Connects to the standby indicator light on the front panel.
Page 63
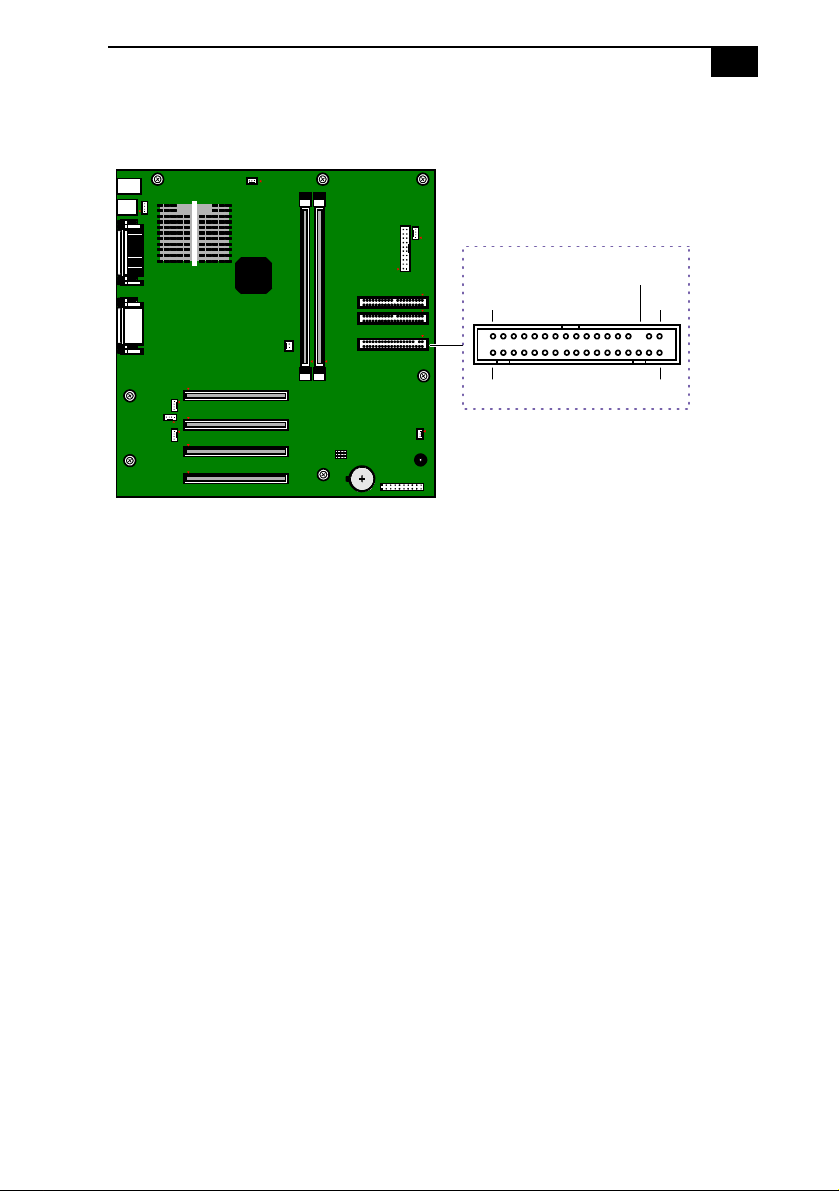
Diskette Drive Connector
System Board
33
55
Key (pin 5)
1
34
2
OM04701H.VSD
Page 64
56
D
VAIO Digital Studio Reference Manual
Memory Module (DIMM) Connectors
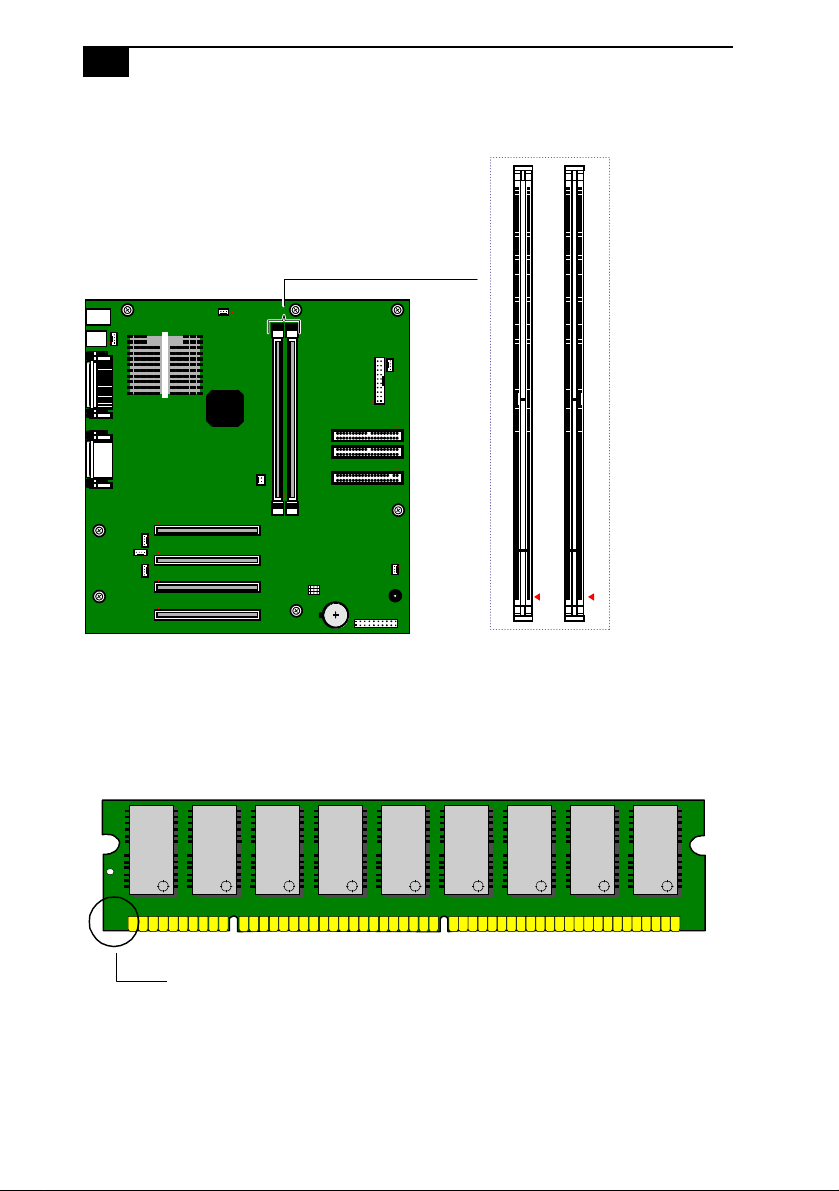
DIMM1
DIMM2
OM04710A.VSD
Both sides of each Dual Inline Memory Module (DIMM) look very
similar. The side with pin 1 has a small "1" to the left of pin 1. Be sure to
orient a DIMM correctly in the DIMM connector (a small triangle on the
connector indicates pin 1).
Memory module (DIMM)
1111
Indicates pin 1
OM04908B.VS
Page 65
System Board
57
PCI Slot Connectors
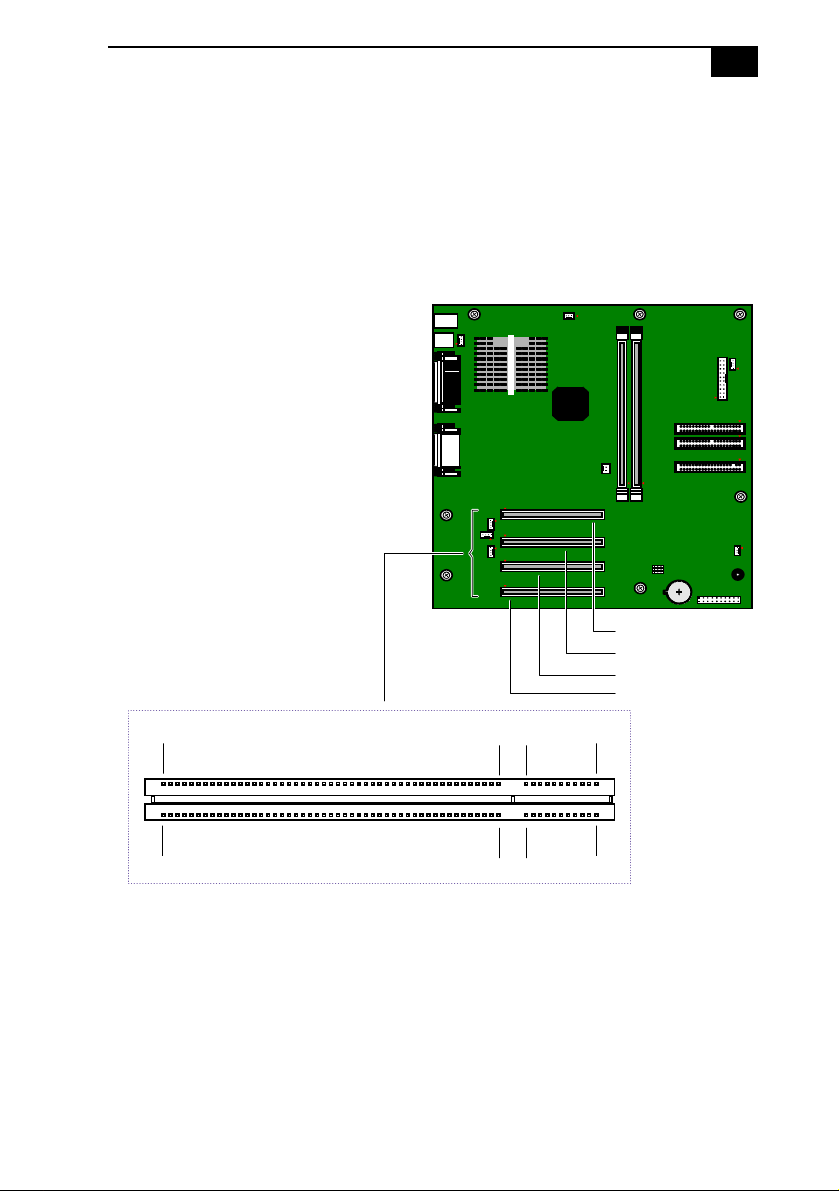
There are a total of four PCI slot connectors (slot #1 to #4). Two PCI slot
connectors (#1 and #2) are ava ilable. The other two PCI slots ar e occ upied
by the i.LINK
bit 5V and Universal (3.3/5V) PCI add-in cards.
PCI slot connector
A1 A62
®
card and the fax/modem card. The PCI slots support 32-
Slot 1 (PCI)
Slot 2 (PCI)
Slot 3 (PCI)
Slot 4 (PCI)
A49 A52
B1 B62
B49 B52
OM04599B.VSD
Page 66
58
VAIO Digital Studio Reference Manual
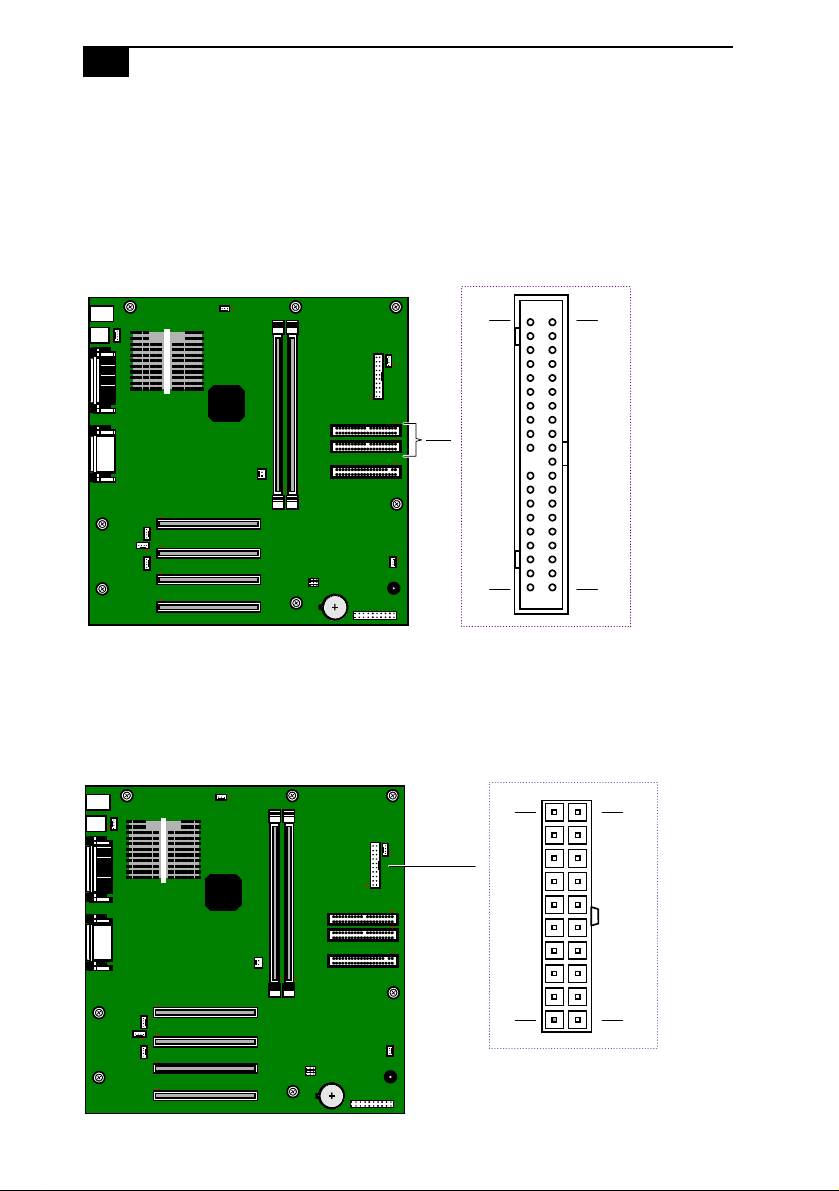
IDE Connectors
There are two IDE (Integrated Drive Electronics) connectors on the
system board: a Primary IDE and a Secondary IDE connector.
Each IDE connector supports up to two IDE drives using a ribbon cable
with two connectors.
40
2
39
1
OM04701G.VSD
Power Connector
The power supply connector on the system board connects to the power
supply connector labelled P1.
10
20
1
11
OM04701I.VSD
Page 67
System Board
59
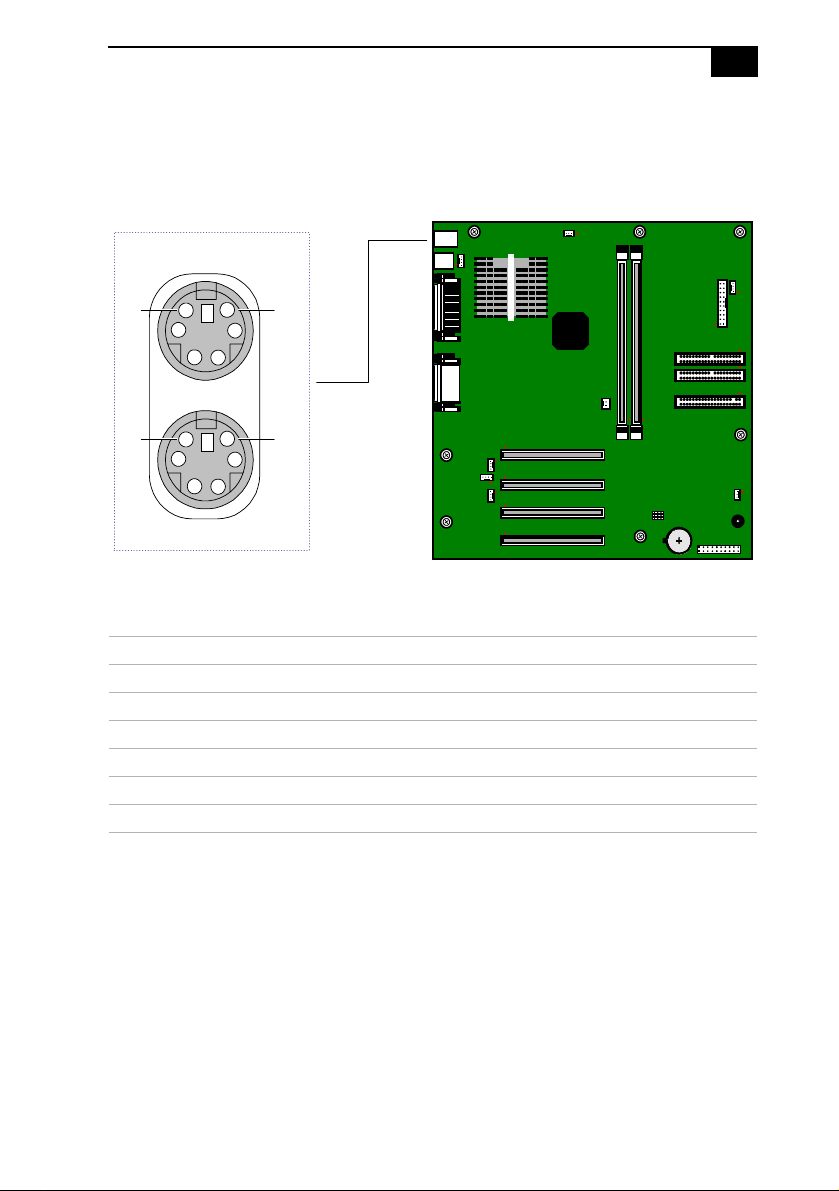
KEYBOARD and MOUSE Connectors
The KEYBOARD connector and the MOUSE connector are 6-pin female
PS/2-type (mini-DIN) connectors. They have identica l pinouts.
MOUSE
1
1
KEYBOARD (optional)
6
6
KEYBOARD and MOUSE
Pin Signal Name
1DATA
2NC
3LOGIC GND
4 +5V (fused)
5CLOCK
6NC
KY0032.VSD
Page 68
60
VAIO Digital Studio Reference Manual
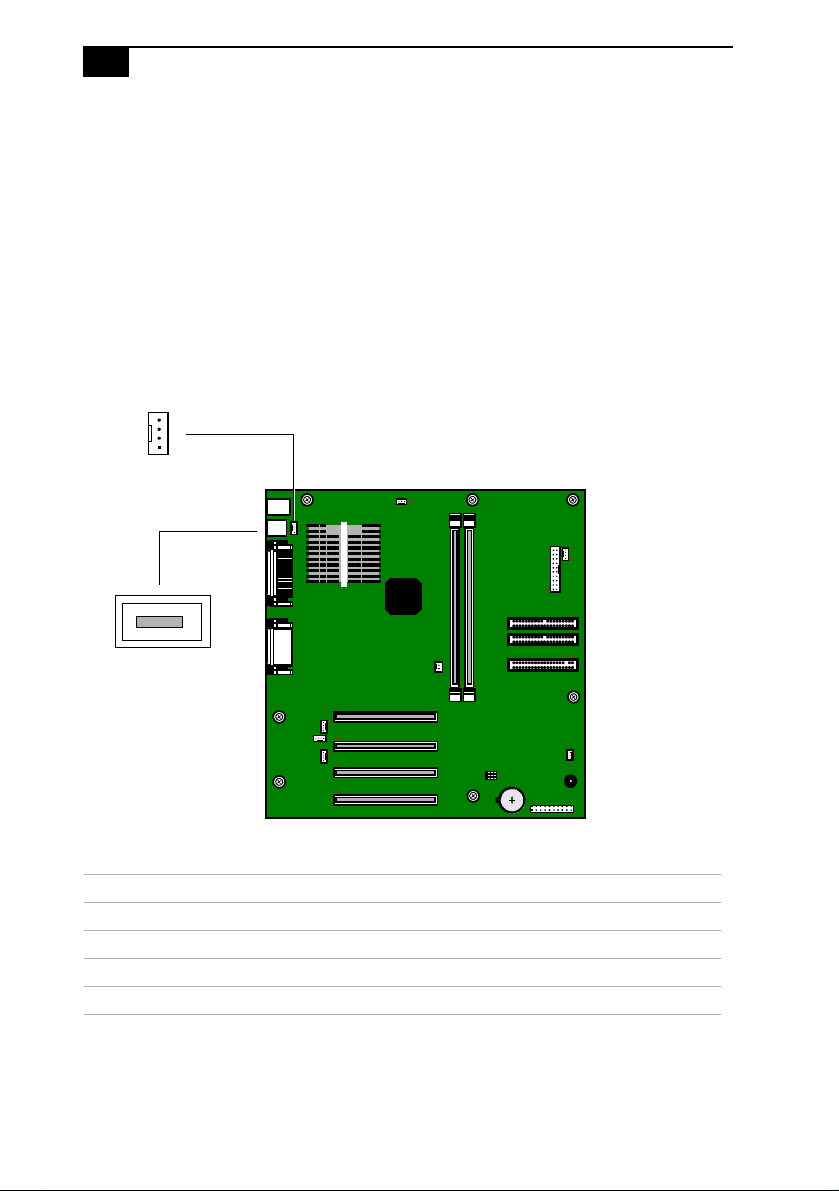
USB Connectors
There are two USB ports that permit connection of two USB peripheral
devices directly to the system without having to use an external hub.
USB2 is a standard USB connector accessible from the rear panel.
USBHEAD is a 4-pin single-line header that connects to a standard USB
connector (USB1) accessible at the bottom of the front panel. An internal
cable connects USBHEAD to an interface board behind the front panel.
If more USB devices are needed, connect an external hub to either USB1
or USB2.
USBHEAD
(connects to USB1
on front panel)
USB2
USBHEAD (connects to USB1 on front panel)
Pin Signal Name
1 USBVCC2
2USBP1#
3USBP1
4Ground
KY0033.VSD
Page 69
System Board
61
USB2
Pin Signal Name
1 USBVCC1
*
2 USBP0#
3 USBP0
4Ground
5 USBVCC2
*
6 USBP1#
7 USBP1
8Ground
* Uses over-current protector.
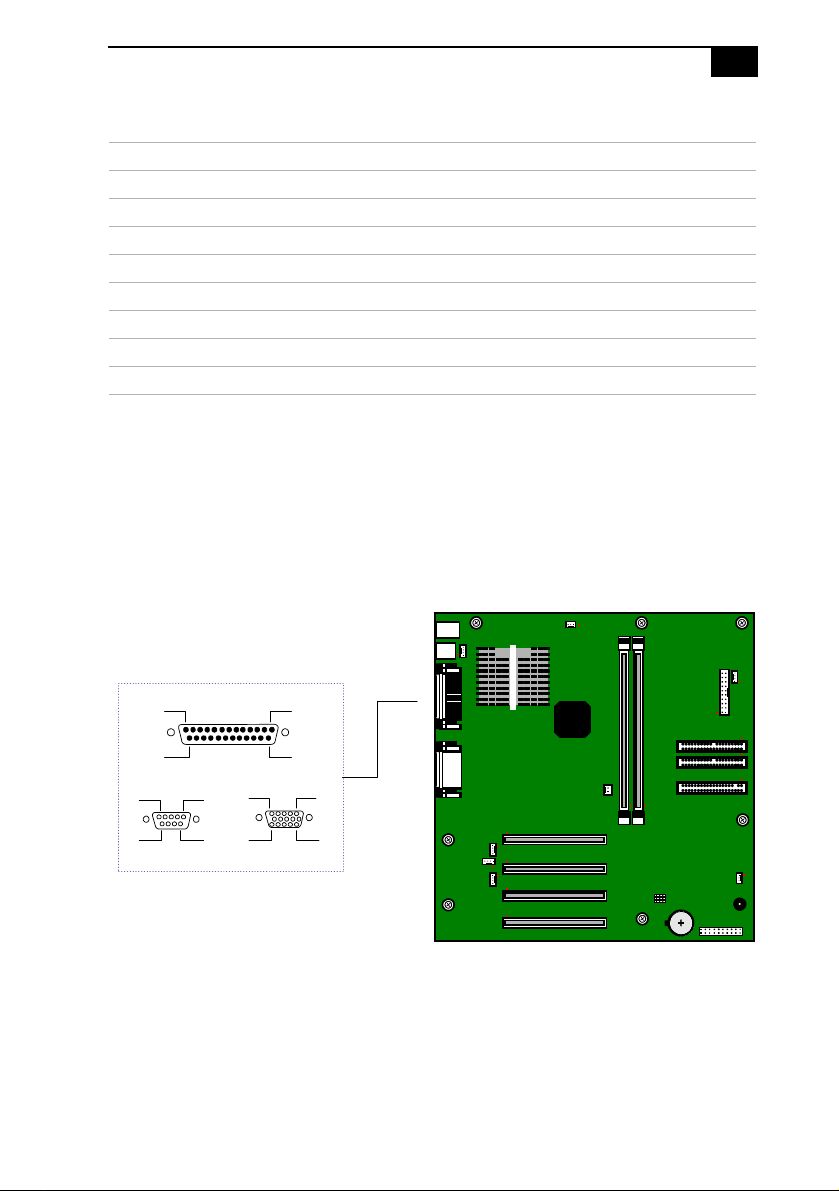
SERIAL 1, PRINTER, and MONITOR Connectors
The SERIAL 1, PRINTER, and MONITOR connectors are mounted in a
single bracket on the system board. The SERIAL 1 connector is a DB-9
male connector. The PRINTER connector is a DB-25 female connector. The
MONITOR connector is a standard 15- pin female high-density VGA-type
connector.
13 1
25 14
15
69
PRINTER
15
11 15
SERIAL 1 MONITOR
OM04701D.VSD
Page 70

62
VAIO Digital Studio Reference Manual
SERIAL 1 connector
Pin Signal Name
1DCD
2RXD
3 TXD
4DTR
5LOGIC GND
6DSR
7RTS
8CTS
9RI
PRINTER conn e ctor
Pin Signal Name
1 STROBE 2 DAT A BIT 0
3 DAT A BIT 1
4 DAT A BIT 2
5 DAT A BIT 3
6 DAT A BIT 4
7 DAT A BIT 5
8 DAT A BIT 6
9 DAT A BIT 7
10 ACK 11 BUSY
12 PE
13 SELECT
14 AUTO-FEED 15 ERROR 16 INIT 17 SELECT -IN 18 LOGIC GND
19 LOGIC GND
20 LOGIC GND
21 LOGIC GND
22 LOGIC GND
Page 71
23 LOGIC GND
24 LOGIC GND
25 LOGIC GND
MONITOR connector
Pin Signal Name
1RED
2GREEN
3 BLUE
4GND
5 DDC GND
6RED GND
7GREEN GND
8 BLUE GND
9NC
10 GND
11 GND
12 SDA
13 HORIZONTAL SYNC
14 VERTICAL SYNC
15 SCL
System Board
63
Page 72
64
VAIO Digital Studio Reference Manual
Fan Connectors
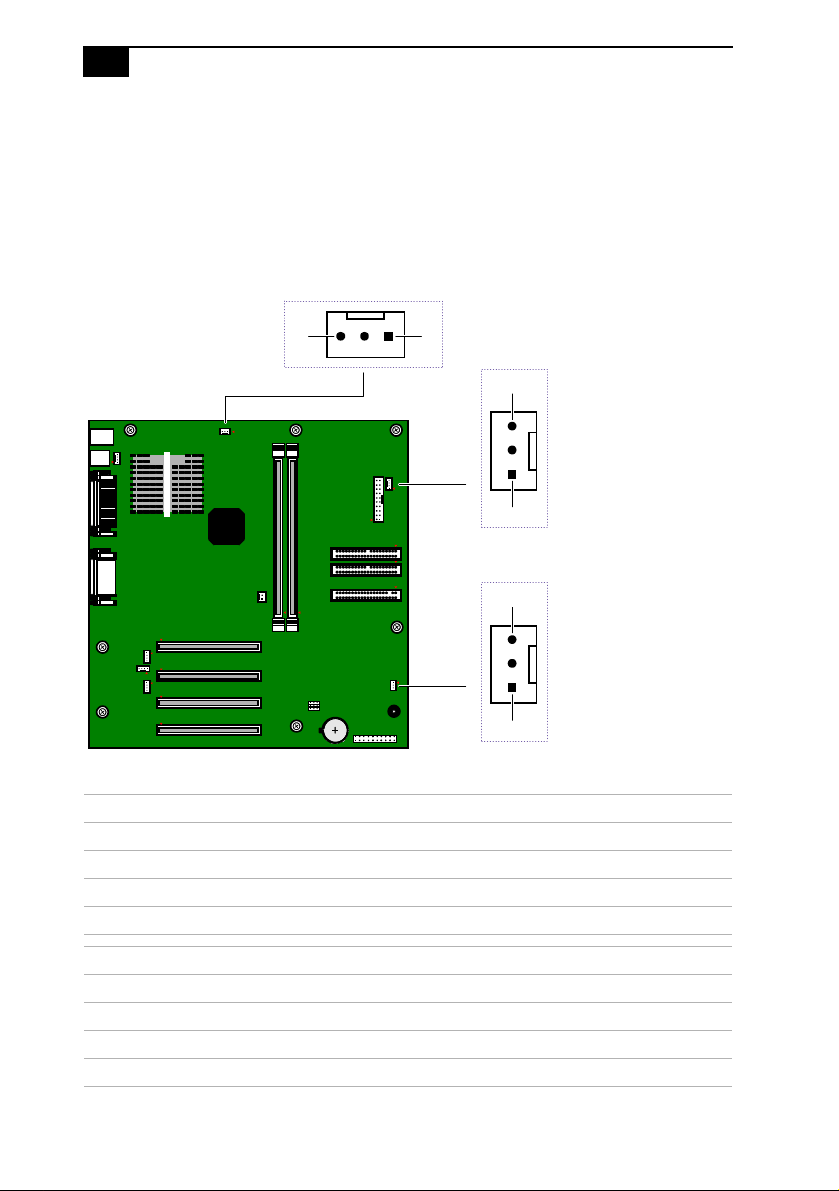
The CPU-FA N, PWR-FAN, and CHA-FAN connectors are 1 x 3-pin
straight header connectors. PWR-FAN connects to the power supply and
controls the power supply cooling fan. CPU-FAN and CHA-FAN
connectors are not used.
CPU-FAN
31
PWR-FAN
3
1
CHA-FAN
3
CPU-FAN and PWR-FAN Connector
Pin Signal Name
1Ground
2 FAN_CTRL (+12V)
3FAN_SEN
CHA-FAN Connector
Pin Signal Name
1Ground
2 FAN_CTRL (+12V)
3FAN_SEN
1
KY0034.VSD
Page 73
System Board
GAME Connector
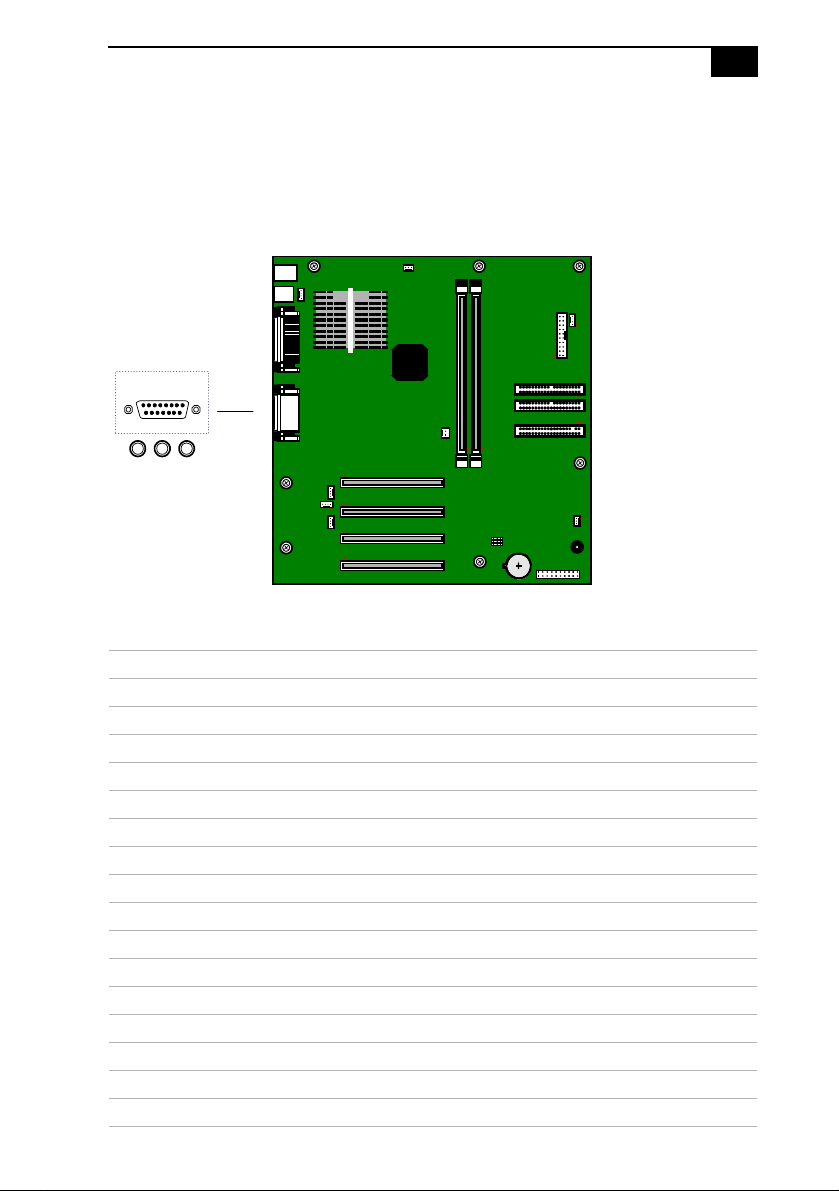
The GAME connector is a female DB-15 connector for connecting to a
game controller/joystick or MIDI device.
GAME
KY0056.VSD
65
GAME Connector
Pin Signal Name
1 GAMEVCC
2JPYB0
3JOYA0
4GND
5GND
6JOYA1
7JOYA2
8 GAMEVCC
9 GAMEVCC
10 JOYB2
11 JOYA2
12 MIDI_TxD
13 JOYA3
14 JOYB3
15 MIDI_RxD
Page 74
66
D
VAIO Digital Studio Reference Manual
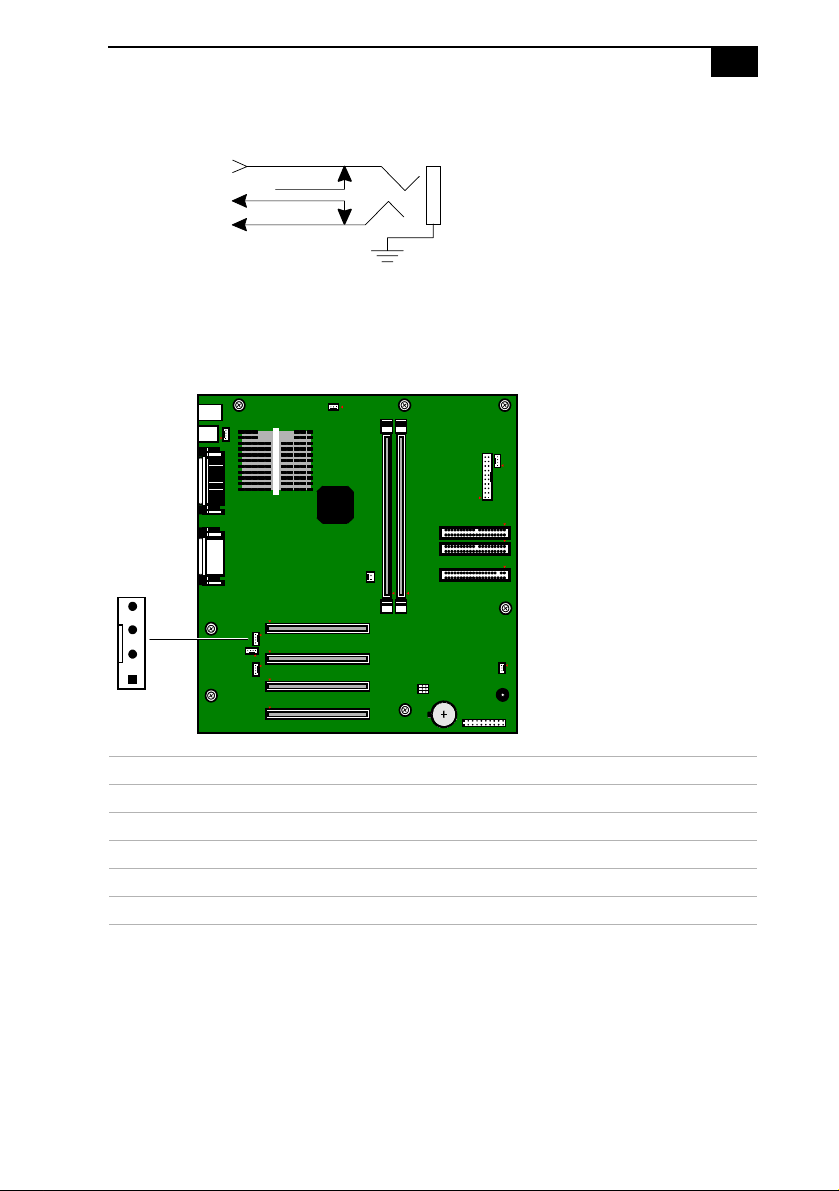
HEADPHONES, LINE IN, MIC Connectors
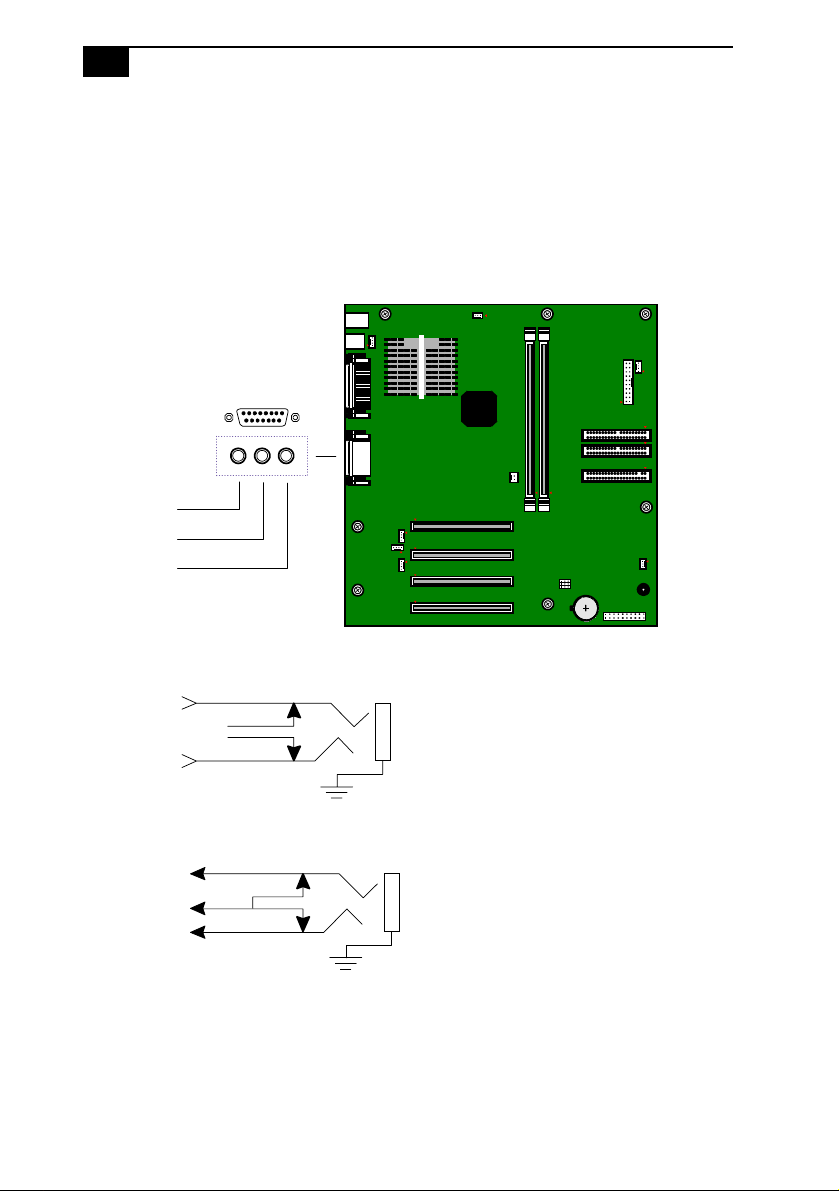
The HEADPHONES jack is a stereo mini-jack (3.5 mm) that connects to
headphones. The LINE IN jack is a stereo mini-jack (3.5 mm) that
connects to a stereo audio source (not an audio source from a video
device). The MIC In jack is a stereo mini-jack (3.5 mm) that connects to a
microphone.
HEADPHONES
LINE IN
MIC
KY0058.VSD
HEADPHONES
Audio Right Out
Audio Left Out
LINE IN
Audio Right In
L Imbalance
Audio Left In
OM04713.VSD
OM04713B.VS
Page 75
System Board
D
67
MIC
Electret bias voltage
MIC imbalance
MIC mono in
OM04713A.VS
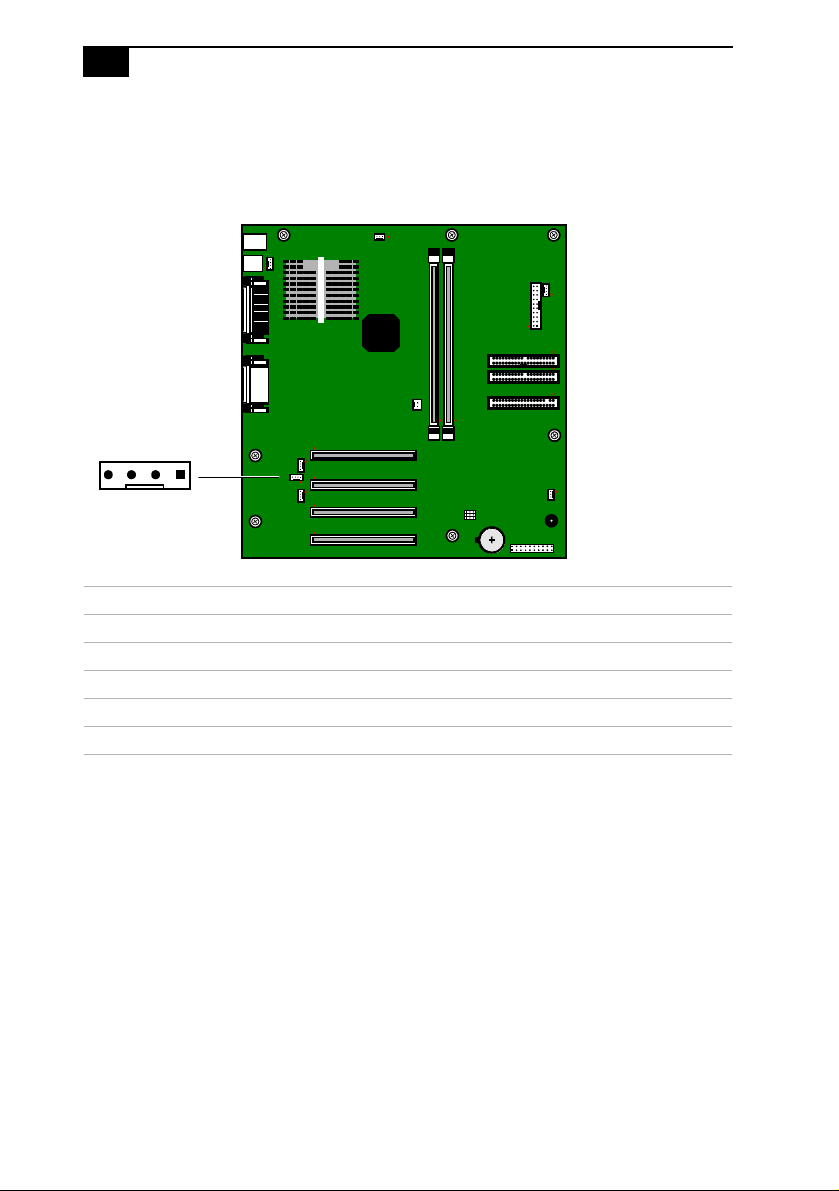
CD-IN Connector
The CD-IN connector on the system board is a 1 x 4-pin header connector
that connects to the DVD-ROM drive’s audio output connector.
CD-IN
4
1
CD-IN
Pin Signal Name
1 Left Line In
2Ground
3Ground
4 Right Line In
KY0062.VSD
Page 76
68
D
VAIO Digital Studio Reference Manual
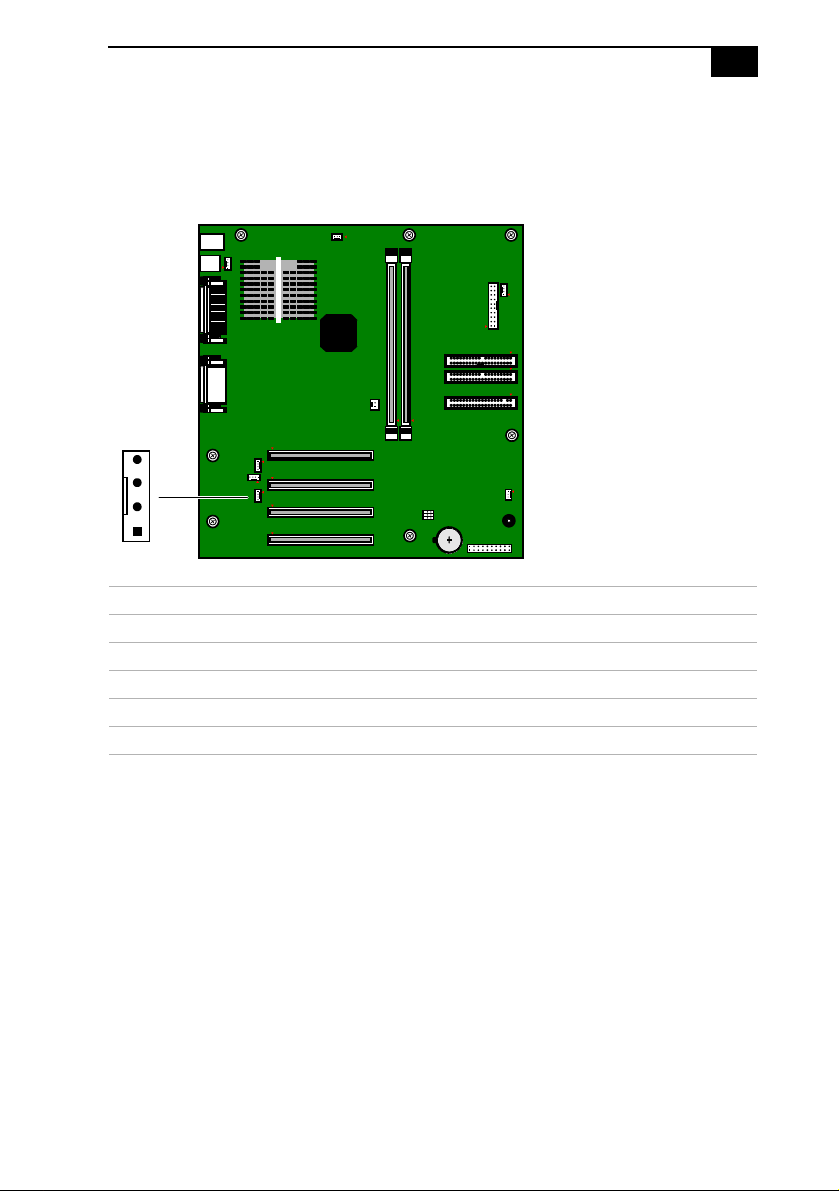
Modem Connector
The Modem connector on the system board is a 1 x 4-pin header that is
not in use.
Modem
Pin Signal Name
1Ground
2 Modem Out
3Ground
4Phone In
Modem
14
KY0062C.VS
Page 77
System Board
D
AUX-IN Connector
The AUX-IN connector on the system board is a 1 x 4-pin header
connector that is not in use.
AUX-IN
4
69
1
AUX-IN
Pin Signal Name
1 Left Line In
2Ground
3Ground
4 Right Line In
KY0062B.VS
Page 78
70
D
VAIO Digital Studio Reference Manual
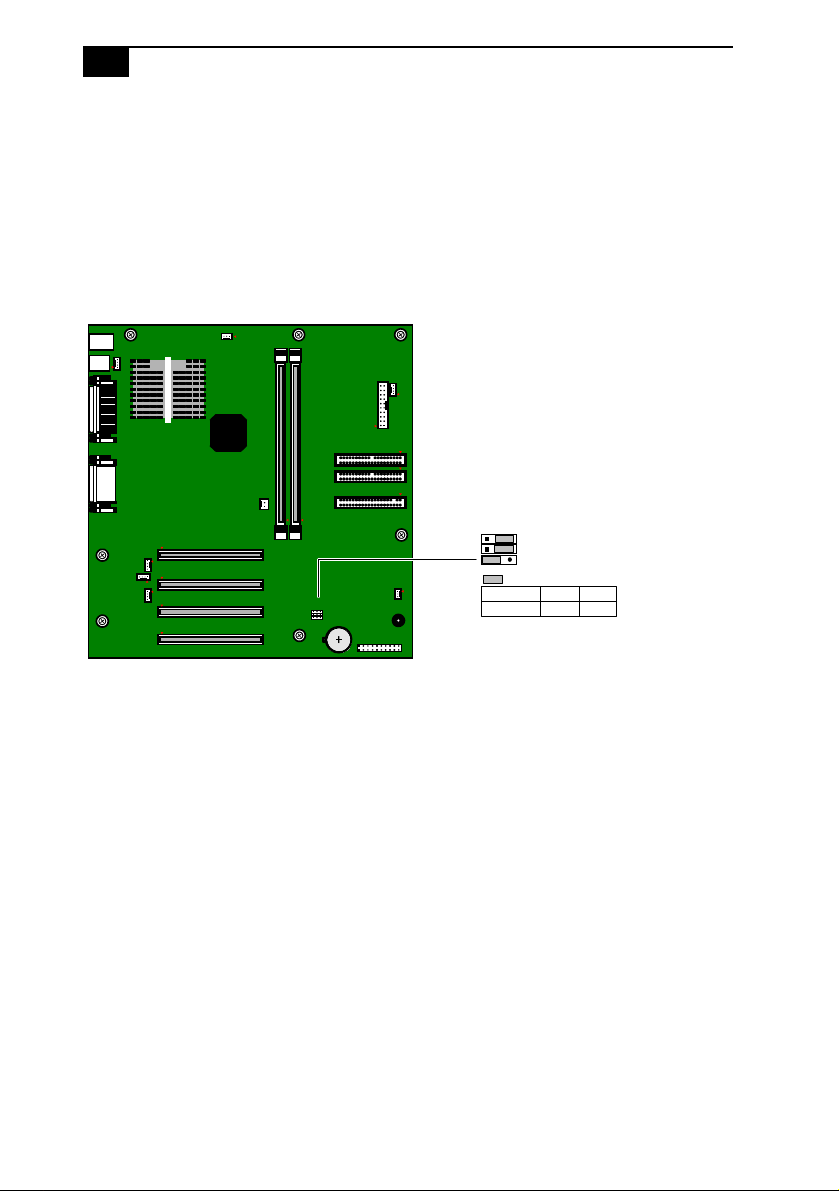
Configuration Jumper
There is one user-configurable jumper for CMOS Clear. The other two
jumpers are reserved (do not change).
The computer ships with CMOS Clear in the Normal position. Do not
change the position of this jumper unless directed by a technical support
person.
13
2
Reserved (do not change)
Reserved (do not change)
CMOS CLR
= default jumper
CMOS Clear
1-2
Normal
2-3
Clear
OM04588.VS
Page 79
Chapter 5
D
Fax/Modem Card
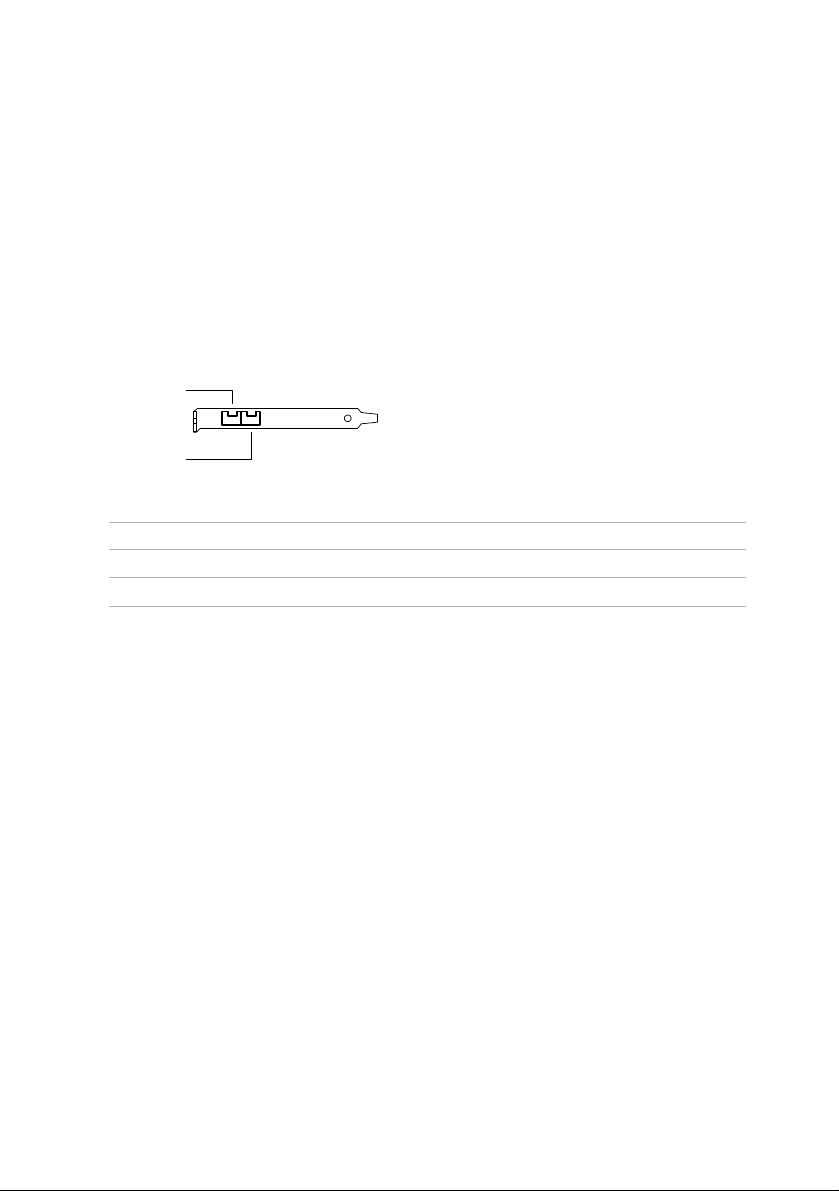
The fax/modem card occupies PCI slot #4. There are two RJ-11 jacks: one
to connect a telephone line, and one to connect a phone.
TELEPHOINE
LINE
Connectors
Name Connector Type Description
TELEPHONE RJ-11 Connects to phone
LINE RJ-11 Connects to telephone line
KY0038.VS
71
Page 80

72
Page 81
Chapter 6
V
i.LINK® Card
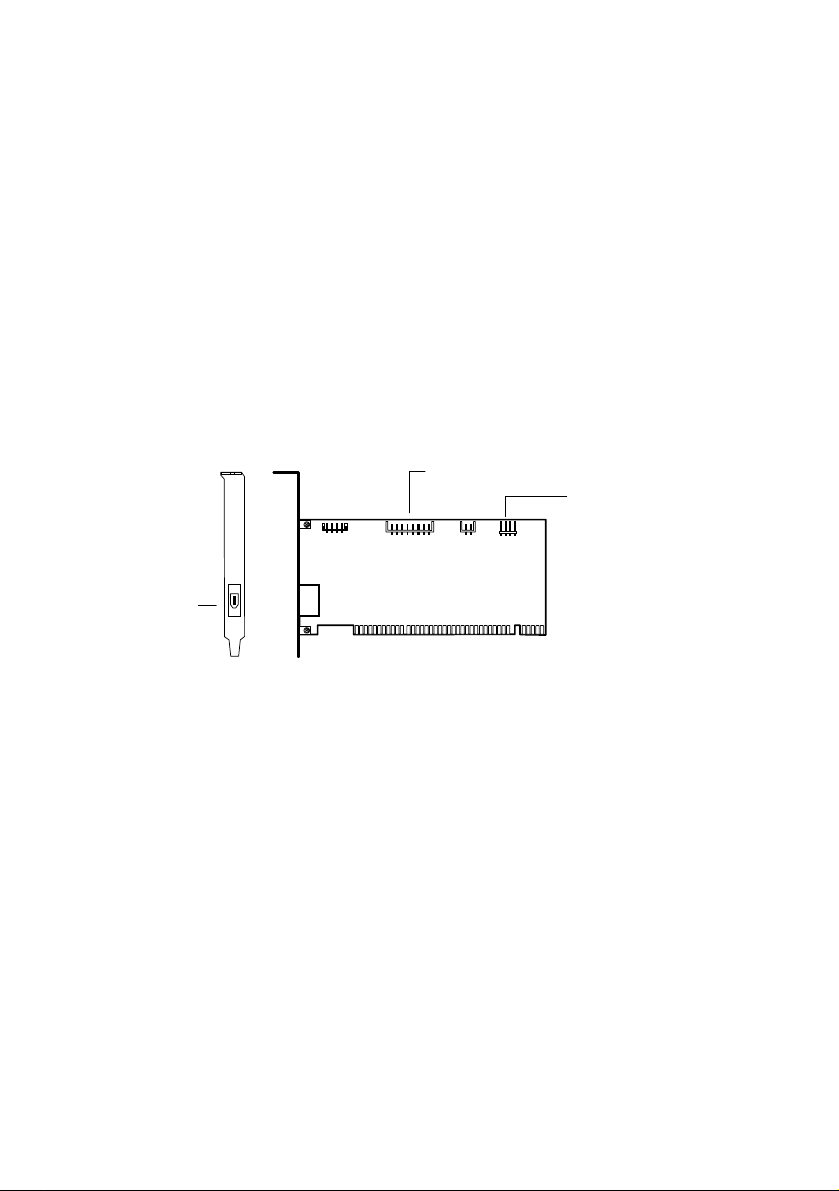
The i.LINK (IEEE-1394) card occupies PCI slot #3. There are four header
connectors, but only two are used: CN3 connects to the power supply,
and CN4 connects to the 4-pin i.LINK connector on the front chassis
through an interface board on the front chassis.
To 4-pin i.LINK connector on front
chassis
CN2 CN3CN4CN5
i.LINK
(IEEE-1394)
to power
supply (+12V)
KY0088.
73
Page 82

74
Page 83

Chapter 7
CMOS Setup Options
This chapter describes each screen in the PhoenixBIOS Setup Utility (see
“Accessing the BIOS Setup Utility” on page 16).
The Award BIOS setup has five menu items on the menu bar. These are:
❑ Main
❑ Advanced
❑ Power
❑ Boot
❑ Exit
Options that you can change are enclosed in brackets. Text that is not
enclosed in brackets cannot be changed.
A small triangle ( ) indicates that there is a sub-menu with additional
information and options. Press Enter to display the sub-menu. The
information and options in a sub-menu are context-sensitive (they appear
or disappear, depending on which options you select).
The item shown in [brackets] in this guide is the default option. The
option shown in [brackets] on the screen is the option currently set for
your system.
The other available options for each item are shown without brackets
directly below the default option in this guide. The available options are
listed in the order they occur when you press the + key.
Use the left and right arrow keys to choose a menu item. Use the up and
down arrow keys to select an option. Press Enter to display a list of
options, or press the + or - key to cycle through the other options.
If you display the list of options, use the up an d do wn arrow keys to
select an option in the list, then press Enter to choose the selection.
Press Esc to go back to the main menu.
75
Page 84

76
VAIO Computer Reference Manual
Press F10 to save the changes and exit, or press Esc to discard the
changes.
Follow the on-screen prompts for other choices. The bottom of the screen
presents a summary of the keys to use for navigation and control.
Page 85
CMOS Setup Options
Main Screen
System Time [00:00:00]
System Date [01/01/1999]
Legacy Diskette A [1.44M, 3.5 in.]
2.88M, 3.5 in.
None
360K, 5.25 in.
1.2M, 5.25 in.
720K, 3.5 in.
Legacy Diskette B [None]
360K, 5.25 in.
1.2M, 5.25 in.
720K, 3.5 in.
1.44M, 3.5 in.
2.88M, 3.5 in.
Floppy 3 Mode Support [Disabled]
Drive A
Drive B
Both
Primary Master (see
Primary Slave (see
Secondary Master (see
Secondary Slave (see
Language [English]
Supervisor Password [Disabled]
User Password [Disabled]
Halt On [All but Keyboard]
Installed Memory 63 MB
“IDE Sub-Menus”
“IDE Sub-Menus”
“IDE Sub-Menus”
“IDE Sub-Menus”
on page 78)
on page 78)
on page 78)
on page 78)
All but Disk
All but Disk/Keyboard
All Errors
No Error
77
Page 86

78
VAIO Computer Reference Manual
IDE Sub-Menus
Type [Auto]
Translation Method
Cylinders
Heads
Sectors
†
†
‡
CHS Capacity
Maximum LBA Capacity
*
*
*
User Type HDD
CD-ROM
LS-120
ZIP-100
MO
Other ATAPI
None
[LBA]
Large
Normal
Match Partition Table
Manual
[ 1024]
[255]
[63]
8422MB
10262MB
Multi-Sector Transfers
*
[Maximum]
Disabled
2 Sectors
4 Sectors
8 Sectors
16 Sectors
32 Sectors
SMART Monitoring
*
[Disabled]
Enabled
PIO Mode
**
ULTRA DMA Mode
Set Device As
††
†
[4]
[2]
[Auto]
Floppy
Hard Disk
* This option appears when Type is set to User Type HDD.
† This option appears when Type is set to Auto or User Type HDD.
‡ This option appears when Type is set to Auto or User Type HDD.
**This option appears when Type is not set to None.
††This option appears when Type is set to ZIP-100 or MO.
Page 87
Advanced Screen
CMOS Setup Options
79
CPU Core:Bus Freq. Multiplier [2.0x]
CPU Level 1 Cache [Enabled]
CPU Level 2 Cache [Enabled]
CPU Level 2 Cache ECC Check [Disabled]
BIOS Update [Enabled]
PS/2 Mouse Function Control [Auto]
USB Legacy Support [Auto]
OS/2 Onboard Memory > 64M [Disabled]
Volume [MEDIUM]
Chip Configuration (see “Chip Configuration Sub-Menu” on page 80)
I/O Device Configuration (see “I/O Device Co nfiguration Sub -Menu” on page 81)
PCI Configuration (see
Shadow Configuration (see
“PCI Configuration Sub-Menu”
“Shadow Configuration Sub-Menu”
2.5x
3.0x
3.5x
4.0x
4.5x
5.0x
5.5x
6.0x
6.5x
7.0x
7.5x
8.0x
Disabled
Disabled
Enabled
Disabled
Enabled
Disabled
Enabled
Enabled
HIGH
MUTE
LOW
on page 82)
on page 84)
Page 88

80
VAIO Computer Reference Manual
Chip Configuration Sub-Menu
SDRAM Configuration [By SPD]
SDRAM CAS Latency [2T]
SDRAM RAS to CAS Delay [2T]
SDRAM RAS Precharge Time [2T]
SDRAM Cycle Time (Tras, Trc) [5T, 7T]
SDRAM Address Setup Time [1T Delay]
SDRAM Page Closing Policy [All Banks]
CPU Latency Timer [Enabled]
Onboard VGA [Enabled]
Display Cache Paging Mode [Page Open]
Video Memory Cache Mode [UC]
Memory Hole At 15M-16M [Disabled]
PCI 2.1 Support [Enabled]
High Priority PCI Mode [ Enabled]
Onboard PCI IDE Enable [Both]
User Define
7ns (143MHz)
8ns (125MHz)
6T, 8T
No Delay
One Bank
Disabled
Disabled
Page Close
USWC
Enabled
Disabled
Disabled
Primary
Secondary
Disabled
Page 89

I/O Device Configuration Sub-Menu
Onboard AC97 Audio Controller [Auto]
Disabled
Onboard FDC Sw ap A & B [No Swap]
Swap AB
Floppy Disk Access Control [R/W]
Read Only
Onboard Serial Po r t 1 [3F8H/IRQ4]
2F8H/IRQ3
3E8H/IRQ4
2E8H/IRQ10
Disabled
Onboard Parallel Port [378H/IRQ7]
278H/IRQ5
Disabled
3BCH/IRQ7
Parallel Port Mode [Normal]
EPP
ECP
ECP+EPP
Onboard Game Port [Disabled]
200H-207H
208H-20FH
CMOS Setup Options
81
Page 90
82
VAIO Computer Reference Manual
PCI Configuration Sub-Menu
Slot 1 IRQ [Auto]
to NA
Slot 4 IRQ 3
PCI/VGA Palette Snoop [Disabled]
PCI Latency Timer [32]
SYMBIOS SCSI BIOS [Auto]
USB Function [Enabled]
ONB VGA BIOS First [No]
Onboard Audio [Enabled]
PCI/PNP ISA IRQ Resource Exclusion
“PCI/PNP ISA IRQ Resource Exclusion Sub-Menu”
(see
PCI/PNP ISA DMAResource Exclusion
(see
“PCI/PNP ISA DMA Resource Exclusion Sub-Menu”
PCI/PNP IS A UM B Resource Exclu s ion
(see
“PCI/PNP ISA UMB Resource Exclusion Sub-Menu”
4
5
7
9
10
11
12
14
15
Enabled
Disabled
Disabled
Yes
Disabled
on page 83)
on page 83)
on page 83)
Page 91
CMOS Setup Options
PCI/PNP ISA IRQ Resource Exclusion Sub-Menu
IRQ 3 Used By ISA [No/ICU]
Yes
IRQ 4 Used By ISA [No/ICU]
Yes
IRQ 5 Used By ISA [Yes]
No/ICU
IRQ 7 Used By ISA [No/ICU]
Yes
IRQ 9 Used By ISA [No/ICU]
Yes
IRQ 10 Used By ISA [No/ICU]
Yes
IRQ 11 Used By ISA [No/ICU]
Yes
IRQ 12 Used By ISA [No/ICU]
Yes
IRQ 14 Used By ISA [No/ICU]
Yes
IRQ 15 Used By ISA [No/ICU]
Yes
PCI/PNP ISA DMA Resource Exclusion Sub-Menu
DMA 1 Used By ISA [No/ICU]
Yes
DMA 2 Used By ISA [No/ICU]
Yes
DMA 3 Used By ISA [No/ICU]
Yes
PCI/PNP ISA UMB Resource Exclusion Sub-Menu
ISA MEM Block BASE [No/ICU]
C800
CC00
D000
D400
D800
DC00
83
Page 92

Shadow Configuration Sub-Menu
Video ROM BIOS Shadow [Enabled]
D0000-D7FFF Shadow [Disabled]
D8000-DBFFF Shadow [Disabled]
DC000-DFFFF Shadow [Disable d]
Disabled
Enabled
Enabled
Enabled
84
Page 93

Power Screen
CMOS Setup Options
85
Power Management [User Define]
Video Off Option [Suspend -> Off]
Video Method [DPMS OFF]
HDD Power Down [Disabled]
ACPI Mode [S1]
Suspend Mode [Disabled]
PWR Button < 4 Secs [Suspend]
Power Up Control (see “Power Up Control Sub-Menu” on page 86
Hardware Monitor (see “Hardware Monitor Sub-Menu” on page 86
Disabled
Min Saving
Max Saving
Always On
DPMS Reduce ON
Blank Screen
V/H SYNC+Blank
DPMS Standby
DPMS Suspend
1 Min
2 Min
3 Min
4 Min
5 Min
6 Min
7 Min
8 Min
9 Min
10 Min
11 Min
12 Min
13 Min
14 Min
15 Min
S3
~
1
2 Min
~
3 Min
2
~
4
5 Min
~
8
9 Min
20 Min
30 Min
40 Min
1 Hour
Soft Off
Page 94

86
VAIO Computer Reference Manual
Power Up Control Sub-Men u
AC PWR Loss Restart [Disabled]
PWR Up On Modem Act [Disabled]
Wake On LAN [Disabled]
Hardware Monitor Sub-Menu
MB Temperature [Ignore]
CPU Temperature [(displays actu al temperature)]
CPU Fan Speed [Ignore]
Power Fan Speed [(displays actual RPM)]
Chassis Fan Speed N/A
VCORE Voltage [(displays actual vo ltage)]
+3.3V Voltage [(displays actual voltage)]
+5V Voltage [(displays actual voltage)]
+12V Voltage [(displays actual voltage)]
-12V Voltage [(displays actual volta ge)]
-5V Voltage [(displays actual voltage)]
Enabled
Enabled
Enabled
(displays actual temperature)
Ignore
N/A
Ignore
Ignore
Ignore
Ignore
Ignore
Ignore
Ignore
Page 95

Boot Screen
CMOS Setup Options
87
1. ATAPI CD-ROM [(displays installed drive)]
2. Removable Device [Legacy Floppy]
3. IDE Hard Drive [(displays installed drive)]
4. Other Boot Device [Disabled]
Plug & Play O/ S [No]
Boot Virus Detection [Enabled]
Quick Power On Self Test [Enabled]
Boot Up Floppy Seek [Disabled]
Boot Up Num Lock Status [On]
Silent Boot [Enabled]
BOOT Sound [Enabled]
Disabled
LS120
ZIP-100
ATAPI MO
Disabled
Disabled
Network
SCSI Boot Device
Yes
Disabled
Disabled
Enabled
Off
Disabled
Disabled
Page 96

88
VAIO Computer Reference Manual
Exit Screen
Exit Saving Changes
Exit Discarding Changes
Load Setup Defaults
Discard Changes
Save Changes
Page 97

Chapter 8
Miscellaneous Technical
Information
This chapter contains information on the following subjects:
❑ User and Supervisor password
❑ Beep code error messages
❑ PCI configuration status and error messages
❑ DMA channel assignments
❑ IRQ assignments
❑ System I/O address map
❑ Memory map
❑ PCI configuration space map
89
Page 98
90
VAIO Computer Reference Manual
About User and Supervisor Passwords
The system allows you to specify up to two passwords (a User password
and a Supervisor password) in the CMOS Setup Utility. The User
password is required; the Supervisor password is optional.
Access to the CMOS Setup Utility depen d s on which passwords were
previously set, as indicated next.
If you set these passwords... ...the following passwords are required:
User password only User password is required at bootup.
Supervisor password only No password is required at bootup.
Supervisor password is required by most
setup options.
Both passwords User password is required at bootup.
Supervisor password is required by most
setup options.
Page 99

Miscellaneous Technical Information
91
Beep Code Error Messages
During a normal bootup, a single sho r t beep signifies that the system is
OK. Other beep patterns signify errors. The number of bee ps indicates the
specific error that occurred.
The Sony Online Support technical representative will need to know how
many beeps your system produces if there is an error, so be sure to count
the number of beeps before calling for support.
Page 100

92
VAIO Computer Reference Manual
PCI Configuration Status and Error Messages
The following is a list of status and error messages that may appear on
your system from time to time.
Message Meaning
Floppy Disk Controller
Resource Conflict
CMOS Checksum Error,
CMOS Cleared
CMOS Data Invalid,
CMOS Cleared
Parallel Port Resource Conflict The parallel port has requested a resource
PCI Error Log is Full This message is displayed when more than
PCI I/O Port Conflict Two devices requested the same resource,
PCI IRQ Conflict Two devices requested the same resource,
PCI Memory Conflict Two devices requested the same resource,
Primary Boot Device Not
Found
Primary IDE Controller
Resource Conflict
Primary Input Device Not
Found
Primary Output Device Not
Found
Secondary IDE Controller
Resource Conflict
Serial Port 1 Resource Conflict Serial port 1 has requested a resource that is
Static Device Resource Conflict A non-Plug and Play ISA card has
The diskette controller has requested a
resource that is already in use.
The CMOS data was reinitialized due to a
CMOS checksum error.
Invalid entry in the CMOS.
that is already in use.
15 PCI conflict errors are detected. No
additional PCI errors can be logged.
resulting in a conflict.
resulting in a conflict.
resulting in a conflict.
The designated primary boot device (hard
disk drive, diskette drive, CD-ROM driv e,
or network drive) could not be found.
The primary IDE contr oll er h as requested a
resource that is already in use.
The designated primary input device
(keyboard, mouse, or other, if input is
redirected ) could not be found.
The designated primary output device
(display, serial port, or other, if input is
redirected ) could not be found.
The secondary IDE controller has r equested
a resource that is already in use.
already in use.
requeste d a resource that is already in use.
 Loading...