

Sony PCV-MXS20 User Manual
VAIO® MX Computer
Getting Started Guide
PCV-MXS20

NOTICE
© 2002 Sony Electronics Inc. Reproduction in
whole or in part without written permission is
prohibited. All rights reserved. This manual and
the software described herein, in whole or in
part, may not be reproduced, translated, or
reduced to any machine-readable form without
prior written approval.
Sony cannot warrant that the functions
described in this guide will be uninterrupted or
error-free. Sony also assumes no responsibility,
and shall not be liable for any damages to, or
viruses that may infect, your computer
equipment, or other property on account of your
access to, use of, or browsing in any described
Web site, or your downloading of any materials,
data, text, images, video, or audio from any
described Web site. Web site information is
obtained from various sources and may be
inaccurate. Copies of copyrighted information
may only be made for legally permissible
purposes.
Sony, VAIO, SonicStage, and Giga Pocket are
trademarks or registered trademarks of Sony.
MagicGate, Memory Stick, and are
trademarks or registered trademarks of Sony
Corporation.
Microsoft and Windows are trademarks or
registered trademarks of Microsoft
Corporation.
All other trademarks are trademarks or
registered trademarks of their respective
owners.
END-USER LICENSE
AGREEMENT FOR SONY
SOFTWARE
Giga Pocket including PicoPlayer
CAREFULLY READ THE FOLLOWING
AGREEMENT BEFORE USING THIS
SOFTWARE. USE OF THIS SOFTWARE
INDICATES YOUR ACCEPTANCE OF THE
AGREEMENT.
IMPORTANT-READ CAREFULLY:
This End User License Agreement (EULA) is a
legal agreement between you and Sony
Electronics Inc. (SONY), the manufacturer of
your SONY computer system (COMPUTER).
Please read this EULA carefully before using
Giga Pocket (including PicoPlayer) software
and related materials distributed together with
this EULA (SONY SOFTWARE). By using the
SONY SOFTWARE, you agree to be bound by
the terms of this EULA. You may use the
SONY SOFTWARE only in connection with
the use of COMPUTER. SONY SOFTWARE is
licensed not sold.
If you do not agree to the terms of this EULA,
SONY is unwilling to license the SONY
SOFTWARE to you. In such event, you may
not use or copy the SONY SOFTWARE, and
you should promptly contact SONY for
instructions on return of the entire
COMPUTER and included SONY
SOFTWARE for a refund of the purchase price
of the COMPUTER.
SONY SOFTWARE LICENSE
Copyright laws and international copyright
treaties, as well as other intellectual property
laws and treaties protect the SONY
SOFTWARE.
2

GRANT OF LICENSE. This License
grants you the following rights:
Software.
You may use one copy of the SONY
SOFTWARE on the COMPUTER except that
you may make multiple copies and distribute
the PicoPlayer software to other users that agree
to the PicoPlayer license
Back-up Copy.
You may make one back-up copy of SONY
SOFTWARE solely for archival purposes.
DESCRIPTION OF
REQUIREMENTS,
RESTRICTIONS, RIGHTS AND
LIMITATIONS
Limitation on Reverse Engineering,
Decompilation and Disassembly.
You may not modify, reverse engineer,
decompile, or disassemble the SONY
SOFTWARE in whole or in part.
Rental.
You may not rent or lease the SONY
SOFTWARE.
Software Transfer.
You may permanently transfer all of your rights
under this EULA only as part of a sale or
transfer of SONY SOFTWARE, provided you
retain no copies, transfer all of the SONY
SOFTWARE (including all copies, component
parts, the media and printed materials, all
versions and any upgrades of the SONY
SOFTWARE and this EULA), and the recipient
agrees to the terms of this EULA.
Termination.
Without prejudice to any other rights, SONY
may terminate this EULA if you fail to comply
with the terms and conditions of this EULA. In
such event, you must destroy all copies of the
SONY SOFTWARE and all of its component
parts.
Confidentiality.
You agree to keep information contained in
SONY SOFTWARE, which is not publicly
known confidential to yourself, and not to
disclose such information to others without
prior written approval from SONY.
COPYRIGHT
All title and copyright in and to the SONY
SOFTWARE (including but limited to any
images, photographs, animation, video, audio,
music, text and “applets”, incorporated into the
SONY SOFTWARE), and any copies of the
SONY SOFTWARE, are owned by SONY or
its suppliers. SONY reserves all rights not
specifically granted under this EULA.
USE OF SONY SOFTWARE WITH
COPYRIGHTED MATERIALS
The Sony Software is capable of being used to
process, store and share personally created and
other content. You agree to use the Sony
Software only in compliance with all copyright
and other laws and agreements that apply to
such content.
3

HIGH RISK ACTIVITIES
The SONY SOFTWARE is not fault-tolerant
and is not designed, manufactured or intended
for use or resale as on-line control equipment in
hazardous environments requiring fail-safe
performance, such as in the operation of nuclear
facilities, aircraft navigation or communication
systems, air traffic control, direct life support
machines, or weapons systems, in which the
failure of the SONY SOFTWARE could lead to
death, personal injury, or severe physical or
environmental damage (High Risk Activities).
SONY and its suppliers specifically disclaim
any express or implied warranty or condition of
fitness for High Risk Activities.
PROHIBITION ON EXPORT.
THE SONY SOFTWARE AND ANY
UNDERLYING TECHNOLOGY MAY NOT
BE EXPORTED OUTSIDE THE UNITED
STATES OR TO ANY FOREIGN ENTITY OR
“FOREIGN PERSON” AS DEFINED BY U.S.
GOVERNMENT REGULATIONS,
INCLUDING WITHOUT LIMITATION,
ANYONE WHO IS NOT A CITIZEN,
NATIONAL OR LAWFUL PERMANENT
RESIDENT OF THE UNITED STATES. BY
DOWNLOADING OR USING THE SONY
SOFTWARE, YOU ARE AGREEING TO
THE FOREGOING AND YOU ARE
WARRANTING THAT YOU ARE NOT A
“FOREIGN PERSON” OR UNDER THE
CONTROL OF A FOREIGN PERSON.
U.S. GOVERNMENT RESTRICTED
RIGHTS.
(I) THE SOFTWARE PRODUCT and
documentation are provided with
RESTRICTED RIGHTS. Use, duplication, or
disclosure by the United States Government is
subject to restrictions as set forth in
subparagraph (c)(1) and (2) of the Commercial
Computer Software-Restricted Rights at 48
CFR 52.227-19, as applicable. Manufacturer is
Sony Electronics Inc., One Sony Drive, Park
Ridge, New Jersey 07656. (II) All SONY
technical data and computer software is
commercial in nature and developed solely at
private expense. Software is delivered as
Commercial Computer Software as defined in
DFARS 252.227-7014 (June 1995) or as a
commercial item as defined in FAR 2.101(a)
and as such is provided with only such rights as
are provided in the SONY standard commercial
license for such software. Technical data is
provided with limited rights only as provided in
DFARS 252.227-7015 (Nov.1995) or FAR
52.227-14 (June 1987), whichever is
applicable.
EXCLUSION OF WARRANTY ON
SONY SOFTWARE.
YOU EXPRESSLY ACKNOWLEDGE AND
AGREE THAT USE OF THE SONY
SOFTWARE IS AT YOUR SOLE RISK. THE
SONY SOFTWARE IS PROVIDED “AS IS”
AND WITHOUT WARRANTY OR
CONDITIONS OF ANY KIND AND SONY
AND SONY’S LICENSORS
(HEREINAFTER, SONY AND SONY’S
LICENSORS SHALL BE COLLECTIVELY
REFERRED TO AS “SONY”) EXPRESSLY
DISCLAIM ALL WARRANTIES AND
CONDITIONS, EXPRESS OR IMPLIED,
INCLUDING, BUT NOT LIMITED TO, THE
IMPLIED WARRANTIES AND
CONDITIONS OF MERCHANTABLE
QUALITY AND FITNESS FOR A
PARTICULAR PURPOSE. SONY DOES NOT
WARRANT THAT THE FUNCTIONS
CONTAINED IN THE SONY SOFTWARE
WILL MEET YOUR REQUIREMENTS, OR
THAT THE OPERATION OF THE SONY
SOFTWARE WILL BE CORRECTED.
FURTHERMORE, SONY DOES NOT
WARRANT OR MAKE ANY
REPRESENTATIONS REGARDING THE
USE OR THE RESULTS OF THE USE OF
THE SONY SOFTWARE IN TERMS OF ITS
CORRECTNESS, ACCURACY,
RELIABILITY, OR OTHERWISE. NO ORAL
4

OR WRITTEN INFORMATION OR ADVICE
GIVEN BY SONY OR A SONY
AUTHORIZED REPRESENTATIVE SHALL
CREATE A WARRANTY OR CONDITION
OR IN ANY WAY INCREASE THE SCOPE
OF THIS WARRANTY. SHOULD THE SONY
SOFTWARE PROVE DEFECTIVE, YOU
(AND NOT SONY OR A SONY
AUTHORIZED REPRESENTATIVE)
ASSUME THE ENTIRE COST OF ALL
NECESSARY SERVICING, REPAIR OR
CORRECTION. SOME JURISDICTIONS DO
NOT ALLOW THE EXCLUSION OF
IMPLIED WARRANTIES OR CONDITIONS,
SO THE ABOVE EXCLUSION MAY NOT
APPLY TO YOU.
LIMITATION OF LIABILITY
SONY SHALL NOT BE LIABLE FOR ANY
INCIDENTAL, INDIRECT OR
CONSEQUENTIAL DAMAGES FOR
BREACH OF ANY EXPRESS OR IMPLIED
WARRANTY OR CONDITION, BREACH OF
CONTRACT, NEGLIGENCE, STRICT
LIABILITY OR ANY OTHER LEGAL
THEORY RELATED TO THIS PRODUCT
AND SONY SOFTWARE. SUCH
DAMAGES INCLUDE, BUT ARE NOT
LIMITED TO, LOSS OF PROFITS, LOSS OF
REVENUE, LOSS OF DATA, LOSS OF USE
OF THE PRODUCT OR ANY ASSOCIATED
EQUIPMENT, DOWN TIME AND
PURCHASER’S TIME, EVEN IF SONY HAS
BEEN ADVISED OF THE POSSIBILITY OF
SUCH DAMAGES. IN ANY CASE, THE
ENTIRE LIABILITY TO SONY, UNDER
ANY PROVISION OF THIS AGREEMENT
SHALL BE LIMITED TO THE AMOUNT
ACTUALLY PAID BY YOU ALLOCABLE
TO THE SONY SOFTWARE. SOME
JURISDICTION DO NOT ALLOW THE
EXCLUSION OR LIMITATION OF
CONSEQUENTIAL, INDIRECT OR
INCIDENTAL DAMAGES, SO THE ABOVE
EXCLUSION OR LIMITATION MAY NOT
APPLY TO YOU.
GOVERNING LAW AND
JURISDICTION, JURY TRIAL
WAIVER
This agreement shall be governed by the laws
of the State of California, United States of
America, without regards to conflict of laws
provisions. Any dispute arising out of this
Agreement shall be subject to the exclusive
venue of the state and federal courts of Santa
Clara County, California, and the parties hereby
consent to the venue and jurisdiction of such
courts. THE PARTIES HERETO WAIVE
TRIAL BY JURY WITH RESPECT TO ANY
MATTERS ARISING UNDER OR
RELATING TO THIS AGREEMENT.
If any part of this Agreement is held invalid or
unenforceable, the other parts will remain valid.
Should you have any questions concerning this
license or this limited warranty, you may
contact SONY by writing to SONY at Sony
Technical Response Center, 12451 Gateway
Boulevard, Fort Myers, Florida 33913.
5

6

Contents
Welcome.....................................................11
About the VAIO MX Computer................................11
Locating Controls And Connectors.........15
Front Panel Overview................................................15
Back Panel Overview ................................................18
Remote Control Overview ........................................20
Additional System Capabilities.................................24
Setting Up Your VAIO MX Computer .......29
To Set Up the FM Tuner ...........................................29
To Set Up Your Giga Pocket
Personal Video Recorder System..............................31
To Set Up Additional Equipment..............................38
SonicStage Premium Software ................43
Overview of SonicStage Premium Software.............43
To Use SonicStage Premium Software .....................47
To Use Playback and Recording Features.................51
To Use the Visualizer, Equalizer,
and Sound Effects......................................................58
To Use the FM Tuner ................................................60
To Use the Timer Functions......................................62
Additional Information..............................................64
7

VAIO MX Computer Getting Started Guide
Setting Up Giga Pocket
For TV Viewing ..........................................65
To Set Up TV Viewing.............................................65
Giga Video Recorder ................................................67
Timer Recording Manager........................................ 71
Timer Recording Wizard ..........................................74
Video Explorer..........................................................76
Playlist Builder .........................................................79
PicoPlayer ................................................................. 81
CLIÉ Converter......................................................... 84
Troubleshooting Topics ...........................87
About the VAIO MX Functions ...............................87
About Software Playback and Recording.................88
About Giga Pocket Personal Video Recorder........... 90
About Using the MiniDisc Drive and Media............ 91
About Recording CDs...............................................94
About the Modem ..................................................... 95
Glossary.....................................................97
8

Contents
Internet Electronic Program
Guide Service ..........................................101
To Set Up Your Internet Electronic
Program Guide Service ...........................................102
Setting Up a Timer Recording ................................104
Viewing Your Selected Program
Recording Schedule.................................................108
Index.........................................................109
9

VAIO MX Computer Getting Started Guide
10

Welcome
Congratulations on your purchase of the Sony VAIO® MX computer!
Your new system is a state-of-the-art multimedia computer that
incorporates the latest audio, television, Internet, and multimedia storage
technologies, into a single, powerful, entertainment package.
About the VAIO MX Computer
The VAIO® MX computer is a fully integrated system that gives you a wide
range of functionality, such as:
Audio playback and recording:
❑ Play back, record, and erase DVD-R/DVD-RW, CD-R/CD-RW, and
MiniDisc media.
❑ Listen and record FM radio broadcasting stations with the built-in FM tuner.
❑ Create custom audio Playlists.
❑ Read and write audio files to and from a Sony MagicGate™ Memory Stick®
media with extended storage capacity.
Video viewing and recording:
❑ Set up and manage one-time, daily, and weekly timer recording schedules.
❑ Manage Video Capsules (recorded video contents) on your computer.
❑ Record personal video content from a videotape.
❑ Play your Video Capsules on other computers.
❑ Create custom video Playlists.
❑ Read, write, or convert video content to and from a Sony MagicGate™
Memory Stick® media for viewing with a Sony CLIÉ handheld device.
Television playback:
❑ Watch and record television from your computer.
❑ View and record TV programming simultaneously.
11

VAIO MX Computer Getting Started Guide
VAIO MX Computer audio capabilities
The audio capability of the VAIO MX computer is advanced, implementing the
latest technologies such as digital audio playback and recording, Dolby® Digital
Surround Sound, an FM tuner scanner, and compatibility with stereo speakers.
A special Sony software application, SonicStage™ Premium, delivers high
quality digital audio playback and recording functions, using your computer’s
built-in audio components or external analog/digital audio devices. SonicStage
Premium software uses ATRAC3 compression technology to supply high quality
sound and increased compression rates for recording.
This software also offers several jukebox-style features:
❑ An audio CD-burning component to record your favorite music on audio
CDs.
❑ A music Visualizer to enhance your listening experience.
❑ A parametric equalizer that fine-tunes your audio playback.
Audio features
❑ MiniDisc Drive — Play and record your favorite music, with full
operational integration with the other audio devices built into the computer,
using the SonicStage Premium software. Your drive is equipped with:
❑ ATRAC3 compression technology that creates high quality audio files
with longer playing time. Audio files recorded with ATRAC3
technology are playable on MiniDisc Long Play (MDLP) compliant
audio players.
❑ Sony OpenMG™ encryption technology that enables you to protect the
music stored on your hard disc drive.
❑ Net MD technology that supports the transfer of music data at high
speeds from your computer to a MiniDisc device or media, while
protecting copyrighted material.
❑ FM Tuner — Enables you to receive FM radio broadcasting stations
through the built-in FM tuner. Through the use of the SonicStage Premium
software, you are able to receive high quality sound.
12
Welcome
VAIO MX Computer video capabilities
Your system utilizes state-of-the-art video technology to function as a DVD
player with recording capability, VCR device, TV, and high-end game console.
Your computer is also equipped with Giga Pocket™ Personal Video Recorder, a
suite of interactive Sony audio and video components that is designed to create,
capture, and play back video files derived from television and your own personal
*
videos.
Giga Pocket Personal Video Recorder features
❑ Giga Video Recorder — This application enables you to watch TV
❑ Timer Recording Manager — The Timer Recording Manager keeps track
❑ Timer Recording Wizard — The Wizard interface guides you through
❑ Video Explorer — The Video Explorer program functions as your video file
❑ Playlist Builder — The Playlist Builder is a video editor that enables you to
Giga Pocket Personal Video Recorder maintains information about the
software and Video Capsules on your computer’s drive D, in a folder
named D:\ Giga Pocket. This folder and its contents are not designed for
your direct maintenance. Please do not move, modify or delete the Giga
Pocket Folder or any of its contents. Any alteration to this folder or its
contents may cause your Giga Pocket software and Video Capsules to stop
working properly.
programs on your computer’s display and record them onto the hard disk
drive as Video Capsules for later playback.
of all TV program recordings you have scheduled. This program also
enables you to modify timer recordings.
setting up a timer recording schedule. You can program one-time recordings
and set up daily or weekly recurring recording schedules.
management system, and stores recorded Video Capsules as well as
modified Playlists. Video Explorer contains export/import functions for file
format conversions.
generate Playlists by selecting various cuts (scenes) from multiple recorded
Video Capsules, and arranging them in any desired sequences for playback.
* Unauthorized duplication of audio or video files is a violation of applicable laws.
13

VAIO MX Computer Getting Started Guide
❑ Giga Pocket Server — The Giga Pocket Server application runs in the
background to support the transfer of data between PicoPlayer users on a
network.
❑ PicoPlayer — This Video Capsule player application can be attached to
Video Capsules that are exported with Video Explorer. You can play a Giga
Pocket Video Capsule on computer systems that do not have Giga Pocket
installed, if such systems support PicoPlayer software requirements.
For more information about Giga Pocket Personal Video Recorder features,
follow these steps to access the Giga Pocket online Help file:
1 Click Start in the Windows® taskbar and select All Programs.
2 Select Giga Pocket and click Giga Pocket Help.
Additional features
❑ DVD-RW drive — This new optical storage technology provides increased
storage capacity and a dynamic multimedia computing experience. Your
state-of-the-art DVD-RW drive writes to DVD-R/DVD-RW and CD-R/CDRW media, and plays your favorite DVDs and CDs.
❑ Sony MagicGate™ Memory Stick® media slot — Delivers data between
Memory Stick media-equipped devices, enabling the transfer of images,
sounds, data and text.
❑ PC Card slot — The PC card slot enables you to increase the functionality
of your computer by connecting portable, external devices. For information
on using PC cards and devices, see the information supplied with the card or
device.
❑ i.LINK® (IEEE1394) interface — Two built-in i.LINK ports provide you
with digital connection capability. The i.LINK name and logo identify a
high-speed communication interface, which allows you to easily connect
compatible digital camcorders.
✍ i.LINK is a trademark of Sony used only to designate that a product contains an
IEEE1394 connection. The i.LINK connection may vary, depending on the software
applications, operating system and compatible i.LINK devices. All products with an
i.LINK connection may not communicate with each other.
Please refer to the documentation that came with your compatible i.LINK device for
information on operating conditions and proper connection. Before connecting
compatible i.LINK PC peripherals to your system, such as an optical or hard disk
drive, confirm their operating system compatibility and required operating conditions.
14
Locating Controls And
Connectors
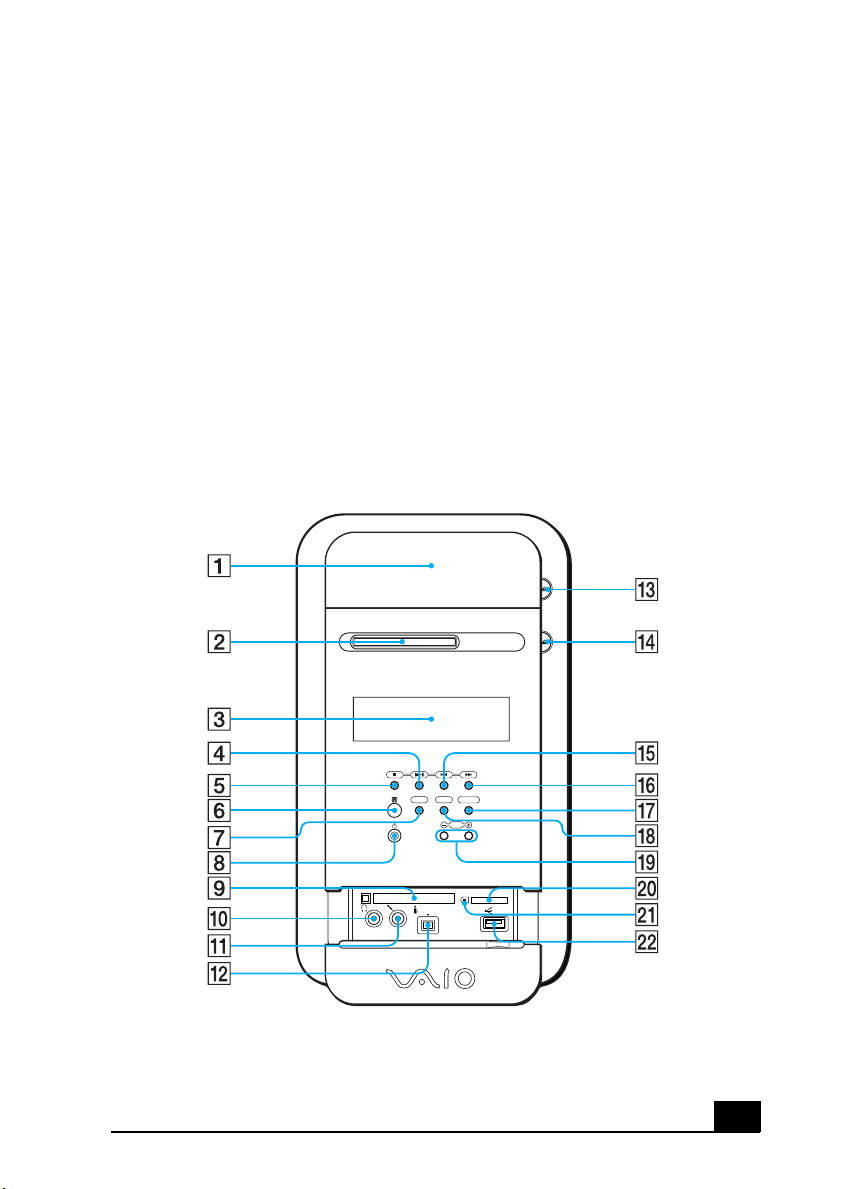
Front Panel Overview
The front panel of your VAIO® MX computer enables access to the optical drive,
MiniDisc drive, Memory Stick®, and PC Card slots. The front panel also
provides access to the Universal Serial Bus (USB) and i.LINK® ports to connect
your compatible peripheral devices.
Front panel
PHONE MIC
PC CARD
MUTING
i.LINK S400
DISPLAY FUNCTION
VOL
MEMORY STICK
USB
15

VAIO MX Computer Getting Started Guide
1 DVD-RW drive
Reads data from DVD or CD media. Writes data to a DVD-R, DVD-RW,
CD-R, or CD-RW media.
2 MiniDisc drive
Plays and records music to and from a MiniDisc media. Supports Net
MD protocol for secure music transfers.
3 LCD display screen
Displays the current operating mode and status of the computer.
4 Play button
Plays the current DVD, CD, or MiniDisc media contents.
5 Stop button
Stops the current playback of DVD, CD, or MiniDisc media.
6 Infrared Receiver
Enables the computer to receive signals from the remote control.
(For proper remote control operation, do not block the infrared receiver.)
7 Muting button
Mutes the current sound output.
8 Power button and indicator light
Turns the computer on and off. The indicator light is blue when the
computer is on and amber when the computer is in Stand by mode.
9 PC Card slot
A PC card (also called a PCMCIA card) can be installed using this slot,
to increase the functions of your system.
10 Headphone jack
Connection for headphones.
11 Microphone jack
Connection for a microphone.
12 i.LINK 4-pin port (IEEE1394)
Connection for a compatible digital device.
16

13 DVD-RW eject button
Ejects a disc from the DVD-RW drive.
14 MiniDisc media eject button
Ejects a MiniDisc media from the MiniDisc drive.
15 Previous/Rewind button
Skips to the previous track on the current playback of a DVD, CD or
MiniDisc media.
16 Next/Fast Forward button
Skips to the next track on the current playback of a DVD, CD or
MiniDisc media.
17 Function button
Selects the operation mode of the computer.
18 Display button
Selects the display mode on the LCD display screen.
19 Volume control buttons
Increases or decreases the volume.
Locating Controls And Connectors
20 MagicGate™ Memory Stick® media slot
Reads and writes data to and from a Memory Stick media.
21 MagicGate Memory Stick media access indicator light
The indicator light is amber when the Memory Stick media slot is in use.
22 Universal Serial Bus (USB) port
Connection for a compatible USB device.
✍ For your convenience, your computer includes USB and i.LINK ports and jacks on
both the front and back panels. (The 4-pin i.LINK port is located on the front panel
and the 6-pin i.LINK port is located on the back.)
17
VAIO MX Computer Getting Started Guide
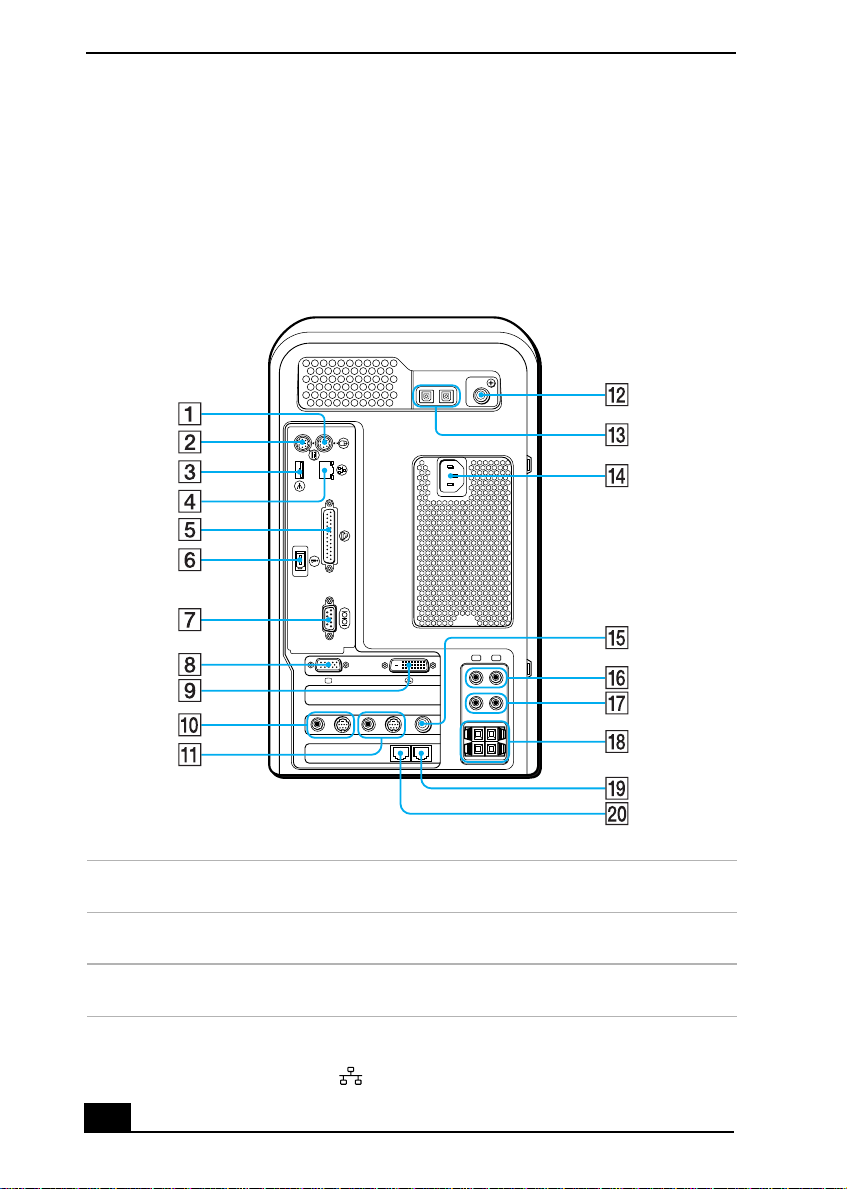
Back Panel Overview
The back panel of your computer contains the ports for supplied and optional
accessories. The back panel also provides access to Giga Pocket™ Personal
Video Recorder ports and jacks. The icons on the back panel locate and identify
the ports and jacks on your computer.
Back panel
OPTICAL FM ANTENNA (75 )
IN OUT
KEYBOARD
MOUSE
USB
NETWORK
ACT
LINK
PRINTER
i.LINK
S400
SERIAL
MONITOR DVI
------ VIDEO OUTPUT ------
S VIDEO/VIDEOS VIDEO/VIDEO AUDIOAUDIO
------ VIDEO 1 INPUT ------
1Mouse port
Connection for a PS/2® mouse.
2 Keyboard port
Connection for a PS/2 Keyboard.
3 Universal Serial Bus (USB) port
Connection for a compatible USB device.
4 Ethernet port
10BASE-T/100BASE-TX Fast Ethernet interface.
(The port marked with (Network) is for LAN connections only.)
18
VHF/UHF
SPEAKER
R L
LINE
IN
LINE
OUT
5 Printer port
Connection for a parallel device, such as a printer or scanner.
6 i.LINK 6-pin port (IEEE1394)
Connection for a compatible digital device.
7 Serial port
Connection for a compatible serial device.
8Monitor port
Connection for a standard display.
9 DVI (LCD) Monitor port
Connection for an LCD display.
10 Audio Out jack
Connection for an audio cable (supplied).
Video/S-video Out port
Connection for a video cable adapter (supplied) or an S-video cable
(optional).
11 Audio In jack
Connection for an audio cable (supplied).
Video/S-video In port
Connection for a video cable adapter (supplied) or an S-video cable
(optional).
12 FM antenna port
Connection for an FM antenna.
13 S/P DIF (IN/OUT) optical ports
Connection for a digital audio or optical device.
14 AC Input port
Connection for the supplied power cord.
15 VHF/UHF port
Connection for a TV coaxial cable (supplied).
16 Line IN jacks (R/L)
Connection for an audio device.
17 Line OUT jacks (R/L)
Connection for an audio device.
18 Stereo speaker terminals (R/L)
Connection for the supplied stereo speakers to the computer.
19 Telephone cable jack
Connection for a phone cable to the computer.
20 Modem line jack
Connection for a modem (supplied) cable to the wall jack.
Back Panel Overview
19
VAIO MX Computer Getting Started Guide
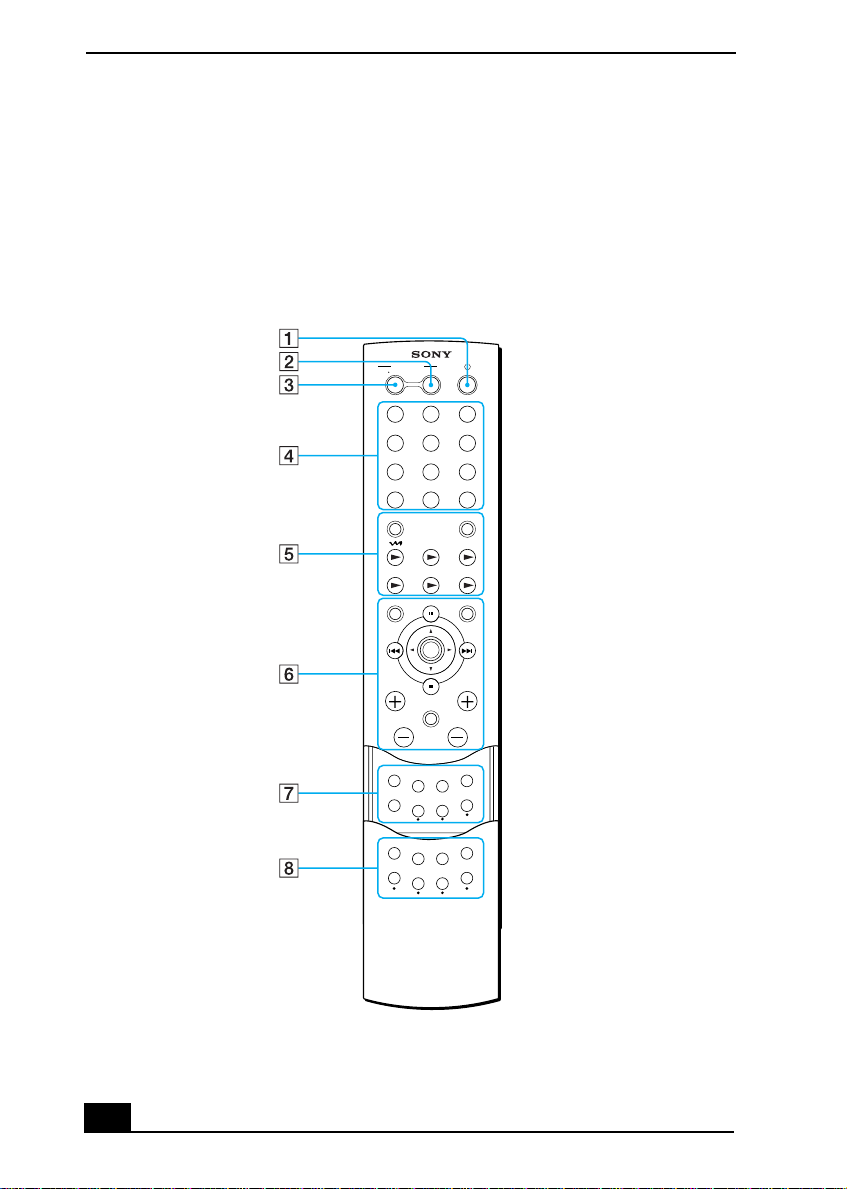
Remote Control Overview
The functions of the VAIO® MX Computer can be controlled using the remote
control (supplied). The remote control can control the functions for the computer,
FM Tuner, MiniDisc player, Memory Stick® media slot, Giga Pocket functions,
and DVD/CD-ROM player.
Remote Control
OPEN/CLOSE
DVD
TV VIDEO
123
456
789
JUMP
MS VIDEO DVD
CANCEL
PREV/
REW
0
CD MD
PAUSE
ENTER
FMTV
MENU
NEXT/
FF
20
DISPLAY
SLEEP
SIZE PLAY
ANGLE
TV
INPUT
REC
VIDEO
MODE
SUBTITLE
STOP
MUTING
DVD
CHANNELVOLUME
MX
MONITOR
DISPLAY
REC MODE
REC
STOP
AUDIO
SELECT
TITLE
EQ
RETURN
1 Power button
Press to turn the computer on or off.
2 DVD button
Press to control a DVD player.
3 TV/VIDEO button
Press to start or stop Giga Video Recorder. Giga Video Recorder is a
feature of the Giga Pocket Personal Video Recorder system.
4 Channel number buttons
Press to select specific channels. Press the ENTER button to activate
channel selection.
Jump button
Press to return to the previous channel. Press again to return to the current
channel.
Enter button
Press to activate channel selection. See channel number buttons.
5TV button
Press to control the onscreen TV image.
FM button
Press to control the FM tuner on the computer.
M button
Press to control the (M drive) on the computer.
CD button
Press to control the CD-ROM drive on the computer.
MD button
Press to control the MiniDisc drive on the computer.
MS button
Press to control the Memory Stick media slot on the computer.
Video button
Press to control video playback.
DVD button
Press to control DVD playback.
6 Cancel button
Press to close a message dialog box.
Pause button
Press to pause playback.
Menu button
Press to display the menu options.
Prev/Rew button
Press to rewind to the previous selection.
Remote Control Overview
21

VAIO MX Computer Getting Started Guide
6
Continued
Direction (center) button
Press in the arrow directions to locate desired content, such as a song or
Video Capsule. Press down to select desired content.
Next/FF button
Press to fast forward to the next selection.
Stop button
Press to stop playback.
Volume buttons
Press to raise or lower the volume.
Muting button
Press to turn off the sound. Press again to restore the sound.
Channel buttons
Press to browse available channels.
7 Display button
Press to display information.
TV input button
Press to select the input source including a television tuner or external
input.
MX Display button
Press to select the mode for the LCD display screen on the computer.
Monitor button
Press to set the display to Stand by mode. Press again to enable the
monitor to resume. This feature is not available while Giga Pocket
features are in use.
Sleep button
Press to program the computer to automatically enter Stand by mode.
Video Rec button
Press to start recording with Giga Video Recorder.
Video Rec Stop button
Press to stop recording on-screen images to Giga Video Recorder.
Video Rec Mode button
Press to select a recording mode for Giga Video Recorder.
8 Size button
If using SonicStage™ Premium software, press to switch to Simple mode
view. Press again to return to the original view.
If using Giga Pocket™ software, press to switch between window and full
screen mode.
Play Mode button
Press to select Play mode.
22

Remote Control Overview
8
Continued
Audio Select button
Press to select audio mode.
EQ button
Press to adjust your equalizer.
Angle button
See the Media Bar™ DVD Player software online Help file for more
information.
Subtitle button
See the Media Bar DVD Player software online Help file for more
information.
Title button
See the Media Bar DVD Player software online Help file for more
information.
Return button
See the Media Bar DVD Player software online Help file for more
information.
23
VAIO MX Computer Getting Started Guide
Additional System Capabilities
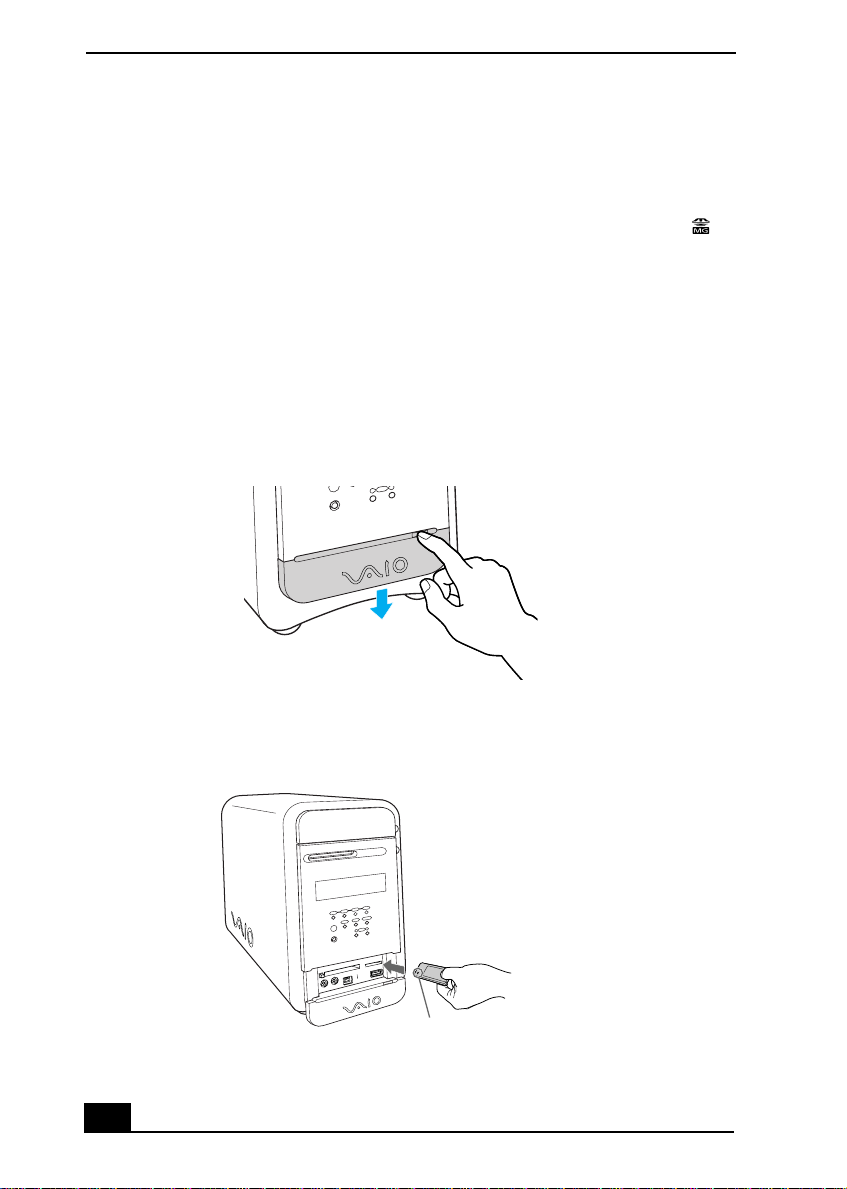
To use the Memory Stick media slot
Your VAIO® MX computer is designed to support the Sony MagicGate™
Memory Stick® media. A Memory Stick media is a compact, portable, and
versatile data storage media designed for exchanging and sharing digital data
with similarly equipped products.
Inserting a Memory Stick media
1 Slide front panel cover in the direction of arrow as shown, to open the lower
front panel.
Opening the lower front panel
2 Insert the Memory Stick media into the Memory Stick media slot.
Inserting the Memory Stick Media
Insert Memory Stick media facing this direction
24
Additional System Capabilities
LOCK
LOCK LOCK
3 If the media does not insert easily, remove it from the slot and verify that it is
not upside-down or backwards. Carefully reinsert the Memory Stick media,
but do not force it into the slot.
Do not remove the Memory Stick media while the media access indicator
light is on. The media or its data may become damaged.
Removing a Memory Stick media
A small portion of the Memory Stick media remains extended when it is inserted
into the Memory Stick media slot.
1 Press and release the extended portion of the Memory Stick media. The
media extends out further from the slot.
2 Remove the Memory Stick media from the slot carefully.
✍ Sony Memory Stick media do not support AVI file playback. First copy the AVI file
to your hard disk drive and then playback the file.
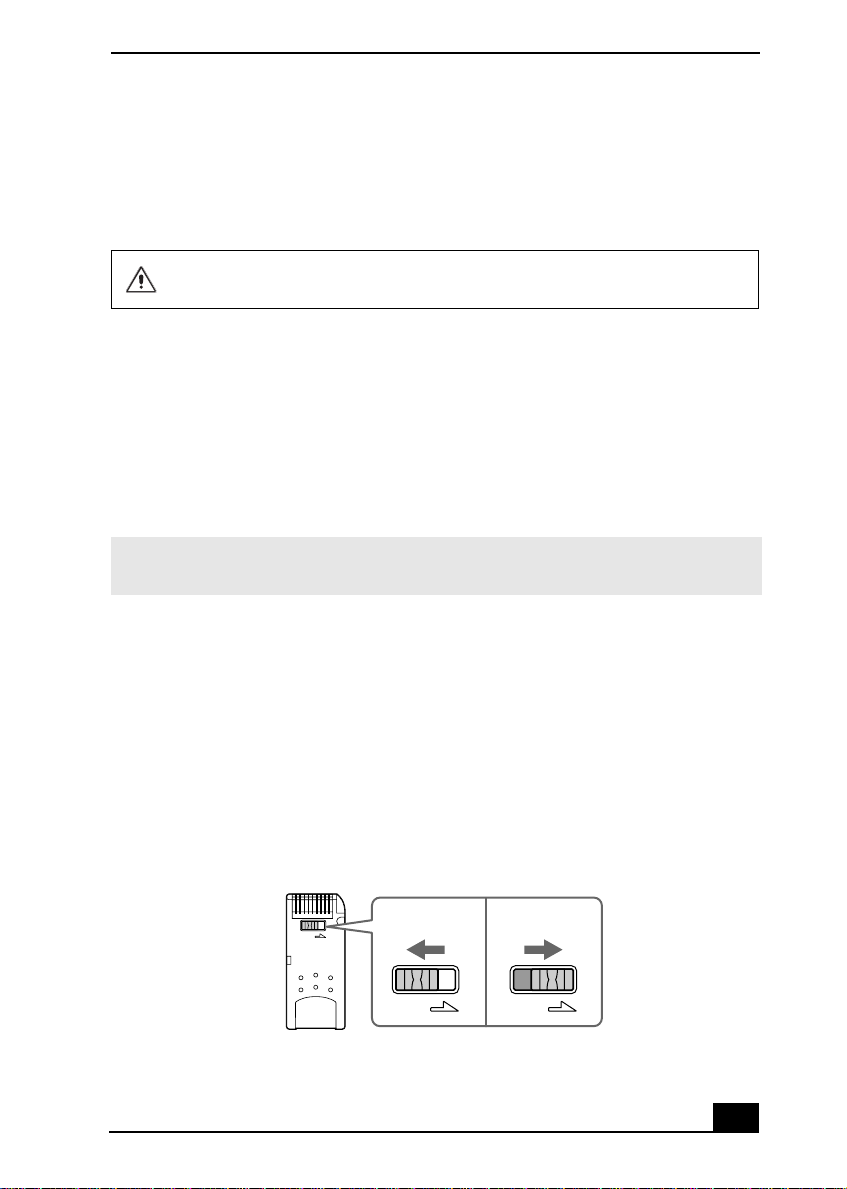
Protecting data on Memory Stick media from accidental changes
Memory Stick media contain a write-protect tab. The write-protect tab prevents
accidental changes to information recorded on your Memory Stick media. When
you slide the write-protect tab to the LOCK position, your Memory Stick media
is write-protected. You cannot delete, copy, or save information on the media
while the write-protect tab in the LOCK position. When you slide the tab to the
un-LOCK position, you can write to or modify your Memory Stick media’s
contents.
Locking the Memory Stick Media
To u nl ock
To l oc k
25
VAIO MX Computer Getting Started Guide
To use PC card slot
Your computer has a card bus PC card slot that supports Type I or Type II PC
(PCMCIA) cards. You do not need to shut down your computer when inserting a
PC card. For more information, see the instructions supplied with your PC card.
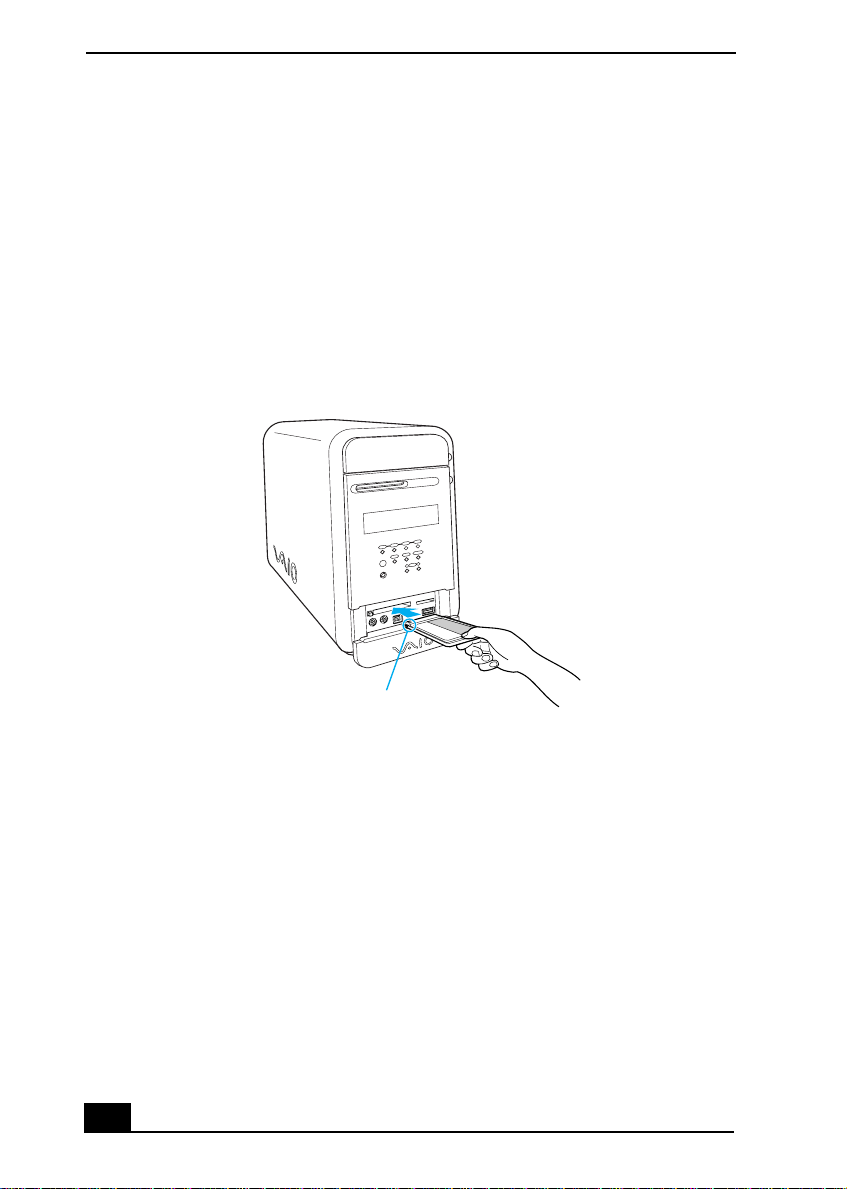
Inserting a PC card
1 Insert the PC card into the PC card slot until it clicks into position.
Inserting a PC card
Insert PC card in this direction
2 If the PC Card does not insert easily, remove it from the PC card slot and
verify that it is not upside-down or backwards. Carefully reinsert the PC
card, but do not force it into the slot.
Removing a PC card
1 Double-click the Safely Remove Hardware icon in the Windows® task tray.
2 Click to select the name of the card that you want to eject and click Stop. The
Stop a Hardware Device window appears.
3 Click OK.
26

Additional System Capabilities
4 When the message “Safe to Remove Hardware” appears, push the PC card
Eject button on the front panel of the system unit. You may need to extend
the Eject button out from the computer before you can eject the card.
5 When the PC card ejects from the PC card slot, remove it by holding the
edges and pulling it out carefully.
✍ If you eject the PC card incorrectly, your computer may not work correctly.
27

VAIO MX Computer Getting Started Guide
28
Setting Up Your VAIO MX
OPTICAL FM ANTENNA (75 )
IN OUT
Computer
This section illustrates how to set up the cables and connections for your
FM Tuner and the Giga Pocket™ Personal Video Recorder system.
To Set Up the FM Tuner
Setting up FM antenna connections
The best method of setting up your FM Tuner depends on the access options
available in your home. This is the basic connection method that enables you to
access FM radio stations with the FM Tuner built into your computer.
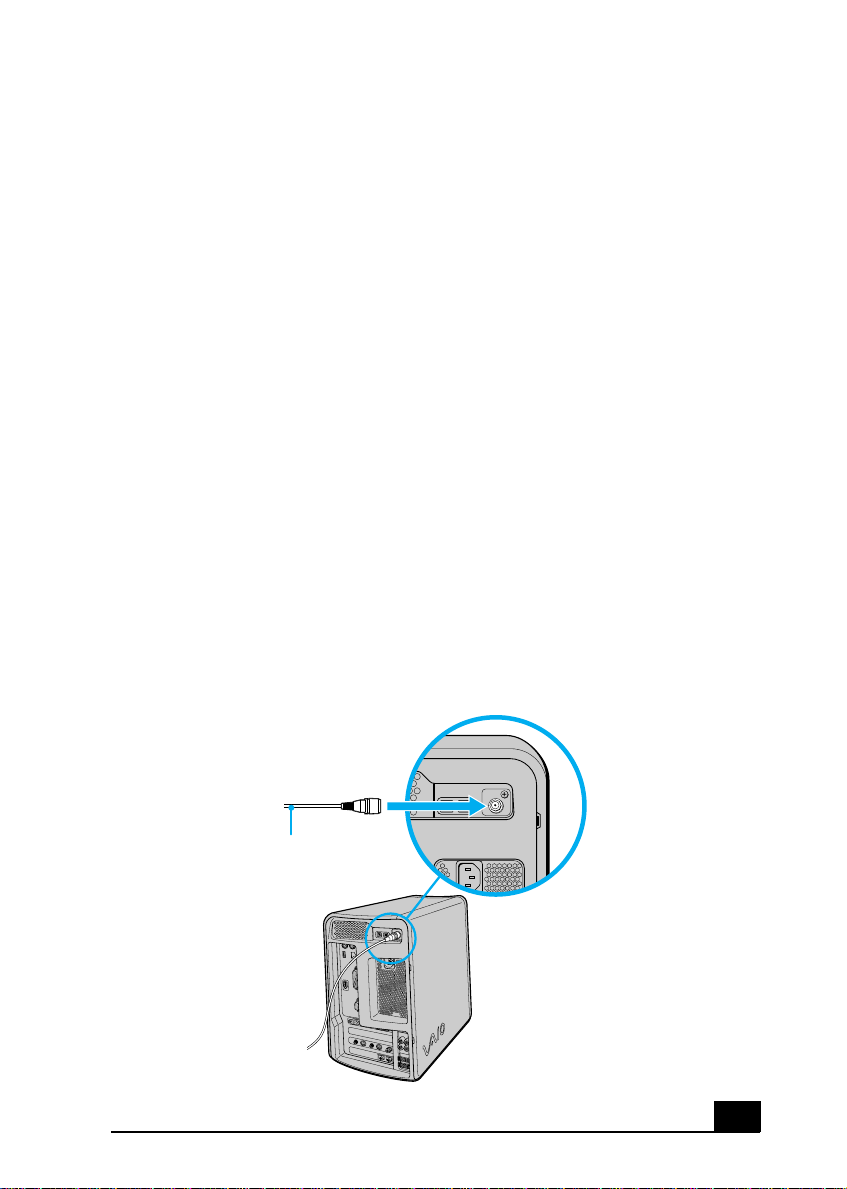
To connect the FM antenna wire (supplied)
1 Connect one end of the FM coaxial cable to the FM antenna port located on
the back of your computer.
Connecting the FM coaxial cable to the FM antenna port
FM coaxial cable
(supplied)
29
VAIO MX Computer Getting Started Guide
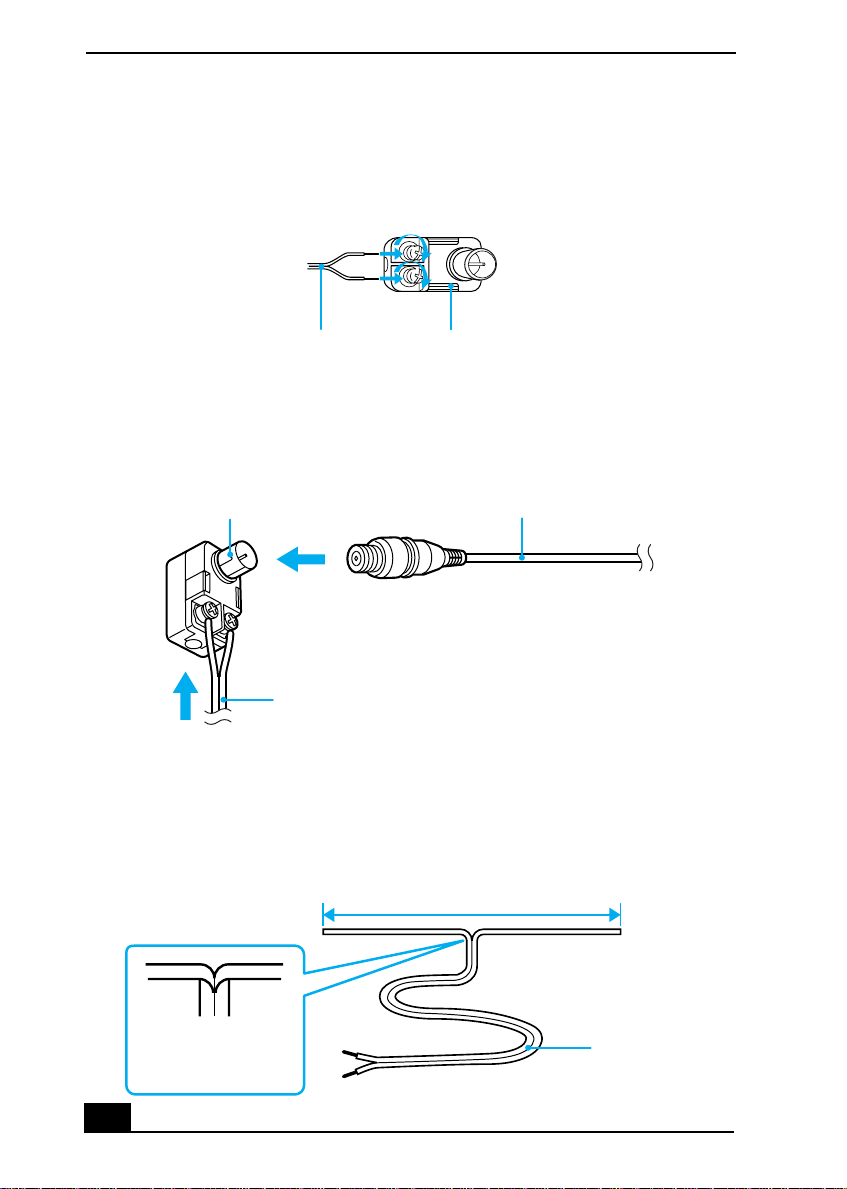
2 Attach the two wire leads of the FM antenna wire (supplied) to the FM
antenna adapter.
Connecting the FM antenna wire leads to the FM antenna adapter
Wire leads
(FM antenna wire)
FM antenna adapter
3 Connect the FM coaxial cable (supplied) to the FM antenna adapter
(supplied).
Connecting the FM coaxial cable to the FM antenna adapter
FM coaxial cableFM antenna adapter
FM antenna wire
4 Carefully separate the other end of the FM antenna wire, as shown, and
mount horizontally onto the wall. For the best reception, mount the antenna
wire away from your computer to avoid static of other electrical interference
with your FM station reception.
Setting up the FM antenna wire (wall mount)
30
FM antenna wire
 Loading...