

Page 1

Welcome
Congratulations on your purchase of this Sony VAIO® computer, and welcome to the VAIO User Guide.
This User Guide provides detailed information on all aspects of using your new VAIO computer, from keyboard functions to
preinstalled software applications.
In the left navigation window, click the topics you want to learn more about, and that information will be displayed in this
main window.
Click here to find the latest updates and supplemental information about your computer.
Click here to view your computer's hardware specifications and software information.
Page 1
Page 2

Using Your VAIO Computer
This section describes the following aspects of your new computer:
Using the Keyboard
VAIO Action Setup
Using the Jog Dial Control
Using Memory Stick Media
Using PC Cards
Using Power Saving Modes
Connecting a Phone Cable
Connecting to a Local Area Network
Connecting to a Wireless Local Area Network
Page 2
Page 3
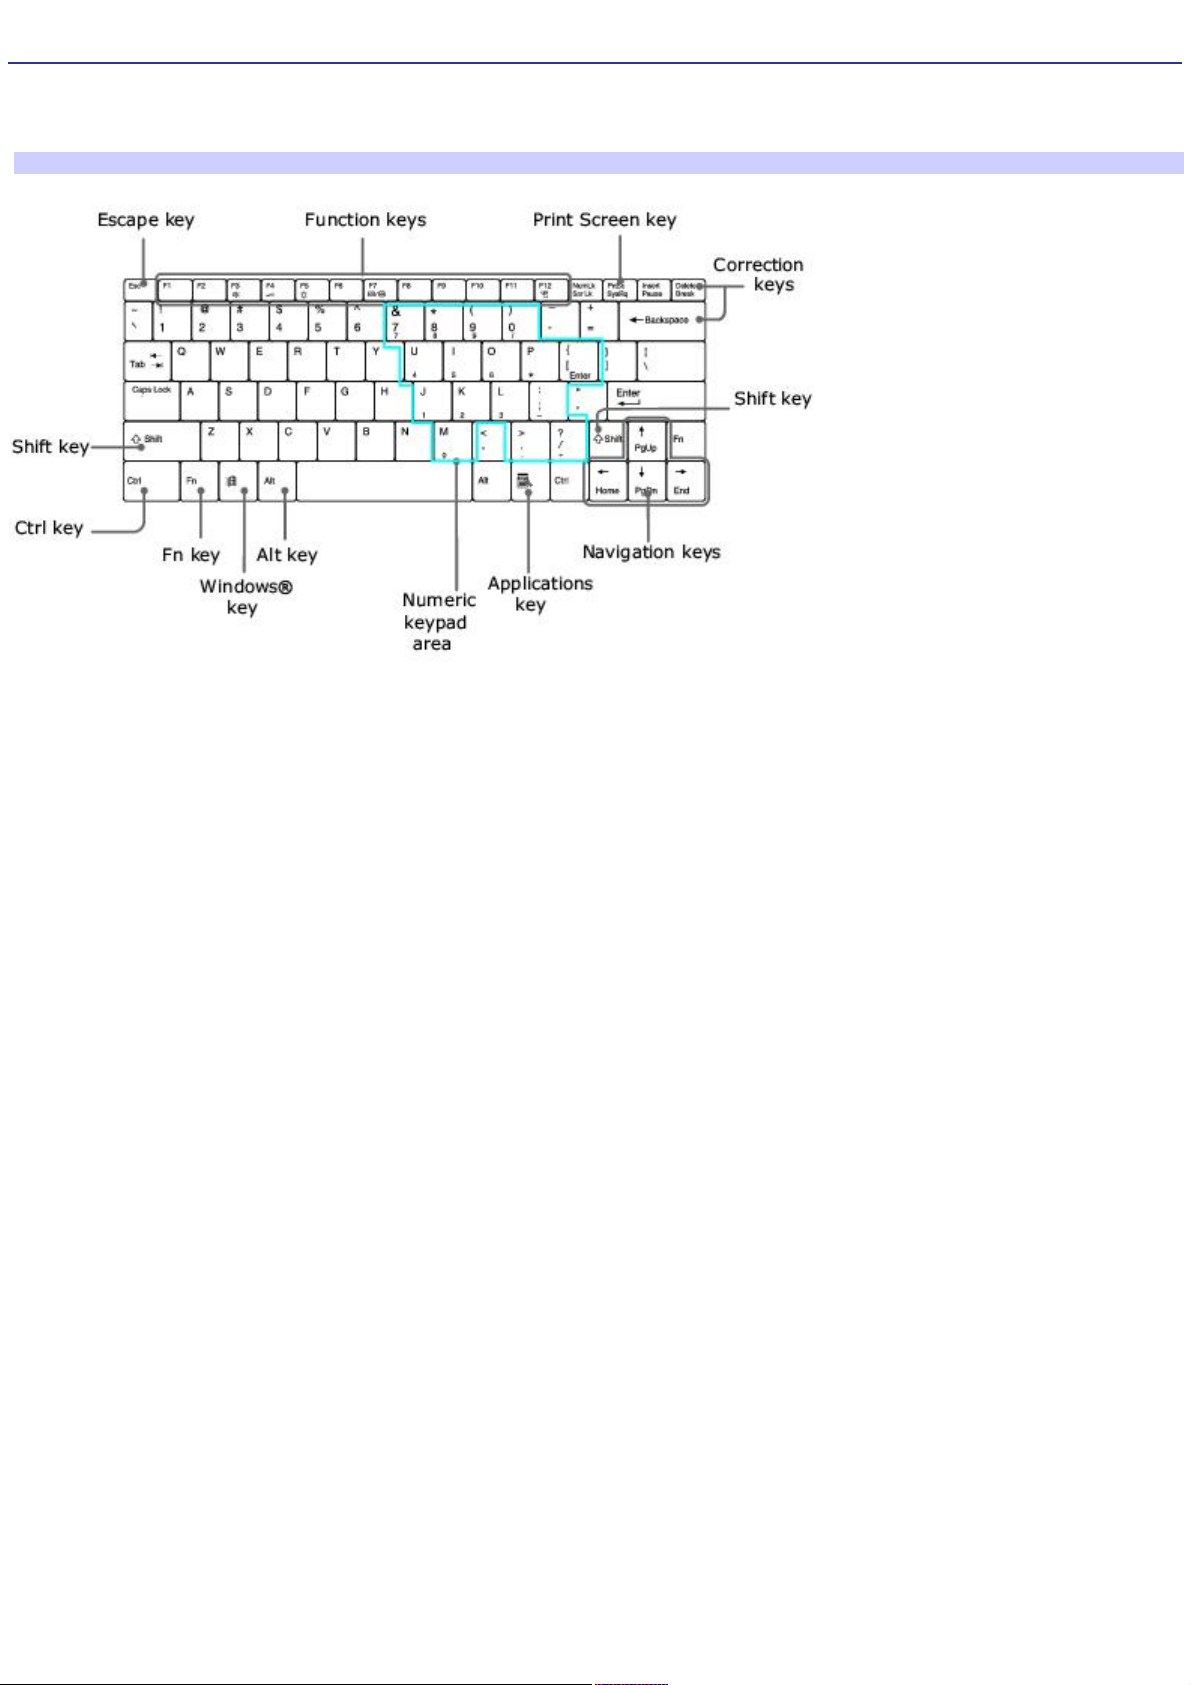
Using the Keyboard
Your keyboard is very similar to a typewriter's, but your computer keyboard has additional keys that perform specific
computer-related tasks.
Keyboard
Page 3
Page 4

Functions of the keyboard keys
Key Description
Numeric keypad area Contains the keys found on a typical calculator. Use the numeric keypad area to type numbers or to
perform mathematical calculations such as addition and subtraction. Numbers appear on the front beveled edge of the
numeric keys. You must press the Num Lock key to activate the numeric keypad. (When you do so, the Num Lock indicator
lights up.)
Navigation keys Several keys are devoted to moving the cursor on the screen (the four arrow keys which also function as
the Home, End, Page Up, and Page Down keys).
Correction keys The Insert, Backspace, and Delete keys enable you to make corrections in your documents.
Function keys The twelve function keys along the top of the keyboard are used to perform designated tasks. For
example, in many applications, F1 is the Help key. The task associated with each function key may vary among applications.
Escape key The Esc (Escape) key is used to cancel commands.
Print Screen key The Print Screen key takes an electronic snapshot of the screen and moves it to the Windows
®
Clipboard. You can then paste the screen shot into a document and print it.
Operator keys (Shift, Ctrl, Alt keys) Several keys are always used with at least one other key: Ctrl, Alt, and Shift. When
held down with another key, the Ctrl (Control) and Alt (Alternate) keys offer another way to give commands. For example,
in many applications, instead of choosing the Save command from a menu, you can hold down Ctrl and press the S key
(referred to as Ctrl+S). The Shift key operates the same way as on a typewriter; it is used to produce capital letters or
special symbols, such as @ and $.
Windows® key
The key with the Windows® logo displays the Windows® Start menu; it's the equivalent of clicking Start on
the taskbar. See Combinations and functions with the Windows key for more information.
Fn key The Fn key is used in combination with other keys to issue commands. See Combinations and functions
with the Fn key for more information.
Applications key
The Applications key displays a shortcut menu of context-sensitive choices. Pressing this key is the
equivalent of clicking the right mouse button.
Page 4
Page 5

Combinations and functions with the Windows key
Combination Function
+ F1 Displays VAIO® Help and Support Center.
+ Tab Switches the selected button on the taskbar.
+ E Displays Windows® Explorer.
+ F Displays the Search window to find a file or folder. This is the equivalent of selecting Search from the Start
menu.
+ Ctrl + F Displays the search results window where you can locate other computers. This is the equivalent of
selecting Search, and then Computers from the Start menu.
+ M Minimizes all displayed windows (with Num Lock off).
Shift + + M Returns all minimized windows to their previous size.
+ R Displays the Run window. This is the equivalent of selecting Run from the Start menu.
Fn + + Insert Displays the System Properties window. This is the equivalent of selecting Control Panel, and then
System from the Start menu.
Page 5
Page 6

Indicators
Indicator Function
Power
Lights up when the power to the computer is turned on, flashes in Standby mode, and turns off when the
computer is in Hibernate mode or powered off.
Battery
Lights up when the computer is using battery power, flashes when the battery is running out of power,
double-flashes when the battery is charging.
Hard disk
Lights up when data is read from or written to the hard disk drive. Do not enter Standby mode or turn off the
computer when this indicator light is on.
Wireless
LAN Lights up when the Wireless LAN function is running.
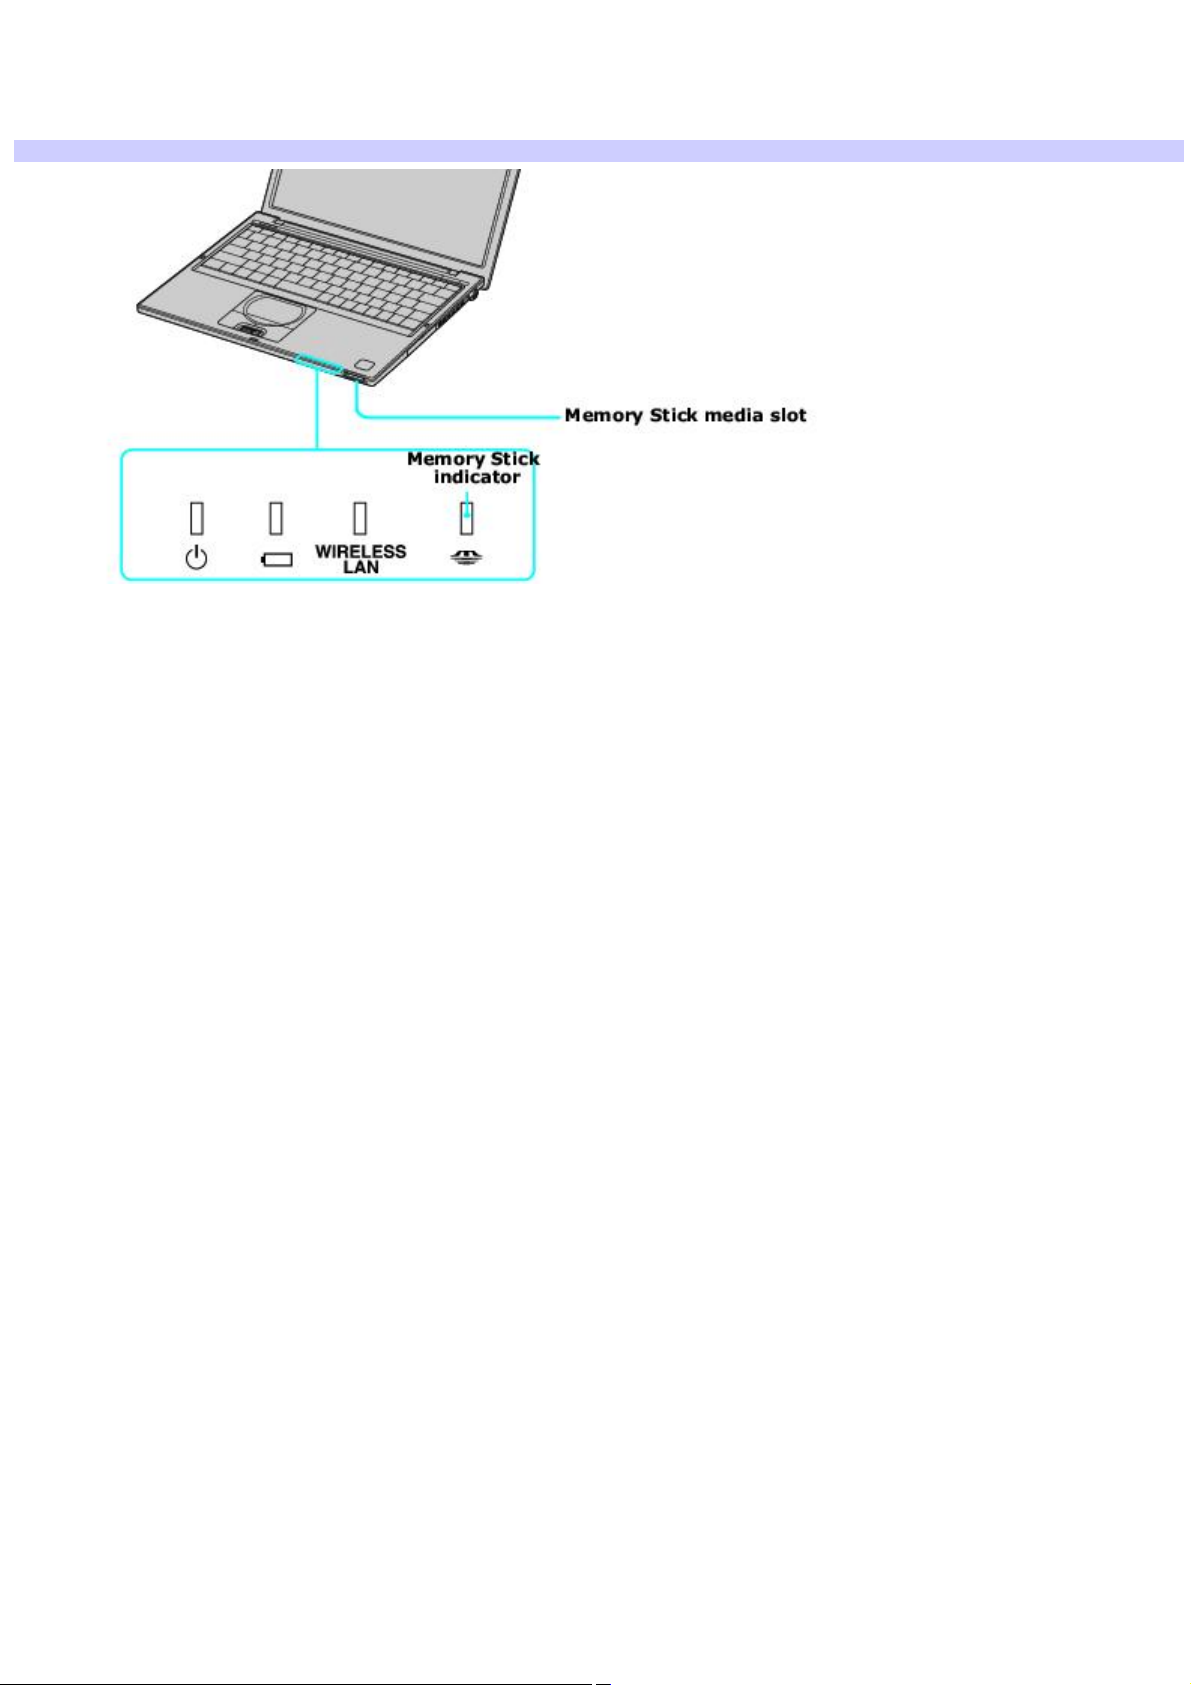
Memory Stick®
Lights up when data is read from or written to the Memory Stick media. (Do not enter Standby mode or turn
off the computer when this indicator light is on.) When indicator is off, the Memory Stick media is not being accessed.
Num Lock
Lights up when the number keys area in the numeric keypad are active. When indicator is off, the
alphanumeric character keys in the keypad area are active.
Caps Lock
Lights up when the letters appear in uppercase as you type. The Shift key lowers the case of typed letters
when Caps Lock is on. When the indicator is off, the letters appear in lower case as you type (unless you hold down the
Shift key).
Scroll Lock
Lights up when the screen scrolls differently. (Exactly how it scrolls depends on the specific application. This
function does not work with all applications.) When indicator is off, information moves across the display normally.
Page 6
Page 7
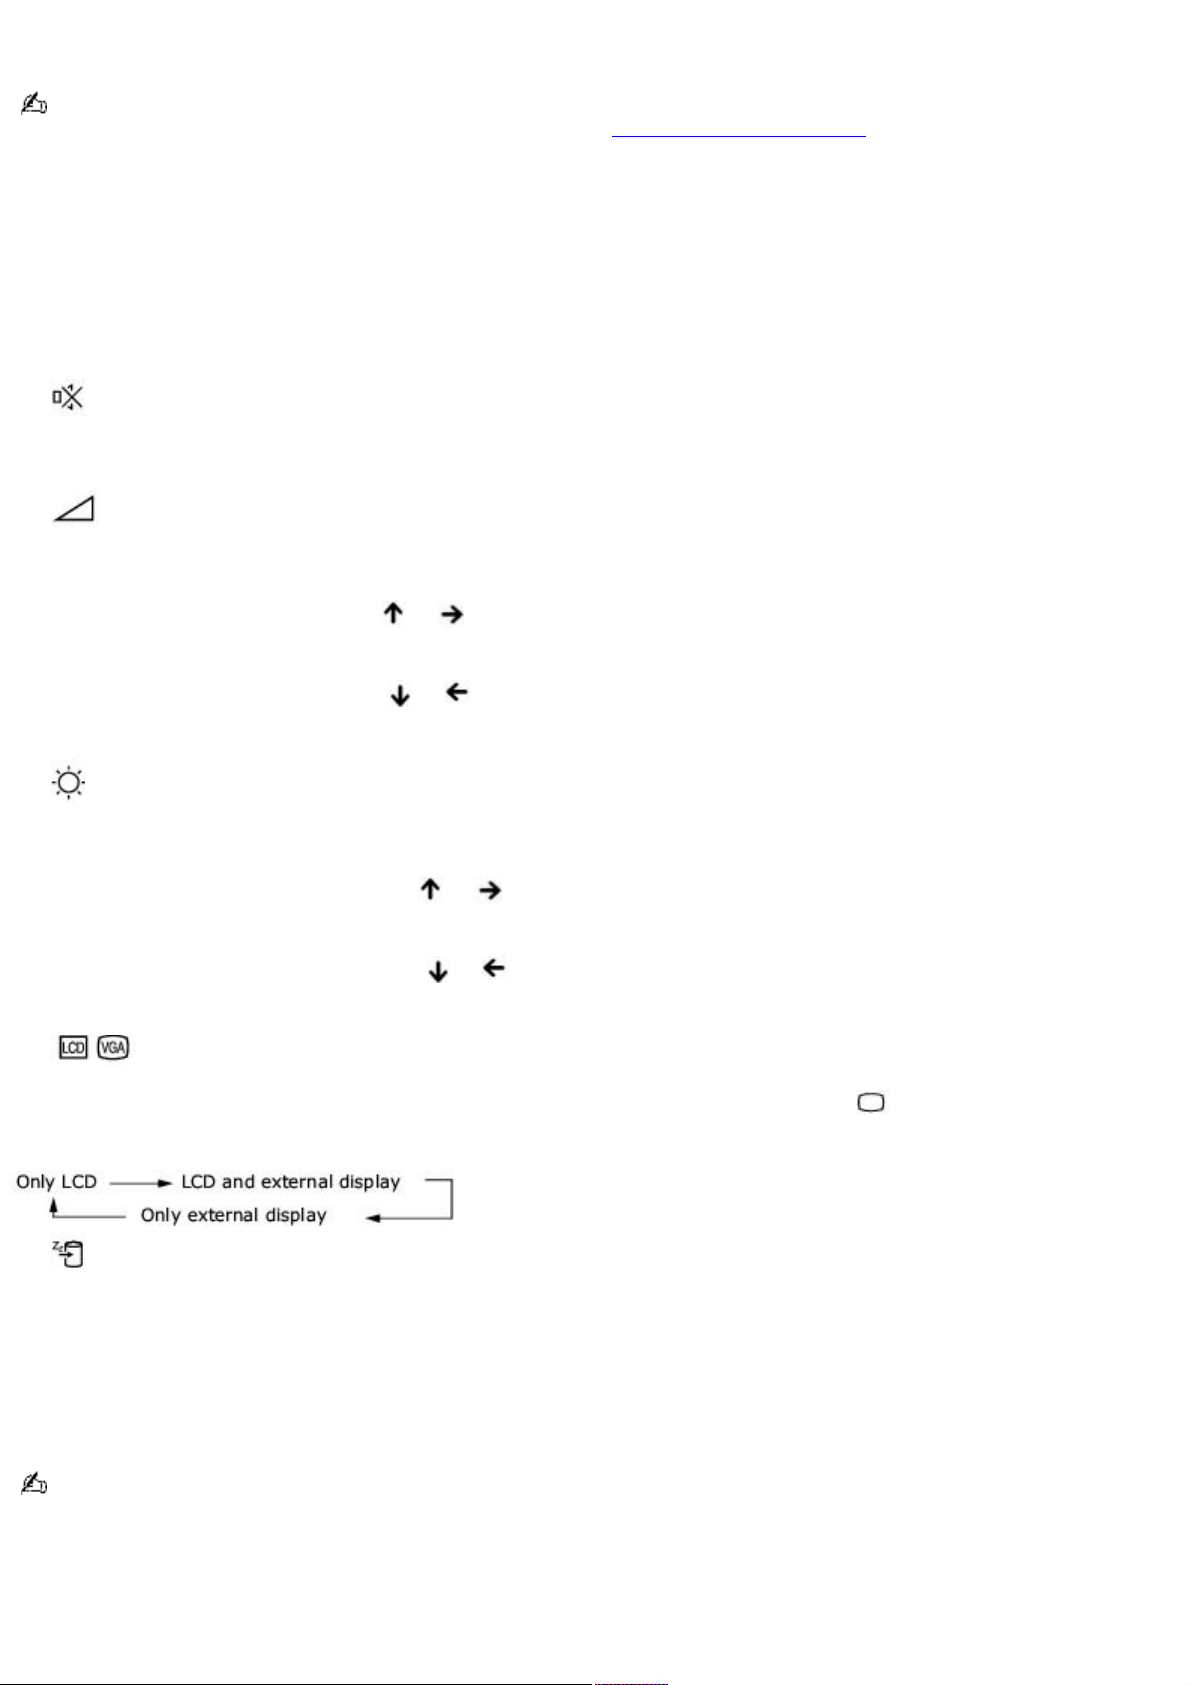
Combinations and functions with the Fn key
If you switch user identities during a computing session, the Fn+F7 key functionality (if available on your computer) will
be interrupted. To switch to an external display or monitor, see Selecting the Display Mode for more information.
Combinations/
Feature Functions
Fn+ (ESC)
Standby Puts the system into Standby mode, a power management state. To return the system to the active state,
press any key on your computer.
Fn+ (F3)
Speaker switch Toggles the built-in speaker off and on.
Fn+ (F4)
Speaker volume Adjusts the built-in speaker volume.
To increase volume, press Fn+F4, then or .
To decrease volume, press Fn+F4, then or .
Fn+ (F5)
Brightness control Adjusts the brightness of the LCD.
To increase the intensity, press Fn+F5 and or .
To decrease the intensity, press Fn+F5 and or .
Fn+ (F7)
Switch to the
external display Toggles between the LCD, external display (connected to the VGA Monitor port), and both LCD
and external display modes.
Fn+ (F12)
Hibernate Provides for the lowest level of power consumption. When you execute this command, the state of the
system and state of the peripheral devices are written to the hard disk, and the system power is turned off. To return the
system to the original state, press the power button briefly to turn on the power.
Fn+B
Bass Boost Toggles the bass-boost function off and on. This feature is available only while using headphones.
Fn+ F Display control. Minimizes and maximizes the LCD screen. If the default display resolution is reduced, this
function maximizes the display resolution to fit the screen size. Maximizing the display screen enables you to view the
display at a greater resolution.
Some functions are not available until Windows® launches.
Page 7
Page 8

VAIO Action Setup
VAIO Action Setup manages the settings for your computer's center Jog Dial Control, Memory Stick® media, and i.LINK
®1
interface. An overview of some of the functions controlled by VAIO Action Setup is provided in this section. For more
information on changing the settings using VAIO Action Setup, right-click the Jog Dial Utility icon or in the taskbar and
click Help Topics.
1
i.LINK is a trademark of Sony us ed to des ignate that a produc t c ontains an I E E E 1 3 9 4 c onnection. T he i.LINK c onnec tion may vary, depending on the
software applications, operating s ys tem, and c ompatible i.LI NK devices. A ll products with an i.LI N K c onnec tor may not c ommunic ate with eac h other. Refer
to the documentation that came with your compatible i.LIN K devic e for information on operating c onditions and proper c onnec tion. Before c onnecting
compatible i.LI N K P C peripherals to your system, s uc h as a C D-RW or hard dis k drive, c onfirm their operating s ystem c ompatibility and required operating
conditions.
Page 8
Page 9
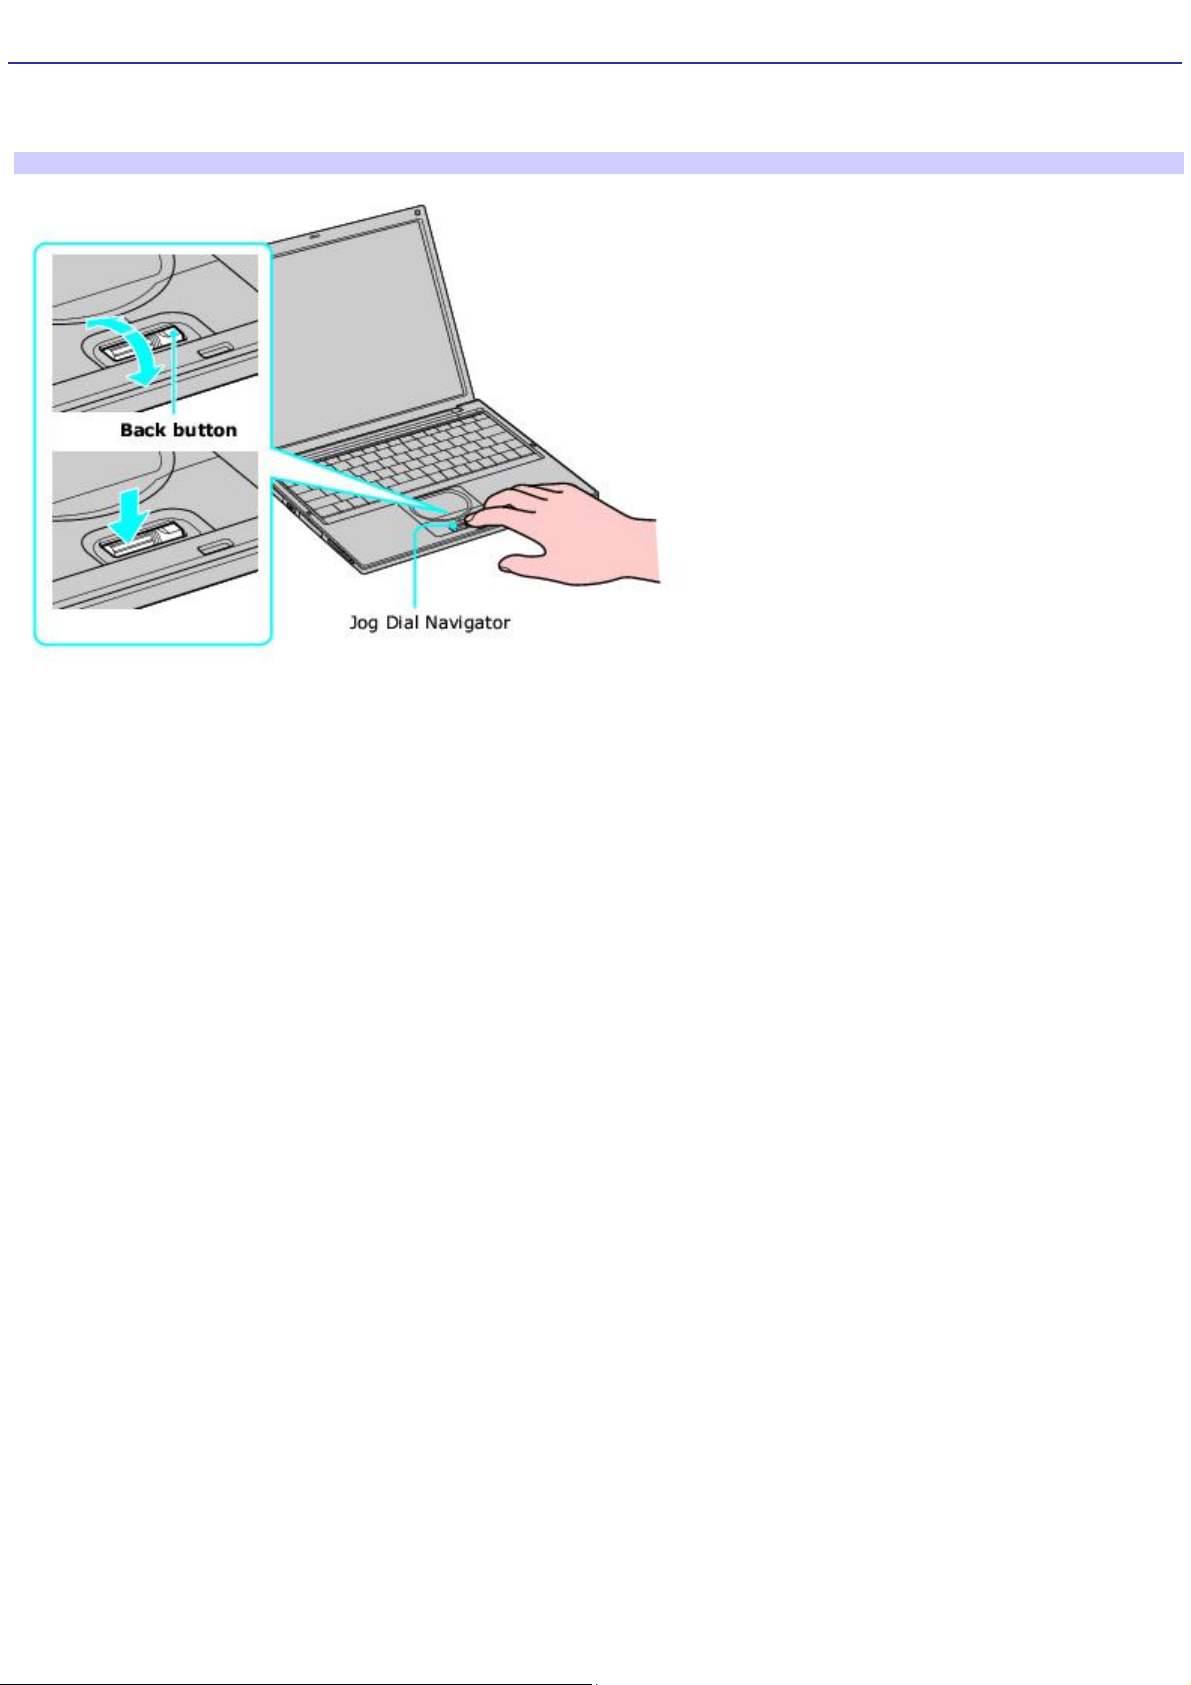
Using the Jog Dial Control
Your computer is equipped with a center Jog Dial Control, which enables you to scroll through applications, folders, and
documents from a predefined list. The Jog Dial Control is only compatible with preinstalled Sony software.
Using the Jog Dial Control
Page 9
Page 10

Using the center Jog Dial Control
This section explains how to use the center Jog Dial Control. For information on how to change the settings of the center
Jog Dial Control, right-click the Jog Dial Utility icon or in the taskbar and click Help Topics.
Page 10
Page 11
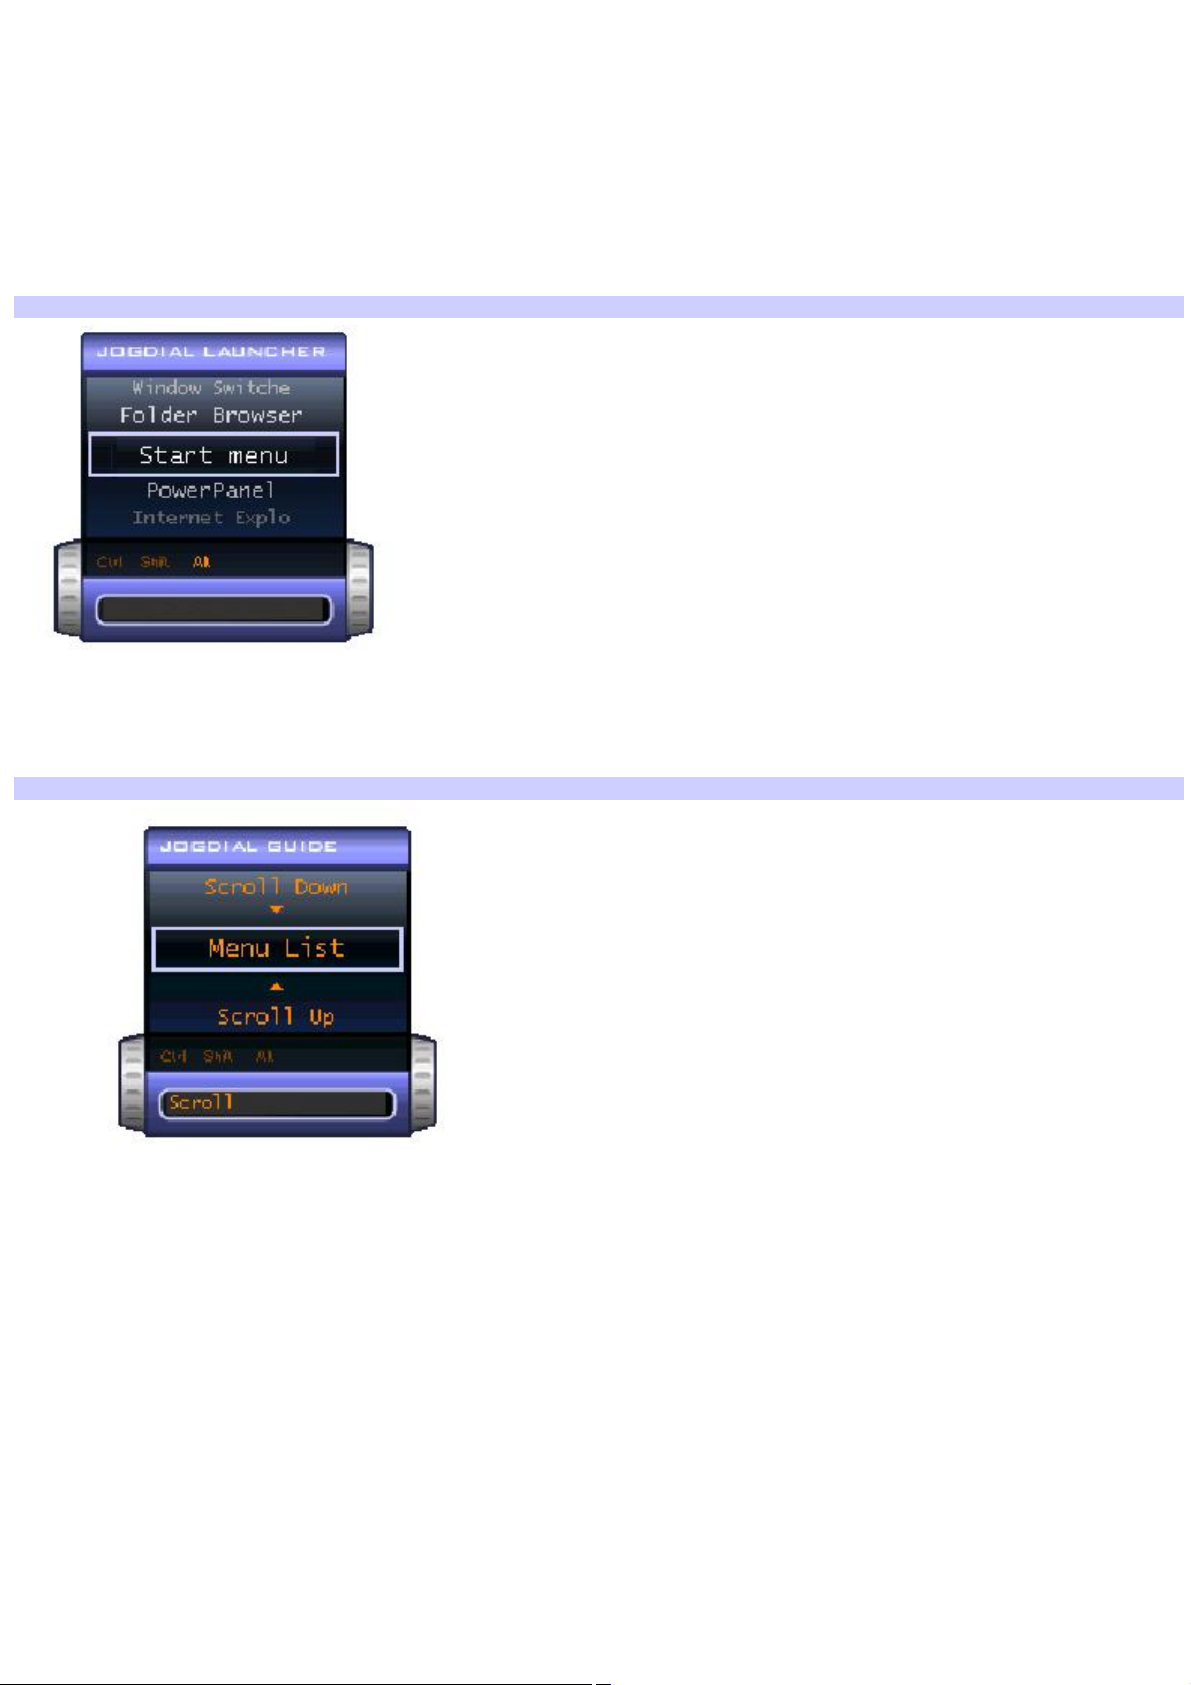
Launcher mode
The center Jog Dial Control window is in launcher mode until a software application is launched or the Jog Dial Control
window becomes active. When you select an item in the Jog Dial Control window and it is displayed between orange bars,
you can press the center Jog Dial Control to view a submenu of that item.
Using Launcher mode
To use the center Jog Dial Control, click the Jog Dial Control window or the Jog Dial Utility icon in the taskbar. Alternatively,
you can press the center Jog Dial Control while the Jog Dial Control window is active to switch to launcher mode.
Jog Dial Launcher
To select a desired item, proceed as follows:
1.
Rotate the center Jog Dial Control to select the item you want, and then press the center Jog Dial Control. The
Jog Dial Launcher window switches to guide mode and shows the function of the center Jog Dial Control.
Jog Dial Guide
2.
Rotate or press the center Jog Dial Control to use the desired function.
3.
To select another item, repeat steps 1 through 3 above.
Page 11
Page 12

Guide mode
The Jog Dial Control window is in the guide mode when software is in use and the software window is active. Depending on
the software you are using, you can select items from the displayed list using the center Jog Dial Control. You can switch
between guide mode and launcher mode by pressing the Ctrl key and the center Jog Dial Control.
Using Guide mode
The Jog Dial Control window displays the function of the center Jog Dial Control.
Page 12
Page 13

Center Jog Dial back button
The center Jog Dial Control includes a back button located to the right of the control. Pressing this button brings you back to
the previous screen.
Page 13
Page 14

Using the center Jog Dial Control with Sony software
If Sony software that supports the center Jog Dial Control is active, you can use the functions of the center Jog Dial Control
that are allocated to that software. For more information on functions allocated to software, see the software application's
Help.
Page 14
Page 15
Using the center Jog Dial Control with other software
If the software you are using supports the center Jog Dial Control, you can still use the center Jog Dial Control to scroll the
window or adjust the window size.
Using a Dialog box
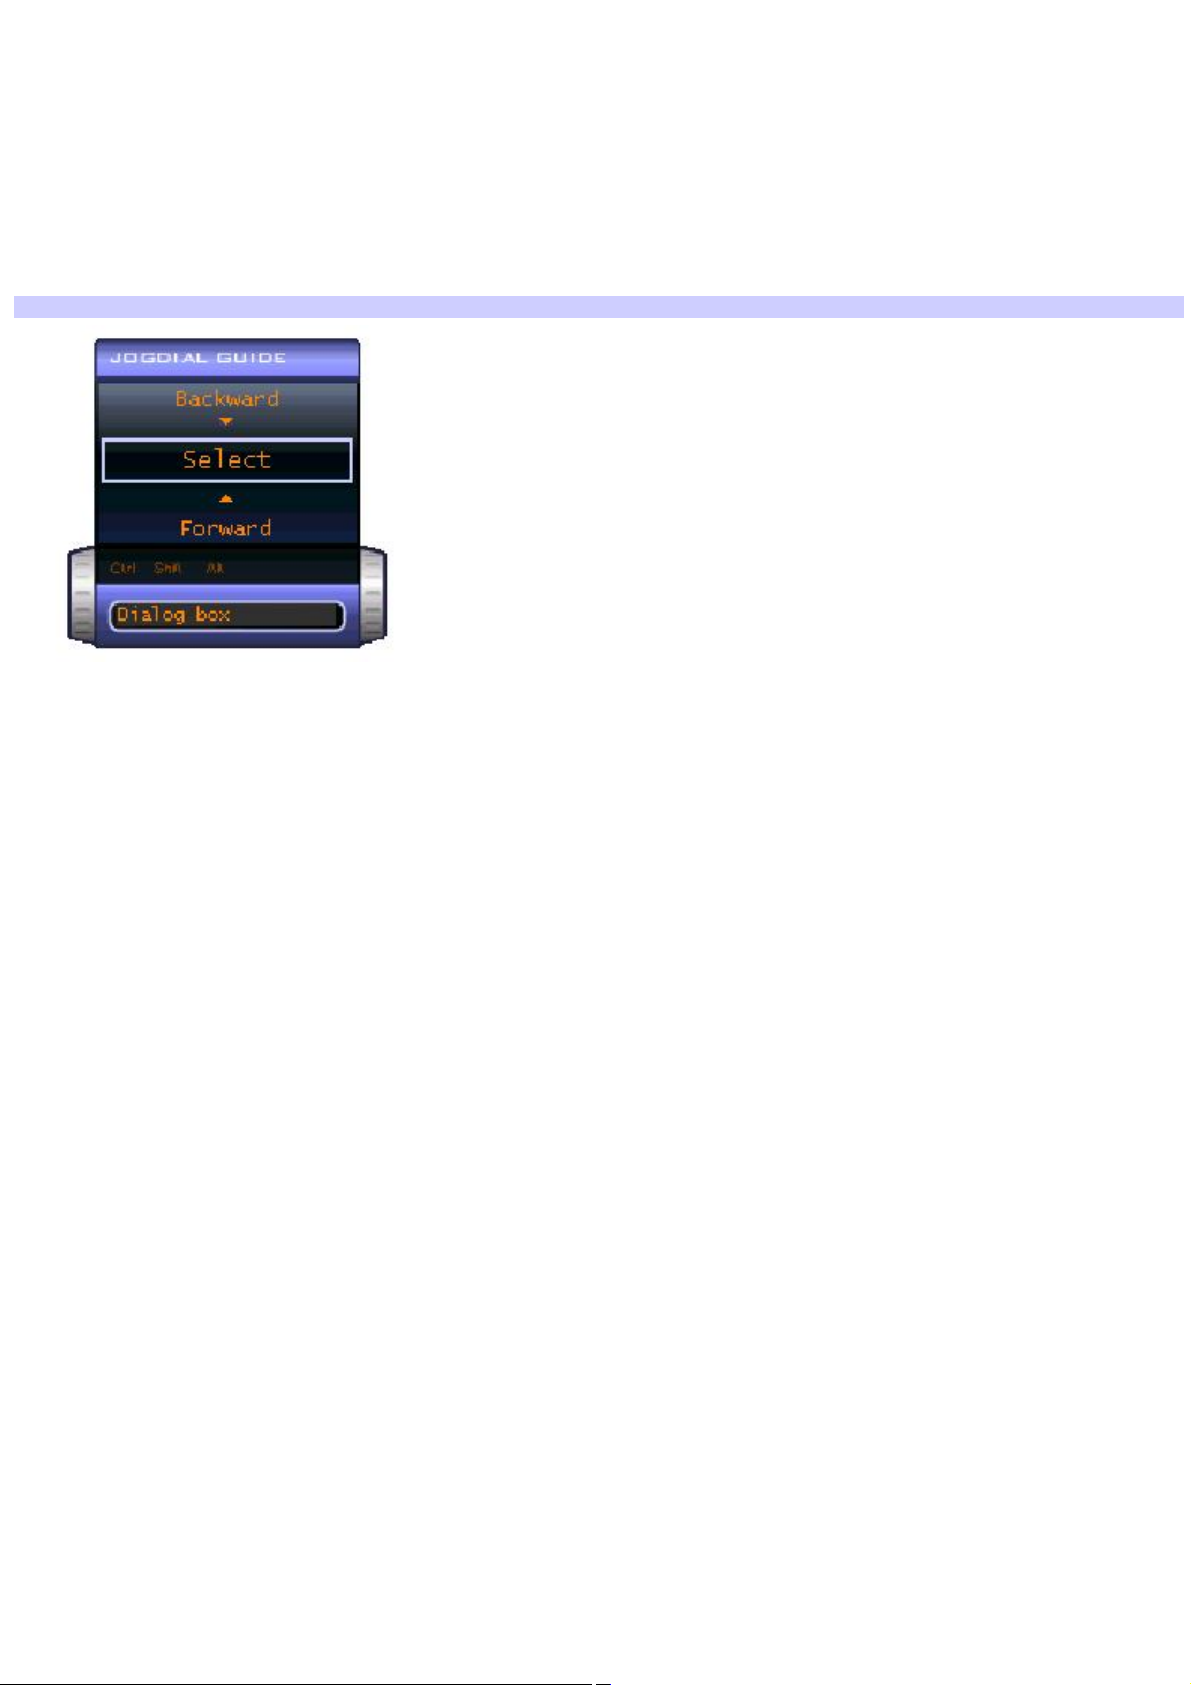
When a window such as Screen Properties is active, the Dialog box is displayed in the Jog Dial window. You can select an
item in the window by rotating the center Jog Dial Control. Pressing the center Jog Dial Control is the equivalent of pressing
Enter or Select.
Jog Dial Guide Dialog Box
Page 15
Page 16

Using Memory Stick Media
This new compact, portable, and versatile recording medium has a data capacity exceeding that of a floppy disk. The media
is specially designed for exchanging and sharing digital data with compatible products. Because it is removable, you can use
the media for external data storage.
Page 16
Page 17
Types of Memory Stick media
Your computer uses two types of Memory Stick® media:
MagicGate Memory Stick media (hereafter referred as MG Memory Stick media), is provided with copyright
protection. (The MG Memory Stick media are colored white.)
Memory Stick media, does not have the same copyright protection as MagicGate. (The Memory Stick media
are colored purple.)
For music, which requires copyright protection, you can only use MG Memory Stick media. You can also use compatible
MagicGate devices to record and play back music when they are connected to your computer.
You can store mixed data on the Memory Stick media. For example, you can copy an image onto MG Memory Stick media
that already contains music.
What is MagicGate?
MagicGate technology is copyright protection that consists of authentication and encryption technology. Authentication
technology ensures that protected content is only transferred between compliant devices and media. Protected content is
recorded and transferred in an encrypted format to prevent unauthorized duplication or playback.
Ensure that the MG Memory Stick media has the MG mark .
To insert a Memory Stick media
1.
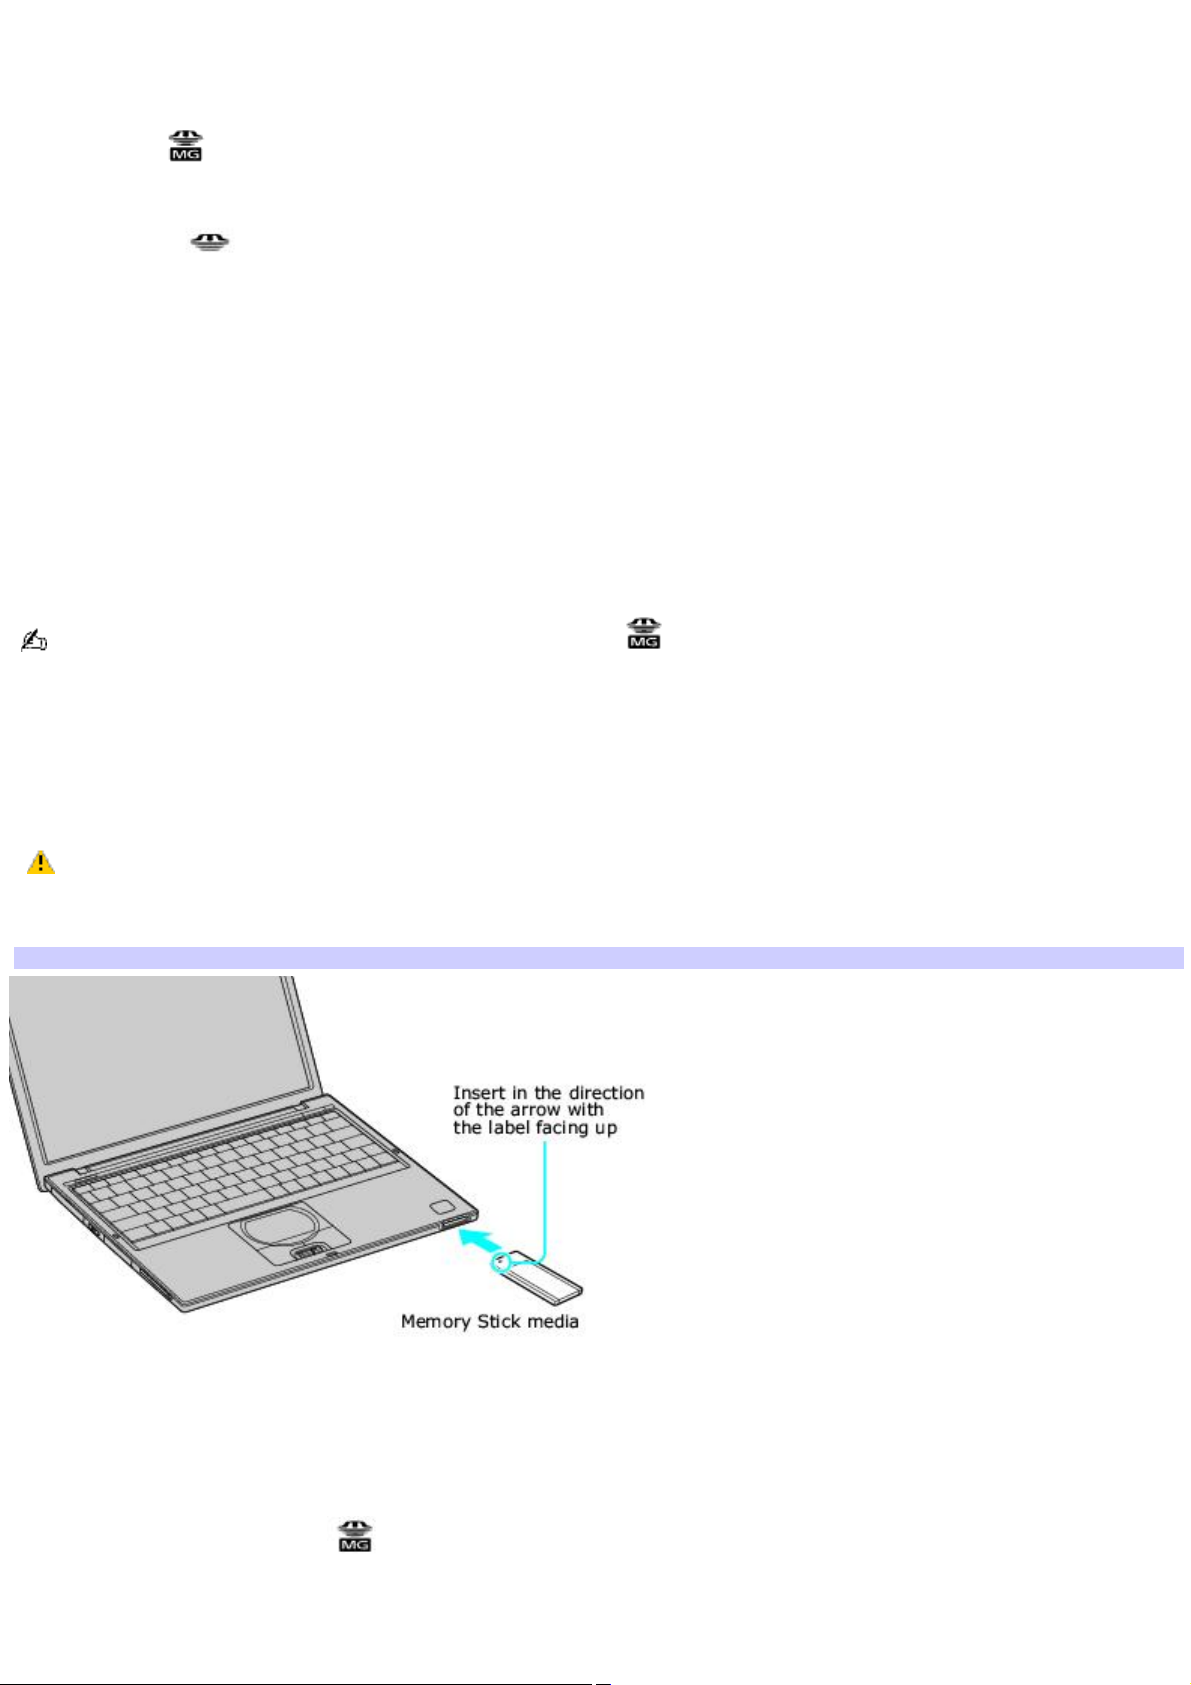
Hold the Memory Stick media with the label facing up and the arrow facing toward the Memory Stick® media slot.
2.
Carefully insert the Memory Stick media into the slot until it clicks into place.
Inserting the media in the wrong direction may damage the connector pins.
To avoid damaging the computer or the Memory Stick Media, do not force the Memory Stick media into the slot.
Inserting Memory Stick
To view the contents of Memory Stick media
1.
Click Start on the Windows® taskbar, and then My Computer.
2.
Click the Sony Memory Stick icon. The Sony Memory Stick window appears, displaying the contents of your
MemoryStick media.
To remove a Memory Stick media
Page 17
Page 18
1.
Wait a minimum of 10 seconds after the media finishes reading or writing data before removing it. If the media is
removed prematurely, an error message appears, prompting you to continue or exit. Reinsert the media into the
slot and press Enter to continue. This enables the media to finish reading or writing data.
2.
Push the media in toward the computer.
Memory Stick m edia indicator
3.
When the media ejects, pull it out. The Memory Stick media may eject completely from the slot.
Page 18
Page 19
Write-protecting Memory Stick media
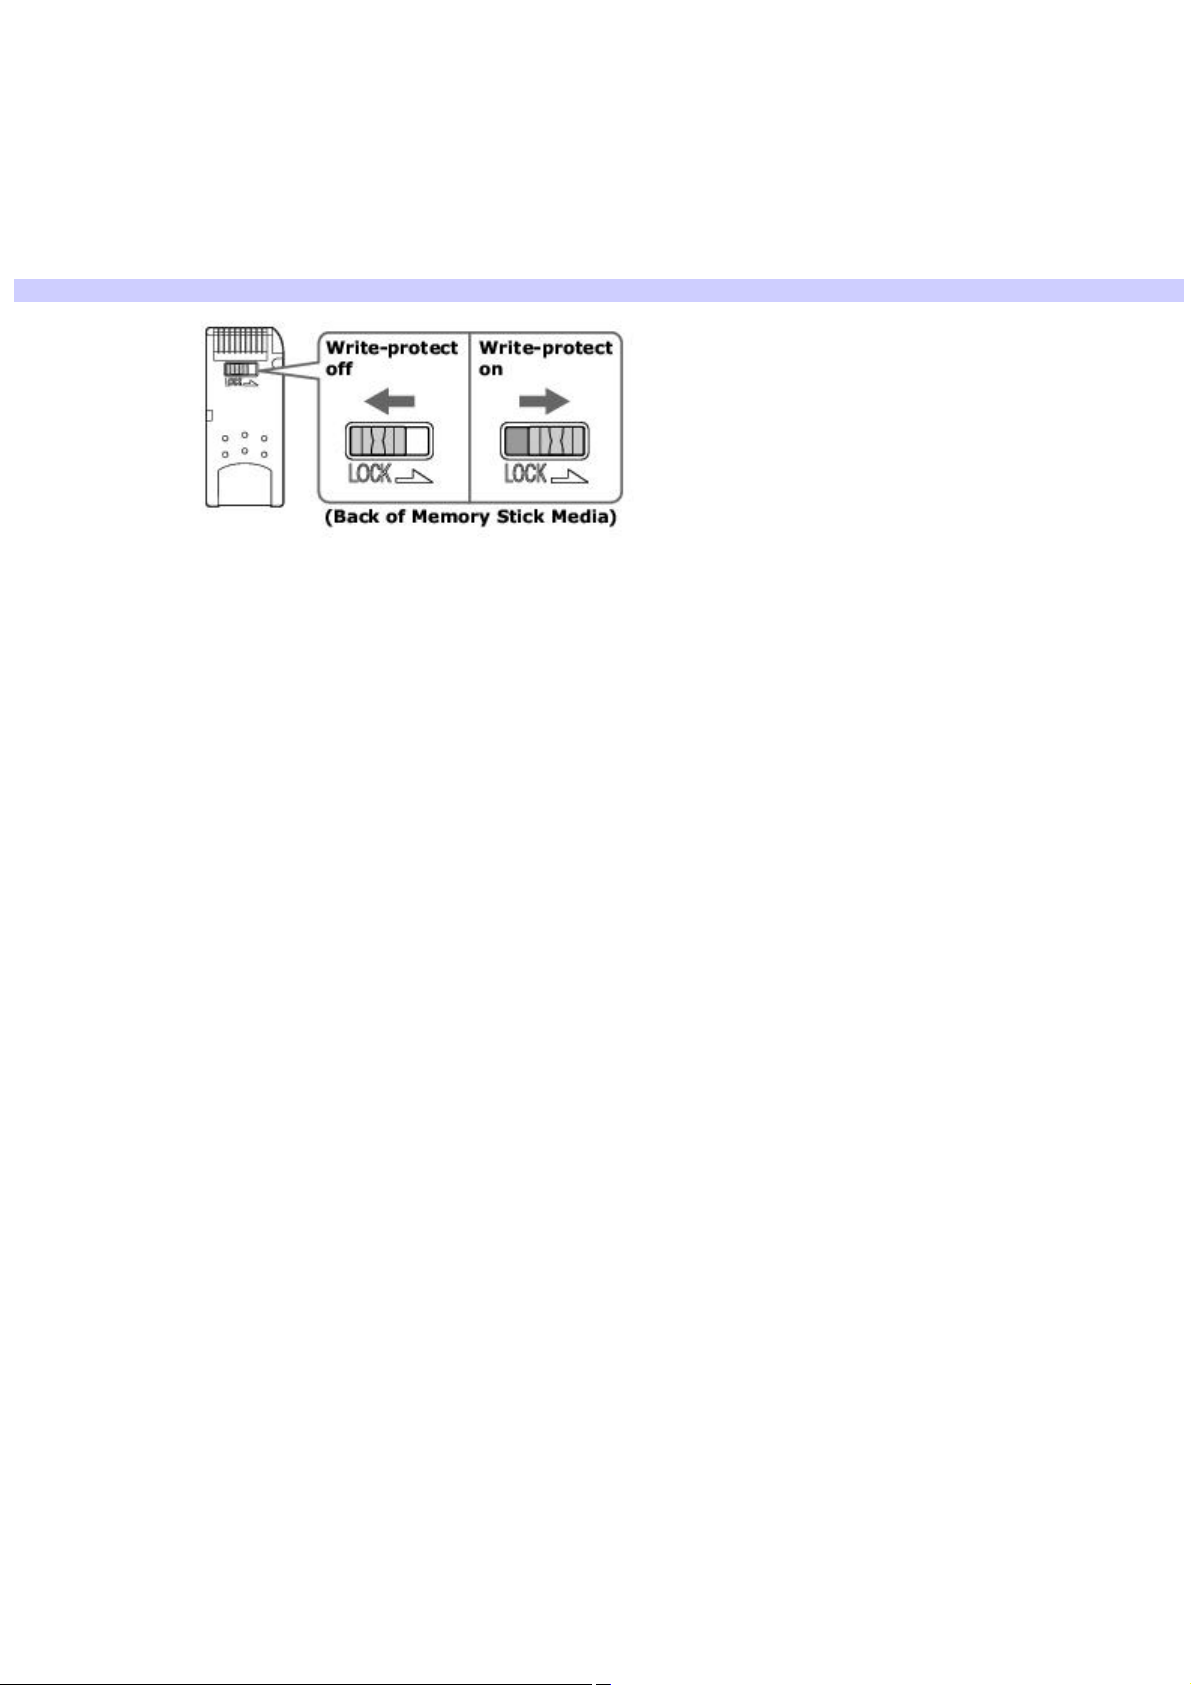
Memory Stick® media is designed with a write-protect tab to protect valuable data from accidental erasure or overwriting.
Move the tab to the right or left to set or release write-protection.
Write-protect off Data can be saved on the Memory Stick media.
Write-protect on Data can be read from but not saved on the Memory Stick media.
Using the Write-protect tab
Page 19
Page 20

Formatting Memory Stick media
Memory Stick® media is formatted for immediate use when you purchase it. If you need to reformat Memory Stick media, use
the Memory Stick Formatter that is provided with the media. Follow the procedures included here. For more details about
using Memory Stick Formatter, refer to Formatter Help.
Reformatting erases all current data that is stored on Memory Stick media. Before you reformat, confirm that
the media does not contain files you want to keep.
Do not try to format the Memory Stick using the Windows formatting function.
1.
Insert the Memory Stick media into the Memory Stick media slot. See To insert a Memory Stick media for more
information.
2.
Click Start, and then My Computer. The My Computer window appears.
3.
Right-click Sony MemoryStick, and then click Format. The Format Sony MemoryStick dialog box appears.
4.
In the Format Options box, click Quick Format to select it, and then click Start. A warning message appears.
5.
Click OK.
Do not try to format the Memory Stick using the Windows formatting function.
Page 20
Page 21

Notes on using Memory Stick media
When the media's write-protect tab is set to LOCK, you cannot record or erase data.
Before using Memory Stick media, you should back up important data.
You can enjoy video clips that you have recorded with compatible Memory Stick digital camcorders.
The media slot accommodates one media at a time.
To copy images from a digital video camera via Memory Stick® media, see Connecting an i.LINK Audio-Video Device
for more information.
Only MG Memory Stick media can be used with copyright protected data like music.
Do not remove the media or turn off the power while the access light is on.
Do not use the media in locations that are subject to static electricity or electrical noise.
Do not touch the media connector with your finger or metallic objects.
Do not attach labels other than the supplied label to a media.
Do not bend, drop, or shock the media.
Do not disassemble or modify the media.
Do not allow the media to get wet.
Do not use or store the media in a location that is subject to:
Extremely high temperatures, such as in a car parked in the sun.
Direct sunlight.
High humidity or places with corrosive substances.
To prolong the life of the media, use the supplied storage case. See the instructions supplied with your media for
more information on its use.
Page 21
Page 22

Using PC Cards
Your computer includes a PC Card slot, which enables you to connect portable external devices, such as an optical disc
drive.
The PC Card slot accommodates a Type I or Type II PC Card. This slot is compatible with Card Bus. Type III PC Cards
are not supported.
Page 22
Page 23
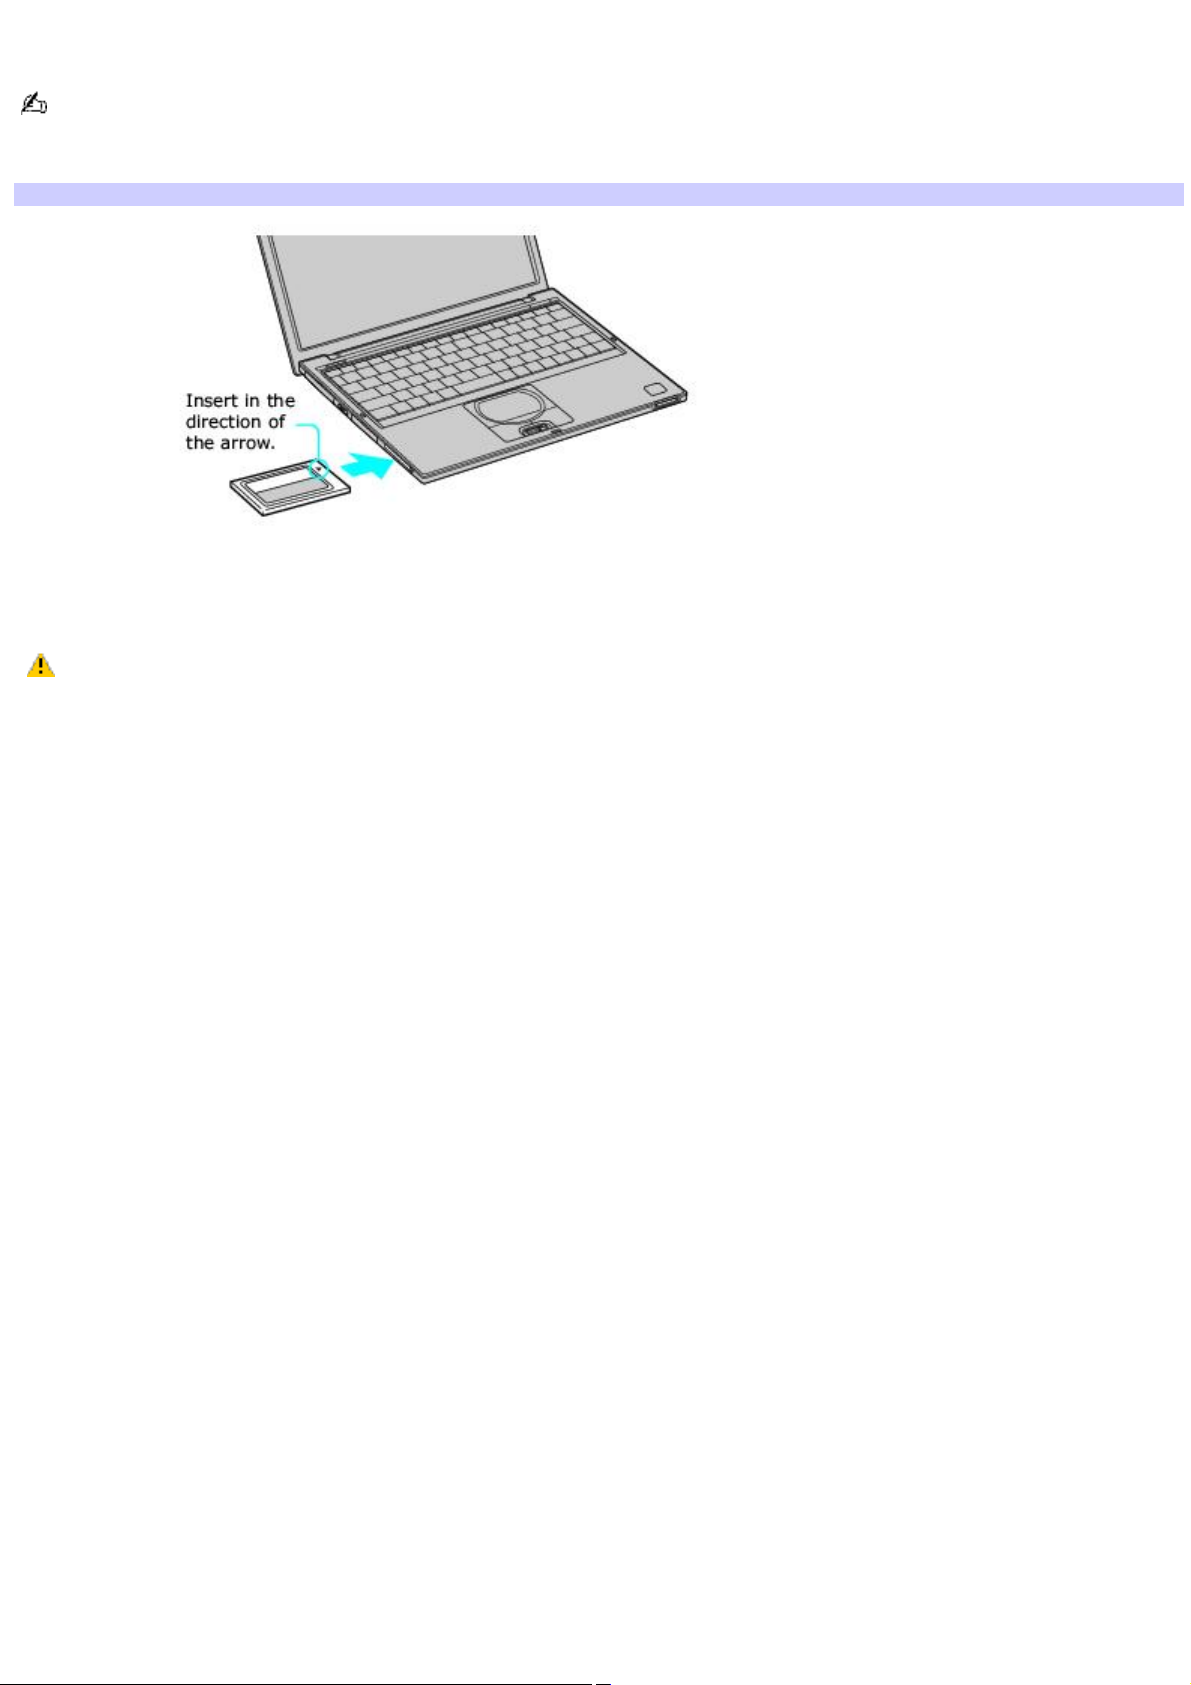
To insert PC card
You do not need to shut down the computer before inserting or removing a PC Card.
1.
Insert the PC Card into the PC Card slot with the front label facing up.
Inserting PC Card
2.
Gently push the PC Card into the slot until it is firmly seated in the port and the release button pops out.
Do not force a PC Card into the slot. It may damage the connector pins.
When a PC Card is inserted, do not place your computer in a bag or case. Pressure or shock to a PC Card may damage
your computer.
Touching the head of the PC Card will not cause damage to the connector pins, but damage can occur if the head of the
PC Card is sticking out of the computer while the unit is being transported.
Page 23
Page 24
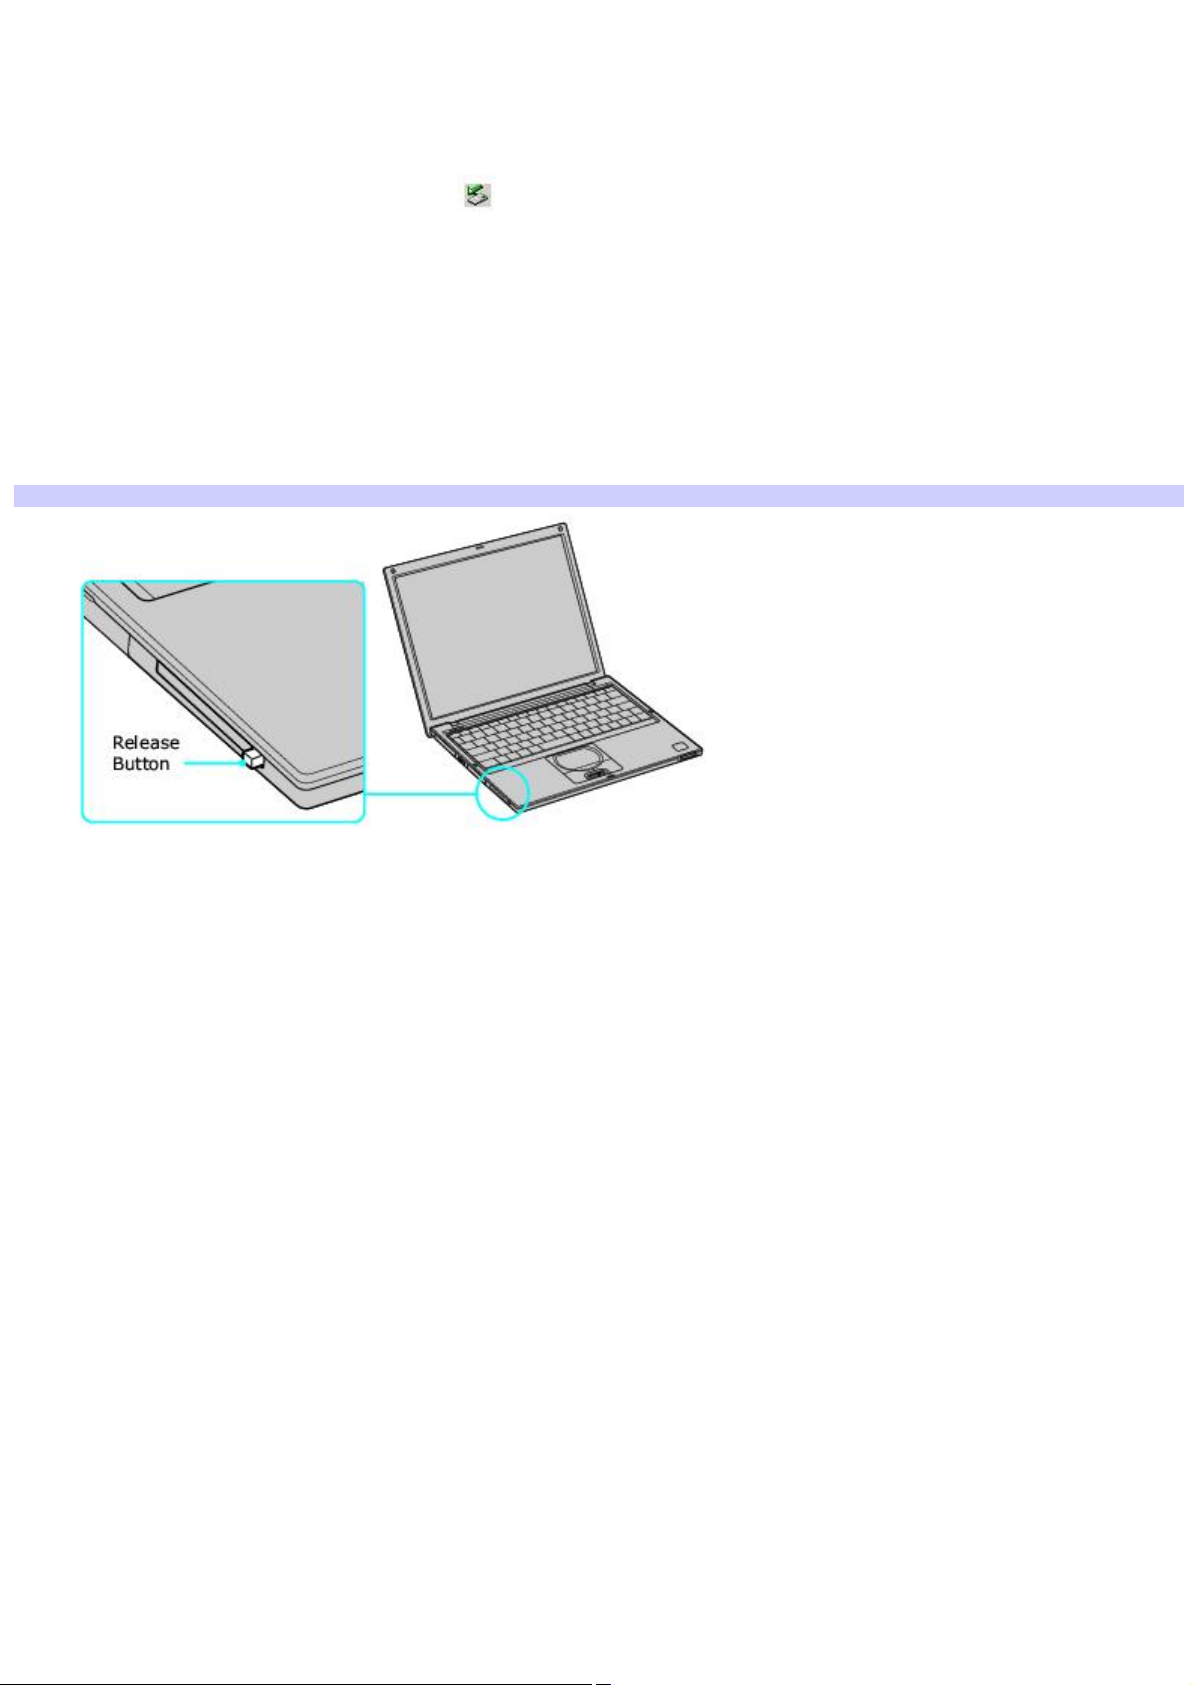
To remove a PC Card while your computer is on
Failure to follow this procedure may result in a malfunction.
1.
Before disconnecting this drive, close all active applications to help prevent data loss.
2.
Double-click the Safely Remove Hardware icon in the taskbar. The Safely Remove Hardware window
appears.
3.
In the Hardware devices box, select the appropriate PC Card name if it is not already selected, and click Stop.
The Stop a Hardware device window appears.
4.
Make sure the appropriate PC Card name is selected, and click OK. A message appears stating it is safe to
remove the hardware.
5.
Press the Release button. The PC Card pops out.
6.
Gently grasp the PC Card and pull it out.
Release Button
Page 24
Page 25

Notes on PC Cards
For some PC Cards, if you alternate between normal power operation and the Standby or Hibernate power
management modes while the card is inserted, you may find that a device connected to your system is not
recognized. Restart your system to correct the problem.
Some PC Cards may require that you disable idle devices when using the PC Card. You can use Sony Notebook
Setup to disable devices. See Displaying the Sony Notebook Setup Screen for more information.
Be sure to use the most recent software driver provided by the PC Card manufacturer.
If an exclamation mark (!) appears on the Device Manager tab in the System Properties dialog box, remove the
software driver, and reinstall it.
You may not be able to use some PC Cards or some functions of the PC Card with this computer. If you have
difficulty inserting a card, check that you are orienting the card correctly. See the manual supplied with your PC Card
for more information on its use.
Page 25
Page 26

Using Power Saving Modes
When you use a battery as the power source for your computer, you can use the power management settings to conserve
battery life. In addition to the normal operating mode, which enables you to turn off specific devices, your computer has two
distinct power saving modes: Standby and Hibernate. When using battery power, the computer automatically enters
Hibernate mode when the remaining battery charge drops below 5 percent, regardless of the power management setting
you select.
If the battery level falls below 10 percent, you should either attach the AC adapter to recharge the battery or turn off
your computer and insert a fully charged battery.
Page 26
Page 27

Normal mode
Normal mode is the normal state of your computer when it is in use. The power indicator displays green when your
computer is in this mode. To save power, you can turn off a specific device such as the LCD or the hard disk.
Page 27
Page 28

Standby mode
In Standby Mode the computer saves the current state of the system in RAM and switches off power to the CPU. The amber
power indicator flashes in this mode.
To activate Standby mode
1.
Press the key combination Fn+Esc. You can also use the PowerPanel utility to enter Standby mode.
2.
Press any key to return to normal mode.
Page 28
Page 29

Hibernate mode
In the Hibernate mode, the state of the system is saved on the hard disk drive and power is turned off. The power indicator
is off in this mode.
To activate Hibernate mode
1.
Press the key combination Fn+F12, or press the power button and release it immediately. The "Preparing to
Hibernate" screen appears, and the computer enters Hibernate mode.
Do not move the computer until its power indicator turns off.
2.
Press the power button to return to normal mode.
Page 29
Page 30

Notes on power saving modes
Standby uses more power than Hibernate.
Standby requires less time than Hibernate to return to normal mode.
Page 30
Page 31

Connecting a Phone Cable
You need to connect a telephone cable (not supplied) to register your VAIO® computer, use online services and the
Internet, and use Sony Computing Support.
Page 31
Page 32
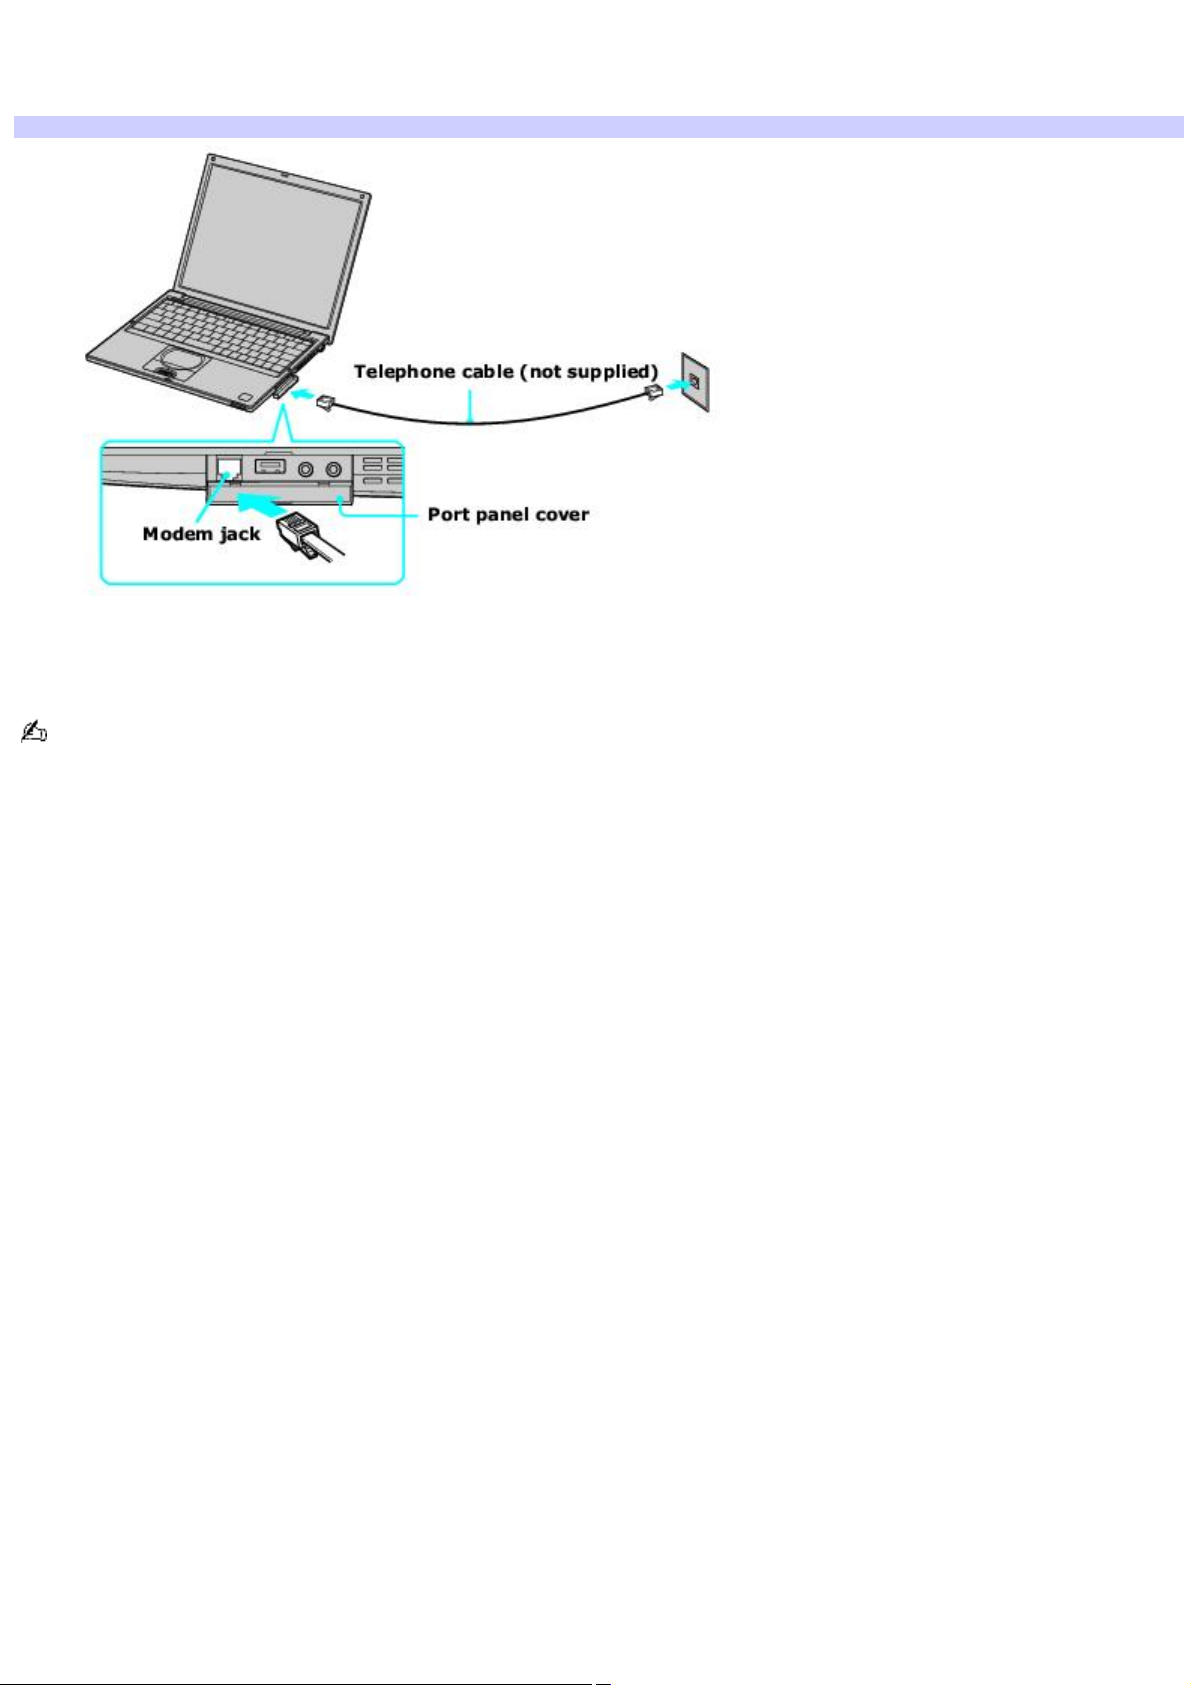
To connect a telephone cable
1.
Open the port panel on the right side of the computer, and locate the modem jack.
Plugging in Telephone Jack
2.
Plug one end of the telephone cable into the Modem jack. Make sure it clicks into place.
3.
Plug the other end into the wall jack.
Your computer does not work with party lines, cannot be connected to a coin-operated telephone, and may not
work with multiple phone lines or a private branch exchange (PBX). Some of these connections may result in excess
electrical current and could cause a malfunction in the internal modem.
If you connect a phone line coming through a splitter, the modem or connected device may not work properly.
Page 32
Page 33
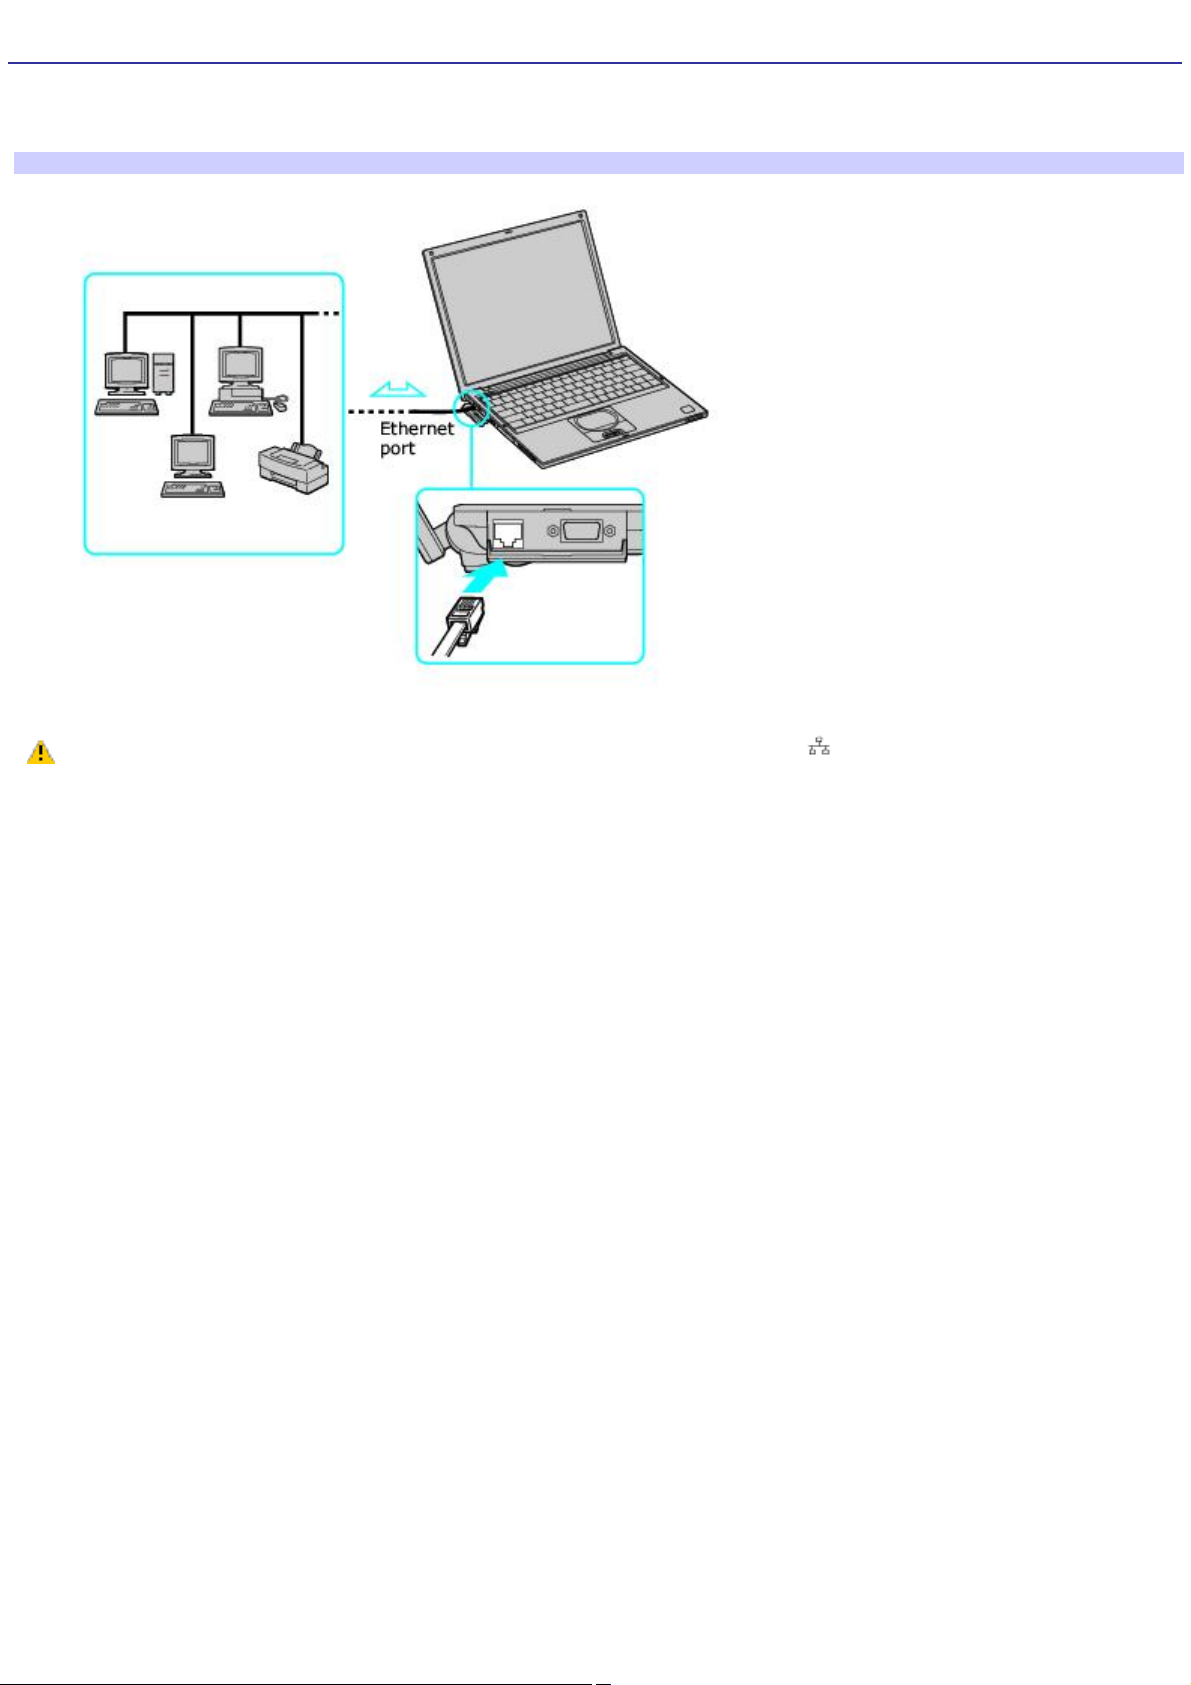
Connecting to a Local Area Network
You can connect your computer to 10BASE-T and 100BASE-TX-type Local Area Networks (LANs) by using the computer's
Ethernet port. For the detailed settings and devices needed to connect to the network, ask your network administrator.
Connecting to LAN
Warning: Only connect 10BASE-T and 100BASE-TX cables to the Ethernet port. Do not connect any
other type of network cable or a telephone cable. Connecting cables other than those listed above may result in an
electric current overload and could cause a malfunction, excessive heat, or fire in the port. To connect the unit to the
network, contact your network administrator.
If you enable Wake on LAN, the power saving mode will be switched to Standby mode.
Page 33
Page 34
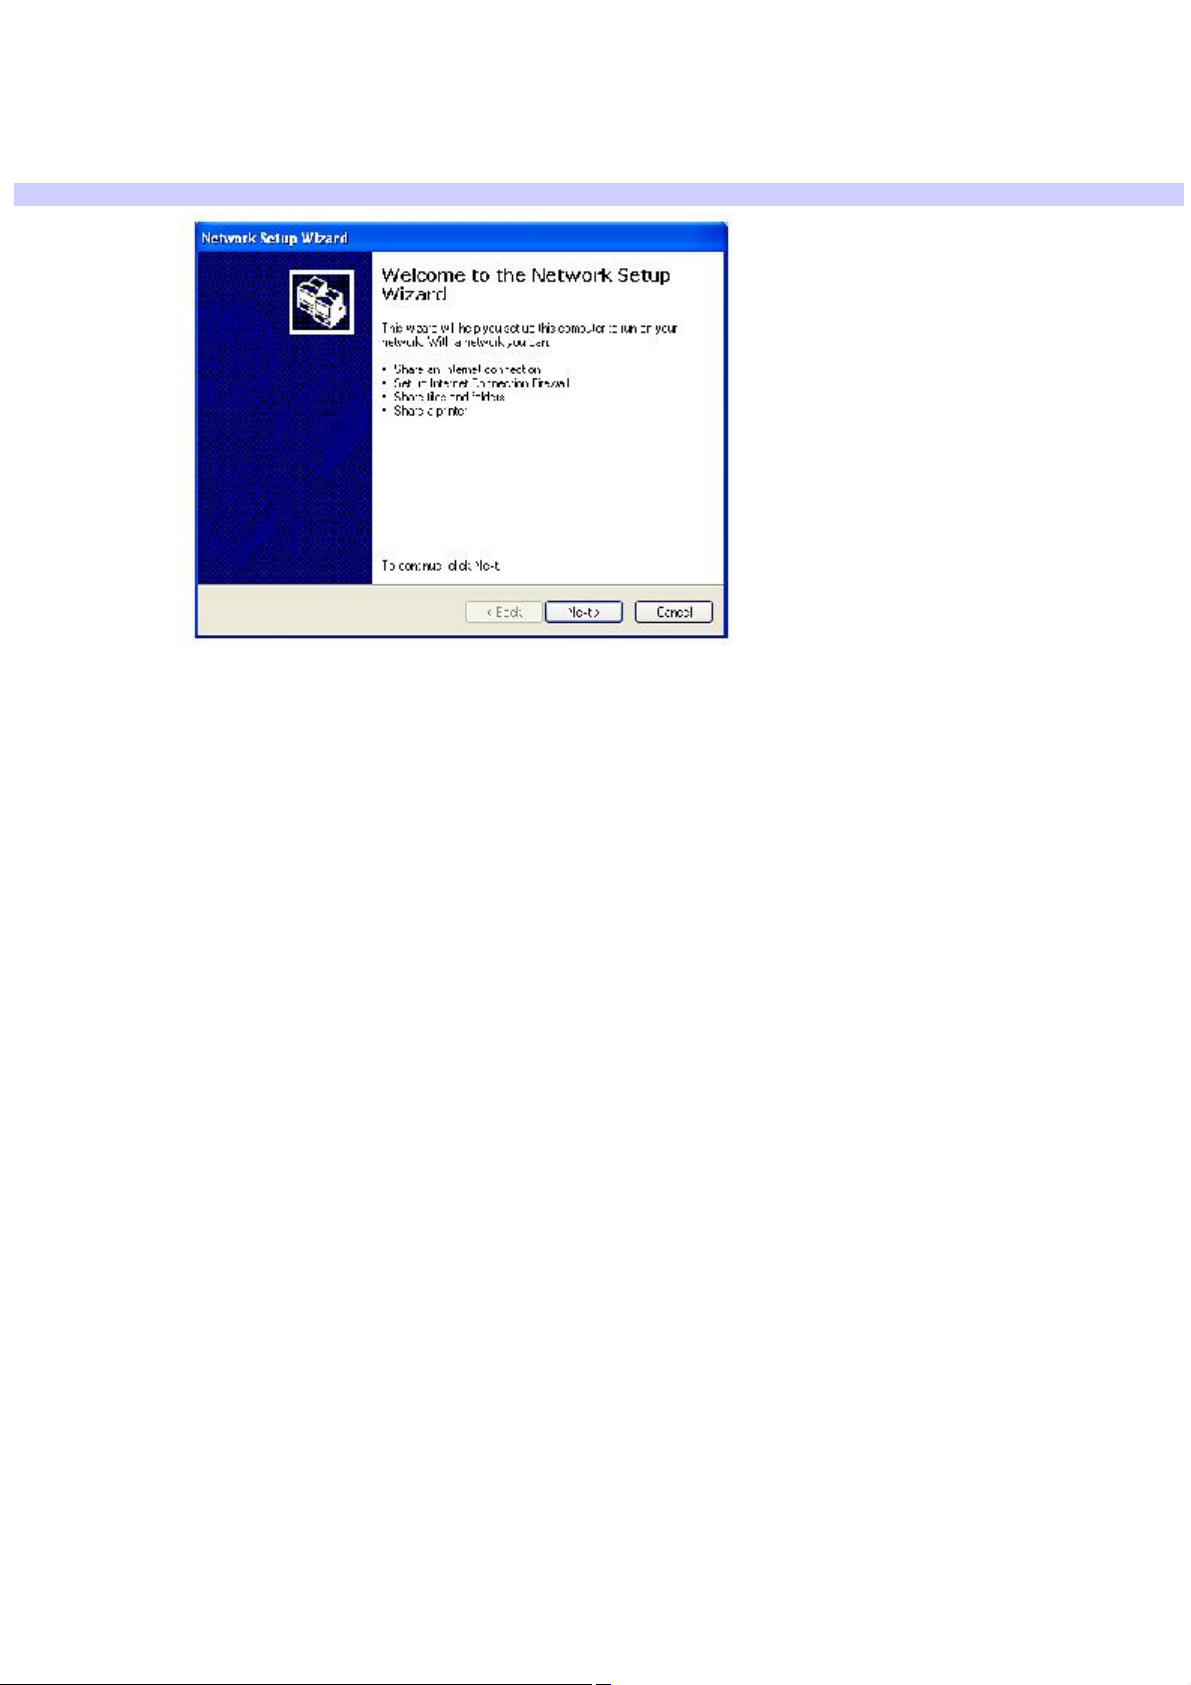
To set up a network
1.
From the Start menu, point to All Programs, Accessories, Communications, and Network Setup Wizard. The
Network Setup Wizard.
2.
Follow the on-screen instructions.
Network Setup Wizard
Page 34
Page 35
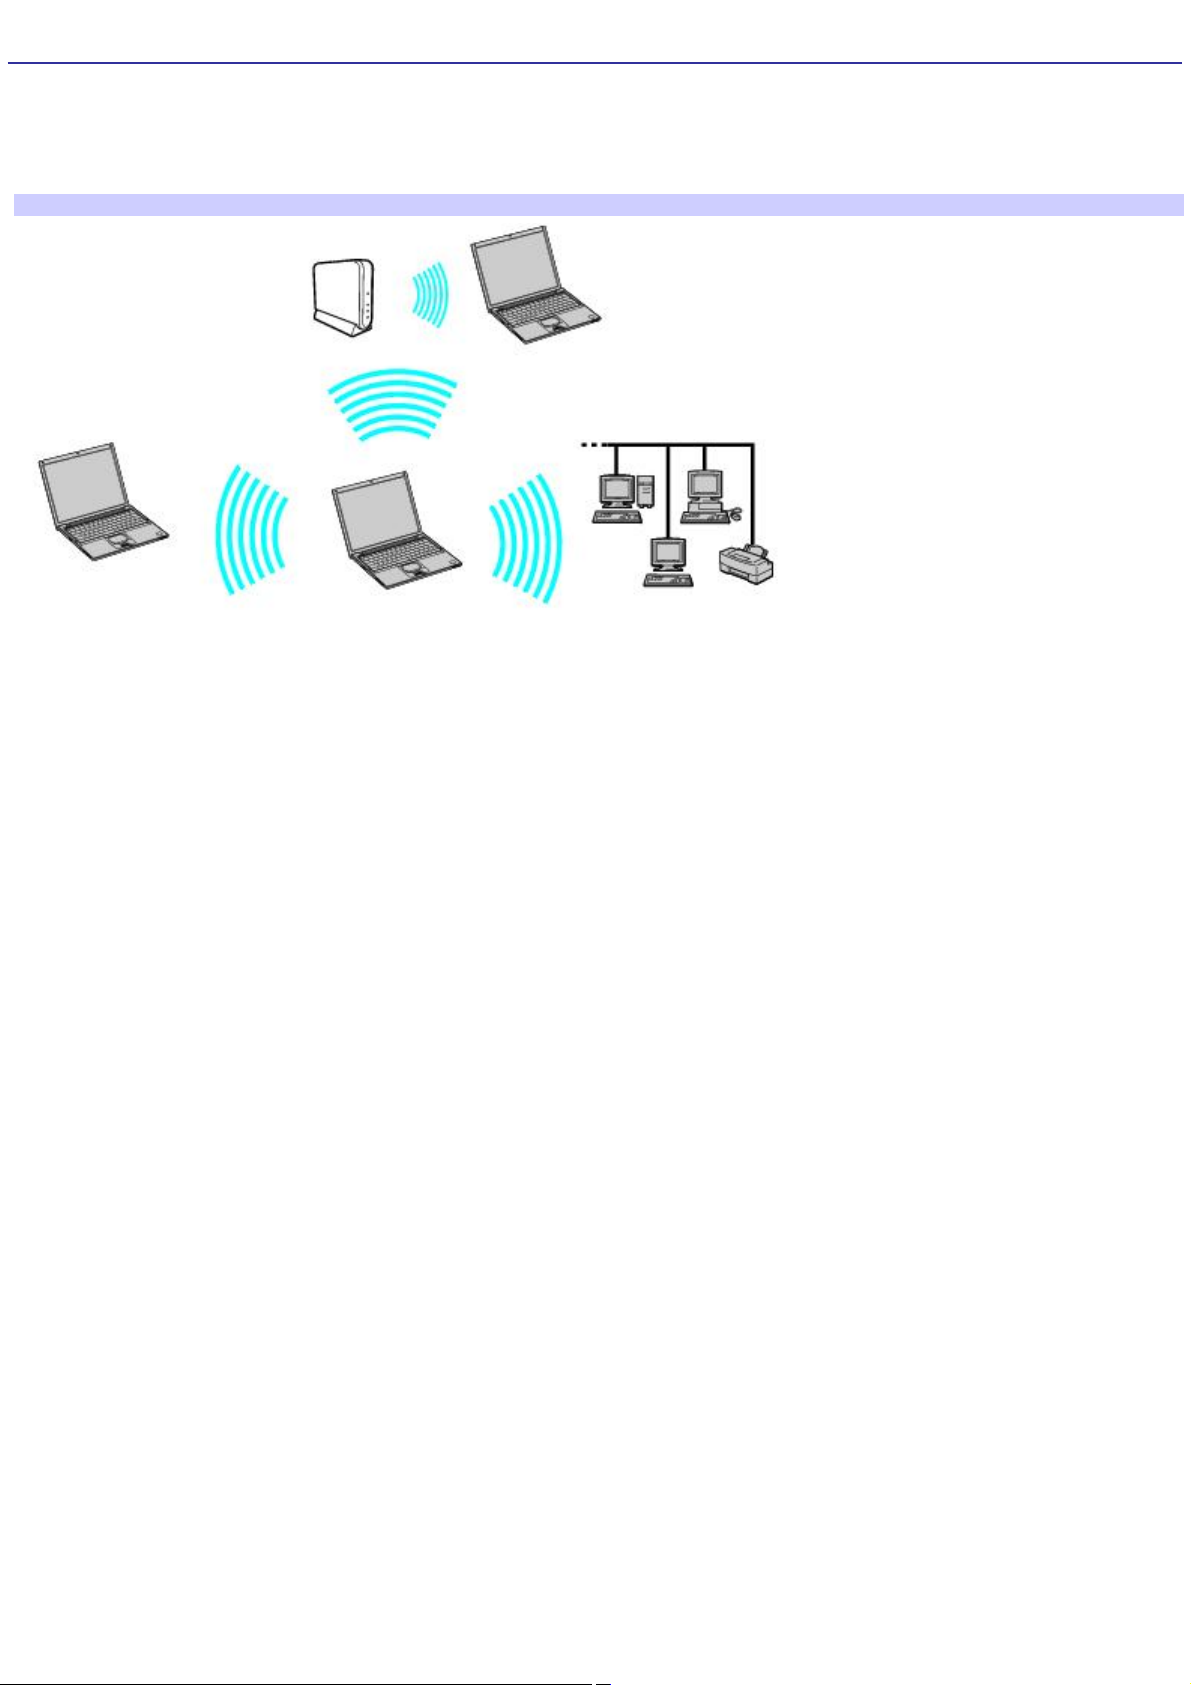
Connecting to a Wireless Local Area Network
Your computer is equipped with a built-in mini PCI card that allows for wireless connections. With Sony's Wireless Local Area
Network (LAN) functionality, all compatible digital devices can communicate freely without cable connections. A Wireless LAN
is a network in which a mobile user can connect to a LAN through a wireless (radio) connection. You can opt to purchase a
Wireless LAN Access Point to set up a LAN.
Wireless LAN connection capabilities
Page 35
Page 36
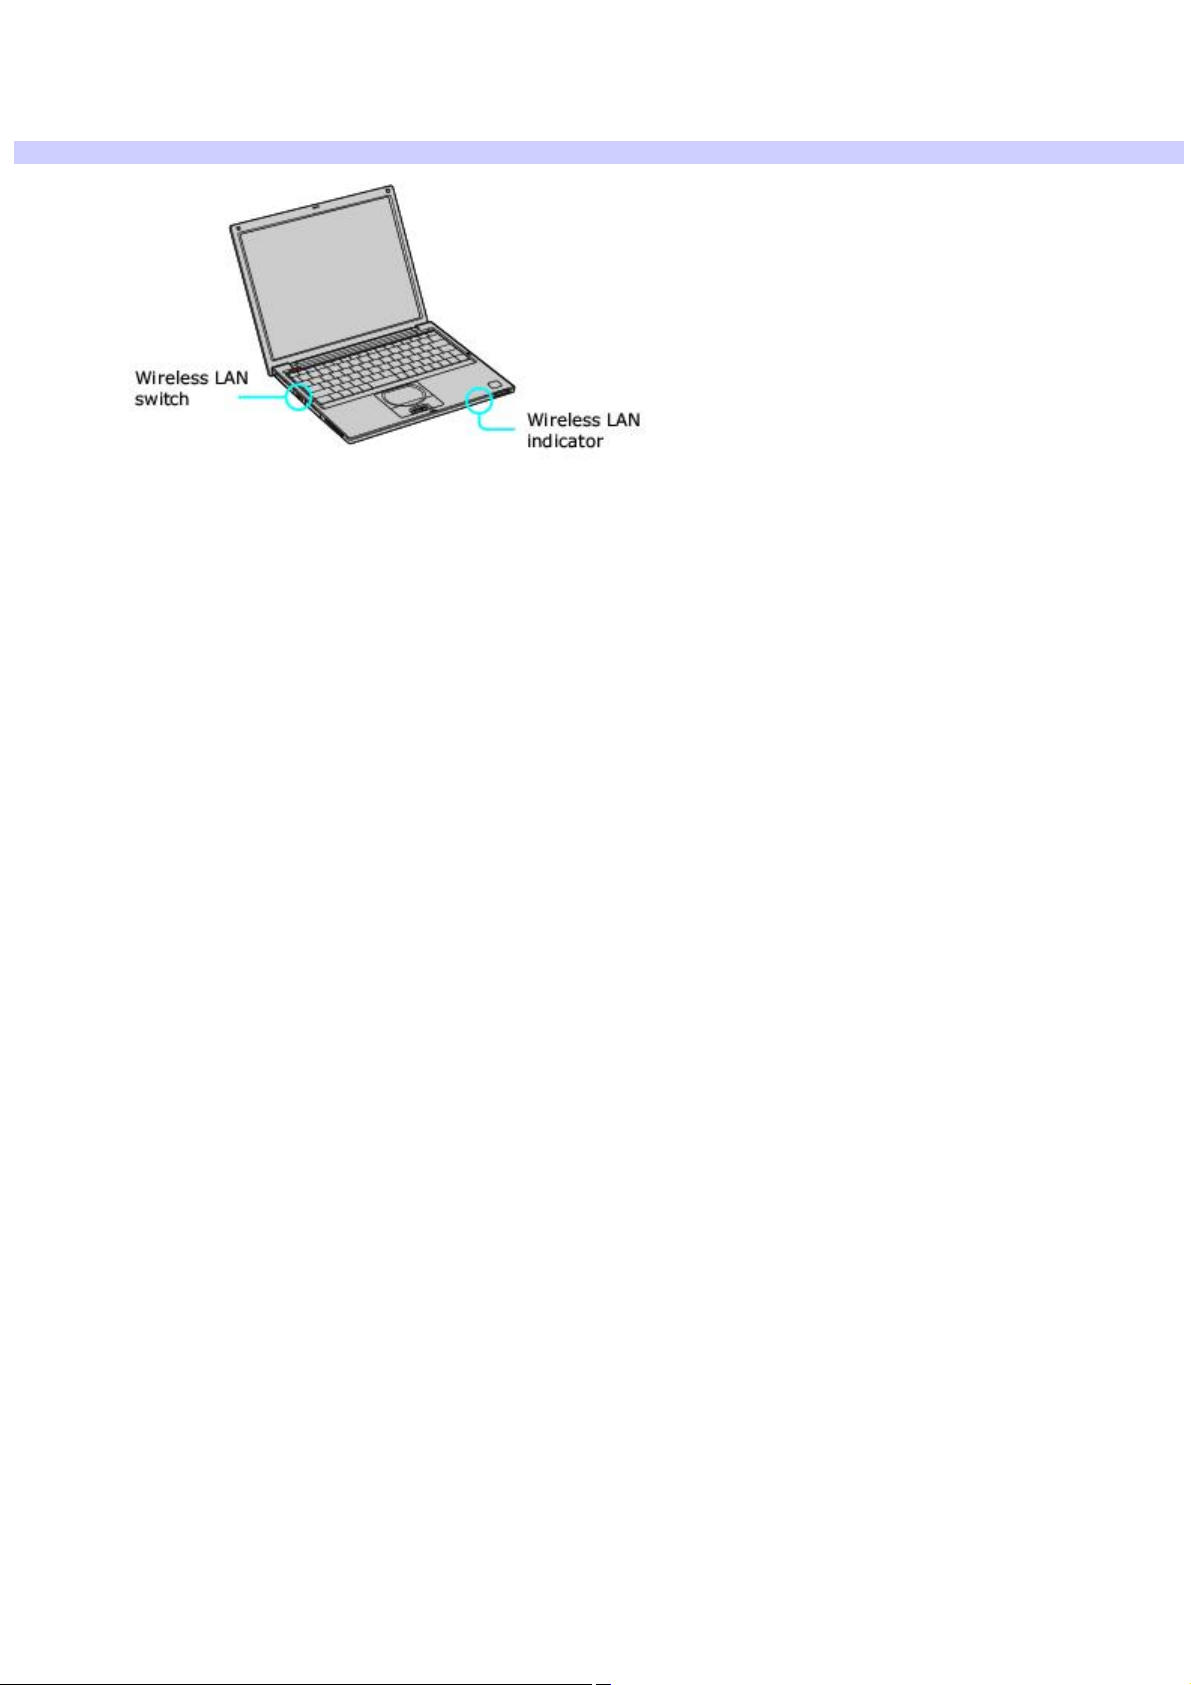
Turning On Wireless LAN functionality
To enable Wireless LAN functionality, first locate the Wireless LAN switch that is located on the left side of the computer.
Move the switch to the ON position. The Wireless LAN indicator on the bottom left front portion of the computer lights up.
Connecting to a wireless LAN
Page 36
Page 37
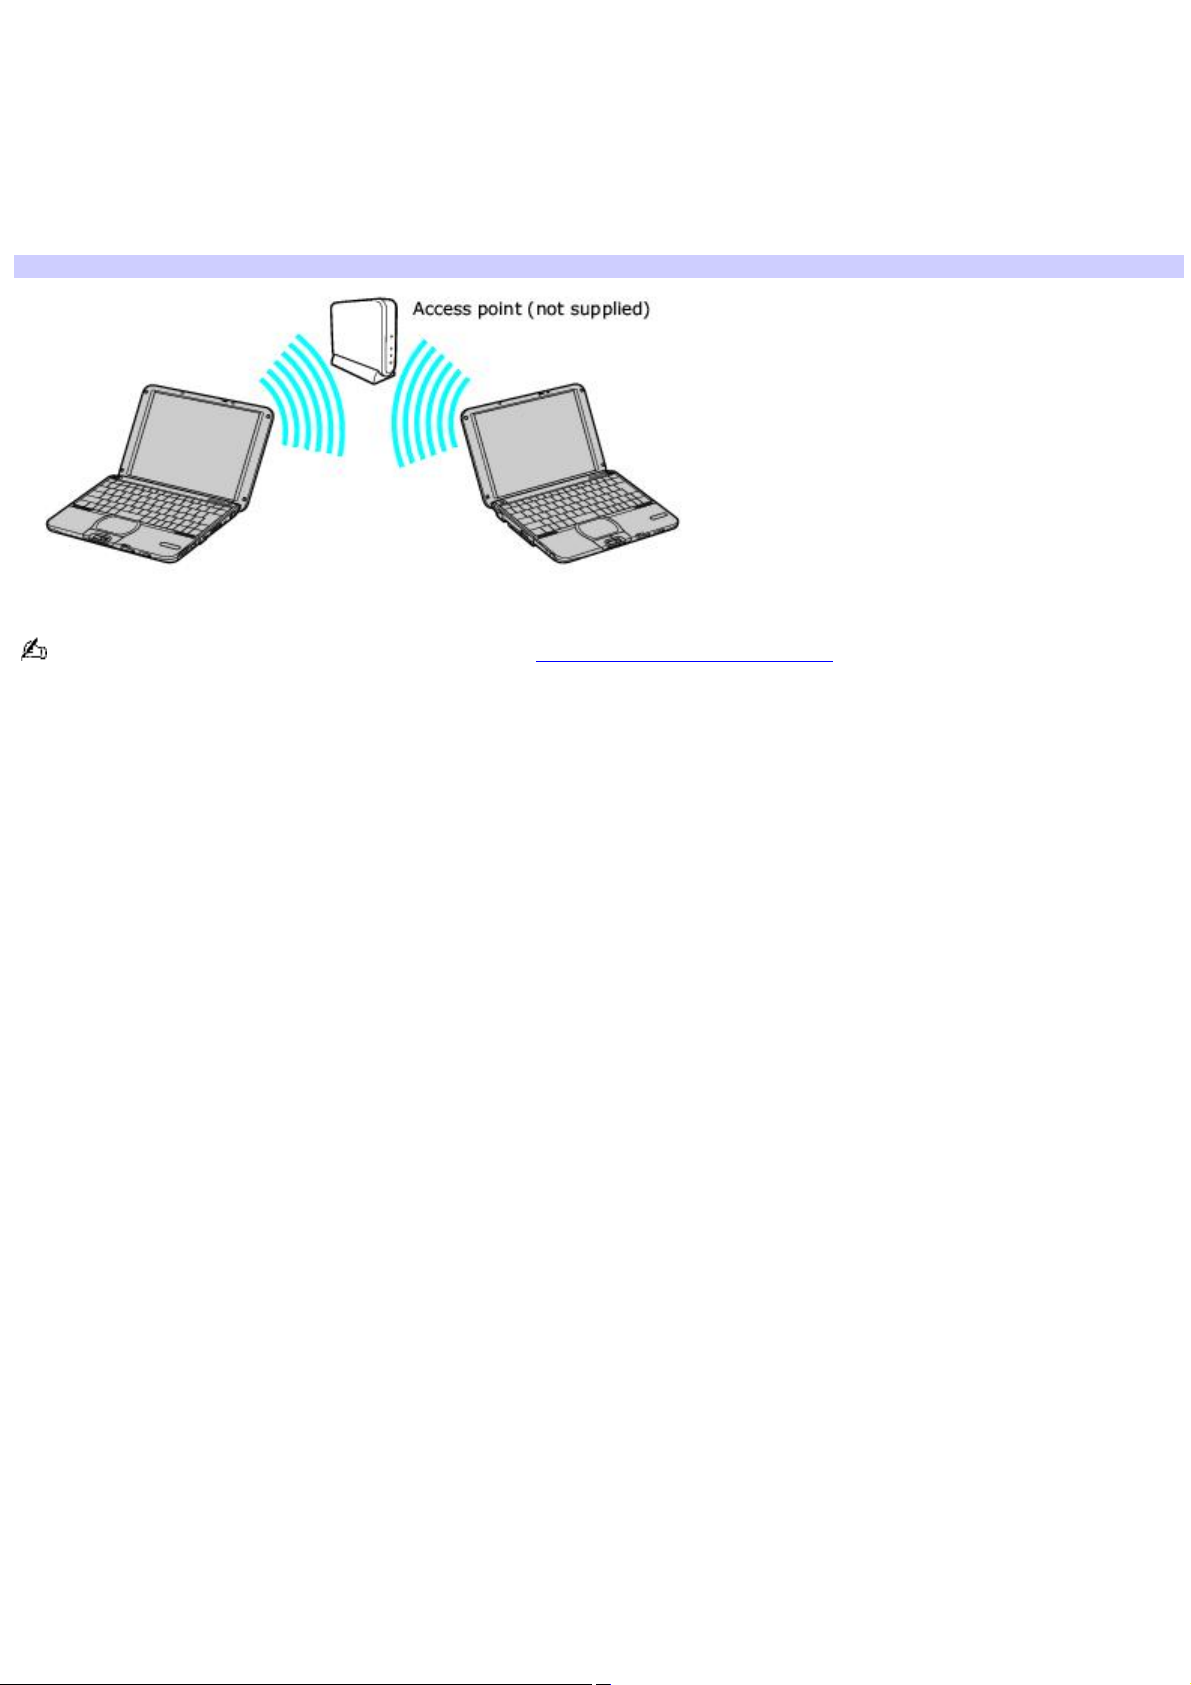
The Wireless LAN Access Point
The Wireless LAN Access Point, also called the access point, is designed for building a Wireless LAN environment. If you
purchase an access point, you can easily build a wireless LAN environment by plugging the access point into an AC power
outlet and using the provided software with compatible devices. Because a wireless LAN configuration requires no wiring,
you can operate multiple computers more freely than ever before.
You can also connect an access point to a telephone line, Integrated Services Digital Network (ISDN) router, cable modem,
or Digital Subscriber Line (xDSL) modem to share access to the Internet among multiple computers.
Comm unicating v ia Wireless LAN Access Point
For information on available Sony products, go to: http://www.sonystyle.com/vaio.
Page 37
Page 38
Communicating with an Access Point (infrastructure) Network
An infrastructure network is one that extends an existing wired local network to wireless devices by providing an access
point. The access point bridges the wireless and wired LAN and acts as a central controller for the Wireless LAN. The access
point coordinates transmission and reception from multiple wireless devices within a specific range.
The network key is data used to protect signals passing through a wireless LAN that conforms with IEEE 802.11b
standard. It is also called an "encryption key." Wireless LAN communication can only occur between an access point and
computer that are using the same key information.
When you enter the network key and the connection is made, the access point is registered, and you do not have to enter
the network key when you connect thereafter.:
To connect to an access point network
1.
Locate the Wireless LAN switch that is located on the left side of the computer. Move the switch to the ON
position.
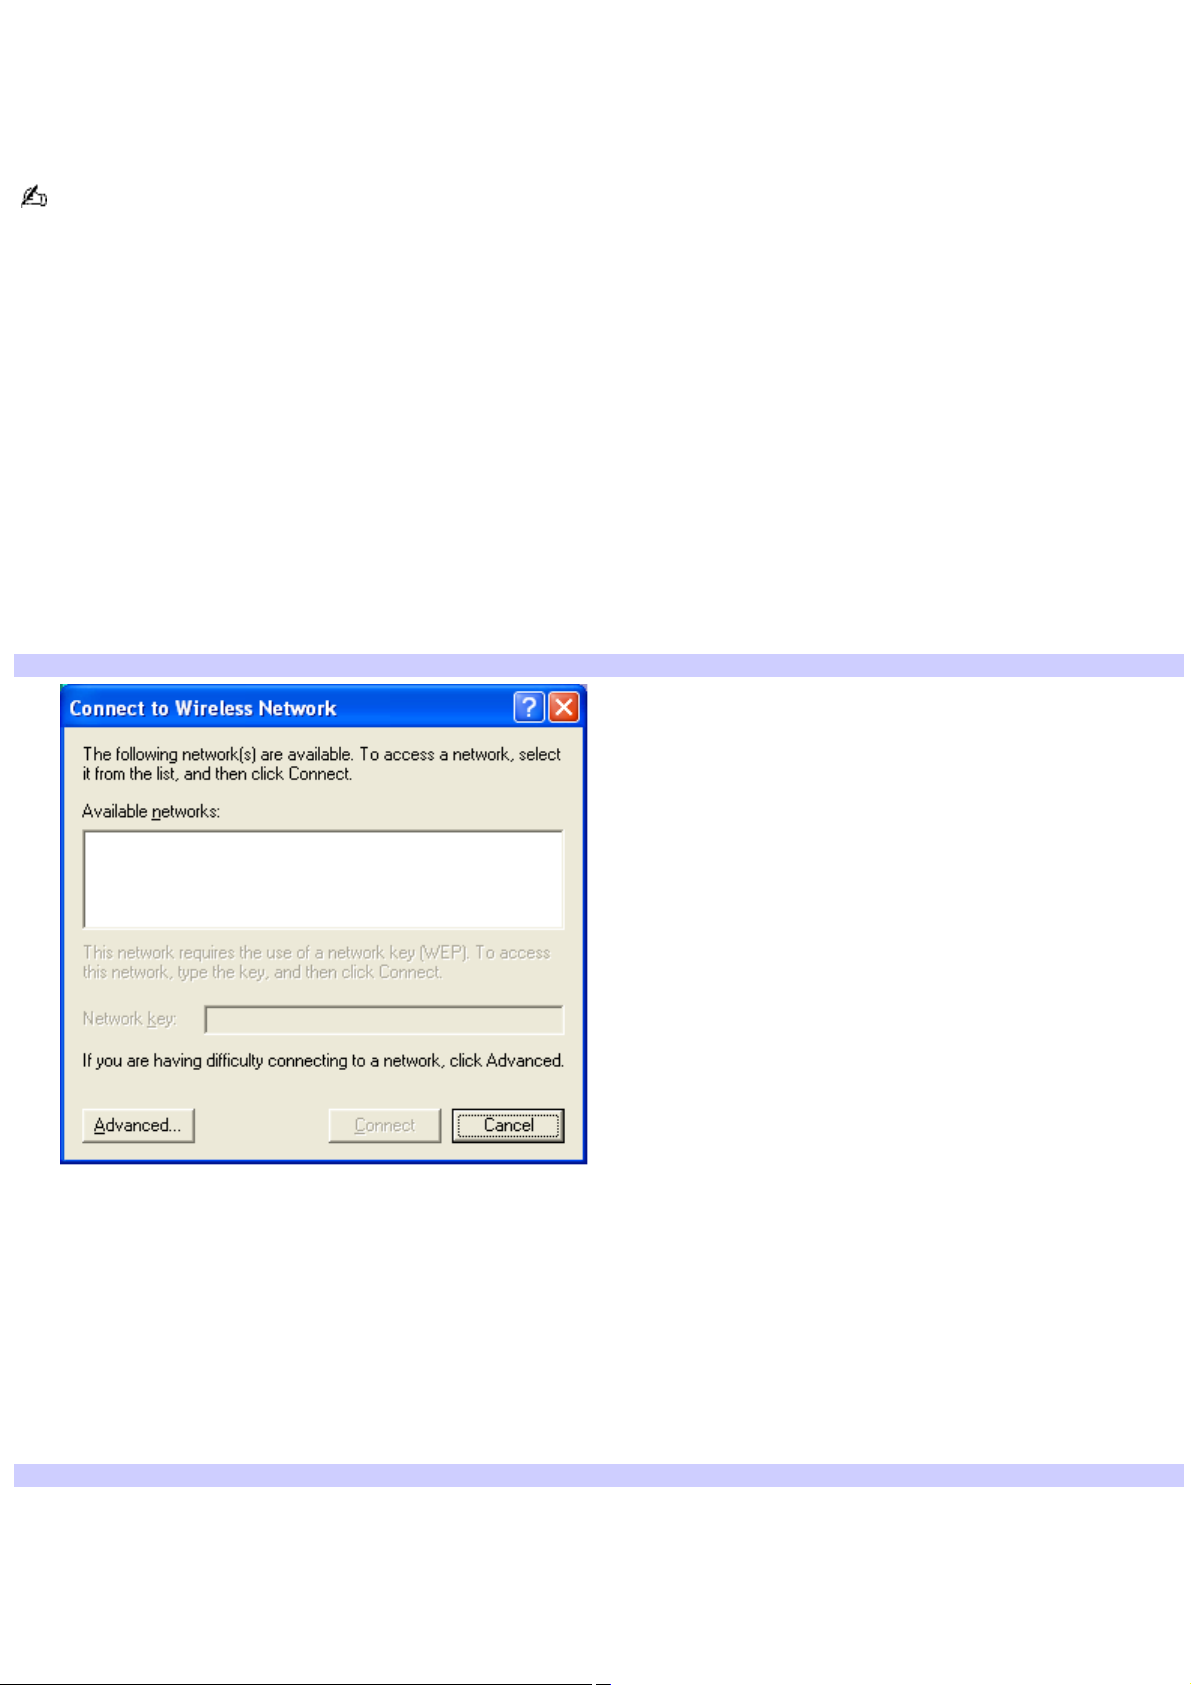
2.
From the Start menu, point to Connect To, and click Wireless Network Connection. The Connect to a Wireless
Network window appears.
3.
Select a network from the Available Networks list box.
4.
Type a key in the Network key box. This is necessary if the network was created with an encryption key;
otherwise, you cannot connect to the network.
Connecting to a wireless LAN
5.
Click Connect.
To set up an access point network
1.
Locate the Wireless LAN switch that is located on the left side of the computer. Move the switch to the ON
position.
2.
From the Start menu, point to Connect To, and click Wireless Network Connection. The Connect to a Wireless
Network window appears.
3.
Click Advanced. The Wireless Network Connection Properties window appears.
Setting Wireless Network Connection Properties
Page 38
Page 39
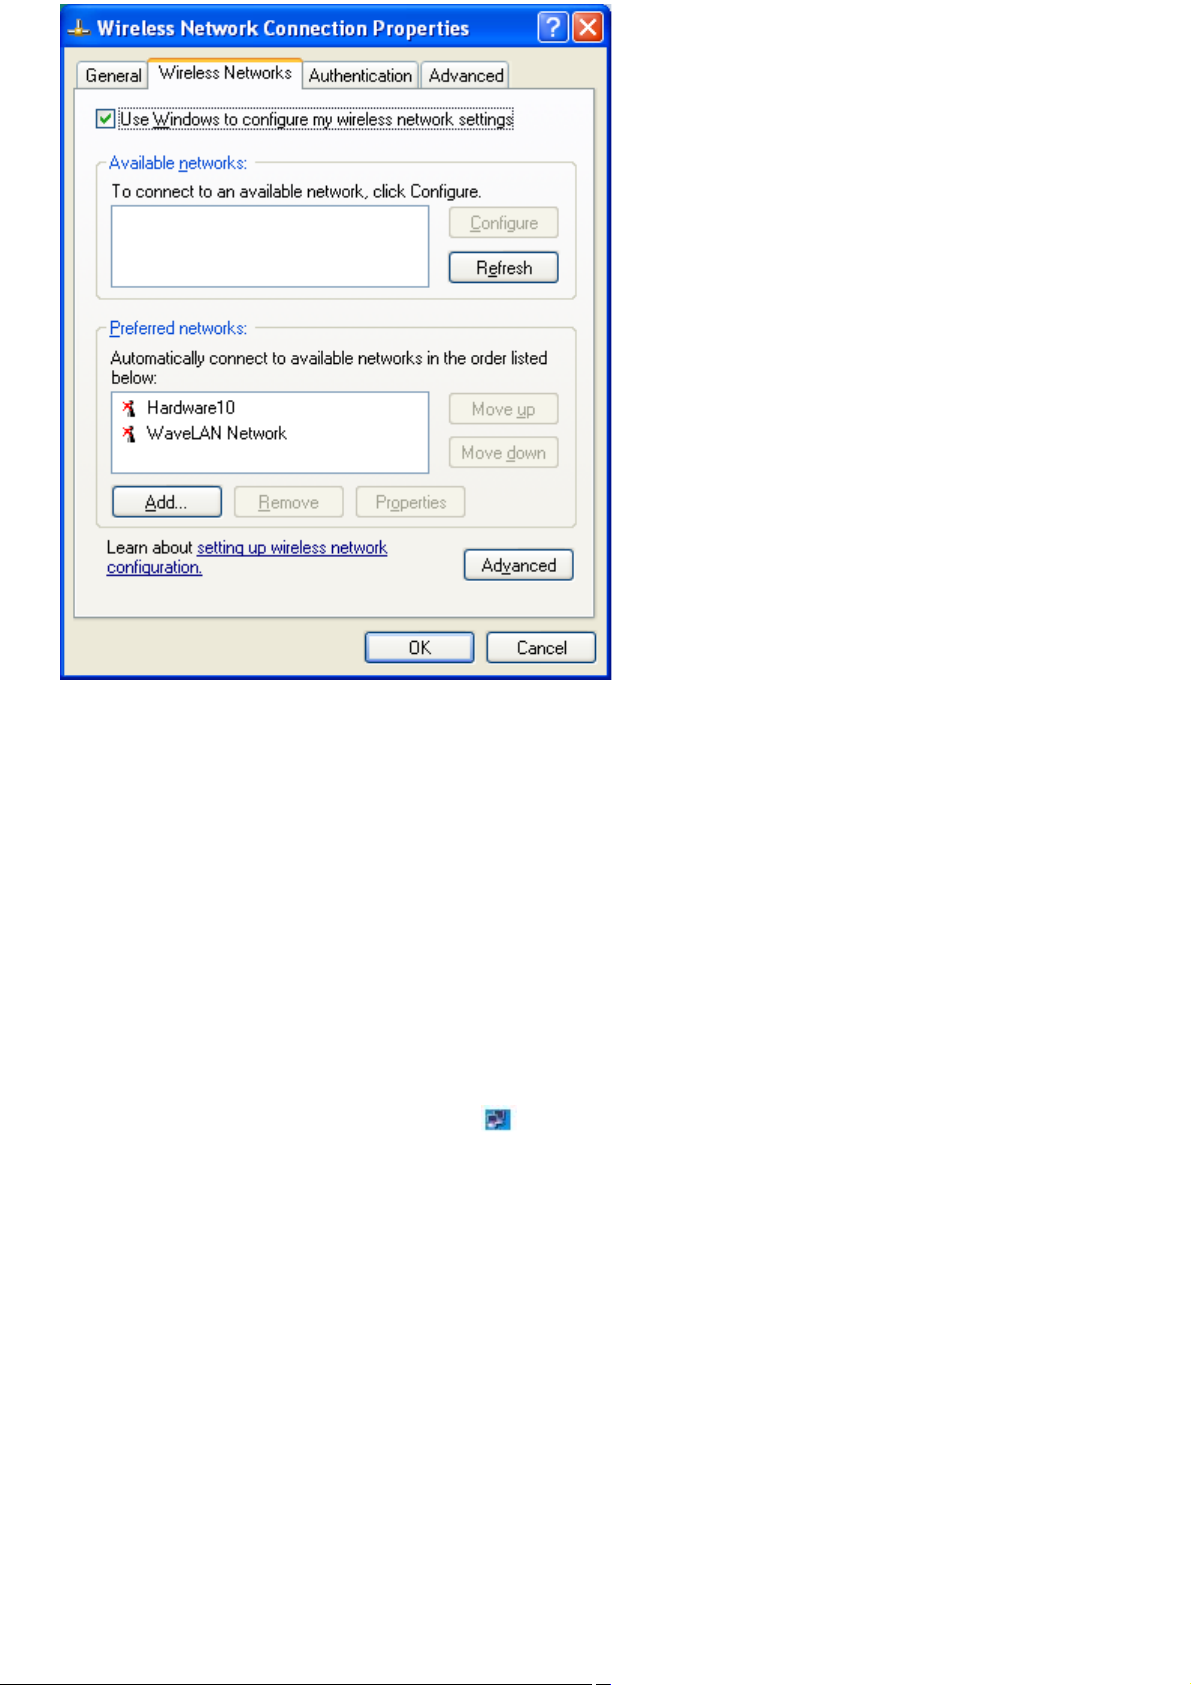
4.
Make sure the Wireless Networks tab is selected, and click Add. The Wireless Network Properties window
appears.
5.
Type a name in the Network name (SSID) box.
6.
Click the "Data encryption (WEP enabled)" check box to select it.
7.
Click the Network Authentication (Shared mode)" check box to select it.
8.
Clear the "This key is provided for me automatically" check box.
9.
Type a key in the Network key box. (In order for others to access your network, you must give them the key.)
10.
Click OK.
To check your connection status
1.
Right-click the Wireless Network Connection icon on the taskbar.
2.
Click Status in the pop-up menu. The Wireless Network Connection Status window appears.
To turn off the Wireless LAN functionality
1.
Close all files that you are accessing through the network connection.
2.
Move the Wireless LAN switch to the OFF position. The Wireless LAN indicator turns off. The Wireless LAN
indicator switches off. It may take a few moments for the computer to disconnect.
Page 39
Page 40
Communicating computer-to-computer (ad-hoc) without an access point
A computer-to-computer (ad-hoc) network is one in which a local network is created only by the wireless devices
themselves, with no other central controller or access point. Each device communicates directly with other devices in the
network. You can set up an ad-hoc network easily at home, either with an network key for added security or without a key.
If a network was created with an network (or encryption) key, then no one can access that network without the key.
To set up a computer-to-computer (ad-hoc) network
1.
Turn on the Wireless LAN switch located on the left side of the computer. The Wireless LAN indicator on the
bottom left front portion of the computer lights up. See Turning On Wireless LAN functionality for more
information.
2.
Click Start on the taskbar, point to Connect To, and click Wireless Network Connection. The Connect to Wireless
Lan window appears.
3.
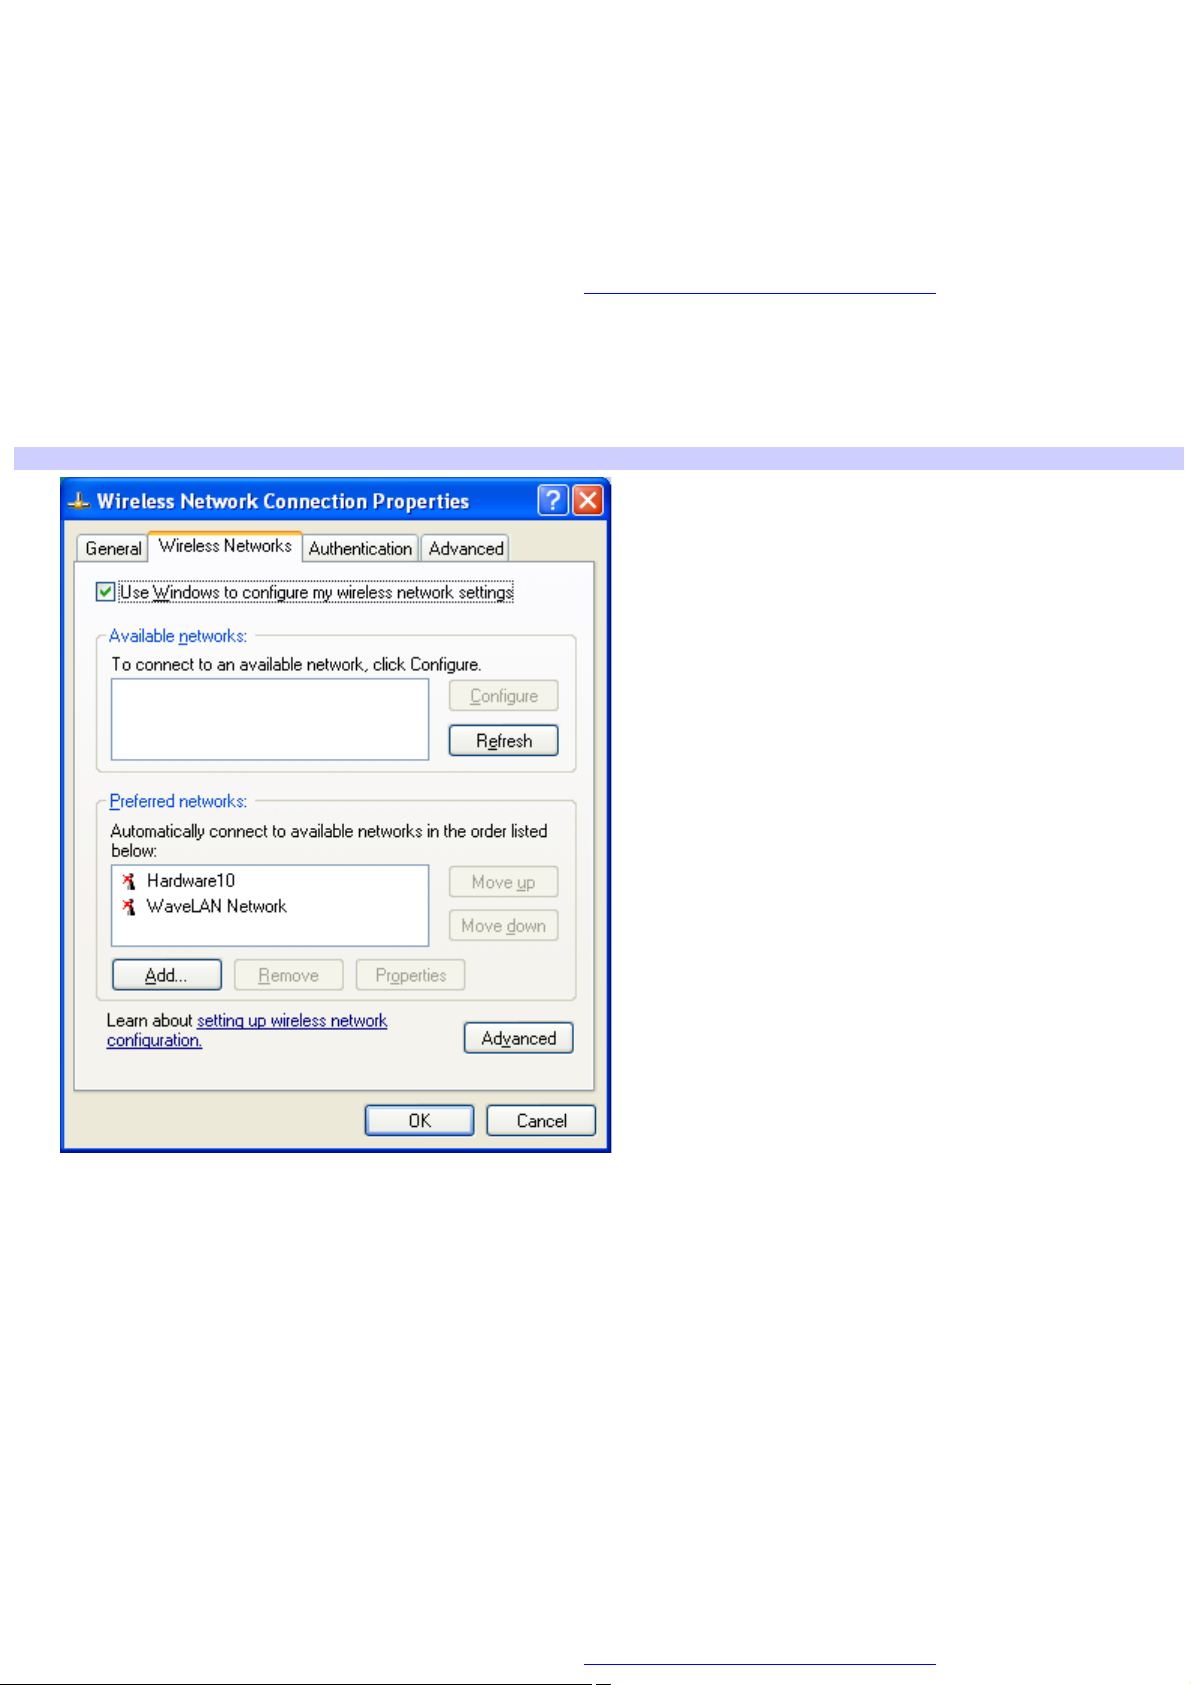
Click Advanced. The Wireless Network Connection Properties window appears.
Setting Wireless Network Connection Properties
4.
Make sure the Wireless Networks tab is selected, and click Add. The Wireless Network Properties window
appears.
5.
Type a name in the Network name (SSID) box.
6.
Click the "Data encryption (WEP enabled)" check box to select it.
7.
Click the Network Authentication (Shared mode)" check box to select it.
8.
Clear the "This key is provided for me automatically" check box.
9.
Type a key in the Network key box. (In order for others to access your network, you must give them the key.)
10.
Click "This is a computer-to-computer (ad-hoc) network; wireless access points are not used" to select it.
11.
Click OK.
To connect to an existing computer-to-computer (ad-hoc) network
1.
Turn on the Wireless LAN switch located on the left side of the computer. The Wireless LAN indicator on the
bottom left front portion of the computer lights up. See Turning On Wireless LAN functionality for more
Page 40
Page 41
information.
2.
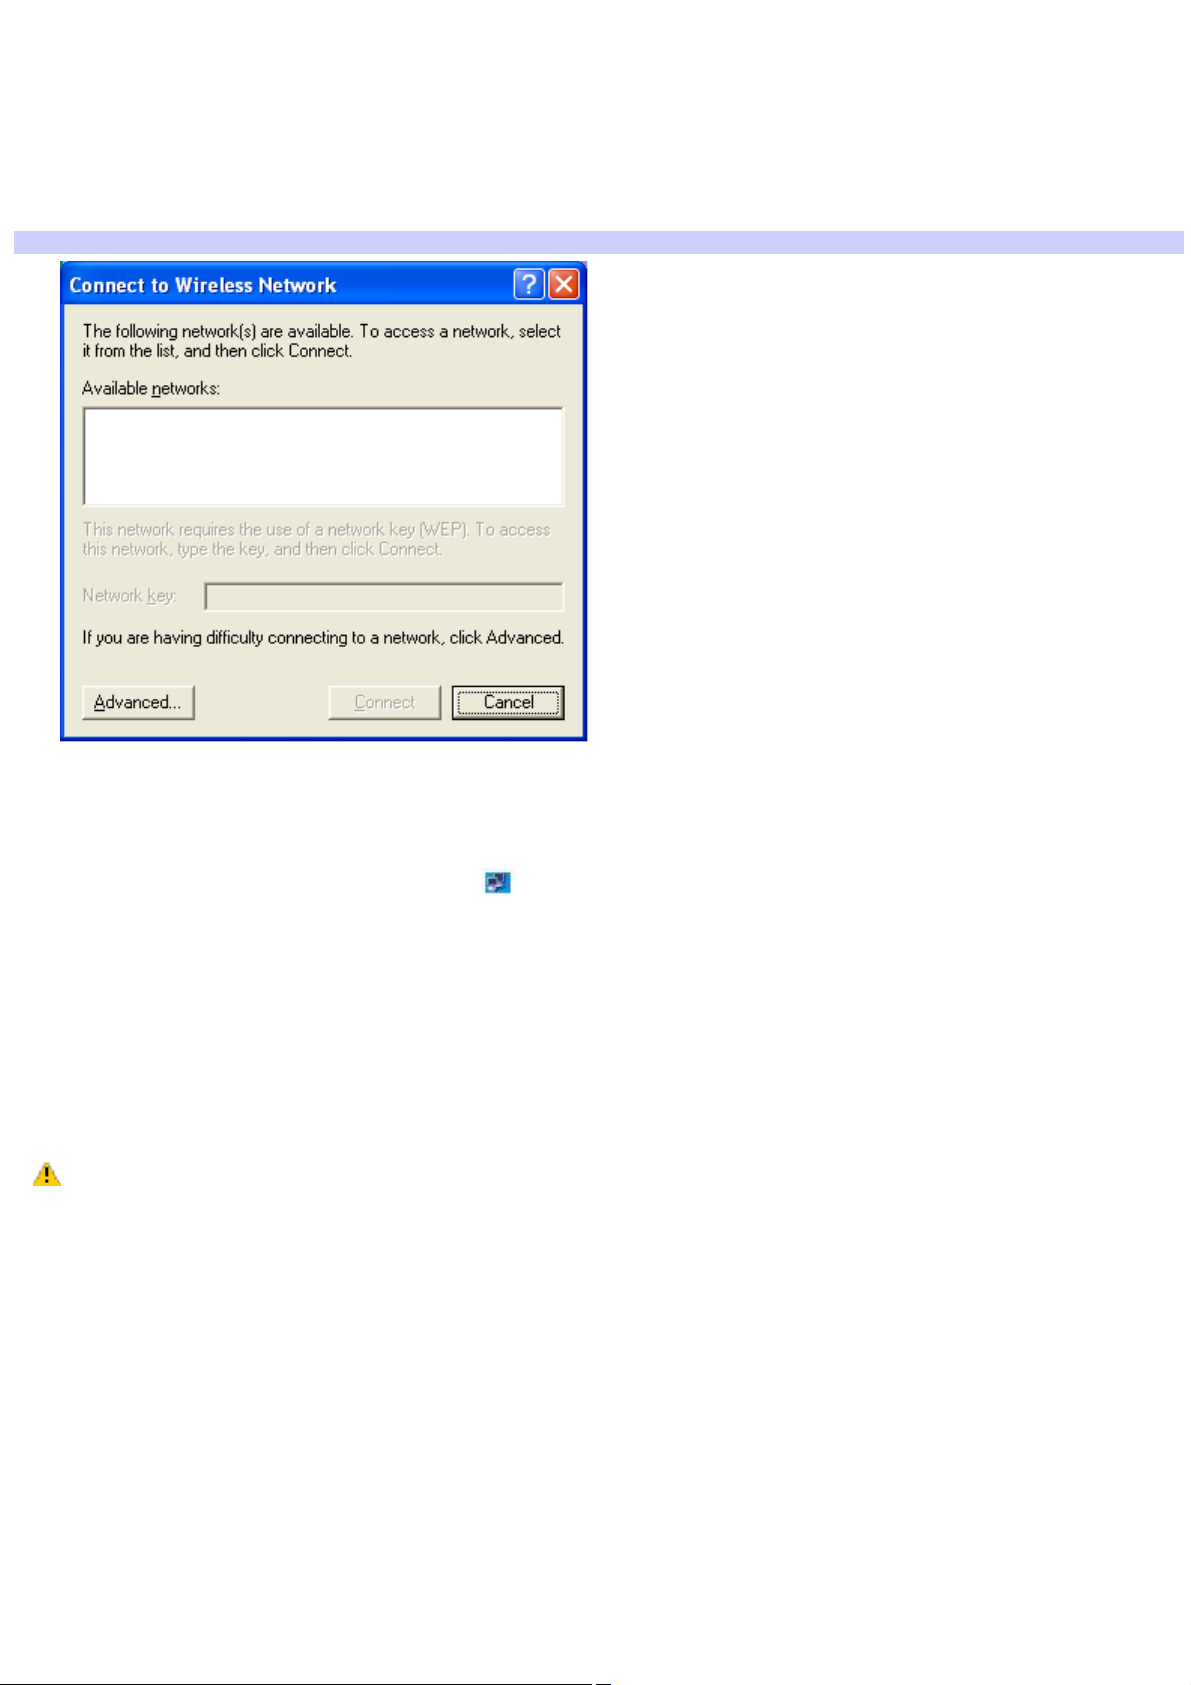
Click Start on the taskbar, point to Connect To, and click Wireless Network Connection. The Connect to Wireless
Lan window appears.
3.
Select a network from the Available Networks list box.
4.
Type a key in the Network key box. This is necessary if the network was created with an encryption key;
otherwise, you cannot connect to the network.
Connecting to a wireless LAN
5.
Click Connect.
To check your connection status
1.
Right-click the Wireless Network Connection icon on the taskbar.
2.
Click Status in the pop-up menu. The Wireless Network Connection Status window appears.
To turn off the Wireless LAN functionality
1.
Close all files that you are accessing through the network connection.
2.
Move the Wireless LAN switch to the OFF position. The Wireless LAN indicator turns off. The Wireless LAN
indicator switches off. It may take a few moments for the computer to disconnect.
Turning off the Wireless LAN functionality while accessing remote documents, files, or resources may
result in data loss.
Page 41
Page 42

Notes on using Wireless LAN
Sony Wireless LAN devices support the IEEE 802.11b standard. Devices connecting to a Wireless LAN using the IEEE
802.11a standard cannot connect to devices using the IEEE 802.11b standard.
Wireless LAN communication occurs on divided frequency bands known as channels. Third-party Wireless LAN Access
Point channels may be preset to different channels from Sony devices.
If using a Wireless LAN Access Point, refer to connectivity information contained in those instructions.
Page 42
Page 43

Connecting Peripheral Devices
You can add functionality to your notebook by connecting a variety of peripherals, as discussed in the following sections:
Connecting a Floppy Disk Drive
Connecting an i.LINK Optical Disc Drive
Connecting a PC Card Drive
Connecting a USB Mouse or Keyboard
Connecting a USB Device
Connecting a USB Printer
Connecting an i.LINK Audio-Video Device
Connecting an External Display
Connecting with another VAIO computer
Connecting External Speakers
Connecting a Microphone
Expanding Your Computer Capabilities
Page 43
Page 44

Connecting a Floppy Disk Drive
You can connect a floppy disk drive (not supplied) to a USB port on your computer, port replicator, or docking station.
Page 44
Page 45
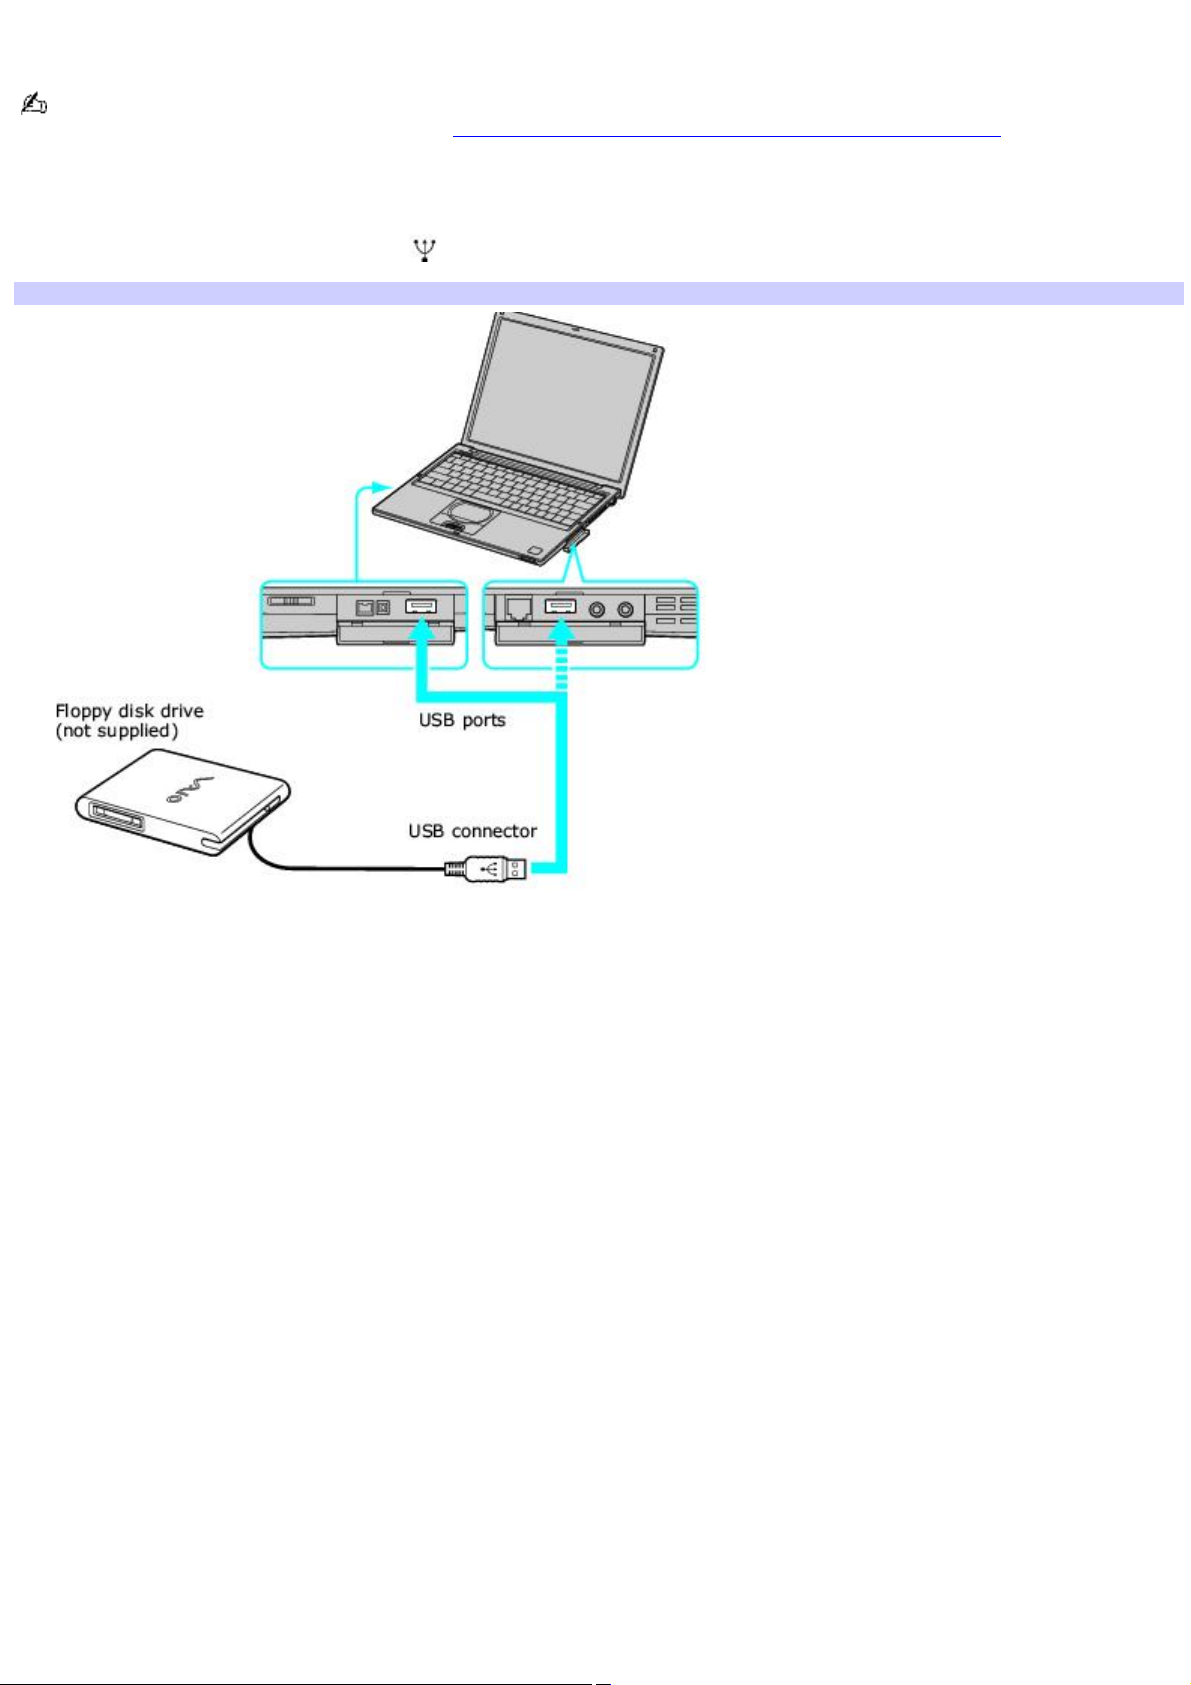
To connect a floppy disk drive
You do not need to shut down your computer before connecting or disconnecting a floppy disk drive.
Before disconnecting the floppy disk drive, see To disconnect a floppy disk drive when the computer is on for more
information.
1.
Before connecting this drive, close any active applications to help prevent data loss.
2.
Plug the USB connector into the USB port. The logo on the floppy disk drive should face upward.
Connecting an Floppy Disk Drive
Page 45
Page 46

To insert a floppy disk into the floppy disk drive
1.
Hold the floppy disk with the label facing up.
2.
Gently push the floppy disk into the drive until it clicks into place.
Inserting a Floppy Disk
Page 46
Page 47
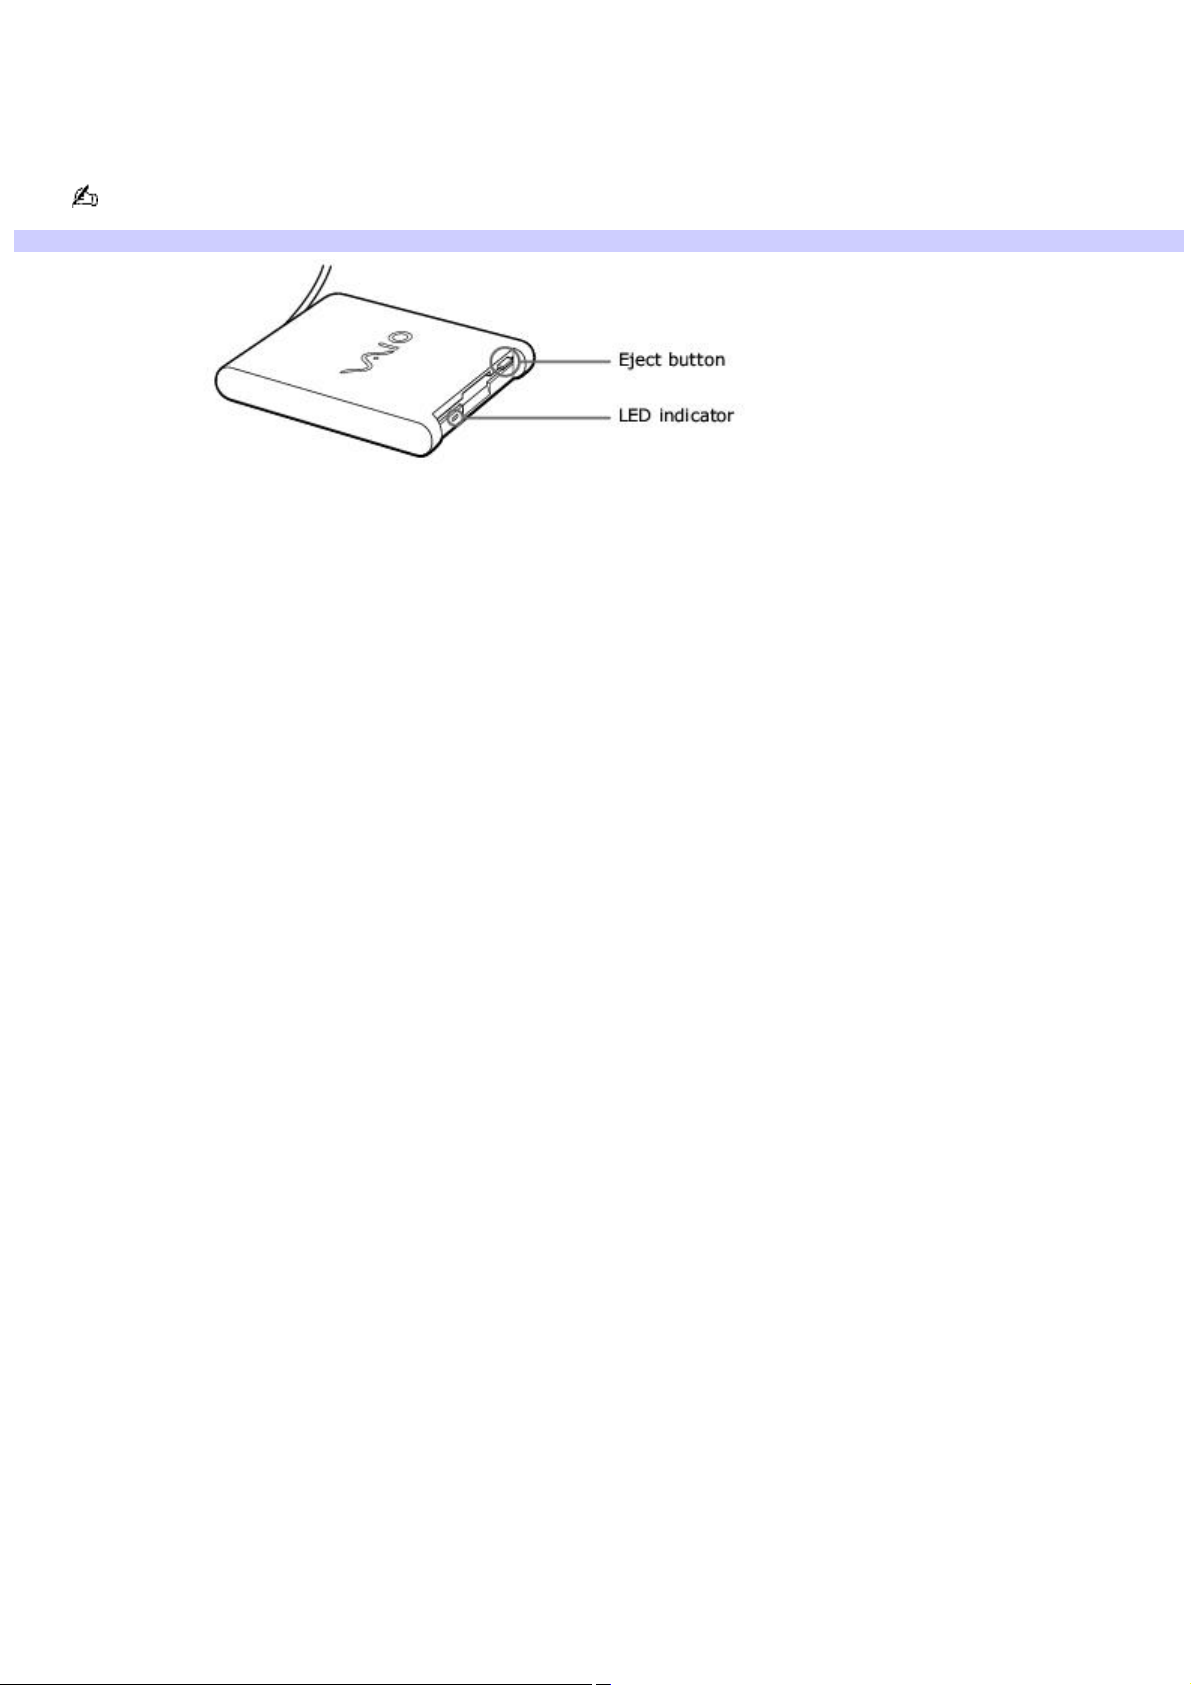
To remove a floppy disk from the floppy disk drive
1.
Close all applications that were opened from the disk and wait for the LED indicator to turn off.
2.
Push the Eject button, and remove the disk.
Do not push the Eject button when the LED indicator is turned on; otherwise, you may lose data.
Remov ing a Floppy Disk
Page 47
Page 48

To disconnect a floppy disk drive when the computer is on
1.
Before disconnecting this drive, close any active applications to help prevent data loss.
2.
Double-click the Safely Remove Hardware icon in the taskbar. The Safely Remove Hardware window
appears.
3.
In the Hardware devices box, select Y-E Data USB Floppy, and click Stop. The Stop a Hardware device
window appears.
4.
Make sure Y-E Data USB Floppy is selected, and click OK. A message appears stating it is safe to remove the
hardware.
5.
Unplug the floppy disk drive from the computer, port replicator, or docking station.
Page 48
Page 49

To carry an floppy disk drive
Fold the floppy disk drive cable and connector into the side compartment on the floppy disk drive.
Carrying an Floppy Disk Drive
Page 49
Page 50

Notes on handling floppy disks
Do not open the shutter manually and touch the surface of the floppy disk.
Keep floppy disks away from magnets.
Keep floppy disks away from direct sunlight and other heat sources.
Page 50
Page 51

Connecting an i.LINK Optical Disc Drive
You can connect an i.LINK®1 optical disc drive to your computer, port replicator, or docking station. This computer is
preinstalled with software that enables you to create CDs and play DVD movies. The i.LINK optical disc drive draws power
from the computer through a peripheral cable. This peripheral cable connects to both the i.LINK port and DC OUT jack on
the computer.2
If you use an optional drive when your computer is running on battery power, the battery life will be shorter.
1
i.LINK is a trademark of Sony us ed only to des ignate that a produc t c ontains an I E E E13 9 4 c onnec tion. T he i.LIN K c onnec tion may vary, depending on the
software applications, operating s ys tem and c ompatible i.LI NK devices. A ll products with an i.LI N K c onnec tion may not c ommunic ate with eac h other. Refer
to the documentation that came with your compatible i.LIN K devic e for information on operating c onditions and proper c onnec tion. Before c onnecting
compatible i.LI N K P C peripherals to your system, s uc h as a C D-RW or hard dis k drive, c onfirm their operating s ystem c ompatibility and required operating
conditions.
2
I f you c onnec t and us e an optional drive when your c omputer is running on battery power, the battery life will be reduc ed.
Page 51
Page 52
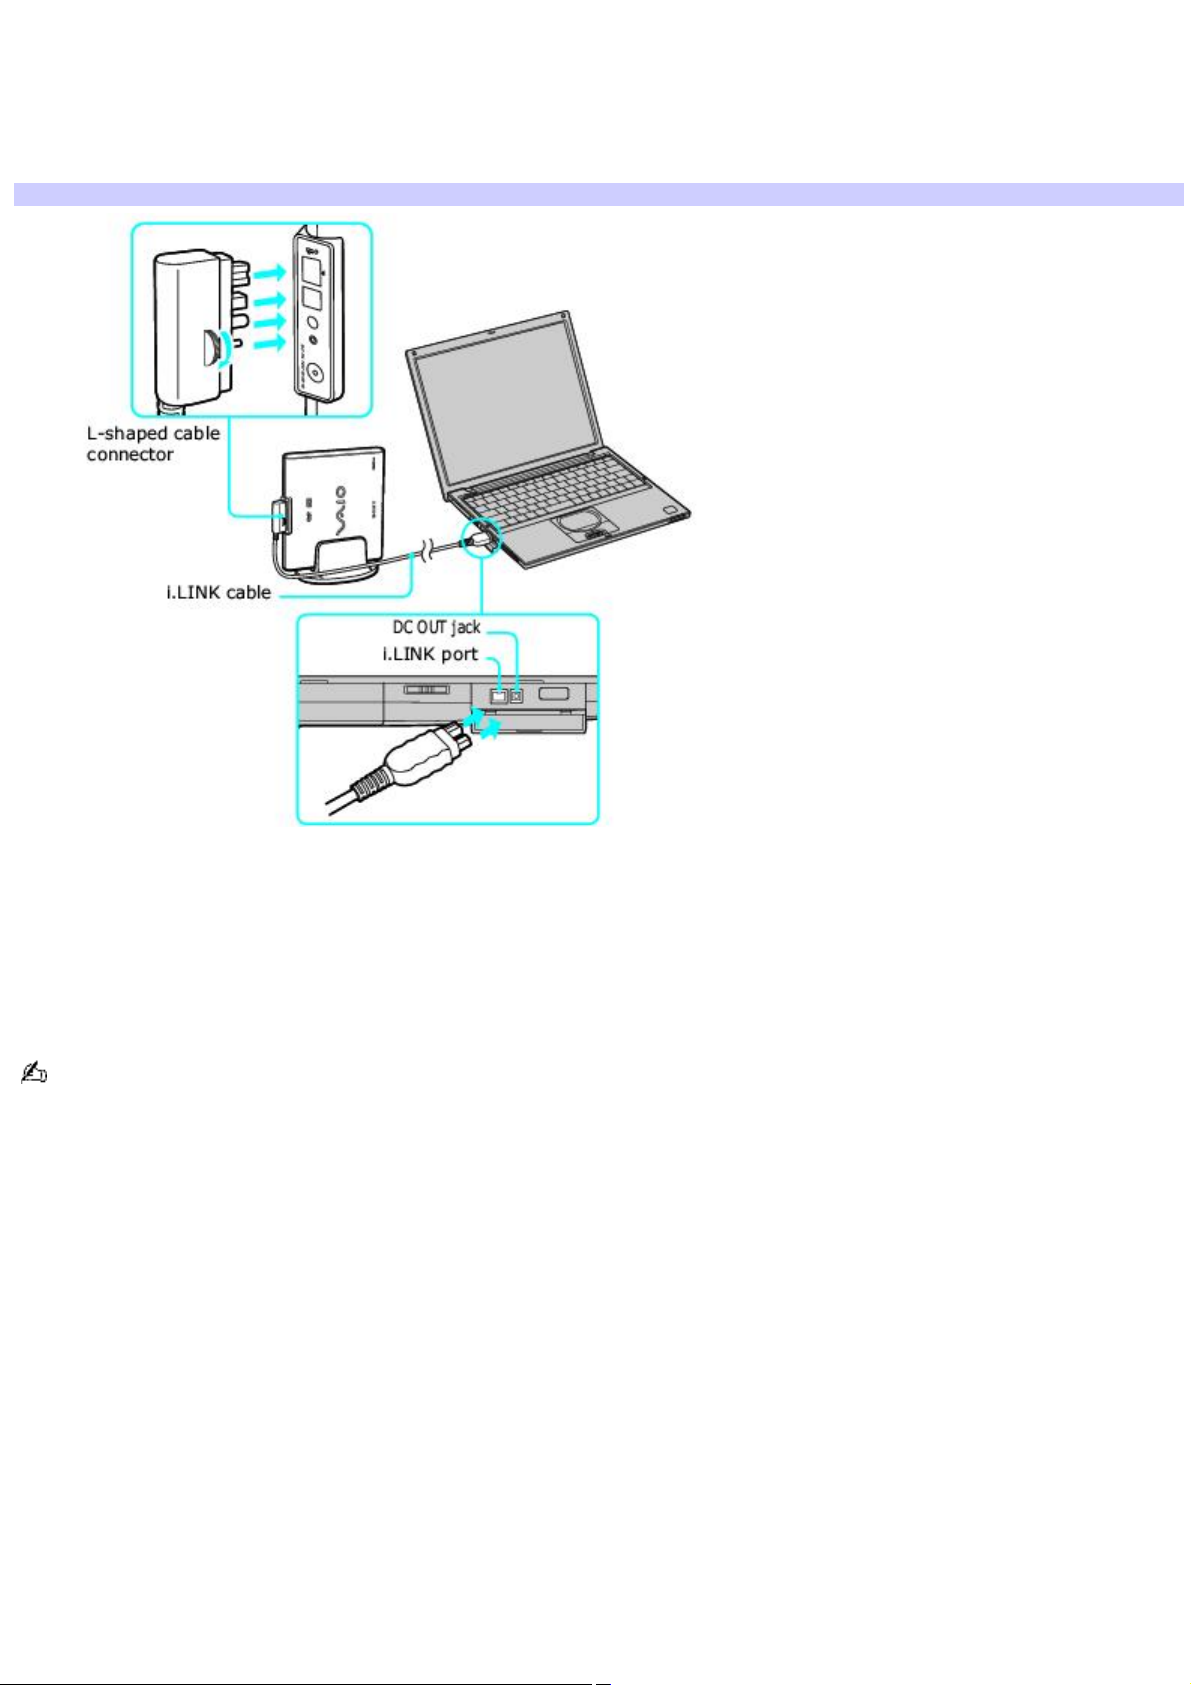
To connect an i.LINK optical disc drive
1.
Before connecting this drive, close any active applications to help prevent data loss.
2.
Insert the L-shaped connector of the peripheral cable (supplied with the i.LINK drive) into the matching jack on
the i.LINK drive. Secure the connector by turning the LOCK device clockwise.
Connecting i.LINK optical disc drive
3.
Insert the straight-shaped, two-prong connector of the peripheral cable into both the computer's i.LINK port and
DC OUT jack.
4.
The i.LINK drive's power indicator lights up, and the computer automatically detects and identifies the connected
drive.
5.
Click Start on the Windows® operating system taskbar, and select My Computer to verify that an icon for the
i.LINK optical disc drive was added in the window.
The Sony i.LINK optical disc drive is compatible only with certain Sony VAIO® PCG series computers preinstalled with
Microsoft® Windows® XP Home Edition or Professional.
Page 52
Page 53

To disconnect an i.LINK optical disc drive
1.
Before disconnecting this drive, close any active applications to help prevent data loss.
2.
Double-click the Safely Remove Hardware icon in the taskbar. The Safely Remove Hardware window
appears.
3.
In the Hardware devices box, select the appropriate i.LINK drive if it is not already selected, and click Stop.
The Stop a Hardware device window appears.
4.
Make sure the appropriate i.LINK drive is selected, and click OK. A message appears stating it is safe to remove
the hardware.
5.
Unplug the i.LINK optical disc drive from the computer, port replicator, or docking station.
Page 53
Page 54

Notes on using i.LINK optical disc drives
You can use the supplied Application Recovery, Driver Recovery, and System Recovery CDs with an i.LINK optical disc
drive. See Application and System Recovery CDs for more information.
Do not use an optional i.LINK optical disc drive and an optional optical disc drive with PC Card at the same time.
Connecting both drives may cause a system malfunction.
Page 54
Page 55

Connecting a PC Card Drive
You can use an optional optical drive with your computer. If you use an optional drive when your computer is running on
battery power, the battery life will be shorter. The drive draws power from the computer through a PC Card.
If you connect a non-Sony DVD drive to your VAIO® computer, the DVD playback may not function
properly. The DVD software (supplied) must be installed to play a DVD.
For best performance, use a Sony compatible DVD drive.
Page 55
Page 56
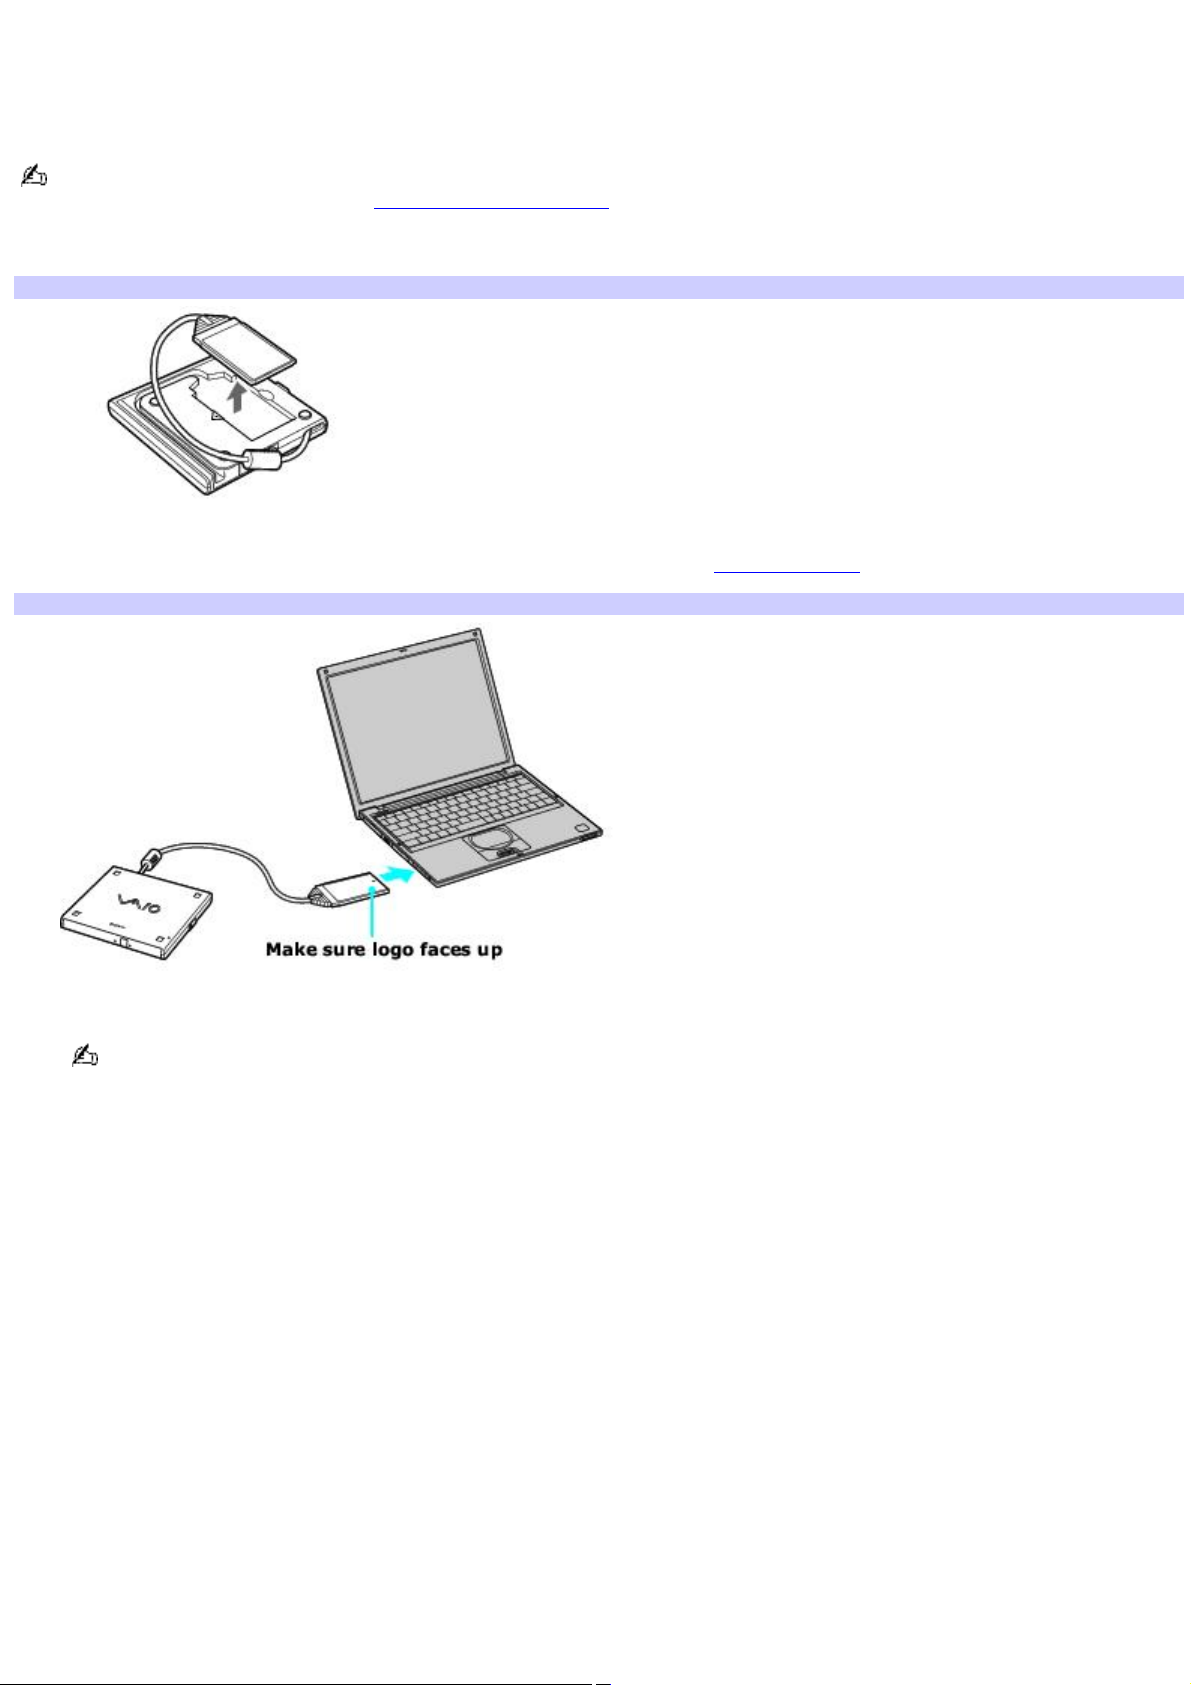
To connect an optical drive
Procedures for connecting an optical drive may vary, depending on the specific drive you purchase. See the manual supplied
with your optical drive for more information on its installation and use.
You can connect an optical drive while the computer is on. For specific instructions on using your supplied Application,
Driver, and System Recovery CDs, see Using Your Recovery CDs for more information.
1.
Remove the PC Card from the bottom side of the optical drive.
Remov ing PC Card
2.
Insert the PC Card into the PC Card slot with the logo facing up. See Using PC Cards for details.
Inserting PC Card
A protective cover is attached to the lens of the optical drive at the factory. Before using the optical drive, remove
the protective cover.
Page 56
Page 57
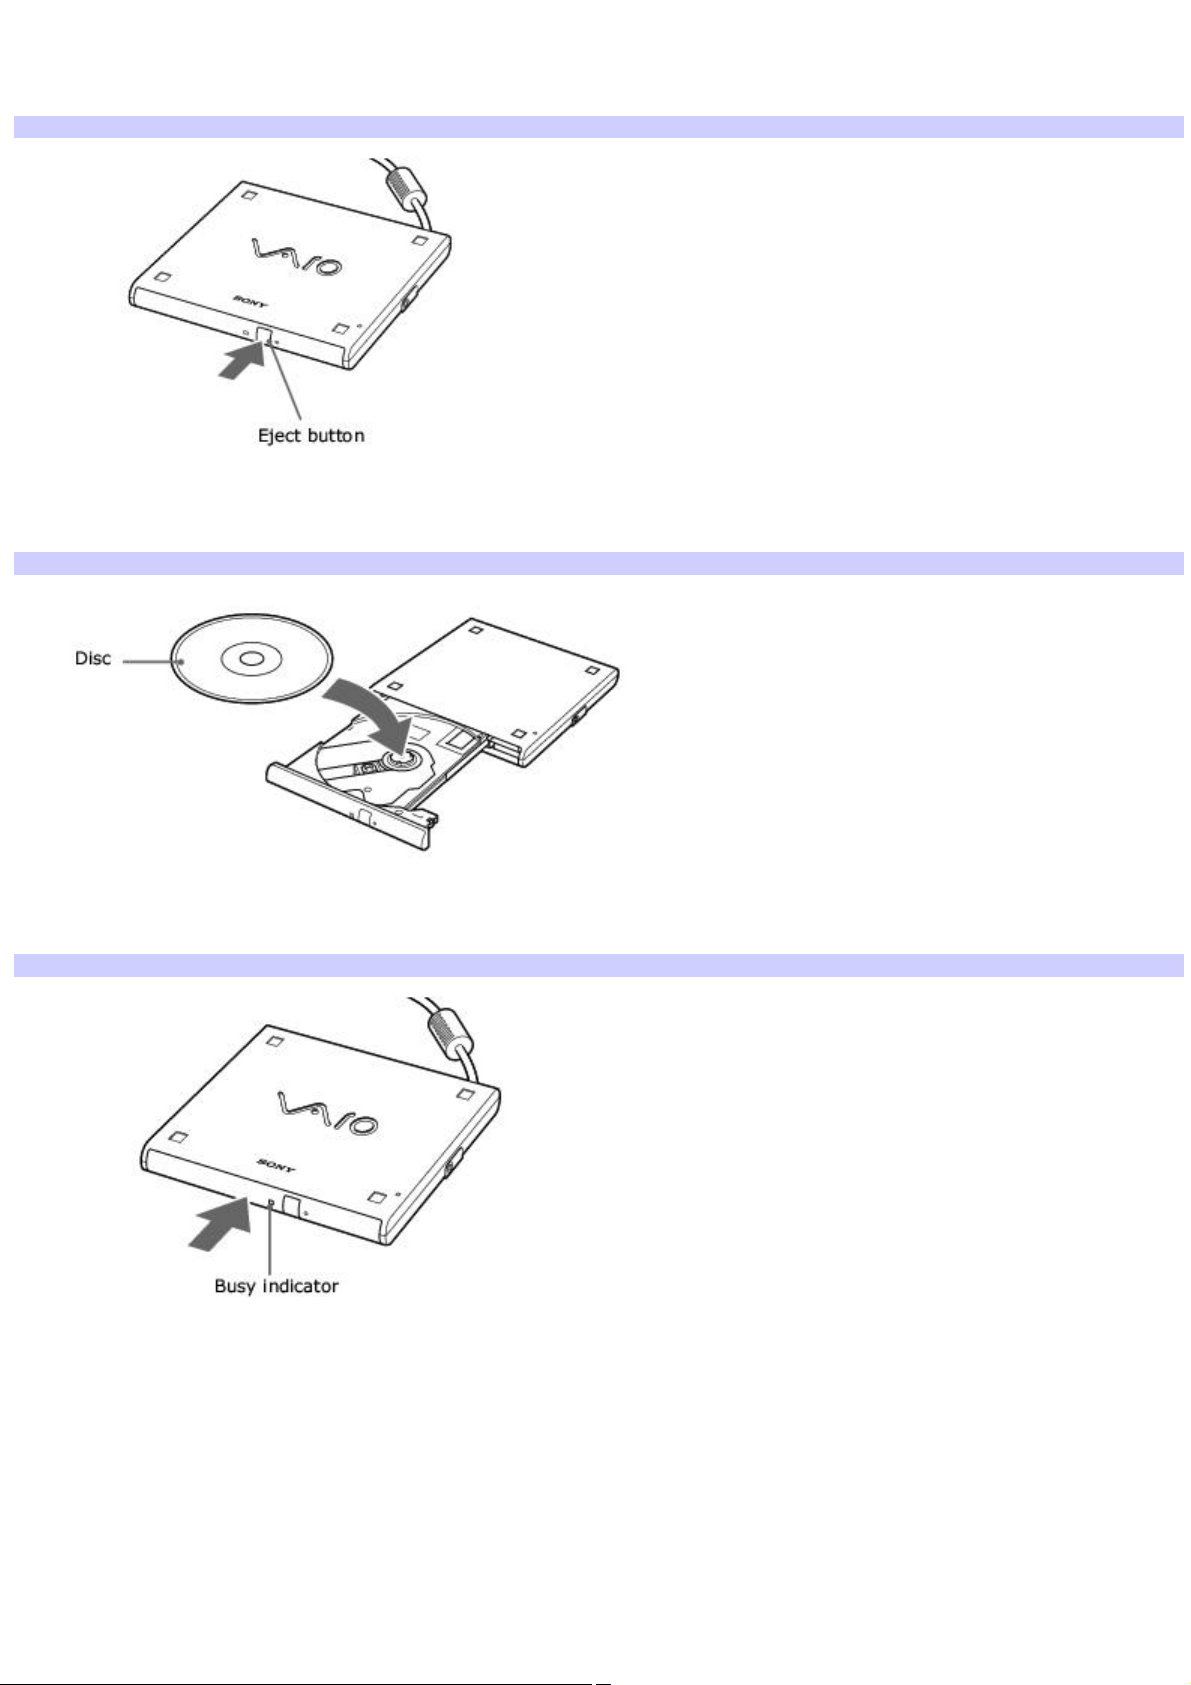
To insert a disc
1.
Press the Eject button. The disc tray slides out.
Optical Drive
2.
Place the disc in the tray with the label facing up.
3.
Push the disc onto the hub until the disc clicks into place.
Inserting Disc
4.
Close the tray by pushing it in gently. The Busy indicator on the drive flashes while your computer is reading data
from the disc.
Flashing Busy Indicator
Page 57
Page 58

To remove the drive
Remove the PC Card from the computer. See To disconnect a floppy disk drive when the computer is on for more
information.
Page 58
Page 59

Notes on CD and DVD discs
Handling CD or DVD discs
Do not touch the surface of the disc.
Do not drop or bend the disc.
Avoid using adhesive labels to identify your discs. Adhesive labels may come off while the disc is in use in your
optical drive and damage to the unit.
Cleaning CD or DVD discs
Fingerprints and dust on the surface of a disc may cause data reading errors. Proper care of the disc is essential to
maintain its reliability. Do not use solvents such as benzine, thinner, commercially available cleaners or anti- static
spray, as they may damage the disc.
For normal cleaning, hold the disc by its edge and use a soft cloth to wipe the surface from the center outward.
If the disc is badly soiled, moisten a soft cloth with water, wring it out well, and use it to wipe the surface of the disc
from the center out. Wipe off any remaining moisture with a dry soft cloth.
Page 59
Page 60

Connecting a USB Mouse or Keyboard
You can connect a universal serial bus (USB) mouse or keyboard to your computer, port replicator, or docking station. Make
sure the USB device is compatible with the Windows® operating system.
Page 60
Page 61
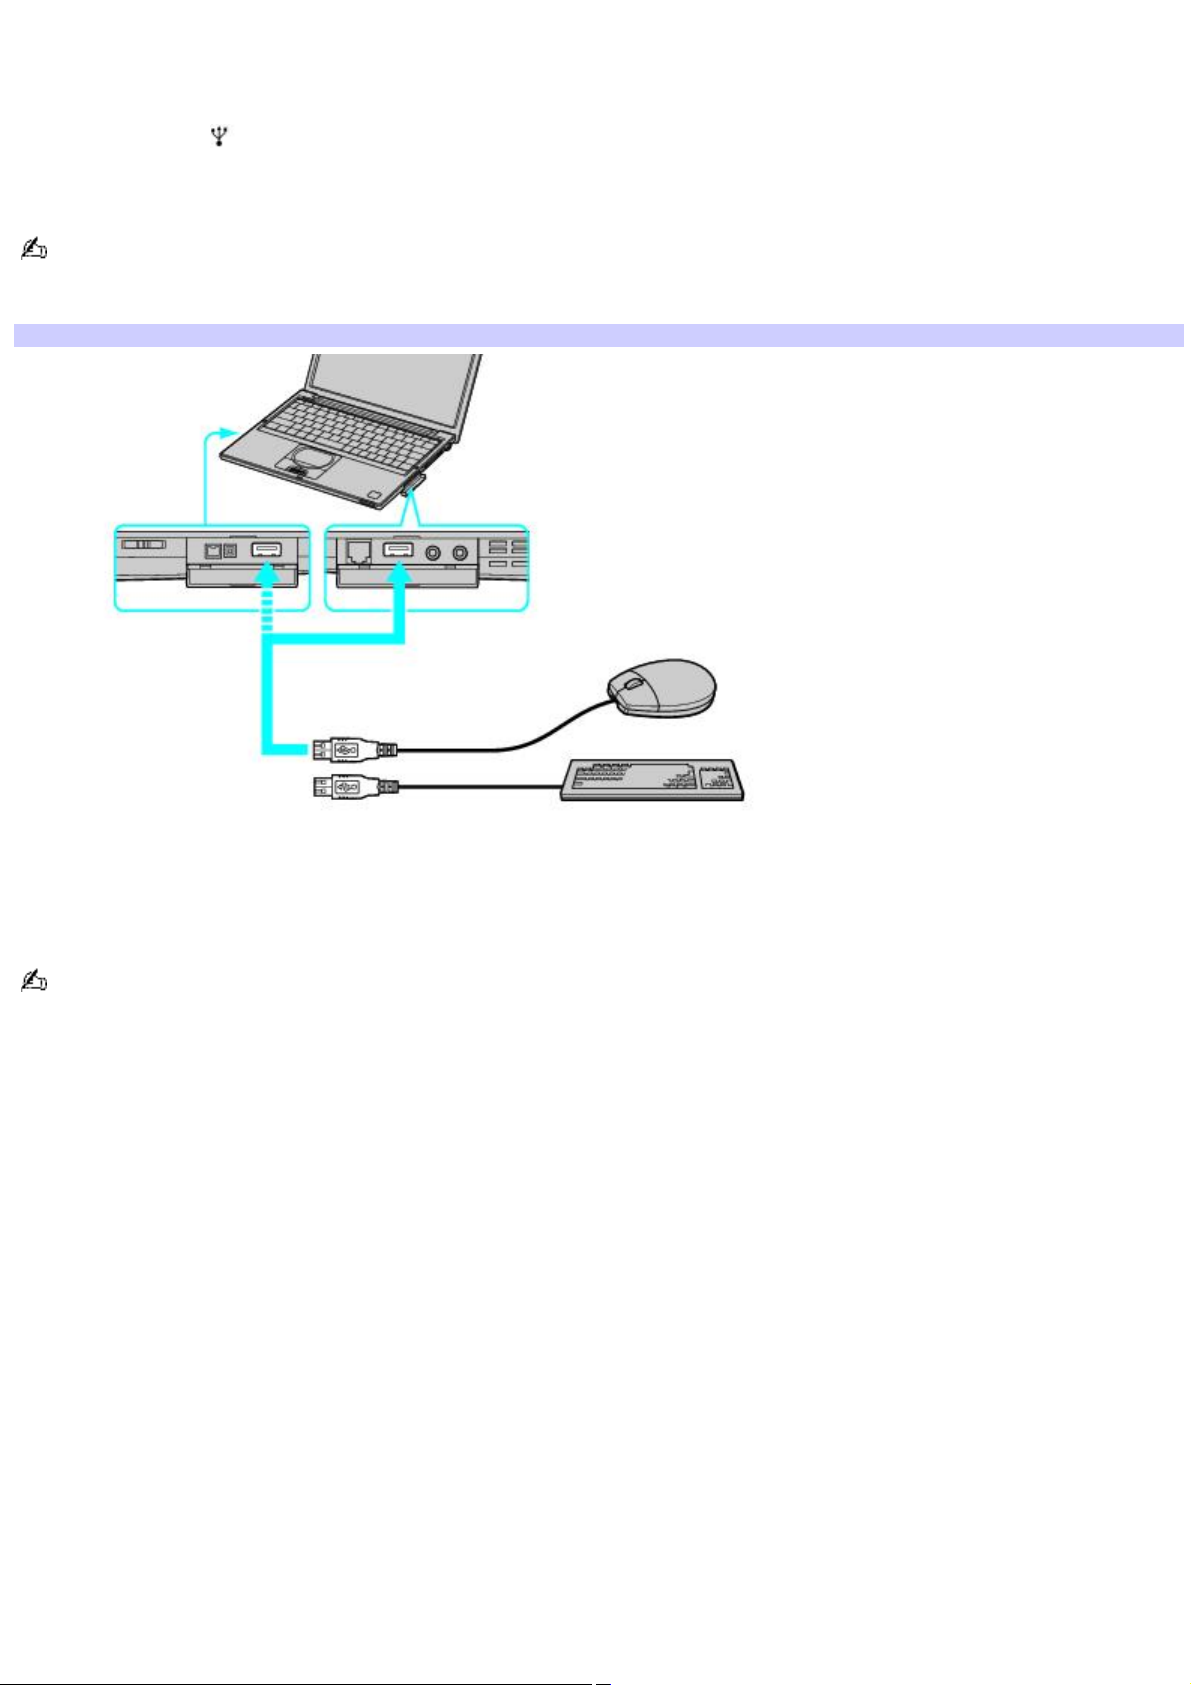
To connect a USB mouse or keyboard
1.
Turn off your computer before you connect or disconnect the mouse or keyboard.
2.
Locate the USB port on your computer, port replicator, or docking station.
3.
Plug the mouse or keyboard cable into this port.
You can use a Sony USB mouse, such as the PCGA-UMSI series, with this computer. The USB mouse software driver is
preinstalled; however, the first time you connect a mouse, on-screen installation instructions may appear. Press Enter to
complete the on-screen instructions.
Connecting a USB Mouse or Keyboard
You can use an optional Sony USB mouse such as the PCGA-UMS1 series (optional) with this notebook. Since the USB
mouse software driver is preinstalled in the notebook, you simply plug the USB mouse into the USB port to use it. One USB
port supports one USB device.
See the manual that came with your mouse or keyboard for more information on its installation and use.
Page 61
Page 62

Connecting a USB Device
You can connect a universal serial bus (USB) device, such as speakers or microphones, to your computer, port replicator, or
docking station. Make sure the USB device is compatible with the Windows® operating system.
Page 62
Page 63
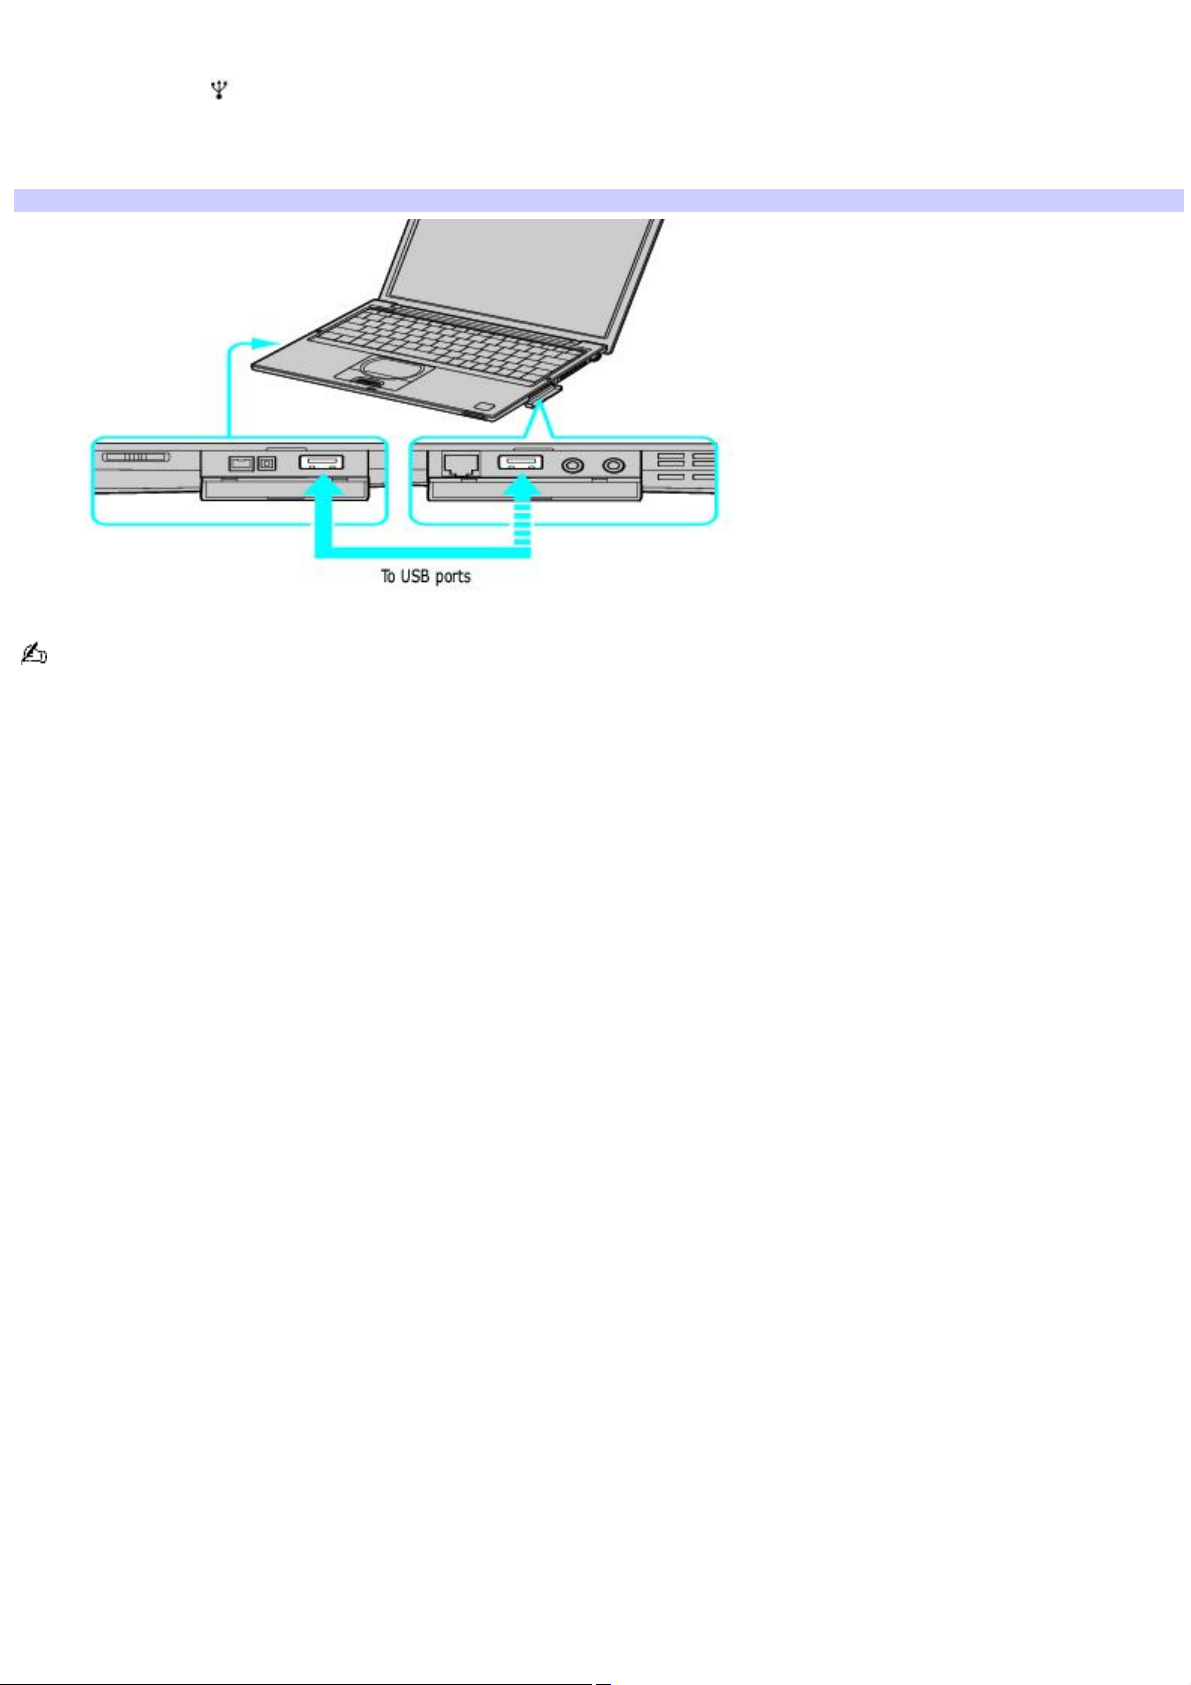
To connect a USB device
1.
Locate the USB port.
2.
Plug the USB cable (not supplied) into this port, and plug the opposite end of the cable into the USB device, if it is
not already connected.
Connecting a USB Device to a USB Port
See the manual that came with your USB device for more information on its installation and use.
Page 63
Page 64

Connecting a USB Printer
You can connect a universal serial bus (USB) printer to your computer, port replicator, or docking station. Make sure the USB
device is compatible with the Windows® operating system.
Page 64
Page 65
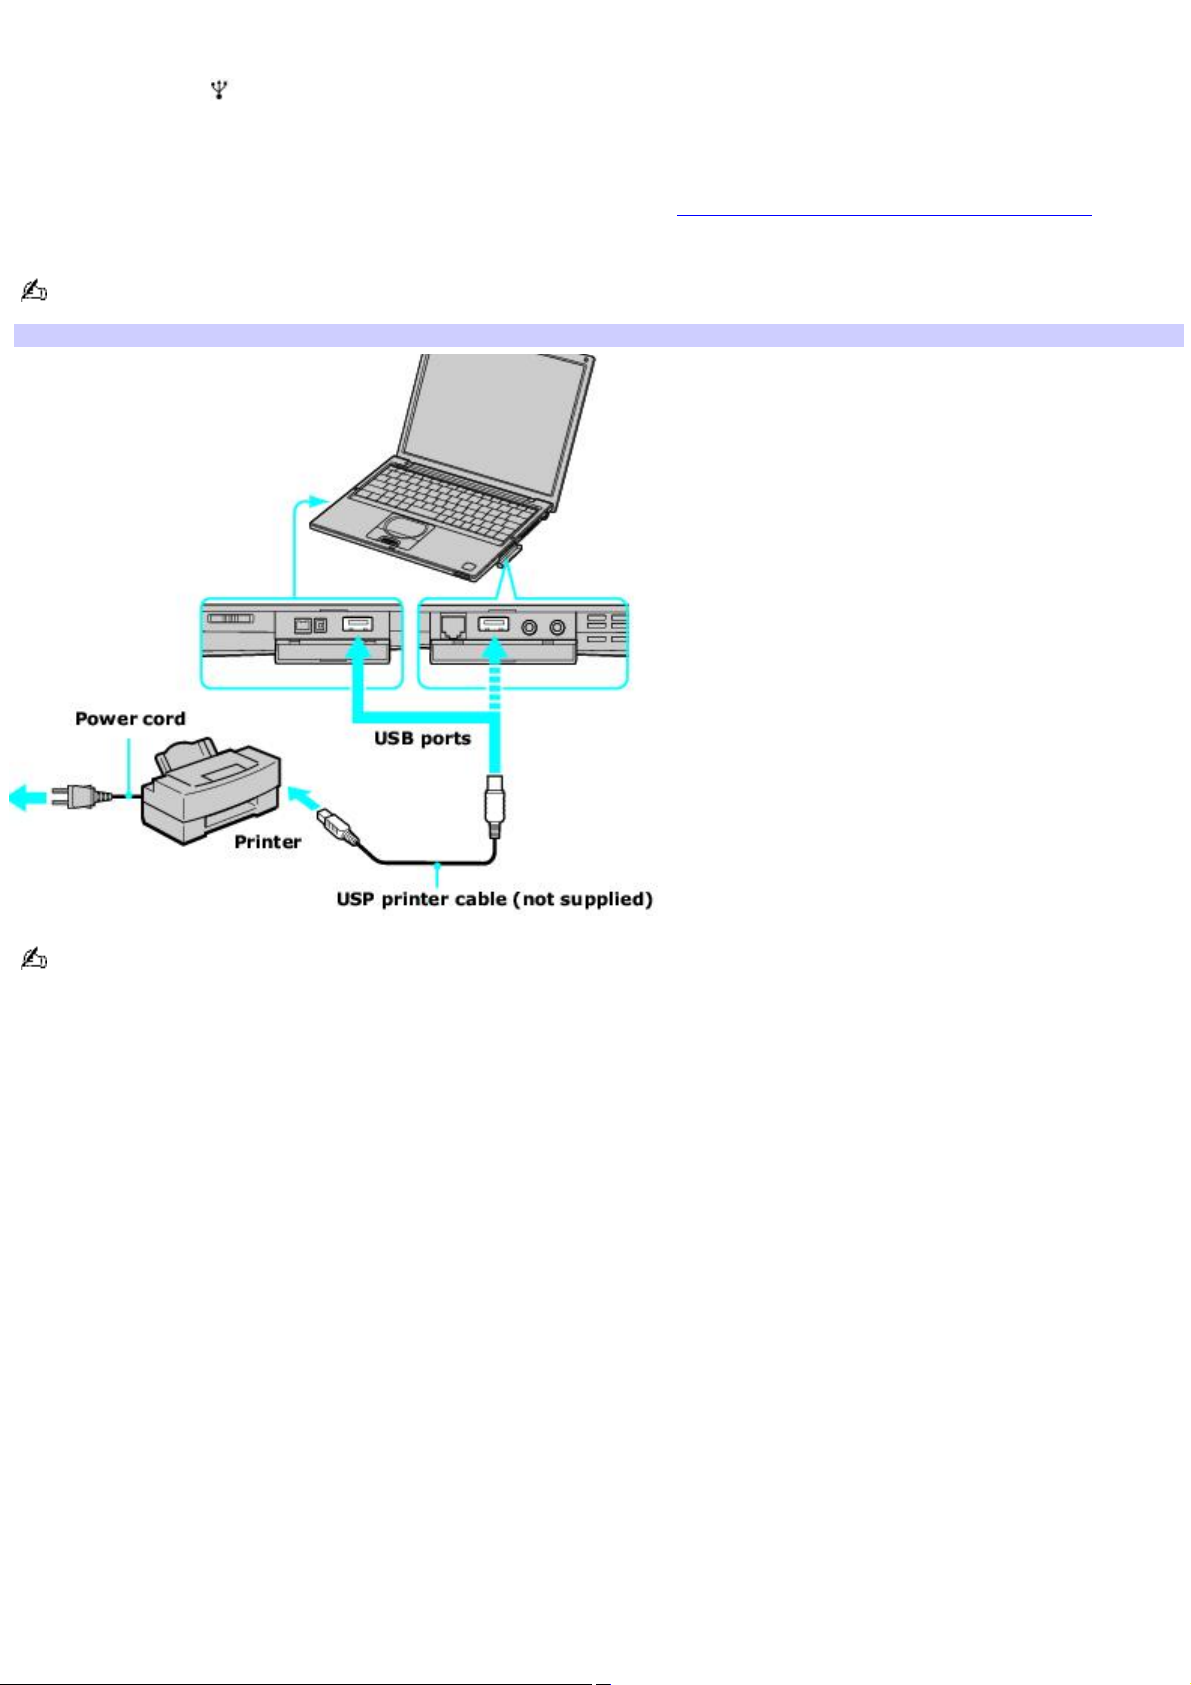
To connect to a USB printer
1.
Locate the USB port.
2.
Plug the USB printer cable (not supplied) into the USB port, and plug the opposite end of the cable into the USB
port on your printer.
3.
Make sure your computer's printer settings are properly set. See Displaying the Sony Notebook Setup Screen for
more information.
To use a printer, you need to install the driver software that came with your printer.
Connecting a USB Printer Cable
See the manual that came with your printer for more information on its installation and use.
Page 65
Page 66

Connecting an i.LINK Audio-Video Device
You can connect an i.LINK®1 enabled digital video camera recorder to the i.LINK® S400 (IEEE 1394) port on your computer,
port replicator, or docking station.
1
i.LINK is a trademark of Sony us ed to des ignate that a produc t c ontains an I E E E 1 3 9 4 c onnector. T he i.LINK c onnec tion may vary, depending on the
software application, operating system, and c ompatible i.LI N K devices. A ll products with an i.LI N K c onnec tion may not c ommunic ate with eac h other. Refer
to the documentation that came with your compatible i.LIN K devic e for more information on operating c onditions and proper c onnec tion. Before c onnecting
compatible i.LI N K P C peripherals to your system, s uc h as a C D-RW or hard dis k drive, c onfirm their operating s ystem c ompatibility and required operating
conditions.
Page 66
Page 67
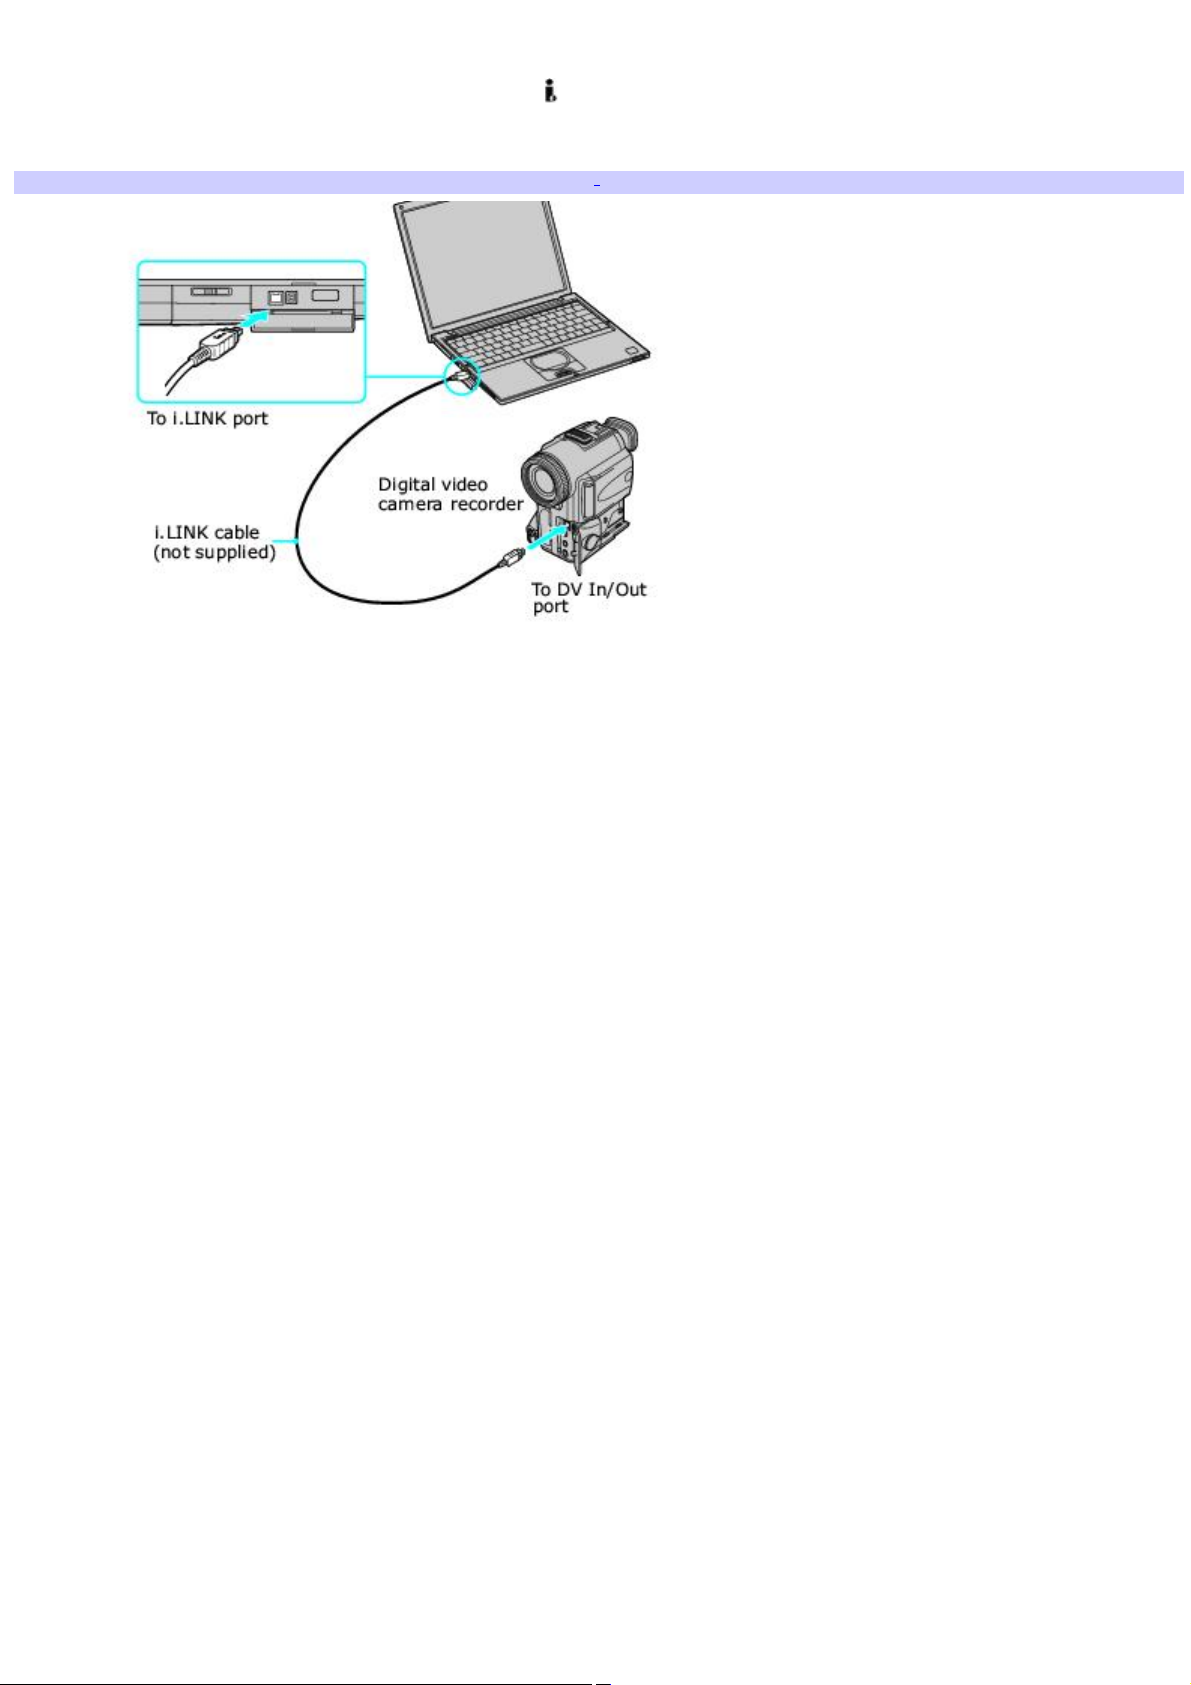
To connect a digital video camera recorder
1.
Plug the i.LINK® cable (not supplied) into the i.LINK port on the computer, port replicator, or docking station.
2.
Plug the opposite end of the i.LINK cable into the DV IN/OUT port on the digital video camera recorder.
Connecting Digital Video Camera Recorder to i.LINK Port1
Page 67
Page 68

Notes on connecting an i.LINK device
Only the Sony digital video camera port labeled DV IN/OUT or i.LINK are i.LINK-compatible.
Do not connect more than one digital video camera at a time. The software supplied with your computer will not
recognize multiple cameras.
The i.LINK port does not supply power to external devices. If the external device requires power from the i.LINK
port, you cannot use the device with the computer.
The computer supports transfer rates up to 400 Mbps; however, the actual transfer rate is the lowest transfer rate
of the external device.
The i.LINK features available may vary depending on the software applications you use. See the documentation that
accompanied your software for more information.
See the manual that came with your digital video camera recorder for more information on its installation and use.
Page 68
Page 69

Connecting an External Display
You can connect any of the following external displays to your computer, port replicator, or docking station:
Computer display (monitor)
Projector
Page 69
Page 70
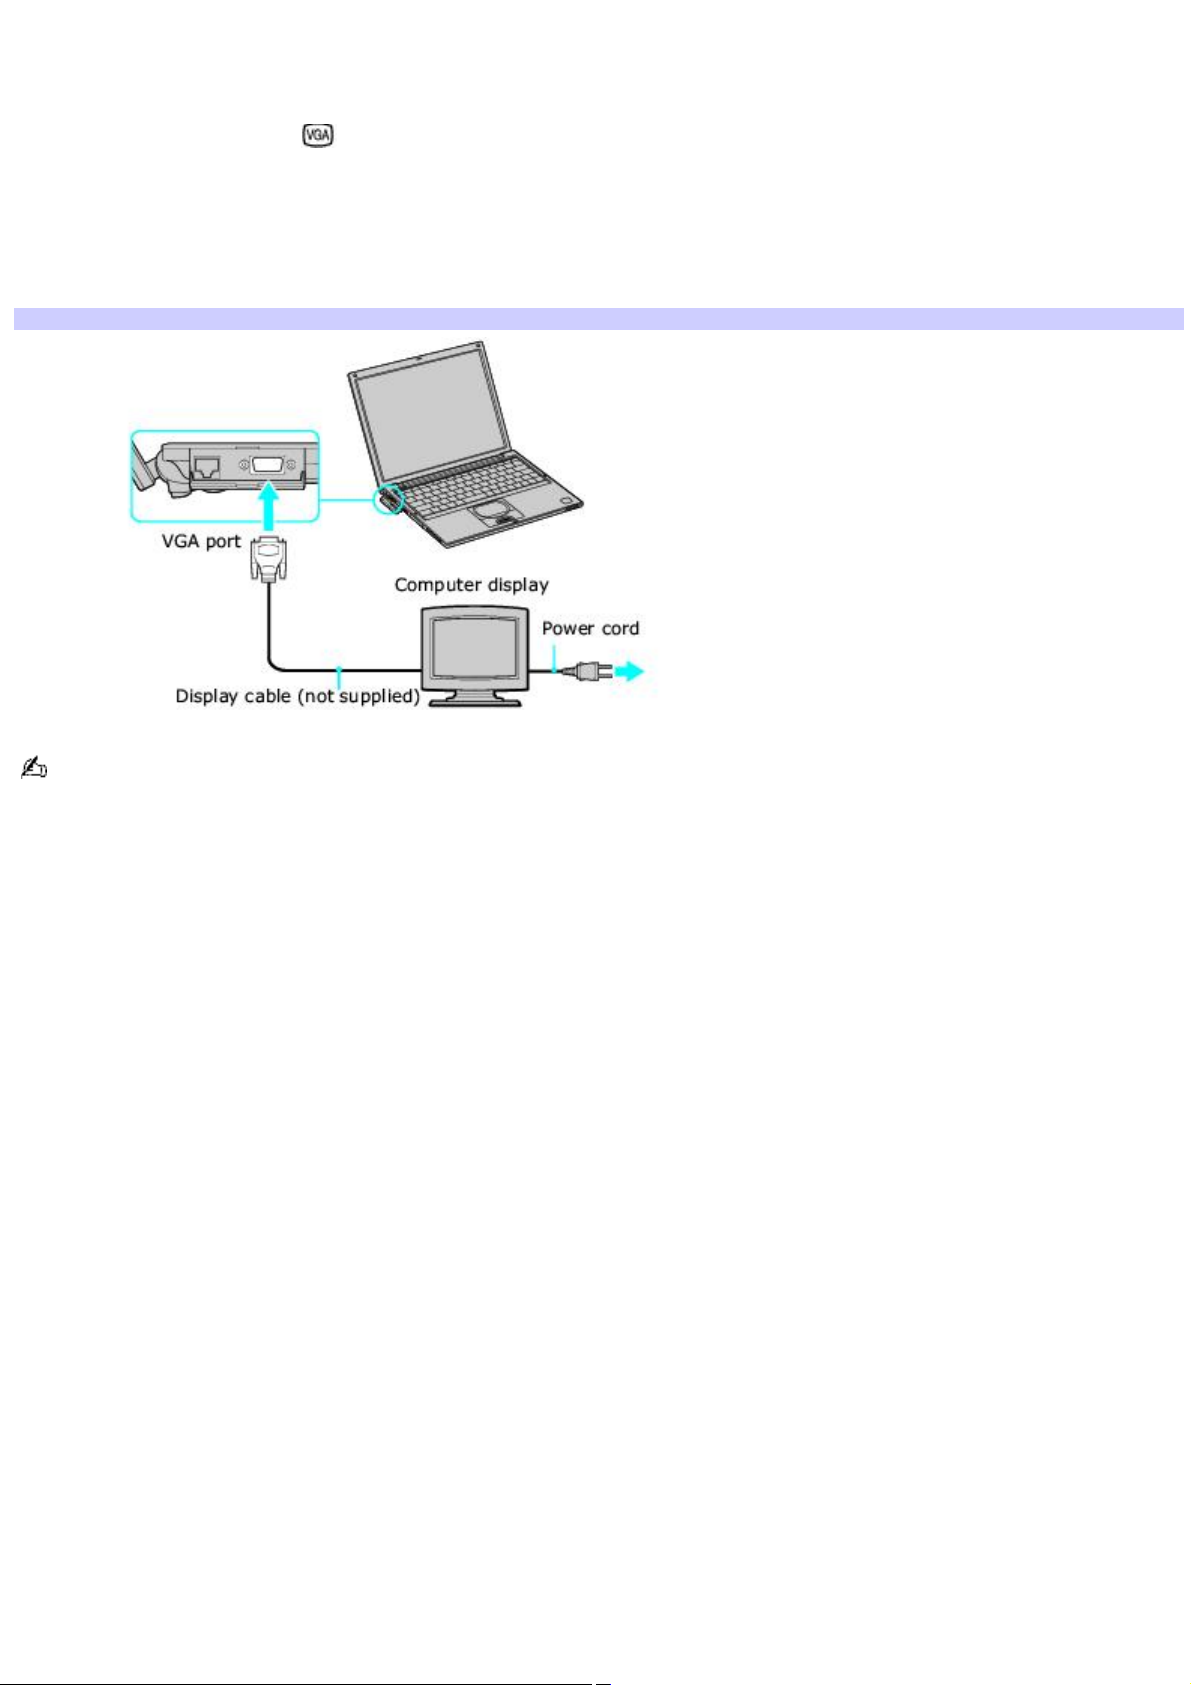
To connect a computer display
1.
Turn off the computer before you connect the computer display.
2.
Locate the VGA (Monitor) port.
3.
Plug the display cable (not supplied) into the VGA (Monitor) port.
4.
Verify that the power cord is plugged into the computer display and an AC outlet.
5.
Turn on all external devices before turning on the computer.
Connecting an External Computer Display
You cannot use the monitor port on your computer when the docking station is connected to the computer; however,
you can use the monitor port on the docking station.
Page 70
Page 71
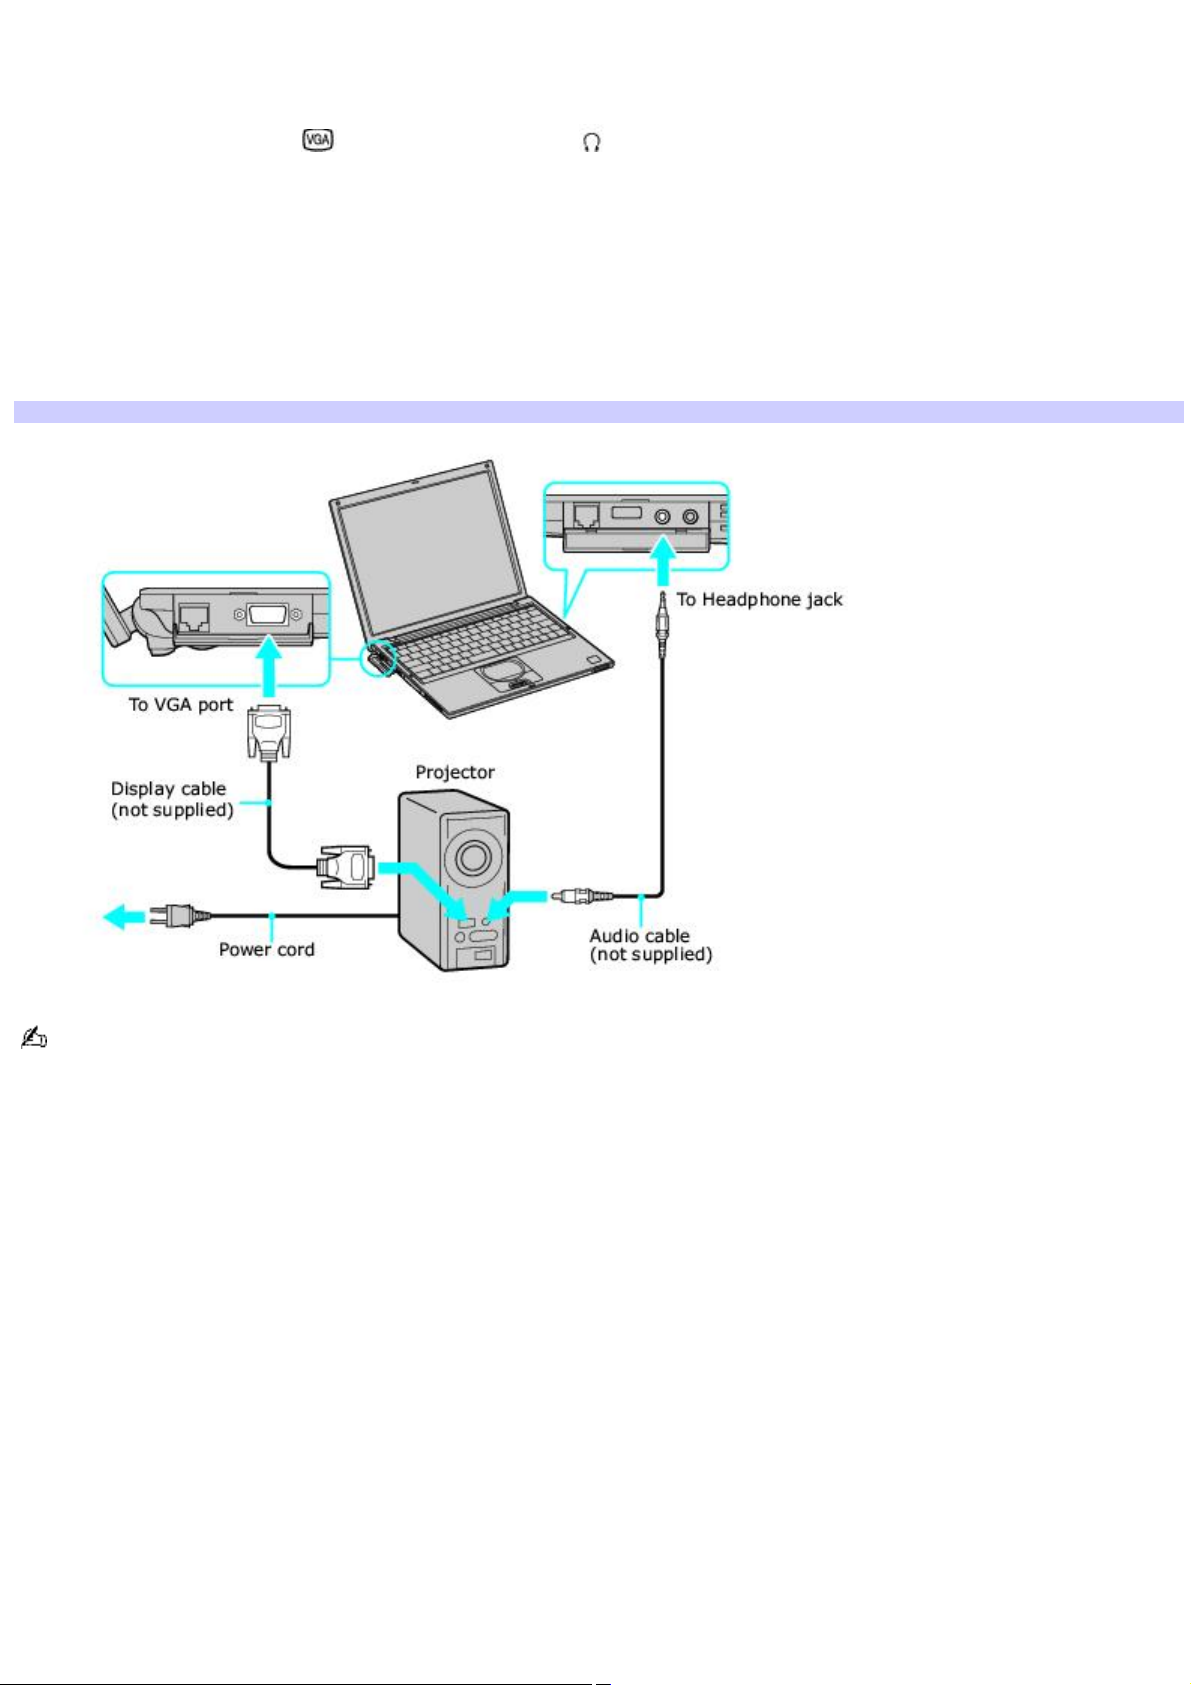
To connect a projector
1.
Turn off the computer before you connect the projector.
2.
Locate the VGA (Monitor) port and the Headphone jack.
3.
Plug the display cable (not supplied) into the VGA port, and plug the opposite end into the appropriate port on
the projector.
4.
Plug the audio cable (not supplied) into the Headphone jack, and plug the opposite end into the appropriate port
on the projector.
5.
Verify that the power cord is plugged into the projector and an AC outlet.
6.
Turn on all external devices before you turn on the computer.
Connecting a Projector
See the manual that came with your projector for more information on its installation and use.
Page 71
Page 72

Changing the display when connecting an external computer display or projector
When you connect an external display to the VGA (Monitor) port, you can toggle the output between the Liquid Crystal
Display (LCD), the external monitor, or both devices.
Press the Fn+F7 key combination to select a display. See Selecting the Display Mode for more information.
To Press Result
Switch to an external display Fn+F7 Toggles between the LCD, the external display connected to the Monitor port, or both
the LCD and external display.
Connect the external display to the notebook or port replicator before you turn on the unit, otherwise the Fn+F7 key
combination will not work.
Page 72
Page 73
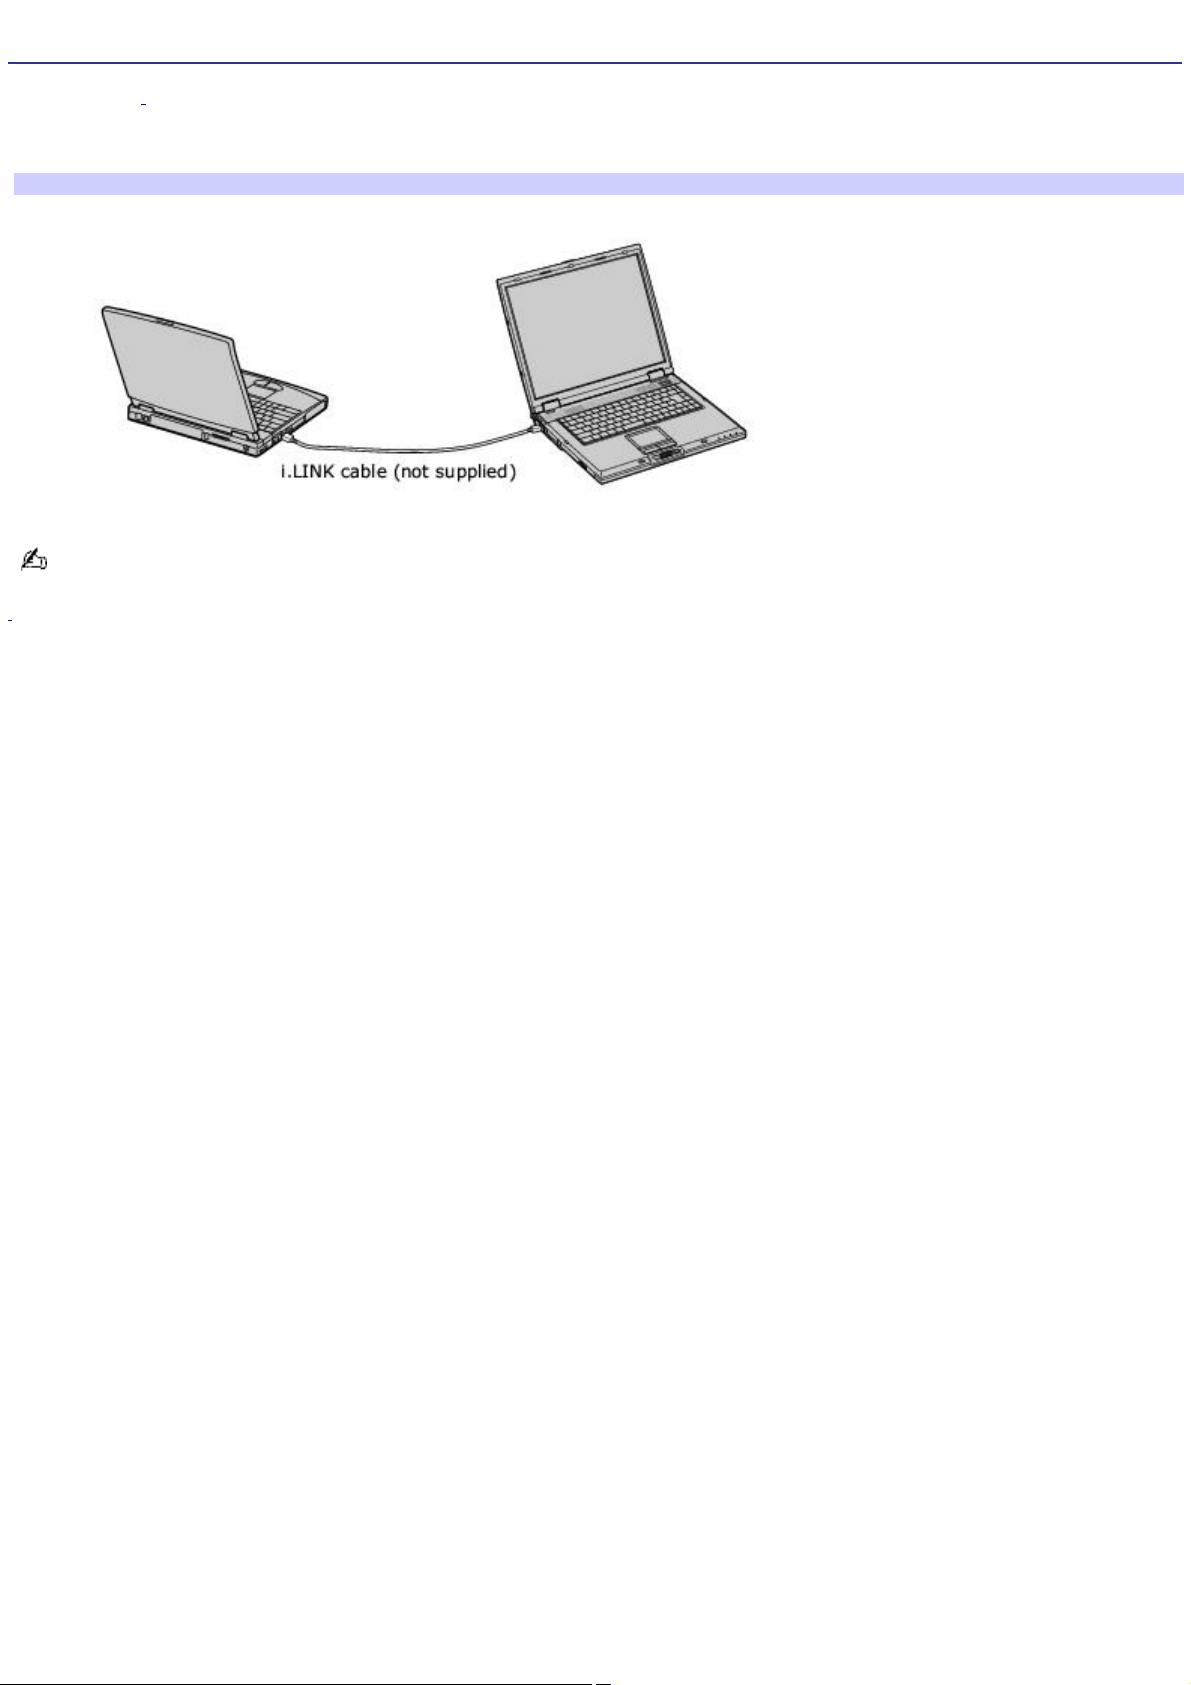
Connecting with another VAIO computer
Use an i.LINK®1 cable (not supplied) to connect your VAIO computer to another computer that also has an i.LINK port. You
can use one computer to edit, copy or delete files on the other computer. You can also print from a printer attached to
either computer.
Connecting with an i.LINK Cable
When you connect two VAIO computers, you must assign each computer a unique name. You can identify the
computers by this unique name when the two computers are networked together.
1
i.LINK is a trademark of Sony us ed to des ignate that a produc t c ontains an I E E E 1 3 9 4 c onnection. T he i.LINK c onnec tion may vary, depending on the
software applications, operating s ys tem, and c ompatible i.LI NK devices. A ll products with an i.LI N K c onnec tor may not c ommunic ate with eac h other. Refer
to the documentation that came with your compatible i.LIN K devic e for information on operating c onditions and proper c onnec tion. Before c onnecting
compatible i.LI N K P C peripherals to your system, s uc h as a C D-RW or hard dis k drive, c onfirm their operating s ystem c ompatibility and required operating
conditions.
Page 73
Page 74

Connecting External Speakers
You can enhance the sound quality of your computer by connecting external speakers (not supplied).
Do not place floppy disks on the speakers; the speakers' magnetic field may damage the data on the floppy
disks.
Page 74
Page 75
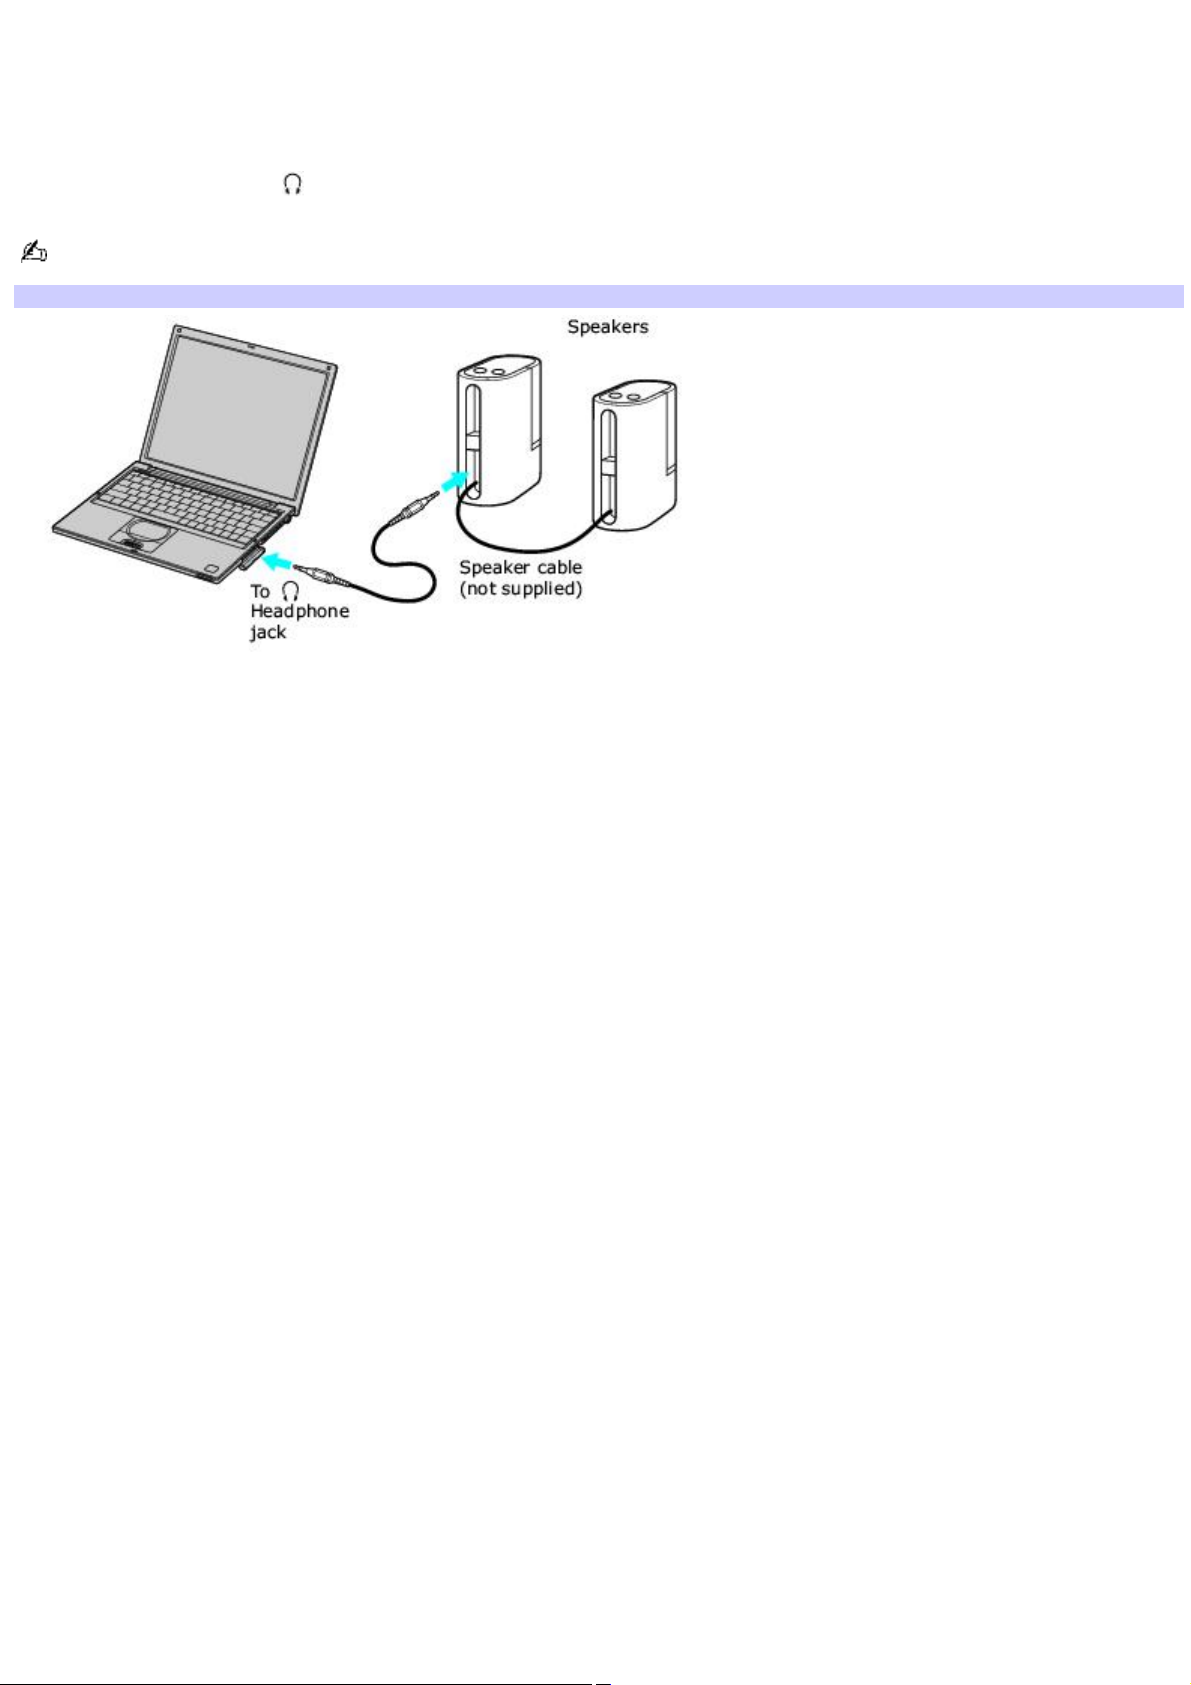
To connect external speakers
1.
Verify that your speakers are designed for computer use.
2.
Turn down the volume of the speakers.
3.
Locate the Headphone jack, and plug the speaker cable (not supplied) into this jack.
See the manual that came with your speakers for more information on its installation and use.
Connecting Speakers to the Headphone Jack
Page 75
Page 76

Connecting a Microphone
You can enhance the quality of sound input by using a microphone (not supplied).
Page 76
Page 77
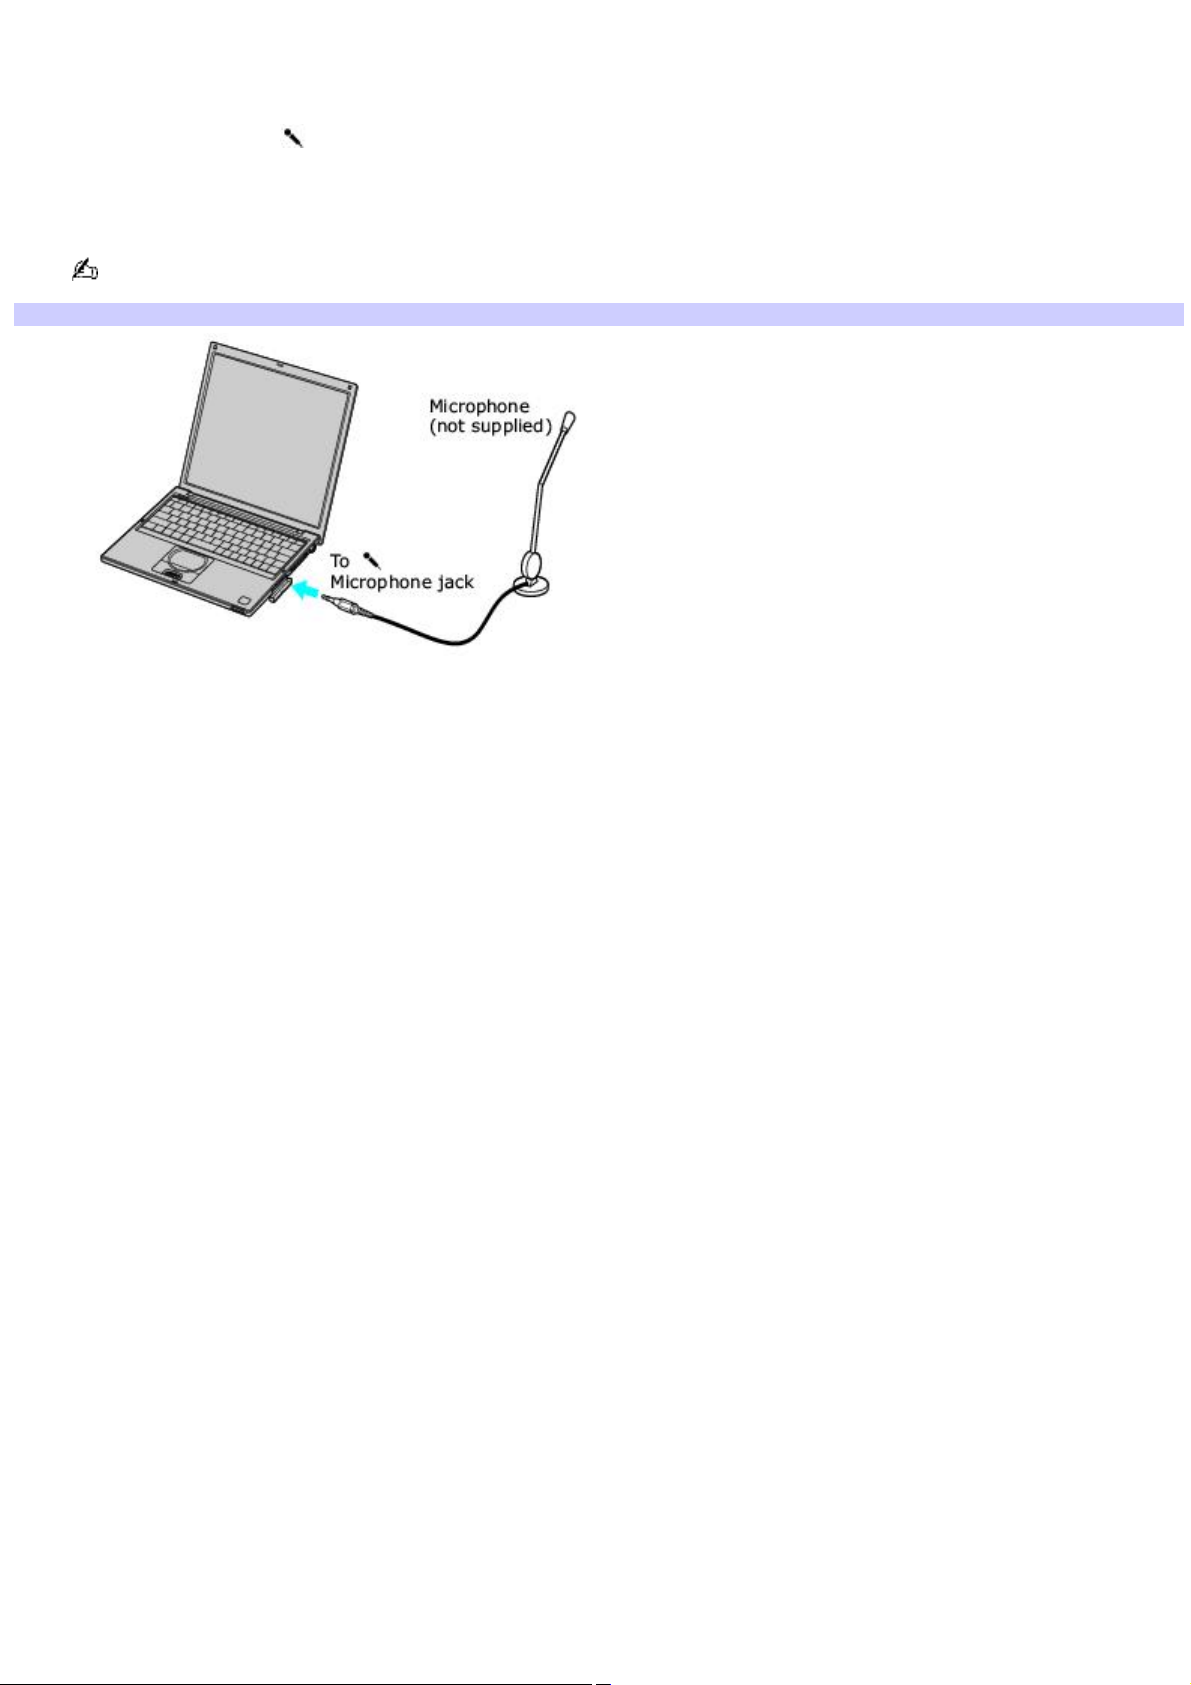
To connect a microphone
1.
Verify that your microphone is designed for computer use.
2.
Locate the Microphone jack. A protruding dot above the Microphone jack distinguishes this jack from the
Headphone jack.
3.
Plug the microphone cable (not supplied) into the Microphone jack.
See the manual that came with your microphone for more information on its installation and use.
Connecting to a Microphone Jack
Page 77
Page 78

To record from a microphone or audio equipment
You can record messages, memos, or other recordings in analog by connecting a microphone or other audio equipment to
the Microphone jack of your computer, port replicator, or docking station and switching the jack functionality. The
Microphone jack is for MIC IN (monaural).
1.
Double-click the Volume icon on the taskbar. The Volume Control window appears.
2.
From the Options menu, click Properties. The Properties window appears.
3.
In the Adjust volume for box, click the Recording option button to select it, and then click OK. The Recording
Control window appears.
4.
If it is not already turned on, click the Select check box at the bottom of the Microphone column. Close the
Recording Control window.
5.
Click Start on the taskbar, and select All Programs, Accessories, Entertainment, and then Sound Recorder. The
Sound - Sound Recorder window appears.
You are ready to begin recording. For help using Sound Recorder, click Help in the Sound Recorder window.
Page 78
Page 79

Adjusting the volume
You can adjust the volume for playing or recording, but you can only adjust the recording volume in the Recording Control
window. If you adjust the volume, the adjustment is only effective for playing sound. It does not adjust the volume for
recording sound.
To adjust the volume when playing
1.
Double-click Volume icon in the taskbar. The Volume Control window appears.
2.
In the Volume Control column, move the slider up for increased volume and down for decreased volume.
Sound device Function
Volume Control Adjust the sound level from the speakers or headphones.
Wave Adjust the wavfile sound or the system sound of Windows.
SW Synth Adjusts the internal or external synthesizer volume.
CD Audio Adjust the volume of the CD in the optional optical drive.
Microphone Adjust the internal or external microphone volume.
Telephony Adjust the modem or telephone line volume.
PC Beep Adjust the beep sound when inserting or removing the PC Card and other devices.
Page 79
Page 80

Expanding Your Computer Capabilities
You can connect the following peripheral devices to your computer to expand its capabilities and enhance its versatility to
meet your needs:
A Personal Digital Assistant (PDA)
A Wireless LAN Access Point
Page 80
Page 81

Personal Digital Assistant
A handheld PDA is the quintessential personal planner and entertainment center that fits in your pocket. With a PDA, you
can easily perform the following functions:
Enter your schedule details in the calendar and view them by the day, week, or month, and even set an alarm to
remind you of important events.
Keep your contact names, addresses, phone numbers, and other details in the address book and find them when
you need them.
Add tasks to the To Do List, prioritize them, and assign them due dates.
Synchronize your data with the software on your computer to back up your data.
Track expenses when you are out of the office and transfer the data to your notebook.
Exchange data with your computer.
Page 81
Page 82

Wireless LAN Access Point
The Wireless LAN Access Point is designed for building a wireless Local Area Network (LAN) environment. The Access Point
comes with the Wireless LAN PC Card and required software. You can easily build a wireless LAN environment by plugging
the Access Point into an AC power outlet, installing the Wireless LAN PC Card in your computer, and using the provided
software. Because a wireless LAN configuration requires no wiring, you can operate multiple computers more freely than
ever before.
You can also connect your Access Point to a telephone line, Integrated Services Digital Network (ISDN) router, cable
modem, or Digital Subscriber Line (xDSL) modem to share access to the Internet among multiple computers.
Page 82
Page 83

Customizing Your VAIO Computer
You can customize the settings of your computer. The following sections briefly describe how to change your computer's
default settings. You can also refer to Sony Notebook Setup Help for more detailed information.
Displaying the Sony Notebook Setup Screen
Controlling Power Management
Displaying Battery Information
Selecting the Display Mode
Using the Multilingual User Interface Language Option
Page 83
Page 84
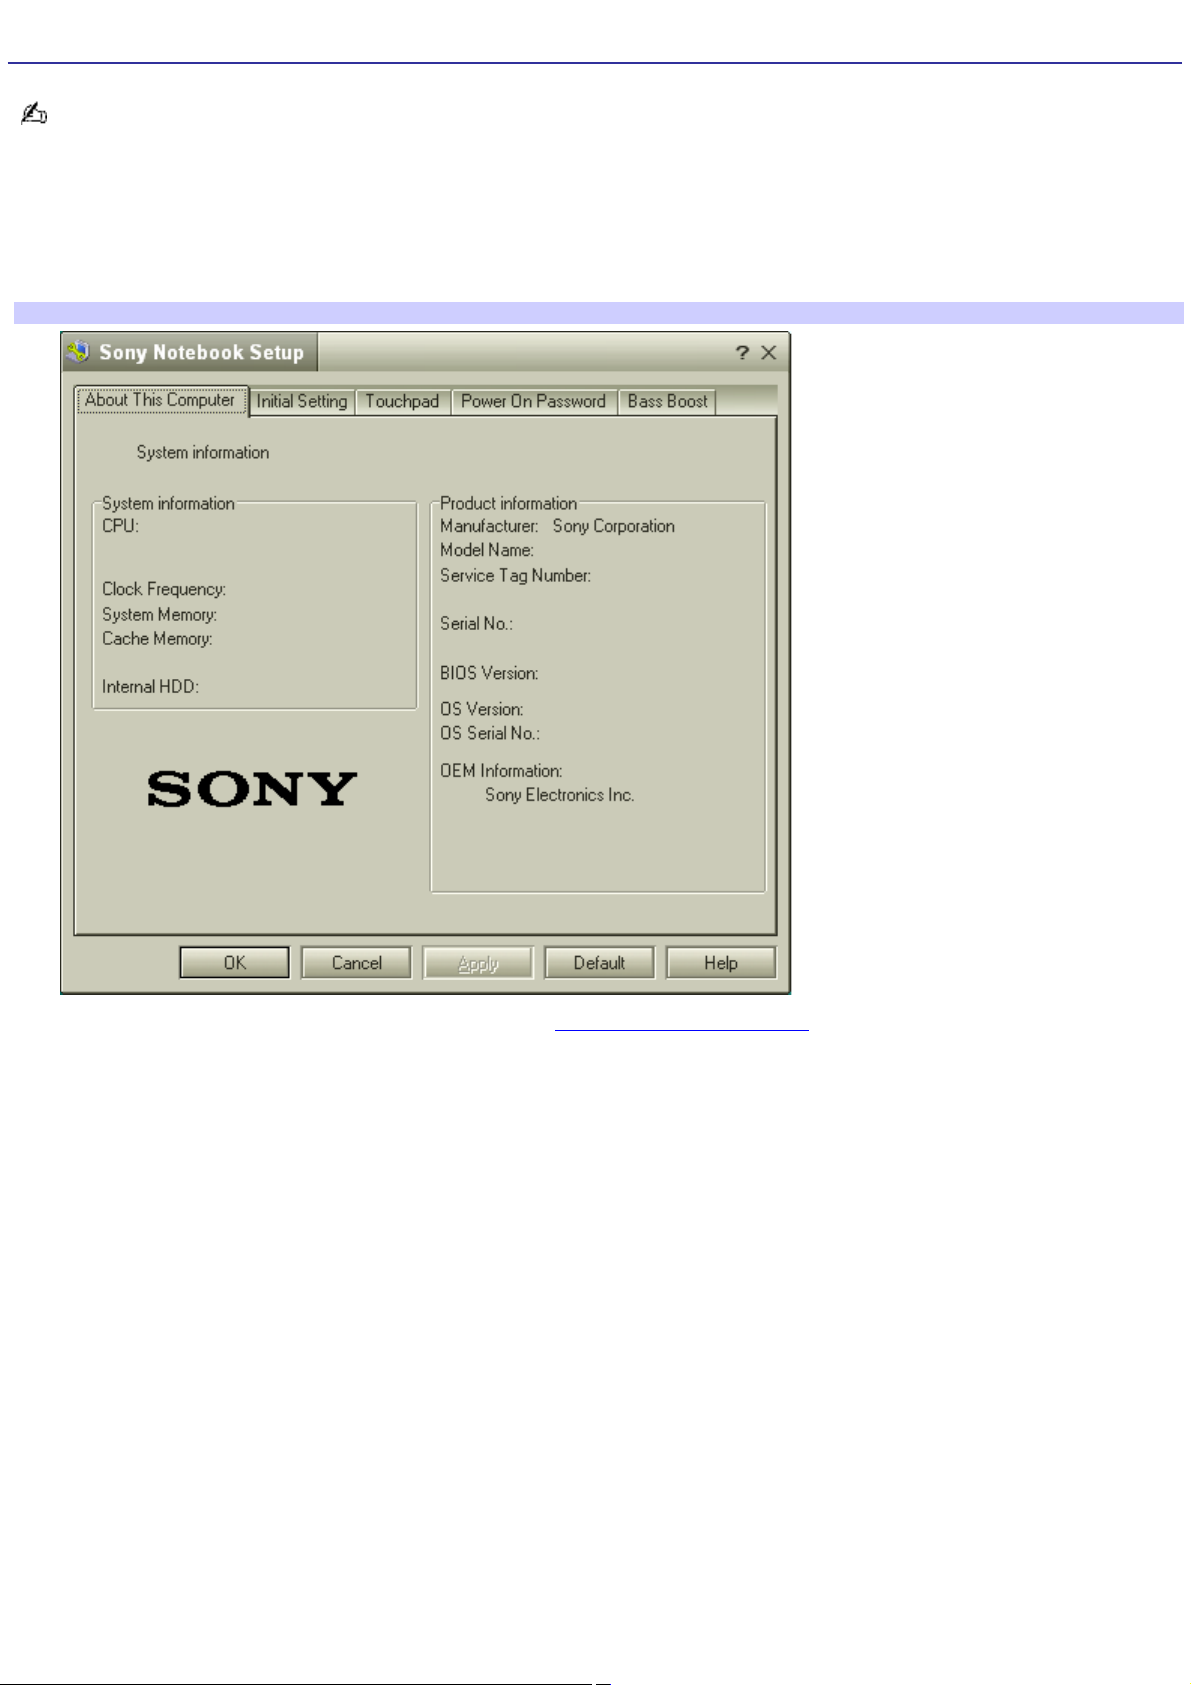
Displaying the Sony Notebook Setup Screen
See the manual supplied with your computer display for more information on its installation and use.
To display the Sony Notebook Setup screen
1.
From the Start menu, point to All Programs, and then Sony Notebook Setup.
2.
From the Sony Notebook Setup menu, click Sony Notebook Setup.
Sony Notebook Setup Screen
3.
Select the tab for the item you want to change. See Sony Notebook Setup tabs for more information.
4.
After you finish making your changes, click OK.
Page 84
Page 85

Sony Notebook Setup tabs
Tab Description
About This Computer Display system information, including memory capacity, serial number, and BIOS version.
Initial Setting Change the volume of the sounds that play while the operating system is loading. Select the order of drives
and devices from which you want to load the operating system. You can specify the hard drive as well as other drives
inserted into your computer.
Touchpad Change touchpad settings, or enable/disable touchpad functionality if you are using an external mouse.
Power On Password Set the password to secure your computer.
Bass Boost Set the Bass Boost option.
For more information about each option, click Help on the Sony Notebook Setup screen to display the Help file.
Page 85
Page 86

Controlling Power Management
The PowerPanel utility allows you to control the power management of your notebook and provides key information about
system activity and battery life. The following sections briefly describe how to conserve your computer's battery power. You
can also refer to PowerPanel Help for more detailed information. To activate a profile or command, see Power Management
profiles and Power Management commands for more information.
Page 86
Page 87

Viewing the Power Management status icons
The Power Management status icons are displayed in the taskbar at the lower-right corner of your screen. Move the pointer
over the Battery icon to see the tool tip that displays information about the active profile. Double-click the icon for additional
information.
To change the Power Management profile
1.
Right-click the CPU: Performance Profile: AC Power icon on the Windows taskbar.
2.
Select Profiles from the menu.
3.
Select a new profile from the pop-up list. See Power Management profiles for a description of available options.
When you use the battery pack to power your notebook, your system selects the Maximum Battery Life power
management profile by default. If you select a different power management profile while using battery power, that profile is
selected automatically the next time you use the battery pack to power your notebook.
Refer to the PowerPanel Help for information on customizing the Power Management toolbars.
To customize Power Management settings
You can customize the power management settings, such as the system timer and the brightness of the screen.
1.
Right-click the CPU: Performance Profile: AC Power icon on the Windows taskbar.
2.
Select Edit/Create Profiles from the menu.
3.
In the left panel, click a profile in which you want to change the settings.
4.
In the right panel, double-click an item in which you want to change the settings.
5.
Select an option from the drop-down list.
6.
Click the File menu, then click Save.
7.
Click the File menu, then click Exit.
Page 87
Page 88
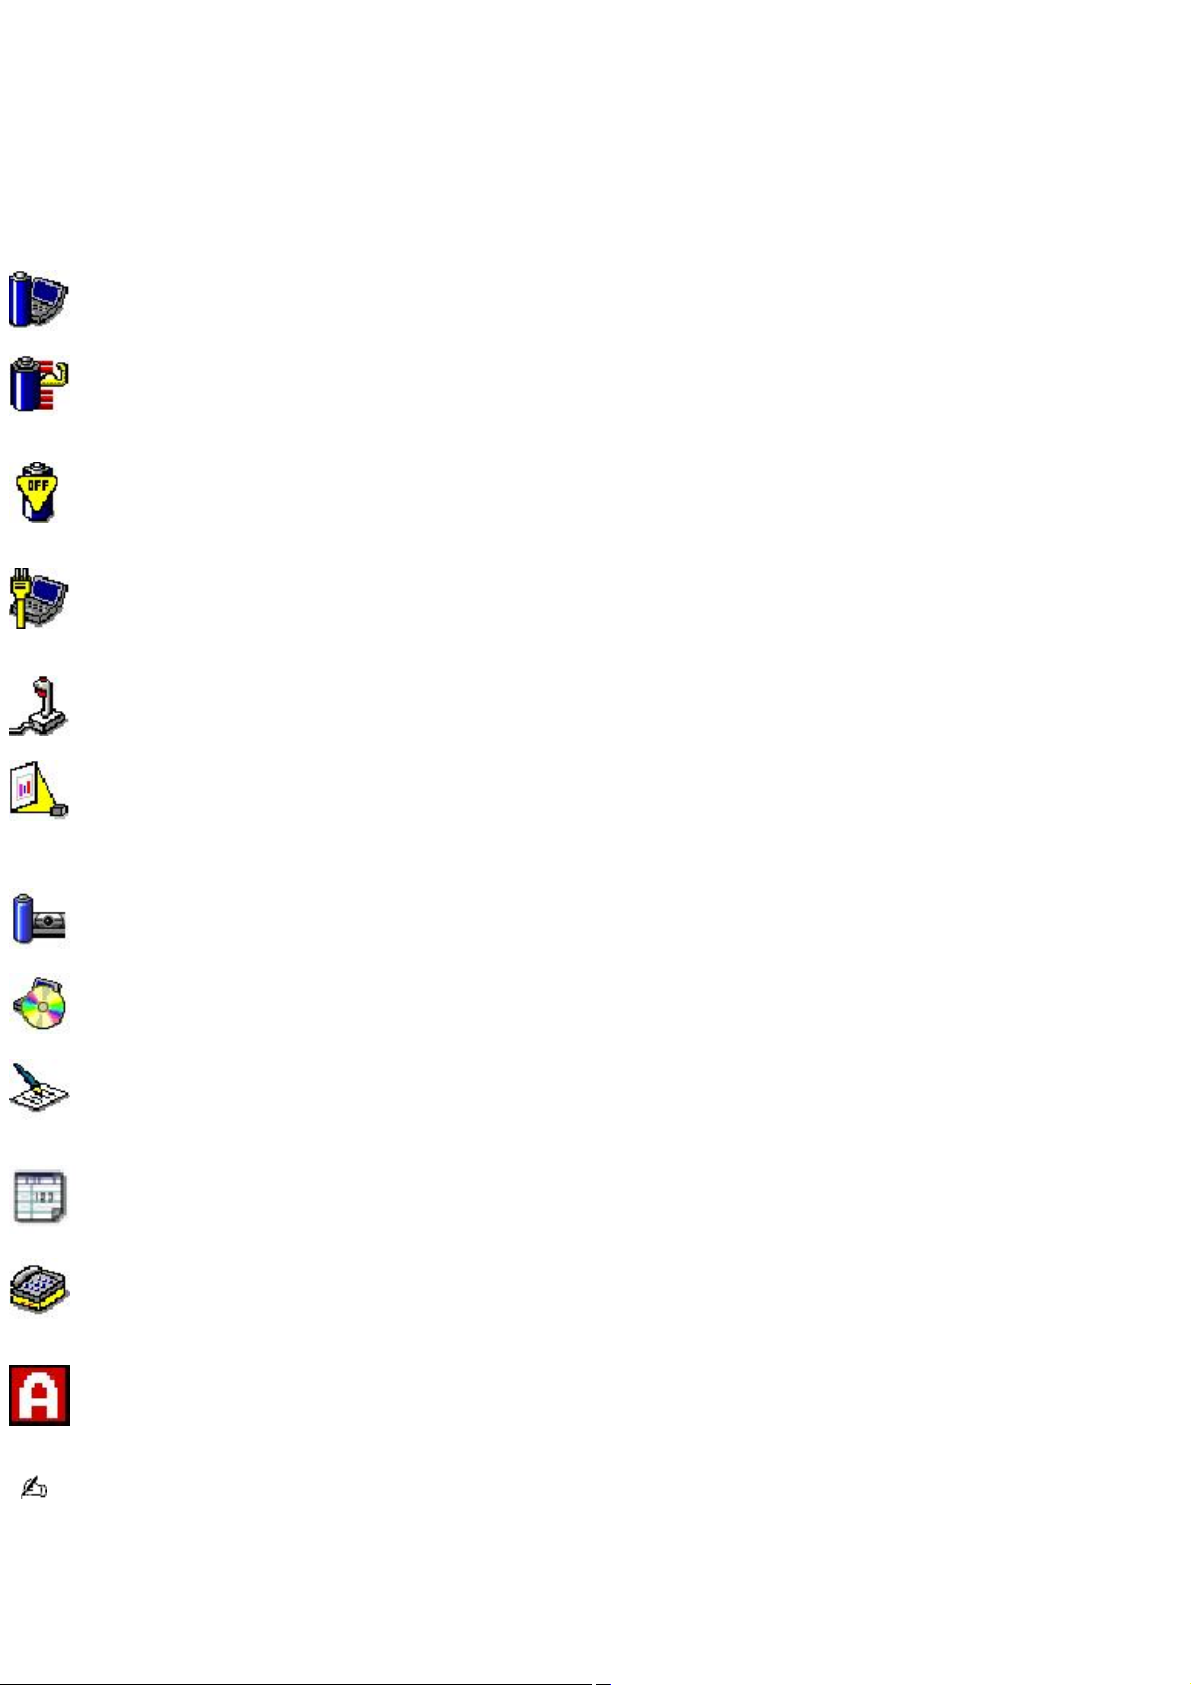
Power Management profiles
The PowerPanel utility provides several predefined power management profiles. Each profile consists of a group of power
management settings that are designed to meet specific power management goals — ranging from maximum power
management to no power management. You can change the settings for any of the predefined profiles (except for the
Disable Power Management profile), or you can create your own profile to suit your portable computing needs. The
predefined profiles are:
Icon Description
Maximum Performance
Provides the best system performance while still conserving power.
Maximum Battery Life
Provides power saving features to give you maximum battery life and good performance. It slows the notebook and puts it
into Standby mode after a specified time period.
Power Management Off
Disables all power management settings, such as Standby and Hibernate modes. You can not change the settings of this
profile.
AC Power
The power management state when AC power is in use. Similar to the Power Management Off setting. Power Management
automatically loads the AC profile unless you disable this feature.
Games
Disables the display and the Hard Disk Standby timer.
Presentation
Keeps the display on at all times while it conserves power. This option is ideal for slide show presentations. You can
establish settings for LCD (Video) Standby, Hard Disk Standby, and Standby mode to optimize power management for your
system.
Camera
Optimizes performance and power requirements for camera usage.
DVD
Optimizes performance and power requirements for DVD usage.
Word Processing
Optimizes power management with longer timeouts on the hard disk and display screen. You can also establish settings for
LCD (Video) Standby, Hard Disk Standby, and Standby mode to optimize power management for your system.
Spreadsheet
Optimizes performance and power requirements for spreadsheet applications.
Communications
Extends battery life by initiating a quick display timeout. The Internal modem remains powered. You can also establish
settings for LCD (Video) Standby, Hard Disk Standby, and Standby mode to optimize power management for your system.
Automatic Profile Selection
Automatically switches to a profile suitable for active applications.
Do not choose the Automatic Profile Selection when connected to AC power.
Page 88
Page 89

Power Management commands
PowerPanel also provides power management commands that you can use to activate specific power management
functions and to control power for a specific device. You can use these commands to override a profile setting or initiate an
immediate action.
Standby — Puts the system into Standby mode, a power management state that saves the state of the system and
peripheral devices in memory (RAM). Power consumption reduces to a minimum, and the system remains on. To
return the system to the active state, press any key on your computer. Your notebook is preset to enter Standby
mode after 25 minutes.
Hibernate — Provides for the lowest level of power consumption. The system writes the state of the system and
peripheral devices to the hard disk and turns off the system power. To return the system to the original state, use
the power button to turn on power. The system saves the data in the Save to Disk Partition on the hard drive.
Page 89
Page 90

Conserving battery power
When using your notebook with a battery, the LCD display and the hard drive can be set to switch off automatically to
conserve battery power.
See Power Management profiles for more information.
Page 90
Page 91

Displaying Battery Information
You can display information for each of the batteries in your computer. The following sections briefly describe how to display
your computer's general battery information. Refer to PowerPanel Help for more detailed information.
Page 91
Page 92

To display the Battery Information window
1.
Double-click the current Profile icon on the taskbar. The Battery Information window appears.
2.
Click Help in the lower right corner of the window for more information.
Page 92
Page 93

To display the Battery Information toolbar
1.
Right-click on the Windows taskbar at the bottom of the screen.
2.
Select Toolbars from the pop-up menu, and then click Battery Information. The Battery Information toolbar
appears on the taskbar.
If the Battery Information toolbar is hidden behind the taskbar icons, right-click the taskbar and deselect Lock the
Taskbar, then click and drag the edge of the Battery Information toolbar to the left.
Battery Information Toolbar
Time indicator — Displays estimated time (hours:minutes) remaining before the battery fully discharges, also
known as the time-to-empty.
Page 93
Page 94

To close the Battery Information toolbar
1.
Right-click the Battery Information toolbar, and point to Toolbars.
2.
Click Battery Information to cancel it. The toolbar disappears from view.
Page 94
Page 95

Battery icon descriptions
Battery icon Battery status
Charging
Fully charged
Discharging
No battery
Page 95
Page 96
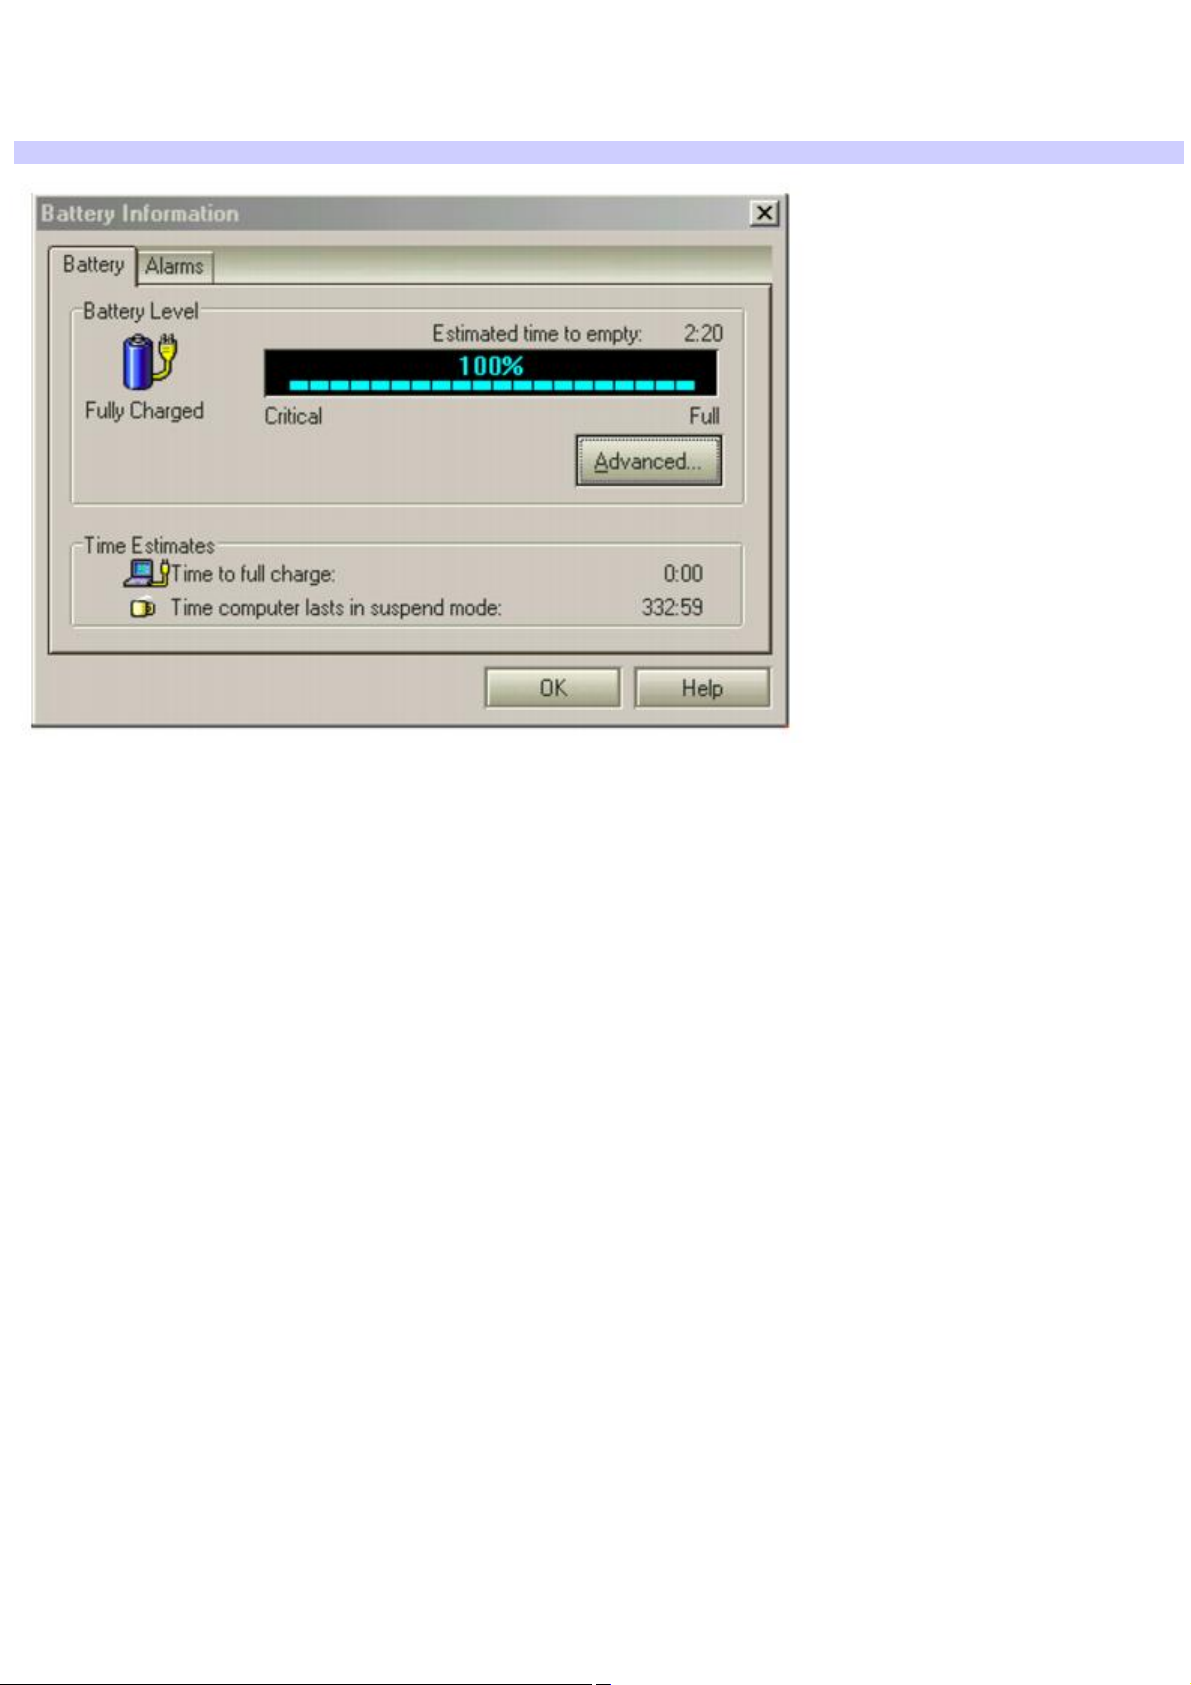
Displaying detailed battery information
Double-click the battery icon on the taskbar to display the Battery Information window. The Battery tab contains information
such as battery charging time and battery charge duration.
Battery Information Window
Customizing the Battery Information toolbar and alarm system
You can customize the Battery Information toolbar and modify the alarm settings, to suit your portable computing needs.
Refer to PowerPanel Help for more information.
Page 96
Page 97

To change the window design of Sony software
1.
Click Start, then select Control Panel.
2.
In the left window pane of the Control Panel, click "Switch to Classic View."
3.
Double-click UI Design Selector. The UI Design Selector dialog box appears.
4.
Click << or >> and select the desired design.
5.
Click Apply. The "UI Design Selector" window design changes. The window design for your Sony software will
match the "UI Design Selector" window.
6.
To try another selection, click << or >> and then click OK.
This feature is available with UI Design Selector-compatible software only.
Page 97
Page 98

Selecting the Display Mode
This computer uses the Intel® video controller, which enables you to select the desired display when the computer is
connected to an external monitor. When you connect an external display, you can switch the display mode between your
notebook's LCD display and the external monitor. See also Connecting an External Display.
Page 98
Page 99
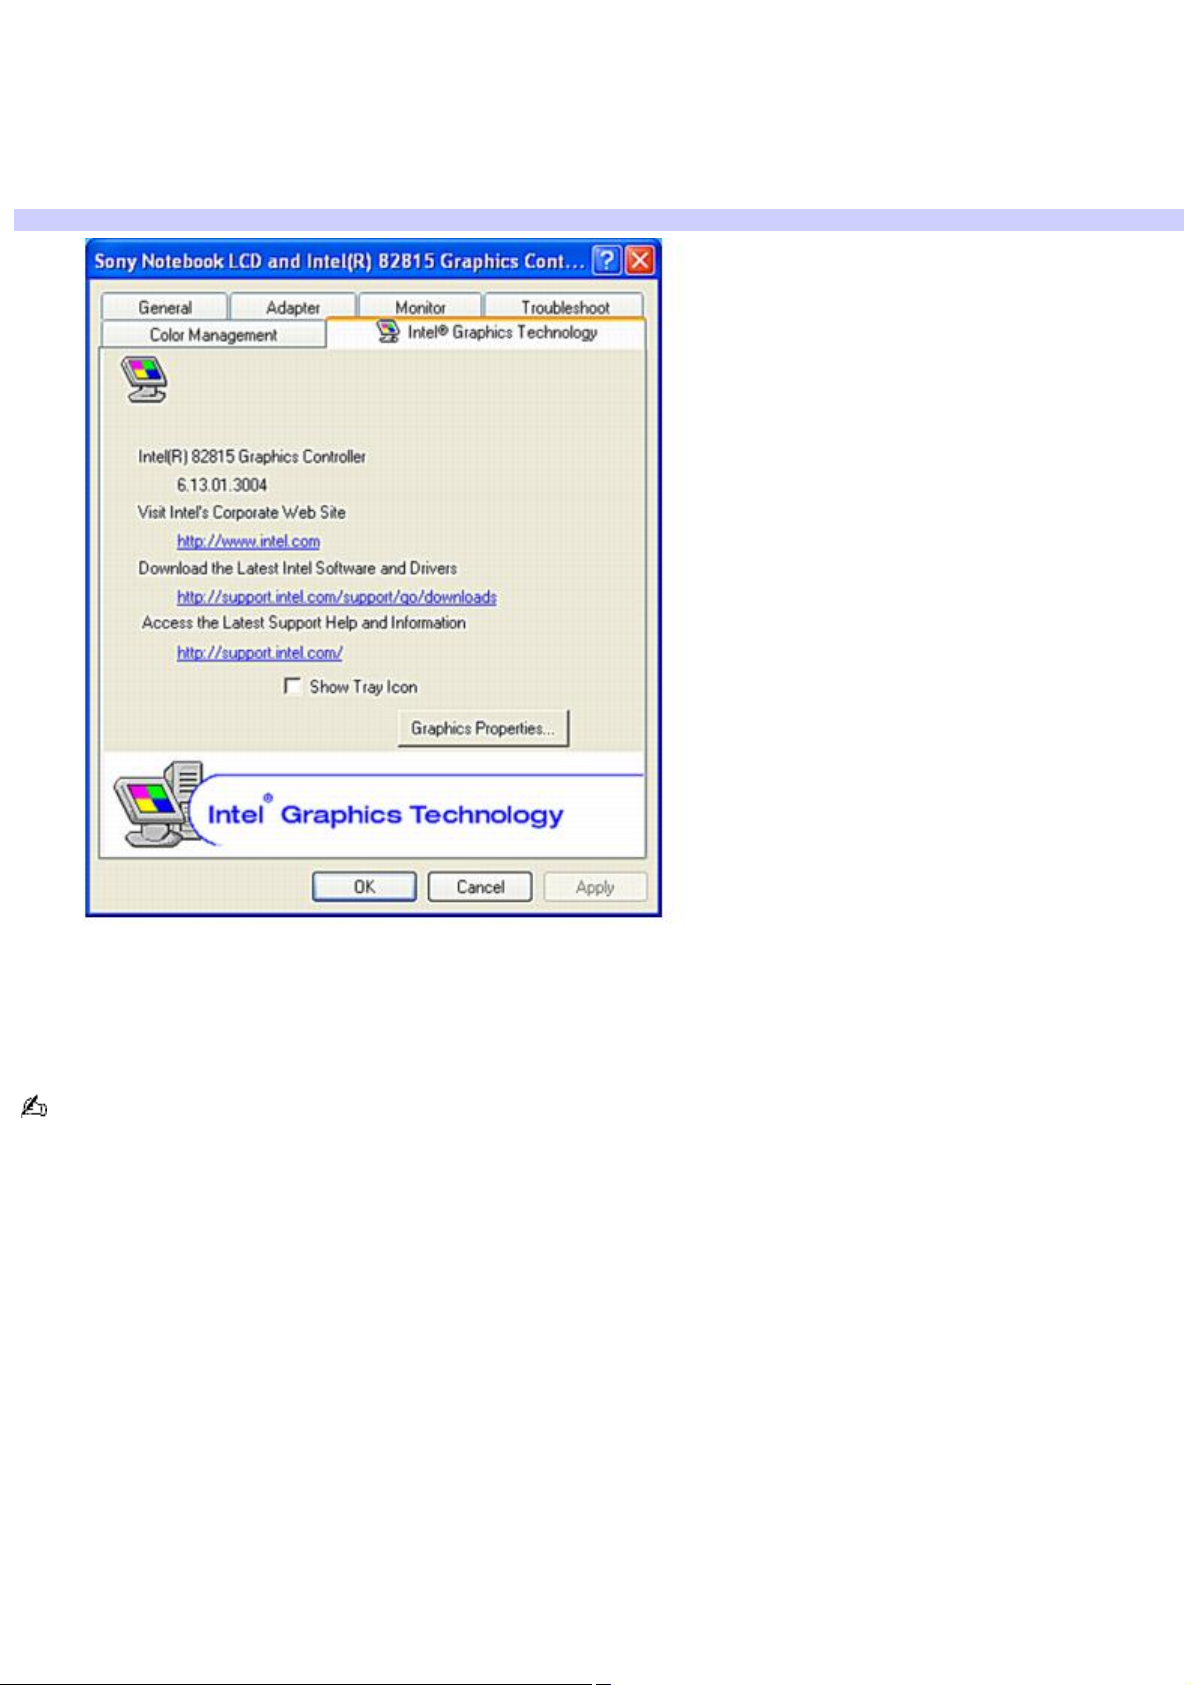
To select the display mode
1.
Click Start, and click Control Panel.
2.
Click Appearance and Themes, and then Display. The Display Properties window appears.
3.
From the Settings tab, click Advanced, and select the Intel® Graphics Technology tab.
Intel® 82815 Graphics Controller Properties Screen
4.
Click the Graphics Properties button.
5.
Click the Device tab.
6.
Select the type of display.
You may not be able to display the computer LCD screen and an external display or projector at the same time,
depending on the types of computer displays and projectors you are using.
Turn on the computer after you turn on the peripheral devices.
Page 99
Page 100

Using the Multilingual User Interface Language Option
(Windows® XP Pro only) After you have initially setup your new VAIO computer, you have the ability to change the language
displayed in Microsoft® Windows® XP Professional operating system. The multilingual user interface (MUI) language option
changes the text controlled by Windows XP Professional operating system. Menus, help files, and icons generated by
Windows XP Professional are shown in your selected language. All other software applications are displayed in English as
the default language.
The multilingual user interface language option is not designed to replace a localized version of the Microsoft Windows
XP Professional operating system. Under certain conditions, some third-party software applications may not function
properly.
Page 100
 Loading...