

Page 1

Welcome.......................................................7
Powering Your Computer...........................9
Using AC Power........................................................10
Connecting the AC adapter................................................10
Turni n g o n the computer.... ................................................1 1
Using the Battery.......................................................13
Inserting a battery ..............................................................13
Removing a battery............................................................14
Displ ay i n g batte ry i n fo rmati o n............... ...... ............ ....... ..15
Char g in g a battery..............................................................18
Notes o n bat t e r i e s.. ............ ...... ............ ...... ............ ...... .......19
Frequently asked questions................................................20
Conserv i n g Battery Power ........ ....................... .........21
Using power saving modes................................................21
Using PowerPanel..............................................................22
Frequently asked questions................................................26
Internet and Network Connections..........27
Internet Connections .................................................28
Setting up a dial-up Internet connection............................28
Sett ing u p a n Ethernet In t ernet c o n n e c t i o n........... ...... .......30
Customizing your Internet connection...............................32
Frequently asked questions................................................33
Network Co nnections................................................34
Using Ethernet and dial-up connections............................34
Using wireless LAN connections ......................................37
Checking your network connection status.........................42
Frequently asked questions................................................43
1
Page 2

VAIO Com pu ter Quick Sta rt
Connecti ng A not he r VAIO Co mpu t er................. .....46
Connecting VAIO computers........................................ .... 46
Disconnecting VAIO computers....................................... 48
Frequently asked questions............................................... 49
CDs, DVDs, and Optical Drives................51
Inserting and Ejecting CDs or DVDs .......................52
Copying and Playing CDs................. ....... ....... ....... ...54
Playi n g CDs . ........ .............................................................54
Copying files to a CD-RW or CD-R................................. 55
Playing DVDs................................... ........................57
Watching DVDs on your computer .................................. 57
Frequently asked questions............................................... 58
Printer Connections..................................61
Printing With Your Computer..................................62
Connecting a printer ........ ................ ................ .................. 62
Disconnecting a printer..................................................... 64
Frequently asked questions............................................... 64
Computer Features...................................67
Using the Keyboard ..................................................68
Key locations and descriptions ......................................... 68
Combinations and functions with the Windows key ........ 70
Indicators........................................................................... 71
Combinations and functions with the Fn key.................... 72
Using the Touch Pad.................................................75
Describing t h e to u ch p a d............. ...... ............ ...... ............ .. 7 5
Customizing the touch pad................................................76
Frequently asked questions............................................... 77
2
Page 3

Using the Jog Dial Control........................................79
Locating the Jog Dial Control............................................79
Using the Jog Dial Navigator icon.....................................80
Usin g the Jo g Dial Bar... ....................................................80
Using Jog Dial Launcher ...................................................81
Using Application and Scroll modes.................................82
Changi n g Jo g D ia l Navigat o r se t t i n g s .. ............ ............ ..... 8 4
Using Memory Stick Media.....................................86
Selecting Memory Stick media..........................................86
Inserting Me mo r y St i c k m e d i a ......... ...... ............ ...... ....... ..87
Viewing the contents .........................................................87
Write-protecting Memory Stick media..............................88
Form a t t i n g Me m o ry St i c k m edia.......................................88
Removing Memory Stick media........................................89
Frequently asked questions................................................90
Changing the Window Design of Sony Programs ....92
Connecting Mice and Keyboards.............93
Using External Mice and Keyboards ........................94
Connecting a mouse or keyboard.......................................94
Disconnecting a mouse or keyboard......... .......... ...............96
Frequently asked questions................................................96
Floppy Disk Drives and PC Cards ...........97
Using Fl o ppy Disk Drives...... ........................ ...........98
Inserting and removing floppy disks .................................98
Frequently asked questions................................................99
Using PC Cards.......................................................101
Inserting PC Cards...........................................................101
Removing PC Cards.........................................................102
Frequently asked questions..............................................103
3
Page 4

VAIO Com pu ter Quick Sta rt
Docking St a tions.....................................105
Connecti ng t he Do ck ing St at ion.............................106
Locat i n g fe atures and p o rt s........ .....................................106
Connecting the docking station......................... .............. 108
Disconnecting the docking station.................................. 109
Frequently asked questions............................................. 112
Audio and Vi de o Connections...............115
Using i.LINK Digital-Video Recorders..................116
Connecting an i.LINK digital video recorder ................. 116
Disconnecting the i.LINK digital video recorder............ 117
Using a dig ital video camera reco rder ........ ...... ............ .. 118
Note s on connec ti n g an i.LINK d e v i ce........................... 118
Frequently asked questions............................................. 119
Using Computer Monitors and Projectors ..............1 20
Connecting a computer monitor...................................... 120
Connecting a projector.................................................... 122
Sele c t i n g a Di splay Mo d e.... ...........................................123
Disconnecting a computer monitor or projector............. 124
Using Speakers .......................................................125
Connecting speakers ......... .......... ............ .......... ............ .. 125
Disconnecting external speakers..................................... 126
Adjusting the volume...................................................... 126
Enabling the audio feature .............................................. 127
Frequently asked questions............................................. 128
Using Microphones.................................................130
Connecting a microphone ............................................... 130
Disconnecting a microphone........................................... 130
Using a microphone or other device to record................ 131
Frequently asked questions............................................. 132
4
Page 5

Prein s talled Programs..... .......................133
Software Programs On Your Computer..................134
Program overview............................................................134
Frequently asked questions..............................................138
DVgate Application Notes......................................140
Record i n g im ag es to a digital vid e o de v ice.......... ........... 1 4 0
Adjusting image resolution..............................................140
Saving to your hard disk drive.........................................140
Program Support Information .................................142
Sony Service Center.........................................................143
Memory Upgrades...................................145
Upgrading Your Computer’s Memory....................146
Precautions and procedures .............................................146
Typical expansion memory configuration.......................147
Removing and installing memory modules ..................... 147
Confi rming add ed memory ca p acity.... ............................150
Using the Recovery CDs.........................153
Application and System Recovery CDs..................154
Using Your Recovery CDs ......................................154
Using the Application Recovery CD(s)...........................154
Using the System Recov ery CD (s). ...... .. ...... ...... .............156
Troubleshooting and Support................159
Troubleshooting Your Computer ............................1 60
Troubleshooting Batteries . ............ .............. ............164
Troubleshooting the Printer. ..... ..... ....... ....... ....... .....165
Troubleshooting the Mouse and Touch pad............167
5
Page 6

VAIO Com pu ter Quick Sta rt
Troubleshooting the M odem. ....... ............ ....... ....... .1 70
Troubleshooting Networ ks .....................................1 71
Troubleshooting DVDs and CDs............................174
Troubleshoo ting PC C a rds................ ....... .... ... ...... . .177
Troubleshooting Audio-Video Connections...........178
Troubleshooting the Computer Screen (LCD)........1 81
Troubleshooting M e mor y Stick Med ia.... ....... ....... .182
Troubleshooting Pr ograms........... ..... ....... ....... .. ..... .184
Troubleshooting the Docking Station.................... .186
Computer Support Information...............................1 88
6
Page 7

Welcome
Congratulations on your purchase of this Sony VAIO® computer, and
welcome to the online VAIO® Computer User Guide.
This user guide provides detaile d inf ormation on all aspe cts of usin g your
new VAIO computer, fr om keyboard functions to preins talled software
programs.
In the left navigation window, click the topics you want to learn more
about, and that information will be displayed in this main window.
✍ View the Electronic Flyer, which pro vides updates and supplem ental in formatio n
about your computer.
✍ View the VAIO® Computer Specifications, which lists your computer’s hardware
specifications and preinstalled software information, such as descriptions and
contact inform ation.
7
Page 8

VAIO Com pu ter Quick Sta rt
8
Page 9

Powering Your Computer
Your VAIO® c omputer comes with a battery and an AC adapter. This
chapter explains how to install and use these supplied accessories to
power your computer. It also de scribes ways y ou can effic iently utilize the
battery as a power source.
❑ Using AC Power
❑ Using the Battery
❑ Conserving Battery Power
9
Page 10
VAIO Com pu ter Quick Sta rt
Using AC Power
The suppli ed batt ery is not cha rg ed when you recei ve your co mputer. To us e your
computer immediately, use the supplied AC adapter as the power sourc e. While
the computer uses AC power, it automatically charges the battery if it is inserted.
See “Using the Battery” for more information on installing and using your
battery.
❑ Connecting the AC adapter
❑ Turning on the computer
Connecting the AC adapter
To connect the AC adapter
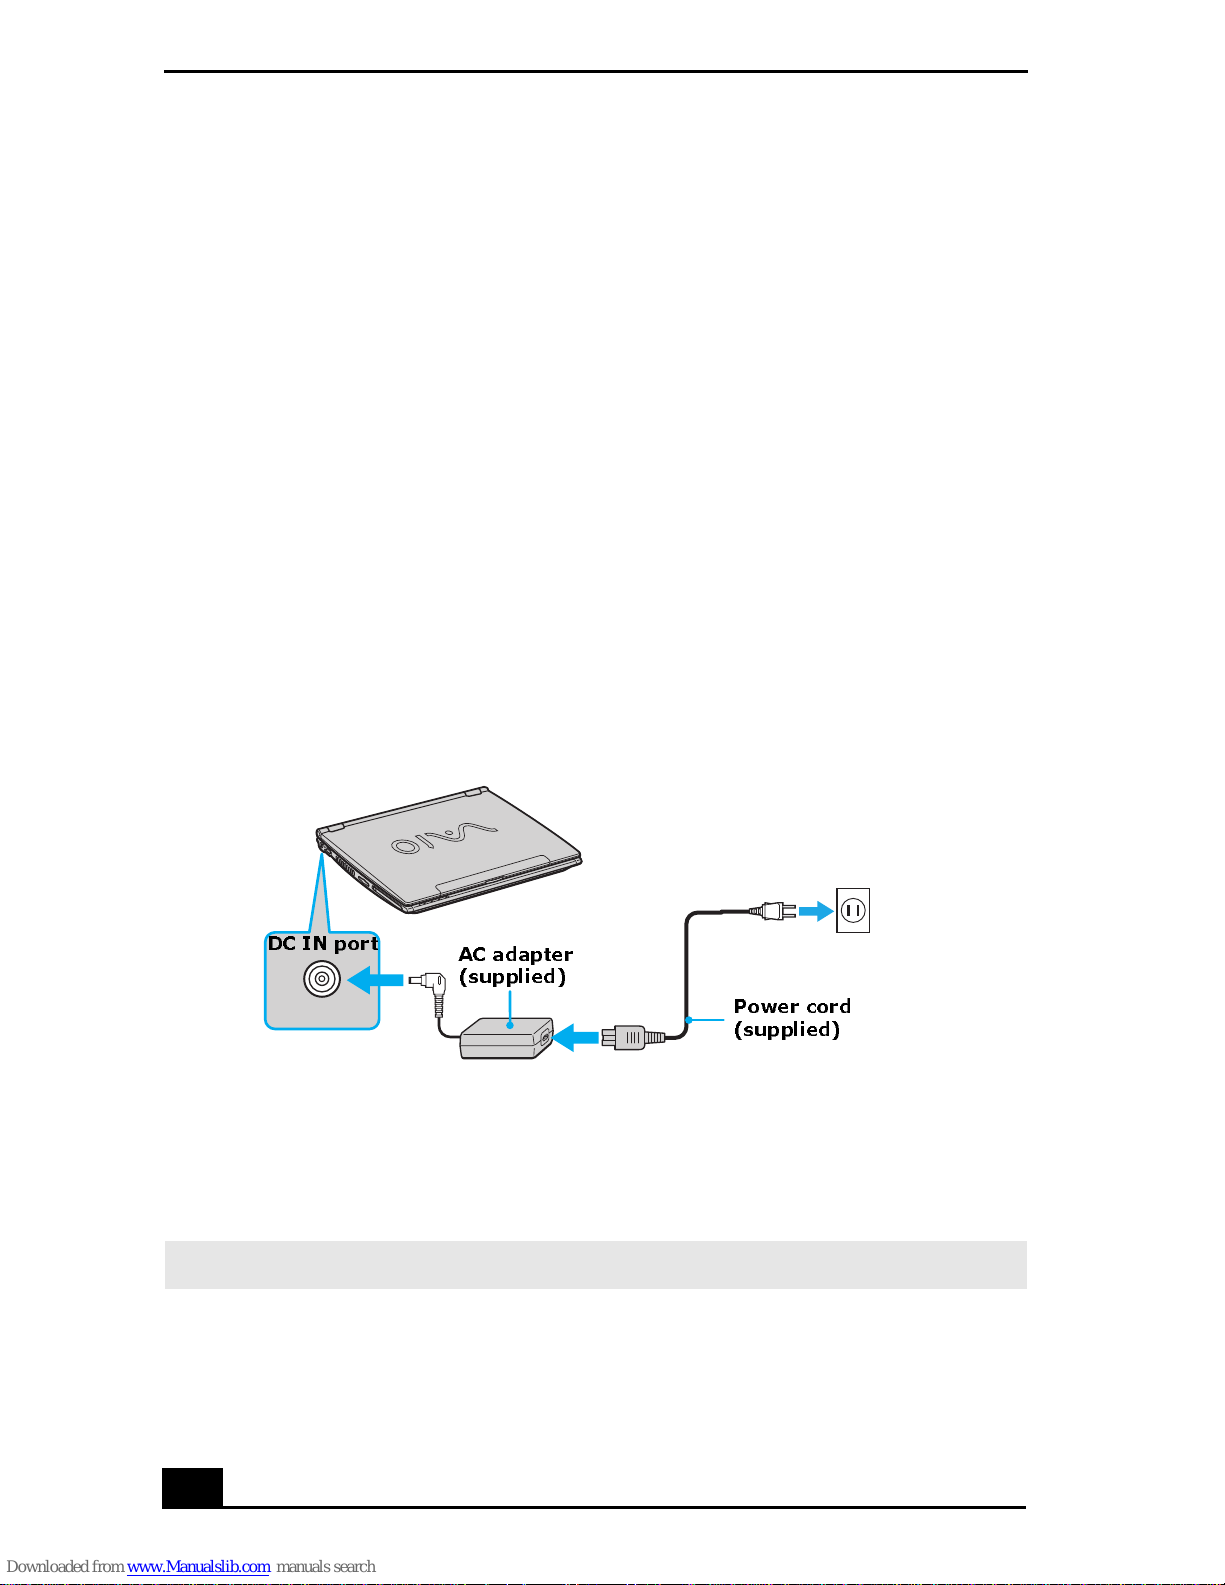
1 Plug the cabl e attached to the AC adapter into the DC IN port on your
comput er or dock in g sta ti on.
Connecting the AC Adapter to the Computer
DC IN port
AC adapter
(supplied)
Power cord
(supplied)
2 Plug one end of the power cord into the AC adapter, and plug the other end
into an AC outlet.
.
✍ Use only the AC adapter supplied with your computer.
10
Page 11

Using AC Power
Turning on the computer
To turn on the computer
1 Slide the re lease lever to the right, and lift the cover while hol ding the
bottom of the computer firmly.
Opening the Computer
Release lever
2 Press the power button until the power indicator turns on.
Turning on the Computer
Power indicator
Power button
✍ If you ho ld th e po w e r bu tt on down , th e co mputer tu rns off.
3 If necessary, adjust the brightness controls for the computer screen (LCD)
displa y as f ollows:
11
Page 12

VAIO Com pu ter Quick Sta rt
❑ To increase light intensity, press Fn+F5 and then or .
❑ To decrease light intensity, press Fn+F5 and then or .
12
Page 13

Using the Battery
Using the Battery
A battery is an aux iliary power source you can use when your computer is not
plugged into an AC outlet. Your computer may come equipped with one or two
battery bays, depending on the model you purchased. If your computer comes
with two batte ry bays, you can purchase a second rechargeable battery to extend
your computing time. Regardle ss how many batteries you use, you can always
extend the life of the battery by conserving power. See “Conserving Battery
Power” for more information.
❑ Inserting a battery
❑ Removi ng a ba ttery
❑ Displaying battery information
❑ Charging a battery
❑ Notes on batteries
❑ Frequently asked questions
✍ The batte ry that comes w ith your computer is not fully charged at the time of
purchase.
Inserting a battery
To inser t a battery
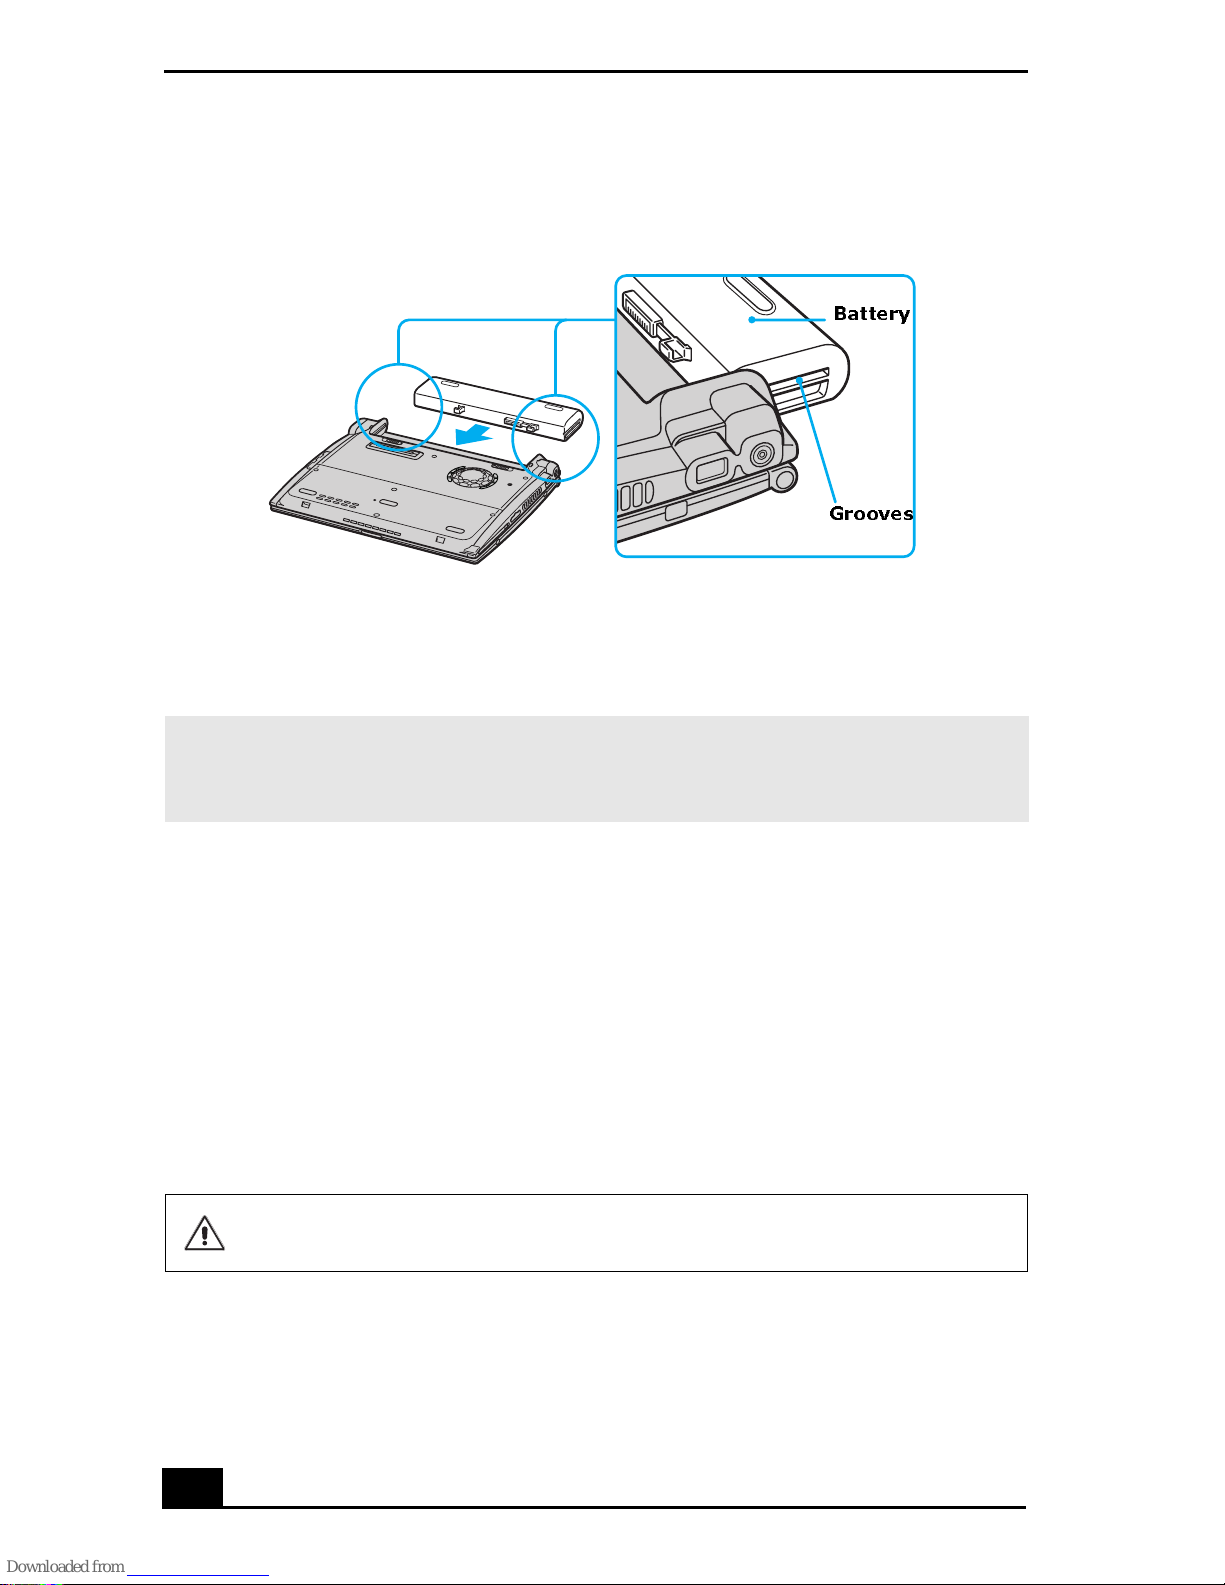
1 Turn the computer o ve r, and sli d e th e LOCK/UNLOCK switch on the
botto m of the com puter to the UNLOCK position.
2 Align the grooves and tabs on the battery with those on the back of the
computer.
13
Page 14
VAIO Com pu ter Quick Sta rt
Inserting a Battery
Battery
Grooves
3 Slide the battery into the computer until it clicks into place.
4 Slid e th e LOCK/UNLOCK switch in to the LOCK position.
✍ If the port replicator is attache d to your computer, do not insert or remov e the
battery. Lifting and turning the computer with the port replicator at tached could
cause a temporary loss of power.
Some software programs and peripheral devices prevent the system from
enab lin g Hib erna te m ode when bat te ry p ow er is lo w. You ca n man u ally ac tiv at e a
power management mode (such as Standby or Hibernate) to conserve po wer, but
you should save your dat a freque ntly to avo id data lo ss. See “Usin g power s aving
modes” for more information.
Removi ng a batter y
If you are not using the computer for an extended period of time, remove the
battery from the computer to avoid dama ging the battery. You can remove the
battery when the computer is on or off.
If the computer is on, connect the AC adapter and exit a power saving
mode before you remove the battery.
14
Page 15
Using the Battery
To remove a battery
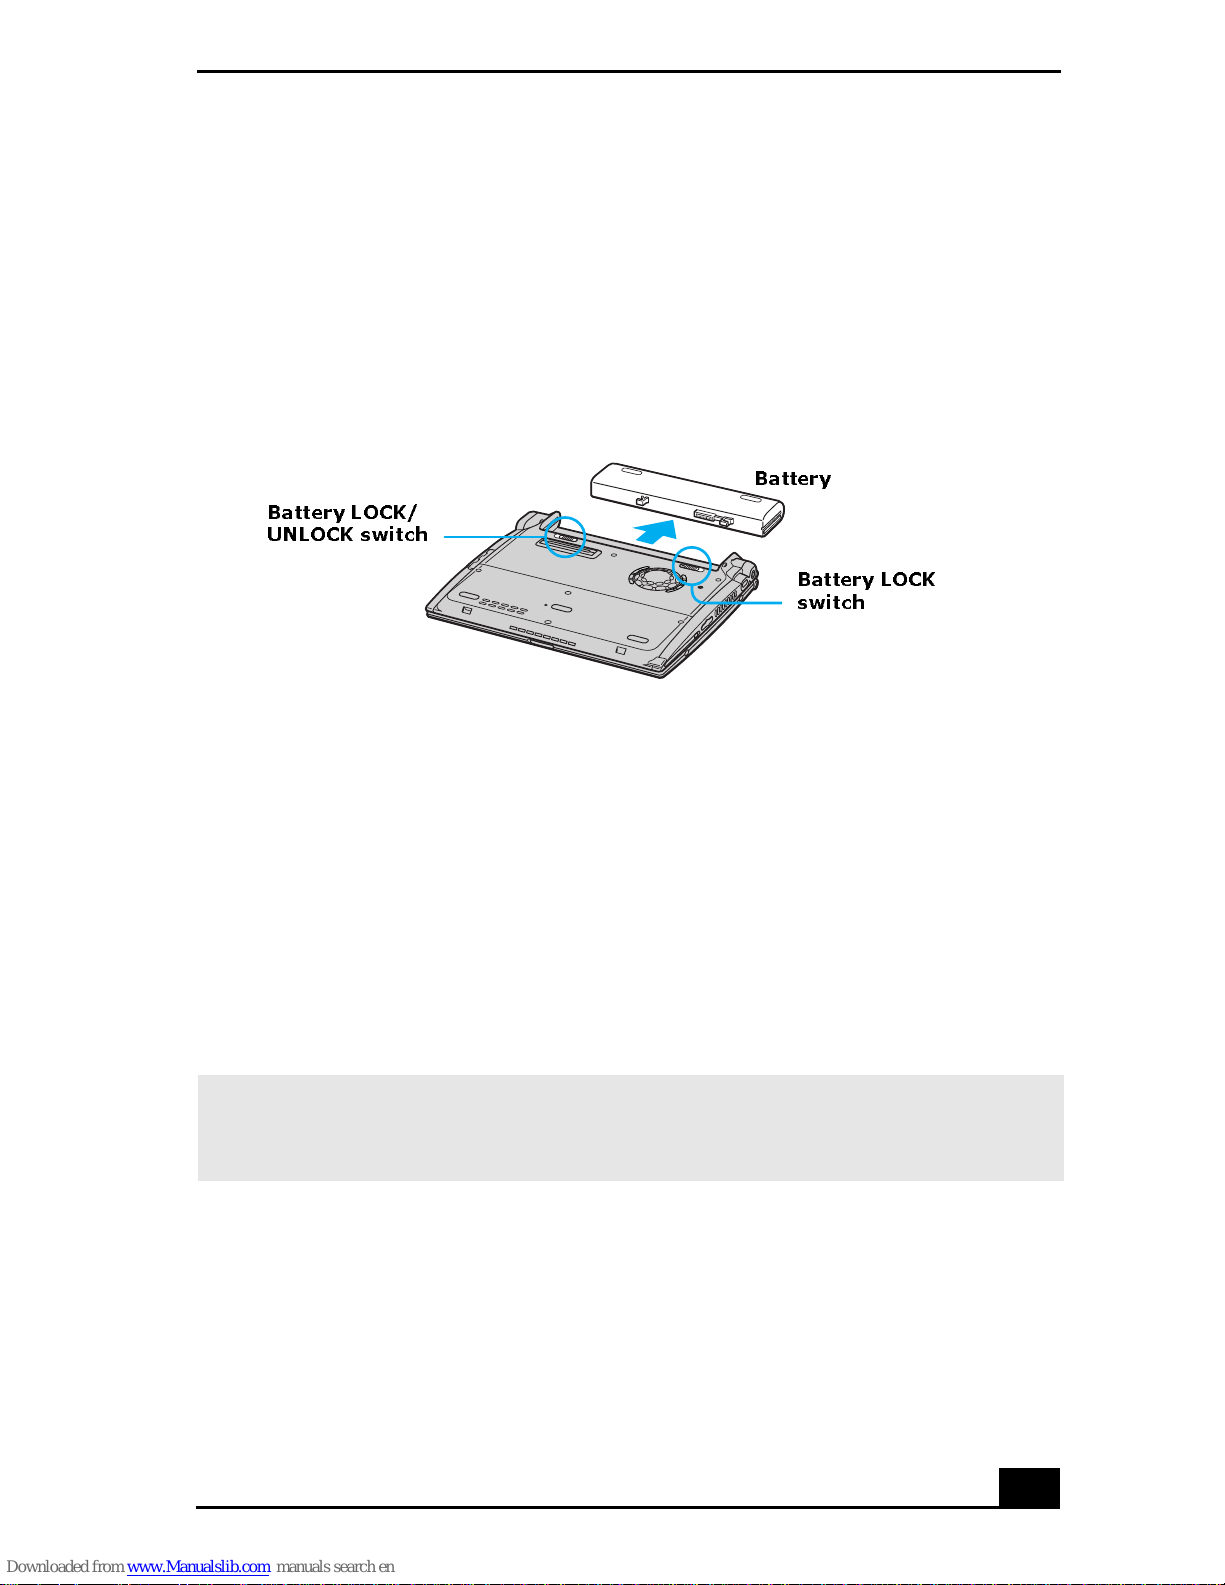
1 Turn the computer o ve r, and sli d e th e LOCK/UNLOCK switch on the
botto m of the com puter to the UNLOCK position.
2 Slide the batte ry away fro m the compu ter.
Removing a Battery
Battery
Battery LOCK/
UNLO C K sw itc h
Battery LOCK
switch
Displaying bat ter y inform ati o n
You can display the remaining battery charge on the Battery Information toolbar
and/or the Battery Information window.
To display the Battery Info rmation toolbar
1 Right-click the center of the Windows® taskbar.
2 Select Toolbars from the shortcut menu, and click Battery Information.
The Battery Information toolbar appears on the taskbar.
✍ If the Batter y I nfo rmat ion toolb ar is hi dde n be hind t he taskba r i con s, r ig ht-cl ick t he
taskbar and click t o cancel Lock the Taskbar. Clic k an d drag th e ed ge of the
Battery Information toolbar to the left until it is in clear view.
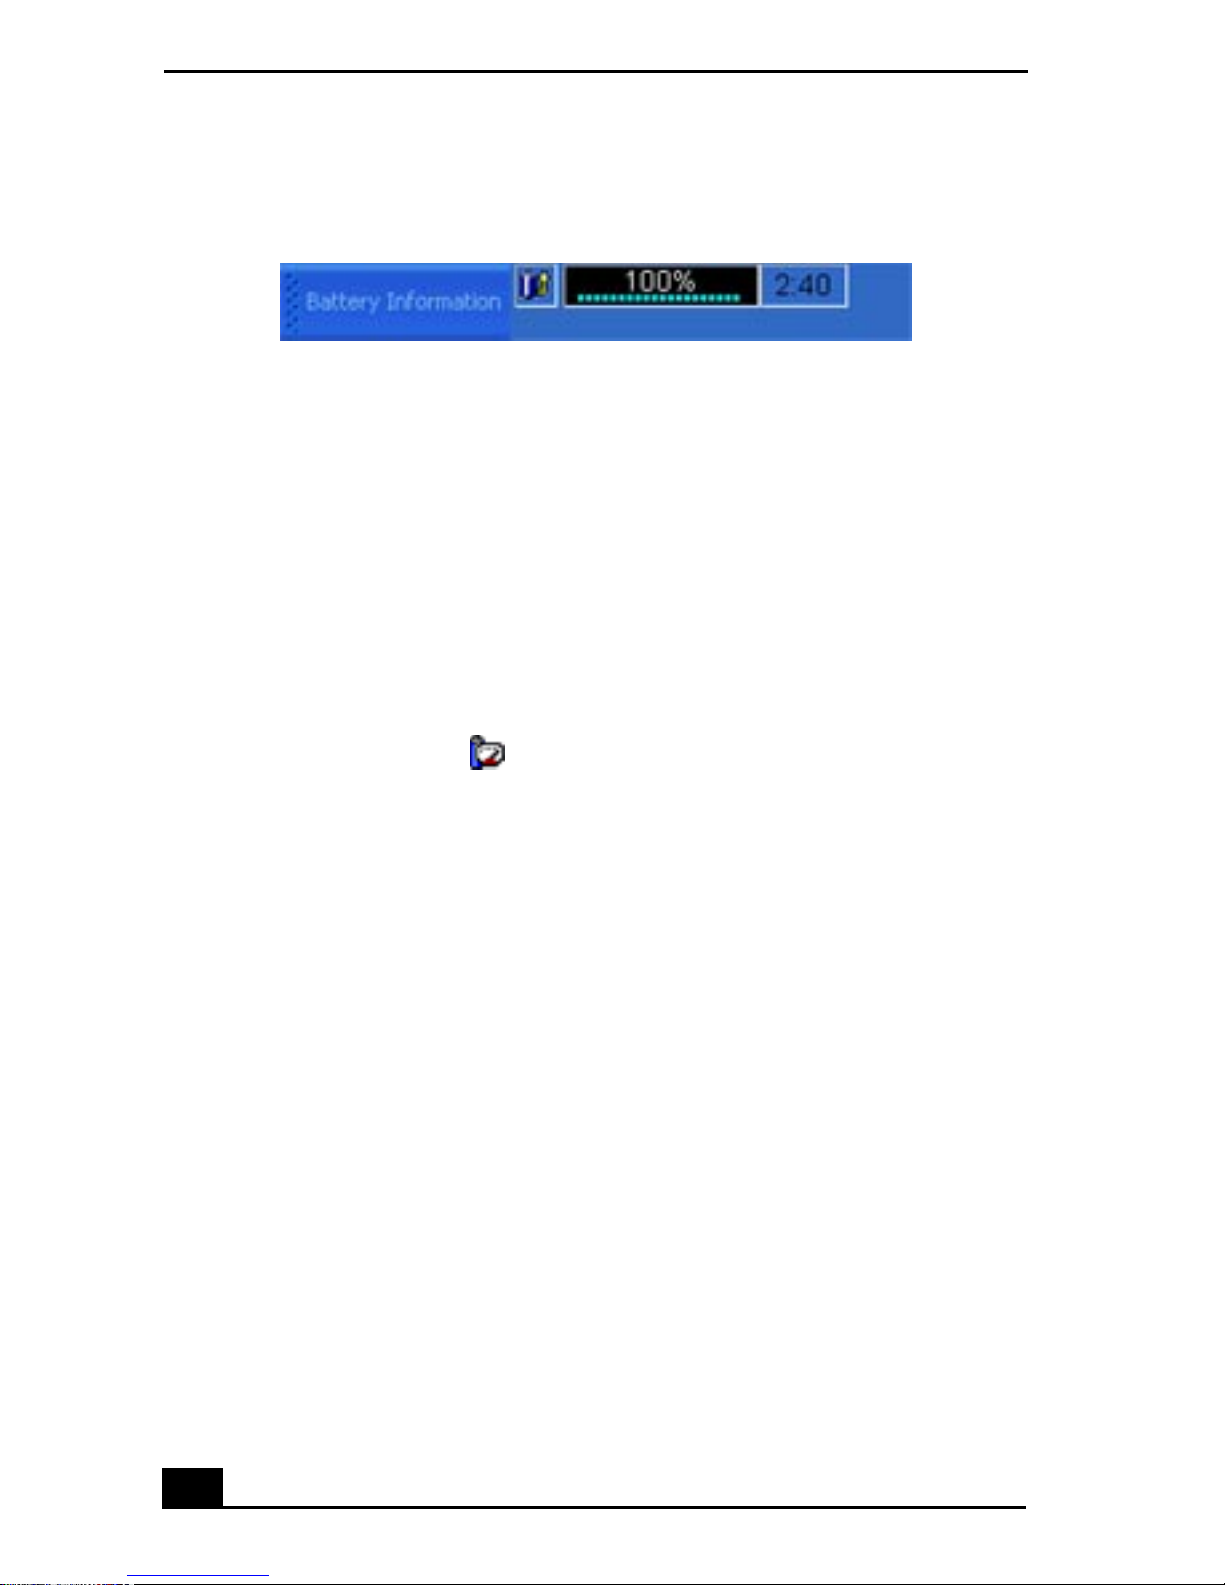
The total charge remaining in the battery is listed in perce nt and re al-time values.
The fol lowing t oolb ar indi cate s the re is 100 perc ent or ap proximate ly 2 ho urs an d
40 minutes of battery charge left.
15
Page 16
VAIO Com pu ter Quick Sta rt
Battery Information Toolbar
❑ Percentage indicator — Displays the percentage of the remaining capacity.
❑ Time indicator — Displays estimate d tim e (hours : minutes) remaining
before the battery fully discharges, also known as the time-to-e mpt y.
To close the Battery Information toolbar
1 Righ t- c lick the Battery Information toolbar.
2 Select Toolbars from the shortcut menu, and click to can ce l Battery
Information. The Battery Information toolbar disappears from the toolbar.
To display the Battery Info rmation window
Dou bl e- click th e CPU icon on the Windows taskbar. The Battery
Information window appears.
16
Page 17
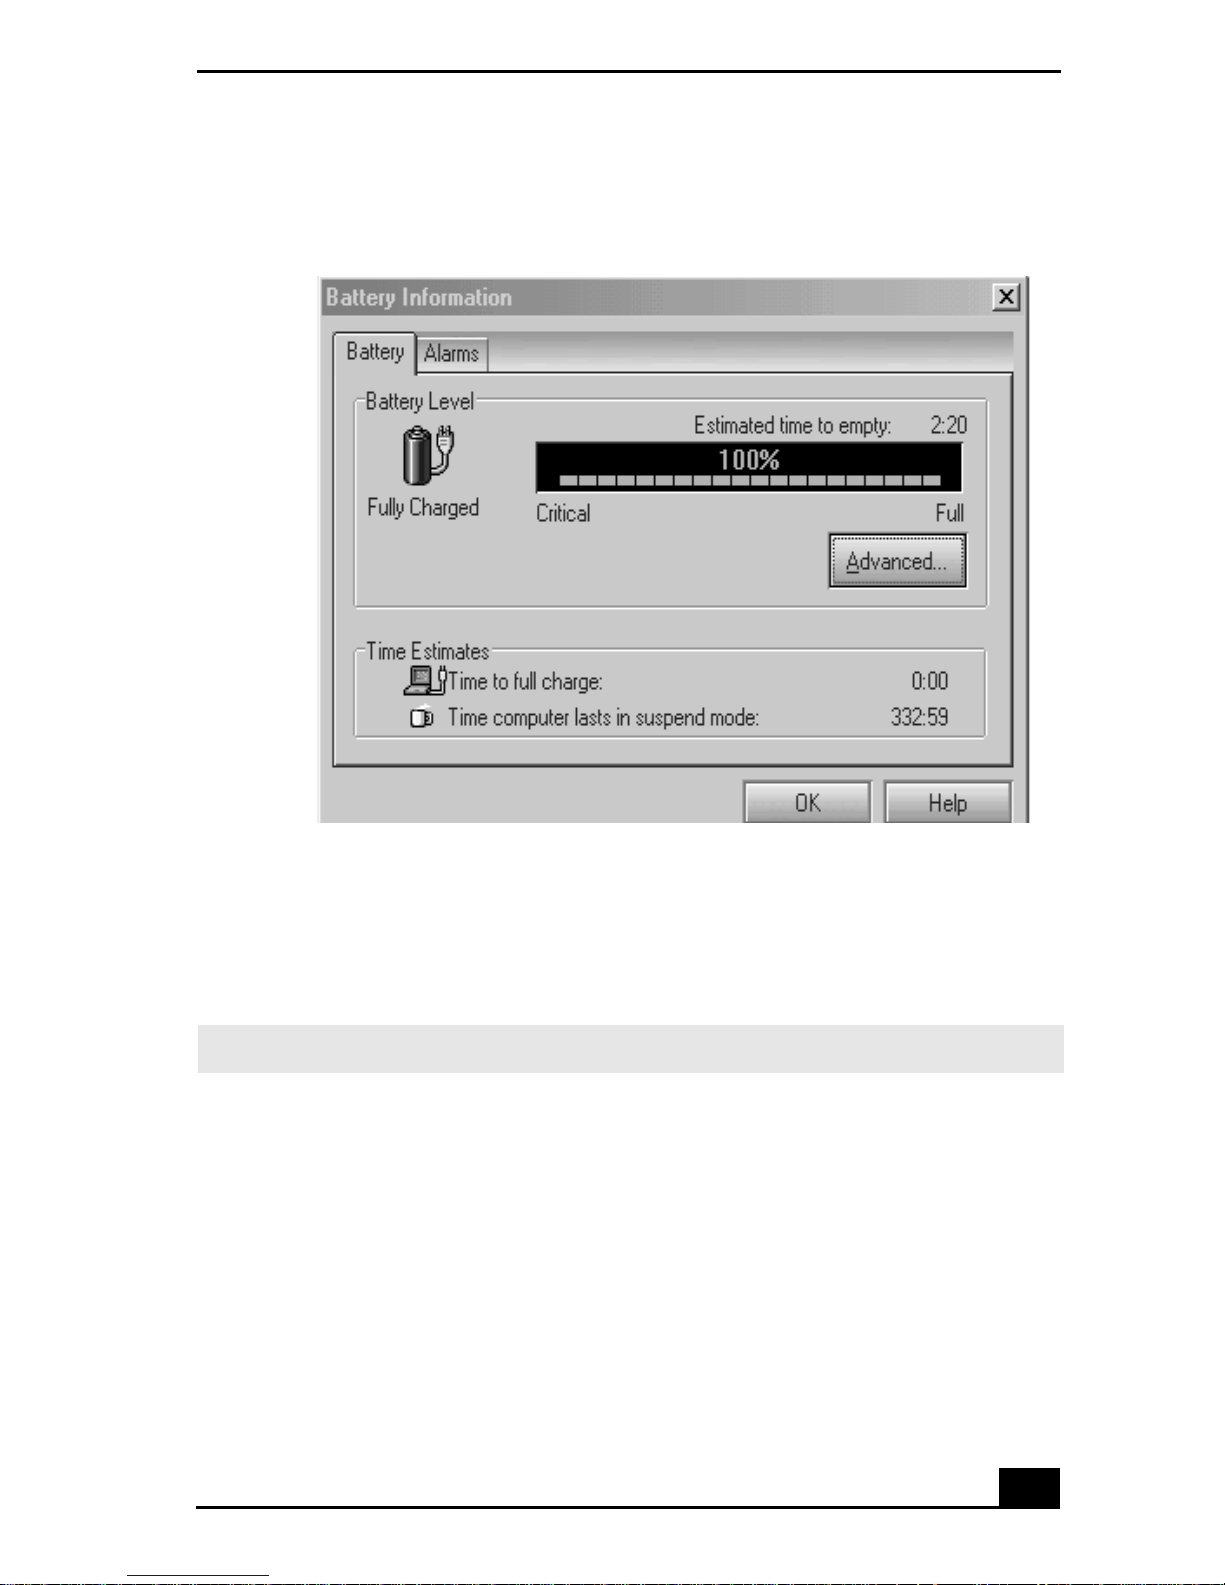
Battery Information Window
Using the Battery
❑ Battery tab — Displays the total charge remaining in the battery. You can
click Advanced for specific information on the battery.
❑ Alarms tab — Displays the alarm settings, which notify you when the
battery is fully charge d and is too low . You can change your computer’s
alarm settings on this window.
✍ Click Help in the lower right corner of the window for more information.
The ba ttery icons that app ear on the Battery Information toolbar and the
Battery Information window indicate the current status of the installed ba ttery.
17
Page 18
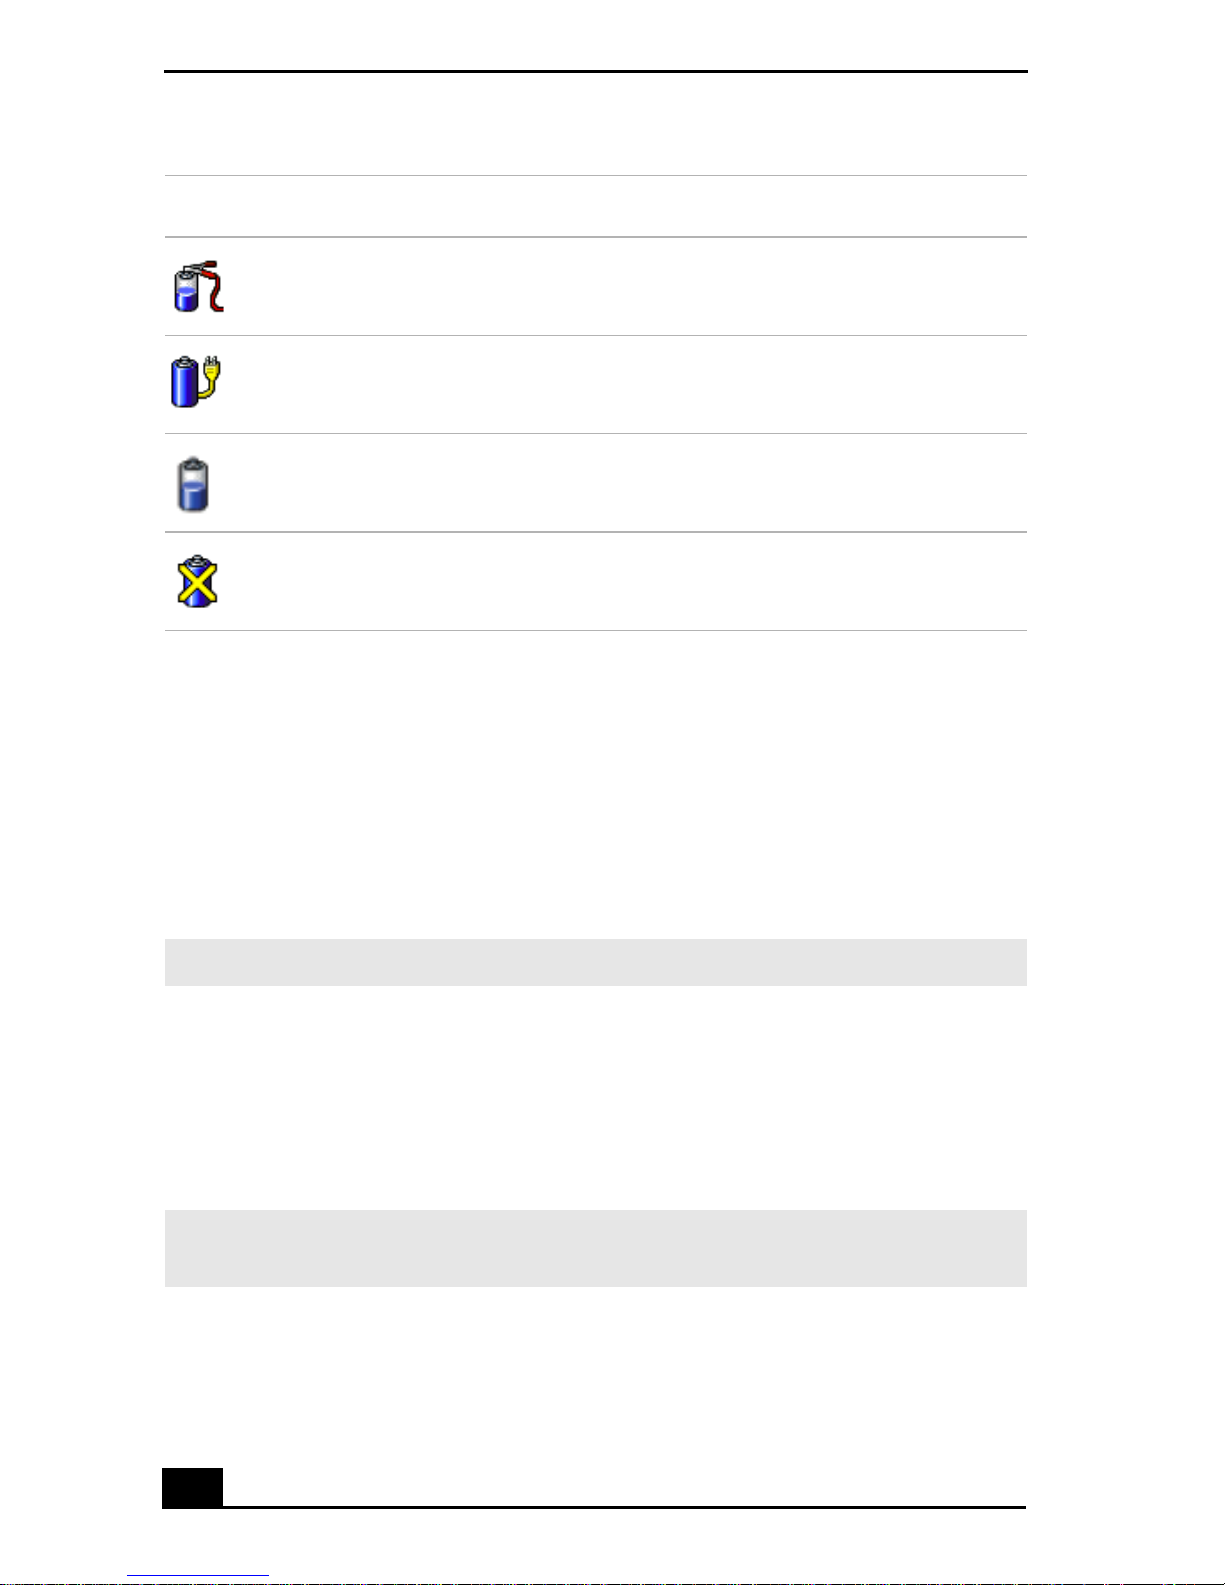
VAIO Com pu ter Quick Sta rt
Battery icon Battery status
Charging
Fully ch arged
Discharging
No battery
Charging a battery
You will need to charge the battery if battery power drops below 10 percent or
you have not used the ba ttery for a considerable amount of time. The lithium-ion
battery supplied with your compute r may be rec harged at any time, whe ther you
wait until the battery is completely or partially discharged. Charging a pa rtially
discharged battery does not affect battery life. If you charge the battery and find
that battery power is still l ow, the battery may be reaching the end of its life, and
you may need to replace it.
✍ The batte ry supplied wit h your computer is not char ged at the time of purchase.
To charge a battery
You can charge the battery when the computer is on or off. Howeve r, the batt ery
will charge faster when the computer is off. Charging the battery ta kes several
hours. S ee your VAIO® Computer Specifications on the “Welcome” page for the
approximate time needed to charge your battery.
✍ Charge the battery at temperatures betwee n 50°F and 80°F (10° C to 30°C). Lower
temperatures require more time to charge.
18
Page 19
Using the Battery
1 Insert th e bat tery into the battery bay. If you want to charge more than one
battery, insert the second battery into the computer. See “Displaying battery
information” for more information.
2 Connect the AC adapter to the computer. The computer automatically
charges the battery as long as the computer is using AC power.
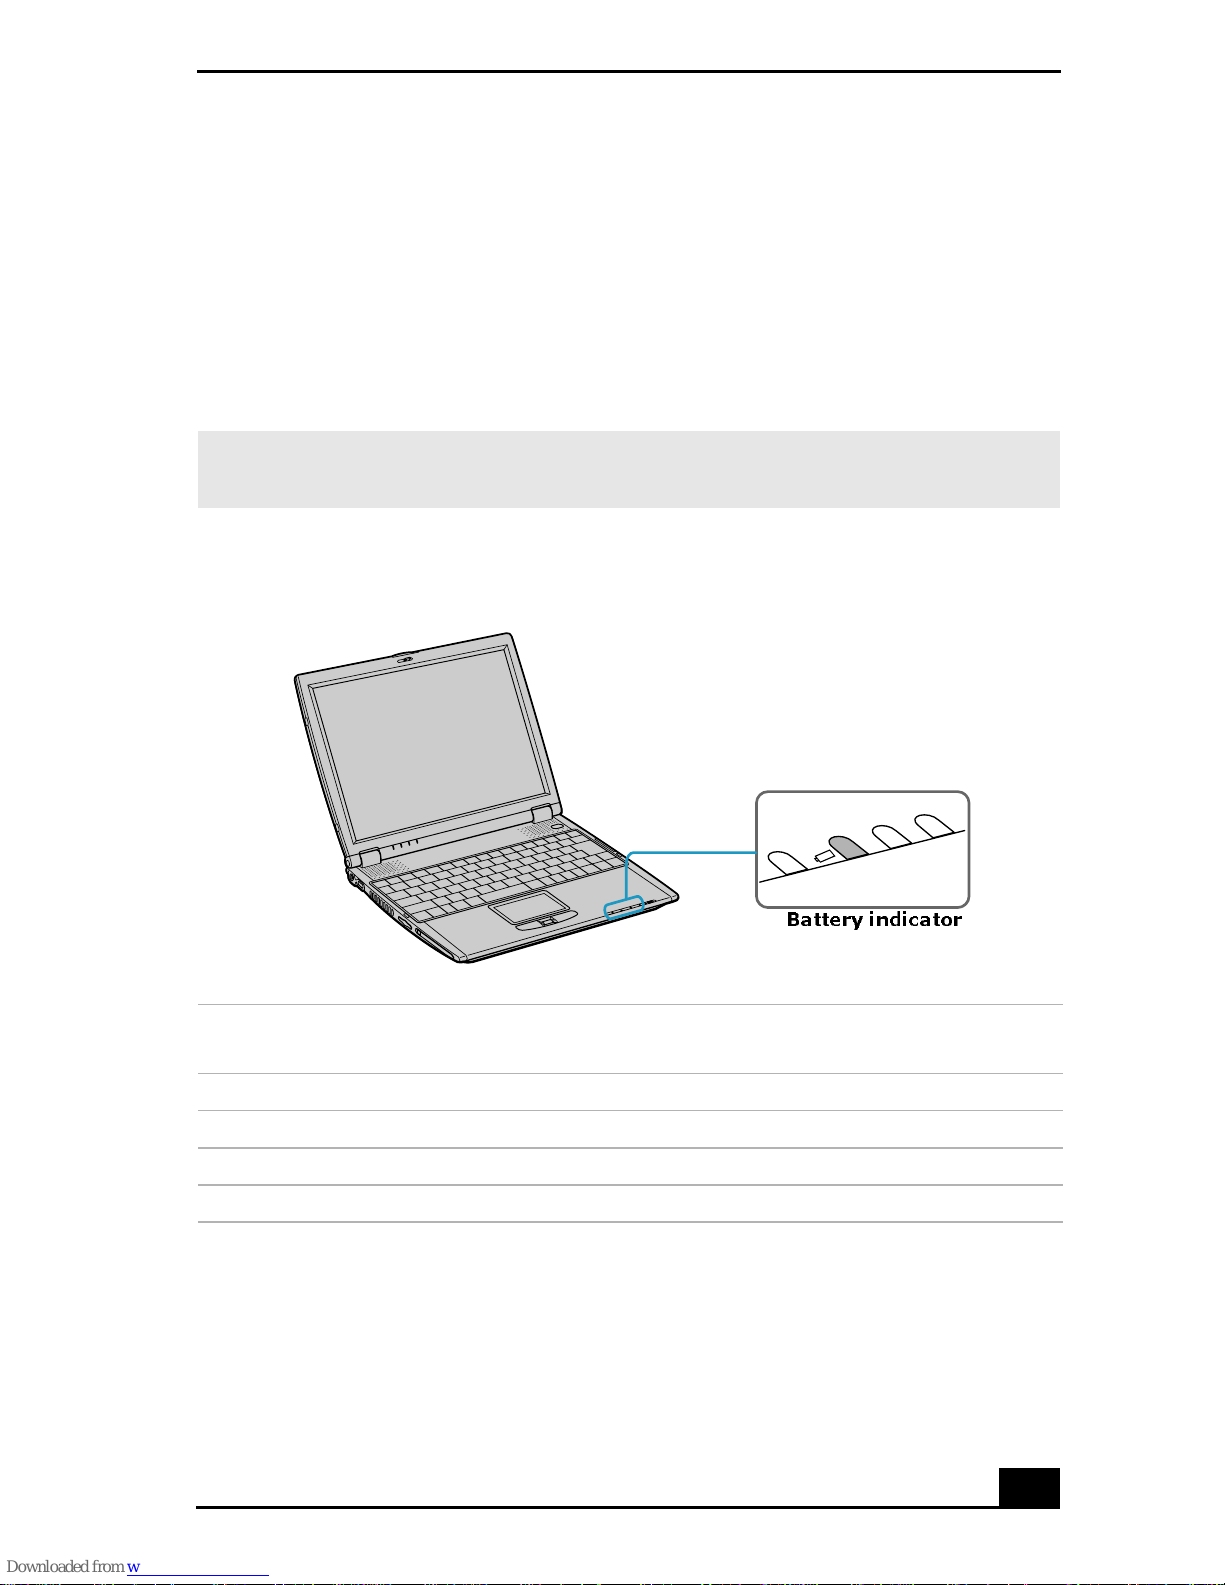
The batter y indi cator b lin ks while the bat tery ch ar ges. Th e batte ry indic ator s top s
blinking when the battery is 100 perce nt full.
✍ When us in g tw o ba tt eries, the ba tt er y yo u ins ert firs t ch arg e s fir st. The sec o nd
battery you inser t begins char ging when the first battery is 85 percent full.
Battery Indicator
Battery indicator
Battery indicator
status Description
On The computer is using battery power.
Single blink The battery is running out of power.
Double blink The battery is charging.
Off The computer is using AC power.
Notes on batteries
❑ Never leave the battery in temperatures above 140°F (60°C), such as under
direct sunlight or in a car parked in the sun.
19
Page 20

VAIO Com pu ter Quick Sta rt
❑ While the battery is in use or being discharged, the ba ttery heats up. This is
normal and is not cause for concern.
❑ Keep the battery away from all sources of heat.
❑ Keep the battery dry.
❑ Do not open or disassemble the battery.
❑ Do not expose the ba ttery to any mechanical shock.
❑ Battery life is shorter in a cold environment because of decreased battery
efficiency at low temperatures.
Frequently asked questions
How do I know when the battery is charged?
To determi ne the remaini ng battery charge, see “Displaying battery information.”
When is th e computer using AC power?
When th e comput er is direct ly co n necte d to th e A C ada p ter, it uses A C p ower,
even if a batte ry is in stall ed.
When should I recharge the battery?
❑ When the battery level falls below 10 percent.
❑ When both the battery and power indicators blink.
❑ When you have not used th e bat tery for a considerable amount of tim e.
20
Page 21

Conserving Battery Power
Conser vin g Bat ter y Power
You may use the power saving modes and PowerPanel or power schemes to
conserve bat tery power. Conserving battery power may signifi cantl y extend your
computing time, depending on how you use your computer.
❑ Using power saving mod es
❑ Using PowerPanel
❑ Frequently asked questions
Using power saving modes
In addition to the normal operating mode, which allows you to turn off specific
devices, your comput er has two distinct power saving modes: Standby and
Hiberna te. You can use the Standby and Hibernate power saving modes to
override a profile setting or initiate an immediate action.
❑ Standby — Sav es the state of the system and p eriph er al devices in memory
(RAM). Power consumption is reduced to a minimum. The system remains
on, and the computer scr een (LCD) is off.
❑ Hibernate — Saves the state of the system and peripheral devices in the
Save to Disk Part iti on on the ha rd disk. Power consum ption is reduce d to the
lowest possible setting with out being completely off. Hibernate mode
consumes the lowest level of power. Your computer enters Hibernate mode
with the remainin g b a t tery ch arge dr o p s below 5 perc e n t, rega r dless of th e
setti ng you select.
✍ Some software programs and peripheral devices prevent the system from enabling
Hibernate mode when battery power is low. You can manually acti vate a power
management mode to conserve power, but you should save your data frequently to
avoid data loss.
To activate Standby mode
1 Press the key combinat ion Fn+Esc. The power indicator blinks in this mode.
2 Press any key to return to Normal mode.
21
Page 22
VAIO Com pu ter Quick Sta rt
To activate Hibernate mode
1 Press the key combination Fn+F12 press the power button and release it
immediately. Do not move the computer until the power indicator turns off.
2 Press the power button to return to normal mode.
✍ If the com puter does not activate Hibernate mode, see “Frequ ently asked questions”
for more information.
Using PowerPanel
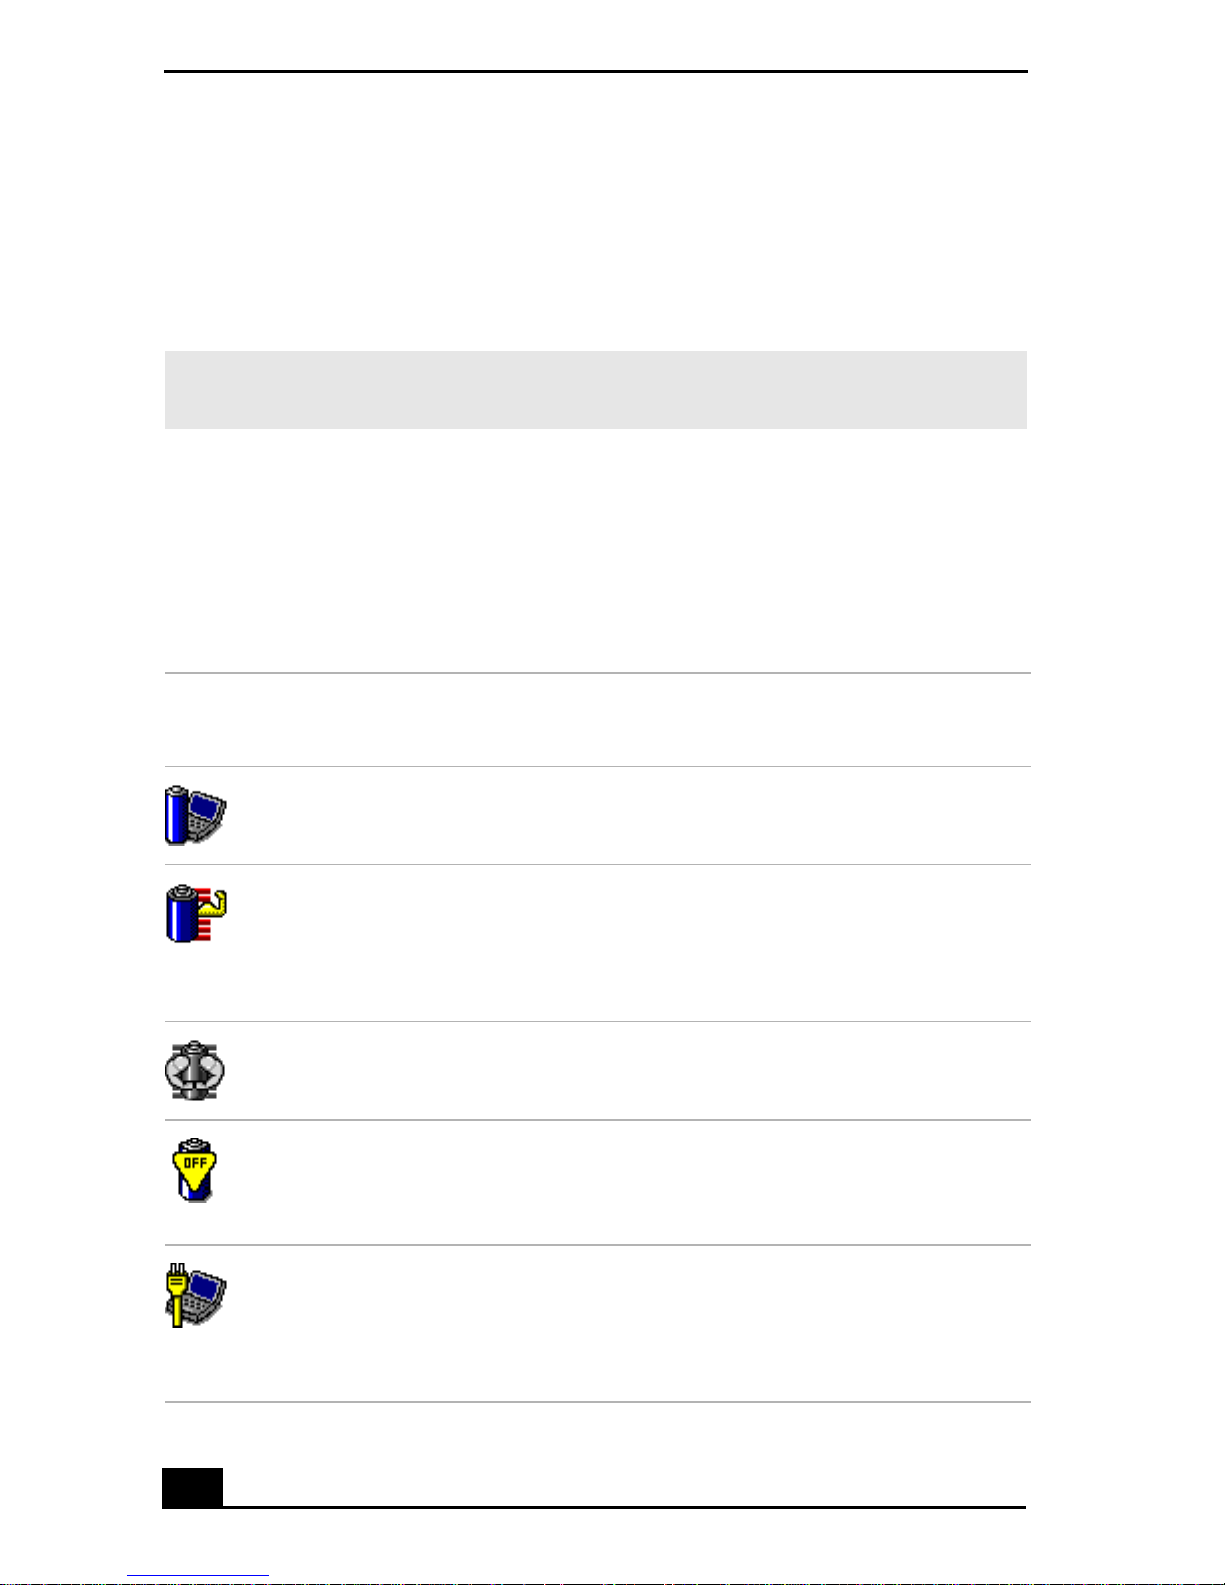
The Pow erPanel u tility enables you to select and customize a predefined pow er
management pr ofil e to con serve batte ry li fe. Th e followi ng table desc ribes al l th e
predefine d power management profile s in Po werPanel. Your computer is set to
Automatic Profile Selection by default. You can customize the settings for all the
following profiles, except the Disable Power Management profile.
Profile
Icon Description
Maximum Performanc e
Provide s th e best system performance but conserves little power.
Maximum Battery Life
Provides power saving features to give you maximum battery life and
good performance. It slows the computer and puts it into Standby
mode after a spec ified time period.
Ultimate Battery Life
Extends the Maximum Battery Life by disabling the i.LINK port.
Power Management Off
Disables all power management settings, such as Standby and
Hibernate mod es. You cannot change the settings of this profile.
AC Power
Indicates when AC po wer is in use. Similar to t he Power Management
Off setting. Power Management automatically lo ads the AC profile
unless you dis able this featu re.
*
22
Page 23
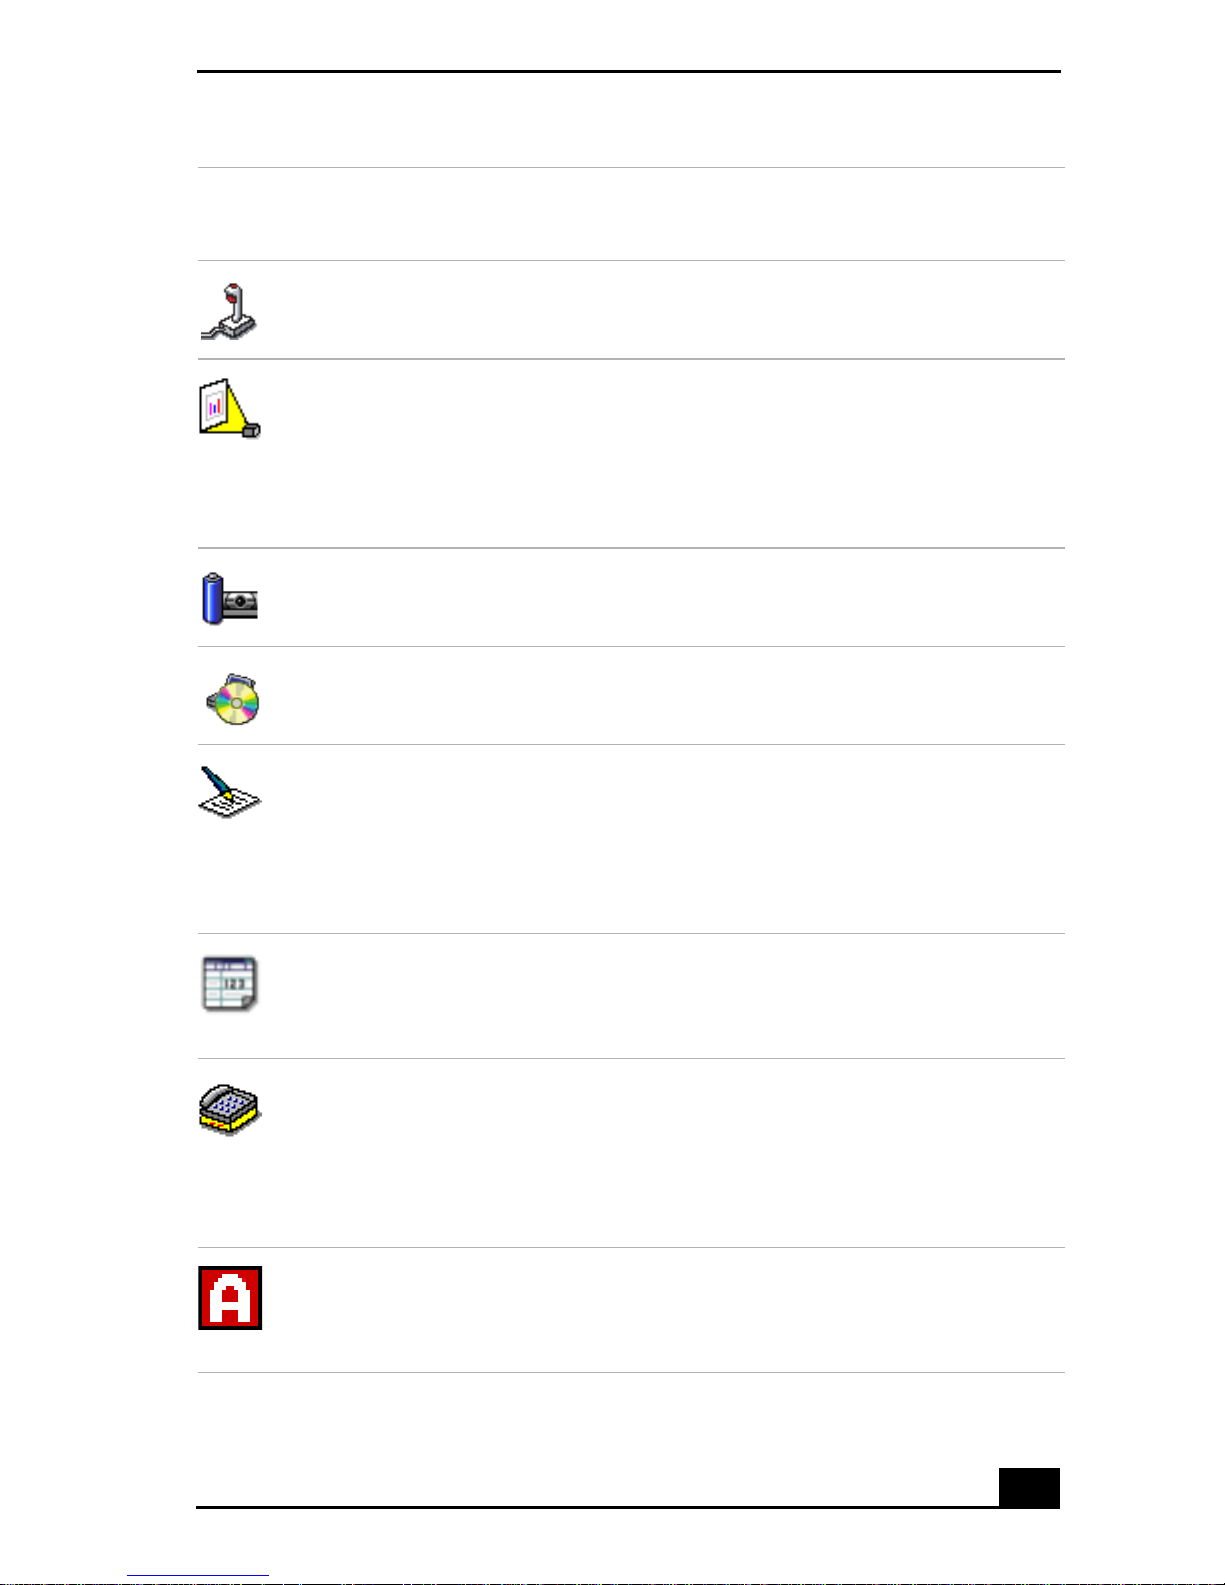
Profile
Icon Description
Games
Disables the display and the Hard Disk Standby timer.
Presentation
Keeps the display on at all times while it conser ves power. This option
is ideal for slide show presentations. You can establish settings for
LCD (Video) Standby, Hard Disk Standby, and S tandby mode to
optimize power management for your system.
Camera
Optimizes performance and power requirements for camera usage.
Conserving Battery Power
DVD
Optimizes performance and power requirements for DVD usage.
Word Processing
Optimizes power management with longer time-outs on the hard disk
and display screen. You can also establish settings for LCD (Video)
Standby, Hard Disk Standby, and Standby mode to optimize power
management for you r system.
Spreadsheet
Optimizes perform anc e and power req uire ments for spreadsheet
programs.
Communications
Extends bat tery life by initiat ing a quick displ ay time -out . The Internal
modem remains powered. You can also establish settings for LCD
(Video) Standby, Hard Disk Standby, and Standby mode to optimize
power management for your sys tem.
Automatic Profile Selection
Swi tc he s au to matic al ly to a pr o f il e s u it ab l e f or ac ti ve sof tware
programs.
23
Page 24
VAIO Com pu ter Quick Sta rt
* On selected models.
✍ Do not cho ose the Automatic Profi le Selection when connected to AC power.
To sele ct a profile
1 Righ t- c lick the CPU icon on the Windows taskbar.
2 Select Profiles, and click the profile on the shortcut menu. The profile
settings are implemented instantly. See “Using PowerPanel” for descriptions
of availa ble profiles.
When you use the battery to power your computer, your system automatically
selects the Maximum Battery Life power management profile by default. If you
select a different power manage ment profile while using battery power, that
profil e is se lected automatically the next time you use the battery to power your
computer.
✍ See PowerPanel Help for information on customizing the power management
profiles.
To customize your profile settings
You can customize your profile settings to sustain enough power for a particular
computi ng function.
1 Righ t- c lick the CPU icon on the Windows® taskbar.
2 Select Edi t/C rea t e Pro f il es from the shortc ut menu.
3 In the left pan el, select the profile that you want to change.
4 Right-cl ick the setting under System, LCD(Video), Hard Disk, or Other
Devices t hat you want to change. S ee the following table for a descrip tion of
each po wer profi l e.
5 Make your changes from the drop-down menu.
6 Click File, and click Save.
24
Page 25

Pow er p r o f il e Des cription
*
CPU Control
Controls th e processor speed. You can select either
Performance, Adaptive, Battery Life, or More Batte ry Li f e.
These selections are listed in orde r f rom the greatest to least
amount of power consumed.
Conserving Battery Power
System Standby
Timer
Controls the time it takes the sys tem to activate the Standby
mode when it is idle. The longer you allow the computer to sit
idle while it is not in a power saving mode the more power the
computer will consume.
Hibernate TimerControls the time i t takes the sys tem to activate the Hi b er nate
mode when it is idle. The longer you allow the computer to sit
idle while it is not in a power saving mode the more power the
computer consumes. Hibernate mode conserves more powe r
than Standby mode.
Thermal Control
Strategy
*
Controls th e speed of the processor fan. You can adjust the fan
speed to Quiet, whic h conserves the most power, or
Performance.
Lid Close
Action
Controls the s tate of your s yste m when you c lose the c ompute r’ s
lid. You can select eit h er Standby or Hibernate mode, or you
can select LCD Off. Hibernate or LCD Off conserves the most
power.
Hibernate on
Low Batt ery
Controls th e state of your syst em when the batter y power is low.
You can turn this setting On or Off. Selecti ng On cons erves the
most power when the battery is low.
LCD Brightnes sControls the brig htness of the computer screen (LCD) screen.
You can select a brightnes s le vel of one to nine, with one bei ng
the darkest setting. The darker you se t the computer screen
(LCD) the more power you conserve.
25
Page 26

VAIO Com pu ter Quick Sta rt
Power profi le Description
LCD Standby
Timer
Con tr o ls the time it tak e s th e sy s te m to s w it ch th e LCD to
Standby mode when the system is idle. This settin g only turns
off power to the LCD. Th e system itself still functions on full
power.
HDD Standby
Timer
Controls the time it takes the system to switch the hard disk
drive to S tan dby mode when the sys tem is i dle. This sett ing only
turns off powe r to the hard disk drive.
i.LINK Port Controls th e power supply to the i.LINK® por t. You can disable
power to the i.LINK port to c onserve power.
Memory Stick
Port Power-
Controls th e power supply to the Memory St ick® slot. You can
disable power to the Memory Stick slot to conserve power.
saving
* Slows the processor speed.
Frequently asked questions
Can my compute r enter Hibernate m ode wh ile using battery power?
Some software programs and peripheral devices prevent the system from
activating Hibernate mod e whe n the battery is low or the computer is running on
AC power. To avoid loss of data when using bat tery power, you should save your
data frequently and manually activate a power management mode, s uch as
Standby or Hibernate. See “Using power saving modes” for more information.
When should I replace the battery?
If, after ful ly cha rging the batt ery, the battery power is st ill low, the battery may
be reaching the end of its life and should be replaced.
Why is the battery warm?
While the battery is in use or being discharged, the ba ttery heats up. This is
normal and is not cause for concern.
26
Page 27

Internet and Network
Connections
❑ Internet Connections
❑ Network Connections
❑ Connecti ng Another VAIO Computer
27
Page 28

VAIO Com pu ter Quick Sta rt
Internet Connections
This section describes the basi c steps for setting up your dial-up or Ethernet
connection to the Internet. The New Connection Wizard guides you through the
process of connecting to the Internet and choosing an Internet service provider
(ISP) or setting up an existing account. When you c onnect to the Internet, you
can registe r your VAIO® computer, us e online services , and gain access to Sony
Computing Support.
❑ Setting up a dial-up Internet connect ion
❑ Setting up an Ethernet Internet connection
❑ Customizing your Internet connection
❑ Frequently asked questions
Setting up a dial-up Internet connection
Before you can conne ct to the Internet, you need to connect your computer to a
telephone line via a telephone cable (not supplied) . Once you have set up your
telephone cable, you’re ready to connect to the Internet.
To conne ct a tele ph one cable
1 Locate the Modem jack on your computer. For location information, see
Locating Ports and Controls in the Setting Up chapter of your printed
VA IO ® Co mput er Q u ick Start.
2 Plug one en d of t he tel ephone cable int o th e Modem ja ck. Ma ke sur e it c lic ks
into place.
3 Plug the other end into the wall jack.
28
Page 29
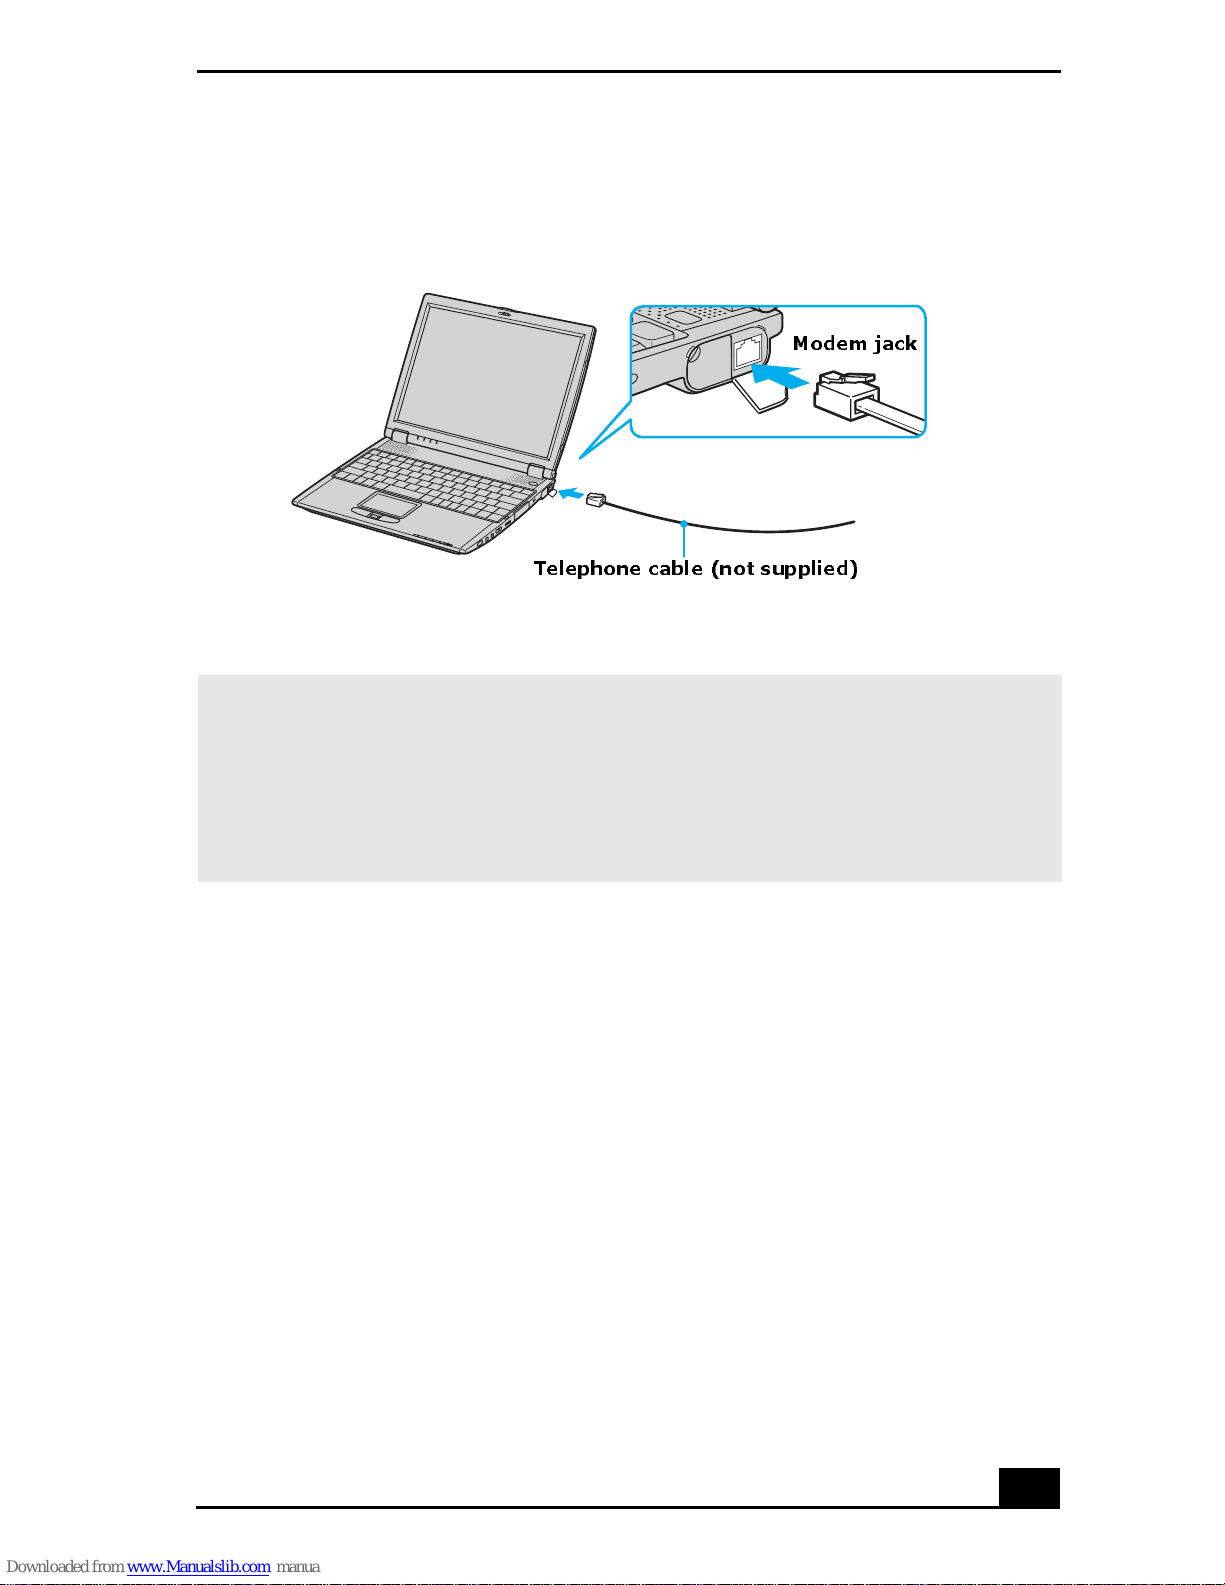
Connect in g a Telephone Cable
Internet Connections
Modem jack
Telephone cable (not sup plied)
✍ Your computer does not work with party lines, cannot be connected to a coin-
operated telephone, and may not work with multiple telephone lines or a private
branch exchange (PBX ). Some of these connectio ns m ay result in excess elec trical
current and could cause a malfunction in the internal modem.
If you connect a tel ephone cable coming through a split ter, the modem or connected
device m ay not work properly.
To set up a dial-u p connection to the Internet
1 Connect your computer to a telephone line. See “To connect a te lephone
cable” for more information.
2 Click Start, point to All Programs, Accessories, Communications, an d
click New Connection Wizard. The New Connection Wizard appears.
29
Page 30

VAIO Com pu ter Quick Sta rt
New Connection Wizard
3 Click Next. If the Location Information dialog box ap pears, follow the on-
screen instru ction s.
4 If it is not alre ady sele cted, cli ck to s elec t Connect to the Internet, and clic k
Next.
5 Foll o w th e on- s c r ee n in s t r u ct io n s.
Setting up an Ethernet Internet connection
Your computer accommodates both 10BASE-T and 100BASE-TX Ethernet
connections, with data transfer speeds of between 10 and 100 Mbps, depending
on the line conditions and Ethernet ca ble.
30
Page 31
Internet Connections
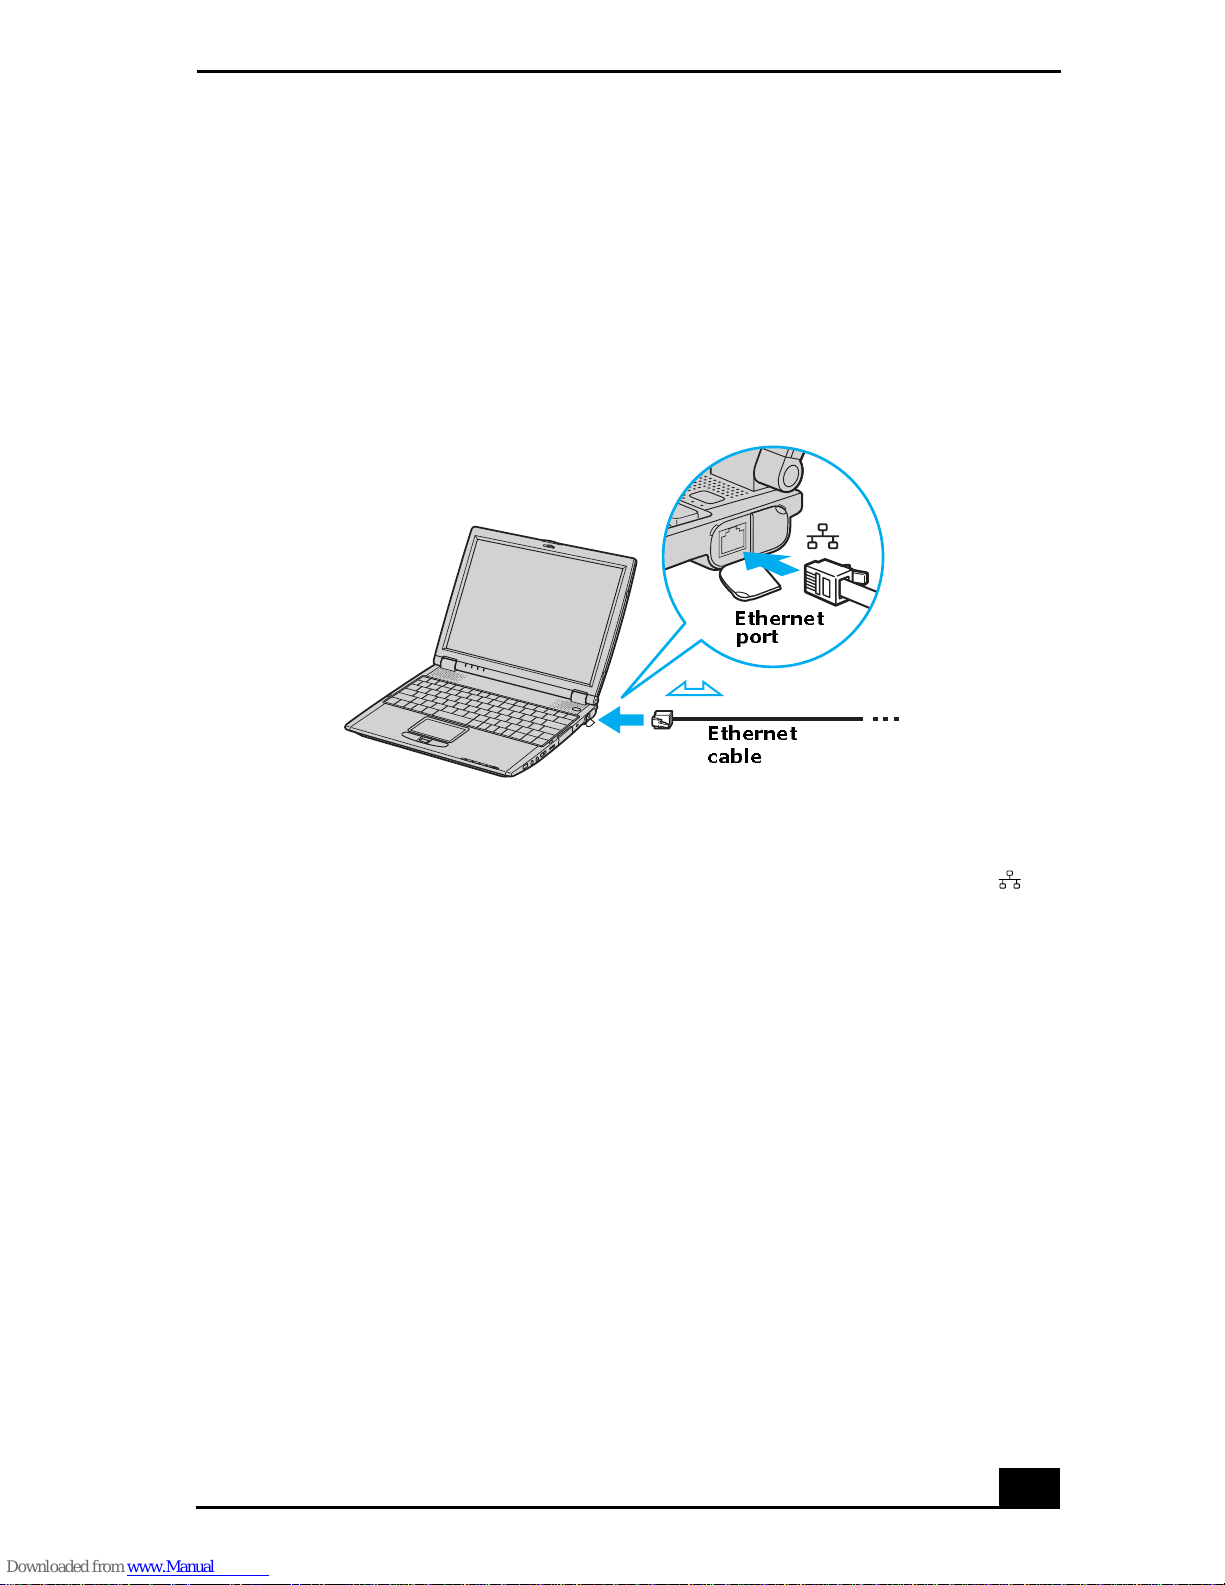
To conne ct an Et hernet ca b le
1 Locate the Ethernet port on your computer. For location information, see
Locating Ports and Controls in the Setting Up chapter of your printed
VAIO® Computer Quick Start.
Connect in g an Eth er n et Cable
Ethernet
port
Ethernet
cable
2 Plug one end of the Ethernet cable into your computer ’s Ethernet port
and the other into the network connection.
To set up an Ethern et connecti on to the Inte r net
1 Connect your computer to a network conne ction. See “To connect an
Ethernet cable ” for more in form ation.
2 Click Start, point to All Programs, Accessories, Communications, an d
click New Connection Wizard. The New Connection Wizard appears.
31
Page 32

VAIO Com pu ter Quick Sta rt
New Connection Wizard
3 Click Next.
4 If it is not alre ady sele cted, cli ck to s elec t Connect to the Internet, and clic k
Next.
5 Foll o w th e on- s c r ee n in s t r u ct io n s.
Customizing your Internet connection
The Internet Properties dialog box ena bles you to change the way you view the
Internet . You can change your home page, fonts, language, an d colors. You can
also regulate content and set your browsing preference s.
To open the In ternet Properti es dialog box
1 Click Start on the Windows® taskbar, a nd then Control Panel.
2 Click Network and Internet connections, and then Internet Options. The
Internet Properti es dialog box appea r s.
3 Click the tabs to view options.
4 Make changes, and click Apply to activate your cha nges .
5 Click OK.
32
Page 33

Internet Connections
Frequently asked questions
Why doesn’t my modem work?
❑ Make sure the te lephone cable is se curely plugged int o the Modem jack and
the wall jack. See “ To connect a telephone cable” for more information.
❑ Make sure the telephone cable is working by plugging the cable into an
ordinary telephone and listening for a dial tone.
❑ Make sure the telephone number the program is di ali ng is correct.
❑ Make sure the software you are using is compatible with the computer’s
modem. (All preinstalled Sony programs are compatible.)
❑ If you are still experiencing problems, use the supplied Application
Recovery CD(s) to reinstall the modem driver software. See “Using the
Application Recovery CD(s)” for more information.
Why is my mo dem conn e ct io n s l ow ?
Your computer is equipped with a V.90 compa tible modem. Many factors may
influence modem connectio n spe ed, including telephone line noise or
compatibility with telephone equipment, s uch as fax machines or other modems.
If you think your modem is not connecting properly to other PC-based modems,
fax machines, or your Internet Service Provider (ISP), follow these steps:
❑ Ask your telephone company to verify your te lephone line is free of any line
noise.
❑ If your problem is fax-related, make sure the re are no problems with the fax
machine you are calling and that it is com patible with fax mode ms.
❑ If you are having a problem connecting with your ISP, make sure the ISP is
not experiencing technical problems.
❑ If you have a second telephone cable available, try conne cting the mod em to
that cable.
33
Page 34
VAIO Com pu ter Quick Sta rt
Netw ork Connections
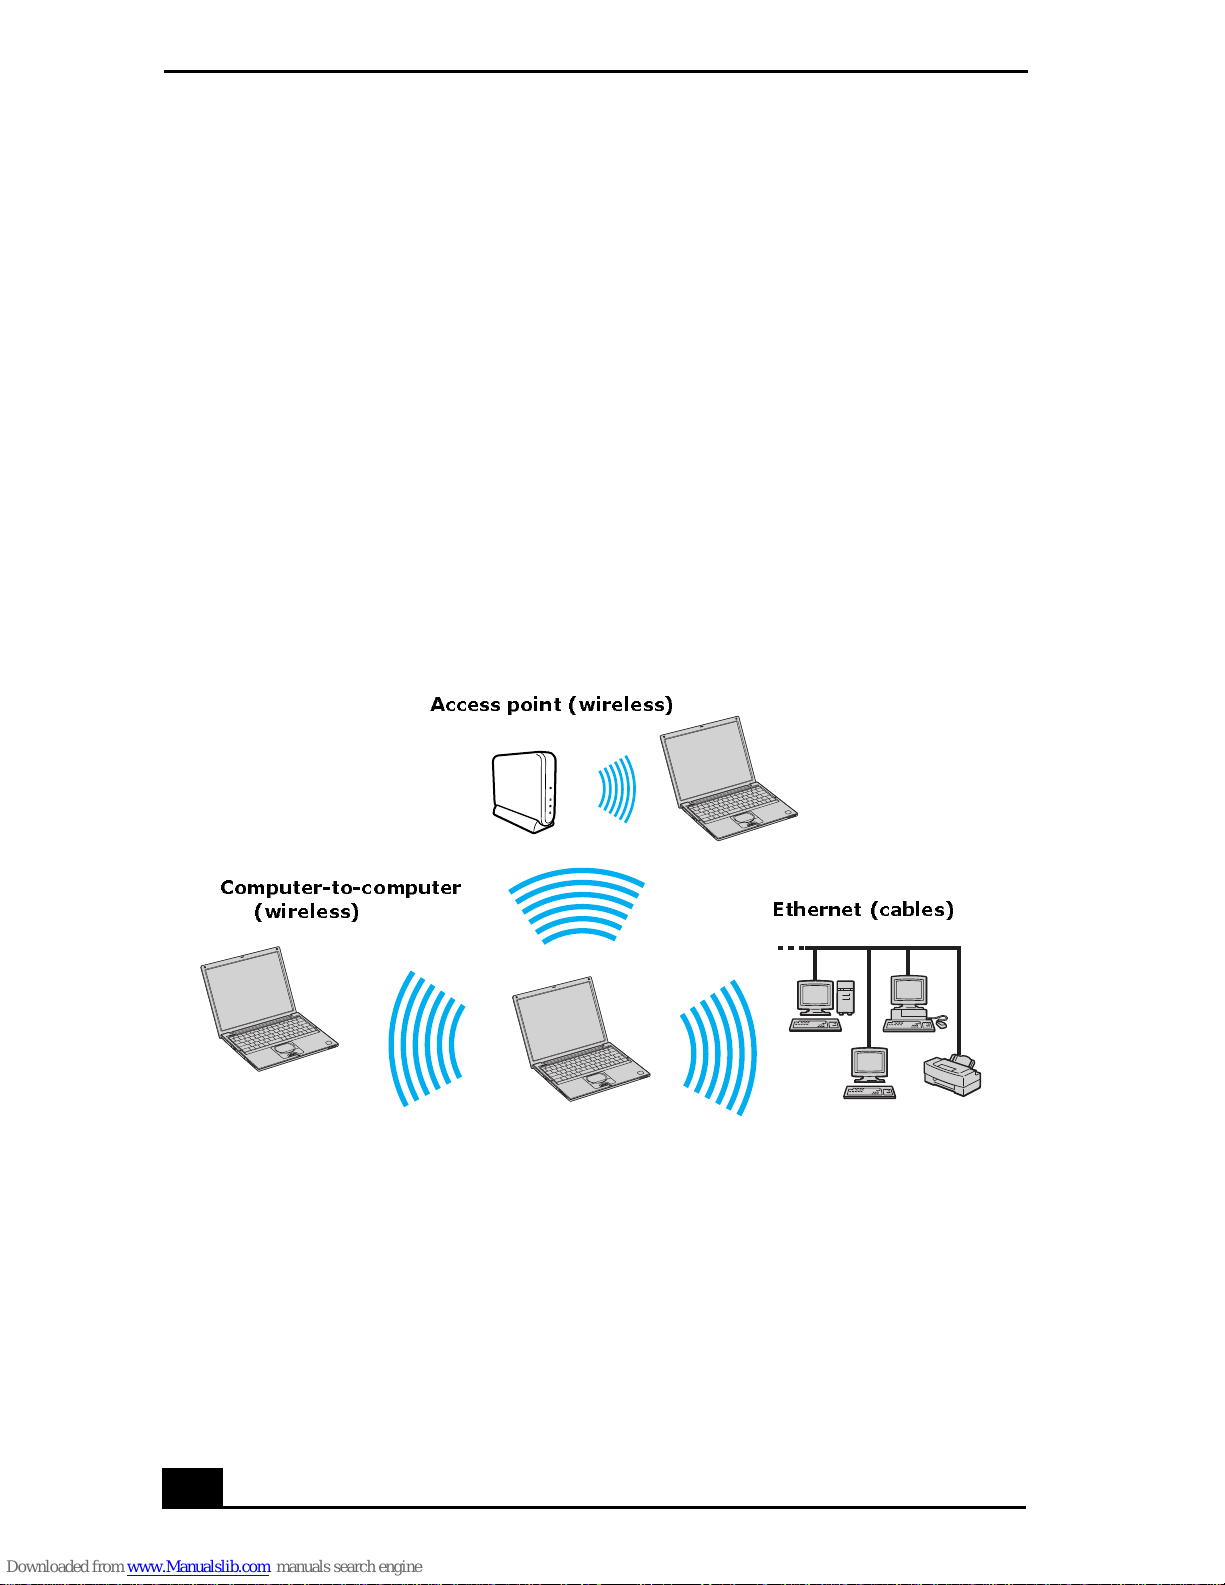
With a Sony computer, you can easily set up or connect to a variety of networks.
The New Connection Wizard and Network Setup Wizard make it ea s y to gain
access to remote and local area networks (LANs) using wireless, Ethernet, or
dial-up con nections.
For more information about networking, click Start, Help and Support, and
then Networking and the Web.
❑ Using Ethernet and dial-up connections
❑ Using wireless LAN connections
❑ Checking your network connection status
❑ Frequently asked questions
Ty pes of Networks
Access point (wireless)
Computer-to-computer
(wireless)
Using Ethernet and dial-up connections
Ethernet (cables)
Local area networks (LANs) comprise a group of computers and associated
devices within a small geographic area, such as a home or office building. For
setting up LANs, Ethernet is a widely installed technology. Y our computer
34
Page 35
Network Connections
accommodate s both 10BASE-T and 100BASE-TX Ethernet connections, with
data tra nsfer speeds of between 10 and 100 Mbps, depending on the Ethern et
cable.
To set up an Etherne t LAN
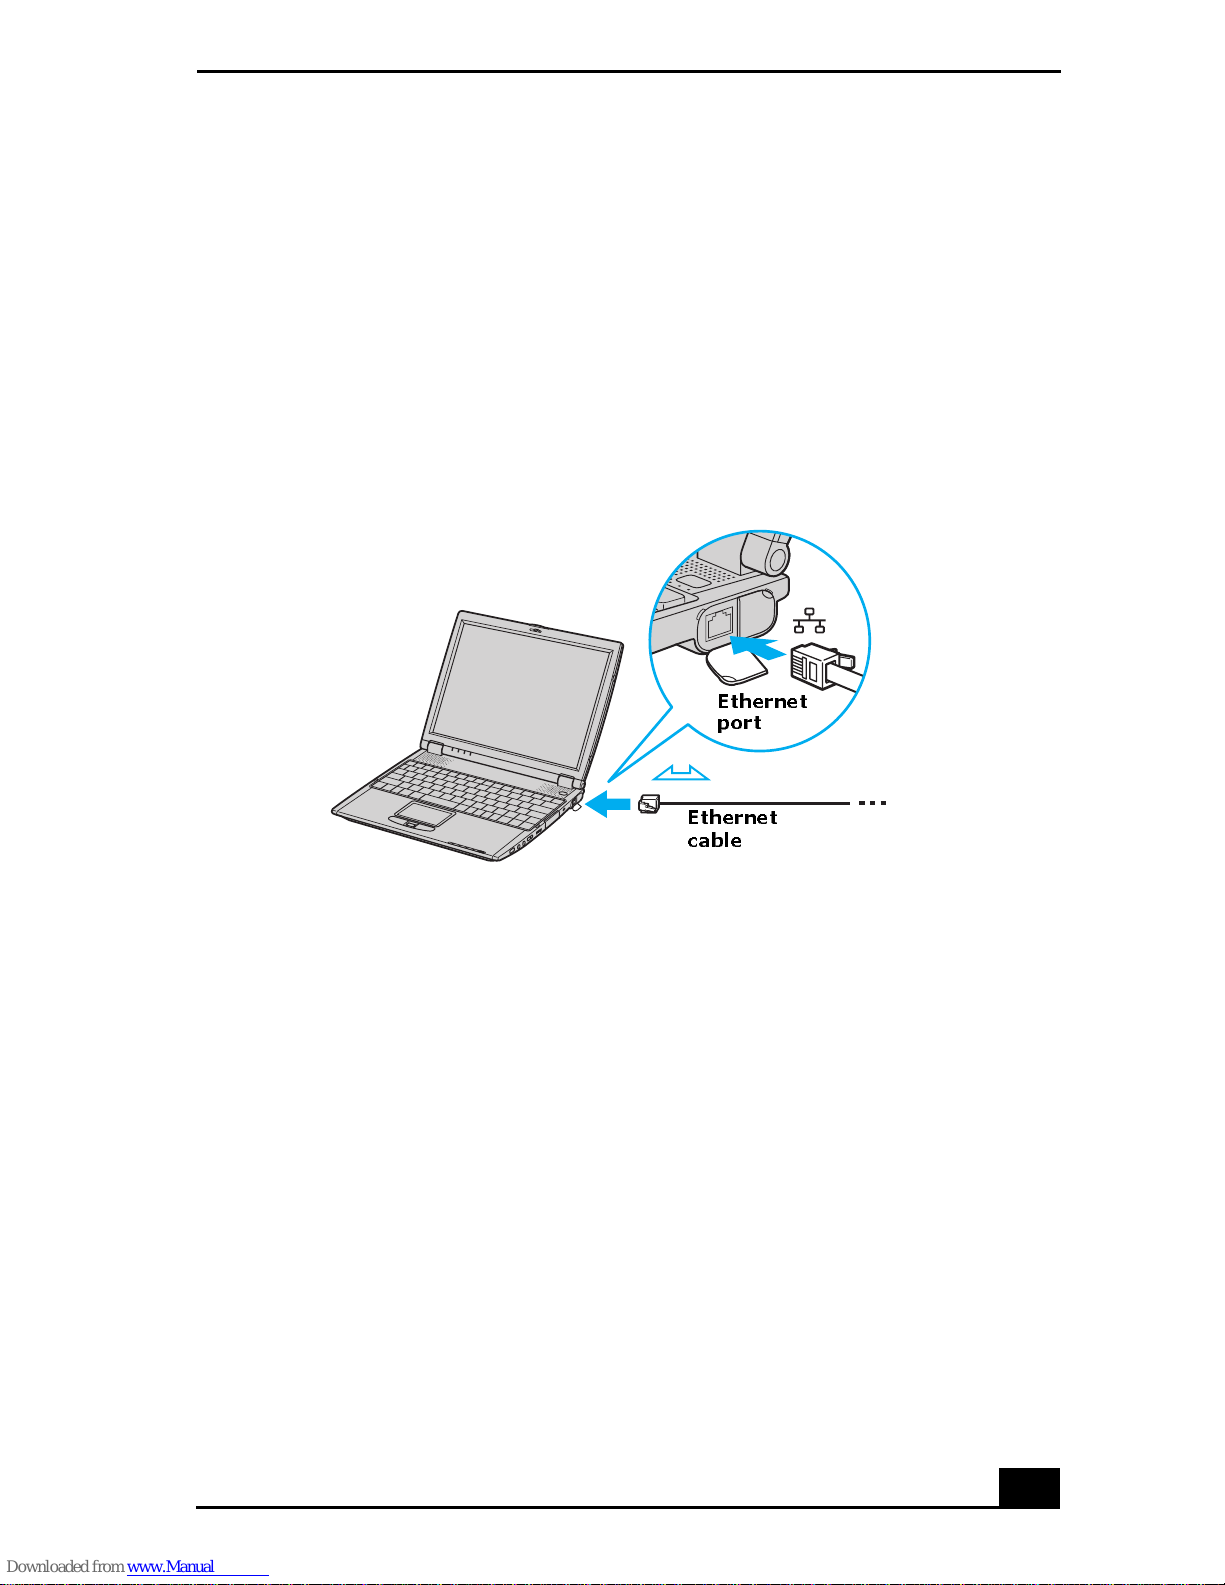
1 Plug one end of the Ethernet cable into your computer ’s Ethernet port and
the other in to the network connection.
Connect in g an Eth er n et Cable
Ethernet
port
Ethernet
cable
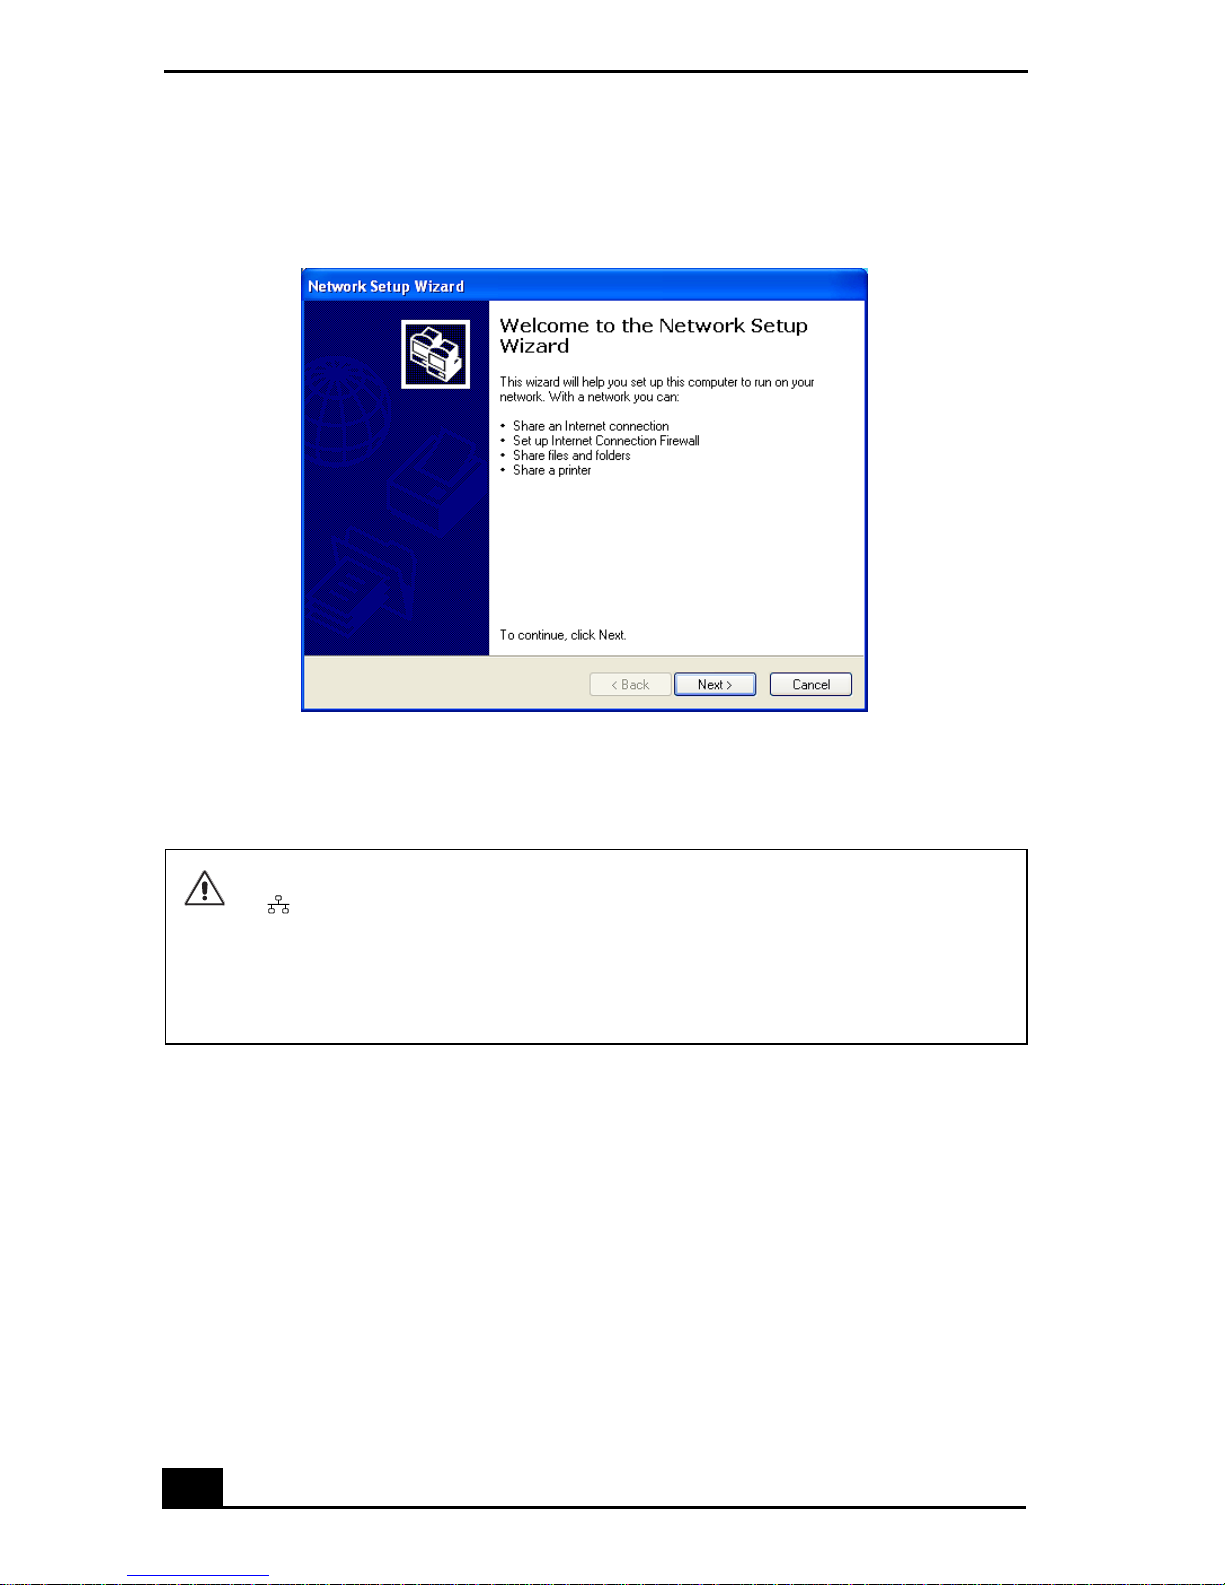
2 Click Start, point to All Programs, Accessories, Communications, an d
click Network Setup Wizard. The Network Setup Wizard appears.
35
Page 36
VAIO Com pu ter Quick Sta rt
The Network Setup Wizard
3 Click Next.
4 Foll o w th e on- s c r ee n in s t r u ct io n s.
Only connect 10BASE-T and 100BASE-TX cables to the Ethernet port
. Do not connect any other type of network cable or any t elephone
cable. Connecting cables other than those list ed above may result in an
electric current overload and could cause a malfunction, exce ssive heat, or
fire i n the port. To connect the unit to the ne twork, contact your network
administrator.
You can connect to your company network from a remote location and use data,
programs, and net w ork resources. See Microsoft ® Windows® Help by clicki ng
Help and Support from the Start menu, and then clicking Networking and the
Web in the le ft panel.
36
Page 37

Network Connections
To connect to a remote netwo rk using a telephone or Eth er net cable
1 Connect a n Ethernet or telephone cab le to your computer. See “Connect ing
an Ethernet Cable” and “Setting up a dial-up Internet connection” for more
information.
2 From the Start menu, point to All Programs, Accessories,
Communications, and click New Connection Wizard.
3 Click Next. If you are prompted to the Local Inf o rm a t io n dialog box,
follow the on-screen instructions.
4 Click Connect to the network at my workplace, and th en click Next.
5 Follow the on-scre en instructions.
6 Ask your netw ork administrator for the detailed settings and devices needed
to connect to an existing network.
Using wireless LAN connections
A wireless lo cal area network (LAN) is a network in which you can connect to a
LAN through a wireless (radio) connection. You can opt to purchase a Sony
W ir eless LAN Access Point to set up a LAN.
The wireles s LAN access point is designed for building a wireless LAN
environment. Because a wirele ss LAN configuration requires no wiri ng, you can
operate mul tip le comp uter s mo r e f reely than ev er be f o re .
You can also purchase an external Wireless LAN PC Card separately, but your
computer (depending on the model you purcha se d) may already come with a
built-in mini PCI card that allows for wireless connections. For information
about your computer’s wireles s capabilities, see the “Welcome” page to view
your VAIO® Computer Specifications. The Wireless LAN PC Card is designed
for a wireless L AN environment. You can use the Wireless LAN PC C ard with or
without the access point.
✍ For more in for mat ion on Son y W ir eles s LAN, g o to htt p:/ /ww w . son ystyl e. com/ vaio.
There are two types of wireless connections:
❑ An infrastructure network is one that ext ends an existing wired loc al
network to wireless devices by providing an access point . T he ac ce ss point
bridges the wire less and wired LAN and acts as a central con troller for the
37
Page 38
VAIO Com pu ter Quick Sta rt
wireless LAN. The acces s poin t coordi na tes transmi ssion a nd r ecept ion from
multiple wireless de vices within a specific range.
❑ A computer -to-c omput er (ad-ho c) networ k is one in wh ic h a loca l netwo rk is
created only by the wireless devices themselves, with no other central
controller or access point. Ea ch device communicates directly with other
devices in the network. You can set up an ad-hoc network easil y at home.
To connect to an existing wireless network
1 Move the Wireless LAN switc h to ON or insert a Wireless LAN PC Card
into the PC Card slot. See “Inserting PC Cards” for more informat ion.
The Wi reless LAN indicator lights up.
2 From the Start menu, cli ck Control Panel.
3 Click Network and Internet Connections, and then click Network
Connections.
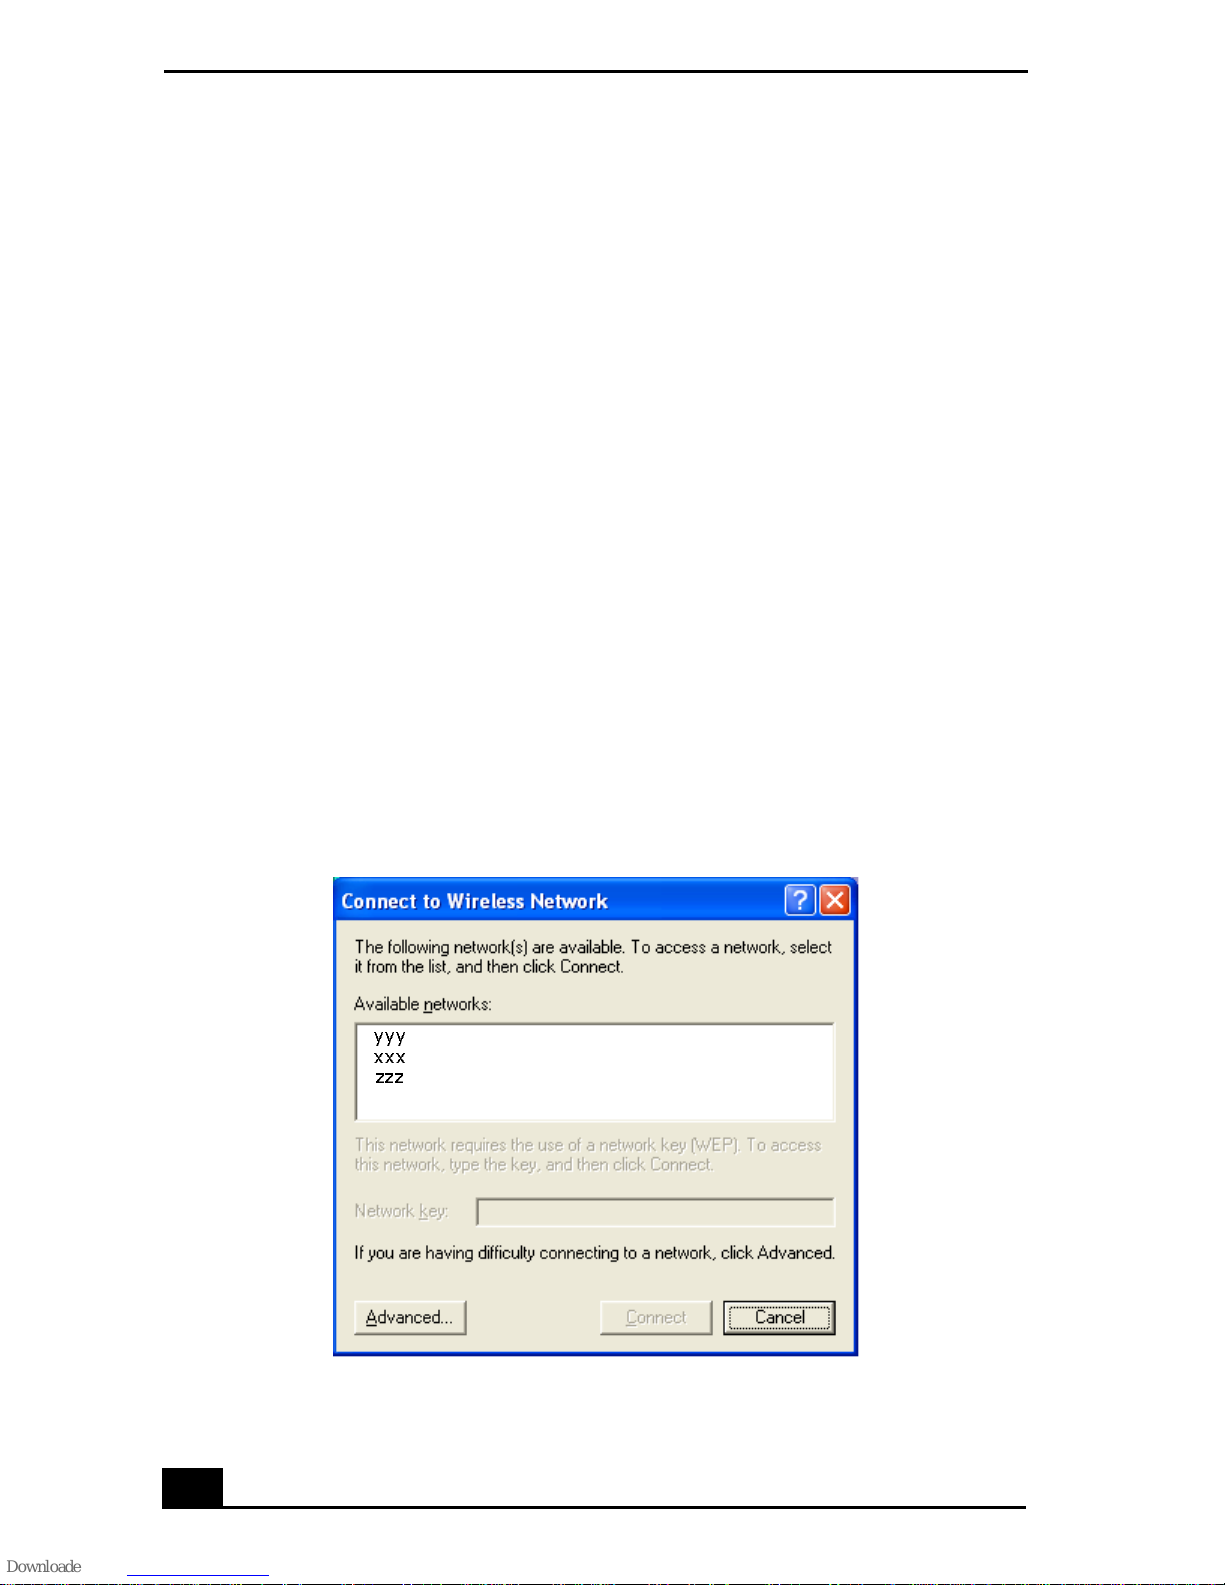
4 Double-click Wireless Network Connection. The Connect t o Wire le s s
Network dialog box appears.
Connecting to a Wire less LAN
yyy
xxx
zzz
38
Page 39
Network Connections
5 Select a network from the Available networks list box.
6 Type the network key of the available network in the Network key box . See
your network administrator for this information.
7 Click Connect.
To set up a wireless netwo rk
1 Move the Wireless LAN switc h to ON or insert a Wi reless LAN PC Card
into the PC Card slot. See “Inserting PC Cards” for more information.
The Wi reless LAN indicator lights up.
2 From the Start menu, click Control Panel, Network and Internet
Connections, and then click Network Connections.
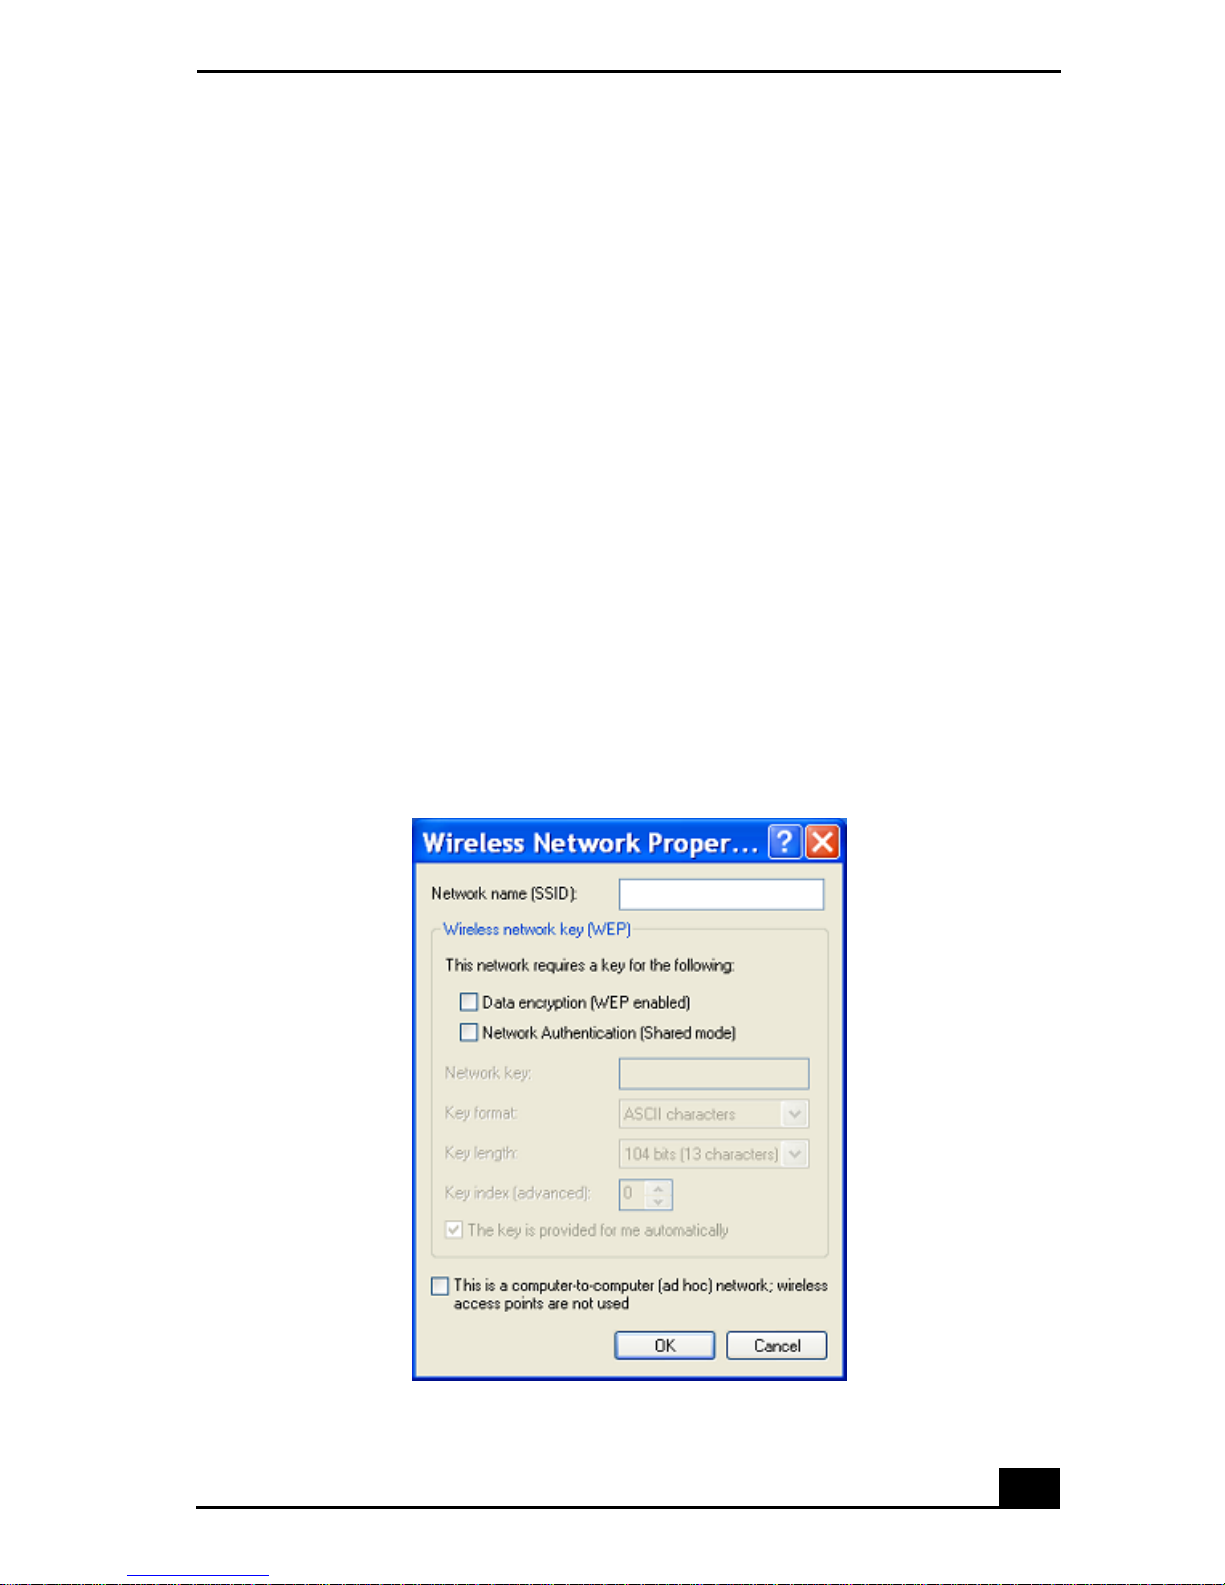
3 Right-click Wireless Network Connection, and select Properties. The
Wireless Network Connection Properties dai log box appears.
4 Click the Wireless Networks tab, and then click Add.
Setting Wireless Network Connection Properties
39
Page 40

VAIO Com pu ter Quick Sta rt
5 Type up to 32 ASCII charact ers in the Netwo rk name (SSID) box.
6 Click to select the Data encryption (WEP enabled) check box.
7 Click to select the Network Authentication (Shared mode) check box.
8 Click to ca ncel the The key is provided for me automatically check box.
9 Type between 5 and 13 ASCII charac ter s or 10 to 26 hexadecima l characte rs
in the Network key box.
10 Click OK. Your new network name appears in the Preferred networks list
box.
To set up a computer-to-computer (ad-hoc) network
1 Move the Wireless LAN switc h to ON or insert a Wireless LAN PC Card
into the PC Card slot. See “Inserting PC Cards” for more informat ion.
The Wirel ess LAN indicator turns on.
2 From the Start menu, cli ck Control Panel, Network and Internet
Connections, and then click Network Connections. The Network
Connections window appears.
3 Right-click Wireless Network Connection, and select Properties. The
Wireless Network Connection Properties dailog box a ppea r s.
4 Click the Wireless Networks tab, and then click Add.
40
Page 41
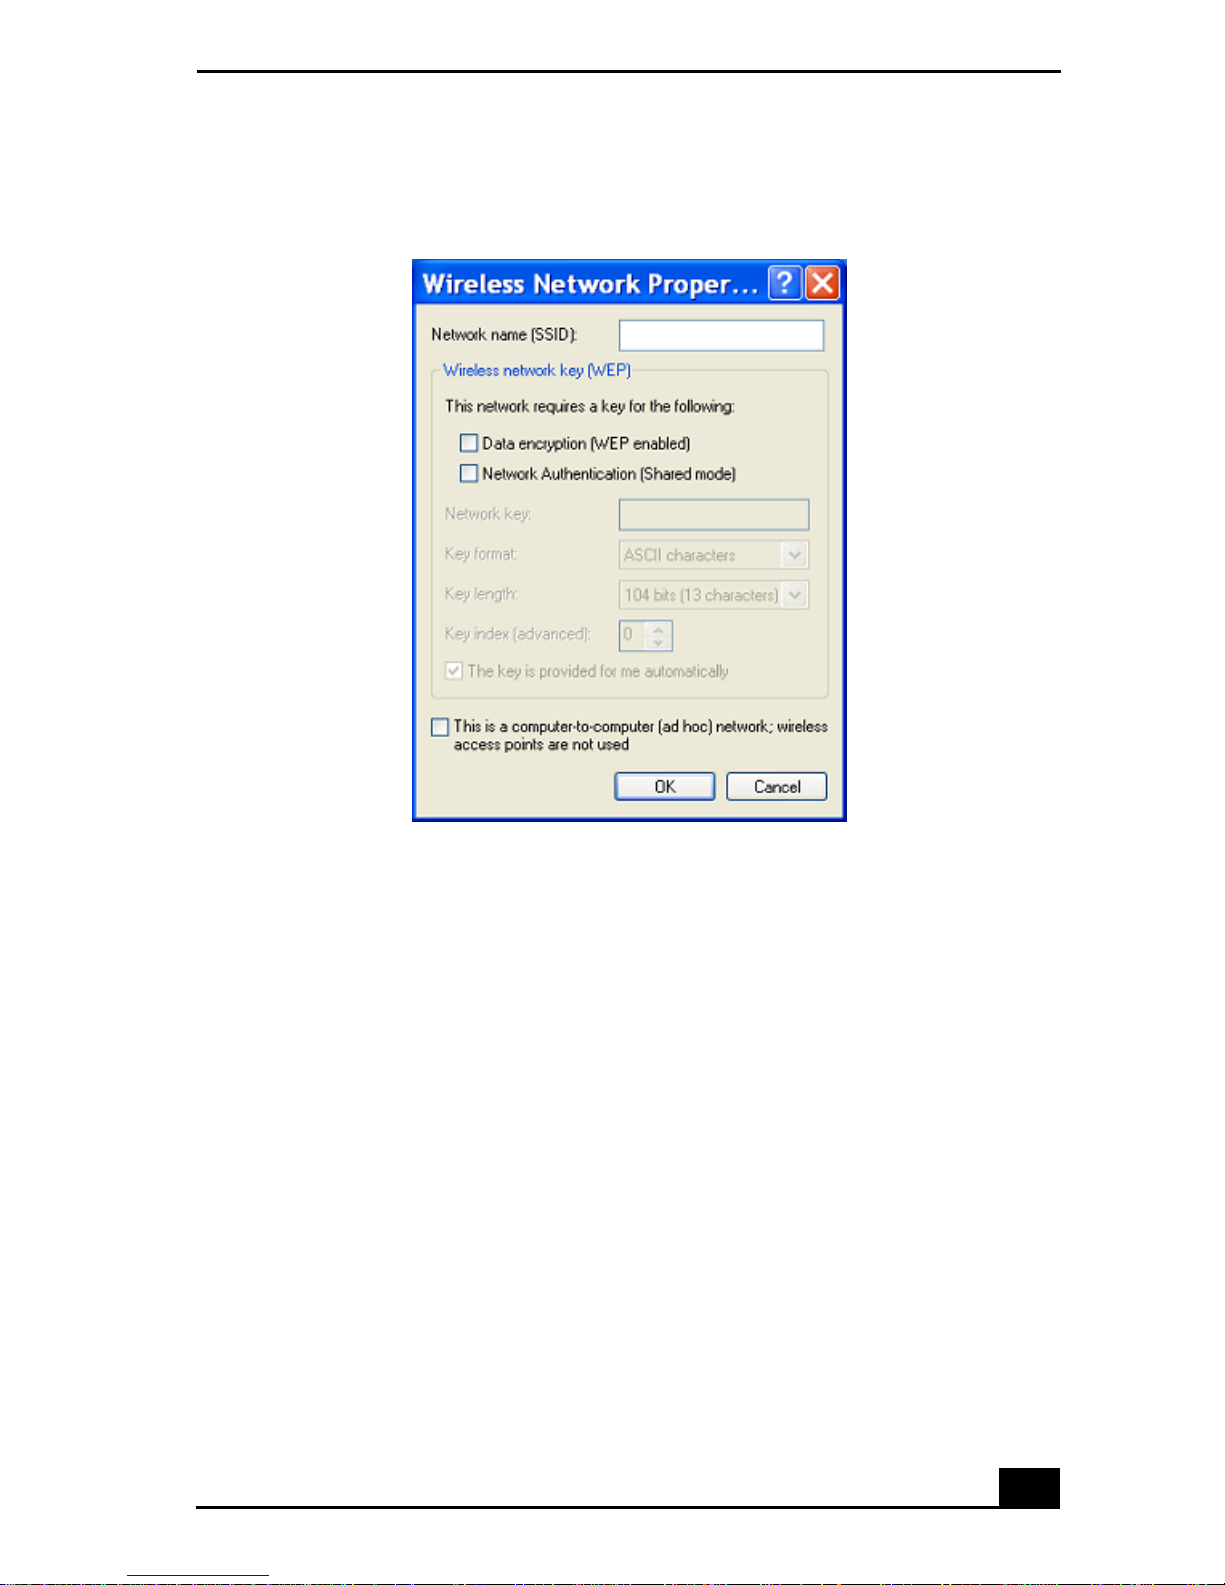
Setting Wireless Network Connection Properties
Network Connections
5 Type up to 32 ASCII characters in the Network name (SSID) box.
6 Click to s elect the Data encryption (WEP enabled) check box.
7 Click to s elect the Network Authentication (Shared mode) check box.
8 Click to cancel the The key is provided for me automatically check box.
9 Type between 5 to 13 ASCII characters or 10 to 26 hexadecimal cha r ac ters
in the Network key box.
10 Click to s elect the This is a computer-to-computer (ad-hoc) network;
wireless access points are not used check box.
11 Click OK. Your new network name appears in the Preferred networks
window. It may take a few moments for both computer systems to recognize
each other.
41
Page 42
VAIO Com pu ter Quick Sta rt
To disco nnect from a wirele ss netw ork
❑ For computers with built-in wireless LAN functionality, open the Wireless
Network Connection Status window, and click Disable. See “Checking
your network connection status. ” Move the Wireless LAN switch to OFF.
The Wirel ess LAN indicator turns off.
❑ For Wi reless LAN PC Card connections, ope n the Wireless Network
Connection Status wi ndow, and click Disable. See “Checking your network
connection status.” Follow these steps to remove the Wireless LAN PC
Card:
1 Dou bl e- click th e Safely Remove Hardware icon on the taskbar.
The Safely Remove Hardware window appears.
2 Select the appropriate device name in the Hardware devices window, if
it is n o t already selected, and click Stop. The Stop a Hardware device
window appear s.
3 Make sure the appropriate device name is sel ected, and click OK. A
message appears stating it is now safe to remove the hardware device.
4 Remove the PC Card. See “Removing PC Cards” for more information.
Turning off the wir eless LAN fu nctionalit y w hile accessing remote
documents, files, or resources may result in data loss.
Checking your network connection status
Whether you have a wireless, Ethernet, or dia l-up connection, you can che ck the
status of tha t connection by double-c licking the W ireless Network Connec tion
icon on your taskbar. The Wireless Network Connection Status window
appears.
42
Page 43
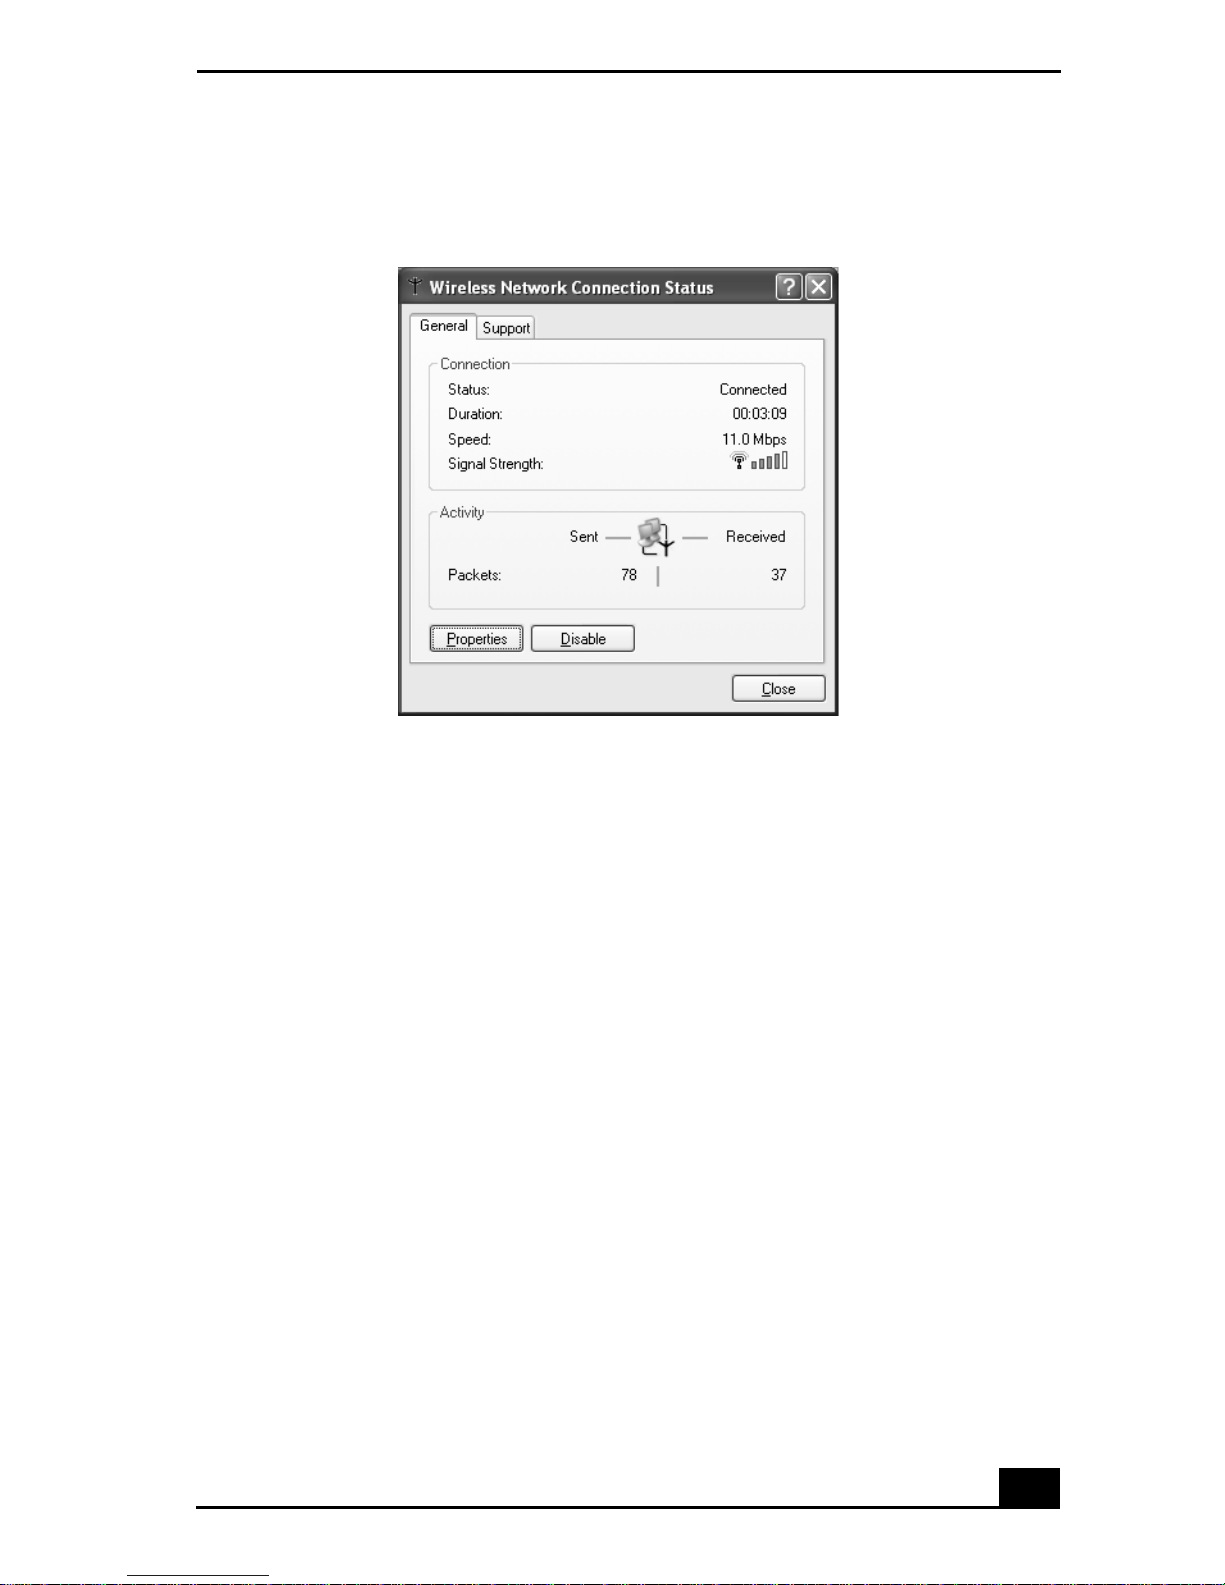
Wireless Network Connection St atus Window
Network Connections
Frequently asked questions
Why can ’t my compute r co n nect to a wire less LAN ac ce s s po i nt ?
❑ Connecti on availability is affected by distance and obstructions. You may
need to move you r computer away from obstructions or closer to a ny ac ce ss
point you may be using.
❑ Make sure th e Wire less LA N sw it ch on the computer is in the ON position
or the Wireless LAN PC Card is properly inserted.
❑ Make sure power to the access point is on.
❑ Make sure the access point is displayed in the Available networks window.
1 From the Start menu, click Control Panel, Network and Internet
Connections, and then Network Connections.
2 Right-click Wireless Network Connection, and sele ct Properties. The
Wireless Network Connection Properties dia log box appears.
43
Page 44

VAIO Com pu ter Quick Sta rt
3 Select the Wireless Networks tab, and make sure the access point is
displayed in the Available networks box. If it is not displayed, see “To
connect to an existing wireless network” for more information.
❑ Make sure the encryption key is correct.
Why can’t I access the Internet?
❑ Make sure the Wi reless LAN PC Card is properly inserted into the PC Card
slot. For more information, see “Inserting PC Cards.”
❑ Check the acce s s p oi n t s et t in gs. Ref e r to th e in s t r u ct io n s su p pl ied with th e
acce ss po i n t.
❑ Make sure your computer and the access point a re connected to one another.
❑ Move your computer away from obstructions or closer to any access point
you may be using.
❑ Make sure your computer is properly configured for Internet access.
Why is the data transfer speed slow?
❑ The wi reless LAN d ata transfer spe ed is affected by di st an ce and
obstruc tions betwee n devic es and ac cess poin ts. Other factors incl ude dev ice
configura tions, radio conditions, and software compatibility. To maximi ze
the data tr ansf er speed, move your computer away from obstructions or
closer to any access point you may be using.
❑ If you are using a wireless LAN access point, the device may be temporarily
overloaded depending on the number of other devices communicating via
the access point.
❑ If your ac ce s s po i n t in t er f er e s with o th er access po i nt s, chang e th e access
point channel. See your access point instructions for more information.
Why is the co m muni ca t ion s p ee d interru p t ed or slowed d o wn when MP E G 2
data is transferred?
The typ i ca l effective data tran s fer s p ee d v ia an ac ce s s po i n t is 4 -5 M b ps wh en
adhering to the IEEE 802.11b sta ndard. High-rate stream transfers with MPEG2
data may lower this rate.
44
Page 45

Network Connections
How do I avoid data transfer interruptions?
❑ Data transfe r interruptions may occur with large files or use of microwaves
and cordless telephones when connected to an access point.
❑ Move the computer closer to the access point.
❑ Make sure the access point connection is intact.
1 From the Start menu, click Control Panel, Network and Internet
Connections. The Network and Internet Connections window
appears.
2 Click Network Connections. The Network Connections window
appears.
3 Check the connection status.
❑ Chang e th e a cces s po i nt c hann el . Se e you r ac ce ss p oint in st ruct io ns f or mor e
information.
Can I connect to a IEEE 802.11a device?
Computers wit h built-in wireless LAN support the IEEE 802.11b standard only.
Devices con necting to a wireless LAN usin g the IEEE 802.11a stand ard ca nnot
connect to devices using the IEEE 802.11b standard.
What are channels?
Wireless LAN communication occurs on divided frequency bands known as
channels. Third-party wireless LAN access point channels may be preset to
diff ere nt channels from Sony devices.
If you are using a wireless LAN access point, refer to connectivity information
contain ed in your access point instructions.
45
Page 46

VAIO Com pu ter Quick Sta rt
Connecting Another VAIO Computer
The preinstalled Microsoft® Windows® XP operating system enables you to
connect a compatible i.LINK®
computer and another compatible computer.
❑ Connecti ng VAIO comput ers
❑ Disconnecting VAIO computers
❑ Frequently asked questions
Connecting VAIO computers
When you connect two VAIO compute rs, y ou can use one com puter t o edit, copy,
or delete files on the othe r computer. Y ou c an also pri nt from a pri nter at tache d to
eith er computer.
To connect VAIO computers
*
cable (not supplied) between your VAIO®
1 Plug one end of the i.LINK cable into the i.LINK port on each computer.
2 Click Start on the Windows® taskbar, and click Control Panel.
3 Click Network and Internet Connections, and click Set up or change
your home or small office network. The Network Setup Wizard appears.
* i.LINK is a trademark of Sony us ed to designate that a product contains an IEEE 1394
connecti on. The i.LINK connection may va ry, depending on the so ftware programs,
operating system, and compatible i.LINK devices. All products with an i.LINK connector
may not communicate with each oth er. Refer to the documentat ion that came with your
compatible i.LINK device for inform ation on operating conditions and proper connection.
Before con necting compatible i.LINK PC perip herals to your sy s tem, such as a CD-RW or
hard disk drive, confirm the ir operating system compatibi lity and required operating
conditions.
46
Page 47
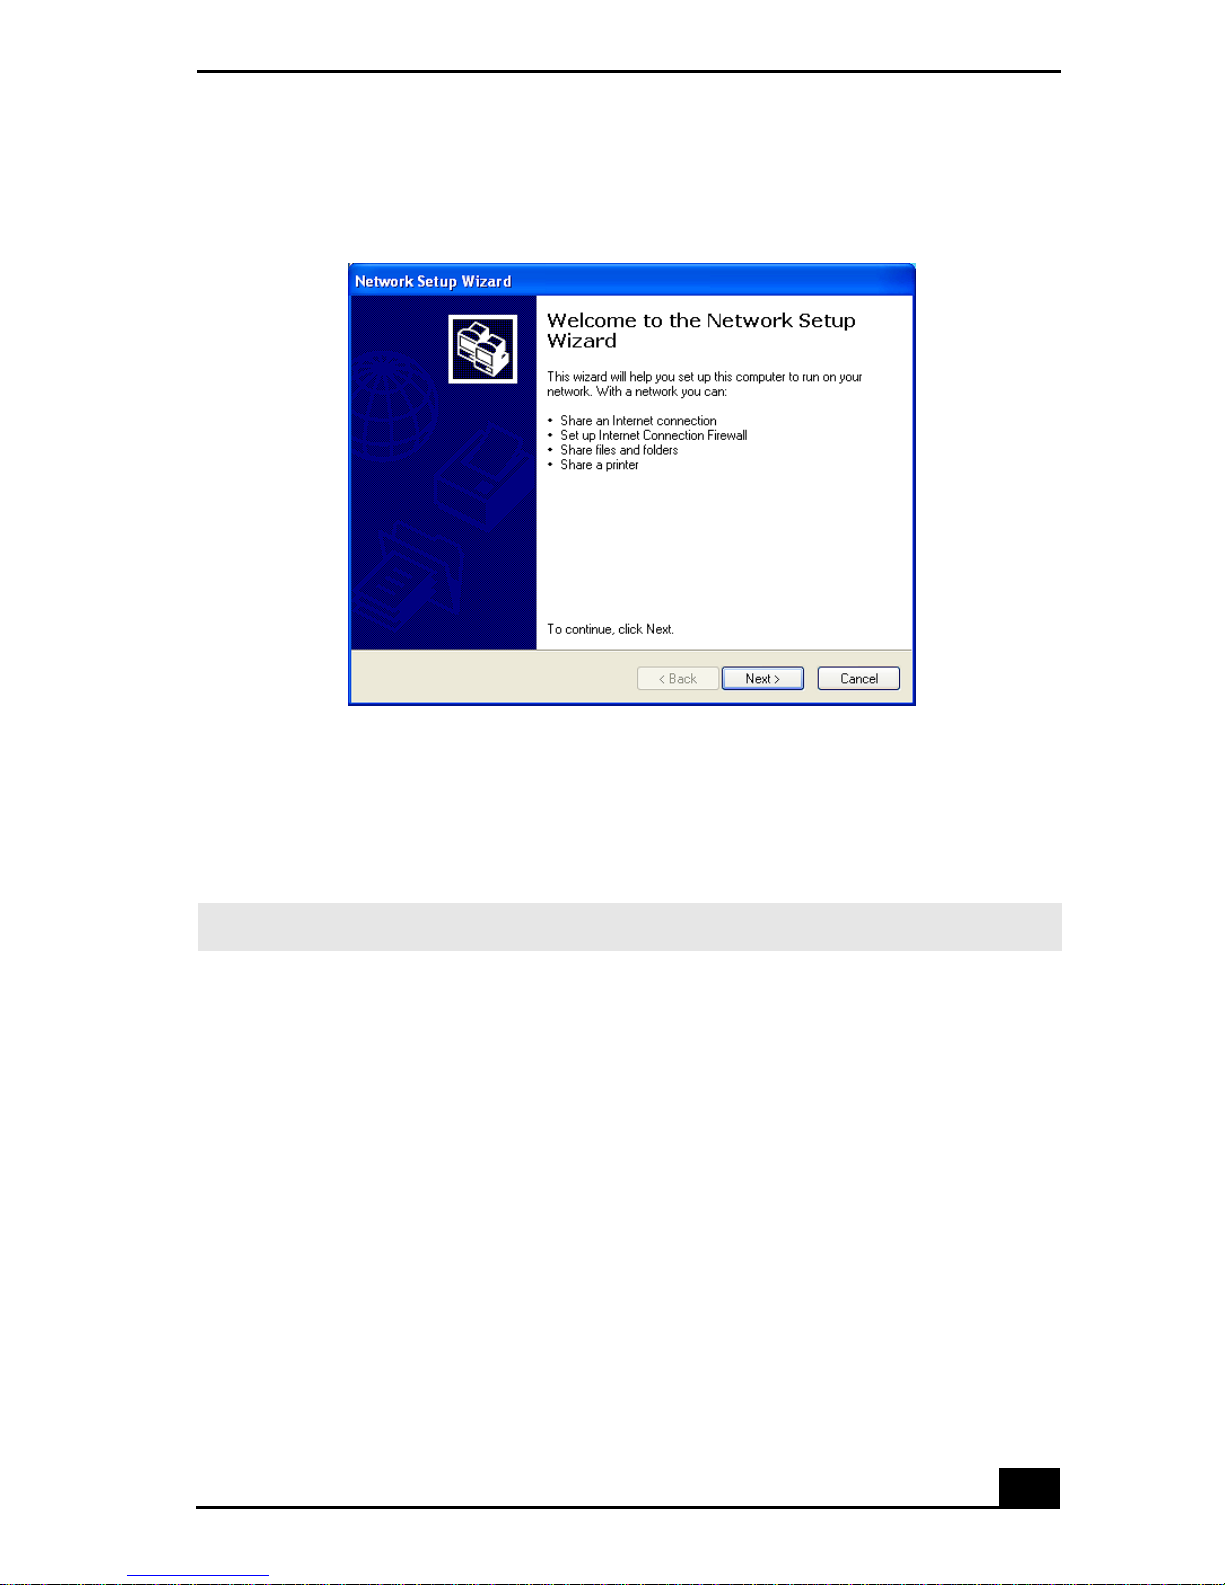
The Network Setup Wizard window
Connecting Another VAIO Com puter
4 Follow the on-scre en Network Setup Wizard instructions.
5 When you are pro mpted, ty pe in a uni que comput er name for e ach comput er.
You will use this unique name to different iate the two computers onc e they
are network ed together.
✍ The Workg roup name should remain the sam e for the two networked com puters.
6 When you finish the Network Setup Wizard on-sc r ee n in st r u ct io n s , cli ck
Start on the Windows® taskbar and click My Computer.
7 Click My Network Place s in th e Other Place s menu. The My Network
Places window appears.
8 Click View wo rkgro up computers in the Network Tasks menu. The
computers that are net worked und er t he sam e workgroup name a re dis playe d
in thi s wi n do w.
47
Page 48
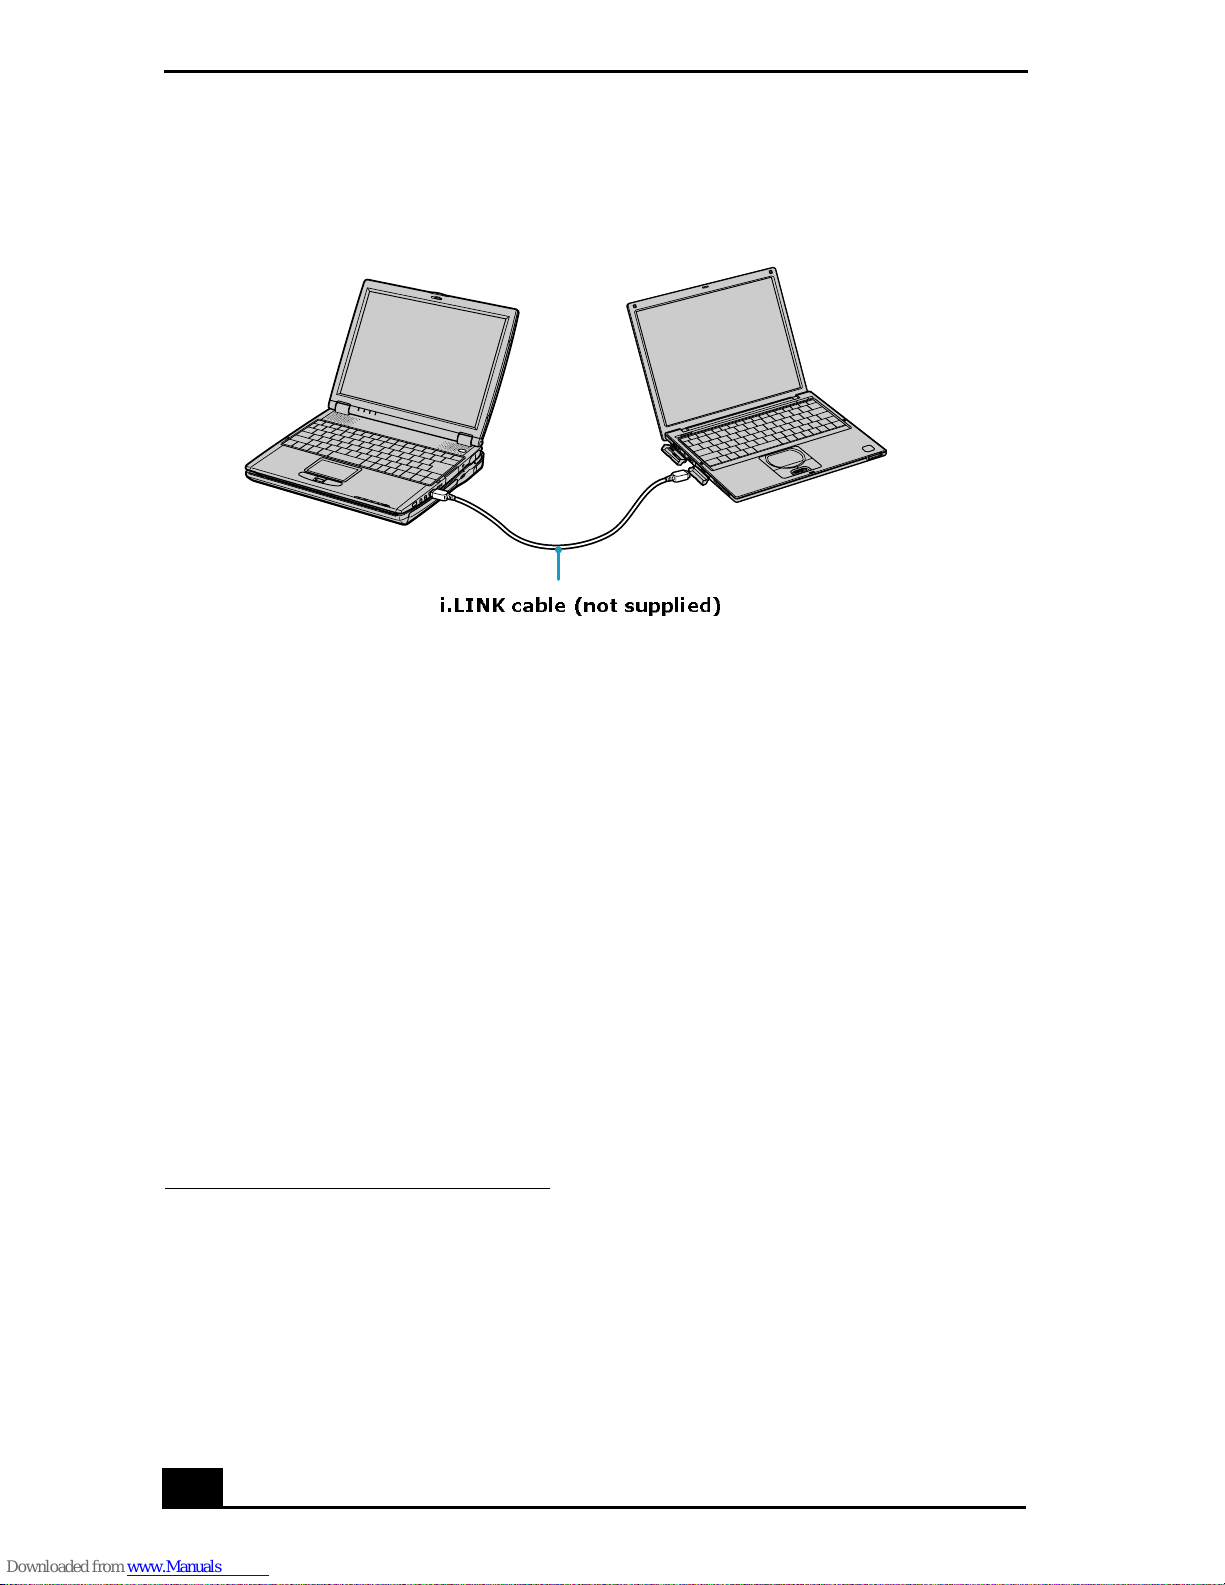
VAIO Com pu ter Quick Sta rt
Connecting Anothe r Computer
i.LINK cable (not supplied)
* This graphic is for illustration purposes only and may not resemble the unit you purchased.
*
Disconnecting VAIO computers
You can disconnect two VAIO® computers when the computer s ar e on or off.
To disconnect VAIO computers when the computers are on
1 Close all open files that are shared with the connected computers.
*
2 Unplug the i. LINK®
cable from the i.LINK port on each computer.
To disconnect VAIO co mputer when the computers are off
❑ Unplug the i. LINK cable from the i.LINK port on each comput er.
* i.LINK is a trademark of Sony us ed only to designat e that a product contains an IEEE 139 4
connection. The i.LINK connection may vary, depending on the software applications,
operating system, and compatible i.LINK devices. All products with an i.LINK connection
may not communicate with each oth er. Refer to the documentat ion that came with your
compatible i.LINK device fo r information on operating conditions and proper connection .
Before con necting compatible i.LINK PC perip herals to your sy s tem, such as CD-RW or
hard disk drive, confirm the ir operating system compatibi lity and required operating
conditions.
48
Page 49

Connecting Another VAIO Com puter
Frequently asked questions
Why can ’t I esta b li s h a co n nection b et ween two VAIO com puters?
❑ Your computer may not re cogniz e an i. LINK
*
connec tion if the i.LI NK cabl e
is not plugged securely into the i.LINK ports. Disconnect the i.LINK cable
and securely rec onnect it to both computers . If neither computer responds
after a few moments, restart both computers .
❑ If the computers do not recognize the i.LINK connection after resuming
from a power saving mode (Standby or Hibernate), restart both computers.
For more information, see “Connecting VAIO computers. ”
* i.LI N K is a trademark of Sony us ed only to designat e that a product contains an IEEE 1394
connection. The i.LINK connection may var y, depending on the soft w are applications,
operating system, and compatible i.LINK devices. All products with an i.LINK connection
may not commun icate with each other. Refer to the documentation t hat came with your
compatible i.LINK device fo r information on operating co nditions and proper connection.
Before connecting compatibl e i.LINK PC peripheral s to your system, such as CD-RW or
hard disk drive, confirm their operating system compatibility and required operating
conditions.
49
Page 50

VAIO Com pu ter Quick Sta rt
50
Page 51

CDs, DVDs, and Optical Drives
❑ Inserting and Ejecting CDs or DVDs
❑ Copying and Playing CDs
❑ Playing DVDs
51
Page 52
VAIO Com pu ter Quick Sta rt
Inserting and Ejecting CDs or DVDs
✍ Avoid using adhesive labels to identify your CDs or DVDs. Adhesive labels may
damage the optical drive if the y c ome off w hile the di sc is in the drive.
To insert a CD or DVD
1 Turn on the computer or exit a power saving mode (Standby or Hibernate) if
one is active. For more information, see “Using power saving modes.”
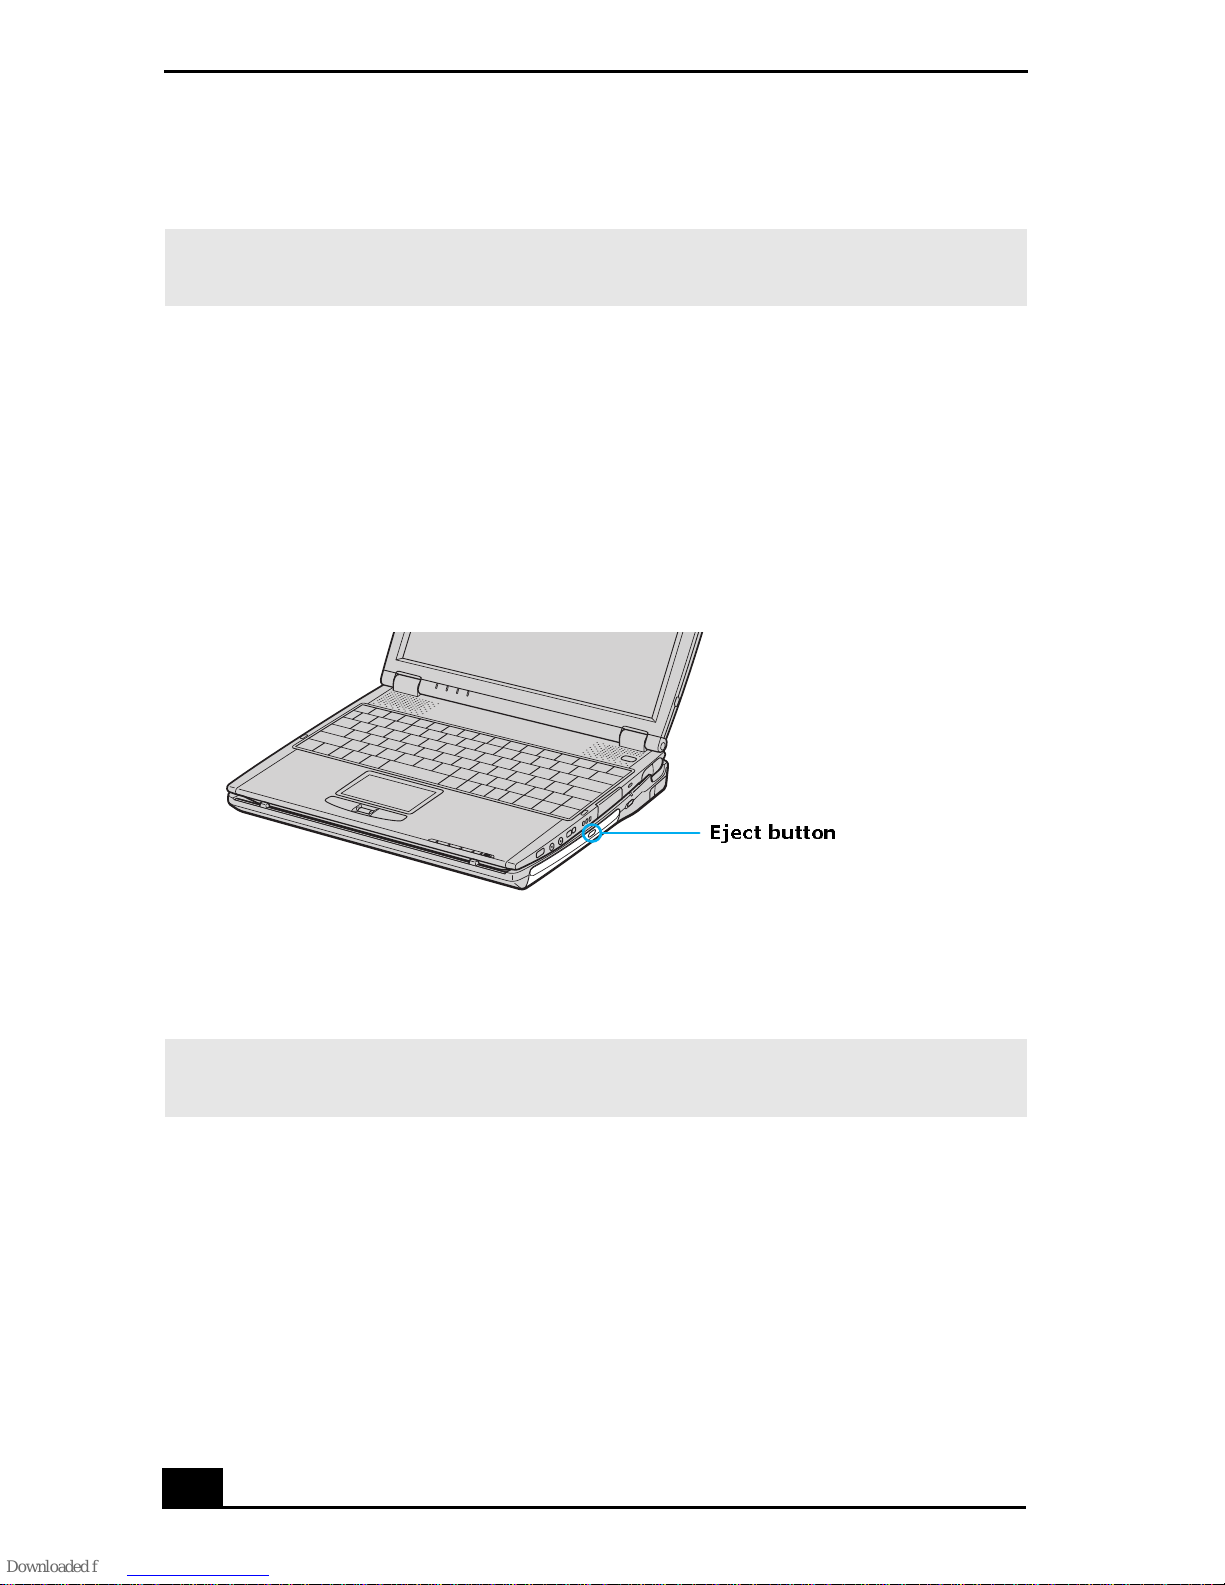
2 Press the Eject button on the opti ca l drive cover to open the drive tray. The
drive tray slides out.
Ejecting the Drive Tray
Eject button
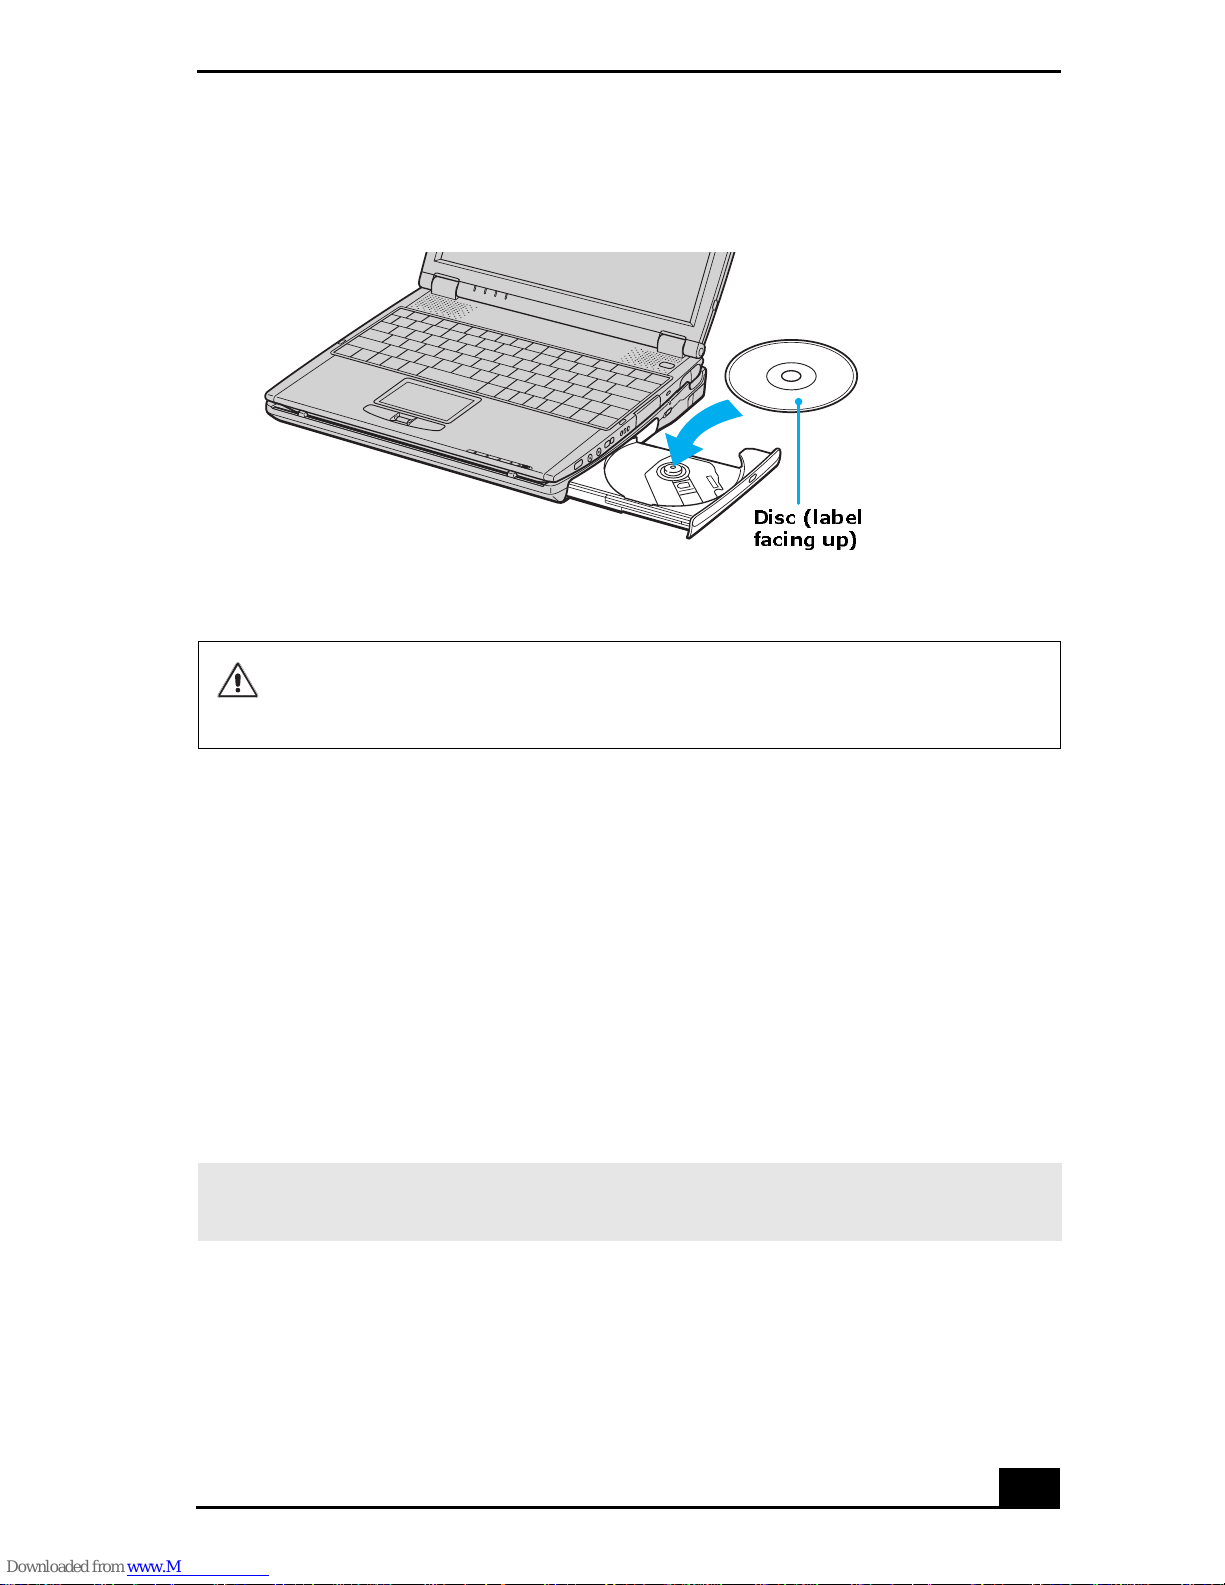
3 Place a disc on the drive tray with the la bel facing up.
✍ You can play some DVDs on both sides. Insert this type of DVD with the side you
want to play facing up.
52
Page 53
Inserting and Ejecting CDs or DVDs
Inserting a Disc
Disc (label
facing up)
4 Press the disc onto the hub until the disc clicks securely into place.
If you do not seat the disc firmly over the hub, the disc may come loose
while it is in the drive. A loose disc may damage the optical drive and
make opening the drive tray difficult.
5 Push the dr ive tray gently to close it. The Busy indicator on the drive blinks
while your computer is reading data from the dri ve.
To eject a C D or D VD
1 Turn on the compu ter or exit a power saving mode (Standby or Hibernate) if
one is active. For more information, see “Using power saving modes.”
2 Close all prog rams that a re open from the opt ical drive, and wait fo r the LED
indicator to turn off.
3 Press th e Ej ect button on the optical drive cover to open the dr ive tray. The
drive tray s lides out.
✍ If the Eject button does not work, turn off the computer and insert a thin, straight
object (such as a paper clip) into the manual eject hole next to the Eject button.
4 Lift the disc from the drive.
5 Push the drive tray gently to close it.
53
Page 54

VAIO Com pu ter Quick Sta rt
Copying and Playing CDs
Your optical drive can read CDs and DVDs. The type of opti ca l drive inst alled in
or connec ted to your com puter m ay var y, depen ding on t he model you pu rchased.
If you are using a CD-RW/DVD Combo Drive, you can write data to CD-R s a nd
CD-RWs.
❑ Playing CDs
❑ Copying files to a CD-RW or CD-R
Playing CDs
Before you play an audio CD, you may need to enable your computer’s audio
feature.
To enable th e audio feature
1 Click Start on the Windows ® taskbar, c lick Control Panel, Performance
and Maintenance, and System. The System Prop erties window appears.
2 Select the Hardware tab, and click Device Manager in th e Device
Manager box. A window with a lis ting of the computer’s hardware devices
appears.
3 Double-click DVD/CD-ROM drives.
4 Dou bl e-click the list ed dri v e na m e , an d se le ct the Properties tab.
5 Click to select the Enable digital CD audi o for this CD-ROM device
check box if it is not already selected.
6 Click OK.
To adjust the volume for playing CDs and DVDs
Some programs have built-in volume cont rols, which you can adjust. If there are
no volume controls, then you can adjust the volume of your computer’s built-in
speakers by doing one of the following:
❑ Using the Function keys. An on-screen display may appear, notifying you
when a ch ange occurs.
❑ To increase volum e, press Fn+F4, then or .
❑ To decrease volume, press Fn+F4, then or .
54
Page 55

Copying and Playing CDs
❑ Using the Volume icon.
1 Double click the Volume icon on the Windows® taskbar. The
Volume Control dialog box ap pears.
2 In the Vo lume Control and AC Audio columns, move the Volume
sliders up to increase the volume and down to decrease the volume.
To play an audio CD
1 Insert th e disc into the optical dri ve. See “To insert a CD or DVD.”
2 Select an option in the Audio CD window.
3 Click OK.
Copying files to a CD-RW or CD-R
*
Before you writ e dat a to a CD-RW or CD-R, read the f ollowing notes to avoid a
computer malfunction and ensure the best writing results:
❑ Deactivate the screen saver and exit anti-virus software.
❑ Deactivate memory-resident disc utilities to avoid data loss.
❑ Turn off the FindFast application if your computer has preinstalled
Microsoft® Office applications, such as E xcel, W ord, and Outlook.
❑ Connect and use the AC adapter to power your computer.
❑ Use CD-Rs that are co mpatible with 16x speed.
❑ Insert th e dis c into the optical drive, and open the preinstalled Sony
SonicStage™ software by clicking Start, All Programs, and then
SonicStage.
❑ For instructions on how to use SonicStage software, follow these steps:
1 Click Start, and then Help and Support.
2 Click VAIO Mul timedia, an d then VAIO AV Applications.
3 Click SonicStage Software.
❑ Once you finish copying files to a CD-R that is readable in a CD-ROM
drive, click Finish to complete the writing process before you eject the disc
from the optical drive.
* For computer models equipped with a CD-RW/DVD Combo Drive.
55
Page 56
VAIO Com pu ter Quick Sta rt
Do not strike or shake the computer while writing data to a disc.
56
Page 57

Playing DVDs
Playing DVDs
You can play DVDs in your computer’s optical drive and view the video on the
computer sc ree n. The type of optical drive installed in or connec ted to your
computer may vary, depending on the model you purchased.
❑ Watching DVDs on your computer
❑ Frequently asked questions
Watching DVDs on your computer
Your computer is equipped with a CD-RW/DVD Combo (optical) drive, which
enables you to watch most DVDs on your computer.
To play a DVD whil e conn ected to the AC adapter
1 Close all open programs.
2 Insert the DVD into the CD-RW/DVD Combo drive.
3 Select a preinstalled DVD program in which to play the DVD. The
preinstalled DVD program launches the video autom atically. See “Program
overview” for a description of your preinstalled DVD software. For detailed
instructions on how to use the preinstalled DVD software, see t he help gui de
included with the DVD software.
To play a DVD whil e u si n g b attery power
1 Set the power management profile to DVD.
1 Close all open programs.
2 Righ t- c li ck the CPU icon on the Windows® taskbar.
3 Select Profiles from the shortcu t menu, and then select DVD from the
submenu. You can also select Automatic Profile Selection, which sets
the power management profi le to DVD whenever a DVD is ins erted into
the optical drive. See “Conserving Battery Power” for more
information.
2 Restart the computer by pressing Ctrl+Alt+Delete, and then select ing
Restart from the Shut Down menu of the Windows Task Manager dialog
box.
57
Page 58
VAIO Com pu ter Quick Sta rt
3 Insert the DVD into the CD-RW/DVD Combo Drive.
4 Select a preinstalled DVD program in which to play the DVD. The
preinstal led DVD program launches the video automat ically. See “Program
overview” for a de sc ription of your preinstalled DVD program. For detailed
instructi ons on how to use the prei nstal led DVD program, see the hel p guide
included with the DVD program.
Some discs recorded at 20 or 24 bits may produ ce noise while pl aying. If
you have audio devices connec ted, this may damage your hearing and the
speakers. Reduce the volume before playing a DVD.
Do not switch the power saving modes while you are pla yi ng the DVD.
Do not use memory-resident utility software to speed up disc access. This
may cause the computer to malfunction.
Frequently asked questions
How do I maintain CDs and DVDs?
❑ Avoid touching the surface of the disc with your f ingers. Fingerprints and
dust on the surface of the disc may cause reading errors.
❑ To clean the disc, hold the edge of the disc, and use a soft cloth to wipe the
surface from the center out. If the disc is badl y so iled, moisten a soft cloth
with water, wring it out well, and use it to wipe the surface of the disc from
the center out. Wipe of f any remaining moisture with a dry, soft cloth.
❑ Do not clean the dis c with solvents (such as benzine, thinne r, commerc ially
available cleaners, or anti-static spray), which may damage the disc.
❑ Do not drop or bend the disc.
Why doe s my comput er freeze w hen I try to read a disc?
The disc your comput er is trying to read may be dirty or damaged. Restart the
computer, and eject the dis c from the optical drive. Examine the disc for dirt or
damage. If the dis c is dirty, see “How do I maintain CDs and DVDs?” for
inst r u ct io n s on h ow to cl ean it.
Why won’t the drive tr ay open?
❑ Make sure the computer is on.
58
Page 59

Playing DVDs
❑ Press the Eject butt on on the optical dr ive.
❑ If the Eject button does not work, cl ick Start on the Windows ® taskbar, and
click My Computer. Right click DVD /CD-RW Drive, and select Eject
from the shortcut menu.
❑ If none of the above options work, insert a thin, straight object (such as a
paper clip) in the manual eject hole to the right of the Eject button.
Why isn’t the optical drive playing my CD or DVD properly?
❑ Make sure the CD or DVD was inserted into the drive with the label facing
up.
❑ Make sure the necessary software program(s) is ins talled according to the
manufacturer’s instructions.
❑ If the CD or DVD is dirty or damaged, the co mpu ter will stop responding.
Follow these steps:
1 Restart the computer by pressing Ctrl+Alt+Delete, and selec ting
Restart from the Shut Down menu of the Windows Task Manger
dialog box.
2 Remove the CD or DVD from the optical drive.
3 Check the dis c for dirt or damage. If you need to clean the dis c, se e
“How do I maintain CDs and DVDs?” for inst ructions.
❑ If you are playing a CD or DVD and cannot hear sound, follow these steps:
❑ Doub l e- click th e Volume icon on the Windows tas kbar, and click
to canc el th e Volume Control and CD Audio Mute check boxes .
❑ Check the volume setting in the audio mixer.
❑ If you are usin g exte rnal speakers, che ck the volume settings on the
speakers and the connections betwe en the speakers and the computer.
❑ Make su r e the CD audi o feature is enabled an d the corr ect driver
software is installed. Fo llow these steps:
1 Click Start on the Windows ® taskbar, and click Control Panel,
Performance and Maintenance, and System. The System Proper t ie s
window appears.
2 Sele ct the Hardware tab, and th en cl ick Device Manager. The Device
Manager window appears .
59
Page 60

VAIO Com pu ter Quick Sta rt
3 Dou bl e- c li ck the list ed DVD/CD-ROM dr i ve. Th e Properties window
appears.
4 Click the Properties tab, and click to select the Enable digital CD
audio for this CD-ROM device check box, if it is not selected.
5 Select the Dr iver tab, and click Driver Details to confir m th e driver
software.
❑ Make sure an adhesive label was not attach ed to the CD or DVD. Adhesive
labels can come off while the disc is in the o ptical driv e and damage the
drive or cause it to malfunction.
❑ If a region code warning appears, the disc may be incompatible with the
optical drive. Check the DVD package to make sure the region code is
compatible with the optical driv e.
❑ If you notice condensation on the computer, do not use the compu ter for at
least one hour. Condensation can cause the computer to malfunction.
Why did the computer screen (LCD) go blank?
❑ Your LCD screen may go bla nk i f the c omput er has l ost powe r or has ent ered
a power saving mode (St andby or Hibernate). If the computer is in LCD
(V ide o) S tandb y mode , pr ess a ny key to activ ate t he LC D screen . See “Usin g
power saving modes ” for more information.
❑ Make sure the computer is plug ged into a power sourc e and is on. T he power
indicat or on the computer will be on if the computer is on.
❑ If your computer is usi ng battery power , make sure the battery is inserted
properly and i s charged. See “Using the Ba ttery” for more information.
❑ If the display mode is set to external display, use the Fn+F7 key
combination. See “Selecting a display mode” for more informati on.
Why don’t my changes appear on the computer sc reen (LCD)?
You may need to refresh the computer screen. Pr ess the Windo ws key and
press D twice.
60
Page 61

Printer Connect ions
❑ Printi ng With Your Computer
61
Page 62

VAIO Com pu ter Quick Sta rt
Printing With Your Computer
You can connect a universal serial bus (USB) printer or a parallel port printe r to
your computer. To pri nt properly, the printer you connect must be compatible
with the Microsoft® Windows ® operating system ins talled on your computer.
❑ Connecting a printer
❑ Disconnecting a printer
❑ Frequently asked questions
Connecting a printer
Your computer is compatib le with many popula r print ers. In many cases , you can
simply connect the printer to the computer and begin printing. Some printers
require separate driver software insta llation. See the instructions that
accompanied your printer for more information. If you cannot print once you
have connected your computer to your pri nter, see “Frequently asked questions”
in this section for more information.
To conne ct a USB pr i nter
1 Locat e a U S B p o rt on the com pu t er an d th e pri n ter.
2 Plug the USB cable into the USB port on your computer .
3 Plug the other e nd of the USB cable into the USB port on the printer.
62
Page 63
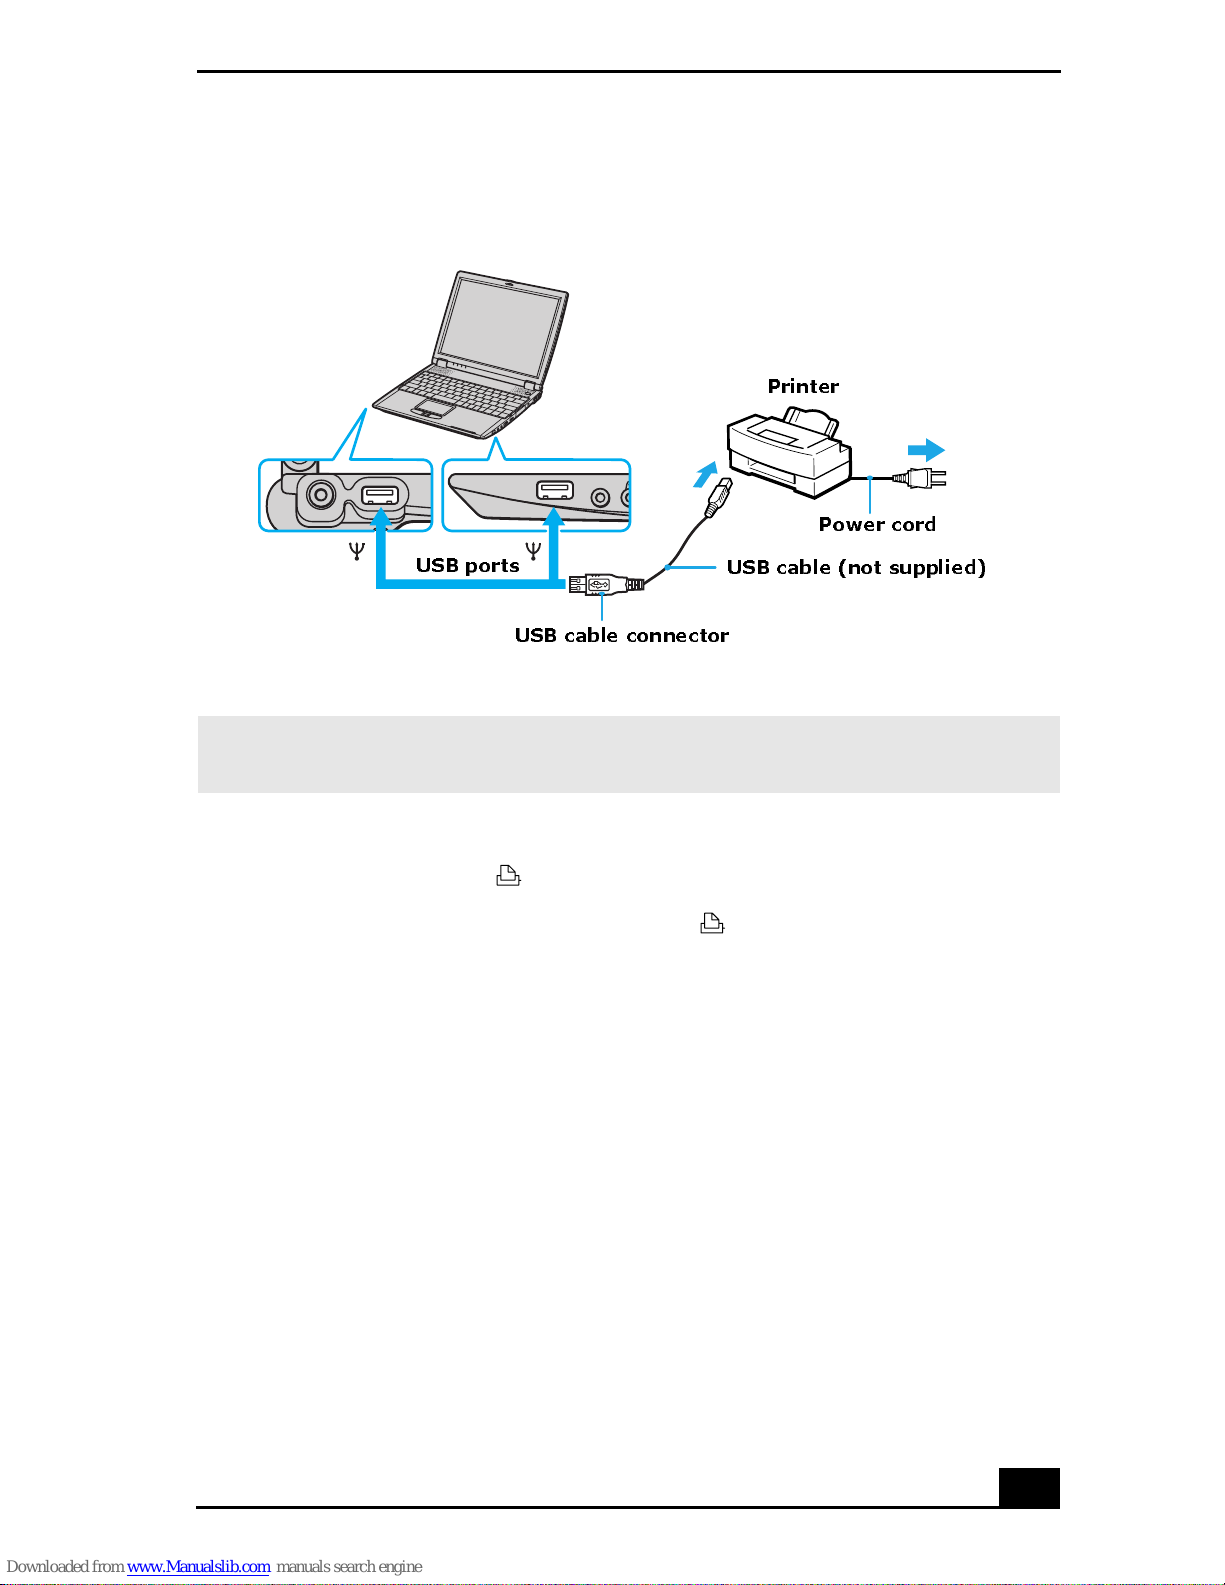
Connect ing a USB Printer Cable
Printing With Your Com puter
Printer
Power cord
USB ports
USB cable connector
.
USB cable (not supplied)
✍ See the guide that came with the USB printer for more information on its installation
and use.
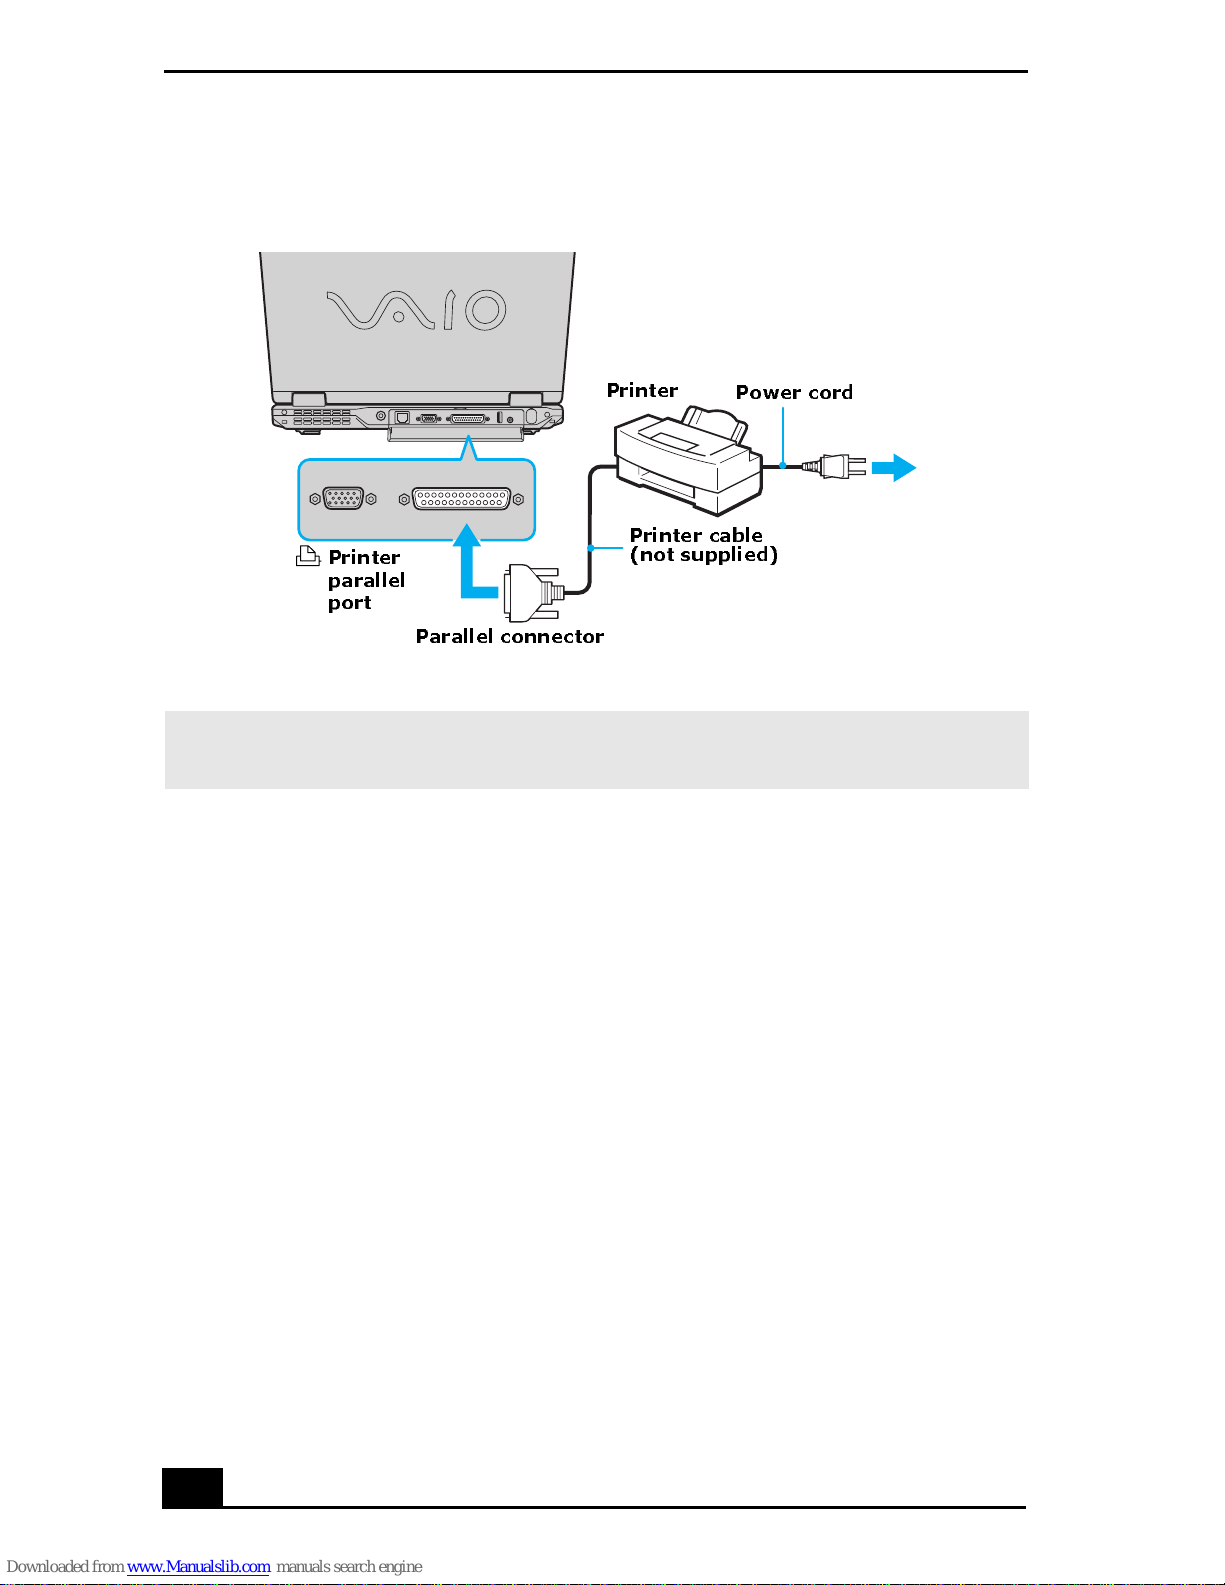
To connect a parallel port printer
1 Locate the Printer port on your computer.
2 Plug the printer cable into the Printer port on your computer
3 Plug the other end of the printer cable into the port on the printer.
63
Page 64
VAIO Com pu ter Quick Sta rt
Connecting a Parallel Port Printer
Printer
Printer cable
Printer
parallel
port
Parallel connector
(not supplied)
Power cord
✍ See the guide that came with the parallel port printer for more information on its
insta lla tion and use .
Disconnecting a printer
You can disconnect the printer ca ble when the computer is on or off.
Disconnecting the printer cable while the computer is in a power saving mode
(Standby or Hibernate) may cause the comuter to malfunction.
To disconnect the printer cable
❑ Unplug the printer cable from the USB or Printer port on the co mpu ter.
Frequently asked questions
Why can’t I print a document ?
❑ Make sure the printe r is on, an d the print er cable is secur ely conne cted t o the
ports on your printer and computer. See “Connecting a printer” for more
information.
❑ Make sure the printer is compatible with the Microsoft® Windows®
operating system installed on your co mputer .
64
Page 65

Printing With Your Com puter
❑ You may need to insta ll th e pri nter dr ive r soft ware bef ore you us e th e print er.
See the instructions tha t came with your printer for information about
installing these dr ivers.
❑ If the printer is not functioning after the computer resumes from a power
saving mode (Standby or Hibernate), reset the printer connection.
1 Click Start, and click Control Panel.
2 Click Printers and Other Hardware, and click Printers and Faxes.
3 Right-cl ick t he printe r i con th at is not func ti oning, a nd se lect Properties
to open the Properties window.
4 Click OK.
❑ Change the default printer port setting, although this setting is generally
correct for most printers.
1 Click Start, and click Control Panel.
2 Click Performance and Maintenance, and click System. The System
Properties dialog box appears.
3 Sele ct the Hardware tab, and click Device Manager. The Device
Manager window appears .
4 Double-click Port s (C OM&LPT), and doubl e-cli ck ECP Printer Port
(LPT1).
5 Sele ct the Port Settings tab, and select a different LPT Port Number.
❑ You may need to enable the computer’s printer settings.
1 Click Start, and point to All Programs, Sony Notebook Setup, and
click Sony Notebook Setup again.
2 Click the Device tab.
3 In the left panel, make sure the Printer Port check box is se lected, and
click Setting.
4 In the Printer port mode box, click the ECP option.
5 Click OK.
65
Page 66

VAIO Com pu ter Quick Sta rt
66
Page 67

Computer Features
❑ Using the Keyboard
❑ Using the Touch Pad
❑ Using the Jog Dia l Control
❑ Using Memory Stick Media
❑ Changing the Window Design of Sony Programs
67
Page 68
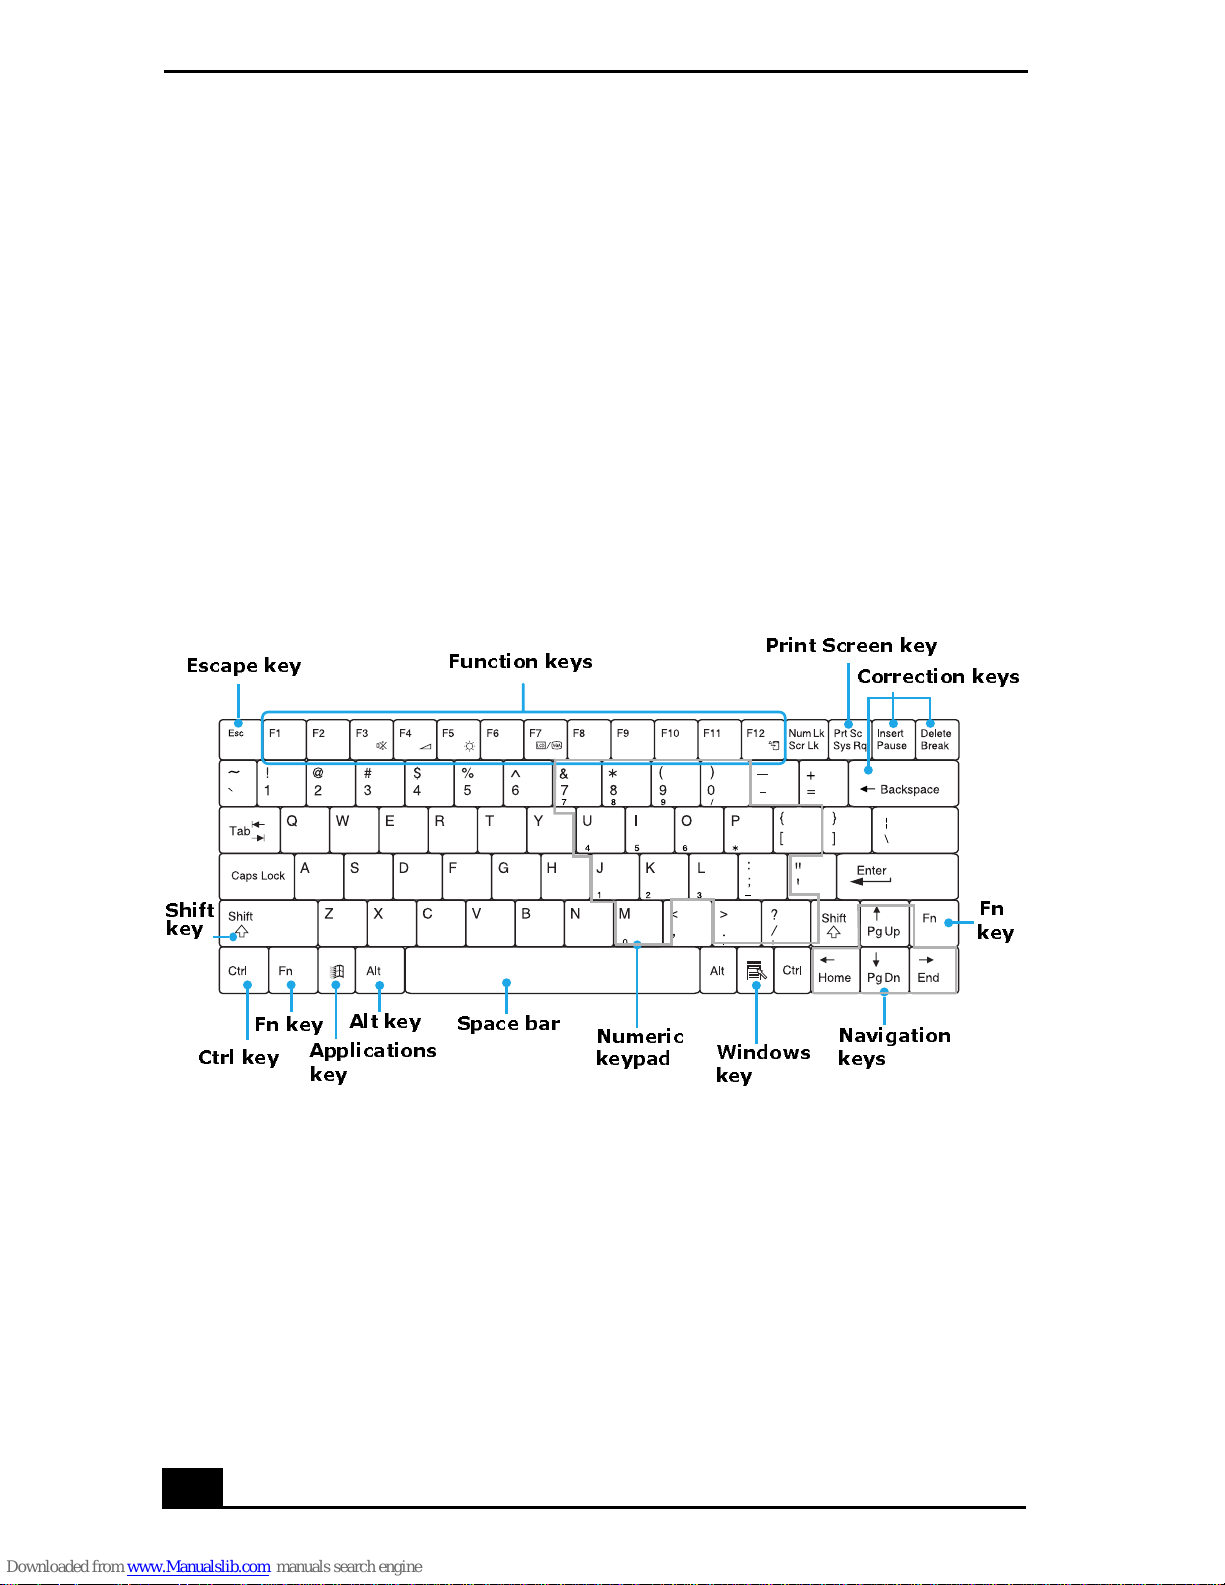
VAIO Com pu ter Quick Sta rt
Using the Keyboard
Your keyboard is very similar to a typewriter’s, but your computer keyboard has
additional keys that perform specific computer -related tasks.
❑ Key locations and descriptions
❑ Combinations and functions wit h the Windows key
❑ Indicators
❑ Combinat ions and functions wit h the Fn key
Key locations and descriptions
Keyboard
Escape key
Shift
key
Ctrl key
Fn key
Applications
key
Alt key
Function keys
Space bar
Numeric
keypad
Print Screen key
Windows
key
Correction keys
Fn
key
Navigation
keys
68
Page 69

Using the Keyboard
Key Description
Numeric keypad Contains the keys foun d o n a typical calculator. Use the
numeric keypad area to type numbers or to perform
mathematical calculations such as additi on and s ubtraction.
Numbers appear on the front beveled edge of the numeric
keys. Press the Num Lock key t o activat e the numeric
keypad. (When you do so, the Num Lock indi cator ligh ts up.)
Press the Num Lock key again to deactivat e the numeric
keypad.
Arrow keys The Left, Right, Up, and Down arrow keys move the pointer
on the scree n and al so function as the Home, End, Page Up,
and Page Down keys, res pec tively.
Correcti on keys The Insert, Bac k Sp ace, and Delete keys enable you to make
corrections in your documents.
Function keys The 12 function keys along the top of the keyboard are used
to perform designate d tas ks. For example , in many programs,
F1 is the Help key. The task as sociated with each functio n
key may vary from one program to the next.
Escape key The Esc (Escape) key is used to cancel commands.
Print Scre en key The Print Screen key takes an electronic snapshot of the
screen and moves it to the Clipboard. You can then paste the
screen shot into a document and print it.
Operator keys
(Shift, Ctrl, Alt
keys)
Several keys ar e al ways use d with at leas t one o ther ke y: C trl,
Alt, and Shift. When held down with another key, the Ctrl
(Control) and Alt (Alternate) keys of fer another way to give
commands. For example, in many programs, instead of
choosing the Save command from a menu, you can hold
down Ctrl and press S (referred to as Ctrl+S). The Shift key
oper at es th e same wa y as on a typ e w r it er ; it is u s ed to
produce capital letters or special symbols such as @ and $.
69
Page 70
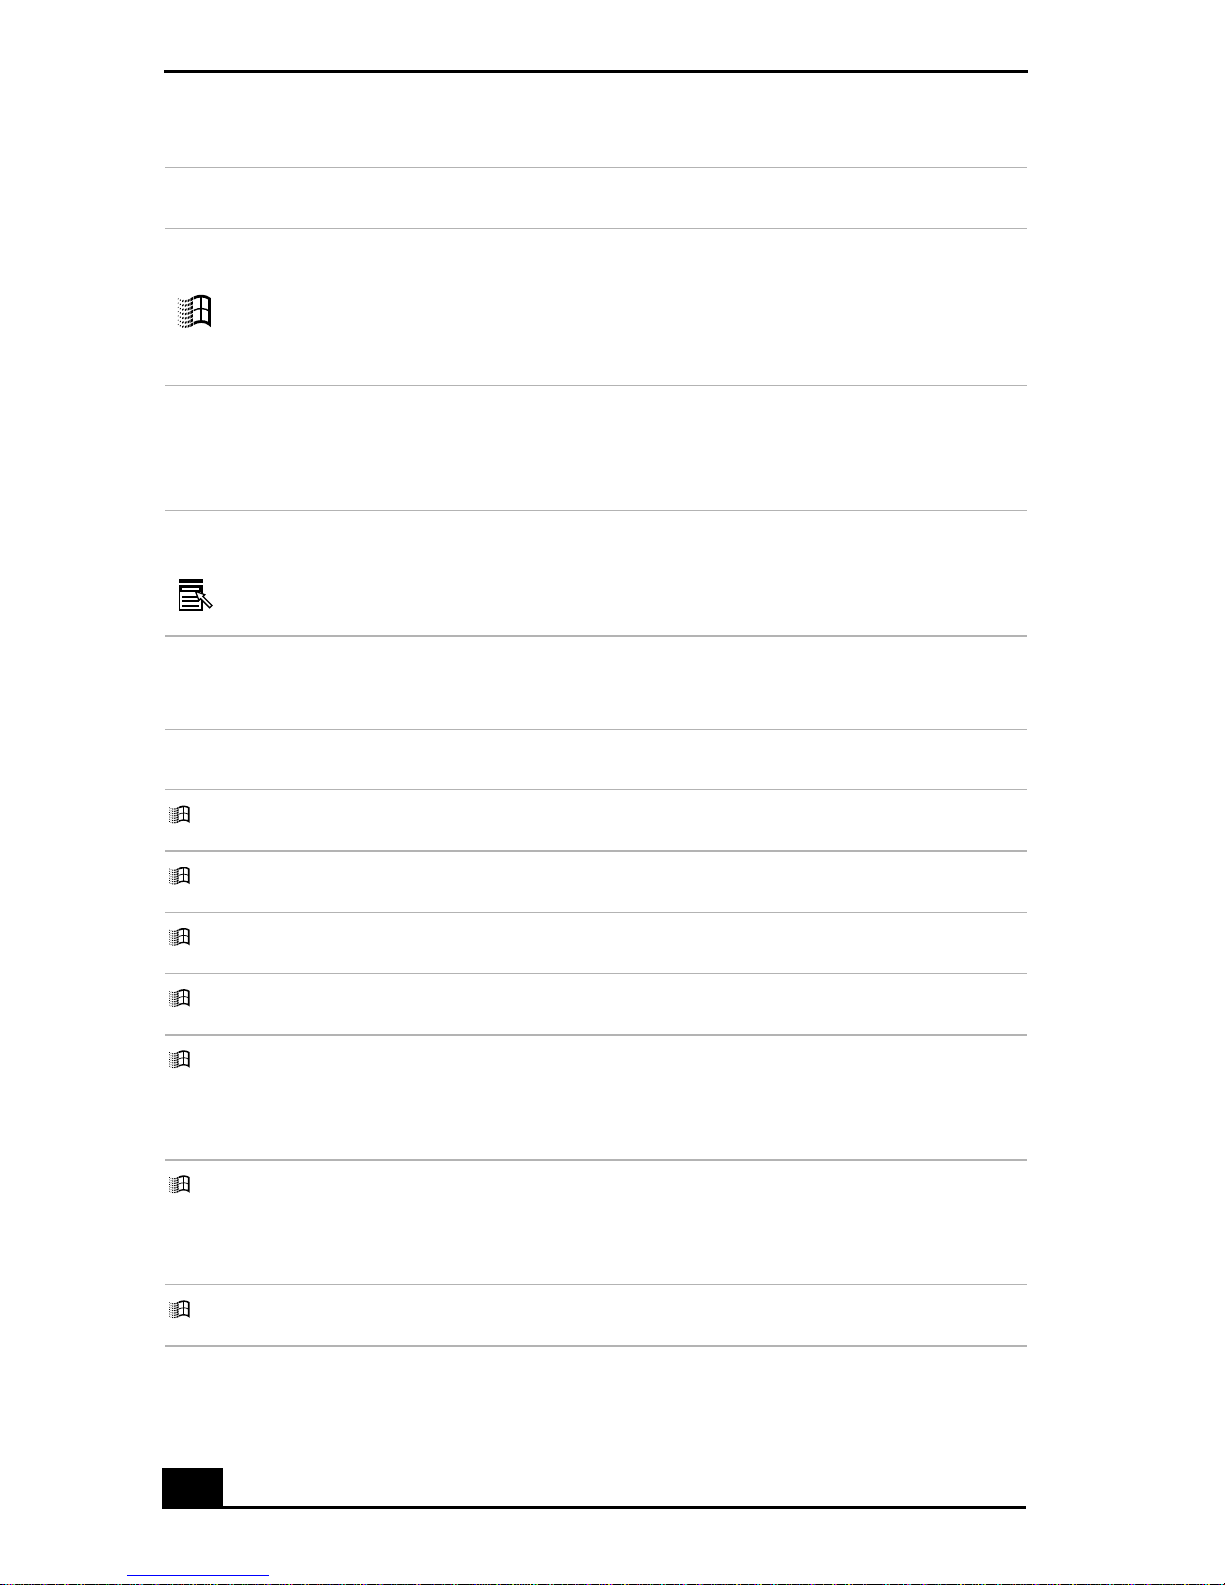
VAIO Com pu ter Quick Sta rt
Key Description
Wi ndows key The key with the Mic r osoft® Win dows® operating system
logo displays the Start menu; it is the equivalent of clicking
Star t on the taskbar. See “Combinations and functions with
the Windows key” for more information.
Fn key The Fn key is used in combination with other keys to issue
commands. See “Combinations and functions with the Fn
key” for more information.
Applicat ions key The Applications key displays a shortcut menu of context-
sensitive choices. Pressing this key is the equivalent of
clicking the right mouse button.
Combinations and functions with the Windows key
Combination Function
+ F1 Displays the VAIO Help and Support Center window.
+ Tab Switches the selected button on the taskbar.
+ D Displa ys the desktop.
+ E Displays the My Computer window.
+ F Displays the Search Res ults window, where you can find a
file or folder. This is the equivalent of selecting Search from
the Start menu.
+ Ctrl + F Di s plays the Search Results - Computers window, where you
can loc ate o ther co mpute rs. This i s the eq uiva lent of sel ecti ng
Search, and then Computer from the Start menu.
+ M Minimiz es all displayed windows.
70
Page 71
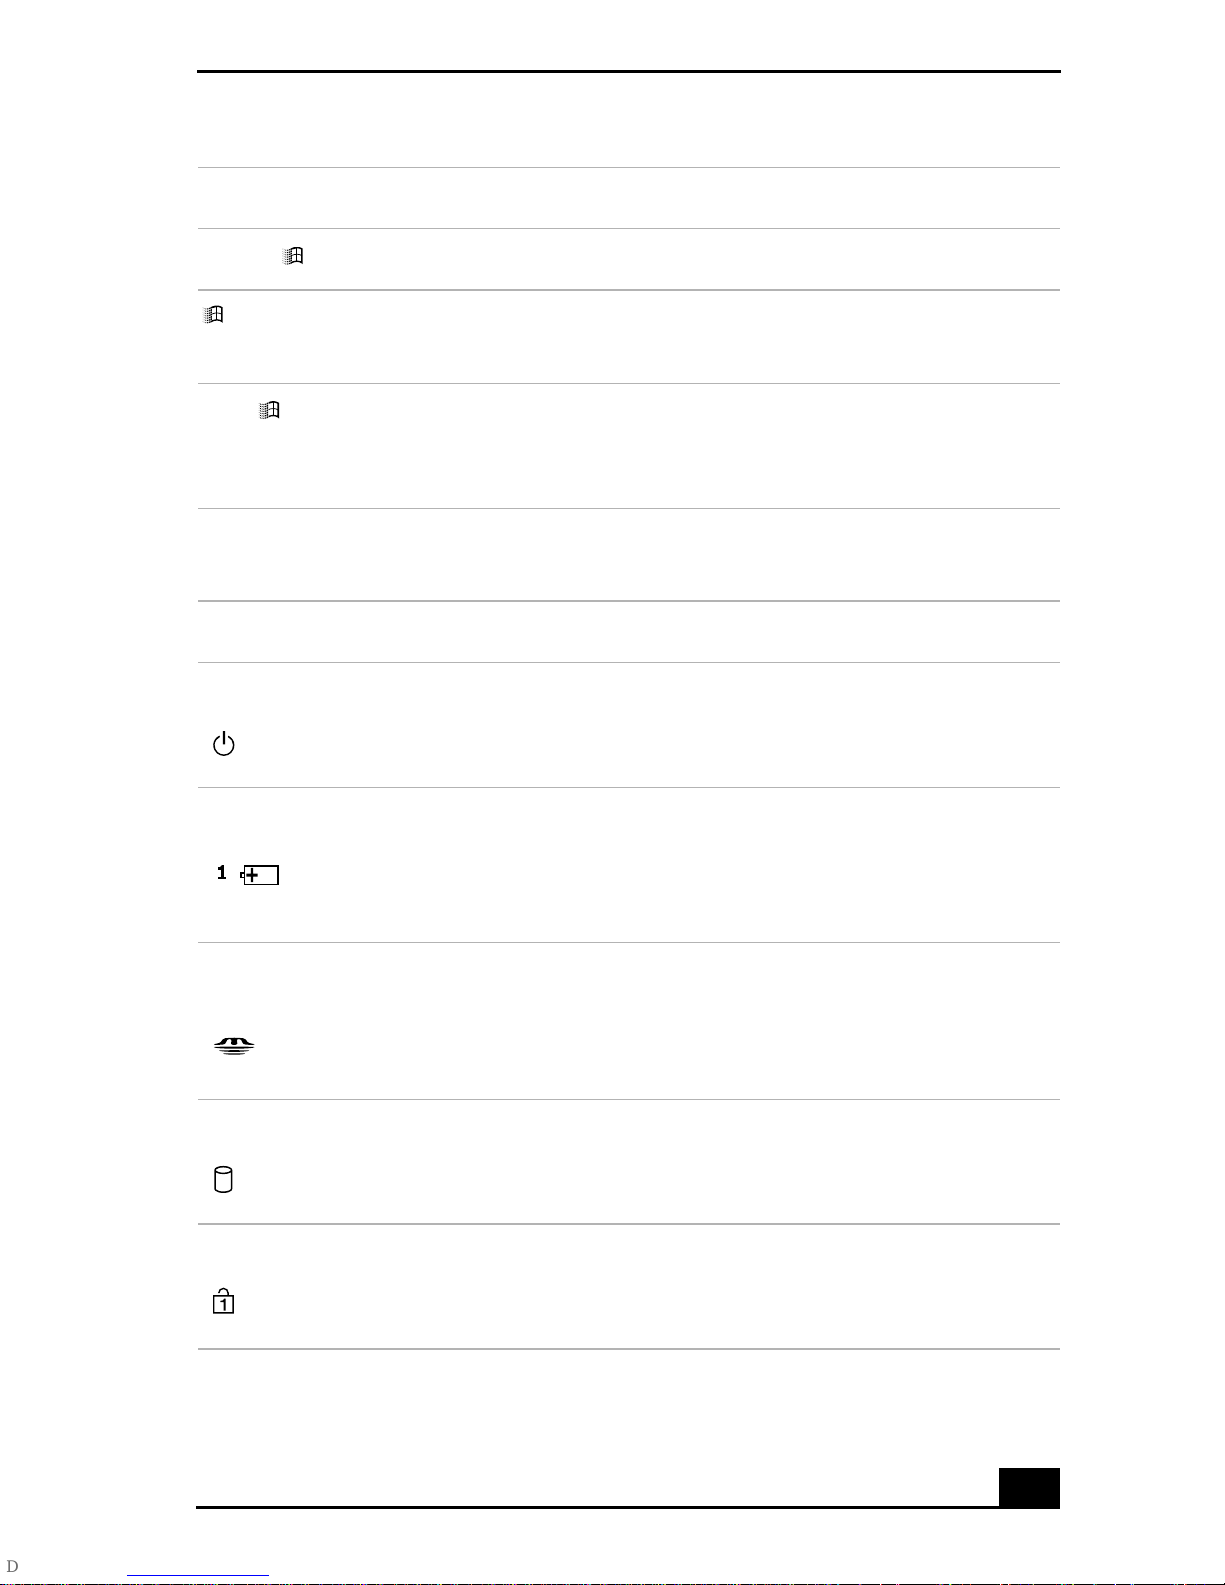
Using the Keyboard
Combination Function
Shift + + M Returns all min im ized windows to their previous si ze.
+ R Displa y s the Run window. This is the eq uivalent of selecting
Run from the S tart menu.
Fn + + Insert Displays the System Properties window. This is the
equivalent of selecting Control Panel, and then System from
the Start m en u .
Indicators
Indicator Function
Power Lights up wh en the power to the computer is on, flashes in
Standby mode, and turns off when the computer is in
Hibernate mode or off.
Battery Lights up wh en the computer is using battery power, flashes
when the battery is running out of power, double-flashes
1
when the battery is charging.
Memory Stick® Lights up when data is read from or written to the Memory
Stick media. (Do not enter Standby mode or turn off the
computer when this indicator is on.) Whe n the indicator is
of f, the Memory Stick media is not being accessed.
Hard disk Lights up when da ta is read from or written to the hard disk.
Do not enter St andby mode or turn off the computer when
this indicator is on.
Num Lock Lights up when the number keys area in the numeric keypad
are acti v e. When the in di c at or is o ff , th e al p h an u m e ri c
character keys in the keypad area ar e active.
71
Page 72
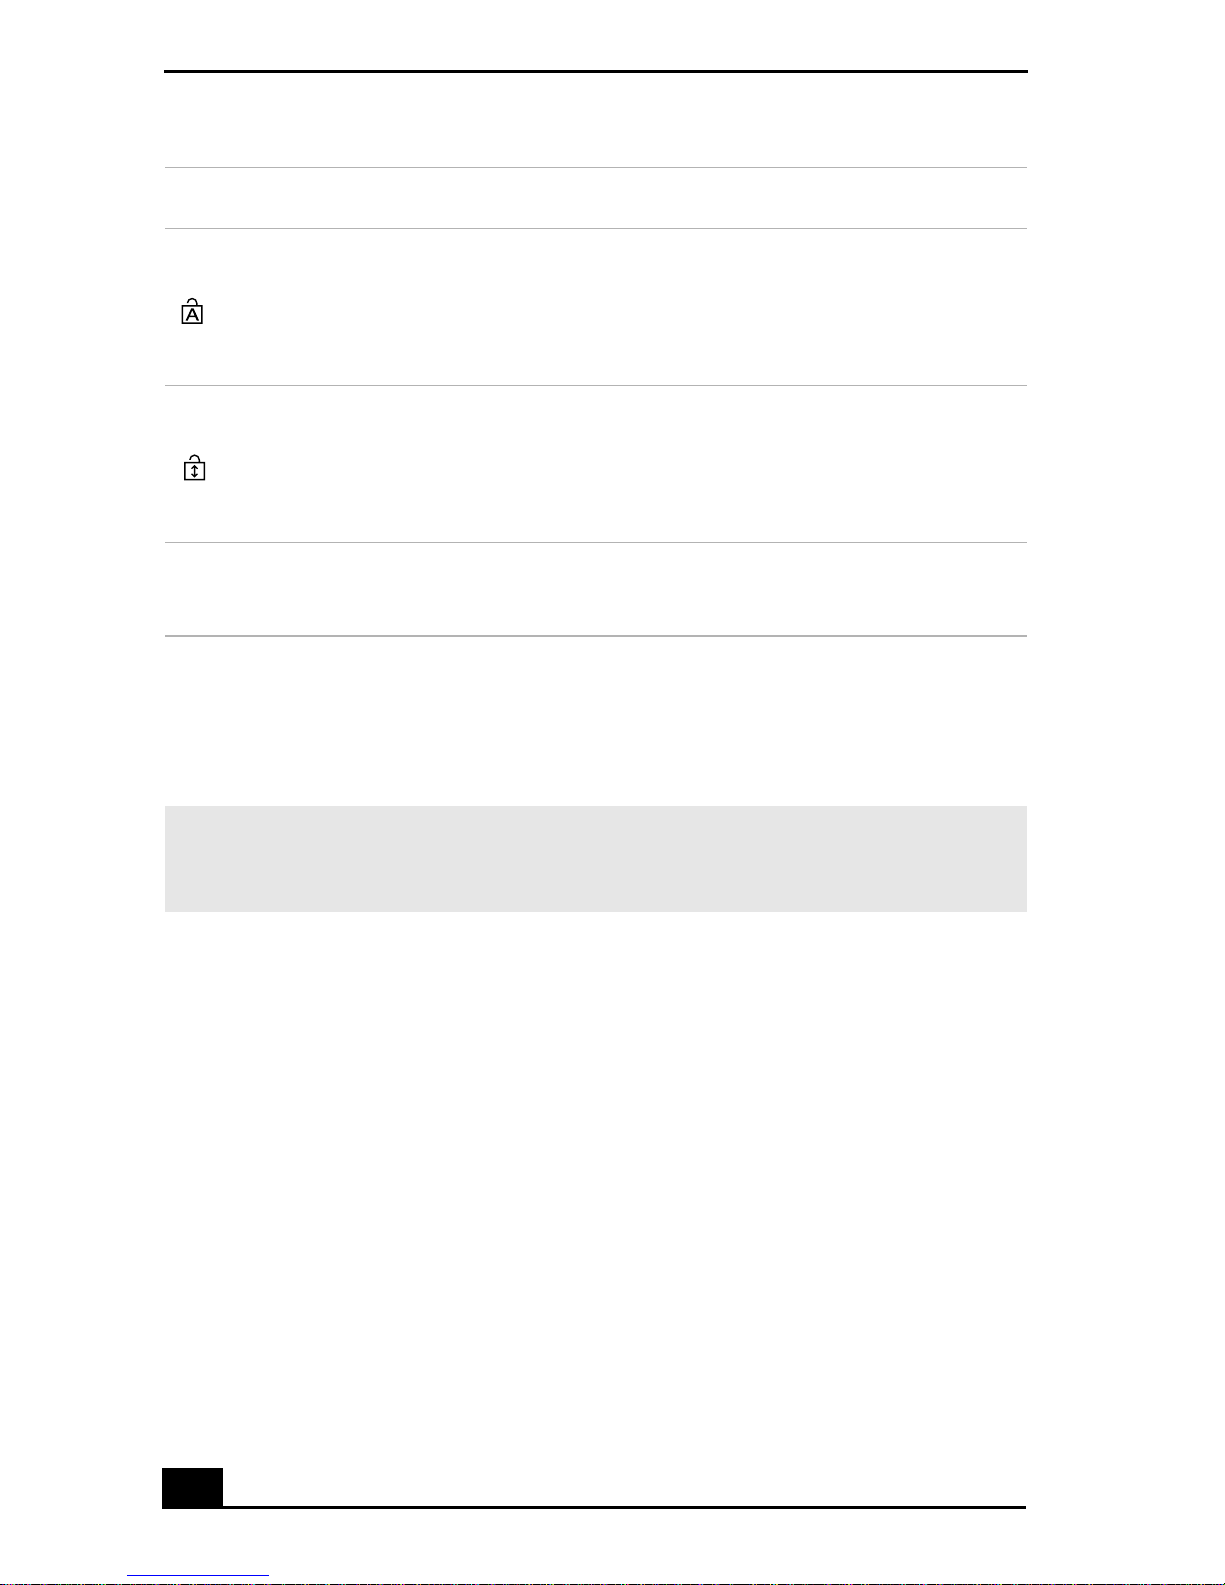
VAIO Com pu ter Quick Sta rt
Indicator Function
Caps Lock Lights up when the letters appear in uppercase as you type.
The Shif t key lowe r s th e case of typ ed letters w h en Caps
Lock is on. When the indicator is off , the letter s appear in
lower case a s you type (unless you hold down the Shift key).
Scroll Lock Lig h ts up when the screen scrolls differently. (Exactly h ow it
scrolls depends on the specific program. This function does
not work with all programs.) When the indicator is off,
information moves across the display normally.
Wireless*
Lights up when the Wireles s LA N function is running.
LAN
* On selected models only.
Combinations and functions with the Fn key
✍ If you swit ch user identities during a computing se ssion, the Fn+F7 key
functionality (if available on your computer) will be in terrupted. To switch to an
exte rnal display or monitor, see “Selecting a display m ode” for more information.
72
Page 73
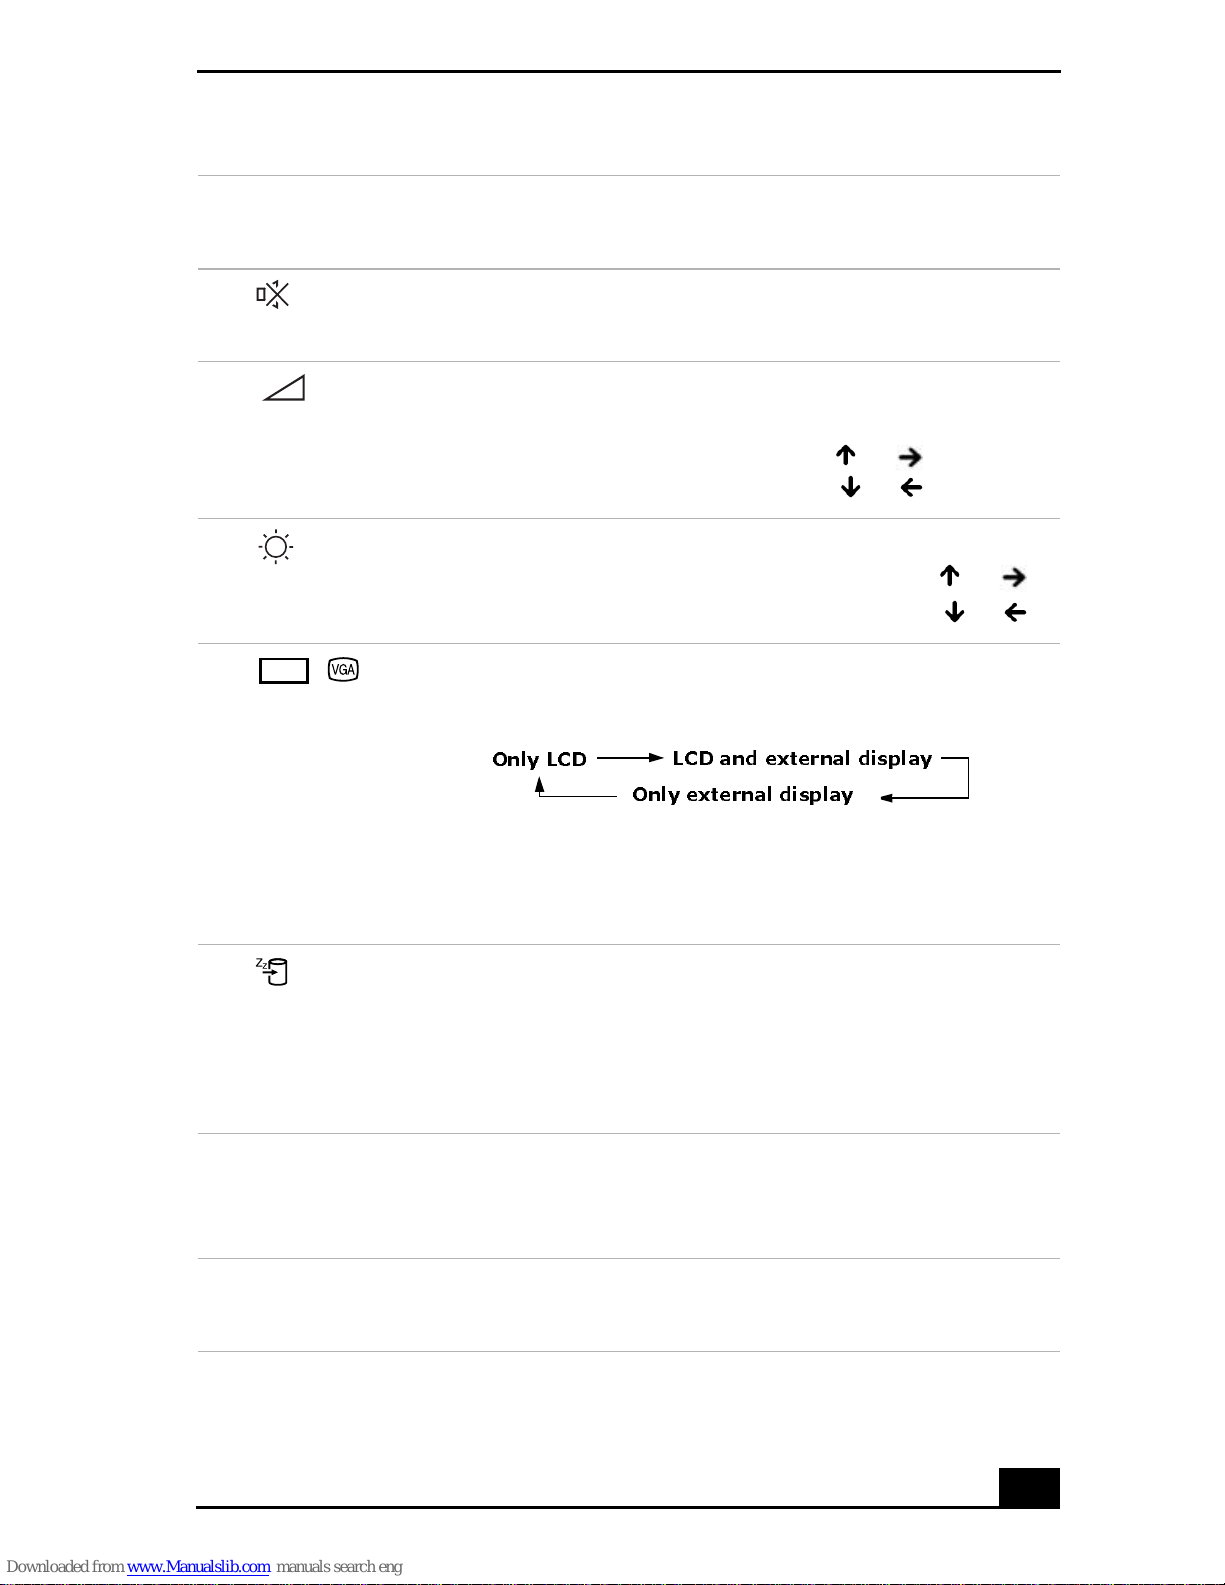
Combinations/
Feature Function
Using the Keyboard
Fn + (F3)
Mute On/Off
Fn + (F4)
Speaker volu me
Fn + (F5)
Bright ness control
Fn + /
LCD
(F7)
Swi tch to the
external
monitor/LCD
Toggles the built-in speaker of f and on.
Adjusts the built-in speaker volume. An on-screen display
appears notifying you when a change occurs.
To increas e volume, press Fn+F4, then or .
To decrease volume, press Fn+F4, then or .
Adjusts the brightness of the computer scre en ( LCD).
To increase light in tensity, pres s Fn+F5 and then or .
To decreas e light intensity, press Fn+F5 and then or .
Toggles betw ee n the computer screen (LCD), a connected
external display, and both the LCD and external display.
Only LCD
LCD and external display
Only external display
Select one display at a time to play bac k DVDs. Connect the
cable before you turn on the computer, otherwise Fn+F7 will
not work.
Fn + (F12)
Hibernate
Fn + Esc
Standby
Fn + B
Bass Boost
Provides for the lowest level of power consumption.
When you run this command, the state of t he syst em and s tate
of the peripheral devices are written to the hard disk and the
system power is turned off. To return the syst em to its
original state, use the power button to turn on power.
Puts the system into Standby mode, a power management
state. T o return the system to the active state, press any key or
press the power button.
Toggles the bass-boost function off and on. This feature is
available only while using headphones.
73
Page 74

VAIO Com pu ter Quick Sta rt
✍ You can also carry out these functions using the Jog Dial™ Control. Some functions
are not available until the Microsoft® Windows® ope rating system launches.
74
Page 75
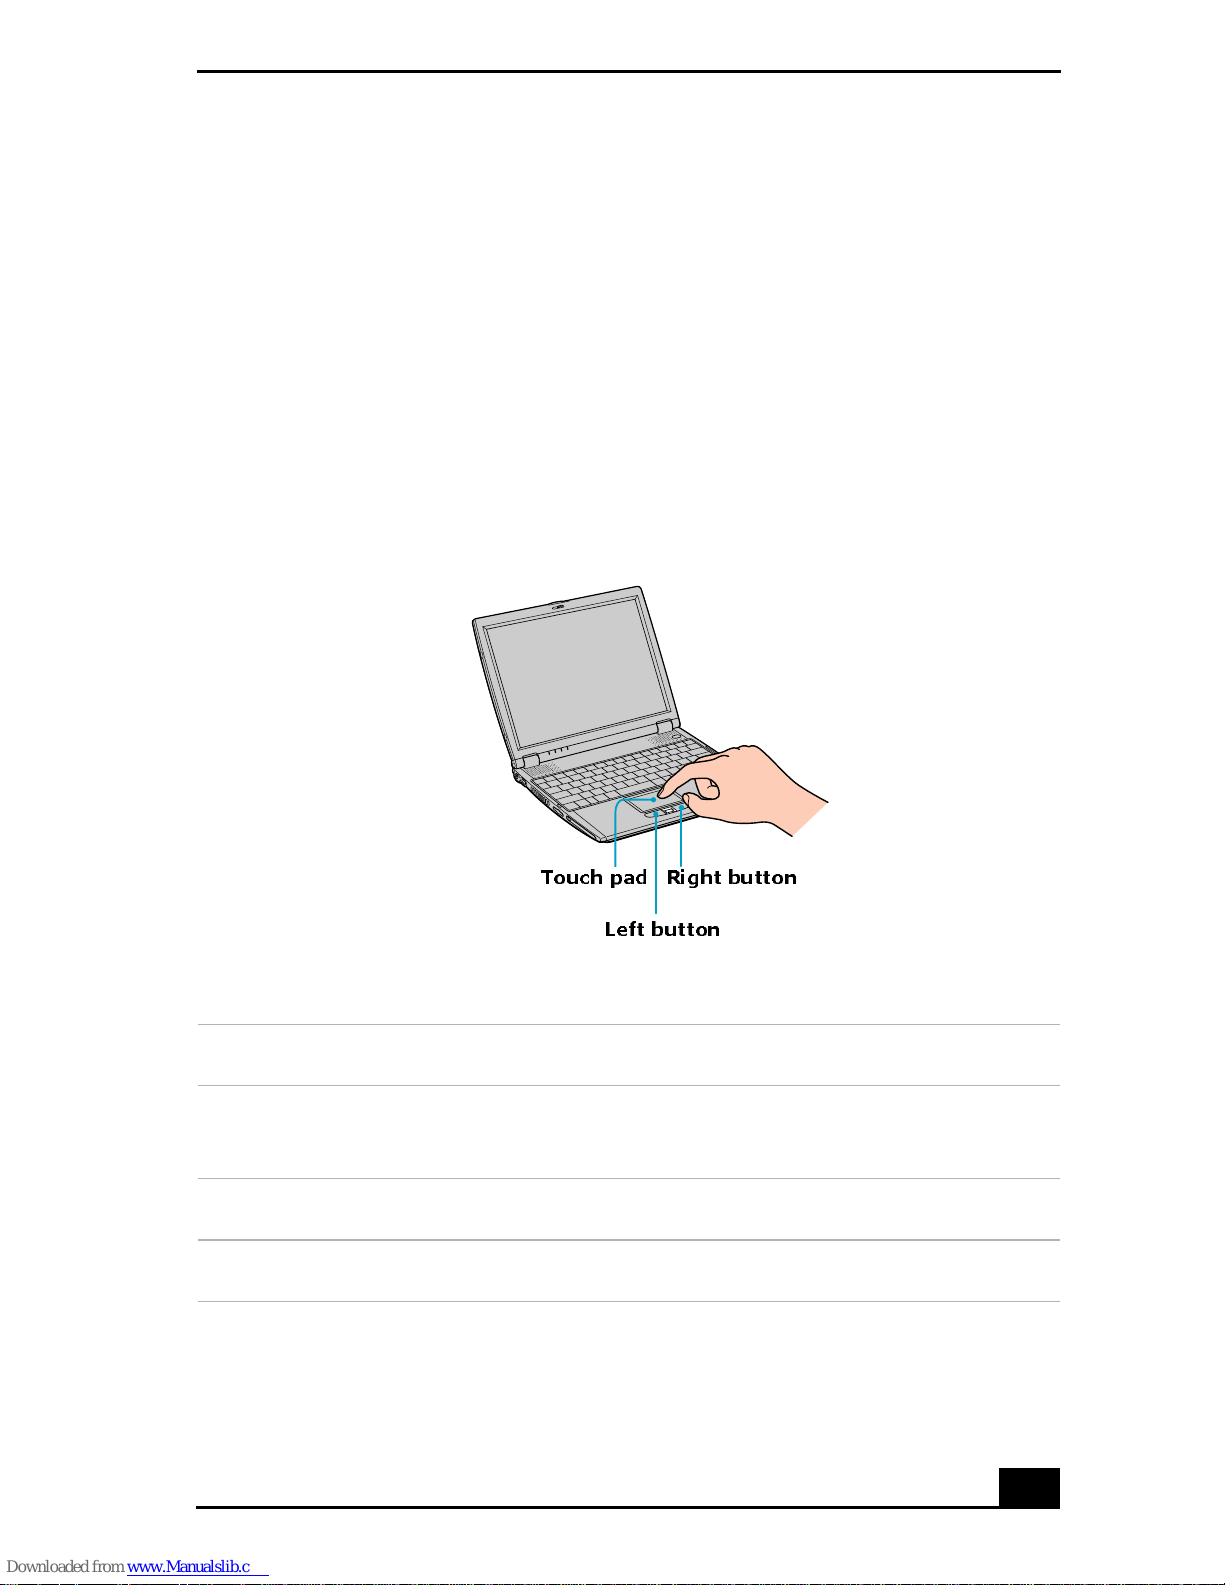
Using the Touch Pad
Using the Touch Pad
The keyboard contains a pointing device called a touch pad. You can point to,
select, drag, and scroll obje cts on the screen using the built-in touch pad .
❑ Describing the touch pad
❑ Customizing the touch pad
❑ Frequently asked questions
Describing the touch pad
Locati ng and describing the touc h pad
Touch pad
Left button
Right button
Action Description
Point Slide one finger on the touch pad to plac e the pointer on an
item or objec t.
Click Press the left button once.
Double-click Press the left button twi ce.
75
Page 76
VAIO Com pu ter Quick Sta rt
Action Description
Right-click Press th e right button once. In many programs, this actio n
displa ys a shortcut menu of conte xt-sensitive choices.
Drag Slide one finger while pressing the left button.
Scroll Move your finger along the right edge of the touch pad to
scroll vertically. Move your fing er along the bottom to scroll
horizontally. (The scroll function is available only with
programs tha t support a touch pad scroll feature.)
Customizing the touch pad
Sony Notebook Setup lets you customize your touch pad, such as enable or
disable the touch pad. You can als o open the Mouse Properties dialog box, which
enables you to set your touch pad and mouse prefer ences, such as chang ing
pointers, enabling or disabling the tapping feature, clicking both buttons
simultaneously, and adjusting the touch pad speed.
To disable the touch pad
1 Click Start on the Windows® taskbar, a nd point to All Programs.
2 Point to Sony Notebook Setup, and click Sony Notebook Setup in th e
submenu. The Sony Notebook Setup dia log box appears.
3 Click the Device tab.
4 In the left panel, click to cancel the Poi nting De v ice check box.
5 Click Apply.
To enable th e tou ch pad
1 Press the Windows key . The Start menu appears.
2 Press the Up Arrow key to select All Programs, and press Enter.
3 Press the Up Arrow key to select Sony Notebook Setup, and press
Enter. A submenu appears wit h Sony Notebook Setup preselected.
4 Press Enter. The Sony Notebook Setup dialog box appea r s .
76
Page 77

Using the Touch Pad
5 Press the Right Arrow key to select the Device ta b.
6 Press the Tab key to select the Default button, and press Enter. A pop-up
window appears.
7 Press the Left Arrow key to select OK, and press Enter. The Enable
Touchpad op ti on is aut o m a ticall y selected.
8 Press the Tab key to select the Apply button, and press Enter.
9 Click OK.
To open the Mouse Properties dialog box
❑ Righ t- c li ck the Touchpad icon on the Windows® taskbar, and click
Mous e Properties from the shortcut menu. The Mouse Pr o pertie s dialog
box appears.
Frequently asked questions
Why doesn’t the touch pad work?
❑ You may have disabled the touch pad without connecting a mouse to the
computer. See “To enable the touch pad. ”
❑ Restar t the computer to acti vate the touch pad agai n.
❑ If your touch pad is interpreting a single tap as a double-click, adjust the
button as signments. Foll ow these steps:
1 Press the Windows key . The Start menu appears.
2 Press the Up Arrow key to s elect All Programs, and press Enter.
3 Press the Up Arrow key to s elect Sony Notebook Setup, and press
Enter. A submenu appears with Sony Notebook Setup preselected.
4 Press Enter. The Sony Notebook Setup dialog box app ears.
5 Press the Right Arrow key to select the Device tab.
6 Press the Tab key to select the left panel, and then press the Down
Arrow key to select Poin ting Device.
7 Press Alt+S simultaneously. The Mouse P ropert ies dialog box appears .
77
Page 78

VAIO Com pu ter Quick Sta rt
8 Make sure the Buttons tab is ope n, and press the Up Arrow and
Down Arrow keys to change the button assignments . Press the Tab
key to move between shortcut menus.
9 Press Enter to save your cha nges and close the dialog box.
❑ If you are still experiencing probl ems, ma ke sure another mouse was not
installed.
❑ You may need to use your Application Recovery CD(s) to reinstall the
mouse dr ivers. See “Using th e Application Reco v er y CD(s)” f o r mor e
information.
Why doesn’t the pointer mov e when I use the touch pad?
❑ Try restarting your computer. Follow these steps:
1 Press the Windows key .
2 Press U. The Turn off computer win dow opens.
3 Press R to restar t the computer.
❑ If the computer does not restart,
1 Press Ctrl+Alt+Delete simultaneously. The Windows Task M anager
window appear s.
2 Press Alt to highlight the menu bar, and press the Right Arrow key
to sel ect Shut Down.
3 Press Enter.
4 Press R to restar t the computer.
❑ If you still cannot restart your computer, press and hold the power button to
turn off th e co mputer.
❑ If the pointe r does not m ove while playing a disc, pre ss Ctrl+Alt+Delete
simultan eously to stop playback and restart the computer.
❑ You may need to use your supplied Application Recovery CD(s) to re install
the touch pad or mouse drivers. See “Using the Application Recover y
CD(s)” for more information.
78
Page 79
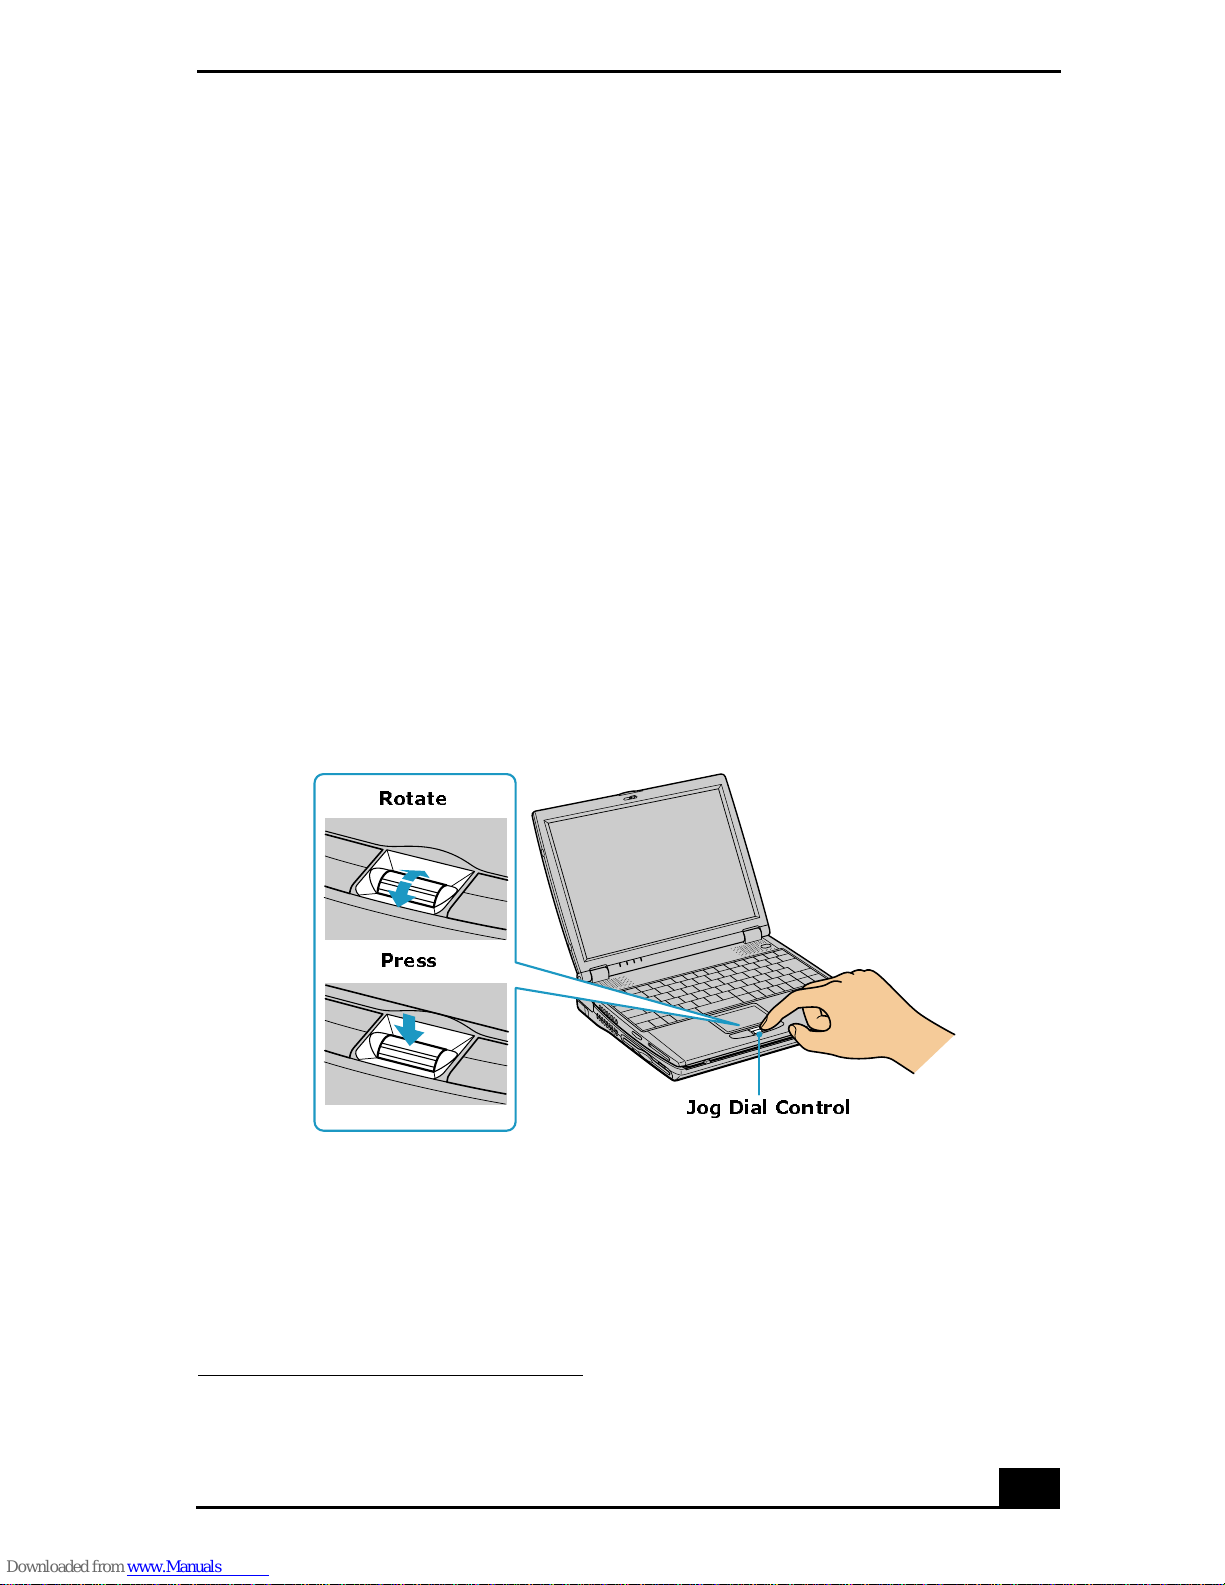
Using the Jog Dial Cont rol
Using the Jog Dial Control
Your computer is equipped with a Jog Dial™ Control and Jog Dial Navigator
software, whi ch en ables you to scroll through programs, folders, and documents
from a predefined list. The Jog Dial Control and J og Dial Navigator are
compatible with preinstalled software programs that support Jog Dial Navigat or
functions.
❑ Locating the Jog Dial Control
❑ Using the Jog Dial Bar
❑ Using Jog Dial Launcher
❑ Using Application and Scroll modes
❑ Changing Jog Dial Navigator settings
Locating the Jog Dial Control
*
Jog Dial Control
Rotate
Press
Jog Dial Control
To use the Jog Dial Control
❑ Rotate the Jog Dial™ Control to scr o ll up and down a menu.
❑ Press the Jog Dial Control to select a menu item.
❑ Press the Back button (on selected models) to return to the previous menu.
* Some programs do not s upport Jog Di al Navigator.
79
Page 80
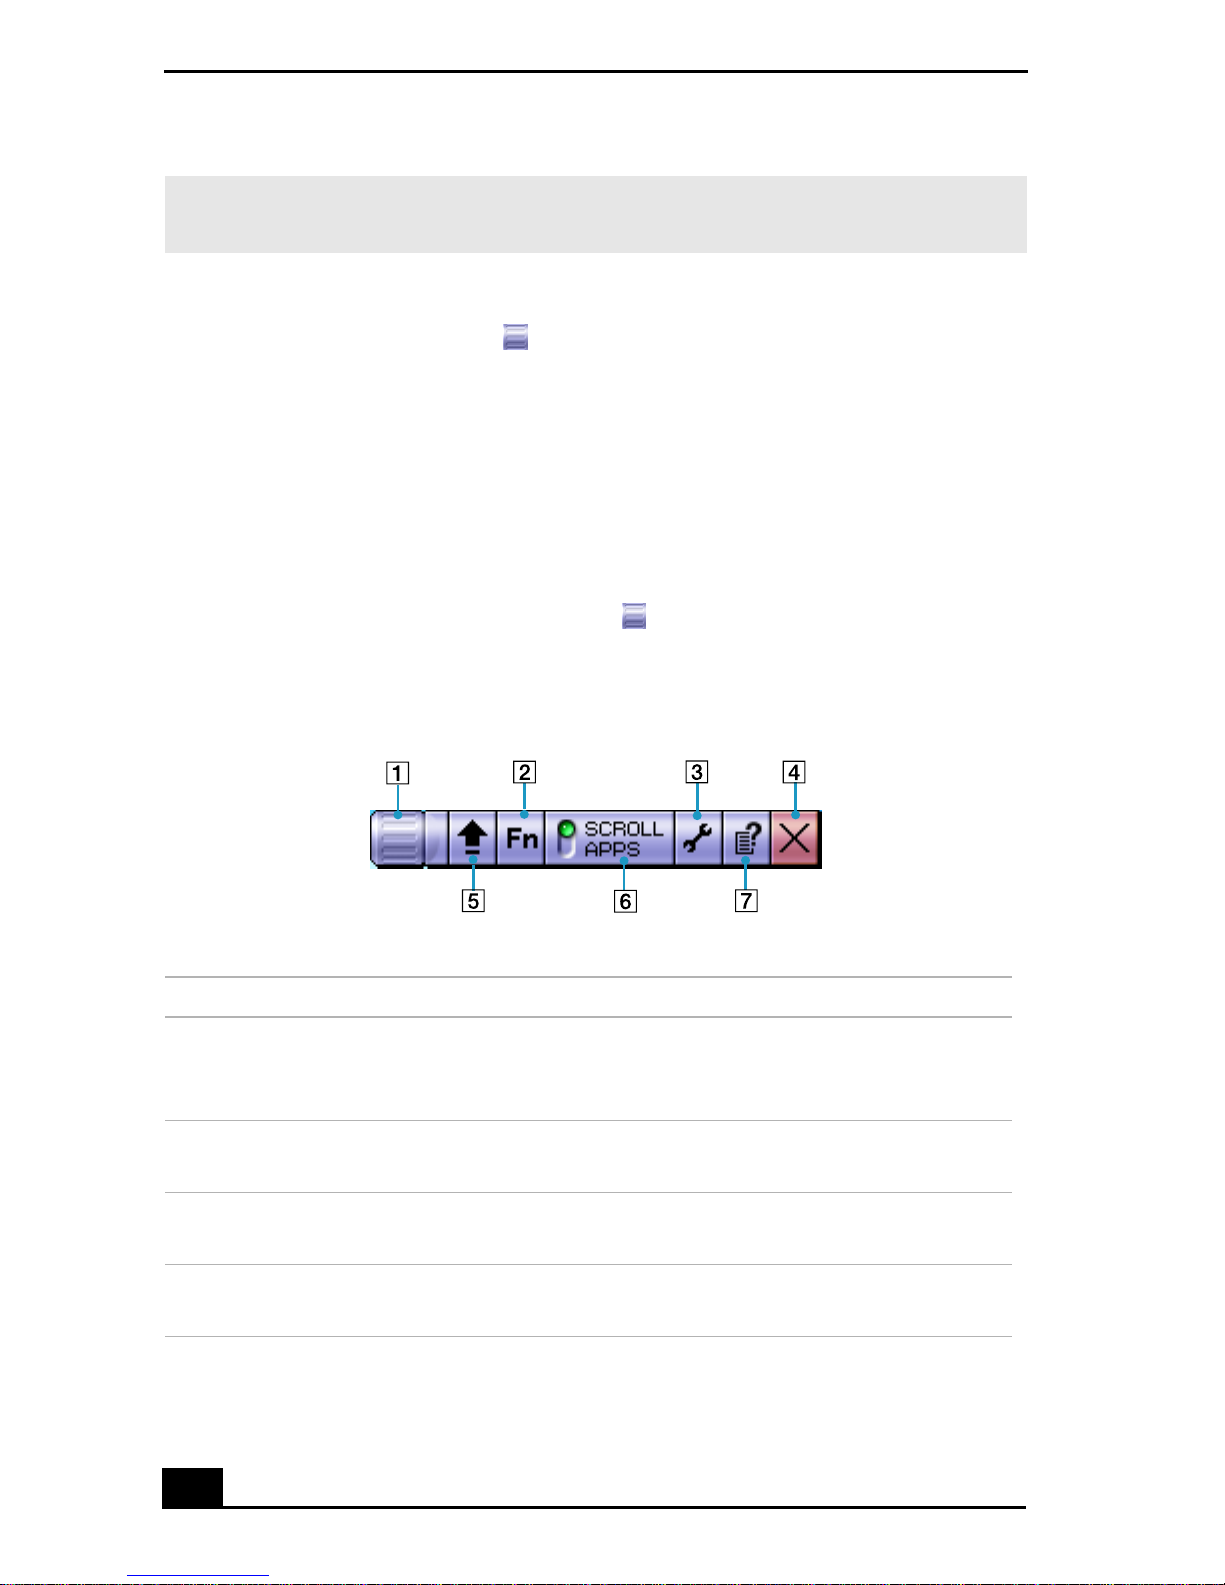
VAIO Com pu ter Quick Sta rt
✍ If your computer does not come with a Back bu tton, you can se lect Return on the
Jog Dial Launcher to go back to the previous menu.
Using the Jog Dial Navigator icon
The Jog Dial™ Navigator icon appear s on the taskba r when you turn on your
computer. The arrows on the Jog Dial Navigator icon on the taskbar change to
show the direction in which you are turning the Jog Dial™ Control. No arrows
appear on the tas kbar icon if the Application mode is selecte d and the Jog Dial
Control is not in use.
Using the Jog Dial Bar
The Jog Dial Bar appear s as a floating window on your desktop when you
double-click the Jog Dial Navigator icon on the taskbar.
Jog Dial Bar
Features Action
1 Jog Dial icon Ri ght-click to display a shortcut menu. This icon
is also displayed on the Microsoft® Windows®
taskbar.
2 VAIO Settin g s
button
3 Jog Dial
Settings button
Click to dis play computer se ttings, such as
volume and scree n brightness.
Click to dis play the Jog Dial Setting dialog box.
4 Close button Click to display the Jog Dial Navigator window,
80
from which you can clo se the Jog Dial Bar.
Page 81
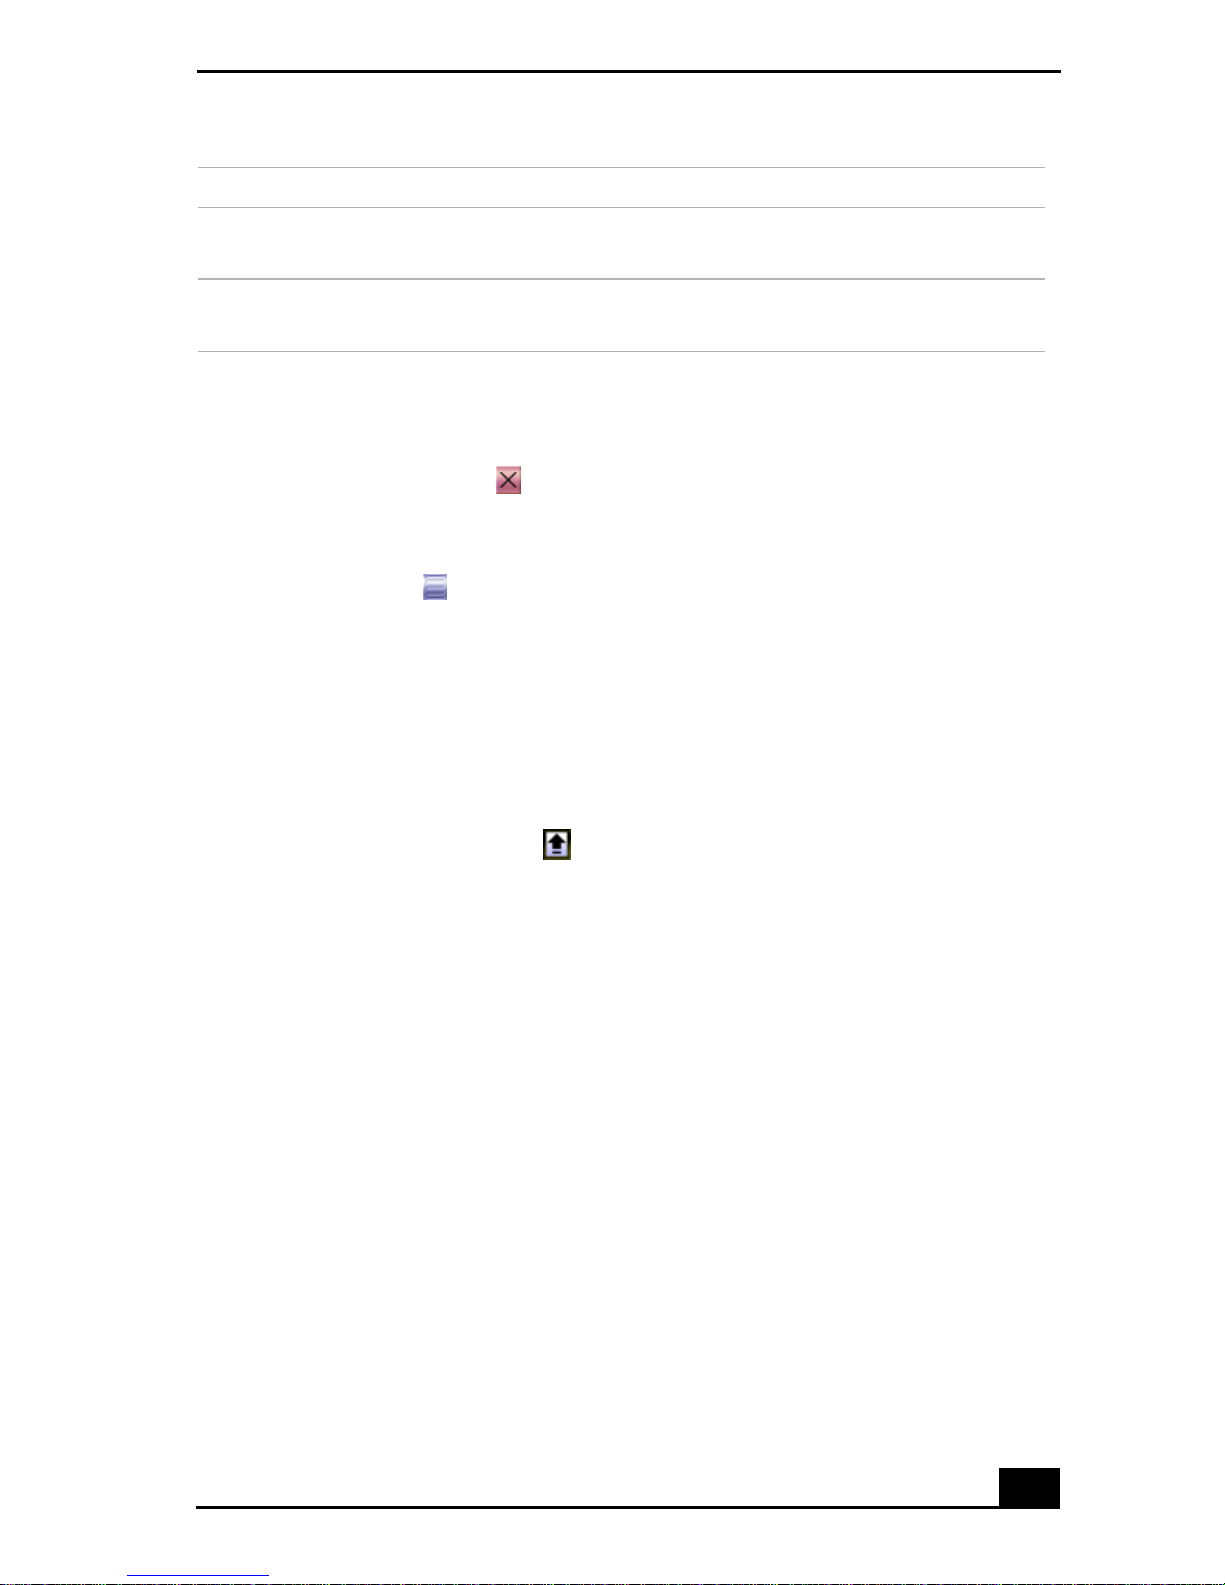
Using the Jog Dial Cont rol
5 Launcher button Clic k to display the Jog Dial La uncher
6 Mode button Click to switch the display bet ween scroll mode
and applic ation mode
7 Help button Click to display the Help guide, which offers
detailed Jog Dial infor ma tion
To move, hide, or close the Jog Dial bar
❑ Click and drag the Jog Dial Bar to another location on the desktop.
❑ Click the Close button .
❑ Right-click the Jog Dial Bar, and select Hide Jog Dial Bar from the shortc ut
menu. To make the Jog Dial Bar reappear , right-click the Jog Dial
Navigator icon on the taskbar, and select Display Jog Dial Bar.
Using Jog Dial Launcher
Jog Dial Lau ncher displays a menu of programs installed on your compute r. You
can use the Jog Dial™ Control to scroll and open these programs.
To open Jog Dial Launcher
❑ Click the Launcher button on the Jog Dial Bar.
❑ Press and hold Ctrl, and then press the Jog Dia l Control.
To ope n a progr a m
1 Open Jog Dial Launcher. See “To open Jog Dial Launc her” for more
information.
2 Rotate the Jog Dial Control until the program you want to sel ect appears
highlighted in the center window.
81
Page 82
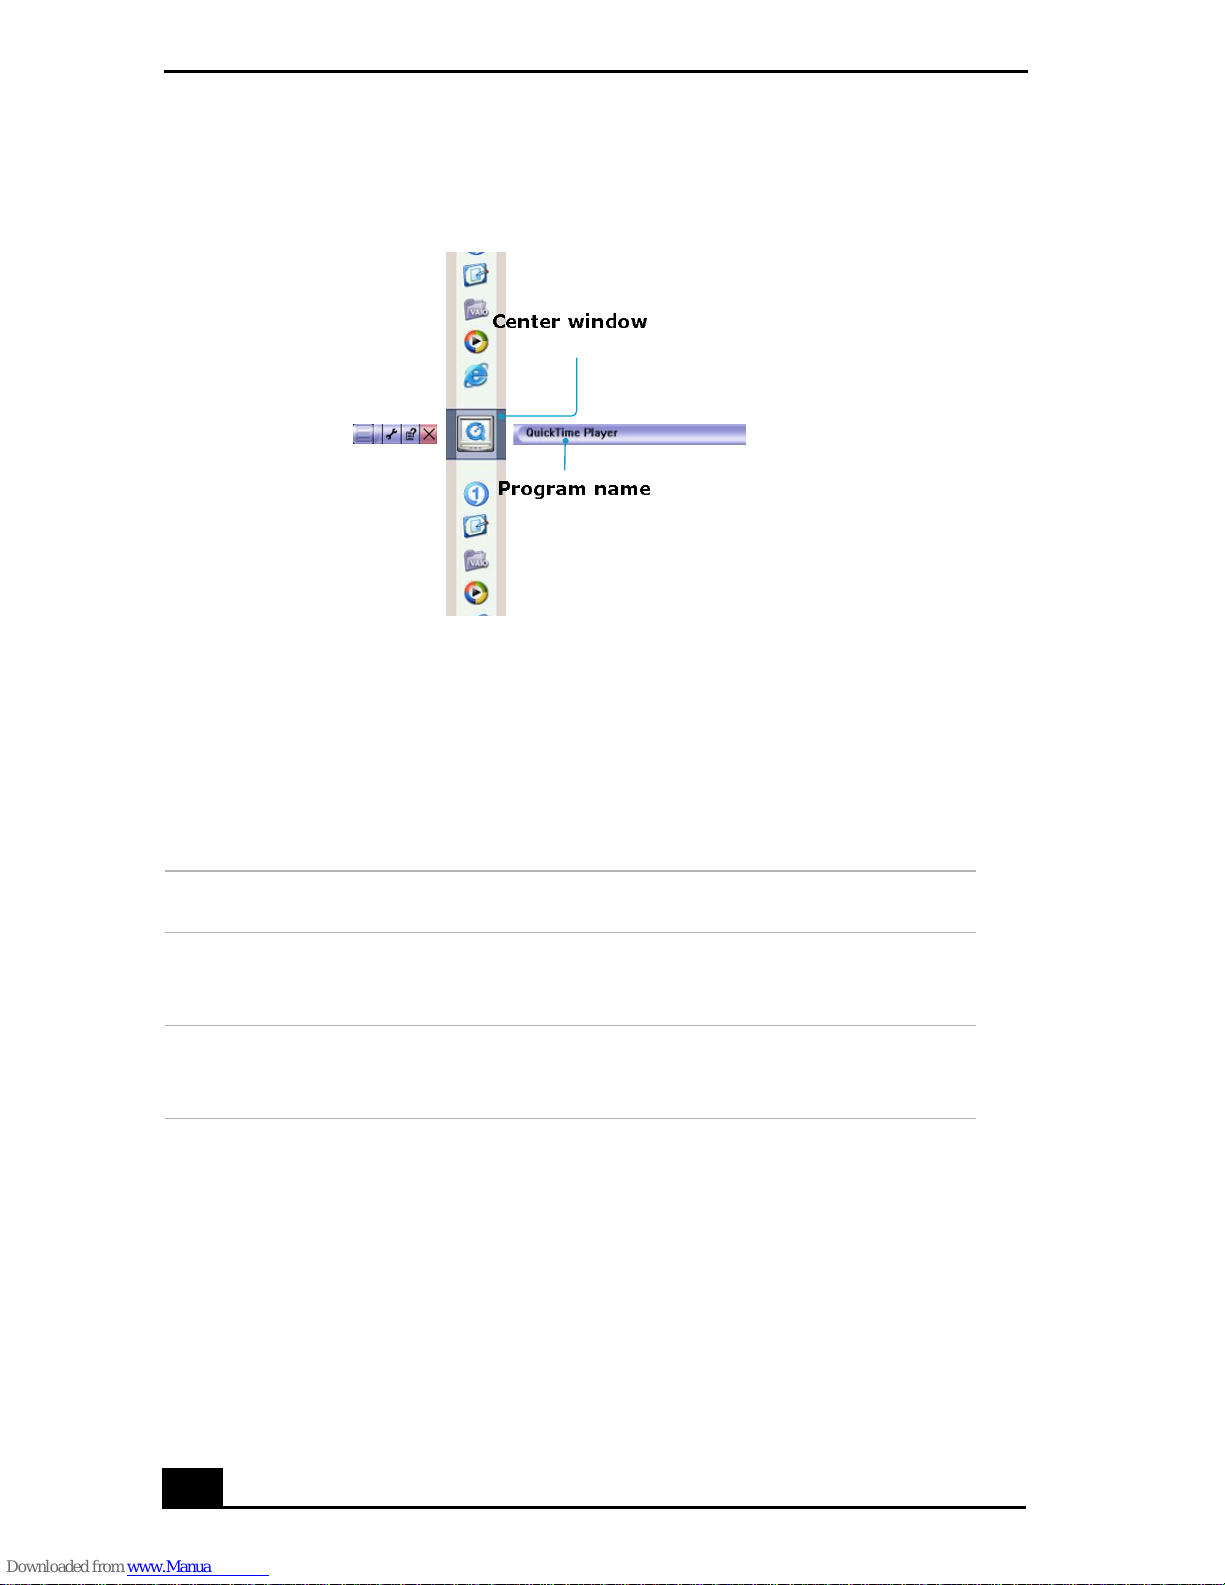
VAIO Com pu ter Quick Sta rt
Jog Dial Launcher
3 Press the Jog Dial Control.
Center window
Program name
4 Repeat steps 2 and 3 as necessary to open a program.
Using Application and Scroll modes
Jog Dial Navigator operates in one of two modes: Scrol l or Application. Once a
program is open, you can easily switch modes.
Mode Description
Applicat ion Enables y ou to ca rry out c ommands for specifi c Son y
programs.
Scroll Enables you to scroll through an active window and
the Sta r t m en u of sp e c if ic So ny pr o grams.
To select Application mode when a prog ram is open
❑ Click APPS on the Jog Dial Bar. When you select Application mode, the
Jog Dial Navigator window appears at the lower right s ide of the program
window. The Jog Dial Navigator window appears in either the List Display
or Guide Display format, depending on the progr am.
82
Page 83
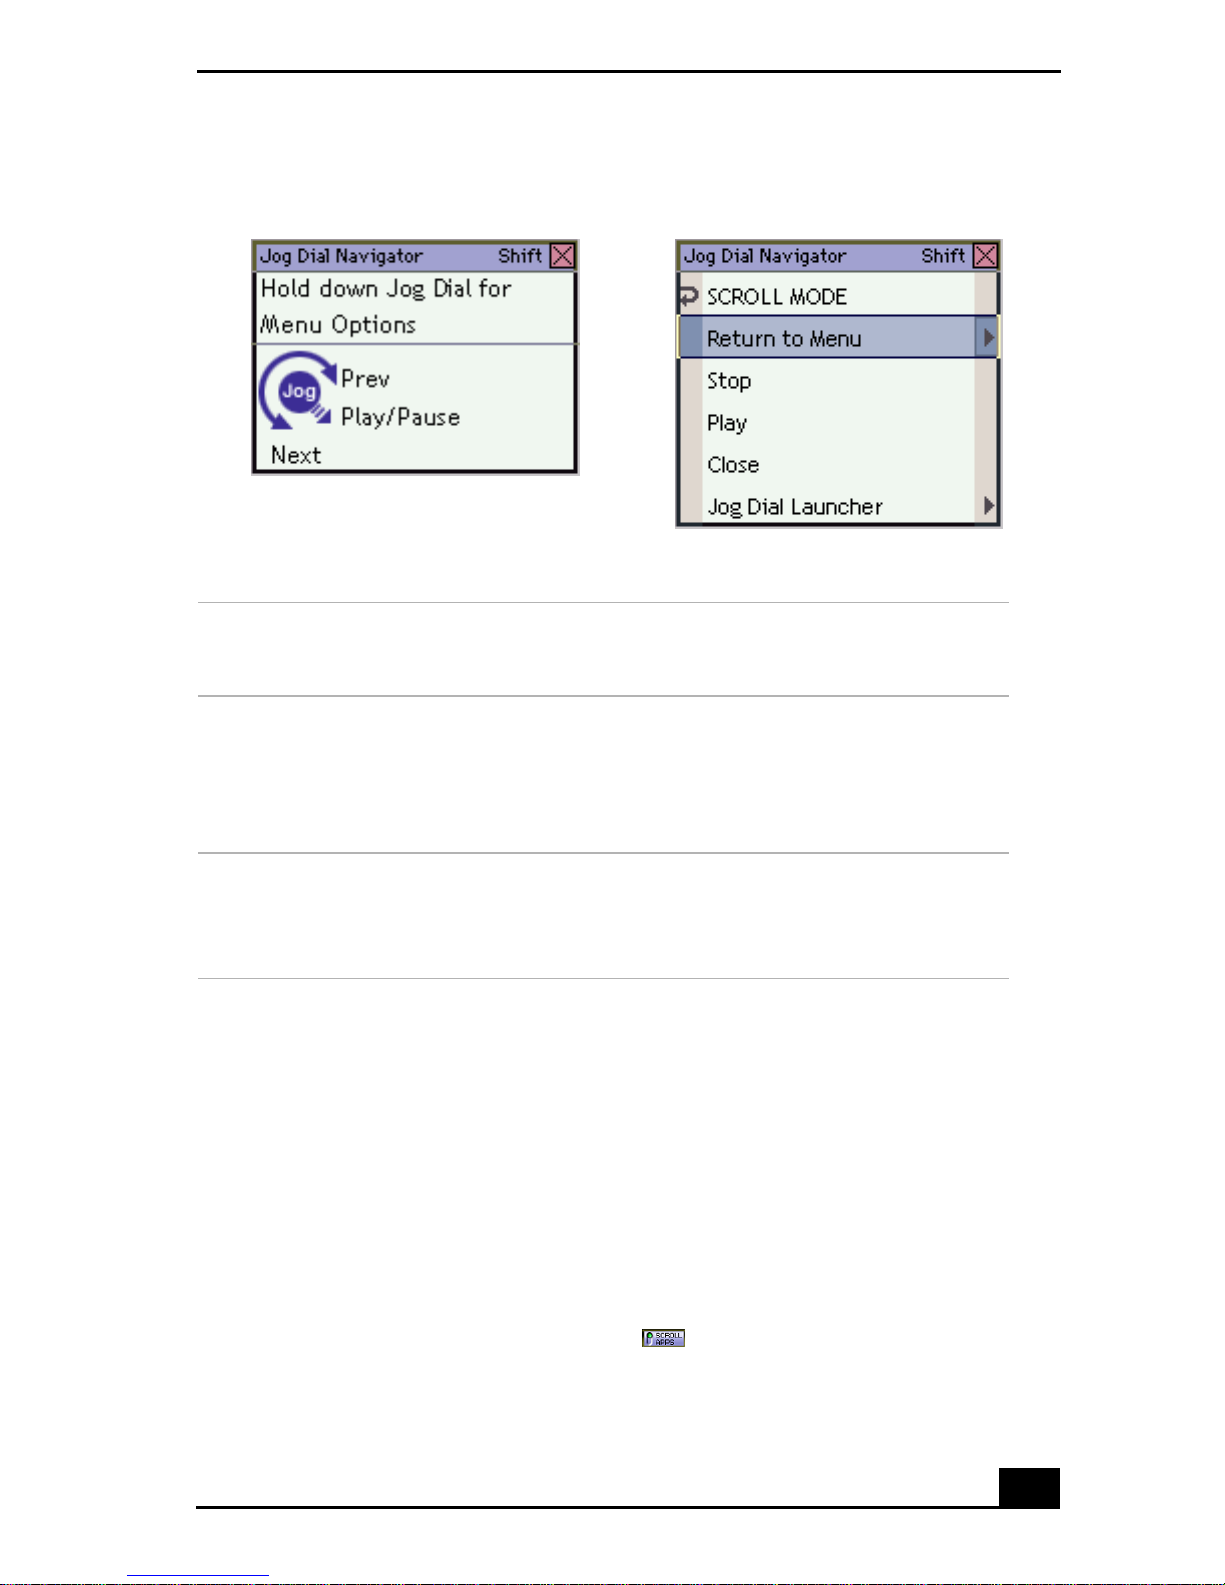
Using the Jog Dial Cont rol
Jog Dial Navigator (Guide Display) Jog Dial Navigator (Lis t Display)
Jog Dial Navigator
windows Descriptions
Guide Display Appears when a program that supports Jog Dial
Navigator has audio fe atures, suc h as volum e co ntro l.
This shows the operation guide for the Jog Dial
Control.
List Display Appears when a program that supports Jog Dial
Navigator is active. This shows menu items and file
names.
When using a progra m tha t has audi o and vide o featur es, you can s witch J og Dial
Navigator displays.
To switch from Guide Display to List Display
❑ Press and hold th e Jog Dial Contr ol.
No windows appear when you select the Scroll mode. Si mpl y rotate the Jog Dial
Control and the active window scrolls up and down or side to side if it has a
scroll option.
To sele ct Scroll mode when a program is ope n
❑ Click SCROLL on the Jog Dial Bar .
83
Page 84
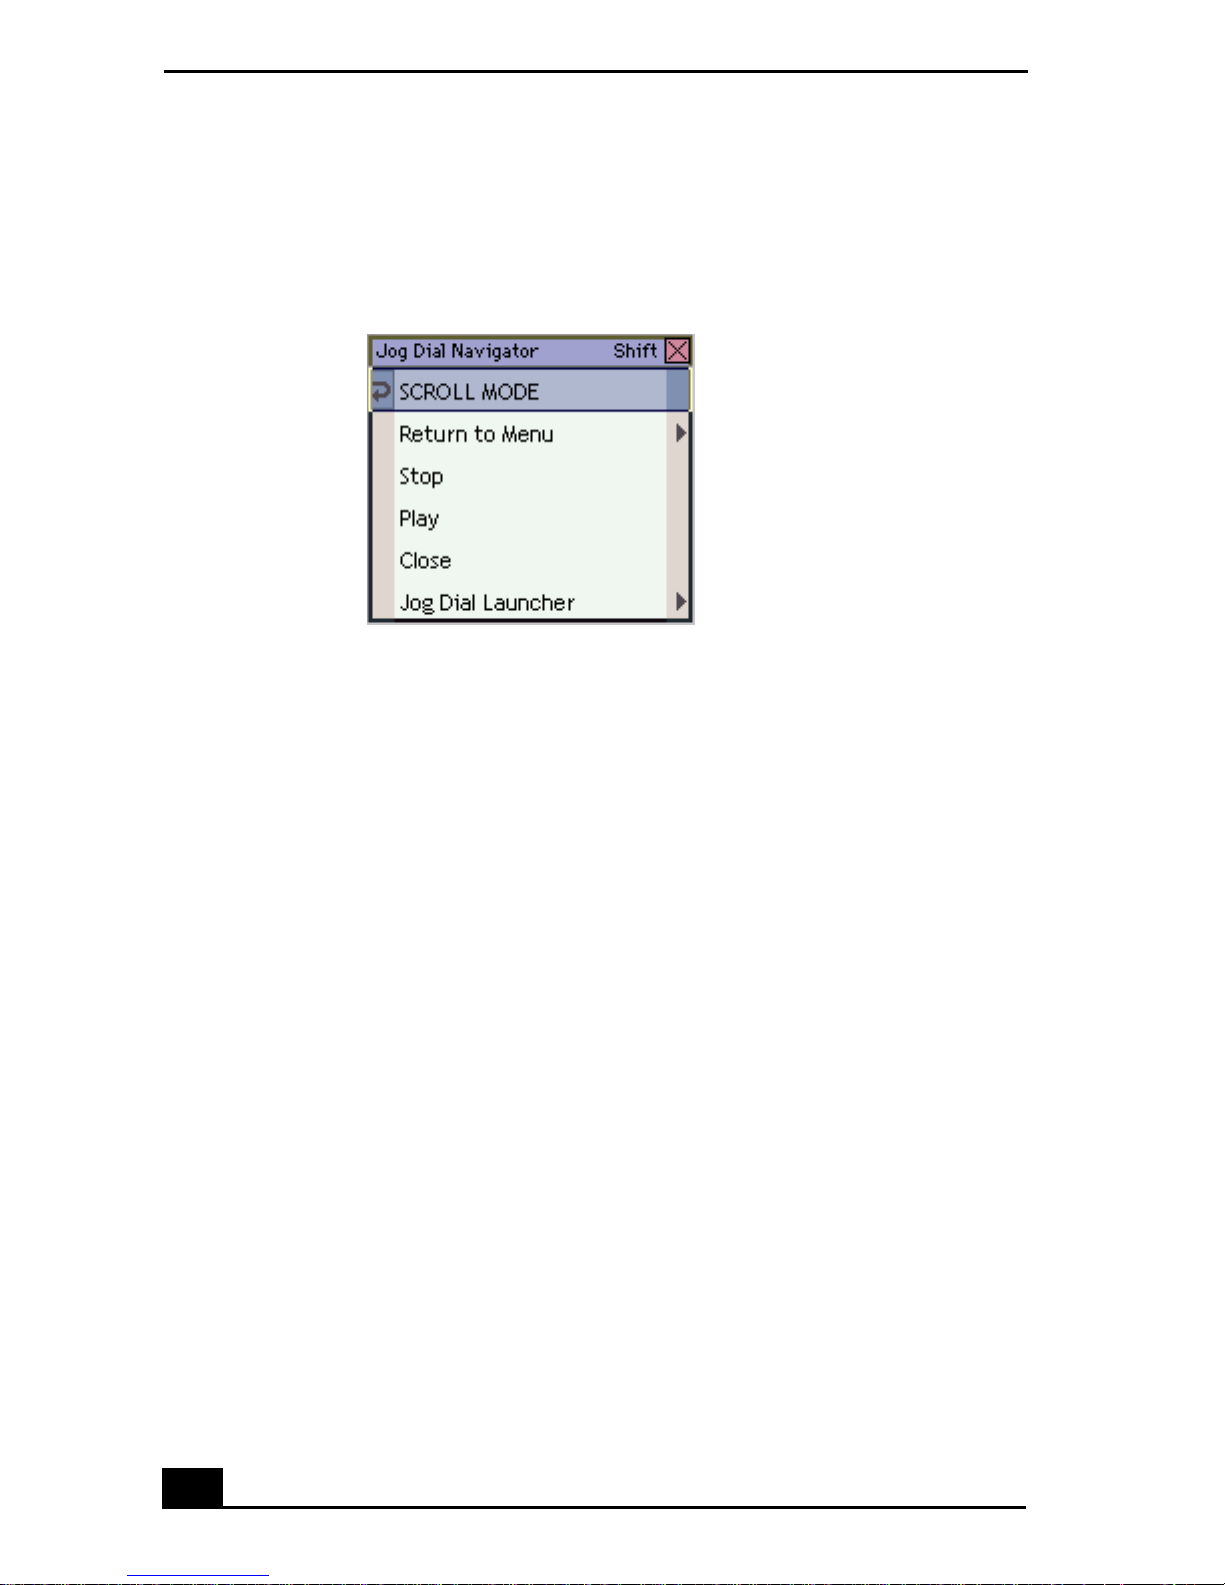
VAIO Com pu ter Quick Sta rt
❑ On the Jog Dial Navigator List Display, select SCROLL MODE and press
the Jog Dial Control.
Selecting Scroll Mode from Application Mode
Changing Jog Dial Navigator settings
You can change the Jog Dial Navigator settings to modify th e Jog Dial Na vigator
functiona lity and appearance.
84
Page 85
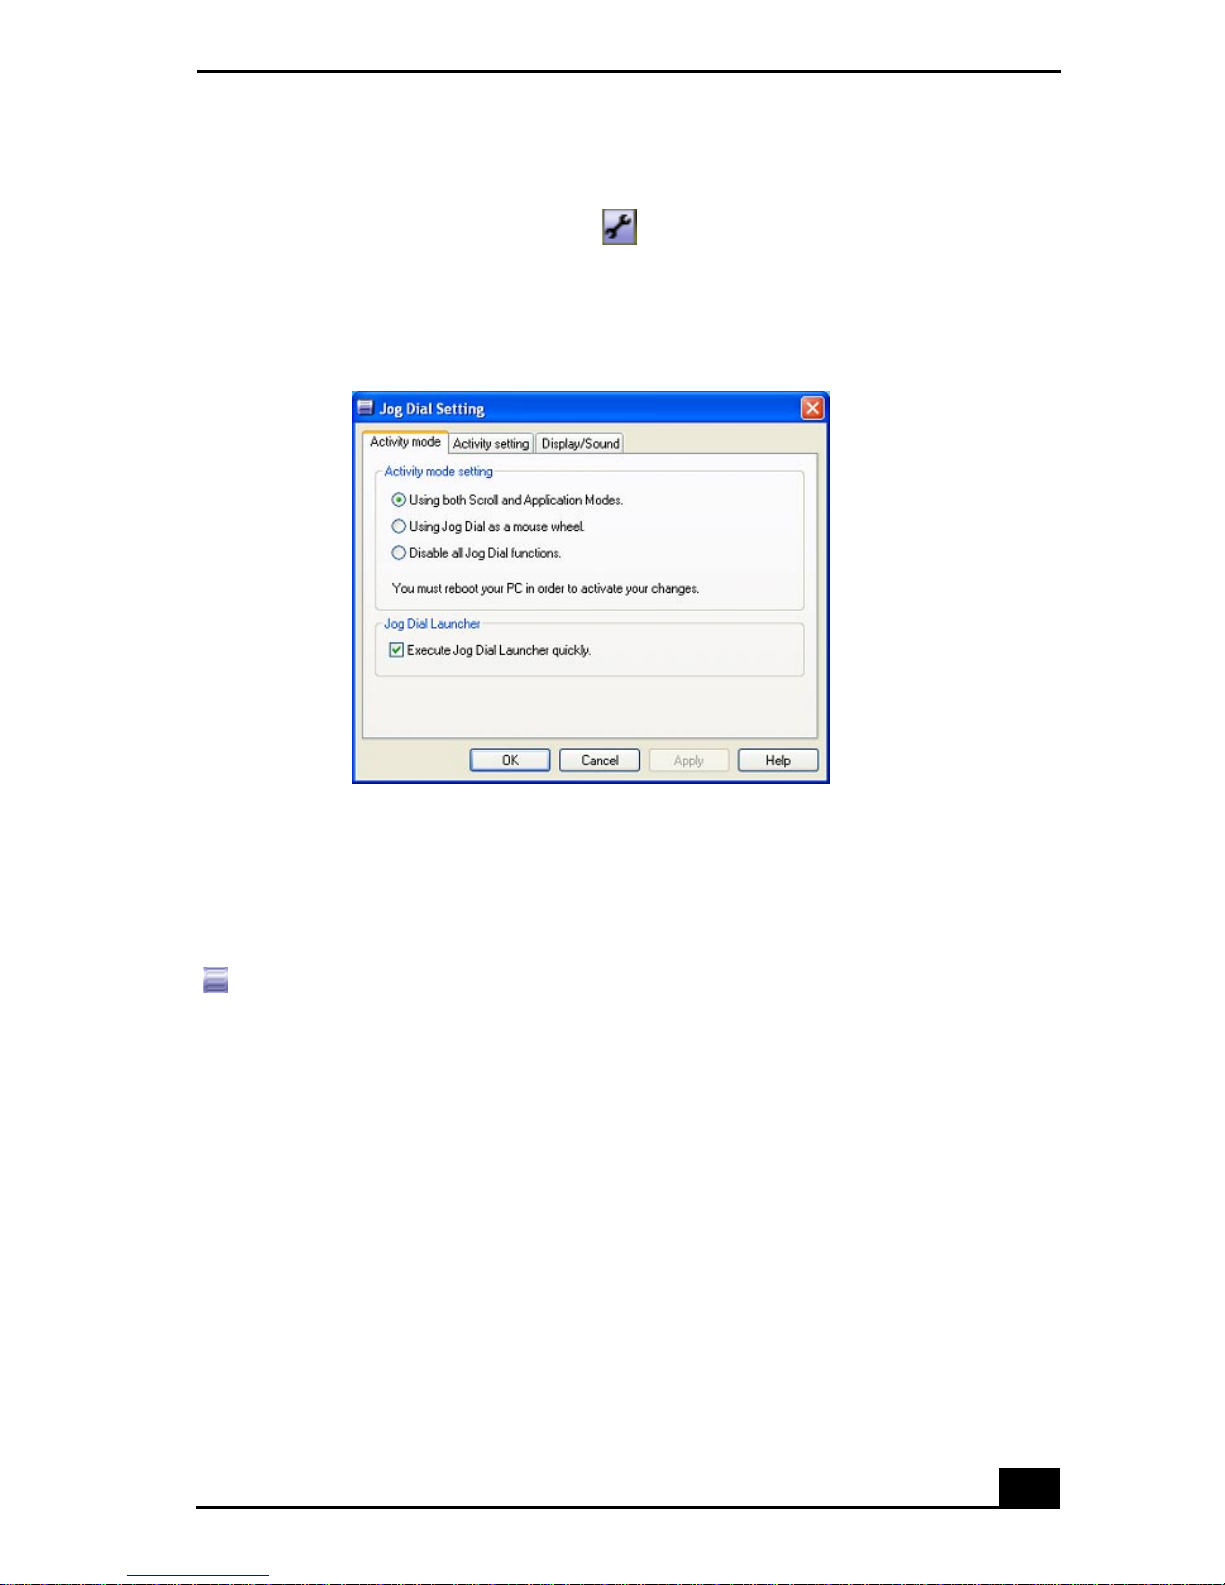
Using the Jog Dial Cont rol
To change settings
1 Click the Jog Dial Setting button on the taskbar. The Jog Dial Setting
dialog box ap pears.
Jog Dial Setting Dialog Box
2 Click the tabs near the top of the dial og box to view options, and the n ma ke
your changes.
3 Click Apply, and then clic k OK.
For informat ion about Jog Dial settings, right-click the Jog Dial Navigator icon
on the taskbar, and click Help.
85
Page 86

VAIO Com pu ter Quick Sta rt
Using Memory Stick Media
This compact, portable, and versatile recording medium has a dat a ca pacity
exceeding that of a floppy disk. The medium is specially designed for
exchanging and sharing digital data with compatible products. Because it is
removable, the media can be used for external data s torage.
❑ Selecti ng Mem ory S tick media
❑ Inserting Mem ory S tick media
❑ Viewing the cont ents
❑ Write-protecting Memory Stick media
❑ Formatti ng Mem ory S tick media
❑ Removing Memory Stick media
❑ Frequently asked questions
Selecting Memory Stick media
The following two types of Memory Stick® media can be used with your
computer:
❑ MagicGate™ Memory Stick media (hereafter called MG Memory Sti ck
media), which is provided with copyright protection
❑ Memory Stick media, which does not have the same copyright
protection as MagicGate Memory Stick media
Some music files with secure copyright protection may be stored on MG
Memory Stick media but not on regular Memor y S tick media.You can also use
MagicGate media-compatible devices to record and playback music when they
are connecte d to your computer.
You can store mixed data on the Memory Stick media. For example, you can
copy an ordinary file on a MG Memory Stick media that already contains music.
What is MagicGat e Memor y Stick media?
MagicGat e Memory S tick media provides copyright protection that consists of
authentication and encr yption technology. Authentication technology ens ures
that protected content is only transferred between compliant devices and media.
Protected content is recorded and transferred in an encrypted format to prevent
unauthorized duplication or playback.
86
Page 87
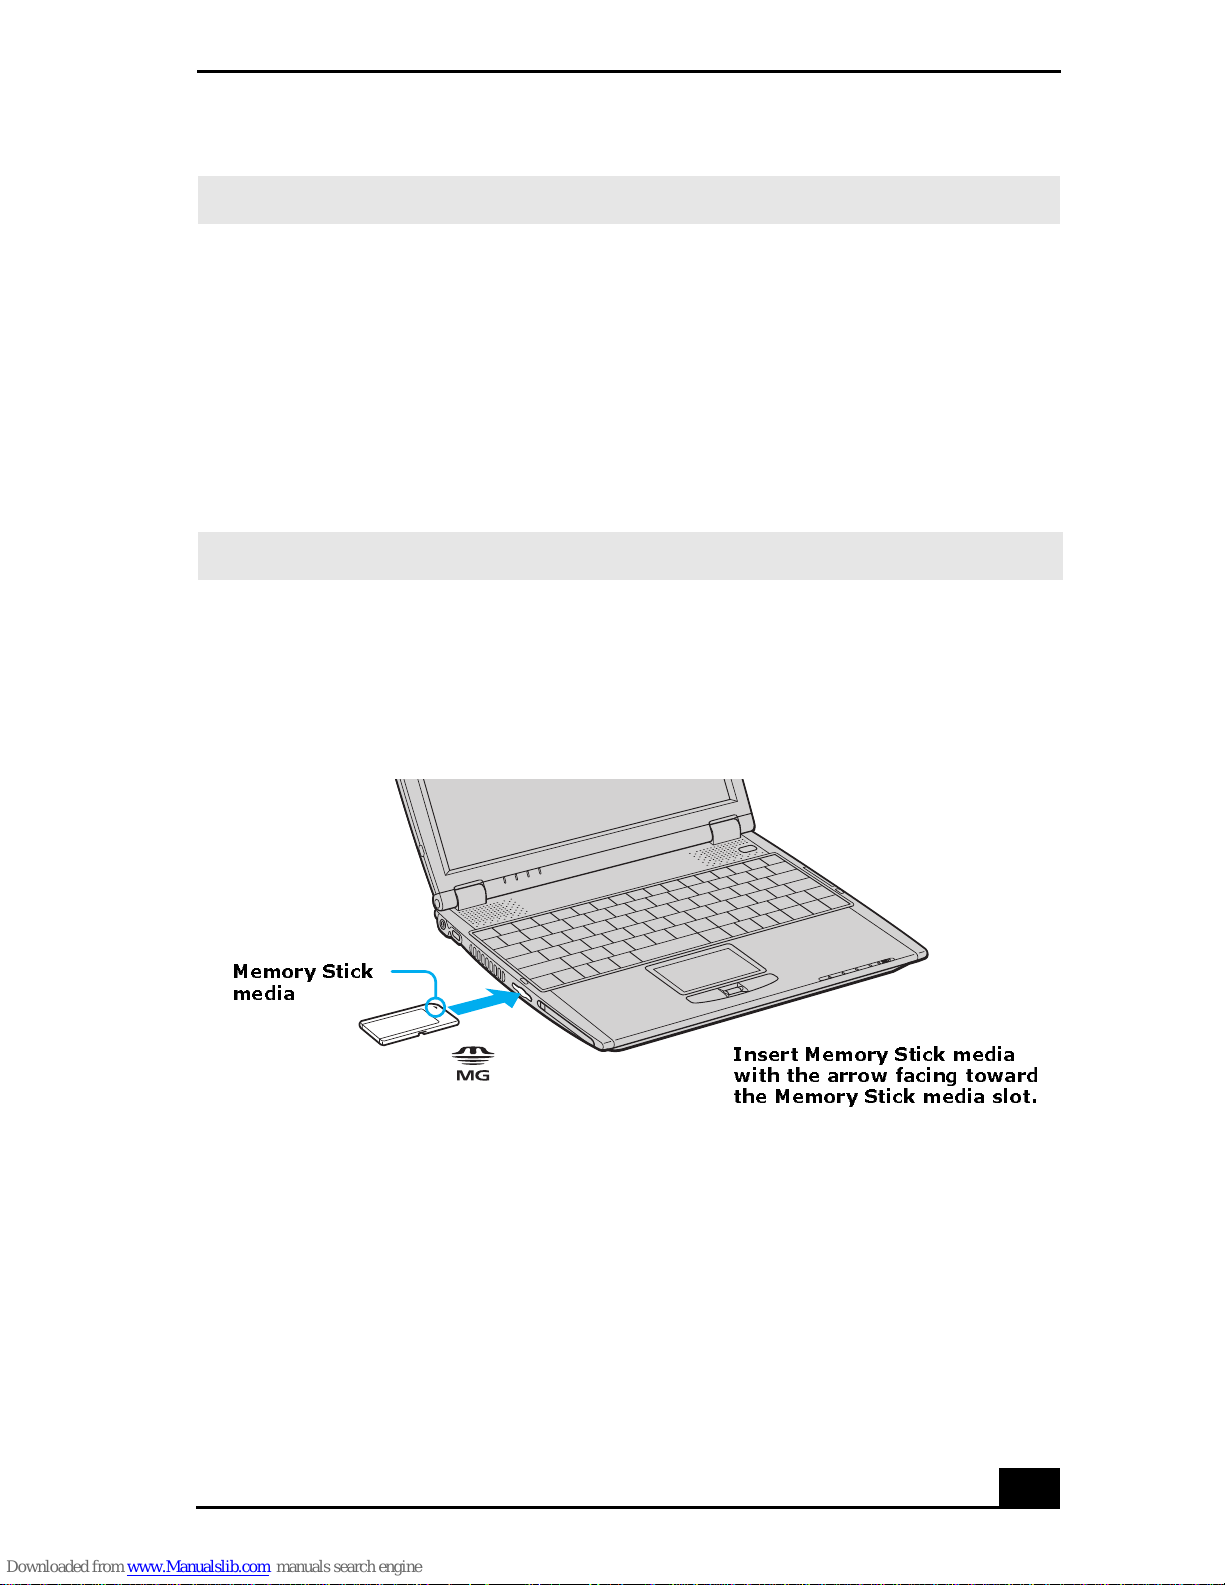
Using Memory Stick Media
✍ MG Memory Stick media has the MG mark.
Inserting Memory Stick media
Before using Memory Stick® media, back up important data . Th e media slot
accommoda t es on l y one M emory Stic k me d ia at a time.
To insert Memory Stick media
1 Insert th e Memory Stick media with the arrow facing up and toward the
Memory Stick media slot.
✍ Inserting the medi a in the wrong direction may dam age the connector pins.
2 Caref ully slide the Memory Stick media into the slot until it clicks in place.
The Memory Stick media indicator br iefly flashes.
Inserting Memory Stick Media
Memory Stick
media
Insert Memory Stick media
with the arrow facing toward
the Memory Stick media slot.
Viewing the contents
Depending on the model you purchased, the Sony Memory Stick window
appears automatically wh en you insert a Memory Sti ck m edia. From this
window, you can choose to view, print, copy or organize your Memory Sti ck
images or data. If the Sony Memory Stick window does not ap pea r when you
insert your Memory Stick media, the n follow these steps:
87
Page 88
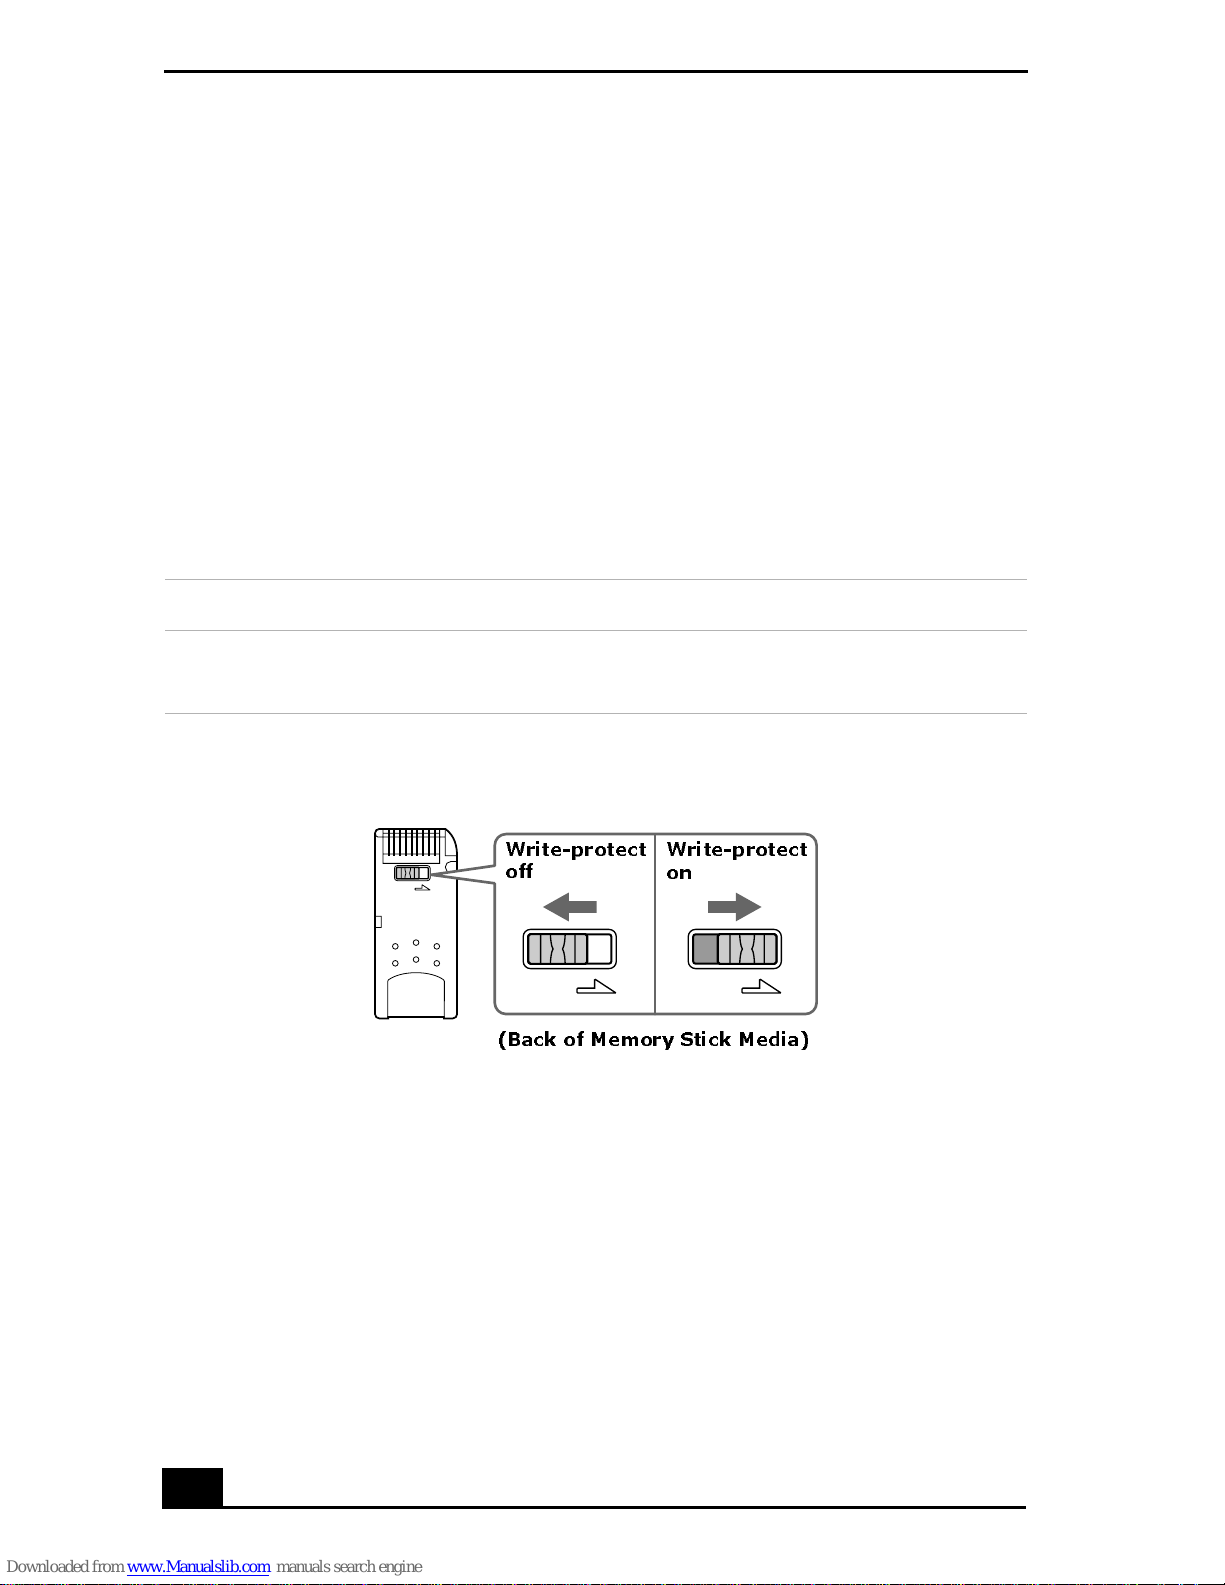
VAIO Com pu ter Quick Sta rt
LOCK
LOCK LOCK
To view the contents
1 From the St ar t menu, click My Computer. The My Computer window
appears.
2 Click Sony MemoryStick. The Sony MemoryS tick window appears,
displaying the contents stored on the Memory Stick media.
Write-pro tecting Memory St ic k media
Memory Stick® media is designed with a write-protect tab to protect data from
accidental erasure or overwriting. Move the tab to the right or left to set or release
write-protection. When the write-protect tab of th e Memory Stick media is set to
LOCK, data cannot be recorded or erased.
Write-protect off Data can be saved on the Memory Stick media.
Write-protect on Data can be read from but not saved on the Memory Stick
media.
Using the Write-Protect Tab
Write-protect
off
(Back of Memory Stick Media)
Write-protect
on
Formatting Memory Stick media
Memory Sti ck® media is formatted for immedia te use when you purchase it. If
you need to reformat Memory Stick media, use the Memory Stick Form atter that
is provided with the media. For more information about using Memory Stick
Formatter, refer to Formatter Help.
88
Page 89

Using Memory Stick Media
Formatting Memory Stick media era ses all data, including music data,
previously saved to it. Before you reformat Memory Stick m edia, confirm
that the media does not contain files you want to keep and back up
important dat a.
To for mat M e mor y Stick me dia
1 Insert th e Memory S tick media into the Memory Stick media slot. See “To
insert Memory Stick media” for more information.
2 From the Start menu, click My Computer. The My Computer window
appears.
3 Right-click Sony MemoryStick, and click Format from the menu. The
Format Sony MemoryStick dialog box appears.
4 Select Quick Format in the Format options box, and then click Start.
Removing Memory Stick media
If the media is removed prema turely, a blue screen with an err or message appe ars
prompting you to continue or exit. Reinsert the media into the slo t and pre ss
Enter to continue. This enables the media to finish reading or writing data.
To remove Memory Stick media
1 Wait a minim um of 10 sec onds after the Memory Stic k media fini sh es
reading or writing data before removing the media.
2 Make sure the access light is off.
3 Push th e Me mory Stick m ed i a in to w ard the computer.
4 When the M emory Stick media ejects, pull it out.
✍ Be caref ul when r emovi ng t he Memo ry S tic k medi a, as it ma y ej ect com plet ely f rom
the slot.
89
Page 90
VAIO Com pu ter Quick Sta rt
Frequently asked questions
Why can’t I open my image files?
You may need to reformat your Memory Stick me dia.
Formatting M em ory Stick media erases all data, incl uding music data,
previously saved to it. Before you reformat Memory Stick media, confirm
that the media does not contain files you want to keep and back up
important dat a.
1 Copy the data from the Memory S tic k media onto you r compute r’s hard di sk
to save data or images.
2 Format the Memory Stick media using Memory Stick Formatter software
preinstalled on your computer. For instruct ions about formatting a Memory
Sti ck media, see “Formatting Memory Stick media.”
Why can’t I save music files onto my Memory Stick media?
❑ Only MagicGate Memory Stick media can be used wit h copyright protected
data, such as music.
❑ Copyright protected music ca nnot be checked out to any Memory Stick
media other th an MG Memory S tick media.
❑ Recorded music is limited to private use only. Using recorded music for any
other purpose requires permission of the cop yright holders.
❑ Sony is not responsible for music files that cannot b e re corded from a CD or
downloaded from oth er sources.
Can I copy images fr om a digital video camera using Memory Stick media?
Yes, and you can view video clips tha t you have recorded with Memory Stick
media-compat ible video camera recorders.
How do I prevent da mage to the Memory Stick media?
❑ Do not use the media in locations that are s ubject to sta tic electricity or
electr i cal noise.
❑ Do not touch the medi a connector with your finger or m etallic object s.
❑ Do not attach labels other than the supplied label to a media .
90
Page 91

Using Memory Stick Media
❑ Do not bend, drop, or apply strong shock to the media.
❑ Do not disassemble or modify the media.
❑ Do not allow the media to ge t wet.
How do I extend the life of the Memory S tick media?
❑ Use the suppl ied storage case. See the ins tructions that came with your
media for more information on its use.
❑ Do not use or store the media in a location that is subject to:
❑ Extre me ly hi g h tem pe r at u r es, such as in a ca r par k ed in th e su n
❑ Direct sunli ght
❑ High humidity or places with corrosive substances
91
Page 92

VAIO Com pu ter Quick Sta rt
Chang ing the Window Design of Sony Programs
This feature is available with UI Design Selector-compatible programs only.
To change the window design
1 Click Start, and then Control Panel.
2 In the left panel, click Switch to Classic View.
3 Double-click UI Design Selector.
4 Click << or >> to view the designs.
5 Click Apply to select a design that appears in the center window. The UI
Design Selector window design changes. The window design for your Son y
software will match the UI Design Selector window.
6 Click OK.
92
Page 93

Connecting Mice and Keyboards
❑ Using External Mice and Keyboards
93
Page 94

VAIO Com pu ter Quick Sta rt
Using External Mice and Keyboards
You can connect a universal serial bus (USB) mouse or keyboard to your
computer. To func tion properly, the device you connect must be compatible with
the Microsoft® Windows® operating system installed on your computer . For
information about your computer’s built-in keyboard and key functions, see
“Using the Keyboard” in the “Computer Features” chapt er.
❑ Connecti ng a mouse or keyboard
❑ Disconnecting a mouse or keyboard
❑ Frequently asked questions
Connecting a mouse or keyboard
Your computer is compatibl e with many popular mice and keyboa rds. The New
Hardware Wizard guides you through the software installation process. Some
devices req uire separate driver s oftware installation. See the instructions that
accompanied you r mouse or keyboard for more information. If the mous e or
keyboard does not work once you have connected it to your computer, see
“Frequently as ked questions” for more information.
Your computer can be on or off when connec ting a mouse or keyboard.
To connect a USB mouse or keyboard to your computer
1 Locate the USB port on your computer, port replicator, or docking
station.
2 Plug the USB cable into the USB port on the computer. (One USB port
supports one USB device.) The New Hardware Wizard appears.
3 Follow the on-screen instructions to complete the installation process.
94
Page 95
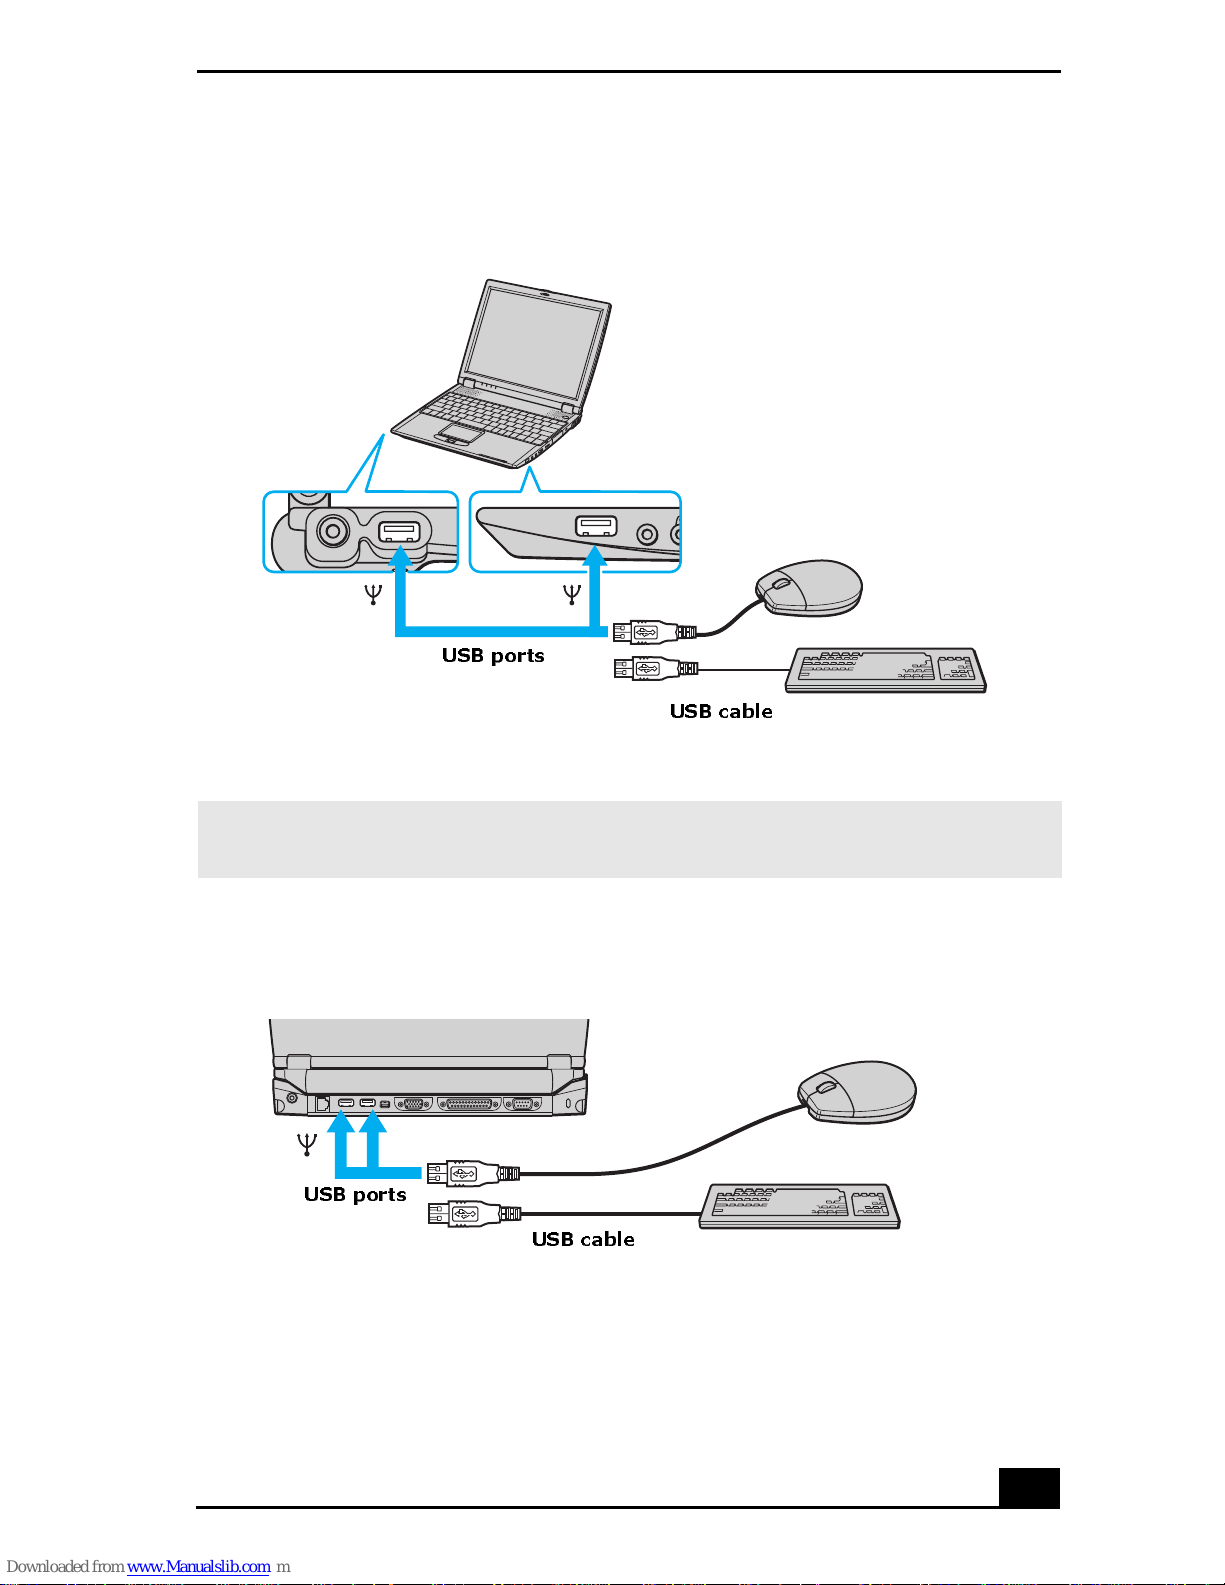
Connectin g a USB Mouse or Keyboard
USB ports
Using External Mice and Keyboards
USB cable
✍ See the guide that came with your mouse or keyboard for more information on its
insta llation and use.
Connect in g a USB Mouse or Keyboard to a Docking S tation
USB ports
USB cable
95
Page 96

VAIO Com pu ter Quick Sta rt
Disconnecting a mouse or keyboard
You can disconnect a USB mouse or keyboard when the com puter is on or off.
Disconnecting the USB mouse or keyboard when the computer is in a power
saving mode (Standby or Hibernate) may cause the computer to malfunction.
To disconnect the USB mouse or keyboard
Unplug the USB cabl e from the USB port on the computer.
Frequently asked questions
Why doesn’t the comp uter reco g nize the U SB mouse?
❑ Make sure the mouse is securely plugged into the USB port. See
“Connecting a mouse or keyboard” for more information.
❑ You may need to install or reinstall the mouse driver software . Use the
supplied Application Recovery CD to install the drivers. See “Using the
Applicat ion Recovery CD(s)” for more information.
Why doesn’t the pointer move when I use the USB mouse?
❑ Make sure anoth er mouse was not installed.
❑ You may need to install or reinstall the mouse driver software . Use the
supplied Appl ic ation Recove ry CD(s). See “Usi ng th e Applic ation Rec overy
CD(s)” for more information.
❑ If you are playing a dis c, press the Ctrl+Alt+Delete keys simultaneously to
stop playback and restart the computer.
❑ If you still cannot use the pointer, restart the computer. You can restart the
computer three different ways.
❑ Press the Windows key , and press U. When the Turn off computer
window appear s, pres s R.
❑ Press the Ctrl+Alt+Delete keys simultaneously. When the Windows
Task Manage r window appears , press the Alt key to hi ghlight the men u
bar, and press the Right Arrow key to s el ect Shut Down. Press
Enter, and then press R.
❑ Press and hold the power but ton. When the comput er turns of f, press the
power button aga in to restart the computer.
96
Page 97

Floppy Disk Drives and PC
Cards
❑ Using Floppy Disk Drives
❑ Using PC Cards
97
Page 98
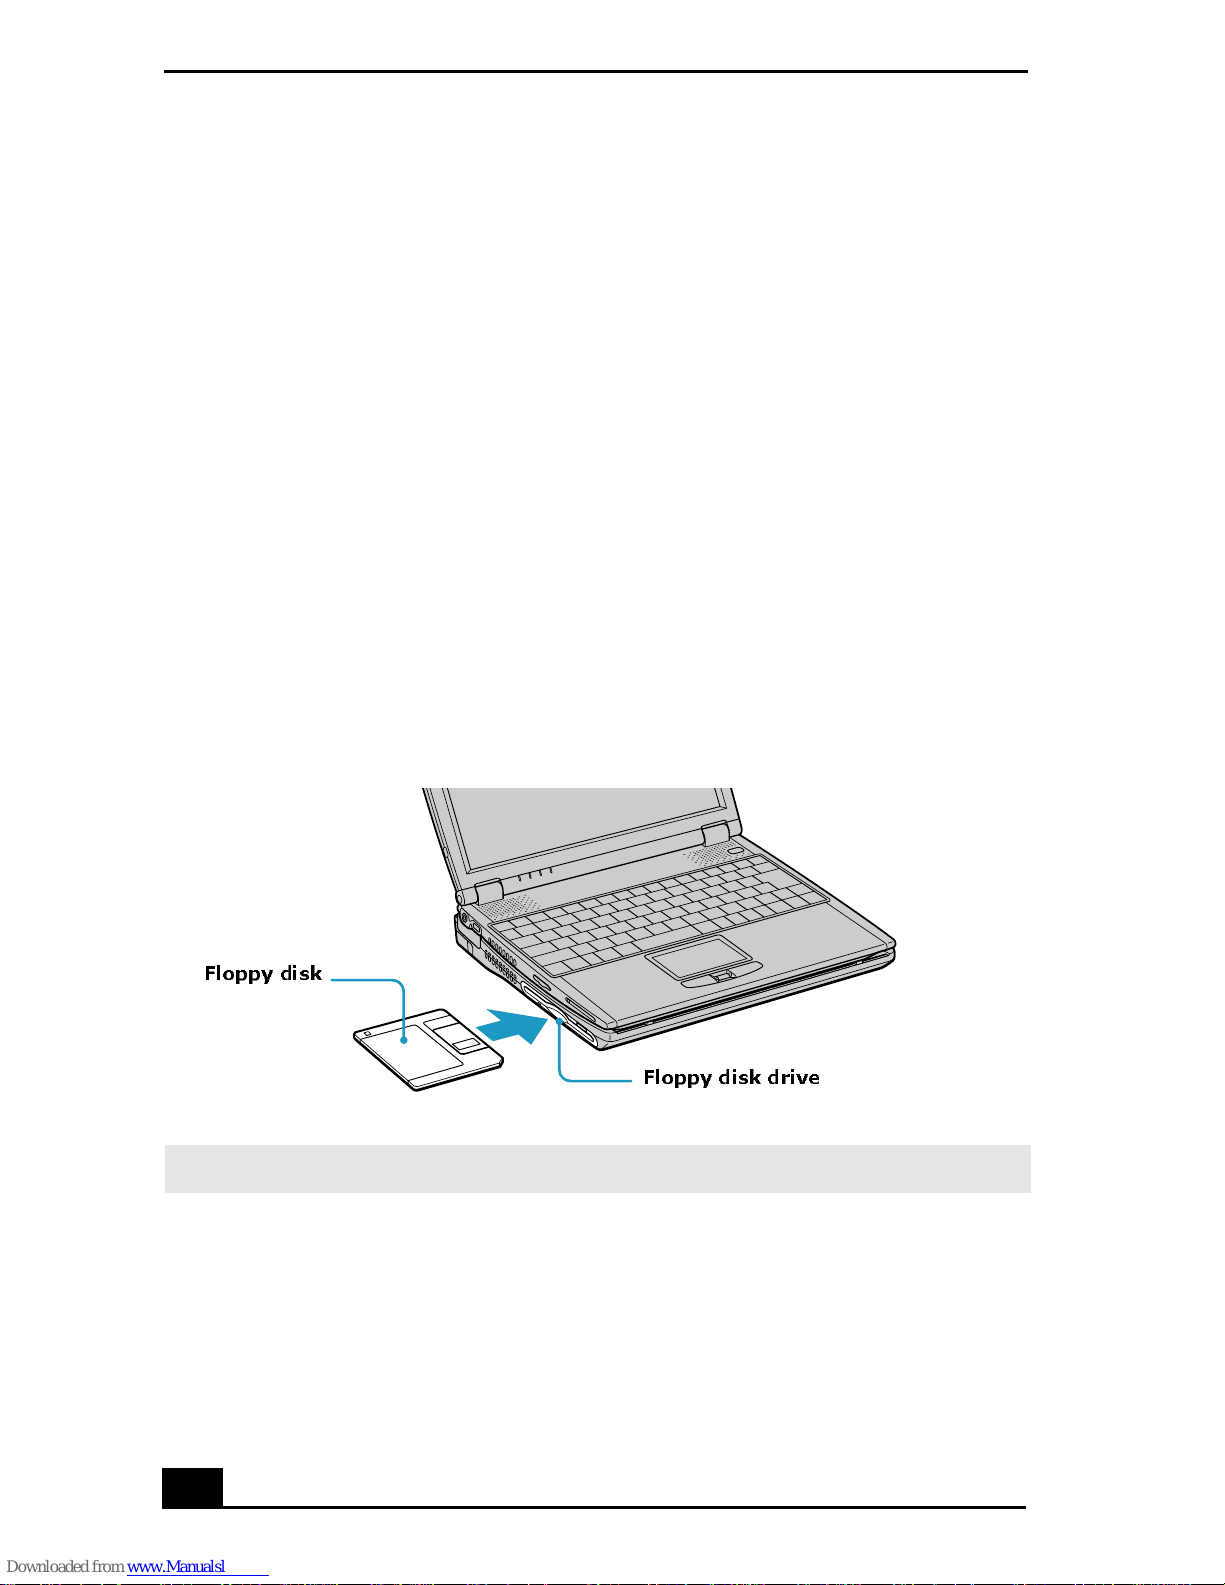
VAIO Com pu ter Quick Sta rt
Usin g Floppy Disk Drives
You can connect a floppy di sk drive t o your computer, port replicator, or docking
station. The floppy disk drive enables you to read data stored on a floppy disk.
❑ Inserting and removing floppy disks
❑ Frequently asked questions
Inserting and removing floppy disks
Floppy disks are portable devices that store data. To protect your floppy disks,
keep them away from magnets and direct sunlight or other he at sources.
To insert a floppy disk
1 Hold the floppy disk with the label facing up.
2 Push the floppy disk into the drive until it clicks into place.
Inserting a Floppy Disk
Floppy disk
Floppy disk drive
✍ Do not open the shutter man ually and touc h the surface of the floppy disk .
To remove a flop py disk
1 Close all programs that were opened from the disk and wait for the LED
indicator to turn off.
2 Push the Eject button, and remove the disk.
98
Page 99
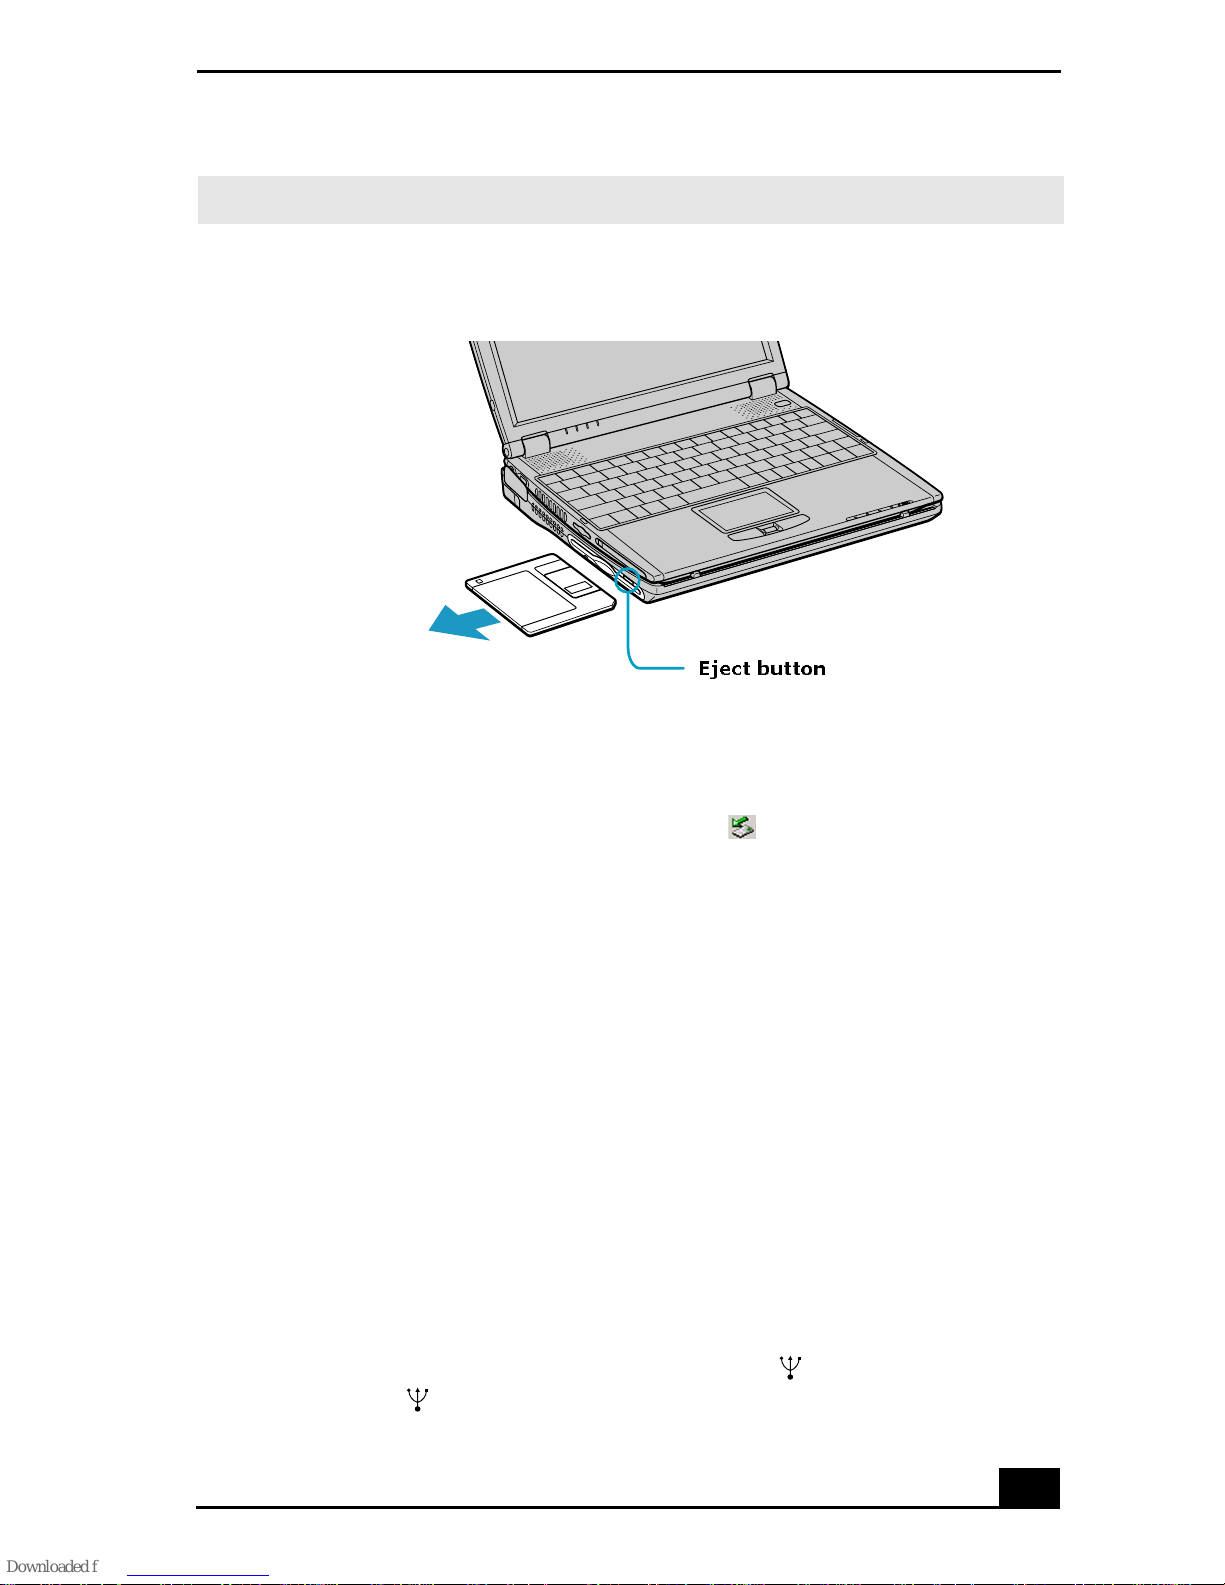
Using Floppy Disk Drives
✍ To avoid losing data, do not push the Eject button when the LED indicator is on.
Removing a Floppy Disk
Eject button
Frequently asked questions
Why doesn’t the Safety Remove Hardware icon appear on the taskbar
when the drive is connected?
The compute r do es not recognize that the floppy disk drive is connected to the
computer. First, make sure the USB connector is properly inserted into the USB
port. If you need to secure the connection, wait a few moments for the computer
to recognize the drive. If the icon still does not appear, follow these steps:
1 Close all open programs to avoid data loss.
2 Eject the flo ppy disk from the floppy disk drive.
1 Close all programs tha t were ope ned from the disk and wait fo r the LED
indicator to turn off.
2 Push the Ejec t button, and remove the disk.
3 Reconne ct the floppy disk drive.
1 Close any act ive programs to prevent dat a loss.
2 Insert the USB c onnect or (wi th the USB i con facing upward) into the
USB port .
99
Page 100

VAIO Com pu ter Quick Sta rt
4 Restart the computer.
1 Click Start on the Windows® taskbar, and click Turn Off Computer.
2 Click Restart.
Why is the drive unable to write data to a floppy disk?
The floppy disk drive cannot write data to a disk if it is inserted into the drive
improperly. See “Inserting and removing floppy disks ” for instr uctions on how to
insert the disk properly.
If the disk is inserted properly and you are still unable to write data to it, the disk
may be write-protected. You can either use a floppy disk tha t is not writeprotected or disable the write- protect feature.
100
 Loading...