

Page 1
PCG-R505DL/R505DS/R505DSK/R505DSP
SERVICE MANUAL
Ver. 1-2002C
Revision History
Lineup: PCG-R505DL
PCG-R505DS
PCG-R505DSK
PCG-R505DSP
For American Area
US Model
Canadian Model
S400
Confidential
• Design and specifications are subject to
change without notice.
9-874-513-01
Notebook Computer
Page 2

Information in this document is subject to change without notice.
Sony and VAIO are trademarks of Sony. Microsoft, MS-DOS,
Windows, the Windo ws 95, W indows 98, Windo ws 2000, W indows
ME and Windo ws XP logo are trademarks of Microsoft Corporation.
All other trademarks are trademarks or registered trademarks of
their respective owners. Other trademarks and trade names may be
used in this document to refer to the entitles claiming the marks and
names or their produces. Sony Corporation disclaims any proprietary
interest in trademarks and trade names other than its own.
Caution Markings for Lithium/Ion Battery - The following or similar
texts shall be provided on battery pack of equipment or in both the
operating and the service instructions.
CAUTION: Danger of explosion if battery is incorrectly replaced.
Replace only with the same or equivalent type recommended by
the manufacturer. Discard used batteries according to the
manufacturer’s instr uctions.
CAUTION: The battery pack used in this de vice may present a fir e
or chemical burn hazard if mistreated. Do not disassemble, heat
above 100°C (212°F) or incinerate.
Dispose of used battery promptly.
Keep away from children.
CAUTION: Changing the back up battery.
•Overcharging, short circuiting, reverse charging, multilation
or incineration of the cells must bi avoided to prevent one or
more of the following occurrences; release of toxic materials,
release of hydrogen and/or oxygen gas, rise in surface
temperature.
• If a cell has leaked or vented, it should be replaced
immediately while avoiding to touch it without any protection.
Service and Inspection Precautions
1. Obey precautionary markings and instructions
Labels and stamps on the cabinet, chassis, and components identify areas
requiring special precautions. Be sure to observe these precautions, as
well as all precautions listed in the operating manual and other associated
documents.
2. Use designated parts only
The set’s components possess important safety characteristics, such as
noncombustibility and the ability to tolerate large voltages. Be sure that
replacement parts possess the same safety characteristics as the originals.
Also remember that the 0 mark, which appears in circuit diagrams and
parts lists, denotes components that have particularly important safety
functions; be extra sure to use only the designated components.
3. Always follow the original design when
mounting parts and routing wires
The original layout includes various safety features, such as inclusion of
insulating materials (tubes and tape) and the mounting of parts above the
printer board. In addition, internal wiring has been routed and clamped so
as to keep it away from hot or high-voltage parts. When mounting parts or
routing wires, therefore, be sure to duplicate the original layout.
4. Inspect after completing service
After servicing, inspect to make sure that all screws, components, and wiring
have been returned to their original condition. Also check the area around
the repair location to ensure that repair work has caused no damage, and
confirm safety.
5. When replacing chip components...
Never reuse components. Also remember that the negati ve side of tantalum
capacitors is easily damaged by heat.
6. When handling flexible print boards...
•The temperature of the soldering-iron tip should be about 270C.
•Do not apply the tip more than three times to the same pattern.
•Handle patterns with care; never apply force.
Caution: Remember that hard disk drives are easily damaged by
vibration. Always handle with care.
Confidential
– 2 – PCG-R505DL/R505DS/R505DSK/R505DSP (AM)
Page 3

TABLE OF CONTENTS
Section Title Page
CHAPTER 1. REMOVAL ...............................................1-1
Please confirm disassembly method by “Repair Manual” which
has been informed you separately.
CHAPTER 2. SELF DIAGNOSTICS.......................... 2-1
Please confirm “Self Diagnostics” method which will be informed
you with distribution of “Self Diagnostics” software.
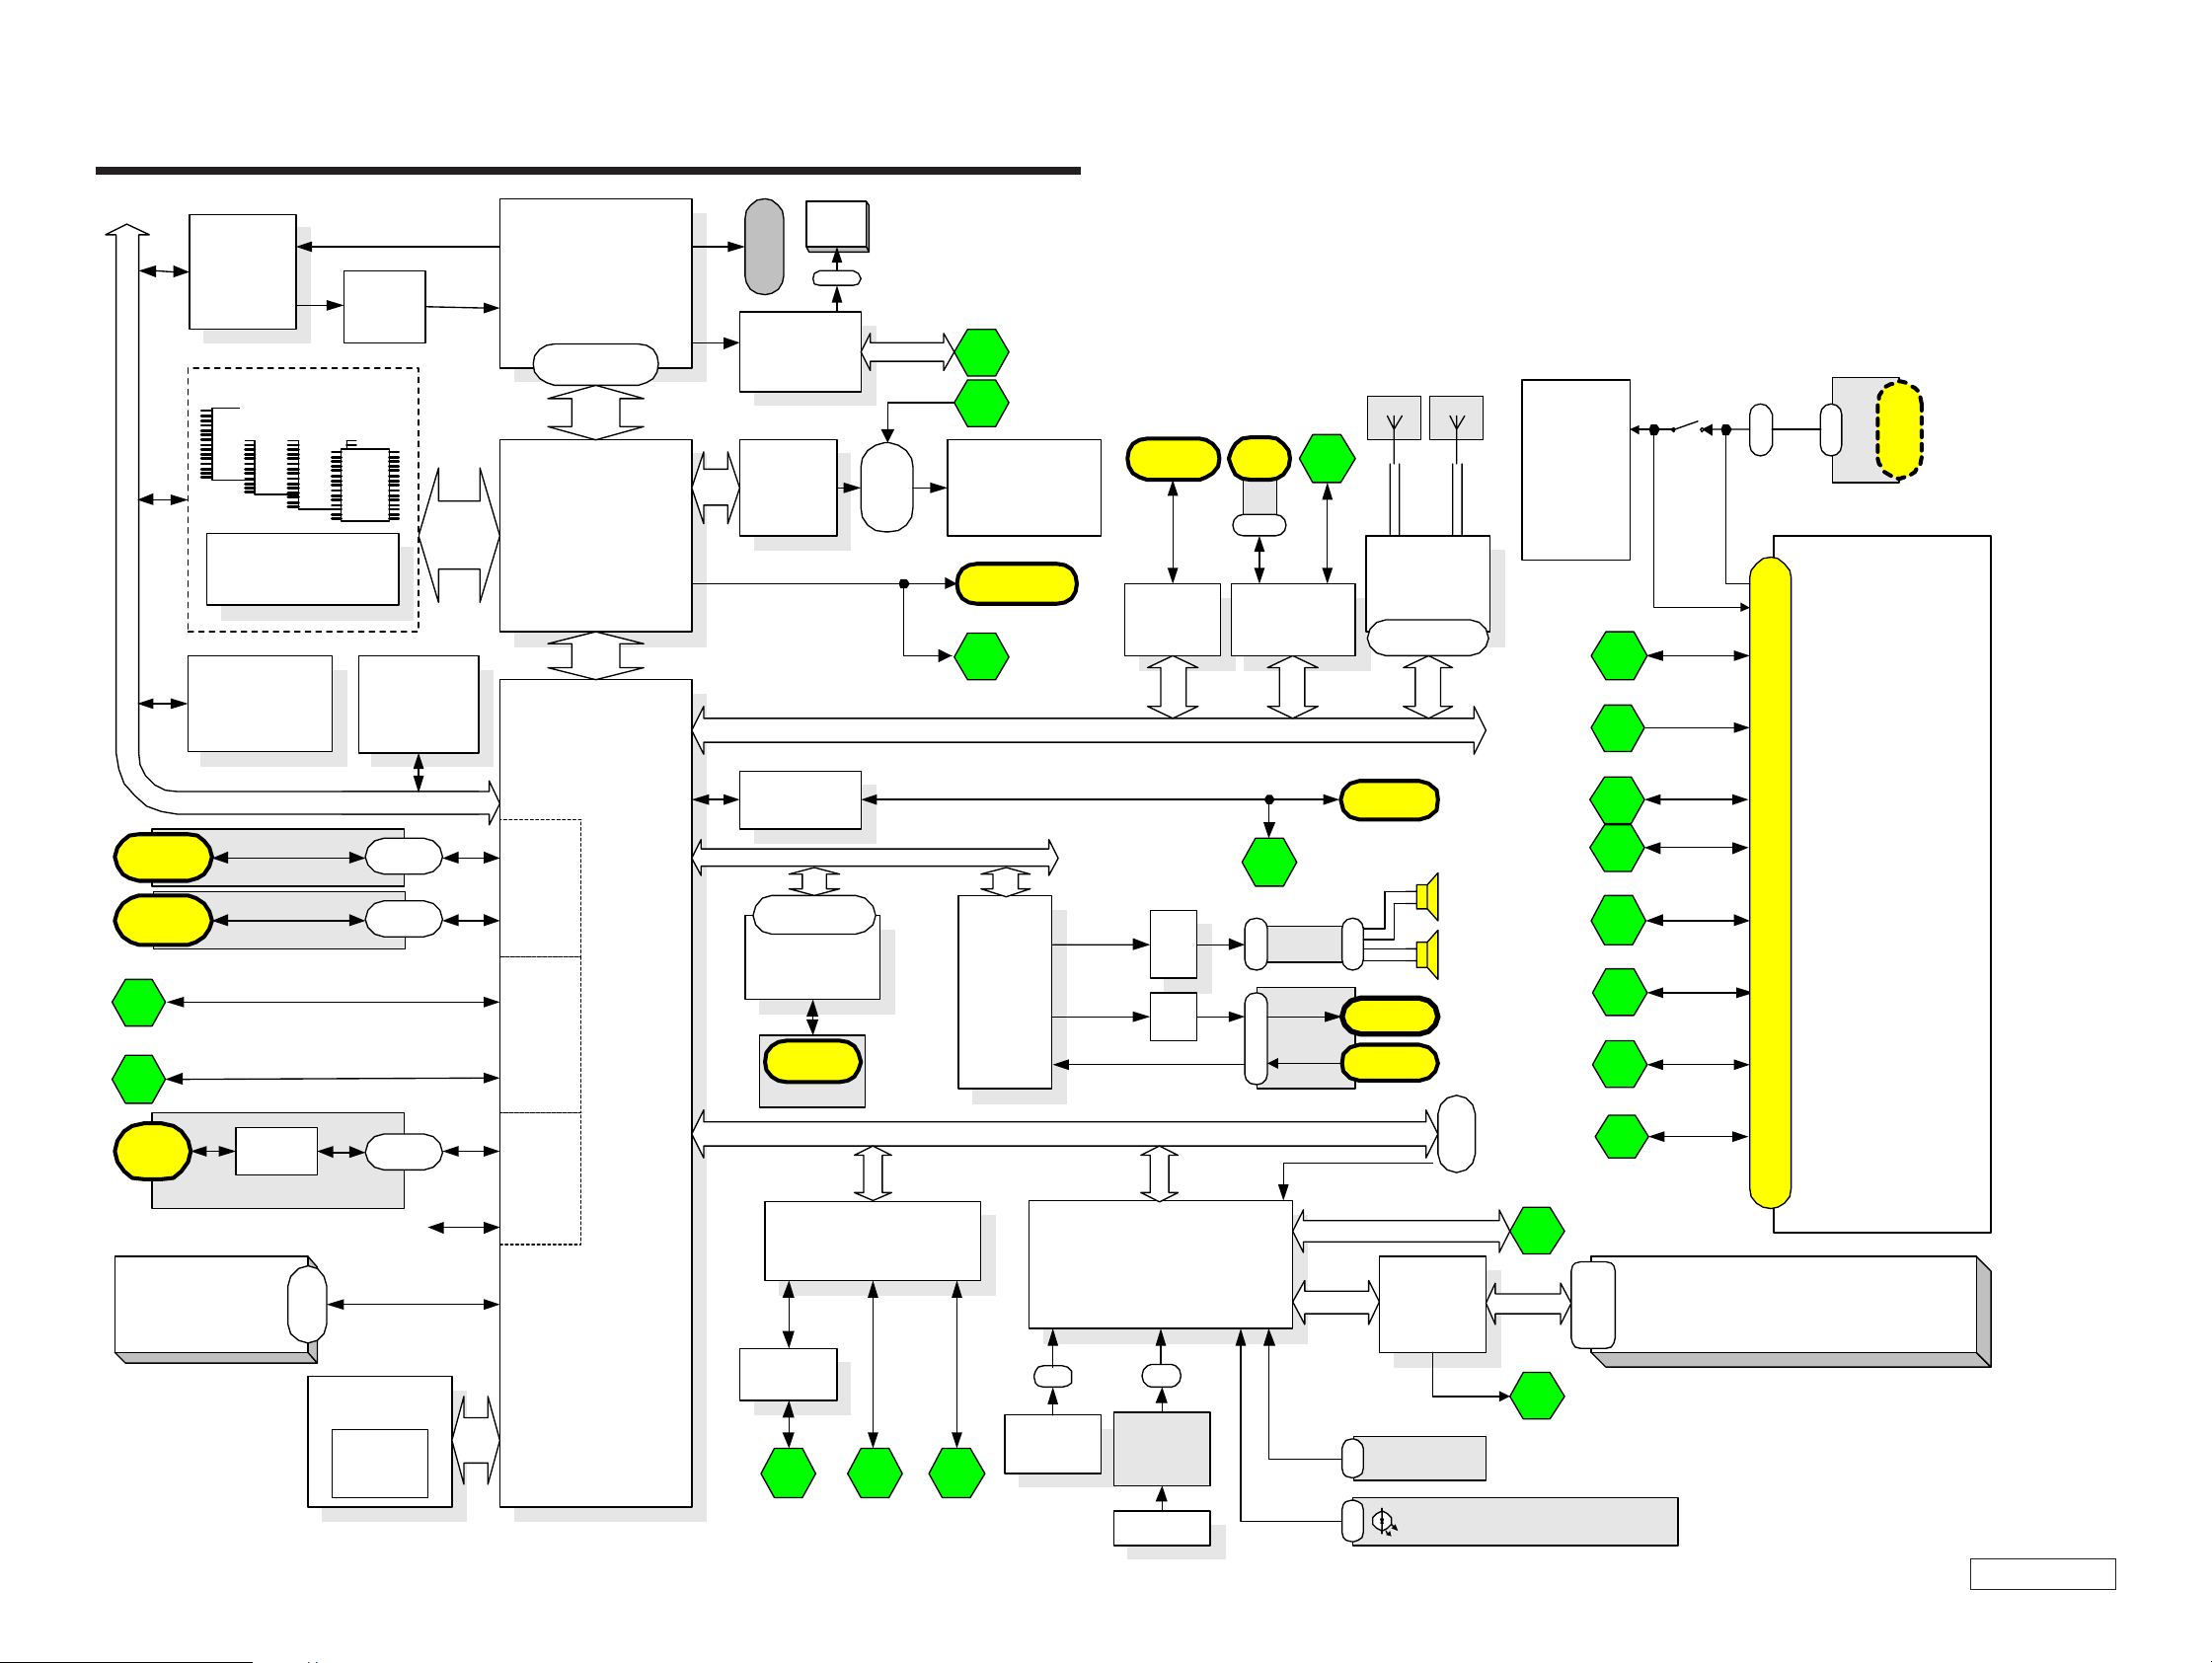
CHAPTER 3. BLOCK DIAGRAM............................... 3-1
(to 3-2)
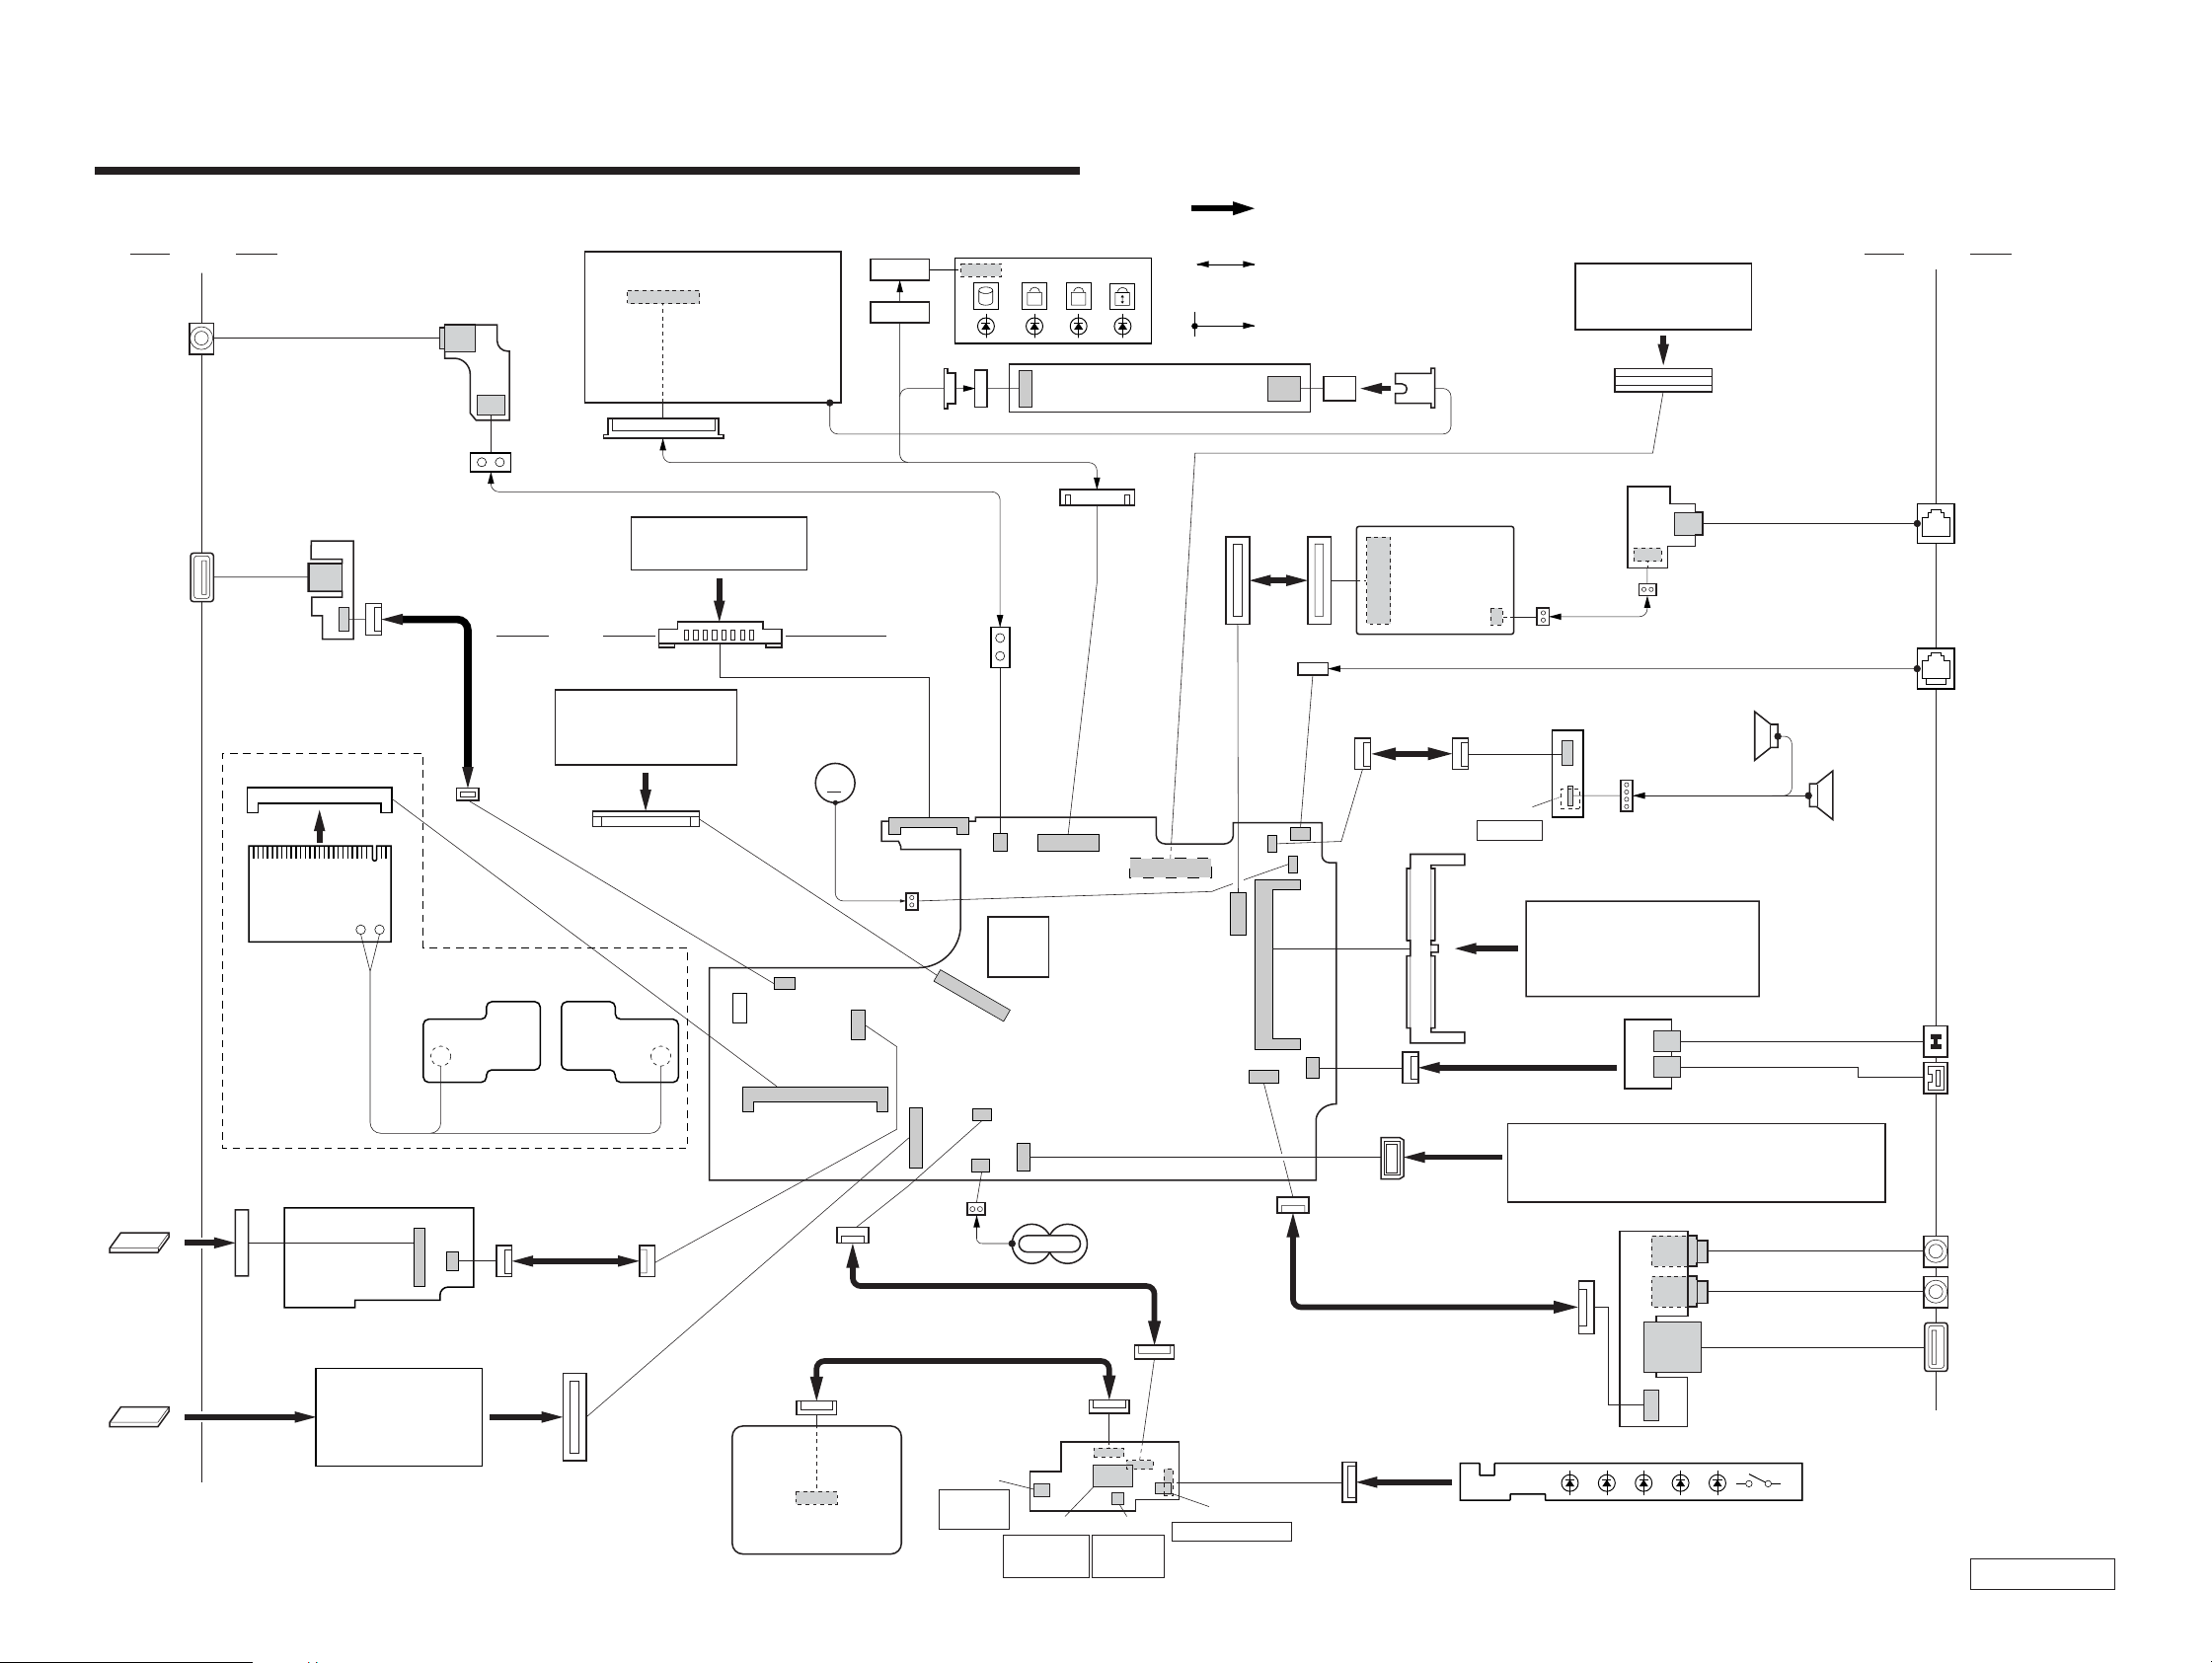
CHAPTER 4. FRAME HARNESS DIAGRAM........ 4-1
(to 4-2)
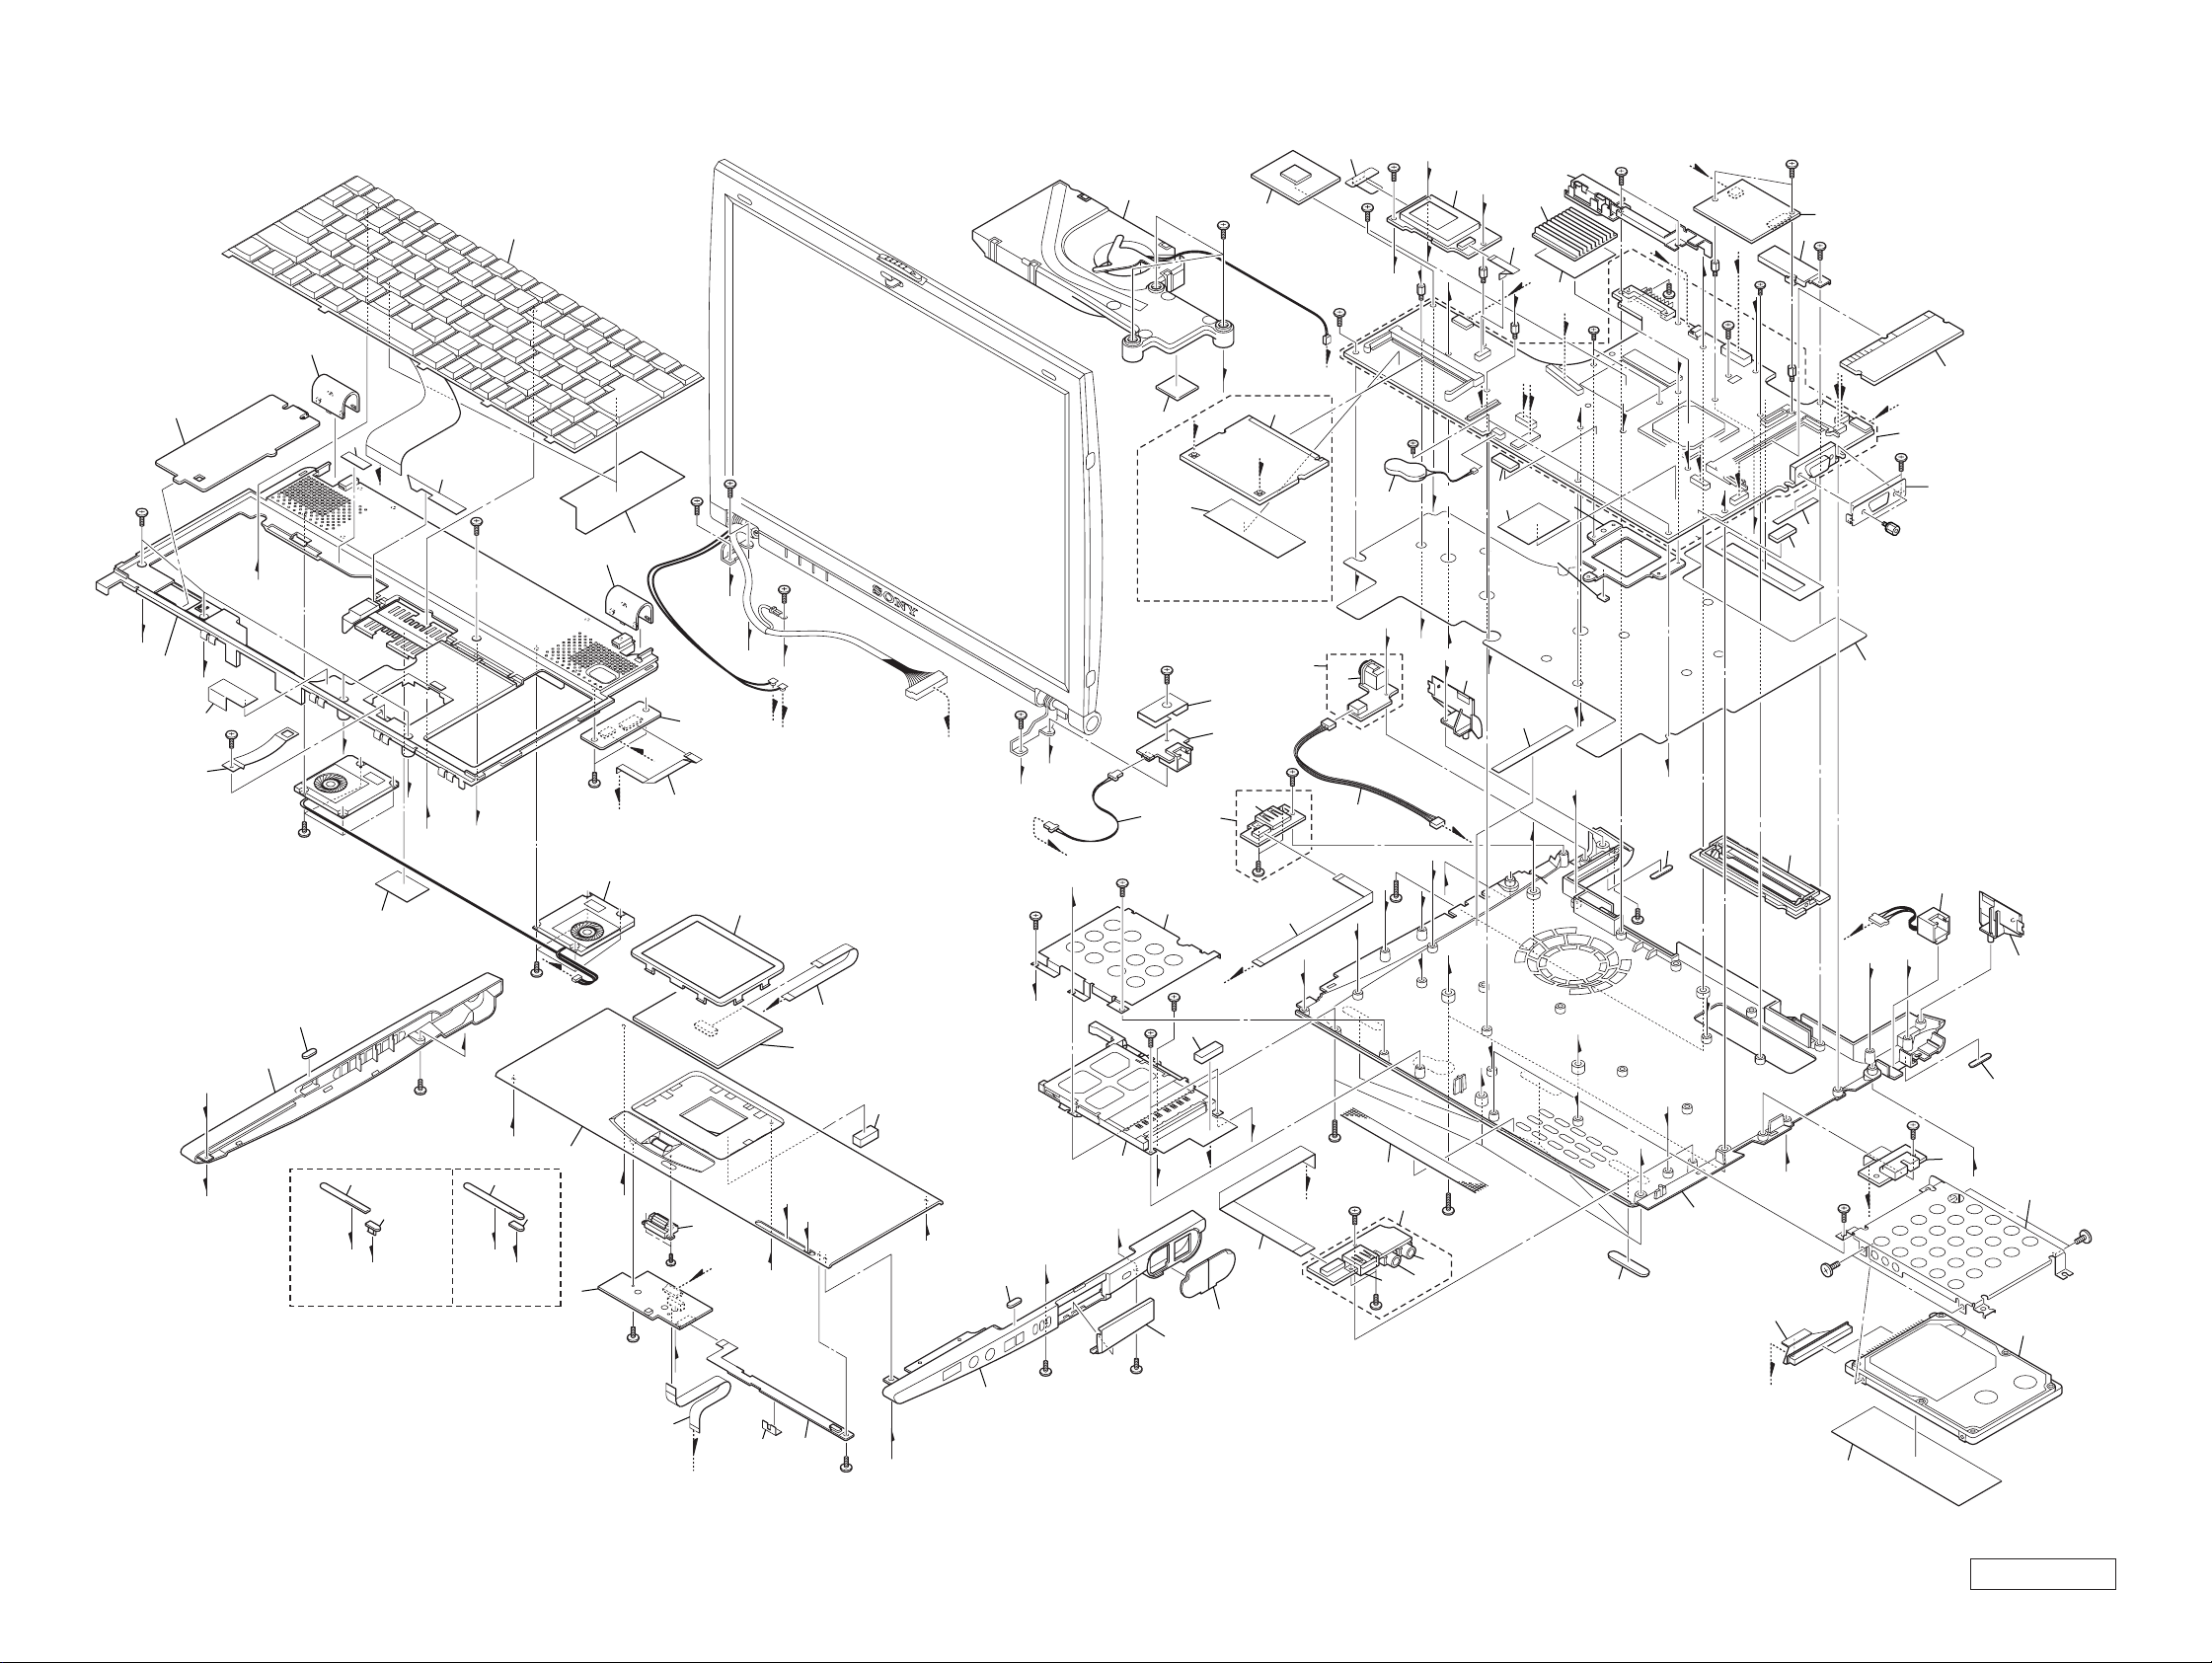
CHAPTER 5. EXPLODED VIEWS AND
PARTS LIST
5-1. Main Section.................................................................... 5-2
5-2. LCD Section .................................................................... 5-5
5-3. Accessories ...................................................................... 5-9
(to 5-9)
•Abbreviations
UC : US model / Canadian model
History of the changes is shown as the “Revision
History” at the end of this data.
Confidential
– 3 – PCG-R505DL/R505DS/R505DSK/R505DSP (AM)
Page 4

< ATTENTION >
Please confirm disassembly method by “Repair Manual”
which has been informed you separately.
CHAPTER 1.
REMOVAL
1-1
(END)
Confidential
PCG-R505DL/R505DS/R505DSK/R505DSP (AM)
Page 5

CHAPTER 2.
SELF DIAGNOSTICS
< ATTENTION >
Please confirm “Self Diagnostics” method which will be informed
you with distribution of “Self Diagnostics” software.
2-1
(END)
Confidential
PCG-R505DL/R505DS/R505DSK/R505DSP (AM)
Page 6
CHAPTER 3.
BLOCK DIAGRAM
USB
Port0
USB
Port1
USB Port5
5
USB Port6
6
VID
VID
Selector
Selector
FM3565
FM3565
On Board Memory
256Mbit x 4
PC133 SO-DIMM
PC133 SO-DIMM
144P Socket
144P Socket
Row#2, 3
CLK GEN
CLK GEN
IMI9870GTD
IMI9870GTD
(CK-Titan)
(CK-Titan)
SMBUS2
CNX-151
CNX-153
Row#0
Row#2, 3
Core
Voltage
Regulator
EEPROM
EEPROM
(Password)
(Password)
(ROMINFO)
(ROMINFO)
FFC
CN
FFC
CN
PC13 3
Memory
BUS
Pentum III-m
Pentum -m
Connector
GMCH-M
GMCH-M
FW82830MG
ICH3- M
Port0
USB Host
Controller0
Port1
Port2
USB Host
Controller1
Port3
CPU
CPU
&
&
Celeron
Celeron
Processor
Processor
uF CPGA
+
AGTL
FW82830MG
HL
ICH3- M
FW82801
FW82801
DVO
B
FAN
ITP
CN
Connector
ATF Sense
ATF Sense
FAN Control
FAN Control
ADM1030
ADM1030
VCH
VCH
FW82807
FW82807
Ether
Ether
82562
82562
MDC
Connector
MDC
MDC
RJ-11
CNX-1 5 2
SMBUS1
LCD
I/F
30pin
AC LINK
SMBUS1
1
LED Caps/Num/ScrLk
2
LCD 12.1" X GA
&
Inverter Board
LEX-32
VGA
DSub-15
VGA
4
PCI
Audio
Audio
CODEC
CODEC
YMF753
YMF753
PC Card
Socket
Cardbus
Cardbus
R5C476II
R5C476
Amp
Amp
Amp
i.LINK
0
FPC
CN
i.LINK
i.LINK
TSB43AB22
TSB43LV22
7
Ether
SWX-87
CN
SWX-151
CN
i.LINK
1
3
Diversity Antenna
IFX-182 IFX-183
W-LAN
W-LAN
Mod ule
Mod ule
802.11b
802.11b
Mini PCI
124pin
RJ-45
Speaker
CN
Headphone
Ext-MIC
Power
Supply
3.3V&5V
1.2V&1.8V
1.5V
Batt Charge
i.LINK
1
VGA
USB
Port5
USB
Port6
Ether
Serial
Pallarel
CN
CN
DC Jack
3
4
5
6
PCGA-DSM5
PCGA-DSD5
7
8
Docking Connector 100Pin
9
MS
Slot
HDD
MS
Chip
IFX-1 80
FPC
50pin
FFC
CN
N.C
FWH
FWH
E82802
E82802
Flash
BIOS R OM
8 Mbit
HL
Port4
USB Host
Controller2
Port5
Primary IDE
3-1 3-2
Serial
Serial
Buffer
Buffer
MA X3243
MA X3243
8 9
Super I/O
Super I/O
LPC47N227
LPC47N227
10
PallarelSerial FDD
LPC
CN
Int. KB D
Int. KB D
EC/KBC/SPIC
EC/KBC/SPIC
H8S/2149
H8S/2149
CN
JogDial
L/R Butto n
SWX-88
Touch PA D
Touch PA D
SMBUS0
FDD
Por t
Debug
SMBUS1
I/O Expande r
I/O Expande r
/SMBUS MU X
/SMBUS MU X
OZ998
OZ998
1
SMBUS0
2
Power SW
CN
SWX-87
FPC LED PWR/BATT/MS/W-LAN
CN
10
SMBUS1
Battery
Connector
LED Caps/Num/ScrLk
(END)
Baterry
BP2R/BP4R
Confidential
PCG-R505DL/R505DS/R505DSK/R505DSP (AM)
Page 7
CHAPTER 4.
FRAME HARNESS DIAGRAM
LEX-32 BOARD
Side L Side R
CNX-154 BOARD
LCD
CN4901
SIDE A
CN4401
DC IN
SIDE A
18
1
A
INVERTER UNIT
CN4402
1
CN4302
USB
CNX-153 BOARD
SIDE B
CN4301
FLEXIBLE FLAT
CABLE (10 CORE)
(EXCEPT: PCG-R505DL)
CN2101
123 1
WIRELESS
LAN CARD
10
2
LITHIUM ION
BATTERY PACK
1
Rear
81
KEY BOARD
CN1111
110
24 1
CN1901
HARNESS (LCD)
HARNESS (POWER 2P)
CN3001
DC FAN
(WITH HEATSINK)
M
CN2801
2
1
CN701
130
1
2
29
CPU
IFX-182 BOARD
(direct connection)
Harness
(with connectors on both ends)
Harness (soldering on either end)
CN1602
1
J1
2
2
1
MODEM
CARD
29
CN1502
30
18
CN2002
9
2101
FLEXIBLE
FLAT CABLE
(10 CORE)
CN501
12
59 60
61 62
30
CN4801
1
10
CNX-152 BOARD
SIDE B
CON2
HARNESS (2PIN)
SWX-87 BOARD
SIDE B
S4801
POWER
MEMORY MODULE
DOCKING STATION
PCGA-DSD5/DSM5
CN1401
1 100
299
2
1
CN5002
RJ-45 HARNESS (FOR INTERNAL)
SPEAKER
CN4802
1
4
L ch
EXTENSION
PCGA-MM128E
SPEAKER
From board to connector
CN5001
MODULAR
JACK
NETWORK
R ch
MEMORY
STICK
PC CARD
CN4601
1
10
IFX-180 BOARD
SIDE A
PC CARD
CONNECTOR
CN4602
1
12
143 144
49150
1
16
FPC (HDD)
IFX-183
BOARD
MBX-62 BOARD
SIDE A
CN1394
PCG-R505DL: 30GB
PCG-R505DS, R505DSK, R505DSP: 40GB
FLEXIBLE PRINT (LED) PWB
FLEXIBLE
FLAT CABLE
(12 CORE)
CN1201
1
2
79
80
CN1121
1
12
20
19
TOUCH PAD
CN2802
S4702
LEFT
BUTTON
21
CN4702
S4701
ENCODER
(ROTARY)
2
CN2001
1
FLEXIBLE FLAT CABLE (20 CORE)
FLEXIBLE FLAT CABLE (12 CORE)
NICKEL HYDROGEN
BATTERY
1
19
CN4701
2
20
1
12
SWX-88 BOARD
SIDE A
S4704
CENTER
BUTTON
RIGHT BUTTON
CN1101
S4703
2
CN2201
118
FLEXIBLE FLAT CABLE
(NI SHIELD) 18P
1
10
CN4703
4-1 4-2
CN4001
1
18
(END)
FLEXIBLE PRINT
(ILINK) PWB
HDD ASSY
CNX-151 BOARD
SIDE B
PCG-R505DL/R505DS/R505DSK/R505DSP (AM)
DC OUT
i.LINK
J4004
MIC/LINE
INPUT
J4003
HEAD POHNE
CN4002
USB
Confidential
Page 8

EXPLODED VIEWS AND PARTS LIST
NOTE:
• The mechanical parts with no reference number in the
exploded views are not supplied.
• Items marked “ * ” are not stocked since they are seldom
required for routine service. Some delay should be
anticipated when ordering these items.
• When the same reference numbers are written down in the
list, please use the one listed in the first place as the main
part.
CHAPTER 5.
The components identified by mark 0 or
dotted line with mark 0 are critical for safety.
Replace only with part number specified.
Les composants identifiés par une marque
0 sont critiques pour la sécurité. Ne les
remplacer que par une pièce portant le
numéro spécifié.
5-1
Confidential
PCG-R505DL/R505DS/R505DSK/R505DSP (AM)
Page 9

5-1. MAIN SECTION
Ref.No. Part No. Description
1 A-8067-097-A COMPLETE PWB SWX-88
2 1-823-811-11 CABLE, FLEXIBLE FLAT 20P
3 1-763-819-11 PWB, FLEXIBLE PRINT (FRONT LED)
4 1-476-762-31 ENCODER (ROTARY)
5 X-4624-454-2 (R505DS, R505DSK, R505DSP)...
HOUSING (PALMREST) (A) ASSY
5 X-4624-466-2 (R505DL)...HOUSING (PALMREST)
(B) ASSY
6 4-660-060-01 (R505DS, R505DSK, R505DSP)...
COVER (PALM), LENS
6 4-660-223-01 (R505DL)...COVER (PALM) (B), LENS
7 4-660-058-01 (R505DS, R505DSK, R505DSP)...
KNOB, SLIDE
7 4-660-603-01 (R505DL)...SPACER (LENS COVER)
8 4-654-382-01 CUSHION HDD CONNECTOR
9 1-796-319-11 PAD, TOUCH
10 4-660-059-02 ESCUTHEON (PAD)
11 1-823-813-11 CABLE, FLEXIBLE FLAT 12P
12 X-4624-451-1 COVER (SIDE L) ASSY
13 4-660-456-01 CUSHION (COVER SIDE)
14 X-4624-452-1 COVER (SIDE R) ASSY
15 1-825-082-11 SPEAKER, (2.0CM) BOX WITH
16 4-662-617-01 SHEET (FAN), INSULATING
17 1-823-812-11 CABLE, FLEXIBLE FLAT 10P
18 A-8067-107-A COMPLETE PWB SWX-87
19 X-4624-447-1 HOUSING (FRAME) ASSY
*20 4-660-019-01 KEYBOARD, PLATE
21 4-660-020-01 COVER, HINGE
22 1-960-827-51 HARNESS (2PIN)
23 A-8067-116-A COMPLETE PWB CNX-152
24 4-653-506-13 SHEET (MODEM)
25 1-477-114-21 KEYBOARD UNIT (US)
*26 1-763-809-11 FAN, DC (WITH HEATSINK)
27 4-660-523-01 SHEET (CPU), THERMAL
28 4-662-258-01 SHEET (MS), INSULATING
29 A-8067-098-A COMPLETE PWB IFX-180
30 1-823-814-11 CABLE, FLEXIBLE FLAT 12P
31 X-4624-494-1 ASSY BRACKET WIRE
32 1-761-380-23 CARD, MODEM
33 X-4624-743-1 ASSY COVER (BATTERY LOCK)
34 6-700-666-01 IC HYS64V16220GDL-7.5-C2
35 4-662-355-01 (R505DS, R505DSK, R505DSP)...
SHEET (WL), INSULATING
36 1-761-495-11 (R505DS, R505DSK, R505DSP)...
CARD, WIRELESS LAN
37 1-756-038-21 BATTERY, NICKEL HYDROGEN
Ref.No. Part No. Description
58 4-662-893-01 SHEET, POWER HEAT SINK GROUND
59 4-663-129-01 PLATE (PALMREST), INTERCEPTION
60 4-662-968-01 REINFORCEMENT, KEYBOARD
61 4-660-015-01 COVER (REAR L)
62 X-4623-577-5 LID (DOG) ASSY
63 1-961-661-12 HARNESS, RJ-45
64 4-660-016-01 COVER (REAR R)
65 4-657-622-01 FOOT (R2)
66 1-683-865-11 PWB, FLEXIBLE PRINT
*67 4-660-022-01 BRACKET (HDD)
69 1-790-750-13 FPC (HDD)
70 A-8059-666-A (R505DS, R505DSK, R505DSP)...
70 A-8059-226-A (R505DL)...
71 4-641-449-01 FOOT (F)
72 X-4624-453-1 DOOR (VGA) ASSY
73 A-8059-716-A MBX-62 (A) (S)
74 4-649-669-11 CUSHION IFX
*75 4-660-052-01 HOLDER, ALMADOR
*76 4-660-053-01 FIN, ALMADOR
77 4-660-067-01 COVER (BOTTOM R)
78 4-660-524-01 SHEET (COIL), THERMAL
79 4-662-616-01 GASKET (FAN 1)
80 4-662-778-01 SHEET (HDD), SHIELD
81 4-662-843-01 SHEET (CS), SHIELD
82 4-662-881-02 CUSHION, KEYBOARD
83 4-662-354-01 COVER (HDD)
84 6-700-582-01 (R505DS, R505DSK, R505DSP)...
84 6-700-583-01 (R505DL)...IC RH80530GZ001512
B1 4-662-967-01 SCREW (2 TAPPING) (2X4)
B2 4-662-756-01 SCREW (1.4 TAPPING) (1.4X3.5)
B3 4-654-273-31 ACE (M2), LOCK (2X3.5)
B4 4-654-273-21 ACE (M2), LOCK (2X13)
B5 4-651-989-31 SPACER (MBX)
B6 4-635-966-01 SCREW (HEX)
B7 4-635-301-01 SCREW M3X4
B8 4-644-492-01 ACE (M2), LOCK (2X6)
B9 4-654-273-01 ACE (M2), LOCK (2X5)
B10 4-645-016-01 ACE (M2) (DIA. 4.6), LOCK (2X3)
* When change the CPU (ref. 84), refer to “Replacing the CPU”
on page 5-7 and 5-8.
ASSY HDD 40GB (T, 20, F) (S)
HDD (30GB, IC25N030ATCS04-0) (S)
IC RH80530GZ006512
*38 4-660-056-01 BRACKET (CPU)
*39 4-660-024-01 BRACKET (VGA)
40 4-654-239-01 INSULATING SHEET
41 4-660-018-02 INSULATOR (BOTTOM)
42 A-8067-114-A COMPLETE PWB CNX-154
43 1-779-745-31 JACK, DC
44 1-961-555-11 HARNESS (POWER 2P)
45 A-8067-101-A COMPLETE PWB CNX-153
46 1-793-100-11 CONNECTOR, USB
47 1-823-815-11 CABLE, FLEXIBLE FLAT 10P
*48 4-660-023-01 PLATE (PC CARD)
49 1-816-270-11 CONNECTOR, PC CARD
50 A-8067-119-A COMPLETE PWB CNX-151
51 1-816-281-11 JACK, SMALL TYPE (MICROPHONE)
52 1-695-514-21 JACK (SMALL TYPE) 1P (HEADPHONE)
53 1-823-816-11 CABLE, FLEXIBLE FLAT
54 4-654-610-03 COVER AIR DUCT
55 X-4624-450-1 HOUSING (BOTTOM) ASSY
56 4-662-966-01 SPACER (VGA)
57 4-663-912-01 ADHESIVE TAPE (5X80)
5-2
Confidential
PCG-R505DL/R505DS/R505DSK/R505DSP (AM)
Page 10
B9
1
19
20
ef
eg
2
16
75
B1
21
wh
B2
13
12
PCG-R505DS,
R505DSK, R505DSP
3
ek
82
28
B3
1
B5
50
qh
wk
wk
qf
ej
52
29
qf
ej
7
qa
51
2
B5
wf
J
wa
61
M
wa
es ws
ql
B8
26
25
27
58
A
B9
B9
B2
B1
E
qk
5
7
el
4
wj
5
78
qa
B3
6
7
el
6
ek
PCG-R505DL
60
21
18
E
D
17
15
wf
B2
1
B3
ql
2
G
B9
35
6
7
10
4
H
wg
59
B
G
ek
8
C
B3
9
14
B9
13
0
9
I
qk
B3
ef
eh
B3
F
11
8
el
3
B1
wd
w;
PCG-R505DS, R505DSK,
R505DSP
B9
22
B3
48
B3
B3
49
qj
8
qh
72
B3
B
45
B4
24
23
J
84
qs
36
C
B3
46
B3
47
L
wl
53
77
eg
K
42
B3
qd
B10
N
B10
37
qg
6
43
44
B8
qd
qg
B8
54
B3
46
B3
74
es
80
H
30
57
wl
B5
L
76
Q
wh
79
A
31
81
8
38
ea
ea
wg
B10
ws
71
w;
3
B9
M
B3
e;
B3
e;
qs
65
4
I
wj
55
K
wd
ed
B5
B3
P
F
5
ed
Q
69
B3
B5
40
62
74
eh
B3
33
56
B7
32
B3
N
B9
83
D
O
9
41
O
P
B6
0
73
B3
B3
39
63
34
66
64
65
qj
67
B7
70
* When change the CPU (ref. 84), refer to “Replacing the CPU”
on page 5-7 and 5-8.
5-3 5-4
Confidential
PCG-R505DL/R505DS/R505DSK/R505DSP (AM)
Page 11
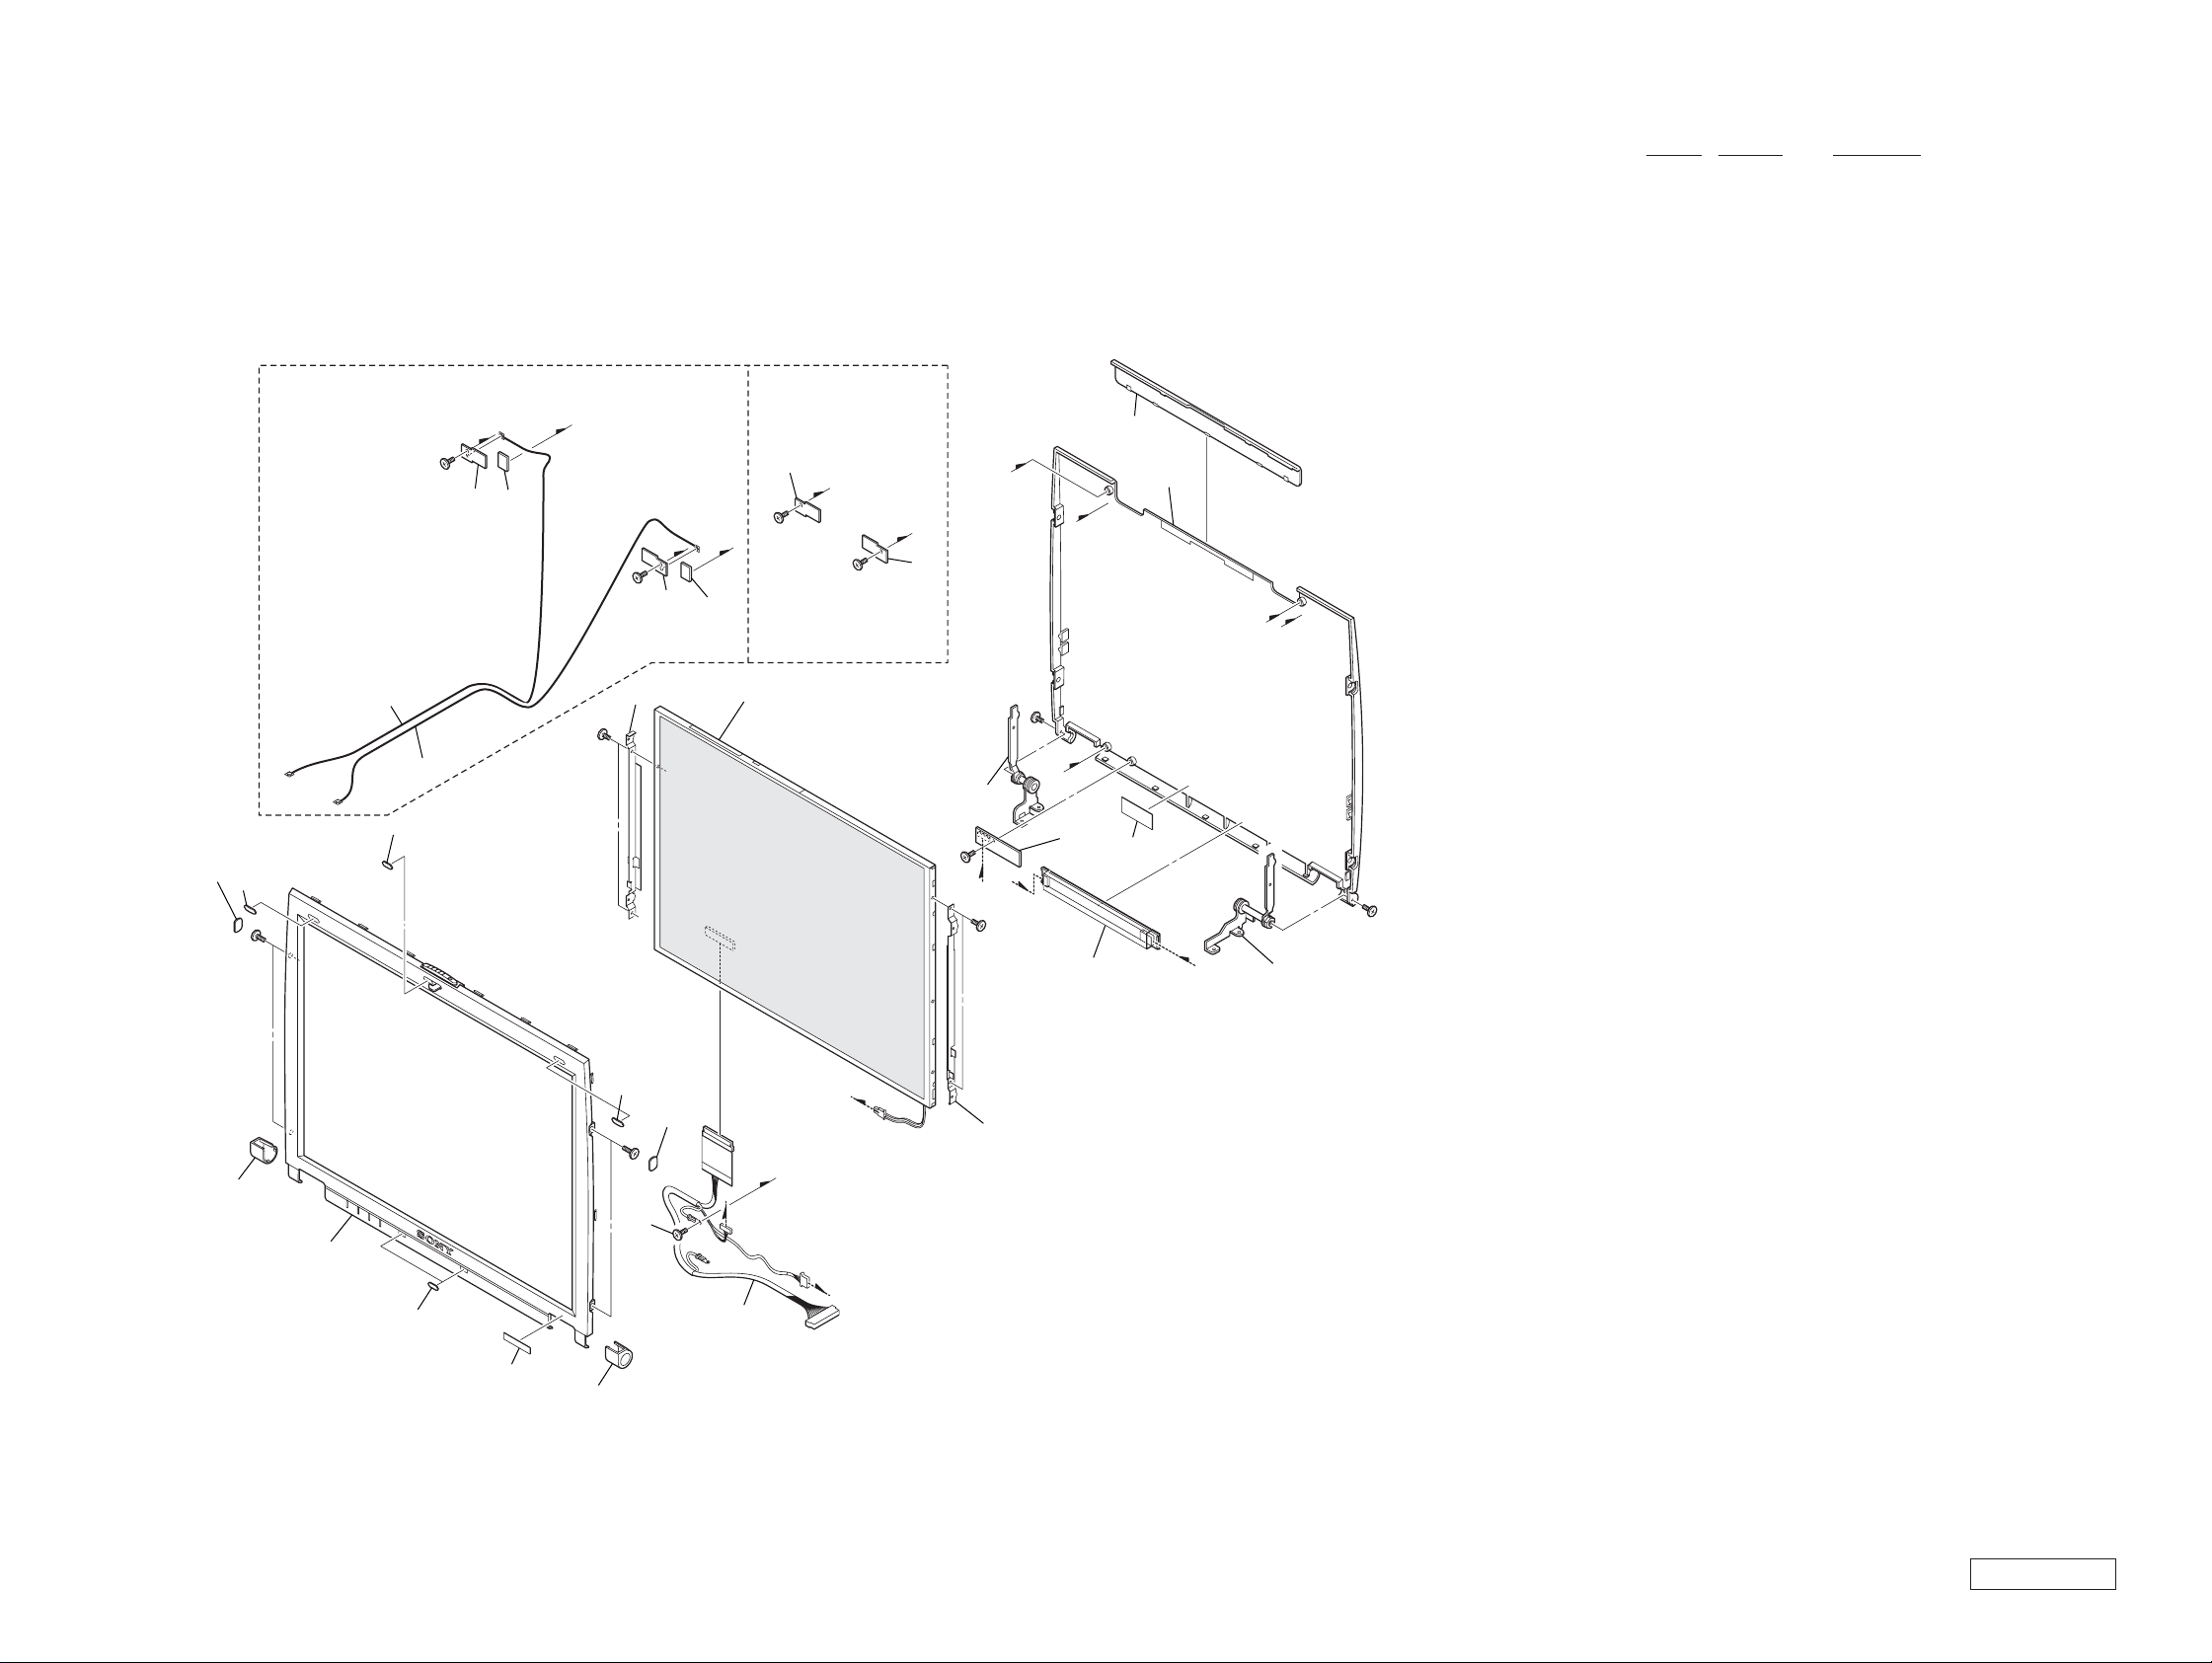
5-2. LCD Section
PCG-R505DS, R505DSK,R505DSP PCG-R505DL
108
109
B11
121
110
121
B10
119
2
124
4
B10
B10
112
3
120
5
124
114
126
B10
2
B10
3
126
B10
B
117
B10
A
2
B11
1
115
4
116
123
125
122
C
3
118
5
Ref.No. Part No. Description
101 X-4624-448-1 HOUSING (BEZEL) ASSY
104 4-660-035-01 COVER (DL)
105 4-660-036-01 COVER (DR)
106 4-660-039-01 BLIND (LCD B), HOLE
107 4-663-268-01 (R505DSP)...LABEL (ID) (U)
107 4-663-268-11 (R505DSK)...LABEL (ID) (U)
107 4-663-268-21 (R505DS)...LABEL (ID) (U)
107 4-663-268-31 (R505DL)...LABEL (ID) (U)
108 4-652-933-02 BLIND (SIDE), HOLE
109 4-660-038-01 BLIND (LCD), HOLE
110 4-652-938-02 CUSHION (LATCH)
111 1-961-579-11 HARNESS (LCD)
* 112 4-660-031-01 BRACKET (LCD-L)
* 113 4-660-032-01 BRACKET (LCD-R)
114 A-8059-714-A LCD (12.1)(H)(S)
115 A-8067-109-A COMPLETE PWB LEX-32
116 1-476-317-12 INVERTER UNIT
* 117 4-660-033-01 TILT UNIT (L)
* 118 4-660-034-01 TILT UNIT (R)
119 A-8067-103-A (R505DS, R505DSK, R505DSP)...
COMPLETE PWB IFX-182
120 A-8067-105-A (R505DS, R505DSK, R505DSP)...
COMPLETE PWB IFX-183
121 1-823-844-11 (R505DS, R505DSK, R505DSP)...
CABLE, COAXIAL
122 X-4624-449-1 HOUSING (DISPLAY) ASSY
123 4-660-029-01 COVER (DISPLAY)
124 4-662-650-01 (R505DS, R505DSK, R505DSP)...
GASKET (W-LAN)
125 4-649-669-11 CUSHION IFX
126 4-663-174-01 (R505DL)...SPACER (W-LAN)
B10 4-645-016-01 ACE (M2) (DIA. 4.6), LOCK (2X3)
B11 4-643-356-01 SCREW (M2X5)
B11
104
101
106
107
109
C
113
A
105
B11
B10
108
1
B
111
5-5 5-6
Confidential
PCG-R505DL/R505DS/R505DSK/R505DSP (AM)
Page 12
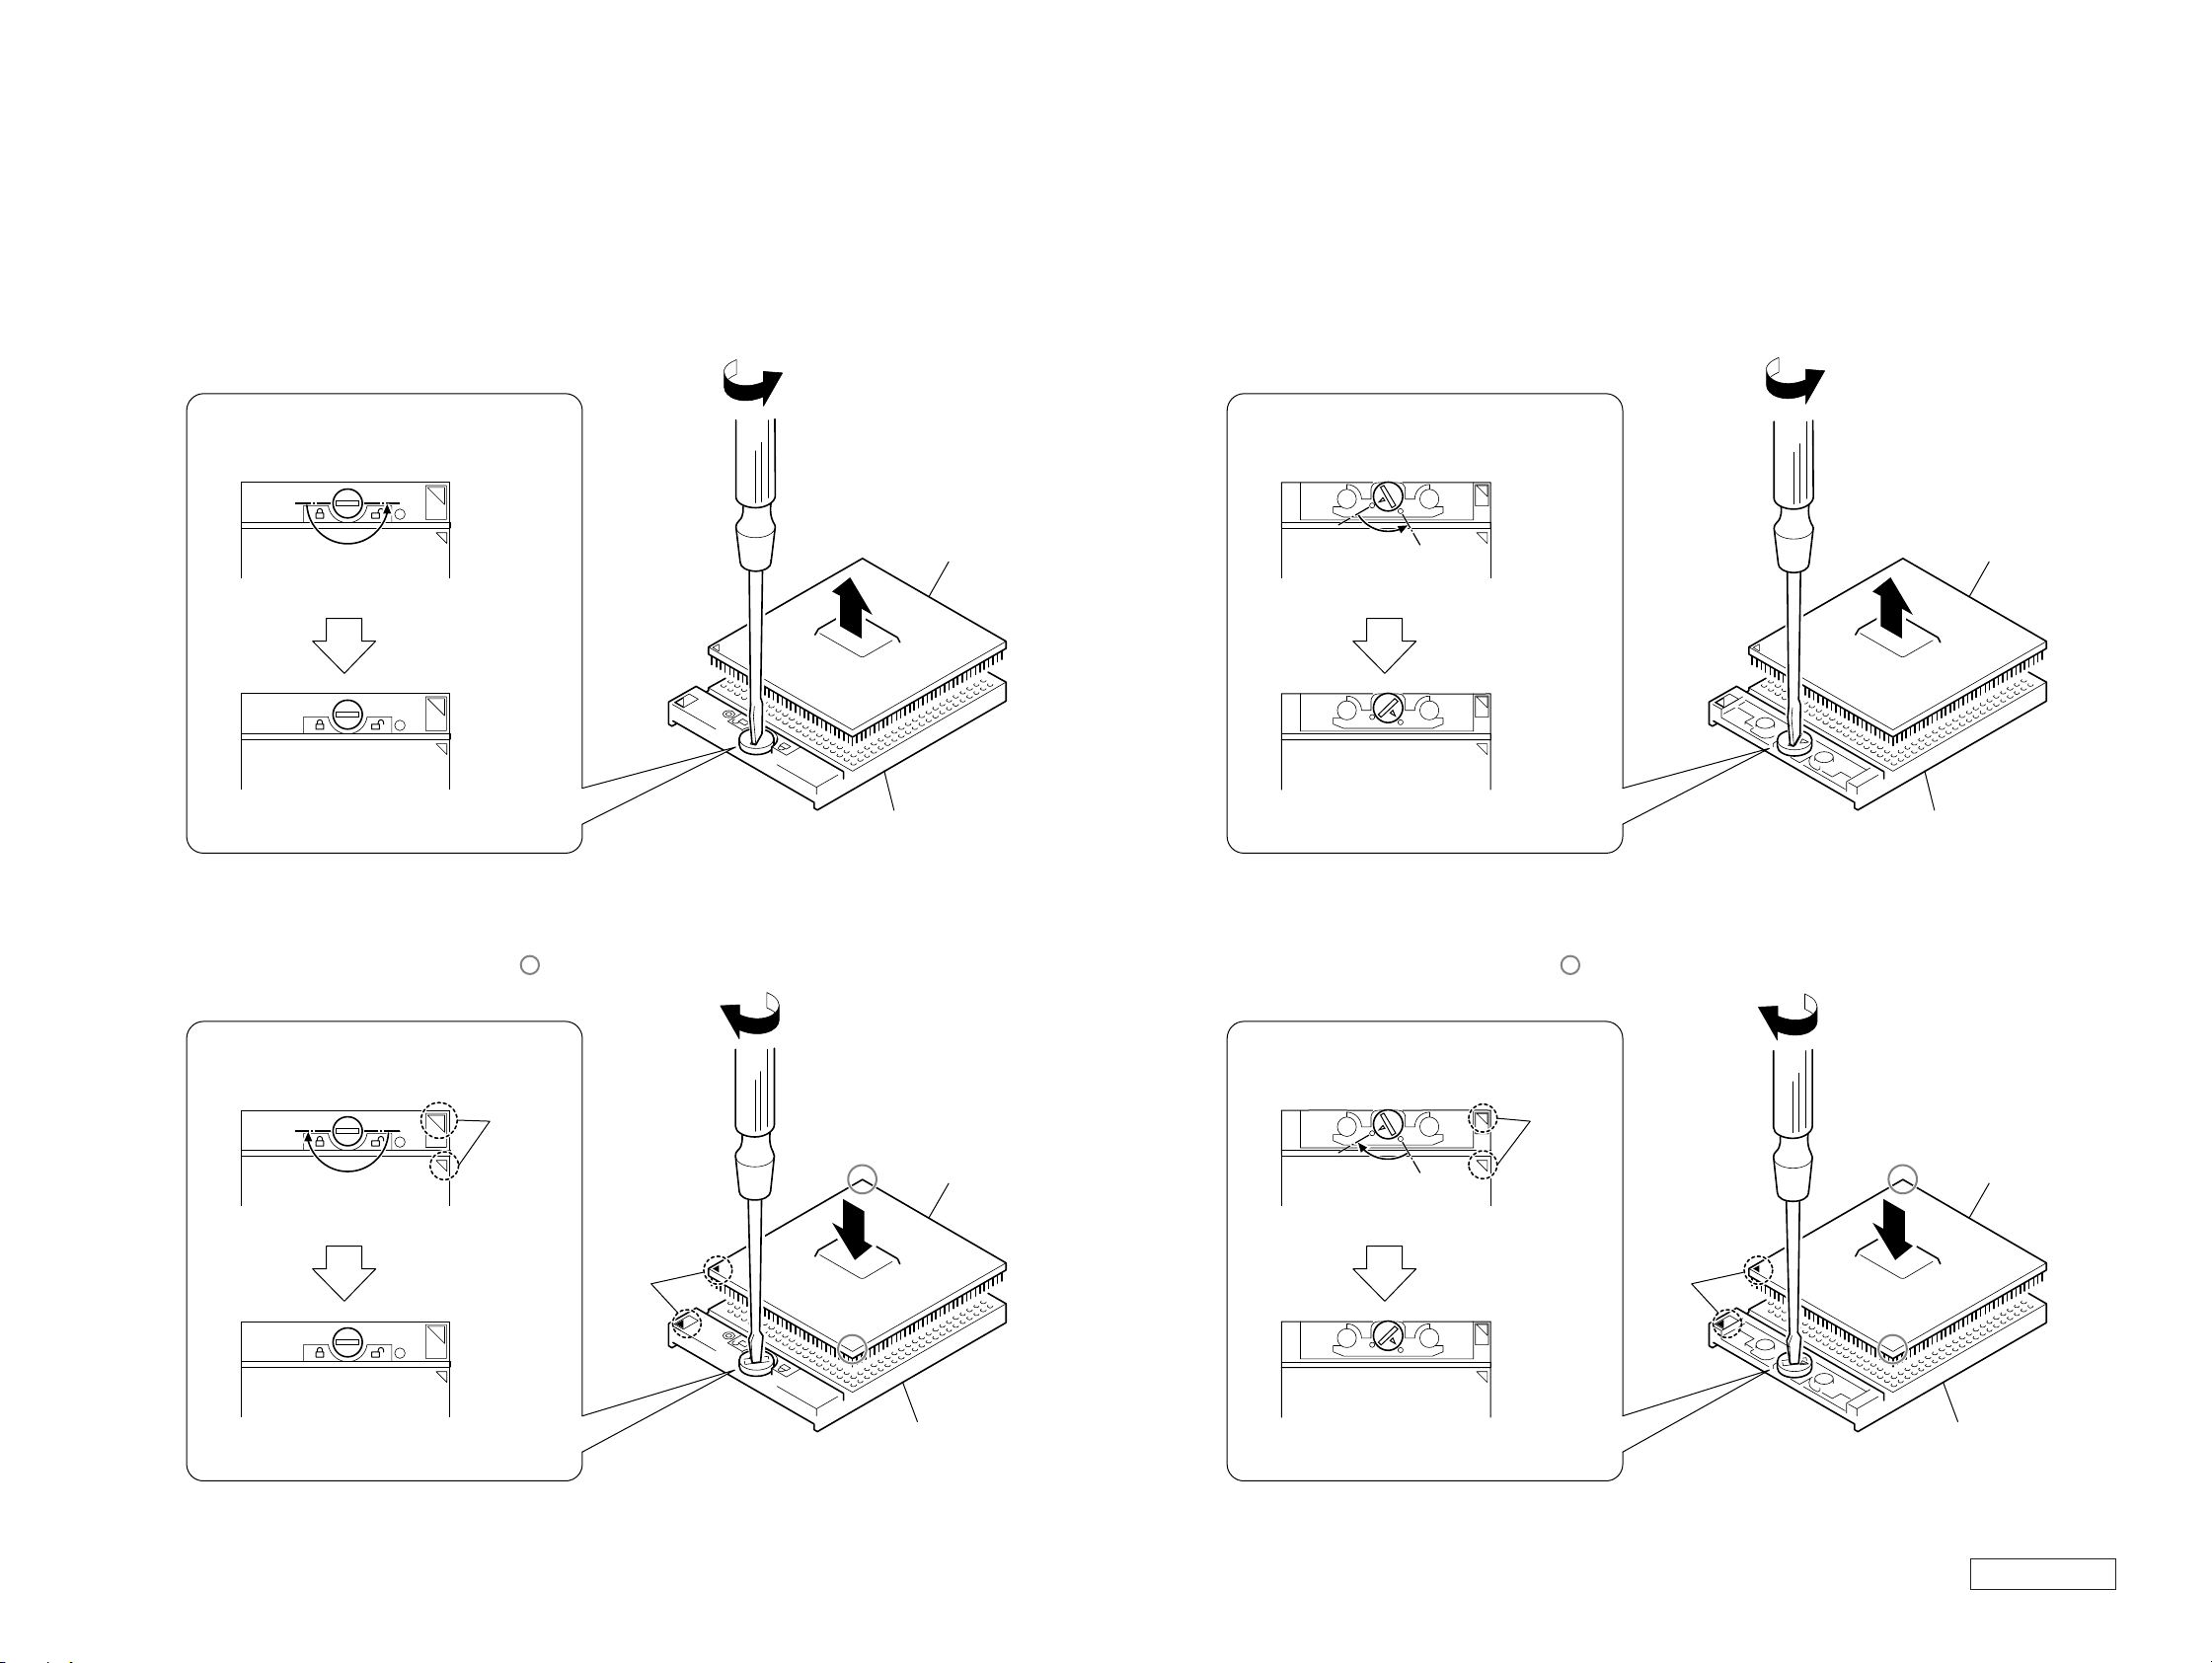
• Replacing the CPU
Note: We have two kinds of CPU for this set, and either of them is used.
Two kinds of CPU have differences in the lock position and the unlock position.
1. Socket configuration 1
1. How to remove the CPU
1 Rotate the lock with a flat-blade screwdriver toward
the unlock position shown in the figure.
2 Remove up the CPU.
(FOX)
lock position
unlock position
2
CPU
2
CPU socket
2. Socket configuration 2
1. How to remove the CPU
1 Rotate the lock with a flat-blade screwdriver toward
the unlock position shown in the figure.
2 Remove up the CPU.
(AMP)
lock position
unlock position
1
CPU
2
CPU socket
2. How to install the CPU
1 Position the mark on the CPU to the mark on the CPU
socket and put in all pins to the holes on the CPU socket.
2 Pressing two corners marked with in the figure,
rotate the lock with a flat-blade screwdriver toward
the lock position.
(FOX)
unlock position
lock position
mark
mark
2
CPU
1
CPU socket
2. How to install the CPU
1 Position the mark on the CPU to the mark on the CPU
socket and put in all pins to the holes on the CPU socket.
2 Pressing two corners marked with in the figure,
rotate the lock with a flat-blade screwdriver toward
the lock position.
(AMP)
unlock position
lock position
2
mark
CPU
1
mark
CPU socket
Note: Lock the CPU properly, or operation
becomes unstable.
Note: Lock the CPU properly, or operation
becomes unstable.
5-7 5-8
Confidential
PCG-R505DL/R505DS/R505DSK/R505DSP (AM)
Page 13
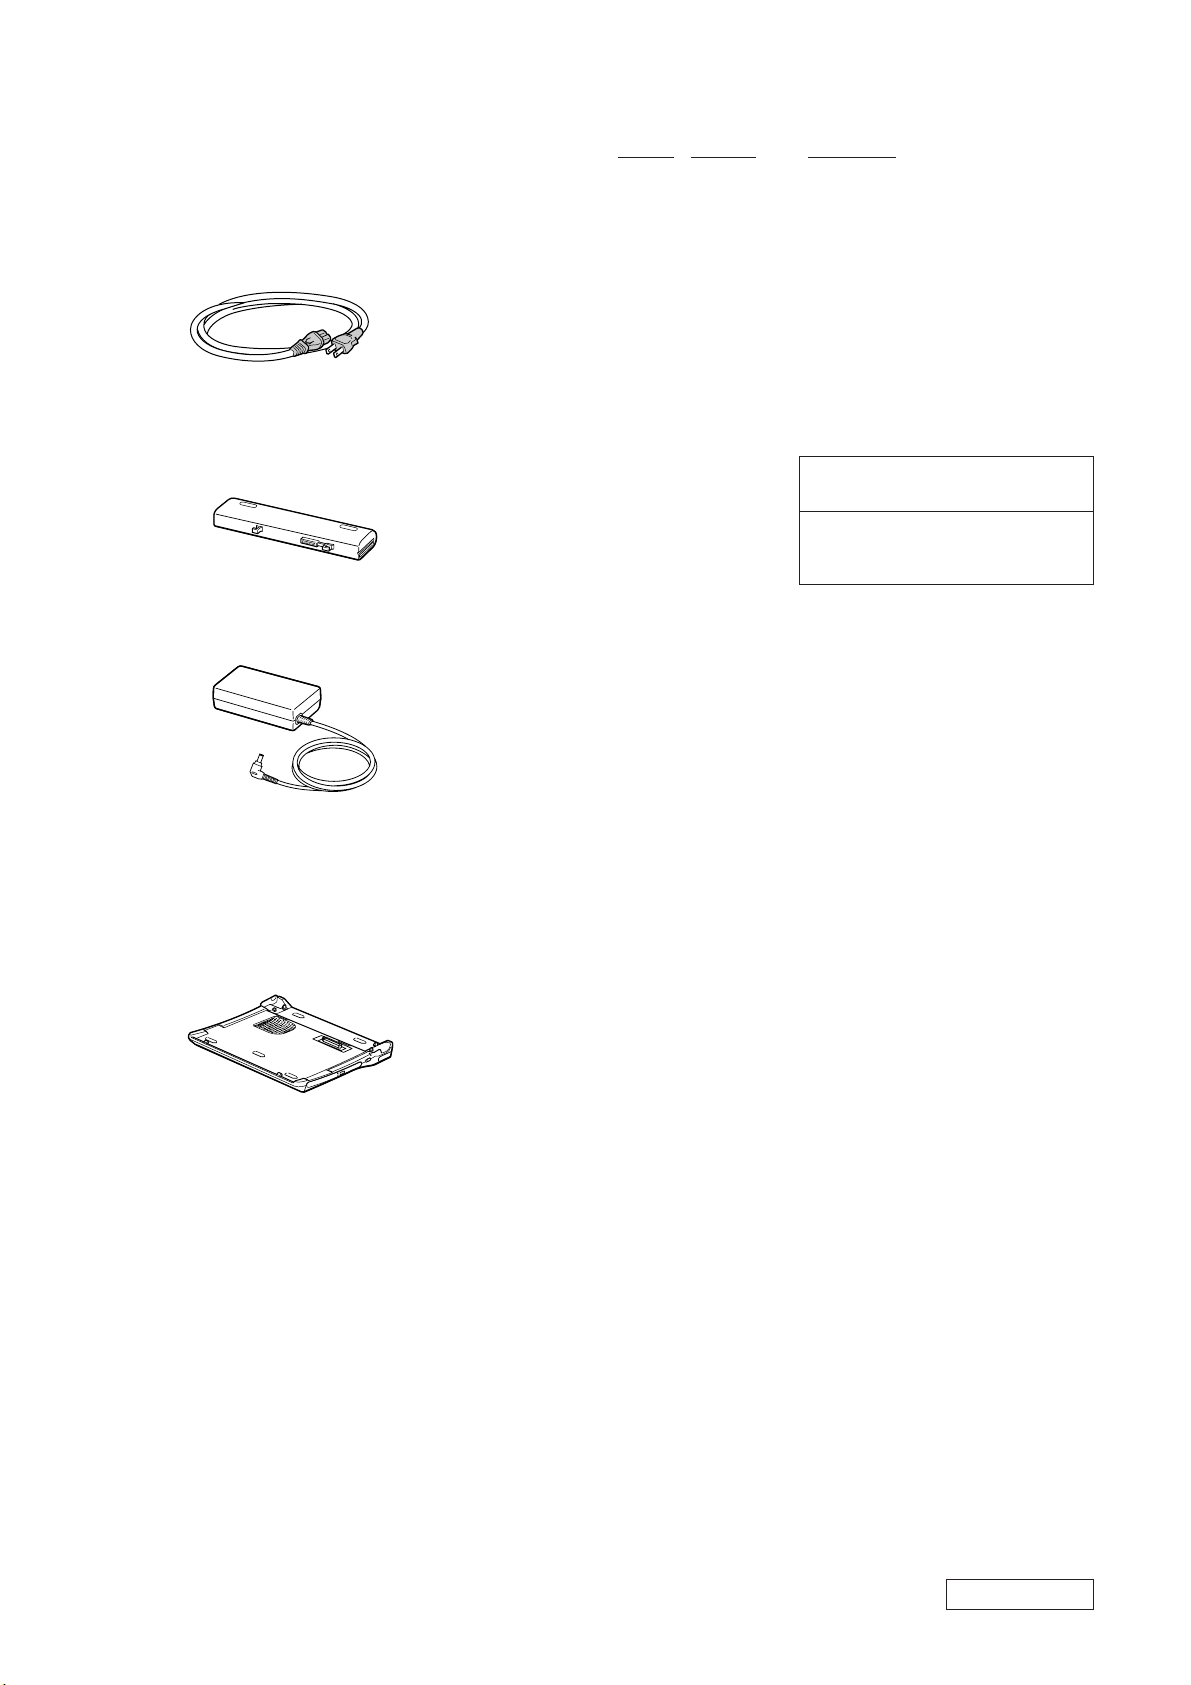
5-3. Accessories
201
Power Cord
Ref.No. Part No. Description
ACCESSORIES
***********
0 201 1-575-562-21 CORD, POWER
202 1-756-152-41 BATTERY PACK, LITHIUM ION
0 203 1-477-205-11 ADAPTOR, AC
4-646-847-11 (R505DSK)...W2K FIRST STEP GUIDE
4-661-919-01 QUICK START
LOOK AT EXPLODED VIEWS OF THE PART
**********************************
202
Battery Pack
203
AC Adaptor
204
Docking Station
(PCGA-DSM5)
204 PCGA-DSM5
The components identified by mark 0 or
dotted line with mark 0 are critical for safety.
Replace only with part number specified.
Les composants identifiés par une marque
0 sont critiques pour la sécurité. Ne les
remplacer que par une pièce portant le
numéro spécifié.
* The main unit is not assigned with a part number.
Refer to the PCGA-DSD5/DSM5 Service Manual
(9-874-401-11).
5-9
(END)
Confidential
PCG-R505DL/R505DS/R505DSK/R505DSP (AM)
Page 14

VAIO® Notebook
Quick S t art
PCG-R505 Series
Page 15

Page 16

Contents
Welcome.......................................................5
Features.......................................................................5
Unpacking Your Notebook .........................................6
Registering Your Notebook ........................................8
Setting Up Your Dial-Up Connection.........................9
Setting Up Your VAIO Notebook..............13
Locating Controls and Ports......................................14
Connectin g the Docking Stati o n ...... ......... ................20
Disconnect i n g the Dock i ng St at i o n........... .......... ......22
Connectin g a Powe r So u r ce........ .......... ................ ....26
Starting Your Notebook ................ .............. ....... ....... 32
Shutting Down Your Notebook.......................... .......33
Using Power Saving Modes......................................34
Adding Memory.........................................37
Precautio n s and Pr o ced u res....... ......... ................. ......38
Removing a Memory Module ...................................40
Installing a Memory Module.....................................41
Viewing the Amount of Memory..............................44
3
Page 17

VAI O ® Notebook Quick Start
About the So ft wa re on Your Not eb ook...45
Overview of the Software on Your Notebook ..........46
Application, Driver, and System Recovery CDs......54
Using Your Recov ery CDs .................. ......... ............55
Troubleshooting........................................61
Troubleshooting Your Notebook.................... ..........62
Troubleshooting the Docking Station.................... ...65
Troubleshooting the LCD Screen .............................66
Troubleshooting the Mouse and Touchpad ..............66
Getting Help............................................... 69
Support Op ti o n s......... ................ ........................ .......70
Software Support Information..................................72
Sony Servi ce Center... ................ .......... ................ .....74
Index ...........................................................75
4
Page 18

Welcome
Congratulations o n your p urchase of t he Sony VAIO® notebook. Sony has
combined leading-edge technology in audio, video, computing, and
communications to provide you with state-of-the-art personal computin g.
Features
✍ For complete spec ifications of your VAIO® notebook, refer to the Specifications
flyer supplied with your notebook.
❑ Exceptional performance — Your notebook includes a mobile Intel®
Pentium® III processor
❑ Portability — Rechargeable battery pack provides hours of use without
AC power, even while you use the optional doc king station.
❑ Sony audio and video quality — High-quality MPEG2 video, which
supports full-screen display (12. 1-inch Active Matrix LCD screen) and
enables you to take advantage of today’s ad vanced multimedia applications,
games, and entertai nment s oftware.
❑ Multimedia features — Enjoy the st ereo speakers or use headphones (not
supplied) to listen to audio and video CDs.
❑ Microsoft ® Wi ndows® op er atin g system — Your system includes the
latest Micros oft® Windows® oper ating system.
❑ Communications — Access popular online services, send e-mail, browse
the Internet, and use fax features.
* CPU speed will be reduced under certain operating conditions.
† Actual upl oad and download speeds may vary due to line conditions, ISP sup por t, and gov-
ernment re gula ti ons .
*
and a V.90 modem.
†
5
Page 19
VAI O ® Notebook Quick Start
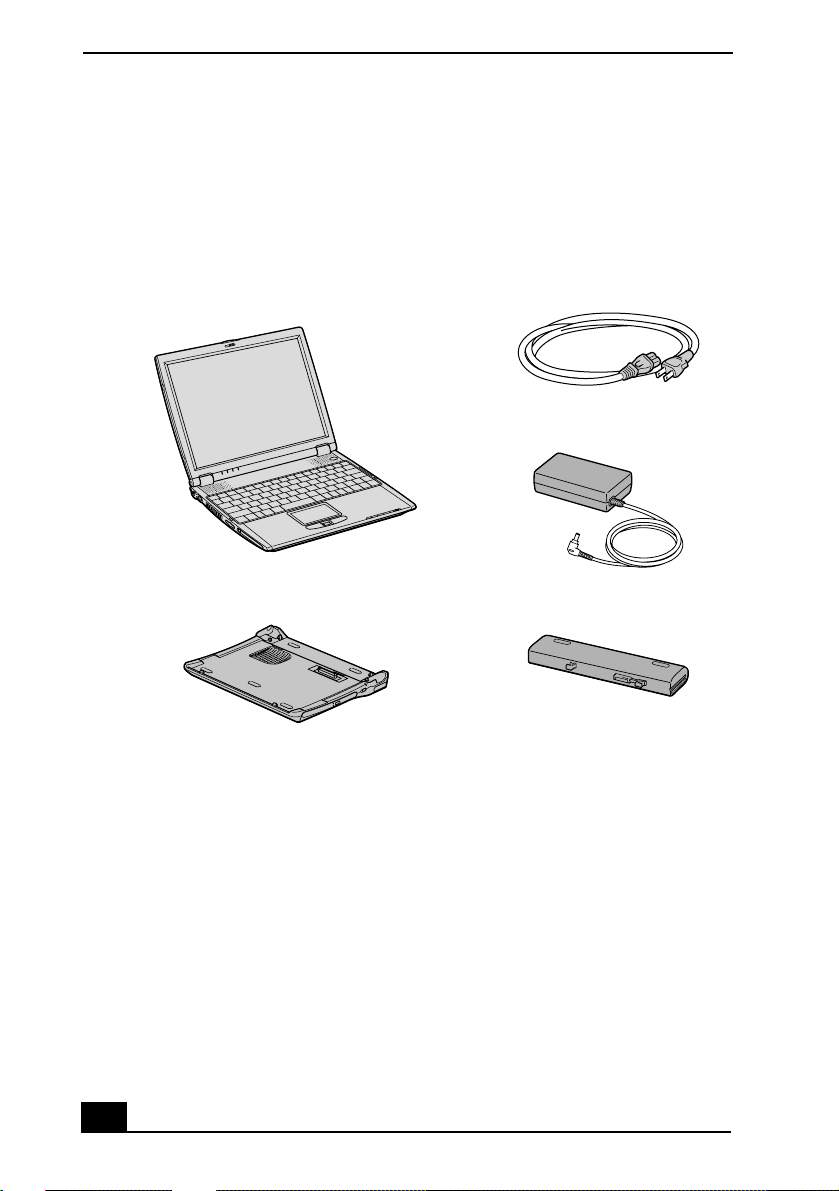
Unpacking Your Notebook
Remove the following hardware, documents, and CDs from the box:
Hardware
Main Unit Power Cord
AC Adapter
Docking Station
* Docking station supplied with selected models.
*
Rechargeable Battery Pack
Documents
❑ VAIO® R505 SuperSlim Pro™ Notebook Quick Start — Contains details
on unpacking and setting up your notebook, supplementary updates, and
software information.
❑ Microsof t® Windows® manual — E xplains how to use the basic features
of the latest Windows operating system.
❑ V AIO® Notebook Specifications flyer — De tails the hardware
specifications for your notebook and th e docking station, which is supplied
with selected models.
6
Page 20

Unpacking Your Notebook
❑ VAIO® Notebook Notes on Use — Explains notes on use and offers safety
tips.
Software CDs
❑ Microsoft® Word — Enables you to reinstall Microsoft Word to the
VA IO® computer you purchased, if the application becomes corrupted or is
erased.
Recovery CDs
❑ Application Recovery CD(s) — Enables you to reinstall individual
applications if they become corrupted or are erased.
❑ Driver Recovery CD(s) — Enables you to reinstall individual device
drivers if they become corrupted or are erased.
❑ System Recovery CD(s) — Enables you to re store t he operati ng syst em a nd
software that shipped with your computer if they bec om e corrupted or are
erased. This CD restores your computer to its or iginal factory settings, so
user data and applications installed since you starte d using your computer
will be lost.
✍ To use these recovery CDs, connect the docking station (supplie d w ith selected
models) or an optional optical dri v e, such as a fully atapi co m p liant PC Card C D ROM drive, to the notebook.
Other
❑ Packet containing special product offers
❑ Limited Warranty Card
7
Page 21

VAI O ® Notebook Quick Start
Registering Your Notebook
Take advantage of Sony’s commitment to quality customer support and receive
these benefit s by reg is tering your notebook :
❑ Sony Customer Support — Talk to a Support Represent ative to
troubleshoot problems you may be having with your notebook.
❑ Limited War ranty — P r otect your invest ment. See the Limited Warranty
Card for more details.
✍ You ar e prompted to register you r computer the first time y ou turn on the unit .
Follow t he on-screen inst ructions to complete the registration process. If you are not
able to register your computer during the first session, you are provided with
additional registration opportunities later .
8
Page 22
Setting Up Yo ur Dia l-Up Connection
Settin g Up Your Di al - Up C on n ect io n
This section describes the basic steps for setting up your dial-up connection. The
Connection Wizard guides y ou through the process of connecting to the Internet
and choosing an Internet S ervice Provider (ISP) or setting up an existing account.
Setting up your Internet connection (Microsoft® Windows®
XP operati n g system)
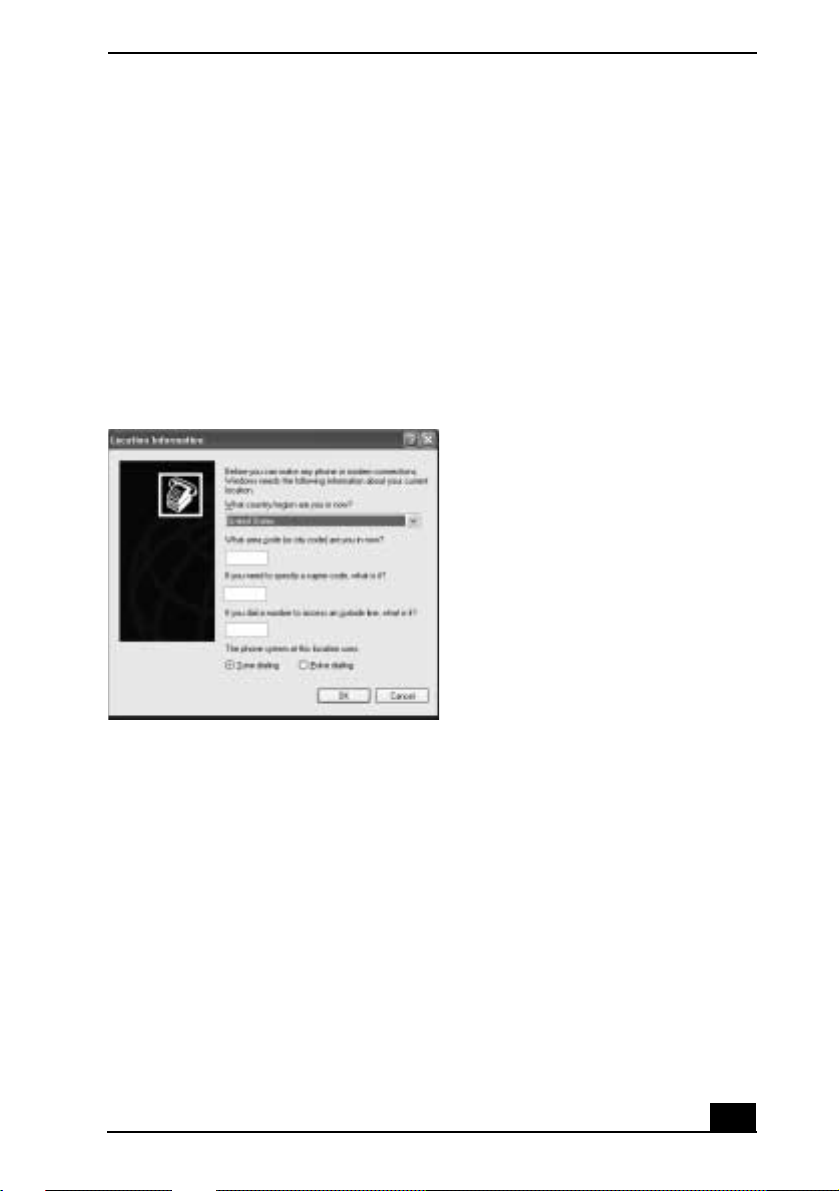
1 Click Start, point to All Programs, Acc es sories, Communica tions, and then
click New Connection Wizard. The Locat ion Information window appears.
Location Information window
2 Follow the on-scree n instr uctions , and t hen clic k OK to contin ue. The Phone
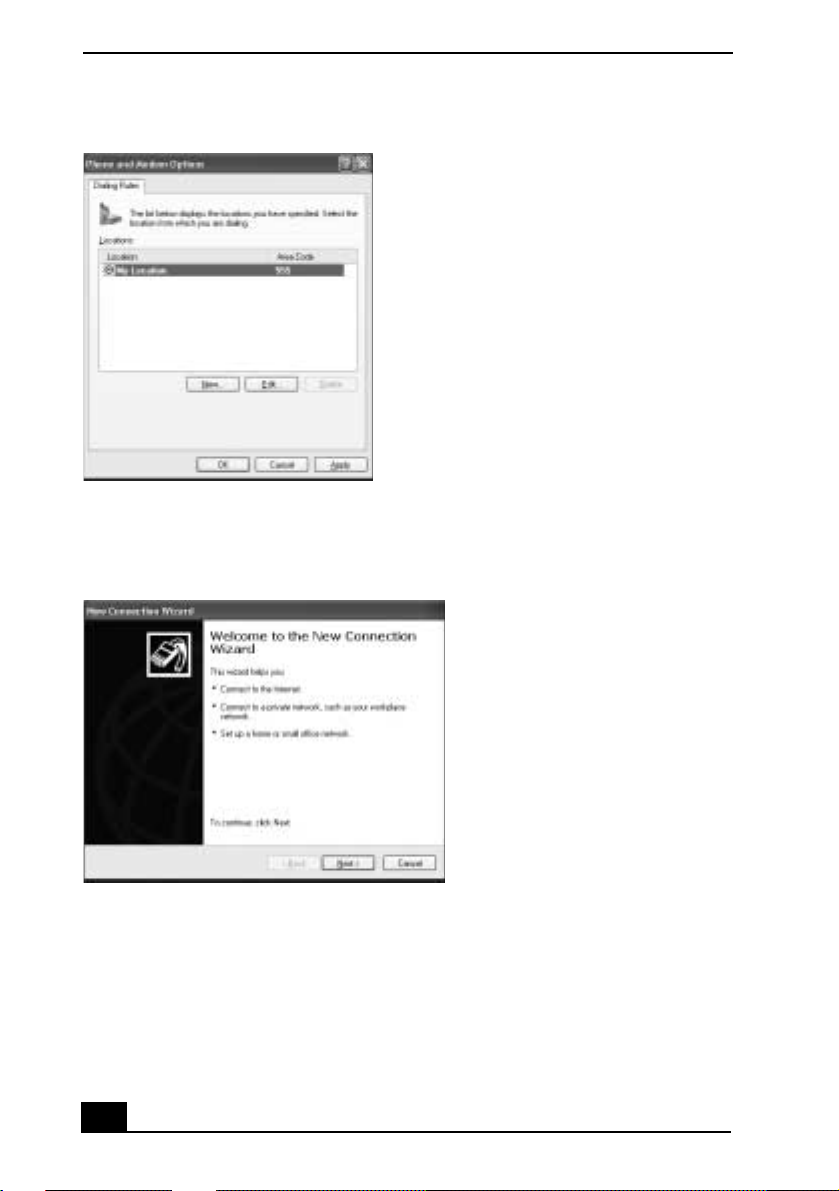
and Modem Options window appears.
9
Page 23
VAI O ® Notebook Quick Start
Phone and Modem Options window
3 Select the location from where you are dialing and the n click OK. The New
Connection Wizard window appear s.
New Connection Wizard window
4 Follow the on-screen instructions to finish se tting up your Internet
connection.
10
Page 24
Setting Up Yo ur Dia l-Up Connection
Setting up your dial-up connection (Microsoft® Windows®
2000)
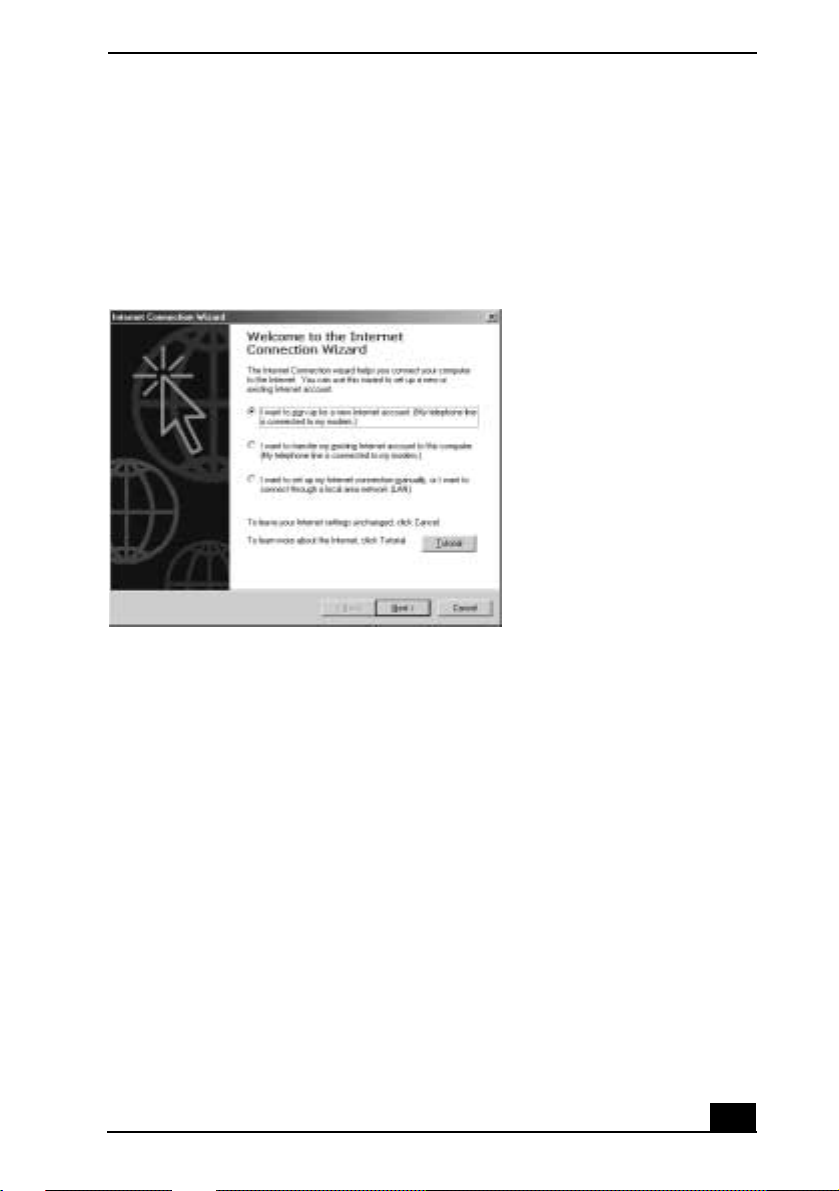
1 Click Star t, point to P rogr ams, Acces sori es, Com municati ons , and t hen cli ck
Internet Conne ction Wizard. The Internet Connection Wizard window
appears.
Internet Connection Wizard window.
2 Follow the on-screen ins tructions to finish setting up your Internet
connection.
11
Page 25

VAI O ® Notebook Quick Start
12
Page 26

Setting Up Your VAIO Notebook
This section describe s the following:
❑ Locating Cont rols and Ports
❑ Connecting the Docking Station
❑ Disconnecting the Docking Station
❑ Connecting a Power Source
❑ Starti ng Your Notebook
❑ Shutting Down Your Notebook
❑ Using Power Saving Modes
13
Page 27

VAI O ® Notebook Quick Start
Locating Controls and Ports
On the Notebook
Front
OFF ON
5
4
6
WIRELESS
LAN
1 Hard disk drive indicato r 9 Touchpad
2 Num lock indicator 10 Left and right buttons
3 Caps lock indi cator 11 Power indicator
4 Scrol l lo ck indi cator 12 Battery indicator
5 LCD screen 13 Memory Stic k® indicator
6 Speakers 14 Docking statio n indicator
7 Power button 15 Wireless LAN indicator
8 Keyboard 16 Wireless LAN switch
* Wireless LAN capa bi liti e s are available on selecte d mod e ls.
*
14
*
Page 28

Back
1 Battery port
Left
Locating Controls and Por ts
2 3 4
1
5
1 DC In port 4 Memory Stick® slot
2 USB port 5 PC Card slot
3 Air vent
15
Page 29

VAI O ® Notebook Quick Start
Right
1 USB port 5 Peripheral device DC Out port
2 Headphone jack 6 Monitor port
3 Microphone jack 7 Ethernet port
4 i.LINK® (IEEE 1394) S400
8 Phone lin e jack
port
Only connect 1 0BASE- T and 100BASE- TX cables to t he Ethernet por t.
Do not connect any other type of network cable or any telephone line.
Connecti ng cables other t h an those liste d above may res ult in an electr ic
curre n t overload and could cause a malfunction, excessive heat, or fire in
the port. To connect the unit to the network, contact your network
administrator.
16
Page 30
Locating Controls and Por ts
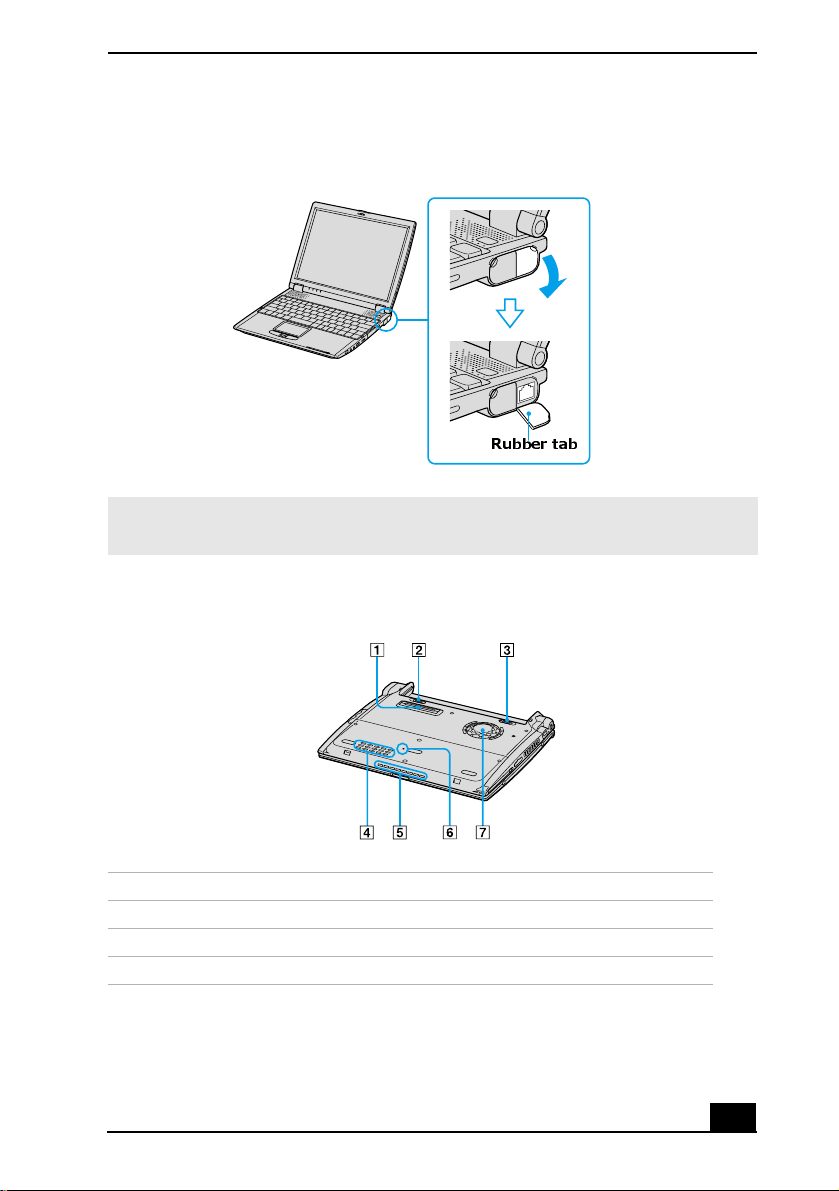
Removing Rubber Tab
Rubber tab
✍ Gently pull the rubb er tab away from the notebook to f ind the Ethernet port and
phone line jack.
Bottom
1 Docking station connector 5 Air vent
2 Battery Unlock/Lock switch 6 Re se t switc h
3 Battery Unlock switch 7 Ventilation fan
4 Air vent
17
Page 31
VAI O ® Notebook Quick Start
On the Do cki n g Stati o n
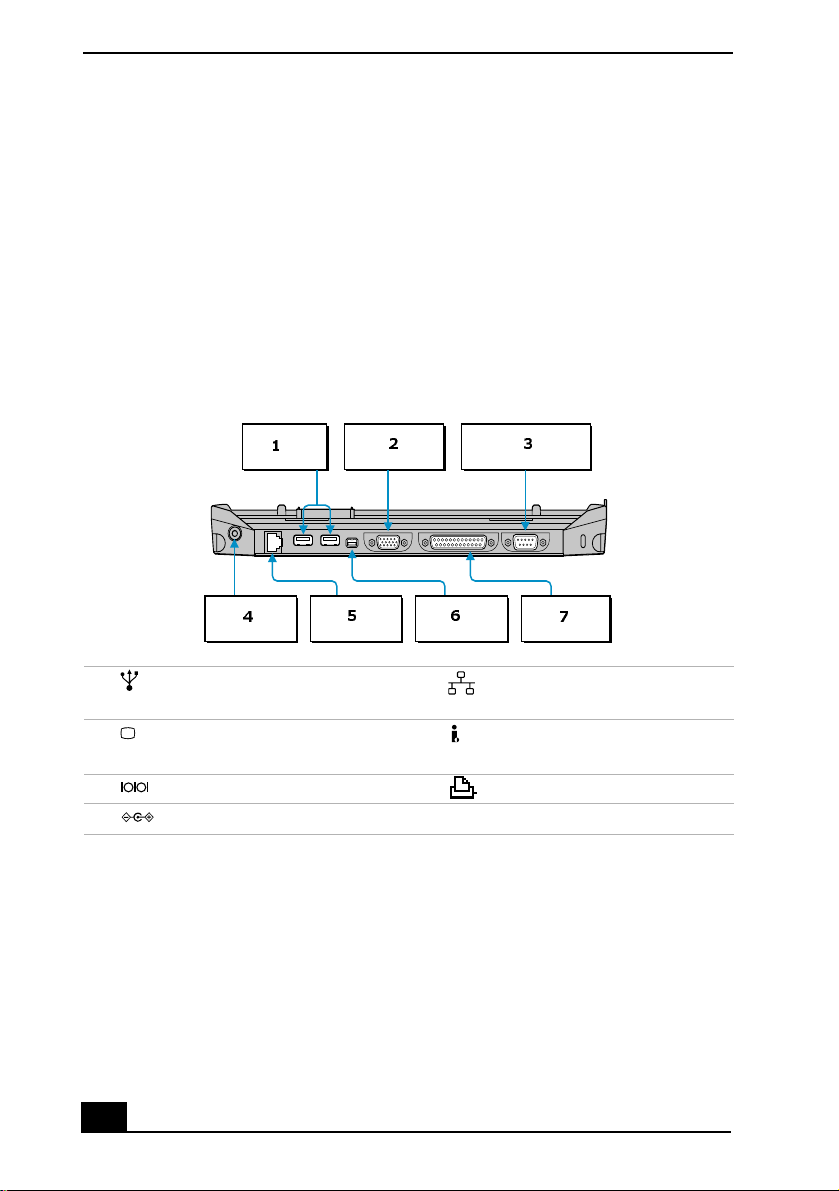
Your notebook may come with a PCGA-DSD5 or PCGA-DSM5 docking sta tion,
depending on the model you purchased. Both Sony docking stations offer the
following features:
❑ A floppy disk drive.
❑ An optical drive.
❑ A back panel that enables you to connect addit ional peripherals to your
notebook, as shown below.
Back Panel
1
4
23
65
7
1 USB ports 5 Ethernet/Network port
(10BASE-T/100BASE-TX)
*
2 Monitor port 6 i.LINK®
(IEEE 1394)
S400 port
3 Serial port 7 Prin ter port
4 DC In port
18
Page 32
Locating Controls and Por ts
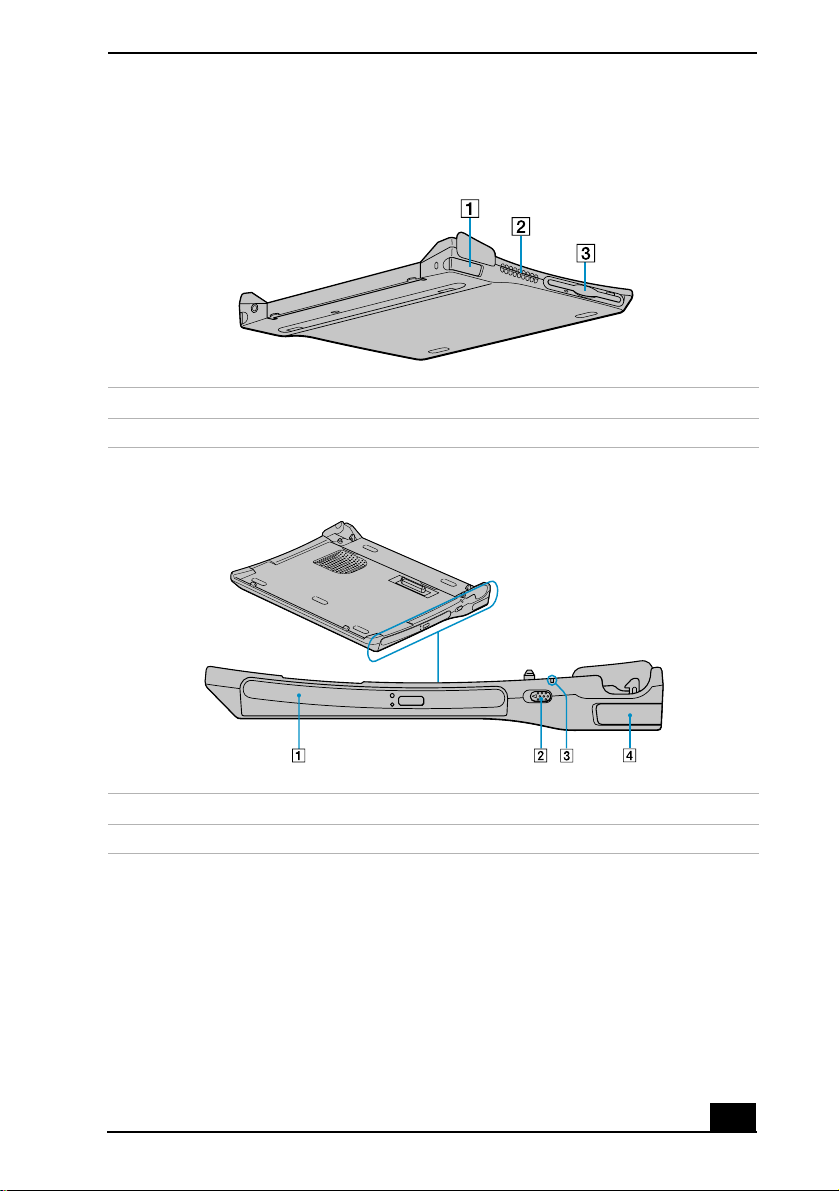
Left
1 Left lever 3 Floppy disk drive
2 Air vent
Right
1 Opti ca l d ri v e 3 DC In indicator
2 Undock sw itch 4 Right lever
19
Page 33
VAI O ® Notebook Quick Start
Connecting the Docking Station
You may connect your notebook to the docking station as long as it is not in
power saving mode, i.e. , S tandby or Hibe rnate. Connecting the note book while it
is in power saving mode may result in data loss or a computer malfunction. Note
the following before connecting your notebook to the docking station:
❑ Disconnect the VGA, USB, AC, and Ethernet devices from your notebook.
Leaving these devices connected while you connect the docking sta tion
could damage them.
❑ Ensure that the battery is installed . If you ins tall a charged battery, you can
connect the docking station while the notebook is on.
Follow the procedure below to connect your notebook to the docking station:
1 Plug one end of the AC ada p ter cable into the DC In p o r t o f th e docking
station and the other end into an AC outlet. The LED of the DC In port
switches on.
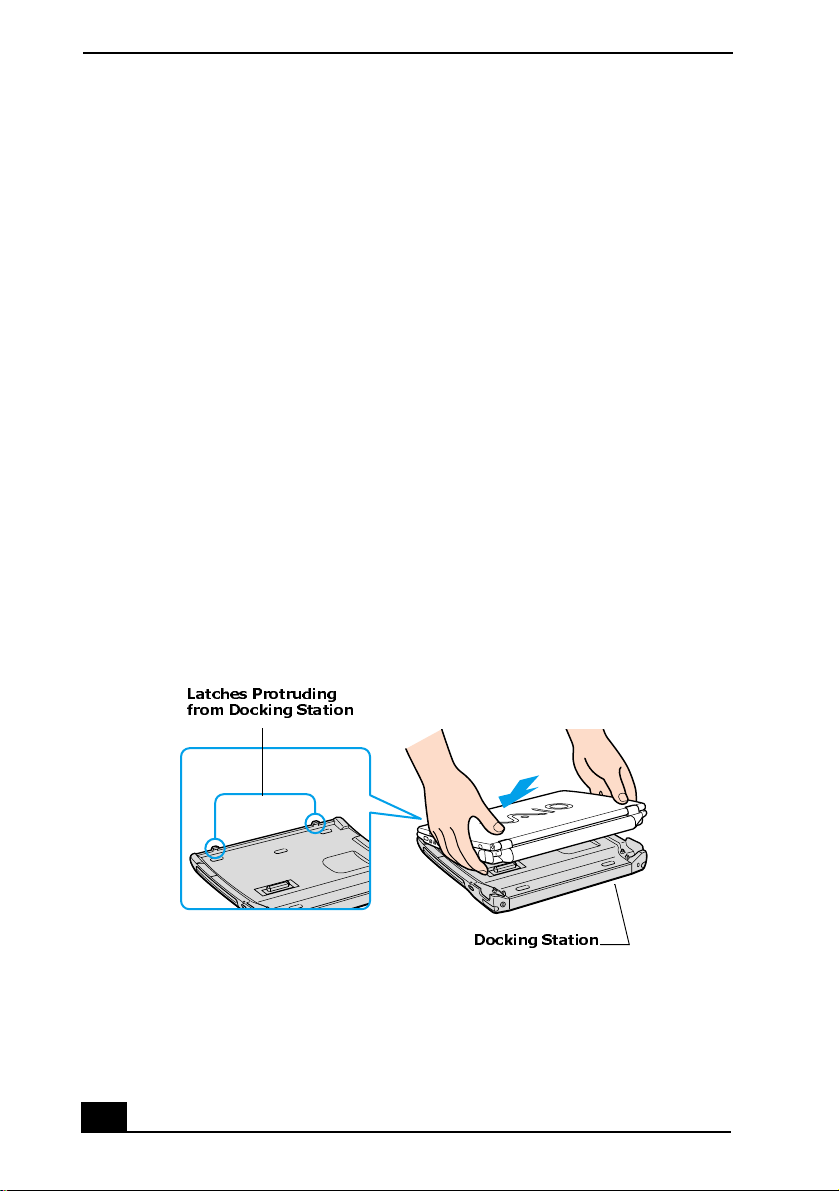
2 Holding the notebook with the front side facing you, insert the two holes on
the front of the noteboo k into the two cor respond ing latc hes prot ruding from
the front side of the dock ing s tation.
Latching the Notebook to the Docki ng Station
Latches Protruding
from Docking Station
20
Docking Station
Page 34
Connecting the Docking Station
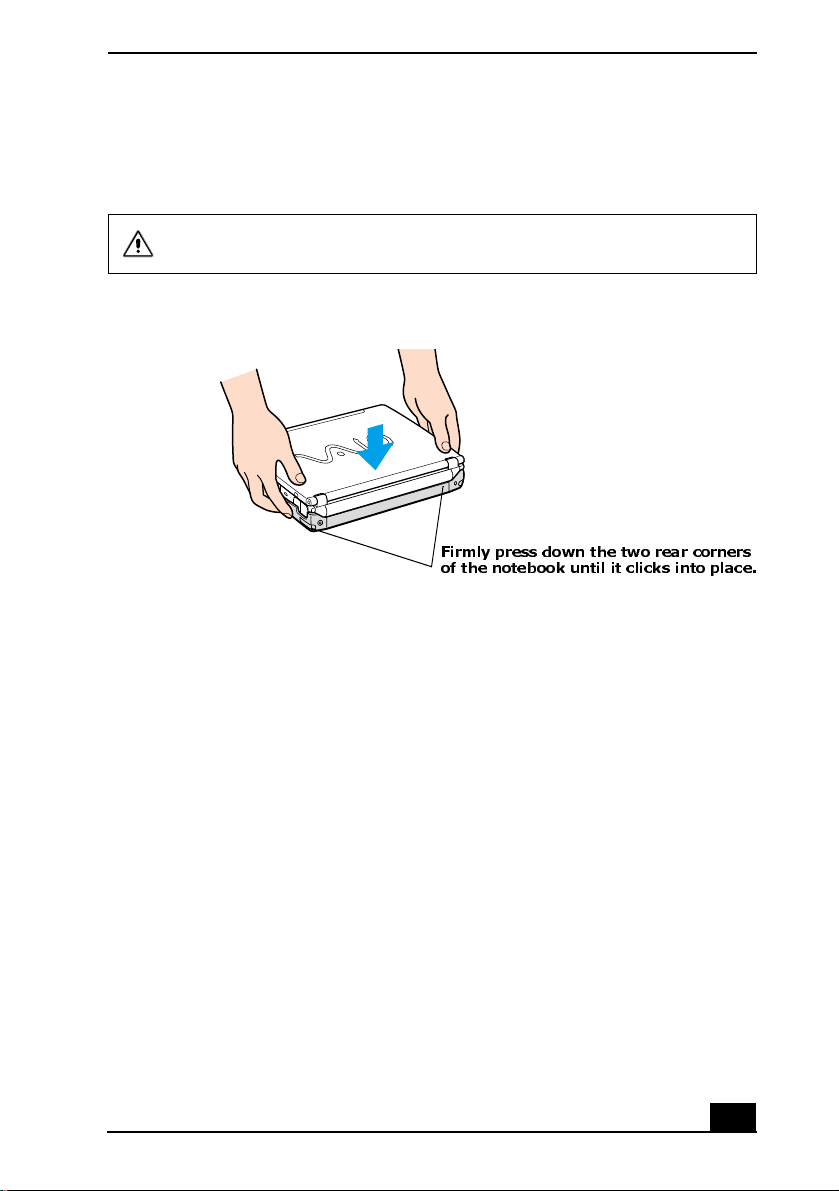
3 Firmly press down the two rear corners of the notebook until it clicks into
place and is securely fast ened to the docking station.
Be careful not to press the top of the notebook too strongly. The LCD
display may be dama ged.
Securing the Notebook to the Docki ng Station
Firmly press down the two rear corners
of the notebook until it clicks into place.
21
Page 35
VAI O ® Notebook Quick Start
f
Disconnecting the Docking Station
You may disconnect the notebook f r om the docking s tation when the notebook is
off or on. However, do not disconnect the notebook from the docking s tation
while the docking indicator is on, while the notebook is in Standby or Hibernate
mode, or while battery power is low. If you do attempt to disconnect the docking
station in any of these three states, you may lose data or the notebook may
malfunction.
✍ When the battery is low, turn off the noteb ook before you disconnect the docking
station.
Follow one of the two proced ures below to disconnect the doc king station when
the notebook is off or on.
To disconnect the docking station when the notebook is off
1 Disconnect all peripheral devices (i.e., i.LINK devices) from the notebook
and the docking station.
2 Remove all objects placed on top of the notebook.
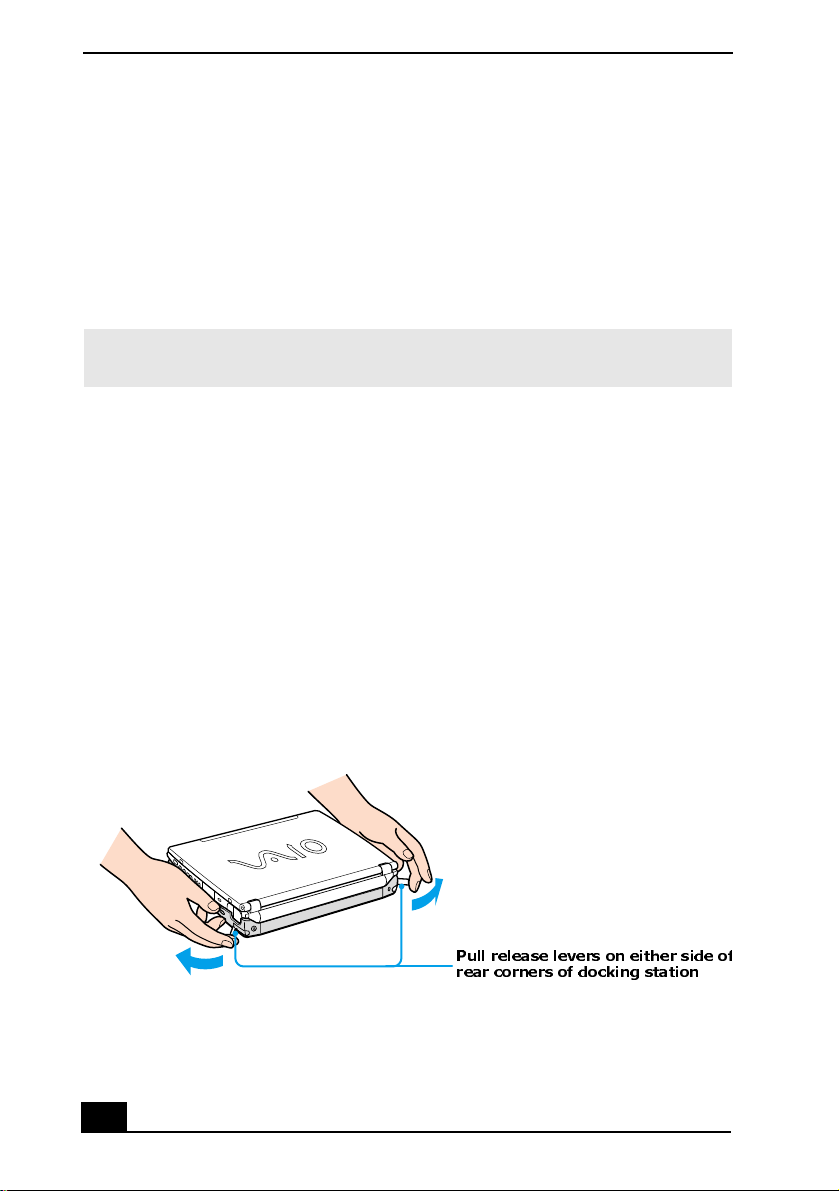
3 Pull out the two release levers on either side of the rear corners of the
docking station.
Releasing the Notebook from the Docki ng Station
Pull release levers on either side o
rear corners of docking station
22
Page 36
Disconnecting the Docki ng Station
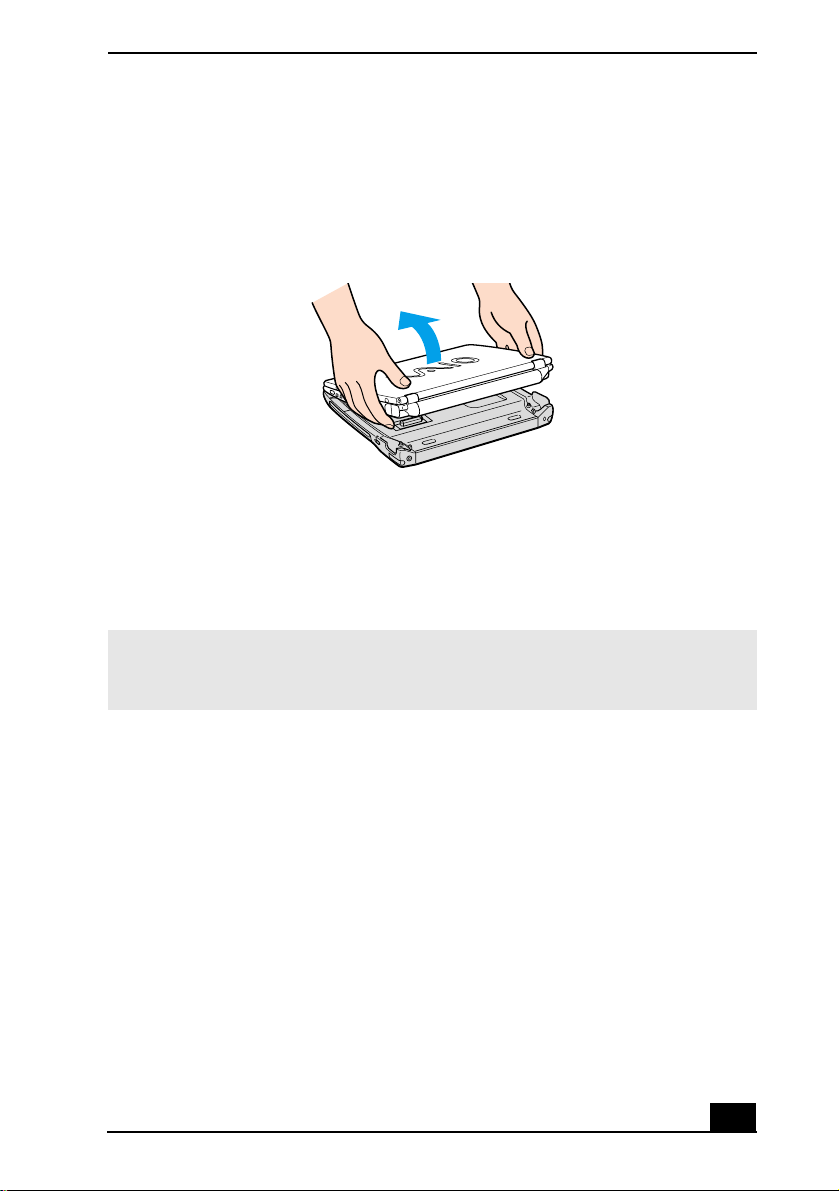
4 Remove the noteboo k fr om th e docking station, while moving the notebook
slightly ba ck to disengage it from the two fron t latches of the docking
station.
Removing the Notebook from the Docking Station
To disconnect the docking station when the notebook is on
You can use the Start Menu in the Windows® task tray or the UNDOCK switch
on the docking station to disconnect your note book from the docking station
while the notebo ok is on.
✍ (Microsoft® W in dows ® XP) If you sw itc h us er acc oun ts using F ast Use r S witchi ng ,
the UNDOCK switch function on the docking station will be interrupted. Instead,
follow th e instruct ions to disconnect the docking statio n from the Start menu.
23
Page 37
VAI O ® Notebook Quick Start
From the Start menu
1 Click Start on the Windows® taskbar.
2 Select Unlock Computer to access the Undock Comp lete dialog box.
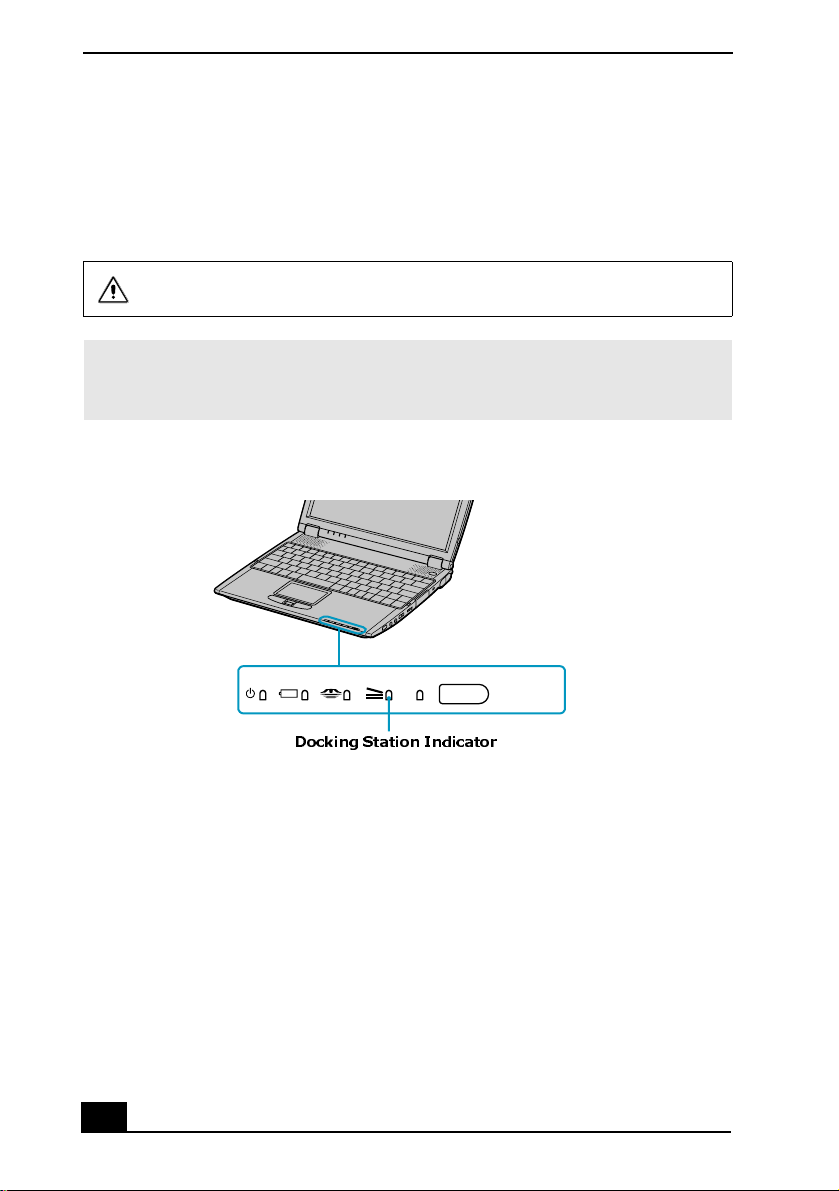
Wait for the dock ing indicat or t o switch of f befor e und ocki ng the not eboo k.
✍ Once the Undock Complet e dialog box appea rs, continue to step 3 to finish
undockin g the notebook. This prevents you from leaving t he notebook on the
docking s tation in this releas ed state for too long.
Docking Indicator
OFF ON
WIRELESS
LAN
Docking Station Indicator
3 Release and remove your notebook. See “To disconnect the docking station
when the notebook is off” on page 22 for instructions.
24
Page 38
Disconnecting the Docki ng Station
Using the UNDOCK switch
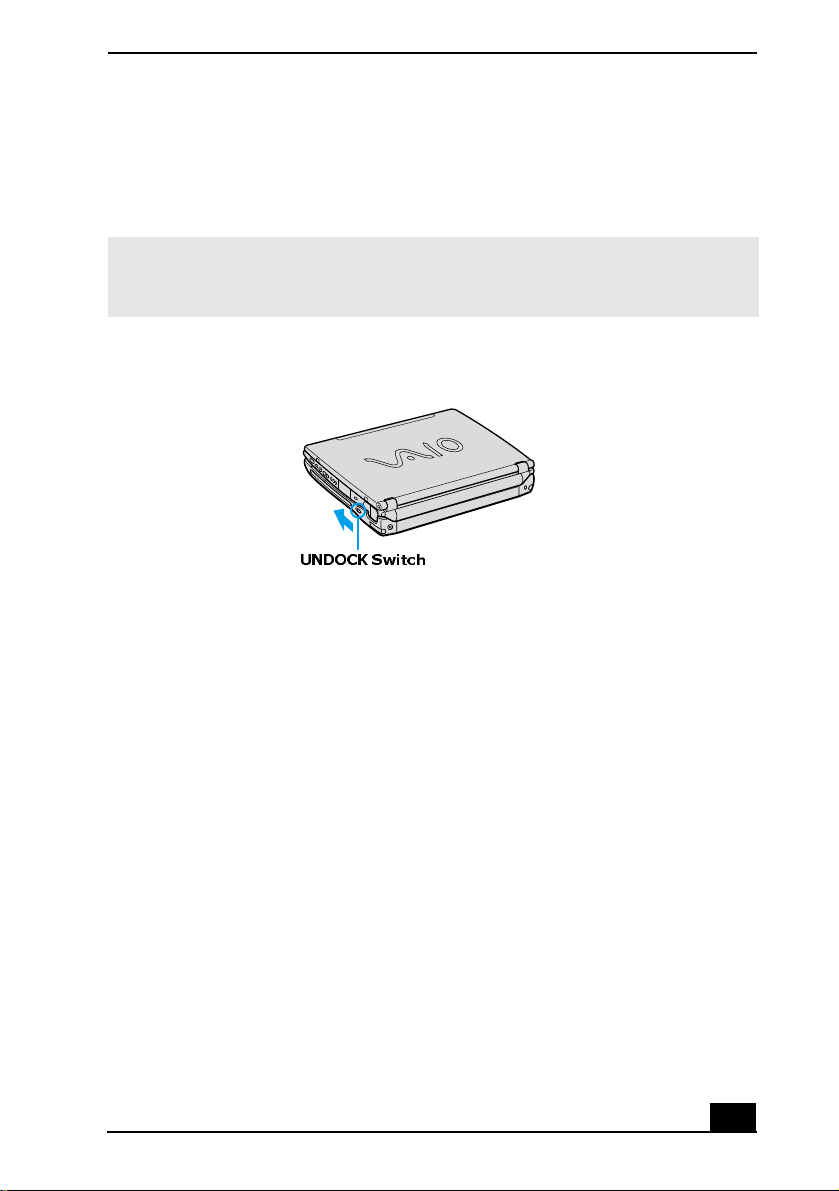
1 Pull the UNDOCK switch on the right sid e of your notebook. The Undock
Complete dialog box appears.
✍ Once the Undock Complet e dialog box appe ars, contin ue on to step 2 to finish
undocki ng the notebook. This prevents you from leaving the notebook on the
docking station in this released state for too long.
UNDOCK switch
UNDOCK Switch
2 Release and remove your notebook as described in “To disconnect the
docking station when the notebook is off” on page 22.
25
Page 39
VAI O ® Notebook Quick Start
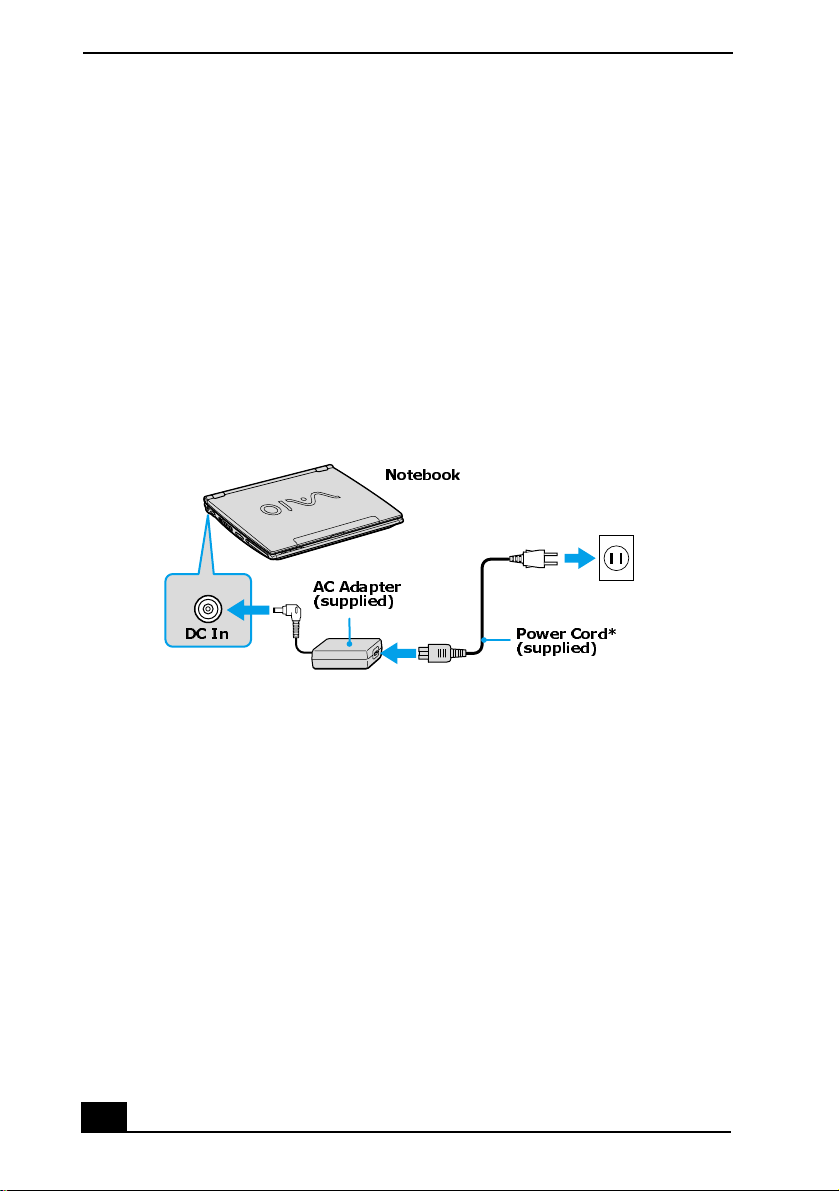
Connecting a Power Source
You can use eith er AC power or a re cha rgeable batter y pac k as a power source.
Using the AC adapter
1 Plug the cable attached to the AC adapter into the DC In port on the
notebook.
2 Plug one end of the po w er co r d into th e A C ad a pt e r.
3 Plug the other end of the power cord into an AC outlet.
Connecting AC Adapter
Notebook
AC Adapter
(supplied)
DC In
Power Cord*
(supplied)
* Power cord plug may vary depending on area voltage requirements.
Notes on th e A C ad apter
❑ Your notebook operates on 100-240V AC 50/60 Hz.
❑ Do not share the AC outlet with other power-consuming equipment, such as
a copy machine or shredder.
❑ You can pur ch ase a powe r st rip wi t h a su rge pr o t ec to r. This d ev i ce prevent s
damage to your computer caused by sudden power surges such as those that
may occur during an electrical storm.
❑ Do not place heavy objects on the power cord.
❑ To disconnect the cord, pull it out by the plug. Never pul l the cord itself.
❑ Unplug your notebook from the wal l outlet if you will not be using the
notebook for a long time.
26
Page 40
Connecting a Power Source
❑ The LED indicator on the AC adapter may be turne d on until the AC adapter
is unplugged from your notebook.
❑ When the AC adapter is not used, unplug it from the AC outlet.
❑ Use only the supplie d AC adapter. Do not use any other AC adapter.
Using battery power
You can use a battery pack as a sour ce of pow er. The batter y pack th at comes
with your notebook is not fully charged at the time of purchas e. Follow the steps
below to insert and charge the battery pack.
To insert the battery pack
You do not need to turn off the notebook to insert the battery pack when your
notebook is connected to the AC adapter.
1 Close the cover of the notebook.
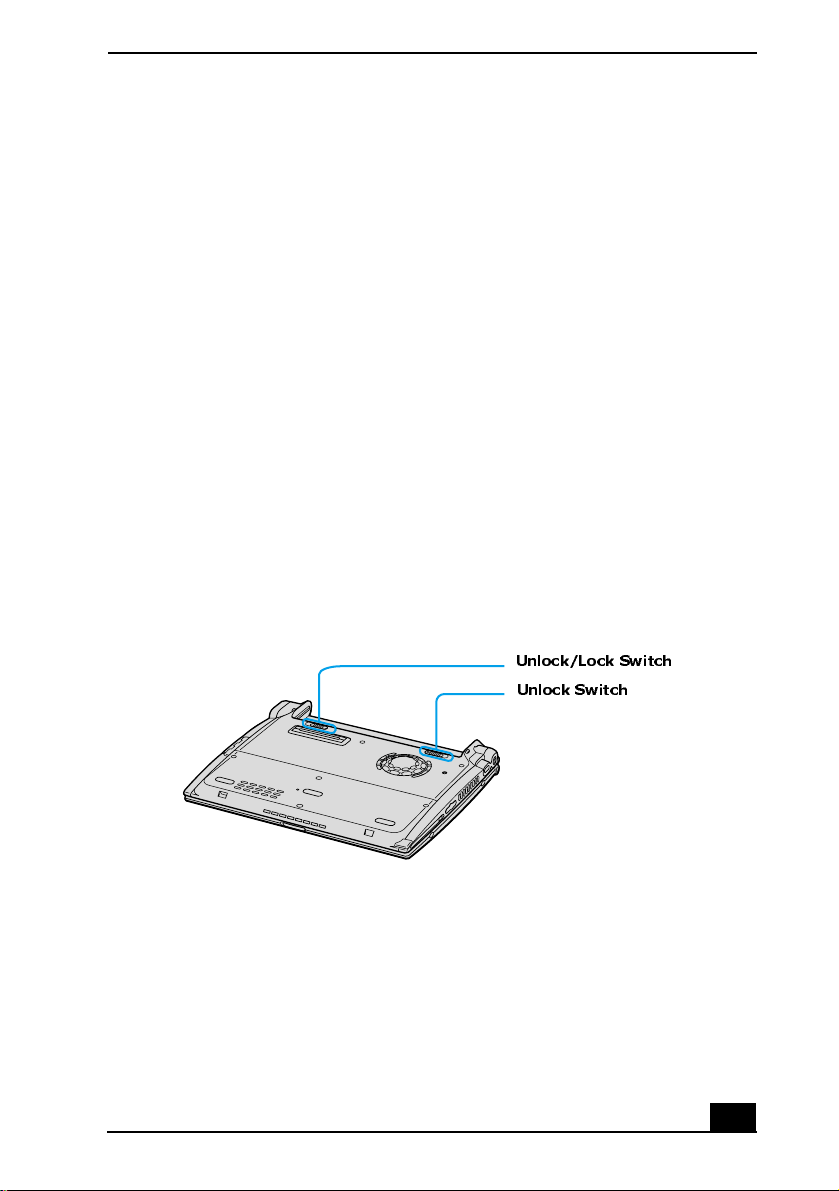
2 Switch the Unlock/Lock switch on the bottom of the notebook to the Unlock
position.
Unlock/Lock Lever
Unlock/Lock Switch
Unlock Switch
27
Page 41
VAI O ® Notebook Quick Start
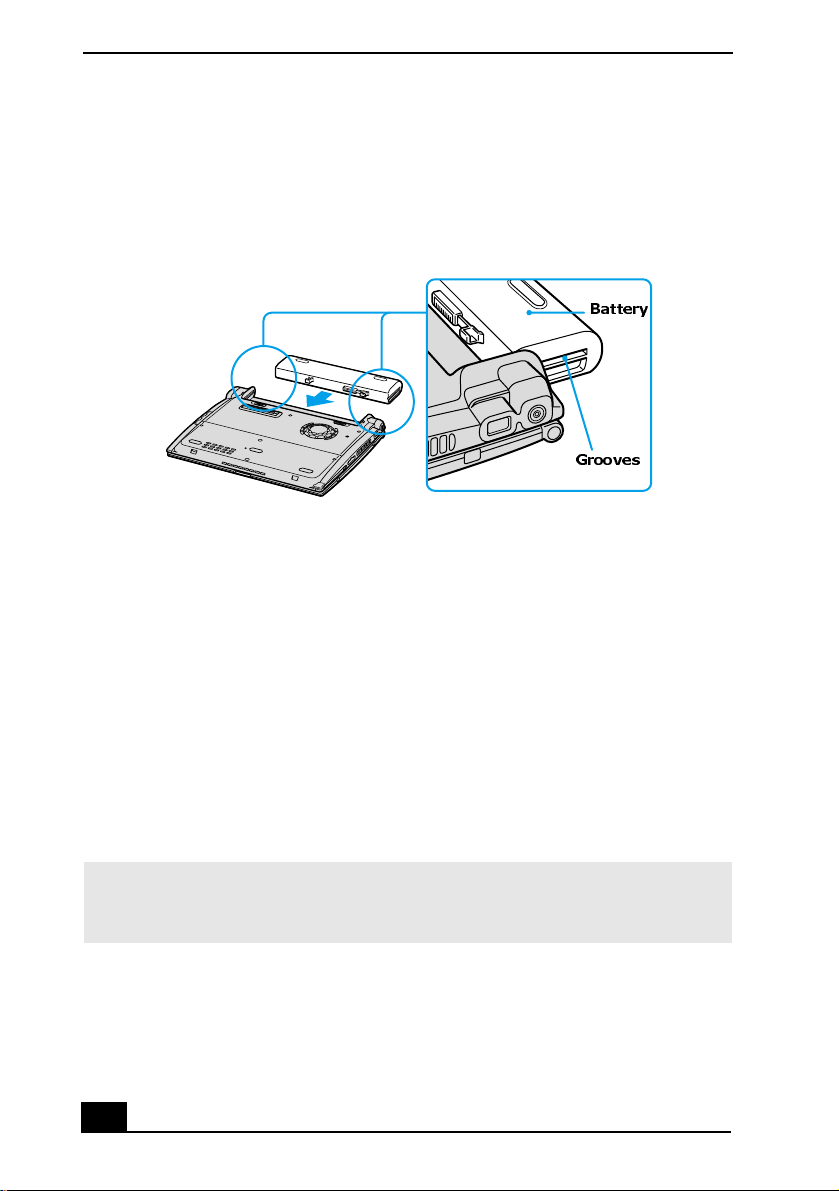
3 Align the grooves and ta bs on the battery with the tabs and notches on the
back of the noteboo k, and s lide t he ba tte ry towa rd t he note book until it clic ks
into pl ace.
Inserting Battery Pack
Battery
Grooves
4 Slide the lock lever into the Lock position to secure the battery on the
notebook.
To charge the battery pack
1 Connect the AC adapter to the notebook.
2 Insert the batter y pac k.
The battery is charging whether or not the notebook is turned on or off. The
battery indicator flashes in a double-blink patter n as the battery charges.
3 When the battery is 85 perce nt full, the battery indicator turns off. It takes
longer to rechar ge the batte ry when the note boo k is turned on than when it is
turned of f.
✍ To char ge the battery com pletely, continue charging for one additional hour. See
“Displaying Battery Information” in your online VAIO® Notebook User Guide for
more information.
28
Page 42
Connecting a Power Source
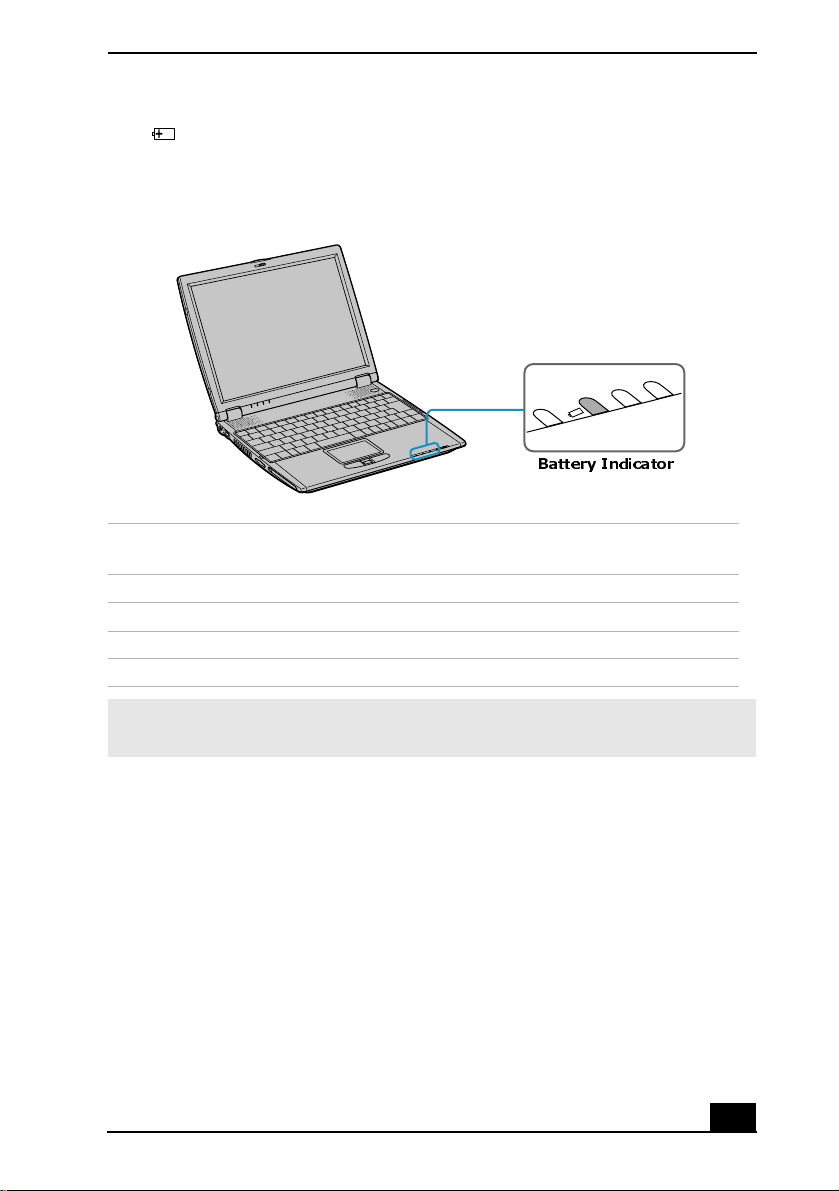
The battery indica tor on the front of the not ebook indi cate s the
battery pack.
Battery Indicator
Battery Indicator
Battery Indicator
Status Meaning
On The notebook is using battery power.
Single blin k The battery is runni ng out of power.
Double blink The battery is charging.
Off The notebook is using AC power.
status of the
✍ Both the battery and po w er indicators blink when the battery is running out of
power.
To remove the battery pack
You can remove the battery pack while your notebook is on or off; however, if
you remove the batter y pack while your notebook is on, make sure the notebook
is connected to the AC adapter.
1 Close the cover of the notebook.
2 Slide the Unlock/Lock switch to the Unlock position.
29
Page 43
VAI O ® Notebook Quick Start
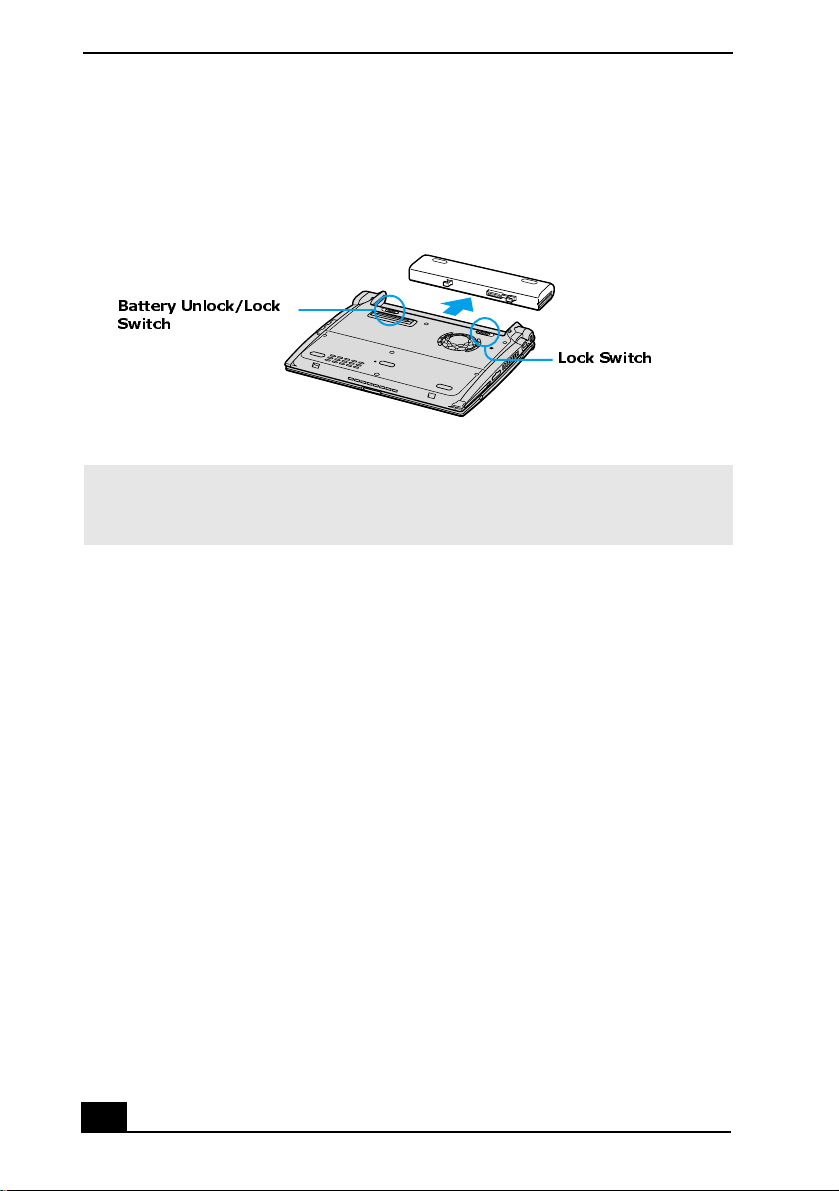
3 Slide the Unlock/Lock switch to the UNLOCK position a nd sl ide th e bat tery
away from the notebook.
Removing Battery Pack
Battery Unlock/Lock
Switch
Lock Switch
✍ You may lose data if you remove the battery pack while the notebook is on and not
connected to the AC adapter or if you remove the battery while the notebook is in a
power saving mode.
Notes on th e b attery
❑ To det er mi n e th e r emainin g bat t er y ch arg e, se e “D i sp l ay ing Batt er y
Information” in your online user guide for more information.
❑ Keep the battery pack in the notebook while it is connected to AC power.
The battery pack co ntinues to charge while you are using the notebook.
❑ If your ba ttery level falls to less than 10 percent, you should either attach the
AC adapter to recharge the battery or shut down your notebook and insert a
fully-charged battery.
❑ You can e xtend bat tery l ife by changi ng t he power mana gement m odes in the
PowerPanel utility. See “Using Power Saving Modes” on page 34 for more
information.
❑ The battery pack supplied with your noteb ook is a lithium-ion battery and
can be recharge d at any time. Charging a partially discharged battery does
not affect battery life.
❑ The battery indicator is on while you use the battery pac k as a power source.
When battery life is nearly depleted, the battery indicator flashes.
❑ Your not ebook may not enter Hibernate mode when the battery life is low, if
certain software applications are active, or if certain peripheral devices are
30
Page 44

Connecting a Power Source
connected. To avoid los s of data when using battery power, save your data
frequently and manually activate a power management mode.
❑ Never leave the battery pack in temperatures above 140° F (60° C), such as
under direct sunlight or in a car parked in the sun.
❑ Battery life is shorter in a cold environment. This is due to decreased batter y
efficiency at low temperatures.
❑ Charge the battery at temperat ures between 50° F and 80° F (10° C to
30° C). Lower temperatures requi re a longer charging time.
❑ While the battery is in use or being discharged, the battery pack heats up.
This is normal and is not cause for concern.
❑ Keep the battery pack away from all sources of heat.
❑ Keep the battery pack dry.
❑ Do not open or try to disassemble the battery pack.
❑ Do not expose the batte ry pack to any mechanical sho ck.
❑ If you are not using the notebook for an extended pe riod of time, remove the
battery pack from the notebook to prevent damage to the battery.
❑ If, aft er f ully char ging the battery pack, the battery power is still low, the
battery pack may be reaching the end of its life and should be replaced.
❑ You do not need to discharge the battery completely before recharging.
❑ If you have not used the battery pack for a considerable amount of time,
recharge the battery.
31
Page 45
VAI O ® Notebook Quick Start
Sta r ting Your Notebook
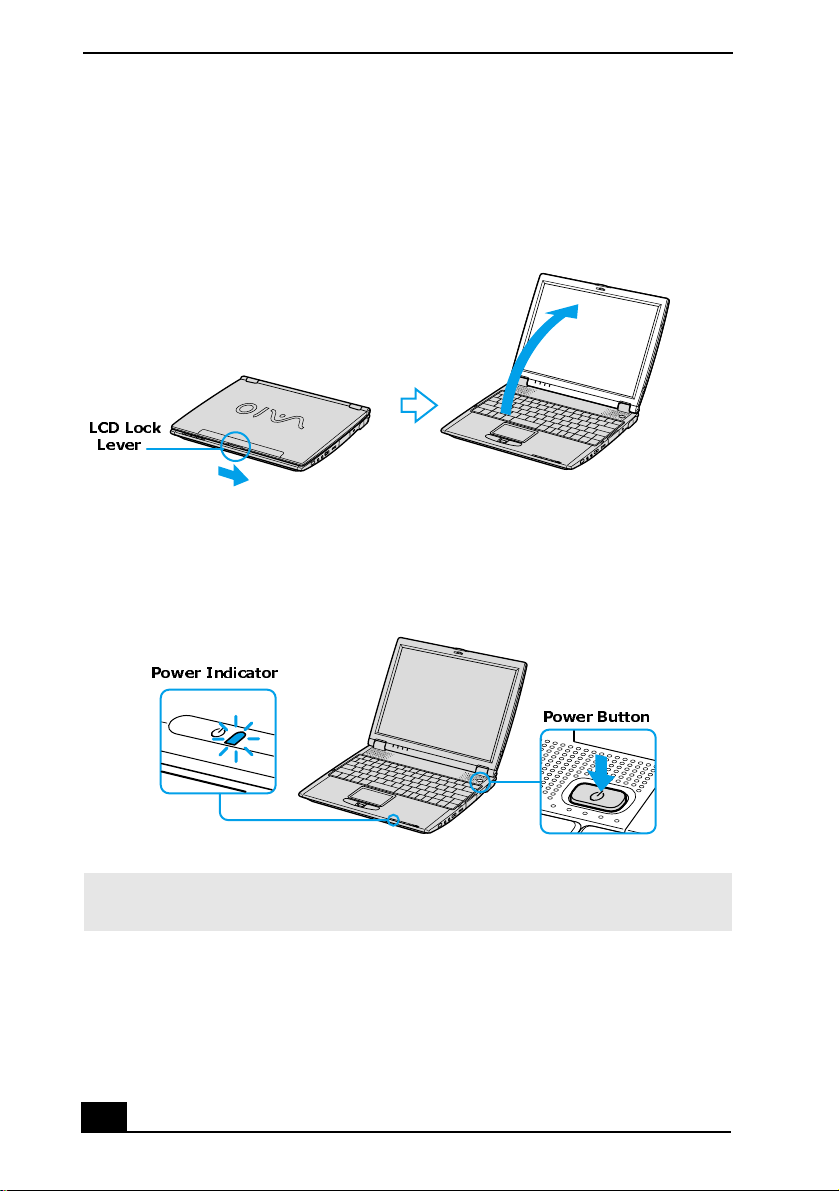
1 Slide the LCD lock lev e r in the dir e ct io n of the arr o w an d lift the cov er.
Opening Notebook
LCD Lock
Lever
2 Press the power button located on the right side of the notebook until the
green power indicator turns on.
Turning on Notebook
Power Indicator
Power Button
✍ If you hold the power button in the On position for more than 4 seconds, the
notebook turns off.
3 If necessary, adjust the bri ghtness controls for the LCD di splay. To dec r ease
the brightness, press Fn+ F5 and then the down or left arrow key. To increase
the brightness , press Fn+F5 and then the up or right arrow key.
32
Page 46
Shutting Down Y our Notebook
Shutting Down Your Notebook
To avoid potential los s of data, fol low these steps to turn off your notebo ok.
1 Click Start on the Windows® taskbar.
2 (Windows XP) Cli ck Turn Off Computer at the bottom of the Start menu to
display the Turn Off computer dialog box, and click Turn Off.
(Windo ws 2000) Cli ck Shut Down at the bottom of the S tart menu to displ ay
the Shut Down Wi ndows dialog box, and click Shut Down.
✍ Respond to any prompts warning you to sav e documents.
3 Wait for your notebook to turn off automatically. The notebook is off when
the power indicator turns off.
4 Turn off any attachments connected to your notebook.
✍ During a period of inactivity, you can conserve batt ery life by using Standby mode.
See “Control li ng Powe r Manag emen t” in the online us er guide for more in for matio n.
If you are unable to tur n off your notebook:
1 Close or end all operations.
❑ Close all applications.
❑ Remove the PC Cards.
❑ Disconnect USB devices.
2 Restart the note book. (Windows XP) Press the key combination
Ctrl+Alt+De lete. The Win dows Task Manager screen appears. Click the
Shut Down tab, and select Restart. (Wi ndows 2000) Press the key
combination Ctrl+Alt+Delete. The Windows Security screen appears. Cli ck
Shut Down, and select Re start from the drop-down list .
✍ If you are still un abl e to s hut down the not eb ook, you ca n pr ess the po wer but ton and
hold it for m o re than 4 seconds. This operation may result in data loss.
33
Page 47

VAI O ® Notebook Quick Start
Using Power Saving Modes
When you use a battery as the source of powe r f or your notebook, you can take
advantage of power man age me nt settings to conserve battery life. In addition to
the normal operat ing mode, which allows you to turn off specific devices, your
notebook has two distinct po wer s aving modes: Standby and Hibernate. When
using batt ery power, be aware that the notebook automatically e nters Hibernate
mode when the remaini ng batt ery char ge drops below 5 pe rcent , regard less of t he
power management setting you select.
✍ If the battery lev el fal ls below 1 0 percen t, you sh ould ei th er att ach the AC ada pt er to
recharge the battery or turn off your notebook and insert a fully charged battery.
Normal mode
Normal mode is the normal state of your notebook when it is in use. The power
indicator displays gr ee n when your noteb ook is in th is mode. To save power, you
can turn of f a sp ec if i c de v ic e s u ch as th e LCD or the har d di sk dr i ve .
Standby mode
In Standby mode th e notebook saves the current s tate of the system in RAM and
switches off power to the CPU. The amber power indicator flashes in this mode.
To use Standby mode
1 Press the key combination Fn + Esc.
2 Press any key to return to normal mo de.
Hibernate mode
In Hibernate mode, th e s tate of the system is saved on th e hard disk drive and
power is turned of f. T he powe r indicator is off in thi s mode.
To use Hibernate mode
1 Press the key combination Fn + F12.
2 Press the power button to return to normal mode.
34
Page 48

Using Power Saving Modes
Notes on power saving modes
❑ When returning from Hibe rnate mode, the system status stored on the hard
disk is erased and the notebook s tarts normally if you pre ss th e power button
and hold it for more than 4 seconds.
❑ Standby mode uses more powe r than Hibernate mode.
❑ Standby mode requires less time than Hibernate mode to return to normal
mode.
35
Page 49

VAI O ® Notebook Quick Start
36
Page 50

Adding Memory
In the future you may want to install memory modules to expand the
functionality of your notebook. The amount of memory on your notebook
will vary depending on the model you purchased. Expansion memory
modules are available as options. For memory upgrades, use onl y
unbuffered PC133 (CL2) SDRAM SO-DIMM (gold lead contacts). This
section describes how to replace memory modules in your computer:
❑ Precautions and Procedures
❑ Installi ng a Memory Module
❑ Removing a Memory Module
❑ Viewing the Amount of Memory
37
Page 51
VAI O ® Notebook Quick Start
Precautions and Proc edures
The procedures describe d below ass ume familia rit y with the genera l term inology
associated with personal computers and with the safety practices and regulatory
compliance req uired for using and modifying electronic equipment. Personal
injury or equipment damage may result from failure to ta ke these precautions.
Sony reco mmends memory upgrades be perform ed by an authorized Sony
Service Center. To fi nd the nearest center or agent, see
http://www.sony.com/pcsupport.
Observe the proper s afety precautions when installing memory modules in
your notebook. See the bulleted l ist below . Use care when addi ng memory.
Mistakes when installing or removing a memory module may cause a
malfunction.
❑ Disconnect the sys tem from its power source and from any
telecommunications links, netwo rks, or modems before you open the
system.
❑ Electrosta tic d ischa r ge (E SD) c an damag e dis k drives a nd o ther c ompone nts.
Perform the procedure s descr ibed below only at an ESD worksta tion. If such
a station is not av ailable, do not work in a carpeted area, and do not handle
materials that produce or hold static electricity (cellophane wrappers, for
example). Ground yours elf by maintainin g contact with an unpaint ed metal
portion of the chassis while performing the procedure.
❑ Do not open the memory module package until you are ready to install the
module. The package protects the module from ESD.
❑ Use the special bag fo r prevent ing ESD or use a luminu m foil when you sto re
the memor y modu le.
38
Page 52

Precautions and Procedures
Typical expansion memory configuration
Total Sys tem Memory (MB) On board (MB) Slot (MB)
256 128 128
*
384
* The 384 MB memory configuration may require the removal and replacement of original
factory-ins talled memory module.
128 256
39
Page 53

VAI O ® Notebook Quick Start
Removing a Memory Mo dule
1 Turn off your notebook and disconnect all peripheral devices, such as your
printer.
2 Unplug the notebook and remove the battery packs.
3 After the notebook has cooled, loosen and remove the two screws with the
mark located on the bottom of your notebook. Use an appropriate
screwdriver.
4 Slide the LCD lock lever and lift the cover. Slide the keyboard toward the
LCD display, th en lift it away slightly.
5 Lift the keyboard from the LCD display side, then gently turn it over on the
touchpad s pace. Be careful not to detach the cabl e when lifting the keyboard.
6 Touch a metal object (such as the connector panel on the back of your
notebook) to discharge any static electricity.
7 Slide the mem or y module out of the slo t.
8 Gently replace the keyboard, then press it into your notebook. Be care ful not
to detach the cable when lifting the keyboard.
9 Close the notebook cover, then tighten the screws on the bottom of the
computer.
40
Page 54
Installing a Memo ry Module
Installing a Memory Module
1 Turn off your notebook and disconnect all peripheral devices, such as your
printer.
2 Unplug the notebook and remove the battery packs.
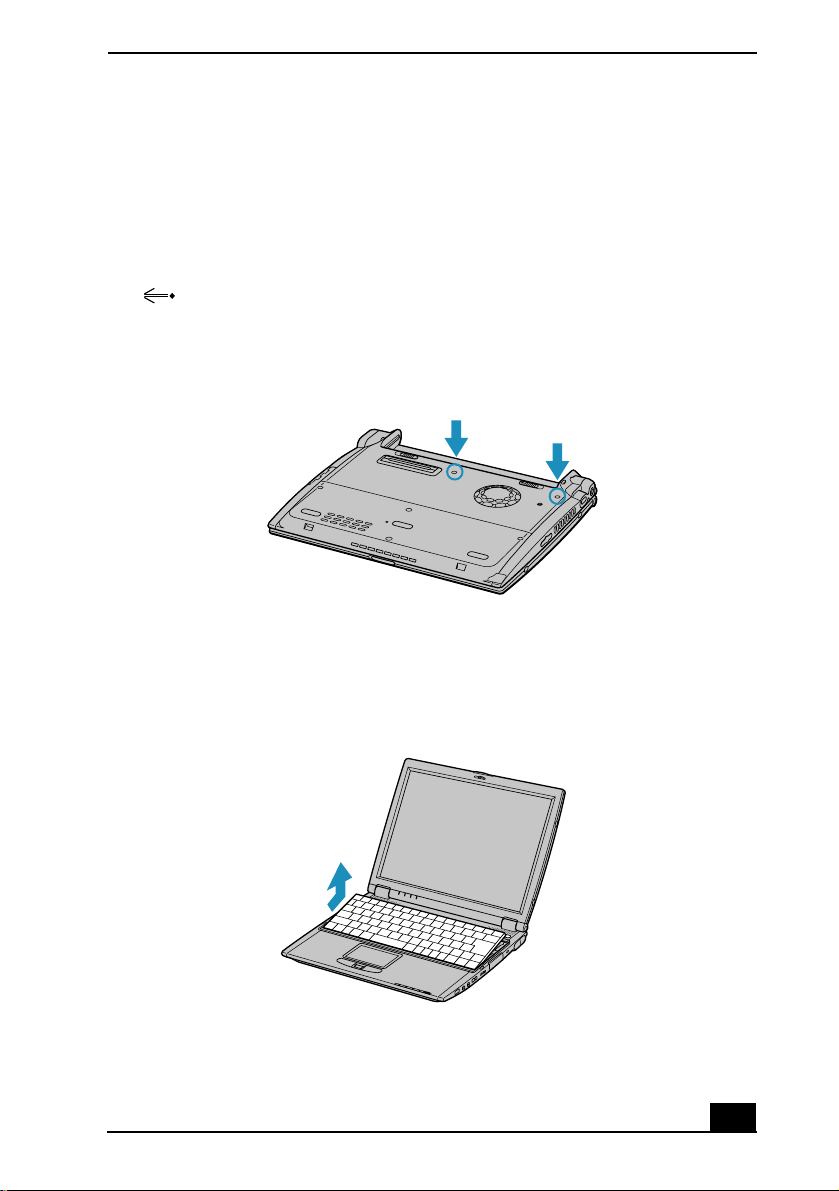
3 After the notebook has cooled, loosed and remove the two screws with the
mark located on the bottom of your notebook. Use an appropriate
screwdriver.
Screws on Bottom of Notebook
4 Slide the LCD lock lever and li ft the cover . Slide the keyboard toward the
LCD display, then lift it away slightly.
Lifting the Keyboard
41
Page 55
VAI O ® Notebook Quick Start
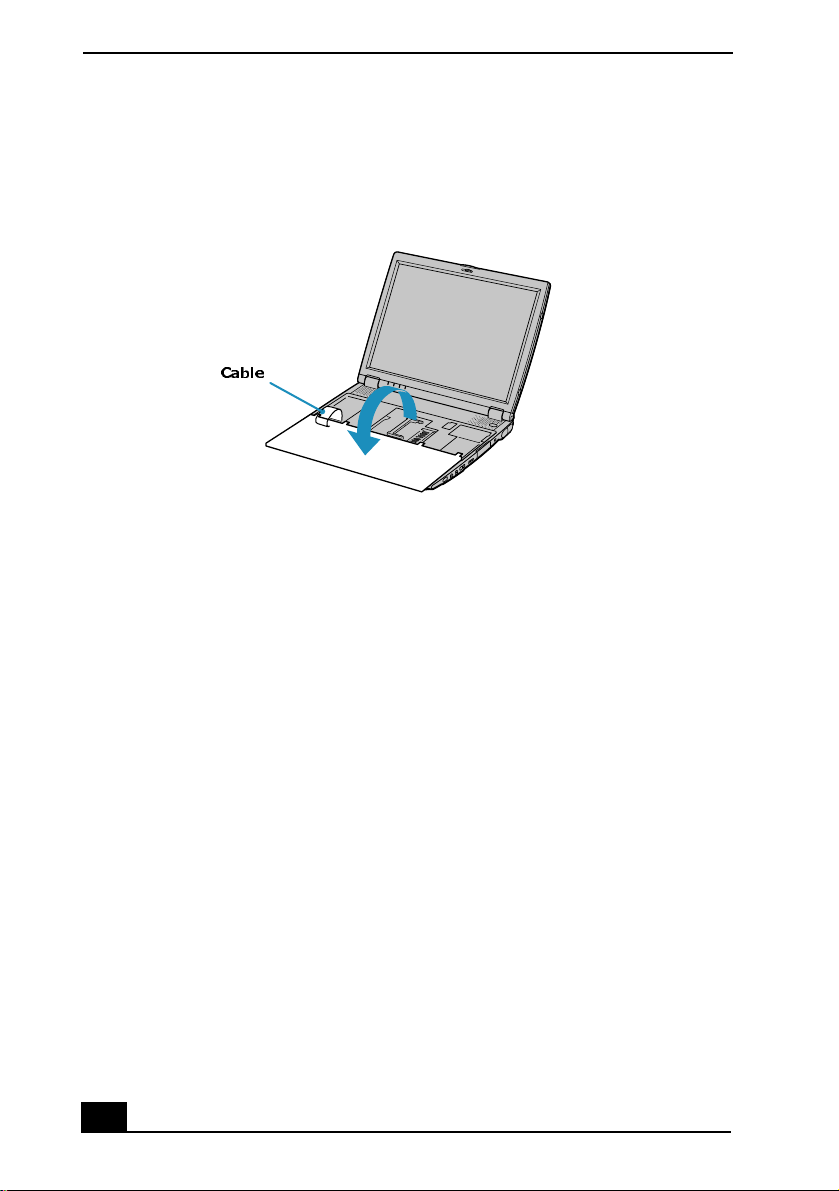
5 Lift the keyboard from the LCD display side, then gently turn it over on the
touchpad s pace. Be careful not to detach the cabl e when lifting the keyboard.
Turning the Keyboar d
Cable
6 You must remove the existing memory module before you can install a new
module. See “Removing a Memory Module” on page 40 for instructions.
7 Touch a metal object (such as the connector panel on the back of your
notebook) to discharge any static electricity.
8 Remove the new memory module from its packaging.
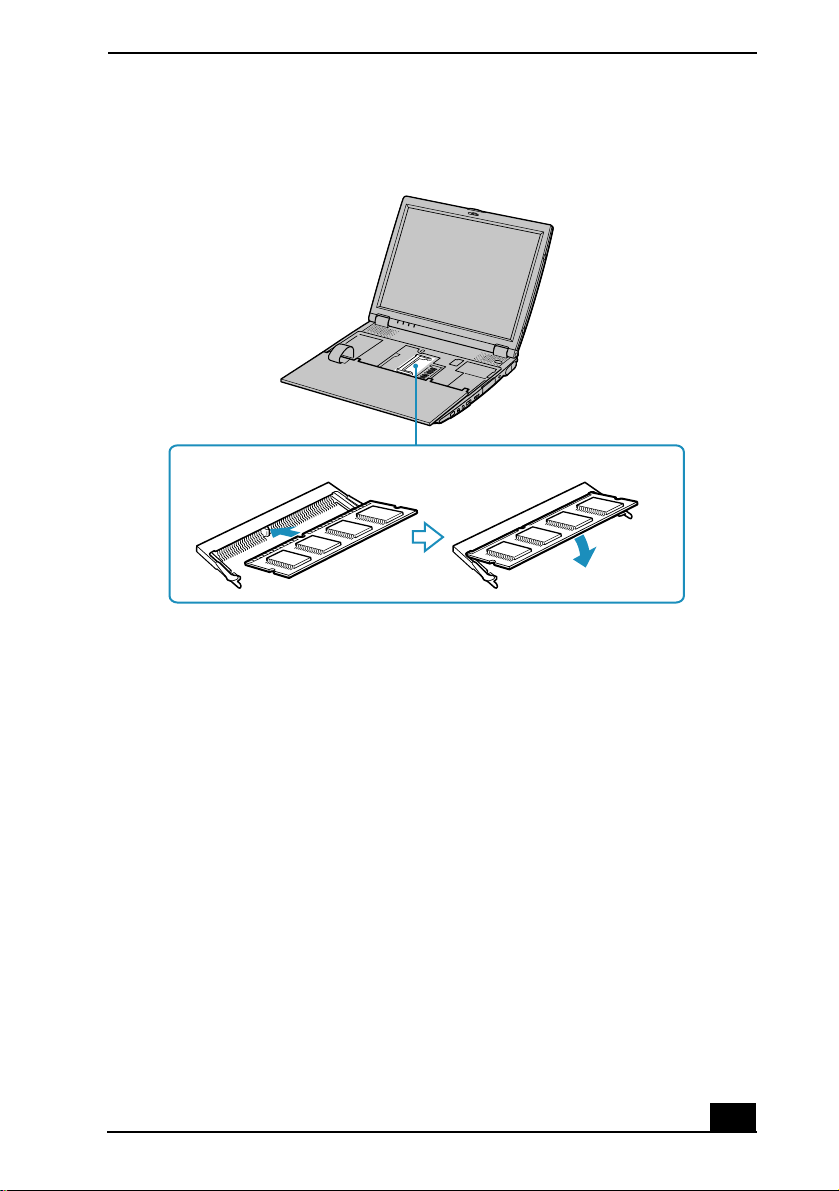
9 Slide the memory module into the empty slot.
10 Press the module into place until it clicks.
42
Page 56
Installing a Memo ry Module
Installing the Mem ory Module
11 Gently replac e the keyboard, then pr ess it int o your notebook . Be care ful not
to detach the cable when lifting the keyboard.
12 Close the notebook cover, then tighten the screws on the bottom of the
computer.
43
Page 57

VAI O ® Notebook Quick Start
Viewing the Amount of Memory
1 Restart the notebook.
2 (Windo ws XP) Clic k S tart on the Wi ndows® taskbar, then Control Panel,
and then Performance and Maintenance. (Windows 2000) Click Start on the
Windows® taskbar, then Settings, and then Control Panel.
3 Select Sony Notebook Setup. The Sony Notebook Setup window ap pea r s.
4 Make sure the About This Comput er tab is open. Memory information is
listed in the System Information box.
✍ The amount of memory displayed in the Sony Notebook Setu p screen is not always
correc t. The video adapter uses some system memory , and that amount of memory
does not ap pear as part of t he total memory shown in the Sony Notebook Setup
screen.
44
Page 58

About the Soft ware on Your
Notebook
Your VAIO® notebook is ready to help you work, play, learn, and
communicate as soon as you turn it on. This section offers the following
information:
❑ Overview of the Software on Your Notebook
❑ Application, Driver, and System Recovery CDs
❑ Using Your Rec overy CDs
45
Page 59

VAI O ® Notebook Quick Start
Overview of the Software on Your Notebook
Your compute r ma y not be supplied with all of the software listed below,
depending on the configuration you purchased. Preinstalled software may not be
identical to retail versions or include supporting documentation.
Adobe® Acrobat® Reader®
Adobe Systems Inc.
Acrobat Reader soft ware allows you to view, navigate, and print electronic
documents in Adobe’s Portable Document Format (PDF), an open file format
that is intended to preserve the fidelity of documents crea ted on all major
comput er pl at fo r ms .
ArcSoft PhotoPrinte r® 2000 Pro
ArcSoft, Inc.
ArcSoft PhotoPrinter Pro software is an easy-to - use, yet advanced printing
program that lets you quickly lay out multiple images in multi ple sizes on a
single sheet of paper. ArcSoft P hotoPrinter Pro softwa re offers a wide selectio n
of templates in cluding landscape, portrait, free-style, mixed sizes, custom
templates and more. The application includes enhancement tools and special
effects for improving photos while giving you the ability to add text to any
image. With ArcSoft PhotoPrinte r 2000 Pro software you can create business
cards, handouts, calendars, mailing labels, and much more.
Adobe® Photoshop® Elements (On selected models)
Adobe Systems Inc.
Using state-of-the-art image editing tools, you can unleash your artistic ability
and create digital images for print, e-mail and posting to the Web. The versatile
image capturing options allow you to start working with digital and traditional
photos immediately. Explore endless c reative possibilities for your personal
images with Adobe Photoshop Elem ents software.
Adobe® Premiere® LE (On selected mod els)
Adobe Systems Inc.
Adobe Premiere LE software offers interface and edi ting tools for producing
movies for video, multimedia, or the Web. View source clips and edited footage
simultaneousl y on-s creen. You can create your own personal video clips that are
up to three hours in length, with complete audi o-video synchronization.
46
Page 60

Overview of the Software on Your Notebook
Americ a On l i n e®
America Online, Inc.
America Online is a popular Internet online service. Stay in touch with family
and friends wi th ea sy-to-u se e -mail. Man age you r pers onal f ina nces, get t he late st
news and sports scores , and chat with thousands of others who sh are your
interests.
DigitalPrint
Sony Electronics Inc.
This image management software makes it fun and easy to edit, import, and
organi ze your digital pictures in a photo album for rich digital printing to any
standard color laser or ink-jet print er. DigitalPrint can also be used to make
custom CD labels for your au dio CDs .
DVgate™
Sony Electronics Inc.
Connect a digit al video camera recorder to the i.L INK ®
*
port and capture your
own video clips and still images. You can edit clips from your video, add new
clips, and combine clips into new movie segmen ts. You can also save your
images in a variety of pop ular file formats.
Drag’n Drop CD™ (On selected models)
DigiOn Inc. and Easy Syst ems Japan Ltd.
Drag’n Drop CD software is desi gned to be the most simple software to make
your own CD. Users can create their own best AudioCD, or data CD that can be
read in many PCs. With Drag’n Drop CD software you can also create your own
backup CD from the original CD that you own.
* i.LINK is a Sony trademark u s ed only to designate that a p roduct contains an IE EE 1394 con-
nection. The i.LINK connection may vary, depending on the software applications, operating
system, and compatible i.LINK devices. All products with an i.LINK connection may not
communicate wi th each other . Refer to the documentation that c ame w ith your compatible
i.LINK device for information on operating conditions and proper connection. Before connecting compatible i.LINK PC per ipherals to you r sy s tem, such as a CD-RW or hard disk
drive, conf irm their op e ra ting s yst em com p at ibility and required ope rat in g con ditio ns.
47
Page 61

VAI O ® Notebook Quick Start
EarthLink Network T otal Access®
EarthLink Ne twork, Inc.
An Internet Servic e Provider that supplies acce ss, information, and ass is tance to
its customers, introducing them to the Internet. Member benefits include e-m ail,
newsgroups, a P ersonal Start Page, free storage space for your personal Web site,
a member magazine, and 24-hour technical support.
EverQuest® (On selected models)
Sony Online Entert ainment Inc.
This introductory edition of EverQuest®, a living, constantly evolving fantasy
world, takes users to new heights of online role-playing gaming.
Microsoft® Office XP Professional (On selected models)
Microsoft Corp.
Microsoft Offi ce XP softwa re re defines the relationshi p between people and
software by providing a smarter, simpler way of working. New Office XP
software features include context-sensitive smart tags, enhanced formatting
options, and more , that enable you to continually integrate additional services
into Office and access information anytime.
Microsoft® Office XP Small Business Edition (On selected models)
Microsoft Corp.
With Micros oft Of fic e XP syste m you’l l find a p owerful n ew tec hnology tha t will
help you get work done more quic kly by providing real-tim e, context-sensitive
options for impor tant actions, from format ting to error correction. Task panes
consolida te im portant task s into a si ngle integ rat ed vie w, enabl ing you t o conduc t
searches, launch and format documents, and view the conten ts of your Clipboard
from one location.
Microsoft® Word (On selected models)
Microsoft Corp.
Microsoft Word makes it easy to create common Web, e-mail, and pri nt
documents for use around the world. It embraces HTML as a first-class file
format and extends Word's ea s e-of-use to the Web and e-mail. Word also extends
that ease-of-use to international users, making it easy to create multilingual
documents.
48
Page 62

Overview of the Software on Your Notebook
MovieShaker™
Sony Electronics Inc.
Sony’s original Movie S hake r software creates perso nal movies that have
transiti ons, backg round m usic, an d text. Just import you r video cl ips and “shake”
with a click of the mouse. Your personal movies are easy to create and fun to
share with family and friends.
OpenMG™ Jukebox
Sony Electronics Inc.
OpenMG Jukebox software enables you to import digital audio files by
downloading audio files from Electronic Music Distribution (EMD) services
over digital networks, such as the Inte rnet. You can record audio CDs onto your
hard drive in a variety of forma ts.
PC-Cillin® 2000
Trend Micro, Inc.
PC-Cillin software provides portable, easy-to-use, real-time antivirus security at
your computer’s entry point (beaming, synchronization, Internet access) to
defend against potential threats hidden inside files , e-mail, or on the Web.
PicoPlayer™
Sony Electronics Inc.
PicoPlayer software is a video player utility that enables you to use Giga
Pocket™ Personal Video Recorder functions on a comput er that does not have
Giga Pocket™ Personal Video Recorder installed . You can play Video Cap sules
created by Giga Pocket™ Personal Video Recorder, and, if a Giga Pocket
Server™ is available on your home network, watch TV streamed from the Giga
Pocket Server™ and re mote ly cont rol the Gi ga Po cket Se rver’ s TV programmi ng
functions.
PictureGear™
Sony Electronics Inc.
This image management software displays image s fr om your hard drive, a Sony
digital still camera, or a Sony Mavica® camera . The images appear in a
convenient light-table format, so that you can easily view the contents of an
entire folder.
49
Page 63

VAI O ® Notebook Quick Start
Quicken®
Intuit Inc.
Quicken software is the fastest, easiest way to organize your fina nce s. Quicken
software works just like your checkbook, so it' s eas y to learn and use. You can
even pay your bills online. Quicken software manages all of your finances, bank
accounts, cre dit cards, investm ents, and loans.
QuickTime®
Apple Computer, Inc.
The versatile QuickTime softwa re is used to play hundreds of different kinds of
files, including video, audio, and virtual reality (VR) movies. You can play
QuickTi me files (r efe rred to a s “Qui ckTi me movie s”) u sing Qui ckT i me Playe r or
any other application, such as a Web browser or word process or, that supports
Quick Tim e s o ft w a re .
RealJukebox®
RealNetworks, Inc.
RealJukebox software is a popular digi tal music system that gives you the ability
to easily acquire, play and manage digital music files. You can locate and
download your favorit e musi c from the Internet and orga nize your own personal
music co l le ct ion .
✍ If you use an extern al CD-ROM driv e connected w ith a PC Card, connect the
extern al CD-ROM drive before starting RealJukebox s oftware. Do not remove the
CD-ROM drive w hile using RealJukebox software. Either action may cause
RealJukebox software to shut down improperly.
Sony recommends using the SonicSt age software’s Rec ord function to create any
CDs on your VAIO® computer, if t he speci fi c mod el you pur ch ased i s p recon fi gur ed
with all necessar y components f o r C D -R and CD-RW capabi lity. Downloading the
optional RealJukebox software CD-burning component to create any CDs on your
compu ter may in te rfere with norm al system op erati on s .
50
Page 64

Overview of the Software on Your Notebook
RealPlayer®
RealNetworks, Inc.
RealPlayer software is a high-quality streaming media player that supports many
digital media formats. The user-friendly interface has enhanced navigation
capabilit ies , all owing you to acce ss and en joy audi o and vide o pr ogramming over
the Inte rnet . Re al Pla yer sof twar e is you r gat eway to a s uper b Inte rne t mult im edia
experience.
Smart Capture
Sony Electronics Inc.
Smart Capture is a fun new way to send multimedia messages vi a e-mail. Smart
Capture manages the i.LINK®
*
connection between your notebook and a Sony
Digital Handy ca m® Camcorder that supports the i.LINK interface. It a llows you
to capture comp ressed video or s till images and save t hem t o your hard di sk dri ve
or share via e-mai l. A smart solution for computer, dig ital audio/vid eo and
network convergence.
Smart Connect (On selected models)
Sony Electronics Inc.
Smart Connect enables you to use an i.LINK®* cable to connect your VAIO®
computer to another VAIO compute r that supports Smart Connect. You can then
use one computer to copy, delete, and edit files on the other computer. You can
also prin t f r o m a printer attached to either computer.
SonicStage™
Sony Electronics Inc.
This new jukebox application adds a host of new features to its predecessor,
OpenMG™ Jukebox. Continuing to take advantage of Sony’s copyrightprotected ATRAC3™ format for high-quality digital audio storage , S onicStage
software sports a new music visualize r, a sleek new pla yer skin des ign, audio CD
burning capabi lity, and a parametric equaliz er for fine-tuning audio playbac k.
* i.LINK is a Sony trademark u s ed only to designate that a p roduct contains an IE EE 1394 con-
nection. The i.LINK connection may vary, depending on the software applications, operating
system, and compatible i.LINK devices. All products with an i.LINK connection may not
communicate wi th each other . Refer to the documentation that c ame w ith your compatible
i.LINK device for information on operating conditions and proper connection. Before connecting compatible i.LINK PC per ipherals to you r sy s tem, such as a CD-RW or hard disk
drive, conf irm their op e ra ting s yst em com p at ibility and required ope rat in g con ditio ns.
51
Page 65

VAI O ® Notebook Quick Start
Sony ScreenBlast™ ACID
Sony Pictures Digital Entertainment
With the powerful Sony ScreenBlast ACID sof tware you can create royalty-free
music by utilizing its loop-based production tool, inc luding unlimited tracks and
enhanced effects.
Sony ScreenBlast™ Sound Forge®
Sony Pictures Digital Entertainment
Sony ScreenBlast™ Sound Forge® allows you to record, edit, and process mono
or stereo audio files for your multimedia or Internet projects. Whether you want
to use a number of professional effects, convert video into streaming media, or
synchronize audio to video — this software has ever ything you need to create
rich, immersive multim edia and Intern et content.
Sony on Y ahoo!
Yahoo! Inc.
Personaliz e your own web portal with Sony on Yahoo! Get a free webmail
account, customi ze d news and local weather reports, comics , instant messaging,
and more.
VAIO Action Setup (On selected models)
Sony Electronics Inc.
VAIO Action Setup manages the settings for your computer's Shortcut keys.
VAIO Support Agent
Sony Electronics Inc.
VAIO Support Agent provides im mediate, interac tive, online support with
information about your preinstalled so ftware and answers to frequently asked
questions.
VisualFlow™
Sony Electronics Inc.
VisualFlow software is a state -of-the-art Sony multimedia brows er designed
specifically for Memo r y Stick® media. It displa ys any still pictur e, movie or
sound file stored in a Memory St ic k media in a visuall y pleasing , art isti c manner.
VisualFlow software not only plays a selected movie or sound file, but also
enables playba ck of files by other applications like PictureGear™ or Memory
Stick Sli des how.
52
Page 66

Overview of the Software on Your Notebook
WinDVD®
InterVideo, Inc.
WinDVD software is a simple-to-use DVD player including all the features you
would expect to find in a stand ard consumer DVD player, while also offering
advanced disp lay an d na vigati on feat ures suc h as zoom, pan , b ookmark, a nd t ime
search.
53
Page 67

VAI O ® Notebook Quick Start
Appl ication, Driver, and System Recovery CDs
Your not ebook c omes wi th the fol lowi ng appl ic ation, dr iver, and s ystem r ecover y
CDs. See “Using Yo ur Rec overy CDs” on page 55 for information.
Application Recovery CD(s)
Sony Electronics Inc.
This CD enable s you to rei nsta ll indi vidu al appl ic ations i f the y beco me corr upte d
or are erased.
Driver Recovery CD(s)
Sony Electronics Inc.
This CD enables you to reinstall individual device drivers if they become
corrupted or are erased.
System Recovery CD(s)
Sony Electronics Inc.
This CD enables you to restore the operating system and software that shipped
with your computer if they become corrupted or are erased. This CD restores
your computer to its original factory settings, so user data and applications
installed si nce you started using your computer will be lost.
✍ To use the recovery CD(s), connect the docking station (suppli ed w ith selected
models) or an optional optical drive, such as a fully atapi compliant PC C ard CDROM drive, to the notebook.
54
Page 68

Using Your Recovery CDs
Using Your Recovery CDs
The following sections describe how to use the Application Recovery, Driv er
Recovery, and System Recovery utilities.
To use the Application Recovery CD(s)
The Applic ation Recove ry CD(s) all ows you to re inst all i ndi vidual appli ca tions if
they become corrupted or are accidentally erased. Reinstalling an individual
software title may correct a problem you are experiencing with your notebook or
software applic ation; you may not need to reinsta ll the entire contents of your
hard drive. If you need to reinstall all the software titles that shi pped with your
notebook, use the System Recovery CD(s). See “To use the System Recovery
CD(s)” on page 58 for more informatio n. If you have any questions on using the
Application Recovery CD, contact Sony Customer Support.
✍ You must be in the W indows® operating system to run the Application Recover y
CD. If you have any questi ons on using the Ap plication Recovery CD, contact Sony
Customer Support.
1 Turn on your note book. If your notebook is already on, cl os e al l
applications.
2 When the Windows desktop appears, inse rt the Sony Application Rec overy
CD in the optical drive. The Application Recovery utilit y loads
automatically.
3 When the Application Re covery menu appears, selec t the icon for the
application you want to restore and then follow the on-s creen instructions to
complete the recovery process.
✍ Your system may include one or two Application Recove ry CDs. If you have t w o
Applic ation Re co v er y C D s, ins er t the first C D to ru n th e A p pl ic ation Re co v er y
program. You may be prompted to insert the second CD, depending on the
application you wish to restore.
55
Page 69

VAI O ® Notebook Quick Start
To use the Driver R ecovery C D (s)
The Driver Recovery CD util ity enables you to rei nsta ll in dividua l drive rs if they
become cor ru pte d or ar e er as ed. You can rein sta ll an indi v id ual driv er t o c orrec t a
problem that you are experiencing with your noteb ook, hardware, or software
applicati on. VAIO Supp ort Agent, an application repair utility, uses a vault
feature on the Driver Recovery CD(s) to repair software appl ications.
✍ If you need to reinstall all of the software applications that shipped with your
computer, use the System Recovery CD.
You must be in Windows® to run the Driver Recovery CD utility.
Reinst alling specific drivers with the Dri ver Recovery CD
(Microsoft® Windows® XP)
1 Turn on your notebook. If your notebook is already on, close all
applications.
2 When the Windows desktop appears, insert the Driver Recovery CD into the
optical disc drive.
3 Click Start on the Windows taskbar, then click Control Panel. The Control
Panel window appears.
4 Click Performance and Mainte n ance, then click System. The Sy stem
Properties dialog box appears.
5 From the Hardware tab, clic k Device Manager .
6 Click to highlight the device for which you wish to reinstall the driver.
7 From the Actions menu, choose Properties. The Properties dialog box for
that device appears.
56
Page 70
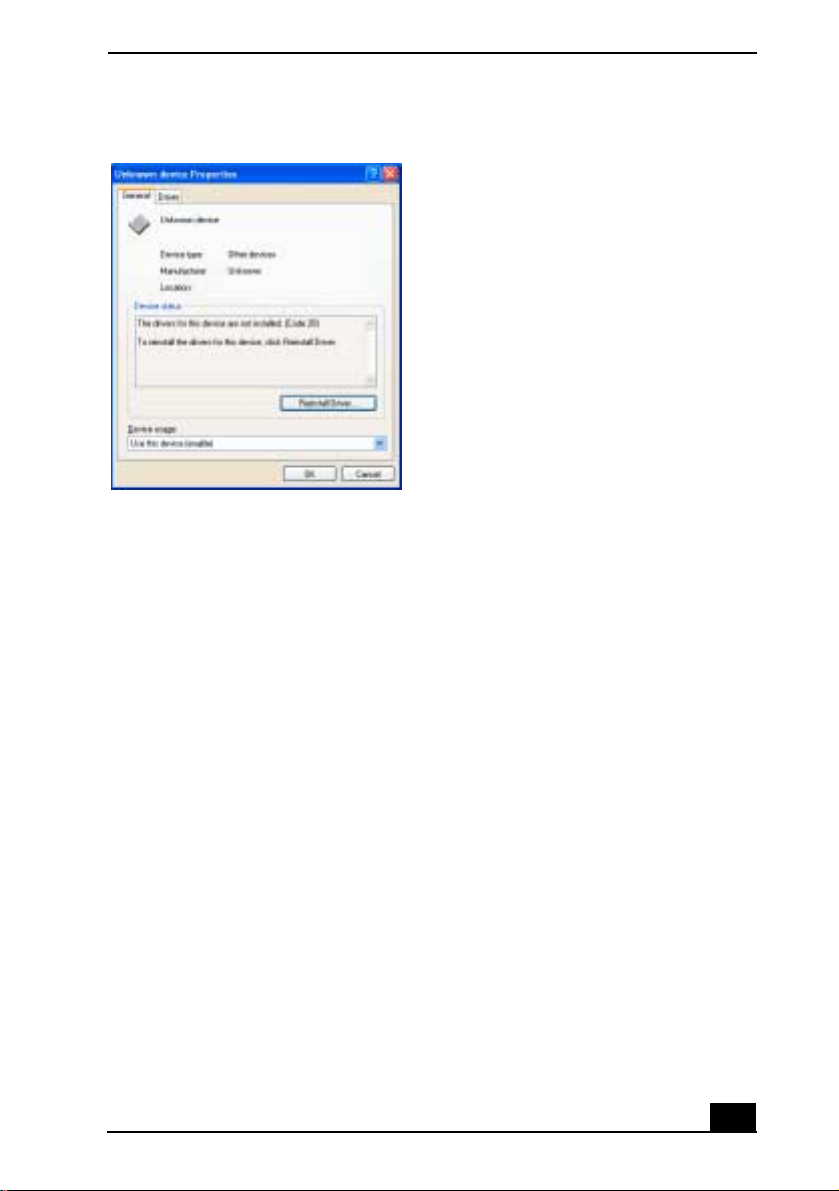
Using Your Recovery CDs
Properties dialog box.
8 Click Reinstall Driver. The Hardware Update Wizard appears.
9 Click Next. The wizard will sear ch for the correct driver on your Driv er
Recovery CD.
10 When the recovery process is complete, c lick Finish. Some d r ivers will
require that you reboot the computer to complete installation.
Using the Driver Recovery CD(s) (Windows 2000)
1 Turn on your note book. If your notebook is already on, cl os e al l
applications.
2 When the Windows® deskt op appears, i nsert the Driver Recovery CD in the
optical disc drive.
3 Use My Computer or Win dows Explorer to view the contents of the Driver
Recovery CD.
4 Select the appropriate driv er.
57
Page 71
VAI O ® Notebook Quick Start
To use the Syst em Recov er y C D (s)
The System Recovery ut ility formats your hard disk drive and restores all
original software applications. Your computer is returned to the original factory
settings.
The System Recovery process removes all software t hat you may have
installed since you started using your computer. Reinstall any
application s that were not incl uded with the computer when you
purchased it.
You can use the System Rec overy CD(s) to reinstall the ope rating system and
software title s th at shipped with your notebook if they become corrupted or
erased. You may not need to reinstall the entire cont ents of your hard drive. If
you experience a problem with your notebook, reinstalling an individual device
driver or software tit le may correct the problem. Use the Appli ca tion Recovery
CD(s) to reinstall individual applications or use the Driver Recovery CD(s) to
reinst al l de vi ce d ri ver s. S e e “To us e th e Ap p licat ion Re cov ery CD (s) ” o n p age 55
or “To use the Driver Recovery CD(s)” on pag e 56 for more information.
The System Recovery CD contains a backup copy of all the software originally
installed on your hard disk drive. It can be used only to recover the hard disk of
the notebook you purc hased.
System Recovery options
❑ System Drive Recovery — All data on Drive C is delet ed. The factory
default settings and software applications are restored on this dri ve only .
❑ Change Partition Size — All partitions, custom installations, and changes
are removed from the hard disk drive. You can set the partition sizes for both
the Drive C and Drive D . Th e original, preinstalled operating system and
software applications are restored.
❑ Recovery to Original Factory Defaults — All data and partitions are
removed from the hard disk drive. All original factory s ettings, operating
system, and preinstalled software is restored.
The System Recovery utility does not back up your system’s data. If you
wish to retain your system dat a, perform a backup to an external media.
58
Page 72

Using Your Recovery CDs
Using the System Recovery CD(s)
Your system may take a few minutes to load necessary files. A blue screen
appears during the downloading process.
1 Insert the Sony System Recovery CD in the optical dr ive. The System
Recovery utility starts from the optical drive. The first CD must be in the
drive when you turn on the notebook.
2 Shut down your notebook as described in the “Shutting Down Your
Notebook” section on page 33.
3 Wait 30 seconds and turn on your not ebook.
4 The VAIO System Recovery Utility dia log box appears. Click Next .
5 At the pop-up prompt, select Yes to begin the system recovery process.
6 Follow the on-screen instructions.
If your notebook does not start from the Rec overy CD
1 Press the power butto n and hold it for more than 4 seconds to turn off the
notebook.
2 Turn on the notebook. When the Sony logo is displayed, press the F2 key.
The BIOS setup menu screen appears.
3 Press th e ar row keys to select the Exit menu.
4 Press the arrow keys to select “Get Default Values” and then press the Enter
key. The message “Load default configuration now?” appears.
5 Make sure “Yes” is selected, then press the Enter key.
6 Press the arrow keys to select “Exit” (Save Changes) and then press the
Enter key. The message “Save configuration ch anges and exit now?”
appears.
59
Page 73

VAI O ® Notebook Quick Start
7 Make sure “Yes” is selected, then press the Enter key. The notebook restarts
from the Recovery CD.
✍ Your system may include one or more System Recovery CDs. If you have two or
more Sy st em R ec o v er y C D s, ins er t th e first CD to run the Syste m Re c ov e ry
program. You are prompted to insert the next CD once the information from the
previous CD has been installed.
The recove ry process takes from 30 to 60 minutes to complete.
After recovering your sy st em usi ng the System Recovery CD(s), you may be
prompted to insert your Application Recovery CD(s) afte r res tarting Windows.
Insert the Application Recovery CD to automatically complete recovery of your
system.
Updating the task tray (Win dows 2000)
In the event that a system recovery is necessary, do the following to optimize
your notebook’s performance:
1 Right-click the Adaptec Create CD icon in the task tray. The Task tray
properties menu appears.
2 Select Disable Adaptec Create CD. A dialog box appears, prompting you to
confirm the setting.
3 Click Yes.
To recover Micr o so ft® Word
If you recover your operating system using the System Recovery CD, Microsoft
Word will not be recovered. Use the supplied Word CD-ROM to recover this
application.
60
Page 74

Troubleshooting
This section describe s how to solve common problems you may encount er
when using your notebook. Many problems have simple solutions, so try
these suggestions bef ore you contact Sony Computing Support
(http://www. sony.com/pcsupport). Consult the following sections:
❑ Troubleshooting Your Notebook
❑ Troubleshooting the Docking Station
❑ Troubleshooting the LCD Screen
❑ Troubleshooting the Mous e and Touchpad
61
Page 75

VAI O ® Notebook Quick Start
Troubleshooting Your Notebook
My notebook does not start.
❑ Check that the notebook is plugged into a powe r source and that it is turned
on. Check that th e power indicator on the notebook’s front panel shows tha t
the power is on.
❑ Check that the battery packs are inserted properly and that they are charged.
❑ If you are connected to a docking station with a floppy disk drive or an
external flopp y disk drive, make sure there is no flo ppy disk in the floppy
disk drive.
❑ Confirm that the power cord and all cables are connected firmly, as
described in “Connecting a Power Source” on page 26.
❑ If the notebook is plugged into a power strip or UPS, make sure the power
strip or UPS is turned on and working.
❑ If you are using an external display, check that it is plugged into a power
source and turned on. Check that the brightness and contrast controls are
adjusted correc tly. See the manual that came with your display for details.
❑ Take the batter y pack off the notebook, unplug t he power cord and plug it in
again, th en turn on th e p o w er.
❑ If the power control button does not functio n, remove the AC adapter and
battery pack. Wait 1 minute, then reattach them, and press the power button.
❑ Condensation ma y cause the notebook to malfunction. If this occu rs , do not
use the notebook for at leas t 1 hour.
My notebook starts but a BIOS error appears.
When the internal backup battery is low on power, your system may not start
properly, and the message “Press <F1> to resume, <F2> to setup” may appear at
the bottom of the screen. Follow these steps:
1 Press the F2 key. The BIOS Setup menu appe ars .
2 Set the date (month/day/year). Press the Enter key.
3 Press to select System Time, then set the time (hour: minute: second).
62
Press the Enter key.
Page 76

T roubleshooting Your Notebook
4 Press to select Exit, th en pr ess to select Get Default Values. The
5 Press the Enter key. The Setup Confirmation window appea r s.
6 Select Yes, and press the Enter key.
7 Select Exit (Save Changes), then press the Enter key. The Setup
8 Select Yes, then press the Enter key. The notebook restarts.
message “Load default values for all SETUP items” appears.
Confirmation window appears.
✍ If this occurs on a regular basis, contact Sony Computing Supp ort
(http://www.sony.com/pcsupport).
My notebook starts, but the message “Operating system not
found” appears and Windows does not start.
❑ If you have connected a docking station with a flop py dis k drive or an
external flop py disk drive, make sure there is no fl oppy disk in the floppy
disk drive.
❑ If a non-bootable fl oppy disk is in the drive, proce ed as follows:
1 Shut down the notebook, then remove the floppy disk.
2 Restart the note book and confirm that the W indows operating sys tem
starts properl y.
❑ If the Wi ndows operating system still does not start, foll ow the steps below
to initialize the BIOS:
1 Remove any floppy disk from the floppy disk drive.
2 Shut down the notebook.
3 Remove any peripheral devices connected to the notebook.
4 Turn on the notebook.
5 Press the F2 key when the Sony logo appears. The BIOS setup menu
window appears.
6 Press th e ar row keys to select the Exit menu.
63
Page 77
VAI O ® Notebook Quick Start
7 Pres s th e ar r o w key s to se l ec t G et Defau l t Values, then pr ess the En t er
key. The message “Load default values for all SETUP items” appears.
8 Press the Enter key, and select Yes.
9 Use the arrow keys to select Exit (Save Changes), then p ress the Enter
key. The message “Save configuration changes and exit now?” appe ars .
10 Select Yes, then press the Enter key. The notebook restarts.
If your notebook c ont inues to dis play t he me ssage “Operating sys tem no t found,”
and Win dows does not start, use your supplied System Recovery CD to rest ore
the software tit les shippe d with your not eb ook. See “To use the Sy stem Re covery
CD(s)” on page 58 for more information.
The System Recovery process removes all software t hat you may have
installed since you started using your computer.
My notebook stops responding or does not shut down.
It is best to shut down your notebook using the Turn Off Computer command
(Microsoft® Windows® XP) or the Shut Down command (Windows 2000) on
the Windo ws S tart menu. Using o ther meth ods, i ncludi ng t hose l isted be low, may
result in loss of unsaved data.
❑ (Windows XP) On the Windows® taskbar, click S tart, select Turn Off
Computer, and then click Turn Off.
(Windows 2000) On the Windows tas kbar, click Start , then Shut Down , then
select Shut Down again, an d cli ck OK.
❑ (Windows XP) If you cannot shut down your notebook as described in the
preceding step, press the Ctrl+Alt+Delete keys simultaneously, and click
Turn Off Com puter on the Wind ows Security window.
(Windows 2000) If you cannot shut down your no tebook as described in the
preceding step, press the Ctrl+Alt+Delete keys simultaneously, and click
Shut Down on the Windows Security window.
❑ If the preceding step does not work, pre ss and hold the power button for at
least 4 s econds to turn off the powe r.
❑ Unplug the noteboo k from the AC ad apter and remove the batt ery pack from
your notebook.
❑ (Windows XP) If your notebook stops responding while playing a CD or
DVD, press the Ctrl+Alt+Delete keys simultaneously and click Turn Of f
64
Page 78

T roubleshooting the Docking Station
Computer on the Windows Security window.
(Windows 2000) If your notebook stops responding while playing a CD or
DVD, press the Ctrl+Alt+Delete keys simultaneously and click Shut Down
on the Windows Security window.
✍ Pressing the Ctrl+Alt+Delete keys simultane ously or turning off the not ebook with
the power button may result in data loss in files that are currently open.
Troubleshooting the Docking Station
I cannot operate the opti cal drive in the docking station, w hen
the docking station is connected to the notebook.
Follow these steps to set the i.LINK® network switch.
1 Disconnect your notebook from the docking stati on.
2 Disconnect the AC adapter and all cables from your docking station.
3 Set the i.LINK® network switch on the bottom of the docking station to the
unmarked side, with a thin pen tip.
4 Connect the docking station to the note book.
5 Turn on your notebook.
✍ Do not set the i. L INK netwo rk switch wh en the notebook is on . This causes the
notebook to malfunction.
Set the i.LINK network switch after removing all cables connected to the docking
station.
I cannot remove the disc.
You cannot re move the disc when the notebook is in power saving mode. Return
to normal mode, then press the Eject button. See “Using Power Saving Modes”
on page 34 for information on how to return to normal mode.
The disc tray does not eject even after I press the Eject button.
Open the tray by inserting a thin, straight object (such as a paper clip) in the
manua l ej ec t h ol e.
65
Page 79

VAI O ® Notebook Quick Start
Troubleshooting the LCD Screen
My LCD screen is blank.
❑ Verify that the notebook is plu gged into a power source and that it is turned
on.
❑ Verify that the power indicator on the notebook is on.
❑ Verify that the battery pack(s) is inserted properly and is charged.
❑ The notebook may be in LCD (Video) Standby mode. Press any key to
activ at e th e scree n.
❑ The display m ode may be set to ext ern al displ ay mode . Pre ss and hold the F n
key while pressin g the F7 key several times.
Troubleshooting the Mouse and Touc hpad
My mouse does not work.
❑ If you are using an optional Sony PCGA-UMS1 series USB mouse, verify
that the mouse is plugged into the USB port. See “Connecting a USB
Device” in the online user guide for more information.
❑ If you are still experiencing problems, us e your s upplied Driver Recover y
CD to reinstall the mouse drivers. See “To use the Driver Recovery CD(s)”
on page 55 for more information.
My touchpad does not work properly.
❑ You may have disabled the touchpad without connecting a mouse to the
notebook. To enable the touchpad:
1 (Windows XP) Pres s th e Windows key and use the arrow keys to select
All Programs. Press the Enter key. (Windows 2000) Press the Windows
key and use the arrow keys to sele ct Programs. Press the Enter key.
2 Use the arrow keys to select Sony Notebook Setup, and press the Enter
key.
3 Select Sony Notebook Setup again, and press the Enter key.
4 Use the arrow keys to se lect the Touchpad tab.
5 Press the Tab key to selec t Ena ble Touchpad, and then press Enter.
66
Page 80

T roubleshooting th e Mou se and Touchpad
6 Press the Enter key.
❑ Restart the notebook to activate the touchpad again.
❑ If your touchpad is interpreting a single tap as a double-click, adjust the
button assignments. Follow these steps:
1 (Windows XP) Press the Windows key and use the arrow keys to select
All Programs. Press the Enter key. (Windows 2000) Pr ess the Windows
key and use the arrow keys to select Settings. Pr es s the En ter key .
2 (Windows XP) Select Sony Notebook Setup, and press the Enter key.
Select Sony Notebook Setup again. (Windows 2000) Select Control
Panel, and then press the Enter key.
3 (Windows XP) Select the Touchpad tab and press the Alt+S keys
simultaneousl y. (W i ndows 200 0) Se lect Mouse, a nd t hen pre ss the Ente r
key. The Mouse Properties dialog box appears.
4 Make sure the Buttons tab is op en, and c hange the but ton ass ignments i n
the Mouse Properties dialog box. Press the Enter ke y to save your
changes and close the dialog box.
❑ If you are still experiencing problems, make sure another mouse was not
installed.
❑ You may need to use your Driver Recovery CD to reinstall the mouse
drivers. See “To use th e Drive r Rec overy CD(s)” on page 55 for more
information.
The pointer does not move when I use the Touchpad or
Mouse.
❑ The notebook should be restarted. Fol low these steps:
1 Press the Windows key.
2 Press the “U” key, and wait for at leas t 4 seconds.
3 Press the “R” key to res tart the notebook.
❑ (Windows XP) If the notebook does not restart, press the Ctrl+Alt+Delete
keys simultaneously. In the Wi ndows Task Manager dialog box, click the
Shut Down menu, and select Restart. (Windows 2000) If the notebook does
not restart , pre ss Ctrl+Alt+Delete simultaneously and cli ck Shut Down on
the Windows Security window.
67
Page 81

VAI O ® Notebook Quick Start
❑ If you cannot rest art you r not ebook a s de scrib ed in t he s teps abo ve, pr ess and
hold the power button for more than 4 seconds to shut down the notebook.
❑ If the pointer does not move while playing a disc, press the Ctrl+Alt+Delete
keys simultaneously to stop playback and restart the notebook.
❑ If you are still experiencing problems, che ck that another mouse was not
installed.
❑ You may need to use your supplied Driver Recovery CD to reinstall the
touchpad or mouse drivers. See “T o use the Driver Recovery CD(s)” on
page 55 for more information.
68
Page 82

Getting Help
Sony prov ides you with several support re sources to answer que stions
about your VAIO® notebook or the pr einstalled software. Refer to these
resources in the order they are listed.
❑ Support Options
❑ Software Support Information
69
Page 83

VAI O ® Notebook Quick Start
Support Options
1 VAIO® Notebook User Guide and VAIO ® Notebook Quick Start
The online VAIO® Notebook User Guide and printed VAIO®
Notebook Quick Start provide you with information on how to
maximize your notebook capabilities and solve common problems.
(W ind ows XP) To access the online User Guide, click Start on th e
Windows® taskbar, select Help and Support and click VAIO User
Guide. (Windows 2000) To access the online User Guide, click Start
on the Wi ndows ® taskbar, select VAIO Help Center, and VAIO
Documentation. The Quick Start is s upplied with your notebook.
2 Manuals and online help files that may accompany your
preinstalled software
Most of the manuals for preinstalled software are located on your hard
disk drive as online help files. You can access the online help files
from the Help menu in the specific application. A printed manual is
available for some applications.
3 VA IO Support Ag ent
VAIO Support Agent can be acce ssed from the Windows des ktop.
Using advanced diagnostic technology, Sony’s VAIO Suppor t Agent
runs scheduled protections of your applica tions, network settings, and
other important software settings. When your software is protected,
you can use VA IO Support Agent to repair software problems by
restoring your software to any of the previously protected states.
4 Sony Computing Support
Provides instant access to inform ation on commonly encounter ed
problems. Enter a description of your problem and the Knowledge
Database searc hes for the corresponding solutions online. You can
access the Sony Computing Support at:
http://www.sony. com/pcsupport.
70
Page 84

5 Sony Fax-on-Demand
This service, which requires a fax machine or your fax software,
provides answers to commonly asked questions. You can use this
automated service to request a list of available topics then select the
topics that you want to receive. To contact the Sony fax-on-demand
service, call: 1-888-4-SONY-PC (1-888-476-6972).
6 Calling Sony Customer Support
Sony provides software support free of charge for 90 days after the
original date of purchase. You can speak with a Sony Customer
Support Repre sentative without using your notebook by calli ng:
1-888-4-SONY-PC (1-888-476-6972).
Support Options
71
Page 85

VAI O ® Notebook Quick Start
Software Support Information
Adobe® Acrobat® Reader®, Photoshop® Elements, Premiere® LE (Adobe
Systems Inc.)
Web site http://www.adobe.com/
e-mail [email protected]
phone 206-675-6126 (fee-based support)
fax 206-628-5737
hours M-F, 6 AM-5 PM (PST)
Apple QuickTime® (Apple Computer, Inc.)
Web site http://www.apple.com
phone 800-275-2273
hours M-F, 6 AM-6 PM (PST)
America Onli ne® ( A me ri ca O nl ine, Inc .)
Web site http://www.aol.com
telephone 800-827-3338
hours 7 days a week, 24 hours a day
Arcsoft PhotoPrinter® 2000 Pro (ArcSoft, Inc.)
Web site http://www.arcsoft.com
e-mail [email protected]
phone 510-440-9901
fax 510-440-1270
hours M-F, 8:30 AM-5:30 PM (PST)
EarthLink™ Network Total Access (EarthLink Network Inc.)
Web site http://support.earthlink.net/
e-mail [email protected]
telephone 800-890-5128, 800-890-6356
hours 7 days a week, 24 hours a day
72
Page 86

Software Support Information
EverQuest® (Sony Online Entertainme nt Inc.)
Web site(s) http://www.ever quest.com
e-mail [email protected]
phone 858-537-0898
hours M-F, 8:30 AM-5:30 PM PST
PC-Cillin® 2000 (Trend Micro, Inc.)
Web site http://www.antivirus.com/pc-cillin/support/
phone 949-387-7800; 900-820-8324
*
hours M-F, 8 AM-5 PM (PST)
* Support from 949-387-7800 is free of charge, but subject to delays. Support from 900-820-
8324 is fee-b ased, but offers immediate response.
Quicken® (Intuit Inc.)
Web site http://www.intuit.com/support
phone 900-555-4932; 800-644-3193
*
hours M-F, 5 AM-5 PM (PST)
* Support from 900-555 -4932 is fee-ba s e d. Support fr om 800-644-3193 is automated and free of
charge.
RealJukebox®, RealPlayer® (RealN etworks , Inc.)
Web site(s ) http://service.real.com/rjopt ions.html
e-mail http://service .real.com/help/cal l.html (online e-mail form)
Sony Application s (Sony Electronic s Inc.)
Web site http://www.sony.com/pcsupport
phone 888-4-SONY-PC (888-476-6972)
*
hours 7 days a week, 24 hours a day
* Support from 1-888-4-SONY-PC is free of charge for 90 days after the original date of purchase.
73
Page 87

VAI O ® Notebook Quick Start
Windows® Operating System, Wor d , Of fice XP Professional, XP Small
Business (Microsoft Corp.)
Web site http://www.sony.com/pcsupport
phone 888-4SONYPC (888-476-6972)
*
hours 7 days a week, 24 hours a day
* Support from 1- 888-4-SONY-PC is free of charg e fo r 90 days after the original date of purchase.
WinDVD® (InterVideo, Inc.)
Web site http://www.intervideo.com
phone 510-651-0888
Sony Service Center
For the Sony Service Cent er nea rest you, call 1-888-4-S ONY-PC
(1-888-476-6972) or find Sony Customer Service on th e Web at
http://www.sony.com/pcsupport.
74
Page 88

Index
A
AC adapter 26
AC power 26
Application Recovery CD 55
B
battery pack
charging
indicator light status 29
indicator lights 29
inserting 27
loading 27
power saving modes 34
power status 29
rechargeable 26
removing 29
using 30
battery power 26
brightness
adjusting
built-in speaker 14
buttons
left
right 14
28
32
14
C
Caps Lock 14
charge status indicator light 29
charging battery pack 28
choosing
power source
computer 70
features 5
26
locating controls and connectors
14
setting up 13, 14
shutting down 33
starting 32
troubleshooting 62
unpacking 6
connecting
dial-up
9
Internet 9
network 18
power source 26
connectors
DC In
26
infrared 16
locating 14
network 18
Serial port 18
controls
locating
14
D
DC In 26
dial-up connection 9
docking station
troubleshooting
Driver Recovery CD 56
65
E
Ethernet
removing protective tab
Ethernet network connector 16
expansion memory configuration 39
17
75
Page 89

VAI O ® Notebook Quick Start
F
features 5
G
getting help 69
H
hardware
online support
headphone
connector
help 69, 70
Hibernate mode 34
70
15
I
indicator lights
battery
29
Caps Lock 14
charge status 29
Num Lock 14
power 14
infrared port 16
inserting
battery pack
intern al speaker
See speakers
Internet connection
27
9
K
keyboard 14
L
LCD
lock lever
troubleshooting 66
left button 14
lever
LCD
loading
battery pack
locating cont rols and connectors 14
32
32
27
M
memory
adding
37
viewing the amount of 44
memory module
expansion
modes
Hibernate
Normal 34
Standby 34
mouse
troubleshooting
39
34
66
N
network
connector
network connector
See Ethernet network connec tor
Normal mode
Num Lock 14
18
34
O
online help 70
P
power
indicator light
switch 32
power saving modes 34
Hibernate 34
Normal 34
Standby 34
power sources 26
connecting 26
14
Q
Quick Start 70
R
rechargeable battery pack 26
recharging battery pack 28
Recovery CD 55
removing
battery pack
restori n g d a t a 55
29
76
Page 90

Index
right button
14
S
selecting
power source
Seria l connector 18
setting up 13
setting up your PC
support
shutting down note book 33
Sony Computing Support 70
Sony Fax-on-Demand service 71
Sony Service Center 74
speakers
built-in
Standby mode 34
starting
computer
starting your notebook 32
startup problems 33
support options 70
26
70
14
32
T
technical support 70
touchpad 14
troubleshooting 66
troubleshooting 62
docking station 65
LCD screen 66
mouse and touchpad 66
startup 33
turning on
computer
32
U
unpacking the computer 6
User Guide 70
V
VA IO Action Setup 52
VA IO Support Agent 70
viewing the amount of memory 44
77
Page 91

Page 92

79
Page 93

© 2002 Sony Electronics Inc. Reproduction in whole or in part withou t written permission is
prohibit ed. A ll ri ghts r eserved . Sony, VAIO, th e VAIO logo, VAIO Smart , DVgate, Handy cam, Med ia
Bar , Mo vieShaker, PictureGear, Memory S tick, Mavica, VisualFl ow, Son icStage, OpenM G,
ATRAC3, Gi ga Pocket, Pico Play er, and i.LI N K a r e trademarks of Sony. All other trademarks are
trademarks or registered trademarks of their respective owne r s .
Printe d in USA 4-661-9 19-01
Page 94
PCG-R505DL/R505DS/R505DSK/R505DSP (AM)
Information Technology Company
Printed in USA
94
List of PCG-R505 Series for American Area
(As of March, 2002)
Model
PCG-R505TE
PCG-R505TEK
PCG-R505TS
PCG-R505TSK
PCG-R505DE 9-874-420-11
PCG-R505TL
PCG-R505TLK
PCG-R505JE
PCG-R505JEK
PCG-R505JEP
PCG-R505JL
PCG-R505JLK 9-874-469-01
PCG-R505JLP
PCG-R505JS
PCG-R505JSK
PCG-R505JSP
PCG-R505AFE 9-874-490-01
PCG-R505DL
PCG-R505DS
PCG-R505DSK
PCG-R505DSP
Service Manual
Parts No.
9-872-185-11
9-874-442-11
9-874-513-01
* : Additional Model
American Area : North, Central and South Americas
*
9-874-513-01
Sony Corporation
– 19 –
This manual and the constituent data may not be
replicated, copied nor reprinted in whole or in part
without prior written authorization of Sony Corporation.
English
2002C0500-1
© 2002 Sony Corporation
Published by Sony EMCS VAIO-GSC [SNT]
Page 95
Revision History
Suffix Ver. Date Contents QM No.
-01 Ver. 1 2002.03.01 First Edition
<Remarks>
[Confidential]
PCG-R505DL/R505DS/R505DSK/R505DSP (AM)
 Loading...