

Page 1

Welcome.....................................................11
Powering Your Computer.........................13
Using AC Power........................................................14
Connecting the AC adapter................................................14
Turning on the computer....................................................15
Using the Battery.......................................................17
Inserting a battery ..............................................................18
Removing a battery............................................................19
Using a second battery .......................................................20
Displaying battery information ..........................................21
Charging a battery..............................................................23
Notes on batteries...............................................................25
Frequently asked questions................................................26
Conserving Battery Power ........................................27
Using power saving modes ................................................27
Using PowerPanel utility ...................................................28
Frequently asked questions................................................32
Internet and Network Connections..........33
Internet Connections .................................................34
Setting up a dial-up Internet connection ............................34
Setting up an Ethernet Internet connection ........................36
Customizing your Internet connection...............................38
Frequently asked questions................................................39
Network Connections................................................41
Using Ethernet and dial-up connections ............................41
Using wireless LAN connections ......................................43
Checking your network connection status .........................50
Frequently asked questions................................................50
1
Page 2

VAIO Computer Quick Start
Connecting Another VAIO Computer......................53
Frequently asked questions ............................................... 54
CDs, DVDs, and Optical Drives................57
Inserting and Ejecting CDs or DVDs ....................... 58
Copying and Playing CDs......................................... 60
Playing CDs ...................................................................... 60
Copying files to a CD-RW or CD-R................................. 61
Frequently asked questions ............................................... 62
Copying and Playing DVDs ..................................... 65
Playing DVDs ................................................................... 65
Disconnecting the TV from the computer......................... 68
Copying files to a DVD-R or DVD-RW........................... 68
Frequently asked questions ............................................... 69
Printer Connections..................................73
Printing With Your Computer ..................................74
Connecting a printer.......................................................... 74
Disconnecting a printer ..................................................... 76
Frequently asked questions ............................................... 76
Computer Features ...................................79
Using the Keyboard ..................................................80
Key locations and descriptions ......................................... 80
Combinations and functions with the Windows key ........ 82
Indicators........................................................................... 83
Combinations and functions with the Fn key.................... 84
2
Page 3

Using the Touch Pad .................................................87
Describing the touch pad ...................................................87
Customizing the touch pad ................................................88
Frequently asked questions................................................89
Using Jog Dial Control..............................................92
Using VAIO Action Setup .................................................92
Locating the Jog Dial Control............................................93
Using launcher mode .........................................................93
Using guide mode..............................................................94
Using the Jog Dial control with Sony programs................95
Using the Jog Dial control with other programs................95
Using Memory Stick Media.....................................96
Selecting Memory Stick media..........................................96
Inserting Memory Stick media ..........................................97
Viewing the contents .........................................................98
Write-protecting Memory Stick media ..............................98
Formatting Memory Stick media .......................................99
Removing Memory Stick media........................................99
Frequently asked questions..............................................100
Changing the Window Design of Sony Programs ..102
Connecting Mice and Keyboards...........103
Using External Mice and Keyboards ......................104
Connecting a mouse or keyboard.....................................104
Connecting a PS/2 mouse or keyboard............................105
Disconnecting a mouse or keyboard................................106
Frequently asked questions..............................................107
Connecting a Port Replicator.................109
Locating Ports and Connectors ...............................110
3
Page 4

VAIO Computer Quick Start
Using the Port Replicator........................................111
Connecting the port replicator......................................... 111
Removing the port replicator .......................................... 112
Floppy Disk Drives and PC Cards .........115
Using Floppy Disk Drives ......................................116
Connecting a floppy disk drive ....................................... 116
Inserting and removing floppy disks............................... 117
Notes on handling floppy disks....................................... 118
Disconnecting a floppy disk drive .................................. 119
Carrying the floppy disk drive ........................................ 119
Frequently asked questions ............................................. 120
Using PC Cards.......................................................121
Inserting PC Cards .......................................................... 121
Removing PC Cards........................................................ 122
Connecting and disconnecting PC Card drives............... 123
Frequently asked questions ............................................. 125
Audio and Video Connections...............127
Using i.LINK Digital-Video Recorders..................128
Connecting an i.LINK digital video recorder ................. 128
Disconnecting the i.LINK digital video recorder............ 129
Using a digital video camera recorder ............................ 130
Notes on connecting an i.LINK device ........................... 130
Frequently asked questions ............................................. 131
4
Page 5

Using Computer Monitors and Projectors...............132
Connecting a computer monitor ......................................132
Connecting a multimedia computer monitor ...................133
Connecting a TV ..............................................................134
Connecting a projector.....................................................138
Selecting a display mode .................................................139
Disconnecting a computer monitor or projector ..............142
Using Speakers, CD Players, or Amplifiers............143
Connecting standard speakers..........................................143
Disconnecting standard speakers .....................................144
Connecting active speakers or amplifiers ........................144
Disconnecting active speakers or amplifiers ...................146
Connecting CD, MiniDisc, or audio cassette players ......146
Disconnecting CD, MiniDisc, or audio cassette players .147
Adjusting the volume.......................................................147
Enabling the audio feature ...............................................148
Frequently asked questions..............................................149
Using Microphones .................................................151
Connecting a microphone ................................................151
Disconnecting a microphone ...........................................151
Using a microphone or other device to record.................152
Frequently asked questions..............................................153
Preinstalled Programs ............................155
Software Programs On Your Computer..................156
Program overview ............................................................156
Frequently asked questions..............................................162
DVgate Program Notes ...........................................163
Recording images to a digital video device .....................163
Adjusting image resolution ..............................................163
Saving to your hard disk drive.........................................163
5
Page 6

VAIO Computer Quick Start
Program Support Information................................. 165
Sony Service Center........................................................ 167
Working with Digital Video.....................169
Editing Video with MovieShaker Software............ 171
Editing Video with DVgate Software ..................... 174
Working with Still Images.......................179
Importing Still Images ............................................180
Editing Still Images ................................................ 182
Printing Still Images ............................................... 184
Working with Digital Music ....................185
Sharing Video, Images, and Music on a
Network....................................................189
How VAIO Media Works.......................................190
Setting up a VAIO Media server computer .................... 191
Setting up a VAIO Media client computer ..................... 192
Using VAIO Media......................................................... 193
Creating DVDs .........................................197
About Disc Formats, Media, and Compatibility.....199
Using the Right Recording Media .................................. 199
Using the Right Disc Format with the Right Playback
Equipment ....................................................................... 200
Creating DVDs with Click to DVD™ Software..... 203
Using Click to DVD software......................................... 203
6
Page 7

Creating DVDs with RecordNow DX.....................213
Using RecordNow DX Software .....................................213
Topics...............................................................................214
Creating DVDs with Drag’n Drop CD/DVD ..........217
Using Drag’n Drop CD/DVD Software...........................217
VAIO AV Applications.............................219
Overview of Preinstalled Software .........................220
DVgate Software.....................................................223
MovieShaker Software............................................225
Creating movies with MovieShaker software..................226
Using the ImageStation online service with MovieShaker
software............................................................................230
Network Smart Capture...........................................233
The Network Smart Capture main window .....................233
Capturing still images ......................................................235
Capturing movie clips ......................................................237
Capturing Web camera images ........................................239
Applying effects to your images and movies...................241
Managing your images and movies .................................241
Using the ImageStation online service ............................242
Getting more help ............................................................243
PictureGear Studio™ Software...............................245
Using the Import Photo feature........................................245
Using the PhotoCollection feature ...................................249
Using the Binder feature..................................................251
Using the PhotoAlbum feature ........................................252
Using the PrintStudio feature...........................................259
7
Page 8

VAIO Computer Quick Start
SonicStage Software...............................................261
Electronic Music Distribution (EMD) Services .............. 261
Starting SonicStage Software.......................................... 261
Recording from a CD ...................................................... 263
Transferring songs (Check-In/Check-Out) ..................... 265
Additional features .......................................................... 267
Additional Software Information............................269
Legal Information....................................271
Memory Upgrades...................................273
Upgrading Your Computer’s Memory ...................274
Precautions and procedures............................................. 274
Typical expansion memory configuration ...................... 275
Removing and installing memory modules .................... 275
Confirming added memory capacity............................... 277
Using the Recovery CDs ........................279
Application and System Recovery CDs.................. 280
Using Your Recovery CDs ..................................... 280
Using the Application Recovery CD(s) .......................... 280
Using the System Recovery CD(s) ................................. 282
Troubleshooting and Support................285
Troubleshooting Your Computer............................ 286
Troubleshooting Batteries....................................... 291
Troubleshooting the Printer .................................... 292
Troubleshooting the Mouse and Touch Pad ...........293
Troubleshooting the Modem................................... 296
8
Page 9

Troubleshooting Networks ......................................297
Troubleshooting DVDs and CDs ............................300
Troubleshooting Floppy Disk Drives......................304
Troubleshooting PC Cards ......................................305
Troubleshooting Audio-Video Connections ...........306
Troubleshooting the Computer Screen (LCD) ........309
Troubleshooting Memory Stick Media ...................311
Troubleshooting Programs ......................................313
Computer Support Information ...............................314
9
Page 10

VAIO Computer Quick Start
10
Page 11

Welcome
Congratulations on your purchase of this Sony VAIO® computer, and
welcome to the online VAIO® Computer User Guide.
This user guide provides detailed information on all aspects of using your
new VAIO computer, from keyboard functions to preinstalled software
programs.
In the left navigation window, click the topics you want to learn more
about, and that information will be displayed in this main window.
✍ View the Electronic Flyer, which provides updates and supplemental information about
your computer.
11
Page 12

VAIO® Computer User Guide
12
Page 13

Powering Your Computer
Your VAIO® computer comes with a battery and an AC adapter. This
chapter explains how to install and use these supplied accessories to
power your computer. It also describes ways you can efficiently utilize the
battery as a power source.
❑ Using AC Power
❑ Using the Battery
❑ Conserving Battery Power
13
Page 14
VAIO Computer Quick Start
Using AC Power
The supplied battery is not charged when you receive your computer. To use your
computer immediately, use the supplied AC adapter as the power source. While
the computer uses AC power it automatically charges the battery if it is inserted.
See “Using the Battery” for more information on installing and using your
battery.
❑ Connecting the AC adapter
❑ Turningonthecomputer
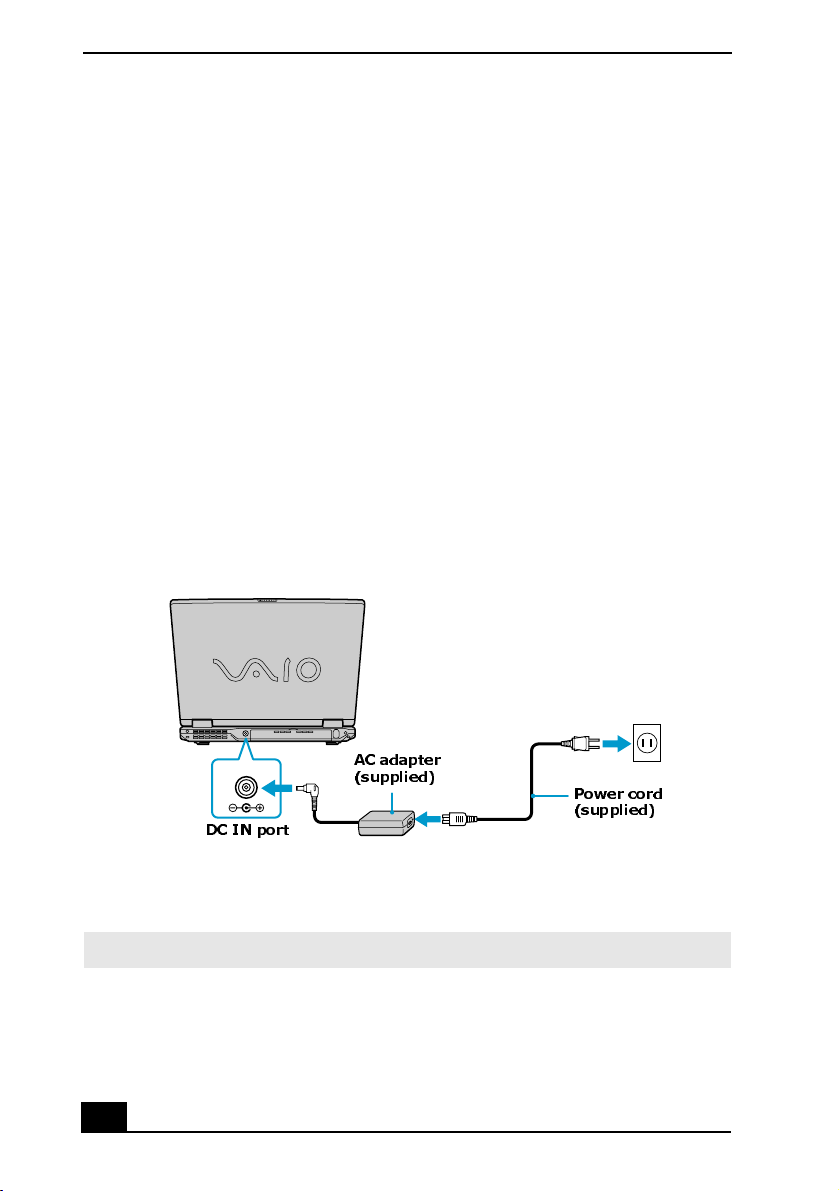
Connecting the AC adapter
To connect the AC adapter
1 Plug the cable attached to the AC adapter into the DC IN port on your
computer.
Connecting the AC Adapter to the Computer
AC adapter
(supplied)
DC IN port
Power cord
(supplied)
2 Plug one end of the power cord into the AC adapter, and plug the other end
into an AC outlet.
✍ Use only the AC adapter supplied with your computer.
14
Page 15
Using AC Power
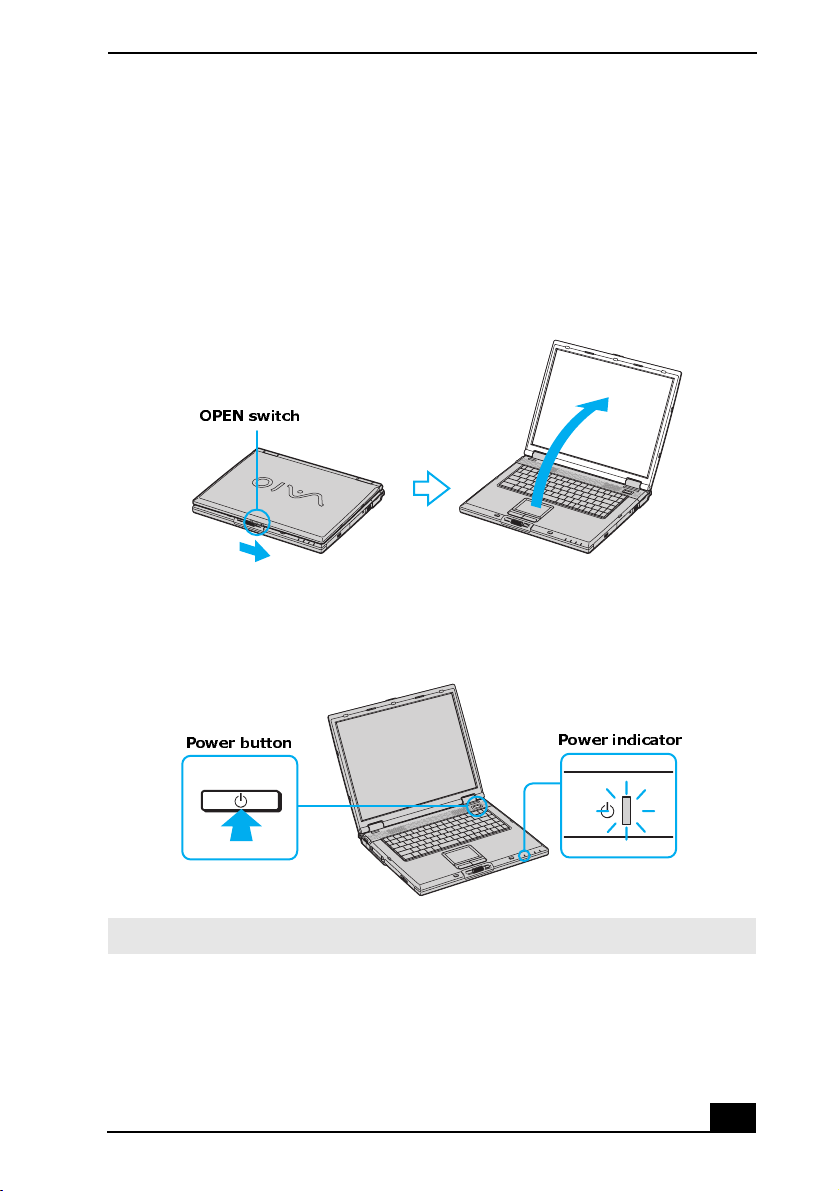
Turning on the computer
To turn on the computer
1 Slide the OPEN switch to the right, and lift the cover while holding the
bottom of the computer firmly.
Opening the Computer
OPEN switch
2 Press the power button until the power indicator turns on.
Turning on the Computer
Power button
Power indicator
✍ If you hold the power button down, the computer turns off.
3 If necessary, adjust the brightness controls for the computer screen (LCD) as
follows:
15
Page 16

VAIO Computer Quick Start
❑ To increase light intensity, press the Fn+F5 keys. Press the Up Arrow
key or the Right Arrow key .
❑ To decrease light intensity, press the Fn+F5 keys. Press the Down
Arrow key or the Left Arrow key .
16
Page 17

Using the Battery
Using the Battery
A battery is an auxiliary power source you can use when your computer is not
plugged into an AC outlet. Your computer may come equipped with one or two
battery bays, depending on the model you purchased. If your computer comes
with two battery bays, you can purchase a second rechargeable battery to extend
your computing time. Regardless how many batteries you use, you can always
extend the life of the battery by conserving power. See “Conserving Battery
Power” for more information.
❑ Inserting a battery
❑ Removing a battery
❑ Using a second battery
❑ Displaying battery information
❑ Charging a battery
❑ Notes on batteries
❑ Frequently asked questions
✍ The battery that comes with your computer is not fully charged at the time of
purchase.
✍ The brightness of your computer screen automatically dims when you switch from AC
power to battery power. To increase the brightness of your screen, press the Fn + F5
keys. Press the Up Arrow or Right Arrow .
17
Page 18
VAIO Computer Quick Start
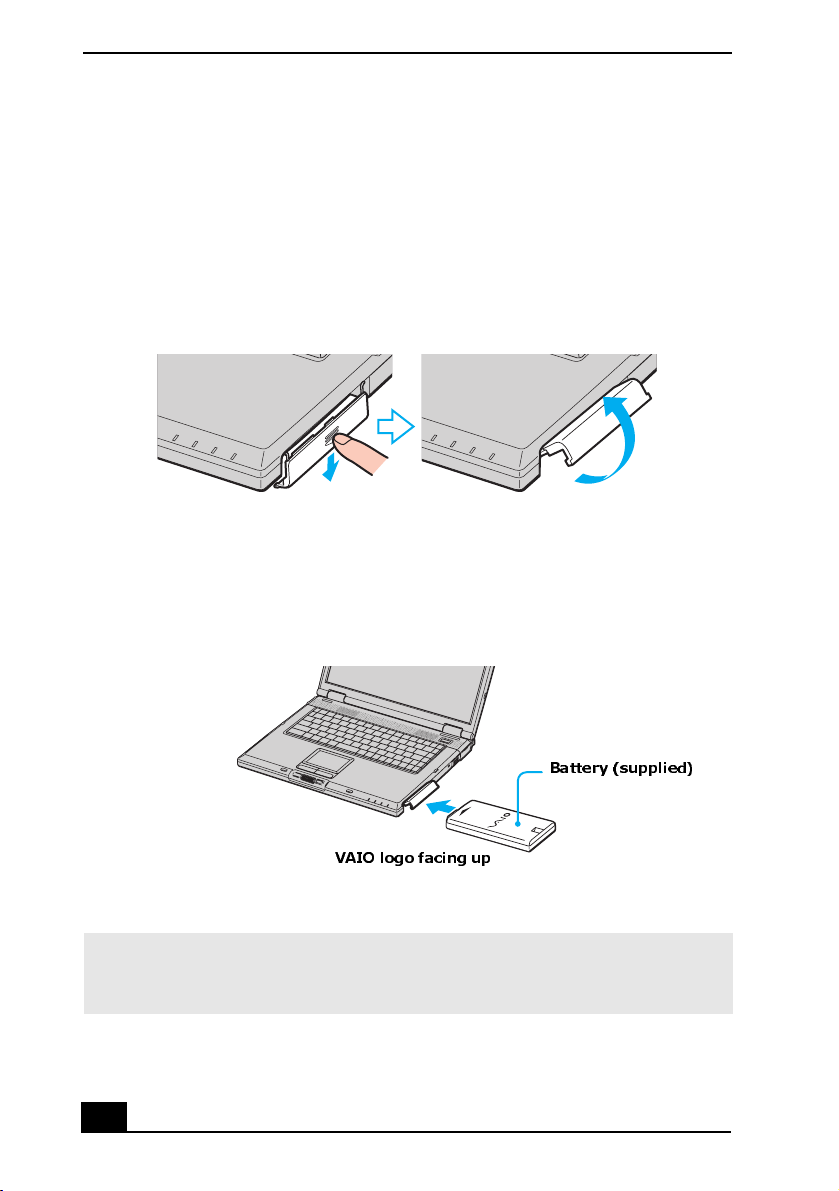
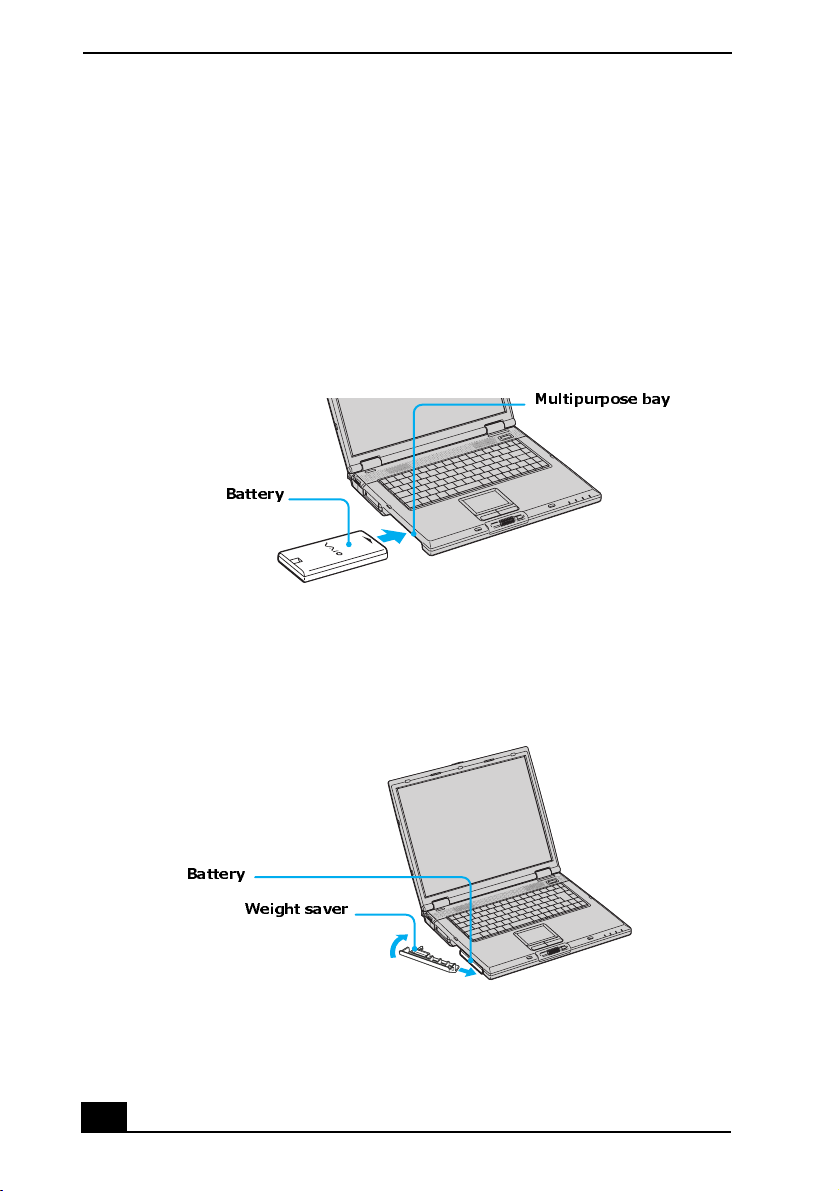
Inserting a battery
To insert a battery
1 Push the battery bay cover down to open it. The battery bay cover swings out
but does not detach from the computer.
Opening the Battery Bay
2 Slide the battery into the battery bay. If the computer is on, it automatically
detects the battery.
Inserting a Battery
Battery (supplied)
VAIO logo facing up
3 Push the battery bay cover up until it clicks into place.
✍ If the port replicator is attached to your computer, do not insert or remove the battery.
Lifting and turning the computer with the port replicator attached could cause a
temporary loss of power.
18
Page 19
Using the Battery
Some software programs and peripheral devices prevent the system from
entering Hibernate mode. If you are using a program that prevents the system
from entering Hibernate mode, save your data frequently to avoid data loss. See
“Using power saving modes” for information on how you can manually activate
a power saving mode.
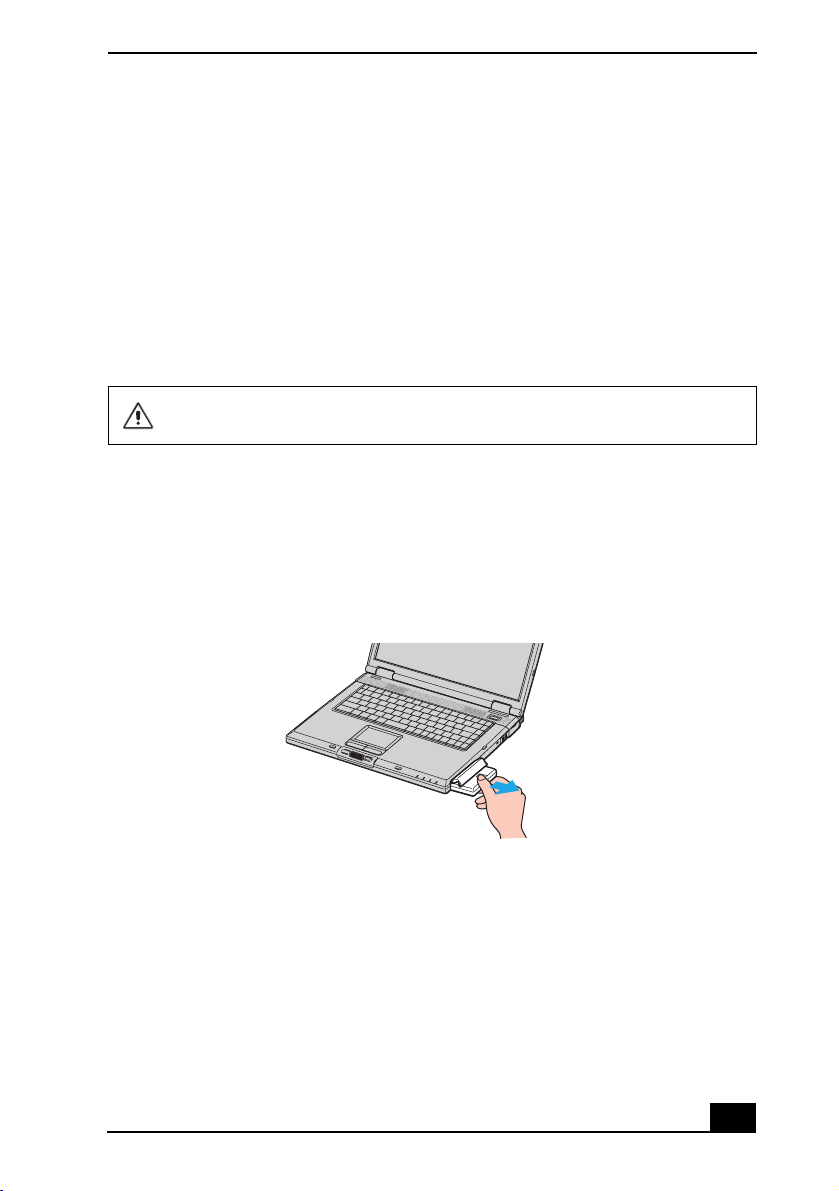
Removing a battery
If you are not using the computer for an extended period of time, remove the
battery from the computer to avoid damaging the battery. You can remove the
battery when the computer is on or off.
If the computer is on, connect the AC adapter and exit a power saving mode
before you remove the battery.
To remove a battery
1 Pushthebatterybaycoverdowntoopenit.
2 Pull the battery out of the battery bay.
Removing a Battery
3 Push in and lift up the battery bay cover until it clicks into place.
19
Page 20
VAIO Computer Quick Start
Using a second battery
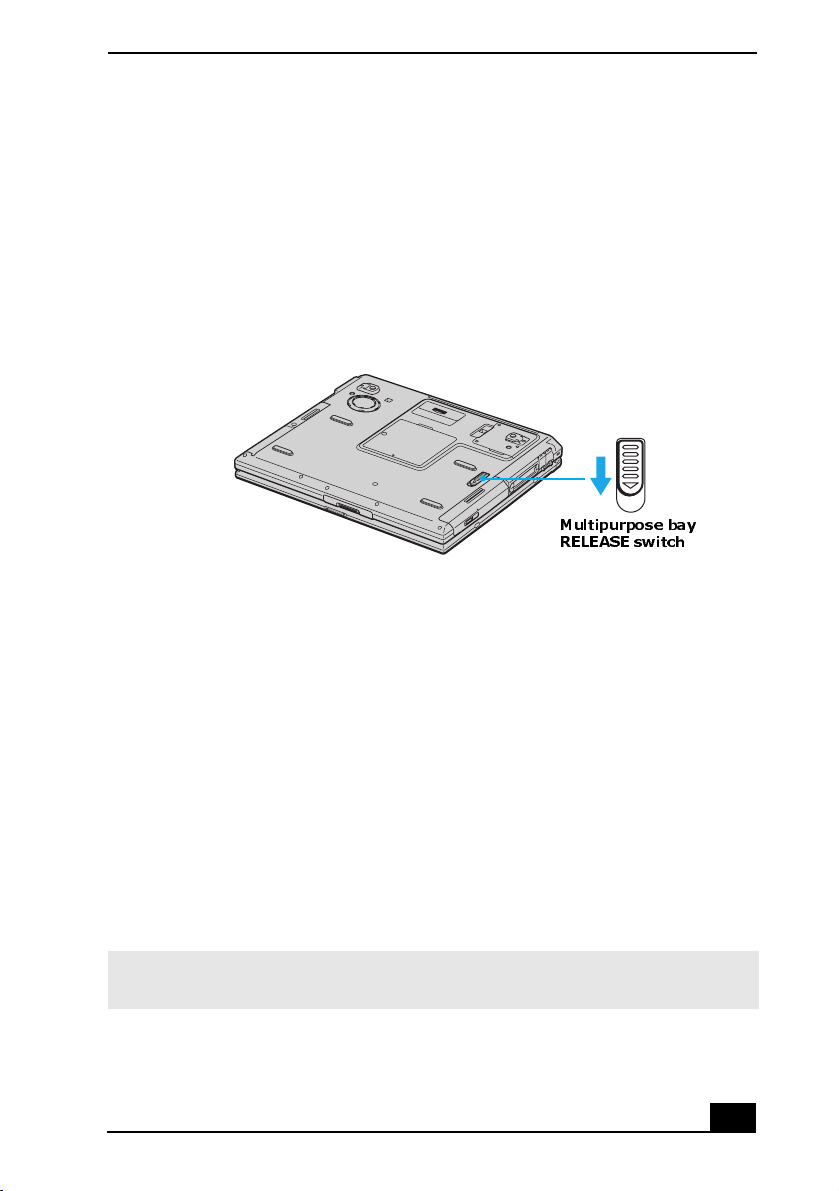
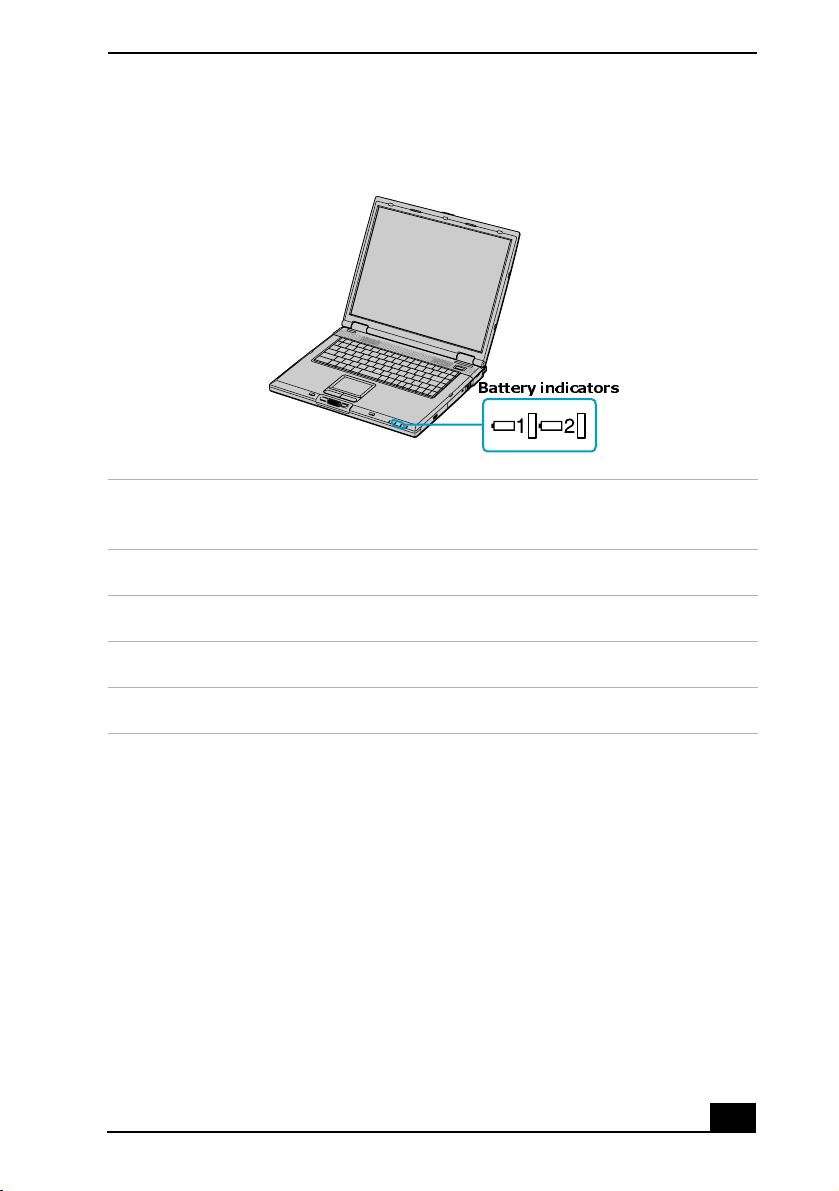
To insert a second battery
1 If another device is in the multipurpose bay, remove that device.
2 Insert the battery into the multipurpose bay. When the computer uses the
second battery, the Battery 2 indicator turns on.
Inserting the Second Battery
Multipurpose bay
Battery
3 Slide the weight saver in the direction of the arrow until it clicks into place.
The weight saver stabilizes the battery.
Inserting the Weight Saver
Battery
Weight saver
20
Page 21
Using the Battery
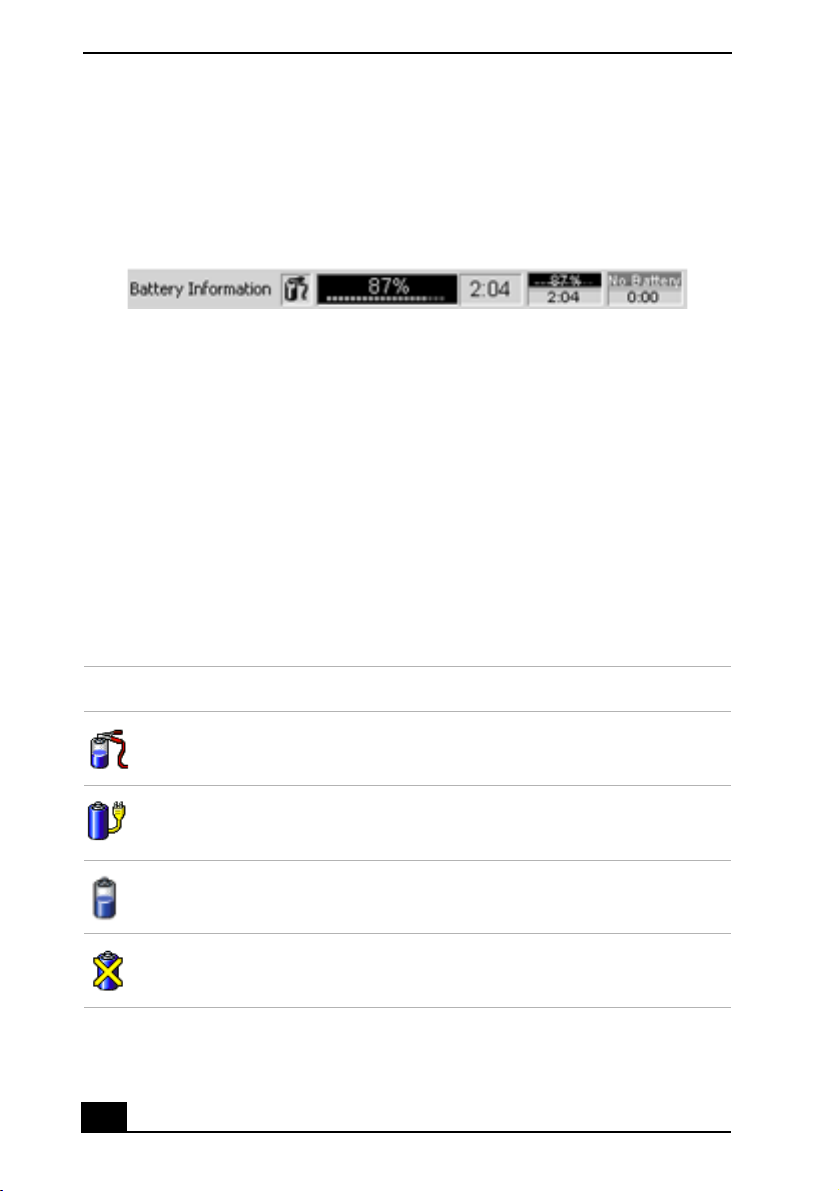
To remove the second battery
1 Make sure the Battery 2 indicator is off and the Battery 1 indicator is on or
the computer is connected to AC power. If the Battery 2 indicator is on,
right-click the battery icon on the taskbar, and click Switch discharge
battery.
2 Turn the computer over, and unlock the multipurpose bay RELEASE switch.
Unlocking the RELEASE Switch
Multipurpose bay
RELEASE switch
3 Pull the weight saver and battery gently from the multipurpose bay.
4 Insert the weight saver into the multipurpose bay to protect the bay. See
“Using the Weight Saver” for more information.
Displaying battery information
You can display the remaining battery charge on the Battery Information toolbar
and/or the Battery Information window.
To display the Battery Information toolbar
1 Right-click the center of the Windows® taskbar.
2 Select Toolbars from the shortcut menu, and click Battery Information.
The Battery Information toolbar appears on the taskbar.
✍ If the Battery Information toolbar is hidden behind the taskbar icons, click and drag
the edge of the Battery Information toolbar to the left until it is in clear view.
21
Page 22
VAIO Computer Quick Start
The total charge remaining in the battery is listed in percent and real-time values.
The following toolbar indicates there is 87 percent or approximately 2 hours and
4 minutes of battery charge left.
Battery Information Toolbar
❑ Percentage indicator — Displays the percentage of the remaining charge.
❑ Time indicator — Displays estimated time (hours : minutes) remaining
before the battery fully discharges, also known as the time-to-empty.
To close the Battery Information toolbar
1 Right-click the Battery Information toolbar.
2 Select Toolbars from the shortcut menu, and click to cancel Battery
Information.TheBattery Information toolbar disappears from the toolbar.
To display the Battery Information window
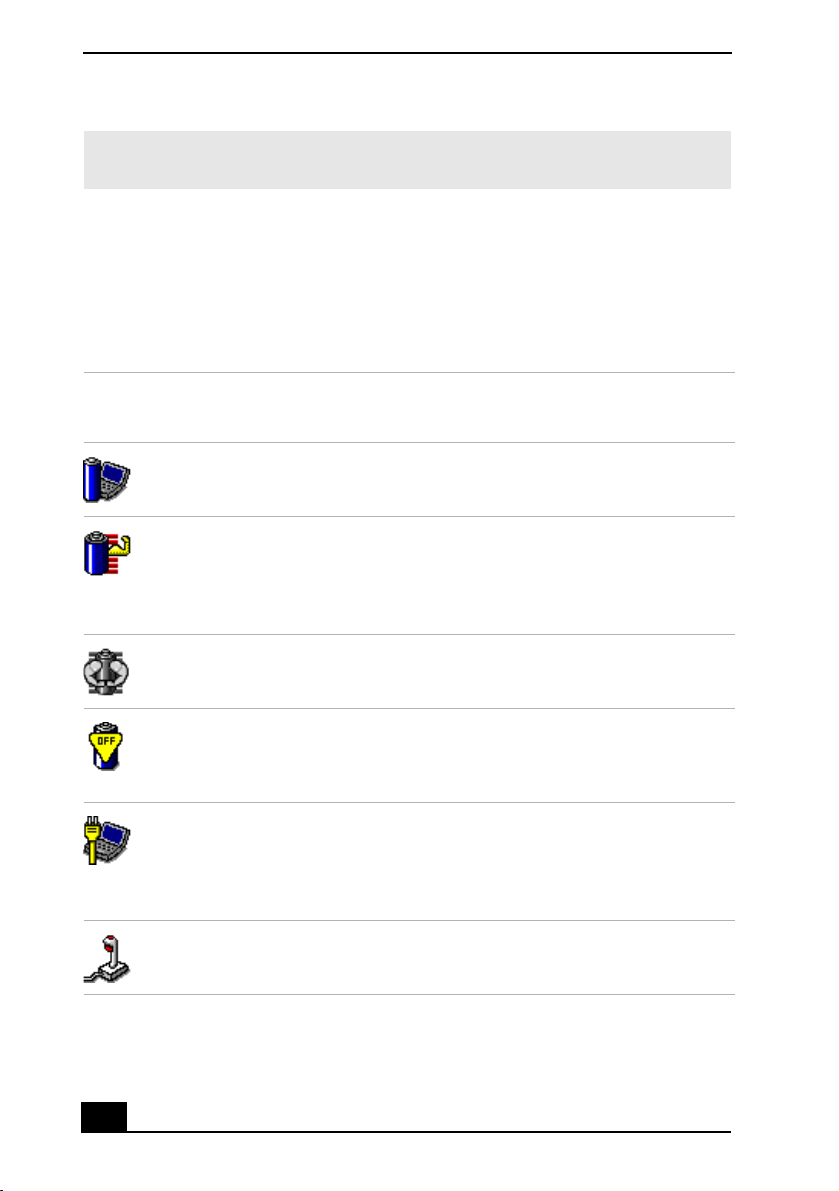
The battery icons that appear on the Battery Information toolbar and the
Battery Information window indicate the current status of the installed battery.
Battery icon Battery status
Charging
Fully charged
Discharging
No battery
22
Page 23
Using the Battery
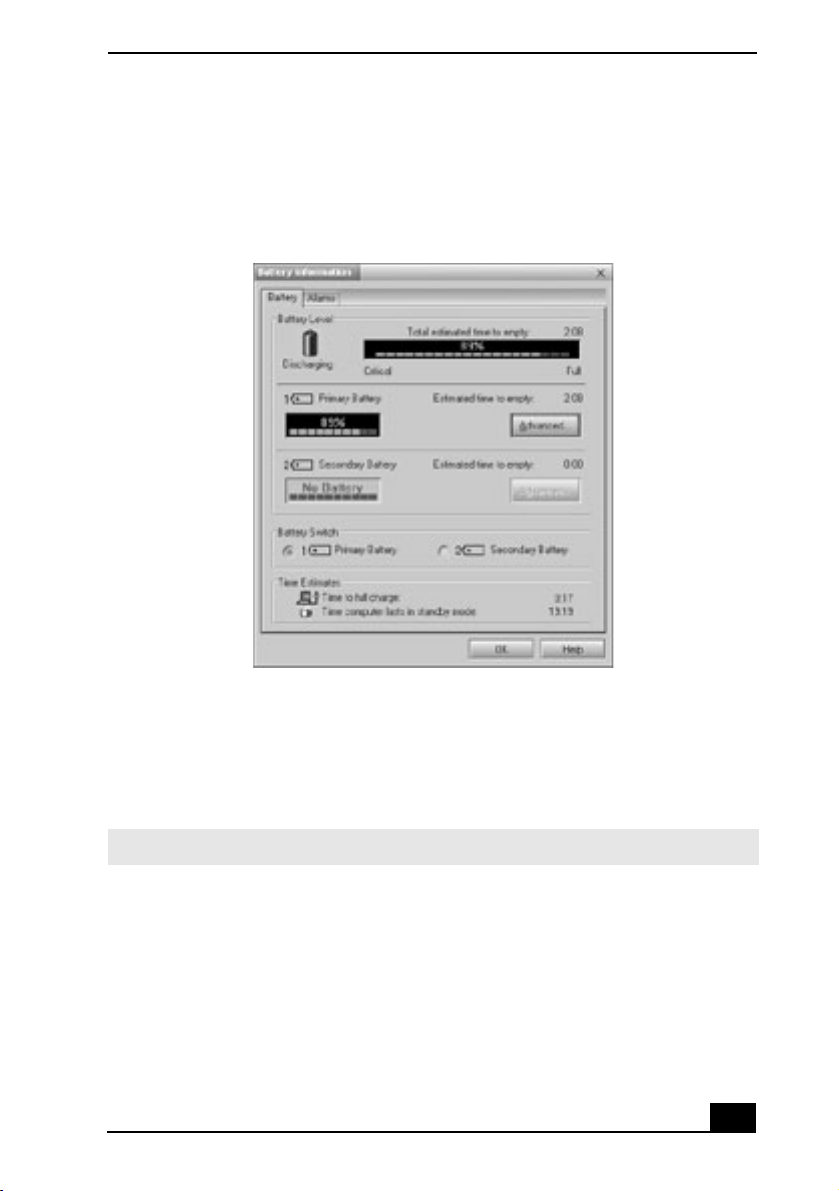
1 Double-click the Battery icon on the Windows taskbar. The Battery
Information window appears.
Battery Information Window
❑ Battery tab — Displays the total charge remaining in the battery. You can
click Advanced for specific information on the battery.
❑ Alarms tab — Displays the alarm settings, which notify you when the
battery is fully charged or too low. You can change your computer’s alarm
settings on this window.
✍ Click Help in the lower right corner of the window for more information.
Charging a battery
You will need to charge the battery if battery power drops below 10 percent or
you have not used the battery for a long time. The lithium-ion battery supplied
with your computer may be recharged at any time, whether you wait until the
battery is completely or partially discharged. Charging a partially discharged
23
Page 24

VAIO Computer Quick Start
battery does not affect battery life. If you charge the battery and find that battery
power is still low, the battery may be reaching the end of its life, and you may
need to replace it.
✍ The battery supplied with your computer is not charged at the time of purchase.
To charge a battery
You can charge the battery when the computer is on or off. However, the battery
will charge faster when the computer is off. Charging the battery takes several
hours. See your printed VAIO® Computer Specifications for the approximate
time needed to charge your battery.
✍ Charge the battery at temperatures between 50°F and 80°F (10°C to 30°C). Lower
temperatures require more time to charge.
1 Insert the battery into the battery bay. If you want to charge more than one
battery, insert the second battery into the computer. See “To insert a second
battery” for more information.
2 Connect the AC adapter to the computer. The computer automatically
charges the battery as long as the computer is using AC power.
The battery indicator blinks while the battery charges. The battery indicator stops
blinking when the battery is fully charged.
✍ When using two batteries, the battery you insert first charges first. The second battery
you insert begins charging when the first battery is 85 percent charged.
24
Page 25
Battery Indicators
Battery indicators
Battery indicator
status Description
On The computer is using battery power.
Single blink The battery is running out of power.
Using the Battery
Double blink The battery is charging.
Off The computer is using AC power.
Notes on batteries
❑ Never leave the battery in temperatures above 140°F (60°C), such as under
direct sunlight or in a car parked in the sun.
❑ While the battery is in use or being discharged, the battery heats up. This is
normal and is not cause for concern.
❑ Keep the battery away from all sources of heat.
❑ Keep the battery dry.
❑ Do not open or disassemble the battery.
❑ Do not expose the battery to any mechanical shock.
25
Page 26

VAIO Computer Quick Start
❑ Battery life is shorter in a cold environment because of decreased battery
efficiency at low temperatures.
Frequently asked questions
How do I know when the battery is charged?
To determine the remaining battery charge, see “Displaying battery information”.
When is the computer using AC power?
When the computer is directly connected to the AC adapter, it uses AC power,
even if a battery is installed.
When should I recharge the battery?
❑ When the battery level falls below 10 percent.
❑ When both the battery and power indicators blink.
❑ When you have not used the battery for a long time.
26
Page 27

Conserving Battery Power
Conserving Battery Power
You may use the power saving modes and PowerPanel™ utility to conserve
battery power. Conserving battery power may significantly extend your
computing time, depending on how you use your computer.
❑ Using power saving modes
❑ Using PowerPanel utility
❑ Frequently asked questions
Using power saving modes
In addition to the normal operating mode, which allows you to turn off specific
devices, your computer has two distinct power saving modes: Standby and
Hibernate. Use the Standby and Hibernate power saving modes to override a
profile setting or initiate an immediate action.
❑ Standby — Saves the state of the system and peripheral devices in memory
(RAM). Power consumption is reduced to a minimum. The system remains
on, and the computer screen (LCD) is off.
❑ Hibernate — Saves the state of the system and peripheral devices to the
hard disk. Power consumption is reduced to the lowest possible setting
without being completely off. Hibernate mode consumes the lowest level of
power. Your computer enters Hibernate mode when the remaining battery
charge drops below 5 percent, regardless of the setting you select.
✍ Some software programs and peripheral devices prevent the system from entering
Hibernate mode. If you are using a program that prevents the system from entering
Hibernate mode, save your data frequently to avoid data loss.
To activate Standby mode
1 Press the key combination Fn+Esc. The power indicator blinks in this mode.
2 PressanykeytoreturntoNormalmode.
To activate Hibernate mode
1 Press the key combination Fn+F12 or the power button and release it
immediately. Do not move the computer until the power indicator turns off.
2 Press the power button to return to normal mode.
27
Page 28
VAIO Computer Quick Start
✍ If the computer does not activate Hibernate mode, see “Frequently asked questions”
for more information.
Using PowerPanel utility
The PowerPanel utility enables you to select and customize a predefined power
management profile to conserve battery life. The following table describes all the
predefined power management profiles in PowerPanel. Your computer is set to
Automatic Profile Selection by default. You can customize the settings for all the
following profiles, except the Disable Power Management profile.
Profile
Icon Description
Maximum Performance
Provides the best system performance but conserves minimal power.
Maximum Battery Life
Provides power saving features to give you maximum battery life and
good performance. It slows the computer and puts it into Standby
mode after a specified time.
28
Ultimate Battery Life
Extends the Maximum Battery Life by disabling the i.LINK port.
Power Management Off
Disables all power management settings, such as Standby and
Hibernate modes. You cannot change the settings of this profile.
AC Power
Indicates when AC power is in use. Similar to the Power Management
Off setting. Power Management automatically loads the AC profile
unless you disable this feature.
Games
Disables the display and the Hard Disk Standby timer.
*
Page 29
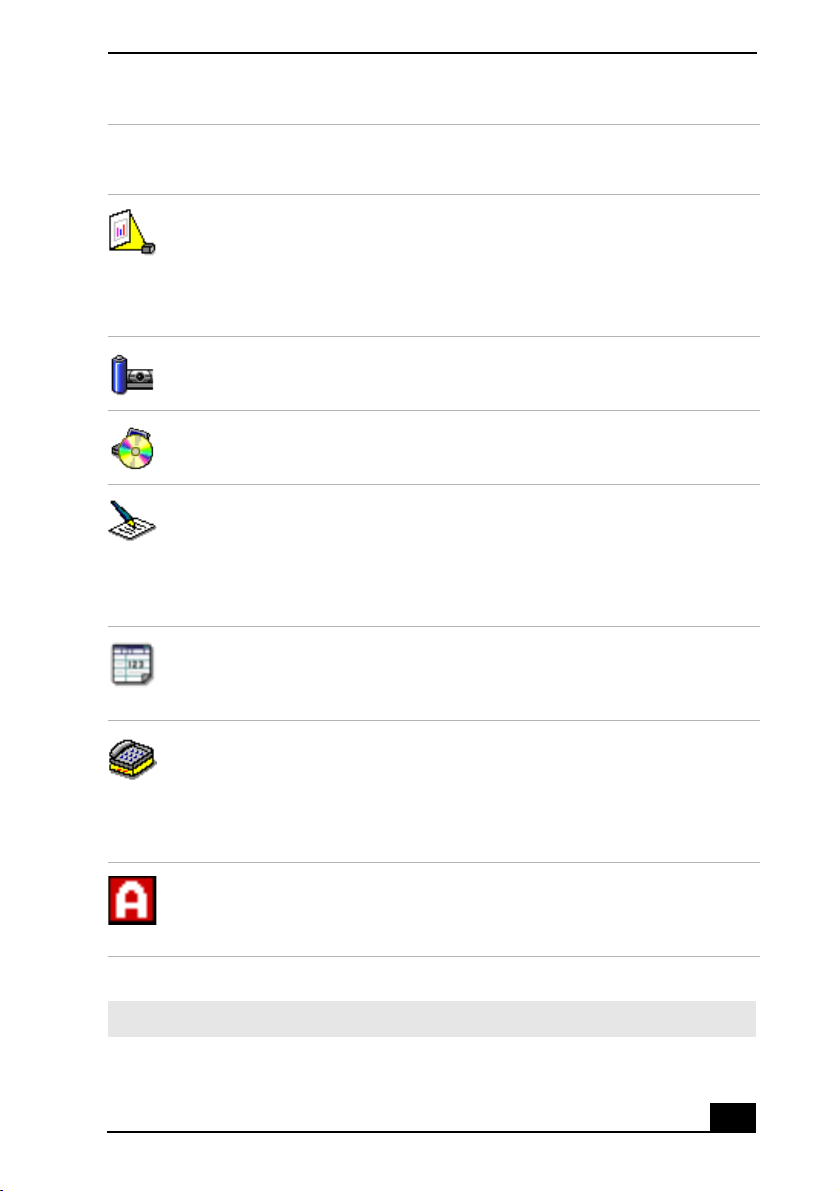
Profile
Icon Description
Presentation
Keeps the display on at all times while it conserves power. This option
is ideal for slide show presentations. You can establish settings for
LCD (Video) Standby, Hard Disk Standby, and Standby mode to
optimize power management for your system.
Camera
Optimizes performance and power requirements for camera usage.
DVD
Optimizes performance and power requirements for DVD usage.
Word Processing
Optimizes power management with longer time-outs on the hard disk
and display screen. You can also establish settings for LCD (Video)
Standby, Hard Disk Standby, and Standby mode to optimize power
management for your system.
Conserving Battery Power
Spreadsheet
Optimizes performance and power requirements for spreadsheet
programs.
Communications
Extends battery life by initiating a quick display time-out. The Internal
modem remains powered on. You can also establish settings for LCD
(Video) Standby, Hard Disk Standby, and Standby mode to optimize
power management for your system.
Automatic Profile Selection
Switches automatically to a profile suitable for active software
programs.
* For models w ith an i.LINK port.
✍ Do not choose the Automatic Profile Selection when connected to AC power.
29
Page 30

VAIO Computer Quick Start
To select a profile
1 Right-click the Battery icon on the Windows taskbar. See “To display the
Battery Information window” for Battery icon descriptions.
2 Select Profiles, and click the profile on the shortcut menu. The profile
settings are implemented instantly. See “Using PowerPanel utility” for
descriptions of available profiles.
When you use the battery to power your computer, your system automatically
selects the Maximum Battery Life power management profile by default. If you
select a different power management profile while using battery power, that
profile is selected automatically the next time you use the battery to power your
computer.
✍ See PowerPanel Help for information on customizing the power management profiles.
To customize your profile settings
You can customize your profile settings to sustain enough power for a particular
computing function.
1 Right-click the Battery icon on the Windows® taskbar. See “To display the
Battery Information window” for Battery icon descriptions.
2 Select Edit/Create Profiles from the shortcut menu.
3 In the left panel, click the profile you want to change.
4 Right-click the setting under System, LCD(Video), Hard Disk,orOther
Devices that you want to change. See the following table for a description of
each power profile.
5 Make your changes from the drop-down menu.
6 Click File, and click Save.
30
Page 31

Power profile Description
Conserving Battery Power
CPU Control
*
Controls the processor speed. You can select either
Performance, Adaptive, Battery Life,orMore Battery Life.
These selections are listed in order from the greatest to least
amount of power consumed.
System Standby
Timer
Controls the time it takes the system to activate the Standby
mode when it is idle. The longer you allow the computer to sit
idle while it is not in a power saving mode the more power the
computer consumes.
Hibernate Timer Controls the time it takes the system to activate the Hibernate
mode when it is idle. The longer you allow the computer to sit
idle while it is not in a power saving mode the more power the
computer consumes. Hibernate mode conserves more power
than Standby mode.
ThermalControl
Strategy
1
Controls the speed of the processor fan. You can set the fan
speed to Quiet, which conserves the most power, or
Performance.
Lid Close
Action
Controls the state of your system when you close the computer’s
lid. You can select either Standby or Hibernate mode, or you
can select LCD Off. Hibernate or LCD Off conserves the most
power.
Hibernate on
Low Battery
Controls the state of your system when the battery power is low.
You can turn this setting On or Off. Selecting On conserves the
most power when the battery is low.
LCD Brightness Controls the brightness of the computer screen (LCD). You can
select a brightness level of one to nine, with one being the
darkest setting. The darker you set the computer screen the more
power you conserve.
31
Page 32

VAIO Computer Quick Start
Power profile Description
LCD Standby
Timer
Controls the time it takes the system to switch the LCD to
Standby mode when the system is idle. This setting only turns
off power to the LCD. The system itself still functions on full
power.
HDD Standby
Timer
Controls the time it takes the system to switch the hard disk
drive to Standby mode when the system is idle. This setting only
turns off power to the hard disk drive.
i.LINK Port Controls the power supply to the i.LINK port. You can disable
power to the i.LINK port to conserve power.
Memory Stick
Port Power-
Controls the power supply to the Memory Stick slot. You can
disable power to the Memory Stick slot to conserve power.
saving
* Slows the processor speed.
Frequently asked questions
Can my computer enter Hibernate mode while using battery power?
Your computer can enter Hibernate mode while using battery power, but some
software programs and peripheral devices prevent the system from entering
Hibernate mode at all. If you are using a program that prevents the system from
entering Hibernate mode, save your data frequently. See “Using power saving
modes” for information on how you can manually activate Hibernate mode.
When should I replace the battery?
If, after fully charging the battery, the battery power is still low, the battery may
be reaching the end of its life and should be replaced.
Why is the battery warm?
While the battery is in use or being discharged, the battery heats up. This is
normal and is not cause for concern.
32
Page 33

Internet and Network Connections
❑ Internet Connections
❑ Network Connections
❑ Connecting Another VAIO Computer
33
Page 34

VAIO Computer Quick Start
Internet Connections
This section describes the basic steps for setting up your dial-up or Ethernet
connection to the Internet. The Internet Connection Wizard guides you through
the process of connecting to the Internet and choosing an Internet service
provider (ISP) or setting up an existing account. When you connect to the
Internet, you can register your VAIO® computer, use online services, and gain
access to Sony Computing Support.
❑ Setting up a dial-up Internet connection
❑ Setting up an Ethernet Internet connection
❑ Customizing your Internet connection
❑ Frequently asked questions
Setting up a dial-up Internet connection
Before you can connect to the Internet, you need to connect your computer to a
telephone line via a telephone cable (not supplied). Once you have set up your
telephone cable, you’re ready to connect to the Internet.
To connect a telephone cable
1 Locate the Modem jack on your computer. For location information, see
Locating Ports and Controls in the Setting Up chapter of your printed
VAIO® Computer Quick Start.
2 Plug one end of the telephone cable into the Modem jack. Make sure it clicks
into place.
3 Plug the other end into the wall jack.
34
Page 35

Internet Connections
Connecting a Telephone Cable
Modem jack
Telephone cable (not supplied)
✍ Your computer does not work with party lines, cannot be connected to a coin-operated
telephone, and may not work with multiple telephone lines or a private branch
exchange (PBX). Some of these connections may result in excess electrical current
and could cause a malfunction in the internal modem.
If you connect a telephone cable coming through a splitter, the modem or connected
device may not work properly.
To set up a dial-up connection to the Internet
1 Connect your computer to a telephone line. See “To connect a telephone
cable” for more information.
2 Click Start, point to Programs, Accessories, Communications, and click
Internet Connection Wizard.TheInternet Connection Wizard appears.
35
Page 36

VAIO Computer Quick Start
Internet Connection Wizard
3 Follow the on-screen instructions.
Setting up an Ethernet Internet connection
Your computer accommodates both 10BASE-T and 100BASE-TX Ethernet
connections, with data transfer speeds of between 10 and 100 Mbps, depending
on the line conditions and Ethernet cable.
36
Page 37

Internet Connections
To connect an Ethernet cable
1 Locate the Ethernet port on your computer. For location information, see
Locating Ports and Controls in the Setting Up chapter of your printed
VAIO® Computer Quick Start.
Connecting an Ethernet Cable
Ethernet
port
Ethernet cable
2 Plug one end of the Ethernet cable into your computer’s Ethernet port
and the other into the network connection.
✍ Your computer does not work with party lines, cannot be connected to a coin-operated
telephone, and may not work with multiple phone lines or a private branch exchange
(PBX). Some of these connections may result in excess electrical current and could
cause a malfunction in the internal modem.
If you connect a telephone cable via a splitter, the modem or connected device may
not work properly.
To set up an Ethernet connection to the Internet
1 Connect your computer to a network connection. See “To connect an
Ethernet cable” for more information.
2 Click Start, point to Settings, Control Panel,andclickInternet Options.
The Internet Properties dialog box appears.
37
Page 38

VAIO Computer Quick Start
3 Click to open the Connections tab, and click LAN Settings near the bottom
of the dialog box. The Local Area Network (LAN) Settings dialog box
appears.
Local Area Network (LAN) Settings
4 Click to select the Automatically detect settings check box.
5 ClicktoselecttheUse automatic configuration script, and type an address
in the Address box.
6 Click OK.
Customizing your Internet connection
The Internet Properties dialog box enables you to change the way you view the
Internet. You can change your home page, fonts, language, and colors. You can
also regulate content and set your browsing preferences.
38
Page 39

Internet Connections
To open the Internet Properties dialog box
1 Click Start, point to Settings, Control Panel,andclickInternet Options.
The Internet Properties dialog box appears.
2 Click the tabs to view customizing options.
3 Make changes, and click Apply to activate your changes.
4 Click OK.
Frequently asked questions
Why doesn’t my modem work?
❑ Make sure the telephone cable is securely plugged into the Modem jack and
the wall jack. See “To connect a telephone cable” for more information.
❑ Make sure the telephone cable is working by plugging the cable into an
ordinary telephone and listening for a dial tone.
❑ Make sure the telephone number the program is dialing is correct.
❑ Make sure the software you are using is compatible with the computer’s
modem. (All preinstalled Sony programs are compatible.)
❑ If you are still experiencing problems, use the supplied Application
Recovery CD(s) to reinstall the modem driver software. See “Using the
Application Recovery CD(s)” for more information.
Why is my modem connection slow?
Your computer is equipped with a V.90 compatible modem. Many factors may
influence modem connection speed, including telephone line noise or
compatibility with telephone equipment, such as fax machines or other modems.
If you think your modem is not connecting properly to other PC-based modems,
fax machines, or your Internet Service Provider (ISP), follow these steps:
❑ Ask your telephone company to verify your telephone line is free of any line
noise.
❑ If your problem is fax-related, make sure there are no problems with the fax
machine you are calling and that it is compatible with fax modems.
❑ If you are having a problem connecting with your ISP, make sure the ISP is
not experiencing technical problems.
39
Page 40

VAIO Computer Quick Start
❑ If you have a second telephone cable available, try connecting the modem to
that cable.
40
Page 41

Network Connections
Network Connections
With a Sony computer, you can easily set up or connect to a variety of networks.
The Network Connection Wizard makes it easy to gain access to remote and local
area networks (LANs) using wireless, Ethernet, or dial-up connections.
For more information about networking, click Start, Help,andthen
Networking.
❑ Using Ethernet and dial-up connections
❑ Using wireless LAN connections
❑ Checking your network connection status
❑ Frequently asked questions
Types of Networks
Access point (wireless)
Computer-to-computer
(wireless)
Ethernet (cables)
Using Ethernet and dial-up connections
Local area networks (LANs) comprise a group of computers and associated
devices within a small geographic area, such as a home or office building. For
setting up LANs, Ethernet is a widely installed technology. Your computer
41
Page 42

VAIO Computer Quick Start
accommodates both 10BASE-T and 100BASE-TX Ethernet connections, with
data transfer speeds of between 10 and 100 Mbps, depending on the Ethernet
cable.
To set up an Ethernet LAN
1 Plug one end of the Ethernet cable into your computer’s Ethernet port and
the other into the network connection.
Connecting an Ethernet Cable
Ethernet port
Ethernet cable
2 Click Start, point to Settings, Control Panel,andclickInternet Options.
The Internet Properties dialog box appears.
3 Click to open the Connections tab, and click LAN Settings near the bottom
of the page. The Local Area Network (LAN) Settings dialog box appears.
4 Click to select the Automatically detect settings check box.
5 ClicktoselecttheUse automatic configuration script, and type an address
in the Address box.
6 Click OK.
42
Page 43

Network Connections
Warning: Only connect 10BASE-T and 100BASE-TX cables to the Ethernet port
. Do not connect any other type of network cable or any telephone cable.
Connecting cables other than those listed above may result in an electric
current overload and could cause a malfunction, excessive heat, or fire in the
port. To connect the unit to the network, contact your network administrator.
You can connect to your company network from a remote location and use data,
applications, and network resources. See Microsoft® Windows® Help by
clicking Help from the Start menu, and then clicking Networking in the left
panel.
Using wireless LAN connections
A wireless local area network (LAN) is a network in which you can connect to a
LAN through a wireless (radio) connection. You can opt to purchase a Sony
Wireless LAN Access Point to set up a LAN.
The Wireless LAN Access Point is designed for building a wireless LAN
environment. Because a wireless LAN configuration requires no wiring, you can
operate multiple computers more freely than ever before.
You can also purchase an external Wireless LAN PC Card separately, but your
computer (depending on the model you purchased) may already come with a
built-in mini PCI card that allows for wireless connections. The Wireless LAN
PC Card is designed for a wireless LAN environment. You can use the Wireless
LAN PC Card with or without the access point.
✍ For more information on Sony Wireless LAN, go to http://www.sonystyle.com/vaio.
There are two types of wireless connections:
❑ An infrastructure network is one that extends an existing wired local
network to wireless devices by providing an access point. The access point
bridges the wireless and wired LAN and acts as a central controller for the
Wireless LAN. The access point coordinates transmission and reception
from multiple wireless devices within a specific range.
❑ A peer-to-peer group (ad-hoc) network is one in which a local network is
created only by the wireless devices themselves, with no other central
controller or access point. Each device communicates directly with other
devices in the network. You can set up an ad-hoc network easily at home.
43
Page 44

VAIO Computer Quick Start
To connect to an existing wireless network
1 Move the Wireless LAN switch to ON or insert a Wireless LAN PC Card
into the PC Card slot. See “Inserting PC Cards” for more information.
2 Click Sta rt, point to Settings, Control Panel,andclickWireless Network.
The Add/Edit Configuration Profile window appears.
Add/Edit Configuration Profile Window
3 Click Add.TheEdit Configuration dialog box appears.
4 Type a profile name, and select Access Point from the Network Type drop-
down list if it is not already selected.
5 Click Next.
6 Type a name in the Network Name box or click Scan to select a network.
7 Click Next.
8 If the network was set up with an encryption key:
1 Click to select the Enable Data Security check box.
2 Select either Use Alphanumeric Characters or Use Hexadecimal,
depending on the encryption key.
44
Page 45

Network Connections
3 Type the five-character encryption key in the Key 1 box, and make sure
Key 1 appears in the Encrypt data with box. Ask the network
administrator for the encryption key if you don’t already have it.
4 Click Next.
If the network was not set up with an encryption key, then click Next.
Add/Edit Configuration Profile Window
9 Select a power management option, and click Next.
10 ClicktoselecttheRenew IP Address when selecting this profile check
box, so you don’t have to type the IP Address every time you want to
connect to the network.
11 Click Finish.
To set up a wireless network
1 Move the Wireless LAN switch to ON or insert a Wireless LAN PC Card
into the PC Card slot. See “Inserting PC Cards” for more information.
2 Click Sta rt,pointtoSettings, Control Panel,andclickWireless Network.
The Add/Edit Configuration Profile window appears.
45
Page 46

VAIO Computer Quick Start
Add/Edit Configuration Profile Window
3 Click Add.TheEdit Configuration dialog box appears.
4 Type a profile name, and select Access Point from the Network Type drop-
down list if it is not already selected.
5 Click Next.
6 Type a name in the Network Name box.
7 Click Next.
8 Set up an encryption key, so only the individuals to whom you give the
encryption key can gain access to the network:
1 Click to select the Enable Data Security check box.
2 Select either Use Alphanumeric Characters or Use Hexadecimal.
3 Type a five-character encryption key in the Key 1 box using either
alphanumeric or hexadecimal characters, depending on your selection in
the previous step.
4 Make sure Key 1 appears in the Encrypt data with box.
5 Click Next.
46
Page 47

Network Connections
Add/Edit Configuration Profile Window
9 Select a power management option, and click Next.
10 ClicktoselecttheRenew IP Address when selecting this profile check
box, so you don’t have to type the IP Address every time you want to
connect to the network.
11 Click Finish.
To set up a peer-to-peer group (ad-hoc) network
1 Move the Wireless LAN switch to ON or insert a Wireless LAN PC Card
into the PC Card slot. See “Inserting PC Cards” for more information.
2 Click Sta rt,pointtoSettings, Control Panel,andclickWireless Network.
The Add/Edit Configuration Profile window appears.
47
Page 48

VAIO Computer Quick Start
Add/Edit Configuration Profile Window
3 Click Add.TheEdit Configuration dialog box appears.
4 Type a profile name, and select Peer-to-Peer Group from the Network
Typ e drop-down list.
5 Click Next.
6 Type a name in the Network Name box, and select a channel using the
Channel Number drop-down list.
7 Click Next.
8 Set up an encryption key, so only the individuals to whom you give the
encryption key can gain access to the network:
1 Click to select the Enable Data Security check box.
2 Select either Use Alphanumeric Characters or Use Hexadecimal.
3 Type a five-character encryption key in the Key box using either
alphanumeric or hexadecimal characters, depending on your selection in
the previous step.
4 Click Next.
48
Page 49

Network Connections
Add/Edit Configuration Profile Window
9 Select a power management option, and click Next.
10 ClicktoselecttheRenew IP Address when selecting this profile check
box, so you don’t have to type the IP Address every time you want to
connect to the network.
11 Click Finish.
To disconnect from a wireless network
❑ For computers with built-in wireless LAN functionality:
1 Click Start, point to Settings,andclickNetwork and Dial-up
Connections.
2 Right-click the appropriate Local Area Connection network icon, and
select Disable.
3 Move the Wireless LAN switch to OFF. The Wireless LAN indicator
turns off.
❑ For wireless LAN PC Card connections:
1 Click Start, point to Settings,andclickNetwork and Dial-up
Connections.
49
Page 50

VAIO Computer Quick Start
2 Right-click the appropriate Local Area Connection network icon, and
select Disable.
3 Correctly remove the PC Card. See “Removing PC Cards” for more
information.
Turning off the wireless LAN functionality while accessing remote
documents, files, or resources may result in data loss.
Checking your network connection status
To check the status of your network connection
❑ Click Star t on the Windows® taskbar, and point to Programs, ORiNOCO,
and click Client Manager.TheStat us box shows information about your
network connection.
Frequently asked questions
Why can’t my computer connect to a Wireless LAN Access Point?
❑ Connection availability is affected by distance and obstructions. You may
need to move your computer away from obstructions or closer to any access
point you may be using.
❑ Make sure the Wireless LAN switch on the computer is in the ON position
or the Wireless LAN PC Card is properly inserted. See “Inserting PC Cards”
for more information.
❑ Make sure power to the access point is on.
❑ Make sure the encryption key is correct.
Why can’t I gain access to the Internet?
❑ If you are using a Wireless LAN PC Card, make sure it is properly inserted
into the PC Card slot. For more information, see “Inserting PC Cards”.
❑ Check the access point settings. Refer to the instructions supplied with the
access point.
❑ Make sure your computer and the access point are connected to one another.
❑ Move your computer away from obstructions or closer to any access point
you may be using.
50
Page 51

Network Connections
❑ Make sure your computer is properly configured for Internet access.
Why is the data transfer speed slow?
❑ The Wireless LAN data transfer speed is affected by distance and
obstructions between devices and access points. Other factors include device
configurations, radio conditions, and software compatibility. To maximize
the data transfer speed, move your computer away from obstructions or
closer to any access point you may be using.
❑ If you are using a Wireless LAN Access Point, the device may be
temporarily overloaded depending on the number of other devices
communicating via the access point.
❑ If your access point interferes with other access points, change the access
point channel. See your access point instructions for more information.
Why is the communication speed interrupted or slowed down when MPEG2 data
is transferred?
The typical effective data transfer speed via an access point is 4-5 Mbps when
adhering to the IEEE 802.11b standard. High-rate stream transfers with MPEG2
data may lower this rate.
How do I avoid data transfer interruptions?
❑ Data transfer interruptions may occur with large files or use of microwaves
and cordless telephones when connected to an access point.
❑ Move the computer closer to the access point.
❑ Make sure the access point connection is intact.
❑ Change the access point channel. See your access point instructions for more
information.
Can I connect to a IEEE 802.11a device?
Computers with built-in Wireless LAN support the IEEE 802.11b standard only.
Devices connecting to a Wireless LAN using the IEEE 802.11a standard cannot
connect to devices using the IEEE 802.11b standard.
51
Page 52

VAIO Computer Quick Start
What are channels?
Wireless LAN communication occurs on divided frequency bands known as
channels. Third-party Wireless LAN Access Point channels may be preset to
different channels from Sony devices.
If you are using a Wireless LAN Access Point, refer to connectivity information
contained in your access point instructions.
52
Page 53

Connecting Another VAIO Computer
Connecting Another VAIO Computer
You can use a compatible i.LINK®*cable (not supplied) to connect two
compatible mobile VAIO computers, and then use one computer to edit, copy, or
delete files on the other computer. You can also print from a printer that is
attached to either computer.
✍ Only i.LINK cables may be used to connect two compatible mobile VAIO computers.
❑ Frequently asked questions
To connect VAIO computers
1 Plug one end of the i.LINK cable into the i.LINK port on each computer.
2 Restart both computers and log on when prompted.
3 Click Sta rt, point to Programs, Smart Connect, and click Smart Connect
Monitor.TheSmart Connect Monitor window appears.
4 Click Option,andselectRun Smart Connect Switch.
5 ClicktoselectEnable Smart Connect.
6 ClicktoselectSTD mode, if it is not already selected.
7 Click OK. Your computers are connected.
8 To view the folders on your network:
❑ In the Smart Connect Monitor window, right-click a computer name,
and select Open with Explorer.
❑ Double-click My Network Places, and click Computers Near Me in
the My Network Places window.
✍ For more information, see Smart Connect Online Help.
* i.LINK is a trademark of Sony used to designate that a product contains an IEEE 1394
connection. The i.LINK connection may vary, depending on the software programs,
operating system, and compatible i.LINK devices. All products with an i.LINK connector
may not communicate with each other. Refer to the documentation that came with your
compatible i.LINK device for information on operating conditions and proper connection.
Before connecting compatible i.LINK PC peripherals to your system, such as a CD-RW or
hard disk drive, confirm their operating system compatibility and required operating
conditions.
53
Page 54

VAIO Computer Quick Start
Connecting Another Computer
i.LINK cable (not supplied)
To disconnect VAIO computers when the computers are on
1 Close all open files that are shared with the connected computers.
2 Unplug the i.LINK cable from the i.LINK port on each computer.
To disconnect VAIO computer when the computers are off
❑ Unplug the i.LINK cable from the i.LINK port on each computer.
Frequently asked questions
Why can’t I establish a connection between two VAIO computers?
❑ Your computer may not recognize an i.LINK
is not plugged securely into the i.LINK ports. Disconnect the i.LINK cable
and securely reconnect it to both computers. If neither computer responds
after a few moments, restart both computers.
* i.LINK is a trademark of Sony used only to designate that a product contains an IEEE 1394
connection. The i.LINK connection may vary, depending on the software applications,
operating system, and compatible i.LINK devices. All products with an i.LINK connection
may not communicate with each other. Refer to the documentation that came with your
compatible i.LINK device for information on operating conditions and proper connection.
Before connecting compatible i.LINK PC peripherals to your system, such as CD-RW or
hard disk drive, confirm their operating system compatibility and required operating
conditions.
54
*
connection if the i.LINK cable
Page 55

Connecting Another VAIO Computer
❑ If the computers do not recognize the i.LINK connection after resuming
from a power saving mode (Standby or Hibernate), restart both computers.
For more information, see “Connecting Another VAIO Computer”.
55
Page 56

VAIO Computer Quick Start
56
Page 57

CDs, DVDs, and Optical Drives
❑ Inserting and Ejecting CDs or DVDs
❑ Copying and Playing CDs
❑ Copying and Playing DVDs
57
Page 58

VAIO Computer Quick Start
Inserting and Ejecting CDs or DVDs
✍ Avoid using adhesive labels to identify your CDs or DVDs. Adhesive labels may
damage the optical drive if they come off while the disc is in the drive.
To insert a CD or DVD
1 Turn on the computer, and exit a power saving mode (Standby or Hibernate)
if one is active. For more information on power saving modes, see “Using
power saving modes”.
2 Press the Eject button on the optical drive cover to open the drive tray. The
drive tray slides out.
Ejecting the Drive Tray
Eject button
3 Place a disc on the drive tray with the label facing up.
✍ When using a DVD that can be played on both sides, insert the DVD with the side you
want to play facing up.
58
Page 59

Inserting and Ejecting CDs or DVDs
Inserting a Disc
Disc (label facing up)
4 Press the disc onto the hub until the disc clicks securely into place.
If you do not seat the disc firmly over the hub, the disc may come loose while
it is in the drive. A loose disc may damage the optical drive and make
opening the drive tray difficult.
5 Push the drive tray gently to close it. The Busy indicator on the drive blinks
while your computer is reading data from the drive.
To eject a CD or DVD
1 Turn on the computer, and exit a power saving mode (Standby or Hibernate)
if one is active. For more information on power saving modes, see “Using
power saving modes”.
2 Close all software programs that are open from the optical drive, and wait for
the LED indicator to turn off.
3 Press the Eject button on the optical drive cover to open the drive tray. The
drive tray slides out.
✍ If the Eject button does not work, turn off the computer and insert a thin, straight
object (such as a paper clip) into the manual eject hole next to the Eject button.
4 Lift the disc from the drive.
5 Push the drive tray gently to close it.
59
Page 60

VAIO Computer Quick Start
Copying and Playing CDs
Your optical drive can read CDs and DVDs. The type of optical drive installed in
or connected to your computer may vary, depending on the model you purchased.
If you are using a CD-RW/DVD drive, you can write data to CD-Rs and CDRWs.
❑ Playing CDs
❑ Copying files to a CD-RW or CD-R
❑ Frequently asked questions
Do not remove the optical drive when the computer is in a power saving
mode (Standby or Hibernate). Doing so may cause the computer to
malfunction.
Playing CDs
Before you play an audio CD, you may need to enable your computer’s audio
feature.
To enable the audio feature
1 Click Start, and point to Settings, Control Panel, and then click System.
The System Properties window appears.
2 Select the Hardware tab, and click Device Manager in the Device
Manager box. A window with a listing of the computer’s hardware devices
appears.
3 Double-click the optical drive to open the sub menu.
4 Double-click the listed drive name, and select the Properties tab.
5 Click to select the Enable digital CD audio for this CD-ROM device
check box if it is not already selected.
6 Click OK.
To adjust the volume for playing CDs and DVDs
Some software programs have built-in volume controls, which you can adjust. If
there are no volume controls, then you can adjust the volume of your computer’s
built-in speakers by doing one of the following:
60
Page 61

Copying and Playing CDs
❑ Using the Function keys. An on-screen display may appear, notifying you
when a change occurs.
❑ To increase volume, press Fn+F4,then or .
❑ To decrease volume, press Fn+F4,then or .
❑ Using the Volume icon.
1 Double click the Volume icon on the Windows® taskbar. The
Vo lu me C ont ro l dialog box appears.
2 In the Volu me C on tro l and CD Audio columns, move the Vo lu me
sliders up to increase the volume and down to decrease the volume.
To play an audio CD
1 Insert the disc into the optical drive. See “To insert a CD or DVD.”
2 Select an option in the Audio CD window.
3 Click OK.
Copying files to a CD-RW or CD-R
*
Before you write data to a CD-RW or CD-R, read the following notes to avoid a
computer malfunction and ensure the best writing results:
❑ Deactivate the screen saver and exit anti-virus software.
❑ Deactivate memory-resident disc utilities to avoid data loss.
❑ Turn off the FindFast program if your computer has preinstalled Microsoft®
Office programs, such as Excel, Word, and Outlook.
❑ Use CD-Rs that are compatible with 16x speed.
✍ Your computer does not support 1x or 2x writing speed.
To copy files to a CD-RW or CD-R
Use the preinstalled SonicStage™ or Drag’n Drop CD/DVD program to create
your own CDs.
* For computer models equipped with a CD-RW/DVD drive.
61
Page 62

VAIO Computer Quick Start
1 Connect the AC adapter to the computer. See “Connecting the AC adapter”
for more information.
2 Insert the disc into the optical drive. See “Inserting and Ejecting CDs or
DVDs” for more information.
3 Click Start, Programs, and select the program you want to use from the
submenu.
❑ For directions on how to use SonicStage and Drag’n Drop CD/DVD
software, see the online help guides supplied with the program.
4 Once you finish copying files to a CD-R that is readable in a CD-ROM
drive, click Finish to complete the writing process before you eject the disc
from the optical drive.
Do not strike or shake the computer while copying files to a disc.
Frequently asked questions
How do I maintain CDs and DVDs?
❑ Avoid touching the surface of the disc with your fingers. Fingerprints and
dust on the surface of the disc may cause reading errors.
❑ To clean the disc, hold the edge of the disc, and use a soft cloth to wipe the
surface from the center out. If the disc is badly soiled, moisten a soft cloth
with water, wring it out well, and use it to wipe the surface of the disc from
the center out. Wipe off any remaining moisture with a dry, soft cloth.
❑ Do not clean the disc with solvents (such as benzine, thinner, commercially
available cleaners, or anti-static spray), which may damage the disc.
❑ Do not drop or bend the disc.
Why does my computer freeze when I try to read a disc?
The disc your computer is trying to read may be dirty or damaged. Restart the
computer, and eject the disc from the optical drive. Examine the disc for dirt or
damage. If the disc is dirty, see “How do I maintain CDs and DVDs?” for
instructions on how to clean it.
62
Page 63

Copying and Playing CDs
Why won’t the drive tray open?
❑ Make sure the computer is on.
❑ Press the Eject button on the optical drive cover.
❑ If the Eject button does not work, double-click the My Computer icon on
the desktop. Right-click the optical drive, and select Eject from the shortcut
menu.
❑ If none of the above options work, insert a thin, straight object (such as a
paper clip) in the manual eject hole to the right of the Eject button.
Why isn’t the optical drive playing my CD or DVD properly?
❑ Make sure the disc label is facing up.
❑ If the disc requires software, make sure the software is installed according to
the manufacturer’s instructions.
❑ A dirty or damaged disc may cause the computer to stop responding while it
tries to read the disc. If necessary, restart the computer, remove the disc, and
check the disc for dirt or damage.
❑ If you see video but cannot hear audio, follow these steps:
❑ Make sure your optical drive does not have the mute setting enabled.
❑ Check the volume setting in the audio mixer.
❑ If you are using external speakers, check the volume settings, and then
check the connections between your external speakers and the
computer.
❑ Click Sta rt on the Windows® taskbar, and click Settings,thenControl
Panel,andSystem. Select the Hardware tab, and click Device
Manager. Make sure the correct driver software is properly installed.
❑ Do not use adhesive labels to identify the CD. The label may come off while
the disc is in use in the optical drive and cause the drive to malfunction.
❑ If a region code warning appears when you try to use your optical drive, it
may be that the DVD you are trying to play is incompatible with the optical
drive. Verify the region code listed on the DVD package.
❑ Condensation may cause the computer to malfunction. If this occurs, do not
use it for at least one hour.
❑ Make sure the digital CD audio is enabled for your optical drive. Follow
these steps:
63
Page 64

VAIO Computer Quick Start
1 Click Start on the Windows® taskbar, and point to Settings, Control
Panel,andclickSystem.TheSystem Properties window appears.
2 Select the Hardware tab,andthenclickDevice Manager.TheDevice
Manager window appears.
3 Double-click the listed optical drive. The Properties window appears.
4 Click the Properties tab, and click to select the Enable digital CD
audio for this CD-ROM device check box.
Why did the computer screen (LCD) go blank?
❑ Your computer screen may go blank if the computer has lost power or is in a
power saving mode (Standby or Hibernate).
❑ Make sure the computer is plugged into a power source and is on. The
power indicator turns on if the computer is on.
❑ Make sure the battery is inserted properly and is charged.
❑ If the computer is in LCD (Video) Standby mode, press any key to
activate the computer screen.
❑ If the display mode is set to external display, press and hold the Fn key while
you press F7 several times.
Why don’t my changes appear on the computer (LCD) screen?
You may need to refresh the computer screen. Press the Windows key and
press D twice.
Is the CD-RW reading speed slower than the CD-ROM or CD-R reading speed?
Generally the CD-RW reading speed is slower than the CD-ROM and the CD-R
reading speeds, although reading speeds vary depending on the format you are
using.
64
Page 65

Copying and Playing DVDs
Copying and Playing DVDs
The type of optical drive installed in your computer may vary, depending on the
model you purchased. Computers equipped with a CD-RW/DVD drive can play
DVDs and can read most DVD-R media. Computers equipped with a DVD-RW
drive can play and copy files to DVDs.
❑ Playing DVDs
❑ Disconnecting the TV from the computer
❑ Copying files to a DVD-R or DVD-RW
❑ Frequently asked questions
Do not remove the optical drive when the computer is in a power saving
mode (Standby or Hibernate). Doing so may cause the computer to
malfunction.
Playing DVDs
You can play a DVD on your computer or TV. If you watch DVDs on your
computer, use either the AC adapter or the supplied battery for power.
To play a DVD on the computer using AC power
1 Close all open programs.
2 Insert the DVD into the optical drive.
3 Select a preinstalled DVD program in which to play the DVD. The
preinstalled DVD program launches the video automatically. See “Program
overview” for a description of your preinstalled DVD program.
✍ See the help guide included with the DVD program for detailed instructions.
Some discs recorded at 20 or 24 bits may produce noise while playing. If you
have audio devices connected, this may damage your hearing and the
speakers. Reduce the volume before playing a DVD.
Do not switch the power saving modes while you are playing the DVD.
Do not use memory-resident utility software to speed up disc access. This
may cause the computer to malfunction.
65
Page 66

VAIO Computer Quick Start
To play a DVD on the computer using battery power
1 Set the power management profile to DVD.
1 Close all open programs.
2 Right-click the Battery icon on the Windows® taskbar.
3 Select Profiles from the shortcut menu, and then select DVD from the
submenu. You can also select Automatic Profile Selection,whichsets
the power management profile to DVD whenever a DVD is inserted into
the optical drive. See “Conserving Battery Power” for more
information.
2 Insert the DVD into the optical drive.
3 Select a preinstalled DVD program in which to play the DVD. The
preinstalled DVD program launches the video automatically. See “Program
overview” for a description of your preinstalled DVD program. For detailed
instructions on how to use the preinstalled DVD program, see the help guide
included with the DVD program.
Some discs recorded at 20 or 24 bits may produce noise while playing. If you
have audio devices connected, this may damage your hearing and the
speakers. Reduce the volume before playing a DVD.
Do not switch the power saving modes while you are playing the DVD.
Do not use memory-resident utility software to speed up disc access. This
may cause the computer to malfunction.
To play a DVD on a TV
1 Connect a TV to the computer. If you purchased a port replicator and want to
connect a TV to it, see “Audio and Video Connections” for more
information.
1 Plug one end of an audio-video (AV) cable into the A/V OUT jack on
the computer.
2 Plug the other end of the AV cable into the video-in ports on the TV.
66
Page 67

ConnectingaTV
Copying and Playing DVDs
Power cord
TV
A/V OUT jack
Audio-video cable
(not supplied)
2 Switch the TV input channel to external input.
✍ See the guide that came with your peripheral device for more information on its
installation and use.
3 Disable the screen saver and the virus checker.
4 Select a display.
❑ Press the Fn+F8 key combination to select either the computer screen
(LCD) or an external display. See “Selecting a display mode” for more
information.
The Fn+F8 key combination will not work once a DVD is inserted into the
optical drive. Switching the display while a DVD is playing may cause the
computer to malfunction, and you may need to restart the DVD software.
67
Page 68

VAIO Computer Quick Start
5 Set the power management profile to DVD, if you are using battery power.
Follow these steps:
1 Close all open programs.
2 Right-click the Battery icon on the Windows® taskbar.
3 Select Profiles from the shortcut menu, and then select DVD from the
submenu menu. You can also select Automatic Profile Selection,
which sets the power management profile to DVD whenever a DVD is
inserted into the optical drive. See “Conserving Battery Power” for
more information.
6 Insert the DVD into the optical drive.
7 Select a preinstalled DVD program in which to play the DVD. The
preinstalled DVD program launches the video automatically. See “Program
overview” for a description of your preinstalled DVD program. For detailed
instructions on how to use the preinstalled DVD program, see the help guide
included with the DVD program.
Some discs recorded at 20 or 24 bits may produce noise while playing. If you
have audio devices connected, this may damage your hearing and the
speakers. Reduce the volume before playing a DVD.
Do not switch the power saving modes while you are playing the DVD.
Do not use memory-resident utility software to speed up disc access. This
may cause the computer to malfunction.
Disconnecting the TV from the computer
Simply unplug the audio-video (AV) cable from the A/V OUT jack on the
computer.
Copying files to a DVD-R or DVD-RW
You can copy files to a DVD-R or DVD-RW if your computer is equipped with a
DVD-RW drive. Use the DVD-RW drive and the preinstalled Click to DVD™ or
Drag’n Drop CD/DVD program to create your own DVDs. The Sony Click to
DVD program is ideal for creating full-featured video DVDs, and the Drag’n
Drop CD/DVD program is ideal for creating data DVDs.
68
Page 69

Copying and Playing DVDs
To copy files to a DVD-R or DVD-RW
1 Connect the AC adapter to the computer. See “Connecting the AC adapter”
for more information.
2 Insert the disc into the optical drive. See “Inserting and Ejecting CDs or
DVDs” for more information.
3 Click Start, Programs, and select the program you want to use from the
submenu.
❑ For directions on how to use Click to DVD and Drag’n Drop CD/DVD
software, see “Creating DVDs” and the online help guides supplied with
the program.
Do not strike or shake the computer while copying files to a disc.
Frequently asked questions
How do I maintain CDs and DVDs?
❑ Avoid touching the surface of the disc with your fingers. Fingerprints and
dustonthesurfaceofthediscmaycausereadingerrors.
❑ To clean the disc, hold the edge of the disc, and use a soft cloth to wipe the
surface from the center out. If the disc is badly soiled, moisten a soft cloth
with water, wring it out well, and use it to wipe the surface of the disc from
the center out. Wipe off any remaining moisture with a dry, soft cloth.
❑ Do not clean the disc with solvents (such as benzine, thinner, commercially
available cleaners, or anti-static spray), which may damage the disc.
❑ Do not drop or bend the disc.
Why can’t I view the entire DVD video display on a TV screen?
The display resolution may not be properly set. To adjust the display resolution,
see “Selecting a display mode” for more information. It is recommended that you
adjust the display resolution to 1024 x 768 or smaller, depending on the size of
the external display screen.
69
Page 70

VAIO Computer Quick Start
Why does my computer freeze when I try to read a disc?
The disc your computer is trying to read may be dirty or damaged. Restart the
computer, and eject the disc from the optical drive. Examine the disc for dirt or
damage. If the disc is dirty, see “How do I maintain CDs and DVDs?” for
instructions on how to clean it.
Why won’t the drive tray open?
❑ Make sure the computer is on.
❑ Press the Eject button on the optical drive cover.
❑ If the Eject button does not work, double-click the My Computer icon on
the desktop. Right-click the optical drive, and select Eject from the shortcut
menu.
❑ If none of the above options work, insert a thin, straight object (such as a
paper clip) in the manual eject hole to the right of the Eject button.
Why isn’t the optical drive playing my CD or DVD properly?
❑ Make sure the disc label is facing up.
❑ If the disc requires software, make sure the software is installed according to
the manufacturer’s instructions.
❑ A dirty or damaged disc may cause the computer to stop responding while it
tries to read the disc. If necessary, restart the computer, remove the disc, and
check the disc for dirt or damage.
❑ If you see video but cannot hear audio, follow these steps:
❑ Make sure your optical drive does not have the mute setting enabled.
❑ Check the volume setting in the audio mixer.
❑ If you are using external speakers, check the volume settings, and then
check the connections between your external speakers and the
computer.
❑ Click Sta rt on the Windows® taskbar, and click Settings,thenControl
Panel,andSystem. Select the Hardware tab, and click Device
Manager. Make sure the correct driver software is properly installed.
❑ Do not use adhesive labels to identify the CD. The label may come off while
the disc is in use in the optical drive and cause the drive to malfunction.
70
Page 71

Copying and Playing DVDs
❑ If a region code warning appears when you try to use your optical drive, it
may be that the DVD you are trying to play is incompatible with the optical
drive. Verify the region code listed on the DVD package.
❑ Condensation may cause the computer to malfunction. If this occurs, do not
use it for at least one hour.
❑ Make sure the digital CD audio is enabled for your optical drive. Follow
these steps:
1 Click Start on the Windows® taskbar, and point to Settings, Control
Panel,andclickSystem.TheSystem Properties window appears.
2 Select the Hardware tab,andthenclickDevice Manager.TheDevice
Manager window appears.
3 Double-click the listed optical drive. The Properties window appears.
4 Click the Properties tab, and click to select the Enable digital CD
audio for this CD-ROM device check box.
Why did the computer screen (LCD) go blank?
❑ Your computer screen may go blank if the computer has lost power or is in a
power saving mode (Standby or Hibernate).
❑ Make sure the computer is plugged into a power source and is on. The
power indicator turns on if the computer is on.
❑ Make sure the battery is inserted properly and is charged.
❑ If the computer is in LCD (Video) Standby mode, press any key to
activate the computer screen.
❑ If the display mode is set to external display, press and hold the Fn key while
you press F7 several times.
Why don’t my changes appear on the computer (LCD) screen?
You may need to refresh the computer screen. Press the Windows key and
press D twice.
71
Page 72

VAIO Computer Quick Start
How do I adjust the image on the TV screen?
Use the controls on your external display to adjust the image. See the help guide
that accompanied your display for more information.
How do I change the video resolution on the TV screen?
The video may not appear on the entire TV screen if your computer resolution is
set to 1280 x 1024 pixels or greater. To change the video resolution, follow these
instructions:
✍ If you are using the A/V Out jack, plug the audio-video (AV) cable into the computer
before you start the computer. Also, set the screen resolution to 800 x 600 or 1024 x
768 pixels. (On Windows 2000 models, you can also set the resolution to 640 x 480
pixels.)
1 Right-click the desktop, and select Properties from the shortcut menu. The
Display Properties dialog box appears.
2 Select the Settings tab.
3 Move the screen resolution slider to the left to reduce the size and to the right
to increase the size of the video resolution.
How do I switch the computer (LCD) screen from LCD to TV?
Press Fn+F8 to select either the computer or TV display. See “Selecting a display
mode” for more information.
The Fn+F8 key combination will not work once a DVD is inserted into the
optical drive. Switching the display while a DVD is playing may cause the
computer to malfunction, and you may need to restart the DVD software.
Is the CD-RW reading speed slower than the CD-ROM or CD-R reading speed?
Generally the CD-RW reading speed is slower than the CD-ROM and the CD-R
reading speeds, although reading speeds vary depending on the format you are
using.
72
Page 73

Printer Connections
❑ Printing With Your Computer
73
Page 74

VAIO Computer Quick Start
Printing With Your Computer
You can connect a universal serial bus (USB) printer or a parallel port printer to
your computer. To print properly, the printer you connect must be compatible
with the Microsoft® Windows® operating system installed on your computer.
❑ Connecting a printer
❑ Disconnecting a printer
❑ Frequently asked questions
Connecting a printer
Your computer is compatible with many popular printers. The New Hardware
Wizard guides you through the software installation process. Some printers
require separate driver software installation. See the instructions that
accompanied your printer for more information. If you cannot print once you
have connected your computer to your printer, see “Frequently asked questions”
in this section for more information.
To connect a USB printer
1 Locate a USB port on the computer and the printer.
2 Plug the USB cable into the USB port on your computer.
3 Plug the other end of the USB cable into the USB port on the printer.
74
Page 75

Connecting a USB Printer Cable
Power cord
Printer
Printing With Your Computer
USB ports
USB cable connector
USB cable (not supplied)
✍ See the manual that came with the USB printer for more information on its installation
and use.
To connect a parallel port printer
1 Locate the Printer port on your computer.
2 Plug the printer cable into the Printer port .
3 Plug the other end of the printer cable into the port on the printer.
75
Page 76

VAIO Computer Quick Start
Connecting a Parallel Port Printer
Printer port
Parallel connector
Printer
Printer cable
(not supplied)
Power cord
✍ See the manual that came with the parallel port printer for more information on its
installation and use.
Disconnecting a printer
You can disconnect a USB or parallel printer when the computer is on or off.
Disconnecting a printer when the computer is in a power saving mode (Standby
or Hibernate) may cause the computer to malfunction.
To disconnect a printer
❑ Unplug the printer cable from the computer.
Frequently asked questions
Why can’t I print a document?
❑ Make sure the printer is on, and the printer cable is securely connected to the
ports on your printer and computer. See “Connecting a printer” for more
information.
76
Page 77

Printing With Your Computer
❑ Make sure the printer is compatible with the Microsoft® Windows®
operating system installed on your computer.
❑ You may need to install the printer driver software before you use the printer.
See the instructions that came with your printer for information about
installing these drivers.
❑ If the printer is not functioning after the computer resumes from a power
saving mode (Standby or Hibernate), reset the printer connection.
1 Click Start, and point to Settings, then click Printers.ThePrinters
window appears.
2 Right-click the printer that is not functioning, and select Properties to
open the Properties window.
3 Click OK.
❑ Change the default printer port setting, although this setting is generally
correct for most printers.
1 Click Start, and point to Settings, then click Printers.ThePrinters
window appears.
2 Right-click the printer, and select Properties from the shortcut menu.
3 Select the Ports tab, and select a different LPT Port Number.
❑ You may need to enable the computer’s printer port.
1 Click Start, and point to Settings and Control Panel,thenclickSony
Notebook Setup.TheSony Notebook Setup window appears.
2 Click the Device tab.
3 If it is not already selected, click the Printer Port check box.
4 Click OK.
77
Page 78

VAIO Computer Quick Start
78
Page 79

Computer Features
❑ Using the Keyboard
❑ Using the Touch Pad
❑ Using Jog Dial Control
❑ UsingMemoryStickMedia
❑ Changing the Window Design of Sony Programs
79
Page 80

VAIO Computer Quick Start
Using the Keyboard
Your keyboard is very similar to a typewriter’s, but your computer keyboard has
additional keys that perform specific computer-related tasks.
❑ Key locations and descriptions
❑ Combinations and functions with the Windows key
❑ Indicators
❑ Combinations and functions with the Fn key
Key locations and descriptions
Keyboard
Shift
key
Ctrl
key
Fn key
Escape key
Esc
F1 F2 F3 F4 F5 F6 F7 F8 F9 F10 F11 F12
!
2134567890
W
Q
Tab
A
Caps Lock
Z
Shift
Fn Alt Alt
Ctrl Ctrl
Function keys
$% & ( )
U
Y
T
R
E
J
H
G
F
D
S
N
B
V
C
X
I
O
K
L
<
M
Fn key
Space bar
Alt key
Applications key
Numeric keypad
Print Screen key
NumLk
Scr Lk
+
P
Enter
>
?
Shift
Windows key
Correction
Insert
Pause
Delete
Break
Home
Page
Up
Page
Down
End
keys
Prt Sc
SysRq
Backspace
Navigation keys
80
Page 81

Using the Keyboard
Key Description
Numeric keypad Contains the keys found on a typical calculator. Use the
numeric keypad area to type numbers or to perform
mathematical calculations such as addition and subtraction.
Numbers appear on the front beveled edge of the numeric
keys. Press the Num Lock key to activate the numeric
keypad. (When you do so, the Num Lock indicator turns on.)
Press the Num Lock key again to deactivate the numeric
keypad.
Arrow keys The Left, Right, Up, and Down arrow keys move the pointer
on the screen and also function as the Home, End, Page Up,
and Page Down keys, respectively.
Correction keys The Insert, Back Space, and Delete keys enable you to make
corrections in your documents.
Function keys The 12 function keys along the top of the keyboard are used
to perform designated tasks. For example, in many programs,
F1 is the Help key. The task associated with each function
key may vary from one program to the next.
Escape key The Esc (Escape) key is used to cancel commands.
Print Screen key The Print Screen key takes an electronic snapshot of the
screen and moves it to the Clipboard. You can then paste the
screen shot into a document and print it.
Operator keys
(Ctrl, Alt, Shift
keys)
Several keys are always used with at least one other key: Ctrl,
Alt,andShift.Whenhelddownwithanotherkey,theCtrl
(Control) and Alt (Alternate) keys offer another way to give
commands. For example, in many programs, instead of
choosing the Save command from a menu, you can hold
down Ctrl and press S (referred to as Ctrl+S). The Shift key
operates the same way as on a typewriter; it is used to
produce capital letters or special symbols such as @ and $.
81
Page 82

VAIO Computer Quick Start
Key Description
Windows key The key with the Windows® operating system logo displays
the Start menu; it is the equivalent of clicking Start on the
taskbar. See “Combinations and functions with the Windows
key” for more information.
Fn key The Fn key is used in combination with other keys to issue
commands. See “Combinations and functions with the Fn
key” for more information.
Applications key The Applications key displays a shortcut menu of context-
sensitive choices. Pressing this key is the equivalent of
clicking the right mouse button.
Combinations and functions with the Windows key
Combination Function
+ F1 Displays the VAIO Help and Support Center window.
+ Tab Switches the selected button on the taskbar.
+ D Displays the desktop.
+ E Displays the My Computer window.
+ F Displays the Search Results window, where you can find a
file or folder. This is the equivalent of selecting Search from
the Start menu.
+ Ctrl + F Displays the Search Results - Computers window, where you
can locate other computers. This is the equivalent of selecting
Search, and then Computer from the Start menu.
+ M Minimizes all displayed windows.
82
Page 83

Using the Keyboard
Combination Function
Shift + + M Returns all minimized windows to their previous size.
+ R Displays the Run window. This is the equivalent of selecting
Run from the Start menu.
Fn + + Insert Displays the System Properties window. This is the
equivalent of selecting Control Panel, and then System from
the Start menu.
Indicators
Indicator Function
Power Lights up when the power to the computer is on, blinks in
Standby mode, and turns off when the computer is in
Hibernatemodeoroff.
Battery Lights up when the computer is using battery power, blinks
when the battery is running out of power, double-blinks when
the battery is charging.
Memory Stick® Lights up when data is read from or written to the Memory
Stick media. (Do not enter Standby mode or turn off the
computer when this indicator is on.) When the indicator is
off, the Memory Stick media slot is not being used.
Hard disk Lights up when data is read from or written to the hard disk.
Do not enter Standby mode or shut down the computer when
this indicator is on.
Num Lock Lights up when the number keys area in the numeric keypad
are active. When the indicator is off, the alphanumeric
character keys in the keypad area are active.
83
Page 84

VAIO Computer Quick Start
Indicator Function
Caps Lock Lights up when the letters appear in uppercase as you type.
The Shift key lowers the case of typed letters when Caps
Lock is on. When the indicator is off, the letters appear in
lowercase as you type (unless you hold down the Shift key).
Scroll Lock Lights up when the screen scrolls differently. (Exactly how it
scrolls depends on the specific program. This function does
not work with all programs.) When the indicator is off,
information moves across the display normally.
Wireless
LAN
Lights up when the wireless LAN function is running.
Combinations and functions with the Fn key
✍ If you switch user identities during a computing session, the Fn+F7 key functionality
(if available on your computer) will be interrupted. To switch to an external display or
monitor, see “Selecting a display mode” for more information.
Combinations/
Feature Function
Fn + (F3)
Mute On/Off
Fn + (F4)
Speaker volume
Fn + (F5)
Brightness control
Toggles the built-in speaker off and on.
Adjusts the built-in speaker volume. An on-screen display
appears notifying you when a change occurs.
To increase volume, press Fn+F4,then or .
To decrease volume, press Fn+F4,then or .
Adjusts the brightness of the LCD.
To increase light intensity, press Fn+F5 and then or .
To decrease light intensity, press Fn+F5 and then or .
84
Page 85

Combinations/
Feature Function
Using the Keyboard
LCD
Fn + /
(F7)
Switch to the
external
monitor/LCD
LCD
Fn + only/
(F8)
Control A/V OUT
Fn + (F12)
Hibernate
Toggles between the LCD, a connected external display, and
both the LCD and external display.
Only LCD
LCD and external display
Only external display
Select one display at a time to playback DVDs. Connect the
cable before you turn on the computer, otherwise Fn+F7 will
not work.
Toggles between LCD-only, external-only, and dual LCD/TV
display modes.
Only LCD
LCD and external display
Only external display
Select one display at a time to playback DVDs. Connect the
cable before you turn on the computer, otherwise Fn+F8 will
not work. You cannot use the Fn+F8 function to switch
between LCD and TV once a DVD is inserted into the optical
drive.
Puts the system into Hibernate mode, a power management
state. To return the system to normal operating mode, press
the power button. Hibernate mode consumes the lowest level
of power.
Fn + Esc
Standby
Puts the system into Standby mode, a power management
state. To return the system to normal operating mode, press
any key or press the power button.
Fn + E Ejects the CD.
Fn + B
Bass Boost
Toggles the bass-boost function off and on. This feature is
available only while using headphones.
85
Page 86

VAIO Computer Quick Start
✍ You can also carry out these functions using the Jog Dial™ Control. Some functions
are not available until the Windows® operating system launches.
86
Page 87

Using the Touch Pad
Using the Touch Pad
The keyboard contains a pointing device called a touch pad. You can point to,
select, drag, and scroll objects on the screen using the built-in touch pad.
❑ Describing the touch pad
❑ Customizing the touch pad
❑ Frequently asked questions
Describing the touch pad
Locating and Describing the Touch Pad
Pointer
Touch pad
Left and right buttons
Action Description
Point Slide one finger on the touch pad to place the pointer on an
item or object.
Click Press the left button once.
Double-click Press the left button twice.
87
Page 88

VAIO Computer Quick Start
Action Description
Right-click Press the right button once. In many programs, this action
displays a shortcut menu of context-sensitive choices.
Drag Slide one finger while pressing the left button.
Scroll Move your finger along the right edge of the touch pad to
scroll vertically. Move your finger along the bottom to scroll
horizontally. (The scroll function is available only with
programs that support a touch pad scroll feature.)
Customizing the touch pad
Sony Notebook Setup lets you customize your touch pad, such as enable or
disable the touch pad. You can also open the Mouse Properties dialog box, which
enables you to set your touch pad and mouse preferences, such as changing
pointers, enabling or disabling the tapping feature, clicking both buttons
simultaneously, and adjusting the touch pad speed.
To disable the touch pad
1 Click Start on the Windows® taskbar, and point to Programs.
2 Point to Sony Notebook Setup,andclickSony Notebook Setup in the
submenu. The Sony Notebook Setup dialog box appears.
3 Click the Device tab.
4 Click to deselect the Pointing Device check box.
5 Click OK.
To enable the touch pad
1 Press the Windows key . the Start menu appears.
2 Press the Up Arrow key to select Programs, and press Enter.
3 Press the Down Arrow key to select Sony Notebook Setup, and press
Enter. A submenu appears.
88
Page 89

Using the Touch Pad
4 Press the Down Arrow key to select Sony Notebook Setup again, and
press Enter.TheSony Notebook Setup dialog box appears.
5 Press the Right Arrow key to select the Device tab.
6 Press the Tab key three times to select the OK button at the bottom of the
dialog box.
7 Press the Right Arrow key to select the Default button.
8 When the Sony Notebook Setup dialog box appears, press the Left Arrow
keytoselectOK, and press Enter.
9 Press Enter again to close the Sony Notebook Setup dialog box.
To open the Mouse Properties dialog box
❑ Right-click the Touchpad icon on the Windows® taskbar, and click
Mouse Properties from the shortcut menu. The Mouse Properties dialog
box appears.
Frequently asked questions
Why doesn’t the touch pad work properly?
❑ You may have disabled the touch pad without connecting a mouse to the
computer. To enable the touch pad:
1 Press the Windows key , and then press P to open the Programs
menu.
2 Press Enter.
3 Press the Down Arrow keytoselectSony Notebook Setup,and
press Enter.
4 Select Sony Notebook Setup again, and press Enter.
5 Press the Right Arrow key to select the Device tab.
6 Press the Tab key to select the left panel, and then press the Down
Arrow key to select Pointing Device.
7 Press Alt+S simultaneously. The Mouse Properties dialog box appears.
89
Page 90

VAIO Computer Quick Start
8 Make sure the Buttons tab is selected, and press the Up Arrow key
and Down Arrow key to change the button assignments. Press the
Tab key to move between shortcut menus.
9 Press Enter to save your changes and close the dialog box.
❑ Restart the computer to activate the touch pad again.
❑ If your touch pad is interpreting a single tap as a double-click, adjust the
button assignments. Follow these steps:
1 Press the Windows and the E keys. The My Computer window
appears.
2 Click the Tools menu, and select Folder Options.TheFolder Options
dialog box appears with the General tab open.
3 In the Click items as follows box,clicktoselectSingle-click to open
an item (point to select).
4 Click Apply.
❑ If you are still experiencing problems, make sure another mouse was not
installed.
❑ You may need to use your Application Recovery CD(s) to reinstall the
mouse drivers. See “Using the Application Recovery CD(s)” for more
information.
Why doesn’t the pointer move when I use the touch pad or mouse?
❑ Restart your computer. Follow these steps:
1 Press the Windows key .
2 Press U.TheShut Down Windows dialog box appears.
3 Press R to restart the computer.
4 Press Enter.
❑ If the computer does not restart,
1 Press Ctrl+Alt+Delete simultaneously. The Windows Security dialog
box appears.
2 Press the Right Arrow keytoselectShut Down.
3 Press Enter.
90
Page 91

Using the Touch Pad
4 Press R to select restart.
❑ If you still cannot restart your computer, press and hold the power button for
more than four seconds to turn off the computer.
❑ If the pointer does not move while playing a disc, press Ctrl+Alt+Delete
simultaneously to stop playback and restart the computer.
❑ If you are still experiencing problems, make sure another mouse was not
installed.
❑ You may need to use your supplied Application Recovery CD(s) to reinstall
the touch pad or mouse drivers. See “Using the Application Recovery
CD(s)” for more information.
91
Page 92

VAIO Computer Quick Start
Using Jog Dial Control
Your computer is equipped with a Jog Dial™ Control, which enables you to open
a program, folder, or document from a predefined list by rotating and pressing the
Jog Dial control.
❑ Using VAIO Action Setup
❑ Locating the Jog Dial Control
❑ Using launcher mode
❑ Using guide mode
❑ Using the Jog Dial control with Sony programs
❑ Using the Jog Dial control with other programs
Using VAIO Action Setup
VAIO Action Setup manages the settings for your computer’s Jog Dial™ Control
interface and enables you to set a timer to launch a program or document. For
more information on customizing the Jog Dial control or setting the timer, rightclick the Jog Dial Control icon or in the taskbar and click Help Topics.
92
Page 93

Locating the Jog Dial Control
Jog Dial Control
Rotate
Press
Using Jog Dial Control
Jog Dial Control
Using launcher mode
The Jog Dial Control window is either in the launcher mode or in the guide
mode. The Jog Dial Control window is in launcher mode until a software
program is launched or the Jog Dial Control window becomes active. When an
arrow is displayed next to an item in the Jog Dial Control window, you can
display a submenu of that item by selecting it and pressing the Jog Dial control.
For more information, right-click the Jog Dial Control icon or , and click
Help Topics.
To open the Jog Dial Launcher
❑ Press the Jog Dial control.
❑ Double-click the Jog Dial Control icon on the taskbar.
93
Page 94

VAIO Computer Quick Start
❑ Press the Jog Dial control while pressing the Ctrl key to switch from guide
mode to launcher mode.
To use the Jog Dial control
1 RotatetheJogDialcontroltoselectanitem,andthenpresstheJogDial
control. When you select an item, the launcher mode changes to guide mode.
Jog Dial Launcher
2 Rotate or press the Jog Dial control to use the desired function.To select
another item, switch to launcher mode by pressing the Jog Dial control and
the Ctrl key.
Using guide mode
The Jog Dial Control window is either in the launcher mode or in the guide
mode. Launcher mode changes to guide mode when a program is active.
Depending on the program, you can select items from the Jog Dial Guide
window using the Jog Dial control. With some Sony programs, you can change
the Jog Dial window to List View, Simple Menu, and Full Menu. For more
information, right-click the Jog Dial Control icon or , and click Help
Top ic s.
94
Page 95

Using Jog Dial Control
Jog Dial Guide Dialog Box
Using the Jog Dial control with Sony programs
If Sony programs that support the Jog Dial™ Control are active, you can use the
Jog Dial’s functions that are allocated to that program. For more information,
click Start, Settings, Control Panel, Jog Dial, and click Help on the VAIO Action
Setup window.
Using the Jog Dial control with other programs
If the program you are using does not support the Jog Dial control, you can still
select menu items to perform the following functions:
❑ Maximize window
❑ Minimize window
❑ Close window
❑ Scroll window
❑ Scroll the File menu
* Some programs do not support these functions.
*
95
Page 96

VAIO Computer Quick Start
Using Memory Stick Media
This compact, portable, and versatile recording medium has a data capacity
exceeding that of a floppy disk. The medium is specially designed for
exchanging and sharing digital data with compatible products. Because it is
removable, the media can be used for external data storage.
❑ Selecting Memory Stick media
❑ Inserting Memory Stick media
❑ Viewing the contents
❑ Write-protecting Memory Stick media
❑ Formatting Memory Stick media
❑ Removing Memory Stick media
❑ Frequently asked questions
Selecting Memory Stick media
The following two types of Memory Stick media can be used with your
computer:
❑ MagicGate™ Memory Stick media (hereafter called MG Memory Stick
media), which is provided with copyright protection.
❑ Memory Stick media, which does not have the same copyright
protection as MagicGate Memory Stick media.
Some music files with secure copyright protection may be stored on MG
Memory Stick media but not on regular Memory Stick media.You can also use
MagicGate media-compatible devices to record and playback music when they
are connected to your computer.
You can store mixed data on the Memory Stick media. For example, you can
copy an ordinary file on a MG Memory Stick media that already contains music.
What is MagicGate Memory Stick media?
MagicGate Memory Stick media provides copyright protection that consists of
authentication and encryption technology. Authentication technology ensures
that protected content is only transferred between compliant devices and media.
Protected content is recorded and transferred in an encrypted format to prevent
unauthorized duplication or playback.
96
Page 97

Using Memory Stick Media
✍ MG Memory Stick media has the MG mark.
Inserting Memory Stick media
Before using Memory Stick media, back up important data. The media slot
accommodates only one Memory Stick media at a time.
To insert Memory Stick media
1 Insert the Memory Stick media with the arrow facing up and toward the
Memory Stick media slot.
✍ Inserting the media in the wrong direction may damage the connector pins.
2 Carefully slide the Memory Stick media into the slot until it clicks in place.
The Memory Stick media indicator blinks.
Inserting Memory Stick Media
Memory Stick media
Insert Memory Stick media
with the arrow facing towar d
the Memory Stick media slot.
97
Page 98

VAIO Computer Quick Start
LOCK
LOCK LOCK
Viewing the contents
Depending on the model you purchased, the Sony Memory Stick window
appears automatically when you insert a Memory Stick media. From this
window, you can choose to view, print, copy or organize your Memory Stick
images or data. If the Sony Memory Stick window does not appear when you
insert your Memory Stick media, then follow these steps.
To view the contents
1 Click the My Computer icon on the desktop. The My Computer window
appears.
2 Double-click Removable Disk.TheRemovable Disk window appears,
displaying the contents stored on the Memory Stick media.
Write-protecting Memory Stick media
Memory Stick® media is designed with a write-protect tab to protect data from
accidental erasure or overwriting. Move the tab to the right or left to set or release
write-protection. When the write-protect tab of the Memory Stick media is set to
LOCK,datacannotberecordedorerased.
Write-protect off Data can be saved on the Memory Stick media.
Write-protect on Data can be read from but not saved on the Memory Stick
media.
Using the Write-Protect Tab
Write-protect
off
(Back of Memory Stick Media)
Write-protect
on
98
Page 99

Using Memory Stick Media
Formatting Memory Stick media
Memory Stick® media is formatted for immediate use when you purchase it. If
you need to reformat Memory Stick media, use the Memory Stick Formatter that
is provided with the media. For more information about using Memory Stick
Formatter, refer to Formatter Help.
Formatting Memory Stick media erases all data, including music data,
previously saved to it. Before you reformat Memory Stick media, confirm that
the media does not contain files you want to keep. Back up important data
before formatting the media.
To format Memory Stick media
1 Insert the Memory Stick media into the Memory Stick media slot. See
“Inserting Memory Stick media” for more information.
2 From the Start menu, point to Programs, Memory Stick Utility,andthen
click Memory Stick Formatter.TheMemory Stick Formatter dialog box
appears.
3 ClicktoselecttheMemory Stick media drive, if it is not already selected.
4 Click Start Format.
Removing Memory Stick media
If the media is removed prematurely, a blue screen with an error message appears
prompting you to continue or exit. Reinsert the media into the slot and press
Enter to continue. This enables the media to finish reading or writing data.
To remove Memory Stick media
1 Wait a minimum of 10 seconds after the Memory Stick media finishes
reading or writing data before removing the media.
2 Make sure the access light is off.
3 Push the Memory Stick media in toward the computer.
4 When the Memory Stick media ejects, pull it out.
99
Page 100

VAIO Computer Quick Start
✍ Be careful when removing the Memory Stick media, as it may eject completely from
the slot.
Frequently asked questions
Why can’t I open my image files?
You may need to reformat your Memory Stick media.
Formatting Memory Stick media erases all data, including music data,
previously saved to it. Before you reformat Memory Stick media, confirm that
the media does not contain files you want to keep and back up important
data.
1 Copy the data from the Memory Stick media onto your computer’s hard disk
to save data or images.
2 Format the Memory Stick media using Memory Stick Formatter software
preinstalled on your computer. For instructions about formatting a Memory
Stick media, see “Formatting Memory Stick media.”
Why can’t I save music files onto my Memory Stick media?
❑ Only MagicGate Memory Stick media can be used with copyright protected
data, such as music.
❑ Copyright protected music cannot be checked out to any Memory Stick
media other than MG Memory Stick media.
❑ Using recorded music requires permission of the copyright holders.
❑ Sony is not responsible for music files that cannot be recorded from a CD or
downloaded from other sources.
Can I copy images from a digital video camera using Memory Stick media?
Yes, and you can view video clips that you have recorded with Memory Stick
media-compatible video camera recorders.
How do I prevent damage to the Memory Stick media?
❑ Do not use the media in locations that are subject to static electricity or
electrical noise.
100
 Loading...