

Sony PCG-GRX510K, PCG-GRX550K, PCG-GRX570K, PCG-GRX590K User Guide

Contents
Welcome.....................................................11
Using Your VAIO Notebook......................13
Using the Keyboard...................................................14
Combinations and functions with the Windows key .........16
Indicators ...........................................................................17
Indicator lights...................................................................18
Combinations and functions with the Fn key ....................19
Using the Touchpad ..................................................21
VAIO Action Setup...................................................23
Using the Center Jog Dial Control ............................24
To use the center Jog Dial control .....................................24
To use the launcher mode..................................................25
To use the guide mode .......................................................26
To use the center Jog Dial back button ..............................26
To use the center Jog Dial control with software ..............27
Using the Optical Disc Drive ....................................28
To insert a disc...................................................................28
To eject a disc ....................................................................29
To play a DVD...................................................................30
To play an audio CD ..........................................................31
Notes on CD and DVD discs .............................................32
To write data to a CD-RW or CD-R disc...........................32
Notes on writing data to a CD-RW or CD-R disc .............32
1

Change text in this variable definition to document title.
Using PC Cards.........................................................34
To insert a PC Card ........................................................... 34
To remove a PC Card while the computer is on ............... 35
Notes on using PC Cards .................................................. 35
Using a Second Battery Pack....................................36
To insert a second battery pack......................................... 36
To charge the second battery pack.................................... 37
To remove the second battery pack................................... 38
Using the Weight Saver ............................................39
To attach the weight saver ................................................ 39
To remove the weight saver.............................................. 40
Using Memory Stick Media ....................................41
Types of Memory Stick media.......................................... 41
To insert Memory Stick media ........................................ 41
To view the contents of Memory Stick media .................. 42
To remove Memory Stick media ..................................... 42
To write-protect Memory Stick media.............................. 43
To format Memory Stick media........................................ 43
Notes on Memory Stick media.......................................... 44
Using Power Saving Modes......................................46
To use Normal mode......................................................... 46
To use Standby mode........................................................ 46
To use Hibernate mode ..................................................... 46
Connecting a Phone Line .........................................48
Connecting to a Local Area Network .......................49
To connect to the network................................................. 49
To set the connections, bindings, and provider order ....... 50
2

Connecting to a Wireless LAN .................................51
The Wireless LAN Access Point .......................................51
Communicating with an Access Point (infrastructure)......52
Checking your connection status .......................................53
Communicating without an Access Point (peer-to-peer)...54
Turning Off Wireless LAN ................................................55
Notes on using Wireless LAN ...........................................55
Connecting Peripheral Devices ...............57
Connecting an External Floppy Disk Drive ..............58
To connect an external floppy disk drive...........................58
To insert a floppy disk into the external floppy disk drive59
To remove a floppy disk from the external floppy disk drive
59
To disconnect an external floppy disk drive when the note-
book is on...........................................................................60
To carry an external floppy disk drive...............................60
Notes on handling floppy disks .........................................60
Connecting a Port Replicator ....................................61
To attach the notebook to the port replicator .....................61
To remove the notebook from the port replicator..............63
Connecting a PS/2 External Mouse or Keyboard......65
To connect an external mouse or keyboard .......................65
Connecting an Audio Device ....................................67
To connect a CD player, active speaker, or an amplifier...67
Connecting an Audio-Video Device .........................69
To change the display ........................................................72
Connecting a Parallel Port Printer.............................73
To connect a printer to the notebook .................................73
Connecting a USB Printer.........................................74
To connect a USB printer to the notebook ........................74
3

Change text in this variable definition to document title.
Connecting an External Display ...............................75
To connect a computer display to the notebook ............... 75
To connect a multimedia computer display to the notebook
76
To connect a projector to the notebook............................. 77
To change the display when connecting an external comput-
er display or projector ....................................................... 78
Connecting a Universal Serial Bus Device...............80
To connect a USB device to the notebook ........................ 80
Connecting an i.LINK Device ..................................81
To connect a digital video camera recorder ...................... 81
Notes on connecting an i.LINK device ............................. 82
Connecting with another VAIO computer................83
Connecting External Speakers..................................84
To connect external speakers............................................ 84
Connecting an External Microphone ........................85
To connect an external microphone .................................. 85
Expanding Your Notebook Capabilities ................... 86
Personal Digital Assistant ................................................. 86
Wireless LAN Access Point.............................................. 86
Wireless LAN PC Card..................................................... 87
Customizing Your VAIO Notebook..........89
Displaying the Sony Notebook Setup Screen........... 90
To display the Sony Notebook Setup screen: ................... 90
Sony Notebook Setup tabs ................................................ 91
4

Controlling Power Management ...............................92
Viewing the Power Management status icons ...................92
Power Management profiles ..............................................93
Power Management commands .........................................96
Conserving battery power..................................................96
Optimizing clock speed settings ........................................96
Displaying Battery Information ................................98
Battery icon descriptions ...................................................99
Displaying detailed battery information ..........................100
Selecting the Display Mode ....................................101
Changing the window design of Sony software ..............103
Display Properties Notes.........................................104
Adding Memory .......................................105
Precautions and Procedures.....................................106
Typical expansion memory configuration...............107
Models with 256 MB Memory ........................................107
Removing a memory module ..................................108
Installing a memory module....................................110
Viewing the amount of memory..............................111
About the Software on Your Notebook .113
Software Overview..................................................114
Application, Driver, and System Recovery CDs.....121
Using Your Recovery CDs......................................122
To use the Application Recovery CD(s) ..........................122
To use the Driver Recovery CD(s) ..................................123
To use the System Recovery CD(s).................................125
To recover Microsoft Word .............................................127
5

Change text in this variable definition to document title.
VAIO AV Applications.............................129
Overview of Preinstalled Software .........................129
DigitalPrint Software ..............................................133
Using PhotoCapture ........................................................ 133
Using PhotoCollection .................................................... 136
Using PhotoDecor........................................................... 138
Using PhotoAlbum.......................................................... 139
Using LabelMaker........................................................... 141
DVgate Software.....................................................143
MovieShaker Software ...........................................145
Creating movies with MovieShaker software ................. 146
Using ImageStation online service with MovieShaker soft-
ware ................................................................................. 150
PictureGear Software..............................................153
Managing your pictures .................................................. 153
Creating a photo album ................................................... 154
Smart Capture .........................................................157
Using Still Mode ............................................................. 158
Using Net Movie Mode................................................... 161
Using ImageStation with Smart Capture software.......... 164
SonicStage Software...............................................167
Electronic Music Distribution (EMD) Services.............. 167
Starting SonicStage......................................................... 167
Recording from a CD ...................................................... 169
Transferring songs (Check-In/Check-Out) ..................... 170
Additional features.......................................................... 172
6

SonicStage Premium Software................................175
Overview of SonicStage Premium Software ...................175
To Use SonicStage Premium Software............................178
To Use Playback and Recording Features .......................183
To Use the Visualizer, Equalizer, and Sound Effects......189
To Use the FM Tuner.......................................................191
To Use the Timer Functions ............................................193
Additional Information ....................................................195
VisualFlow Software...............................................197
Using VisualFlow software .............................................197
Additional Software Information............199
VAIO Edit Components Software ...................................199
Troubleshooting......................................201
Troubleshooting Your Notebook ............................202
My notebook does not start..............................................202
My notebook starts but a BIOS error appears..................202
My notebook starts, but the message “Operating system not
found” appears and Windows does not start....................203
My notebook stops responding or does not shut down....204
The power management setting is not responding...........204
The sound of my notebook’s fan is too loud. ..................205
Why does the System Properties dialog box display a slower
CPU speed than advertised? ............................................205
Troubleshooting the LCD Screen............................206
My LCD screen is blank. .................................................206
My LCD screen continues to show the previous screen. .206
The image on my connected external display is not centered
7

Change text in this variable definition to document title.
or sized properly.............................................................. 206
I want to change the video resolution of my display. ..... 206
I cannot switch the LCD display to TV, and vice versa. 206
I changed the display screen settings to 1600 x 1200 pixels,
but now the fonts are too small. How do I increase the dis-
play font size? ................................................................. 207
Troubleshooting the Mouse and Touchpad ............ 208
My mouse does not work. ............................................... 208
My touchpad does not work properly. ............................ 208
The pointer does not move while using the Touchpad or
Mouse. ............................................................................. 209
Troubleshooting Drives, PC Cards, and Peripheral De-
vices ........................................................................210
I cannot establish a connection between two VAIO comput-
ers when using an i.LINK cable. ..................................... 210
My floppy disk drive (optional) cannot write to a floppy disk.
210
My optical disc drive is not playing my CD or DVD proper-
ly...................................................................................... 210
My optical drive tray does not open................................ 211
I cannot use Digital Video (DV) devices. The message “DV
equipment seems to be disconnected or turned off” appears.
211
My PC Card is not working. ........................................... 212
Troubleshooting Software....................................... 213
My software program stops responding or crashes......... 213
When I click an application icon, the message “You must insert the application CD into your optical drive” appears and
the software does not start............................................... 213
What software do I use for CD-R/CD-RW software func-
tions? ............................................................................... 213
Why is my computer operating improperly after download-
8

ing the CD-burning feature of RealJukebox software?....213
I cannot use the DVgate™ software. ...............................213
Troubleshooting the Modem ...................................215
My modem does not work. ..............................................215
My modem connection is slow. .......................................215
Troubleshooting Audio ...........................................216
My speakers make no sound. ...........................................216
My microphone does not work. .......................................217
Troubleshooting the Printer.....................................218
I cannot print....................................................................218
Troubleshooting Wireless LAN ..............................219
The computer cannot connect to a Wireless LAN Access
Point. ................................................................................219
I cannot access the Internet. .............................................219
The data transfer speed is slow. .......................................220
The communication speed is interrupted or slowed down
when MPEG2 data is transferred.....................................220
Data transfers are interrupted...........................................220
Getting Help .............................................221
Support Options.......................................................222
Software Support Information.................................224
Sony Service Center.........................................................226
9

Change text in this variable definition to document title.
10

Welcome
Congratulations on your purchase of this Sony VAIO® computer, and
welcome to the VAIO User Guide.
This User Guide provides detailed information on all aspects of using
your new VAIO computer, from keyboard functions to preinstalled
software applications.
In the left navigation window, click the topics you want to learn more
about, and that information will be displayed in this main window.
11

Change text in this variable definition to document title.
12

Using Your VAIO Notebook
This section provides you with some essential information on the
following topics.
❑ Using the Keyboard
❑ Using the Touchpad
❑ VAIO Action Setup
❑ Using the Center Jog Dial Control
❑ Using the Optical Disc Drive
❑ Using PC Cards
❑ UsingaSecondBatteryPack
❑ Using the Weight Saver
❑ UsingMemoryStickMedia
❑ Using Power Saving Modes
❑ Connecting a Phone Line
❑ ConnectingtoaLocalAreaNetwork
❑ ConnectingtoaWirelessLAN
13
Change text in this variable definition to document title.
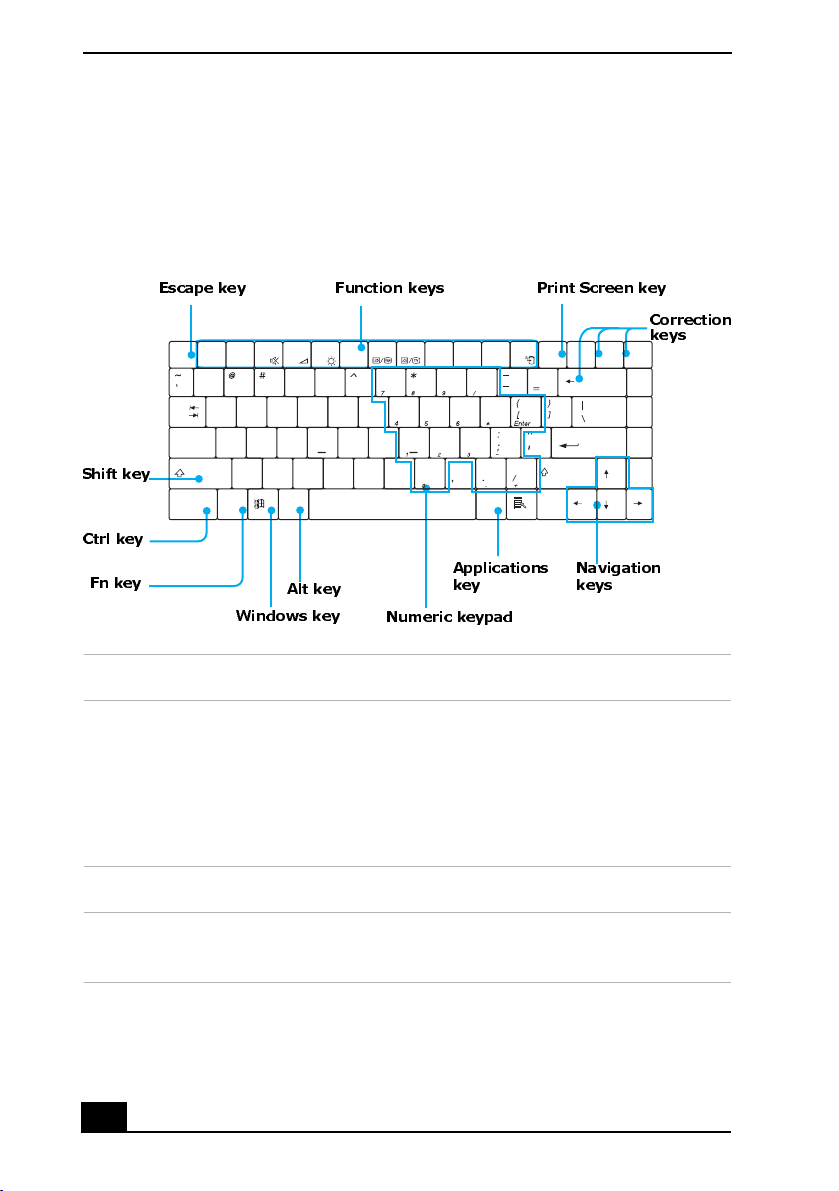
Using the Keyboard
Your notebook keyboard is very similar to that of a typewriter, but the keyboard
has additional keys that perform specific computer-related tasks.
Keyboard
Function keys
$% & ( )
U
Y
T
R
G
F
D
B
V
C
I
O
J
H
K
L
<
M
N
Print Screen key
+
P
>
?
NumLk
Scr Lk
Correction
Insert
Pause
Delete
Break
Home
Page
Up
Page
Down
End
keys
Prt Sc
SysRq
Backspace
Enter
Shift
hift key
Escape key
Esc
F1 F2 F3 F4 F5 F6 F7 F8 F9 F10 F11 F12
!
2134567890
E
W
Q
Tab
S
A
Caps Lock
X
Z
Shift
Fn Alt Alt
Ctrl Ctrl
Ctrl key
Fn key
Alt key
Windows key
Applications
key keys
Numeric keypad
Navigation
Key Description
Numeric keypad Contains the keys found on a typical calculator. Use the
numeric keypad area to type numbers or to perform
mathematical calculations such as addition and subtraction.
Note that you must press the Num Lock key to activate the
numeric keypad. (When you do so, the Num Lock light will
be on.)
Navigation keys Several keys are devoted to moving the cursor on the screen.
Correction keys The Insert, Back Space, and Delete keys enable you to make
corrections in your documents.
14
Using the Keyboard
Key Description
Function keys The twelve function keys along the top of the keyboard are
used to perform designated tasks. For example, in many
applications, F1 is the Help key. The task associated with
each function key may vary from one application to the next.
Escape key The Esc (Escape) key is used to cancel commands.
Print Screen key The Print Screen key takes an electronic snapshot of the
screen and places it in the Windows Clipboard. You can then
paste the screen shot into a document and print it.
Operator keys
(Shift, Ctrl, Alt
keys)
Several keys are always used with at least one other key: Ctrl,
Alt,andShift.Whenhelddownwithanotherkey,theCtrl
(Control) and Alt (Alternate) keys offer another way to give
commands. For example, in many applications, instead of
choosing the Save command from a menu, you can hold
down Ctrl and press S (referred to as Ctrl+S). The Shift key
operates the same way as on a typewriter; it is used to
produce capital letters or special symbols such as @ and $.
Windows key The key with the Windows logo displays the Windows Start
menu; it is the equivalent of clicking the Start button on the
taskbar. See “Combinations and functions with the Windows
key” for more information.
Fn key The Fn key is used in combination with other keys to issue
commands. See “Combinations and functions with the Fn
key” for more information.
Applications key The Applications key displays a shortcut menu of context-
sensitive choices. Pressing this key is the equivalent of
clicking the right mouse button.
15

Change text in this variable definition to document title.
Combinations and functions with the Windows key
Combination Function
+ F1 Displays Windows Help.
+ Tab Switches the selected button on the taskbar.
+ D Displays the desktop.
+ E Displays Windows Explorer.
+ F Displays the Windows Find: All Files window to find a file or
folder. This is the equivalent of selecting Find and then Files
or Folders from the Start menu.
+ Ctrl + F Displays the Windows Find: Computer window where you
can locate other computers. This is the equivalent of selecting
Find and then Computer from the Start menu.
+ M Minimizes all displayed windows.
Shift + + M Returns all minimized windows to their previous size.
+ R Displays the Run window. This is the equivalent of selecting
Run from the Start menu.
Fn + + Insert Displays the Properties window. This is the equivalent of
double-clicking the System icon in the Control Panel.
16
Using the Keyboard
Indicators
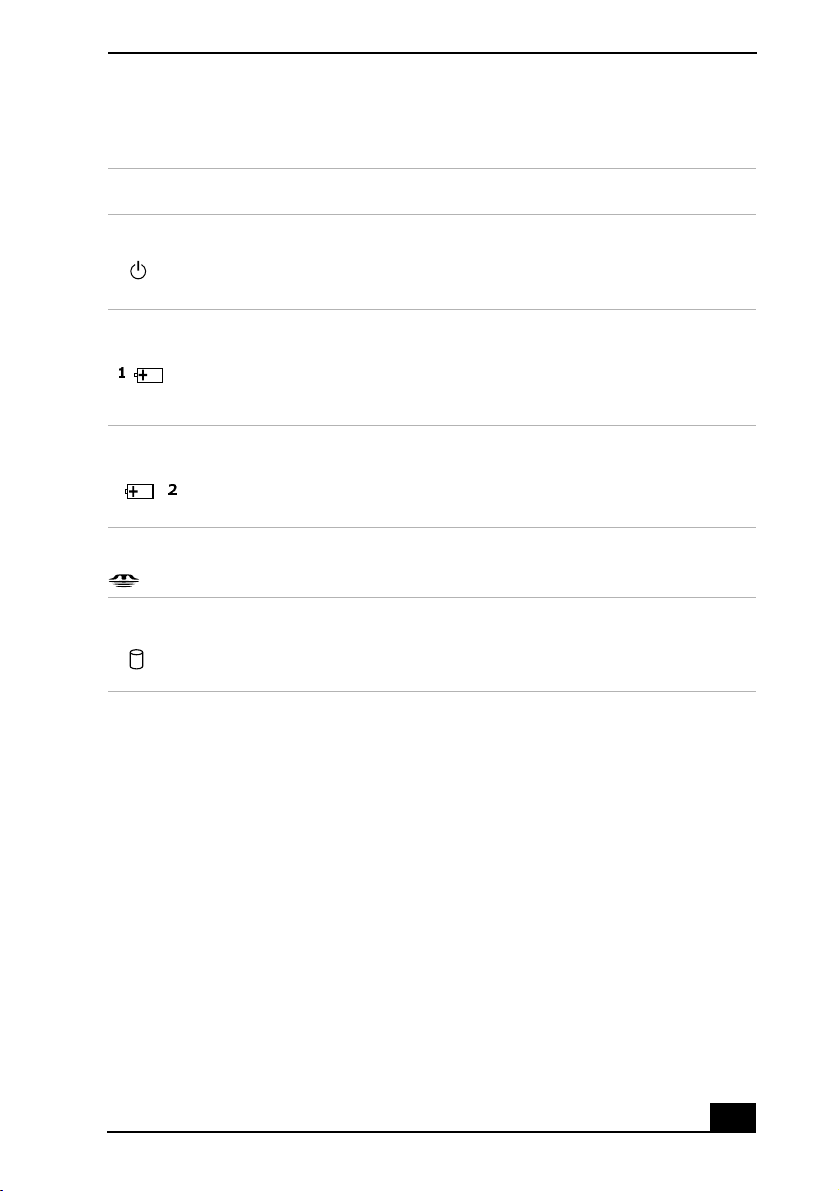
Indicator Function
Power Light is green when the power to the notebook is turned on,
flashes amber in Standby mode, and turns off when the
notebook is in Hibernate mode or powered off.
Battery 1 Indicates the status of the battery inserted in the battery bay
1
Battery 2 Indicates the status of the battery inserted in the multipurpose
2
Memory Stick Indicates that the Memory Stick® slot is in use.
Hard disk This indicator will light when data is being read from or
on the right side of the notebook.
drive bay on the left side of the notebook.
written to the hard disk. Do not enter Standby mode or turn
off the notebook when this indicator is on.
17

Change text in this variable definition to document title.
Indicator lights
Light On Off
Num
Lock
Caps
Lock
Scroll
Lock
The number keys in the numeric
keypad are active.
The letters appear in uppercase as you
type. The Shift key lowers the case of
typed letters when Caps Lock is on.
The screen scrolls differently
depending on the specific application.
Many applications do not affect
scrolling.
The alphanumeric character keys
in the keypad area are active.
Letters appear in lower case as
you type, unless you hold down
the Shift key.
Information moves across the
display normally.
18
Combinations and functions with the Fn key
Combinations/
Feature Function
Using the Keyboard
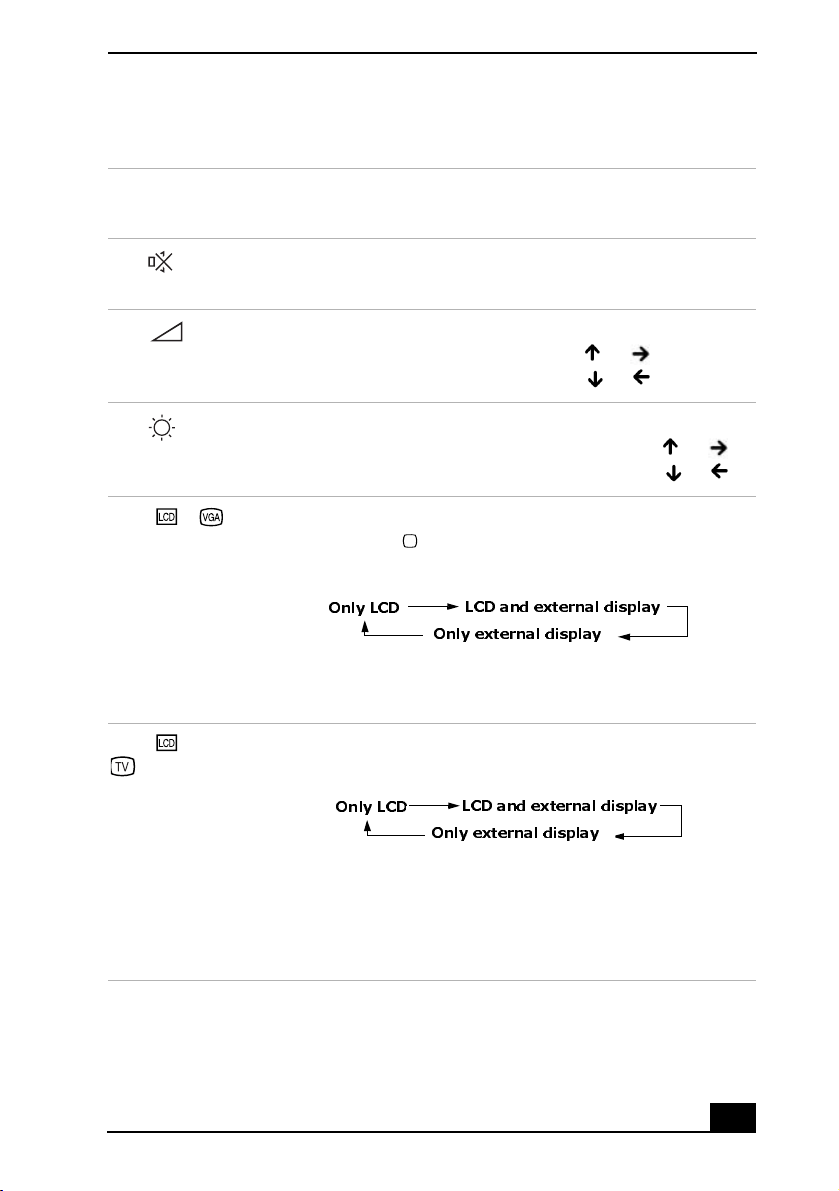
Fn+ (F3)
Mute On/Off
Fn+ (F4)
Speaker volume
Fn+ (F5)
Brightness control
Fn+ /
(F7)
Switch to the
external
monitor/LCD
Fn+ only/
(F8)
Control AV out
Toggles the built-in speaker off and on.
Adjusts the built-in speaker volume.
To increase volume, press Fn+F4, then or .
To decrease volume, press Fn+F4, then or .
Adjusts the brightness of the LCD.
To increase light intensity, press Fn+F5 and then or .
To decrease light intensity, press Fn+F5 and then or .
Toggles between the LCD, external display (when the unit is
connected to the VGA (Monitor) port), and both LCD and
external display.
Only LCD
LCD and external display
Only external display
Connect the external display cable before you turn on the
computer, otherwise the Fn+F7 combination will not work.
Toggles between LCD-only, external-only, and dual LCD/TV
display modes.
Only LCD
LCD and external display
Only external display
Connect the external display cable before you turn on the
computer, otherwise the Fn+F8 key combination will not
work. You cannot use the Fn + F8 function to switch between
LCD and TV once a DVD is inserted into the optical drive.
19

Change text in this variable definition to document title.
Combinations/
Feature Function
Fn+ (F12)
Hibernate
Fn+Esc
Standby
Fn+E Ejects CD.
Fn+F Display control. Minimizes and maximizes the LCD screen.
Puts the system into Hibernate mode, a power saving mode.
When you run this command, the state of the system and state
of the peripheral devices are written to the hard disk and the
system power is turned off. To return the system to its
original state, use the power button.
Puts the system into Standby mode, a power saving mode. To
return the system to the active state, press any key or press
the power button.
If the default display resolution is reduced, this function
maximizes the display resolution to fit the screen size.
Maximizing the display screen enables you to view the
display at a greater resolution.
✍ Some functions are not available until the Windows® operating system launches.
20
Using the Touchpad
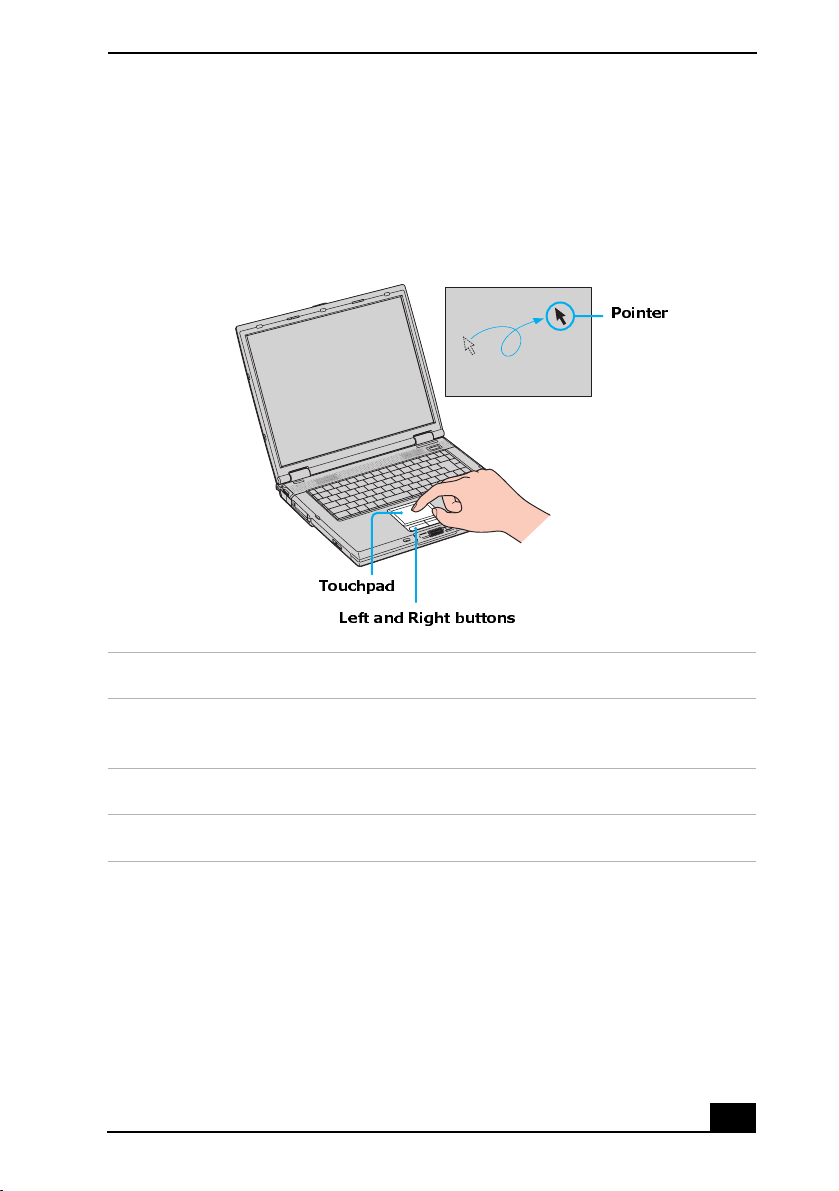
Using the Touchpad
The keyboard contains a touchpad that works like a mouse. You can use the
touchpad to point to, select, drag, and scroll objects on the screen.
Touchpad
Pointer
Touchpad
Left and Right buttons
Action Description
Point Slide one finger on the touchpad to place the pointer on an
item or object.
Click Press the left button once.
Double-click Press the left button twice.
21

Change text in this variable definition to document title.
Action Description
Right-click Press the right button once. In many applications, this action
displays a shortcut menu of context-sensitive choices.
Drag Slide one finger while pressing the left button.
Scroll Move your finger along the right edge of the touchpad to
scroll vertically. Move your finger along the bottom to scroll
horizontally. (The scroll function is available only with
applications that support a touchpad scroll feature.)
✍ See Mouse Properties for information on touchpad features, such as clicking both
buttons simultaneously, adjusting touchpad speed, and Easy Launcher functions. To
access Mouse Properties, click Start on the Windows taskbar, and point to Settings,
and Control Panel. Click the Mouse icon in the Control Panel.
22

VAIO Action Setup
VAIO Action Setup
VAIO Action Setup manages the settings for your notebook’s center Jog Dial™
control interface. An overview of some of the functions controlled by VAIO
Action Setup is provided in this section. For more information on changing the
settings using VAIO Action Setup, right-click the Jog Dial Utility icon or
in the taskbar and click Help Topics.
23
Change text in this variable definition to document title.
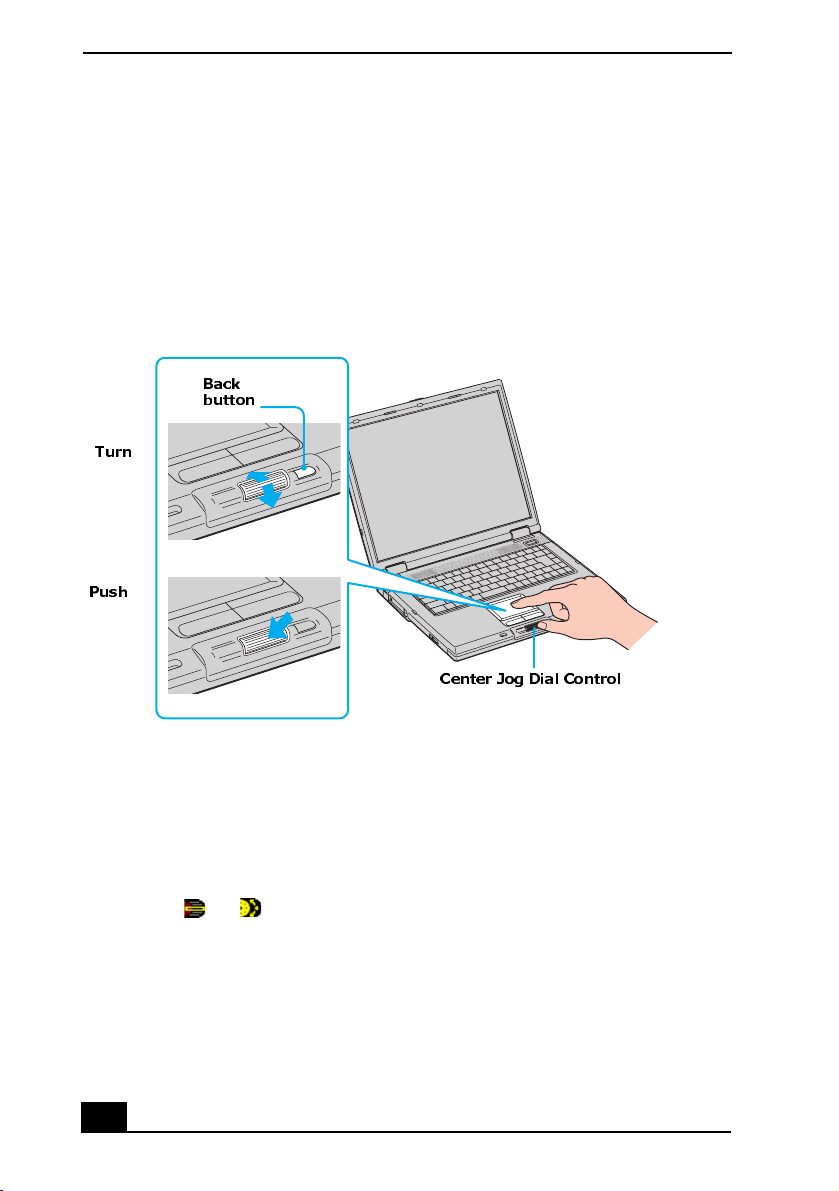
Using the Center Jog Dial Control
Your notebook is equipped with a center Jog Dial control located below the left
and right buttons. The center Jog Dial control enables you to open an application,
folder, or document from a predefined list by rotating and pressing the center Jog
Dial control. In addition, when you push the center Jog Dial control, you can turn
on your notebook automatically and start the selected application or document.
Center Jog Dial Control
Back
button
Turn
Push
Center Jog Dial Control
The center Jog Dial control window always appears in the display. It is either in
the launcher mode or in the guide mode.
To use the center Jog Dial control
This section explains how to use the center Jog Dial control. For information on
how to change the settings of the center Jog Dial control, right-click the Jog Dial
Utility icon or in the task tray and click Help Topics.
24
Using the Center Jog Dial Control
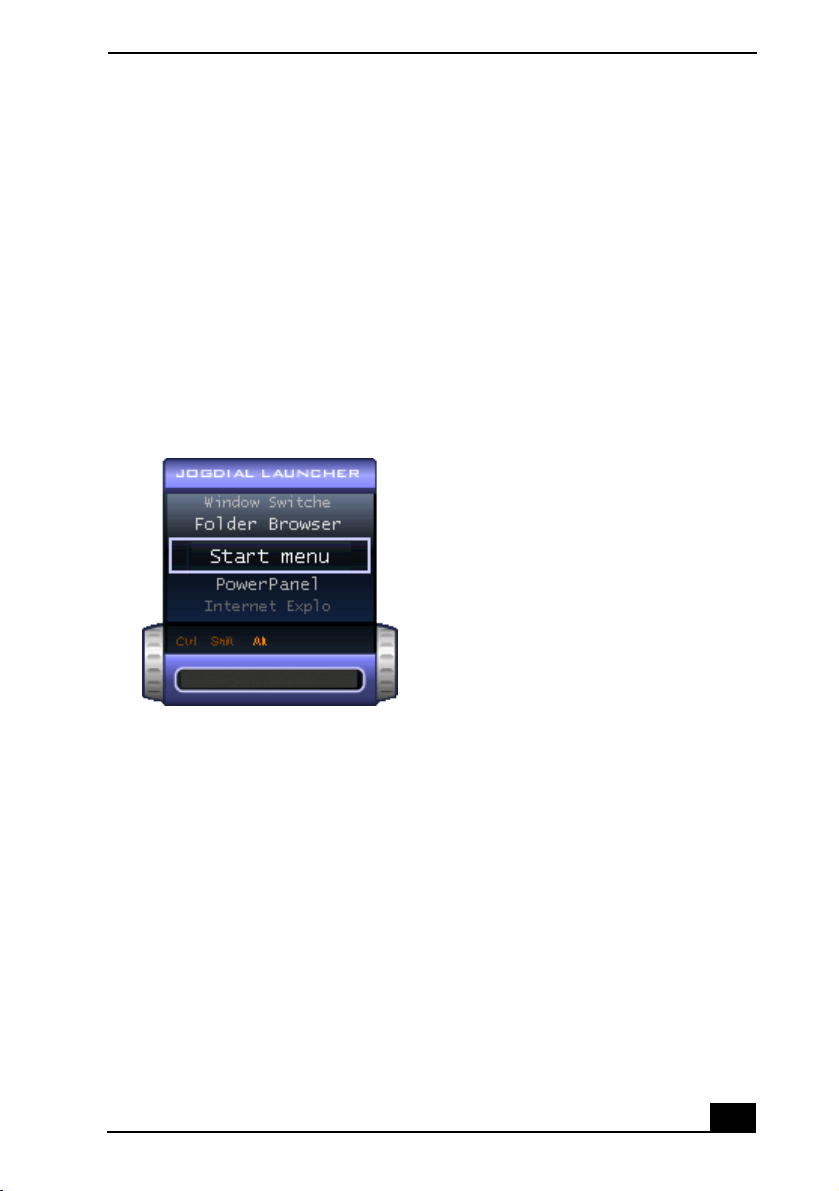
To use the launcher mode
The center Jog Dial control window is in launcher mode until a software
application is launched or the Jog Dial control window becomes active. When
you select an item in the Jog Dial control window and it is displayed between
orange bars, you can push the center Jog Dial control to view a submenu of that
item.
To use the center Jog Dial control, click the Jog Dial control window or the Jog
Dial Utility icon in the taskbar. Alternatively, you can press the Ctrl key and the
center Jog Dial control while the Jog Dial control window is active to switch to
launcher mode.
Jog Dial Launcher Mode
To select a desired item, proceed as follows:
25
Change text in this variable definition to document title.
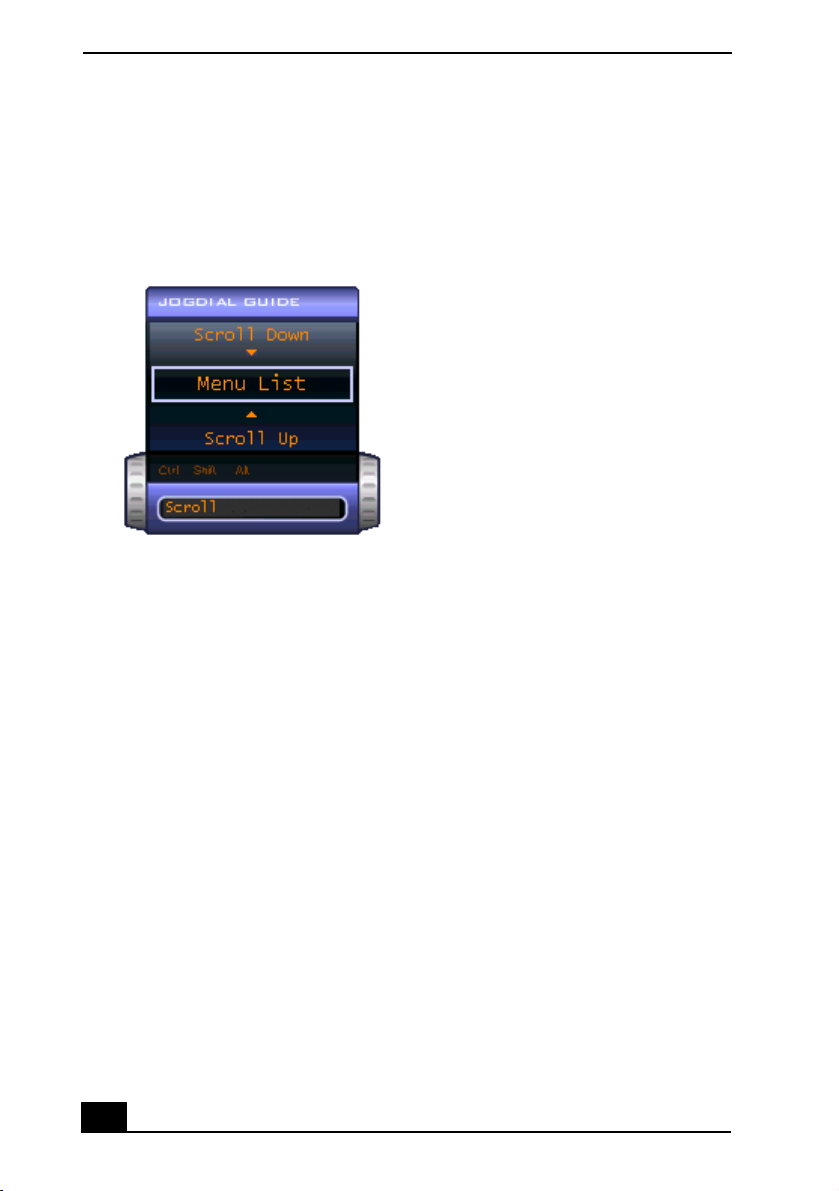
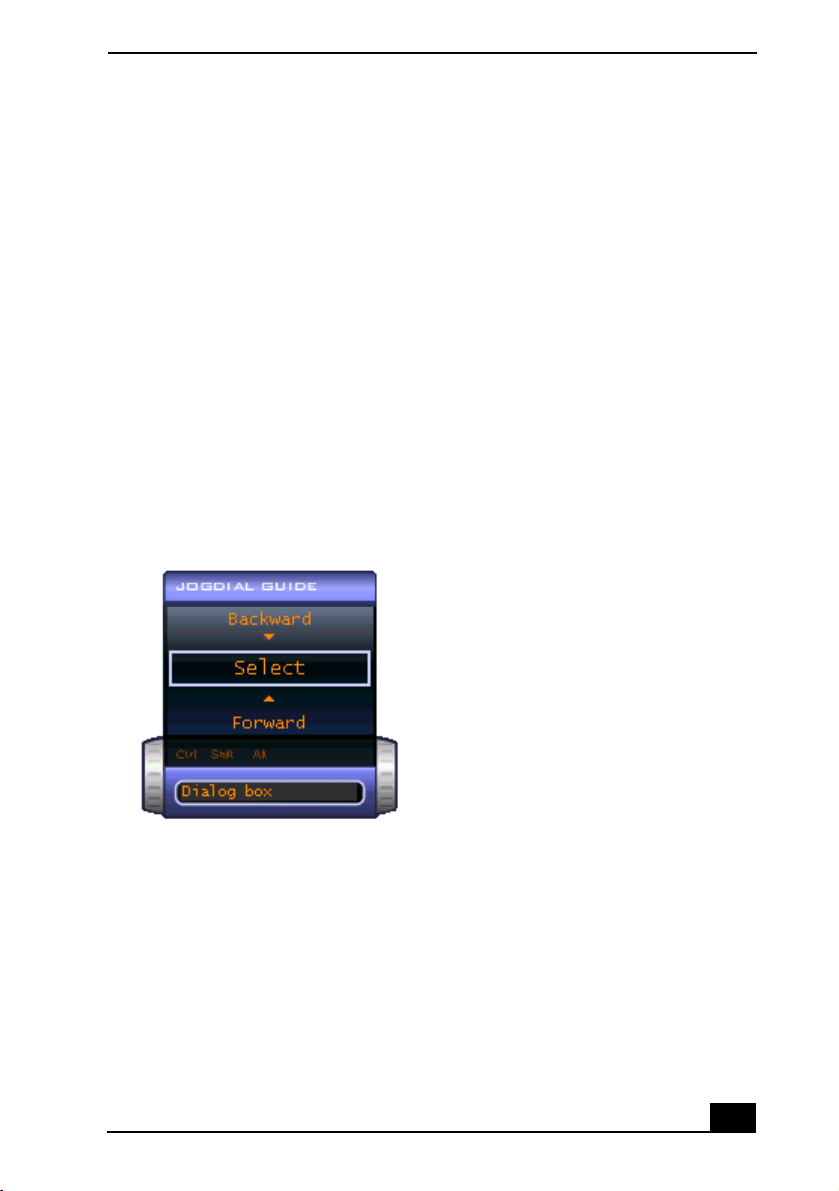
1 Rotate the center Jog Dial control to select the item you want, then press the
center Jog Dial control. The Jog Dial Launcher window switches to guide
mode and shows the function of the center Jog Dial control.
Jog Dial Guide Mode
2 Rotate or push the center Jog Dial control to use the desired function.
3 To select another item, repeat steps 1 through 3 again.
To use the guide mode
The Jog Dial control window is in the guide mode when software is in use and
the software window is active. Depending on the software you are using, you can
select items from the displayed list using the center Jog Dial control. You can
switch between guide mode and launcher mode by pushing the Ctrl key and the
center Jog Dial control. The Jog Dial control window displays the function of the
center Jog Dial control.
To use the center Jog Dial back button
The center Jog Dial control includes a back button located to the right of the
control. Pushing this button brings you back to the previous screen.
26
Using the Center Jog Dial Control
To use the center Jog Dial control with software
If Sony software that supports the center Jog Dial control is active, you can use
the functions of the center Jog Dial control that are allocated to that software. For
more information on functions allocated to the software, see the online help file
supplied with the software application.
If the software you are using is not Sony software and it supports the center Jog
Dial control, you can still use the center Jog Dial control to scroll the window or
adjust the window size.
Using the Dialog box
When a window such as Screen Properties is active, the Dialog box is displayed
in the Jog Dial window. You can select an item in the window by rotating the
center Jog Dial control. Pushing the center Jog Dial control is equivalent to
pushing the Enter or Select key.
Jog Dial Guide Dialog Box
27
Change text in this variable definition to document title.
Using the Optical Disc Drive
Your notebook comes with a removable optical disc drive located in the
multipurpose bay. Depending on the system you purchased, your optical disc
drive is either a CD-RW/DVD Combo Drive or a DVD-ROM drive.
The optical disc drive is removable when the power is on, but do not remove
the drive when your notebook is in a power saving mode. Any attempt to do
so may result in malfunction and/or data loss.
To insert a disc
1 Turn on the notebook.
✍ When the notebook is in Standby or Hibernate mode, you cannot insert a disc. See
“Controlling Power Management” for more information on Standby and Hibernate
modes.
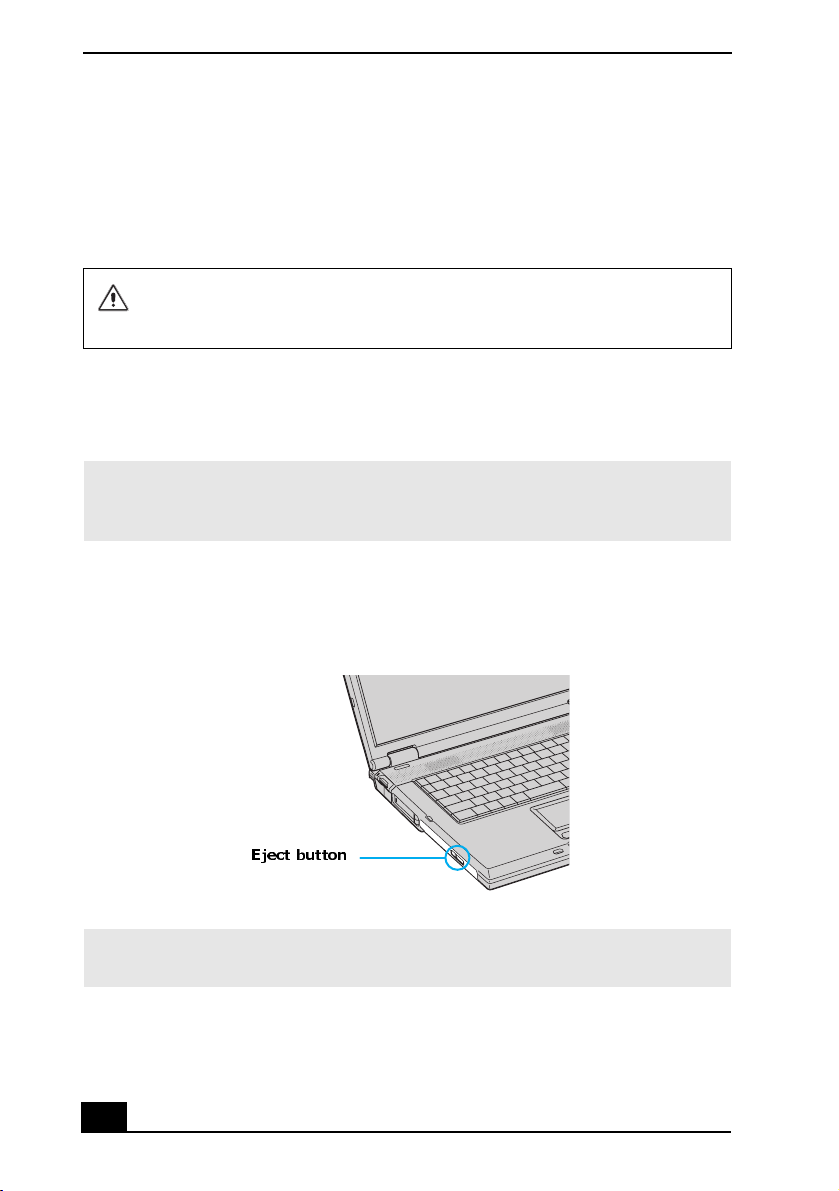
2 Press the Eject button to open the optical drive. The tray slides out.
Ejecting the Tray
Eject button
✍ Avoid using adhesive labels to identify your discs. Adhesive labels may come off while
the disc is in use in your optical drive, and may cause damage to the unit.
3 Place an optical disc on the tray with the label side facing up. For DVDs that
can played on both sides, the side of the disc facing up is the side that plays.
28

Using the Optical Disc Drive
4 Push the disc onto the hub until the disc clicks securely into place.
Inserting an Optical Disc
Label side facing up
5 Close the tray by pushing it gently into the slot.
To eject a disc
When you finish using a disc, wait until the LED indicator turns off, and push the
Eject button to remove the disc.
When the notebook is in a power saving mode, you cannot remove an optical
disc. See “Controlling Power Management” for more information about power
saving modes.
29
Change text in this variable definition to document title.
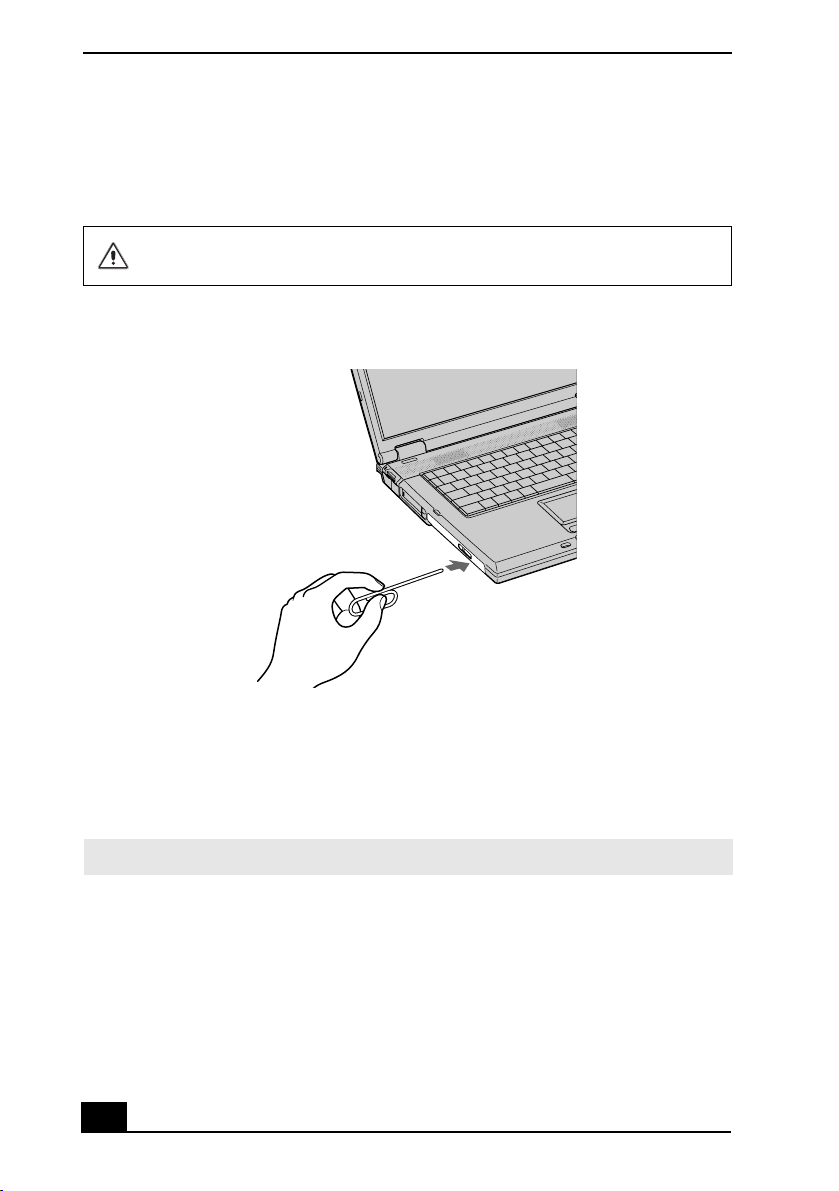
If the optical disc does not slide out when you push the Eject button, turn off the
notebook and insert a thin, straight object (such as a paper clip) into the manualeject hole.
Seat the disc firmly on the hub fingers. If the disc is not seated firmly, it
could damage the optical drive and you may be unable to open the tray.
Manual Eject Hole
To play a DV D
To play a DVD, you may use the optical disc drive and the preinstalled
WinDVD® software. For more information on WinDVD, see the help manual
that came with your software.
✍ Before you use the optical disc drive to play a DVD, close any open applications.
Systems equipped with a CD-RW/DVD Combo Drive can read DVD-R media,
but systems equipped with a DVD-ROM drive cannot read DVD-R media. When
you are ready to play a DVD, read the following suggestions on how to maximize
your video viewing experience.
30
 Loading...