

Page 1

Sony notebook user guide
PCG-GRX516SP
N
Page 2

Read this first
Sony Notebook User Guide
nN
1
Read this first
Notice
© 2002 Sony Corporation. All rights reserv ed.
This manual and the softw a r e des c ribed he r ei n, in whole or in part , ma y not be repr oduc ed, tran slat e d, or reduc ed t o a ny machine-
readable form without prior writt e n appr ova l .
Sony Corp or ation provides no warr a nt y wi t h rega rd to this manual, the software, or oth er i nf or mati on c ont ained herein and hereby
expressly disclaims any implied warranties or merchantability or fitness for any particular purpose with regard to this ma nual, the
soft ware or such other in fo rmat ion. In no e vent shall Sony Corpor at ion be liabl e f or a ny inci dent al, consequenti al, or s pec ial damages,
whether ba s ed on to rt, con trac t , or other wi s e, aris i ng out of or in conn ec tion with this ma nual, the softw ar e , or oth er infor mation
contai ned he r ei n or the use th ere of .
Macrov i si on: This produc t incorpor at e s copy r i ght pr ot e ct ion tec hnol ogy t hat i s pr ot e ct e d by m et hod clai m s o f cer t ain U.S. pat e nts and
other in tel l e ctu a l proper t y right s own ed by Macrov i si on Corpor ation and other rights owner s . Use of this copyr ight prote cti on
technology must be authorised by Macrovision Corporation, and is intended for home and other limited viewing uses only unless
otherwise authorised by Macrovision Corporation. Reverse engineering or disassembly is prohibited.
Sony Corporat i on res er ves the right t o make any modi ficatio n t o this m anu al o r the inf orm at ion contai ned herein at any time wit hout
notice. The software descr ibe d herein is governed by the terms of a separate user licence agreement .
Page 3

Read this first
Sony Notebook User Guide
nN
2
Trademarks
Sony, Digita lPri nt , DVDit, Drag’n Drop CD/DV D, DVgate, HotKey Utili ty, i.LIN K, Jog Dial Navigator, MovieShaker, Simple DVD Mak er,
Smart Cap tu re , Soni c Stage, Sony Note book S et up, UI Desi gn Selector , V AI O Edi t Comp onent s , Memory Sti ck , the Me mo ry St ick logo,
VAI O and the V AI O l ogo ar e tradem ar ks of Sony Corp or a tion. The Windows and Window s XP Profes s ional l ogo ar e regi s t ere d
tradema rks o f Micro so ft Corpo ra ti o n.
WinDVD is a trademark of InterVideo, Inc.
i.LINK is a trademark of Sony used to designate that a product contains an IEEE1394-connection.
Adobe, Adobe Acro ba t Reader, Adobe Ph ot os hop El e me nt s and Ad obe Pr e m iere a r e tradem ar k s of Adobe S ys tems Incor porated.
QuickTime and the QuickT ime logo a r e tradem a r ks use d under li c enc e. Q uickTime is register ed in the U.S . and othe r countr ies.
RealPlayer is a registered tradem ark of RealNetwor ks , Inc. in the U.S. and other countries.
PowerPanel i s a trademark of Phoenix Technologies Ltd.
Symantec Norton An tiVir us is a trademar k of Symantec Corporat ion .
All other names of systems, products and services are trademarks of their respective owners. In the manual, the ™ or ® marks are not
specified.
Speci f icat i ons are s ubj ec t to change w it hout noti c e.
All other trademar ks are trademarks of their respecti ve owners.
Page 4

Read this first
nN
3
Sony Notebook User Guide
ENERGY STAR
As an ENER GY STAR ® Partne r, Sony has det ermin ed that th is pro duct meets the ENERGY STAR ® guidelines for energy efficiency.
The Interna ti o nal ENERGY STAR® Office Equipme nt Program is an internati onal program that promo te s energy saving throu gh the use
of comput e r s and their office eq uip m e nt . The progr a m bac ks the development and dissemi na t io n of products wit h fun c tions th at
effec t ively re duc e ene r gy co ns um pt io n. It is an ope n s ystem in w hich busine s s pro pr ietor s can participate voluntar ily. The targeted
prod ucts a r e of fic e equipment such as comput er s, dis pl ay s , printers , facs imiles a nd copiers. Their s tan da r ds and logos are uni form
among participating nations.
ENERGY STAR is a U.S. registered mark.
®
Safety information
Owner's recor d
The serial num be r and mo del numb er are loca t ed on t he bot t om of your S ony not e book. Record the serial number and the model
number in the spaces provided here. Refer to the model number and serial number if you call VAIO-Link.
Serial number: ________________________
Model number (model name in brackets): PCG-8D1M (PCG-GRX516SP)
Page 5

Read this first
Sony Notebook User Guide
nN
4
Warnings
General
❑ Opening th e unit, for whatever re aso n, coul d lead to damages that are not cove red by the guarant ee.
❑ To avoid electrical shoc k, do not open the cabi net. Refe r serv i cing t o qual ifi ed per so nnel only.
❑ To prevent fire or shock hazard, do not expose your VAIO notebook to rain or moisture.
❑ Avoid using the modem during a se vere electrical storm.
❑ Do not use the modem or a telephone to report a gas leak in the vicinity of the leak.
❑ To change the backup bat te ry, please contact your near es t Sony Ser vice Cent r e.
❑ Before you connec t per iph era ls, tur n off the computer and all per iph er als.
❑ Connect the power cord only after connecting all cables.
❑ Tu rn on th e compu ter onl y after turn ing off al l per iph era ls.
❑ The magnetic properties of some objects can have serious consequences for your hard disk drive. They
can erase the data on the hard disk drive and cause the computer to malfunction. Do not place your
computer near or on any objec ts which em it mag net ic fiel ds , mainly :
❑ TV sets
❑ Speakers
❑ Magnets
❑ Magnetic bracelets.
Audio/video
❑ Audio and picture distortion may occur if this equipment is positioned in close proximity to any
equipment em itting electromagnetic r adiation.
Page 6

Read this first
Sony Notebook User Guide
nN
5
Connectivity
❑ Never instal l modem or tele phone wiring during a severe light ning storm.
❑ Never install telephone jacks in wet locations unless the jack is specifically designed for wet locations.
❑ Be cautio us when instal li ng or modif yi ng tel ephone lines.
❑ Use your notebook only with the suppli ed AC adapte r. To disc onnect your notebo ok comp lete l y from
mains volta ge, unp lug the AC adapte r.
❑ Please make sure that the socke t outlet is easily accessi ble .
❑ Never touch uninsulated tel ephone wire or terminals unl es s the telephone line has been disconnected
at the network interfa ce .
Optical disc drive
❑ Misuse o f opt ical i n strume n ts can cau se eye h az ard. As the lase r be a m use d in th is product is harmful to
eyes, do not atte mp t any disass em bl ing process. For servic ing , refe r to qualif ied personnel only.
❑ There are visible and invisible radiations when the optical disc drive is open: avoid direct exposure to the
laser beam.
Page 7
Read this first
Sony Notebook User Guide
nN
6
Regulatory information
Sony hereb y declar e s that t his pr oduc t is in com pli anc e w ith t he essent ial requirements and other r eleva nt provisions of European
Directive 1999/5/EC (radio equipm ent and telecomm uni cat ion s terminal equip ment Directive).
This product compli es with EN 55022 Class B and EN 55024 for use in following areas: residential , commer cial and light-indu strial.
This pro duc t has been test ed and fo und c om plian t wit h th e limi t s set out in the EMC Di r e cti ve fo r using conne ct ion ca bles not longer
than 3 metres (9.8 feet).
The opti cal disc drive i s c lassified as a CLA S S 1 LASER PRODUCT and c ompl ies w i th t he Laser Product Saf et y St andard EN 60825-1. Repair
and maintenance only by authorised Sony technicians. Improper repairs and use can create safety hazards.
CLASS 1
LASER PRODUCT
TO EN 60825-1
Before activating the built-in modem, please read the Modem Regulations flyer.
Page 8

Read this first
Sony Notebook User Guide
nN
7
Disposing of lithium ion batteries
❑ Do not handle damaged or leaking lithium ion batteries. Dispose of promptly and properly .
❑ Danger of explosion if the battery is incorrectly replaced. Replace only with the same or equivalent type
recomm ende d by the ma nuf ac ture r. Disca rd us ed ba tt er ies a ccord i ng to t he m a nufactur er’ s instruction s.
❑ The battery pac k used in this device may present a fire or chemical burn hazard if mistreated. Do not
disassemble, heat above 60°C (140°F) or incinerat e.
❑ Dispose of used batt er ies pr om pt ly and proper ly.
❑ Keep away from childr en.
❑ In some areas the disposal of lithium ion batteries in household or business waste may be prohibited.
❑ Use the public coll ection syste m.
Disposing of the internal memory backup battery
❑ Your VAIO note bo ok is equi pped with an inte rn al memo ry back up battery that sh oul d not have to be
replac ed during the lifetime of the product. For in fo rmati on on ch angi ng th is bat te ry, please contact
VAIO-Link.
❑ Danger of explosi on if th e battery is incorr ec tly rep lace d .
❑ Dispose of prop erly at its end- of -life.
❑ In some areas the disposal of lithium ion and other non-hazardous batteries in household or business
waste may be prohibited.
❑ Please use the public c ollec tion system.
Page 9

Welcome
Sony Notebook User Guide
nN
8
Welcome
Congratulations on purchasing a Sony VAIO notebook. Sony has combined leading-edge technology in
audio, video, computing and communications to provide you with state-of-the-ar t personal computing.
Here are just some of the featur es your VAIO not ebook has to offer :
❑ Exceptional performance - Your PC inclu des a fast proces s or, a fast CD-RW/DVD-RW drive and an
inte rnal modem.
❑ Portability - The rechargeabl e bat tery pack pr ov id es hou rs of use without AC power.
❑ Sony audio and video quality - A high-resolution LCD screen enables you to take advantage of today’s
advanced multimedia applications, games, and entertainment software.
❑ Multimedia featur es – Enjoy audio and video CDs.
❑ Interconnectivity – Your computer has MagicGate Memory Stick™, Ethernet and i.LINK™
functi ona l iti es. Me mory Stick ™ is Sony’s universal sto rag e medi um . i.LI NK™ is a bi-d irectional digital
interface for exchanging data.
❑ Windows
❑ Communications - Access popular onli ne s ervic es , send and r ece ive e-m ail s , browse the Inter net , and
more.
❑ Excellent customer support - If you are experiencing any problems with your computer , please check
the VAIO-Link website fo r a poss ible so luti on:
http://www.vaio-link.com
Before contactin g VA IO-Link, yo u may try to solve the proble m by readi ng the User Guide or the man uals
and help fi les for the peripherals or software.
®
- Yo ur syste m includes the Microsoft Wi ndow s® XP Professional operating system.
Page 10

Welcome
Sony Notebook User Guide
nN
9
Documentation pack
Your Docume nt ation Pac k c ontains paper and online user guides on y our compu te r's hard drive.
Printed documentat ion
The printe d part of your docu men ta tion c ont ains:
❑ A Getting Started broc hure, where you will find a brief desc r iption of the items in your box, some
specifications of your notebook, and how to setup your notebook;
❑ A Troubleshooting Guide, where you will find all the basic in forma tion you need to start using your
notebook, as well as troubleshooting and VAIO-Link information;
❑ Your Sony Guarantee conditions;
❑ A Safet y Reg ulatio ns flye r;
❑ A Modem Regulations flyer.
Onlin e doc um e nt at io n
1 The Hardware Guide:
❑ Using your notebook show s you how to use th e standa rd co mp onen ts o f yo ur syste m. In thi s part
of the manua l you will als o find out wh at you can do with a Memory Stick™.
❑ Connecting peripheral devices expl ain s how y ou ca n add fun ctionality by connect i ng va rious
peripherals.
❑ Getting Help explains the support options availa ble to you, and offers basic troubles hoot i ng tips .
❑ Precautions provides facts and adv ice about using your note book.
❑ Glossary refers to terms used i n this manual.
Page 11

Welcome
Sony Notebook User Guide
nN
10
2 Refer to your Software Guide for inf ormati on on th e bundl ed so ftw ar e and th e Sony applic at ion s.
❑ About the Software on your computer i s a short description of the features of the software pre-
installed on your system.
❑ Using Video software explai ns how to use Sony video so ftw ar e: DVgat e, MovieShaker and Smart
Capture.
❑ Mana gi ng audi o file s wit h Soni cSt age explains how to convert your existing MP3, WMA and
WA V forma t a udi o files into A TR A C3 fo rmat.
❑ Using D igitalPri nt explains how to get the most enjoyment out of your photographs taken with a
digi tal came ra.
❑ Customizing your computer explains how to set your system and power management.
❑ Installing and updating applications expl ains how to ins tall, run or unins t all a soft ware
application.
❑ Mana gi ng driv er s explains how to install, update or uninstall a driver.
❑ Using the Product Recovery CD-ROMs explains how to per form a sy stem and applica tion recovery .
❑ Using partitioned drives tells you what you can do with par tit io ned dr ives.
3 Refer to the Specifications online document for deta ils on your c om put er, drivers and accesso rie s .
4 In the VAIO-Link Customer Service Guide you will find all the VAIO-Link information you need,
including specific contact numbers and addresses for each country .
5 Consult the Online Help files of the software you a re using fo r detai led information on feat ur es and
troubleshooting.
6 Refer to the Microsoft Quick Start man ual for more in fo rmation on Windows®.
7 Go to http://www.club-vaio.sony-europe.com to find online tutorials about y our favo ur ite VAIO
software.
Page 12
Welcome
Sony Notebook User Guide
nN
11
Yo ur notebook and it s accessories
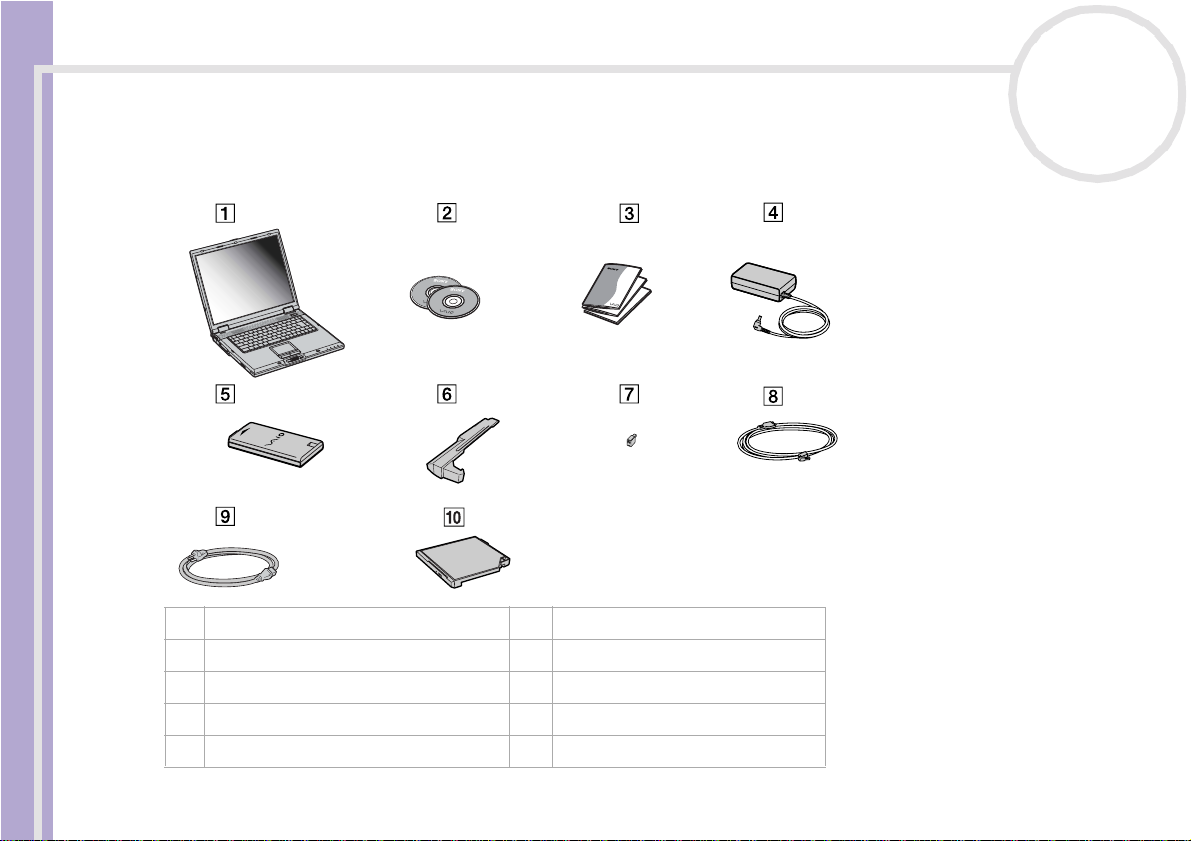
The fol lowi ng har dw are items* are in the box:
1 Main unit 6 Weight sa v er
2 Prod uc t rec over y CD- RO M s 7 Phone plug ( c ount r y- sp e cif ic)
3 Documentation pack 8 Phone cable
4 AC adapter 9 Power cord
5 Rechargeable battery pack 10 CD-RW/DVD-RW
* See the Specifications online document.
Page 13
Welcome
Sony Notebook User Guide
nN
12
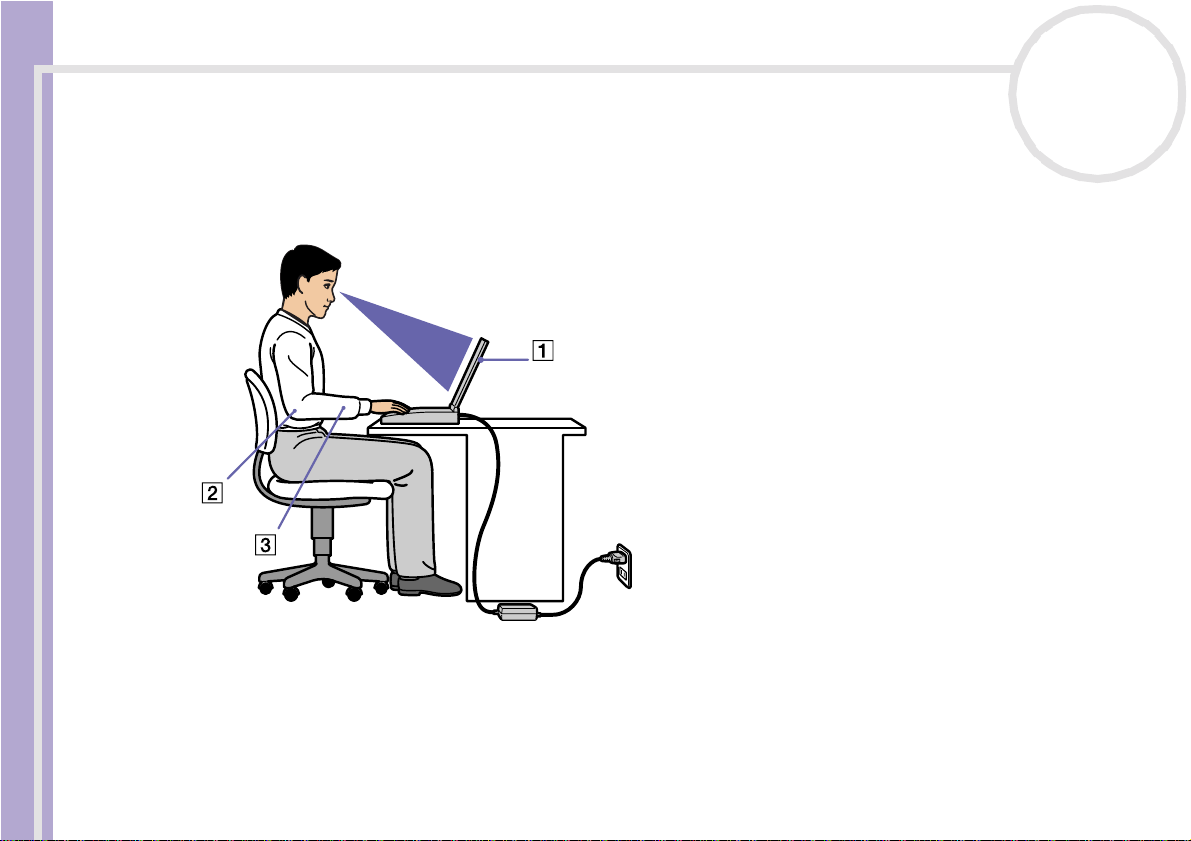
Ergonomic considerations
❑ You will be using y our not ebook as a portabl e dev ice i n a variety of env ironments. Whenever pos sibl e,
you should at tempt to take account of the fol low i ng erg onom i c considerations to both stat io nar y and
portab le environments:
❑ Position of your computer – Place the computer direc t ly in front of you (1). Keep y our fo rea rms
horizont al (2) , with your wrist s in a neutral , comf or tab le posi tion (3) while using the keyboard,
touch pad, or exte rn al mouse. Let yo ur upper arms h a ng nat ur ally a t your side s. Have bre aks during
sessio n s with your comp u te r. Excessive use of the compu ter may str ain musc les or tendons.
❑ Furniture and posture – Sit in a chair with good back support. Adjust the level of the chair so your feet
are flat on the floor. A footrest may make you mor e comfor t able . Sit in a relaxed, upr ig ht postur e and
avoid slouching forward or lean ing far bac kwards .
Page 14

Welcome
Sony Notebook User Guide
nN
13
❑ Viewing angle of the computer’s display – Use the display’s tilting feature to find the best position.
You can reduce eyestrain and muscle fatigue by adjusting the tilt of th e display to the proper position.
Adjust th e brigh tn ess se tti n g of the disp lay as well.
❑ Lighting – Choo se a location where windows and lights do not create gl ar e and reflection on the
display. Use indirect li ght in g to avoid br ight spots on the display. You can also purchase accessories fo r
your display that help reduce glare. Proper lighting adds to your comfort and work effectiveness.
❑ Positi oning an external dis play – When using an ext ern al di splay, set the display at a comfortab le
viewing di stance. Mak e sure the display screen is at eye level or slightly lower when you are sitt ing in
front of the mo nito r.
Page 15

Using your notebook
Using your notebook
This section describes how to start using your computer and how to use your computer’s internal and
externa l de vices.
❑ Locating controls and connectors (page 15)
❑ Connecting a power source (page 20)
Sony Notebook User Guide
❑ Starting your not ebook (page 28)
❑ Shutting down your notebook (page 29)
❑ Using the keyboar d (page 30)
❑ Using the touchpad (page 35)
❑ Using the Jog Dial™ (page 36)
❑ Using PC Cards (page 45)
❑ Us ing Memory S tick™ (page 48)
❑ Us ing the modem (page 57)
❑ Using the correct phone plug (page 58)
❑ Using pow er savi ng mo des (page 59)
❑ Using the CD- RW/D VD -RW drive (page 61)
❑ Using the weight saver (page 65)
nN
14
Page 16
Using your notebook
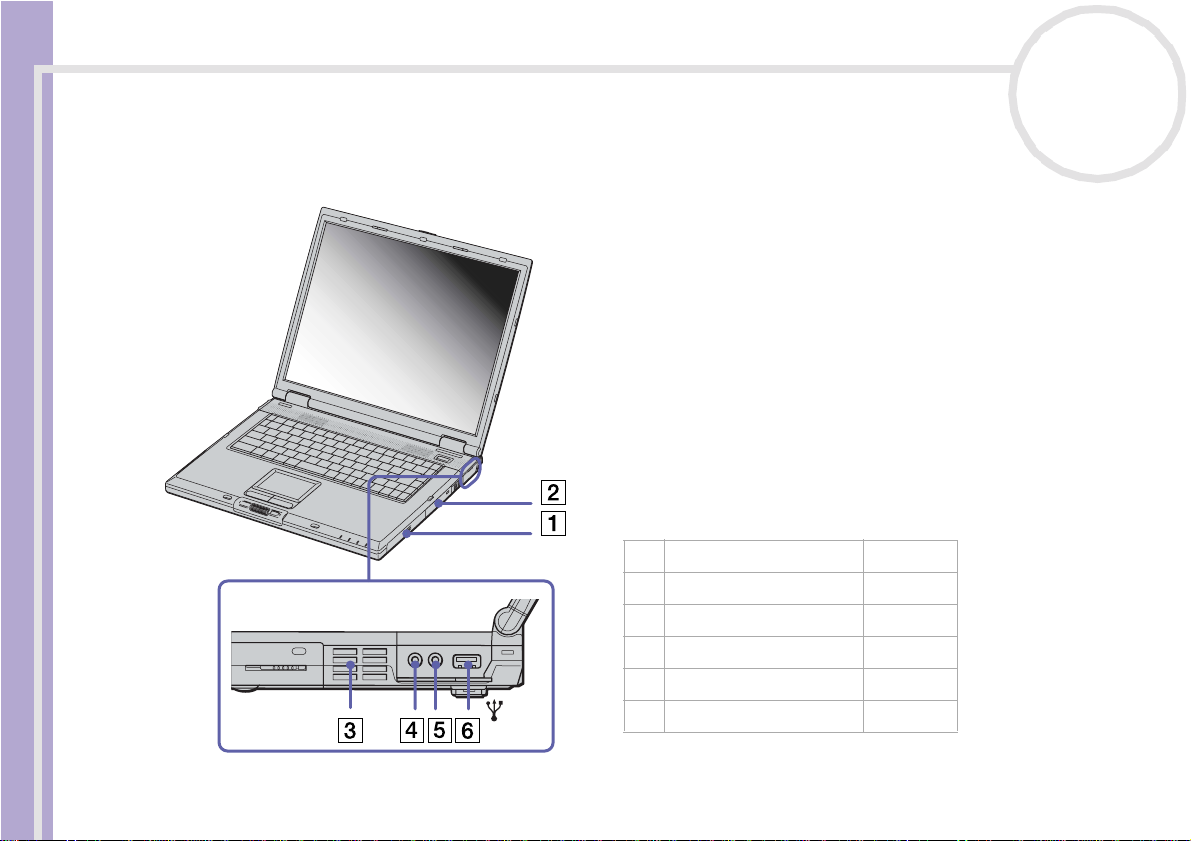
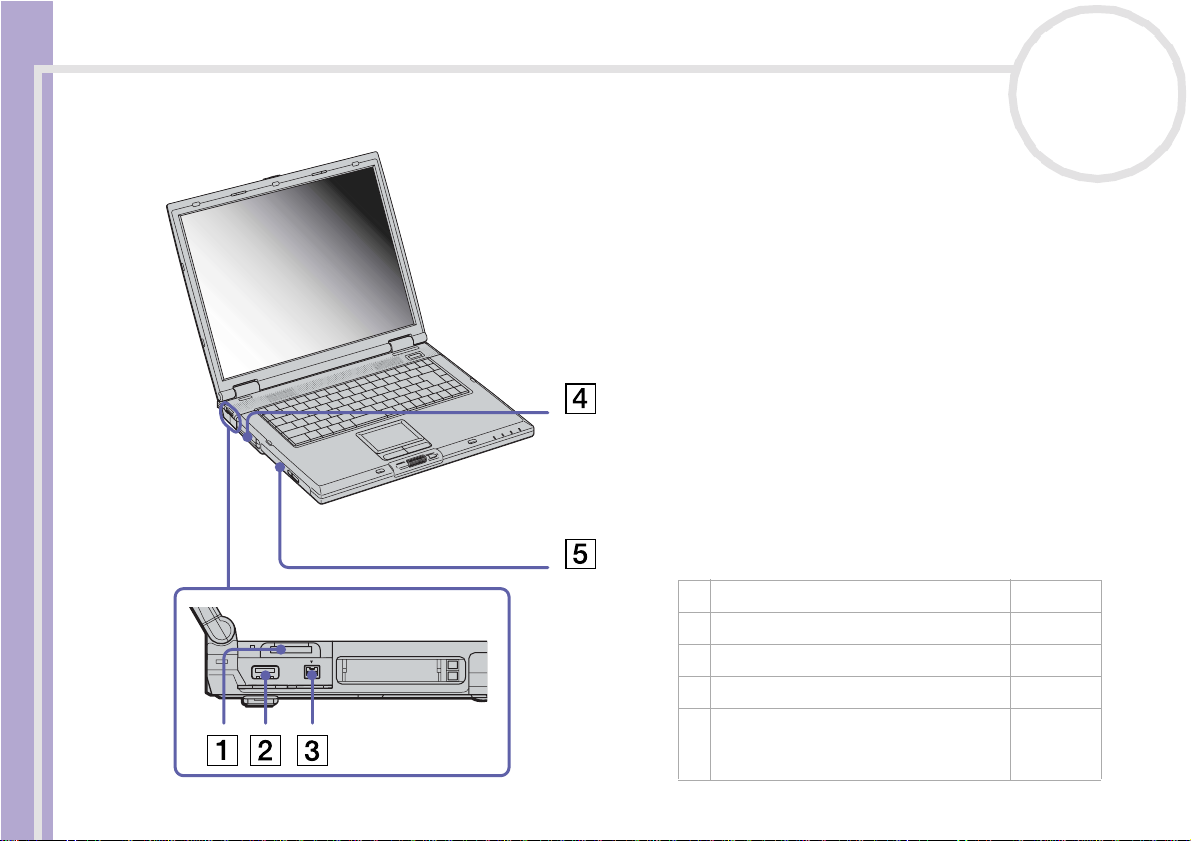
Locating controls and c onnec t or s
Right
Sony Notebook User Guide
nN
15
1Battery bay (page 21)
2 Hard disk drive /
3 Ventilation slot /
4 Headphone c onnector (page 76)
5 Microphone connector (page 77)
6 USB port (page 79)
✍ Do not cover the ventilation sl ot when the computer is on.
Page 17
Using your notebook
Left
Sony Notebook User Guide
1 Memory Stick™ slot (page 48)
2 USB port (page 79)
3 i.LINK™ (IEEE13 94) S400 port (page85)
4 PC Car d slot s (page 45)
5 Multipurpose bay (for weight sav er or
second battery with weight saver or
removable CD-RW/DVD- RW drive)
(page 65)
(page 61)
(page 25)
nN
16
Page 18
Using your notebook
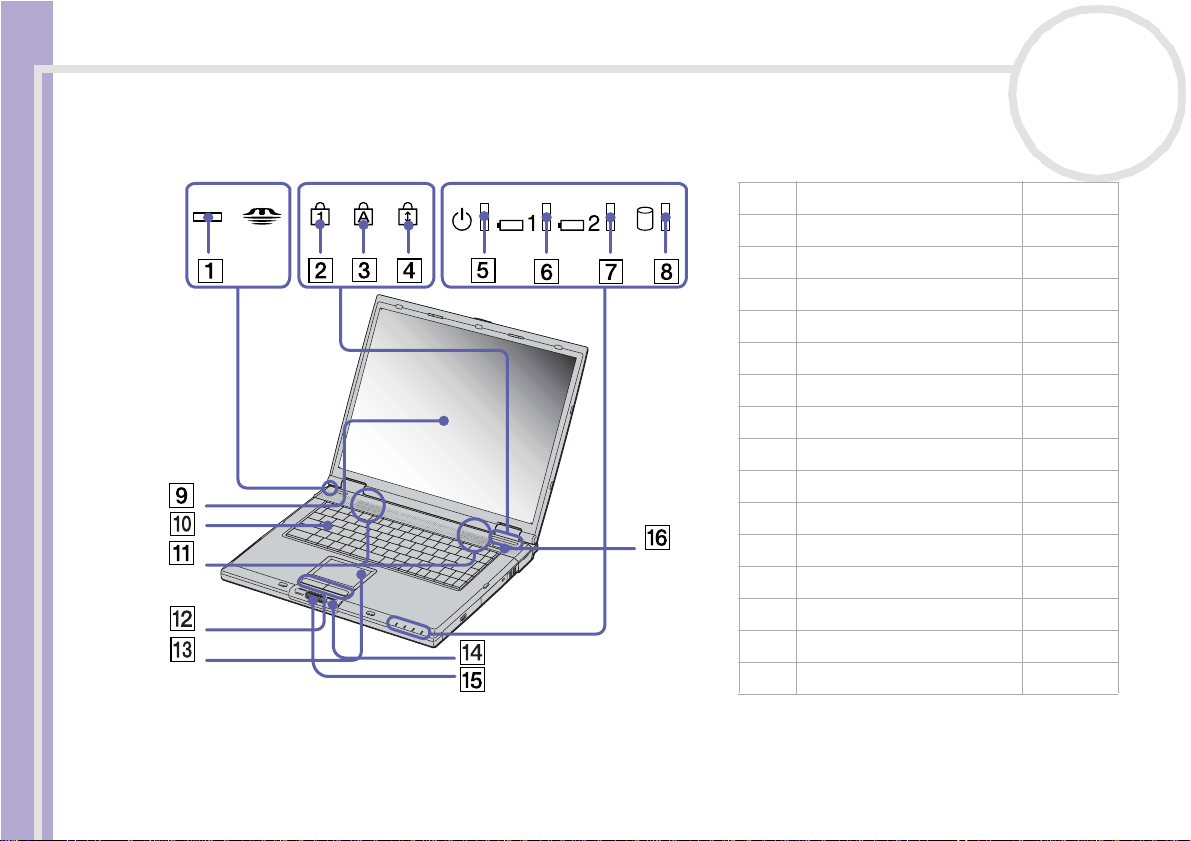
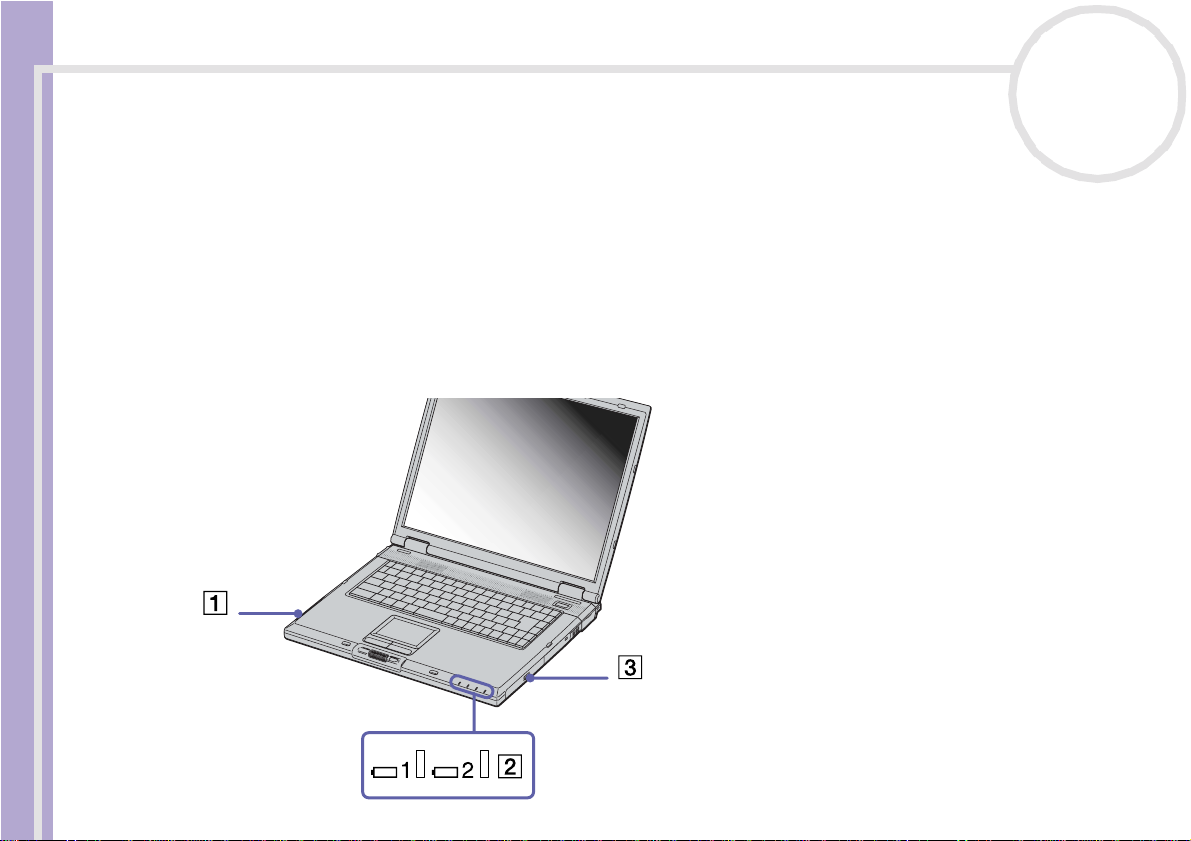
Front
Sony Notebook User Guide
nN
17
1 Memory Stick™ indicator (page 33)
2 Num Lock indi c at or (page 33)
3 Caps Lock indicator (page 33)
4 Scroll Lo c k indicator (page 33)
5 Power indicat or (page 33)
6 Battery 1 indicator (page 33)
7 Battery 2 indicator (page 33)
8 Hard disk dri v e indi ca t or (page 33)
9LCD screen (page 34)
10 Keyboard (page 34)
11 Speakers (page 34)
12 Left/right buttons (page 35)
13 Touchpad (page 35)
14 Jog Dial™ (page 36)
15 Back button fo r Jog Di al™ (page36)
16 Power button (page 28)
Page 19
Using your notebook
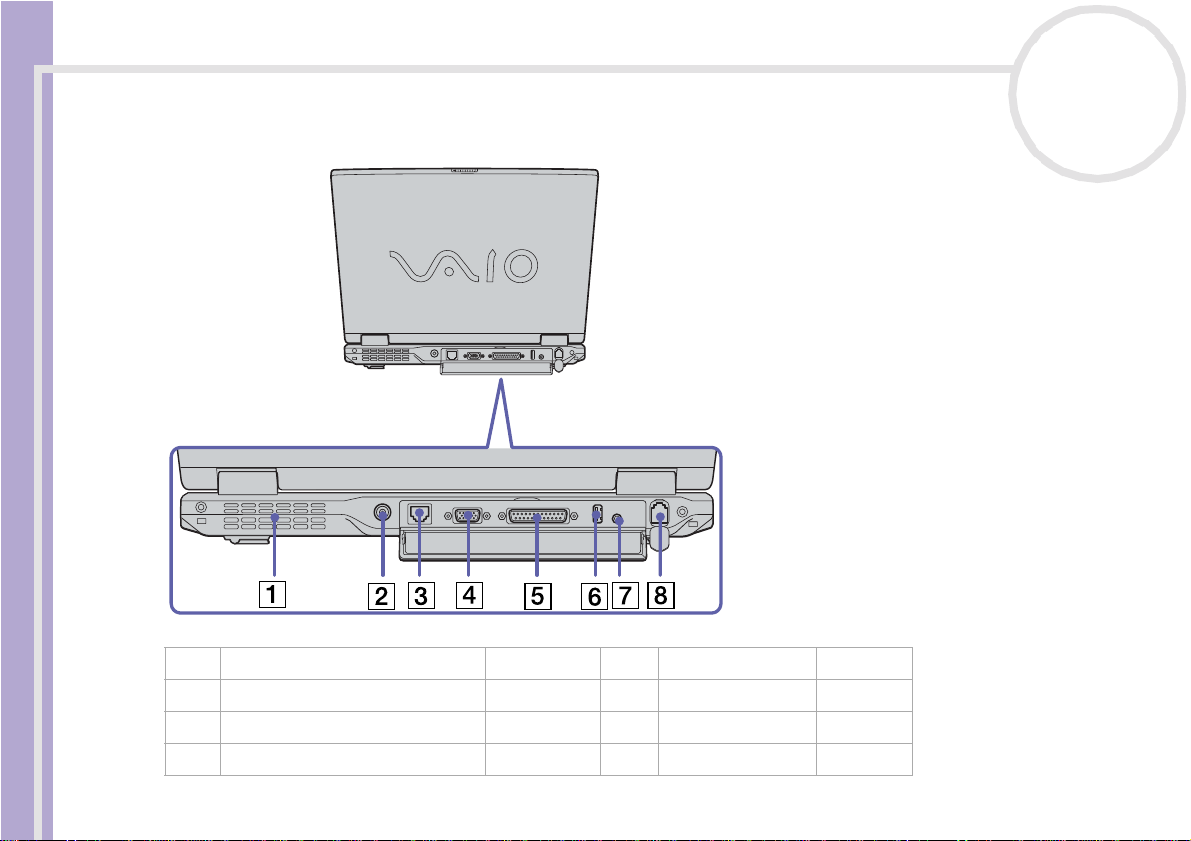
Back
Sony Notebook User Guide
nN
18
1 Ventilation s lot / 5 Printer c onnec t or (page 83)
2DC In (page 20) 6USB port (page 79)
3 Ethernet connector (network) (page 87) 7 A V Out con nec tor (page 73)
4 Monitor/VGA connector (page 70) 8 Modem connec t or (page57)
✍ There is a ventilation slot located on the left side of the back panel . Do not cover the ventilation slot when the computer is on.
Page 20
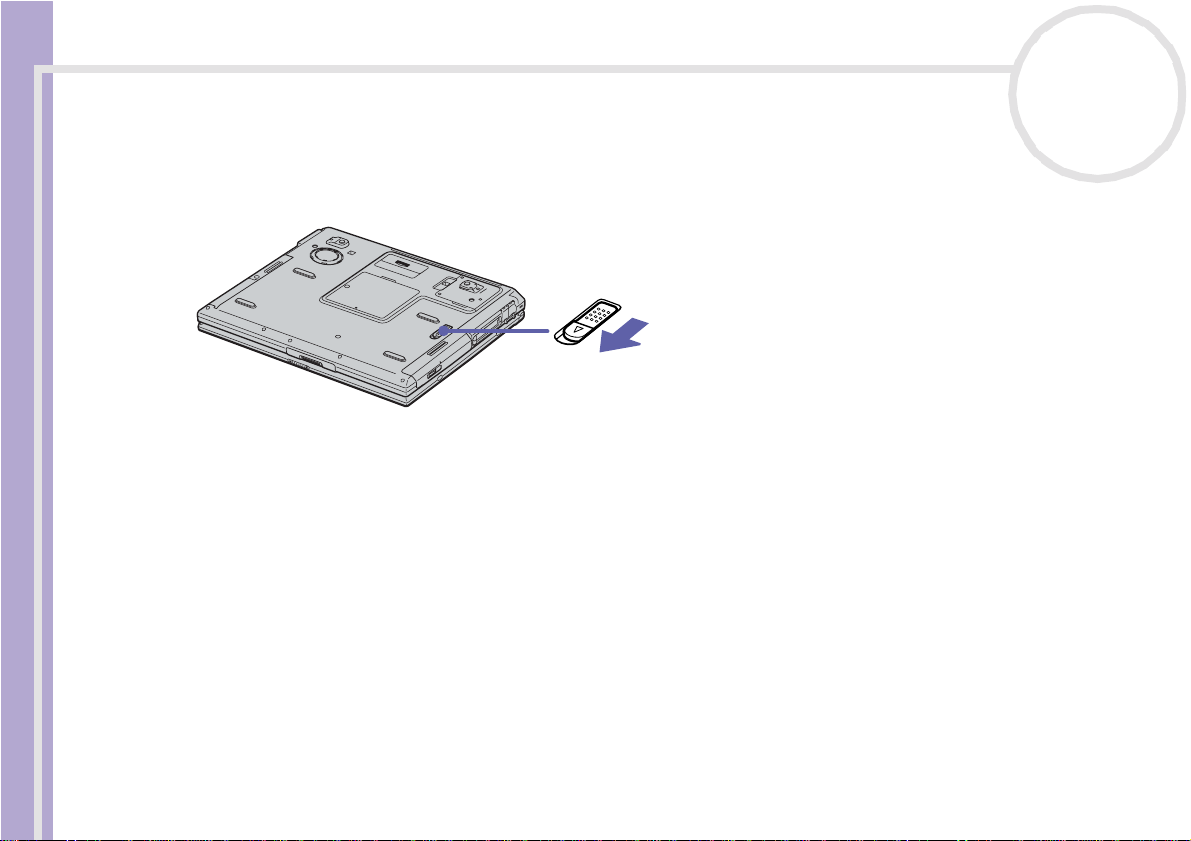
Using your notebook
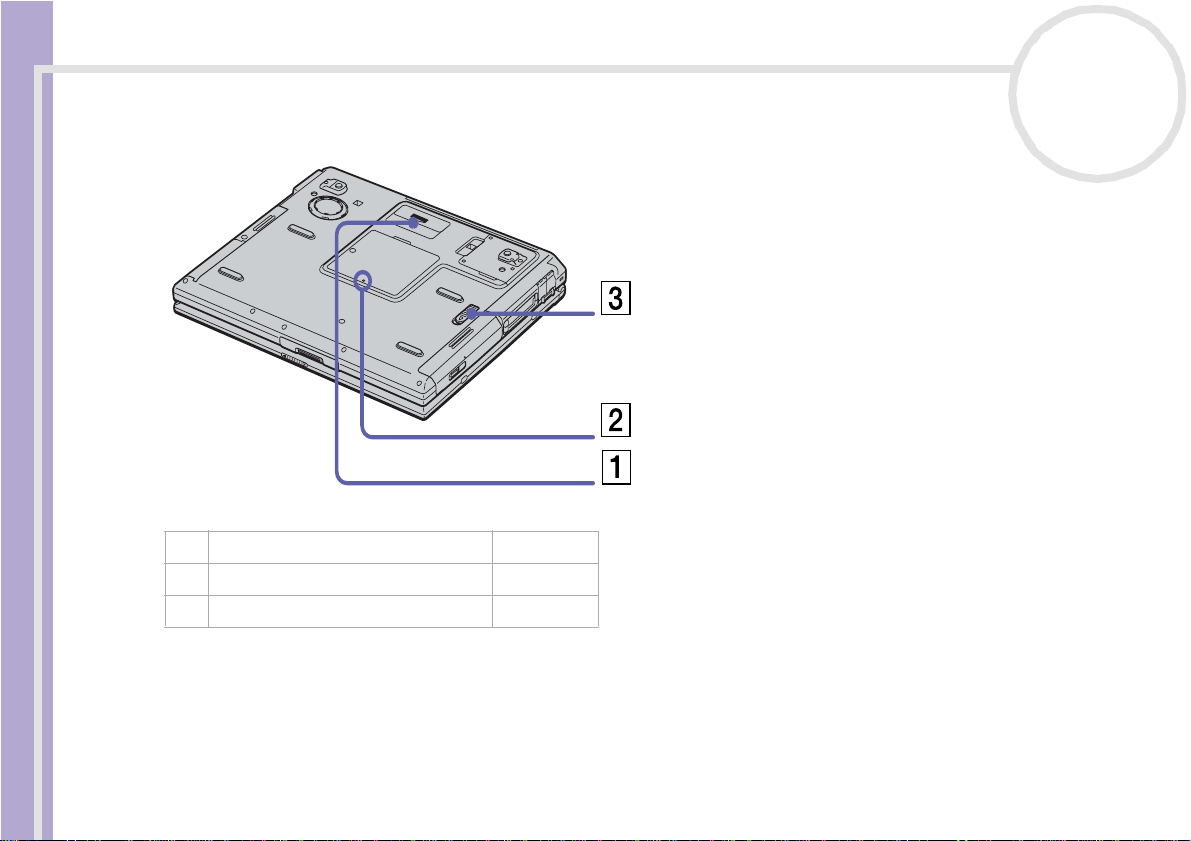
Bottom
Sony Notebook User Guide
1 Port replicator connector cover (page 67)
2 Memory module cover (page 105)
3 Multipurpose bay rel ease lever (page 65)
nN
19
Page 21

Using your notebook
Connecting a power source
You can use either an AC adapter or a rechargeabl e batt ery pack as a power source.
Using the AC adapter
To use the AC adapter, proceed as follows:
1 Plug the cable attached to the AC adapter (1) into the DC In connector (2) on the comp ut er.
Sony Notebook User Guide
2 Plug one end of the power cord (3) into the AC adapter.
3 Plug the othe r end of the power c or d into an AC outlet.
nN
20
✍ Use your notebook only with the supplied AC adapter.
To disconnect your notebook completely from mains voltage, unplug the AC adapter.
Make sure that the socket outlet is easily accessible.
Some models may be su pplied wi th 2 p ower c ords, respectively for a UK and for a Contine ntal power o utlet. In this case, please make sure to u s e the
power cord, which corresponds to the type of your power outlet.
Page 22
Using your notebook
Usi ng th e batt e ry pack
You can use one or two batteri e s as a source of pow er. You can inser t the second bat t er y pack into the
multipurpos e bay on the left side of the comp ut er. Addit io nal batt er y pac ks are available as a separ ate
option. The battery pack supplied with your computer is not fully charged at the time of purchase.
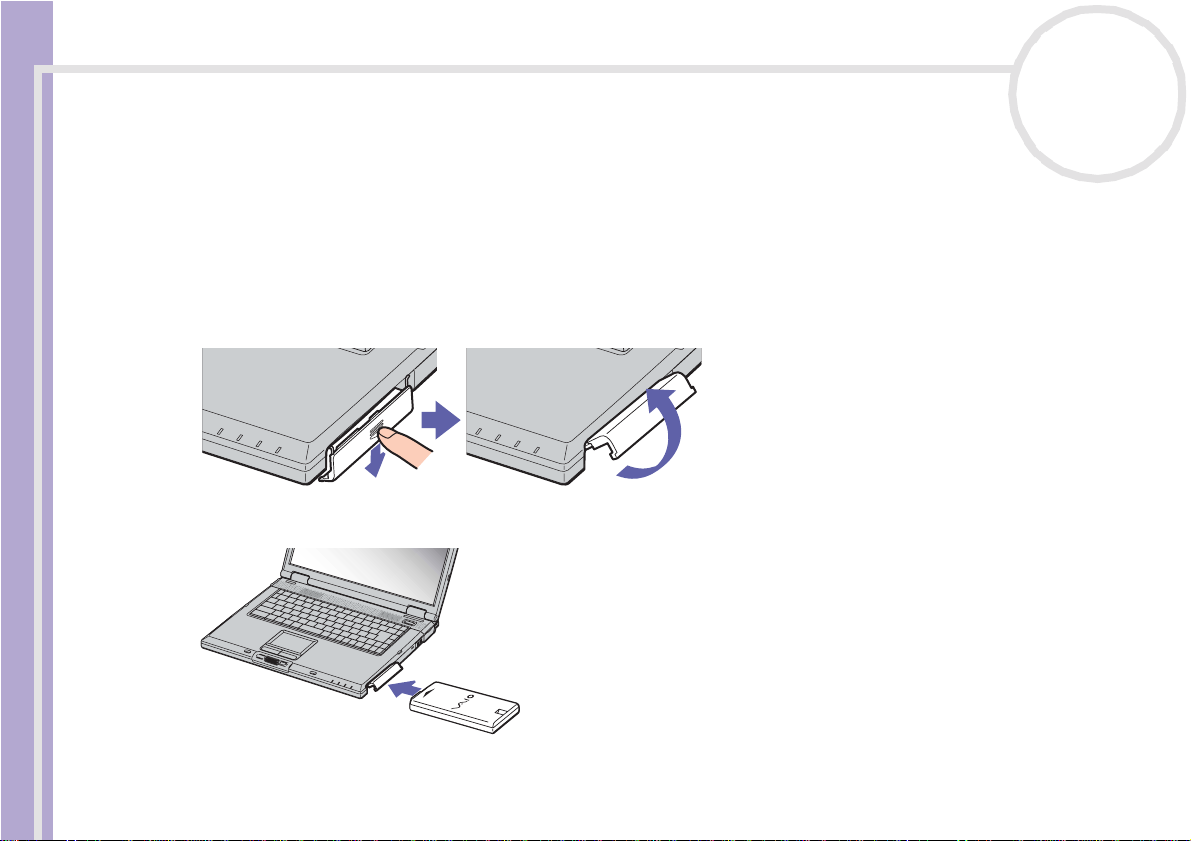
Inse rtin g the b a ttery pa ck
To insert the battery pack , proceed as foll ows:
Sony Notebook User Guide
1 Open th e cover of the battery bay.
2 Insert the battery pack with the label facing up into the battery bay on the right si de of the computer.
nN
21
3 Close the cover of the batte ry bay unti l it clic ks.
✍ When the computer is direc tly connected to AC power and has a battery pack inserted in the battery bay, it uses power from the AC outlet.
Page 23
Using your notebook
Charging t he batte ry pack
To charge the battery pac k, proc eed as follow s:
1 Connect the AC adapter to the comput er.
2 Inse rt th e b atte ry pack .
Sony Notebook User Guide
nN
22
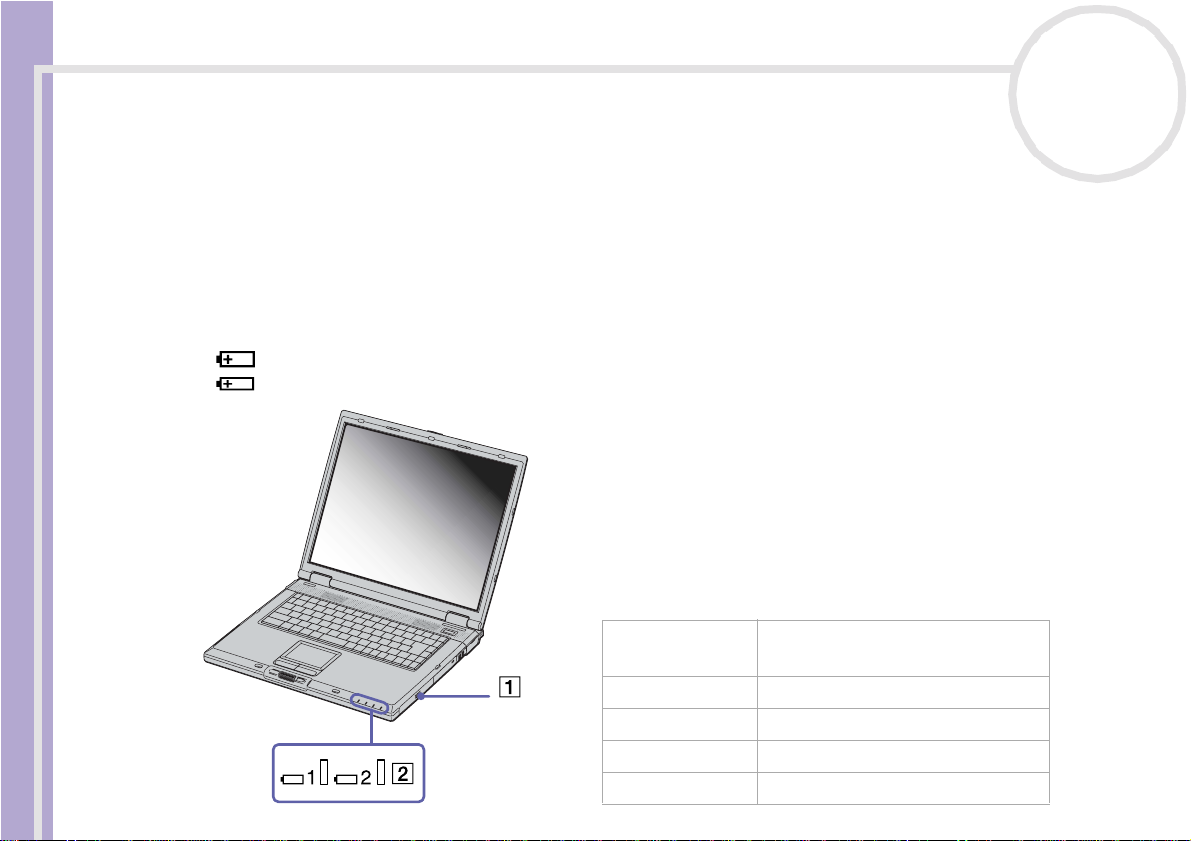
The computer aut omatic all y ch arges the batt er y (1) (the bat te ry indicat or (2) light flas hes in a double
blin k pattern as the b atte ry ch arg e s) . Wh e n the b atte ry is 85% full, the b at tery ind icator ligh t turn s o ff.
This process take s 2.5 hour s when the syst em is off/on. To charge the battery comple tely, continue
charging fo r an addit ional hour.
There are two batte ry indicator lights on the computer:
1 indicates the status of the battery pack in the battery ba y on the right side of th e computer.
2 indicat es the sta tus o f th e battery pa ck in the mu lt ipu rp os e bay on th e left sid e o f the comp u ter.
Battery indicator
light status
On The co mp ut er is using bat tery power.
Single bl ink The ba t tery is ru nning out o f power.
Double blink The ba t tery is c har ging.
Off The co mp ut er i s usin g AC pow er.
Meaning
Page 24

Using your notebook
✍ When the battery is running out of power, both the battery and power indicators blink.
Sony Notebook User Guide
nN
23
Keep the battery pack in the com puter while it is directly connected to AC power. The battery pack continues to charge while you are using the
computer.
If the battery level fal ls below 10%, you should either attach the AC adapter to recharge the battery or shut down your computer and insert a fully
charged battery.
You can extend battery life by changing the power management modes in the PowerPanel utility.
The battery pack supplied with your computer is a lithium ion battery and can be recharged any time. Charging a partially discharged battery does
not affect battery life.
The battery indicator light is on while you use the battery pack as a power source. When the batte ry life is nearly depleted, both the battery and power
indicators start flashing.
For some softw are applications and some peripheral devices , your computer may not enter Hibernate mode even when battery life is low. To avoid
loss of data when using battery power, you should save your data frequently and manually activate a power management mode, such as Standby
or Hibernate.
When the computer is direc tly connected to AC power and has a battery pack inserted in the battery bay, it uses power from the AC outlet.
Page 25
Using your notebook
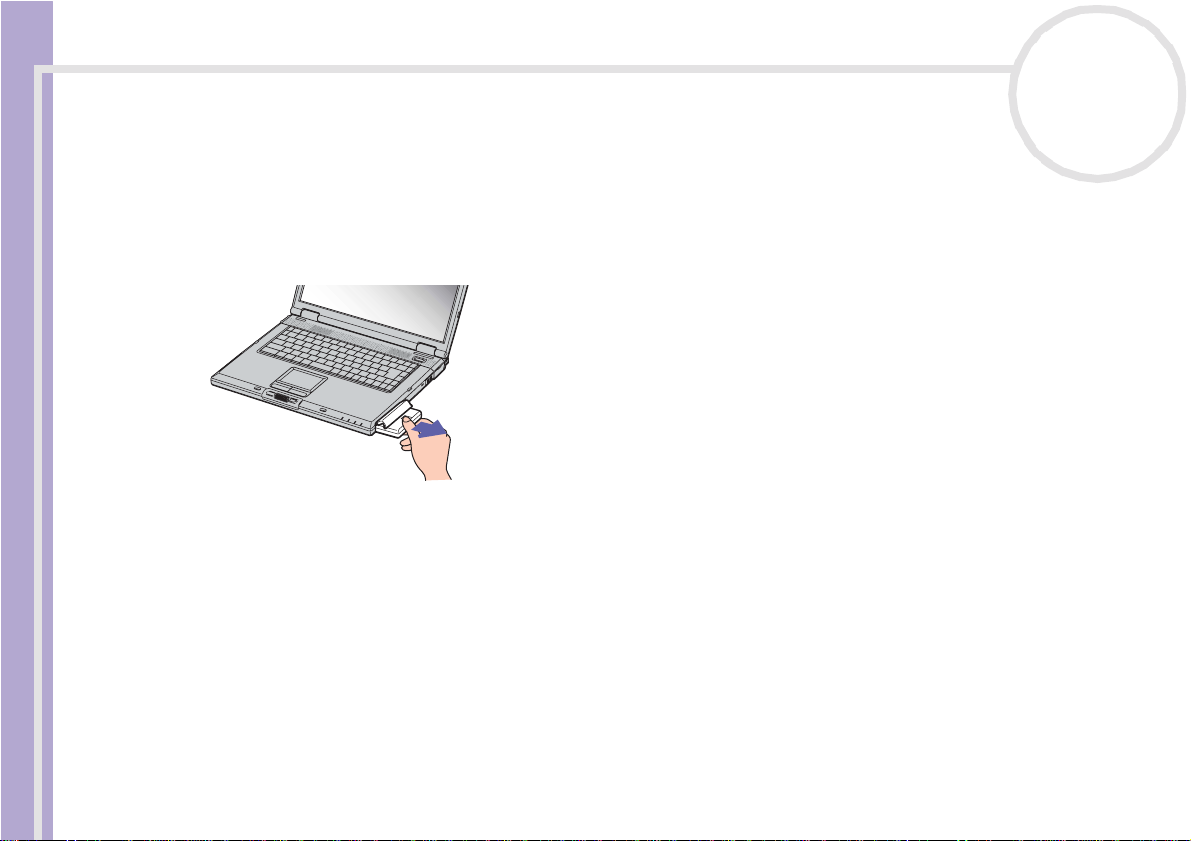
Removing t he battery pac k
To remo ve the battery p ack, proceed as follows:
1 Tu rn of f the compute r.
2 Open th e cover of the battery bay.
3 Pull out the battery pac k.
Sony Notebook User Guide
4 Close the cover of the battery bay.
✍ Yo u may lose data if you remove the battery pack while the computer is on and not connected to the AC adapter or if you remove the battery while
nN
24
the computer is in Standby mode.
Page 26
Using your notebook
Usi ng th e sec ond bat ter y pack
You can purchase a second rechargeable battery pack. With two battery packs, you can extend the time you
use your compu ter with battery power. When using two battery packs, the battery pack you insert first,
charge s fi rst. The ba ttery pa ck you i ns ert se co nd, cha rg es wh en the fi rst b atte ry p ack is 85 pe rce nt fu ll . Y ou
can monitor wh ich bat t er y pack is charging by observing the bat t ery i ndi ca tor light s .
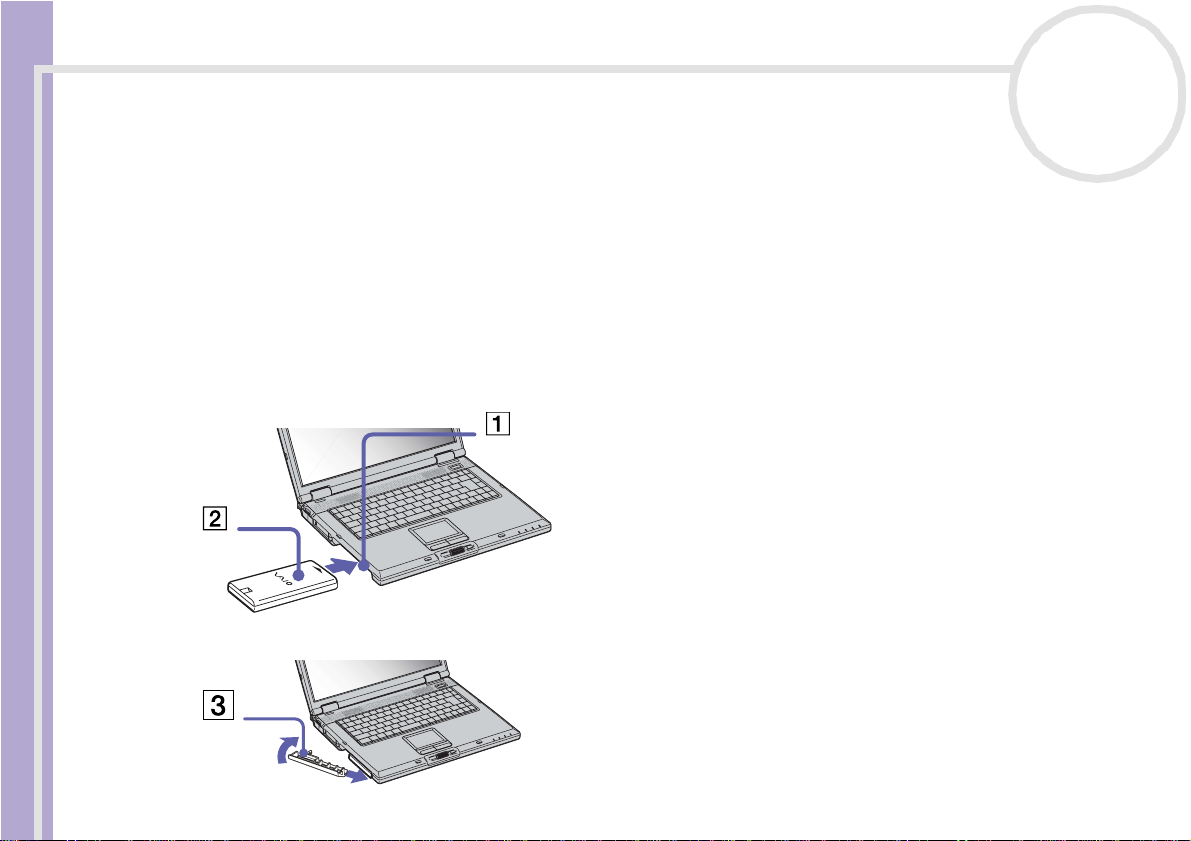
Inserting the second battery pack
Sony Notebook User Guide
To insert a second battery pac k, proceed as follows:
1 If the weight saver or the optic al disc dr ive is in the multipur pose bay (1), remove it.
2 Inse rt th e b atte ry pack (2 ) into t h e mul tipurpose bay.
nN
25
The battery 2-indicator light turns on.
3 Attach the weight saver (3) to the computer to stabil ize the battery pack.
Page 27
Using your notebook
4 Slide the eject lever on the b ottom of the weight saver toward the front of the computer to lock it.
✍ If you attach two battery packs, you can re move one of them without shutting do wn th e compute r. When removing one battery pack, mak e su re that
Charging t he se cond bat te ry pack
To charge the second batter y pac k, proc eed as follows:
nN
26
the other battery pack indicator is on. If the indicator of the battery pack you are going to remove is on, right-click the PowerPanel icon in the system
tray and click the Switch Battery option.
Sony Notebook User Guide
1 Keep the battery pack (1-3) in the comput er while it is connect ed t o AC power.
The battery indicator (2) flashes while the battery is charging.
2 When the battery indicator stops flashing, the battery is 85% charged.
Page 28
Using your notebook
Removing the second battery pack
To remove the second bat t er y pa ck, pr oceed as follo ws:
1 Slide the multip ur pos e bay releas e lever on the bottom of the comput er in the direct ion of the arrow.
Sony Notebook User Guide
2 Remove the weight sa ve r.
3 Pull out the battery pac k.
4 Reinsert the weight saver.
nN
27
Page 29
Using your notebook
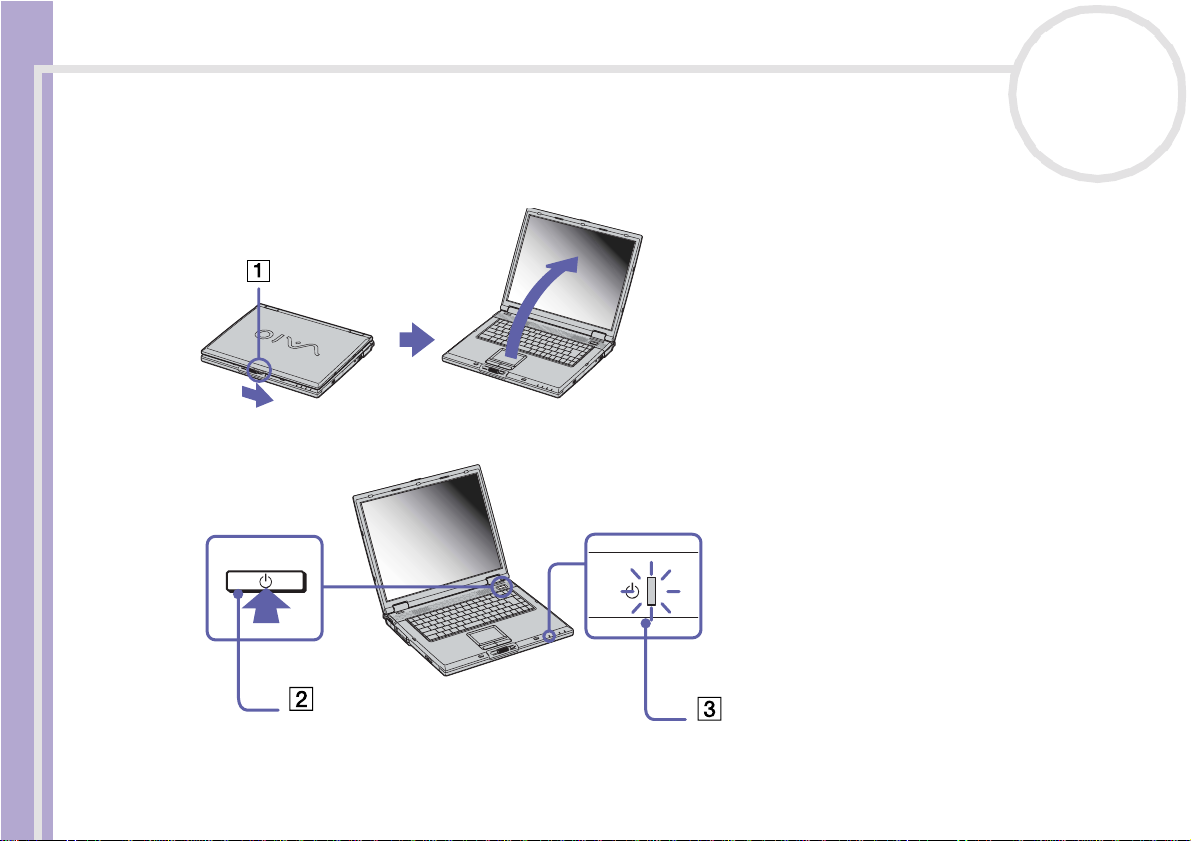
Starting your notebook
To start your co mp ute r, proc eed as follows:
1 Slide the LCD lock lever (1) in the direction of the arrow, and lift the cover.
Sony Notebook User Guide
2 Press the power button (2) of the compu te r unti l the gree n powe r indicat or (3 ) light tu rns on.
nN
28
3 If necessary, press <Fn>+<F5> to adju st th e brightn e ss cont ro ls for the LC D display. T o increas e the
bright ness , use the up or right arrow key s . To decrease, use the down or left arrow keys.
✍ If you press the power button for more than four seconds, the computer will turn off .
Page 30

Using your notebook
Shutting down your noteb ook
It is important th at you shut dow n yo ur comput er pr oper l y so you do not lose uns aved dat a.
To shut down you r comput er , proceed as follows:
1 Click the Start button.
2 Click Turn Off Computer.
Sony Notebook User Guide
3 Click Turn Off.
4 Turn off any peripherals connected to your computer.
✍ Respond to any prompts warning you to save documents or to consider other users.
nN
29
The Turn off compute r screen appears.
Wait for your computer to turn off automatically.
The power ind icato r tu rn s off.
If you are unable to shut down your computer;
- Close all software in use.
- If applica bl e, rem ove the PC Card. To do so, double -c l ick the Safely Remove Hardware icon in the taskbar . Select the hardware you want to
unplug and click Stop.
- Disconnect any USB devices.
Press <Alt>+<F4> and sele c t Tu rn Of f from the screen that appears.
If this does not work, you can press the po wer button for more than fou r s econds. This will shut d own the computer. This operati on may result in loss
of data.
If you are not using the computer for a short period of time, you can save power by using the Standby mode. To enter Standby mode, pre ss the
<Fn> and <Esc>-keys simultaneously. Or go to the Start men u, sel ect Turn Off Computer, and th en click on
management, see Using power saving modes (page 59).
Stand By. F or more details on power
Page 31

Using your notebook
Using the keyboard
Your keyboard is very similar to a desktop computer’s, but has additional keys that perform specific
notebook-related tasks.
Sony Notebook User Guide
nN
30
Page 32

Using your notebook
Keys Descriptions
Escape key (1) The <Esc> (Escape) key is used to cancel commands.
Function keys (2) The twelve function keys along the top of the keyboard are used to per form designated
Print Screen key (3) The <Print Screen> key takes an electro nic snapshot of the screen and moves it to the
Sony Notebook User Guide
Corre cti on key s (4) The <Insert>, <Back Space> and < Delete> keys enable you to make corrections.
Navigation keys (5) These keys enab le you to move the cursor on the screen.
Application key (6)
Nume ric k eypad area (7) Contains the keys foun d on a typi cal calcu lator. Use the nu meric keypad area t o type num bers
Operator keys (8-11-12) Severa l keys ar e always used with at least one other key: <Ctrl>, <Alt>, and <Shift>. When
Windows® key (9)
<Fn> key (10) The <Fn> key is used in combination with other keys to execute commands.
nN
31
tasks. For example, in many applications, <F1> is the Hel p key. The task associated with eac h
fun cti on key ma y vary from one appl ica t i on t o the other.
Windows Clipboard. You can then paste the screenshot i nto a document and print it .
The Application key displays a shortcut menu; pressing this key is equivalent to clicking the
right mo us e button.
or to per fo rm m ath em ati ca l calc ulat i ons su c h as addi t ion and sub tra ct ion. No te that y ou
must press the <Num Lock> key to activate the numeric keypad. When you do so, the Num
Lock indicato r il luminates.
held down with anot her key, the <Ctrl> (Control) and <Alt> (Al ternate) key s of fer anot her
way t o execute comm ands . For example, in many applicati ons , instead of choosing t he Save
command from a menu, you can hold down <Ctrl> and press <S> (referred to as
<Ctrl>+<S>). The <Shift> key is used to produce capital letters or special symbols such as @
and $.
The key with the Windows®logo di sp lays th e Windows®Start me nu; it is e quivale n t to
clicking the Start button on the taskba r.
Page 33

Using your notebook
Comb ina t io ns and fu nct io ns with th e <Windows> key
Combinations Functions
+ F1
+ T a b
+ E
Sony Notebook User Guide
+ F
+ Ctrl + F
+ M
Shift + + M
+ R
<Fn> + + Insert
nN
32
Displays Help and Support Centre.
Switch es the se lected button on the taskba r.
Displays My Computer.
Displays the Search Results wi ndow to find a fi le or fol der. This is equiv alent to s elect ing Search
from the Start menu.
Displays the Search Results - Computers window wher e you c an loca t e ot her co mp ut er s.
Minimises all displayed windows.
Returns all minimis ed wi ndow s to thei r prev i ous si ze.
Displays the Run window. Thi s is equi valent to s elect ing Run from the Start menu.
Displays the System Properties window. This is e qui v alent to doubl e- c li c kin g the System icon in
the Control Panel or to right-clicking My Computer from the Start menu.
Page 34

Using your notebook
Indicators
Indicator Functions
Power
Battery 1
Sony Notebook User Guide
Battery 2
Memory S tick™
Light On Off
Hard disk
Num Lock
Caps Lock
Scroll Lock
Power on: lights gr een.
Standby mode: flashes umber.
Hibernate mode: turns off.
Indicates the status of the battery inserted in the battery bay on the right side of the computer.
Indicate s th e stat us of the batter y in sert e d i n th e batter y ba y on t he left s ide of the com put e r.
Turns on when the Memory Stick™ is in use. Turns off when the Memory Stick™ is no l onger
in use.
Data is read from or written to the hard drive. The hard drive is not being accessed.
Turns on when the number keys in the numeric
keypad are active.
Turns on when the charac ters a p pear in
uppercas e as you t ype. The <Shift> key lowers
the case of typed characters when Caps Lock
is on.
Turns on when the screen scrolls differently
(depend s on the applicati on, no ef fect in ma ny
applications).
Turns off when the alphanumeric character
keys in t he keypad area are active.
Turns off when the characters appear in
lowercas e as you ty pe (u nless you hold dow n
the <Shift> key).
Turns off when the information moves across
the disp lay normally.
nN
33
Page 35

Using your notebook
Comb ina t io ns and fu nct io ns with th e <Fn> key
Combinations/Feature Functions
<Fn> + (ESC): Standby
<Fn> + (F3) : speaker swi tch
Sony Notebook User Guide
<Fn> + (F4): speaker volume
<Fn> + (F5): brightness control
<Fn> + / (F7)*: switch to the ext ern al displ ay
<Fn> + / (F8)*
<Fn> + (F12) : Hibernat e
nN
34
Puts the system into Standby mode, a power management state. To return
the system to the ac tive sta te, press any key.
Toggles the bui lt-in speaker on and off.
Adjusts the built-in speake r volume.
To increase vol um e, press <Fn>+<F4> and then or .
To decrease volume, pr ess <Fn>+<F4> and then or .
Adjusts the brightness of the LCD.
To increas e li ght ness intensity, pres s <Fn>+<F5> and then or .
To decrease light intensity, press <Fn>+<F5> and then or .
Toggles between the LCD, external display (connec ted to t he moni tor
connector) and both LCD and external display.
Toggles between the LCD and both LCD and TV.
Provides f or t he l ow est le vel of power consumption. When you execute this
co mma n d, t he s ta te s of t he sy s te m and of th e p eri ph e ral d ev i ce s ar e wr i t ten
to the hard disk and the system power is turned off. T o return the system to
its orig ina l state, use the power switc h to turn on the power.
* This function can only be used by the first user to log in. It will not work if you have switched to another user account.
Page 36

Using your notebook
Using the touc hpad
The keyboard contains a cursor-pointing device, your touchpad (1). You can point to, select, drag, and scroll
object s on the screen using the built-in touc hpad.
Sony Notebook User Guide
nN
35
Action Description
Point Slide one finger on the touc hpad to pl ac e the
pointer (2) on an item or object.
Click Press the left button (3) once.
Double-click Press the left button twice.
Right-cl ick Press the right butt on (4 ) once. In many
appli c atio ns, th is action displays a shortcu t
menu.
Drag Slide one finger while pres s ing the left but t on.
Scroll Move your finger a lo ng th e ri ght edge of the
touchpad to scro ll vert ical ly. Move your finge r
along the bot to m to scrol l hor i z ont al ly (the
scroll function is available only with
applicat i ons th at supp or t a touc hpad s c ro ll
feature).
Page 37

Using your notebook
Using the Jog Dial™
Your computer is equip ped wi th a Jog Dial ™ (1). You c an tu rn (2) and press (3) the Jog Dial™ t o scrol l the
window , se lect so ftw ar e, adj us t the intern a l speaker v o lume , an d so on.
Sony Notebook User Guide
nN
36
Page 38

Using your notebook
To launch the Jog Dial Navigator software, click Start, All Programs, then J og Di a l Navigato r, and
choose the fea tu re you want .
The Jog Dial Navigator so ftware includes the following features:
nN
37
Sony Notebook User Guide
Dial Up Tool
Folder Browser
Jog Dial Setting
PowerPanel
VAIO Setting
Window Switcher
From here you c an dial up to a networ k and the Inte r net .
Opens the J og Di al F older Brow ser window, w her e you can rot at e th e J og Dial™ and browse al l the
folders on your com puter and open any drive, folder, application or document.
Opens th e Jog Dial Setting window . See Changing Jog Dia l Navigator settings (page 43).
Control you r po wer ma nage m ent se tti ngs through Jo g Di a l Navi gat or.
Select to adjust settings of the Monitor, TV/LCD, Brightness, Bas s Boost , Mute and Speaker. Select
an opti on and pr ess the Jo g Dial™ to comp lete th e setti ngs .
Select t o di s play a window co nt aini ng all your open applications. Rot at e t o t he a ppli ca tion you want
to switch to and pres s the Jog Dia l™ to select .
Page 39

Using your notebook
Starting Jog Dial Navigator
To launch Jog Dial Navi gat or , proc eed as follo ws:
❑ Press the Jog Dial™.
OR
❑ Double-cl ick t he Jog Dial Navigator icon in the taskbar.
Sony Notebook User Guide
✍ Right-clicking the Jog Dial N avigator icon in the taskbar will give you additional options.
Usi ng th e Ind ic at or window
This window is the initial wi ndow of Jog Dial Naviga to r and can be displ ay ed on t he des kt op at all times .
You can choose to display the Indicato r wind ow on the ta skb ar or hide it altoget her .
nN
38
The Jog Di al Indica tor windo w appears at the top of the screen.
1 Launcher button Click this button to dis play the Jog Dial Launcher an d to l aunc h an applicat i on.
2 Mode button T his button displays the current mode for Jog Dial Navigator.
Click it t o sw itch bet we e n mod e s :
- Select SCROLL to enter Scroll mode.
- Select APPS to enter Appl i ca tion m ode .
Page 40

Using your notebook
3 LCD area This area display s infor ma tion a bout Jog Di al Na v igato r. The informati on displayed
4 Close button Click this button to close the Indicator window.
5 Jog Dial Navigator icon This icon dis pla y s Jog Di al Navi gat or oper a t i ons . You can click thi s ico n inst ea d of
Sony Notebook User Guide
Switching modes
When you are working in an application suppo rti ng th e Jog Dial Navig at or functio ns , you ca n use either
Scroll mode or Application mode. By switching m odes , you c hange the functions that can be perform ed
using the Jog Dial™.
✍ Functions that can be used with the Jog Dial™ depend on the software you are using.
Scrol l mode
You can use th is mode to scroll in th e current software. You can also scroll in the Start menu.
To switch from Application mode to Scroll Mode, proceed as follows:
nN
39
depends on the mode and softwar e in use.
To sh ow the w in dow a gain, dou ble-cl ick t he J og Di al N av iga to r i con in the tas kba r, or
right-click the Jog Dial Navigator icon in the taskbar and select Display Indicate
Window.
pressing the Jog Dia l™.
❑ Select SCROLL in the Indicator window.
OR
❑ with the Jog Dia l Navi gat or, select SCROLL MODE from the menu displ ayed in the Jog Dial
Navigator windo w.
✍ Even with software applications that do not support other Jog Dial Navigator functions, you can still scroll.
Page 41

Using your notebook
Application mode
To swi tch fro m S croll mode to Applic at ion mode, pr oc eed a s fo ll ows:
❑ Press the Jog Dial™.
OR
❑ Click APPS in t h e Indicator window.
This mode is used f or ope rati ons ot her than scr olling.
Sony Notebook User Guide
Depending on the application you are working in, you will see either
the Jog Dial Navigator or the Jog Dial Guide displayed on the
right-hand side.
Jog Dial Na vigator: Displa ys ite ms such as menus an d file names,
which you can se lect with the Jog Dial Navi gat or .
Jog Di a l Guid e: Disp lays the oper ation gui de f or the Jog Dial
Navigator.
A Shift indi ca to r: This ligh ts u p when the keybo a rd <Shift> key
B Close button: Click this to close the Jog Dial Navigator wi ndow
nN
40
opera ti on (u sing the Jog Dia l Naviga to r whil e the <Shift> key is
held down) is enabled.
and enter Scroll mode.
✍ If the software supports both display formats, you can switch between the two. If you select
the folder icon on t he left edge of the Jog Dial Navigator window, you can move down a
lev el or switch to the Guide display format.
Page 42

Using your notebook
Softw are not suppo rting Jo g Dial Navi gato r
Even if the software in use does not support the Jog Dial Navigator functions, you can scroll the window or
adjust the window size.
Action Description
Turn the Jog Dial™ Scrolls the window vertically. When several
Sony Notebook User Guide
Press the Jog Dial™ Maximizes t he size of the acti ve window. Press
Press <Alt> and the Jog Dial™ Minimise the size of the active window. Press
Press <Shift> and the Jog Dial™ Ends softwa re or progra ms in use.
nN
41
windows are displayed, the last selected
window will be scrolled.
again to return to its normal size.
both <Alt> and the Jog Dial™ again to return
to its normal size.
Page 43

Using your notebook
Usi ng th e Jog Di al Launcher
To start the Jog Dial Launc her , proceed as follo ws:
❑ In the Indicator window, click the arrow icon on the left .
OR
❑ Click the Jog Dial Navigator symbol on the right .
Sony Notebook User Guide
nN
42
The Jog Dial Launcher wi ndow appears.
Rotate the Jog Dial™ up and down to view the software applications and utilities on your computer. To
launch an appl icat io n, make su re it is selected and press the Jog Dial™.
With some folde rs you wil l then get t o a submen u. Agai n, rotate th e Jog Dial ™ to select a feature , then pre ss
to la u nch it.
Press the Back button to go back to the main menu, or to close the Jog Dial Launcher. You can also scroll
to and select Return.
Page 44

Using your notebook
Chan gin g Jo g Dia l Na vig at or se ttings
You can chang e the operation and display of the Jog Dial Navi gat or wit h the options in Jog Dial Setting.
To display the Jog Dial Se tti ng dialog box , pr oc eed as follows :
❑ Right-click the Indicator window or the Jog Dial Navigator icon in th e taskbar , and select Jog Dial
OR
Sony Notebook User Guide
❑ Double-click Jog Di a l Navigato r in the Control Panel (classic view).
OR
❑ Click Start, All Programs, Jog Dial Navigator then Jog Dial Setting.
Click a tab to display the setti n g item s.
nN
43
Setting from the me n u.
The Jog Dial Setti ng window appears .
Activity mode tab
Activity setting tab
Activity mode settings are enabled after you reboot your computer .
Using both scroll and application f unction ( normal activities): This is the normal activity m ode
settin g for Jog Dial Navi gato r.
Using Jog Dial as a mouse wheel: If this is selected, Jog Dial functions as a mouse wheel only.
Disabling all the Jog Dial functions.: If this is selected, al l the Jog Dial functions are disabled.
This sets the Jog Dial Navigator functions.
Scroll range: You can drag the slider left or right to set the scroll range.
Handling menu or dialog box by J og Dial. (You must reboot Windows): If this is se le c te d, you ca n
operate both pop-up menus and dialog boxes wit h J og Dial. This sett ing is enabled after you re boot y our
computer.
Select JogScript file: This specifies the location and name of JogScript files.
Page 45

Using your notebook
nN
44
Sony Notebook User Guide
Display/Sound tab
This sets the sound effects for the Jog Dial wi ndow display and Jog Dial functions.
Enabling moving anim ation: This enables or disables the animation effects during Jog Dial window
display.
Transparency: Y ou c an dr ag the slider lef t or rig ht to set the transp a re nc y of the Jog Dial window.
Sound whe n press ing Jog Di al: This specifies the sound file that is played when the Jog Dial is pressed.
Sound w he n spi nni ng Jog Di al : Th is s peci fies the s oun d f ile t hat is played when the Jog D ial is ro tated .
Page 46

Using your notebook
Using PC Cards
Your computer incl udes two PC Car d slot s. PC Cards allo w you to connec t portab le ext er nal devi ce s.
Inse r ti ng a PC Car d
To insert a PC Card, proc eed as follow s:
1 Insert the PC Card into one of the PC Card slots with the front label facing up.
Sony Notebook User Guide
2 Gently pus h the PC Card slot in to the connect or.
✍ Some devices may not function properly if you repeat Returning to Normal mode from Standby mode or Hibernate mod e.
nN
45
The PC Card is automatically detected by your system.
The Safely Remove Hardware icon appears in the system tray.
The computer will return to its original state if you restart it.
The PC Card slots can accommodate (at the same time) two Types I, two Types II or one Type III PC Card. These slots are compatible with Card Bus
ports.
Use the lo wer slot for P C Type III c ards.
Some PC Cards may require you to disable idle devices when using the PC Card. Y ou can use Sony Notebook Setup to disable devices.
Be sure to use the most recent software driver provided by the PC Card manufacturer.
Page 47

Using your notebook
nN
46
If an “!” mark app ears on the Devic e Manager tab in the System Properties dialog box, remove the software driver and then reinstall it.
You do not need to shut down the computer before inserting or removing a PC Card.
Do not force a PC Card into the slot. It may dam age the con nector pins. If you h ave difficulty ins erting a P C Card, chec k that you are i nserting the PC
Card in the correct di rection. See the manual supplied with your PC Card for more information on use.
For some PC Cards, if you alternate between Normal pow e r operat i on and Standby or Hibernate pow er management modes wh i le the c ard is
inserted, you may find that a device connected to your system is not recognised. Reboot your system to correct the problem.
Do not carry your notebook while touching the head of a PC Card, as pressure or shock may damage the connector pins.
Sony Notebook User Guide
Remo v ing a PC Card
Follow the steps below to remove the PC Card while your computer is on. If it is not removed properly, your
syste m may not work properl y. If you want to remove a PC Card when your computer is off, skip steps 1 to 7.
To remove a PC Card, procee d as follow s :
1 Double-cl ick t he Safely Remove Hardware icon in the syste m tra y.
The Safely Remove Hardware dialog box appears.
2 Select the hardware you want to unplug.
3 Click Stop.
4 In the Stop a Har dware Device dialog box, confi rm that the device can be safely removed from the
system.
5 Click OK.
A dialog box appears, explaining that it is safe to remove the device.
6 Click OK.
7 Click Close.
8 Push the PC Car d release button so that th e rel eas e button pops out.
9 Push the PC Card release button a second time so that the PC Card pops out.
10 Gently take hold of the Card and pull it out of the slot.
Page 48

Using your notebook
✍ If you unplug the PC Card from the computer when it is still turned on, your system might crash and you might lose data that you did not save before.
Sony Notebook User Guide
nN
47
Before you re move th e PC Card, cl ick th e PC Card icon in th e taskbar and close the card. C lose an y applications th at u se th e PC C ard before re m oving
the card. Oth erwise, data may be lost.
While the card is inserted, your computer may not enter the Hibernate power management mode. It may e nter Standby mode. It is recommended
that you remove the card when y our computer enters Hibernate mode by pressing the <Fn>+<F12> keys or by using the PowerPanel Utility, and
when it is set to enter Hibernate automatically while using a battery as the source of power.
Some PC Cards or their functions may not be compatible with this computer.
Page 49

Using your notebook
Using Memory Stick™
Your VAIO computer is de signed to sup port the Memory S tick™. The Memo ry Stick™ is a co mpact, portable,
and versatile device especially designed for exchanging and sharing digital data with compatible products.
Because it is remo v able , it can be used for external dat a stora ge.
Use the flash memory te chnology to download anythi ng t hat can be converte d in to digita l data , such as
pictu res, musi c, words, sounds, movie s and pho to gr aphs .
Foresee n as the universa l d ata storage device of the future, the Memory Stick™ can alre a dy be u sed wi th a n
Sony Notebook User Guide
ever-incr easing range of compatible products, includin g:
❑ Audio system s
❑ Visual devices
❑ VAIO products
❑ CLIE handhelds
❑ Mobile pho nes .
There are curren tly two di ffere n t typ es of Memo ry Stick ™:
❑ The generic Memory S tick™ , colo ur ed blu e.
❑ The MagicGate Me mory St ick™, col our ed wh ite.
✍ You can purchase Memory Sticks™ from the Sony Style website (http://www.sonystyle-europe.com), or fr om y ou r local Sony dea l er.
nN
48
Why Memory Stick™?
Sony's vision is to expand the worl d of communi c ation, promoting the port ability of digital data. The
Memory Stick™ is the resulting medium, through which digital devices can be instantly connected. With it,
you can download data from any compatible device, then transfer it to another in a single and instant
transfer.
Page 50

Using your notebook
The main advant ages of the Memory Stick™ are its:
❑ Compactness: with dimensions of just 21.5 mm (W) x 2.8 mm (H) x 50 mm (D), compatible products can
❑ Capacity: Its data capacity far exceeds that o f a floppy disk.
❑ Security: its lock option means you can prot ect your data f ro m accid ent al eras ur e.
❑ Versatility: memory capacity ranges fr om 4MB up to 128MB (the equivalent capacity of 88 floppy disks).
❑ Reliability: by way of protecting the hardware and its contents, the number of terminals is reduced to
Sony Notebook User Guide
❑ Durability: the sa me Memory Stick™ can be used tens of tho usands of times.
❑ Forward compatibili ty: th e Me mo ry Stick's™ c urre nt forma t is designe d to b e comp a tibl e wi th fu ture
The future of Memory Stick™
Memory Stick's™ potential is virtually unlimited, with the number of compatible products increasi ng
rapidly in both personal and professional spheres.
The introduc t ion of th e 256 MB and 512 MB Memory Stick™ is anticip ate d in 2002, and a 1 gigabyte
capacity Memory Stick™ is expected in 2003. Additionally, the native transfer speed of the Memory Stick™
will be increased to acco mmodate the increasing capacity . By the end of 2002, Memor y Sti ck's™ transfer
speed will be increased by eight times to a maximum of 20MB/sec.
nN
49
also be small, lightweight and attractive in their design.
only 10 pins. This, and the ov er all ro bus t stru ctur e of the stick, gives it a longer lif esp an th an oth er
storag e devices .
produ cts and hig her capa cit y Memor y S ticks ™ .
Page 51

Using your notebook
Gene ric Memory S tick™
The origina l Memo ry Stick™ , blue in colour, can be used to record image data taken wit h digit al st ill
cameras, etc. or data fro m the PC. With it, yo u can record, play back and transfer various kinds of data at
any given time.
Sony Notebook User Guide
Becau se it i s e asy to re mo ve and tran sp ort sa fe l y, yo u can u se Me mo ry Stick™ anywhere by inse r tin g it i nt o
any compatib le devi ce to transfer and sh ar e the informat i on y ou have save d.
For you, this means you can expand the capabilities of your VAIO computer in the following scenarios:
❑ With your still dig ital camera, share your holiday pict ur es inst a ntly by e-mail.
❑ From your handycam to your VAIO, make the most of your captured moments with the VAIO's movie
❑ Carry pictures on you by copying image files from the Internet to your V AIO to your CLIE handheld.
❑ With your voic e record er, add your voice to e-mails so your tone is nev er misu nderstood.
The blue Memory Stick™ is current l y avail able with a 4, 8, 16, 32, 64 or a 128 MB memory (the equi val ent
capacity of 88 fl oppy di sks) .
✍ Generic Memory Sticks™ cannot be used with the Memory Stick™ Walkman, or with data that is protected by copyright.
nN
50
editing tools.
Page 52

Using your notebook
MagicGate Memory Stick ™
The MagicGate Memor y St ick™ , white in colour, records PC and image data just like its blue count er par t ;
the differ ence is it use s the MagicGate copyright pr ote cti on t ec hnol ogy .
nN
51
Sony Notebook User Guide
With this type of Memory Stick™, also called the MG Memory Stick™, you can enjoy the following features:
❑ 32, 64 and 128 MB capacity versions.
❑ Storage of up to 120 minutes of audio data.
❑ Download and save:
❑ digi tal mu sic
❑ pictures
❑ movies, and more.
❑ Combine dat a file s to add musi c to your hom e movies , for example.
❑ Transfer and s har e data between sev er al digital products.
❑ MagicGate Copyright Protection Technology.
❑ SDMI (Secure Digital Music Initiative) Compliance.
❑ SonicS t age so ftwa r e.
So that you furthe r disti n gui sh a MagicGate Me mory Stick™ fro m a generic one, look for:
❑ the log o print e d on it
❑ a protruding dot located on the back.
Page 53

Using your notebook
✍ MagicGate is a copy right protection technology that complies with the standards set by SDMI (Secure Digital Music Initiative, an organization working
MagicGate
MagicGate refers to the copyright protection technology used by the MagicGate Memory Stick™ and other
MagicGate Memory S tick™ comp atibl e devices .
Sony Notebook User Guide
The Me mory Stic k™ Wa lkman a nd Mag icGa te Memo ry Stick™ work togeth er to ch ec k th e data a n d ensu re
it complies with copyright protection.
If no probl em s are detected , the data is ex cha n ged in encryp ted fo rm; if authe n ti catio n is not passe d, d ata
cannot be exchanged or played back.
SonicStage
SonicStage uses copyright protection technology designed to manage the digital music content downloaded
to the PC from CDs , the Intern et a nd/ or other sources.
Softw are install ed on the PC records mu sic conten t in encryp ted form onto th e hard disk. As well as allowing
you to enjoy music on the PC, this technology protects against unauthorised distribution on the Internet.
Since it is compatible with MagicGate, you can use SonicStage to transfer music that you have downloaded
onto your PC to your MG Me mo ry Stick™ , and playback on ot her Mag ic Gat e- equipped devices and medi a.
nN
52
to draw up industry standard spe cifications in order to protect copyrights of digital music).
The logo indicates the copyright protection system devised by Sony. It is not meant to guarantee compatibility with other media.
Copyright pr ot ec tion
People who create artistic works such as music are entitled to a "copyright", meaning that they have
exclusive right s to dic ta te how their wo rk is used. When they are created , artis tic works are automatically
protected by a copyright without having to submit notification or registra tion , and may no t be used wi thout
the permission of the person who created the work.
In the music world, however, i llegal acts of distributing mu sic without the permissi on of the artist,
parti cu larl y on the Intern e t, have rece n tly been on th e increase. That is why the Recordi ng Ind us try
Page 54

Using your notebook
Association of America (RIAA) took the initiative to organize a forum called Secure Music Digital I nitiative
(SDMI) to study technology for protecting copyrights during the electronic distribution of music.
Sony offers the MagicGate Memo ry Stick ™ an d Memory S tick™ Wa lkma n with a copyrigh t pr ote ctio n
functio n that com plies wi th SDMI standards, thereby prov iding an env i ro nm ent where indivi duals can
record and enj oy third- par ty music data wit hout worry i n g about co pyr igh t infring e men t.
✍ Literary works that are recorded by individuals are permitted for private usage only.
Compatible devices
Sony Notebook User Guide
There are nearly 80 Memory Stick™-enabled products on the market or announced for introduction worldwide, ranging from camcorders and portable music players to voice recorders and many other electronic
devices.
You can curre ntly us e Memory St icks ™ with the fo llow ing Sony products:
Visual:
❑ Cybershot di git al camer a
❑ Mavica digital ca mera
❑ PC, TRV and VX series digital video cameras
❑ LC data projector
Audio:
❑ MS Walkman
❑ MS Hi-fi system
❑ Network Walkmans
❑ Voice re corde rs
Other:
❑ VAIO notebooks
❑ VAIO desktops
❑ CLIE Handh eld Ent er t ain me nt O rga niser
nN
53
Page 55

Using your notebook
LOCK
LOCK LOCK
❑ Sony mobi le phon es
❑ Digita l print er s
❑ AIBO the Sony Enter t a in men t Rob ot
To find out more about the products available in your co unt r y, go to:
http://www.sonystyle-europe.com
Writ e - pr ot ec ti ng a Mem or y Stick ™
Sony Notebook User Guide
Memory Sticks™ are designed with an erasure prevention switch to protect valuable data from accidental
erasure or overwriting.
Move th e tab to th e rig ht or lef t* to set o r relea se write-protec tion . Whe n the e rasu re preven ti o n sw itch is
off, data can be saved on the Memory St ick™ . When the er asu re preven tion s wit ch is on, data can be read
from but not saved on the Memory Stick™.
nN
54
* The 128 MB Memory Stick™ has a vertical lock.
Page 56

Using your notebook
Inse r ti ng a Memo r y Stick ™
To insert a Memory Stick™ , proc eed as follo ws:
1 Once you have store d your dat a from yo ur digit a l device , insert th e Memory Stick™ with the arrow
2 Carefully slide the Memory Stick™ into the slot until it clicks in place.
Sony Notebook User Guide
nN
55
facin g up and toward the Me mory Stick™ slot.
The Memory Stick™ is automatically detected by your system and appears in your My Computer
window as a local drive, under the appropriate letter (depending on the configur ation of your
computer).
✍ Hold the Memory Stick™ with the arrow pointing in the c orrect direction
when you insert it into the slot. To avoid damaging the computer or the
Memory Stick™, do not f orce the Memory Stick™ into the slot if it does not
insert smoothly.
Page 57

Using your notebook
Removing a Memory Stick™
To remove a Memory Sti ck™ proceed as foll ows:
1 Check that the access light is off.
2 Push the Memory St ick™ in towards t he not ebook.
3 Pull the Memory St ick™ out of the slot .
Sony Notebook User Guide
✍ Always remove the Memory Stick™ gently, or it may pop out unexpectedly.
nN
56
The Memory Stick™ ejec ts.
It is recommended that you remove the Memory Stick™ before shutting down the computer.
Page 58

Using your notebook
Using the modem
Your noteb ook is equipped with an internal mod em .
You need to conne ct to a phone line to take advantage of online services and the Inter net , as well as to
register y our compu ter and s oftwar e online, and to contact VAIO -Li nk.
To connect a phone line, proceed as follows :
1 Plug one end of the phone cab le (1 ) into the phone li ne jack on the computer.
2 Plug the othe r end int o the wall jack (2).
Sony Notebook User Guide
✍ Do not pull the flexible cover too forcefully.
nN
57
A country-specific phone plug is supplied with your VAIO notebook, allowing you to plug the phone line into the wall jack.
We recom me nd tha t you use the sup pl ie d pl ug, be cau se the usa ge of any other phone plug can decr eas e the co nne c tio n qua l ity.
Your computer cannot be connected to a coin-operated telephone, and may not work with multiple phone lines or a private branch exchange (PBX).
If you connect the modem to a parallel connected phone line, the modem or the other connected device may not function properly. Some of these
connections may result in excess electrical current and could cause a malfunction in the internal modem.
Only DTMF (Dual Tone Multi Frequency) signalling (tone dialling) is supported.
Before using the modem, it will be necessary to select the country where you are actually using it. The detailed procedure for selecting the actu a l
coun tr y is explai ne d in Configuring your mo dem in the Software User Guide.
Page 59

Using your notebook
Using the correct phone plug
If there are two phone pl ugs in the box, make sure you use the correct one for the cou ntry you are in, as
follows:
Sony Notebook User Guide
nN
58
UK: Th e conn ecto r can be ide nt ified by its cuboi d sh ape and
flat pins .
Netherlands: The connector can be identified by its
protruding pins.
Page 60

Using your notebook
Using power saving m odes
When you use a battery as the sour c e of power for your compu te r, yo u can take advantage of power
manag e ment se tti ngs t o c onse rve b atte ry lif e. In a dd iti on to th e n o rmal o p era ti ng mo de , w hi ch allows you
to turn off specific devices, your computer has two dis tinct power saving modes: Standby and Hibernate.
When usin g batte ry p owe r, you shou ld b e aw are that the comp ut er auto matically enters Hibernate mode
when the rema ini ng battery charg e drops bel o w 7 perce nt, re gar dle ss of the power man agemen t se tti n g
you select.
Sony Notebook User Guide
✍ If the battery level falls below 10 percent, you sh ould either attach the AC adapter to recharge the battery or shut down your compu ter a nd ins ert a
Usi ng No r mal mo de
This is the normal state of your computer when it is in use. The green power indicator light is on in this mode.
To save power while not working, you can turn off a specific device such as the LCD or the ha rd disk.
Usi ng Sta nd by mo de
The computer saves the current stat e of the sys tem in RAM and switches off power to the CPU. The umbe r
power light flashes in this mode.
To activate Sta ndby mode, proceed as follows:
Press the <Fn> and <Esc> keys si mu lt a n e o usly.
Alternatively,
1 Click Start and then Turn Off Computer.
2 In the Turn off co mputer scree n, press Standby.
To retu rn to Normal mode, proceed as follows:
Press any key.
nN
59
fully charged battery.
The computer ent ers St andby m ode.
Page 61

Using your notebook
Usi ng Hi be r na te mod e
The sta te o f th e system is save d on the h ard d isk a nd power is turn ed o ff. The po we r ind ic at or li ght i s o ff i n
this mode.
To activate Hiber nat e mode, proc eed as foll ows:
Press <Fn>+<F12>.
The Hibernating screen appears and the notebooks enters Hibernate mode.
Sony Notebook User Guide
Alternatively,
Click Start, and then Turn Off Computer.
In the Turn off computer screen , hold dow n the <Shift>-key and press Hibernate.
To retu rn to Normal mode, proceed as follows:
Turn on the compu te r by pres sing t he pow er button.
The computer returns to its previous state.
✍ When the co mputer is in Hibernate mode, you cannot insert a disc.
nN
60
Hibernate mode requires more time than Standby m o de to be activated.
It takes more time to return to normal mode from Hibernate mode than from Standby mode.
Hibernate mode uses less power than Standby mode.
Do not move the notebook until its power indicator turns off.
Page 62

Using your notebook
Using the CD-RW/ DVD-RW drive
Your computer is equipped with a CD-RW/DVD-RW dr ive.
To insert a disc, proc eed as follo ws:
1 Tu rn on the compute r.
2 Press the eject butt on (1) to open the drive.
Sony Notebook User Guide
3 Place a disc in the middle of the tray w ith the lab el side facing u p until the disc clicks into place.
nN
61
The tray slides out.
4 Close the tra y by pushi ng it gent l y.
Page 63

Using your notebook
✍ When the co mputer is in Standby or Hibernate mode, you cannot insert or remove a disc.
nN
62
Be sure to seat the disc firmly over the disc drive hub fingers. If you do not seat the disc firmly, you could damage your disc drive and you may not be
able to open the tray.
When you finish using a disc, wait until the LED indicator turns off and then press the eject button to remove the disc.
If the disc does not come out when you press the eject button, go to Windows Explorer or My Computer . Se lect the drive, cl ick the right button
of y our mouse and sel e c t Eject or press the <Fn>+<E> k eys to open the disk tray. If it still does not work, turn off the computer and insert a thin,
pointed object (e.g., a paper clip) into the manual eject hole.
Sony Notebook User Guide
Usi ng th e DV D funct ion
To achieve opt imum perfor m ance w hen playing DVD-ROM discs , you s houl d fo llow these
recommendatio ns.
❑ You can play DVDs using the CD-RW/DVD-RW drive and the WinDVD software. See the help file on the
WinDV D softwa r e for details.
❑ You r com put er should not be connected to the port repli cat or while pl aying DVD movies or using DVD
applications.
❑ Close all open applications before playing a DVD-ROM movie.
❑ When playing DVD movies on battery power, set the power management profile to DVD. With other
profiles , the mo vies c an be choppy.
❑ Do not switc h power sa ving mode s whil e playi ng a DVD video.
❑ Do not use resident disc ut il iti e s or resident ut il iti es to speed up th e access of discs, because they may
cause th e system to become unstable.
❑ Make sure that the screensaver is deactivated.
❑ Depending on the display setup properties you selected, you may use the <Fn>+<F> command to expand
the screen to full screen size.
Page 64

Using your notebook
❑ Region codes in dicat or s are labelled on t he DVD disc s to indicate in which r egi on and on wh at type of
❑ Do not try to change the reg ion code settings of the CD-R W/D VD-RW dr ive. Any diff icul t ies c aus ed by
❑ When a DVD video disc is inserted in the CD-RW/DVD-RW drive, you cannot toggle between LCD and TV
Sony Notebook User Guide
❑ When a TV is connected, a part of the video screen will not appear with the factory settings. Adjust the
nN
63
player you can play the disc. Unless a 2 (Europe belongs to region '2') or All (this means that you can play
this DVD everywhere in the world) is labelled on your DVD disc or on the packaging, you cannot play the
disc on this pl ayer.
changing the region code settings of CD-RW/DVD-RW drive are out of warranty.
by pressing <Fn>+<F8>.
display res olu tion t o 640x480.
Page 65

Using your notebook
Usi ng th e CD- RW/DVD-RW funct ion
To burn CDs/DVD s , you c an us e CD/DVD-RW and CD/DVD-R di scs:
❑ The CD/DVD-RW (CD/DVD-Re Writa ble) disc is a data mem or y medium that can be use d to writ e, erase
❑ The CD/DVD-R (CD/DVD-Re cordable ) disc is a data memory me dium that can be use d to write a progra m
To achieve opt imum perfor m anc e w hen wri ting dat a on a CD-RW /DVD-RW disc, follow these
Sony Notebook User Guide
recommendatio ns:
❑ To make a CD/DVD-R’s data readable on a CD-RW/DVD-RW drive, you need t o close the session when you
❑ Only u se circul ar d iscs . D o not u se discs with any other sh a pe (star, heart, card, etc.), as th i s ma y d ama ge
❑ Do not strike or shake the comput er while writ ing data to a disc.
❑ For optima l wri ting sp eed, deactiva te the scre ensave r b efo re writi n g data to a disc.
❑ Memory- residen t disc u tilitie s may cause unstab le ope ration or d ata loss . Deac tivate the se utili ties befo re
❑ For be st r e su lts, u se C D/ DVD -R s th at a re com pati b le wi th 4x spe e d, a s t he sof tware p re-installed on yo u r
❑ When using a software application to burn CDs/DVDs, be sure to exit and close all other applications.
❑ Never touch the surface of the disc. Fingerprints and dust on the surface of a disc may cause writing
❑ Do not put your VAIO noteb ook into a pow er saving mo de while using the pre-insta ll ed so ftw ar e.
nN
64
and rewrit e a program or other data .
or other data, but once only.
eject it. To complete this process, fo llow the instructions i ncluded with your software.
the CD-RW/DVD -R W drive.
writing data to a disc.
computer is preset to that speed. Your VAIO notebook does not support 1x-writing speed.
errors.
Page 66

Using your notebook
Using the weight save r
The weight saver protects the multipurpose bay when it is empty, and secures the second battery or the
CD-RW/DV D-RW dr i ve when they ar e inst all ed in the multip ur pos e bay .
To attach the weigh t saver, proc eed as follo ws:
1 If another devi c e is in the multipur pose bay, remove th e device.
2 Slide the weight sa ve r in the directi on of the arrow until it clic ks into place.
Sony Notebook User Guide
To remo ve the weight saver, proceed as follows:
1 Slide the multip ur pos e bay releas e lever on the bottom of the comput er in the direct ion of the arrow.
nN
65
2 Remove the weight sa ve r.
Page 67

Connecting peripheral devices
Connecting peripheral devices
You can add functionality to your comput er by conn ec ting or using any of these per i pher als.
Before you connec t per iph era ls, tur n of f the comp ut er and all peri pher al s.
Connect the power cord only after connecting all cables.
Turn on the computer onl y after turning on all peripherals.
nN
66
Sony Notebook User Guide
❑ Connecting a port replicator (page 67)
❑ Connecting an external display (page 70)
❑ Connecting external speakers (page 76)
❑ Connecting an external microphone (page 77)
❑ Connecting an external mouse or keyboard (page 78)
❑ Connecti n g a Universa l Seria l Bus (USB) device (page 79)
❑ Connecting a printer (page 83)
❑ Connect ing an i.LINK™ device (page 85)
❑ Connecting to a network (LAN) (page 87)
✍ Hot plug and play devices should be plugged when the computer is switched on.
USB devices are hot plug and play devices. Y ou do not need to shutdown your computer prior to connecting these devices unless the manual supplied
wit h the device stat es differen t ly.
Page 68

Connecting peripheral devices
Connecting a port rep licator
Your notebook supports the use of an optional po rt replicator. Attaching a port replicator en ables you to
conne ct addit ion al peripherals to your computer , such as a printe r or an external displ ay .
Sony Notebook User Guide
1 DC In port (page 20) 7 S-Video out conn e cto r (page 73)
2USB port (page 79) 8 Ethernet/netwerk port (10BASE -T/100BA SE- TX) (page 87)
3 Serial por t (page 84) 9 Monitor/ VGA por t (page 70)
4 R ig h t lin e -in and lef t line- in connectors (page 73) 10 PS/2 mouse /keyboard connector (page 78)
5 Right line-out and left line-out connectors (page 73) 11 Printer port (page 83)
6 Video out connector (page 73) 12 US B por t (page 79)
nN
67
✍ The po rt replicato r can b e powered on ly with th e AC ad apter s upplied with you r notebook. Do not remo ve the AC adap ter from th e port replicator or
the AC outlet when using the port replicator; this may cause data damage or hardware malfunctions .
When connecting video cables to S-Video out and Video out simultaneously , only the S-Video out connector can be used.
Page 69

Connecting peripheral devices
Attaching your comput er to the port replic ator
To attach your computer to the port replicator, proceed as follows:
1 Disconnect all peripherals from the
computer.
2 Plug the cable attached to the AC adapter (1)
into the DC In port (2) on the port repli c at or
(3).
Sony Notebook User Guide
3 Plug the power cord (4) into the AC adapter
and an AC outlet.
The power indicator DC IN of the port
repli cato r tu rn s green .
4 Close the cover and ali gn t he botto m
conne ctor of the notebo ok wi t h the
conne ctor on th e por t repl icat or.
5 Gently press the notebook down until it clicks
into place.
6 Open the cover and tur n on the noteb ook.
✍ When you use the port replicator for the first time , the installation
of the network drivers starts automatically.
When attaching your computer to the port replicator, do not
attempt to insert or remo ve the battery p ack. Lifting and turn ing
the computer with the attached port replicator may cause a
temporary loss of power.
Use the AC adapter that comes with your notebook or the optional Sony adapter.
nN
68
Page 70

Connecting peripheral devices
Disconnecting your com puter from the port replicator
To disconnec t your com puter from the port repli c at or, pr oceed as follo ws:
1 Stop the connected peripherals using the Unplug/Eject icon in the ta sk ba r.
2 Close the cover and pull the levers on each side of the port replicator to disconnect the computer from
the port replicator.
Sony Notebook User Guide
3 Lift the notebook aw ay from the port rep li cat or.
nN
69
4 Close the port rep li cat or conn ecto r cover on the bottom of your comput er.
✍ It is extremely important to close the port replicator connector cover after removing your computer from the port replicator. If the cover is left open,
dust may get inside and damage the computer.
To disconnect your port replicator completely from the mains voltage, unplug the AC adapter .
Page 71

Connecting peripheral devices
Connecting an external display
You can conne ct an ext ern al disp lay t o your noteb ook. For example, you can use your notebook wi t h the
following devices:
❑ Compu ter di sp lay (monitor);
❑ Multimedia c o mputer dis p la y ;
❑ TV;
Sony Notebook User Guide
❑ Projector.
✍ T urn off your computer and the peripherals, unplug the AC adapter and the power cord before connecting the external display.
Connect the power cord after connecting all other cables.
Turn on the peripherals, then turn on your computer.
Connected external displays are used as second screens.
On Win do ws
®
nN
70
systems only, you can also use an external display to set up a virtual desktop.
Page 72

Connecting peripheral devices
Conne ct ing a computer disp la y
You can connec t a computer display (monitor) either directly to your notebook or via the (optional) port
replicator.
To connect a compu ter di sp lay, pro ce ed as follow s :
1 Plug the display cable (1) (not supplied) into the monitor/VGA connector (2) on the notebook or the
port repl icator.
Sony Notebook User Guide
2 If necessary, plug one end of the display’s power cord (3) into the display, and the other end into an AC
outlet.
nN
71
✍ Yo u cannot use the monitor connector on your notebook when the port replicator is connected to the notebook.
Page 73

Connecting peripheral devices
Conne ct in g a mu lt im ed ia comp ut er dis pla y
You can conne ct the not ebook to a multimedia computer display t hat incl udes built -in s peaker s and a
microphone.
To connect a mult imedi a co mp ut er display, pr oc eed as fol lows :
1 Plug the displ ay cable (1) into t he monitor /VGA connector (2) on the computer or on the port
replicator.
2 Plug the speaker cable (3) into the headphone connector (4) on the comp ut er.
Sony Notebook User Guide
3 Plug the microp hone c abl e (5) into the mic ro phone connector (6) on the computer.
nN
72
Page 74

Connecting peripheral devices
Conne ct ing a TV
You can connec t a TV to the notebook or to the optional port replicator.
To connect a TV to the notebook, proceed as follows:
1 Plug one end of the audio/video cable (1) (optional) into the AV Out connector (2) (yellow) and the other
end into the TV.
2 Plug the power cor d of the TV (3) into an AC outlet .
Sony Notebook User Guide
3 Switch the input c hannel of the TV to external inp ut .
4 Set up the TV configu ration system.
nN
73
✍ See the manual supplied with your peripheral for more
information on installation and use.
If you ins ert a DVD in your CD-RW/DVD-RW drive to watch a
video o n y our TV, the <Fn>+<F8> key combination might
not activate the function to to ggle b etween you r LCD and TV.
Solution:
1. Eject your DVD from you r computer.
2. Once th e DVD is ej ected, toggle between your LCD and
your TV with the combination <Fn>+<F8>.
Your image displays now on both LCD and TV. Re-insert your
DVD to launch your DVD so ftw are.
If the display resol ution of y our c omputer is m ore th an 800 x
600 pixels, a part of the image cannot be displayed on your
TV. The hidden area on your TV can be seen by moving the
cursor on your computer . If you want to display the full image,
change the display resolution of your computer to 640 x 48 0
pixels.
Page 75

Connecting peripheral devices
To connect a TV to the port replicator, proceed as follows:
1 Attach the por t repl icat or to your not ebook.
2 Plug one end of the aud io/v id eo cab le (1) (opt ional)
into the right and left line- out and t he Video out
connec tor (2) and the other end into the Audio Left
and Audio Right connectors and the Video connector
on your TV.
Sony Notebook User Guide
3 Plug one end of the S-video cable (3) (optiona l) into
the S-Video out connec t or (4) a nd the other end in to
the S-video connec t or on your T V.
4 Switch the input c hannel of the TV to external inp ut .
5 Set up the TV configu ration system.
nN
74
Page 76

Connecting peripheral devices
Conne ct ing a projector
You can conne ct a project or (such as the Sony LCD projector) directly to your notebook or via the port
replicator.
To connect a project or , proc eed as foll ows:
1 Plug the RGB signal cable (1) into the monitor /
VGA connector (2) identified by the symbol.
Sony Notebook User Guide
2 Plug the audio cable (3) (no t suppl ie d) i nt o the
earphone connector (4) identified by the
symbol.
3 Plug the RGB signal cable and the audio cable
into the conne ctor s of the projector (5).
4 Connect the power cord (6) of the project or into
an AC outlet.
✍ Yo u may not be able to display the computer's LCD and the external
display together, depending on the types of computer display and
projector used.
You can toggle the output between the notebook LCD-screen and the
external monitor by pressing the key combination <Fn>+<F7>.
nN
75
Page 77

Connecting peripheral devices
Connecting exter nal speakers
You can enhanc e the sound quali t y of your co mp uter by connec t i ng ex te rnal speaker s .
To connect exte rn al speakers , proc eed as foll ows:
1 Plug the speaker cable (1) into the headphone connector (2).
2 Plug the other end of th e speaker cabl e into the external sp eaker.
3 Turn down the volume of the speaker s before y ou turn them on.
Sony Notebook User Guide
nN
76
✍ Make sure your speake rs are designed for computer use.
Do not place diskettes on the speakers; their magnetic f ield may damage the data on the diskettes.
Page 78

Connecting peripheral devices
Connecting an external microphone
Your VAIO notebook does not contain an internal microphone. If you need to use a sound input device, for
example to chat on the Intern et , you need to plug in an external microphone.
To connect an external microphone, pr oceed as follows:
1 Plug the microphone cable (1) into the microphone connector (2) identified by the symbol.
Sony Notebook User Guide
✍ Make sure your microphone is designed for computer use.
nN
77
Page 79

Connecting peripheral devices
Connecting an externa l mou se or keyboard
You can conne ct an extern al mous e or keyboar d to the optional port replicat or using th e PS/2 mous e/
keyboard connector. There is only one PS/2 connector, so you can only connect one external device at the
same time. Of cour se, you can alway s conn ec t an exter nal USB mouse or key board. See Connecting a
Universal Serial Bus (USB) device (page 79).
Before you connec t or dis connec t the mouse or the keybo ard , turn off the computer.
To connect an external mouse or keyboard, proc eed as follows:
Sony Notebook User Guide
1 Plug the mouse cable (1) or the keyboard cable (2) with the sym bol facin g up into the PS/2 mo use/
keyboard connec tor (3) ident ifi ed by MOUSE/KEYBOARD.
nN
78
✍ See the manual supplied with your mouse or keyboard for more information on installation and use.
Page 80

Connecting peripheral devices
Connecting a Univer s al Serial Bus (USB) device
You can connect a USB device (for example, a mouse, floppy disk drive, keyboard, printer) to your computer.
Before connec t in g or dis co nnec t in g a USB peripher al, you do not need to shut down the comp ut er.
You may need to install software (device drivers) supplied with your USB device before using the USB device.
There are 3 USB ports on your note book ( at the back, at the left, at the right) and 2 USB ports at the back
of the optional port replicator.
nN
79
Sony Notebook User Guide
Conne ct ing a USB mous e
To connect a USB mouse , proc eed as follo ws:
1 Choose the USB connector you prefer to use (at
the back, left or right of the notebook (1) or the
optional port replicator).
2 Plug the USB mouse cable (2) into the USB
connector.
You can use your USB mouse (3).
✍ The VAIO USB mouse software driver is preinstalled on your
notebook, therefore, you only need to plug the USB mouse into the
USB conn ect or a nd yo u can sta rt work i ng.
Page 81

Connecting peripheral devices
Conne ct ing a USB flop py dis k driv e
As an optional ext r a, you can pur c has e a USB floppy di sk drive and connect it to your compu te r.
To connect a USB floppy di s k drive, proc eed as foll ows:
1 Choos e the USB conn ecto r you pref er to use.
2 Plug the USB floppy di sk dri ve cab le (1) into the USB connector (2). The VAIO logo on the disk drive
should be faci ng up.
Sony Notebook User Guide
Your USB floppy disk dri ve is now ready for use.
nN
80
Page 82

Connecting peripheral devices
To remove a USB floppy disk dr ive, proceed as follo ws:
❑ If your computer is on, wait until the floppy drive LED indicator turns off and then unplug the USB cable.
If the floppy dis k dri ve is not rem oved pr oper l y, your system may crash and y ou ma y lose any unsaved
data.
❑ If your comp uter i s off, you can direc t ly unpl ug t he USB cable from the computer.
Inserti ng a floppy di sk
nN
81
Sony Notebook User Guide
To insert a floppy di sk, pr oceed as fol lows :
1 Hold the disk (1) with the label side facing up.
2 Gently push the disk into th e drive (2) until it clicks into place.
Page 83

Connecting peripheral devices
Removing a floppy di sk
To remove a floppy disk , proceed as follows:
When you have finished using the floppy disk, wait until the LED indicator (1) turns off and then press the
eject button (2) to remove the disk.
Sony Notebook User Guide
✍ Before pressing the eject button , mak e sure that the LED indicator is turned off.
If the disk does not come out by pressi ng the e j ect bu tton, disconnect the floppy disk dr i ve fr om the c omputer.
! Do not press the ej ect button while the LED indicator is on. It may damage the floppy disk.
nN
82
Page 84

Connecting peripheral devices
Connecting a printer
You can conne ct a Windo ws®-compatible printer to your com put er to print docum ents.
Conne ct ing a printer using the USB conn ec to r
You can conne ct a USB printe r com pat ibl e wit h yo ur versio n of Win dow s® to your computer.
To connect a print er using t he USB connec t or , proc eed as follows:
Sony Notebook User Guide
1 Plug an option al USB
printer cable into one of the
USB connec to rs on your
notebo ok or your opti onal
port repl icator.
A USB connector is
identifi ed by the symbol
on your notebook, port
replicator and printer.
2 Plug the printer power cord
into an AC outlet.
✍ Befo re usi ng the print e r, you may need
to change the Printer settings in the
Sony Notebook Setup softwar e.
Turn off the printer, unplug the AC
adapter and the power cord before
connecting the printer.
nN
83
Page 85

Connecting peripheral devices
Conne ct ing a printer using the prin ter conne ct or
The optional port replicator and the notebook are equipped with a printer connector.
To connect a print er using t he printe r connec t or , proceed as follows:
1 Plug the printer cable (1 ) suppl ied with the printer into the pri nter connect or (2) identi fied by the
symbol.
2 Plug th e printer power cord (3) into an AC outlet.
Sony Notebook User Guide
nN
84
✍ Before using the printer, you may need to change the Printer se ttings in the Sony Notebook Setup software.
Page 86

Connecting peripheral devices
Connecting an i.LINK ™ device
Your computer includes an i.LINK™ (IEEE1394) connector, which you can use to connect to an i.LINK™ device
such as a digital video cam era recor der or to connect two VAI O noteb ooks in order to copy, delet e or edit
files.
The i.LINK™ connec t or of your not ebook does not supply power to extern al devi ce s genera lly powered by
i.LINK™ c onnec tor s .
The i.LINK™ connec t or sup port s tr ans fe r rates up to 400 Mbps; how ever , the actual transfer rate depends
Sony Notebook User Guide
on the transfer rate of the external device.
The i.LINK™ featu re s available may vary depending on the software applications you use. Ref er to the
docu ment a tion that came with your software for more informati on.
i.LINK™ ca ble s compat ible with your VAIO notebo ok incl ude c ables with the following part numb er s:
VMC-IL 4415A (a 1.5 meter cable with a 4-pin connector at each end), VM C-IL4408S eries (a 0.8 meter cable
with a 4-pin connect or at each end) .
✍ An i. LINK™ connection with other compatible devices is not fully guaranteed.
The i. LINK™ connection varies depending on the software applications, operating system and i. LINK™ compatible devices you use. Refer to the
documentation that came with your softw are for more information.
Check the working conditions and OS compatibi lit y of i.LINK ™ -compat ible PC per ipherals (HDD, CD-RW drive etc. ) before yo u connect them to your
notebook.
nN
85
Page 87

Connecting peripheral devices
Connecting a di gi tal vide o c amera reco rder
To connect a digit al vid eo camer a r ec or der, proc eed as follo ws:
1 Plug one end of the i.LINK™ cable (1) into the i.LINK™ connector (2) of the computer and the other end
into the DV Out connecto r (3) o n the digi tal vid eo camera reco rd er.
Sony Notebook User Guide
nN
86
2 Launch the DVgate application.
✍ On Sony digital video came ras , connectors labelled DV Out, DV In/Out or i.LINK™ are i.LINK™-compatible.
The Sony digital video camera recorder is an examp le; your digital video camera recorder may need to be connected differently.
If your digital video camera recorder includes a Memory Stick™ slot, you can copy images from it to your computer via a Memory Stick™. To do so,
simply copy images on the Memory Stick™, then insert it into the Memory Stick™ slot of your computer.
Page 88

Connecting peripheral devices
Connecti ng two VAIO note book s
You can copy, edit or delet e files on another VAIO compu ter to yo ur computer wit h an optional i.LINK™
cable. If the secon d compu te r has the Window s® XP operating system, you just need the i.LINK™ cable. If
the second comp ut er has a diffe r ent operating s y s tem (e.g. , Win dow s® 2000), you need a software
applica tion s uc h as Smar t Con nect .
You can also print a documen t on a printer connec t ed to anot her VAIO com put er .
nN
87
Sony Notebook User Guide
Connecting to a net work (LAN)
You can connect your c omputer or port replicator to 10BASE-T/100BASE-TX-type networks via an Ethernet
network cab le. For the det ailed se tti ngs and dev ices needed to connect to the network, cons ult your
Network Admin istrator.
✍ The default settings make your computer able to connect to
the network.
If the main unit is docked, you can only use the Ethernet network
connector on the port replicator.
For mo re information about connecting your notebook to the
network, ple ase consult th e Hardware troubleshooting section of
the VAIO-Link website:
How to troubleshoot network problems
! Do not plug a phone cable into the Ethernet network connector.
Page 89

Getting help
Sony Notebook User Guide
nN
88
Getting help
This section describes how to get help and support from Sony, and provides troubleshooting tips for your
computer.
Sony support options
Sony provi des sever al supp or t opti ons fo r your comp ut er .
Printed documentat ion supplied with your notebook
The printe d part of your docu men ta tion c ont ains:
❑ A Getting Started broc hure, where you will find a brief desc r iption of the items in your box, some
specifications of your notebook, and how to setup your notebook;
❑ A Troubleshooting Guide, where you will find all the basic in forma tion you need to start using your
notebook, as well as troubleshooting and VAIO-Link information;
❑ Your Sony Guarantee conditions;
❑ A Safet y Reg ulatio ns flye r;
❑ A Modem Regulations flyer.
Online user guides on your hard disk drive
1 The Sony Noteb ook User Guide:
❑ Using your notebook show s you how to use th e standa rd co mp onen ts o f yo ur syste m. In thi s part
of the manua l you will als o find out wh at you can do with a Memory Stick™.
❑ Connecting peripheral devices expl ain s how y ou ca n add fun ctionality by connect i ng va rious
peripherals.
❑ Getting help explains the support opt io ns availa ble to you, and offers basic troublesh oot in g tips .
Page 90

Getting help
Sony Notebook User Guide
nN
89
❑ Precautions provides facts and adv ice about using your note book.
❑ Glossary refers to terms used i n this manual.
2 Refer to your Software Guide for inf ormati on on th e bundl ed so ftw ar e and th e Sony applic at ion s.
❑ About the Software on your computer i s a short description of the features of the software pre-
installed on your system.
❑ Using Video software explai ns how to use Sony video so ftw ar e: DVgat e, MovieShaker and Smart
Capture.
❑ Mana gi ng audi o file s wit h Soni cSt age explains how to convert your existing MP3, WMA and
WA V forma t a udi o files into A TR A C3 fo rmat.
❑ Using D igitalPri nt explains how to get the most enjoyment out of your photographs taken with a
digi tal came ra.
❑ Customizing your computer explains how to set your system and power management.
❑ Installing and updating applications expl ains how to ins tall, run or unins t all a soft ware
application.
❑ Mana gi ng driv er s explains how to install, update or uninstall a driver.
❑ Using the Product Recovery CD-ROMs explains how to per form a sy stem and applica tion recovery .
❑ Using partitioned drives tells you what you can do with par tit io ned dr ives.
3 Refer to the Specifications online document for deta ils on your c om put er, drivers and accesso rie s .
4 In the VAIO-Link Customer Service Guide you will find all the VAIO-Link information you need,
including specific contact numbers and addresses for each country .
5 Consult the Online Help files of the software you a re using fo r detai led information on feat ur es and
troubleshooting.
6 Refer to the Microsoft Quick Start man ual for more in fo rmation on Windows®.
7 Go to http://www.club-vaio.sony-europe.com to find online tutorials about y our favo ur ite VAIO
software.
Page 91

Getting help
Sony Notebook User Guide
nN
90
Oth er sources of in formati on
❑ The Online help files that accompany your pre-installed software contain instructions o n using the
software.
❑ VAIO-Link website: if you have any problem with your c om put er, you can access the VAIO-Link web
site. Go to :
http://www.vaio-link.com
❑ VAIO-Link: Before contacting VAIO-Link, try to solve the problem by reading the User Guides and help
files fo r the per iph era ls or soft ware .
✍ You need to plug in the phone line and configure your modem for use before using the communication features described in this manual.
Page 92

Getting help
Sony Notebook User Guide
nN
91
Troubleshooting
This section describes how to solve common problems you might encounter when using your notebook.
Many problems have simple solutions. Pleas try these su ggestions before contacting VAIO-Link .
❑ About the computer and software (page 92)
❑ About the display (page 95)
❑ About CD- ROMs , DVD-ROMs and floppy disks (page 96)
❑ About sound (page 100)
❑ About the modem (page 101)
❑ About peripherals (page 102)
❑ About digi t al vid eo cap tu re s and DVgat e (page 103)
❑ About power management (page 103)
❑ About i.LINK™ devices (page 104)
Page 93

Getting help
Sony Notebook User Guide
nN
92
About the computer and software
My computer does not start
❑ Check that the computer is plugged into a power source and that it is turned on.
❑ Check that the powe r indica tor on th e front pane l of the comp ut er indi ca tes that the power is on.
❑ Check that the batte ry packs are inserte d prope rly an d that they are charge d .
❑ Make sure there is no diskett e in the floppy disk drive.
❑ Confirm that the power cord and all cables are connected firmly.
❑ If you have plugged the computer into a UPS (Uninterruptible Power Supply), make sure the UPS is
turned on and works.
❑ If you are using an exter nal di splay, check that it is plugge d into a power s our c e and turne d on. Check
that yo u have switch ed to the ex ternal disp lay and that the brightn ess and con trast c ontrols are adjusted
correctly.
❑ Moisture condensation may have occurred. D o not use the computer for at least one hour and then turn
it on.
❑ When the internal backup battery is l ow on power, it may not b e able to start your system properly.
The mess age 'Pre ss <F1> to resume , <F2 > to setu p ' appea rs at sta rtu p
If the floppy disk drive is empty, proceed as follows to initialize the BIOS:
1 Tu rn of f the compute r.
2 Remove any perip her al devi ce s conn ec te d to the comput er.
3 Turn on the computer and pres s <F2> when the Sony logo appears.
The BIOS setup men u screen appear s .
4 Set the date (month/day/year).
Page 94

Getting help
Sony Notebook User Guide
nN
93
5 Press Enter.
6 Press the arrow keys to select System Time.
7 Set the time (hour :mi nut e:second).
8 Press Enter.
9 Press the arrow keys to select the Exit menu.
10 Press the arrow keys to select Get Default Values and then press <Enter>. The message Load default
configuration now? appea rs.
11 Make sure that Yes is selected and then press <Enter>.
12 Press the arrow keys to select Exit (save changes) and then press <Enter>.
The Save configuration changes and exit now? message appe ars.
13 Make sure that Yes is selected and then press <Enter>.
My computer does not shut down
You are recommended to shut down your computer using the Turn Off command on the Windows®Start
menu. Using other methods, including those listed here, may result in loss of unsaved data. If the Turn Off
command does not work pr oper ly, pr oceed as fol low s :
❑ Press <Ctrl>+<Alt>+<Delete>. If you have not chang ed the default se tti ngs, you wil l enter the Task
Manager, where you ca n close any appl icat io n tha t cannot close normally, and restart your syst em .
❑ If this does not work, press <Alt>+<F4> to get to the Turn off computer screen, from where you can
shut down or resta rt your comp ut er.
❑ If this does not work, press the power button and hol d it for at least four secon ds .
This turn s off th e power.
❑ Unplug the computer from th e AC adapter an d remove the battery pack fro m your computer.
Page 95

Getting help
Sony Notebook User Guide
nN
94
My computer locks up
❑ If you suspect o n e application is locki ng your syst em , you can try to stop it. To do this, pres s
<Ctrl>+<Alt>+<Delete> simultaneously. If you have not changed the default settings, you will enter the
Task Manager. Sel ec t the appl ication or process that is locking your system, and then click End Task.
❑ If the above method does not work or you do not know which application is locking your system, restart
the computer. On the Windows® task bar, click the Start button, click Turn Off Computer, and then
select Turn Off.
❑ If the above met hod doe s not work , press the power button and hol d it for at leas t four seco nds. Thi s
turns off th e power.
❑ If your comput er loc ks up while pl aying a CD-ROM , sto p the CD-ROM, and shut dow n th e compu ter by
pressing <Alt>+<F4> and clicking Tu rn Off in the Turn off computer screen.
My software program locks up or cras hes
❑ Contact the software publisher or designated provider for technical support.
❑ Make sure the softwar e is compa tible with your equipment and oper at in g syst em .
❑ Try re-installing the software.
My touchpad interpr et s a single tap as a double-c lic k
Open the Mouse icon in the Control Panel and change the button assignments in the Mo u se P r op e rt i es
dialog box. One of the buttons is assigned to the double-click action.
Page 96

Getting help
nN
95
My mouse does not work
❑ If you are using an external serial PS/2 mouse, check that the mouse is plugged into the mouse connector
of your optional port replicator.
❑ If you are using an opti onal Sony USB mouse, chec k that the appr opr ia te dri v er and soft ware are
properly installed.
❑ Check that the USB mouse is plugged into the USB connector.
Sony Notebook User Guide
Abo ut the di splay
My LCD does not display anything
❑ Check that the computer and display are both plugged into a power source and that they are turned on.
❑ Check that the powe r indica tor on th e front pane l of the comp ut er is on.
❑ Check that the batte ry packs are inserte d prope rly an d that they are charge d .
❑ Adjust th e brigh tn ess o f the LCD.
❑ The compu ter ma y be in LCD (video ) stan d by mode . Pres s any key to acti va te the disp lay.
❑ The d isplay mo de ma y b e set to e xte rn al d is pla y mo d e . Press and hold th e <Fn> key while pressing <F7>
several times.
The screen image on my ext er nal displa y is not centr ed or sized prop erly
Use the controls on your external display to adjust the image.
The window I have just clo sed continues t o appear on my LCD
Press the <Windows®> key and <D> key twice to refresh the screen .
Page 97

Getting help
Sony Notebook User Guide
nN
96
I cannot switch fro m LCD di splay to TV and vice versa
If a DVD disc is insert ed in the CD- RW/ DVD -R W driv e, re mov e the disc.
Abou t CD- RO Ms , DVD - ROM s and floppy disks
My CD-RW/DVD-RW drive tray does not open
❑ Make sure the computer is turned on.
❑ Press the eject button on the disc drive.
❑ If the disc does not come out when yo u press th e eject butto n, go to Windows Explorer or My
Computer. Select the drive, click the right button of your mouse and select Eject or press <Fn>+<E> keys
to open the disk tray.
❑ If t h e eject butt on does not work, you can open the tray by inser ting a sh arp , point ed object into the
hole to the righ t of the eject but t on.
I cannot play a CD-ROM
❑ After inse rti n g the CD, wait fo r a few secon ds for the syste m to dete ct it before y ou try to access it.
❑ Make sure the label of the disc is facing up.
❑ If the disc requires softwar e, make sure the so ftwar e is install ed acc or ding to the instructions of the
program.
❑ Check the volume of your spea ker s.
❑ Clean the disc with an appropriate cleaner.
❑ Moisture condensation may have occurred. Do not use the computer for at least 1 hour before turning
it on.
Page 98

Getting help
Sony Notebook User Guide
nN
97
I cannot play a DVD-RO M
❑ If a region code warning appears when you are using the DVD player, it could be that the DVD-ROM you
are trying to play is incompatible with the CD-RW/DVD-RW drive on your notebook. The region code is
listed on th e packagi ng o f the disc.
❑ If you hear sound but cannot see a picture, your computer's video resolution may be set too high. Change
the resolution in the Windows® Control Panel - Display to a lower resolution.
❑ If you see a picture but cannot hear any sou nd, check all of the follow ing:
❑ Make sure the mute sett ing is off on your DVD player.
❑ Check the master volume setting o f the Volume Control. If you have c onnected speakers externally,
check the volume se ttings of your c om puter spea ker s and check th e connec tions between your
speakers and the computer .
❑ In the Device Manag er, check that t he correct drivers are installed properly. T o display the Device
Manager, click Start, and selec t Control Panel. Double-click the System icon. On the Hardware
tab, click the Device Manager button.
❑ A dirty or damaged disc may cause th e compu te r to 'hang ' while it trie s to read the disc. If nec essary,
reboot the co mpute r, remove the disc and then check that it is not dirt y or damaged.
❑ Check your PG (Par ent al Guidance) in the DVD software as this might be pr event in g you from playing
certain DVDs when it is activated.
✍ On your computer , the default DVD region code is 2. Do not change this setting using the Region Code Change function in Windows
other software appli c ations. Sy stem malfu nctio ns originating from the user c hanging the DVD re gion code, are bey ond the scop e of your war r a nty
and w ill result in service charges for repair.
®
, or using any
The reading sp eed of CD-RW s is slow
Generall y, the rea din g spee d of a CD-RW is slow er than that of a CD-ROM or CD-R. The reading s peed c an
also vary depe ndi ng on the type of format.
Page 99

Getting help
Sony Notebook User Guide
nN
98
Why does my CD-RW/ DV D- RW dr ive not recor d at the highest speed?
You must use 8x CD-R or 4x CD-RW medi a or higher to achiev e opt imum perf or man ce .
If you want to use other media and are having difficulty formatting non-4x CD-RW discs, change the writing
speed from 4x to a lower setting.
To change the writing speed from the default to a lower speed, proceed as follows:
1 Go to My Computer from the Start menu.
2 Right- cli ck the disc dr ive ico n.
3 Select Properties.
4 Select the Settings ta b .
5 Change the Current Write Speed field to 2x.
6 Click OK.
✍ The VAIO notebook has a maximum recording rate of 8x for CD-R and 4x for C D-RW discs.
When I doubl e-cl ick an appl ication icon a message such as 'You must insert the applic at ion CD into your
CD-R OM drive ' ap pears and the soft ware does not sta rt.
❑ Some titles require specific files th at are located on the application CD-ROM. Insert the disc and try
starting the program again.
❑ Make sure you place the disc in the tray with the label side facing up.
The disc tray does not eje ct even wh en the eject button is presse d
❑ Check that the noteb ook is tu rned on.
❑ The CD-writing application soft w ar e may be stop ping the disc fro m being ej ec ted .
Page 100

Getting help
nN
99
The disc tray eject s even when it has been locked i nt o place
❑ Ensure that the disc is placed with the label side facing u p.
❑ The disc may be scratched. Place another disc to see if that is the reason.
❑ There may be condens at ion in t he drive. Remove the disc and leave the drive open for approxi ma tely
one hour.
My floppy disk drive cannot write to a diskette
Sony Notebook User Guide
❑ The diskette is writ e-p ro tected. Disable the write-protect feature or use a diskette th at is not write-
protected.
❑ Check that the diskette is properly inserted into the floppy disk drive.
❑ Your diskette may be corrupt. Try to insert another diskette.
The optional PCGA-UFD5 (USB) floppy dis k dr ive is not recognised as drive A
To set the UFD5 to A, procee d as follow s :
1 Turn the system power on .
2 Connect the UFD5.
3 Select Control Panel from th e Start menu.
4 Double-click System.
5 Select the Hardware tab, then click Device Manager.
6 Select Universal Serial Bus controllers, then Y-E Data USB Floppy.
7 From the Action menu, click Uninstall.
8 Keep clicking OK unt il th e Confirmation of deletion of device message appears.
9 Select Scan for hardware c hanges from the Action menu.
The UFD5 is recognised as drive A.
 Loading...