

Page 1

Contents
Welcome.......................................................9
Using Your VAIO Notebook......................11
Using the Keyboard...................................................12
Functions of the keyboard keys .........................................13
Combinations and functions with the Windows key .........14
Indicators ...........................................................................15
Indicator lights...................................................................15
Combinations and functions with the Fn key ....................16
Using the Touchpad ..................................................18
Using the Floppy Disk Drive ....................................20
To insert a floppy disk .......................................................20
To remove a floppy disk....................................................20
To remove the floppy disk drive........................................21
To reinsert the floppy disk drive........................................22
Using the Optical Drive.............................................23
To insert a disc...................................................................23
To remove a disc................................................................24
To play a DVD...................................................................25
Notes on CD and DVD media ...........................................26
To write data to CD-RW/CD-R media (For models with a
CD-RW/DVD Combo Drive)............................................27
1
Page 2

Using PC Cards .........................................................28
To insert a PC card.............................................................28
To remove a PC Card.........................................................29
Notes on PC Cards.............................................................30
Using a Second Battery Pack ....................................31
To insert a second battery pack..........................................31
To charge the second battery pack.....................................32
To remove the second battery pack ...................................33
Using the Weight Saver.............................................34
To attach the weight saver .................................................34
To remove the weight saver...............................................34
Using Smart Connect ................................................36
Connecting with i.LINK ....................................................36
Using Power Saving Modes......................................37
Normal mode .....................................................................37
Standby mode ....................................................................37
Hibernate mode..................................................................37
Notes on power saving modes ...........................................38
Connecting a Phone Line ..........................................39
Connecting to a LAN ................................................40
To set up your ethernet connection....................................40
Connecting Peripheral Devices ...............43
Connecting a Port Replicator ....................................44
To attach your notebook to the port replicator ..................44
To remove your notebook from the port replicator ...........46
Connecting an External Mouse or Keyboard ............48
To connect an external mouse or keyboard .......................48
2
Page 3

Connecting a Parallel Port Printer.............................49
To connect a printer ...........................................................49
Connecting a Univ ersal Serial Bus (USB) Printer ....50
To connect a USB printer ..................................................50
Connecting an External Display................................51
To connect a computer display ..........................................51
To connect a multimedia computer display.......................51
To connect a projector .......................................................52
To select a display..............................................................52
Connecting a TV Display..........................................54
To connect a TV ................................................................54
Notes on TV display ..........................................................54
Connecting a Universal Serial Bus (USB) Device....56
To connect a USB device...................................................56
Connecting an i.LINK Device...................................57
To connect a digital video camera recorder.......................57
Notes on i.LINK devices ...................................................58
Connecting External Speakers ..................................59
Before connecting your external speakers .........................59
To connect external speakers.............................................59
Connecting an External Microphone..... ....................60
To connect an external microphone...................................60
Expanding Your Notebook Capabilities ...................61
Personal Digital Assistant..................................................61
Wireless LAN Access Point ..............................................61
Wireless LAN PC Card......................................................62
3
Page 4

Customizing Your VAIO Notebook ..........63
Displaying the Sony Notebook Setup Screen ...........64
To display the Sony Notebook Setup screen .....................64
Sony Notebook Setup Tabs................................................65
Controlling Power Management ...............................66
To view the Power Management status icons....................66
Power Management profiles ..............................................67
Power management commands .........................................69
Conserving battery power..................................................70
Displaying Battery Information ................................71
To activate the Battery Information toolbar ......................71
Battery icon descriptions ...................................................71
To display detailed battery information.............................72
To customize the Battery Information toolbar and alarm sys-
tem .....................................................................................73
Selecting the Display Mode ......................................74
To select the display mode.................................................74
To change the Window Design of Sony software .............75
Adding Memory to Your VAIO Notebook 77
Precautions and Procedures.......................................78
Typical expansion memory configuration .........................79
Removing a Memory Module ...................................80
Installing a Memory Module.....................................82
Viewing the Amount of Memory ..............................83
About the Software on Your Notebook ...85
Software Overview....................................................86
4
Page 5

DVgate ......................................................................92
To defragment a partition ..................................................92
DVgate plug-in for Adobe Premiere..................................92
MovieShaker .............................................................94
To import images and sound clips.....................................94
To create a movie using Shaker.........................................94
To edit clips and scenes .....................................................95
To add effects to a scene or a clip......................................96
To save a movie.................................................................96
OpenMG Jukebox .....................................................97
Electronic Music Distribution (EMD) services .................97
To start OpenMG Jukebox 2.0...........................................98
To record a CD ..................................................................99
To transfer songs (check-in/check-out) ...........................100
Additional OpenMG Jukebox features ............................102
Notes on using Portable Players ......................................103
PictureGear..............................................................104
To manage your pictures..................................................104
To create a photo album...................................................104
To use Panorama Maker ..................................................105
To make still images and panoramic from MPEG ..........105
Smart Capture..........................................................106
To use Still mode.............................................................107
To use Net Movie mode...................................................111
To use ImageStation ........................................................114
VisualFlow ..............................................................117
To use VisualFlow...........................................................117
Application, Driver, and System Recovery CDs.....118
5
Page 6

Using Your Recovery CDs......................................119
To use the Application Recovery CD(s)..........................119
To use the Driver Recovery CD(s) ..................................120
To use the System Recovery CD(s).................................120
Troubleshooting......................................123
Troubleshooting Your Notebook ............................124
Troubleshooting the LCD Screen............................128
Troubleshooting the Mouse and Touchpad.............130
Troubleshooting Drives, PC Cards and Peripheral De-
vices.........................................................................132
Troubleshooting Software.......................................134
Troubleshooting the Modem ...................................135
Troubleshooting Audio ...........................................136
Troubleshooting the Printer.....................................137
Getting Help.............................................139
Support Options.......................................................140
VAIO Support Agent ..............................................142
To use the Quick Fix Wizard...........................................142
To use Common Solutions...............................................144
Automatic updates ...........................................................146
Update notification ..........................................................148
VAIO Support Agent Properties......................................148
To use Support Central ....................................................149
Software Support Inform ation.................................154
Sony Service Center................................................157
6
Page 7

Index.........................................................159
7
Page 8

Change text in this variable definition to document title.
8
Page 9

Welcome
Congratulations on your purchase of this Sony VAIO computer, and
welcome to the VAIO User Guide.
This User Guide provides detailed information on all aspects of using
your new VAIO computer, from keyboard functions to preinstalled
software applications.
In the left navigation window, click the topics you want to learn more
about, and that information will be displayed in this main window.
9
Page 10

Change text in this variable definition to document title.
10
Page 11

Using Your VAIO Notebook
This section describes the following aspects of your new computer:
❑ Using the Keyboard
❑ Using the Touchpad
❑ Using the Floppy Disk Drive
❑ Using the Optical Drive
❑ Using PC Cards
❑ Using a Second Battery Pack
❑ Using the Weight Saver
❑ Using Smart Connect
❑ Using Power Saving Modes
❑ Connecting a Phone Line
❑ Connecting to a LAN
11
Page 12
Change text in this variable definition to document title.
C
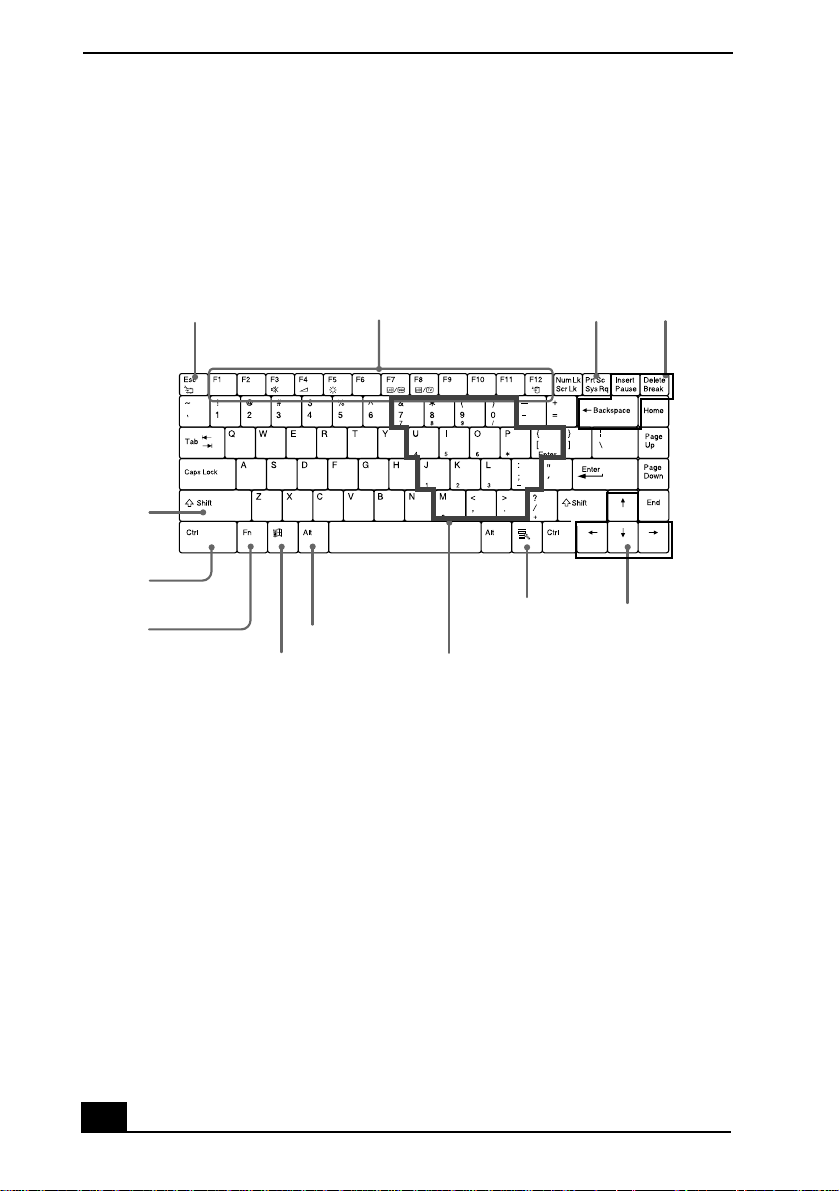
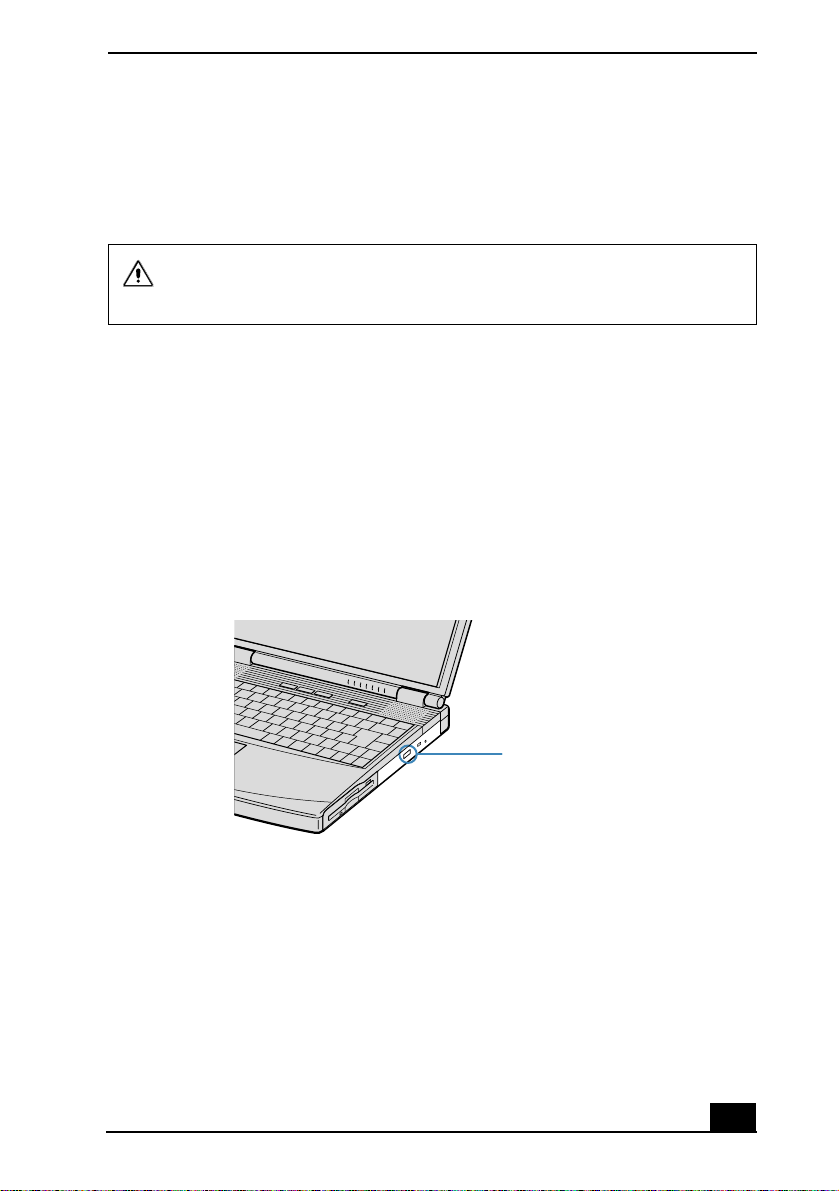
Using the Keyboard
Your keyboard is very similar to a typewriter’s, but the keyboard has additional
keys that perform specific computer-related tasks.
Keyboard
Correction
keys
Navigation
keys
Shift
key
trl key
Fn key
Escape key Function keys Print Screen key
Applications key
Alt key
Windows key
Numeric keypad area
12
Page 13

Functions of the keyboard keys
Key Description
Using the Keyboard
Numeric k eypad
area
Contains the keys found on a typical calculator. Use the
numeric keypad area to type numbers or to perform
mathematical calculations such as addition and subtraction.
Note that you must press the Num Lock key to activate the
numeric keypad. (When you do so, the Num Lock light will
be on.)
Navigation keys Several keys are devoted to moving the cursor on the screen.
Correction keys The Insert, Back Space, and Delete keys enable you to make
corrections in your documents.
Function keys The twelve function keys along the top of the keyboard are
used to perform designated tasks. For example, in many
applications, F1 is the Help key. The task associated with
each function key may vary from one application to the next.
Escape key The Esc (Escape) key is used to cancel commands.
Print Screen key The Print Screen key takes an electronic snapshot of the
screen and places it in the Windows Clipboard. You can then
paste the screen shot into a document and print it.
Operator keys
(Shift, Ctrl,
Alt keys)
Several keys are alwaysused with at least one other key: Ctrl,
Alt, and Shift. When held down with another key, the Ctrl
(Control) and Alt (Alternate) keys offer another way to give
commands. For example, in many applications, instead of
choosing the Save command from a menu, you can hold
down Ctrl and press S (referred to as Ctrl+S). The Shift key
operates the same way as on a typewriter; it is used to
produce capital letters or special symbols, such as @ and $.
13
Page 14

Change text in this variable definition to document title.
Key Description
Windows key The key with the Windows logo displays the Windows Start
menu; it is the equivalent of clicking the Start button on the
taskbar. See “Combinations and functions with the Windows
key” for more information.
Fn key The Fn key is used in combination with other keys to issue
commands. See “Combinations and functions with the Fn
key” for more information.
Applications key The Applications key displays a shortcut menu of context-
sensitive choices. Pressing this key is the equivalent of
clicking the right mouse button.
Combinations and functions with the Windows key
Combination Function
+ F1 Displays Windows Help.
+ Tab Switches the selected button on the taskbar.
+ D Displays the Desktop.
+ E Displays Windows Explorer.
+ F Displays the Windows Find: All Files window tofind a file or
folder. This is the equivalent of selecting Find and then Files
or Folders from the Start menu.
+ Ctrl + F Displays the Windows Find: Computer window where you
can locate other computers. This is the equivalent of selecting
Find and then Computer from the Startmenu.
+ M Minimizes all displayed windows.
14
Page 15
Using the Keyboard
Combination Function
Shift + + M Returns all minimized windows to their previous size.
+ R Displays the Run window. This is the equivalent of selecting
Run from the Start menu.
Fn + + Insert Displays the Properties window. This is the equivalent of
double-clicking the System icon in the Control Panel.
Indicators
Indicator Function
Power Light is green when the power to the notebook is turned on,
flashes amber in Standby mode, and turns off when the
notebook is in Hibernate mode or powered off.
Battery 1 Indicates the status of the battery inserted in the battery bay
1
on the left side of the notebook.
Battery 2 Indicates the status of the battery inserted in the multipurpose
2
drive bay on the right side of the notebook.
Hard disk Lights when data is being read from or written to the hard
drive. Do not enter Standby mode or turn off the notebook
when this indicator light is on.
Indicator lights
15
Page 16
Change text in this variable definition to document title.
Light On Off
Num
Lock
Caps
Lock
Scroll
Lock
The number keys in the numeric
keypad are active.
The letters appear in uppercase as you
type. The Shift key lowers the case of
typed letters when Caps Lock is on.
The screen scrolls differently.
(Exactly how it scrolls dependson the
The alphanumeric character keys
in t he keypad area are active.
Letters appear in lower case as
you type (unless you hold down
the Shift key).
Information moves across the
display normally .
specific application. It has no effect in
many applications.)
Combinations and functions with the Fn key
Combinations/
Feature Function
Fn+ (ESC)
Standby
Fn+ (F3)
Mute On/Off
Puts the system into Standby mode, a power management
state. Toreturn the system tothe active state, press any key or
press the power button on your notebook.
Toggles the built-in speaker off and on.
Fn+ (F4)
Speaker volume
Fn+ (F5)
Brightness control
16
Adjusts the built-in speaker volume.
To increase volume, press Fn+F4, then or .
To decrease volume, press Fn+F4, then or .
Adjusts the brightness of the LCD.
To increase light intensity, press Fn+F5 and then or .
To decrease light intensity, press Fn+F5 and then or .
Page 17
Combinations/
Feature Function
Using the Keyboard
LCD
Fn+ /
(F7)
Toggles through the LCD, external display (connected to the
Monitor jack) and both LCD and external display.
Switch to the
external
monitor/LCD
LCD
Fn+ only/
(F8)
Control TV Out
Only LCD
Toggles between LCD-only and dual LCD/TV display
modes.
Only LCD
LCD and external display
Only external display
LCD and external display
Only external display
Connect the cable before youturn on the notebook, otherwise
Fn + F8 will not work.
Fn+ (F12)
Hibernate
Provides for the lowest level of power consumption.
When you execute this command, the state of the system and
state of the peripheral devices are written to the hard disk and
the system power is turned off. To return the system to its
original state, use the power button to turn on power.
Fn+ F Display control. Minimizes and maximizes the LCD screen.
If the default display resolution is reduced, this function
maximizes the display resolution to fit the screen size.
Maximizing t he display screen enables you to view the
display at a greater resolution.
✍ Some functions are not available until Windows launches.
17
Page 18
Change text in this variable definition to document title.
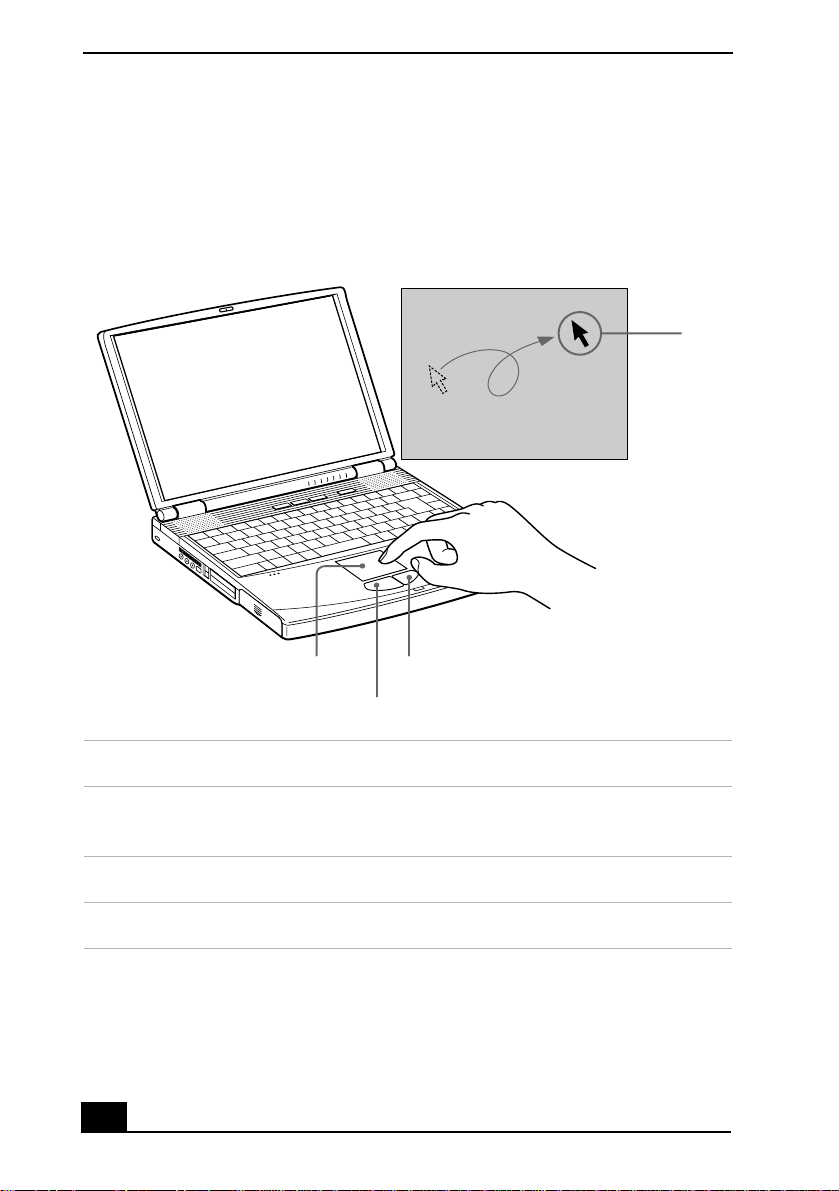
Using the Touchpad
The keyboard containsa cursor-pointing device called a touchpad. Youcan point
to, select, drag, and scroll objects on the screen using the built-in touchpad.
Touchpad
Pointer
Touchpad
Right button
Left button
Action Description
Point Slide one finger on the touchpad to place the pointer on an
item or object.
Click Press the left button once.
Double-click Press the left button twice.
18
Page 19

Using the Touchpad
Action Description
Right-click Press the right button once. In many applications, this action
displays a shortcut menu of context-sensitive choices.
Drag Slide one finger while pressing the left button.
Scroll Move your finger along the right edge of the touchpad to
scroll vertically. Move your finger along the bottom to scroll
horizontally. (The scroll function is available only with
applications that support a touchpad scroll feature.)
See Mouse Properties for information on touchpad features, such as clickingboth
buttons simultaneously, adjusting touchpad speed, and Easy Launcher functions.
To access Mouse Properties, go to Start > Settings > Control Panel > and click
the Mouse icon.
19
Page 20
Change text in this variable definition to document title.
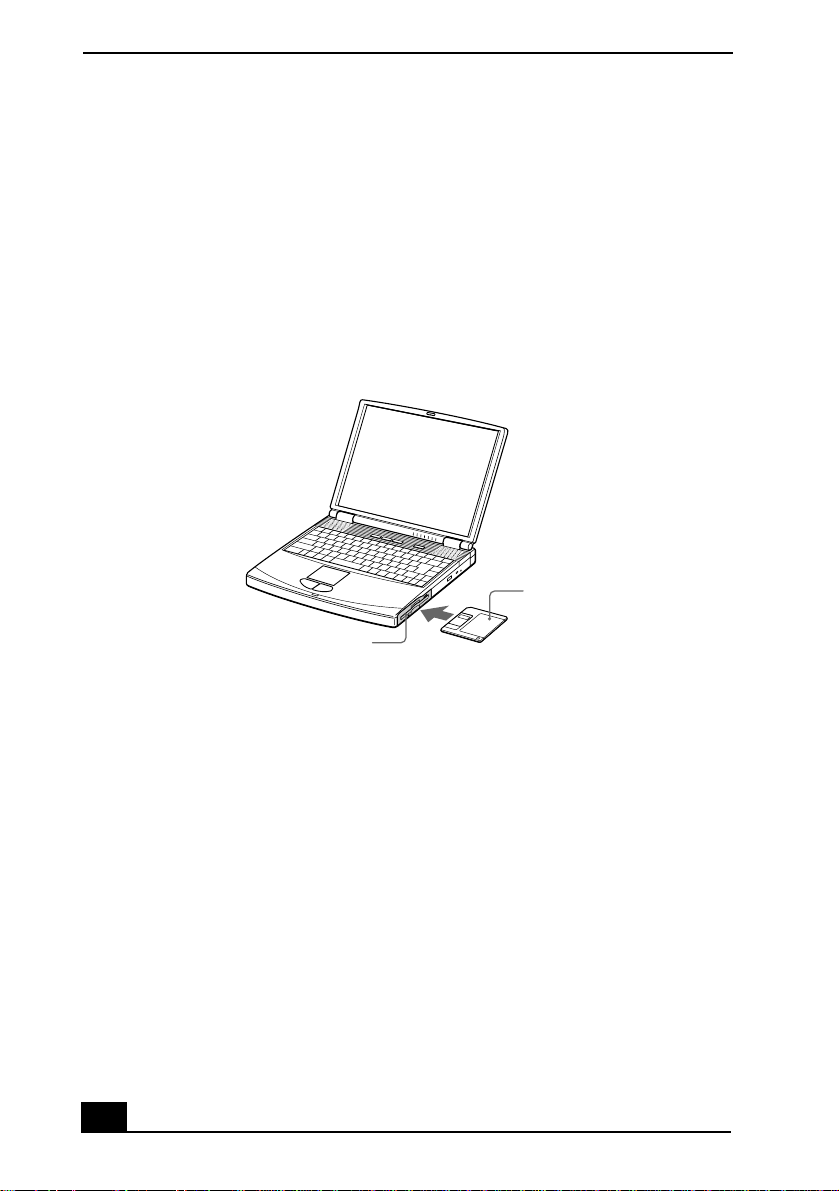
Using the Floppy Disk Drive
Your notebook comes with the floppy disk drive in the multipurpose bay.
To insert a floppy disk
1 Hold the floppy disk with the label side facing up.
2 Gently push the floppy disk into the drive until it clicks into place.
Inserting a floppy disk
Floppy disk
Floppy disk drive
To remove a floppy disk
1 After you finish using the floppy disk, wait until the LED indicator turns off.
2 Press the Eject button to remove the floppy disk.
20
Page 21
Using the F loppy Disk Drive
Removing a floppy disk
Eject button
LED indicator
✍ Do not push the eject button when the LED in dicator is turn ed on. Othe rwise, data m ay
be lost.
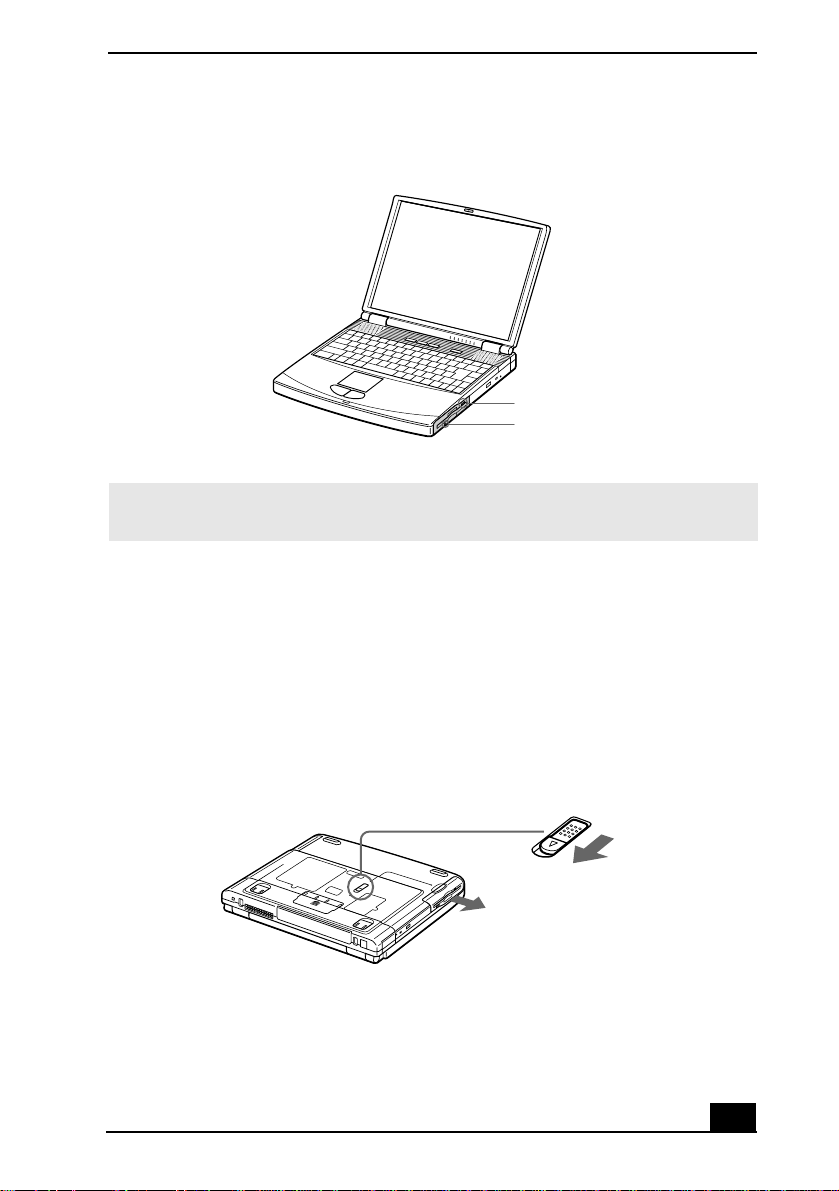
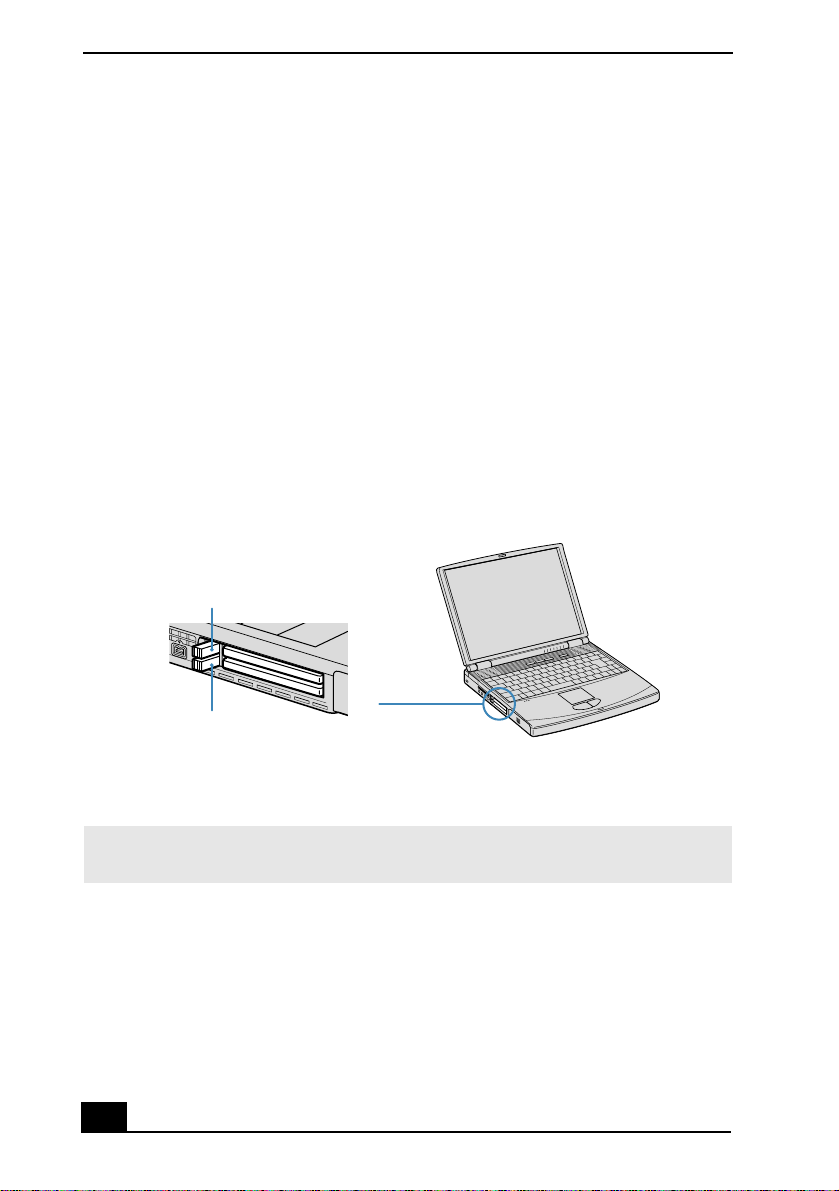
To remove the floppy disk drive
1 Turn off the notebook.
2 Locate the release lever on the bottom of the notebook.
3 Slide the lever in the direction of the arrow.
Multipurpose bay release lever
Multipurpose bay release lever
4 Slide the floppy disk drive out of the multipurpose bay.
5 Insert the weight saver. See “Using the Weight Saver” for more information.
21
Page 22
Change text in this variable definition to document title.
To reinsert the floppy disk drive
1 Turn off the notebook.
2 Ifanother device is in the multipurpose bay, remove the device. See “To
remove the second battery pack” for more information.
3 Insert the floppy disk drive into the multipurpose bay with the VAIO label
facing up.
4 Continue pushing the drive into the bay until the release lever locks into
place.
Inserting the floppy disk drive
Multipurpose bay
Floppy disk drive
22
Page 23
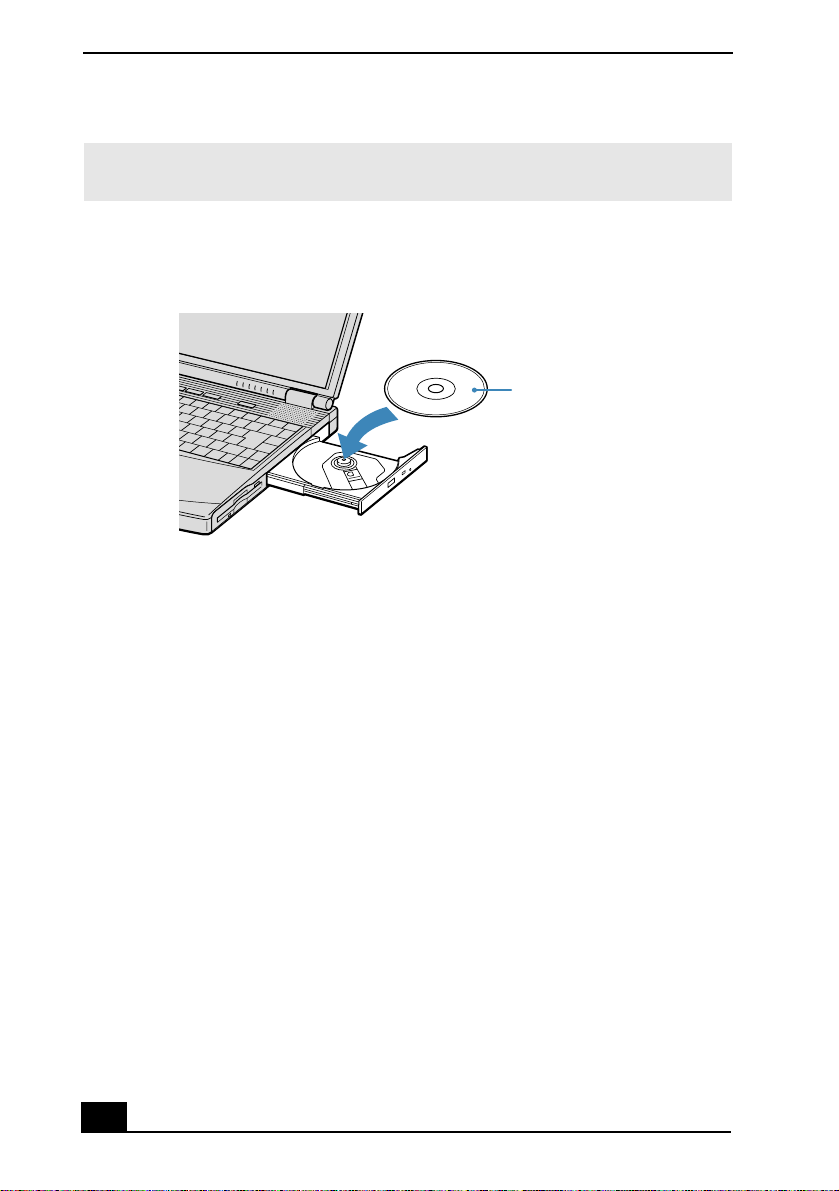
Using the Optical Drive
Using the Optical Drive
Your notebook comes with an optical drive, eithera CD-RW/DVD Combo Drive
or DVD-R OM drive, depending on the model you purchased.
Do not use adhesive lab els to id en tify you r d is cs. Ad h es ive l ab els m ay c o me
off while the disc is in use in the optical drive(s), and may cause damage to
the drive.
To insert a disc
When the notebook is in Standby or Hibernate mode, you cannot insert a disc.
See “Controlling Power Management” for more information on Standby and
Hibernate modes.
1 Turn on the notebook.
2 Press the Eject button to open the optical drive. The tray slides out.
Ejecting the tray
Eject button
3 Placean optical disc on the tray with the label side facing up. For DVDs that
can be played on both sides, the side of the disc facing up is the side that
plays.
4 Push the d isc onto the hub until the disc clicks securely into place.
23
Page 24
Change text in this variable definition to document title.
✍ Be sure to seat the disc firmly over the hub fingers. If you do not seat the disc f irmly,
you could damage your optical drive and you may no t be able to open the tray.
Inserting an optical disc
Label side facing up
5 Close the tray by pushing it gently.
To remove a disc
When the notebook is in power saving modes, you cannot remove a disc. See
“Controlling Power Management” for more information about power saving
modes.
1 After you finish using a disc, wait until the LED indicator turns off.
2 Press the Eject button to remove the disc.
3 Ifthe disc does not come out when you press the Eject button, turn off the
notebook and insert a thin, pointed object (such as a paper clip) into the
manual eject hole.
24
Page 25

Using the Optical Drive
Manually removing a disk
To play a DVD
You can play DVDs using the optical drive and the WinDVD® software. See the
help file that comes with the WinDVD software for details.
❑ To ach ieve optimum performance when playing DVDs, it is recommended
that your notebook not be connected to the port replicator while playing
DVD movies or using DVD applications. Close any open applications before
playing a DVD movie.
❑ When playing DVD movies on battery power, set the power management
profile to DVD. With other profiles, the movies are choppy. As an
alternative, you can set the power management profile to Automatic Profile
Selection, which will cause the DVD profile to be selected automatically
whenever you insert a DVD. See “Controlling Power Management” for
information on how to set the power management profile.
Some discs record ed at 20 or 24 bits may produce noise while playing. If you
have audio devices connected, this may cause damage to your hearing and
the speakers. Reduce the volume before playing such discs.
You cannot switch between LCD and TV if you press Fn+F8 when a DVD is
inserted in the optical drive.
25
Page 26

Change text in this variable definition to document title.
Notes on CD and DVD media
❑ Do not switch the power saving modes while you are playing the DVD disc.
❑ Do not switch between LCD and the external display while you are playing
the DVD video.
❑ Change the setting to disable the screen saver and the virus checker (if it is
active).
❑ Do not use memory-resident utility software to speed up disc access. This
may cause the notebook to malfunction.
❑ Donotdroporbendthedisc.
❑ Do not touch thesurface of the disc. Fingerprints and dust on the surface of a
disc may cause reading errors. Proper careof the disc is essential to maintain
its reliability. Do not use solvents such as benzine, thinner, commercially
available cleaners or anti-static spray, as they may cause damage to the disc.
❑ For normal cleaning, hold the disc byits edge and use a softcloth to wipe the
surface from the center out.
❑ If the disc is badly soiled, moisten a soft cloth with water, wring it out well,
and use it to wipe the surface of the disc from the center out. Wipe off any
remaining moisture with a dry soft cloth.
When using your notebook to play DVDs on your TV
❑ If you connect a TV to your notebook to play DVDs, see “Selecting the
Display Mode” for instructions.
❑ When a TV is connected to a notebook that is set to factory settings, a part of
the video screen will not appear. To view the entire screen, adjustthe display
resolution to 640 x 480. See “Selecting the Display Mode” for more
information.
❑ If you set the display resolution higher than the default setting (1280 x 1024,
24 bits), the DVD video may not play properly.
❑ (For models with SXGA+ panels) To view the DVD video clearly, set the
display resolution to 1024 x 768 dots (16 bits).
26
Page 27

Using the Optical Drive
To write data to CD-RW/CD-R media (For models with a
CD-RW/DVD Combo Drive)
You can use Easy CD Creator™ software to write data to a CD-R or CD-RW. To
use Easy CD Creator, see the online help manual that comes with the software.
❑ For optimal writing speed, deactivate the screen saver and exit anti-virus
software before writing data to a disc.
❑ For best results, use CD-Rs that are compatible with 4x speed.
❑ Do not put your notebook into power saving mode while using Easy CD
Creator.
Do not touch the surface of the disc. Fingerprints and dust on the surface of a
disc may cause writing errors.
Do not strike or shake the notebook whi le writing data to a disc.
Memory-resident disc ut ilities , such as the s cre en saver a nd viru s chec ker, may
cause unstable operation or data loss. Deactivate these utilities before writing
data to a disc.
Always use the AC adapter as the power source for your notebook when you are
writing data to a CD-R or CD-RW. Using battery power may result in data
transfer failure.
27
Page 28
Change text in this variable definition to document title.
Using PC Cards
Your notebook includes two PC Card slots. PC Cards enable you to connect
portable external devices such as another hard disk drive, or to connect to a
network.
The PC Card slots can accommodate two Type I/II PC Cards, or one Type III PC
Card. These slots are compatible with CardBus. Use the lower slot for Type III
PC Cards. You do not need to shut down your notebook before inserting or
removing a PC Card.
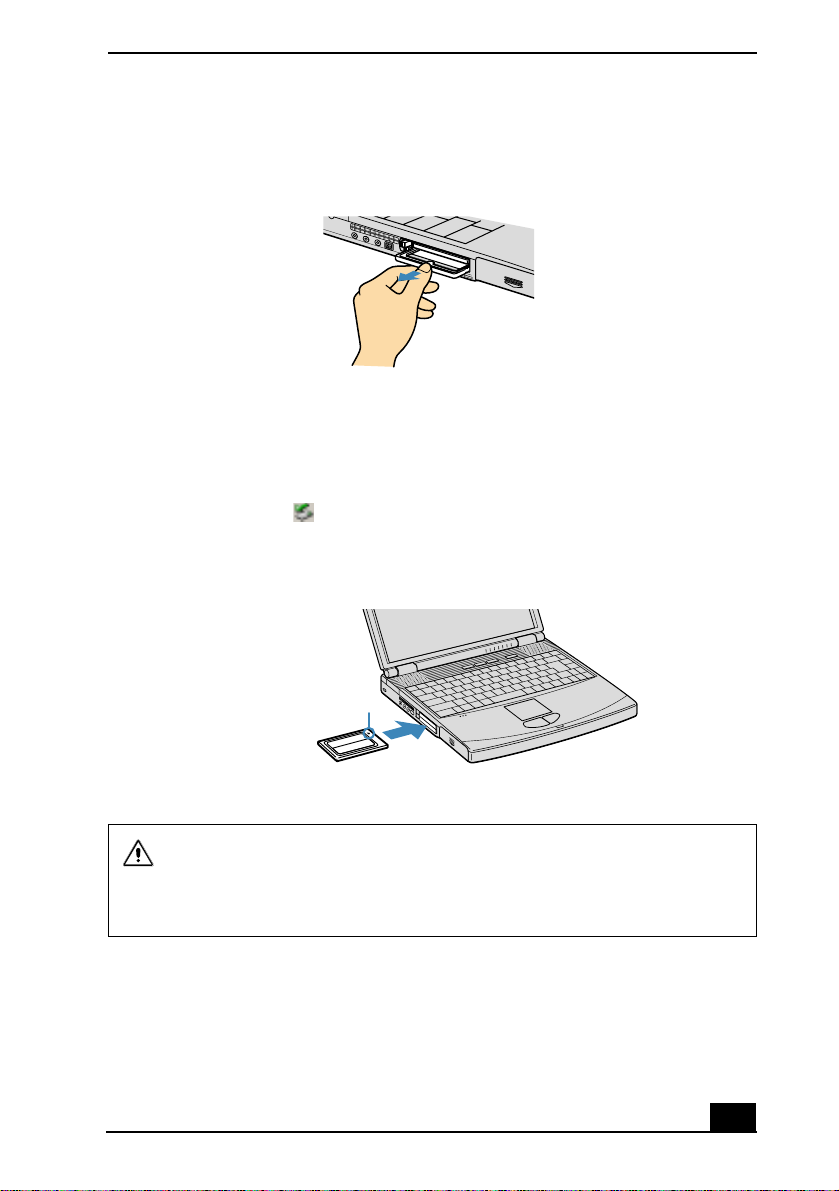
To insert a PC card
1 Push the Release button. The Release button pops out.
PC Card release button
Release button
Release button
2 Press the Release button a second time. The PC Card slot protector pops out.
✍ When you u se a Type III PC Card, you need to remove both the top and bottom PC
Card slot protectors.
28
Page 29
Using PC Cards
PC Card slot protector
3 Insert the PC Card into the PC Card slot.
4 Verify that the front label of the PC Card is facing up.
5 Pushthe PC Card slot gently into theport. Your system automatically detects
the PC Card. The Unplug or Eject Hardware icon appears in the taskbar.
Inserting a PC Card
Insert with the
arrow facin g toward
the slot
PC Card
Do not force a PC Card into the slot as this may damage the connector pins.
Touching the head of the PC Card will not cause damage to the connector
pins, but dama ge can occur if the head of the PC Card is sticking out of the
notebook while the unit is being t ran s po rted .
To remove a PC Card
If your notebook is turned off, you do not have to follow these instructions.
29
Page 30

Change text in this variable definition to document title.
1 Double-click in the taskbar. The “Unplug or Eject Hardware” dialog
box appears.
2 Select the hardware device you wish to remove.
3 Click Stop. In the “Stop a Hardware device” dialog box, confirm that the
device can be safely removed from the system.
4 Click OK. The message, “PC Card can now be safely removed from the
system” appears.
5 Click OK again and click Close.
6 Push the Release button. The Release button pops out.
7 Push the Release button a second time. The PC Card pops out.
8 Gently grasp the card and pull it out of the slot.
9 Insert the PC Card slot protector into the empty slot.
Notes on PC Cards
❑ For some PC Cards, if you alternate between normal power operation and
the Standby or Hibernate power management modes while the card is
inserted, you may find that a device connected to your system is not
recognized. Reboot your system to correct the problem.
❑ Some PC Cards may require that you disable idledevices when using the PC
Card. You can useSony Notebook Setup to disable devices. See “Displaying
the Sony Notebook Setup Screen” for more information.
❑ Be sure to use the most recent software driver provided by the PC Card
manufacturer.
❑ If an exclamation mark (!) appears on the Device Manager tab in the System
Properties dialog box, remove the software driver and then reinstall it.
❑ You may not be ableto use some PC Cardsor some functions of thePC Card
with this notebook. If you have difficulty inserting a card, check that you are
orienting the card correctly. See the manual that came with your PC Card for
more information on use.
30
Page 31

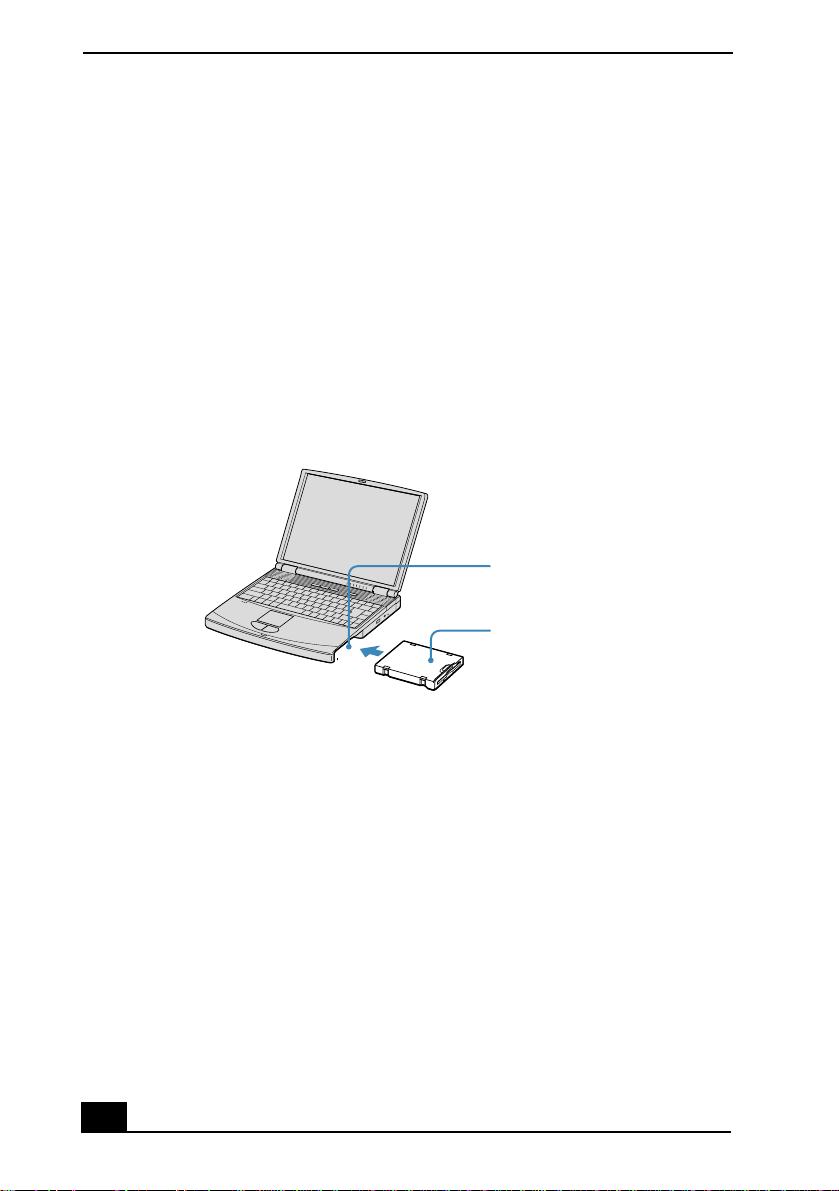
Using a Second Battery Pack
Using a Second Battery Pack
You can purchase a second rechargeable battery pack. With two battery packs,
you can extend the time that you use your notebook with battery power. When
using two battery packs, the battery pack you insertfirst charges first. The second
battery pack you insert charges when the first battery pack is 85 percent full. Yo u
can monitor which battery pack is charging by observing the battery indicators.
To insert a second battery pack
1 Ifanother device is in the multipurpose bay, remove the device.
2 Insert the battery pack into the multipurpose bay.
✍ If the battery is being used, the battery 2 indicator turns on.
Second battery in multipurpose bay
Multipurpose bay
Battery pack
Label side facing down
3 Attach the weight saver to the notebook to stabilize the battery pack.
4 Locate the release lever on the bottom of the weight saver.
5 Slide the levertoward the front of the notebook to lock the weight saver. See
also “Using the Weight Saver” for more information.
31
Page 32

Change text in this variable definition to document title.
Using weight saver for second battery cover
Battery pack
Weight saver
To charge the second battery pack
❑ Keep the battery pack in the notebook while it is connected to AC power.
The battery indicator flashes while the battery is charging.
See also “To charge the battery pack” in your printed Quick Start for more
information.
Charging the second battery
Battery indicators
✍ To determine the amount of time the battery lasts, see “Displaying Battery
Information”.
32
Page 33

Using a Second Battery Pack
To remove the second battery pack
If you attach two battery packs, you can remove either of them without shutting
down the notebook.
1 When removing one battery pack, verify that the other battery pack’s
indicator is on.
2 Ifthe indicator of the battery pack you are removing is on, right-click the
battery icon on the task tray and click the “Switch discharge battery” option.
3 Locate the release lever on the bottom of the weight saver.
4 Slide the lever in the direction of arrow 1, then slide the release lever on the
bottom of the notebook in the direction of arrow 2.
Multipurpose bay release levers
Arrow 1: Weight saver release lever
Arrow 2: Release lever
5 Remove the weight saver, and then pull out the battery pack.
6 Reinsert the weight saver. See “Us ing the Weight Saver” for more
information.
33
Page 34

Change text in this variable definition to document title.
Using the Weight Saver
The weight saver protects the multipurpose bay when it is empty.
To attach the weight saver
1 Ifanother device is in the multipurpose bay, remove the device. See “To
remove the second battery pack” for more information.
2 Foldout the hinged arm of the weight saver and then pushon the hinged arm
to lock it into place. Slide the weight saver in the direction of the arrow until
it clicks.
Attaching the weight saver
Weight sav er
(supplied)
3 Manually lock the weight saver ’s release lever.
To remove the weight saver
1 Locate the release lever on the bottom of the weight saver.
2 Slidethis lever in the direction of arrow 1, then slide the release lever on the
bottom of the notebook in the direction of arrow 2.
34
Page 35

Using the Weight Saver
Multipurpose bay release levers
Arrow 1: Weight saver release lever
Arrow 2: Release lever
3 After removing the weight saver, pull out the weight saver’shinged arm and
fold it into the weight saver.
35
Page 36

Change text in this variable definition to document title.
Using Smart Connect
Connecting with i.LINK
The preinstalled Smart Connect software enables you to use an optional i.LINK®
cable to connect your VAIO notebook to another VAIO computer that also has
Smart Connect. Youcan then use onecomputer to edit, copy or delete fileson the
other computer. You can also print from a printer attached to either computer.
Connecting with an i.LINK cable
i.LINK cable (optional)
✍ When you co nnect two VAIO computers, you must assign each computer a unique
name. The computers can be identified by this unique name when the two computers
are networked together.
If you have previously purchased a VAIO computer or notebook that does not have the
Smart Connect software pr einstalled, consult the Sony Web site for support options
(http://www.sony.com/pcsupport).
36
Page 37

Using Power Saving Modes
Using Power Saving Modes
When you use a battery as the source of power for your notebook, you can take
advantage of power management settings to conserve battery life. In additio n to
the normal operating mode, which allows you to turn off specific devices, your
notebook has two distinct power saving modes: Standby and Hibernate. When
using battery power, be aware that the notebook automatically enters Hibernate
mode when the remaining battery charge drops below 5 percent, regardless of the
power management setting you select .
✍ If the bat tery level falls below 10 percent, you should either attach the A C adapter to
recharge the battery or shut down your notebook and insert a fully charged battery.
Normal mode
Normal mode is the normal state of your notebook when it is in use. The power
indicator displays green when your notebook is in this mode. To save power, you
can turn off a specific device such as the LCD or the hard disk.
Standby mode
In Standby Mode the notebook saves the current state of the system in RAM and
switches off power to the CPU. The amber power indicator flashes in this mode.
To activate Standby mode
1 Press t he key combination Fn+Esc, or press the power button and release it
immediately.You can also use the PowerPanel utility to enter Standby mode.
2 Press any key to return to normal mode.
Hibernate mode
In the Hibernate mode, the state of the system is saved on the hard drive and
power is turned off. The power indicator is off in this mode.
37
Page 38

Change text in this variable definition to document title.
To activate Hibernat e mode
1 Press the key combination Fn+F12. The “Save to Disk Manager” screen
appears and the notebook enters Hibernate mode.
✍ Do not move the notebook unt il its power indicator turns off.
2 Press on the power button to return to normal mode.
Notes on power saving modes
❑ When returning from Hibernate mode, the system status stored on the hard
disk is erased and the notebook startsnormally if you press the power button
and hold it for more than four seconds.
❑ Standby requires less time than Hibernate to return to normal mode.
❑ Standby uses more power than Hibernate.
38
Page 39

Connectin g a Phone Line
Connecting a Phone Line
You need to connect a p hone cable (supplied with selected models) to take
advantage of online services and the Internet.
✍ In order to register your Sony VAIO® Notebook, register your software online, and use
Sony Customer Support, you must connect to a phone line.
1 Plug one end of the phone cable into the modem jack on the notebook.
Connecting phone cable
Modem jack
Wall jack
Phone cable (supplied with selected models)
2 Plug the other end into the wall jack.
✍ Your notebook does not work with party lines, cannot be connected to a coin-operated
telephone, and may no t work with multiple phone li nes or a private branch exchange
(PBX). Some of these connections may result in excess electrical current and could
cause a malfunction in the int ernal modem.
If you connect a phone line coming through a splitter, the modem or connected device
may not work properly.
39
Page 40

Change text in this variable definition to document title.
Connecting to a LAN
You can connect your notebook to 10Base-T and 100Base-TX-type Local Area
Networks (LANs). For the detailed settings and devices needed to connect to the
network, ask your network administrator.
Connecting to LAN
Ethernet
port
Warning: Only conn ect 10Base-T and 100Base-TX cables to the Ethernet
port. Do not connect any other type of network cable or any telephone line.
Connecting cables other than those listed above may result in an electric
current overloa d and could cause a malfunction, excessive heat, or fire in the
port. To connect the unit to the network, contact your network administrator.
If you enable Wake on LAN, the power saving mode will be switched to
Standby mode.
To set up your ethernet connection
To connect to the network:
1 Right-click My Network Places and select Properties.
2 ClickAdvanced and select Network Identification to set the computer name,
domain, workgroup, and DNS suffix. You can also use the Network
Identification Wizard.
To set the connections, bindings, and provider order:
40
Page 41

Connectin g to a LAN
1 Right-click My Network Places and select Properties
2 Click Advanced and select Advanced Settings. You now have access to
Adapters and Protocol Bindings and Provider Order.
41
Page 42

Change text in this variable definition to document title.
42
Page 43

Connecting Peripheral Devices
You can add functionality to your notebook by connecting a variety of
peripherals, as dicussed in the following sections:
❑ Connecting a Port Replicator
❑ Connecting an External Mouse or Keyboard
❑ Connecting a Parallel Port Printer
❑ Connecting a Universal Serial Bus (USB) Printer
❑ Connecting an External Display
❑ Connecting a TV Display
❑ Connecting a Universal Serial Bus (USB) Device
❑ Connecting an i.LINK Device
❑ Connecting External Speakers
❑ Connecting an External Microphone
❑ Expanding Your Notebook Capabilities
43
Page 44

Change text in this variable definition to document title.
Connecting a Port Replicator
Your notebook supports the use of an optional port replicator (PCGA-PRFX1).
Attaching a port replicator enables you to connect additional peripherals to your
notebook.
Port replicator
2
1
3
4
5
6
7
1 Serial port 5 USB ports
2 Printer port 6 / Mouse/Keyboard (PS/2
port)
3 Monitor port 7 DC In jack
4 Network (Ethernet 10BASE-T)
jack
The port replicator can be power ed only with an AC power adapter. Do not
remove the AC adapte r from the port replicat or or the AC o utlet whi le u sing the
port replicator; this may cause data damage or hardware malfunctions.
To attach your notebook to the port replicator
To supply power to yournotebook while it is connected tothe port replicator,you
can connect the AC adapter directly to the port replicator.
✍ When attaching your notebook to the port replicator, do not attempt to insert or
remove the battery pack. Lifting and turning the no tebook with an attached port
replicator co u l d ca u s e a tem porary loss of power.
44
Page 45

Connecting a Port Replicator
k
1 Turn off your notebook and disconnect all peripheral devices.
2 Onthe bottom of the notebook, slide the port replicator connector cover
open.
Port replicator connector
Port replicator connector
3 Attach the bottom of the notebook to the port replicator connector until it
clicks.
Attaching notebook to port replicator
Noteboo
Port replicator
(not supplied)
4 Plug the cable attached to the AC adapter into the DC IN jack on the port
replicator.
5 Plug the power cord into th e AC adapter and an AC outlet. The power
indicator turns green.
45
Page 46

Change text in this variable definition to document title.
Connecting AC adapter to port replicator
AC adapter
Power cord
✍ Use the AC adapter that comes with your notebo ok, or an optional Sony adapter.
Power indicator
Release lever
Power
Port replicator connector
6 Turn on the notebook.
To remove your notebook from the port replicator
1 Turn off your notebook and the connected peripherals.
2 Pull the levers on each side of the port replicator to disengage the notebook
from the port replicator.
46
Page 47

Connecting a Port Replicator
Disengaging notebook from port replicator
Lever
3 Lift the notebook away from the port replicator.
Lifting notebook
4 Close the port replicator connector cover on the bottom of your notebook.
Close the port replicator connector cover after removing your notebook
from the port replicator. If the cover is left open, dirt may get inside and
damage the notebook.
47
Page 48

Change text in this variable definition to document title.
Connecting an External Mouse or Keyboard
You can connect an external mouse or keyboard to the optional port replicator
using a similar type PS/2® plug or adapter. You can only connect one external
device at a time. Therefore, you cannot connect both a PS/2 mouse and PS/2
keyboard simultaneously.
✍ Before you connect or disconn ect the mouse or keyboard, turn off the notebo ok.
To connect an external mouse or keyboard
1 Turn off your notebook.
2 Locate the mouse/keyboard port on the port replicator identified by the
symbols.
3 Plug the mouse or the keyboard cable into this port with the arrow facing up.
4 See the manual that came with your mouse or keyboard for more
information on its installation and use.
/
48
Page 49

Connecting a Parallel Port Printer
Connecting a Parallel Port Printer
You can connect a Windows 2000 compatible printer to your notebook to print
documents.
To connect a printer
1 Locate the Printer port identified by the symbol.
2 Plug the printer cable (supplied with the printer) into this port on the
notebook.
3 See the manual that came with your printer for more information on its
installation and use.
Printer port
Printer
to
Printer
Printer cable
(supplied with the printer)
Power cord
✍ Before using the printer, you may need to change the Printer setting in the Sony
Notebook Setup sof tware. S ee “Displa ying the So ny Notebo ok Setu p Screen” for more
information.
If your printer stops functioning after resuming from a power-saving mode, see
“Troubleshooting the Printer” for more information.
49
Page 50

Change text in this variable definition to document title.
Connecting a Universal Serial Bus (USB) Printer
You can connect a Windows 2000 compatible USB printer to either of your
notebook’s two USB ports to print documents.
✍ To use a printer, first install the driver software that came with your printer.
To connect a USB printer
1 Plug the optional USB printer cable into one of the two USB ports on your
notebook and the USB port on your printer.
2 See the manual that came with your printer for more informationon its
installation and use.
Connecting a USB Printer
50
Power cord
Printer
USB connector
USB printer cable (not supplied)
To USB port
Page 51

Connecting an External Display
Connecting an External Display
You can connect external display devices such as a computer display (monitor),
multimedia computer display, and projector to your notebook.
To connect a computer display
1 Locate the Monitor jack identified by the symbol on the back of the
notebook.
2 Plug the display cable (not supplied) into this jack.
3 Ifnecessary, plug one end of the display power cord into the display, and the
other end into an AC outlet.
4 See the manual that came with your computer display for more information
on its installation and use.
Connecting an external computer display
Computer display
Power cord
To
Monitor
Display cable (optional)
To connect a multimedia computer display
You can connect the notebook to a multimedia computer display that includes
built-in speakers and a microphone.
1 Locate the Monitor jack identified by the symbol.
2 Plug the display cable into this jack.
3 Locate the Headphone jack identified by the symbol.
51
Page 52

Change text in this variable definition to document title.
4 Plug the speaker cable into this jack.
5 Locate the Microphone jack identified by the symbol.
6 Plug the microphone cable into this jack.
7 See the manual that came with your multimedia computer display for more
information on its installation and use.
To connect a projector
You can use a projector, such as the Sony LCD Projector, as an external display.
❑ See the manual that came with your projector for more information on its
installation and use.
Connecting a projector
Projector
Power cord
To
monitor
RGB signal
cable (optional)
To
headphones
Audio cable
(optional)
To select a display
When you connect an external display to the monitor jack, you can toggle the
output between the Liquid Crystal Display (LCD), the external monitor, or both
devices.
Use the Fn+F7 keys to select a display. See also “Selecting the Display Mode”
for more information.
52
Page 53

To Press Result
Connecting an External Display
Switch to an
external display
Fn+F7 Toggles between the LCD, the external display
connected to the Monitor jack, or both the LCD
and external display.
Only LCD LCD and external display
Only external display
53
Page 54

Change text in this variable definition to document title.
Connecting a TV Display
You can enjoy playing audio/video by connecting optional AV devices to your
notebook. See also the manuals supplied with your AV devices for more
information on their installation and use.
To connect a TV
1 Connect the notebook to a TV using audio/video cables.
2 Switch the input channel of the TV t o external input.
Connecting a TV
To AC ou tlet
To audio input
Audio cable
(not supplied)
Video cable
(supplied)
Power cord
To video input
Notes on TV display
❑ TV Out does not work unless you start your notebook with the TV Out jack
plugged in.
❑ If you insert a DVD in your optical drive to watch a video on your TV,the
Fn+F8 key combination might not activate the function to toggle between
your LCD and TV. Perform the following steps:
54
Page 55

Connecting a TV Display
1 Connect the TV to the notebook.
2 Restart the notebook and wait until it finishes.
3 Toggle between your LCD and your TV with the Fn+F8 key
combination.
Your image is now displayed on both the LCD and the TV. Re-insert your DVD
to launch your DVD software.
❑ In order to play a DVD while using the TV Out jack, the screen resolution
must be set to 640 x 480 dots.
55
Page 56

Change text in this variable definition to document title.
Connecting a Universal Serial Bus (USB) Device
You can connect USB devices such as an external mouse, keyboard, speaker, and
microphone to your notebook.
To connect a USB device
The following steps describe the procedure for connecting a USB mouse to your
notebook. Use the same procedure for connecting all USB devices.
1 Locate the USB device identified by the symbol.
2 Plug one end of the USB cable into this port and the other end into the USB
device.
Connecting USB device to USB port
USB device
To
USB
USB connectin g cable
(optional)
You can use an optional Sony USB mouse PCGA-UMS1 series (not supplied)
with this notebook. Since the USB mouse software driver is preinstalled in the
notebook, you simply plug the USB mouse into the USB port to use it. One USB
port supports one USB device.
See the manual that came with your USB device for more information on its
installation and use.
56
Page 57

Connecting an i.LINK Device
Connecting an i.LINK* Device
Your VAIO®Notebook includes an i.LINK®S400 (IEEE1394) port, which
you can use to connect a compatible i.LINK device, such as an i.LINK enabled
digital video camera recorder. See the manual that accompanied your digital
video camera recorder for more information on i ts installation and use.
To connect a digital video camera recorder
❑ Plug one end of the i.LINK cable (not supplied) into the i.LINK port on the
left side of the notebook and the other end into the DV In/Out port on the
digital video camera recorder.
Connecting digital video camera recorder to i.LINK port
Digital video
camera recorder
To i.LINK
To DV In/Ou t
* i.LINK is a Sony trademark used only to designate that a product contains an IEEE 1394 con-
nection. The i.LINK connection may vary, depending on the software applications, operating
system, and compatible i.LINK devices. All products with an i.LINK connection may not
communicatew ith each other. Refer to thedocumentation thatcamewithyour compatible
i.LINK device for information on operating conditions and proper connection. Before connectingcompatiblei.LINK PC peripherals to your system, such as a CD-RW or hard disk
drive, confirm theiro perating system compatibility and requiredoperating conditions.
i.LINK cable
(optional)
57
Page 58

Change text in this variable definition to document title.
Notes on i.LINK devices
❑ The above figure displays a connection to a Sony digital video camera
recorder; your digital video camera recorder may need to be connected
differently.
❑ Only Sony digital video camera ports labeled “DV In/Out” or “i.LINK” are
compatible i.LINK devices.
❑ Do not connect more than one digital video camera at a time. The software
supplied with your notebook will not recognize multiple cameras.
❑ The i.LINK port on the notebook does not supply power to external devices.
If the external device requires power from the i.LINK port, you cannot use
the device with the notebook.
❑ The notebook supports transfer rates up to 400 Mbps; however, the actual
transfer rate is the lowest transfer rate of the external device.
❑ The i.LINK features available may vary depending on the software
applications you use. See the documentation that accompanied yoursoftware
for more information.
❑ The i.LINK cables c ompatible with your VAIO notebook includecables with
the following part numbers: VMC-IL4415 (a 1.5-meter cable with a 4-pin
connector at each end), VMC-IL4615 (a 1.5 meter-cable with a 4-pin
connector at one endand a 6-pin connectorat the other), and VMC-IL4408A
(a 0.8-meter cable with a 4-pin connector at each end). You canpurchase
these cables from your localretailer,throughtheSony VAIO® Direct Web site
(http://www.sonydirect.com), or by calling 1-888-315-7669(toll free).
58
Page 59

Connecting External Speakers
Connecting External Speakers
You can enhance the sound quality of your notebook by connecting external
speakers. See the manual that accompanied your speakers for more information
on their installation and use.
Do not place floppy disks on the speakers; the speakers’ magnetic field may
damage the data on the floppy disks.
Before connecting your external speakers
❑ Verify your speakers are designed for computer use.
❑ Turn down the volume of the speakers before you turn them on.
To connect external speakers
1 Locate the Headphone jack identified by the symbol on the side of the
notebook.
2 Plug the speaker cable into this jack.
Connecting speakers to the headphone jack
To Headphones
Speakers
Speaker cable
(supplied with speakers)
59
Page 60

Change text in this variable definition to document title.
Connecting an External Microphone
You can enhance the qualityof sound input by using anexternal microphone. See
the manual that accompanied your microphone for more information on its
installation and use.
✍ Verify that your microphone is designed for computer use. The microphone should be
compliant with the plug-in power microphone.
To connect an external microphone
1 Locate the Microphone jack identified by the symbol on the side of the
notebook.
2 Plug the microphone cable into this jack.
Connecting microphone to microphone jack
Microphone
(optional)
60
To
Microphone
Page 61

Expanding Your Notebook Capabilities
Expanding Your Notebook Capabilities
A Personal Digital Assistant (PDA), Wireless LAN Access Point, and Wireless
LAN PC Card peripheral device can be connected to your notebook, to expand
the capabilities of your computer and enhance its versatility to meet your various
business or personal needs.
Personal Digital Assistant
A handheld PDA is the quintessential personal planner and entertainment center
that fits in your pocket. With a PDA, you can easily perform the following
functions:
❑ Enter your schedule details in the calendar and view them by the day, week,
or month, and even set an alarm to remind you of important events.
❑ Keep your contact names,addresses,phone numbers, and other details in the
address book, and find them when you need them.
❑ Add tasks to the To Do List, prioritize them, and assign them due dates.
❑ Synchronize your data with the software on your notebook, to back up your
data.
❑ Track expenses when you are out of the office, then transfer the data to your
notebook.
❑ Exchange data with your notebook.
Wireless LAN Access Point
The Wireless LAN Access Point, which is also called the Access Point, is
designed for building a wireless Local Area Network (LAN) environment. The
Access Point comes with the Wireless LAN PC Card and required software. You
can easily build a wireless LAN environment by plugging the Access Point into
an AC power outlet, installing the Wireless LAN PC Card in your notebook, and
using the provided software. Because a wireless LAN configuration requires no
wiring, you can operate multiple computers more freely than ever before.
You can also connect your Access Point to a telephone line, Integrated Services
Digital Network (ISDN) router, cable modem, or DigitalSubscriberLine (xDSL)
modem to share access to the Internet among multiple computers.
61
Page 62

Change text in this variable definition to document title.
Wireless LAN PC Card
The Wireless LAN PC Card, which comes with the Wireless LAN Access Point,
can be purchased separately and is designed for building a wireless LAN
environment. The Wireless LAN PC Card can be used withor without the Access
Point. With the Access Point, you can build a wireless LAN between computers
that are equipped with the Wireless LAN PC Card and gain access to the Internet.
Without the Access Point, you can achieve direct communication (Peer to Peer
mode) between computers.
✍ For information on available Sony products, go to http://www.sonystyle.com/vaio/.
62
Page 63

Customizing Your VAIO Notebook
The following sections briefly describe how to change your notebook’s
default settings:
❑ Displaying the Sony Notebook Setup Screen
❑ Controlling Power Management
❑ Displaying Battery Information
❑ Selecting the Display Mode
63
Page 64

Change text in this variable definition to document title.
Displaying the Sony Notebook Setup Screen
To display the Son y Notebook Setup screen
1 Click the Start button on the Windows® taskbar.
2 PointtoVAIOandclickSonyNotebookSetup.
Sony Notebook Setup Screen
3 Select the tab for the item you want to change. See “Sony Notebook Setup
Tabs” for more information.
4 After you finish making your changes, click OK.
64
Page 65

Displaying the Sony Notebook Setup Screen
Sony Notebook Setup Tabs
Tab Description
About This Computer Display system information, including memory
capacity, serial number, and BIOS version.
Printer Select printer port mode settings.
Initial Setting Change the volume of the sounds that play while the
operating system is loading. Select the order of drives
and devices from which you want to load the operating
system. You can specify the hard drive as well as other
drives inserted into your notebook.
Touchpad When you connect an optional mouse to your
notebook, you can make your touchpad inactive. You
can also customize the settings of your mouse using the
mouse utility.
Power On Password Set the password to secure your notebook.
Enable Ports Enable or disable ports. Disabling ports releases
resources to the system. To change the serial settings,
click Advanced on the Basic/Advanced tab.
Basic/Advanced Switch between Advanced mode (additional screens
with advanced settings) and Basic mode of display.
✍ For mo re information about each option, click Help on the S ony Notebook Setup
screen to display the help file.
65
Page 66

Change text in this variable definition to document title.
Controlling Power Management
The PowerPanel™ utility allows you to control the power management of y our
notebook and provides key information about system activity and battery life.
The following sections briefly describe how to conserve your notebook’s battery
power. You can also refer to PowerPanel Help for more detailed information. To
activate a profile or command, see “Displaying Battery Information” for more
information.
To view the Power Management status icons
The Power Management status icons are displayed in the task tray at the lower
right side of your screen. Move the pointer over the icons to see the tool tip that
displays information about the active profile. The Battery status icon indicates
the batt ery power level and the CPU status icon indicates the performance level
of the CPU.
To activate the Power Manageme nt Toolbar
1 Right-click on the taskbar at the bottom of the screen.
2 Select Toolbars from the pop-up menu, and t hen click Power Management.
The Power Management toolbar appears on the taskbar.
The current profile icon is highlighted on the Power Management toolbar. It is
the first icon farthest to the left, and its appearance changes depending on which
power management profile is currently selected. To change the power
management profile, click the current profile icon, and then select a profile from
the pop-up list. See “Power Management profiles” for a description of available
options. To select another power management profile, click that icon in the
Power Management toolbar.
✍ When you u se the battery pack to po wer your notebook, your system selects the
Maximum Battery Life power management profile by default. If you select a different
power management profile while using battery power, that profile is selected
automatically the next ti me you use the battery pack to power your notebook.
Refer to PowerPanel Help for information on customizing the Power Management
toolbars.
You can change the powermanagementsettings, such as the systemtimer and the
brightness of the screen.
66
Page 67

Controlling Power Management
To customize Power Management settings
1 Click the Current Profile icon on the Power Management toolbar.
2 Select Edit/Create Profiles from the menu.
3 Click a profile whose setting you want to change from the list in the left
field.
4 Double-click an item whose setting you want to change from the list in the
right field.
5 Clickthedesiredsetting.
6 Click the File menu, and then click Save.
7 Click the File menu, and then click Exit.
Power Management profiles
The PowerPanel utility provides several predefined Power Management profiles.
Each profile consistsof a groupof Power Management settings that are designed
to meet specific Power Management goals—ranging from maximum Power
Management to no Power Management. You can change the settings for any of
the predefined profiles (except for the Disable Power Management profile), or
you can create your own profile to suit your portable computing needs. The
predefined profiles are:
Icon Description
Maximum Performance
Provides the best system perfo rmance while still conserving power.
Maximum Battery Life
Provides power saving features to give you maximum battery life and
good performance. It slows the notebook and puts it into Standby mode
after a specified time period.
Disable Power Management
Turns off all power management features such as Standby and
Hibernate modes.
You can not change the settings of this profile.
67
Page 68

Change text in this variable definition to document title.
Icon Description
AC Power
The power management state when AC power is in use. Similar to the
Power Management Off setting. Power Management automatically
loads the AC profile unless you disable this feature.
Games
Disables the display and the Hard Disk Standby timer.
Presentation
Keeps the display on at all times while it conserves power. This option
is ideal for slide show presentations. You can establish settings for
LCD (Video) Standby, Hard Disk Standby, and Standby mode to
optimize power management for your system.
Camera
Optimizes performance and power requirements for camera usage.
DVD
Optimizes performance and power requirements for DVD usage.
68
WordProcessing
Optimizes power management with longer timeouts on the hard disk
and display screen. You can also establish settings for LCD (Video)
Standby, Hard Disk Standby, and Standby mode to optimize power
management for your system.
Page 69

Controlling Power Management
Icon Description
Spreadsheet
Optimizes performance and power requirements for spreadsheet
applications.
Communications
Extends battery life by initiating a quick display timeout. The Internal
modem remains powered. You can also establish settings for LCD
(Video) Standby, Hard Disk Standby, and Standby mode to optimize
power management for your system.
Automatic Profile Selection
Automatically switches to a profile suitable for active applications.
Power management commands
The PowerPanel™ utility also provides power management commands that you
can use to activate specific power management functions and to control power
for a specific device. You can use these commands to override a profile setting or
initiate an immediate action.
Icon Description
Standby
Puts the system into Standby mode, a power management state that
saves the state of the system and peripheral devices in memory
(RAM). Power consumption reduces to a minimum, and the system
remains on. To return the system to the active state, press any key or
the power button on your notebook.
Hibernate
Provides for the lowest level of power consumption. The system
writes the state of the system and peripheral devices to the hard disk
and turns off the system power. To return the system to the original
state, use the power button to turn on power. The system saves the
data in the Save to Disk Partition on the hard drive.
69
Page 70

Change text in this variable definition to document title.
Conserving battery power
When using the notebook with a battery, the LCD display and the hard drive can
be set to switch off automatically to conserve battery power.
See “Power Management profiles” for more information.
70
Page 71

Displaying Battery Information
Displaying Battery Information
You can display information for each of the batteries in your notebook. The
following sections briefly describe how to display your notebook’s general
battery information. Refer to PowerPanel™ Help for more detailed information.
To activate the Battery Information toolbar
1 Right-click on the taskbar at the bottom of the screen.
2 Select Toolbars from the pop-up menu, then click Battery Information. The
Battery Information toolbar appears on the taskbar.
To view the total capacity remaining in the battery, place the pointer over the
battery status icon in the task tray on the lower right side of the screen.
Battery Information Toolbar
❑ Percentage indicator — Displays the percentage of the remaining capacity.
❑ Time indicator — Displays estimated time (hours:minutes) remaining
before the battery fully drains, also known as the time-to-empty.
Battery icon descriptions
Battery icon Battery status
Charging
71
Page 72

Change text in this variable definition to document title.
Battery icon Battery status
Fully charged
Discharging
No battery
To display detailed battery information
Double-click the battery icon on the task tray to display the Battery Information
window. The screen appears displaying the Battery tab, which contains
information such as the estimated time-to-empty and charging time.
Battery Information Window
72
Page 73

Displaying Battery Information
To customize the Battery Information toolbar and alarm system
You can customize the Battery Information toolbar and modify the alarm
settings, to suit your portable computing needs. Refer to PowerPanel™ Help for
more information.
73
Page 74

Change text in this variable definition to document title.
Selecting the Display Mode
This notebook uses the Intel® video controller, which enables you to select the
desired display when the notebook is connected to an external monitor. When
you connect an external display, you can switch the display mode between your
notebook’s LCD display and the external monitor.
To select the display mode
✍ See “Connect ing an External Display” f or more information.
1 Click the Start button, point to Settings, then point to Control Panel.
2 Click Display to access the Display Properties window.
3 Click the Settings tab, then click the Advanced button, to display the Intel®
82815 Graphics Controller Properties dialog box.
Intel® 82815 Graphics Controller Properties Screen
74
Page 75

Selecting the Display Mode
4 Click the Intel® GraphicsTechnology tab, then click theGraphicsProperties
button. If you want to use the TV as a display, deselect the Synchronous
Display Mode box and click Apply. You cannot use the TV and another
display simultaneously.
5 Click the Device tab.
6 Select the type of display.
✍ You may not be able to display the notebook LCD screen and an external display or
projector at the same time, depending on the types of computer displays and
projectors you are using.
Turn on the notebook after you turn on the peripheral devices.
To change the Window Design of Sony software
1 Click the Start button, point to Settings, then point to Control Panel.
2 Click UI Design Selector.
3 Click << or >> and select the desired design.
4 Click Apply.
5 The “UI Design Selector”window design changes. The window design for
your Sony software will match the “UI Design Selector” window.
6 To try another selection, click << or >> and then click OK.
7 The “UI Design Selector”window closes and the Sony software window
design displays.
✍ This feature is available with UI Design Selector-compatible software only.
75
Page 76

Change text in this variable definition to document title.
76
Page 77

Adding Memory to Your VAIO Notebook
In the future you may want to install memory modules to expand the
functionality of your notebook. The amount of memory on your notebook
will vary depending on t he model you purchased. Expansionmemory
modules are available as options. For memory upgrades, use onlyPC100
(CL2) SDRAM SO-DIMM (gold lead contacts). This section describes
how to replace memory modules in your computer:
❑ Precautions and Procedures
❑ Removing a Memory Module
❑ Installing a Memory Module
❑ Viewing the Amount of Memory
77
Page 78

Change text in this variable definition to document title.
Precautions and Procedures
The procedures described below assume you are familiar with the general
terminology associated with personal notebooks and with common safety
practices required for using and modifying electronic equipment. Personal injury
or equipment damage may result from failure to take these precautions.
Observe the proper safety precautions when installing memory modules in
your notebook. See the bulleted list below. Use care when adding memory.
Mistakes made when installing or removing a memory module may cause a
malfunction.
❑ Disconnect your system from its power source and from any
telecommunications links, networks, or modems before you open the
system.
❑ Electrostatic discharge (ESD) can damage memory modules and other
components. Perform the procedures described below only at an ESD
workstation. If such a station isnot available, do not work in a carpeted area,
and do not handle materials that produce or hold static electricity
(cellophane wrappers, for example). Ground yourself by maintaining contact
with an unpainted metal portion of the chassis while performing the
procedure.
❑ Do not open the memory module package until you are ready to install the
module. The package protects the module from ESD.
❑ Use the special bag for preventing ESD or usealuminum foil when you store
the memory module.
78
Page 79

Precautions and Procedures
Typical expansion memory configuration
128 MB Memory Models
Total System Memory (MB)Slot 1 (MB) Slot 2 (MB)
128 128
192 128 64
256 128 128
512 256 256
256 MB Memory Models
Total System Memory (MB)Slot 1 (MB) Slot 2 (MB)
256 128 128
512 256 256
79
Page 80

Change text in this variable definition to document title.
Removing a Memory Module
1 Shutdownyournotebookand disconnect all peripheral devices, such as your
printer.
2 Unplug the notebook and remove the battery pack(s).
3 Afterthe notebook has cooled, loosen and remove the screw that secures the
cover of the memory bay on the bottom of your notebook. Use an
appropriate screwdriver.
Removing the memory module cover
Screwdriver
Screw
4 Touch a metal object (such as the connector panel on the back of your
notebook) to discharge any static electricity.
5 Remove the memory module.
80
Page 81

Removing memory module
1
2
1 Pull the tabs in the direction of the arrows.
The memory module is released.
2 Pull the memory module in
6 Tightenthescrewonthememorybaycover.
Removing a Memory Module
1
the direction of the arrow.
81
Page 82

Change text in this variable definition to document title.
Installing a Memory Module
1 Follow steps 1 to 4 of “Removing a Memory Module”.
2 Remove the memory module from its packaging.
3 Slide the memory module into the empty slot.
4 Press the module into place until it clicks.
Installing memory module
1 Slide the memory module into the slot.
2 Press the module into place until it clicks.
5 Tighten the screw on the cover of the memory bay.
82
Page 83

Viewing the Amount of Memory
Viewing the Amount of Memory
1 Restart the notebook.
2 Click the Start button on the Windows status bar, point to VAIO option,and
click Sony Notebook Setup. The Sony Notebook Setup screen appears.
3 Click the About This Computer t ab to view the amount of system memory. If
the additional memory is not shown, repeat steps 1 through5 in “Installing a
Memory Module”.
83
Page 84

Change text in this variable definition to document title.
84
Page 85

About the Software on Your Notebook
Your VAIO® Notebook is ready to help you work, play, learn, and
communicate as soon as you turn it on. This section provides the
following information:
❑ An overview of the various software that come with your notebook and the
activities you can perform with your software
❑ Details on your Sony application, driver, and system recovery CDs
85
Page 86

Change text in this variable definition to document title.
Software Overview
Adobe Acrobat™ Reader
Adobe Systems, Inc.
Acrobat Reader software enables you to view, navigate, and print electronic
documents in Adobe Portable Document Format (PDF), an open file format that
is intended to preserve the fidelity of documents created on all major computer
platforms.
America Online®
America Online, Inc.
America Online is a popular Internet online service. Stay in touch with family
and friends with easy-to-usee-mail, manage your personal finances, getthe latest
news and sports scores, and chat with thousands of others who share your
interests.
Apple QuickTime™
Apple Computer Inc.
QuickTime is the Apple technology that makes video, sound, music, 3D, and
virtual reality come alive for our Internet browser and Windows.
CompuServe® 2000
CompuServe Interactive Services, Inc.
CompuServe is the most comprehensive source of organized business and
educational information online today. CompuServe allows you to access the
vastness of the Internet, withoutwasting time wading through it. Maximize your
time online with CompuServe.
86
Page 87

Software Overview
DVgate™
Sony Electronics Inc.
Connect a compatible digital video camera recorder to the i.LINK®
*
connector
and capture your own video clips and still images. You can edit clips from your
video, add others, and combineclips into new movie segments.You can alsosave
your images in a variety of popular file formats.
Easy CD Creator™ (On selected models)
Roxio, Inc.
Easy CD Creator lets you make your own data, audio and multimedia CDs. You
can back up your important files to C D, and read them back on standard CDROM drives. Create your own audio C Ds right on your desktop, and play them
back on your home o r car stereo CD player.You can make your own personalized
color jewel case inserts with custom text and graphics. Yo u can even make
backup copies of your existing CDs. The Easy CD Creator Wizard makes
creating y our own custom CDs a simple process.
Microsoft® Internet Explorer
Microsoft Corp.
Internet Explorer delivers the Web the way youwant it. It is safe, easy touse, and
you can personalize how you access the Web. Outlook Express and other tools in
Internet Explorer also help you h ave a great experience when you are on the
Web.
Microsoft® Word
Microsoft Corp.
Microsoft Word makes it easy to create shared Web, e-mail, and print documents
for use around the world. It embraces HTML as a first-class file format and
extends Word’s ease-of-use to the Web and e-mail. Word also extends that easeof-use to international users, making it simple to create multilingual documents.
* i.LINK is a Sony trademark used only to designate that a product contains an IEEE 1394 con-
nection. The i.LINK connection may vary, depending on the software applications, operating
system, and compatible i.LINK devices. All products with an i.LINK connection may not
communicatew ith each other. Refer to thedocumentation thatcamewithyour compatible
i.LINK device for information on operating conditions and proper connection. Before connectingcompatiblei.LINK PC peripherals to your system, such as a CD-RW or hard disk
drive, confirm theiro perating system compatibility and requiredoperating conditions.
87
Page 88

Change text in this variable definition to document title.
MovieShaker™
Sony Electronics Inc.
Sony’s original MovieShaker software creates personal movies that have
transitions, background music and text. Just import your video clips and “shake”
with a click of the mouse. Your personal movies are easy to create and fun to
share with family and friends. See “MovieShaker” for more information.
Netscape Communicator®
Netscape Communications Corp.
Netscape Communicator is an all-in-one Internet tool that makes it easy to
browse the Web, send Internet e-mail, chat, read newsgroups, and compose great
Web documents.
Norton AntiVirus™
Symantec Corporation
Norton AntiVirusprovidessecurityforyour Internet and e-mail communications.
This powerful antivirus software works in the background to continuously
protect your PC, byscanning the files you downloadfrom the Weband receive as
e-mail attachments. Each time you connect to the Internet, Norton Antivirus
updates its virus definitions to deliver automatic protection today and in the
future.
OpenMG™ Jukebox
Sony Electronics Inc.
OpenMG Jukebox software enables you to import digital audio files by
downloading audio files from Electronic Music Distribution (EMD) services
over digital networks, such as the Internet. You can record audio CDs onto your
hard drive in a variety of formats.
PictureGear™
Sony Electronics Inc.
This image management software displays images from your hard drive, a Sony
digital stil l camera, or a Sony Mavica® camera. The images appear in a
convenient light-table format, so that you can easily view the contents of an
entire folder. See “PictureGear” for more information.
88
Page 89

Software Overview
Prodigy Internet®
Prodigy Communications Corp.
An online service that helps you find what you need online faster and smarter.
Prodigy delivers powerful online content such as sports scores, stock quotes,
news, and easy access to Excite, plus quality customer service, all at a
competitive price.
Quicken® 2001
Intuit Inc.
Quicken is a fast, easy way to organize your finances. Quicken works just like
your checkbook, so it is easy to learn and use. Quicken manages all your
finances, bank accounts, credit cards, investments, and loans. You can even pay
your bills online.
RealJukebox
Real Networks Inc.
RealJukebox is one of the world’s most widely used personal music management
systems. Using RealJukebox, you can capture the contents of a music CD,
manage and play back your music, and v iew various music-related information
via the Internet. This Custom RealJukebox for Sony allows seamless check-out
capabilities to a wide range of Sony personal audio devices, and offers
convenient links to Sony product and music service home pages.
✍ If you are using an external CD-ROM drive connected with a PC Card, be sure to
connect your external CD-ROM drive before starting RealJukebox. Additionally, do not
remove your CD-ROM drive while using RealJukebox. Either of these act ions may
cause RealJukebox to shut down improperly.
RealPlayer®
Real Networks Inc.
RealPlayer is the RealNetworks video and audio player which lets you access
2,500 radio stations featuring music, news and sports.
89
Page 90

Change text in this variable definition to document title.
RealProducer®
Real Networks Inc.
RealProducer converts your audio and video files, or live feeds, into RealAudio
and RealVideofor the Internet or your i ntranet. RealProduceris easy to use, gives
you better control over your content, and is packed with exclusive features.
Featuring support for CD-quality RealAudio 8 and VHS-quality RealVideo 8,
RealProducer is an excellent choice for both beginners and pros.
Smart Capture
Sony Electronics Inc.
Smart Capture is a fun new way to send multimedia messages via e-mail. Smart
Capture manages the i.LINK® connection between your computer and a Sony
Digital Handycam® Camcorder that supports the i.LINK interface. It allows you
to capture compressed video or still images that you can save or share via e-mail.
A smart solution to computer, digital audio/video and network convergence.
Smart Connect
Sony Electronics Inc.
Smart Connect allows you to use an i.LINK cable to connect your VAIO
computer to another VAIO computer that supports Smart Connect. You can then
use one computer to copy, delete, and edit files on the other computer. You can
also print from a printer attached to either computer.
VAIO Action Setup
Sony Electronics Inc.
VAIO Action Setup manages the settings for your notebook’s Shortcut keys and
i.LINK interface.
VAIO Support Agent
Sony Electronics Inc.
VAIO Support Agent provides immediate, interactive online support.
90
Page 91

Software Overview
VisualFlow™
Sony Electronics Inc.
VisualFlow software is a state-of-the-art Sony multimedia browser designed
specifically for Memory Stick® media. It displays any still picture, movie, or
sound file stored in a Memory Stick media in a visually pleasing, artistic manner.
VisualFlow software not only plays a selected movie or sound file, but also
enables playback of files by other applications such as PictureGear, Memory
Stick Slideshow, and Windows Explorer.
WinDVD® 2000
InterVideo Inc.
WinDVD is a simple-to-use DVD player including all the features you would
expect to find in a standard consumer DVD player, while also offering advanced
display and navigation features such as zoom, pan, bookmark, and time search.
91
Page 92

Change text in this variable definition to document title.
DVgate
In order to improve the performance of your notebook’s DVgate™ motion
software, the hard disk drive on your notebook has been formatted with two
partitions, C and D. The C partition holds 40 percent, and the D partition holds 60
percent of the entire drive capacity. DVgate software saves files to the D
partition. This prevents large video captures from consuming the available space
on your C partition. To maintain optimum performance of DVgate software, you
should defragment or format the D partition regularly.
To defragment a partition
Before you defragment a partition, make sure you back up all files that you
want to save.
1 Click the Start button in the Windows® taskbar.
2 Click Programs, then Accessories, then System Tools, and then Disk
Defragmenter. The Disk Defragmenter window appears.
3 Select the drive you want to defragment from the list, and click the
Defragment button.
See Windows® Help for more information on defragmenting.
DVgate plug-in for Adobe Premiere
If your VAIO® Notebook does not come with Adobe Premiere® pre-installed
and you subsequently purchasethat software, you must install a plug-into enable
DVgate™ 2.3 software.
To install the DVgate plug-in for Adobe Premiere® 5.1 and 5.1LE
1 Click Start in the Windows® taskbar and select Run.
2 Click Browse and, from your C: drive, select Program Files, and Sony, and
Dvgate, and Premiere Plug-in, and then 5.1.
3 Select “Setup.exe” and click Open. Then click OK to install the plug-in.
92
Page 93

DVgate
To install the DVgate plug-in for Adobe Premiere® 6.0
1 Click Start in the Windows® taskbar and select Run.
2 Click Browse and, from your C: drive, select Program Files, and Sony, and
Dvgate, and Premiere Plug-in, and then 6.0.
3 Select “Setup.exe” and click Open.
4 Click OK to install the plug-in.
93
Page 94

Change text in this variable definition to document title.
MovieShaker
This application can be used to create fun and innovative movies without any
prior knowledge of film editing. In a few simple steps, motion pictures can be
combined with special effects, still images, and music files, and then saved in a
format compatible with most computers.
Main Window
Workin g Pa nel
Clip tray
Product tray
Editing trays
Help
Trash
To import images and sound clips
1 Click (File Import) or (DV Import).
2 Find the file you want to add.
3 Select the file.
4 Click Open. The file is added to the Clip tray.
✍ Importing large files may cause MovieShaker software to stop responding.
To create a movie using Shaker
After adding clip(s) to the Clip tray, you can create a short movie using the
Shaker feature. Shaker randomly select clips from the Clip tray to create a 30second scene.
1 Click the Shake tab.
2 Select a mood by clicking a face in the Shaker tray.
94
Page 95

MovieShaker
Shaker Tray
3 Click . A 30-second scene is automatically generated and
saved to the Product tray.
4 To preview, switch the scene from the Product Tray to the Work Panel and
press play.
✍ Scenes created with Shaker begin with a black frame and after processing are placed
in the first available slot on the Product tray. Limit the number of scenes placed on the
Product tray to five or fewer. MovieShaker software may stop responding if too many
scenes are placed on the Product tray.
To edit clips and scenes
You can edit your movie by adding effects and text, adjusting the color and
contrast, and modifying the length of clips.
Working Panel
Monitor
Trim Palette
Sound
Color
Speed
Effect Palette
Effect
Knobs
95
Page 96

Change text in this variable definition to document title.
To add effects to a scene or a clip
1 Double-click the clip or scene to move it to the Working Panel.
2 Select the Effects tab from the Editing tray.
3 Dragand drop the Effect you want to add from the Effects tray to the Effects
palette on the Working Panel.
✍ To preview an Effect, click on the clip in the Working panel monitor. Your clip displays
with the new effect on the Effect tray monitor.
4 SeeHelp for instructions on adjusting effect duration and replaying clips and
scenes.
To save a movie
1 Verify that the clip(s) you want to save is on the Product tray. See Help for
more details on saving movies.
2 Click Export.
3 Select the format in which you want the clip to be saved.
4 Click Next.
5 Locate the folder to which you want the file saved.
6 Name the file.
7 Click Save.
✍ Exporting movies may take a long time to complete—Qui ck-S ave is the fastest wa y to
save a movie, while “Save movie as DV” (Digital Video) takes the longest.
MovieShaker can play video files up to 65 MB in length.
For DV playback and smooth video playback, use the following resolution refresh
rates: 1024 x 768/75 Hz or lower.
96
Page 97

OpenMG Jukebox
OpenMG Jukebox
OpenMG Jukebox is a software application that utilizes Sony Corporation’s
copyright protection technology. OpenMG Jukebox maintains the holder’s
copyrights by preventing unauthorized distribution of digital audio files.
OpenMG Jukebox software enables youto play and record audioCDs and import
digital audio files while maintaining the copyright information of the contents.
When you record an audio CD with OpenMG Jukebox, it is encoded in ATRAC3
format onto your notebook’s hard d rive. You can download digital audio files
from Electronic Music Distribution (EMD) services. The imported data can be
played on your notebook or transferred to external devices or media. OpenMG
Jukebox converts your existing MP3 and WAV format audio files into OpenMG
format (WAV format audio files are converted into ATRAC3 format or changed
into OpenMG MP3 format).
Your VAIO® Notebook ships with OpenMG Jukebox 2.0 installed. Other
external devices that are compatible with OpenMG Jukebox may contain an
earlier version of the software (Version 1.0, 1.1, or 1.2). Do not install an
earlier version of OpenMG Jukebox on your notebook, as this may cause the
software to work improperly or damage your audio files.
Electronic Music Distribution (EMD) services
EMD allows you to download music files via the Internet. To use Internet
services that are compatible with OpenMG Jukebox, you need:
❑ Access to the Internet from your notebook. Sign up with an Internet Service
Provider (ISP) and configure your notebook for Internet access before using
EMD services.
❑ An EMD service provider. Consult the provider for details regarding service.
✍ To protect your personal data, Sony uses Secure Sockets Layer (SSL), an encryption
protocol for communication between your browser and Sony’s World Wide Web
(WWW) server. If you are accessing the Internet from an enterprise Local Area
Network (LAN), you may not be able to use SSL due to the proxy server of the LAN.
Contact your network administrator for more information.
97
Page 98

Change text in this variable definition to document title.
To start OpenMG Jukebox 2.0
1 From the Start button on the Windows taskbar, select Programs, OpenMG
Jukebox, and then click on OpenMG Jukebox. The C DDB® Music
Recognition Service Registration wizard appears.
2 Follow the onscreen instructions to complete registration.
✍ To register with CDDB, you will need Interne t access from your notebook. For more
information regarding CDDB registration, click the Help button.
3 When you have registered with CDDB, the “Set OpenMG Jukebox as the
Application for playing Audio CD” dialog box appears. You can set
OpenMG Jukebox as the default application for playing audio CDs by
selecting the appropriate checkbox.
4 Click OK. The OpenMG Jukebox window appears.
OpenMG Jukebox 2.0 Basic Features
1 2 3
4 5 6 7 8
98
Page 99

OpenMG Jukebox
1Menubar
Displays OpenMG Jukebox menus.
2 Screen Tabs
Change the operational sheet view
according to function.
3 Player control buttons
Control playback (play, stop, pause,
etc.).
4 File Tree view
Displays the folders on your
notebook.
5 File List view
Lists the items under the selected
folder in the File Tree view.
6 Drop-down list
Displays the playlists, audio files,
etc., of the current screen tab.
7Tutorialtab
Opens and closes the Tutorial
screen.
8 URL drop-down list
Displays URL address information
if available. Clicking the “Go to
URL link” button connects to the
Internet Web page of the URL.
To record a CD
You can record songs from audio CDs and import them to playlists within
OpenMG Jukebox.
✍ When you record from an audio CD on your o pt ical drive for the first time, th e “CD
Drive Optimization” dialog box appears. Click Start to verify your optical drive. After
the verification is performed, recording begins.
1 Insert an audio CD into the optical drive.
2 Click the CD tab.
3 Select the Bit Rate, CD drive, and Record to location from the drop-down
lists.
99
Page 100

Change text in this variable definition to document title.
CD tab screen
4 Toselect certain tracks from your CD, uncheck any unwanted tracks. You
can also click the empty checkbox next to Select All (clears all checkboxes),
and then select the desired tracks.
5 Click Rec to Jukebox to begin recording. When the recording is
finished, the new playlist appears in the File Tree view of the Playlist screen
tab.
6 To name the album and songs, type the name, or retrieve it from the CDDB
Web site on the Internet at http://www.cddb.com/cddb2info/using.html.
To transfer songs (check-in/check-out)
You can transfer songs between t he playlists of your OpenMG Jukebox and
external devices/media. For details on using your external devices/media, see the
user guide that came with your product. These instructions are for the Checkin/Check-out 1 step mode; for information on 2 step mode, see “Changing the
check-in/check-out settings” in th e OpenMG Jukebox Help menu.
100
 Loading...