

Sony PCG-FX290 Primary,VAIO PCG-FX290K,VAIO PCG-956A,VAIO PCG-9562 User Manual

VAIO® Notebook
User Guide
PCG-FX290/FX290K
VAIO Notebook User Guide
Notice to Users
© 2001 Sony Electronics Inc. All rights
reserved. This manual and the softwa re
described herein, in whole or in part, may not
be reproduced, tra nslated, or reduced to any
machine-readable form without prior written
approval.
SONY ELECTRONICS INC. PROVIDES NO
WARRANTY WITH REGARD TO THIS
MANUAL, THE SOFTWARE, OR OTHER
INFORMATION CONTAINED HEREIN
AND HEREBY EXPRESSLY DISCLAIMS
ANY IMPLIED WARRANTIES OF
MERCHANTABILITY OR FITNESS FOR
ANY PARTICULAR PURPOSE WITH
REGARD TO THIS MANUAL, THE
SOFTWARE, OR SUCH OTHER
INFORMATION. IN NO EVENT SHALL
SONY ELECTRONICS INC. BE LIABLE
FOR ANY INCIDENTAL,
CONSEQUENTIAL, OR SPECIAL
DAMAGES, WHETHER BASED ON TORT,
CONTRACT, OR OTHERWISE, ARISING
OUT OF OR IN CONNECTION WITH THIS
MANUAL, THE SOFTWARE, OR OTHER
INFORMATION CONTAINED HEREIN OR
THE USE THEREOF.
Updates and additions to software may require
an addition a l charge. Subscriptions to online
service provider s m ay re quire a fee and credi t
card information. Financial services may
require prior arrangements with participating
financial institutions.
As an ENERGY STAR
Partner, Sony Corporation
has determined that this
product meets the
ENERGY STAR
guidelines for energy
efficiency.
The International
Equipment Program is an international program
that promotes ene rgy savin g through the use of
computers and other office equ ipment. The
program backs the development and
dissemination of products with functions that
effectively reduce energy consumption. It is an
open system in which business proprietors can
participate voluntari ly. The targeted products
are office equi pm ent such as computers,
displays, printers, facsimiles and copiers. Their
standards and logos are uniform among
participating nations.
registered mark.
ENERGY STAR Office
ENERGY ST AR is a U.S.
Sony Electronics Inc. reserves the right to make
any modification to this manual or the
information cont ained herein at any ti m e
without notice. The software described herein is
governed by the terms of a separate user license
agreement.
This product conta ins soft wa re owned by Sony
and licensed by third parties. Use of such
software is subject to the t erm s an d conditions
of license ag reements encl os ed with this
product. Some of the software may not be
transported or used outside the United States.
Software s p ecifications are subject to chan ge
without notice and may no t ne cessarily be
identica l to current retail version s .
2
Sony, Handycam, i.LINK, Mavica, Media Bar,
MovieShak er , Pictur eGear , VAIO and th e VAIO
logo are trademarks of Sony Corporation.
Microsoft, Windows Me, Windows Media,
Windows, Windows NT, and the Windows logo
are register ed trademarks of Micr osoft
Corporatio n. I ntel, SpeedS te p, and Pentium a r e
trademarks of Inte l Cor poration. PS/2 is a
register ed trademark of IBM.
This product incorporates copyright protection
technology that is protected by me thod claims
of certain U.S. pate nts and other intellectual
property rights owned by Macrovision
Corporation an d other rights owners. Use of
this copyright protection technology must be

authorized by Ma crovision Corporati on, and is
intended for hom e a nd other limited viewing
uses only unless otherwise authorized by
Macrovision Corporation. Reverse engineering
or disassembly is prohibited. i.LINK is a SONY
trademark used only to designate that a product
contains an IEEE 1394 connector. All products
with an i.LINK connector may not
communicat e wi th each other.
unless the telephone line has been
disconnected at the network
interface.
❑ Use caution when installing or
modifying tel e ph one li n e s.
❑ A void using the modem during an
electrical storm.
All other trademarks are trademarks of their
respective owne rs.
Owner’s Record
The model n umber and seri al number are
located on the bott om of your Sony VAIO®
Notebook. Refer to the m odel and serial
number when you call your Sony Service
Center.
Model Numbers: PCG-956A, PCG-956 2
Serial Number:___________________ _____
Safety Information
WARNING
To prevent fire or shock hazard,
❑
do not expose your notebook
computer to rain or moisture.
❑ To avoid electrical shock, do not
open the cabinet. Refer servicing
to qualified personnel only.
❑ Do not use the modem or a
telephone to report a gas leak in
the vicinity of the leak.
❑ A socket outlet should be as close
as possible to the unit and easily
accessible.
! To change the backup battery,
please contact your neare s t Sony
Service Center.
! Caution - The use of op tic a l
instruments with thi s produ c t will
increase eye hazard. As the laser
beam used in this product is
harmful to the eyes, do not
attempt to disassemble the
cabinet. Refer servicing to
qualified personnel only.
! For CD-RW/DVD-ROM drive:
Danger - Visible and invisib le
laser radiation when open. Avoid
direct exposure to beam.
❑ Never install modem or
telephone wiring during a
lightning storm.
❑ Never install telephone jacks in
wet locations unless the jack is
specifically designed for wet
locations.
❑ Never touch uninsulated
telephone wire or terminal s
! Caution: To reduc e the risk of fire ,
use only No. 26 AWG or larger
telecommunicatio n lin e cord.
AVERTISSEMENT
❑ Pour prévenir tout risque
d’incendie ou d’électrocution,
garder cet appareil à l’abri de la
pluie et de l’humidité.
3
VAIO Notebook User Guide
❑ Pour prévenir tout risque
d’électrocution, ne pas ouvrir le
châssis de cet appareil et ne
confier son entretien qu’à une
personne qualifiée.
❑ Ne jamais effectuer l’installation
de fil modem ou télé phone durant
un orage électrique.
❑ Ne jamais effectuer l’installation
d’une prise téléphonique dans un
endroit mouillé à moins que la
prise soit conçue à cet effet.
! Pour change r la pile de r echange,
veuillez contacter votre centre de
service Sony le plus pr ès.
! Avertissem e nt - L'ut ilis ation
d'instrume nts optiques ave c ce
produit augmente les risques pour
les yeux. Pui sque le faisceau
laser utilisé dans ce produit est
dommageable pour les yeux, ne
tentez pas de désassemble r le
boîtier. Adressez-vous à un agent
de service qualifié.
❑ Ne jamais toucher un fil
téléphonique à découvert ou un
terminal à moins que la ligne
téléphonique n’ait été débranché
de l’interface réseau.
❑ Soyez très prudent lorsque vous
installez ou modifiez les lignes
téléphoniqu es.
❑ Évitez d’utiliser le modem durant
un orage électrique.
❑ N'utilisez pas le modem ni le
téléphone pour prévenir d'une
fuite de gaz vous êtes près de la
fuite.
❑ L’appareil doit être le plus près
possible d’une prise murale pour
en faciliter l’accès.
! Pour les lecteur CD-RW/DVD-
ROM: Danger : Radiation laser
visible et invisible si ouvert.
Évitez l’exposition directe au
faisceau.
! Attention : Afin de rédu ire les
risques d'i nc en die, n'utilisez
qu'un cordon de communic ation
N0. 26 AWG ou plus gros.
If you have questions about this product, you
can reach the Sony Custom e r Information
Service Center at 1-888-4SONYPC; or write to
the Sony Custom e r Information Service Center
at 12451 Gateway Blvd. , Ft. My ers, FL 33 913
or find Sony Customer Service on the web at:
http://www.sony.com/pcsupport
Regulatory Information
Declaration of Conformity
4
Trade Name: SONY
Model No.: PCG-956A
PCG-9562
Responsible Party: Sony Electronics Inc.
Address:
T elephone:
(For FCC-related
matters only.)
This device complies with Part 15 of the
FCC rules. Oper ation is subject to th e
following two conditions:
(1) This device may not cause harmful
interference.
(2) This device must ac cept any interference
received, including interference that may
cause undesired operation.
This equipment has been tested a nd found to
comply with the limits fo r a Cl as s B digital
device, pursuant t o Part 15 of the Rules. These
limits are designed to provide reasonable
protection against harmful in terference in a
residentia l i n s ta ll ation. This eq uipment
generates, uses, and can radiate radio frequency
energy and, if not installed and used in
accordance with the instructions, may cause
harmful interference to radio communicati on s.
However, there is no guarantee that interference
will not occur in a particular installation. If this
equipment doe s cause harmful interference to
radio or televi sion reception, which can be
determined by turning the equipment off and
on, the user is encouraged to try to correct the
interference by one or more of the following
measures:
680 Kinderkamack Rd .
Oradell, NJ 07649
201-930-6972
❑ Reorient or relocate the receiving
antenna.
❑ Increase the separation between
the equipment and the receiver.
❑ Connect the equipment into an
outlet on a circuit different from
that to which the receiver is
connected.
❑ Consult the dealer or an
experienced radio/TV technician
for help.
You are cautioned that any chan ges or
modifications not expressly approve d in this
manual could void your authority to operate this
equipment.
Only peripherals (co mp ut er i nput /output
devices, terminals, printers, etc.) that comply
with FCC Class B limi ts may be at tached to this
computer product. Operation with noncomplia nt peripherals is likely to result in
interference to radio and televi sion reception.
All cables used to connect peripherals must be
shielded and grou nde d. O peration with cabl es,
connected to peripherals, that are no t shi el ded
and grounded, m ay re sul t in int erference to
radio and television reception.
FCC Part 68
This equipment complies with Part 68 of the
FCC rules. On the bottom of this equipment is a
label that co ntains, among othe r information,
the FCC equivalence number (REN) for this
equipment. If requested, this infor mation must
be provided to the telephone company.
This modem uses the USOC RJ-11 telephone
jack.
The REN is used to determine the quantit y of
devices which may be connected to the
telephone line. Excessive RENs on the
telephone li ne may result in the de vices not
ringing in response to an incoming call. In
most, but not all area s , th e sum of the RENs
should not exce e d five (5.0). To be certain of
the number of devi ce s th at may b e con nect ed to
the line, as determined by the total RENs,
contact the telephone company to determine the
maximum REN for t he c al li ng a r ea .
If the terminal equipment ca us es harm to the
telephone network, the telephone company will
5

VAIO Notebook User Guide
notify you in advance that temp orary
discontinuance of service m ay be required. But
if advance notice is not pract ic al, the telephone
company will notify the customer as soon as
possible. Also, you will be advised of your right
to file a complaint with the FCC if you believe
it is necess ary.
The telepho ne comp an y may make changes in
its facilities, equipm en t, operations or
procedures that could affect the operati ons of
the equipme nt. If this happens, the te le phone
company will provide advance notice in order
for you to make the necessary modifications in
order to maintai n uni nterrupted service .
If trouble is exper ie nced with this equipme nt,
you can reach the Sony Customer Information
Service Center at 1-888-4SONYPC; or write to
the Sony Customer Information Service Center
at 12451 Gateway Blvd. , Ft. Myers, F L 33 913
or find Sony Custome r Service on the web at:
http://www.sony.com/pcsupport
Repair of this equipment should be made only
by a Sony Service Ce nt er or Sony authorized
agent. For the Sony Service Center nearest you,
call 1-888-4SONYPC (1-888-476-6972).
page or on the first page of the transmission, the
date and time it is sent and an identification of
the business, other entity, or individual sending
the message , and t he telephone number of the
sending mach ine or such business, other entity ,
or individual.
In order to program this information into your
facsimile machine , see your fax software
documentation.
Telephone Consumer
Guidelines (Canada)
Please refer to you r te lephone directory under
‘Privacy Issues’ a nd/ or ‘Terms of Service.’ For
more detailed information, please contact:
CRTC
T errasses de la Chaudiére, Tour centrale
1 promenade du Po rtag e, 5 é tage Hul l
PQ K1A 0N2.
This Class B digita l ap paratus complies with
Canadian ICES-003.
Cet àppareil numérique de la classe B est
conforme à la norme NMB-003 du Canada.
This equipment cannot be used on public coin
service provide d by t he telephone compa ny.
Connection to Part y Line Service is subje ct to
state and possible provincial tariffs. (Contact
the state or pr ovincial utilit y s ervice
commission, public service commission, or
corporation co m mi ssion, for information. )
Telephone Consumer
Protection Act of 1991
(United States)
The Telephone Consumer Protection Act of
1991 makes it unlawful for any person to use a
computer or other electronic device to send any
message via a telephone facsimile machine
unless such message clearl y contains, in a
margin at the top or bottom of each transmitted
DISPOSAL OF LITHIUM ION
BATTERY
You can return your unwanted lithium ion
batteries to your nearest Sony Service Center or
Factory Service Center.
✍ In some areas the disposal of lithium
ion batteries i n ho us e ho ld or
business trash may be prohibite d.
6

For the Sony Service Center nearest you, call 1888-476-6972 in the Unit e d Sta te s or 1-800961-7669 in Canada.
! Do not handle damaged or leaking
lithium ion batteries.
! Ne pas manipu ler le s batteries au
lithium-ion qui fuient ou sont
endommagées.
! Danger of explosion if battery is
incorrectly replaced. Replace only
with the same or equivalent type
recommended by the
manufacturer. Discard used
batteries according to the
manufacturer’s instructions.
! Une batterie non conforme
présente un danger d'expl os io n.
La remplacer seulement par une
batteri e identique ou de type
équivalent recommandé par le
fabricant. Évacuer les batt er ies
usées selon les directiv es du
fabricant.
! The battery pack used in this
device may present a fire or
chemical burn ha zard if
mistreated. Do not disassemble,
heat above 212°F (100°C) or
incinerate.
Dispose of used battery promptly.
Keep away from children.
! La manutention inco r r e cte du
module de batterie de cet appareil
présente un risque d'incendie ou
de brûlures chimiques. N e pas
démonter, incinérer ou exposer à
une température de plus de 100°C.
Évacuer promptement la batterie
usée. Garder hors de portée des
enfants.
INDUSTRY CANADA NOTICE
NOTICE: The Industry Canada label identifies
certified equipment. This certification means
that the equipment meets certain
telecommunications network protective,
operational and safet y requirements as
prescribed in the appropriate Terminal
Equipment Technical Requirements
document(s). The Departm en t doe s not
guarantee the equipment will operate to the
user’s satisfaction.
Before installin g thi s equ ip me nt , use rs should
ensure that i t is permissible to be connecte d to
the facilities of the local telecommunications
company. The equipment must also be installed
using an acceptable method of connection.
The custo mer should be aware that co mpliance
with the above conditions may not prevent
degradation of service in some situatio ns.
Repairs to certified equipment should be
coordinated by a representative designated by
the supplier. Equipment malfunctions or any
repairs or alterations made by the user to this
7

VAIO Notebook User Guide
equipment m ay give the tele communications
company cause to request that the user
disconnect the equipment.
Users should ensure for their own protection
that the elec trical ground connections of the
power utility, telephone lines and interna l
metallic water pipe system, if present, are
connected together. This precaution may be
particularly im portant in rural are as.
Caution: Users should not attempt to make such
connections themselves , but should con tact the
appropriate e le ctric inspection authority, or
electrician, as appropriate.
NOTICE: The Ringe r Equivalence Numb e r
(REN) assigned to each terminal device
provides an indication of the maximum number
of terminals allowed to be connected to a
telephone interface. The termination on an
interface m ay c onsist of any combin ation of
devices subject only to the requirement that the
sum of the Ringer E qui valence Numbers of a ll
the devices does no t e xceed 5. The Ringer
Equivalence Number for this equipment is 0.2.
qu’il est possible que la conformité aux
conditions énoncées ci-dessus n’empêche pas la
dégradation du service dans certaines
situations.
Les réparations de matériel homologué doivent
être coordonnées pa r un représentant désigné
par le fournisseur. L’entreprise de
télécommun ications peut dema n der à
l’utilisateur de débrancher un appareil à la suite
de réparations ou de modifications effectuées
par l’utilisate ur ou à cause de mauvais
fonctionnement.
Pour sa propre prot ection, l’utilis ateur doit
s’assurer que tous les fils de mise à la terre de la
source d’énergie électrique, des lignes
téléphoniques et des c analisations d’eau
métalliques, s’il y en a, sont raccordés
ensemble. Ce tt e pr écau ti on e st pa rt icul iè reme nt
importante dans les régions rurales.
Avertissemen t: L’utilisateur ne doit pas tente r
de faire ces raccor dements lui-même; il doit
avoir recours à un service d’inspection des
installa tions électriques, ou à un él ectricien,
selon le cas.
AVIS DE L’INDUSTRIE
CANADA
AVIS: L’étiquette d’Indu strie Canada ident ifi e
le matériel homologué.
Cette étiquette certifie que le matériel est
conforme aux nor mes de protection,
d’exploitation et de sécurité des réseaux de
télécommunic at ion s, comme le prescrivent les
documents concernant les exigences techniques
relatives au matériel terminal. Le Ministère
n’assure toutefois pas que le matériel
fonctionnera à la sati sfa ct ion de l’utilisateur.
A vant d’installer ce matériel, l’utilisateur doit
s’assurer qu’il est permis de le raccorder aux
installatio n s de l’en treprise locale de
télécommunication. Le matériel doit également
être install é en suivant un e méthode acc eptée de
raccordeme nt. L’abonné ne doit pas oublier
AVIS: L’indice d’équivalence de la sonnerie
(IES) assigné à chaque dispositif termi na l
indique le nombre maximal de termina ux qui
peuvent être raccordés à une interface.
La terminaison d’une interface télé phonique
peut consister en une combination de quelques
dispositifs, à la seule condition que la somme
d’indices d’é quivalence d e la s onnerie de tous
les dispositifs n’excède pas 5. L’indice
d’équival ence de la sonnerie de ce matériel es t
de 0.2.
8

Notice to Users 2
Welcome 13
Features 13
Unpacking Your Notebook 14
Manuals 14
Software CDs 15
Recovery CDs 15
Other 15
Ergonomic Considerations 16
Notes on Setup 17
Handling Your Notebook 18
Cleaning Your Notebook 18
Handling the LCD Screen 18
Setting Up Your VAIO® Notebook 21
Locating Controls and Connectors 21
Connecting a Power Source 27
Starting Your Computer 33
Shutting Down Your Computer 34
Using Your VAIO® Notebook 35
Using the Keyboard 35
Combinations and Functions with the Windows Key 36
Indicators 37
Indicators (continued) 38
Combinations and Functions with the Fn Key 39
Using the Touchpad 40
Using the Floppy Disk Drive 42
9

VAIO Notebook User Guide
Using the Optical Drive 45
Playing a DVD 47
Notes on CD and DVD media 49
Writing data to CD-RW/CD-R media 49
Using PC Cards 51
To insert a PC card 51
To remove a PC card 52
Using a Second Battery Pack 54
To insert a second battery pack 54
To charge the second battery pack 55
To remove the second battery pack 56
Using the Weight Saver 57
To attach the weight saver 57
To remove the Weight Saver 58
Using Smart Connect 59
Windows Me™ 59
Windows 2000 59
Power Saving Modes 60
Normal Mode 60
Standby Mode 60
To activate Standby mode 60
To return to normal mode 61
Hibernate Mode 61
To activate Hibernate mode 61
To return to normal mode 61
Connecting a Phone Line 62
Connecting to the Local Area Network (LAN) 63
Setting Up Your Ethernet Connection 63
Connecting Peripheral Devices 65
Connecting the Port Replicator 66
10

Connecting an External Mouse or Keyboard 70
Connecting a Printer 71
Connecting an External Display 71
Connecting a TV Display 75
Connecting a Universal Serial Bus (USB) Device 76
Connecting an i.LINK® Device 77
Connecting External Speakers 80
Connecting an External Microphone 81
Customizing Your VAIO® Notebook 83
Displaying the Sony Notebook Setup Screen 83
Sony Notebook Setup Tabs 84
Controlling Power Management 85
Viewing the Power Management status icons 85
Power Management Profiles 86
Power Management Commands 88
Conserving Battery Power 88
Displaying Battery Information 89
Battery Icon Descriptions 89
Displaying Detailed Battery Information 90
Selecting the Display Mode 91
Changing the Window Design of Sony Software 92
Adding Memory 95
About the Software on Your Notebook 99
Overview 99
MovieShaker™ 103
Importing Images and Sound Clips 103
11

VAIO Notebook User Guide
Create a Movie using Shaker 105
Editing Clips and Scenes 106
Saving a Movie 106
PictureGear™ 107
Managing Your Pictures 107
Creating a Photo Album 107
Using Panorama Maker 108
Making Still Images and Panoramic from MPEG 108
Software Support Information 109
Sony Service Center 111
Application, System, and Driver Recovery CDs 111
Using Your Recovery CDs 112
Using the Application Recovery CD(s) 112
Using the System Recovery CD(s) 113
Using the Driver Recovery CD(s) 114
Troubleshooting 117
Troubleshooting your notebook 117
Troubleshooting the LCD screen 121
Troubleshooting the mouse and touchpad 122
Troubleshooting drives, PC cards and peripheral devices 123
Troubleshooting software 124
Troubleshooting the modem 125
Troubleshooting audio 125
Troubleshooting the printer 126
Specifications 129
12

Welcome
Congratulations on your purchase of the Sony VAIO® notebook. Sony has
combined leading-edge technology in audio, video, computing, and
communications to provide you with state-of-the-art personal computing.
Features
✍ For a complete description of the specification s of your VAIO® Notebook, see
“Specifications”
❑ Exceptional performance — Your notebook includes a mobile Intel
®
Pentium® III processor featuring Intel® SpeedStep™ technology* and a
V.90 compatible K56flex modem.
❑ Portability — Rechargeable batt ery pack provi des hours of use withou t AC
†
power.
❑ Sony audio and video quality — High-quality MPEG1/MPEG2 video,
which supports full-screen display and enables you to take advantage of
today’s advanced multimedia applications, games, and entertainment
software.
❑ Multimedia features — Enjoy the stereo speakers or use a headphone (not
supplied) to listen to audio and video CDs.
❑ Microsoft
Microsoft
Windows
❑ Communications — Access popular online services, send e-mail, browse
®
Windows® operating system — Your system includes
®
Windo ws® Millennium Edit ion (W indows MeTM) or Microsoft®
®
2000 Professional.
the Internet, and use fax features.
❑ Optical drive (CD-RW/DVD-ROM) — The CD-RW/DVD-ROM drive
utilizes a new optical storage technology that combines the features of both a
* The processor may be reduc e d to a lower operating speed when operating on batte ry power.
† Actual upload and download speeds m ay va ry due to line condit ions, ISP support, and gov-
ernment re gul ations.
13
VAIO Notebook User Guide
CD-RW drive and DVD-ROM drive, providing increased storage capacity
and a rich multimedia computing experience. The CD-RW/DVD-ROM drive
plays DVD-ROM, CD-ROM, CD-RW, and CD-R discs.
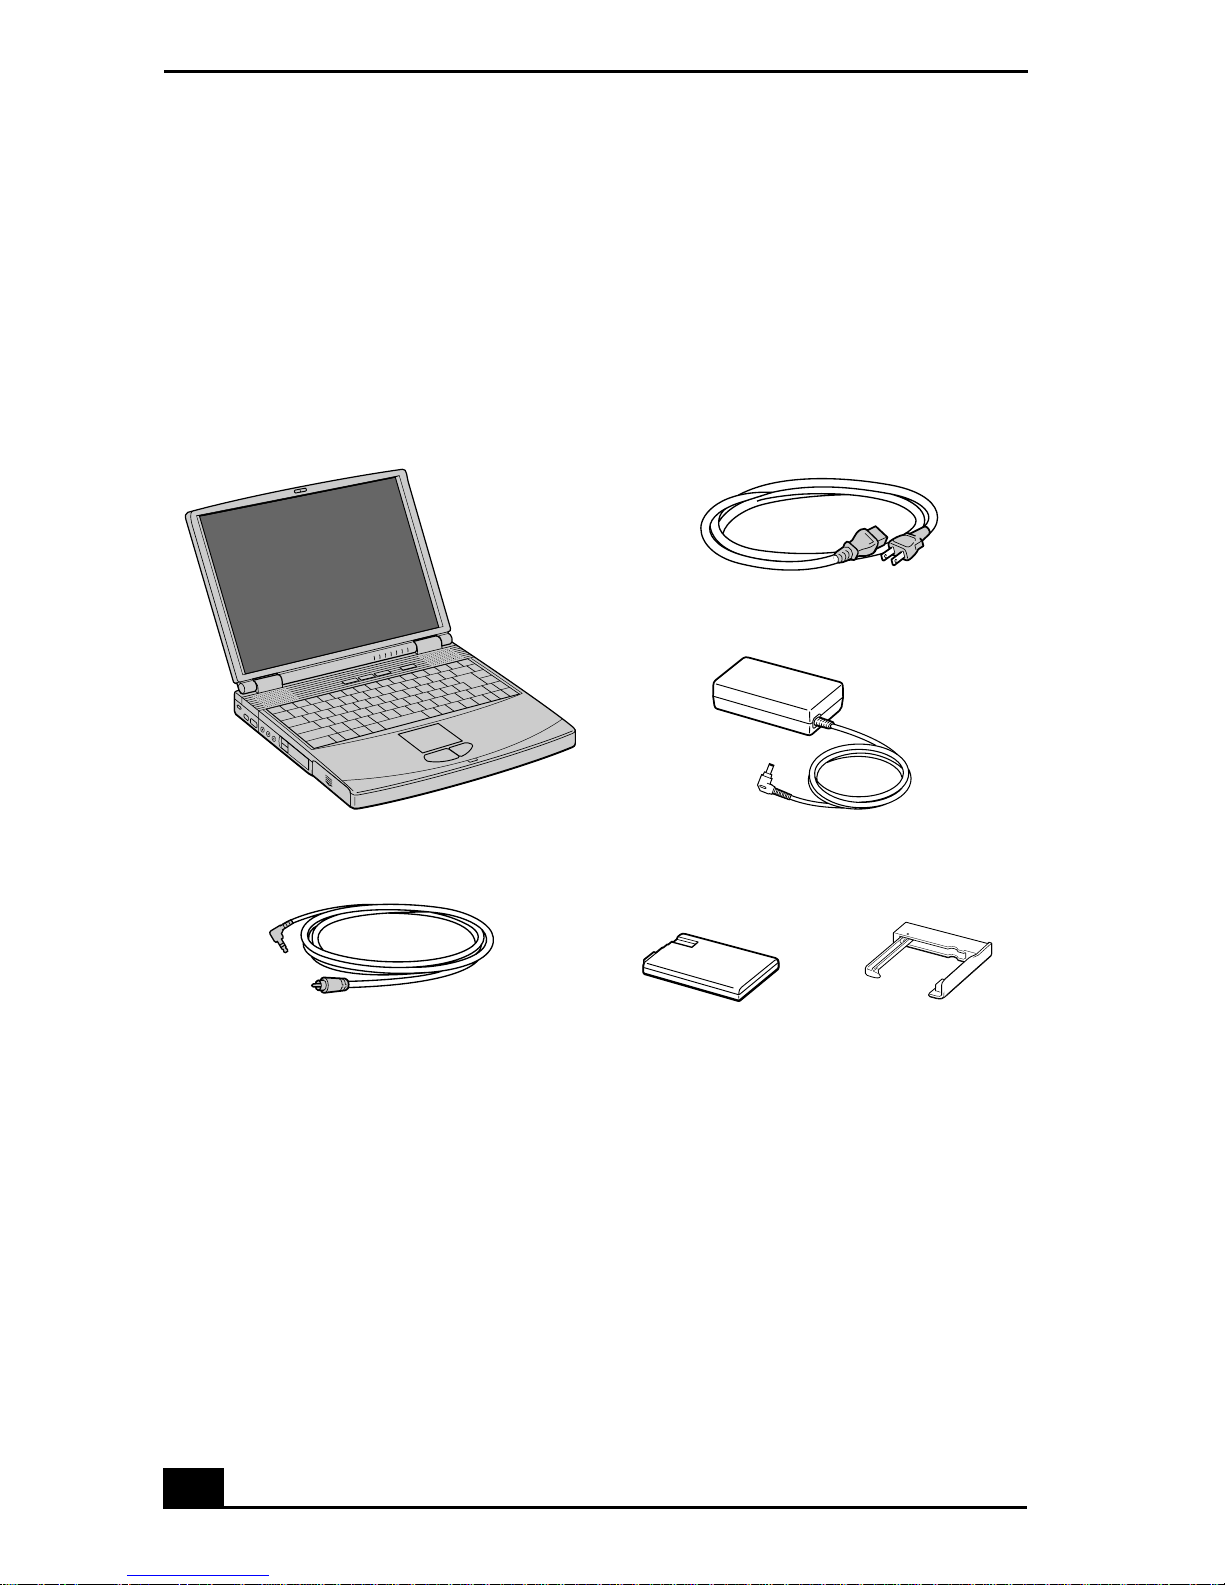
Unpacking Your Notebook
Remove the following hardware items from the box:
Main unit
Video cable Rechargeable
*
Power cord
AC adapter
battery pack
Weight saver
* Removable floppy disk drive is in the m ult ipurpose bay.
Manuals
❑ VAIO® Quick Start — Contains information on unpacking and setting up
your notebook, supplementary updates, and software information.
❑ Microsoft® Windows® Millennium Edition Getting Started manual or the
Microsoft® Windows® 2000 Professional Getting Started manual —
Explains how to use the basic features of this latest Windows operating
system.
14

Unpacking Your Notebook
Software CDs
❑ Microsoft® Word 2000 — Allows you to reinstall Microsoft Word to the
VAIO notebook you purchased.
Recovery CDs
❑ System Recovery CD(s) — Allows you to restore the software titles that
shipped with your computer if they become corrupted or are erased. It can
only be used to restore the hard disk of the VAIO notebook you purchased.
❑ Application Recovery CD(s) — Allows you to reinstall individual
applications or device drivers if they become corrupted or erased.
❑ Driver Recovery CD(s) — Allows you to reinstall individual device
drivers. Use it to restore corrupted or erased files.
Other
❑ Packet containing special product offers
15
VAIO Notebook User Guide
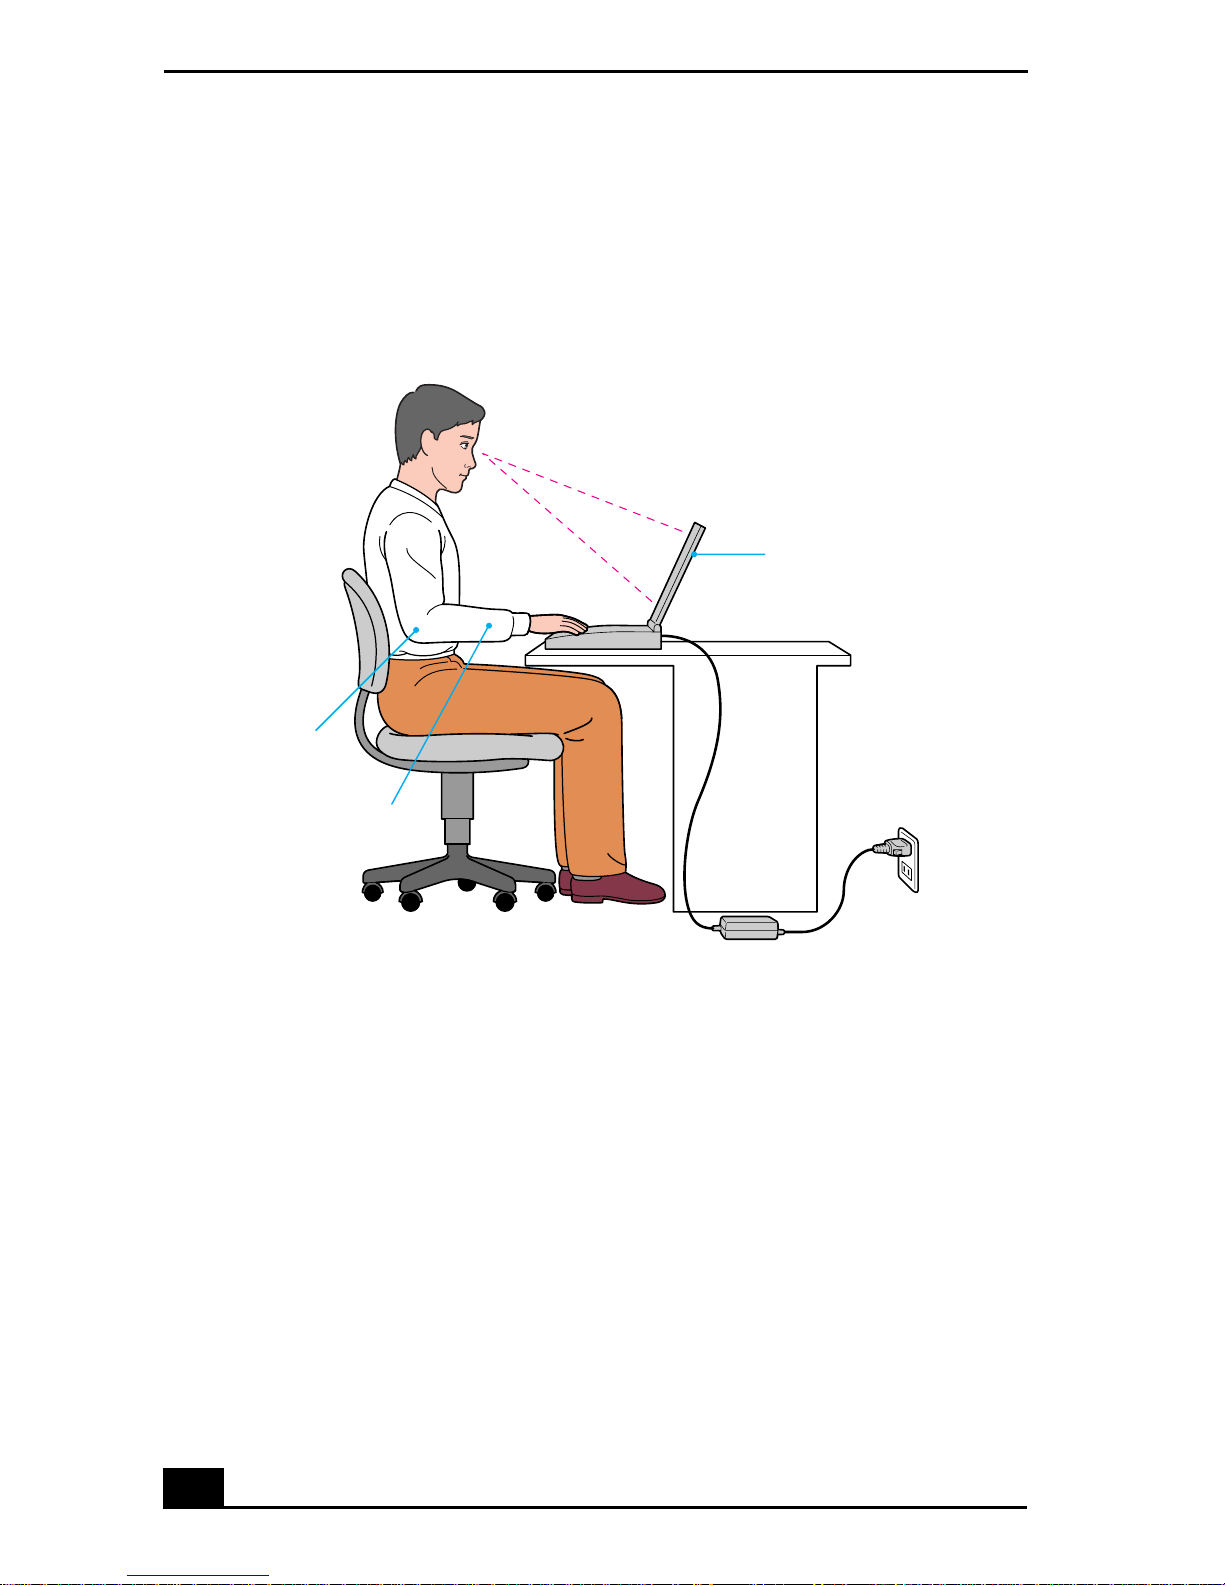
Ergonomic Considerations
You will be using your notebook computer as a portable device in a variety of
environments. Whenever possible, you should attempt to apply the following
ergonomic considerations to both stationary and portable environments.
Ergonomic Position
Computer positioned
directly in front of you
Arms at desk
level
Wrists relaxed
and flat
❑ Position of your computer — Place the computer directly in front of you as
you work. Keep your forearms horizontal, with your wrists in a neutral,
comfortable posi tion while u sing the k eyboard, touchpad, or external mo use.
Let your upper arms hang naturally at your sides. Take breaks during
sessions with your computer. Excessive use of the computer may strain
muscles or tendons .
❑ Furniture and posture — Sit in a chair with good back support and
armrests. Adjust the level of the chair so your feet are flat on the floor. A
footrest may make you more comfortable. Sit in a relaxed, upright posture
and avoid slouching forward or leaning far backward.
❑ Viewing angle of the computer’s display — Use the display’s tilting
feature to find the best position. You can reduce eye strain and muscle
16

Ergonomic Consid erati on s
fatigue by adjusting the tilt of the display to the proper position. Adjust the
brightness setting of the display also.
❑ Lighting — Choose a location where windows and lights do not create glare
and reflection on the display. Use indirect lighting to avoid bright spots on
the display. You can also purchase accessories for your display that help
reduce glare. Proper lighting adds to your comfort and work effectiveness.
❑ Placement of an external display — When using an external display, set
the display at a comfortable viewing distance. Make sure the display screen
is at eye level or slightly lower when you are sitting in front of the monitor.
Notes on Setup
❑ Do not place your computer in a location subject to:
❑ Heat sources, such as radiators or air ducts
❑ Direct sunlight
❑ Excessive dust
❑ Moisture or rain
❑ Mechanical vibration or shock
❑ Strong magnets or speakers that are not magnetically shielded
❑ Ambient temperature of more than 95º F (35º C) or less than 40º F
(5º C)
❑ High humidity
❑ Do not place electronic equipment near your computer. The computer’s
electromagnetic field may cause a malfunction.
❑ Provide adequate air circulation to prevent internal heat buildup. Do not
place your computer on porous surfaces such as rugs or blankets, or near
materials such as curtains or draperies that may block its ventilation slots.
Leave a space of at least 8 inches (20 cm) behind the back panel of the
computer.
❑ If the computer is brought directly from a cold location to a warm one,
moisture may condense inside your computer. In this case, allow at least an
hour before turning on your computer. If any problems occur, unplug your
computer, and contact your Sony Service Center.
❑ The computer uses high-frequency radio signals and may cause interference
to radio or TV reception. Should this occur, relocate the computer a suitable
distance away from the set.
17

VAIO Notebook User Guide
❑ Use only specified peripheral equipment and interface cables; otherwise,
problems may result.
❑ Do not use cut or damaged c onnection cables.
❑ If the telephone company makes a service call to your home or office and
determines that your computer is responsible for a problem, the telephone
company may bill you for the service call. Also, if you do not disconnect
your computer when it is adversely affecting the telephone line, the
telephone company ha s the right to disc onnect your service un til yo u correct
the problem.
Handling Your Notebook
❑ Clean the cabinet with a soft, dry cloth or a soft cloth lightly moistened with
a mild detergent solution. Do not use any type of abrasive pad, scouring
powder, or solvent such as alcohol or benzine, as these may damage the
finish of your computer.
❑ Should any solid object or liquid fall into the computer, shut down your
computer and then unplug it. You may want to have the computer checked
by qualified personnel before operating it any further.
❑ Do not drop the computer or place heavy objects on top of the computer.
Cleaning Y our Notebook
❑ Make sure to disconnect the power cord before cleaning the computer.
❑ Avoid rubbing the LCD screen as this can damage the scr een. Use a soft, dry
cloth to wipe the LCD screen.
❑ Clean the computer with a soft cloth lightly moistened with a mild detergent
solution. Do not use any type of abrasive pad, scouring powder or solvent,
such as alcohol or benzine.
Handling the LCD Screen
❑ Do not leave the LCD facing the sun as it can damage the LCD. Be careful
when using the computer near a window.
❑ Do not scratch the LCD or exert pressure on it. This could cause
malfunction.
18

Ergonomic Consid erati on s
❑ Using the computer in low temperature cond itions may produce a residual
image on the screen. This is no t a malfunction . When the compu ter returns to
normal temperature, the screen returns to normal.
❑ The screen becomes warm during operation. This is normal and does not
indicate a malfunction.
❑ The LCD is m anufacture d using high-precision technolo gy. You may,
however, see tiny black points and/ or bright poin ts (red, blue, or green) that
continuously appear on the LCD. This is a normal result of the
manufacturing process and does not indicate a malfunction.
19

VAIO Notebook User Guide
20
Setting Up Your VAIO®
Notebook
This section describes all the controls and connectors on your computer, how to
connect your computer to a power source, and how to start and shut down your
computer.
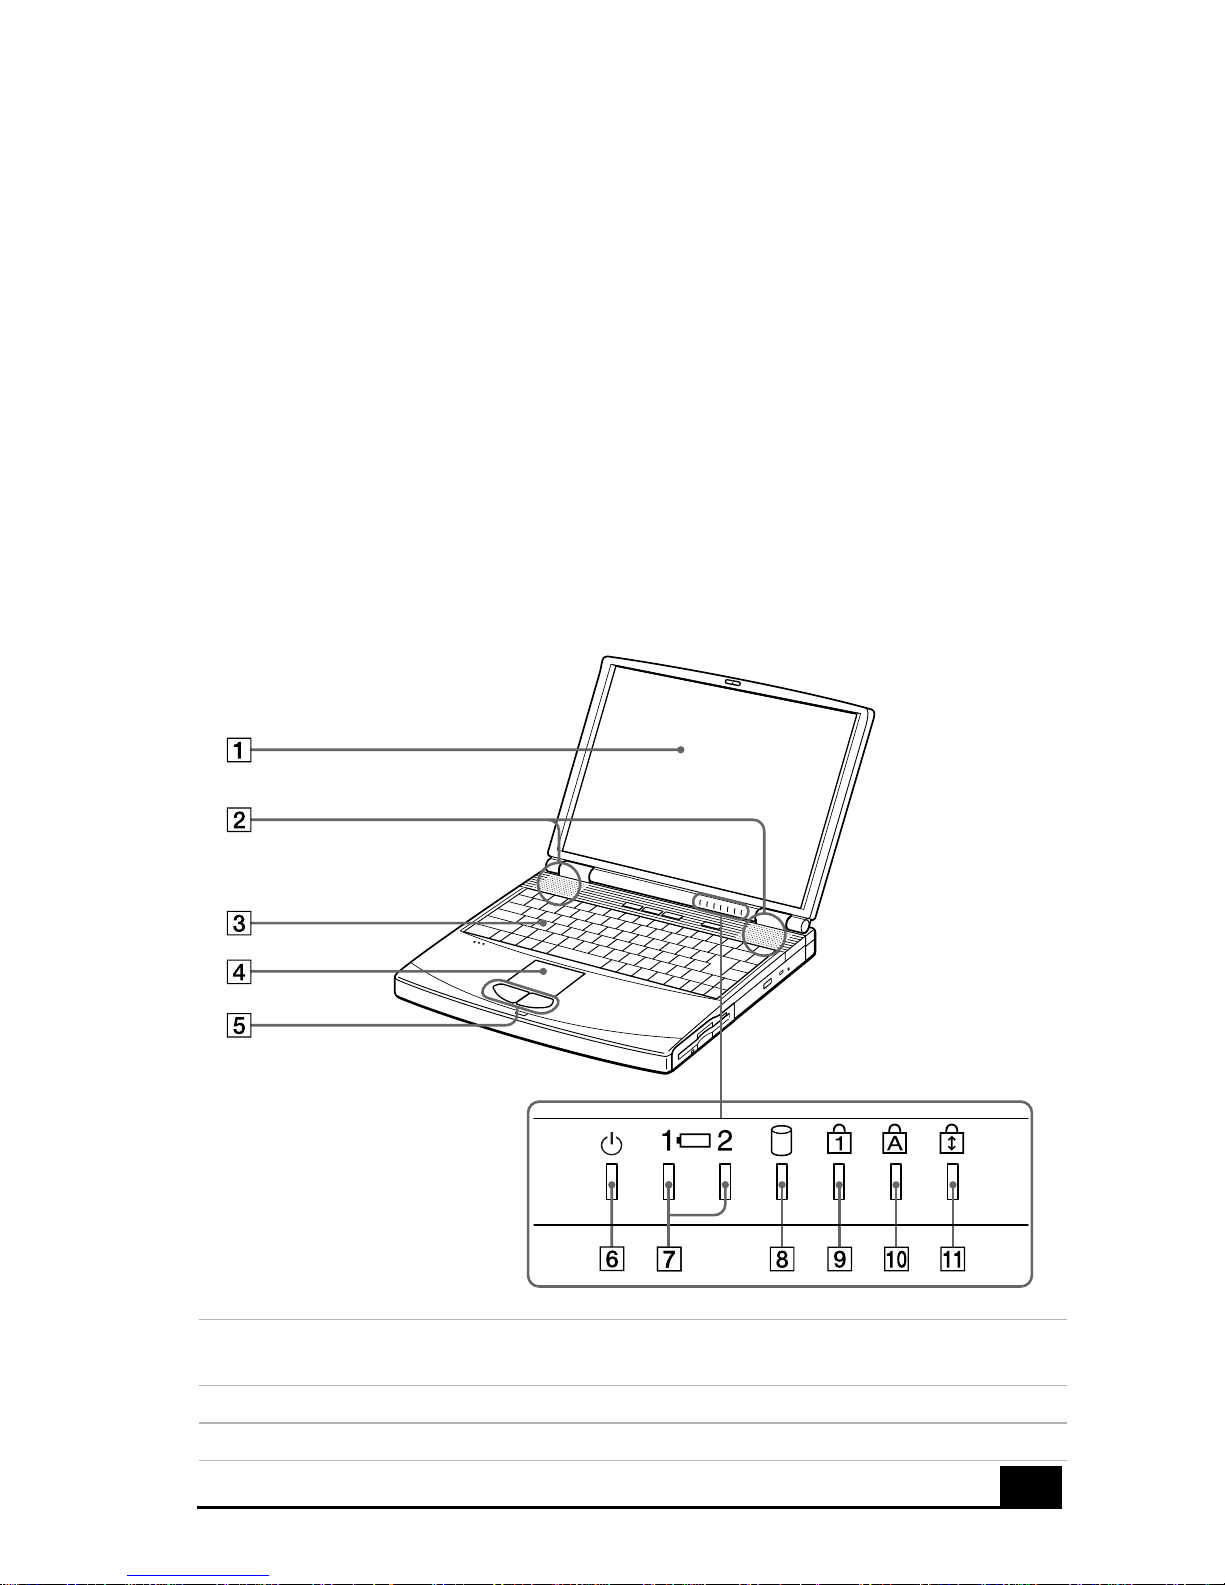
Locating Controls and Connectors
Front
1 LCD (Liquid Crystal Display)
screen
2 Speakers 8 Hard disk drive indicator
3 Keyboard 9 Num Lock indicat or
+
7 Battery 1 and 2 indicato r s
21

VAIO Notebook User Guide
4 Touchpad 10 Caps Lock indicator
5 Left/right butto ns 11 Scroll Lock indi ca to r
6 Power indicator
22
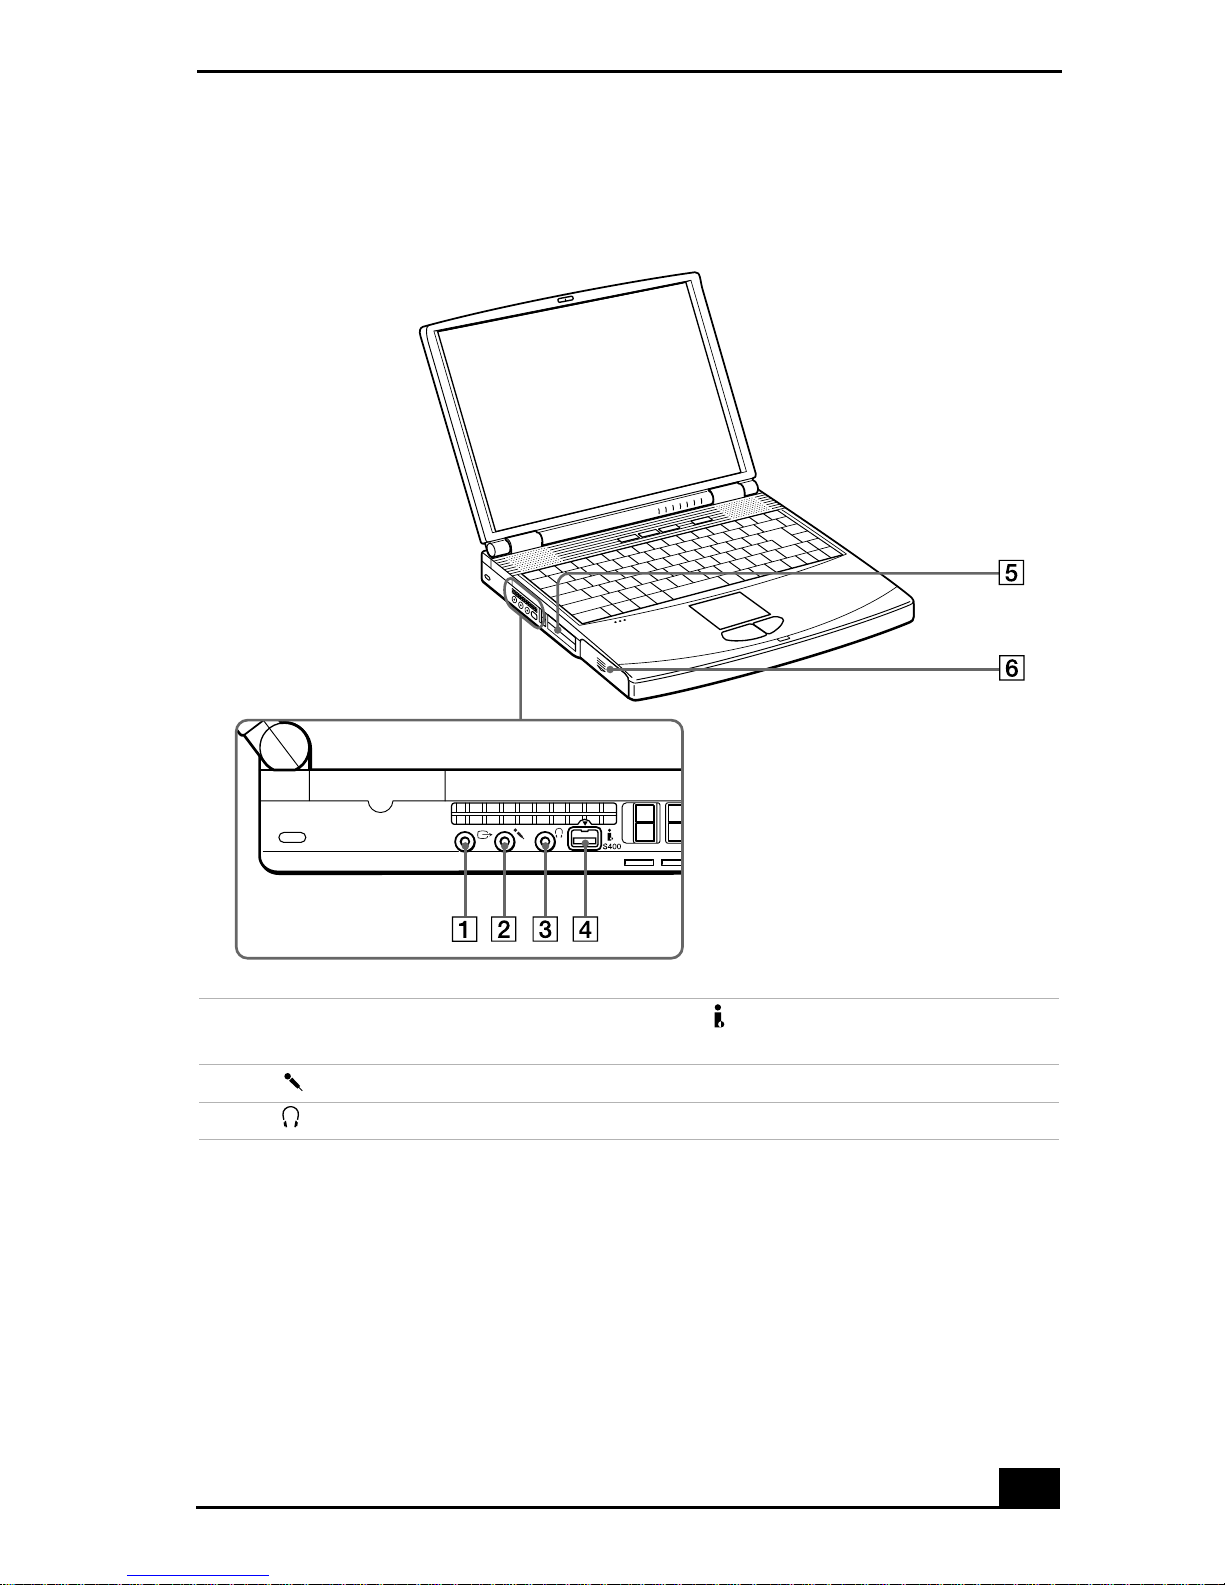
Left
Locating Controls and Connectors
1 Video out 4
2
3
Microphone connector 5 PC card slots
Headphone connector 6 Battery bay
i.LINK® (IEEE1394) S400
connector
23
VAIO Notebook User Guide
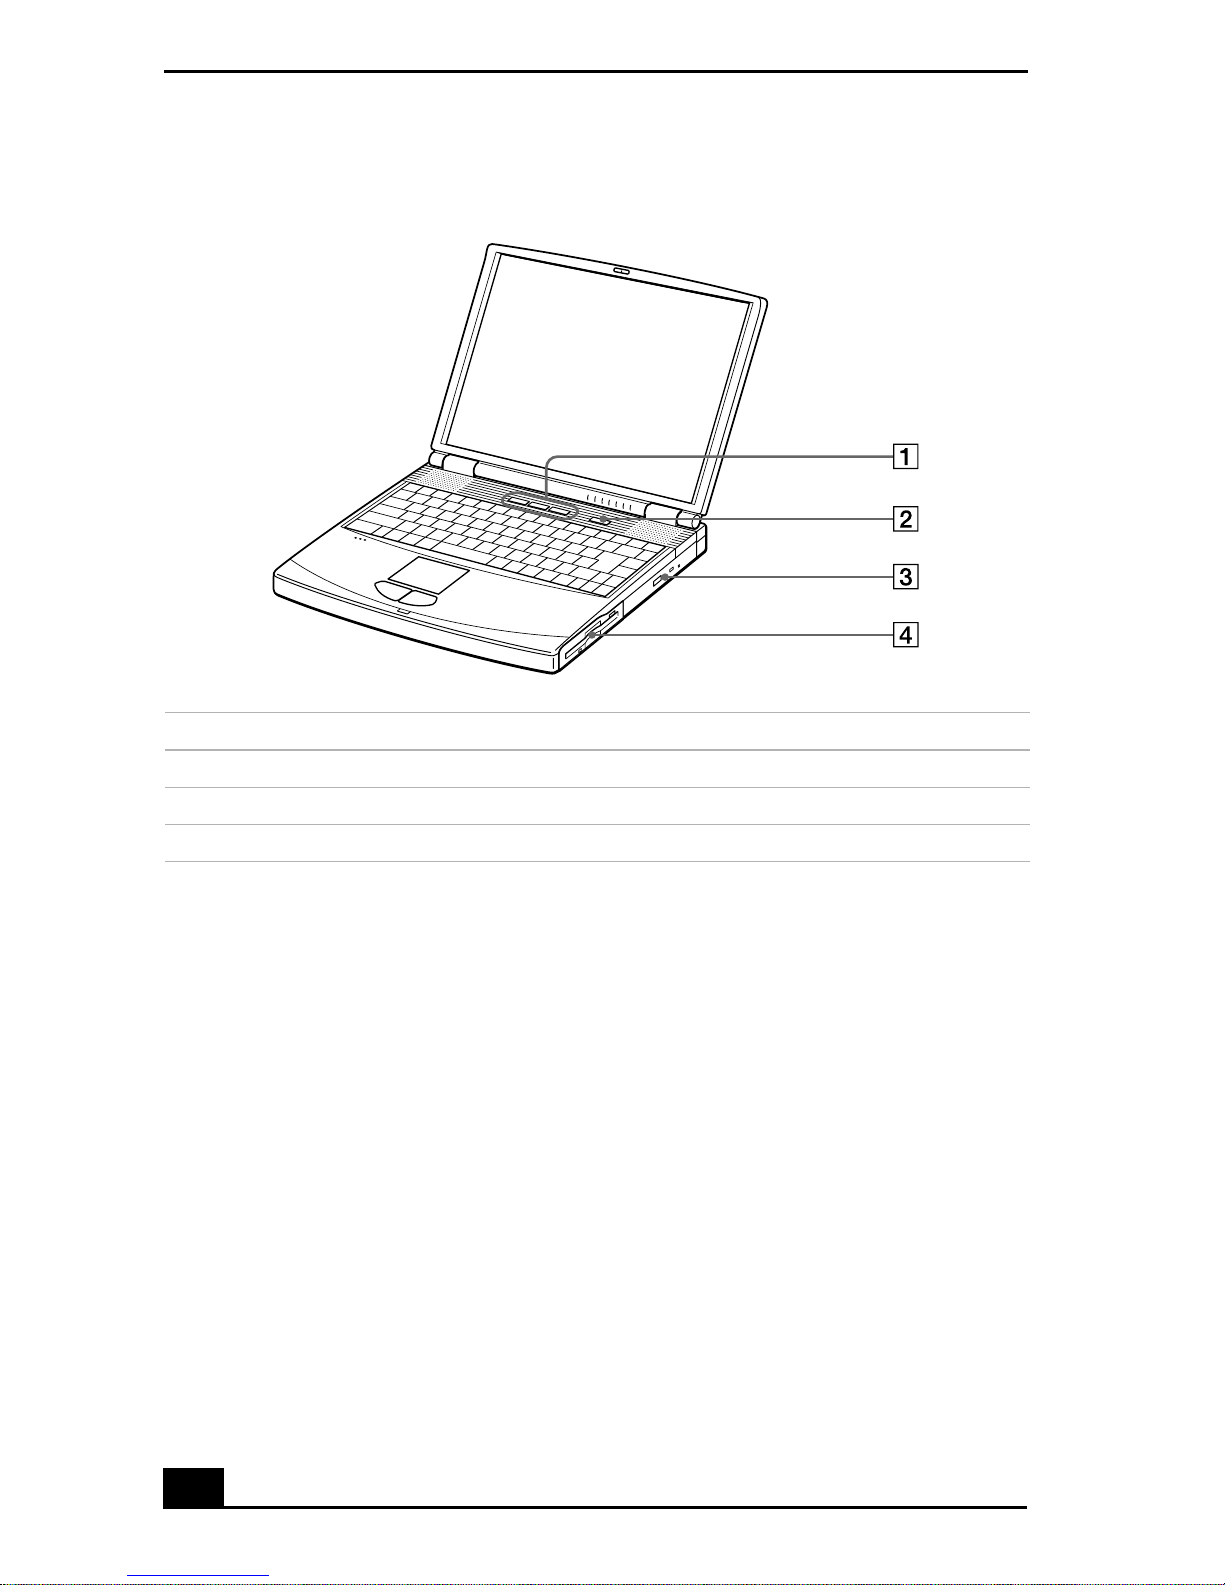
Right
1 PPK buttons
2 Power button
3 Optical drive (CD-RW/DVD-ROM drive)
4 Multipurpose bay
24
Back
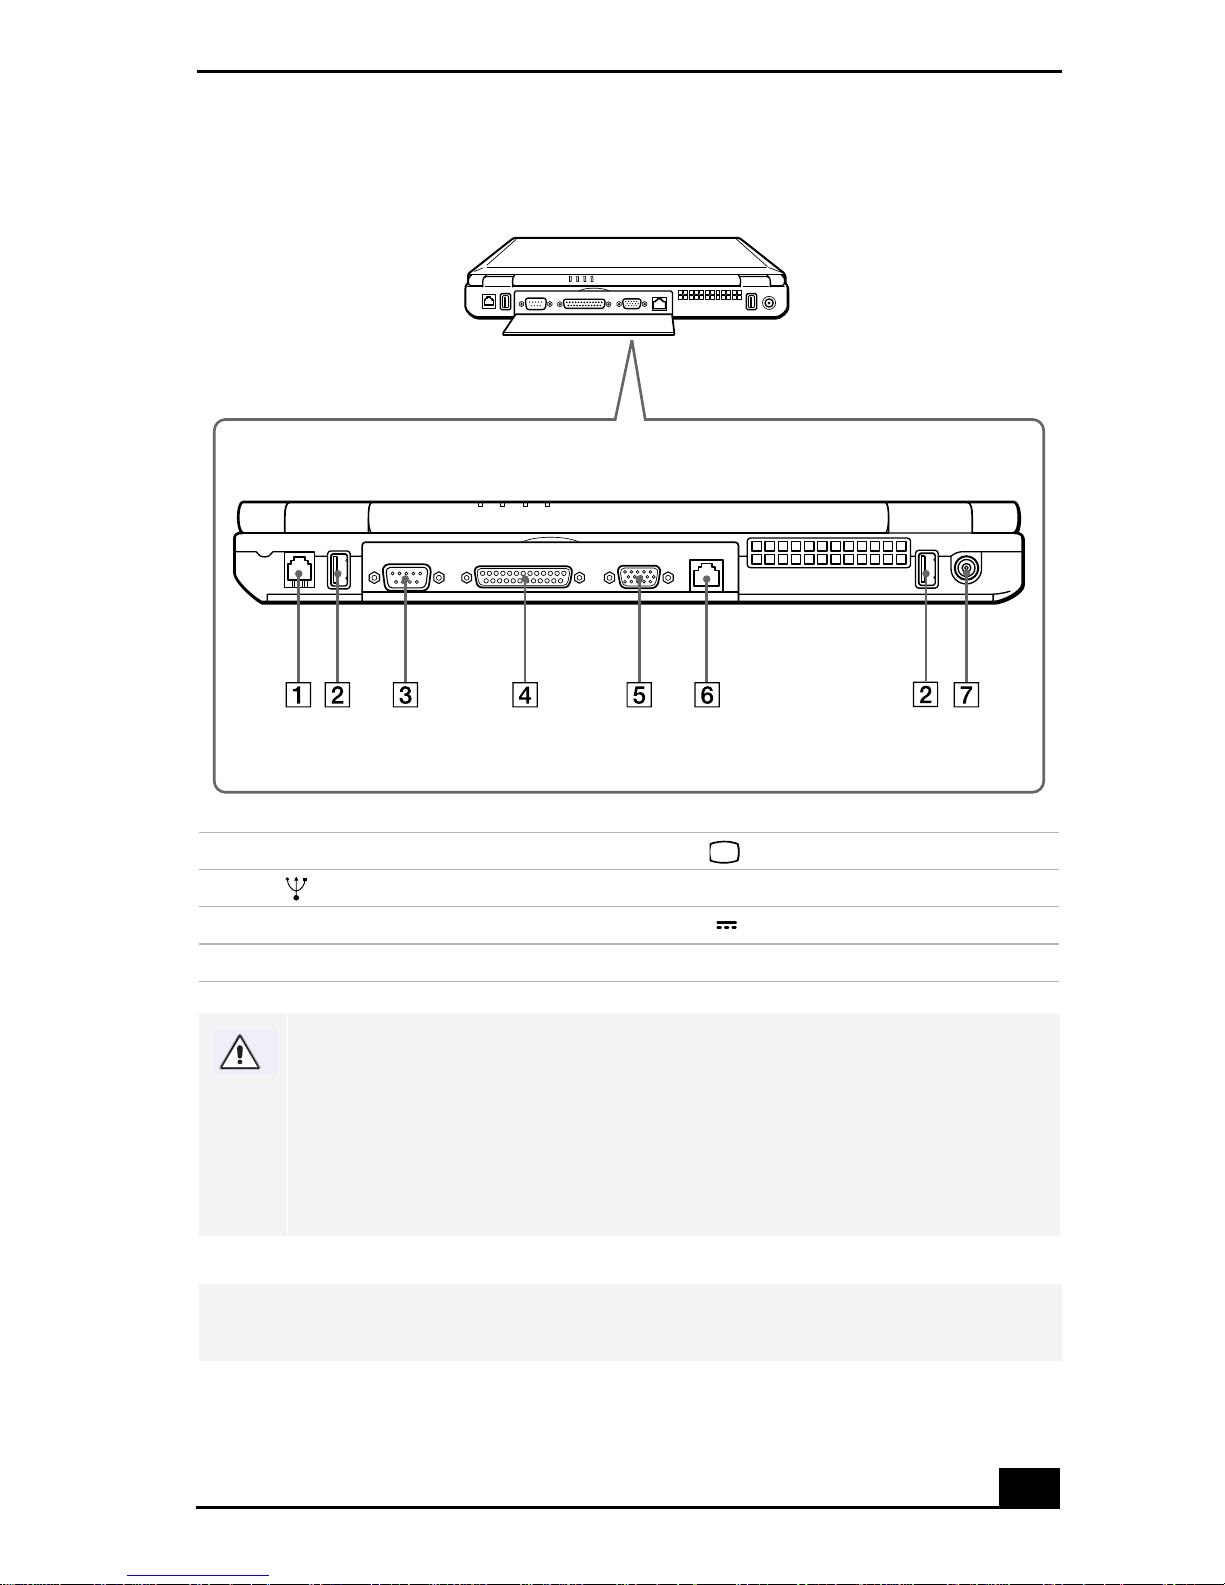
Locating Controls and Connectors
cover
1 Modem jack 5 Monitor connector
2
USB connect or s 6 Etherne t connector
3 Serial connector 7 DC In connector
4 Printer connector
Warning:
Only connect 10BASE-T and 100BASE-TX cables to the Ethernet network port.
Do not connect any other type of network cable or any telephone line.
Connecting cables other than those listed above may result in an electric
current overload and could cause a malfunction, excessive heat, or fire in the
connector. To connect the un it to the network, contact you network
administra tor.
✍ There is a ventilation slot located betw een the Ethernet connector and the US B
connector. Do not cover the ventilation slot when your computer is on.
25
VAIO Notebook User Guide
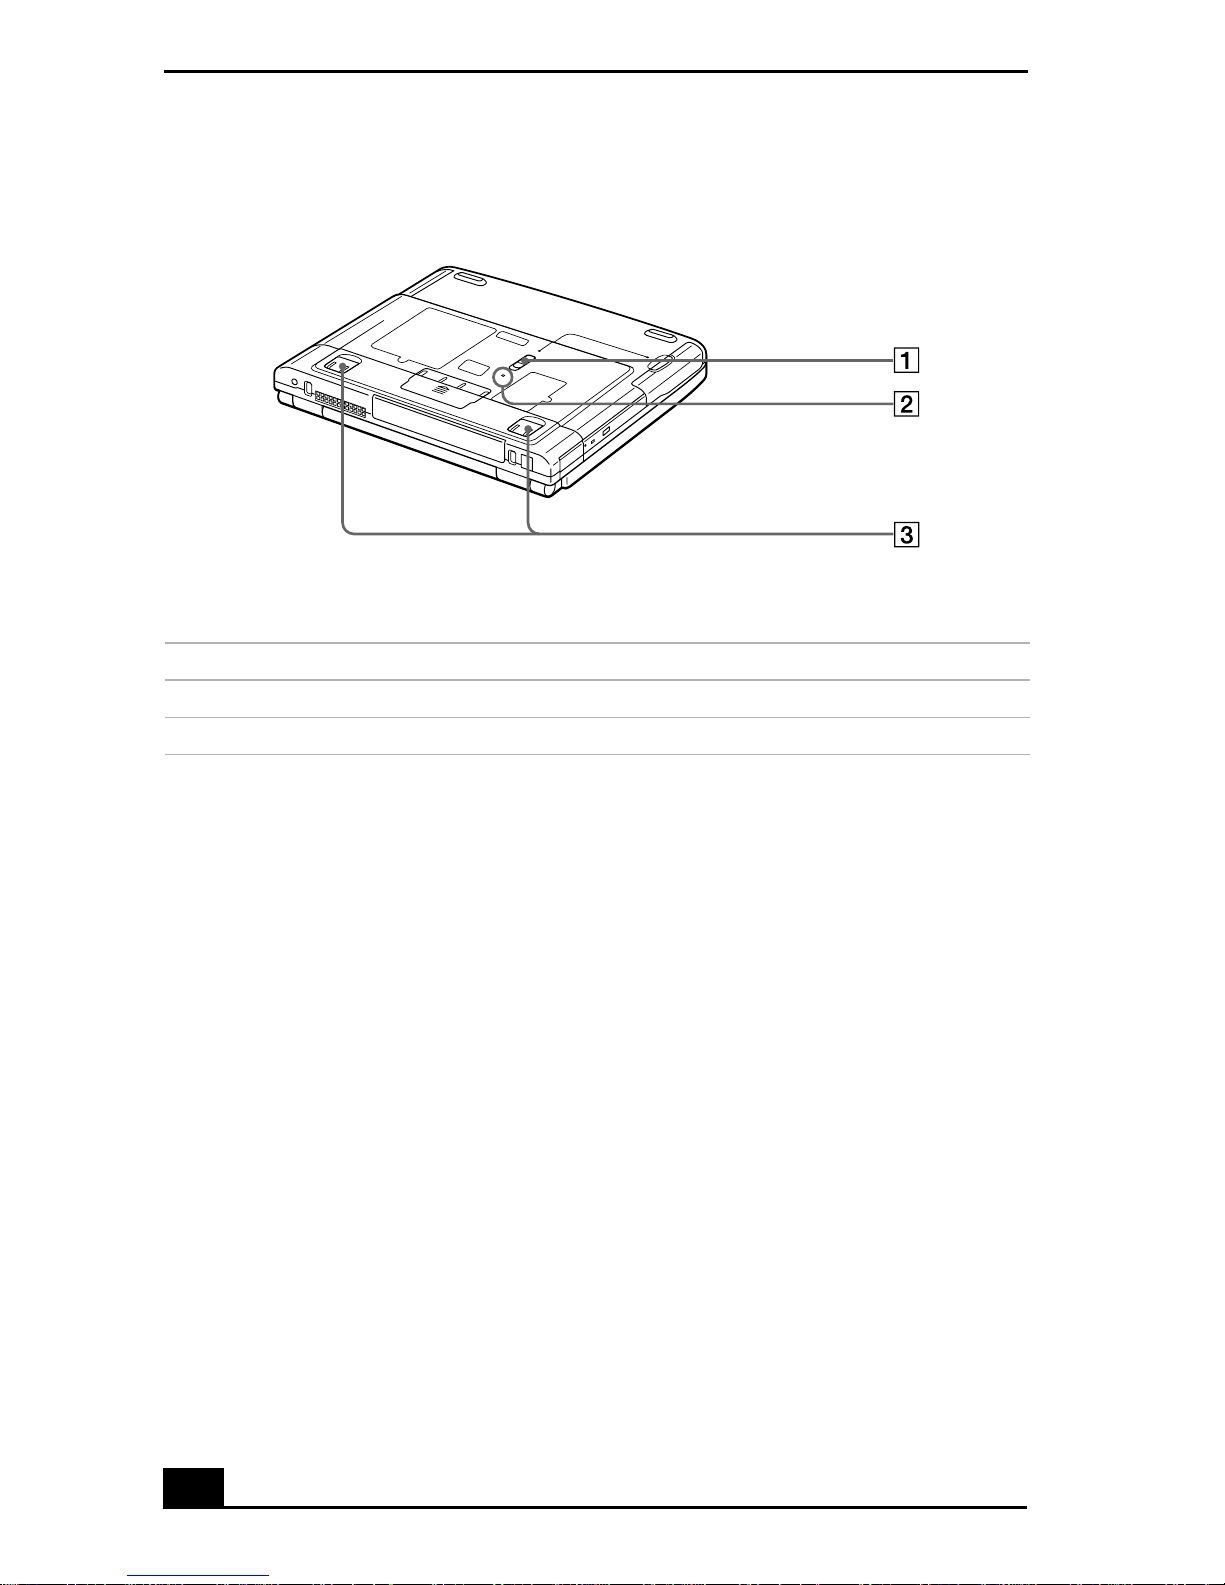
Bottom
1 Multipurpose bay RELEASE lever
2 Reset switch
3 Tilt stands
26
Connecting a Power Source
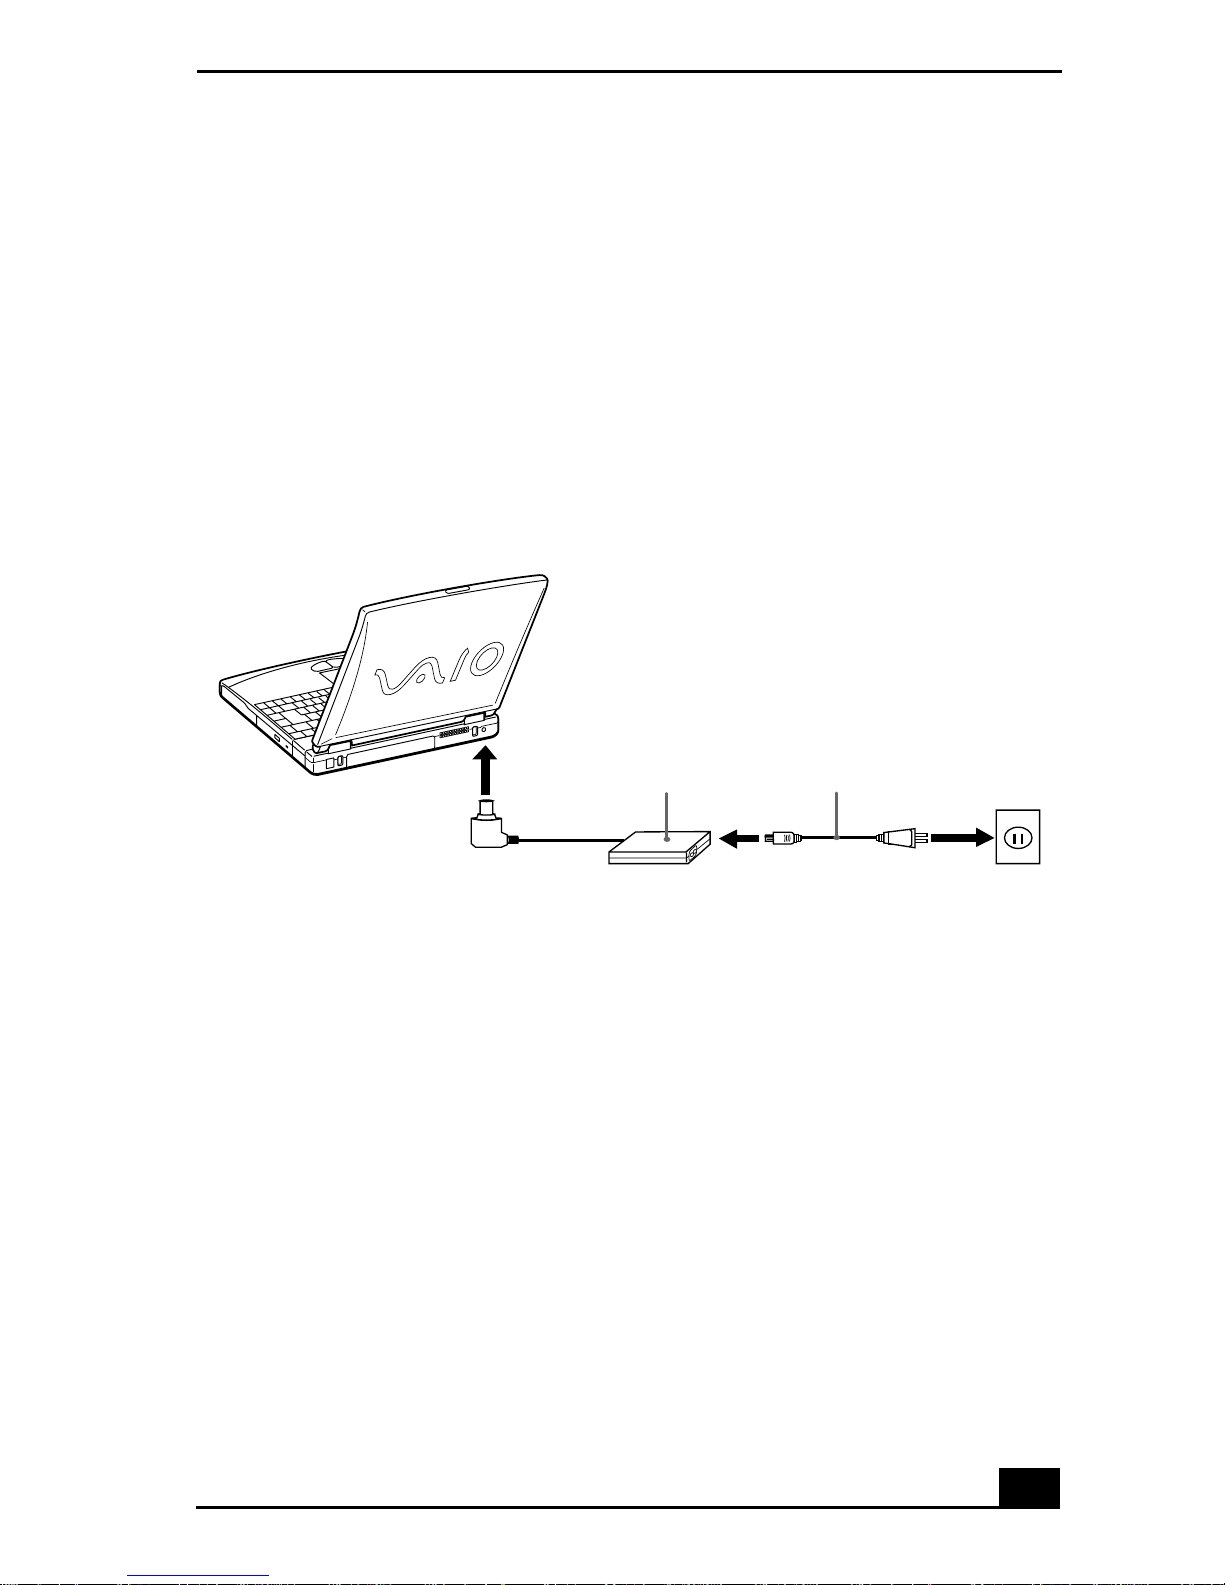
Connecting a Power Source
You can use either AC power or a rechargeable battery pack as a power source.
Using the AC Adapte r
1 Plug the cable attached to the AC adapter into the DC In connector on the
computer.
2 Plug one end of the power cord into the AC adapter.
3 Plug the other end of the power cord into an AC outlet.
Connecting the AC adapter
Notebook
AC adapter
(supplied)
DC In
Power cord
(supplied)
Notes on the AC Adapter
❑ Your computer operates on 100V-240V AC 50/60 Hz.
❑ Do not share the AC outlet with other power-consuming equipment, such as
a copy machine or shredder.
❑ You can purchase a power strip with a surge protector. This device prevents
damage to your computer caused by sudden power surges such as those that
may occur during an electrical storm.
❑ Do not place heavy objects on the power cord.
❑ To disconnect the cord, pull it out by the plug. Never pull the cord itself.
❑ Unplug your computer from the wall outlet if you will not be using the
computer for a long time.
❑ The LED indicator on the AC adapter may be turn ed on until the AC adapter
is unplugged from your notebook.
❑ When the AC adapter is not used, unplug it from the AC outlet.
27

VAIO Notebook User Guide
❑ Use only the AC adapter supplied. Do not use any other AC adapter.
Using Battery Power
You can use one or two battery packs as a source of power. The second battery
pack inserts into the multipurpose bay on the right side of the computer. (See
“Using a Second Battery Pack” ) Additional battery packs are available as a
separate option.
The battery pack that comes with your computer is not fully charged at the time
of purchase. Follow the steps below to insert and charge the battery pack.
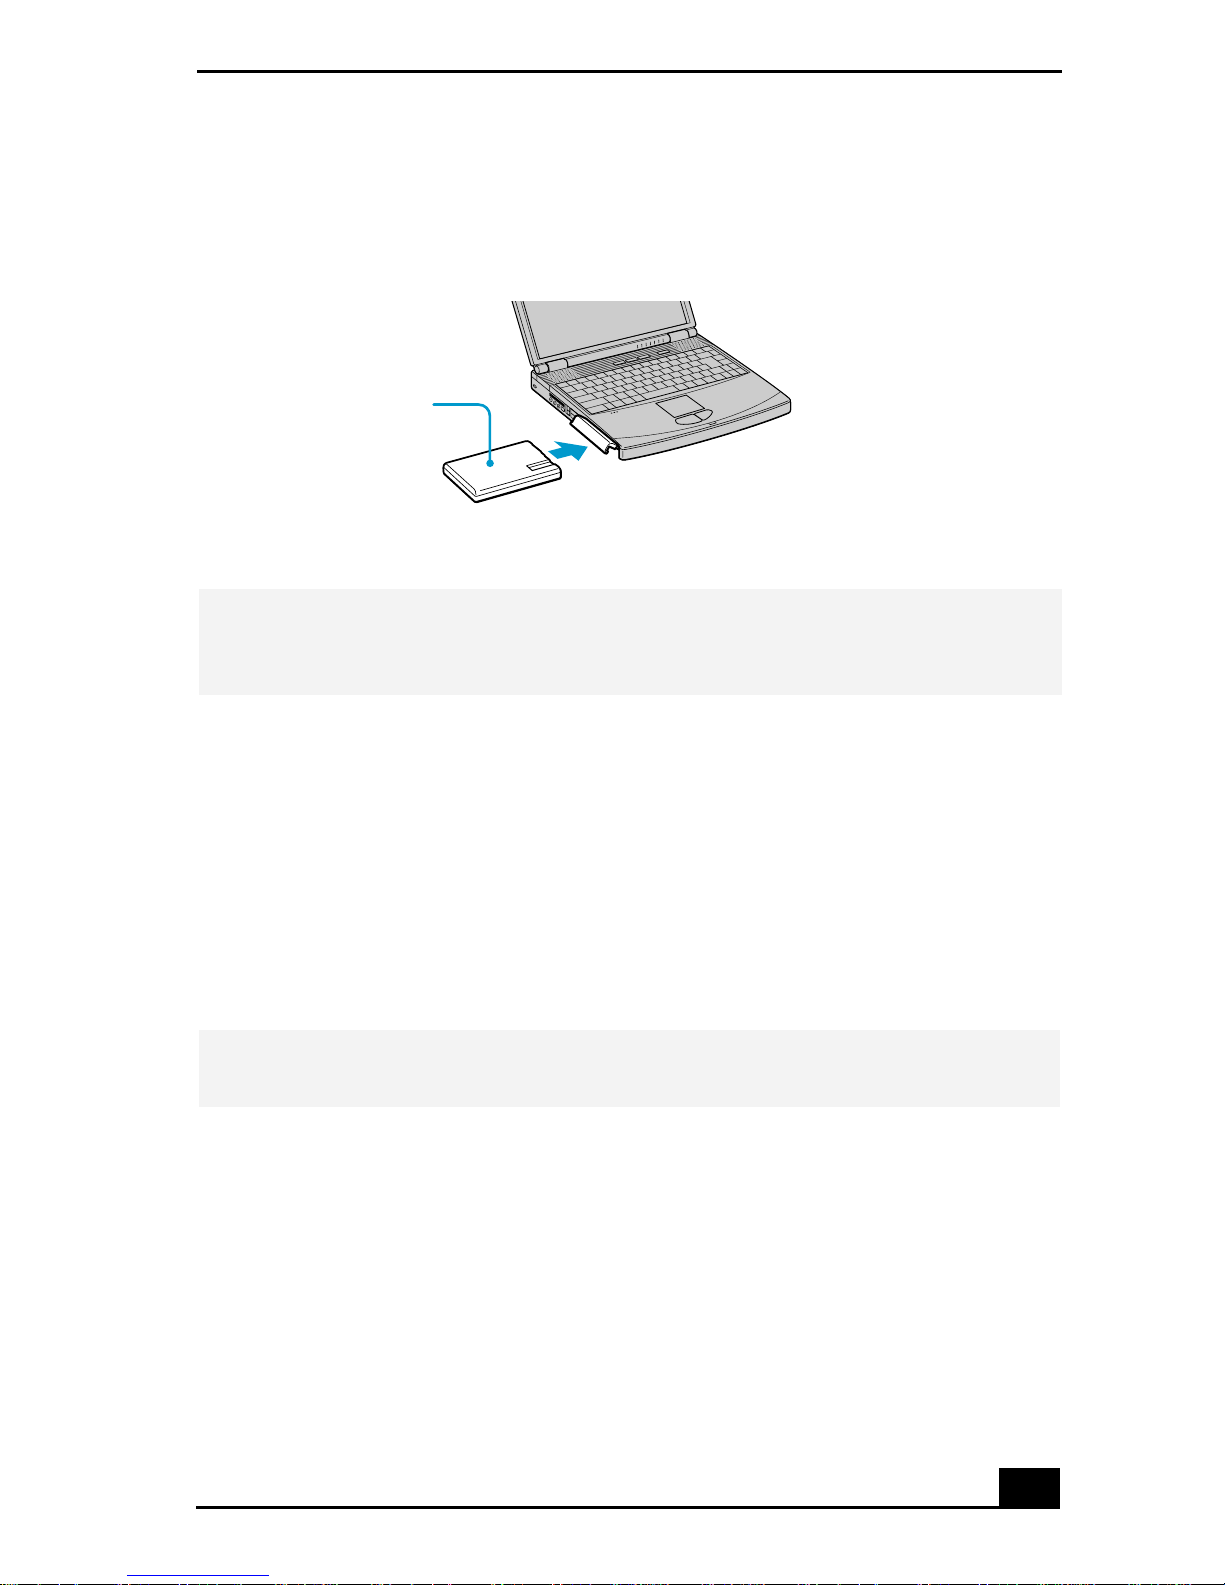
To insert the battery pack
1 To open the battery bay, press cover down.
✍ Cover swings out but does not detach.
Battery bay
28
Connecting a Power Source
2 Insert the battery pack into the battery bay on the left side of the computer.
Inserting battery pack
Battery pack
(supplied)
Label side facing do wn
3 Close the cover of the battery bay until it clicks.
✍ If the port replicator is attached to your computer, do not attempt to insert or remove
the battery pack. Lifting and turning the computer with a port replicator attached could
cause a temporary loss of power.
To charge the battery pack
1 Connect the AC adapter to the computer.
2 Insert the battery pack.
The computer automatically charges the battery (the battery indicator light
flashes in a double blink pattern as the battery charges).
3 When the battery is 85% full, the battery ind icato r light turns off. This
process takes approximately 3 hours if your notebook’s power is on.
✍ To charge the battery completely, continue charging f or an additional hour. See
“Displaying Battery Information”
29
VAIO Notebook User Guide
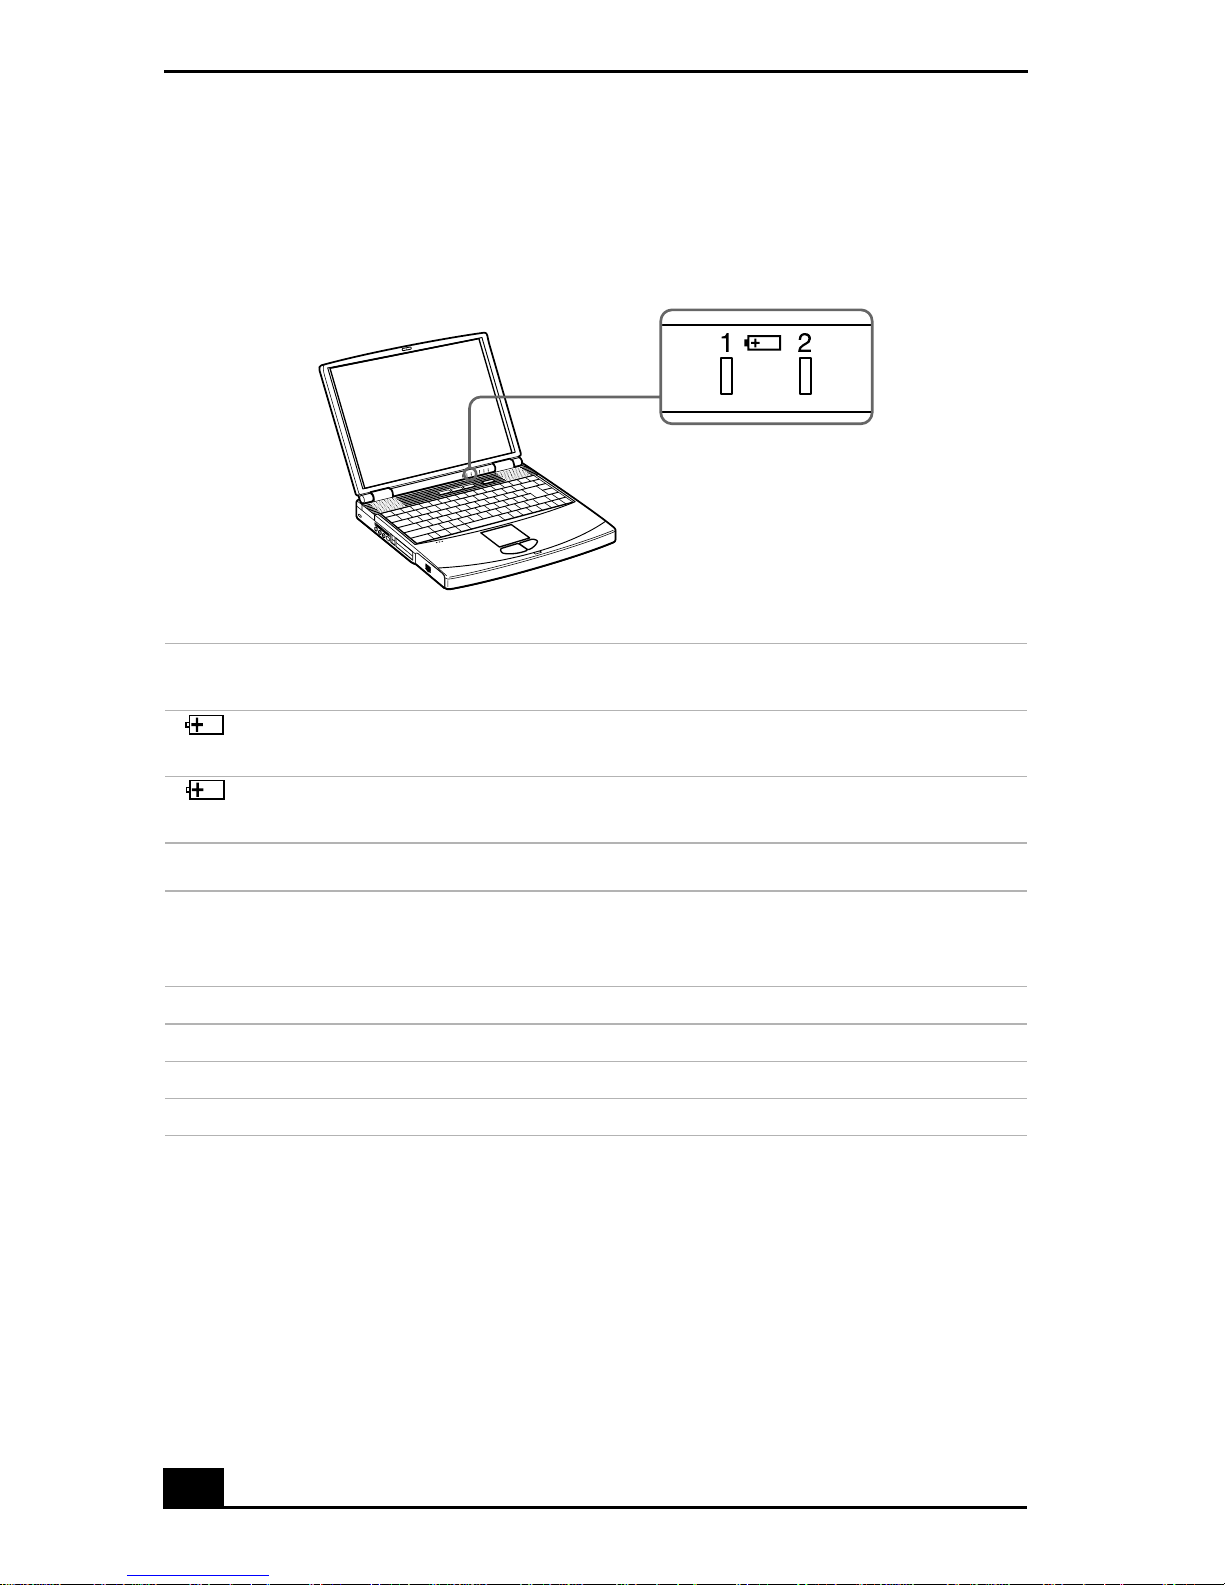
There are two battery indicator lights on the computer
Battery indicator lights
Battery indicator lights
Battery
Description
Indicator
1 Indicates the status of the battery pack in the battery bay on the left
side of the computer.
2
Indicates the status of the battery pack in the multipurpose bay on
the right side of the comp uter.
Battery
Description
Indicator Light
Status
On The computer is using battery power.
Single blink The battery is running out of power.
Double blink The battery is charging.
Off The computer is using AC power.
30
 Loading...