

Page 1

ч
Page 2

Notice to Users
Safety Information
© \997 Sonv Electronics Inc. All rij;hts
reserved. This manual and the software
described herein, in whole or in part, may
not be reproduced, translated, or reduced
to any machine-readable form without
prior written approval.
SONY ELECTRONICS INC. PROVIDES
NO WARRANTY WITH REGARD TO
THIS MANUAL, THE SOFTWARE, OR
OTHER INFORMATION CONTAINED
HEREIN AND HEREBY EXPRESSLY
DISCLAIMS ANY IMPLIED
WARRANTIES OR MERCHANTABILITY
OR FITNESS FOR ANY PARTICULAR
PURPOSE WITH REGARD TO THIS
MANUAL, THE SOFTWARE, OR SUCH
OTHER INFORMATION. IN NO EVENT
SHALL SONY ELECTRONICS INC. BE
LIABLE FOR ANY INCIDENTAL,
CONSEQUENTIAL, OR SPECIAL
DAMAGES, WHETHER BASED ON
TORT, CONTRACT, OR OTHERWISE,
ARISING OUT OF OR IN CONNECTION
WITH THIS MANUAL, THE SOFTWARE,
OR OTHER INFORMATION
CONTAINED HEREIN OR THE USE
THEREOF.
Sony Electronics Inc. reserves the right to
make any modification to this manual or
the information contained herein at any
time without notice. The software
described herein is governed by the terms
of a separate user license agreement.
Sony and VAIO are registered trademarks
of Sony Corporation. Windows and the
Windows 95 logo are registered
trademarks of Microsoft Corporation.
Intel, MMX, and Pentium are trademarks
of Intel Corporation.
All other trademarks are trademarks of
their respective owners.
Owner's Record
The model number and serial number are
located on the back of your Sonv PC.
Record the serial number in the space
provided here Refer to the model and
serial number when you call your Sony
Service Center.
Model Number: PCG-717/PCG-719
Serial Number:
_________________________
WARNING
Q To prevent fire or shock hazard, do
not expose your Sony PC to rain or
moisture.
□ Never install modem or telephone
wiring during a lightning storm.
Q Never install telephone jacks in wet
locations unless the jack is specifically
designed for wet locations
□ Never touch uninsulated telephone
wire or terminals unless the telephone
line has been disconnected at the
network interface.
□ Use caution when installing or
modifying telephone lines.
Q Avoid using the modem during an
electrical storm.
□ Do not use the modem or a telephone
to report a gas leak in the vicinity of
the leak.
The use of optical instruments with this product will increase eye hazard.
Page 3

Regulatory Information
Declaration of Conformity
Trade Nami’: SONY
Model No: l’CG-717/PCG-714
Responsible Party:
Sony Electronics Inc.
Address:
1 Sony Drive
Park Ridge, NJ 07636
Telephone No.: 201-930-6970
Contact: Louis Mecseri
This device complies with Part 15 of
the FCC rules. Operation is subject
to the following two conditions: (1)
This device may not cause harmful
interference, and (2) this device
must accept any interference fhaf
may cause undesired operation.
This equipment has been tested and found
to comply with the limits for a Class B
digital device, pursuant to Part 15 of the
Rules. These limits are designed to provide
reasonable protection against harmful
interference in a residential installation.
This equipment generates, uses, and can
radiate radio frequency energy and, if not
installed and used in accordance with the
instructions, may cause harmful
interference to radio communications.
However, there is no guarantee that
interference will not occur in a particular
installation. If this equipment does cause
harmful interference to radio or television
reception, which can be determined by
turning the equipment off and on, the user
is encouraged to try to correct the
interference by one or more of the
following measures:
_1 Roorienf or relocafe the receiving
antenna.
ü Increase the separation between the
equipment and the receiver.
_1 Connect the equipment into an outlet
on a circuit different from that to
which the receiver is connected.
Ü Consult the dealer or an experienced
radio/TV technician for help.
You are cautioned that any changes or
modifications not expressly approved in
this manual could void your authority to
operate this equipment.
Onh peripherals (computer input/output
devices, terminals, printers, etc.) tliat
comply with FCC Class B limits may be
attached to this computer product.
Operation with non-compliant peripherals
is likely to result in interference to radio
and television reception.
All cables used to connect peripherals must
be shielded and grounded. Operation with
cables, connected to peripherals, that are
not shielded and grounded, may result in
interference to radio and television
reception.
FCC Part 68
This equipment complies with Part 68 of
the FCC rules. On the bottom of this
equipment is a label that contains among
other information, the FCC equivalence
number (REN) for this equipment. If
requested, this information must be
provided to the telephone company.
All applicable registration jack USCOs, any
facility interface codes and service order
codes associated with the services the
equipment is to be cormected.
Page 4

1 ho RKN is used to dotermino tho qiuintih'
ot dov'lcos u liich mav bo ooniioctod to tho
tolophono lino. Excessive REN's on the
telephone lino mav result in tho devices not
ringing in response to an incoming call. In
most, but not all areas, the sum of tho
REN's should not exceed five (5.0). To bo
cerfain of fhe number of devices fhaf mav
- be connecfed fo the line, as determined by
the total REN's, contact the telephone
company to determine the maximum REN
for the calling area.
If the terminal equipment (Notebook
Computer PCG-717/PCG-719) causes
harm to the telephone network, the
telephone company will notify you in
advance that temporary discontinuance of
service may be required. But if advance
notice isn't practical, the telephone
company will notify the customer as soon
as possible. Also, you will be advised of
your right to file a complaint with the FCC
if you believe it is necessary
The telephone company may make
changes in its facilities, equipment,
operations or procedures that could affect
the operations of the equipment. If this
happens, the telephone company will
provide advance notice in order for you to
make the necessary modifications in order
to maintain uninterrupted service.
If trouble is experienced with this
equipment (Notebook Computer PCG717/PCG-719), please contact 1-8884SONYPC, or write to the Sony Customer
Information Center, One Sony Drive, Park
Ridge, NJ 07656 for repair and (or)
warranty information. If the trouble is
causing harm to the telephone network, the
telephone company may request you
remove the equipment from the network
until the problem is resolved.
Repair ot this equipment should be made
onl\' bv a Sonx Service Center or Sonv
authorized agent. Eor the Sonv Serx’ice
Center nearest vou, call 1-800-222-SONY
(1-81X1-222-7669).
This equipment cannot be used on public
coin service provided by the telephone
companv. Connection to Parts' Line Service
is subject to state tariffs. (Contact the state
utility serx'ice commission, public service
commission or corporation commission
for information.)
This equipment is compatible with certain
hearing aids.
Telephone Consumer
Protection Act of 1991
The Telephone Consumer Protection Act of
1991 makes it unlawful for any person to
use a computer or other electronic device
to send any message via a telephone
facsimile machine unless such message
clearly contains, in a margin at the top or
bottom of each transmitted page or on the
first page of the transmission, the date and
time it is sent and an identification of the
business, other entity, or individual
sending the message, and the telephone
number of the sending machine or such
business, other entity, or individual.
In order to program this information into
your facsimile, see your fax software
documentation.
Page 5

DISPOSAL OF LITHIUM ION
BATTERY
^ ou can rc'tum vour unwantod lithium ion
batteries to vour nearest SiUiv Sc'rviee
Center or Factory Service Center.
^ In some areas the disposal of lithium
ion batteries in household or business
trash may be prohibited.
For the Sony Service Center nearest you
call 1-800-222-SONY (United States only).
! Do not handle damaged or
leaking lithium ion batteries.
I
Danger of explosion if battery is
incorrectly replaced. Replace
only with the same or equivalent
type recommended by the
manufacturer. Discard used
batteries according to the
manufacturer's instructions.
The battery pack used in this
device may present a fire or
chemical burn hazard if
mistreated. Do not disassemble,
heat above 212° (100°C) or
incinerate.
Dispose of used battery promptly.
Keep away from children.
Page 6

Contents
Welcome
Unpacking Your Notebook Computer.............................................2
Ergonomic Considerations.................................................................3
Using Your Notebook Computer
Locating the Controls and Connectors.............................................5
Connecting a Power Source...............................................................9
Starting Your Computer ..................................................................13
Shutting Down Your Computer......................................................14
Registering Windows® 95................................................................15
Registering Your Computer.............................................................16
Using the Keyboard...........................................................................17
Using the Touchpad..........................................................................23
Using the Floppy Disk Drive...........................................................25
Using the CD-ROM Drive................................................................28
Using the Headphones with Remote Control...............................31
Using PC Cards..................................................................................34
Using Infrared Communication Devices
Using Power Saving Modes ............................................................38
Using a Second Battery Pack
Using the Weight Saver....................................................................42
...........................................................
.......................................
36
40
Connecting Peripheral Devices
Connecting a Phone Line..................................................................44
Connecting the Docking Station......................................................45
Connecting a Printer
Connecting an External Display......................................................54
Connecting an External Mouse or Keyboard................................59
Connecting External Speakers.........................................................60
.........................................................................
53
VII
Page 7

Contents
Connecting an External Microphone
Connecting a Digital Still Camera or Other Serial Device
Connecting a Digital Video Camera Recorder..............................63
Connecting a Universal Serial Bus (USB) Device
.............................................
.........................
Using the Communication Center
Opening and Closing the Communication Center ......................65
Getting Started with the Communication Center
Communication Center Main Screen
Using Mailboxes and Greetings
Using Messages..................................................................................76
Placing and Receiving Phone Calls.................................................92
Using the Phone Book.......................................................................95
.............................................
.....................................................
........................
Using the Music/Movie Player
Music/Movie Player Functions......................................................100
Customizing Your Notebook Computer
Displaying the Sony Notebook Setup Screen
Controlling Power Management...................................................103
Displaying Battery Information
Selecting the Display Mode............................................................109
Adding Memory..............................................................................112
....................................................
.............................
............
101
61
62
64
66
67
68
106
Getting Help
About Sony's Support Options .....................................................117
Calling SOS.......................................................................................119
Troubleshooting...............................................................................122
Using the System and Application Recovery CD.......................126
Notes on Use
..........................................................
133
Index....................................................................139
VIII
Page 8

Welcome
Congratulations on your purchaso of the Son\' Notebook Computer. Sony
has combined leading-edge technolog\' in audio, \ ideo, computing, and
communications to provide vou with state-of-the-art personal
computing.
Here are just some of the features vour Sonv Notebook Computer has to
offer.
Ü Exceptional performance: Your PC includes a fast Intel® Pentium®
processor with MMX technolog^', a 14x (maximum performance)
CD-ROM drive, and a 33.6 kbps full-duplex modem.
□ Portability: The rechargeable battery pack provides two to three
hours of use without AC power.
□ Sony audio and video quality: High-quality, "Sony Tuned" MPEGl
video, which supports full-screen display (12.1-inch Active Matrix
LCD screen) and enables you to take advantage of today's advanced
multimedia applications, games, and entertainment software.
□ Multimedia features: Enjoy the stereo speakers or use the supplied
headphones to listen to audio and video CDs. The headphones
include a remote control. You can even listen to audio CDs when
your computer is in suspend (sleep) mode.
□ Windows® 95: Your system includes the latest operating system
from Microsoft.
□ Communications; Access popular online services, send e-mail,
browse the Internet, and use the built-in speakerphone, answering
machine, and fax features.
□ Excellent customer support: Click the SOS icon to access Sony Online
Support 24 hours a day, seven days a week. The SOS software
enables a support representative to talk to you on the phone, perform
remote diagnostics on your PC, and send you updates, all through a
single phone call.
Page 9

Welcome
Unpacking Your Notebook Computer
Remove the follo\vinj^ hardware items from tlie box:
Floppy disk drive
Floppy disk
drive cable
AC adapter
Power cord
Headphones
Phone cable
You can find the complete list of the items that come with your computer
in the About Your Sony Notebook Computer guide.
Page 10

Ergonomìe Consideration
Ergonomic Considerations
You will bo using your notebook computer as a portable device in a
variety ot environments. Wbenex er possible, \ ou shoulci attempt to
apply the following ergonomic considerations to both stationer}' and
portable environments.
Position of your computer - Place the computer directly in front of
you as you work. Keep your forearms horizontal with your wrists in
a neutral, comfortable position while using the keyboard, touchpad,
or external mouse. Let your upper arms hang naturally at your sides.
Take breaks during sessions with your computer. Excessive use of the
computer may strain muscles or tendons.
Furniture and posture - Sit in a chair with good back support and
armrests. Adjust the level of the chair so your feet are flat on the floor.
A footrest may make you more comfortable. Sit in a relaxed, upright
posture and avoid slouching forward or leaning far backward.
Viewing angle of the computer's display - Use the display's tilting
feature to find the best position. You can reduce eye strain and
muscle fatigue by adjusting the tilt of the display to the proper
position. Adjust the contrast or brightness settings of the display also.
Page 11

Welcome
Lighting - Choose a location wliere \\'indovvs and lights do not create
glare and reflection on tlie display. Use indirect lighting to a\ oid
bright spots on the display. You can also purchase accessories for
your display that help reduce glare. Proper lighting adds to your
comfort and work effectiveness.
Tilt stand - You use the tilt stand to place the computer at an angle
that allows comfortable typing.
□ Placement of an external display - When using an external display,
set the display at a comfortable viewing distance. Make sure the
display screen is at eye level or slightly lower when you are sitting in
front of the monitor.
Page 12

Using Your Notebook Computer
Back
■■ ■ DC In (page 9)
Ш
OOI Serial COM1 connector (page 62)
@
Infrared port (page 36)
[3]
0
0
USB connector (page 64)
^
/ (Ml Mouse/Keyboard connector (page 59)
O
Monitor connector (page 54)
Docking station (page 45)
0
Q/A FDD/Printer connector (page S3)
s
O*
video Out connector (page 57)
8
Page 13

Connecting a Power Source
Connecting a Power Source
You can use either AC power or a rechargeable batter}' pack as a power
source.
Using the AC Adapter
1 Plug the cable attached to the AC adapter into the DC In connector on
the computer.
2 Plug one end of the power cord into the AC adapter.
3 Plug the other end of the power corci into an AC outlet.
Notebook PC
0
L£J LiJ
—I
--------
(m)
Power cord (supplied)
a
Page 14

Right
Locating the Controls and Connectors
Q] Phone line jack (page 44)
[2] PC card slots (page 34)
[U Drive bay (page 25)
Page 15

Using Your Notebook Computer
Left
Power switch (page 13' T
s
Hard disk drive
ID
Battery bay (page 10, 49)
a
^ There is a ventilation slot xace: trecr » atove the headphones connector. Do not cover
the ventilation slot when vour CO-:ote- s :n.
. . Kedbcnones connector (page 22, 25)
T \ Wcrcchone connector (page 26)
-C '_«>€ n connector
T
Page 16
Connecting a Power Source
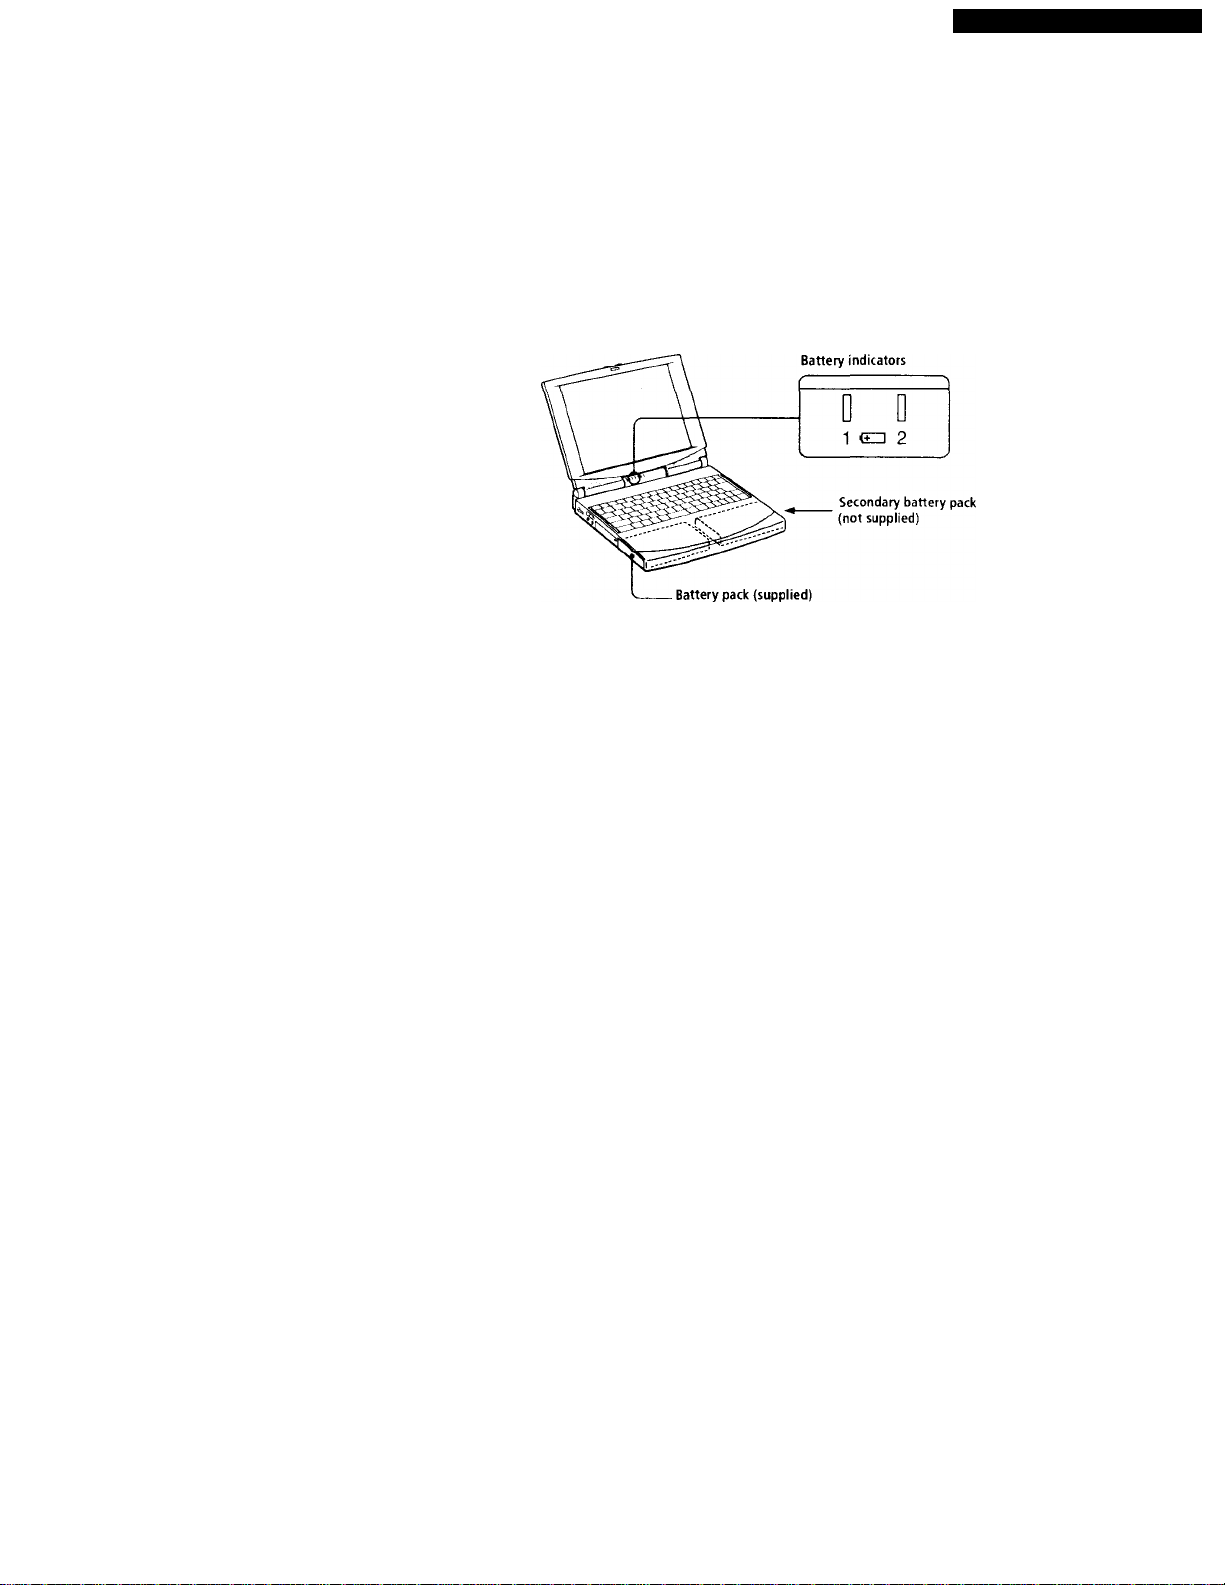
The computer automaticallv charges the battery (the battery indicator
light flashes as the battery charges). When the battery is 85% full, the
battery indicator light turns off. This process takes approximately one
and a half hours. To charge the battery completely, continue charging for
an additional hour.
A fully charged battery pack supplies power for approximately tw’o to
three hours. See "Displaying Detailed Battery Information" on page 107
for information on checking the battery life.
There are two battery indicator lights on the computer:
Battery Indicator
iflQ
Meaning
Indicates the status of the battery pack
bay on the left side of the computer.
Indicates the status of the battery pack:
^ 2 on the right side of the computer.
Battery Indicator
Light Status Meaning
On
Flashing quickly
The computer is using battery power.
The battery is running out of power.
Flashing slowly The battery is charging.
Off
The computer is using AC power.
11
Page 17

Using Your Notebook Computer
^ See "Using a Second Battery Pack” on page 40 for information on installing and charging a
battery pack in the drive bay.
Keep the battery pack in the computer while it is directly connected to AC power. The
battery pack continues to charge while you are using the computer.
When the remaining battery charge drops to 7%, the computer automatically enters System
Save to Disk mode. This may result in data loss as the system changes modes.
You can extend battery life by changing the power management modes in the PowerPanel
utility. See "Using Power Saving Modes" on page 38.
The battery pack supplied with your computer is a lithium ion battery and can be recharged
at any time. Charging a partially discharged battery does not affect battery life.
The battery indicator light is on while you use the battery pack as a power source. When
battery life is nearly over, the battery indicator starts flashing.
To remove the battery pack
1 Open the cover of the battery bay.
2 Pull out the battery pack.
3 Close the cover of the battery bay.
12
Page 18
Connecting a Power Source
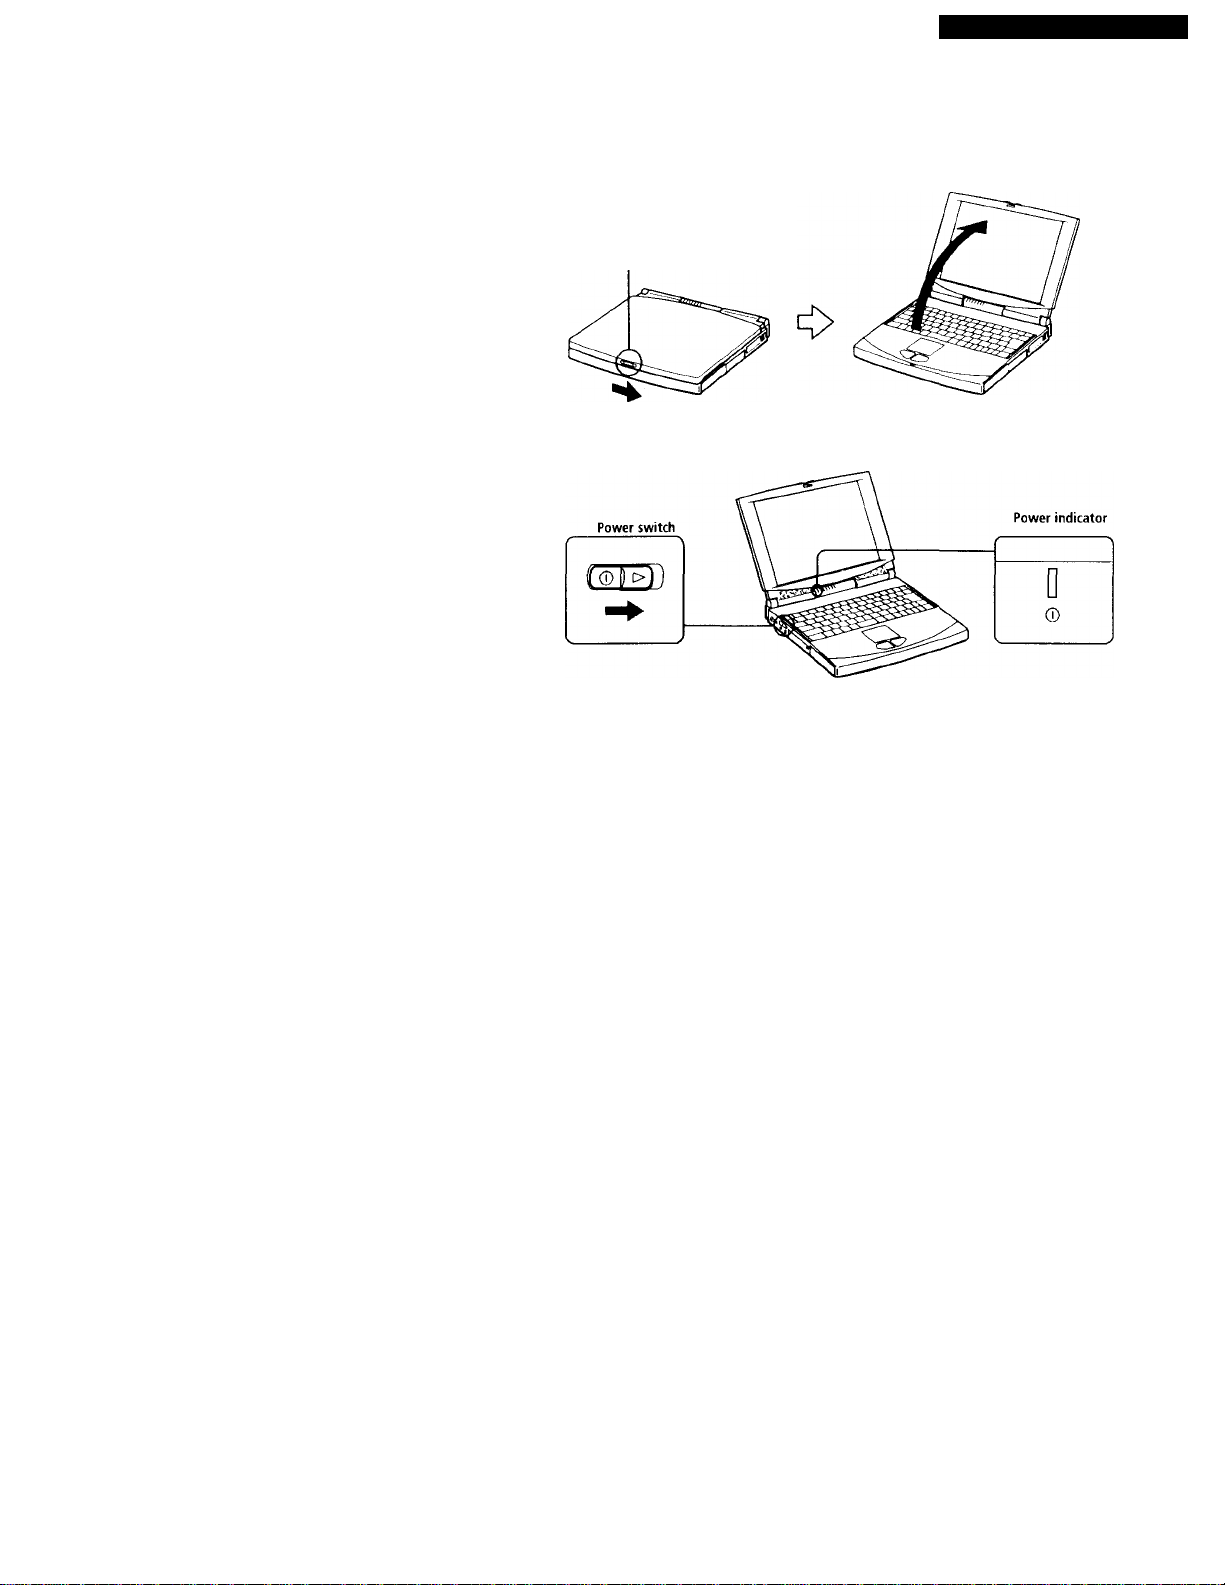
Starting Your Computer
1 Slide the LCD lock lever in the direction ot the arrow, and litt the
cover.
LCD lock lever
2 Slide the power switch on the left side toward the front of the
computer until the power indicator light turns on.
13
Page 19
Using Your Notebook Computer
Using Battery Power
You can use one or two battery packs as a source ot power. The second
battery pack inserts into the drive bay on the right side of the computer.
(See "Using Power Saving Modes" on page 38.) Additional batter)’ packs
are available as a separate option.
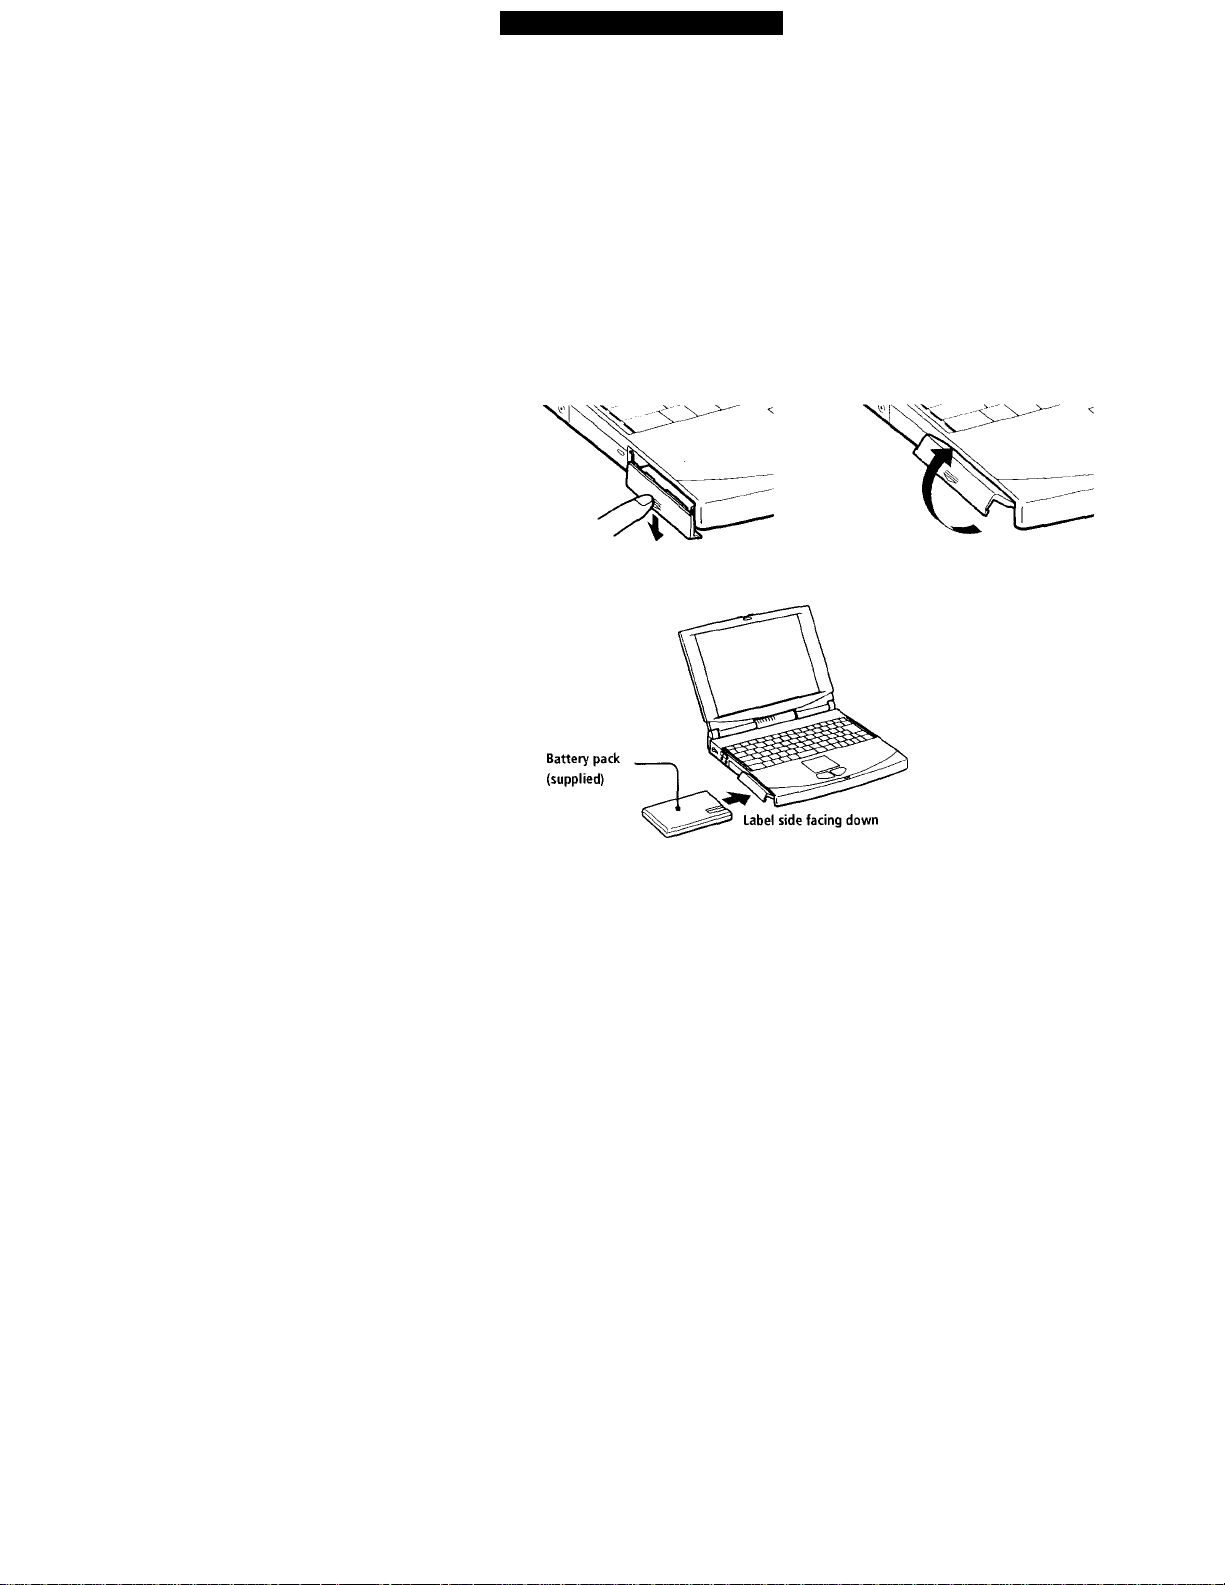
The battery pack that comes with your computer is not fully charged at
the time of purchase. Follow the steps below to insert and charge the
battery pack.
To insert the battery pack
1 Open the cover of the battery bay.
2 Insert the battery pack into the battery bay on the left side of the
computer.
3 Close the cover of the battery bay.
To charge the battery pack
1 Connect the AC adapter to the computer.
2 Insert the battery pack.
10
Page 20

Registering Windows® 95
Registering Windows® 95
The first time \ ou turn on your computer, \ ou need to complete a few
steps to register and configure the Windows 95 software tliat is already
installed on \ our computer.
^ You must register Windows 95 before you can use the computer.
The on-screen instructions guide you through the registration and
configuration process. The following is an overview of the process.
1 Gathering information;
□ Enter your name.
Ü Read and accept the License Agreement.
□ Enter your Certificate of Authenticitv number located on the
cover of the Introducing Windows 95 manual.
2 Windows 95 setup:
□ Click the Finish button on the Windows 95 Setup Wizard screen.
3 Selecting your computer settings:
□ If necessary, change the Time Zone, Date and Time on the
Date/Time Properties screen.
4 Learning about Windows 95:
□ If you want, take the tour of Windows 95.
15
Page 21

Using Your Notebook Computer
Registering Your Computer
You can take advantage of Sony's commitment to quality customer
support and receive the following benefits by registering vour computer
with Sony:
□ Sony Online Support - Talk to a Support Representative to
troubleshoot problems you may be having with your computer.
Limited Warranty - Protect your investment. See the Limited
□
Warranty Card for details.
Express service - Provides convenient resolution of problems.
□
Follow these steps to use the Sony notebook computer's online
registration service.
^ You must connect your phone line before using any online services, including the online
registration service. See "Connecting a Phone Line" on page 44.
1 Enter the information requested on the first online registration form.
Press the Tab key to move from box to box.
2 Click the Next button to advance to the next form.
3 Complete the remaining forms by clicking the Next button each time
you complete a form.
4 Click the Register Now button to register your computer. Your
computer automatically transfers your registration information using
your built-in modem and a toll-free telephone number.
16
Page 22

Using the Keyboard
Using the Keyboard
Your keyboard is very similar to a typewriter's, but tlie keyboard has
additional keys that perform specific computer-related tasks.
Escape Key
- ?-- -- -- ----- -- -- -- -------B-- -- --- -- ----- --
Shift key
Ctrl key
Fn key
Keys
Numeric keypad
Navigation keys
Correction keys
Function keys Print Screen key
f irts^rr 1 CWif
^ Set Lk
, 1" 1" :l.. l"-1'
,
1 2 3
, Q W E
A S
0
1
1
P t cf)
.
.,.:L
1
En(»i
F
j Applications key
Alt key
Windows 95 key
Descriptions
Contains the keys found on a typical calculator.
Use the numeric keypad area to type numbers or
to perform mathematical calculations such as
addition and subtraction. Note that you must
press the Num Lock key to activate the numeric
keypad. (When you do so, the Num Lock light
will be on.)
Several keys are devoted to moving the cursor on
the screen (the four arrow keys which also
function as the Home, End, Page Up, and Page
Down keys).
The Insert, Back Space, and Delete keys enable
you to make corrections in your documents.
Numeric keypad area
17
Page 23

Using Your Notebook Computer
Keys
Function keys
Escape key
Print Screen key
Operator keys
Windows 95 key
Fn key
Applications key
Descriptions
The twelve function keys along tire top ot the
keyboard are used to perform designated tasks.
For example, in many applications, FI is the Help
kev. The task associated with each function key
may vary from one application to the next.
The Esc (Escape) key is used to cancel commands
The Print Screen key takes an electronic snapshot
of the screen and places it in the Windows
Clipboard. You can then paste the screen shot into
a document and print it.
Several keys are always used with at least one
other key; Ctrl, Alt, and Shift. When held down
with another key, the Ctrl (Control) and Alt
(Alternate) keys offer anofher way to give
commands. For example, in many applications,
instead of choosing the Save command from a
menu, you can hold down Ctrl and press S
(referred to as Ctrl+S). The Shift key operates the
same way as on a typewriter; it's used to produce
capital letters or special symbols such as @ and $.
The key with the Windows logo displays the
Windows 95 Start menu; it's the equivalent of
clicking the Start button on the task bar. See
"Combinations and Functions with the Windows
95 Key" on page 19.
The Fn key is used in combination with other
keys. To issue commands. See "Combinations and
Functions with the Fn Key" on page 21.
The Applications key displays a shortcut menu of
context-sensitive choices; pressing this key is the
equivalent of clicking the right mouse button.
18
Page 24

m
Using the Keyboar
Combinations and Functions with the Windows 95 Key
Combinations
0 + FI
0 + Tab
a + E
a + F
a + Ctrl + F
a + M
Shift + a + M
a + R
a + Pause +
Break
Indicators
Indicators
Power
0
Fiard disk
0
Battery 1
1
Functions
Displays Windows Help.
Switches the selected button on the taskbar.
Displays Windows Explorer.
Displays the Windows Find window to find a
file or folder. This is the equivalent of selecting
Find from the Start menu.
Displays Find window which is for finding in
other computers. This is the equivalent of
selecting Find from the Start menu.
Minimizes all displayed windows.
Returns all minimized windows to their
previous size.
Displays the Run window. This is the
equivalent of selecting Run from the Start
menu.
Displays the Properties window. This is the
equivalent of double-clicking the System icon
in the Control Panel.
Functions
Lights when the power to the computer is turned
on. Flashes in system suspend mode.
Turns off when the computer is in system save to
disk mode or powered off.
Lights when data is being read from or written to
the hard drive. Do not enter system suspend
mode or turn off the computer when this
indicator light is on.
Indicates the status of the battery inserted in the
battery bay on the left side of the computer.
Battery 2
■ Ed 2
Indicates the status of the battery inserted in the
drive bay on the right side of the computer.
19
Page 25

Using Your Notebook Computer
Combinations/
Feature
Fn+ "d(F12)
System save to disk
mode
Fn+E
Eject CD-ROM
Fn+F
Change the display
size
Fn+D
Video standby
Fn-i-S
System standby
Functions
Provides for the lowest level of power
consumption. When you execute this command,
the state of the system and state of the
peripheral devices are written to the hard disk
and the system power is turned off. To return
the system to the original state, use the power
switch to turn on power.
Ejects the CD-ROM drive. This command is
active only when the CD-ROM drive is in the
drive bay; it is inactive when the driv'e is in the
docking station.
Zooms in or zooms out the display size.
Turns off the LCD in order to save power.
Puts the system in standby mode, a power
management state. When the system enters
standby mode, the hard disk and video enter a
low power state, and the CPU clock and the
processor are not active.
22
Page 26

Using the Touchpad
Using the Touchpad
Tile keyboard contains a cursor-pointing device called a touchpad. You
can point to, select, drag, and scroll objects on the screen using the built-
in touchpad. With the touchpad, you have the option to press the left or
right buttons, or tap the pad.
-Pointer
Actions
Point
Click
Double-click
Right-click
Drag
Scroll
Descriptions
Slide one finger on the touchpad to place the pointer on an item
or object.
Tap the touchpad with one finger once or press the left button
once.
Tap the touchpad with one finger twice or press the left button
twice.
Tap the touchpad with three fingers once or press the right
button once. In many applications, this action displays a
shortcut menu of context-sensitive choices.
Tap once and then slide your finger on the touchpad, or slide
one finger while holding down the left button. When your
finger reaches a touchpad edge, the pointer keeps moving until
you lift your finger. Use this action to select and move objects.
Move your finger along the right edge of the touchpad.
23
Page 27

Combinations and Functions with the Fn Key
Using the Keyboard
Combinations/
Feature
Fn+ (ESC)
System suspend
mode
Fn+ Ca (F2)
Display power status
Fn+ ^ (F3)
Speaker switch
Fn+ -J (F4)
Speaker volume
Fn+ (F5)
Brightness control
Fn+ 3 (F6)
Contrast control
Fn+ [113/ W (F7)
Switch to the
external display
Fn+ cm]/® (F8)
Select video out
Fn-i-
(F9)
I
Functions
Puts the system into system suspend mode, a
power management state. To return the system
to the acti\'o state, press any key or press the
power switch on your computer.
Displays the power status, as in the two
examples below:
Using AC
power
Charging
the battery
Toggles the built-in speaker between off and on.
Adjusts the built-in speaker volume.
To increase volume, press Fn-rF4, then t or
To decrease volume, press Fn-rF4, then 4- or
Adjusts the brightness of the LCD.
To increase light intensity, press Fn-t-F5 and then
i or
To decrease light intensity, press Fn-t-F5 and
then 4r or .
The contrast control is not currently used on the
LCD display.
Toggles through the LCD, external display
(connected to the O Monitor connector) and
both LCD and external display.
Only LCD
----------
LCD and external display
^
-----------
Only external display -4—
Toggles between LCD and TV connected to the
O Video Out connector.
Disconnects from the docking station when the
power is on.
21
Page 28

Using Your Notebook Computer
Notes on Mouseware
See Mouseware Help for information on additional features of the
touchpad, such as middle button click, adjusting touchpad speed,
enabling and disabling tapping, tap and drag lock, and Wheel Mouse
functions.
To access Mouseware Help:
1 Click the Start button.
2 Point to Settings and click Control Panel.
3 Double-click the Mouse icon.
4 Click the Help button on the Mouse Properties screen.
24
Page 29
Using Your Notebook Computer
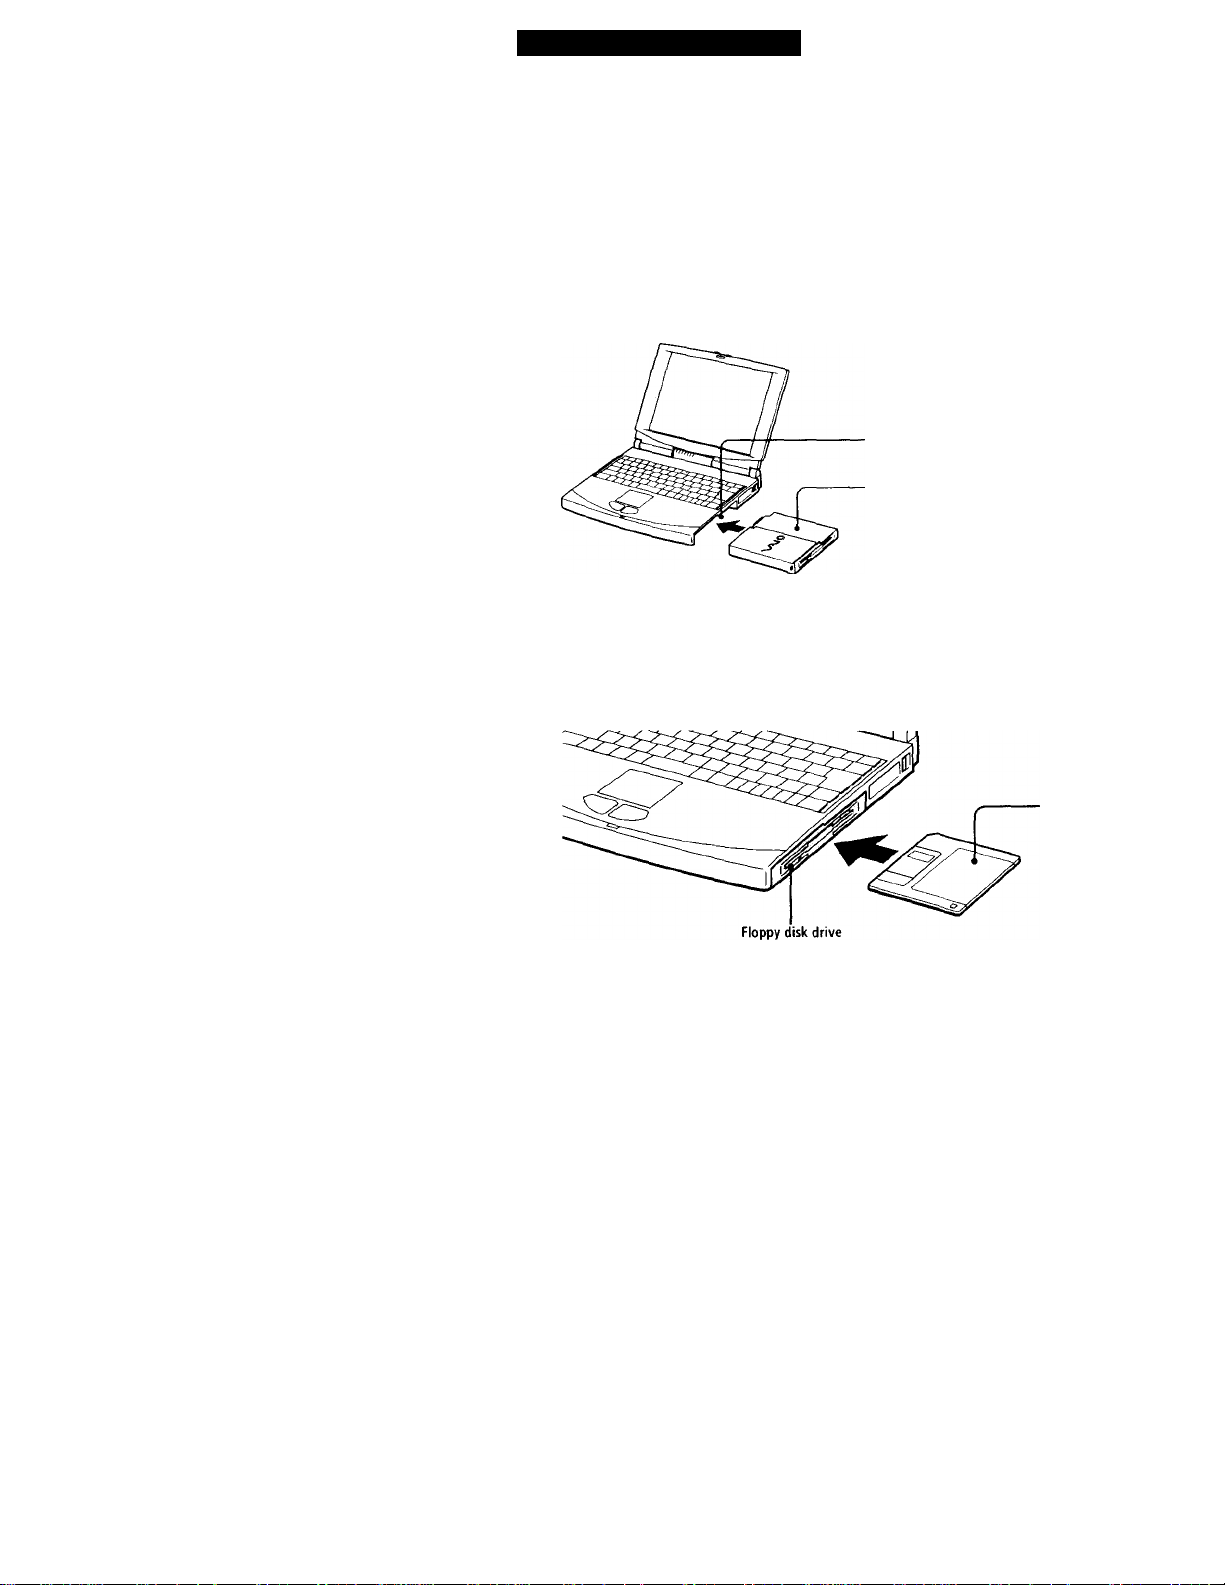
To insert the floppy disk drive
1 Turn off the computer.
2 If another des ice is in the drive bay, remove the device. See "To
remove the CD-ROM drive" on page 30 or "To remove the second
battery pack" on page 41.
3 Insert the floppy disk drive into the drive bay with the VAIO label
facing up. Continue pushing the drive into the bay until the eject
lever locks into place.
Drive bay
Floppy disk drive
To insert a floppy disk
1 Hold the floppy disk with the label side facing up.
2 Gently push the floppy disk into the drive until it dicks into place.
Floppy disk
26
Page 30

Using the Floppy Disk Drive
To remove a floppy disk
-1 When YOU finish using tho floppv disk, press the hjoet button to
remove the floppy disk.
^ If you have difficulty removing a floppy disk from the floppy disk drive, remove the floppy
disk drive from the drive bay.
To remove the floppy disk drive
1 Turn off the computer.
2 There is an Eject lever on the bottom of the floppy disk drive. Slide
this lever in the direction of the arrow.
t
3 Slide the drive out of the drive bay.
4 Insert the weight saver. See “Using the Weight Saver" on page 42.
27
Page 31

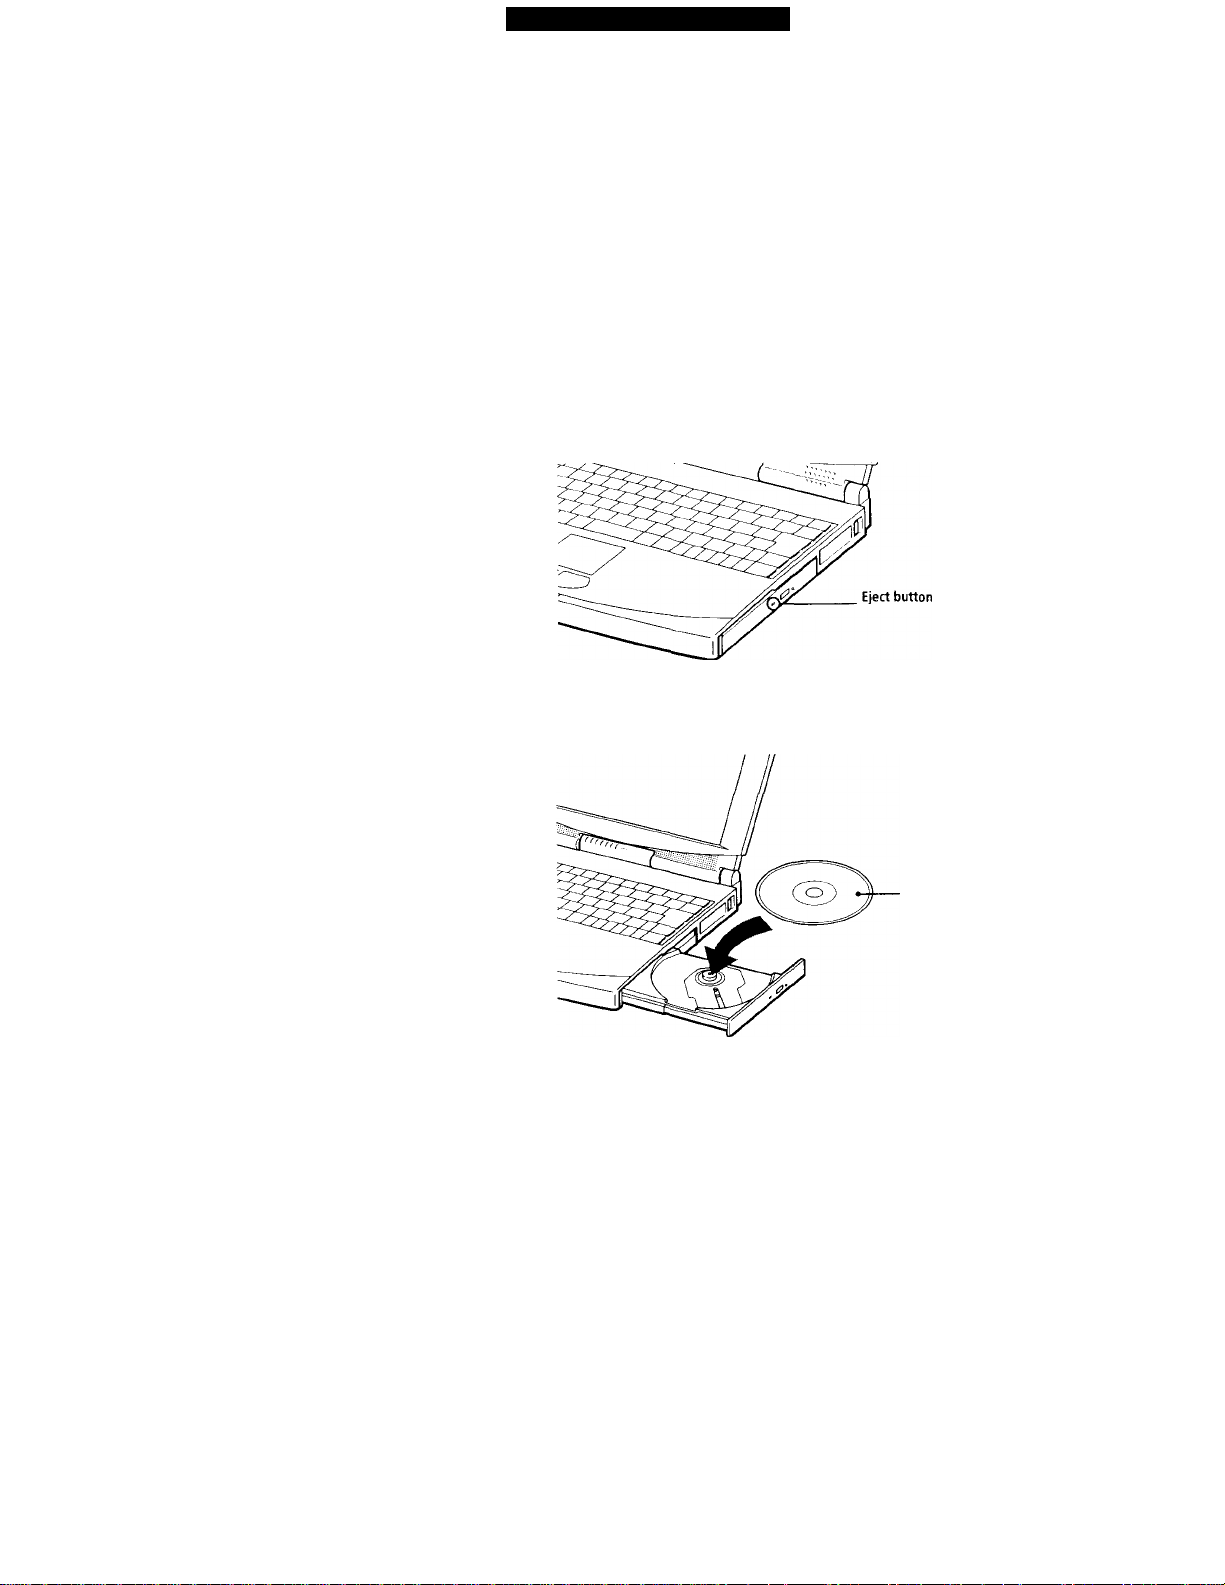
Using the CD-ROM Drive
4 Close the tray by pushing it genth’.
^ Be sure to seat the CD-ROM disk firmly over the CD-ROM drive hub fingers. Failure to do so
could damage your CD-ROM drive.
When you finish using the CD-ROM, press the Ejea button to remove the CD-ROM disk.
When the computer is in system suspend or system save to disk mode, you cannot remove a
CD-ROM disk. See "Controlling Power Management" on page 103 for more information
about system suspend and system save to disk modes.
If the CD-ROM disk does not come out when you press the Eject button, turn off the
computer and insert a sharp, pointed object into the manual ejeO hole.
29
Page 32
Using Your Notebook Computer
Using the CD-ROM Drive
Your computer comes with the CD-ROM dri\ e in the drive ba\'. You can
remove it so that you can use other cievices in the drive hav.
To insert a CD-ROM disk
1 Turn cm the computer.
^ When the computer is in system suspend or system save to disk mode, you cannot
insert a CD-ROM disk. See "Controlling Power Management” on page 103 for more
information on system suspend and system save to disk modes.
2 Press the Eject button to open the CD-ROM drive.
The CD tray slides out.
3 Place the CD-ROM disk in the tray with the label side facing up. Push
the disk onto the hub until the disk clicks into place.
Label side
facing up
28
Page 33

Using Your Notebook Computer
To remove the CD-ROM drive
1 Turn off fhe compufor before removing the CD-ROM drive.
2 There is an Eject lever on the bottom of the CD-ROM drive. Slide tliis
lever in the direction of the arrow.
3 Slide the drive out of the drive bay.
4 Insert the weight saver. See "Using the Weight Saver" on page 42.
To reinsert the CD-ROM drive
1 Turn off the computer.
2 If another device is in the drive bay, remove the device. See "To
remove a floppy disk" on page 27 or "To remove the second battery
pack" on page 41.
3 Insert the CD-ROM drive into the drive bay with the label side facing
up.
Drive bay
CD-ROM drive
(supplied)
Page 34

Using the Floppy Disk Drive
Using the Floppy Disk Drive
There are two wavs to connect the floppy disk drive to vonr computer:
J Externallv, by connecting it to the computer's i-DD/I’rinter
connector.
J Internally, by inserting it into the drive bay.
The computer comes with the CD-ROM drive in the drive bay. If you
want to use both the CD-ROM and the floppy disk drive at the same time,
use the floppy disk drive as an external drive.
If you connect the floppy disk drive exfernally while your computer is on,
use the Sony Notebook Setup utility to select Floppy Disk Drive. See
"Displaying the Sony Notebook Setup Screen" on page 101 for details.
To connect the floppy disk drive externally
□ Connect the floppy disk drive to the 0 / A FDD/Printer connector
using the external floppy disk drive cable.
25
Page 35

Using the Headphones with Remote Contro
Using the Remote Control to Play an Audio CD
I (stop)
To
Find the beginning of
Press
( 1 side of
) once**
the current track (AMS*)
Find the beginning of
(1-^
side of
) repeatedly**
previous tracks (AMS)
Find the beginning of
(
side of
) once**
the next track (AMS)
Find the beginning of
(► «
side of
) repeatedly**
succeeding tracks (AMS)
Go forward quickly Hold down
Go backwards quickly
"AM S = Automatic Music Sensor
'"These operations are possible in both the play and pause modes.
Hold down
► ► 1 (•
*► • side of ) **
( 1-
side of ) **
Using the Hold Switch
You can use the Hold switch to lock the controls of the headphone remote
control. When you are not using the headphone remote control, slide
Hold in the direction of the arrow. To unlock, slide Hold back.
33
Page 36

Using PC Card
2 Ronio\'o the PC card slot protector.
When you use a Type HI PC card, you need to remove both the top
and bottom PC card slot protectors.
3 Insert the PC card into the PC card slot, front label facing up. Gently
push the card into the slot until the card is fixed into the connector.
The release button comes out.
>1
PC card
^ Do not force a card into the slot. It may damage the connector pins.
If you have difficulty inserting a card, check that you are inserting the card with the correct
orientation.
To remove a PC card
1 Pull the PC card release button up and press it.
2 Gently grasp the card and pull it out.
3 Insert the PC card slot protector back into the empty slot.
35
Page 37

Using Your Notebook Computer
Using Infrared Communication Devices
Your computer includes an intrarod port, located on the back panel. You
can use this port to communicate with other intrared-equipped devices
with compatible protocols, such as a digital still camera or other
computers.
To use infrared communication with a digital still camera
Align the infrared ports on the computer and the digital camera so that
they are in a direct line.
To use infrared communication with another computer
Align the infrared ports on the two computers so that they are in a direct
line.
36
Page 38

Using Infrared Communication Device
^ Check the Status tag of the Infrared Monitor in the Windows Control Panel to determine if
the infrared device is deteaed.
If the two devices are too far apart or too close together, data transfer may be interrupted
or there may be noise in the transmission.
Do not cover the infrared ports with your hand or any other objects.
Avoid direct sunlight, fluorescent light, or flashing incandescent light close to the infrared
ports.
See the manual that came with your digital still camera or other infrared communication
device for more information on installation and use.
The active area of infrared transmission extends about 39 V, inches (1 m) with a radius of 15
degrees.
S'
37
Page 39

Using Your Notebook Computer
Using Power Saving Modes
when vou uso a battery as the source ot po\yer for your computer, you
can take advantage of power management settings to conser\'e battery
life. In adciition to the normal operating mode, which allows vou to turn
off specific devices, your compufer has fhree distinct power sac'ing
modes: System Standby, System Suspend, and System Save to Disk.
When using battery power, you should be aware that the computer
automatically enters System Save to Disk mode when the remaining
battery charge drops below 7%, regardless of fhe power management
setting you select.
Normal Mode
This is the normal state of your computer when it is in use. To save
power, you can turn off a specific device such as the LCD or the modem.
The power indicator light is on in this mode.
For details, see "Controlling Power Management" on page 103.
System Standby Mode
This mode is convenient if you do not need to use your computer for a
brief period. The hard disk and video display enter a low power state,
and the CPU clock and processor stop. The power indicator light is on in
this mode.
To activate system standby mode
Press Fn+S. You can also enter system standby mode using the
PowerPanel utility.
To return to normal mode
Press any key.
System Suspend Mode
The computer saves the current state of the system in RAM and switches
off power to the CPU. The power indicator light flashes in this mode.
38
Page 40

Using Infrared Communication Device
To activate system suspend mode
Press Fti+Esc, or slide the power switcli forward and hold it for at least
four seconds. You can also use the PowerPanel utility to enter system
suspend mode.
To return to normal mode
Press any key.
System Save to Disk Mode
The state of the system is saved on the hard drive and power is turned
off. The power indicator light is off in this mode.
To activate system save to disk mode
Press Fn+F12. You can also use the PowerPanel utility to enter system
save to disk mode.
To return to normal mode
Turn on the computer by sliding the power switch forward. The
computer returns to its previous state.
^ When returning from system save to disk mode, the system status stored on the hard disk is
erased and the computer starts normally if you slide the power switch forward and hold for
at least four seconds.
Time to return to normal mode:
□
System standby < System suspend < System save to disk
Power consumption:
□
System standby > System suspend > System save to disk
3S
Page 41

Using Your Notebook Computer
Using a Second Battery Pack
You can purchase a second recliargeable battery pack. With two battery
packs, you can extend the time that you use )’our computer with battery
power. When using two battery packs, the battery pack you insert first
charges first. The battery pack you insert second charges when the first
battery pack is 85% full. You can defermine which battery pack is
charging by the battery indicator light status.
To insert a second battery pack
1 If another device is in the drive bay, remove the device. See "To
remove a floppy disk" on page 27 or "To remove the CD-ROM drive"
on page 30.
2 Insert the battery pack into the drive bay.
The battery 2 indicator light turns on.
3 Attach the Weight Saver to the computer to stabilize the battery pack.
See also "Using the Weight Saver" on page 42.
Battery pack
Weight saver
Page 42

1
To charge the second battery pack
Keep the battery pack in the computer while it is connected to AC power.
The battery indicator flashes while the batter\’ is charging. See also "To
charge the battery pack" on page 10 for more information.
To determine the amount of time the battery lasts, see "Displaying Battery Information" on
page 106.
To remove the second battery pack
Using a Second Battery Pack
1 There is an Eject lever on the bottom of the weight saver. To remove
the battery pack, slide this lever in the direction of the arrow.
2 Remove the weight saver, and then pull out the battery pack.
3 Reinsert the weight saver. See "Using the Weight Saver" on page 42.
41
Page 43

Using Your Notebook Computer
Using the Weight Saver
The weight saver protects the drive bav when it is empty.
To attach the Weight Saver
1 If another device is in the drive bay, remcrve the device. See "To
remove a floppy disk" on page 27, "To remove fhe CD-ROM drive"
on page 30, or "To remove the second battery pack" on page 41.
2 Slide the weight saver in the direction of the arrow until it clicks.
Weight saver (supplied)
To remove the Weight Saver
There is an Eject lever on the bottom of the weight saver. To remove the
weight saver, slide this lever in the direction of the arrow.
42
Page 44

Connecting Peripheral Devices
You can add functionality to vour computer by connecting any of these
peripherals:
□ Phone line (page 44)
□ Docking station (page 45)
□ Printer (page 53)
□ External display (page 54)
□ External mouse or keyboard (page 59)
□ External speakers (page 60)
□ External microphone (page 61)
□ Digital still camera or other serial device (page 62)
□ Digital video camera recorder (page 63)
□ Universal serial bus (USB) device (page 64)
^ Before you connea peripherals, turn off the computer and all peripherals.
Connect the power cord only after connecting all cables.
Turn on the computer only after turning on all peripherals.
43
Page 45

Connecting Peripheral Devices
Connecting a Phone Line
You need to connect a phone line to take advantage ot online services, the
Internet, and Sony Online Support. The phone line also enables you to
register your computer and software online.
1 Pull the PC card release buttons away from the computer.
2 Plug one end of the phone cable into the phone line jack on the
computer.
3 Plug the other end into the wall jack.
^ Your computer does not work with party lines, cannot be connected to a coin-operated
telephone, and may not work with multiple phone lines or a private branch exchange (PBX).
44
Page 46

Connecting the Docking Station
Connecting the Docking Station
Attaching an optional docking station enables you to connect additional
peripherals as shown below. There are two types of docking stations: the
I’orsonal Docking Station and the Network Docking Station. The Personal
Docking Station does not include the SCSI, Network (ethernet), and DV
In/Out connectors.
Q] C3* Video Out (page 57)
g USB * (page 64)
^ / (Ml Mouse/Keyboard (page 59)
0 ~ DC In (page 9)
0 A Game
0 V Microphone (page 26)
[2l -0 Line In
* USB ports are included to provide state-of-the-art technology. Your operating system supports a
limited number of USB devices. You may need to install software (device drivers) supplied with your
USB device before using the USB device.
t Network docking station only.
^ When your computer is connected to the docking station, you cannot use the system
suspend or save to disk power saving modes.
To listen to audio CDs through the computer's built-in speakers, insert the CD-ROM drive
into the computer's drive bay. Audio from a CD in the docking station's drive bay cannot be
heard through the built-in speakers.
G» Line Out
0
O Monitor (page 54)
0
£)i Printer
0
lOICH Serial C0M1 (page 62)
0
Network (ethernet)'
0
SCSI*
0
DV In/Out (page 63)'
0
45
Page 47

Connecting Peripheral Devices
To attach your computer to the docking station
To supph' power to vour computer while it is connected to tire docking
station, N’ou can connect the AC adapter directly to the docking station.
1 Turn off your computer and disconnect all peripherals.
2 On the back of fhe compufer, liff the cover that protects the docking
station port.
Align the indentation on the bottom of fhe computer with the guide
post on the docking station.
Notebook computer Docking station
46
Page 48

Using the Headphones with Remote Control
Using the Headphones with Remote Control
Your computer includes headphones, wliiclr \ ou can use to listen to
audio and video CDs. You can listen to audio CDs e\ en when your
computer is in system suspend mode.
To use the remote control when vour computer is active, you must use
the Music/Movie Player software. To use tlie remote control when your
computer is in system suspend mode, follow fhe directions in the next
section.
^ See "Using the Music/Movie Player" on page 99 for more information on how to play audio
CDs.
To use the remote control in system suspend mode
1 Connect the micro-plug of the headphones to the headphone remote
control, not to the f} Headphone connector of the computer.
^ Connect the headphones firmly to the remote control. A loose conneaion may cause
noise during playback.
2 Connect the headphone remote control to the Cl Headphone
connector on the computer.
3 While holding down the Fn key, press Esc.
The computer enters system suspend mode.
4 Press the ■ Stop button on the remote control.
31
Page 49

Using Your Notebook Computer
Shutting Down Your Computer
! To avoid potential loss of data, follow these steps to shut down your computer.
1 Click the Start button on the Winciows 95 taskbar.
2 Click Shut Down at the bottom of the Start menu to display the Shut
Down Windows dialog box.
Shut Down Windows
Are you sue you want to:
^ the computet?;
fieslart the computcf?
Restartthecompytef intis DOS mode?
^ ¿lose ei piogidm and log as a dilerent user?
ies No Help
Select Shut Down the Computer.
3
Click Yes.
4
^ Respond to any prompts warning you to save documents.
5 Wait for your computer to turn off automatically.
6 Turn off any peripherals connected to your computer.
If you are unable to shut down your computer using the steps described above, press the
Ctrl+Alt+Delete keys at the same time to restart the computer. If you are unable to restart
the computer in this way, you can slide the power switch forward and hold for four seconds.
This operation may result in data loss.
During a period of inactivity, you can conserve battery life by using system suspend mode.
See "Controlling Power Management" on page 103.
14
Page 50

Using Your Notebook Computer
This section describes how to start using \ our computer and how to use
vour computer's internal and external dev ices, such as the touchpad,
floppy disk drive, and CD-ROM drive.
Locating the Controls and Connectors
Front
LCD screen (pages 21, 133)
0
Speakers (page 60)
0
Keyboard (pages 17)
0
Touchpad (page 23)
0
Left/right button
0
Microphone (page 61)
0
Power indicator (pages 13, 19)
0
Hard disk drive indicator (page 19)
1
Battery 1/2 indicators (pages 19, 106)
0
Num Lock indicator (page 20)
Caps Lock indicator (page 20)
0
Scroll Lock indicator (page 20)
EH
Page 51

Telephone Options
You can use the tollovving telephone options;
Placing and Receiving Phone Calls
Option
Do Not Disturh
Call Screening
Adjust ring volume
Description
Turn Do Not Disturh on if you want the
Communication Center to answer automatically
incoming calls and take a message without
disturbing you. To turn Do Not Disturb on, click
the MENU button on the Main screen and select
Options, then select the Interface tab and check the
"Do Not Disturb" checkbox.
Turn Call Screening on if you want to monitor your
calls. With Call Screening on, incoming messages
will be played through your computer's speakers.
To turn Call Screening on, click the MENU
button on the Main screen and select Options, then
select the Interface tab and check the "Call
Screening" checkbox.
Click the right mouse button on the Volume slider
and adjust the Ring slider.
93
Page 52

Connecting the Docking Statio
Make sure the docking station lever is in the release position.
Align the guide posts on the docking station with the openings on the ^
back of the computer, and then slide the computer in the direction of
the arrow until it stops. .
5 Slide the docking station lever into the lock position to secure your
computer in the docking station.
IN USE indicator
/
\
Plug the cable attached to the AC adapter into the dc in connector on
the docking station. Plug the power cord into the AC adapter and an
AC outlet.
(M)
47
Page 53

Connecting Peripheral Devices
Tht' ® power indicator light turns greor
(T) Power indicator
I Battery charger indicator
IN USE In use indicator
7 Turn on the computer.
The IN USE indicator light turns on.
IKi
48
Page 54

To charge a battery pack using the docking station
1 Open the cover of the batterc' charger ba\'.
Connecting the Docking Sta
3 When the battery pack is fully inserted, close the cover.
4 Connect the docking station to an AC outlet.
The docking station automatically charges the battery. The battery
charger indicator light is on while the battery is charging. When the
battery is fully charged, the battery charger indicator light turns off.
^ Do not move the docking station or place it on a slant while the battery is in the docking
station charger bay.
Page 55

Connecting Peripheral Devices
To remove the battery pack
1 Open the cover of the battery charter bay.
2 Press the Eject button.
3 Pull out the battery pack.
4 Close the cover of the battery charger bay.
To insert the CD-ROM or floppy disk drive into the docking station
You can use the CD-ROM drive or the floppy disk drive in the docking
station. By using the drive bays in both the computer and the docking
station, you can use the CD-ROM drive and the floppy disk drive at the
same time.
^ Turn off the computer before inserting or removing the drive.
To remove the drive
There is an Eject lever on the bottom of the drive. Slide the lever in the
direction of the arrow, and then pull the drive out of the bay. Insert
another drive or the weight saver into the drive bay. See "Using the
Weight Saver" on page 42. Do not leave the drive bay empty.
50
Page 56

Connecting the Docking Station
To remove your computer from the docking station when the power is on
1 On the Start menu, select Eject. Alternatively, press Fn+F9.
The IN USE indicator turns off. If you press Fn+F9, fhe compufer beeps
once.
^ Do not remove the computer before the IN USE indicator light turns off. Removing
the computer before the light turns off may cause malfunction.
2 Slide the docking station lever forward into the release position to
disengage the computer from the docking station.
3 Lift the computer away from the docking station.
Close the docking station port cover on the back of your computer.
51
Page 57

Connecting Peripheral Devices
To remove your computer from the docking station when the power is off
1 Turn off your computer and the connected peripherals.
2 Slide the docking lever forward into the release position to disengage
the computer from the docking station.
3 Lift the computer away from the docking station.
4 Close the docking station port cover on the back of your computer.
^ If the docking station lever does not move, insert a sharp, pointed object into the manual
eject hole on the rear of the docking station.
52
Page 58

Connecting a Printer
Connecting a Printer
You can connect a Windows 95-compatible printer to your computer to
print documents.
To connect a printer
□ Use the 0/ symbol to locate the FDD/Printer connector. Plug the
printer cable (supplied with the printer) into this port on the
computer.
See the manual that came with your printer for more information on installation and use.
Before using the printer, you may need to change the FDD/Printer setting in the Sony
Notebook Setup software. See “Displaying the Sony Notebook Setup Screen" on page 101.
53
Page 59

Connecting Peripheral Devices
Connecting an External Display
You can connect an external display to your notebook computer. For
example, you can use the computer with a:
□ Computer display (monitor) (page 54)
□ Multimedia computer display (page 55)
□ Projector (page 56)
□ TV (page 57)
To connect a computer display
□ Use the O symbol on the back of the computer to locate the Monitor
connector. Plug the display cable into this connector on the back of
the computer.
□ If necessary, plug one end of fhe display power cord into the display,
and the other end into an AC outlet.
^ See the manual that came with your computer display for more information on installation
and use.
54
Page 60

Connecting an External Display
To connect a multimedia computer display
You can connect the notebook computer to a multimedia computer
display that includes built-in speakers and a microphone.
1
Use the O symbol to locate the Monitor connector. Plug the display
cable into this connector.
2
Use the 0 symbol to locate the Headphones connector. Plug the
speaker cable into this connector.
3
Use the V symbol to locate the Microphone connector. Plug the
microphone cable into this connector.
^ See the manual that came with your multimedia computer display for more information on
installation and use.
55
Page 61

Connecting Peripheral Devices
To connect a projector
You can use a projector as an external display, such as Sony's LCD
Projector.
See the manual that came with your projector for more information on installation and use.
56
Page 62

Connecting an External Display
To connect a TV
You can connect a TV that has audio and \ ideo connectors hy using
optional A/V connecting cables.
TV
Video
cable
^ See the manual that came with your TV for more information on installation and use.
57
Page 63

Connecting Peripheral Devices
To select a display
When you connect an external display to the monitor connector, you can
toggle the output among the Liquid Crystal Display (LCD), the external
monitor, or both devices. When you use the Video Out connector to send
the output to a TV, you can toggle between the LCD and the TV.
Use the following keys to select a display. See also "Selecting the Display
Mode" on page 109 for more information.
To Press Result
Switch to the Fn+F7 Toggles among the LCD, the external display
VGA monitor connected to the Monitor connector, and both
the LCD and external display.
Only LCD
—► LCD and external display
Only external display —
Select LCD Fn+F8 Toggles between the LCD and TV (the display
or TV connected to the Video Out connector).
58
Monitor connector
Video Out connector
Page 64

Using Your Notebook Computer
5 Press the Eject button to open the CD-ROM drive.
The CD Tray slides out.
6 Place the audio CD in the trav and close the tray bv gently pushing
the tray.
7 Press the ► Play button on the remote control.
Playback begins.
To stop playback, press the ■ Stop button and press the Eject button on
the CD-ROM drive. Then remove the audio CD.
^ See 'Controlling Power Management" on page 103 for more information about system
suspend mode.
To recover from system suspend mode, press any key on the keyboard.
Use only the supplied headphone remote control. You cannot operate this computer with
the remote control supplied with other models.
To remove an audio CD from the CD-ROM drive, remove the CD within one minute after
pressing the ■ Stop button on the remote control. If the CD tray does not open, press the
■ Stop button and try again.
32
Page 65

Using Your Notebook Computer
ISS.-'
Light
Num Lock
Caps Lock
Scroll
Lock
On
Turns on when the
number keys area in the
numeric kev'pati are
active.
Turns on when the letters
appear in uppercase as
you type.
The Shift key lowers the
case of typed letters when
Caps Lock is on.
Turns on when the screen
scrolls differently. (Exactly
how it scrolls depends on
the specific application. It
has no effect in many
applications.)
Off
Turns off when the
a 1 p ha n u m e n c c h a r a c t e rs
keys in the keypad area are
active.
Turns off when letters
appear in lower case as you
type (unless you hold down
the Shift key).
Turns off when information
moves across the display
normally.
20
Page 66

Connecting an External Mouse or Keyboard
Connecting an External Mouse or Keyboard
You can connect an external mouse or keyboard to your computer. To
connect both a mouse and a keyboard, use the docking station (see
"Connecting the Docking Station" on page 43). The Mouse/Keyboard
connector requires a PS/2-style plug or adapter.
To connect an external mouse or keyboard
□ Use the ^ /symbol to locate the Mouse / Keyboard connector.
Plug the keyboard cable or mouse cable into this connector with
the t mark facing up.
^ See "Using Your Notebook Computer" on page 5 for more information on using the
keyboard.
See the manual that came with your mouse or keyboard for more information on
installation and use.
Before you connect or disconnect the mouse or keyboard, turn off the computer.
To use a mouse connected to the Serial port, make sure the mouse is compatible with the
Serial port.
59
Page 67

Connecting Peripheral Devices
Connecting External Speakers
You can enhance the sound quality of your computer by connecting
external speakers.
^ Make sure your speakers are designed for computer use.
Turn down the volume of the speakers before you turn them on.
To connect external speakers
□ Use the 0 symbol to locate the Headphones connector. Plug the
speaker cable into this connector.
Speakers
^ See the manual that came with your speakers for more information on installation and use.
60
Page 68

Connecting an External Miaophone
Connecting an External Microphone
You can enhance the quality of sound input b\' using an external
microphone.
^ Make sure your microphone is designed for computer use.
To connect an external microphone
□ Use the \ to locate the Microphone connector. Plug the microphone
cable into this connector.
Microphone
^ See the manual that came with your microphone for more information on installation and
use.
61
Page 69

Connecting Peripheral Devices
Connecting a Digital Still Camera or Other Serial Device
You can connect other computer peripherals, such as Sony's Digital Still
camera, to the Serial connector on your computer.
To connect a digital still camera
□ Use the oa symbol to locate the Serial connector. Plug the connecting
cable into this port on the computer and into the Digital I/O
connector on the digital still camera.
^ Sony's Digital Still camera (DSC-F1) is pictured; your camera may need to be connected
differently.
See the manual that came with your digital camera or other serial device for more
information on installation and use.
You can connect the DSC-FI either to the Serial port or by using an infrared communication.
If you use a digital camera that has an infrared data communication system or other
infrared communication device, see "Using infrared Communication Devices" on page 36.
62
Page 70

Connecting a Digital Video Camera Recorder
Connecting a Digital Video Camera Recorder
You can connect a digital \ ideo camera recorder to the DV In/Out
connector on the docking station. See "Connecting the Docking Station"
on page 45.
To connect a digital video camera recorder
□ Plug the DV connecting cable into the DV In/Out connector on the
rear of the docking station and the DV In/Out connector on the
digital video camera recorder.
^ Sony's digital video camera recorder (DCR-PC7) is pictured; your digital video camera
recorder may need to be conneded differently.
See the manual that came with your digital video camera recorder for more information on
installation and use.
63
Page 71

Connecting Peripheral Devices
Connecting a Universal Serial Bus (USB) Device
You can connect a USB device to your computer.
To connect a USB device
□ Use the symbol to locate the USB connector. Plug the USB cable
into this port.
USB device
______
-
----------
^ USB ports are included to provide state-of-the-art technology. You may need to install
software (device drivers) supplied with your USB device before using the USB device.
To use your USB device, you must install the USB supplemental software using your Sony
Application Recovery utility.
See the manual that came with your USB device for more information on installation and
use.
k SL
(ion
64
Page 72

Using the Communication Center
The Communication Center is a complete, powerful, flexible, yet simpleto-use communications system.
You can use the Communication Center as a speakerphone and as a full-
featured answering machine with multiple mailboxes and optional
password protection.
The Phone Book allows you to speed dial frequently used numbers. You
can create recipient groups, which streamlines the process of sending
messages.
You can send and receive faxes, e-mail, and data files, and attach
documents to your faxes.
Other features include;
□ Voicemail
□ Pager notification
□ Message forwarding
Opening and Closing the Communication Center
To open the Communication Center
□ Click the Communication Center icon on the desktop.
If this is the first time you are using the Communication Center, the
Setup Wizard is displayed.
If you have used the Communication Center before, the Main screen is
displayed (see page 67 for details on the Main screen).
65
Page 73

Using the Communication Center
To close the Communication Center
1 Click the 0 button on the Main screen.
2 Click Yes to close the Communication Center.
Getting Started with
the Communication Center
The first time you start the Communication Center, the Setup Wizard is
displayed, and you are prompted to provide information that the
Communication Center needs to configure your system properly. To
reconfigure the Communication Center later, you can run the Setup
Wizard again.
To access the Setup Wizard
1 Click the MENU button on the Main screen and choose Configure.
2 Select Setup Wizard to open the Setup Wizard.
3 Follow the Wizard's instructions to change your settings as needed.
66
Page 74

m
Communication Center Main Screen
Communication Center Main Screen
You can access most of the Communication Center’s features from the
Main screen, including: placing and receiving calls, sending and
receiving faxes, checking your messages, and using your Phone Book.
Access other features-,
Control menu
Mailbox name
Access messages
Go online to
send/receive e-mail
Status
Open phone pad
Dial pad
Telephone options
Start Wleb browser Compose and send a fax
Help
Minimize
Close
Number of new
messages
Digital display
Volume control
Access Phone Book
Compose and send
e-mail
The dial pad allows you to quickly enter phone numbers. Click the DIAL
button to place the call. Information on the status of your call, along with
date and time, the name of the current mailbox, and the number of
messages, is displayed on the digital display.
Many features of the Communication Center are available in a variety of
ways. There are buttons on the Main screen that take you directly to your
messages, the Phone Book, quick fax, and a Web browser. The
Communication Center's main screen expands into a phone pad when
you click the left edge of the Main screen. By clicking on the title of the
expanded screen you can toggle through expanded screens.
67
Page 75

Using the Communication Center
The MENU button gives you access to other features, such as adding
mailboxes, recording and changing greetings, setting up special services
for vour callers, and customizing the Communication Center.
Getting Help
^ Although this manual includes instructions for the most commonly used features and
funaions of the Communication Center, you will find more detailed instructions on
advanced features by using the program's online help.
While using the Communication Center, you can access online help by:
U Pressing FI from the Main Screen or when viewing a dialog box.
□ Clicking the MENU button on the Main screen and selecting Help.
□ Clicking the LU button on the Main screen.
Using Mailboxes and Greetings
Mailboxes organize messages for each Communication Center user.
When you start the Communication Center, one mailbox is automatically
created for you. You can add other mailboxes at any time. Mailboxes
come with a pre-recorded greeting. You can record your own greeting or
choose one of the existing greetings.
When a caller calls into the Communication Center, the default mailbox
answers the call. Callers can then leave a message in this mailbox, or
transfer to another mailbox. You can set up the Communication Center to
answer all types of incoming calls, or to answer only fax or only data
calls.
68
Page 76

Communication Center Main Screen
Accessing Mailboxes
Ü Click the MENU button on the Main screen, choose Configure and
select Mailboxes.
MAILBOXES
101 Haiold Smith 0 Voice
"•I Harold Smith
102 JaiwSMth 0 Voice
JeneSiHth
0 Fax 0 Data
0 Fan 0 Data
DlinE )
Click the title to switch
among the screens for
Mailboxes. Messages,
Phone Book, and
Greetings.
The Mailboxes screen displays a list of all mailboxes, including fhe name
of each mailbox, ifs exfension number, and the number of new messages.
Before you can access mailbox messages, record greetings, or change
mailbox options for a mailbox, you need to select the mailbox. To select
the mailbox, click the mailbox from the list of mailboxes on this screen.
The selected mailbox is displayed on the Main screen above the new
message indicator.
Adding a Mailbox
You can add up to 50 mailboxes. If you have multiple mailboxes, you
must designate a default mailbox.
□ Click Add on the Mailboxes screen or
□ Click the DO button on the Mailboxes screen and select Add
The Mailbox Wizard is displayed to guide you through the process of
setting up the mailbox. Follow the Wizard's instructions to add a
mailbox.
69
Page 77

Using the Communication Center
Accessing Mailbox Options
You can customize mailbox options. For example, vou can change a
mailbox extension, assign or change passwords, specify a length and
number of messages. To customize your mailbox:
Ü Click the MENU button on the Main screen and select Options...
□ Click the DO button on the Mailboxes screen and select Options...
□ Right-click on the mailbox and select Options...
Mailbox Passwords
You can assign passwords to protect against unauthorized access to your
mailbox. Local passwords prevent access to your mailbox from your
compufer; remote passwords prevent access to your mailbox from a
remote telephone.
Keep the following in mind when working with passwords;
□ Remote passwords must be numeric and four-digits long. Remote
passwords cannot begin with a 0 (zero).
□ Local passwords can be any letters, symbols or numbers, and up to
eight characters long. Local passwords are case sensitive.
□ You can set different passwords for remote and local mailbox access.
□ Do not forget your local password. You will not be able to access the
mailbox from your computer if you forget its local password. If you
forget your local password, you must reinstall the Communication
Center using the Application Recovery CD (see "Using the System
and Application Recovery CD" on page 126). Be sure to select the
option "I want to save my old information, but clear all passwords."
This will preserve your messages.
□ If you forget your remote password, you can re-configure the
mailbox by running the Setup Wizard, and re-entering the remote
password.
70
Page 78

â
Communication Center Main Screen
Setting the Default Mailbox
If vou have more than one mailbox, vou must set one as the default
mailbox. The default mailbox is used to answer all incoming calls.
Incoming faxes and data messages are always sent to the default mailbox. The sender
cannot transfer them to another mailbox
The default mailbox is indicated by a yellow border around its icon on the
Mailboxes screen.
1 Click the MENU button on the Main screen, choose Configure and
select Mailboxes. The Mailboxes screen is displayed.
2 Select the mailbox you want to set as the default.
3 Click the DO button on the Mailboxes screen and select Set Default.
4 Click OK. The selected mailbox is set as the default.
You can right-click on the mailbox that you want to set as the default and select Set Default
from the pop-up menu.
To delete a mailbox
When you delete a mailbox, all messages and information in the mailbox
are also deleted.
^ You cannot delete the default mailbox. If you want to delete a mailbox that is the default
mailbox, first set a different mailbox as the default.
1 Click the MENU button on the Main screen, choose Configure and
select Mailboxes. The Mailboxes screen is displayed.
2 Select the mailbox you want to delete.
3 If the mailbox has a local password, enter the password.
4 Click the DELETE button on the Mailboxes screen.
5 Click Yes to delete the mailbox.
71
Page 79

Using the Communication Center
Mailbox Greetings
A mailbox greeting plavs for vour callers when the Commnnication
Center answers a call. Your mailbox contains several pre-recorded
greetings that tell callers how to leave a message, transfer to other
mailboxes, and access other services. Each new mailbox you create
contains a pre-recorded greeting that tells callers how to leave a message
for this mailbox. You can listen to the pre-recorded greetings and decide
if you want to use one of them as your default greeting or record your
own greeting.
To access greetings
1 Click the MENU button on the Main screen, choose Configure and
select Greetings.
2 Select the Greetings tab.
.............
_.j ;
DEim j
PO J
' '
► PW Y ; ■ Stop } UC J
The Greeting screen displays a list of all the greetings available for this
mailbox, along with the information about this recording. The yellow
border around the greeting icon indicates the default greeting for this
mailbox.
72
Page 80

Communication Center Main Screen
To play a greeting
-I Click the PLAY button on the Greetings screen. The selected greeting
is played.
To record a greeting
Your greeting can instruct callers to press the pound key (#) after
recording their message. This allows them to hear more options, such as
marking the message "urgent."
1 On the Greetings screen, click the REC button to start recording and
begin speaking into the computer's microphone.
2 When you finish speaking, click the STOP button to end the
recording.
3 The greeting is recorded and added to the list of greetings for the
mailbox.
If you want the new greeting to play for your callers, you can make it
the default greeting for the mailbox.
To set the default greeting
You must set a default greeting for every mailbox that has more than one
greeting.
When the Communication Center answers an incoming call, the default
mailbox's default greeting is played. If a caller transfers to another
mailbox, that mailbox's default greeting is played.
The default greeting is indicated by a yellow border around its icon on
the Greetings screen.
□ Select a greeting, click the DO button on the Greetings screen, and
select Set Default.
The selected greeting is set as the default for the current mailbox.
73
Page 81

Using the Communication Center
To delete a greeting
You cannot delete the default greeting. If vou want to delete a greeting
that is the default greeting, first set a different greeting as the default.
1 Select the greeting you want to delete.
2 Click the DELETE button on the Greetings screen or click the DO
button on the Greetings screen and select Delete.
The selected greeting is deleted.
Accessing Mailboxes Remotely
You can retrieve your messages, record greetings, and access mailbox
contents and other services from any touch tone telephone using the
Communication Center remote access feature. You can access mailboxes
remotely by pressing keys on the remote telephone (DTMF tones).
To access the default mailbox
1 Dial the telephone number of your Communication Center system.
The default mailbox's greeting answers the call.
2 While the default greeting is playing:
□ If the mailbox has a remote password, press the star (*) key, enter
the password, then the pound key (#).
or
□ If the mailbox does not have a remote password, press the star
key (*) followed by the pound key (#).
The Main Menu options are played.
3 Follow the Main Menu instructions to listen to messages or to access
other services.
74
Page 82

Communication Center Main Screen
To access a different mailbox
1 Dial the telephone number ot your Communication Center system.
The default mailbox's greeting answers the call.
2 While the default greeting is playing, dial that mailbox extension
number.
The mailbox greeting starts playing.
3 While the mailbox greeting is playing:
□ If the mailbox has a remote password, press the star (*■ ) key, enter
the password, then the pound key (#).
or
□ If the mailbox does not have a remote password, press the star
key (*) followed by the pound key (#).
The Main Menu options are played.
Follow the Main Menu instructions to listen to messages or to access
other services.
75
Page 83

Using the Communication Center
Using Messages
Incoming e-mail messages appear simultaneously in all mailboxes. An
incoming fax or data file is placed in the default mailbox. Faxes, e-mail,
and data files fhat vou send or schedule to be sent are also stored as
messages in your mailbox. This makes it easy for you to manage all
communications activities from one place.
K -
Accessing Messages
If you have multiple mailboxes, you first need to select the mailbox in
which you want to access messages.
1 Click the MENU button on the Main screen, point to Mailboxes, and
select the mailbox in which you want to access messages.
2 Click the MESSAGE button on the Main screen.
The Message screen is displayed.
!P:
Nsw j
MESSAGE
Qld [ Outbox \ Sent [ C abin et
ll^
11
OO ) ► PLAY ■ ST OP
76
1
R£C ; DlLHt j
Page 84

Using Messages
Message Folders
In Message folders, each message type (audio, fax, e-mail, and data) is
represented by an icon. Message folders are organized as follows:
J New messages and e-mail messages marked "unread" are stored in
the New folder.
□ Messages you have played or saved, and e-mail messages marked
"read," are moved to the Old folder.
□ Messages scheduled for future transmission are stored in the Outbox
folder (with a Pending status) until they are sent.
□ Successfully transmitted and canceled messages are stored in the Sent
folder.
□ Unsuccessfully transmitted messages are stored in the Outbox folder
(with a Pending status). The Communication Center attempts to send
the message up to a maximum number of tries you have specified. If,
after the maximum number of attempts, transmission is still
unsuccessful, these messages are marked as unsuccessful, and moved
to the Sent folder.
□ You can move fax, data and voice messages you want to save for
future reference to the Cabinet folder.
77
Page 85

Using the Communication Center
To play or view messages
The digital display on the Main screen displa\ s the number ot new
messages in the current mailbox. After you pla\’ each new message, the
indicator is updated, and the messages are mo\ ed to the Old folder.
1 Click the MESSAGE button on the Main screen.
The Messages screen is displayed.
2 Select a message you want to play or view from any folder.
3 Click the Play button on the Messages screen or click the DO button
on the Messages screen and select Open.
^ If you dick the Play button for an e-mail message, you will hear the message instead of
viewing it.
After you play each new message, it moves to the Old folder. If you are
sharing a mailbox and play a message intended for another person, you
can copy the message from the Old folder back into the New folder.
Simply right-click on the message, select Copy, point to Mailbox, and
select the mailbox.
Managing Messages
You can copy fax, voice, and data messages, view detailed information on
a message, delete a message from the mailbox, and forward it to another
mailbox.
1 Click the MESSAGE button on the Main screen.
The Messages screen is displayed.
2 Select a message and click the DO button on the Messages screen.
3 Choose a command from the selection.
^ You can right-click on a message to see a list of available commands.
78
Page 86

Using Messages
Sending Faxes
You can use the Communication Center to send faxes in a number of
different ways:
□ Quick Fax — available directly on the Main screen, for sending a
short one page fax. You can also attach a document to a fax.
U Fax from any Windows application — by using an application's Print
command.
Fax by "drag and drop" — for faxing any file that supports OLE or
□
one of the Communication Center's messages, simply drag the file
from the desktop to the Communication Center interface.
When you send a fax, select the Communication Center Fax printer driver
as the current printer. By changing the properties of the Communication
Center Fax printer, you can change the characteristics of how the fax is
transmitted.
Before sending out your first fax, you may want to check the different
options available in the Fax options dialog. (Click the MENU button on
the Main screen and select Options, then select the Fax tab.)
To configure Communication Center fax
1 Click Start on the Windows 95 taskbar.
2 Point to Settings, then click Printers.
The Printers screen is displayed.
3 Select Communication Center Fax. If it is not the default printer, you
may want to select Set as Default from the File menu.
4 Select Properties from the File menu.
The Communication Center Fax Properties dialog is displayed.
79
Page 87

Using the Communication Center
You can modih’ tlie following optioiis:
Option
Specify how faxes are
positioned on the page
Change paper size
Specify fhe resolufion at
which faxes are sent
Improve display of gray
shading in graphics
Specify how dark to
print graphics
Restore the original
printer settings
Description
Change Portrait or Landscape orientation on the
Paper tab.
Change Paper size on the Paper tab
The following paper sizes are supported:
□ Letter (8.5"xll'') (default)
□ Legal (8.5"xl4")
□ A4 (210x297 mm)
Change resolution on the Graphics tab.
□ High sends the highest quality image.
□ Low sends a lower quality image and reduces
transmission time.
Change dithering on the Graphics tab.
□ Use None if you want no dithering.
□ Use Coarse if your resolution setting is 300 dpi
or higher.
□ Use Fine if your resolution setting is 200 dpi or
lower.
□ Use Line art if your graphics include well-
defined borders between black, white and gray
shadings.
□ Use Error diffusion if your graphics do not
have sharp, well-defined edges.
^ The best settings for printing graphics in the
Communication Center faxes is Fine dithering with
Current intensity set at 190.
Change Intensity on the Graphics tab.
Click Restore Defaults on the Device Options tab
To send a Quick Fax
The easiest way to send a fax is Quick Fax — a short, one page message.
You can attach a document to a Quick Fax.
1 Click the QUICK FAX button on the Main screen.
The Send Fax dialog is displayed.
80
Page 88

J"
Using Messages
2 Fill in the recipient information and type vour message in the Note
field. This note will appear on the cover page of your fax.
For more information about the Send Fax dialog, see "Filling in the
Send Fax Dialog" on page 82.
3 Click Send Fax Now.
The Communication Center begins sending the fax. To stop
transmission, click Cancel.
To send a fax from another application
You can fax a document from any Windows application that supports the
Print command (e.g., your word processing or spreadsheet program).
1 Open the Windows program and create or open the document you
want to fax.
2 Select Print or the equivalent command from the program's File
menu.
The program's Print dialog is displayed.
3 Select Communication Center Fax as the current printer.
4 Click OK or the program's equivalent command to print the
document.
The Send Fax dialog is displayed.
5 Fill in the Send Fax dialog.
For more information, see "Filling in the Send Fax Dialog" on
page 82.
6 Click Send Fax Now.
The Communication Center begins sending the fax. To stop transmission,
click Cancel.
^ Faxes cannot exceed 100 pages.
81
Page 89

Using the Communication Center
Filling in the Send Fax Dialog
The Send Fax dialog appears when vou send a fax, either from the
Communication Center or from another program.
Reapienk'
FntName
i
--------
Counliy
Code Code
FoK
Number
Ehone«..,
¿dd ReciDTH*.
P,e!e»e ReciDient
Save Pii-.-t*
Note ~
¿end Fax Now
y»**... 1 Pi^lo.Fle I flptkm- 1
SchedrieEaK... |
lo Fie Cabinet j
Covet Page... |
C«Kel
To send a fax, you must specify at least the recipient's fax number.
The following fields and buttons are available on the Send Fax dialog;
Option
Use Cover Page
Description
Lets you use a cover page with space for a note up
to 23 lines long. Quick Faxes always use a cover
page.
High Resolution
When the light is on, indicates that a fax will be
sent at high resolution.
First Name, Last
Name, Country Code,
Recipient information. To send a fax, you must
specify at least the recipient's fax number.
Area Code,
Fax Number
Documents
Lets you attach documents to the fax. A green light
indicates that the fax contains attachments (click
the button to see the list of attached documents).
82
Page 90

Using Messages
Option
Phoiu'S
Add Recipient
Delete Recipient
Save Phone
Note
Send Fax Now
View
Print to File
Options
Schedule Fax
To File Cabinet
Cover Page
Cancel
Description
Lets you use vour Phone Book to fill in the recipient
information. Make sure a fax number is entered in
the Fax field. You may need to edit a recipient's
ontp,’ in your pihone hook to add a fax number (see
page 97).
Lefs you address the fax to several people. To add
multiple recipients, fill in the recipient information
and click Add Recipient, then repeat for each
recipient.
^ You can create Groups in your Phone Book to send faxes
to people who frequently receive the same information.
See "Using the Group Feature" on page 84.
Deletes the selected recipient from the list.
Adds recipient information to your Phone Book.
Type the information to put on the fax cover page
or the Quick Fax message. The note cannot exceed
23 lines.
Sends the fax.
Opens the Fax Viewer displaying the fax.
Copies the fax to a location you specify in .tif file
format.
Lets you change fax options.
Lets you schedule the fax for future transmission.
Copies the fax to the Cabinet folder of the current
mailbox.
Lets you select and view fax cover pages.
Closes the Send Fax dialog without sending the fax.
83
Page 91

Using the Communication Center
Using the Group Feature
To create or change a group;
1 Click the PHONE BOOK button on the Main screen to open the
Phone Book.
2 Right-click the name of the person you would like to acid to the
group, and select Edit from the pop-up menu that appears.
3 Make sure that a fax number has been entered in the Fax field.
4 Click the GROUPS button.
5 If you are creating a new group, click the NEW GROUP button and
enter the name of the group.
The Group Membership field lists all the groups to which this person
belongs. The Available Groups field lists all the groups to which this
person does not belong.
6 To add this person to a group, select the group from the Available
Groups list and click the ADD button.
To remove this person from a group, select the group from the Group
Membership list and click the DELETE button.
To send a fax to the group:
1 Click the QUICK FAX button.
2 Click the PHONES button.
3 Click the SELECT button.
4 Click the Group Membership drop-down box and select the group to
which you would like to send the fax.
5 Click OK.
6 Click All in List.
84
Page 92

Using Your Notebook Computer
Using PC Cards
Your computer includes two PC card slots. PC cards allow you to connect
portable external devices, sucli as anotlrer hard disk drive, additional
memory, or to connect a network,
^ The PC card slots can accommodate (at the same time) two Type 1, two Type 11, or one Type
III PC card. These slots are compatible with Card Bus. The lower slot is compatible with ZV
(Zoomed Video) port.
To insert a PC card
Use the lower slot for Type III PC cards.
^ You do not need to shut down the computer before inserting or removing a PC card.
1 Pull the PC card release button up away from the computer and push
it in.
34
Page 93

Using the Communication Center
If voii did not select to use the Conimunicatiiin Center to send and
receive e-mail during set up, you need to enable e-mail. Select Configure
from the main menu and run the Setup Wizard. The Setup Wizard guides
you through the steps of setting up e-mail in the Communication Center
and correctly configures Microsoft^ Exchange/Windows Messaging.
To enable e-mail
1 Click fhe MENU buffon on the Main screen and select Options
The Options dialog is displayed.
Select the E-mail tab.
2
The E-mail options dialog is displayed.
3
Change the option from "Do not log on to Microsoft
Exchange/Windows Messaging."
You are prompted to restart the Communication Center for your
changes to take effect.
Click Yes.
The Communication Center is restarted with e-mail enabled.
86
Page 94

Using Messages
To send a data file
You can use drag-and-drop to send a file or a Communication Center
message to any computer that is capable of receiving a data file, such as
one running the Communication Center, a terminal program, or a BBS.
You can drag-and-drop directly from any computer application that
supports object linking and embedding (OLE), the Windows Explorer,
the desktop, or any Communication Center folder.
^ Before sending data files, make sure that the computer to which you are sending the file is
running and is ready to receive data.
1
Drag the icon of the file or the Communication Center message you
want to send onto the Main screen.
The Send File dialog is displayed.
I Se nd F ile
nieNam e ’
^ВИ!1ЕШ9зП11Э1№
Sen dM£aK
' * V r>Se((;>d«b 4la ,| |
S^n daiE -ma ii J С «хй 1 I 1
. -
...
13131
2 Click Send as Data.
The Send Data dialog is displayed.
3 Fill in the Send Data dialog.
For more information, see "Filling in the Send Data Dialog" on
page 88.
4 Click Send Data Now.
The Communication Center begins sending the data file. To cancel
transmission, click the HANGUP button on the Main screen.
87
Page 95

a
Using Message
Sending E-mail
If you used the Communication Center Setup Wizard to configure the
Communication Center for e-mail, the Send command connects you to
vour service provider. Incoming e-mail is then delivered to the New
folder, and oufgoing mail is delivered from fhe Oufbox.
If you do not want the Communication Center to connect automatically
to your seryice proyider, clear the "Deliver outgoing messages
immediately" checkbox on the E-mail tab of the Options dialog. Outgoing
mail is stored in the Outbox until you are ready to send it.
To send an e-mail message
1 Click the CREATE MAIL button on the Main screen.
The New Message dialog is displayed.
2 Address and compose your message.
3 Click the button with the icon of the envelope.
If fhe Communication Center is not set up to deliver outgoing messages
immediately, the message is moved to the Outbox folder. To send e-mail
messages from the Outbox folder, click the CHECK MAIL button on the
Main screen.
85
Page 96

Using the Communication Center
i:.
Filling in the Send Data Dialog
The Send Data dialog appears when you send or resend data.
To send data, you must specify at least the recipient's telephone data
number. The following fields and buttons are available on the Send Data
dialog.
Option
First Name, Last
Name, Country
Code, Area Code,
Data Number
Phones
Save Phone
Add Recipient
Delete Recipient
Send Data Now
Schedule Data
Options
Cancel
Description
Recipient information.
Lets you use your Phone Book to fill in the recipient
information. Make sure a Data Number is entered in the
Data field. You may need to edit a recipient's entry in
your phone book to add a data number (see page 97).
Adds recipient information to your Phone Book.
Lets you address the data file to several people. To add
multiple recipients, fill in the recipient information and
click Add Recipient, then repeat for each recipient.
^ You can create Groups in your Phone Book to send data files to
people who frequently receive the same information. See "Using
the Group Feature" on page 84.
Deletes the selected recipient from the list.
Sends the data file.
Lets you schedule future data transmission.
Lets you change data options.
Closes the Send Data dialog without sending the data
file.
88
Page 97

Using Messages
To record a message
1 Click the MESSAGE button on tlie Main screen.
The Messages screen is displayed. You can record a message in the
New tolder or in the Cabinet folder.
2 Click the REC button on the Messages screen to start recording the
message, and begin speaking.
3 Click the STOP button on the Messages screen to finish recording.
Receiving Faxes
When the Communication Center is on, it receives faxes automatically.
The Fax Operation screen is displayed when an incoming call is from a
fax machine. You can also receive faxes manually when you are online.
New faxes are stored in the New folder of the default mailbox. Faxes you
have viewed or saved are moved to the Old folder.
If you are using the Communication Center for e-mail and have Microsoft
Fax installed as a service, Microsoft Fax is automatically launched with
the Communication Center. To ensure that your incoming fax calls are
answered correctly, do one of the following:
□ Remove Microsoft Fax from your Microsoft Exchange/Windows
Messaging profile.
□ Disable answering on Microsoft Fax.
□ Specify each service to answer after a different number of rings (for
example, set the Communication Center to answer after 2 rings, and
Microsoft Fax to answer after 4 rings).
To receive faxes manually
□ While you are online, click the MENU button on the Main screen,
choose Tools and select Manual Fax Receive.
89
Page 98

Using the Communication Center
To forward faxes
You can forward incoming faxes to another fax number automatically.
Select Options from the main menu and choose the Forwarding tab. Click
the FAX FORWARDING button. To enable forwarding, change the Never
Forward option to Forwarci All. Then enter the fax number to which faxes
should be forwarded and click OK. To disable fax forwarding, change the
Forward All option back to Never Forward.
To print a fax
You can print the current fax or an existing fax using Fax Viewer.
1 Click fhe MESSAGE bufton on fhe Main screen, select the fax you
want to print from any folder and click fhe PLAY bufton or click
View on the Send Fax dialog.
The Fax Viewer is displayed.
2 Click the PRINT button (or select Print from the File menu).
^ Make sure that the Communication Center Fax is not selected as the current printer.
Printing to the Communication Center Fax will send the fax.
3 Click OK.
The fax is prinfed on fhe selected printer.
^ If you have difficulty printing a fax, right-click on the fax and select Copy to File. Double
click on the copy of the file. The Wang Imaging application opens. Select Print from the File
menu.
To receive e-mail
If you used the Communication Center Setup Wizard to configure the
Communication Center for e-mail, the Communication Center receives e-
mail when you click the CHECK MAIL button on the main screen. If not,
run the Communication Center Setup Wizard to enable e-mail.
90
Page 99

Using Messages
To receive data files
When the Communication Center is on, it receives data files
automatically. New data messages are stored in the New folder of fhe
default mailbox. Data messages you have \ iewed or saveef are moved to
the Old folder.
To force the Communication Center to answer in data mode, select the
Answ'er as data only option in the Answering tab of the Options menu.
Note that with this setting, the Communication Center does not receive
voice messages or faxes. To enable voice and fax reception again, change
this setting back Complete Answering Machine.
If someone wants to send a data file to the Communication Center from a terminal
program, they must add ”09" to the end of the number they dial. The "09" tells the
Communication Center to switch into data mode. If the Communication Center is not
answering data calls correctly, the sending party should try adjusting the number of
commas before the "09" so that the "09" will be transmitted while the Communication
Center is playing the greeting. Each comma normally produces a two-second pause in
terminal programs. If the sender is also running the Communication Center program, it is
not necessary to add "09“ because the Communication Center sends "09" automatically.
However, the sender may want to change the Delay After Dialing setting in Options/Data to
adjust the length of the pause before the "09" is transmitted.
91
Page 100

Using the Communication Center
Placing and Receiving Phone Calls
To place a phone call
1 Dial or select the number vou want to call. You can:
□ Dial the number using the Communication Center's dial pad or
the numeric keypad on your keyboard, then click the DIAL
button.
□ Click the PHONE BOOK button, select the Phone Book tab, then
double-click the name of the person you want to call.
U Click the REDIAL button on the Main screen to redial the last
number you called.
U Previously placed calls are logged in the Call Log. To call any of
these numbers again, select an entry from the Log tab of the
Phone Book, then click the DIAL button.
^ If you make a mistake while dialing, click the CLEAR button on the Main screen to
delete one digit, or double-click to delete the entire number.
2 To end the conversation, click the HANGUP button on the
Communication Center's handset.
To answer a phone
If you want to be able to answer incoming calls while working in another
program, the "Maximize on Ring" checkbox on the Interface tab of the
Options dialog should be checked. "Maximize on Ring" is the default
option.
□ When you have an incoming call, the SPEAKERPHONE button on
the Main screen changes to the ANSWER button. Click this button to
answer the call.
^ If you are running another data terminal application that is answering incoming calls
instead of the Communication Center, change the settings in the data terminal application
so that it will not answer incoming calls, or set it to answer after a number of rings that is
greater than the number of rings that the Communication Center is set to answer calls. If
Microsoft Fax is answering incoming calls instead of the Communication Center, see
"Receiving Faxes" on page 89 for troubleshooting tips.
92
 Loading...