


Sony
Notebook Computer
User Guide
PCG-705/707
\/\

Notice to Users
© 1997 Sony Electronics Inc. All rights
reserved. This manual and the software
described herein, in whole or in part, may
not be reproduced, translated, or reduced
to any machine-readable form without
prior written approval.
SONY ELECTRONICS INC. PROVIDES
NO WARRANTY WITH REGARD TO
THIS MANUAL, THE SOFTWARE, OR
OTHER INFORMATION CONTAINED
HEREIN AND HEREBY EXPRESSLY
DISCLAIMS ANY IMPLIED
WARRANTIES OR MERCHANTABILITY
OR FITNESS FOR ANY PARTICULAR
PURPOSE WITH REGARD TO THIS
MANUAL, THE SOFTWARE, OR SUCH
OTHER INFORMATION. IN NO EVENT
SHALL SONY ELECTRONICS INC. BE
LIABLE FOR ANY INCIDENTAL,
CONSEQUENTIAL, OR SPECIAL
DAMAGES, WHETHER BASED ON
TORT, CONTRACT, OR OTHERWISE,
ARISING OUT OF OR IN CONNECTION
WITH THIS MANUAL, THE SOFTWARE,
OR OTHER INFORMATION
CONTAINED HEREIN OR THE USE
THEREOF.
Sony Electronics Inc. reserves the right to
make any modification to this manual or
the Information contained herein at any
time without notice. The software
described herein is governed by the terms
of a separate user license agreement.
Sony and VAIO are trademarks of Sony
Corporation. Windows and the Windows
95 logo are registered trademarks of
Microsoft Corporation. Intel, MMX, and
Pentium are trademarks of Intel
Corporation.
All other trademarks are trademarks of
their respective owners.
Safety Information
Owner's Record
The model number and serial number are
located on the back of your Sony PC.
Record the serial number in the space
provided here. Refer to the model and
serial number when you call your Sony
Service Center.
Model Number: PCG-705/707
Serial Number:
Q To prevent Are or shock hazard, do
not expose your Sony PC to rain or
moisture.
□ Never install modem or telephone
wiring during a lightning storm.
Q Never install telephone jacks in wet
locations unless the jack is specifically
designed for wet locations
Q Never touch uninsulated telephone
wire or terminals unless the telephone
line has been disconnected at the
network interface.
□ Use caution when installing or
modifying telephone lines.
Q Avoid using the modem during an
electrical storm.
_______________________
Q Do not use the modem or a telephone
to report a gas leak in the vicinity of
the leak.
The use of optical instruments
with this product will increase
eye hazard.

Regulatory Information
FCC Part 68
Declaration of Conformity
Trade Name; SONY
Model No: PCG-705/707
Responsible Party:
Sony Electronics Inc.
Address:
1 Sony Drive
Park Ridge, NJ 07656
Telephone No.: 201-930-6970
Contact: Louis Mecseri
This device complies with Part 15 of
the FCC rules. Operation is subject
to the following two conditions: (1)
This device may not cause harmful
interference, and (2) this device
must accept any interference that
may cause undesired operation.
You are cautioned that any changes or
modifications not expressly approved in
this manual could void your authority to
operate this equipment.
Only peripherals (computer Input/output
devices, terminals, printers, etc.) that
comply with FCC Class B limits may be
attached to this computer product.
Operation with non-compllant peripherals
is likely to result in interference to radio
and television reception.
All cables used to connect peripherals must
be shielded and grounded. Operation with
cables, connected to peripherals, that are
not shielded and grounded, may result in
interference to radio and television
reception.
This equipment complies with Part 68 of
the FCC rules. On the bottom of this
equipment is a label that contains among
other Information, the FCC equivalence
number (REN) for this equipment. If
requested, this information must be
provided to the telephone company.
All applicable registration jack USCOs, any
facility interface codes and service order
codes associated with the services the
equipment is to be connected.
The REN is used to determine the quantity
of devices which may be connected to the
telephone line. Excessive REN's on the
telephone line may result in the devices not
ringing in response to an incoming call. In
most, but not all areas, the sum of the
REN's should not exceed five (5.0). To be
certain of the number of devices that may
be connected to the line, as determined by
the total REN’s, contact the telephone
company to determine the maximum REN
for the calling area.
If the terminal equipment (Notebook
Computer PCG-705/707) causes harm to
the telephone network, the telephone
company will notify you in advance that
temporary discontinuance of service may
be required. But if advance notice isn’t
practical, the telephone company will
notify the customer as soon as possible.
Also, you will be advised of your right to
file a complaint with the FCC if you believe
it is necessary
The telephone company may make
changes in its facilities, equipment,
operations or procedures that could affect
the operations of the equipment. If this
happens, the telephone company will
provide advance notice in order for you to
make the necessary modifications in order
to maintain uninterrupted service.

If trouble is experienced with this
equipment (Notebook Computer PCG705/707), please contact 1-888-4SONYPC,
or write to the Sony Customer Information
Center, One Sony Drive, Park Ridge, NJ
07656 for repair and (or) warranty
information. If the trouble is causing harm
to the telephone network, the telephone
company may request you remove the
equipment from the network until the
problem is resolved.
Repair of this equipment should be made
only by a Sony Service Center or Sony
authorized agent. For the Sony Service
Center nearest you, call 1-800-222-SONY
(1-800-222-7669),
This equipment cannot be used on public
coin service provided by the telephone
company. Connection to Party Line Service
is subject to state tariffs. (Contact the state
utility service commission, public service
commission or corporation commission
for information.).
This equipment is compatible with certain
hearing aids.
Telephone Consumer Protection Act of 1991
The Telephone Consumer Protection Act of
1991 makes it unlawful for any person to
use a computer or other electronic device
to send any message via a telephone
facsimile machine unless such message
clearly contciins, in a margin at the top or
bottom of each transmitted page or on the
first page of the transmission, the date and
time it is sent and an identification of the
business, other entity, or individual
sending the message, and the telephone
number of the sending machine or such
business, other entity, or individual.
In order to program this information into
your facsimile, see your fax software
documentation.
DISPOSAL OF LITHIUM ION
BATTERY
You can return your unwanted lithium ion
batteries to your nearest Sony Service
Center or Factory Service Center.
^ In some areas the disposal of lithium
ion batteries in household or business
trash may be prohibited.
For the Sony Service Center nearest you
call 1-800-222-SONY (United States only).
! Do not handle damaged or
leaking lithium ion batteries
! Danger of explosion if battery is
incorrectly replaced. Replace
only with the same or equivalent
type recommended by the
manufacturer. Discard used
batteries according to the
manufacturer's instructions.
The battery pack used in this
device may present a fire or
chemical burn hazard if
mistreated. Do not disassemble,
heatabove212°(100‘C)or
incinerate.
Dispose of used battery promptly.
Keep away from children.

Contents
Welcome.................................................................................................1
Setting Up Your Notebook Computer
Unpacking Your Computer.......................................................... 3
Locating the Controls and Connectors..........................................4
Connecting a Phone Line................................................................8
Connecting a Power Source............................................................9
Connecting Additional Peripherals..............................................13
Using Your Notebook Computer
Starting Your Computer
Shutting Down Your Computer................................................. 36
Registering Windows® 95............................................................37
Registering Your Computer....................................................... 38
.Adjusting the Brightness...............................................................39
Adjusting the Volume
Using the Touchpad
Using the Floppy Disk Drive.........................................................42
Using the CD-ROM Drive
Using the Headphones with Remote Control
Using PC Cards.............................................................................51
Using Infrared Communication Devices......................................53
Using a Second Battery Pack........................................................55
Using the Weight Saver.................................................................57
.............................................................
...................................................................
......................................................................40
............................................................
...........................
35
39
45
48

Using the Communication Center
Opening and Closing the Communication Center
.....................
Getting Started with the Communication Center.......................60
Communication Center Main Screen
..........................................
Using Mailboxes and Greetings ...................................................62
Using Messages
Placing and Receiving Phone Calls
Using the Phone Book
Using the Music/Movie Player
Music/Movie Player Functions
Customizing Your Notebook Computer
Displaying the Sony Notebook Setup Screen
Controlling Power Management
Displaying Battery Information
............................................................................
..............................................
.................................................................
...................................................
..............................
..................................................
.............................................
Selecting the Display Mode....................................................... 103
Getting Help
About Sony’s Support Options
........................................
Calling SOS.............................................................................. 109
Troubleshooting........................................................................ .Ill
Using the System and Application Recovery CD......................115
59
61
70
86
89
94
95
97
100
.........107
Other Information
Power Saving Modes
...................................................................
Notes on Use.................................................................................125
Ergonomic Considerations
.........................................................
Using the Keyboard................................................................... 132
Upgrading Your Notebook Computer
Adding Memory...........................................................................139
VI
123
130

Contents
Index.
143
VII

vili

Welcome
Congratulations on your purchase of the Sony Notebook Computer. Sony
has combined leading-edge technology in audio, video, computing, and
communications to provide you with state-of-the-art personal
computing.
Here are just some of the features your Sony Notebook Computer has to
offer.
□ Exceptional performance: Your PC includes a fast Intel® Pentium®
processor with MMX technology, a 14x (maximum performance)
CD-ROM drive, and a 33.6 kbps full-duplex modem.
□ Portability: The rechargeable battery pack provides two to three
hours of use without AC power.
□ Sony audio and video quality: High-quality, “Sony Tuned” MPEGl
video, which supports full-screen display (12.1-inch Active Matrix
LCD screen) and enables you to take advantage of today’s advanced
multimedia applications, games, and entertainment software.
□ Multimedia features: Enjoy the stereo speakers or use the supplied
headphones to listen to audio and video CDs. The headphones
include a remote control. You can even listen to audio CDs when
your computer is in suspend (sleep) mode.
□ Windows® 95: Your system includes the latest operating system
from Microsoft.
□ Communications: Access popular online services, send e-mail,
browse the Internet, and use the built-in speakerphone, answering
machine, and fax features.
□ Excellent customer support: Click the SOS icon to access Sony Online
Support 24 hours a day, seven days a week. The SOS software
enables a support representative to talk to you on the phone, perform
remote diagnostics on your PC, and send you updates, all through a
single phone call.

Setting Up Your Notebook Computer
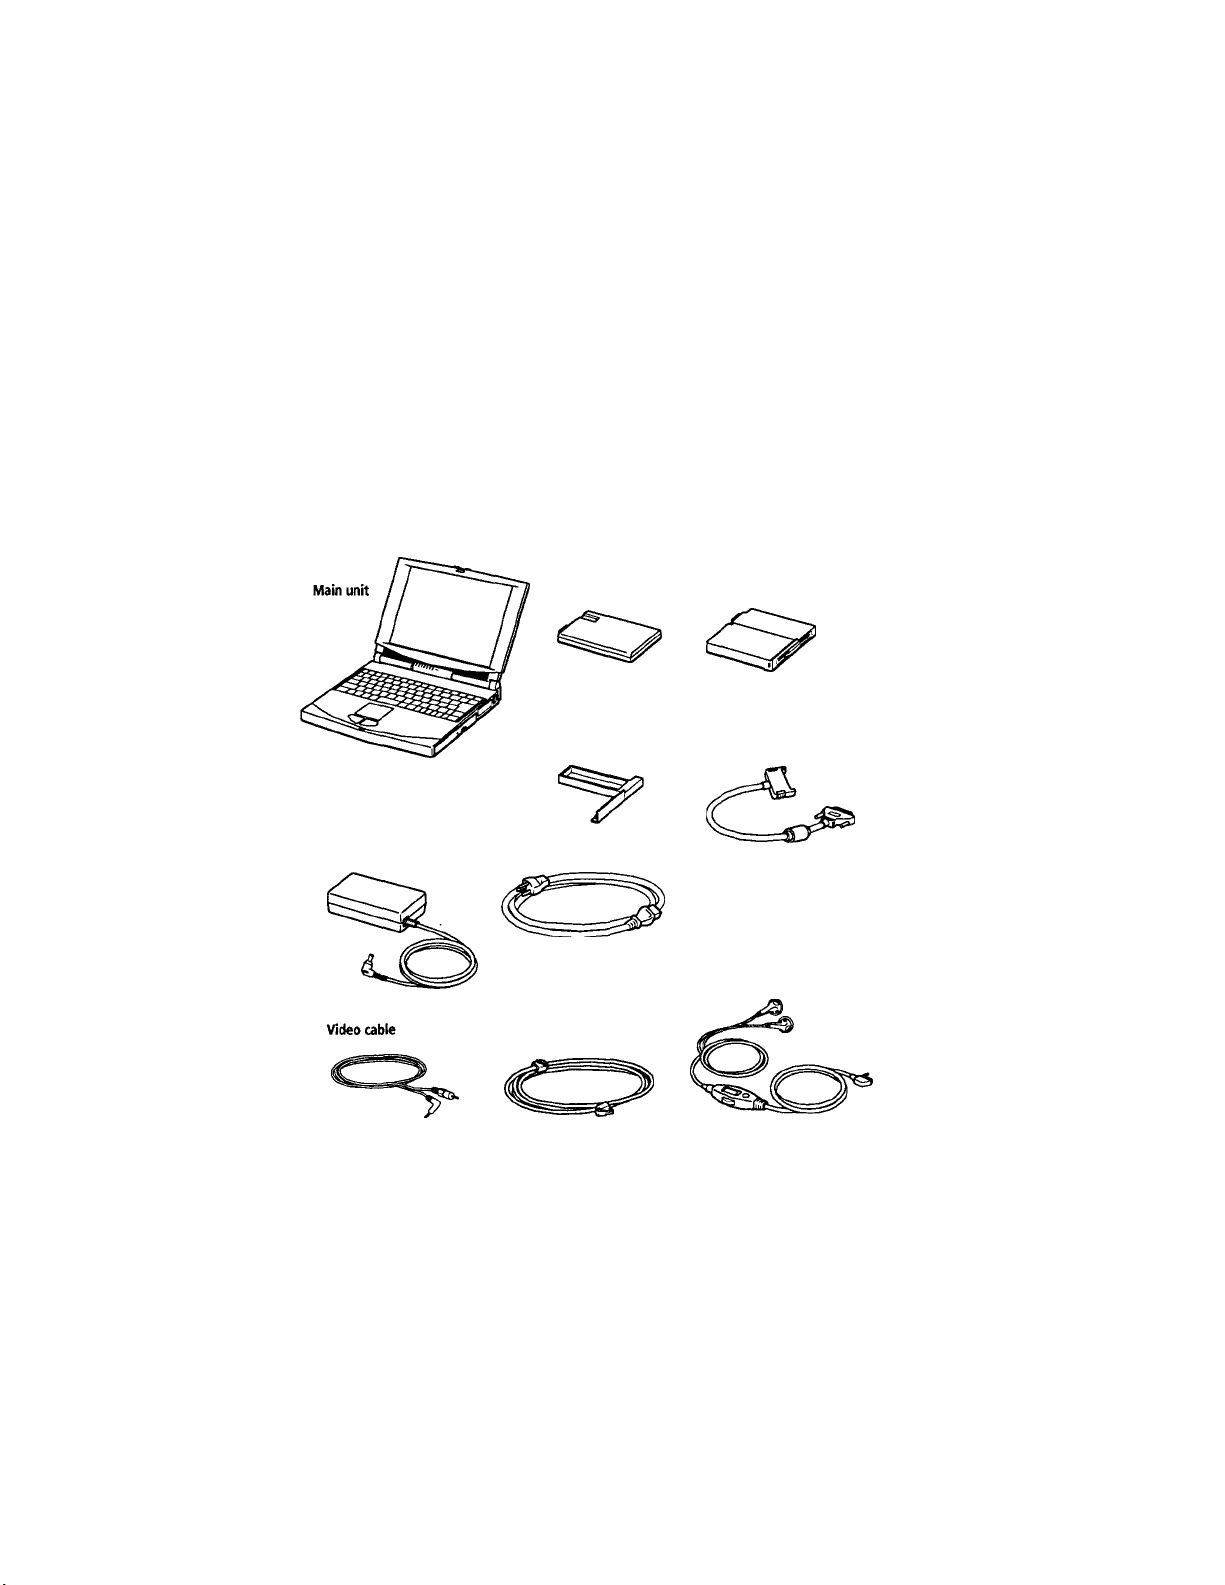
Unpacking Your Computer
Remove the follo\ving hardware items from the box:
Rechargeable
battery pack
Weight Saver
Floppy disk drive
Floppy disk
drive cable
AC adapter
Power cord
Headphones
Phone cable
You can find the complete list of the items that come with your computer
in the About Your Sony Notebook Computer guide.
Locating the Controls and Connectors
This section explains the controls and connectors available on your
computer.
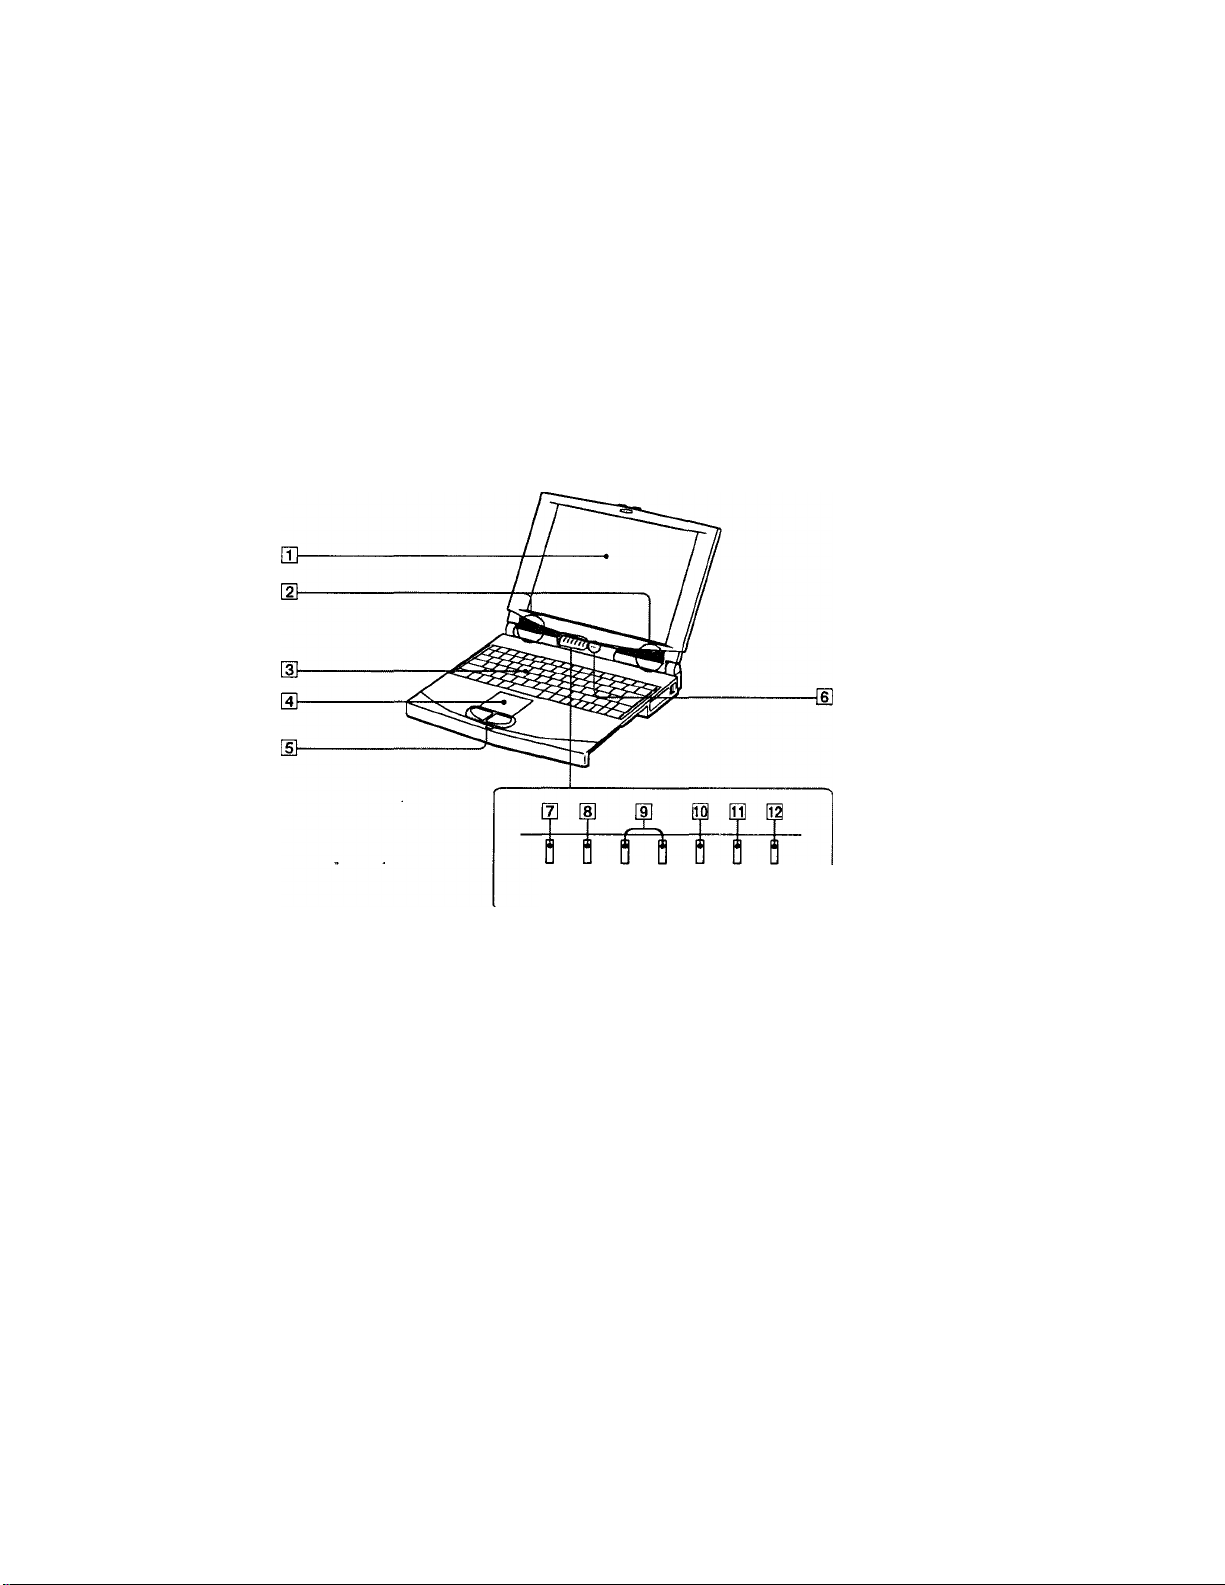
Front
R 1 c—I o Num Caps Scroll
®
U Lock Lock Lock
LCD screen (pages 39,125)
m
Speakers (page 27)
a
Keyboard (pages 29, 132)
a
Touchpad (page 40)
0
Left/right button
a
Microphone (page 28)
a
Power indicator (pages 35,134)
0
Hard disk drive indicator (page 134)
a
Battery 1/2 indicators (pages 100,134)
a
Num Lock indicator (page 135)
E3
Caps Lock indicator (page 135)
E
Scroll Lock indicator (page 135)
E
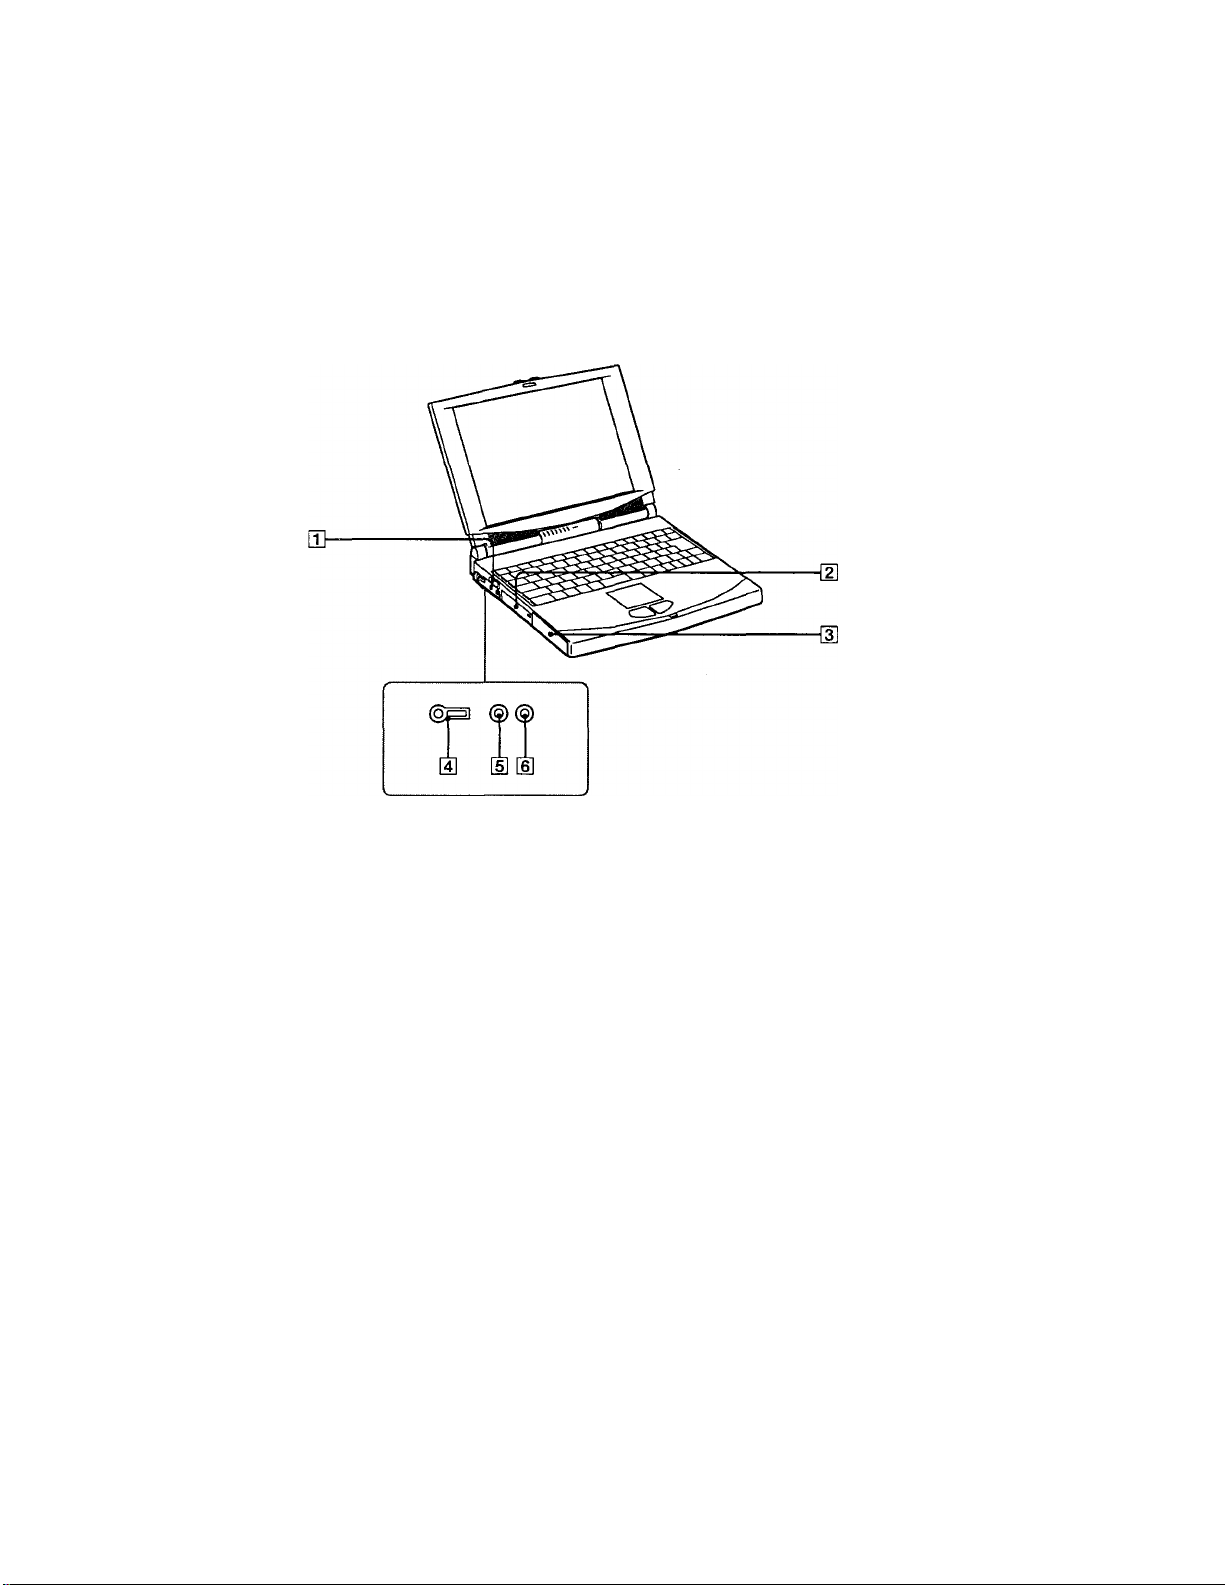
Left
Power switch (page 35)
0
Hard di^ drive
m
Battery bay (page 10,19)
a
0 Headphones connector (page 22,25)
0
V. Microphone connector (page 26)
0
-© Line In connector
0
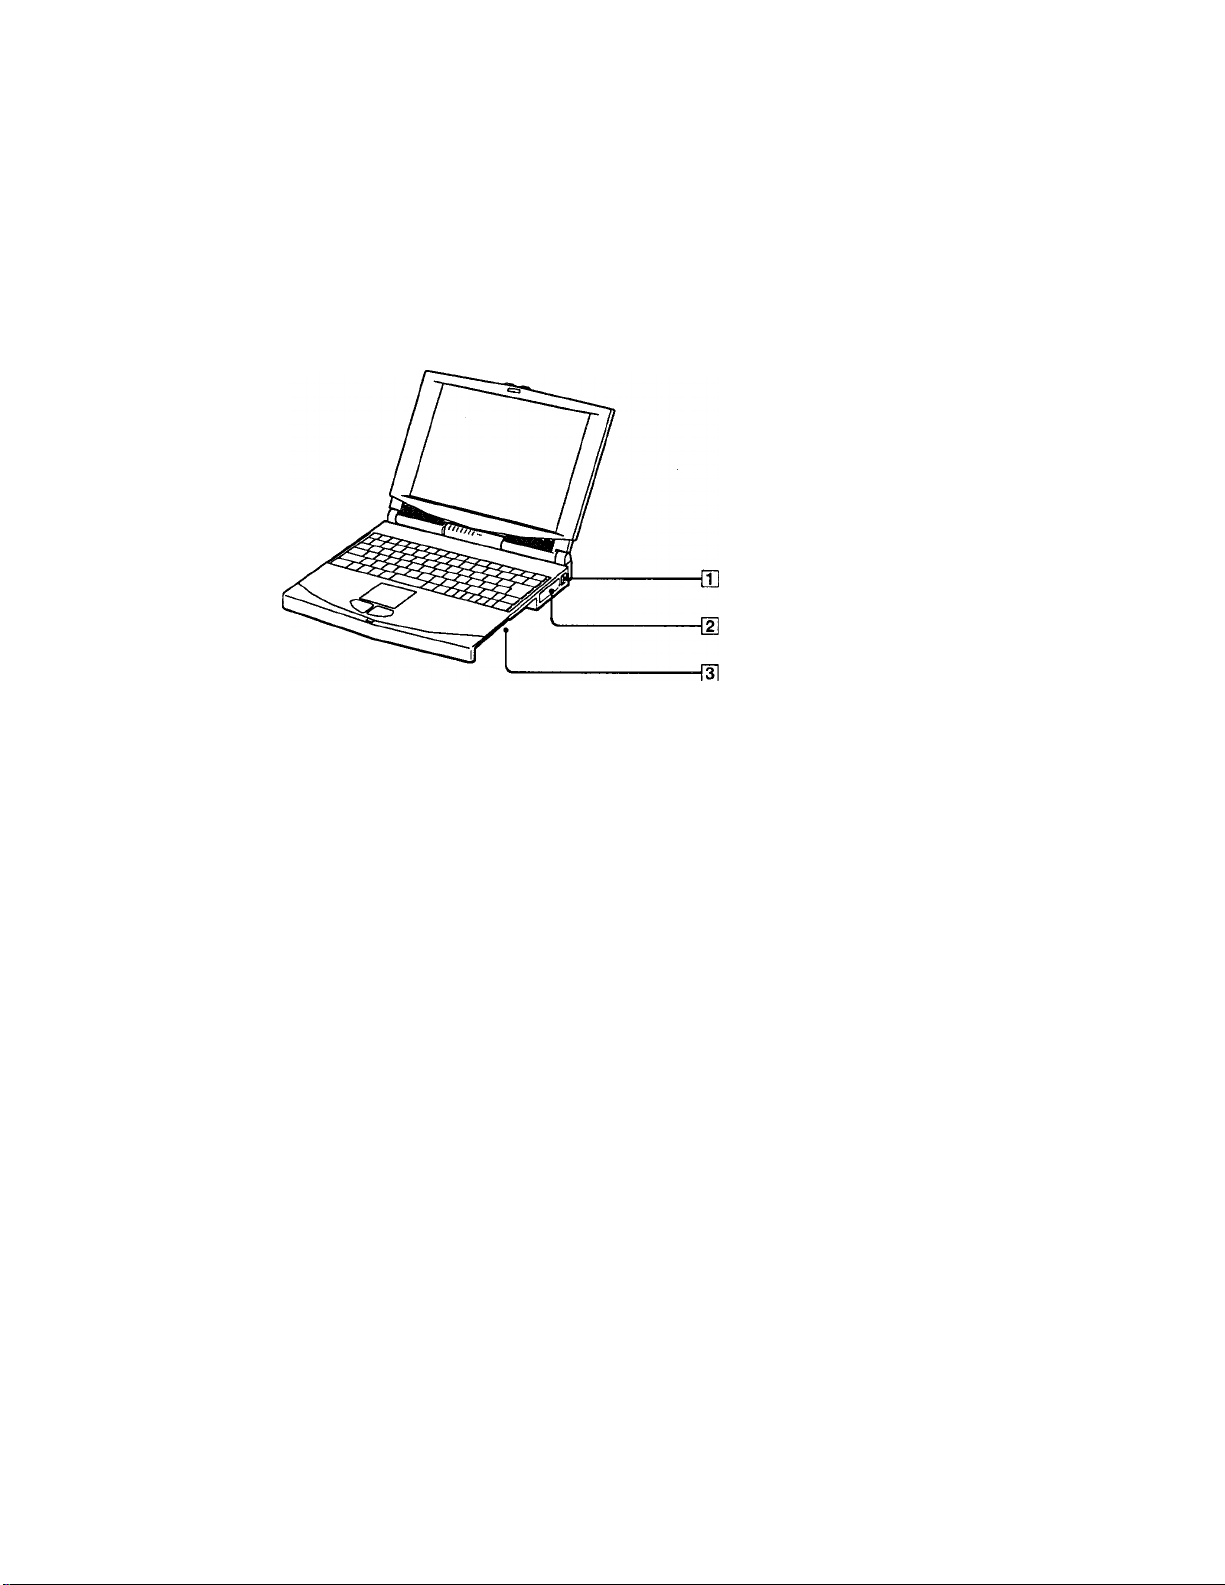
Right
Q] Phone line jack (page 8)
[U PC card slots (page 51)
[U Drive bay (page 42)

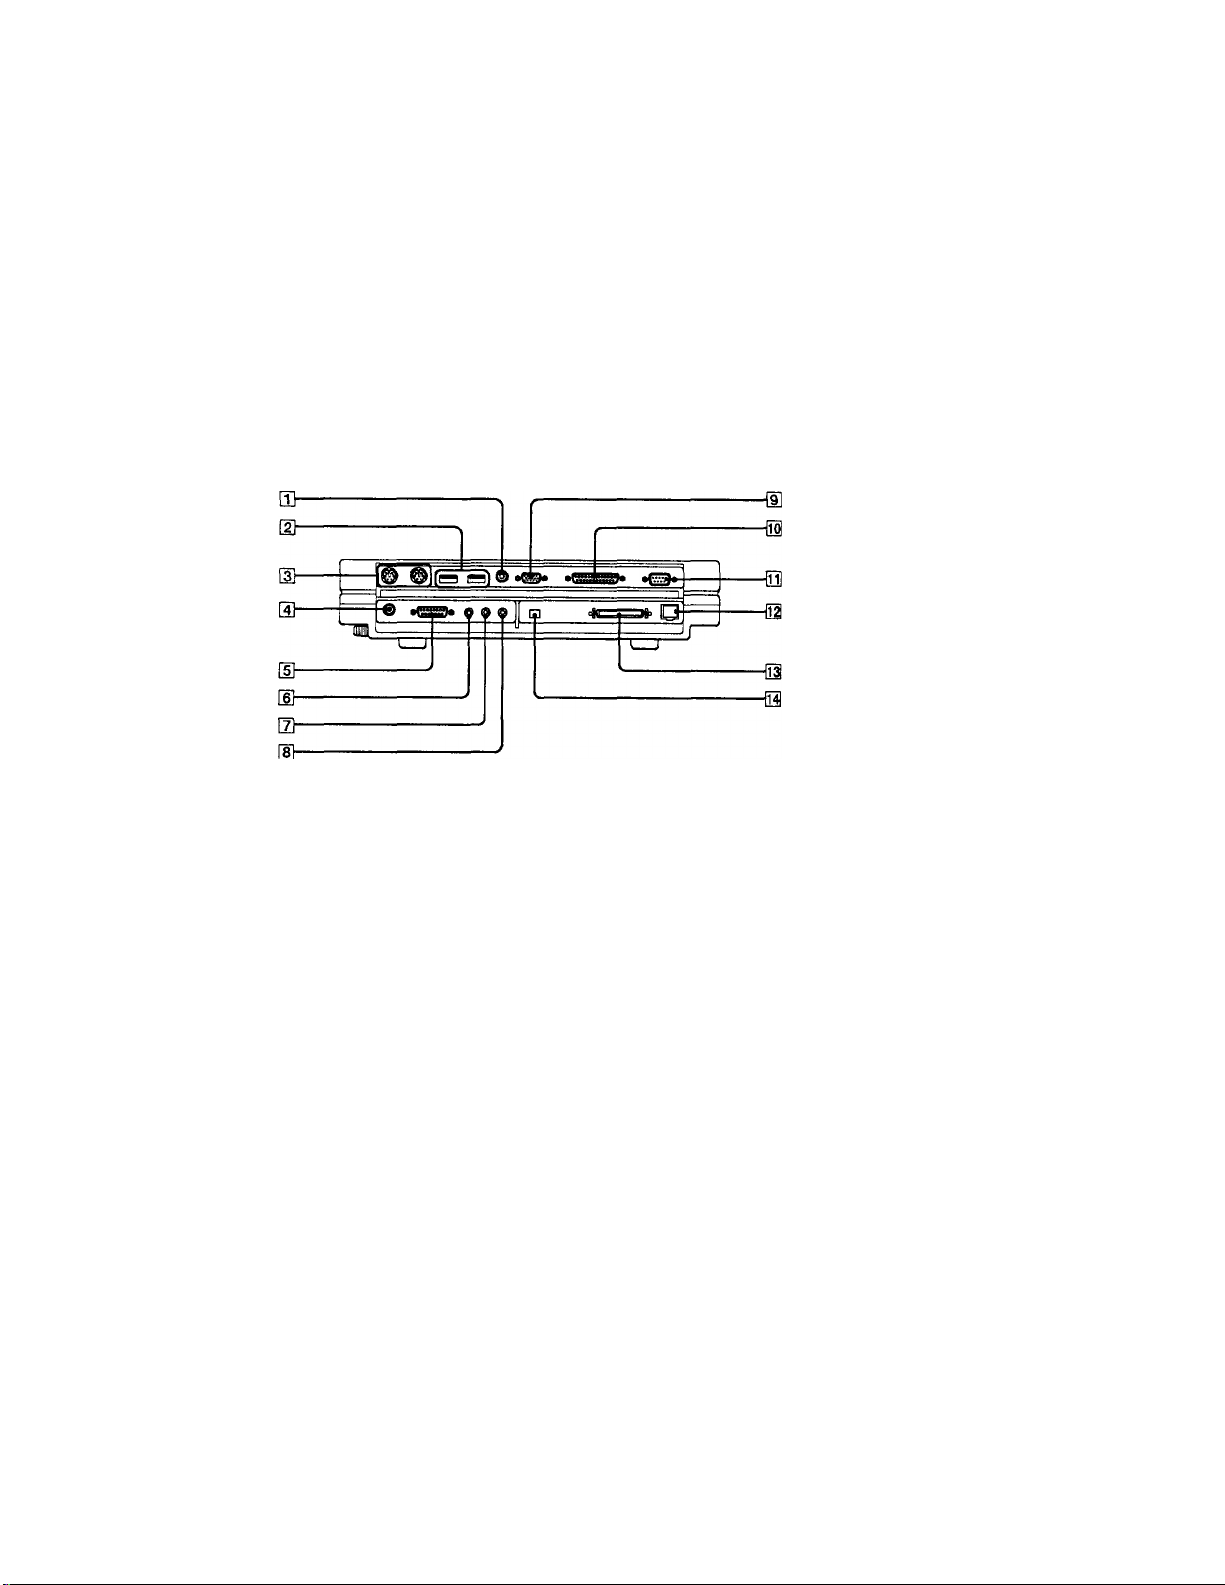
Back
DC In (page 9)
0
KDOI Serial C0M1 connector (page 31)
0
Infrared port (page 93)
0
■ ^ USB connector (page 33)
0
^ 1 IB) Mouse/Keyboard connector (page 29)
0
O Monitor connector (page 22)
0
Docking station (page 14)
0
Q/iS> FDD/Printer connector (page 30)
0
O' Video Out connector (page 25)
0

Connecting a Phone Line
You need to connect a phone line to take advantage of online services, the
Internet, and Sony Online Support. The phone line also enables you to
register your computer and software online.
1 Pull the PC card release buttons away from the computer.
2 Plug one end of the supplied phone cable into the phone line jack on
the computer.
3 Plug the other end into the wall jack.
Phone cable (supplied)
Your computer does not work with party lines, cannot be connected to a coin-operated
telephone, and may not work with multiple phone lines or a private branch exchange (PBX).
8
Connecting a Power Source
You can use either AC power or a rechargeable battery pack as a power
source.
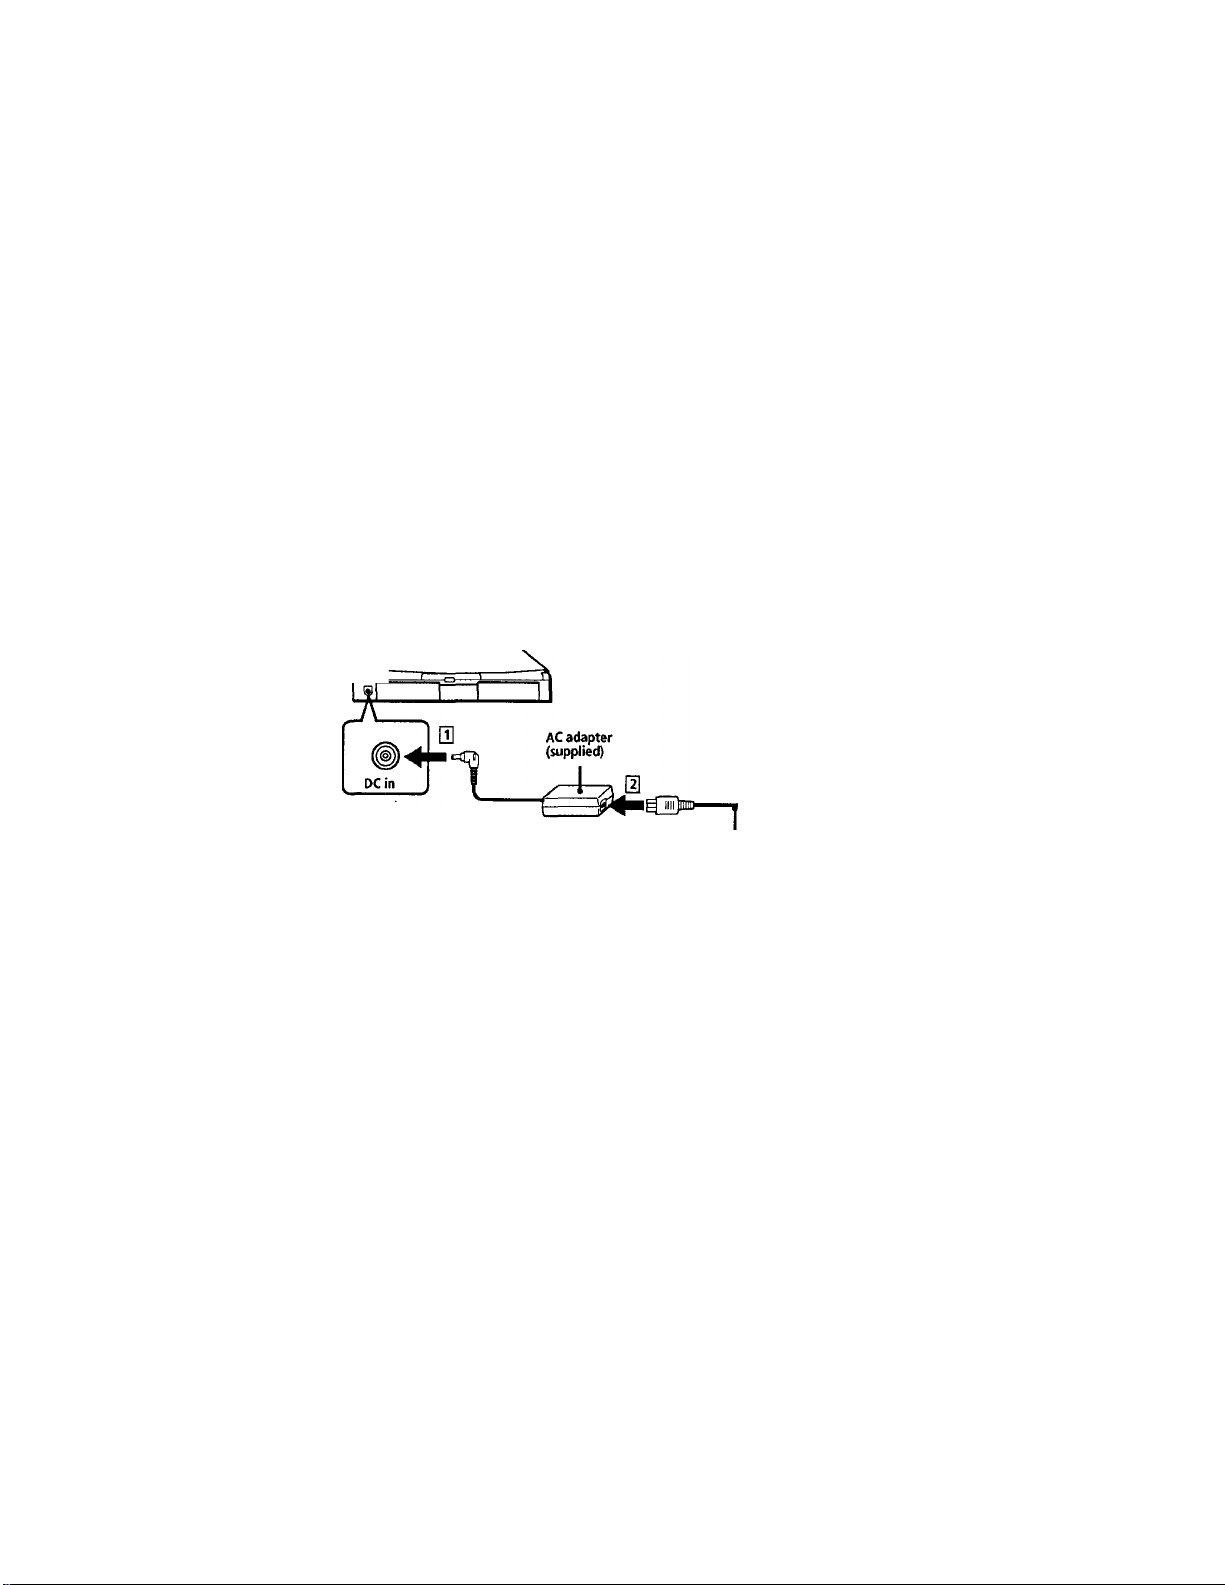
Using the AC Adapter
1 Plug the cable attached to the AC adapter into the DC In connector on
the computer.
2 Plug one end of the power cord into the AC adapter.
3 Plug the other end of the power cord into an AC outlet.
Notebook PC
a rrn
«aOt'
Power cord (supplied)
(u)
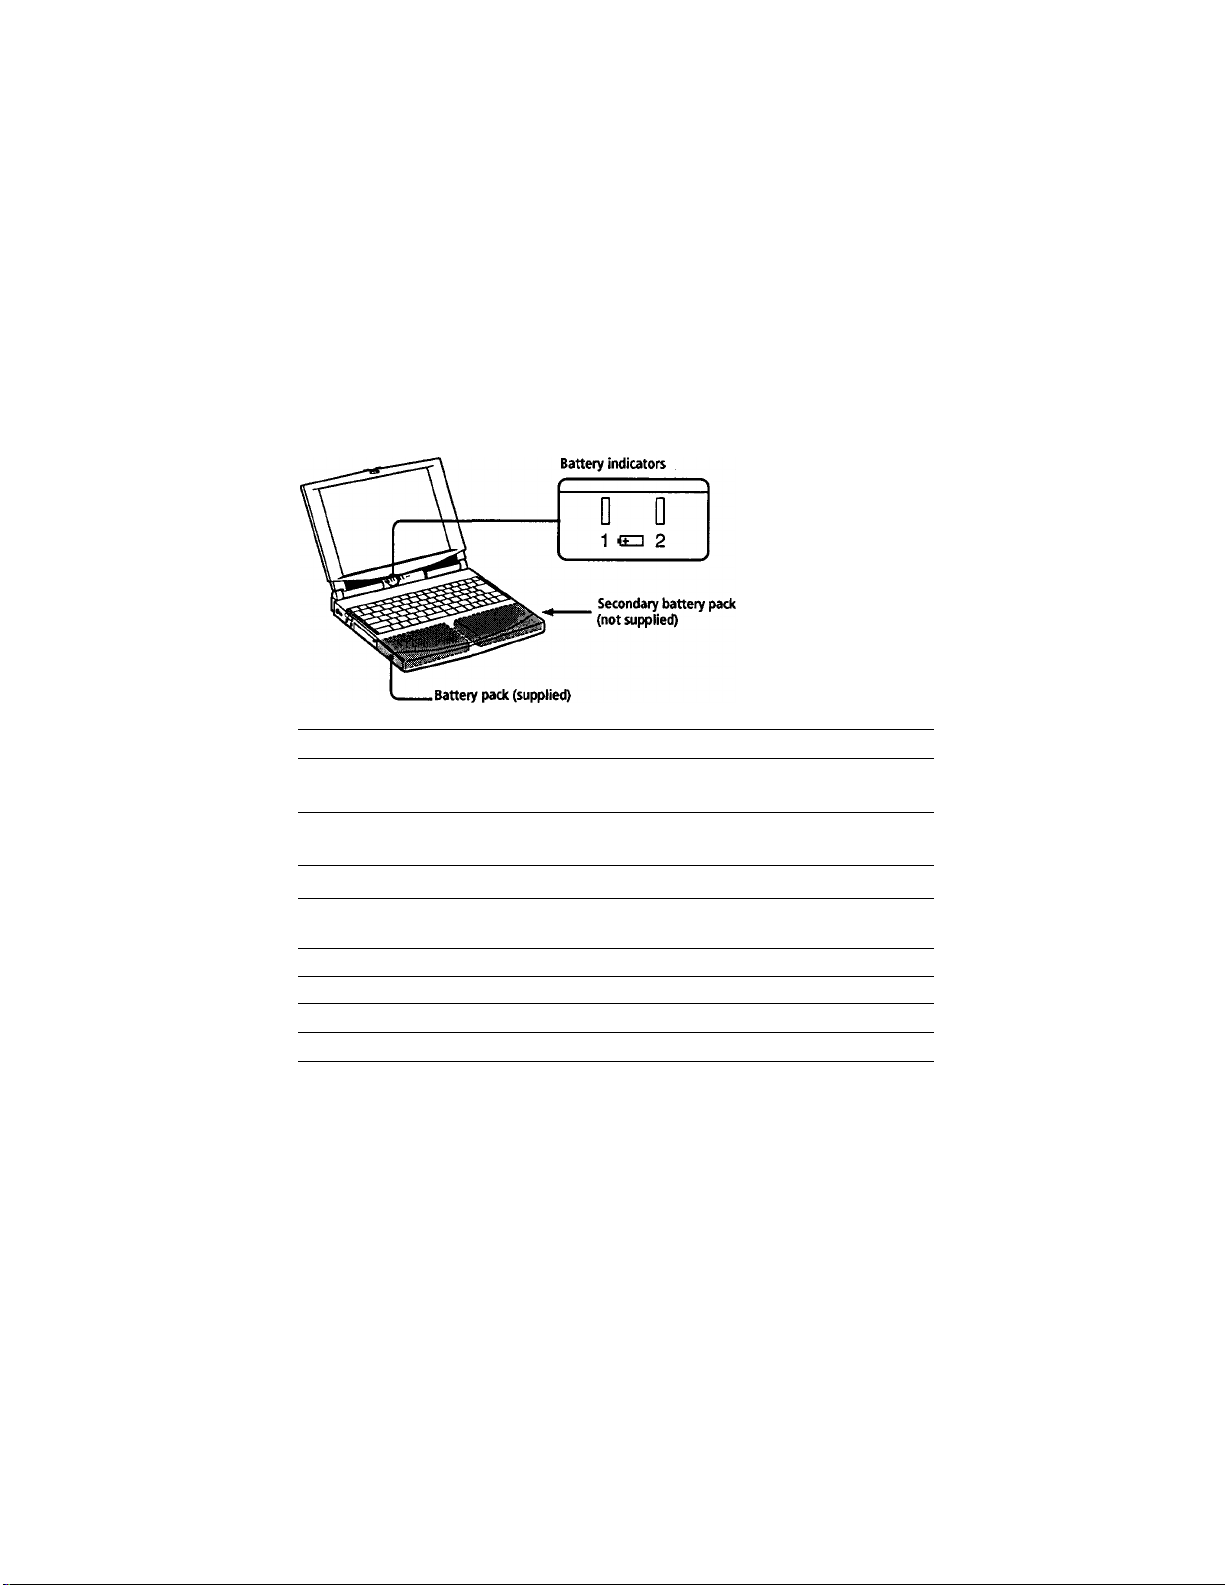
Using Battery Power
You can use one or two battery packs as a source of power. A second
battery pack can be inserted into the drive bay on the right side of the
computer. (See “Using a Second Battery Pack” on page 55.) Additional
battery packs are available as a separate option.
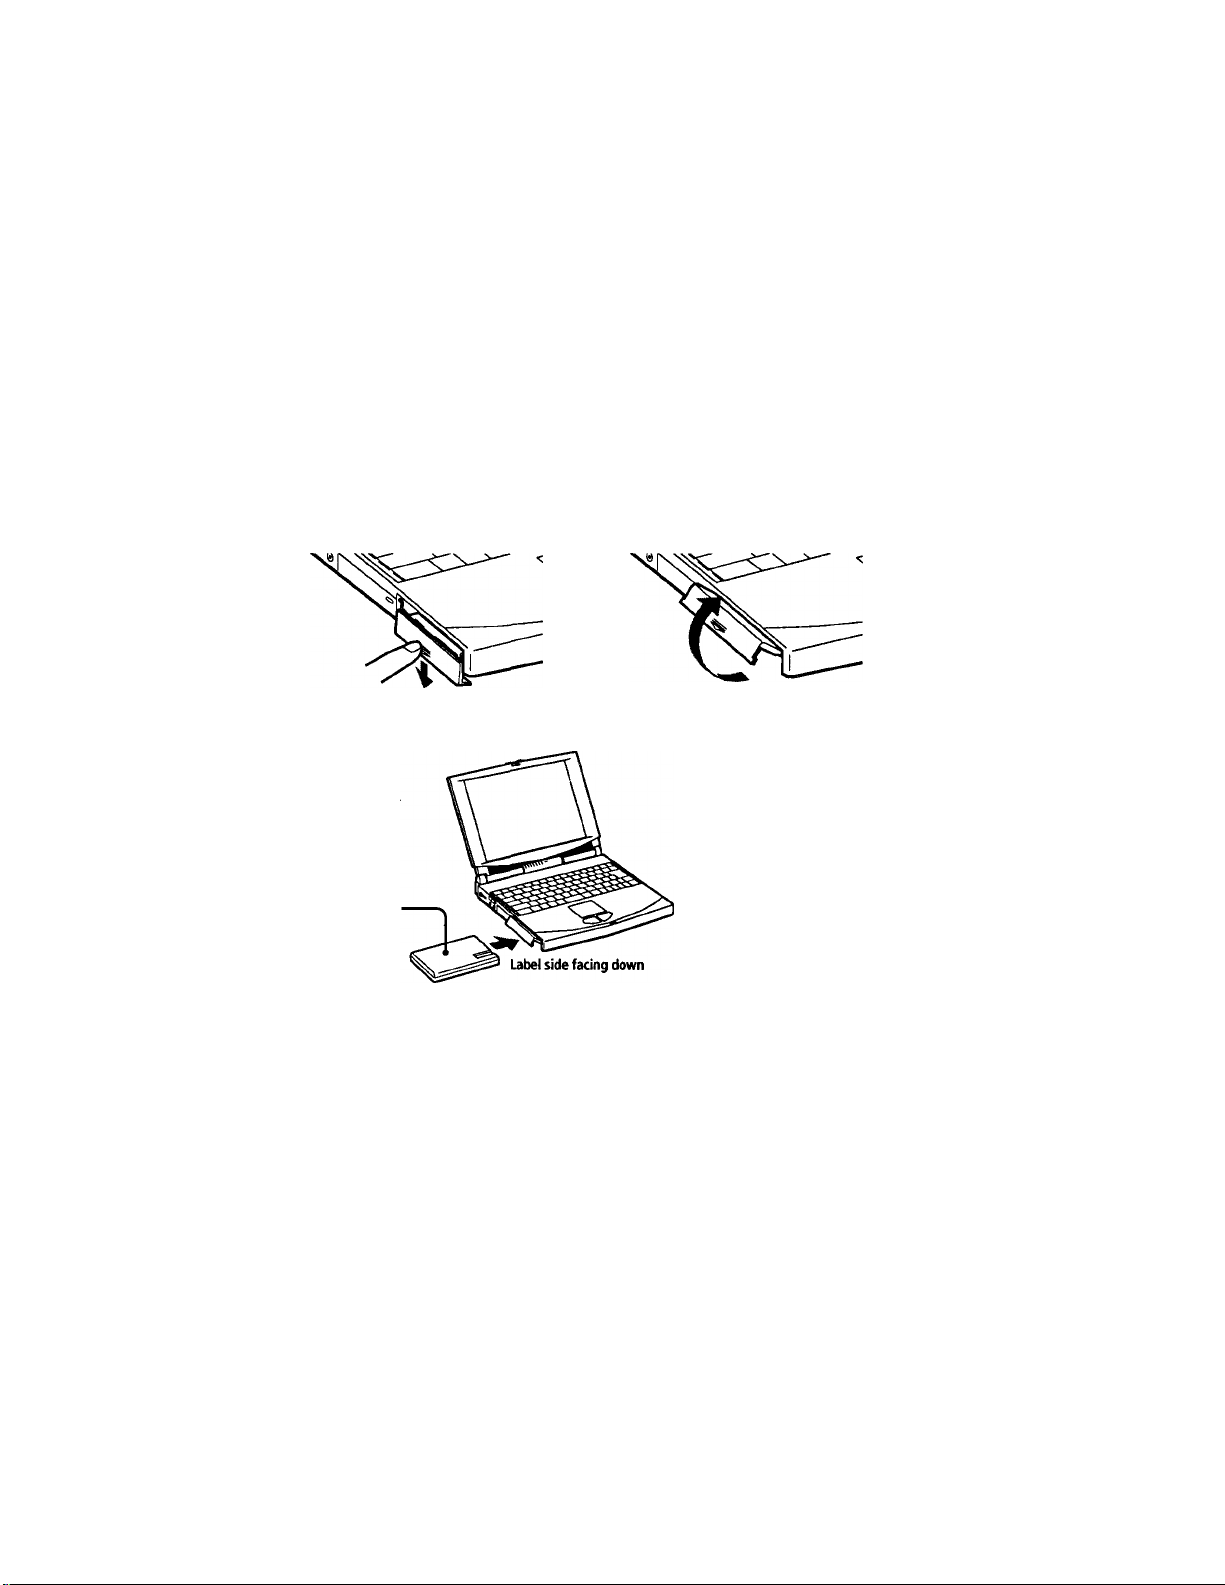
To insert the battery pack
1 Open the cover of the battery bay.
2 Insert the battery pack into the battery bay on the left side of the
computer.
Battery pack
(supplied)
3 Close the cover of the battery bay.
To charge the battery pack
1 Connect the AC adapter to the computer.
2 Insert the supplied battery pack.
The computer automatically charges the battery (the battery indicator
light flashes while the battery is charging). When the battery is 85%
charged, the battery indicator light turns off. This process takes
approximately one and a half hours. To charge the battery
completely, continue charging for an additional hour.
10
A fully charged battery pack supplies power for approximately two to
three hours. See “Displaying Detailed Battery Information” on page 101
for information on checking the battery life.
There are two battery indicator lights on the computer:
Battery Indicator Meaning
iflEZI
2
Battery Indicator
Light Status
On
Indicates the status of the battery pack in the
battery bay on the left side of the computer.
Indicates the status of the battery pack in the
drive bay on the right side of the computer.
Meaning
The computer is using battery power.
Flashing quickly The batteiy is running out of power.
Flashing slowly
The battery is charging.
Off The computer is using AC power.
^ See ’Using a Second Batteiy Pack' on page 55 for information on installing and charging a
battery pack in the drive bay.
When two battery packs are inserted, the battery pack inserted first is charged first. The
battery pack inserted second is charged when the first battery pack is 85% charged. You
can determine which battery pack is being charged by the battery indicator light status.
Keep the battery pack in the computer while it is directly connected to AC power. The
battery pack continues to charge while you are using the computer.
11
You can extend battery life by changing the power management modes in the PowerPanel
utility. See 'Controlling Power Management' on page 97.
The battery pack supplied with your computer is a lithium ion battery and can be recharged
at any time. Charging a partially discharged battery does not affect battery life.
The battery indicator light is on while you use the batte^ pack as a power source. When
battery life is nearly over, the battery indicator starts flashing.
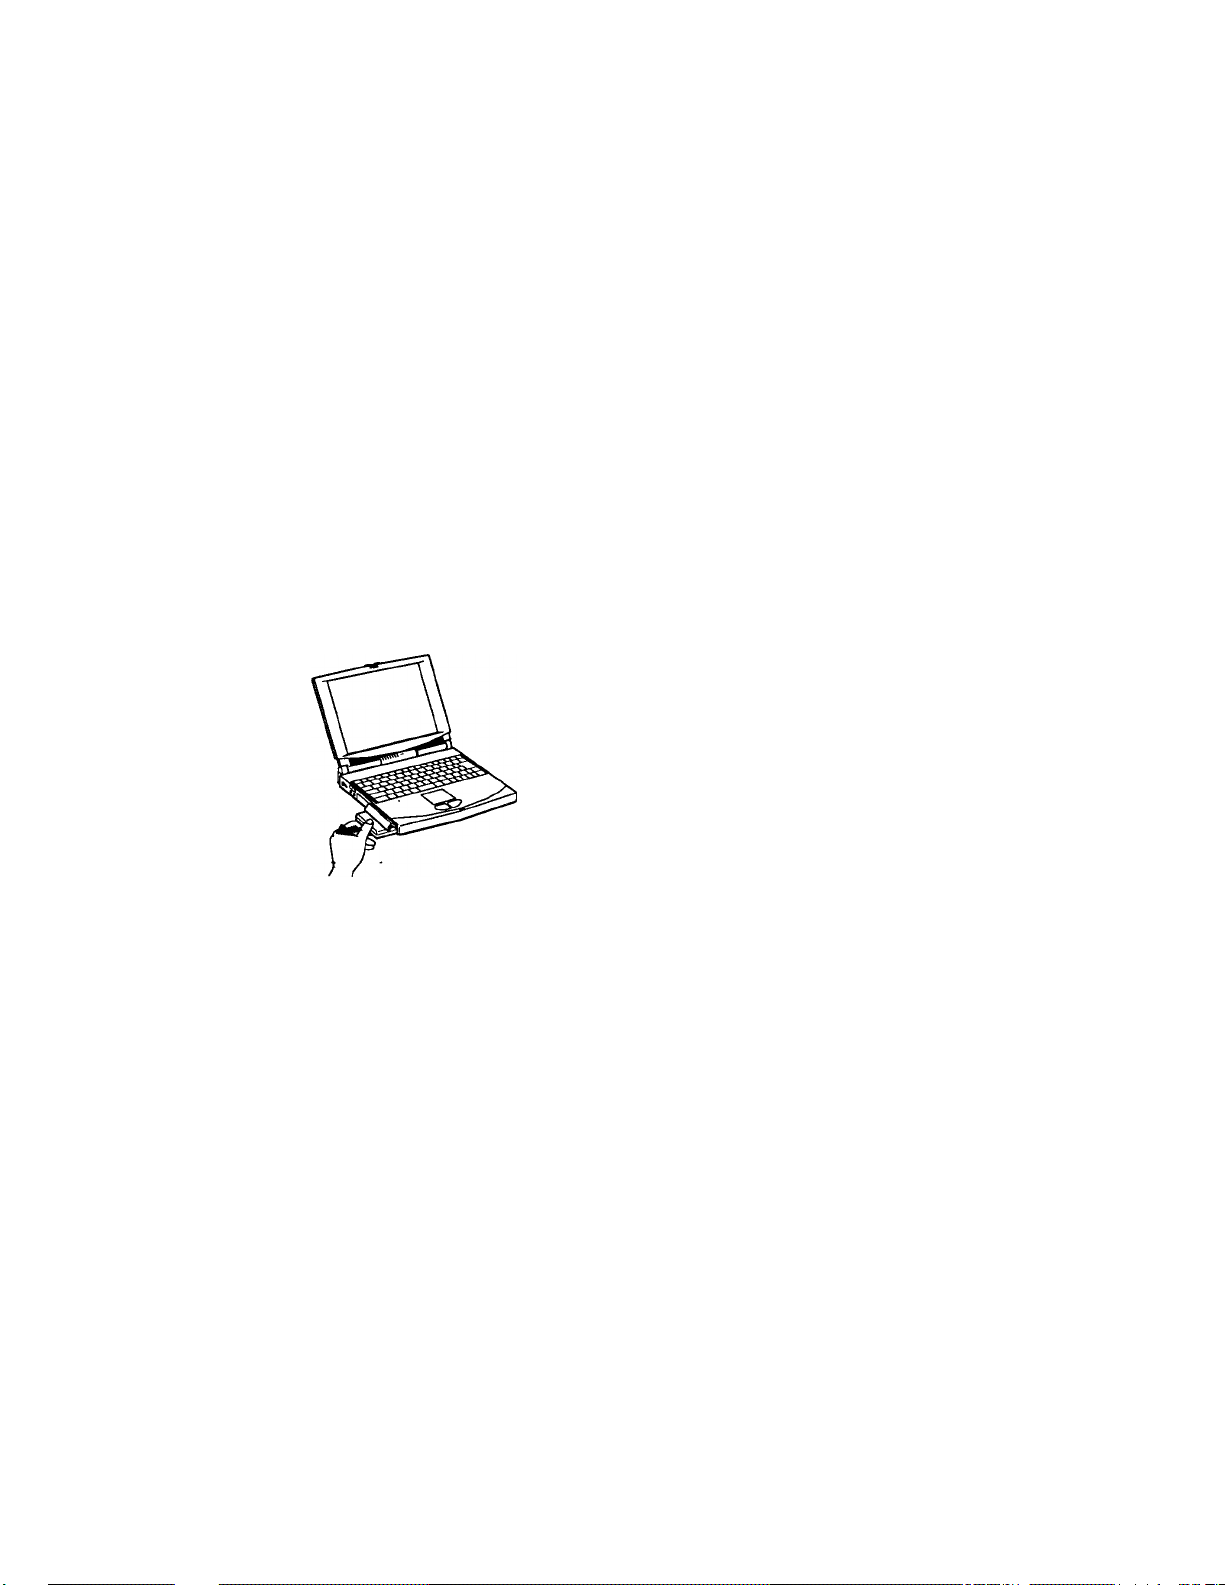
To remove the battery pack
1 Open the cover of the battery bay.
2 Pull out the battery pack.
3 Close the cover of the battery bay.
12

Connecting Additional Peripherals
You can add functionality to your computer by connecting any of these
peripherals;
□ Docking station (page 14)
□ External display (page 22)
□ External speakers (page 27)
□ External microphone (page 28)
□ External mouse or keyboard (page 29)
□ Printer (page 30)
□ Digital still camera or other serial device (page 31)
□ Digital video camera recorder (page 32)
□ Universal serial bus (USB) device (page 33)
^ Before you connect peripherals, turn off the computer and all peripherals.
Connect the power cord only after connecting all cables.
Turn ori the computer only after turning on all peripherals.
13
Connecting the Docking Station
Attaching an optional docking station enables you to connect additional
peripherals as shown below. There are two types of docking station: the
Personal Docking Station and the Network Docking Station. The Personal
Docking Station does not include the SCSI, Network (ethernet), and DV
In/Out connectors.
[3 C3» Video Out.(page 25)
[3 'I' USB * (page 33)
[3 ^ / IHl Meuse/Keyboard (page 29)
[3 DC In (page 9)
[3 Game
d] V Microphone (page 26)
[3 -Q Line In
* USB ports are included to provide state-of-the-art technology. Your operating system supports a
limited number of USB devices. You may need to install software (device drivers) supplied with your
USB device before using the USB device.
t Network docking station only.
Line Out
m
O Monitor (page 22)
dl
& Printer
y
ICHCH Serial COMI (page 31)
0
Network (ethernet)^
0
SCSI'
0
53 DVIn/Out(page32)'
^ When your computer is connected to the docking station, you cannot use the system
suspend or save to disk power saving modes.
To listen to audio CDs through the computer's built-in speakers, insert the CD-ROM drive
into the computer's drive bay. Audio from a CD in the docking station's drive bay cannot be
heard through the built-in speakers.
14
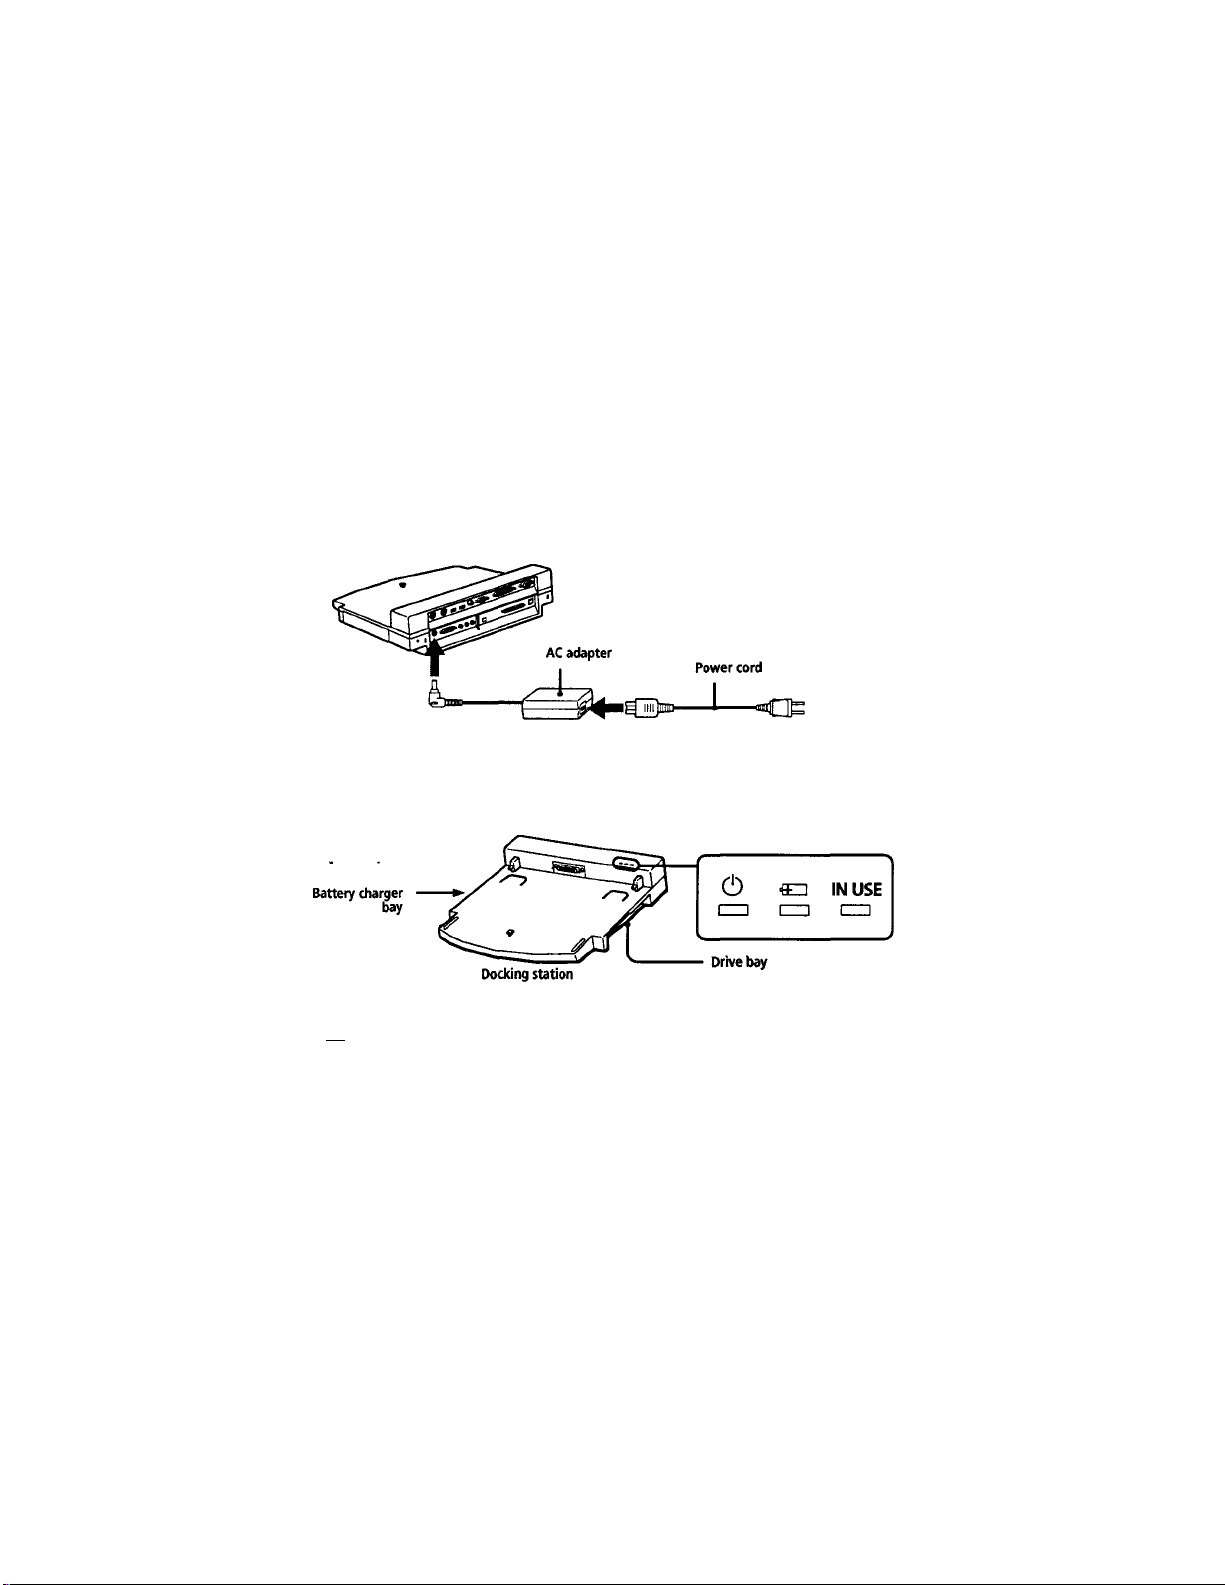
To attach your computer to the docking station
To supply power to your computer while it is connecteci to the (docking
station, you can connect the supplied AC adapter directly to the docking
station.
1 Turn off your computer and disconnect all peripherals.
2 Plug the cable attached to the AC adapter into the DC In connector on
the docking station. Plug the power cord into the AC adapter and an
AC outlet.
The ©power indicator light turns green.
Power indicator
©
fr~1 Battery charger indicator
IN USE In use indicator
15
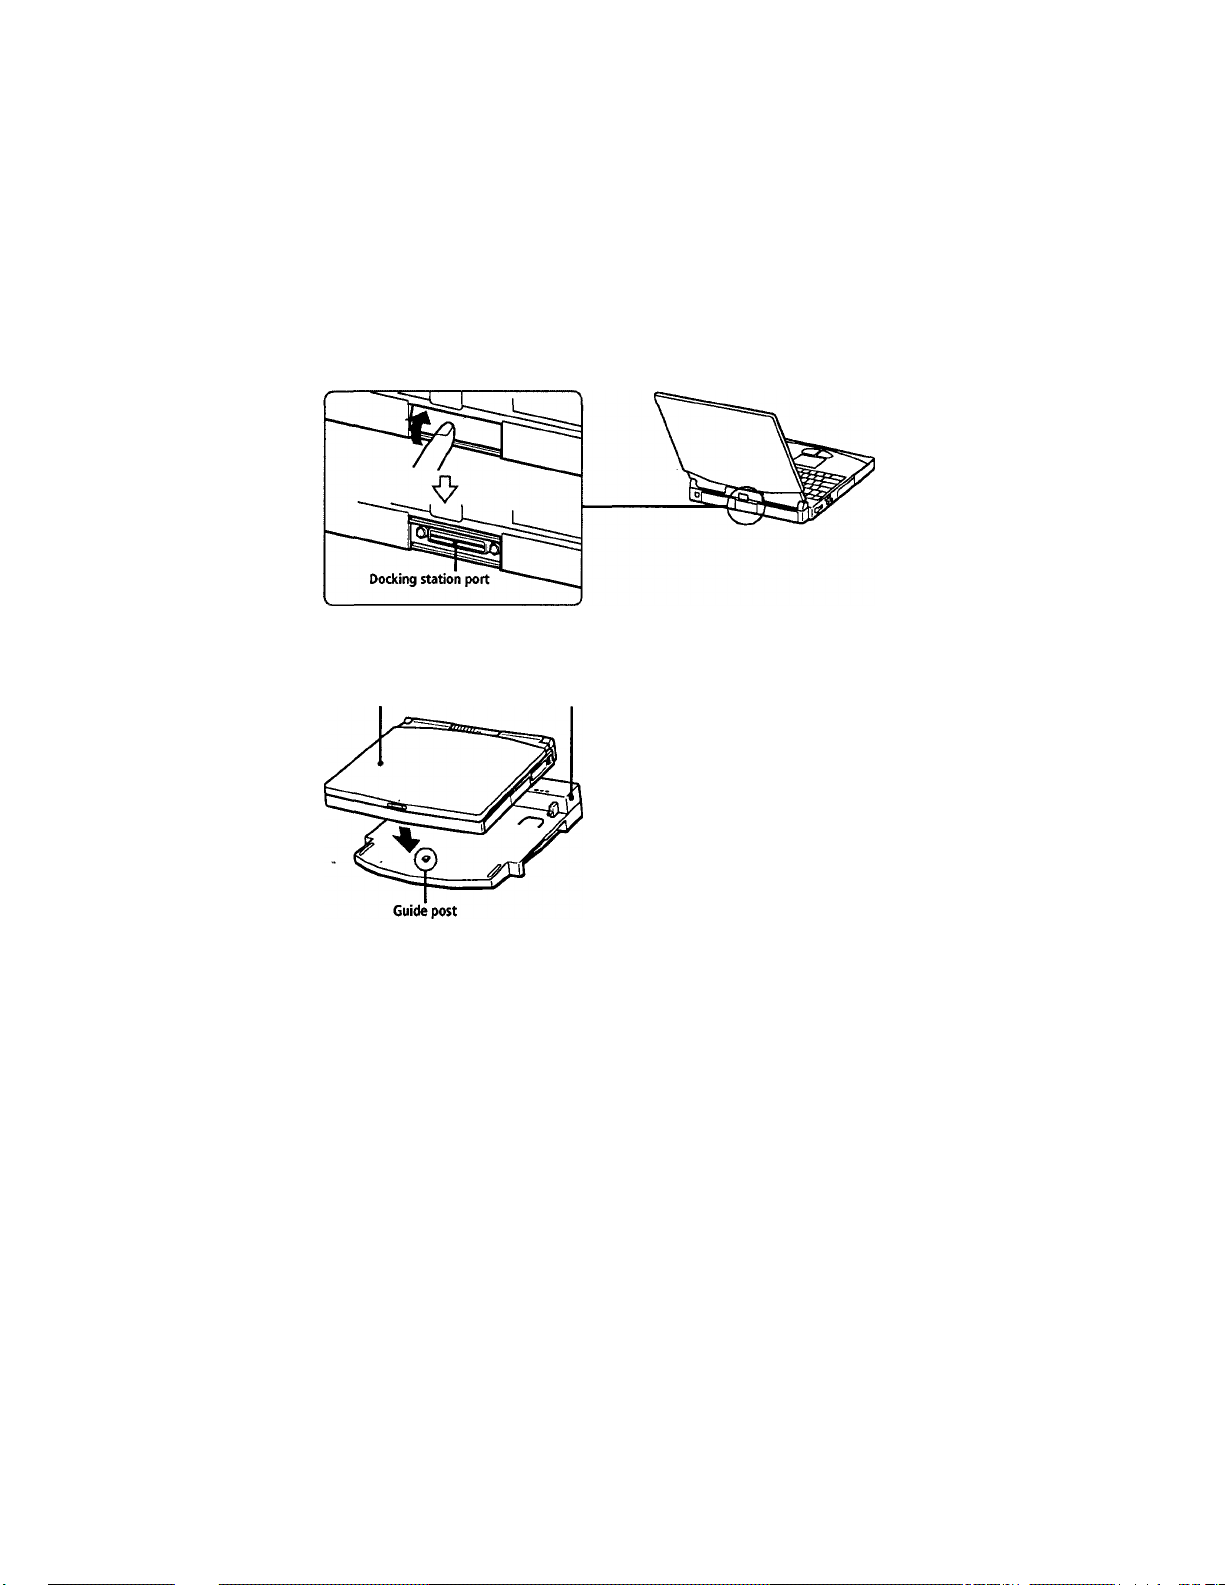
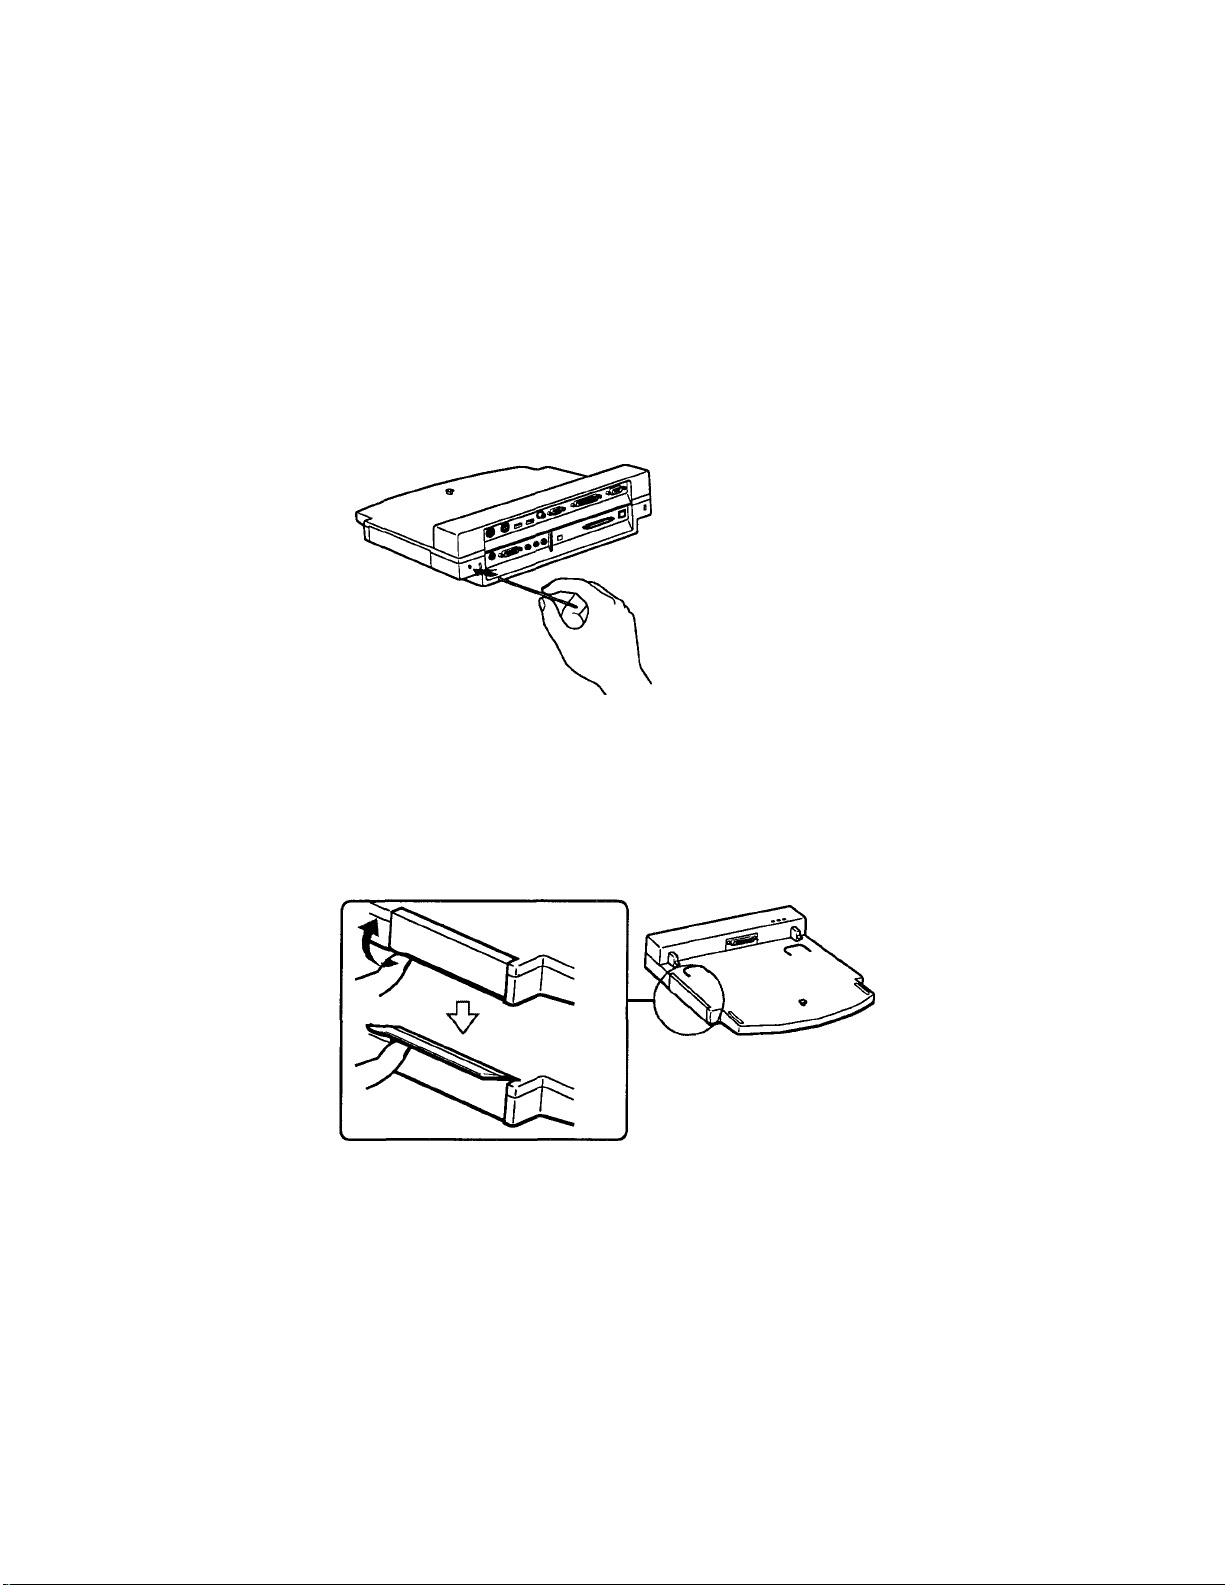
3 On the back of the computer, lift the cover that protects the docking
station port.
4 Align the indentation on the bottom of the computer with the guide
post on the docking station.
Notebook computer Docking station
16
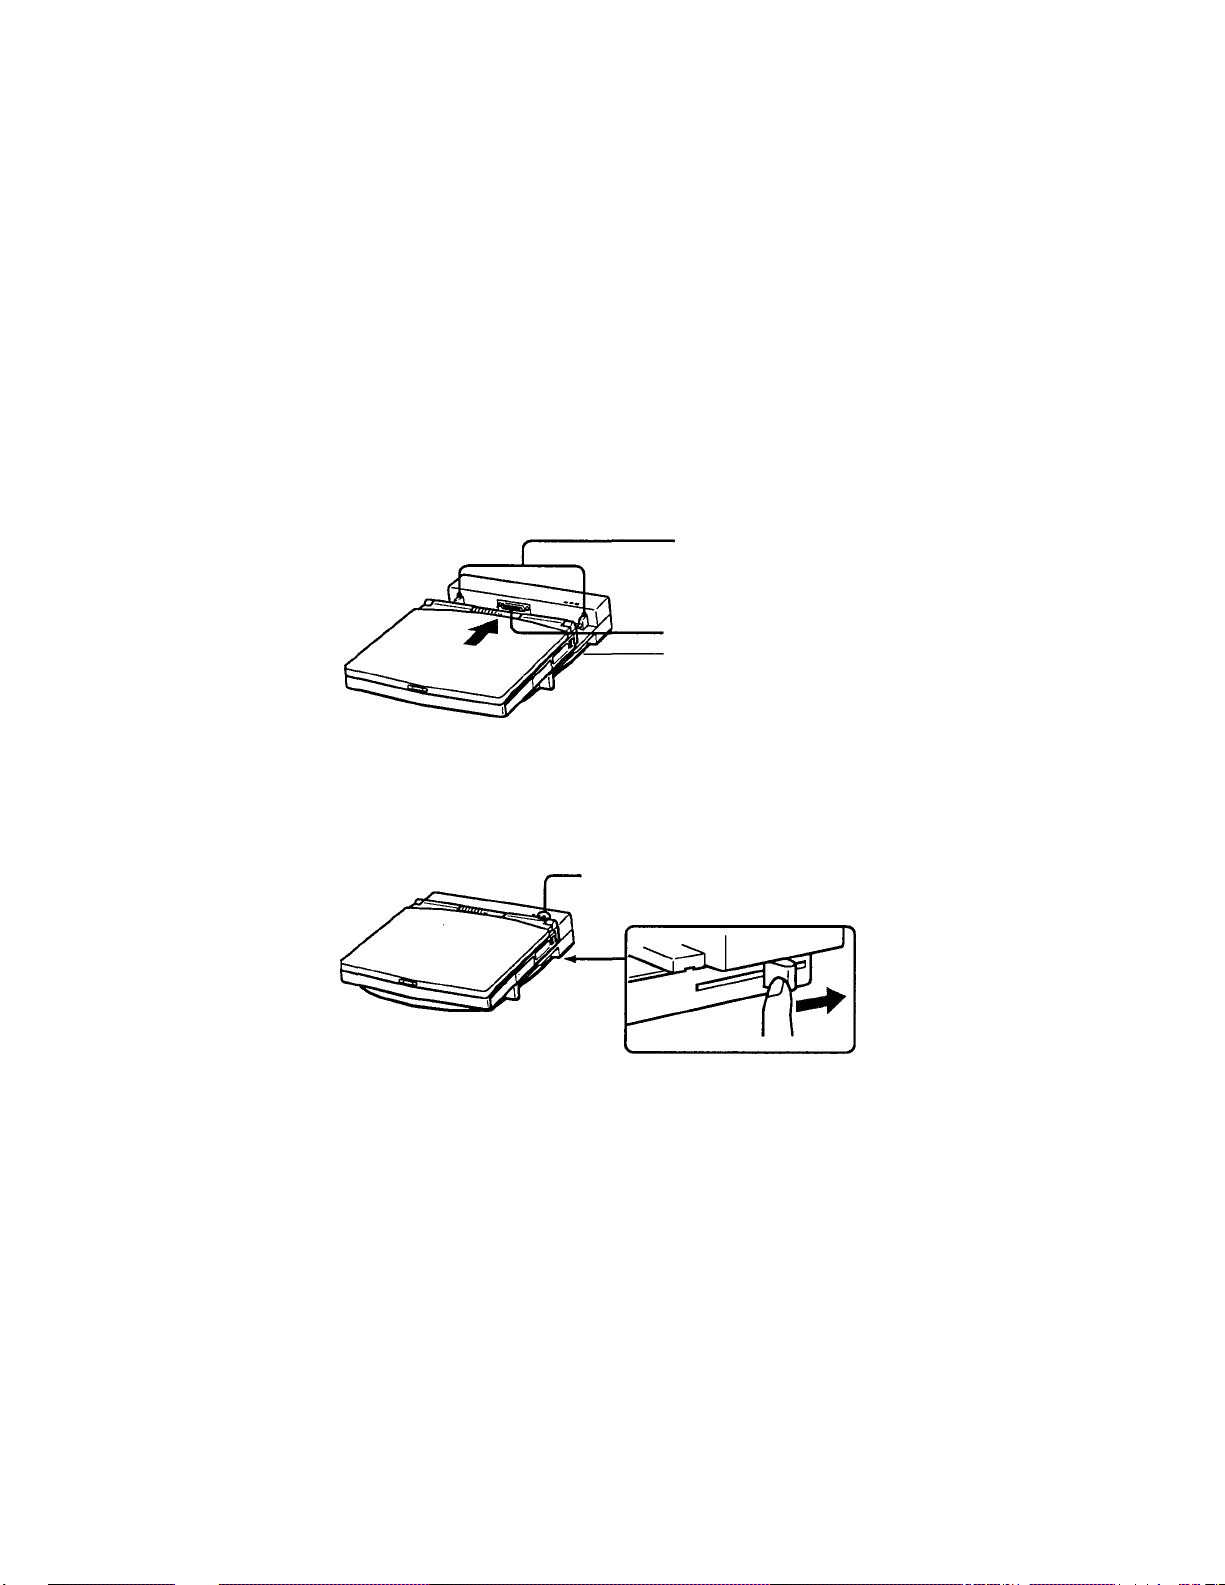
Make sure the docking station lever is pulled all the way forward.
Slide the computer in the direction of the arrow until the computer
clicks into place. Connect the docking station port on the computer to
the port on the docking station.
Make sure that the guide posts on the docking station are aligned so
that they enter the corresponding openings on the back of the
computer.
Guide posts
Docking station port
Docking station lever
6 Slide the docking station lever all the way to the rear to secure your
computer in the docking station.
7 Turn on the computer.
The IN USE indicator light turns on.
IN USE indicator
17

To remove your computer from the docking station when the power is off
1 Turn off your computer and the connected peripherals.
2 Slide the docking station lever forward until the lever stops once.
Continue to slide the lever forward until the computer is disengaged
from the docking station.
3 Lift the computer away from the docking station.
4 Cfose the docking station port cover on the back of your computer.
To remove your computer from the docking station when the power is on
1 On the Start menu, select Eject. Alternatively, press Fn+F9.
The IN USE indicator turns off. If you press Fn+F9, the computer beeps
once.
Do not remove the computer before the IN USE indicator light turns off. Removing
the computer before the light turns off may cause malfunction.
2 Slide the docking lever forward until the lever stops once.
3 Lift the computer away from the docking station.
4 Close the docking station port cover on the back of your computer.
18
^ If the docking station lever does not move, turn off your computer and insert a sharp,
pointed object into the manual eject hole on the rear of the docking station.
To charge a battery pack using the docking station
The docking station can be used as a battery charger. Just connect the
docking station to an AC outlet and insert the battery pack into the
docking station charger bay.
To insert a battery pack
1 'Operi the cover of the battery charger bay.
19
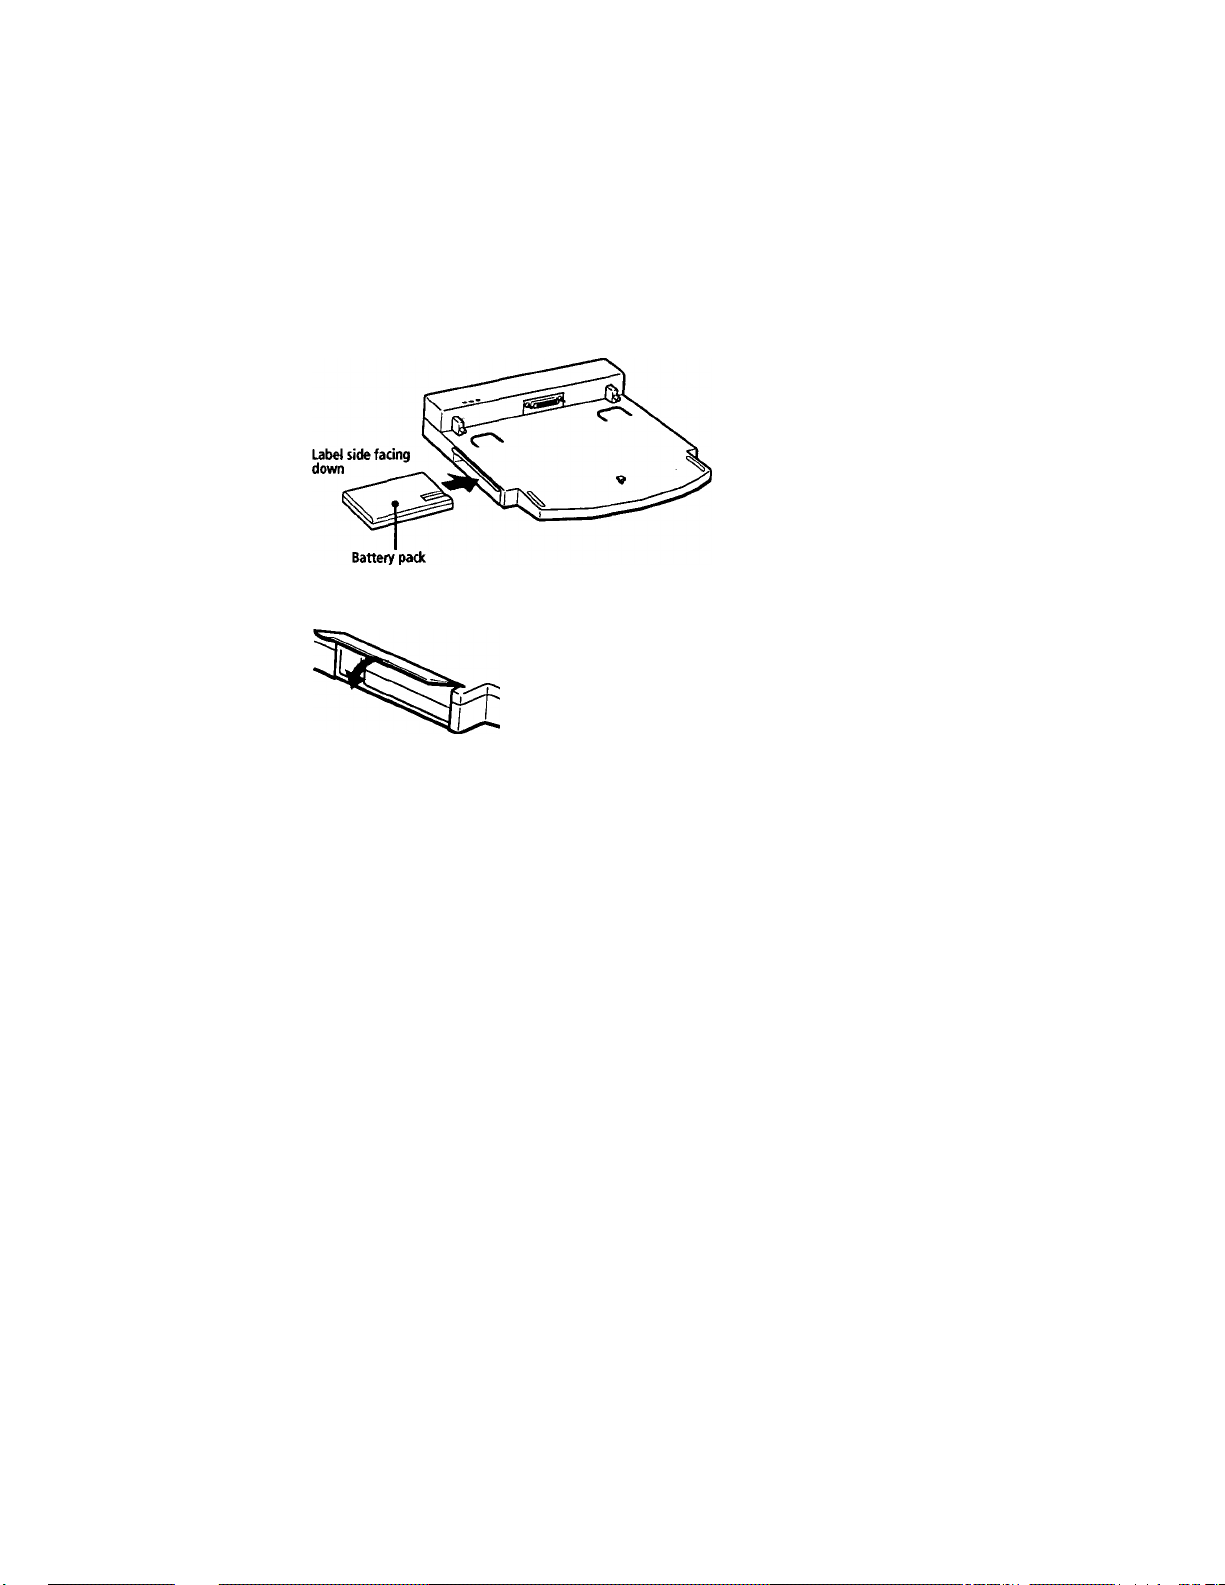
2 Insert the battery pack.
3 When the battery pack is fully inserted, close the cover.
The docking station automatically charges the battery. The ffZl battery
charger indicator light is on while the battery is charging. When the
battery is fully charged, the battery charger indicator light turns off.
The battery pack can be recharged as long as the docking station is
connected to AC power.
20

To remove the battery pack
1
Open the cover of the battery charger bay.
2
Press the Eject button.
3 Pull out the battery pack.
4 Close the cover of the battery charger bay.
To insert the CD-ROM or floppy disk drive into the docking station
You can use the supplied CD-ROM drive or the floppy disk drive in the
docking station. By using the drive bays in both the computer and the
docking station, you can use the CD-ROM drive and the floppy disk
drive at the same time.
^ Turn off the computer before inserting or removing the drive. ,
To remove the drive
There is an Eject lever on the bottom of the drive. Slide the lever in the
direction of the arrow.
iin Remove the floppy disk before you remove the floppy disk drive.'
21
Connecting an External Display
You can connect an external display to your notebook computer. For
example, you can use the computer with a:
□ Computer display (monitor) (page 22)
□ Multimedia computer display (page 23)
□ Projector (page 24)
□ TV (page 25)
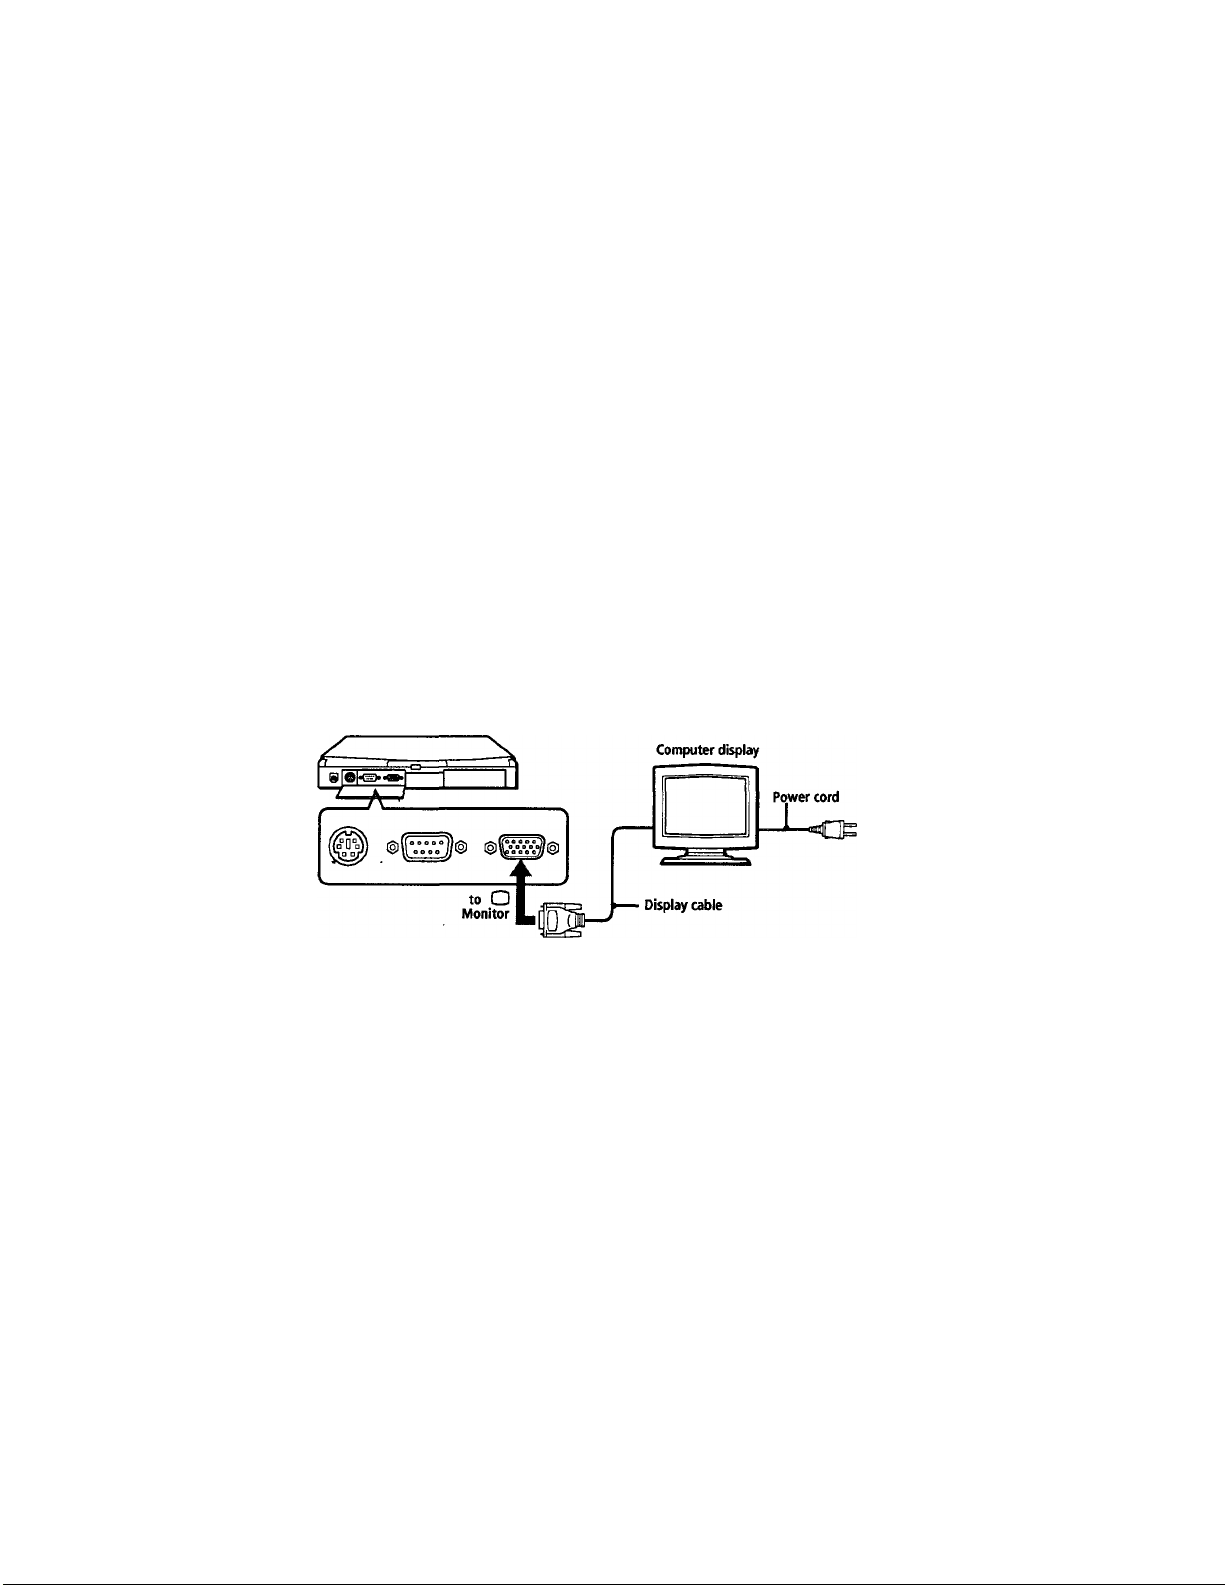
To connect a computer display
□ Use the O symbol on the back of the computer to locate the Monitor
connector. Plug the display cable into this port on the back of the
computer.
□ If necessary, plug one end of the display power cord into the display,
and the other end into an AC oudet.
See the manual that came with your computer display for more information on installation
22
 Loading...