

Sony PCG-R505GCP, PCG-R505GL, PCG-R505GLP, VAIO PCG-R505 Series, PCG-652L Quick Start Manual [en, fr]
Page 1

VAIO® Computer
Quick Start
PCG-R505 Series
Page 2

Page 3

Notice to Users............................................5
Setti ng Up .......... ......................... ...............1 5
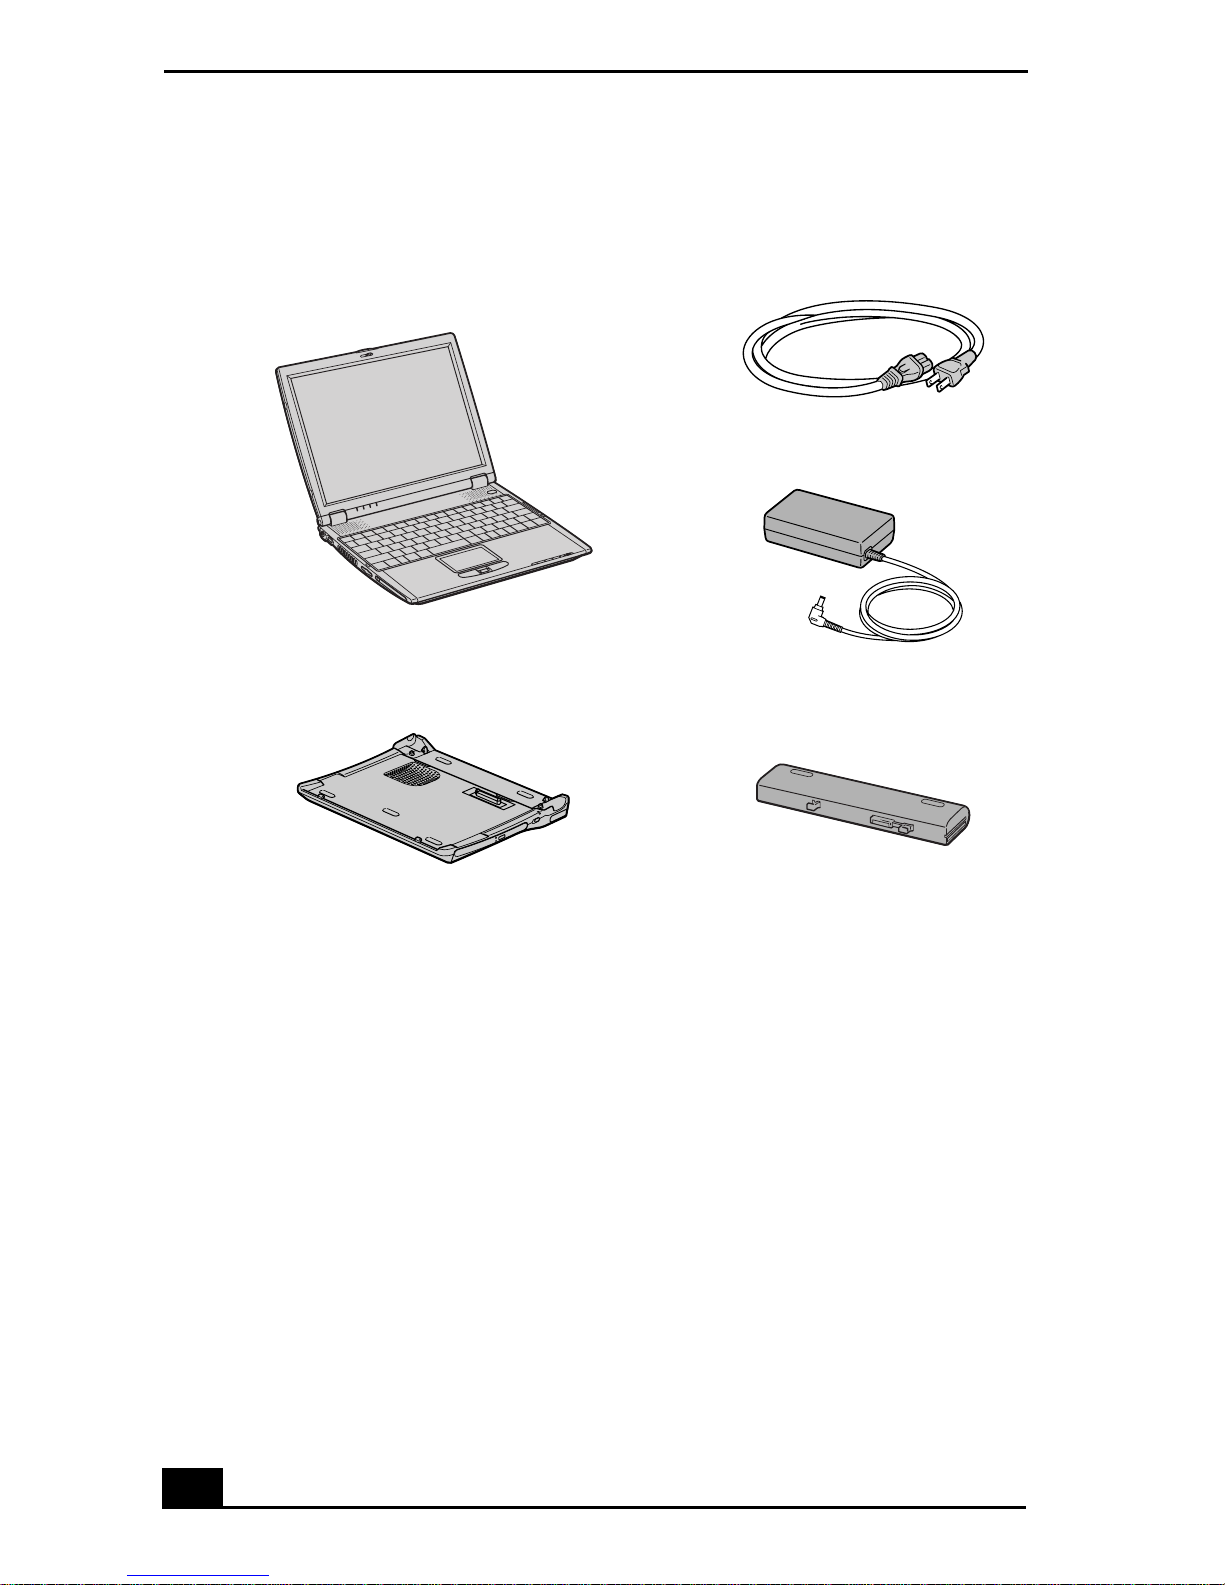
Unpacki n g Yo ur Comp u ter.......................................16
Applying Ergonomics ................................. ....... .......18
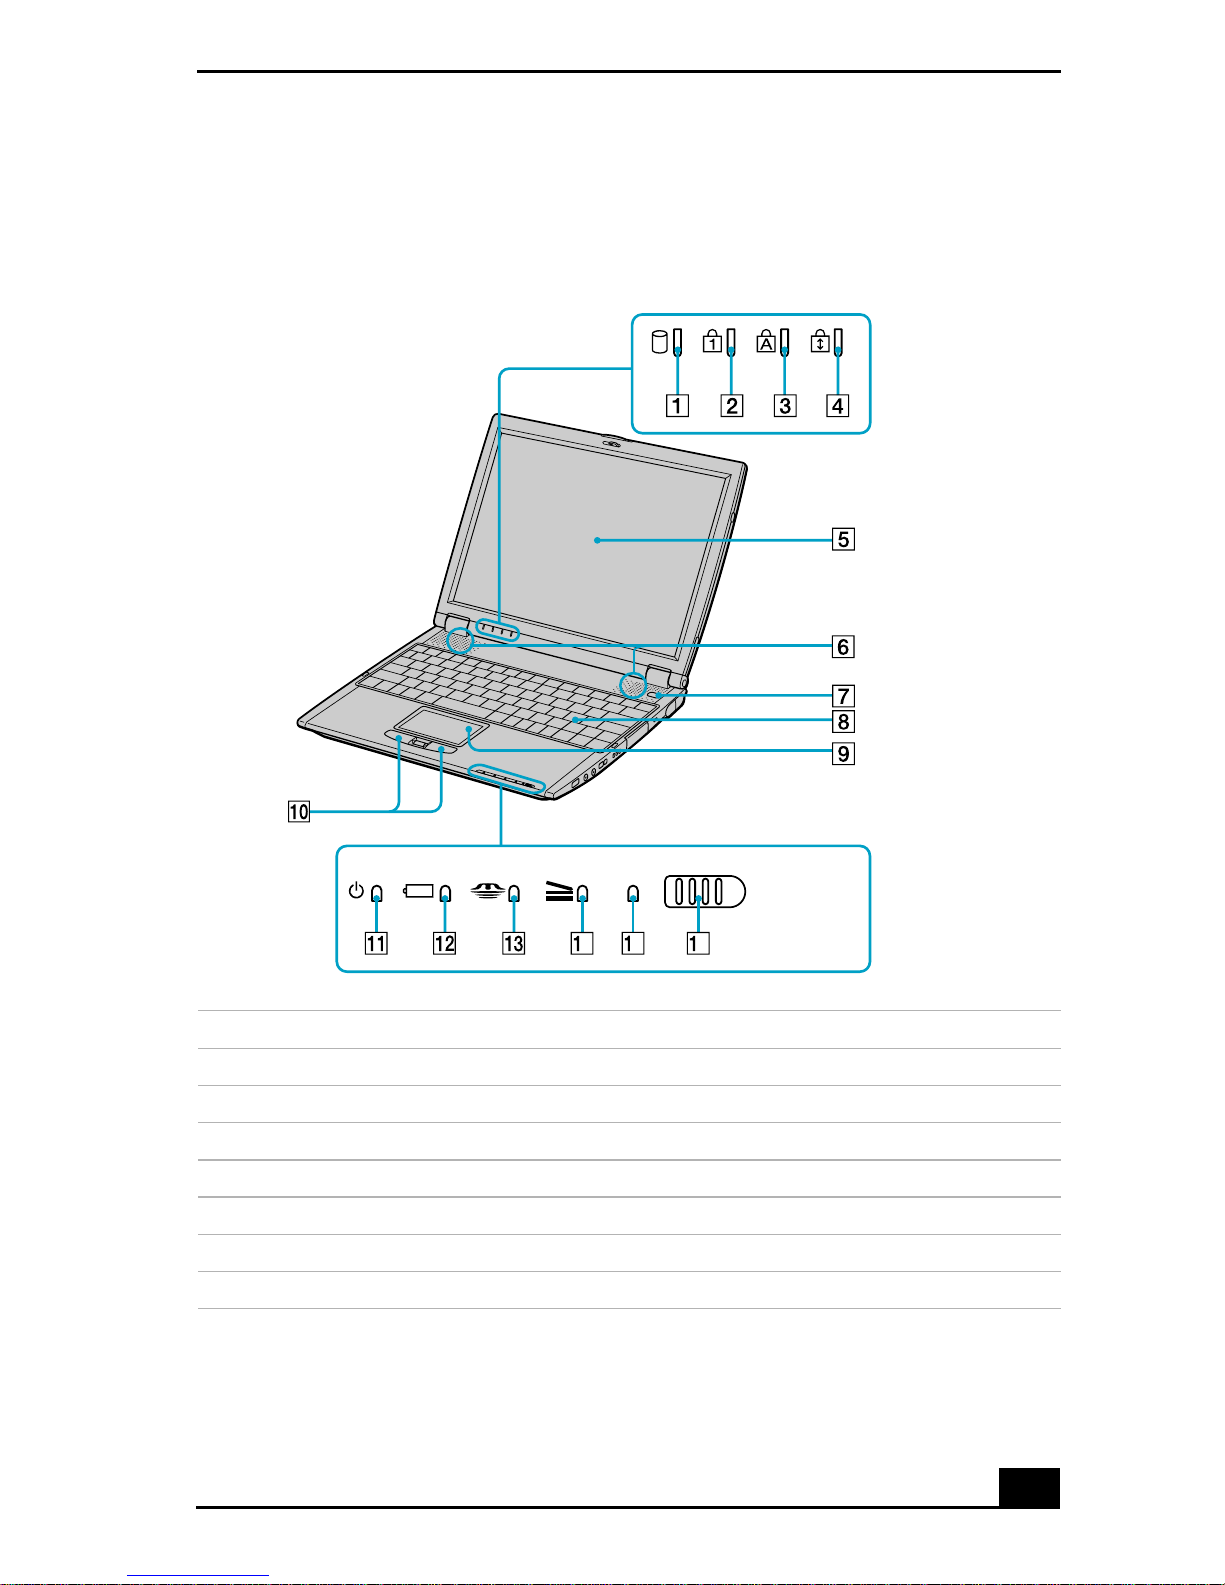
Locating Controls and Ports......................................19
Locating Docking Stat ion Controls and Ports.... ....... 2 4
Connecting the Docking St at ion ...............................26
Disconn ect i n g the Docking Stati o n...........................27
Getting Starte d .......... ....... ............ .............31
Turni n g On You r Co mpu t er.................................... ..32
Using the Touch Pad.................................................35
Register i n g Yo ur C omp u t er......................................36
Locating Your VAIO Computer User Guide............37
Setting Up A Dial-Up Connection............................39
Turni n g Off Your Co m put er..... .. ....... ... ....... .............41
Expand ing Your Computi ng Power..... ....43
Upgrading Memory...................................................44
Locating Preinstalled Programs ................................44
Using the Recovery CDs...........................45
Application and System Recovery CDs....................46
Using Your Recovery CDs........................................46
3
Page 4

V AIO® Computer Quick Start
Caring for Your Compute r...... ..................51
Stori n g Your Com p u t er ............................................52
Using Cables and Connections .................................52
Cleaning Your Computer..........................................53
Handl ing the LCD Screen.........................................53
Troubleshooting........................................55
Troubleshooting Your Computer........................... ...56
Troubleshooting the LCD Screen .............................60
Troubleshooting the Mous e and Touch Pad .............60
Troubleshooting the Docking Station...... ....... ....... ...62
Suppor t Op ti o n s................................. .......................63
Program Support Information...................................64
Index........................................................... 67
4
Page 5
Noti ce to U sers
© 2002 Sony Electronics I nc. All rights
reserved. This manual and the software
desc r ibed her e i n , in wh ole or in part, ma y not
be reproduced, translated, or reduced to any
machine-readable form without prior written
approval.
SONY ELECTRONICS INC. PROVIDES NO
WARRANTY WITH REGARD TO THIS
MANUAL, THE SOFTWARE, OR OTHER
INFORMATION CONTAINED HEREIN
AND HEREBY EXPRESSL Y DISCLAIMS
ANY IMPLIED WARRANTIES OF
MERCHANT AB ILITY OR FITNESS FOR
ANY PARTICULAR PURPOSE WITH
REGARD TO THIS MANUAL, THE
SOFTWARE, OR SUCH OTHER
INFORMATION. IN NO EVENT SHALL
SONY ELECTRONICS INC. BE LIABLE
FOR ANY INCIDENTAL,
CONSEQUENTIAL, OR SPECIAL
DAMAGES, WHETHER BASED ON TORT,
CONTRACT, OR OTHERWISE, ARISING
OUT OF OR IN CONNECTION WITH THIS
MANUAL, THE SOFTWARE, OR OTHER
INFORMATION CONTAINED HEREIN OR
THE USE THEREOF.
Sony Elect ron ics In c. res erves the r igh t to mak e
any modification to this manual or the
inform ati on contain ed herein at any time
withou t not ice. The s oftw are descr ibe d h erei n is
govern ed by the terms of a s epa rate us er licen se
agreement.
This product contains software ow ned by Sony
and lice ns ed by third parties. Use of such
software is subject to the terms and conditions
of license agreements enclosed with this
product. Some of the software ma y not be
transported or used outside the United States.
Software specifications are subject t o change
without notice and may not necessarily be
identical to current retail versions.
Updates and additions to software may require
an additional charge. Subscriptions to online
service providers may requi re a fee and credit
card information. Financial services may
require prior a rrangements wi th participating
financial institutions.
As an ENERGY
STAR® Partner, Sony
Corporation has
determined that this
product mee t s the
ENERGY STAR®
guidelines for energy
efficiency.
The International
Equipmen t Pr ogr am is an int ern atio nal pr o gram
that promotes energy saving through the use of
computers and other offi ce equipment. Th e
program backs the development and
dissem in a tio n of prod u cts with fun ctio ns th at
effecti vely reduc e energy consumption. It is an
open system in which business proprietors can
participate voluntarily. The targeted products
are office equipment such as computers,
displays, printers, facsimiles and copiers. Their
standa rd s and logos are uniform among
participating nations.
register ed mark.
ENERGY ST AR® Office
ENERGY STAR is a U.S.
5
Page 6
V AIO® Computer Quick Start
The Wireless LAN
PC card, which is
incorporated into
selected models
only, has passed WiFi certification and
compli es with the
interoperability
specifications
establi shed by
WECA (Wir eless
Ethernet
Compatibility
Alliance).
i.LINK connection may vary, depending on the
software application s , operating syst em, and
compatible i.LIN K devi ces . All pro d ucts with
an i.LINK connection may not communicate
with each other. Pl eas e refer to the
docum en ta tio n that cam e with your com p atib le
i.LINK device for information on operating
conditions and proper connection. Before
connecting compatible i.LINK PC peripherals
to your system, such as a CD-RW or hard disk
drive, confirm their operating system
compatibility and required operating
condition s. All other trade mar ks are t rade marks
of their respective owne rs.
Microsoft note
Sony, DVgate, Handycam, i.LINK, Mavica,
MagicGat e™ Memory Stick , Memory
Stick , MovieShaker, VAIO, and the
MEMORY STICK
TM
V A IO logo are trademar ks of Sony Corp oration.
Micros of t, Windows Media, W indows,
Windows NT, and the Windows logo are
register ed trademarks of Microsoft
Corporation. Intel, SpeedStep, and Pentium are
trade marks or regist ered trademar ks of Intel
Corporation. PS/2 is a re gistered trademark of
IBM. Ac robat Reade r, Photoshop, Ph otoshop
Elements, and Premiere are trademarks of
Adobe Syst ems In cor porated. Po we r Panel is a
trade m ark of Phoenix Technologies Ltd.
This product incorporates copyright protection
technol ogy that is protected by method claims
of certain U .S. patents and other intellectual
property rights ow ned by Macrovision
Corp o r a tion an d other ri gh t s ow ners . U se of
this copyright protection technology must be
authorized by Macrovision Corporation, and is
intended for home and other limited viewing
uses on l y unless other wise au t h o r ized by
Macrovision Corporat ion. Reverse engineering
or disass embly is pr ohibited. i.LINK is a
trade mark of Sony used only to designate that a
produc t cont ains an I EEE 1 394 con necti on. T he
Certain so ftw a r e product(s) included with this
computer may include features such as copy
protecti on an d con tent ma nage ment te chnol ogy.
Use of the software product(s) requires
agreement to applicable en d us er agreements
and full comp li ance with applicable product
activation procedu res. Product activation
procedures and pr ivac y pol ici es will be detai le d
during initial launch of the software product(s),
or upon certain reinstallations of the software
product(s) or reconfiguration of the computer,
and may be comp leted by Inter net or telephone
(toll charges may apply).
Owner’s Record
The model number and serial number ar e
located on the bottom of you r S ony VAIO
computer. Re f er to the model a nd serial number
when you call your Sony Ser vice Center.
Model Num b er : PCG-6 5 2L
Serial Num ber:______________________ __
6
Page 7
Notice to Users
Safety Information
WARNING
❑
To prevent fire or shock hazard, do not
expos e your computer to ra in or moisture.
❑ To avoid electrica l shock, do not open the
cabinet. Refer servicing to qualified
personne l only.
❑ Never install modem or telephone wiring
during a lightning storm.
❑ Never install telephone jacks in wet
locations unless the jack is specifically
designe d for we t loca tio ns.
❑ Never touch uninsulated telephone wire
or terminals unless the telephone line has
been disconnected at the network
interface.
❑ Use caut ion when installing or modifying
telephon e lin es .
❑ Avoid using the modem dur ing an
electrical storm.
❑ Do not use th e modem or a telephone to
report a gas leak in the vic inity of the leak.
❑ A socket outlet should be as close as
possible to the unit and easily accessible.
❑ i.LINK, PC Card, and USB connect ors are
not supplied with Limited Power Sources
.
To change the backup battery,
plea se c ont a ct yo ur ne ar e st Sony
Service Cen t er.
Caution: The use of optical
inst r um e nts w ith t his produc t
will incr ease eye hazard. As the
laser beam used in this product
is harmful to the eyes, do not
attempt to disassemble the
cabinet. R ef er s ervicing to
qualified personnel only.
(For CD-RW/DVD Combo
Drive, CD-ROM drive,
DVD-ROM drive) Danger:
Vi sible an d invisible laser
radiati on when open. Avoid
direct exposure to beam.
Caution: To reduce the risk of
fire, use only No. 26 AWG or
larger telecommunication line
cord.
AVERTISSEMENT
Pour prévenir tout risque d’incendie ou
❑
d’électrocution, garder cet appareil à
l’abri de la pl uie et de l’humi dité.
❑ Pour prévenir tout risque d’électrocution,
ne pas ouvrir le châssis de cet appareil et
ne confier son ent retie n qu’à une per sonne
qualifiée.
❑ Ne jamais effectuer l’instal lation de fil
modem ou téléphone durant un orage
électrique.
❑ Ne jamais effectuer l’instal lation d’une
prise té léphonique dans un endroit
mouillé à moins que la prise soit conçue à
cet effet.
❑ Ne jamais to uch e r un fil télé ph o ni que à
découvert ou un terminal à moins que la
7
Page 8
V AIO® Computer Quick Start
ligne téléphonique n’ait été débranche de
l’interface réseau.
❑ Soyez très pr udent lorsque vous installez
ou modifiez les lignes téléphoniques.
❑ Évitez d’utiliser le modem durant un
orage électrique.
❑ N'utilisez pas le modem ni le téléphone
pour prévenir d'une fuite de gaz quand
vous êtes près de la fuite .
❑ L’appareil doit être le plus près possible
d’une prise murale pour en faciliter
l’accès.
❑ Des connecteurs i.LINK, PC Card, et
USB ne sont pas fo urnis avec des So urces
d’Énergie Limitées.
Pour changer l a pile de
rechange, veuillez contacter
votre cen t r e de service Sony le
plus près.
Avertissement: L'utilisation
d'instruments optiques avec ce
produit augmente les risques
pour les yeux. Puisque le
faisceau laser utilisé dans ce
produit est dommageable pour
les yeux, ne tentez pas de
désassembler le boîtier.
Adressez-vous à un agent de
service qualifié.
(Pour le lecteur Combo de
CD-RW/DVD, le lecteur CDROM, le lecteur DVD-ROM)
Danger: Radiation laser visible
et invisible si ouvert. Évitez
l’exposition directe au f aisceau.
Attention : Afin de réduire les
risques d'incendie, n'utilisez
qu'un c ord on de c ommu ni ca tio n
N0. 26 AWG ou plus gros.
If you have ques tions about this product, you
can reach the Sony Customer Information
Service Center at 1-888-4-SONY-PC; or wr it e
to the Sony Customer Information Service
Center at 12451 Gate w ay Blvd., Ft. Myers, FL
33913 or find Sony Cust om er Servi ce on the
Web at: http://www.sony.com/pcsupport.
Regu l ato r y I n formatio n
Declaration of Conformity
Trade Name: Sony
Model No.: PCG-652L
Responsible Party: Sony Electronics
Inc.
Address: 680 Kinderkamack
Road
Oradell, NJ 07649
Telephone:
(For FCC-related
matt ers only.)
This device complies with Part 15 of the
FCC rules. Ope ratio n is subj ect to the
following two conditions:
(1)This device may not cause harmful
interference.
(2)This device must accept a ny interferen c e
received, including interference that may
cause undesired operation.
This equipment has been tested and found to
compl y with the lim its for a Clas s B digi tal
device, pu rsuant to Part 15 of the Rules. These
lim i ts are des i g ned t o provi d e r e as o nable
protection against harmfu l interferenc e in a
reside n tial installatio n . This equ ip me nt
generate s, uses , and can radia te rad io fre quen cy
energy and, if not inst alled and used i n
accordanc e with the instructions, may cause
201-930-6972
8
Page 9

Notice to Users
harmful interference to radio communications.
However , the re i s no gua rantee t ha t in ter ference
will not occur in a particular installation. If this
equipment does cause harmful interference to
radi o or televisio n rec eption, wh ic h can be
deter mined by turnin g the equipment off and
on, the user is enco u ra ged to try to correc t the
interference by one or more of the following
measures:
❑ Reorien t or relo cate the rec eivi ng antenn a.
❑ Increase the separation between the
equipment and the receiver.
❑ Connect the equipment into an outlet on a
circuit different from that to which the
recei ver is connected.
❑ Consult the dealer or an experienced
radio/TV technician for help.
You are cautioned t hat any changes or
modif ications not expressly approved in thi s
manual coul d vo id your a uthori ty to oper ate t his
equipment.
Only peripherals (computer input/output
devices, terminals, pri nters, etc.) that comply
with FCC Class B limits may be attached to this
computer product. O per ation with noncompliant peripherals is likely to result in
interference to radio and television reception.
This modem uses the USOC RJ-11 telephone
jack.
The REN is used to determine the quantity of
devices wh ich may be connected to the
telepho ne line. Excess ive RENs on the
telephone line may result in the devices not
ringing in response to an incoming call. In
most, but not all ar eas , the sum of the RENs
should not exceed five (5.0). To be certain of
the numb er of devices that may be connected to
the line, as determined by the total RENs,
contact th e te lepho ne co mpany t o dete rmin e the
maximum REN for the calling area.
If the terminal equipment causes harm to the
telephone network, the telephone company will
notify you in advance that temporary
disconti nuance of service may be required. But
if advance notice is not pract ical, the telephone
company wil l notify the customer as soon as
possib le. Al so, you w il l be ad vi sed of yo ur r ight
to fi le a com plaint with the FCC i f you believe
it is necessary.
The telephone company may make changes in
its facili tie s, eq u ip ment, op e ra tio n s or
procedures that could affect the operations of
the equipment. If this happens, the telep hone
company wil l provide advanc e notice in order
for you to make the necessary modifications in
order to maintain uninterrupted service.
All cabl es us ed to connect peripherals must be
shield ed and grounded . Oper ation with cables,
connected to periphe rals, that are not s hielded
and grounded, may re s ult in interfe rence to
radio and televisi on reception.
FCC Part 68
This equ ipment complies wi th Part 68 of the
FCC rules. On the bottom of this equipment is a
label that contains, among other information,
the FCC Ringer Equiva lency Number (REN )
for this equipment. If requested, this
inf ormation m ust be p rovided to the teleph one
company.
If trouble is experienced with this equipment,
you can reach the Sony Customer Information
Servic e Cen ter at 1-888-4- SONY-PC; or write
to the Sony Customer Information Service
Center at 12451 Gatew ay Blvd., Ft. Myers, FL
33913 or find Sony Customer Servi ce on the
Web at: http://www.sony.com/pcsuppo rt.
Repair of this equipmen t should be made onl y
by a Sony Service Center or Son y authorized
agent. For the Son y Servic e Center nea rest you,
call 1-888-4-SONY-PC (1-888-476-6972).
This equipment cannot be used on public coin
service provided by the telep hone company.
Connection to Party Line Service is subject to
9
Page 10

V AIO® Computer Quick Start
state and poss ible provin cial tariffs. (Contact
the state or provincial utility service
commission, public service commission, or
corporation commission, for information.)
FCC Radio Frequency
Exposure (United States)
This equipment complies with FCC radiation
exposu re limits set for th for an uncont rolled
environm ent. This equipment s hould be
installed and operated wit h minimum distance
of 8 inches ( 20 cm ) between the radiator and
body (excluding extremitie s : hands, wri s ts, and
feet).
Users are not permitted t o make changes or
modify the system in any way.
IC RSS-210 (Canada)
Operation is subject to the following two
condit ions: (1) this device may not cause
interference, and (2) this device must accept
any interference, including interference that
may cause undesired oper ation of the device.
To prevent radio interference to the licensed
service, this device is intended to be operated
indoors and away from w indows to prov ide
max imum shielding. Eq uipm ent (o r its transmit
antenna) that is installed outdoors is subject to
licensing.
Pour empêcher que cet appareil cause du
broui llag e au serv ic e faisa n t l’ob jet d’u n e
licence, il doit être utilisé à l’interieur et devrait
être placé loin des fenêtres afi n de fournir un
écran de blindage maximal. Si le matériel (ou
son antenne d’ émission) est installé a
l’exterieur, il doit faire l’objet d’une licence.
L’expression “IC:” avant le numéro
d’homol ogation/enregistrem ent signifi e
seulement que les spécifications techniques
d’Industrie Canada on t ét é r es pectées.
Telephone Consumer
Protection Act of 1991
(United States)
The T elephone Cons umer Protection Act of
1991 makes it unlawful fo r any person to us e a
computer or other electronic device to s end any
message via a telephone facsimile machine
unless such message clearly contains, in a
margin at the top or bottom of each transmitted
page or on the f irst pa ge o f the trans mis sion, the
date and time it is sent and an identification of
the business, other enti ty, or individual sending
the m essage, and the telephone number of the
sending machine or such business, other entity,
or individual.
In order to program this information into your
facsimile mac hine, see your fax sof tware
documentation.
The term “IC :” before the
certif ication/re gistration number only signifies
that the Industry Canada technical
specifications were met.
L’utilisation de ce dispositif est autorisée
seulement aux conditions suivantes: (1) il ne
doit pas produire de brouillage et (2)
l’utilisateur du dispositif doit être prêt à
accepter tout brouillage radioél ectrique reçu,
même si ce brouillage est susceptible de
compromettre le fonctionnement du dispositif.
10
Page 11

Notice to Users
Telephone Consumer
Guideli n es (Cana d a)
Please refer to your t e lephone directory under
‘Privacy Issues’ and/or ‘Terms of Service.’ For
more detailed information, please cont act:
CRTC
Terrasses de la Chaudiére, Tour centrale
1 promenade du Por tage, 5 étage Hull
PQ K1A 0N2.
This Class B digital apparatus complies with
Canadian ICES-003.
Cet àppareil numérique de la classe B est
conforme à la norme NMB-003 du Canada.
RECYCLING LITHIUM ION
BATTERIES
RECYCLING
LITHIUM-ION
BATTERIES
Lithium-Ion
batteries are
recyclable.
You can help
preserve our
environment by
returning your us ed
rechargeable
batteries to the
colle cti on and
recycling location
nearest you.
RECYCLAGE DES
ACCUMULATEURS AUX
IONS DE LITHIUM
RECYCLAGE DES
ACCUMULATEU
RS AUX IONS DE
LITHIUM
Les accumulateurs
aux ions de lith iu m
sont recyclables.
Vo us pouve z
contribuer à
préserver
l’environnement en
rappor tant les pile s
usées dans un point
de collection et
recyclage le plus
proche.
Pour plus d’informations sur le recyclage
des accumulateurs, télé phonez le numéro
gratuit 1-800-822-8837 (Etats-Units et
Canada uni quement), ou vi sitez
http://www.rbrc.org/.
Avertissment: Ne pas utiliser des
accumulat eurs aux ions de lit hium qui sont
endomma gées ou qui fui e nt .
For more information regarding recycling of
rechargeable batteries, call toll free 1-800822-8837, or visit http://www.rbrc.org/.
Caution: Do not handle damaged or leaking
Lithium-Ion batteries.
11
Page 12
V AIO® Computer Quick Start
INDUSTRY CANADA NOTICE
Do not ha ndle dama ge d or
leaking lithium ion batterie s.
Danger of explosion if battery is
incorrectly replaced. Replace
only with the same or equivalent
type recommended by the
manufacturer . Discard used
batteries accordin g to the
manufacturer’s instructions.
The batt ery pack used i n this
device may present a f ire or
chemical burn hazard if
mistreated. Do not disassemble,
heat above 14 0°F (60°C) or
incinerat e. Dispose of used
battery promptly. Keep away
from children.
Ne pas utiliser des batteries au
lithium ionis é qui sont
endommagées ou qui fuient.
Une batterie non conforme
présente un danger d'explosion.
La rempla cer seu lemen t par une
batterie identique ou de type
équivalent recommandé par le
fabricant. Évacuer les batteries
usées selon les directives du
fabricant.
La manu tention incorrect e du
module de batt erie de cet
ap parei l p r é s ente un risque
d'ince ndie ou de brûlures
chimiques. Ne pas démonter,
inc i n érer ou expos e r à u n e
température de plus de 60°C.
Évacuer promptement la
batterie usée. Garder hors de
porté e de s enfant s.
NOTICE: The Industry Canada label identifies
certi fie d equip m ent. This certific atio n mean s
that the equipment meets certain
telecommunications net w ork protective,
operational and safety requirements as
pre scri bed in the app r opriate Terminal
Equipmen t Technical Requirements
document(s). The Department does not
guarantee the equipment will operate to the
user’s satisfaction.
Before installing this equipment, users should
ensure tha t it is permissibl e to be connected to
the facil itie s of th e local te le comm u ni cat ion s
company. The equipmen t must also be installed
using an acceptable method of connection .
The customer should be aware that com pliance
with the above conditions may not prevent
degradation of service in some situations.
Repairs to certified equipment should be
coordinated by a representative designated by
the supplier. Equipment m alfunctions or any
repair s or al ter atio ns mad e by the user to this
equipment m ay give the telecommunications
company caus e to request that the user
disconnect the equipment .
Users should ensure for their own protection
that the electrical ground connectio ns of the
power utility, telephone lines and internal
metallic water pipe system, if present, are
connected together. This precaution may be
particularly important in rural areas.
Caution: User s sho uld no t att emp t to ma ke su ch
connections themselves, but should contact the
appropri ate electric inspection authority, or
electrician, as appropriate.
NOTICE: The Rin ger Equivalency Number
(REN) assigned to each terminal device
provides an indi cation of t he maximum number
of terminals allowed to be connected to a
telepho ne interface. Th e termination on an
interface may consist of any combination of
12
Page 13

Notice to Users
devices subject only t o t he requirement that the
sum of the RENs of all the devices does not
exceed 5. The REN for this equipment is 0.2.
AVIS DE L’INDUSTRIE
CANADA
AVIS: L’étiquette d’In dus tri e Cana d a ident ifie
le matériel homologué.
Cette étiquette certifie que le matériel est
conforme aux normes de protection,
d’expl oitation et de s écurité des réseaux de
télécommunications, comme le prescrivent les
document s con cernan t les ex igence s tec hni ques
relatives au matériel terminal. Le Ministère
n’assure toutefois pas que le matériel
fonctionnera à la satisfaction de l’utilisateur.
Avant d’installer ce matériel, l’utilisateur doit
s’assurer qu’il est permi s de le raccorder aux
installations de l’entreprise locale de
télécommunication. Le matériel doit également
être in stall é en sui vant un e métho de accep té e de
raccordement. L’abonné ne doit pas oublier
qu’il est possible qu e la conformité aux
conditi ons éno ncées ci-dess us n’ empêche p as l a
dégradation du service dans certaines
situations.
Les réparations de matériel homologué doivent
être coordonnées par un représent ant désigné
par le fo urniss e u r. L’e n tr e pr ise de
téléco mm unications peut demander à
l’utilisateur de débrancher un appareil à la suite
de réparations ou de modifications effectuées
par l’utili sat e ur ou à cau se de mau vai s
fonctionnement.
Pour sa pr opre protect ion, l’utilisateur doit
s’assurer que tous les fils de mise à la terre de la
source d’énergie électrique, des lignes
téléph oniques et des canalisation s d’ eau
métalliques, s’il y en a, sont raccordés
ensemble. Cette pr éc auti on est par tic uliè rement
impor tante dans les régions rurales.
Avertissement: L’util is ate ur ne doit pas te nt er
de faire ces raccordements lui-même; il doit
avoir reco urs à un service d’inspection de s
installations électriques, ou à un électri cien,
selon le cas.
AVIS: L’indice d’équivalence de la sonnerie
(IES) assig né à chaque disposi ti f terminal
indique le nombre maximal de terminaux qui
peuvent êtr e raccordés à une inter f ace.
La termin a ison d’une in ter fa ce télé pho niq u e
peut consi s ter en une combination de quelques
dispositifs, à la seule condition que la somme
d’indices d’équivalence de la son nerie de tous
les dispositifs n’excède pas 5. L’indice
d’équivalence de la sonnerie de ce matériel est
de 0.2.
INDUSTRY CANADA NOTICE
NOTICE: This equip ment mee ts th e applic ab le
Industry Canada T er minal Equi pment Te chnic al
Specifications. This is confirmed by the
registr a tion number. The abbreviation, IC,
before the registration number signifies that
reg is t ra t ion was pe r f o r m e d ba s e d on a
Declaration of Conform it y indicating that
Industry Canada technical specifications were
met. It does not imply that Industry Canada
appr ove d t h e equi p m ent.
The Ringer Equivalence Number (REN) for this
terminal equipment is 0.2. The REN assigned to
each term inal equipment provides an i ndication
of the maximum number of ter minals allowed
to be connected to a telephone inter face. The
termination on an interf ace may cons ist of any
combination of devices s ubject only to the
requirement that the sum of the Ringer
Equivalence Numbers of all th e devices does
not exceed f ive.
13
Page 14
V AIO® Computer Quick Start
CD-RW/DVD-ROM Laser
Diode Properties
PCGA-DSM51 docking s tation
Laser Output: 64 µW (CD)
1.28 µ W (DVD)
Wave Length: 784 nm (CD)
662 nm (DVD)
The use of optical instruments
with this product will increase
eye hazard. As the laser beam
used in this product is harmful
to the eyes, do not attempt to
disassemble the drive cabi net .
Refer servicing to qualified
person ne l only.
Visible and invisible laser
radiation when open. Avoid
direct exposure to beam.
14
Page 15

Setting Up
Congratulati ons o n your p ur chas e of t he Sony VAIO® computer. Sony h as
combined leading-edge technology in audio, vide o, co mputing, and
communications to provide you with state-of-the-a rt personal computing.
❑ Unpacking Your Computer
❑ Applying Ergonomics
❑ Locating Controls and Ports
❑ Connecti ng the Docking Station
❑ Disconnecting the Docking Station
15
Page 16
V AIO® Computer Quick Start
Unpacking Your Computer
Main U n i t Po we r Co rd
AC Adapter
Docking Station Rechargea ble Battery
Documents
❑ VAIO® Computer User Guide — A searchable online help file that
contain s de tailed informati on on how to use your new computer. See
“Lo c atin g Your VAI O Computer Use r G u id e” on pa ge 37 for m ore
information.
❑ VAIO® Computer Quick S tart — Contains information on unpacking and
setting up your computer for immediate use.
❑ VAIO® Computer Specifications (Windows® XP) — An online file that
details the hardware specific ations and lists the ins talled software progra ms
on your computer. See “Locating Your VAIO Computer User Guide” on
page 37 for more information.
❑ VAIO® Computer Specifications (Windows® 2000) — A printed sheet
that details your computer's hardware specifications.
16
Page 17

Unpacking Your Computer
❑ Microsoft® Windows® manual — Explains how to use the basi c fea tures
of the Microsoft® Windows ® opera ting system installed on your computer.
Software CDs
❑ Microsoft® W ord — Enables you to reinsta ll Microsoft Word to your
VAIO ® co mputer if the application becomes corrupted or is erased.
Recovery CDs
❑ Application Recovery CD(s) — Enables you to reinstall individ u al
software programs and device drivers if they become corrupted or are
erased.
❑ System Recovery CD(s) — Enables you to re store the oper ating sys tem a nd
software tha t sh ipped with your computer if the y become corrupted or are
erased. This CD restores your computer to its original factory settings, so
user data and program s installed since you s tarted using your comp uter will
be lost.
✍ To use these recovery CDs, connect th e docking station (supplied with selected
model s) or an optical drive to the computer. See “Using the Recovery C D s” on
page 45 for more information.
17
Page 18

V AIO® Computer Quick Start
Appl ying Ergonomics
Your computer is a portable device and can be used in a va riety of environments.
Whenever possible , you should apply the follo wing ergono mic considerati ons for
both stationary and portable environments.
❑ Position of your computer — Place th e computer directl y in front of you a s
you work. Keep your forearm s horizontal, with your wrists in a neutral,
comfortable position while using the keyboard, touch pad, or external
mouse. Let your upp er arms han g natural ly at your s ides. Take breaks during
sessions with your computer. Excessive use of the computer may strain
muscles or tendons.
❑ Furniture and posture — Sit in a chair with good back support and
armrests. Adjust the level of the chair s o your feet are flat on the floor. A
footrest may make you mo re co mfortable. Sit in a rela xed, upright posture
and avoid slouc hing forward or leaning far backward.
❑ Viewing angle of the computer’s display — Use the display’s tilting
feature to find the best viewing angle. Also try adjusting the brightness
setting of the display. Following these suggestions can reduce eye strain and
muscle fatigue.
❑ Lighting — Ch oose a l ocati on where windo ws and lig hts do not create gla re
and reflection on the display. Use indirect lighting to avoid bright spots on
the display. You can also purchase accessories for your display that help
reduce glare. P roper lighting adds to your comfort and work effecti vene s s.
❑ Placement of an external d is p lay — When using an external display , s et
the display at a comfortable viewing distance. Make sure the display screen
is at eye level or s lightly lower when you are si tting in front of the monitor.
18
Page 19
Locating Controls and Ports
Front
Applying Ergonom ics
OFF ON
WIRELESS
LAN
5
4
6
1 Hard disk drive indicator 9 Tou ch pad
2 Num lock indi cator 10 Left and right buttons
3 Caps lock indicator 11 Power indicator
4 Scroll lock indicator 12 Batter y indicator
5 LCD screen 13 Memory Stick® media indicator
6 Speakers 14 Docking station indicator
7 Power button 15 Wireless LAN indicator
8 Keyboard 16 Wireless LAN switc h
* Wireless LAN cap a bilities are availab le on sele cte d mod e ls.
*
*
19
Page 20
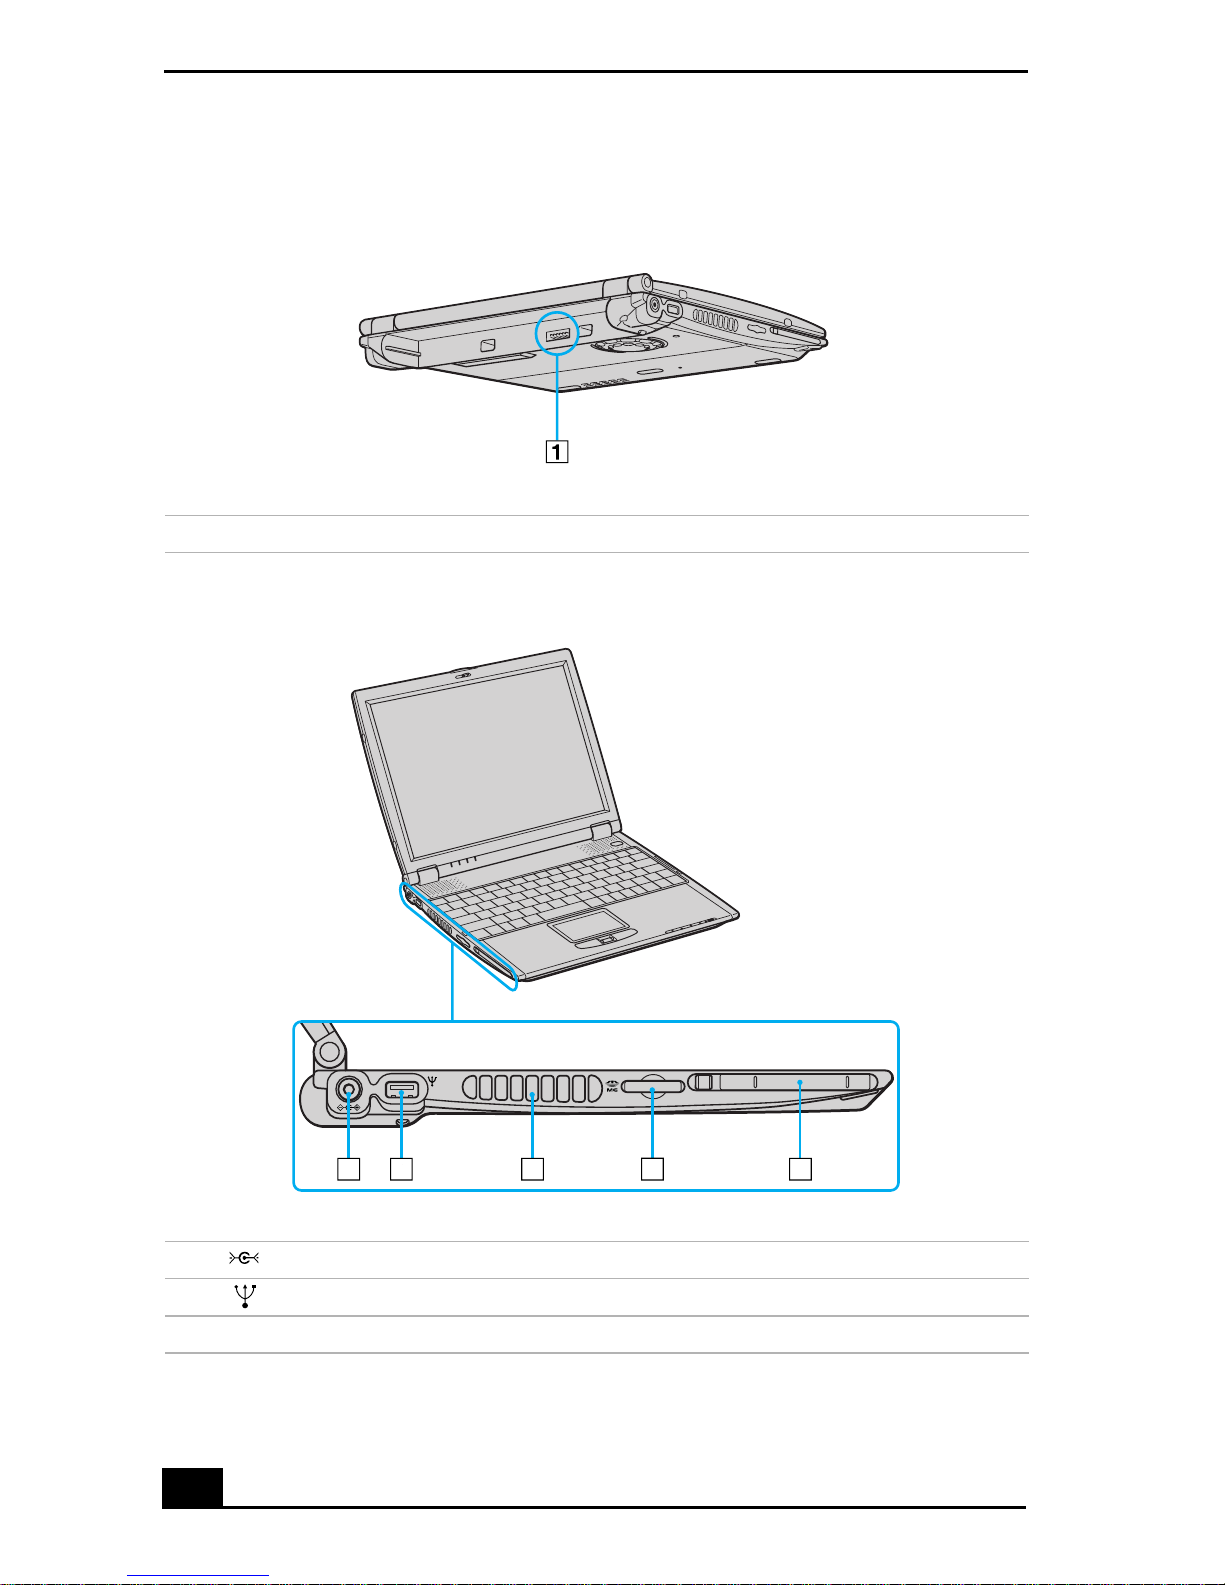
V AIO® Computer Quick Start
Back
1 Battery port
Left
12 3
1 DC IN port 4 Memory Stick® media slot
2 USB port 5 PC Card slot
3 Air vent
20
4
5
Page 21
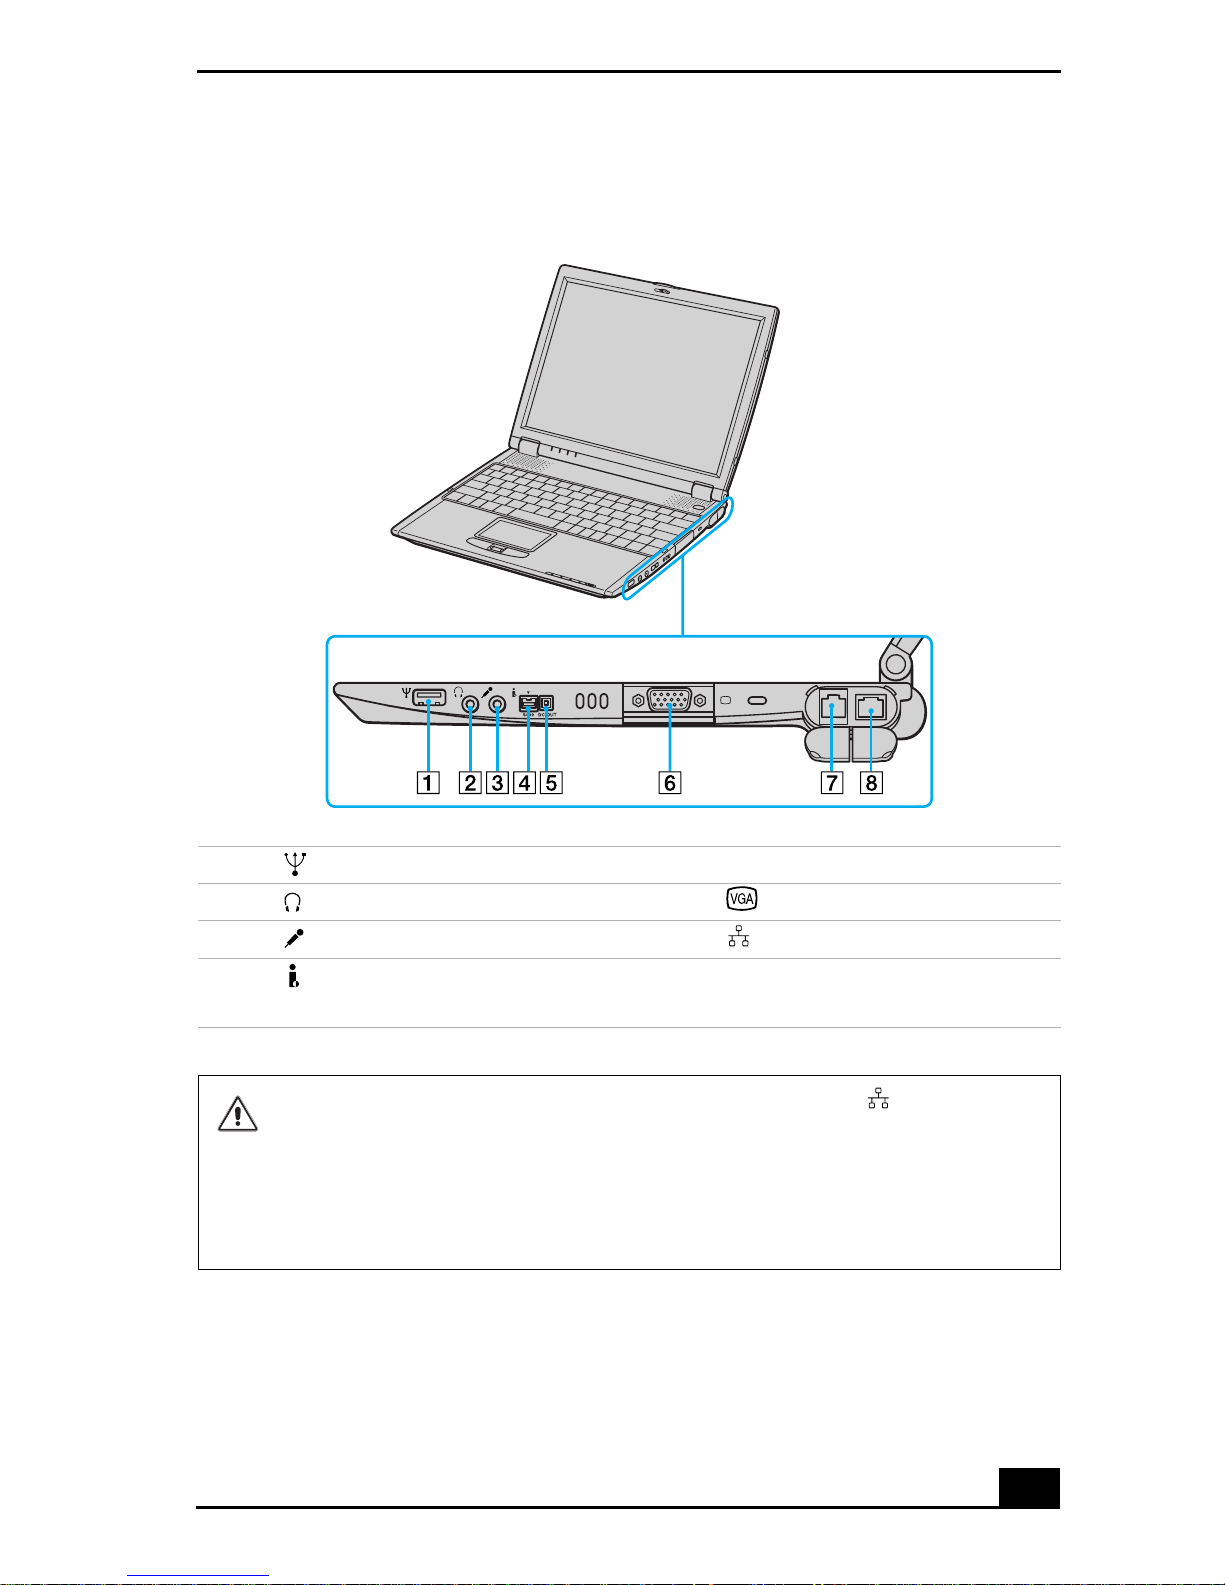
Right
Applying Ergonom ics
1 USB port 5 Periphera l device DC OUT port
2 Headphone jack 6 VGA (monitor) port
3 Microphone jack 7 Ethernet port
4 i.LINK® (IEEE 1394) S40 0
8 Modem jack
port
Only connect 10BASE-T and 100BASE-TX cables to the Ethernet port.
Do not co nnect any other type of network cable or any telephone line.
Connec ting cables ot her than those listed above may result in an electric
current overload and could cause a malfunction , excessive he at, or fire in
the port. To connect the unit to the network, contact your network
administrator.
21
Page 22
V AIO® Computer Quick Start
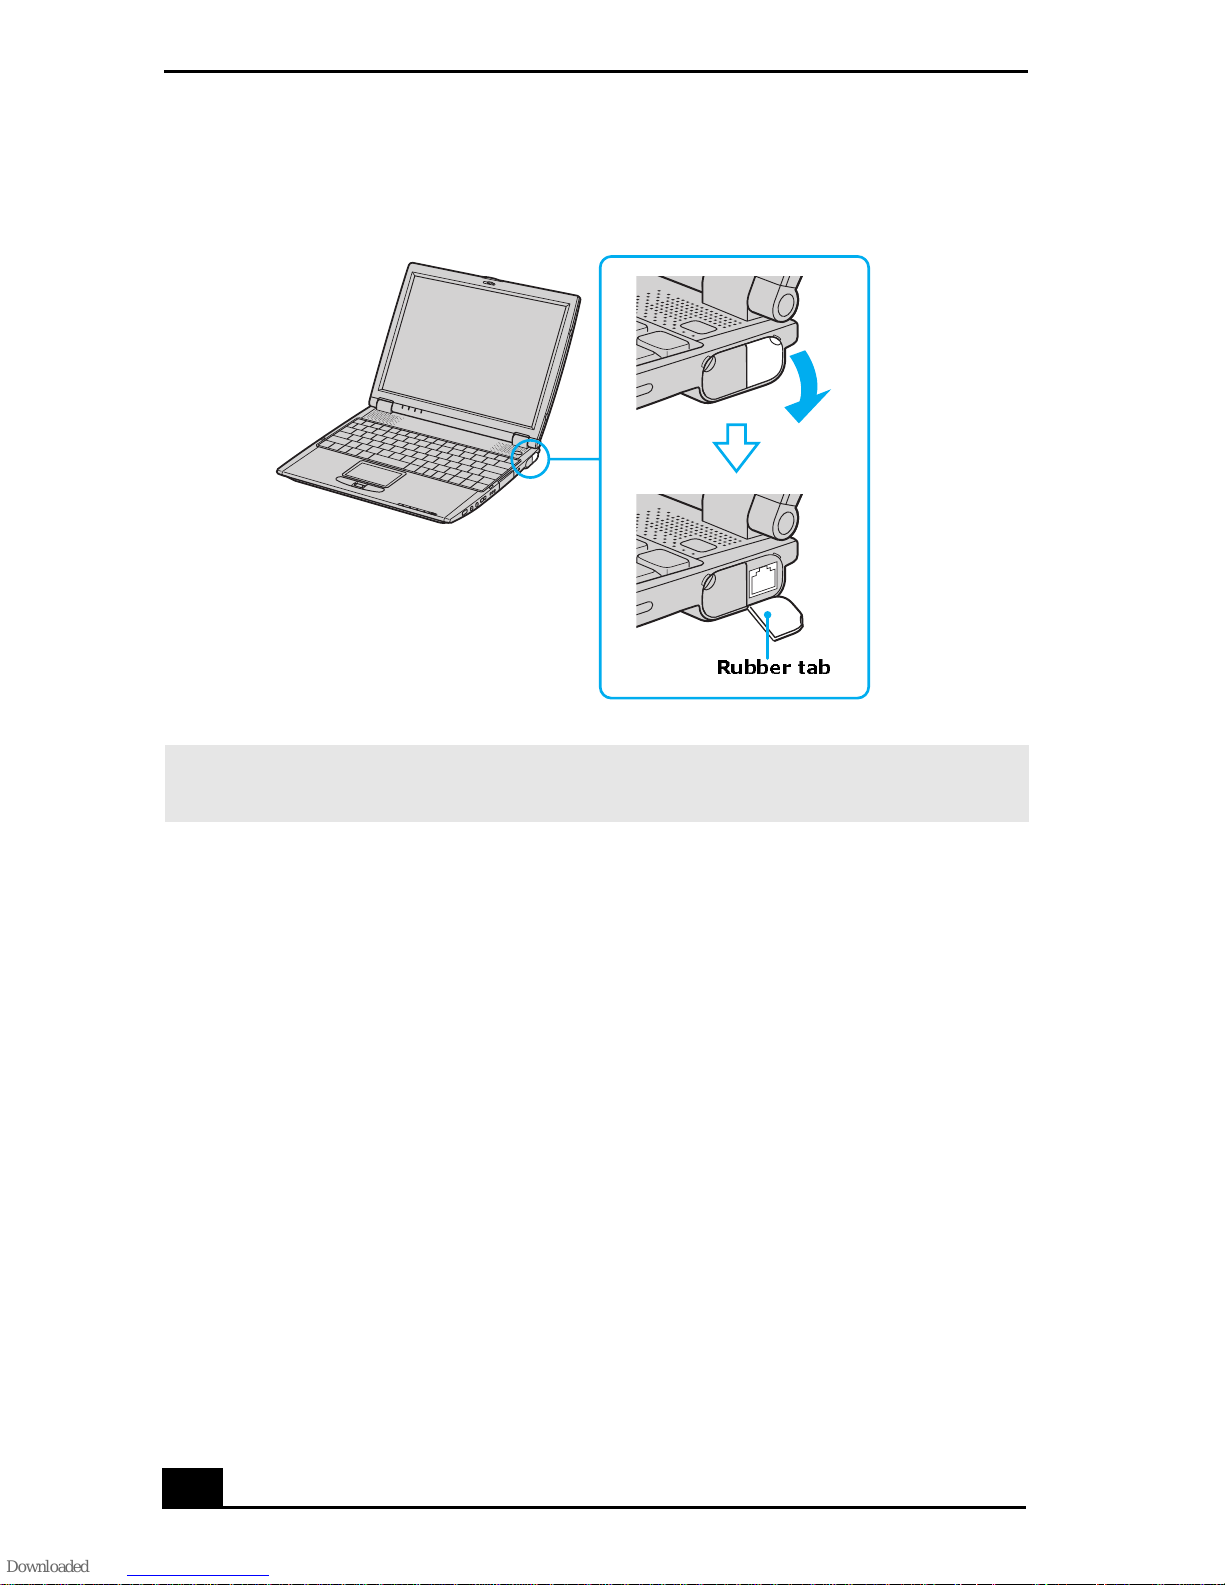
Removing Rubber Tab
Rubber tab
✍ Gently pull the rubber tab away from the computer to find the Ether net port and
modem jack.
22
Page 23
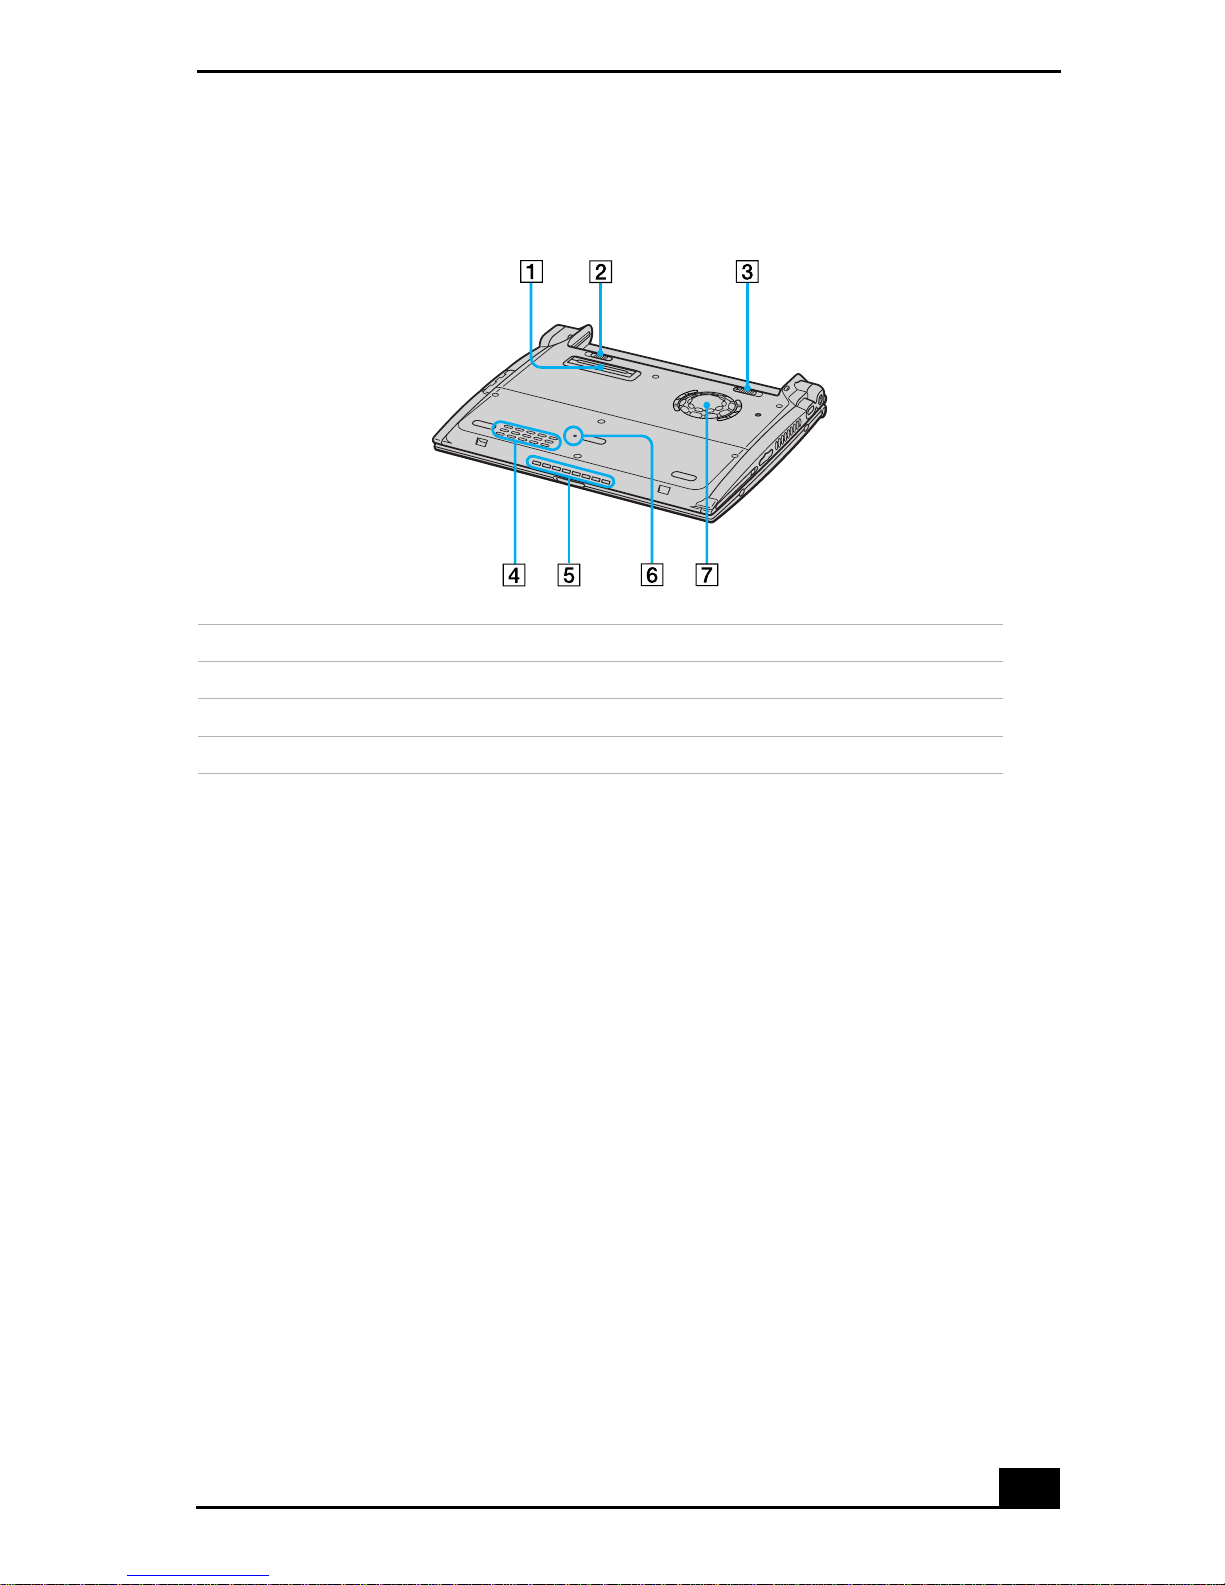
Bottom
1 Docking station connector 5 Air vent
Applying Ergonom ics
2 UNLOCK/LOCK switch 6 Reset switch
3 UNLOCK switch 7 Ventilation fan
4 Air vent
23
Page 24
V AIO® Computer Quick Start
Locating Docking Station Controls and Ports
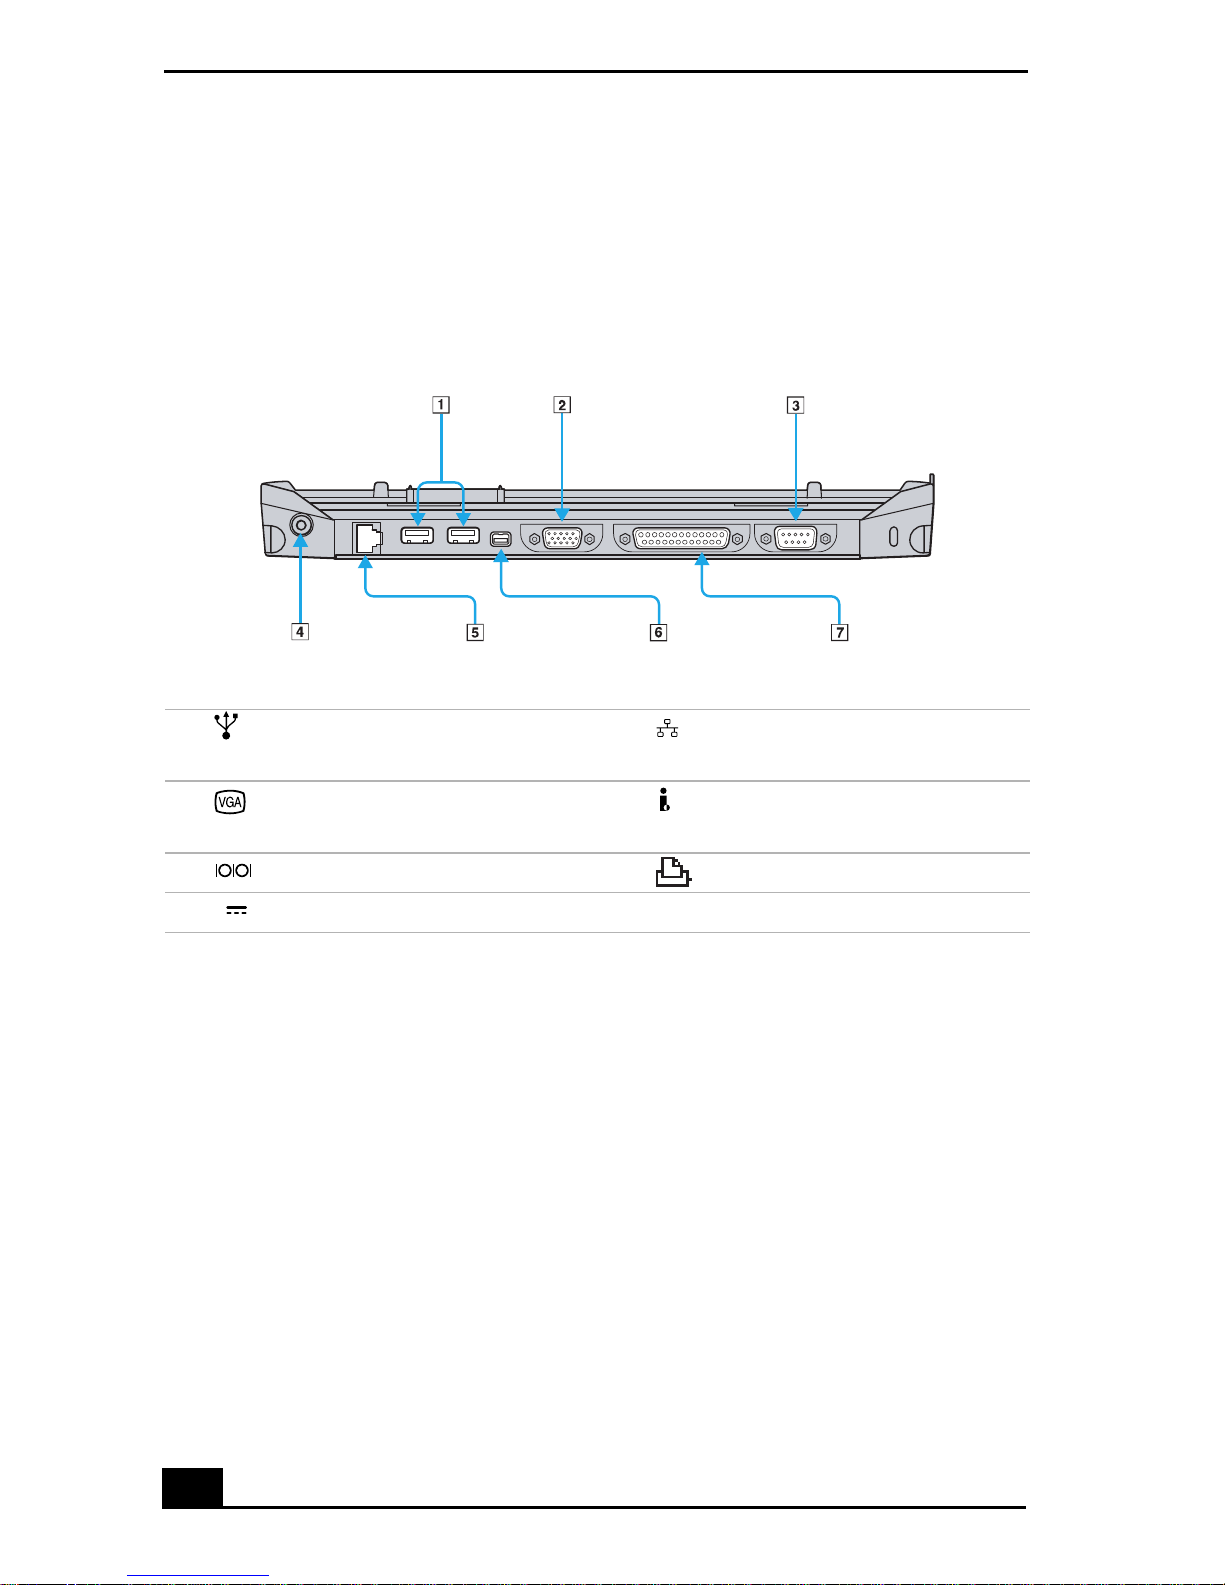
Your computer comes wit h a PCGA-DSM51 docking station. The Sony docking
station includes a floppy disk drive, an optical drive, and additional ports.
Back Pane l
1 USB ports 5 Et hernet/Network port
(10BASE-T/100BASE-TX)
2 VGA (monitor) port 6 i.LINK®
*
(IEEE 1394)
S400 port
3 Serial port 7 Printer port
4 DC IN port
24
Page 25
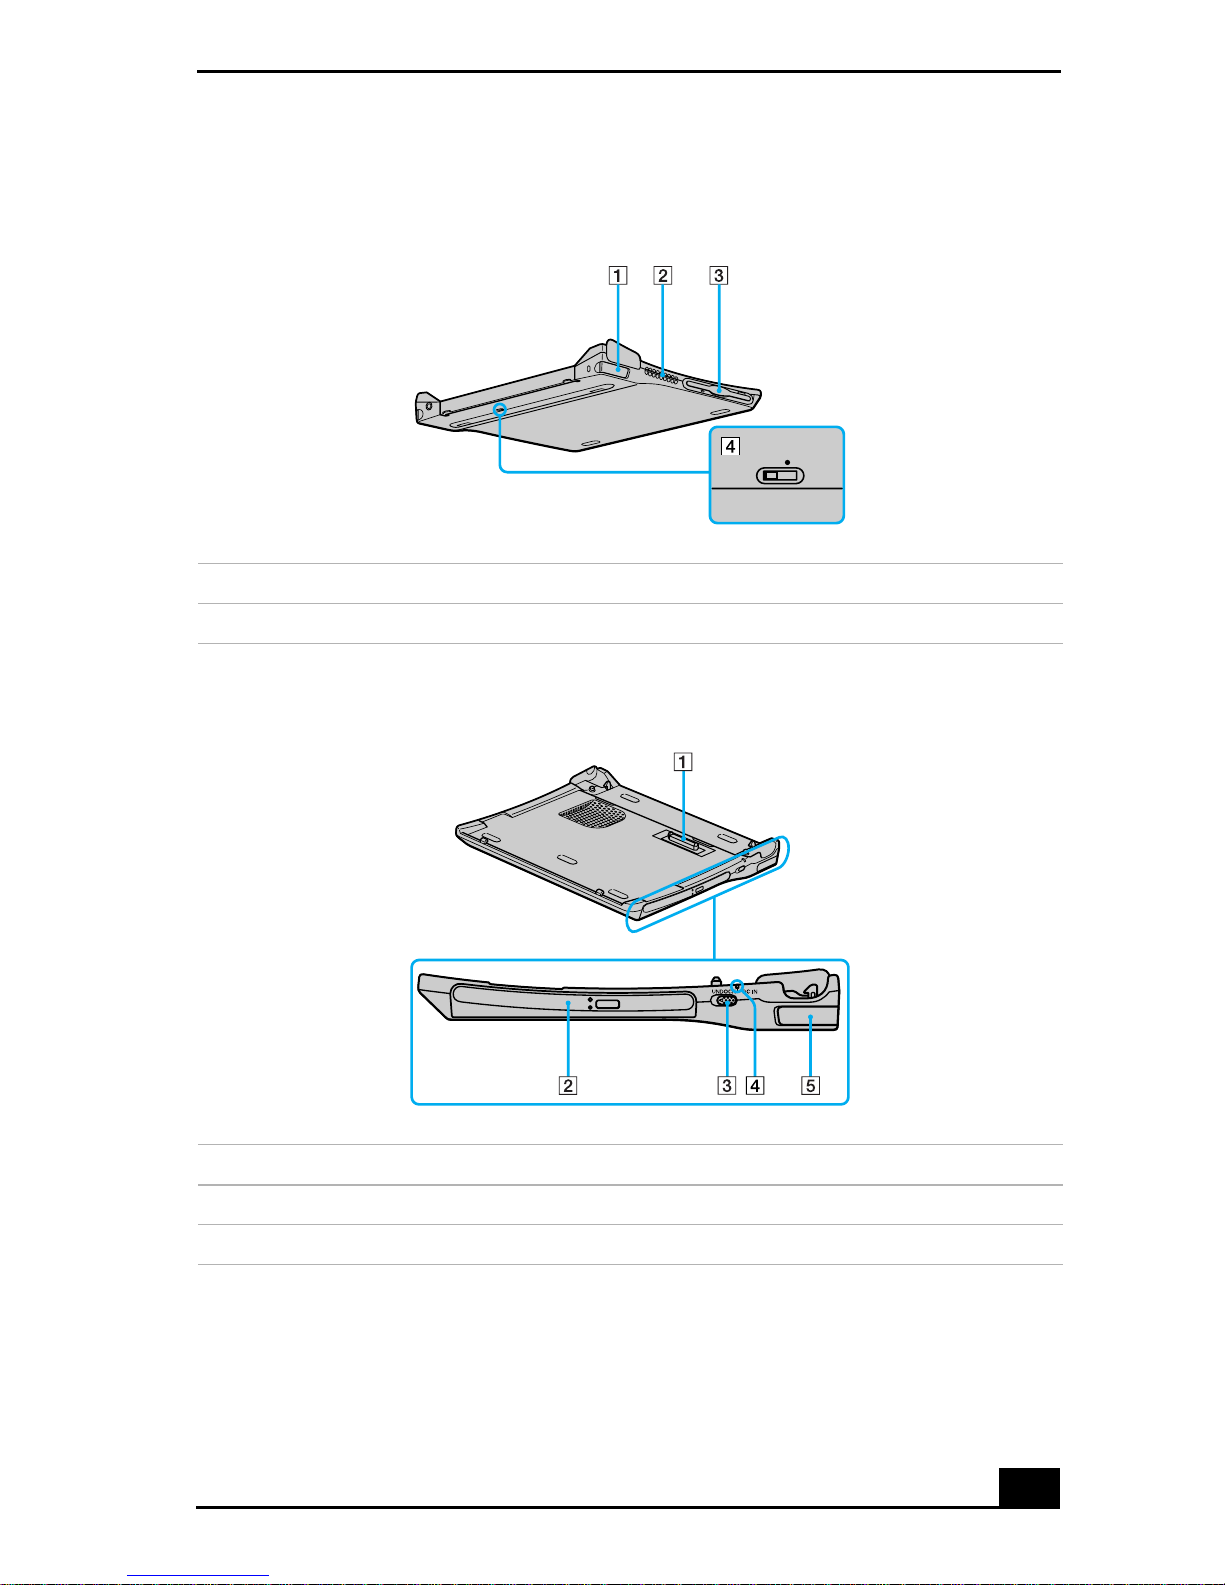
Locating Docking Station Controls and Ports
Left
1 Left lever 3 Floppy disk drive
2 Air vent 4 i.LINK network switch
Right
1 Docking station connector 4 DC IN indicator
2 Opti cal driv e 5 Right lev er
3 UNDOCK switch
25
Page 26
V AIO® Computer Quick Start
Connecting the Docking Station
You can connect the do cking station to the computer while the computer is on or
off. Connecting the computer while it is in power saving mode (Standby or
Hibernate) may res ult in data loss or a computer malfunction.
1 Disconnect the VGA, USB, AC, and Et hernet devic es from you r compute r t o
avoid damaging them.
2 Install th e ba ttery i f it is not alr eady in stal led. If you in stal l a char ged batte ry,
you can connect the docking station while the computer is on.
3 Plug o n e en d of the AC ad apter cable into the DC IN port o n th e docking
station, and plug the other end into an AC outlet. The Power indicator turns
on.
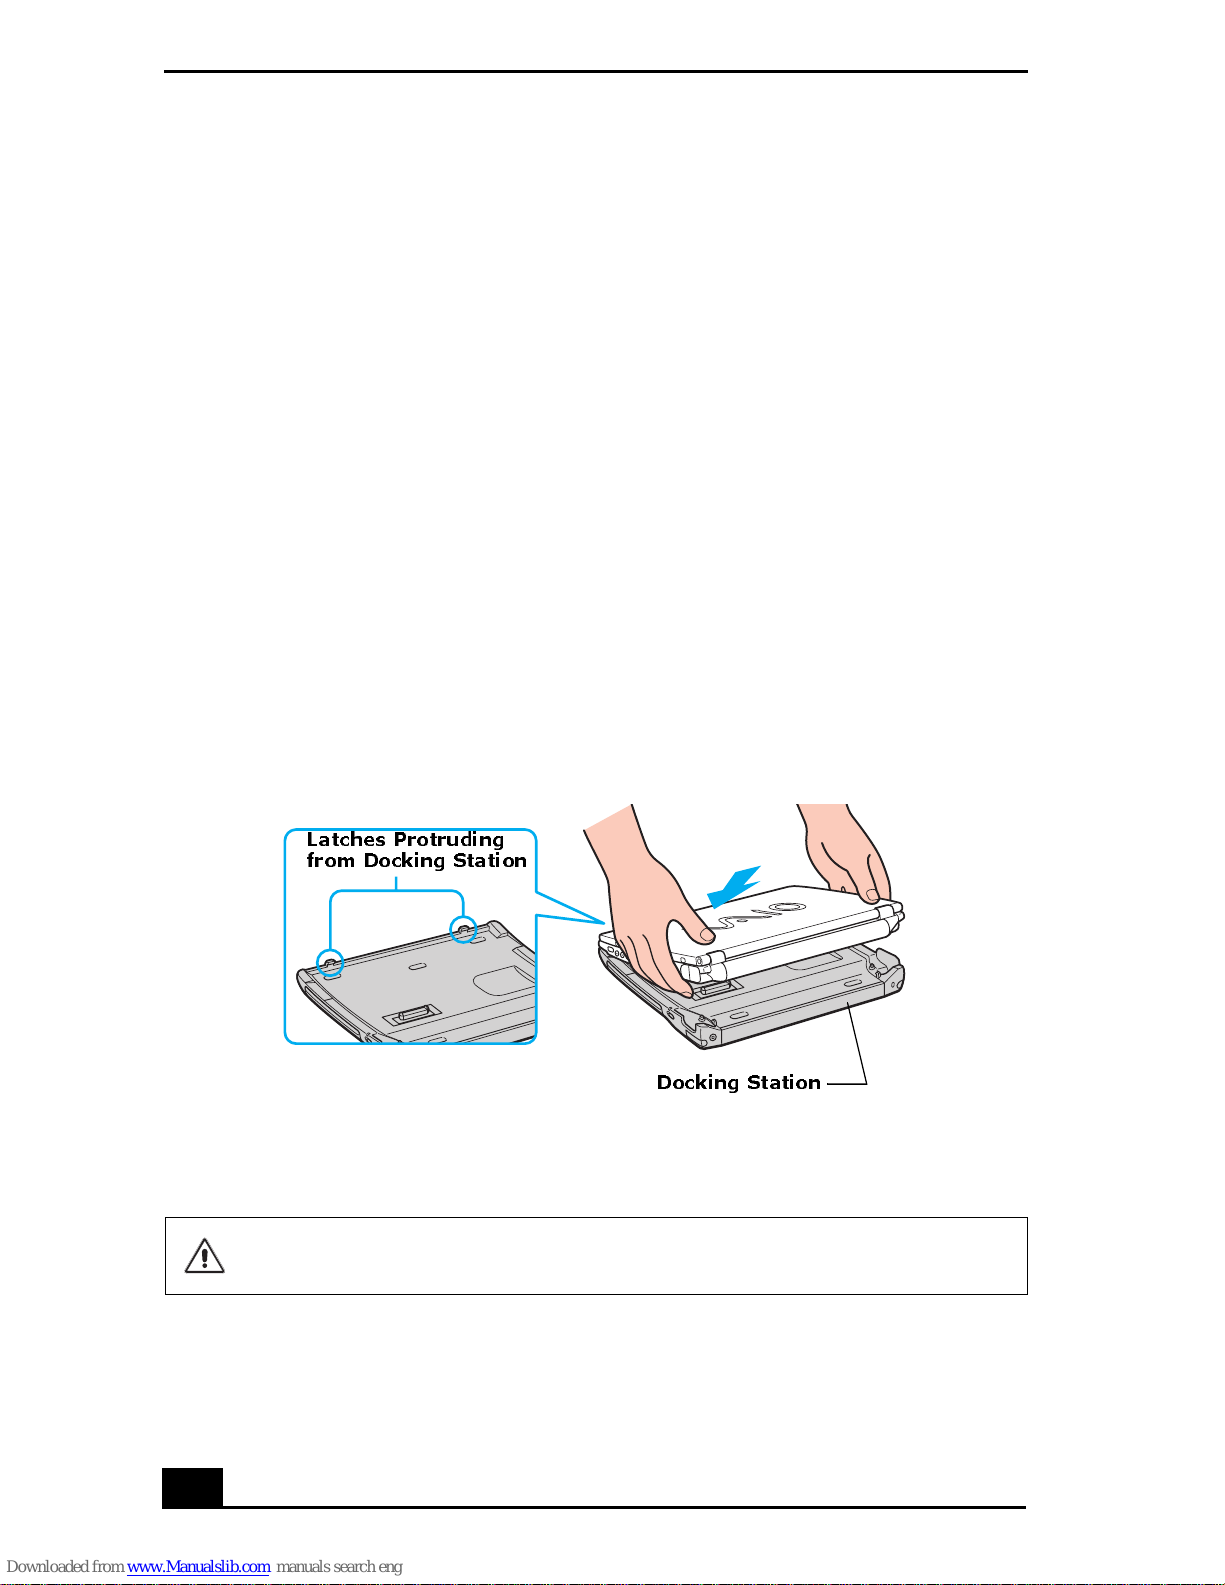
4 Insert th e two grooves on the front of the computer into the two
corresponding latches protruding from the front of the docking station.
Connecting the Docking Station
Latches Protruding
from Docking Station
Docking Station
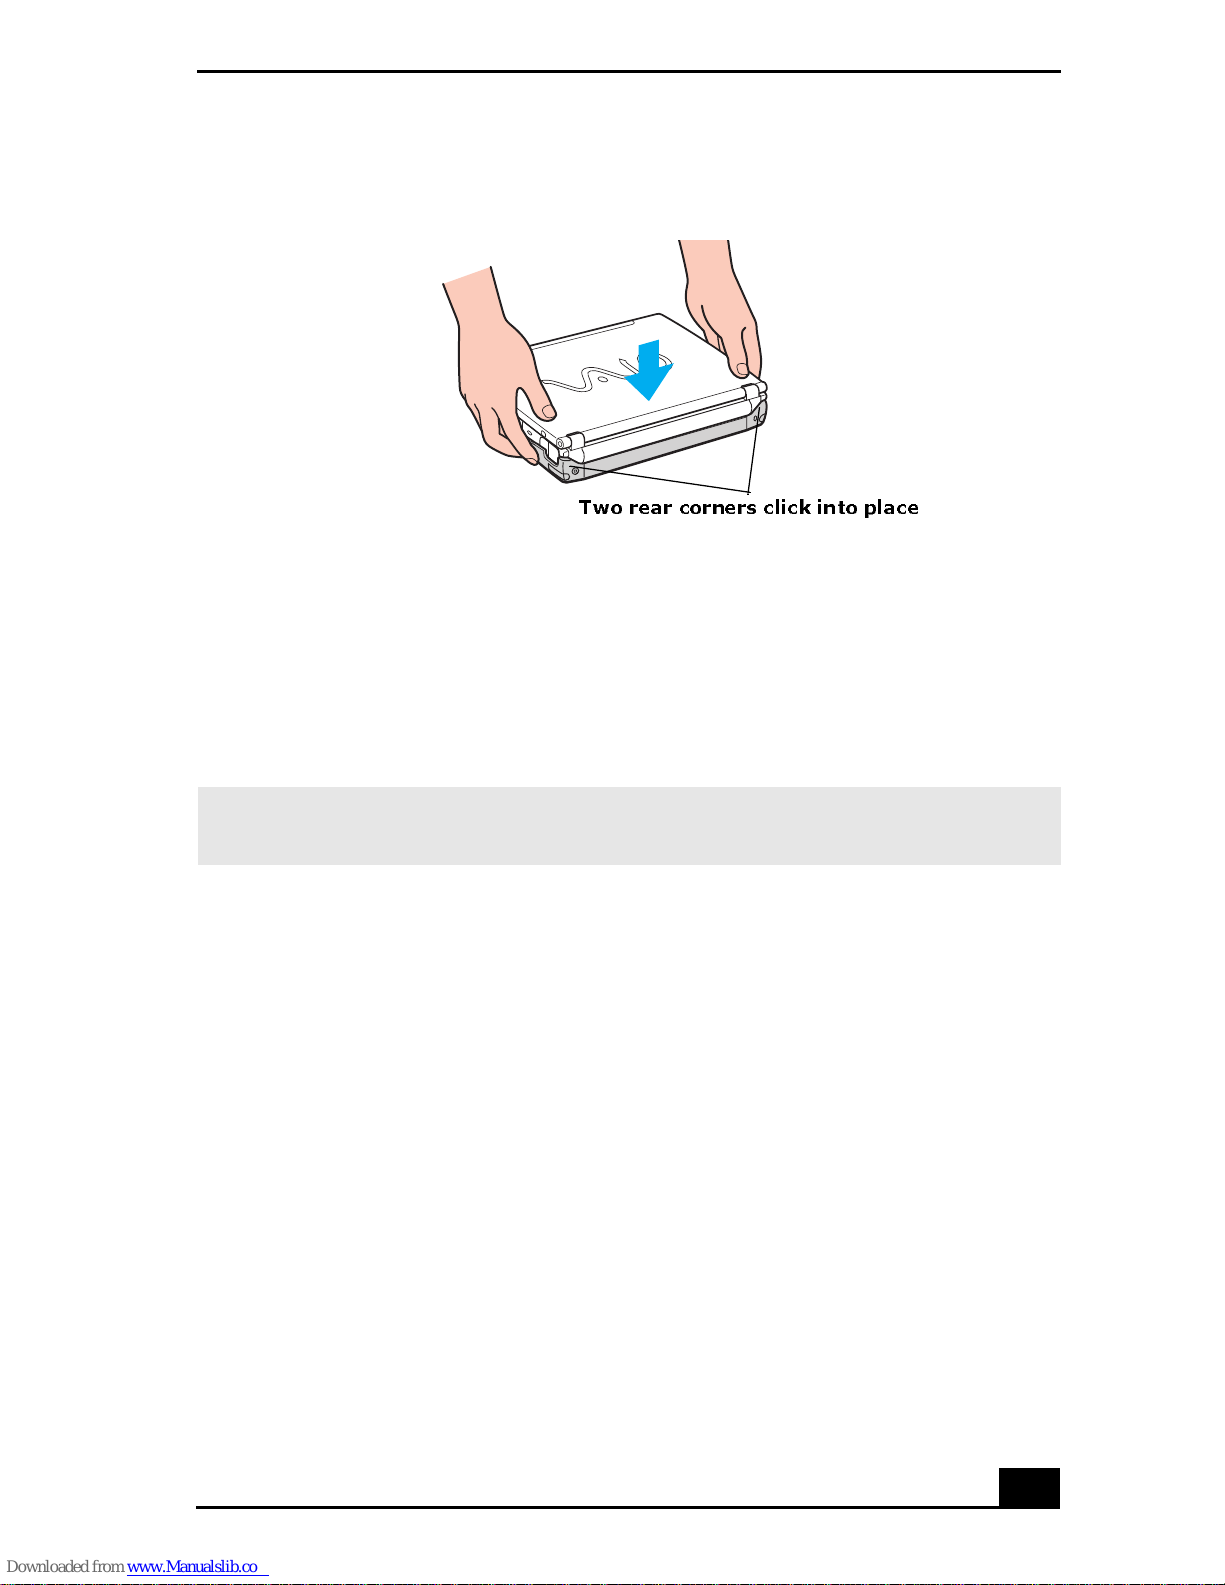
5 Push the two rear corners of the computer onto the docking station until it
clicks into place and is securely fastened to the doc king station.
T o avo id damag ing the LCD displ ay, do not apply too much pre ss ure to the
top of the computer.
26
Page 27
Locating Docking Station Controls and Ports
Securing the Docking Station
Two rear corners click into place
Disco nn ec tin g th e Dock in g Stati on
You can disconnect the docking station when the computer is on or off.
Disconnecting the docking station when the docking station indicator is on, the
computer is in a power savin g mode (St and by or Hibernat e), or the batte ry power
is low may result in data loss or a computer m alfunction.
✍ When th e ba tt ery is lo w, turn off the computer before you disconnect the docking
station.
To disconnect the docking station when the computer is off
1 Disconnect all peripheral (attached) devices from the computer and the
docking station.
2 Remove all objects placed on top of the computer.
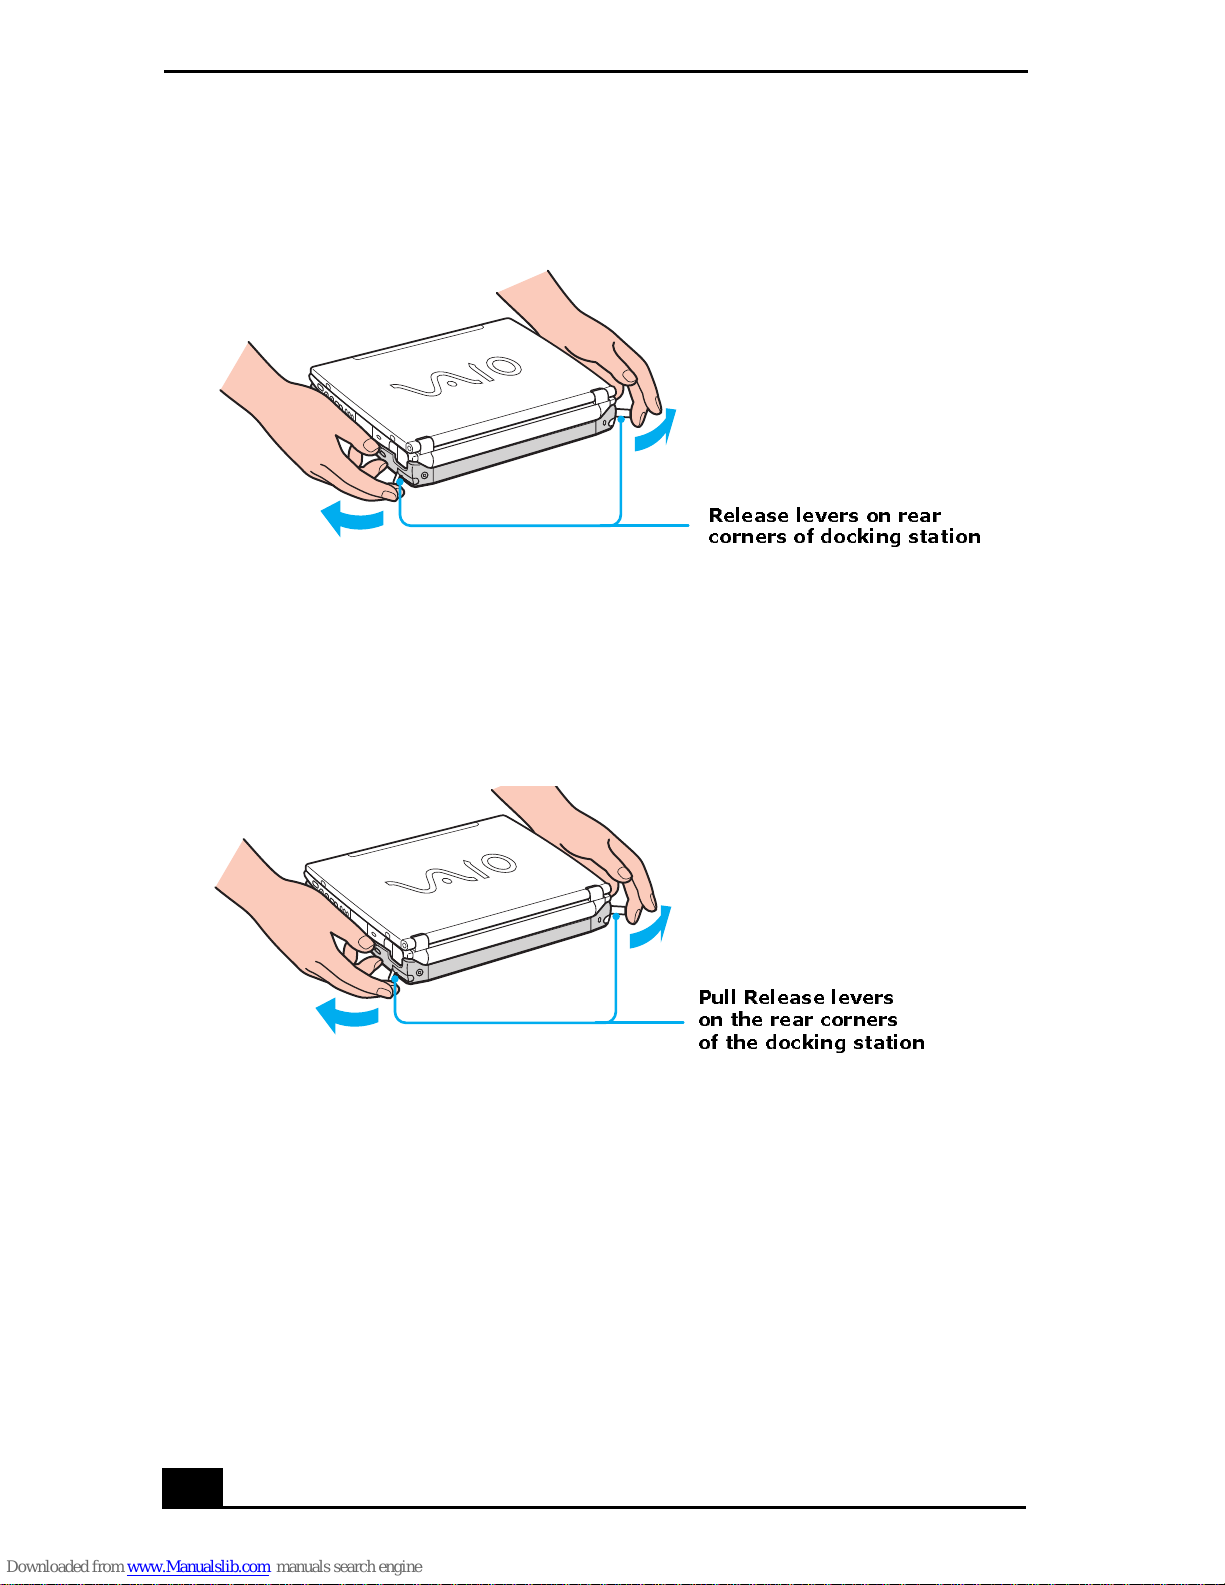
3 Pull the two rel ease levers on the rear corners of the docking station to
release the computer from the docking station.
27
Page 28
V AIO® Computer Quick Start
Dis co n necting th e D oc k in g Statio n
Release levers on rear
corners of docking station
4 Lift the computer up and slightly back to disengage it from the two front
latche s of th e docking station.
Removing the Docking Station
Pull Release levers
on the rear corners
of the docking station
To disconnect the docking station when the computer is on
There are two ways to disconnect the docking station when the computer is
turn ed on :
❑ Using the S tart menu (Windows XP)
❑ Using the UNDOCK switch
28
Page 29
Locating Docking Station Controls and Ports
Using the Start menu (Windows XP)
✍ If you switch user account s using Fast User Swit ching, the UNDOCK switch
functi on on the doc king stat ion w ill be inte rrupt ed . Ins te ad, f oll ow th e in st ructi on s to
disconnect the docking stat ion from the Start menu.
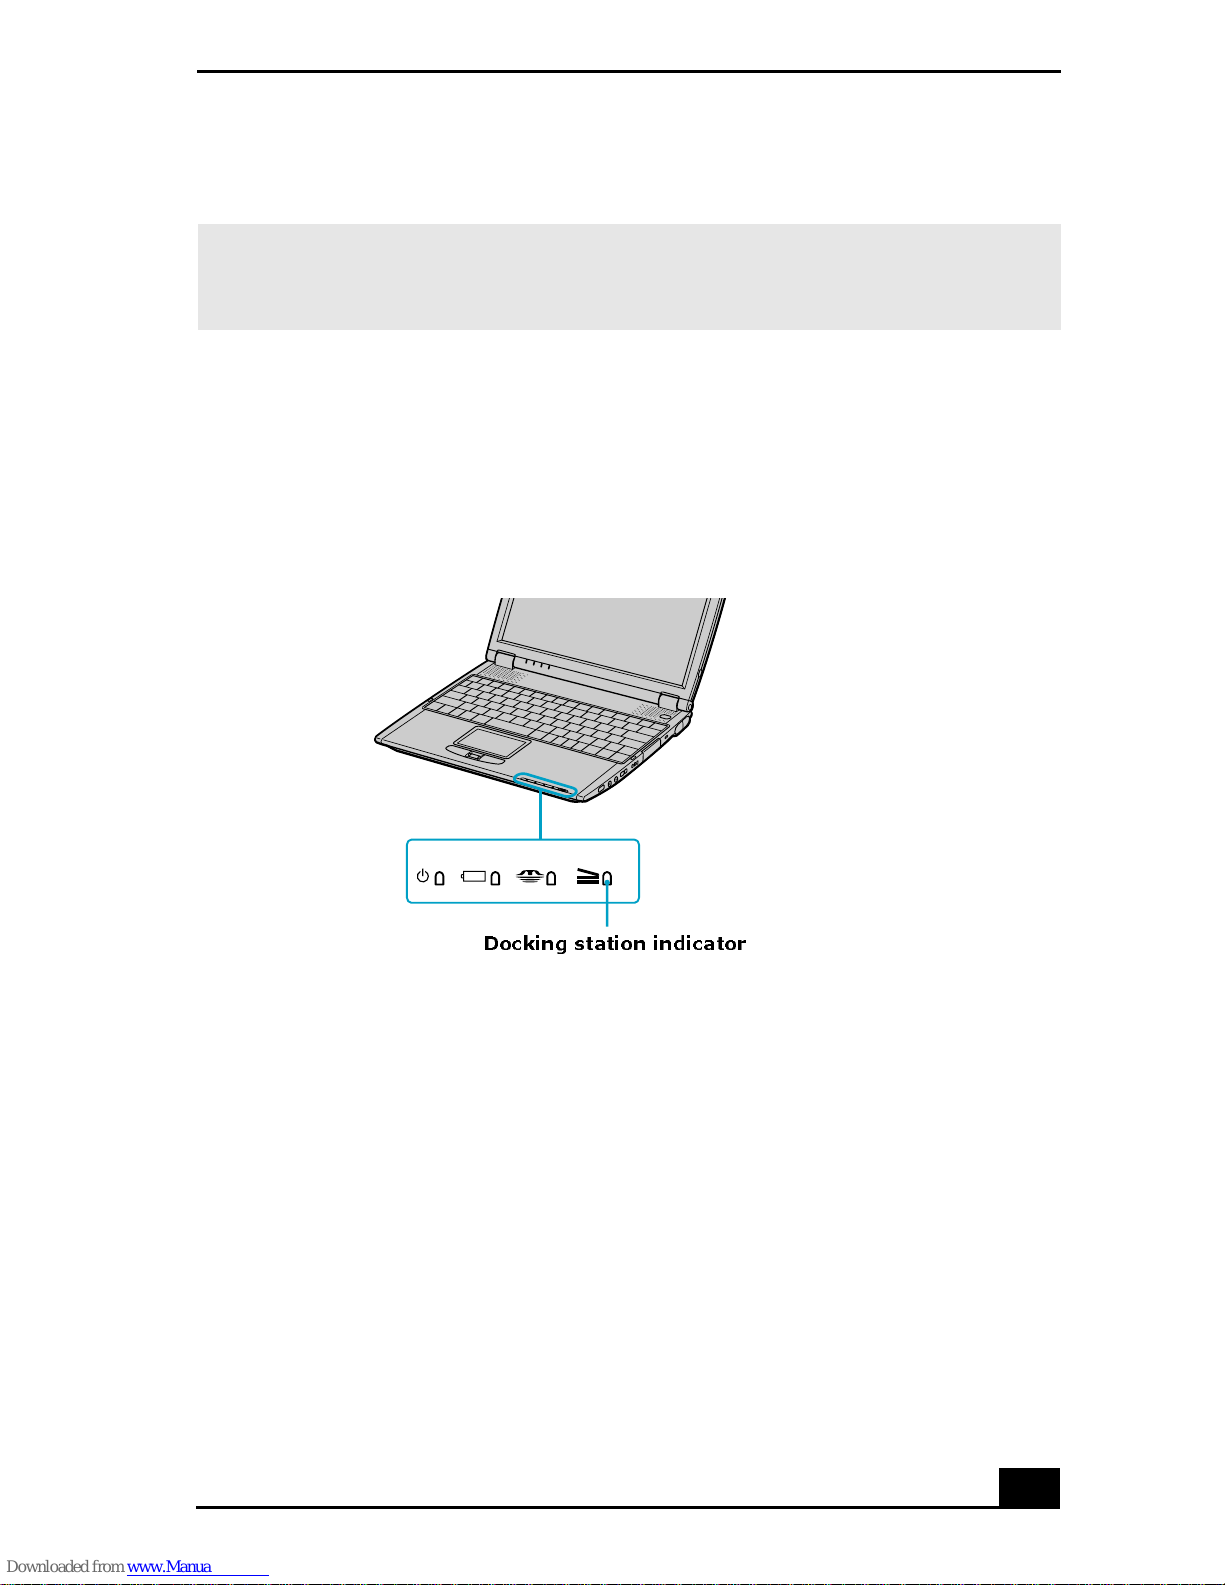
1 Click Start, and click Undock Computer. The Undock Complete pop-up
window appears.
2 Wait for the docking station indicator to turn off before undocking the
computer.
Docking Indicator
Docking station indicator
3 See “To disconnect the do cki ng stati on whe n the comput er is of f” on pag e 27
and follow steps 3 and 4.
29
Page 30
V AIO® Computer Quick Start
Using the UNDOCK switch
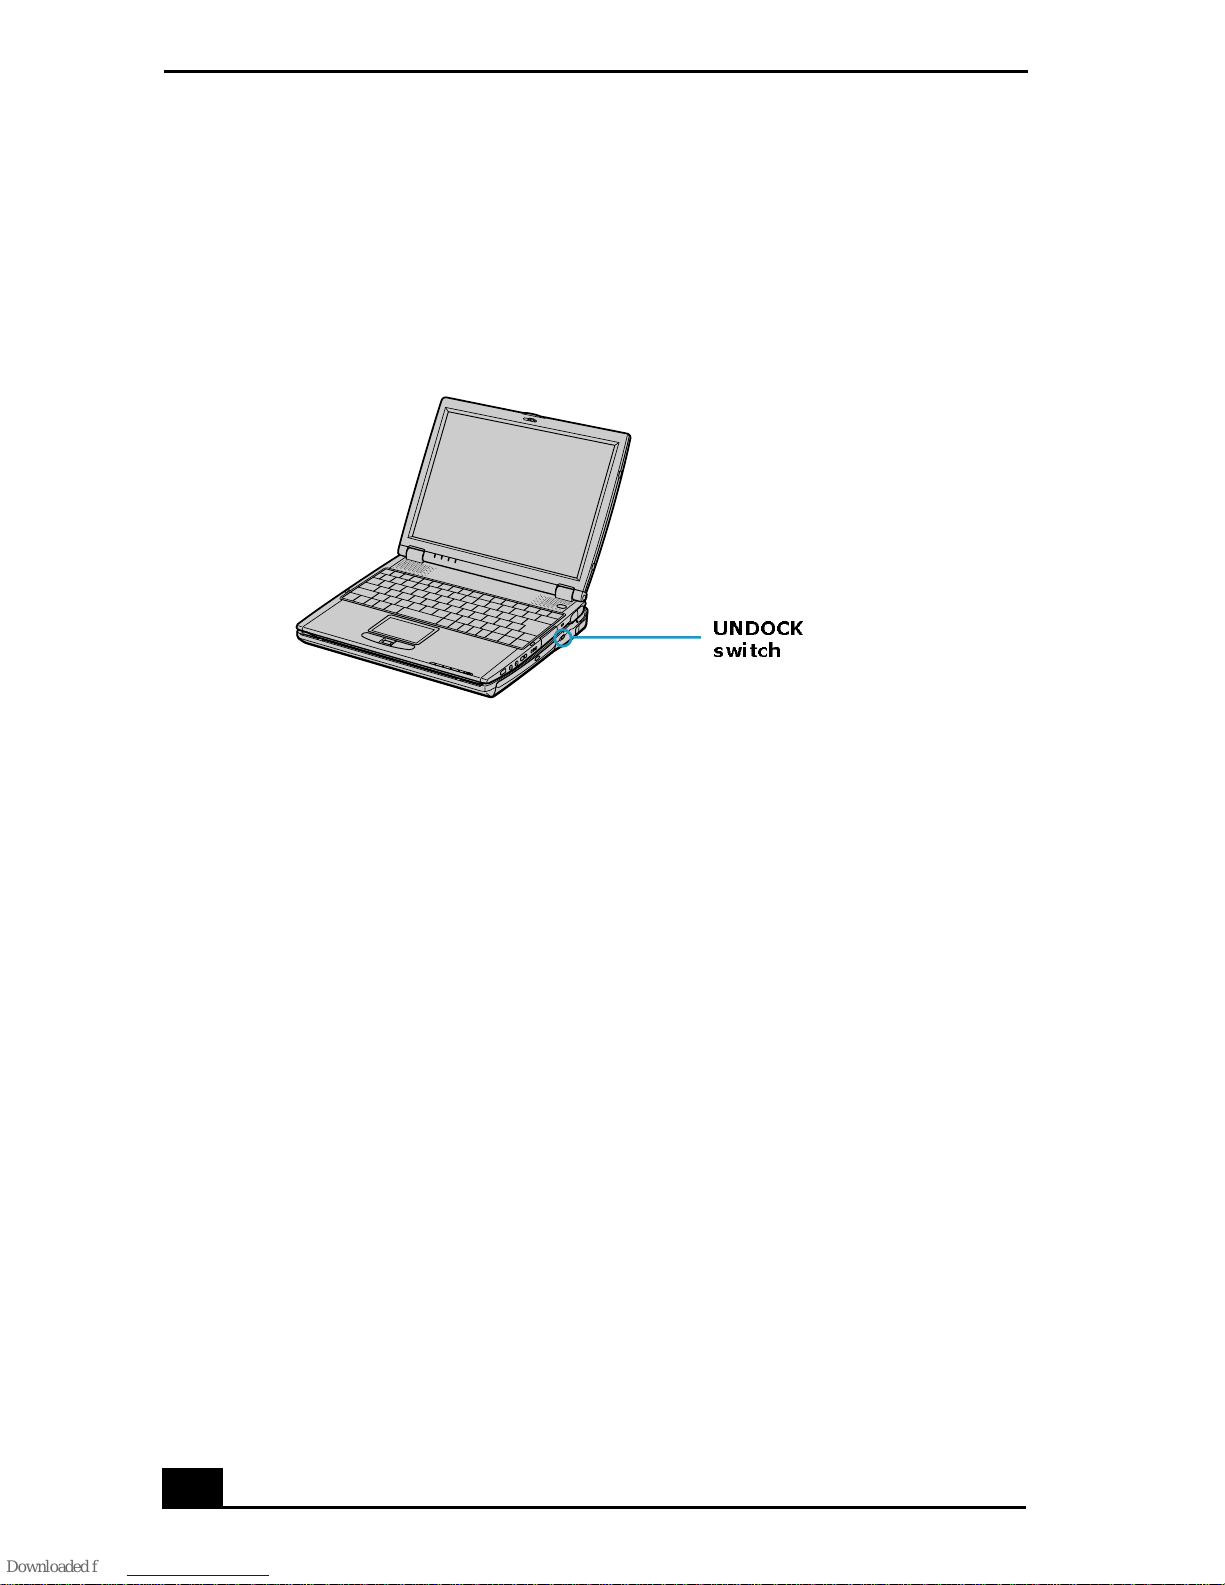
1 Slid e th e UNDOCK switch forward. The Undock Complete window
appears.
UNDOCK Switch
UNDOCK
switch
2 Wait for the docking station indicator to turn of f before undocking the
computer.
3 See “To disconnect the doc ki ng stati on whe n the comput er is of f” on page 27
and follow steps 3 and 4.
30
Page 31

Getting Started
This section helps you get your computer running and registered, so you
can take advantage of Sony’s many support options. You’ll also le arn how
to locate your online VAIO® Computer User Guide, which contai ns stepby-step instructions for operating your computer.
❑ Turning On Your Computer
❑ Using the Touch Pad
❑ Registering Your Computer
❑ Locating Your VAIO Comput er Us er Guide
❑ Setting Up A Dial-Up Connection
31
Page 32
V AIO® Computer Quick Start
Turning On Your Computer
To use your comp u ter immediately, use the supplied AC adapter as a power
source. Your supplied battery is not char ged when you unpack it, howe ver, you
can begin charging it when you use your AC ada pter. See “Powering Your
Computer” in your online VAIO® Computer User Guide for more information
about using batteries. See also “L ocating Your VAIO Computer User Guide” on
page 37.
To charge your battery
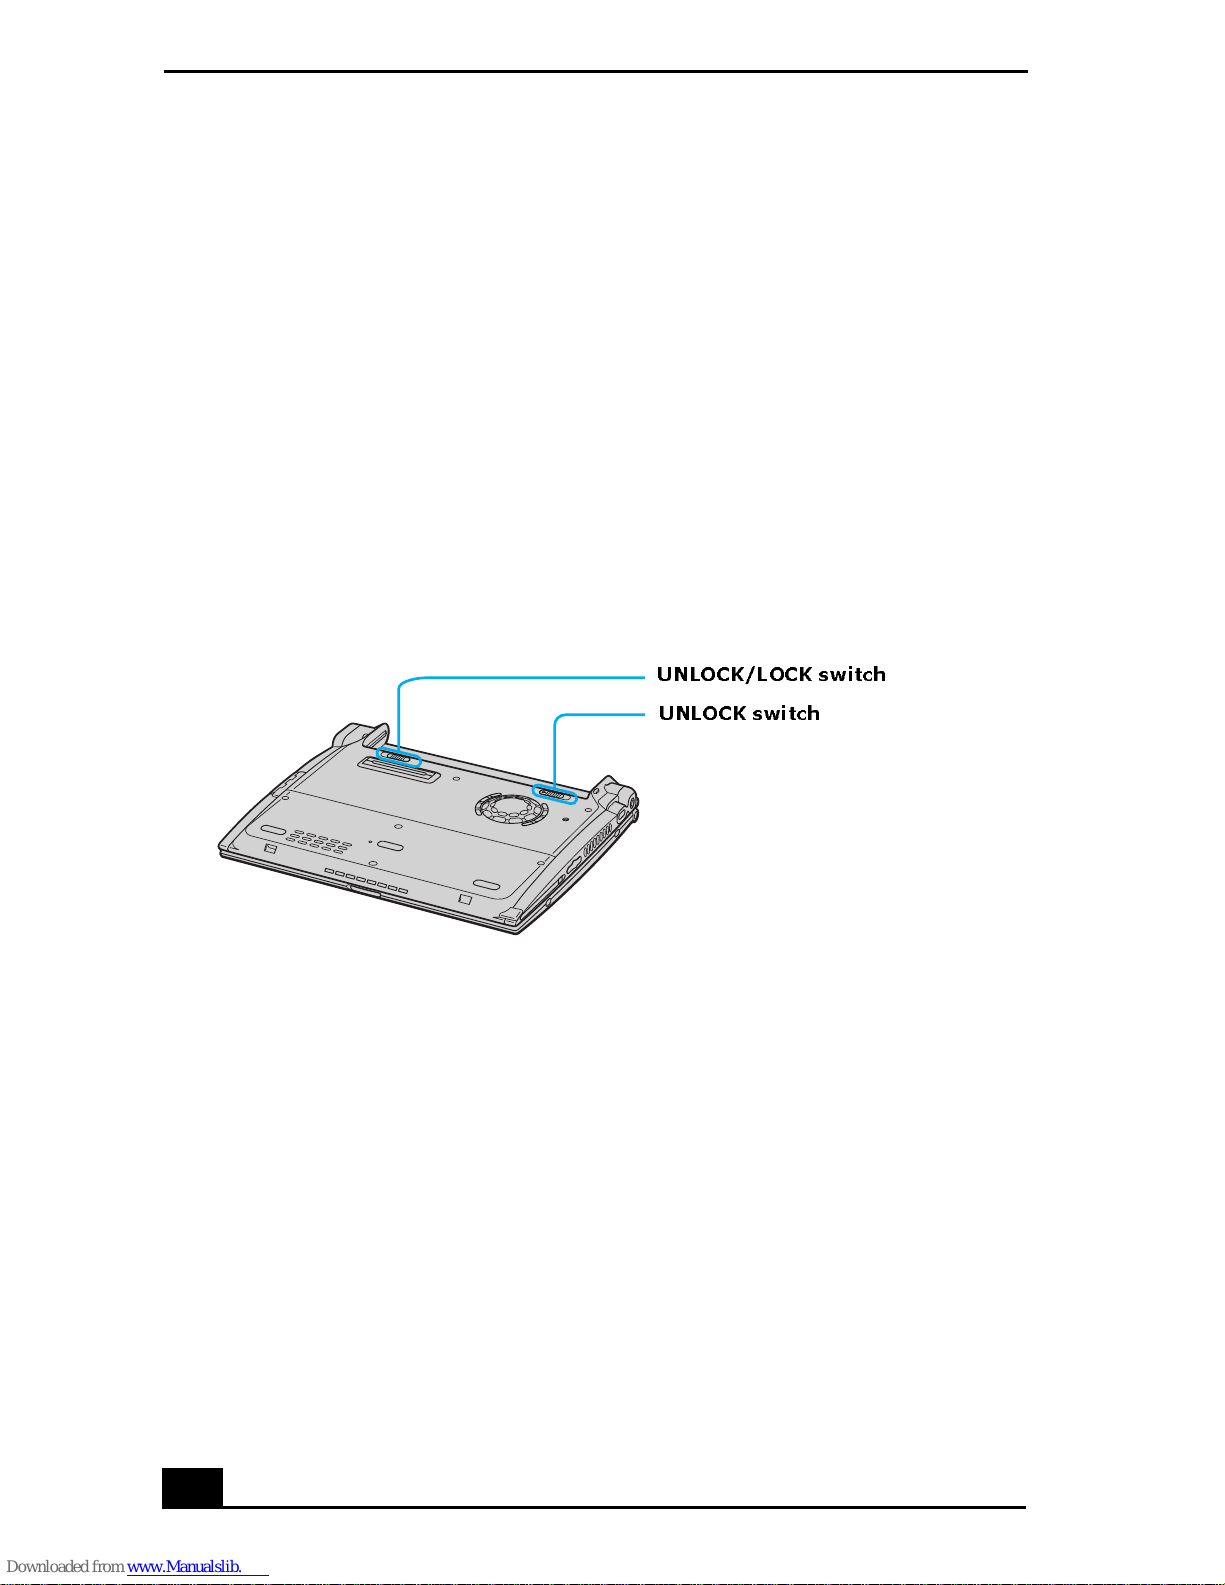
1 Switch the UNLOCK/LOCK switch on the bottom of the computer to the
UNLOCK position.
UNLOCK/L O CK Switch
UNLOCK/LOCK switch
UNLOCK switch
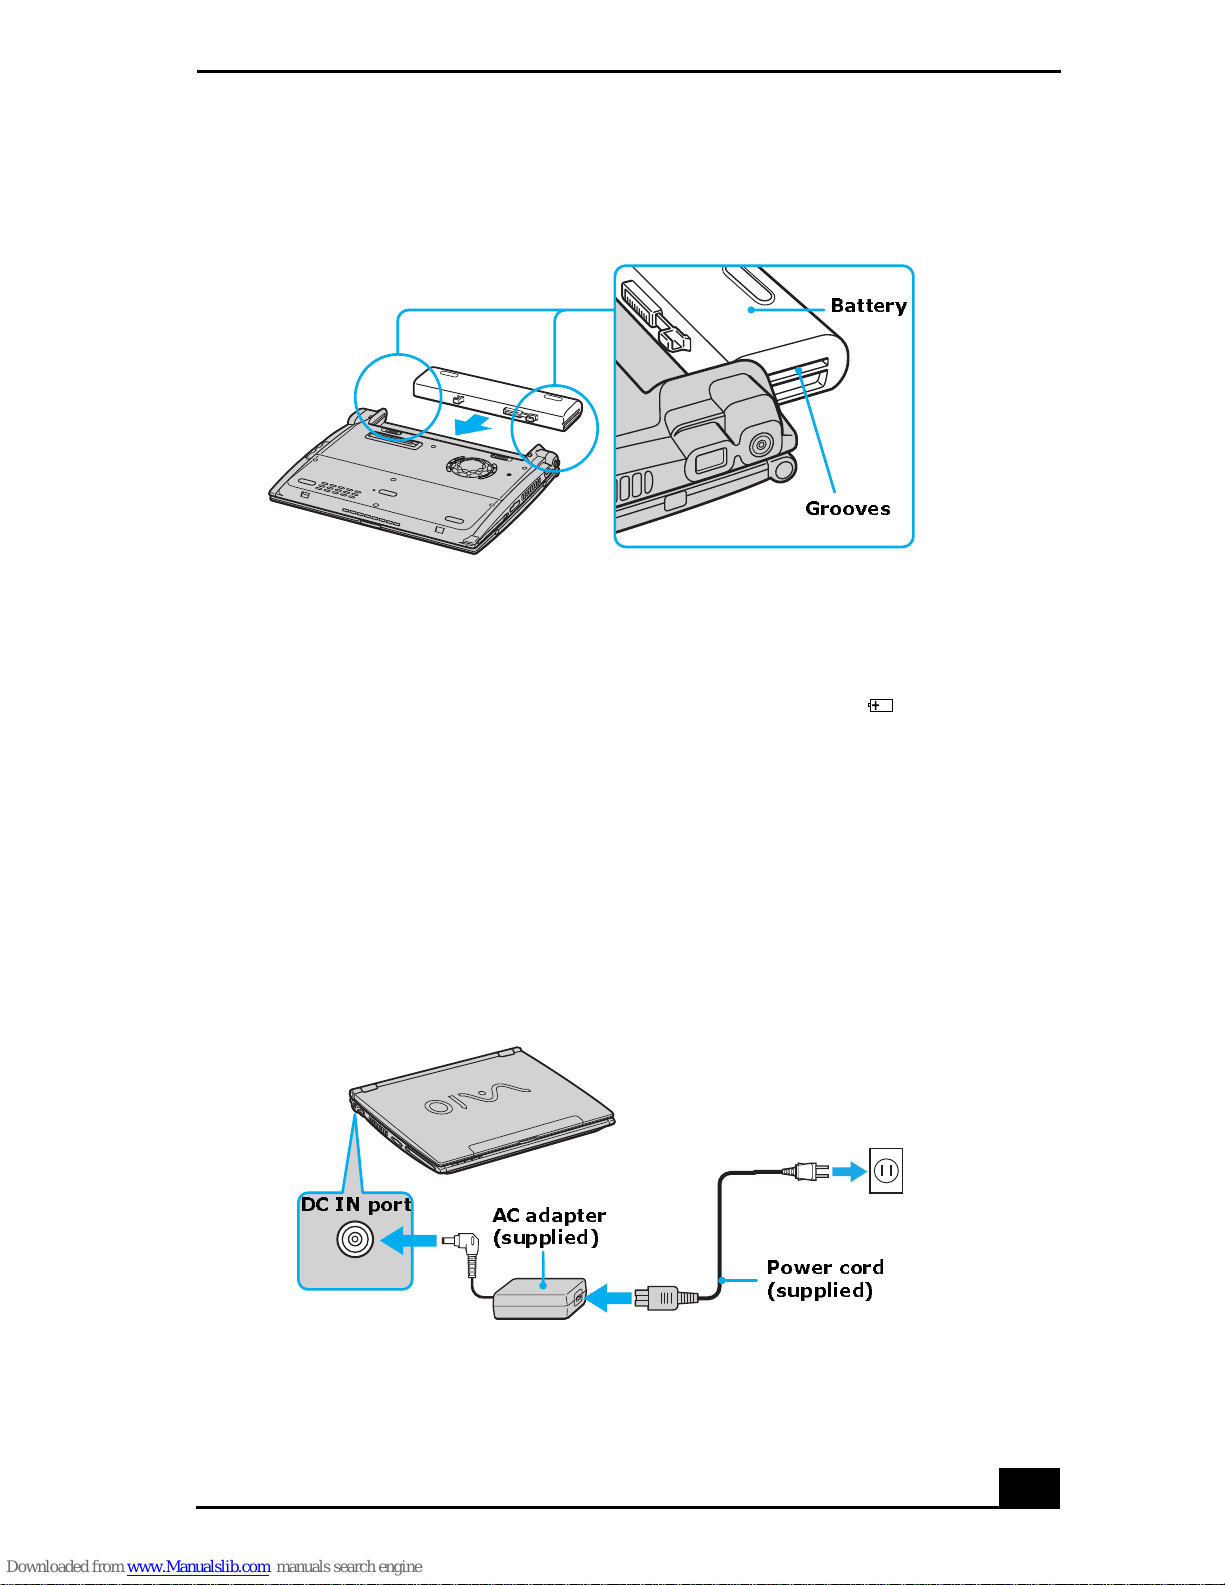
2 Align the grooves and tabs on the battery with the tabs and notches on the
back of the computer, and slide the battery toward the com puter until it
clicks into place.
32
Page 33
Turning On Your Computer
Inserting a Battery
Battery
Grooves
3 Slide the LOCK switch into the LOCK position to secure the battery on the
computer.
Once you connect the AC adapter to the comput er, the battery begins to charge
whether or not th e computer is on or off. The batte ry indicator shows the
battery status. The indicator blinks as the battery charges. See “Powering Your
Computer” in your online VAIO® Computer User Guide for more information.
To co n nect the A C a dap t er
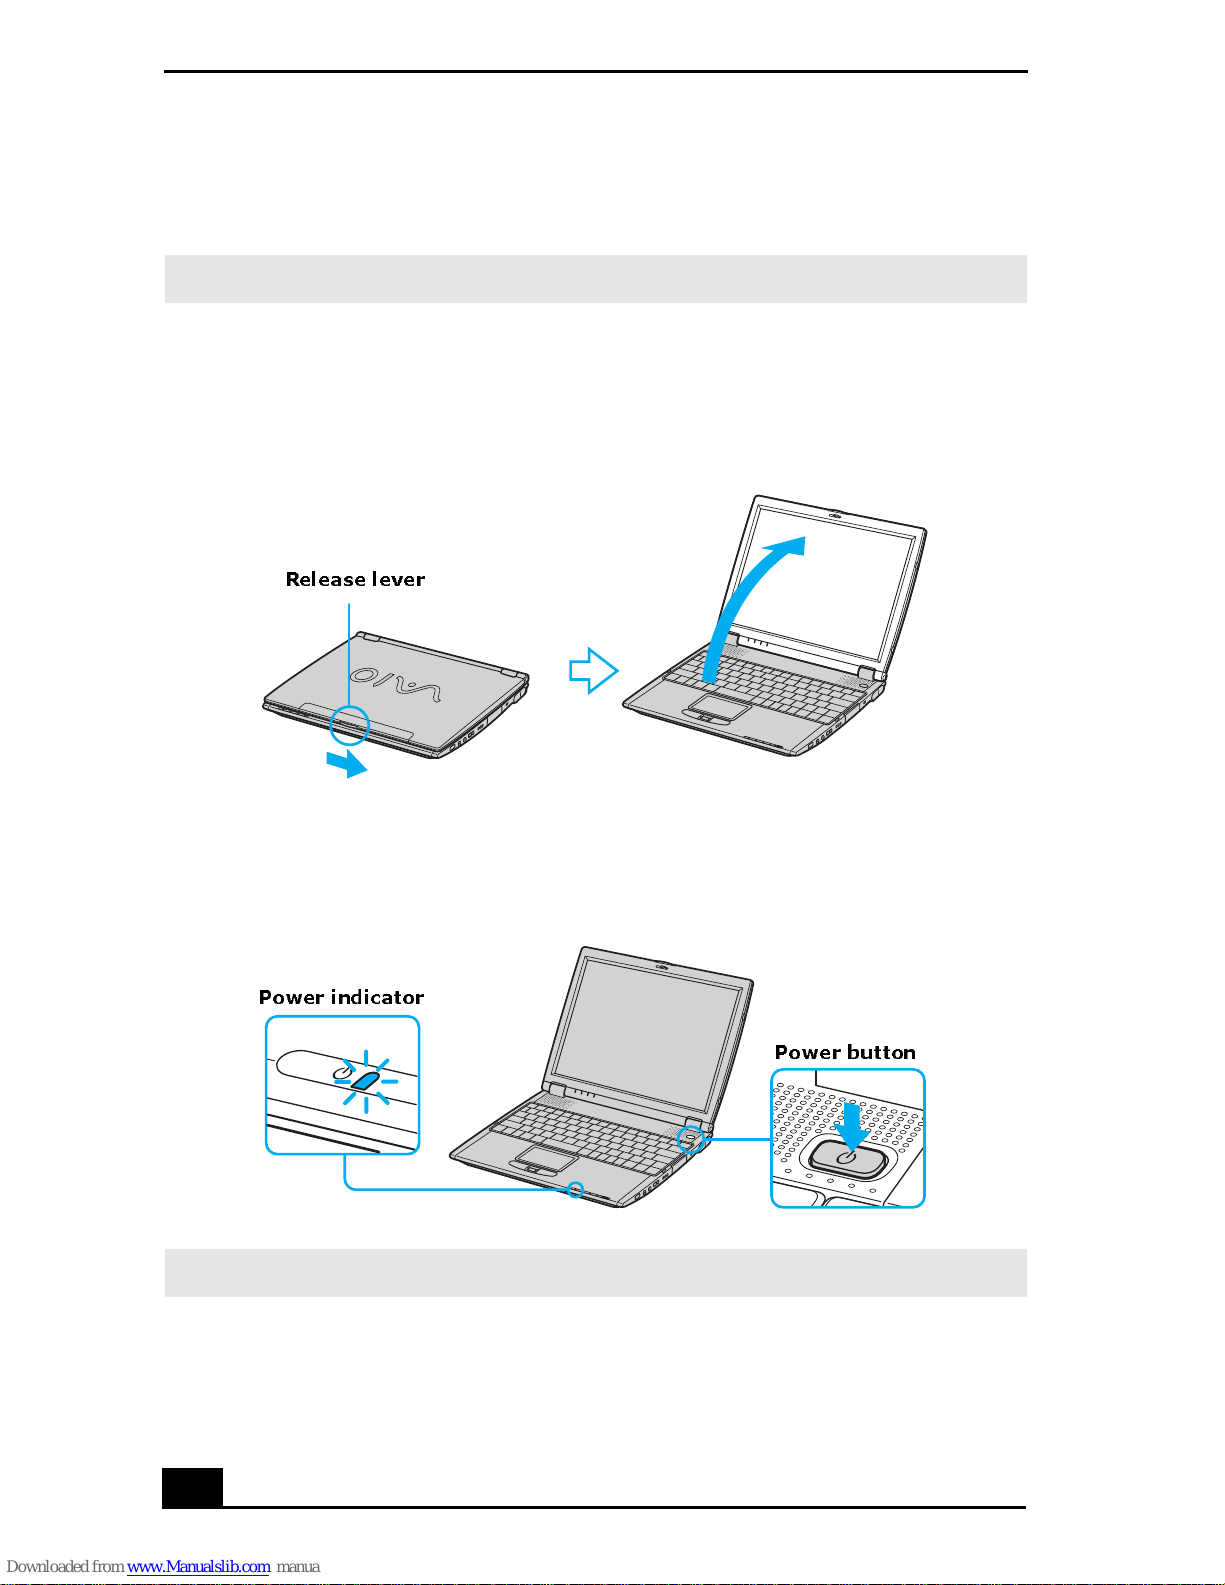
1 Plug the cabl e at tached to the AC adapter into the DC IN port on your
computer or do cking station.
Con necting th e A C a da p t er to the Co m p uter
DC IN port
AC adapter
(supplied)
Power cord
(supplied)
33
Page 34
V AIO® Computer Quick Start
2 Plug one end of the power cord into the AC adapter, and plug the other end
into an AC outlet
.
✍ Use only the supplied AC adapter with your computer.
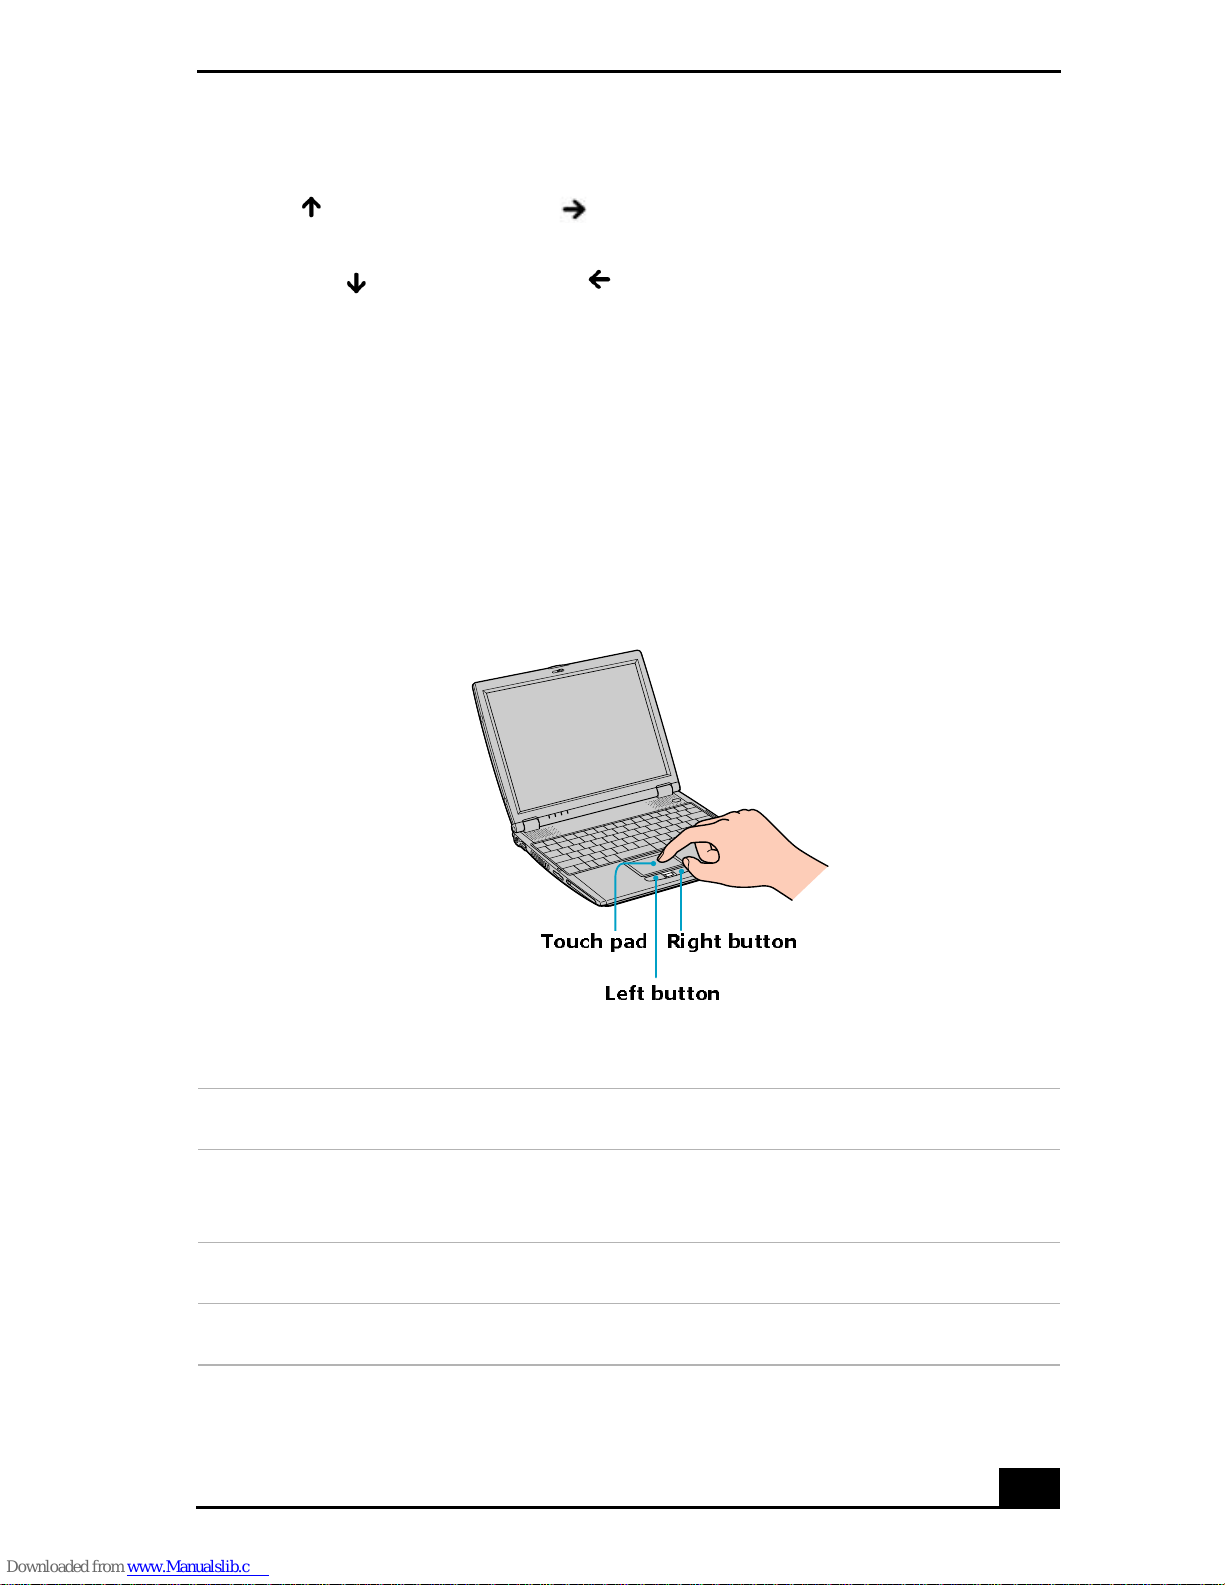
3 Slide the release le ver to the righ t and li ft th e cover whi le hold ing t he botto m
of the co mputer firmly.
Opening the Computer
Release lever
4 Press the power button until the green power indi cator lights up.
Turning on the Compute r
Power indicator
Power button
✍ If you hold down the power button, the c omputer turns off.
5 If necessary, adjust the brightness controls for the LCD display as follows:
34
Page 35
Turning On Your Computer
❑ To increa se brightness, press Fn+F5, and then press the Up Arrow key
or Right Arrow key .
❑ To decrease brightness, pre ss Fn+F5, and then press the Down Arrow
key or Left Arrow key .
Using the Touch Pad
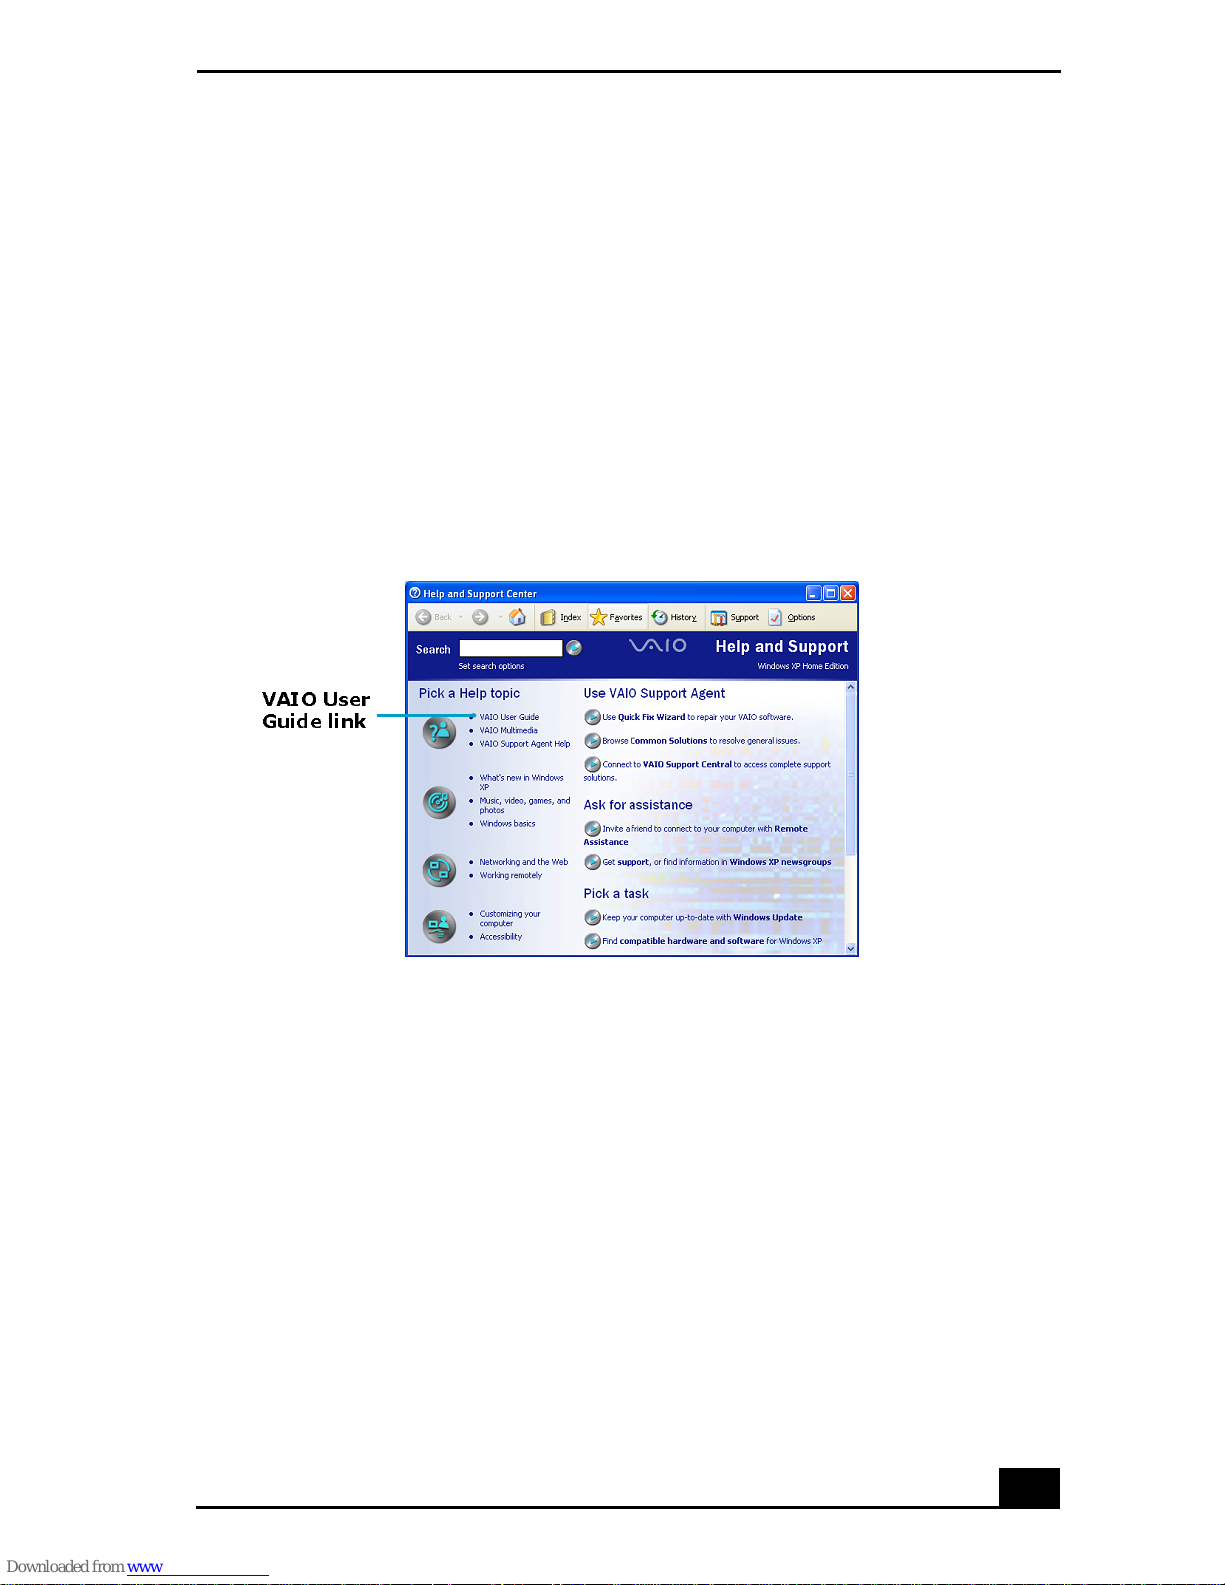
The keyboard contains a pointing device called a touch pad. You can point to,
select, drag, and scroll objects on the screen using the built-in tou ch pad.
Describing touch pad actions
Touch pad
Touch pad
Left button
Right button
Action Description
Point Slide one finger on th e touch pad to place the poi nter on an
item or objec t.
Click Pre ss the left button once.
Double-click Press the left button twice.
35
Page 36

V AIO® Computer Quick Start
Action Description
Right-click Press th e right button once. In many pr ograms, this actio n
displa ys a shortcut menu of context-sensit ive choices.
Drag Slide one finger while pressing the left button.
Scroll Move your finger along the right edge of the touch pad to
scroll vertically. Move your finger along the bottom to scroll
horizontally. (The scroll function is available only with
programs tha t support a touch pad scroll fe ature.)
Registering Your Computer
Take advantage of Sony’s commitment to qua lity customer support and receive
these benefits by registerin g your computer:
❑ Sony Customer Support — Talk to a Support Representative to
troubleshoot problems you may have with your computer.
❑ Limi ted Warranty — Protect your investment. See the Warranty Card for
more details.
✍ You are prompted to register your computer the first time you tu rn on the unit .
Follow the on -screen instructions to complete the registration process. I f you are not
able to register your computer during the first session, you are provided with
additional registration opportunities later.
36
Page 37
Turning On Your Computer
Locating Your VAIO C omputer User Guide
The VAIO® Computer User Guide is a searchable online help file that contains
detail ed information on how to use your new computer.
To open the us er guide (Windows XP)
1 Click Start on the Windows ® taskbar, and then click Help and Support.
The Help and Support Center window appears, displaying information
about your Microsoft® Windows® operating system.
Turning on the Compute r
VAIO User
Guide link
2 Click VAIO User Guide in the Pick a Hel p topic column. A second Help
and Support Center window appears, which offers de tailed informati on
about your computer.
37
Page 38
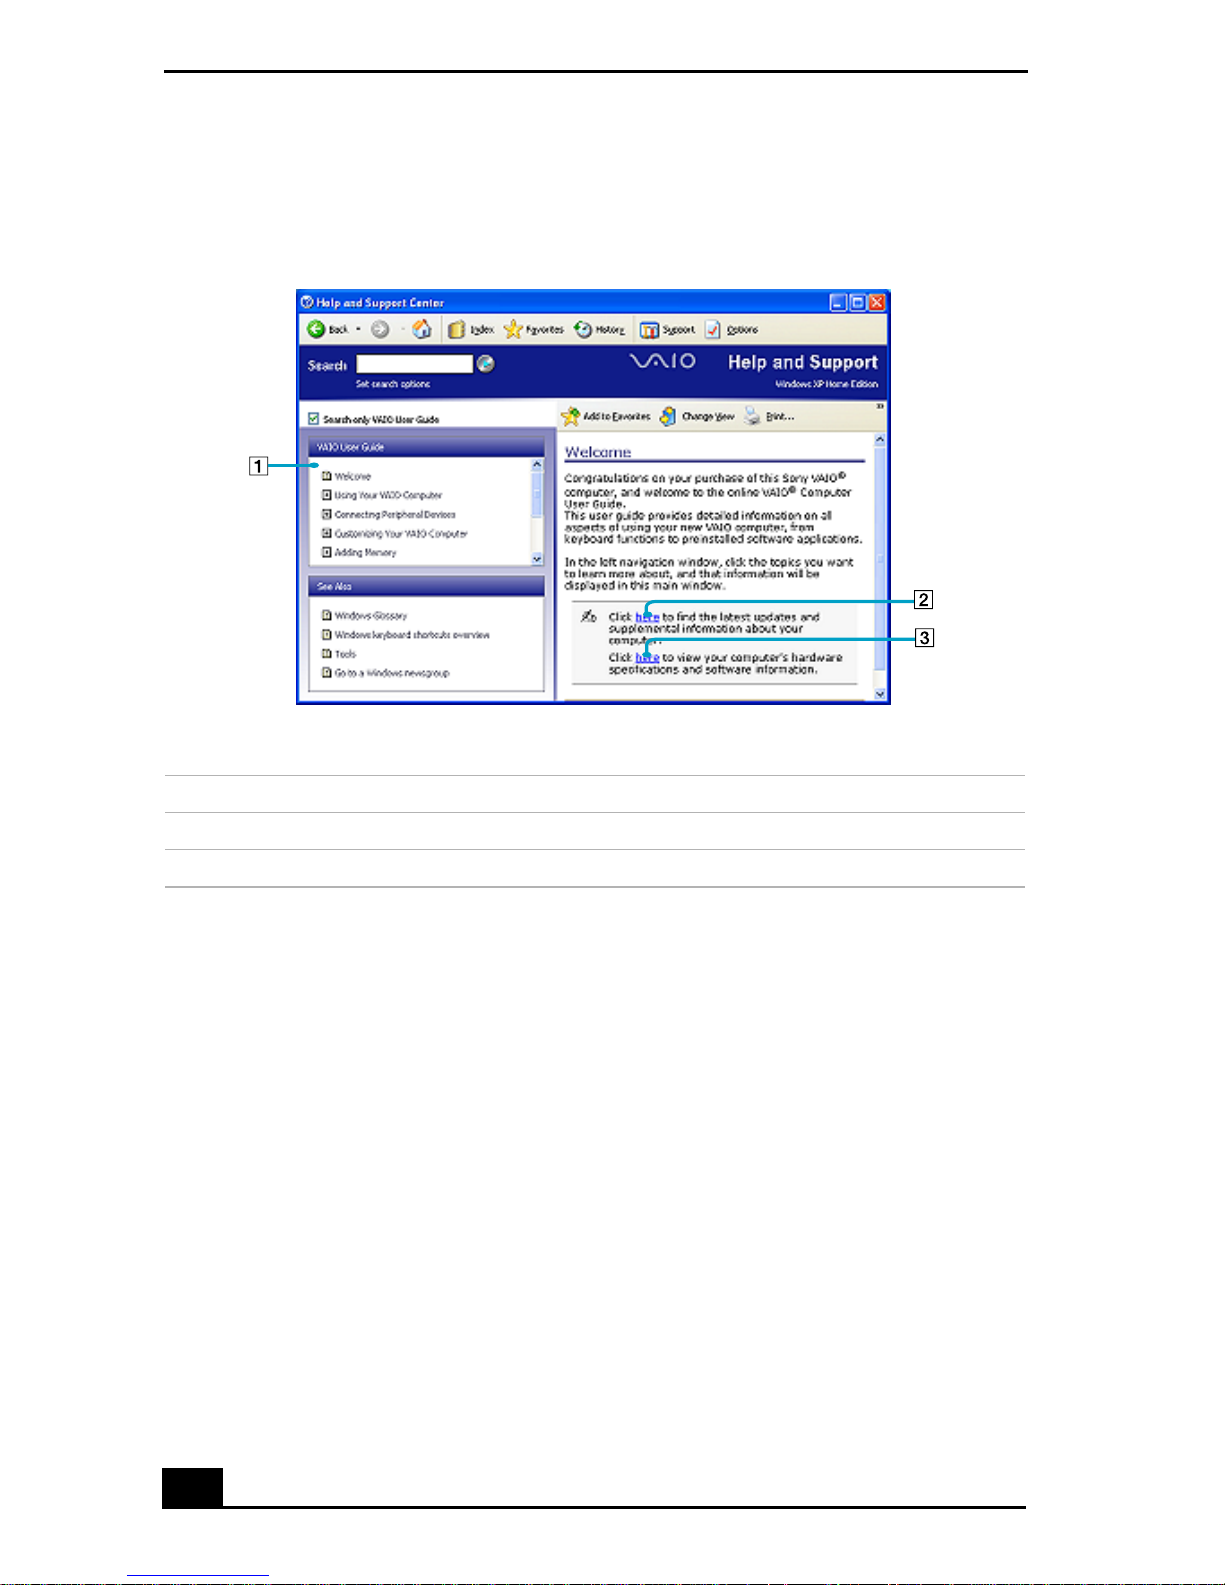
V AIO® Computer Quick Start
VAIO® User Guide Window
1 User guide table of contents — List of computer help topics
2 Electronic Flyer — List of updates and suppl em ental information
3 VAIO Computer Specifications — List of specifications and software.
To open the user guide (Windows 2K)
❑ Click Start on the Windows ® taskba r, point to VAIO Help Center and clic k
Documentation. The VAIO User Guide appears.
38
Page 39
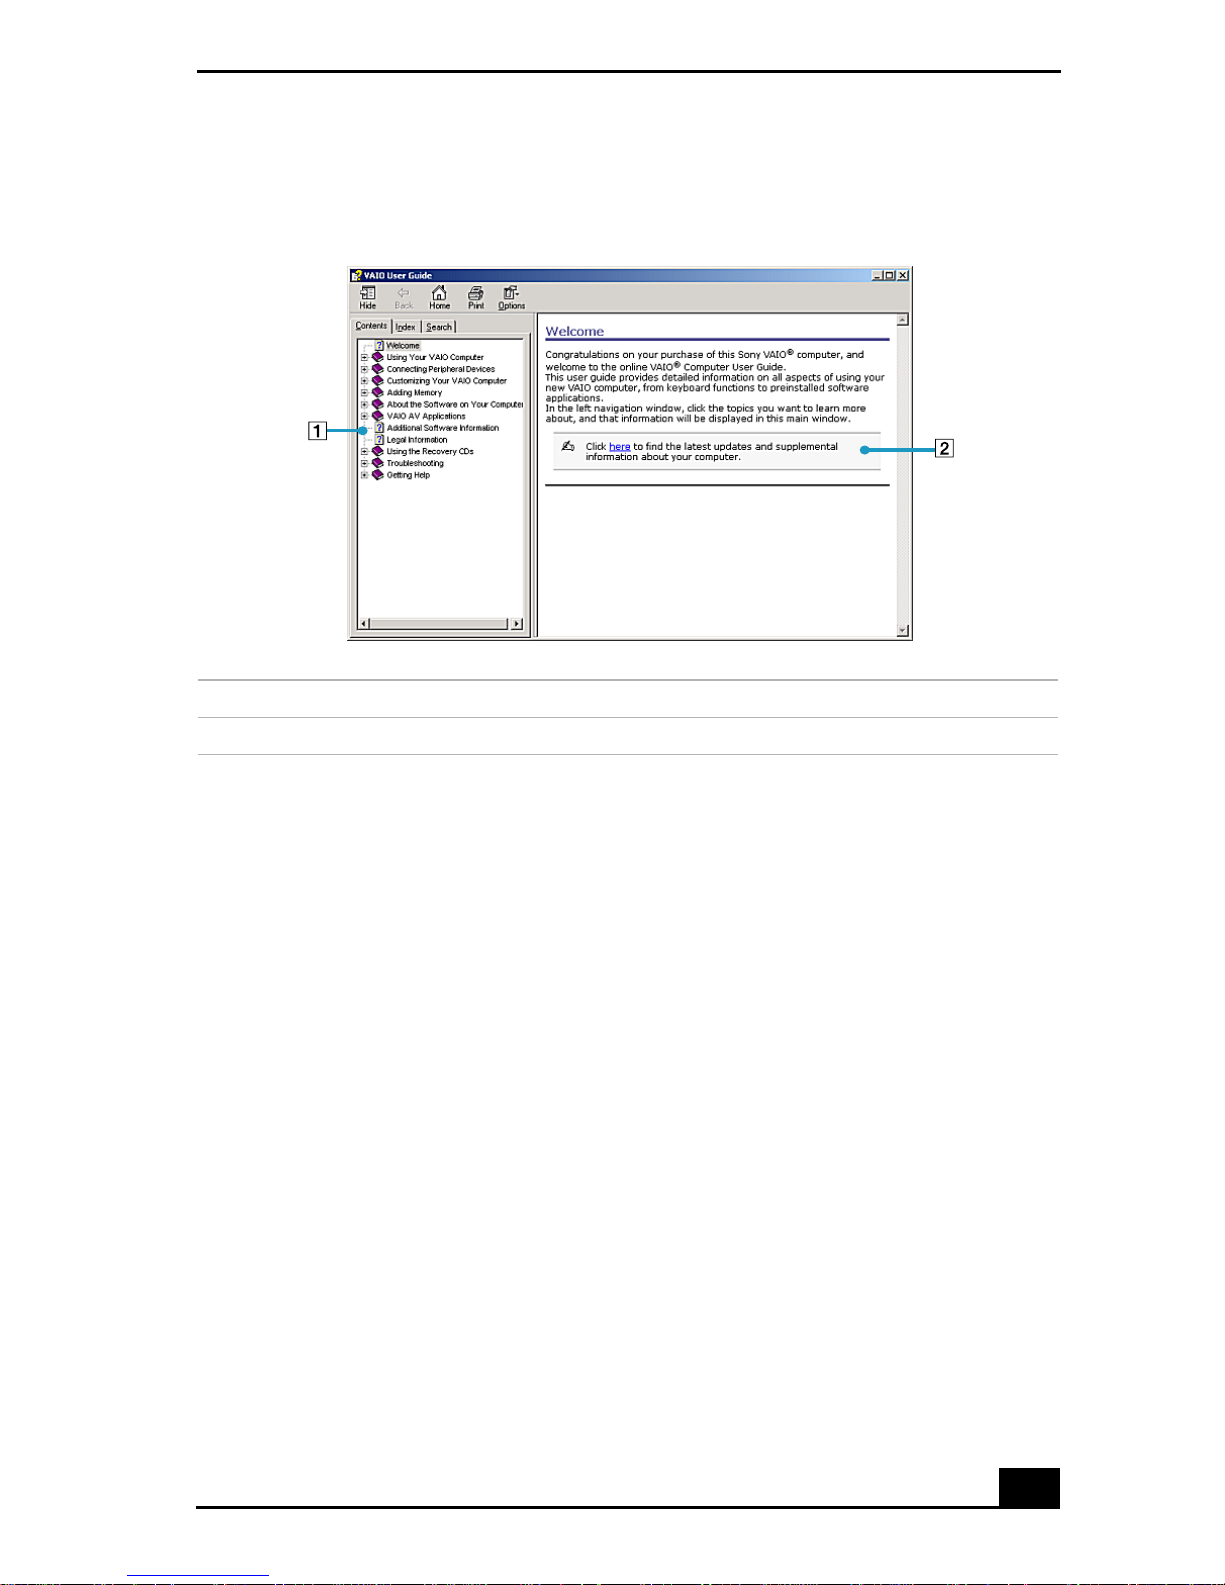
VAIO User Guide
Turning On Your Computer
1 User guide table of contents — List of computer help topics
2 Electronic Flyer — List of updates and supplemental information
Setting Up A Dial-Up Connection
This section describes the basic steps for setting up your dial-up connection to
the Internet. The Connection W izard guides you thro ugh the process of
connecting to the Internet and choosing an Internet Service Provi der (ISP ) or
setti ng up an existing account.
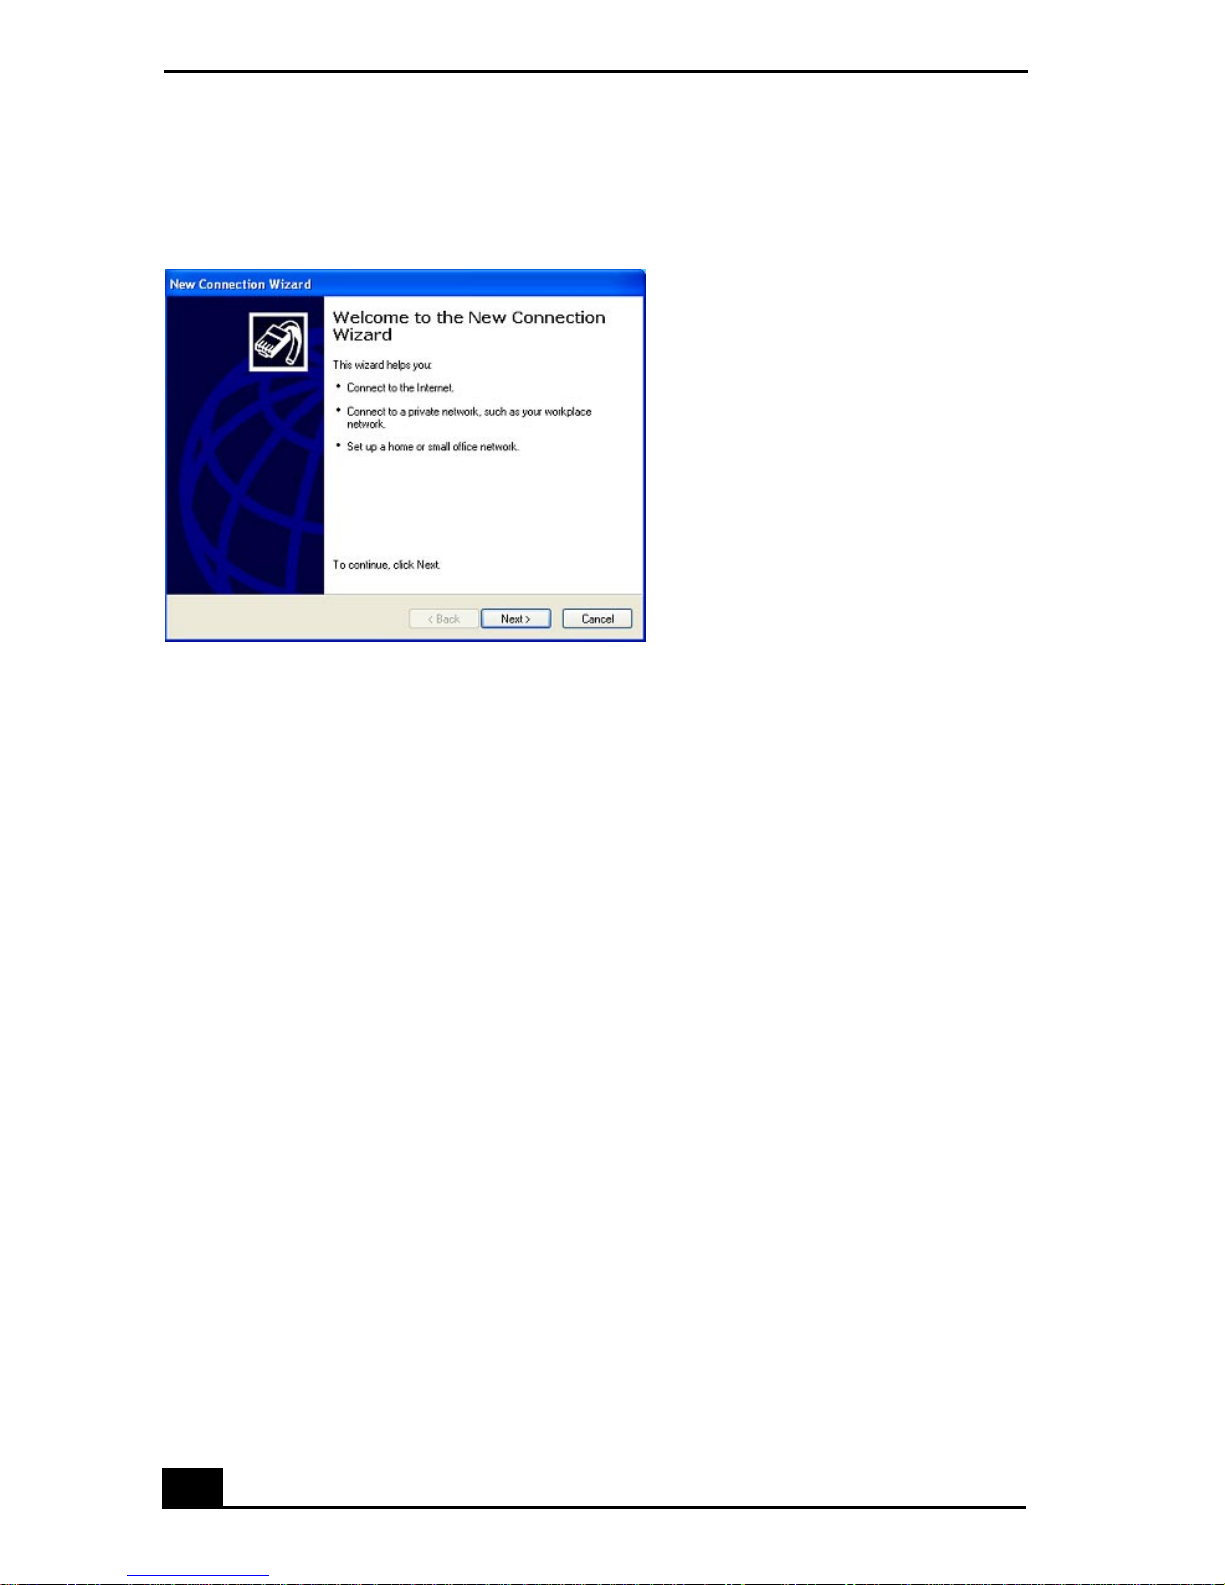
To set up a dial-up connec tion (Microsoft® Windows® X P operating system )
1 Connect a tele phone cable to your compu ter. See “To connect a telephone
cable” in the Internet and Network Connections chapter of your online
VAIO® Co mputer U s er G ui d e.
2 Click Start, point to All Programs, Accessories, Communications, and
then click New Connection Wizard. The New Connection Wizard
appears.
39
Page 40
V AIO® Computer Quick Start
New Connection Wizard
3 Click Next.
4 If it is not already selected, click Connect to the Internet.
5 Click Next.
6 Foll o w th e on- s c r ee n in s t r u ct io n s.
40
Page 41
Turning On Your Computer
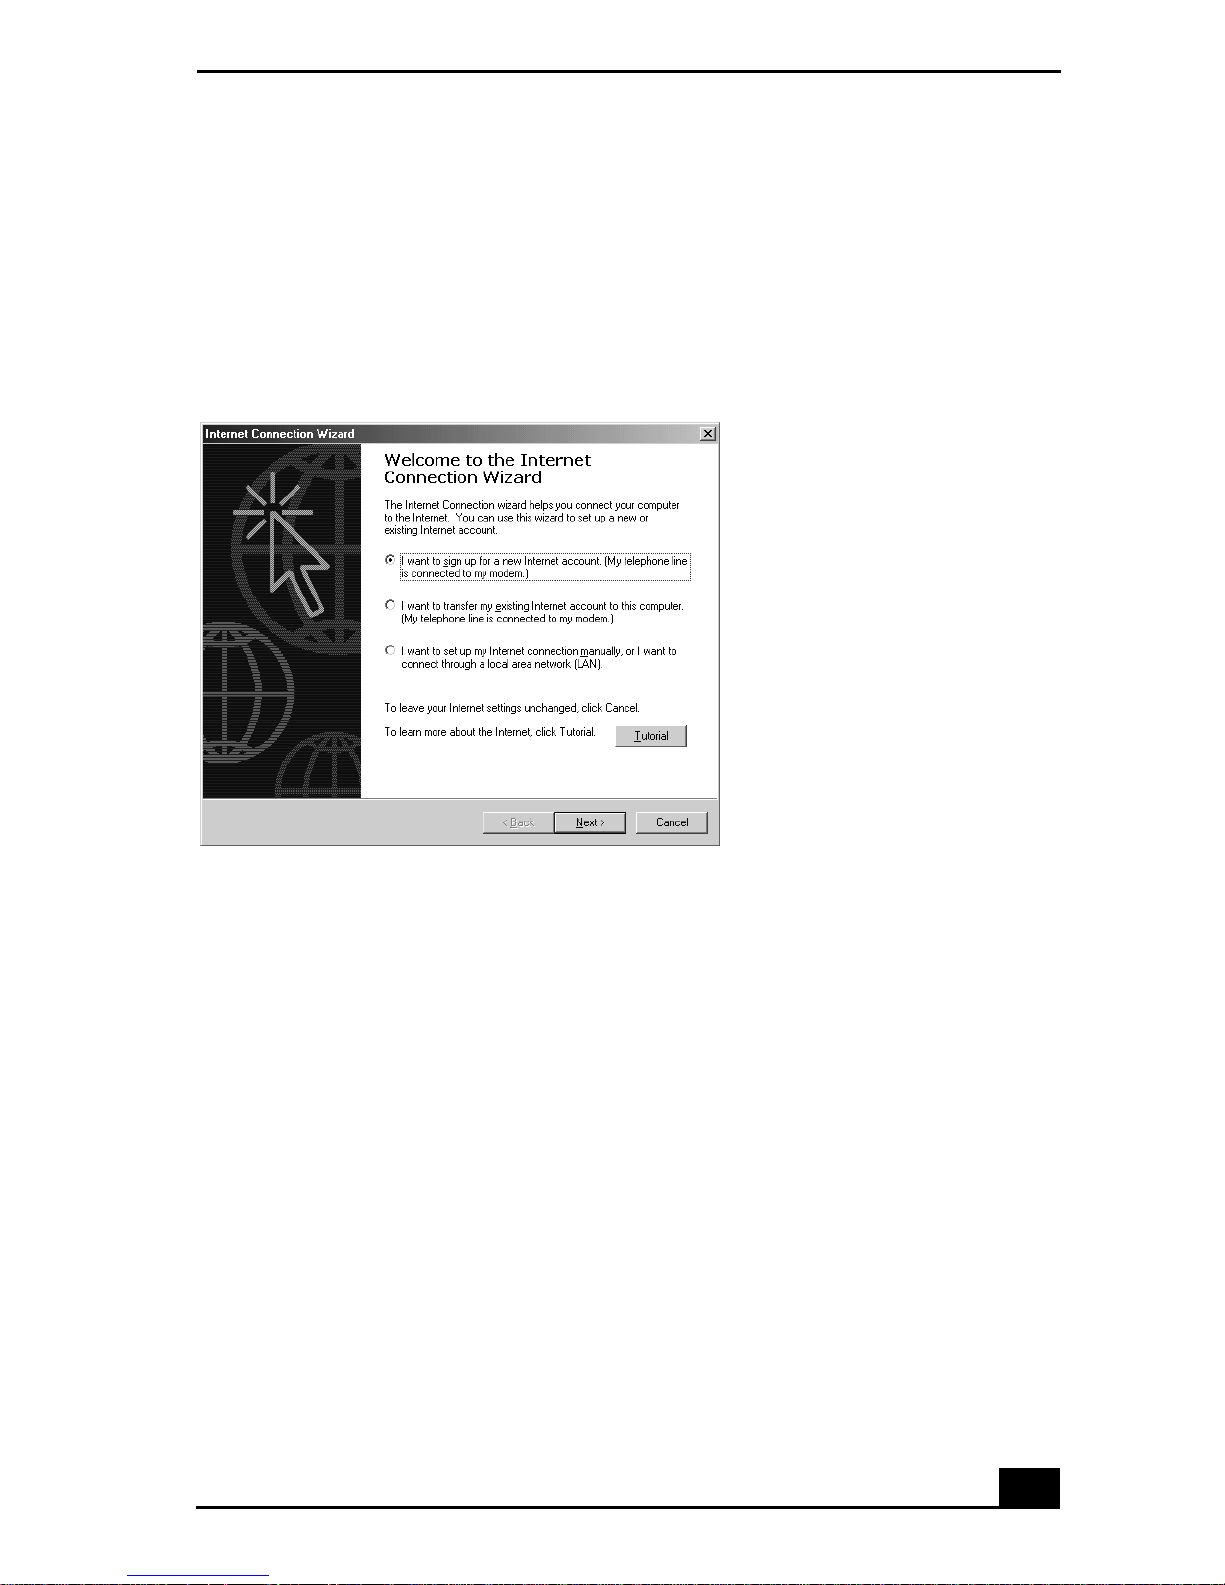
To set up a dial-up connection (Microsoft® Windows® 2000 operating system)
1 Click Start, point to Programs, Accessories, C ommunications, and then
click Internet Connection Wizard. The Internet Connection Wizard
window appears.
Internet Connection Wizard
2 Follow the on-screen instructions to finish setting up your Internet
connection.
Turning Off Your Comp uter
Using the power button to turn off your com puter may result in loss of data.
Follow the steps below to properly turn off your computer and avoid losing data.
To turn off your co mputer
1 Close or end all operations.
❑ Close all programs.
❑ Remove the PC Cards.
❑ Disconnect USB devices.
2 Click Start on the Windows ® taskbar.
41
Page 42

V AIO® Computer Quick Start
3 Select the Turn Off Computer or Shut Down command at the bottom of
the menu.
❑ (W indows XP) Click Turn Off Computer at the bottom of the Start
menu to display the Turn o ff co m p ut er window, and click Tu rn Off.
❑ (W indows 2000) Click Shut Down at the bottom of the Start menu to
display the Shut Down Windows window, and click Shut Down.
✍ Respond to any prompts warning you to sav e documents.
4 Wait fo r yo ur com p u t er to tu rn of f aut o m at i ca ll y. The com put er is o ff when
the power indi ca tor turns off.
✍ During a period of inactivity, you can conserve battery life by using the power
saving modes. See “Controlling Power Management” in the online VAIO®
Computer User Guide for more information.
5 If you are unable to turn off your computer, then restart the computer.
❑ (W indows XP) Press the key combinati on Ctrl+Alt+Delete. The
Windows T ask Manager dialog box appears. Select Restart from the
Shut Down menu.
❑ (W indows 2000) Press the key combination Ctrl+Alt+Delete. The
Windows Security screen appears. Select Restart from the Shut Down
menu.
✍ If you ar e sti l l unabl e t o shut down th e comp uter, you can pre ss the powe r b utton and
hold it for more than four seconds. This operation may result in data loss.
42
Page 43

Expanding Your Computing
Power
This section helps you get started upgrading computer memory and
locating information about preinstalled software programs.
❑ Upgrading Memory
❑ Locating Preinstalle d Programs
43
Page 44

V AIO® Computer Quick Start
Upgr ad in g Memor y
Depending on the configuration you purchased, your comput er may ac cept
additional memory modules. For information about install ation procedures, refer
to the online VAIO® Computer User Guide and print those relevant steps. See
“Lo c a ting Your VAIO Comput e r U s e r G uide ” on page 37.
The specif ica tions supplied wit h your computer (either online for Windows XP
or printed for Windows 2000, depending on your computer's operating system)
lists the amount of install ed memory and required memory modu les for upgr ades.
Locating Preinstall ed Programs
Your computer c omes with a variety of pre installed audio/video programs. The
following is a list of preinstalled programs, descriptions, and informati on:
❑ VAIO® Computer User Guide — The Preins talled Pr o g rams chap ter of
your online VAIO® Computer User Guide contains a list of programs,
descriptions, and support information. See “Locating Your VAIO Computer
User Guide” on page 37 for more information.
❑ VAIO® Computer Specifications (Windows XP) — The online fi le det ails
your computer’s hardware spe cifications and li sts preinstalled programs,
descriptions, and support information. See “Locating Your VAIO Computer
User Guide” on page 37 for more information.
❑ All Prog ram s — The All Programs file on the Start menu contains a list of
all the preinstalled programs on your com puter.
44
Page 45

Using the Recovery CDs
❑ Application and System Recovery CDs
❑ Using Your Recovery CDs
45
Page 46

V AIO® Computer Quick Start
Application and System Recovery CDs
Your computer comes wit h the following Application Recovery and System
Recovery CDs. You will need an optical drive to use these recovery CDs. If your
compu t er do e s no t come with an o pt i ca l drive, us e an ex ternal op ti ca l d r iv e.
Application Recovery CD(s)
Sony Electronics Inc.
This CD enabl es you to rei nsta ll indiv idua l soft ware programs a nd devic e drivers
if they become corrupted or are erased.
System Recovery CD(s)
Sony Electronics Inc.
This CD enables you to restore the operating system and software that shipped
with your computer if they become corrupted or are erased. This CD restores
your computer to it s origina l fact ory sett ings, so user data and softwa re program s
installed since you started using your computer will be lost.
Using Your Recovery CDs
The following sections describe how to us e the Application Recovery and
Syste m Re covery utilities.
❑ Using the Application Recovery CD(s)
❑ Using th e S y stem Recovery CD(s)
Using the Application Recovery CD(s)
The Application Recovery CD(s) utility enables you to reinstall individual
software programs, device drivers, and repair software programs if they become
corrupted or are erased. Reinst alling an indiv idual program or device driver may
correct a pr oblem y ou are e xperie ncing wi th yo ur compute r , pe rip heral h ardware,
or software. You may not need to rein stall the entire conte nts of your hard disk.
To reinstall all the software titles that shipped with your computer, use the
System Recovery CD(s). See “Using the System Recovery CD(s)” for more
information.
✍ You must be using a Windows® operating system to run the Application Recovery
CD utility .
46
Page 47

Application and System Recovery CDs
To re i n stall progra ms wi th the App li catio n R ecovery CD( s )
1 Turn on your computer. If your computer is already on, close all open
programs.
2 Logon to the Micros oft® Windows ® desktop.
3 Insert Sony Application Recovery CD No. 1 into your computer’s optical
drive. The Application Recovery utility loads automati cally.
4 Click OK in the VA IO welcome window. The Sony Application Recovery
Program window appears.
5 Doub l e- click th e Software folder icon.
6 Double-cl ick the application you want to restore, and then follow the on-
screen instructions to complet e the recovery process.
✍ Your system m ay include one or more A pplication Recovery CDs. If you h ave more
than one A pplicati on Recovery CD, insert the first CD to run the Applicati on
Recovery program. You may be pr om pted to insert the next CD, depending on the
application you wis h to restore.
To reinstall device drivers with th e Application Recovery CD(s)
1 Logon to the Micros oft® Windows ® desktop.
2 Insert Application Recovery CD No. 1 int o your com puter’s opt ical drive.
3 Click Start on the Windows ® ta skbar, and right-click My Computer.
4 Click Properties. The System Properties dialog box appear s.
5 Click the Hardware tab, and click Device Manager.
6 Right-click the unknown device or the device that requires the driver
installation, and click Update Driver from the shortcut me nu.
✍ The unknown devices(s) is identified by a yellow question mark. A device that has a
driver problem is identified by a yellow exclamation point.
7 In the Hardware Update Wizard, click to select Install from a list or
spec if ic location (Advanced).
8 Click Next.
47
Page 48
V AIO® Computer Quick Start
9 Click to ca ncel the Search removable media (floppy, CD-ROM...) option.
10 Click to select the Incl ude this lo cation in the search check box.
11 Click Browse. The Brows e For Folder dialog box appears.
12 Navigate to the optical drive, and click to select the Application Recovery
CD. The CD contents are displayed.
13 Click the folder name of the device in which you want to reinstall, and click
OK. The Hardware Update Wizard appears.
14 Click Next, and select the de vice folder. The Microsoft® Windows®
operating system automatically reinstalls the device driver(s) from the
Applicat ion Recovery CD.
15 Click Finish, and remove the Application Recovery CD from the optical
drive.
16 Turn off your computer by clicking Start, and then Turn off computer.
17 Wait 30 seconds, and turn on your computer.
✍ Your system incl udes one or more Application Recovery CDs. Insert A pplication
Recove ry CD No. 1 to st art the app lication or driver recovery process. You are
prompted to insert the next CD(s), de pending on the application or driver you w ant
to restore.
If you have any quest ions about using the Appl ication Recovery CD(s), visit
http://www.sony.com/pcsupport, or conta ct Sony Customer Support at 1-88 8-4SONY-PC.
Using th e System Recovery CD(s)
The System Recovery CD(s) ena bles you to format your hard disk and restores
all original software programs. Your computer is returned to the original factory
settings.
The System Rec overy process removes all software that you may have
installed since you started using your computer. Reinstall any software
program s that were not i ncluded with the co mputer when you pur chased
it.
48
Page 49
Application and System Recovery CDs
You can use the System Recovery CD(s) to reinstall the operating system and
software titles that shipped with your computer if they become corrupted or are
erased. You may not need to reinstall the entire contents of your hard drive. If
you experience a problem with your computer, reinstalling an individual device
driver or software title may correct the problem. Use the Application Recovery
CD(s) to reinsta ll indivi dua l programs and to reins tall dev ice drive rs. See “Usin g
the Application Re cove ry CD(s )” for more information.
The System Recovery CD(s) contains a backup copy of all the soft ware
originally inst alled on yo ur hard di sk . It can be used only to re cover the hard di sk
of the computer you purchased.
Syst em Recovery options
❑ Default System Drive Recovery — All data on Drive C is del eted. The
factory default settings and software programs are restore d on this drive
only.
❑ Change Partition Size — All partitions, custom installations, and changes
are removed from the hard drive. You can set the partition sizes for both the
Drive C and Drive D. The origina l, preinstall ed operating system and
software prog ram s are restore d .
❑ Recovery to Original Factory Defaults — All data and partitions are
removed from the hard drive. All ori ginal fac tory setti ngs, ope rating system,
and preinsta lled software are restored.
The System Recovery utility does not back up your system’s data. If you
wish to retain your system data, perform a backup to an external media.
To u se the Syst em Reco ve r y C D ( s)
Your system may take a few minutes to load necessary files. A blue screen may
appear duri ng the downloading process.
1 Inse r t the Sony System Recovery CD in the optical driv e. The first CD must
be in the drive before you restart your comput er.
2 Turn off your computer by clicking Start, and then Turn of f computer.
3 Wait 30 seconds, and turn on your computer. The System Recove ry utility
restarts from the opt ical drive.
49
Page 50

V AIO® Computer Quick Start
4 When the VAIO System Recovery Utility wizar d ap p ea r s, click Next.
5 Foll o w th e on- s c r ee n in s t r u ct io n s to c o mp l e t e th e r ec o very pr oc ess.
If your computer does not start from the Recovery CD
1 Press the powe r button and hold it for more than four seconds to turn off the
computer.
2 Turn on the computer. When the Sony logo is displayed, press the F2 key.
The BIOS Setup Utility appears.
3 Press the right arrow key to select the Exit menu.
4 Press the down arrow key to select Get Default Values, and pres s Enter.
The Setup Confirmation window appears.
5 Press Enter agai n to select Yes.
6 Make sure Exit (Save Changes) is selected, and then press Enter. The
Setup Confirmation window appears again.
7 Make sure Yes is selected, and press Enter. The computer restarts from the
Recovery CD.
✍ Your system m ay include one or more System Recovery CDs. If you have more than
one System Recovery CDs, insert the first CD to run the System Recovery pr ogram.
You are promp ted to inser t t he seco nd CD onc e t he info rmat i on from the f irst CD has
been installed.
The recovery process takes from 30 to 60 minutes to complete.
After recovering your system using the System Rec overy CD(s), you may be
prompted to insert your Application Recovery CD(s) after restart ing the
Wi ndows op erati ng sys tem. Ins ert th e Appl icat ion Recovery CD t o aut omat icall y
complete re covery of your system.
50
Page 51

Caring for Your Comput er
This section provides information on how to safely use your Sony
computer.
❑ Storing Your Computer
❑ Using Cables and Connections
❑ Cleaning Your Computer
❑ Handling the LCD Screen
51
Page 52

V AIO® Computer Quick Start
Storing Your Computer
❑ Do not place your computer in a location subject to:
❑ Heat sources, such as radiators or air ducts
❑ Direct sunlight
❑ Excess ive d us t
❑ Moisture or rain
❑ Mechanical vibration or shock
❑ Strong magnets or speakers that are not magnetically shielded
❑ Ambient temp erature of more than 95ºF (35ºC) or le ss than 40ºF (5ºC)
❑ High humidi ty
❑ Do not place electronic equipment near your computer. The computer’s
electr omagnetic field may caus e a malfunction.
❑ Provide adequate air circulation to prevent internal heat buildup. Do not
place your computer on porous surfaces such as rugs or blankets, or near
material s such as curtains or draperies that may block its ventilation slots.
Leave a space of at least 8 inches (20 cm) behind th e bac k panel of the
computer.
❑ If the computer is brought directly from a cold location to a warm one,
moisture may condens e insi de your computer. In this case, allow at least one
hour before turning on your computer. If any problems occur, unplug your
computer, and contact your Sony Service Cent er.
❑ The computer uses high-frequency radio signals and may interfere with
radio or TV reception. Should this occur, relocate the computer a suitable
dist ance away from the set.
❑ Do not drop the computer or place heavy objects on top of the computer.
Using Cables and Connections
❑ Use only specified peripheral equi pment and interface ca bles; otherwise,
problems may result.
❑ Do not use cut or damaged connection cables.
❑ If the telephone company makes a service call to your home or office and
determines that your computer is responsible for a problem, the telephone
company may bill you for the service cal l. Also, if you do not disconnect
52
Page 53

Cleaning Your Computer
your computer when it is adversely affecting the telephone line, the
telepho ne company has the right t o disconnect your service until you corre ct
the problem.
Cleaning Your Computer
❑ Clean the computer with a soft, dry cloth or a soft cloth lightly moistened
with a mild det erge nt soluti on. Do not us e any t ype of abra sive pad, scour ing
powder, or solvent suc h as alc ohol or benzine, as th es e m ay da ma ge the
finish of your computer.
❑ If a solid object falls o n to the computer or a liquid leaks into th e computer,
immediatel y turn off and unplug the co mpu ter. It is best to have the
computer che cke d by qualified personnel before you use it again.
❑ A vo id rubbi ng the LCD screen as this ca n damage the scr een. Use a soft, dr y
cloth to wipe the LCD scree n.
❑ Always disc onnect the power cord before cleaning the computer.
Handling the LCD Screen
❑ Do not leave the LCD faci ng the sun as it can damage the LCD. Be careful
when using th e computer near a window.
❑ Do not scratch th e LCD or exert pressure on it. This could ca use a
malfunction.
❑ Using the computer in low temperature conditions may produce a residual
image on th e sc re en. T his i s not a m al func ti on. Wh en the co mputer returns t o
normal temperature, the screen returns to normal.
❑ The screen beco mes warm during operation. This is normal and does not
indicate a malfunction.
❑ The LCD is manufactured using high-precision technology. You may,
however, see tiny black points and/or bright points (red, blue, or green) that
continuously appear on the LCD. This is a normal result of the
manufacturing process and does not indicate a malfunction.
53
Page 54

V AIO® Computer Quick Start
54
Page 55

Troubleshooting
This section describes how to solve some basic problems you may
encounter when using your computer. For more troubleshooting topics
refer to the online VAIO® Computer User Guide. Many problems have
simple solutions, so refer to these sources before you contac t Sony
Computing Support (http://www.sony.com/pcsupport).
❑ Troubleshooting Your Computer
❑ Troubleshooting the LCD Screen
❑ Troubleshooting the Mouse and Touch Pad
❑ Troubleshooting the Docking Station
❑ Support Opti ons
❑ Program Support Information
55
Page 56

V AIO® Computer Quick Start
Tr oubleshootin g Your Computer
Why doesn’ t my compu ter start?
❑ Make sure the computer is securely plugged into a power source and is
turned on. Make sure the power indicator shows the power is on. See
“Connecting a Power Source” for more information.
❑ Make sure the battery is inserted pr operly and is charge d.
❑ If you are connected to a docking station with a floppy disk drive or an
externa l floppy disk drive, make sure the floppy disk drive is emp ty.
❑ If the computer is plugged into a power strip or Uninterruptible Power
Supply (UPS), make sure the power strip or UPS is turned on and workin g.
❑ If you are using an ext erna l display, make sure it is plugge d into a power
source and turned on. Make sure the brightness and con trast controls are
adjusted correctly. See the manual that came with your display for details.
❑ Remove the ba ttery from the comput er , unplu g the powe r cord , and pl ug it in
again. Turn on the power.
❑ If the power control button does not function, remove the AC adapter and
battery. W ait one minute, and then rea ttach them before pressing the power
button.
❑ Condensation may cause the compute r to malfunction . If this occurs, do not
use the computer for at least one hour.
❑ Unplug the power cord, press the rese t button by using a thin , straight object
(such as a paper clip), remove the battery, plug it in again, and turn on the
power.
Why does a BIOS error ap pear whe n my comp uter starts?
If the message “Pres s <F1> to resume, <F2> to setup” appear s at the bottom of
the screen. F o llow thes e steps:
1 Press F2. The BI OS Se t up menu appears.
2 Set the date (month/day/year). Press Enter.
3 Press the Down Arrow key to select Syst e m Time, and then set the tim e
(hour: minute: second). Press Enter.
56
Page 57
Troubleshooting Your Computer
4 Press the Right Arrow key to select the Exit tab, and then press the
Down Arrow key to select Get Default Values. The message Load
default values for all SETUP items appears.
5 Press Enter. The Setup Confirmation window appears.
6 Select Yes, and press Enter.
7 Select Exit (Save Changes), and pre ss Enter. The Setup Confirmation
window appears again.
8 Select Yes, and press Enter. Th e com pu t er res t art s .
✍ If this o ccurs on a regu lar basis, contact Son y Com puting Support
(http://www.sony.com/pcsupport).
Why does the message “Operating system not found” appear when my
computer s tarts, an d why won ’t Windows st art?
❑ If you have connected a docking station with a floppy disk drive or an
externa l floppy di sk drive , make sure there is no dis k in the flopp y disk dri ve
(non-bootable).
❑ If a non-bootabl e floppy disk is in the driv e, proceed as follows:
1 Turn off the computer, and remove the floppy disk.
2 Restart the computer and confir m that the Windows ® operating system
starts prop erly.
❑ If Wi ndows still does not start, follow thes e steps to initialize the BIOS:
1 Remove any floppy disk from the floppy disk drive.
2 Turn off the computer.
3 Remove any peripheral devices connected to the computer.
4 Resta r t the computer.
5 Press F2 when the Sony logo appear s . The BIOS Setup window
appears.
6 Press the Right Arrow key to select the Exit menu.
7 Press the Down Arrow key to select Get Default Values. The
message Load default values for all SETUP items appears.
57
Page 58
V AIO® Computer Quick Start
8 Press Enter. Th e Setup Confirmation window appears.
9 Select Yes, and pr ess Enter.
10 Select Exit (Save Changes), and pres s Enter. The Setup Confirmation
window appear s ag ain.
11 Select Yes, and pr ess Enter. The computer restarts.
If your comput er contin ues t o di spla y the message “Opera tin g syste m not foun d,”
and Wi ndows doe s not s tart , use your supp lied S ystem R ecover y CD(s) to r estor e
the sof tware titles shipped with your computer. See “Using the System Recovery
CD(s)” for more information.
The System Recovery CD restores your computer to its original state, so
user data and appl ications will be lost.
Why does my computer st op responding or won’t turn off?
It is best to turn of f you r comput er usin g the T urn Off Compute r command on t he
Windows Start menu. Using other methods, including those listed below, may
result in loss of unsaved data.
❑ (W indows XP) Click Start on the Windows® taskbar, select Turn Off
Computer, and then click Turn Off.
(W indows 2000) Click Start on the Win dows® taskbar, and select Shut
Down. When th e Shut Down Windows window appears, make sure Shut
down is selected, and click OK.
❑ If your computer does not turn off, press Ctrl+Alt+Delete simultaneously.
(W indows XP) When the Windows Task Manager dialog box appears,
click Turn Off from the Shut Down me nu.
(Windows 2000) When the Windows Security dialog box appears, click
Shut Down, and select Shut down again from the Shut Down Windows
window.
❑ If your computer s till does not turn off, press and hold the power button for
at least four secon ds to turn off the power.
❑ Unplug the computer from the AC adapter, and remove the battery from
your computer.
❑ If your computer stops responding while playi ng a CD or DVD, press
Ctrl+Alt+Delete simultaneousl y. You can turn off the computer from the
Shut Down menu.
58
Page 59

Troubleshooting Your Computer
✍ Pressi ng the Ctrl+Alt+Delete keys sim ultaneously or turni ng off the computer with
the power button may result in data loss in files that are currently open.
Why won’t the power management respond?
Your computer’s operating system may become unstable if a lower power state,
such as Hibernate, is initiated and changed before the computer completely
ente r s the lower p o wer state.
To resto r e the com puter to its normal operating stability
1 Close all open programs.
2 Restart the comp u ter. Follow thes e steps:
1 Press the Windows key .
2 Press U. The Turn off computer window opens.
3 Press R to select restart.
4 (W indows 2000) Press Enter.
3 If th e co mputer do es not restart,
1 (W indows XP) Press Ctrl+Alt+De lete si multan e o usly. The Windows
Task Manager window appears.
(W indows 200 0) Press Ctrl+Alt+Delete si multa neous ly. The Windows
Security dialog box appears.
2 (W indows XP) Press Alt to highlight the menu bar, and press the Right
Arrow key to select Shut Down.
(Windows 2000) Press the Right Arrow key to select Shut Down.
3 Press Enter.
4 Press R to select restart.
5 (W indows 2000) Press Enter.
4 If this procedure does not work, press and hold the power button for four
seconds or lon ger to turn off the computer.
59
Page 60

V AIO® Computer Quick Start
Troubleshooting the LCD Screen
Why did the computer (LCD) scr een go blank?
❑ Your computer screen may go blank if the computer has lost power or is in a
power saving mode (Standby or Hibernate).
❑ Make sure t he computer is pl ugge d in to a powe r sourc e and is t urne d on.
The power indicator on the computer will be on if the computer is on.
❑ Make sure the battery is inserted pr operly and is charge d.
❑ If the computer is in LCD (Video) S tandby mode, press any key to
activate the computer screen.
❑ If the displa y mode is s et to exter nal dis play (s uch as TV), press and hold the
Fn key while you pre ss F7 several times.
Tr oubleshootin g the Mouse and Touch Pad
Why doesn’t the mouse work properly?
❑ If you are using a Sony USB mouse, make sure the mouse is securely
plugged into the USB port.
❑ If you are using an extern al mouse, make sure the mous e is securel y plugged
into th e mouse connector.
❑ If you are still experiencing problems, use your supplie d Application
Recov er y CD to reins tall the mouse drivers. See “Using the Application
Recovery CD(s)” on page 46 for more information.
Why doesn’t the touch pad work properly.
❑ You may have disabled the touch pad without connecting a mouse to the
com put er. To en ab l e th e to u c hp a d :
1 (W indows XP) Press the Windows key , and then press the Up
Arrow key to select All Programs.
(W indows 2000) Press the Windows key , and then press the Up
Arrow key to select Programs.
2 Press Enter.
3 Press the Down Arrow key to select Sony Notebook Setup, and
press Enter.
60
Page 61
Troubleshooting Your Computer
4 Select Sony Notebook Setup again, and pr ess Enter.
5 Press the Right Arrow key to select the Device tab.
6 Press the Tab key to select the left panel, and the n press the Down
Arrow key to select Pointing Device.
7 Press Alt+S simultaneously. The Mouse Propert ies dialog box app ea r s.
8 Make sure the Buttons tab is selected, and press the Up Arrow key
and Down Arrow ke y to change the button assignments. Press the
Tab key to move between sho r tcut menus.
9 Press Enter to save your changes and clos e the dialog box.
❑ Resta r t the computer to activate the touchpad again.
❑ If your touch pad is interpreting a single tap as a double-click , adj ust the
button as signments. Follow these steps:
1 Righ t- c li ck the To uchpad icon on the right side of the Windows®
taskbar.
2 Select Mouse Properties, and press Enter. The Mouse Properties
dialog box ap pears.
3 Make sure the Buttons tab is open, and press the Up Arrow and
Down Arrow keys to change the button assignments .
4 Press the Tab key to select the Default button, and press Enter. The
button preferences automatically update to the original settings.
5 Press the Tab key to select Apply, an d pres s Enter.
6 Press the Tab key to select OK, and press Enter.
❑ If you are still experiencing problems, make sure another mouse was not
installed.
❑ You may need to use your Application Recovery CD(s) to reinstall the
mouse driver s. See “Using the Application Recovery CD(s)” on page 46 for
more information.
Why doesn’t the point er mov e when I use the touch pad or mouse .
❑ You should restart your computer. Follow these steps:
1 Press the Windows key .
61
Page 62

V AIO® Computer Quick Start
2 Press U. The Turn off computer window opens.
3 Press R to select restart.
4 (W indows 2000) Press Enter.
❑ If the computer does not restart,
1 (W indows XP) Press Ctrl+Alt+De lete sim u lt an eously. The Windows
Task Manager window appears.
(W indows 200 0) Press Ctrl+Alt+Delete si multa neous ly. The Windows
Security dialog box appears.
2 (W indows XP) Press Alt to highlight the menu bar, and press the Right
Arrow key to select Shut Down.
(W indows 2000) Press the Right Arrow key to select Shut Down.
3 Press Enter.
4 Press R to select restart.
5 (W indows 2000) Press Enter.
❑ If you st ill cannot restart you r computer, press a nd hold the power button for
more than four seconds to turn off the computer.
❑ If the pointe r does not m ove while playing a disc, pre ss Ctrl+Alt+Delete
simultan eously to stop playback and restart the computer.
❑ If you are still experiencing probl ems, make sure another mouse was not
installed.
❑ You may need to use your supplied Application Recovery CD(s) to reinstall
the touch pad or mouse drivers. See “Using the Application Recovery
CD(s)” on page 46 for more information.
Troubleshooting the Docking Station
Why did an error message appear when I correctly disconnected th e docking
station?
An error message may appea r if a software application is open or a device is
connected to the docking station. Close all software applications that are in use
and disconnect any devices. Try to disconnect the docking station again. If an
error message appears after doing thes e steps, contact Sony Customer Support.
62
Page 63

Troubleshooting Your Computer
How do I remove a disc from th e optical drive?
To remo v e a d isc from th e o p ti cal driv e, mak e su r e th e co m pu t er is tu r n ed on . If
the compute r is in a power saving mode (Standby or Hibe rnate), the following
instructions will not work.
1 Press any key to return to Normal mode.
2 Press the Eject button.
How can I open the optical drive tray if th e Eject button does not work?
Your computer comes wit h a manual eject hole on the cover of th e optical drive.
Insert a thin, straight object (such as a paper clip) into this hole to eject a disc.
Support Options
If you have questions about your computer or th e prei nstalled programs, refer to
the followi ng sources for answers in the sequence listed below.
1 VAIO® Computer User Guide
The online VAIO ® Co mputer User Guide an d the printed VAIO®
Computer Quick Start provide information on how to maximize your
computer capabiliti es and s olve common problems.
2 Softw are Manuals and Online Help Fil es
The software preinstalled on your co mput er may come with an online
manu al. These manu als are st o r ed on the hard disk d rive as on l ine Help
files. You can find the Help f iles from the Help menu under the spec ific
software appl ication. Some software programs may come with a printed
manual.
63
Page 64

V AIO® Computer Quick Start
3 Operating System Online Support
Your computer comes preins talled with Micros oft® Windows®. For
operating system support, you can access Microsoft ® customer support
at: http://support.microsoft.com/directory/.
4 VAIO Support Agent
You can find VAIO Support Agent by clicking Start and selecting Help
and Support. Us ing advanced diagnostic technology, Sony’s VAIO
Support Agent runs scheduled protec tions of your programs, network
settings, and other important software settings. When your software is
protected, you can use VAIO Support Agent to repair soft ware problems
by restoring your software to any of the previously protected states.
5 Sony Computing Support
This se r v ic e pro v id es inst an t ac cess to in f o rm at io n on co m m o nl y
encountered problems. Enter a description of your problem and the
Knowledge Database searches for the corresponding solutions onli ne.
You can access Sony Com puting Support at:
http://www.sony. com/pcsupport.
Progr am Support Information
Adobe® Acrobat® Reader®, Photoshop® Elements Trial Version (Adobe
Systems Inc.)
Web site http://www.adobe.com
e-mail [email protected]
telepho ne 206-675-6126 (fee-based support)
fax 206-628-5737
hours M-F, 6 A.M.-5 P.M. (Pacific time)
64
Page 65

Troubleshooting Your Computer
Ameri c a On l i n e® ( A me ri ca O nl in e , In c .)
Web site http://www.aol.com
telephone 800-827-3338
hours 7 days a week, 24 hours a day
EarthLink™ Network Total Access (EarthLink Network Inc.)
Web site http://s upport.earthlink.net/
e-mail [email protected]
telepho ne 800-890-5128, 800-890-6356
hours 7 days a week, 24 hours a day
PC-Cillin® 2000 (Trend Micro , Inc.)
Web site http://www.antivirus. com/pc-cillin/support/
telephone 949-387-7800; 900-820-8324
1
hours M-F, 8 A.M.-5 P.M. (Pacific time)
1 Support from 949-387-7800 is fr ee of charge, but subject to delays. Sup port from 900 -820-
8324 is fee-based, bu t offers immediate r esponse.
Quicken® 2002 New User Edition (Intuit Inc.)
Web site http://www.intuit. com/support
telephone 900-555-4932; 800-644-3193
1
hours M-F, 5 A.M.-5 P.M. (Pacific time)
1 Support from 900- 555-4932 is fee- based. Su pport from 800-644-3193 is automated and free
of charge.
QuickTime® (Apple Computer, Inc.)
Web site http://www.apple.com
telephone 800-275-2273
hours M-F, 6 A.M.-6 P.M. (Pacific time)
Real One™ (Rea l N et w o rk s , In c. )
Web site(s) http://service. r eal.com/rjoptions.html
e-mail http://service.real.com/help/call.html (online e-m ail form)
65
Page 66

V AIO® Computer Quick Start
Sony Applications (Sony Electr on ics Inc.)
Web site http://www.sony.com/pcsupport
telephone 888-4-SONY-PC (888-476-6972)
1
hours 7 days a week, 24 hours a day
1 Support from 1-888-4-SONY-PC is free of char ge for 90 days a fter the original date of
purchase.
Windows® Operating System, Word, (Microsoft Corp.)
Web site http://www.sony.com/pcsupport
telephone 888-4SONYPC (888-476-6972)
1
hours 7 days a week, 24 hours a day
1 Support from 1-888-4-SONY-PC is free of char ge for 90 days a fter the original date of
purchase.
WinDVD® (InterVideo, Inc.)
Web site http://www.intervideo.com
telepho ne 510-651-08 88
Sony Service Center
For the Sony Service Center nearest you, call 1-888-4-SONY-PC
(1-888-47 6-6972) or find Sony Customer Service on the Web at
http://www.sony.com/pcsupport.
66
Page 67

Index
A
AC adap ter 32
connecting 33
Application Recovery CD 46
B
battery
charging
indicator 19
port 20
UNLOCK/LOCK switch 23
brightnes s control 34
buttons
left
power 19
right 19
32
19
C
caps lock 19
computer
cables
care 51
cleaning 53
controls and connectors 19
LCD screen 53
online s upport 63
specifications 16
specifications (online) 38
storage 52
troubleshooting 56
turning off 41
turning on 32
unpacking 16
52
updates 38, 39
connecting
dial-up
docking station 26
network 24
port replicator 24
Serial port 24
controls 19
brightness 34
39
D
DC IN port 20
DC OUT port 21
dial-up connection 39
docking station
connecting
disconnecting 27
indicator 19
26
E
Electronic Flyer 38, 39
Energy Star 5
Ethernet
removing protec tive tab
Ethernet port 21
F
faxes
laws governing
10
H
handling the LCD screen 53
hard disk drive
indicator
headphone jack 21
19
22
67
Page 68

V AIO® Computer Quick Start
help
37, 55
I
i.LINK port 21
indicators
battery
caps lock 19
docking station 19
hard disk drive 19
Memory Stick media 19
num lock 19
power 19
scroll lock 19
Wireless LAN 19
input devices 9
interference 9
inte rnal speaker 19
Internet connection 39
19
J
jacks
headphone
microphone 21
modem jack 21
21
K
keyboard 19
L
LCD scre en
handling
locating 19
troubleshooting 60
53
M
maintanence 53
manual 37
Memory Stick media
indicator
slot 20
micropho ne jack 21
modem
laws governing
19
10
modem jack 21
monitor (VGA) port 21
mouse
troubleshooting
60
N
network
connector
port replicator 24
network connector 21
num lock 19
24
O
online support 63
online user guide 37
output devices 9
P
PC Card slot 20
phone
laws governing
port replicator
connecting
network 24
ports
battery
DC IN 20
DC OUT 21
i.LINK 21
network 24
Serial port 24
USB 20, 21
VGA (monitor) 21
power
indicator light
power button 34
power source 32
programs
locating
20
44
10
24
19
R
radio interference 9
68
Page 69

Index
Recovery CDs
regulatory information 8
reset switch 23
restoring dat a 46
46
S
scroll loc k in d i cator 19
Serial port 24
shutti ng down com puter 41
software
locating
Sony Service Center 66
specifications 16
specifications (online) 38
starting computer 32
startup problems 42
support
Sony
System Recovery CD 48
44
55
user guide 37
V
VGA (monitor) port 21
W
Wireless LAN
indicator
switch 19
19
T
technical support 55
telephone line jack 21
touch pad 19
troubleshooting 60
touchpad
using
35
troubleshooting 56
LCD screen 60
mouse and touch pad 60
startup 42
turning off computer 41
turning on computer 32
TV
interference
9
U
UNLOCK/LOCK switch 23
unpacking the computer 16
updates 38, 39
USB port 20, 21
69
Page 70

Page 71

Page 72

http://www.sony.com/vaio
Printed in USA © 2002 Sony Electron ics Inc. 4-668-131- 01
 Loading...