

Page 1
PCG-505F/505FX (U/C)
PCG-505F/505FX
PCG-505F/505FX
(
U/C
)
SERVICE MANUAL
Ver 4-2002D
Revision History
US Model
Canadian Model
English
Sony Corporation
XXXXXXX
9-974-491-14 XXXXXXXX
—34 —
98X11XXX-1
Printed in XXX
© 1998. X
9-974-491-14
98X11XXX-1
Notebook Computer
9-974-491-14
Page 2

Information in this document is subject to change without
notice.
Sony and VAIO are trademarks of Sony. Intel logo and Intel
Inside logo are registered trademarks of Intel Corporation.
Pentium MMX is a trademarks of Intel Corporation. Microsoft,
MS-DOS, Windo ws, the Windo ws 95 and Windows 98 logo are
trademarks of Microsoft Corporation.
Caution Markings for Lithium/Ion Battery - The following or
similar texts shall be provided on battery pack of equipment or
in both the operating and the service instructions.
CAUTION: Danger of explosion if battery is incorrectly replaced.
Replace only with the same or equivalent type recommended by
the manufacturer . Discard used batteries according to the manufacturer’s instructions.
All other trademarks are trademarks or registered trademarks of
their respective owners. Oter trademarks and trade names may
be used in this document to refer to the entitles claiming the
marks and names or their produces. Sony Corporation disclaims
any proprietary interest in trademarks and trade names other than
its own.
†
†
†
†
†
†
†
†
†
†
†
†
†
†
†
Service and Inspection Precautions
1. Obey precautionary markings and
instructions
Labels and stamps on the cabinet, chassis, and components identify areas requiring special precautions. Be sure to observe these
precautions, as well as all precautions listed in the operating
manual and other associated documents.
CAUTION: The battery pack used in this device may present a
fire or chemical burn hazard if mistreated. Do not disassemble,
heat above 100˚C (212˚F) or incinerate.
Dispose of used battery promptly.
Keep away from children.
†
†
†
†
†
†
†
†
†
†
†
†
†
†
†
†
†
†
†
4. Inspect after completing service
After servicing, inspect to make sure that all screws, components, and wiring have been returned to their original condition.
Also check the area around the repair location to ensure that
repair work has caused no damage, and confirm safety.
2. Use designated parts only
The set’s components possess important safety characteristics,
such as noncombustibility and the ability to tolerate large
voltages. Be sure that replacement parts possess the same safety
characteristics as the originals. Also remember that the ( mark,
which appears in circuit diagrams and parts lists, denotes components that have particularly important safety functions; be extra
sure to use only the designated components.
3. Always follow the original design
when mounting parts and routing wires
The original layout includes various safety features, such as inclusion of insulating materials (tubes and tape) and the mounting of parts above the printer board. In addition, internal wiring
has been routed and clamped so as to keep it away from hot or
high-voltage parts. When mounting parts or routing wires. therefore, be sure to duplicate the original layout.
5. When replacing chip components...
Never reuse components. Also remember that the negative side
of tantalum capacitors is easily damaged by heat.
6. When handling flexible print boards...
• The temperature of the soldering-iron tip should be about 270C.
• Do not apply the tip more than three times to the same pattern.
• Handle patterns with care; never apply force.
Caution: Remember that hard disk drives are easily damaged
by vibration. Always handle with care.
— 2 —PCG-505F/505FX (U/C)
Page 3

TABLE OF CONTENTS
CHAPTER 1. REMOVAL
1-1. Flowchart ................................................................................................... 1-1
1-2. Electric Parts Arrangement Diagram ......................................................... 1-1
1-3. Removal ..................................................................................................... 1-2
1. Palm rest housing assembly ....................................................................... 1-2
2. Keyboard unit, touch pad, SWX-19 board................................................. 1-2
3. HDD ........................................................................................................... 1-3
4. SWX-20 board, IRC-4 board, CNX-44 board, CNX-45 board and
CNX-25 board ............................................................................................ 1-3
5. MBX-13 board, speaker unit, and nickel-hydrogen battery ...................... 1-4
6. PC card connector, heat pipe, and heat sink .............................................. 1-4
7. Display assembly ....................................................................................... 1-5
8. Housing bezel assembly, LCD unit, and inverter ...................................... 1-5
(to 1-5)
CHAPTER 2. SELF-DIAGNOSTICS
2-1. Note ............................................................................................................ 2-1
2-2. Necessary Tools ......................................................................................... 2-1
2-3. Start-up of the Self-Diagnostics Program .................................................. 2-1
2-4. Diagnostics on the Setup Screen ................................................................ 2-1
2-5. Diagnostics Using the Self-Diagnostics Program ...................................... 2-2
2-6. Test Items ................................................................................................... 2-3
2-7. Tests that are not Supported ....................................................................... 2-5
(to 2-5)
CHAPTER 3. BLOCK DIAGRAM ............................................................ 3-1
(to 3-2)
CHAPTER 4. FRAME HARNESS DIAGRAM ......................................... 4-1
(to 4-2)
CHAPTER 5. EXPLODED VIEW AND PARTS LIST
5-1. Main Unit ................................................................................................... 5-1
5-2. Display Unit ............................................................................................... 5-3
5-3. FDD Assembly ........................................................................................... 5-5
(to 5-6)
History of the changes is shown as the
“Revision History” at the end of this data.
— 3 — PCG-505F/505FX (U/C)
Page 4
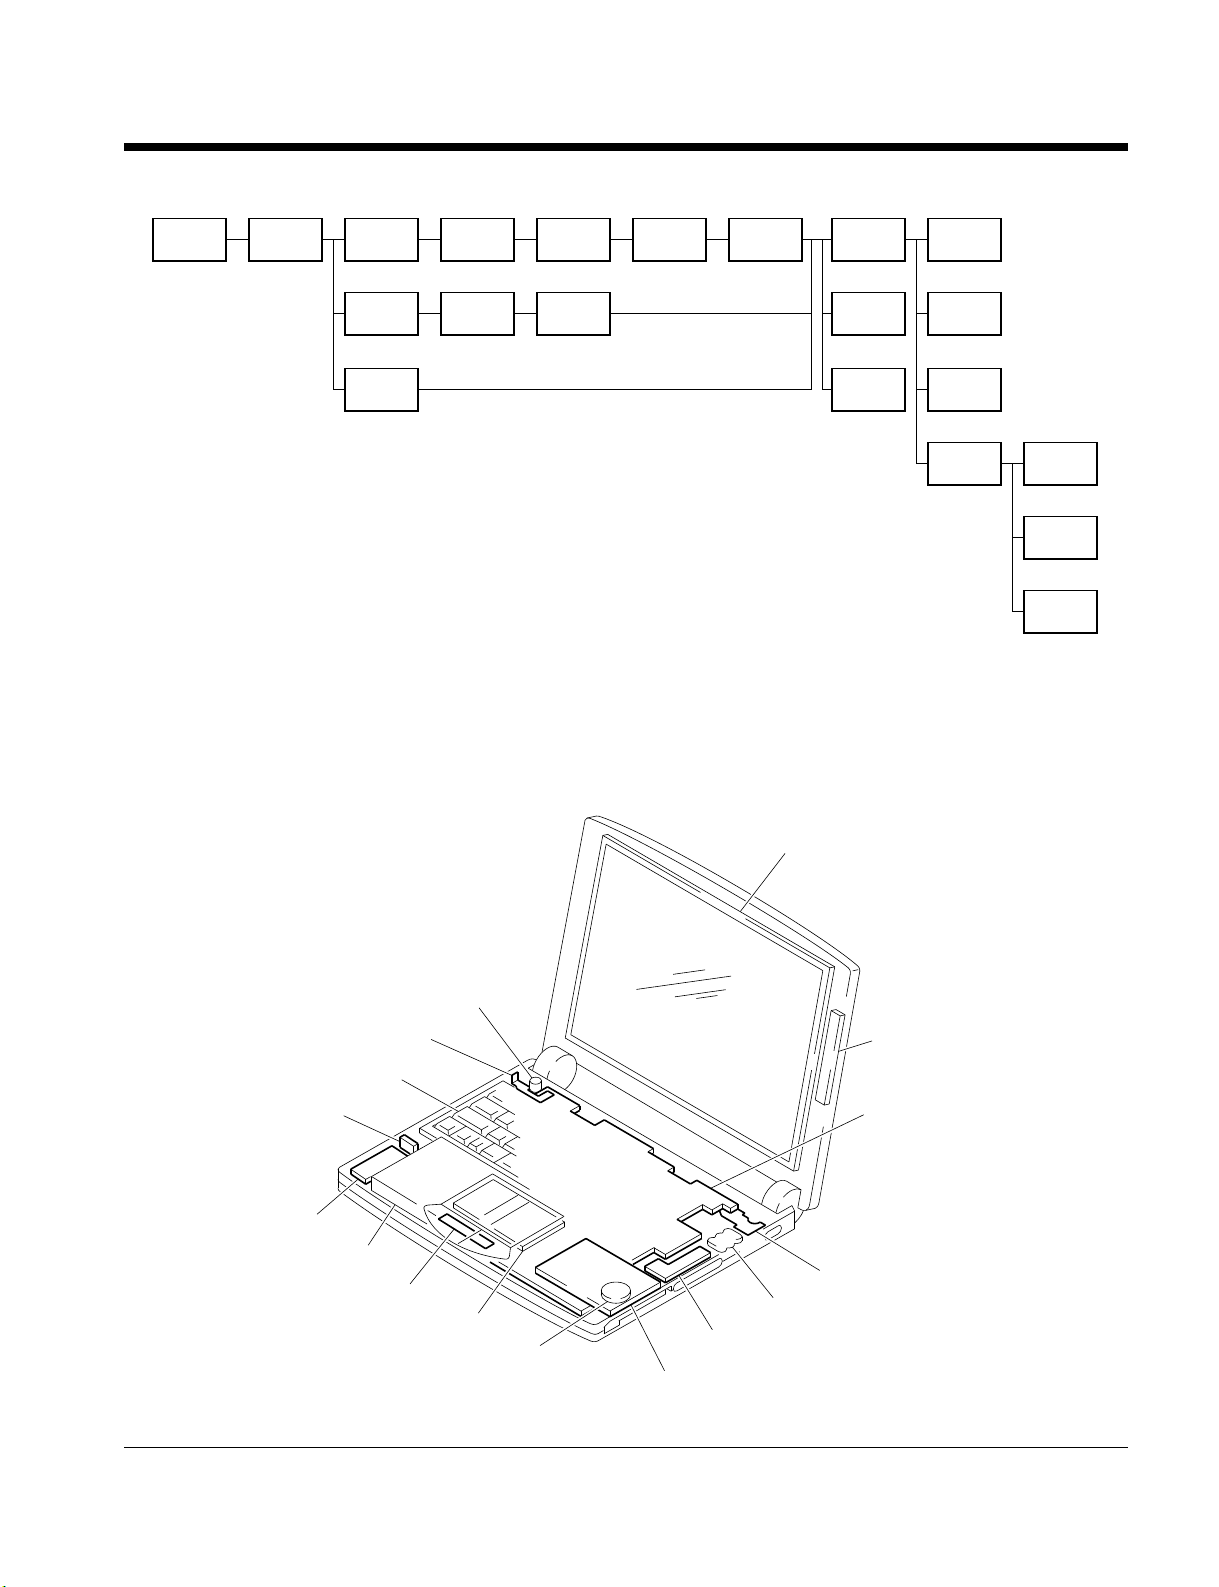
1-1. Flowchart
CHAPTER 1.
REMOVAL
POWER
OFF
PALM REST
HOUSING
SWX-20
BOARD
IRC-4
BOARD
CNX-44
BOARD
CNX-45
BOARD
P2-2 P2-3 P2-3 P2-3 P2-3 P2-3 P2-4 P2-4
KEYBOARD
UNIT
TOUCH
PAD
SWX-19
BOARD
P2-2 P2-2 P2-2 P2-4 P2-4
HDD
P2-3 P2-4 P2-4
• Page x-x indicates the page for the topic.
• Note that HDDs (Hard Disc Drives) are easily damaged by shock of impact.
1-2. Electric Parts Arrangement Diagram
CNX-25
BOARD
MBX-13
BOARD
SPEAKER
UNIT
NICKEL-
HYDROGEN
BATTERY
PC CARD
CONNECTOR
HEAT
SINK
HEAT
PIPE
DISPLAY
ASSY
P2-5 P2-5
HOUSING
BEZEL
ASSY
LCD
UNIT
P2-5
INVERTER
P2-5
CNX-25 Board
Keyboard Unit
CNX-44 Board
CNX-45 Board
HDD
SWX-19 Board
Microphone Unit
Touch Pad
Speaker Unit
LCD Unit
Inverter
MBX-13 Board
IRC-4 Board
Nickel-hydrogen Battery
SWX-20 Board
PC Card Connector
• Note that HDDs (Hard Disc Drives) are easily damaged by shock of impact.
1-1 PCG-505F/505FX (U/C)
Page 5
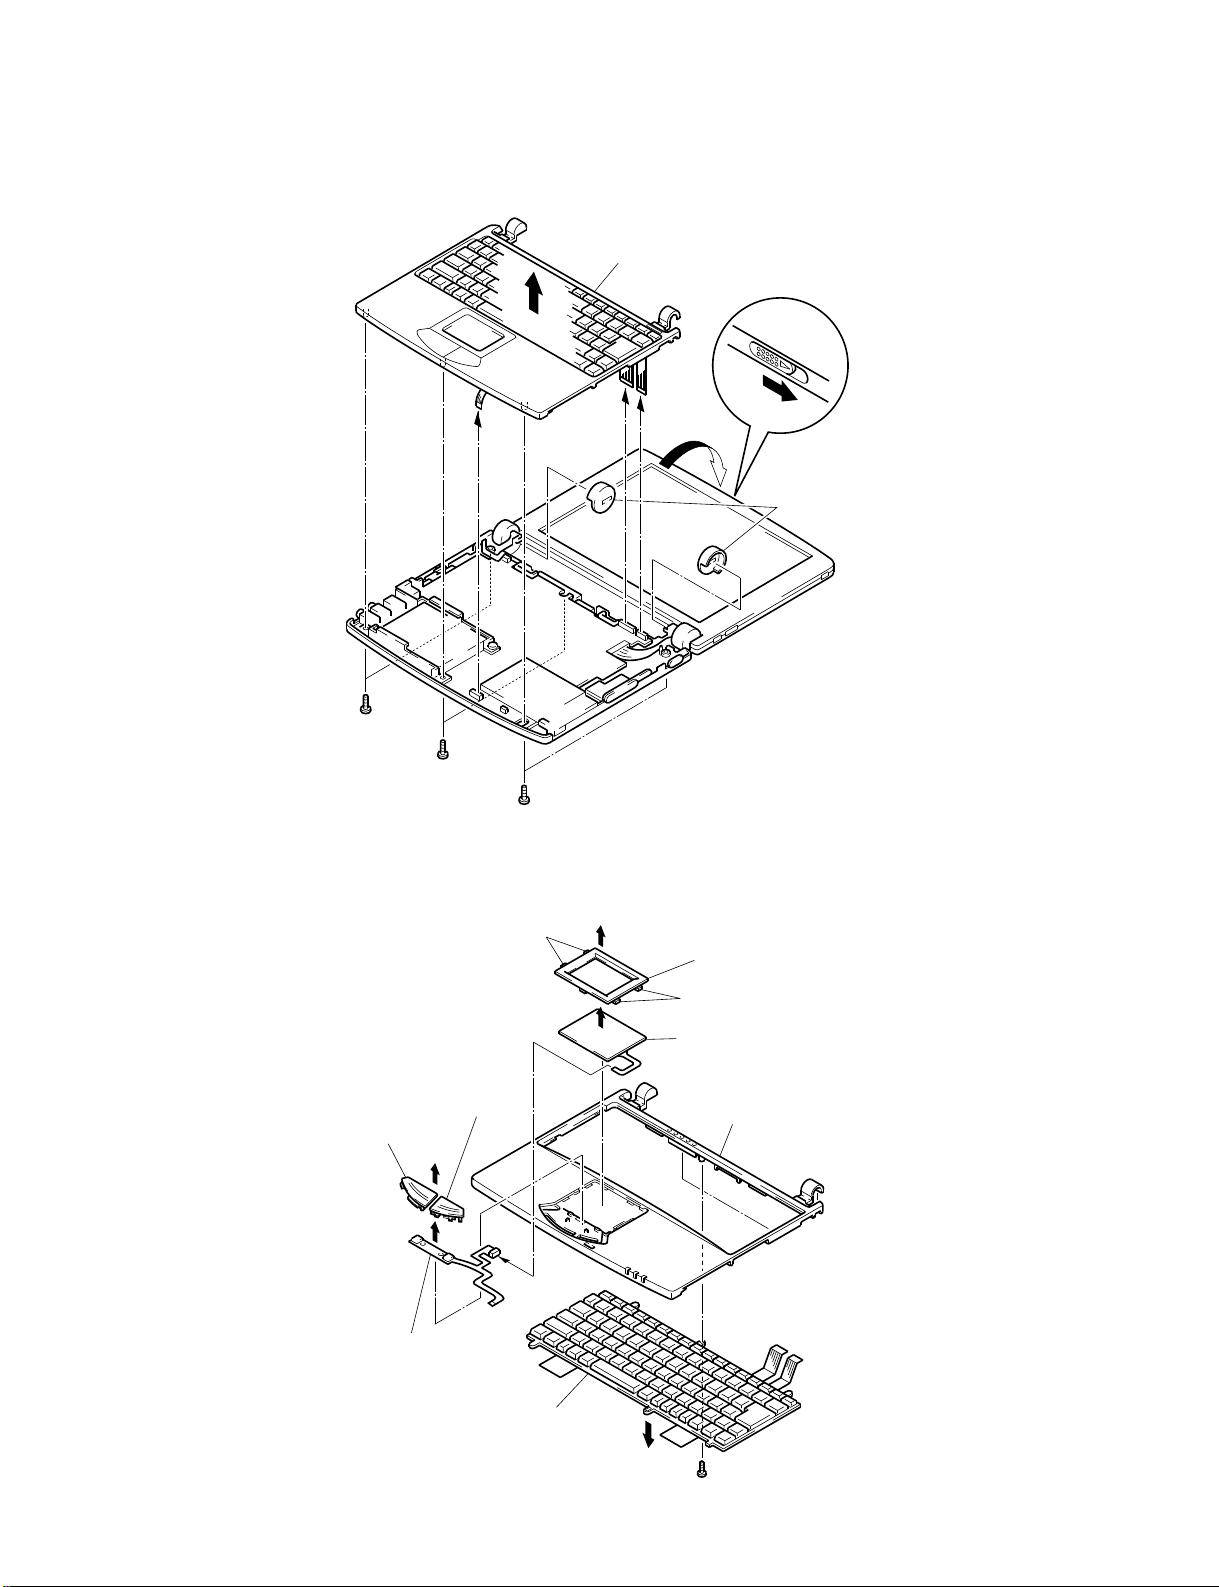
1-3. Removal
1. Palm rest housing assembly
Palm Rest Housing ASSY
6
5
4 +B 2.6×6
4 +B 2×6
4 +B 2.6×6
2. Keyboard unit, touch pad, SWX-19 board
Claw
5
2
4
1
L
R
Cover
3
Escutcheon
Button (L)
6
SWX-19 Board
Button (R)
7
5
Keyboard Unit
4
Claw
Touch Pad
Palm rest Housing
2
1 +B 2×3.5
1-2PCG-505F/505FX (U/C)
Page 6
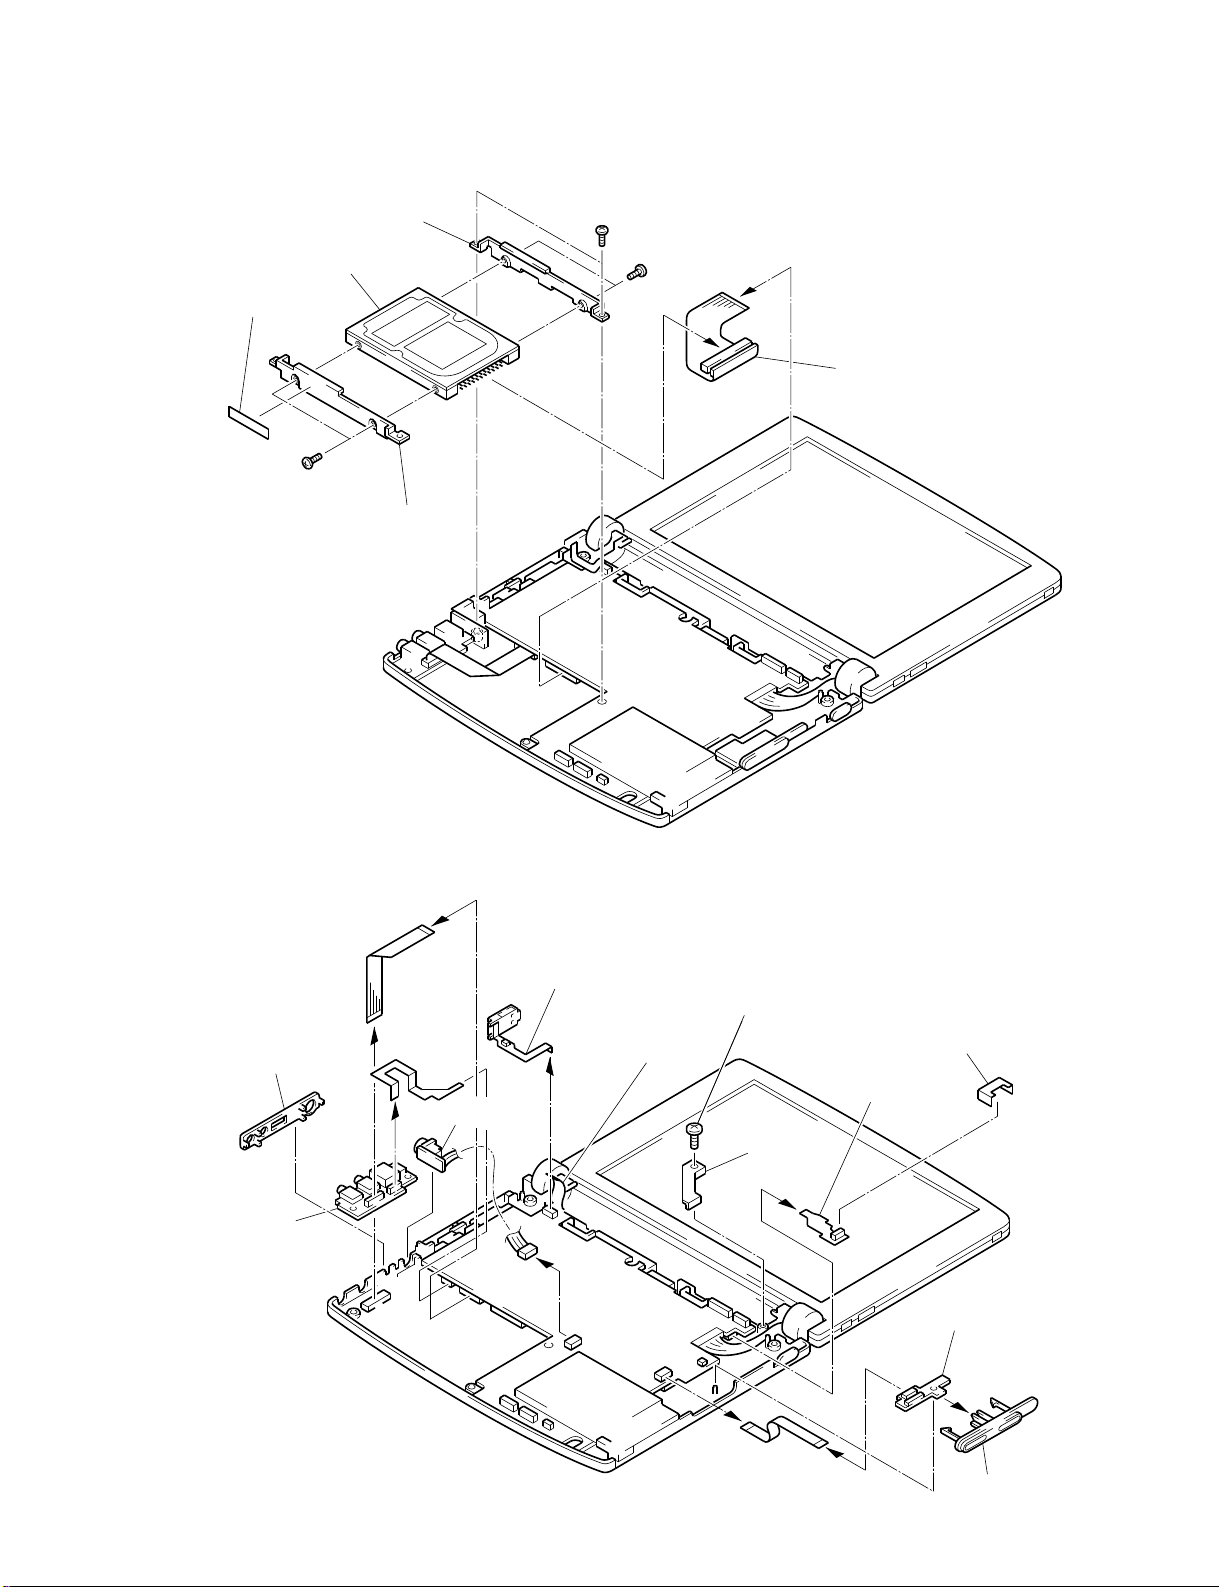
3. HDD
6 Cover Tape
7 +P 3×4
5 Bracket
8 HDD
8 Bracket
1 +B 2.6×4
4 +P 3×4
2
3
HDD Cable
4. SWX-20 board, IRC-4 board, CNX-44 board, CNX-45 board and CNX-25 board
7
CNX-25 Board
3 +B 2×3
7
5 Escutcheon
CNX-44 Board
TAPE (WJ),
INSULATING
8
IRC-4 Board
Wire
Holder
4
CNX-45 Board
6
Insulating Sheet
SWX-20 Board
2
1
1
Escutcheon
1-3 PCG-505F/505FX (U/C)
Page 7

5. MBX-13 board, speaker unit, and nickel-hydrogen battery
Fasten these screws
when connecting a display unit.
2 +B 2.6×42 +B 2.6×6
MBX-13 Board
1 +B 2×3
+B 2.6×4
2
2 +B 2.6×6
4
5
Speaker Unit
MBX-13 Board
1 +B 2×3
3
Nickel-hydrogen Battery
6
6. PC card connector, heat pipe, and heat sink
CUSHION (HDD) (T1)
CUSHION (SP)
CHOMERICS
FORM
5 Heat Pipe L
6 Heat Sink
Thermal Sheet F
PC Card Connector
2
Dummy Card
3
1 +B 2×6
Insulating Sheet
4 +B 2×3
1-4PCG-505F/505FX (U/C)
Page 8

7. Display assembly
These screws have been removed if
the MBX-13 board was removed.
2 Cover
3
1 +B 2×3
8. Housing bezel assembly, LCD unit, and inverter
3
Display ASSY
Cover
2
1 Screw Cover
2 +B M2.6×6
7
5 +B M2.5×5
2 +B 2.6×5
4
2 +B 2.6×5
LCD Unit
9
1 Screw Cover
2 +B 2.6×5
Housing Bezel ASSY
5 +B M2.5×5
Inverter
8
A
0
+B 2.6×5
6
3 Color
BUSHING
1-5
(END)
PCG-505G/505GX (US)
Page 9

CHAPTER 2.
SELF-DIAGNOSTICS
2-1. Note
This chapter describes the items to be checked and the self-tests to be performed using the main unit, floppy-disk drive, and CD-ROM
drive, Port Replicator.
2-2. Necessar y Tools
• PCG-505F/FX main unit
• Floppy-disk drive
• CD-ROM drive
• Battery
• AC adaptor
• CD-ROM for self-Diagnostics
• Floppy disk for self-diagnostics (with DOS installed)
• Port Replicator
• Other tools required for the tests
2-3. Start-up of the Self-Diagnostics Program
Connect a floppy-disk drive, CD-ROM drive, battery and AC adaptor, Port Replicator to the PCG-505F/FX (hereinafter referred to as the
main unit).
Insert a floppy disk for self-diagnostics in the floppy-disk drive and a CD-ROM for self-diagnostics in the CD-ROM drive.
2-4. Diagnostics on the Setup Screen
Turn the power of the main unit on, and press F2 with the SONY logo displayed.
The Setup screen appears. Check the BIOS Version, memory capacity, CPU clock, hard-disk capacity, etc.
PhoenixBIOS NoteBIOS 4.0 Setup — Copyright. . .
Main Advanced Security Power Boot Exit
The currently selected tag appears in blue with a white background.
• BIOS version
Tag [MAIN] Item [BIOS Version] should show the correct BIOS.
• Serial number
Tag [MAIN] Item [Serial Number] should be a correct number
• Memory capacity
Tag [MAIN] Item [Total Memory] should show sufficient memory (at least 32MB without expansion).
• Video memory
Tag [MAIN] Item [Video Memory] should show 1MB.
• Hard disk
Tag [Advanced] Press Enter for Item [Primary IDE Adapter (Master)] Press Enter for Item [Autotype Fixed Disk] will display
the hard-disk information under the following items.
Check whether or not they are correct.
The remaining items are confirmed that they match the default values.
To set to default:
Tag [Exit] Press Enter for Item [Get Default Values]
Tag [Exit] Press Enter for Item [Exit (Save Changes)] restarts the unit.
2-1 PCG-505F/505FX (U/C)
Page 10

2-5. Diagnostics Using the Self-Diagnostics Program
Insert a floppy disk for self-diagnostics in the floppy-disk drive, and a CD-ROM for a self-diagnostics in the CD-ROM drive.
When the power of the main unit is turned on, the system starts up from the CD-ROM, and the following screen appears.
Diagnostics for Service Version 1.0.
PCG-505G
(C)1997 Sony Corporation All rights reserved.
Press any key to continue...
Press any key, and the Start menu will appear.
**********
1:Diagnostics for PCG-505G (Self-Diagnostics)
2:Diagnostics for PCGA-PR5 (Self-Diagnostics)
3:PASSWORD BYPASS (Password Bypass)
4:QUIT MAIN MENU (Quit)
Move the cursor to the desired item, and press Enter.
• Diagnostics for PCG-505G
When Diagnostics 2 or 3 is selected from the Start menu, the screen shown below will appear.
**********
1:Machine Configuration
2:Audio test Group...
3:Battery test...
Once you select an item, the self-diagnostics for that item will be performed.
Pressing keys and/or listening to sounds may be required. Follow the instructions on the screen.
START MENU
Diagnostics for PCG-505G
:
:
**********
**********
For details on each item, see “2-6 Test items.”
*
(Some modifications may be made.)
When the test ends normally:
************
PASS appears.
************
When the test ends abnormally:
***********
FAIL appears.
***********
2-2PCG-505F/505FX (U/C)
Page 11

• PASSWORD BYPASS
If the BIOS is locked with a password and you don’t know the password, use this function.
To use this function, another machine is necessary.
PASSWORD BYPASS is selected from the Start menu, the following screen appears.
Password Bypass Program 1.0
(C)1997 Sony Corporation All rights reserved.
Input last 7 digits of Serial number
(If serial xxxxxxxx-ooooooo,input serial number
Input serial number
Enter the last seven digits of the serial number and a temporary password will appear.
Bypassed pass word zzzzzzz
• QUIT MAIN MENU
Self-Diagnostics ends.
ooooooo)
2-6. Test Items
• Machine Configuration
Select which PCG-505-series main unit you are using.
As some test items operate based on this configuration, this should be the first selection made.
• Audio test Group . . .
For audio testing.
No details are defined. You listens to the sound and evaluates the results.
• Battery test . . .
Test for charging and discharging of the battery.
If the battery is almost fully discharged or overcharged, an error may occur.
• Check System BIOS Revision . . .
The BIOS version will appear.
This test always ends in normal status. It’s up to you to evaluate the results.
• FDD test . . .
Test to find defects in a floppy disk drive.
Be sure to insert a floppy disk without a write-protect tab for self-Diagnostics.
If some defect is detected, the data may be lost. The data should always be backed up.
• HDD test . . .
Test for the hard-disk drive.
The recognition test is done in the start-up process with the BIOS.
2-3 PCG-505F/505FX (U/C)
Page 12

• Keyboard test . . .
Test for keyboard operation.
A keyboard appears on a screen. Press the keys one by one. Pressing a function key alone will not be recognized.
Press the desired function key with the
If a disabled key is found, press the ESC key twice to end the test.
• IrDA test Group . . .
Communication test for IrDA.
The PCG-505G for communication is required.
• LED test . . .
LEDs for the hard-disk drive, NumLock, CapsLock. ScrlLock, Information and Battery will light one after another, in that order.
After checking all the LEDs, press the y key.
• Memory test Group . . .
Tests for memory.
The time required for testing depends on the memory capacity.
• Modem AT Command test . . .
Test for the modem.
This checks for generation of an AT command.
No actual call is required.
key.
• System test . . .
Tests for items on the mother board.
DMA, IRQ, the CPU, etc. are checked.
• Touch Pad test . . .
Test for a touch pad.
Follow the instructions on the screen. The test proceeds from left-clicking, right-clicking, touching four corners with a pen and,
pushing the center with a finger, in that order.
To stop the test, press the ESC key.
• USB test . . .
Test for an USG port.
USB tools are required.
• Video test . . .
Test for an LCD display.
In the first half, checking that the screen is displayed within a frame and that the palette is normal is performed for your evaluation.
The second half is performed as self-diagnostics.
• Programmable power key test . . .
Test for a programmable power key.
Press it once.
• IEEE 1394 Interface test . . .
Communication test of the IEEE 1394.
A PCG-505-series unit on which Windows will run is required.
2-4PCG-505F/505FX (U/C)
Page 13

• Parallel loopback test . . .
Test for a parallel port.
Connect a loopback tool to the parallel port of the port Replicator, and perform the test.
• PS/2 mouse test . . .
Test for an external mouse.
Connect a mouse to the mouse connector of the port Replicator.
• Serial loopback test . . .
Test for a serial port.
Connect a loopback tool to the port Replicator and perform the test.
• Modem loopback test . . .
Perform data transmission and reception between modems.
Tool modems are required.
2-7. Tests that are not Supported
• PCMCIA test
The 16-bit PC-CARD test is replaced with the CD-ROM test.
Testing a CardBUS, ZV, etc. is not available, because such tests required special hardware.
2-5
(END)
PCG-505F/505FX (U/C)
Page 14

CHAPTER 3.
BLOCK DIAGRAM
HDD CONN
DC-IN
CONN
PRIMARY
BATTERY
Back Up
Battery
HOST_ADDR[31:3]
HOST_DATA[63:0]
HOST_CTRL
PCI_AD[31:0]
PCI_CTRL
HDD
BAT CONN
USB
CONN
Primary IDE
POWER
SUPPLY
&
CHARGER
CPU
P55C
PORT 0
EIO_SA[19:0]
EIO_SD[15:0]
EIO_CTRL
L2 CACHE
Mcahce
32Kx64
MTXC (430TX)
SYSTEM CONTROLLER
HOST-PCI BRIGE
MEMORY CONTROLLER
ATF_INT
PCI-ISA BRIDGE
MODEM
PIIX4
IDE
USB
RTC
TAG
8Kx8
DATA CTRL
PCI_CLKs
48M
OSC
HOST
CLOCK
GENERATOR
MK1491-02
48M
AUDIO
ES1878
MIC CONN
MIC SPKR
SONY
CONFIDENTIAL
ATF
ATF_INT
LM75
MEMORY BUS
66M
33M
32MBytes
(64Mb x 4)
14M
ZV AUDIO
FLASH
Daughter
Board
SPKR CONN
512Kx8
Inverter
VIDEO CONTROLLER
ZV VIDEO
CONN
Expansion Memory
FLASH
256Kx8
FROM
CONN
KEYBOARD
POWER CONTROL
LCD
SVGA 800x600
TFT
LCD CONN
LVDS DRIVER
NM2097
PCIC
RL5C465A
KB CONN
ACCESS BUS
Q-SW
ULTRA I/O
FDC37N958FR
SUPER I/O
KBC
ROM INTEFACE
BLOCK DIAGRAM
IEEE1394
Link Chip
PCI_AD[31:0]
PCI_CTRL
PCI_CLKs
ZV
BUFFER
PC CARD
SLOT A
Extend IO_SA[19:0]
EIO_SD[15:0]
EIO_CTRL
FD
14M
TP
COM2
CONN
LT1237
TOUCH
PAD
PS/2
LPT1
COM1
IEEE1394
PHY Chip
FDD connector(26pin)
Port Replicator(68pin)
IEEE1394
CONN
FDD
Drive
VGA DB-15
COM1 DB-9
PS/2 MD-6
LPT1 DB-25
RJ11
LINE
IN
PHONE
OUT
IrDA
SONY CONFIDENTIAL
3-2
(END)
PCG-505F/505FX (U/C)3-1
Page 15

CHAPTER 4.
FRAME HARNESS DIAGRAM
BATTERY PACK
FDD
DRIVE
CN2
129
230
CN1
226
125
CNX-30 BOARD
FDD ASSY
FROM board connector (direct connection)
Harness (connector at both end)
Harness (soldered at one end)
I/O
CABLE
FCC
MODULER
JACK
CN454
PORT
REPLICATER
CONNECTOR
CN353
FDD
CN962
DC IN
CN972
i-LINK
CN970
LINE IN
CN969
MIC IN
CN968
HEADPHONE
Side
CNX-25
BOARD
CNX-44
BOARD
CNX-45
BOARD
CN967
CN731
CN902
CN971
1
23
Rear
CN651
1
4
CN451
FFC
MIC
16
12
28 1
CN751
MBX-13 BOARD
SIDE A
CN251
45 1
FPC
HDD
DRIVE
61
CN401
CN352
71
82
PALM
REST
SWX-19
BOARD
BUTTON (R)
BUTTON (L)
CN901
KEYBOARD
31 1
32 2
Touch
PAD
2
1
CN801
1
2
12
SPEAKER
CN402
18
17
NiMH
BATTERY
CN752
CN501
1
26
CN453
1
8
CN601
168 68
135 35
134
101
34
1
DISPLAY ASSY
CN1
1
INVERTER
6
STEREO
SPEAKER
TERMINAL (R)
STEREO
SPEAKER
TERMINAL (L)
FFC
PC
CARD
CONNECTOR
CN452
1
8
CN2
1
2
1
14
SWX-20
BOARD
CN961
1
8
CARD
IRC-4
BOARD
LCD
PC
Side
WINDOW
LED
PROGRAMMABLE
P
POWER KEY
SWITCH
SW972
POWER
SWITCH
SW971
4-2
(END)
PCG-505F/505FX (U/C)4-1
Page 16

Main Unit
CHAPTER 5.
Note:
• Parts marked by
are not normally in stock.
*
• Any part that has no part number is not available.
5-1.
70
B3
18
2
26
24
[ADD]
25
83
72
20
[ADD]
19
B1
2
17
62
81
31
27
82
C
67
71
E
3
B4
F
32
29
28
16
22
33
34
D
K
30
B4
G
21
B2
G
63
B
A
7
B1
3
34
EXPLODED
The components identified by mark or dotted line with
mark
Replace only with part number specified.
15
14
2
B2
are critical for safety.
35
37
H
I
B3
36
B8
13
6
5
4
1
B2
38
B5
58
40
39
51
50
49
B2
57
68
12
11
68
9
8
59
61
41
C
10
Ref.No. Part No. Description
1 4-636-330-01 LID (MEMORY)
2 A-8044-588-A BOTTOM (1020) ASSY (S), HOUSING
3 4-635-946-01 FOOT
4 4-635-919-03 KNOB (BR)
5 4-635-956-01 SPRING (B), COMPRESSION COIL
6 4-636-934-01 SPACER (SPRING)
7 4-635-918-03 KNOB (BL)
8 1-505-734-11 SPEAKER UNIT
9 4-635-917-02 KONB (POWER)
10 X-4621-667-1 ESCUTCHEON (BUTTON) ASSY
11 A-8054-718-A SWX-20, 1020, ASSY (S)
12 4-635-920-01 WINDOW
13 1-528-908-11 BATTERY, NICKEL HYDROGEN
14 4-635-927-01 COVER (RL)
15 4-635-926-01 COVER (LR)
16 X-4621-613-1 LID (FDD) ASSY
55
17 X-4621-614-1 LID (REPLICATOR) ASSY
18 4-635-908-01 ESCUTCHEON (JACK)
19 A-8054-719-A CNX-44, 1020, ASSY (S)
20 4-635-950-02 INSULATING SHEET (BOTTOM)
*
54
53
K
48
A
47
B3
65
H
I
60
52
46
B5
45
B7
2
[ADD]
64
73
E
63
D
F
43
B
42
B7
44
Ref.No. Part No. Description
21 4-632-530-01 CHOMERICS FOAM
*
22 4-683-229-01 PIPE (L), HEAT
*
24 1-783-159-11 FPC (CUX-25)
25 4-636-345-01 TAPE (WJ), INSULATING
26 4-635-952-01 INSULATING SHEET (WJ)
27 A-8054-720-A CNX-45, 1020, ASSY (S)
28 4-635-923-01 HOLDER (MICROPHONE)
29 1-542-331-11 MICROPHONE UNIT
30 4-638-232-01 INSULATING SHEET (PIPE L)
31 1-783-098-11 CABLE, FLEXIBLE FLAT (24 CORE)
32 4-635-922-01 HOLDER (SW)
33 4-635-949-01 PLATE (SW)
34 4-636-344-01 CUSHION (KB)
35 4-636-329-01 HEAT SINK (VIA)
*
36 1-783-815-11 FFC (8 CORE)
37 A-8045-021-A (505F)...MBX-13, 1020U, 233 ASSY (S)
38 1-783-161-11 FPC (IRC-4)
39 4-635-955-11 INSULATING SHEET (PCMCIA)
40 1-779-808-11 CONNECTOR, PC CARD
41 4-627-811-21 CARD, DUMMY
42 4-635-930-01 BRACKET (HDDF)
*
43 A-8054-876-A 4 .3" HDD ASSY (S)
44 1-782-617-11 FPC (HDD CABLE)
45 4-635-931-01 BRACKET (HDDR)
*
46 4-635-951-01 INSULATING SHEET (KEY BOARD)
47 A-8054-714-A KEY BOARD (U) ASSY (S)
48 4-635-914-02 LENS (F)
49 1-783-590-11 FPC (SWX-19)
50 4-635-913-03 BUT TON (R)
51 4-635-912-04 BUT TON (L)
52 4-635-915-01 LENS (R)
53 A-8044-589-A REST (1020) ASSY(S), PARM
54 1-759-461-11 PAD, TOUCH
55 4-635-910-05 ESCUTCHEON (PAD)
57 4-636-932-01 HOLDER (WIRE)
58 4-637-148-02 INSULATED PLATE (IRDA)
59 4-637-074-01 SPACER (SP)
60 4-637-454-21 LABEL ID
61 4-637-411-01 TAPE (BLIND)
62 4-636-551-01 CUSH ION (HDD) (T0.5)
63 4-626-552-01 CUSHION (HDD) (T1)
64 4-636-553-01 CUSHION (HDD) (T2)
65 3-839-640-00 CUSHION
67 4-637-139-01 GASKET (4X2)
68 4-637-147-01 SPACER (DIA.5.7)
70 4-638-221-01 PLATE, CONDUCTOR
71 4-638-234-01 GASKET (CONNECTOR)
72 1-670-718-11 FPC (CNX-48)
73 4-637-075-01 TAPE (KEY BOARD)
81 1-695-514-21 JACK (SMALL TYPE)
82 1-695-514-11 JACK (SMALL TYPE)
83 1-695-619-11 JACK, DC
B1 7-621-770-67 +B 2.6X6
B2 7-621-772-08 +B 2X3
B3 7-621-772-18 +B 2X4
B4 7-621-772-38 +B 2X6
B5 7-621-773-86 +B 2.6X4
B6 7-621-775-20 +B 2.6X5
B7 7-682-145-01 +P 3X4
B8 7-621-259-45 +P 2.6X6
A-8045-022-A (505FX)...MBX-13, 1020U, 266 ASSY (S)
1P (HEADPHONE)
1P (MICROPHONE)
5-2 PCG-505F/505FX (U/C)5-1
Page 17

5-2. Display Unit
131
127
127
125
131
B3
126
127
131
Ref.No. Part No. Description
101 4-635-947-01 COLOR
*
102 X-4621-652-1 HOUSING (DISPLAY) ASSY
103 4-635-929-01 COVER (RR)
104 4-636-332-01 HOLDER (RIGHT), PC BOARD
105 4-635-944-01 INSULATOR (1VT)
106 1-475-400-11 INVERTER (LCD)
107 4-636-339-01 BLIND (SNAP RETAINTER), HOLE
108 4-636-335-01 SNAP RETAINER
109 4-636-334-01 CLAMP
110 4-636-338-01 PLATE, HEAT TRANSFER
*
111 X-4621-545-1 TILT UNIT ASSY
112 4-635-928-01 COVER (LL)
113 4-636-333-01 HOLDER (LEFT), PC BOARD
115 4-635-937-01 HOLDER (PEN)
116 4-635-938-01 LOCK (PEN)
110
111
113
B2
122
PEN
(ACCESSORIES)
108
107
112
128
B9
124
115
116
B3
108
123
117
B2
121
109
129
119
124
117 4-635-934-01 LEVER (LATCH)
118 4-635-932-01 KNOB (LATCH)
119 4-635-935-01 HOLDER (LATCH)
120 2-300-616-01 SPRINNG, COMPRESSION
121 4-636-558-01 INSULATOR (LCD)
122 1-958-912-11 HARNESS (LCD SPEAKER)
123 A-8054-418-A 10.4" LCD ASSY (S)
124 4-636-559-01 SCREW (+B M2.5X4)
125 4-636-331-01 CLAW, JOINT
126 X-4621-669-1 HOUSING (BEZEL) ASSY
127 4-635-939-01 COVER (SCREW)
128 4-636-945-01 CLAN (B), JOINT
129 4-637-460-01 SPACER
130 4-637-232-01 TUBE
131 4-636-560-01 SCREW (+B M2.6X5.5)
B2 7-621-772-18 +B 2X4
B9 7-621-772-08 +B 2X3
118
120
106
B2
102
101
107
105
103
130
104
5-3PCG-505F/505FX (U/C) 5-4
Page 18

5-3. FDD Assembly
211
Ref.No. Part No. Description
201 4-636-397-01 FOOT (FDD)
202 3-719-381-31 SCREW (M2X3)
203 4-636-391-04 CASE (LOWER)
204 4-636-394-01 GUIDE, LIGHT
205 A-8054-413-A CNX-30 MOUNTED PWB
206 1-783-043-11 CABLE, I/O (26P)
207 3-948-339-01 SCREW, TAPPING
208 4-636-395-01 PLATE, SHIELD
*
209 4-636-396-01 INSULATING SHEET
*
210 A-8054-426-A 3.5" FDD ASSY (S)
211 4-636-398-01 CUSHION
212 1-782-868-11 FFC (FDD)
213 4-636-390-04 CASE (UPPER)
214 4-636-399-01 RUBBER, RETAINER
215 4-636-392-01 ESCUTCHEON (CONNECTOR)
Ref.No. Part No. Description
A-8054-713-A AC ADAPTOR 1020 U ASSY (S)
*
*
3
[DEL]
1-777-926-31 CORD, CONNECTION
A-8044-383-A FDD (505) ASSY
A-8054-768-A PACK (S) ASSY(S), BATTERY
4-635-936-01 PEN
3-865-464-11 MANUAL (MAIN), INSTRUCTION
A-8044-650-A PORT REPLICATOR (PR5 ASSY)
ACCESSORIES & PACKING MATERIALS
**************************************
213
216 4-636-393-01 BRACKET
A
*
217 3-719-381-21 SCREW (M2X6)
212
216
214
210
204
201
208
207
205
209
A
B1
215
217
214
206
203
202
202
FDD (505) ASSY (ACCESSORIES)
5-6
(END)
PCG-505F/505FX (U/C)5-5
Page 19

QUICK MEMO
The object of information
Technical Parts Other information
The relation document to the plan of
T/N Service manual Others No publication
[Model/Series]
PCG-505 Series
VAIO Notebook Computer SERVICE MANUAL
[Subject]
ADDITION
[Contents]
Addition (of part)
Model (Page) Ref.No. Part No. Description
505,
505X/505EX,
505G/GX (505G/GX ADD-1),
505RX/RS/R,
505SX/S (505SX/4G),
J
505V,
505V/ABX,
505V/CBX,
505V/CBP
505F/FX,
505TX/TS,
UC
505TR
505G/GX
80 4-638-224-01 SHEET (F) THERMAL
(1/1)
No. FIT- M2001_013K
J UC E I
Date : 2001.3.19
From : PNC Planning & Control Dept.
[SODP]
Tel : +81 3 5795 6931
505E, 505G
E
∗ Please make these changes on the list of repair parts as well until revised version published.
[Applicable Models]
J : PCG-505 (9-974-467-01)
PCG-505X/505EX (9-974-473-01)
PCG-505G/GX (505G/GX ADD-1) (9-974-481-01)
PCG-505RX/RS/R (9-974-492-01)
PCG-505SX/S (505SX/4G) (9-928-301-01)
PCG-505V (9-928-325-01)
PCG-505V/ABX (9-928-326-01)
PCG-505V/CBX (9-928-348-01)
PCG-505V/CBP (9-872-014-01)
UC : PCG-505F/FX (9-974-491-11)
PCG-505TX/TS (9-928-301-11)
PCG-505TR (9-928-328-01)
PCG-505G/GX (9-974-481-11)
E : PCG-505E (9-928-301-31)
PCG-505G (9-974-481-31)
< For Japanese staff > Please look at information in Japanese by visiting at our web site.
Page 20

Revision Histor
y
Suffix Ver. Date Contents QM No.
Ver.1 1999.09.30
-11
Ver.2 2001.03.19
-13 Ver.3 2001.10.05
-14 Ver.4 2002.03.20
First
Page 5-1, Page 5-2 (See Remarks.)
Page 5-1, Page 5-2
Page 5-6
M2001_013K
M2001_063K
N2002_018K
< Remarks >
2001.10.05 No suffix number -12 exists in part number of SM.
The changes of are not reflected in this Service Manual (i.e., not shown in red).
See the QUICK MEMO for these changes.
[Confidential]
PCG-505F/505FX(U/C)
 Loading...