

Page 1

3-859-881-23(1)
PC Connecting Kit
Operating Instructions
For the latest information on this product
For Windows: Refer to the “readme.txt” file on the supplied
CD-ROM.
For Macintosh: Refer to the “ReadMe” file on the supplied
CD-ROM.
1997 by Sony Corporation
Page 2

Notice for users
Program ©1997 Sony Corporation/
Documentation ©1997 Sony
Corporation
All rights reserved. This manual or the
software described herein, in whole or
in part, may not be reproduced,
translated or reduced to any machine
readable form without prior written
approval from Sony Corporation.
IN NO EVENT SHALL SONY
CORPORATION BE LIABLE FOR
ANY INCIDENTAL,
CONSEQUENTIAL OR SPECIAL
DAMAGES, WHETHER BASED ON
TORT, CONTRACT, OR OTHERWISE,
ARISING OUT OF OR IN
CONNECTION WITH THIS
MANUAL, THE SOFTWARE OR
OTHER INFORMATION
CONTAINED HEREIN OR THE USE
THEREOF.
By breaking the seal of the envelope of
the CD-ROM package, you accept all
the terms and conditions of this
agreement. If you do not accept these
terms and conditions, please return
this disk envelope unopened, along
with the rest of the package,
immediately to the dealer where you
obtained it.
Sony Corporation reserves the right to
make any modification to this manual
or the information contained herein at
any time without notice.
The software described herein may
also be governed by the terms of a
separate user license agreement.
For the latest information
For the latest information on this
product, refer to the following:
For Windows:
“readme.txt” file on the supplied
CD-ROM, using the Windows
“Notepad” program. (You can open
the file by clicking [Start],
[Programs], [Sony] and then
[Supplement]. )
For Macintosh:
“ReadMe” file on the supplied CDROM using the Simple Text.
Trademarks
• IBM and PC/AT are registered
trademarks of International Business
Machines Corporation.
• Microsoft and Windows are
trademarks of Microsoft
Corporation, registered in the U.S.A.
and other countries.
• Apple, Macintosh and Power PC are
trademarks of Apple Computer Inc.,
registered in the U.S.A. and other
countries.
• QuickTime is a trademark of Apple
Computer Inc.
• Adobe and Photoshop are
trademarks of Adobe Systems
Incorporated.
All other trademarks and registered
trademarks are trademarks or
registered trademarks of their
respective holders.
User registration
To receive the customer services,
complete and return the registration
card included in your package.
2
Page 3

About this manual
This instruction manual is divided into two sections:
For Windows
The former section explains how to use
the PC Connecting Kit for Windows:
(from page 7)
Before you begin (page 8)
Explains features of the PC connecting
kit. Also explains the system
requirements for using this product.
Setting up (page 13)
Explains how to install the software,
set the Digital Still Camera and connect
the Camera to your PC.
Sony Digital Still Camera Album Utility
Capturing an image (page 23)
Explains how to save the camera
images onto hard disk in album or
another file format and then display
the images on the hard disk. Also
explains how to acquire an image from
the devices which support TWAIN
protocol into your PC.
Editing an image (page 54)
Explains how to change album
thumbnail and comments, copy and
delete an image, print and transfer an
image and other editing features.
Sony DSC-F1 TWAIN 1.5
Using the TWAIN data source (page 69)
Explains how to transfer a camera
image to an application which
supports TWAIN protocol.
Others (page 71)
Gives additional information.
For Macintosh
The later section explains how to use
the PC Connecting Kit for Macintosh:
(from page 77)
Before you begin (page 78)
Explains features of the PC connecting
kit. Also explains the system
requirements for using this product.
Setting up (page 82)
Explains how to connect the software
to your Macintosh. Also explains how
to set the Digital Still Camera and
connect the Camera to your Macintosh.
Sony Digital Still Camera Album Utility
Capturing an image (page 86)
Explains how to save the camera
images onto hard disk in album or
another file format and then display
the images on the hard disk.
Editing an image (page 113)
Explains how to sort the images,
change a comment, zoom and rotate an
image, review the image information,
print and transfer an image and other
editing features.
Sony Digital Still Camera Plug-in
Using the Plug-in (page 123)
Explains how to transfer a camera
image into the application which
supports Adobe Photoshop Plug-in.
Others (page 125)
Gives additional information
Note
Explanations in this manual assume that you are familiar with basic Windows and Macintosh
operations. For how to use your computer and operating systems, please refer to the
respective manuals.
3
Page 4

Table of contents
About this manual ................................. 3
Getting started........................................ 6
For Windows
Before you begin
Features ................................................... 8
System requirements ........................... 12
Setting up
Determining how to connect the Digital
Still Camera .................................... 13
Connecting via cable ........................... 14
Connecting via infrared port ............. 18
Sony Digital Still Camera
Album Utility
Capturing an image
Starting “Sony Digital Still Camera
Album Utility” ............................... 23
About the menus ................................. 24
Using the tool bar ................................ 29
Changing system settings................... 30
Opening the camera images ............... 31
Opening the image from
the image list window .................. 31
Opening the image directly ......... 34
Saving the camera images in album . 35
Opening and saving the camera
images ............................................. 35
Saving all the camera images
without opening them .................. 37
Saving the selected camera images
without opening them .................. 38
Saving the camera images as another
file format ....................................... 40
Opening and saving the camera
images ............................................. 40
Saving all the camera images
without opening them .................. 43
(from page 7)
Saving the selected camera images
without opening them .................. 45
Opening an album of the hard disk .. 47
Opening an image file directly .......... 50
Capturing an image from TWAIN
device .............................................. 53
Editing an image
Changing the album front cover ....... 54
Changing the caption .......................... 55
Moving albums or images
(drag and drop) ............................ 56
Copying an image to another album 57
Copying with the File menu .............. 59
Deleting images or albums................. 60
Searching for images ........................... 61
Printing images .................................... 62
Changing the image display size ...... 64
Rotating an image................................ 65
Reviewing the image information..... 66
Transferring an image to
the camera ...................................... 67
Sony DSC-F1 TWAIN 1.5
Using the TWAIN data source
Transferring camera images to an
application which supports the
TWAIN protocol ............................ 69
Others
Troubleshooting ................................... 71
Index ................................................... 74
4
Page 5

For Macintosh
(from page 77)
Before you begin
Features ................................................. 78
System requirements ........................... 81
Setting up
Step 1: Installing the software ........... 82
Step 2: Connecting the Digital Still
Camera ............................................ 84
Step 3: Setting up the Digital Still
Camera ............................................ 85
Sony Digital Still Camera
Album Utility
Capturing an image
Starting “Sony Digital Still Camera
Album Utility” ............................... 86
About the menus ................................. 87
Using the tool bar ................................ 91
Setting the Preferences ........................ 92
Opening the camera images ............... 94
Opening the image from
the image list window .................. 94
Opening the image directly ......... 97
Saving the camera images in album . 98
Opening and saving the camera
images ............................................. 98
Saving all the camera images
without opening them ................ 100
Saving the selected camera images
without opening them ................ 101
Saving the camera images as another
file type ......................................... 103
Opening and saving the camera
images ........................................... 103
Saving all the camera images
without opening them ................ 105
Saving the selected camera images
without opening them ................ 106
Opening an album of the hard disk 109
Opening an image file directly ........ 111
Editing an image
Changing the comment.....................113
Sorting the images ............................. 114
Copying an image to another
album ............................................ 115
Deleting images ................................. 116
Printing images .................................. 117
Changing the image display size .... 119
Rotating an image.............................. 120
Reviewing the image information... 121
Transferring an image to
the camera .................................... 122
Sony Digital Still Camera
Plug-in
Using the Plug-in
Transferring camera images to your
application .................................... 123
Others
Troubleshooting ................................. 125
Index ................................................. 127
5
Page 6
Getting started
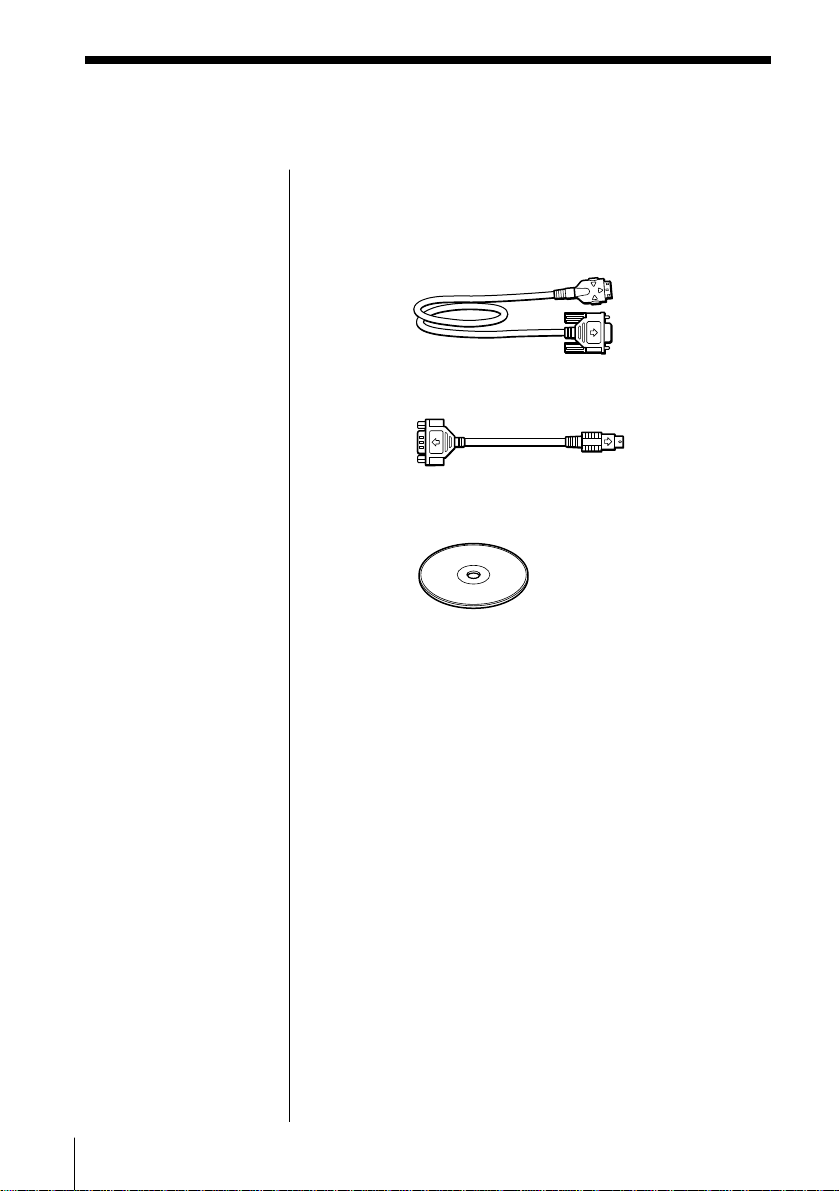
The items used in this product are supplied in the
Digital Still Camera DSC-F1 package together with the
other supplied accessories. Unpack the package and
pick up the following items:
Connecting cable (1)
Cable adapter for Macintosh (1)
Hybrid CD-ROM for IBM PC/AT compatible
PC and Macintosh (1)
Operating instructions for PC Connecting Kit
(1)
Registration card (1)
6
Page 7

For Windows
Operating Instructions
Page 8

Before you begin
Features
***Language install
option
You can select the menu
and dialog language for
each software you install.
The directory described as
“***” in each installer
stands for a language
install option-English,
French or German.
For the file name of the
installer, refer to the files
contained in each
language folder: The file
named “Setup.exe” or
“Install.exe” is the
installer.
The PC Connecting Kit for Windows comprises the
connecting cable and the CD-ROM, which includes
the following:
p Installer (DSCAlbum\***\Setup.exe)
Installs the following:
❐Application software “Sony Digital Still Camera
Album Utility Version 1.5”
Captures images from the Sony Digital Still
Camera DSC-F1 and edits them:
• Captures Digital Still Camera images with or
without opening them and copies them onto the
hard disk in the desired file format.
• Offers a variety of album and image editing
functions: moves the position of an image in an
album, copies images to another album, deletes
images, searches for images, zooms and rotates
images, prints an image, and transfers an image
from a hard disk. You can also capture an
image from a TWAIN device such as a digital
image scanner.
❐TWAIN data source driver “Sony DSC-F1 TWAIN
1.5”
Enables direct capturing of images from the
Digital Still Camera into an application which
supports the TWAIN protocol.
p Installer (Infrared\***\Setup.exe)
Installs the following:
❐Microsoft Windows 95 Infrared
Communications Driver Version 2.0
Enables infrared data communication between the
Digital Still Camera DSC-F1 and your PC, which
is equipped with the infrared communication
hardware or adapter. Please install this driver if it
is not installed on the Windows 95 operating
system of your PC. For information using the
driver software, see the release notes or Help
online document.
8 Before you begin
Page 9
Notes
• Do not delete nor
change the names of
folders or files under
the PIC_CAM
directory. Doing so
will prevent the control
file inside the directory
from activating and the
“Sony Digital Still
Camera Album Utility”
from displaying the
image.
• In case the Dscalbum
folder is renamed or
moved to another
directory, it cannot be
located with [Open
Folder] in the File
menu of the “Sony
Digital Still Camera
Album Utility.” You
can locate the folder
with [Find Folder] in
the Option menu.
Image filing system of the Album
Utility
The “Sony Digital Still Camera album Utility” handles
the images in a unique album filing system–“Album”
format. You can also handle the images as standard
file formats such as BMP, TIFF or JPEG.
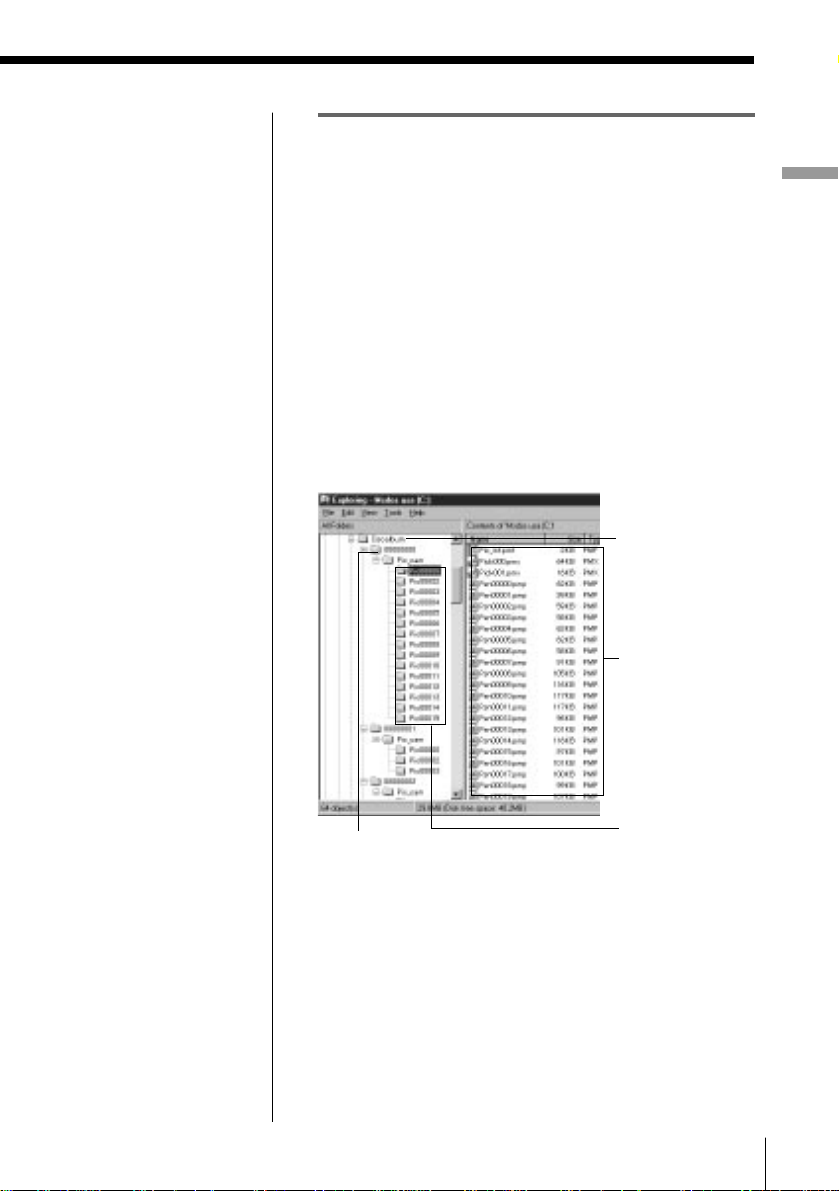
Album format
When the Digital Still Camera images are copied onto
the hard disk or other storage device, they are stored
in the original filing system shown below, which is
called the “Album” format. The “Album” format
enables saving an image in a small file size without
degrading its picture quality. Since the “Album”
format is the original filing system, you cannot open
an Album format file with other applications.
Dscalbum folder
located on the
root directory.
The list of files
contained in the
selected album.
Album folder
The folder named with an 8-digit
number containing the maximum of
30 PIC
folder whose name users can
register.
folders. It is the only
*****
Albums
Each folder can
contain up to 200
image files
(.pmp).
Before you begin
Before you begin
9
Page 10
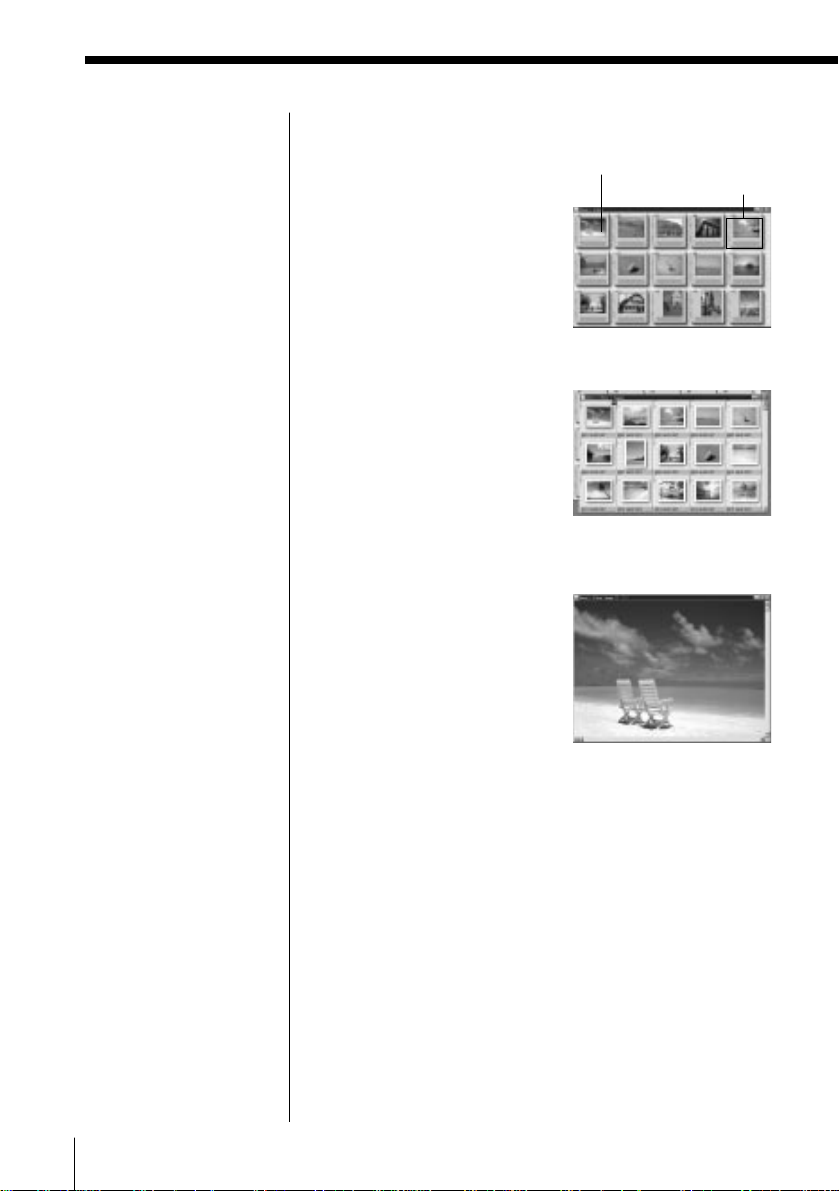
Features
Thumbnail
Stands for each image in
the album list or image
list.
The Album is displayed as follows:
Thumbnail
Album list
Album icons contained in
the album folder (
********
)
are listed with the
thumbnail. Each album in
the list stands for the
PIC
*****
folder.
Album icon
Image list
v
The thumbnails of images
contained in the selected
album (PIC
) are listed.
*****
Each image in the list stands
for a PMP file. You can
select and open any image.
v
Image
The selected image is
displayed in full size.
Other file formats
You can also save or display the images in standards
file formats: BMP (bitmap), TIFF, and JPEG formats.
10 Before you begin
Page 11

Operation flow chart
Connect the Digital Still Camera with the PC via cable or infrared port and
install the software.
Setting Up (page 13)
vv
Sony Digital Still Camera Album
Utility
Start the “Sony Digital Still Camera Album Utility”
v
Open the Camera Image
(page 31)
v
Select the images to be
stored in the hard disk
v
Save
v
Open the image stored in the hard disk (page 47)
Select the image in the image list or specify the image file to be
opened.
Edit an image/Print an image/Transfer an image to the
Camera (page 54)
You can edit an image: changing album front cover, moving,
copying, deleting, printing an image, enlarging and
diminishing an image, rotating an image. You can also transfer
an image to the Digital Still Camera.
(page 23)
v
v
Save the Camera Image
without Opening it
all the camera
images
only selected
images
v
Before you begin
Sony DSC-F1
TWAIN 1.5
Start a TWAIN
application
(page 69)
v
Select the “Sony
DSC-F1 TWAIN 1.5”
v
Transfer camera
images to a TWAIN
application
Before you begin
11
Page 12

System requirements
Your PC and system software must meet the
following minimum requirements to use this product:
• IBM PC/AT or compatible
– CPU: 80386SX 66MHz and above
– RAM: 16MB or more
• OS: Microsoft Windows 3.1 or Windows 95
• Hard disk space: 40MB or more depending on the
size and number of images you store.
• A color monitor with a video board or video driver
to display 640 × 480 pixels and 256 colors or better.
(A video board with 16,770,000 colors is
recommended.)
• CD-ROM drive
Note
Depending on the PC, the
selectable serial speeds
(bps) are limited.
• RS-232C port (serial speed selectable among
9600bps/19200bps/38400bps) or infrared port
12 Before you begin
Page 13
Setting up
Determining how to connect the
Digital Still Camera
Before using this software to capture the Digital Still
Camera Images onto your PC, the Camera and your
PC should be properly connected and the necessary
software modules should be correctly installed in your
PC. As illustrated below, there are two options for
connecting the Digital Still Camera with your PC.
Determine which option you use and follow the
necessary steps:
Setting up
Operation flow in
connecting via cable
1 Installing the “Sony
Digital Still Camera
Album Utility” and
“Sony DSC-F1 TWAIN
1.5.”
2 Connecting the Digital
Still Camera.
3 Setting up the Digital
Still Camera–setting
the menu and making
the camera ready for
communication.
Operation flow in
connecting via infrared
port
1 Installing the “Sony
Digital Still Camera
Album Utility” and
“Sony DSC-F1 TWAIN
1.5.”
2 Installing Microsoft
Windows 95 Infrared
Communications
Driver
3 Connecting the Digital
Still Camera.
4 Setting up the Digital
Still Camera–setting
the menu and making
the camera ready for
communication.
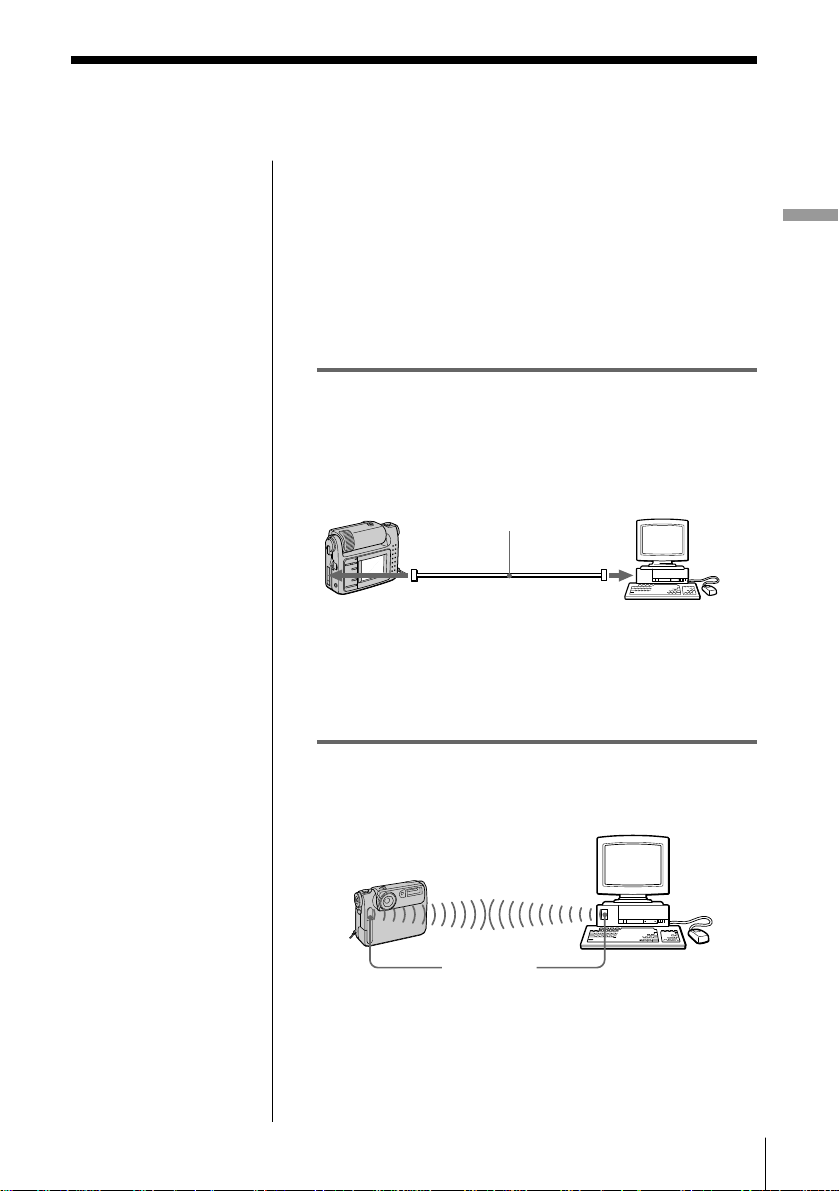
Connecting via cable
Use the connecting cable supplied to connect the
Digital I/O port of the Digital Still Camera with the
serial port of your PC:
Digital Still
Camera DSC-F1
to DIGITAL
I/O port
Connecting cable
(supplied)
to serial port
Your PC
Follow the steps explained in “Connecting via cable”
(page 14).
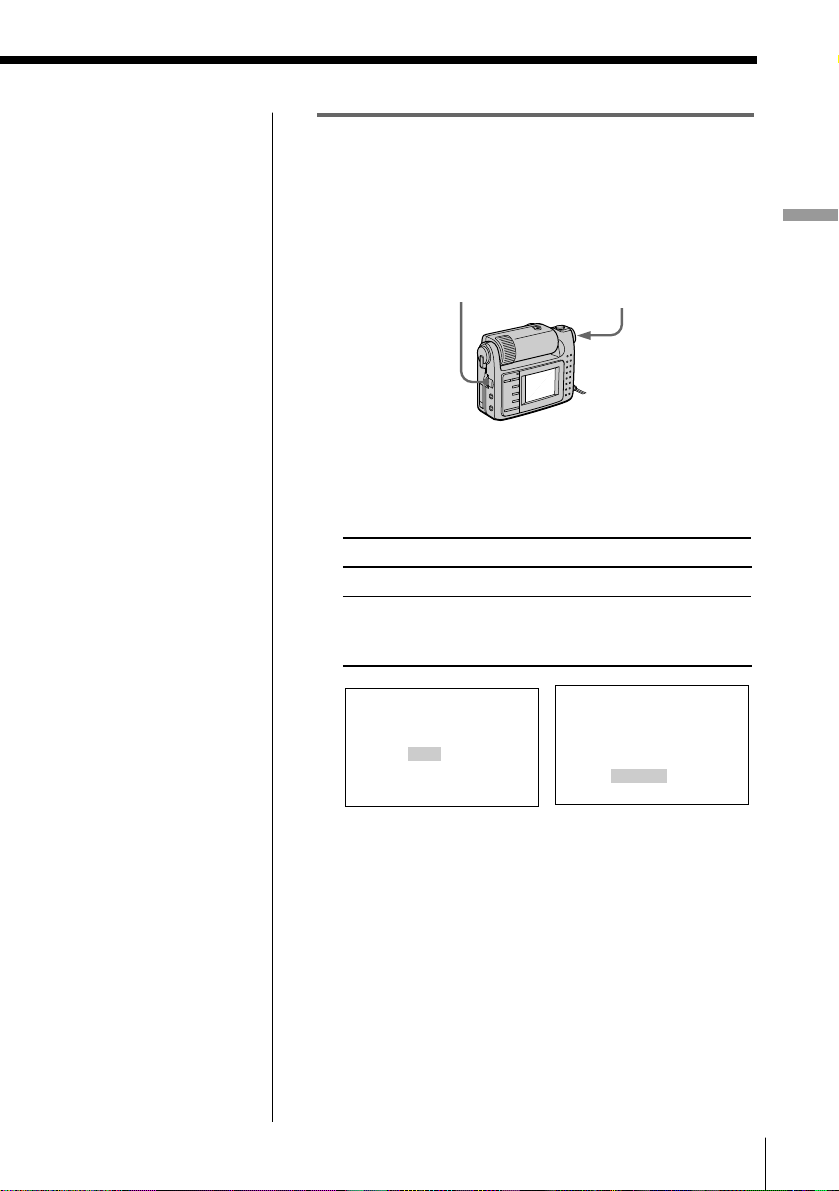
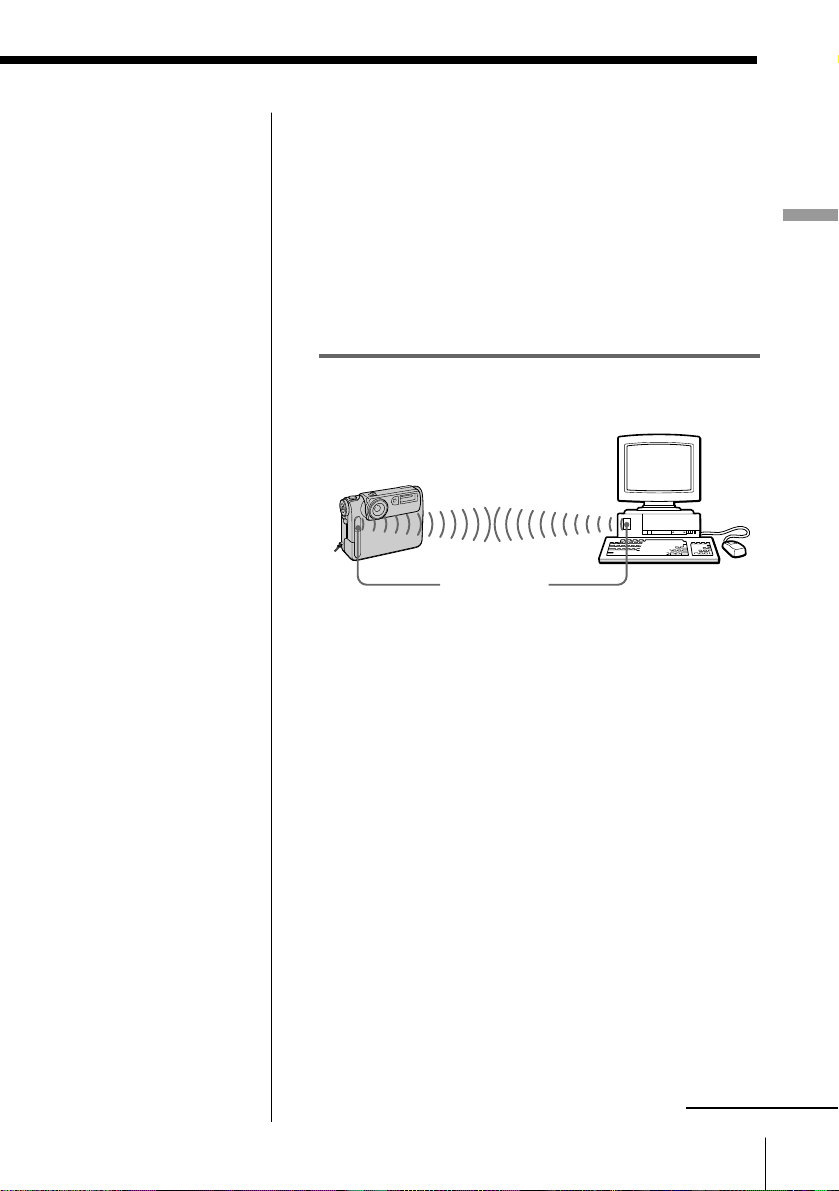
Connecting via infrared port
Use the infrared ports to transfer the images between
the Digital Still Camera and the PC:
Digital Still
Camera DSC-F1
Infrared port
Follow the steps explained in “Connecting via infrared
port” (page 18).
Your PC
13Setting up
Page 14

Connecting via cable
Important notice to
the users who have
installed the previous
version (Version 1.0)
of “Sony Digital Still
Camera Album
Utility”
Before installing the
Version 1.5 of the
software, make sure to
uninstall the Version
1.0 of the software with
the CD-ROM supplied
with the Version 1.0.
***Language install
option
You can select the menu
and dialog language
among English, French or
German. Type one of
these language options in
the directory described as
“***” in step 4.
1 Installing “Sony Digital Still Camera
Album Utility” and “Sony DSC-F1
TWAIN 1.5”
To handle Digital Still Camera images on your PC, use
the installer to install “Sony Digital Still Camera
Album Utility” and “Sony DSC-F1 TWAIN 1.5.”
1 Turn on your PC and start up Windows 95.
2 Insert the supplied CD-ROM into the CD-ROM
drive on your PC .
3 For Windows 95, click the [Start] button and then
click [Run].
For Windows 3.1, open the Program Manager or
File Manager and choose [Run] in the [File] menu.
The [Run] dialog box appears.
4 In the command line entry box, type the drive
letter for your CD-ROM drive followed by a colon
(:) and a backslash (\), and then type the characters
“DSCAlbum\***\Setup.exe.”
For example, if your CD-ROM is on drive D and
your language install option (***) is “English” type:
d:\DSCAlbum\English\Setup.exe
The destination drive and directory
The drive and directory are by default set to
“C:\SONYDSC\.”
you want to install the software to another drive or
directory, type the drive or directory name in the
text box.
Usually, use the default ones. If
14
5 Click [Install].
The confirmation window for installation appears.
6 Click [Yes].
Installation starts up. When all the files and
programs are copied, the dialog box appears.
Setting up
Page 15

Note
In case you want to move
the software to another
drive or directory after it
is installed, make sure to
uninstall the software
and then install it again.
Do not use the Explorer
or File Manager to move
the software files.
7 Click [OK].
The installation is completed.
Uninstalling the software
When the software becomes unnecessary, remove all
the software files from your hard disk as follows:
1 Follow the steps 1 to 4 on page 14 to display the
[Sony DSC Setup] dialog box.
2 Click [Uninstall].
The confirmation window for uninstallation
appears.
3 Click [Yes].
The component files are deleted from your hard
disk.
4 Click [Exit].
Setting up
continued
15Setting up
Page 16

Connecting via cable
Notes
• Turn off the power on
your PC and Digital
Still Camera before
connection.
• Do not turn off the
power of the camera
nor disconnect the
cable during
transmitting the data,
which may cause a
transmission failure.
• Use only the supplied
connecting cable.
Other brands of cables
may cause
malfunctions.
• The supplied
connecting cable is for
the Sony Digital Still
Camera DSC-F1 only.
It cannot be used to
connect other cameras.
• Insert the connecting
cable carefully into the
port, making sure that
the port goes in straight
and is firmly seated.
When inserting the
cable into the Digital
I/O port of the Digital
Still Camera, match the
¢ mark of the cable
with that of the port.
• Keep metal objects
away from the
connector pins to avoid
short circuits.
• We suggest you use the
Digital Still Camera
with the AC power
adapter.
2 Connecting the Digital Still Camera
Digital Still
Camera
DSC-F1
to DIGITAL
I/O port
Connecting cable
(supplied)
to serial port
Your PC
Use the supplied connecting cable to connect the serial
port on your PC and the DIGITAL I/O port on the
Digital Still Camera DSC-F1.
To resume data transmission
In case the data transmission is interrupted (and the
Digital Still Camera becomes disabled), resume the
transmission as follows :
1 Close all the windows of “Sony Digital Still
Camera Album Utility” being displayed on the PC
monitor.
2 Turn the POWER/Function dial of the Digital Still
Camera to “OFF.”
3 Turn the POWER/Function dial to “PLAY.”
4 Transmit the data again.
16
Setting up
Page 17
3 Setting up the Digital Still Camera
9600
19200
38400
CAMERA MENU
SERIAL SPEED
Before you start data communications between the PC
and the Digital Still Camera, set up the Digital Still
Camera as follows. For the details, refer to the
instruction manuals of the Digital Still Camera
DSC-F1.
Setting up
* The SERIAL menu
defines the serial speed
via the connecting
cable.
Note
During the data
communication in process,
do not change the position
of the POWER/Function
dial.
MENU/EXECUTE
jog dial
Digital Still
Camera
DSC-F1
POWER/Function
dial
1 Set the POWER/Function dial to “PLAY.”
2 To activate the data transmission via the
connecting cable, set the menu as follows:
Menu Select
WIRELESS OFF
SERIAL* The same serial speed as selected in
the [Settings] dialog box of the “Sony
Digital Still Camera Album Utility.”
CAMERA MENU
WIRELESS
OFF
ON
The Digital Still Camera is ready for
communication via cable.
17Setting up
Page 18

Connecting via infrared port
Important notice to
the users who have
installed the previous
version (Version 1.0)
of “Sony Digital Still
Camera Album
Utility”
Before installing the
Version 1.5 of the
software, make sure to
uninstall the Version
1.0 of the software
with the CD-ROM
supplied with the
Version 1.0.
***Language install
option
You can select the menu
and dialog language
among English, French or
German. Type one of
these language options in
the directory described as
“***” in step 4.
1 Installing “Sony Digital Still Camera
Album Utility” and “Sony DSC-F1
TWAIN 1.5”
To handle Digital Still Camera images on your PC,
use the installer to install “Sony Digital Still Camera
Album Utility” and “Sony DSC-F1 TWAIN 1.5.”
1 Turn on your PC and start up Windows 95.
2 Insert the supplied CD-ROM into the CD-ROM
drive on your PC .
3 For Windows 95, click the [Start] button and then
click [Run].
For Windows 3.1, open the Program Manager or
File Manager and choose [Run] in the [File] menu.
The [Run] dialog box appears.
4 In the command line entry box, type the drive
letter for your CD-ROM drive followed by a colon
(:) and a backslash (\), and then type the
characters “DSCAlbum\***\Setup.exe.”
For example, if your CD-ROM is on drive D and
your language install option (***) is “English”
type: d:\DSCAlbum\English\Setup.exe
The destination drive and directory
The drive and directory are by default set to
“C:\SONYDSC\.”
you want to install the software to another drive
or directory, type the drive or directory name in
the text box.
Usually, use the default ones. If
Note
In case you want to move
the software to another
drive or directory after it
is installed, make sure to
uninstall the software and
then install it again. Do
not use the Explorer or
File Manager to move the
software files.
18
Setting up
5 Click [Install].
The confirmation window for installation appears.
6 Click [Yes].
Installation starts up. When all the files and
programs are copied, the dialog box appears.
7 Click [OK].
The installation is completed.
Page 19

Uninstalling the software
When the software becomes unnecessary, remove all
the software files from your hard disk as follows:
1 Follow the steps 1 to 4 on page 18 to display the
[Sony DSC Setup] dialog box.
2 Click [Uninstall].
The confirmation window for uninstallation
appears.
3 Click [Yes].
The component files are deleted from your hard
disk.
4 Click [Exit].
Setting up
Tip
You can check to see if
this driver software is
installed by opening the
Control Panel and looking
for “Infrared Monitor.”
Note
You need the infrared
communication device to
use this driver software.
***Language install
option
You can select the
language among English,
French or German. Type
one of these language
options in the directory
described as “***” in step
4.
For the file name of the
installer, refer to the files
contained in each
language folder: The file
named “Setup.exe” or
“Install.exe” is the
installer.
2 Installing Microsoft Windows 95
Infrared Communications Driver
To perform infrared communications with the Digital
Still Camera, use the installer to install “Microsoft
Windows 95 Infrared Communications Driver Version
2.0.” Install this driver software if it is not installed on
the Windows 95 of your PC. You can use this driver
under Windows 95 only. When using Window 3.1, do
not install this driver.
1 Turn on your PC and start up Windows 95.
2 Insert the supplied CD-ROM into the CD-ROM
drive on your PC .
3 Click the [Start] button and then click [Run].
The [Run] dialog box appears.
4 In the command line entry box, type the drive
letter for your CD-ROM drive followed by a colon
(:) and a backslash (\), and then type the characters
“infrared\***\setup.exe.”
For example, if your CD-ROM is on drive D and
your language install option (***) is “English” type:
d:\infrared\English\setup.exe
continued
19Setting up
Page 20

Connecting via infrared port
5 Click [OK] .
The [Infrared Device Wizard] starts up. Follow the
instructions on your screen, referring to the
“Setting the infrared device wizard” on the
following, to continue the setup process.
Setting the Infrared Device Wizard
❐ Hardware manufacturer and the model name
• When using a lap-top or desktop PC with the
• When using a PC with an infrared adapter
• When you cannot find your adapter in the list,
❐ Port to which the infrared driver is installed
Select the port to which the infrared device is
physically connected.
• When using a lap-top or desktop PC with the
• When using a PC with an infrared adapter
Note
If the built-in infrared
communications device
is set to OFF, you cannot
set the port number on
the screen. Refer to the
PC manual to set it to
ON.
❐ Simulation (virtual) port
Select the port number supported by the infrared
communications driver. Usually use the default
port number. In the Settings dialog box of an
infrared communications application such as the
“Sony Digital Still Camera Album Utility,” the same
port number as set here should be specified.
built-in infrared communications device, select
“Lap-top/Desktop built-in infrared port.”
connected to the RS-232C port, select the
manufacturer and model names of the adapter.
select “Disk.” In case no disk is attached, contact
the manufacturer of the adapter.
built-in infrared communications device, select
the port number allocated to the infrared
communications device.
connected to the RS-232C port, select the RS-232C
port number.
20
Setting up
Page 21
Uninstalling the software
When the software becomes unnecessary, remove all
the software files from your hard disk as follows:
1 Select [Add/Remove Programs] in the Control
Panel.
2 Select “Infrared Support for Windows 95 Version
2.0” in the [Add/Remove Programs Properties]
and double-click [Add/Remove].
Setting up
Notes
• Place the infrared ports
of the camera and PC
within the controllable
area. Do not place
them too far nor too
close, which may
interrupt transferring
or cause noises.
• Do not cover the
infrared ports with
your hand or any other
objects.
• Infrared rays cannot
pass through a wall,
opaque glass, etc. If
they pass through
glass, etc., the
controllable distance
becomes short.
• Do not turn off the
power of the camera or
interfere with
communication during
transmitting the data,
which may cause a
transmission failure.
• We suggest you use the
Digital Still Camera
with the AC power
adapter.
• Also refer to the online
manual of the Infrared
Data Communications
Driver.
4 Connecting the Digital Still Camera
Digital Still
Camera
DSC-F1
Infrared port
❐Place the infrared port located on the front panel of
the Digital Still Camera DSC-F1 and that of your PC
face to face so that you can transmit image data
from the camera to the PC or vice versa.
(Controllable area is about 4 - 12 inches (10 - 30 cm)
in terms of straight line distance and 15 degrees
right, left, up and down each in terms of conical
angle.)
❐Check the Status tag of the Infrared Monitor in the
Control Panel to see if the infrared device is
detected.
❐The figure above is an example of connecting the
Digital Still Camera with a PC with the built-in
infrared communications device. You can also use a
PC equipped with an infrared adapter.
Your PC
continued
21Setting up
Page 22
Connecting via infrared port
To resume data transmission
In case the data transmission is interrupted (and the
Digital Still Camera becomes disabled), resume the
transmission as follows :
1 Close all the windows of “Sony Digital Still
Camera Album Utility” being displayed on the PC
monitor.
2 Turn the POWER/Function dial of the Digital Still
Camera to “OFF.”
3 Turn the POWER/Function dial to “PLAY.”
4 Transmit the data again.
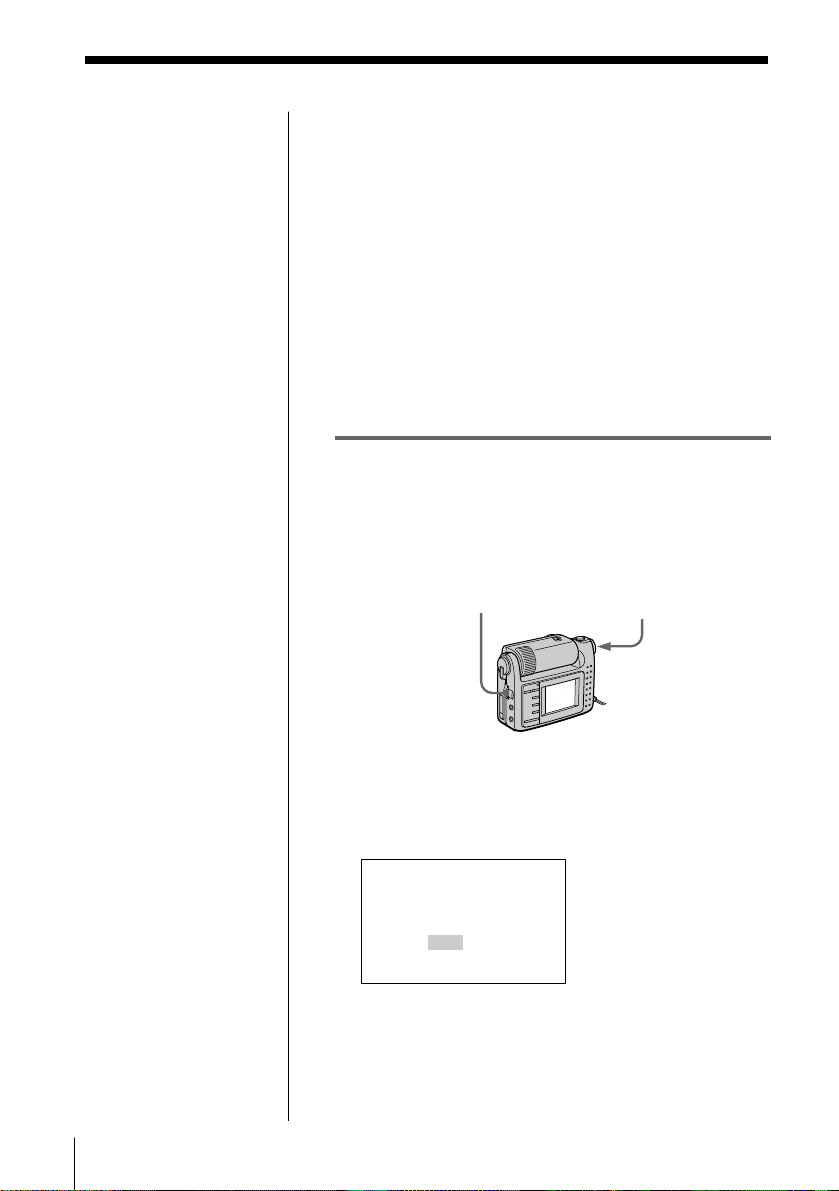
5 Setting up the Digital Still Camera
Before you start data communications between the PC
and the Digital Still Camera, set up the Digital Still
Camera as follows. For the details, refer to the
instruction manuals of the Digital Still Camera
DSC-F1.
MENU/EXECUTE
jog dial
POWER/Function
dial
Notes
• Do not set the
POWER/Function dial
to “CAMERA,” which
may occur data
transmission error.
• During the data
communication in
process, do not change
the position of the
POWER/Function dial.
22
Setting up
Digital Still
Camera
DSC-F1
1 Set the POWER/Function dial to “PLAY.”
2 To activate the data transmission via the infrared
port, set the WIRELESS menu to ON. (Setting with
the SERIAL menu is not necessary.)
CAMERA MENU
WIRELESS
OFF
ON
The Digital Still Camera is ready for
communication via cable.
Page 23

Sony Digital Still Camera Album Utility
Capturing an image
Starting “Sony Digital
Still Camera Album
Utility”
Using Windows 95
1 Start up Windows 95 on your PC.
2 Click the [Start] button on the taskbar.
3 Point to [Programs] and to [Sony], and then click
[Sony Digital Still Camera Album Utility].
The “Sony Digital Still Camera Album Utility”
starts up.
The main window appears.
Capturing an image
Quitting the “Sony Digital Still Camera Album
Utility”
Select [Exit] in the File menu.
Using Windows 3.1
1 Start Windows 3.1 and run the Program Manager
and double-click “Sony” group.
2 Double-click “Sony Digital Still Camera Album
Utility” icon and select [Open] in the Icon menu.
Quitting the “Sony Digital Still Camera Album
Utility”
Select [Exit] in the File menu.
23Capturing an image
Page 24
About the menus
The “Sony Digital Still Camera Album Utility”
consists of the following menus. For frequently used
menu items, you can use the tool bar buttons (page
29).
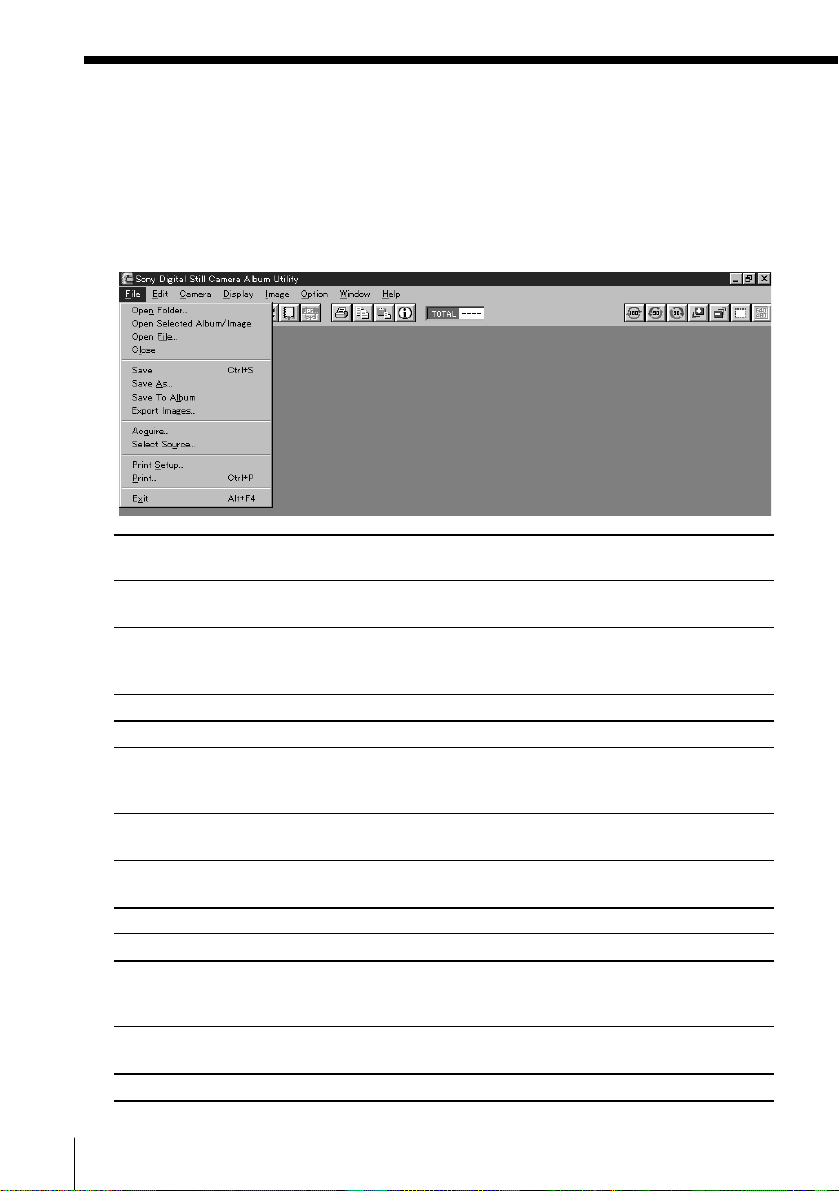
File menu
Open Folder Opens an album folder that is stored in the hard disk or MO
disk and displays images of the album.
Open Selected Album/Image
Open File Opens and displays an image file from the hard disk or MO
Close Closes the currently active window.
Save Saves the image rotated in the album.
Save As Saves the currently selected image with another file name
Save To Album Saves the image(s) selected in the image list or a BMP, TIFF,
Export Images Saves the-image(s) selected in the image list onto the desired
Acquire Acquires an image file from the TWAIN source.
Select Source Selects a TWAIN source such as a digital scanner.
Print Setup Selects the model name of the printer, paper, and other
Print Displays the dialog box to print an album list, image list, and
Exit Exits “Sony Digital Still Camera Album Utility.”
Opens and displays the selected album(s) or image(s) at a
time.
disk. The available file types are BMP, TIFF, JPEG and PMP
(Album).
onto the selected folder. The available file types are BMP,
TIFF, and JPEG.
or JPEG file onto the album in the hard disk.
folder. The available file types are BMP, TIFF, and JPEG.
settings. (The printer driver needs to be installed prior to
printing. )
image.
24
Capturing an image
Page 25
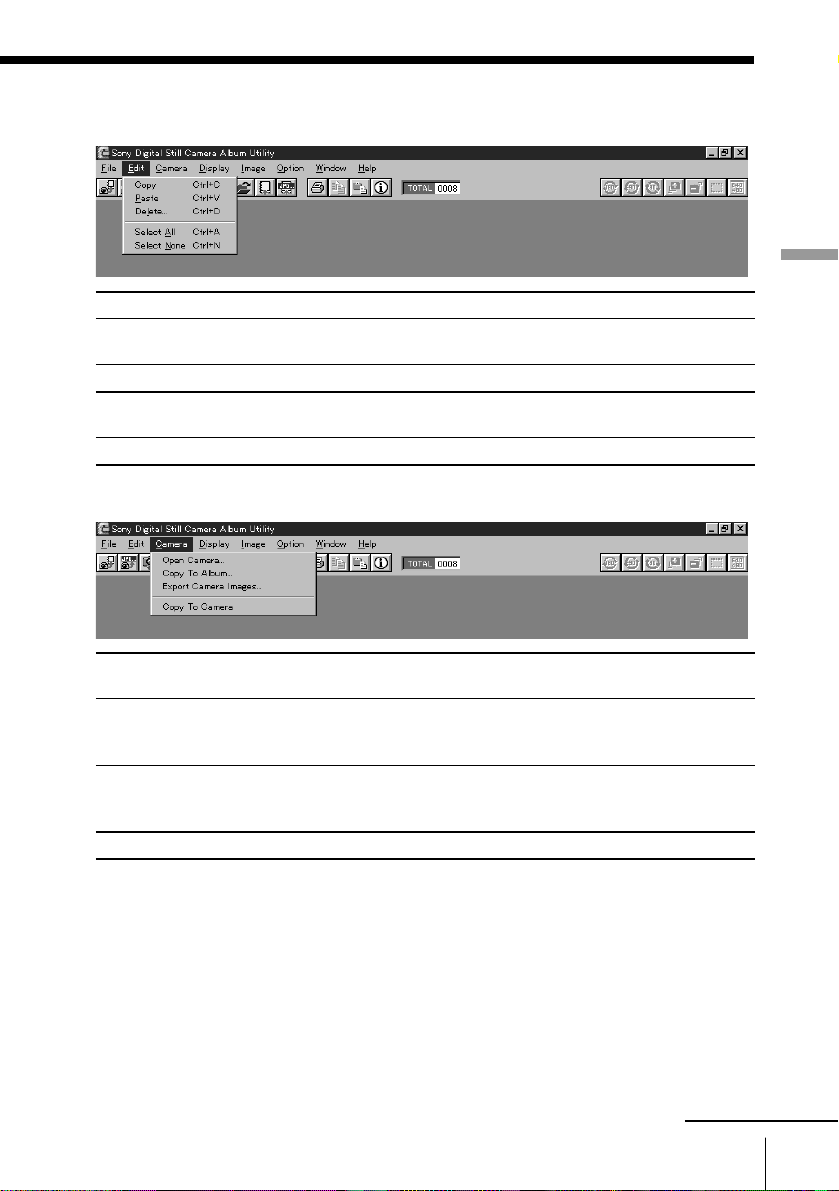
Edit menu
Copy Copies the selected image to the clipboard.
Paste Pastes an image of the clipboard. (You cannot use this command
if no image is in the clipboard. )
Delete Deletes the selected albums or images of an album.
Select All Selects all the albums in the album list or all the images in the
image list.
Select None Cancels the selection in the album list or image list.
Camera menu
Open Camera Opens and displays the camera image list or the image on the
monitor.
Copy To Album Saves all the images or selected images of the camera to the
album on the hard disk in the album format without opening
them.
Export Camera Images Saves all the images or selected images of the camera to the
desired folder on the hard disk in the BMP, TIFF or JPEG file
type without opening them.
Copy to Camera Transfers the images from the hard disk to the camera.
Capturing an image
continued
25Capturing an image
Page 26
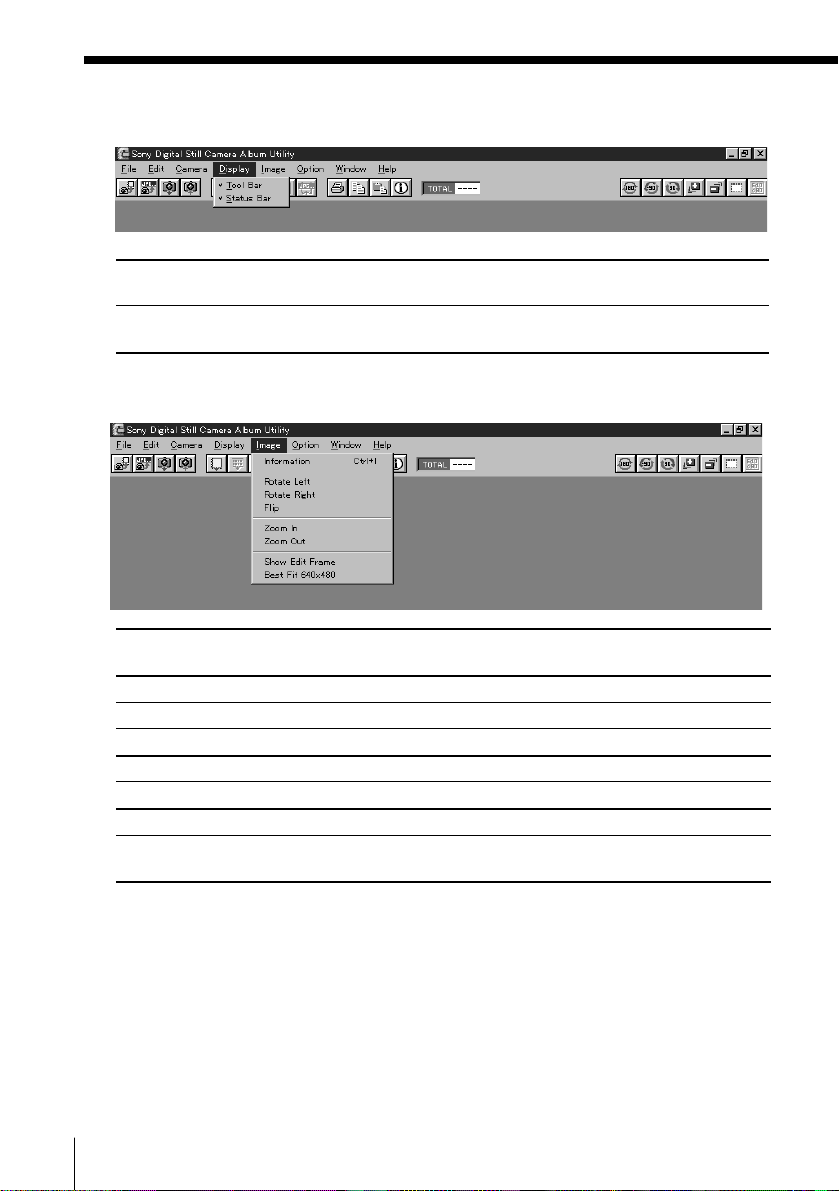
About the menus
Display menu
Tool Bar Displays (with a check mark) or hide (without a check mark) the tool
bar.
Status Bar Displays (with a check mark) or hide (without a check mark) the
status bar.
Image menu (When an image is displayed)
Information Displays the information about the opened image or selected
image in the image list.
Rotate Left Rotates the image 90 degrees counterclockwise.
Rotate Right
Flip Rotates the image 180 degrees.
Zoom In Enlarges the displayed image size.
Zoom Out Reduces the displayed image size.
Show Edit Frame Displays the frame for trimming a part of the image.
Best Fit 640 × 480
Rotates the image 90 degrees clockwise.
Adjusts the size of the image to fit into 640 × 480 pixels. The image
is enlarged or reduced without changing its aspect ratio.
26
Capturing an image
Page 27

Options menu
Set Album Cover Sets the selected image in the image list as the album's front
cover. You can only select a single image for the cover.
Show Date Displays the recorded date for each image when the image list is
displayed in the window.
Show Caption Displays the caption for each image in an album when the image
list is displayed in the window.
Find Images Searches for images from your image list by entering the search
keys.
Find Folder Searches for album folders created using older version of this
software.
Touchup Adjusts the colors and contrast of the monitor to eliminate the
color differences between the image data and the monitor*.
Settings Sets the application preferences, such as the serial port and
speed.
* Adjusting the colors and the contrast of the
monitor
Usually no adjustment is necessary. Only when the color
balance degrades under the conditions of use, such as climate
and time, adjust the color and contrast as follows:
Colors: Move the scroll bar to the point where you can find that
the colors of the right and left sides match as much as
possible for red, green, and blue.
Contrast (rate of gamma): Usually set to 1.0. When you adjust
the color of the monitor, the rate of gamma that is
specifically for the monitor can be adjusted to a certain
rate. Adjust the contrast to achieve the same contrast in
the case of displaying the data in a different system.
Capturing an image
27Capturing an image
Page 28
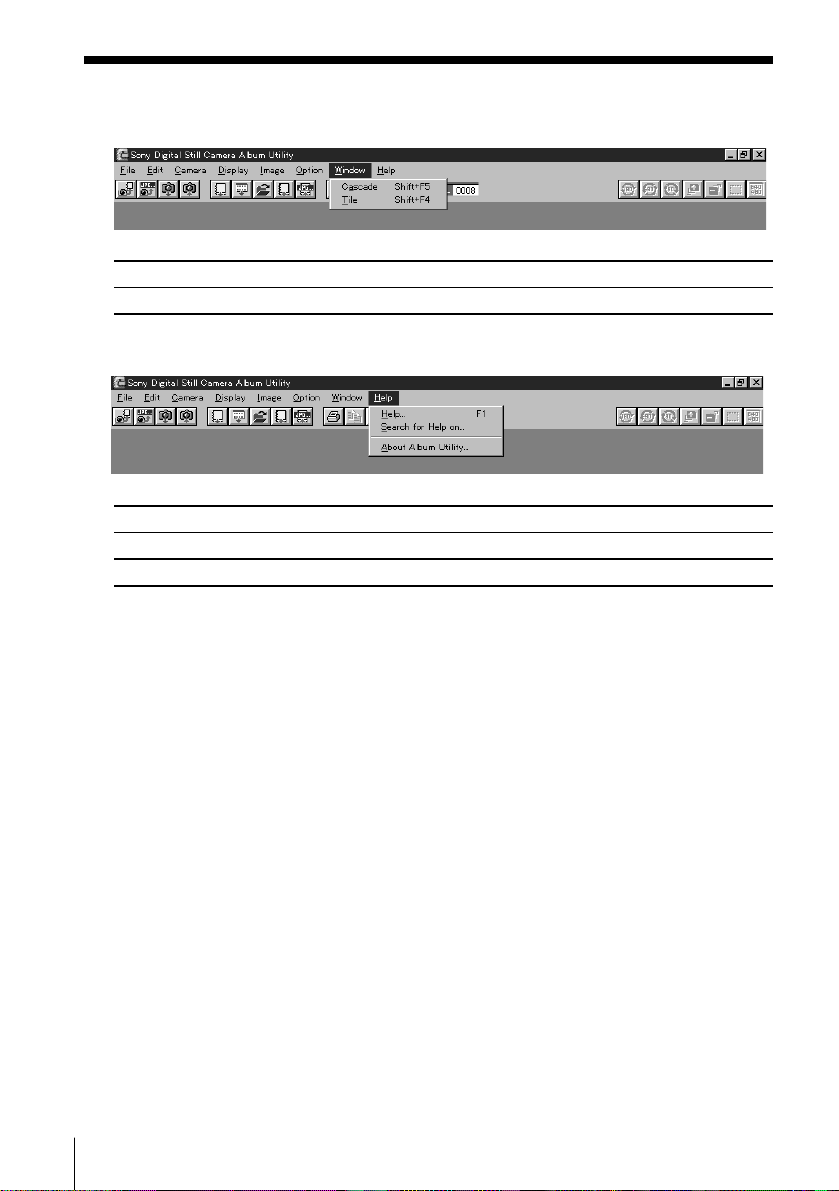
About the menus
Window menu
Cascade Displays windows like cascades.
Tile Displays windows like tiles.
Help menu
Help Calls up the online Help window.
Search for Help on Searches for Help on the keywords and topics you enter.
About Album Utility Displays the version number of this program.
Keyboard shortcuts
The descriptions including “Ctrl + C,” “Shift + F5” and “Alt + F4” next to the file
menu stand for keyboard shortcuts. ("+” means pressing the two buttons at the
same time and F means a function key.)
28
Capturing an image
Page 29
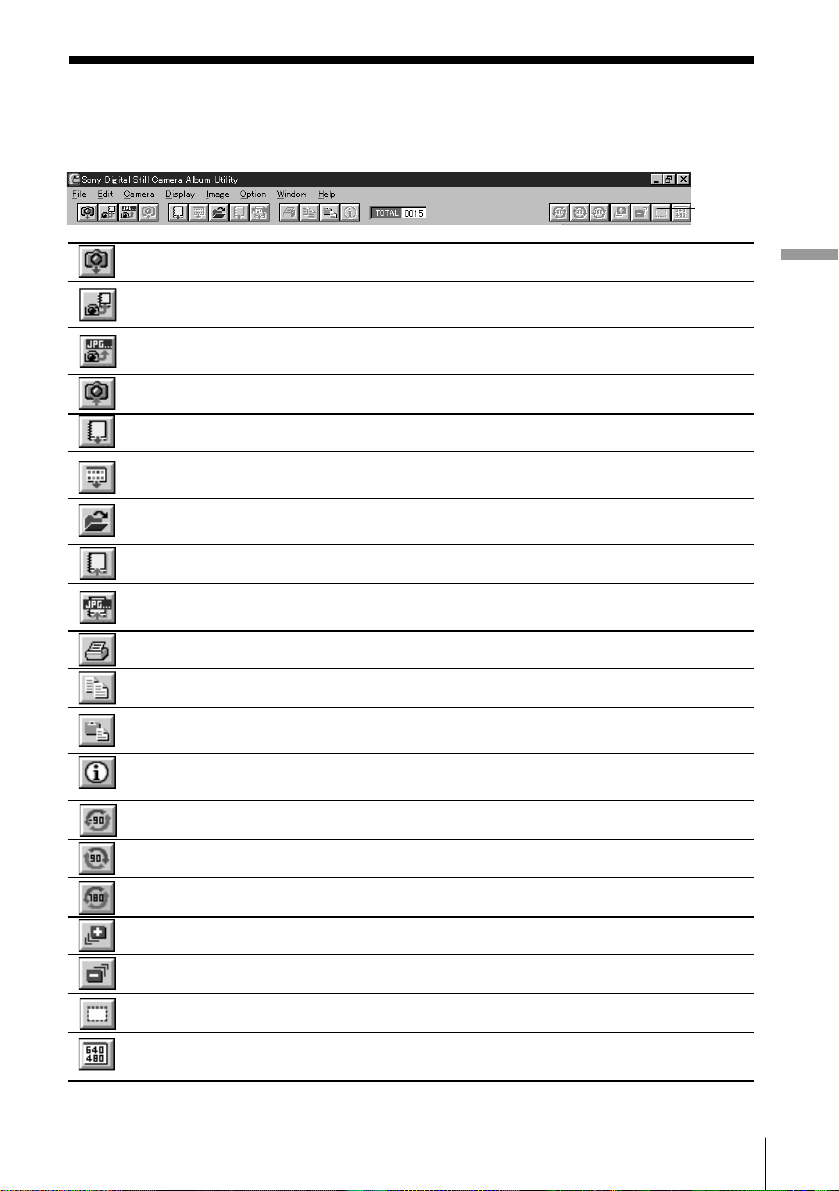
Using the tool bar
The tool bar shortcuts to frequently used menu items.
Tool Bar
Open Camera: Opens and displays the camera images on the monitor.
Copy To Album: Saves the camera images to the album on the hard disk in the album
format without opening them.
Export Camera Images: Saves the camera images to the desired folder on the hard
disk in the BMP, TIFF, or JPEG format without opening them.
Copy to Camera: Transfers the images to the camera.
Open Folder: Opens and displays the album stored in the hard disk.
Open Selected Album/Image: Opens and displays the multiple images selected in the
image list simultaneously.
Open File: Opens and displays the image file of the PMP (album), BMP, TIFF, or JPEG
file type stored in the hard disk.
Save To Album: Saves the selected image to the album on the hard disk.
Export Images: Saves the selected image in the desired folder on the hard disk in the
BMP, TIFF, or JPEG file type.
Print: Displays the dialog box to print an image, image list, or album list.
Copy: Copies the selected image to the clipboard.
Paste: Pastes an image of the clipboard. (You cannot use this command if no image is
in the clipboard. )
Information: Displays the information about the opened image or selected image in
the image list.
Rotate Left: Rotates an image 90 degrees in the counterclockwise direction.*
Capturing an image
Rotate Right: Rotates an image 90 degrees in the clockwise direction.*
Flip: Rotate an image 180 degrees.*
Zoom In: Enlarges the displayed image size.**
Zoom Out:Reduces the displayed image size.**
Show Edit Frame: Displays the frame for trimming a part of the image.
Best Fit 640 X 480: Adjusts the size of the image to fit into 640 × 480 pixels. The image is
magnified or reduced without changing its aspect ratio.
* To save the image rotated, select [Save] in the File menu.
** You can change the display size only; you cannot save an image zoomed in or out.
*
29Capturing an image
Page 30
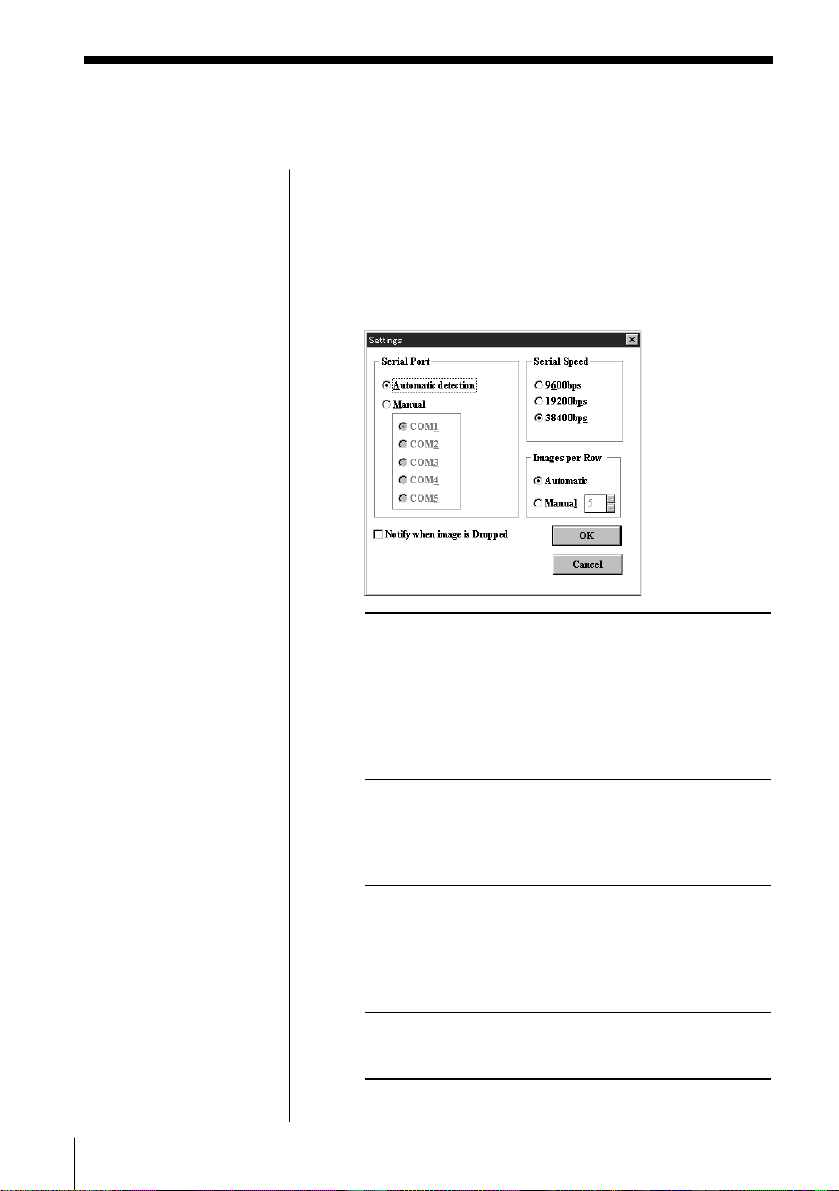
Changing system settings
Set the program settings according to your PC and
monitor.
1 Start the “Sony Digital Still Camera Album
Utility.”
2 Select [Settings] in the Option menu.
The [Settings] dialog box appears. Set the items.
Notes
• The SERIAL menu
defines the serial speed
via the connecting
cable.
• You may not be able to
select the serial speed
from the available
options according to
your PC. Refer to your
PC's manual for the
available serial speeds.
• When using the
infrared port, you do
not have to set the
Serial Speed.
30
Capturing an image
Serial Port Select [Automatic detection] to
automatically set the proper serial port.
You can also select [Manual] and select the
available COM port which the camera is
connected. When using the infrared port,
select the same port number as the
simulation port specified in the Infrared
Device Wizard.
Serial Speed Set the serial speed as selected in the
SERIAL menu of the DSC-F1 when
connecting via cable. Certain setting may
be disabled due to limitation inherent to
your computer system.
Images per Select the number of the thumbnail images
List displayed per row in the album list and
image list. Usually, select [Automatic] to
display as many images as possible. You
can also select [Manual] to select the
number.
Notify when Check the check box to display the
image is confirmation message when you
Dropped drag and drop an image.
3 Click [OK].
The settings are changed.
Page 31

Opening the camera images
To view images in the Digital Still Camera DSC-F1,
open the camera images.
Before you start
Make sure you have done the necessary preparations
as described in pages 13 through 22.
Opening the image from the image
list window
1 Select [Open Camera] in the Camera menu or click
on the tool bar.
The following dialog box appears.
The image to be displayed at the beginning.
The total number of the images stored in the camera
2 Click [Open Image List] and input the image
number which you want to start the image list
with in the [Start with image number] box.
Use the numeric keys to specify the image number
or click up arrow to increase or down arrow to
decrease the number.
Capturing an image
3 Click [Open].
The selected thumbnail images are transferred
from the camera (the camera icon is displayed in
red) and the image list of the camera is displayed.
continued
31Capturing an image
Page 32

Opening the camera images
Switching the caption
and date display of an
image
Select either [Show
Caption] or [Show Date]
in the Options menu.
You can change the
caption.
Displaying other
thumbnails
When hidden pages exist,
the scroll bar appears.
To scroll rows on a page,
click either up or down
arrow.
To scroll page by page,
click somewhere between
the arrow and the handle.
To display the desired
page quickly, drag the
handle.
Status bar
The status bar shows
program information,
such as the progress of a
time consuming task.
Depending on window
content, information such
as file path name,
number of images and
image size is displayed.
Image number
4 Click the thumbnail(s) you want to open (the
Caption or date display
(Communication starts with camera.)
Status bar
Camera icon
The following icons on an image stand for:
Selected as album front cover. You can change
the album front cover with [Set Album Cover]
in the Option menu (see page 54).
Protected from accidental erasure and editing
(see page 66).
selected thumbnail frame becomes yellow) and
select [Open Selected Album/Image] in the File
menu. Or, double-click the image or click
on
the tool bar.
The selected images are displayed in full size.
32
Capturing an image
Page 33

How to select images in the image list
❐ Selecting an image
Click the desired thumbnail of the image; the image
is selected. Click another thumbnail and that
image is selected instead of the previous image.
❐ Selecting multiple images
To select the images each isolated: Press and hold
down the Ctrl key as you click the left button
of the mouse on the desired images.
To select the images in succession: Press and hold
down the Shift key as you click the left button
of the mouse on the desired images.
To select all the images in the image list: Select
[Select All] in the Edit menu.
To cancel the selection: Click the right button of
the mouse on the selected image. Select [Select
None] in the Edit menu to cancel the selection
of all the images.
To open the multiple selected images: Double-
click the left button of the mouse on one of the
selected images as you hold down the Shift or
Ctrl key. Or select [Open Selected Album/
Image] in the File menu; all the selected
images are opened.
Capturing an image
Closing an album list, image list or image
Select [Close] in the File menu or click the close button.
The selected window is closed.
Switching the active window
An album list window, an image list window and an
image window are displayed in cascade. You can
switch the active window (the window selected and
displayed front) using the following:
• Click the desired window listed in the Window pulldown menu.
• Click a part of the desired window. You can easily
select the window by selecting [Tile] in the Window
menu to display all the windows in tile .
• Point to
windows or
and click [Next Window] until the desired window
displays active.
in the album list and image list
in an image window in the title bar
continued
33Capturing an image
Page 34

Opening the camera images
Opening the image directly
1 Select [Open Camera] in the Camera menu or click
In the initial status, the image number currently
displayed on the camera.
2 Click [Open Single Image] and input the image
3 Click [Open].
on the tool bar.
The following dialog box appears.
number which you want to open in the [Open
image number] box.
Use the numeric keys to specify the image number
or click up arrow to increase or down arrow to
decrease the number.
The selected images are displayed in full size.
34
Capturing an image
Page 35

Saving the camera images in album
To quickly handle and process camera images on your
PC, save the selected camera images in album of the
hard disk with or without opening them. The album
is stored in the album folder of the Dscalbum folder in
the each drive's root directory.
Opening and saving the camera images
1 Follow the steps 1 through 3 of “Opening the
camera images” (page 31) to display the image list
of the camera.
Capturing an image
2 Click the thumbnails of the desired images. To
save all the images, select [Select All] in the Edit
menu.
The frame of the selected image is highlighted in
yellow.
3 Select [Save To Album] in the File menu or click
on the tool bar.
The following dialog box appears.
continued
35Capturing an image
Page 36

Saving the camera images in album
Deleting and renaming
an album folder
Select the desired album
folder in the [Folder] list
box and click [Delete] or
[Rename].
Creating a new album folder
In the [Folder] list box, album folders contained in
the Dscalbum folder of the root directory are listed
with the album caption. To add a new album
folder to the list, click [New] under the list box. In
the [Album Title] dialog box, input the new folder
name and click [OK].
Creating a new album
In the [Album] list box, albums contained in the
selected album folder are listed. Each album
folder can store the maximum of 30 albums,
including no more than one empty album.
Therefore, you can add only one new album,
namely an empty album without album cover
thumbnail. To create the new album “PIC
number), click [New] under the list box.
Album cover thumbnail
” (*:
*****
Stopping saving
midway
Press the [Esc] key. (You
cannot stop saving in the
infrared data
communication.)
Note
After saving an image, do
not change the name of
the file or folder nor
delete them with the
Explorer. Doing so will
prevent displaying an
album on the monitor.
When you should delete
an image, select [Delete]
in the Edit menu of the
“Sony Digital Still
Camera Album Utility.”
36
Capturing an image
3 Select the destination album folder and album to
which the images are to be saved and click [OK].
Each image is stored in the specified album with a
file name “psn
” (*: number).
*****
Page 37

Note
When the image list or
images of the camera are
displayed, close them
before selecting [Save To
Album].
Deleting and renaming
an album folder
Select the desired album
folder in the [Folder] list
box and click [Delete] or
[Rename].
Saving all the camera images without
opening them
1 Select [Save To Album] in the Camera menu or
click
The following dialog box appears.
on the tool bar.
Capturing an image
The total number of the images stored in the camera
Album cover thumbnail
2 Click the option button of [All Images] in the
[Selection] block and click [OK].
Creating a new album folder
In the [Folder] list box, album folders contained in
the Dscalbum folder of the root directory are listed
with the albums folder caption. To add a new
albums folder to the list, click [New] under the list
box. In the [Album Title] dialog box, input the new
folder name and click [OK].
Creating a new album
In the [Album] list box, albums contained in the
selected album folder are listed. Each album folder
can store the maximum of 30 albums, including no
more than one empty album. Therefore, you can
add only one new album, namely an empty album
without album cover thumbnail. To create the new
album “PIC
the list box.
” (*: number), click [New] under
*****
continued
37Capturing an image
Page 38

Saving the camera images in album
Stopping saving midway
Press the [Esc] key. (You
cannot stop saving in the
infrared data
communication.)
3 Select the destination album folder and album to
which the images are saved and click [OK].
Each image is stored in the specified album with a
file name “psn
” (*: number).
*****
Note
After saving an image, do
not change the name of
the file or folder nor
delete them with the
Explore. Doing so will
prevent displaying an
album on the monitor.
When you should delete
an image, select [Delete]
in the Edit menu of the
“Sony Digital Still Camera
Album Utility.”
Note
When the image list or
images of the camera are
displayed, close them
before selecting [Save To
Album].
Saving the selected camera images
without opening them
1 Select [Save To Album] in the Camera menu or
click
The following dialog box appears.
Specifying the images to be stored
on the tool bar.
Album cover thumbnail
2 Click the option button of [Selected Images] in the
[Selection] block.
38
Capturing an image
3 Select the images to be saved.
Select Day/ Click up or down arrow or directly input
Month/Year the date. All the images stored in the
date are to be saved.
Select Range
Select Last The last image stored is to be saved.
Image Only
Click up or down arrow or directly input
the image numbers of the first (From)
and last (To) images to be saved. All the
images between the specified numbers
are to be saved. If you want to save only
one image, specify the same image
number for both the boxes.
Page 39

Deleting and renaming
an album folder
Select the desired album
folder in the [Folder] list
box and click [Delete] or
[Rename].
Creating a new album folder
In the [Folder] list box, album folders contained in
the Dscalbum folder of the root directory are listed
with the albums folder caption. To add a new
albums folder to the list, click [New] under the list
box. In the [Album Title] dialog box, input the new
folder name and click [OK].
Creating a new album
In the [Album] list box, albums contained in the
selected album folder are listed. Each album folder
can store the maximum of 30 albums, including no
more than one empty album. Therefore, you can
add only one new album, namely an empty album
without album cover thumbnail. To create the new
album “PIC
” (*: number), click [New] under
*****
the list box.
Capturing an image
Stopping saving midway
Press the [Esc] key. (You
cannot stop saving in the
infrared data
communication.)
Note
After saving an image, do
not change the name of
the file or folder nor
delete them with the
Explore. Doing so will
prevent displaying an
album on the monitor.
When you should delete
an image, select [Delete]
in the Edit menu of the
“Sony Digital Still Camera
Album Utility.”
3 Select the destination album folder and album to
which the images are saved and click [OK].
Each image is stored in the specified album with a
file name “psn
” (*: number).
*****
39Capturing an image
Page 40

Saving the camera images as another
file format
To quickly handle and process camera images on your
PC, save the selected camera images as standard file
format including BMP, TIFF or JPEG with or without
opening them.
Note
When saving an image as
standard file format, part
of the image information
may not be saved.
Selecting the file type
BMP The bitmap format supported generally by Windows.
The file extension is “.bmp.”
TIFF Stands for Tagged Image File Format, which is
widely used to store a bitmap image of various
resolutions. The file extension is “.tif.”
JPEG Stands for the group named “Joint Photographic
Experts Group,” who standardized the compression
system of the still image. The image is compressed in
a small data size, but the original image cannot be
perfectly reproduced. The file extension is “.jpg.”
Opening and saving the camera images
1 Follow the steps 1 through 3 of “Opening the
camera images” (page 31) to display the image list
of the camera.
40
Capturing an image
Page 41

2 Click the thumbnails of the desired images. To
save all the images, select [Select All] in the Edit
menu.
The frame of the selected image is highlighted in
yellow.
3 Select [Export Images] in the File menu or click
on the tool bar.
The following dialog box appears.
Currently selected folder
Displays the folders of one level upper the
currently selected folder in the list box.
4 Select the destination drive and folder in which the
images are to be saved and file type.
To select the drive: Click the desired drive in the
[Drive] list box.
To select the folder: Double-click the desired
folder in the [Folder] list box so that the
folder is displayed as currently selected
folder above the list box.
To select the file type: Click the file type in the
[Save as type] drop-down list box.
Capturing an image
Creating a new folder
In the [Folder] list box, folders contained in the
currently selected folder are listed. To add a new
folder to the list, click [Create New Folder]. In the
[Set Folder Name] dialog box, input the new folder
name and click [OK].
continued
41Capturing an image
Page 42

Saving the camera images as another file format
Stopping saving midway
Press the [Esc] key. (You
cannot stop saving in the
infrared data
communication.)
Note
If you select TIFF, the file
is created in Class R.
5 Click [OK].
Each image is stored in the specified folder in the
specified file type with a file name “psn
(
: serial number). The file is automatically
*****
numbered in serial starting from one larger
number than the largest number of the files
already stored in the currently selected folder.
Saving in JPEG file type
When you select [JPEG] file type and click [OK],
the dialog box to define the image quality
(compression ratio) appears. You can select the
image quality within the range from 1 to 100.
Usually, the larger number you select, the lower
compression ratio with the better image quality
you get. The file size, however, becomes larger.
Click [OK] to save the image.
*****
”
42
Capturing an image
Page 43

Saving all the camera images without
opening them
1 Select [Export Camera Images] in the Camera
menu or click
The following dialog box appears.
Currently selected folder
The total number of images stored in the camera
on the tool bar.
Displays the folders of one level upper the
currently selected folder in the list box.
2 Click the option button of [All Images] in the
[Selection] block.
Capturing an image
3 Select the destination drive and folder in which the
images are to be saved and file type.
To select the drive: Click the desired drive in the
[Drive] list box.
To select the folder: Double-click the desired
folder in the [Folder] list box so that the
folder is displayed as currently selected
folder above the list box.
To select the file type: Click the file type in the
[Save as type] drop-down list box.
continued
43Capturing an image
Page 44

Saving the camera images as another file format
Creating a new folder
In the [Folder] list box, folders contained in the
currently selected folder are listed. To add a new
folder to the list, click [Create New Folder]. In the
[Set Folder Name] dialog box, input the new folder
name and click [OK].
4 Click [OK].
Each image is stored in the specified folder in the
specified file type with a file name “psn
(
serial number). The file is automatically
*****:
numbered in serial starting from one larger
number than the largest number of the files
already stored in the currently selected folder.
*****
”
Stopping saving
midway
Press the [Esc] key. (You
cannot stop saving in the
infrared data
communication.)
Note
If you select TIFF, the file
is created in Class R.
Saving in JPEG file type
When you select [JPEG] file type and click [OK],
the dialog box to define the image quality
(compression ratio) appears. You can select the
image quality within the range from 1 to 100.
Usually, the larger number you select, the lower
compression ratio with the better image quality
you get. The file size, however, becomes larger.
Click [OK] to save the image.
44
Capturing an image
Page 45

Saving the selected camera images
without opening them
1 Select [Export Camera Images] in the Camera
menu or click
The following dialog box appears.
Currently selected folder
The total number of images stored in the camera
on the tool bar.
Displays the folders of one level upper the
currently selected folder in the list box.
2 Click the option button of [Selected Images] in the
[Selection] block.
Capturing an image
3 Select the images to be saved.
Select Day/ Click up or down arrow or directly input
Month/Year the date. All the images stored in the
date are to be saved.
Select Range
Select Last The last image stored is to be saved.
Image Only
Click up or down arrow or directly input
the image numbers of the first (From)
and last (To) images to be saved. All the
images between the specified numbers
are to be saved. If you want to save only
one image, specify the same image
number for both the boxes.
continued
45Capturing an image
Page 46

Saving the camera images as another file format
4 Select the destination drive and folder in which the
images are to be saved and file type.
To select the drive: Click the desired drive in the
[Drive] list box.
To select the folder: Double-click the desired
folder in the [Folder] list box so that the
folder is displayed as currently selected
folder above the list box.
To select the file type: Click the file type in the
[Save as type] drop-down list box.
Creating a new folder
In the [Folder] list box, folders contained in the
currently selected folder are listed. To add a new
folder to the list, click [Create New Folder]. In the
[Set Folder Name] dialog box, input the new folder
name and click [OK].
5 Click [OK].
Each image is stored in the specified folder in the
specified file type with a file name “psn
(
: serial number). The file is automatically
*****
numbered in serial starting from one larger
number than the largest number of the files
already stored in the currently selected folder.
*****
”
Stopping saving midway
Press the [Esc] key. (You
cannot stop saving in the
infrared data
communication.)
Note
If you select TIFF, the file
is created in Class R.
46
Capturing an image
Saving in JPEG file type
When you select [JPEG] file type and click [OK],
the dialog box to define the image quality
(compression ratio) appears. You can select the
image quality within the range from 1 to 100.
Usually, the larger number you select, the lower
compression ratio with the better image quality
you get. The file size, however, becomes larger.
Click [OK] to save the image.
Page 47

Opening an album of the hard disk
Important notice to
the users who have
used the previous
version (Version 1.0)
of the “Sony Digital
Still Camera Album
Utility”
The folders created by
the previous version of
the software cannot be
located with the [Open
Folder] command. To
locate the folders,
select [Find Folder] in
the Option menu.
Changing the drive
Click the desired drive in
the [Drive] list box so that
the album folders
contained in the selected
drive are listed in the
[Folder] list box.
Deleting and renaming
an album folder
Select the desired album
folder in the [Folder] list
box and click [Delete] or
[Rename].
You can open the image from the album folder, stored
from the Digital Still Camera onto the hard disk in the
album format.
1 Select [Open Folder] in the File menu or click
on the tool bar.
The following dialog box appears.
2 Click the desired album folder in the [Folder] list
box and click [OK].
The album thumbnails of the selected album folder
are displayed.
Capturing an image
Thumbnail of the album contained in the selected album
folder
continued
47Capturing an image
Page 48

Opening an album of the hard disk
Switching the caption
and date display of an
image
Select either [Show
Caption] or [Show Date] in
the Option menu. You can
change the caption.
Displaying other
thumbnails
When hidden pages exist,
the scroll bar appears.
To scroll rows on a page,
click either up or down
arrow.
To scroll page by page,
click somewhere between
the arrow and the handle.
To display the desired
page quickly, drag the
handle.
Status bar
The status bar shows
program information,
such as the progress of a
time consuming task.
Depending on window
content, information such
as file path name, number
of images and image size
is displayed.
3 Double-click the desired album thumbnail.
The image list of the selected album appears.
Caption or date display
Image number
Serial number of the images store in the hard disk
Status bar
The following icons on an image stand for:
Selected as album front cover. You can change
the album front cover with [Set Album Cover]
in the Option menu (see page 54).
Protected from accidental erasure and editing
(see page 66).
4 Click the image(s) you want to open (the selected
image frame becomes yellow) and select [Open
Selected Album/Image] in the File menu. Or,
double-click the image or click
For various ways to select images in the image list,
refer to page 33. The selected images are displayed
in full size.
on the tool bar.
48
Capturing an image
Page 49

Closing an album list, image list or images
Click [Close] in the File menu.
Saving the image
You can save the images in album or other file types.
Refer to “Saving the camera images in album” to save
them in album format, or “Saving the camera images
as another file format” to save them in standard file
type including BMP, TIF, and JPEG.
Capturing an image
49Capturing an image
Page 50

Opening an image file directly
You can open an image stored in the hard disk by
designating its file name. In addition to a PMP (album
format) file, you can open a BMP, TIF or JPEG file.
1 Select [Open File] in the File menu or click in
the tool bar .
The following dialog box appears.
The selected folder
2 Select the image file you want to open.
To select the drive: Click the desired drive in the
[Drives] drop-down list box.
To open the folder: Double-click the desired folder
in the [Directories] list box.
To select the file type: Click the desired file type in
the [List Files of Type] drop-down list
box. The files of the selected file type
are listed in the [File name] list box.
Select [All Files] to display the files of all
the types.
To select the file name: Click the desired file name
in the [File Name] list box or input the
file name directly in the text box.
3 Click [OK].
The selected image is displayed in full size.
50
Capturing an image
Page 51

Closing an image
Select [Close] in the File menu or click the close
button. The selected window is closed.
Saving the image in album
You can save the image on the hard disk in an album
in the same way as the camera images. “Opening and
saving the camera images” of the “Saving the camera
images in album” on page 35.
Saving the image as another file format
1 Select [Save As] in the File menu.
The following dialog box appears.
Capturing an image
The selected folder
2 Select the destination drive and folder in which
the images are to be saved and file name.
To select the drive: Click the desired drive in the
[Drives] drop-down list box.
To select the folder: Click the desired folder in the
[Directories] list box.
continued
51Capturing an image
Page 52

Opening an image file directly
To select the file type: Click the desired file type in
To select the file name: Click the desired file name
3 Click [OK].
The image is saved in the selected destination
folder in the file format.
Saving in JPEG file type
When you select [JPEG] file type and click [OK],
the dialog box to define the image quality
(compression ratio) appears. You can select the
image quality within the range from 1 to 100.
Usually, the larger number you select, the lower
compression ratio with the better image quality
you get. The file size, however, becomes larger.
the [List Files of Type] drop-down list
box.
in the [File Name] list box or input the
file name directly in the text box.
52
Capturing an image
Page 53

Capturing an image from TWAIN
device
What is TWAIN?
TWAIN is the standards
software protocol for
communication between
an application software
and a picture-capturing
device such as a scanner.
You can capture an image from a device that supports
TWAIN protocol.
1 Select [Select Source] in the File menu.
The [Select Source] dialog box appears.
2 Select the desired device and click [Select].
3 Select [Acquire] in the File menu.
4 Follow the users' manual of the TWAIN device to
acquire an image.
Capturing an image
53Capturing an image
Page 54

Sony Digital Still Camera Album Utility
Editing an image
Changing the album front cover
In the image list window, the thumbnail with the
icon is assigned as the album front cover. You can
change the album front cover as follows:
1 Display the image list stored in the camera or hard
disk whose album front cover you want to change.
See “Opening the camera images” (page 31) or
“Opening an album of the hard disk” (page 47) for
details.
2 Click the thumbnail you want to assign as the
album front cover image.
The selected thumbnail is highlighted.
3 Select [Set Album Cover] in the Option menu.
icon, representing the album front cover,
The
is attached to the selected image.
54
Editing an image
Selected
image
4 Display the Album list window.
The selected image in step 2 is displayed as album
front cover.
Changed
album
front
cover
Page 55

Changing the caption
Tips
• You can input up to 14
characters for a caption.
• You can also input a
caption in the Image
Information dialog box.
To display the dialog
box, select
[Information] in the
Image menu or click
on the tool bar.
When the date is
displayed
Select [Show Caption] in
the Option menu. The
date display is replaced
with the caption display.
You can change the comment of albums or images.
The procedure below describes how to change the
image comment. (You can change the album
comment in the same way.)
1 Display the image list of a camera or the hard disk.
See “Opening the camera images” (page 31) or
“Opening an album of the hard disk” (page 47) for
details.
2 Click the caption box underneath the image
thumbnail whose caption you want to change.
The [Image Caption] dialog box appears.
Image
Caption
dialog box
Caption
box
3 Type the caption in the dialog box and click [OK].
The caption is changed.
Editing an image
Inputted
caption
55Editing an image
Page 56

Moving albums or images
(drag and drop)
Note
You cannot move a
camera image.
Exchanging two images
In the step 2, drag the
image while pressing the
Ctrl key. The two images,
the dragged image and
the original image of the
destination, exchange
positions, moving no
other images.
You can change the position of an album in the album
list or an image in the image list stored in the hard
disk.
The procedure below describes how to move an
image. (You can move an album in the same way.)
1 Display the image list stored in the hard disk.
See “Opening an album of the hard disk” (page
47) for details.
2 Drag the desired image.
The drag pointer
dragging direction. According to the pointer
move to the position where you want to drop the
image.
moves according to the
,
(
Note
When you select [Notify
when image is Dropped]
in the Settings dialog box
(page 30), the confirmation
dialog box appears in the
step 3. Click [OK] to drop
the album or the image.
56
Editing an image
3 Drop the image.
The image is moved to the position, pushing
forward or backward the original image and the
other images.
Moved
image
Page 57

Copying an image to another album
You can copy an image of an album to another album.
When copying, arrange the two album windows in
tile.
1 Display the image list of the camera or hard disk
which includes the image to be copied and then
the image list to which you want to copy the
image.
See “Opening the camera images” (page 31) or
“Opening an album of the hard disk” (page 47) for
details.
The two image list windows are displayed in
cascade.
Editing an image
2 Select [Tile] in the Window menu.
The two image list windows are displayed in tile.
continued
57Editing an image
Page 58

Copying an image to another album
3 Drag the desired image.
Note
When you select [Notify
when image is Dropped]
in the Settings dialog box
(page 30), the
confirmation dialog box
appears in the step 3.
Click [OK] to drop the
album or the image.
Displaying the windows
in cascade again
Select [Cascade] in the
Window menu.
4 Move the dragging pointer to the album to
which you want to copy the image then drop the
image.
The image is copied as the last image of the
destination album.
(
58
Editing an image
Copied image
Page 59

Copying with the File menu
1 Display the album list or image list and click the
thumbnail which you want to copy.
2 Select [Save To Album] in the File menu or click
on the tool bar.
The following dialog box appears.
Album cover thumbnail
Creating a new album folder
In the [Folder] list box, album folders contained in
the Dscalbum folder of the root directory are listed
with the album caption. To add a new album
folder to the list, click [New] under the list box. In
the [Album Title] dialog box, input the new folder
name and click [OK].
Creating a new album
In the [Album] list box, albums contained in the
selected album folder are listed. Each album folder
can store the maximum of 30 albums, including no
more than one empty album. Therefore, you can
add only one new album, namely an empty album
without album cover thumbnail. To create the new
album “PIC
the list box.
” (*: number), click [New] under
*****
3 Select the destination album folder and album to
which the images are to be saved and click [OK].
Each image is stored in the specified album with a
file name “psn
” (*: number).
*****
Editing an image
59Editing an image
Page 60

Deleting images or albums
Notes
• When deleting an
image, double-check
that it is the right
image. Once deleted,
the image is lost
forever.
• You cannot delete
protected images. To
delete them, first cancel
the protect setting in
the Image Information
dialog box (page 66).
You can delete albums or images in an album.
1 Open the album list or image list of the camera or
hard disk which includes the album(s) or the
image(s) to be deleted.
See “Opening the camera images” (page 31) or
“Opening an album of the hard disk” (page 47) for
details.
2 To delete an album, click the desired album
thumbnail in the album list; to delete an image,
click the desired image thumbnail in the image
list.
You can select multiple thumbnails at a time. The
selected albums or images are highlighted.
3 Select [Delete] in the Edit menu.
The confirmation dialog box appears.
4 Click [OK].
The albums or images are deleted.
60
Editing an image
Page 61

Searching for images
You can search for images using the searching keys of
recorded date and edited date .
1 Open the image list of the camera or hard disk
which includes the image you want to search.
See “Opening the camera images” (page 31) or
“Opening an album of the hard disk” (page 47) for
details.
2 Select [Find Images] in the Option menu.
The [Find Images] dialog box appears.
3 Select the searching key by clicking [Recorded
Date] and/or [Edited Date].
4 Input the recorded or edited date. Select the
searching option among “On” (the same date),
“Before” (before the date) and “After” (after the
date).
5 Click [Find].
The searching starts up. The images searched are
listed in the box with its recorded date, edited
date, and caption.
Editing an image
6 Click [OK] to close the dialog box.
61Editing an image
Page 62

Printing images
You can print an album list, an image list, or an image.
1 Turn on the power of the printer and make it
2 Display the window you want to print.
Note
Before you start printing,
the printer driver should
be installed in your hard
disk.
3 Select [Print Setup] in the File menu.
ready for printing.
To print Do this
an album list Select [Open Folder] in the File menu
or click in the tool bar.
an image list Select [Open Camera] in the Camera
menu or click in the tool bar.
Double-click the desired album in the
album list.
an image Double-click the desired image in the
image list, or select [Open File] in the
File menu or click in the tool bar to
designate the image file to be opened.
The [Print Setup] dialog box appears. Set each
item according to your printer.
Setting more details
Click [Options] to display
the Printer Properties
window where you can
set more details of the
printer's specifications.
62
Editing an image
Printer The printer whose driver is selected is
displayed as the [Default printer]. Usually
select [Default printer]. To select another
printer, click [Specific printer] and select the
one from the drop-down list box.
Orientation Select the orientation of the paper when
printed between [Portrait] and [Landscape].
Paper Select the paper size in [Size], the paper
feeder cassette type or manual feeder in
[Source].
Page 63

4 Click [OK].
5 Select [Print] in the File menu or click in the
tool bar.
The [Print] dialog box appears.
Thumbnail image
Set the following:
Size Select the output size between [Fit to
Page] (printing as large as the print paper
allows) and [Actual Size] (printing as
shown in the thumbnail image).
Copies Select the print quantity by clicking the
up arrow button to increase the number
and the down arrow button to decrease
the number.
Brightness Usually use the default level (0). When
the image is too dark, click the right
arrow button or drag the handle to the
right to increase brightness.
To decrease brightness, click the left
arrow button or drag the handle to the
left.
Initialize Set the Brightness to the default level (0).
Editing an image
6 Click [OK].
Printing starts up.
63Editing an image
Page 64

Changing the image display size
You can enlarge (zoom in) and reduce (zoom out) an
image displayed on the monitor.
Display the image of a camera or hard disk which you
want to change the display size. See “Opening the
camera images” (page 31) or “Opening an album of
the hard disk” (page 47) for details.
Notes
• The zoom-in factor can
be either 200%, 400%,
800% or 1600%. The
zoom-out factor is
either 50% or 25%.
However, if you select
high rate of percentage,
some images may not
be properly displayed
due to the display
driver's limit.
• When you zoom in and
out an image, only the
image displayed on the
monitor is changed but
the original image does
not change.
Enlarging an image
Select [Zoom In] in the Image menu or click
in the
tool bar. The display size of the image is enlarged.
Diminishing an image
Select [Zoom Out] in the Image menu or click
in
the tool bar. The display size of the image is reduced.
64
Editing an image
Page 65

Rotating an image
You can rotate an image, which is useful to view an
image recorded with the camera oriented side ways.
Display the image of a camera or hard disk which you
want to change the angle. See “Opening the camera
images” (page 31) or “Opening an album of the hard
disk” (page 47) for details.
Editing an image
Note
When you rotate an
image, only the image
displayed on the monitor
is rotated but the original
image does not change.
To save the original image
rotated, select [Save] in
the File menu.
Rotating an image in
clockwise direction
Select [Rotate Right] in the
Image menu or click
the tool bar. Each time you
select the menu or tool, the
image is rotated 90 degrees in
the clockwise direction.
Rotating an image in
counterclockwise direction
Select [Rotate Left] in the
Image menu or click
the tool bar. Each time you
select the menu or tool, the
image is rotated 90 degrees in
the counterclockwise
direction.
Rotating an image 180
degrees
Select [Flip] in the Image
menu or click
bar. Each time you select the
menu or tool, the image is
rotated 180 degrees.
in
in
in the tool
65Editing an image
Page 66

Reviewing the image information
You can view the image information and revise some
of the items.
1 Display the image or select the image in the image
list whose information you want to review.
See “Opening the camera images” (page 31) or
“Opening an album of the hard disk” (page 47) for
details.
2 Select [Information] in the Image menu or click
in the tool bar.
The following dialog box appears.
Note
The contents of the dialog
box of the image of a
standard file format
differ.
66
Editing an image
3 Review the settings when the image is recorded.
Image Quality* The image quality mode (compression
ratio) when the image is recorded:
FINE/STANDARD/SNAPSHOT
Shutter Speed* The shutter speed when the image is
recorded.
Flash* The flash is used (ON) or not used (OFF)
when the image is recorded.
Recorded Date* The date when the image is recorded.
Edited Date You can manually input the date when
the image is transferred or edited.
Caption You can input a caption in the text box.
Protected Check to set the protection( ). Do not
check to release the protection to edit or
delete the image.
* You cannot change from the PC.
4 Click [OK] to close the window.
Page 67

Transferring an image to the camera
You can transfer a BMP, TIFF, JPEG or PMP image file
to the camera. Since the image being stored in the
camera is limited to 640 × 480 pixels, a larger image
should be diminished or trimmed.
1 Display the image to be transfer to the camera.
Editing an image
Note
When transferring a
smaller image, select
[Best Fit 640 × 480] in the
Image menu.
Transferring an image
in the image list
In the image list window,
select the image(s) to be
transferred. Then select
[Copy to Camera] in the
Camera menu. The
selected image is or
images are added to the
camera with landscape
position. Rotate the
image if necessary.
Note
When you change the
frame size, select [Best Fit
640 x 480] in the Image
menu.
2 • To adjust the image to fit 640 × 480 pixels
Select [Best Fit 640 × 480] in the Image menu or
click
in the tool bar. The image is resized to
640 × 480 pixels. Skip the steps 3 and 4.
• To trim the image to 640 × 480 pixels or smaller
Select [Show Edit Frame] or click in the tool
bar. The edit frame appears.
3 Move the edit frame to assign the area to be
transferred.
To adjust the frame size, drag its corner. To move
the frame itself, drag somewhere on the frame
except for corners.
continued
Edit
frame
67Editing an image
Page 68

Transferring an image to the camera
4 Select [Copy] in the Edit menu or click on the
tool bar to copy the image inside the edit frame to
the clipboard.
Then select [Paste] in the Edit menu or click
the tool bar to paste the clipboard image to the
window.
The edited image is displayed.
Note
For the image quality,
refer to the instruction
manual of the Digital Still
Camera DSC-F1.
5 Select [Copy to Camera] in the Camera menu or
click
The dialog box defining the image quality (FINE,
STANDARD, and SNAPSHOT) appears.
on the tool bar.
6 Select the image quality.
The confirmation window appears.
7 Click [OK].
The image is compressed in the selected image
quality and transferred to the camera.
on
68
Editing an image
Page 69

Sony DSC-F1 TWAIN 1.5
Using the TWAIN data source
Transferring camera images to an
application which supports the TWAIN
protocol
What is TWAIN?
TWAIN is the standards
software protocol for
communication between
an application software
and a picture-capturing
device such as a scanner.
For access to the camera
from the TWAIN
application, refer to the
users' manual of the
application you are using.
Note
Depending on the
application, the number
of images which can be
transferred from the
camera via TWAIN
differs.
Checking the system
settings
Click on the tool
bar. The Settings
window appears where
you can check to see that
the items are set
according to the system
settings you use.
(See “Changing system
settings” on page 30.)
By switching the data source driver to “Sony DSC-F1
TWAIN 1.5,” you can transfer a camera image directly
to an application which supports the TWAIN protocol.
Before you begin
• Do the necessary preparations as described in pages
13 through 22.
• Start the application and display its main menu
window.
• Quit the “Sony Digital Still Camera Album Utility”
if it has been started. (You cannot start the “Sony
DSC-F1 TWAIN 1.5” while the “Sony Digital Still
Camera Album Utility” is accessing the camera.)
1 Select [Select Source] in the File menu. (The file
menu name differs depending on the application.)
The [Select Source] dialog box appears.
2 Select [Sony DSC-F1 TWAIN 1.5] and click [Select].
3 Select [Acquire] in the File menu. (The file menu
name differs depending on the application.)
The Sony DSC-F1 TWAIN 1.5 main menu window
appears.
Using the TWAIN data source
continued
69Using the TWAIN data source
Page 70

Transferring a camera image to an application which supports
the TWAIN protocol
4 Click .
The image list appears immediately.
Transfer button
5 Click the images which you want to transfer to the
application, then click
The selected images are transferred to the
application and the application window appears
again.
.
Note
Depending on the
application, the window
closes after the images
are transferred. If this
occurs, repeat steps 3
through 5.
70
Using the TWAIN data source
To transfer another image
Repeat steps 3 through 5 or step 5.
Page 71

Others
Troubleshooting
After trying the following remedies, if the problem
persists, please consult “Sony Customer Technical
Support.” Also refer to the operating instructions of
the Digital Still Camera DSC-F1.
An error occurs during data transmission via cable.
• The connecting cable between the PC and the
Digital Still Camera is not fitted properly.
m Connect the cable properly. (page 16)
• The power of the Digital Still Camera is not turned
on.
m Set the POWER/Function dial of the Digital Still
• The WIRELESS setting of the Digital Still Camera is
not proper.
m Select “OFF” in the WIRELESS menu of the
Note
The SERIAL menu
defines the serial speed
via the connecting cable.
• The serial speed of your computer does not match
that of the Digital Still Camera.
m Select the same serial speed in the Settings dialog
m Check that the serial speed selected in the Settings
• The Serial Port in the Settings dialog box is not
properly assigned.
m Assign the Serial Port to which the connecting
• The Serial Port selected in the Settings dialog box
may be used by another communication software.
m Check which serial port the communication
Others
Camera to “PLAY.” (page 17)
Digital Still Camera. (page 17)
box as set in the SERIAL menu of the Digital Still
Camera. (page 17)
dialog box matches that of your PC. Some PC
does not support all of the serial speed options.
(page 30)
cable is inserted. (page 30)
software is used and assign another serial port for
either the “Sony Digital Still Camera Album
Utility” or the communication software.
continued
71Others
Page 72

Troubleshooting
Notes
• You can check the
simulation port number
and the port which the
infrared device is
installed: Double-click
the [Infrared Monitor]
icon in the Control
Panel and click the
Option tag.
• The hardware port
number and simulation
port number differ. Set
each port number
correctly.
An error occurs during infrared data transmission
• The WIRELESS setting of the Digital Still Camera is
not proper.
m Select “ON” in the WIRELESS menu of the Digital
Still Camera. (page 22)
• The power of the Digital Still Camera is not turned
on or set to “CAMERA.”
m Set the POWER/Function dial of the Digital Still
Camera to “PLAY.” (page 22)
• The infrared device or driver is not properly
installed.
m Check to see if the infrared hardware is built in
your PC or an infrared adapter is properly
connected to the proper hardware port number.
m Check to see if the infrared driver is installed in
the hard disk. You can check the driver by
opening the Option tag of the [Infrared Monitor]
in the Control Panel.
• The Serial Port in the Settings dialog box is not
properly assigned.
m Assign the proper simulation port in the Infrared
Device Wizard. (page 20)
m Check to see that the Serial Port in the Settings
dialog box of the “Sony Digital Still Camera
Album Utility” is properly assigned. (page 30)
• The infrared ports of the Digital Still Camera and the
PC are not properly oriented.
m Place the two ports within the controllable area.
Remove an obstacle which may interrupt the
infrared communications, if any. Also check the
Status tag of the [Infrared Monitor] in the Control
Panel to see if the infrared device is detected.
(page 21)
72
Others
Page 73

The application does not work properly.
m Turn of the Digital Still Camera and quit the
application. Then turn on the Camera and restart
the application to see if the software and the Camera
work properly.
Cannot open the camera’s images .
• You cannot access the Digital Still Camera from two
or more applications at a time.
m Quit the other applications once and start “Sony
Digital Still Camera Album Utility.” Then try to
access the camera.
The “Sony DSC-F1 TWAIN 1.5” does not work
properly (when the screen saver is working).
m Do not use the screen saver when you use “Sony
DSC-F1 TWAIN 1.5.” If the screen saver is working,
the screen will not be updated while transferring
camera images. However, this is not a malfunction
and the screen will return to normal after the
transfer.
Others
73Others
Page 74

Index
A
Adjusting the colors
and the contrast of
the monitor 27
Adjusting the image to
fit 640 × 480 pixels 67
Album format 9
Album list 10
B
BMP 40
C
Caption 55, 66
Capturing an image
from TWAIN device
53
Cascade 57
Changing the album
front cover 54
Changing the caption
55
Changing the system
settings 30
Connecting
via cable 14
via infrared port 18
Copying an image 57
Copying with the File
menu 59
D
Deleting and renaming
an album folder 36
Deleting images or
albums 60
DIGITAL I/O port 16
Diminishing an image
64
Drag and drop 56
Drag pointer 56
E
Edit frame 67
Enlarging an image 64
F, G, H
Features 8
File type 40
I
Image 10
Image filing system 9
Image information 66
Image list 10
Infrared Device Wizard
20
Infrared Monitor 19, 71
Installer 8
Installing 14
Microsoft Windows
95 Infrared
Communications
Driver 19
Sony Digital Still
Camera Album
Utility 14
J
JPEG 40
M, N
Making a new album 36
Making a new album
folder 36
Making a new folder 41
Menu
Camera menu 25
Display menu 26
Edit menu 25
File menu 24
Help menu 28
Image menu 26
Options menu 27
Window menu 28
Moving albums or
images 56
74
Others
Page 75

O
Opening the camera
images 31
Opening an image file
directly 50
Opening an image list
of the hard disk 47
Opening and saving the
camera images 35
Operation flow chart 11
P
PIC_CAM 9
Print Setup 62
Printing 62
Protection setting 66
Q
Quitting the “Sony
Digital Still Camera
Album Utility” 23
R
Rotating an image 65
S
Saving
Opening and saving
the camera images
35, 40
Saving all the camera
images without
opening them 37,
43
Saving an image as
another file format
51
Saving the camera
images as anther
file format 40
Saving the camera
images in album
35
Saving in JPEG file
type 42
Saving the selected
camera images
without opening
them 38, 45
Searching for images 61
Selecting an image 33
Selecting multiple
images 33
SERIAL menu 17
Serial port 16, 30
Serial speed 30
Setting up the Digital
Still Camera 17, 22
Sony DSC-F1 TWAIN
1.5 69
Starting “Sony Digital
Still Camera Album
Utility” 23
Status bar 32
Stopping saving
midway 36
Switching the active
window 33
Switching the comment
and date display of
an image 32
System requirements 12
System settings 30
T
Thumbnail 10
TIFF 40
Tile 57
Transferring an image to
the camera 67
Transferring an image in
an image list 67
Transferring camera
images to a TWAIN
application 69
Troubleshooting 71
TWAIN 53, 69
U
Using the tool bar 29
Z
Zoom In 64
Zoom Out 64
Others
75Others
Page 76

Page 77

For Macintosh
Operating Instructions
Page 78

Before you begin
Features
The PC Connecting Kit for Macintosh comprises the
connecting cable and the CD-ROM, which includes
the following:
Application software “Sony Digital
Still Camera Album Utility”
Captures images from the Sony Digital Still
Camera DSC-F1 and edits them:
• Captures Digital Still Camera images with or
without opening them and copies them onto the
hard disk in the desired file type–PICT, JPEG or
the software original album (CAMS) file type.
• The software offers a variety of album and
image editing functions: moves the position of
images in an album, copies images to a different
album, deletes images, and zooms and rotates
images.
What is Plug-in?
The Plug-in is an interface
which allows image data
transfer from an input
device such as a digital
scanner and digital still
camera to an application.
To capture an image of a
particular device into a
particular application,
you need to install the
Plug-in module
compatible with both the
device and the
application.
78 Before you begin
Plug-in module “Sony Digital Still
Camera Plug-in”
Enables direct capturing of images from the
Digital Still Camera into PhotoStudio or another
application which supports Photoshop Plug-in.
Page 79

Image filing system of the Album
Utility
The “Sony Digital Still Camera album Utility” handles
the images in a unique album filing system–“Album”
format. You can also handle the images as standard
file formats– JPEG and PICT.
Album format
When the Digital Still Camera images are copied onto
the hard disk or other storage device, they are stored
in the original filing system shown below, which is
called the “Album” format. The file type is called
“CAMS.” The “Album” format enables displaying the
images as shown below. The folder containing the
images in this album structure is called a “Album
Folder.”
Before you begin
*Thumbnail
Stands for each image in
the album list or image
list.
Image list
A page containing fifteen
thumbnails* of the album
contained in the Digital
Still Camera or the hard
disk is displayed. You
can select any image.
v
Image
The selected image is
displayed in full size.
Before you begin
79
Page 80

Features
Operation flow chart
Connect the Digital Still Camera with the PC and install the software.
Setting Up (page 82)
vv
Sony Digital Still Camera Album
Utility
Start the “Sony Digital Still Camera Album Utility”
v
Open the Camera Image
(page 94)
v
Select the images to be
stored in the hard disk
v
Save
v
Open the image stored in the hard disk (page 109)
Select the image in the image list or specify the image file to be
opened.
Edit an image/Print an image/Transfer an image to the
Camera (page 113)
You can edit an image: changing image comments, moving,
copying, deleting, printing an image, enlarging and
diminishing an image, rotating an image. You can also transfer
an image to the Digital Still Camera.
(page 86)
Save the Camera Image
without Opening it
all the camera
images
v
v
only selected
images
v
Sony Digital Still
Camera Plug-in
Start a Plug-in
application
(page 123)
v
Select the “Sony
Digital Still Camera
Plug-in”
v
Transfer camera
images to a Plug-in
application
80 Before you begin
Page 81

System requirements
Your computer and system software must meet the
following minimum requirements to use this product:
• An Apple Macintosh computer with a 68030
processor or later model/PowerPC 601 or later
model
• OS: Apple system software version 7.1 or higher
• Extension: QuickTime version 1.5 or higher for the
Sony Digital Still Camera Plug-in
• RAM: 8MB or more for Sony “Digital Still Camera
Album Utility” (16MB is recommended.)
• Application memory for the “Sony Digital Still
Camera Plug-in:” the application's Suggested size
Note
For stable operation of
the software, we suggest
you use the latest version
of the operating system;
especially in serial
communication, a
remarkable improvement
has been achieved.
plus 3000KB to the Preferred size of the Memory
Requirements
• 40MB or more available hard disk space
• A color monitor with a video board or video driver
to display 640 × 480 pixels and 256 colors or better.
(16,770,000 full color is recommended.)
• Modem or printer port
• CD-ROM drive
Before you begin
Before you begin
81
Page 82

Setting up
Step 1: Installing the software
To transfer Digital Still Camera images onto your PC,
install the “Sony Digital Still Camera Album Utility, ”
or/and “Sony Digital Still Camera Plug-in” onto your
hard disk.
1 Start up your Macintosh.
2 Insert the CD-ROM supplied into the CD-ROM
drive.
*Language install option
You can select the menu
and dialog language
among English, French or
German.
3 Open your language folder.
Double-click your language folder* among
English, French, and German.
4 Install the “Sony Digital Still Camera Album
Utility.”
Drag the “Sony Digital Still Camera Album
Utility” icon
“Sony Digital Still Camera Album Utility” icon
onto your hard disk.
82
Setting up
Page 83

Note
The folder name to which
the “Sony Digital Still
Camera Plug-in” is copied
differs depending on the
application you use.
For example, when you
use Adobe PhotoShop 3.0,
the plug-in should be
copied onto the Acquire/
Import folder of the Plugins folder.
For the details, refer to the
user's manual of the
application.
5 Install the “Sony Digital Still Camera Plug-in.”
Drag the “Sony Digital Still Camera Plug-in" icon
onto the plug-in folder.
With the “Sony Digital Still Camera Plug-in”
copied, you can capture images from the Sony
Digital Still Camera DSC-F1 with an application
supporting the Adobe Photoshop Plug-in.
Setting up
83Setting up
Page 84

Step 2: Connecting the Digital Still
Camera
Notes
• Turn off the power on
your computer and
Digital Still Camera
before connection.
• Do not turn off the
power of the camera
nor disconnect the cable
during transmitting the
data, which may cause a
transmission failure.
• Use only the supplied
connecting cable. Other
brands of cables may
cause malfunctions.
• The connecting cable
supplied is for the Sony
Digital Still Camera
DSC-F1 only. It cannot
be used to connect other
cameras.
• Insert the connecting
cable carefully into the
port, making sure that
the port goes in straight
and is firmly seated.
When inserting the
cable into the Digital
I/O port of the Digital
Still Camera, match the
¢ mark of the cable
with that of the port.
• Keep metal objects
away from the
connector pins to avoid
short circuits.
• We suggest you use the
Digital Still Camera
with the AC power
adapter.
• Also refer to the
instructions manual of
your Macintosh.
Digital Still
Camera
DSC-F1
to DIGITAL
I/O port
Connect the connecting cable to the cable
adapter (supplied) and then to the
modem or printer port.
Connecting cable Cable adapter
Connecting cable
(supplied)
Your Macintosh
to the
modem or
printer port
Use the supplied connecting cable to the modem/
printer port via the cable adapter to the DIGITAL
I/O port on the Digital Still Camera DSC-F1. For a
Macintosh with the built-in modem, use the printer
port.
To resume data transmission
In case the data transmission is interrupted (and the
Digital Still Camera becomes disabled), resume the
transmission as follows :
1 Close all the windows of “Sony Digital Still
Camera Album Utility” being displayed on the
Macintosh monitor.
2 Turn the POWER/Function dial of the Digital Still
Camera to “OFF.”
3 Turn the POWER/Function dial to “PLAY.”
4 Transmit the data again.
84
Setting up
Page 85

Step 3: Setting up the Digital Still
9600
19200
38400
CAMERA MENU
SERIAL SPEED
Camera
Before you start data communications between the PC
and the Digital Still Camera, set up the Digital Still
Camera as follows. For the details, refer to the
instruction manuals of the Digital Still Camera
DSC-F1.
* The SERIAL menu
defines the serial speed
via the connecting
cable.
** “38400” means 38,400
bps.
Note
During the data
communication in
process, do not change
the position of the
POWER/Function dial.
MENU/EXECUTE
jog dial
Digital Still
Camera
DSC-F1
POWER/Function
dial
1 Set the POWER/Function dial to “PLAY.”
2 To activate the data transmission via the
connecting cable, set the menu as follows:
Menu Select
WIRELESS OFF
SERIAL* 38400**
CAMERA MENU
WIRELESS
OFF
ON
The Digital Still Camera is ready for
communication via cable.
Setting up
85Setting up
Page 86

Sony Digital Still Camera Album Utility
Capturing an image
Starting “Sony Digital
Still Camera Album
Utility”
Note
When using the “Sony
Digital Still Camera Plugin” module to transfer
camera images into an
application which
supports the PhotoShop
Plug-in protocol, the steps
here are not necessary
(see page 123).
To capture images from the Digital Still Camera into
your Macintosh, start the “Sony Digital Still Camera
Album Utility.”
Tip
To open as many windows as possible, we suggest you
allocate as much memory as possible to the “Sony Digital
Still Camera Album Utility.”
1 Start up Macintosh
2 Double-click the “Sony Digital Still Camera Album
Utility” icon.
“Sony Digital Still Camera Album Utility” icon
The “Sony Digital Still Camera Album Utility”
starts up.
86
Capturing an image
The menu bar of the
“Sony Digital Still Camera
Album Utility” appears.
v
Quitting the “Sony Digital Still Camera Album
Utility”
Select [Quit] in the File menu.
Page 87

About the menus
“Sony Digital Still Camera Album Utility” consists of
the following menus. You can also use the tool bar
icons to proceed with part of the menu operations
(page 91).
File menu
Open Album Opens an album that is stored in the hard disk or MO disk and
displays images of the album.
Open Selected Image Opens and displays the selected image(s) in the image list
window at a time.
Open Image File Opens and displays an image file from the hard disk or MO
disk. The available file types are PICT, JPEG and Album
(CAMS).
Close Closes the currently active window.
Save File Saves the image rotation in the album.
Save As Saves the currently selected image with another file name as a
PICT or JPEG file onto the selected folder.
Save in Album Saves the image(s) selected in the image list onto the album in
the hard disk.
Save as File Saves the currently selected image in the image list as a PICT or
JPEG file onto the desired folder.
Print Setup Selects the model name of the printer, paper, and other settings.
(The printer driver needs to be installed prior to printing. )
Print Displays the dialog box to print an image.
Quit Exits “Sony Digital Still Camera Album Utility.”
Capturing an image
continued
87Capturing an image
Page 88

About the menus
Edit menu
Undo Undoes the most recent zooming or rotation command.
Copy Copies the selected image or comment to the clipboard.
Paste Pastes the comment of the clipboard. (You cannot use this command if
nothing is in the clipboard. )
Select All Selects all the images in the image list window.
Select None Cancels the selection in the album list or image list window.
Camera menu
Open Camera's Image Opens and displays the camera images on the monitor.
Save in Album Saves all the images or selected images of the camera to the
Save as File Saves all the images or selected images of the camera to the
Save to Camera Transfers the images on the hard disk to the camera.
88
Capturing an image
album on the hard disk in the album format without opening
them.
desired folder on the hard disk in JPEG or PICT file type
without opening them.
Page 89

Display menu
Zoom In Enlarges the image display size.
Zoom Out Reduces the image display size.
Image menu
Display Frame 640 × 480 Displays the frame for trimming an image in
landscape.
Display Frame 480 × 640 Displays the frame for trimming an image in portrait.
Rotate Clockwise 90 degrees Rotates the image 90 degrees clockwise.
Rotate Counter-Clockwise 90 degrees Rotates the image 90 degrees counterclockwise.
Rotate 180 degrees Rotates the image 180 degrees.
Window menu
Go to First Page Displays the first page of the image list window.
Go to Previous Page Displays one page before the current page of the
image list window.
Go to Next Page Displays one page after the current page of the image
list window.
Go to Last Page Displays the last page of the image list window.
Capturing an image
continued
89Capturing an image
Page 90

About the menus
Option menu
Image Information Displays the image information window of the
currently displayed image.
Show Filename Displays the file name for each image of the image list
window.
Show Recorded Date Displays the date recorded by the Digital Still Camera
for each image of the image list window.
Show Comment Displays the comment for each image of the image list
window.
Delete Image Delete the image(s) selected in the image list window.
Select Representative Register the representative image of an album.
Update to Current Album Displays the updated image list. Select this command
after you turn off the Digital Still Camera, record the
images and then turn it on.
Preferences Displays the window to set the software to
decompress the camera images, select the image
transfer method, and customize some menu items.
Keyboard shortcuts
The key descriptions next to the file menu stand for keyboard shortcuts.
90
Capturing an image
Page 91

Using the tool bar
The tool bar shortcuts to frequently used menu items.
When an image list is displayed
Go to First Page: Displays the first page.
Go to Previous Page:Displays the previous page.
Go to Next Page:Displays the next page.
Go to Last Page:Displays the last page.
Show Filename:Displays the file name for each
image of the image list window.
Go to Recorded Date:Displays the recorded date
for each image of the image list window.
Show Comment: Displays the comment for each
image of the image list window.
Tool Bar
When an image is displayed
Tool Bar
Capturing an image
* You can change the
display size only; you
cannot save an image
zoomed in or out. To
undo the zooming,
select [Undo] in the
Edit menu.
** To save the image
rotated, select [Save] in
the File menu. To
undo the rotation,
select [Undo] in the
Edit menu.
Image Information:Displays an Image
Information dialog box of the image currently
displayed or selected in the image list window.
Zoom In: Zooms in an opened image.*
Zoom Out:Zooms out an opened image.*
Rotate Clockwise 90 degrees: Rotates an image
90 degrees in the clockwise direction.**
Rotate Counter-Clockwise 90 degrees:Rotates
an image 90 degrees in the counterclockwise
direction.**
Rotate 180 degrees: Rotates an image 180
degrees.**
91Capturing an image
Page 92

Setting the Preferences
Before you start using the “Sony Digital Still Camera
Album Utility, ” set the preferences to comply the
software with the Sony Digital Still Camera DSC-F1.
You can select the software to decompress a JPEG
image, the way an image is transferred to the camera,
and customise some menu items.
In case colors of the image captured are not displayed
normally or a communication error occurs frequently,
check the preferences.
1 Select [Preferences] in the Option menu.
The Preferences window appears.
Preferences
* QuickTime
decompresses JPEG
images more quickly
than the original
software does. In case
colors of the image are
not displayed normally,
use the original
software.
92
Capturing an image
2 Click the [general] tab to set the following:
π Use QuickTime for decompressing index image.
Check the check box when you use QuickTime to
decompress JPEG images and to display the
thumbnail on the image list window. Do not
check when you use the original software.*
πUse QuickTime for decompressing full size image.
Check the check box when you use QuickTime to
decompress a JPEG image and to display the
image in full size on the monitor. Do not check
when you use the original software.*
π Fit in size on saving small image.
Check the check box when you fit a small image to
640 × 480 pixels to transfer it to the camera.
Page 93

Customizing the menu
Assigning a special
operational purpose to a
menu is called
“Customizing.” In the
“Sony Digital Still
Camera Album Utility,”
you can customize the
two menu items–“Open
Camera's Image” and
“Save Camera's Image” –
by specializing the
images to be opened and
saved.
3 Click the [others] tab to set the following:
Preferences
π Customise the menu 'Open Camera's Image'
When this option is checked, the dialog box
specifying the images to be opened with the
[Open Camera's Image] menu will not appear.
Select the images to be always opened among the
two image options.
π Customise the menu 'Save Camera's Image'
When this option is checked, the dialog box
specifying the images to be saved with the [Save
Camera's Image] menu will not appear. Select the
images to be always saved among the two image
options.
Capturing an image
4 Click [OK] to close the preferences window.
93Capturing an image
Page 94

Opening the camera images
To view images in the Digital Still Camera DSC-F1,
open the camera’s images. You can open the image
directly by specifying its image number.
Before you start
Make sure you have done the necessary preparations
as described in pages 82 through 85.
Opening the image from the image
list window
1 Select [Open Camera's Image] in the Camera
menu.
The following window appears.
Note
If there is only one page
stored, the pull-down list
does not appear.
94
Capturing an image
Total number of pages
Page number
Image numbers
2 Click [Image List] and click the down arrow
button to select the page to be displayed in the
pull-down page number list.
On the right of the page number, the image
numbers contained in the page are displayed.
3 Click [Open].
The images on the selected page are transferred
from the camera and displayed.
Page 95

Switching the file name,
recorded date and
comment display of an
image
Select either [Show
Filename], [Show
Recorded date] or [Show
Comment] in the Option
menu. Or click the
corresponding icon on
the tool bar. (You can
change the comments.)
Displaying other
thumbnails
When hidden pages exist,
select [Go to First Page],
[Go to Previous Page],
[Go to Next Page] or [Go
to Last Page] in the
Window menu. Or click
the corresponding icon
on the tool bar.
Image number
Comment, file name, or date display
If image is protected from accidental erasure
and edition, the protect icon (
here.
) is attached
4 Click the image(s) you want to open (the selected
image frame becomes yellow) and select [Open
Selected Image] in the File menu. Or, double-click
the image.
The selected images are displayed in full size.
Capturing an image
continued
95Capturing an image
Page 96

Opening the camera images
How to select and cancel images in the image list
window
❐ Selecting an image
Click the desired thumbnail of the image list
window; the image is selected. Click another
thumbnail and that image is selected instead of the
previous image. To cancel the selection, click
somewhere in the background without an
thumbnail.
❐ Selecting multiple images
To select multiple images: Press and hold down
the Shift key as you click the desired images.
To select all the images in the image list window:
Select [Select All] in the Edit menu.
To cancel the selection: Press and hold down the
Shift key as you click the selected images. The
selection is canceled. To cancel the selection
of all the images, select [Select None] in the
Edit menu.
To open all the selected images: While pressing
the Shift key, double-click one of the selected
images. Or select [Open Selected Image] in
the File menu.
96
Capturing an image
Closing an album list, image list window or image
Select [Close] in the File menu or click the close
button. The selected window is closed.
Switching the active window
You can switch the active window using the following
methods:
• Click a part of the desired window.
• Click the desired file listed in the Window menu.
The image files currently opened.
Page 97

Opening the image directly
1 Select [Open Camera' s Image] in the Camera
menu.
The following dialog box appears.
The total number of images
The image currently displayed on the camera
2 Click [Image] and input the image number which
you want to open in the [Image No.] box.
3 Click [Open].
The selected images are displayed in full size.
Capturing an image
Closing an album list, image list or image
Select [Close] in the File menu or click the close
button. The selected window is closed.
97Capturing an image
Page 98

Saving the camera images in album
To quickly handle and process camera images on
your PC, save the selected camera images in the
CAMS file type in album of the hard disk with or
without opening them.
Opening and saving the camera images
The order of the images
to be saved
The images are saved in
the alphanumerical order
of the file names:
• When the file name or
recorded date is
displayed underneath
each image, the images
are automatically
named (IMAGE001,
IMAGE002...) and
saved in the same order
as in the camera.
• When the comment is
displayed, the
comment of each image
becomes its file name
and the images are
stored in the
alphanumerical order
of the comments.
You can change the order
of the images later (page
114).
Notes
• You can select all the
images of all the pages
without regard to the
page being displayed.
• For how to select
multiple images, see
page 96.
1 Follow the steps 1 through 3 of “Opening the
camera images” (page 94) to display the image list
window of the camera.
2 Click the thumbnails of the desired images. To
save all the images, select [Select All] in the Edit
menu.
The frame of the selected image is highlighted in
yellow.
98
Capturing an image
Page 99

Saving in a different
drive
Click [Desktop] to display
the available drives in the
list, from which you can
select the desired drive.
Creating a new album
folder
Click [New]. The dialog
to define a new album
folder name appears.
Type the new folder name
and click [Create].
Note
When the comment is
displayed in the image
list, the comment of each
image becomes the file
name and the images are
copied and placed in the
hard disk according to the
alphanumerical order of
their file names.
3 Select [Save in Album] in the File menu.
The following window appears.
The destination folder where the camera
images are to be saved.
When you click [New], a new folder is created under this
folder.
4 Select the destination album folder and click
[Select].
The selected camera images are saved in the
destination album folder.
Stopping saving midway
Press the [] and [.] keys together.
Capturing an image
continued
99Capturing an image
Page 100

Saving the camera images in album
Note
When the image list or
images of the camera are
displayed, close them
before selecting [Save in
Album].
Saving all the camera images without
opening them
1 Select [Save in Album] in the Camera menu.
The following window appears.
2 Select [All Images] and click [OK].
Saving in a different
drive
Click [Desktop] to display
the available drives in the
list, from which you can
select the desired drive.
Creating a new album
folder
Click [New]. The dialog
to define a new album
folder name appears.
Type the new folder
name and click [Create].
The following window appears.
When you click [New], a new folder is created in this
folder.
The destination folder where the camera
images are to be saved.
100
Capturing an image
3 Select the destination album folder and click
[Select].
The selected camera images are saved in the
destination album folder with a file name
“IMAGE
Stopping saving midway
Press the [] and [.] keys together.
***
” (
***
: serial number).
 Loading...