

DCR-PC103E/PC104E/
PC105/PC105E
RMT-830/RMT-831
SERVICE MANUAL
Ver 1.0 2003. 04
Revision History
Revision History
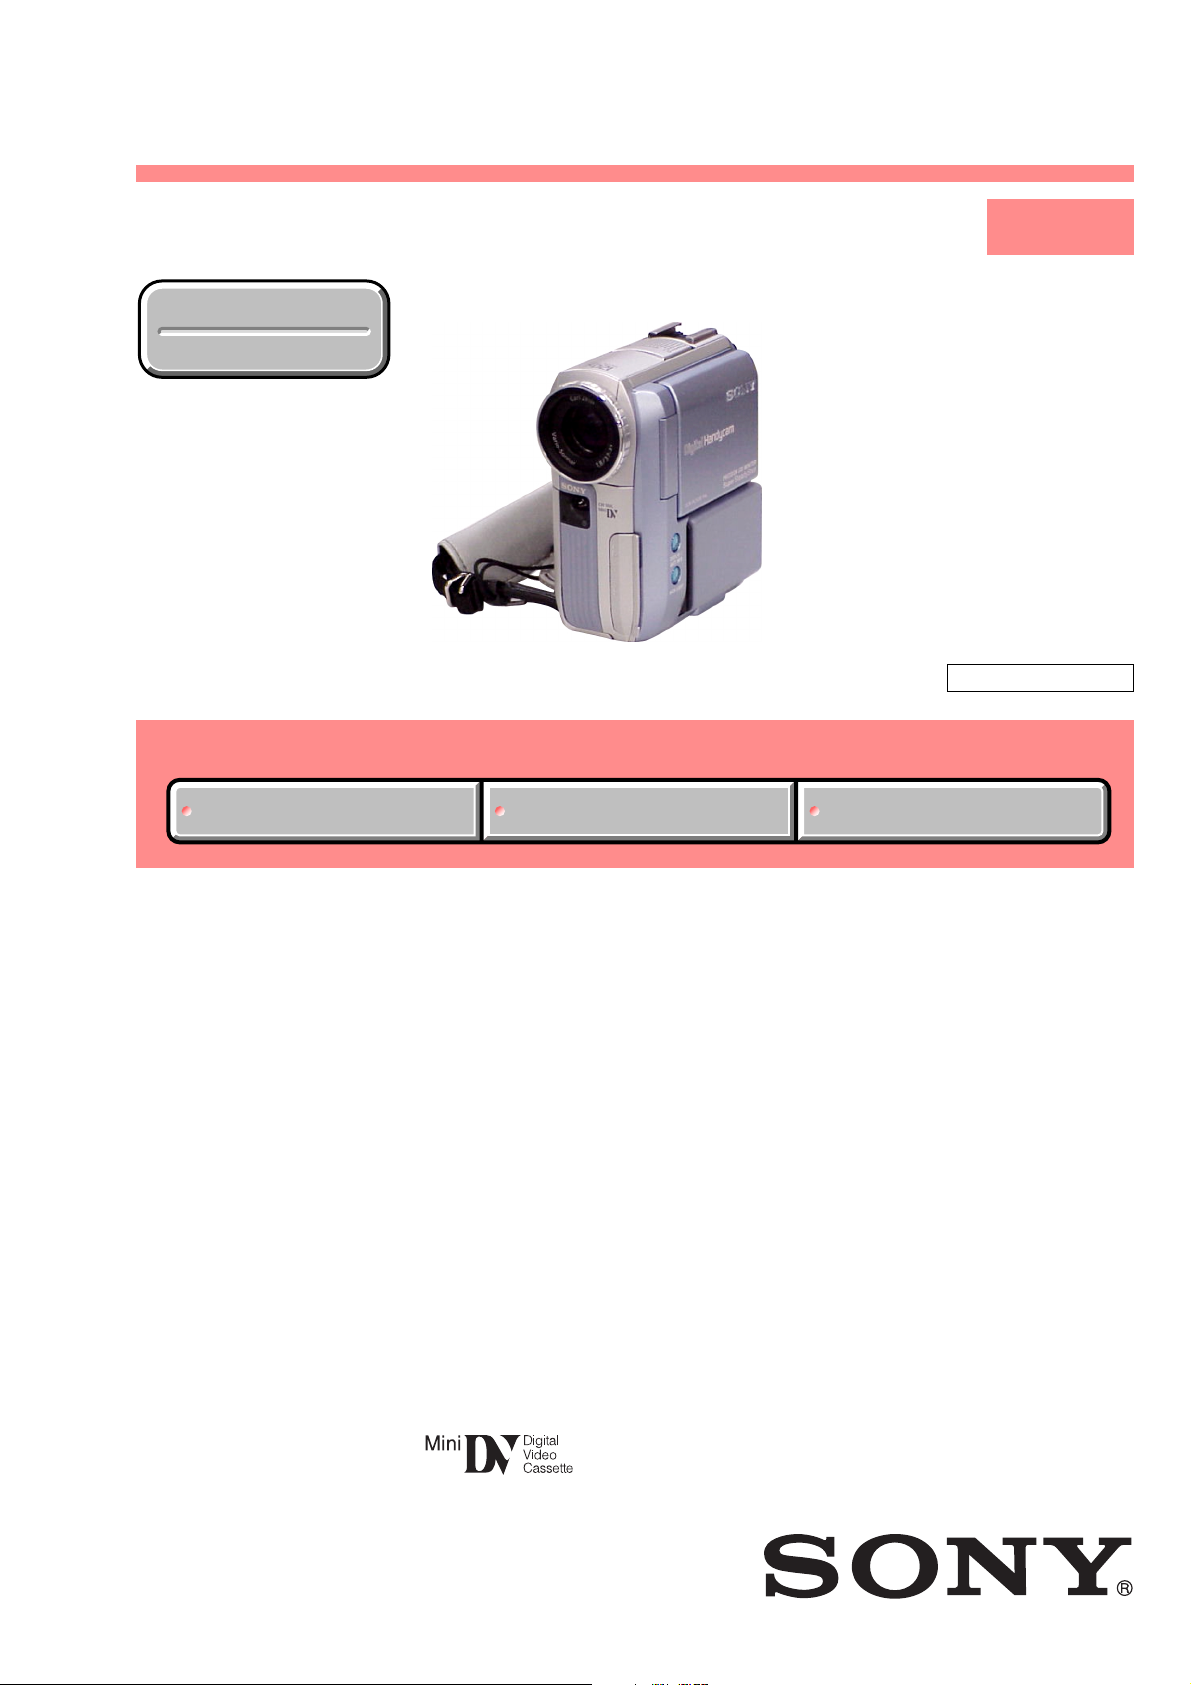
Photo : DCR-PC103E
Link
Link
SELF DIAGNOSIS FUNCTION
SELF DIAGNOSIS FUNCTION
LEVEL 1
US Model
Canadian Model
Korea Model
AEP Model
UK Model
East European Model
Hong Kong Model
Australian Model
ORNAMENTAL PARTSSPECIFICATIONS
ORNAMENTAL PARTSSPECIFICATIONS
DCR-PC103E/PC105E
E Model
DCR-PC104E/PC105/PC105E
Chinese Model
DCR-PC104E/PC105E
DCR-PC105E
Tourist Model
DCR-PC105/PC105E
Z MECHANISM
DCR-PC105
• INSTRUCTION MANUAL is shown at the end of this document.
DIGITAL VIDEO CAMERA RECORDER

DCR-PC103E/PC104E/PC105/PC105E
COVER
COVER
Video camera
recorder
System
Video recording system
2 rotary heads
Helical scanning system
Mini DV Format (SD Specification of
Consumer-Use Digital VCR)
Audio recording system
Rotary heads, PCM system
Quantization: 12 bits (Fs 32 kHz,
stereo 1, stereo 2), 16 bits
(Fs 48 kHz, stereo)
Video signal
NTSC colour, EIA standards
(DCR-PC105 only)
PAL colour, CCIR standards
(DCR-PC103E/PC104E/PC105E only)
Usable cassette
Mini DV cassette with the
mark printed
Tape speed
SP: Approx. 18.81 mm/s
LP: Approx. 12.56 mm/s
Recording/playback time
(using cassette DVM60)
SP: 1 hour
LP: 1.5 hours
Fastforward/rewind time
(using cassette DVM60)
Approx. 2 min. and 40 seconds
Viewfinder
Electric viewfinder (Colour)
Image device
3.8 mm (1/4.7 type)
CCD (Charge Coupled Device)
Gross: Approx. 1 070 000 pixels
Effective (still)
(DCR-PC105/PC105E only):
Approx. 1 000 000 pixels
Effective (moving):
Approx. 690 000 pixels
Lens
Carl Zeiss
Combined power zoom lens
Filter diameter: 30 mm (1 3/16 in.)
10× (Optical), 120× (Digital)
F = 1.8 – 2.0
Focal length
3.7 – 37 mm (5/32 – 1 1/2 in.)
When converted to a 35 mm still
camera
In CAMERA mode:
50 – 500 mm (2 – 19 3/4 in.)
In MEMORY mode
(DCR-PC105/PC105E only):
42 – 420 mm (1 11/16 – 16 5/8 in.)
Colour temperature
Auto, HOLD, INDOOR (3 200 K),
OUTDOOR (5 800 K)
Minimum illumination
7 lx (lux) (F 1.8)
0 lx (lux) (in the NightShot mode)*
* Objects unable to be seen due to
the dark can be shot with infrared
lighting.
Input/Output connectors
Audio/Video input (DCR-PC104E/
PC105E only) /output
10-pin connector
Input/output auto switch (DCRPC104E/PC105/PC105E only)
Video signal: 1 Vp-p, 75 Ω,
unbalanced
Luminance signal: 1 Vp-p, 75 Ω,
unbalanced
Chrominance signal:
0.286 Vp-p, 75 Ω (DCR-PC105 only)
0.3 Vp-p, 75 Ω
(DCR-PC103E/PC104E/PC105E only)
unbalanced
Audio signal: 327 mV, (at output
impedance more than 47 kΩ)
Input impedance with more than
47 kΩ
(DCR-PC104E/PC105/PC105E only)
Output impedance with less than
2.2 kΩ
DV input (DCR-PC104E/PC105E
only)/output
4-pin connector
DV jack (DCR-PC105 only)
4-pin connector
Headphone jack
Stereo minijack (ø 3.5 mm)
LANC jack
Stereo mini-minijack (ø 2.5 mm)
USB jack
mini-B
MIC jack
Minijack, 0.388 mV low impedance
with 2.5 to 3.0 V DC, output
impedance 6.8 kΩ (ø 3.5 mm)
Stereo type
LCD screen
Picture
6.2 cm (2.5 type)
Total dot number
211 200 (960 × 220)
General
Power requirements
7.2 V (battery pack)
8.4 V (AC Adaptor)
SPECIFICATIONS
Average power consumption
(when using the battery pack)
During camera recording using LCD
3.7 W
(DCR-PC103E/PC104E/PC105E only)
3.8 W (DCR-PC105 only)
Viewfinder
3.1 W
(DCR-PC103E/PC104E/PC105E only)
3.2 W (DCR-PC105 only)
Operating temperature
0°C to 40°C (32°F to 104°F)
Storage temperature
–20°C to + 60°C
(–4°F to + 140°F)
Dimensions (approx.)
51 × 104 × 97 mm
(2 × 4 1/8 × 3 7/8 in.) (w/h/d)
Mass (approx.)
DCR-PC105/PC105E:
460 g (1 lb)
,
DCR-PC103E/PC104E:
440 g (1 lb)
main unit only
DCR-PC105/PC105E:
550 g (1 lb 4 oz)
DCR-PC103E/PC104E:
530 g (1 lb 3 oz)
including the rechargeable battery
pack NP-FM30 (not for sale),
cassette DVM60
Supplied accessories
See page 3.
AC Adaptor
AC-L15A/L15B
Power requirements
100 – 240 V AC, 50/60 Hz
Current consumption
0.35 – 0.18 A
Power consumption
18 W
Output voltage
DC OUT: 8.4 V, 1.5 A
Operating temperature
0°C to 40°C (32°F to 104°F)
Storage temperature
–20°C to + 60°C
(–4°F to + 140°F)
Dimensions (approx.)
56 × 31 × 100 mm
(2 1/4 × 1 1/4 × 4 in.) (w/h/d)
excluding projecting parts
Mass (approx.)
190 g (6.7 oz)
excluding mains lead
Rechargeable
battery pack
NP-FM30
Maximum output voltage
DC 8.4 V
Output voltage
DC 7.2 V
Capacity
5.0 Wh (700 mAh)
Dimensions (approx.)
38.2 × 20.5 × 55.6 mm
(1 9/16 × 13/16 × 2 1/4 in.)
(w/h/d)
Mass (approx.)
65 g (2.3 oz)
Operating temperature
0°C to 40°C (32°F to 104°F)
Type
Lithium ion
“Memory Stick”
(DCR-PC105/PC105E only)
Memory
Flash memory
8MB: MSA-8A
Operating voltage
2.7 – 3.6 V
Power consumption
Approx. 45 mA during operation
mode
Approx. 130 µA during tape
recording standby
Dimensions (approx.)
50 × 2.8 × 21.5 mm
(2 × 1/8 × 7/8 in.) (w/h/d)
Mass (approx.)
4 g (0.14 oz)
Design and specifications are subject
to change without notice.
CAUTION :
Danger of explosion if battery is incorrectly replaced.
Replace only with the same or equivalent type.
SAFETY-RELATED COMPONENT WARNING!!
COMPONENTS IDENTIFIED BY MARK 0 OR DOTTED LINE WITH
MARK 0 ON THE SCHEMATIC DIAGRAMS AND IN THE PARTS
LIST ARE CRITICAL TO SAFE OPERATION. REPLACE THESE
COMPONENTS WITH SONY PARTS WHOSE PART NUMBERS
APPEAR AS SHOWN IN THIS MANUAL OR IN SUPPLEMENTS
PUBLISHED BY SONY.
ATTENTION AU COMPOSANT AYANT RAPPORT
À LA SÉCURITÉ!
LES COMPOSANTS IDENTIFÉS P AR UNE MARQUE 0 SUR LES
DIAGRAMMES SCHÉMA TIQUES ET LA LISTE DES PIÈCES SONT
CRITIQUES POUR LA SÉCURITÉ DE FONCTIONNEMENT. NE
REMPLACER CES COMPOSANTS QUE PAR DES PIÈSES SONY
DONT LES NUMÉROS SONT DONNÉS DANS CE MANUEL OU
DANS LES SUPPÉMENTS PUBLIÉS PAR SONY.
— 2 —
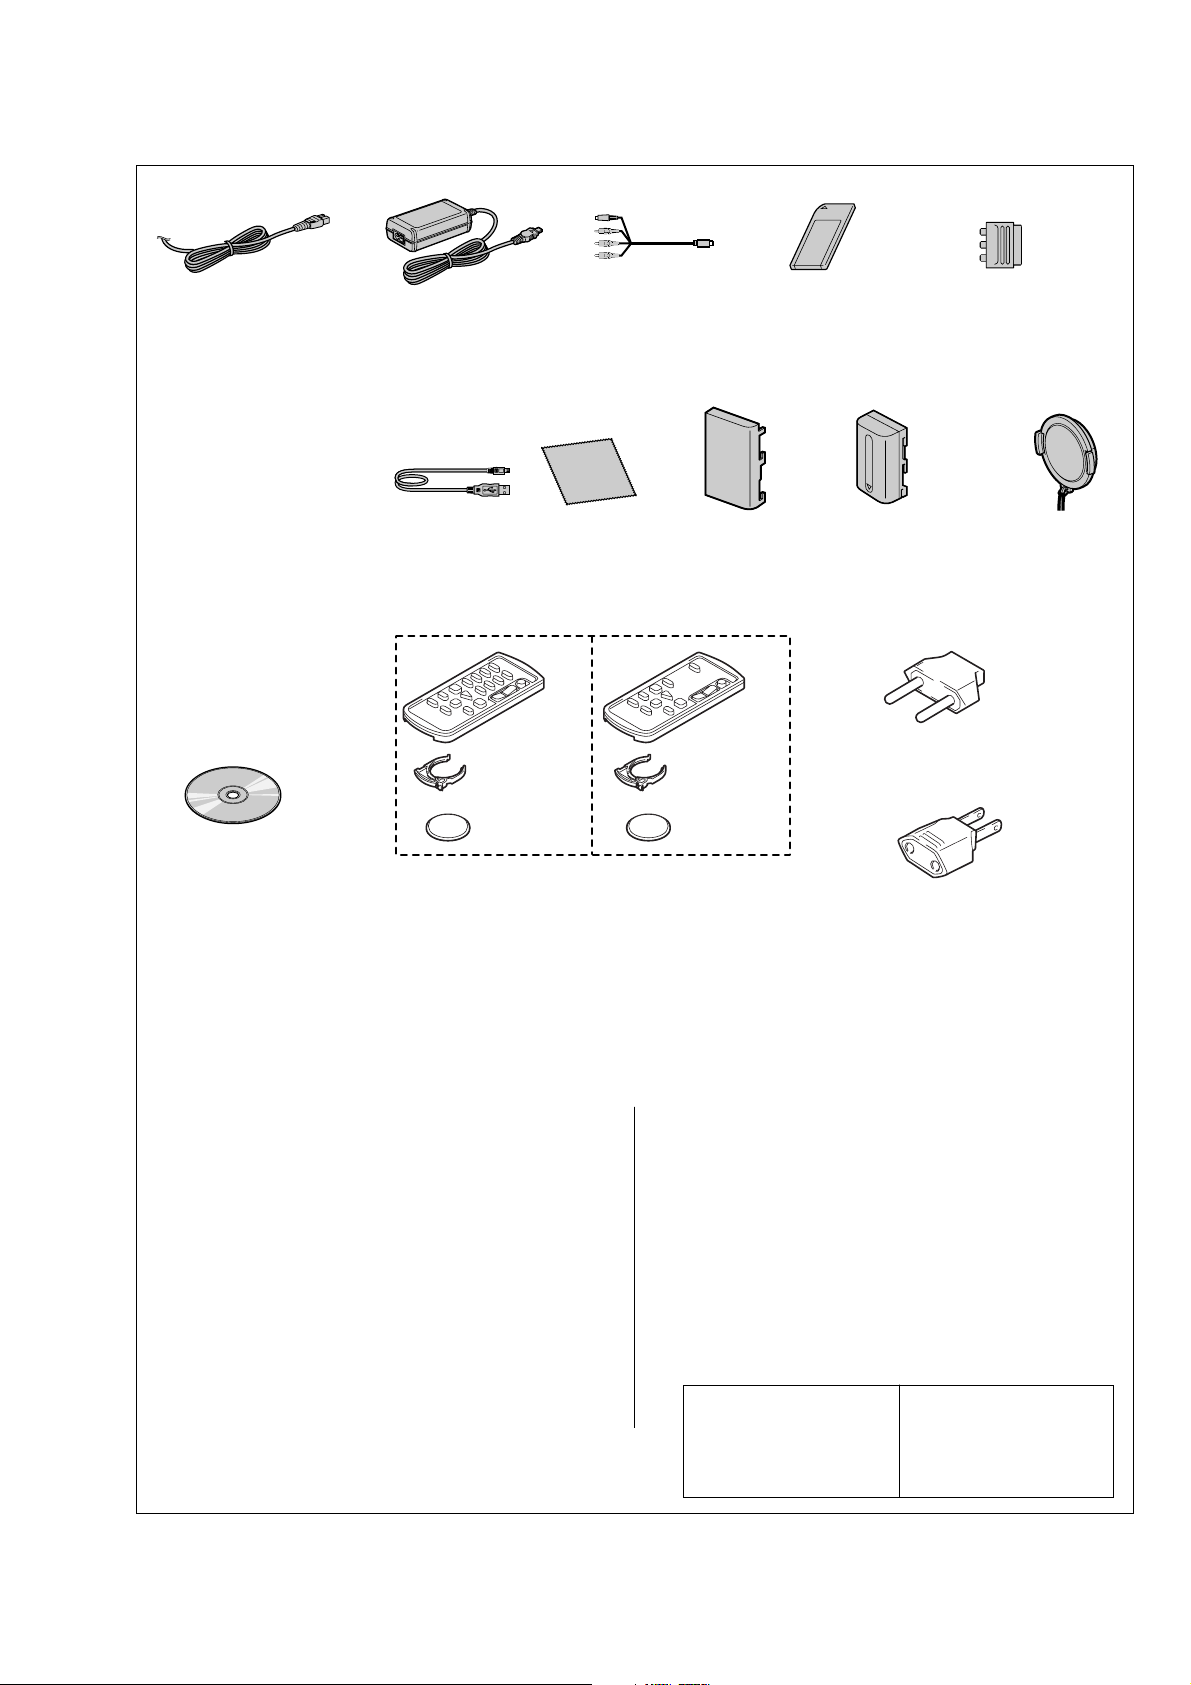
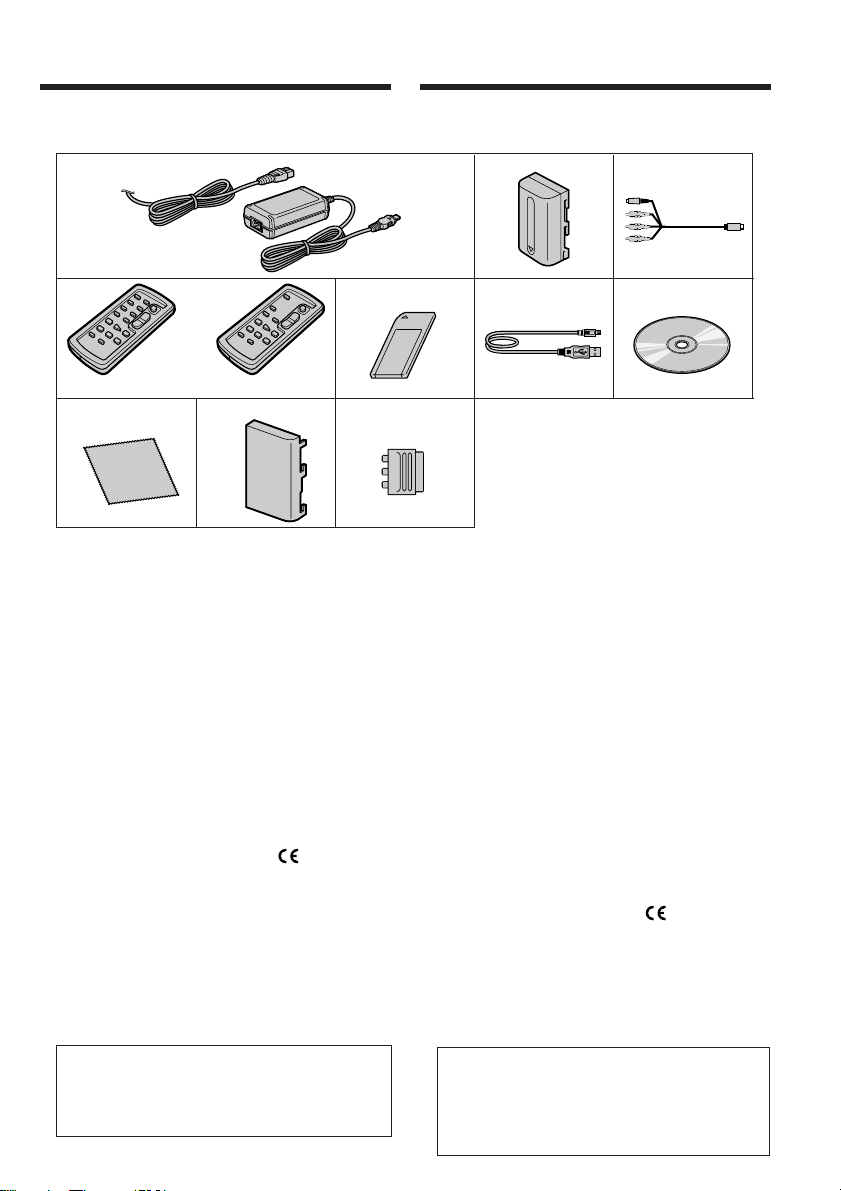
Checking supplied accessories.
Make sure that the following accessories are supplied with your camcorder.
DCR-PC103E/PC104E/PC105/PC105E
Power cord (Main lead)(1)
(PC105:US,CND)
0
1-790-107-22
Power cord (Main lead)(1)
(PC105E:AUS)
0
1-696-819-21
Power cord (Main lead)(1)
(PC103E:AEP,EE/PC104E:E/
PC105:E/PC105E:AEP,EE,E)
0
1-769-608-11
Power cord (Main lead)(1)
(PC105:KR)
0
1-776-985-11
Power cord (Main lead)(1)
(PC104E:CH/PC105E:CH)
0
1-782-476-13
Power cord (Main lead)(1)
(PC103E:UK/PC104E:HK/
PC105:HK/PC105E:UK,HK)
0
1-783-374-11
Power cord (Main lead)(1)
(PC105:JE/PC105E:JE)
0
1-790-732-12
CD-ROM
(SPVD-010 USB Driver) (1)
(PC103E/PC104E/PC105:
E,HK,JE,KR/PC105E)
3-078-942-03
CD-ROM
(SPVD-010 (I) USB Driver) (1)
(PC105:US,CND)
3-078-943-03
AC power adaptor (1)
(AC-L15A/L15B)
(EXCEPT PC104E:CH/
PC105E:CH)
0
1-477-533-31
A/V connecting cable
(AV multi)
(1.5m) (1)
1-823-156-12
(PC104E:CH/PC105E:CH)
0
1-477-533-41
USB cable (1)
1-823-931-11
RMT-831
Cleaning cloth (1)
3-073-861-01
RMT-830
Battery Holder
(SERVICE)
3-083-973-01
Wireless Remote Commander (1)
(DCR-PC105/PC105E)
(RMT-831)
1-477-898-41
(DCR-PC103E/PC104E)
(RMT-830)
1-477-898-71
“Memory Stick” (1)
(MSA-8A)
A-7024-735-A
(DCR-PC105/
PC105E only)
Battery terminal
cover (1)
3-082-552-01
Battery Holder
(SERVICE)
3-083-973-01
• Abbreviation
CND : Canadian model
AUS : Australian model
CH : Chinese model
EE : East European model
21-pin adaptor (1)
(PC103E/PC105E:
AEP,UK,EE only)
1-770-783-21
NP-FM30 battery
pack (BLUE) (1)
A-7095-528-A
(PC105:US,CND)
A-7095-529-A
(Except PC105:US,CND)
2-pin conversion adaptor (1)
(PC105:JE/PC105E:JE only)
1-569-007-12
2-pin conversion adaptor (1)
(PC104E:E,HK/
PC105:E,HK/PC105E:E,HK)
1-569-008-12
KR : Korea model
HK : Hong Kong model
JE : Tourist model
Lens cap (1)
X-3953-477-1
Other accessories
3-081-602-11 MANUAL, INSTRUCTION(ENGLISH)
(PC105:US,CND,E,HK,JE)
3-081-602-21 MANUAL, INSTRUCTION (FRENCH)(PC105:CND)
3-081-602-31 MANUAL, INSTRUCTION (SPANISH/PORTUGUESE)
3-081-602-41 MANUAL, INSTRUCTION (TRADITIONAL CHINESE)
(PC105:E,HK)
3-081-602-51 MANUAL, INSTRUCTION (KOREAN)(PC105:JE,KR)
3-081-602-61 MANUAL, INSTRUCTION (ARABIC)(PC105:E)
3-081-627-11 MANUAL, INSTRUCTION (ENGLISH/FRENCH)
(PC103E:AEP,UK/PC104E/PC105E:AEP,UK,E,HK,AUS,CH,JE)
3-081-627-21 MANUAL, INSTRUCTION (SPANISH/PORTUGUESE)
(PC103E:AEP/PC105E:AEP)
3-081-627-31 MANUAL, INSTRUCTION (ITALIAN/GREEK)
(PC103E:AEP/PC105E:AEP)
(PC105:E,JE)
— 3 —
3-081-627-41 MANUAL, INSTRUCTION (GERMAN/DUTCH)
3-081-627-51 MANUAL, INSTRUCTION (RUSSIAN/SWEDISH)
3-081-627-61 MANUAL, INSTRUCTION (ARABIC/PERSIAN)
3-081-627-71 MANUAL, INSTRUCTION (TRADITIONAL CHINESE)
3-081-627-81 MANUAL, INSTRUCTION (SIMPLILIED CHINESE)
Note :
The components identified by
mark 0 or dotted line with mark
0 are critical for safety.
Replace only with part number
specified.
(PC103E:AEP/PC105E:AEP)
(PC104E:E/PC105E:E,JE)
(PC104E:E/PC105E:E)
(PC104E:HK/PC105E:HK)
(PC104E:E,CH/PC105E:E,CH,JE)
Note :
Les composants identifiés par
une marque 0 sont critiques
pour la sécurité.
Ne les remplacer que par une
pièce portant le numéro spécifié.

DCR-PC103E/PC104E/PC105/PC105E
SAFETY CHECK-OUT
After correcting the original service problem, perform the following
safety checks before releasing the set to the customer.
1. Check the area of your repair for unsoldered or poorly-soldered
connections. Check the entire board surface for solder splashes
and bridges.
2. Check the interboard wiring to ensure that no wires are
"pinched" or contact high-wattage resistors.
3. Look for unauthorized replacement parts, particularly
transistors, that were installed during a previous repair . Point
them out to the customer and recommend their replacement.
4. Look for parts which, through functioning, show obvious signs
of deterioration. Point them out to the customer and
recommend their replacement.
5. Check the B+ voltage to see it is at the values specified.
6. Flexible Circuit Board Repairing
• Keep the temperature of the soldering iron around 270˚C
during repairing.
• Do not touch the soldering iron on the same conductor of the
circuit board (within 3 times).
• Be careful not to apply force on the conductor when soldering
or unsoldering.
— 4 —
DCR-PC103E/PC104E/PC105/PC105E
COVER
COVER
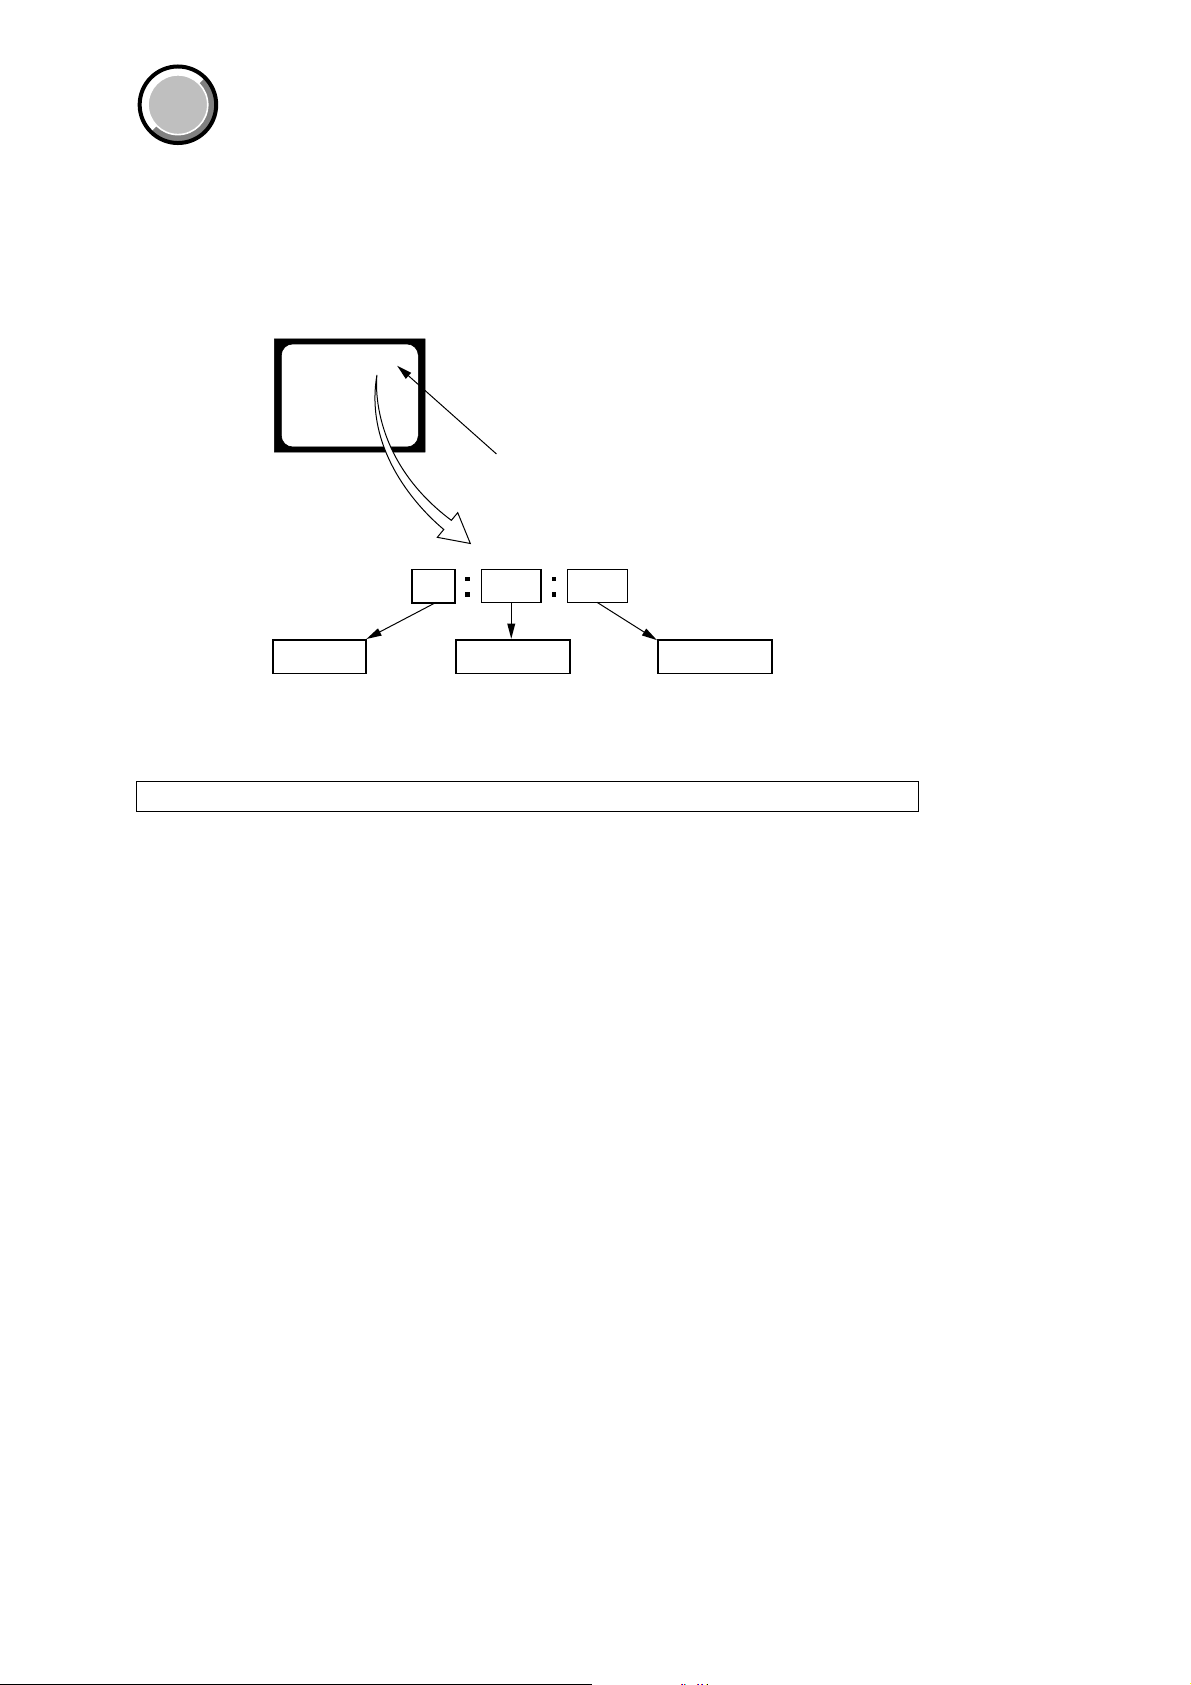
SELF-DIAGNOSIS FUNCTION
1. SELF-DIAGNOSIS FUNCTION
When problems occur while the unit is operating, the self-diagnosis
function starts working, and displays on the viewfinder, or LCD
screen what to do.
Details of the self-diagnosis functions are provided in the Instruction
manual.
Viewfinder or LCD screen
C : 3 1 : 1 1
Blinks at 3.2Hz
1 1
Repaired by:
C : Corrected by customer
H : Corrected by dealer
E : Corrected by service
engineer
3 1C
Block
Indicates the appropriate
step to be taken.
E.g.
31 ....Reload the tape.
32 ....Turn on power again.
2. SELF-DIAGNOSIS DISPLAY
When problems occur while the unit is operating, the counter of the
viewfinder or LCD screen consists of an alphabet and 4-digit number ,
which blinks at 3.2Hz. This 5-character display indicates the
“repaired by:”, “block” in which the problem occurred, and “detailed
code” of the problem.
Detailed Code
Refer to page 6.
Self-diagnosis Code Table.
Note: The “self-diagnosis display” data will be kept even if the lithium battery (BT6401 of LI-070 board) is removed.
— 5 —

DCR-PC103E/PC104E/PC105/PC105E
3. SELF-DIAGNOSIS CODE TABLE
Self-diagnosis Code
Block
Function
Repaired by:
C
04
C
21
C
22
C
31
C
31
C
31
C
31
C
31
C
31
C
31
C
31
C
31
C
31
C
31
C
31
C
32
C
32
C
32
C
32
C
32
C
32
C
32
C
32
E
61
E
61
E
62
E
62
E
91
Note: Add the sentence as follows.
If other codes are displayed, service is required.
Please send the set to a specialized center.
Detailed
Code
00
00
00
10
11
20
21
22
23
24
30
40
42
10
11
20
21
22
23
24
30
40
42
00
10
00
01
01
Non-standard battery is used.
Condensation.
Video head is dirty.
LOAD direction. Loading does not
complete within specified time
UNLOAD direction. Loading does not
complete within specified time
T reel side tape slacking when unloading
Winding S reel fault when counting the
rest of tape.
T reel fault.
S reel fault.
T reel fault.
FG fault when starting capstan.
FG fault when starting drum.
FG fault during normal drum operations.
LOAD direction loading motor time-
out.
UNLOAD direction loading motor
time-out.
T reel side tape slacking when
unloading.
Winding S reel fault when counting the
rest of tape.
T reel fault.
S reel fault.
T reel fault.
FG fault when starting capstan.
FG fault when starting drum
FG fault during normal drum
operations
Difficult to adjust focus
(Cannot initialize focus.)
Zoom operations fault
(Cannot initialize zoom lens.)
Steadyshot function does not work well.
(With pitch angular velocity sensor output
stopped.)
Steadyshot function does not work well.
(With yaw angular v elocity sensor output
stopped.)
Abnormality when the power supply
capacitor of the flash unit is being
charged.
Symptom/State
Correction
Use the info LITHIUM battery.
Remove the cassette, and insert it again after one hour.
Clean with the optional cleaning cassette.
Load the tape again, and perform operations from the beginning.
Load the tape again, and perform operations from the beginning.
.
Load the tape again, and perform operations from the beginning.
Load the tape again, and perform operations from the beginning.
Load the tape again, and perform operations from the beginning.
Load the tape again, and perform operations from the beginning.
Load the tape again, and perform operations from the beginning.
Load the tape again, and perform operations from the beginning.
Load the tape again, and perform operations from the beginning.
Load the tape again, and perform operations from the beginning.
Remove the battery or power cable, connect, and perform
operations from the beginning.
Remove the battery or power cable, connect, and perform
operations from the beginning.
Remove the battery or power cable, connect, and perform
operations from the beginning.
Remove the battery or power cable, connect, and perform
operations from the beginning.
Remove the battery or power cable, connect, and perform
operations from the beginning.
Remove the battery or power cable, connect, and perform
operations from the beginning.
Remove the battery or power cable, connect, and perform
operations from the beginning.
Remove the battery or power cable, connect, and perform
operations from the beginning.
Remove the battery or power cable, connect, and perform
operations from the beginning.
Remove the battery or power cable, connect, and perform
operations from the beginning.
Inspect the lens block focus MR sensor (Pin ql, w; of CN1013 of
VC-319 board) when focusing is performed when the focus ring is
operated in the focus manual mode, and the focus motor drive circuit
(IC1301 of VC-313 board) when the focusing is not performed.
Inspect the lens block zoom MR sensor (
VC-319 board
is operated and the zoom motor drive circuit (IC1301 of VC-319
board) when zooming is not performed.
Inspect pitch angular velocity sensor (SE5202 of CD-444 board)
peripheral circuits.
Inspect yaw angular velocity sensor (SE5201 of CD-444 board)
peripheral circuits.
Checking or replacement of the flash unit.
) when zooming is performed when the zoom switch
Pin 8, 0 of CN1013 of
— 6 —

DCR-PC103E/PC104E/PC105/PC105E
2
COVER
COVER
Note:
• Follow the disassembly procedure in the numerical order given.
• Items marked “*” are not stocked since they are seldom required for routine service.
Some delay should be anticipated when ordering these items.
• The parts numbers of such as a cabinet are also appeared in this section.
Refer to the parts number mentioned below the name of parts to order.
MAIN PARTS
1. ORNAMENTAL PARTS
(PC105/PC105E)
Standard commander (RMT-831)
1-477-898-41
Battery holder (SERVICE)
(for RMT-831)
3-083-973-01
(PC103E/PC104E)
Standard commander (RMT-830)
1-477-898-71
CPC lid
(3-082-525-01)
Battery holder (SERVICE)
(for RMT-830)
3-083-973-01
Screw
(M1.7), lock ace, p
(3-989-735-11)
Jack cover (HP)
Note: Disassembling the main unit
is necessary to replace it.
— 7 —

DCR-PC103E/PC104E/PC105/PC105E
9-876-258-41
Sony EMCS Co.
— 8 —
2003D1600-1
©2003.4
Published by DI Customer Center
3-081-627-11(2)
Digital
Video Camera
Recorder
Operating Instructions
Before operating the unit, please read this manual thoroughly,
and retain it for future reference.
Mode d’emploi
Avant la mise en service de cet appareil, prière de lire intégralement ce mode
d’emploi et de le conserver pour toute référence ultérieure.
DCR-PC105E
DCR-PC103E/PC104E/PC105E
©2003 Sony Corporation

English
Français
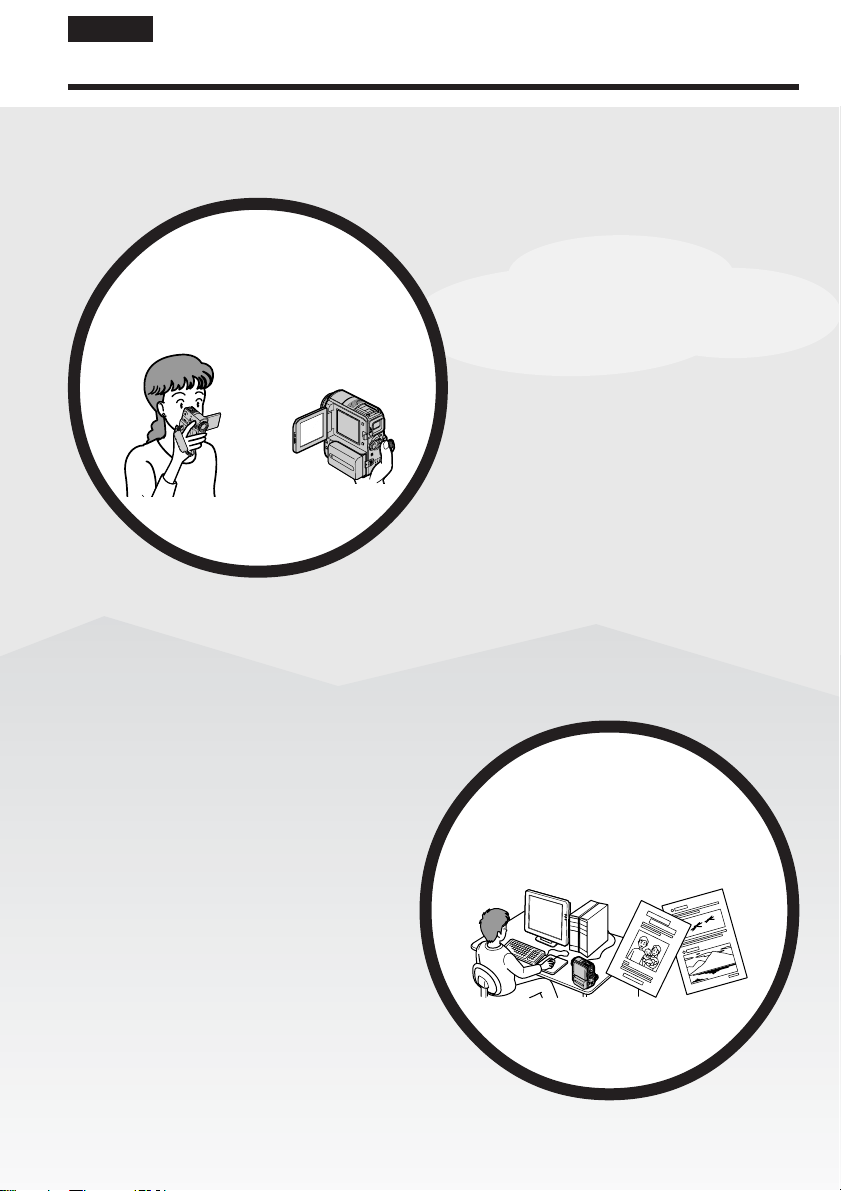
Welcome!
Congratulations on your purchase of this Sony
Handycam. With your Handycam you can capture
life’s precious moments with superior picture and
sound quality.
Your Handycam is loaded with advanced features,
but at the same time it is very easy to use. You will
soon be producing home video that you can enjoy
for years to come.
To prevent fire or shock hazard, do not expose the
unit to rain or moisture.
To avoid electrical shock, do not open the cabinet.
Refer servicing to qualified personnel only.
Memory Stick
NOTICE ON THE SUPPLIED AC POWER
ADAPTOR FOR THE CUSTOMERS IN
THE UNITED KINGDOM
A moulded plug complying with BS1363 is fitted
to this equipment for your safety and
convenience.
Should the fuse in the plug supplied need to
be replaced, a fuse of the same rating as the
supplied one and approved by ASTA or BSI
to BS1362 (i.e., marked with or mark)
must be used.
If the plug supplied with this equipment has a
detachable fuse cover, be sure to attach the
fuse cover after you change the fuse. Never
use the plug without the fuse cover. If you
should lose the fuse cover, please contact
your nearest Sony service station.
For the customers in Europe
ATTENTION
The electromagnetic fields at the specific
frequencies may influence the picture and sound
of this camcorder.
This product has been tested and found
compliant with the limits set out in the EMC
Directive for using connection cables shorter than
3 metres. (9.8 feet)
Notice
If static electricity or electromagnetism causes
data transfer to discontinue midway (fail), restart
the application or disconnect and connect the
USB cable again.
WARNING
N50
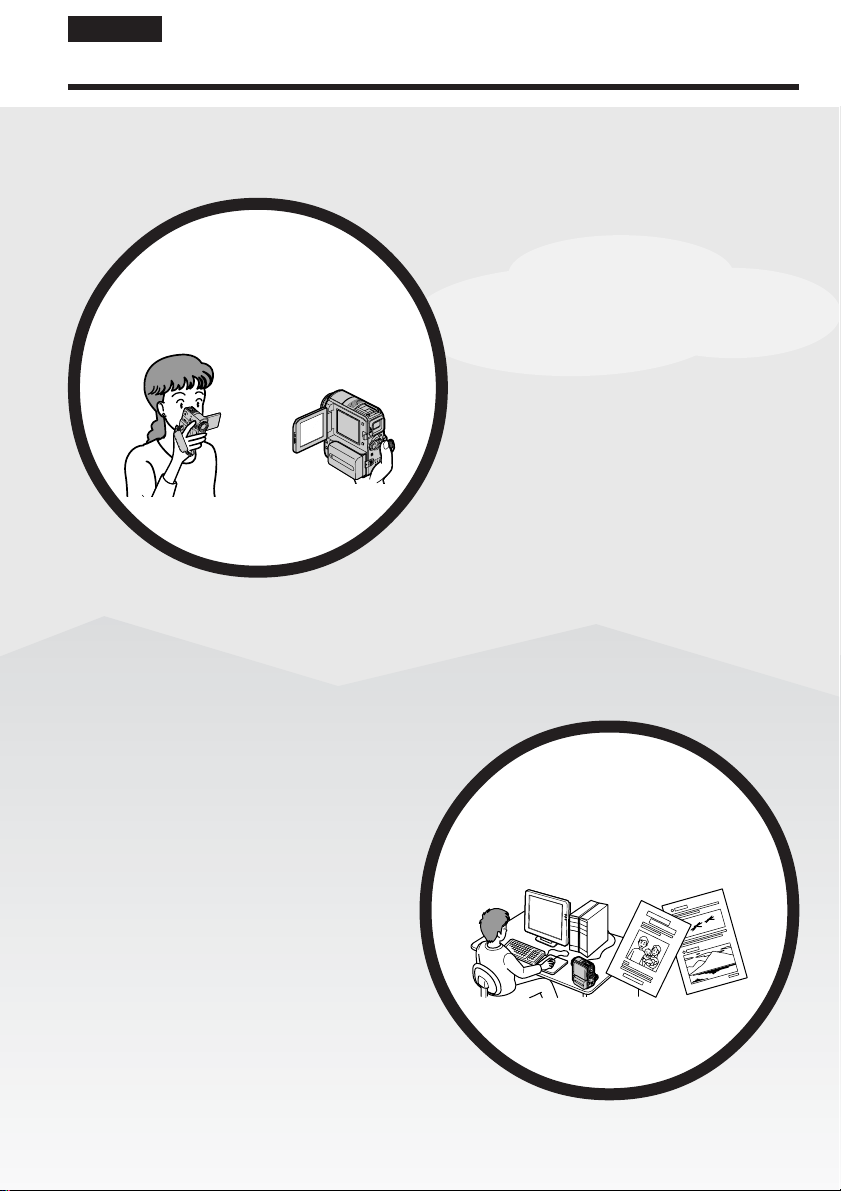
Bienvenue !
Nous vous félicitons d’avoir porté votre choix sur
ce caméscope Sony Handycam. Votre Handycam
vous permettra de capturer de précieux moments
de la vie avec des images et du son de qualité
supérieure.
Bien que votre Handycam soit équipé de
fonctionnalités avancées, il s’avère aussi
extrêmement facile à utiliser. Vous produirez
bientôt vos propres vidéos amateurs dont vous
pourrez profiter pendant de nombreuses années.
AVERTISSEMENT
Pour éviter tout risque d’incendie ou
d’électrocution, n’exposez pas cet appareil à la
pluie ni à l’humidité.
Pour éviter tout risque d’électrocution,
n’ouvrez pas le châssis de l’appareil.
Confiez l’entretien exclusivement à un
personnel qualifié.
Pour la clientéle en Europe
ATTENTION
Les champs électromagnétiques à des fréquences
spécifiques risquent d’altérer l’image et le son de
ce caméscope umnérique.
Ce produit a été testé et déclaré conforme aux
limites énoncées dans la Directive EMC relatives
aux câbles de moins de 3 mètres.
Avis
Si de l’électricité statique ou de
l’électromagnétisme interrompt le transfert de
données, redémarrez l’application ou débranchez
et rebranchez le câble USB.
2
Checking the supplied
accessories
Vérification des
accessoires fournis
Make sure that the following accessories are
supplied with your camcorder.
1
4
or/
ou
RMT-831 RMT-830
8
1 AC-L15A/L15B AC Adaptor, Mains lead
(p. 25)
2 NP-FM30 rechargeable battery pack* (p. 24)
3 A/V connecting cable (p. 59)
4 Wireless Remote Commander (p. 309)
(A button type lithium battery is built in.)
RMT-831: DCR-PC105E
RMT-830: DCR-PC103E/PC104E
5 “Memory Stick” (DCR-PC105E only, p. 138)
6 USB cable (p. 190)
7 CD-ROM (SPVD-010 USB Driver) (p. 198)
8 Cleaning cloth (p. 294)
9 Battery terminal cover (p. 24)
0 21-pin adaptor (Models with mark
printed on their bottom surfaces only. p. 60)
* The rechargeable battery pack (NP-FM30)
supplied with your camcorder is not for sale.
9
5627
q;
Assurez-vous que tous les accessoires suivants
sont fournis avec votre caméscope.
3
1 Adaptateur secteur AC AC-L15A/L15B,
cordon d’alimentation (p. 25)
2 Batterie rechargeable NP-FM30* (p. 24)
3 Cordon de liaison audio et vidéo (p. 59)
4 Télécommande sans fil (p. 309)
(Pile bouton au lithium incorporée.)
RMT-831 : DCR-PC105E
RMT-830 : DCR-PC103E/PC104E
5 « Memory Stick » (DCR-PC105E seulement,
p. 138)
6 Câble USB (p. 190)
7 CD-ROM (Pilote USB SPVD-010) (p. 198)
8 Chiffon de nettoyage (p. 294)
9 Couvercle de protection des bornes de la
batterie (p. 24)
0 Adaptateur à 21 broches (Uniquement les
modèles comportant le logo imprimé sous
l’appareil. p.60)
* La batterie rechargeable (NP-FM30) fournie
avec votre caméscope n’est pas disponible dans
le commerce.
Contents of the recording cannot be
compensated if recording or playback is not
made due to a malfunction of the
camcorder, storage media, etc.
Aucune compensation relative au contenu de
l’enregistrement ne sera accordée si
l’enregistrement ou la lecture ne se font pas
en raison d’un mauvais fonctionnement du
caméscope, du support d’enregistrement, etc.
3
English
Main Features
Recording moving pictures
or still images, and playing
them back
Main Features
•Recording moving pictures on tape
(p. 37)
•Recording still images on tape*
1)
(p. 64)
•Playing back a tape (p. 53)
•Recording still images on a “Memory
•Recording moving pictures on a
•Viewing still images recorded on a
•Viewing moving pictures recorded on
2)
Stick”*
(p. 61, 148)
“Memory Stick”*
“Memory Stick”*
a “Memory Stick”*
2)
(p. 163)
2)
(p. 174)
2)
(p. 177)
•Viewing moving pictures recorded on
a tape using the USB cable (p. 209)
•Viewing images recorded on a
“Memory Stick” using the USB
2)
(p. 218, 226)
cable*
•Capturing images on a computer
from your camcorder using the USB
cable (p. 212)
•Converting an analogue signal into
digital to capture images onto the
computer*
3)
(p. 228)
•DVD video creating with VAIO
(p. 230)
4
4
Capturing images on the
computer

Main Features
Other uses
Functions for adjusting exposure during recording
•Back light function (p. 47)
•NightShot/Super NightShot/Colour Slow Shutter (p. 48)
•PROGRAM AE (p. 79)
•Manual exposure (p. 81)
•Flexible Spot Meter (p. 82)
•Recording images with the flash*
Functions for giving images more impact
•Digital zoom (p. 46)
The default setting is OFF. (To zoom greater than 10×,
select the digital zoom power in D ZOOM in the menu settings.)
•Fader (p. 72)
•Picture effect (p. 75, 91)
•Digital effect (p. 76, 92)
•Title (p. 130)
•MEMORY MIX*2) (p. 156)
Functions for giving a natural appearance to your recordings
•PROGRAM AE (p. 79)
– SPORTS
– LANDSCAPE
•Manual focus (p. 83)
•Spot Focus (p. 85)
Functions for using after recording
•End search/Edit search/Rec Review (p. 51)
•Data code (p. 55)
•Tape PB ZOOM (p. 93)/Memory PB ZOOM*2) (p. 181)
•Zero set memory (p. 95)
•Title search (p. 97)
•Digital program editing (p. 108, 169*2))
2)
(p. 152)
Main Features
*1)DCR-PC103E/PC104E only
*2)DCR-PC105E only
*3)DCR-PC104E/PC105E only
Before you start reading this manual and operating your camcorder, check the
model number by looking at the bottom of your camcorder. The DCR-PC105E is
the model used for illustration purposes. Otherwise, the model name is indicated
in the illustrations. Any differences in operation are clearly indicated in the text, for
example, “DCR-PC105E only.”
5
5
Français
Principales caractéristiques
Enregistrement d’images
animées ou fixes, et lecture
de celles-ci
Principales caractéristiques
•Enregistrement d’images animées sur
cassette (p. 37)
•Enregistrement d’images fixes sur
cassette*
1)
(p. 64)
•Lecture de la cassette (p. 53)
•Prise de vues d’images fixes sur le
« Memory Stick »*
•Prise de vues d’images animées sur le
« Memory Stick »*
2)
(p. 61, 148)
2)
(p. 163)
•Visionnage d’images fixes
enregistrées sur le « Memory Stick »*
(p. 174)
•Visionnage d’images animées
enregistrées sur le « Memory Stick »*
(p. 177)
2)
2)
•Visionnage d’images animées
enregistrées sur cassette avec le câble
USB (p. 209)
•Visionnage d’images enregistrées sur
un « Memory Stick » avec le câble
2)
(p. 218, 226)
USB*
•Capture d’images sur l’ordinateur à
partir de votre caméscope avec le
câble USB (p. 212)
•Conversion d’un signal analogique en
un signal numérique pour la capture
d’images sur l’ordinateur*
•Création d’un DVD vidéo avec un
VAIO (p. 230)
6
6
3)
(p. 228)
Capture d’images sur
l’ordinateur

Principales caractéristiques
Autres fonctions
Fonctions servant à régler l’exposition en mode d’enregistrement
•Fonction de compensation de contre-jour (p. 47)
•NightShot/Super NightShot/Colour Slow Shutter (p. 48)
•PROGRAM AE (p. 79)
•Réglage manuel de l’exposition (p. 81)
•Flexible Spot Meter (p. 82)
•Enregistrement d’images avec le flash*2) (p. 152)
Fonctions servant à accroître l’impact des images
•Zoom numérique (p. 46)
Son réglage par défaut est OFF. (Pour un rapport de zoom supérieur à 10×,
sélectionnez la puissance du zoom numérique dans D ZOOM dans les
réglages de menu.)
•Transitions en fondu (p. 72)
•Effet d’image (p. 75, 91)
•Effet numérique (p. 76, 92)
•Attribution d’un titre (p. 130)
•MEMORY MIX*2) (p. 156)
Fonctions permettant d’obtenir des films plus naturels
•PROGRAM AE (p. 79)
– SPORTS
– LANDSCAPE
•Mise au point manuelle (p. 83)
•Mise au point spot (p. 85)
Fonctions pouvant être utilisées après l’enregistrement
•Recherche de fin/Recherche de montage/Revue d’enregistrement (p. 51)
•Code de données (p. 55)
•PB ZOOM cassette (p. 93)/PB ZOOM mémoire*2) (p. 181)
•Mémoire à zéro réglable (p. 95)
•Recherche de titre (p. 97)
•Montage numérique de programme (p. 108, 169*2))
*1)DCR-PC103E/PC104E seulement
*2)DCR-PC105E seulement
*3)DCR-PC104E/PC105E seulement
Principales caractéristiques
Avant de lire ce manuel et d’utiliser le caméscope, vérifiez le numéro de modèle
indiqué sous votre caméscope. Les illustrations de ce mode d’emploi représentent
le DCR-PC105E. S’il s’agit d’un autre modèle, son nom est indiqué dans
l’illustration. Toute différence de fonctionnement est clairement signalée dans le
texte, par exemple, « DCR-PC105E seulement ».
7
7

English
Table of Contents
Checking the supplied accessories................ 3
Main Features .............................................. 4
Quick Start Guide
– Recording on tape ...................................... 12
– Recording on a “Memory Stick”
(DCR-PC105E only) ................................ 14
Getting Started
Using this manual ......................................... 20
Step 1 Preparing the power source ............. 24
Installing the battery pack ..................... 24
Charging the battery pack ..................... 25
Checking status of the battery pack
– Battery Info .................................... 28
Using your camcorder on mains .......... 29
Step 2 Adjusting the grip belt ...................... 30
Step 3 Setting the date and time .................. 32
Step 4 Using the touch panel ....................... 34
Recording – Basics
Recording a picture ....................................... 37
Shooting backlit subjects
– Back light function ....................... 47
Shooting in the dark
– NightShot/Super NightShot/
Colour Slow Shutter ........................ 48
Checking recordings
– End search/Edit search/
Rec Review .............................................. 51
Playback – Basics
Playing back a tape........................................ 53
To display the screen indicators
– Display function ........................... 54
Viewing a recording on TV .......................... 59
Advanced Recording Operations
Recording still images on a “Memory Stick”
during tape recording standby or tape
recording (DCR-PC105E only) ............. 61
Recording still images on a tape
– Tape Photo recording
(DCR-PC103E/PC104E only)................ 64
Self-timer recording ...................................... 66
Adjusting the white balance manually ...... 68
Using the wide mode .................................... 70
Using the fader function ............................... 72
Using special effects – Picture effect ........... 75
Using special effects – Digital effect ........... 76
Using PROGRAM AE ................................... 79
Adjusting the exposure manually ............... 81
Using spot light-metering function
– Flexible Spot Meter.............................. 82
Focusing manually ........................................ 83
Using spot focus function – Spot Focus ..... 85
Interval Recording ......................................... 86
Frame by frame recording
– Frame recording .................................. 88
Using the viewfinder .................................... 89
Advanced Playback Operations
Playing back a tape with picture effect ...... 91
Playing back a tape with digital effect ....... 92
Enlarging images recorded on tape
– Tape PB ZOOM ................................... 93
Quickly locating a scene
– Zero set memory.................................. 95
Searching for a recording by title
– Title search............................................ 97
Searching for a recording by date
– Date search ........................................... 99
Searching for a photo
– PHOTO SEARCH/PHOTO SCAN
(DCR-PC103E/PC104E only).............. 102
Editing
Dubbing a tape ............................................. 105
Dubbing only desired scenes
– Digital program editing (on tape) ... 108
Recording video or TV programmes
(DCR-PC104E/PC105E only).............. 120
Inserting a scene from a VCR
– Insert editing
(DCR-PC104E/PC105E only).............. 123
Audio dubbing............................................. 125
Superimposing a title on a cassette with
Cassette Memory .................................. 130
Making your own titles .............................. 133
Labelling a cassette with Cassette
Memory.................................................. 135
Erasing all the data in Cassette
Memory.................................................. 137
8

Table of Contents
“Memory Stick” Operations
(DCR-PC105E only)
Using a “Memory Stick”
– Introduction ....................................... 138
Selecting image quality and size ............... 144
Recording a still image on a “Memory
Stick” – Memory photo recording ..... 148
Recording an image from a tape as a still
image ...................................................... 154
Superimposing a still image in a
“Memory Stick” on an image
– MEMORY MIX................................... 156
Interval Photo Recording ........................... 161
Recording a moving picture on a
“Memory Stick”
– MPEG MOVIE recording ................. 163
Self-timer recording .................................... 165
Recording a picture from a tape as a
moving picture...................................... 167
Recording edited pictures from a tape as a
moving picture – Digital program
editing (on a “Memory Stick”) ........... 169
Changing the recording folder .................. 172
Viewing a still image
– Memory photo playback .................. 174
Viewing a moving picture
– MPEG MOVIE playback................... 177
Choosing a playback folder ....................... 180
Enlarging a still image recorded on a
“Memory Stick”
– Memory PB ZOOM ........................... 181
Playing back images continuously
– Slide show........................................... 183
Preventing accidental erasure
– Image protection ................................ 184
Deleting images – DELETE ........................ 185
Writing a print mark – Print mark ............ 188
Changing the image size – Resize ............. 189
Viewing Images with your
Computer
Viewing images with a computer
– Introduction ....................................... 190
Connecting your camcorder to a
computer using the USB cable
(For Windows users) ............................ 195
Viewing pictures recorded on a tape on a
computer – USB Streaming
(For Windows users) ............................ 209
Viewing images recorded on a “Memory
Stick” on a computer (For Windows
users) (DCR-PC105E only) .................. 218
Connecting your camcorder to a computer
using the USB cable (For Macintosh
users) (DCR-PC105E only) .................. 223
Viewing images recorded on a “Memory
Stick” on a computer (For Macintosh
users) (DCR-PC105E only) .................. 226
Capturing images from an analogue
video unit on a computer
– Signal convert function
(DCR-PC104E/PC105E only).............. 228
Copying images to DVD with VAIO ........ 230
Customising your Camcorder
Changing the menu settings ...................... 233
Troubleshooting
Types of trouble and how to correct
trouble .................................................... 257
Self-diagnosis display ................................. 265
Warning indicators ...................................... 266
Warning messages....................................... 267
Additional Information
Usable cassettes............................................ 281
About the “InfoLITHIUM” battery
pack ........................................................ 285
About i.LINK................................................ 288
Using your camcorder abroad ................... 291
Maintenance information and
precautions ............................................ 292
Specifications................................................ 300
Quick Reference
Identifying parts and controls ................... 304
Index .............................................................. 313
9

Français
Table des matières
Vérification des accessoires fournis .............. 3
Principales caractéristiques ............ 6
Guide de mise en marche rapide
– Enregistrement sur cassette ...................... 16
– Enregistrement sur un « Memory Stick »
(DCR-PC105E seulement) ..................... 18
Préparatifs
Utilisation de ce manuel ............................... 20
Etape 1 Préparation de l’alimentation ........ 24
Installation de la batterie ....................... 24
Recharge de la batterie........................... 25
Vérification de l’état de la batterie
– Informations sur la batterie......... 28
Utilisation du caméscope sur secteur ... 29
Etape 2 Réglage de la sangle ........................ 30
Etape 3 Réglage de la date et de l’heure..... 32
Etape 4 Utilisation du panneau tactile ....... 34
Enregistrement – Opérations de
base
Enregistrement d’une image ........................ 37
Prise de vues de sujets à contre-jour
– Fonction de compensation de
contre-jour ........................................ 47
Prise de vues dans l’obscurité
– NightShot/Super NightShot/
Colour Slow Shutter ........................ 48
Contrôle des prises de vues
– Recherche de fin/Recherche de
montage/Revue d’enregistrement ...... 51
Lecture – Opérations de base
Lecture d’une cassette ................................... 53
Pour afficher les indicateurs à l’écran
– Fonction d’affichage ..................... 54
Visionnage d’un enregistrement sur un
téléviseur.................................................. 59
Opérations d’enregistrement
avancées
Enregistrement d’images fixes sur un
« Memory Stick » en mode
d’enregistrement sur cassette ou en
mode d’attente d’enregistrement sur
cassette (DCR-PC105E seulement) ....... 61
Enregistrement d’une image fixe sur une
cassette
– Enregistrement de photos
sur cassette (DCR-PC103E/PC104E
seulement) ............................................... 64
Prise de vues avec le retardateur ................ 66
10
Réglage manuel de la balance des blancs .... 68
Utilisation du mode Grand écran ............... 70
Utilisation de la fonction de transitions
en fondu ................................................... 72
Utilisation d’effets spéciaux
– Effet d’image ........................................ 75
Utilisation d’effets spéciaux
– Effet numérique ................................... 76
Utilisation de la fonction PROGRAM AE ... 79
Réglage manuel de l’exposition .................. 81
Utilisation de la fonction de mesure de
l’éclairage directionnel
– Flexible Spot Meter.............................. 82
Mise au point manuelle ................................ 83
Utilisation de la fonction de mise au point
spot
– Mise au point spot ............................... 85
Enregistrement par intervalles .................... 86
Enregistrement image par image
– Enregistrement image par image ...... 88
Utilisation du viseur ..................................... 89
Opérations de lecture avancées
Lecture d’une cassette avec effet d’image ... 91
Lecture d’une cassette avec effet
numérique ............................................... 92
Agrandissement des images enregistrées
sur cassette
– PB ZOOM cassette ............................... 93
Recherche rapide d’une scène
– Mémoire à zéro réglable ..................... 95
Recherche d’un enregistrement en fonction
de son titre
– Recherche de titre ................................ 97
Recherche d’un enregistrement en fonction
de sa date
– Recherche par date .............................. 99
Recherche d’une photo
– PHOTO SEARCH/PHOTO SCAN
(DCR-PC103E/PC104E seulement) ... 102
Montage
Copie d’une cassette.................................... 105
Copie de scènes souhaitées uniquement
– Montage numérique de programme
(sur cassette) .......................................... 108
Enregistrement de programmes téléviseur
ou vidéo
(DCR-PC104E/PC105E seulement) ... 120
Insertion d’une scène à partir d’un
magnétoscope
– Montage à insertion
(DCR-PC104E/PC105E seulement) ... 123
Copie audio .................................................. 125

Table des matières
Incrustation d’un titre sur une cassette
avec mémoire ........................................ 130
Création de titres personnalisés ................ 133
Création d’une étiquette pour une
cassette avec mémoire ......................... 135
Effacement de toutes les données de la
mémoire de la cassette ......................... 137
Opérations « Memory Stick »
(DCR-PC105E seulement)
Utilisation d’un « Memory Stick »
– Introduction ....................................... 138
Sélection de la taille et de la qualité
d’image .................................................. 144
Enregistrement d’une image fixe sur un
« Memory Stick »
– Enregistrement de photos en
mémoire ................................................. 148
Enregistrement d’une image sous forme
d’image fixe depuis une cassette ........ 154
Superposition d’une image fixe du
« Memory Stick » sur une image
– MEMORY MIX................................... 156
Enregistrement de photos par
intervalles .............................................. 161
Enregistrement d’une image animée sur
un « Memory Stick »
– Enregistrement MPEG MOVIE ....... 163
Prise de vues avec le retardateur .............. 165
Enregistrement d’une image à partir d’une
cassette sous forme d’image animée ... 167
Enregistrement d’images montées à partir
d’une cassette sous forme d’images
animées
– Montage numérique de programme
(sur un « Memory Stick ») ................... 169
Changement de dossier
d’enregistrement................................... 172
Visualisation d’une image fixe
– Lecture de photos en mémoire ........ 174
Visionnage d’une image animée
– Lecture MPEG MOVIE ...................... 177
Sélection d’un dossier de lecture ............... 180
Agrandissement d’une image fixe
enregistrée sur un « Memory Stick »
– PB ZOOM mémoire .......................... 181
Lecture d’images en continu
– Diaporama .......................................... 183
Prévention d’un effacement accidentel
– Protection de l’image ........................ 184
Suppression d’images – DELETE .............. 185
Inscription d’une marque d’impression
– Marque d’impression ........................ 188
Modification de la taille de l’image
– Redimensionner ................................. 189
Visionnage d’images sur votre
ordinateur
Visionnage d’images sur un ordinateur
– Introduction ....................................... 190
Raccordement de votre caméscope à votre
ordinateur à l’aide du câble USB
(pour utilisateurs Windows) ............... 195
Visionnage sur un ordinateur d’images
enregistrées sur une cassette
– USB Streaming
(pour utilisateurs Windows) ............... 209
Visionnage sur un ordinateur d’images
enregistrées sur un « Memory Stick »
(pour les utilisateurs Windows)
(DCR-PC105E seulement) ................... 218
Raccordement du caméscope à un
ordinateur à l’aide du câble USB
(pour utilisateurs Macintosh)
(DCR-PC105E seulement) ................... 223
Visionnage sur un ordinateur d’images
enregistrées sur un « Memory Stick »
(pour les utilisateurs Macintosh)
(DCR-PC105E seulement) ................... 226
Capture d’images d’un appareil vidéo
analogique sur un ordinateur
– Fonction de conversion du signal
(DCR-PC104E/PC105E seulement) ... 228
Copie d’images sur DVD avec VAIO ....... 230
Personnalisation du caméscope
Modification des réglages de menu .......... 233
Dépannage
Types de problèmes et leurs solutions ..... 269
Code d’autodiagnostic ................................ 277
Indicateurs d’avertissement ....................... 278
Messages d’avertissement .......................... 279
Informations complémentaires
Cassettes utilisables ..................................... 281
A propos de la batterie « InfoLITHIUM » .... 285
A propos de i.LINK ..................................... 288
Utilisation de votre caméscope
à l’étranger ............................................. 291
Précautions et informations relatives à
l’entretien ............................................... 292
Spécifications................................................ 302
Référence rapide
Identification des composants et des
commandes ........................................... 304
Index .............................................................. 314
11
English
Quick Start Guide – Recording on tape
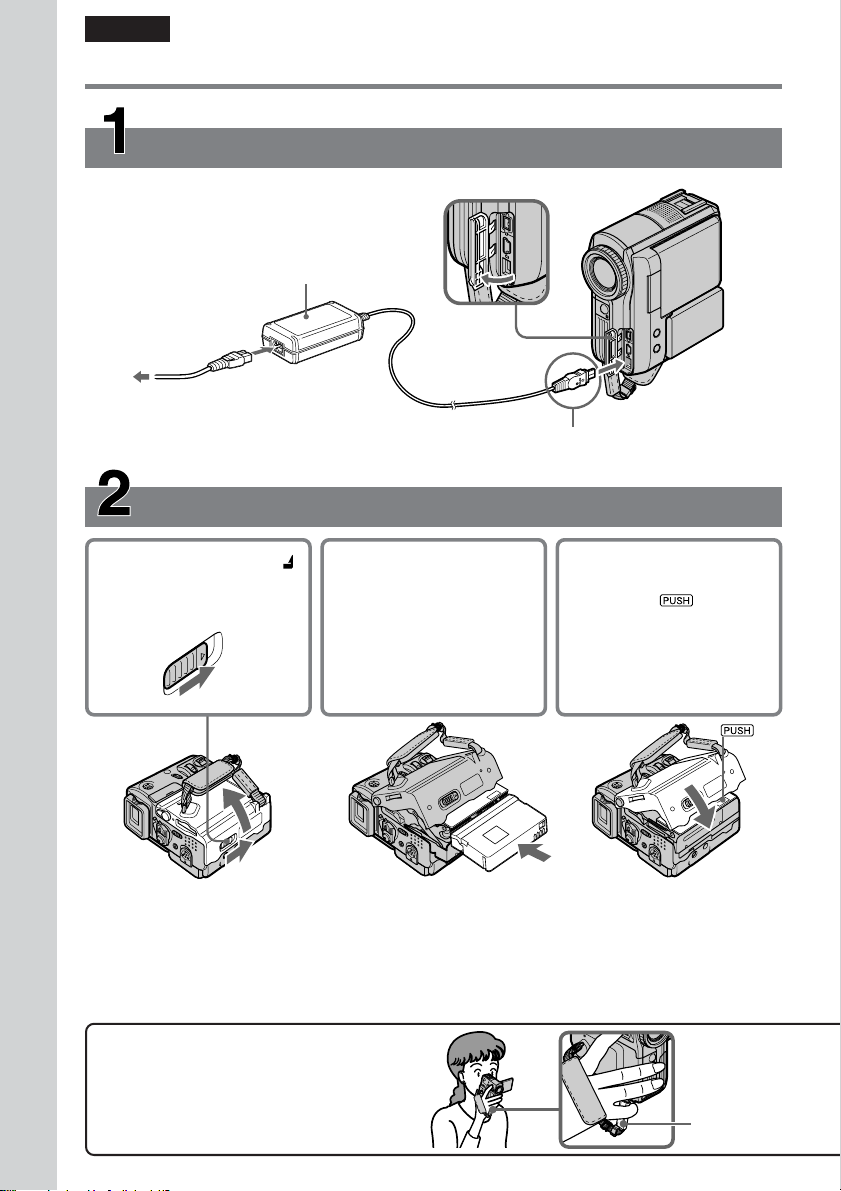
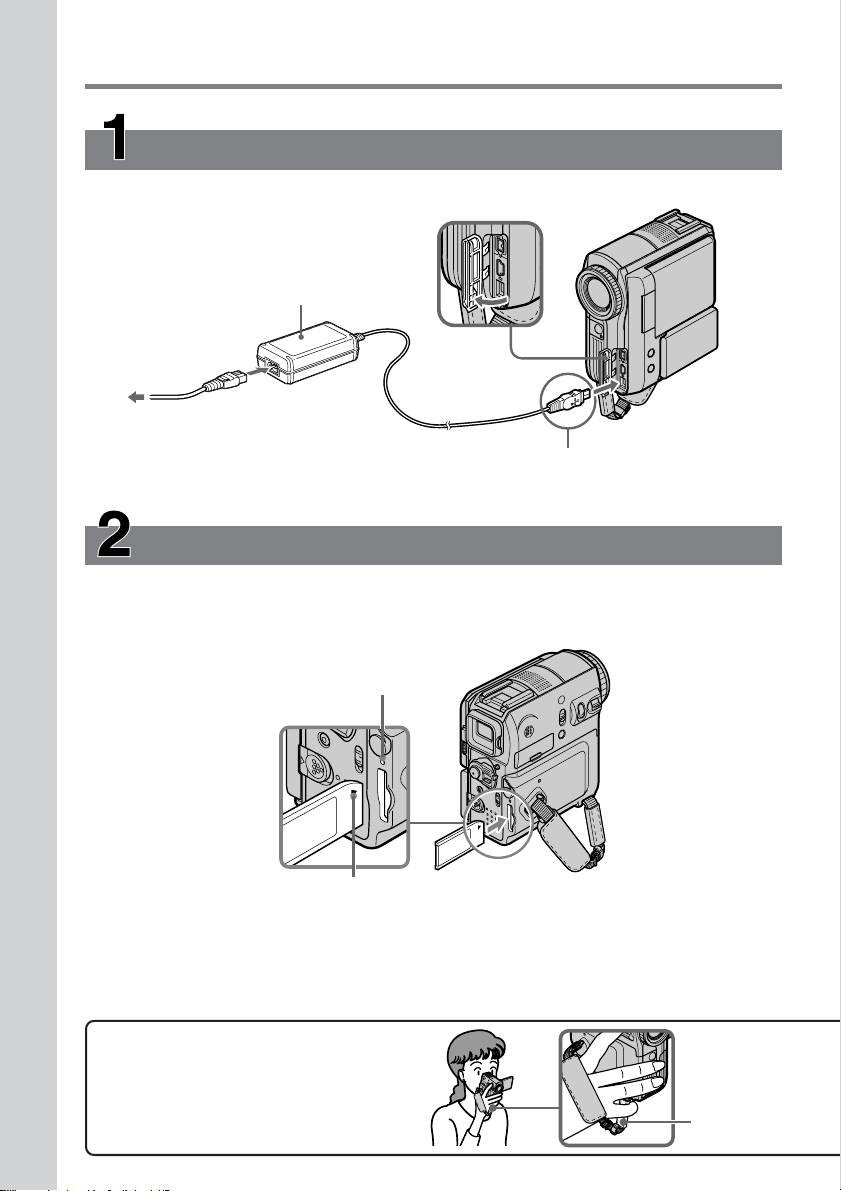
Connecting the mains lead
Use the battery pack when using your camcorder outdoors (p. 24).
Open the
jack cover.
AC Adaptor (supplied)
2
1
3
Connect the plug with its v mark facing the
grip belt.
Quick Start Guide
To eject the cassette
Follow the procedures above, and take out the cassette after the cassette compartment opens
completely in step 2.
Note
Do not press the cassette compartment down forcibly. Doing so may cause a malfunction.
Inserting the cassette
1Slide OPEN/ZEJECT
in the direction of the
arrow and open the lid.
2Push the centre of the
cassette back to insert
the cassette. Insert the
cassette straight as far as
possible into the cassette
compartment with the
window facing up.
3Close the cassette
compartment by
pressing on the
cassette compartment.
After the cassette
compartment goes
down completely, close
the lid until it clicks.
12
How to hold your camcorder
Hold the camcorder, putting your wrist
through the belt and your fingers lightly on
the finger rest (p. 30).
Finger rest
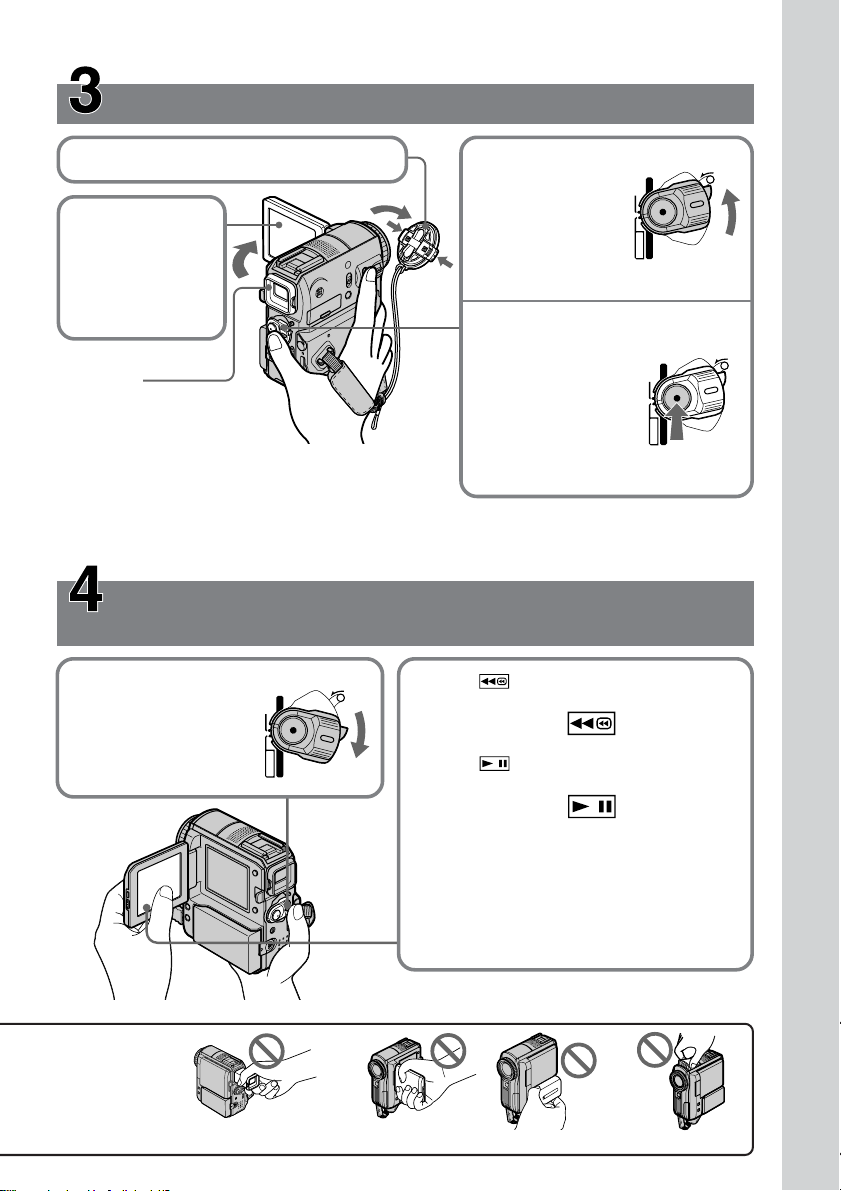
Recording a picture on the tape (p. 37)
1Remove the lens cap.
3Press OPEN to
open the LCD
panel.
2Set the POWER
switch to
CAMERA
while pressing
the small green
button.
(CHG)OFF
VCR
CAMERA
MEMORY
POWER
LOCK
The picture
appears on the
screen.
Viewfinder
When the LCD panel is closed,
pull out the viewfinder placing
your eye against the eyecup.
Adjust the viewfinder lens to
your eyesight (p. 44).
4Press START/
STOP. Your
camcorder starts
recording.
To stop
recording, press
START/STOP
again.
(CHG)OFF
POWER
VCR
CAMERA
MEMORY
LOCK
When you purchase your camcorder, the clock is not set up yet. If you want to record the date and
time for a picture, set the clock before recording (p. 32).
Monitoring the playback picture on the LCD
screen (p. 53)
1Set the POWER
switch to
PLAYER*1)/VCR*
while pressing the
small green
button.
(CHG)OFF
POWER
VCR
2)
CAMERA
MEMORY
LOCK
2Press of the touch panel to rewind the
tape.
3Press of the touch panel to start
playback.
Quick Start Guide
Do not pick up
your camcorder
by the parts
illustrated.
Note
When using the touch panel, press operation
buttons lightly with your finger supporting
the LCD panel from the back side of it. Do
not press the LCD screen with sharp objects
such as a pen.
*1)DCR-PC103E only
*2)DCR-PC104E/PC105E only
Viewfinder LCD panel Battery pack Flash
13
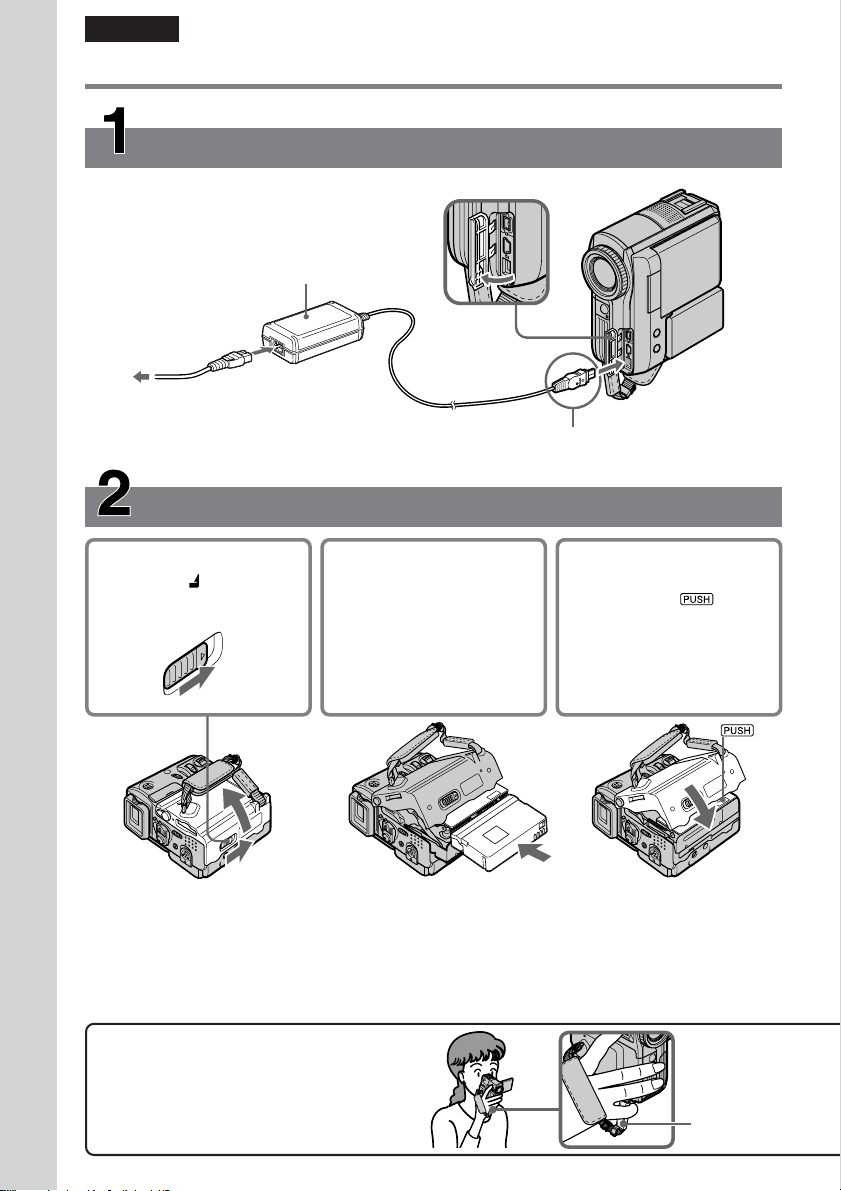
Quick Start Guide – Recording on a “Memory
Stick” (DCR-PC105E only)
Connecting the mains lead
Use the battery pack when using your camcorder outdoors (p. 24).
Open the
jack cover.
AC Adaptor (supplied)
2
1
3
Connect the plug with its v
mark facing the grip belt.
Quick Start Guide
Inserting a “Memory Stick”
Insert a “Memory Stick” in the “Memory Stick” slot as far as it can go with the B mark
facing the grip belt as illustrated.
To remove the “Memory Stick,” press the “Memory Stick” once lightly.
Access lamp
B mark
While the access lamp is lit or flashing
Do not shake or strike your camcorder because your camcorder is reading the data from the
“Memory Stick” or recording data on the “Memory Stick.” Do not turn the power off, remove the
“Memory Stick” or remove the battery pack. Otherwise, image data breakdown may occur.
14
How to hold your camcorder
Hold the camcorder, putting your wrist
through the belt and your fingers lightly on
the finger rest (p. 30).
Finger rest
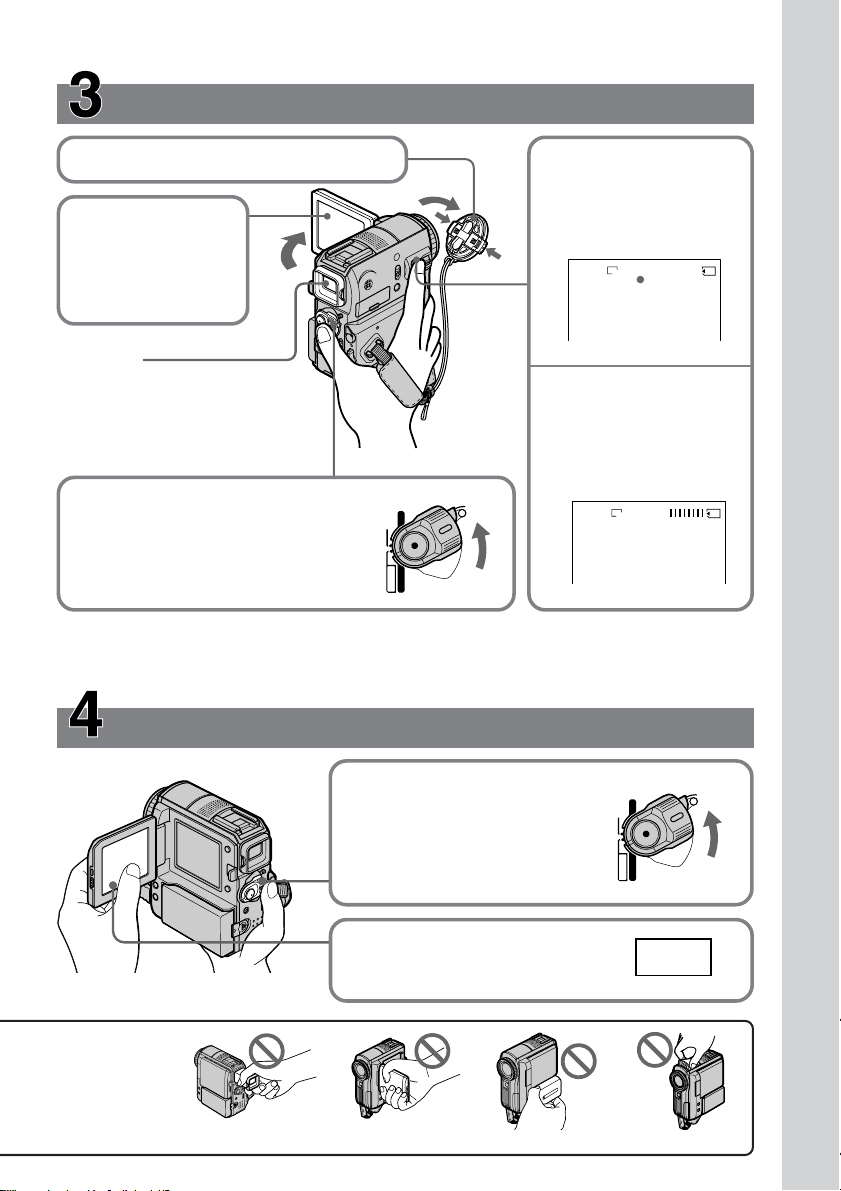
Recording still images on the “Memory Stick”
(p. 148)
1Remove the lens cap.
4Press PHOTO lightly.
You can record when
the green z stops
3Press OPEN to
flashing and remains lit.
open the LCD
panel.
The picture appears
FINE
640
12
on the screen.
Viewfinder
When the LCD panel is closed,
pull out the viewfinder placing
your eye against the eyecup.
Adjust the viewfinder lens to your
eyesight (p. 44).
5Press PHOTO deeper.
The image displayed
when you press PHOTO
deeply is recorded on
the “Memory Stick.”
(CHG)OFF
2Set the POWER switch to
MEMORY while pressing the small
VCR
POWER
LOCK
FINE
640
green button.
Make sure that the LOCK switch is
CAMERA
MEMORY
set to the right (unlock) position.
When you purchase your camcorder, the clock is not set up yet. If you want to record the date and
time for a picture, set the clock before recording (p. 32).
Monitoring a still image on the LCD screen (p. 174)
Quick Start Guide
Do not pick up
your camcorder
by the parts
illustrated.
1Set the POWER switch to
MEMORY while pressing
(CHG)OFF
POWER
VCR
the small green button.
Make sure that the LOCK
switch is set to the right
CAMERA
MEMORY
(unlock) position.
2Press PLAY. The last recorded
image is displayed.
PLAY
Viewfinder LCD panel Battery pack Flash
LOCK
15
Français
Guide de mise en marche rapide – Enregistrement sur cassette
Raccordement du cordon d’alimentation
Utilisez la batterie lors de l’utilisation du caméscope en extérieur (p. 24).
Ouvrez le
cache de la
prise.
Adaptateur secteur AC
(fourni)
2
1
3
Branchez la prise de manière à ce que le
signe v soit tourné vers la sangle.
Guide de mise en marche rapide
Pour éjecter la cassette
Suivez la procédure ci-dessus et sortez la cassette à l’étape 2, après ouverture complète du logement.
Remarque
N’appuyez pas avec force sur le logement de la cassette pour le refermer. Ceci peut entraîner un
problème de fonctionnement.
Insertion de la cassette
1Faites glisser OPEN/
ZEJECT dans le sens
de la flèche et ouvrez le
couvercle.
2Insérez la cassette en
poussant le centre de la
tranche arrière. Insérez
la cassette à
l’horizontale le plus loin
possible dans son
logement, en orientant
sa fenêtre vers le haut.
3Fermez le logement de
cassette en appuyant sur
l’indication sur le
logement de cassette.
Une fois le logement de
cassette complètement
abaissé, fermez le
couvercle en appuyant
dessus jusqu’au déclic.
16
Prise en main du caméscope
Tenez le caméscope en passant le poignet
dans la sangle et en posant légèrement
les doigts sur le support prévu à cet effet
(p. 30).
Support
des doigts
Enregistrement d’une image sur la cassette (p. 37)
1Enlevez le capuchon d’objectif.
2Réglez le
commutateur
(CHG)OFF
VCR
POWER
POWER sur
3Appuyez sur
OPEN pour
ouvrir le
panneau LCD.
L’image
CAMERA tout
en appuyant
sur le petit
bouton vert.
CAMERA
MEMORY
s’affiche à
l’écran.
Viseur
Quand le panneau LCD est
fermé, déployez le viseur en
plaçant l’œil contre l’œilleton
de l’oculaire.
Réglez l’oculaire à votre vue
(p. 44).
4Appuyez sur
START/STOP.
Votre caméscope
commence
l’enregistrement.
Pour arrêter
l’enregistrement,
appuyez de
nouveau sur
START/STOP.
(CHG)OFF
POWER
VCR
CAMERA
MEMORY
Lorsque vous achetez votre caméscope, l’horloge n’est pas encore réglée. Si vous souhaitez
enregistrer la date et l’heure d’enregistrement d’une image, vous devez régler l’horloge avant
d’effectuer la prise de vues (p. 32).
Contrôle de l’image en lecture à l’écran LCD (p. 53)
1Réglez le
commutateur
POWER sur
PLAYER*1)/VCR*
tout en appuyant sur
le petit bouton vert.
(CHG)OFF
POWER
VCR
2)
CAMERA
MEMORY
LOCK
2Appuyez sur sur le panneau tactile
pour rembobiner la cassette.
3Appuyez sur sur le panneau tactile
pour lancer la lecture.
LOCK
LOCK
Guide de mise en marche rapide
Ne soulevez pas
le caméscope en
le tenant par un
des composants
illustrés ci-contre.
Remarque
Quand vous utilisez le panneau tactile,
effleurez simplement les touches du doigt en
soutenant le panneau LCD par l’arrière.
N’appuyez pas sur l’écran LCD avec un objet
pointu tel qu’un stylo.
*1)DCR-PC103E seulement
*2)DCR-PC104E/PC105E seulement
Viseur Panneau LCD Batterie Flash
17

Guide de mise en marche rapide – Enregistrement
sur un « Memory Stick » (DCR-PC105E seulement)
Raccordement du cordon d’alimentation
Utilisez la batterie lors de l’utilisation du caméscope en extérieur (p. 24).
Ouvrez le
cache de la
prise.
Adaptateur secteur AC
(fourni)
2
1
3
Branchez la prise de manière à ce que
le signe v soit tourné vers la sangle.
Guide de mise en marche rapide
Insertion du « Memory Stick »
Introduisez un « Memory Stick » dans la fente pour « Memory Stick » et poussez-le aussi
loin que possible en orientant la marque B vers la sangle, comme illustré.
Pour éjecter le « Memory Stick », appuyez une fois légèrement sur le « Memory Stick ».
Voyant d’accès
Marque B
Lorsque le voyant d’accès est allumé ou clignote
Ne secouez pas ou ne frappez pas votre caméscope, car il est en train de lire les données sur le
« Memory Stick » ou d’enregistrer des données sur le « Memory Stick ». Ne coupez pas
l’alimentation, n’éjectez pas le « Memory Stick » et ne retirez pas la batterie. Sinon, les données
d’image risquent d’être brisées.
18
Prise en main du caméscope
Tenez le caméscope en passant le poignet
dans la sangle et en posant légèrement
les doigts sur le support prévu à cet effet
(p. 30).
Support
des doigts
Enregistrement d’images fixes sur le « Memory Stick »
(p. 148)
1Enlevez le capuchon d’objectif.
3Appuyez sur
OPEN pour ouvrir
le panneau LCD.
L’image s’affiche à
l’écran.
Viseur
Quand le panneau LCD est fermé,
déployez le viseur en plaçant l’œil
contre l’œilleton de l’oculaire.
Réglez l’oculaire à votre vue
(p. 44).
(CHG)OFF
POWER
CAMERA
VCR
MEMORY
LOCK
2Réglez le commutateur POWER
sur MEMORY tout en appuyant
sur le petit bouton vert.
Assurez-vous que le commutateur
LOCK est réglé sur la position de
déverrouillage (droite).
Lorsque vous achetez votre caméscope, l’horloge n’est pas
encore réglée. Si vous souhaitez enregistrer la date et l’heure
d’enregistrement d’une image, vous devez régler l’horloge avant
d’effectuer la prise de vues (p. 32).
Contrôle de l’affichage de l’image fixe sur l’écran LCD
4Appuyez légèrement sur
PHOTO.
Vous pouvez commencer à
enregistrer quand le témoin
z vert cesse de clignoter et
demeure allumé.
FINE
640
12
5Appuyez à fond sur
PHOTO.
L’image affichée lorsque
vous avez appuyé à
fond sur PHOTO est
enregistrée sur le
« Memory Stick ».
FINE
640
(p. 174)
Guide de mise en marche rapide
Ne soulevez pas
le caméscope en
le tenant par un
des composants
illustrés ci-contre.
1Réglez le commutateur POWER
sur MEMORY tout en appuyant
sur le petit bouton vert.
Assurez-vous que le
commutateur LOCK est réglé
sur la position de
déverrouillage (droite).
2Appuyez sur PLAY. La
dernière image enregistrée
s’affiche.
Viseur Panneau LCD Batterie
(CHG)OFF
POWER
VCR
CAMERA
MEMORY
PLAY
Flash
LOCK
19
— Getting Started —
— Préparatifs —
Using this manual
The instructions in this manual are for the
3 models listed in the table on the next page.
Before you start reading this manual and
operating your camcorder, check the model
number by looking at the bottom of your
camcorder. The DCR-PC105E is the model used
for illustration purposes. Otherwise, the model
name is indicated in the illustrations. Any
differences in operation are clearly indicated in
the text, for example, “DCR-PC105E only.”
As you read through this manual, buttons and
settings on your camcorder are shown in capital
letters.
In sections from “Advanced Recording
Operations” onward, position of the POWER
switch is shown by the icons below.
(CHG)OFF
VCR
CAMERA
MEMORY
: Set the POWER switch to
PLAYER.
(DCR-PC103E only)
Utilisation de ce manuel
Les instructions contenues dans ce manuel
s’appliquent aux 3 modèles répertoriés dans le
tableau de la page suivante. Avant de lire ce
manuel et d’utiliser le caméscope, vérifiez le
numéro de modèle indiqué sous votre caméscope.
Les illustrations de ce mode d’emploi représentent
le DCR-PC105E. S’il s’agit d’un autre modèle, son
nom est indiqué dans l’illustration. Toute différence
de fonctionnement est clairement signalée dans le
texte, par exemple, « DCR-PC105E seulement ».
Dans ce manuel, les touches et les réglages de votre
caméscope sont toujours indiqués en majuscules.
Dans les sections qui suivent celle intitulée
« Opérations d’enregistrement avancées », la
position du commutateur POWER est illustrée
par les icônes ci-dessous.
POWER
LOCK
: Réglez le commutateur POWER
sur PLAYER.
(DCR-PC103E seulement)
: Set the POWER switch to VCR.
(DCR-PC104E/PC105E only)
: Set the POWER switch to
CAMERA.
: Set the POWER switch to
MEMORY.
(DCR-PC105E only)
All operations you carry out are indicated by a
beep.
20
: Réglez le commutateur POWER
sur VCR.
(DCR-PC104E/PC105E seulement)
: Réglez le commutateur POWER
sur CAMERA.
: Réglez le commutateur POWER
sur MEMORY.
(DCR-PC105E seulement)
Chaque opération effectuée est confirmée par un
signal sonore.

Using this manual
Types of differences/Différences entre les modèles
DCR-PC 103E 104E 105E
Built-in flash/
Flash incorporé
MEMORY mark*1) (on the POWER switch)/
Marque MEMORY*
(sur le commutateur POWER)
VCR mark*2) (on the POWER switch)/
Marque VCR*2) (sur le commutateur POWER)
AUDIO/VIDEO jack/
Prise AUDIO/VIDEO
DV Interface/
Interface DV
z Provided/Fourni
— Not provided/Non fourni
*1)The model with MEMORY marked on the
POWER switch is provided with “Memory
Stick” functions.
See page 138 for details.
*2)The models with VCR marked on the POWER
switch can record pictures from other
equipment such as VCR. The DCR-PC103E has
PLAYER mark on the POWER switch.
*3)Output only
1)
Note on Cassette Memory
Utilisation de ce manuel
——z
——z
— zz
3)
z*
3)
z*
*1)Le modèle qui porte la marque MEMORY sur le
commutateur POWER est équipé des fonctions
« Memory Stick ».
Pour plus de détails, reportez-vous à la page 138.
*2)Les modèles qui portent la marque VCR sur le
commutateur POWER peuvent enregistrer des
images à partir d’autres appareils tels qu’un
magnétoscope. Le commutateur POWER du
modèle DCR-PC103E porte l’indication
PLAYER.
*3)Sortie seulement
zz
zz
Getting Started Préparatifs
Your camcorder is based on the DV format. You
can use only mini DV cassettes with your
camcorder. We recommend that you use a
cassette with Cassette Memory .
Cassettes with Cassette Memory have the
(Cassette Memory) mark.
Remarque relative à la mémoire
de la cassette
Votre caméscope est basé sur le format DV. Il ne
peut utiliser que des cassettes de format mini DV.
Nous vous recommandons d’utiliser une cassette
avec fonction mémoire qui porte la marque .
Les cassettes qui possèdent une mémoire portent
la marque (mémoire de la cassette).
21

Using this manual
Utilisation de ce manuel
Note on TV colour systems
TV colour systems differ depending on the
country or region. To view your recordings on a
TV, you need a PAL system-based TV.
Copyright precautions
(DCR-PC104E/PC105E only)
Television programmes, films, video tapes, and
other materials may be copyrighted.
Unauthorised recording of such materials may be
contrary to the copyright laws.
Note on connecting other
equipment
When you connect your camcorder to other
video equipment or a computer using the USB
cable or i.LINK cable, observe the shape of the
jack.
If you insert the plug forcibly, the jack may get
damaged and it may result in a malfunction of
your camcorder.
Precautions on camcorder care
Lens and LCD screen/finder (on
mounted models only)
•The LCD screen and the finder are
manufactured using extremely highprecision technology, so over 99.99% of the
pixels are operational for effective use.
However, there may be some tiny black
points and/or bright points (white, red, blue
or green in colour) that constantly appear on
the LCD screen and the finder. These points
are normal in the manufacturing process and
do not affect the recording in any way.
Remarque sur les systèmes de
télévision couleur
Les systèmes de télévision couleur diffèrent d’un
pays ou d’une région à l’autre. Pour visionner
vos enregistrements sur un téléviseur, il vous
faut un modèle utilisant le système PAL.
Précautions concernant les
droits d’auteur (DCR-PC104E/
PC105E seulement)
Les programmes de télévision, les films, les
cassettes vidéo et autres enregistrements peuvent
être protégés par des droits d’auteur.
Leur enregistrement non autorisé peut être
contraire aux lois sur les droits d’auteur.
Remarque sur le raccordement
d’autres appareils
Lorsque vous branchez votre caméscope sur un
autre appareil vidéo ou un ordinateur à l’aide du
câble USB ou du câble i.LINK, examinez la forme
de la fiche.
Si vous devez forcer pour entrer la fiche, la prise
risque d’être endommagée et d’entraîner un
mauvais fonctionnement de votre caméscope.
Précautions concernant
l’entretien du caméscope
Objectif et écran LCD/viseur (sur
modèles montés seulement)
•L’écran LCD et le viseur sont les produits d’une
technologie de pointe et plus de 99,99% des
pixels sont opérationnels. Cependant, on peut
constater de très petits points noirs et/ou
lumineux (blancs, rouges, bleus ou verts)
apparaissant en permanence sur l’écran LCD et
dans le viseur. Ces points sont normaux et
proviennent du processus de fabrication ; ils
n’affectent en aucun cas la qualité de
l’enregistrement.
22
 Loading...