

Page 1

P990i
User Guide
This is the Internet version of the user guide. © Print only for private use.
Page 2

Contents
Welcome........................................................ 9
Getting to know your phone...................... 10
Package................ ... ... ... ................................... 10
Overview....................... ................................... 11
Before using your phone.................................. 12
First time start-up............................................. 13
Turning the phone on and off .......................... 13
Flip closed........................................................ 14
Flip open.......................................................... 14
Flip removed.................................................... 15
Importing phonebook entries........................... 15
Navigation......................... ... ............................ 15
Finding the applications................................... 16
Using the applications...................................... 18
Task manager................................ ... ................ 18
Keypad and keyboard functions ...................... 19
Status bar icons................................................ 20
Memory Stick PRO Duo.................................. 21
Connecting the included accessories ............... 23
Updating software......................................... ... 23
General functions............................................. 24
Text Entry........................................................ 25
Entering text with the flip closed..................... 26
Entering text with the flip open ....................... 28
Locks................................................................ 33
Sound............................................................... 33
Transferring data between phones ................... 34
Phone........................ ................................... 35
Making a call ................................................... 35
Receiving a call................................................ 36
Handling two or more calls.............................. 37
Call log............................................................. 38
More features............. ... ... ................................ 38
Video phone................................... ............. 42
Demo mode............. ... ... ................................... 42
Making a video call ..................................... ... 42
Receiving a video call...................................... 43
Video call options............................................ 43
Messaging ..... ............................. ................. 45
Before using.. .... ... ... ......................................... 45
Folders ............................................................. 45
2 Contents P990i
This is the Internet version of the user guide. © Print only for private use.
Page 3

SMS.................................................................. 46
MMS ................................................................ 47
Email ................................................................ 48
More about Messaging..................................... 49
Camera........................................................ 51
Taking pictures and video clips............ ............ 52
Viewing pictures and clips............................... 54
Changing the settings ....................................... 55
Contacts ................................................. .. ... 57
Using Contacts ................................................. 57
Creating and editing contacts........................... 58
Managing contacts ........................................... 60
Calendar ..................................................... 61
Creating calendar entries.................................. 61
Managing calendar entries ............................... 62
Settings............................................................. 62
Web ......... .................................................... 64
Working with pages ......................................... 64
Settings menu ...................... ... ......................... 65
Views menu...................................................... 66
Configuring the browser .................................. 66
RSS feeds ......... ............................. .............. 68
Subscribing to RSS feeds................................. 68
Reading news items................. ... .... ... ............... 68
Updating feeds ................................................. 69
Settings........................ ..................................... 69
Media player............................................... 70
Music.................................... ... ... ...................... 70
Video................................................. ... ... ......... 72
FM radio........................................................... 74
Online............................. .................................. 76
PlayNow™................................................... 77
Picture gallery and Picture editor ............ 78
Picture gallery .................................................. 78
Picture editor .................................................... 80
Business card scanner................................ 82
Scanning cards ................................................. 82
Sound recorder................................. .......... 83
Record ........................................ .... .................. 83
Playback... ... ...................................... ... ... ... ...... 83
Manage recordings.. .... ..................................... 83
Preferences....................................................... 83
MusicDJ™................................................... 84
P990i Contents 3
This is the Internet version of the user guide. © Print only for private use.
Page 4

Games.......................................................... 85
Quickoffice and Pdf+ ................................. 86
Quickoffice ...................................... ................ 86
Pdf+................................... ............................... 87
Notes and Tasks.......................................... 88
Notes................. ... ...................................... ... ... 88
Tasks.................................................... ... ... ...... 88
Calculator and Converter.......................... 90
Calculator................ ... ...................................... 90
Converter ............................. ... ......................... 90
Time, timer and stopwatch............... ......... 92
Time.............................................................. ... 92
Timer....................... ...................................... ... 92
Stopwatch .................. ...................................... 92
Managing files and applications................ 93
File manager .................................................... 93
Installing applications...................................... 94
Storage wizard ..................................... ... ... ... ... 94
PC Suite....................................................... 95
Installing PC Suite........................................... 95
Application launcher........................................ 95
Connecting to other devices ...................... 96
Bluetooth wireless technology... ...................... 96
Infrared port..................................................... 97
USB port.......................................................... 97
Wireless LAN.................................................. 98
Connections manager....................................... 98
Computer modem ............................................ 98
Synchronization and backup ............ ........ 99
Local synchronization...................................... 99
Backing up data ............................ ... .............. 100
Restoring data................................................ 100
Remote synchronization .................. .............. 100
Setting up Internet, email and MMS ..... 101
Setting up accounts.................... ... ... ... ........... 101
Setting up Internet manually.......................... 102
Setting up email manually ............................ 106
Setting up MMS manually ........ ... ... ... ........... 109
Control panel............................................ 112
Call settings .................................................. 112
Accept calls.................................................... 112
Add to Contacts ............................................. 112
Calling cards.................................................. 112
Call waiting.................................................... 114
4 Contents P990i
This is the Internet version of the user guide. © Print only for private use.
Page 5

Divert calls ..................................................... 114
Flag Call......................................................... 114
Handsfree settings .......................................... 114
Reject with SMS ............... ... .......................... 11 5
Restrict calls................ ... ................................ 115
Show or hide number ..................................... 115
TTY Settings .................................................. 115
Voice control.................................................. 115
Voicemail............................................. .......... 116
ALS settings ........ .... ... ................................... 116
Call meter ...................................................... 116
Connections......... .......................................... 117
Bluetooth wireless technology ....................... 117
Infrared port ................................................... 119
Internet accounts ............................................ 119
Mobile networks............................................. 119
USB................ ...................................... ... ....... 119
Wireless LAN................................................. 120
Device ............ ... ...................................... ... .... 122
Backlight ........................................................ 122
Device management ....................................... 123
Flight mode .................................................... 124
Hardware buttons ........................................... 124
Location................ .... ... ... ................................ 124
Number formats ......................................... .... 125
Power save ..................................................... 125
Screen saver ................................................... 125
Sounds & alerts .............................................. 125
Storage wizard............. ................................... 126
Text input ................................ ... .... ................ 127
Themes........................................................... 127
Time & date.................... ................................ 128
User greeting .................................................. 128
Wallpaper....................................................... 128
Messaging settings........................................ 128
Area information ............................................ 128
Email accounts ............................................... 129
MMS accounts ............... ... ... ... ....................... 129
SMS .................................. ............................ . 129
Wap push........................................................ 129
Security.......................................................... 129
Certificate manager and Java certificates....... 129
Locks.............................................................. 129
MIDlet settings .. ... ......................................... . 131
VPN accounts................................................. 132
Other.............................................................. 132
Format disk..................................................... 132
Install.............................................................. 132
Language........................................................ 132
P990i Contents 5
This is the Internet version of the user guide. © Print only for private use.
Page 6

Master reset................ ... .... ............................. 132
Setup wizard .................................................. 132
Uninstall......................................................... 133
Troubleshooting........................................ 134
Important information............................. 135
Guidelines for safe
and efficient use ........................................ 138
End User Licence Agreement........................ 142
Limited Warranty.............. ... .......................... 142
Declaration of Conformity............................. 145
Technical data... ............................. ........... 146
Index.......................................................... 148
6 Contents P990i
This is the Internet version of the user guide. © Print only for private use.
Page 7

Sony Ericsson P990i
User Guide
This User Guide is published by Sony Ericsson Mobile
Communications AB, without any warranty. Improvements and
changes to this User Guide necessitated by typographical errors,
inaccuracies of current information, or improvements to
programs and/or equipment, may be made by Sony Ericsson
Mobile Communications AB at any time and without notice.
Such changes will, however, be incorporated into new editions
of this User Guide.
©Sony Ericsson Mobile Communications AB, 2006. All rights
reserved.
Publication number: EN/LZT 162 77 R3A
The Bluetooth™ word mark and logos are owned by the
Bluetooth SIG , Inc. and any use of such marks by Sony Ericsson
is under license.
Wi-Fi® is a registered trademarks of the Wi-Fi Alliance
Symbian and all Symbian-based marks and logos are trademarks
of Symbian Limited.
Memory Stick™, Memory Stick Duo™ and Memory Stick PRO
Duo™ are trademarks of Sony, its parent and/or its affiliates.
PlayNow™ and MusicDJ™ are trademarks or registered
trademarks of Sony Corporation.
Beatnik is a trademark of Beatnik, Inc.
Opera is a trademark of Opera Software ASA.
Quicksheet, Quickpoint, Quickoffice and Quickword are either
trademarks or registered trademarks of Quickoffice, Inc.
Adobe and Acrobat are either trademarks or registered
trademarks of Adobe Systems Incorporated in the United S tat es
and/or other countries.
Microsoft Outlook, Visual Basic, Windows and PowerPoint are
either registered trademarks or trademarks of Microsoft
Corporation in the Unites States and/or other countries.
Apple is a trademark of Apple Corporation, Inc.
Lotus Notes is a trademark of International Business Machines
Corporation in the United States, other countries, or both.
This product contains software copyright © Beatnik, Inc.
1996-2002.
Java and all Java-based trademarks and logos are trademarks or
registered trademarks of Sun Microsystems, Inc. in the U.S. and
other countries. End-user license agreement for Sun™ Java™
J2ME™.
1. Restrictions: Software is confidential copyrighted information
of Sun and title to all copies is retained by Sun and/or its
licensors. Customer shall not modify, decompile, disassemble,
decrypt, extract, or otherwise reverse engineer Software.
Software may not be leased, assigned, or sublicensed, in whole
or in part.
2. Export Regulations: Software, including technical data, is
subject to U.S. export control laws, including the U.S. Export
Administration Act and its associated regulations, and may be
subject to export or import regulations in other countries. The
Customer agrees to comply strictly with all such regulations and
acknowledges that it has the responsibility to obtain licenses to
export, re-export, or import Software. Software may not be
downloaded, or otherwise exported or
re-exported (i) into, or to a national or resident of, Cuba, Iraq,
Iran, North Korea, Libya, Sudan, Syria (as such listing may be
revised from time to time) or any country to which the U.S. has
embargoed goods; or (ii) to anyone on the U.S. Treasury
P990i 7
This is the Internet version of the user guide. © Print only for private use.
Page 8

Department's list of Specially Designated Nations or the U.S.
Commerce Department's Table of Denial Orders.
3. Restricted Rights: Use, duplication or disclosure by the United
States government is subject to the restrictions as set forth in the
Rights in Technical Data and Computer Software Clauses in
DFARS 252.227-7013(c) (1) (ii) and FAR 52.227-19(c) (2) as
applicable.
Copyright © SyncML initiative Ltd. (1999-2002). All rights
reserved.
Portions of software © PacketVideo Corporation (USA) 1999,
2002. PacketVideo, pvPlayer and the PacketVideo logo are
trademarks of PacketVideo Corporation. All rights reserved.
Other product and company names mentioned herein may be the
trademarks of their respective owners.
Any rights not expressly granted herein are reserved.
Note Some of the services in this User Guide are not supported
by all networks. This also applies to the GSM International
Emergency Number 112. Please contact your network operator
or service provider if you are in doubt whether you can use a
particular service or not.
8 P990i
This is the Internet version of the user guide. © Print only for private use.
Page 9

Welcome
Thank you for purchasing the Sony Ericsson P990i the
all-in-one entertainment phone and PDA.
Before you start to use your new phone please read these
instructions carefully to enjoy maximum performance
and a longer life service.
The Getting to know your phone chapter in this User
Guide gives a quick overview of the main functions of
the phone, shortcuts and general information.
The complete user documentation consists of the
following parts:
• Quick Guide – the information needed to get you
started.
• User Guide – an overview of the phone with
detailed settings information.
• Help in the phone – your phone has built-in help
texts that you can access with the flip open. In most
applications,
menu. Some dialogs, for example, those where you
make important settings, have specific Help
available. To view this Help, tap .
• Web Guide – an up-to-date User Guide available on
the Internet on www.sonyericsson.com/support
Help is available in the application
. Y ou
can access this from your computer or the browser
on your phone.
This icon indicates that the function is networkor operator-dependent. The service may not
always be available in all countries or when you
are roaming. Please contact your operator for
information
P990i Welcome 9
This is the Internet version of the user guide. © Print only for private use.
Page 10
Getting to know your phone
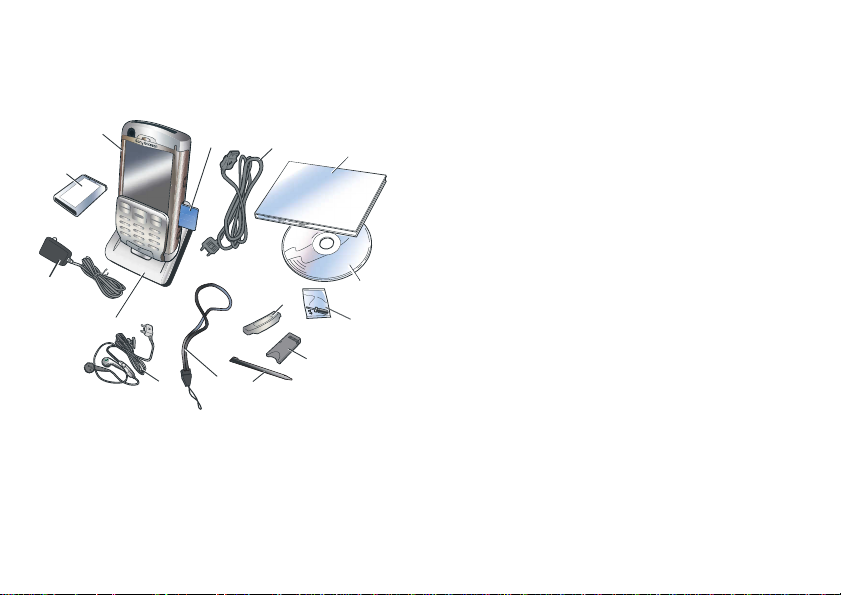
Package
A
B
N
M
L
F. Strap
G. Extra st ylu s
H. Memory Stick adapter
I. Flip replacement cover
J. Flip replacement tool set
K. CD with Sony Ericsson PC Suite (in the
documentation package)
L. Documentation package
M. USB cable
C
D
E
F
I
H
G
N. Memory Stick PRO Duo™ inserted in the Memory
K
J
Stick slot. The Memory Stick contains Try and Buy
applications.
If your package does not include all the listed items
above, please contact your retailer.
Note: Before you can use your phone you need to in sert
the SIM card, and insert and char ge the b attery. Always
detach the charger before you insert or remove the SIM
A. Phone
card.
B. Battery
C. Charger
D. Desk stand
E. Stereo headset
10 Getting to know your phone P990i
This is the Internet version of the user guide. © Print only for private use.
Page 11
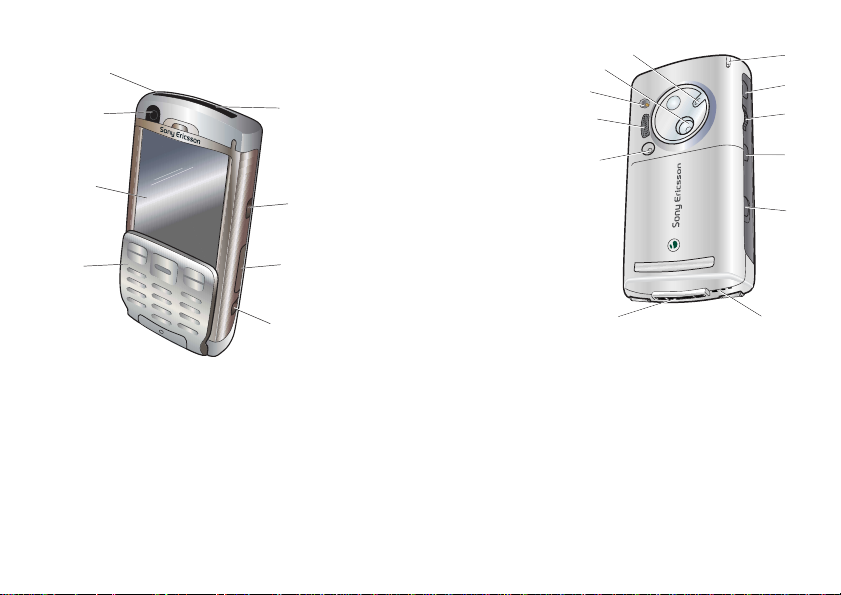
Overview
A
B
C
D
I. Camera lens
cover
H
J. Camera lens
K. External
antenna
connector
L. Loudspeaker
M. Photo light
G
F
E
N. Connector for
accessories
and charger
O. Microphone
P. Key and
touch screen
lock slider
Q. Back button
I
J
K
L
M
N
T
S
R
Q
P
O
R. Jog Dial
A. On/Off button
B. Camera for video calls
S. Media player button
T. Stylus
C. Screen
D. Flip with keypad
E. Camera button
F. Slot for Memory Stick
G. Internet button
H. Infrared port
P990i Getting to know your phone 11
This is the Internet version of the user guide. © Print only for private use.
Page 12

Before using your phone
SIM card
You receive your SIM
card when you register
with a network
operator. The SIM
card keeps track of
your phone number,
the services included
in your subscription
and phonebook
information, among
other things.
A PIN code is supplied
with the SIM card and must be entered when switching
on the phone for the first time.
Remove the battery (if it is in place) and insert the SIM
card into the SIM card holder.
Battery
To open the battery
cover press it slightly
on its upper part and
slide it down the phone.
Insert the battery and
close the cover.
Before you use the
phone for the first time,
charge the battery for at
least 4 hours. When the
battery is new, or
completely discharged,
it may take up to 30 minutes before the battery icon
appears on the screen.
Charging the battery
You need to charge the battery when the indicator light
flashes red. Low battery is also indicated by a message
on the screen and a beep.
Make sure the battery is inserted and connect the charger
to the phone, then connect the charger to the mains. The
battery is charged when the indicator light shows a
steady green light and the battery icon is full.
12 Getting to know your phone P990i
This is the Internet version of the user guide. © Print only for private use.
Page 13

Care instructions
Please take care of your phone and follow these advice:
• Use a moist cloth when you clean the screen.
• Only use the stylus provided to tap the screen.
• For detailed care instructions, see Recommendations
for safe use of product (mobile phone, battery,
charger and other accessories) on page 139.
First time start-up
Please read Guidelines for safe and efficient use on
page 138 be fo re yo u us e yo u r ph on e.
To switch on your phone press the On/Off button
keeping the flip closed. Select
Power menu opens.
You will be prompted to select a language. Read more
about selecting and installing languages in Language on
page 132.
The first time you start the phone you have the option to
run the Setup wizard. Open the flip and follow the
instructions.
Phone on when the
Turning the phone on and off
Normal operation
When you turn the phone on you will be prompted to
choose between
operation, choose
To turn the phone off, press the On/Off button and
choose Power off.
Flight mode
If you choose Flight mode, the phone’s radio functions
are switched off. You can still use the organizer
applications, and applications that use a wireless LAN
connection.
Note: If you want to use wireless LAN in Flight mode,
make sure that Flight mode is enabled befor e you choose
wireless LAN, as wireless LAN is disabled by default in
Flight mode.
Use Flight mode where mobile phones are prohibited,
such as in hospitals and aircrafts. See Flight mode on
page 124.
Phone On and Flight mode. For normal
Phone On.
P990i Getting to know your phone 13
This is the Internet version of the user guide. © Print only for private use.
Page 14
Flip closed
A
With the keypad flip closed, your phone can be used as
a conventional mobile phone, using the keypad to dial
and the Jog Dial to navigate. See Navigation on page 15.
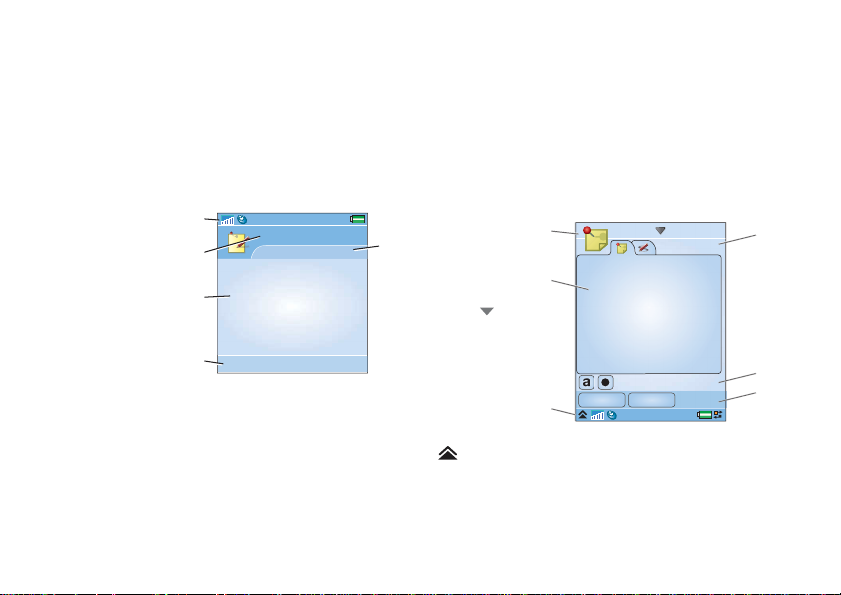
Screen areas
When the flip is closed, the screen is not touch-sensitive.
It is divided into the following areas:
A. Status bar,
containing status
icons.
B. Application title
bar.
C. Application area.
D. Selection key bar.
Many options are
available from the
More menu.
E. Context bar.
A
B
C
D
Notes
New More
Flip open
Y ou can open the flip to reach more applications, and to
continue working with any active application.
When the flip is open, the large touch-screen is revealed
and the keyboard is available. To navigate menus and
lists, see Navigation on page 15.
Screen areas
When the flip is open the screen is touch-sensitive. The
screen is divided into a number of areas that are used for
different purposes.
The areas and some terms are shown in the figure below:
A. Application
title bar,
E
containing
the
application
menu .
B. Application
area.
C. Status bar,
containing
status icons
and the status
bar menu
.
D. Selection key bar.
E. Button bar.
B
C
Notes
Save Cancel
F. Context bar, containing tabs.
14 Getting to know your phone P990i
This is the Internet version of the user guide. © Print only for private use.
F
E
D
Page 15

Closing the flip
Closing the flip while an application is running generally
ends the application and saves the data. Exceptions,
among others, are voice/video phone calls, data sessions
and multimedia applications, that will continue to run.
Flip removed
The flip can be removed, which makes the organizer
applications easier to access. When the flip is removed,
your phone works as if the flip was open.
Note: Turn the phone off before you remove the flip to
avoid to damage your phone.
To remove and attach the flip, refer to the separate
instructions.
Note: Sony Ericsson does not accept any liability for
lost parts or product defects resulting from any
disassembly or modification of the product.
• Copy phonebook entries stored on your SIM card.
See Copying contacts to and from a SIM card on
page 60.
• Transfer phonebook entries from a computer
application using the synchronize function. See
Synchronization and backup on page 99.
• Beam phonebook entries from another phone using,
for example, Bluetooth™ wireless technology. See
Connecting to other devices on page 96.
Navigation
You can navigate menus and select items in various
ways. With the flip closed, you can use the Jog Dial,
Back button or Back key , Navigation key, and Selection
keys.
With the flip open, the Jog Dial, Back button and the
stylus are accessible. There is also a handwriting
recognition feature, so you can use the stylus to write on
the screen.
Importing phonebook entries
You can import contact information in several ways:
P990i Getting to know your phone 15
This is the Internet version of the user guide. © Print only for private use.
Page 16

Jog Dial
Rotate the Jog Dial to scroll
lists up and down, adjust
sound volume or move
through a multimedia
message. Press the Jog Dial
inwards to select a
highlighted item.
Inwards
Up
Down
Back button
The Back button on the side has the same
functions as the Back key on the flip, see Keypad
functions on page 19.
Keys on the flip
The navigation keys on the flip are used when the flip is
closed. See Keypad functions on page 19.
Stylus
The stylus is used when the flip is open. Tap the screen
to navigate and select required items. You can also use
it to pan multimedia pictures.
Finding the applications
Activity menu
The Activity menu is displayed whenever you switch on
your phone and is the starting point for performing a
variety of tasks whether you are working with the flip
closed or flip open. The Activity menu is operatordependent and is described in the Quick Guide.
Standby view
The standby view is the first view in the Activity menu
and is shown when no application is activated. Through
shortcuts in the standby view you can directly reach the
most commonly used applications. You can also select
the shortcut to take you to all the applications in the
Main menu.
Status bar
The status bar contains icons that indicate the status of
the current settings and activities. See Status bar icons
on page 20.
If you select the Status bar menu you get access to
certain settings not shown in the status bar. From the
Status bar menu you can also reach the Connections
16 Getting to know your phone P990i
This is the Internet version of the user guide. © Print only for private use.
Page 17
settings and some of the applications when the shortcut
is invisible.
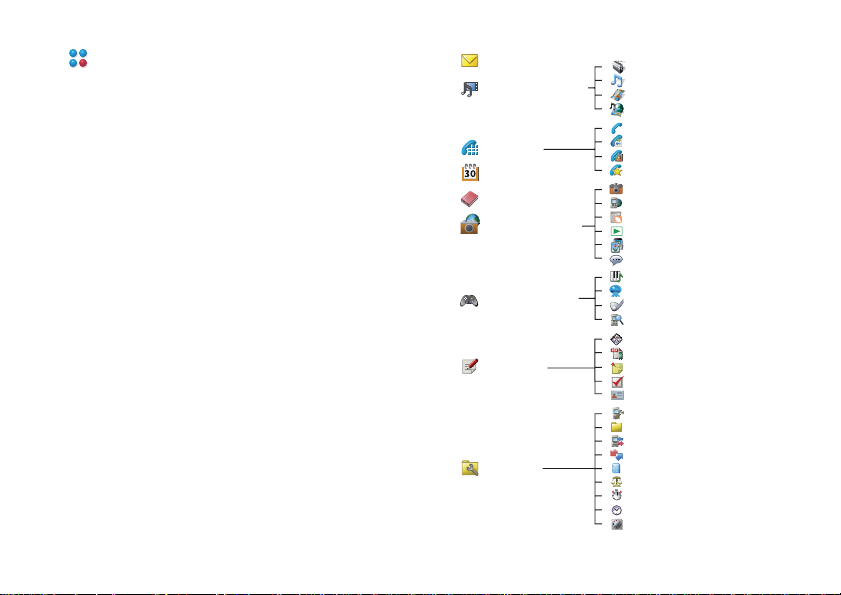
Main menu
You can find all the phone’s applications in the Main
menu, which can be shown either in a list or a grid view.
Applications are categorized under folders as shown in
the following overview.
Messaging
Media player
Phone
Calendar
Contacts
Multimedia
Entertainment
Office
Tools
Radio
Music
Video
Online
Phone
Call log
Video phone
Speed contacts
Camera
Web
RSS feeds
TM
PlayNow
Picture gallery
Sound recorder
TM
MusicDJ
QuadraPop
Vijay Singh Pro Golf 2005
Demo
Quickoffice
Pdf
Notes
Tasks
Business card scanner
Control panel
File manager
Connections manager
Remote sync
Calculator
Converter
Stopwatch
Time
Timer
P990i Getting to know your phone 17
This is the Internet version of the user guide. © Print only for private use.
Page 18

Using the applications
Starting an application
You have the following options in the Main menu:
Flip open – rotate the Jog Dial to highlight an
•
application. Press the Jog Dial, or tap the application
icon/name, to start the application.
•
Flip closed – rotate the Jog Dial or press
or to highlight an application. Press the Jog
Dial or press to start the application.
Leaving an application
You can leave an application in two ways:
• Close it by using the back key or the back button.
All data is saved. The next time you open the
application, it will open in the base view.
• Leave it open and switch to another application
using Task manager, see Task manager on page 18.
When you switch back to it, you will return to the
same view you were in when you left it.
Closing an application
• Flip open – from the application base view, tap
or press on the side of the phone.
•
Flip closed – from the application base view, press
on the keypad or .
Task manager
Task manager helps you switch between applications.
Leaving an application via Task manager rather than
closing it, lets you return to the same view when you
switch back to the application. This is useful, for
example, when cutting and pasting text from one
application to another. To open Task manager:
•
Flip open – tap in the status bar.
•
Flip closed – press and hold the More key.
With the flip open, select the
to recently used applications, or select
open a new application from there. Y o u can also switch
directly to any ongoing call. To switch to an application
in the list, tap it or highlight it and select
options are also available with the flip closed.
With the flip open, you can also access some advanced
features on the
running applications, as well as those that are closed but
still reserve memory. Highlight an application and select
End to end the application and free up all the memory
used by it. From the Task manager menu, you can sort
the applications in the list by time, size or name.
Open tab. This tab contains a list of all
Recent tab. Y ou can switch
Main menu and
Switch. These
18 Getting to know your phone P990i
This is the Internet version of the user guide. © Print only for private use.
Page 19

Keypad and keyboard functions
Keypad functions
Navigation key
Press the navigation key up, down, left or right
to move in the required direction. Press for
example right to open the right tab. Press the
centre to perform the command that appears on
the screen just above the key or to select a
highlighted item.
In this User Guide , for example, means
press navigation key up.
Selection key
• The two keys are application-dependent
and perform the command that appears on
the screen just above the key.
• Press and hold the right selection key to
bring up Task manager.
Back key
• Return to the previous screen or menu.
• Dismiss a dialog.
• Send a busy signal to a calling party. It will
not end a call.
• Press and hold to return to the standby view .
Clear key
• Delete entered characters/digits one by one.
• Press and hold to delete entered words one
by one.
• Delete an entry from, for example, Contacts
or Calendar.
• Press and hold to mute the microphone
during a call.
• Mute the ring signal during an incoming
call.
Star
a/A
• Enter the character *.
• Press to switch between different input
types (Abc, ABC ...).
• Press and hold to change between
Predictive text and Multitap.
Hash
• Enter the character #.
• In text entry, press and hold to open the
symbol selector table.
• Terminate the input of PIN and security
codes.
• Retrieve a SIM card entry. Enter the
memory position number (1-999) and then
press .
• Press and hold to put the phone into silent
mode when your phone is in standby view.
P990i Getting to know your phone 19
This is the Internet version of the user guide. © Print only for private use.
Page 20

Numeric keys
• Enter digits.
to
• Enter associated characters or perform
associated functions.
• Press and hold “1” from the standby view to
initiate a call to voicemail.
• Press and hold one of the keys 2 to 9 to open
Contacts. 2 highlights the entry closest to
“a” and 9 the entry closest to “w”.
Keyboard functions
With the flip open you can use some of the keyboard
keys in all applications, not only when entering text.
Press and hold to open the virtual keypad for
instant dialling.
Use the arrow keys for navigation within the
or
application. Press an arrow key, for
example, to:
• Access the next or previous tab.
• Scroll through contacts with multiple
telephone numbers.
Press ALT + an arrow key to navigate up
and down, for example, in lists.
Press ALT + Shift/Caps simultaneously to
+
bring up the application menu in the open
application.
In standby view , if you press and hold any character key,
the Contacts list will be displayed starting with the
corresponding character.
Status bar icons
Below is a selection of icons appearing in the status bar.
With the flip open, you can tap an icon to get more
information or start an application.
Icon Function
3G Available
Battery strength
Bluetooth headset connected
Bluetooth on
Current line selection (when Alternate Line
Service available on the SIM card)
Divert all calls notification
Email notification
Flight mode
Infrared on
20 Getting to know your phone P990i
This is the Internet version of the user guide. © Print only for private use.
Page 21

Icon Function
Internet connection active (flashes when data is
transferred)
Key lock activated
Missed call notification
MMS notification
Muted microphone
Predictive text activated
Ring volume set to zero
Signal strength, packet data available
Silent mode
SMS notification
SMS overflow
Speakerphone activated
Status bar menu
Task ma nager
Wireless LAN active
Icon Function
Voicemail notification
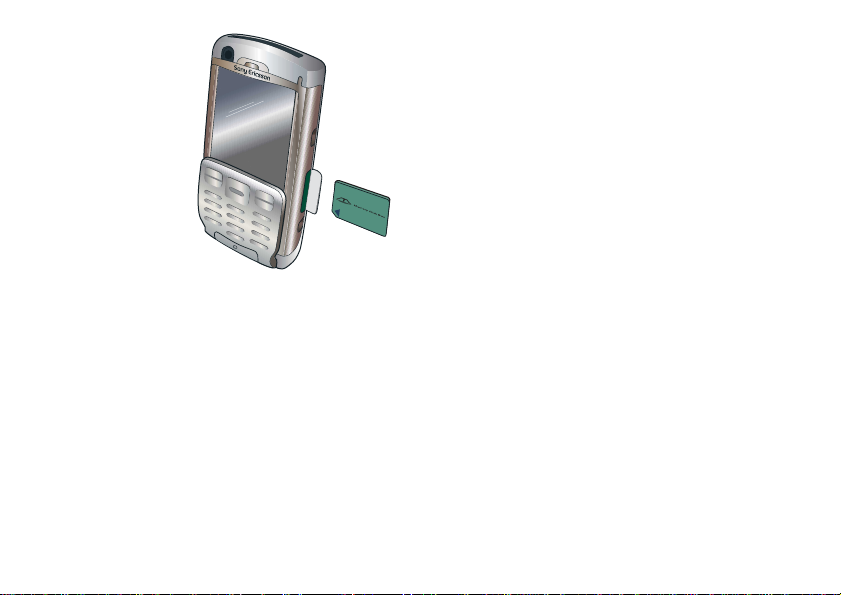
Memory Stick PRO Duo
There are Try and Buy applications that represent a wide
variety of business and entertainment applications prestored on the supplied Memory Stick PRO Duo ™. There
you also find information on how to buy the
applications. You can remove the pre-stored
applications from the Memory Stick to free up storage
space.
The Memory Stick also provides extra storage space
where you can store pictures, music, applications,
documents and so forth.To insert the Memory Stick,
open the cover and then insert it into the slot.
P990i Getting to know your phone 21
This is the Internet version of the user guide. © Print only for private use.
Page 22
To release the Memory
Stick, first press its
edge inwards and then
release it.
Important: Do not
remove a “busy”
Memory Stick. This
may cause the phone to
hang or corrupt the file
system on the Memory
Stick.
You can rename and
format Memory Sticks, and also organize data to and
from the Memory Stick. See File manager on page 93.
Memory Stick adapter
Your phone uses the shorter Memory Stick Duo or
Memory Stick PRO Duo variants. Use the Memory
Stick adapter when using your Memory Stick in a device
equipped with a regular Memory Stick slot.
22 Getting to know your phone P990i
This is the Internet version of the user guide. © Print only for private use.
Page 23
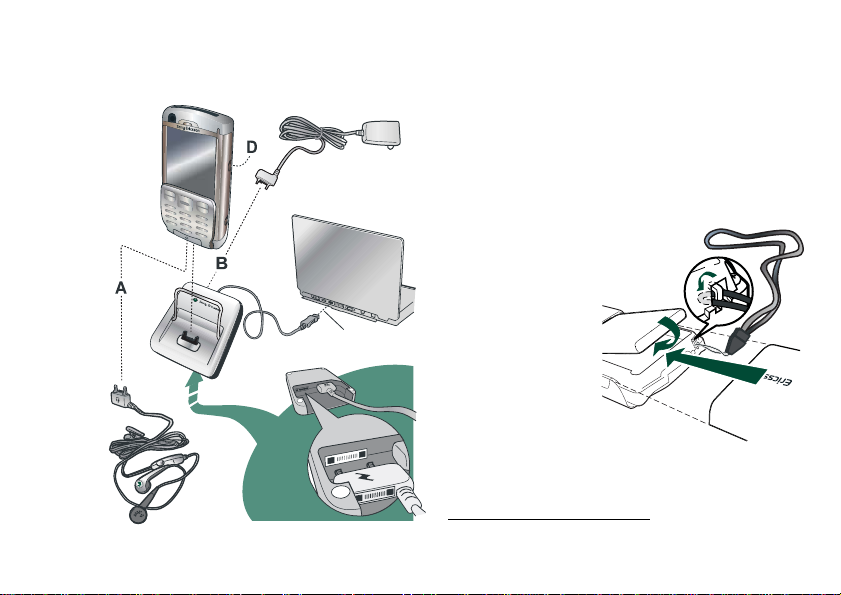
Connecting the included accessories
D
B
A
C
A. Connect the headset and other accessories to the
base of the phone.
B. Connect the travel charger to the desk stand or to the
base of the phone.
C. Connect the desk stand to a USB connector on a
computer.
D. Connect the car holder antenna to the antenna
connector at the rear of the phone.
Tip You can use the stylus to remove the plastic cup
covering the antenna connector.
Fastening the wrist strap
The wrist wrap can be
threaded through the
holes next to the
connector at the
bottom of the phone.
1.
2.
Updating
3.
software
When an improved
software version for your phone is introduced, you can
update it using the Sony Ericsson Update Service on
www.sonyericsson.com/support
P990i Getting to know your phone 23
This is the Internet version of the user guide. © Print only for private use.
. The Web page has
Page 24

further instructions and will guide you through the
process.
To run an update, you need a PC with an Internet
connection. Y ou also need to have the Sony Ericsson PC
Suite installed and a USB connection between your
phone and the PC.
General functions
pictures or change the size of the screen fonts. You can
choose between Small, Medium and Large.
Help in the phone
Your phone has built-in help texts that you can access
with the flip open. In most applications,
in the application menu. Some dialogs, for example, in
those where you make important settings, have specific
Help available. To view this Help, tap in the top
right corner.
Help is available
Send as
From many applications it is possible to exchange items
like appointments, contacts and images. Use the
command
between the following transfer options:
•SMS
•MMS
•Infrared
• Bluetooth
•Email
Send as in the application menus to choose
Organizing information
Using the Folder menu
In some applications you use folders to organize
information, for example, your contacts, task entries,
notes entries, or RSS feeds.
Note: These applications have their own set of folders.
A folder created in one application is not visible in
another application.
Zooming
In most applications, you can select the Zooming option
in the application menu. This allows you to zoom
24 Getting to know your phone P990i
This is the Internet version of the user guide. © Print only for private use.
Page 25
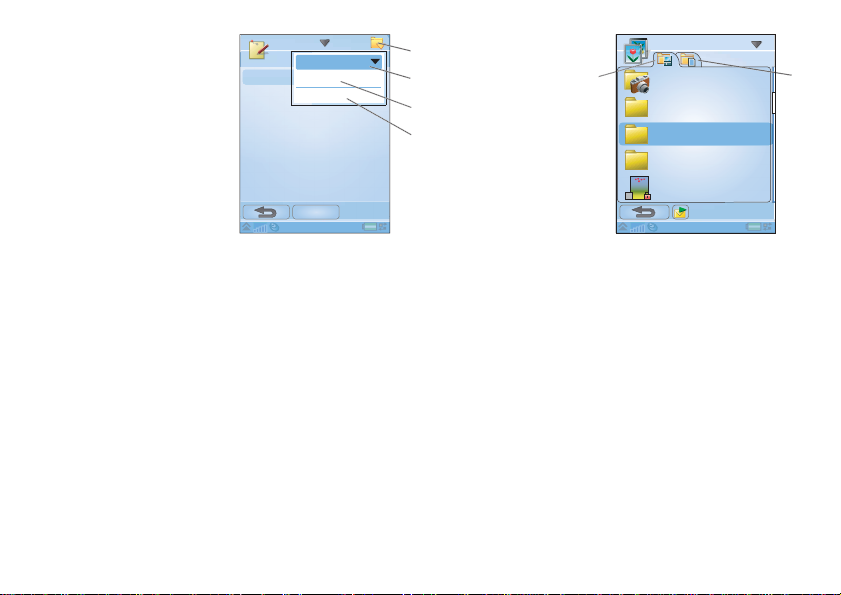
A. Folder menu.
A
A
B.
All folder . When this
is selected, entries
from all folders are
displayed.
Note: The
in Contacts does not
display the entries
on the SIM card.
C.
Unfiled folder. Each
application has its
own default folder,
so if you do not
create folders of your own, your items will be stored
in the
D.
Edit folders. Select this to rename, delete or add a
new folder. You can only rename and delete fo lders
you have created yourself. A folder can only be
All folder
Unfiled folder.
Note A
Notes
All notes
Unfiled
Edit folders
New
deleted if it is empty.
To display entries from a certain folder you select it in
A. Phone memory
tab.
B. Memory Stick
B
tab.
C
In the respective
application menu
D
you can find
functions for
copying, moving,
Picture Gallery
Camera folder
Business cards
Clipart
Frames
Plane
09:01, 30/05/05
renaming, and
deleting files.
When handling files you can select one or more files in
a folder. You can also add, rename and delete folders.
Managing your files in File manager
Using File manager, you can handle the content and
organization of media, both in the phone memory and on
the Memory Stick. See File manager on page 93.
B
the folder menu. A new entry is created in the folder that
is currently active in the application. You can later move
an entry to another folder.
Managing your multimedia files
You can organize your media files directly in the
respective multimedia application. The media folders
Text Entry
There are four ways to enter text in the phone:
Flip closed
•Use the keypad.
are displayed on two tabs.
P990i Getting to know your phone 25
This is the Internet version of the user guide. © Print only for private use.
Page 26

Flip open
• Use the virtual keyboard located in the status
bar.
• Write directly on the screen using the stylus.
• Use the keyboard below the screen.
Entering text with the flip closed
With the flip closed, you use the keypad keys to enter
text.
Editing text
Select More to access editing functions like copy, paste
and cut text, or if applicable to format text (size, style
and alignment).
Text options with the flip closed
When you are editing text you can select More > Text
to open the Text options menu:
options
• Add symbol – launch the symbols and punctuation
marks table. Use the navigation key to select an
item.
Note You can also open the symbol selector table by
pressing and holding the button.
• Input type – change the text input type between
(initial uppercase, the rest lowercase),
(lowercase entry), (uppercase entry) and
(numeric entry only).
Note You can also change the input type by pressing
a/A
the button.
• Auto capitalization – switch Auto capitalization on
and off.
• Predictive text – switch between Predictive text,
in the status bar, and Multitap text entry. See
below.
When the Predictive text is selected you can also select:
• 1st language – change the 1st language choice for
the prediction dictionary.
• 2nd language – change the 2nd language choice for
the prediction dictionary.
• Spell word – spell a new word to be entered to the
user dictionary.
• My words – view the user dictionary where you can
add, edit or delete words.
• Word suggestions – switch the word suggestion list
on and off.
A
Aa
a
12
26 Getting to know your phone P990i
This is the Internet version of the user guide. © Print only for private use.
Page 27
Multitap text entry
When you press a key, a pre-edit box with the different
characters on that key is shown in the title area:
If the same key is pressed again, the next character in the
pre-edit box will be selected.
Note: To enter digits you can also press and hold the
corresponding key.
The key deletes the character to the left of the
cursor. If continuously pr essed, the key deletes several
characters and then whole words.
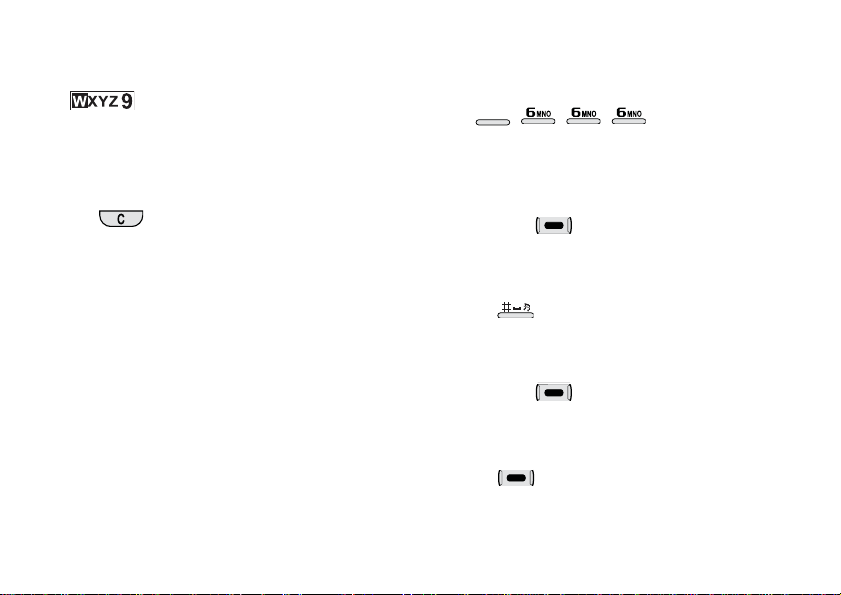
Predictive text with the flip closed
The Predictive text method uses up to two language
dictionaries to recognize the most commonly used
words for each sequence of key presses. In addition,
word completion and next word prediction software is
used to complete or predict words without requiring
every letter to be entered. This way, you only need to
press each key once at the most, even if the letter you
want is not the first letter on the key.
The following example shows how to start writing text.
To enter words using Predictive Text
1. Select, for example,
message > Create SMS
Messages > Create new
.
2. If you want to write the word “tomorrow”, press
TUV
8
suggestion list with word candidates is presented.
The most frequently used word is shown where yo u
are writing, and is also highlighted in the suggestion
list.
. During text entry, a
3. If the word shown is the word you want:
– Press or press the Jog Dial inwards to
accept the word. (The word tomorrow only
requires four key presses with the Predictive text
method.)
To accept the word and add a space, press
.
If the word shown is not the one you want:
– Scroll with the navigation key or the Jog Dial up
or down to view alternative word suggestions.
Press to accept the word.
If you do not find the word you want:
–Select
More > Text options > Spell word.
– Edit the word using Multitap text and select
. The word is added to the user
dictionary. The next time you enter the word, it
will appear as one of the alternative words.
P990i Getting to know your phone 27
This is the Internet version of the user guide. © Print only for private use.
Page 28

4. Continue writing your message.
5. Press to enter a full stop. To enter other
punctuation marks, scroll with the navigation key or
the Jog Dial to view the alternative symbols.
Entering text with the flip open
Editing text
Select the application menu to access editing functions
like copy, paste and cut text, or if applicable to format
text (size, style and alignment).
Copy and cut
To get access to copy or cut functions you must first
highlight the text. T o highlight text with the stylus, hold
the stylus on the end of the text, wait a moment, and then
drag the stylus across the text you wish to copy or cut.
To highlight text with the, keyboard, see Highlighting
text on page 30.
Text options with the flip open
The text options with the flip open are almost the same
as with the flip closed with some exceptions. When you
are editing text, select
menu to:
• Add symbol – launch the symbols and punctuation
marks table.
• Auto capitalization – switch Auto capitalization on
and off.
• Predictive text – enable or disable Word complete
and Next word prediction, in the status bar.
When the Predictive text is selected you can also select:
• 1st language – change the 1st language choice for
the prediction dictionary.
• 2nd language – change the 2nd language choice for
the prediction dictionary.
• My words – view the user dictionary where you can
add, edit or delete words.
Text options in the application
Keyboard
With the flip open
you can use the
keyboard to enter
text and for
navigation.
When you press a
key, if there are
additional
28 Getting to know your phone P990i
This is the Internet version of the user guide. © Print only for private use.
Page 29

characters associated with that key, then these will be
shown in a pre-edit box in the title area:
If the same key is pressed again, the next character in the
pre-edit box will be selected. (The pre-edit box will be
displayed on screen for as long as you have the key
depressed.) When the key is released, the highlighted
character will be selected.
Press to delete the character or spaces to the left of
the cursor. Press and hold to delete several
characters and then whole words.
Press the to enter a character space to the right of
the cursor.
Changing input type
You can change your text input type as described in the
list below. Icons are displayed in the status bar to show
selected input type:
Aa
First letter upper case
Press once followed by, fo r
example, E to write a capital E. Any
additional keys pressed will be
displayed in lowercase.
A
All upper case
Press twice for caps-lock. Any
additional keys pressed will be
displayed in uppercase until is
pressed again to remove caps-lock.
Press once followed by, for
12
example,
E to type the number 3. Any
additional keys pressed will display the
standard characters on the keys.
123
All upper characters
Press twice to lock the coloured
characters. Any additional keys pressed
will type the coloured characters until
is pressed again.
Note: Simultaneously pressing with a character
key will insert an uppercase character. Releasing
after this action will revert the case to lowercase. The
same principle applies when and a key is press ed
to access a symbol from a key.
Inserting symbols
There are a number of ways to insert symbols with the
keyboard.
P990i Getting to know your phone 29
This is the Internet version of the user guide. © Print only for private use.
Page 30
• Press the or keys to show additional
symbols in the pre-edit box in the title area.
• Use the to access the coloured symbols on the
keys.
• Press and to bring up the application
menu. Select
the symbol selector table. Use the Jog Dial to scroll
within the table, and select the symbol by pressing
the Jog Dial. You can also select a symbol by using
Text options > Add symbol to open
the stylus.
Navigating within text
Press or for horizontal navigation within text
entry.
Press and or for vertical navigation
within text entry.
Highlighting text
Press and or simultaneously to highlight
text to the left or the right of the cursor.
Indenting text
Press and to indent the text (tab function).
Virtual keyboard.
A. Select this icon
to open or close
the virtual
keyboard.
B. Drop down
menu. Select
>
Setup to
change the
language of the
virtual
keyboard.
C. The current input field. Tap the arrows or rotate the
Jog Dial to change the input field.
D. Character sets.
international characters, 123 - numeric characters
and currencies.
B
C
D
abc - standard characters, àëó -
Handwriting recognition
Handwriting recognition translates stylus gestures into
letters, numbers or other characters, and displays these
Notes
Minutes of meeting
Minutes of meeting
meeting meet meetings
cap
abc
åäö
123
Done
,
?
@
characters as text. Handwriting recognition is only
active in places where text can be entered.
30 Getting to know your phone P990i
This is the Internet version of the user guide. © Print only for private use.
A
Page 31

A. Arrow that splits
the text mode
screen into an
upper part and a
lower part.
B. Write numbers
and symbols
above the arrow.
C. Write uppercase
letters in line
with the arrow.
D. Write lowercase letters below the arrow .
To select icons or buttons, tap and hold them using the
stylus.
Note: Most letters can be written using different stroke
styles. See the tables below. The style does not determine
case. The position on the screen decides case, not the
style.
B
C
D
First name
Dan
Mobile:
Save Cancel
Letters
A
Lowercase letters are written below the arrow and
uppercase letters in line with the arrow.
a
b
c
d
e
f
g
h
k
m
2
2
1
i
2
2
1
1
j
1
2
l
n
o
p
q
r
1
s
1
t
2
u
v
w
1
2
x
y
z
@
.
,
?
1
!
2
&
'
"
P990i Getting to know your phone 31
This is the Internet version of the user guide. © Print only for private use.
Page 32

Note: Start each stroke at the dotted end.
Numbers
Numbers are written above the arrow.
0
1
2
3
4
5
6
7
Note: Start each stroke at the dotted end.
32 Getting to know your phone P990i
8
9
+
*
/
\
(
)
=
or
.
,
Accented letters
Write the character as described above, then write the
accent above the arrow. Other such characters, for
example, ö and ü, follow the same principle.
*
Note: Start each stroke at the dotted end.
Extended characters
To write symbols and characters that are not shown in
these tables, please consult the Extended characters
section of the Handwriting recognition help topic in
your phone or visit www.sonyericsson.com/support
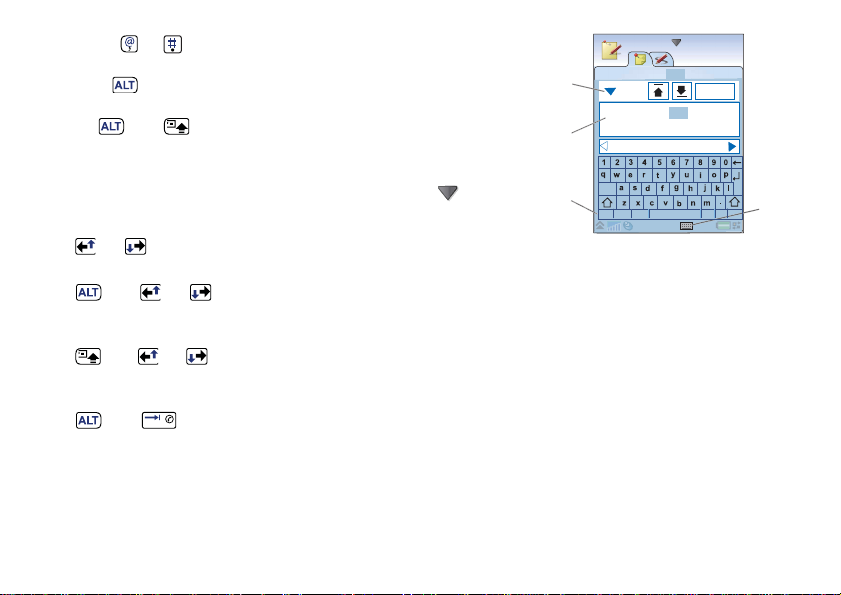
Predictive text with the flip open
You can use Predictive text when writing with the flip
open in all three methods: Keyboard, Virtual keyboard
and Handwriting recognition. The word or next word
predictions are presented where you are writing and also
in a predictive text suggestions window, but u nlike Flip
closed they are complementary. While entering text, you
have the option to either select any of the word
suggestions displayed, or to ignore them and continue
entering text via your chosen method.
S
.
This is the Internet version of the user guide. © Print only for private use.
Page 33

Note: If a prediction suggestion is displayed when you
are sending or saving the text, this word will not be sent
or saved.
Selecting words
You select word suggestions in different ways
depending on your chosen method:
• Handwriting recognition & Virtual keyboard –
Tap the selected word with the stylus, or tap the
small left and right arrows on either side of the
Predictive text suggestions window to scroll through
any additional words (if available).
• Keyboard – Press the key to select the primary
suggested word.
To select the secondary and additional word suggestions
press key to highlight the word and press to
select it.
Note: The Jog Dial can be used in all text entry methods
to highlight and select suggested words.
Key lock
You can turn the key lock on and off by using the key
and touch screen slider on the left side of the phone. For
information about the Automatic key lock, see
Automatic key lock on page 131.
Sound
Adjusting volume
During phone calls or when listening to music or the FM
Radio, the easiest way to adjust the sound level is to
rotate the Jog Dial. When using a Bluetooth headset, you
can use either the Jog Dial or the volume control on the
headset. If you are working with another application and
you need to adjust the sound level of, for example, an
ongoing call or music, select
volume dialog. When you are in standby view with the
flip closed, select
More > Volume.
> Volume to open the
Locks
The phone has four security locks that you can set fr om
the Control panel. See Locks on page 129.
Silent mode
With the flip open, tap in the status bar, select
Volume and mark Silent mode. To exit silent mode, tap
and unmark
press and hold from the standby view. You can
also select
Silent mode. When the flip is closed,
More > Turn on silent.
P990i Getting to know your phone 33
This is the Internet version of the user guide. © Print only for private use.
Page 34

Selecting sounds
Select > Volume > Settings from the status bar, or
select
Tools > Control panel > Device > Sounds and
to access settings such as ringtones, button clicks
Alerts
and equalizer, see Sounds & alerts on page 125. You can
also set individual ring signals for your contacts, see
Managing contacts on page 60.
Transferring sound
During an ongoing call or audio playback, you can
transfer the sound, for example, from the speaker to a
Bluetooth headset. With the flip open, tap to open
the status bar menu and select
the flip closed and in standby view, select
Volume > More > Transfer sound
is also available from the menus within the relevant
applications. It may not be possible to transfer sound
during playback of copyright-protected material.
Volume > Transfer. With
More >
. The transfer function
To keep data when replacing an old smartphone
1. Using the old Sony Ericsson PC Suite, synchronize
your old phone with the relevant computer
applications and copy other required files to the
computer.
2. Uninstall the old Sony Ericsson PC Suite and restart
your computer.
3. Install the new Sony Ericsson PC Suite. For more
information, see Installing PC Suite on page 95.
4. Using the new Sony Ericsson PC Suite, synchronize
your new phone with the relevant computer
applications and copy other required files to the
phone. For more information, see Synchronization
and backup on page 99.
All data from the old phone has now been transfer red to
the new one.
Transferring data between phones
If you are upgrading from an old smartphone, you can
transfer data, such as calendar entries and tasks to your
new smartphone.
34 Getting to know your phone P990i
This is the Internet version of the user guide. © Print only for private use.
Page 35

Phone
You can use the Phone application with other functions
of the phone, including applications from outside Sony
Ericsson. Some special features are:
• Personalized polyphonic ringtones.
• Multitasking – use other applications during a call.
• Handling of two lines on the SIM card (ALS).
• Handling of voice controlled calls.
Making a call
Y ou can make a call fr om many of the applications. This
chapter mainly describes the Phone application calling
options.
Making a call from the application
Open Phone and enter the desired phone number on th e
keypad or, if the flip is open, use the virtual keypad.
Select
OK.
Making a call from standby view
When no application is open, you can make a call
directly from the keypad. When you press the number
keys, the phone application is launched automatically.
Enter the desired number and select
Note: With the flip open, press and hold the space bar
key on the keyboard to display the Phone application’s
virtual keypad. Enter the number and select
Call.
OK.
Features when dialling
Some features available when dialling a number are:
• Delete characters – press to delete
characters.
• International call prefix – press and hold
• Hide/show ID – select the
• Speed dial – press the number key corresponding to
• Send DTMF tones – press keys on the keypad if
to get the international call prefix.
and show ID
show your number for the called party. Y ou can
only select the option after entering the number but
before initiating the call.
your speed contact and select
dial call.
you, for example, are calling a bank. See
Controlling tone-based services on page 39.
option in the Phone menu to hide or
Call and hide ID/Call
Call to make a speed
P990i Phone 35
This is the Internet version of the user guide. © Print only for private use.
Page 36

More ways to make a call
Making a call from other applications
Y ou can also make a phone call from other applications.
Whenver a phone number is available as a link, you can
select the number and immediately get a calling option.
Making a call by using voice control
If you have activated the voice control feature and made
the necessary settings, you can make a call to a contact
by saying the contact’s name. See Voice control on
page 39.
Making an emergency call
You can make an emergency calls as follows:
• Enter the emergency number from the keypad. Press
the Jog Dial or select
• Select a pre-defined SOS number in the
menu. Press the Jog Dial or select Call.
Call.
Phone
Usually no SIM card or PIN code is required for
emergency calls, but this is something you need to check
with your operator.
Receiving a call
• Answer – select
control. See Voice control on page 39.
• Send Busy
using voice control.
• Reject with SMS – reject the call by sending an
SMS text message to the caller. Select
> Send SMS > Send. See Reject with SMS on
page 115.
• Reject and create a reminder
the call and choose whether you want to create a
reminder to follow up the call at a later date. See
Flag Call on page 114.
Options during or after a call
You can find the following options in either of the
Phone and More menus, or on selections keys:
Mute the microphone – disconnect the microphone
•
after you have answered.
•
Speakerphone on – transfer the sound to the
speakerphone during a call. See Speakerphone on
page 38.
•
Show contact – display the corresponding entry in
Contacts, or access DTMF tones sequences stored in
Contacts.
•
Add call/Hold/Retrieve – make a call during a call,
put the active call on hold, or retrieve a held call.
Yes, or answer by using voice
– reject the call by pressing or by
Phone menu
– select No to reject
Handling an incoming call
Y ou can handle an incoming phone call in several ways:
36 Phone P990i
This is the Internet version of the user guide. © Print only for private use.
Page 37

• Transfer sound – transfer a call to a Bluetooth or a
regular headset, or to the speakerphone. See
Handsfree settings on page 114.
•
Turn on tones/Turn off tones – choose whether you
want to turn DTMF tones on/off.
•
Create task – create a task in Tasks.
•
Make note – make a note in Notes. (Call data is
automatically entered).
•
Call voicemail – check the messages in your
voicemail box. See Voice mail on page 116.
Handling two or more calls
You can handle more than one call at the same time, as
follows:
• Put an ongoing call on hold and start a new one, or
answer an incoming call.
• Start a conference call during an ongoing call.
(operator-dependent)
• Extract one party in a conference call for a private
talk and put the conference call on hold.
• Make a call on another line (if ALS is available)
• Retrieve a held call, or release it.
Conference calls
A conference call can be
started when you have one
active call and one on hold.
Select
Start conference call
in the
Phone menu to start the
call. If you answer an
incoming call during a
conference call, the
conference call will be put on
5:18 pm
hold. The maximum number
of conference parties is five.
Note: Conference calls are only available if they are
supported by your operator.
1
Phone
Conference
2
3
10.12
End callHold
Making a new call on another line
When ALS (Alternate Line Service) is available on your
SIM card, you have two lines and two phone numbers
within your subscription. You can choose which line
you want to use for outgoing calls. See ALS settings on
page 116.
One of the lines can be used for both data and voice,
while the other can only be used for voice calls.
Incoming calls can be received on both lines at the same
P990i Phone 37
This is the Internet version of the user guide. © Print only for private use.
Page 38

time. The current line is shown by the ALS
icon, or , in the status bar. To switch to the other
line, tap the icon.
Call log
All your calls are being logged in the application Call
. Here you can find c all information, such as the type
log
of calls, time, date, phone numbers and call lengths. Yo u
can choose any of the four tabs to display the logged
information.:
All calls
Answered calls only
Dialled calls only
Missed calls only
You can also make phone calls and call notes directly
from this application.
More features
Speakerphone
You can activate the speakerphone during a call in two
ways:
• Rotate the Jog Dial to bring up the
dialog. Select to transfer the sound to the
speakerphone. (You can also adjust the volume).
• Select
Note: The speakerphone does not wo rk when the phone
is in silent mode.
WARNI NG! The volume may be uncomfortably loud at
the higher volume levels if the phone is close to your ear .
This may also damage your hearing.
Speakerphone on/off in either of the Phone
and More menus.
Setting up speed dial numbers
Speed dial numbers are abbreviated numbers, number
keys to , which are used to reach your
nine Speed contacts from the keypad. To set up your
Speed contacts, see Creating a speed contact on
page 59.
Transfer sound
38 Phone P990i
This is the Internet version of the user guide. © Print only for private use.
Page 39

Abbreviated numbers and shortcut s
For a fast access to, for example, your voicemail and
other features, you can use abbreviated numbers and
shortcuts. See Keypad and keyboard functions on
page 19.
Controlling tone-based services
You can use your phone for phone banking services or
other tone-based services that use DTMF (Dual Tone
Multi Frequency).
You can send tones during a call as follows:
• Press the keypad keys during an active call.
• Include a tone sequence when dialling.
• Use digit sequences stored in Contacts entries. See
Adding a DTMF tone sequence on page 60.
To make it easier to use phone services, you can store
tone sequences in fields in Contacts. Each tone sequence
must start with a
Note: Y o u should not store any secret personal codes in
your phone, in case it gets stolen or lost.
One way to store a tone sequence in Contacts is that you
make, for example, a banking call and use the
option in
p and end with a space.
Copy
Phone and the Paste option in Contacts.
To include a 3-second pause in a tone sequence, use the
p by pressing and holding with the flip
letter
closed. Use as many
p:s in a row as required.
a/A
Tip Call your bank’s service number and time the length
of the spoken instructions, so that you know how long the
pauses you include in your tone sequence should be.
V oice control
The voice control feature lets you manage calls by usin g
your voice. With Voice answer you can use words
recorded for “answer” and “busy” to answer, or to send
a busy tone to an incoming call. With Voice dialling, you
can make a call by saying a contact’s name.
A ‘Magic word’ is used to activate the V oice dialling, to
ensure that the phone does not call anybody whose name
has just been mentioned by chance. (To read more about
the Magic word, see Voice control on page 115). You
can activate the Voice dialling feature in any of the
following ways:
• Say the ‘Magic word’ (only supported when a
regular headset or a car kit is attached to the phone).
• Press and hold the call button on a headset, or press
the button on a Bluetooth headset.
P990i Phone 39
This is the Internet version of the user guide. © Print only for private use.
Page 40

• Press and hold the Jog Dial from the standby view
(also supported when no equipment is attached to
the phone).
To make a call, wait for the tone to finish, and then say
the voice command linked to the contact you want to
call. For information about settings, see Voice control on
page 115.
Calling cards
There are two main types of calling cards: corporate and
commercial cards. With a corporate card you can use
your phone as a corporate phone, and get access to
special services since all your calls pass through a
corporate switchboard.
A commercial calling card is either a “real” plastic card,
containing number information, or just a phone number
provided over the Internet. The calls you make pass
through a calling card server, which usually allows you
to make international phone calls at a lower cost. See
Calling cards on page 112.
Business phone services
Your mobile phone can be used with a corporate
switchboard. For information about setting up business
phone services, see Business phone services on
page 113.
Handsfree and Bluetooth
You can choose whether you want to use a regular or a
Bluetooth headset with your phone. See Handsfree
settings on page 114 and Bluetooth wireless technology
on page 117.
Diverting calls
Y ou can divert inco ming calls to another numb er, if you
for any reason are unable to answer. See Divert calls on
page 114.
Accepting calls
You can specify who should be able to call you. All
other callers will be blocked. See Accept calls on
page 112.
Restricting calls
You can set restrictions for calls made from, or to, your
phone. For example, you can prevent it to be used for
long distance calls. See Restrict calls on page 115.
40 Phone P990i
This is the Internet version of the user guide. © Print only for private use.
Page 41

Call waiting
You can choose whether you should be alerted or not
when a new call is coming in during an ongoing call. See
Call waiting on page 114.
Call meter service
The Call meter service allows you to keep track of the
costs of calls, and to prevent you from making calls
when a certain credit limit has been exceeded. See Call
meter on page 116.
Note: The service is available only if it is supported by
your operator.
Support for TTY
To use a teletype (TTY) device with the phone, connect
the device at the base of the phone. See TTY Settings on
page 115. For further information, refer to your TTY
device supplier’s product information.
Note: Y ou can still make normal calls when the phone is
in TTY mode, but other accessories, such as handsfree,
will not work properly.
P990i Phone 41
This is the Internet version of the user guide. © Print only for private use.
Page 42

Video phone
When you make a video call, you can see the person you
are talking to on the screen. By using Video phone you
can:
• Explore the application in Demo mode (off-line).
• Zoom the outgoing video.
• Show both incoming and outgoing video.
This chapter describes the use of the application with the
flip open, unless otherwise stated.
Demo mode
When you open Video phone, the application starts in
demo mode (off-line), which means that you can explore
the functionality without initiating a call. All options are
available.
Making a video call
Before making a video call
Before you make a video call make sure that:
• Both you and the called party have 3G SIM cards
and 3G phones.
• A 3G network is available.
Note: This function is network- or operator-dependent.
The service may not always be available in all countries
or when you are roa ming. Please contac t your operator
for information about your subscription and video calls.
Making a call from the application
Select Video phone and choose the appropriate option:
Flip closed – enter the number from the keypad and
•
select OK.
•
Flip open – tap to bring up the Virtual keypad.
Enter the phone number and se lect OK.
Making a call from standby
You can make a video call from the standby view:
Flip closed – enter the number on the keypad and
•
select Video call.
•
Flip open – select the Phone shortcut and tap
the video call tab . Enter the number and select
OK.
42 Video phone P990i
This is the Internet version of the user guide. © Print only for private use.
Page 43

Other ways to make a video call
You can also make a video call from other applications .
Whenever a phone number is available as a link, you can
select the number and immediately get a calling option.
Receiving a video call
When the phone indicates that you have an incoming
video call, you can either accept or reject the call:
• Accept
• Reject
– select Yes. The front camera is switched
on by default.
– select No to reject a video call.
Zoom
You can zoom the outgoing
video feed in the large
window between four zoom
levels.
Use the buttons and
to zoom. The magnifying
glass is displayed when the
picture is fully zoomed out.
When you zoom, the current
zoom level is displayed.
Video phone
05:37
Stop camera End call
Pause picture
Video call options
Switch between front and rear camera
The outgoing video feed is by default captured with the
front camera and shown in the small window.
If you select Camera from this default state, the
outgoing video feed will instead be captured with the
rear camera and shown in the large window, while the
incoming video will be shown in the small window. If
you select
Camera again, the default state will return.
If the outgoing video feed is stopped, a pause picture is
sent to the other person. You can set a pause picture in
Video phone menu > Advanced > Paused picture. You
can use any picture that you have stored in the phone.If
you do not set a pause picture, a default picture will be
shown.
Options in the Video phone menu
You can find these options in the Video phone menu
when you make a video call:
P990i Video phone 43
This is the Internet version of the user guide. © Print only for private use.
Page 44

• Start camera/Stop camera – start or stop your
outgoing video feed. When the camera is paused,
the pause picture is sent.
•
Switch pictures – switch the incoming and the
outgoing video during a call. The large and the
small picture change place.
•
Use front camera/Use rear camera – select either of
the cameras, front or rear, to be used for the
outgoing video. The outgoing video feed is shown
in the large picture.
•
Hide small picture/Show small picture – choose
whether to remove the small picture from your
display.
•
Turn on night mode – use this option to get a
brighter image when the lighting is poor.
•
Share data – send a Vcard, SMS or MMS message.
Options in the Advanced menu
You can make these settings in Video phone menu >
Advanced, preferably before you use the application.
Answer mode – you can choose whether the camera
•
should be started automatically when a call starts.
You can also choose if the rear or front camera
should be used as the default camera when a video
call starts.
•
Mirror image – your front camera image is reversed
so that you see yourself as in a mirror. This does not
affect the image that is sent to the other phone.
•
Paused picture – you can choose an alternate pause
picture from the pictures you have stored on the
phone.
When you receive a video call, you can select extra
options:
Speakerphone off/Speakerphone on – turn the
•
speakerphone on or off.
•
Mute microphone/Unmute microphone –
disconnect or connect the microphone.
•
Transfer sound – choose one of the options to
transfer the sound.
•
Create task – create a task in the Tasks application.
•
Make note – make a note in the Notes application.
44 Video phone P990i
This is the Internet version of the user guide. © Print only for private use.
Page 45

Messaging
You can create, send, and receive differen t types of
messages:
SMS (Short Message Service), which are text
messages.
MMS (Multimedia Message Service), which, for
example, can include text, pictures and sound.
Email messages.
Beamed messages, which are files received via
infrared or Bluetooth.
Auto setup files for configuring Internet, email
and MMS.
You can also receive these types of messages:
Area information messages, which are text
messages broadcast to all subscribers in a
network area, for example, local road reports.
(Area information services are not available
from all service providers.)
Wa p push messages, which make certain Internet
content available in your phone’s browser.
Before using
Before you can send and receive any messages (except
for SMS) you need to set up the necessary accounts. See
Setting up Internet, email and MMS on page 101, and
sections describing SMS and area information setup in
Messaging settings on page 128. You can also find
additional settings in Control panel.
Folders
The different types of messages are handled by dif ferent
accounts. The default account,
messages except email. Email messages are handled by
email accounts you create during setup. All accounts
consist of a number of folders. You can also create your
own, local, folders.
The following folders are used:
•
Inbox in Messages – contains all received messages
except email messages. In Control panel, you can
set how you will be notified when a message is
received.
•
Inbox in an email account – contains the received
email messages for that particular account. In
Messages, handles all
P990i Messaging 45
This is the Internet version of the user guide. © Print only for private use.
Page 46

Control panel, you can set how you will be notified
when a message is received.
•
Outbox – contains messages ready to be sent. You
can move a message from this box to the Drafts
folder.
•
Drafts – contains messages that are not ready to be
sent. When you are creating a message, and exit the
message before sending it, you will be asked if you
want to save it. If you select Yes, the message will
automatically be stored in this folder.
•
Sent – contains messages you have sent.
•
SIM – a folder located on your SIM card.
You may also find the following types of folders:
• Local folders that you have created yourself.
• Remote email folders on your email server that you
have subscribed to (these require that you have
selected connection type IMAP during setup).
The figure shows
the main view in
Messaging.
A. Shortcuts to
call voicemail
and to create a
new message.
A
B
C
D
B. Account for all
message types
except email.
C. Folder line.
Select the
arrow to change folder. Select the folder name to
E
Messaging
Call
CallVVoicemaioicemail
Create new message
MessagesMessages
InboxInbox
Email
Email
Inbox
Inbox
Home
Inbox
Inbox
0 unread0 unread
0 unread
0 unread
1 unread
open the folder.
D. Email account. You can have as many email
accounts as you like.
E. A new message has been received.
F.
Messaging menu. Select the title to find menu
options.
SMS
A message can contain up to 160 characters. If you
create a longer message it will be sent as two or more
separate messages (concatenated), but will usually be
received as one message. If you add pictures, sounds and
46 Messaging P990i
This is the Internet version of the user guide. © Print only for private use.
F
Page 47

other items to your message it becomes an EMS
(Enhanced Message Service) message.
You can answer an SMS with an MMS. You can also
receive a delivery report, see SMS on page 129.
MMS
Multimedia messages can include pictures, video clips,
animations and sound, organized like a slide
presentation with time-based control of the playback.
You can answer with an SMS.
If the sending or receiving of messages is interrupted,
the sending or receiving will resume when it is possible,
without losing information.
Creating and sending MMS
Select Messaging >
Create new
message > MMS
New > MMS, if you
have opened the
, or
A
B
Messages account.
A. Menu options.
You can select a
template, or
select what you
want to add to the
C
message. (If the
menu is not open, select .)
B. Entry field (on the detail tab). Create your message
here.
1/1
MMS
5
Select template
Picture
Text
Scribble
Sound
Video
Take picture
Record sound
Make video
1 KB
C. Playback buttons.
D. New page icon. Select this to open a new page.
E. Time view icon. Select this to open a view where
you can adjust when and for how long your added
items will be shown.
F. Address tab. Select this to enter the recipient and
other details.
G. Attachments tab. Select this to add attachments.
(The tab is only visible if
Free or Warning. See Send tab on page 110.)
Creation mode is set to
P990i Messaging 47
This is the Internet version of the user guide. © Print only for private use.
G
F
E
D
Page 48

You can edit pictures you have added. While you are
creating a message you can leave it to take a picture or a
video film, and then return to the message to add the
picture or film.
When you are ready, select
Send.
Incoming MMS
Select the new message. The first time you open the
message it plays automatically. After that, you have to
use the playback buttons to play it. You can forward and
reply to a multimedia message.
D. Address tab. You
can enter the
address here and
other details, such
as message
priority.
E. Attachments tab.
Select this to add
attachments.
When you are ready,
select
Send. You will
A
B
C
To:
Subject:
Send Cancel
have the option to
send the message immediately, or to save it to Outbox.
E
D
Email
You can create email messages from each email
account.
Creating and sending email
Select Messaging > Create new message > your email
account, or
A. Address field. Select this to enter the address.
B. Subject field. Select this to enter message subject.
C. Entry field (on the detail tab). Write the message
New, if you have opened an email account.
here.
Receiving email
Email messages must be fetched from the email server
on the Internet or at your office. This can be done
manually using the
by setting your phone to check for new email at certain
times.
If you have a special IMAP account, you have the
possibility to automatically receive messages from your
server. This service is service provider-dependent.
When you forward an email message, you can choose
whether to forward the attachment. Large attachments
Get & send option or automatically
48 Messaging P990i
This is the Internet version of the user guide. © Print only for private use.
Page 49

increase the size of an email and the connection time
needed to send it.
You can choose not to receive large messages and only
to receive a header.
To view th e body of an open HTML-mail me ssage with
MHTML-formatting, select
To fit the text to the width of the screen also select
Settings > Always fit to screen
Y ou will see the priority of the messages in the different
inboxes.
To view an attachment you need a viewer for that type
of file. Y our phone comes with pre-installed viewers for
Microsoft® Word®, Excel®, PowerPoint®, and
Adobe® Acrobat® files.
Settings > Display MHTML.
.
Deleting email
Y ou can delete a message both locally and on your email
server. When you delete it locally , the message body and
attachments are deleted but the heading remains. You
can fetch the message again later with the
option. When you delete the message in your server, it is
deleted both in your phone and on your server .
Get & send
More about Messaging
Some common messaging and email functions are
described below.
Finding messages
Select Messaging menu > Find message to search
through the subject lines, senders’ details and the text of
the message. In an open message,
searches through the message.
Get and send
To get and send mes s ages for all your accounts, the
default Messages and all your email accounts, select
Messaging menu > Get & send. To get and send
messages from a specific account, for example an email
account, first open the account and then select your
account menu
> Get & send.
Saving contact details
When you receive a message, you can save the contact
details of the person who sent the message.
Entering more than one recipient
When you create a message, and want to send it to
several recipients, type a comma between each address.
Find message
P990i Messaging 49
This is the Internet version of the user guide. © Print only for private use.
Page 50

You can also add addresses and address lists from
Contacts.
calendar will be updated automatically. You can also
reply to and forward an invitation.
Full screen view
You can view and edit your email messages and MMS
in full screen view.
Disconnecting from the Internet
Select a connection icon, for example , in the status
bar. In Connections manager , select your connection and
then
Close connection.
Push email
You can install a push email application on your phone.
With push email, email messages received in your
ordinary mailbox will automatically be sent to your
phone. You can send messages from your phone, and
also use Calendar
ordinary email application in your computer. Please
consult your email service provider for further details.
and Contacts as if you were using the
Email synchronization accounts
With these accounts you can create email messages in
your phone and let your computer send them. An
account for synchronized email is automatically created
in your phone when you set up an email synchronization
with your computer. When you have created an email
message in your phone, it will automatically be sent by
your computer the next time you synchronize.
Invitations
If you receive an invitation to an appointment via an
email message, you can choose to accept or decline the
appointment using your phone. If you accept, your
50 Messaging P990i
This is the Internet version of the user guide. © Print only for private use.
Page 51

Camera
Your phone has a digital camera that also works as a
video clip recorder. You can take pictures, record video
clips, store them on a Memory Stick or in phone
memory, view them and send them directly as an MMS
message. You can also send pictures and clips using
Send as, see Send as on page 24.
Exposure control is automatic, with manual
compensation so that you can adjust picture brightness.
Y o u can set the camera to focus automatically. A macro
mode setting allows you to take extreme closeups.
The zoom level is adjustable from 100 to 250 percent.
Y o u can save pictures and clips in different frame sizes,
(pixel resolutions). This allows you to choose the quality
of a picture or clip in relation to its use. The number of
pictures and clips that you can save on the Memory Stick
or in the phone will vary with the frame sizes of your
pictures and clips.
The built-in photo light is useful when taking still
pictures in poor lighting conditions. A Night Mode
setting is also available.
You can take pictures with overlay frames, with filter
effects such as sepia toning, or black and white pictures
by changing the camera settings.
Use the camera with the flip open or closed. This guide
describes using it with the flip closed.
To activate the camera
You can activate the camera in two ways:
• Open the lens cover.
• Press the camera button.
See Overview on page 11, all the way down. It also
activates when you select
indicator next to the camera button lights while the
camera is activating. When you activate the camera it
will be set to the shoot mode (of the four available: still
pictures, video recording, burst of four pictures, pictures
with frames) last chosen with
Multimedia > Camera. An
Settings > Shoot mode.
P990i Camera 51
This is the Internet version of the user guide. © Print only for private use.
Page 52

Taking pictures and video
V
e
i
sgn
itt
eS
500+
100%
+0.0
clips
When the camera is activated you can see the following
information:
100%
+0.0
A
B
C
D
E
A. Shows the zoom setting:
Press to increase zoom level, to
decrease zoom level when taking a picture or clip.
500+
B. Shows the remaining number of pictures or
recording time for the current storage location,
frame size and quality settings.
w
e
i
V
sgn
itt
eS
F
C. Shows the exposure compensation.
Press to increase brightness, to
decrease.
D. Shows the type of picture or recording the camera is
set to. Use the Jog Dial to switch between video
recorder , and single-shot pictures .
To take a burst of four still pictures in rapid
succession or a picture with a frame , you
must change the
the settings on page 55
Shoot mode setting, see Changing
E. Shows steady green when the camera is ready:
– Press the camera button half-way to focus a
single-shot picture.
An audible signal and the icon indicate that
the camera is focused.
– Press the camera button all the way to take the
picture or clip.
– Press the Jog Dial to pause or resume a video
recording.
– Press the camera button all the way to stop a
video recording.
52 Camera P990i
This is the Internet version of the user guide. © Print only for private use.
Page 53

F. A row of indicator icons give a quick overview of
your current settings:
Frame size (resolution) for still pictures can be:
The
1600 x 1200 (UXGA)
1280 x 960
640 x 480 (VGA)
320 x 240 (QVGA)
Frame size (resolution) when recording video
The
clips can be:
128 x 96 (SQCIF)
160 x 120 (QQVGA)
176 x 144 (QCIF)
320 x 240 (QVGA)
Quality setting can be:
The
Fine, Normal or Economy.
The number of pictures or video
recording time available for the
current storage location (Memory
Stick or phone memory) will vary with
There are five possible
different lighting conditions:
Pictures and clips can be saved to the
Memory Stick, or to phone memory
with the Save to setting.
White balance settings for
Cloudy, Daylight, Fluorescent, Bulb,
or Auto.
When taking still pictures:
The photo light will light when you
take the picture.
When recording video clips:
The camera is set to record a clip
suitable for sending by MMS.
Set with
Video length > Messaging.
The Self-timer is set.
When you press the camera button the
icon flashes as the timer is counting
down.
Night mode is on. Exposure times are
longer to compensate for bad lighting
conditions, but the camera is also
more sensitive to movement.
this setting.
P990i Camera 53
This is the Internet version of the user guide. © Print only for private use.
Page 54

When taking still pictures:
The camera is set to focus the lens
automatically at normal distances.
The camera is set to focus the lens
automatically for extreme close-ups
(Macro mode).
When recording video clips:
The microphone is muted, no audio
will be recorded.
pictures and clips after they are taken, select
Settings > Auto review > On.
Sharing pictures and clips
Select Send when viewing a picture or clip to send it as
an MMS message using Messaging, launching the MMS
message editor. You can also send the picture or clip
using Send as, select
More > Send as.
Options
To hide all icons
Press to hide all icons. Press to show
them again.
Taking a self-portrait
Hold the camera so that you can see your reflection in
the circular mirror next to the lens. You can use the self
timer. Select
Settings > Self-timer > On to set it.
Viewing pictures and clips
Y ou can view pictures or video clips stored in the current
camera folder (on the Memory Stick or in the phone)
directly in the camera. Select
Dial to scroll through the pictures and clips in playback
view. To set the camera to automatically play back
View and rotate the Jog
Select More for a menu of options. You can rotate the
picture, zoom, send it using Send as, take a new clip or
picture, or hide all icons.
When you zoom a picture you can rotate the Jog Dial to
change the zoom level, and pan to a part of the picture
using the navigation key to view the zoomed part of the
picture.
Y ou can press the Jog Dial to play, pause and stop video
clips.
Editing a picture in Picture editor
View the picture with the flip open and select
More > Edit to open the picture for editing, see Picture
editor on page 80.
54 Camera P990i
This is the Internet version of the user guide. © Print only for private use.
Page 55

Changing the settings
Select Settings to show a scrollable list of camera
settings. Rotate the Jog Dial to move through the list and
see the options for each setting.
Select
Info to see a short description of the setting.
To change a setting, press and then rotate the Jog Dial to
highlight the desired option, then press again.
You settings will remain until you change them, even if
you have switched the camera or your phone off
Shoot mode – Select what sort of pictures to
take:
Burst4: Take four pictures in rapid succession.
With frame: Overlays a frame on top of single-
shot pictures.
Frame size – Select what picture or video size
to use. Choose from four still picture and four
video clip sizes
Auto focus – Allows the camera to
automatically focus the camera lens.
Select
Macro for extreme close-ups.
Video length – Select Messaging to limit the
length and size of video clips (when recording)
so that they can be sent by MMS.
White balance – Select a white balance option
that matches the lighting conditions.
Select
Bulb for normal indoor artificial lighting
conditions.
Light – Only for still pictures:
Select
On to enable the photo light.
Microphone mute – Only for recording Video
clips:
Select
Muted to turn off sound recording.
Effects – Set and view different effects before
you take a picture.
Quality – Select a quality level, Fine, Normal or
Economy, suitable for your use of the clip or
picture.
Night mode – Increases the exposure time for
conditions where the lighting is poor.
Save to – Select if pictures and clips will be
saved to the Memory Stick or the pho ne. If you
select
Memory Stick preferred they will be
stored on the phone when there is no room left
on the Memory Stick
Auto review – Switches the camera to review
mode automatically after picture or clip has
been taken.
P990i Camera 55
This is the Internet version of the user guide. © Print only for private use.
Page 56

Shutter sound – Select (or mute) a shutter
sound. The Muted option may not be available
since there may be legal requirements that all
cameras give an audible indication that a
picture is being taken.
Self-timer – Select On to take pictures and clips
with a time delay.
Reset file number – Resets the file number for
pictures and clips in the currently set storage
location.
56 Camera P990i
This is the Internet version of the user guide. © Print only for private use.
Page 57

Contacts
Contacts is your personal phonebook where you can
store names, phone numbers, email addresses, photos,
and other contact information.
Information stored on the SIM card is also accessible.
SIM card entries can be copied to and from Contacts.
Using Contacts
Each entry in Contacts can be viewed in four tabs:
Links tab – contains fields for name, photo,
phone and pager numbers, title, emails, and Web
pages.
Address tab – contains fields for addresses,
birthday, city, postcode, company and job title.
Notes tab – make personal notes for each
contact.
Audio tab – set a personal ringtone, and a voice
command to be used for voice dialling.
You can handle the contacts in three views:
• List view – shows an alphabetical list of contacts.
• Detail view – shows a contact’s details.
• Edit view – allows you to add to, and change, the
contact’s information.
To change from the list view to the detail view, with the
flip open, tap a contact’s name. To proceed to the edit
view, select
Tip Press and hold a key on the keypad, or th e keyboard,
to open Contacts.
Contacts menu > Edit contact.
Contacting others from Contacts
Phone calls, video phone calls and messages can be
handled directly from Contacts.
Making a call from Contacts
Choose the appropriate option:
Flip open – scroll to an entry in the list. Tap the
•
name, to open it. Tap a phone number to make a
call.
•
Flip closed – scroll to an entry in the list. Press the
Jog Dial to open it. Scroll to a phone number, then
press the Jog Dial to make a call.
Making a call from the SIM card
Choose the appropriate option:
P990i Contacts 57
This is the Internet version of the user guide. © Print only for private use.
Page 58

• Flip open – select Contacts folder menu > SIM,
to open the SIM card. Make a call in the same way
as from Contacts.
•
Flip closed – select More > View folder > SIM, to
open the SIM card. Make a call in the same way as
from Contacts.
Note: The All folder does not include SIM card entries.
Sending an SMS or an MMS message
To send an SMS or an MMS message to a contact you
can tap the icon next to a phone number, in the detail
view.
Creating an owner card
You can make your own electronic business card that
you can send to another device. Create a new contact and
enter your own details. Select
> Set as My card
Service numbers
Some operators have stored their Service numbers on the
SIM cards. To find these, select
Contacts folder menu.
My numbers
You can store your own phone numbers so that you can
look them up, whenever you need to. To make the
.
Contacts menu > Settings
Service numbers in the
settings, select
menu
Creating and editing contacts
Creating a new contact
To manually enter the contact data, choose the New
contact
menus. Use either of the keyboard, virtual keyboard, or
the keypad, to enter the data.
Y ou can also use contact data from a recent call. See Add
to Contacts on page 112.
Tip If you save your contacts’ numbers in the
international number format, starting with +, you can
call directly from Contacts when you are abroad.
Editing a contact
Adding a field to a contact
Select the links tab . Select Contacts menu > Add
. Mark a field in the list and select Add.
field
Contacts folder menu > SIM > SIM
> My numbers.
option from either of the Contacts and More
58 Contacts P990i
This is the Internet version of the user guide. © Print only for private use.
Page 59

Editing a field
Select the appropriate tab, and highlight the field you
want to edit. Some useful editing commands are
available in the field dropdown menu. For more
information about text entry, see Text Entry on page 25.
Adding or editing a contact on the SIM card
To add a contact on your SIM card, select Contacts
folder menu > SIM > New. To edit a contact on your
SIM card, select
Contacts folder menu > SIM. Highlight
the desired contact and press and hold the Jog Dial.
Select
SIM menu > Edit contact.
Creating a speed con tact
To speed up dialling, or the
sending of messages, you can
create 1-9 shortcuts for
contacts that you call often.
Select
Speed Contacts in the
folder menu. Highlight the one
you want to create. Select
Contacts menu > Edit
speedcontact
contact in the list.
and select a
Select Done.
Speed contacts
23
1
Shu
Bob
45
Marcel
Anna
8
7
Empty
Nadja
6
9
Note: Copyright-protection may prevent pictures from
being displayed in Speed contacts. See Protected files on
page 93.
Adding a voice dialling command
To use the Voice dialling feature, you need to record and
store the names of the contacts you want to call by voice
control. Select the audio tab to make the settings.
Adding a photo or a picture to a contact
If you want to add a photo or a picture to a contact’s
Picture field, you can select a picture from
.
gallery
Adding a birthday reminder
Select the address tab and enter the date in the
contact’s birthday field. You will then get the option to
set a birthday reminder in
Karen
calendar entries on page 61.
Adding a note to a contact
Lars
Select the notes tab and enter the text. If you do not
Calendar. See Creating
want the note to be included when you send, beam, or
Peter
synchronize the contact, mark the
Adding a personal ringtone to a contact
Private check box.
You can store a link to a ringtone for each of your
Picture
contacts, so that all the contacts can have different ring
P990i Contacts 59
This is the Internet version of the user guide. © Print only for private use.
Page 60

tones. Select the audio tab to set the desired
ringtone.
Adding a DTMF tone sequence
Y ou can add a DTMF tone sequence to a contact’s phone
number, or store it in a separate field. You can for
example store your bank account numbers, to make your
phone banking easier. Always start a ton e sequence with
p and end it with a space. To send tones during a call,
open the corresponding Contacts entry and select a
stored tone sequence. See Controlling tone-based
services on page 39.
Copying or deleting a contact
To copy a contact, highlight the contact and select
Contacts menu > Add to > desired folder. To delete a
contact, highlight it and select
Contacts menu > Delete.
Copying contacts to and from a SIM card
To copy entries from Contacts to the SIM card
1. Mark the entries in Contacts.
2. Select
To copy entries from the SIM card to Contacts
1. Select
Contacts menu > Add to > SIM.
Contacts folder menu > SIM, to open the SIM
card.
Managing contacts
To list all entries (except SIM card entries), select All
from the
Contacts folder menu . You can sort the
contacts according to first name, last name, or company.
They can also be filtered by folder or group.
Creating a group of contacts
2. Mark the en tries.
3. Select
With the flip closed, use the
SIM menu > Copy to Contacts.
More menu instead, and
follow the same procedure. To open the SIM card, select
More menu > View folder > SIM.
Note: Only 3G SIM card entries can contain multiple
phone numbers.
To create a group, select Contacts menu > New group.
Select the contacts that should be included in the group
by marking them, and select
group and select
Save.
Done. Enter the name of the
60 Contacts P990i
This is the Internet version of the user guide. © Print only for private use.
Page 61

Calendar
Calendar helps you to keep track of appointments,
reminders, all day events and anniversaries. You can use
anniversaries for annual reminders of important dates,
such as birthdays or celebrations. You can set reminder
alarms for the entries.
You can invite attendees to appointments or all day
events. The invitations are sent via email and when
recipients open them in Messages, they can accept them
and add them to Calendar, or decline them.
Note: Before you can invite attendees you must set up
your email account in the phone, see Setting up email
manually on page 106.
Viewing calendar entries
• With the flip closed you select
switch between Month view and Week view. Scroll
by using the navigation key or the Jog Dial.
• With the flip open you can switch between the views
by selecting month view or week view . Use
the Jog Dial to scroll. Select to move the focus
to the current day.
More > Set view to
Select a day that already has entries to display the Day
view. It can be displayed with or without empty slots.
Select an entry to display the entry details.
You can quickly switch to any date in the calendar:
• With the flip closed you select
and enter the desired date in the entry fields in the
displayed dialog.
• With the flip open you can tap on the week-, mo nthor year-heading above the sheet. Then scroll by
tapping the right or left arrows above the calendar
sheet in the displayed dialog. You can also select a
month by tapping on the year and the month.
Note:
More > Go to date
Creating calendar entries
Select New and then one of the entry types:
Appointment , Rem inder , All day event or
Anniversary . You can add comments on the tab.
Note: In Contacts, if you enter a contact’s birthday, you
have the possibility to create a birthday anniversary
entry at the same time. See Editing a contact on page 58.
P990i Calendar 61
This is the Internet version of the user guide. © Print only for private use.
Page 62

Invitations
If the entry is an appointment or an all day event you can
invite others to the appointment on the tab. You
invite attendees by entering their email addresses.
Recipients will get invitations that they can accept or
decline. If accepted, the current calendar application (for
example Calendar or Outlook) is updated. An invitation
receipt will be generated.
Note: An invitation receipt from an attendee will be
received as a normal email.
To see if an invitation is accepted open the invitation
details and select
More > Response status.
Managing calendar entries
You can search for a certain entry by entering a search
text. You can delete a single entry or all entries in a
defined period of time. You can copy entries from one
date to another in Calendar and move entries to Tasks.
You can send an entry or a whole category of calendar
entries to other devices, see Send as on page 24.
Note: If you select the note tab, you can mark a calendar
entry as
Private in the More menu. Such entries are
excluded when sending.
Managing received invitations
Y ou might receive invitations to appointments when you
are fetching email messages from the email server. You
have the possibility to accept or decline the invitations
and if you accept Calendar is updated automatically. See
Email on page 48.
Synchronization and backup
You can synchronize Calendar with a corresponding
application in your computer. You can also perform a
remote synchronization over the telephone network.
Select
More > Calendar manager > Synchronize, see
Remote synchronization on page 100.
Note: Information about which folders you use to
organize the entries will not be synchronized.
As a complement to the “normal” Backup application,
see Backing up data on page 100, you can backup
calendar entries on the Memory Stick. Select
Calendar manager > Back up
.
More >
Settings
You can, for example, set default values for the alarm,
Day view and the duration of appointments. Select
> Settings > Alarm & display
.
More
62 Calendar P990i
This is the Internet version of the user guide. © Print only for private use.
Page 63

Note: By specifying the first day of your week you can
change the display of both Week and Month. Select
Tools > Control panel > Device > Time & date > Time &
date > Set workdays
.
P990i Calendar 63
This is the Internet version of the user guide. © Print only for private use.
Page 64

Web
A
The integrated browser is the entry-point to the Internet
in your phone. It supports both frames and JavaScript™.
You can easily switch from portrait to landscape view,
and change from normal to full screen presentation. The
browser can fit the contents of the page to the width of
the screen.
You can save pages to view them offline.
The browser has separate download managers for files
Working with pages
Use the browser with the flip open. Select Multimedia >
to open the browser:
Web
• A Sony Ericsson homepage is shown if no page has
been set remotely.
Web
J
I
that need secure download and for other files. The secure
downloads manager is especially useful for
downloading commercial media objects.
You can set up the browser to block pop-ups.
The browser can provide a secure encrypted link to the
Web site. The icon in the context bar of the browser
window shows when a secure connection is established.
Note: Before you can use the Web application to access
the Internet you must set up your Internet accounts in the
phone, see Setting up accounts on page 101.
The browser can remember a username-password pair
that you enter when you log in to a site so that you can
use it later.
A. Page icons are shown in the context bar. The icon s
B. Go back.
B
CDEF
H
G
change when the page has finished loading.
– Tap to switch page.
– Tap and hold for a menu of options for the
current page. Select
Close page to close a page.
64 Web P990i
This is the Internet version of the user guide. © Print only for private use.
Page 65

C. Open web page.
D. Go to the previous page.
E. Go to the next page.
F.
Refresh or Stop loading the page.
G. Find (on the Internet or in the current page).
H. Go to the
I. Progress bar, shows the loading progress.
J. Select the title to find menu options.
Navigation is quick and simple:
• Select a link or a bookmark to navigate.The
homepage is always the first bookmark in the
bookmarks list.
• Tap and hold a link to open a menu of o ptions based
on the type of link.
– If the link is to an RSS feed (see RSS feeds on
• Use the Jog Dial to scroll a page up or down. Links
will be highlighted as you scroll.
• When you want to log in to a site and the username
and password fields are highlighted with yellow
boxes, you can select
username-password pair you saved earlier.
• When not in text mode you can slide a page up or
down, left or right, with the stylus.
• To change the zoom level select
the Jog Dial and then select Save.
Bookmarks view.
page 68)
RSS Feeds opens so that you can
subscribe to the feed.
Web > Log in to use the
Web > Zoom, rotate
Working with bookmarks
To open a list of book marks in the bookmarks view
select in the main view. Select an entry in the list to
open it.
When you highlight a bookmark in the list you can use
the options in the W eb menu to delete it, edit it, or set it
to always open in a new page. Use the Folder menu
to organize it in a folder.
To add a bookmark for a page, select
Web > Current page > Add to bookmarks
Working with text
To be able to s elect text on a page, select Web > Settings
and mark
editing options on the selected text.
Select text mode. Select Web > Edit for text
Settings menu
Select Web > Settings to find options that you may want
change while working with pages. You can switch the
Fit to screen, Full screen, and Landscape modes on or
off. You can also select text mode.
P990i Web 65
This is the Internet version of the user guide. © Print only for private use.
Page 66

Views menu
Select Web > Views to open list views where you can
work with saved pages, history or downloads.
Saving pages
You can save the current page to open it later offline.
Select
Web > Curr ent page > Save page to save the
page.
Select Web >Views > Saved pages to see a list of your
saved pages. Y ou can open a page in the list, delete it or
rename it.
Using the History list
To open a page you have visited earlier select Web >
Views > History
the details and open the page.
Downloading
When you select a download link in the browser and
accept the download you will see a new entry in the
appropriate download list:
downloads
You can pause and resume the download if required (if
the server supports this).
. A list is displayed allowing you to view
Secure downloads or Other
.
There is no notification when a download has been
completed. Return to the appropriate list view to check
the status of your downloads. Select
Downloads > Secure downloads
Downloads > Other downloads
Web > Views >
or Web > Views >
to return.
Configuring the browser
Select Web > Settings > Configuration to open a dialog
where you can change the browser’s configuration
settings:
On the
General tab you can choose to:
• Add or delete prefixes and suffixes to the list that
the browser uses when it suggests a Web address.
• Enable or disable JavaScript. Disabling JavaScript
can make pages load faster, but some pages may not
function properly.
• Enable the browsers pop-up blocking feature.
Display tab you can choose to:
On the
• Load and display pictures or not. Pages will load
faster if you do not display pictures
• Switch off the presentation of animations.
• Enable or disable plug-ins.
Advanced tab you can choose to:
On the
• Allow cookies.
66 Web P990i
This is the Internet version of the user guide. © Print only for private use.
Page 67

• Configure the cache handling. You can choose
cache size as well as have the cache emptied every
time you disconnect.
• Delete all cookies.
• Set browser to show a warning dialog before
submitting a form over an insecure Internet
connection.
To delete private data
Select Web > Settings > Delete private data to open a
dialog where you can mark check boxes to delete:
• All history data (includes internal security data and
the list of previously entered Web addresses).
• The contents of the cache.
• All cookies.
• All username-password pairs that you have stored.
P990i Web 67
This is the Internet version of the user guide. © Print only for private use.
Page 68

RSS feeds
A
RSS provides a way for Web sites to distribute their
content outside of a We b browser. A news Web site
might have an RSS feed which contains breaking stories,
while a magazine Web site may provide an RSS feed
Tip An easy way to subscribe to a new feed is to navigate
to an RSS/XML link in the Web browser. Select the link
and the Add feed dialog is opened with the Web adress
of the feed already entered.
with excerpts of their latest articles.
An RSS feed is a file containing a list of information
items, each of which has a title, a description and a link
to the Web page.
The RSS feeds application enables you to get
information from the Internet into an easy-to-view
format without browsing the Web sites. Y o u can browse
information from dozens, or hundreds, of Web sites
without ever visiting them.
Note: Before you can use the RSS feeds a pplication you
must set up your Internet accounts in the phone, see
Setting up accounts on page 101.
Subscribing to RSS feeds
Reading news items
When you start the
application a list of
your subscribed RSS
feeds is displayed..
A. Title of a
subscribed RSS
feed and time of
last update.
B. Numbers that
appear in
parentheses
indicate unread
feeds.
C. Feeds with new news items are displayed in bold.
RSS feeds
FUN&downloads
13:34
Sony Ericsson News
13:33
Update all
To add an RSS feed to your application you select
Multimedia > RSS feeds > RSS feeds > Add feed and
enter the Web address of a feed.
68 RSS feeds P990i
This is the Internet version of the user guide. © Print only for private use.
(8)
(10)
C
B
Page 69

Select the RSS feed
A
you are interested in to
display the news items
list. Then select a news
item headline to
display the full
headline and
RSS feeds
FUN & downloads
Software and services
Expand your capabilities with
software and services for
your Sony Ericsson mobile
phone.
Transform your personal
communication.
description.
A. Move backwards
and forwards
between the news
items.
B. Launch more details about the news story in the
We b browser.
Updating feeds
Y ou can update feeds manually or by scheduled updates.
Select
Update all to update all feeds at the same time.
Tip Update all can take a while if you have a lot of RSS
feeds. You can switch to another application during the
update which continues in the background.
When the news item list of a certain feed is displayed
you can select
Update to update the current feed.
To schedule the updates you select
. You can choose to update the feeds by time or
updates
Settings > Schedule
by interval. When the feeds are updated automatically a
status bar icon appears. Tapping the status bar icon
RSS
launches the RSS application.
Settings
B
Select Settings > RSS options to access the following
options:
Save items for – set how long the items should be
•
saved.
•
Internet account – set the Internet connection to be
used.
Tip Set the Internet account to the same connection as
the Web browser.
P990i RSS feeds 69
This is the Internet version of the user guide. © Print only for private use.
Page 70

Media player
Media player works as a music player, video player and
FM radio all-in-one. Y ou can play mus ic and video clips
that are stored on your phone. You can also receive
streaming video and music from the Internet. For a list
of supported media formats, see Media formats on
page 147.
You can start the Music player or the FM radio simply
by pressing and holding the media player button .
For information on how to configure the media player
button, see Hardware buttons on page 124.
Music
Note: Copyright-protection may prevent content from
being copied, modified or transferred. If a file is
copyright-protected, or if an access key has expir ed or is
unavailable, an icon is displayed at the file name.
Select
Media player > Music. The first time you open
Music, tap the
music with the flip closed, to search the ph one memory
and the Memory Stick for sound files. This pr ocess may
take a while, especially if you have a high capacity
Update button, or select More > Update
Memory Stick with a lot of sound files. You can select if
this update should be performed automatically each time
you open the Media player, or if you want to do it
manually. If you select to do it manually, the command
Update will be available as a button and in the menu.
Y ou can also select which types of sound f iles an update
should search for. See Preferences on page 72.
All tracks, including those that do not contain any album
or artist information, can be found under
My recordings contain clips that you have recorded with
Sound recorder. To further organize your music files,
you can create
Playlists.
Tracks.
Playlists
A playlist is simply a list of links to some of your music
files, and it describes which songs to play and in which
order. This also means that when you remove a track
from a playlist, the sound file itself is not deleted.
A playlist can contain links to tracks both in the phone
and on a Memory Stick, and you can add a track to more
than one playlist.
70 Media player P990i
This is the Internet version of the user guide. © Print only for private use.
Page 71

If a playlist contains links to tracks stored on a Memory
Stick that you have removed from the phone, the track
titles are displayed in italics and the tracks are skipped.
Playlists can be moved or copied between the phone
memory and a Memory Stick using the File manager.
The playlists that you create on the phone are stored in
\Music\playlists.
To create a playlist
Open
Playlists and select New Playlist.
To add tracks to a playlist
Scroll to the desired track and select
Add to playlist
Manage > Add to playlist
. With the flip closed, select More >
.
Music > Manage >
You can add several tracks at once. See Manage tracks
on page 72.
In playback view, you can add the track you are
currently listening to by selecting
. With the flip closed, select More > Add to
playlist
.
playlist
Music > Add to
Playback
To start playback, select an album, artist, playlist or
individual track and press the Jog Dial or select the
button or touch option. You can also simply tap on an
individual track to play it.
To pause playback press the media player button, tap
with the flip open, or select the
Pause softkey when the
flip is closed.
Tap and drag the progress indicator to move within a
track.
When playback is paused, rotating the Jog Dial will
browse the tracks from the current playlist, album or
artist.
You can leave Music and continue to listen to music by
tapping . With the flip closed, select
. Playback will also continue when you switch
Minimize
to another application via the task manager.
When Music is minimized, start and pause playback by
pressing the media player button. T o return to Music, tap
in the status bar, or open it via Main menu or Task
manager.
Playback will also pause when you make or receive a
call, or if you open another application that uses the
audio output. You can select if Music should resume
automatically when the call is ended. See Preferences on
Play
page 72.
More >
P990i Media player 71
This is the Internet version of the user guide. © Print only for private use.
Page 72

Adjust volume and tone
During playback, rotate the Jog Dial to adjust volume.
You can further adjust the sound by selecting
Settings > Equalizer
closed, select
or by tapping . When the flip is
More > Settings > Equalizer.
Music >
Manage tracks
If you want to select several tracks at once, scroll to one
of the tracks and select
flip is closed, select
Music > Manage > Mark. If the
More > Manage > Mark. You can
now select additional tracks by tapping the check boxes
or by scrolling to the desired track and pressing the Jog
Dial. With the flip closed, press the
Mark softkey.
Within a category , you can sort tracks in different ways.
Preferences
by, for example, an incoming phone call.
means playback resumes automatically when you
have finished the call.
press the media player button or switch back to the
Manual requires that you
media player and resume playback from there.
Files
• File update – select if you want the media player to
automatically search for new sound files each time
you open Media player, or if you want to do this
manually.
•
Filter files – set a filter to exclude small files or file
types with low sound quality from the search.
Ringtones and other sounds that are stored in the
\Music\sounds folder are always excluded.
•
Full update – a normal update only searches for new
sound files. A full update will rebuild the tracks list
and look for changes made to existing files, for
example, new artist and album information.
Automatic
Select Music > Settings > Preferences to access the
following options:
Play
• Shuffle – the tracks in a playlist, album or artist are
shuffled randomly before playback begins.
•
Loop – restart the playlist when the last track has
been played.
•
Resume Audio – this setting determines how
playback should resume after it has been interrupted
Video
Note: Copyright-protection may prevent content from
being copied, modified or transferred. If a file is
copyright-protected, or if an access key has expired or is
unavailable, an icon is displayed at the file name.
You can watch clips stored on your phone or Memory
Stick as well as streaming video from the internet.
72 Media player P990i
This is the Internet version of the user guide. © Print only for private use.
Page 73

To play a video clip
1. Open the flip and select
2. Navigate to the clip you want to watch. The first
folder in the list contains clips you have recorded
with the camera.
Media player > Video
3. Tap the clip or press the Jog Dial to start playback.
To play streaming video
Provided you have an Internet account set up, you can
also watch video streams from the internet. Select
> Manage > Open URL
and enter the address to the
Video
stream. You can save shortcuts to streaming content.
These will be stored in the Online folder that you see
when you open the Media player.
Playback controls
Rotate the Jog Dial to adjust the sound level.
Tap to pause playback. T ap to resume playback.
Y ou can also switch between play and pause by pres sing
the Jog Dial.
Tap to switch to full screen view. You can also tap
directly on the playback area.
Tap on the progress bar or tap and drag the progress
indicator to move backwards and forwards within the
clip.
When playback is paused, tap the arrows in the playback
area, or rotate the Jog Dial, to select another clip in the
current folder.
Playback options
In playback view, select Video > Playback options to
access the following settings:
Continuous play – play all clips in the current
•
folder.
•
Loop – keep repeating the current clip.
Manage clips
Select how the clips are sorted in Video > Preferences.
To move, copy, delete or rename clips, select
.
Manage
Video >
Settings
In playback view, select Video > Settings to access the
following options:
Display tab
• Default view – select if you want video clips to open
in portrait or landscape view.
•
Size – video clips intended for larger displays will
always be scaled down to fit within the screen of the
phone. If you select
smaller than the phone’s screen will also be
Fit to screen, videos that are
P990i Media player 73
This is the Internet version of the user guide. © Print only for private use.
Page 74

stretched to use as much of the screen as possible,
A
without changing the aspect ratio.
Buffering tab
• Media buffer – controls the amount of data that is
saved before playback of a stream begins. Normally
you would use the default setting. Selecting a higher
setting can improve playback, at the expense of
higher memory usage.
•
Cache – cache memory is used to temporarily store
streaming video so that data does not have to be
downloaded again if you rewind and watch a clip
again. Select
Proxy tab
Clear cache to free up memory.
Use the Internet settings unless you have instructions
from, for example, your operator or company IT
department to use manual configuration.
FM radio
Y our phone features an FM radio with RDS (Radio Data
System) functionality. You can save up to 20 favourites
as presets.
You can switch to another application and still listen to
the radio in the background.
Your handsfree acts as the antenna and must be
connected before you start the radio.
The sound from the radio can be used as an alarm signal
(provided your handsfree is connected.). The sound will
automatically be transferred to the loudspeaker. Set the
alarm time in the Time application, see Setting alarms
on page 92.
Note: You must switch your phone on to use the radio.
(You cannot use it in Flight Mode.) Do not switch it on
in areas where mobile phones ar e pro hibited. See Flight
mode on page 13.
Y ou can use the FM
Radio with the flip
closed or open –
this describes how
to use it with the
flip closed. The
picture shows a
B
C
RDS
FM radio
STEREO
6
AF
TA NEWS
SR P1
typical radio FM
Save More
radio base dialog
Search
with indicators and
controls:
A. Status for RDS, AF, TA and NEWS. If no indicator
is visible the function is off. See Using the RDS
functions on page 76.
B. Stereo/Mono indicator.
74 Media player P990i
This is the Internet version of the user guide. © Print only for private use.
E
D
Page 75

C. Shows the number in the list of presets of the preset
station currently playing.
D. Station name (or the tuned frequency).
E. Signal strength indicator.
To start listening to the radio
To use the radio you must connect the handsfree to your
phone. The handsfree acts as an antenna. Open
Media Player and select Radio. The first time you use
the radio it will ask you if you want to do an automatic
search for stations (
Auto store).
T uning in to a channel
You can search for channels automatically or manually
and save up to 20 favourites as presets. You have these
options:
• Select
• Press and hold or to move manually
• Press or to go up and down between
Search to automatically search for the next
channel on the band.
along the band in 0.1 MHz steps until you release
the key.
the preset channels that you have saved. The
number of the preset in the list of stored presets is
shown in the display.
• You can also press the button on the handsfree to go
up the list of preset channels.
•Select
More > Set frequency and enter the desired
frequency. The figures you enter will be adjusted
automatically to a valid frequency.
Saving channels
To store the current channel as a preset, select Save. You
can use the Jog Dial to scroll in the
Select position list.
You have these options:
• Highlight an empty slot and select
• Highlight a preset that you want to replace. Select
Replace.
Select
More > Auto store to automatically search for
Insert.
and store up to 20 channels. The radio indicates each
channel that it finds and asks for confirmation before it
writes over a previous stored list of presets.
Managing presets
Select More > Presets to manage the list of preset
channels. You can highlight an entry in the list to move
it, delete it, or rename it using the options in the
menu. If a position in the list is occupied, you can
replace it with another preset.
More
P990i Media player 75
This is the Internet version of the user guide. © Print only for private use.
Page 76

Using the RDS functions
The RDS functionality lets you set the radio to
automatically switch to a channel when it is
broadcasting a traffic announcement (
announcement (
alternative frequency that gives the best reception for the
channel you have set (AF).
Select
the dialog you can turn the RDS, TA and NEWS
functions on or off and set the volume level for
interrupting announcements.
To read the RDS radio text information sent out over the
current channel, open the flip and tap the text. Up to 64
characters will be displayed.
NEWS). The radio can also re-tune to the
More > Settings > RDS options in the menu. In
TA) or news
While listening to the radio
To adjust the volume
Rotate the Jog Dial to adjust the volume.
To transfer the sound
To transfer the sound to the device you want to use, for
example the speaker or a Bluetooth headset, select
More > Settings > Transfer sound to open the Transfer
dialog, see Transferring sound on page 34.
sound
To switch to another application with the radio in the
background
You can listen to the radio while using other
applications:
• Select
• Alternatively, select
More > Minimize. Th e radio continues to play
in the background and the phone switches to the
standby screen.
the Task manager, from where you can switch to
other applications.
More > Task manager to open
Online
Online contains the streaming media links that you have
saved from within Video. Media links may also have
been preloaded by your operator. Select a link and tap
Open link, or select Online > New link and enter the Web
address. You must enter the full path to the streaming
content.
76 Media player P990i
This is the Internet version of the user guide. © Print only for private use.
Page 77

PlayNow™
With PlayNow™ you can download top music hits,
videos, games and pictures to your phone. You can then
set downloaded files as alarm signals, ringtones,
wallpapers, and screen savers, or add them to your
contacts.
All content of the PlayNow service is available on a Web
page that is updated regularly by Sony Music
Entertainment. Before deciding to purchase, you can
preview most of the content.
Note: Copyright-protection may prevent content from
being copied, modified or transferred. If a file is
copyright-protected, or if an access key has expired or is
unavailable, an icon is displayed by the file name.
Before using PlayNow
Before you can use PlayNow please ensure that you
have the following:
• A phone subscription that supports GPRS or 3G
data transmission. Alternatively, you can have a
wireless LAN connection.
• An Internet account and the correct settings in your
phone, see Setting up Internet, email and MMS on
page 101.
• Free memory in your phone.
To preview the content
1. To open PlayNow select
2. Select the Web link you wish to preview. The
content is downloaded to your phone and images
and ringtones can be previewed. Press
Tip You can return to the PlayNow start page from
wherever you are in the PlayNow website by pressing
.
To purchase the content
1. If you wish to purchase the content, select
Your phone bill or prepay phone card will be
charged by your network operator, and you will
receive a text message confirming that the item is
paid for and made available. The content is
automatically saved to the folder for that media
type.
2. Depending on the type of file, you will be asked
whether you wish to install, play or use it now.
Select
Yes and then choose how to use it.
Note:
Multimedia > PlayNow™.
Continue.
Yes.
P990i PlayNow™ 77
This is the Internet version of the user guide. © Print only for private use.
Page 78

Picture gallery and Picture editor
Picture gallery
In Picture gallery you can view, send and organize all
the pictures saved in your phone’s internal and external
memory. The pictures can be taken with the phone
camera or loaded from elsewhere. Picture gallery
supports image types with file extensions .jpg, .bmp, .gif
(including animated GIFs), .mbm (SymbianOS Multi
BitMap Image), .png and .wbmp. You can do any of the
following:
• Send the pictures to others (using MMS messaging
or Send as).
• Add pictures to the contacts in your phonebook.
• Use a picture as a background image (wallpaper) or
screensaver.
• Show a series of pictures in a slide show.
You can also start Picture editor from Picture gallery in
order to edit a picture.
To open Picture gallery select
> Picture gallery
.
Main menu > Multimedia
A. Select one of
two tabs and
see either the
folders and
pictures stored
on the
Memory Stick
or those stored
internally on
the phone.
(With the flip
closed, use
or
to switch tabs.
B. Camera still pictures and video clips are stored in
the
Camera folder.
C. Rotate the Jog Dial to move through folders and
files in the list. To open a detail view of a picture
highlighted in the list, press the Jog Dial.
D. Copyright-protection may prevent content from
being copied, modified or transferred. If a file is
copyright-protected, or if an access key has expired
or is unavailable, an icon is displayed.
E.
– send a highlighted picture by MMS
messaging. This is also available in the detail view
A
B
C
D
Picture gallery
Camera folder
Business cards
Clipart
Frames
Plane
09:01, 30/05/05
of a picture.
78 Picture gallery and Picture editor P990i
This is the Internet version of the user guide. © Print only for private use.
G
F
E
Page 79

F. The list can be sorted by name, size, type, or date, in
ascending or descending order. Select
gallery > Sort by
to change the sorting
Picture
G. Select the title to find menu options.
Options for using picture files
You will find options for using pictures under Picture
gallery > Use
Send as – see Send as on page 24.
•
•
Edit picture – open a picture in Picture editor.
•
Remote screen – mark the check box to beam
pictures that you open in detail view to an external
device.
•
Set as wallpaper – open a picture in Wallpaper to
set it as the background wallpaper.
•
Set as screensaver – open the Screen saver dialog
where you can set the picture as screensaver.
•
Set as contact picture – open a dialog to set the
picture as contact picture.
•
Slideshow settings – open the Slide show settings
dialog where you can set how the content of the
current folder will be presented as a slide show.
.
Options for managing picture files
Select Picture gallery > Manage files for a menu with
options for managing selected files and folders. From
this menu you can:
• Open
Picture editor to create a new picture.
• Create a new folder.
• Copy, move, rename and delete files.
• Copy and move (Import and Export) pictures to an d
from the Camera folder on a Memory Stick and the
internal Camera folder.
• Open
File manager. For more information, see File
manager on page 93.
Detail view
Highlight and select a picture in the list to show the
detail view. Select to expand the view to full screen.
To enable Zoom in detail view, mark Zoom in the
Picture gallery
and mark
menu. If the picture is expanded, tap
Zoom in the popup menu. Rotate the Jog Dial
to change the zoom level. The Zoom indicator thumbnail
shows the part of the whole picture that is shown
zoomed. You can move the thumbnail to pan. Unmark
Zoom to disable zoom.
Slide shows
You can show the contents of a folder as a slide show,
moving from picture to picture automatically or
manually. Slide s hows can have an accompanying sound
track and you can choose from different transition styles
between the pictures.
P990i Picture gallery and Picture editor 79
This is the Internet version of the user guide. © Print only for private use.
Page 80

Sending pictures using MMS messaging
A
To send selected pictures as well as a picture in detail
view using MMS messaging, select .
Picture editor
The editor can be started from Picture gallery,
Messaging
Using
images. You can add fun layers such as clipart and
and Camera.
Picture editor, you can crop, rotate and resize
A. When
you
select a
mode in
the tool
bar the
set of
available
tools
changes
Picture editor
holiday.jpg
Save Cancel
frames. There are tools for drawing on the image using
the stylus with different pen sizes and colours av ailable,
as well as a text tool for formatting and inserting text
into the image. There are a number of filters for effects
and picture correction.
When you create MMS messages, you use
Picture editor for editing inserted images with .jpg,
.png, .gif and .bmp file extensions as well as for creating
simple .jpg images from scratch.
You use
Picture editor with the flip open.
B. The set of available tools changes according to the
mode:
Scribble – set the pen width with , choose
colour with the colour palette or the colour
dropper .
Select rectangle – fix red-eye removal ,
copy a selected part of the picture , or crop
the picture .
Zoom – zoom in or zoom out .
C. Select the title to find menu options.
80 Picture gallery and Picture editor P990i
This is the Internet version of the user guide. © Print only for private use.
C
B
Page 81

Correcting images
Select Picture editor > Correction to adjust the
brightness, contrast, intensity, or colour balance of a
picture. Colour balance is adjusted automatically, use
the Jog Dial to adjust the others.
Zoom mode
The Zoom indicator thumbnail view shows the part of
the whole picture that is shown zoomed. Y ou can use the
stylus to drag the picture on the screen. You can capture
the visible part of the picture: select
> Crop
.
Picture editor > Edit
Editing options
Select Picture editor > Edit for a menu of editing
options. Y ou can rotate, mirror or flip a picture, paste the
contents of the clipboard into the picture, and resize it
for different uses such as MMS image or as wallpaper
You can undo your changes.
Adding clipart, text or frames
Select Pictureeditor > Add to add clipart, formatted text
or a frame to a picture. When you have chosen the clipart
or formatted the text you can place it in the picture and
adjust its position with the set of tools provided in the
tool bar. Frames are applied to the whole picture.
Adding effects
Select Picture editor > Effects to filter a picture. You
can choose between these effects:
• Emboss
• Frosted glass
•Warp
•Solarize
•Sepia
• Black & white
• Negative
For some of the filters you can adjust the level of the
effect.
Preferences
Select Picture editor > Preferences to set the size,
background colour and quality (
- this will affect the file size) for new pictures that you
create with
Picture editor.
Good, Medium or High
P990i Picture gallery and Picture editor 81
This is the Internet version of the user guide. © Print only for private use.
Page 82

Business card scanner
With Business card scanner you can scan a business card
that is handed to you, and add the contact details to your
contacts.
A. Select
Card Scanner
menu to set the
language to be used.
Card scanner
ENG/CHI card
B. The currently selected
language(-s).
C. Start the Camera.
D. Browse for business
cards that you have
already captured.
Browse
Scanning
Capture
cards
1. Select Office > Business card scanner.
2. Select
3. Hold the business card in front of the camera and
Capture or tap the large central Business card
scanner icon to start the camera.
take a picture of the card, see Camera on page 51. A
few camera settings are available. The picture is
displayed in the Business card scanner application.
4. If the picture is good enough you can choose either
to process it as a contact entry or to leave it and
process it later.
When you process the picture of a business card, most of
the text will be displayed in appropriate fields in the
A
contact entries. If there is information that the business
B
card scanner cannot place into a field, you can find it in
the tab of the contact’s entry. From there you can
copy text to the appropriate fields in the contact entry.
See more in Creating and editing contacts on page 58.
C
Processing batches of captured cards
Y ou can pr ocess batches of pictures of bu siness cards as
D
contact entries.
1. Select
Browse to view the list of captured business
cards. (Already processed cards have contact
names.)
2. Mark the cards you want to process and select
The contacts names from the processed batch are
displayed in Contacts. They are categorized in a
folder named
Business cards n, where n is the
serial number of the batch.
Tip To delete pictures of business cards, see Picture
gallery on page 78 or File manager on page 93.
Done.
82 Business card scanner P990i
This is the Internet version of the user guide. © Print only for private use.
Page 83

Sound recorder
Select Multimedia > Sound recorder. You can use the
sound recorder with the flip closed or open. The
description below assumes the flip is closed. With the
flip open, you can reach most commands from the
Sound recorder menu and you can tap the screen
buttons to record, play, pause and stop.
Tip You can assign the Internet button to launch the
Sound recorder and to start and stop recording. See
Hardwar e buttons on page 124.
Record
To start a new recording, select New rec ording and press
Rec. Recording starts after the beep.
Y ou can also continue previous recordings. Scroll to the
desired clip and select Rec. Recording will resume at the
end of the previously recorded material.
Press Stop when you are finished recording.
Playback
Scroll to the desired clip and select Play. If the flip is
open, you can tap and drag the progress indicator to
navigate within the recording.
Rotate the Jog Dial to adjust the playback volume.
Manage recordings
On the More menu you find commands to rename, send
and delete recordings.
All recordings that you make with the Sound recorder
are also available in
recordings
Tip You can use recordings as ringtones.
Media player under Music > My
.
Preferences
Select More > Preferences. You can choose where to
save your recordings.
that the recordings are saved on the Memory Stick if one
is inserted. Otherwise the recordings will be stored on
the phone memory.
Memory Stick preferred means
P990i Sound recorder 83
This is the Internet version of the user guide. © Print only for private use.
Page 84

MusicDJ™
With MusicDJ™ you can compose melodies to use as
ringtones. MusicDJ™ is only accessible with the flip
open.
.A melody consists of four
tracks: Drums, Bass, Chords
and Accents. You compose
the melody by adding prearranged sound samples to the
tracks. Each sample is one bar
long. The samples are
TM
MusicDJ
123456
5 5 13 13 13 13
14 14
1 14141414
910
bars by rotating the Jog Dial, or selecting
Go to
and entering the numbers of the desired track and
bar.
From the MusicDJ™ menu you can also save, open and
send melodies.
10
MusicDJ™ >
grouped into Intro, Verse,
Chorus and Break.
To compose a melody
1. Select
2. Select
3. Tap a bar in one of the tracks and select a sample to
Entertainment >
MusicDJ™
of the melody in beats per minute (BPM).
insert. When you tap previously inserted samples
you can choose to copy , paste, delete or insert a new
.
MusicDJ™ > Set tempo and adjust the tempo
sample from the pop-up menu.
Use the transport bar to play, pause, stop, fast forward or
rewind. When composing you can also move between
84 MusicDJ™ P990i
This is the Internet version of the user guide. © Print only for private use.
Page 85

Games
Your phone comes with two games preloaded in the
Entertainment folder.
Vijay Sin gh Pr o Golf 2005™ is a 3D game that lets you
play golf on one of the most spectacular 18-hole golf
courses on the American circuit, the Harbour Town Golf
Links at Sea Pines Resort. The game has a built-in
tutorial.
Quadrapop is a puzzle game. Select
Quadrapop > Help
to learn more.
P990i Games 85
This is the Internet version of the user guide. © Print only for private use.
Entertainment >
Page 86

Quickoffice and Pdf+
Quickoffice™ and Pdf+ are found in the Office folder.
With Quickoffice you can view and edit Microsoft
Wor d, Excel and PowerPoint documents as well as text
documents. With Pdf+ you can view Adobe Acrobat
(PDF) documents.
Quickoffice
In Quickoffice you can see a list of all the Quickoffice or
text documents in a folder. Use the tabs to display a list
of a certain Quickoffice document type. Use the
memory
menu to switch between phone memory and
Memory Stick. You can sort, move, copy and delete
documents, and create and delete folders.
Select
View to specify how to view the document. You
can view documents in
Landscape or Full screen mode.
Quickword
To create a new Quickword™ do cument, select Off ice >
Quickoffice > New > Quickword
location of the new document. You can save documents
in Word (.doc) or text (.txt) format.
. Enter the name and
Phone
When you open existing documents you need to select
Edit to enable editing. T o save a document af ter making
changes, tap
Quickword has a Format toolbar, which you enable by
selecting View > Format toolbar.
Save.
Quicksheet
To create a new Quicksheet™ document, select Office >
Quickoffice > New > Quicksheet
There are two toolbars available in Quicksheet, the Edit
toolbar and the Format toolbar. A quick way to enable
the Edit toolbar is to double tap a spreadsheet cell.
To save a spreadsheet after making changes, tap
.
Save.
Quickpoint
You can use Quickpoint™ to view Microsoft
PowerPoint presentations and to edit text in them, but
you cannot create new presentations in Quickpoint.
Quickpoint contains three different views of a slide
presentation: Slide, Notes and Outline view.
To display a presentation via presentation hardware,
select
Quickpoint > Start presentation.
86 Quickoffice and Pdf+ P990i
This is the Internet version of the user guide. © Print only for private use.
Page 87

Pdf+
In Pdf+ you use the two tabs on the top to switch
between phone memory and Memory Stick.
In an open PDF document you can control the viewing
from the toolbar at the bottom of the screen:
Displays the next part of the screen. If you have
selected
Display > Column mode the top of the
next column of a page will be displayed. A
column is defined as the width of the screen.
Displays the Bookmarks view if the document
contains bookmarks. Select a heading to go to
the corresponding page. Y ou can also use the Jog
Dial to select a bookmark, and then use the
button below to go to the corresponding page.
Takes you to the selected pag e.
Returns you to the page view.
Full screen.
To return to the normal view, select the menu
icon and unmark the
Wraps the document. The text fits the screen, but
images and line drawings are not visible.
Unwraps the document.
Full screen check box.
Displays the Find dialog.
Goes to the next link in the document.
P990i Quickoffice and Pdf+ 87
This is the Internet version of the user guide. © Print only for private use.
Page 88

Notes and Tasks
Notes
Notes is a notebook where you can write notes and draw
sketches. You can separate notes into different folders,
for example work and personal notes.
Creating and managing notes
Select Office > Notes > New . A notes entry consists of
two tabs, tab for text and tab for sketches.
When you create a note, use to make the text bold
and to make a bulleted list. The first words of your
notes are displayed in your list of notes.
Select a note from the list to view or edit it. With the flip
closed, you can read and edit the text but not the
sketches.
Use the menu commands to search through the notes,
sort them into folders, edit, copy and paste notes, delete
notes, select text options among other things. You can
send notes to other devices using
on page 24. Send as SMS will send the text only.
Send as. See Send as
Drawing sketches
Select the tab and use your stylus as a pen to draw
sketches. Set the pen width with and choose the
colour with the colour palette . Tap to change to
an eraser. Tap the eraser a second time to go back to the
pen.
Tasks
With T asks you can make a list of things you need to do.
You can separate task entries into different folders, for
example, work and personal activities.
Creating and managing task entries
Select Office > Tasks > New. A task entry consists of
two tabs, tab for details about the task and tab
for notes.
When you create a task entry, enter a description of the
task. The beginning of this description is displayed in
your list of entries. In addition to giving each entry a
description you can also choose any of the following:
•
Priority – assign a priority.
88 Notes and Tasks P990i
This is the Internet version of the user guide. © Print only for private use.
Page 89

• Start date – set a start date.
•
Due date – set a deadline by which it must be
completed. (Overdue entries are displayed in bold.)
•
Alarm – set an alarm time and date.
•
Folder – select a folder or create a new one.
As a complement to the “normal” Backup application,
see Backing up data on page 100, you can back up task
entries on the Memory Stick. Select
Backup
.
Tasks manager >
Select a task from the list to view or edit it. Use the menu
commands to search through the task entries, copy and
paste entries, delete entries, select text options among
other things. You can also move entries between Tasks
and Calendar, which is useful when scheduling task
entries.
You can send a folder with task entries to other devices
using
Send this folder, see Send as on page 24.
If you select the tab, you can mark a task as
in the
Tasks menu. Such entries are excluded when they
Private
are sent as messages.
Synchronization and backup
You can synchronize Tasks with a corresponding
application in your computer. You can also perform a
remote synchronization over the telephone network.
Select
Tasks manager > Synchronize, see Remote
synchronization on page 100.
Note: The Folders will not be synchronized.
P990i Notes and Tasks 89
This is the Internet version of the user guide. © Print only for private use.
Page 90

Calculator and Converter
Calculator
You can add, subtract, multiply, divide and calculate
square roots and percentages. It also has a memory
function.
Select
Tools > Calculator . All
calculations, except
percentage calculations, are
performed in the order they
are entered, for example:
5+5x5=50, not 30.
Percentage calculations are
performed backwards. To
calculate, for example, 10% of
50, enter 50x10%. The result
is displayed when you tap the
%-key.
Key Functionality
MR Tap once to retrieve a value from the memory
and enter it into the screen.
Tap twice to clear the memory.
MR
7
4
1
0
Calculator
M+ M-
9
8
6
5
3
2
.
+
+
%+/-
Key Functionality
M+ Tap once to store an entered value in the
memory.
If you have already entered a value in the
memory, tap once to add the value on the
screen to the value in the memory.
M- Tap once to subtract the entered value from
0
C
:
the value in the memory. The memory is
adjusted but not displayed.
Tap once to delete the last digit you entered.
C Tap once to reset the screen to 0.
=
You can copy and paste values to and from other
applications.
Values stored in the memory are retained while using
other applications.
Converter
With Converter you can convert different values of the
following categories; Distances, Volumes, Weights,
Temperatures, Speeds, Areas and Currencies.
90 Calculator and Converter P990i
This is the Internet version of the user guide. © Print only for private use.
Page 91

Y ou can add further currencies to the list of currencies to
convert and you can enter the exchange rate of different
currencies.
Converting units of measurement
If you for example want to convert distances from
kilometers to nautical miles, you select
Converter > Distances
you enter the value. Select
Nautical tab to see the result.
Setting converter decimals
, and then the Metric tab where
Convert and then the
Tools >
Adding currencies
When the phone is delivered Converter contains a few
commonly used currencies. Select
Currencies > Currencies > Add currencies
Tools > Converter >
to add
further currencies and their exchange rates to the
currency list.
You can set the number of decimals for all categories,
select
Decimals in the Converter menu.
Converting currencies
Select Tools > Converter > Currencies and select the
convert from and convert to currencies from the
currency list. Enter the amount of the currency you want
to convert and select
Entering exchange rates
Convert.
The default exchange rates in Converter are set to 0. You
have to enter the current rates manually.
Select
Tools > Converter > Currencies > Currencies >
Exchange rate
to enter the current exchange rate for a
currency for example Japanese yen in US dollar.
P990i Calculator and Converter 91
This is the Internet version of the user guide. © Print only for private use.
Page 92

Time, timer and stopwatch
Time
Select Tools > Control panel > Device > Time & date to
set the time and date. For more information, see Time &
date on page 128.
Setting alarms
You can set three different alarms in your phone.
To set a new alarm, tap one of the alarm slots. You can
specify when and how often the alarm will go off.
You have three possibilities for what happens when an
alarm goes off:
• A sound is played. Choose between one of the
sounds stored in your phone.
• The FM radio starts. This function works just like a
clock radio.
Important: You must connect the handsfree to your
phone, which acts as an antenna. When the alarm goes
off the radio will be played in the speaker.
• A silent alarm. A message is displayed on the
screen.
If you select
Control panel > Device > Sounds & alerts > Alarms
be used.
Alarms require that the phone is turned on.When the
alarm goes off you can select
alarm for five minutes or
To turn off the alarm completely, tap
Timer
Use Tools > Timer if you need to be reminded within a
certain amount of time. A message is displayed and a
sound is played exactly when the time has passed. Select
Continue to stop the alarm.
Stopwatch
Use Tools > Stopwatch if you want to measure how
long time an event takes.
If you select New lap you can measure the time
individually for nine separate events, for example a lap
in a race or individual contestants in a race.
Default melody, the settings from Tools >
will
Snooze to postpone the
Silence to turn off the alarm.
Done.
92 Time, timer and stopwatch P990i
This is the Internet version of the user guide. © Print only for private use.
Page 93

Managing files and applications
File manager
File manager is used to manage content and organize
media, both within the phone memory and on Memory
Sticks. The File manager view is displayed in two tabs;
tab for the phone memory and tab for the
Memory Stick.
Protected files
Downloaded or received files may be copyrightprotected. Copyright-protection may prevent content
from being copied, modified or transferred. If a file is
copyright-protected, or if an access key has expired or is
unavailable, an icon is displayed by the file name.
Handling files and folders
With File manager you can view, rename, copy, move
and delete files and folders. Select
.
manager
Many operations in File manager can also be launched
from Tools > Control panel > Other.
Tools > File
Sharing data with other devices
Your phone creates its own folder structure on the
Memory Stick. Other devices must access the same
folder structure to interact with your phone files. On a
computer you can browse to the required folder on the
Memory Stick. With a device that does not allow you to
browse folders (for example, a camera) you use File
manager to put the required file into a folder accessible
by that device.
Launching media files
Y ou can launch media files direct from File manager by
selecting them.
Renaming a Memory Stick
You can rename a Memory Stick to give it a name that
is meaningful to you. This name will be shown in the
folders menu. Select
manager > Device > Format Memory Stick > Rename
Tools > File manager > File
Formatting a Memory Stick
New Memory Sticks are normally formatted the first
time they are inserted in a phone.
P990i Managing files and applications 93
This is the Internet version of the user guide. © Print only for private use.
Page 94

Note: Do not remove a Memory S tick during formatting,
which may take some time.
Select
Tools > File manager > File manager > Device >
Format Memory Stick > Format
Note: All information on the Memory Stick will be
deleted during formatting.
Installing applications
You can install the following two types of applications
in your phone:
• Applications specially intended for your phone or
compatible with the Symbian operating system.
These installation files have the extension .sis.
TM
•Java
Install an application by selecting
> File manager > Device > Install
application and select
the certificate. If the signature details are OK, select
Install and follow the instructions in the phone. The
application will be installed in
move it to another folder if you desire.
applications compatible with the Symbian
operating system. These installation files have the
extension .jar or .jad.
Tools > File manager
Details to view information about
. Select the required
Tools folder. You can
Note: Only install applications where the vendor
identity and file integrity can be verified. To be sur e that
a certificate has not been revoked, you can select
Security, mark Enable revocation check and enter the
URL-address where the certificate can be checked.
Removing applications
Select Tools > File manager > File manager > Device >
. Select the application you want to uninstall
Uninstall
and select
Yes.
Storage wizard
The Low on storage space dialog is displayed when
your phone has no more storage space available to save
or store information. From that dialog you can start
Storage wizard to clean up storage space by removing
unwanted applications and files.
Whenever required you can also launch Storage wizard
from
Tools > File manager > File manager > Device >
Storage wizard
> Storage wizard
Note: Before you clean up stora ge space, make sure you
have a backup copy of important information.
or from Tools > Control Panel > Device
.
94 Managing files and applications P990i
This is the Internet version of the user guide. © Print only for private use.
Page 95

PC Suite
Note: If you are rep lacing an old smartphone a nd wa nt
to keep data, see Transferring data between phones on
page 34.
The
Sony Ericsson PC Suite is a set of computer
software tools delivered with your phone. These tools
can be used for a variety of tasks, including:
• Synchronizing, for example, contacts, email, and
calendar events between the phone and a computer.
• Backing up phone data to a computer and restoring
data to the phone from a backup on the computer .
• Installing new software and languages in the phone.
• Connecting a computer to the Internet via the phone.
• Managing phone files from a computer and
exchanging files between the phone and the
computer.
For further information on synchronizing, making
backups, and restoring from backups, see
Synchronization and backup on page99.
Installing PC Suite
Note: Make sure that no Sony Ericsson equipment is
connected to your computer when starting the
installation.
Install the Sony Ericsson PC Suite on your computer by
inserting the supplied CD. The installation normally
starts automatically, otherwise you can start it by
executing the
Y ou can also download the Sony Ericsson PC Suite from
www.sonyericsson.com/support
start.exe file located on the CD.
.
Application launcher
The individual applications in the Sony Ericsson PC
Suite are started from an application launcher. To reach
this, select
Ericsson PC Suite for Smartphones
A connection to the phone can be made using Bluetooth,
the infrared port, or the USB cable. Some applications
may require a specific connection to be used.
Start > Programs > Sony Ericsson > Sony
.
P990i PC Suite 95
This is the Internet version of the user guide. © Print only for private use.
Page 96

Connecting to other devices
When you want to exchange information between your
phone and another device, connect them together using
Bluetooth, an infrared link, or a USB cable.
With such a connection you can, for example:
• Send a file (a picture, for example) to a computer or
to another phone.
• Use a Bluetooth headset in a phone call.
• Synchronize calendar events and contacts with the
corresponding applications on a computer.
• Back up phone data onto a computer.
• Use your phone as a computer modem.
For more information on synchronizing and making
backups, see Synchronization and backup on page 99.
Bluetooth wireless technology
The Bluetooth™ wireless technology uses radio waves
to connect devices at a range of up to ten metres. The
connection may be improved if there are no solid objects
between your phone and the other Bluetooth device.
See Bluetooth wireless technology on page 117 for
information on how to make the Bluetooth settings.
Item exchange
From any application with a Send as option, you can
send a file via Bluetooth without first having to pair with
the receiving device. To send a file, select
Bluetooth
devices. Select one of them.
If another Bluetooth device sends a file to your phone, a
dialog may appear (operator-dependent) with options
for accepting or rejecting the file transfer. When the
transfer is complete, select the file name and choose
where to store the file. If you select
will not get any option to decide where to store the file.
Y ou th en have to look under
device is paired with your phone, you can mark
this device
the future without confirmation.
and your phone will search for available
Messaging to find it. If the
to allow it to connect to your phone again in
Send as >
Save instead you
Trust
96 Connecting to other devices P990i
This is the Internet version of the user guide. © Print only for private use.
Page 97

Infrared port
When you connect your phone to another device using
an infrared link, the ports of both devices have to be
within one metre from each other, in line of sight, and at
an angle of no more than about 30 degrees.
See Infrar ed port on page119 for infor mation on how to
activate the infrared port.
WARNI NG! Never point an active infrared port at
somebody’s eye, or at the port of other infrared devices
than the one you are connecting to.
Sending and receiving files
From any application with a Send as option, you can
send a file over the infrared port. To send a file, select
Send as > IR.
When the transfer of a file sent to your phone is
complete, select the file name and choose where to store
the file. If you select
option to decide where to store the file. You then have to
look under
Messaging to find it.
Save instead you will not get any
USB port
With a USB (Universal Serial Bus) cable, you can
connect your phone to the USB port of another device.
See USB on page 119 for information on how to make
the USB settings.
Note: Before connecting the USB cable to a computer,
install the Sony Ericsson PC Suite on the computer.
USB connection, with the
required for phone data backup to a computer and for
restoring data from a backup.
USB connection, with the
required when using the Sony Disc2Phone and Adobe
Photoshop Album SE computer applications to transfer
music and image files respectively to and from the
phone.
Note: During data transfer over USB, do not change the
USB settings or disconnect the phone from the other
device, as this may cause data loss
Charging battery over USB
When your phone is connected to, for example, a
computer over a USB connection you can
simultaneously charge the phone’s battery.
Phone mode setting, is
File transfer setting, is
.
P990i Connecting to other devices 97
This is the Internet version of the user guide. © Print only for private use.
Page 98

Note: For battery charging fr om a USB hub , only use a
hub with its own external power supply.
Wireless LAN
From any application using the Internet (for example,
Web) you can use a Wireless LAN (WLAN) for access.
The simplest way to reach the Internet from an
application is to connect to a Hot spot wireless LAN (no
setup necessary), or you can connect to a wireless LAN
for which an account has already been created in your
phone.
Note: In France, you are only allowed to use wireless
LAN indoors.
See Wireless LAN on page 120 for information on how
to connect to a wireless LAN.
To view the details about a connection or a log, select the
connection or log. If you, for example, want to reset a
log, mark it and select
mgr
menu.
Reset log in the Connections
Computer modem
Through the Sony Ericsson PC Suite, a computer can use
your phone as a modem for connecting to the Internet.
Connections manager
Connections manager lets you view and close all open
Internet connections and view the logs for both open and
closed connections.
Select
Tools > Connections mgr to display the
connections and the logs.
98 Connecting to other devices P990i
This is the Internet version of the user guide. © Print only for private use.
Page 99

Synchronization and backup
The Sony Ericsson PC Suite lets you synchronize your
phone with common computer applications (local
synchronization) and make backups of data.
Without using the Sony Ericsson PC Suite you can
synchronize your phone over a mobile network with a
remote server (remote synchronization).
Local synchronization
Local synchronization is between your phone and a
connected computer. Email, contacts, calendar events,
tasks, notes (text only), and browser bookmarks can be
synchronized this way.
Note: The Sony Ericsson PC Suite must be installed on
the computer and the chosen connection method must
have been configured.
To synchronize, connect your phone to the computer
using a USB, Bluetooth or infrared connection.
Note: If you are using a USB connection, select the
Phone mode setting.
P990i Synchronization and backup 99
This is the Internet version of the user guide. © Print only for private use.
On the computer, select
Ericsson > Sony Ericsson PC Suite for Smartphones
to open the Sony Ericsson PC Suite. In the
select
Sync Manager.
Synchronization settings
In the Sync Manager window, select Settings to define
what is to be synchronized and how.
Starting synchronization
In the Sync Manager window, select Synchronize now
to start synchronizing. After each synchronization, you
can view the results by displaying the summary.
Bluetooth
Infrared
USB cable
Start > Programs > Sony
File menu,
Page 100

Backing up data
Use the Sony Ericsson PC Suite to make backups of
phone user data. Your backups are stored on the
computer and can later be restored to the phone. Make
backups on a regular basis, and always before having the
phone upgraded since upgrading clears all the user data.
Note: Even copyright-protected files are included when
backing up data, but the access keys to such files are not.
If you, for example, make a Master Reset after a backup
you will lose any access keys. Y ou will then have to
reorder these keys (and pay for them once again) to be
able to use the files.
Remote synchronization
GPRS/3G, wireless LAN,
Bluetooth, HSCSD or CSD
PIM Application
Sync Server
Firewall
Internet/Intranet
Restoring data
To restore phone data, select Backup Manager as when
making a backup, but then select the restore option
instead. Y ou can restore data m anually or have a wizard
assist you.
Important: All the phone data is overwritten during the
restore process. You may damage your phone if you
interrupt the restore process.
Remote synchronization is between your phone and a
synchronization server on the Internet or an intranet.
This is a way to keep your phone synchronized wh ile on
the move. To set up and star t remote synchronization, go
to
Tools > Remote sync.
Synchronization services may be offered by mobile
operators, third-party service providers or as added
capability to corporate applications for personal
information management (PIM).
100 Synchronization and backup P990i
This is the Internet version of the user guide. © Print only for private use.
 Loading...