

Page 1
Safety and Reference
Please read this manual carefully before operating your set and retain it for
future reference.
OLED55B6P
OLED65B6P
OLED55C6P
OLED65C6P
*MFL69383602*
OLED55E6P
OLED65E6P
www.lg.com
P/NO : MFL69383602 (1601-REV00)
Page 2
Important Safety Instructions
Always comply with the following precautions
to avoid dangerous situations and ensure peak
performance of your product.
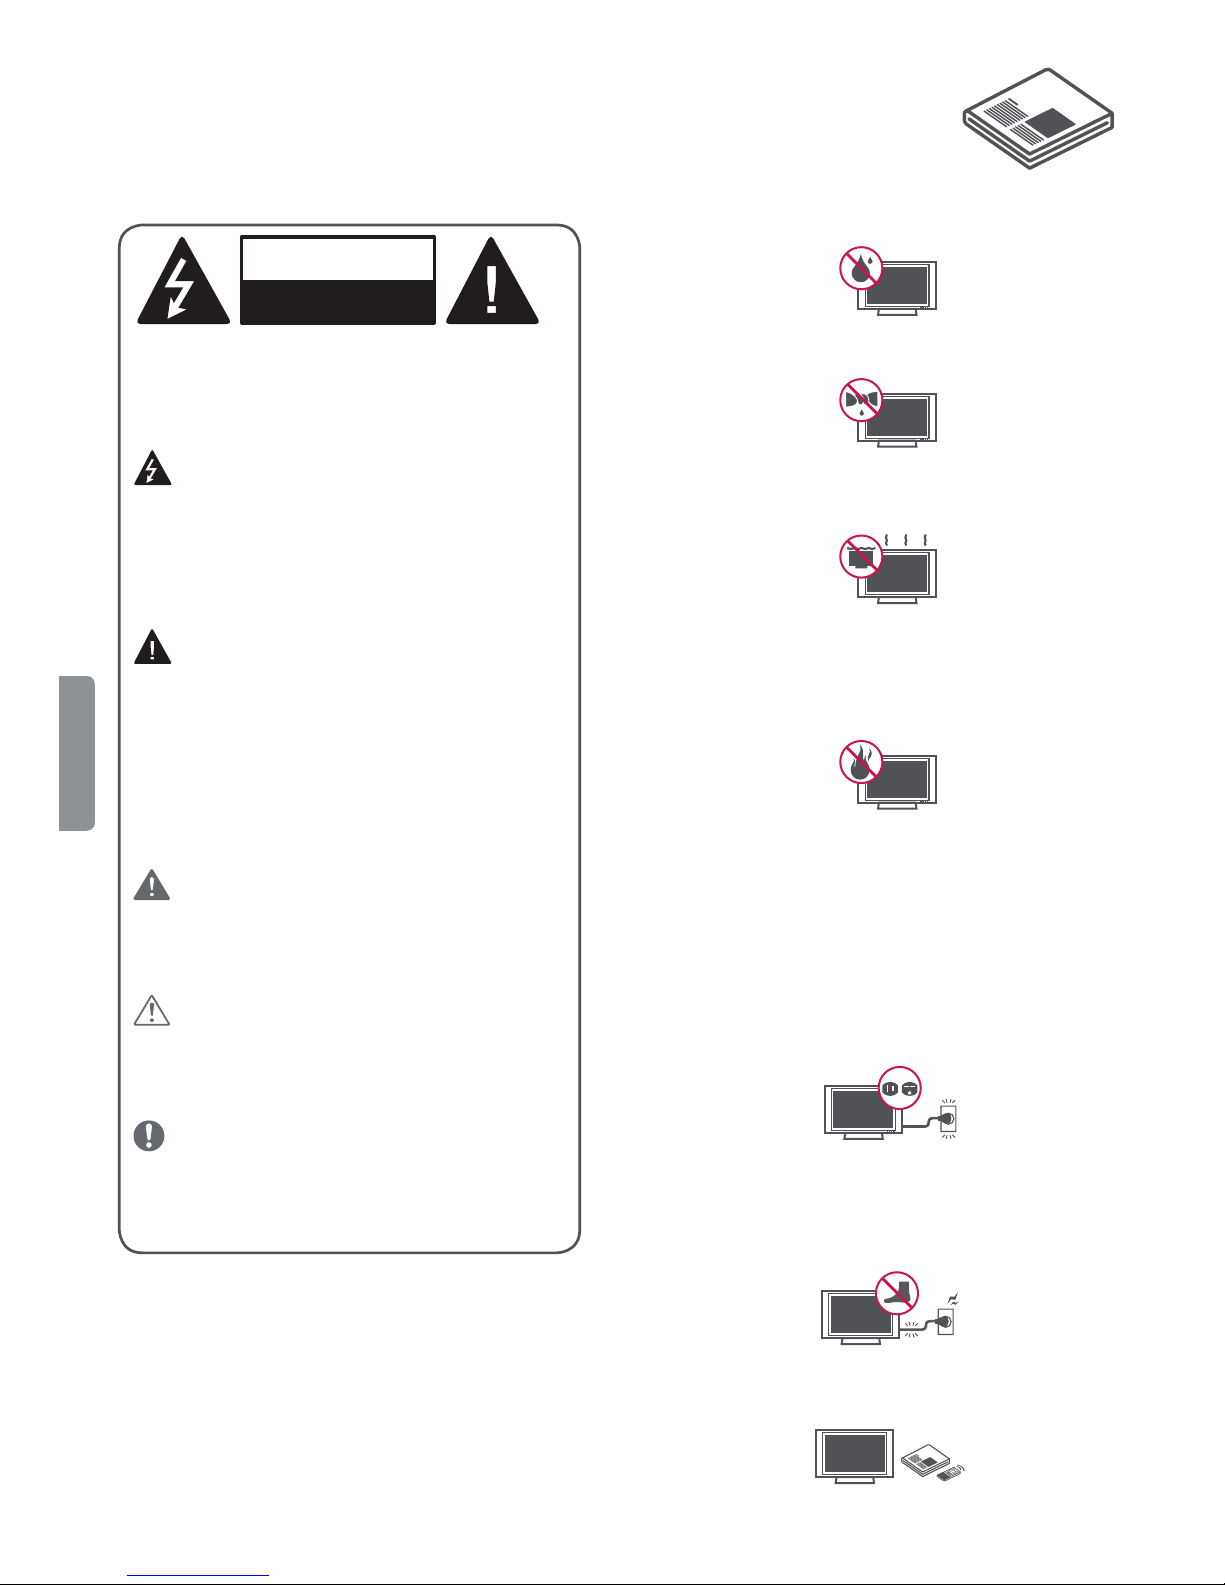
WARNING/CAUTION
RISK OF ELECTRIC SHOCK
DO NOT OPEN
TO REDUCE THE RISK OF ELECTRIC SHOCK
DO NOT REMOVE COVER (OR BACK). NO
USER SERVICEABLE PARTS INSIDE. REFER TO
QUALIFIED SERVICE PERSONNEL.
The lightning flash with arrowhead
symbol, within an equilateral triangle, is
intended to alert the user to the presence of
uninsulated dangerous voltage within the
product’s enclosure that may be of sufficient
magnitude to constitute a risk of electric shock
to persons.
The exclamation point within an
equilateral triangle is intended to alert the
ENGLISH
user to the presence of important operating
and maintenance (servicing) instructions in the
literature accompanying the device.
WARNING/CAUTION
- TO REDUCE THE RISK OF FIRE AND ELECTRIC
SHOCK, DO NOT EXPOSE THIS PRODUCT TO
RAIN OR MOISTURE.
WARNING
If you ignore the warning message, you may
be seriously injured or there is a possibility of
accident or death.
CAUTION
If you ignore the caution message, you may
be slightly injured or the product may be
damaged.
Read these instructions.
Keep these instructions.
Heed all warnings.
Follow all instructions.
f Do not use this apparatus near water.
f Clean only with dry cloth.
f Do not block any ventilation openings. Install in
accordance with the manufacturer’s instructions.
f Do not install near any heat sources such
as radiators, heat registers, stoves, or other
apparatus (including amplifiers) that produce
heat.
f Do not defeat the safety purpose of the
polarized or grounding-type plug. A polarized
plug has two blades with one wider than the
other. A grounding type plug has two blades
and a third grounding prong. The wide blade or
the third prong are provided for your safety. If
the provided plug does not fit into your outlet,
consult an electrician for replacement of the
obsolete outlet.
NOTE
The note helps you understand and use the
product safely. Please read the note carefully
before using the product.
WAR NING: This product contains chemicals known
to the State of California to cause cancer and birth
defects or other reproductive harm.
after handling.
2
f Protect the power cord from being walked on
or pinched particularly at plugs, convenience
receptacles, and the point where they exit from
the apparatus.
Wash hands
f Only use attachments/accessories specified by
the manufacturer.
Page 3
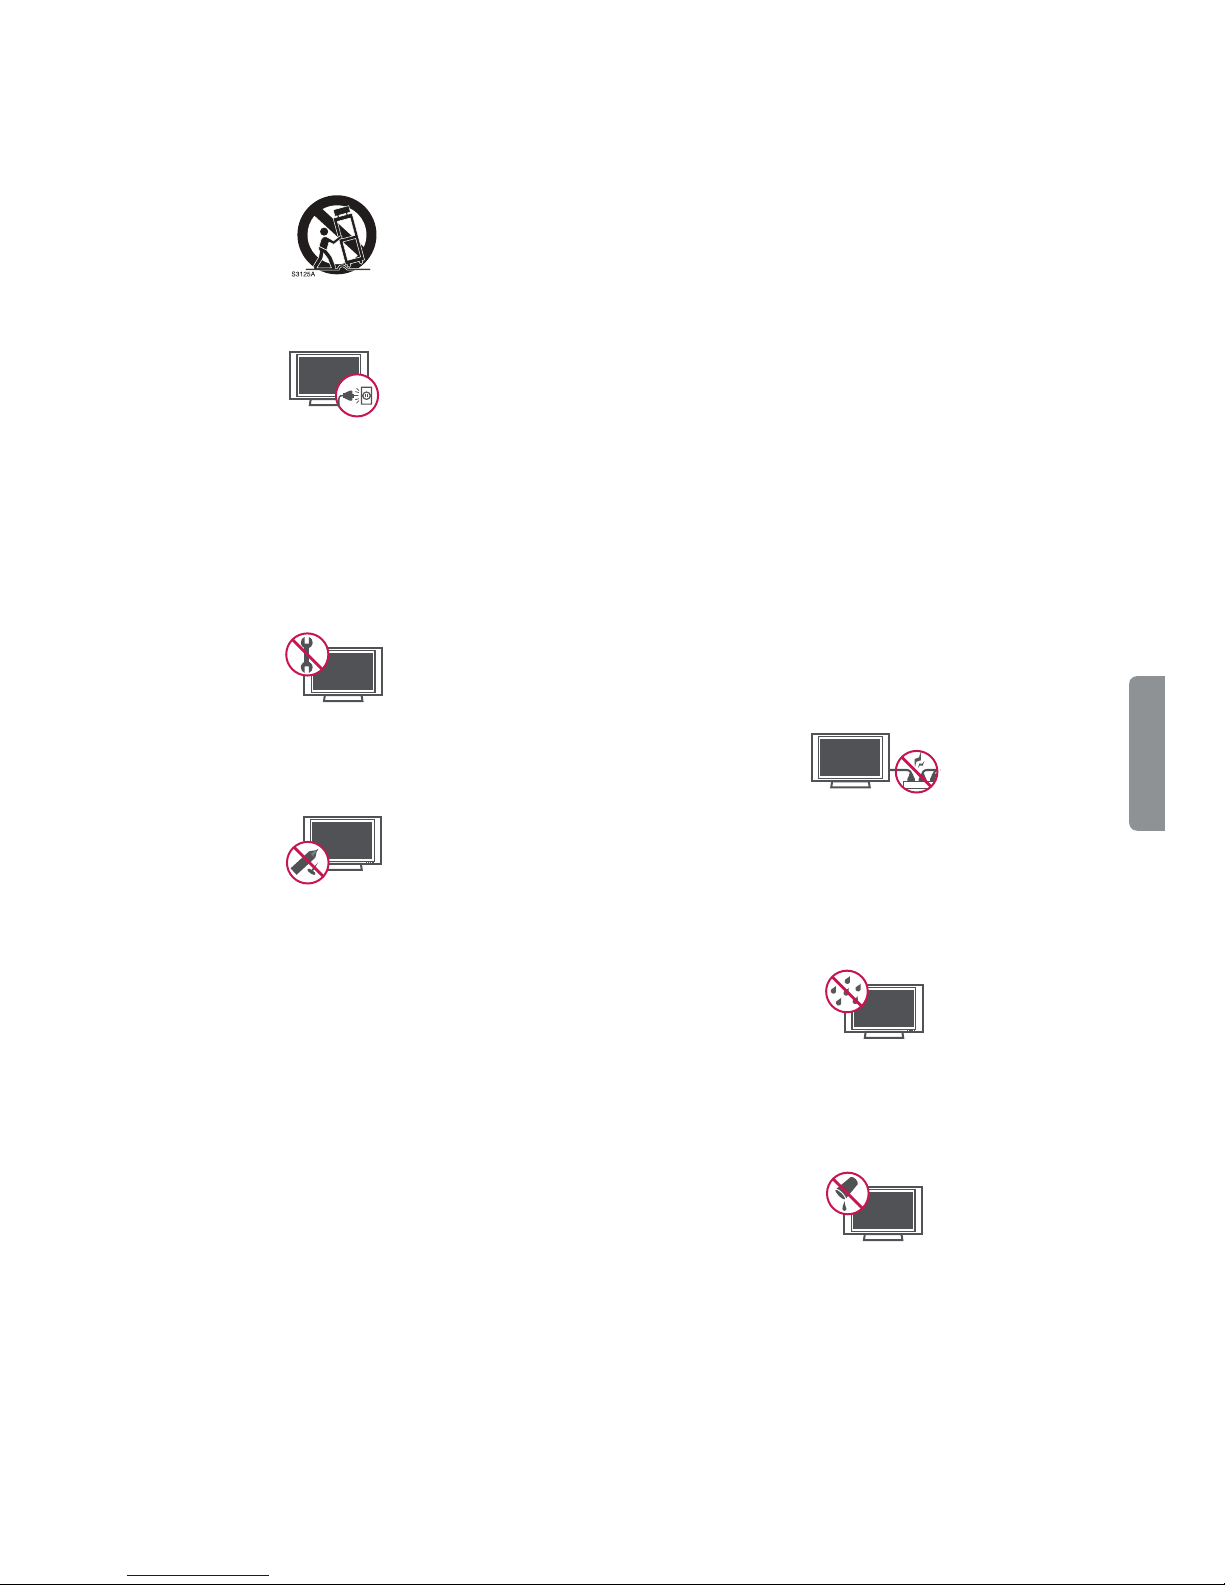
f Use only with the cart, stand, tripod, bracket, or
table specified by the manufacturer, or sold with
the apparatus. When a cart is used, use caution
when moving the cart/apparatus combination to
avoid injury from tip-over.
f Unplug this apparatus during lightning storms
or when unused for long periods of time.
f Refer all servicing to qualified service personnel.
Servicing is required when the apparatus has
been damaged in any way, such as power-supply
cord or plug is damaged, liquid has been spilled
or objects have fallen into the apparatus, the
apparatus has been exposed to rain or moisture,
does not operate normally, or has been dropped.
f Do not press strongly upon the panel with a
hand or a sharp object such as a nail, pencil, or
pen, or make a scratch on it.
f Do not stick metal objects or any other
conductive material into the power cord. Do
not touch the end of the power cord while it is
plugged in.
f Keep the packing anti-moisture material or
vinyl packing out of the reach of children.
Anti-moisture material is harmful if swallowed.
If swallowed, induce vomiting and go to the
nearest hospital. Additionally, vinyl packing can
cause suffocation. Keep it out of the reach of
children.
f CAUTION concerning the Power Cord
(Can differ by country):
Check the specification page of this owner’s
manual to be certain concerning current
requirements. Do not connect too many
devices to the same AC power outlet as this
could result in fire or electric shock. Do not
overload wall outlets. Overloaded wall outlets,
loose or damaged wall outlets, extension cords,
frayed power cords, or damaged or cracked
wire insulation are dangerous. Any of these
conditions could result in electric shock or fire.
Periodically examine the cord of your device,
and if its appearance indicates damage or
deterioration, unplug it, discontinue use of
the device, and have the cord replaced with
an exact replacement part by an authorized
servicer. Protect the power cord from physical or
mechanical abuse, such as being twisted, kinked,
pinched, closed in a door, or walked upon. Pay
particular attention to plugs, wall outlets, and
the point where the cord exits the device. Do not
move the TV with the power cord plugged in. Do
not use a damaged or loose power cord. Be sure
do grasp the plug when unplugging the power
cord. Do not pull on the power cord to unplug
the TV.
f Warning - To reduce the risk of fire or electrical
shock, do not expose this product to rain,
moisture or other liquids. Do not touch the TV
with wet hands. Do not install this product near
flammable objects such as gasoline or candles,
or expose the TV to direct air conditioning.
f Do not expose to dripping or splashing and
do not place objects filled with liquids, such as
vases, cups, etc. on or over the apparatus (e.g.,
on shelves above the unit).
ENGLISH
3
Page 4
f Grounding
- (Except for devices which are not grounded.)
Ensure that you connect the earth ground wire
to prevent possible electric shock (i.e., a TV
with a three-prong grounded AC plug must
be connected to a three-prong grounded AC
outlet).
If grounding methods are not possible, have
a qualified electrician install a separate circuit
breaker. Do not try to ground the unit by
connecting it to telephone wires, lightning
rods, or gas pipes.
f As long as this unit is connected to the AC wall
outlet, it is not disconnected from the AC power
source even if the unit is turned off.
f Do not attempt to modify this product in any
way without written authorization from LG
Electronics. Unauthorized modification could
void the user’s authority to operate this product.
f Outdoor Antenna Grounding
- (Can differ by country):
ENGLISH
If an outdoor antenna is installed, follow
the precautions below. An outdoor antenna
system should not be located in the vicinity of
overhead power lines or other electric light or
power circuits, or where it can come in contact
with such power lines or circuits as death or
serious injury can occur. Be sure the antenna
system is grounded to provide some protection
against voltage surges and built-up static
charges. Section 810 of the National Electrical
Code (NEC) in the U.S.A. provides information
with respect to proper grounding of the mast
and supporting structure, grounding of the
lead-in wire to an antenna discharge unit, size
of grounding conductors, location of antenna
discharge unit, connection to grounding
electrodes, and requirements for the grounding
electrode.
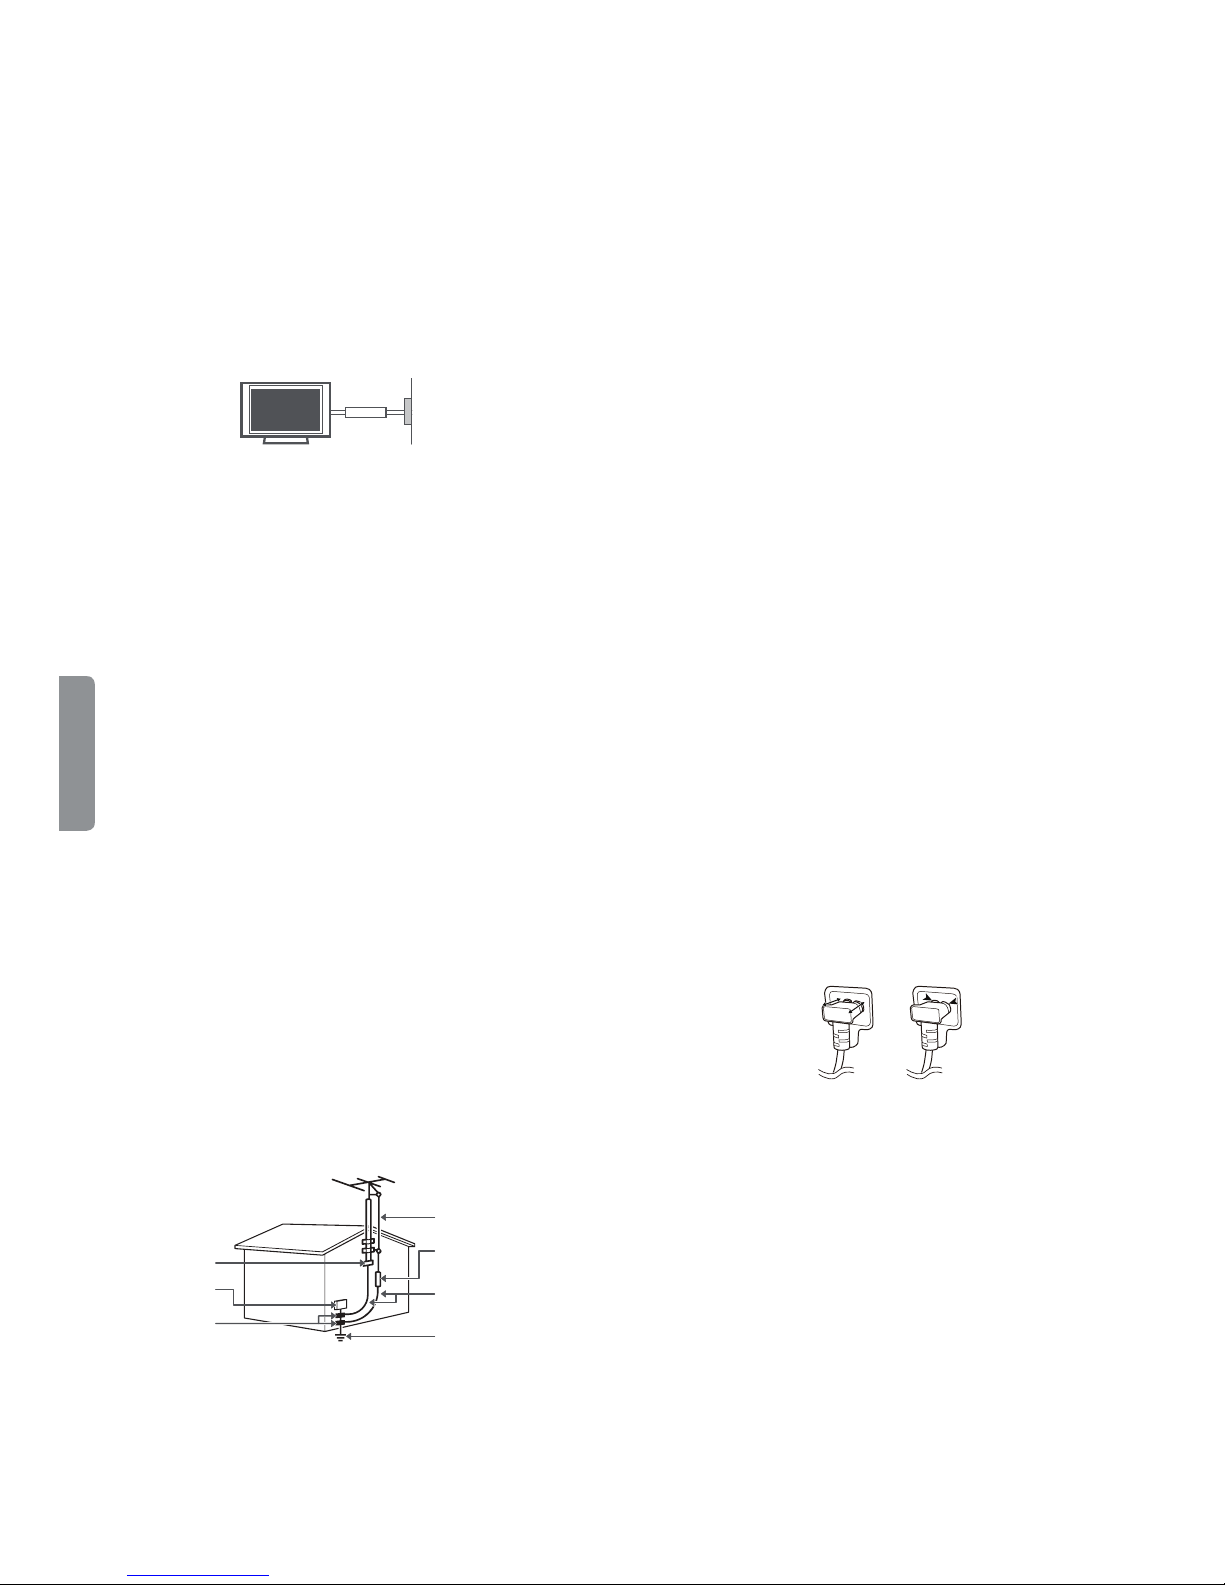
Antenna grounding according to the National
Electrical Code, ANSI/NFPA 70
Ground Clamp
Electric Service
Ground Clamp
Equipment
Circuit
Breaker
NEC: National Electrical Code
Power
Supply
Antenna Lead in Wire
Antenna Discharge Unit
(NEC Section 810-20)
Grounding Conductor
(NEC Section 810-21)
Power Service Grounding
Electrode System
(NEC Art 250, Part H)
f Cleaning
- When cleaning, unplug the power cord and
wipe gently with a soft cloth to prevent
scratching. Do not spray water or other liquids
directly on the TV as electric shock may occur.
Do not clean with chemicals such as alcohol,
thinners, or benzene.
f Moving
- Make sure the product is turned off, unplugged,
and all cables have been removed. It may take 2
or more people to carry larger TVs. Do not press
or put stress on the front panel of the TV.
f Ventilation
- Install your TV where there is proper ventilation.
Do not install in a confined space such as a
bookcase. Do not cover the product with cloth
or other materials while plugged in. Do not
install in excessively dusty places.
f If you smell smoke or other odors coming from
the TV, unplug the power cord and contact an
authorized service center.
f Keep the product away from direct sunlight.
f Never touch this apparatus or antenna during a
lightning storm.
f When mounting a TV on the wall, make sure not
to install the TV by hanging the power and signal
cables on the back of the TV.
f Do not allow an impact shock or any objects to
fall into the product, and do not drop anything
onto the screen.
f DISCONNECTING THE DEVICE FROM THE MAIN
POWER
The power plug is the disconnecting device.
In case of an emergency, the power plug must
remain readily accessible.
f Make sure the power cord is connected securely
to the power plug on the TV.
f Batteries
- Store the accessories (battery, etc.) in a safe
location out of the reach of children.
f This apparatus uses batteries. In your community
there might be regulations that require you
to dispose of these batteries properly due to
environmental considerations. Please contact
your local authorities for disposal or recycling
information.
4
Page 5

f Do not dispose of batteries in a fire.
f Do not short circuit, disassemble, or allow the
batteries to overheat.
f Do not use high voltage electrical equipment
near the TV, (e.g., a bug zapper).
This may result in product malfunction.
f Dot Defect
- This panel is an advanced product that contains
millions of pixels. In a very few cases, you could
see fine dots on the screen while you’re viewing
the TV. Those dots are deactivated pixels and
do not affect the performance and reliability
of the TV.
f Generated Sound
- Cracking noise A cracking noise that occurs
when watching or turning off the TV is
generated by plastic thermal contraction
due to temperature and humidity. This noise
is common for products where thermal
deformation is required.
- Electrical circuit humming/panel buzzing
A low level noise is generated from a highspeed switching circuit, which supplies a
large amount of current to operate a product.
It varies depending upon the product.
This generated sound does not affect the
performance and reliability of the product.
f Take care not to touch the ventilation openings.
When watching the TV for a long period, the
ventilation openings may become hot. This does
not affect the performance of the product or
cause defects in the product.
f Do not install this product on a wall if it could be
exposed to oil or oil mist. This may damage the
product and cause it to fall.
f If the TV feels cold to the touch, there may
be a small flicker when it is turned on. This is
normal; there is nothing wrong with TV. Some
minute dot defects may be visible on the screen,
appearing as tiny red, green, or blue spots.
However, they have no adverse effect on the
TV’s performance. Avoid touching the screen or
holding your finger(s) against it for long periods
of time. Doing so may produce some temporary
distortion effects on the screen.
f Displaying a still image for a prolonged time may
cause image sticking. Avoid displaying a fixed
image on the TV screen for a long period of time.
f Some horizontal lines may appear when the
Clear Panel Noise feature is performed. It is
normal and there is no need to be concerned.
Viewing 3D Imaging
(For 3D models)
CAUTION
f Guardians should not leave children
unsupervised who are watching a 3D video.
Guardians should make children stop watching
the video and take a rest if they experience eye
fatigue, headache, or dizziness.
f When viewing a 3D video, some may experience
discomfort such as a headache, dizziness,
fatigue, or blurred vision. In this case, stop
watching the 3D video and take a rest.
f If you watch a 3D video for a long time, you
may experience eye fatigue. In this case, stop
watching the 3D video and take a rest.
f Only use LG 3D glasses. Otherwise, you may not
be able to view 3D videos properly.
f Do not use 3D glasses instead of your normal
glasses, sunglasses, or protective goggles. Place
the 3D glasses over your normal eye ware.
f Do not keep your 3D glasses in extremely high or
low temperatures. It will cause deformation.
f Do not use the 3D glasses while walking or
moving around. It may cause an accident or
injury.
f Be careful not to poke your eye with the frames
of the 3D glasses.
f Do not watch 3D content if you have
photosensitive seizures, epilepsy, or heart
disease.
ENGLISH
5
Page 6
Preparing
NOTE
f When the TV is turned on for the first time after
being shipped from the factory, initialization of
the TV may take approximately one minute.
f Image shown may differ from your TV.
f Your TV’s OSD (On Screen Display) may differ
slightly from that shown in this manual.
f The available menus and options may differ from
the input source or product model that you are
using.
f New features may be added to this TV in the
future.
f The items supplied with your product may vary
depending upon the model.
f Product specifications or contents of this manual
may be changed without prior notice due to
upgrade of product functions.
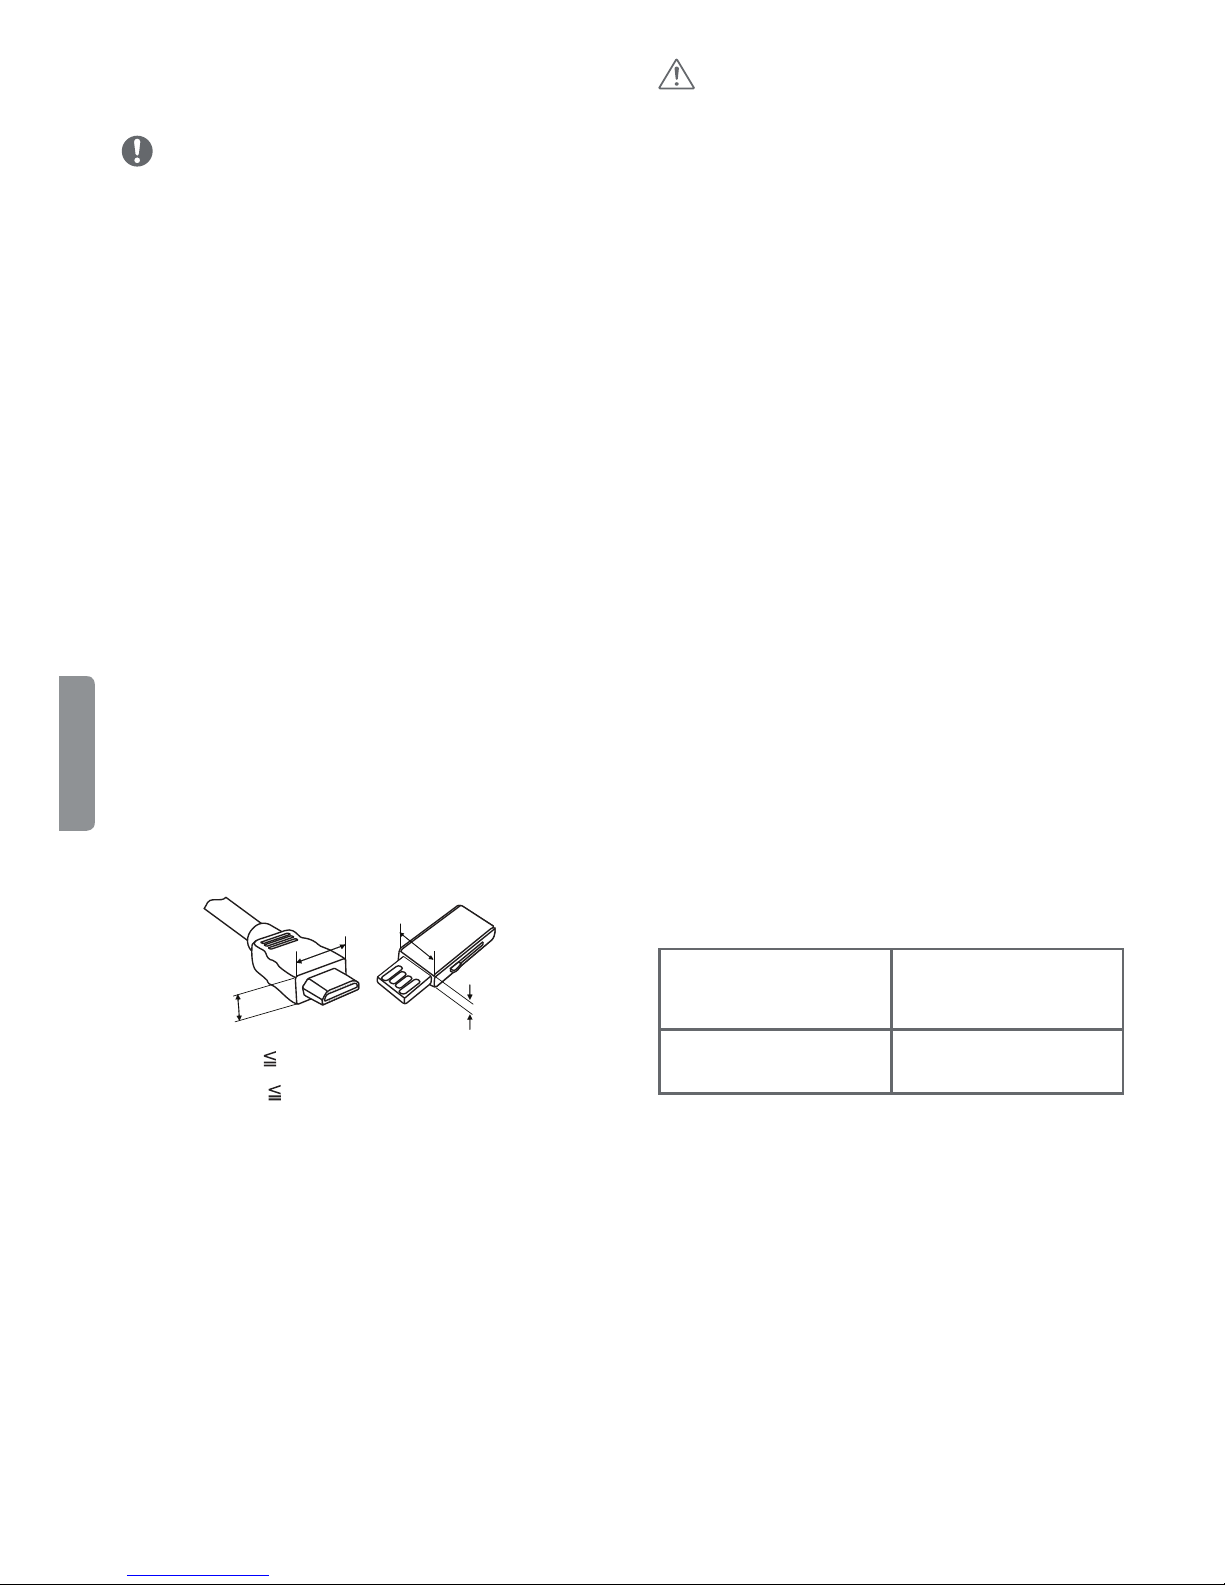
f For an optimal connection, HDMI cables and
USB devices should have bezels less than 10 mm
(0.39 inches) thick and 18 mm (0.7 inches) width.
f Use an extension cable that supports USB 2.0 if
ENGLISH
the USB cable or USB flash drive does not fit into
your TV’s USB port.
f Use a certified cable with the HDMI logo
attached. If you do not use a certified HDMI
cable, the screen may not display or a
connection error may occur.
f Recommended HDMI cable types (3 m or less)
- High-Speed HDMI®/
- High-Speed HDMI ®/
CAUTION
f Do not use any unapproved items to ensure the
safety and product’s lifespan.
f Any damages or injuries by using unapproved
items are not covered by the warranty.
f Some models appear to have a thin film on the
screen. It is actually part of the screen; do not
remove it.
f When attaching the stand to the TV set, place
the screen facing down on a cushioned table or
flat surface to protect the screen from scratches.
f Make sure that the screws are fastened tightly.
(If they are not fastened securely enough, the TV
may tilt forward after being installed.)
f Do not fasten the screws with excessive force;
otherwise, they may be worn out and become
loose.
f Make sure to wring any excess water or cleaner
from the cloth.
f Do not spray water or cleaner directly onto the
TV screen.
f Make sure to spray just enough of water or
cleaner onto a dry cloth to wipe the screen.
Optional Extras
Optional extras can be changed or modified for
quality improvement without any notification.
TM
cable
TM
cable with Ethernet
B
A
B
A
Contact your dealer for buying these items.
These devices work only with certain models.
The model name or design may be changed due to
the manufacturer’s circumstances or policies.
(Depending upon model)
AG-F***
Cinema 3D Glasses
AG-F***DP
Dual Play Glasses
*A 10 mm (0.39 inches)
*B
18 mm (0.7 inches)
6
AN-MR650
Magic Remote
AN-VC550
Smart Camera
Page 7
Lifting and Moving the TV
Using the Button
When moving or lifting the TV, read the following
to prevent the TV from being scratched or
damaged and for safe transportation regardless of
its type and size.
f It is recommended to move the TV in the box or
packing material that the TV originally came in.
f Before moving or lifting the TV, disconnect the
power cord and all cables.
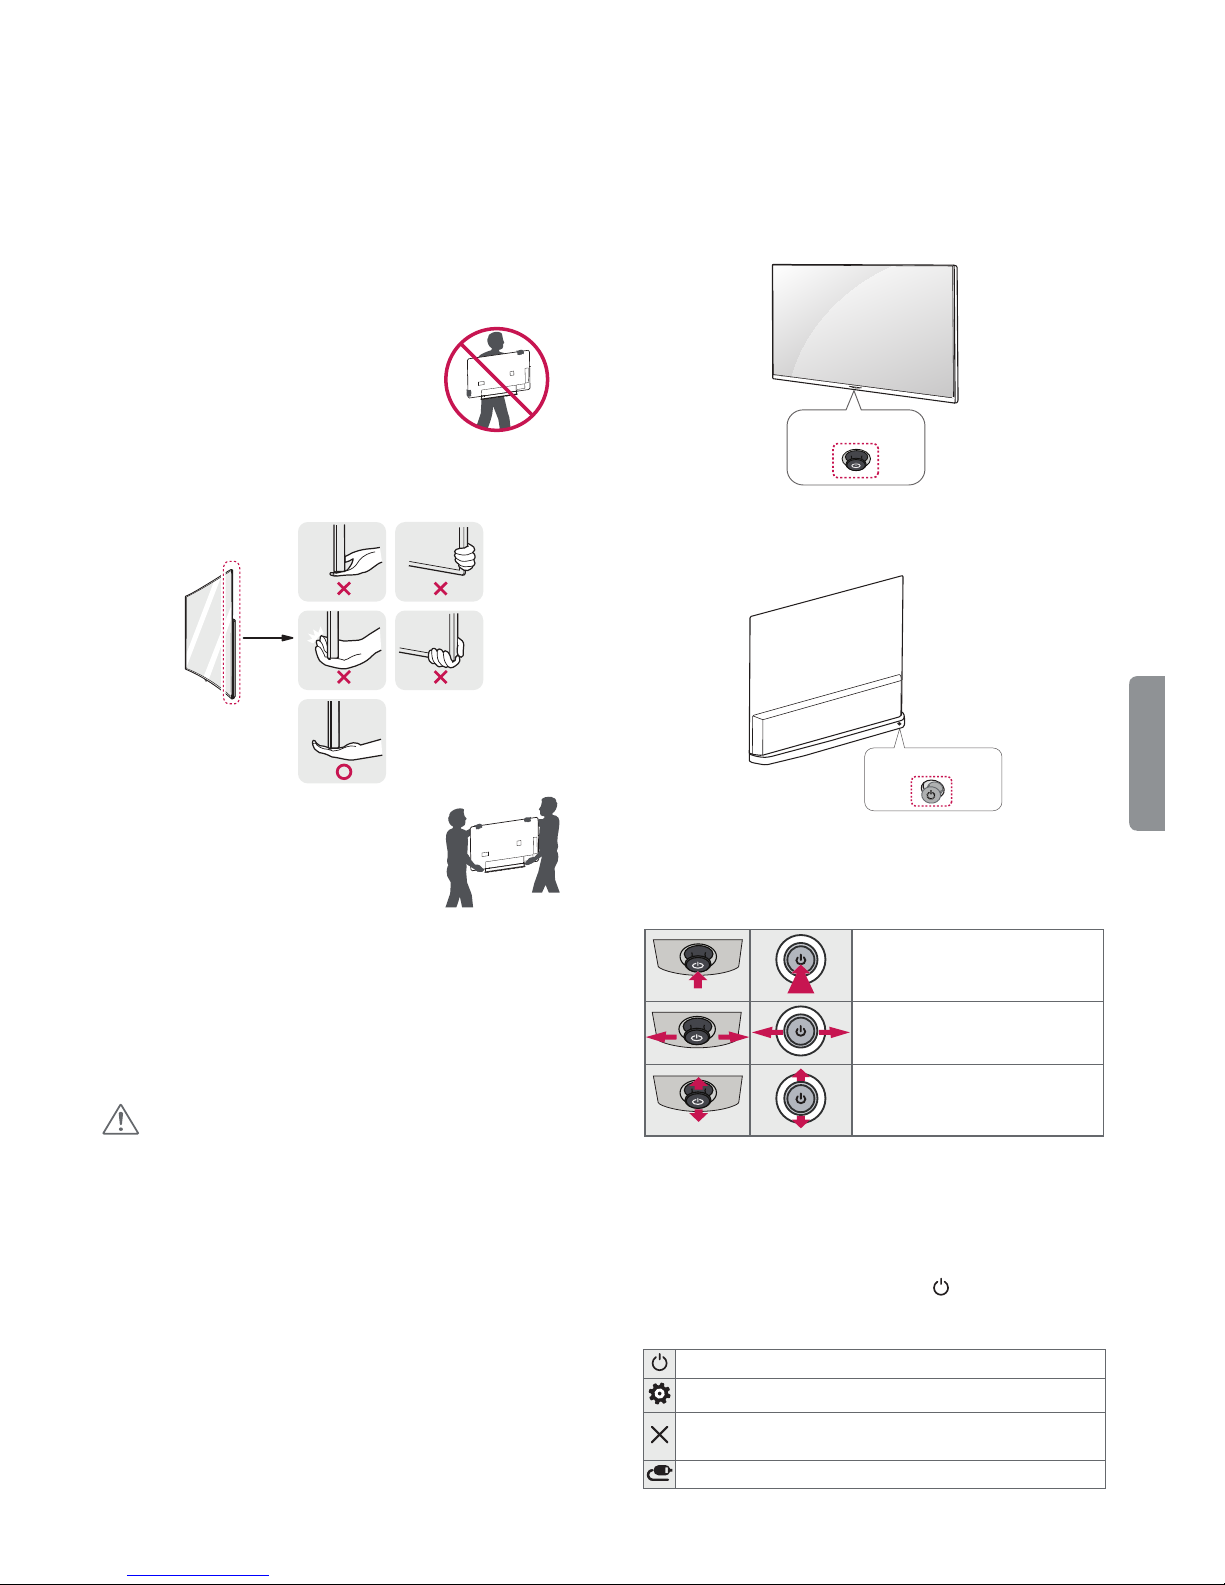
f When holding the TV, the screen
should face away from you to
avoid damage.
f Hold the top and bottom of the TV frame firmly.
Make sure not to hold the transparent part,
speaker, or speaker grille area.
(Depending upon model)
You can simply operate the TV functions, pressing
or moving the button.
[A type]
Joystick Button
[B type]
ENGLISH
f Use at least two people to move
a large TV.
f When transporting the TV by
hand, hold the TV as shown in the
following illustration.
f When transporting the TV, do not expose the TV
to jolts or excessive vibration.
f When transporting the TV, keep the TV upright;
never turn the TV on its side or tilt towards the
left or right.
f When handling the TV, be careful not to damage
the protruding buttons.
CAUTION
f Avoid touching the screen at all times, as this
may result in damage to the screen.
f Do not place the product on the floor with its
front facing down without padding. Failure to do
so may result in damage to the screen.
f Do not move the TV by holding the cable
holders, as the cable holders may break, and
injuries and damage to the TV may occur.
(Depending upon model)
Joystick Button
Basic Functions
Power On (Press)
1
1 A
ll running apps will close.
Power Off (Press and Hold)
Volume Control
Channels Control
Adjusting the Menu
When the TV is turned on, press button one time.
You can adjust the Menu items pressing or moving
the buttons.
Turns the power off.
Accesses the setting menu.
Clears on-screen displays and returns to TV
viewing.
Changes the input source.
7
Page 8
Mounting on a Table
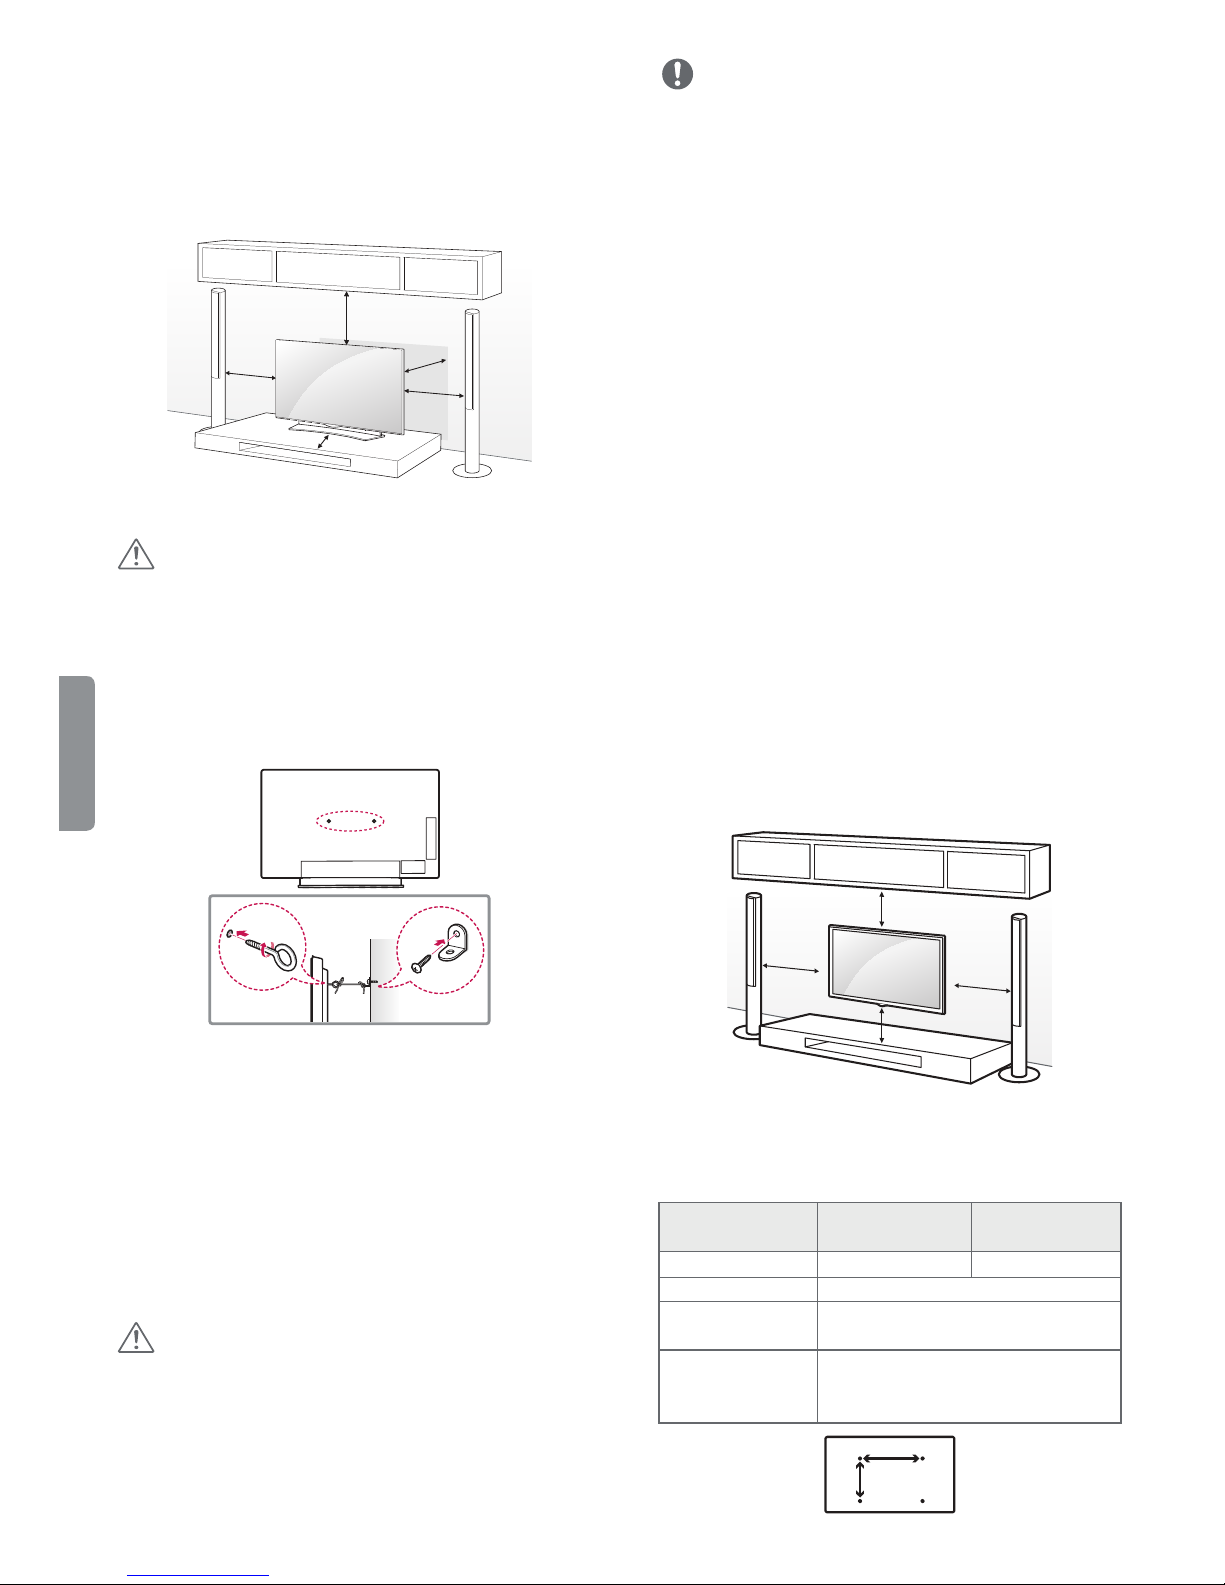
1 Lift and tilt the TV into its upright position on a
table.
- Leave a 10 cm (4 inches) (minimum) space from
the wall for proper ventilation.
NOTE
f Use a platform or cabinet that is strong and large
enough to support the TV securely.
f Brackets, bolts, and ropes are optional. You can
obtain additional accessories from your local
dealer.
10 cm
(4 inches)
10 cm
10 cm
10 cm
10 cm
2 Connect the power cord to a wall outlet.
CAUTION
f Do not place the TV near or on sources of heat,
as this may result in fire or other damage.
ENGLISH
Securing the TV to a Wall (optional)
(Depending upon model)
Mounting on a Wall
An optional wall mount can be used with your
LG Television. Consult with your local dealer for
a wall mount that supports the VESA standard
used by your TV model. Carefully attach the wall
mount bracket at the rear of the TV. Install the wall
mount bracket on a solid wall perpendicular to the
floor. If you are attaching the TV to other building
materials, please contact qualified personnel to
install the wall mount. Detailed instructions will
be included with the wall mount. We recommend
that you use an LG brand wall mount. The LG wall
mount is easy to adjust or to connect the cables.
When you do not use LG’s wall mount bracket,
use a wall mount bracket where the device is
adequately secured to the wall with enough space
to allow connectivity to external devices. If you are
using a non-adjustable mount, attach the mount
to the wall. Attach the cables to the TV first, then
attach the TV to the mount.
1 Insert and tighten the eye-bolts, or TV brackets
and bolts on the back of the TV.
- If there are bolts inserted at the eye-bolts
position, remove the bolts first.
2 Mount the wall brackets with the bolts to the
wall. Match the location of the wall bracket and
the eye-bolts on the rear of the TV.
3 Connect the eye-bolts and wall brackets tightly
with a sturdy rope or cable. Make sure to keep
the rope parallel to the flat surface.
CAUTION
f Make sure that children do not climb on or hang
on the TV.
8
10 cm
(4 inches)
10 cm
10 cm
10 cm
Make sure to use screws and wall mounts that
meet the VESA standard. Standard dimensions for
the wall mount kits are described in the following
table.
Model OLED55/65B6P OLED55/65C6P,
OLED55/65E6P
VESA (A x B) 300 x 200 400 x 200
Standard screw M6
Number of
screws
4
Wall mount
bracket
OTW420B
(optional)
A
B
Page 9
NOTE
f Remove the stand before installing the TV on a
wall mount by performing the stand attachment
in reverse.
CAUTION
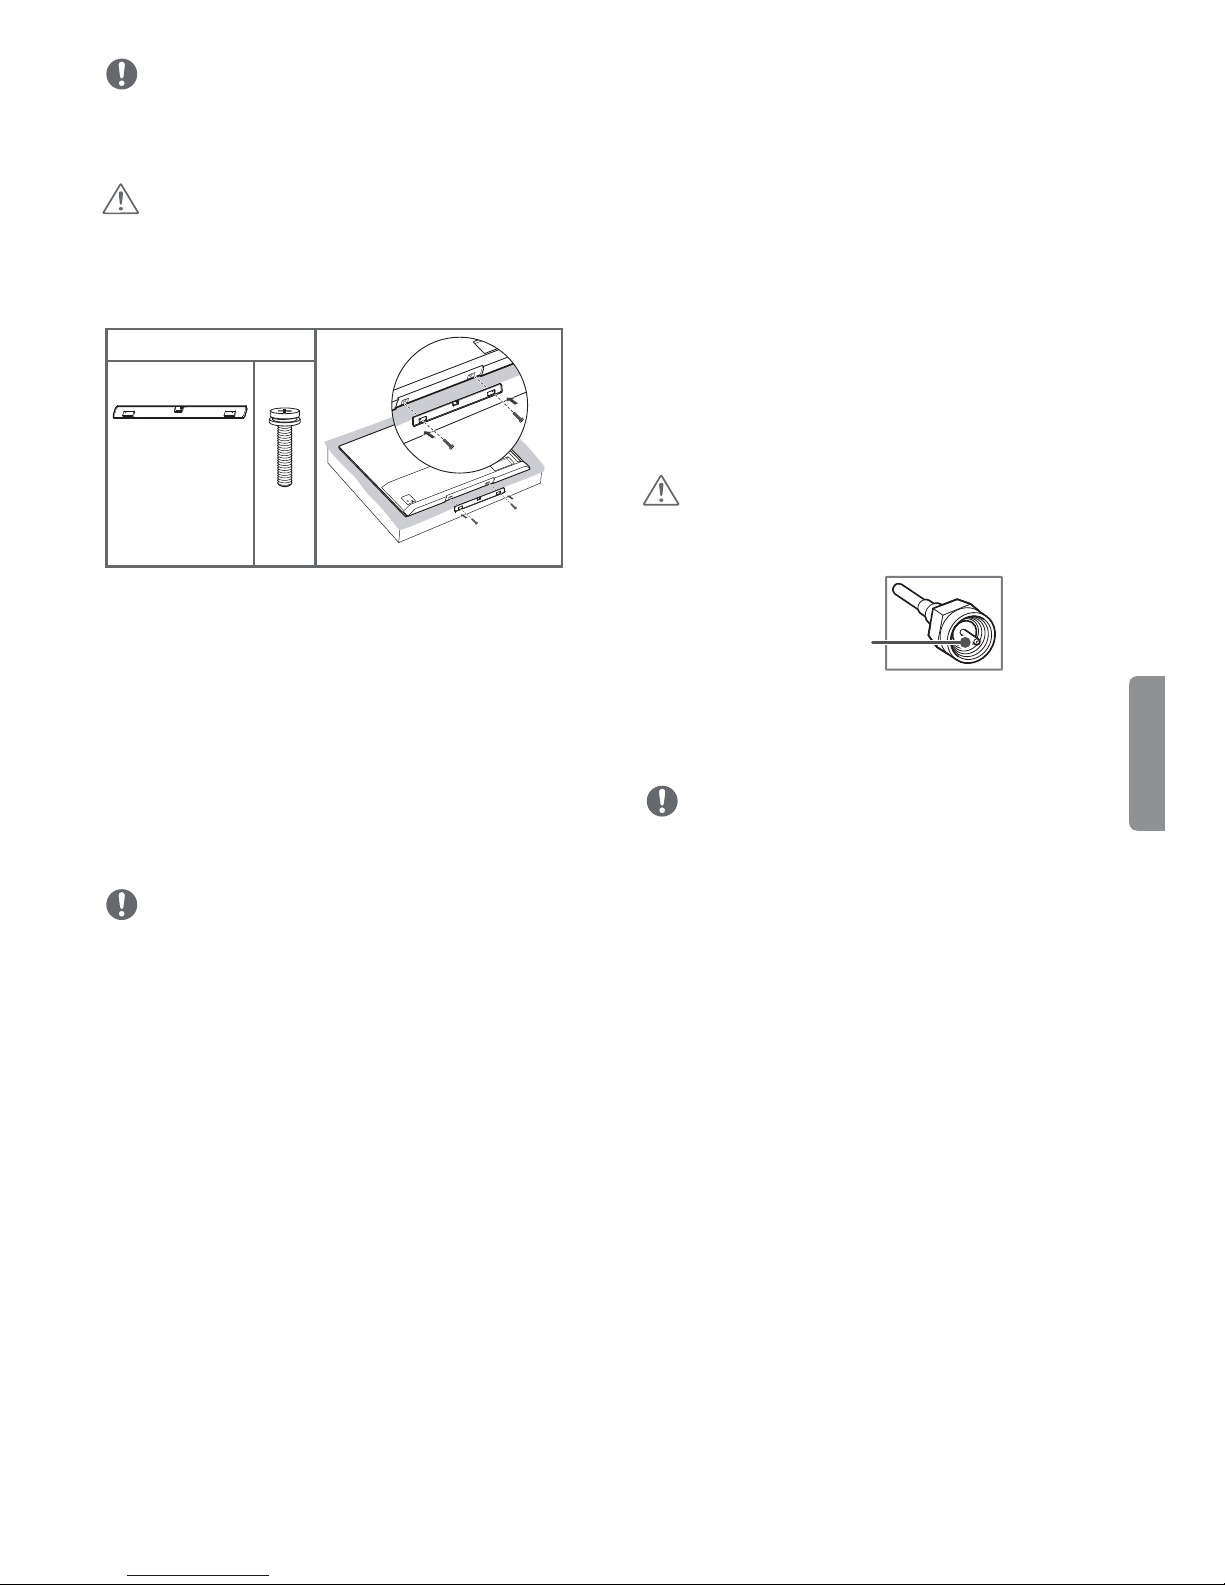
f To install the wall mount, use the stand assembly
screws to attach the wall mount cover to the
bottom of the product as shown in the following
illustration. (For OLED55/65E6P)
Provided Item
Wall mount
cover
X 2
f Depending upon the graphics card, some
resolution settings may not allow the image to
be positioned on the screen properly.
f Some USB Hubs may not work. If a USB device
connected through a USB Hub is not detected,
connect it directly to the USB port on the TV.
f The TV may be capable of operating without a
set-top from a multichannel video programming
distributor (MVPD).
Connecting to an Antenna or Cable
Connect an antenna, cable, or cable box to watch
TV. The illustrations may differ from the actual
items and an RF cable is optional.
CAUTION
f Make sure not to bend the copper wire of the RF
cable.
Connections (Notifications)
You can connect various external devices to the TV.
Supported external devices are: HD receivers, DVD
players, VCRs, audio systems, USB storage devices,
PC, gaming devices, and other external devices.
For more information on an external device’s
connection, refer to the manual provided with
each device.
NOTE
f If you record a TV program on a DVD recorder or
VCR, make sure to connect the TV signal input
cable to the TV through a DVD recorder or VCR.
For more information about recording, refer to
the manual provided with the connected device.
f The external device connections shown may
differ slightly from illustrations in a manual.
f Connect external devices to the TV regardless
about the order of the TV port.
f If you connect a gaming device to the TV, use the
cable supplied with the gaming device.
f Refer to the external equipment’s manual for
operating instructions.
f In PC mode, there may be noise associated
with the resolution, vertical pattern, contrast,
or brightness. If noise is present, change the PC
output to another resolution, change the refresh
rate to another rate, or adjust the brightness and
contrast on the PICTURE menu until the picture
is clear.
Copper wire
f Complete all connections between devices, and
then connect the power cord to the power outlet
to prevent damage to your TV.
NOTE
f Use a signal splitter to use 2 TVs or more.
f DTV Audio Supported Codec: MPEG,
Dolby Digital.
f Direct ULTRA HD broadcast is unavailable in
areas without an ULTRA HD signal.
f This TV cannot receive ULTRA HD (3840 x 2160
pixels) broadcasts directly because the related
standards have not been confirmed.
(Depending upon model)
ENGLISH
9
Page 10
Other Connections
Connect your TV to external devices. For the best
picture and audio quality, connect the external
device and the TV with the HDMI cable. Depending
upon the model, a cable may not be provided.
NOTE
f > > > General >
HDMI ULTRA HD Deep Color:
- On : Support 4K @ 60 Hz (4:4:4, 4:2:2, 4:2:0)
- Off : Support 4K @ 60 Hz 8bit (4:2:0)
f If the device connected to Input Port also
supports ULTRA HD Deep Color, your picture
may be clearer. However, if the device doesn’t
support it, it may not work properly. In that case,
connect the device to a different HDMI port or
change the TV’s HDMI ULTRA HD Deep Color
setting to Off.
- This feature is available only on certain models
which support HDMI ULTRA HD Deep Color.
f HDMI Audio Supported Format:
DTS (44.1 kHz / 48 kHz),
AC3 (32 kHz / 44.1 kHz / 48 kHz),
PCM (32 kHz / 44.1 kHz / 48 kHz / 96 kHz /
ENGLISH
192 kHz) (Depending upon model)
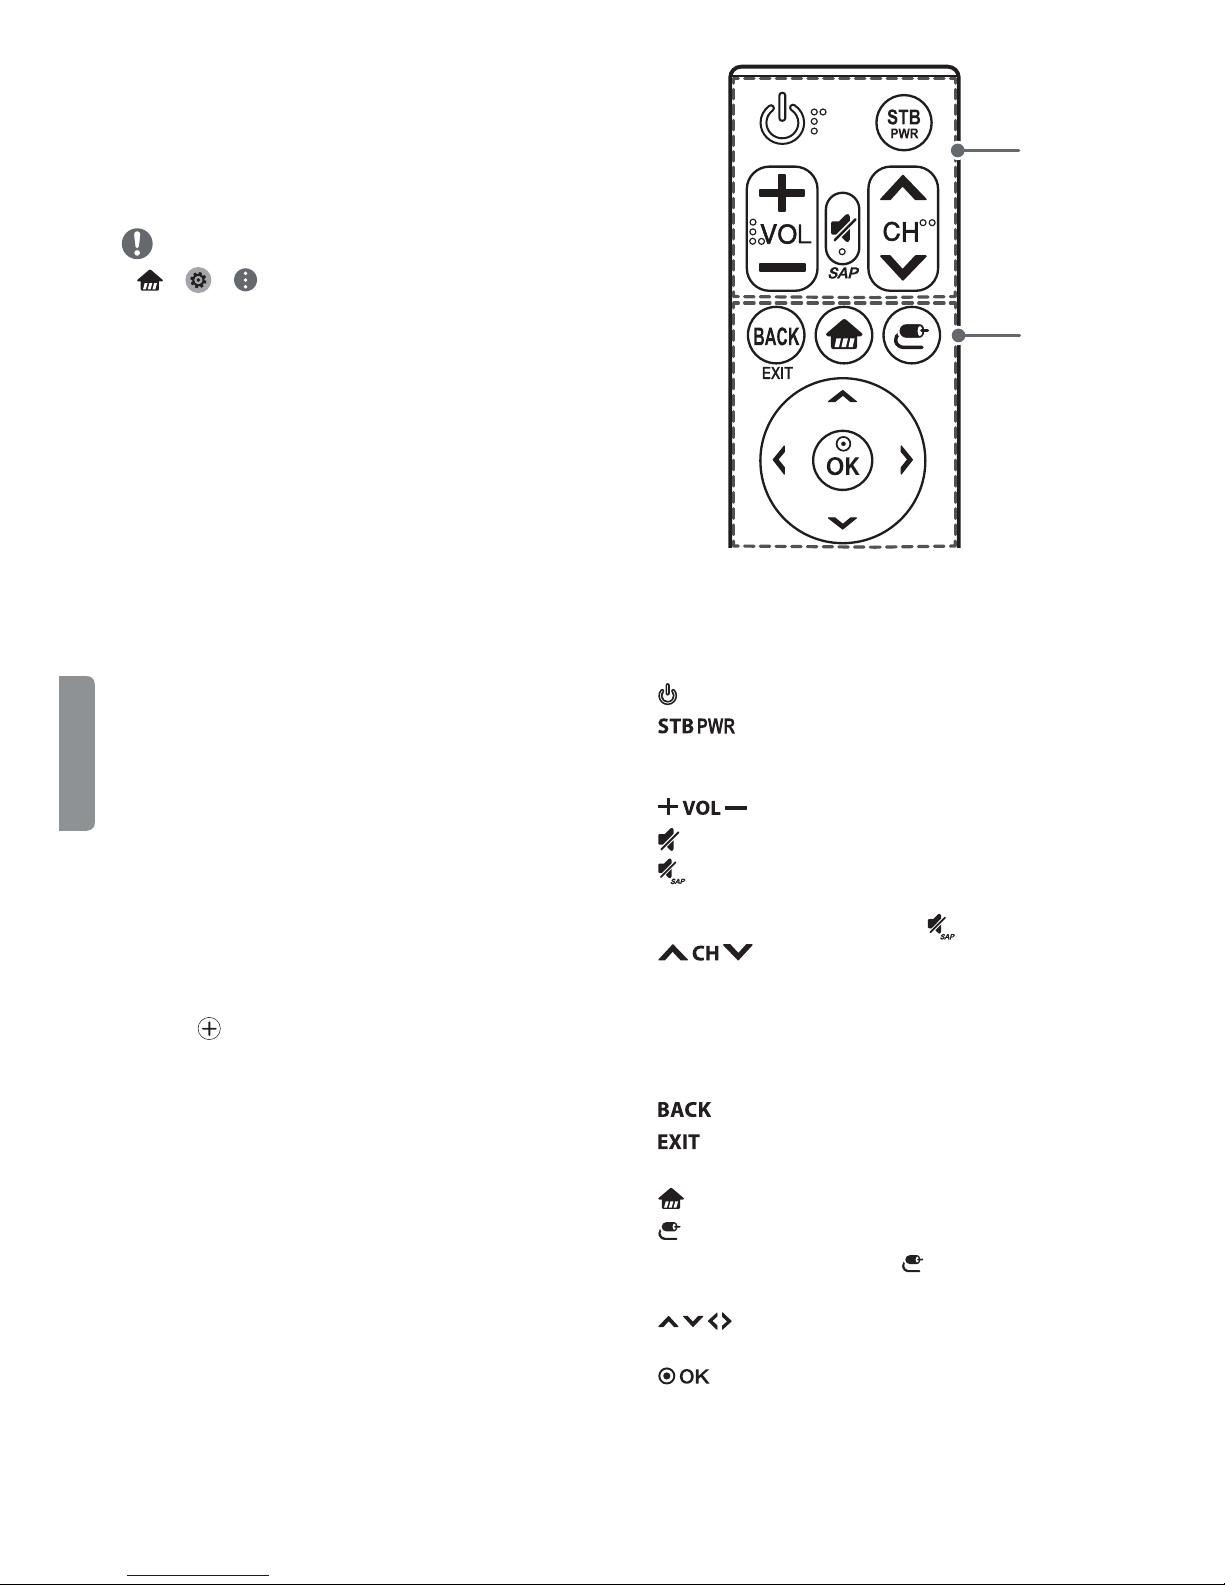
Slim Remote Control
(Depending upon model)
The descriptions in this manual are based on
the buttons on the remote control. Please read
this manual carefully and use the TV correctly.
To replace coin batteries, turn the battery cover
counterclockwise by using a coin. Then, take the
battery cover. Insert and fix the battery (CR2032)
with the
cover on the remote control and turn it clockwise
to close.
When in use, it should be pointed in the direction
of the TV’s remote sensor.
facing forward. And, Put the battery
A
B
A
(POWER) Turns the TV on or off.
You can turn your set-top box on or off
by adding the set-top box to the universal remote
control for your TV.
Adjusts the volume level.
(MUTE) Mutes all sounds.
* Video descriptions function will be enabled.
f SAP (Secondary Audio Program) Feature can also
be enabled by pressing the
Scrolls through the saved channels.
B
Returns to the previous screen.
* Clears all on-screen displays and returns to
TV viewing.
(Home) Accesses the Home menu.
INPUT Changes the input source.
* Pressing and holding the
displays all the lists of external inputs.
Navigation buttons) Scrolls through
menus or options. (up/down/left/right)
Selects menus or options and confirms your
input.
* : To use the button, press and hold for more than
3 seconds.
key.
INPUT button
10
Page 11
Battery Installation
WARNING
DO NOT INGEST BATTERY. CHEMICAL BURN
HAZARD.
CAUTION
f The battery used in this device may present a
fire or chemical burn hazard if mistreated. Do
not recharge, disassemble, incinerate, or heat
above 100 °C (212 °F). Replace the battery part
no. CR2032 only. Use of another battery may
present a risk of fire or explosion. Dispose of
used battery. Keep battery away from children.
Do not disassemble or dispose of in fire.
f [The remote control supplied with] This product
contains a coin/button cell battery. If the coin/
button cell battery is swallowed, it can cause
severe internal burns in just 2 hours and can lead
to death. Keep new and used batteries away
from children. If the battery compartment does
not close securely, stop using the product and
keep it away from children. If you think batteries
might have been swallowed or placed inside
any part of the body, seek immediate medical
attention.
f If you have long nails, do not open the battery
cover by using your finger. Or else, your nail
could break.
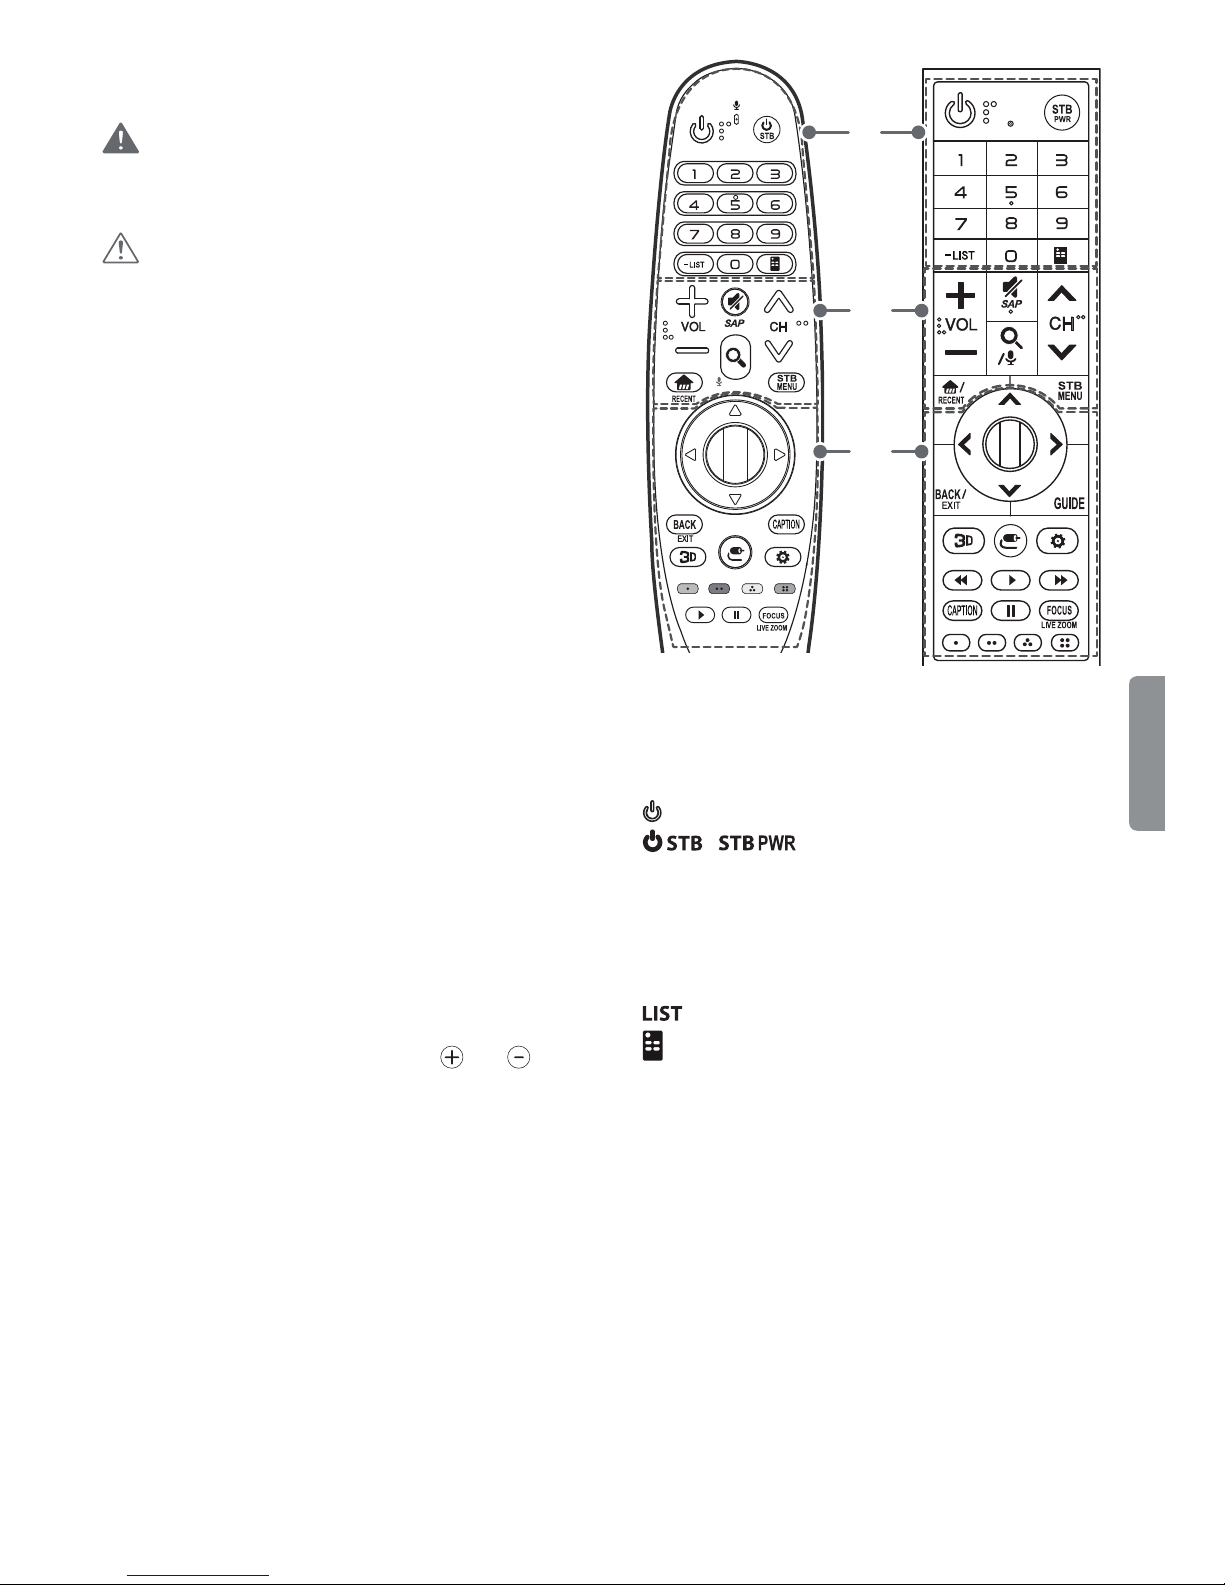
Magic Remote Functions
(Depending upon model)
When the message
Change the battery.
battery. To install batteries, open the battery cover,
replace batteries (1.5 V AA) matching
ends to the label inside the compartment, and
close the battery cover. Failure to match the correct
polarities of the battery may cause the battery to
burst or leak, resulting in fire, personal injury, or
ambient pollution. Be sure to point the remote
control at the remote control sensor on the TV.
To remove the batteries, perform the installation
actions in reverse.
This remote uses infrared light. When in use, it
should be pointed in the direction of the TV’s
remote sensor.
Magic remote battery is low.
is displayed, replace the
and
A
B
C
ENGLISH
A
(POWER) Turns the TV on or off.
/ You can turn your set-top box on
or off by adding the set-top box to the universal
remote control for your TV.
Number button Enters numbers.
- (Dash) Inserts a dash between numbers such as
2-1 and 2-2.
Accesses the saved channel list.
(Screen Remote) Displays the Screen Remote.
f Accesses the Universal Control Menu in some
regions.
11
Page 12

B
Adjusts the volume level.
(MUTE) Mutes all sounds.
* Video descriptions function will be enabled.
f SAP (Secondary Audio Program) Feature can also
be enabled by pressing the
Scrolls through the saved channels.
(Home) Accesses the Home menu.
* Shows the previous history.
(Search) Search for content such as channels,
movies and other videos, or perform a web search
by entering your search terms in the search box.
(Voice recognition) * Network connection is
required to use the voice recognition function.
1 Press the
2 Speak when the voice display window appears
on the TV screen.
(When you are not watching with a set-top box:
the set-top box screen is displayed.)
(Voice recognition) button.
Displays the set-top box Home menu.
ENGLISH
key.
Color buttons These access special functions in
some menus.
Red, Green, Yellow, Blue)
(
, / , , , Control buttons for media
contents (Depending upon model)
You can zoom in on the area where the
remote control is pointed.
* By zooming in on the selected area,
you can view it in full screen.
* : To use the button, press and hold for more than
3 seconds.
Registering Magic Remote
How to Register the Magic Remote
To use the Magic Remote, first pair it with your TV.
1 Put batteries into the Magic Remote and turn the
TV on.
2 Point the Magic Remote at your TV and press the
(Wheel) (OK) on the remote control.
f If the TV fails to register the Magic Remote, try
again after turning the TV off and back on.
C
/ Navigation buttons) Press the
up, down, left or right button to scroll the menu.
(up/down/left/right)
If you press
pointer is in use, the pointer will disappear from
the screen and Magic Remote will operate like a
general remote control. To display the pointer on
the screen again, shake Magic Remote to the left
and right.
(Wheel) (OK) Press the center of the Wheel
button to select a menu. You can change channels
by using the Wheel button.
Returns to the previous screen.
* Clears all on-screen displays and returns to
TV viewing.
Used for viewing 3D video. (For 3D models)
INPUT Changes the input source.
* Pressing and holding the
displays all the lists of external inputs.
Displays the program event according to
time scheduler. (Depending upon model)
(Q. Settings) Accesses the quick settings.
* Pressing and holding the
displays the All Settings menu.
/ buttons while the
INPUT button
Activates or deactivates the subtitles.
(Q. Settings) button
How to Deregister the Magic Remote
Press the / and (Home) buttons
at the same time, for five seconds, to unpair the
Magic Remote with your TV.
f Pressing and holding the
let you cancel and re-register Magic Remote at
once.
button will
Licenses
Supported licenses may differ by model.
For more information about licenses,
visit
www.lg.com
. (Depending upon model)
12
Page 13

Open Source Software Notice
Information
To obtain the source code under GPL, LGPL, MPL,
and other open source licenses, that is contained in
this product, please visit
In addition to the source code, all referred license
terms, warranty disclaimers and copyright notices
are available for download. LG Electronics will also
provide open source code to you on CD-ROM for
a charge covering the cost of performing such
distribution (such as the cost of media, shipping,
and handling) upon email request to
lge.com
the date on which you purchased the product.
. This offer is valid for three (3) years from
http://opensource.lge.com
opensource@
Specifications
Product specifications may be changed without
prior notice due to upgrade of product functions.
Estimated yearly energy consumption indicated on
.
the FTC label is measured in accordance with the
Test Procedures for Television Sets (USA only).
The actual energy consumption depends on the
usage environment (The content watched, TV
settings, etc.).
Television System
ATSC, NTSC-M, 64 & 256 QAM
External Control Device Setup
To obtain the external control device setup
information, please visit
(Depending upon model)
www.lg.com
.
Troubleshooting
f Cannot control the TV with the remote control.
- Check if anything such as tape has been placed
over the receiver.
- Check if there is any obstacle between the
product and the remote control.
- Replace the batteries with new ones.
f No image display and no sound is produced.
- Check if the product is turned on.
- Check if the power cord is connected to a wall
outlet.
- Check if there is a problem in the wall outlet by
connecting other products.
f The TV turns off suddenly.
- Check the power control settings. The power
supply may be interrupted.
- Check if the Sleep Timer / Timer Power Off
feature is activated in the Timers settings.
- If there is no signal while the TV is on, the TV
will turn off automatically after 15 minutes of
inactivity.
Program Coverage
VHF 2-13, UHF 14-69, DTV 2-69, CATV 1-135,
CADTV 1-135
External Antenna Impedance
75 Ω
Environment Condition
f Operating Temperature
0 °C to 40 °C (32 °F to 104 °F)
f Operating Humidity
Less than 80 %
f Storage Temperature
- 20 °C to 60 °C (-4 °F to 140 °F)
f Storage Humidity
Less than 85 %
ENGLISH
13
Page 14
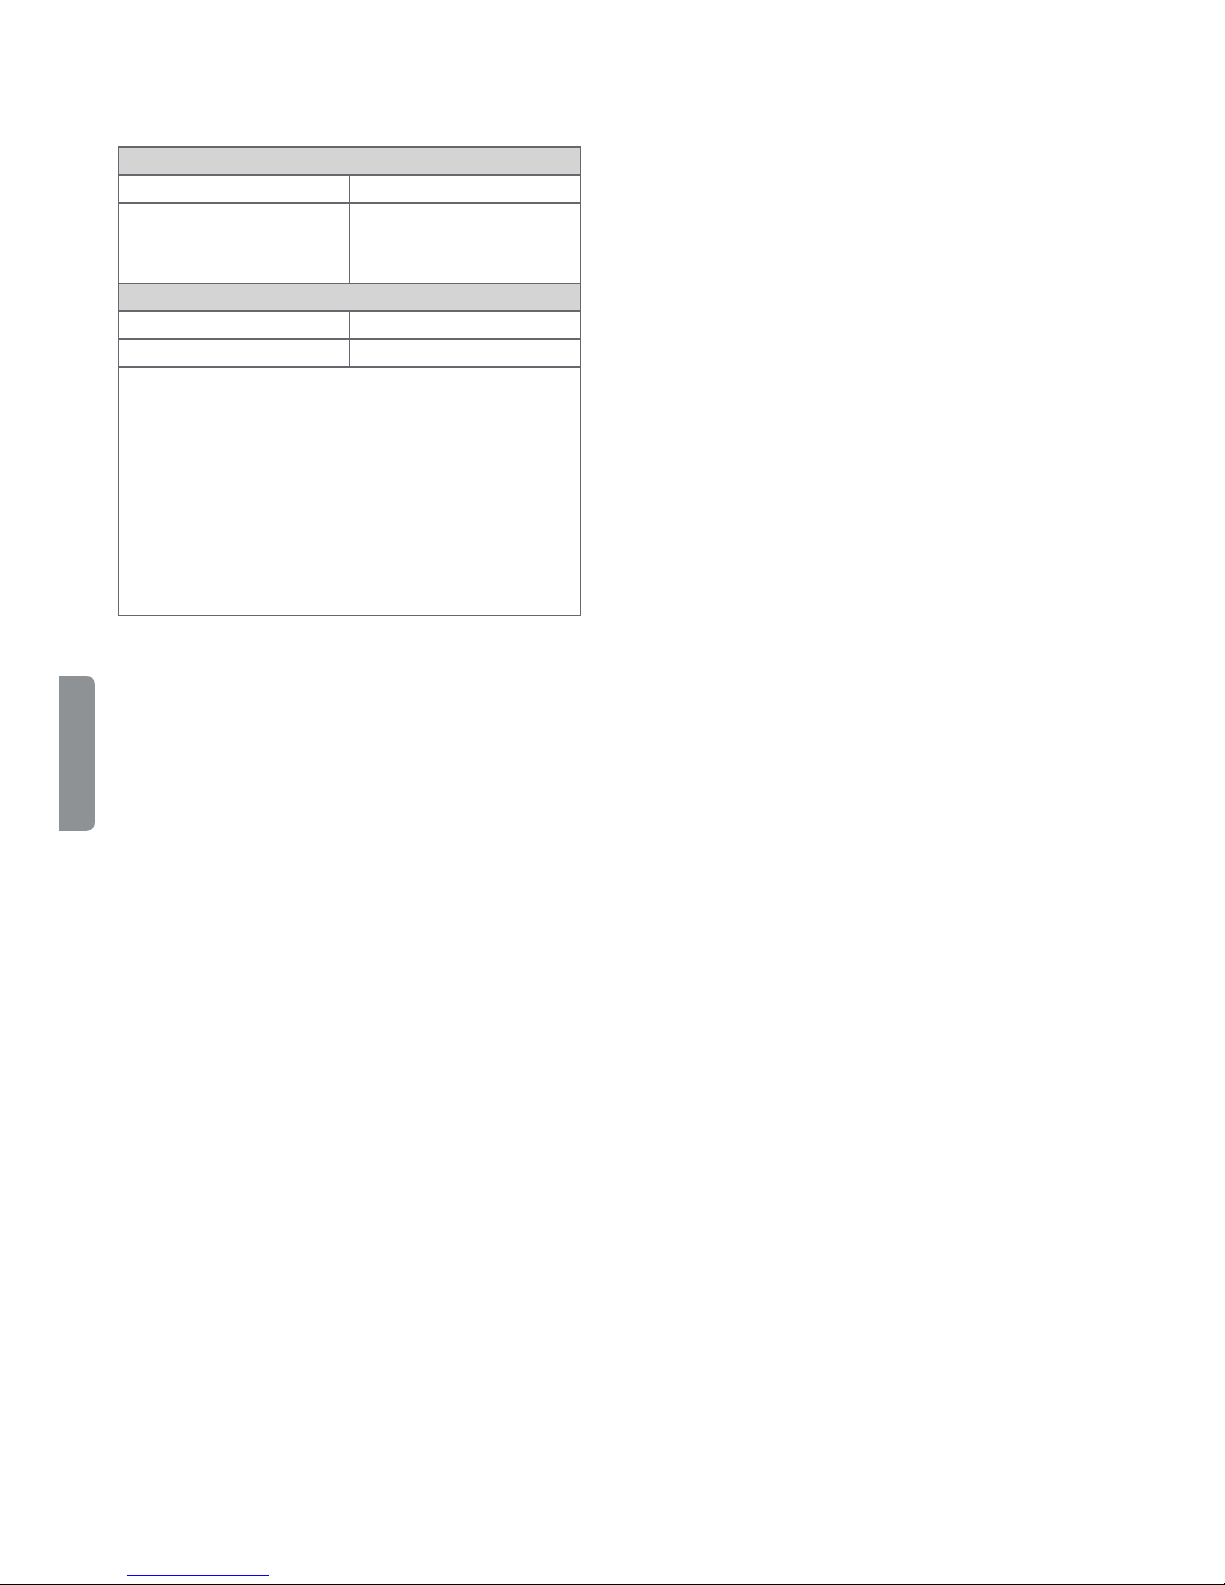
Wireless Module (LGSBWAC61)
Specifications
Wireless LAN (IEEE 802.11a/b/g/n/ac)
Frequency Range Output Power (Max.)
2400 to 2483.5 MHz
5150 to 5725 MHz
5725 to 5850 MHz
Bluetooth
Frequency Range Output Power (Max.)
2400 to 2483.5 MHz 10 dBm
f As band channels can vary per country, the
user cannot change or adjust the operating
frequency. This product is configured for the
regional frequency table.
f For consideration of the user, this device should
be installed and operated with a minimum
distance of 20 cm (7.8 inches) between the
device and the body.
f FCC ID: BEJLGSBWAC61
IC: 2703H-LGSBWAC61
15 dBm
16 dBm
12.5 dBm
ENGLISH
14
Page 15

Regulatory
FCC Notice
(For USA)
This equipment has been tested and found to
comply with the limits for a Class B digital device,
pursuant to Part 15 of the FCC Rules. These limits
are designed to provide reasonable protection
against harmful interference in a residential
installation. This equipment generates, uses,
and can radiate radio frequency energy and, if
not installed and used in accordance with the
instructions, may cause harmful interference
to radio communications. However, there is no
guarantee that interference will not occur in a
particular installation. If this equipment does
cause harmful interference to radio or television
reception, which can be determined by turning
the equipment off and on, the user is encouraged
to try to correct the interference by one or more of
the following measures:
- Reorient or relocate the receiving antenna.
- Increase the separation between the
equipment and the receiver.
- Connect the equipment to an outlet on a circuit
different from that to which the receiver is
connected.
- Consult the dealer or an experienced radio/TV
technician for help.
This device complies with part 15 of the FCC
Rules. Operation is subject to the following two
conditions: (1) this device may not cause harmful
interference and (2) this device must accept any
interference received, including interference that
may cause undesired operation of the device.
Any changes or modifications in construction of
this device which are not expressly approved by
the party responsible for compliance could void
the user’s authority to operate the equipment.
FCC Radio Frequency Interference
Requirements (for UNII devices)
FCC RF Radiation Exposure Statement
[For having wireless function (WLAN, Bluetooth,...)]
This equipment complies with FCC radiation
exposure limits set forth for an uncontrolled
environment. This transmitter must not be colocated or operating in conjunction with any other
antenna or transmitter.
This equipment should be installed and operated
with minimum distance 20 cm (7.8 inches)
between the antenna and your body. Users must
follow the specific operating instructions for
satisfying RF exposure compliance.
Industry Canada Statement
(For Canada)
[For having wireless function (WLAN, Bluetooth,...)]
This device complies with Industry Canada’s
licence-exempt RSSs. Operation is subject to the
following two conditions:
1 This device may not cause interference; and
2 This device must accept any interference,
including interference that may cause undesired
operation of the device.
IC Radiation Exposure Statement
(For Canada)
[For having wireless function (WLAN, Bluetooth,...)]
This equipment complies with IC radiation
exposure limits set forth for an uncontrolled
environment. This equipment should be installed
and operated with minimum distance 20 cm (7.8
inches) between the antenna & your body.
NOTE: THE MANUFACTURER IS NOT RESPONSIBLE
FOR ANY RADIO OR TV INTERFERENCE CAUSED
BY UNAUTHORIZED MODIFICATIONS TO THIS
EQUIPMENT. SUCH MODIFICATIONS COULD
VOID THE USER’S AUTHORITY TO OPERATE THE
EQUIPMENT.
ENGLISH
High power radars are allocated as primary users
of the 5.25 to 5.35 GHz and 5.65 to 5.85 GHz bands.
These radar stations can cause interference with
and/or damage this device. This device cannot be
co-located with any other transmitter.
15
Page 16
WARNING
(For Canada)
[For product having the wireless function using 5
GHz frequency bands]
1 The device for operation in the band 5150–5250
MHz is only for indoor use to reduce the
potential for harmful interference to co-channel
mobile satellite systems;
2 For devices with detachable antenna(s), the
maximum antenna gain permitted for devices in
the bands 5250-5350 MHz and 5470-5725 MHz
shall be such that the equipment still complies
with the e.i.r.p. limit;
3 For devices with detachable antenna(s), the
maximum antenna gain permitted for devices in
the band 5725-5850 MHz shall be such that the
equipment still complies with the e.i.r.p. limits
specified for point-to-point and non-point-topoint operation as appropriate; and
4 The worst-case tilt angle(s) necessary to remain
compliant with the e.i.r.p. elevation mask
requirement set forth in Section 6.2.2(3) shall be
clearly indicated.(devices operating in the band
ENGLISH
5250-5350 MHz with a maximum e.i.r.p. greater
than 200 mW)
5 High-power radars are allocated as primary
users (i.e. priority users) of the bands 5250–5350
MHz and 5650–5850 MHz and that these radars
could cause interference and/or damage to LELAN devices.
WARNING!
Never place a television set in an unstable
location. A television set may fall, causing serious
personal injury or death. Many injuries, particularly
to children, can be avoided by taking simple
precautions such as:
f Using cabinets or stands recommended by the
manufacturer of the television set.
f Only using furniture that can safely support the
television set.
f Ensuring the television set is not overhanging
the edge of the supporting furniture.
f Not placing the television set on tall furniture
(for example, cupboards or bookcases) without
anchoring both the furniture and the television
set to a suitable support.
f Not placing the television set on cloth or other
materials that may be located between the
television set and supporting furniture.
f Educating children about the dangers of
climbing on furniture to reach the television set
or its controls.
If your existing television set is being retained
and relocated, the same considerations as above
should be applied.
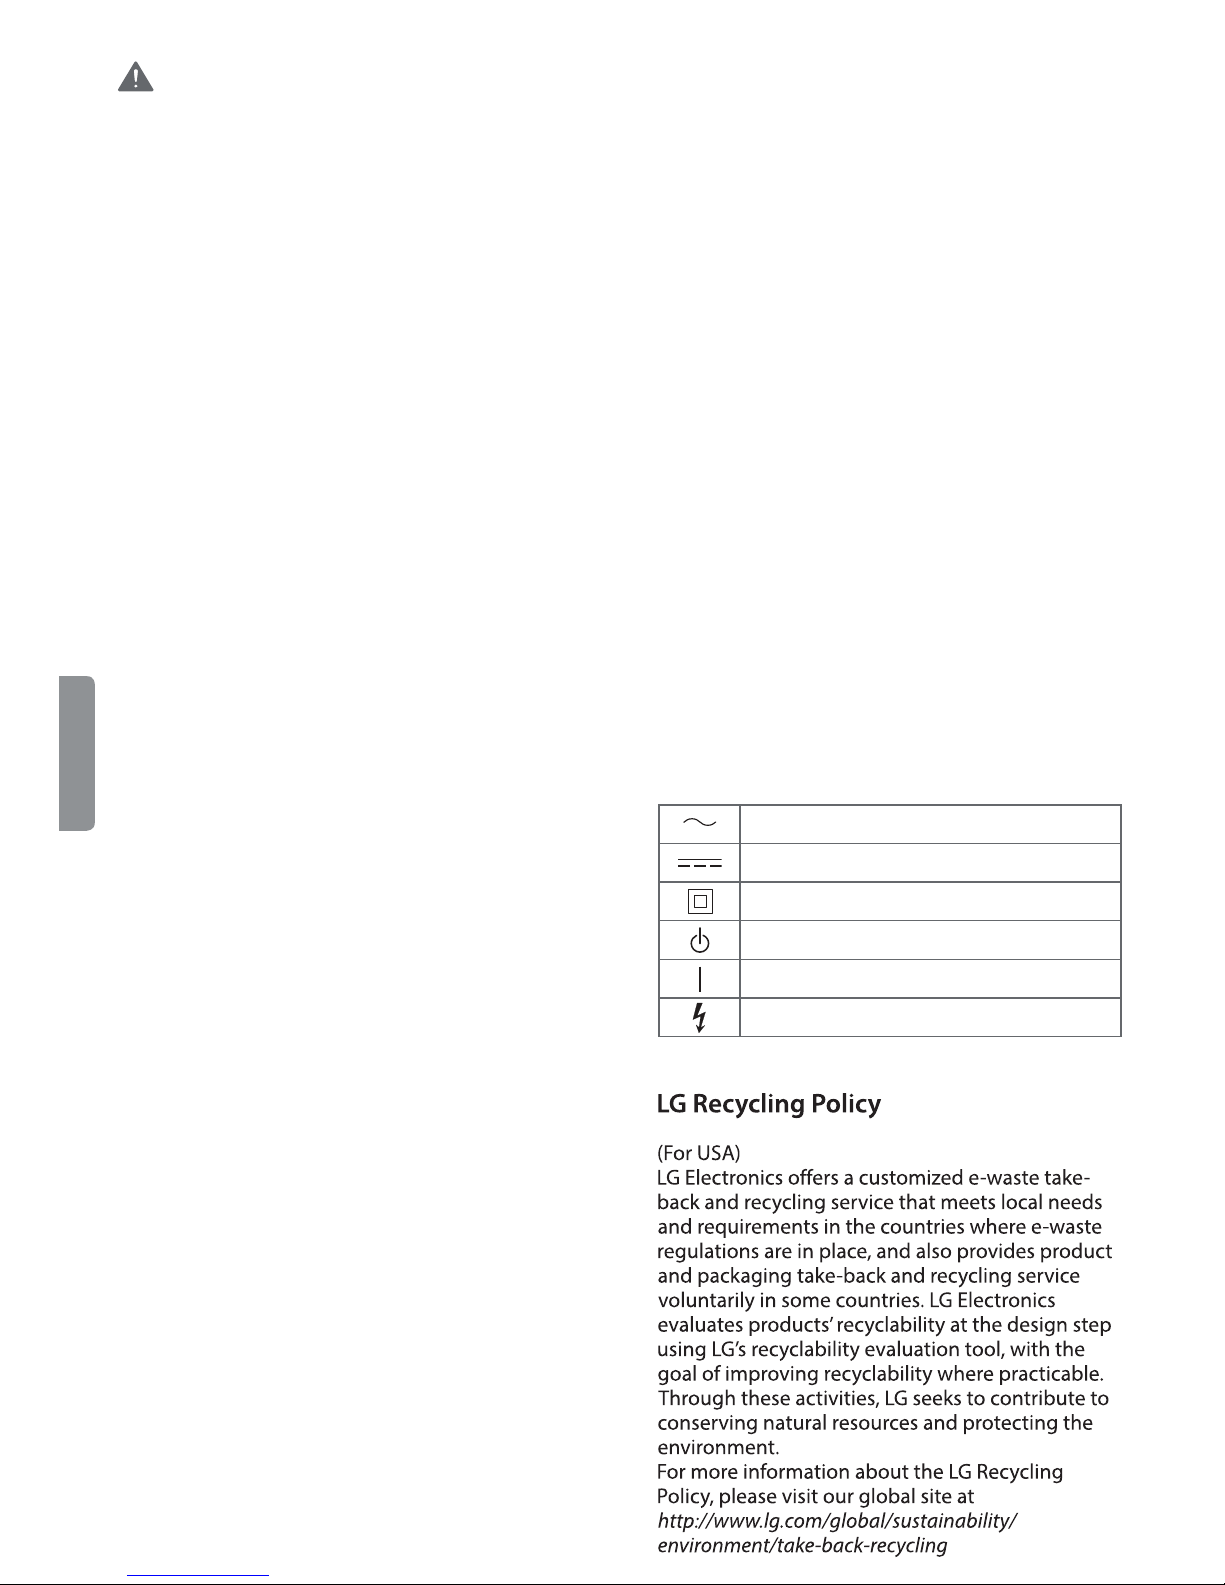
Symbols
Refers to alternating current(AC).
Refers to direct current(DC).
Note to Cable/TV Installer
(For USA and Canada)
This reminder is provided to call the CATV system
installer’s attention to Article 820-40 of the
National Electric Code (U.S.A.). The code provides
guidelines for proper grounding and, in particular,
specifies that the cable ground shall be connected
to the grounding system of the building, as close
to the point of the cable entry as practical.
16
Refers to class II equipment.
Refers to stand-by.
Refers to “ON” (power).
Refers to dangerous voltage.
Page 17

CHILD SAFETY:
PROPER TELEVISION PLACEMENT MATTERS
THE CONSUMER ELECTRONICS INDUSTRY CARES
BVcj[VXijgZgh!gZiV^aZghVcY i]Z gZhi d[ i]Z XdchjbZg ZaZXigdc^Xh^cYjhign VgZ Xdbb^iiZY id
bV`^c\]dbZZciZgiV^cbZcihV[ZVcYZc_dnVWaZ#
6hndjZc_dnndjgiZaZk^h^dc!eaZVhZcdiZi]ViVaaiZaZk^h^dch¸cZlVcYdaY"bjhiWZhjeedgiZYdc
egdeZghiVcYhdg^chiVaaZYVXXdgY^c\idi]ZbVcj[VXijgZg½hgZXdbbZcYVi^dch#IZaZk^h^dchi]Vi
VgZ^cVeegdeg^ViZanh^ijViZYdcYgZhhZgh!Wdd`XVhZh!h]ZakZh!YZh`h!heZV`Zgh!X]Zhih!XVgih!ZiX#!
bVn[VaadkZg!gZhjai^c\^c^c_jgn#
TUNE IN TO SAFETY
ALWAYS[daadli]ZbVcj[VXijgZg½hgZXdbbZcYVi^dch[dgi]ZhV[Z^chiVaaVi^dcd[ndjgiZaZk^h^dc#
ALWAYSgZVYVcY[daadlVaa^chigjXi^dch[dgegdeZgjhZd[ndjgiZaZk^h^dc#
NEVERVaadlX]^aYgZcidXa^bWdcdgeaVndci]ZiZaZk^h^dcdgi]Z[jgc^ijgZdcl]^X]i]ZiZaZk^h^dc
^heaVXZY#
NEVER eaVXZ i]Z iZaZk^h^dcdc [jgc^ijgZ i]Vi XVc ZVh^an WZ jhZY Vh hiZeh! hjX] Vh V X]Zhi d[
YgVlZgh#
ALWAYS^chiVaai]ZiZaZk^h^dcl]ZgZ^iXVccdiWZejh]ZY!ejaaZYdkZgdg`cdX`ZYYdlc#
ALWAYS gdjiZ XdgYh VcYXVWaZh XdccZXiZY id i]Z iZaZk^h^dc hd i]Vii]Zn XVccdi WZ ig^eeZY
dkZg!ejaaZYdg\gVWWZY#
WALL OR CEILING MOUNT YOUR TELEVISION
ALWAYSXdciVXindjggZiV^aZgVWdjiegd[Zhh^dcVa^chiVaaVi^dc^[ndj]VkZVcnYdjWihVWdjindjg
VW^a^inidhV[ZanbdjcindjgiZaZk^h^dc#
ALWAYSjhZV bdjcii]Vi]VhWZZcgZXdbbZcYZY Wni]ZiZaZk^h^dcbVcj[VXijgZgVcY]VhV
hV[ZinXZgi^ÅXVi^dcWnVc^cYZeZcYZciaVWdgVidgnhjX]VhJA!8H6!:IA#
ALWAYS[daadlVaa^chigjXi^dchhjeea^ZYWni]ZiZaZk^h^dcVcYbdjcibVcj[VXijgZgh#
ALWAYSbV`ZhjgZi]Vii]ZlVaadgXZ^a^c\l]ZgZndjVgZbdjci^c\i]ZiZaZk^h^dc^hVeegdeg^ViZ#
HdbZbdjcihVgZ cdiYZh^\cZYidWZ bdjciZYidlVaah VcY XZ^a^c\hl^i]hiZZahijYh dgX^cYZg
WadX`XdchigjXi^dc#>[ndjVgZjchjgZ!XdciVXiVegd[Zhh^dcVa^chiVaaZg#
IZaZk^h^dch XVc WZ ]ZVkn# 6 b^c^bjb d[ ild eZdeaZ ^h gZfj^gZY [dg V lVaa dg XZ^a^c\ bdjci
^chiVaaVi^dc#
MOVING AN OLDER TELEVISION TO A NEW PLACE IN
YOUR HOME
BVcncZliZaZk^h^dcWjnZghbdkZ i]Z^g daYZg 8GI iZaZk^h^dch^cidVhZXdcYVgngddbV[iZgi]Z
ejgX]VhZd[VÆVi"eVcZaiZaZk^h^dc#HeZX^VaXVgZh]djaYWZbVYZ^ci]ZeaVXZbZcid[daYZg8GI
iZaZk^h^dch#
ALWAYSeaVXZndjgdaYZg8GI iZaZk^h^dcdc[jgc^ijgZi]Vi^hhijgYnVcYVeegdeg^ViZ[dg^ihh^oZ
VcYlZ^\]i#
NEVER eaVXZndjgdaYZg8GIiZaZk^h^dcdcVYgZhhZgl]ZgZX]^aYgZcbVnWZiZbeiZYidjhZi]Z
YgVlZghidXa^bW#
ALWAYSbV`ZhjgZndjgdaYZg8GIiZaZk^h^dcYdZhcdi]Vc\dkZgi]ZZY\Zd[ndjg[jgc^ijgZ#
CE.org/safety
Page 18
Declaration of Conformity
Trade Name LG
Model OLED55B6P-U, OLED65B6P-U
OLED55C6P-U, OLED65C6P-U
OLED55E6P-U, OLED65E6P-U
Responsible
Party
Address 1000 Sylvan Ave.
TEL 201 - 266 - 2534
The model and serial numbers of the TV are located on the
back and one side of the TV.
Record them below should you ever need service.
MODEL
SERIAL
LG Electronics Inc.
Englewood Cliffs NJ 07632
U.S.A
LG Customer Information Center
For inquires or comments, visit www.lg.com or call;
1-800-243-0000 USA, Consumer User
1-888-865-3026 USA, Commercial User
1-888-542-2623 CANADA
Register your product online!
www.lg.com
Page 19

OWNER’S MANUAL
EXTERNAL CONTROL
DEVICE SETUP
Please read this manual carefully before operating the set and retain it for
future reference.
www.lg.com
Page 20
KEY CODES
2
2
ENGLISH
ENG
KEY CODES
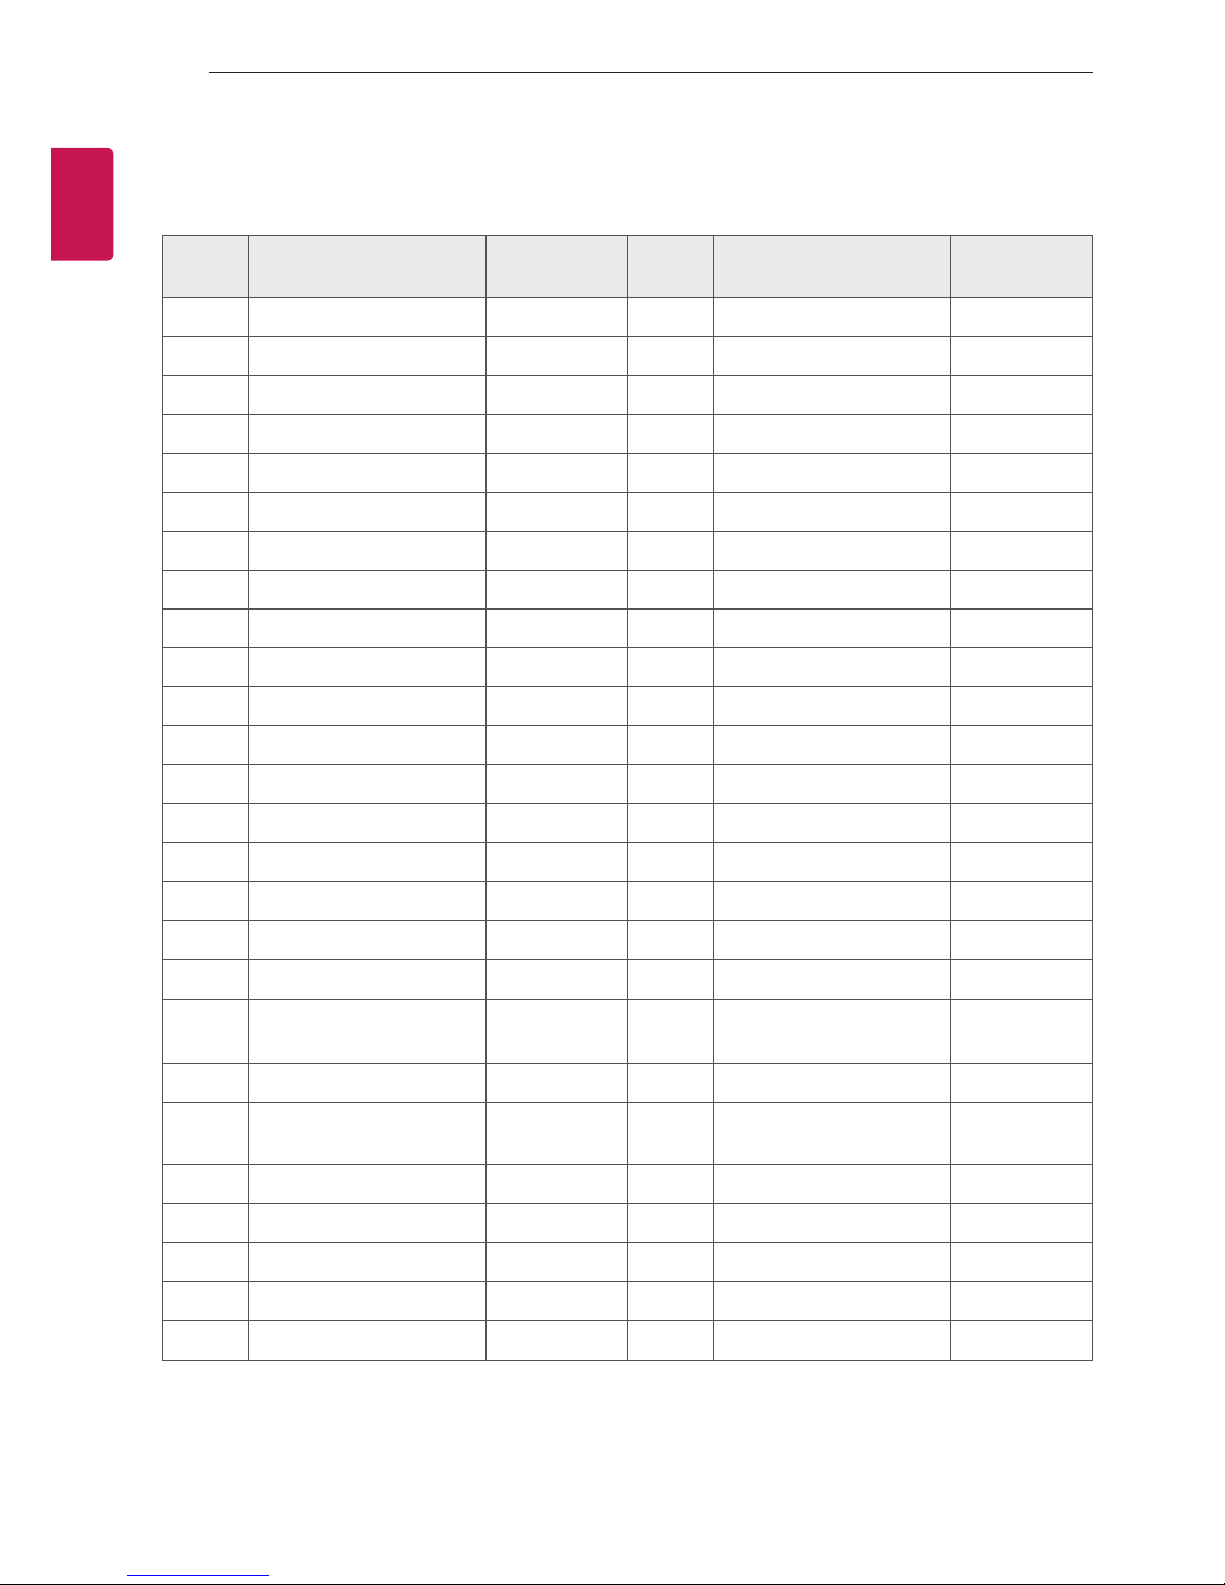
• This feature is not available for all models.
Code
(Hexa)
00 CH +, PR + R/C Button 53 List R/C Button
01 CH -, PR - R/C Button 5B Exit R/C Button
02 Volume + R/C Button 60 PIP(AD) R/C Button
03 Volume - R/C Button 61 Blue R/C Button
06 > (Arrow Key / Right Key) R/C Button 63 Yellow R/C Button
07 < (Arrow Key / Left Key) R/C Button 71 Green R/C Button
08 Power R/C Button 72 Red R/C Button
09 Mute R/C Button 79 Ratio / Aspect Ratio R/C Button
0B Input R/C Button 91 AD (Audio Description) R/C Button
0E SLEEP R/C Button 7A User Guide R/C Button
0F TV, TV/RAD R/C Button 7C Smart / Home R/C Button
Function Note
Code
(Hexa)
Function Note
10 - 19 * Number Key 0 - 9 R/C Button 7E SIMPLINK R/C Button
1A Q.View / Flashback R/C Button 8E ŹŹ)RUZDUG R/C Button
1E FAV (Favorite Channel) R/C Button 8F ŻŻ5HZLQG R/C Button
20 Text (Teletext) R/C Button AA Info R/C Button
21 T. Opt (Teletext Option) R/C Button AB Program Guide R/C Button
28 Return (BACK) R/C Button B0 Ź3OD\ R/C Button
30 AV (Audio / Video) Mode R/C Button B1
39 Caption/Subtitle R/C Button BA
40 ȁ
41
42 My Apps R/C Button DC 3D R/C Button
43 Menu / Settings R/C Button 99 AutoConfig R/C Button
44 OK / Enter R/C Button 9F App / * R/C Button
45 Q.Menu R/C Button
(Arrow Key / Cursor Up)
V (Arrow Key / Cursor
Down)
R/C Button BB Soccer R/C Button
R/C Button BD
䲘 (Stop / File List)
䲙 (Freeze / Slow Play /
Pause)
䱅 (REC)
R/C Button
R/C Button
R/C Button
4C List, - (ATSC Only) R/C Button
* Key code 4C (0x4C) is available on ATSC/ISDB models which use major/minor channel.
(For South Korea, Japan, North America, Latin America except Colombia models)
Page 21
EXTERNAL CONTROL DEVICE SETUP
3
3
EXTERNAL CONTROL DEVICE SETUP
• Image shown may differ from your TV.
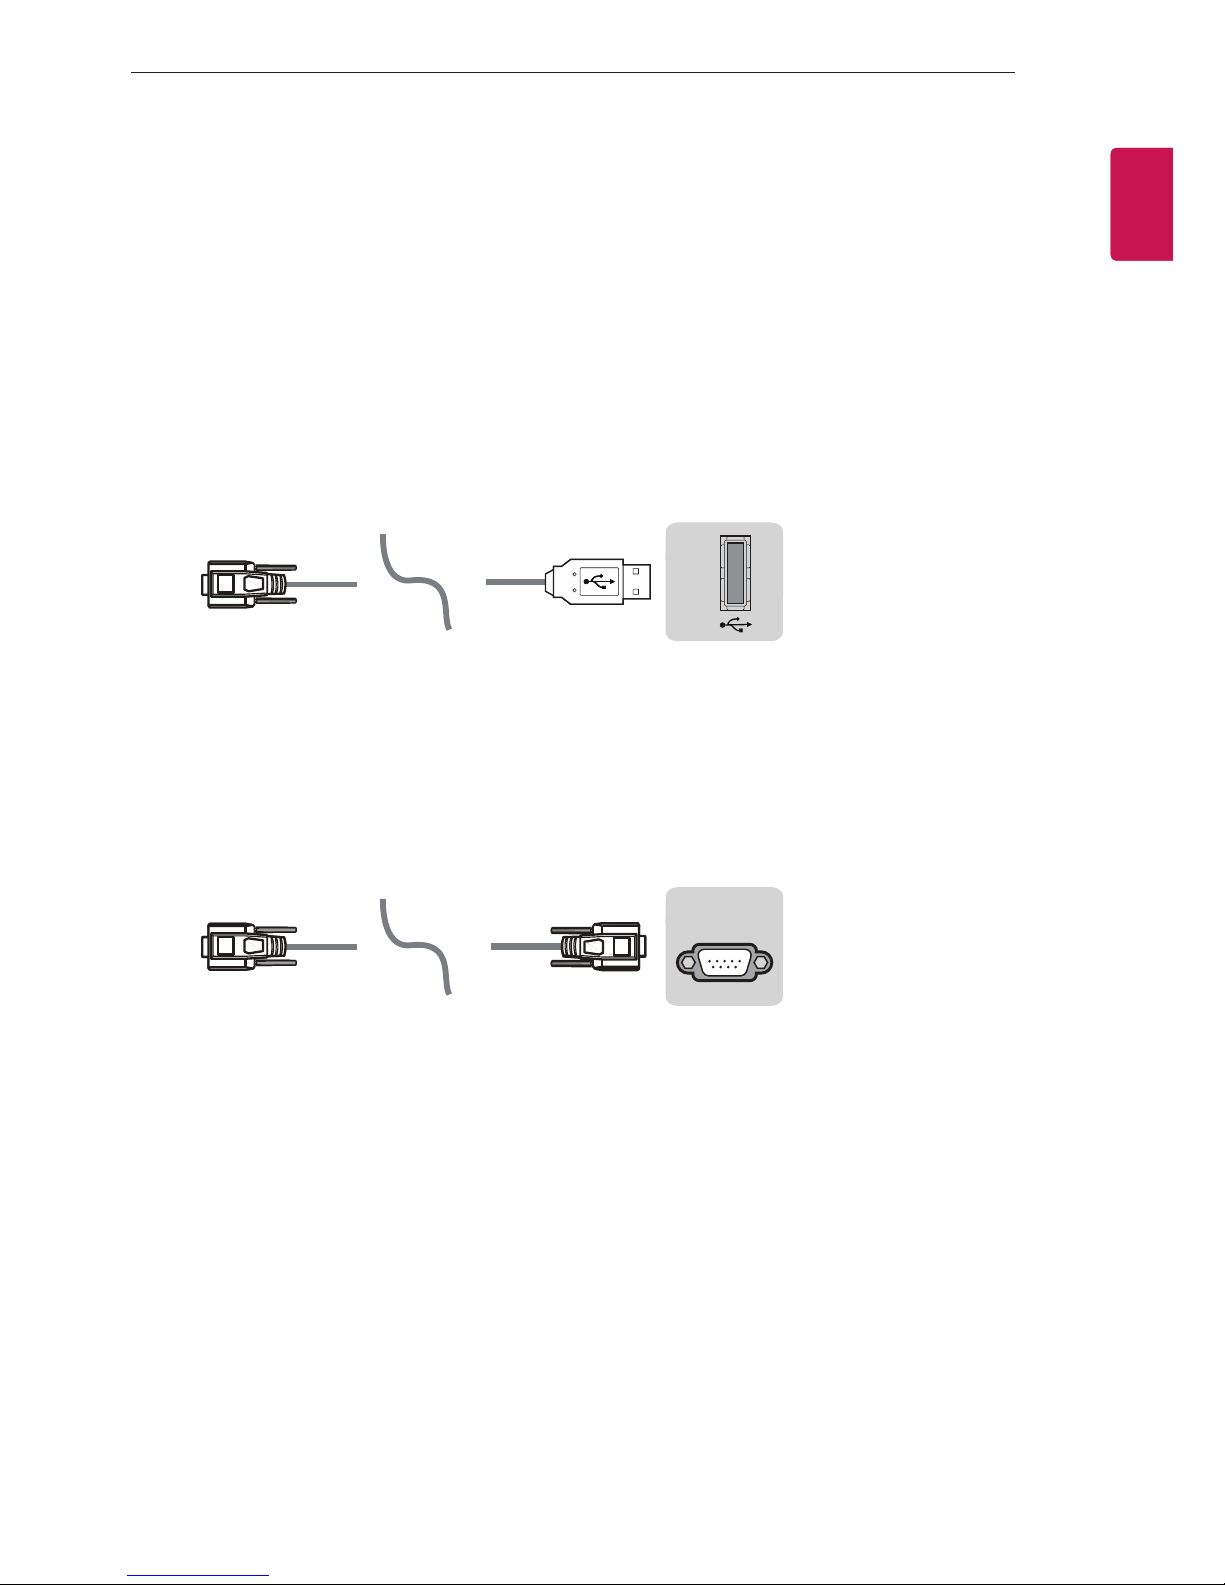
Connect the USB to Serial converter/RS-232C input jack to an external control device (such as a computer
or an A/V control system) to control the product’s functions externally.
Note: The type of control port on the TV can be different between model series.
* Please be advised that not all models support this type of connectivity.
* Cable is not provided.
USB to Serial converter with USB Cable
USB Type
(PC)
• LGTV supports PL2303 chip-based (Vendor ID : 0x0557, Product ID : 0x2008) USB to serial converter
which is not made nor provided by LG.
• It can be purchased from computer stores that carry accessories for IT support professionals.
USB IN
(TV)
ENGENGLISH
RS-232C With RS232C Cable
DE9 (D-Sub 9pin) Type
• You need to purchase the RS-232C (DE9, D-Sub 9pin female-to-female type) to RS-232C cable required
for the connection between the PC and the TV, which is specified in the manual.
RS-232C IN
(CONTROL & SERVICE)
(PC)
The connection interface may differ from your TV.
(TV)
Page 22
EXTERNAL CONTROL DEVICE SETUP
4
4
ENGLISH
ENG
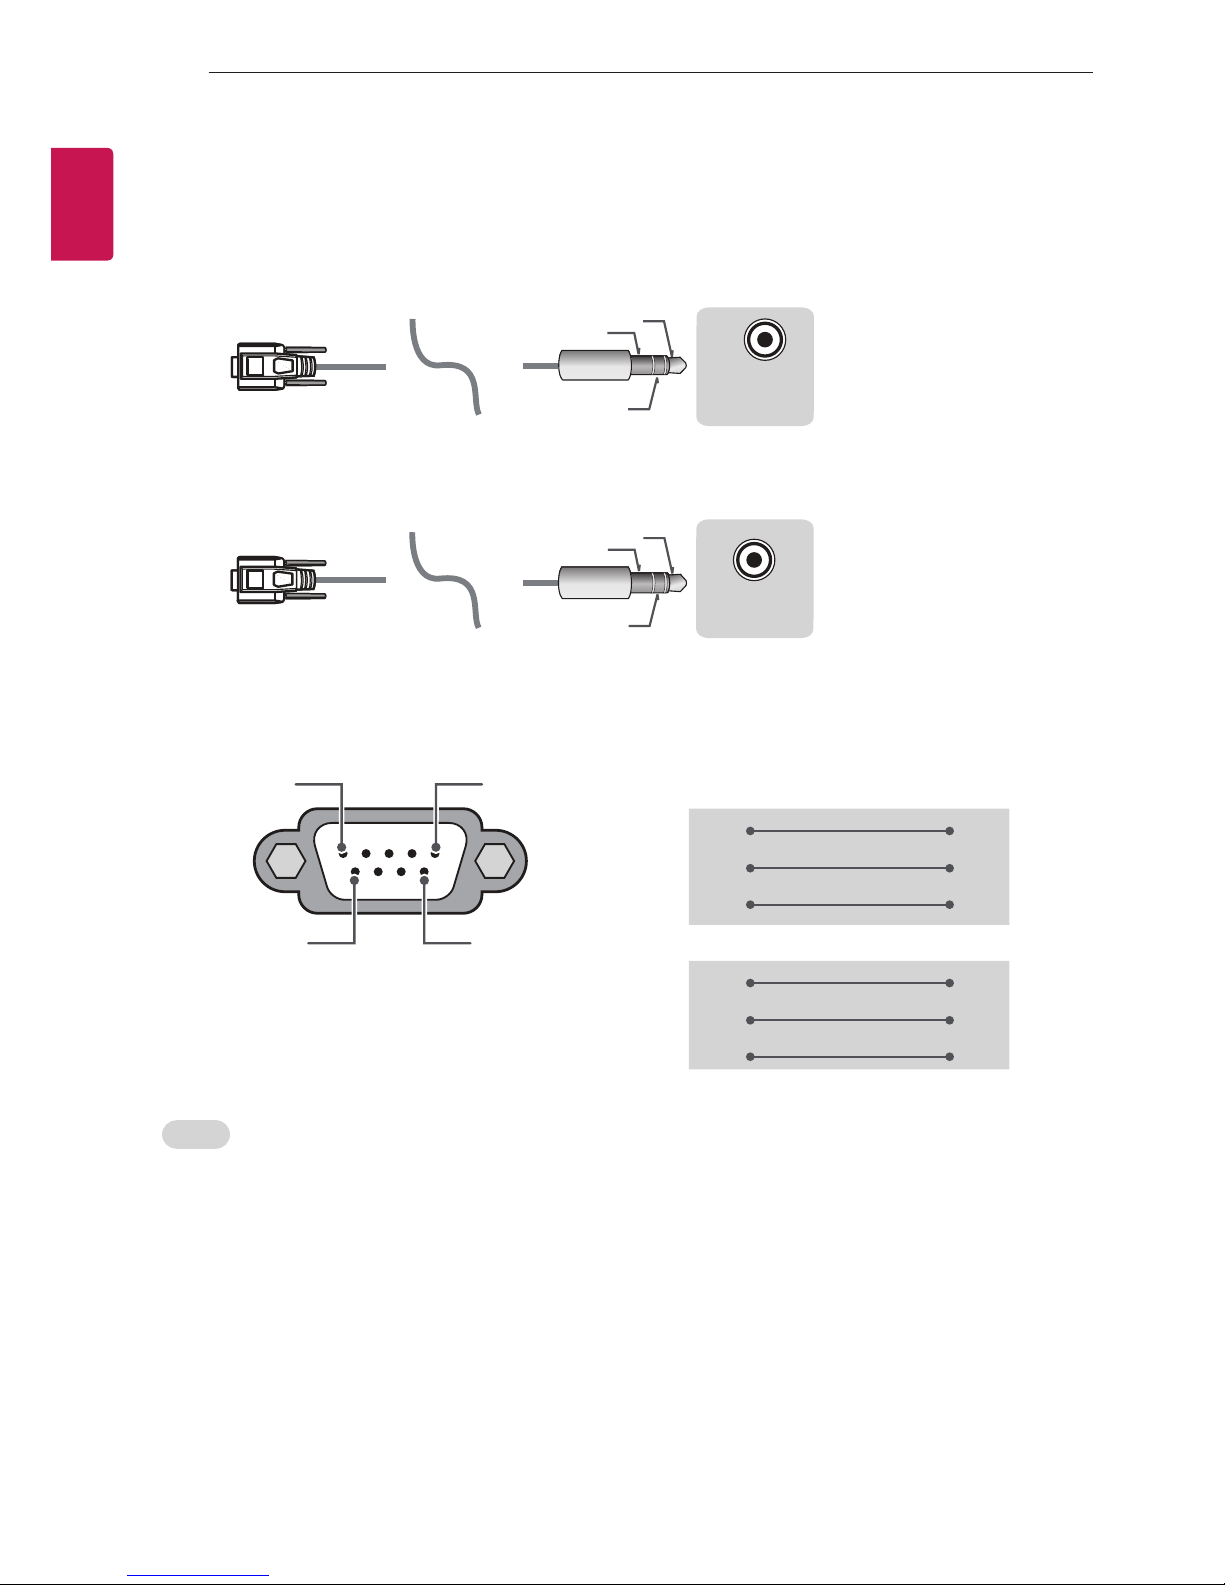
Phone jack Type
• You need to purchase the phone-jack to RS-232 cable required for the connection between the PC and
the TV, which is specified in the manual.
* For other models, connect to the USB port.
* The connection interface may differ from your TV.
1
3
(PC)
- or
(PC)
2
1
3
2
SERVICE ONLY
RS-232C IN
(CONTROL & SERVICE)
(TV)
(TV)
Customer Computer RS-232C configurations
3-Wire Configurations(Not standard)
1
6
RS-232C
(Serial port)
Set ID
For Set ID number, see "Real Data Mapping" on p.6
1. Press SETTINGS to access the main menus.
2. Press the Navigation buttons to scroll to *HQHUDOĺ$ERXWWKLV79RU237,21 and press OK.
3. Press the Navigation buttons to scroll to SET ID and press OK.
4. Scroll left or right to select a set ID number and select CLOSE. The adjustment range is 1-99.
5. When you are finished, press EXIT.
* (Depending on model)
5
RXD 2 2 TXD
TXD 3 1 RXD
GND 5 3 GND
9
RXD 3 2 TXD
TXD 2 1 RXD
GND 5 3 GND
PC TV
OR
D-Sub 9 Phone
Page 23
EXTERNAL CONTROL DEVICE SETUP
5
5
Communication Parameters
• Baud rate : 9600 bps (UART)
• Data length : 8 bits
• Parity : None
• Stop bit : 1 bit
• Communication code : ASCII code
• Use a crossed (reverse) cable.
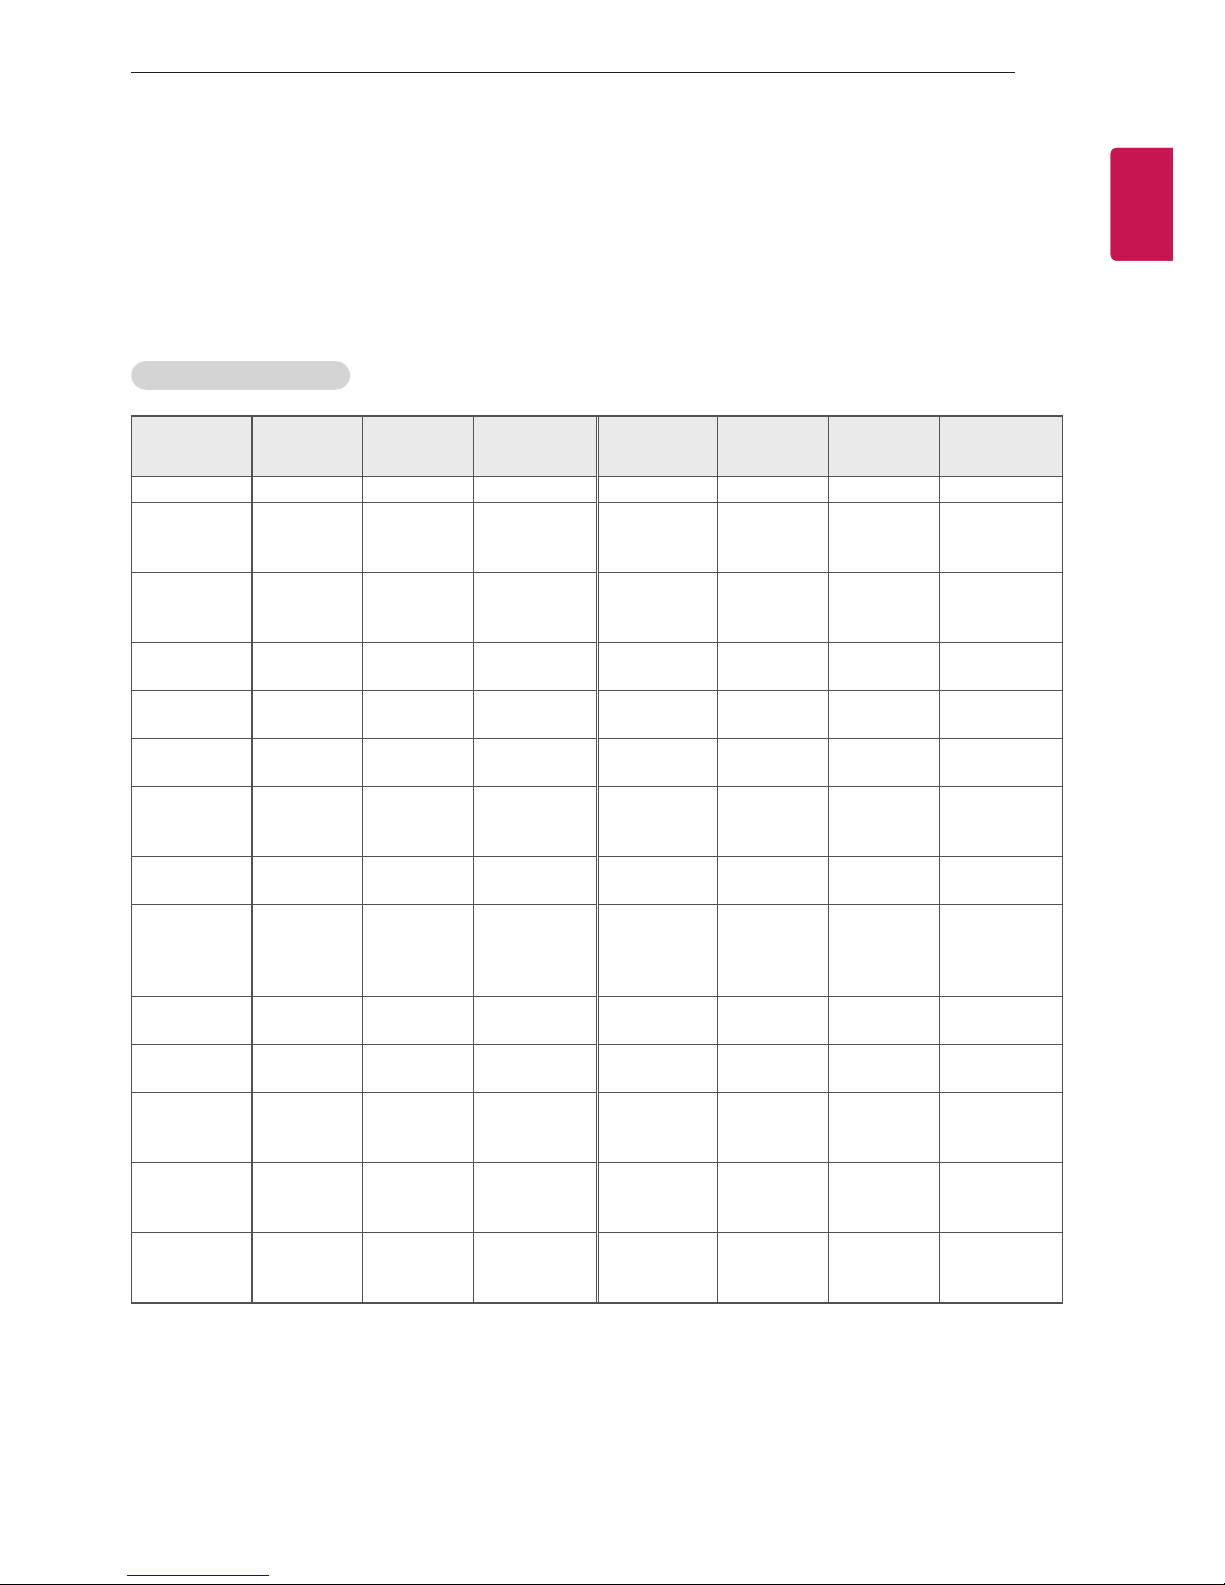
Command reference list
(Depending on model)
COMMAND1 COMMAND2
01. Power* k a 00 to 01 15. Balance k t 00 to 64
02. Aspect
Ratio
03. Screen
Mute
04. Volume
Mute
05. Volume
Control
06. Contrast k g 00 to 64
07.
Brightness
08. Color/
Colour
09. Tint k j 00 to 64
10.
Sharpness
11. OSD
Select
12. Remote
Control Lock
Mode
13. Treble k r 00 to 64
k c (p.7)
k d (p.7)
k e 00 to 01 18. Equalizer j v (p.8)
k f 00 to 64
k h 00 to 64
k i 00 to 64 22. Key m c Key Codes
k k 00 to 32
k l 00 to 01
k m 00 to 01
DATA
(Hexadecimal)
16. Color
(Colour)
Temperature
17. ISM
Method (Only
Plasma TV)
19. Energy
Saving
20. Tune
Command
21. Channel
(Programme)
Add/Del(Skip)
23. Control
Backlight,
Control Panel
Light
24. Input
select (Main)
25. 3D (Only
3D models)
26. Extended
3D (Only 3D
models)
27. Auto
Configure
COMMAND1 COMMAND2
x u 00 to 64
j p (p.8)
j q 00 to 05
m a (p.9)
m b 00 to 01
m g 00 to 64
x b (p.11)
x t (p.11)
x v (p.11)
j u (p.12)
DATA
(Hexadecimal)
ENGENGLISH
14. Bass k s 00 to 64
* Note: During playing or recording media, all commands except Power (ka) and Key (mc) are not
executed and treated as NG.
With RS232C cable, TV can communicate "ka command" in power-on or power-off status. but with
USB-to-Serial converter cable, the command works only if TV is on.
Page 24

EXTERNAL CONTROL DEVICE SETUP
6
6
ENGLISH
ENG
Transmission / Receiving Protocol
Transmission
[Command1][Command2][ ][Set ID][ ][Data][Cr]
[Command 1] : First command to control the TV. (j, k, m or x)
[Command 2] : Second command to control the TV.
[Set ID] : You can adjust the [Set ID] to choose desired monitor ID number in option menu.
Adjustment range in TV is 1 to 99. If [Set ID] value is selected to ‘0’, every connected set
can be controlled.
* [Set ID] is indicated as decimal (1 to 99) on menu and as Hexadecimal (0x00 to 0x63) on
transmission/receiving protocol.
[DATA] : To transmit command data (hexadecimal). Transmit ‘FF’ data to read status of command.
[Cr] : Carriage Return - ASCII code ‘0x0D’
[ ] : Space – ASCII code ‘0x20’
OK Acknowledgement
[Command2][ ][Set ID][ ][OK][Data][x]
* The set transmits ACK (acknowledgement) based on this format when receiving normal data. At this time,
if the data is data read mode, it indicates present status data. If the data is data write mode, it returns the
data of the PC computer.
Error Acknowledgement
[Command2][ ][Set ID][ ][NG][Data][x]
* The set transmits ACK (acknowledgement) based on this format when receiving abnormal data from
non-viable functions or communication errors.
Data 00: Illegal Code
Real data mapping (Hexadecimal b Decimal)
* When you enter the [data] in hexadecimal, refer to following conversion table.
* Channel Tune (ma) Command uses two-byte hexadecimal value([data]) to select channel number.
00 : Step 0 32 : Step 50 (Set ID 50) FE : Step 254
01 : Step 1 (Set ID 1) 33 : Step 51 (Set ID 51) FF : Step 255
... ... ...
0A : Step 10 (Set ID 10) 63 : Step 99 (Set ID 99) 01 00 : Step 256
... ... ...
0F : Step 15 (Set ID 15) C7 : Step 199 27 0E : Step 9998
10 : Step 16 (Set ID 16) C8 : Step 200 27 0F : Step 9999
... ... ...
Page 25

EXTERNAL CONTROL DEVICE SETUP
* Commands may work differently depending on model and signal.
01. Power (Command: k a)
Ź To control Power *On or Off of the set.
Transmission[k][a][ ][Set ID][ ][Data][Cr]
Data 00 : Power Off 01 : *Power On
Ack [d][ ][Set ID][ ][OK/NG][Data][x]
* In case of video mute on only, TV will display On
Screen Display(OSD). But, in case of Screen mute
on, TV will not display OSD.
7
7
ENGENGLISH
Ack [a][ ][Set ID][ ][OK/NG][Data][x]
Ź To Show TV is Power On or *Off
Transmission [k][a][ ][Set ID][ ][FF][Cr]
Ack [a][ ][Set ID][ ][OK][Data][x]
* Similarly, if other functions transmit ‘FF’ data
based on this format, Acknowledgement feedback
presents status about each function.
02. Aspect Ratio (Command: k c)
(Main Picture Size)
Ź To adjust the screen format. (Main picture format)
You can also adjust the screen format using the
Aspect Ratio in the Q.MENU. or PICTURE menu.
Transmission [k][c][ ][Set ID][ ][Data][Cr]
Data 01 : Normal screen
(4:3)
02 : Wide screen
(16:9)
04 : Zoom
05 : Zoom 2
(Latin America
except Colombia
Only)
06 : Set by Program/
Original
Ack [c][ ][Set ID][ ][OK/NG][Data][x]
07 : 14:9
(Europe, Colombia, Mid-East,
Asia except South Korea and
Japan)
09 : * Just Scan
0B : Full Wide
(Europe, Colombia, MidEast, Asia except South
Korea and Japan)
10 to 1F : Cinema Zoom 1 to 16
0c : 21:9 (Depending on model)
* Using the PC input, you select either 16:9 or 4:3
screen aspect ratio.
* In DTV/HDMI/Component mode (high-definition),
Just Scan is available.
* Full wide mode may work differently based on
model and is supported for DTV fully, and ATV,
AV partially.
04. Volume Mute (Command: k e)
Ź To control volume mute on/off.
You can also adjust mute using the MUTE button
on remote control.
Transmission [k][e][ ][Set ID][ ][Data][Cr]
Data 00 : Volume mute on (Volume off)
01 : Volume mute off (Volume on)
Ack [e][ ][Set ID][ ][OK/NG][Data][x]
05. Volume Control (Command: k f)
Ź To adjust volume.
You can also adjust volume with the volume
buttons on remote control.
Transmission [k][f][ ][Set ID][ ][Data][Cr]
Data Min : 00 to Max : 64
Ack [f][ ][Set ID][ ][OK/NG][Data][x]
06. Contrast (Command: k g)
Ź To adjust screen contrast.
You can also adjust contrast in the PICTURE
menu.
Transmission [k][g][ ][Set ID][ ][Data][Cr]
Data Min : 00 to Max : 64
Ack [g][ ][Set ID][ ][OK/NG][Data][x]
07. Brightness (Command: k h)
Ź To adjust screen brightness.
You can also adjust brightness in the PICTURE
menu.
Transmission [k][h][ ][Set ID][ ][Data][Cr]
03. Screen Mute (Command: k d)
Ź To select screen mute on/off.
Transmission [k][d][ ][Set ID][ ][Data][Cr]
Data 00 : Screen mute off (Picture on)
Video mute off
01 : Screen mute on (Picture off)
10 : Video mute on
Data Min : 00 to Max : 64
Ack [h][ ][Set ID][ ][OK/NG][Data][x]
08. Color/Colour (Command: k i)
Ź To adjust the screen Color(Colour).
You can also adjust colour in the PICTURE menu.
Transmission [k][i][ ][Set ID][ ][Data][Cr]
Page 26
EXTERNAL CONTROL DEVICE SETUP
8
8
ENGLISH
ENG
Data Min : 00 to Max : 64
Ack [i][ ][Set ID][ ][OK/NG][Data][x]
09. Tint (Command: k j)
Ź To adjust the screen tint.
You can also adjust tint in the PICTURE menu.
Transmission [k][j][ ][Set ID][ ][Data][Cr]
Data Red : 00 to Green : 64
Ack [j][ ][Set ID][ ][OK/NG][Data][x]
10. Sharpness (Command: k k)
Ź To adjust the screen sharpness.
You can also adjust sharpness in the PICTURE
menu.
Transmission [k][k][ ][Set ID][ ][Data][Cr]
Data Min : 00 to Max : 32
Ack [k][ ][Set ID][ ][OK/NG][Data][x]
11. OSD Select (Command: k l)
Ź To select OSD (On Screen Display) on/off when
controlling remotely.
Transmission [k][l][ ][Set ID][ ][Data][Cr]
Data 00 : OSD off 01 : OSD on
* (Depending on model)
14. Bass (Command: k s)
Ź To adjust Bass.
You can also adjust in the AUDIO menu.
Transmission [k][s][ ][Set ID][ ][Data][Cr]
Data Min : 00 to Max : 64
Ack [s][ ][Set ID][ ][OK/NG][Data][x]
* (Depending on model)
15. Balance (Command: k t)
Ź To adjust balance.
You can also adjust balance in the AUDIO menu.
Transmission [k][t][ ][Set ID][ ][Data][Cr]
Data Min : 00 to Max : 64
Ack [t][ ][Set ID][ ][OK/NG][Data][x]
16. Color(Colour) Temperature (Command: x u)
Ź To adjust colour temperature. You can also adjust
Color(Colour) Temperature in the PICTURE menu.
Transmission [x][u][ ][Set ID][ ][Data][Cr]
Data Min : 00 to Max : 64
Ack [u][ ][Set ID][ ][OK/NG][Data][x]
Ack [l][ ][Set ID][ ][OK/NG][Data][x]
12. Remote control lock mode (Command: k m)
Ź To lock the front panel controls on the monitor and
remote control.
Transmission [k][m][ ][Set ID][ ][Data][Cr]
Data 00 : Lock off 01 : Lock on
Ack [m][ ][Set ID][ ][OK/NG][Data][x]
* If you are not using the remote control, use this
mode.
When main power is off & on (plug-off and plug-in,
after 20 - 30 seconds), external control lock is
released.
* In the standby mode (DC off by off timer or ‘ka’,
‘mc’ command), and if key lock is on, TV will not
turn on by power on key of IR & Local Key.
13. Treble (Command: k r)
Ź To adjust treble.
You can also adjust in the AUDIO menu.
Transmission [k][r][ ][Set ID][ ][Data][Cr]
Data Min : 00 to Max : 64
Ack [r][ ][Set ID][ ][OK/NG][Data][x]
17. ISM Method (Command: j p) (Only Plasma TV)
Ź To control the ISM method. You can also adjust
ISM Method in OPTION menu.
Transmission [j][p][ ][Set ID][ ][Data][Cr]
Data Min : 02: Orbiter
08: Normal
20: Color(Colour) Wash
Ack [p][ ][Set ID][ ][OK/NG][Data][x]
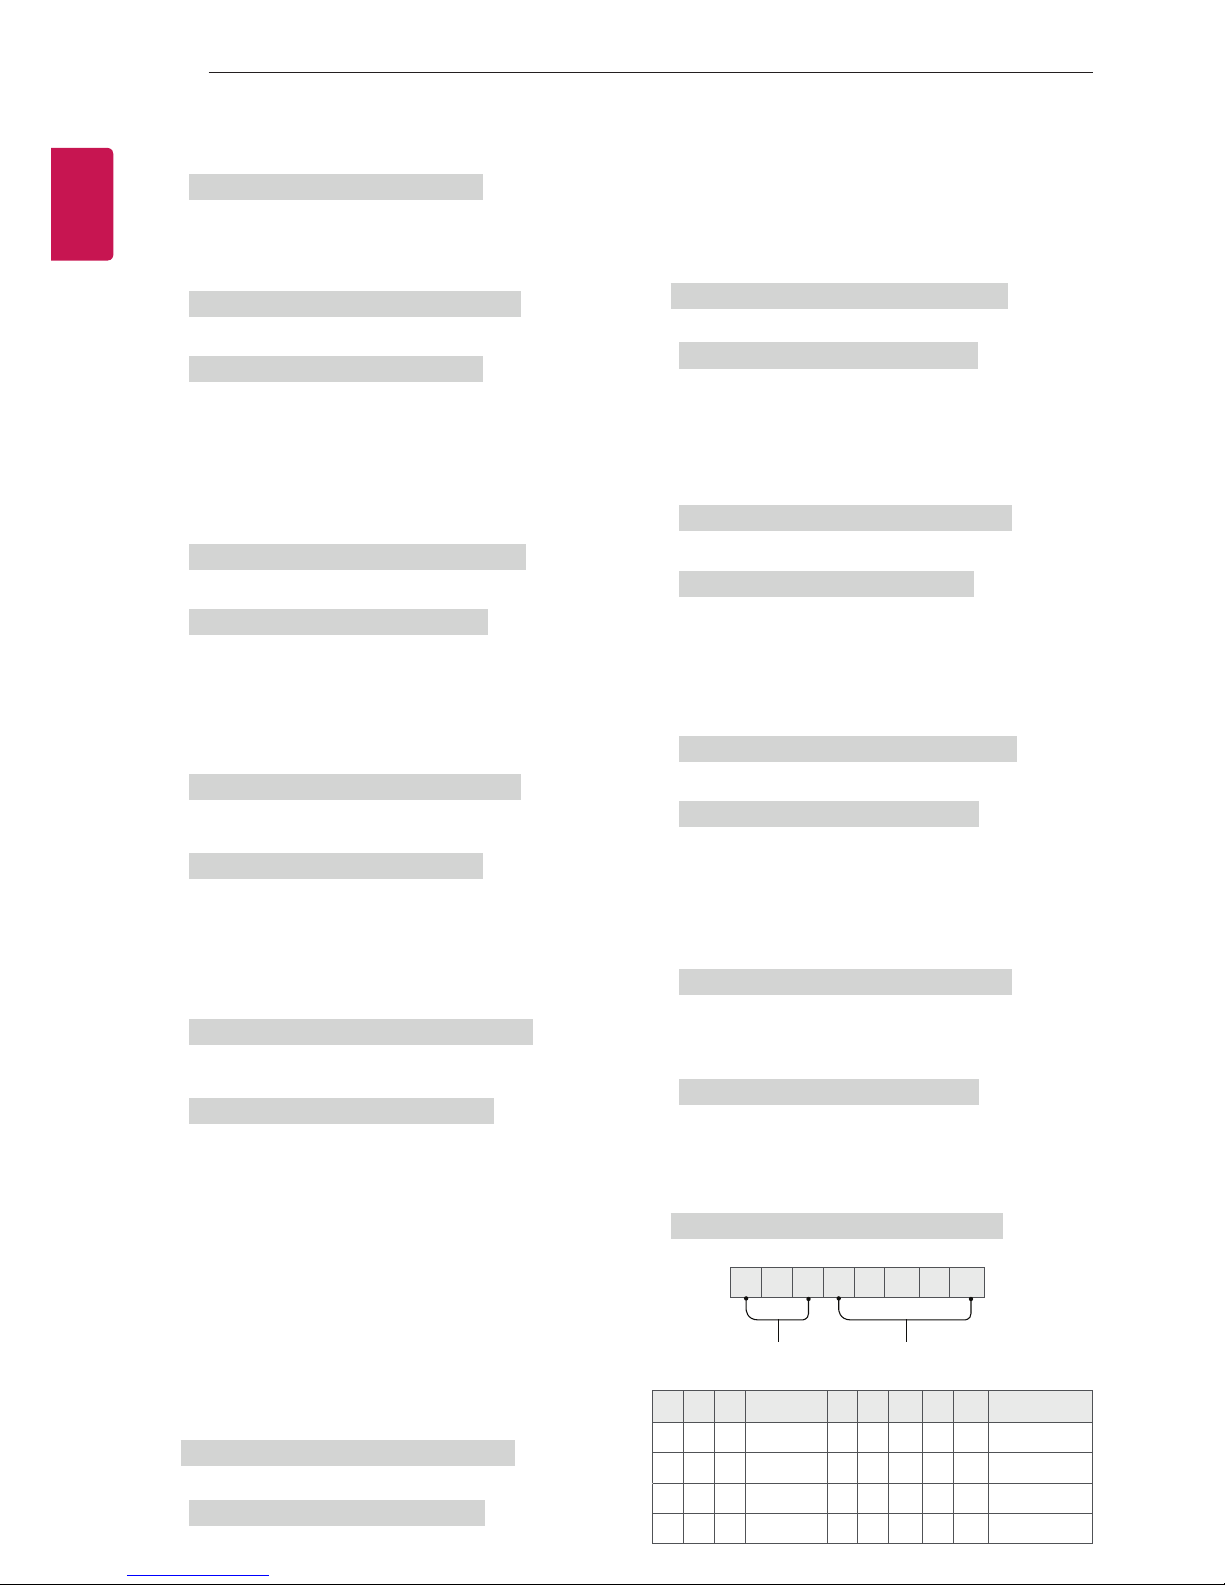
18. Equalizer (Command : j v)
Ź Adjust EQ of the set.
Transmission [j][v][ ][Set ID][ ][Data][Cr]
06%
/6%
)UHTXHQF\ 'DWD
000
001
010
011
Frequency
VW%DQG
QG%DQG
UG%DQG
WK%DQG
6WHS
00000
00001
... ... ... ... ...
00011
GHFLPDO
GHFLPDO
GHFLPDO
Page 27

EXTERNAL CONTROL DEVICE SETUP
9
9
100
Acknowledgement [v][ ][Set ID][ ][OK/NG][Data][x]
* It depends on model, and can adjust when sound
mode is EQ adjustable value.
WK%DQG
00101
GHFLPDO
19. Energy Saving (Command: j q)
Ź To reduce the power consumption of the TV. You
can also adjust Energy Saving in PICTURE menu.
Transmission [j][q][ ][Set ID][ ][Data][Cr]
Data
00 : Off
01 : Minimum
02 : Medium
03 : Maximum
04 : Auto (For LCD TV / LED TV) /
Intelligent sensor (For PDP TV)
05 : Screen off
* (Depending on model)
Ack [q][ ][Set ID][ ][OK/NG][Data][x]
20. Tune Command (Command: m a)
* This command may work differently depending on
model and signal.
• For Europe, Mid-East, Colombia, Asia except
South Korea and Japan Model
Ź Select channel to following physical number.
Transmission [m][a][ ][Set ID][ ][Data 00][ ]
[Data 01][ ][Data 02][Cr]
* Analog Antenna/Cable
Set ID = All = 00
Data 00 & 01 = Channel Data is 10 = 00 0a
Data 02 = Analog Antenna TV = 00
Result = ma 00 00 0a 00
2. Tune to the digital antenna (DVB-T) Channel 01.
Set ID = All = 00
Data 00 & 01 = Channel Data is 1 = 00 01
Data 02 = Digital Antenna TV = 10
Result = ma 00 00 01 10
3. Tune to the satellite (DVB-S) Channel 1000.
Set ID = All = 00
Data 00 & 01 = Channel Data is 1000 = 03 E8
Data 02 = Digital Satellite TV = 40
Result = ma 00 03 E8 40
Ack [a][ ][Set ID][ ][OK][Data 00][Data 01]
[Data 02][x][a][ ][Set ID][ ][NG][Data 00][x]
• For South Korea, North/Latin America except
Colombia Model
Ź To tune channel to following physical/major/minor
number.
Transmission [m][a][ ][0][ ][Data00][ ][Data01]
[ ][Data02][ ][Data03][ ][Data04][ ][Data05][Cr]
Digital channels have a Physical, Major, and Minor
channel number. The Physical number is the actual
digital channel number, the Major is the number that
the channel should be mapped to, and the Minor is
the sub-channel. Since the ATSC tuner automatically
maps the channel from the Major / Minor number,
the Physical number is not required when sending a
command in Digital.
* Analog Antenna/Cable
ENGENGLISH
[Data 00][Data 01] Channel Data
Data 00 : High byte channel data
Data 01 : Low byte channel data
- 00 00 ~ 00 C7 (Decimal : 0 ~ 199)
Data 02 : Input Source (Analog)
- 00 : Antenna TV (ATV)
- 80 : Cable TV (CATV)
* Digital Antenna/Cable/Satellite
[Data 00][Data 01]: Channel Data
Data 00 : High Channel data
Data 01 : Low Channel data
- 00 00 ~ 27 0F (Decimal: 0 ~ 9999)
Data 02 : Input Source (Digital)
- 10 : Antenna TV (DTV)
- 20 : Antenna Radio (Radio)
- 40 : Satellite TV (SDTV)
- 50 : Satellite Radio (S-Radio)
- 90 : Cable TV (CADTV)
- a0 : Cable Radio (CA-Radio)
* Tune Command Examples:
1. Tune to the Analog antenna (PAL) Channel 10.
Data 00 : Physical Channel Number
- Antenna (ATV) : 02~45 (Decimal: 2 ~ 69)
- Cable (CATV) : 01, 0E~7D (Decimal : 1, 14~125)
[Data 01 ~ 04]: Major/Minor Channel Number
Data 01 & 02: xx (Don't care)
Data 03 & 04: xx (Don't care)
Data 05: Input Source (Analog)
- 00 : Antenna TV (ATV)
- 01 : Cable TV (CATV)
* Digital Antenna/Cable
Data 00 : xx (Don't care)
[Data 01][Data 02]: Major Channel Number
Data 01 : High byte Channel Data
Data 02 : Low byte Channel Data
- 00 01 ~ 27 0F (Decimal: 1 ~ 9999)
[Data 03][Data 04]: Minor Channel Number
Data 03 : High byte Channel Data
Data 04 : Low byte Channel Data
Data 05 : Input Source (Digital)
- 02 : Antenna TV (DTV) – Use Physical Channel
Number
- 06 : Cable TV (CADTV) – Use Physical Channel
Page 28

EXTERNAL CONTROL DEVICE SETUP
10
10
ENGLISH
ENG
Number
- 22 : Antenna TV (DTV) – Don’t Use Physical
Channel Number
- 26 : Cable TV (CADTV) - Don’t Use Physical
Channel Number
- 46 : Cable TV (CADTV) – Use Major Channel
Number Only (One Part Channel)
Two bytes are available for each major and minor
channel data, but usually the low byte is used alone
(high byte is 0).
* Tune Command Examples:
1. Tune to the Analog cable (NTSC) channel 35.
Set ID = All = 00
Data 00 = Channel Data is 35 = 23
Data 01 & 02 = No Major = 00 00
Data 03 & 04 = No Minor = 00 00
Data 05 = Analog Cable TV = 01
Total = ma 00 23 00 00 00 00 01
2. Tune to the digital antenna (ATSC) channel 30-3.
Set ID = All = 00
Data 00 = Don’t know Physical = 00
Data 01 & 02 = Major is 30 = 00 1E
Data 03 & 04 = Minor is 3 = 00 03
Data 05 = Digital Antenna TV = 22
Total = ma 00 00 00 1E 00 03 22
Ack [a][ ][Set ID][ ][OK][Data 00][Data 01]
[Data 02][Data 03][Data 04][Data 05]
[x][a][ ][Set ID][ ][NG][Data 00][x]
Data 05 = Digital Antenna TV = 02
Total = ma 00 00 00 11 00 01 02
2. Tune to the BS (ISDB-BS) channel 30.
Set ID = All = 00
Data 00 = Don’t know Physical = 00
Data 01 & 02 = Major is 30 = 00 1E
Data 03 & 04 = Don’t Care = 00 00
Data 05 =
Total = ma 00 00 00 1E 00 00 07
* This feature is varied based on the model.
Ack [a][ ][Set ID][ ][OK][Data 00][Data 01]
[Data 02][Data 03][Data 04][Data 05]
[x][a][ ][Set ID][ ][NG][Data 00][x]
Digital BS TV = 07
21. Channel(Programme) Add/Del(Skip)
(Command: m b)
Ź To skip current channel(programme) for next time.
Transmission [m][b][ ][Set ID][ ][Data][Cr]
Data 00 : Del(ATSC,ISDB)/Skip(DVB) 01 : Add
Ack [b][ ][Set ID][ ][OK/NG][Data][x]
* Set the saved channel status to del(ATSC, ISDB)/
skip(DVB) or add.
• For Japan Model
Ź To tune channel to following physical/major/minor
number.
Transmission [m][a][ ][0][ ][Data00][ ][Data01]
[ ][Data02][ ][Data03][ ][Data04][ ][Data05][Cr]
* Digital Antenna/Satellite
Data 00: xx (Don't care)
[Data 01][Data 02]: Major Channel Number
Data 01: High byte Channel Data
Data 02: Low byte Channel Data
- 00 01 ~ 27 0F (Decimal: 1 ~ 9999)
[Data 03][Data 04]: Minor/Branch Channel Number
(Don’t care in Satellite)
Data 03: High byte Channel Data
Data 04: Low byte Channel Data
Data 05 : Input Source (Digital/Satellite for Japan)
- 02 : Antenna TV (DTV)
- 07 : BS (Broadcasting Satellite)
- 08 : CS1 (Communication Satellite 1)
- 09 : CS2 (Communication Satellite 2)
* Tune Command Examples:
1
Tune to the digital antenna (ISDB-T) channel 17-1
Set ID = All = 00
Data 00 = Don’t know Physical = 00
Data 01 & 02 = Major is 17 = 00 11
Data 03 & 04 = Minor/Branch is 1 = 00 01
22. Key (Command: m c)
Ź To send IR remote key code.
Transmission [m][c][ ][Set ID][ ][Data][Cr]
Data Key code - p.2.
Ack [c][ ][Set ID][ ][OK/NG][Data][x]
23. Control Backlight (Command: m g)
• For LCD TV / LED TV
Ź To control the backlight.
Transmission [m][g][ ][Set ID][ ][Data][Cr]
Data Min : 00 to Max : 64
Ack [g][ ][Set ID][ ][OK/NG][Data][x]
Control Panel Light (Command: m g)
• For Plasma TV
Ź To control the panel light.
Transmission [m][g][ ][Set ID][ ][Data][Cr]
Data Min : 00 to Max : 64
.
Ack [g][ ][Set ID][ ][OK/NG][Data][x]
Page 29
EXTERNAL CONTROL DEVICE SETUP
11
11
24. Input select (Command: x b)
(Main Picture Input)
Ź To select input source for main picture.
Transmission [x][b][ ][Set ID][ ][Data][Cr]
Data
00 : DTV
02 : Satellite DTV
ISDB-BS (Japan)
03 : ISDB-CS1 (Japan)
04 : ISDB-CS2 (Japan)
11 : CATV
20 : AV or AV1 21 : AV2
40 : Component1
60 : RGB
90 : HDMI1
92 : HDMI3
Ack [b][ ][Set ID][ ][OK/NG][Data][x]
* This function depends on model and signal.
01 : CADTV
10 : ATV
41 : Component2
91 : HDMI2
93 : HDMI4
25. 3D(Command: x t) (only 3D models)
(Depending on model)
Ź To change 3D mode for TV.
Transmission [x][t][ ][Set ID][ ][Data 00][ ][Data 01]
[ ][Data 02][ ][Data 03][Cr]
* (Depending on model)
Data Structure
[Data 00] 00 : 3D On
01 : 3D Off
02 : 3D to 2D
03 : 2D to 3D
[Data 01] 00 : Top and Bottom
01 : Side by Side
02 : Check Board
03 : Frame Sequential
04 : Column interleaving
05 : Row interleaving
[Data 02] 00 : Right to Left
01 : Left to Right
[Data 03] 3D Effect(3D Depth): Min : 00 - Max : 14
(*transmit by Hexadecimal code)
* [Data 02], [Data 03] functions depend on model
and signal.
* If [Data 00] is 00 (3D On), [Data 03] has no
meaning.
* If [Data 00] is 01 (3D off) or 02 (3D to 2D), [Data
01], [Data 02] and [Data 03] have no meaning.
* If [Data 00] is 03 (2D to 3D), [Data 01] and
[Data 02] have no meaning.
* If [Data 00] is 00 (3D On) or 03 (2D to 3D), [Data
03] works when 3D Mode (Genre) is manual only.
* All 3D pattern options ([Data 01]) may not be
available according to broadcasting/video signal.
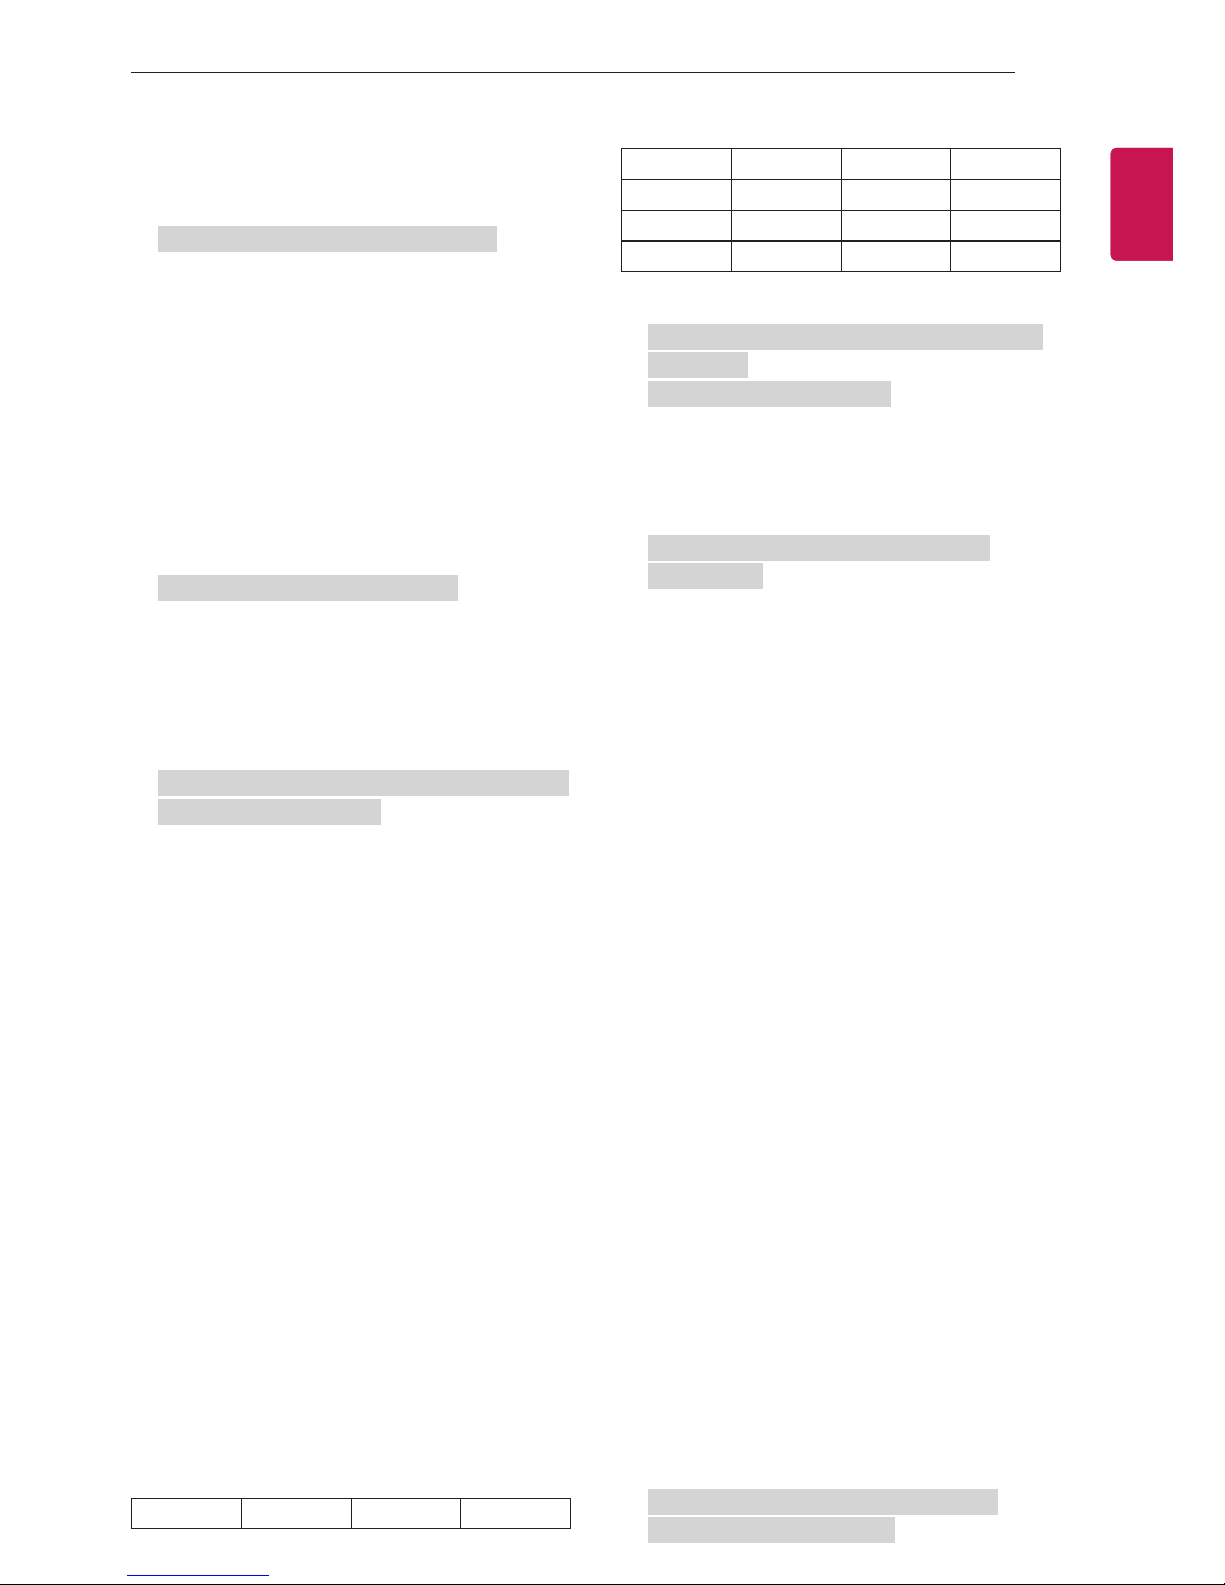
[Data 00] [Data 01] [Data 02] [Data 03]
00OOO
01XXX
02XXX
03 X O O
X : don’t care
Ack [t][ ][Set ID][ ][OK][Data00][Data01][Data02]
[Data03][x]
[t][ ][Set ID][ ][NG][Data00][x]
26. Extended 3D(Command: x v) (only 3D models)
(Depending on model)
Ź To change 3D option for TV.
Transmission [x][v][ ][Set ID][ ][Data 00][ ]
[Data 01][Cr]
[Data 00] 3D option
00 : 3D Picture Correction
01 : 3D Depth (3D Mode is Manual Only)
02 : 3D Viewpoint
06 : 3D Color Correction
07 : 3D Sound Zooming
08 : Normal Image View
09 : 3D Mode (Genre)
[Data 01] It has own range for each 3D option
determined by [Data 00].
1) When [Data 00] is 00
00 : Right to Left
01 : Left to Right
2) When [Data 00] is 01, 02
Data Min: 0 - Max: 14 (*transmit by Hexadecimal
code)
Data value range(0 - 20) converts Viewpoint range
(-10 - +10) automatically (Depending on model)
* This option works when 3D Mode (Genre) is manual
only.
3) When [Data 00] is 06, 07
00 : Off
01 : On
4) When [Data 00] is 08
00 : Revert to 3D video from 3D-to-2D
converted 2D video
01 : Change 3D video to 2D video, except
2D-to-3D video
* If conversion condition doesn’t meet, command is
treated as NG.
5) When [Data 00] is 09
00 : Standard
02 : Cinema
04 : Manual
Ack [v][ ][Set ID][ ][OK][Data00][Data01][x]
[v][ ][Set ID][ ][NG][Data00][x]
01 : Sport
03 : Extreme
05 : Auto
ENGENGLISH
Page 30

EXTERNAL CONTROL DEVICE SETUP
12
12
ENGLISH
ENG
27. Auto Configure (Command: j u)
(Depending on model)
Ź To adjust picture position and minimize image
shaking automatically. It works only in RGB (PC)
mode.
Transmission [j][u][ ][Set ID][ ][Data][Cr]
Data 01 : To set
Ack [u][ ][Set ID][ ][OK/NG][Data][x]
Page 31
webOS TV Quick Setup Guide
* Image shown may differ from your TV.
* Image shown on a PC or mobile phone may vary depending upon the Operating System (OS).
* Depending upon the version of the software, icon position can be changed.
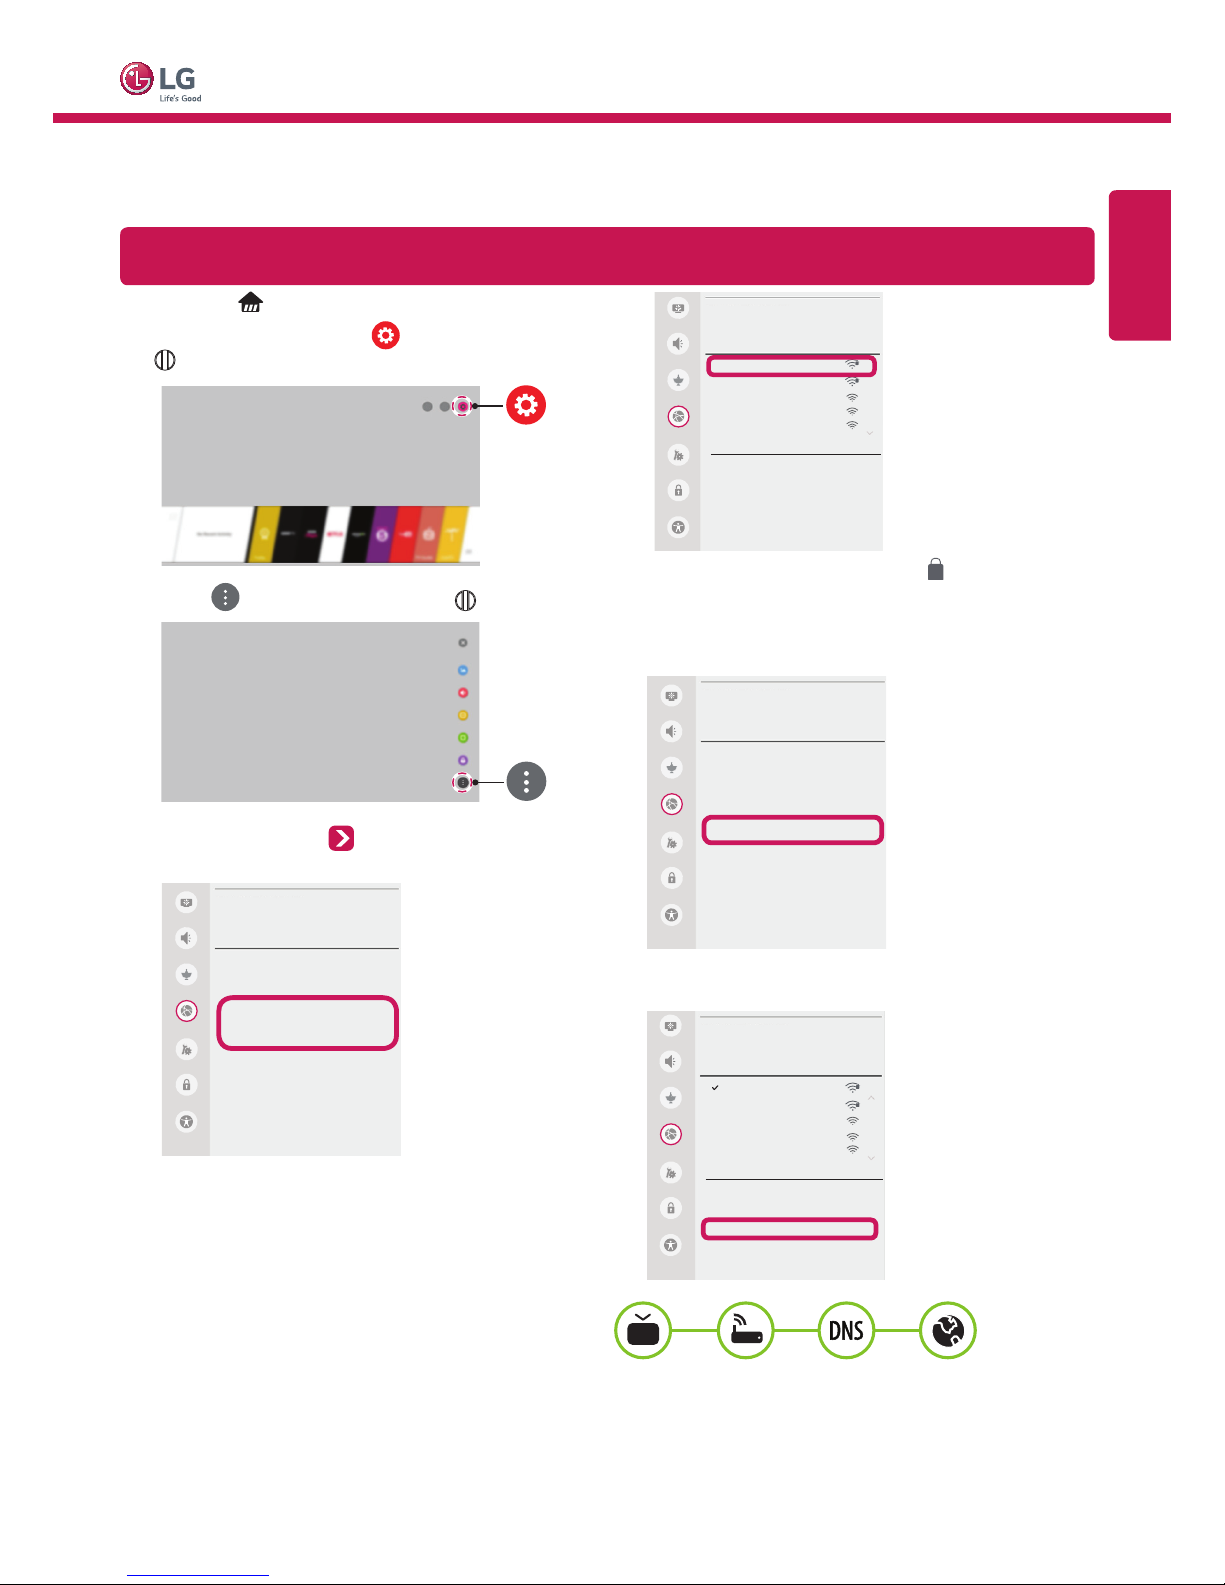
Network Settings
Press the (Home) button to access the
1
Smarthome menu. Select
Wheel (OK).
Select (All Settings) and press Wheel (OK).
2
(Settings) and press
For wireless AP (Router) that has the symbol, you need
to enter the security key.
If the connection is completed, Connected to
5
WI-FI NETWORK
Picture
Network /
Sound
iptime_xu.ji
Channels
Accessibility
iptime_shinsung.kang
iptime_ungkee.choi
iptime_sungho.jo
iptime_seungjun.lee
Network
Add a Hidden Wireless Network
General
Connect via WPS PBC
Connect via WPS PIN
Advanced Wi-Fi Settings
Safety
Internet is displayed.
NETWORK
Picture
ENGLISH
Select the Network Wired Connection
3
(Ethernet) or Wi-Fi Connection
NETWORK
Picture
Sound
TV Name
[LG] webOS TV
Channels
Wired Connection (Ethernet)
Not Connected
Network
Wi-Fi Connection
Not Connected
Wi-Fi Direct
General
LG Connect Apps
Safety
Accessibility
The device automatically tries to connect to the
4
available network (wired network first).
.
When you select the Wi-Fi Connection, the
network list available is displayed. Choose the
network you wish to use.
Sound
TV Name
[LG] webOS TV
Channels
Wired Connection (Ethernet)
Not Connected
Network
Wi-Fi Connection
Connected to Internet
Wi-Fi Direct
General
LG Connect Apps
Safety
Accessibility
You can check the status of connection
in Advanced Wi-Fi Settings.
WI-FI NETWORK
Picture
Network /
Sound
iptime_xu.ji
Channels
Network
General
Safety
Accessibility
iptime_shinsung.kang
iptime_ungkee.choi
iptime_sungho.jo
iptime_seungjun.lee
Add a Hidden Wireless Network
Connect via WPS PBC
Connect via WPS PIN
Advanced Wi-Fi Settings
Page 32
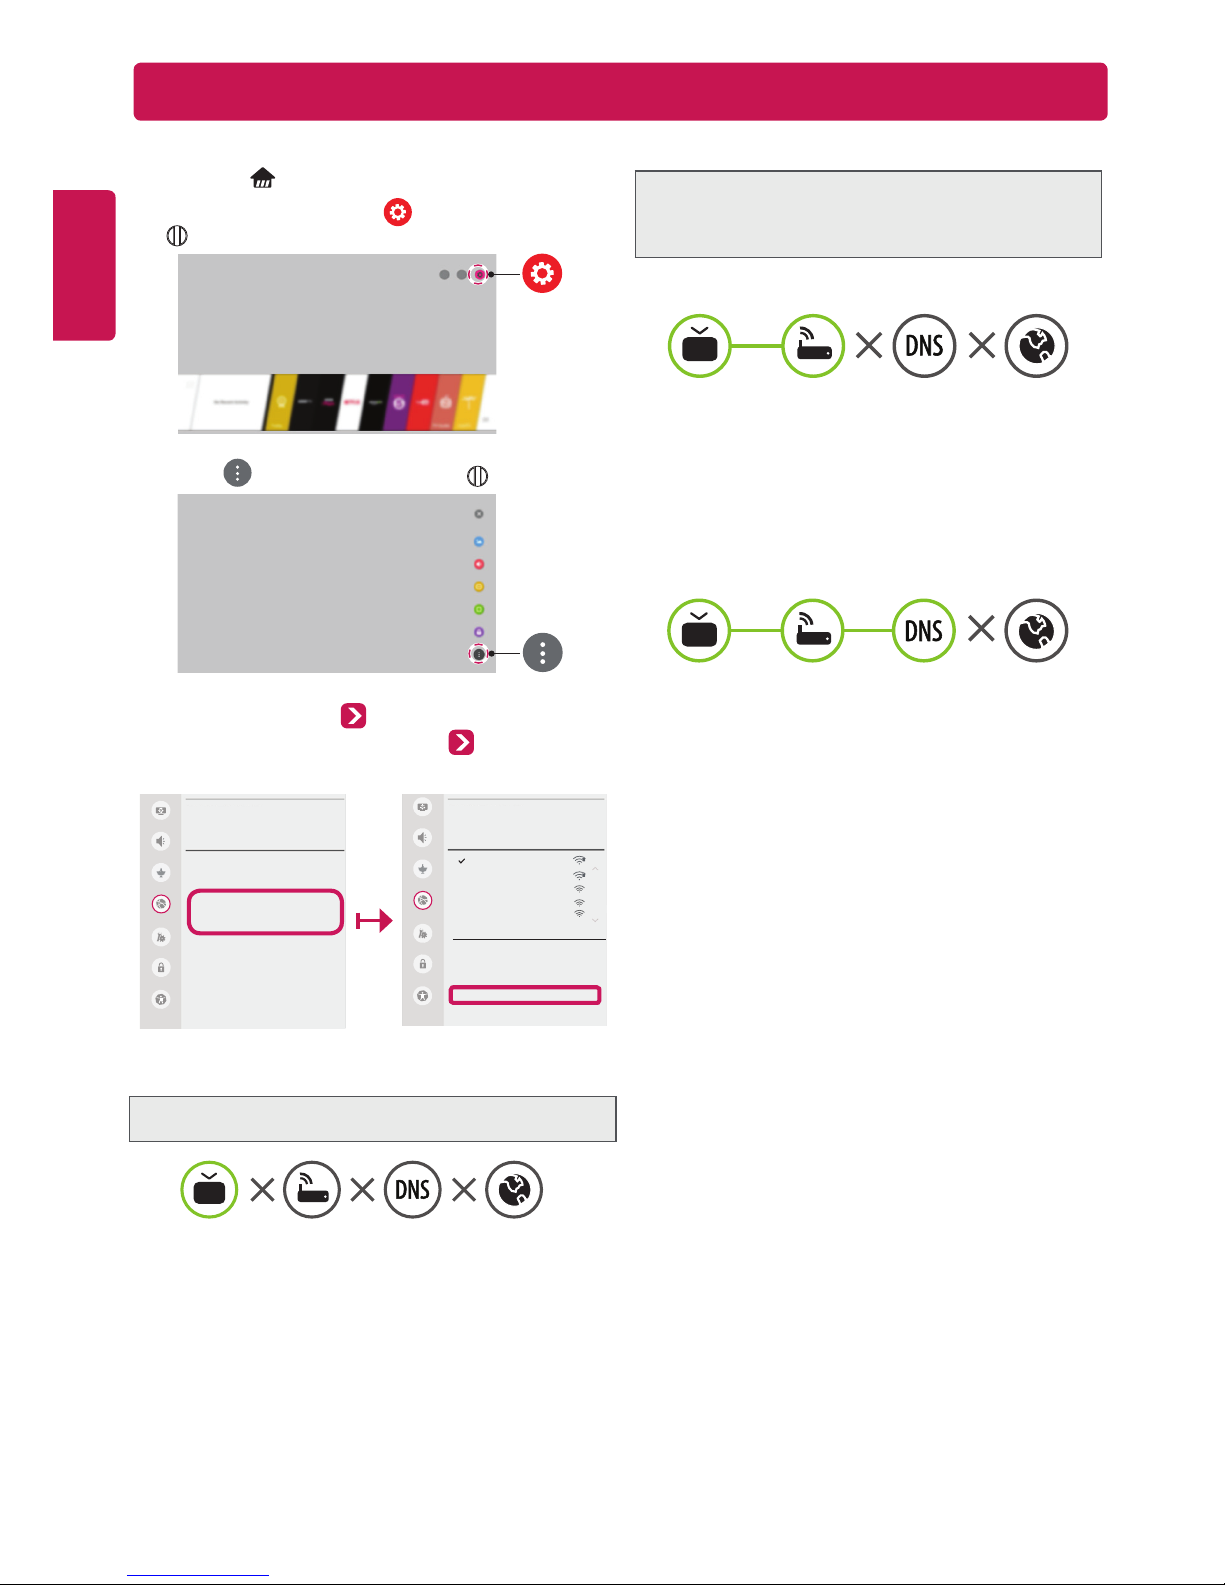
Troubleshooting Network Problems
Depending upon the version of the software, icon position can be changed.
Press the (Home) button to access the
1
ENGLISH
Smarthome menu. Select
Select
2
Wheel (OK).
(All Settings)
(Settings) and press
and press Wheel (OK)
When X appears next to Gateway:
1
.
2
3
Check the AP (Router) or consult your Internet
service provider.
Unplug the power cord of the AP (Router) or cable
modem, wait 10 seconds. Reapply power.
Initialize (Reset) the AP (Router) or cable modem.
Contact Internet service provider or AP
(Router) manufacturer.
Select the Network Wired Connection
3
(Ethernet)
Wi-Fi Connection
or
Advanced Wi-
Fi Settings.
NETWORK
Picture
Sound
TV Name
[LG] webOS TV
Channels
Wired Connection (Ethernet)
Not Connected
Network
Wi-Fi Connection
Not Connected
Wi-Fi Direct
General
LG Connect Apps
Safety
Accessibility
Picture
WI-FI NETWORK
Network /
Sound
iptime_xu.ji
iptime_shinsung.kang
Channels
iptime_ungkee.choi
iptime_sungho.jo
Network
iptime_seungjun.lee
General
Add a Hidden Wireless Network
Connect via WPS PBC
Safety
Connect via WPS PIN
Advanced Wi-Fi Settings
Accessibility
Follow the instructions below that match to your
network status.
Check the TV or the AP (Router).
When X appears next to TV:
Check the connection status of the TV,
1
AP (Router) and cable modem.
Power off and power on in the following order; (1st)
2
the cable modem, wait for the cable modem to reset,
(2nd) the AP (Router), wait for the AP (Router) to
reset and (3rd) the TV.
If you are using a static IP, enter the IP directly.
3
Contact Internet service provider or AP (Router)
4
manufacturer.
When X appears next to DNS:
Unplug the power cord of the cable modem or the
1
AP (Router), wait 10 seconds. Reapply power.
After the cable modem or AP (Router) has
2
initialized (Reset), try to reconnect.
Check that the MAC address of the TV/AP (Router)
3
is registered with your Internet service provider.
(The MAC address displayed on the right pane of
the network status window should be registered
with your Internet service provider.)
Check the AP (Router) manufacturer’s website
4
to make sure your router has the latest firmware
version installed.
Page 33
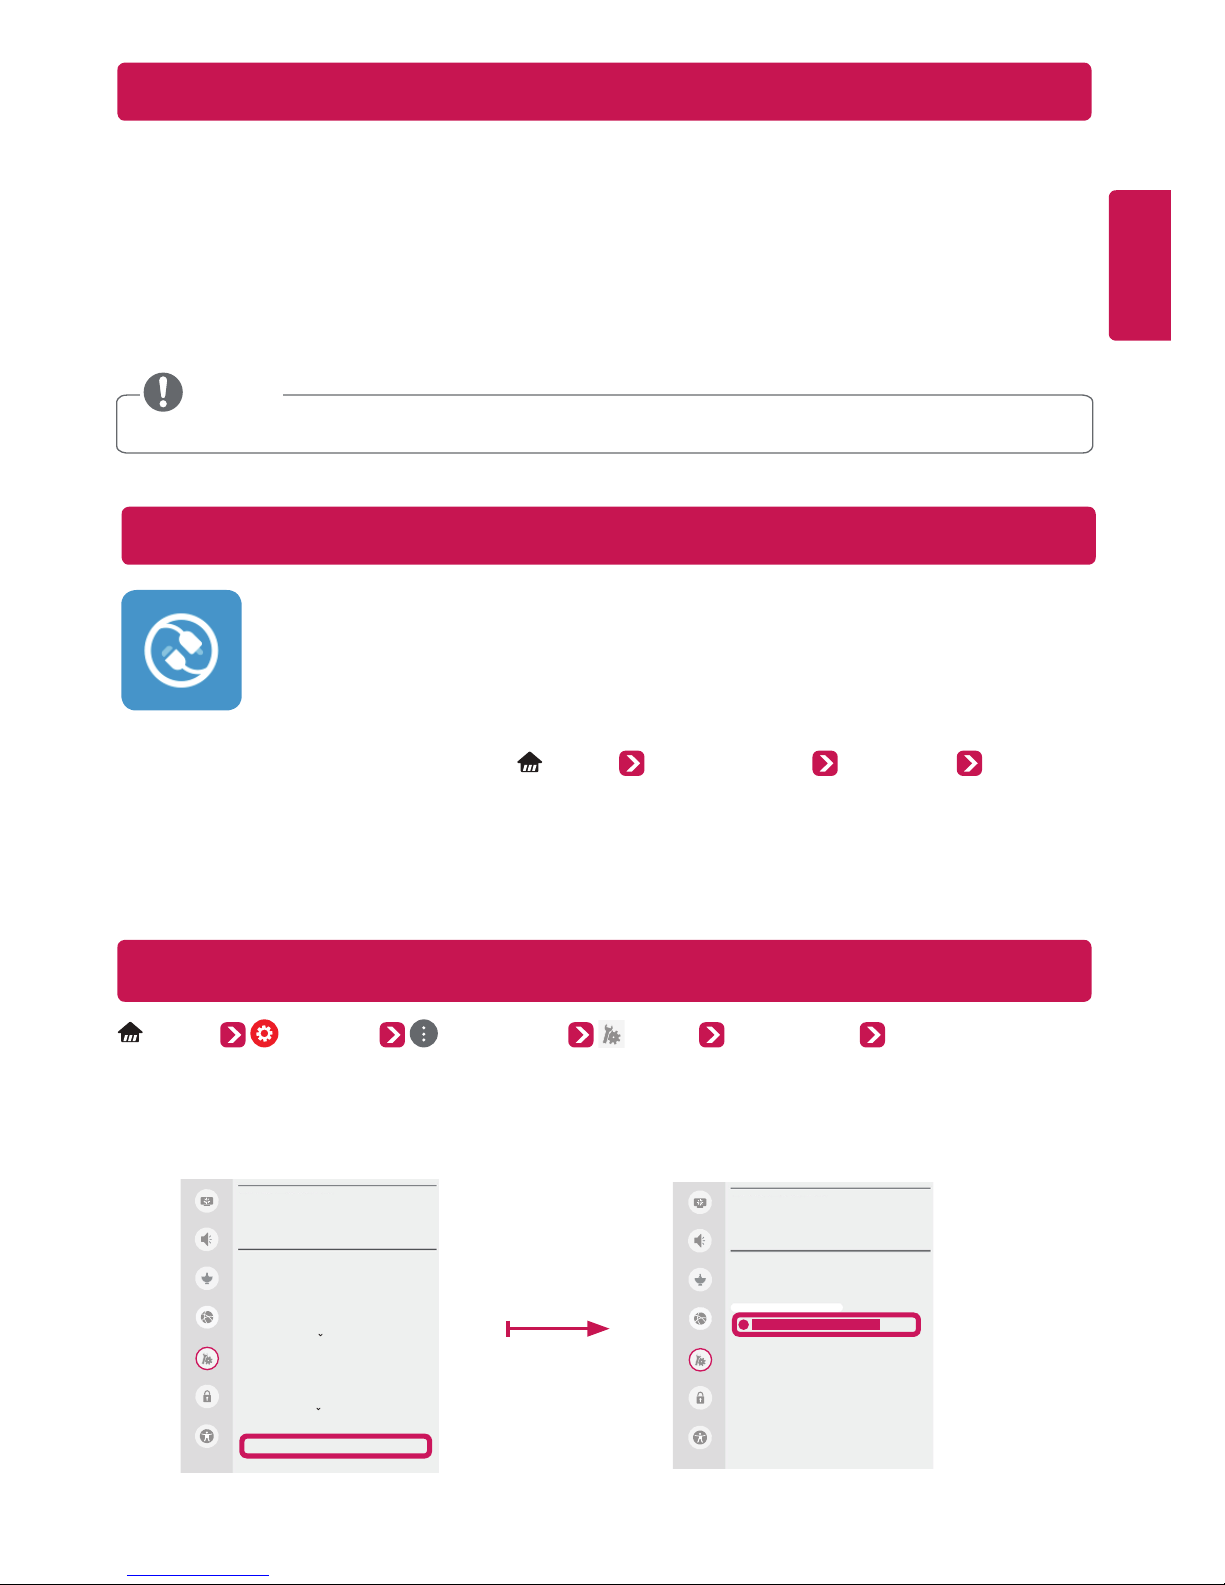
SmartShare PC SW Installation & Setting
Install the SmartShare PC SW program on your PC.
Go to
1
Select SUPPORT.
2
Select Software & Firmware. Then, search for your model. Then, select SmartShare PC SW.
3
Download the SmartShare PC SW and install it on your PC. You can run the program when installation is
4
www.lg.com
. Then, select your region.
complete.
NOTE
ySmartShare service is only available if TV and other devices are connected to the same AP (Router).
SmartShare Connection to Smartphone
Check that Wi-Fi is enabled on your smartphone. To use SmartShare, both devices must on the
1
same local network.
Install/run the app for sharing content on your smartphone (It's called LG TV Plus on LG phones).
2
Enable your smartphone to share content files with other devices.
3
Open Device Connector application on TV. (Home) Device Connector Smartphone CONTENT
4
SHARE.
ENGLISH
Select the file type you want to play (movie, audio, or photo).
5
Select a movie, music, or photo file to play on the TV.
6
Play the media file to view and enjoy it on your TV.
7
Updating the TV Firmware
(Home) (Settings) (All Settings) General About This TV CHECK FOR UPDATES
You can check the Software Version and update it.
If you check the Allow Automatic Updates, the TV will check for updated software automatically each time the set
is turned on (Internet Connection is required).
* When the TV is turned on for the first time after a software update, initialization of the TV may take approximately
one minute.
Picture
Sound
Channels
Network
General
Safety
Accessibility
GENERAL
Language
Location
Time & Date
Timers
Standby Light
Home/Store Mode
Power saving mode
SIMPLINK
Settings Help
Reset to Initial Settings
About This TV
ABOUT THIS TV
Picture
General /
Sound
Software Version xx.xx.xx
Channels
CHECK FOR UPDATES
Allow Automatic Updates
Network
TV Information
LG webOS TV
General
LG Remote Service
Customer Service
x-xxx-xxx-xxxx
Safety
User Agreements
Legal Notice
Accessibility
Open Source Software Notice
Page 34
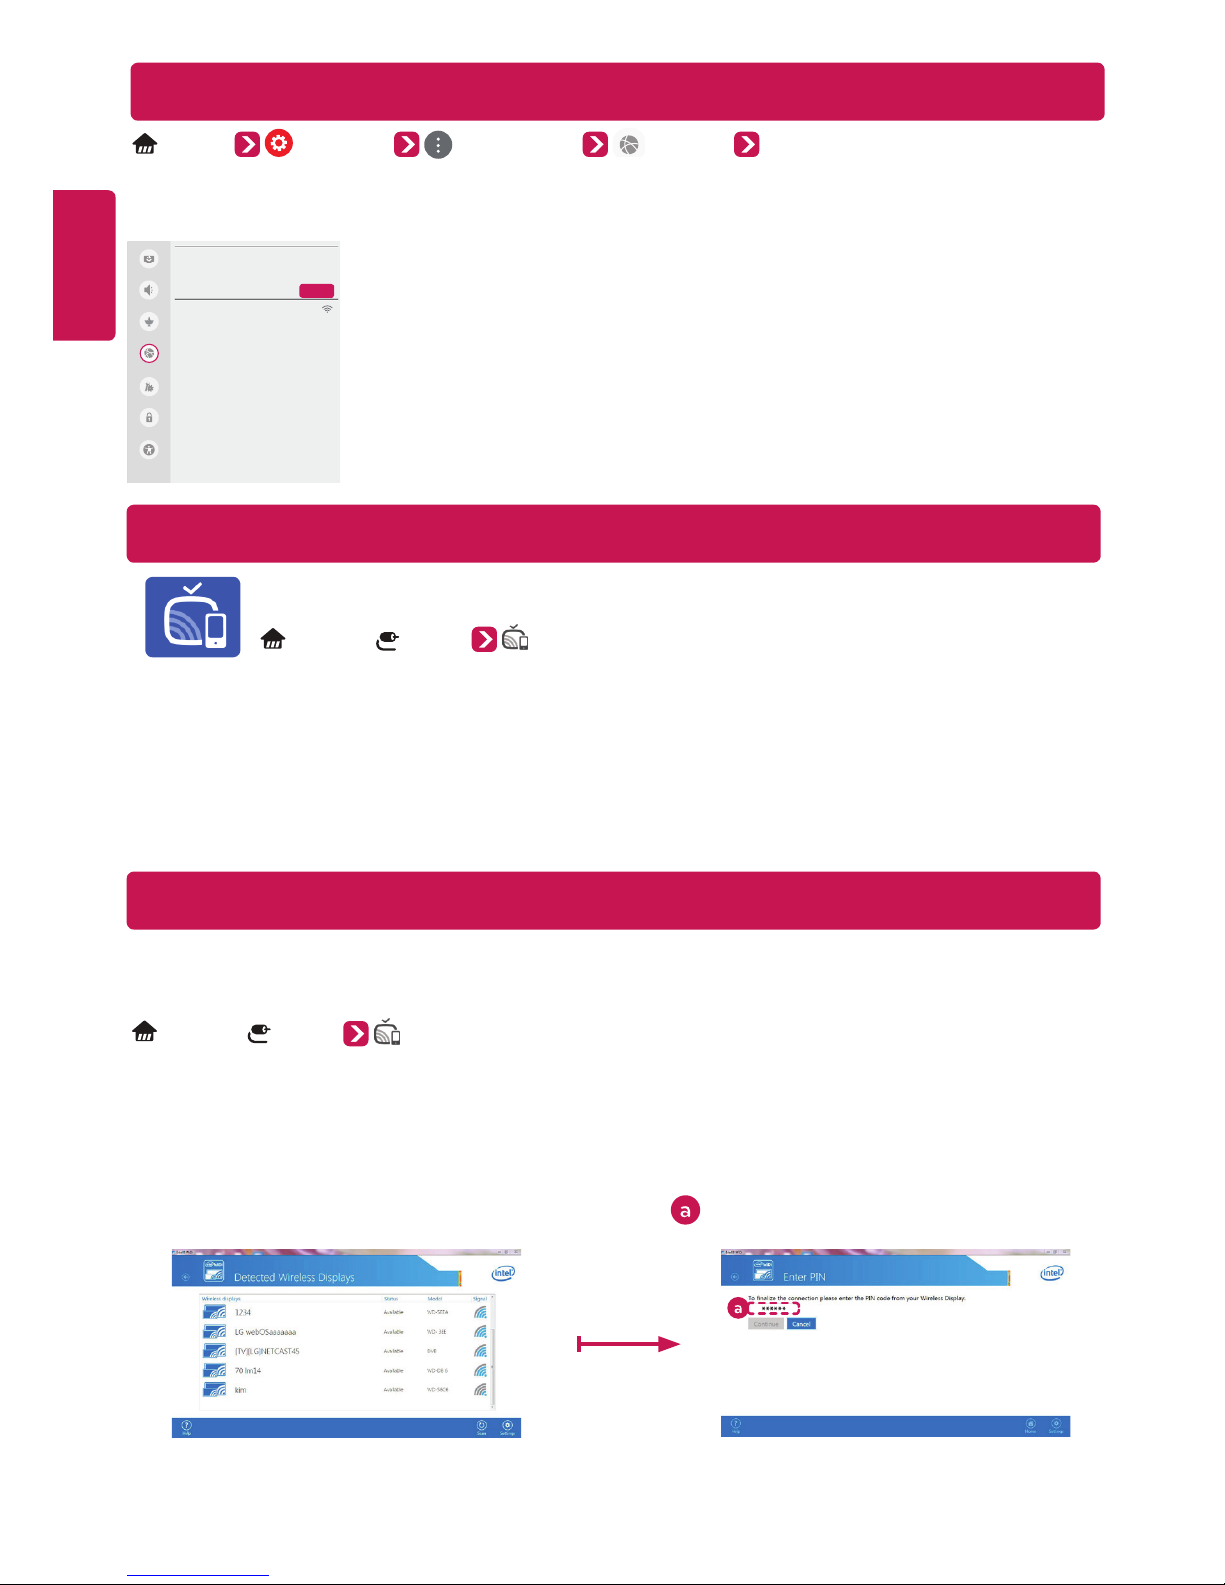
Wi-Fi Direct Setting
(Home) (Settings) (All Settings) Network Wi-Fi DIRECT
If a local network is not available, you can connect a portable device directly to the TV using Wi-Fi Direct.
With SmartShare, you can share files or screens of devices connected to Wi-Fi Direct.
ENGLISH
WI-FI DIRECT
Picture
Sound
Channels
Network
General
Safety
Accessibility
Network /
LG Smart+ TV
When you open Wi-Fi Direct menu, a list of available devices appears. Select your
REFRESH LIST
1
device.
When you are prompted to the connection request, select Ye s . Wi-Fi Direct is
2
now connected to your TV.
* You can only use devices that support WiFi Direct.
Miracast Setting
Miracast allows a portable device to send video and sound securely to the TV wirelessly.
(Home) / (Input) (Screen Share)
Miracast should be set to ON on your portable device.
1
When your TV is detected, select the device on your portable device.
2
When connection is completed, the device screen appears on the TV screen.
* If you turn Listen Mode to ON after launching the Screen Share app, you can connect the device without starting
the Screen Share app.
WiDi (Wireless Display) Setting
Intel® WiDi (Wireless Display) technology enables easy and fast connection without wires or internet network for
mirrored and dual monitor display on your TV. You can sit back and experience your favorite movies, videos, photos,
online shows and more in full HD on your TV with great image clarity and sound.
(Home) / (Input) (Screen Share)
On the TV Intel® WiDi is set to On. Your laptop runs the Intel® WiDi program.
1
* LG TVs do not need to register.
* For more information on Intel® WiDi, visit
* You can control your PC using the Magic Remote. (above WiDi version 4.2)
It detects LG webOS TVs available, which supports WiDi. In the list, select the TV you want and click Connect.
2
Enter the number shown on the screen into the input field (
http://intel.com/go/widi
) on your laptop and then click Continue.
.
The laptop screen appears on the TV screen. The wireless environment may affect the screen display. If the
3
connection is poor, the Intel® WiDi connection may be lost.
Notebook Screen
Page 35
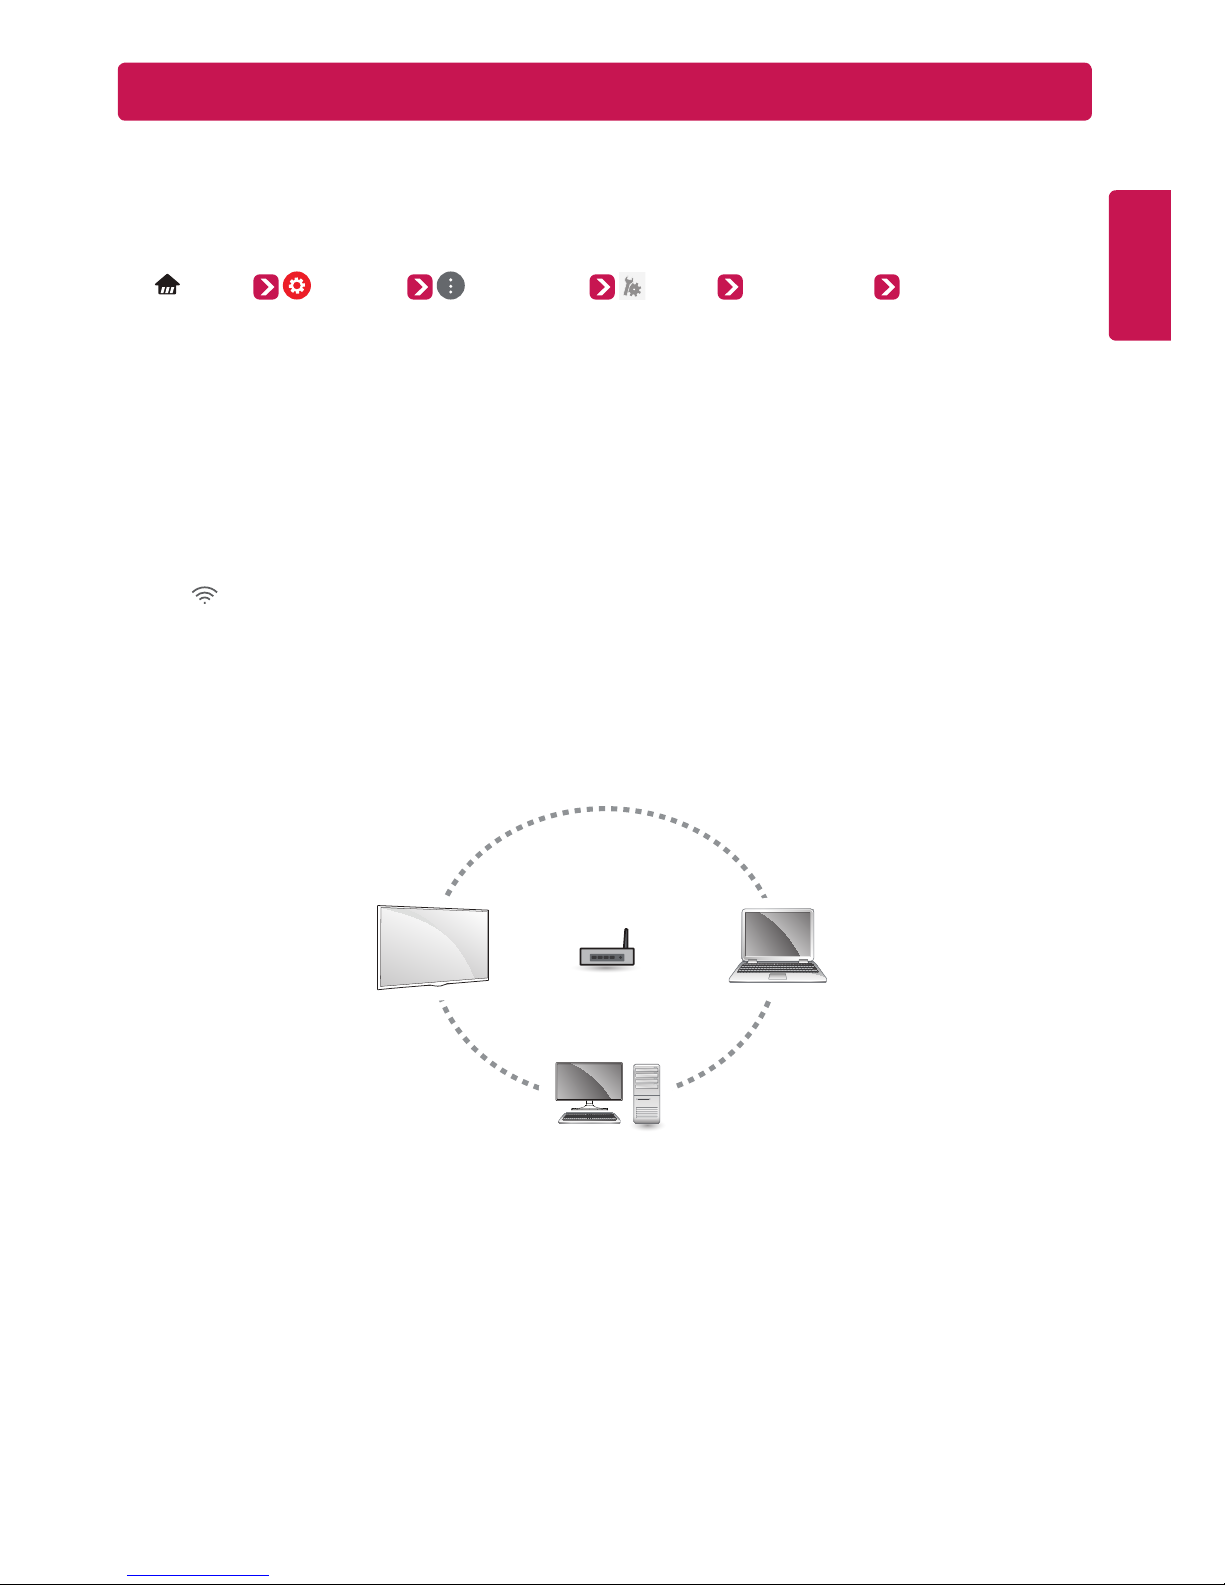
Troubleshooting Wi-Fi Network Problems
Checkpoints
yMake sure that you have the latest version of the software.
-If you are using a Wi-Fi router, check whether you have the latest firmware installed.
-If there are any available updates, update the firmware according to the manufacturer's instructions.
- Check the current software version and if there is an available update, install it.
(Home) (Settings) (All Settings) General About This TV Software Version
yCheck if the same symptom occurs with two or more Wi-Fi devices.
-Wi-Fi problems may be related to network condition and a device that is connected to the network.
- If other Wi-Fi devices can connect to the Internet at the same location as the TV, then your Wi-Fi router is
probably normal.
yCheck the power and Ethernet cables of the Wi-Fi router.
- When the Ethernet cable connected to the Wi-Fi router is loose or disconnected, network problems can
occur.
-Check all power and Ethernet cables of the Wi-Fi router to see if they are correctly connected.
yCheck the Wi-Fi router to see if the router is set to the recommended wireless settings. If network problems
continue, reset your network devices.
yCheck the signal strength of the Wi-Fi router to connect to from the TV UI.
-The
-It is recommended that you connect to a Wi-Fi network with 3 or more bars of signal strength.
- If the number of bars indicating signal strength are less than 3, the network connection status may be weak
or unstable, so shorten the distance between the Wi-Fi router and the TV.
yIf the signal strength of the Wi-Fi router is weak, wireless speed slowdowns and network disconnection may
occur.
yTo supplement wireless coverage of network equipment, your Wi-Fi router should be placed in the middle of
the network equipment.
that is next to the Wi-Fi router name (SSID) in the menu indicates the sensitivity of the receiver.
ENGLISH
yInterference Factors
If there is any interference from surrounding equipment, the network connection may be weak or unstable.
-Wireless telephones that operate in the 2.4 GHz or 5 GHz bandwidth
-Wireless speakers that operate in the 2.4 GHz or 5 GHz bandwidth
-Video transmitters that operate in the 2.4 GHz or 5 GHz bandwidth
- Other wireless devices (Microwaves, cameras, baby monitors, neighboring wireless devices, etc.) that operate
in the 2.4 GHz or 5 GHz bandwidth.
y How to reduce the effects of interference between Wi-Fi and Bluetooth devices
- Set the channel on your wireless network equipment to avoid the 2.4 GHz or 5 GHz bandwidth which has lots
of interference.
-If possible, use the 5 GHz wireless network.
- If the Wi-Fi router is located too far away or in environments with high interference, the network connection
may be weak or unstable.
- In this case, move the Wi-Fi router closer to the TV or check if there are any obstructions (e.g., concrete walls,
cabinets) between the two devices.
Wi-Fi Router
Page 36
yRadio Frequency (RF) Interference and Absorbing Obstructions
Type of Barrier
Interference
Potential
Type of Barrier
Wood Low Water Medium
Synthetic material Low Bricks Medium
ENGLISH
Glass Low Marble Medium
Metal Very High
Interference
Potential
Type of Barrier
Plaster High
Concrete High
Bulletproof glass High
Interference
Potential
Page 37
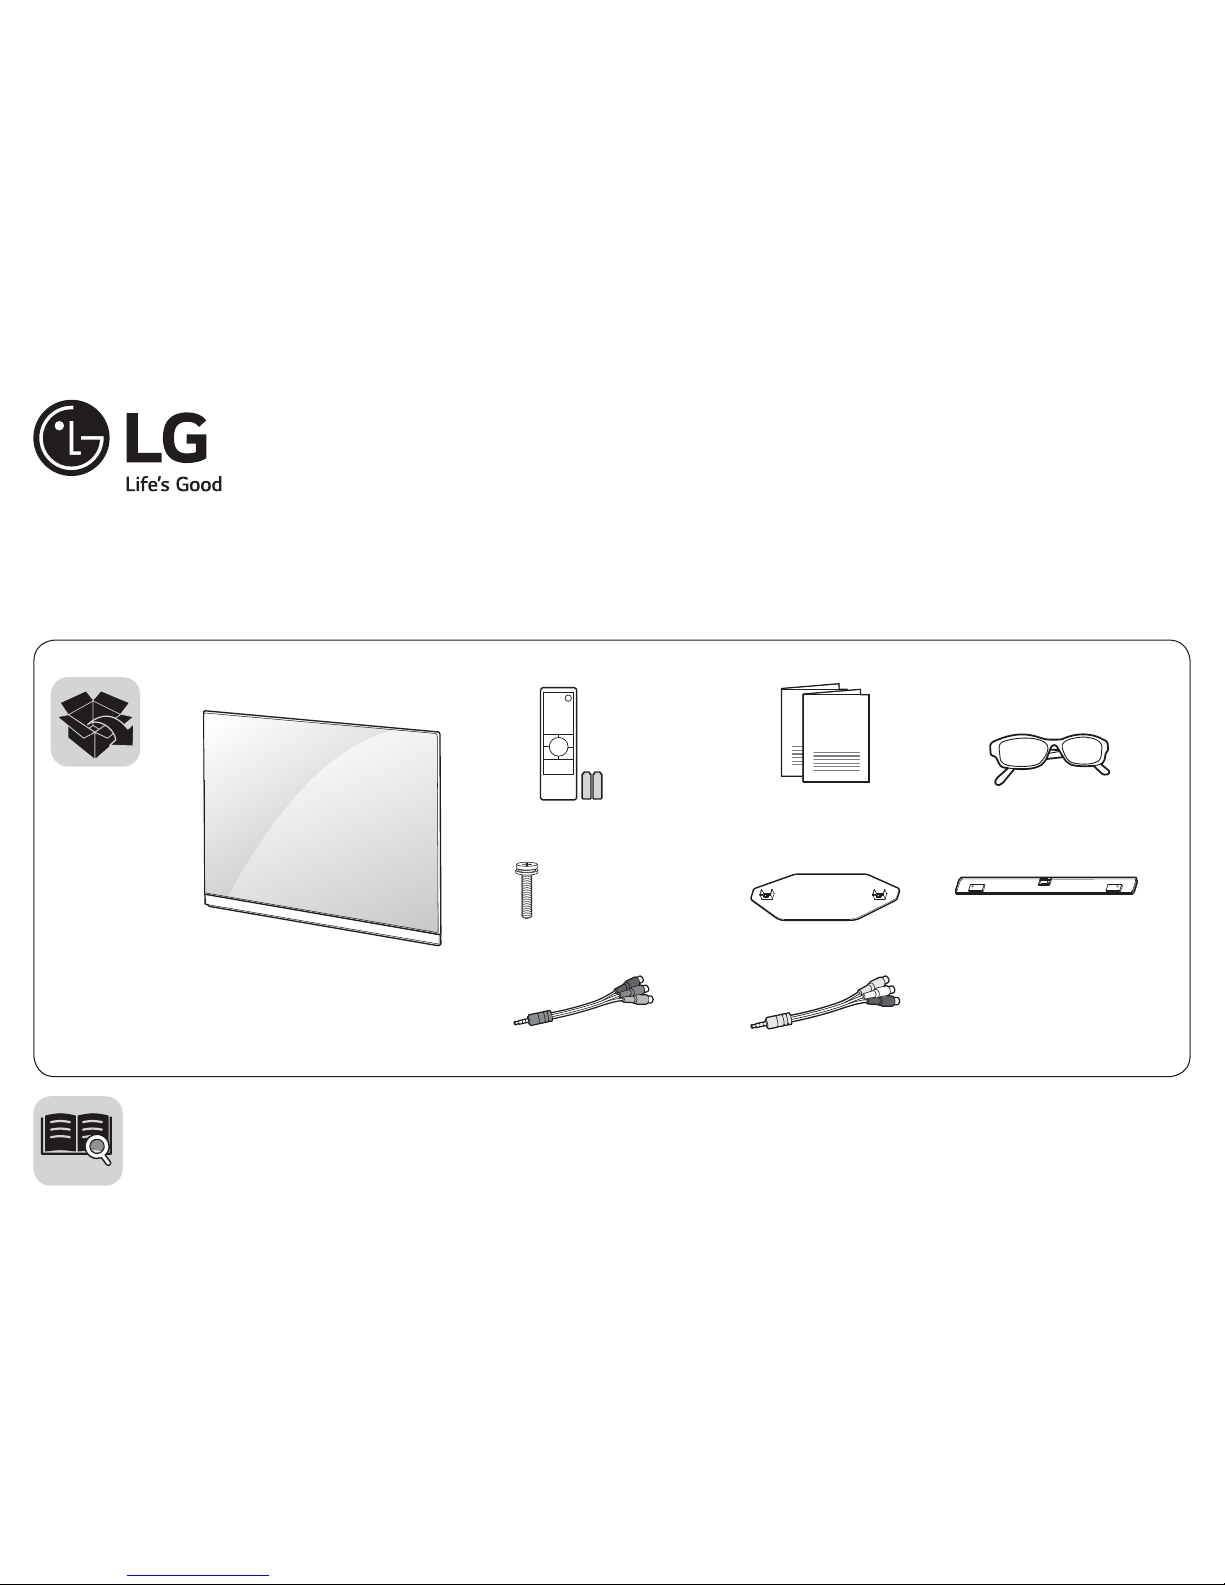
P/No: MFL69383608 (1602-REV00)
OLED TV
OLED55E6P
OLED65E6P
www.lg.com
ENGLISH
Easy Setup Guide
Please read this manual carefully before operating your set and retain it for future reference.
ESPAÑOL
Qye\tmhehiMsrŃkyvegm¬r
Lea atentamente este manual antes de poner en marcha el equipo y consérvelo para futuras consultas.
FRANÇAIS
QymhihigsrŃkyvexmsrvetmhi
Avant d’utiliser l’appareil, veuillez lire attentivement ce guide et conservez-le pour pouvoir vous y reporter ultérieurement.
""
X 4
(M4 x L20)
Page 38
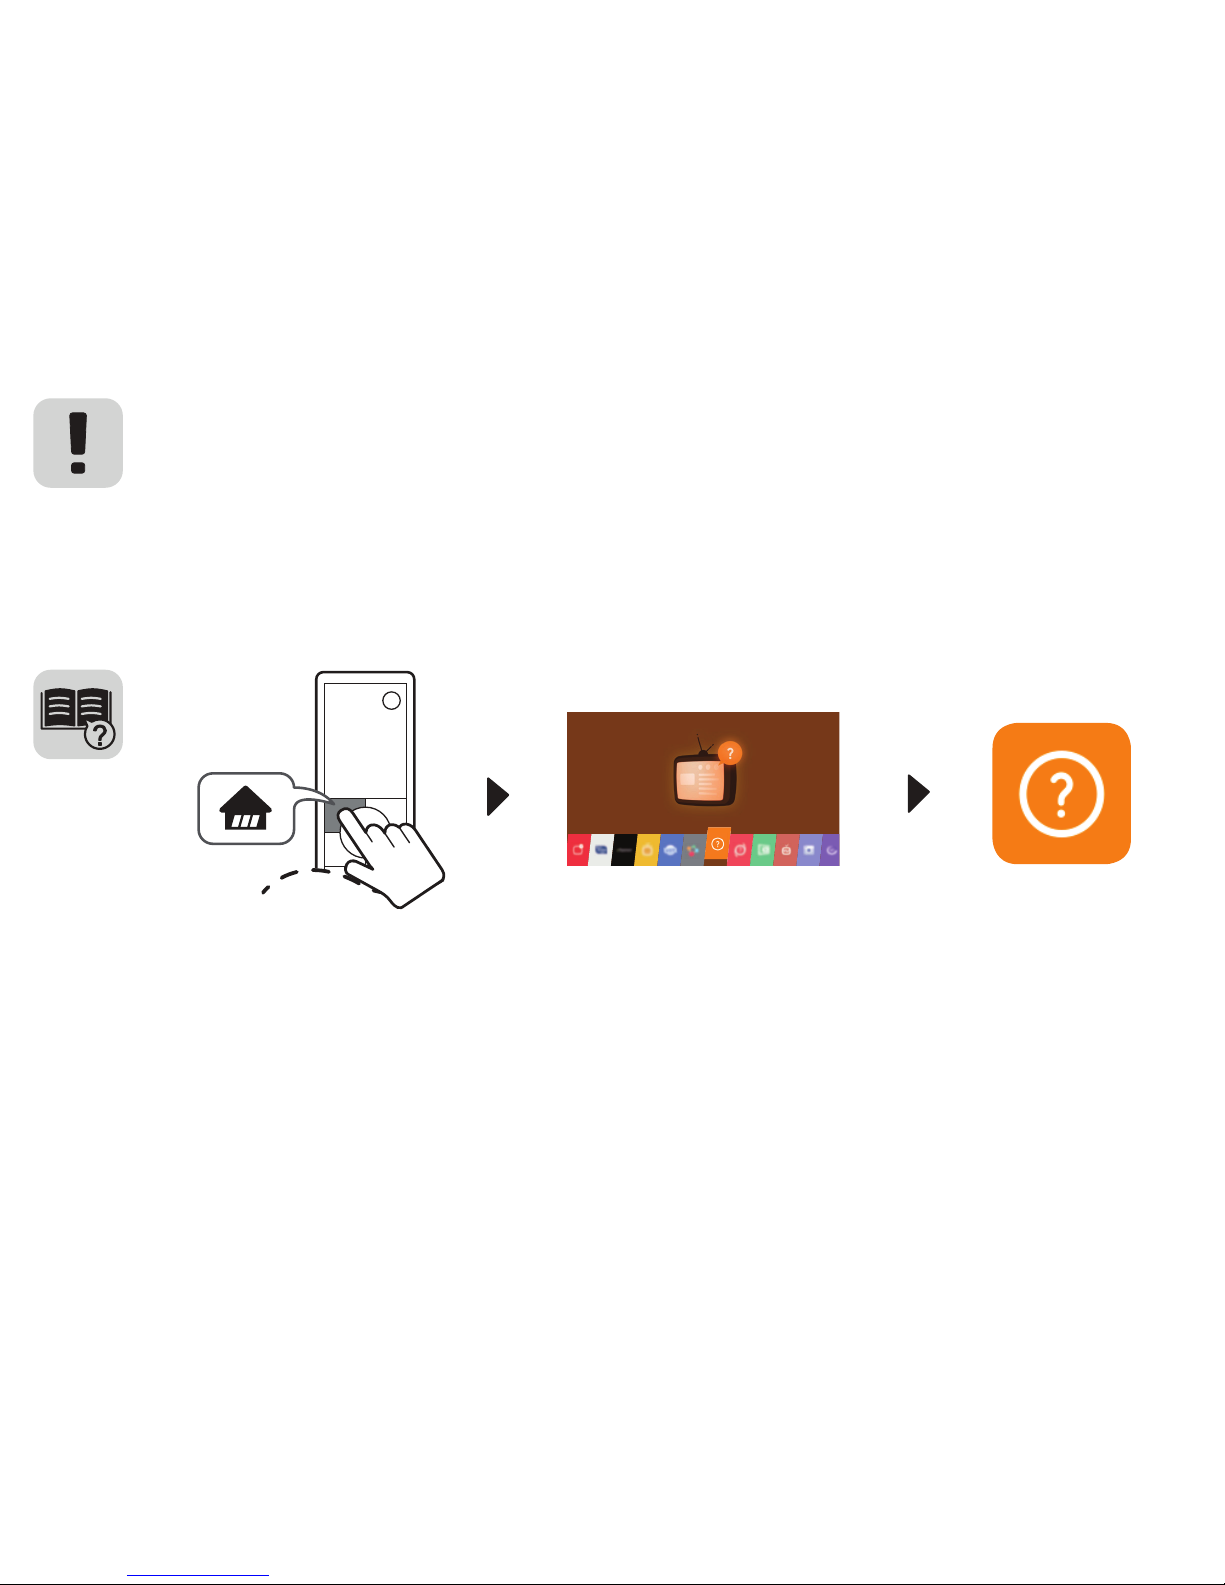
Read ]ejix}erh\ijivirgi.
Leer ]ikyvmheh}Msrwypxew.
Lisez ]gyvmxixvjvirgiw.
ENGLISH
ESPAÑOL
FRANÇAIS
Page 39
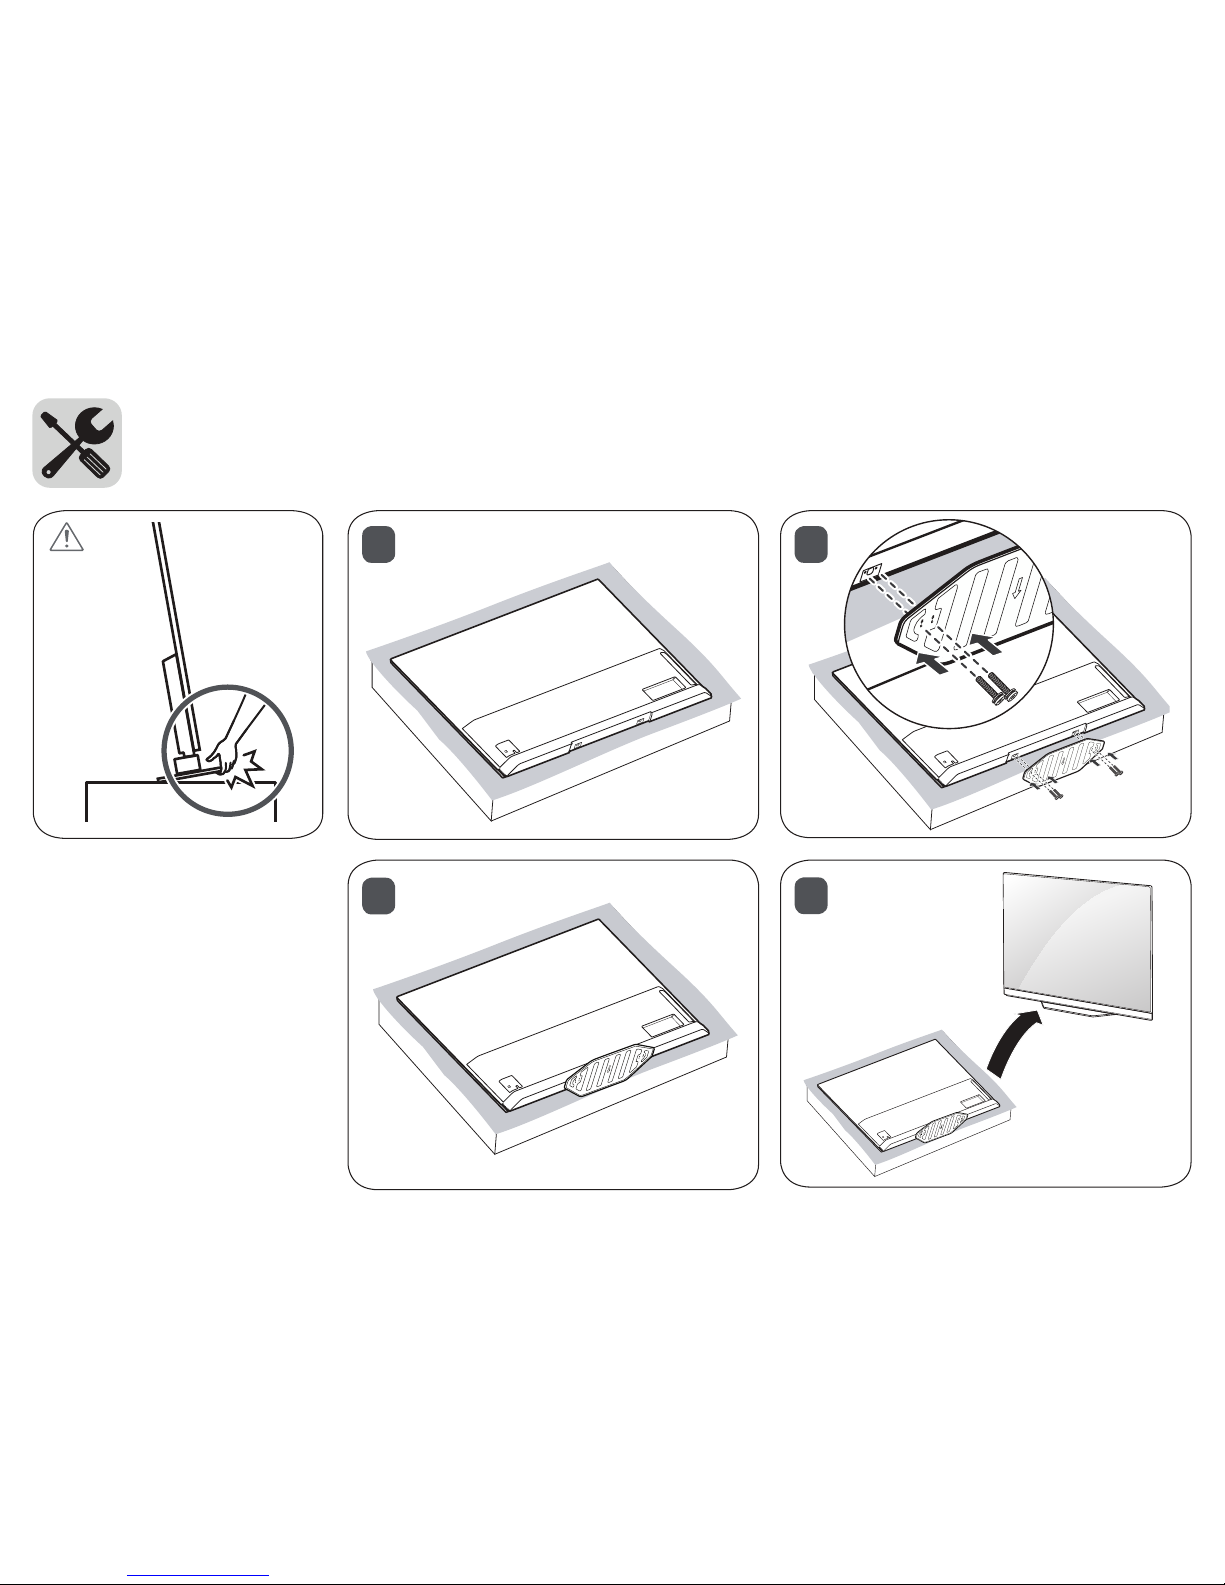
1
3
4
2
Page 40
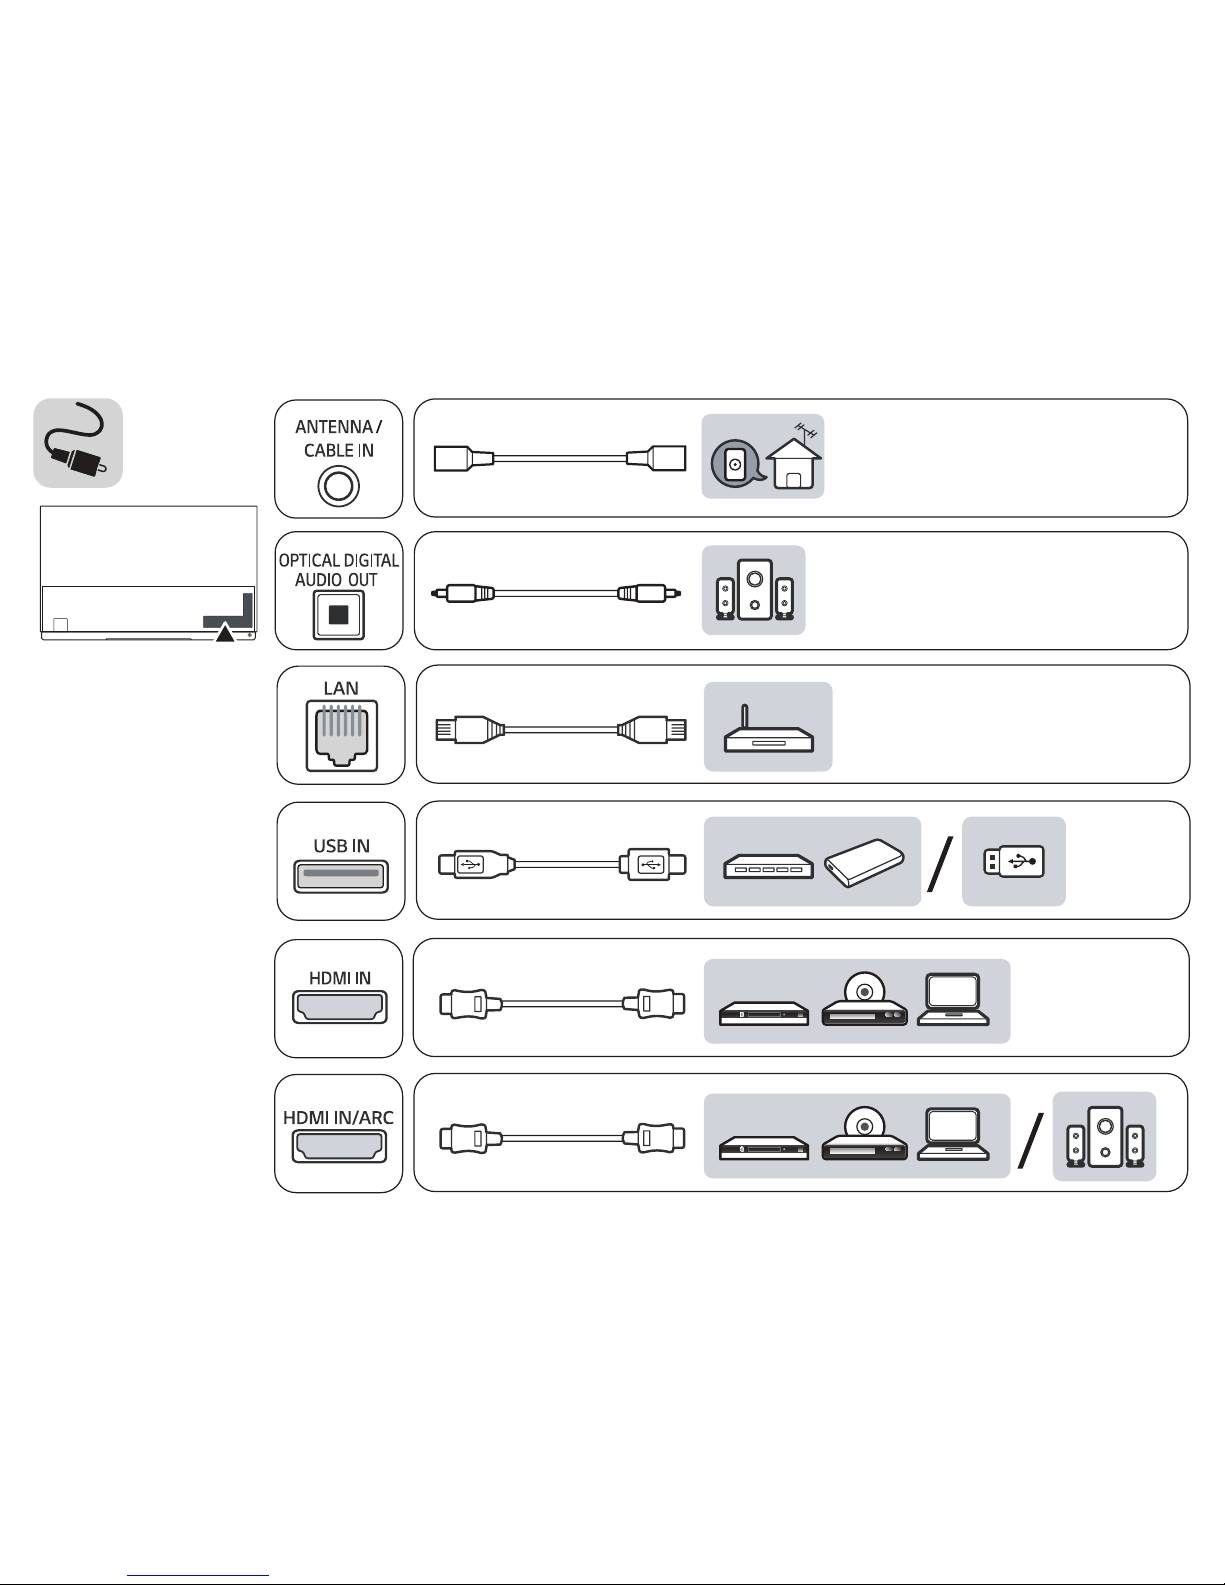
Page 41
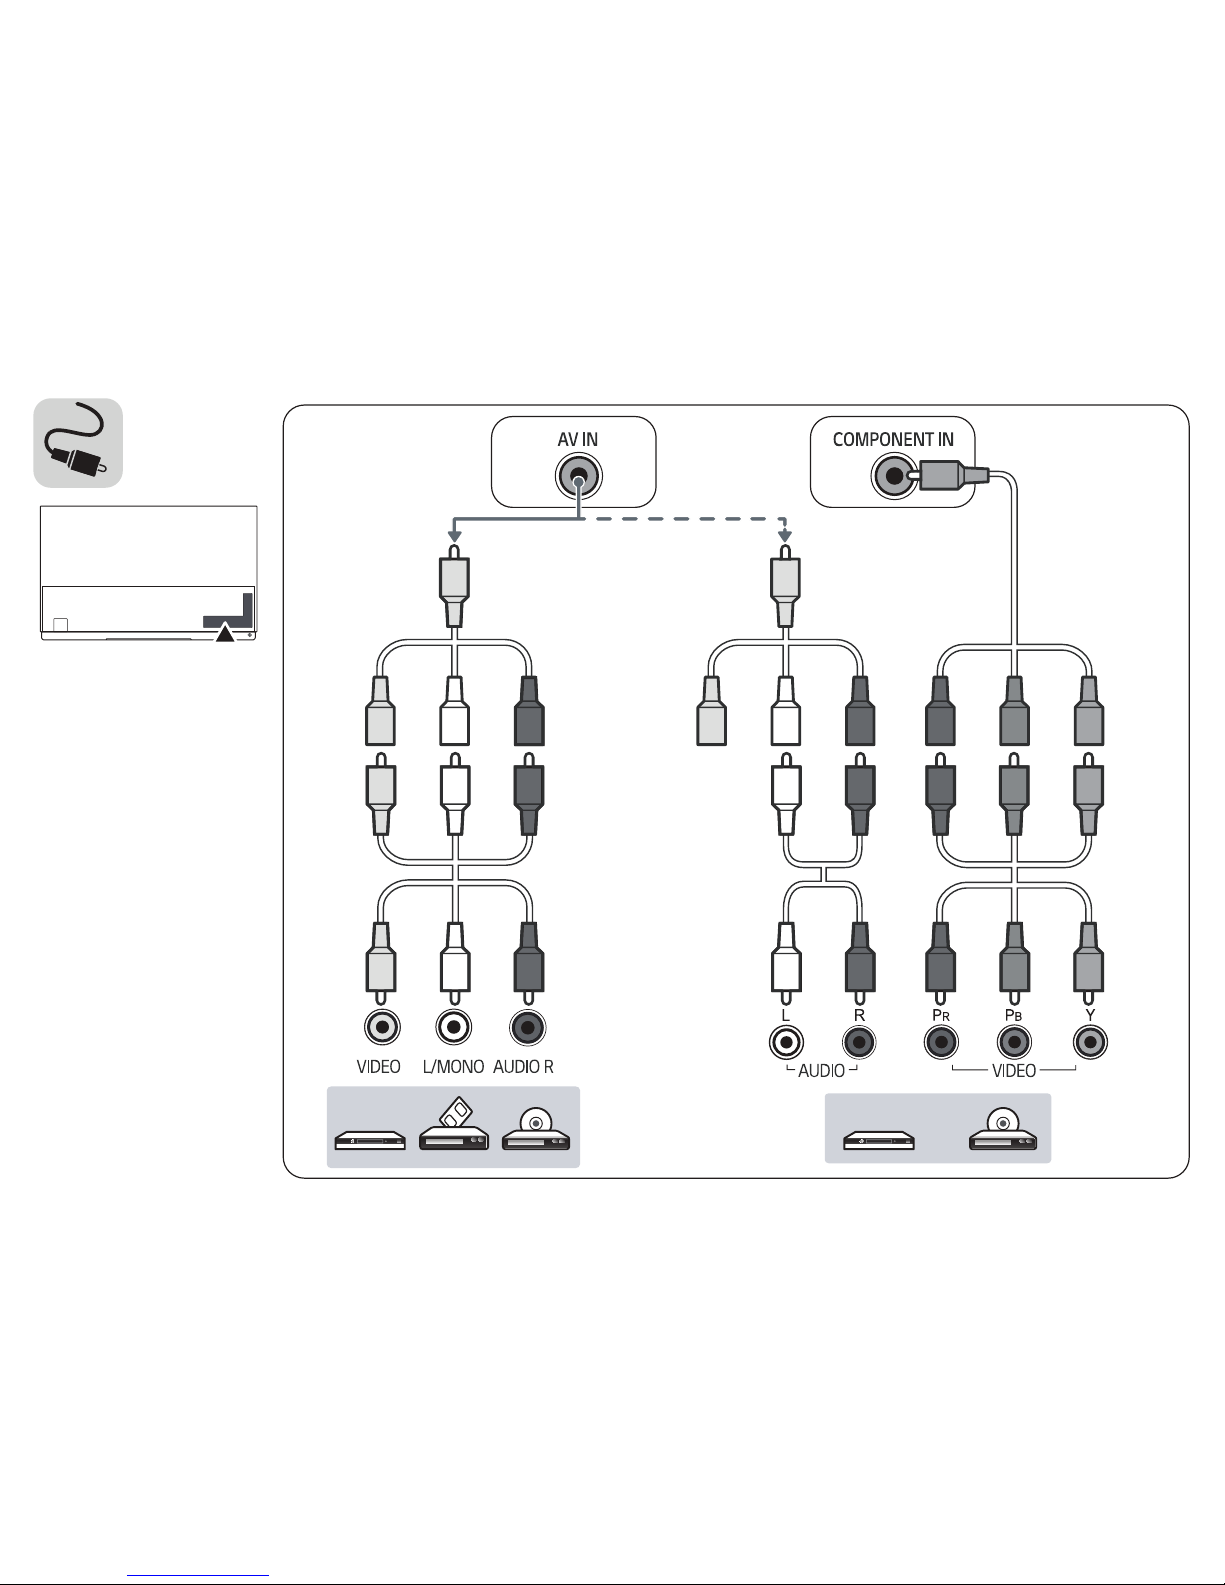
Page 42
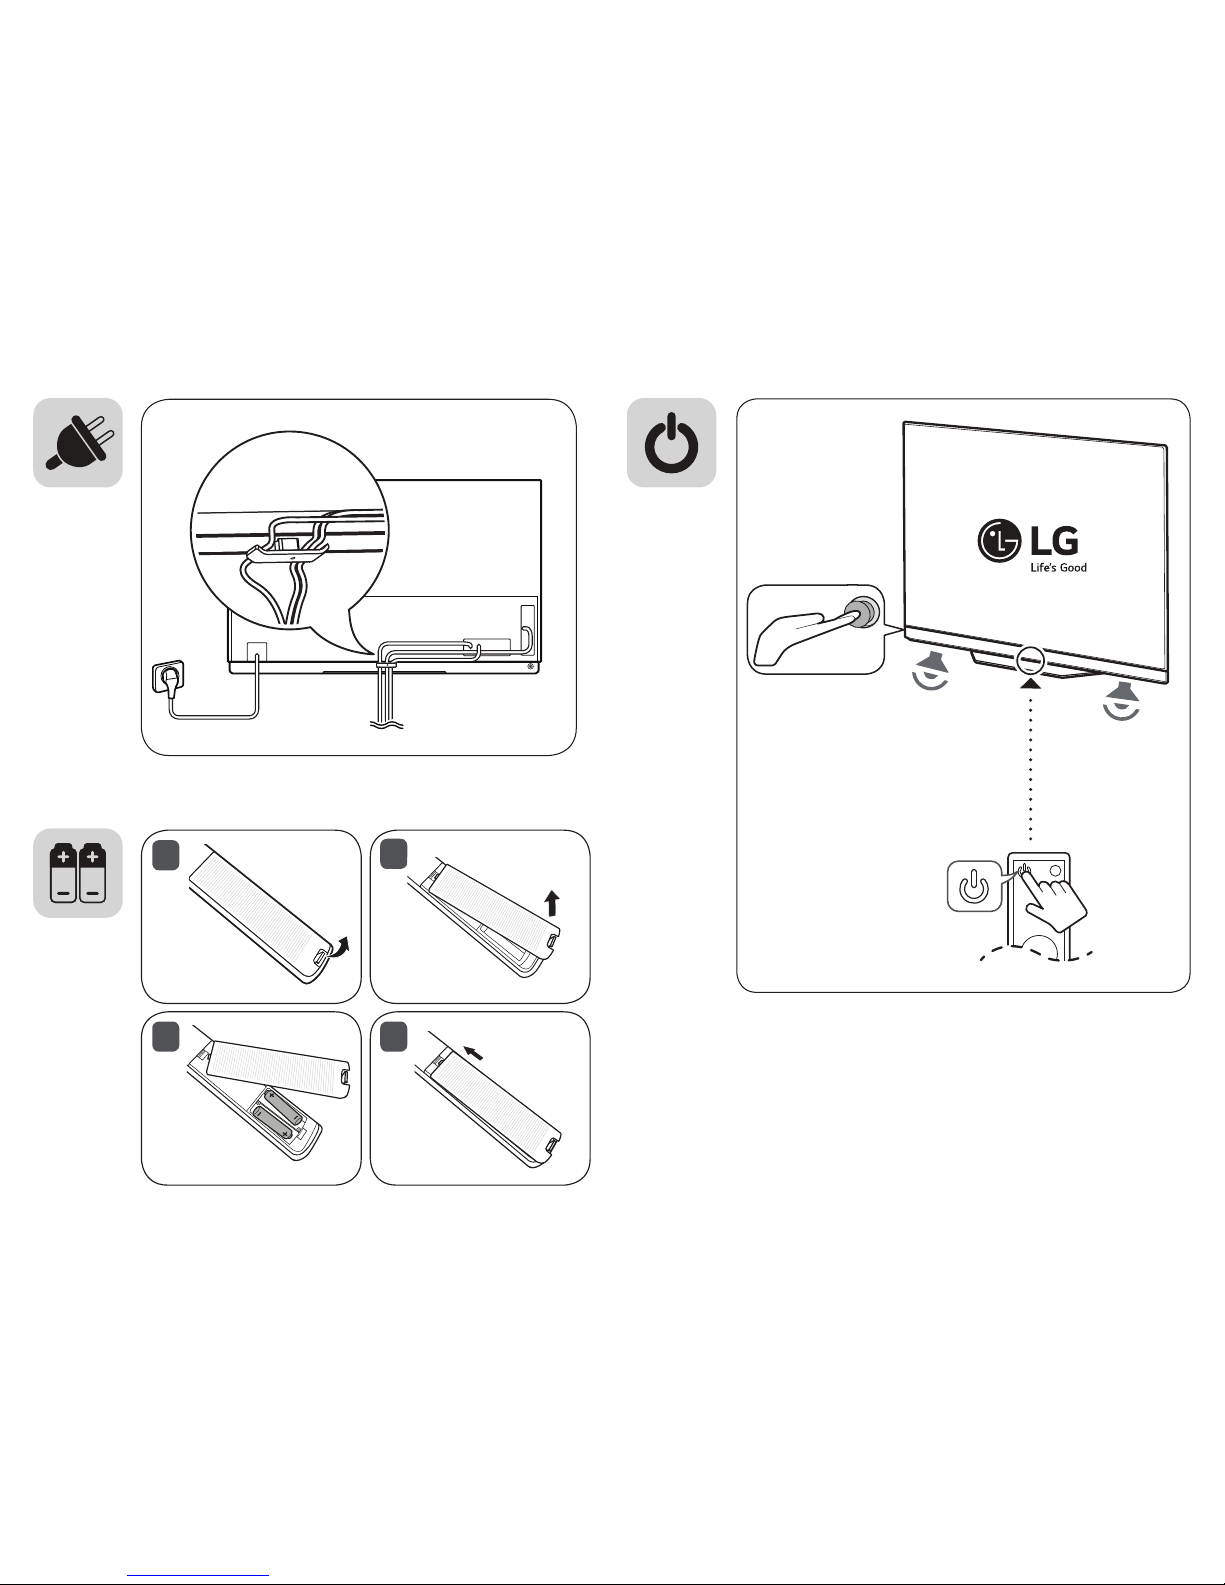
1
2
43
Page 43
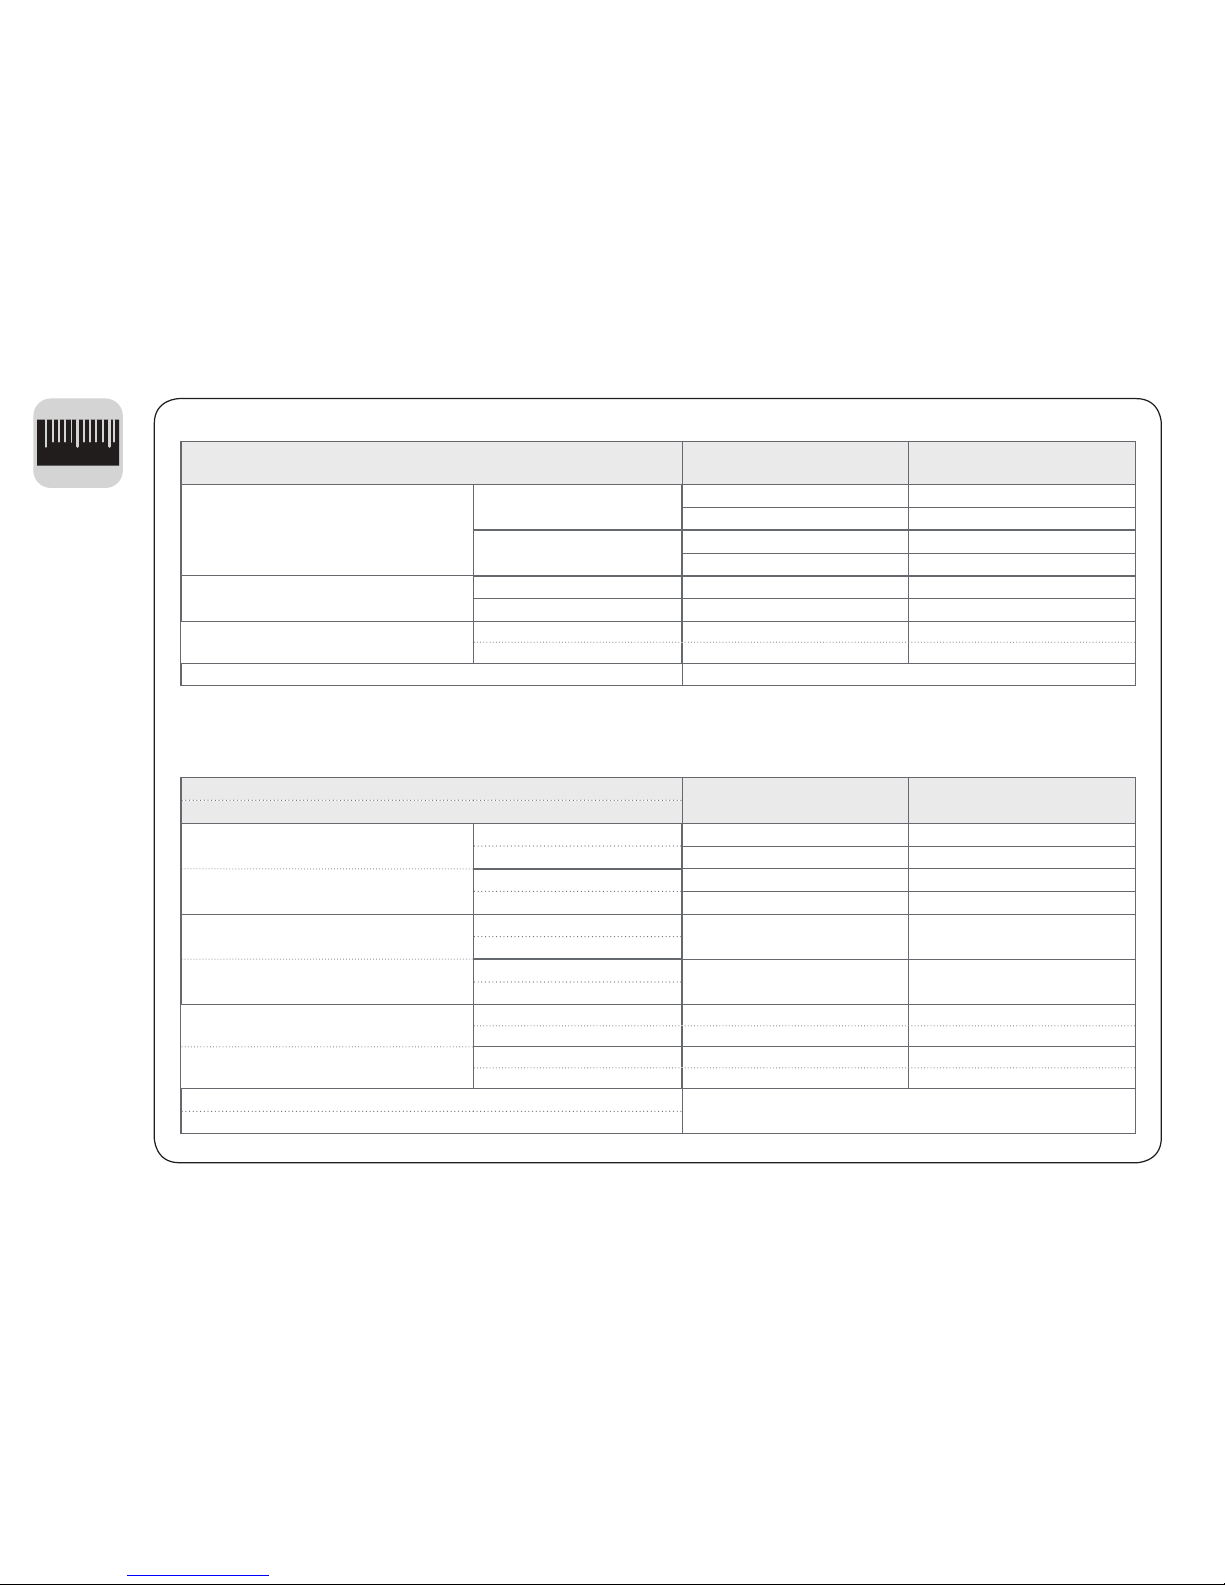
1
2
0
ENGLISH
MODELS
OLED55E6P
(OLED55E6P-U)
OLED65E6P
(OLED65E6P-U)
Dimensions
(W x H x D)
With stand
1,237 x 767 x 175 (mm) 1,461 x 893 x 200 (mm)
48.7 x 30.1 x 6.8 (inches) 57.5 x 35.1 x 7.8 (inches)
Without stand
1,237 x 767 x 56.7 (mm) 1,461 x 893 x 56.7 (mm)
48.7 x 30.1 x 2.2 (inches) 57.5 x 35.1 x 2.2 (inches)
Weight
With stand 18.5 kg (40.7 lbs) 24.8 kg (54.6 lbs)
Without stand 17.1 kg (37.6 lbs) 22.8 kg (50.2 lbs)
Current value / Power consumption
For USA and Canada
2.3 A / 230 W 3.1 A / 310 W
For Mexico 3.3 A / 330 W 4.3 A / 430 W
Power requirement AC 120 V ~ 50 / 60 Hz
MODELOS
OLED55E6P
(OLED55E6P-U)
OLED65E6P
(OLED65E6P-U)
MODÈLES
Dimensiones
(Ancho x altura x profundidad)
Con base 1 237 x 767 x 175 (mm) 1 461 x 893 x 200 (mm)
Avec support 48,7 x 30,1 x 6,8 (pulgadas / po) 57,5 x 35,1 x 7,8 (pulgadas / po)
Dimensions
(L x H x P)
Sin base 1 237 x 767 x 56,7 (mm) 1 461 x 893 x 56,7 (mm)
Sans support 48,7 x 30,1 x 2,2 (pulgadas / po) 57,5 x 35,1 x 2,2 (pulgadas / po)
Peso
Con base
18,5 kg (40,7 libras / lb) 24,8 kg (54,6 libras / lb)
Avec support
Poids
Sin base
17,1 kg (37,6 libras / lb) 22,8 kg (50,2 libras / lb)
Sans support
Corriente de consumo / Consumo de potencia
Para Estados Unidos y Canadá 2,3 A / 230 W 3,1 A / 310 W
Para México 3,3 A / 330 W 4,3 A / 430 W
Valeur courante / Consommation électrique
Pour les États-Unis et le Canada 2,3 A / 230 W 3,1 A / 310 W
Pour le Mexique 3,3 A / 330 W 4,3 A / 430 W
Alimentación requerida
AC 120 V ~ 50 / 60 Hz
Alimentation
ESPAÑOL
FRANÇAIS
Page 44

*MFL69383608*
Page 45
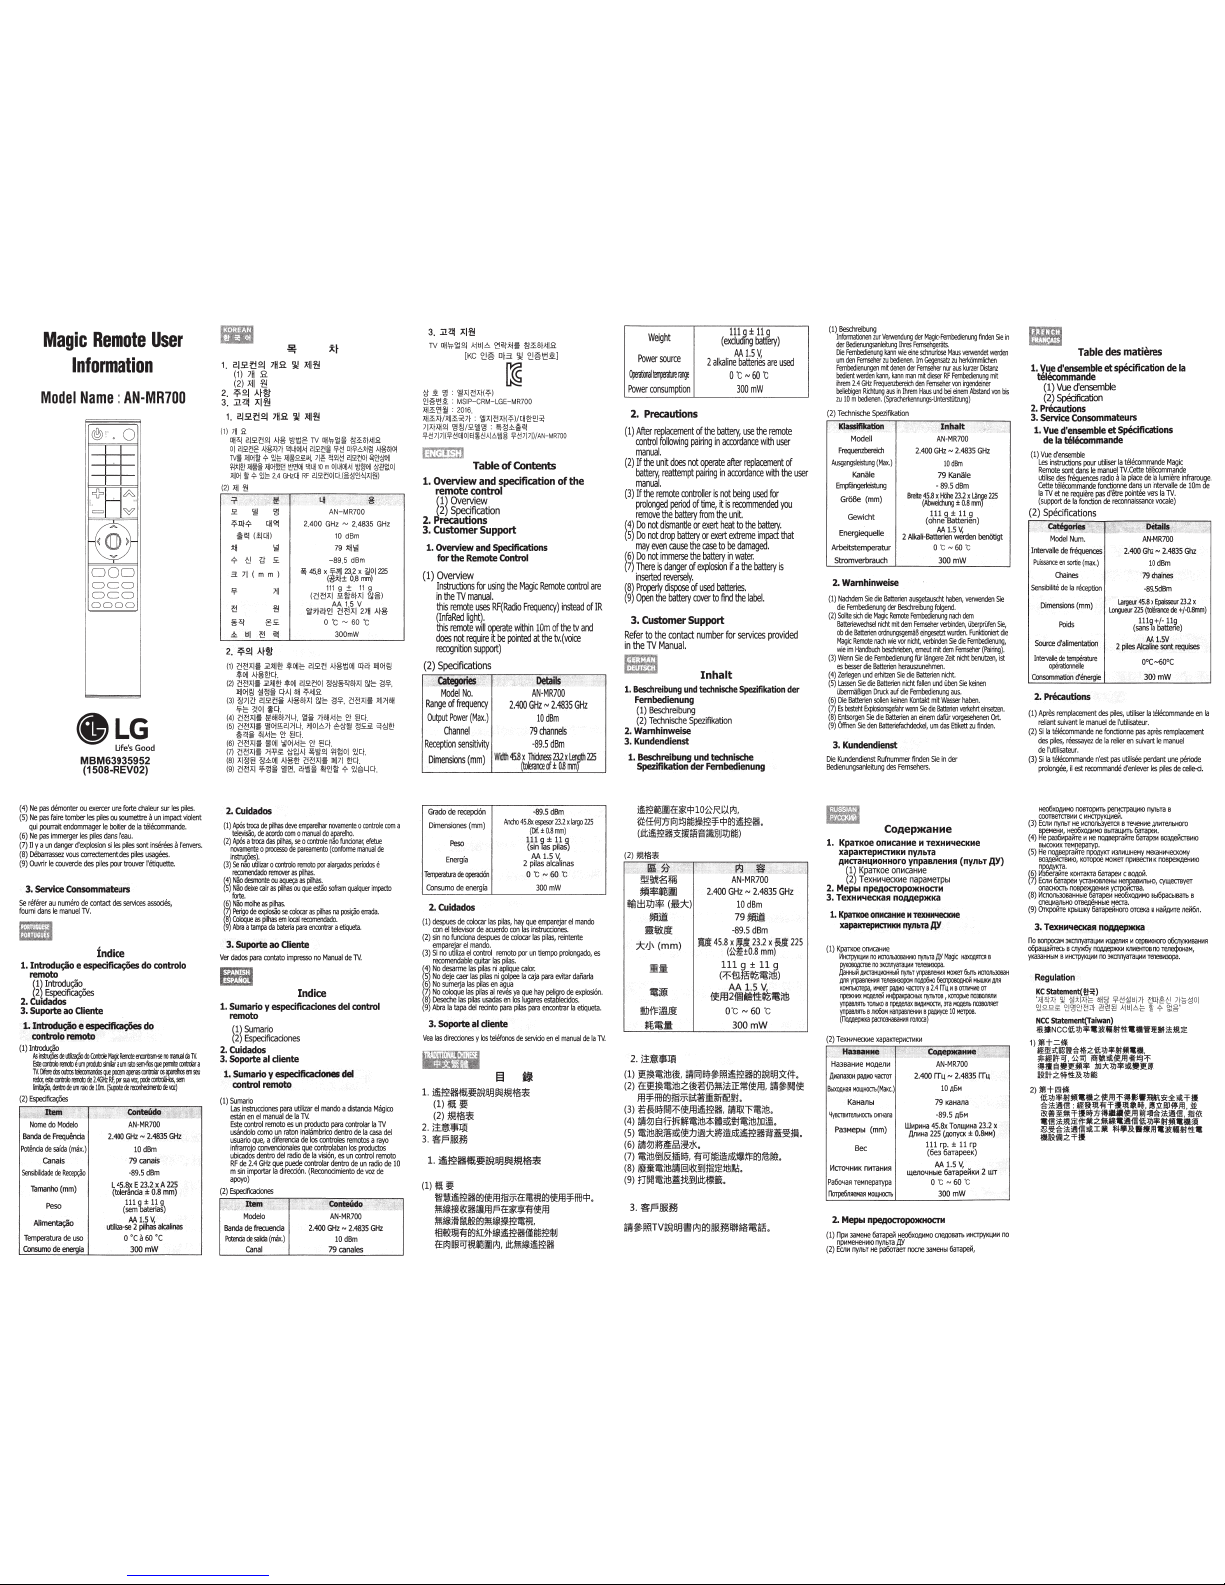
Magic
Remote
User
Information
Model
Name : AN·MR700
@)
' . 0
1-
- -
1-
~
-
1-
- -
~
~
A
~
=
'0'
@
DOD
C) C) C)
C) C) C)
0000
.LG
life's Good
MBM63935952
(1508-REV02)
(4)
Ne
pas
demonter
ou
exercer
une
forte
chaleur
sur
les
piles.
(S)
Ne
pas
faire
tomber
les
~les"'
soumettre a un
impact
violent
qui
pourrait
endommager
le
boitier
de
Ia
telecommande.
(6)
Ne
pas
immerger
les
~les
dans
l'eau.
(7)
D y a
un
danger
d'e>qjosion
si
les
~les
soot
inserees a renvers.
(8)
Debarrassez
vous
oorrectement
des
~les
usag<es
.
(9)
Ouvrir
le
couvercle
des
piles
pour
lrouver
!'etiquette.
3.
Service
Consommateurs
Se
rererer
au
numero
de
contact
des
services
associes,
foomi
dans
le
manuel
TV.
in
dice
1.
Introd~o
e especifica¢es do controlo
remoto
(!UntroduQio
(2
Especificaif>e$
2.cu
ados
3.
Suporte
ao
Cliente
1.I~e~do
controlo remoto
(l)lntroci.JIOo
~':~"t=~==~~J:.
l'lllleeilis-l!l!mimllsiii'I'Xian"""'Cl!tOo~~en"'
rm,.;._....,de2.4QizRF,"'"""';ro,~,.,
ilil>,iiJ,II<rtrodeumraildelOII\(S<!x>1ede""'"'""""de"')
(2)Espedlica<;Oes
CJm!illl
:lt!!!"
c,onteUdo;
"'
Nome
do
Modelo
AN·MR700
Banda
de
Frequeooa
2.400
GHz-
2.'183S
GHz
Potinda
de
saida
(max.)
IOdBm
canais
79
canais
SensioiNJadedeRe<eP<;iio
-89.5
d8m
Tamanho
(mm)
L
4S.Sx E 23.2
X A
225
(tolerinda ±
0.8
nvn)
Peso
(~~~~JJ
Alimenta<;Oo
utiliza~"1
~~
alcalinas
Tempetatura
de
uso
0'060'C
Coosuno
de
energ~
300mW
GDlJ
lii3W
~
xt
1.
2.l!U:!21
7Hli
~
Xilf,!
(I)
7H
li
(2)
Xil
l'-1
2.
?21
At~
3.
11~
Xlf,!
1.
2.1.2.'C!21
7Hli
~
~f:!
(1)7"ll
DH~
2.1£~£1
A~
~~g
Tl/
D
Hir~~ {J~OfAiiR
Ol
2.l2~g
A~Af71
Q!LIIOOA1
2.12~~ ~ OfSf~j:j~
~0101
TV~ :tii
OJ~
.::f
~E
A~2£Ui.
7le
~~~
212f.!OI
~~{lOll
!f.ljf~ ~ XiiO!~t!
I~Jii!!Oj
l
liJIUI
IO
m
OIUIOUJ·
i
~mot
{J~OI
:i:iOJ
!I*
VE
2.4
GHzQI
RF
~I£[!OICf.(~~~~.XIf:!l
(2)
'il
f.!
,.
,.
!;!
.
Lll
*
.2
\!!
'i'l
AN-MR700
~nt~
1:1121
2.400
GHz
""
2.4835
GHz
S"4
1'11:111
10
dBm
.ill
'il
79
;nli!
*
~
~
50
-89.5
dBm
3.
71
( m m I
li!f
45.8
X
!j'~l
23.2
X
~01225
(g~±
0.8nm)
'"
~I
11
1 g ±
11
g
W~AI
!!.~'SfAI
PJ~)
~
f.!
AA
15
V
'1t>f2/'1!
<:!'EJXI
278
Af*
~~
gso
0
'C
~ 60
'C
±
"'
\'!
~
300mW
2. ?21
At~
(1)
<:!i'!'l~
:ii!;m
*-~le
21£<!
Af§~~l
rrt2/
~101;:)
$~1
AI§~C).
(2)
~{1.XI~ 1i!Jil~
'OJI
2.12C!O
I
~{t§A~f.XI
UE
~.!f.
nnOJ~ ~~~
q,q
t8
9-AiiR
(3
)
~t71l!
2.1.2{:!~
At*tifAI
?JE
~..!f.
?jr!
.XI
~
Ail7i811
SfE
~OIWCt.
(4
)
<:!i'!'l
~
!i''i!WIL!.
\!!~
7i'"Aie
'1!
ECJ.
(5
)
~r!
.XIS ~OJE£2.1714.
~IO
I~7f
~'2ti!
~££
~~~
~~i
{:IAiE:
~
~CI.
16
1
111'!'1·
i~l
'i!OIAie
'1!
l'!CJ
.
{7)
~~AI§
7-l¥~
~~AI
~~.Qj
~~01
Vet.
(8)
'l~l'!
og±~l AI*~
111'!'1~
~171
~CJ.
{9)
~r!AI
!f~~
~~.
i!t~~
i/<2JW * 'U§Licf.
2.
CUidados
(I)
ApOs
troca
de
pihas
deve
empa<Ohar
novamente o mntrole
com
a
televisao,
de
acordo
oom o manual
do
aparel
ho.
(2)
Ap<is
a
troca
das
~lhas,
se o controo
roo funclooar,
efelue
oovamente
o
iJOC<$O
de
pareamento
(confoone
manual
de
(3!=iizarooontroloremotoporalargadosperi00osi
rec.omEJldado
remover
as
pi
lhas.
(4)
Nao-ou
aq""9'
as
~lhas
.
(S)
NOo
deb<e
car
as
~lhas
0\J
que-
solram
qua~uer
i,..,acto
forte.
!
6!Naomolheas~lhas
.
7
Perigodeexplos3o
se
oolocaras
pilhas
na ~ errada.
8
COOque
as
~lhas
em
klcal
reaJif<ndado.
9
Alxaatampadabateriapamencontraraetiqueta.
3.
Suporte
ao
Cliente
Vel
dados
para
contato
impresso
no
Manual
de
Tv.
Indice
1.
Sumario y especificaciones
del
control
remoto
(1)
Sumario
(2)
Espedftcaeiones
2.CUidados
3.
Soporte
al
diente
1.
Sumario
y especificacbw
del
control remoto
(1)
SUmano
Las
instrucdones
para
utilizar
el
mando a dist:anda
Mag
ico
estan
en
el
manual
de
Ia
lV.
Este
rontrol
remoto
es
un
producto
para
controlar
la
lV
ustlndolo
como
un
raton
inalambrioo
denbo
de
Ia
casa
del
usualio
que, a diferenda
de
los
conboles
remotos
a
reyo
infrarrojo
convendonales
que
controlaban
los
productos
ubicaOOs
denbo
del
radio
de
Ia
VisiOn,
es
un
conbol
remoto
RF
de
2.4
GHz
que
puede
controlar
dentro
de
un
radio
de
10
m
sin
importar
Ia direcd6n. (Reconocimiento
de
voz
de
apoyo)
(2)
Especificaciones
.n-
Modelo
Banda
de
freaJencia
llbniadesalda(milx
.)
canal
I J•
<U ··•
ConteUdo
' 'i:
<:'
AN·MR700
2.400
GHz-
2.483S
GHz
IOdBm
79
canales
3.
11~
Jtlf:!
TV
D
Hir~9.l
Aittl~ <[!~X~-
{l2titAil~
[KC
'0!%
0(3.
:lJ
'1!%~:£]
~
~ ~ ~ : ~AI{:!At(9
)
~%~~
:
MSIP-CRM-LGE-MR700
>1±\'!
lil:
201
6.
Atj~~tf;l:jj2;pf
:
~~lr!Af(?)/Ql~~~
7l~tAH2l
https://manualmachine.com/£'!!~ : ~~±~~
¥~
7171(¥~CliOIE\!~AI~~~
¥~71
71)/AN-MR700
Table
of
Contents
1.
OVerview
and specification of
the
remote
control
J
ll
Overview
2
Specification
2.
recautions
3. Customer Support
1.
Overview
and Specifications
for
the
Remote
Control
(
1)
Ovetview
Instructions
for
using
the
Magic
Remote
0011trol
are
in
the
1V
manual.
this
remote
uses
RF(Radio
Frequency)
instead
of
JR
(InfaRed
light).
this
remote
will
operate
within
!Om
of
the
tv
and
does
not
require t be
pointed
at
the
tv
.(
voice
recognition
support)
(2)
Specifications
,.
catagories
Details
Model
No.
AN·MR700
Range
of
frequency
2.400
GHz N 2.4835
GHz
Output
Power
(Max.)
10
dBm
Olannel
79
channels
Reception
sensitivity
·89.5
dBm
Dimensions(mm)
Wdlh45.8x
Thid'Jiess23.2xl.a!#l225
(trli!alll!of±
Mlllllf
Grado
de
n!Cepci/Jn
Dimensiones
(mm)
Peso
Energia
Tempesatu~deopEJOCilin
Consumo
de
energia
2.Cuidados
·89.5
d8m
Ardlo45.8<espesor23.2xi<r9J225
(Dif.±O~mm)
~~~?:~~~
2
t~/;,f~;nas
O
'C-60'C
300mW
(1)
despues
de
colocar
las
pilas,
hay
que
emparejar
el
mando
con
el
televisor
de
acuerdo
con
las
instrucdones.
(2)
sin
no
funciona
despues
de
colocar
las
pilas,
reintente
emparejar
el
mando.
(3)
5i
no
utiliza
el
(X)!llrol
remoto
por
un
tiempo
prolongado,
es
reoomendable
quitar
las
pilas.
5
No
deje
caer
las
P.ilas
ni
golpee
Ia
caja
para
evitar
dariarla
6
No
sume~a
las
p!las
en
agua
1
41
No
desamne
~s
~las
ni
apl~ue
ca
loc:
~
~~!~~~~~:::~~~
~a~~~~::plosoo
.
9
Abr.l ~ tapa
d~
re:into
para
pilas
para
enoontrar
Ia
eliqueta.
3. Soporte
al
diente
Vea
las
direcdones
y
k:ls
telefonos
de
servido
en
el
manua
l
de
Ia TV.
1§1
•
1.
iil3!Hili'~8Jl~!il!!§:<l<
(1)
Ill'
(2)
Jill!§;&
2.
il~~!Jl!
3.\§F'DI>fjl
1.
iil£Hl!lli'~8Jl~n!!§:<l<
(1)
!Ill'
~~~!2H~~mm~a~m~~m~oo~.
l!ll!®!illli:HilfflJSff~~1l~ffl
l!ll!®ittM~~~~~~!®tf!2!l!:m,
lll~lli1l~mr!®~I2Hilfl'8!2lliJ
ff~DBOJm*BI~
,
iltl!ll!®iil3!H
Weight
Power
source
(\atmjl!lqlmre
~
Power consumption
Ill g ±11
g
(exduding
battety)
AA1.5V,
2
alkaline
batteries
are
used
OtN60 t
300mW
2. Precautions
(I)
After
replacement
of
the
battety,
use
the
remote
control
following
pairing
in
accordance
with
user
manual.
(2)
If
the
unt
does
not
operc~te
after
replacement
of
battety,
reattempt
pairing
in
accordance
with
the
user
manual.
(3)
If
the
remote
controller
is
not
being
used
for
prolonged
period
of
time, t is
recommended
you
remove
the
battety
from
the
un~.
(
4)
Do
not
dismantle
or
exelt
heat
to
the
battery.
(5)
Do
not
drop
battery
or
exelt
extreme
impact
that
may
even
cause
the
case
to
be
damaged.
(6)
Do
not
immerse
the
battety
in
water.
(7)
There ~ danger
of
explosion
if
a
the
battery
~
inserted
rM'Sely.
(8)
Properly
dispose
of
used
batteries.
(9)
Open
the
battery
rover
to
find
the
labei
.
3.CusbHnerSupport
Refer
to
the
contact
number
for
services
provided
in
the
1V
Manual.
In
halt
1.
Beschreibung
und
technische
Spezifikation
der
Fembedienung
(
1)
Besch
rei
bung
(2)
Technische
Spezifikation
2.
Wamhinweise
3.
Kundendienst
1.
Beschreibung
und
technische
Spezifikation der
Fembedienung
iil3!*BIIIff~~l0i}R~;(~.
ltE1fjli]JJioJ~fl'8~13!~~~~13!H.
(ilt~l3!H~Il~liiiiEUI!Jfl'8l
.
.• IA:B
ll'Hmi!':ifill
lli!i~~~~~
Mt±lJ;iJ~(Ai;i;:J
lli!ili
§fjJ(J~
;I;:Jj,(mm)
2.iUJJJfi
Pl
.
~
-
>J:
AN·MR700
2.400
GHz N 2.4835
GHz
lOdBm
79&
·89.SdBm
JI:I4S.8 X J!JI23.2
Xu
225
(i};!:l±0.8
mm)
111 9 ± 11 g
(:f'@.l5~~itll)
AA
1.5
V,
{Y!Jll20011Q11~11itll
O
'C N 60
'C
300mW
(1)
ll!~~it!lilt, ~ll'J~~!ffii!l3!HB3~8Jl:il:f4.
(21
ffll!~!l!:it!lZilt:SfJJI!IIii'i:IE:ljl~ffl.
~~11!1t
m~ootBFs~lil:fi1UrllG11t.
(3)
:S!ii:~llll'F~ffliil3!H,
l;l!lll'ifiit!l
.
< 4 J
~m
eH:r!JlM~~!iit!l;;t;:llrui!M
t~
it!lllDi!i\.
(5)
!iit!l~llru\~t.J~;i;:~~Ji£~13!H~IiS'I:ll!.
(61
~m~~.J1,~7.1<
.
(7)
ifiit!lfflJ&!IIi~.
ij'OJflll~~~~j$BgfB~.
(8)
llllli<~it!l~@lllli:iiJFslEit!!~.
(91
Hllll!l!:it!l&f~iiJilt!ili!E.
3.
§F'D~J;}
~$~~TV~8JJ~r-"'B3Diiil';}l!lll.l&~~.
(I)
Beschreibung
~onen
zur
Verwendung
der
Magk:·Fembedienung
finden
Sie
in
d
erBedlell
Urv;JSanleitung
Ihres.Femsel'gerats.
Die
Fembedienung
kann
wie
e111e
schnurlose
Maus
verwendet
werden
urn
den
Femsmer
zu
bedienen. Im
Gegensatz
zu
herkOmmlichen
Fembedienungen
mit
denen
der
Femseher nur
aus
klmr
Distanz
bedient
werden
kann,
kann
~n
mit
dieser
RF
Fembedienung
mit
ihrem 2.4
GHz
Frequenzbereich
den
Femseher
von
irgendeiner
beliebigen
Richtung
aus
in
Itrem
Haus
und
bei
einem
Abstand
voo
bis
zu !Om bed.,.,. (
Spachet1<ennungs-LOterstijzlJl9)
(2)
Technische
Spezifikation
Modell
Frequenzbereich
Ausgangsiostung(Max
.)
Kan~le
Empliinge!1eiru
Grti6e
(mm)
Gewicht
Energiequelle
Arbeitstemperatur
Stromverbrauch
2.
Wamhinweise
In
halt
AN·MR700
2.400
GHz • 2.483S
GHz
!Od8m
79
Kan~ile
•
89.5
dBm
&eite~~n:i::r
225
(M~.\!~~n)
2
AlkaH·Ba~~rden
benOtigt
01>60
1:
300mW
(I)
Nachdem
5ie
d~
Satterien
ausgetauscht
haben,
vetWenden
Sie
do
Fenbedienung
der
llesd1reibung
folgend.
(2)
Sollesidl
d~
MagK:
Raootf
Fenbedienung
nad1
dem
Batteiewedls0nid1tmitdem
Fem-vertJi
nder,
ube<priifenSie,
ob
do
Balterien
cronungsgemaB
ongesetzt
wuroen. Furttiooert die
Mag
icRel'niXenachWi
evornicht,verb
indenSie
dieFembedien
ung,
wie
im
Handbuch
beschriEben,
emeut
ml
dem
Femseher
(Pairing).
(3)
"Ne-ln
Sie
die
Fembedienung
fiir
langere
Zeit
nicht
benutzen,
ist
es
besser
d
ie
Batterien
herauszunehmen.
(4)
Zerlejen
und
erhlzen
Sie
d~
Batterien
nid1t.
(
S)
Ulssen
So
die
Batterien
nidlt
fallen
und
uben
5ie
keinen
Obenna6igen
Dru:k
auf
die
Fembedienung
aus.
(6)
Do
Batterien
S(jlen
keine11
Kontakt
mrtlNf£H!r
haben
.
(?)
Esbest<llt
Explosionsgelai-SiedieBatlenenverkelvteilselzen
.
(8)
[ntsorgen
S
ie
die
Batterien
an
onem
dafijr
vorgesehenen
o.t
(9)
Offnen So
den
Batteriefacllded<el,
um
das
Elikelt
zu
finden
.
3.
Kundendienst
Die
Kundendienst
Rufnurrvner
finden
Sie
in
der
Bedienungsanleitu
ng
des
Femsehers.
CoAeplKaHHe
1.
KpaTKoe
onHcaHHe"
TeXHH~eCKHe
xapaKTepHctHKH
nynbTa
AHctaH~HOHHoro
ynpaaneHHR
(nynbT
AY)
(!l
KpaTKoe
onHcaHHe
(2
T
exHHYecKHe
napaMerpbl
2.
Mepbt
npe~~ocropolKHOCTH
3.
TexHH~ecKaR
noMepHCKa
1.
KpaTKoe
011MCa-"
n!XHH'II!CICMe
xap;IKTepMCTHIOI
nvnbTa
AY
(
1)
KpaTKoe
on~caH~e
~
HCTJlVKUMHOOM01011b30BaHHIOnynb
TaA'f
Magic
HaXOlUI'T'OIB
pyt«l££IllC1ll
no
3Kmnyatal.IHM
Wle&lXJila
.
AaHHblliAOC1(IHL!HCJIHbliinyllbT~MO:terlibrTbHOII'JnbJOBaH
,!VIllyrlpaBJieliiUIT~Il:)Ao61(16ecnp:)llOtl!QiHbiiUIG1,li/1Sl
KOMI1biO'fel)a,I1MeeTpaJI00'0001Y82.4ITU1180Tillf-lHeOT
npem«~
l1~biXf1VIlb
TOB,KOropbl
ermooJIIUII1
ynpalliUITbTonbKOBnpe.!lenaxB~W-t~,:mHO.Wl
bi10380IISieT
'f!lpalliUITbBil!Cfu.!Hanpaanett1111Bpa.aHyCe
1
0Me'f!XS.
(rioMep""
paaxn'""""
ronoca)
(2)
TexHl.14ect<l1e
xapaKTepMCll1KM
·H....,!!!!"
~.
Ha3BaHHe
MO.QenH
JlHana30Hpa.!IM04acTOT
Bblxo,QH
a.IIHOli!HOCTb
{MaKC.}
KaHanbl
l.lyBCTBKTeTibHOCTbGirHalla
Pa3Hep~
(mm)
Bee
~CTO"lH.-tK
mtTaHIIIA
Pa604aSl
TeMnepaTYpa
lloTpe6AAeHa•
"""""
~~"Me;;~
:i
l:
AN·MR700
2.400
rru-
2.4835
rru
10A5M
79
KaHana
-89.5
.Q6M
WHpHHa
45.8x
TOII~Ha
23.2
X
AnHHa
22S
(IIOnYCK ± O.S..•)
111
rp.
±
11
rp
(6e>
6arapee<)
AA
J.SV,
UleJl~Hble
fialapeMKH 2 WT
O
'C·60'C
300mW
2.
Mepw
npeaocropolKHOCTH
(1)
Opl-1JaMeHe
6arape~
Heo6XOllHMO
Cf'leA08CITb
!.1HcrpyKUHH
no
nJ)HMeHeHl-110
nyllbTa
{f/
(2)
EcnH
nynbT
He
paf5cn'aer
nocne
3aHeHbl6aTapai,
Table
des
matieres
l.J~=~ble
et
specification
de
Ia
(1)
Vue
d'ensemble
(2)
Sp€cification
2.
Precautions
3.
Service
Consommateurs
1.
Vue
d'ensemble
et Specifications
de
Ia
telecommande
(
I)
Vue
d'ensem~e
Les
instructions
pour
utiiser
Ia
teteoommande
Magic
Remote
sont
dans
1e
manuellV.cette
telecommande
=:=n:rora:o~~~:~~
:~t~f:d~~~
~
lV
et
ne
requ~re
pas
d'
etre
pointie
vers
Ia lV.
(support
de~
fonction
de
reconnaissance
vocao)
(2)
Specifications
Interval~
de
frequences
Puissanceenscrtie{max.)
Chaines
Sensibilite
de
la
rtkeption
Oimensioos
(mm)
Poids
Source
d'~imenlatioo
lnteM::rature
Consonwnation
~inergie
2.
Precautions
2.400
Ghz -2.483S
Ghz
10d8m
79chaines
-89.5dBm
largar
45,8 X Epaisseur
23.2
X
longueur
225
(toli<anre
de
+/.O.Smm)
(~~;~·t!.;Ji~)
AAI.SV
2
pilesAkalnesootrequses
O"C-60"C
300mW
(1)
Apres
remplacement
des
piles,
utiliser
Ia
teiEkommai'Kle
en
Ia
reliant
suivant
le
manuel
de
l'
utilisateur.
(2)
Si Ia
teiEkommande
ne
fonctionne
pas
al)f6
remplacement
des
piles,
rfessayez
de
Ia
relier
en
suivant
le
manuel
del'utilisateur.
(3)
Si Ia
ti~mande
n'est
pas
utilisee
pendant
une
piriode
proongie,
il
est
recommancli
~en
lever
les
~les
de
celle-d.
Heo6XQilHMO
OOBTqJHTb
pe~l.#-110
nynbTa
B
COOTBeTO'BI1!.1
C
!.1HCfPYKl,ll1eH.
(3)
ECJ11-1
nyllbT
He
HCflOilblyeTOI B Teo-.eHHe
AflHTellbHOI'O
(4)~~H~=X~M===BQl!le~HIO
BbiCOKMX
TeMnepaT)'p.
(5)
He
no.geepraifre
npo.QYKT
H3111-tWHeMY
MexaHH"'ecKOHy
B03,ll~IO,
kOTOj)Cie
MO)I(eT
npHBeC'TH K nOBj)e)I(JleHHIO
(6)
~e
KOHTaKTa
6arapeH
c
BOAQH.
(7)
Ec.nl-1
6aTapeH
ycrati06JleHbl
HeQpaBHilbHO,
C)'UlE!CTByeT
(8)~=~=~~.:meb16pacbleaTbe
cnettHallbHO
OTBe.AeHHble
Mecra.
(9)
OrKpoilTe
lqlbiWKY
6arape1Horo
"'"""
'
Haiiolrre
ner.6n.
3.
Texttii'I«Kall
nGMePJ10G1
flo
BOOpOCOM
3KmnyaTaUHH
113AE!fllotR
H
tepBMCHOI'O
ol5eJiy>KHsaHHSl
o6pama~
B
rJfo{'lll.fy.f
nQA!teP)ICKH
KflHeHTOB
no
Te/le¢loHaM
,
}'I<CI3aHHbiM
B
HlfCTPYKI.tHl-1
no
*0111YaTai.IHH
reneBM30pa.
Regulation
KC
Statement(!!~)
'Jli
-QJ:
f
9.1
~
XIAfE 15
H~ ~{:j~tliJf
~nf~t!
Jt~{:JOI
?i2.Q£
?J~?Jt!ilt ~£:1~
Ai
tti!::
E
~ 4-ill~'
NCC
Statement(Talwan)
jj!itNCCitt!bll't~lltti't•ll'lflllli!l!!lE
Page 46
1.
'J'e:t/O)I!J!ci±l*
IIIII!Jli
<'l·'?'J~o~11Jitl;:lii!ll.
'f~t'11Jl!ll&!ltiiiii:!CII~n'CL'Jt,
<'l·,?·J~o~l1.
?1'1'v><?;<11JJ:;I:~mL
<'T~t'f~f;'CHt.
I!MMilf'J~OO'CI1,
'T~t'11J!!!it!II1:
0
J~o
O!'!Oilt'C!if;to
oJJ!I~IJfLio!l,
?'l
·,?
•J~oOI1,
24GJOmllftllft~lilLio!lt
lllliltKH.
'
J'Eo~l1l!Oi~fl!l:toc<t;<.ltf;toc<;
1
'CHt.
l10mJ;l~l1lU'CIIf;toc
<;10Jif<t.
!i"~li!IIIWI#-fL
<L'H.l
(2) ti: Iii
AN·MR700
2.400
GHz
N
2.4835
GHz
10
dBm
797-~J;jt.J(..
·89.5
dBm
T.Y/::f.JV
lll:iU!Jl
~;!;
(mm)
•4s
.?±
o~~;a)fjf2
5
ill
I
tll
IIJfFiol\illfillll
;"Jtt:t.J
(ll~~
~til3:<)
AA
L5V
,
7
Jt-:h'Jti!l211il@lll
01>60
't
300mW
LG8ectronicsEu~nSilaredSetviceCenter8.V.
Trro~~~~a~
11
1
=~=~~c~J:v~~~om~Fiuozrooe:
~~~~vonie~h~op.i~=sr.emajeurlenY~
LGEiedrmicsE~nSha_~edServiceCenterB.V.
~8Totf
~~~~~
~:J9SIT\all
1
sau
JXI<ltefisolicitata
pesite-ulnostru
DoC:
http:flwww.r,mm)globaVSOJ"""'cedo</cedoc#
Acestdispqzitivesteunsistemdetransmisiede
~~~'~~d~f:~=~trUE~
i
EFTA.
[~~~EuropeanSharedServiceCente
rB
.V.AeWpltpaCHaCTOlllliQTO,
'II!
rosa
A~CTaH~OHHO
Magic
e s
CbOllleTCTBHe
CbC
Cbtllf(TBeH~Te
M31o1001aH11~
H
AP'flll
CbOTBeTHI!
pa3nopeA6i1
Ha
AH~~sa
1999/5/EO.
llbnHara
AelcrlapaUH113CIC"bQTBeTCTBHeMO)(e.Qa6WJ.eno~O<aHanoc~cne.n~t~R
OOI.IIetO:Ma,apec:
~rEiedrm:J~~nmSh~~sm~CenterB.V.
ll~Nnstelveen,XonaH,AIISl
IV1HMOlll:e,lla6bAf11011otaHaOTHaWHHCf1€411a1\~3Hpi!Hye6003il
Do(
~=lg~v:e~cedoc/cedoc#
=c:~~~~~~H~~g:o~c:as~~n:laBaHe,
,nl.pl<aBM-'lnet!KHHaECHEACT.
LGEiectrooicsEuropeanSha_redServiceCenterB.V.
wsro~
~~~~~~https://manualmachine.com/=a:rJs
Du
kan
{)(~
bestalla
den
~
v~r
sarskilda
DoCwebbplats:
http:/(www.lg.rom/gKlbaVsuPJXIrtlcedoc/cedoc#
~va':a~ri:,saE~~!\W~~
fOr
2,4
GH
zbredfrekvensband
avsett
att
3.
;IJ;:<.1!?-"t-t::;:<.
0*1!\0)~IjiJiEJIC~cit<!<;ftt=:IJ::<.'9<--Ij
;f{-J-1!:/'9-0)il$11$'tO't\!llL
-c<t=!<~
'·
Japan
-
2.4
FH1
i~~~~t~~H~:~~~j;~~ilf~~::i~\;~,;;·~
r.
<:!:!:I,",Ollfl!l.tOli:Uli'!J>
C11JIIIil1lil!l!l/U!!IIll!1'1t.
l!t'fv~~"Olill·!l'i'·!Oiflllllll
Ol'"n'IIIOlllia'H:.-IJ~Il!l!ll'lln•~ijJ!i*IUII!lOlltl<'l!IIUi
ll!~H!'t~lliUil&!JlOjE'
i
'lli1lllll/illl!Ml!LfJL'i111Uil
lW<:??h7it!IU\Il!Ml!'t~l!llf/Oln<ill!l~n"t
l
•H.
1
COllllll~ll!lllnl1il:,
;&<~31JJI*iU/1!111llil<'ll!lf!ii&lJI<jE
1l,'lti~UJ~:lU:1:7?7~
71:tijijtl
<ilm~n
-n
lfJL
';:C~fii:M!
l"Cf~L'
.
2 n-.
Cl1ll/llln•~31JJI*iUJJ!!I1lltlf'lll!lfliii:J;fL
cliWI.il!iR'f
jJJ;O)lJI!In
<
J!1.Lto!I~I:J1.
ill'b•l:~l!l/lllllllUJ!'t~n•l1
11iUOll!ll~!JJJ:Lio.t,
1'IO;!!
.I!*I:C:;JI!Jl
~.
illliil!li!Ollo
&';)(1.)~1-(J:M:tlt,
I {---T1:..-3J(1)S:ilfJCII:?l
l"(;:'t!IU:l
'(1'
C!:P
.
3 tOll!.
C11JIIIillin•~31!1*ilil/lil0li<O',I•ii:flliiii/OML
1
117?
7~71JI~J:1-IL
t"li'Wt,rt.a:Ti$(1)$~fl~~
l
t:IIS'tJ.!:fcff.l'
J3EflLJO);:,!:f.l(iti:~t:.!::~l!,tJ1.0).\I~~A.f.\rc,LIS'.Pttt~L
1
o
LG
Electronics Japan (
4!k)
'hA,~-<!j-;ff-1-1!/'
~;;.02~?;!~
,3,,
;,~~3 ~'
""";~C.
:O;"Jm""~'"'
I
Federal
Communications
COmmission(
FCC)
Statement
This
equipment
has
been
tested
and
found
to
comply
with
the
limits
for
a
Qass
B
digital
device,
pursuant
to
part
15
ol
the
FCC
rules.
These
limits
are
designed
to
provide
reasonable
protection
aga
inst
hannful
interference
in a residential
installatioo
.
This
equipment
generates,
uses
and
can
radiate
radio
frequency
energy
and,
if
not
installed
and
used
in
accordance
with
the
i
nstructions,
may
cause
hannful
interference
to
radio
communications.
However,
there
is
oo
guarantee
that
interfereoce
will
not
occur in a partirular
installation.
U
this
equipment
does
cause
hannful intetference
to
radio
or
television
reception,
which
can
be
detennined
by
hlming
the
equipment
off
and
on,
the
user
is
encouraged
to
try
to
correct
the
interference
by
one
oc more
of
the
followi~
measures:
-
Reorient
or
relocate
the
receiving
antenna.
-Increase
the
separation
between
the
eq~pment
and
""'""'
-~~~:hu:::=~ro.mdMerent
•
Glro.JI
the
deaOJ-
cr
an
experiena<l
radK>{l'l
ll!dlnKian
11>
help.
lW~icsEuropeanSharedServiceCenterB.V.eJti<Ererhervedatdenne
iMJ~~i:Th~~~.n~l~~~furJe~~~~:a~=':~r
fulgendepost>dresse:
LGElectlooicsEuropeanSha.redServiceCenterS.V.
i~a~:=~~~~
~=~001samsvarse~ngenp3vart
http:IJwww.~.<JJ"'igklbaVsupport/cedo</cedoc#
Denneenheteneretoverforingssystemrr.eden~ndbreO::lep32,4GHzoger
bare
beregnet
for
br1Jk
i
land
som
er
medlem
av
EU
og
EFTA.
lGEiecttooicsEuropeanSharedServiceCenterB.V.
~~amn:~~~~=~
el!erviavoresdedikeretwebsted:
http:/fwww.lg.com/globaVsupport/cedoc/cedoclt
Denne
enhed
er
et
2,4
GHz·bredMndstransmlssionssystem,
som
er
beregnet
til
brug i aile
EUmed!emslande
og
EFTA-Iande.
LGEiectronicsEuropeanSharedSerticeCeoterB.V.
~~rrr:~=~m:i
~~=~r.c:Jgjg~~=~~isuustietojen
siwstonbutta:
T~ma
I~
it~
on
2,4
.GHz:n
l
aajakai~ii~~a.jesteltna,
~on
tarkoitettu
kaytettavaksikaiklssaEuroopanuniCK\In~senvaltiOissajaEFTA-ma
i
ssa.
(EESTII
~lGEiearonics.European~SerticeCenterB.V.bmnistabsii[lkohal
kaeso!evahikumistundlikukaugjuhtJmlspu!dlvastaVUSidirektiiVil999/5/EU
£:=~~tzi~:~rz:~
1
e~~~~~iklikuvastavusdeklaratsiooni
lGEiectronic:sEuropeanSharedServiceCenterB.V.
~~~i~=~da~1:an
I
~~iJ~~~~.:t~:av~~~==#veebi!ehelt:
Seade
01}
sageduSI?f2,4 q,H,< tolmN
lairi~
~stussUsteem,
mis
oo
ette
niihtud
kasutarmsekSEUiukmesnikides)aEFTAnikides.
!l~;~~r!=,~~J:~~l""''"·
99
1
rkitas
pastoadresu:
This
device
complies
with
Part
15
of
the
FCC
Rules.
Operation
is
subject
to
the
followi~
two
conditions:
1)
this
device
may
not
cause
harmful interference,
and
l) this
device
must
accept
any
interference
received,
including
interference
that
may
cause
undesired
operation
of
the
device.
You
are
cautioned
that
changes
or
modifications
not
express
ly
approved
by
the
part
responsible
for
compliance
cou
ld
void
the
user's
authority
to
operate
the
equipT~ent
FCC
caution
=w~~c==~~=~~m~~party
operate
this
equipT~ent
and
For
inclool'
use
only,
use
outdoors
or
in
other
IOOdes
not
covered
by this
manual
may
violate
the
FCC
regulation
and
violate
the
userauthoritytousethe
product.
FCC
RF
Radiation
Exposure
Statement
This
equipment
complies
with
FCC
radiation
exposure limits
set
forth
for
an
uncontrolled
envirooment
End
users
must
follow
the
specific
operating
instruct:OOs
for
satisfying
RF
exposure
compliance.
Indusby
Canada
Statement
Th
is
device
complies
with
Industry
Canada's
licence-exempt
RSSs.
Operaoon
is
subject
to
the
follov<ng
two
conditions:
1)
This
device
may
not
cause
interference; and
2)
This
device
must
accept
any
interference,
including
interference
that
may
cause
undesired
operation
of
the
device.
Avis
d1ndustrie
canada
le
presentappareilestconforme
aux
CNR
d1ndustrie
Canada
applicables
aux
appareils
radio
exempts
de
l
icence.
l
'exploitationestautocisee
aux
deux
conditions
suivantes
:
1) t'appareil ne
doit
pas
~oduire
de
brouillage;
2) l'utilisateur
de
l'appareildoit
accepter
tout
tl'ouillageradioelectriq
uesubi,
mfrnesi
le
tl'ouillageest
susceptib
le
d'encompromettre
lefonctionnement.
JC
Radiation
Exposure
Statement
This
equipment
complies
with
IC
radiation
exposure
limits
set
forth
for
an uncontrolled
environment
NOTE:
THE
MANUFACTURER
IS
NOT
RESPONSIBLE
FOR
loiN
RADIO
OR
1V
INTERFERENCE
CAUSED
BY
UNAUTHORIZED
MODIACATIONS
TO
T
HIS
EQUIPMENT.
SIXH
MOOIACATIOIIS
COULD
VOID
THE
USER'S
AUTHORITY
TO
OPERATE
THE
EQUIPMENT.
Avis
d1ndustrie
Canada
su~'exposition
aux
rayonnements
Cetappareilestconformeauxlimitesd'e<pasitionaux
rayonnements
d1ndustrie
canada
pcu
un
enviroonement
oon
cootr61f.
REMARQUE:
,
lE
FAIJ!UCANT N'EST
PAS
1\ESPONSABLE
DES
INTERFERENCES
RADUL<CTRJQUES
I;AUS,
EES
PAR
DES
MODIACATIONS
NON
AUTORISEES
APPORTEES A CET
APPARBL
DE
TEU.ES
MODI
ACA
TIONS
POURRAIENT
ANNULER
~AUTORISATION
LGEiectronicsEuropeanSharedServiceCenterB.V.
itsroMn
~~~(v~~;~n
1
taippatj<jgaliterasti
miisl.jpaskirtojeDoCintemetinejesvelainE!je:
http:/(www.lg.co:n/global(support/cedoc/cedoc#
Sisjrenginysyra2,4GHzdiapazonopen:lavimosistema,skirtanaWotivisose
ESsalySenareseirEFTASa~se.
LG
Electronics
Eu~n
Sha~ed
SeM:e
Center B.V.
~~~n
Z:~~~~~
~~~;
~~=.~.::~==~~~:~tir.1~\1etne:
~~~~~c:mttz~rvatr.rraides
sistema,
kas
paratzeta
betoSanai
visas
LGEiectronicsEuropeanSharedServiceCenterB.V.
~':gr;~standardTeam
Krijgsman 1 Nl-1186
DM
Amstelveen
ali
jo
zahtevajle
na
naSern
s~etnem
mestu,
namenjenem
tzjavi o skladr)lS!i:
hrtp:/I'IMW
.Ig.com
(global/support/cedoc/cedoc#
~r!;~i
~~r~b~
:t.o~=C~~
i
~:hnfu
~
~~~i~~~~~~:~FTA,
[SRPS~I
Kor]1panij~
LG
B~ics
European
Shared
Servb!
C~nter
B.V
.
ovi~
i
zjavljuje
da
Je
Mag1Cni dai
JinSki
~vljaC
usklac!ensa
suSti~k1m
zahtevima
1
~I'IJ
=~~r:sred:jpoSta~j
~~(:5/EZ.
Celu
lzjavu
o
uskladenostJ
moiete
~e:nno~~~or:'ms~j~Seje
Center s.v.
uaffl1AmstelveenTheN~rlands
~~:rt!::.~:~~~~~l:~~~:~~ciji:
0va)uredajpredstavtjaSirokopojasnisistemzaprenoskojiradina2,4GHz,
predviden
za
koriSCenje u svim
zemljama
EU i zemljama
Clanicama
udruZenja
EFTA
(HRVATSIJI
T
LG
Electronics
European
Sha~ed
Sei'Vi:eCenter
B.V
.
~~~nl:~~~~~
~~~~d~
ilijemoi.etepotraiitinanaSemposebnoolwebmjestuzalzjavuosukladnosti
https://manualmachine.com/www.lg.co;n/global/supportjcedOC/cedoc#
ACCORDEE A LUTIUSATEUR
DE
FAIRE
FONCTIONNER
l'APPAREIL
IFT(Mexico)
La
operatiOn
de
este
equipo
esta
sujeta a las
siguientes
dos
condidones:
{1)
es
posible
que
este
equipo o dispositive
no
cause
in
terferencia
perjudidal
y
{2)
este
equipo o dispositivo
debe
aceptar
cualquier
interfe
reoda,
induyendo
Ia
que
pueda
causar
su
operad6n
no
deseada.
CE
Statement
EU
Confolmrry
Notice:
CE
0197
IENGUSHI
~er~
LGEiectronic:s
LGEiectronicsEuropeanSharedServiceCenterB.V.
Krijgsman
I,
1186
OM
Amstelveen
The
Netherlands
or
can
be
req
uested
at
ou
r
dedicated
DoC
website:
http:/fv.ww.lg.com(global/support/cedoc/cedoc#
Thisdeviceisa2.4GHzwidebandtransmissl:lnsystem,intendedforuseinall
EUmerrtlerstatesandEFTAcountries.
(
D<UTSCHI
HienniterkliirtdaslGEiectronicsEIJ'Of:nSharedServiceCenterB.V.,dass
~~~~c~:m~~~~d~~Ri~~i:1~,W~~undanderen
SiekannauchiiberunsereentsprechendeWebsite
angefordertwerden:
http:f(wwN.Ig.com,lglobal/support/cedoc/cedoc#
DiesesGeratistein2(~-Breitbandiibertragllfl9ssystemUndzurVerwendungin
allen
EU-
und
EFTA-llindem
geeignet.
Shared
SeM:eCenter B.V.
declare
de
LG8ectrooicsEuropeanSharedSe-viceCenterB.V.
European
Standard
Team
Krijgsman 1,1186DMAmstelveen,PaysBas
~~~:O~~(ement
en
faire
Ia
demande
sur
notre
site
web
oor,e
a Ia
http:l/www.lg.com/g~oba
l
/support/cedoc/cedoc#
~
·uredajjesustavza5irokopojasniprijenos(2,4GHz),namijerl}enza
u
svim
zemljama
Ctan'=ama
BJ
i
zeml]ama
Clan~~:ama
organizacije
EA
..
[Ti)RK<;EI
LGE~furopeanSha~eciServiceCenterB.V.
i~~n~~~~aK~a~sman
1
~~F!!~=~~~~P~==~dende
ii
Etebilirsiniz:
~~ka~lii~~Bba~f3:~U::d~
EFTAiilke
leriOOe kul
lannna
postare:
LGEiectronic:s
EuropeanSha.redServiceCeoterB.V.
European
Standard
Team
Krijgsman
I,
1186
DM
Amstelveen
The
Netllerl¥ids
osemundteki!rkohetni!faqeotooi!ti!dedikuarDoC:
http:I/WNW.Ig.comJgloba
l/support/cedoc/cedoc#
~:~~~~~~~:re:=~
i
~~~~te~~HNfr~~~ar
re-
LGEiectronicsEu~nS~ServiceCenterB.V.
European
Standard
Team
Kn)!ISman
1,
1186
OM
Amstetv~n
The
Netherlands
iligamoietepotral:itinanaWjposebnojDoCwebstranici:
http:J)www.~.canfgObaVS<IJlport/cedo</cedoc#
~~ij~~~jke~~~~~~=~~~~~=~~:,Gfizi
nowreHcKaa.npeca:
Service
Center
B.V.,
~3jasysa
Ae~a
.liBHJKelbe€BOCoraacHOCTCO
OApeA6~QIIAI1~Tal999f5/EC.
HOl!Ce.llacen06apa
HaC11!!.11HaTa
§e~=~~~ms~:.,s:nrvi{et~~~~M
8
kste~veen
The
Netherlands
M~naKHaHaWHOTnoce6HoHa!'lel!eTBe6-cajT3a.lleKnapaUHH3il
~;Jr~!:.:~i
.
am/global/support/cedoc/cedoclt
~~~~~~~~~~~HC:
~;'E§~
~~K;tiOCoa
z,4
GHz ~ eHaHeHer
Ce
periphfrique
est
un
systfme
de
transmission
large
bande
2,4
GHz,
COfiOJ
poururteutiliSaliondanstouslesetatsmerr.brescleiUmoneuropeenneetde
I'Associa
tioneuropeenrted
eli
bre-tchange.
ServiceCenterB.V.,dich(ara
OO!leairequisities:senzia
lle
La
versi~ne
rompleta
de!la
i
estatramitellseguenteindlnzzo
LGEiectronicsEuropeanSharedServiceCenterB.V.
Eu~peanStandardTeam
Kn
]gsman
I,
1186
DM
Amstelveen
Paesi
Bas:si
~f~~z~:ei~~:fo:ta~ebdedicato
re
lativo
http:/{wwN.Ig.com{global/support/cedoc/cedoc#
1:~t~i~~~
~
~~
~e:.r~~~~~~~arga
da
2,~
GHz,
(
ESPANDLI
Por
l:sreesente,
LG
Electronics European
Shared
Serv)ce
Center
B.V.1 dedara
~lquiir':~~=~~~~N~
~~m~~i~~~~~jsJ~~~t~~~~
de
conform~ad
com~
se
puede
solic1tar
a Ia
sigu1ente
d1recd6n
postal:
lGEi
ectronicsEuropeanSharedServiceCenterB.V.
Eu.~peanStandardTeam
Kn]gsman
l,liB6DMAmstelveenPaisesBajos
~~:=~~~~~~~;:ro~c~w~~:
~=~~es:~~t:!~ostr~S:~i~~~~~
~av~N:s
Gd~zla
AELC.
Emalternativa,fpossivelsolicita-laoonossowebsite
~i~=~f~roB:~=~C:erB.v.
European
Standard
Team
g~~:~~~~.:V~~~~~w~:~op:
~b~i~~i~~~~~~e~·:~~~~~transmrssesysteern,
bedoeld
vOOf
~AI
R=~~~~~=~~~;jS}~QH~~<;:~~~~~~~
M
ett6aCI@TMfCTi~enepiHecaiieKeHiHMan~I.TOJiblll;cai1KecriK
typanbiM<miHJ:reHeH
I
Kenednoorran~>~~~;Me~eHJKiiHilpk.blflbl(¥payFa!iollaAbl:
~~=nog~~~:n,~~~~~~tgJ~eenTheNetherlands
:;~,~:\~.~kiba~~=~~5oJlatibl:
6apnb111;eypol\aJ1biii;Qllal\ll;a(E0)M'{IJJee11Aep.c.e:t:at~eEyponanb111;epKiHcay.aa
aCCOL!Mi'IUIUICbl {EECA)
e.n.gepiH,Qe
naMAanaHyra
apHa11FaH
2,4
IT
Ulll:~iniK
lii:OnaFbiHTaCbiMan,!layli:'{HeCI.
~:~JLG
Electr~ics
European
Shared
Service
CenterB.V.
3iiH81111eT,
'ITO
==M~~~~=~i~itc1»~~i:ci~~~et!HH
O~HMO~H03ilnpoomnocneayiOIIIeMY~0Hya,apecy:
~e=~~~~~
nm~tsm~~~~or:~~n,
H"Aepna~
MM
JilnpootTb
Ha
HaWeM
tneUHa.nt>HOM
ae6-caffie
DoC:
t!W:Jfwww.~.rom/gObaVSOJ"""'cedo</cedoc#
r:~~=~=~~~~~=:-:~~~4MS
~~~icsEur~nSharedServiceCenterB.V.cr~woueii
nynb
T
{JJ(
MagiC
Remote
B~j:~rJlSi,!laE:
OOIOBHHM
~MOfC!M.
Ta
I
HWHI-t
Slllno81AH~M
~OBaM!\l-tpeKT~BM1999{5/EC.floBHV.Qei'JlapalU(I()'MICHocriMOJKHa0TPIIKCITH
3aa.llpecclKl:
LGEi
ectronicsEur~nSha.redServiceCenterB.V.
~re~e~:m:~:)sman
1,
u86
oM
flmstetveen
~f~~~~:;~:r,:g-pocw~t;cedoc#
~~~~~~cr:0:~:6~~
r
~M;~~~~~~Hax2,4
UAE
TRA
REGISTERED
No:
ER43021/15
DEALER No:
0014318/08
Philippines
~e=
g~r:~~m
Shared
Service
Center
s.v.
Kri
)!ISman1,1186
DMAmstetveen,
The
Netherlands
Va~J~kfrjeDoCwebolda
l
unkonkeresztOI:
http:{/www.lg.COOVglobaVsuwort{cedoc/cedocf
~~~~~~es~~~~~~=v~kl~:~~~~~:~azEu
~er~=tJ~~~mShared
SeviceCeoter
s.v.
Krijgsman
1,1186DMAmstelveenH(jandia
~~~stronyfrmylGpoSw~nej
http://W,.,~.conVglobaVsupport/cedoc/ce<b:#
l.lr2<jdzenie
wykorrfS'llje
system
transmis
ji
szerokopasmowej
o
czElS!OtliwoSci
2,4
GHz
i
jest
przez,naczone
00
ulytku
we
w~~
krajach
~
E
oraz
krajach
ESWH 2 ogramczer11em
dopus.zCZaJ¥'{111
wyl<jCZnle
uiytkowame.
adrese:
LG
Electronics
European
Sha.~ed
Service
Center
B.V.
~~;,:rdTeamKrijgsmanl,I1B6DMAmstelveen
~~slp~~~~=nanaSistrnnce
http:/lwww.lg.<XI!Tl/global/support!(f([OC/cedoc#
~o~~=h~~~a~enct2,4Giz.Jelrieno
Russia,
Kazakhstan,
Belarus
lHl
Ukraine
<±
-w;•~'""
nu.nrE.nEKTPO
~II
<CYJ<pa
i
t~a
•
syn_5~..a.6,M.K~i
e,0100<1,
Te.n
.:
~38
(044)20
1-43-50
032
BRAZIL
Israel
MoC
10
MoC:
51-50761
MoC: 51-
51145
fllANATEL
4321-15-9946
1111111111111111111111111111111111111
(01
)D7893299670886
0
Russian
Language
0 Kazakhstan
langt~age
[Spedfication
I
1)
Model
Name:
AN·MR700
2)
Batch/Serial
No.:·
3)
Manufacturer:
LG
Electronics
Inc.
4)
Factory:
OHSUNG Ele<tronics/
HANSUNG
Electronics
S)
Product
Name:
Magic
Remote
Page 47
T
oll
free
number
1-800-243-0000
1-888-542-2623
USA
CANADA
Page 48
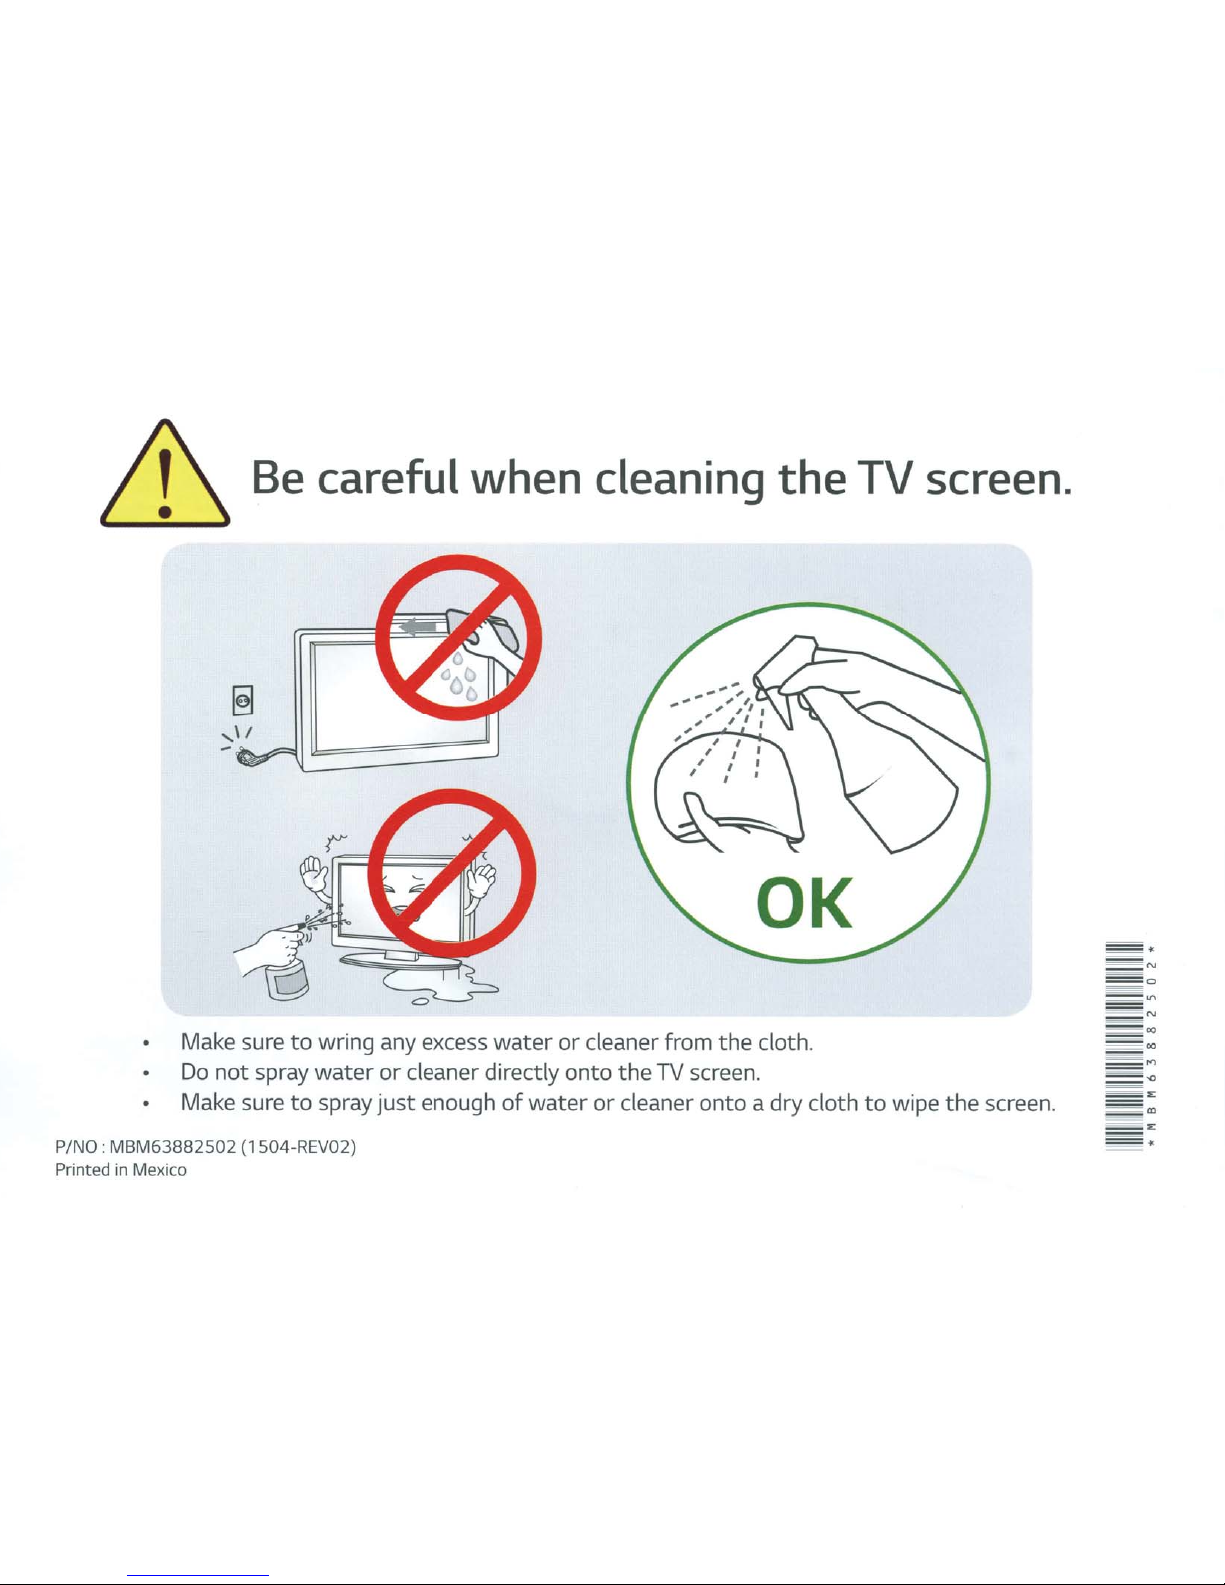
Be
careful when cleaning
the
TV
screen.
OK
• Make sure
to
wring any excess
water
or
cleaner from
the
cloth.
•
Do
not
spray
water
or
cleaner directly
onto
the
TV screen.
• Make sure
to
spray
just
enough
of
water
or
cleaner onto a dry cloth
to
wipe
the
screen.
P/NO: MBM63882502 (1504-REV02)
Printed in Mexico
Page 49
.LG
Life's Good
VDB01
LG
Electronics
PROTECT YOUR INVESTMENT
DON'T
FORGET TO REGISTER!
1.
First
Street
City
Email
online
0
Mr
name
address
at
www.lgusa.com/register
within
.
0
Mrs.
0
Ms
.
0
Miss
the
Initial
S
next
10
Last
Fill
days
name
State
out
I
Province
and
return
ZIP
this
Apt
I
Postal
card
Code
2.
(
3.
(
4.
0
LG
To
not
Telephone
Mobile
Date
Month
By
checking
Electronics
update
diminish
number
)
number
)
of
purchase
I I
Day
this
box,
in
accordance
your
communication
your
warranty
I
wish
rights.
Year
to
receive
with
the
preferences,
helpful
privacy
information
policy
please
5.
6.
7.
located
visit
Model
Serial
Name
at
MyLG
about
www
at
number
number
of
my
new
.
lgusa
www
.
lgusa.com/mylg
store
product
.
com/privacy
Copyright©
where
as
well
.
.
Failure
purchased
as
news
and
to
return
2014
All
Rights
offers
this
Reserved
from
card
will
Page 50
3
EASY
WAYS
to
register
®®®
Please
questions
www.lgusa.com/support
1.800.243.0000
VDB01
LG
direct
or
Electronics
all
service-related
comments
your
to
or
product
call
First
..
Class
postage
required
Post
Office
will
not
without
postage.
.
deliver
proper
.LG
Thank
enjoying
Now
process
•
•
you
it's
Serves
Helpful
11.1111··1111111111•11•1111··1111••1•111·111111·1·1·1111111111.11
Life's Good
for
purchasing
it!
important
with
many
as
verification
emails
to
register
benefits:
on
how
•
REGISTER
LG
PO
BOX
DENVER,
Electronics
174355
CO
80217-4355
YOUR
ACTIVATE YOUR
an
LG
your
of
ownership
to
make
product.
product-
the
if
it's
most
We
lost
of
hope
a
quick,
or
your
you're
simple
stolen
product
PRODUCT!
WARRANTY!
3
to
www
EASY
register
.
lgusa
WAYS
your
ONLINE
visit
.
com/register
product
•
Reminders
•
More
•
Exclusive
•
Special
Welcome
efficient
111111111
*
about
warranty
information
offers
to
111
3 8 4
the
111
1
11111
and
LG
1
111111111
0
downloads
service
on
promotions
family!
Please
1
1111
1
1111
1
111
V A
0 0
new
11
1111111111
4
and
products
seal
1
111
1
111
2 G
*
firmware
with
tape.
updates
and
innovations
Do
not
staple.
drop
P/N
3840VA0042G
Printed
text
this
in
in
Mexico
@
MOBILE
LG
to
MAIL
completed
the
mailbox
77228
card
(1506-REV09)
Page 51
Your
LG
Electronics ("LG")
proves
listed below, effective
is good
Territories.
to
be defective in material
only
to
the
original purchaser
LCD I LED
LCD I LED I OLEO
or
from
the
date
.LG
Life's
Good
LG
Electronics,
I OLEO Television Limited
Television
workmanship
("Date
of
the
of
Purchase")
unit
under
and effective
("unit")
normal use, during
Inc.
of
original consumer purchase
only
Warranty
will be repaired
the
warranty
when used in
- USA
or
replaced,
period
the
United States, excluding U.S.
of
the
at
LG's
option,
("Warranty
unit.
This
if it
Period")
warranty
WARRANTY PERIOD HOW SERVICE
LABOR:
PARTS:
Replacement Units and Repair Parts
factory remanufactured.
Replacement Units and Repair Parts are warranted
the
period.
THIS
LIMITATION,
THE
EXPRESS
BE
LIABLE FOR
ANY
OR
DATA,
do
not
warranty
rights and you
One
(1)
Year
One
(1)
Year
remaining portion
WARRANTY
EXTENT
WARRANTY
NATURE,
OR
allow
the
lasts, so
IS
ANY
WARRANTY
ANY
IMPLIED
ANY
INCLUDING
ANY
OTHER
exclusion
the
may
also have
from
the
Date
from
the
Date
of
the
original
IN
LIEU
OF
ANY
OF
WARRANTY
PERIOD
INCIDENTAL,
or
above exclusion
ABOVE.
WITHOUT
DAMAGE
limitation
other
rights
of
Purchase.
of
Purchase.
may
be
new
unit's
warranty
OTHER
MERCHANTABILITY
IS
NEITHER
CONSEQUENTIAL,
LIMITATION,
WHETHER
of
incidental
or
limitation
that
vary
Please
ticket
warranty, and
service person
CONSUMER USER
or
WARRANTY,
REQUIRED
BASED
or
Please
getting
Visit
http:/
for
COMMERCIAL
Please
getting
Visit
http:/
THE MANUFACTURER
INDIRECT,
LOST
IN
consequential damages
may
not
from
state
retain
as evidence
Call
the
defective
our
website
/www.lg.com
Call
the
defective
our
website
fwww.lg.com/us/
EXPRESS
OR
FITNESS
BY LAW,
PROFITS,
CONTRACT,
apply
to
to
state.
IS
HANDLED
dealer's dated bill
of
the
Date
submit
at
1-800-243-0000
USER
(888)
IT
SPECIAL,
LOST
you. This
the
at:
at:
OR
IMPLIED,
FOR A
IS
LIMITED
NOR
OR
TORT,
or
a copy
time
warranty
unit
repaired
865-3026
unit
repaired
PARTICULAR
ITS
OR
CORRUPTED
OR
limitations
warranty
of
sale
or
of
Purchase
of
the
service is provided.
for
or
for
or
commercial/
INCLUDING
IN
DURATION
U.S.
DISTRIBUTOR
PUNITIVE
OTHERWISE.
on how long an implied
gives you specific legal
for
bill
of
sale
instructions on
replaced.
instructions on
replaced.
display
PURPOSE.
DAMAGES
PROGRAMMING
Some states
delivery
proof
of
to
the
WITHOUT
TO
TO
THE
SHALL
OF
THIS
LIMITED
• damage caused in shipping
• service required
including incorrect
consult
requirements).
• installation
converters, cable company
other
components in a video system
set-up
•
damage caused by
• damage caused by
unit
• any
other
any
• replacement
The cost
of
WARRANTY
the
owner's manual
or
repair
or
adjustment
that
has been modified
unit.
of
batteries on
repair
or
DOES
or
transit
as
a result
or
of
improper
other
replacement under
of
improper
insufficient
for
antenna systems, cable
supplied
on consumer controls,
adjustments
system components
the
NOT
APPLY TO:
installation,
AC
supply (please
power
supply
equipment,
or
or
incorporated into
remote control.
the
se excluded circumstances shall be borne by the consume
or
•
damage
or
improper
nature
beyond
lightning
water
• image burn-in
• repair
than
• units purchased
• units where
been removed, defaced
• units sold and labeled as
disclaimer.
(including cosmetic damage), failure, loss
personal
an
injury
maintenance
or
other
our
control include
strike, power
damage.)
or
replacement
LG
authoriz
the
due
to
or
causes beyond
surges,
of
ed service centers.
or
serviced outside of
original
misuse, abuse, negligence,
storage,
but
warranted parts by
factory
or
changed in
"as
or
to
acts
of
our
control. (Causes
are
not
limited
power
is, where
outages and
other
the
U.S.A.
serial numbers have
any
way.
is"
or
similar
r.
to
Page 52
LCD 1 LED 1 OLEO
Television Limited
Warranty-
USA
(continued)
CUSTOMER
INTERACTIVE
CENTER
NUMBERS
CONSUMER USER
Please
call
1-800-243-0000
and select the appropriate option
To
obtain
Product
Authorized
CONCERNING
Customer
Information,
Service
PIXEL
FUNCTIONALITY:
Assistance,
or
Center
Dealer
location:
Or
visit
our
website
or
http://www.lg.com
COMMERCIAL
Please
call
and select
Or
visit
our
http://www.lg.com/us/commercial/display
USER
(888)
the
appropriate option from
website
at:
865-3026
at:
Your LCD/LED/OLED television contains hundreds
vidual pixels. LCD/LED/OLED displays typically contain a small number
with
display has been inspected and is in compliance
not
effect the operation
BEFORE
Please have
CALLING
your
Under some circumstances you
deposit
If
defective
for
advanced shipment,
a replacement
unit
to
an
Parts and service in accordance with
Other service requirements will be
service,
To
any
assure
unit
write
proper
to
the
or
call
Factory Service Center. Contact
or
use
of
your display.
FOR SERVICE:
unit's model number, serial number, and
may
be asked
or
cost
of
unreturned loaner unit.
unit
is received, please use
LG
authorized service center.
the
LG
at
the
owner's expense.
the
LG
Customer
Interactive
credit and avoid unnecessary charges, you
manufacturer's specifications, indicating
the
date
of
to
provide credit card information
the
carton and packaging
warranty
is LG's responsibility and will be provided
If
you have problems in obtaining satisfactory
Center.
must
obtain a Return Authorization before returning
the
Customer
Interactive
from
the
menu.
the
menu.
of
pixels
that
do
not
purchase available.
for
a non-warranty service fee, as a
from
that
replacement
Center
for
details.
of
thousands
of
indi-
function normally. Your
that
any pixel defects do
unit
in
returning
without
the
charge.
warranty
Service
for
the United States.
Television is provided
TO
CONTACT
LG
Customer
P.
0.
Box
240007
201
James Record Road
Huntsville, Alabama
through
LG
ELECTRONICS BY
Interactive
Center
35824
LG
for
your
LG
ATTN: CIC
LG
LCD/LED/OLED Televisions are marketed and distributed in
LG
Electronics U.S.A., Inc.,
111111111111111111111111
* 3 8 4 0 T W L 0 5 6 A *
1
1111111111111111111111111111111111111111
1000
Sylvan Avenue, Englewood Cliffs,
Electronics Alabama, Inc.,
MAIL:
the
United States
NJ
07632
PINO : 3840TWL056A (1506-REV04)
the
authorized
by:
LG
Service Center
Printed in Mexico
 Loading...