

Sony NWZ-W273 User Manual
Contents
Attaching Your Walkman to the USB Cradle (Supplied) and Charging the Battery Parts and Controls
How to Install the Supplied Software
Quick Start Guide
How to Install the Supplied Software
How to Use Your “WALKMAN”
NWZ-W273
©2013 Sony Corporation Printed in Malaysia
About the manuals
This Quick Start Guide only describes the basic operating instructions and
how to install the supplied software.
For detailed information and operating instructions, refer to the Help guide
(HTML document) included in the supplied software after installation.
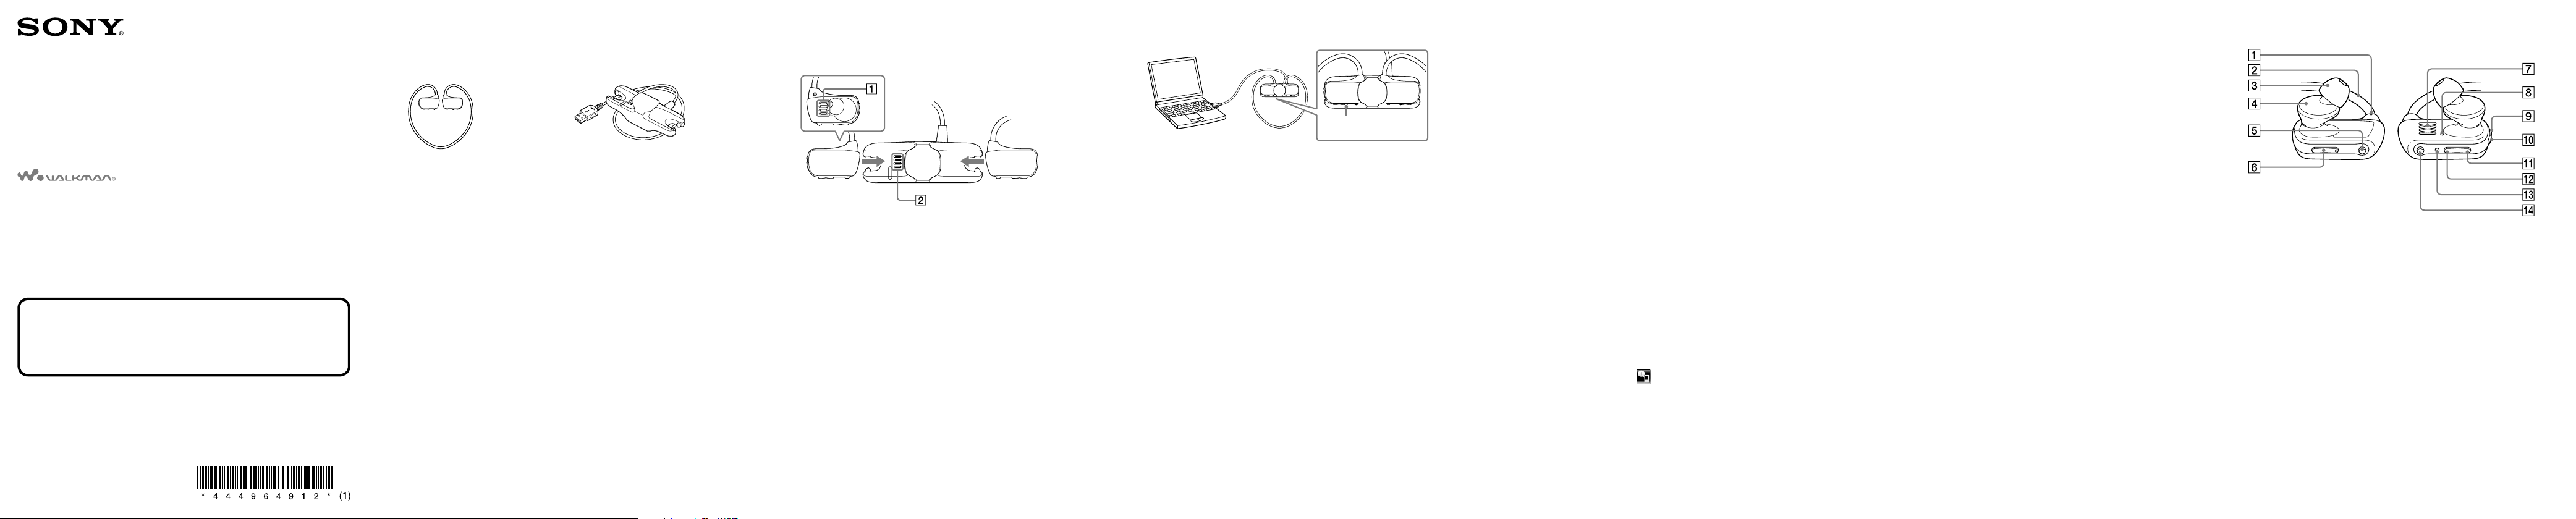
Please check the items in the package.
“WALKMAN” (1) USB cradle (1)
Earbuds (1 set)
Adjustment band (1)
Quick Start Guide (this manual)
Notes on Water Resistant Specifications
About the Operating System
Make sure that the OS is Windows XP (Service Pack 3 or later), Windows Vista*1
(Service Pack 2 or later), Windows 7*
*1 [Compatibility mode] for Windows XP is not supported.
For a Mac computer, make sure that the OS is Mac OS X v10.6 or later.
Not supported by OSs other than above
1
(Service Pack 1 or later), or Windows 8.
To connect your Walkman to a computer, the Walkman must be attached to the USB
cradle (supplied) correctly.
1 Dry the terminals of your Walkman () using a
soft dry cloth.
2 Attach your Walkman to the USB cradle (supplied).
Make sure that the terminals of your Walkman () and the USB
cradle (supplied) (
) are in contact with each other.
3 Connect your Walkman to an operating computer
using the USB cradle (supplied).
If a screen appears presenting a choice of actions, click “Cancel.”
Charging starts.
Make sure that the OPR lamp window on the USB cradle (supplied)
lights up in red.
OPR lamp
Notes on charging by using the computer
Charge the battery when the OPR lamp blinks in red rapidly.
While the battery is charging, the OPR lamp indicates the charging status of your
Walkman.
You can see the status of the OPR lamp through the OPR lamp window on the USB
cradle (supplied).
Lights up in red: Being charged
Turns off: Charged fully or not being charged
Charging time is approx. 1.5 hours.
When your Walkman has been fully charged, disconnect it from the computer.
For a Mac computer, click the eject icon of [WALKMAN] in the sidebar of Finder to
disconnect your Walkman.
If the computer enters a power saving mode such as the Sleep or Hibernation mode
while your Walkman is connected via the USB cradle (supplied), the Walkman
continues to draw power from the battery, discharging it.
When you use your Walkman for the first time, or if you have not used the Walkman for
a long time, it may take a few minutes to be recognized by the computer, even if
charging has already started (the OPR lamp lights up in red). Check that the computer
recognizes your Walkman after you have connected it to the computer for about
5 minutes.
Installing WALKMAN Guide and Media Go (for Windows)
1 Connect your Walkman to a running computer
using the USB cradle (supplied).
2 Select the following with the computer.
Windows 7 or earlier: Select [Start] – [Computer] or [My Computer] –
[WALKMAN] – [Storage Media] – [FOR_WINDOWS].
Windows 8: Select [Desktop] from [Start screen] to open [File Explorer]. In the
[Computer] list, select [WALKMAN] – [Storage Media] – [FOR_WINDOWS].
3 Double-click [Setup.exe].
The install wizard appears.
When you execute [Setup.exe], the [Setup.exe] file stored in the
[FOR_WINDOWS] folder of your Walkman is copied to your
computer for backup, and WALKMAN Guide and Media Go are
installed to your computer.
If [Setup.exe] does not start, copy the [Setup.exe] file to your
desktop, then double-click it.
4 Follow the on-screen instructions.
After the install wizard finishes, the WALKMAN Guide and Media
Go shortcuts appear on the desktop of your computer.
5 Double-clicking the (WALKMAN Guide) icon on
the desktop allows you to browse information
such as the Help guide.
For detailed information on transferring music, etc., refer to the Help
guide included in the WALKMAN Guide.
Hint
You can install the supplied software on another computer through the following
procedure even if you delete the [Setup.exe] file by formatting the built-in flash memory
of your Walkman. Copy the [Setup.exe] file and the [Install] folder from the [Backup]
folder of your computer to your Walkman. Then, connect your Walkman to another
computer on which you want to install the software and follow the above procedure
from step 2.
The [Backup] folder can be found at:
C:\Program Files*
*1 [Program Files(x86)] may be displayed depending on the computer OS.
1
\Sony\WALKMAN Guide\NWZ-W270\Backup
Installing the Help guide (for Mac)
1 Connect your Walkman to a running computer
using the USB cradle (supplied).
2 On the computer, select [WALKMAN] in the
sidebar of Finder, then open the [FOR_MAC]
folder.
3 Double-click [Help_Guide_Installer_for_Mac].
The installer starts.
4 Follow the on-screen instructions.
After the installer finishes, the HelpGuide alias (shortcut) appears on
the desktop of your computer.
Hint
Before you attempt to delete the software from your Walkman, copy the [FOR_MAC]
folder to your Mac computer as a backup if necessary.
Tactile dot
Neckband
Earbud
Headphone section
SHUF (Shuffle)/PLAYLISTS
button
VOL +*1/– button
*1 There are tactile dots. Use them to help with button operations.
Terminals
OPR (Operation) lamp
Power lock switch
(Power) button
Previous button
Next button
RESET button
button*
1
About volume operation (Only for countries/areas
complying with European Directives)
An alarm (beep) and warning “Check the volume level” are meant to protect your
ears when you raise the volume setting beyond a specific level*
You can cancel the alarm and warning by pressing any button.
Note
You can turn up the volume beyond the specific level*1 after canceling the alarm and
warning.
After the initial warning, the alarm and warning repeat for every 20 cumulative hours
that the volume is set beyond the specific level*
changed to level [7] automatically.
If the volume is set beyond the specific level*1 and you turn off the Walkman, the
volume returns to the specific level*
*1 Specific level = [18]
1
automatically.
1
; when this happens, the volume is
1
for the first time.
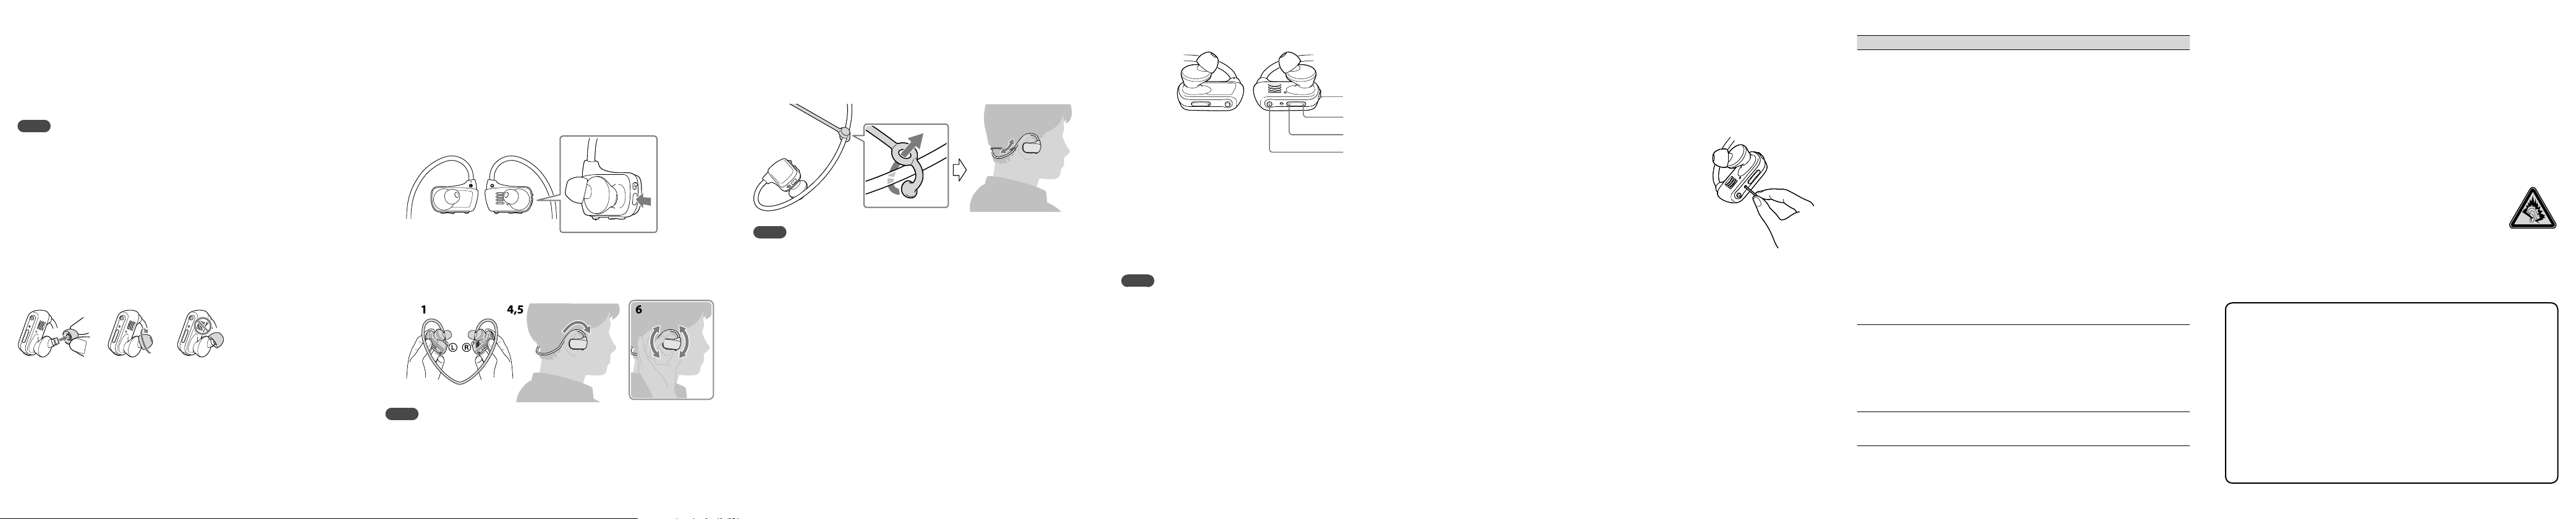
How to install the earbuds
To enjoy better sound quality, or to fit your ears, change the size of the earbuds or
adjust the earbud position to fit comfortably and snugly in your left and right ears
separately.
When you change the earbuds, turn them to install firmly on your Walkman and
prevent the earbud from detaching and remaining in your ear.
Optional replacement earbuds can be ordered from your nearest Sony dealer.
How to Turn the Power On and Place Your Walkman on Your Ears
1 Check the left () and right () parts of your Walkman.
2 Slide the Power lock switch to unlock the (Power)
button.
3 Press and hold the (Power) button located on the right
() part for about 3 seconds to turn on your Walkman.
4 Hang the neckband over the back of your ears.
5 Place the headphone sections into your ears.
6 Adjust your Walkman so it feels comfortable.
Note
If your Walkman does not feel comfortable, replace the earbuds. Refer to “How to install
the earbuds.”
To prevent your Walkman from accidently coming off your
ears
Attach the supplied adjustment band to the neckband part before placing your
Walkman on your ears.
Note
After wearing your Walkman with the adjustment band attached, adjust the position of
the adjustment band to a position where it feels comfortable.
Hint
If your Walkman comes off your ears while you are swimming, stabilize the adjustment
band using the band of your swimming goggles.
Taking your Walkman off
Gently take your Walkman off your ears.
Playing Music
Turning your Walkman on and off
Press and hold the (Power) button
for about 3 seconds to turn your
Walkman on or off.
After you turn off the power, make sure
to slide the Power lock switch to lock
the
(Power) button.
Note
When carrying your Walkman, make
sure to slide the Power lock switch to
lock the
(Power) button to prevent
the Walkman from being turned on
accidentally.
(Power) button
Previous button
Next button
button
Playing songs
Press the button.
To pause playback
Press the button.
Skipping to the previous/next song
Press the Previous or Next button.
Troubleshooting
If your Walkman does not function as expected, try the following steps to resolve
the issue.
1 Find the symptoms of the issue in “Troubleshooting” in the
Help guide (HTML document), and try any corrective
actions listed.
For details on troubleshooting, see the tables on the right too.
2 Press the RESET button with a pen or
paper clip, etc.
When you reset your Walkman, please make sure
of the following.
Your Walkman is not connected to your
computer.
Your Walkman is not playing back music.
RESET buttonRESET button
Symptom Cause/Remedy
The computer does not
recognize your
Walkman.
When double-clicking
[Setup.exe] to install the
supplied software to your
Windows computer,
[Setup.exe] does not
execute, and the
Properties window
opens.
During playback of a
song, the next song is
suddenly started.
Your Walkman is not attached to the USB cradle
(supplied) properly.
Attach your Walkman to the USB cradle (supplied)
properly and firmly. Charging will start (the OPR
lamp lights up in red) even if the connection was not
made properly, but there is a possibility that the
computer has not recognized the Walkman. In such a
case, remove the Walkman from the USB cradle
(supplied) and then attach to the USB cradle
(supplied) again.
The remaining battery power is low or insufficient.
Recharge the battery. When you use your Walkman
for the first time, or if you have not used the
Walkman for a long time, it may take a few minutes
to be recognized by the computer, even if charging
has already started (the OPR lamp lights up in red).
Check that the computer recognizes the Walkman
after you have connected it to the computer for
about 5 minutes.
The computer is running another software other than
that used for transferring.
Disconnect the USB cradle (supplied), wait for a
few minutes, and reconnect it. If the problem
persists, disconnect the USB cradle (supplied),
restart the computer, and then reconnect the USB
cradle (supplied).
Install the supplied software after installing Windows
Media Player 11 or later into your Windows
computer. For details on Windows Media Player, refer
to the following web site:
http://support.microsoft.com/
Your Walkman may perform ZAPPIN playback. For
details, refer to the Help guide.
Precautions
About the in-ear headphones
The earbuds seal your ears. Therefore, be aware that there is a risk of damage to your ears
or eardrums if strong pressure is applied to the earbuds, or the earbuds are suddenly
removed from your ears. After use, be sure to take the earbuds off your ears gently.
About the headphones
Avoid playing the unit at so loud a volume that extended play might affect your hearing.
At a high volume outside sounds may become inaudible. Avoid listening to the unit in
situations where hearing must not be impaired, for example, while driving or cycling.
As the supplied headphones are of open-air design, sounds go out through the
headphones. Remember not to disturb those close to you.
License and Trademark Notice
Refer to the Help guide (HTML document).
At high volume, prolonged listening to the personal audio player can
damage the user’s hearing.
Owner’s Record
The model and serial numbers are located on the back of the player. Record them in the
space provided below. Refer to these numbers in the spaces whenever you call upon your
Sony dealer regarding this product.
Model No. ________________________
Serial No._________________________
For the latest information
If you have any questions or issues with this product, or would like information on
compatible items with this product, visit the following web sites.
For customers in the USA:
http://www.sony.com/walkmansupport
For customers in Canada:
http://esupport.sony.com/ca/
For customers in Europe:
http://support.sony-europe.com/DNA
For customers in Latin America:
http://www.sony-latin.com/index.crp
For customers in other countries/regions:
http://www.sony-asia.com/support
For customers who purchased the overseas models:
http://www.sony.co.jp/overseas/support/
 Loading...