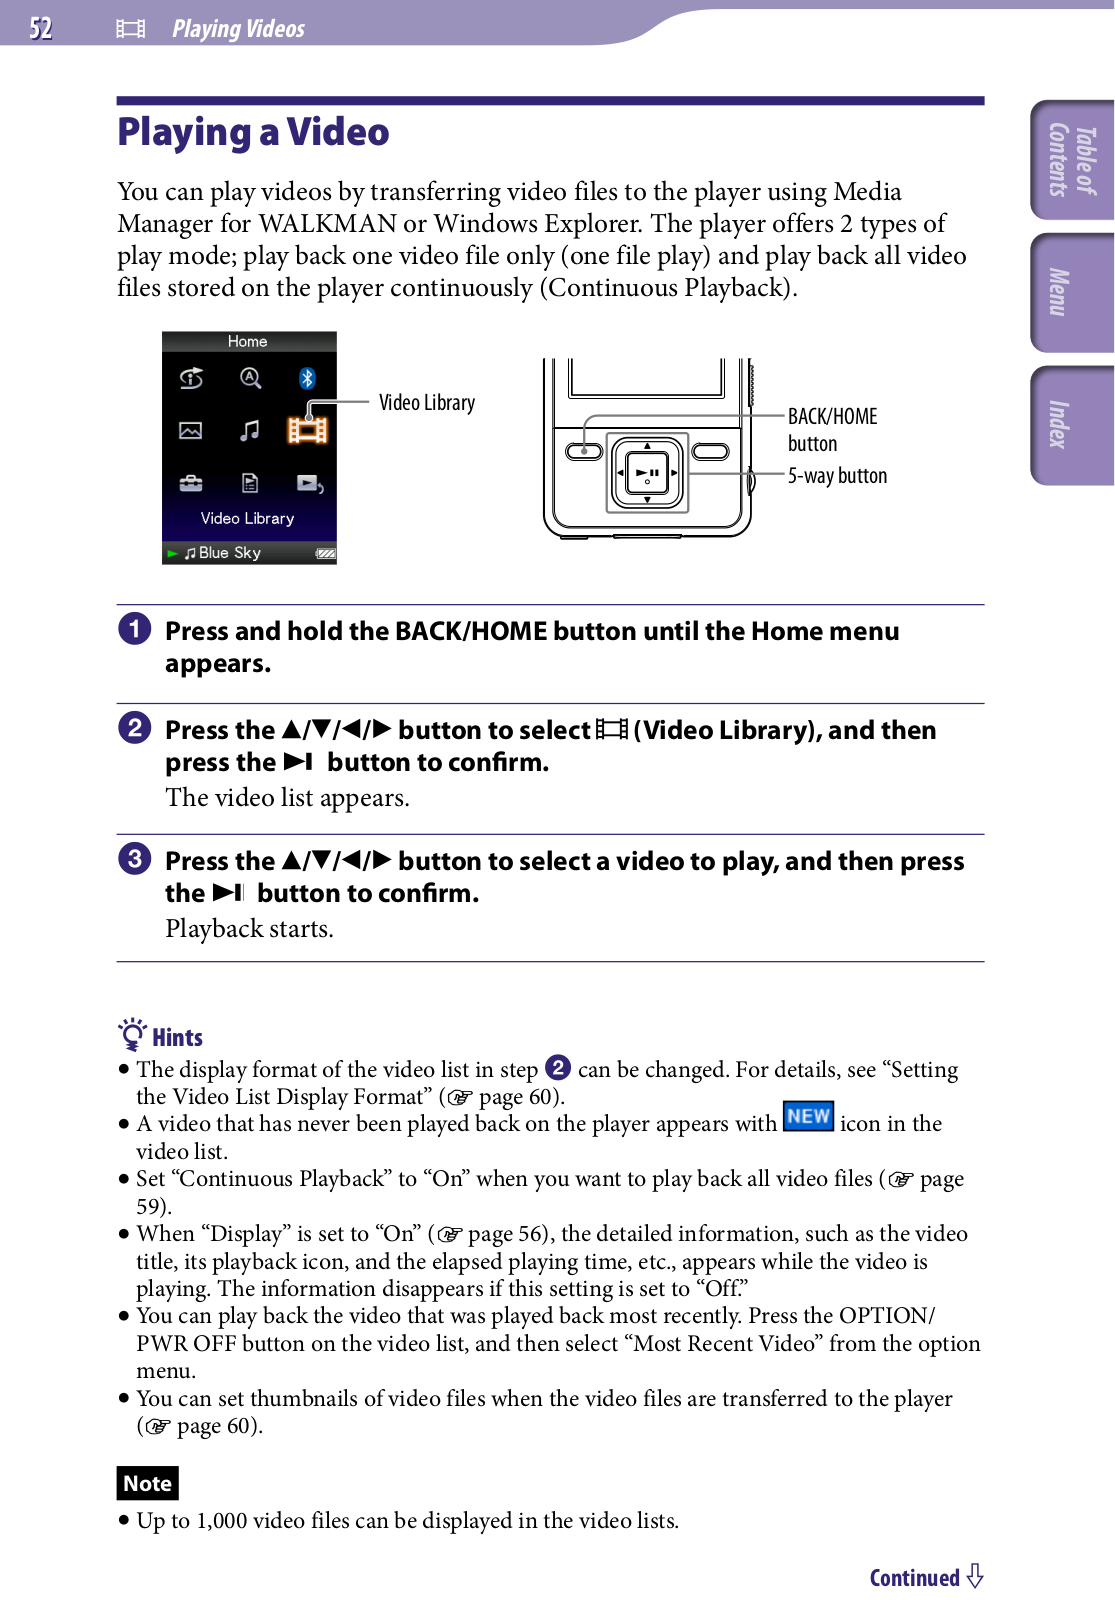
42 |
|
Setting the Music |
Setting to Search by Folders ( / Button Setting)
While playing back music or pausing playback, you can search for songs by skipping folders. You can set the / button to skip folders or to search for songs from the information of the currently playing song.
BACK/HOME
Settings button
5-way button
Press and hold the BACK/HOME button until the Home menu appears.
Press the / / / button to select (Settings), and then press the button to confirm.
Press the / / / button to select “Music Settings,” and then press the button to confirm.
The list of “Music Settings” options appears.
Press the / / / button to select “ / Button Setting,” and then press the button to confirm.
Press the / / / button and select the desired setting, and then press the button to confirm.
“Direct Search”: By pressing the / button, you can select an information of the song using the displayed cursor and search for songs from the selected information ( page 29). (Default setting)
“Folder +/–”: By pressing the / button, the player skips folders.
Hint
When the player skips folders in “Folder +/–” mode, the folder units vary depending on the list before the song list. For example, if you select a song in the following order; “Artist”- album list – song list, the folder units are based on album, and you can search for songs by skipping albums.
of Table
Index Menu Contents
43 |
|
Setting the Music |
Setting the Sound Quality (Equalizer)
You can set the sound quality according to the music genre, etc.
BACK/HOME
Settings button
5-way button
Changing the sound quality
You can customize the player’s sound quality.
Press and hold the BACK/HOME button until the Home menu appears.
Press the / / / button to select (Settings), and then press the button to confirm.
Press the / / / button to select “Music Settings,” and then press the button to confirm.
The list of “Music Settings” options appears.
Press the / / / button to select “Equalizer,” and then press thebutton to confirm.
The list of equalizer settings appears.
Press the / / / button to select the desired setting, and then press the button to confirm.
The selected sound setting is applied, and the list of “Music Settings” options reappears.
For details of each equalizer option, see page 44.
of Table
Index Menu Contents
Continued
44 |
|
Setting the Music |
To return to the normal sound quality
Select “None” in step , and then press the button to confirm.
Hint
You can also set the sound quality from the “Now Playing” screen. Press the OPTION/ PWR OFF button, and select “Equalizer” from the option menu.
Notes
If your personal settings saved as “Custom 1” and “Custom 2” seem to produce a different volume level than the other settings, you may have to adjust the volume manually to compensate.
The “Equalizer” setting is not applied while playing a video.
Setting/icon |
|
|
|
|
|
|
|
|
|
|
|
|
|
|
|
|
|
|
|
|
|
|
|
|
|
|
|
|
|
|
|
Description |
|||||||||||||||||||
|
|
|
|
|
|
|
|
|
|
|
|
|
|
|
|
|
|
|
|
|
|
|
|
|
|
|
|
|
|
|
|
|
|
|
|
|
|
|
|
|
|
|
|
|
|
|
|
|
|
|
|
None |
|
|
|
|
|
|
|
|
|
|
|
|
|
|
|
|
|
|
|
|
|
|
|
|
|
|
|
|
|
|
|
Sound quality setting is not activated. |
|||||||||||||||||||
|
|
|
|
|
|
|
|
|
|
|
|
|
|
|
|
|
|
|
|
|
|
|
|
|
|
|
|
|
|
|
|
|
|
|
|
|
|
|
|
|
|
|
|
|
|
|
|
|
|
|
(Default setting) |
Heavy ( |
|
|
|
|
|
|
|
|
|
|
|
|
|
|
|
|
|
) |
|
|
|
|
Emphasizes high and low ranges for a powerful sound. |
||||||||||||||||||||||||||||
|
|
|
|
|
|
|
|
|
|
|
|
|
|
|
|
|
|
|
|||||||||||||||||||||||||||||||||
Pop ( |
|
|
|
|
|
|
|
|
|
|
|
|
|
|
|
|
|
|
|
) |
|
|
|
|
|
|
|
|
|
|
|
|
|
|
|
|
Stresses the middle range audio, ideal for vocals. |
||||||||||||||
|
|
|
|
|
|
|
|
|
|
|
|
|
|
|
|
|
|
|
|
|
|
|
|
|
|
|
|
|
|
|
|
|
|
|
|
|
|
|
|
|
|
|
|
|
|
|
|
|
|
|
|
Jazz ( |
|
|
|
|
|
|
|
|
|
|
|
) |
|
|
|
|
|
|
|
|
|
|
|
|
|
|
|
|
Emphasizes high and low ranges for a lively sound. |
||||||||||||||||||||||
|
|
|
|
|
|
|
|
|
|
|
|
|
|
|
|
|
|
|
|
|
|
|
|
|
|
|
|
|
|
|
|
|
|
|
|
|
|
|
|
|
|
|
|
|
|
|
|
|
|
|
|
Unique ( |
|
|
|
|
|
|
|
|
|
|
|
|
|
|
|
|
|
|
|
) |
|
|
|
Emphasizes high and low ranges, so that a small sound |
|||||||||||||||||||||||||||
|
|
|
|
|
|
|
|
|
|
|
|
|
|
|
|
|
|
|
|
|
|
|
|
|
|
|
|
|
|
|
|
|
|
|
|
|
|
|
|
|
|
|
|
|
|
|
|
|
|
|
can be listened easily. |
Custom 1 ( |
|
|
|
|
|
|
|
|
|
|
) |
User-customizable sound settings for which you can |
|||||||||||||||||||||||||||||||||||||||
|
|
|
|
|
|
|
|
|
|
|
|
|
|
|
|
|
|
|
|
|
|
|
|
|
|
|
|
|
|
|
|
|
|
|
|
|
|
|
|
|
|
|
|
|
|
|
|
|
|
|
adjust each frequency range individually. See page 45 |
|
|
|
|
|
|
|
|
|
|
|
|
|
|
|
|
|
|
|
|
|
|
|
|
|
|
|
|
|
|
|
|
|
|
|
|
|
|
|
|
|
|
|
|
|
|
|
|
|
|
|
|
Custom 2 ( |
|
|
|
|
|
|
|
|
) |
for details. |
|||||||||||||||||||||||||||||||||||||||||
|
|
|
|
|
|
|
|
|
|
|
|
|
|
|
|
|
|
|
|
|
|
|
|
|
|
|
|
|
|
|
|
|
|
|
|
|
|
|
|
|
|
|
|
|
|
|
|
|
|
|
|
|
|
|
|
|
|
|
|
|
|
|
|
|
|
|
|
|
|
|
|
|
|
|
|
|
|
|
|
|
|
|
|
|
|
|
|
|
|
|
|
|
|
|
|
|
|
|
|
|
|
|
|
|
|
|
|
|
|
|
|
|
|
|
|
|
|
|
|
|
|
|
|
|
|
|
|
|
|
|
|
|
|
|
|
|
|
|
|
|
|
|
|
|
|
|
|
|
|
|
|
|
|
|
Continued |
of Table
Index Menu Contents
45 |
|
Setting the Music |
Customizing sound quality
You can preset the value of CLEAR BASS (bass) and 5 bands Equalizer as “Custom 1” or “Custom 2.”
Press and hold the BACK/HOME button until the Home menu appears.
Press the / / / button to select (Settings), and then press the button to confirm.
Press the / / / button to select “Music Settings,” and then press the button to confirm.
The list of “Music Settings” options appears.
Press the / / / button to select “Equalizer,” and then press thebutton to confirm.
The list of equalizer settings appears.
Press the / / / button to select “Edit” displayed under “Custom 1” or “Custom 2” to change a value, and then press the button to confirm.
The setting screen appears.
Press the / button to select a cursor for the CLEAR BASS or the frequency range setting, and press the / button to adjust the setting level.
The CLEAR BASS can be set to any of 4 sound levels, and the 5 frequency ranges can be set to any of 7 sound levels.
Press the button to confirm.
The list of equalizer settings reappears.
After you have adjusted the setting level, be sure to press the button to confirm. If you press the BACK/HOME button before you confirm, the setting will be canceled.
Note
of Table
Index Menu Contents
The settings of “Custom 1” or “Custom 2” are not applied while playing a video.
46 |
|
Setting the Music |
Making the Sound More Vibrant (VPT(Surround))
You can choose from “Studio,” “Live,” “Club,” “Arena,” “Matrix” or “Karaoke” according to your song using the “VPT*1(Surround)” function. Setting to “Studio,” “Live,” “Club” or “Arena,” simulates these sound fields in the headphones.
Additionally, “Matrix” reproduces a rich acoustic sound field, and “Karaoke” suppresses the vocals.
BACK/HOME
Settings button
5-way button
Press and hold the BACK/HOME button until the Home menu appears.
Press the / / / button to select (Settings), and then press the button to confirm.
Press the / / / button to select “Music Settings,” and then press the button to confirm.
The list of “Music Settings” options appears.
Press the / / / button to select “VPT(Surround),” and then press the button to confirm.
The list of “VPT(Surround)” settings appears.
Press the / / / button to select the desired “VPT(Surround)” setting ( page 47), and then press the button to confirm.
*1 VPT, which stands for Virtual Phone Technology, is a proprietary sound processing technology developed by Sony.
To return to the normal sound quality
Select “None” in step , and then press the button to confirm.
Continued
of Table
Index Menu Contents
47
Setting the Music
Hint
You can also set the “VPT(Surround)” setting from the “Now Playing” screen. Press the OPTION/PWR OFF button, and select “VPT(Surround)” from the option menu.
Note
The “VPT(Surround)” setting is not applied while playing a video.
List of “VPT(Surround)” settings
The sound settings appear on the screen as the letters in parentheses.
Setting/icon |
|
|
|
|
|
|
|
|
|
|
Description |
|||||||||||||||
|
|
|
|
|
|
|
|
|
|
|
|
|
|
|
|
|
|
|
|
|
|
|
|
|
|
|
None |
|
|
|
|
|
|
|
|
|
|
“VPT(Surround)” setting is not activated. (Default setting) |
|||||||||||||||
Studio ( |
|
|
|
|
|
|
|
|
|
|
|
|
|
) |
|
|
Creates the sound of a recording studio. |
|||||||||
|
|
|
|
|
|
|
|
|
|
|
|
|
||||||||||||||
|
|
|
|
|
|
|
|
|
|
|
|
|
|
|
|
|
|
|
|
|
|
|
|
|
|
|
Live ( |
|
|
|
|
|
|
|
|
|
|
|
|
|
|
) |
|
|
|
|
|
|
|
|
|
Creates the sound of a concert hall. |
|
|
|
|
|
|
|
|
|
|
|
|
|
|
|
|||||||||||||
|
|
|||||||||||||||||||||||||
|
|
|
|
|
|
|
|
|
|
|
||||||||||||||||
Club ( |
|
|
|
|
|
|
|
|
|
|
|
|
) |
|
|
|
|
|
|
|
Creates the sound of a club. |
|||||
|
|
|
|
|
|
|
|
|
|
|
|
|
|
|
|
|
||||||||||
|
|
|
|
|
|
|
|
|
|
|
|
|
||||||||||||||
Arena ( |
|
|
|
|
|
|
|
|
|
|
) |
|
|
Creates the sound of an arena. |
||||||||||||
|
|
|
|
|
|
|
|
|
|
|
||||||||||||||||
|
|
|
|
|
|
|
|
|
|
|||||||||||||||||
Matrix ( |
|
|
|
|
|
|
|
|
) |
|
|
Reproduces an additional surround effect, and creates a |
||||||||||||||
|
|
|
||||||||||||||||||||||||
|
|
|
|
|
|
|
|
|||||||||||||||||||
|
|
|
|
|
|
|
|
|
|
|
|
|
|
|
|
|
|
|
|
|
|
|
|
|
|
natural, yet richly enhanced sound. |
Karaoke ( |
|
|
|
|
|
|
) |
Creates a stage-like sound field by suppressing vocal |
||||||||||||||||||
|
|
|
|
|
|
|
|
|
||||||||||||||||||
|
|
|
|
|
|
|
|
|
|
|
|
|
|
|
|
|
|
|
|
|
|
|
|
|
|
sound, and adding a surround effect to the music. |
of Table
Index Menu Contents
48 |
|
Setting the Music |
Listening with Clear Stereo Sound (Clear Stereo)
“Clear Stereo” enables individual left and right digital processing of the sound.
BACK/HOME
Settings button
5-way button
Press and hold the BACK/HOME button until the Home menu appears.
Press the / / / button to select (Settings), and then press the button to confirm.
Press the / / / button to select “Music Settings,” and then press the button to confirm.
The list of “Music Settings” options appears.
Press the / / / button to select “Clear Stereo,” and then press the button to confirm.
Press the / / / button to select the desired setting, and then press the button to confirm.
“On”: Activates the “Clear Stereo” function when you use the supplied headphones.
“Off”: Disables the “Clear Stereo” function and plays back normal sound. (Default setting)
Notes
The “Clear Stereo” setting is not applied while playing a video.
The “Clear Stereo” function is designed to obtain maximum effect with the supplied headphones. The “Clear Stereo” effect may not be obtained with other headphones. When using other headphones, set “Clear Stereo” to “Off.”
of Table
Index Menu Contents
49 |
|
Setting the Music |
Correcting Sound in the High Range
(DSEE(Sound Enhancer))
By activating the “DSEE*1(Sound Enhancer)” feature, you can hear a rich and natural sound almost exactly like the original source.
BACK/HOME
Settings button
5-way button
Press and hold the BACK/HOME button until the Home menu appears.
Press the / / / button to select (Settings), and then press the button to confirm.
Press the / / / button to select “Music Settings,” and then press the button to confirm.
The list of “Music Settings” options appears.
Press the / / / button to select “DSEE(Sound Enhance),” and then press the button to confirm.
Press the / / / button to select the desired setting, and then press the button to confirm.
“On”: The “DSEE*1(Sound Enhancer)” function is activated, and plays back naturally extended sound that is close to the original sound.
“Off”: Plays back normal sound. (Default setting)
*1 DSEE, which stands for Digital Sound Enhancement Engine, is a technology developed by Sony, to enhance the sound quality of compressed audio files by restoring high-range sound removed by the compression process.
of Table
Index Menu Contents
Continued
50 |
|
Setting the Music |
Notes
The “DSEE(Sound Enhancer)” setting is not applied while playing a video.
The “DSEE(Sound Enhancer)” function is not effective for songs with a file format that is not compressed, or songs that are of a high bit rate with no treble loss.
In the case of songs of very low bit rate, the “DSEE(Sound Enhancer)” function will not be effective.
of Table
Index Menu Contents
51 |
|
Setting the Music |
Adjusting the Volume Level (Dynamic Normalizer)
You can reduce the volume level between songs. With this setting, when listening to album songs in the shuffle play mode, the volume level between songs is moderated to minimize the difference in their recording levels.
BACK/HOME
Settings button
5-way button
Press and hold the BACK/HOME button until the Home menu appears.
Press the / / / button to select (Settings), and then press the button to confirm.
Press the / / / button to select “Music Settings,” and then press the button to confirm.
The list of “Music Settings” options appears.
Press the / / / button to select “Dynamic Normalizer,” and then press the button to confirm.
Press the / / / button to select the desired setting, and then press the button to confirm.
“On”: Minimizes the difference of the volume level between songs.
“Off”: Plays back songs with their original volume level as transferred. (Default setting)
Note
of Table
Index Menu Contents
The “Dynamic Normalizer” setting is not applied while playing a video.
52 |
Playing Videos |
Playing a Video
You can play videos by transferring video files to the player using Media Manager for WALKMAN or Windows Explorer. The player offers 2 types of play mode; play back one video file only (one file play) and play back all video files stored on the player continuously (Continuous Playback).
Video Library |
BACK/HOME |
|
|
|
button |
|
5-way button |
Press and hold the BACK/HOME button until the Home menu appears.
Press the / / / button to select (Video Library), and then press the button to confirm.
The video list appears.
Press the / / / button to select a video to play, and then press the button to confirm.
Playback starts.
Hints
The display format of the video list in step can be changed. For details, see “Setting the Video List Display Format” ( page 60).
A video that has never been played back on the player appears with icon in the
video list.
Set “Continuous Playback” to “On” when you want to play back all video files ( page 59).
When “Display” is set to “On” ( page 56), the detailed information, such as the video title, its playback icon, and the elapsed playing time, etc., appears while the video is playing. The information disappears if this setting is set to “Off.”
You can play back the video that was played back most recently. Press the OPTION/ PWR OFF button on the video list, and then select “Most Recent Video” from the option menu.
You can set thumbnails of video files when the video files are transferred to the player ( page 60).
Note
Up to 1,000 video files can be displayed in the video lists.
of Table
Index Menu Contents
Continued
53 |
|
Playing Videos |
|
|
|
|
|
|
|
On video playback operations |
|
|
|
||||
|
|
|
|
|
|
|
|
|
|
|
To (icon) |
|
|
|
5-way button operation |
|
|
|
|
|
|
|
||||
|
|
Find the beginning of the next |
Press the button. |
|
||||
|
|
video ( )*1 |
|
|
|
|
|
|
|
|
Find the beginning of the |
|
Press the button. |
|
|||
|
|
current video ( |
)*2 |
|
|
|
|
|
|
|
Go forward slightly ( |
)*3 |
|
Press the button while the video is paused. |
|||
|
|
Go backward slightly ( |
)*3 |
Press the button while the video is paused. |
||||
|
|
Go forward quickly over the |
Press and hold the button while the video is |
|||||
|
|
paused video ( |
)*4 |
|
|
paused. |
|
|
|
|
Go backward quickly over the |
Press and hold the button while the video is |
|||||
|
|
paused video ( |
)*4 |
|
|
paused. |
|
|
|
|
Go forward quickly ( |
, |
, |
Forward speed changes through 3 levels by |
|||
|
|
) |
|
|
|
repeatedly pressing the button ( |
(×10), |
|
|
|
|
|
|
|
(×30), |
(×100)). |
|
|
|
|
|
|
|
Press the button to exit the operation. |
||
|
|
Go backward quickly ( |
, |
, |
Backward speed changes through 3 levels by |
|||
|
|
) |
|
|
|
repeatedly pressing the button ( |
(×10), |
|
|
|
|
|
|
|
(×30), |
(×100)). |
|
|
|
|
|
|
|
Press the button to exit the operation. |
*1 Activates when “Continuous Playback” is set to “On” ( page 59).
*2 When “Continuous Playback” is set to “On,” you can find the beginning of the previous video from the currently playing video by pressing the button twice.
*3 The interval used when going forward or backward varies, depending on the video. *4 Fast forward/backward speed varies, depending on the length of the video.
of Table
Index Menu Contents
54 |
Playing Videos |
Setting the Video Orientation
You can set the video orientation to “Vertical,” “Horizontal (right),” or “Horizontal (left).”
BACK/HOME
Settings button
5-way button
Press and hold the BACK/HOME button until the Home menu appears.
Press the / / / button to select (Settings), and then press the button to confirm.
Press the / / / button to select “Video Settings,” and then press the button to confirm.
The list of “Video Settings” options appears.
Press the / / / button to select “Video Orientation,” and then press the button to confirm.
Continued
of Table
Index Menu Contents