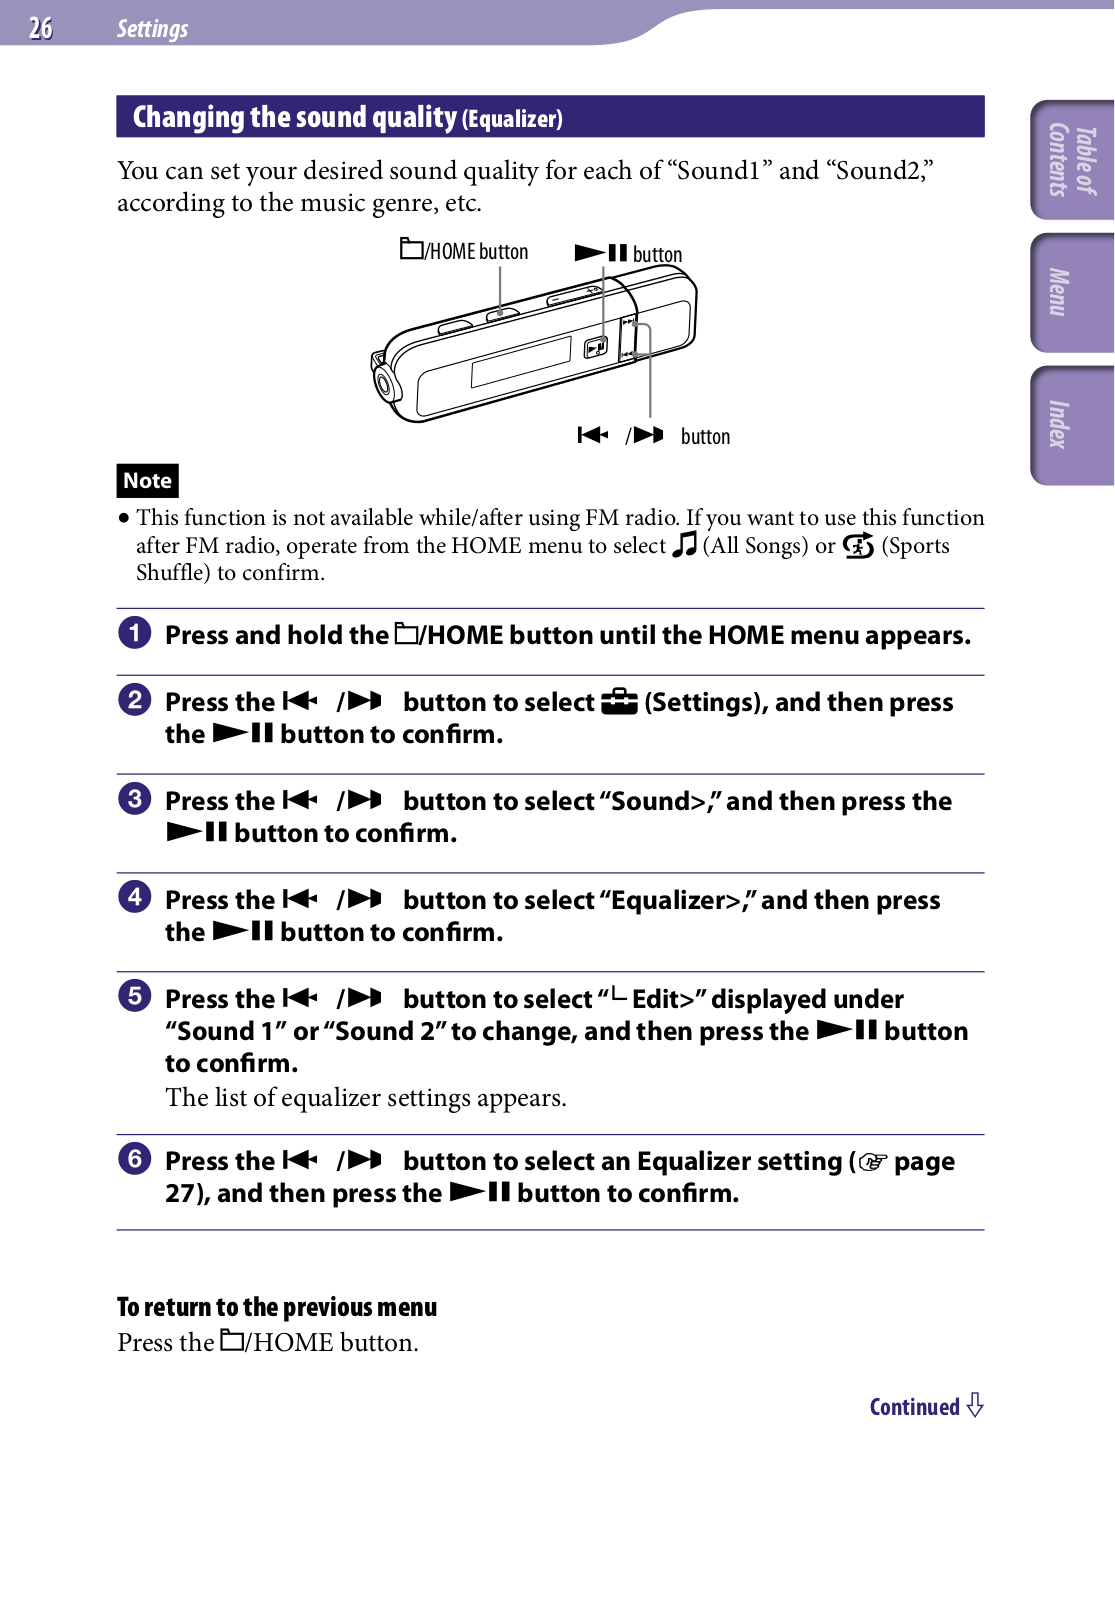
SONY NWD-E023, NWD-E025 User Manual

of Table

Index Menu Contents

Operation Guide

NWD-E023F / E025F

©2008 Sony Corporation

3-875-124-11 (1)

About the Manuals

The following manuals are supplied with the player. Additionally, after connecting the player, you can refer to the help provided within the software.

“Quick Start Guide” explains set up, enabling you to import songs to a computer, and to transfer them to the player.

“Precautions” explains important notes to prevent accidents.

“Troubleshooting” explains symptoms, causes and remedies when the player has problems.

This “Operation Guide” explains standard and advanced features, enabling you to make full use of the player and troubleshoot problems.

Browsing the Operation Guide

To use the buttons in the Operation Guide

Click the buttons located in the upper right of this manual to jump to Table of Contents, HOME Menu List, or Index.

Jumps to the table of contents

Find what you are looking for from a list of topics in the manual.

Jumps to the home menu list

Find what you are looking for from a list of option items in the player’s menu.

Jumps to the index

Find what you are looking for from a list of key words mentioned in the manual.

Continued

of Table

Index Menu Contents

Hints

You can jump to the indicated page by clicking a page number in the table of contents, in the home menu list, or in the index.

You can jump to the indicated page by clicking a page reference indication (e.g. page 4) on each page.

To search for a reference page by keyword, click the “Edit” menu, select “Search” of the Adobe Reader to display the navigation frame, type the keyword into the Search text box, and click “Search.”

Once you jump to another page, you can jump to the previous or next page by clicking

the or button located at bottom of the Adobe Reader screen.

Operation procedure may differ, depending on your Adobe Reader version.

To change the page layout

The buttons at the bottom of the Adobe Reader screen enable you to select how pages are displayed.

of Table

Index Menu Contents

Single Page

Pages are displayed one at a time. When you scroll, the display changes to a previous or succeeding page.

Continuous

Pages are displayed as a continuous roll of pages.

When you scroll, the previous or next pages scroll up or down continuously.

Continuous - Facing

Two pages are displayed side by side with each pair part of a continuous roll of pages. When you scroll, the previous and next pairs of pages scroll up or down continuously.

Facing

Two pages are displayed side by side. When you scroll, the display changes to previous or succeeding pairs of pages.

Table of Contents


HOME Menu List................................

6

Supplied Accessories...........................

7

Changing the Style-Up® Panel......................

8

Parts and Controls...............................

9

Front................................................................

9

Rear................................................................

11

Display...........................................................

12

Getting Started


Preparing the Player..........................

13

Charging the Player.....................................

13

Turning the Player On and Off..................

14

Getting Data......................................

15

Transferring Data.............................. 16

Transferring music in Windows


Explorer......................................................

16

Transferring music automatically using


the “Auto Transfer” software....................

17

To delete music transferred


to the player...............................................

18

Playing Music


Playing Music (All Songs)...........................

19

Playing Songs in Random Order for a

Specified Period of Time


(Sports Shuffle)...............................................

20

Searching for Songs (Search)....................

21

Changing the Play Mode (PLAY MODE)

........................................................................

22

Settings


Setting the File Display Language


(File Disp Language)......................................

23

Setting the Sound Quality (Sound)........

25

Selecting the sound quality


(Equalizer • Clear Bass).............................................

25

Changing the sound quality (Equalizer)........

26

Setting the EQ Custom values....................

28

Listening with Clear Stereo Sound


(Clear Stereo).................................................

30

Adjusting the Volume Level


(Dynamic Normalizer)...................................

31

Changing the Display Mode


(Display Mode)...............................................

32

Setting the Volume Level


(Volume Mode)..............................................

34

Setting to a Manual Volume


(Manual Volume).......................................................

34

Setting a Preset Volume (Preset Volume)........

35

Setting a Preset Volume value....................

36

Limiting the Volume (AVLS)....................

37

Turning Off the Beep Sound (Beep)......

38

Setting the Current Time


(Set Date-Time)..............................................

39

Setting the Date Format


(Date Disp Type)............................................

41

Setting the Time Format


(Time Disp Type)...........................................

42

Changing the USB Connection Setting

(USB Bus Powered)........................................

43

Setting the Power Save Screen


(Power Save Mode).........................................

44

Setting the Contrast of the Display


(Contrast).......................................................

45

Setting the Brightness of the Display


(Brightness)....................................................

46

Displaying the Player Information


(Information).................................................

47

Resetting to Factory Settings


(Reset All Settings).........................................

48

Formatting Memory (Format)..................

49

Listening to FM Radio


Listening to FM Radio......................

51

1 Switching to the FM radio.......................

51

2 Presetting broadcast stations


automatically (FM Auto Preset).........................

52

3 Selecting broadcast stations.....................

53

Presetting


Broadcast Stations Manually...........

55

Deleting preset broadcast stations.............

55

Setting the Reception (Scan Sens)............

56

Changing the Monaural/Stereo


(Mono/Auto)..................................................

57

Continued

of Table

Index Menu Contents

Useful Facts


Maximizing Battery Life....................

58

What are Format and Bit Rate?......... 59

What is audio format?.................................

59

Storing Data Other than


Audio Files......................................

60

Upgrading the Player’s Firmware...... 61

Troubleshooting


Troubleshooting................................

62

Messages............................................ 70

Additional Information


Precautions........................................

72

About Copyrights.............................. 79

Specifications..................................... 80

Index.................................................. 84

Note

Depending on the country/region in which you have purchased the player, some models may not be available.

of Table

Index Menu Contents

HOME Menu List

You can display the HOME menu by pressing and holding the /HOME button of the player.

The HOME menu is the starting point to play audio, search for songs, and change settings as follows.

Selectable menu items may differ, depending on the function or settings you use.

/HOME button

*1 5 icons appear in the display with the current selection in the center. The number of icons may differ depending on the function you use. By pressing the/ button, you can select an icon and press the button to confirm.

(Search)...................................

21

(Sports Shuffle)........................

20

(All Songs)................................

19

(FM)........................................

51

(Settings)


File Disp Language.......................

23

Sound..............................................

25

Equalizer...................................

26

Clear Stereo....................................

30

Display Mode.................................

32

Scan Sens........................................

56

Mono/Auto....................................

57

FM Auto Preset.............................

52

Advanced Settings


Date-Time


Set Date-Time.......................

39

Date Disp Type.....................

41

Time Disp Type....................

42

Power Save Mode.....................

44

Dynamic Normalizer...............

31

AVLS..........................................

37

Volume Mode...........................

34

Beep...........................................

38

Information...............................

47

Initialize


Reset All Settings.................

48

Format...................................

49

USB Bus Powered.....................

43

Contrast.....................................

45

Brightness.................................

46

of Table

Index Menu Contents

Supplied Accessories

Please check the accessories in the package.

Headphones (1)

Style-Up® Panel (1)

USB cap for Style-Up® Panel (1)

Quick Start Guide (1)

Operation Guide (PDF file)*1 (1)

“Auto Transfer” software*2 (1)

*1 Operation Guide (PDF file) is stored in the built-in flash memory of the player.

*2 The “Auto Transfer” software is stored in the built-in flash memory of the player. For details about this software, see “Transferring music automatically using the “Auto Transfer” software” ( page 17).

About the serial number

The serial number provided for this player is required for the customer registration. The number is shown on the rear of the player.

You can also check the serial number on this player ( page 47).

Continued

of Table

Index Menu Contents

SONY NWD-E023, NWD-E025 User Manual

Changing the Style-Up® Panel

You can select from a variety of Style-Up® Panel colors and matching USB cap.

Slide the HOLD switch in the direction of the arrow ( ) to deactivate the player, and then remove the USB cap.

HOLD switch

Remove the Style-Up® Panel as in the following illustrations.

Slide the Style-Up® Panel in the direction of the arrow slightly, and remove.

Attach the supplied Style-Up® Panel as in the following illustrations.

Place the supplied Style-Up® Panel on the front face of the player alongside then slide in to attach.

Guide line

Attach the supplied matching USB cap.

Notes

Be sure to attach the Style-Up® Panel when you use the player.

Be sure to attach Style-Up® Panel properly. Otherwise, you may not be able to operate the buttons of the player properly.

Handle the Style-Up® Panel with care. If the Style-Up® Panel becomes deformed, you may not be able to attach the Style-Up® Panel to the player or operate the buttons of the player.

If dust or dirt gets on the Style-Up® Panel, remove with a dry cloth, etc.

of Table

Index Menu Contents

Parts and Controls

Front

Headphones

PLAY MODE/SOUND*1 button

Switches the play mode ( page 22). Press and hold this button to change the sound quality setting ( page 25).

/HOME*1 button

When you press this button while playing or pausing a song, you can switch between Song control mode and Folder control mode. In Song control mode, the player skips to the beginning of the song. In Folder control mode, the player skips to the beginning of the folder.

You can check Song/Folder control mode by the or icon, which appears in the display.

Press and hold this button to display the HOME menu.

*1 Functions marked with on the player are activated if you press the corresponding buttons.

Likewise functions marked on the player are activated if you press and hold the corresponding buttons.

*2 There are tactile dots. Use them to help with button operations.

VOL +*2/– button

Adjusts the volume.

*2 button

During playback, appears in the display. If this button is pressed again, appears and playback pauses.

This button is also used to confirm menu items.

To turn off the power

When you pause song playback or FM reception by pressing the button, after a few seconds, “POWER OFF” appears and the display goes off automatically, then the player enters Sleep status. The player consumes very little battery power in Sleep status. If you press any button, the player is turned on.

Continued

of Table

Index Menu Contents

10

Headphones

Headphone jack

For connecting the headphones. Insert the jack pin until it clicks into place. If the headphones are connected improperly, the sound from the headphones may not sound right.

Display

See page 12.

/ button

Selects a song, folder, or menu item. You can also skip to the beginning of the song/folder, or fast-forward or fast-rewind as follows.

Pressing the ( ) button: Skips to the beginning of the current (or next) song/folder.

Pressing and holding the ( ) button during playback and releasing it at the desired point in Song control mode:

Fast-rewinds (or fast-forwards) the current song.

Pressing and holding the ( ) button soon after entering pause mode:

Skips to the beginning of the current (or next) song/folder, and if held longer, continues to skip through the previous (or next) song/folder.

Continued

of Table

Index Menu Contents

11

Rear

HOLD switch

You can protect the player against accidental operation by using the HOLD switch when carrying it.

By sliding the HOLD switch to the direction of the arrow ( ), all operation buttons are disabled. If you press buttons while the HOLD function is activated, “HOLD” appears in the display. If you slide the HOLD switch to the opposite position, the HOLD function is released.

RESET button

Resets the player when you press the RESET button with a small pin, etc ( page 62).

Strap hole

Used to attach a strap (sold separately).

Accessory hole

Used to attach the optional accessories.

USB cap

Remove the USB cap and connect the USB connector of the player to a USB port on your computer.

To remove the USB cap

Remove the USB cap as shown below.

USB connector

Continued

of Table

Index Menu Contents

12

Display

Icon indication

In Song control

appears, in

Folder control


appears on


the 1st line. In either


appears on the 2nd line.


Text/graphic information display

Displays the song title, folder name, artist name, current date/time, messages and menu items.

To change the display mode, proceed to the “Display Mode” menu ( page 32). Switch the display to power save mode if you do not intend to use the player for a while ( page 44).

Playing status indication

Displays the current play mode ( : playback, : pause, ( ): fastrewinds (fast-forwards), ( ): skips to the beginning of the current (or next) song /folder).

Lapse time indication

Displays the elapsed time.

Play mode indication

Sound quality setting indication

Displays the current sound quality icon ( page 25). If the sound quality is not set, no icon appears.

Remaining battery indication

Displays the remaining battery power.

Hint

For information on the FM radio display, see “Listening to FM Radio” ( page 51).

of Table

Index Menu Contents

Displays the current play mode icon ( page 22). If the play mode is set to Normal, no icon appears.

13 Getting Started

Preparing the Player

Charging the Player

The player’s battery is recharged while the player is computer.

Remove the USB cap and connect the USB

connector to a USB port on your computer.

When the remaining battery indication of the

display shows:


, charging is completed


(charging time is approx. 60 minutes*1).

When you use the player for the first time, or if

you have not used the player for a long time,

recharge it fully (until the


battery indication is


*1 This is the approximate charging time when the battery power is low and the “USB Bus Powered” setting ( page 43) is “High-Power 500mA” under room temperature. The charging time will vary depending on remaining battery power and battery condition. If the battery is charged in a low-temperature environment, the charging time will be longer. It will also be longer if you transfer audio file(s) to the player while charging.

Recharging the player

The battery icon in the display ( page 12) changes as shown below. See

The battery power gets low as shown in the battery icon. If “LOW BATTERY” appears, you cannot operate with the player. In this case, charge the battery by connecting to your computer.

Continued

of Table

Index Menu Contents

14

Getting Started

Notes

Charge the battery in an ambient temperature of between 5 to 35 ºC (41 to 95 ºF).

The number of times the battery can be recharged before it is used up is approximately 500 times. This number may vary, depending on the conditions under which you use the player.

The battery indicator on the display is only an estimation. For example, one section of black in the indicator will not always indicate exactly one-fourth of the battery’s charge.

“DATA ACCESS” appears in the display while the player accesses the computer. Do not disconnect the player while “DATA ACCESS” appears or the data being transferred may be damaged.

The control buttons on the player are all disabled while it is connected to a computer.

Some USB devices connected to the computer may interfere with proper operation of the player.

We do not guarantee the recharge of the battery using personally assembled computers or modified computers.

If the computer enters a power saving mode, such as the sleep or hibernation mode, even during USB connection, the player’s battery is not charged. Instead, the player continues to draw power from the battery, discharging it.

Do not leave the player connected for extended periods to a laptop computer that is not connected to AC power, because the player may discharge the computer’s battery.

Turning the Player On and Off

button

To turn on the player

Press any button to turn the player on.

To turn off the player

When you pause song playback or FM reception by pressing the button, after a few seconds, “POWER OFF” appears and the display goes off automatically, then the player enters Sleep status. The player consumes very little battery power.

of Table

Index Menu Contents

15

Getting Started

Getting Data

To enjoy audio data transferred to the player, you need to import audio data from the Internet or audio data from CDs to your computer before using the player. To import audio data from CDs, you need to use appropriate software for importing.

For details about supported file formats, see “Supported file format” ( page 80).

of Table

Index Menu Contents

16

Getting Started

Transferring Data

You can directly transfer data by dragging and dropping in Windows Explorer on your computer. Be sure to transfer data into the “MUSIC” folder.

Playable data hierarchy has rules. To transfer data properly, read the following instructions.

You can also transfer data using the supplied “Auto Transfer” software ( page 17).

Hint

Data hierarchy may differ, depending on your computer environment.

Notes

Do not disconnect the player while “DATA ACCESS” appears on the player as the data being transferred may be damaged.

Do not delete or change the name of the “MUSIC” folder. Otherwise, songs will not be played back on the player.

Transferring music in Windows Explorer

Connect the USB connector of the player to your computer.

Insert the USB connector fully.

Select the player on Windows Explorer, and then drag and drop data.

The player appears on Windows Explorer as [WALKMAN] or [Removable Disk].

Data hierarchy

(On Windows Explorer)

Drag and drop files or folders into the “MUSIC” folder. However, beyond the 8th level, neither files nor folders will

be recognized.

For details on the order of song playback on the player, see page 19.

1st

7th

8th

9th

of Table

Index Menu Contents

Continued

17

Getting Started

Transferring music automatically using the “Auto Transfer” software

You can transfer audio files automatically from a desired folder every time you connect the player to your computer using the “Auto Transfer” software stored on the player.

When you use the “Auto Transfer” software for the first time, transfer audio files as follows.

Connect the player directly to a USB port on your computer.

If the screen for selecting what you want Windows to do appears, select [Launch Auto Transfer] and click [OK]. “Auto Transfer” stored in the builtin flash memory of the player starts up, and then go to the step .

Double-click [My Computer] - [WALKMAN] or [Removable Disk] - (AutoTransfer.exe).

Set the desired items on the “Settings” screen.

Automatic search folder

You can specify a folder as the automatic search folder when you connect the player to your computer. [My Music] and [Desktop] are specified (checked) by default. If you want to search audio files from folders other than [My Music] and [Desktop], select a folder to search from.

“Specified folder(s)”

Folders to be searched except for [My Music] and [Desktop] appear. When you click [Add], the folder select screen appears and you can add a folder that is in “Specified folder(s).” If you want to delete a folder from “Specified folder(s),” select it, and then click [Remove].

“Search all folders”

When you check [Search all folders and drives], audio files will be searched from the hard disk drive(s) and folders in your computer. If you check [Search all folders and drives], search time may increase.

“Advanced”

The “Advanced Settings” screen appears. You can specify the extension for an audio file or folder to be transferred. For details, see “Setting items of the “Advanced Settings” screen” ( page 18).

Click [OK].

The screen for transfer appears and transfer starts.

When transferring completes, a message appears on the “Transfer log” section of the screen. Click at the right of the screen to close.

of Table

Index Menu Contents

Continued

18Getting Started

To quit the “Auto Transfer” software

Even if you close the screen of “Auto Transfer” software, the “Auto Transfer” software will not be quit. To quit the “Auto Transfer” software, right-click the

icon from the notification area, at the lower right of Desktop, then select [Exit Application] from the menu.

When you connect the player to your computer after the first time

The screen for transfer appears and transfer starts. Only audio files that have not been transferred to the player are transferred.

Setting items of the “Advanced Settings” screen

You can set the following items on the “Advanced Settings” screen.

Set files/destination for transfer

Extensions of audio files to be transferred and a list of destination folders appear.

[Add]

You can add an extension to an audio file to be transferred and the destination folder.

[Edit]

You can change the extension setting currently selected.

[Remove]

You can delete the extension currently selected.

Clear transfer history

When you click [Clear], the history of the audio file transferred before by “Auto Transfer” is cleared. If you clear the history, when you connect the player to your computer next time, all audio files in “Specified folder(s)” are transferred to the player.

Hints

To stop transferring audio files, click [Stop transfer] on the screen for transfer.

When you click [Settings] on the screen for transfer, the “Settings” screen appears. When you click [Display destination folder], the root folder of the player ([WALKMAN] or [Removable Disk]) appears on Windows Explorer.

Note

The “Auto Transfer” software is stored in the built-in flash memory of the player. If the built-in flash memory is formatted ( page 49), all files including the “Auto

Transfer” software will be erased. Be sure to verify the data stored in memory prior to formatting, and export necessary data to the hard disk of your computer or other device. If you format the built-in flash memory of the player accidentally, download the “Auto Transfer” software from the following support web sites and store it in the built-in flash memory of the player.

For customers in Europe: http://support.sony-europe.com/DNA

For customers in Latin America: http://www.sony-latin.com/index.crp

For customers in other countries/regions: http://www.sony-asia.com/support

For customers who purchased the overseas models: http://www.sony.co.jp/overseas/support/

To delete music transferred to the player

of Table

Index Menu Contents

Connect the player to your computer, and then delete any unnecessary audio files using Windows Explorer.

19

Playing Music

Playing Music (All Songs)

Songs transferred by the “Auto Transfer” software or Windows Explorer can be played back on the player.

/HOME button button

/ button

Press and hold the /HOME button until the HOME menu appears.

Press the / button to select (All Songs), and then press the button to confirm.

Playback starts from the last song you listened to. If you did not play any song, playback starts from the beginning.

Playback continues in order through the last song and then pauses. After a few seconds, “POWER OFF” appears, the display turns off automatically, and the player enters Sleep status.

To skip to the beginning of a song

By pressing the ( ) button while playing or pausing a song, the player skips to the beginning of the current (or next) song.

By pressing the /HOME button to change to the Folder control mode, and then pressing the ( ) button while playing or pausing a song, the player skips to the beginning of the first song of the current (or next) folder.

Hints

Songs are played back on the player in the following order.

The files under the “MUSIC” folder at the 1st level are played back. And then the folders at the 1st level are selected in folder name order. When the folder is selected, the files under the selected folder are played back in file name order. Subsequent folders/files are similarly played back in hierarchical order. There is no case distinction between A to Z characters for folder/file names.

You can change the play mode to random, repeat, etc., by pressing the PLAY MODE/ SOUND button ( page 22).

You can change the artist and song names on the property screen on your computer. When you did, transfer the audio files to the player again.

If the song title and the artist name can be obtained from an audio file, they can be displayed on the playback screen. However, if the song title and the artist name cannot be obtained from the audio file, the file name is displayed instead of the song title, and “Unknown” is displayed instead of the artist name.

The player does not support all additional information formats of files.

of Table

Index Menu Contents

(Sports Shuffle)

20

Playing Music

Playing Songs in Random Order for a Specified Period ofTime

The player randomly selects songs from all transferred songs and plays them in random order for a specified duration (between 1 and 99 minutes). “10 min” (10 minutes) is set by default.

/HOME button button

/ button

Note

“Search” is not available while/after using this function or FM radio. If you want “Search” after this function or FM radio, operate from the HOME menu to (All Songs) to confirm.

Press and hold


/HOME button until the HOME menu appears.


Press the / button to select(Sports Shuffle), and then press the button to confirm.

The screen to select the playback time appears.

Press the / button to select the playback time, and then press the button to confirm.

The selected playback time appears, and songs are randomly selected from all transferred songs and played back.

Elapsed time appears during playback. When the specified period passes, playback pauses. After a few seconds, “POWER OFF” appears, the display turns off automatically, and the player enters Sleep status.

Hints

When the specified period has passed and playback pauses, then the button is pressed to start playback again, the player starts playback in random order for the specified period of time again.

To stop “Sports Shuffle” and then start playing songs in another play mode, press and

hold

/HOME button until the HOME menu appears and

(All Songs),

and then press the button to play.


Notes

The play mode automatically switches to the shuffle mode during “Sports Shuffle.”

The display does not change to the one you set in “Display Mode” ( page 32) during “Sports Shuffle.”

of Table

Index Menu Contents

21

Playing Music

Searching for Songs (Search)

You can search for a song by its file name or its folder name. When you transfer audio data to the “MUSIC” folder using the “Auto Transfer” software or Windows Explorer, up to the 8th level under the “MUSIC” folder will appear on the player and can be played back.

/HOME button button

/ button

Notes

This function is not available while/after using “Sports Shuffle” or FM radio. If you want to use this function after “Sports Shuffle” or FM radio, operate from the HOME menu to

select

(All Songs) to confirm.

The “MUSIC” folder does not appear, but data under the “MUSIC” folder appears on the player.

Press and hold the /HOME button until the HOME menu appears.

Press the / button to select (Search), and then press thebutton to confirm.

The folder list or the song appears.

Press the / button to select a folder or song, and then press the button to confirm.

When you select a folder, the song or folder list(s) appear. When you select a song, the playback screen appears, and then the song playback starts. Repeat step if necessary until the desired song appears. The song you selected starts to play back and the playback of songs continues in order.

Hints

of Table

Index Menu Contents

The play mode ( page 22) does not change when (Search) is activated.

When you activate (Search), the songs are displayed by the file name in the song list.

22

Playing Music

Changing the Play Mode (PLAY MODE)

The player offers a variety of play modes, including random play and selected repeat play.

PLAY MODE/SOUND button

Note

This function is not available while/after using “Sports Shuffle” or FM radio. If you want to use this function after “Sports Shuffle” or FM radio, operate from the HOME menu to

select (All Songs) to confirm.

Press the PLAY MODE/SOUND button repeatedly to select the desired play mode.

List of play modes

Play mode type/Icon

Description


Normal/No icon

The current song is played, and then all transferred


songs are played once. (Default setting)

Folder/


All transferred songs of the folder containing the


current song are played once.


In this case, songs/folders under the folder


containing the current song cannot be played back.

Repeat All (all repeat)/

The current song is played, and then all transferred


songs are played repeatedly.

Repeat Folder

All transferred songs of the folder containing the

(folder repeat)/


current song are played repeatedly.


In this case, songs/folders under the folder


containing the current song cannot be played back.

Repeat 1 Song

The current song is played repeatedly.

(one song repeat)/ 1


Repeat Shuffle All

The current song is played, and then all transferred

(all song shuffle repeat)/

songs are played in random order.

SHUF


Repeat Shuffle Folder

The current song is played, and then all transferred

(folder shuffle repeat)/

songs of the folder containing the current song are


SHUF

played in random order.


In this case, songs/folders under the folder


containing the current song cannot be played back.

of Table

Index Menu Contents

23 Settings

Setting the File Display Language

(File Disp Language)

You can select from 8 languages in which to display the transferred folder and audio file name.

/HOME button button

/ button

Notes

This function is only available in pause mode.

When the remaining battery is low, you cannot set this function. Charge the battery before setting.

This function is not available while/after using FM radio. If you want to use this function

after FM radio, operate from the HOME menu to select (All Songs) to confirm.

Depending on the country/region in which you have purchased the player, the default setting may differ.

Press and hold the /HOME button until the HOME menu appears.

Press the / button to select (Settings), and then press the button to confirm.

Press the / button to select “File Disp Language>,” and then press the button to confirm.

The language list appears.

Press the / button to select a language ( page 24), and then press the button to confirm.

When you select a language other than one already set, “Create Database?” appears.

When you select the same language as before setting of step , the screen returns to step .

Press the / button to select “OK,” and then press the button to confirm.

“ACCESS” appears and the database of the player updates.

To return to the previous menu

Press the /HOME button.

of Table

Index Menu Contents

Continued

24 Settings

Setting

Description


English

Folders and audio files are displayed in English.

Español

Folders and audio files are displayed in Spanish.

Português

Folders and audio files are displayed in Portuguese.

Русский

Folders and audio files are displayed in Russian.

Українська

Folders and audio files are displayed in Ukrainian.


Folders and audio files are displayed in Korean.


Folders and audio files are displayed in Simplified


Chinese.


Folders and audio files are displayed in Traditional


Chinese.

Notes

After you select “OK” in step , it may take time until updating completes.

If you display audio data that is not one of the 8 setting languages, “ ” will be displayed instead of the audio data name.

Audio data order may also change, depending on the language you set.

of Table

Index Menu Contents

25 Settings

Setting the Sound Quality (Sound)

You can preset 2 sound quality settings and switch between them during playback or in pause mode by pressing and holding the PLAY MODE/SOUND button.

Furthermore, you can set the sound quality setting according to the music genre, etc., by selecting an “Equalizer”setting. If you set “Clear Bass,” you will hear clear sound without distortion. It is recommended to use “Clear Bass” when you adjust the volume up or emphasize the bass sound of “Equalizer.”

Selecting the sound quality (Equalizer • Clear Bass)

You can select preset sound quality settings from either “Equalizer” or “Clear Bass.”

Default settings

Sound quality

Sound 1

Sound 2

Sound OFF

(Indication)

( 1)

( 2)

(None)


Equalizer

EQ Custom

EQ Custom

Off


(0, 0, 0, 0, 0)

(0, 0, 0, 0, 0)


Clear Bass (bass)

+1

+3

0

PLAY MODE/SOUND button

Note

This function is not available while/after using FM radio. If you want to use this function after FM radio, operate from the HOME menu to select (All Songs) or (Sports Shuffle) to confirm.

Press and hold the PLAY MODE/SOUND button.

Each time the button is pressed, the sound quality setting is changed as follows:

None (Sound OFF)

To return to normal sound quality

Select None (Sound OFF).

of Table

Index Menu Contents

Continued

26 Settings

Changing the sound quality (Equalizer)

You can set your desired sound quality for each of “Sound1” and “Sound2,” according to the music genre, etc.

/HOME button button

/ button

Note

This function is not available while/after using FM radio. If you want to use this function after FM radio, operate from the HOME menu to select (All Songs) or (Sports Shuffle) to confirm.

Press and hold the /HOME button until the HOME menu appears.

Press the / button to select (Settings), and then press the button to confirm.

Press the / button to select “Sound>,” and then press thebutton to confirm.

Press the / button to select “Equalizer>,” and then press the button to confirm.

Press the / button to select “ Edit>” displayed under “Sound 1” or “Sound 2” to change, and then press the button to confirm.

The list of equalizer settings appears.

Press the / button to select an Equalizer setting ( page 27), and then press the button to confirm.

To return to the previous menu

Press the /HOME button.

of Table

Index Menu Contents

Continued

Loading...
+ 59 hidden pages