

Page 1
This warranty is valid only in the United States.
2-638-632-11(1)
Operating Instructions
MZ-M10
Portable MD Recorder MZ-M10
Portable
MD Recorder
“WALKMAN” is a registered trademark of Sony
Corporation to represent Headphone Stereo products.
is a trademark of Sony Corporation.
Recorder
Operation ___________
Software
Operation ___________
page 12
page 86
Printed in Malaysia
*263863211 (1)*
© 2005 Sony Corporation
Page 2

WARNING
To prevent fire or shock hazard, do
not expose the unit to rain or
moisture.
Do not install the appliance in a
confined space, such as a bookcase or
built-in cabinet.
To prevent fire, do not cover the
ventilation of the apparatus with
newspapers, tablecloths, curtains, etc.
And don’t place lighted candles on the
apparatus.
To prevent fire or shock hazard, do not
place objects filled with liquids, such as
vases, on the apparatus.
Certain countries may regulate disposal of
the battery used to power this product.
Please consult with your local authority.
Caution
The use of optical instruments with this
product will increase eye hazard.
CAUTION
RADIATION WHEN OPEN
AVOID EXPOSURE TO BEAM
CAUTION — CLASS 1M INVISIBLE
LASER RADIATION WHEN OPEN
DO NOT VIEW DIRECTLY WITH
OPTICAL INSTRUMENTS
— INVISIBLE LASER
Information
IN NO EVENT SHALL SELLER BE
LIABLE FOR ANY DIRECT,
INCIDENTAL OR
CONSEQUENTIAL DAMAGES OF
ANY NATURE, OR LOSSES OR
EXPENSES RESULTING FROM
ANY DEFECTIVE PRODUCT OR
THE USE OF ANY PRODUCT.
For customers who purchased
this product in the USA
Owner’s Record
The serial number is located at the rear of
the disc compartment lid and the model
number is located at the top and bottom.
Record the serial number in the space
provided below. Refer to them whenever
you call upon your Sony dealer regarding
this product.
Model No. MZ-M10
Serial No.
Product registration
Please register this product on line at
www.sony.com/walkmanreg
<http://www.sony.com/walkmanreg>
Proper registration will enable us to send
you periodic mailings about software
upgrades, new products, services and
other important announcements. Thank
you.
If you have any questions about
this product, contact:
— http://www.sony.com/
walkmansupport
— Sony Network Portable Audio
Support Line
1-(866)-456-7669
— Sony Customer Information
Services Center
12451 Gateway Blvd. Fort Myers,
FL 33913
2
Page 3
Declaration of Conformity
Trade Name: SONY
Model No.: MZ-M10
Responsible Party: Sony Electronics
Inc.
Address: 16450 W. Bernardo Dr, San
Diego, CA 92127 USA
Telephone No.: 858-942-2230
This device complies with Part 15 of
the FCC Rules. Operation is subject to
the following two conditions: (1) This
device may not cause harmful
interference, and (2) this device must
accept any interference received,
including interference that may cause
undesired operation.
This equipment has been tested and found
to comply with the limits for a Class B
digital device, pursuant to Part 15 of the
FCC Rules. These limits are designed to
provide reasonable protection against
harmful interference in a residential
installation. This equipment generates,
uses, and can radiate radio frequency
energy and, if not installed and used in
accordance with the instructions, may
cause harmful interference to radio
communications. However, there is no
guarantee that interference will not occur
in a particular installation. If this
equipment does cause harmful
interference to radio or television
reception, which can be determined by
turning the equipment off and on, the user
is encouraged to try to correct the
interference by one or more of the
following measures:
— Reorient or relocate the receiving
antenna.
— Increase the separation between the
equipment and receiver.
— Connect the equipment into an outlet
on a circuit different from that to
which the receiver is connected.
— Consult the dealer or an experienced
radio/TV technician for help.
You are cautioned that any changes or
modifications not expressly approved in
this manual could void your authority to
operate this equipment.
For customers in the USA and
Canada only
RECYCLING NICKEL METAL
HYDRIDE BATTERIES
Nickel Metal
Hydride batteries
are recyclable.
You can help
preserve our
environment by
returning your used
rechargeable batteries to the collection
and recycling location nearest you.
For more information regarding
recycling of rechargeable batteries, call
toll free
1-800-822-8837 or visit
http://www.rbrc.org/
Caution: Do not handle damaged or
leaking Nickel Metal Hydride batteries.
The validity of the CE marking is
restricted to only those countries where it
is legally enforced, mainly in the
countries EEA (European Economic
Area).
3
Page 4

Disposal of Old Electrical &
Electronic Equipment
(Applicable in the European
Union and other European
countries with separate
collection systems)
This symbol on the product
or on its packaging indicates
that this product shall not be
treated as household waste.
Instead it shall be handed
over to the applicable
collection point for the
recycling of electrical and electronic
equipment. By ensuring this product is
disposed of correctly, you will help
prevent potential negative consequences
for the environment and human health,
which could otherwise be caused by
inappropriate waste handling of this
product. The recycling of materials will
help to conserve natural resources. For
more detailed information about recycling
of this product, please contact your local
city office, your household waste disposal
service or the shop where you purchased
the product.
Applicable accessories: Remote control,
Earphones
Notice for users
On the supplied software
• Copyright laws prohibit reproducing the
software or the manual accompanying it
in whole or in part, or renting the
software without the permission of the
copyright holder.
• In no event will SONY be liable for any
financial damage or loss of profits,
including claims made by third parties,
arising out of the use of the software
supplied with this recorder.
• In the event a problem occurs with this
software as a result of defective
manufacturing, SONY will replace it.
However, SONY bears no other
responsibility.
• The software provided with this
recorder cannot be used with equipment
other than that which is so designated.
• Please note that, due to continued efforts
to improve quality, the software
specifications may be changed without
notice.
• Operation of this recorder with software
other than that provided is not covered
by the warranty.
• The ability to display specific languages
by the software will depend on the
installed OS on your PC. For better
results, please ensure that the installed
OS is compatible with the desired
language you want to display.
— We do not guarantee all the
languages will be able to be
displayed properly on the software.
— User-created characters and some
special characters may not be
displayed.
• Depending on the type of the text and
characters, the text shown by the
software may not be displayed properly
on the device. This is due to:
— The capability of the connected
device.
— The device is not functioning
normally.
4
Page 5

• SonicStage and the SonicStage logo are
trademarks or registered trademarks of
Sony Corporation.
• MD Simple Burner, OpenMG, “Magic
Gate
”, “MagicGate Memory Stick”,
“Memory Stick”, Hi-MD, Net MD,
ATRAC, ATRAC3, ATRAC3plus and
their logos are trademarks of Sony
Corporation.
• Microsoft, Windows, Windows NT and
Windows Media are trademarks or
registered trademarks of Microsoft
Corporation in the United States and /or
other countries.
• IBM and PC/AT are registered
trademarks of International Business
Machines Corporation.
• Macintosh is a trademark of Apple
Computer, Inc. in the United States and/
or other countries.
• Pentium is a trademark or a registered
trademark of Intel Corporation.
• MPEG Layer-3 audio coding
technology and patents licensed from
Fraunhofer IIS and Thomson.
• All other trademarks and registered
trademarks are trademarks or registered
trademarks of their respective holders.
• ™ and ® marks are omitted in this
manual.
• CD and music-related data from
Gracenote, Inc., copyright © 2000-2004
Gracenote. Gracenote CDDB
R
Client
Software, copyright 2000-2004
Gracenote. This product and service
may practice one or more of the
following U.S. Patents: #5,987,525;
#6,061,680; #6,154,773, #6,161,132,
#6,230,192, #6,230,207, #6,240,459,
#6,330,593, and other patents issued or
pending. Services supplied and/or
device manufactured under license for
following Open Globe, Inc. United
States Patent 6,304,523.
Gracenote is a registered trademarks of
Gracenote. The Gracenote logo and
logotype, and the
Gracenote
“Powered by
” logo are trademarks of
Gracenote.
On the “Software Operation”
section
• In Software Operations section, “Net
MD” refers to the recorder with
standard disc inserted and “Hi-MD”
refers to the recorder with a Hi-MD disc
or a standard disc in Hi-MD mode
inserted.
• The displayed items in the illustrations
that appear in this section may differ
from the actual items displayed by the
software.
• Explanations in this section cover
general Hi-MD/Net MD products. For
this reason, some explanations (and
some illustrations) may not be
applicable to your Hi-MD/Net MD.
Please refer to the operating instructions
of your Hi-MD/Net MD as well.
On the use of computers
Explanations in this manual assume a
familiarity with basic computer
operations. For details on the use of your
computer and the operating system,
please refer to the respective manuals.
Program © 2001, 2002, 2003, 2004, 2005
Sony Corporation
Documentation © 2005 Sony Corporation
5
Page 6

Table of contents
About available functions and supplied
manuals ...........................................................10
Recorder Operation
Looking at controls .............................................14
Getting started ....................................................17
Recording a disc right away! .............................. 21
Playing a disc right away! ...................................25
Using menus ........................................................27
How to use the menu items .........................................................................27
List of menus ............................................................................................... 28
Various ways of recording ..................................30
Before recording .........................................................................................30
Viewing various information ......................................................................31
Recording from a microphone ....................................................................32
Recording from a TV or radio (Analog Recording) ...................................34
Selecting the recording mode ......................................................................34
Adjusting the recording level manually ...................................................... 35
Adding track marks while recording ...........................................................36
Recording without creating a new group ....................................................37
To start/stop recording in sync with the sound source
(Synchro-recording) ............................................................................... 38
Various ways of playback ...................................39
Viewing various information ......................................................................39
Selecting the play mode ..............................................................................40
Searching for a track (Search) ..................................................................... 43
Selecting the sound quality (6-Band Equalizer) .........................................44
6
Page 7

Editing recorded tracks ...................................... 46
Before editing ..............................................................................................46
Adding titles (Title Input) ...........................................................................46
Assigning tracks or groups as a new group (Group Set) .............................49
Releasing a group setting (Group Release) .................................................50
Moving recorded tracks or groups (Move) .................................................50
Erasing tracks and the entire disc (Erase) ...................................................52
Dividing a track (Divide) ............................................................................53
Combining tracks (Combine) ......................................................................54
Formatting the disc (Format) .......................................................................55
Other operations ................................................. 56
Changing the displayed menu items (Menu Mode) ....................................56
Protecting your hearing (AVLS) .................................................................56
Turning off the beep sound .........................................................................56
Storing the settings for individual discs (Disc Memory) ............................57
Starting the playback quickly (Quick Mode) ..............................................57
Selecting the disc mode (Disc Mode) .........................................................58
Adjusting the contrast of the display window (Contrast Adjustment) ........58
Changing the operational direction of the display ......................................59
Selecting the display language ....................................................................59
Using the recorder with a computer .................. 60
What you can do through connection with a computer ...............................60
Connecting the recorder to your computer ..................................................61
Storing non-audio data to a disc ..................................................................62
Viewing non-audio data stored on the disc in the display window of the
recorder (File List) .................................................................................63
Additional information ........................................ 65
Precautions ..................................................................................................65
Specifications ..............................................................................................67
Troubleshooting and explanations ..................... 69
Troubleshooting ..........................................................................................69
Messages .....................................................................................................77
Explanations ................................................................................................81
7
Page 8

Software Operation
What you can do with SonicStage/MD Simple
Burner ..............................................................86
Installing ............................................................. 88
Providing the required system environment ............................................... 88
Installing the software onto your computer ................................................89
Using SonicStage ................................................91
Importing audio data ...................................................................................91
Transferring audio data from your computer to the MD Walkman ............93
Transferring back audio data from the MD Walkman to your computer ...95
Writing audio data to a CD-R/CD-RW disc ...............................................98
Using SonicStage Help .............................................................................100
Referring to SonicStage Help ...................................................................102
Using MD Simple Burner ...................................104
Before using MD Simple Burner ..............................................................104
Recording using MD Walkman operations (Simple mode) ......................105
Recording by computer operations (Standard mode) ...............................106
Other information ..............................................108
Uninstalling SonicStage/MD Simple Burner ............................................108
On copyright protection ............................................................................109
Troubleshooting ........................................................................................110
Index ......................................................................................................... 113
8
Page 9

9
Page 10
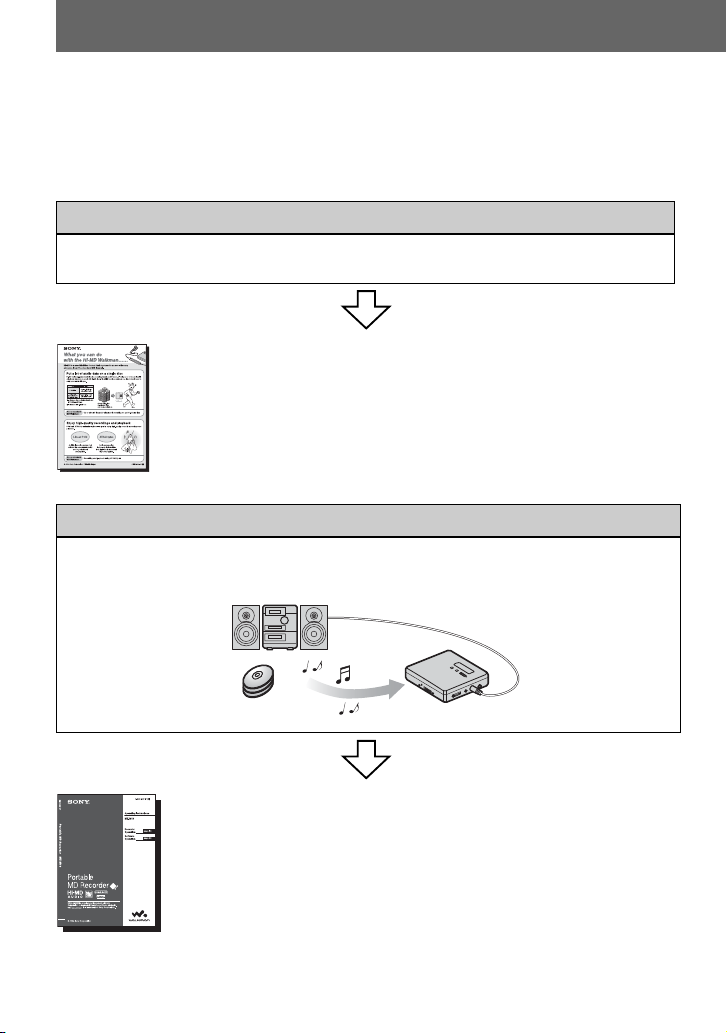
About available functions and supplied manuals
This section explains the functions of this portable MiniDisc recorder and the manuals that
have been supplied with it. Please refer to the manual that applies to each use of the
recorder.
Learning more about Hi-MD
“Hi-MD” is a new MiniDisc format with advanced capabilities over the standard MD
format.
The “What you can do with the Hi-MD Walkman” flyer
Using the recorder
You can enjoy recording from a CD player or a microphone, then enjoy listening to the
recordings that you made.
This flyer explains the major features of Hi-MD Walkman and how it
differs with standard MD Walkman.
10
Recorder Operation (pages 12 to 85)
This section explains all of the recorder functions. It also gives details
on the problems you may encounter while using the recorder and how to
solve them, and about what to do when a message appears in the display.
, When you encounter any problems or need more explanation
Refer to “Troubleshooting and explanations” (page 69).
Page 11
Using the recorder while it is connected to a computer (Windows)
The supplied SonicStage software allows you to transfer audio data between the recorder
and the computer.
The supplied MD Simple Burner software allows you to record audio data to the recorder.
Audio CDs
Internet
Music files
Software Operation (pages 86 to 112)
This section explains the installation and basic operations of the supplied SonicStage/MD
Simple Burner software.
SonicStage Help
This is an online help that you can view on your computer
screen.
Online help explains the detailed operations and information
about SonicStage software. You can also refer to online help
if you encounter any problems while using the SonicStage.
Using the recorder while it is connected to a computer (Macintosh)
The supplied Hi-MD WAV Importer allows you to import audio data recorded in
linearPCM on a Hi-MD Walkman to a Macintosh computer, automatically converting
linearPCM audio data to WAV-format.
LinearPCM
audio data
Hi-MD WAV
Importer
The “Hi-MD WAV Importer for Mac” operating
instructions
This operating instructions explains the installation and operations of
the supplied Hi-MD WAV Importer software.
11
Page 12
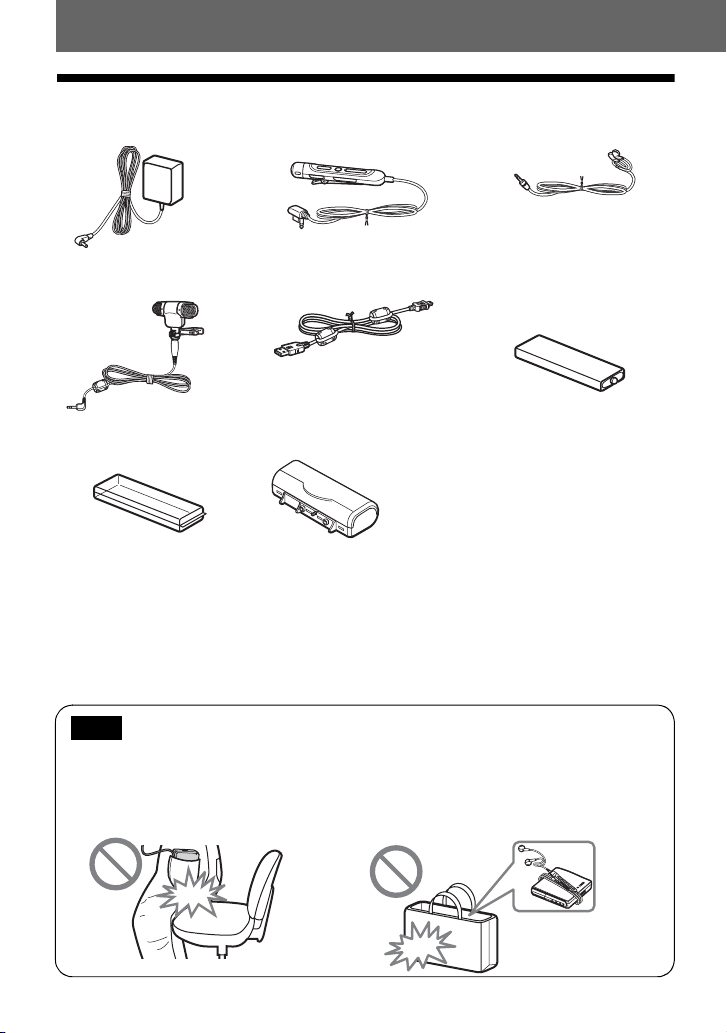
Checking the supplied accessories
AC power adaptor (1) Remote control (except for the
North American model) (1)
Earphones (1)
A clamp filter is attached to
the cord for the North
American model.
Stereo microphone (1)
S
S
T
T
E
E
R
R
E
E
O
O
Battery carrying case (1)
USB cable (1)
Clamp filters are not attached to
the cord for the Southeast Asian,
African, Mexican and tourist
models.
Dry battery case (1)
NH-10WM Nickel metal
hydride rechargeable
battery (1)
Optical cable (except for the North American and Mexican models) (1)
Clamp filters (small-size)
• for the North American model (1)
• for the European, Australian, Hong Kong and Korean models (2)
CD-ROM (SonicStage/MD Simple Burner/Hi-MD WAV Importer for Mac) (1)*
Carrying pouch (1)
* Do not play a CD-ROM on an audio CD player.
Note
When using this unit, remember to follow the precautions below in order to avoid warping the
cabinet or causing the unit to malfunction.
• Make sure not to sit down with the unit in
your back pocket.
• Make sure not to put the unit into a bag with the
remote control or the earphones cord wrapped
around it and then subject the bag to strong impact.
12
Page 13
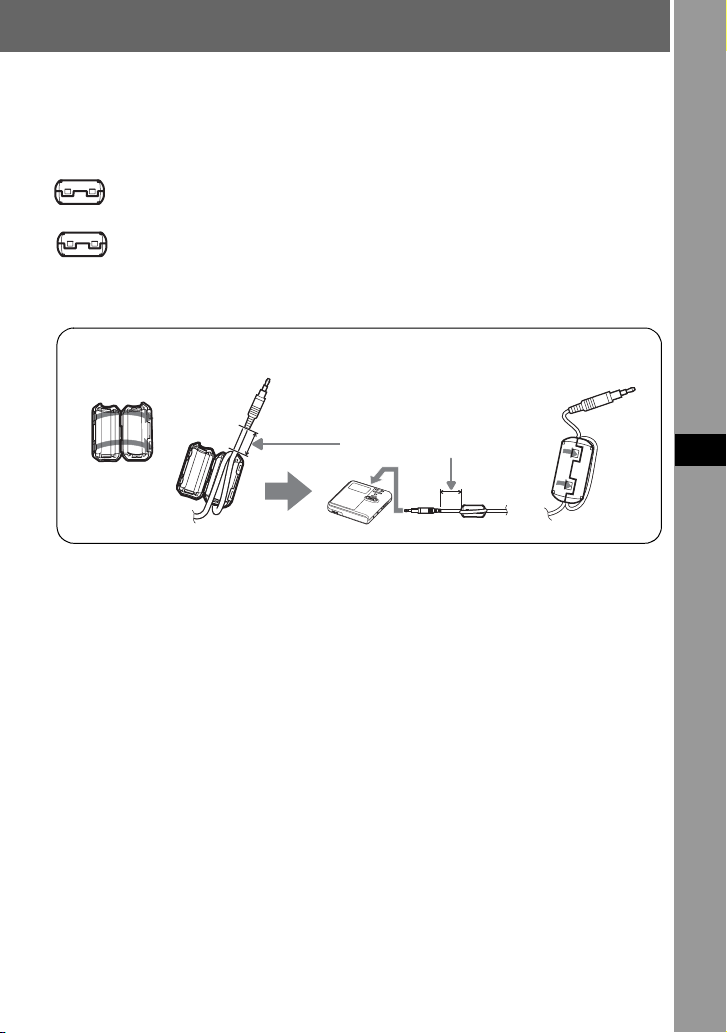
How to use the supplied clamp filters
When using the recorder connected to the computer, make sure to attach the clamp filters in
the way described. (You must attach a clamp filter to comply with the applicable EMC
standards.) It is unnecessary to attach the clamp filters if you use the unit without
connecting it to the computer.
• For the supplied remote control: small-size clamp filter/ESD-SR-110
(for the European, Australian, Hong Kong and Korean models)
• For the optional line cable (RK-G129/RK-G136): small-size clamp filter/
ESD-SR-110
(except for the Southeast Asian, African, Mexican and tourist models)
1
2
Refer to step 2 below for the
distance from the plug
connected to the recorder.
3
1 Open the clamp filter.
2 Attach the clamp filters as follows.
For the supplied remote control: Wind the cord around the clamp filter once/Approx. 4
cm (1.6 in.) from the plug
For the optional line cable: Pass the cord through the clamp filter/Approx. 1 cm (0.4
in.) from the plug
3 Close the clamp filter. Make sure the clasps are fully engaged.
Recorder Operation
13
Page 14
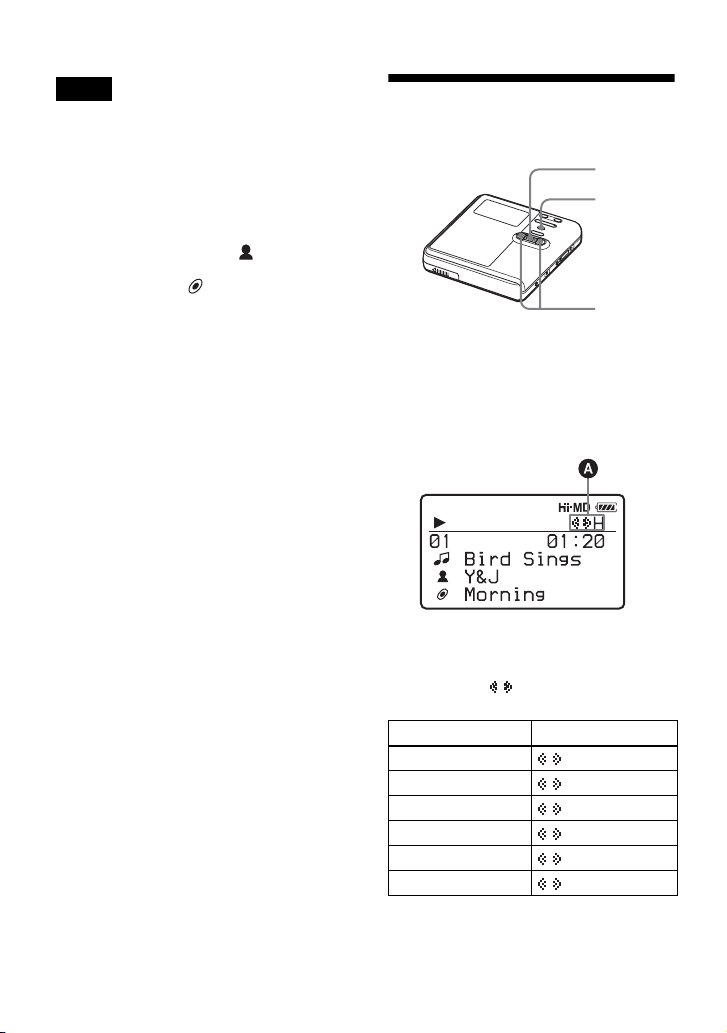
Looking at controls
The recorder
A MIC (PLUG IN POWER) jack
B LINE IN (OPT) jack
C HOLD switch
Slide the switch in the direction of the
arrow to disable the buttons on the
recorder. To prevent the buttons from
being accidentally operated when you
carry the recorder, use this function.
D Display window
E OPEN switch
F Jog dial (N (play)/ENT)
G . (AMS, fast rewind), > (AMS,
fast forward) button
H Battery compartment
I X (pause) button
14
1)
J VOL (volume) +
1)
, – button
K i (earphones) jack
L REC(+N)/T MARK button
M •SEARCH/ MENU button
2)
N x (stop) • CANCEL/CHG button
O DC IN 3V jack
P USB cable connecting jack
Q The cover of the USB cable
connecting jack
R Terminals for attaching dry battery
case
1)
There are tactile dots beside the VOL + button
and the MIC (PLUG IN POWER) jack.
2)
• indicates a function that requires a slight
press of the button. indicates a function
that requires pressing the button for 2 seconds
or more.
Page 15
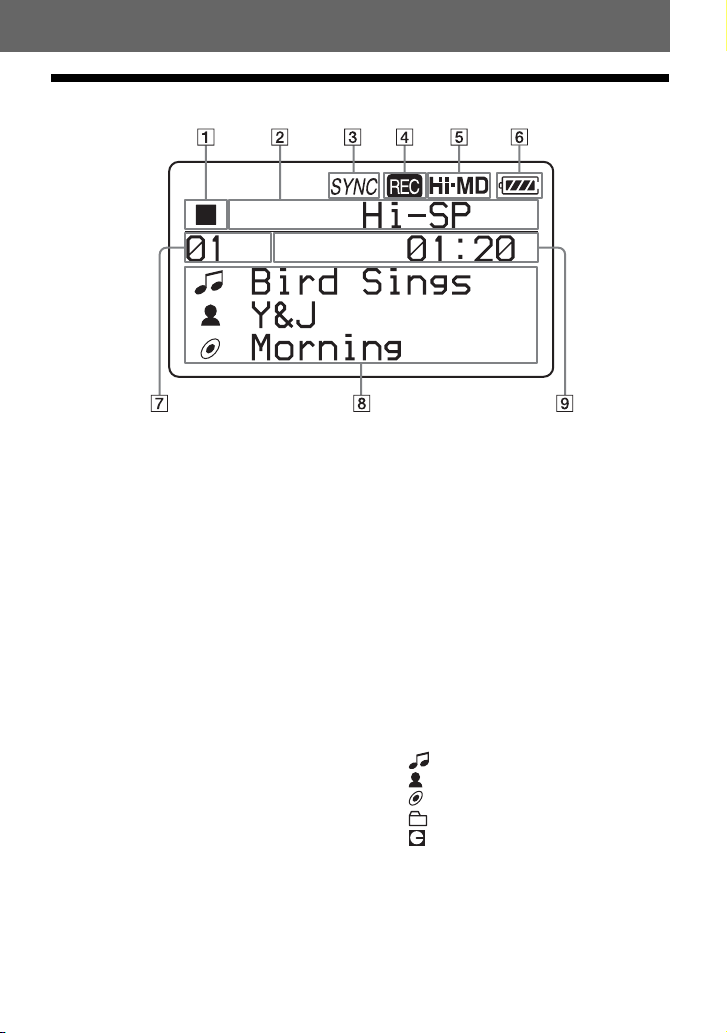
The display window of the recorder
A Operating condition indication display
area
Displays the indications of each
operating condition.
x: stop
N: play
X: pause
m: fast rewind
M: fast forward
., >: AMS
B Selected operating condition display
area
Displays the recording mode, play
mode, or selected menu item, etc.
C SYNC (synchro-recording) indication
D REC indication
Lights up during recording or file
transfer from the Windows computer.
When flashing, the recorder is in
record standby mode.
E Hi-MD/MD indication
“Hi-MD” lights up when the disc used
in Hi-MD mode is inserted in the
recorder and “MD” lights up when the
disc used in MD mode is inserted in
the recorder.
F Battery indication
Shows the approximate remaining
battery power. If the batteries are
weak, the indication becomes empty
and starts flashing.
G Track number display area
H Text information display area
Displays titles, menu items, error
messages, etc. Titles are preceded by
the following icons.
: track name
: artist name*
: album name*
: group name
: disc name
* Appears only for discs used in Hi-MD mode.
I Time display area
Displays the elapsed time, remaining
time of the track or disc, etc.
15
Page 16
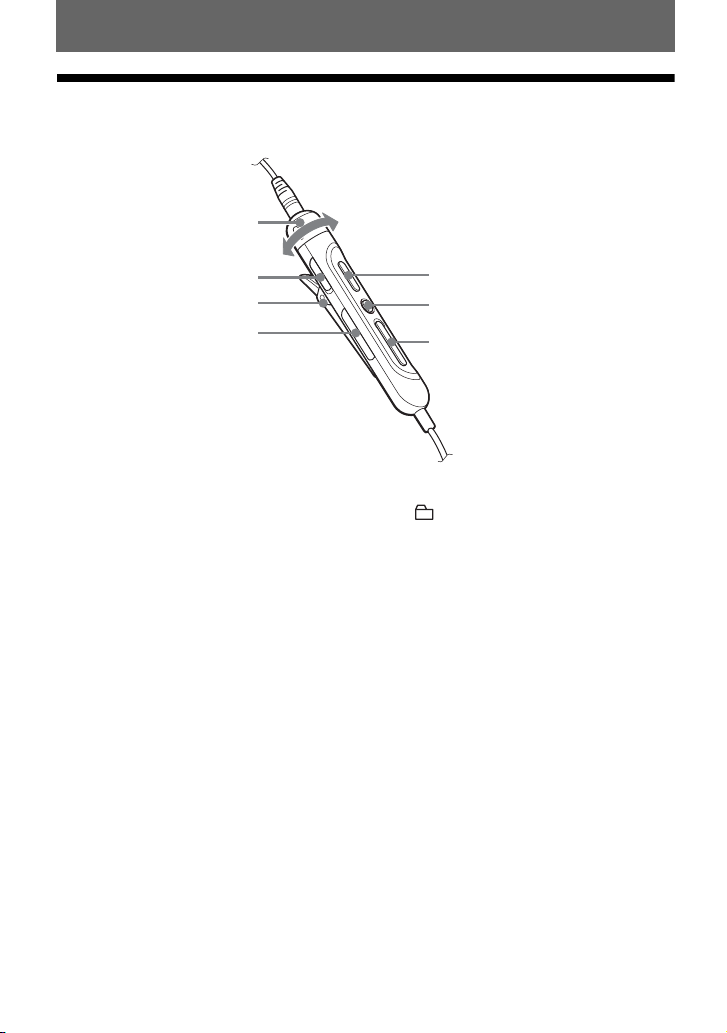
The earphones with a remote control (except for
the North American model)
A
B
C
D
A VOL (volume) +, – control
B HOLD switch
Slide the switch in the direction of the
arrow to disable the buttons on the
remote control. To prevent the buttons
from being accidentally operated
when you carry the recorder, use this
function.
E
F
G
C Clip
D (group) +, – button
E NX (play, pause) button
F x (stop) button
G . (AMS, fast rewind), > (AMS,
fast forward) button
16
Page 17
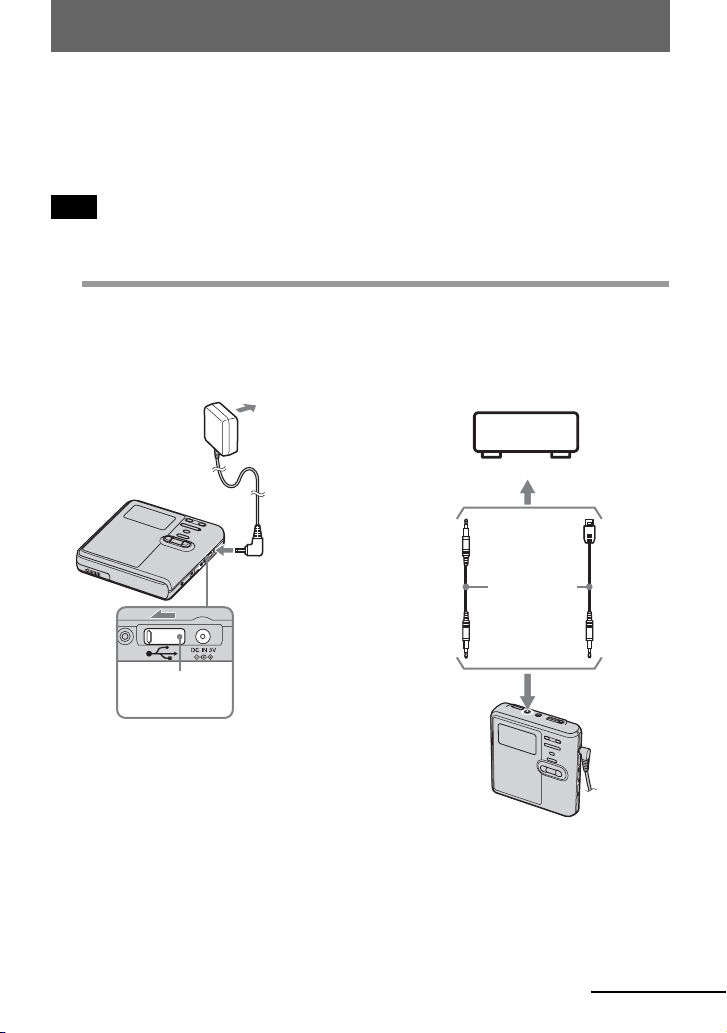
Getting started
Charge the rechargeable battery before using.
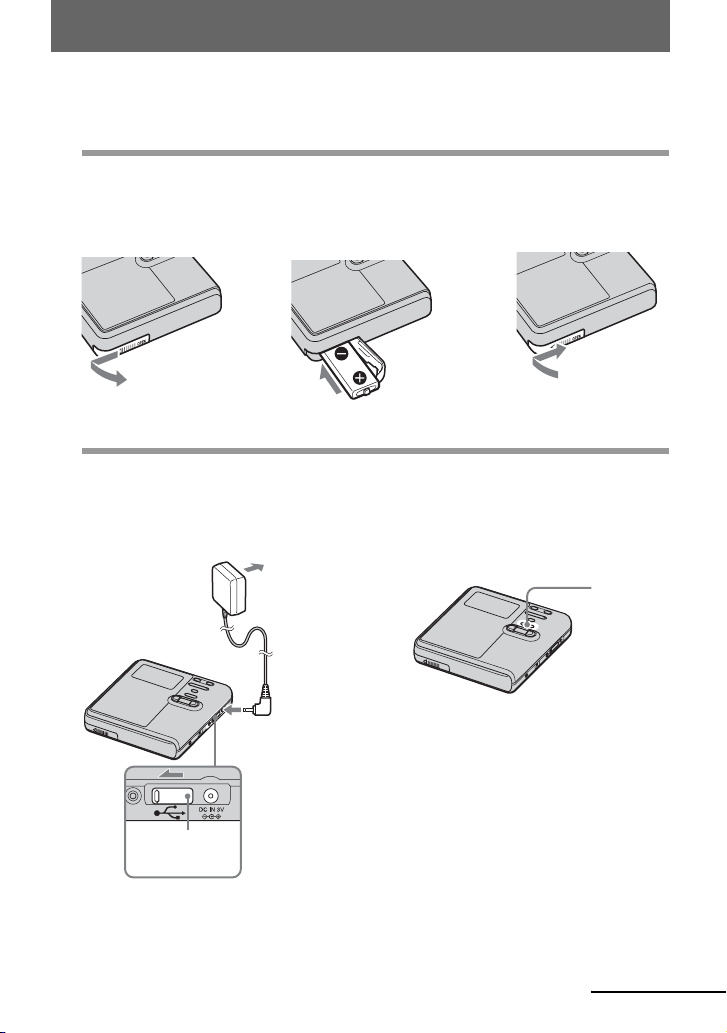
1
Insert the rechargeable battery.
2Insert the NH-10WM
battery compartment lid.
2
Charging the rechargeable battery.
1Connect the AC power adaptor to DC IN
3V on the recorder and the AC power
adaptor to a wall outlet.
AC power
adaptor
rechargeable battery E
end first.
2Press x • CANCEL/CHG.
To a wall
outlet
3Close the lid.1Slide OPEN to open the
“Charging” appears in the display, and
charging starts. When charging is
completed, “Charging” disappears.
x •
CANCEL/
CHG
Make sure the
cover is closed.
To D C IN 3 V
continued
17
Page 18
z
If the display disappears after a short time, the
•
rechargeable battery is sufficiently charged.
Using the alkaline dry battery for extended operation
• If the rechargeable battery is completely
drained at the start of charging, it will take
about 2.5 hours for the rechargeable battery
become sufficiently charged. The charging
time may vary, depending on the condition of
the rechargeable battery.
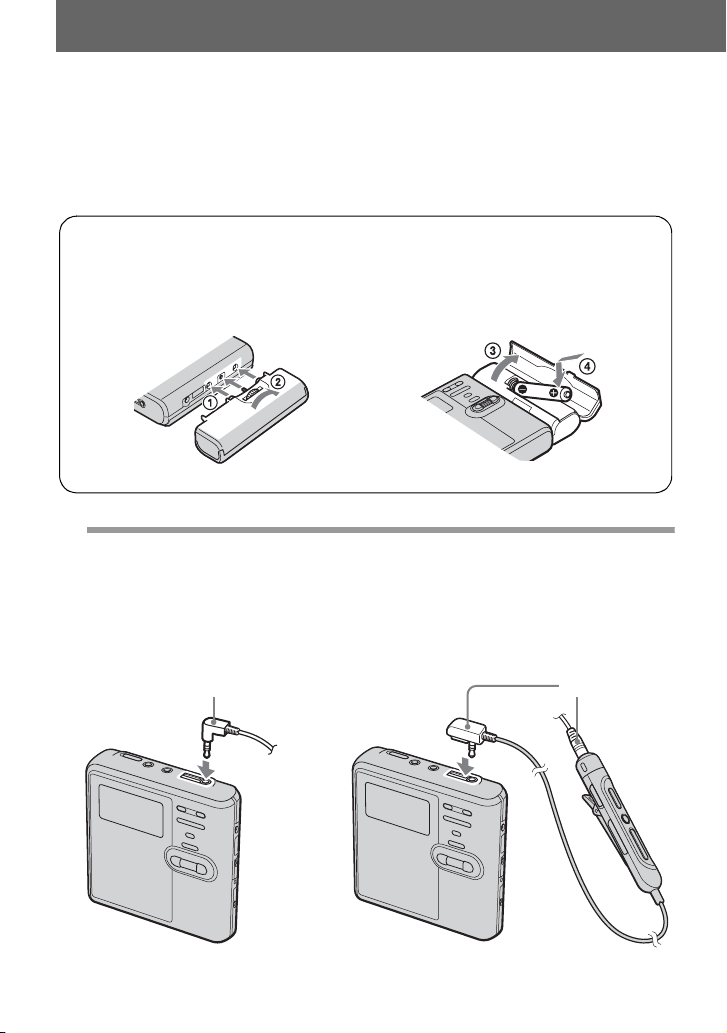
1 Attach the dry battery case to the recorder.
Rear of the
recorder
3
Make connections.
For USA and Canadian
models
Connect the earphones to i.
Connect firmly
To i
2 Insert a LR6 (size AA) alkaline dry
battery.
Inset the battery
E end first.
For models except USA and
Canadian models
Connect the earphones with the remote
control to i.
Connect firmly
To i
18
Page 19
4
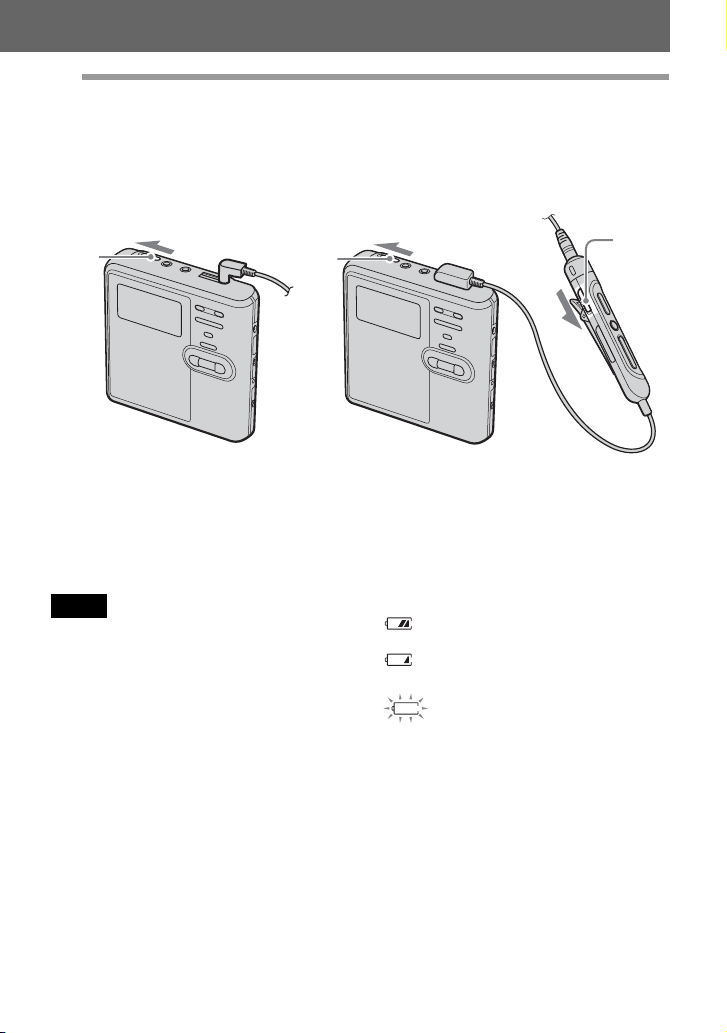
Unlock the control.
Slide HOLD to the opposite direction of the arrow (.) on the recorder or the remote
control to unlock the controls.
For USA and Canadian
models
HOLD
HOLD
For models supplied with the
AC plug adaptor
If the AC power adaptor does not fit the wall
outlet, use the AC plug adaptor.
Notes
• When the rechargeable battery is being
charged, the charging will stop when you
operate the recorder.
• Because of the battery’s characteristics, the
capacity of the rechargeable battery may be
smaller than normal when it is used for the
first time or after a long period of disuse. In
this case, charge and discharge the battery
several times. The normal battery life will be
restored.
• It is preferable to use the recorder on house
current when recording or editing. When
powering the recorder with batteries, make
sure to use a fully charged rechargeable
battery or a new alkaline dry battery.
• When operating the recorder with a dry
battery, make sure it is an alkaline type. Use of
another type may result in shorter battery life
or cause a deterioration in the performance of
the rechargeable battery being used in
conjunction with the dry battery.
For models except USA and
Canadian models
HOLD
When to charge the
rechargeable battery or
replace the dry battery
You can check the battery condition on the
display window of the recorder.
Battery power decreasing
m
Weak battery
m
The battery is drained.
“LOW BATTERY” flashes in the
display and the power goes off.
The battery level indicator is approximate. It
may be more or less than the indication
depending on the operating condition or the
operating environment.
19
Page 20
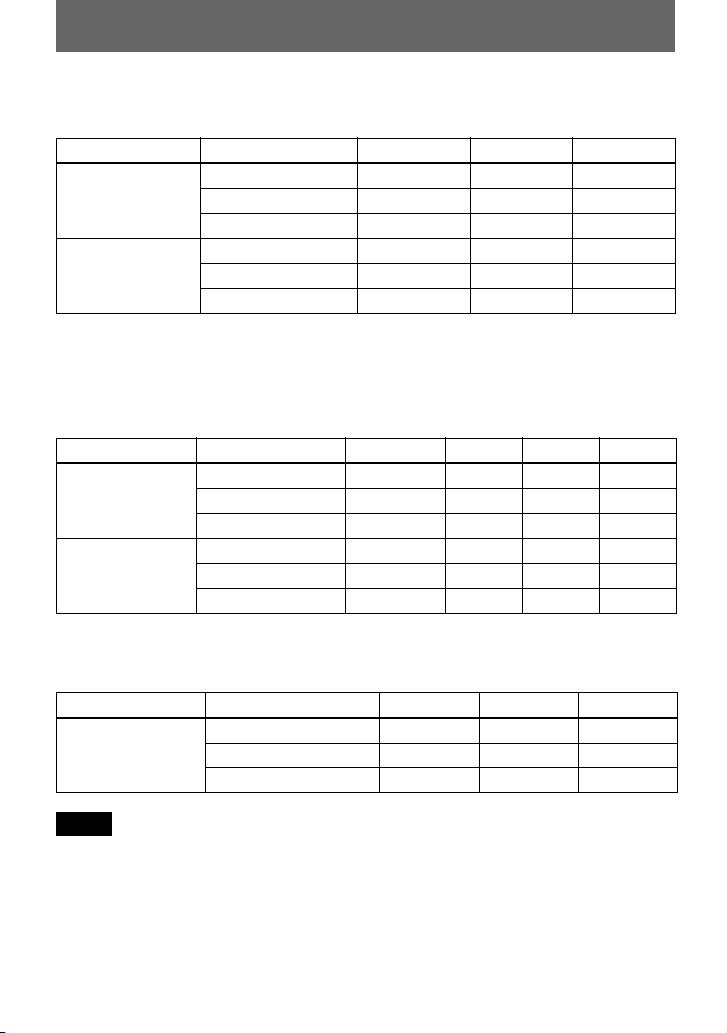
Battery life
When recording continuously in Hi-MD mode
(Unit: approx.hours)(JEITA1))
Disc type Batteries LinearPCM Hi-SP Hi-LP
1GB Hi-MD disc
NH-10WM
LR6
2)
3)
4 5.5 6.5
2 3 3.5
NH-10WM + LR6 6.5 9 11
60/74/80-minute
standard disc
NH-10WM 3.5 5.5 6.5
LR6 4 6.5 7.5
NH-10WM + LR6 8 13 15
1)
Measured in accordance with the JEITA (Japan Electronics and Information Technology Industries
Association) standard.
2)
When using a 100% fully charged nickel metal hydride rechargeable battery
3)
When using a Sony LR6 (size AA) alkaline dry battery (produced in Japan)
When playing continuously in Hi-MD mode
(Unit: approx.hours)(JEITA)
Disc type Batteries LinearPCM Hi-SP Hi-LP MP3
1GB Hi-MD disc NH-10WM 6.5 9.5 11 10
LR6 10.5 15.5 18 16.5
NH-10WM + LR6 20 30 34.5 31.5
60/74/80-minute
standard disc
NH-10WM 5.5 9 11 10
LR6 8.5 15 18 16.5
NH-10WM + LR6 16.5 28.5 34.5 31.5
1)
Tracks transferred at 128 kbps
1)
When playing continuously in MD mode
(Unit: approx.hours)(JEITA)
Disc type Batteries SP LP2 LP4
60/74/80-minute
standard disc
NH-10WM 10 11 12
LR6 17.5 20 21
NH-10WM + LR6 33 37 39.5
Notes
• Stop the recorder before replacing the battery.
• When using a 1GB Hi-MD disc, the continuous recording time may be shortened if you repeatedly
make short recordings.
20
Page 21
Recording a disc right away!
This section explains the basic procedure for making digital recordings using
an optical cable connected to a CD player, Digital TV or other digital
equipment. Make sure to use the optical cable.
Note
Recording cannot be done in MD mode when you record directly with this recorder without using a
Windows computer. You can record in Hi-MD mode on this recorder.
1
Make connections.
the appropriate jacks.)
1Connect the AC power adaptor to the
recorder and a house current.
AC power
adaptor
(Insert the cables firmly and completely into
2Connect the optical cable to the
recorder and an external component.
To a wall
outlet
To a digital (optical) out jack
CD player,
MD player,
DVD video
player, etc.
Make sure the
cover is closed.
To D C IN 3 V
Optical
miniplug
Optical cable*
∗ See “Optional accessories”
(page 68).
Optical
plug
To LINE IN (OPT)
continued
21
Page 22
2
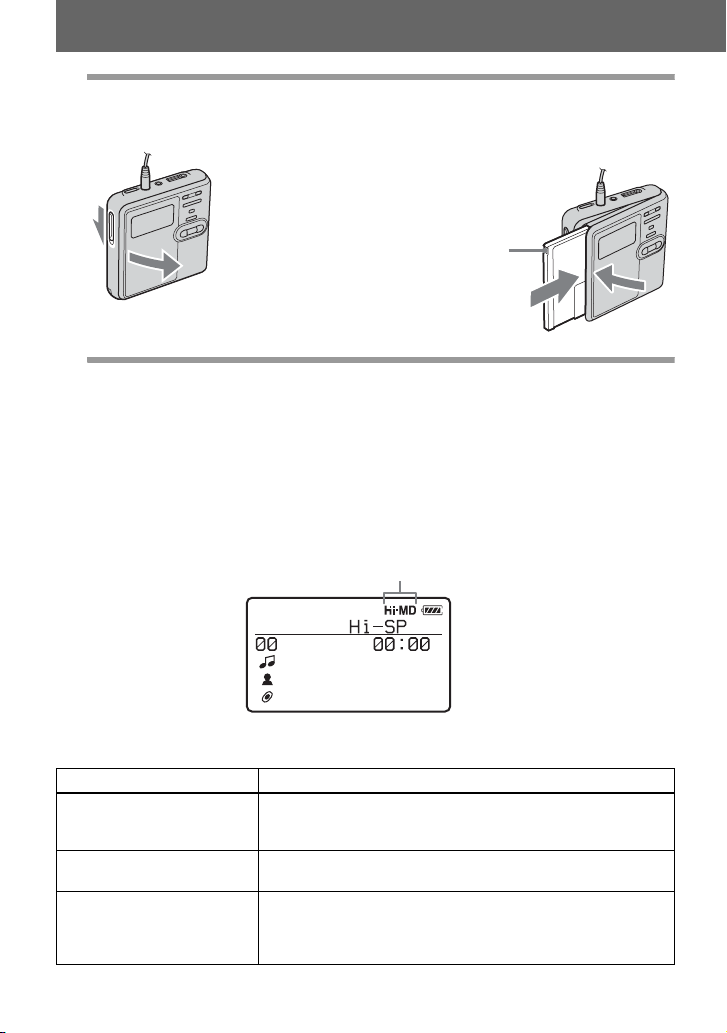
Insert a recordable disc.
1Slide OPEN to open the lid. 2Insert a disc with the label side facing
front, and press the lid down to close.
Make sure to
check the
record-protect
tab is closed.
3
Confirm the operation mode.
This recorder has two operation modes, “Hi-MD mode” and “MD mode”. The operation
mode is automatically recognized whenever the disc is inserted. After you insert a disc,
check the operation mode on the display window of the recorder.
You can record on this recorder only in “Hi-MD mode”. It is not possible to record
in “MD mode”. If you want to record in “MD mode”, for example to allow the disc
to be played on another component that does not support Hi-MD, connect the
recorder to a Windows computer and use the supplied SonicStage or MD Simple
Burner software to record in MD mode (refer to the “Software Operation” section).
“Hi-MD” lights up when the operation mode is Hi-MD and
“MD” lights up when the operation mode is MD.
x
•
When using a 1GB Hi-MD disc, the operation mode will only be Hi-MD.
• When using a standard disc (60/74/80 minutes), the operation mode can be set as follows.
Disc condition Operation mode
Blank disc
The disc contains material
recorded in
The disc contains material
recorded in
1)
Refer to “Selecting the disc mode (Disc Mode)” (page 58) for the “Disc Mode” setting.
Hi-MD mode
MD mode
The mode set for the “Disc Mode” in the menu.
, When recording on this recorder, set “Disc Mode” to “Hi-
MD” so that the operation mode will be “Hi-MD mode”.
Hi-MD
MD
, You cannot use this recorder to record in MD mode.
Recording in “MD mode” is possible if you use the
supplied SonicStage or MD Simple Burner software.
1)
22
Page 23
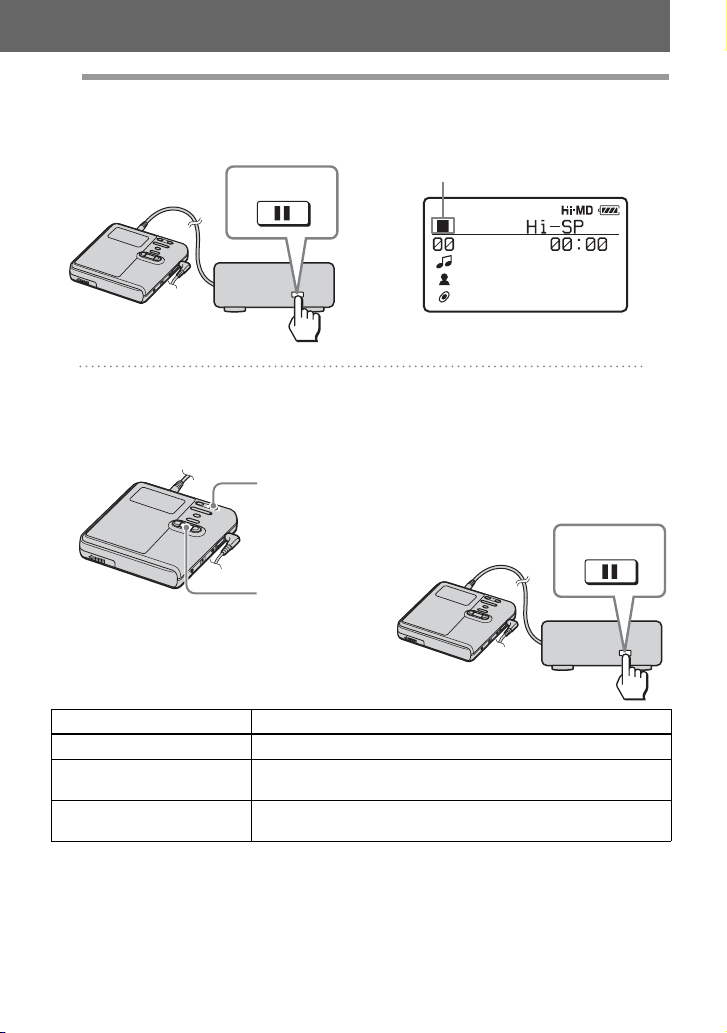
4
Record a disc.
1Select and pause the sound source to
be recorded.
PAUS E
Connected component
2Make sure that the x indication
appears in the display window.
Make sure the x indication is displayed.
3While the recorder is stopped, press
the jog dial (N/ENT) while pressing
REC(+N)/T MARK.
“REC” lights up and recording starts.
REC(+N)/
T MARK
Jog dial
(N/ENT)
To Press
Stop Press x.
1)
Pause Press X
Remove the disc Press x and open the lid. (The lid does not open while
1)
A track mark is added at the point where you press X again to resume recording while pausing; thus
the remainder of the track will be counted as a new track.
Press X again to resume recording.
“SYSTEM FILE WRITING” is displayed.)
.
4Play the source you want to record.
If you insert a previously recorded disc,
the recording starts after the existing
contents.
Track marks are automatically added at
the same point as the sound source, and
the contents are recorded together as a
group.
PAUSE
Connected component
23
Page 24

Notes
• When you record on a 1GB Hi-MD disc,
connect the AC power adaptor to the recorder,
charge the rechargeable battery fully (battery
level indication shows ), or use a new
alkaline dry battery (battery level indication
shows ). When you attempt to start
recording on a 1GB Hi-MD disc, “NOT
ENOUGH POWER TO REC” may appear
and recording cannot be done even if the
battery level indication shows sufficient
remaining power while the recorder is stopped
or playing. This is because of a mechanism
that disables recording when the remaining
battery power is estimated by the recorder to
be insufficient due to the high power
consumption required for 1GB Hi-MD disc
recording.
• Make sure to place the recorder at a stable,
vibration-free place during recording.
• If you start recording before the x indication
appears in the display, the first few seconds of
the material may not be recorded. Make sure
the x indication is displayed before you start
recording.
• Do not move or jog the recorder or disconnect
the power source while recording, or while
“DATA SAVE” or “SYSTEM FILE
WRITING” is displayed. If you do, the data
recorded up to that point may not be recorded
to the disc, or data on the disc may be
damaged.
• Recording cannot be done when the disc does
not have enough space for recording.
• If the power supply is disrupted (i.e. the
battery is removed or becomes exhausted or
the AC power adaptor is disconnected) during
a recording or editing operation, or while
“DATA SAVE” or “SYSTEM FILE
WRITING” is displayed, then it will not be
possible to open the lid until power is restored.
z
• The recorder is factory set to make a new
group whenever recording is done. If you do
not want to make a group, set “Group REC” to
“Off” (page 37).
• To start recording from a specific point on the
disc, pause the recorder at the desired point,
and then start recording from that point.
• You can monitor the sound during recording.
Changing the volume level will not affect the
recording level.
24
Page 25

Playing a disc right away!
1
Insert a recorded disc.
1Slide OPEN to open the lid. 2 Insert a disc with the label side facing
front, and press the lid down to close.
2
Play a disc.
1Press the jog dial (N/ENT) on the
recorder.
Press NX on the remote control.
VOL +, –
X
x
Jog dial
(NENT)
2Press VOL + or – to adjust the volume
on the recorder.
Turn the VOL +, – control on the remote
control.
The volume will be shown in the
display.
VOL +, –
NX
x
., >
+, –
., >
To stop play, press x.
Playback starts from the point you last stopped playing.
will automatically turn off in about 10 seconds (when using batteries) or about 3 minutes (when using
an AC power adaptor).
After you stop the recorder, the recorder
25
Page 26
To Operation on the recorder Operation on the remote
control
Stop Press x. Press x.
Pause Press X. Press X again to
Select a track directly
viewing track number or
name
Find the beginning of
the current track or the
previous track
Find the beginning of
the next track
Go backwards or
forward
Cue to the next or
previous group while
playing a track in a
group (Group skip)
Start with the first track
of the disc
resume play.
Turn the jog dial to select a
track, and then press the jog dial
(N/ENT) to enter.
Press .. Press .
repeatedly until you reach the
beginning of the desired track.
Press >.Press >.
Press and hold . or >. Press and hold . or >.
—Press + or –.
1)
While the recorder is stopped,
press the jog dial (N/ENT) for 2
seconds or more.
Remove the disc Press x and open the lid.
1)
Cues to the beginning of every 10th track during playback of the disc with no group settings or during
Bookmark play.
2)
Once you open the lid, the point to start play will change to the beginning of the first track.
Note
The playback sound may skip if:
Press NX. Press NX again to
resume play.
—
Press .. Press . repeatedly
until you reach the beginning of
the desired track.
While the recorder is stopped,
press NX
2)
Press x and open the lid.
for 2 seconds or more.
2)
• the recorder is subject to strong, repeated
shocks.
• a dirty or scratched disc is played.
When using a disc in Hi-MD mode, sound may
drop out for a maximum of about 12 seconds.
26
Page 27
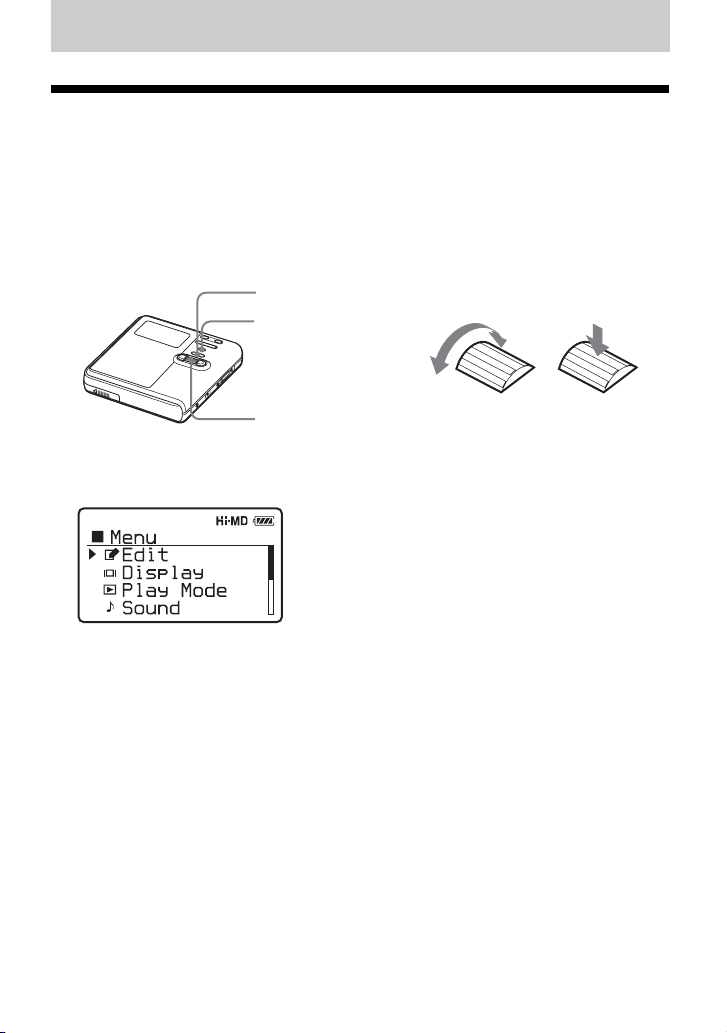
Using menus
How to use the menu items
The recorder has many menus with useful functions for recording, playback, editing, etc.
To set the menu items, do the following procedure.
If you are doing a menu operation for the first time after purchasing the recorder, “Menu
Mode” appears in the display. Before the menu operation, you can set “Menu Mode” to
“Advanced” (all menu items appear) or “Simple” (only basic menu items appear). Refer to
“Changing the displayed menu items (Menu Mode)” (page 56) for menu mode setting.
x • CANCEL
MENU
Jog dial (N/ENT)
Jog dial
Turn to select Press to enter
1 Press and hold MENU for 2 seconds or more to enter the menu.
2 Turn the jog dial to select the item.
3 Press the jog dial (N/ENT) to enter the selection.
4 Repeat steps 2 and 3.
The setting will be entered when you press the jog dial (N/ENT) at the last.
To return the preceding setting
Press x • CANCEL.
To cancel the operation while setting
Press x • CANCEL for 2 seconds or more.
27
Page 28
List of menus
The following table shows the menu items that you can select. Menu items can be set with
the recorder only.
Items listed under “Menu 1” are the selectable items which appear when you enter the
menu, and items listed under “Menu 2” are the selectable items which appear when you
select an item in Menu 1.
It is possible to display all menu items only when “Menu Mode” is set to “Advanced”.
Menu items with an asterisk (*) are not displayed when “Menu Mode” is set to “Simple”.
For details, see “Changing the displayed menu items (Menu Mode)” (page 56).
Note
Different indication may be displayed depending on the operating conditions and disc settings.
The items can be displayed in other languages. For details, refer to “Selecting the display
language” (page 59).
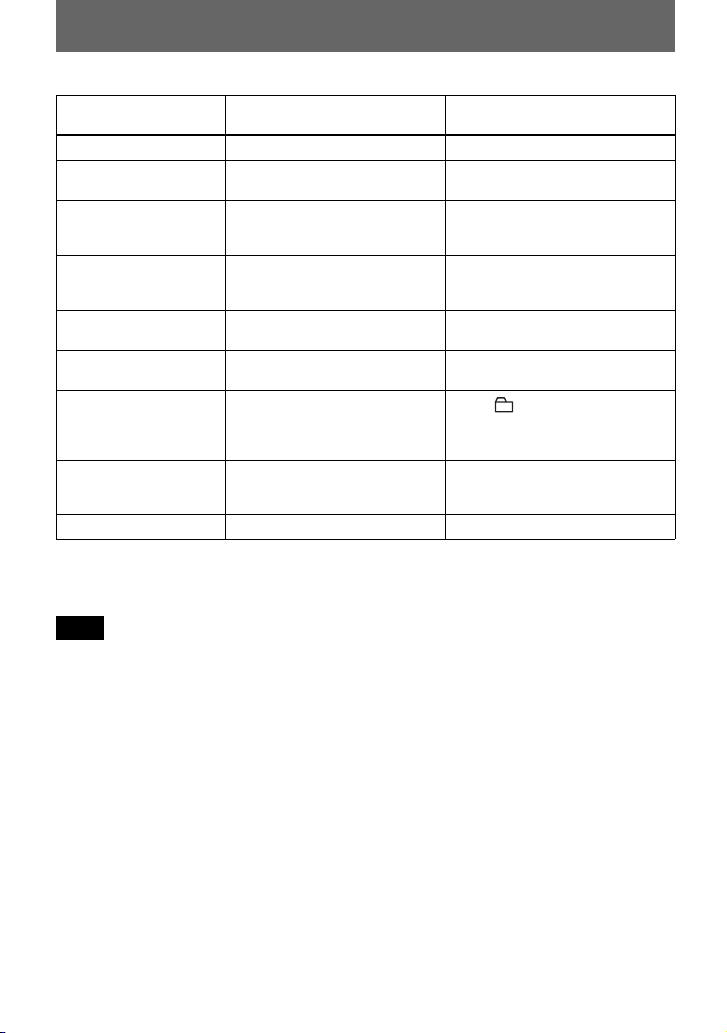
Menu 1 Menu 2 Function Site
Edit Title Input* Adding a track name, artist name,
Group Set* Assigns recorded tracks or groups to a
GroupRelease* Releases group settings. page 50
Move* Changes the order of tracks or groups. page 50
Erase Erases tracks, groups, or the entire disc
Format* Formats the disc and restores it to the
Display Lap Time Displays various information such as
1 Remain
Tr Property
REC Remain
All Remain
Play Mode MainPlayMode Selects tracks by category, such as
Sub PlayMode Selects the type of play, such as single-
Repeat Repeats playback.
Sound Normal Plays with normal sound quality. page 44
Sound EQ Customizes the sound quality.
album name, group name, or disc name.
new group.
contents.
condition it was in at the time of
purchase (in Hi-MD mode only).
the recorder status, etc. in the display
window.
group name or artist name.
track play or shuffle play.
page
page 46
page 49
page 52
page 55
page 31,
page 39
page 40
28
Page 29
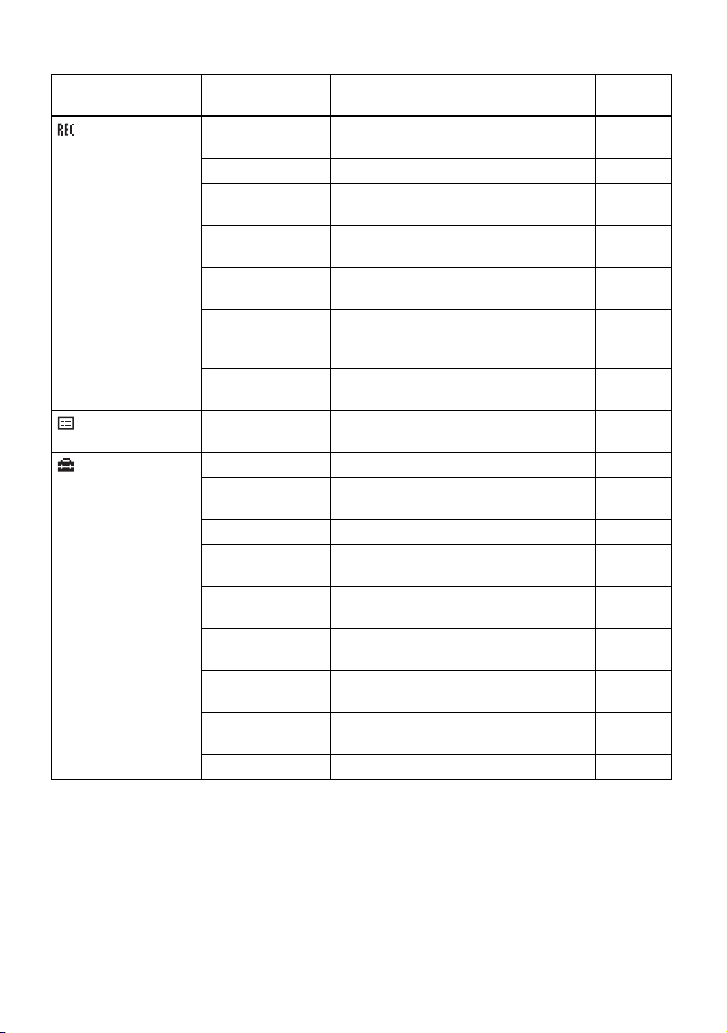
Menu 1 Menu 2 Function Site
REC Settings REC Mode Selects the recording mode (PCM, Hi-
SP or Hi-LP).
REC Level* Manually adjusts the recording level. page 35
MIC AGC* Sets the microphone recording level
adjustment mode.
MIC Sens* Sets the microphone sensitivity to suit
the source sound.
Time Mark* Adds track marks automatically in a
specific time interval.
Group REC* Selects or deselects creation of a new
group for each recording operation
(Group Recording).
SYNC REC* Simplifies operations during digital
recording (Synchro-Recording).
File List — Displays a list of the non-audio data
stored on a disc used in Hi-MD mode.
Option Menu Mode Changes the displayed menu items. page 56
AVLS* Sets a limit on the maximum volume to
protect your hearing.
Beep* Turns the beep sound on or off. page 56
Disc Memory* Stores the recorder settings (Disc
Memory).
Quick Mode* Sets the recorder to start playback
quickly.
Disc Mode Selects MD mode or Hi-MD mode
when a blank disc is inserted.
Contrast* Adjusts the contrast of the display
window.
Jog Dial* Changes the operational direction on the
display when turning the jog dial.
Language Selects the language used in the display. page 59
page
page 34
page 33
page 32
page 36
page 37
page 38
page 63
page 56
page 57
page 57
page 58
page 58
page 27
29
Page 30
Various ways of recording
Before recording
About the operation mode
This recorder has two operation modes,
“Hi-MD mode” and “MD mode”. The
operation mode is automatically
recognized whenever the disc is inserted.
After you insert a disc, check the
operation mode on the display window of
the recorder.
You can record on this recorder only
in “Hi-MD mode”. It is not possible to
record in “MD mode”. If you want to
record in “MD mode”, for example to
allow the disc to be played on another
component that does not support HiMD, connect the recorder to a
Windows computer and use the
supplied SonicStage or MD Simple
Burner software to record in MD
mode (refer to the “Software
Operation” section).
“Hi-MD” lights up when the operation
mode is Hi-MD and “MD” lights up
when the operation mode is MD.
x
Notes
• When you record on a 1GB Hi-MD disc,
connect the AC power adaptor to the recorder,
charge the rechargeable battery fully (battery
level indication shows ), or use a new
alkaline dry battery (battery level indication
shows ). When you attempt to start
recording on a 1GB Hi-MD disc, “NOT
ENOUGH POWER TO REC” may appear
and recording cannot be done even if the
battery level indication shows sufficient
remaining power while the recorder is stopped
or playing. This is because of a mechanism
that disables recording when the remaining
battery power is estimated by the recorder to
be insufficient due to the high power
consumption required for 1GB Hi-MD disc
recording.
• Make sure to disconnect the supplied USB
cable before recording. Recording may not
occur if the USB cable is connected to the
recorder.
• If you start recording before the x indication
appears in the display, the first few seconds of
the material may not be recorded. Make sure
the x indication is displayed before you start
recording.
• Do not move or jog the recorder or disconnect
the power source while recording, or while
“DATA SAVE” or “SYSTEM FILE
WRITING” is displayed. If you do, the data
recorded up to that point may not be recorded
to the disc, or data on the disc may be
damaged.
For details on the operation mode for
different disc conditions, refer to
“Confirm the operation mode.” (page 22).
Selecting the Menu Mode
If the “Simple” menu mode is selected,
some menu items will not be displayed. If
you cannot find certain menu items while
operating the recorder, make sure that the
menu mode is set to “Advanced”.
For details on selecting the menu mode,
see “Changing the displayed menu items
(Menu Mode)” (page 56).
30
Page 31

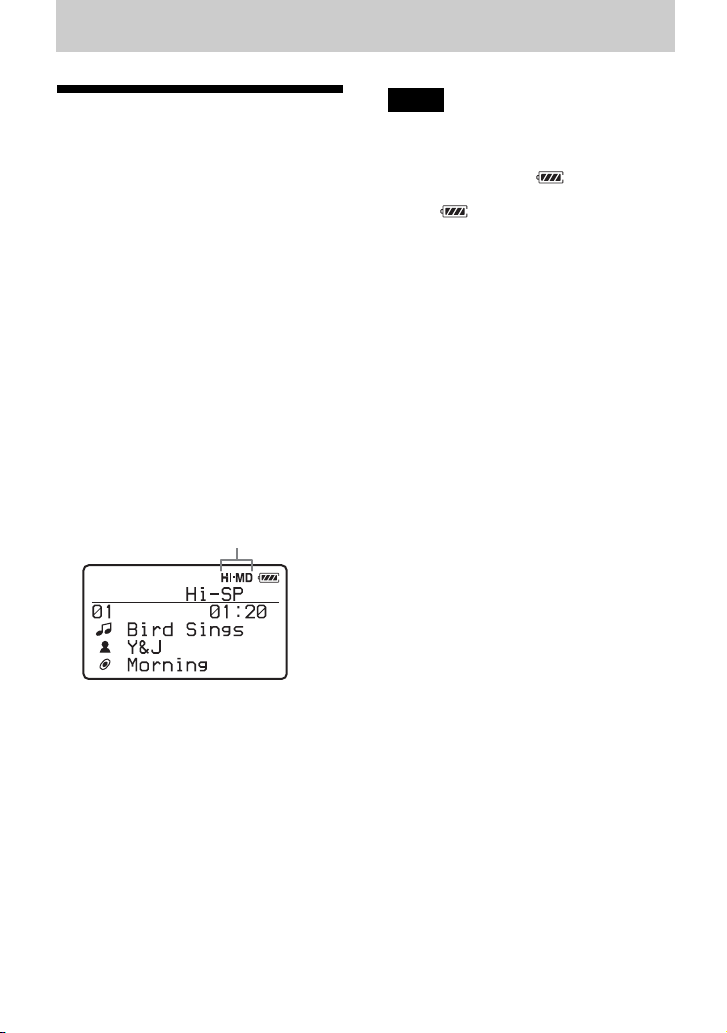
Viewing various information
You can check the remaining time, track
number, etc. when recording or during
stop.
MENU
While the recorder is stopped
Lap Time
A Track number
B Elapsed time
C Track name
Artist name (Hi-MD)/
Group name (MD)
Album name (Hi-MD)/
Disc name (MD)
Jog dial
1 Enter the menu and select “Display”.
2 Turn the jog dial to select the
information you want, and then press
the jog dial to enter the selection.
Each turn selects the menu item as
follows:
While the recorder is stopped:
“Lap Time” t “1 Remain” t “Tr
Property” t “REC Remain” t “All
Remain”
While recording:
“Lap Time”
When you press the jog dial, the
selected information appears at A,
B and C.
1 Remain
A Track number
B Remaining time after the current
location in the track
C Track name
Artist name (Hi-MD)/
Group name (MD)
Album name (Hi-MD)/
Disc name (MD)
Tr Pr o p e r ty
A Track number
B Elapsed time
C Track name
Group name
Codec information (Hi-MD)
Track mode information (MD) and
time and date of recording
1)
If the case of an MP3 track that supports VBR
(Variable Bit Rate), the bit rate that appears
here may not match the one displayed by the
SonicStage software.
2)
Appears for tracks that have time stamp
information.
REC Remain
1)
/
2)
A Track number
B Elapsed time
C Disc name
Remaining recording time and
remaining free space (in Hi-MD
mode only)
continued
31
Page 32

All Remain
A Track number
B Elapsed time
C Disc name
Remaining time after the current
location on the disc and number of
tracks after the current track
1)
The title that is displayed varies according to
the selected Main play mode.
While recording
Lap Time
1)
A Track number
B Elapsed time
Time mark indication
1)
C Remaining recording time
Recording level meter (L • R)
1)
Appears when “Time Mark” is set to “On”.
Notes
When a disc used in Hi-MD mode is inserted
•
in the recorder, the free space will show as
“2.0MB” when the remaining recording time
becomes “–00:00”. This is a system
limitation, “2.0MB” being the capacity of the
reserve domain.
• Depending on the group settings, the
operating conditions, and the disc settings,
you may not be able to select certain
indications or the indications may appear
differently.
z
If you want to check the playing position or
track name while playing, see “Viewing various
information” (page 39).
Recording from a microphone
Stereo
microphone
(supplied)
REC(+N)/
T MARK
MENU
Jog dial
(N/ENT)
To MIC (PLUG IN
POWER)
STEREOSTEREO
1 Connect the stereo microphone to the
MIC (PLUG IN POWER) jack.
2 Press the jog dial (N/ENT) while
pressing REC(+N)/T MARK to
start recording.
To select microphone sensitivity
You can select the microphone sensitivity
depending on the volume of the sound
source.
1 While the recorder is recording or
stopped, enter the menu and select
“REC Settings” - “MIC Sens”.
32
Page 33

2 Turn the jog dial to select “Sens
High” or “Sens Low”, and then press
the jog dial to enter the selection.
Sens High: When recording a soft
sound or a sound with a normal
volume.
Sens Low: When recording with a
loud or close-range sounds, such as
those during an oral recording or a
music concert.
To change the microphone recording level adjustment mode
When recording with a microphone, you
can select automatic adjustment mode
which sets the microphone recording level
to suit the sound source.
1 While the recorder is recording or
stopped, enter the menu and select
“REC Settings” - “MIC AGC”.
2 Turn the jog dial to select “Standard”
or “ForLoudMusic”, and then press
the jog dial to enter the selection.
Standard: When recording a sound
source with a normal volume, such as
a conversation or soft music.
ForLoudMusic: When recording a
sound source with a comparatively
high volume, such as a music concert
or a practice session with a musical
instrument.
Notes
• The recorder automatically switches input in
the following order; optical input, microphone
input, and analog input. You cannot record
through the microphone while an optical cable
is connected to the LINE IN (OPT) jack.
• You cannot set the “MIC AGC” setting if you
are recording with the recording level
manually adjusted (page 35).
• The microphone may pick up the operating
sound of the recorder itself. Use the
microphone away from the recorder in such
cases.
• If you record with the microphone
disconnected from its cord and directly
connected to the recorder, the sound of the
recorder operations may be picked up.
• Only the left-channel sound is recorded when
a monaural microphone is used.
• When recording a normal volume sound (soft
music, etc.), set “MIC AGC” to “Standard”. If
an unexpectedly loud sound is input when
“MIC AGC” is set to “ForLoudMusic”, the
recorded volume thereafter may drop very
low, depending on the sound source.
z
•
When “MIC AGC” is set to “ForLoudMusic”,
sound can be recorded with less distortion
during high volume input, and with natural
volume transitions similar to those of the
original.
• When using a plug-in power-type
microphone, the microphone can be operated
even when its power switch is turned off since
power is supplied from the recorder itself.
33
Page 34

Recording from a TV or radio (Analog Recording)
This section explains how to record from
equipment with analog output, such as a
cassette recorder, radio, or TV.
TV, cassette
recorder, etc.
Selecting the recording mode
Select each recording mode according to
the recording time that you want.
You can record only in Hi-MD mode
on this recorder. If you want to record
in MD mode, connect the recorder to
a Windows computer and record or
transfer audio data using the
supplied SonicStage or MD Simple
Burner software (refer to the
“Software Operation” section).
To LINE OUT jacks, etc.
L
(white)
To LINE IN (OPT)
R
(red)
Line cable
RK-G129,
RK-G136, etc.
REC(+N)/
T MARK
Jog dial
(N/ENT)
1 Make connections.
Use the appropriate connecting cord
to suit the source equipment. For
details, see “Optional accessories”
(page 68).
2 Press the jog dial (N/ENT) while
pressing REC(+N)/T MARK to
start recording.
3 Play the source you want to record.
MENU
Jog dial
1 While the recorder is stopped, enter
the menu and select “REC Settings” “REC Mode”.
2 Turn the jog dial to select the desired
recording mode, and then press the
jog dial to enter the selection.
The recording mode is saved on the
recorder until it is next changed.
Recording
mode
LinearPCM PCM • Approx. 28 min.
Hi-SP Hi-SP • Approx. 2 hours
Display Recording time
on an 80-minute
standard disc
• Approx. 1 hour
and 34 min. on a
1GB Hi-MD disc
and 20 min. on an
80-minute
standard disc
• Approx. 7 hours
and 55 min. on a
1GB Hi-MD disc
34
Page 35

Recording
mode
Hi-LP Hi-LP • Approx. 10 hours
z
Audio components that support the linearPCM,
Hi-SP and Hi-LP mode are indicated by the
Notes
• It is recommended that you use the AC power
adaptor for long recordings.
• It is recommended that you use the recorder to
edit (dividing or combining) long tracks
recorded in linearPCM. Transferring such
tracks and editing them on a Windows
computer may require an extremely long time.
Display Recording time
and 10 min. on an
80-minute
standard disc
• Approx. 34 hours
on a 1GB Hi-MD
disc
or logo mark.
3 Play the source.
4 While observing the level meter in the
display, adjust the recording level by
turning the jog dial.
Set the level so that the meter
segments light up around –12dB
segment. If high sound input causes
the segments beyond the “OVER”
segment to light up, lower the
recording level.
Each level meter shows the following.
Upper — L channel input level
Lower — R channel input level
Volume increases (,)
or decreases (<)
–12dB OVER
Adjusting the recording level manually
The recording level is adjusted
automatically while recording. If
necessary, you can set the recording level
manually during both analog and digital
recording.
X
Jog dial
REC(+N)/
T MARK
MENU
1 Press REC(+N)/T MARK while
pressing X.
The recorder stands by for recording.
2 Enter the menu and select “REC
Settings” - “REC Level” - “Manual”.
5 Press X again to start recording.
If your source is an externally
connected component, play the
source to the beginning of the
material to be recorded, and then start
recording.
To switch back to automatic
level control
Select “Auto (AGC)” in step 2.
Notes
• You cannot adjust the left and right channel
levels separately.
• Once you stop recording, the recorder will
revert to automatic recording level adjustment
mode the next time you start a recording
operation.
• To adjust the recording level manually when
synchro-recording, do steps 1 to 4 of the
procedure in this section with “SYNC REC”
is set to “Off”. Afterwards, set “SYNC REC”
setting to “On”, and start recording (page 38).
35
Page 36

Adding track marks while recording
You can add track marks (track number)
while recording to divide the material into
separate parts, that allow you to go to
specific track quickly and easily.
REC(+N)/
T MARK
Jog dial
MENU
Adding track marks manually
While the recorder is recording, press
REC(+N)/T MARK at the point you
want to add a track mark.
Adding track marks automatically
Use this feature to add track marks
automatically at specified intervals when
recording through the analog input
connector or a microphone. This function
is convenient for recording long period of
time, such as lectures, meetings, etc.
1 While the recorder is recording or in
recording pause, enter the menu and
select “REC Settings” - “Time Mark”
- “On”.
2 Turn the jog dial to select the desired
time interval, and then press the jog
dial to enter the selection.
One rotation changes the time setting
(Time __ min) by 1 minute, within the
range of 1 to 60 minutes.
To cancel Time Mark
Select “Off” in step 1.
Using Time Mark to add track
marks while recording
When the elapsed recording time
exceeds the time interval for Time
Mark:
The recorder adds track marks at the point
you set the time interval and from that
point the recorder adds a track mark
whenever the time interval has elapsed.
Example: Eight minutes of recording
has been completed when the Time Mark
time interval is set to 5 minutes.
A track mark will be added at the 8minute point (after the start of recording)
and after each 5-minute interval
thereafter.
When the time interval set for Time
Mark exceeds the elapsed recording
time:
The recorder adds track marks when the
set Time Mark time interval has elapsed.
Example: Three minutes of recording
has been completed when the Time Mark
time interval is set to 5 minutes.
A track mark will be added at the 5minute point (after the start of recording)
and after each 5-minute interval
thereafter.
z
“T MARK” appears before the time display for
track marks added automatically.
Notes
• If you add a track mark by pressing
REC(+N)/T MARK or X, etc. while
recording, the recorder will start adding track
mark automatically each time the selected
time interval as elapsed.
• The setting is canceled when you connect a
digital optical cable to the recorder.
36
Page 37

Recording without creating a new group
The recorder is factory set to
automatically create a new group for each
recording. To record without creating a
new group, set the recorder as follows.
Disc with no groups recorded
Disc
2 4 5 6 7 8 12 13 14 153
1
MENU
Jog dial
While the recorder is stopped, enter the
menu and select “REC Settings” - “Group
REC” - “Off”.
What is the group function?
The group function allows you to place
several tracks into one unit.
For example, if you create a group for all
your favorite tracks, then you can select
that group to play those tracks.
The following figure shows the difference
between a disc on which groups are
recorded and a disc on which no groups
are recorded.
Disc with groups recorded
Disc
Group 1
1
2345 6 712345123
Group 2
Group 3
You can record a maximum of 255 groups
on a disc.
If you record a track without creating a
group, but then later want to create a
group for that track, refer to “Assigning
tracks or groups as a new group (Group
Set)” (page 49).
Tracks that were not assigned to a group are
treated as being part of “Group - -”.
37
Page 38

To start/stop recording in sync with the sound source (Synchro-recording)
When making a digital recording (e.g.,
from a CD), this function automatically
starts and stops the recorder in
synchronization with the sound source.
This eliminates the need for separate
operation of the recorder and the sound
source.
MENU
Jog dial
While the recorder is stopped, enter the
menu and select “REC Settings” - “SYNC
REC” - “On”.
z
When there is no sound from the player for
about 3 seconds during synchro-recording, the
recorder goes into the standby mode
automatically. When the sound comes from the
player again, the recorder resumes synchrorecording. If the recorder is kept in the standby
mode for 5 minutes or longer, the recorder stops
automatically.
Notes
• The pause function cannot be turned on or off
manually during synchro-recording.
• Do not switch the “SYNC REC” setting while
recording. Recording may not be done
properly.
• Even when there is no sound on the sound
source, there may be cases when recording
does not pause automatically during synchrorecording due to the noise level emitted from
the sound source.
• If a silent portion is encountered for
approximately 2 seconds during synchrorecording from a sound source other than a
CD or an MD, a new track mark is
automatically added at the point where the
silent portion ends.
38
Page 39

Various ways of playback
Viewing various information
You can check the track name, disc name,
etc. during playback.
MENU
Jog dial
1 Enter the menu and select “Display”.
2 Turn the jog dial to select the
information you want, and then press
the jog dial to enter the selection.
Each turn selects the display as
follows.
“Lap Time” t “1 Remain” t “Tr
Property”
When you press the jog dial, the
selected information appears at A,
B and C.
While the recorder is stopped
Lap Time
A Track number
B Elapsed time
C Track name
Artist name (Hi-MD)/
Group name (MD)
Album name (Hi-MD)/
Disc name (MD)
1 Remain
A Track number
B Remaining time of the current track
C Track name
Artist name (Hi-MD)/
Group name (MD)
Album name (Hi-MD)/
Disc name (MD)
Tr Pr o p e r ty
A Track number
B Elapsed time
C Track name
Group name
Codec information (Hi-MD)
Track mode information (MD) and
time and date of recording
1)
If the case of an MP3 track that supports VBR
(Variable Bit Rate), the bit rate that appears
here may not match the one displayed by the
SonicStage software.
2)
Appears for tracks that have time stamp
information.
Note
Depending on the group settings, the operating
conditions, and the disc settings, you may not
be able to select certain indications or the
indications may appear differently.
z
If you want to check the remaining time or the
recording position while recording or in stop
mode, see “Viewing various information”
(page 31).
1)
/
2)
39
Page 40

Selecting the play mode
You can listen to tracks in various play
modes. The play mode can consist of a
combination of Main play mode, Sub play
mode and Repeat play.
• Main play mode: selects the playback
unit, such as tracks or groups
• Sub play mode: selects the type of play
• Repeat play: selects Repeat play
MENU
Jog dial
Playing tracks in Main play mode
Selects the first track to be played in Main
play mode.
1 While playing, enter the menu and
select “Play Mode” “MainPlayMode”.
The Main play mode display appears.
2 Turn the jog dial to select the desired
play mode, and then press the jog dial
to enter the selection.
Display Play mode
Normal Play All tracks after the
Group Play Tracks in a specified
Artist Play
Album Play
BookmarkPlay Bookmarked tracks are
1)
Appears only for discs used in Hi-MD mode.
40
selected track are played.
group are played.
1)
Tracks by a specified artist
are played.
1)
Tracks in a specified
album are played.
played.
Playing tracks in normal mode
(Normal Play)
1 Do step 1 and select “Normal Play” in
step 2 of “Playing tracks in Main play
mode” (page 40).
2 When selecting a track out of a group,
skip this step.
When selecting a track within a
group, turn the jog dial to select the
group that the desired track belongs,
and then press the jog dial to enter.
A list of the tracks in the selected
group appears in the display.
3 Turn the jog dial to select the desired
track, and then press the jog dial to
enter the selection.
The selected track starts playing. The
recorder plays from the selected track
to the last track in the disc.
Listening to tracks in a
specific group (Group Play)
1 Do step 1 and select “Group Play” in
step 2 of “Playing tracks in Main play
mode” (page 40).
A list of the groups on a disc appears.
2 Turn the jog dial to select the desired
group, and then press the jog dial to
enter.
A list of the tracks in the selected
group appears.
3 Turn the jog dial to select the desired
track, and then press the jog dial to
enter the selection.
The selected track starts playing. The
recorder plays the tracks in that
group, from the selected track to the
last track.
z
Tracks that do not belong to a group are placed
together in “Group - -” and displayed at the last
of the list of groups.
Page 41

Listening to tracks by a
specific artist (Artist Play) (in
Hi-MD mode only)
If the track data includes the artist name,
you can listen to tracks by a specific artist
only.
1 Do step 1 and select “Artist Play” in
step 2 of “Playing tracks in Main play
mode” (page 40).
A list of the artists on the disc appears
in alphabetical order.
2 Turn the jog dial to select the desired
artist name, and then press the jog
dial to enter.
A list of the tracks of the selected
artist appears in recorded order.
3 Turn the jog dial to select the desired
track, and then press the jog dial to
enter the selection.
The selected track starts playing. The
recorder plays the tracks by the same
artist on the disc, from the selected
track to the last track.
z
Tracks without artist name data are placed
together in “
at the last of the list of artists.
__ (space)” and are displayed
2 Turn the jog dial to select the desired
album name, and then press the jog
dial to enter.
A list of the tracks in the selected
album appears in recorded order.
3 Turn the jog dial to select the desired
track, and then press the jog dial to
enter the selection.
The selected track starts playing. The
recorder plays the tracks in that
album, from the selected track to the
last track.
z
Tracks without album name data are placed
together in “
at the last of the list of albums.
Listening to selected tracks
only (Bookmark Play)
You can bookmark tracks on a disc and
play them only. The sequence of
bookmarked tracks cannot be changed.
To bookmark the tracks
__ (space)” and are displayed
1 While playing the track you want to
bookmark, press the jog dial for 2
seconds or more.
Listening to tracks of a
selected album (Album Play)
(in Hi-MD mode only)
If the track data includes the album name,
you can listen to tracks of a selected
album only.
1 Do step 1 and select “Album Play” in
step 2 of “Playing tracks in Main play
mode” (page 40).
A list of the albums on the disc
appears in alphabetical order.
2 Repeat step 1 to bookmark the other
tracks.
To play the bookmarked tracks
1 Do step 1 and select “BookmarkPlay”
in step 2 of “Playing tracks in Main
play mode” (page 40).
continued
41
Page 42

2 Turn the jog dial to select a track, and
then press the jog dial to enter the
selection.
To erase bookmarks
While playing the track for which you
want to erase the bookmark, press the jog
dial for 2 seconds or more.
Playing tracks in Sub play mode
By specifying Sub play modes, you can
listen to tracks selected in Main play
mode in various ways.
For example, by selecting “Group Play”
in Main play mode and “Shuffle” in Sub
play mode, the recorder will play the
tracks in the selected group in random
order.
1 Enter the menu and select “Play
Mode” - “Sub PlayMode”.
2 Turn the jog dial to select the desired
play mode, and then press the jog dial
to enter the selection.
Listening to a section of a
track repeatedly (A-B Repeat)
Make sure that points A and B are within
the same track.
1 While playing a track that contains
the section you want to repeat, do step
1 and select “A-B Repeat” in step 2 of
“Playing tracks in Sub play mode”
(page 42).
“Ap” flashes in the display.
2 Press the jog dial at the starting point
(A).
Point A is entered and “B” flashes in
the display.
3 Press the jog dial at the ending point
(B).
Point B is entered, “ApB” and “ ”
lights up, and the section between
point A and B starts playing
repeatedly.
z
You can reset points A and B by pressing the
> button during A-B Repeat play.
Display Play mode
Normal Normal play (All tracks
1 Track Single-track play (A
Shuffle Shuffle play (All tracks in
A-B Repeat
1)
“A-B Repeat ” does not appear when the
“Menu Mode” is set to “Simple” (page 56).
are played once.)
single track is played.)
the selected Main Play
Mode are played in
random order.)
1)
A-B Repeat play (Tracks
between the selected
points A and B are played
repeatedly.)
42
Note
If the recorder comes to the end of the last track
on the disc while you are selecting point A, the
setting is canceled.
Playing tracks repeatedly (Repeat Play)
You can use the Repeat play function to
repeat tracks in all play modes except
when selecting A-B Repeat play.
1 While playing, enter the menu and
select “Play Mode” - “Repeat”.
2 Turn the jog dial to select “On”, and
then press the jog dial to enter the
selection.
appears in the display.
Page 43

To cancel Repeat Play
Select “Off” in step 2.
Searching for a track by initial
character (Initial Search)
You can search for a track, group, artist,
or album by its initial character.
Searching for a track (Search)
You can easily search for a track by track
name, group name, artist name, or album
name.
SEARCH
Jog dial
1 Press SEARCH.
2 Turn the jog dial to select the item
you want to use for searching, and
then press the jog dial to enter.
Display To
by Track search by track name
by Group search by group name
1)
by Artist
by Album
1)
Appears only for discs used in Hi-MD mode.
search by artist name
1)
search by album name
3 If you select “by Track” in step 2,
skip this step.
If you select an item other than “by
Track” in step 2, turn the jog dial to
select the desired group, artist, or
album, and then press the jog dial to
enter.
A list of tracks for the selected group,
artist, or album appears in the display.
4 Turn the jog dial to select the desired
track, and then press the jog dial to
enter the selection.
The selected track starts playing.
1 Do steps 1 and 2 of “Searching for a
track (Search)”.
2 Turn the jog dial to select “Initial”,
and then press the jog dial to enter.
3 Turn the jog dial to select the first
character of the name to be searched
for, and then press the jog dial to enter
the letter.
The following characters can be
entered for an initial search.
Display To
Alphabet
(A to Z)
Num (Numbers) Searches for a name
Other Searches for a name
When you press the jog dial, a list of
tracks, groups, artists, or albums with
names starting with the selected
initial character appears in the
display.
Searches for a name
starting with an English
letter.
starting with a number.
starting with a character
other than an English
letter or a number.
4 Turn the jog dial to select the desired
track, and then press the jog dial to
enter the selection.
43
Page 44
Notes
• After step 4, Bookmark play is canceled.
• After step 4, A-B Repeat play is canceled.
• During a search, unlabeled tracks appear at
the end of each list.
• During a search, ungrouped tracks are placed
together as “Group - -” and appear at the end
of the list of groups.
• During a search, tracks without artist name
data are placed together as “
and tracks without album name data are
placed together as “
appear at the end of the list.
• While the recorder is sorting the selected
items, “SORTING” appears in the display.
• The Search function is automatically canceled
if no operation is made for 3 minutes.
__ (space)” and
44
__ (space)”,
Selecting the sound quality (6-Band Equalizer)
Jog dial
MENU
., >
1 While playing, enter the menu and
select “Sound” - “Sound EQ”.
2 Turn the jog dial to select the desired
sound mode, and then press the jog
dial to enter the selection.
When you press the jog dial, the
selected sound mode will appear at
A.
The icon “ ” indicates that a sound
mode has been set.
Sound mode A
Heavy H
Pops P
Jazz J
Unique U
Custom 1
Custom 2
1)
1)
1)
“Custom 1” and “Custom 2” do not appear on
European models.
“Custom 1” and “Custom 2
when the “Menu Mode” is set to “Simple”
(page 56).
1
2
” do not appear
Page 45

To cancel the setting
Select “Normal” in step 1.
To modify and store the sound
(For models except European
models)
You can modify the sound and store the
results in “Custom 1” and “Custom 2”.
1 Do steps 1 and select “Custom 1” or
“Custom 2” in step 2 of “Selecting
the sound quality (6-Band Equalizer)”
(page 44).
2 Press . or > repeatedly to
select the frequency.
Frequency (100 Hz)
From the left, you can select 100 Hz,
250 Hz, 630 Hz, 1.6kHz, 4 kHz, or 10 kHz
3 Turn the jog dial to adjust the level.
Note
6-Band Equalizer will not function during
recording.
Level (+10 dB)
You can select from among seven levels.
–10 dB, –6 dB, –3 dB, 0 dB, +3 dB, +6 dB,
+10 dB
4 Repeat steps 2 and 3 to adjust the
level for each frequency.
5 Press the jog dial to enter the
selection.
45
Page 46

Editing recorded tracks
Before editing
Notes
• When you edit the contents of a 1GB Hi-MD
disc, connect the AC power adaptor to the
recorder, charge the rechargeable battery fully
(battery level indication shows ), or use a
new alkaline dry battery (battery level
indication shows ). When you attempt to
edit on a 1GB Hi-MD disc, “NOT ENOUGH
POWER TO EDIT” may appear and editing
cannot be done even if the battery level
indication shows sufficient remaining power
while the recorder is stopped or playing. This
is because of a mechanism that disables
editing when the remaining battery power is
estimated by the recorder to be insufficient
due to the high power consumption required
for 1GB Hi-MD disc editing.
• Close the record-protect tab on the side of the
disc before editing.
• Do not move or jog the recorder or disconnect
the power source while editing or “SYSTEM
FILE WRITING” is displayed. If you do, the
data edited up to that point may not be
recorded to the disc, or data on the disc may
be damaged. “SYSTEM FILE WRITING” is
displayed while the editing results are being
recorded.
• While “SYSTEM FILE WRITING” is
displayed, the lid becomes locked.
Adding titles (Title Input)
You can add titles to tracks, groups and
discs. You can also add artist names and
album names to tracks on a disc used in
Hi-MD mode.
Available characters
• Capital and small letters of the alphabet
for English and European languages
• Numbers 0 to 9
• Symbols
1)
2)
2)
European alphabets appear only for discs used
in Hi-MD mode.
The available symbols will differ for Hi-MD
mode and MD mode (see “About the character
palette” (page 47)).
Maximum number of
characters per name
Track names, group names, and disc
name: Approx. 200 each (containing a
mixture of all available characters)
Maximum number of
characters that can be input
per disc*
In Hi-MD mode:
A maximum of about 55,000 characters
In MD mode:
A maximum of about 1,700 characters
* The number of titles that can be stored on a
disc depends on the number of characters that
are input for track names, group names, artist
names, album names and disc name.
1)
46
Page 47

About the character palette
During operations on the recorder,
characters can be selected from the
character palette in the display window.
The character palette has the following
configuration.
Character palette
for Hi-MD mode
Character palette
for MD mode
Since only a part of the character palette
is visible on the display, use the controls
or buttons to move the cursor and enter
characters.
Letter input area
The cursor appears.
Character palette
VOL +, –
Jog dial
(N/ENT)
X
MENU
x
., >
Labeling
You can do a labeling operation while the
recorder is stopped or playing. You can
also label artist names and album names
to tracks in a disc used in Hi-MD mode.
To label a track with a track name, artist
name, or album name, you must first
select the track that you want to label. To
add a group name, you must first select a
track that belongs to the group you want
to label.
1 Enter the menu and select “Edit” -
“Title Input”.
2 Turn the jog dial to select one of the
following, and then press the jog dial.
Title Display
Track name Track
Group name Group
Artist name (to a track) Artist
Album name (to a track) Album
Disc name Disc
1)
Appears only for discs used in Hi-MD mode.
The cursor flashes in the letter input
area.
The cursor flashes.
1)
1)
Note
If you enter the symbol “//” between the
characters in disc names such as “abc//def”, you
may be unable to use the group function (in MD
mode only).
continued
47
Page 48

3 Turn the jog dial downward.
The cursor shifts from the letter input
area to the character palette.
The cursor and character alternate.
4 Select a letter and press the jog dial to
enter.
The selected letter appears in the
letter input area and the cursor moves
to the next input position.
The cursor flashes at the next input
position.
The buttons used for character input
and their functions are listed below.
Functions
To move the cursor
to the left or to the
right.
To move the cursor
up or down
To enter a letter. Press the jog dial
To insert a blank
space.
To delete a letter. Press VOL –.
To move the cursor
from the character
palette to the letter
input area.
1)
Operations
Press . or >.
Turn the jog dial.
(N/ENT).
Press VOL +.
Press x.
Functions
To switch between
capital letters and
small letters
1)
Functions of the buttons or the control may
differ depending on when the cursor is in the
letter input area or in the character palette.
1)
Operations
Press X.
.
5 Repeat step 4, and then enter all
characters of the label name.
6 Press the jog dial for 2 seconds or
more to enter the title
Re-labeling
You can change the titles by doing the
procedure for “Labeling” (page 47).
Notes
• The recorder is able to display, but cannot
label using Japanese “Katakana” characters.
• The recorder cannot rewrite a disc or track
name of more than 200 letters that was created
by another device (in MD mode only).
.
48
Page 49

Assigning tracks or groups as a new group (Group Set)
With this function, you can assign
existing tracks or groups to a new group,
and also you can assign a track that
currently belongs to no group to an
existing group.
You can create a maximum of 255 groups
on a disc used in Hi-MD mode and 99
groups on a disc used in MD mode.
Disc
Track number
24567891011123
1
Disc
Group 1
2456 91011123
1
Group 1
Assigning tracks 1 to 3 to a new
group
Assigning group 1 and group 2 to a
new group
Registration of non-consecutive tracks is
not possible (for example, track 3 and
tracks 7 and 8 cannot be assigned to a new
group).
It is not possible to make a new group if
the first track or last track of the group has
been selected from the middle of an
existing group.
Track numbers appear according to their
order on the disc, not their order within
the group.
Group 2
Group 2
78
Notes
• When the total number of characters in the
titles on a disc exceed the maximum that can
be input:
—If the disc is being used in Hi-MD mode,
you can make a group setting, but cannot
add a group name in step 4.
—If the disc is being used in MD mode, you
cannot make a group setting.
• The tracks or groups must be sequential. If the
desired tracks or groups are not consecutive,
you must move them to make them
consecutive before you can assign them
(“Moving recorded tracks or groups (Move)”,
page 50).
MENU
Jog dial
1 While the recorder is stopped, enter
the menu and select “Edit” - “Group
Set”.
2 Turn the jog dial to select the number
of the desired first track, and then
the jog dial to enter.
press
This selects the first track of a new
group. If the disc contains groups,
only the first track number of each
group is displayed.
continued
49
Page 50

3 Turn the jog dial to select the number
of the desired last track, and then
press the jog dial to enter.
This selects the last track of the new
group and the group can be labeled. If
the disc contains groups, only the last
track number of each group is
displayed.
4 Label a group (see “Adding titles
(Title Input)” (page 46)).
Notes
• In step 2, the first track must be either the first
track of an existing group or a track that does
not belong to a group.
• When selecting the last track in step 3, make
sure the track comes after the one selected in
step 2. The last track must be either the last
track of an existing group or a track that does
not belong to a group.
4 Turn the jog dial to select “OK”, and
then press the jog dial to release a
group.
The group setting of the selected
group is released.
Moving recorded tracks or groups (Move)
You can change the order of the recorded
tracks or groups.
MENU
Jog dial
Releasing a group setting (Group Release)
Select a group you want to release and
check the contents (see “Listening to
tracks in a specific group (Group Play)”
on page 40).
1 Select a group that you want to
release and check the contents (see
page 40).
2 Press x.
3 Enter the menu and select “Edit” -
“GroupRelease”.
50
x
MENU
Jog dial
Moving a track on a disc
You can move a track from one group to
another or from inside a group to outside
the group. When you move tracks, track
numbers are automatically renumbered.
1 While playing the track you want to
move, enter the menu and select
“Edit” - “Move” - “Track Move”.
If the selected track is in the group,
the name of the group to which the
currently selected track belongs
appears with “B” in the display.
When the currently selected track is
in a group
Page 51
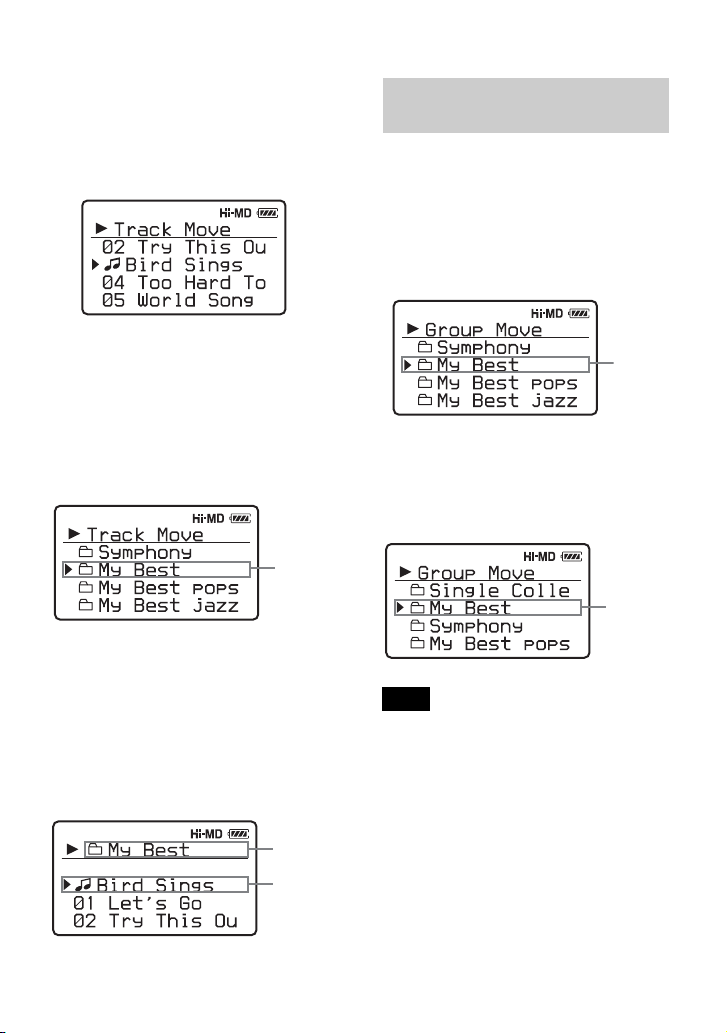
If the selected track is not in the
group, the name of the currently
selected track appears with “B” in the
display.
When the currently selected track is
in a group
Changing the order of a group on a disc
1 While playing a track within a group
whose order you want to change,
enter the menu and select “Edit” “Move” - “Group Move”.
The name of the group to which the
currently selected track belongs
appears with “B” in the display.
2 If you are moving a track from inside
a group to outside the group, or if
there is no group on a disc, skip this
step.
If you are moving a track to a
different group, turn the jog dial to
select the destination group, and then
press the jog dial to enter.
Name of the
destination
group
If you are moving a track within the
same group, select the group to which
the currently selected track belongs.
3 Turn the jog dial to select the
destination position, and then press
the jog dial to enter the selection.
The track moves to the selected
destination.
Name of the
destination
group
Destination
position
Name of
the group
you want
to move
2 Turn the jog dial to select the
destination position, and then press
the jog dial to enter the selection.
Example: When moving the group “My Best” to
the position after the group “Single Collection”
Destination
position in
the disc
Note
If all tracks are moved out of the group, the
group automatically disappears from the disc.
51
Page 52

Erasing tracks and the entire disc (Erase)
Note that once a recorded item has
been erased, it cannot be recovered.
Make sure to confirm the contents of
the selected item before erasing it.
When erasing tracks that have
been transferred from the
Windows computer
When you try to erase tracks that have
been transferred from the Windows
computer, “TRK FROM PC ERASE
OK?” appears in the display. If you erased
tracks that have been transferred from the
computer, the transfer authorization of the
tracks will be as follows.
• If the tracks were transferred in Hi-MD
mode, the transfer authorization of the
tracks are restored automatically when
you insert the disc into the recorder and
then connect the recorder to the
computer.
• If the tracks were transferred in MD
mode, the transfer authorization of the
tracks is lost. If you do not want to lose
the transfer authorization, restore the
authorization by transferring the tracks
to the computer again before erasing
them.
Note
You cannot erase non-audio data (for example,
text data or image data) on a disc used in HiMD mode.
x
MENU
To erase a track
1 While playing the track you want to
erase, enter the menu and select
“Edit” - “Erase” - “Track Erase”.
2 Turn the jog dial to select “OK”, and
then press the jog dial to erase the
track.
The track is erased and the next track
starts to play. All the tracks after the
one erased are automatically
renumbered.
Note
If all tracks in a group are erased, the group is
automatically deleted from the disc.
To erase a part of a track
Add track marks at the beginning and the
end of the part you want to erase, then
erase the part (page 53).
To erase a group
1 Select a group you want to erase and
check the contents (see page 40).
2 Press x.
3 Enter the menu to select “Edit” -
“Erase” - “Group Erase”.
4 Turn the jog dial to select “OK”, and
then press the jog dial to erase the
group.
The group is erased.
52
Jog dial
Page 53

To erase the whole disc
1 Play the disc you want to erase to
check the contents.
2 Press x.
3 Enter the menu to select “Edit” -
“Erase” - “All Tr Erase”.
“ALL TRACKS WILL BE
ERASED” appears in the display.
4 Turn the jog dial to select “OK”, and
then press the jog dial to erase the
whole disc.
“SYSTEM FILE WRITING” appears
in the display, and all the tracks will
be erased.
When erasing completes, “NO
TRACK” appears in the display in
Hi-MD mode and “BLANKDISC”
appears in MD mode.
Dividing a track (Divide)
You can divide a track with a track mark,
creating a new track from the part
following the track mark. The track
numbers will increase as follows.
1 3 42
Track marking
231 4 5
Track numbers increase.
Note
You cannot divide a track if:
• the track has been transferred from a Windows
computer.
• the track has been recorded in Hi-MD mode
using the MD Simple Burner software.
• the dividing point is at the beginning or end of
the track.
• the division would cause the total number of
tracks on the disc to exceed the maximum
allowed (2,047 tracks for a disc used in HiMD mode or 254 tracks for a disc used in MD
mode).
T MARK
Dividing a track directly
While playing or pausing, press T MARK
at the point you want to mark.
53
Page 54

To add track marks while
recording (except while
synchro-recording)
Press T MARK on the recorder at the
point you want to add a track mark.
You can use the “Time Mark” setting to
add track marks automatically at specified
intervals (except while digital recording)
(page 36).
Combining tracks (Combine)
When you record with analog (line) input,
unnecessary track marks may be recorded
where recording level is low. You can
erase a track mark to combine the tracks
before and after the track mark.
The track numbers will change as follows.
1 While playing the track with the track
mark you want to erase, press X to
pause.
2 Find the track mark by pressing .
slightly.
For example, to erase the third track
mark, find the beginning of the third
track. “00:00” appears in the display.
“MARK” appears in the display for a
few seconds.
3 Press T MARK to erase the mark.
“MARK OFF” appears in the display.
The track mark is erased and the two
tracks are combined.
z
When a track mark is erased when you combine
two tracks, the title and the recording date of
the second track changes to those of the first
track.
1 3 42
Erase a track mark
1 32
Track numbers decrease
Note
You cannot combine tracks if:
• one of the two tracks or the both tracks have
been transferred from the Windows computer.
• one of the two tracks or the both tracks have
been recorded in Hi-MD mode using the MD
Simple Burner software.
• the tracks are recorded in different recording
mode.
X
.
54
Note
When you erase a track mark between the two
consecutive tracks that are assigned into
different groups, the second track is re-assigned
into the group containing the first track. In
addition, if you combine a track that is assigned
to a group with a track that is not assigned to a
group (two consecutive tracks), the second
track takes the same registration setting as the
first track.
T MARK
Page 55

Formatting the disc (Format)
When using a disc in Hi-MD mode, you
can use the Format function to restore a
disc to the condition it was in at the time
of purchase.
You can use this function only when using
a disc in Hi-MD mode.
Disc
type
1GB
Hi-MD
disc
60/74/80minute
standard
disc
Notes
• By formatting a disc, all data (including non-
audio data) will be erased. If you think a disc
contains such data, insert the disc into the
recorder and connect the recorder to the
computer to check the contents of the disc.
• If you format a disc, the transferred tracks on
the disc will also be erased and the number of
transfer authorizations for those tracks will be
decreased by one. To prevent the reduction in
transfer authorizations, restore the transfer
authorization by transferring the tracks to the
Windows computer again before formatting
the disc.
• The operation mode set in the “Disc Mode”
menu is applied to a blank 60/74/80-minute
standard disc used on the recorder even if a
different operation mode was selected in the
SonicStage software or a different operation
mode appeared on the display after the disc
was formatted by the SonicStage software.
After disc formatting
“NO TRACK” appears.
All data including non-audio
data will be erased.
NOTE: Transfer authorization
of the transferred tracks can be
restored by inserting the disc
into the recorder and
connecting the recorder to the
Windows computer.
“BLANKDISC” appears.
All data including non-audio
data will be erased.
NOTE: Transfer authorization
of the transferred tracks will
decrease by one.
MENU
Jog dial
1 While the recorder is stopped, enter
the menu and select “Edit” “Format”.
“ALL DATA WILL BE DELETED”
appears in the display.
2 Turn the jog dial to select “OK”, and
then press the jog dial to enter the
selection.
“SYSTEM FILE WRITING” appears
in the display, and a disc will be
formatted.
When formatting completes, “NO
TRACK” appears in the display if a
1GB Hi-MD disc is inserted in the
recorder, or “BLANKDISC” appears
if a standard disc in Hi-MD mode is
inserted.
55
Page 56

Other operations
Changing the displayed menu items (Menu Mode)
You can specify the display of all items in
the menu (Advanced mode) or only basic
items (Simple mode).
Refer to “List of menus” (page 28) to
check the menu items that cannot be
displayed.
MENU
1 Enter the menu and select “Option” -
“AVLS”.
2 Turn the jog dial to select “On”, and
then press the jog dial to enter the
selection.
When you try to turn the volume too
high, “AVLS NO VOLUME
OPERATION” appears in the display.
The volume is kept to a moderate
level.
To cancel the AVLS
Select “Off” in step 2.
Jog dial
1 Enter the menu and select “Option” -
“Menu Mode”.
2 Turn the jog dial to select
“Advanced” or “Simple”, and then
press the jog dial to enter the
selection.
Protecting your hearing (AVLS)
The AVLS (Automatic Volume Limiter
System) function prevents the volume
from being raised above a given level to
minimize sound leakage, sound pressure
on the ears and the danger connected with
the failure to hear important exterior
sounds.
MENU
Jog dial
Turning off the beep sound
You can turn off/on the beep sound on the
recorder and the remote control.
MENU
Jog dial
1 Enter the menu and select “Option” -
“Beep”.
2 Turn the jog dial to select “Off”, and
then press the jog dial to enter the
selection.
To turn on the beep sound
Select “On” in step 2.
56
Page 57

Storing the settings for individual discs (Disc Memory)
The recorder is factory set to
automatically store settings for each disc.
The recorder automatically stores the
settings for a disc and retrieves them
whenever the disc is inserted.
The following setting can be stored:
• Bookmark
• “Custom 1” and “Custom 2” settings of
6-Band Equalizer (for models except
European models)
You can check the setting as follows.
MENU
Jog dial
1 Remove the disc from the recorder,
enter the menu and select “Option” “Disc Memory”.
2 Turn the jog dial to select “On”, and
then press the jog dial to enter the
selection.
To set the recorder so that
disc settings are not stored
Select “Off” in step 2.
Erasing the disc information
1 Insert the disc whose information is
to be erased and verify its contents.
2 Select “1MemoryErase” in step 2.
The disc information is erased.
Notes
• Settings for up to 64 discs can be stored. Any
settings stored afterwards will replace the
settings with the lowest frequency of use
among the 64. The numbers of discs that can
be stored depend on the numbers of tracks
recorded on the discs. More tracks recorded
per disc means fewer discs can be stored.
• If you try to erase the disc information of a
disc that have never been stored, “NO DISC
MEMORY” appears in the display for a few
seconds.
Starting the playback quickly (Quick Mode)
The recorder is factory set to quickly start
playback after the playback button is
pressed.
You can check the setting as follows.
MENU
Jog dial
1 While the recorder is stopped or
playing, enter the menu and select
“Option” - “Quick Mode”.
2 Turn the jog dial to select “On”, and
then press the jog dial to enter the
selection.
If you will not use the recorder
for a long time
Select “Off” in step 2.
You can minimize battery drain while the
recorder is not being used.
Note
When “Quick Mode” is set to “On”, power
continues to flow in the recorder even when it is
not being operated. The power is automatically
cut off when the batteries become drained.
57
Page 58

Selecting the disc mode (Disc Mode)
When you insert a 60/74/80-minute
standard disc (blank) into the recorder,
you can use this function to specify use of
the disc in Hi-MD mode or MD mode.
When recording on this recorder without
using a computer, set “Disc Mode” to
“Hi-MD”. Recording is not possible if
“Disc Mode” is set to “MD”. To allow a
disc recorded on this recorder to be used
on another component that does not
support Hi-MD, set “Disc Mode” to
“MD” and use a Windows computer to
record in MD mode (refer to the
“Software Operation” section).
MENU
Jog dial
1 Enter the menu and select “Option” -
“Disc Mode”.
2 Turn the jog dial until “Hi-MD”
(factory setting) or “MD” appears in
the display, and then press the dial to
enter the selection.
Adjusting the contrast of the display window (Contrast Adjustment)
You can adjust the contrast of the display
window.
MENU
Jog dial
1 While the recorder is stopped, enter
the menu and select “Option” “Contrast”.
2 Turn the jog dial to adjust the
contrast, and then press the dial to
enter the selection.
Notes
• Even if you select “MD” as the “Disc Mode”
setting, the operation mode can only be “HiMD” when using a 1GB Hi-MD disc.
• The operation mode set in the “Disc Mode”
menu is applied to a blank 60/74/80-minute
standard disc used on the recorder even if a
different operation mode was selected in the
SonicStage software or a different operation
mode appeared on the display after the disc
was formatted by the SonicStage software.
58
Page 59

Changing the operational direction of the display
When you turn the jog dial downward, the
display scrolls downward. This is the
factory setting. You can change the
factory setting to scroll in the opposite
direction.
MENU
Selecting the display language
You can select the language used in the
display window.
The following languages are available.
English (factory setting), French,
German, Italian and Spanish
MENU
Jog dial
1 Enter the menu and select “Option” -
“Jog Dial”.
2 Turn the jog dial to select “Reverse”,
and then press the jog dial to enter the
selection.
To turn the setting to normal
Select “Default” in step 2.
Jog dial
1 Enter the menu and select “Option” -
“Language”.
2 Turn the jog dial to select the desired
language, and then press the jog dial
to enter the selection.
59
Page 60

Using the recorder with a computer
z
What you can do through connection with a computer
To use the recorder connected to a
computer, you must install the software
from the supplied CD-ROM. For details
on the installation procedure, refer to the
“Software Operation” (page 86) section
(if you are using Windows) or the “HiMD WAV Importer for Mac” operating
instructions (if you are using Macintosh).
When using the supplied
software
• SonicStage for Windows
The SonicStage software enables you to
transfer audio data between the recorder
and the computer. When a disc used in
Hi-MD mode is inserted in the recorder,
tracks recorded with a microphone or
from a CD player to the recorder can
also be migrated to your computer. (See
the “Software Operation” section or
online help.)
• MD Simple Burner for Windows
The MD Simple Burner software
enables you to record a CD in the
computer’s CD drive directly to a disc in
the recorder. (See the “Software
Operation” section.)
• Hi-MD WAV Importer for Macintosh
The Hi-MD WAV Importer software
enables you to import audio data
recorded in linearPCM on the recorder
to a Macintosh computer. (See the
supplied “Hi-MD WAV Importer for
Mac” operating instructions.)
When using the disc in the
recorder as a storage device
When a disc used in Hi-MD mode is
inserted in the recorder, the recorder
appears on the computer display as an
external drive, allowing you to transfer
non-audio data such as text and image
files. For details, refer to “Storing nonaudio data to a disc” (page 62).
60
If you play audio files using the SonicStage
software, the sound is output from the computer
speakers when a disc used in Hi-MD mode is
inserted, and from the earphones connected to
the recorder when a disc used in MD mode is
inserted in the recorder.
Charging the rechargeable
battery of the recorder
You can charge the rechargeable battery
while the recorder is connected to a
computer (using USB bus power).
When you connect the recorder to the
computer, power (bus power) from the
computer begins to charge the recorder’s
rechargeable battery. However, this
charge is only provisional and cannot be
used to fully charge the rechargeable
battery. For example, if you charge a
completely drained rechargeable battery
in this way, the recorder will stop
charging after about 6 hours when the
battery level is between half and full
charge. The charging time may vary
according to the condition of the
rechargeable battery and the surrounding
temperature.
You can check the USB bus power
charging with the battery indication.
Note
Charging by USB bus power charge is not
possible when the battery level indication
( ) is flashing in the display.
• Reinsert the rechargeable battery and close the
battery compartment lid firmly.
• The temperature of the battery-charging
location is too low or too high. The
rechargeable battery should be charged within
a temperature range of +5°C (+41°F) to
+35°C (+95°F).
Page 61

Connecting the recorder to your computer
When you connect the supplied US B cable
directly to the USB connecting jack on the
recorder, power (bus power) is supplied
from the USB port of the computer. This
allows the recorder to be used without
power being supplied from the battery.
Note
When using Windows ME or Windows 98SE
• If you connect the recorder to the computer
with the disc mode on the recorder set to “HiMD” (factory setting), and then insert a 60/74/
80-minute standard disc, the operation mode
of the disc may automatically change to HiMD mode even if you do not record anything.
• When you disconnect the USB cable, the
message “Unsafe Removal of Device” appears
in the computer display. This is not a problem.
Merely click “OK” to make the message
disappear.
Computer
1 Insert a recordable disc into the
recorder.
2 Make sure the recorder is stopped and
HOLD is released.
3 Open the cover of the USB
connecting jack on the recorder and
connect the supplied USB cable to the
recorder and to the computer.
4 Check the connections.
When the connections have been
properly made, “PC – – MD” appears
in the display.
When you unplug the USB
cable from the computer or
remove the disc from the
recorder
Be sure to remove the recorder or the disc
as follows. If not, damage to the data may
occur.
To the USB port
Make sure to
open the cover.
USB cable
(supplied)
To the USB cable
connecting jack
1 If you are using a Macintosh
computer, drag the ([NO NAME]
icon) on the desktop to the trash can.
If you are using a Windows computer,
skip this step.
2 Make sure that the “REC” indication
is not displayed in the display
window of the recorder.
3 Press x on the recorder.
“EJECT DISC OK” appears in the
display.
Depending on the conditions, it may
take some time until “EJECT DISC
OK” appears in the display.
61
Page 62

4 Unplug the USB cable from the
computer or remove the disc from the
recorder.
Notes
• If you use the recorder connected to the
computer, it is recommended that you insert a
fully charged rechargeable battery as a
precaution against power failures,
disconnection of the USB cable or other
unforeseen occurrences. We do not assure the
results should there be a mis-operation,
transfer failures, or destruction of audio data
caused by unforeseen occurrences.
• If you disconnect the USB cable from the
recorder and want to reconnect it, make sure
to wait at least 2 seconds before connecting it
again.
• Make sure to place the recorder at a stable,
vibration-free place during recording.
• Make sure not to connect the recorder to your
computer during recording or playing.
• Make sure to turn off any system suspend,
sleep, or hibernation function that may be
active on your computer. If the computer
changes to any of these modes while
connecting with the recorder, a malfunction
may occur; for example, the computer may
not recognize the recorder. If this happens,
reconnect the USB cable.
• Make sure not to connect the recorder and the
computer through a USB hub.
• When the recorder is connected to a computer,
power (bus power) is supplied to the recorder
through the computer’s USB port. If the
computer (a laptop PC, for example) is
operating on battery power, this connection
may cause the computer’s battery to drain. It
is thus recommended to use the computer with
an AC power adaptor.
• We do not ensure trouble-free operation on all
computers that satisfy the system
requirements.
Storing non-audio data to a disc
If you connect the recorder to a computer
with a disc in Hi-MD mode inserted, the
disc is recognized as storage media by the
computer, allowing you to store nonaudio data such as text data or image data.
For the storage space for each disc, refer
to the next page.
When you insert a disc in Hi-MD mode
into the recorder and make connection
with the computer, the recorder is
recognized as an external device and can
be viewed on the computer display. You
can use the recorder in the same way as
other devices.
z
You can view non-audio data stored on a disc in
the display window of the recorder. For details,
refer to “Viewing non-audio data stored on the
disc in the display window of the recorder (File
List)” (page 63).
Notes
• When the SonicStage software is active, the
recorder is not recognized as a data storage
device.
• To format a disc on the computer, follow the
instructions below.
—If you are using a Windows computer,
format the disc with the SonicStage
software.
—If you are using a Macintosh computer, you
cannot format a disc on the computer.
Format the disc on the recorder (page 55).
• Make sure not to delete the file management
folder (HMDHIFI folder and HI-MD.IND
file) on the computer.
62
Page 63

Viewing non-audio data stored on the disc in the display window of the recorder (File List)
When using a disc in Hi-MD mode, you
can view non-audio data stored on the
disc in the display window of the
recorder. The name and size of files are
displayed.
Root
directory
(first level)
• Up to 16 levels of directories can be
viewed.
• Up to 512 files or folders can be viewed
in a root directory in the order saved.
• Up to 1,024 files or folders can be
viewed in each sub-directory.
Subdirectory
(2nd level)
Subdirectory
(3rd level)
: Directory
: File
MENU
Jog dial
1 While the recorder is stopped, enter
the menu and select “File List”.
The root directories appear in the
order saved.
Disc name
x
A list of
files and
folders is
displayed.
2 Turn the jog dial to select the file you
want to confirm, and then press the
jog dial to enter the selection.
File size appears.
x
File size
appears
If you want to go deeper, select the
folder containing the file you want to
check, and then press the jog dial. A
list of files and folders in the selected
folder appears in the display.
Afterwards, perform the operation in
step 2 again.
Notes
• This function cannot be used to open files.
• Text containing characters that are not
supported by the recorder will not be
displayed correctly.
• File or directory names more than 9 characters
long will be shortened.
• If you select “File List” while playing or
recording a track, “CANNOT SET” appears in
the display and no list will appear.
63
Page 64

The storage space for each disc (formatted with the recorder/the
SonicStage software)
Disc type Total size Disc management
60-minute
standard disc
74-minute
standard disc
80-minute
standard disc
219 MB
(229,965,824 bytes)
270 MB
(283,312,128 bytes)
291 MB
(305,856,512 bytes)
1GB Hi-MD disc 964 MB
(1,011,613,696 bytes)
1)
This is space that is used for managing the files on the disc.
2)
The size of the disc management space changes according to the operating conditions of your computer
and other factors. Therefore, the actual space available for use may be lower than that displayed on the
computer display.
1)2)
space
832 KB
(851,968 bytes)
832 KB
(851,968 bytes)
832 KB
(851,968 bytes)
832 KB
(851,968 bytes)
Free space
218 MB
(229,113,856 bytes)
269 MB
(282,460,160 bytes)
290 MB
(305,004,544 bytes)
963 MB
(1,010,761,728 bytes)
64
Page 65

Additional information
Precautions
On safety
Do not put any foreign objects in the DC IN 3V
jack.
On power sources
• Use house current, nickel metal hydride
rechargeable battery, or LR6 (size AA)
battery.
• For use in your house: Use the AC power
adaptor supplied with this recorder. Do not
use any other AC power adaptor since it may
cause the recorder to malfunction.
Polarity of the plug
• Connect the AC power adaptor to an easily
accessible AC outlet. Should you notice an
abnormality in the AC power adaptor,
disconnect it from the AC outlet immediately.
• The recorder is not disconnected from the AC
power source (mains) as long as it is
connected to the wall outlet, even if the
recorder itself has been turned off.
• If you are not going to use this recorder for a
long time, be sure to disconnect the power
supply (AC power adaptor, dry battery, or
rechargeable battery). To remove the AC
power adaptor from the wall outlet, grasp the
adaptor plug itself; never pull the cord.
• Never wrap the recorder in anything when it is
being used with the AC power adaptor. Heat
build-up in the recorder may cause
malfunction or damage.
On the earphones
Road safety
Do not use earphones while driving, cycling, or
operating any motorized vehicle. It may create
a traffic hazard and is illegal in many areas. It
can also be potentially dangerous to play your
recorder at high volume while walking,
especially at pedestrian crossings. You should
exercise extreme caution or discontinue use in
potentially hazardous situations.
Preventing hearing damage
Avoid using earphones at high volume. Hearing
experts advise against continuous, loud and
extended play. If you experience a ringing in
your ears, reduce the volume or discontinue
use.
Caring for others
Keep the volume at a moderate level. This will
allow you to hear outside sounds and to be
considerate of the people around you.
On the remote control (except
for the North American model)
The supplied remote control is designed for use
with this recorder only. The recorder cannot be
operated with a remote control that was
supplied with another device.
On heat build-up
Heat may build up in the recorder if it is used
for an extended period of time. This, however,
is not a malfunction.
On installation
• If you use the recorder at a place subject to
static or electrical noise, the recording may
not be properly done or the recorded data may
be lost. If you perform a transfer operation at
such a place, the track’s transfer authorization
may be lost.
• Never use the recorder where it will be
subjected to extremes of light, temperature,
moisture or vibration.
On charging
• Do not charge any other battery beside the
supplied one or the one designated for it (NH10WM).
• Be sure to use the supplied AC power adaptor.
• Charge the rechargeable battery at a
temperature of +5°C (+41°F) to +35°C
(+95°F).
• The recorder may become hot during the
charging procedure; this, however poses no
danger.
65
Page 66

• Because of the battery’s characteristics, the
capacity of the rechargeable battery may be
smaller than normal when it is used for the
first time or after a long period of disuse. In
this case, charge and discharge the battery
several times. The normal battery life will be
restored.
• If the capacity of the rechargeable battery
drops to half the normal amount, replace with
the new one.
• If the recorder will be unused for a long time,
remove the rechargeable battery and remove
the AC power adaptor from the wall outlet.
On the dry battery case
The supplied dry battery case is designated for
this recorder only.
On the MiniDisc cartridge
• When carrying or storing the MiniDisc, keep
it in its case.
• Do not break open the shutter.
• Do not place the cartridge where it will be
subject to light, extreme temperatures,
moisture or dust.
• Attach the supplied disc label only in the
space designated for it on the disc. Do not
stick it on any other disc surface.
On cleaning
• Clean the recorder casing with a soft cloth
slightly moistened with water or a mild
detergent solution. Do not use any type of
abrasive pad, scouring powder or solvent such
as alcohol or benzene as it may mar the finish
of the casing.
• Wipe the disc cartridge with a dry cloth to
remove dirt.
• Dust on the lens may prevent the unit from
operating properly. Be sure to close the disc
compartment lid after inserting or ejecting a
disc.
• To obtain the best sound quality, use a dry
cloth to wipe the plugs of the earphones or the
remote control. Dirty plugs may cause sound
distortion or intermittent breaks in the sound.
66
On batteries
Incorrect battery usage may lead to leakage of
battery fluid or bursting battery. To prevent
such accidents, observe the following
precautions:
• Install the + and – poles of the batteries
correctly.
• When the recorder is not to be used for a long
time, be sure to remove the batteries.
• If a battery leak should develop, carefully and
thoroughly wipe away battery fluid from the
battery compartment before inserting new
ones.
On mechanical noise
The recorder gives off mechanical noise while
operating, which is caused by the power-saving
system of the recorder and it is not a problem.
To protect a recorded disc
To record-protect a disc, slide open the tab at
the side of the disc. In this position, the disc
cannot be recorded. To record again, slide the
tab back so the tab is visible.
Ta b
Recorded material is
Back of the disc
protected.
Recorded material is
not protected.
On maintenance
Clean the terminals periodically with a cotton
swab or a soft cloth.
If you have any questions or problems
concerning your recorder, please consult your
nearest Sony dealer. (If a trouble occurred when
the disc was in the recorder, we recommend that
the disc be left in the recorder when you consult
your Sony dealer so that the cause of trouble
may be better understood.)
Page 67

Specifications
Audio playing system
MiniDisc digital audio system
Systems
MiniDisc system, Hi-MD system
Laser diode properties
Emission duration: continuous
Laser output: less than 44.6 µW
(This output is the value measured at a distance
of 200 mm from the lens surface on the optical
pick-up block with 7 mm aperture.)
Recording and playback time
See “List of the recording time for each disc”
(page 82).
Revolutions
Approx. 350 rpm to 3,000 rpm (CLV)
Error correction
Hi-MD:
LDC (Long Distance Code)/BIS (Burst
Indicator Subcode)
MD:
ACIRC (Advanced Cross Interleave Reed
Solomon Code)
Sampling frequency
44.1 kHz
Sampling rate converter
Optical (digital) input: 32 kHz/44.1 kHz/
48 kHz
Audio formats supported by this
recorder
Recording:
LinearPCM (44.1 kHz/16 bit)
ATRAC3plus (Adaptive TRansform
Acoustic Coding 3 plus) (Hi-SP/Hi-LP)
Playback:
LinearPCM
ATRAC3plus
ATRAC3
AT RA C
MP3 (MPEG-1 Audio Layer-3/Sampling
frequency 44.1 kHz/Bit rate 32 - 320 kbps
(constant/variable bit rate))
Modulation system
Hi-MD:
1-7RLL (Run Length Limited)/PRML
(Partial Response Maximum Likelihood)
MD:
EFM (Eight to Fourteen Modulation)
Frequency response
20 to 20,000 Hz ± 3 dB
1)
Inputs
MIC: stereo mini-jack
(minimum input level 0.13 mV)
Line in:
stereo mini-jack for analog input
(minimum input level 49 mV)
optical (digital) mini-jack for optical
(digital) input
Outputs
i: stereo mini-jack (dedicated remote control
jack)
Maximum output (DC)
Headphones:
2.8 mW + 2.8 mW (16 Ω) (European
models)
5 mW + 5 mW (16 Ω) (Other models)
Power requirements
Sony AC Power Adaptor connected at the DC
IN 3V jack:
120 V AC, 60 Hz (Models for USA, Canada,
Mexico and Taiwan)
240 V AC, 50 Hz (Model for Australia)
220 V AC, 50 Hz (Models for China and
Argentine)
100 - 240 V AC, 50/60 Hz (Other models)
The recorder:
Nickel metal hydride rechargeable battery
NH-10WM 1.2V 900 mAh (MIN) Ni-MH
LR6 (size AA) alkaline battery
AC power adaptor DC 3V
Operating temperature
+5°C (+41°F) to +35°C (+95°F)
Battery operation time
See “Battery life” (page 20)
2)
Dimensions
Approx. 80.2 × 20.7 × 84.3 mm (w/h/d)
1
/4 × 27/32 × 33/8 in.) (excluding projecting
(3
parts and controls)
Mass
Approx. 112 g (4.0 oz) (the recorder only)
Approx. 138 g (4.9 oz) (including the
rechargeable battery)
1)
The LINE IN (OPT) jack is used to connect
either a digital (optical) cable or a line
(analog) cable.
2)
Measured in accordance with JEITA.
US and foreign patents licensed from Dolby
Laboratories.
Design and specifications are subject to change
without notice.
67
Page 68

Optional accessories
Optical Cable
POC-15B, POC-15AB
Line Cable
RK-G129, RK-G136
MDR-series Stereo Headphones/earphones*
SRS-series Active Speakers
Recordable MDs MDW-series
Recordable Hi-MD disc
HMD1G
Nickel metal hydride rechargeable battery
NH-10WM
Your dealer may not handle some of the above
listed accessories. Please ask the dealer for
detailed information about the accessories in
your country.
∗ When using optional headphones, use only
headphones/earphones with stereo mini
plugs. You cannot use headphones/
earphones with micro plugs.
68
Page 69

Troubleshooting and explanations
Troubleshooting
If a problem occurs during recorder operation, follow the steps described below before
consulting the nearest Sony dealer. If any messages appear, it is recommended to take
notes.
1 Check to see if the problem is listed in, “Troubleshooting” (page 69).
Check “Messages” (page 77) for the problem as well.
2 If after step 1 you still cannot solve the problem, consult your nearest Sony dealer.
While charging
Symptom Cause/Remedy
The rechargeable
battery does not start
charging. The
rechargeable battery
cannot be fully
charged.
The rechargeable
battery has become
drained even when the
recorder was not used
for a while.
Even when fully
charged, the life of the
battery is only about
half what it normally is.
The recorder become
hot during the charging
procedure.
• The rechargeable battery has been inserted incorrectly or the AC
power adaptor has been connected incorrectly.
, Insert the rechargeable battery correctly or connect the AC
power adaptor correctly.
• Because of the battery’s characteristics, the capacity of the
rechargeable battery may be smaller than normal when it is used for
the first time or after a long period of disuse.
, Charge and discharge the battery several times. The normal
battery life will be restored.
• The surrounding temperature is too high or too low.
, Charge the battery at a temperature of +5°C (+41°F) to +35°C
(+95°F).
• You charged the rechargeable battery using USB bus power.
, USB bus power charging is only provisional and cannot be used
to fully charge the rechargeable battery. Disconnect the recorder
from the computer and charge the rechargeable battery with the
AC power adaptor.
• The Quick mode was set to “On”.
, If you set the Quick mode to “On”, the power stays on inside
recorder even when there is no operation, causing the
rechargeable battery life to shorten (page 57). If the rechargeable
battery is not fully charged, the battery may become drained
after a while. If this happens, charge the rechargeable battery
again (page 17).
• The useful life of the rechargeable battery may be ending.
, Replace the rechargeable battery with the new one.
• This is normal and poses no danger.
69
Page 70

While recording
Symptom Cause/Remedy
“NOT ENOUGH
POWER TO REC”
appears and recording
cannot be done on a
1GB Hi-MD disc.
The remaining
recording time appears
as “–00:00” and
recording cannot be
done, even though
2.0MB of free space is
displayed.
The recorder always
creates a new group
when recording.
The first few seconds
of a track cannot be
recorded.
Recording cannot be
done correctly.
• Recording is not possible when using a 1GB Hi-MD disc even when
the battery level indication shows enough power remaining while the
recorder is stopped or playing. This is because of a mechanism that
disables recording when the remaining battery power is estimated by
the recorder to be insufficient due to the high power consumption
required for 1GB Hi-MD disc recording.
, Connect the AC power adaptor to the recorder or insert a fully
charged rechargeable battery or a new alkaline dry battery.
• This is a system limitation. 2.0MB is the capacity of the reserve
domain.
• The group recording (“Group REC”) is set to “On”. (You cannot
overwrite tracks.)
, Set the group recording setting to “Off” (page 37).
• If you start recording before the x indication appears in the display,
data will not be recorded to the first few seconds of the first track.
, Wait until the x indication appears before you start recording.
• You tried to record in MD mode on this recorder.
Only Hi-MD mode can be used to record directly on this recorder
,
without using a computer. To record in MD mode, connect the
recorder to a Windows computer and use the supplied SonicStage
or MD Simple Burner software (pages 22 and 30).
• Audio sources may not be securely connected.
, Disconnect the audio sources once and connect them again
(pages 21 and 34).
• There is no digital signal from the portable CD player.
, When recording digitally from a portable CD player, use the AC
power adaptor and disable the anti-skip function (such as ESP)
on the CD player.
• The analog recording was made using a connecting cord with an
attenuator.
, Use a connecting cord without an attenuator.
• Recording level is too small to record (when adjusting the recording
level manually).
, Pause the recorder and adjust the recording level (page 35).
• The recorder is connected to the computer.
, Disconnect the recorder from the computer when recording.
• The power sources was disconnected or a power outage occurred
during recording.
, The recording result is not recorded on the disc. Make recording
again.
• Recording may not be done if the remaining recordable time on the
disc is 48 seconds or less (“DISC FULL” appears).
, Replace the disc.
70
Page 71

Symptom Cause/Remedy
The lid does not open
after recording.
“TRACK FULL”
appears even before the
disc has reached the
maximum recording
time and the recording
cannot be done.
The remaining
recording time does not
increase even after
erasing numerous short
tracks.
The total recorded time
and the remaining time
on the disc may not
total the maximum
recording time (60, 74,
or 80 minutes).
“TRACK FULL”
appears even before the
disc has reached the
maximum track
number or recording
time.
• The lid does not open until “SYSTEM FILE WRITING” disappears
in the display.
• This is due to the MiniDisc system limitation. When 2,047 tracks (on
a disc used in Hi-MD mode) have been recorded on the disc,
“TRACK FULL” appears regardless of the total recorded time. More
than 2,047 tracks cannot be recorded on the disc.
, To continue recording, erase unnecessary tracks.
• This is due to the MiniDisc system limitation (in MD mode only).
Tracks of under 12 seconds (in SP mode), 24 seconds (in LP2 mode
or monaural), or 48 seconds (in LP4 mode) in length are not counted
and so erasing them may not lead to an increase in the recording
time.
• This is due to the MiniDisc system limitation (in MD mode only).
Normally, recording is done in minimum units of approximately 2
seconds (in SP mode), 4 seconds (in LP2 mode or monaural), or 8
seconds (in LP4 mode). When recording is stopped, the last unit of
recording always uses this unit of 2 seconds, 4 seconds, or 8 seconds
even if the actual recording is shorter. Likewise, when recording is
restarted after the stop, the recorder will automatically insert a blank
space amounting to 2 seconds, 4 seconds, or 8 seconds before the
next recording. (This is to prevent accidental erasing of a previous
track whenever a new recording is started). Therefore, the actual
recording time will decrease whenever a recording is stopped by a
maximum of 6 seconds, 12 seconds, or 24 seconds.
• This is due to the MiniDisc system limitation. Repeated recording
and erasing may cause fragmentation and scattering of data.
Although those scattered data can be read, each fragment is counted
as a track. In this case, the number of tracks may reach 2,047 (on a
disc used in Hi-MD mode) and further recording is not possible.
, To continue recording, erase unnecessary tracks.
While playing
Symptom Cause/Remedy
A disc is not played
normally.
A disc is not played
from the first track.
• Repeat play is selected.
, Set the Repeat play to “Off” to change back to the normal play
(page 42).
• Playback mode is changed.
, Enter the Main play mode or Sub play mode to change back to
the normal play (page 40).
• Disc playing stopped before it came to the last track.
, Press the jog dial (N/ENT) on the recorder or press NX on
the remote control for 2 seconds or more to start playing.
71
Page 72

Symptom Cause/Remedy
Playback sound skips. • The recorder is placed where it receives continuous vibration.
Momentary noise is
heard.
Sound has a lot of static. • Strong magnetism from a television or such device is interfering
The volume of the
recorded track is low.
Volume cannot be
turned up.
No sound comes
through the earphones.
The disc cannot be
played on another
component.
The edited tracks may
exhibit sound dropout
during search
operations.
There is no R-channel
sound output when
playing a track recorded
from a cassette deck or
through an amplifier, or
when listening to sound
from a cassette deck or
amplifier.
The recorder cannot
play MP3 tracks.
“R” appears in the
display window during
playback.
, Put the recorder on a stable place.
• A very short track may cause sound to skip.
, Try not to create a short track.
• Due to the special digital audio compression technology used in
LP4 mode, momentary noise may occur on very rare occasions with
certain sound sources.
with operation.
, Move the recorder away from the source of strong magnetism.
• The track was recorded in analog mode (in digital mode, the
recording level is automatically set to the same level as that of the
sound source). Or you used a connecting cord with an attenuator.
, Use a correct connecting cord without an attenuator.
• The recording level was low.
, Adjust the recording level manually while recording (page 35).
• AVLS is on.
, Release the AVLS settings (page 56).
• The earphones plug is not firmly connected.
, Plug in the plug of the earphones or the remote control firmly to
the appropriate jacks.
• The plug is dirty.
, Clean the plug.
• The component does not support Hi-MD.
, Discs recorded on this recorder can be played only on
components that support Hi-MD.
• This occurs due to the MiniDisc system limitation. The
fragmentation of data may cause sound dropout while searching
because the tracks are played in higher speed than normal playback.
• There is no R-channel output if the cassette deck or an amplifier is
connected with a monaural cord.
, Make sure to use a stereo connecting cord. If, however, the
connected equipment is monaural, there will be no R-channel
sound output even with a stereo connecting cord.
• You tried to play an MP3 track with a format not supported by this
recorder.
, This recorder only supports MP3 tracks (MPEG-1 Audio Layer-
3/Sampling frequency 44.1 kHz) that have been transferred
using the SonicStage software.
• “R” appears when the contents of an editing operation performed
during recorder playback are ready to be written to the disc.
, When playback on the recorder is stopped, the edited contents
are written to the disc and the “R” disappears.
72
Page 73

While editing
Symptom Cause/Remedy
“NOT ENOUGH
POWER TO EDIT”
appears and editing
cannot be done on a
1GB Hi-MD disc.
The lid does not open. • The recorder is saving the contents of an editing operation. The lid
Editing cannot be done. • The power source has been disconnected or a power outage has
Non-audio data cannot
be erased.
Tracks cannot be
combined.
The disc cannot edit on
other component.
• Editing is not possible when using a 1GB Hi-MD disc even when the
battery level indication shows enough power remaining while the
recorder is stopped or playing. This is because of a mechanism that
disables editing when the remaining battery power is estimated by
the recorder to be insufficient due to the high power consumption
required for 1GB Hi-MD disc editing.
, Connect the AC power adaptor to the recorder or insert a fully
charged rechargeable battery or a new alkaline dry battery.
will not open until “SYSTEM FILE WRITING” disappears from the
display.
occurred during editing.
, The editing done to that point is not saved to the disc. Do the
editing operation again.
• Non-audio data cannot be erased with the Erase function.
, Confirm the contents by connecting the recorder to your
computer. If it is okay to delete the contents, then perform the
Format function (page 55).
• This is due to the MiniDisc system limitations. When the tracks are
scattered and the length of each track is short*, you may not be able
to combine the tracks.
* Combining tracks of the following lengths may not be possible.
Hi-MD mode
LinearPCM: 9 seconds or less
Hi-SP: 8 seconds or less
Hi-LP: 32 seconds or less
MD mode
SP: 12 seconds or less
LP2/Monaural: 24 seconds or less
LP4: 48 seconds or less
• You cannot combine tracks recorded in different recording modes,
e.g., a track recorded in stereo and a track recorded in monaural; nor
can you combine a track recorded with digital connection and a track
recorded with analog connection.
• The component does not support Hi-MD.
, Edit on other component that support Hi-MD.
While using group function
Symptom Cause/Remedy
The group function does
not operate.
• While using a disc without group setting, an attempt was made to
select some group-related menu.
, Use a disc with group setting.
73
Page 74

Symptom Cause/Remedy
A new group cannot be
created.
• This is due to the MiniDisc system limitations (in MD mode only).
Group information has been written to the area where the disc name
is stored. The disc name and track names are recorded in the same
area, which can store a maximum of approximately 1,700
characters. If the total number exceeds this amount, it is impossible
to make group settings.
While the recorder is connected to the computer
Symptom Cause/Remedy
The recorder is not
recognized by the
computer.
Charging by USB
bus power cannot be
done ( flashes
in the display).
The rechargeable
battery cannot be
charged sufficiently
through USB bus
power.
Even though the
recorder is
recognized by the
computer, it does n ot
operate normally.
The recorder cannot
be used as a storage
device.
• The supplied USB cable is not firmly connected.
, Connect the USB cable firmly to the recorder and the computer.
• A USB hub is used.
, Connect the USB cable directly to the USB port of the computer.
• Network communication has failed.
, Disconnect the USB cable, wait at least 2 seconds, and then
reconnect it. If the recorder is still not recognized, disconnect the
USB cable, restart the computer, and then connect the USB cable
again.
When using Windows 2000 Professional, you turned on or restarted the
•
computer while the supplied USB cable was connected, and then
disconnected it afterwards.
, Disconnect the USB cable, restart the computer, and then reconnect
the USB cable. This problem may be resolved by updating your
Windows operating system so that it contains all the latest features.
• The battery compartment lid is not firmly closed.
, Reinsert the rechargeable battery and close the battery compartment
lid firmly.
• The temperature of the battery-charging location is too low or too high.
, Charge the rechargeable battery within a temperature range of +5°C
(+41°F) to +35°C (+95°F).
• The rechargeable battery is charged through USB bus power.
, USB bus power only charges temporary and cannot charge the
rechargeable battery sufficiently. Disconnect the recorder from the
computer and charge the rechargeable battery using the AC power
adaptor.
• A USB hub is used.
, Connect the supplied USB cable directly to the USB port of the
computer.
• You are using the recorder at a place with vibration.
, Use the recorder at a place with no vibration.
• The SonicStage or MD Simple Burner software is active.
, Close the SonicStage or MD Simple Burner software.
• A disc which is not used in Hi-MD mode is inserted.
, Insert a disc used in Hi-MD mode. Only discs used in Hi-MD mode
can be used as a storage media.
74
Page 75

Symptom Cause/Remedy
The playing time of
a transferred track is
different from the
time that appears on
your computer
monitor.
You cannot transfer
tracks that will fill
up the remaining
recording time on
the disc.
The disc size
displayed on the
computer is not the
same as the disc size
printed on the disc.
You cannot operate
the recorder.
The lid does not
open.
This is due to a calculation discrepancy between the recorder and the
computer.
• The minimum recordable time on a disc is normally 2 seconds in SP
mode, 4 seconds in LP2 mode, and 8 seconds in LP4 mode. When you
transfer a track from your Windows computer, the recorder needs a 2second (or 4- or 8-second) space for a track even if the track is under 2
seconds (or 4 or 8 seconds) in length. Also, the recorder inserts a 2second (or 4 -or 8-second) space in between tracks during transfer
operation. For this reason, the recorder needs an additional 6 seconds
(or 12 or 24 seconds) for each track. This reduces the maximum
recording time for each track by 6 seconds (or 12 or 24 seconds) during
transfer operation (in MD mode only).
• The difference is due to the use of the binary system to indicate the disc
size on the computer and the decimal system to express the disc size on
the disc and other recording media. For details on the disc size, see
page 64.
• You cannot operate the recorder while the recorder is connected to the
computer.
• It happens if you disconnect the supplied USB cable in the middle of a
data transfer, recording, or editing operation on the computer, but while
the rechargeable battery is missing from the recorder or is drained.
, Reconnect the USB cable or insert a fully charged rechargeable
battery into the recorder, and then press x.
Others
Symptom Cause/Remedy
“Advanced” or
“Simple” is
displayed.
Some menu items
cannot be displayed.
The recorder does
not work or works
poorly.
• You attempted to do a menu operation for the first time after purchase
of the recorder (by pressing the MENU button for 2 seconds or more).
, Select the Menu mode (page 56).
• “Menu Mode” is set to “Simple”.
, Set the “Menu Mode” to “Advanced” to display all the menu items.
• The rechargeable battery is not charged.
, Charge the rechargeable battery.
• The volume is low.
, Turn up the volume.
• No disc is inserted.
, Insert a recorded disc.
• The HOLD function is turned on (“HOLD” appears in the display when
you press an operation button on the recorder).
, On the recorder, disable HOLD by sliding the HOLD switch to the
opposite direction of the arrow
(pages 14, 18).
75
Page 76

Symptom Cause/Remedy
The recorder does
not work or works
poorly.
File names or folder
names displayed by
the File list function
are different from
those saved on the
computer.
The file names or
folder names are not
correctly displayed
by the File list
function.
The operation mode
of the blank 60/74/
80-minute standard
disc differs from the
mode following
formatting or the
mode selected in the
SonicStage software.
• The lid is not firmly closed.
, Close the lid until it clicks. Then slide OPEN to open the lid.
• Moisture has condensed inside the recorder (for example, when the
recorder has been brought in from a cold place to a warm place).
, Take the disc out and leave the recorder in a warm place for several
hours until the moisture evaporates.
• The AC power adaptor is not firmly connected.
, Connect the AC power adaptor firmly to the DC IN 3V jack on the
recorder.
• The rechargeable battery or dry battery is weak (“LOW BATTERY”
flashes or nothing appears).
, Charge the rechargeable battery, replace the dry battery with a new
one, or use the supplied AC power adaptor.
• The disc is damaged or does not contain proper recording or editing data.
, Reinsert the disc. Rerecord the disc. If the error message still
appears, replace it with another disc.
• There is a built-in malfunction in the system.
• While operating, the recorder received a mechanical shock, too much
static, abnormal power voltage caused by lightning, etc.
, Restart the operation as follows.
1 Disconnect all the power sources and the USB cable.
2 Leave the recorder for about 30 seconds.
3 Connect the power source.
• File names and folder names that exceed the maximum display length
supported by the recorder are shortened.
• The names contain characters that are not supported by the recorder.
• When using a blank 60/74/80-minute standard disc in the recorder, the
operation mode set in the “Disc Mode” menu is applied.
, Use the “Disc Mode” menu to change the operation mode as
desired.
76
Page 77

Messages
If the following messages appear in the display window on the recorder, check the chart
below.
Message Meaning/Remedy
AVLS NO
VOLUM E
OPERATION
BLANKDISC • A disc with no recording on it is inserted.
BUSY WAIT A
MOMENT
CANNOT EDIT • You selected, “Group Set”, “GroupRelease”, “Move”, or “Erase” while
CANNOT
OPERATE
CANNOT PLAY • You tried to play a track that is subject to play restrictions.
CANNOT
RECORD
CANNOT
RECORD OR
PLAY
CANNOT SET • You tried to set “Time Mark” during synchro-recording.
Charging • The rechargeable battery is being charged.
• AVLS is set to “On” and so the volume cannot rise higher.
, Set AVLS to “Off” (page 56).
• The recorder is accessing disc information.
• You tried to operate the recorder while it was accessing the recorded data.
, Wait until the message goes out (in rare cases, it may take a few
minutes).
recording.
• You tried to erase the track mark at the beginning of the first track or group.
• You tried to erase a track mark to combine tracks the recorder cannot
combine (a track recorded in stereo and in mono, for example).
• You tried to overwrite a track marks.
• You tried to change a title that includes characters the recorder cannot edit.
, Editing titles cannot be done if the title includes characters that cannot
be input on the recorder.
• You tried to press X or T MARK during synchro-recording.
• You tried to play an MP3 track with a format not supported by this recorder.
, This recorder only supports MP3 tracks (MPEG-1 Audio Layer-3/
sampling frequency 44.1 kHz) that have been transferred using the
SonicStage software.
• You tried to record on a disc that has already been recorded in MD mode.
, On this recorder, you cannot do additional recording on a disc that is
already recorded in MD mode. If you want to do additional recording
on such a disc, connect the recorder to a Windows computer and use the
supplied SonicStage or MD Simple Burner software.
• There is no audio data that can be played on the recorder.
• The audio data or disc management file has been damaged.
, Erase the whole disc (page 53) or perform the Format function
(page 55).
• You selected “REC Level” while the recorder is not in recording-pause.
, Set “REC Level” while the recorder is in recording-pause.
• You tried to make the following settings while recording.
— Recording mode
— Disc Memory
— Play mode
— Selection of “Group REC” in menu
77
Page 78

Message Meaning/Remedy
DATA SAVE • The recorder is writing information to the system file, such as the recorded
DC IN TOO
HIGH
DISC FULL • Recording may not be done if the remaining recordable time on the disc is
DOWNLOAD
READY
EJECT DISC OK • The recorder has finished communicating with the computer and it is safe
END • The recorder reached to the end of the disc while playing or pressing >.
ERROR • There is an internal malfunction in the system.
ERROR XX • There is an internal malfunction in the system.
FOLDER NO
EXPAND
FORMAT
ERROR DISC
GROUP FULL • You tried to create a 256th group on a disc used in Hi-MD mode or 100th
HOLD • The recorder is locked.
IN MENU • You pressed a key on the remote control while selecting a menu on the
LOW BATTERY • Batteries are weak.
MEMORY
OVE R
NO
BOOKMARKED
TRACK
data or editing information.
, Wait until the message disappears from the display.
• Voltage of the power supply is too high (The supplied AC power adaptor is
not used).
, Use the supplied AC power adaptor.
48 seconds or less.
, Replace the disc.
• MD Simple Burner is now ready to record an audio CD to the disc in the
recorder using Simple mode. (Refer to
to eject the disc from the recorder or disconnect the USB cable.
, Restart the operation by doing steps 1 to 3 on page 76.
, Restart the operation by doing steps 1 to 3 on page 76. If the message
appears again, please consult your nearest Sony dealer.
• You tried to use the File List function to expand a folder that is already at
the 16th level.
, Files and folders can be expanded down to 16 levels. Expansion beyond
this level is not possible.
• A disc with a format that the recorder does not support was inserted.
, Insert a disc used in Hi-MD mode.
• A disc formatted on a computer was inserted.
, A disc formatted on a Windows or Macintosh computer cannot be used.
Format the disc on the recorder or with the SonicStage software.
group on a disc used in MD mode.
, You can create only up to 255 groups (on a disc used in Hi-MD mode)
or 99 groups (on a disc used in MD mode) on a disc. Keep the group
number within 255 or 99.
, Slide HOLD against the arrow to unlock the recorder (page 18).
recorder.
, Charge the rechargeable battery or replace the dry battery (page 17).
• You tried to record with the recorder placed where it receives continuous
vibration.
, Put the recorder on a stable place, and start recording again.
• You selected bookmark play without setting bookmarks.
, Set bookmarks (page 41).
“Software Operation” section.)
78
Page 79

Message Meaning/Remedy
NO DIGITAL
COPY
NO DISC • You tried to play or record with no disc in the recorder.
NO DISC
MEMORY
NO FILE • While viewing the file list, you selected a folder that have no folders or files
NO GROUP • You selected “Group Erase” with a disc without group setting.
NO INPUT
SIGNAL
NON GROUPED
TRACK
NOT ENOUGH
POWER TO
EDIT
NOT ENOUGH
POWER TO
REC
NO TRACK • You tried to play a disc with no recorded tracks.
NO TRACK IS
SELECTED
P/B ONLY DISC • You tried to record or edit on a premastered disc (P/B stands for
PC – – MD • The recorder is connected to the computer.
PROTECTED
DISC
PUSH STOP
BUTTON
• You tried to make a copy from a disc that is protected by the Serial Copy
Management System. You cannot make copies from a digitally connected
source which was itself recorded using digital connection.
, Use analog connection instead (page 34).
, Insert a disc.
• You tried to erase a setting in the Disc Memory on a disc that contains no
settings in the Disc Memory (page 57).
, You cannot erase groups with a disc with no groups.
• You tried to release a group setting with a disc that has no groups.
, Insert a disc with group settings.
• The recorder could not detect digital input signals.
, Make sure that the source is connected firmly (page 21).
• You selected “Group Move” or “Group Erase”, or you tried to label a group
while selecting a track that does not belong to a group.
, Select a track within a group you want to edit, and then do the editing
operation again.
• You tried to edit the contents of a 1GB Hi-MD disc with insufficient battery
power for editing (page 73).
, Connect the AC power adaptor to the recorder or insert a fully charged
rechargeable battery or a new alkaline dry battery.
• You tried to record on a 1GB Hi-MD disc with insufficient battery power
for recording (page 70).
, Connect the AC power adaptor to the recorder or insert a fully charged
rechargeable battery or a new alkaline dry battery.
, Insert a recorded disc.
• You selected “Track Move” or “Track Erase”, or you tried to label a track
without first selecting a track.
, Do the editing operation again after selecting the desired track first.
“playback”).
, Insert a recordable disc.
• You tried to record or edit on a disc with the tab in the record-protect
position.
, Slide the tab back (page 66).
• You tried to open the lid by sliding the OPEN switch or operate the recorder
while the recorder was storing disc information with the supplied USB
cable connecting the recorder to a computer.
, Operation must be done only after pressing x and “SYSTEM FILE
WRITING” has disappeared from the display.
79
Page 80

Message Meaning/Remedy
READ ERROR • The recorder cannot read the disc information correctly.
REC ERROR • Recording was not correctly done.
SEARCH • You pressed a button or a control on the remote control while using the
SYSTEM FILE
WRITING
TEMP OVER
REC STOP
TITLE FULL • You tried to enter more than 200 letters to label a single track, group, or
TOC DATA
ERROR
TRACK FULL • You tried to record more than 2,047 tracks on a disc used in Hi-MD mode.
TRK FROM PC
NO EDIT
TRK FROM PC
NO REC
, Reinsert the disc.
, Place the recorder at a place with no vibrations and record again.
• The disc is soiled with an oil film or finger prints, is scratched, or is not a
standard disc.
, Try recording again with another disc.
Search function on the recorder.
, Use the buttons and controls on the recorder.
• The recorder is storing information (track start and end position) from the
memory to the disk.
, Wait until this process is completed. Do not expose the player to
physical shock, nor disrupt power supply.
• Heat has built up in the recorder.
, Let the recorder cool down.
disc.
• You tried to enter a total of more than approximately 55,000 letters (in a
disc used in Hi-MD mode) or 1,700 letters (in a disc used inMD mode) for
titles.
• The recorder cannot read the disc information correctly.
, Insert another disc.
, If it is no problem to erase the entire disc, do so (page 53).
, Erase unnecessary tracks (page 52).
• You tried to combine or divide tracks that were transferred from the
Windows computer.
, You cannot combine or divide transferred tracks.
• You tried to combine or divide tracks that were recorded in Hi-MD mode
using the MD Simple Burner software.
, You cannot combine or divide tracks recorded in Hi-MD mode with the
MD Simple Burner software.
• You tried to record in the middle of a protected track that has been
transferred from the Windows computer.
• You tried to record in the middle of a track that was recorded in Hi-MD
mode with the MD Simple Burner software.
, You cannot record new material in the middle of a protected track or a
track that was recorded in Hi-MD mode with the MD Simple Burner
software.
80
Page 81

Explanations
About Hi-MD
“Hi-MD” is a new MiniDisc format.
Incorporating the new ATRAC3plus audio compression technology, Hi-MD is a new recording format
that delivers longer recording times than ordinary MDs. Hi-MD discs can also be used as a computer
storage medium for non-audio data such as text and images. This recorder supports Hi-MD only.
For more details on Hi-MD, refer to the supplied flyer “What you can do with the Hi-MD Walkman”.
About ATRAC3plus
ATRAC3plus is an enhanced version of ATRAC3.
Compared to ATRAC3 (used in LP2 and LP4 recording mode of MiniDisc components), which attains
a compression ratio 10 times higher than that of a CD, ATRAC3plus (used in Hi-SP and Hi-LP mode of
the recorder) achieves a higher compression ratio that is 20 times higher than that of a CD, but with no
loss in sound quality.
“Hi-MD mode” and “MD mode”
This recorder has two operation modes, “Hi-MD mode” and “MD mode”. The operation mode is
automatically recognized whenever the disc is inserted.
• When using a 1GB Hi-MD disc, the operation mode will only be Hi-MD.
• When using a standard disc (60/74/80 minutes), the operation mode can be set as follows.
Disc condition Operation mode
Blank disc The mode set for the “Disc Mode” in the menu.
, When recording on this recorder without using a Windows
computer, set “Disc Mode” to “Hi-MD” so that the operation
mode will be “Hi-MD mode”.
The disc contains material
Hi-MD
recorded in Hi-MD mode
The disc contains material
recorded in MD mode
MD
, You cannot use this recorder to record in MD mode without
using a Windows computer. Recording in “MD mode” is
possible if you use the supplied SonicStage or MD Simple
Burner software.
1)
Refer to “Selecting the disc mode (Disc Mode)” (page 58) for the “Disc Mode” setting.
1)
About LinearPCM
LinearPCM is a digital, non-compressed audio coding system. You can enjoy high-quality sound equal
to that of CDs by recording in this mode.
The meaning of “no sound”
“No sound” describes a recorder condition in which the input level is about 4.8 mV during analog input
or less than –89 dB during optical (digital) input (with 0 dB as full bit (the maximum recordable level
for a MiniDisc)).
81
Page 82

About “System File”
The system file is space on the disc that is used to store information other than audio files; for instance,
track numbers.
If the MiniDisc were a book, the system file would correspond with the index or table of contents.
The recorder rewrites the system file whenever an operation such as recording, adding or deleting track
marks, or moving tracks has been done. (“SYSTEM FILE WRITING” appears in the display when the
recorder is rewriting the system file.) While the recorder is writing disc information, make sure not to
move or jog the recorder or disconnect the power source as this may cause the information to be
incorrectly recorded or the disc contents to be lost.
List of the recording time for each disc
When using a disc in Hi-MD mode
When recording on the
recorder
Recording
mode on the
Codec/
Bit rate
1GB Hi-MD
disc
recorder
PCM LinearPCM/
1.4Mbps
Hi-SP ATRAC3plus/
256kbps
Hi-LP ATRAC3plus/
When transferring from the
Windows computer
64kbps
1 hour and 34
minutes
7 hours and 55
minutes
34 hours 10 hours and
Codec/Bit rate 1GB Hi-MD
disc
LinearPCM/1.4Mbps 1 hour and 34
Recording time
80-minute
standard
disc
28 minutes 26 minutes 21 minutes
2 hours and 20
minutes
10 minutes
Recording time
80-minute
standard
disc
28 minutes 26 minutes 21 minutes
1)
74-minute
standard
disc
2 hours and
10 minutes
9 hours and
20 minutes
1)2)
74-minute
standard
disc
60-minute
standard
disc
1 hour and 40
minutes
7 hours and
40 minutes
60-minute
standard
disc
minutes
ATRAC3plus/256kbps 7 hours and 55
minutes
ATRAC3plus/64kbps 34 hours 10 hours and
ATRAC3plus/ 48 kbps 45 hours 13 hours and
ATRAC3/132kbps 16 hours and
30 minutes
ATRAC3/105kbps 20 hours and
40 minutes
ATRAC3/66kbps 32 hours and
40 minutes
MP3/128kbps 17 hours 5 hours 4 hours and
1)
Approximate time
2)
When transferring 4-minute tracks
2 hours and 20
minutes
10 minutes
30 minutes
4 hours and 50
minutes
6 hours and 10
minutes
9 hours and 50
minutes
2 hours and
10 minutes
9 hours and
20 minutes
12 hours and
1 hour and 40
minutes
7 hours and
40 minutes
10 hours
30 minutes
4 hours and
30 minutes
5 hours and
40 minutes
3 hours and
40 minutes
4 hours and
40 minutes
9 hours 7 hours and
20 minutes
30 minutes
3 hours and
30 minutes
82
Page 83

When using a disc in MD mode
You cannot record in MD mode on this recorder.
When transferring from the
Recording time
1)2)
Windows computer
Codec/Bit rate 80-minute
standard disc
74-minute
standard disc
60-minute
standard disc
ATRAC(stereo)/292kbps 80 minutes 74 minutes 60 minutes
ATRAC3/132, 105kbps 2 hours and 40
minutes
ATRAC3/66kbps 5 hours and 20
minutes
1)
Approximate time
2)
When transferring 4-minute tracks
2 hours and 28
minutes
4 hours and 56
minutes
2 hours
4 hours
About recordable audio formats
The audio formats that can be recorded on this recorder vary according to the disc type and recording
method. Check the following table for details.
Disc type Recording
method
1GB Hi-MD
disc
When recording
on the recorder
When transferring
Format Component used for playback
Component
that supports
1)
Hi-MD
Component
that supports
2)
MDLP
MD
component
Hi-MD
Hi-MD
from the Windows
computer
60/74/80minute
standard disc
When recording
on the recorder
When transferring
from the Windows
computer
Hi-MD
Hi-MD
MDLP
MD
1)
Audio components marked with the or logo mark
2)
Audio components marked only with the or logo mark
83
Page 84

Note on digital recording
This recorder uses the Serial Copy Management System, which allows only first-generation digital
copies to be made from premastered software. You can only make copies from a home-recorded disc by
using the analog (line out) connections.
Premastered software such as CDs or MDs.
Digital recording
Microphone, record player, tuner, etc. (with
analog output jacks).
Analog recording
Home-recorded disc
Homerecorded
disc
No
digital
recording
Recordable
disc
Recordable
disc
Digital recording
No
digital
recording
Recordable
disc
Restrictions on the editing of tracks transferred from your
Windows computer
This unit was designed so that editing functions (i.e., adding track marks and erasing track
marks) do not function for tracks that have been transferred from your Windows computer. This
is to prevent the loss of transfer authorization by the transferred tracks. To edit these tracks, first
transfer them into the computer, and then edit them on the computer.
About the DSP TYPE-S for ATRAC/ATRAC3
This recorder supports DSP TYPE-S, a specification for high-level Sony MiniDisc decks
equipped with digital signal processors (DSP). This specification allows the recorder to produce
high-quality sound from tracks recorded in MDLP mode. Since it retains DSP TYPE-R support,
the recorder produces superior results during playback in SP (normal stereo) mode.
Suppressing the skips of the sound (G-PROTECTION)
The G-PROTECTION function was developed to provide a higher level of shock resistance than
that of existing players.
84
Page 85

Difference between digital (optical) and analog (line) inputs
The input jack of this recorder works as both digital and analog input jacks. Connect the
recorder to a CD player or a cassette recorder using either digital (optical) input or analog
(line) input. To record, see “Recording a disc right away!” (page 21) to record using digital
(optical) input, and “Recording from a TV or radio (Analog Recording)” (page 34) to
record using analog (line) input.
Difference Digital (optical) input Analog (line) input
Connectable
source
Equipment with a digital (optical) output jack
(CD player, DVD player, etc.)
Equipment with an analog (line)
output jack (Casette deck, radio,
record player, etc.)
Usable cord Optical cable (with an optical or an optical-
mini plug) (page 21)
Signal from
Digital Analog
the source
Line cable (with 2 phono plugs
or a stereo-mini plug) (page 34)
Even when a digital source
(such as a CD) is connected, the
signal sent to the recorder is
analog.
Track marks
Marked (copied) automatically
• at the same positions as the source (when the
sound source is a CD or an MD).
• after more than 2 seconds of no sound
(page 81) or low-level segment (with a
sound source other than a CD or an MD).
Marked automatically
• after more than 2 seconds of
no sound (page 81) or lowlevel segment.
• when the recorder is paused
while recording.
1)
• when the recorder is paused (3 seconds of no
sound is encountered while synchrorecording)
Recorded
sound level
1)
You can erase unnecessary marks after recording. (“Combining tracks (Combine)”, page 54).
Note
Track marks may be copied incorrectly:
Same as the source.
Can also be adjusted manually (Digital REC
level control) (“Adjusting the recording level
manually”, page 35).
Adjusted automatically. Can
also be adjusted manually
(“Adjusting the recording level
manually”, page 35).
• when you record from some CD players or multi disc players using digital (optical) input.
• when the source is in shuffle or program play mode while recording using digital (optical) input. In
this case, play the source in normal play mode.
• when programs with audio that is digitally broadcast (e.g., digital TV) are recorded through the digital
(optical) input.
85
Page 86

What you can do with SonicStage/ MD Simple Burner
Refer to the supplied “Hi-MD WAV Importer for Mac” operating instructions for details on
operations of the Hi-MD WAV Importer software.
What you can do with SonicStage
SonicStage allows you to import audio data to your computer from music sources such as
audio CDs and the Internet, and then transfer the audio data stored in your computer to an
MD.
Audio CD
Import
Internet
∗ Copyright-protected WMA files cannot be transferred.
Music files in the
MP3,WAV, and
WMA* formats
Transfer
MD Walkman
What you can do with MD Simple Burner
MD Simple Burner allows you to record music tracks from an audio CD in the CD drive of
your computer to an MD Walkman, without first recording the music tracks to the
computer.
MD Walkman
Audio CD
86
Page 87

Basic operational flow using an MD Walkman
SonicStage
Providing the required system environment (page 88)
Installing the software onto your computer (page 89)
Importing audio data to
your computer (page 91)
Connecting an MD
walkman to your computer
(see page 61 on “Recorder
Operation”)
Transferring audio data
from your computer
(page 93)
MD Simple Burner
Connecting an MD
walkman to your
computer (see page 61
on “Recorder Operation”)
Recording music tracks
from an audio CD in the
CD drive of your
computer (page 104)
Software Operation
Listening to an MD
87
Page 88

Installing
Providing the required system environment
System requirements
The following system environment is required in order to use the SonicStage Ver. 3.1/MD
Simple Burner Ver. 2.0 software for the MD Walkman.
Computer IBM PC/AT or Compatible
• CPU: Pentium III 450 MHz or higher
• Hard disk drive space: 200 MB or more (1.5 GB or more is
recommended) (The amount of free space will vary according to
Windows version and the number of music files stored on the hard
disk.)
• RAM: 128 MB or more
Others
• CD drive (capable of digital playback by WDM) (A CD-R/RW drive
is necessary for CD writing)
• Sound Board
•USB port
Operating
System
Display High Color (16bit) or higher, 800 × 600 dots or better (1,024 × 768 dots
Others • Internet access: for Web registration, EMD services and CDDB
Factory installed:
Windows XP Media Center Edition 2005/Windows XP Media Center
Edition 2004/Windows XP Media Center Edition/Windows XP
Professional/Windows XP Home Edition/Windows 2000 Professional
(Service Pack 3 or later)/Windows Millennium Edition/Windows 98
Second Edition
or better is recommended)
• Windows Media Player (version 7.0 or higher) installed for playing
WMA files
This software is not supported by the following environments:
• OSs other than those indicated above
• Personally constructed PCs or operating systems
• An environment that is an upgrade of the original manufacturer-installed operating system
• Multi-boot environment
• Multi-monitor environment
• Macintosh
Notes
• We do not ensure trouble-free operation on all computers that satisfy the system requirements.
• The NTFS format of Windows XP/Windows 2000 Professional can be used only with the standard
(factory) settings.
• We do not ensure trouble-free operation on computers which have changed to the system suspend,
sleep, or hibernation mode.
88
Page 89

Installing the software onto your computer
Before installing the software
• Make sure to close all Windows software programs. Especially, make sure to close any
virus-check software, as such software usually demands a large amount of system
resources.
• When you use the MD Walkman, make sure to install the software with the supplied CD-
ROM.
— If OpenMG Jukebox, SonicStage or Net MD Simple Burner is installed already, the
current software will be overwritten by the new version. The new version retains the
functions of the older version, but with new functions added.
— If SonicStage Premium or SonicStage Simple Burner is installed already, the current
software will co-exist with the new version.
— You will still be able to use music data registered by the older software version even
after the new SonicStage has been installed. As a precaution, we recommend that you
back up your music data. To back up the data, refer to [Backing Up My Library] on
SonicStage Help.
The method for managing music data differs in part from conventional methods. For
details, refer to [For Users of Earlier Versions of SonicStage] in SonicStage Help.
• Make sure to install SonicStage before connecting the MD Walkman to the computer
with the supplied USB cable.
1 Turn on your computer and start up Windows.
2 Insert the supplied CD-ROM into the CD drive of your computer.
The setup program starts up automatically and the installation window appears.
3 When the [Region Selection] screen appears, select the region where the
SonicStage software will be used, and then click [Next].
continued
89
Page 90

4 Click [Install SonicStage and MD Simple Burner] and then follow the
displayed instructions.
Click [Install SonicStage and MD Simple
Burner]
Read the instructions carefully.
Depending on your region, the buttons other than [Install SonicStage and MD Simple
Burner] may differ from those in the illustration above.
The installation may take 20 to 30 minutes, depending on your system environment.
Make sure to restart your computer only after the installation is completed.
Was the installation successful?
If any trouble occurs during the installation, see “Troubleshooting” (page 110).
90
Page 91

Using SonicStage
Importing audio data
This section explains how to record and store audio data from an audio CD to My Library
of SonicStage on the hard disk drive of your computer. You can also assign cover art for
imported albums.
You can record or import music from other sources such as the Internet and your
computer’s hard disk. Refer to SonicStage Help for details.
Notes
• Only audio CDs with a mark can be used with SonicStage.
• We do not guarantee normal operation in the case of the copy-controlled CDs.
Playback
control
section
Cover art
display
[CD Info]
[ Music Source]
[Settings]
1 Start up SonicStage.
Select [Start] – [All Programs]
∗[Programs] in the case of Windows 2000 Professional/Windows Millennium Edition/Windows 98
Second Edition
SonicStage starts up and the main window appears.
z
You can also start SonicStage with double click ([SonicStage] icon) on the desktop.
*
– [SonicStage] – [SonicStage].
2 Insert the audio CD that you want to record into the CD drive of your
computer.
continued
91
Page 92

3 Point to [ Music Source] on the upper-left side of the screen and click
[Import a CD].
The screen switches to the “Music Source” (Importing CD) screen and all the tracks on
the audio CD are listed.
4 If necessary, click to uncheck tracks you do not want to record.
If you unchecked a box by mistake, click it again to restore the check.
To check all boxes, click
To uncheck all boxes, click .
.
5 If necessary, change the format and bit rate for audio CD recording.
When you click [Settings] on the right side of the screen, “CD Importing Format”
dialog box will appear. The dialog box will ask you to select the format and bit rate for
recording an audio CD.
6 Click .
The recording of the tracks selected in step 4 starts.
To stop recording
Click .
To assign cover art for imported albums
Find the desired image file (jpg, gif, bmp file) using Windows Explorer and drag it to the
cover art display in the playback control section.
z
If CD information such as album title, artist name, and track names could not be obtained
automatically, click [CD Info] on the right side of the screen. When you do this, your computer must be
connected to the Internet.
92
Page 93

Transferring audio data from your computer to the MD Walkman
Audio data stored in My Library of SonicStage can be transferred to your MD Walkman an
infinite number of times.
[Transfer ]
The My Library
list
[Settings]
1 Insert a disc into the MD Walkman and connect the MD Walkman to your
computer.
Use the supplied USB cable for the MD Walkman to connect the MD Walkman to your
computer.
For details about connections, see page 61 on “Recorder Operation”.
Do not disconnect the power source or the USB cable before the transfer has
completed.
2 Point to [Transfer ] on the upper-right side of the screen and click [Hi-MD]
or [Net MD].
The screen is switched to the transfer (Hi-MD or Net MD) screen.
3 Click the tracks you want to transfer in the My Library list on the left side of
the screen.
To transfer more than one track, hold down the [Ctrl] key while selecting the tracks.
To transfer all tracks of the album, click the album.
continued
93
Page 94

4 If necessary, change the transfer mode.
As the default setting, tracks in the OpenMG (PCM/ATRAC3/ATRAC3plus) format
will be transferred in the same format and bit rate (normal transfer).
If the device connected to the computer does not support the above format, the format
and bit rate will be converted to those of the device. In some case, this process may
take time.
If you want to change the format and bit rate, click [Settings] in the center of the screen
to display “Transfer Mode Settings” dialog box.
5 Click .
Transfer of the tracks selected in step 3 begins.
To stop transferring
Click .
To play a disc on a Net MD device that does not support Hi-MD
If you want to play the transferred tracks on a Net MD Walkman that does not support HiMD, select [Net MD] for the mode (operation mode) on the right side of the screen after
step 2. This operation mode can be selected only when using a 60/74/80-minute standard
disc in Hi-MD mode for recording.
Notes
• A transfer will fail and an error message will appear in the following cases:
—When there is no enough free space on the disc.
—When the track is subject to playback restrictions.
• During the transfer, the system suspend, sleep, or hibernation function will not operate.
• Depending on the type of the text and number of characters, the text entered by SonicStage may not be
displayed on the connected MD Walkman. This is due to the limitations of the connected MD
Walkman.
z
If you are using a camera-equipped Hi-MD Walkman in Hi-MD mode, whenever you select an album
for which album art has been registered, the cover art is transferred to the Hi-MD Walkman along with
the album. Cover art is not be transferred in the case of individual tracks.
94
Page 95

Transferring back audio data from the MD Walkman to your computer
[Transfer ]
The My Library
list
List of tracks on
the MD
Transferring from the MD Walkman back to your computer
Audio data that has been transferred from your computer and stored on the MD can be
transferred back to My Library of SonicStage on your computer.
1 Insert a disc into the MD Walkman and connect the MD Walkman to your
computer.
Use the supplied USB cable for the MD Walkman to connect the MD Walkman to your
computer.
For details about connections, see page 61 on “Recorder Operation”.
Do not disconnect the power source or the USB cable before the transfer has
completed.
2 Point to [Transfer ] on the upper-right side of the screen and click [Hi-MD]
or [Net MD].
The screen is switched to the transfer (Hi-MD or Net MD) screen.
3 In the list on the right side of the screen (Hi-MD or Net MD), click to select
the tracks you want to transfer to your computer.
continued
95
Page 96

4 Click in the middle of the screen.
The transferring of the tracks selected in step 3 starts.
To stop transferring
Click .
To import cover art set using a camera-equipped Hi-MD Walkman
to My Library
If you are using a camera-equipped Hi-MD Walkman in Hi-MD mode, you can modify the cover art for
any group transferred from My Library, as well as register the covet art for another group. The
following two ways can be used to import the cover art to My Library.
• Insert the disc with the updated cover art, and then press the [ Auto Import] button on the bottom-
right side of the screen.
The cover art in My Library is automatically updated.
• Select the group for which you want to import the cover art by clicking it on the right side (Hi-MD
side) of the display, select [Import Cover Art] from the right-click menu, and then select the album for
which you want to add the cover art from the “Select an Album” dialog box.
Note
Tracks transferred to the MD Walkman from another computer cannot be transferred back to My
Library on your computer.
Importing tracks recorded on a Hi-MD Walkman* to your
computer
Tracks that have been recorded on a Hi-MD Walkman* can be imported to My Library of
SonicStage on your computer only once.
You can save analog-recorded tracks as WAV format files, which makes them easier to
handle during editing, etc.
∗ Only tracks recorded in Hi-MD mode
1 Insert recordable disc into the Hi-MD Walkman and connect the Hi-MD
Walkman to your computer.
2 Point to [Transfer ] on the upper-right side of the screen and click [Hi-MD].
The screen is switched to the transfer (Hi-MD) screen.
96
Page 97

3 Click the tracks you want to transfer in the Hi-MD list on the right side of the
screen.
To transfer more than one track, hold down the [Ctrl] key while selecting the tracks.
To transfer all tracks of the group, click the group.
4 Click in the middle of the screen.
The “Import” dialog box appears.
5 Click [Yes].
The importing of the tracks selected in step 3 starts.
To stop importing
Click .
z
When tracks recorded in analog are included on a Hi-MD, a dialog box appears confirming whether to
save those tracks in WAV format. To save the tracks as WAV format music files, select the check box
next to “Save in WAV format when importing”, click Browse button and specify a destination folder as
necessary, and click the [OK] button.
Note
Notes
• You cannot import tracks that were recorded in a Net MD mode (MD mode) to your computer, or
tracks that have been recorded on a device that does not support Hi-MD mode.
• Before importing tracks recorded on the Hi-MD Walkman to the computer, click [Settings] in the
middle of the screen to display “Transfer Mode Settings” dialog box, and then confirm the status of
the [Import settings] check box (it is checked by default) in [Advanced...]. Then do as follows:
— To import tracks to My Library while deleting them on the Hi-MD Walkman, uncheck the box.
— To import tracks to My Library while leaving the copy of them on the Hi-MD Walkman, check the
box. Tracks left on the Hi-MD Walkman are treated the same as tracks that have been automatically
transferred from the computer. For this reason, they cannot be divided or combined on the Hi-MD
Wal km an .
• When you transfer tracks recorded in linearPCM on the Hi-MD Walkman to a computer for editing
(dividing or combining) in My Library, the editing may take a long time, depending on the length of
the tracks and capabilities of your computer. This is due to limitations in the MiniDisc system. If you
want to edit long tracks recorded in linearPCM, we recommend that you do the editing on the Hi-MD
Walkman first, and then transfer the edited data to a computer afterwards.
97
Page 98

Writing audio data to a CD-R/CD-RW disc
You can write tracks in My Library of SonicStage to a CD-R/CD-RW disc. Analog tracks
recorded on a Hi-MD device and imported to My Library can be written to and enjoyed on
a CD-R/CD-RW. The number of times data can be written may be limited due to copyright
restrictions.
[Transfer ]
Operation Status
Display
The My Library list
The tentative list
of items to be
written to the
CD-R/CD-RW
disc
1 Point to [Transfer ] on the upper-right side of the screen, and then select the
type of CD to be created.
To create an audio CD, select [Create an Audio CD]. To create an ATRAC CD, select
[Create an ATRAC CD]. To create an MP3 CD, select [Create an MP3 CD].
ATRAC CDs can be played only on devices that support ATRAC CDs. MP3 CDs can
be played only on devices that support MP3 CDs.
2 Insert a blank CD-R/CD-RW disc into the disc drive of your computer.
Use a CD-R/CD-RW with a recording capacity of 650MB or 700MB. Data may not be
correctly written if a disc of another capacity is used.
3 Select the albums or tracks to be written to the CD-R/CD-RW disc by clicking
them in the My Library list on the left side of the screen
By double-clicking an album, you can see a list of the tracks on the album and select
the tracks you want.
98
.
Page 99

4 Click in the middle of the screen.
The selected albums or tracks appear on the right side of the screen (the CD-R/CDRW) as a tentative list of items to be written.
5 Click in the right of the screen.
The “Writing Settings” dialog box appears allowing you to set options for writing.
6 Click [OK].
Writing to the disc begins.
A message appears when writing has completed.
7 Click [OK].
The disc is automatically ejected, and the screen returns to the Transfer (CD Creation)
screen.
To cancel track writing
1 Click in the Operation Status Display while tracks are being written to the disc.
Writing to the disc is canceled and a message appears.
2 Click [OK].
The disc is automatically ejected, and the screen returns to the Transfer (CD Creation) screen.
Note
Notes
• Only tracks in MP3 format can be written to an MP3 CD.
• Tracks that have been digitally recorded on a Hi-MD device and then imported to SonicStage cannot
be written to an audio CD. However, analog tracks recorded on a Hi-MD device can be written to a
CD.
99
Page 100

Using SonicStage Help
SonicStage Help provides further details on how to use SonicStage. SonicStage Help
allows you to search easily for information from a list of operations, such as “Importing
Tracks” or “Transferring Tracks”, or from large list of keywords, or by typing in words that
might lead you to the appropriate explanations.
To display SonicStage Help
Click [Help]
z
You can display SonicStage Help by selecting the following:
[Start] – [All Programs]*– [SonicStage] – [SonicStage Help]
∗ [Programs] in the case of Windows 2000 Professional/Windows Millennium Edition/Windows 98
Second Edition
Notes
• In SonicStage Help, “Device/Media” is the general term for the external device such as the MD
Walkman, the Network Walkman, and the CD Walkman.
• Follow the instructions of your internet provider regarding such things as recommended system
environment when using EMD services.
– [SonicStage Help] while SonicStage is running.
[SonicStage Help]
.
100
 Loading...