

Page 1
“
Portable MiniDisc Player MZ-E310
3-247-462-13(1)
Portable
MiniDisc Player
Operating Instructions
Mode d’emploi
Bedienungsanleitung
Manual de instrucciones
Gebruiksaanwijzing
Bruksanvisning
Istruzioni per l’uso
Manual de instruções
WALKMAN” is a registered trademark of Sony Corporation to
represent Stereo products. is a trademark of
Sony Corporation.
Käyttöohjeet
MZ-E310
©2002 Sony Corporation
Page 2

WARNING
To prevent fire or shock hazard, do
not expose the unit to rain or
moisture.
Do not install the appliance in a
confined space, such as a bookcase or
built-in cabinet.
To prevent fire, do not cover the
ventilation of the apparatus with
newspapers, table-cloths, curtains, et c.
And don’t place lighted candles on the
apparatus.
To prevent fire or shock hazard, do not
place objects filled with liquids, such as
vases, on the apparatus.
Certain countries may regulate disposal of
the battery used to power t his product.
Please consult with your local authority.
Caution
The use of optical instruments with this
product will incre as e eye hazard.
CAUTION — INVISIBLE LASER
RADIATION WHEN OPEN
The validity of the CE marking
is restricted to only those
countries where it is legally
enforced, mainly in the
countries EEA (Europ ean
Economic Area).
The C-Tick mark on the
W alkman is valid onl y for
the products ma rket ed in
Australia.
DO NOT STARE INTO BEAM OR
VIEW DIRECTRY WITH OPTICAL
INSTRUMENTS
Information
IN NO EVENT SHALL SELLER BE
LIABLE FOR ANY DIRECT,
INCIDENTAL OR
CONSEQUENTIAL DAMAGES OF
ANY NATURE, OR LOSSES OR
EXPENSES RESULTING FROM
ANY DEFECTIVE PRODUCT OR
THE USE OF ANY PRODUCT.
2-GB
Page 3

Table of contents
Looking at the controls ....................................4
Getting started! ................................................6
Playing an MD right away! ................................8
Various ways of playback ..............................10
Searching for a specific track or a position quickly (Quick Search) ....10
Selecting the play mode .............................. .... ..................... .... .... ........ 10
Listening to tracks in a desired sequence (Prog ra m Play ) ............. 12
Using the group function ...................................................................... 12
What is a disc with group settings? ............................................... 12
Listening to tracks in a specific group (Group Mode Playback) ... 13
Selecting and playing specific groups (Group Skip Function) ...... 13
Registering groups using your MiniDisc recorder ......................... 14
Adjusting treble or bass (Digital Sound Preset) ...................................15
Selecting the sound quality ............................................................ 15
Adjusting the sound quality ........................................................... 15
Other Operations ............................................17
Viewing the track name and playing time ........................................... 17
Protecting your hearing (AVLS) .......................................................... 18
Locking the controls (HOLD) .............................................................. 18
GB
Additional information ....................................19
Precautions ........................................................................................... 19
Troubleshooting ................................................................................... 21
Specifications ....................................................................................... 23
3-GB
Page 4

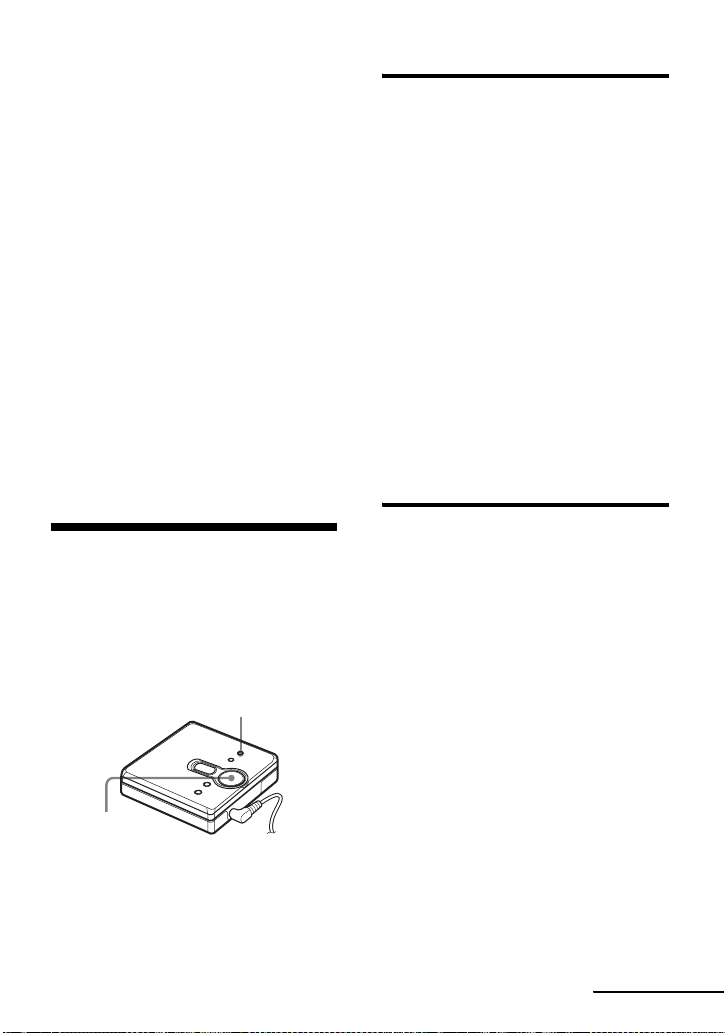
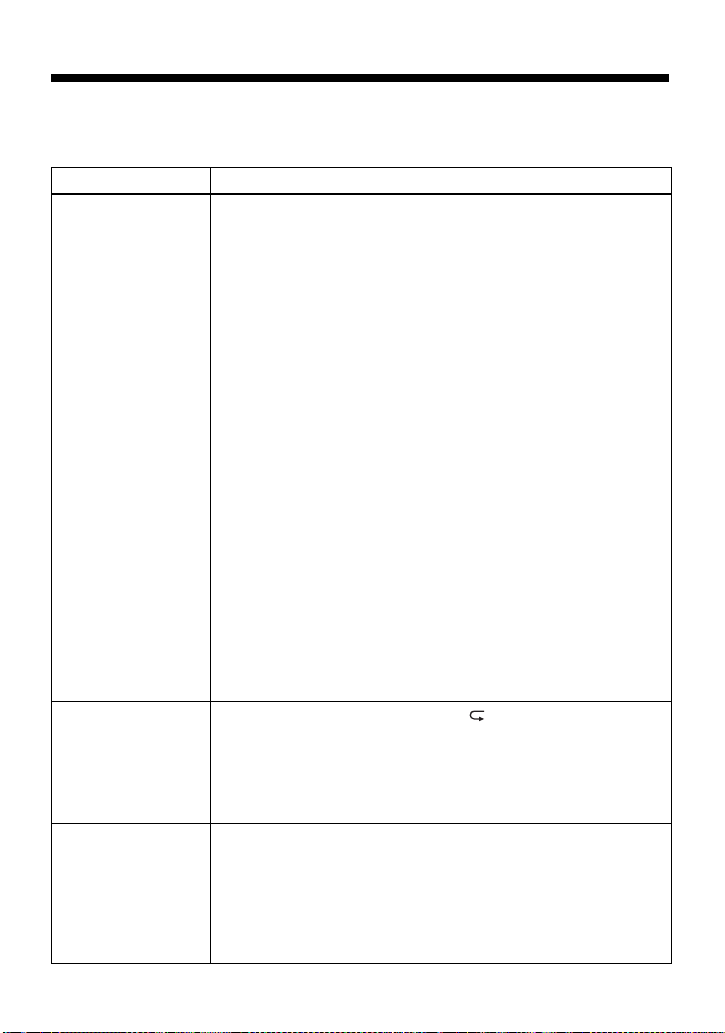
Looking at the controls
Front of the player
3
1
2
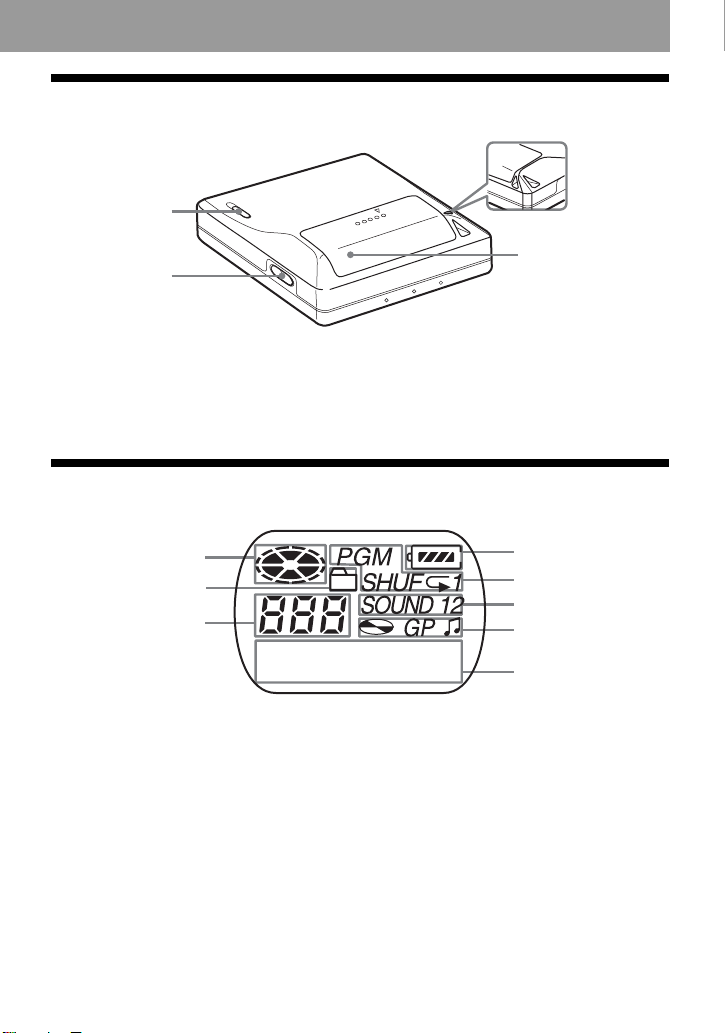
A Display window
B VOL + and – button
The VOL + button has a tactile dot.
C 4-position control key
N (play)
. and > (search/AMS)
x (stop)
X (pause)
∗ The N button has a tactile dot.
*
4
5
6
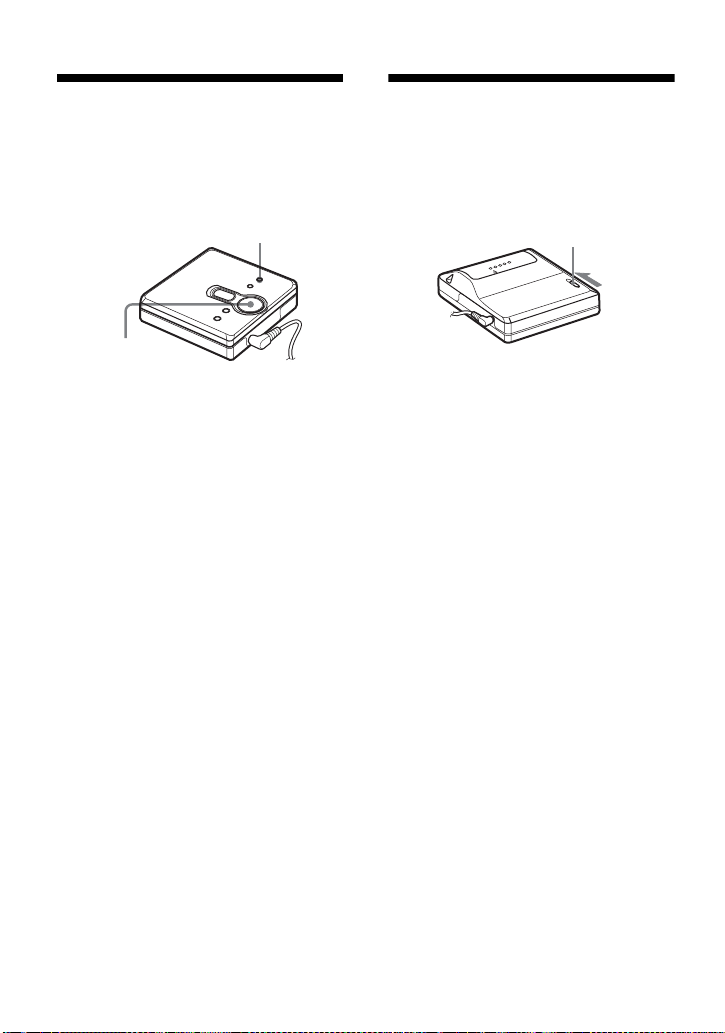
D
MENU/ENTER button
E GROUP button
F i (headphones/earphones) jac k
G Headphones/earphones
7
4-GB
Page 5
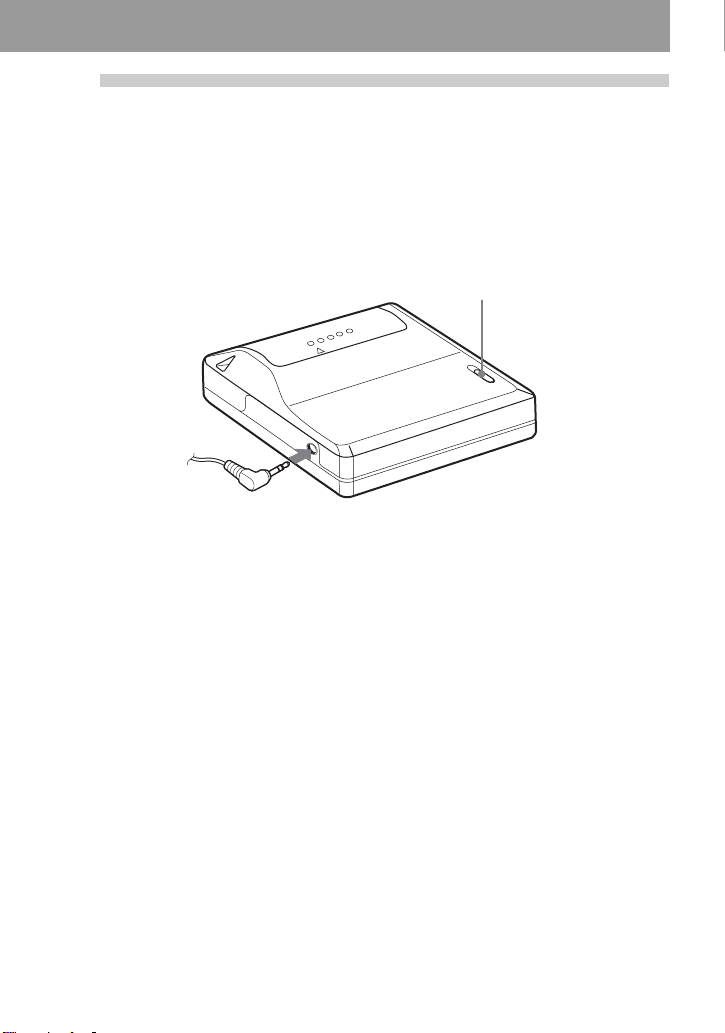
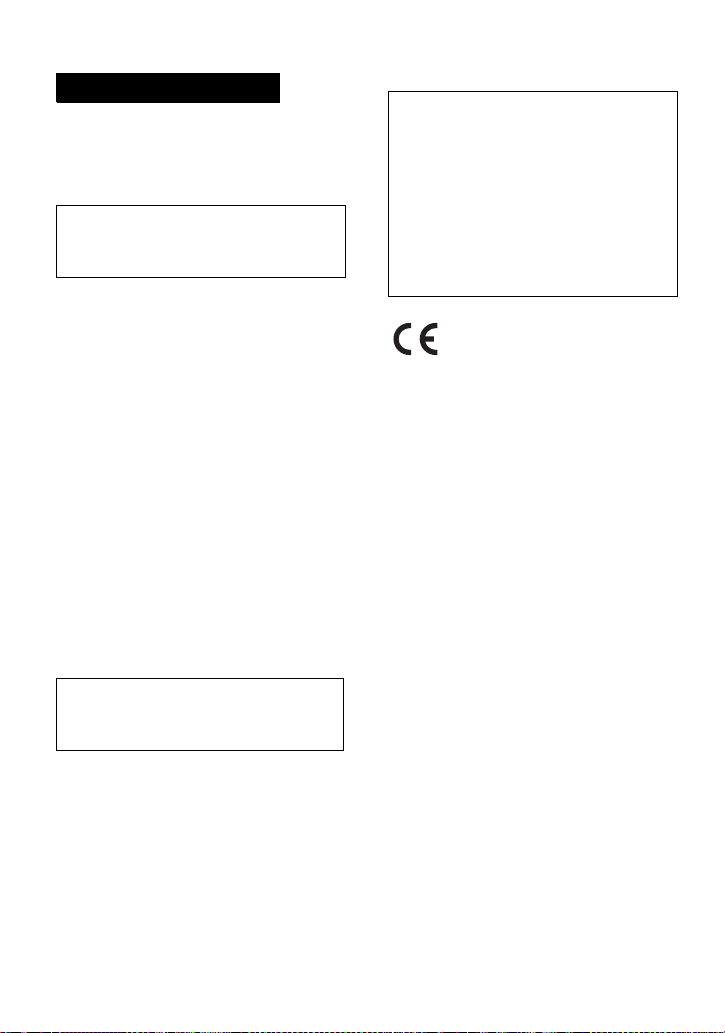
Back of the player
3
1
2
4
A HOLD switch
B OPEN button
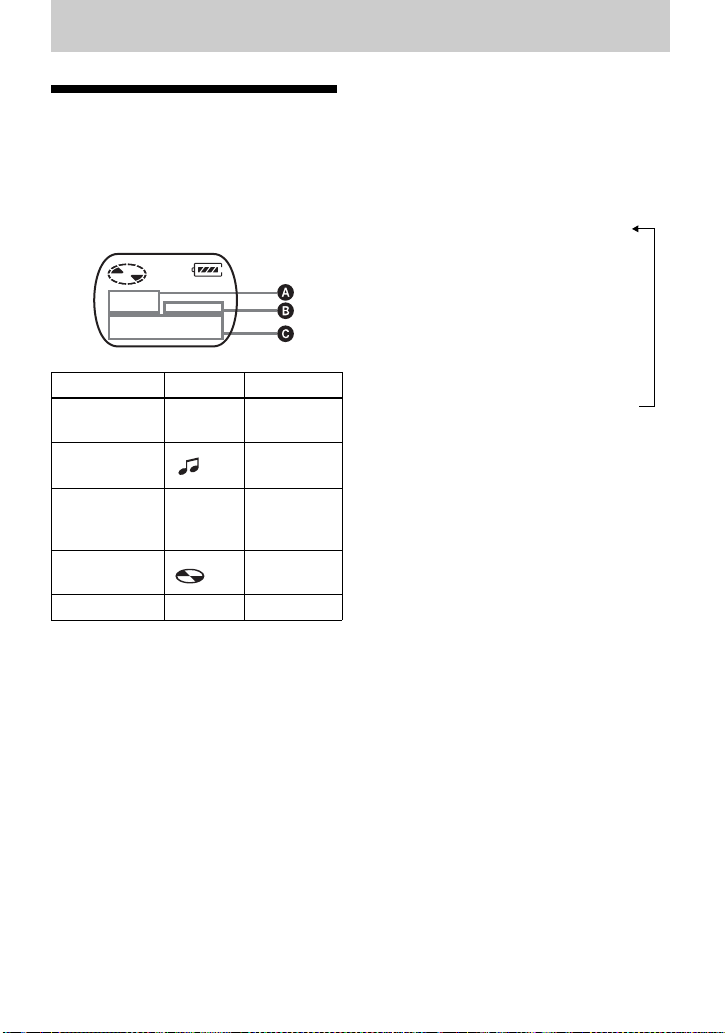
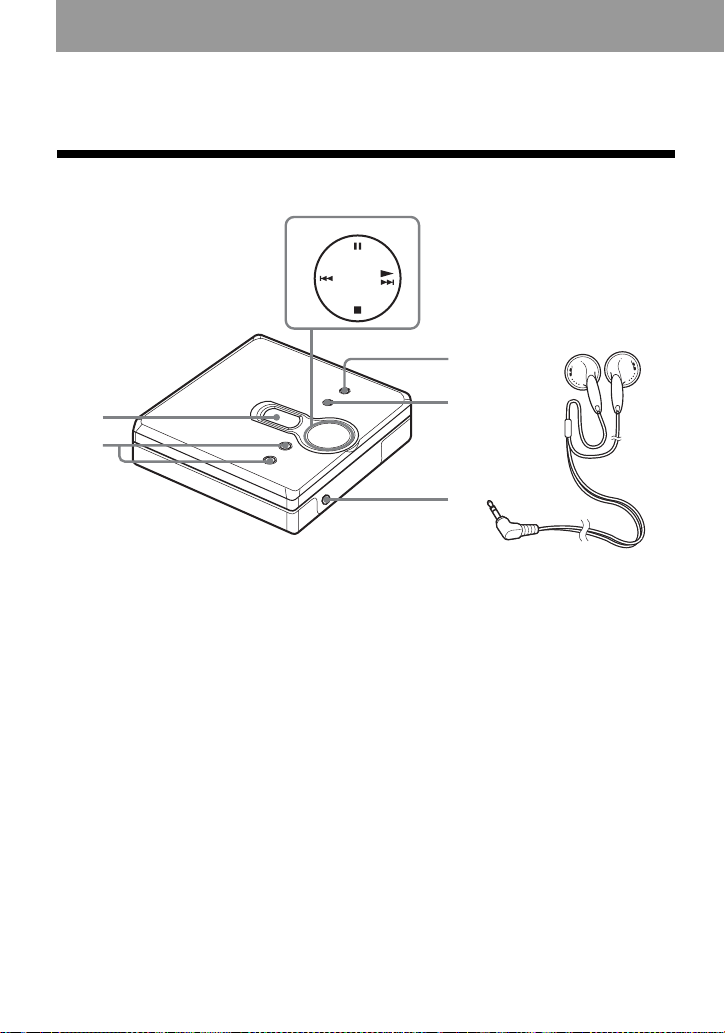
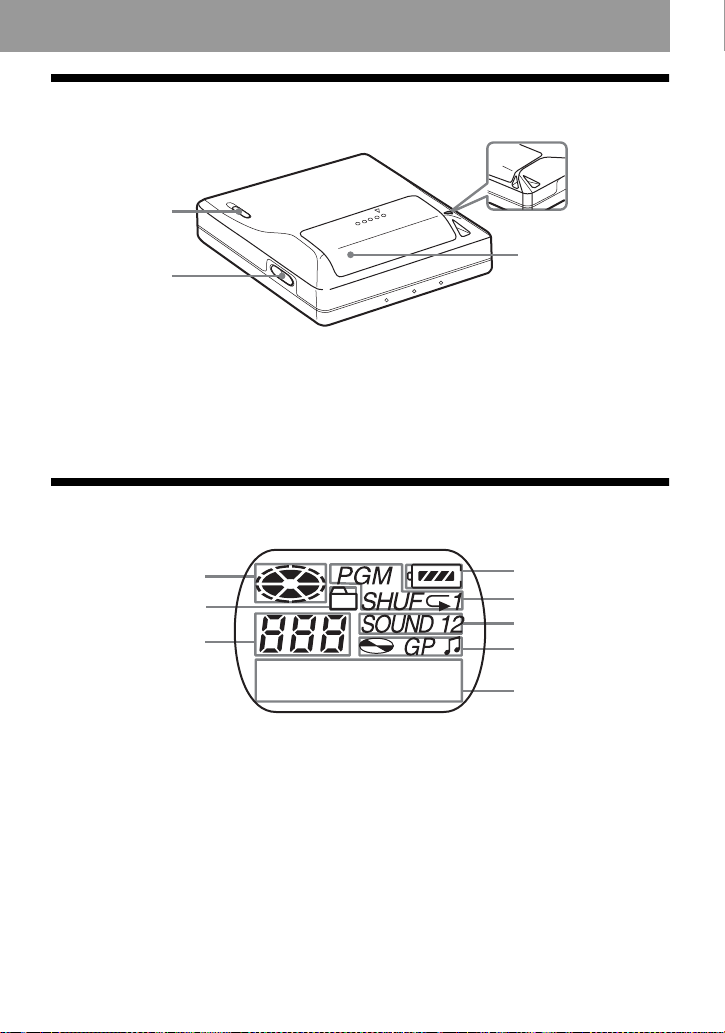
The display window of the player
1
2
3
A Disc indication
B Group mode indication
Lights up when group mode is on.
C Track number display
D Battery level indication
Shows approximate battery condition.
E Play mode indication
Shows play mode of the MD.
F SOUND indication
G Disc, group, track indic at io n
C Hand strap hole
Use the hole to attach your own strap.
D Battery compartment lid
4
5
6
7
8
H Character information display
Displays the track names, elapsed
time, etc.
5-GB
Page 6

Getting started!
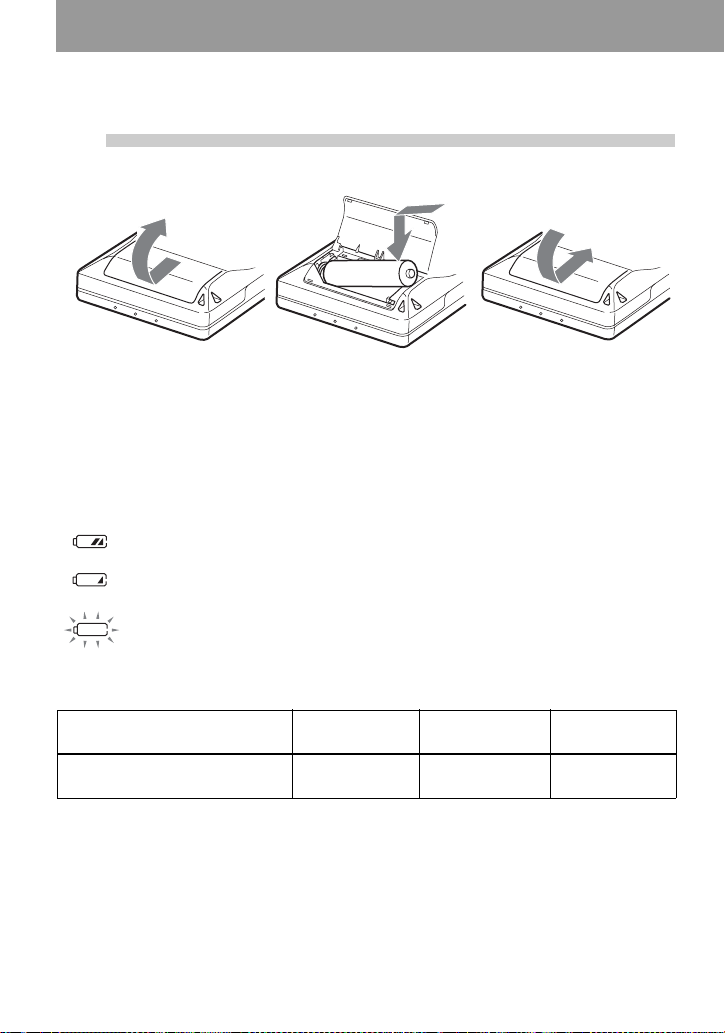
1
When to replace the battery
You can check the battery co ndition through the battery indicator w hile using the player.
Battery life
Battery SP
LR6 (SG)
Sony alkali ne dry battery
1)
2)
Note
The battery life may be shorter than that spe c ified, depe nding on the operating conditions, the
temperature of the location, and varieties of batteries.
Insert an alkaline dry battery.
E
e
Slide to open the battery
compartment lid.
Battery power decreasing
r
Weak battery
r
The battery has gone out.
“LoBATT” flashes in the displ ay, and the power goes o ff.
Measured in accordance with the JEITA (Japan Electronics and Information Te ch nol ogy I ndustries
Association) standard.
When using a Sony LR6 (SG) “STAMINA” alkaline dry battery (produced in Japan).
Insert one LR6 (size AA)
alkaline dry battery
minus end first.
Stereo
2)
41 50 56
Close the lid.
(Unit:approx.hours)(JEITA
LP2
Stereo
LP4
Stereo
1)
)
6-GB
Page 7
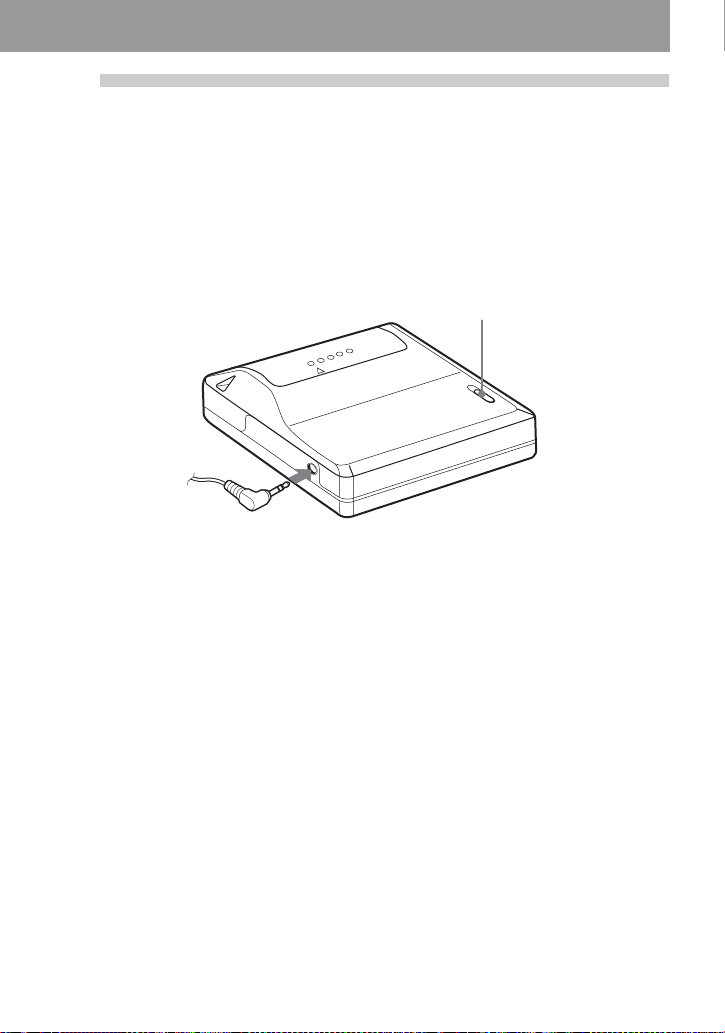
2
Make connections and unlock the
control.
1 Connect the headphones/earphones to
i.
Connect firmly.
to i
2 Slide HOLD in the opposite direction of
the arrow indicated on the player
(HOLD .) to unlock the controls.
HOLD
7-GB
Page 8
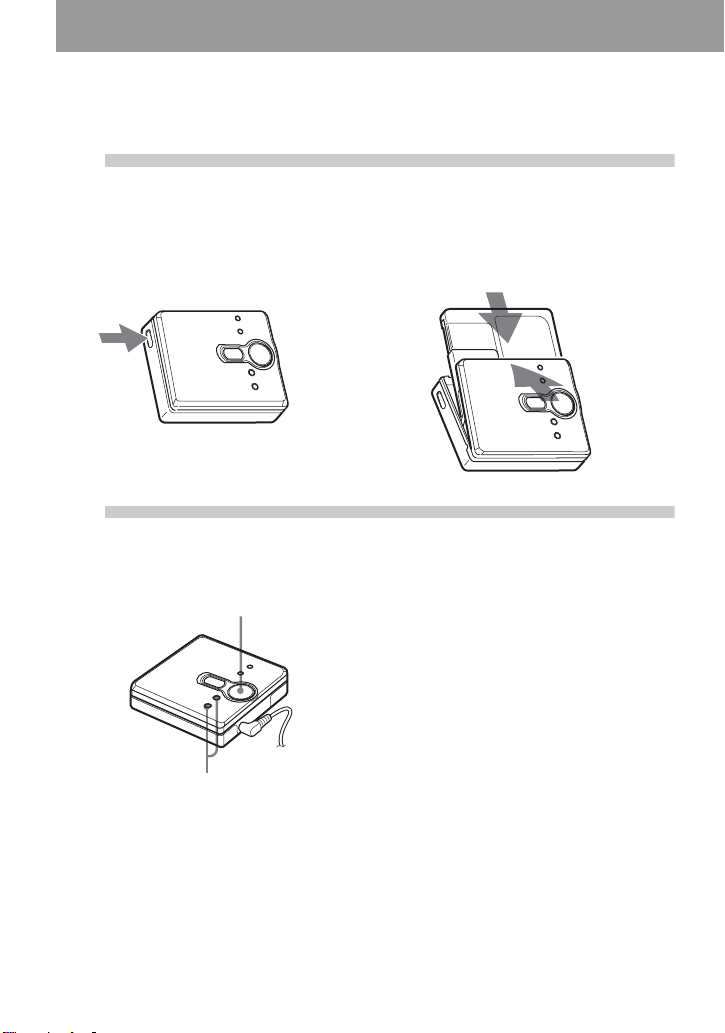
Playing an MD right away!
1
1 Press OPEN to open the lid. 2 Insert an MD with the label side facing
2
Insert an MD.
Play an MD.
., N>, x, X
VOL +, –
front, and press the lid down to close.
1 Press N>.
2 Press VOL + or – to adjust the volume.
The volume indicator appears in the
display allowing you to check the
volume level.
To stop play, press x.
Playback starts from the point you last stopped
playing. To start playback from the beginning
of the first track, hold down
seconds or more.
N> for 2
8-GB
Page 9

To Operation
Find the beginning of the current
track or the previous trac k
1)
Press ..
Press . repeatedly until the beginning of th e
desired track appears.
Find the beginning of the next track
2)
Press N> once.
Go backwards while pl aying Hold down ..
Go forward whil e pl aying Hold down
N>.
Pause Press X.
Press X again to resume play.
Remove the MD Press x, and then press OPEN.
1)
If you press . twice continuously while playing the first track of the disc , the pla yer goes to the
beginning of the last track on the disc.
2)
If you press N> during the last track of the disc, the player goes to the beginning of the first track
on the disc.
3)
If you open the lid, the playback will begin from the beginning of the first trac k (exc e pt whe n group
mode is on).
3)
Suppressing the skip of the sound (G-PROTECTION)
The G-PROTECTION function was developed to provide a higher level of shock resistance
than that of existing players in order to allow the player to be used while jogging.
Note
The playback sound may skip if:
• the player receives stronger continuous shock.
• a dirty or scratched MiniDisc is played.
z
• The MZ-E310 supports the newly developed DSP TYPE-R for ATRAC. It thus allows you to enjoy
TYPE-R high-quality sound from MDs re corded in SP stereo on TYPE-R-equipped MD decks, etc.
• The player can play the t rack recorded by 2 × or 4 × long playing mode (LP2 or LP4). Normal stereo
playback, LP2 stereo playback, LP4 stereo playback or monaural playback is automatically selected
to match the audio source.
• The display will turn off shortly after you press
x.
9-GB
Page 10

Various ways of playback
Searching for a specific track or a position quickly (Quick Search)
You can do two kinds of quick searches.
• Index search — Searching qui ckly
while monitoring the track number or
track name (factory setting).
• Time search — Searching quickly
while monitoring the elapsed time.
MENU/ENTER
., N>,
X, x
1 During playback, press MENU/
ENTER.
2 Press . or N> repeatedly until
“SEARCH” flashes in the display,
and then press MENU/ENTER.
3 Press . or N> repeatedly until
“Index”(i ndex search ) or “Ti me”(time
search) flashes in the display, and
then MENU/ENTER.
4 Press X.
5 Hold down . or N> u ntil the
desired track num ber/track name
(index search) or the desired elapsed
time (time search) appears in the
display.
6 Press X.
Playback starts fr om the selected
track.
z
• If you do this procedur e whi le the play er is in
shuffle play mode, s huf fl e play st arts from the
track that you selected.
• If the pla yer reaches to the first tra c k o r th e
last track on the disc as you are holding .
or N> button in step 5, it will return to
the last track or the first track, respectively. (In
group mode, if the player reaches to the first
track or the last track in a group as you are
holding . or N> button in step 5, it
will return to the last track or the first track in
that group, respectively.) (See “Using the
group function” (page 12).)
Selecting the play mode
Y ou can select various play modes such as
normal play, repeat play (1Rep.), shuffle
play (Shuff), or program play (PGM).
MENU/ENTER
., N>
1 During playback, press MENU/
ENTER.
2 Press . or N> repeatedly until
“P-MODE” flashes in the displ ay , and
then press MENU/ENTER.
To cancel the procedure
Press x.
10-GB
Page 11
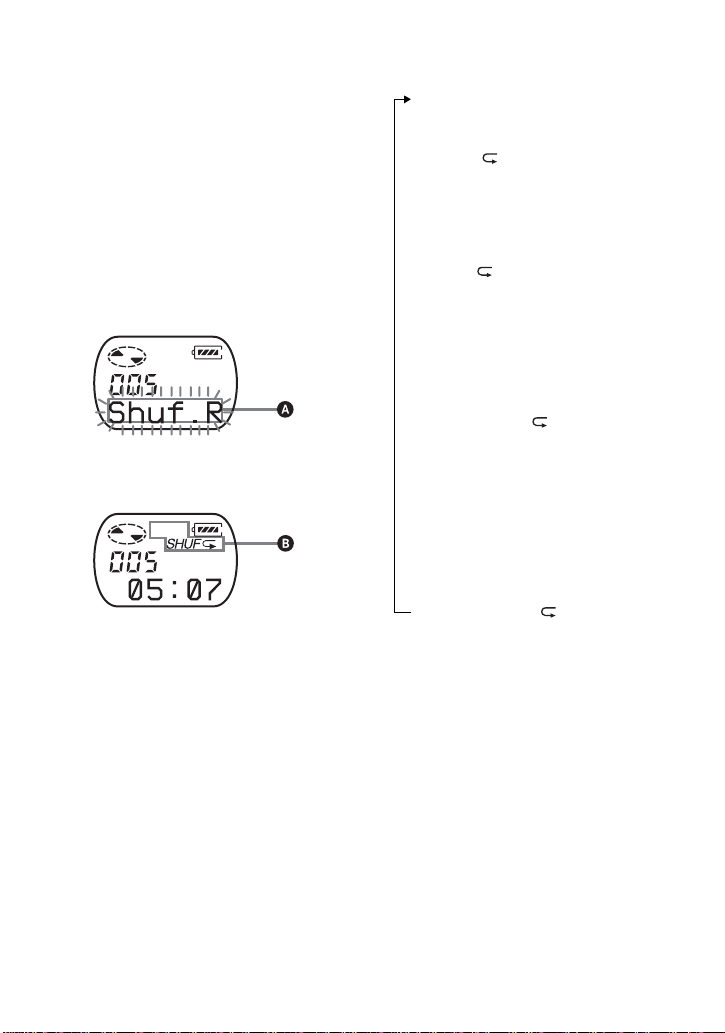
3 Press . or N> repeatedl y to
select the play mo de, and then press
MENU/ENTER.
Each time you pr ess
display item in di cated by A changes
as follows:
Pressing MENU/ENTER while A is
flashing causes the play mode to
change.
The new mode then appears in the
display indicat ed by B.
Pressing N> repeatedly changes
A.
B lights up when you press MENU/
.
ENTER
N>, the
Indication A/B (play mode)
Normal/—(normal play)
All the tracks are pla y ed once.
r
AllRep/
All the tracks are p la y ed repeatedly.
r
1 Track/1
A track is played onc e.
r
1Rep./ 1
A single track is played repeatedly.
r
Shuff/SHUF
After the currently selected track
finishes playing, the remainin g
tracks are played in r andom order.
r
Shuf.R/SHUF
After the currently selected track
finishes playing, the remainin g
tracks are played rep eatedly in
random order.
r
PGM/PGM
The tracks are played i n t he order
that you specified.
r
PGMRep/PGM
The tracks are played r epeatedly in
the order that you specified.
To cancel the procedure
Press x.
11-GB
Page 12
Listening to tracks in a desired sequence (Program Play)
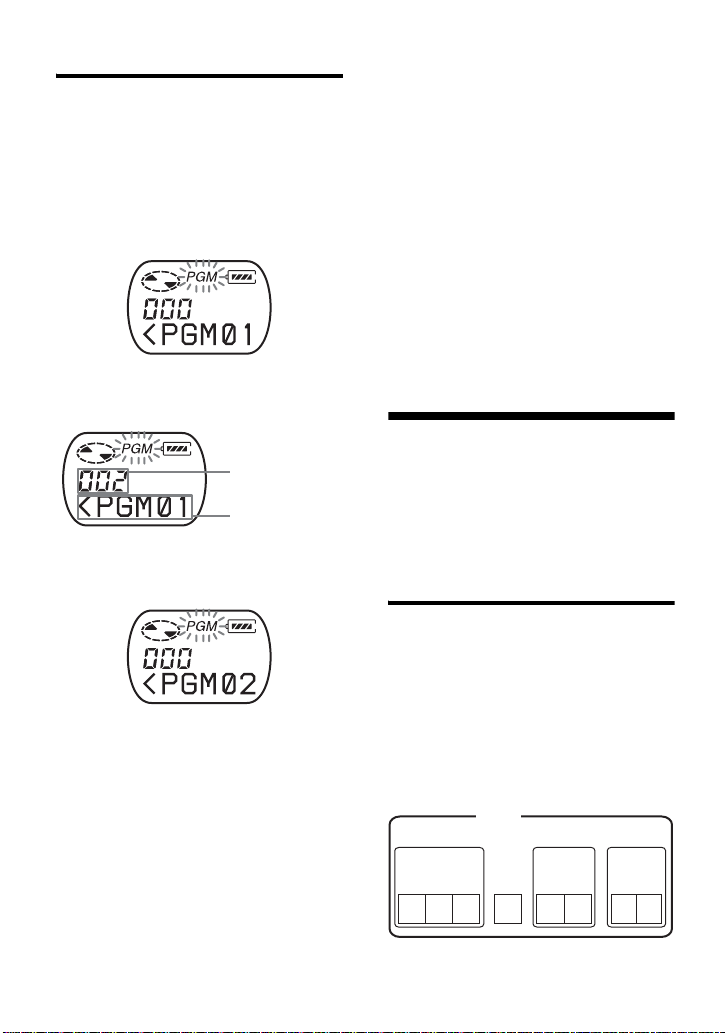
1 Do the steps 1 and 2 in “Selecting the
play mode” (page 10), select “PGM”
in step 3 and then press MENU/
ENTER.
2 Press . or N> repeatedly to
select the track number.
Track number
Program number
3 Press MENU/ENTER.
The track is entered.
4 Repeat step s 2 and 3 to select other
tracks in the desired sequence.
5 Press MENU/ENTER for 2 seconds
or more.
The settings are ent er ed and pl ayba ck
starts from the first programmed
track.
z
• The program play settings will remain in
memory even after playback finishes or is
stopped.
• You can set the program play up to 20 tracks.
• You can specify the play mode for a selected
group when group mode is on. To activate
group mode, see “Selecting and playing
specific gro ups (Group Skip Fu nction)”
(page 13).
• The play mode can also be selected when the
player is paused or stopped.
Notes
• All program settings are lost when the lid is
opened.
• If no settings are made for 5 minutes while the
player is stopped, the se ttings made up to that
point are entered.
• During program setting, you cannot do group
mode’s on/off setting.
• If you turn on group mode dur ing program
play, the program play is canceled.
Using the group function
The player can be used with a disc which
has group setting.
The group function is useful for playing a
great number of tracks, or tracks that hav e
been recorded in MDLP (LP2/LP4) mode.
What is a disc with group settings?
This is a disc with settings that organize
tracks int o groups, and which allow th ose
groups to be selected.
The player does not support the recording
of group settings. Use your MD recorder
to record information, and then use the
player for playback.
Group 1
Tra ck
number
123
Disc
Group 2
Track
number
4
Group 3
Track
number
7
85 6
12-GB
Page 13
z
If your recorder has a function for editing disc
names, you can use it to register groups. For
details, see “Registering groups using your
MiniDisc recorder” (page 14).
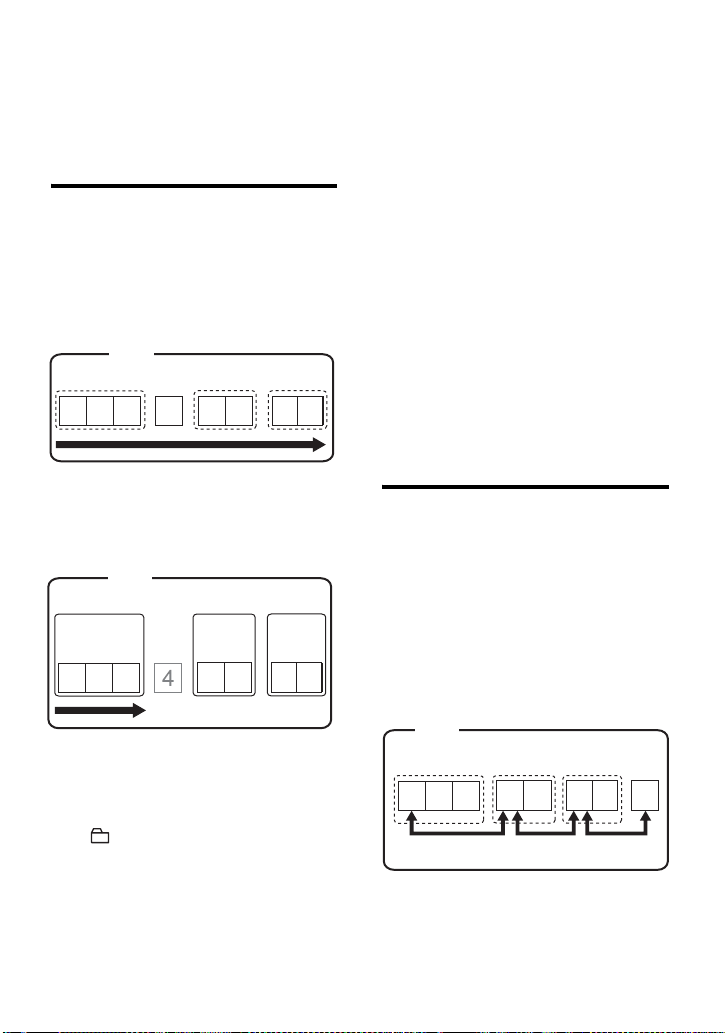
Listening to tracks in a specific group (Group Mod e Playback)
Playback when group mode is off:
Playback starts with the first track in the
disc, and stops with the last track in the
disc.
Disc
Track number
7
123
4
85 6
To turn off group mode
Press GROUP for 2 seco nds or more
again.
z
• When group mode is on, it is possible to do
repeat play, shuffle play, or program play. For
details on the respective operation s, see
“Selecting the play mode” (pa g e10).
• In group mode, pressing N> during the
last track of the group moves playback to the
first track of the group. Pressing . twice
continuously while playing the first track of a
group moves playback to the last track of the
group.
Note
In group mode, the player treats al l tr acks
without group settings as belonging to the last
group on the disc. The last group is indicated in
the display as “GP --”. Within a group, the
tracks appear in their order on the disc, not their
order within the group.
Playback when group mode is on:
Playback of the selected group starts with
the first track in the group, and stops with
the last track in the group.
Disc
Group 1
Tra ck
number
123
Group 2
Tr ack
number
Group 3
Tra ck
number
21 2
1
1 Insert a disc which has group settings
into the player, and t h en play the dis c.
2 Press GROUP fo r 2 seconds or more.
“ ” and “GP ON” light up in the
display and group mode is turned on .
Playback stops at the end of the last
track in the select ed group.
For details on selecting another
group, see “Selecting and playing
specific groups (Gr oup Skip
Function)” (page 13).
Selecting and playing specific groups (Group Skip Function)
When playing a disc with group settings,
the group skip funct ion allows you to
jump from the cur rently playing grou p t o
any other gr ou p on the MD. The group
skip function can be used at any time
during playba ck, regardless of whet her
the player is in group mode on or not.
When group mode is off:
Disc
Track number
85 6
123
Skip
7
Skip
4
Skip
13-GB
Page 14
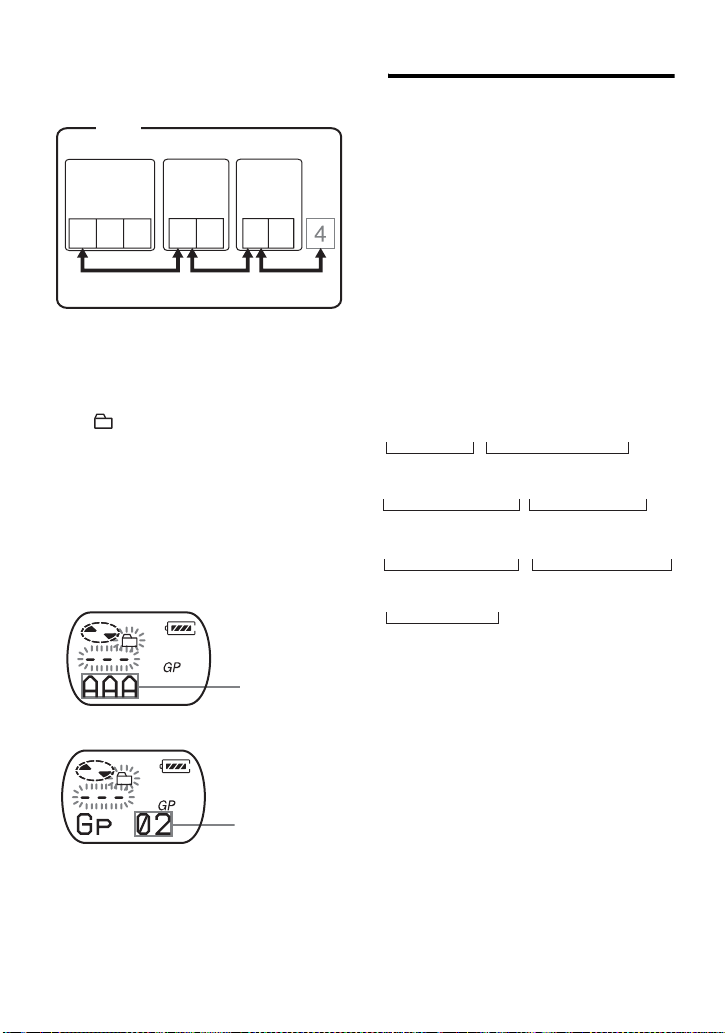
When group mode is on:
Disc
Group 1
Tra ck
number
123
Skip
Group 2
Tr ack
number
Skip
Group 3
Tra ck
number
1
1 Insert a disc which has group settings
into the player, and then play the disc.
2 Press GROUP.
“ ” and “- - -” flash in the displ ay
and groups skip mode is turned on.
3 Within 5 seconds, press . or
N> repeatedly until the name or
number of the desired group appears.
The player starts pl aying from the
first track in the group.
When there is a group name
(Example: AAA)
Group name
When there is no group name
Group number
To cancel the procedure
Press x.
Note
If no operation is performed within 5 seconds in
step 3, group skip mode is cancel ed . To do the
procedure, start from step 2 a gai n.
14-GB
21 2
Skip
Registering groups using your MiniDisc recorder
If your MD recorder (MD deck or
recording MD Walkman) has a function
for editing disc nam es, you can use it to
register groups even if your re corder does
not have the group function.
Make sure you ente r t he text string
exactly as described below. The group
function will not work if you enter the text
string incorrectly.
To specify groups
1 Change the disc name to the
following by using your MD
recorder:
0;[Disc name] // [First track of group 1 ]-
A
[Last track of group 1] ; [Name of group 1 ] //
B
[First track of group 2] - [Last track of group 2 ] ;
BB
[Name of group 2] // ......
C
A Disc name
B Track number
C Group name
// Separator between groups
– Hyphen placed between the first
track and the last track
; Separator betwe en track number
and group name
(Ex.) Set the following groups for the disc
named “Collections”:
Group name for tracks 1-7:
My Favorites“2002winter”
Group name for tracks 8-17:
Jun&Tac“sunshine head”
Group name for tracks 18-24:
THE NIGHT BUTTERFLYS
Group name for tracks 25-32:
Dream World/Kiss Me!
B
C
Page 15
Text string entered:
0;Collections//
1-7;My Favori tes“2002winter”//
8-17;Jun&Tac“sunshine head”//
18-24;THE NIGHT BUTTERFLYS//
25-32;Dream World/Kiss Me!//
z
• Up to 99* groups can be registered on a single
MD.
• The characters “;”, “/ ”, and “–” can be used in
a group name.
• You can register the same group name twice
or more on the same MD .
• You can specify a group without entering a
group name (C) for it.
∗The actual number will be less than 99 if you
have entered more characters than are
allowed per disc.
Note
Depending on the specifications of your MD
recorder, the group function will not work.
Adjusting treble or bass (Digital Sound Preset)
You can adjust the treble and bass to suit
your taste. The pla yer can store two sets
of treble-bass adjustments, which can
then be selected later during playback.
MENU/ENTER
Selecting the sound quality
Factory settings
Factory set tings of the di gital soun d preset
are as follo ws :
•“SOUND 1”: bass +1, treble ±0
•“SOUND 2”: bass +3, treble ±0
1 During pl ayback, press MENU/
ENTER.
2 Press . or N> repea tedly until
“S–SEL” flashes in the display, and
press MENU/ENTER.
3 Press . or N> repeatedl y to
select “SOUND 1”, “SOUND 2”, or
“OFF” in the display, and then press
MENU/ENTER.
Selecting “OFF” turns off the digital
sound preset function.
Adjusting the sound quality
You can change the preset sound quality.
To change the preset sound quality, select
“SOUND 1” or “SOUND 2”, the one you
want to change, in advance.
1 While playing and “ S O UN D 1” or
“SOUND 2” has been selected, press
MENU/ENTER.
2 Press . or N> repea tedly until
“S–SET” flashes in the display, and
then press MENU/ENTER.
The display shows the currently
“BASS” sound sett ing.
., N>,
x
continued
15-GB
Page 16

3 Press . or N> repeatedly to
adjust the sound level.
Shows “SOUND 1” or “SOUND 2” is
selected
The sound can be adjusted in 8 steps.
(–4, –3, ...±0, ...+2, +3)
4 Press MENU/ENTER.
“BASS” is set and the display
changes to “TRE” (treble) setting
mode.
5 Press . or N> repeatedly to
adjust the sound leve l, and then pres s
MENU/ENTER.
“TRE” (treble) is set.
The sound setting s ar e saved and the
playback display appears again.
To cancel the procedure
Press x.
z
You can set a preset sound while playback is
paused.
Note
When using a digital sound preset, the sound
may break or become distorted if the volume is
turned up too high, depending on the settings or
the track. In thi s cas e, ch ange t he s etti ngs o f the
sound quality.
16-GB
Page 17
Other Operations
Viewing the track name and playing time
You can chec k th e tr ac k nam e, di sc nam e,
etc. during playback. Group-related items
appear only when a tr ac k w ith group
settings is played.
ABC
Track number — The elapsed
Track number Track name
The number of
total tracks in
the groups
The number of
total tracks
Track number — Track mode
GP Group name
time
Disc name
1 Press MENU/ENTER.
2 Press . or N> repea tedly until
“DISP” flashe s i n the display, and
then press MENU/ENTER.
3 Press . or N> repea tedly until
the information that you want flashes
in the display, and then press MENU/
ENTER.
Each time you pr ess
display changes as follows:
LapTim (The elapsed time of the
current track)
r
T.Name (Track name)
r
G.Name (Group name)
r
D.Name (Disc name)
r
T–MODE (indicates the recording
mode selected on the MD recorder
used; i.e., “SP”, “LP2”, “LP4”, or
“MONO”. )
Notes
• Items may appear differently or may not be
selectable, depending on the group mode’s on/
off status, the player’s operating status, or the
player and disc settings.
• The mode indication appears only during
playback. It appears for 2 seconds, and is then
replaced by the elapsed time of the current
track.
N>, the
17-GB
Page 18
Protecting your hearing (AVLS)
The AVLS (Automatic Volume Limiter
System) function keeps down the
maximum volume to protect your ears.
MENU/ENTER
., N>, x
1 Press MENU/ENTER.
2 Press . or N> repeatedly until
“OPTION” flashes in the display, and
then press MENU/ENTER.
“AVLS” flashes in the display.
3 Press MENU/ENTER.
4 Press . or N> repeatedly until
“ON” flashes in the display, and then
press MENU/ENTER.
“ON” appears in the display, and after
2 seconds, the pla y back display
appears again.
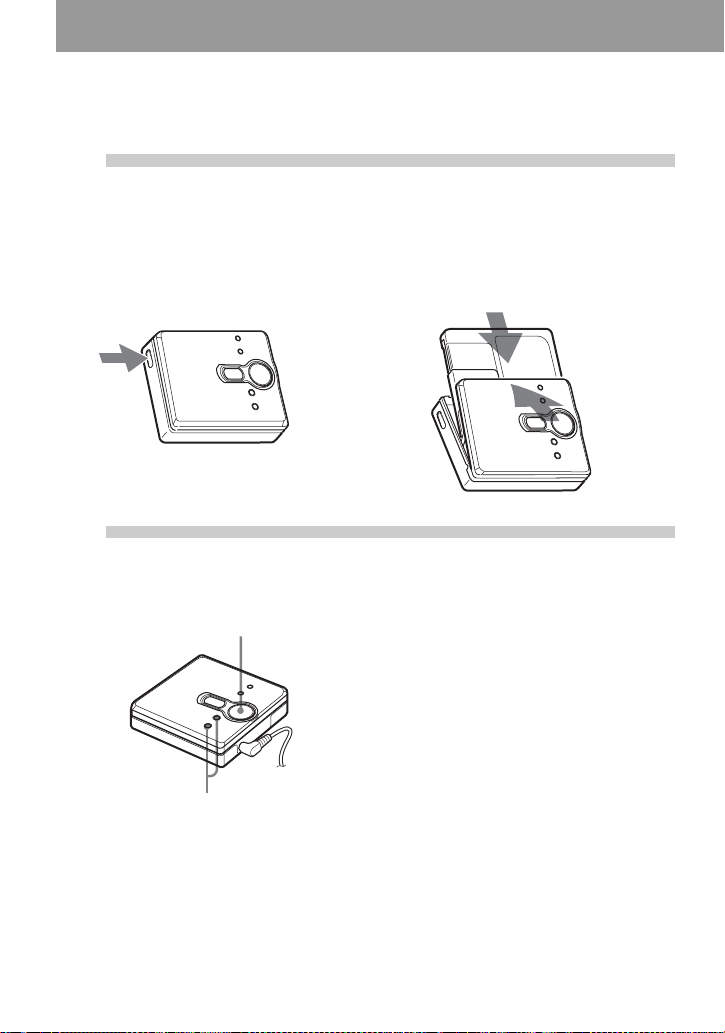
Locking the controls (HOLD)
To prevent the buttons from being
accidentally operated when you carr y the
player, use this function .
HOLD
1 Slide HOLD in the direction of the
. to lock.
To unlock the controls
Slide HOLD to the opposite direction of
the arrow.
To cancel the AVLS function
Select “OFF” in ste p 4, and press MENU/
ENTER.
To cancel the procedure
Press x.
18-GB
Page 19

Additional information
Precautions
On safety
• Do not carry or store the dry battery in the
same place with metallic objects such as
coins, key rings, or neckl aces. This may cau se
a short-circuit and the generation of heat.
• Incorrect battery usage may cause the battery
fluid to leak or battery to burst. To prevent
such accidents, make su re th e b at tery is
installed with the + and – poles oriented
correctly.
• If a battery leak should develop, carefully and
thoroughly wipe away the battery fluid in the
battery compartment before inserting a new
battery.
• If you will not use the player for a long time,
be sure to remove the dry battery.
On Handling
• Do not drop or bump the player. This may
cause the player to ma lf unction.
• Do not pull headphones/e arphones cords.
• Do not place the player in the following
places:
—An extremely hot place (ov er 60°C
(140°F))
—A place exposed to direct sunlight or near a
heater
—In a car with the windows rolled up
(especially in the summer)
—In a damp place such as a bathroom
—Near a source of electromagnetic fields
such as a magnet, speaker, or TV
—In a dusty place
On heat build-up
Heat may build up in the player if it is used for
an extended period of time. This, however, is
not a malfunction.
On mechanical noise
The player emits mechanical noise while
operating, which is caused by the power-saving
system of the player. This is not a malfunction.
On installation
Never use the player where it will be subjected
to extremes of light, temperature, moisture or
vibration.
On the MiniDisc cartridge
• Do not touch the internal disc directly. Forcing
the shutter open may damage the internal disc.
• When transporting a Mini Disc , keep it in its
case.
• Do not place the cartridge wher e it will be
subjected to light, temperature, moisture or
dust.
• Do not affix the label outside of the specified
area on the MD. Make su re t h e label is placed
within the recessed space on the disc.
On the headphones/earphones
Road safety
• Do not use headphones/earph one s while
driving, cycling, or operating any motorized
vehicle. This may lead t o a traf f ic accid ent and
is illegal in many areas. It ca n also be
potentially dangerous to play your pl ay er at
high volumes while walking, especially at
pedestrian crossings. You should exercise
extreme caution or discontinue us ing the
player in potentially hazardous situations.
• If you experience an allergic reaction to the
supplied headphones/earp hone s, stop us ing
them at once and consult a doctor or a Sony
service center.
Preventing hearing damage
Avoid using headphones/earphones at high
volumes. Hearing experts advise against
continuous, loud and extended play. If you
experience a ringing in your ears, reduce the
volume or discontinue use.
Caring for others
Keep the volume at a moder ate level. This will
allow you to hear outside sounds and to be
considerate of the people around you.
19-GB
Page 20
On cleaning
• After wiping the player casing with a soft
cloth slightly moistened with water, wipe it
again with a dry cloth. Do not use any type of
abrasive pad, scouring powder or solvent such
as alcohol or benzene as this may mar the
finish on the casing.
• Wipe the disc cartridge with a dry cloth to
remove dirt.
• Dust on the lens may prevent the unit from
operating properly. Be sure to close the disc
compartment lid a f te r inserting or ejecting an
MD.
• To maintain good sound quality, use a soft
cloth to clean the plugs of the headphones /
earphones. A dirty plug may cause noise or
intermittent breaks in the so und dur ing
playback.
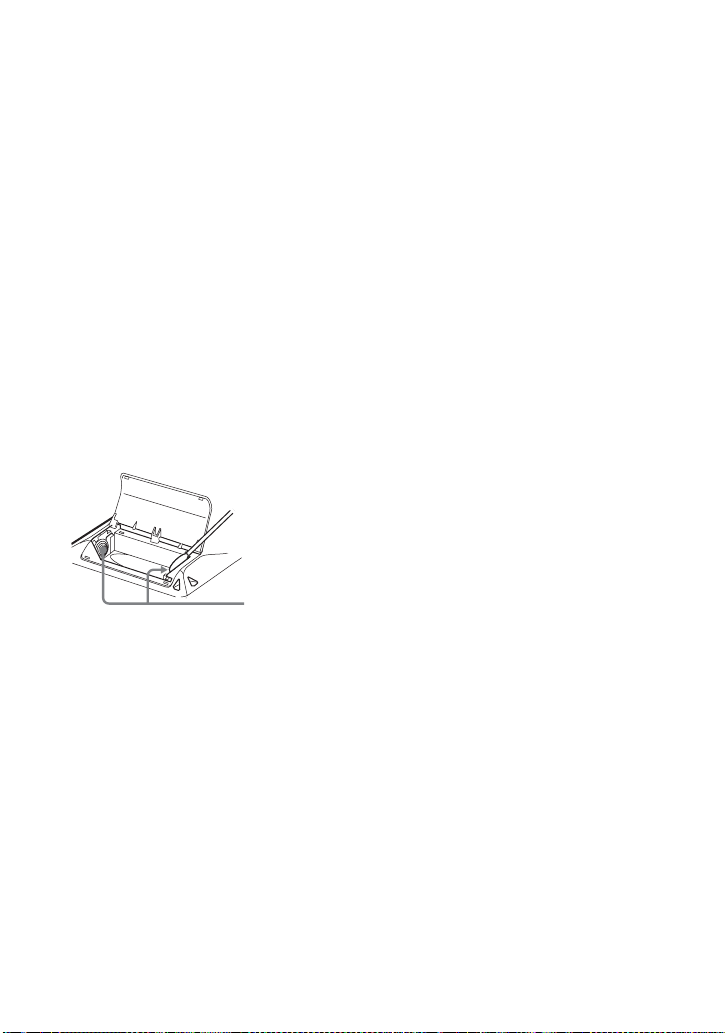
• Clean the terminals periodically with a cotton
swab or a soft cloth as illustrated.
Dry battery compartment
Terminals
If you have any questions or problems
concerning your player, please consult your
nearest Sony dealer. (If a trouble occurred when
the disc was in the player, we recommend that
the disc be left in the player when you cons ult
your Sony dealer so that the cause of trouble
may be better understood.)
When consulting your Sony dealer, be sure to
bring the player, and the headphones/
earphones.
20-GB
Page 21
Troubleshooting
Should any problem per si st after you have made these ch ecks, consult your near est Sony
dealer.
Symptom Cause/Solution
The player does not
work or works
poorly.
The MD does not
play normally.
The MD does not
play from the first
track.
• You tried to operate the player with no MD in it. (“NoDISC”
flashes in the display.)
, Inse rt an MD.
• The HOLD function is turned on (“HOLD” appears in the
display when yo u press an operation butt on on the player).
, Disable HOLD by sliding the HOLD switch to the opposite
direction of the arr ow (pag es 7, 18).
• Moisture has co ndensed inside the player.
, Take the MD out and leave the player in a warm place for
several hours until the moisture evaporates.
• The dry battery is weak (“LoBATT” flashes or nothing appears).
, Replace the dr y battery with the new one (pag e 6).
• T he dry battery has been inserted incorrectly.
, Inse rt the battery cor rectly (page 6) .
• An MD with nothing recording on it is inserted. (“BLANK”
flashes in the display.)
, Inse rt a recorded MD.
• The player cannot read the disc. (I t ’s scratche d or
dirty.)(“ERR OR ” flashes in the display.)
, Reinsert or replace the disc.
• While operating, the player received a mechanical shock, too
much static, etc.
, Restart the operation as follows:
1 Remove the dry battery.
2 Leave the player fo r about 30 seconds.
3 Reinsert the dry battery.
• The player is set to repeat mode. (“ ” is displayed on the
player.)
, Select “N ormal” for the play m ode and start playback. For
more details, “Selecting the play mode” (page 10).
• The disc is playing i n gr oup mode.
, Turn off group mode.
• The disc stoppe d pl aying before reac hi ng the last track.
, Hold down
from the first track.
• The disc is playing i n gr oup mode.
, Turn off group mode and stop playback. Then hold down
N> for 2 seconds or more to start playing from the first
track.
N> for 2 seconds or more to start playing
21-GB
Page 22

Symptom Cause/Solution
The digital sound
preset function does
not work.
The playback sound
skips.
The sound has a lot
of static.
Noise is momentarily
heard.
The player does not
operate properl y.
No sound comes
through the
headphones/
earphones.
Volume cannot be
turned up.
The group function
does not operate.
When rewinding or
fast forwarding, the
track does not go
back to the previous
track or go forward
to the next track.
• The digital sound pres et i s off.
, Select “SOUND 1” or “SOUND 2”. For more details, see
“Adjusting treble or bass (Digital Sound Preset)” (page 15).
• The player is placed where it receives continuous vibration.
, Put the player on a stable place.
• A very short track may cause sound to skip.
, Try not to create a track under one second long.
• Strong magnetism from a television or such device is interfering
with operation .
, Move the pla yer away from the source of st rong magnetism.
• The sound was recorded in LP4 stereo mode.
, Because of the nature of the compression method used in
LP4 mode, noise may be output on very rare occasions
during playback of sound recorded in this mode.
• An attempt was made to enter gr oup mode with program pl ay
selected.
, Change to group mode bef or e selecting program play.
• The headphones/ear phones plug is no t firmly conne cted.
, Plug in the plug of the headphones/earphones firmly to the i
jack.
• Volume is too low.
, Ad ju st th e volu me by pressing VOL + or –.
• The plug is dirty.
, Clean the plug.
• AVLS is on.
, Set AVLS to “OFF” (page 18).
• While using a disc that has no group information, an attempt was
made to turn group m ode on.
, Us e a disc with a group information.
• While a track that belongs to no group is playing, an att empt was
made to turn group m ode on.
, The group function cannot be used while a track that belongs
to no group is playing .
• When selecting program play, an attempt was made to turn
group mode on.
, Turn group mode on, before selecting program play.
• Group skip mode is on.
, Turn off group skip mode. Group skip mode is automatically
canceled if no operation is performed with in 5 sec onds . F o r
more details, see “Selecting an d pl aying specific group s
(Group Skip Fu nction)” (page 13) .
22-GB
Page 23

Specifications
MD Player
Audio playing system
MiniDisc digital audio system
Laser diode properties
Material: GaAlAs
Wavelength: λ = 790 nm
Emission duration: continuous
Laser output: less than 44.6 µW
(This output is the valu e measur ed at a distan ce
of 200 mm from the objective lens surface on
the optical pick-up block with 7 mm ap erture.)
Revolutions
Approx. 300 rpm to 2,700 rpm
Error correction
ACIRC (Advan ced Cross Interleave Re ed
Solomon Code)
Sampling frequency
44.1 kHz
Coding
ATRAC (Adaptive TRansform Acoustic
Coding)
A TR AC3 — LP2/LP4
Modulation system
EFM (Eight to Fourteen Modulation)
Number of channels
2 stereo channels
1 monaural channel
Frequency response
20 to 20,000 Hz ± 3 dB
Wow and Flutter
Below measurable limits
Outputs
i: stereo mini-jack, maximum output level
3.5 mW + 3.5 mW, load impedance 16 Ω
General
Power requirements
One LR6 (size AA) alkaline battery (not
supplied)
Battery operati o n time
See “Battery life” (page 6)
Dimensions
Approx. 81 × 28.9 × 74.4 mm (w/h/d) (31/4 ×
3
1
/16 × 3 in.) without pr ojections.
Mass
Approx. 93 g (3.3 oz) the player only
US and foreign patents licensed from Dolby
Laboratories.
Design and specifications are subject to change
without notice.
Optional accessories
MDR series stereo Headphones/earphones*
SRS series Active Speakers
∗ When u sing optional headphones, use only
headphones/earphones with ste reo mini
plugs. You cannot use headphones/
earphones with micro plugs.
Your dealer may not handle some of the above
listed accessories. Please ask the dealer for
detailed information about the ac cess o rie s in
your country.
23-GB
Page 24
AVERTISSEMENT
Pour prévenir tout risque
d'incendie ou d'électrocution,
gardez cet appareil à l'abri de la
pluie ou de l'humidité.
N'installez pas l'appareil dans un espace
confiné, comme dans une bibliothèque
ou un meuble encastré.
Pour prévenir tout risque d'incendie, ne
recouvrez pas la ventilation de l'appareil
avec des journaux, nappes, rideaux, etc.
Evitez également de placer des bougies
allumées sur l'appareil.
Pour prévenir tout risque d'incendie ou
d'électrocution, ne placez pas d'objets
remplis de liquides (p. ex. un vase) sur
l'appareil.
Dans certains pays, l'élimination des piles
utilisées pour alimenter cet appareil peut
être réglementée.
Consultez les autorités locales.
Attention
L'utilisation d'instruments optiques avec
cet appareil présente un risque pour l'œil.
Informations
EN AUCUN CAS, LE VENDEUR
NE POURRA ETRE TENU
RESPONSABLE DE TOUT
DOMMAGE DIRECT OU INDIRECT
DE QUELQUE NATURE QUE CE
SOIT, OU DE TOUTE PERTE OU
DEPENSE RESULTANT D'UN
PRODUIT DEFECTUEUX OU DE
L'UTILISATION DE TOUT
PRODUIT.
La validité de la marque CE
est limitée aux pays où elle
est légalement en application,
notamment dans les pays de
l'EEE (Espace économique
européen.)
A pleine puissance, l'écoute prolongée
du baladeur peut endommager l'oreille
de l'utilisateur.
ATTENTION — EMISSION DE
RAYON LASER INVISIBLE SI
L'APPAREIL EST OUVERT
NE PAS REGARDER FIXEMENT LE
RAYON OU LE REGERDER AVEC UN
INSTRUMENT OPTIQUE.
-FR
2
Page 25

Table des matières
Présentation des commandes .......................... 4
Mise en service .................................................6
Lecture directe d'un MD ...................................8
Différents modes de lecture ...........................10
Recherche rapide d'une plage ou d'une position spécifique
(recherche rapide) ................................................................................ 10
Sélection du mode de lecture ............................................................... 10
Ecoute de plages dans l'ordre de votre choix
(lecture programmée) .............................................. 12
Utilisation de la fonction de groupe ..................................................... 12
Définition d'un disque avec des réglages de groupe ...................... 12
Lecture de plages dans un groupe spécifique
(lecture en mode groupe) ................................................ 13
Sélection et lecture de groupes spécifiques
(fonction de saut de groupe) ........................................... 14
Enregistrement de groupes à l'aide de l'enregistreur de
minidisques .............................................................. 14
Réglage des graves et des aigus (Digital Sound Preset) ...................... 15
Sélection de la qualité sonore ........................................................ 16
Réglage de la qualité sonore .......................................................... 16
FR
Autres opérations ...........................................17
Affichage du titre de la plage et du temps de lecture ........................... 17
Protection de l'ouïe (AVLS) ................................................................. 18
Verrouillage des commandes (HOLD) ................................................ 18
Informations complémentaires ......................19
Précautions ........................................................................................... 19
Dépannage ............................................................................................ 21
Spécifications ....................................................................................... 23
-FR
3
Page 26
Présentation des commandes
Avant du lecteur
3
1
2
A
Fenêtre d'affichage
B
VOL + et –
La touche VOL + possède un point
tactile.
C
Touche de commande à 4 positions
N (lecture)
*
. et > (recherche/AMS)
x (arrêt)
X (pause)
∗
La touche N possède un point tactile.
4
5
6
D
Touche MENU/ENTER
E
Touche GROUP
F
Prise i (casque/écouteurs)
G
Casque/écouteurs
7
-FR
4
Page 27
Arrière du lecteur
3
1
2
4
A
Commutateur HOLD
B
Touche OPEN
Fenêtre d'affichage du lecteur
1
2
3
A
Indicateur de disque
B
Indicateur de mode groupe
S'allume lorsque le mode groupe est
activé.
C
Affichage du numéro de plage
D
Indicateur du niveau de la pile
Affiche l'état approximatif de la pile.
E
Indicateur de mode de lecture
Indique le mode de lecture du MD.
F
Indicateur SOUND
C
Orifice pour dragonne
Utilisez l'orifice pour fixer la
dragonne.
D
Couvercle du compartiment à pile
4
5
6
7
8
G
Indicateur de disque, groupe, plage
H
Affichage d'informations par
caractères
Affiche le titre de la plage, la durée
écoulée, etc.
-FR
5
Page 28
Mise en service
1
Remplacement de la pile
Vous pouvez vérifier le niveau de la pile en consultant l'indicateur correspondant pendant
l'utilisation du lecteur.
Durée de vie de la pile
Piles Stéréo
Pile sèche alcaline LR6 (SG)
Sony
1)
2)
Remarque
La durée de vie de la pile peut être inférieure à celle spécifiée, en fonction des conditions de
fonctionnement, de la température ambiante et du type de pile.
Insertion d'une pile sèche alcaline.
E
e
Faites coulisser
le couvercle du
compartiment à
pile pour l'ouvrir.
Diminution du niveau de charge de la pile
r
Pile faible
r
Pile déchargée.
“LoBATT” clignote dans l'affichage et le lecteur se met hors tension.
2)
Valeur mesurée conformément à la norme JEITA (Japan Electronics and Information Technology
Industries Association).
En cas d'utilisation d'une pile sèche alcaline “STAMINA” Sony LR6 (SG) (fabriquée au Japon).
Insérez une pile sèche
alcaline LR6 (format
AA), le pôle négatif
en premier.
(Unité : heures approx.)(JEITA
SP
41 50 56
Stéréo
LP2
Fermez le
couvercle.
Stéréo
LP4
1)
)
-FR
6
Page 29
2
Connexions et déverrouillage de la
commande.
Connectez le casque/les écouteurs à i.
1
Raccordez fermement.
vers i
Faites glisser HOLD dans la direction
2
opposée à la flèche figurant sur le
lecteur (HOLD .) pour déverrouiller
la commande.
HOLD
-FR
7
Page 30
Lecture directe d'un MD
1
1
2
Insertion d'un MD.
Appuyez sur OPEN pour ouvrir le
couvercle.
Lecture d'un MD.
, N>, x, X
.
VOL +, –
Introduisez un MD étiquette vers l'avant
2
et appuyez sur le couvercle pour le
fermer.
Appuyez sur N>.
1
Appuyez sur VOL + ou sur – pour régler
2
le volume.
L'indicateur de volume apparaît dans la
fenêtre d'affichage pour vous permettre
de vérifier le niveau de volume.
Pour arrêter la lecture,
appuyez sur x.
La lecture commence au point où vous l'avez
arrêtée la dernière fois. Pour démarrer la lecture
au début de la première plage, appuyez sur
N> et maintenez-la enfoncée pendant 2
secondes au moins.
-FR
8
Page 31

Pour Opération
Localiser le début de la plage en
cours ou de la plage précédente
Appuyez sur ..
1)
Appuyez plusieurs fois sur . jusqu'à
l'affichage du début de la plage désirée.
Localiser le début de la plage
2)
suivante
Revenir en arrière en cours de
Appuyez une fois sur
N>
.
Maintenez la touche . enfoncée.
lecture
Avancer en cours de lecture Maintenez la touche
> enfoncée.
N
Activer une pause d'enregistrement Appuyez sur X.
Rappuyez sur X pour reprendre la lecture.
Retirer le MD Appuyez sur x, puis sur OPEN.
1)
Si vous appuyez sur . deux fois en continu pendant la lecture de la première plage du disque, le
lecteur passe au début de la dernière plage du disque.
2)
Si vous appuyez sur N> pendant la dernière plage du disque, le lecteur retourne au début de la
première plage du disque.
3)
Si vous ouvrez le couvercle, la lecture commencera au début de la première plage (sauf en cas
d'activation du mode groupe).
Suppression des sauts du son (G-PROTECTION)
3)
La fonction G-PROTECTION a été développée pour offrir un niveau de résistance aux
chocs plus élevé que celui des lecteurs existants afin de pouvoir utiliser le lecteur pendant
un jogging.
Remarque
Le son peut sauter dans les conditions suivantes :
• le lecteur reçoit des chocs continus plus forts.
• vous lisez un minidisque griffé ou sale.
z
• Le MZ-E310 assiste le DSP TYPE-R nouvellement développé pour ATRAC.
Il vous permet ainsi d'apprécier le son de haute qualité TYPE-R des MD enregistrés en stéréo SP sur
des platines MD TYPE-R etc.
• Le lecteur peut lire les plages enregistrées en mode longue durée 2
sélectionne automatiquement la lecture stéréo normale, stéréo LP2, stéréo LP4 ou monaurale en
fonction de la source audio.
• L'affichage s'éteindra dès que vous appuyerez sur
.
x
×
ou 4 × (LP2 ou LP4). Le lecteur
-FR
9
Page 32

Différents modes de lecture
Recherche rapide d'une plage ou d'une position spécifique (recherche rapide)
Vous pouvez effectuer deux types de
recherche rapide.
• Recherche d'index — Recherche
rapide tout en contrôlant les numéros ou
titres de plages (réglage par défaut).
• Recherche temporelle — Recherche
rapide tout en contrôlant le temps
écoulé.
MENU/ENTER
., N>,
X, x
1 Pendant la lecture, appuyez sur
MENU/ENTER.
2 Appuyez plusieurs fois sur . ou
sur
clignote dans la fenêtre d'affichage,
puis appuyez sur MENU/ENTER.
jusqu'à ce que “SEARCH”
N>
3 Appuyez plusieurs fois sur . ou
sur
(recherche d'index) ou “Time”
(recherche temporelle) clignote dans
la fenêtre d'affichage, puis appuyez
sur MENU/ENTER.
jusqu'à ce que “Index”
N>
4 Appuyez sur X.
5 Maintenez la touche . ou
enfoncée jusqu'à ce que le titre/
numéro de plage désiré (recherche
d'index) ou la durée écoulée désirée
(recherche temporelle) apparaisse
dans la fenêtre d'affichage.
N>
6 Appuyez sur X.
La lecture commence à partir de la
plage sélectionnée.
Pour annuler la procédure
Appuyez sur x.
z
• Si vous effectuez cette procédure pendant que
le lecteur est en mode de lecture aléatoire, la
lecture aléatoire commence à partir de la plage
sélectionnée.
• Si le lecteur atteint la première ou la dernière
plage du disque pendant que vous maintenez
la touche . ou N> enfoncée à l'étape
5, il reviendra à la dernière ou la première
plage, respectivement. (En mode groupe, si le
lecteur atteint la première ou la dernière plage
d'un groupe pendant que vous maintenez la
touche . ou N> enfoncée à l'étape 5,
il reviendra à la dernière ou la première plage
de ce groupe, respectivement.) (Voir
“Utilisation de la fonction de groupe”
(page 12).)
Sélection du mode de lecture
Vous pouvez sélectionner différents
modes de lecture, tels que la lecture
normale, répétée (1Rep.), aléatoire
(Shuff) ou programmée (PGM).
MENU/ENTER
., N>
1 Pendant la lecture, appuyez sur
MENU/ENTER.
10
-FR
Page 33

2 Appuyez plusieurs fois sur . ou
sur
clignote dans la fenêtre d'affichage,
puis appuyez sur MENU/ENTER.
jusqu'à ce que “P-MODE”
N>
3 Appuyez plusieurs fois sur . ou
sur
de lecture, puis appuyez sur MENU/
ENTER.
A chaque fois que vous appuyez sur
N>
désigné par A se modifie comme
suit :
Appuyer sur MENU/ENTER pendant
que A clignote modifie le mode de
lecture.
Le nouveau mode apparaît alors dans
la fenêtre d'affichage indiqué par B.
Appuyer plusieurs fois sur N>
modifie A.
B
s'allume lorsque vous appuyez sur
MENU/ENTER
pour sélectionner le mode
N>
, l'élément de l'affichage
.
Indication A/B (Mode de
lecture)
Normal/—(lecture normale)
Toutes les plages sont lues une fois.
r
AllRep/
Toutes les plages sont lues à
plusieurs reprises.
r
1 Track/1
Une plage est lue une seule fois.
r
1Rep./ 1
Une seule plage est lue à plusieurs
reprises.
r
Shuff/SHUF
Après la lecture de la plage
sélectionnée, les plages restantes
sont lues dans un ordre aléatoire.
r
Shuf.R/SHUF
Après la lecture de la plage
sélectionnée, les autres plages sont
lues à plusieurs reprises dans un
ordre aléatoire.
r
PGM/PGM
Les plages sont lues dans l'ordre
spécifié.
r
PGMRep/PGM
Les plages sont lues plusieurs fois
dans l'ordre spécifié.
Pour annuler la procédure
Appuyez sur x.
11
-FR
Page 34

Ecoute de plages dans l'ordre de votre choix (lecture programmée)
1 Respectez les étapes 1 et 2 dans la
section “Sélection du mode de
lecture” (page 10), sélectionnez
“PGM” à l'étape 3 et appuyez sur
MENU/ENTER.
2 Appuyez plusieurs fois sur . ou
sur
numéro de la plage.
pour sélectionner le
N>
• Vous pouvez spécifier le mode de lecture pour
un groupe sélectionné lorsque le mode groupe
est activé. Pour activer le mode groupe,
reportez-vous à la section “Sélection et lecture
de groupes spécifiques (fonction de saut de
groupe)” (page 14).
• Il est également possible de sélectionner le
mode de lecture lorsque le lecteur est à l'arrêt.
Remarques
• Tous les paramètres de programme sont
perdus lorsque le couvercle est ouvert.
• Si aucun paramètre n'est défini pendant 5
minutes lorsque le lecteur est à l'arrêt, les
paramètres définis jusqu'alors sont entrés.
• Pendant la définition du programme, vous ne
pouvez pas activer ou désactiver le mode
groupe.
• Si vous activez le mode groupe pendant la
lecture programmée, la lecture du programme
est annulée.
Numéro de
plage
Numéro de
programme
3 Appuyez sur MENU/ENTER.
La plage est entrée.
4 Répétez les étapes 2 et 3 pour
sélectionner d'autres plages dans
l'ordre désiré.
5 Appuyez sur MENU/ENTER pendant
au moins 2 secondes.
Les paramètres sont entrés et la
lecture commence à la première plage
programmée.
z
• Les paramètres du mode lecture programmée
restent en mémoire même après la fin ou
l'arrêt de la lecture.
• Il est possible de définir un maximum de 20
plages pour la lecture programmée.
-FR
12
Utilisation de la fonction de groupe
Le lecteur peut être utilisé avec un disque
avec des réglages de groupe.
La fonction de groupe est utile pour lire
un grand nombre de plages ou des plages
enregistrées en mode MDLP (LP2/LP4).
Définition d'un disque avec des réglages de groupe
Il s'agit d'un disque comportant des
paramètres qui organisent les plages en
groupes, qui peuvent être sélectionnés.
Le lecteur ne prend pas en charge
l'enregistrement de réglages de groupe.
Utilisez votre enregistreur de MD pour
enregistrer les informations puis utilisez
le lecteur pour la lecture.
Groupe 1
Numéro
de plage
123
Disque
Groupe 2
Numéro
de plage
4
Groupe 3
Numéro
de plage
7
85 6
Page 35

z
Si votre enregistreur est équipé d'une fonction
permettant de modifier les titres de disques,
vous pouvez l'utiliser pour enregistrer des
groupes. Pour plus d'informations, reportezvous à la section “Enregistrement de groupes à
l'aide de l'enregistreur de minidisques”
(page 14).
Lecture de plages dans un groupe spécifique (lecture en mode groupe)
Lecture lorsque le mode groupe est
désactivé :
La lecture commence par la première plage
du disque et s'achève par la dernière.
Disque
Numéro de plage
7
85 6
Groupe 3
Numéro
de plage
21 2
1
Disque
4
Groupe 2
Numéro
de plage
123
Lecture lorsque le mode groupe est activé :
La lecture du groupe sélectionné
commence par la première plage du
groupe et s'achève par la dernière.
Groupe 1
Numéro de
plage
123
2 Appuyez sur GROUP pendant au
moins 2 secondes.
“ ” et “GP ON” s'allument dans la
fenêtre d'affichage et le mode groupe
est activé.
La lecture cesse à la fin de la dernière
plage du groupe sélectionné.
Pour plus d'informations sur la
sélection d'un autre groupe, reportezvous à la section “Sélection et lecture
de groupes spécifiques (fonction de
saut de groupe)” (page 14).
Pour désactiver le mode
groupe
Rappuyez sur GROUP pendant au moins
2 secondes.
z
• Lorsque le mode groupe est activé, il est
possible d'effectuer une lecture répétée,
aléatoire ou programmée. Pour plus
d'informations sur les opérations respectives,
reportez-vous à la section “Sélection du mode
de lecture” (page 10).
• En mode groupe, appuyer sur N>
pendant la dernière plage du groupe fait passer
la lecture à sa première plage. Appuyer deux
fois en continu sur . pendant la lecture de
la première plage d'un groupe fait passer la
lecture à sa dernière plage.
Remarque
En mode groupe, le lecteur considère toutes les
plages sans réglage de groupe comme faisant
partie du dernier groupe du disque. Le dernier
groupe est signalé dans la fenêtre d'affichage
par “GP --”. Au sein d'un groupe, les plages
apparaissent dans l'ordre du disque, et non dans
l'ordre au sein du groupe.
1 Insérez un disque possédant des
réglages de groupe dans le lecteur et
procédez à la lecture.
13
-FR
Page 36

Sélection et lecture de groupes spécifiques (fonction de saut de groupe)
Lors de la lecture d'un disque avec des
réglages de groupe, la fonction de saut de
groupe permet de passer du groupe en
cours de lecture à n'importe quel autre
groupe sur le MD. La fonction de saut de
groupe peut être utilisée à n'importe quel
moment pendant la lecture, que le lecteur
se trouve en mode groupe ou non.
Lorsque le mode groupe est désactivé :
Disque
Numéro de plage
85 6
Saut
7
Groupe 3
Numéro
de plage
123
Saut
Lorsque le mode groupe est activé :
Disque
Groupe 1
Numéro
de plage
Groupe 2
Numéro
de plage
4
Saut
3 Dans les 5 secondes, appuyez
plusieurs fois sur . ou sur
jusqu'à ce que le nom ou le numéro
du groupe désiré apparaisse.
Le lecteur commence la lecture à
partir de la première plage du groupe.
Lorsqu'il y a un nom de groupe
(exemple : AAA)
En l'absence de nom de groupe
Pour annuler la procédure
Appuyez sur x.
Remarque
Si aucune opération n'est effectuée dans les 5
secondes à l'étape 3, le mode saut de groupe est
annulé. Pour effectuer la procédure,
recommencez à l'étape 2.
N>
Nom de groupe
Numéro de
groupe
123
Saut
Saut
1 Insérez un disque possédant des
réglages de groupe dans le lecteur
et procédez à la lecture.
2 Appuyez sur GROUP.
“ ” et “- - -” clignotent dans la
fenêtre d'affichage et le mode saut
de groupe est activé.
-FR
14
1
21 2
Enregistrement de groupes à
l'aide de l'enregistreur de
Saut
minidisques
Si votre enregistreur MD (platine MD
ou enregistreur de minidisques MD
Walkman) possède une fonction de
modification des titres de disques, vous
pouvez l'utiliser pour enregistrer des
groupes, même s'il ne possède pas de
fonction de groupe.
Veillez à entrer la chaîne de texte
exactement comme indiqué ci-dessous.
La fonction de groupe échouera si vous ne
l'entrez pas correctement.
Page 37

Pour spécifier des groupes
/
C
1 Modifiez le titre du disque comme
suit à l'aide de l'enregistreur MD :
0;[
Nom du disque
[
Dernière plage du groupe 1
[Première plage du groupe 2] -
[Dernière plage du groupe 2] ;
[Nom du groupe 2] // ......
] // [
Première plage du groupe 1
A
B
B
B
B
] ; [
Nom du groupe 1
C
z
• Vous pouvez enregistrer au maximum 99*
groupes sur un seul MD.
• Vous pouvez utiliser les caractères “;”, “/”, et
“–” dans un nom de groupe.
]-
• Vous pouvez enregistrer le même nom de
groupe plusieurs fois sur le même MD.
• Vous pouvez spécifier un groupe sans lui
] /
attribuer un nom de groupe (C).
∗
Le nombre réel sera inférieur à 99 si vous
avez entré un nombre de caractères supérieur
à la limite du disque.
Remarque
En fonction des caractéristiques de
l'enregistreur MD, la fonction de groupe
échouera.
A Titre du disque
B Numéro de la plage
C Nom du groupe
// Séparateur entre les groupes
– Trait d'union placé entre la première
et la dernière plages
; Séparateur entre le numéro de la
plage et le nom du groupe
(Ex.) Définissez les groupes suivants pour
le disque nommé “Collections” :
Nom du groupe pour les plages 1-7 :
My Favorites“2002winter”
Nom du groupe pour les plages 8-17 :
Jun&Tac“sunshine head”
Nom du groupe pour les plages 18-24 :
THE NIGHT BUTTERFLYS
Nom du groupe pour les plages 25-32 :
Dream World/Kiss Me!
Chaîne de texte entrée :
0;Collections//
1-7;My Favorites“2002winter”//
8-17;Jun&Tac“sunshine head”//
18-24;THE NIGHT BUTTERFLYS//
25-32;Dream World/Kiss Me!//
Réglage des graves et des aigus (Digital Sound Preset)
Vous pouvez régler les graves et les aigus
en fonction de vos préférences. Le lecteur
peut mémoriser deux ensembles de
réglages graves-aigus, qui sont
ultérieurement sélectionnables pendant
la lecture.
MENU/ENTER
., N>,
x
-FR
15
Page 38

Sélection de la qualité sonore
Réglages par défaut
Les réglages par défaut de Digital Sound
Preset sont les suivants :
•“SOUND 1”: graves +1, aigus ±0
•“SOUND 2”: graves +3, aigus ±0
1 Pendant la lecture, appuyez sur
MENU/ENTER.
2 Appuyez plusieurs fois sur . ou
sur
clignote dans la fenêtre d'affichage,
puis appuyez sur MENU/ENTER.
jusqu'à ce que “S–SEL”
N>
3 Appuyez plusieurs fois sur . ou
sur
“SOUND 1”, “SOUND 2”, ou “OFF”
dans la fenêtre d'affichage, puis
appuyez sur MENU/ENTER.
Sélectionner “OFF” désactive la
fonction Digital Sound Preset.
Réglage de la qualité sonore
Vous pouvez changer la qualité sonore
prédéfinie. Pour modifier la qualité
sonore prédéfinie, sélectionnez “SOUND
1” ou “SOUND 2” - le paramètre à
modifier - à l'avance.
1
Pendant la lecture et avec “SOUND
1”
appuyez sur MENU/ENTER.
pour sélectionner
N>
ou “SOUND 2” sélectionné,
2 Appuyez plusieurs fois sur . ou
jusqu'à ce que “S–SET”
N>
clignote dans la fenêtre d'affichage,
puis appuyez sur MENU/ENTER.
Le réglage de son sélectionné
“BASS” apparaît dans la fenêtre
d'affichage.
3 Appuyez plusieurs fois sur . ou
sur N> pour régler le volume.
Indique que “SOUND 1” ou “SOUND 2”
est sélectionné
Le son peut être réglé en 8 étapes.
(–4, –3, ...±0, ...+2, +3)
4 Appuyez sur MENU/ENTER.
“BASS” est réglé et la fenêtre
d'affichage passe en mode de réglage
des aigus “TRE”.
5 Appuyez plusieurs fois sur . ou
sur N> pour régler le volume,
puis appuyez sur MENU/ENTER.
“TRE” (aigus) est réglé.
Les réglages du son sont enregistrés
et la fenêtre d'affichage de lecture
réapparaît.
Pour annuler la procédure
Appuyez sur x.
z
Vous pouvez définir un son présélectionné
pendant la pause momentanée de la lecture.
Remarque
Lorsque vous utilisez Digital Sound Preset,
le son peut s'interrompre ou présenter une
distorsion si le volume est trop élevé, en
fonction des réglages ou de la plage. Dans ce
cas, modifiez les réglages de la qualité sonore.
16
-FR
Page 39

Autres opérations
Affichage du titre de la plage et du temps de lecture
Vous pouvez vérifier le titre de la plage, le
titre du disque, etc. en cours de lecture.
Les options relatives aux groupes
n'apparaissent que lorsqu'une plage avec
réglages de groupe est lue.
ABC
Numéro de
plage
Numéro de
plage
Nombre total
de plages dans
les groupes
Nombre total
de plages
Numéro de
plage
—Temps
écoulé
Titre de la
plage
GP Nom de
groupe
Titre du
disque
— Mode de
plage
1 Appuyez sur MENU/ENTER.
2 Appuyez plusieurs fois sur . ou
jusqu'à ce que “DISP”
N>
clignote dans la fenêtre d'affichage,
puis appuyez sur MENU/ENTER.
3 Appuyez plusieurs fois sur . ou
N>
jusqu'à ce que
N>
entraîne
sur
l'information désirée clignote dans la
fenêtre d'affichage, puis appuyez sur
MENU/ENTER.
Chaque pression sur
la modification du contenu de la
fenêtre d'affichage comme suit :
LapTim (Temps écoulé de la plage
en cours)
r
T.Nam e (Titre de la plage)
r
G.Name (Nom de groupe)
r
D.Name (Titre du disque)
r
T–MODE (Indique le mode
d'enregistrement sélectionné sur
l'enregistreur MD utilisé ; c.-à-d.,
“SP”, “LP2”, “LP4”, ou “MONO”.)
Remarques
• Il est possible que les options apparaissent
différemment ou ne puissent pas être
sélectionnées selon l'état du mode groupe
(activé/désactivé), l'état de fonctionnement
ou les réglages du lecteur et du disque.
• L'indicateur du mode n'apparaît que pendant
la lecture. Il s'affiche pendant 2 secondes, puis
est remplacé par la durée écoulée de la plage
en cours.
17
-FR
Page 40

Protection de l'ouïe (AVLS)
La fonction AVLS (Automatic Volume
Limiter System - système de limitation
automatique du volume) limite le volume
maximum pour protéger l'ouïe.
MENU/ENTER
., N>, x
1 Appuyez sur MENU/ENTER.
2 Appuyez plusieurs fois sur . ou
jusqu'à ce que “OPTION”
N>
clignote dans la fenêtre d'affichage,
puis appuyez sur MENU/ENTER.
“AVLS” clignote dans la fenêtre
d'affichage.
3 Appuyez sur MENU/ENTER.
4 Appuyez plusieurs fois sur . ou
sur
clignote dans la fenêtre d'affichage,
puis appuyez sur MENU/ENTER.
“ON” apparaît dans la fenêtre
d'affichage et, après 2 secondes,
la fenêtre d'affichage de lecture
réapparaît.
jusqu'à ce que “ON”
N>
Verrouillage des commandes (HOLD)
Utilisez cette fonction pour éviter
d'actionner accidentellement les
commandes lors du transport du lecteur.
HOLD
1 Faites glisser HOLD dans le sens de
la . pour verrouiller.
Pour déverrouiller les
commandes
Faites glisser HOLD dans le sens opposé
de la flèche.
Pour annuler la fonction AVLS
Sélectionnez “OFF” à l'étape 4, puis
appuyez sur MENU/ENTER.
Pour annuler la procédure
Appuyez sur x.
-FR
18
Page 41

Informations complémentaires
Précautions
Sécurité
• Ne transportez pas et ne rangez pas la pile
sèche dans le même endroit que des objets
métalliques, tels que pièces de monnaie,
porte-clés ou colliers. Ceci peut engendrer un
court-circuit et un dégagement de chaleur.
• Une utilisation incorrecte de la pile peut
entraîner sa fuite ou son explosion. Pour éviter
ces accidents, vérifiez que la pile est installée
avec les pôles + et – orientés correctement.
• Si une pile fuit, essuyez soigneusement
l'électrolyte qui s'est écoulé dans le
compartiment à pile avant d'en installer une
nouvelle.
• Si vous ne comptez pas utiliser le lecteur
pendant une longue période, retirez la pile
sèche.
Manipulation
• Ne laissez pas tomber le lecteur et ne le
cognez pas. Cela peut entraîner un
dysfonctionnement.
• Ne tirez pas sur le fil des écouteurs/du casque.
• Ne placez pas le lecteur dans les endroits
suivants :
—Un endroit extrêmement chaud (plus de
60 °C)
—Un endroit directement exposé aux rayons
du soleil ou proche d'un chauffage
—Dans une voiture avec les vitres fermées (en
particulier en été)
—Dans un endroit humide tel qu'une salle de
bains
—A proximité d'une source de champs
électromagnétiques comme un aimant, un
haut-parleur ou un téléviseur
—Dans un endroit poussiéreux
Surchauffe interne
Une surchauffe interne risque de se produire si
vous utilisez le lecteur pendant une période
prolongée. Il ne s'agit toutefois pas d'un
dysfonctionnement.
Bruits mécaniques
Le lecteur émet des bruits mécaniques en cours
de fonctionnement. Ils sont causés par son
système d'économie d'énergie. Il ne s'agit pas
d'un dysfonctionnement.
Installation
N'exposez jamais le lecteur à des conditions
extrêmes de luminosité, de température,
d'humidité ou de vibrations.
Cartouche de minidisques
• Ne touchez pas directement le disque interne.
Forcer l'ouverture de l'obturateur risque
d'endommager le disque interne.
• Lorsque vous transportez un minidisque,
laissez-le dans son étui.
• N'exposez pas la cartouche à la lumière, à des
températures extrêmes, à l'humidité ou à la
poussière.
• N'apposez pas l'étiquette dans un autre endroit
que la zone spécifiée sur le MD. Vérifiez que
l'étiquette est placée dans l'espace enfoncé sur
le disque.
Casque/écouteurs
Sécurité routière
• N'utilisez pas le casque/les écouteurs lorsque
vous roulez à vélo ou pendant la conduite
d'une voiture ou de tout autre véhicule
motorisé. Cela peut entraîner un accident et
est illégal dans de nombreux pays. Il peut
également s'avérer dangereux d'utiliser le
lecteur à volume élevé en marchant et plus
particulièrement lorsque vous traversez un
passage piéton. Redoublez de vigilance ou
interrompez l'écoute dans les situations à
risque.
• En cas de réaction allergique au casque ou aux
écouteurs fournis, arrêtez immédiatement de
les utiliser et consultez un médecin ou un
centre de traitement Sony.
Prévention des troubles de l'ouïe
Evitez d'utiliser le casque/les écouteurs avec
un volume sonore élevé. Les médecins
déconseillent l'écoute prolongée à volume
élevé. Si vous percevez des sifflements dans les
oreilles, réduisez le volume ou interrompez
l'écoute.
Respect d'autrui
Maintenez le volume à un niveau modéré. Ceci
vous permettra d'entendre les sons extérieurs et
d'être attentif à votre entourage.
19
-FR
Page 42

Entretien
• Après avoir essuyé le boîtier du lecteur avec
un chiffon doux légèrement imprégné d'eau,
essuyez-le de nouveau avec un chiffon sec.
N'utilisez pas de tampon abrasif, de poudre à
récurer ni de solvant tel qu'alcool ou benzène,
qui risquent de ternir la surface du boîtier.
• Essuyez la cartouche du disque à l'aide d'un
chiffon sec pour enlever la poussière.
• La poussière sur la lentille peut altérer le
fonctionnement de l'appareil. Refermez le
couvercle du compartiment à disque après
avoir introduit ou éjecté un MD.
• Pour assurer une bonne qualité sonore, utilisez
un chiffon doux pour nettoyer les fiches du
casque/des écouteurs. Une fiche sale peut
provoquer des bruits ou une interruption
intermittente du son pendant la lecture.
• Nettoyez régul ièrement les bornes à l 'aide d'un
coton-tige ou d'un chiffon doux, comme
illustré.
Compartiment à pile sèche
Bornes
Si vous avez des questions ou des problèmes
concernant ce lecteur, consultez votre
revendeur Sony le plus proche. (Si un problème
survient alors que le disque se trouve dans le
lecteur, il est conseillé de ne pas le retirer afin
que votre revendeur Sony puisse identifier et
comprendre le problème.)
Lorsque vous consultez le revendeur Sony,
veillez à amener le lecteur et le casque/les
écouteurs.
-FR
20
Page 43

Dépannage
Si un problème quelconque persiste après ces vérifications, consultez votre revendeur
Sony.
Problème Cause/solution
Le lecteur ne
fonctionne pas ou
fonctionne mal.
Le MD n'est pas lu
normalement.
La lecture du MD ne
commence pas à la
première plage.
• Vous avez essayé d'utiliser le lecteur sans MD. (“NoDISC”
clignote dans la fenêtre d'affichage.)
,Insérez un MD.
• La fonction HOLD est activée (“HOLD” apparaît dans la fenêtre
d'affichage lorsque vous appuyez sur une touche de
fonctionnement du lecteur).
,Désactivez HOLD en faisant glisser le commutateur HOLD
dans le sens opposé à la flèche (pages 7, 18).
• De la condensation s'est formée à l'intérieur du lecteur.
,Retirez le MD et laissez le lecteur dans un endroit chaud
pendant quelques heures jusqu'à l'évaporation de l'humidité.
• La pile sèche est épuisée (“LoBATT” clignote ou rien
n'apparaît).
,Remplacez-la (page 6).
• La pile sèche a été mal insérée.
,Mettez-la correctement en place (page 6).
• Le MD introduit ne comporte aucun enregistrement. (“BLANK”
clignote dans la fenêtre d'affichage.)
,Introduisez un MD enregistré.
• Le lecteur ne peut pas lire le disque. (Il est griffé ou sale.)
(“ERROR” clignote dans la fenêtre d'affichage.)
,Réinsérez ou remplacez le disque.
• Pendant le fonctionnement, le lecteur a subi un choc mécanique,
un excès d'électricité statique, etc.
,Redémarrez l'appareil de la façon suivante :
1 Retirez la pile sèche.
2 Laissez reposer le lecteur pendant 30 secondes environ.
3 Réinsérez la pile sèche.
• Le lecteur est réglé sur le mode de répétition. (“ ” est affiché
dans le lecteur.)
,Sélectionnez “Normal” pour le mode de lecture et
commencez la lecture. Pour plus d'informations, reportezvous à la section “Sélection du mode de lecture” (page 10).
• Le disque est lu en mode groupe.
,Désactivez le mode groupe.
• La lecture du disque s'est interrompue avant d'atteindre la
dernière plage.
,Maintenez la touche
moins pour commencer la lecture à la première plage.
• Le disque est lu en mode groupe.
,Désactivez le mode groupe et arrêtez la lecture. Maintenez
ensuite la touche
moins pour commencer la lecture à la première plage.
N>
enfoncée pendant 2 secondes au
N>
enfoncée pendant 2 secondes au
21
-FR
Page 44

Problème Cause/solution
La fonction Digital
Sound Preset ne
fonctionne pas.
Le son de lecture
saute.
Le son est fortement
brouillé.
Un bruit momentané
se fait entendre.
Le lecteur ne
fonctionne pas
correctement.
Aucun son ne
parvient au casque/
aux écouteurs.
Il est impossible
d'augmenter le
volume.
La fonction de
groupe est
inopérante.
Lorsque vous
avancez ou revenez
en arrière, vous ne
passez pas à la plage
suivante ou vous ne
revenez pas à la
plage précédente.
22
-FR
• La fonction Digital Sound Preset est désactivée.
, Sélectionnez “SOUND 1” ou “SOUND 2”. Pour plus
• Le lecteur est soumis à des vibrations continues.
, Placez le lecteur sur une surface stable.
• Une plage très courte peut faire sauter le son.
, Essayez de ne pas créer une plage de moins d'une seconde.
• Un fort champ magnétique provenant d'un téléviseur ou d'un
appareil similaire interfère avec le fonctionnement du lecteur.
, Eloignez le lecteur de ce champ magnétique.
• Le son a été enregistré en mode stéréo LP4.
, En raison de la nature de la méthode de compression utilisée
• Vous avez tenté d'activer le mode groupe avec la lecture
programmée sélectionnée.
, Activez le mode groupe avant de sélectionner la lecture
• La fiche du casque/des écouteurs n'est pas correctement enfoncée.
, Enfoncez fermement la fiche du casque/des écouteurs dans
• Le volume est trop faible.
, Réglez le volume en appuyant sur VOL + ou sur –.
• La fiche est sale.
, Nettoyez la fiche.
• AVLS est activé.
, Réglez AVLS sur “OFF” (page 18).
• Lors de l'utilisation d'un disque sans informations de groupe,
vous avez tenté d'activer le mode groupe.
, Utilisez un disque avec informations de groupe.
• Lors de la lecture d'une plage n'appartenant à aucun groupe,
vous avez tenté d'activer le mode groupe.
, La fonction de groupe ne peut pas être utilisée pendant la
• Lors de la sélection de la lecture programmée, vous avez tenté
d'activer le mode groupe.
, Activez le mode groupe avant de sélectionner la lecture
• Le mode saut de groupe est activé.
, Désactivez le mode saut de groupe. Le mode saut de groupe
d'informations, reportez-vous à la section “Réglage des
graves et des aigus (Digital Sound Preset)” (page 15).
en mode LP4, il est possible qu'un son soit très rarement
émis pendant la lecture de son enregistré dans ce mode.
programmée.
la prise i.
lecture d'une plage qui n'appartient à aucun groupe.
programmée.
est automatiquement annulé si aucune opération n'est
effectuée dans les 5 secondes. Pour plus d'informations,
reportez-vous à la section “Sélection et lecture de groupes
spécifiques (fonction de saut de groupe)” (page 14).
Page 45

Spécifications
Lecteur MD
Système de lecture audio
Système audionumériqu e Mi niDisc
Propriétés de la diode laser
Matériau : GaAlAs
Longueur d'onde : λ = 790 nm
Durée d'émission : continue
Puissance laser : moins de 44,6µW
(Cette puissance est la valeur mesurée à une
distance de 200 mm de la surface de la lentille
de l'objectif du bloc optique avec une ouverture
de 7 mm.)
Vitesses de rotation
Environ 300 à 2 700 tr/min
Correction d'erreur
ACIRC (Advan ced Cross Interleave Re ed
Solomon Code)
Fréquence d'échantillonnage
44,1 kHz
Codage
ATRAC (Adaptive TRansform Acoustic
Coding)
A TR AC3 — LP2/LP4
Système de modulation
EFM (Eight to Fourteen Modulation)
Nombre de canaux
2 canaux stéréo
1 canal monaural
Réponse en fréquence
20 à 20 000 Hz ± 3 dB
Pleurage et scintillement
Inférieurs aux limites mesurables
Sorties
i : minifiche stéréo, niv eau de s ortie ma ximum
3,5 mW + 3,5 mW, impédance de
charge 16 ohms
Caractéristiques générales
Puissance de raccordement
Une pile alcaline LR6 (format AA) (non
fournie)
Autonomie de fonctionnement
Voir “Durée de vie de la pile” (page 6)
Dimensions
Environ 81 × 28,9 × 74,4 mm (l/h /p) sa ns
ergots.
Poids
Environ 93 g, lecteur seul
Licences de brevets U.S. et étrangers obtenues
de Dolby Laboratories.
La conception et les sp écifications sont
susceptibles d'être modifiées sans préavis.
Accessoires en option
Casque/écouteurs stéréo série MDR*
Haut-parleurs actifs série SRS
∗ Quand vous utilisez un casque en option,
utilisez uniquement un casque/des
écouteurs équipés de minifiche s stéréo.
Vous ne pouvez pas utiliser un casque/des
écouteurs avec microfiches.
Pour les utilisateurs en France
En cas de remp la cement du ca sque/écouteurs,
référez-vous au modèle de casque/écouteurs
adapté à votre appareil et indiqué ci-dessous.
MDR-E808SP
Il se peut que votre revendeur ne dispose pas de
certains accessoires. Demandez-lui la liste des
accessoires disponible s da ns votre pay s.
23-FR
Page 46

VORSICHT
Um Feuergefahr und die Gefahr
eines elektrischen Schlages zu
vermeiden, dürfen Sie das Gerät
weder Regen noch Feuchtigkeit
aussetzen.
Stellen Sie das Gerät nicht an einem Ort
auf, an dem ausreichende Luftzufuhr
nicht gegeben ist, zum Beispiel in
einem engen Regalfach oder in einem
Einbauschrank.
Decken Sie die Lüftungsöffnungen des
Geräts nicht mit Zeitungen, Tischdecken,
Vorhängen usw. ab, und stellen Sie keine
brennenden Kerzen auf dem Gerät ab, da
sonst Feuergefahr besteht. Stellen Sie
auch keine angezündeten Kerzen auf dem
Gerät ab.
Um Feuergefahr und die Gefahr eines
elektrischen Schlages zu vermeiden,
dürfen keine mit Flüssigkeit gefüllten
Objekte, z. B. Vasen, auf dem Gerät
abgestellt werden.
In bestimmten Ländern können
gesetzliche Vorschriften für die
Entsorgung der für dieses Produkt
verwendeten Batterien/Akkus gelten.
Weitere Informationen erhalten Sie bei
der zuständigen Behörde.
Informationen
IN KEINEM FALL HAFTET DER
VERKÄUFER FÜR DIREKTE,
INDIREKT VERURSACHTE ODER
FOLGESCHÄDEN, GLEICH
WELCHER ART, ODER FÜR
ENTGANGENE GEWINNE ODER
AUSGABEN, DIE AUFGRUND
EINES DEFEKTEN PRODUKTS
ODER AUFGRUND DER
VERWENDUNG EINES PRODUKTS
ENTSTEHEN.
Die Gültigkeit der CEKennzeichnung ist auf
ausschließlich solche Länder
beschränkt, in denen diese
Kennzeichnung gesetzlich
vorgeschrieben ist. Dies gilt
vornehmlich für EEA-Länder
(European Economic Area).
Achtung
Die Verwendung optischer Geräte mit
dem Produkt erhöht die Gefahr für die
Augen.
VORSICHT — UNSICHTBARE
LASERSTRAHLUNG BEI
GEÖFFNETEM GERÄT
KEINESFALLS MIT ODER OHNE
OPTISCHE INSTRUMENTE DIREKT
IN DEN LASERSTRAHL BLICKEN.
-DE
2
Page 47

Inhalt
Bedienelemente ................................................4
Vorbereitungen ................................................. 6
Umgehende Wiedergabe einer MD! .................. 8
Verschiedene Arten der Wiedergabe .............10
Schnelles Suchen eines bestimmten Titels oder einer bestimmten
Position (Quick Search) ....................................................................... 10
Auswählen des Wiedergabemodus ...................................................... 10
Anhören von Titeln in einer bestimmten Reihenfolge
(Program Play) ................................................................ 12
Verwendung der Group-Funktion ........................................................ 12
Was ist eine MD mit Gruppeneinstellungen? ................................ 12
Anhören von Titeln einer bestimmten Gruppe
(Wiedergabe im Gruppenmodus) ................................... 13
Auswahl und Wiedergabe gewünschter Gruppen
(Gruppenüberspringfunktion) ......................................... 14
Registrieren von Gruppen unter Verwendung des
MiniDisc-Recorders ........................................................ 14
Höhen- und Tiefeneinstellung (digitale Klangvoreinstellung) ............ 15
Auswählen der Tonqualität ............................................................ 15
Einstellen der Tonqualität .............................................................. 16
DE
Weitere Bedienfunktionen ..............................17
Anzeigen des Titelnamens und der Spieldauer .................................... 17
Schützen Ihrer Hörfähigkeit (AVLS) ................................................... 18
Sperren der Regler (HOLD) ................................................................. 18
Weitere Informationen ....................................19
Sicherheitsmaßnahmen ........................................................................ 19
Fehlerbehebung .................................................................................... 21
Technische Daten ................................................................................. 23
-DE
3
Page 48

Bedienelemente
Vorderseite des MD-Players
3
1
2
A
Display
B
VOL +- und –-Taste
Die VOL +-Taste verfügt über einen
Tastpunkt.
C
Funktionswahlschalter
N (Wiedergabe)
*
. und > (Suche/AMS)
x (Stop)
X (Pause)
∗
Die N-Taste verfügt über einen
Tastpunkt.
4
5
6
D
MENU/ENTER-Taste
E
GROUP-Taste
i (Kopf-/Ohrhörer)-Buchse
F
G
Kopf-/Ohrhörer
7
-DE
4
Page 49

Rückseite des MD-Players
3
1
2
4
A
HOLD-Schalter
B
OPEN-Taste
Das Display des MD-Recorders
1
2
3
A
MD-Anzeige
B
Gruppenmodusanzeige
Leuchtet bei aktiviertem
Gruppenmodus.
C
Titelnummeranzeige
D
Batteriekapazitätsanzeige
Zeigt den ungefähren
Batterieladezustand an.
E
Wiedergabemodusanzeige
Zeigt den Wiedergabemodus der MD
an.
C
Vertiefung für Tragschlaufe
Befestigen Sie Ihre Tragschlaufe an
dieser Vertiefung.
D
Deckel des Batteriefachs
4
5
6
7
8
F
SOUND-Anzeige
G
MD-, Gruppen-, Titelanzeige
H
Zeichen-Display
Zeigt den Titelnamen, die verstrichene
Zeit etc. an.
-DE
5
Page 50

Vorbereitungen
1
Einlegen einer AlkaliTrockenbatterie.
E
e
Öffnen Sie den Deckel
des Batteriefachs.
Wann muss die Batterie
ausgewechselt werden?
Sie können während der Verwendung des Players den Batterieladezustand anhand der
Batterieanzeige überprüfen.
Die Batterieladung nimmt ab
r
Schwache Batterie
r
Die Batterie ist entladen.
“LoBATT” leuchtet im Display und die Stromversorgung wird unterbrochen.
Batterielebensdauer
Batterien SP
Sony LR6 (SG)
-Alkali-Trockenbatterie
1)
Gemessen entsprechend JEITA-Standard (Japan Electronics and Information Technology Industries
Association).
2)
Bei Verwendung einer LR6 (SG) Alkali-Trockenbatterie der Marke “STAMINA” von Sony
(hergestellt in Japan).
Hinweis
Die Batterielebensdauer hängt von Betriebsbedingungen, Umgebungstemperatur und Art der
verwendeten Batterie ab und kann unter Umständen kürzer als angegeben sein.
Legen Sie eine LR6-AlkaliTrockenbatterie (Größe AA)
mit dem Minuspol zuerst ein.
Stereo
2)
41 50 56
Schließen Sie den
Deckel.
(Einheit:ca. Stunden)(JEITA
LP2
Stereo
LP4
Stereo
1)
)
-DE
6
Page 51

2
Anschließen und Aufheben der
Sperre.
Schließen Sie die Kopf-/Ohrhörer an i
1
an.
Fest anschließen.
an i
Schieben Sie HOLD in die
2
entgegengesetzte Richtung des Pfeils
auf dem Player (HOLD .), um die
Sperre aufzuheben.
HOLD
-DE
7
Page 52

Umgehende Wiedergabe einer MD!
1
1
2
Einlegen einer MD.
Drücken Sie OPEN, um den Deckel zu
öffnen.
Wiedergabe einer MD.
, N>, x, X
.
VOL +, –
Legen Sie eine MD mit der Beschriftung
2
nach vorn ein, und schließen Sie den
Deckel.
Drücken Sie N>.
1
Drücken Sie VOL + oder –, um die
2
Lautstärke einzustellen.
Die Lautstärkenanzeige erscheint im
Display und ermöglicht die
Überprüfung der Lautstärke.
Zum Stoppen der Wiedergabe
drücken Sie x.
Die Wiedergabe wird an der Stelle fortgesetzt,
an der sie zuvor unterbrochen wurde. Drücken
Sie zum Starten der Wiedergabe der MD ab
dem ersten Titel N> mindestens 2
Sekunden lang.
-DE
8
Page 53

Aktion Bedienfunktion
Suchen des Anfangs des aktuellen
oder vorherigen Titels
1)
Drücken Sie ..
Drücken Sie wiederholt ., bis der Player zum
Anfang des gewünschten Titels springt.
Suchen des Anfangs des nächsten
2)
Titels
Zurückspulen während der
Drücken Sie einmal
N>
Halten Sie . gedrückt.
.
Wied er gab e
Vorspulen während der Wiedergabe Halten Sie
> gedrückt.
N
Pause Drücken Sie X.
Drücken Sie erneut X, um die Wiedergabe
fortzusetzen.
Herausnehmen der MD Drücken Sie x, und danach OPEN.
1)
Wenn während der Wiedergabe des ersten Titels auf der MD zweimal auf . gedrückt wird, springt
der Player zum Anfang des letzten Titels auf der MD.
2)
Wenn während des letzten Titels der MD N> gedrückt wird, springt der Player zum Anfang des
ersten Titels der MD.
3)
Wenn Sie den Deckel öffnen, start die Wiedergabe mit dem Anfang des ersten Titels (sofern der
Gruppenmodus nicht aktiviert ist).
Unterdrückung von Tonsprüngen (G-PROTECTION)
3)
Die G-PROTECTION-Funktion wurde entwickelt, um die Stoßsicherheit so weit zu
verbessern, daß der Player beim Joggen verwendet werden kann.
Hinweis
In folgenden Fällen können Tonsprünge bei der Wiedergabe auftreten:
• Der Player ist stärkeren, dauerhaften Stößen ausgesetzt.
• Es wird eine verschmutzte oder verkratzte MiniDisc abgespielt.
z
• Der MZ-E310 unterstützt das neu für die ATRAC-Norm entwickelte System DSP TYPE-R.
Dies ermöglicht es Ihnen, den hochwertigen TYPE-R-Klang von MDs zu erzielen, die im SPStereomodus mit einem mit TYPE-R ausgestatteten MD-Recorder aufgezeichnet worden sind.
• Der Player kann Titel wiedergeben, die im LP2- oder LP4-Modus (2
aufgenommen wurden. In Übereinstimmung mit der Audioquelle wird automatisch der entsprechende
Wiedergabemodus ausgewählt: Stereo, LP2, LP4 oder Mono.
• Kurz nachdem Sie
gedrückt haben, wird das Display ausgeschaltet.
x
×−
oder 4 ×−Long Play-Modus)
-DE
9
Page 54

Verschiedene Arten der Wiedergabe
Schnelles Suchen eines bestimmten Titels oder einer bestimmten Position (Quick Search)
Die schnelle Suche kann auf zweierlei
Arten durchgeführt werden.
• Index-Suche — schnelle Suche auf
der Basis von Titelnummern oder
Titelnamen (werkseitige Einstellung).
• Zeit-Suche — schnelle Suche auf der
Basis der verstrichenen Zeit.
MENU/ENTER
., N>,
X, x
1 Drücken Sie während der Wiedergabe
MENU/ENTER.
2 Drücken Sie wiederholt . oder
, bis “SEARCH” im Display
N>
blinkt, und drücken Sie dann MENU/
ENTER.
3 Drücken Sie wiederholt . oder
, bis “Index” (Index-Suche)
N>
oder “Time” (Zeit-Suche) im Display
blinkt, und drücken Sie dann MENU/
ENTER.
4 Drücken Sie X.
5 Halten Sie . oder
gedrückt, bis die gewünschte
Titelnummer oder der gewünschte
Titelname (Index-Suche) bzw. der
gewünschte verstrichene Zeitraum
(Zeit-Suche) im Display angezeigt
wird.
N>
6 Drücken Sie X.
Die Wiedergabe beginnt mit dem
gewählten Titel.
-DE
10
Abbrechen des Verfahrens
Drücken Sie x.
z
• Wenn Sie dieses Verfahren durchführen,
während sich der Player im Shuffle-Modus
befindet, startet die Wiedergabe mit dem
ausgewählten Titel.
• Wenn der Player den ersten oder letzten Titel
auf der MD erreicht, während Sie die .oder N>-Taste in Schritt 5 gedrückt
halten, springt der Player jeweils zum letzten
oder ersten Titel zurück. (Wenn sich der
Player im Gruppenmodus befindet und den
ersten oder letzten Titel in einer Gruppe
erreicht, während Sie die .- oder N> -
Taste in Schritt 5 gedrückt halten, springt der
Player jeweils zum letzten bzw. zum ersten
Titel aus dieser Gruppe zurück.) (Siehe
“Verwendung der Group-Funktion”
(Seite 12).)
Auswählen des Wiedergabemodus
Es stehen mehrere Wiedergabemodi zur
Auswahl, zum Beispiel normale
Wiedergabe, Repeat Play (1Rep.), Shuffle
Play (Shuff) oder Program Play (PGM).
MENU/ENTER
., N>
1 Drücken Sie während der Wiedergabe
MENU/ENTER.
2 Drücken Sie wiederholt . oder
, bis “P-MODE” im Display
N>
blinkt, und drücken Sie dann MENU/
ENTER.
Page 55

3 Drücken Sie wiederholt . oder
, um den Wiedergabemodus
N>
auszuwählen, und drücken Sie dann
MENU/ENTER.
Bei jedem Drücken von
ändert sich die Anzeige von A im
Display folgendermaßen:
Durch Drücken von MENU/ENTER
während A blinkt, wird der
Wiedergabemodus geändert.
Der neue Modus wird dann im
Display über die Anzeige B
angezeigt.
Durch wiederholtes Drücken von
N>, wird die Anzeige A geändert.
B
leuchtet auf, wenn Sie MENU/
drücken.
ENTER
N>
,
Anzeige A/B
(Wiedergabemodus)
Normal/—(normale Wiedergabe)
Alle Titel werden einmal
wiedergegeben.
r
AllRep/
Alle Titel werden mehrmals
wiedergegeben.
r
1 Track/1
Ein Titel wird einmal wiedergegeben.
r
1Rep./ 1
Ein einzelner Titel wird mehrmals
wiedergegeben.
r
Shuff/SHUF
Wenn die Wiedergabe des derzeit
ausgewählten Titels beendet ist,
werden die restlichen Titel in
willkürlicher Reihenfolge
wiedergegeben.
r
Shuf.R/SHUF
Nachdem die Wiedergabe des
aktuell ausgewählten Titels beendet
ist, werden die restlichen Titel
in willkürlicher Reihenfolge
wiederholt.
r
PGM/PGM
Die Titel werden in der von
Ihnen festgelegten Reihenfolge
wiedergegeben.
r
PGMRep/PGM
Die Titel werden in der von Ihnen
festgelegten Reihenfolge
wiederholt.
Abbrechen des Verfahrens
Drücken Sie x.
11
-DE
Page 56

Anhören von Titeln in einer bestimmten Reihenfolge (Program Play)
1 Führen Sie die Schritte 1 und 2 von
“Auswählen des Wiedergabemodus”
(Seite 10) aus, und wählen Sie
“PGM” in Schritt 3 aus. Drücken Sie
dann MENU/ENTER.
2 Drücken Sie wiederholt . oder
, um die Titelnummer
N>
auszuwählen.
Titelnummer
Programmnummer
3 Drücken Sie MENU/ENTER.
Der Titel ist eingegeben.
4 Wiederholen Sie die Schritte 2 und 3,
um weitere Titel in der gewünschten
Reihenfolge auszuwählen.
5 Drücken Sie MENU/ENTER
mindestens 2 Sekunden lang.
Die Einstellungen werden eingegeben,
und die Wiedergabe startet mit dem
ersten programmierten Titel.
z
• Die Einstellungen für die programmierte
Wiedergabe bleiben auch nach Beendigung
oder Stoppen der Wiedergabe gespeichert.
• Sie können bis zu 20 Titel für die Wiedergabe
programmieren.
• Bei aktiviertem Gruppenmodus kann der
Wiedergabemodus für eine gewählte Gruppe
angegeben werden. Weitere Informationen zum
Aktivieren des Gruppenmodus finden Sie unter
“Auswahl und Wiedergabe gewünschter
Gruppen (Gruppenüberspringfunktion)”
(Seite14).
• Der Wiedergabemodus kann auch gewählt
werden, wenn sich der Player im Stop-Modus
befindet.
Hinweise
• Alle Programmeinstellungen gehen verloren,
wenn der Deckel geöffnet wird.
• Wenn sich der Player länger als 5 Minuten im
Stop-Modus befindet, ohne daß Einstellungen
vorgenommen werden, werden die bis zu
diesem Zeitpunkt vorgenommenen
Einstellungen eingegeben.
• Während der Programmeinstellung können
Sie den Gruppenmodus nicht aktivieren oder
deaktivieren.
• Wenn Sie während der programmierten
Wiedergabe den Gruppenmodus aktivieren, wird
die programmierte Wiedergabe abgebrochen.
Verwendung der GroupFunktion
Der Player kann zur Wiedergabe einer MD
mit Gruppeneinstellungen verwendet
werden.
Die Group-Funktion ist für die Wiedergabe
einer großen Anzahl von Titeln ebenso
nützlich wie für die Wiedergabe von Titeln,
die im MDLP-Modus (LP2/LP4)
aufgenommen wurden.
Was ist eine MD mit Gruppeneinstellungen?
Es handelt sich um eine MD mit
Einstellungen, die Titel in Gruppen
organisieren, die anschließend zur
Auswahl verfügbar sind.
Der Player unterstützt nicht die Aufnahme
mit Gruppeneinstellungen. Verwenden Sie
Ihren MD-Recorder zur Aufzeichnung von
12
-DE
Page 57

Daten, und verwenden Sie anschließend
den Player zur Wiedergabe.
Medium
Gruppe 1
Titel-
nummer
123
z
Wenn Ihr Recorder über eine Funktion zur
Bearbeitung von MD-Titeln verfügt, können
Sie diese zum Registrieren von Gruppen
verwenden. Einzelheiten dazu finden Sie unter
“Registrieren von Gruppen unter Verwendung
des MiniDisc-Recorders” (Seite 14).
Gruppe 2
Titel-
nummer
4
Gruppe 3
Titel-
nummer
7
85 6
1 Legen Sie eine MD mit Gruppenein-
stellungen in den Player ein, und spielen Sie sie ab.
2 Drücken Sie GROUP mindestens 2
Sekunden lang.
“ ” und “GP ON” leuchten im
Display auf, und der Gruppenmodus
wird aktiviert.
Die Wiedergabe wird am Ende des
letzten Titels der gewählten Gruppe
angehalten.
Einzelheiten zur Auswahl einer anderen
Gruppe finden Sie unter “Auswahl und
Wiedergabe gewünschter Gruppen
(Gruppenüberspringfunktion)”
(Seite 14).
Anhören von Titeln einer
bestimmten Gruppe (Wiedergabe im Gruppenmodus)
Wenn der Gruppenmodus deaktiviert ist:
Die Wiedergabe beginnt mit der ersten Titel
auf der MD und endet mit dem letzten Titel
auf der MD.
Medium
Titelnummer
7
123
Wenn der Gruppenmodus deaktiviert ist:
Die Wiedergabe beginnt mit der ersten Titel
aus der Gruppe und endet mit dem letzten
Titel aus der Gruppe.
Gruppe 1
Titelnummer
4
Medium
Gruppe 2
Titelnummer
123
85 6
Gruppe 3
Titelnummer
21 2
1
Deaktivieren des
Gruppenmodus
Drücken Sie GROUP mindestens
2 Sekunden lang.
z
• Bei aktiviertem Gruppenmodus können fol-
gende Wiedergabemodi verwendet werden:
Repeat Play, Shuffle Play oder Program Play.
Einzelheiten zu den einzelnen Bedienfunktionen finden Sie unter “Auswählen des Wiedergabemodus” (Seite 10).
• Wenn im Gruppenmodus während der
Wiedergabe des letzten Titels aus der Gruppe
auf N> gedrückt wird, startet die
Wiedergabe des ersten Titels aus der Gruppe.
Wenn während der Wiedergabe des ersten
Titels aus einer Gruppe zweimal auf .
gedrückt wird, startet die Wiedergabe des
letzten Titels aus der Gruppe.
Hinweis
Im Gruppenmodus teilt der Player alle Titel
ohne Gruppeneinstellungen der letzten Gruppe
auf der MD zu. Die letzte Gruppe wird auf dem
Display des Players als “GP --” angezeigt.
Innerhalb einer Gruppe werden die Titel in der
Reihenfolge angezeigt, in der sie auf der MD
gespeichert sind, nicht in der Reihenfolge
innerhalb der Gruppe.
13
-DE
Page 58

Auswahl und Wiedergabe gewünschter Gruppen (Gruppenüberspringfunktion)
Bei der Wiedergabe einer MD ohne
Gruppeneinstellungen kann der Player
mithilfe der Gruppenüberspringfunktion
von der aktuell wiedergegebenen Gruppe
zu einer anderen Gruppe auf der MD
springen. Die Gruppenüberspringf unktion
kann jederzeit während der Wiedergabe
verwendet werden. Dabei spielt es keine
Rolle, ob der Gruppenmodus aktiviert
oder deaktiviert ist.
Wenn der Gruppenmodus deaktiviert ist:
Medium
Titelnummer
85 6
123
Überspringen
Wenn der Gruppenmodus aktiviert ist:
Medium
Gruppe 1
Titelnummer
123
Überspringen
Überspringen
Gruppe 2
Titelnummer
Überspringen
7
Gruppe 3
Titelnummer
1
Überspringen
21 2
Überspringen
4
1 Legen Sie eine MD mit
Gruppeneinstellungen in den Player
ein, und spielen Sie sie ab.
2 Drücken Sie GROUP.
“ ” und “- - -” leuchten im Display
auf, und der Gruppenüberspringmodus wird aktiviert.
3 Drücken Sie innerhalb von 5 Sekunden
wiederholt . oder
Name oder die Nummer der
gewünschten Gruppe erscheint.
Der Player startet die Wiedergabe mit
dem ersten Titel aus der Gruppe.
Gruppe mit Gruppenname
(Beispiel: AAA)
Gruppe ohne Gruppenname
Abbrechen des Verfahrens
Drücken Sie x.
Hinweis
Wenn innerhalb von 5 Sekunden in Schritt 3
keine Bedienung vorgenommen wird, wird der
Gruppenüberspringmodus deaktiviert. Wenn
Sie das Verfahren erneut ausführen möchten,
beginnen Sie wieder mit Schritt 2.
Registrieren von Gruppen unter Verwendung des MiniDisc-Recorders
Wenn Ihr MD-Recorder (MD-Deck oder
MD-Walkman mit Aufnahmefunktion)
über eine Funktion zur Bearbeitung von
MD-Namen verfügt, können Sie Gruppen
auch dann registrieren, wenn Ihr Recorder
nicht über eine Gruppenfunktion verfügt.
Gehen Sie bei der Eingabe des Textstrings
genau wie nachfolgend beschrieben vor.
Die Gruppenfunktion kann bei einer
inkorrekten Eingabe des Textstrings nicht
verwendet werden.
, bis der
N>
Gruppenname
Gruppennummer
14
-DE
Page 59

Angeben von Gruppen
/
C
1 Ändern Sie den MD-Namen auf
Ihrem MD-Recorder wie im
Folgenden beschrieben:
0;[Discname] // [Erster Titel von Gruppe 1]-
A
Letzter Titel von Gruppe 1
[
B
[Erster Titel von Gruppe 2]-
[Letzter Titel von Gruppe 2] ;
[Name von Gruppe 2] // ......
B
B
A MD-Name
B Titelnummer
C Gruppenname
// Trennzeichen zwischen Gruppen
– Zwischen dem ersten und dem
letzten Titel wird ein Bindestrich
eingefügt
; Trennzeichen zwischen
Titelnummer und Gruppenname
(Bsp.) Geben Sie die folgenden Gruppen
für eine MD an, die “Collections” benannt
wurde:
Gruppenname für Titel 1-7:
My Favorites“2002winter”
Gruppenname für Titel 8-17:
Jun&Tac“sunshine head”
Gruppenname für Titel 18-24:
THE NIGHT BUTTERFLYS
Gruppenname für Titel 25-32:
Dream World/Kiss me!
Eingegebene Textstrings:
0;Collections//
1-7;My Favorites“2002winter”//
8-17;Jun&Tac“sunshine head”//
18-24;THE NIGHT BUTTERFLYS//
25-32;Dream World/Kiss me!//
z
• Auf einer MD können bis zu 99* Gruppen
registriert werden.
B
] ; [
Name von Gruppe 1
C
• Die Zeichen “;”, “/”, und “–” können für einen
Gruppennamen verwendet werden.
• Sie können einen Gruppennamen auf
derselben MD mehrmals registrieren.
• Sie können eine Gruppe ohne Eingabe eines
Gruppennamens (C) eingeben.
∗
Die tatsächliche Anzahl wird niedriger als
] /
99 sein, wenn Sie pro MD mehr Zeichen als
maximal zulässig eingegeben haben.
Hinweis
Die Spezifikat ionen Ihres MD-Recorders lassen
die Verwendung der Gruppenfunktion unter
Umständen nicht zu.
Höhen- und Tiefeneinstellung (digitale Klangvoreinstellung)
Sie können die Höhen und Tiefen nach
Ihrem Geschmack einstellen. Der Player
kann zwei Höhen- und Tiefeneinstellungen speichern. Diese können später während der Wiedergabe ausgewählt werden.
MENU/ENTER
., N>,
x
Auswählen der Tonqualität
Werkseitige Einstellung
Die werkseitigen Einstellungen für die
digitale Klangvoreinstellung lauten wie
folgt:
•“SOUND 1”: Tiefen +1, Höhen ±0
•“SOUND 2”: Tiefen +3, Höhen ±0
-DE
15
Page 60

1 Drücken Sie während der Wiedergabe
MENU/ENTER.
2 Drücken Sie wiederholt . oder
bis “S–SEL” im Display
N>,
blinkt, und drücken Sie dann MENU/
ENTER.
3 Drücken Sie wiederholt . oder
, um “SOUND 1”, “SOUND 2”
N>
oder “OFF” im Display auszuwählen,
und drücken Sie dann MENU/ENTER.
Durch die Auswahl von “OFF” wird
die digitale Klangvoreinstellung
deaktiviert.
Einstellen der Tonqualität
Sie können die voreingestellte Tonqualität
ändern. Wählen Sie dazu zunächst die
Tonqualität aus, die Sie ändern möchten,
also “SOUND 1” oder “SOUND 2”.
1 Drücken Sie während der Wiedergabe
und nachdem “SOUND 1” oder
“SOUND 2” ausgewählt wurde, auf
MENU/ENTER.
2 Drücken Sie wiederholt . oder
, bis “S–SET” im Display
N>
blinkt, und drücken Sie dann MENU/
ENTER.
Im Display werden die aktuell
gewählten “BASS” angezeigt.
3 Drücken Sie wiederholt . oder
N>, um den Tonpegel
einzustellen.
Zeigt an, ob “SOUND 1” oder
“SOUND 2” ausgewählt wurde
4 Drücken Sie MENU/ENTER.
“BASS” wird eingestellt, und das
Display wechselt zum “TRE”
(Höhen)-Einstellungsmodus.
5 Drücken Sie wiederholt . oder
N>, um den Tonpegel
einzustellen, und drücken Sie dann
MENU/ENTER.
“TRE” (Höhen) wird eingestellt.
Die Klangeinstellungen werden
gespeichert, und die Wiedergabeanzeige erscheint wieder.
Abbrechen des Verfahrens
Drücken Sie x.
z
Sie können eine Klangvoreinstellung
auswählen, während die Wiedergabe
angehalten wurde.
Hinweis
Bei Verwendung der digitalen Klangvoreinstellung kann der Klang bei zu hoher
Lautstärke je nach Einstellungen oder Titel
gebrochen oder verzerrt sein. Ändern Sie in
diesem Fall die Einstellungen für die
Klangqualität.
Der Klang kann in 8 Schritten eingestellt
werden. (–4, –3, ...±0, ...+2, +3)
-DE
16
Page 61

Weitere Bedienfunktionen
Anzeigen des Titelnamens und der Spieldauer
Sie können während der Wiedergabe den
Musiktitel, den Namen der MD etc.
überprüfen. Gruppenbezogene Elemente
werden nur angezeigt, wenn ein Titel mit
Gruppeneinstellung abgespielt wird.
ABC
Titelnummer — Verstrichene
Titelnummer Titelname
Gesamtanzahl
der Titel in der
Gruppe
Gesamtanzahl
der Titel
Titelnummer — Titelmodus
GP Gruppen-
Zeit
name
MD-Name
1 Drücken Sie MENU/ENTER.
2 Drücken Sie wiederholt . oder
, bis “DISP” im Display
N>
blinkt, und drücken Sie dann MENU/
ENTER.
3 Drücken Sie wiederholt . oder
, bis die gewünschte
N>
Information im Display blinkt, und
drücken Sie dann MENU/ENTER.
Bei jedem Drücken der Taste
ändert sich das Display wie folgt:
LapTim (Die verstrichene Zeit des
aktuellen Titels)
r
T.Nam e (Titelname)
r
G.Name (Gruppenname)
r
D.Name (MD-Name)
r
T–MODE (zeigt den ausgewählten
Aufnahmemodus für den
verwendeten MD-Recorder an, z. B.
“SP”, “LP2”, “LP4” oder
“MONO”.)
Hinweise
• Die Elemente werden teilweise je nach dem
Ein/Aus-Status des Gruppenmodus, des
Betriebszustands des Players oder den Playerbzw. MD-Einstellungen anders dargestellt
oder sind teilweise nicht auswählbar.
• Der Modus wird nur während der Wiedergabe
angezeigt. Die Modusanzeige ist 2 Sekunden
lang zu sehen, anschließend wird die
verstrichene Zeit des aktuellen Titels
angezeigt.
N>
,
17
-DE
Page 62

Schützen Ihrer Hörfähigkeit (AVLS)
Die AVLS-Funktion (Automatic Volume
Limiter System - Automatisches
Lautstärkebegrenzungssystem) verringert
die maximale Lautstärke, um Ihre
Hörfähigkeit zu schützen.
MENU/ENTER
., N>, x
1 Drücken Sie MENU/ENTER.
2 Drücken Sie wiederholt . oder
, bis “OPTION” im Display
N>
blinkt, und drücken Sie dann MENU/
ENTER.
“AVLS” blinkt im Display.
3 Drücken Sie MENU/ENTER.
4 Drücken Sie wiederholt . oder
bis “ON” im Display blinkt,
N>,
und drücken Sie dann MENU/
ENTER.
“ON” wird im Display angezeigt, und
nach 2 Sekunden erscheint erneut die
Wiedergabeanzeige.
Sperren der Regler (HOLD)
Mit dieser Funktion können Sie
verhindern, daß beim Transportieren des
Players versehentlich eine Taste gedrückt
wird.
HOLD
1 Schieben Sie den Schalter HOLD in
die Richtung des Pfeils ., um den
Player zu sperren.
Aufheben der Sperre der
Regler
Schieben Sie den Schalter HOLD
entgegen der Pfeilrichtung.
Abbrechen der AVLS-Funktion
Wählen Sie “OFF” in Schritt 4, und
drücken Sie dann MENU/ENTER.
Abbrechen des Verfahrens
Drücken Sie x.
-DE
18
Page 63

Weitere Informationen
Sicherheitsmaßnahmen
Sicherheit
• Lagern oder transportieren Sie die
Trockenbatterie nicht zusammen mit
Metallgegenständen, wie Münzen, Schlüssel
oder Ketten. Dadurch könnte ein Kurzschluss
entstehen, der in einer gefährlichen
Hitzeentwicklung resultieren kann.
• Bei unsachgemäßer Verwendung können die
Batterien auslaufen oder explodieren. Um dies
zu vermeiden, achten Sie beim Einlegen der
Batterie darauf, daß die Pole der Batterie
(+ und –) ordnungsgemäß ausgerichtet sind.
• Sollte eine Batterie ausgelaufen sein, reinigen
Sie das Batteriefach sorgfältig, bevor Sie eine
neue Batterie einlegen.
• Nehmen Sie die Batterie heraus, wenn der
Player für längere Zeit nicht verwendet wird.
Hinweise zum Umgang mit
dem Gerät
• Achten Sie darauf, daß der Player nicht
hinfällt oder Stößen ausgesetzt wird. Dadurch
kann eine Fehlfunktion des Players verursacht
werden.
• Ziehen Sie nicht an den Kabeln für die Kopf-/
Ohrhörer.
• In folgenden Umgebungen sollten Sie den
Player nicht verwenden:
—In einer Umgebung mit extrem heißen
Temperaturen (über 60°C)
—An einem Ort, der direkter Sonnenstrahlung
ausgesetzt ist oder in der Nähe einer
Heizung
—In einem Auto mit geschlossenen Fenstern
(besonders im Sommer)
—In einer feuchten Umgebung wie dem
Badezimmer
—In der Nähe einer Quelle elektromagneti-
scher Felder, z. B. Magnete, Lautsprecher
oder Fernsehgerät
—In einer staubigen Umgebung
Wärmestau
Wenn der Player über längere Zeit verwendet
wird, kann es im Recorder zu einem Wärmestau
kommen. Dabei handelt es sich jedoch nicht um
einen Fehler.
Hinweise zu Laufgeräuschen
Der Player verursacht während des Betriebs
Laufgeräusche, die durch das Stromsparsystem
des Players verursacht werden. Hierbei handelt
es sich nicht um eine Fehlfunktion.
Aufstellung
Verwenden Sie den Player niemals an Orten, an
denen er extremen Licht- oder Temperaturverhältnissen, Feuchtigkeit oder Erschütterungen
ausgesetzt ist.
MiniDisc-Cartridge
• Berühren Sie das Innere der MD nicht direkt.
Durch gewaltsames Öffnen des
Schutzschiebers kann das Innere der MD
beschädigt werden.
• Transportieren Sie die MiniDisc in ihrer
Cartridge.
• Setzen Sie die Cartridge keinen extremen
Licht- oder Temperaturverhältnissen,
Feuchtigkeit oder Staub aus.
• Kleben Sie das Etikett nur auf die dafür
vorgesehene Stelle auf der MD. Achten Sie
darauf, daß das Etikett innerhalb des vertieften
Bereichs auf der MD geklebt wird.
Kopf-/Ohrhörer
Verkehrssicherheit
• Verwenden Sie die Kopf-/Ohrhörer nicht beim
Autofahren, Radfahren oder beim Führen
anderer Fahrzeuge. Dies kann Verkehrsunfälle
verursachen und ist vielerorts verboten. Auch
wenn Sie zu Fuß gehen, insbesondere beim
Überqueren einer Straße, stellt ein zu laut
eingestellter Player eine potentielle Gefahr
dar. In möglicherweise gefährlichen
Situationen sollten Sie mit der Verwendung
des Players äußerst vorsichtig sein oder die
Kopf-/Ohrhörer vorübergehend abnehmen.
• Sollten Sie allergisch auf die mitgelieferten
Kopf-/Ohrhörer reagieren, verwenden sie
diese ab sofort nicht mehr, und konsultieren
Sie einen Arzt, oder wenden Sie sich an ein
Sony-Service-Center.
19
-DE
Page 64

Vermeiden von Hörschäden
Vermeiden Sie es, die Kopf-/Ohrhörer mit
hoher Lautstärke zu verwenden.
Gehörspezialisten warnen vor ständiger oder
lange anhaltender Wiedergabe bei hoher
Lautstärke. Wenn Sie Ohrgeräusche
wahrnehmen, verringern Sie die Lautstärke,
oder verzichten Sie ganz auf Kopf-/Ohrhörer.
Rücksicht auf andere
Senken Sie die Lautstärke auf ein vernünftiges
Maß. So können Sie noch Geräusche von außen
wahrnehmen und Rücksicht auf die Menschen
in Ihrer Umgebung nehmen.
Reinigung
• Reinigen Sie das Gehäuse des Players
zunächst mit einem weichen Tuch, das leicht
mit Wasser angefeuchtet wurde. Wischen Sie
das Gehäuse anschließend mit einem
trockenen Tuch ab. Verwenden Sie keinerlei
Scheuerschwämme oder -pulver oder
Lösungsmittel wie Alkohol oder Benzin, da
dadurch die Gehäuseoberfläche angegriffen
werden könnte.
• Wischen Sie die MD-Cartridge mit einem
trockenen Tuch sauber.
• Staub auf der Linse kann zu
Betriebsstörungen des Gerätes führen.
Schließen Sie unbedingt den Deckel des MDFachs, nachdem Sie eine MD eingelegt oder
entnommen haben.
• Wischen Sie für gleichbleibend gute
Tonqualität die Stecker der Kopf-/Ohrhörer
mit einem trockenen Tuch sauber. Durch
einen verschmutzten Stecker können
Störgeräusche oder Auslassungen bei der
Klangwiedergabe verursacht werden.
• Reinigen Sie die Kontakte regelmäßig mit
einem Wattestäbchen oder einem weichen
Tuch wie in der folgenden Abbildung.
Fach für Trockenbatterie
Kontakte
Falls Sie Fragen zu oder Probleme mit Ihrem
Player haben, wenden Sie sich bitte an Ihren
nächstgelegenen Sony-Fachhändler. (Falls ein
Problem auftritt, während sich eine MD im
Player befindet, sollten Sie die MD im Gerät
belassen, wenn Sie sich an Ihren SonyFachhändler wenden. Die Ursache für die
Störung läßt sich so leichter feststellen.)
Bringen Sie den Player sowie die Kopf-/
Ohrhörer mit, wenn Sie zu einem SonyFachhändler gehen.
20
-DE
Page 65

Fehlerbehebung
Wenn ein Fehler auch nach Prüfung der nachfolgenden Punkte bestehen bleibt, wenden Sie
sich an Ihren nächstgelegenen Sony-Fachhändler.
Symptom Ursache/Lösung
Der Player
funktioniert nicht oder
nur mangelhaft.
Der Player befindet
sich nicht im normalen
Wiedergabemodus.
Die MD wird nicht
vom ersten Titel an
wiedergegeben.
Die digitale
Klangvoreinstellung
funktioniert nicht.
• Sie haben versucht, den Player zu betreiben, ohne eine MD
einzulegen. (“NoDISC” blinkt im Display.)
, Einlegen einer MD.
• Die HOLD-Funktion ist aktiviert (“HOLD” wird angezeigt, wenn
Sie auf dem Player eine Bedientaste drücken).
, Deaktivieren Sie die HOLD-Funktion, indem Sie den Schalter
HOLD entgegen der Pfeilrichtung schieben (Seiten 7, 18).
• Feuchtigkeit hat sich im Inneren des Players gebildet.
, Nehmen Sie die MD heraus, und lassen Sie den Player einige
Stunden lang an einem warmen Ort stehen, bis die Feuchtigkeit
verdunstet ist.
• Die Trockenbatterie ist nahezu leer (“LoBATT” blinkt oder es
erfolgt keine Anzeige).
, Tauschen Sie die Trockenbatterie gegen eine neue aus (Seite 6).
• Die Trockenbatterie wurde falsch eingesetzt.
, Setzen Sie die Batterie richtig ein (Seite 6).
• Eine unbespielte MD wurde eingelegt. (“BLANK” blinkt im
Display.)
, Legen Sie eine bespielte MD ein.
• Der Player kann die MD nicht lesen. (Die MD ist verkratzt oder
verschmutzt.) (“ERROR” blinkt im Display.)
, Legen Sie die MD erneut oder eine andere MD ein.
• Während des Betriebs wurde der Player einer zu starken mechanischen Erschütterung, einer zu hohen statischen Aufladung etc. ausgesetzt.
, Nehmen Sie das Gerät folgendermaßen wieder in Betrieb:
1 Nehmen Sie die Trockenbatterie heraus.
2 Lassen Sie den Player ca. 30 Sekunden lang ausgesteckt.
Legen Sie die Trockenbatterie wieder ein.
3
• Der Player ist auf den Repeat-Modus eingestellt. (“ ” wird im
Display des Players angezeigt.)
, Wählen Sie als Wiedergabemodus “Normal” aus, und starten Sie
die Wiedergabe. Weitere Einzelheiten finden Sie unter
“Auswählen des Wiedergabemodus” (Seite 10).
• Die MD wird im Gruppenmodus wiedergegeben.
, Deaktivieren Sie den Gruppenmodus.
• Die Wiedergabe wird angehalten, bevor der letzte Titel auf der MD
erreicht wurde.
, Halten Sie N> für mindestens 2 Sekunden gedrückt, um die
Wiedergabe vom ersten Titel an zu starten.
• Die MD wird im Gruppenmodus wiedergegeben.
, Deaktivieren Sie den Gruppenmodus, und halten Sie die
Wiedergabe an. Halten Sie N> für mindestens 2 Sekunden
gedrückt, um die Wiedergabe vom ersten Titel an zu starten.
• Die digitale Klangvoreinstellung ist deaktiviert.
, Wählen Sie “SOUND 1” oder “SOUND 2”. Weitere
Einzelheiten finden Sie unter “Höhen- und Tiefeneinstellung
(digitale Klangvoreinstellung)” (Seite 15).
21
-DE
Page 66

Symptom Ursache/Lösung
Bei der Wiedergabe
treten Tonsprünge auf.
Es kommt zu heftigen
statischen
Störgeräuschen.
Vorübergehende
Tonstörungen treten
auf.
Der Player
funktioniert nicht
ordnungsgemäß.
Aus den Kopf-/
Ohrhörern ist nichts zu
hören.
Die Lautstärke läßt
sich nicht erhöhen.
Die Gruppenfunktion
kann nicht verwendet
werden.
Beim Zurück- oder
schnellen Vorspulen
springt der Player nicht
zum vorherigen Titel
zurück bzw. springt
nicht zum darauffolgenden Titel.
• Der Player steht an einem Platz, an dem er ständigen Vibrationen
ausgesetzt ist.
, Schützen Sie den Player vor Vibrationen.
• Ein sehr kurzer Titel kann Tonsprünge verursachen.
, Versuchen Sie immer Titel aufzunehmen, die länger als eine
Sekunde sind.
• Starke Magnetfelder von einem Fernseher oder dergleichen stören
den Betrieb.
, Stellen Sie den Player außerhalb der Reichweite starker
Magnetfelder auf.
• Der Ton wurde im LP4-Stereomodus aufgenommen.
, Die Komprimierungsmethode des LP4-Modus kann dazu
führen, daß in seltenen Fällen während der Wiedergabe von Ton,
der in diesem Modus aufgenommenen wurde, Störungen
auftreten.
• Sie haben versucht, den Gruppenmodus zu aktivieren, während die
programmierte Wiedergabe ausgewählt war.
, Wechseln Sie zum Gruppenmodus, bevor Sie die programmierte
Wiedergabe auswählen.
• Der Stecker der Kopf-/Ohrhörer ist nicht ordnungsgemäß
angeschlossen.
, Schließen Sie den Stecker der Kopf-/Ohrhörer ordnungsgemäß
an die i-Buchse.
• Die Lautstärke ist zu niedrig.
, Regeln Sie die Lautstärke, indem Sie drücken VOL + oder –
drücken.
• Der Stecker ist verschmutzt.
, Reinigen Sie den Stecker.
• AVLS ist aktiviert.
, Setzen Sie AVLS auf “OFF” (Seite 18).
• Bei Verwendung einer MD ohne Gruppeninformationen wurde
versucht, den Gruppenmodus zu aktivieren.
, Verwenden Sie eine MD mit Gruppeninformationen.
• Während der Wiedergabe eines Titels, der nicht zu einer Gruppe
gehört, wurde versucht, den Gruppenmodus zu aktivieren.
, Die Gruppenfunktion kann nicht verwendet werden, während
ein Titel wiedergegeben wird, der nicht zu einer Gruppe gehört.
• Bei der Auswahl der programmierten Wiedergabe wurde versucht,
den Gruppenmodus zu aktivieren.
, Aktivieren Sie den Gruppenmodus, bevor Sie die programmierte
Wiedergabe auswählen.
• Der Gruppenüberspringmodus ist aktiviert.
, Deaktivieren Sie den Gruppenüberspringmodus. Wenn innerhalb
von 5 Sekunden keine Bedienung erfolgt, wird der
Gruppenüberspringmodus automatisch deaktiviert. Weitere
Einzelheiten finden Sie unter “Auswahl und Wiedergabe
gewünschter Gruppen (Gruppenüberspringfunktion)” (Seite 14).
22
-DE
Page 67

Technische Daten
MD-Player
Audiowiedergabesystem
Digitales MiniDisc-Audiosystem
Eigenschaften der Laserdiode
Material: GaAlAs
Wellenlänge: λ = 790 nm
Emissionsdauer : ko ntinuierlich
Laseremission: weniger als 44,6 µW
(Gemessen im Abstand von 200 mm von der
Linsenoberfläche am optischen Sensorblock
mit einer Apertu r von 7 mm.)
Umdrehungen
ca.300 U/min. bis 2 700 U/min.
Fehlerkorrektursystem
ACIRC (Advan ced Cross Interleave Re ed
Solomon Code)
Abtastfrequenz
44,1 kHz
Codierung
ATRAC (Adaptive TRansform Acoustic
Coding)
A TR AC3 — LP2/LP4
Modulationssystem
EFM (Eight to Fourteen Modulation)
Anzahl der Kanäle
2 Stereokanäle
1 Monokanal
Frequenzgang
20 bis 20 000 Hz ± 3 dB
Gleichlaufschwankungen
Unterhalb der Meßgrenze
Ausgänge
i: Stereominibuchse, maximaler
Ausgangspegel 3,5 mW + 3,5 mW,
Lastimpedanz 16 Ohm
Allgemeines
Stromversorgung
Eine LR6-Alkali-Trockenbatterie (Größe AA,
nicht im Lieferumfang enthalten)
Batteriebetriebsdauer
Siehe “Batterielebensdauer” (Seite 6)
Abmessungen
ca. 81 × 28,9 × 74,4 mm (B/H/T) ohne
vorstehende Komponenten.
Gewicht
ca. 93 g nur Player
U.S. und Auslandspatente in Lizenz von Dolby
Laboratories.
Änderungen, die dem technischen Fortschritt
dienen, bleiben vorbehalten.
Optionales Zubehör
Stereo-Kopf-/Ohrhö rer de r MDR-S eri e*
Aktivlautsprecher der SRS-Serie
∗ Wenn Sie opt iona l e Kopfhörer verwenden,
verwenden Sie nur Kopf-/Ohrhörer mit
Stereoministeckern. Die Verwendung von
Kopf-/Ohrhörern mit Mikrosteckern ist
ausgeschlossen.
Bei Ihrem Händler finden Sie möglicher wei se
nicht alle Teile des oben aufgelistete n
Zubehörs. Fragen Sie Ihren Händler nach
ausführlichen Informa ti one n übe r das in Ihre m
Land erhältliche Zubehör.
23-DE
Page 68

Reproductor de Minidisco
portátil
POR FAVOR LEA
DETALLADAMENTE ESTE
MANUAL DE INSTRUCCIONES
ANTES DE CONECTAR Y OPERAR
ESTE EQUIPO.
RECUERDE QUE UN MAL USO DE
SU APARATO PODRÍA ANULAR LA
GARANTÍA.
ADVERTENCIA
Para evitar el riesgo de incendios o
descargas eléctricas, no exponga
la unidad a la humedad ni a la
lluvia.
No instale el aparato en un espacio
cerrado, como una estantería para libros
o un armario empotrado.
Para evitar incendios, no tape la
ventilación del aparato con periódicos,
manteles, cortinas, etc. Tampoco debe
colocar velas encendidas sobre el aparato.
Para evitar el riesgo de incendios o
descargas eléctricas, no coloque objetos
que contengan líquidos, como un jarro,
sobre el aparato.
NO MIRE HACIA EL RAYO NI
OBSERVE CON INSTRUMENTOS
ÓPTICOS.
Información
EL VENDEDOR NO SERÁ
RESPONSABLE EN NINGÚN CASO
DE LOS DAÑOS DIRECTOS,
INCIDENTALES O
CONSECUENCIALES DE
CUALQUIER NATURALEZA, O DE
LAS PÉRDIDAS O GASTOS
RESULTANTES DE UN PRODUCTO
DEFECTUOSO O DEL USO DE UN
PRODUCTO.
La validez de la marca CE se
limita sólo a los países en los
que se aplique legalmente,
principalmente en los países del
Espacio Económico Europeo
(EEE).
En algunos países puede haber normas
que regulen la forma de deshacerse de la
pila de alimentación de este producto.
Obtendrá más información de las
autoridades locales.
Precaución
El uso de instrumentos ópticos con este
producto incrementa el riesgo de lesiones
oculares.
PRECAUCIÓN: RADIACIÓN LÁSER
INVISIBLE CUANDO LA UNIDAD
ESTÁ ABIERTA
-ES
2
Page 69

Contenido
Presentación de los controles .........................4
Procedimientos iniciales ..................................6
Reproducción de un MD ................................... 8
Opciones de reproducción ............................. 10
Búsqueda rápida de una pista o posición específica
(Búsqueda rápida) ................................................................................ 10
Selección del modo de reproducción ................................................... 10
Audición de pistas en el orden especificado
(Reproducción programada) ........................................... 12
Uso de la función de grupo .................................................................. 12
¿Qué es un disco con ajustes de grupo? ......................................... 12
Audición de pistas de un grupo determinado
(Reproducción en modo de grupo) ................................. 13
Selección y reproducción de grupos determinados
(función de salto de grupo) ............................................. 13
Registro de grupos mediante la grabadora de MiniDisc ................ 14
Ajuste de agudos o graves (Preajuste de sonido digital) ...................... 15
Selección de la calidad del sonido ................................................. 15
Ajuste de la calidad del sonido ...................................................... 15
ES
Otras operaciones ..........................................17
Visualización del nombre de la pista y del tiempo de reproducción ... 17
Protección auditiva (AVLS) ................................................................. 18
Bloqueo de los controles (HOLD) ....................................................... 18
Información adicional .....................................19
Precauciones ......................................................................................... 19
Solución de problemas ......................................................................... 21
Especificaciones ................................................................................... 23
-ES
3
Page 70

Presentación de los controles
Parte frontal del reproductor
3
1
2
A
Pantalla
B
Botón VOL + y –
El botón VOL + tiene un punto táctil.
C
Botón de control de 4 posiciones
N (reproducción)
*
. y > (búsqueda/AMS)
x (parada)
X (pausa)
∗
El botón N tiene un punto táctil.
4
5
6
D
Botón MENU/ENTER
E
Botón GROUP
F
Tom a i (auriculares/cascos)
G
Auriculares/cascos
7
-ES
4
Page 71

Parte posterior del reproductor
3
1
2
4
A
HOLD interruptor
B
OPEN Botón
Pantalla del reproductor
1
2
3
A
Indicación de disco
B
Indicación de modo de grupo
Se ilumina cuando está activado el
modo de grupo.
C
Pantalla del número de pista
D
Indicación del nivel de la pila
Muestra el estado aproximado de
carga de la pila.
E
Indicación del modo de reproducción
Muestra el modo de reproducción del
MD.
C
Orificio para la correa de mano
Utilice este orificio para fijar su
propia correa de mano.
D
Tapa del compartimento de pilas
4
5
6
7
8
F
Indicación SOUND
G
Indicación de disco, grupo y pista
H
Pantalla de información de caracteres
Muestra el nombre de la pista, el
tiempo transcurrido, etc.
-ES
5
Page 72

Procedimientos iniciales
1
Cuándo hay que sustituir la pila
Puede comprobar el estado de las pilas con el indicador de las mismas mientras utiliza el
reproductor.
Duración de la pila
Pila SP
Pila seca alcalina
Sony LR6 (SG)
1)
2)
Nota
La duración de la pila puede ser menor de la especificada en función de las condiciones de
funcionamiento, la temperatura ambiente y los distintos tipos de pila.
Inserte una pila seca alcalina.
E
e
Deslice la tapa para
abrir el compartimento
de la pila.
Disminución de la potencia de la pila
r
Pila gastada
r
La pila se ha agotado.
“LoBATT” parpadea en la pantalla y la alimentación se interrumpe.
2)
Medido según el estándar de JEITA (Japan Electronics and Information Technology Industries
Association).
Si se utiliza una pila seca alcalina Sony LR6 (SG) “STAMINA” (fabricada en Japón).
Utilice una pila alcalina
LR6 (tamaño AA) insertando
primero el extremo con el
signo menos (negativo).
estéreo
41 50 56
LP2
estéreo
Cierre la tapa.
(Unidad: horas aprox.)(JEITA
LP4
estéreo
1)
)
-ES
6
Page 73

2
Realice las conexiones y
desbloquee el control.
Conecte los auriculares/cascos a i.
1
Conéctelo firmemente.
a i
Deslice HOLD en la dirección opuesta a
2
la flecha indicada en el reproductor
(HOLD .) para desbloquear los
controles.
HOLD
-ES
7
Page 74

Reproducción de un MD
1
1
2
Inserte un MD.
Pulse OPEN para abrir la tapa.
Reproduzca un MD.
.
VOL +, –
, N>, x, X
Inserte un MD con la cara de la
2
etiqueta hacia delante y presione para
cerrar la tapa.
Pulse N>.
1
Pulse VOL + o – para ajustar el
2
volumen.
El indicador de volumen aparece en la
pantalla para que pueda comprobar el
nivel.
Para detener la reproducción,
pulse x.
La reproducción se inicia desde el punto en que
se detuvo. Para iniciar la reproducción desde el
principio de la primera pista, mantenga pulsado
N> durante 2 segundos o más.
-ES
8
Page 75

Para Operación
Encontrar el inicio de la pista actual
o de la pista anterior
1)
Pulse ..
Pulse . varias veces hasta llegar al principio de
la pista deseada.
Encontrar el principio de la pista
siguiente
2)
Pulse
N>
una vez.
Retroceder durante la reproducción Mantenga pulsado ..
Avanzar durante la reproducción Mantenga pulsado
N
>.
Realizar una pausa Pulse X.
Pulse X otra vez para reanudar la reproducción.
Extraer el MD Pulse x y, a continuación, pulse OPEN.
1)
Si pulsa . dos veces seguidas durante la reproducción de la primera pista del disco, el reproductor
irá al principio de la última pista del disco.
2)
Si pulsa N> durante la última pista del disco, el reproductor se sitúa al comienzo de la primera
pista del disco.
3)
Si abre la tapa, la reproducción comenzará desde el principio de la primera pista (excepto cuando el
modo de grupo está activado).
Eliminación de los saltos de sonido (G-PROTECTION)
3)
La función G-PROTECTION se ha desarrollado para proporcionar un mayor nivel de
protección a los impactos que el de los reproductores existentes, con el fin de permitir que
el reproductor se utilice mientras se hace ejercicio físico.
Nota
El sonido de reproducción puede saltar si:
• el reproductor recibe sacudidas continuas y más fuertes.
• se reproduce un MiniDisc sucio o arañado.
z
• El MZ-E310 acepta el DSP de TIPO R para ATRAC desarrollado a nuevo.
Esto permite disfrutar del sonido de alta calidad de TIPO R de los minidiscos grabados en SP estéreo
en las platinas de minidiscos equipadas con TIPO R.
• El reproductor puede reproducir la pista grabada en modo de larga duración 2
reproducción en estéreo normal, la reproducción en estéreo LP2, la reproducción en estéreo LP4 o la
reproducción monaural se seleccionan automáticamente para coincidir con la fuente de audio.
• La pantalla se desconectará brevemente después de pulsar
.
x
×
o 4 × (LP2 o LP4). La
-ES
9
Page 76

Opciones de reproducción
Búsqueda rápida de una pista o posición específica (Búsqueda rápida)
Puede realizar dos tipos de búsqueda
rápida.
• Búsqueda de índice: se realiza una
búsqueda rápida mientras se controla el
número o nombre de pista (ajuste de
fábrica).
• Búsqueda de tiempo: se realiza una
búsqueda rápida mientras se controla el
tiempo transcurrido.
MENU/ENTER
., N>,
X, x
1 Durante la reproducción, pulse
MENU/ENTER.
2 Pulse . o
hasta que “SEARCH” parpadee en la
pantalla y, a continuación, pulse
MENU/ENTER.
3 Pulse . o
hasta que “Index” (búsqueda de
índice) o “Time” (búsqueda de
tiempo) parpadee en la pantalla y, a
continuación, pulse MENU/ENTER.
N>
N>
varias veces
varias veces
4 Pulse X.
5 Mantenga pulsado . o
hasta que aparezca en la pantalla el
número de pista/nombre de pista
(búsqueda de índice) o el tiempo
transcurrido deseado (búsqueda de
tiempo).
N>
6 Pulse X.
La reproducción comienza desde la
pista seleccionada.
Para cancelar el
procedimiento
Pulse x.
z
• Si realiza este procedimiento mientras el
reproductor está en modo de reproducción
aleatoria, la reproducción aleatoria se inicia
desde la pista que ha seleccionado.
• Si el reproductor alcanza la primera o última
pista del disco mientras mantiene pulsado el
botón . o N> en el paso 5, volverá a
la última o primera pista, respectivamente. (En
modo de grupo, si el reproductor alcanza la
primera o última pista del grupo mientras
mantiene pulsado el botón . o N> en
el paso 5, volverá a la última o primera pista
del grupo, respectivamente.) (Consulte “Uso
de la función de grupo” (página 12).)
Selección del modo de reproducción
Puede seleccionar varios modos de
reproducción como, por ejemplo,
reproducción normal, reproducción
repetida (1Rep.), reproducción aleatoria
(Shuff) o reproducción programada
(PGM).
MENU/ENTER
., N>
1 Durante la reproducción, pulse
MENU/ENTER.
2 Pulse . o
hasta que “P-MODE” parpadee en la
pantalla y, a continuación, pulse
MENU/ENTER.
N>
varias veces
10
-ES
Page 77

3 Pulse . o
para seleccionar el modo de
reproducción y, a continuación, pulse
MENU/ENTER.
Cada vez que pulse
de la pantalla indicada en A
cambiará como se indica a
continuación:
si se pulsa MENU/ENTER mientras
A está parpadeando, cambia el modo
de reproducción.
El nuevo modo aparecerá en la
pantalla, indicado por B.
Si se pulsa N> varias veces,
cambia A.
B
se iluminará si pulsa MENU/
.
ENTER
N>
varias veces
, la opción
N>
Indicación A/B (Modo de
reproducción)
Normal/—(reproducción normal)
Todas las pistas se reproducen una
vez.
r
AllRep/
Todas las pistas se reproducen de
forma repetida.
r
1 Track/1
Se reproduce una pista una sola vez.
r
1Rep./ 1
Una sola pista se reproduce de
forma repetida.
r
Shuff/SHUF
Cuando termine la reproducción de
la pista actual, las pistas restantes se
reproducirán en orden aleatorio.
r
Shuf.R/SHUF
Cuando termine la reproducción de
la pista actual, las pistas restantes se
reproducirán de forma repetida en
orden aleatorio.
r
PGM/PGM
Las pistas se reproducen en el orden
que se haya especificado.
r
PGMRep/PGM
Las pistas se reproducen de forma
repetida en el orden que se haya
especificado.
Para cancelar el
procedimiento
Pulse x.
11
-ES
Page 78

Audición de pistas en el orden especificado (Reproducción programada)
1 Realice los pasos 1 y 2 de “Selección
del modo de reproducción”
(página 10), seleccione “PGM” en el
paso 3 y, a continuación, pulse
MENU/ENTER.
2 Pulse . o
para seleccionar el número de pista.
N>
varias veces
• Puede especificar el modo de reproducción
para un grupo seleccionado cuando está
activado el modo de grupo. Para activar el
modo de grupo, consulte “Selección y
reproducción de grupos determinados
(función de salto de grupo)” (página 13).
• También se puede seleccionar el modo de
reproducción cuando el reproductor está en
pausa o parado.
Notas
• Se pierden todos los ajustes del programa
cuando se abre la tapa.
• Si no se realiza ningún ajuste durante 5 minutos
mientras el reproductor está parado, se
introducirán los ajustes realizados hasta ese
momento.
• Durante el ajuste del programa, no puede
realizar el ajuste de activación/desactivación
del modo de grupo.
• Si activa el modo de grupo durante la
reproducción programada, ésta se cancela.
3 Pulse MENU/ENTER.
Se accede a la pista.
4 Repita los pasos 2 y 3 para
seleccionar otras pistas en el orden
deseado.
5 Pulse MENU/ENTER al menos
durante 2 segundos.
Se introducen los ajustes y la
reproducción comienza desde la
primera pista programada.
z
• Los ajustes de reproducción programada
permanecerán en la memoria aunque la
reproducción finalice o se pare.
• Se puede programar la reproducción de
20 pistas como máximo.
-ES
12
Número de pista
Nº de programa
Uso de la función de grupo
El reproductor se puede utilizar con
discos que tengan el ajuste de grupo.
La función de grupo es útil para
reproducir un gran número de pistas o
pistas que se hayan grabado en modo
MDLP (LP2/LP4).
¿Qué es un disco con ajustes de grupo?
Se trata de un disco con ajustes que
organizan las pistas en grupos y permiten
seleccionar dichos grupos.
El reproductor no admite la grabación
de ajustes de grupo. Utilice la grabadora
de MD para grabar información y, a
continuación, utilice el reproductor para
la reproducción.
Grupo 1
Número
de pista
123
Disco
Grupo 2
Número
de pista
4
Grupo 3
Número
de pista
7
85 6
Page 79

z
Si la grabadora tiene la función de editar
nombres de discos, puede utilizarla para
registrar grupos. Para más información,
consulte “Registro de grupos mediante la
grabadora de MiniDisc” (página 14).
Audición de pistas de un grupo determinado (Reproducción en modo de grupo)
Reproducción cuando el modo de grupo
está desactivado:
La reproducción comienza con la primera
pista del disco y se detiene con la última.
Disco
Número de pista
7
123
Reproducción cuando el modo de grupo
está activado:
La reproducción del grupo seleccionado
comienza con la primera pista del grupo y
termina con la última pista del grupo.
Grupo 1
Número de
pista
4
Disco
Grupo 2
Número
de pista
123
85 6
Grupo 3
Número
de pista
21 2
1
1 Inserte un disco que disponga de
ajuste de grupo en el reproductor y
reproduzca el disco.
2 Pulse GROUP al menos durante 2
segundos.
“ ” y “GP ON” se iluminan en la
pantalla y se activa el modo de grupo.
La reproducción finaliza al final de la
última pista del grupo seleccionado.
Para más información sobre la
selección de otro grupo, consulte
“Selección y reproducción de grupos
determinados (función de salto de
grupo)” (página 13).
Para desactivar el modo de
grupo
Pulse de nuevo GROUP durante 2
segundos como mínimo.
z
• Cuando el modo de grupo está activado, se
puede realizar una reproducción repetida,
aleatoria o programada. Para obtener más
información sobre las operaciones
correspondientes, consulte “Selección del
modo de reproducción” (página 10).
• En modo de grupo, la acción de pulsar
N> durante la última pista del grupo
mueve la reproducción a la primera pista del
grupo. Si pulsa . dos veces seguidas
durante la reproducción de la primera pista de
un grupo, la reproducción se mueve a la
última pista del grupo.
Nota
En modo de grupo, el reproductor considera
todas las pistas sin ajustes de grupo como si
pertenecieran al último grupo del disco. El
último grupo aparece como “GP --” en la
pantalla. Dentro del grupo, las pistas aparecen
en el orden que tienen en el disco, no en el
orden del grupo.
Selección y reproducción de grupos determinados (función de salto de grupo)
Cuando reproduce un disco con ajustes de
grupo, la función de salto de grupo le
permite saltar del grupo que se está
reproduciendo en esos momentos a
cualquier otro grupo del MD. La
función de salto de grupo se puede
utilizar en cualquier momento durante la
reproducción, independientemente de que
el reproductor esté en modo de grupo o no.
Cuando el modo de grupo está desactivado:
Disco
Número de pista
85 6
123
Salto
7
Salto
4
Salto
13
-ES
Page 80

Cuando el modo de grupo está activado:
/
Disco
Grupo 1
Número
de pista
123
Salto
Grupo 2
Número
de pista
Salto
Grupo 3
Número
de pista
1
1 Inserte un disco que disponga de
ajuste de grupo en el reproductor y
reproduzca el disco.
2 Pulse GROUP.
“ ” y “- - -” parpadean en la pantalla
y se activa el modo de salto de grupo.
3 Antes de que pasen 5 segundos, pulse
. o
aparezca el nombre o el número del
grupo que desea.
El reproductor empieza a reproducir
desde la primera pista del grupo.
Si hay un nombre de grupo (por
ejemplo: AAA)
Si no hay ningún nombre de grupo
Para cancelar el procedimiento
Pulse x.
Nota
Si no se realiza ninguna operación en 5
segundos en el paso 3, se cancelará el modo de
salto de grupo. Para realizar este procedimiento,
vuelva a empezar desde el paso 2.
-ES
14
varias veces hasta que
N>
Nombre del
grupo
Número de
grupo
21 2
Salto
Registro de grupos mediante la grabadora de MiniDisc
Si la grabadora de MD (platina de MD o
grabadora Walkman MD) tiene la función
de editar nombres de discos, puede
utilizarla para registrar grupos aunque no
disponga de la función de grupo.
Asegúrese de introducir las cadenas de
texto exactamente como se describe a
continuación. La función de grupo no
funcionará si no introduce correctamente
las cadenas de texto.
Para especificar grupos
1 Cambie el nombre del disco al
siguiente mediante la grabadora de
MD:
0;[Nombre del disco] //
A
[Primera canción del grupo 1]-
B
Ultima canción del grupo 1
[
[Primera canción del grupo 2]-
[Ultima canción del grupo 2] ;
[Nombre del grupo 2] // ......
B
B
C
A Nombre del disco
B Número de pista
C Nombre del grupo
// Separador entre grupos
– Guión situado entre la primera y la
última pista
; Separador entre el número de pista y
el nombre del grupo
(Ej.) Defina los siguientes grupos para el
disco titulado “Collections”:
Nombre del grupo para las pistas 1-7:
My Favorites“2002winter”
Nombre del grupo para las pistas 8-17:
Jun&Tac“sunshine head”
Nombre del grupo para las pistas 18-24:
THE NIGHT BUTTERFLYS
] ; [
Nombre del grupo 1
B
] /
C
Page 81

Nombre del grupo para las pistas 25-32:
Dream World/Kiss Me!
Cadena de texto introducida:
0;Collections//
1-7;My Favorites“2002winter”//
8-17;Jun&Tac“sunshine head”//
18-24;THE NIGHT BUTTERFLYS//
25-32;Dream World/Kiss Me!//
z
• Se pueden registrar hasta 99* grupos en un
solo MD.
• En los nombres de grupo se pueden utilizar los
caracteres “;”, “/” y “–”.
• Puede registrar el mismo nombre de grupo
varias veces en el mismo MD.
• Puede especificar un grupo sin introducir un
nombre de grupo (C) para el mismo.
∗
Si ha introducido más caracteres de los
permitidos por disco, el número final será
inferior a 99.
Nota
La función de grupo de la grabadora funcionará
según las especificaciones de la grabadora de
MD.
Selección de la calidad del sonido
Ajustes de fábrica
Los ajustes de fábrica del preajuste de
sonido digital son los siguientes:
•“SOUND 1”: graves +1, agudos ±0
•“SOUND 2”: graves +3, agudos ±0
1 Durante la reproducción, pulse
MENU/ENTER.
2 Pulse . o
hasta que “S–SEL” parpadee en la
pantalla y, a continuación, pulse
MENU/ENTER.
3 Pulse . o
seleccionar “SOUND 1” (sonido 1),
“SOUND 2” (sonido 2) o “OFF” en la
pantalla y, a continuación, pulse
MENU/ENTER.
Si selecciona “OFF”, se desactivará la
función de preajuste de sonido.
N>
varias veces para
N>
varias veces
Ajuste de agudos o graves (Preajuste de sonido digital)
Puede ajustar los agudos y graves según
sus gustos. El reproductor puede
almacenar dos conjuntos de ajustes de
agudos-graves, que se pueden seleccionar
posteriormente durante la reproducción.
MENU/ENTER
., N>,
x
Ajuste de la calidad del sonido
Puede cambiar la calidad de sonido
preajustada. Para cambiar la calidad de
sonido preajustada, seleccione
previamente “SOUND 1” o “SOUND 2”,
la que desea cambiar.
1 Durante la reproducción y habiendo
seleccionado “SOUND 1” o
“SOUND 2”, pulse MENU/ENTER.
2 Pulse . o
hasta que “S–SET” parpadee en la
pantalla y, a continuación, pulse
MENU/ENTER.
La pantalla muestra el ajuste de
sonido de “BASS” seleccionado
actualmente.
N>
varias veces
continuación
15
-ES
Page 82

3 Pulse . o N> varias veces
para ajustar el nivel de sonido.
Muestra si está seleccionado “SOUND 1”
o “SOUND 2”.
El sonido se puede ajustar en 8 pasos.
(–4, –3, ...±0, ...+2, +3)
4 Pulse MENU/ENTER.
Con “BASS” ajustado, la pantalla
cambia el modo de ajuste a “TRE”
(agudo).
5 Pulse . o N> varias veces
para ajustar el nivel de sonido y, a
continuación, pulse MENU/ENTER.
“TRE” (agudo) queda ajustado.
El ajuste de sonido se guarda y
aparece de nuevo la pantalla de
reproducción.
Para cancelar el
procedimiento
Pulse x.
z
Puede ajustar un sonido preajustado mientras la
reproducción está en pausa.
Nota
Cuando se utiliza un preajuste de sonido digital,
se puede producir alguna distorsión del sonido
si el volumen está demasiado alto, dependiendo
de los ajustes o la pista. En ese caso, cambie los
ajustes de la calidad del sonido.
16
-ES
Page 83

Otras operaciones
Visualización del nombre de la pista y del tiempo de reproducción
Durante la reproducción, puede
comprobar el nombre de la pista, el
nombre del disco, etc. Las opciones
relacionadas con el grupo aparecen sólo
cuando se reproduce una pista sin ajustes
de grupo.
ABC
Número de
pista
Número de
pista
Número total
de pistas de
los grupos
Número total
de pistas
Número de
pista
— Tiempo
transcurrido
Nombre de
la pista
GP Nombre del
grupo
Nombre del
disco
— Modo de
pista
3 Pulse . o
hasta que la información que desea
parpadee en la pantalla y, a
continuación, pulse MENU/ENTER.
Cada vez que pulse
pantalla cambiará de la forma
siguiente:
LapTim (Tiempo transcurrido de la
pista actual)
r
T.Nam e (Nombre de la pista)
r
G.Name (Nombre del grupo)
r
D.Name (Nombre del disco)
r
T–MODE (indica el modo de
grabación seleccionado en la
grabadora de MD utilizada; p. ej.,
“SP”, “LP2”, “LP4” o “MONO”.)
Notas
• Dependiendo del estado activado/desactivado
del modo de grupo, del estado de
funcionamiento del reproductor o de los
ajustes del reproductor y el disco, puede que
las opciones aparezcan de forma diferente o
que no se puedan seleccionar.
• La indicación de modo aparece sólo durante la
reproducción. Aparece durante 2 segundos y,
a continuación, se sustituye por el tiempo
transcurrido de la pista actual.
N>
varias veces
, la
N>
1 Pulse MENU/ENTER.
2 Pulse . o
hasta que “DISP” parpadee en la
pantalla y, a continuación, pulse
MENU/ENTER.
N>
varias veces
17
-ES
Page 84

Protección auditiva (AVLS)
La función AVLS (Limitador automático
de volumen) mantiene bajo el volumen
máximo para proteger los oídos.
MENU/ENTER
., N>, x
1 Pulse MENU/ENTER.
2 Pulse . o
hasta que “OPTION” parpadee en la
pantalla y, a continuación, pulse
MENU/ENTER.
“AVLS” parpadea en la pantalla.
N>
varias veces
3 Pulse MENU/ENTER.
4 Pulse . o
hasta que “ON” parpadee en la
pantalla y, a continuación, pulse
MENU/ENTER.
Aparece “ON” en la pantalla y,
después de 2 segundos, aparece de
nuevo la pantalla de reproducción.
N>
varias veces
Bloqueo de los controles (HOLD)
Utilice esta función para evitar el
accionamiento involuntario de los botones
mientras transporta el reproductor.
HOLD
1 Deslice HOLD en la dirección
indicada por la flecha . para
bloquear el dispositivo.
Para desbloquear los
controles
Deslice HOLD en la dirección opuesta a
la de la flecha.
Para cancelar la función AVLS
Seleccione “OFF” en el paso 4 y, a
continuación, pulse MENU/ENTER.
Para cancelar el
procedimiento
Pulse x.
-ES
18
Page 85

Información adicional
Precauciones
Seguridad
• No transporte ni almacene la pila seca en el
mismo lugar que objetos metálicos como
monedas, llaveros o collares. Puede provocar
un cortocircuito y generar calor.
• Un uso incorrecto de las pilas puede producir
la pérdida de fluido o su combustión. Para
evitar esos accidentes, asegúrese de que la pila
está instalada con los polos + y – orientados
correctamente.
• Si se produjera una fuga en una pila, limpie
cuidadosa y completamente el líquido vertido
en el compartimento de la pila antes de
introducir otra nueva.
• Si no va a utilizar el reproductor durante mucho
tiempo, asegúrese de extraer la pila seca.
Manejo
• No deje caer ni golpee el reproductor, ya
que podría provocar un funcionamiento
incorrecto.
• No tire de los cables de los auriculares/cascos.
• No coloque el reproductor en los siguientes
lugares:
—Lugares muy cálidos (más de 60°C)
—Lugares expuestos a la luz solar directa o
cerca de una fuente de calor
—En un coche con las ventanillas cerradas
(sobre todo en verano)
—En un lugar húmedo como un cuarto de
baño
—Junto a una fuente de campos
electromagnéticos como un imán, un
altavoz o un televisor
—En un lugar con polvo
Acumulación de calor
El reproductor se puede calentar si se utiliza
durante un período prolongado de tiempo. No
se trata, no obstante, de un funcionamiento
incorrecto.
Ruido mecánico
Mientras est á en funcionamient o, el reproductor
produce un ruido mecánico causado por el
sistema de ahorro de energía. No se trata de un
funcionamiento incorrecto.
Instalación
Nunca use el reproductor en lugares expuestos a
condiciones extremas de luz, temperatura,
humedad o vibraciones.
El cartucho MiniDisc
• No toque directamente el disco interno. Si
abre el obturador a la fuerza podría dañar el
disco interno.
• Para transportar un MiniDisc, guárdelo en su
caja.
• No coloque el cartucho en lugares sometidos a
condiciones extremas de luz, temperatura,
humedad o polvo.
• No coloque la etiqueta fuera del área
especificada del MD. Asegúrese de que la
etiqueta se coloca en el lugar reservado en el
disco.
Auriculares/cascos
Seguridad en carretera
• No utilice auriculares/cascos mientras
conduce, va en bicicleta o maneja un vehículo
motorizado. En muchos países es ilegal y
puede provocar un accidente de tráfico.
También puede ser potencialmente peligroso
escuchar la reproducción a un volumen muy
alto mientras pasea, especialmente en los
pasos de peatones. Debería extremar las
precauciones o dejar de utilizar el reproductor
en situaciones potencialmente peligrosas.
• Si tiene alguna reacción alérgica a los
auriculares/cascos, deje de utilizarlos y
consulte al médico o acuda a un centro de
servicio Sony.
Prevención de lesiones auditivas
Evite utilizar auriculares/cascos a un volumen
alto. Los expertos en audición desaconsejan la
escucha continua y prolongada a un volumen
excesivo. Si nota pitidos o zumbidos en los
oídos, reduzca el volumen o interrumpa la
audición.
Respeto a los demás
Mantenga el volumen a un nivel moderado. Le
permitirá escuchar los sonidos exteriores y
mostrará su consideración hacia las personas
que se encuentren cerca de usted.
19
-ES
Page 86

Limpieza
• Después de limpiar la carcasa del reproductor
con un paño suave ligeramente humedecido
con agua, vuelva a limpiarlo con un paño
seco. No use ningún tipo de almohadilla
abrasiva, pulimento o disolvente, como
alcohol o benceno, ya que podría deteriorar el
acabado de la carcasa.
• Limpie el cartucho del disco con un paño seco
para eliminar la suciedad.
• El polvo depositado en la lente puede impedir
que la unidad funcione de forma correcta.
Compruebe que la tapa del compartimento del
disco está bien cerrada después de insertar o
extraer un MD.
• Para mantener una buena calidad de sonido,
utilice un paño suave para limpiar los
enchufes de los auriculares/cascos. Un
enchufe sucio puede provocar ruido o saltos
en el sonido durante la reproducción.
• Limpie los terminales de forma periódica con
un algodón o un paño suave como muestra la
ilustración.
Compartimento de la pila seca
Terminales
Si tiene problemas o dudas sobre el
reproductor, póngase en contacto con el
proveedor Sony más cercano. (Si se ha
producido un problema mientras el disco estaba
en el reproductor, recomendamos que deje el
disco dentro cuando vaya a consultar al
proveedor Sony, de forma que éste pueda
entender mejor la causa del problema.)
Cuando consulte al proveedor Sony, asegúrese
de llevar el reproductor y los auriculares/cascos.
-ES
20
Page 87

Solución de problemas
Si el problema persiste después de haber realizado estas comprobaciones, póngase en
contacto con el proveedor Sony más próximo.
Síntoma Causa/Solución
El reproductor no
funciona o lo hace
deficientemente.
El MD no se
reproduce
normalmente.
El MD no se
reproduce desde la
primera pista.
• Ha intentado hacer funcionar el reproductor sin ningún MD
dentro. (“NoDISC” parpadea en la pantalla.)
,Inserte un MD.
• La función HOLD está activada (“HOLD” aparece en el visor
cuando se pulsa un botón del reproductor).
,Desactive HOLD deslizando el interruptor HOLD en la
dirección opuesta a la de la flecha (páginas 7, 18).
• Se ha condensado humedad dentro del reproductor.
,Extraiga el MD y deje durante varias horas el reproductor en
un lugar cálido hasta que se evapore la humedad.
• La pila seca está casi descargada (“LoBATT” parpadea o no
aparece nada).
,Sustituya la pila seca por una nueva (página 6).
• La pila seca se insertado incorrectamente.
,Inserte la pila correctamente (página 6).
• Se ha insertado un MD que no contiene ninguna grabación.
(“BLANK” parpadea en la pantalla.)
,Inserte un MD grabado.
• El reproductor no puede leer el disco. (Está rayado o sucio.)
(“ERROR” parpadea en la pantalla.)
,Vuelva a insertar o sustituya el disco.
• Durante el funcionamiento, el reproductor recibió un golpe
mecánico, estática excesiva, etc.
,Reinicie el funcionamiento de la forma siguiente:
1 Extraiga la pila seca.
2 Deje el reproductor desconectado unos 30 segundos.
3 Vuelva a insertar la pila seca.
• El reproductor está establecido en modo de repetición. (“ ”
aparece en el reproductor.)
,Seleccione “Normal” para el modo de reproducción e inicie
la reproducción. Para obtener más información, “Selección
del modo de reproducción” (página 10).
• El disco se reproduce en modo de grupo.
,Desactive el modo de grupo.
• La reproducción del disco se detuvo antes de llegar a la última
pista.
,Mantenga pulsado
iniciar la reproducción desde la primera pista.
• El disco se reproduce en modo de grupo.
,Desactive el modo de grupo y detenga la reproducción. A
continuación, mantenga pulsado
o más para iniciar la reproducción desde la primera pista.
durante 2 segundos o más para
N>
durante 2 segundos
N>
21
-ES
Page 88

Síntoma Causa/Solución
La función de
preajuste de sonido
digital no funciona.
La reproducción del
sonido salta.
El sonido tiene
mucha estática.
Se oye ruido
momentáneamente.
El reproductor no
funciona de manera
correcta.
No se recibe ningún
sonido a través de los
auriculares/cascos.
El volumen no se
puede subir.
La función de grupo
no funciona.
Al utilizar el
rebobinado/avance
rápido, la pista no
vuelve a la pista
anterior ni va a la
pista siguientes.
22
-ES
• El preajuste de sonido digital está desactivado.
, Seleccione “SOUND 1” (sonido 1) o “SOUND 2” (sonido 2).
• El reproductor está situado en un lugar sometido a vibraciones
continuas.
, Coloque el reproductor en un lugar estable.
• Una pista muy corta puede hacer que salte el sonido.
, Procure no crear pistas con una duración inferior a un segundo.
• Un fuerte campo magnético, de un televisor o de otro
dispositivo, está interfiriendo en el funcionamiento.
, Aleje el reproductor de la fuente del campo magnético.
• El sonido se ha grabado en modo estéreo LP4.
, Debido a la naturaleza del método de compresión utilizado
• Se ha intentado acceder al modo de grupo con la reproducción
programada seleccionada.
, Cambie al modo de grupo antes de seleccionar la
• El enchufe de los auriculares/cascos no está conectado firmemente.
, Conecte firmemente el enchufe de los auriculares/cascos a la
• El volumen es demasiado bajo.
, Ajuste el volumen pulsando VOL + o –.
• El enchufe está sucio.
, Limpie el enchufe.
• AVLS está activado.
, Ajuste AVLS en “OFF” (página 18).
• Al utilizar un disco que no tenía información de grupos, se
intentó activar el modo de grupos.
, Utilice un disco con información de grupos.
• Se ha intentado activar el modo de grupo durante la
reproducción de una pista que no pertenece a ningún grupo.
, No se puede utilizar la función de grupo mientras se está
• Al seleccionar la reproducción programada, se ha intentado
activar el modo de grupo.
, Active el modo de grupo antes de seleccionar la
• Se ha activado el modo de salto de grupo.
, Desactive el modo de grupo. Si no se realiza ninguna
Para obtener más información, consulte “Ajuste de agudos o
graves (Preajuste de sonido digital)” (página 15).
en el modo LP4, se produce ruido en muy raras ocasiones
durante la reproducción del sonido grabado en este modo.
reproducción programada.
toma i.
reproduciendo una pista que no pertenece a ningún grupo.
reproducción programada.
operación en el transcurso de 5 segundos, el modo de salto
de grupo se cancela automáticamente. Para obtener más
información, consulte “Selección y reproducción de grupos
determinados (función de salto de grupo)” (página 13).
Page 89

Especificaciones
Reproductor MD
Sistema de reproducción de audio
Sistema MiniDisc de audio digit al
Propiedades del diodo láser
Material: GaAlAs
Longitud de onda: λ = 790 nm
Duración de la emisión: continu a
Salida del láser: menor de 44,6 µW
(Esta salida es el valor med i d o a una d istancia
de 200 mm de la superficie del objetivo del
bloque de captura óptica con una ab ertura de
7mm.)
Revoluciones
Aprox. 300 rpm a 2 700 rpm
Corrección de errores
ACIRC (Advan ced Cross Interleave Re ed
Solomon Code)
Frecuencia de muestreo
44,1 kHz
Codificación
ATRAC (Adaptive TRansform Acoustic
Coding)
A TR AC3 — LP2/LP4
Sistema de modulación
EFM (Eight to Fourteen Modulation)
Número de canales
2 canales estéreo
1 canal monoaural
Respuesta en frecuencia
20 a 20 000 Hz ± 3 dB
Fluctuación y trémolo
Por debajo de límites medible s
Salidas
i: minitoma estéreo , nivel de salida má ximo
3,5 m W + 3,5 mW, impedancia de carga 16 Ω
Generales
Requisitos de alimentación
Una pila alcalina LR6 (tamaño AA) (no
suministrada)
Tiempo de funcionamiento con pilas
Consulte “Duración de la pila” ( pá gina 6)
Dimensiones
Aprox. 81 × 28,9 × 74,4 mm (an/al/prf.) sin
salientes.
Peso
Aprox. 93 g sólo el reproductor
Patentes de los Estados Unidos y otros paí se s
con licencia de Dolby Laboratories.
Diseño y especif i cacion es s ujeto s a camb ios s in
prev io aviso.
Accesorios opcionales
Auriculares/cascos estéreo serie MDR*
Altavoces activos serie SRS
∗ Si utiliza auriculares opcionales, use sólo
auriculares/cascos con minienchufes
estéreo. No se pu e d en utilizar auriculares/
cascos con microenchufes.
Es posible que su proveedor no pueda
proporcionarle alguno de los accesorios de
la lista. Solicite al proveedor in fo rmación
detallada sobre los acces o r ios disponibles en
su país.
23-ES
Page 90

WAARSCHUWING
Stel het apparaat niet bloot aan
regen of vocht, om brand en
elektrische schokken te
voorkomen.
Plaats het apparaat niet in een gesloten
ruimte, zoals een boekenrek of
ingebouwde kast.
Bedek de ventilatie van het apparaat niet
met een krant, tafelkleed, gordijn, enz. om
brand te voorkomen. Plaats geen verlichte
kaarsen op het apparaat.
Om brand en elektrische schokken te
voorkomen, mag u geen voorwerpen op
het apparaat neerzetten die met
vloeistoffen zijn gevuld, zoals
bloemenvazen.
Gebruikte batterijen moet u inleveren bij
het klein chemisch afval.
Neem voor meer informatie contact op
met de betrokken gemeentelijke dienst.
Let op!
Wanneer u dit apparaat gebruikt in
combinatie met optische instrumenten,
neemt de kans op oogbeschadiging toe.
Informatie
DE VERKOPER IS IN GEEN ENKEL
GEVAL AANSPRAKELIJK VOOR
ENIGE DIRECTE OF INDIRECTE
SCHADE VAN WELKE AARD DAN
OOK, ONGEVALLEN, VERLIEZEN
OF ONKOSTEN DIE WORDEN
VEROORZAAKT DOOR EEN
DEFECT APPARAAT OF DOOR HET
GEBRUIK VAN WELK PRODUCT
DAN OOK.
De CE-markering is alleen
geldig in de landen waar deze
wettelijk bindend is, zoals
voornamelijk in de EEA-landen
(landen van de Europese
economische zone).
LET OP! — ONZICHTBARE
LASERSTRALING INDIEN GEOPEND
KIJK NIET RECHTSTREEKS OF
MET BEHULP VAN OPTISCHE
INSTRUMENTEN IN DE
LASERSTRAAL.
-NL
2
Page 91

Inhoudsopgave
De bediening .....................................................4
Voorbereidingen ...............................................6
Meteen een MD afspelen! .................................8
Verschillende manieren van afspelen ............10
Snel een bepaald muziekstuk of punt opzoeken (Snel zoeken) ........... 10
De zoekmodus selecteren ..................................................................... 10
Muziekstukken in de gewenste volgorde beluisteren
(geprogrammeerd afspelen) ............................................ 12
De groepsfunctie gebruiken ................................................................. 12
Wat is een disc met groepsinstellingen? ........................................ 12
Muziekstukken in een bepaalde groep beluisteren
(afspelen in groepsmodus) .............................................. 13
Groepen selecteren en afspelen (groepsselectiemodus) ................. 13
Groepen registreren met uw MiniDisc-recorder ............................ 14
Hoge en lage tonen aanpassen (digitale geluidsvoorkeuren) ............... 15
De geluidskwaliteit selecteren ....................................................... 16
De geluidskwaliteit regelen ........................................................... 16
NL
Andere functies ..............................................17
De naam van het muziekstuk en de afspeeltijd bekijken ..................... 17
Uw gehoor beschermen (AVLS) .......................................................... 18
De bediening vergrendelen (HOLD) .................................................... 18
Aanvullende informatie ..................................19
Voorzorgsmaatregelen ......................................................................... 19
Storingen verhelpen ............................................................................. 21
Technische gegevens ............................................................................ 23
-NL
3
Page 92

De bediening
Voorkant van de recorder
3
1
2
A
Uitleesvenster
B
VOL +-en –-toets
De VOL +-toets heeft een voelbare
punt.
C
Vierstandenschakelaar
N (afspelen)
*
. en > (zoeken/AMS)
x (stoppen)
X (pauze)
∗
De N -toets heeft een voelbare punt.
4
5
6
D
MENU/ENTER-toets
7
(muziekstukmarkering)
E
GROUP-toets (muziekstukmarkering)
i-aansluiting (hoofdtelefoon/
F
oortelefoon)
G
Hoofdtelefoon/oortelefoon
-NL
4
Page 93

Achterzijde van de speler
3
1
2
4
A
HOLD-schakelaar (vergrendelen)
B
OPEN-toets (muziekstukmarkering)
Het uitleesvenster van de speler
1
2
3
A
Discindicatie
B
Indicatie voor groepsmodus
Licht op wanneer de groepsmodus is
ingeschakeld.
C
Uitleesvenster muziekstuknummer
D
Batterijniveau-indicatie
Toont bij benadering de toestand van
de batterij.
E
Indicatie voor afspeelstand
Geeft de afspeelstand van de MD aan.
F
SOUND-indicatie
C
Gaatje voor draagriem
Bevestig uw eigen riem aan dit gaatje.
D
Klep van batterijcompartiment
4
5
6
7
8
G
Indicatie voor disc, groep en
muziekstuk
H
Tek e nve ns t er
Geeft de namen voor muziekstukken,
verstreken tijd, enz. aan.
-NL
5
Page 94

Voorbereidingen
1
De batterij vervangen
U kunt de toestand van de batterij via de batterij-indicatie controleren tijdens het gebruik
van de speler.
Gebruiksduur van de batterij
Batterijen SP
LR6 (SG)
droge alkalinebatterij van Sony
1)
2)
Opmerking
De levensduur van de batterij kan korter zijn dan opgegeven afhankelijk van de
gebruiksomstandigheden, de omgevingstemperatuur en het soort batterij.
Plaats een droge alkalinebatterij.
E
e
Schuif het deksel van het
batterijcomparti ment om
deze te openen.
Batterij wordt zwakker
r
Zwakke batterij
r
De batterij is leeg.
“LoBATT” knippert op het uitleesvenster en de stroom wordt uitgeschakeld.
Meetwaarden conform de JEITA-standaard (Japan Electronics and Information Technology Industries
Association).
Met een droge alkalinebatterij, Sony LR6 (SG) “STAMINA” (gemaakt in Japan).
Plaats één droge LR6alkalinebatterij (AA-formaat)
en schuif daarbij de minzijde
eerst naar binnen.
(Eenheid: geschatte uren) (JEITA
Stereo
41 50 56
2)
LP2
Stereo
Sluit het deksel.
LP4
Stereo
1)
)
-NL
6
Page 95

2
De verbindingen maken en de
bediening ontgrendelen.
Sluit de hoofdtelefoon/oortelefoon aan
1
op i.
stevig aandrukken
voor i
Schuif HOLD in de tegengestelde
2
richting van de pijl op de speler
(HOLD .) om de bediening te
ontgrendelen.
HOLD
-NL
7
Page 96

Meteen een MD afspelen!
1
1
2
Plaats een MD.
Druk op OPEN om het deksel te openen.
Een MD afspelen.
, N>, x, X
.
VOL +, –
Plaats een MD met het label naar
2
boven en druk op het deksel om het te
sluiten.
Druk op N>.
1
Druk op VOL + of – om het volume aan
2
te passen.
De volume-indicator verschijnt op het
uitleesvenster zodat u het volumeniveau
kunt controleren.
Om het afspelen te stoppen,
drukt u op x.
Het afspelen begint vanaf het punt waar u het
laatst met afspelen bent opgehouden. Als u wilt
beginnen met afspelen vanaf het begin van het
eerste muziekstuk, houdt u N> twee
seconden of langer ingedrukt.
-NL
8
Page 97

Naar Handeling
Zoeken naar het begin van het
huidige of het vorige muziekstuk
Druk op ..
1)
Druk net zo vaak op . totdat u aan het begin
van het gewenste muziekstuk bent.
Het begin van het volgende
muziekstuk vinden
2)
Druk eenmaal op
N>
.
Achteruitspoelen tijdens het afspelen Houd . ingedrukt.
Achteruitspoelen tijdens het afspelen Houd
> ingedrukt.
N
Pauzeren Druk op X.
Druk nogmaals op X om het afspelen te hervatten.
De MD verwijderen Druk op x en vervolgens op OPEN.
1)
Als u tijdens het eerste muziekstuk op de disc tweemaal achtereenvolgens op . drukt, gaat de spel er
naar het begin van het laatste muziekstuk op de disc.
2)
Als u tijdens het laatste muziekstuk op de disc op N> drukt, gaat de speler naar het begin van het
eerste muziekstuk op de disc.
3)
Wanneer u de klep opent, begint het afspelen aan het begin van het eerste muziekstuk (behalve
wanneer de groepsmodus is ingeschakeld).
Het overslaan van geluid onderdrukken (G-PROTECTION)
3)
De G-PROTECTION-functie is ontwikkeld om een betere schokbestendigheid te bieden
dan andere spelers hebben, zodat u de speler ook tijdens het joggen kunt gebruiken.
Opmerking
In de volgende gevallen kan het geluid tijdens het afspelen overslaan:
• de speler heeft onafgebroken sterke schokken ondergaan.
• er wordt een vuile of bekraste MiniDisc afgespeeld.
z
• De MZ-E310 ondersteunt de nieuw ontwikkelde DSP TYPE-R voor ATRAC.
Dit betekent dat u van TYPE-R topkwaliteit geluid kunt genieten van MD’s die zijn opgenomen in SP
stereo op TYPE-R-uitgeruste MD-decks enz.
• Met de speler kunt u muziekstukken afspelen die in de 2
(LP2 of LP4). Wanneer u een audiobron selecteert, wordt automatisch de stand voor normaal stereo
afspelen, LP2-stereo afspelen, LP4-stereo afspelen of mono afspelen geselecteerd.
• Kort nadat u op
drukt wordt het uitleesvenster uitgeschakeld.
x
×
- of 4 × -afspeelstand zijn opgenomen
-NL
9
Page 98

Verschillende manieren van afspelen
Snel een bepaald muziekstuk of punt opzoeken (Snel zoeken)
U kunt op twee manieren snel zoeken.
• Indexzoeken — Snel zoeken terwijl
u de nummers of namen van de
muziekstukken in de gaten houdt
(fabrieksinstelling).
• Tijdzoeken — Snel zoeken terwijl u de
verstreken tijd in de gaten houdt.
MENU/ENTER
., N>,
X, x
1 Druk tijdens het afspelen op MENU/
ENTER.
2 Druk enkele malen op . of
totdat “SEARCH” op het
N>
uitleesvenster knippert en druk
vervolgens op MENU/ENTER.
3 Druk herhaaldelijk op . of
totdat “Index” (indexzoeken)
N>
of “Time” (tijdzoeken) op het
uitleesvenster knippert en druk
vervolgens op MENU/ENTER.
4 Druk op X.
5 Houd . of
totdat het nummer/de naam van het
gewenste muziekstuk verschijnt
(indexzoeken) of totdat de gewenste
verstreken tijd (tijdzoeken) op het
uitleesvenster verschijnt.
N>
ingedrukt
6 Druk op X.
Het afspelen begint vanaf het
geselecteerde muziekstuk.
De bewerking annuleren
Druk op x.
z
• Als u deze procedure uitvoert terwijl de
speler in de shufflestand staat, begint het
afspelen in shufflestand met het geselecteerde
muziekstuk.
• Als het eerste of het laatste muziekstuk op de
disc wordt bereikt terwijl u de toets . of
N> ingedrukt houdt in stap 5, wordt
verder gezocht in respectievelijk het laatste
of het eerste muziekstuk. (Als u in de
groepsmodus het eerste of het laatste
muziekstuk bereikt terwijl u de toets . of
N> ingedrukt houdt in stap 5, wordt
verder gezocht in respectievelijk het eerste of
het laatste muziekstuk in de groep.) (Zie “De
groepsfunctie gebruiken” (pagina 12).)
De zoekmodus selecteren
U hebt keuze uit verschillende
afspeelstanden zoals één afspelen (1Rep.),
shuffle (Shuff) en geprogrammeerd
afspelen (PGM).
MENU/ENTER
., N>
1 Druk tijdens het afspelen op MENU/
ENTER.
2 Druk enkele malen op . of
totdat “P-MODE” op het
N>
uitleesvenster knippert en druk
vervolgens op MENU/ENTER.
10-
NL
Page 99

3 Druk herhaaldelijk op . of
om de afspeelstand te
N>
selecteren en druk vervolgens op
MENU/ENTER.
Elke keer dat u op
verandert het weergave-item dat met
A wordt aangegeven op de volgende
wijze:
wanneer u op MENU/ENTER drukt
terwijl A knippert, wijzigt u de
afspeelstand.
De nieuwe afspeelstand verschijnt
op het uitleesvenster en wordt
aangegeven met B.
Wanneer u herhaaldelijk op N>
drukt, wijzigt u A.
B
licht op wanneer u op MENU/
ENTER drukt
.
N>
drukt,
Indicatie A/B (afspeelstand)
Normal/—(normaal afspelen)
Alle muziekstukken worden
eenmaal afgespeeld.
r
AllRep/
Alle muziekstukken worden
herhaald afgespeeld.
r
1 Track/1
Er wordt één muziekstuk
afgespeeld.
r
1Rep./ 1
Eén muziekstuk wordt herhaald
afgespeeld.
r
Shuff/SHUF
Nadat het gekozen muziekstuk is
afgespeeld, worden de overige
muziekstukken in willekeurige
volgorde afgespeeld.
r
Shuf.R/SHUF
Nadat het gekozen muziekstuk is
afgespeeld, worden de overige
muziekstukken in willekeurige
volgorde herhaald afgespeeld.
r
PGM/PGM
De muziekstukken worden in de
door u opgegeven volgorde
afgespeeld.
r
PGMRep/PGM
De muziekstukken worden in de
door u opgegeven volgorde
herhaald afgespeeld.
De bewerking annuleren
Druk op x.
11
-NL
Page 100

Muziekstukken in de gewenste
r
volgorde beluisteren
(geprogrammeerd afspelen)
1 Voer de stappen 1 en 2 in “De
zoekmodus selecteren” (pagina 10)
uit, selecteer “PGM” in stap 3 en druk
vervolgens op MENU/ENTER.
2 Druk enkele malen op . of
om het gewenste
N>
muziekstuknummer te selecteren.
• Als de groepsmodus is ingeschakeld, kunt u
de afspeelstand voor een geselecteerde groep
opgeven. Zie “Groepen selecteren en afspelen
(groepsselectiemodus)” (pagina 13) voor het
activeren van de groepsmodus.
• De afspeelsta nd kan ook worden geselecte erd als
de speler in de pauzestand staat of is gestopt.
Opmerkingen
• Als de klep wordt geopend, gaan alle
programma-instellingen verloren.
• Als de speler is gestopt en er vijf minuten lang
geen nieuwe instellingen worden opgegeven,
worden de instellingen ingevoerd die tot dat
moment zijn opgegeven.
• Tijdens het programmeren kunt u de
groepsmodus niet in- of uitschakelen.
• Als u de groepsmodus inschakelt terwijl u
geprogrammeerd afspeelt, wordt het
afgespeelde programma geannuleerd.
Muziekstuknummer
Programmanumme
3 Druk op MENU/ENTER.
Het muziekstuk wordt ingevoerd.
4 Herhaal stap 2 en 3 om andere
muziekstukken in de gewenste
volgorde in te voeren.
5 Druk gedurende 2 seconden of langer
op MENU/ENTER.
De instellingen worden ingevoerd en
het afspelen begint vanaf het eerste
geprogrammeerde muziekstuk.
z
• Het programma blijft in het geheugen
opgeslagen, ook als het afspelen is voltooid of
wordt onderbroken.
• U kunt maximaal 20 muziekstukken
programmeren.
-NL
12
De groepsfunctie gebruiken
De speler kan worden gebruikt met een
disc die een groepsinstelling heeft.
De groepsfunctie is handig wanneer u een
groot aantal muziekstukken afspeelt of
muziekstukken die in de MDLP-stand
(LP2/LP4) zijn opgenomen.
Wat is een disc met groepsinstellingen?
Dat is een disc met instellingen waarin
muziekstukken in groepen zijn geordend
en waarin deze groepen kunnen worden
geselecteerd.
Met de speler kunt u geen groepsinstellingen
opnemen. Gebruik de MD-recorder om
dergelijke gegevens op te nemen en
gebruik de speler om deze af te spelen.
Disc
4
Groep 2
Muziekstuk
nummer
Groep 1
Muziekstuk nummer
123
-
Groep 3
Muziekstuknummer
7
85 6
 Loading...