

Page 1

Operation Guide
MX-C400PMODEL:
BEFORE USING
BEFORE USING
THE MACHINE
THE MACHINE
SYSTEM SETTINGS
SYSTEM SETTINGS
PRINTING
PRINTING
TROUBLESHOOTING
TROUBLESHOOTING
Page 2
MANUALS PROVIDED WITH THE MACHINE
Operation manuals in PDF format (this manual)
The manuals in PDF format provide detailed explanations of the procedures for using the machine in each mode. To
view the PDF manuals, download them from the hard drive in the machine. The procedure for downloading the manuals
is explained in "Downloading the Operation Guide" in the Quick Start Guide.
1. BEFORE USING THE MACHINE
This chapter provides information, such as basic operation procedures and how to load paper.
2. PRINTING
This chapter provides detailed explanations of the procedures for printing.
3. SYSTEM SETTINGS
This chapter explains the "System Settings", which are used to configure a variety of parameters
to suit the aims and the needs of your workplace. Current settings can be displayed or printed out
from the "System Settings".
4. TROUBLESHOOTING
This chapter explains how to remove paper misfeeds and provides answers to frequently asked
questions regarding the operation of the machine in each mode. Refer to this manual when you
have difficulty using the machine.
Printed manuals
Manual name Contents
Safety Guide
Software Setup
Guide
Quick Start Guide
This manual contains instructions for using the machine safely and lists the specifications of the machine
and its peripheral devices.
This manual explains how to install the software and configure settings to use the machine.
This manual provides easy-to-understand explanations of all the functions of the machine in a single
volume. Detailed explanations of each of the functions can be found in the manuals in PDF format.
i
Page 3
ABOUT OPERATION MANUAL
This manual explains how to use the MX-C400P digital full color printer.
Please note
• For information on installing the drivers and software cited in this manual, please refer to the Software Setup Guide.
• For information on your operating system, please refer to your operating system manual or the online Help function.
• The explanations of screens and procedures in a Windows environment are primarily for Windows
vary depending on the version of the operating system or the software application.
• The explanations of screens and procedures in a Macintosh environment are based on Mac OS X v10.4 in the case of Mac OS
X. The screens may vary depending on the version of the operating system or the software application.
• Wherever "MX-xxxx" appears in this manual, please substitute your model name for "xxxx".
• Considerable care has been taken in preparing this manual. If you have any comments or concerns about the manual, please
contact your dealer or nearest SHARP Service Department.
• This product has undergone strict quality control and inspection procedures. In the unlikely event that a defect or other problem
is discovered, please contact your dealer or nearest SHARP Service Department.
• Aside from instances provided for by law, SHARP is not responsible for failures occurring during the use of the product or its
options, or failures due to incorrect operation of the product and its options, or other failures, or for any damage that occurs due
to use of the product.
Warning
• Reproduction, adaptation or translation of the contents of the manual without prior written permission is prohibited, except as
allowed under copyright laws.
• All information in this manual is subject to change without notice.
Vista®. The screens may
Illustrations and the operation panel and display shown in this manual
The peripheral devices are generally optional, however, some models include certain peripheral devices as standard equipment.
The explanations in this manual assume that 500-sheet paper feed units (total of four trays) are installed on the MX-C400P.
For some functions and procedures, the explanations assume that devices other than the above are installed.
The display screens, messages, and key names shown in the manual may differ from those on the actual machine
due to product improvements and modifications.
Icons used in the manuals
The icons in the manuals indicate the following types of information:
Warning This alerts you to a situation where there is a risk of human death or injury.
Caution This alerts you to a situation where there is a risk of human injury or property damage.
This alerts you to a situation where
there is a risk of machine damage or
failure.
This provides a supplemental
explanation of a function or procedure.
This explains how to cancel or correct
an operation.
This indicates the name of a system setting and provides a brief
explanation of the setting.
When "System Settings:" appears:
A general setting is explained.
When "System Settings (Administrator):" appears:
A setting that can only be configured by an administrator is
explained.
ii
Page 4

CHAPTER 1
BEFORE USING THE MACHINE
This chapter provides information on basic operation procedures, how to load paper and machine maintenance.
BEFORE USING THE MACHINE
PART NAMES AND FUNCTIONS . . . . . . . . . . . . . . 1-3
• EXTERIOR . . . . . . . . . . . . . . . . . . . . . . . . . . . . . 1-3
• INTERIOR . . . . . . . . . . . . . . . . . . . . . . . . . . . . . 1-5
• SIDE AND BACK . . . . . . . . . . . . . . . . . . . . . . . . 1-6
• OPERATION PANEL . . . . . . . . . . . . . . . . . . . . . 1-7
USING THE OPERATION PANEL . . . . . . . . . . . . . . 1-8
• USING THE DISPLAY . . . . . . . . . . . . . . . . . . . . 1-8
USING THE WEB PAGE . . . . . . . . . . . . . . . . . . . . 1-12
TURNING THE POWER ON AND OFF . . . . . . . . . 1-13
• ENERGY SAVE FUNCTIONS . . . . . . . . . . . . . 1-14
• [POWER SAVE] KEY . . . . . . . . . . . . . . . . . . . . 1-14
USER AUTHENTICATION . . . . . . . . . . . . . . . . . . . 1-15
• AUTHENTICATION BY USER NUMBER. . . . . 1-15
• AUTHENTICATION BY LOGIN NAME /
PASSWORD. . . . . . . . . . . . . . . . . . . . . . . . . . . 1-17
• ACCESSING THE WEB PAGE . . . . . . . . . . . . 1-20
USER CONTROL . . . . . . . . . . . . . . . . . . . . . . . . . . 1-21
• USER LIST . . . . . . . . . . . . . . . . . . . . . . . . . . . . 1-21
• DEFAULT SETTING. . . . . . . . . . . . . . . . . . . . . 1-24
• PAGE LIMIT GROUP LIST. . . . . . . . . . . . . . . . 1-26
• AUTHORITY GROUP LIST . . . . . . . . . . . . . . . 1-27
• FAVORITE OPERATION GROUP LIST. . . . . . 1-29
• VIEW USER COUNT . . . . . . . . . . . . . . . . . . . . 1-30
LOADING PAPER
IMPORTANT POINTS ABOUT PAPER . . . . . . . . . 1-37
• NAMES AND LOCATIONS OF TRAYS . . . . . . 1-37
• USEABLE PAPER . . . . . . . . . . . . . . . . . . . . . . 1-37
TRAY SETTINGS FOR TRAYS 1 TO 4 . . . . . . . . . 1-40
• LOADING PAPER AND CHANGING THE
PAPER SIZE . . . . . . . . . . . . . . . . . . . . . . . . . . 1-40
LOADING PAPER IN THE BYPASS TRAY . . . . . . 1-42
• IMPORTANT POINTS WHEN USING THE
BYPASS TRAY. . . . . . . . . . . . . . . . . . . . . . . . . 1-43
PERIPHERAL DEVICES
PERIPHERAL DEVICES . . . . . . . . . . . . . . . . . . . . 1-45
FINISHER . . . . . . . . . . . . . . . . . . . . . . . . . . . . . . . . 1-46
• PART NAMES . . . . . . . . . . . . . . . . . . . . . . . . . 1-46
• SUPPLIES . . . . . . . . . . . . . . . . . . . . . . . . . . . . 1-46
SHARP OSA . . . . . . . . . . . . . . . . . . . . . . . . . . . . . . 1-47
• STANDARD APPLICATION . . . . . . . . . . . . . . . 1-47
• EXTERNAL ACCOUNT APPLICATION . . . . . . 1-48
REMOTE OPERATION OF THE MACHINE. . . . . . 1-31
JOB LOG . . . . . . . . . . . . . . . . . . . . . . . . . . . . . . . . 1-32
• SAVE / DELETE JOB LOG . . . . . . . . . . . . . . . 1-32
• VIEW JOB LOG . . . . . . . . . . . . . . . . . . . . . . . . 1-32
ITEMS RECORDED IN THE JOB LOG . . . . . . . . . 1-33
STORAGE BACKUP . . . . . . . . . . . . . . . . . . . . . . . 1-35
• EXPORT SETTINGS . . . . . . . . . . . . . . . . . . . . 1-35
• IMPORT SETTINGS. . . . . . . . . . . . . . . . . . . . . 1-35
DEVICE CLONING . . . . . . . . . . . . . . . . . . . . . . . . . 1-36
• EXPORT SETTINGS . . . . . . . . . . . . . . . . . . . . 1-36
• IMPORT SETTINGS. . . . . . . . . . . . . . . . . . . . . 1-36
1-1
Page 5

MAINTENANCE
REPLACING THE TONER CARTRIDGES. . . . . . . 1-49
REPLACING THE TONER COLLECTION
CONTAINER . . . . . . . . . . . . . . . . . . . . . . . . . . . . . . 1-52
REPLACING THE DEVELOPER CARTRIDGE
/ DRUM CARTRIDGE . . . . . . . . . . . . . . . . . . . . . . . 1-55
• REPLACING THE DEVELOPER
CARTRIDGE . . . . . . . . . . . . . . . . . . . . . . . . . . 1-55
• REPLACING THE DRUM CARTRIDGE. . . . . . 1-60
REPLACING THE STAPLE CARTRIDGE IN
THE FINISHER . . . . . . . . . . . . . . . . . . . . . . . . . . . . 1-62
REGULAR MAINTENANCE . . . . . . . . . . . . . . . . . . 1-64
• CLEANING THE MAIN CHARGER OF
THE PHOTOCONDUCTIVE DRUM . . . . . . . . . 1-64
• CLEANING THE BYPASS FEED ROLLER . . . 1-67
• CLEANING THE LASER UNIT. . . . . . . . . . . . . 1-69
• CLEANING THE PT CHARGER . . . . . . . . . . . 1-73
BEFORE USING THE MACHINE
ENTERING TEXT
FUNCTIONS OF THE MAIN KEYS . . . . . . . . . . . . 1-75
1-2
Page 6
BEFORE USING THE MACHINE
BEFORE USING THE MACHINE
This section provides basic information about the machine. Please read this chapter before using the machine.
PART NAMES AND FUNCTIONS
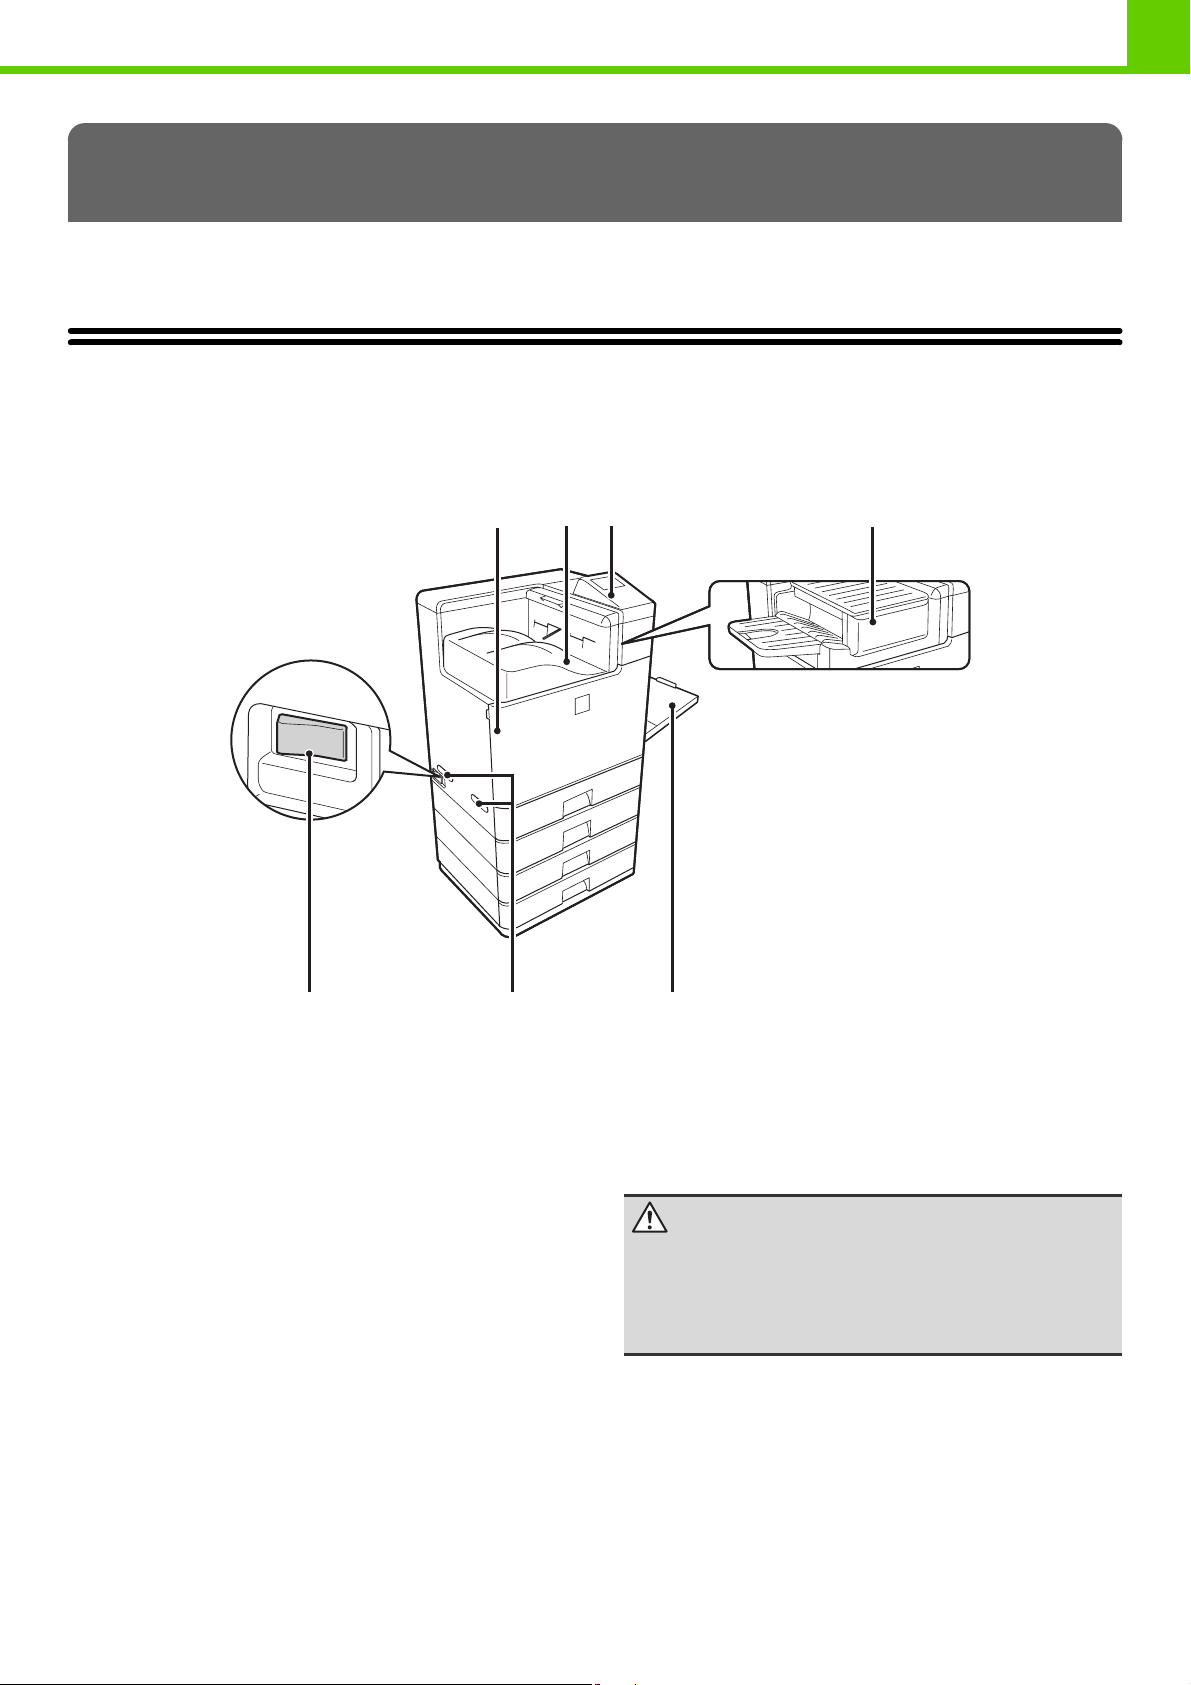
EXTERIOR
(5) (6) (7)
(1) Front cover
Open this cover to replace a toner cartridge.
☞ REPLACING THE TONER CARTRIDGES (page
1-49)
(2) Output tray (center tray)
Output is delivered to this tray.
(3) Operation panel
This is used to select functions.
☞ OPERATION PANEL (page 1-7)
(4) Finisher*
This can be used to staple output.
☞ FINISHER (page 1-46)
* Peripheral device.
(1)
(2) (3)
(4)
When a finisher is installed
(5) Main power switch
This is used to power on the machine.
☞ TURNING THE POWER ON AND OFF (page 1-13)
(6) Handle
Grasp it when moving the machine.
Caution
The main unit is extremely heavy, and thus
two people are required to do the work. When
lifting the main unit, grasp the handles on
each side firmly.
(7) Bypass tray
Use this tray to feed paper manually.
When loading paper larger than 8-1/2" x 11" or A4, be
sure to pull out the bypass tray extension.
☞
LOADING PAPER IN THE BYPASS TRAY (page 1-42)
1-3
Page 7
(8) (10)(9)
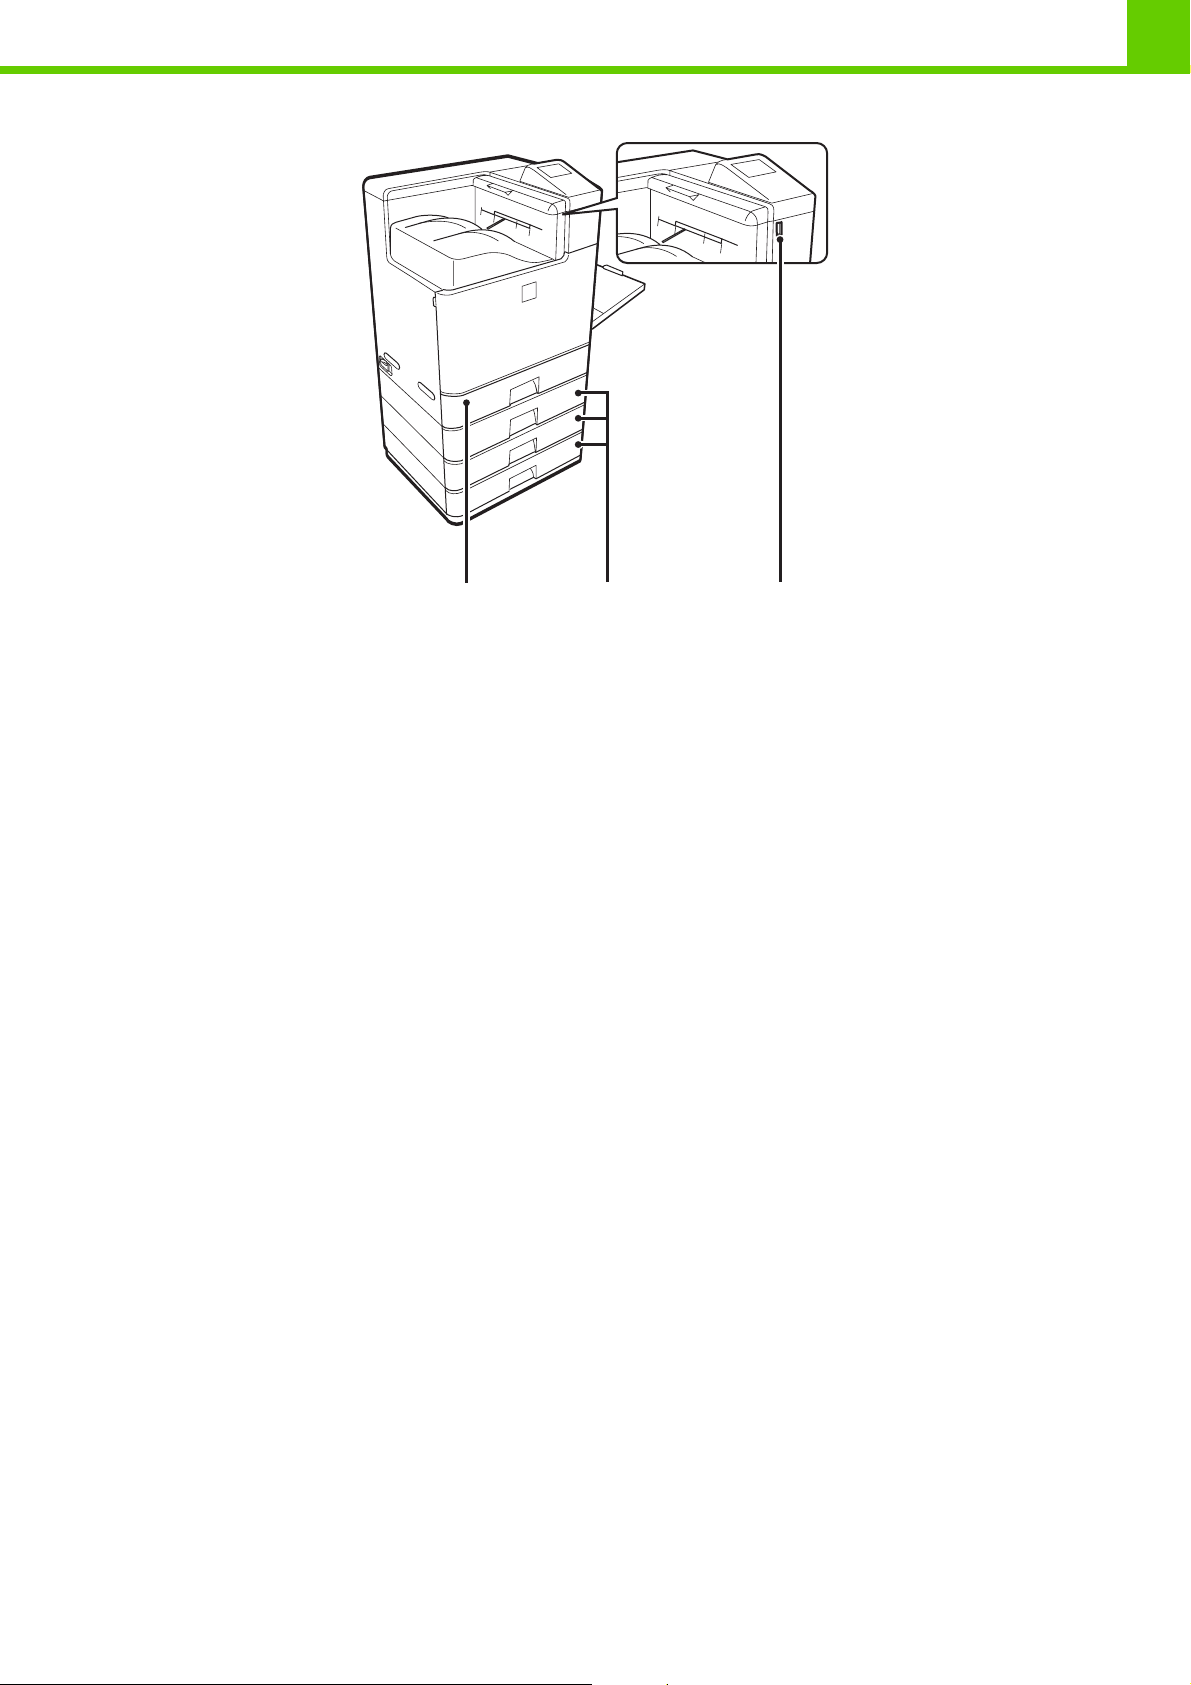
BEFORE USING THE MACHINE
(8) Tray 1
This holds paper.
☞ TRAY SETTINGS FOR TRAYS 1 TO 4 (page 1-40)
(9) Tray 2/Tray 3/Tray 4
(when 500-sheet paper feed units are installed)*
These hold paper.
For 500-sheet paper feed unit combinations, consult your
dealer or nearest SHARP Service Department.
☞ TRAY SETTINGS FOR TRAYS 1 TO 4 (page 1-40)
* Peripheral device.
(10) USB connector (A type)
Supports USB 2.0 (Hi-Speed).
This is used to connect a USB device such as USB
memory to the machine.
For the USB cable, use a shielded cable.
1-4
Page 8
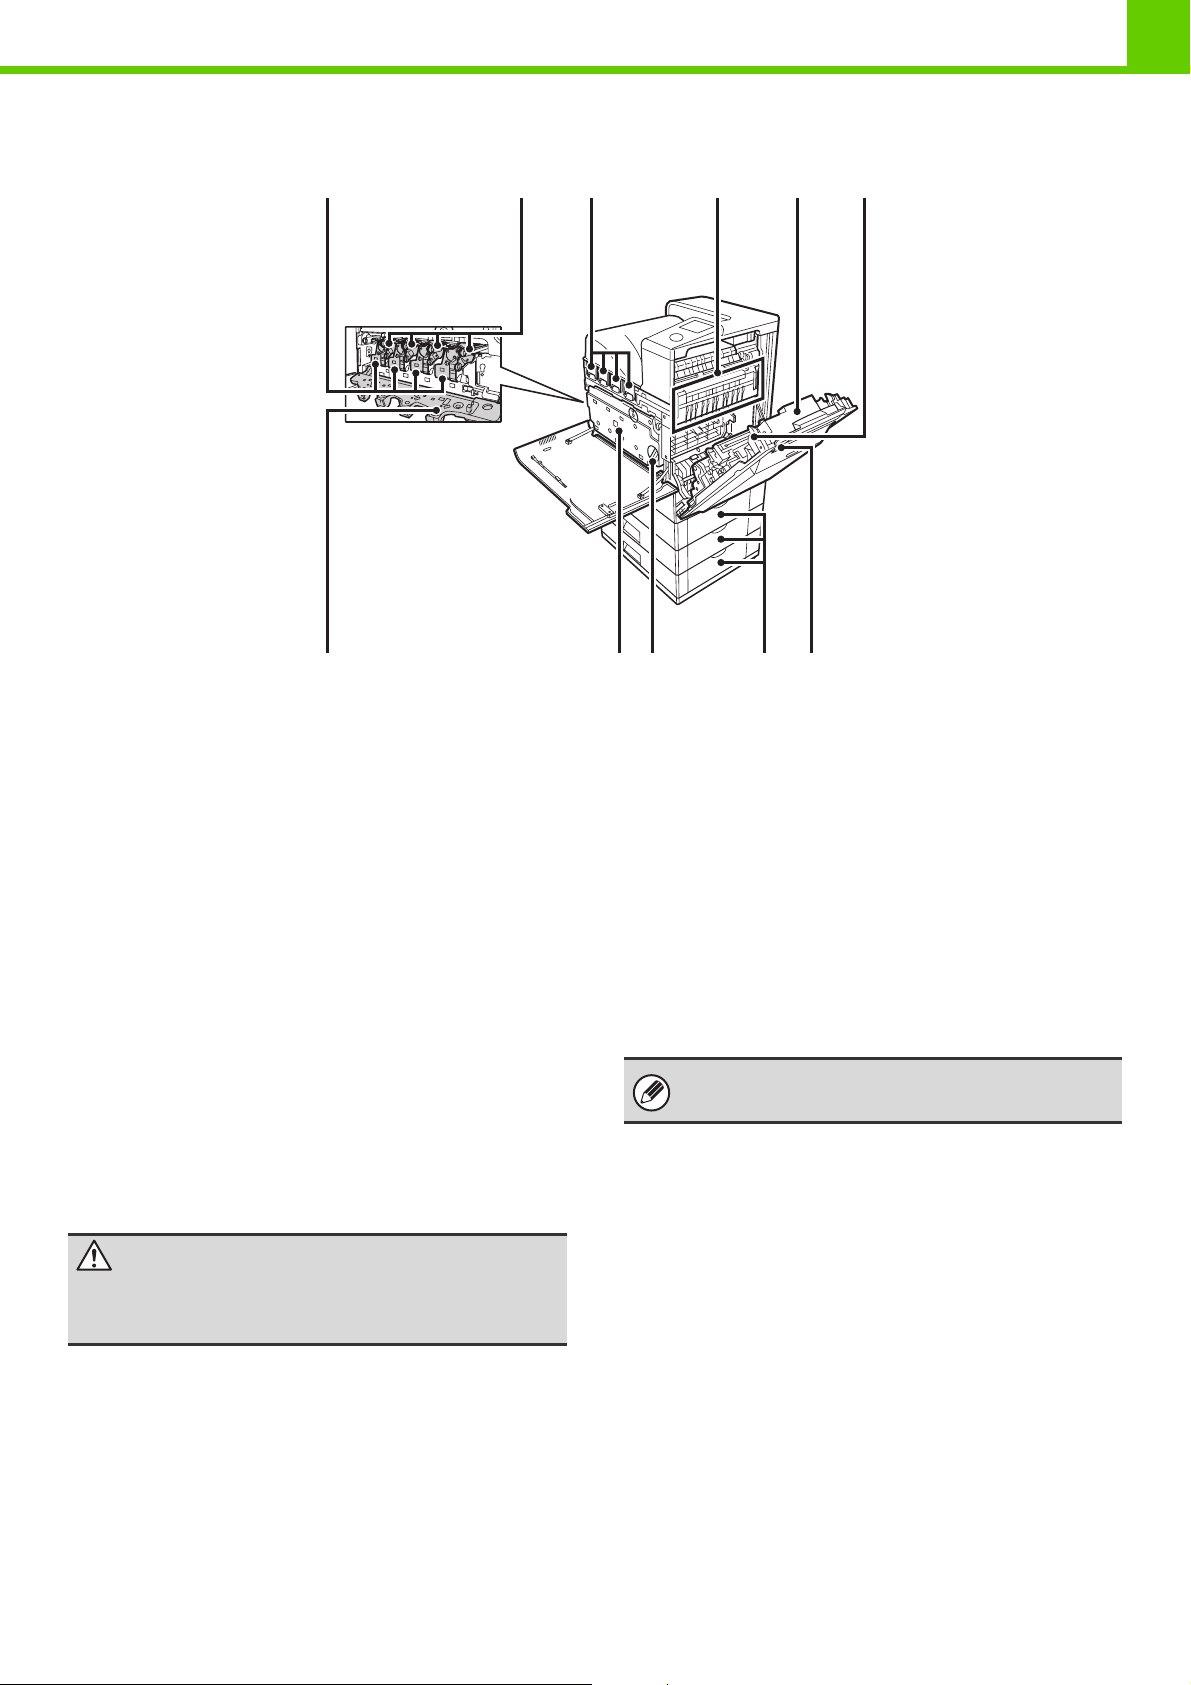
INTERIOR
BEFORE USING THE MACHINE
(11)
Toner collection
container removed
and main charger
cover open
(11) Developer cartridges
This contains the developer that is necessary to transfer
the toner to the paper.
When replacing the drum cartridge, the developer cartridge
must be removed before the drum cartridge is replaced.
☞ REPLACING THE DEVELOPER CARTRIDGE (page
1-55)
(12) \Drum cartridges
This contains the photosensitive drum that is used to
create images for printing.
☞ REPLACING THE DRUM CARTRIDGE (page 1-60)
(13) Toner cartridges
These contain toner for printing. When the toner runs out
in a cartridge, the cartridge of the color that ran out must
be replaced.
☞ REPLACING THE TONER CARTRIDGES (page
1-49)
(14) Fusing unit
Heat is applied here to fuse the transferred image onto
the paper.
Caution
The fusing unit is hot. Take care not to burn
yourself when removing a paper misfeed.
(15) Right side cover
Open this cover to remove a misfeed.
☞ 4. TROUBLESHOOTING "REMOVING MISFEEDS"
(page 4-2)
(13)(12) (14) (16)(15)
(19)(18)(17) (20) (21)
(16) Paper reversing section
This is used when 2-sided printing is performed. Open
this part to remove a paper misfeed.
☞ 4. TROUBLESHOOTING "REMOVING MISFEEDS"
(page 4-2)
(17) Main charger cover
Open this cover to clean the main charger.
☞ CLEANING THE MAIN CHARGER OF THE
PHOTOCONDUCTIVE DRUM (page 1-64)
(18) Toner collection container
This collects excess toner that remains after printing.
☞ REPLACING THE TONER COLLECTION
CONTAINER (page 1-52)
Your service technician will collect the toner collection
container.
(19) Toner collection container release lever
Turn this lever when you need to release the toner
collection container lock to replace the toner collection
container or clean the laser unit.
☞ REPLACING THE TONER COLLECTION
CONTAINER (page 1-52)
(20) Paper tray right side cover
Open this to remove a paper misfeed in trays.
☞ 4. TROUBLESHOOTING "REMOVING MISFEEDS"
(page 4-2)
(21) Right side cover release lever
To remove a paper misfeed, pull and hold this lever up to
open the right side cover.
☞ 4. TROUBLESHOOTING "REMOVING MISFEEDS"
(page 4-2)
1-5
Page 9
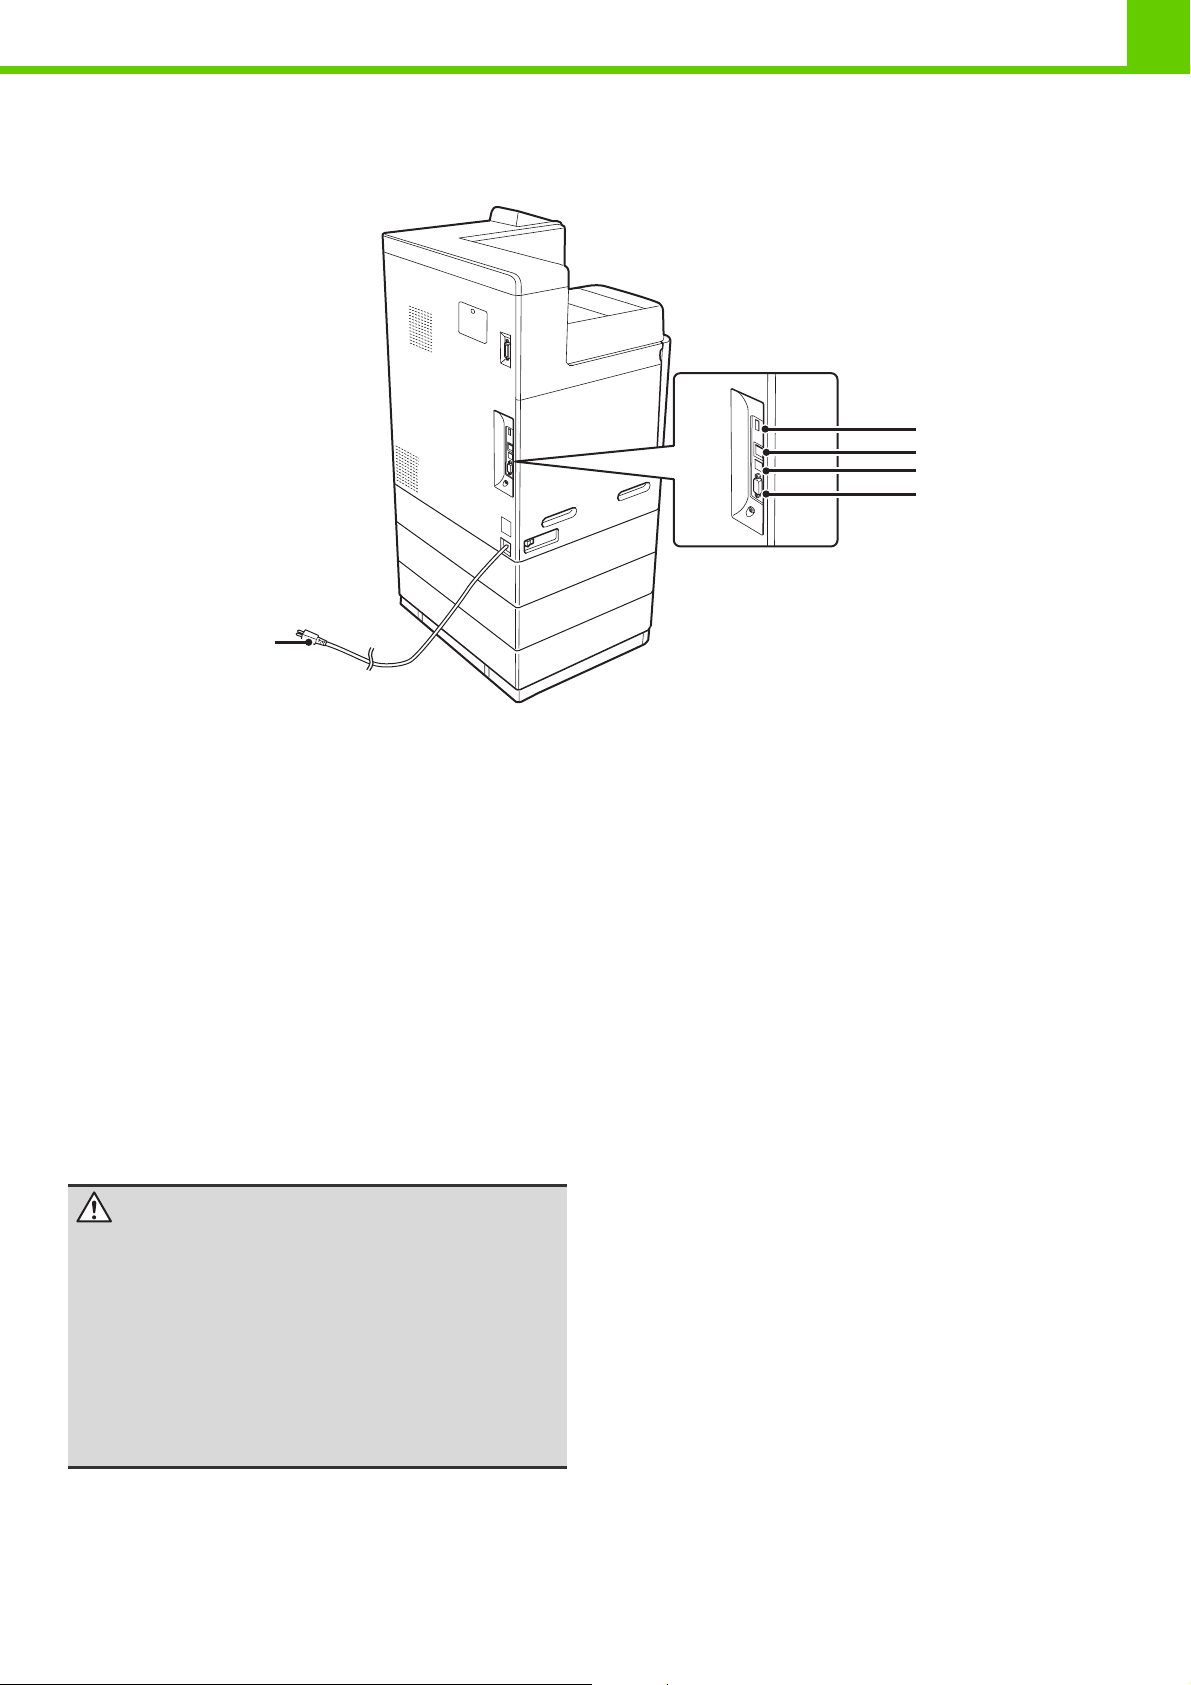
SIDE AND BACK
BEFORE USING THE MACHINE
(1)
(2)
(3)
(4)
(5)
(1) USB connector (A type)
Supports USB 2.0 (Hi-Speed).
This is used to connect a USB device such as USB
memory to the machine.
This connector is not initially available for use. If you wish
to use the connector, contact your service assistance.
(2) LAN connector
Connect the LAN cable to this connector when the
machine is used on a network.
For the LAN cable, use a shielded type cable.
(3) USB connector (B type )
Supports USB 2.0 (Hi-Speed).
A computer can be connected to this connector to use
the machine as a printer.
For the USB cable, use a shielded cable.
(4) Service-only connector
Caution
This connector is for use only by service
technicians.
Connecting a cable to this connector may
cause the machine to malfunction.
Important note for service technicians:
The cable connected to the service connector
must be less than 118" (3 m) in length.
(5) Power plug
1-6
Page 10
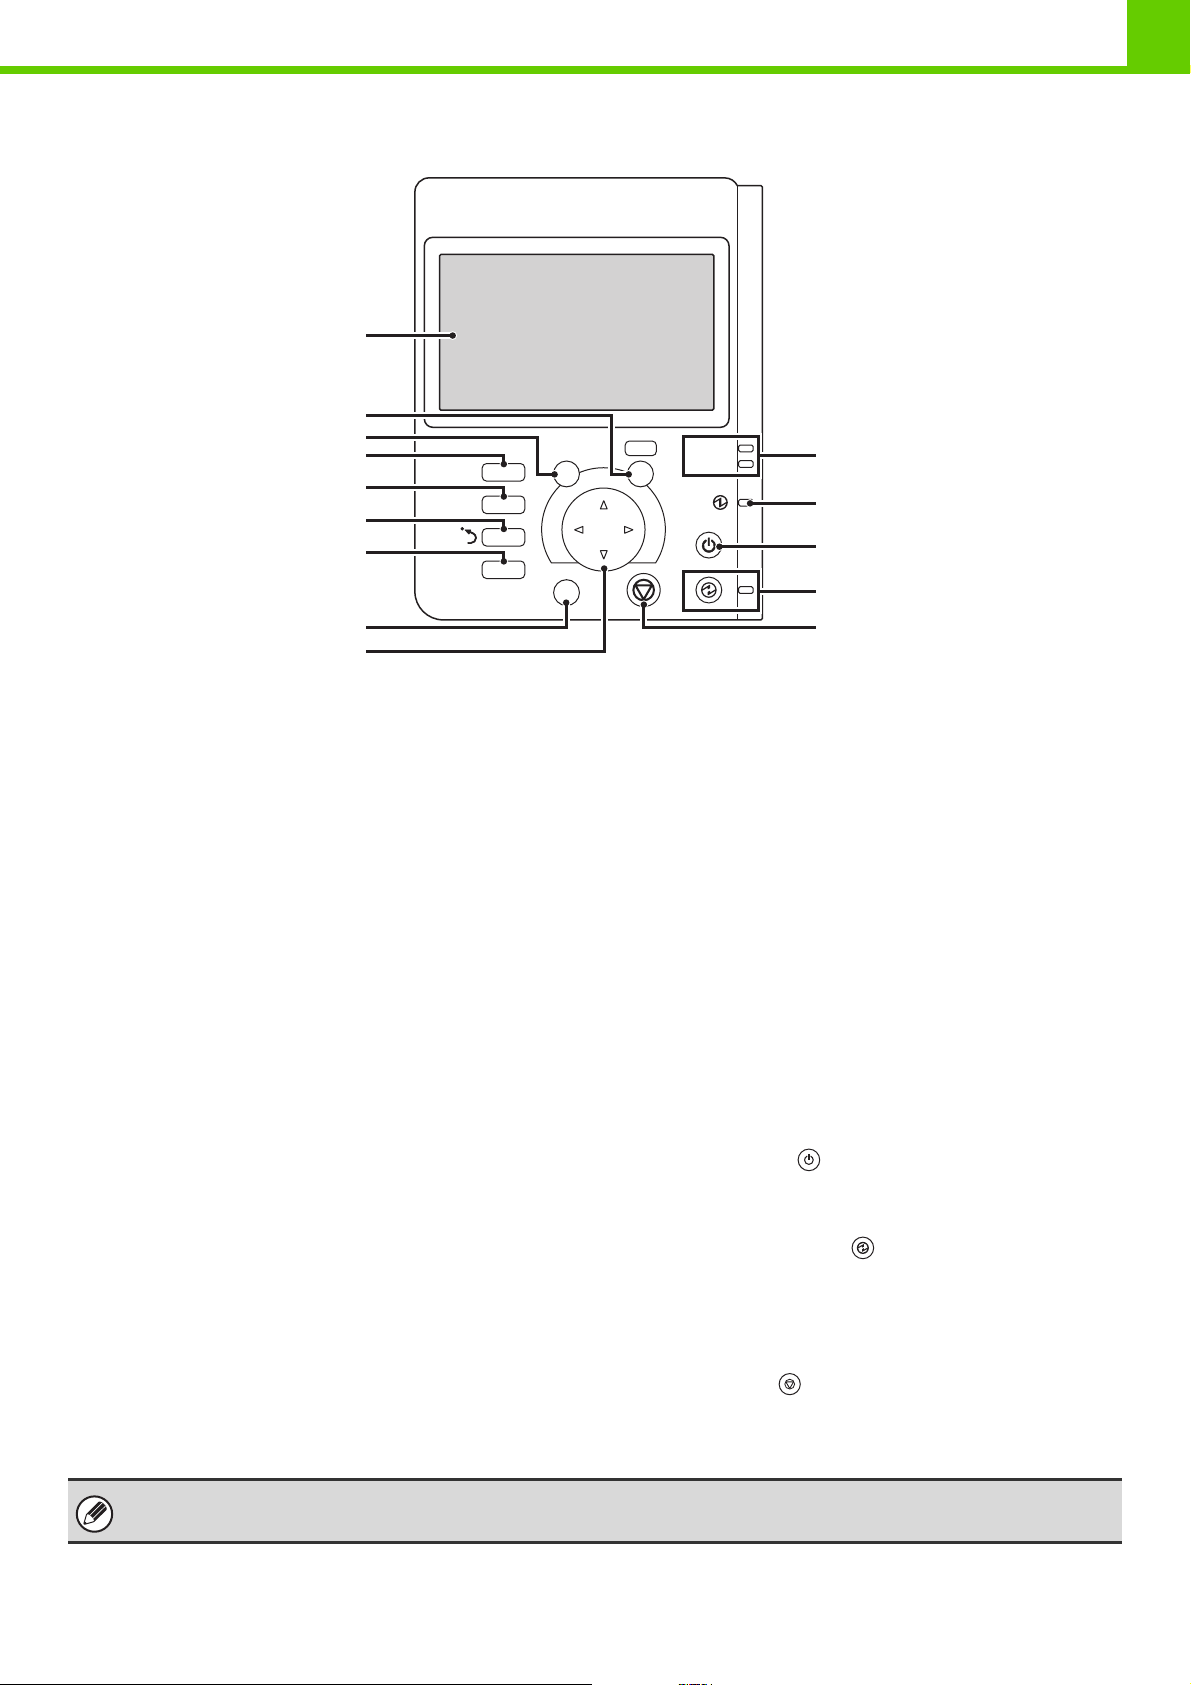
OPERATION PANEL
(1)
(2)
(3)
(4)
(5)
(6)
(7)
SYSTEM
SETTINGS
PRINT
JOB
STATUS
LOGOUT
BACK
OK
READY
DATA
BEFORE USING THE MACHINE
(10)
(11)
(12)
(13)
(8)
(9)
(1) Display
Messages and keys appear in the display.
Use the arrow keys and the [OK] key to select displayed
items and perform various operations.
☞ USING THE OPERATION PANEL (page 1-8)
(2) [OK] key
Press this key to enter a selected setting.
(3) [BACK] key
Press this key to return to the previous screen without
discarding your settings.
(4) [PRINT] key
When you wish to print a print hold job, press this key to
switch to print mode.
You can hold down the [PRINT] key to check the total
pages used, remaining toner, and machine display.
(5) [JOB STATUS] key
Press this key to display the job status screen. The job status
screen is used to check information on jobs and to cancel jobs.
For details, see "CHECKING THE PRINT STATUS"
(page 2-79).
(14)
(8) [LOGOUT] key
Press this key to log out after you have logged in and
used the machine.
☞ USER AUTHENTICATION (page 1-15)
(9) Arrow keys
Press these keys to move the selection frame that is
used to select setting keys and items in the display.
(10) PRINT mode indicators
• READY indicator
Print jobs can be received when this indicator is lit.
• DATA indicator
This blinks while print data is being received and lights
steadily while printing is taking place.
(11) Main power indicator
This lights up when the machine's main power switch is
in the "on" position.
☞ TURNING THE POWER ON AND OFF (page 1-13)
(12) [POWER] key ( )
Use this key to turn the machine power on and off.
☞ TURNING THE POWER ON AND OFF (page 1-13)
(6) Sharp OSA shortcut key
Press this key to display a shortcut key to Sharp OSA
mode.
(7) [SYSTEM SETTINGS] key
Press this key to display the system settings menu
screen. The system settings are used to configure paper
tray settings, and adjust parameters to make the
machine easier to use.
The indicators of the operation panel may differ depending on the country and region.
(13) [POWER SAVE] key ( ) / indicator
Use this key to put the machine into auto power shut-off
mode to save energy.
The [POWER SAVE] indicator blinks when the machine
is in auto power shut-off mode.
(14) [STOP] key ( )
Press this key to stop a printing job.
1-7
☞ [POWER SAVE] KEY (page 1-14)
Page 11
BEFORE USING THE MACHINE
USING THE OPERATION PANEL
This section explains how to use the operation panel.
• To enter text, see "ENTERING TEXT" (page 1-75).
• For information on the screens and procedures for using the system settings, see "Common Operation Methods"
(page 3-5) in "3. SYSTEM SETTINGS".
USING THE DISPLAY
Base screen
04/04/2010
04/04/2010
OK
BACK
(2)
(1)
(1) Move the selection frame with the arrow keys
Use the arrow keys to move the selection frame in the display to the desired setting key.
04/04/2010
Selection frame
(2) [OK] key
When the selection frame is on the desired setting, press the [OK] key to enter your selection. The setting screen will appear.
1-8
Page 12
BEFORE USING THE MACHINE
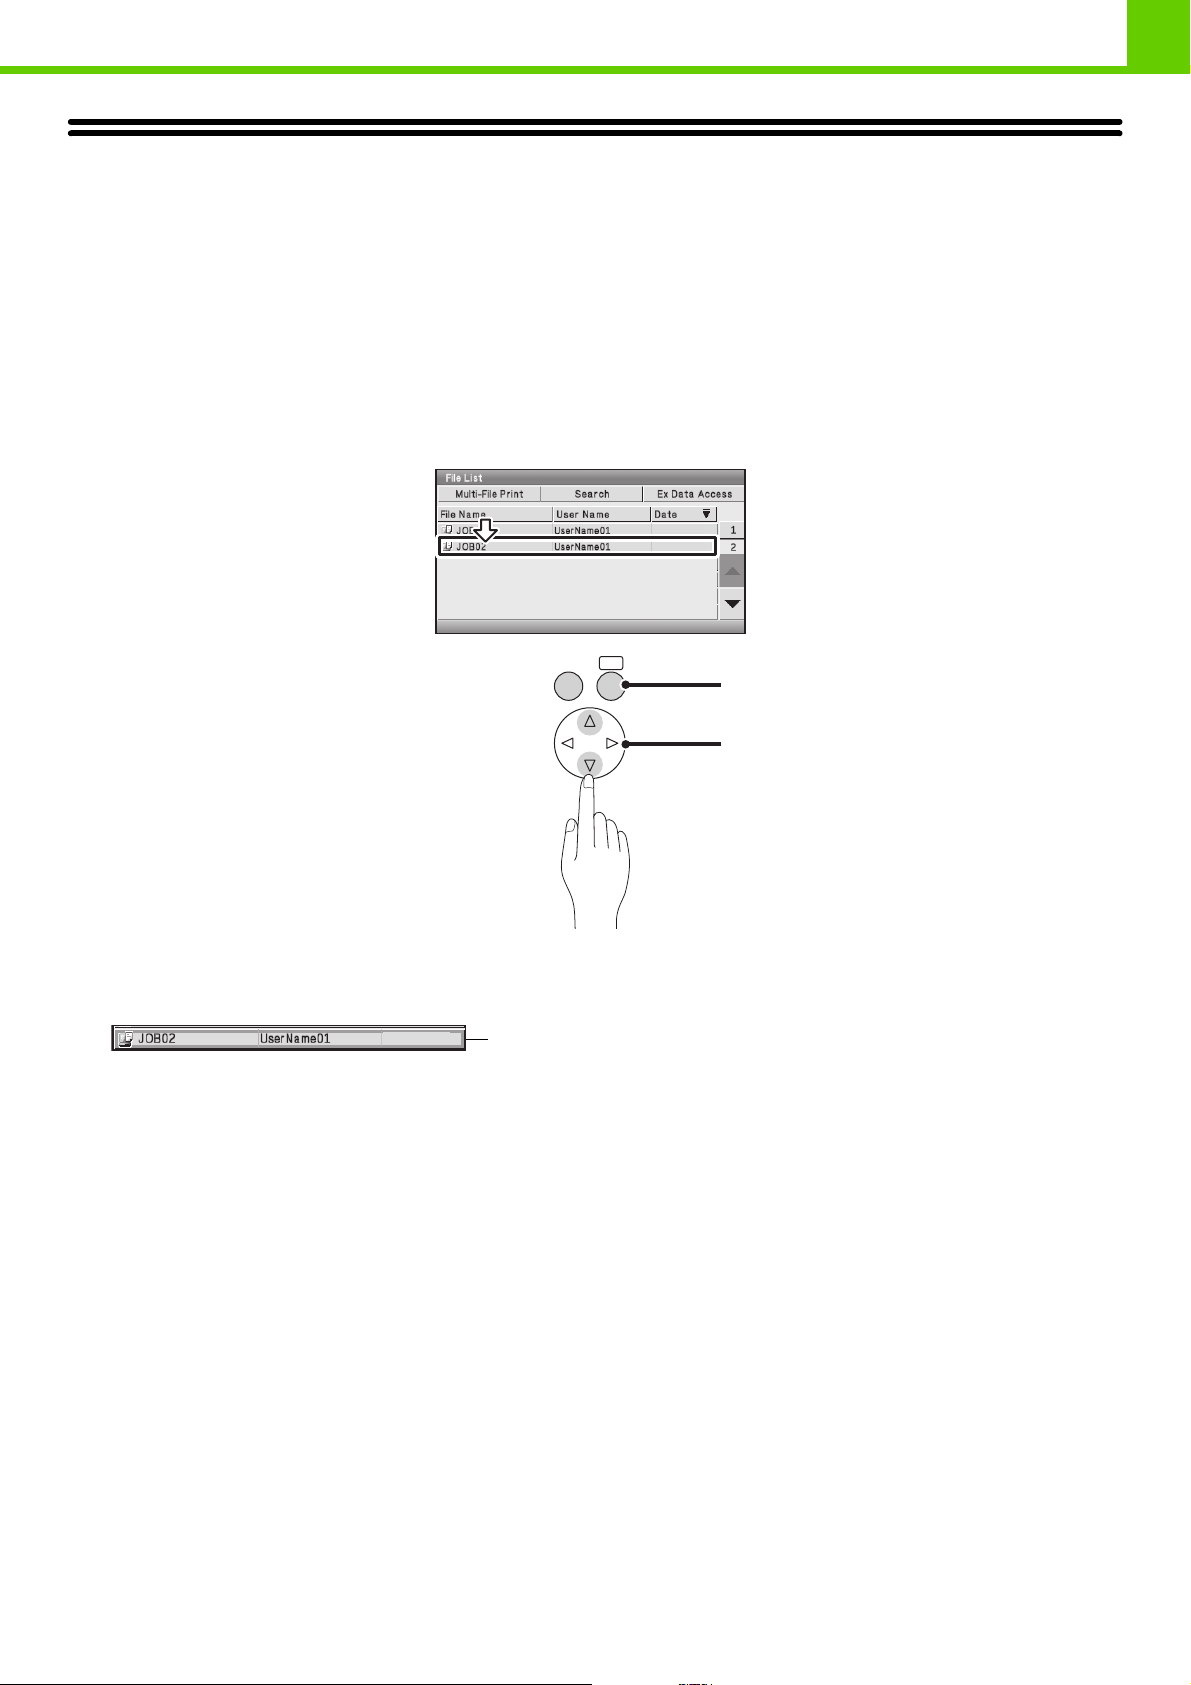
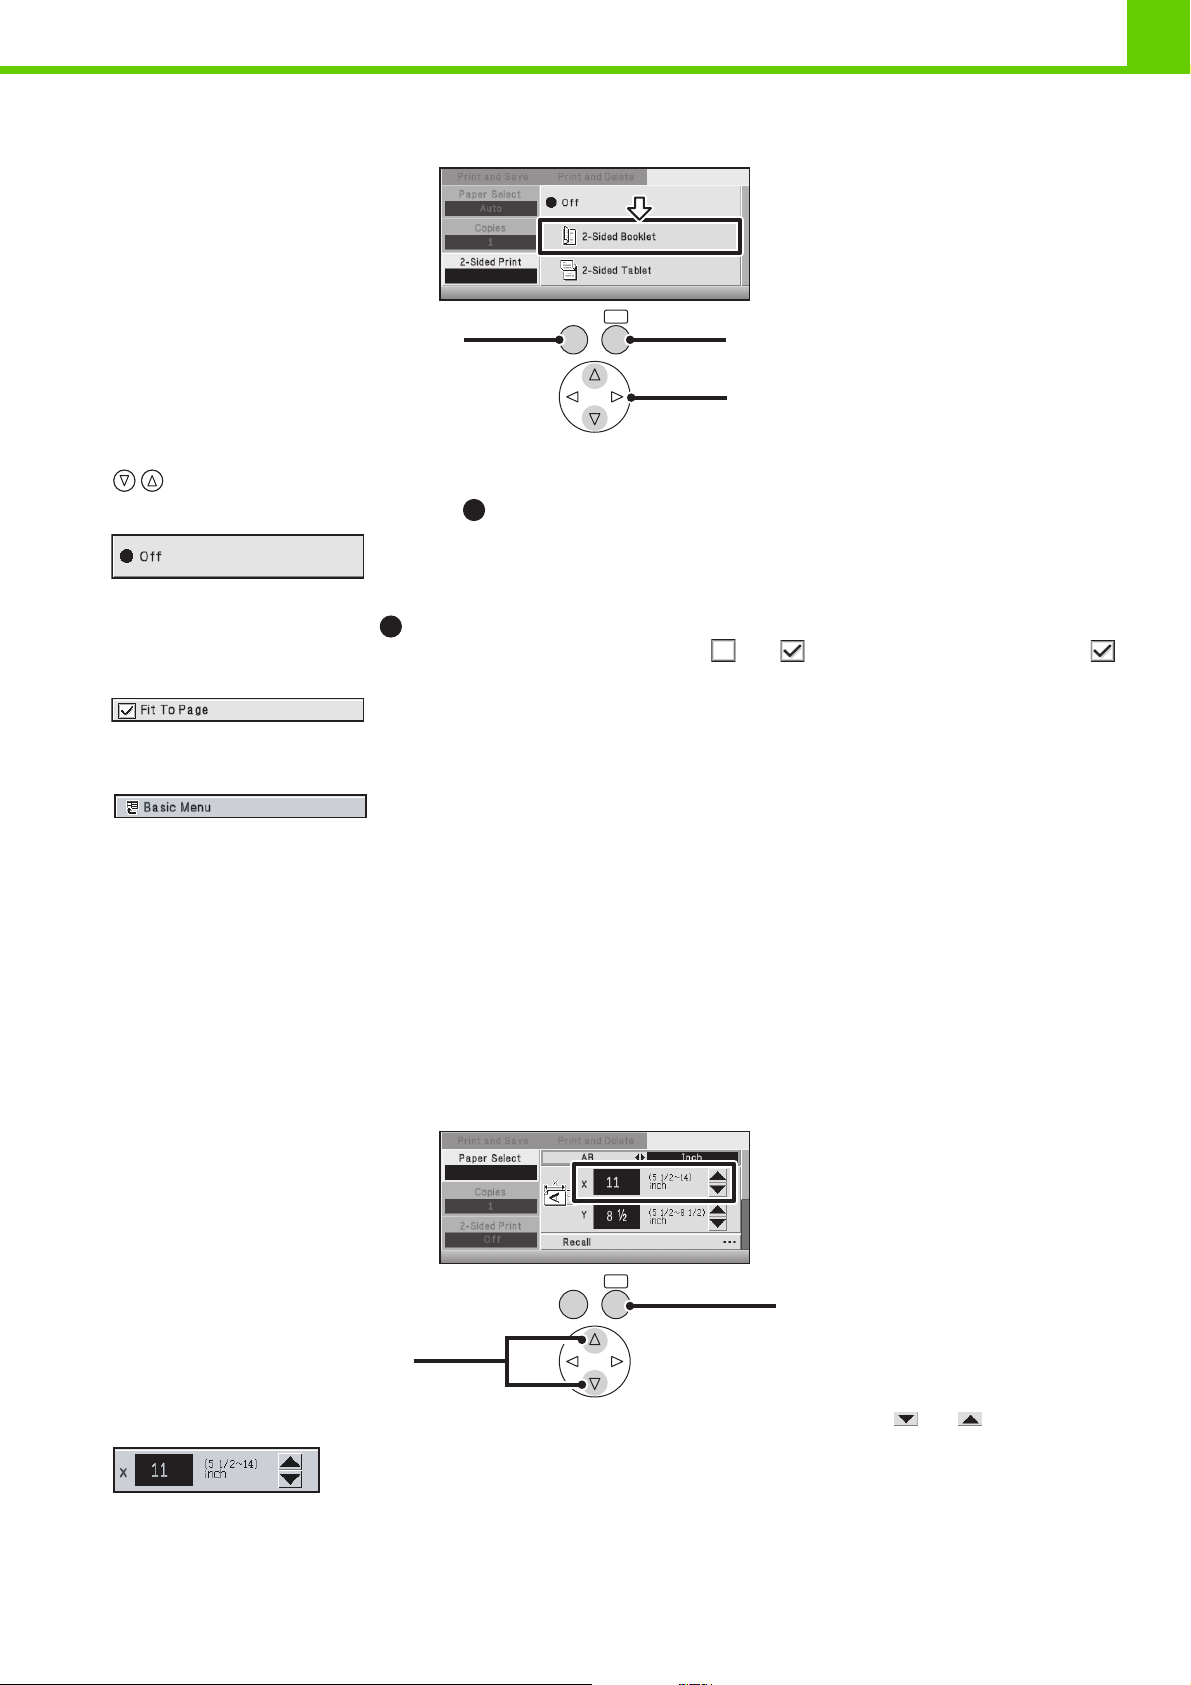
Selecting items in lists and returning to the previous screen
OK
BACK
(3)
(1) When selections appear as a list in a setting screen, select the desired item in the list with the
keys.
Items that are currently set are indicated by .
(2) Press the [OK] key to enter your selection.
• When the [OK] key is pressed, appears next to the selected item.
• For a selected item that has a checkbox, the checkbox changes between and each time the [OK] key is pressed.
indicates that the setting is selected.
(2)
(1)
(3) To return to the previous screen, press the [BACK] key.
To return to the base screen, select the [Basic Menu] key.
Entering numbers
There are three methods for entering numbers.
Entering with the increment/decrement keys (below)
Entering with the arrow keys (page 1-10)
Using the soft numeric keypad (page 1-10)
Entering with the increment/decrement keys
To change the paper size, enter a number as follows.
OK
BACK
(2)
(1)
(1) If a setting requires that a number be entered, move the selection frame to or .
(2) The number increases or decreases each time the [OK] key is pressed. To make the number
change quickly, hold down the [OK] key.
1-9
Page 13
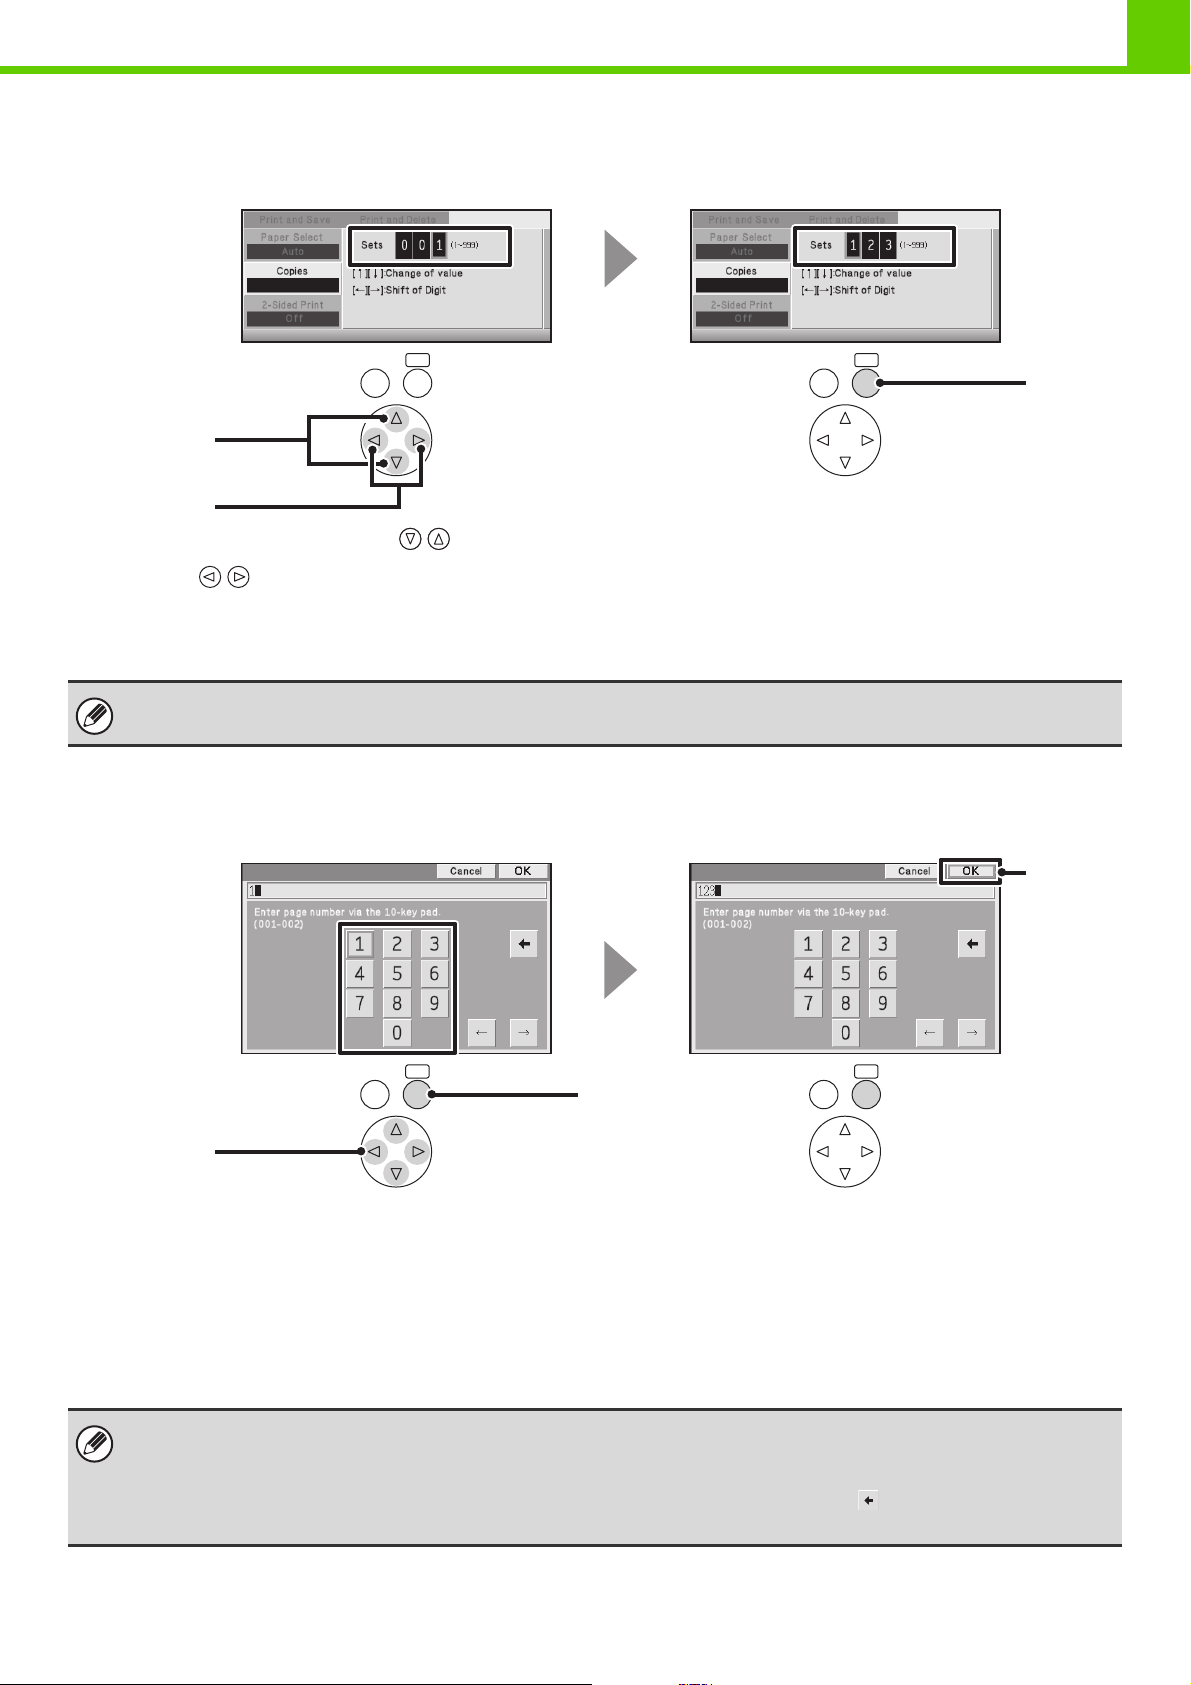
Entering with the arrow keys
To change the number of copies, enter a number as follows.
Example: 123
BEFORE USING THE MACHINE
OK
BACK
(1)
(2)
BACK
(1) Select the number with the keys.
(2) Use the keys to move the frame to the next place.
(3) Repeat steps (1) and (2) to enter 2 and 3.
(4) After entering the number, press the [OK] key
To restore a number...
Set all digits to 0.
Using the soft numeric keypad
To enter a password or page number, use the soft numeric keypad to enter the number.
Example: 123
OK
(4)
(4)
(1)
BACK
OK
(2)
BACK
OK
(1) Use the arrow keys to move the frame to the desired number.
Here the frame is moved to "1".
(2) Press the [OK] key.
(3) Repeat steps (1) and (2) to enter the desired number.
Here enter "2" and "3".
(4) When you have finished entering the number, select the [OK] key.
Adding a digit..
Move the cursor to the position where you want to add a digit and enter the digit.
Deleting a digit..
Move the cursor to the position immediately after the digit you wish to delete and select the key. The digit immediately
before the cursor is deleted.
1-10
Page 14

Items that appear in the display
(2) (3)
(1)
(4)
BEFORE USING THE MACHINE
(5)
(1) Icon display (2) This shows messages.
This icon appears when a USB memory or
other USB device is connected to the
machine.
This icon appears when the data security kit
is being used.
This icon appears when the machine is
communicating with an external application.
This icon appears when the machine and
computer are communicating using the
remote operation function.
The display illustrations shown in this manual are only images, and may differ from the actual screens.
System Settings (Administrator): Keys Touch Sound
This is used to adjust the volume of the beep that sounds when keys are touched. The key touch sound can also be turned
off.
(3) Settings appear here.
If you move the selection frame to the bottom setting and
then press the key, the next screen appears.
(4) This shows the current page / total pages.
(5) This shows an operation hint.
1-11
Page 15
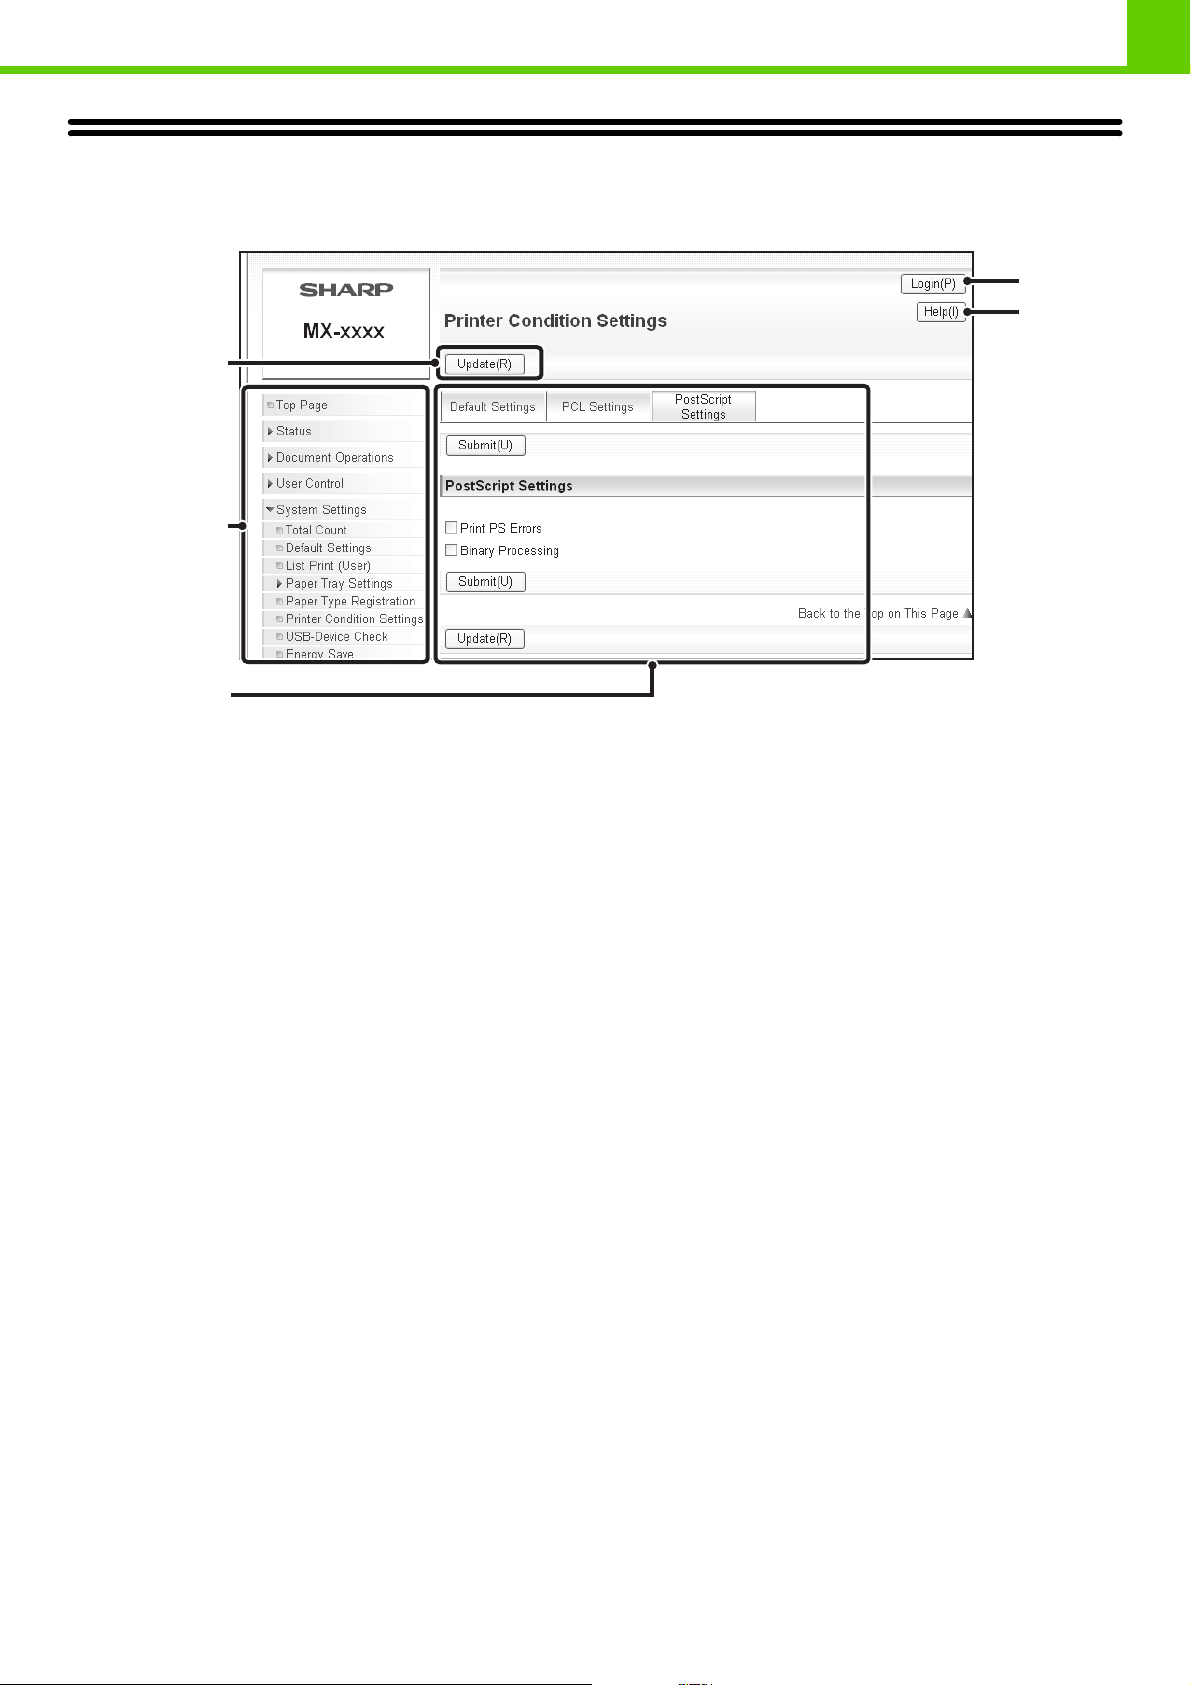
USING THE WEB PAGE
The procedures for using the Web page are explained below.
(1)
(2)
BEFORE USING THE MACHINE
(4)
(5)
(3)
(1) Common buttons
The [Submit] button used to store settings, the [Update]
button used to update settings, and the [Cancel] button
used to cancel a setting and return to the previous screen
appear here.
After changing a setting, be sure to click the [Submit]
button.
(2) Web page menu
The items that can be set in the Web page appear here.
Click an item to display the settings of that item.
(3) Settings appear here.
The settings of an item selected from the Web page
menu appear here.
(4) [Logout] button
When user authentication is enabled, click this button to
log out from the Web server. When you are not logged in,
this button is the [Login] button.
(5) [Help] button
This shows Help for each item.
1-12
Page 16
BEFORE USING THE MACHINE
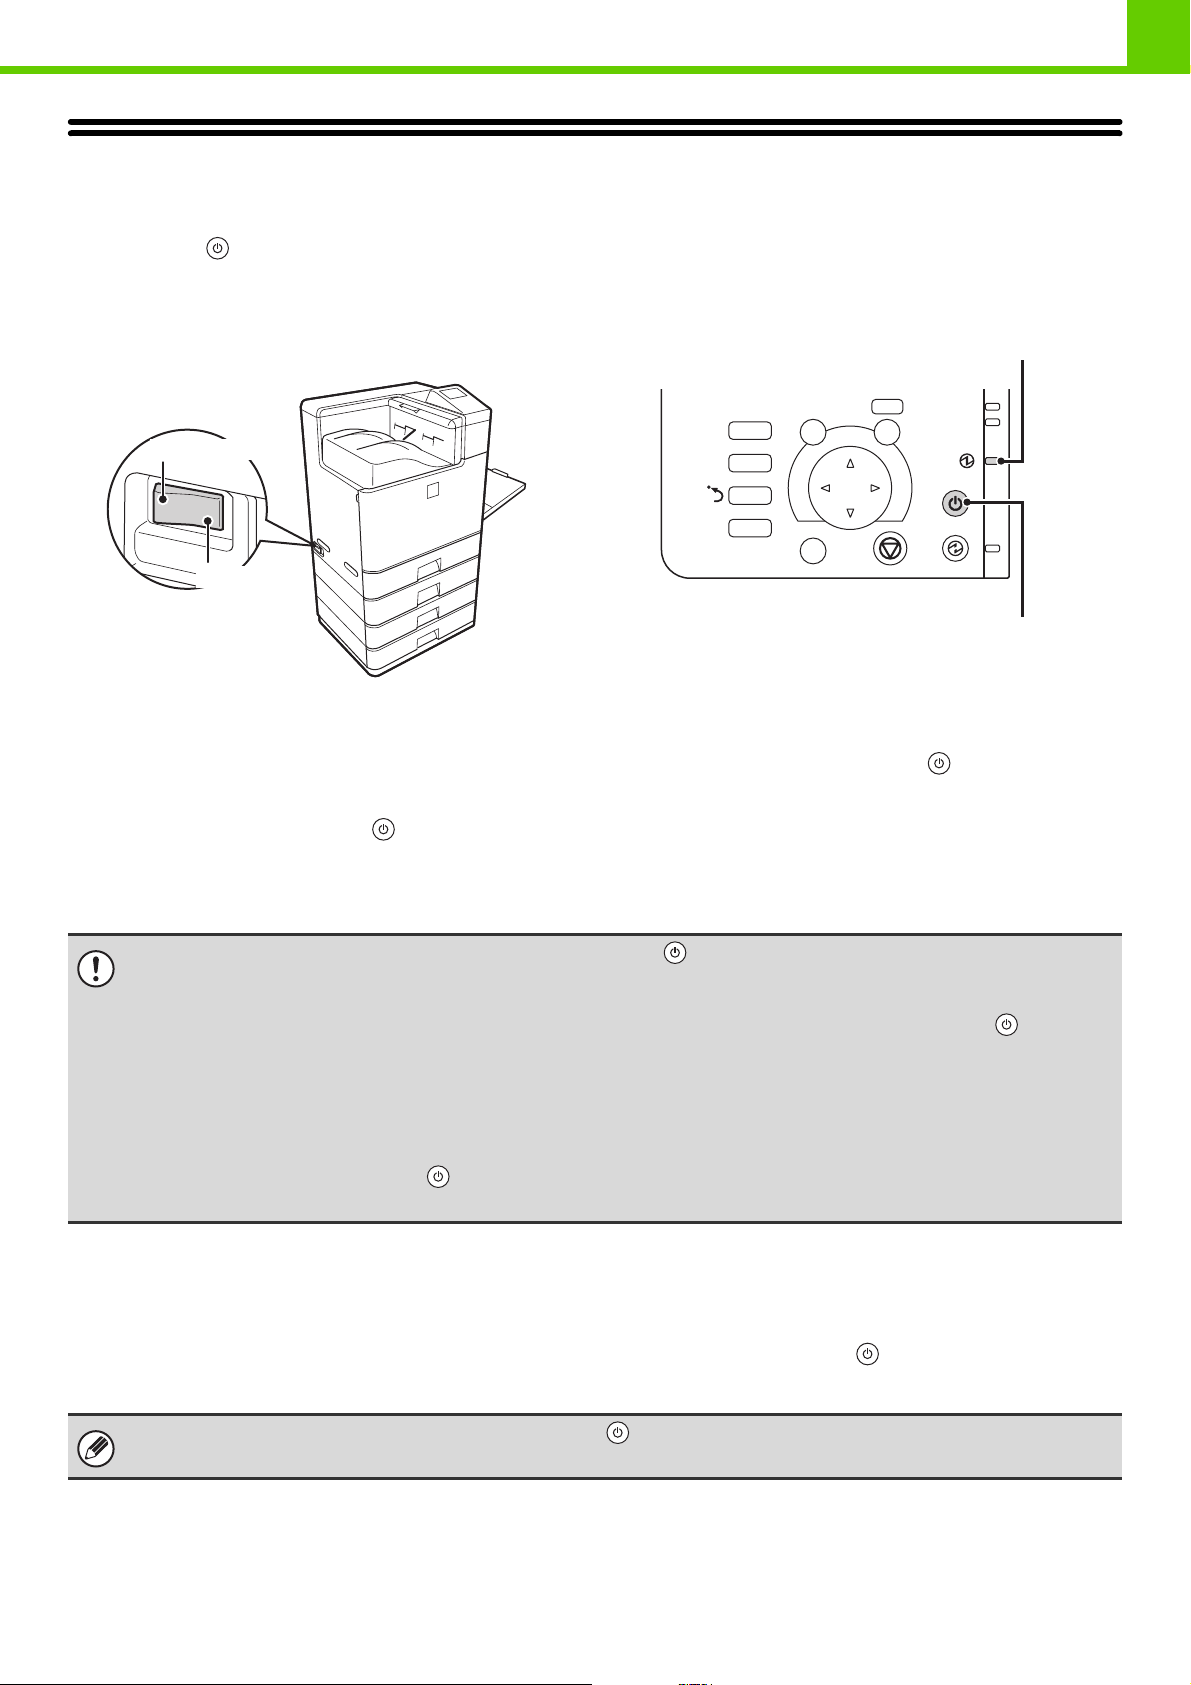
TURNING THE POWER ON AND OFF
The machine has two power switches. One is the main power switch on the left side of the machine, and the other is the
[POWER] key ( ) on the right side of the operation panel.
Main power switch
When the main power switch is switched on, the main
power indicator on the operation panel lights up.
"On" position
"Off" position
Turning on the power
(1) Switch the main power switch to the "on"
position.
(2) Press the [POWER] key ( ) to turn on the
power.
[POWER] key
Main power indicator
PRINT
JOB
STATUS
SYSTEM
SETTINGS
BACK
LOGOUT
OK
READY
DATA
[POWER] key
Turning off the power
(1) Press the [POWER] key ( ) to turn off the
power.
(2) Make sure that the display is off.
(3) Switch the main power switch to the "off"
position.
• When turning off the power, be sure to press the [POWER] key ( ) on the operation panel, then wait 20 seconds and
switch off the main power switch. In the event that the main power is suddenly interrupted due to a power failure or other
reason, turn the machine power back on and then turn it off in the correct order.
If the machine is left for a long time with the main power having been turned off prior to the [POWER] key ( ), abnormal
noises, degraded image quality, and other problems may result.
• Before switching off the main power switch, make sure that the display is off and the DATA indicator for printing is not lit or
blinking on the operation panel.
Switching off the main power switch or removing the power cord from the outlet while any of the indicators are lit or blinking
may cause failure, such as damage to the hard drive or loss of data.
• Switch off both the [POWER] key ( ) and the main power switch and unplug the power cord if you suspect a machine
failure, if there is a bad thunderstorm nearby, or when you are moving the machine.
Restarting the machine
In order for some settings to take effect, the machine must be restarted.
If a message in the display prompts you to restart the machine, press the [POWER] key ( ) to turn off the power and
then press the key again to turn the power back on.
In some states of the machine, pressing the [POWER] key ( ) to restart will not make the settings take effect. In this case,
use the main power switch to switch the power off and then on.
1-13
Page 17
BEFORE USING THE MACHINE
ENERGY SAVE FUNCTIONS
This product has the following two energy save functions that conform to the Energy Star guidelines to help conserve
natural resources and reduce environmental pollution.
Preheat Mode (Low power mode)
Preheat mode automatically lowers the temperature of the fusing unit and thereby reduces power consumption if the
machine remains in the standby state for the interval of time set in "Preheat Mode Setting" in the system settings
(administrator).
The machine automatically wakes up and returns to normal operation when a print job is received, a key is pressed on
the operation panel.
Auto power shut-off mode (Sleep mode)
Auto power shut-off mode automatically shuts off power to the display and the fusing unit if the machine remains in the
standby state for the interval of time set in "Auto Power Shut-Off Timer" in the system settings (administrator). This
mode provides the lowest level of power consumption. Considerably more power is saved than in preheat mode,
however, the wakeup time is longer. This mode can be disabled in the system settings (administrator).
The machine automatically wakes up and resumes normal operation when a print job is received or when the [POWER
SAVE] key
() is pressed.
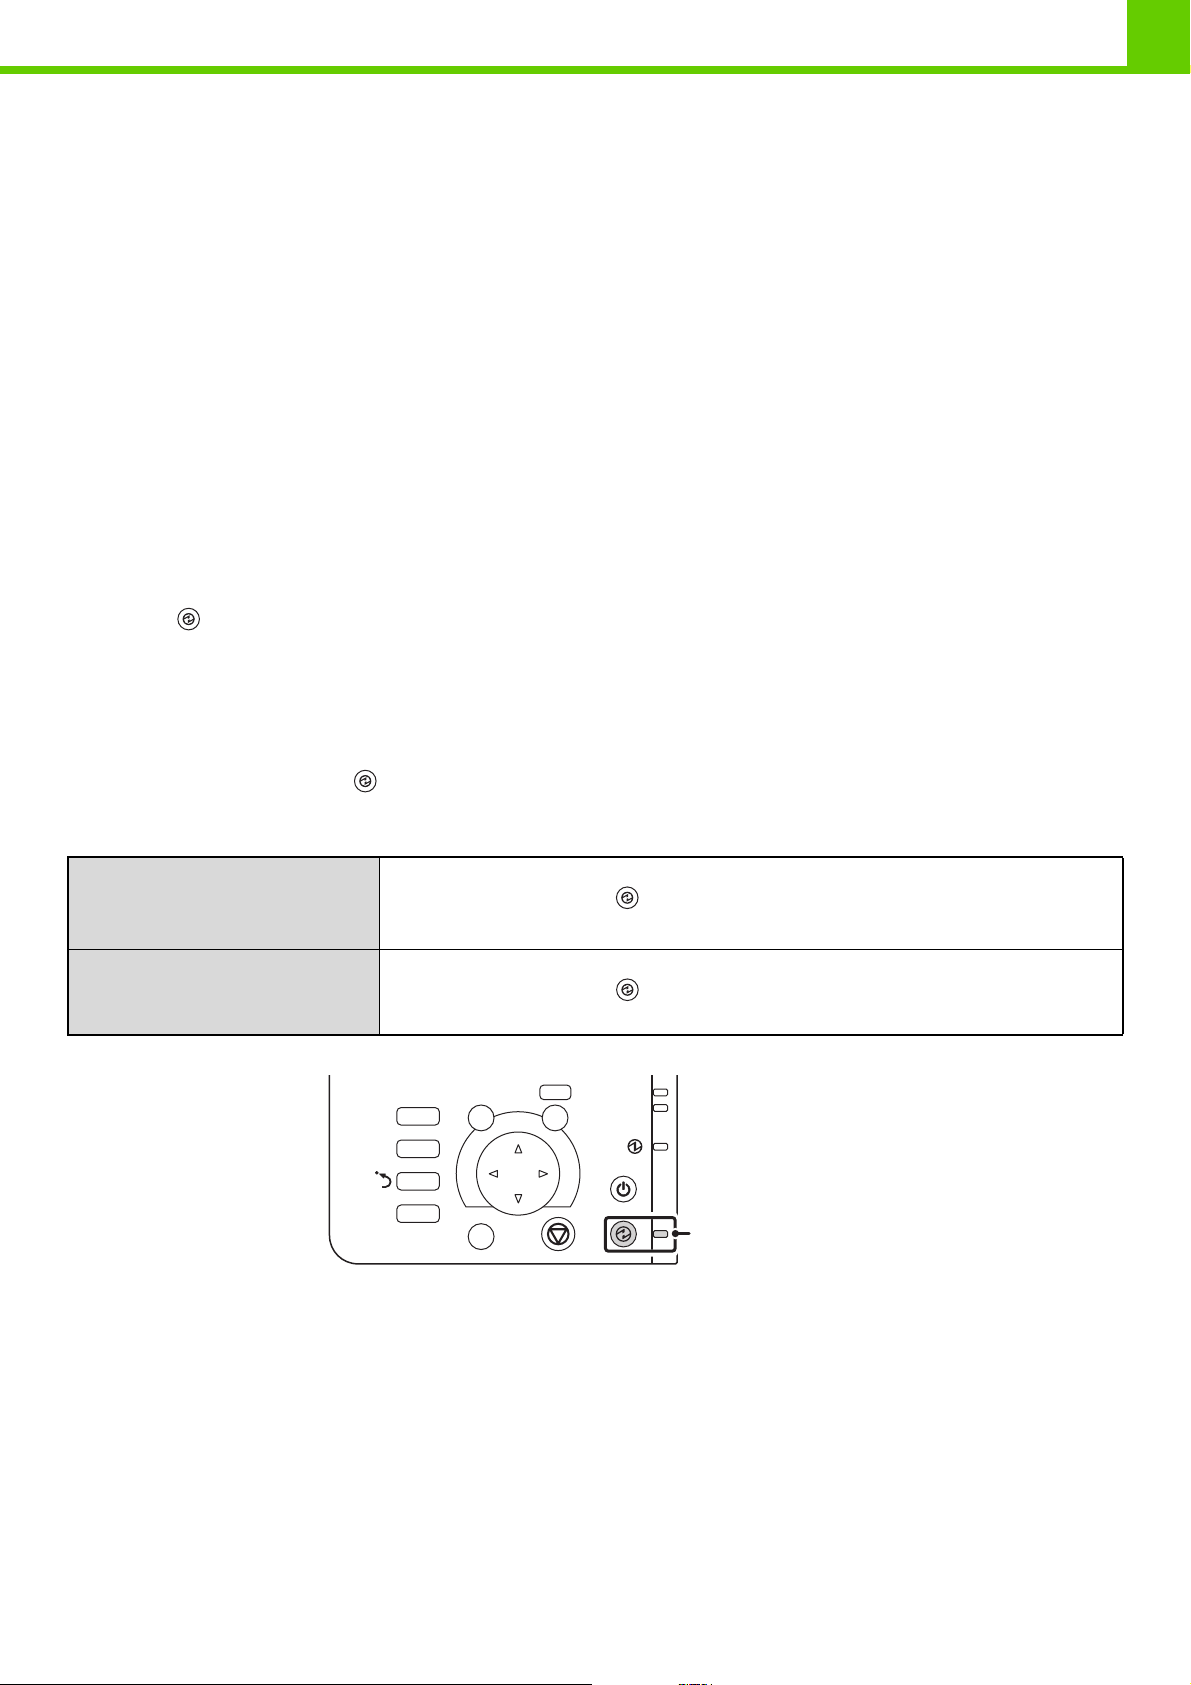
[POWER SAVE] KEY
Press the [POWER SAVE] key () to put the machine in auto power shut-off mode or wake it up from auto power
shut-off mode. The [POWER SAVE] indicator has an indicator that indicates whether or not the machine is in auto power
shut-off mode.
When the [POWER SAVE]
indicator is off in the standby
state
When the [POWER SAVE]
indicator is blinking
The machine is ready to be used.
If the [POWER SAVE] key ( ) is pressed when the indicator is off, the indicator will blink
and the machine will enter auto power shut-off mode after a brief interval.
The machine is in auto power shut-off mode.
If the [POWER SAVE] key ( ) is pressed when the indicator is blinking, the indicator will
turn off and the machine will return to the ready state after a brief interval.
PRINT
JOB
STATUS
SYSTEM
SETTINGS
BACK
LOGOUT
OK
READY
DATA
[POWER SAVE]
key / indicator
1-14
Page 18
BEFORE USING THE MACHINE
USER AUTHENTICATION
User authentication restricts the use of the machine to users that have been registered. The functions that each user is
allowed to use can be specified, allowing the machine to be customized to meet the needs of your workplace.
When the administrator of the machine has enabled user authentication, each user must log in to use the machine.
There are different types of user authentication, and each type has a different login method.
For more information, see the explanations of the login methods.
☞ AUTHENTICATION BY USER NUMBER (see below)
☞ AUTHENTICATION BY LOGIN NAME / PASSWORD (page 1-17)
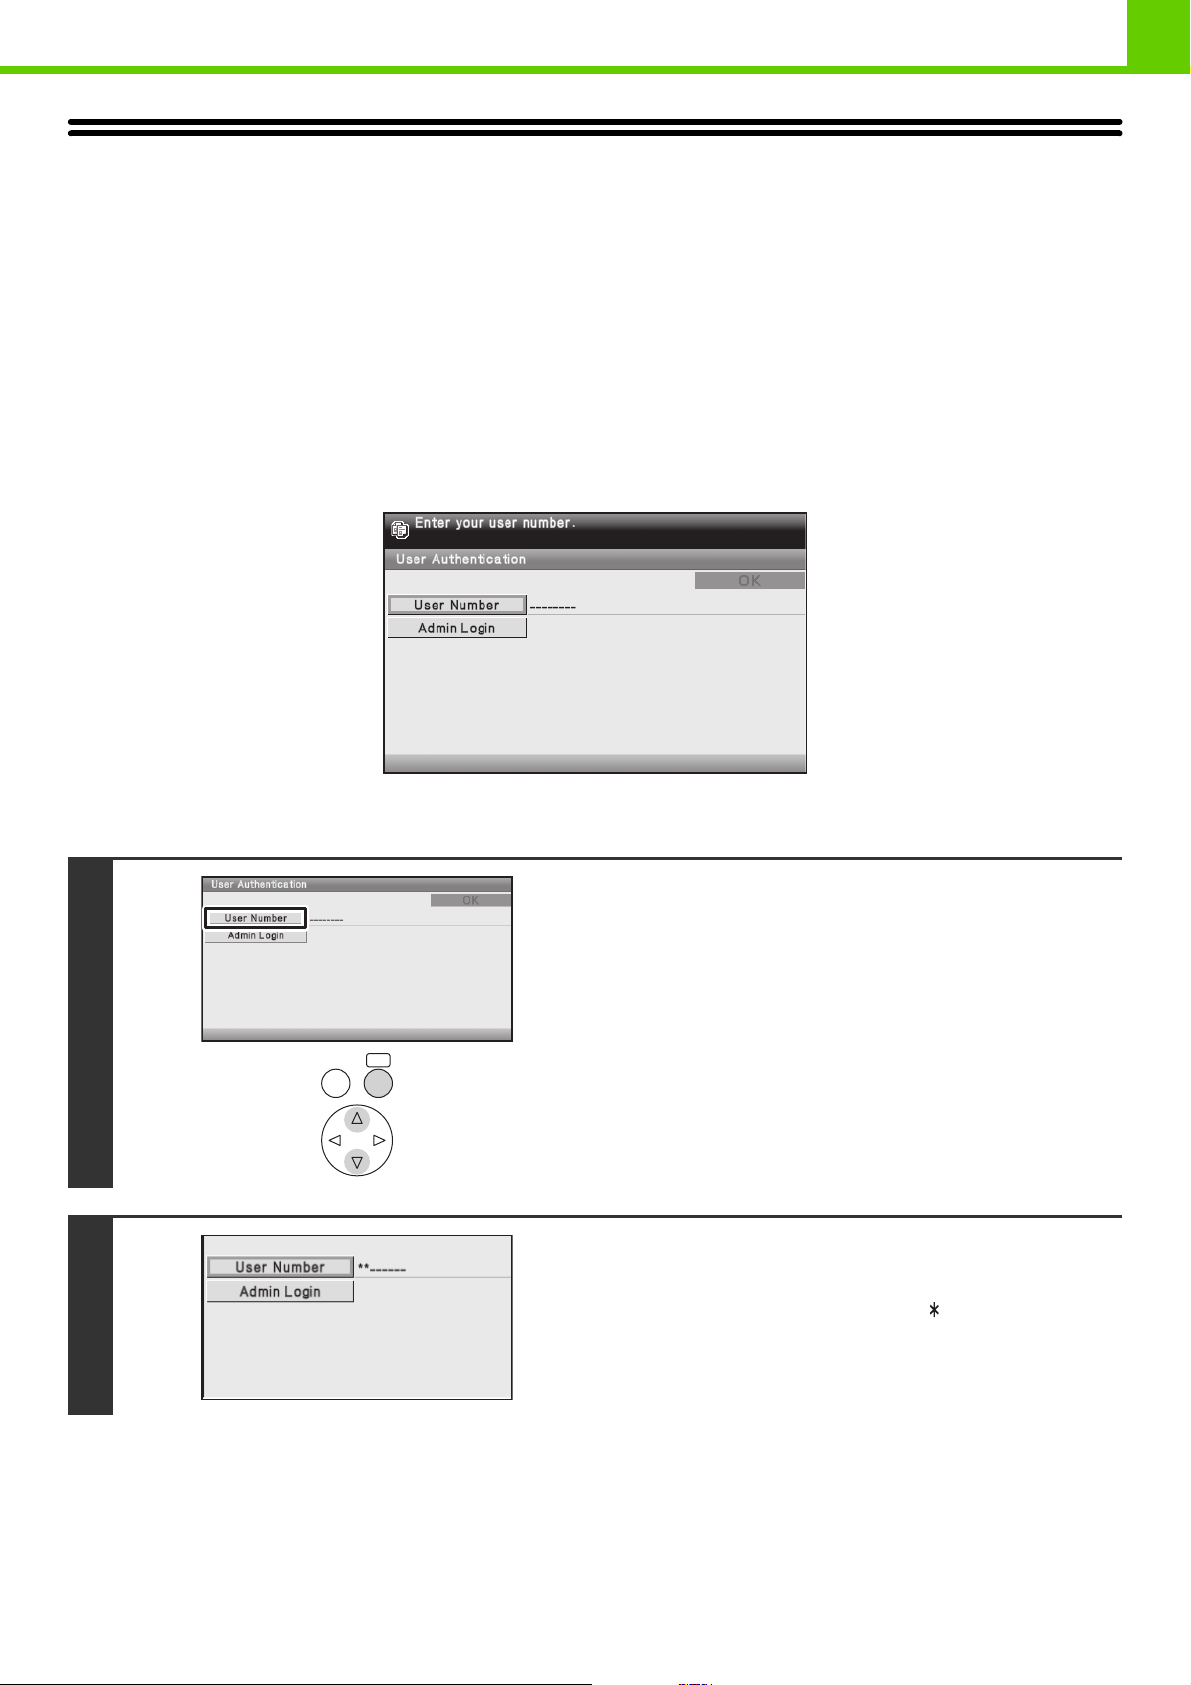
AUTHENTICATION BY USER NUMBER
The following procedure is used to log in using a user number received from the administrator of the machine.
When controlled by user number
Keys in the display can be selected with the arrow keys and the [OK] key.
Select [User Number] key.
1
OK
BACK
Enter your user number (5 to 8 digits)
with the soft numeric keypad.
2
Each entered digit will be displayed as " ".
For the procedure for entering numbers, see "Entering
numbers" (page 1-9).
1-15
Page 19
BACK
BEFORE USING THE MACHINE
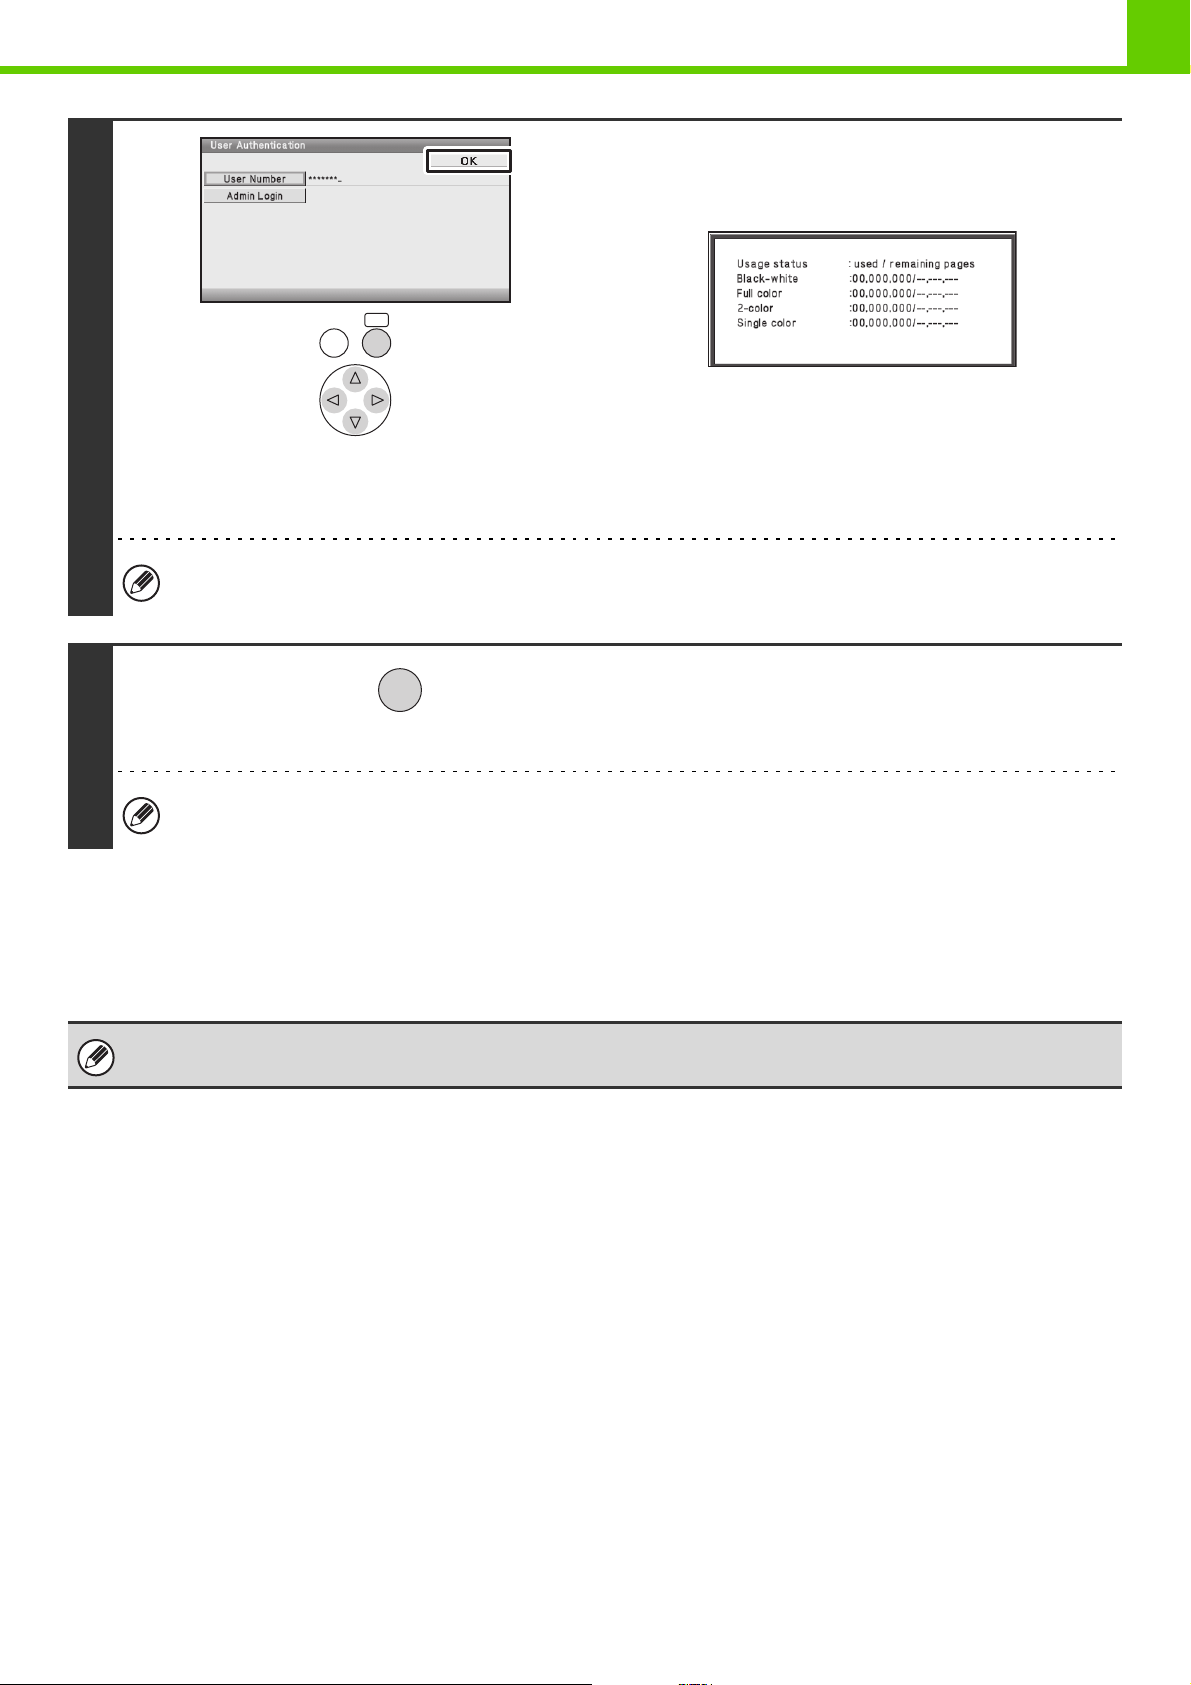
Select the [OK] key.
After the entered user number is authenticated, the user count
screen will appear briefly.
OK
3
When the user number is an 8-digit number, this step is not necessary. (Login takes place automatically after the user
number is entered.)
When page limits have been set in "Pages Limit Group List" in
the Web page, the number of pages remaining will appear.
(The remaining number of pages that the user can use
appears.) The amount of time that this screen appears can be
changed using "Message Time Setting" in the system settings
(administrator).
When you have finished using the
LOGOUT
machine and are ready to log out, press
the [LOGOUT] key.
4
If a preset duration of time elapses after the machine is last used, the Auto Clear function will activate. When Auto
Clear activates, logout takes place automatically.
If an incorrect user number is entered 3 times in a row...
If "A Warning when Login Fails" is enabled in the Web page, the machine will lock for 5 minutes if an incorrect user
number is entered 3 times in a row.
Verify the user number that you should use with the administrator of the machine.
The administrator can clear the locked state.
This is done from [User Control] and then [Default Settings] in the Web page menu.
1-16
Page 20
BEFORE USING THE MACHINE
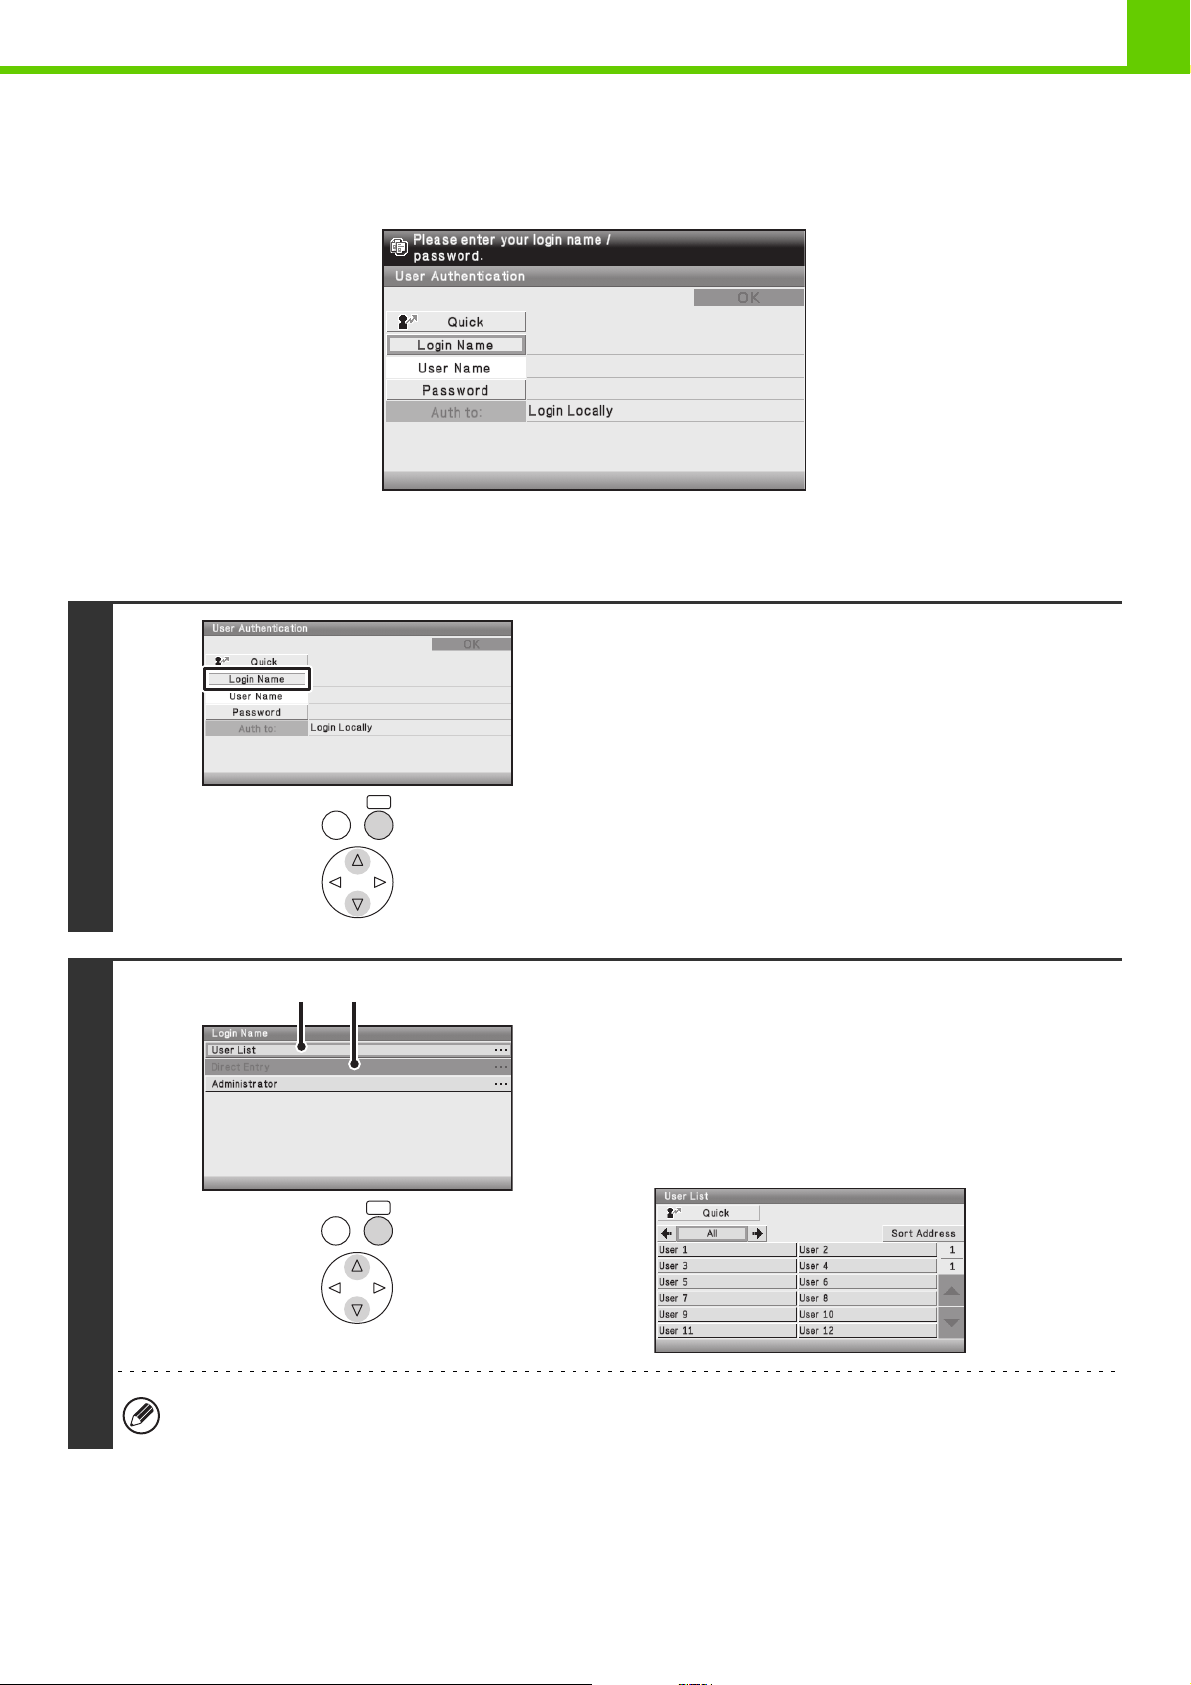
AUTHENTICATION BY LOGIN NAME / PASSWORD
The following procedure is used to log in using a login name and password received from the administrator of the
machine or the administrator of the LDAP server.
When controlled by login name and password
(Different items will appear in the screen when LDAP authentication is used.)
Keys in the display can be selected with the arrow keys and the [OK] key.
1
2
BACK
A B
BACK
OK
OK
Select the [Login Name] key or the
[Quick] key.
If the [Login Name] key is selected, a screen for selecting the
user name appears. Go to the next step.
If the [Quick] key is selected, an area for entering a
"Registration No." appears [---].
Use the soft numeric keypad to enter your registration number
that has been stored in "User List" in the Web page. For the
procedure for entering numbers, see "Entering numbers" (page
1-9). After entering the registration number, go to step 3.
Select the user name.
(A) [Direct Entry] key
Users who are not registered users and are only using
LDAP authentication use this key.
A text entry screen will appear. Enter your login name.
(B) [User List] key
Select your user name that has been stored in "User List"
in the Web page.
LDAP authentication can be used when the administrator of the server provides LDAP service on the LAN (local area
network).
1-17
Page 21
3
BEFORE USING THE MACHINE
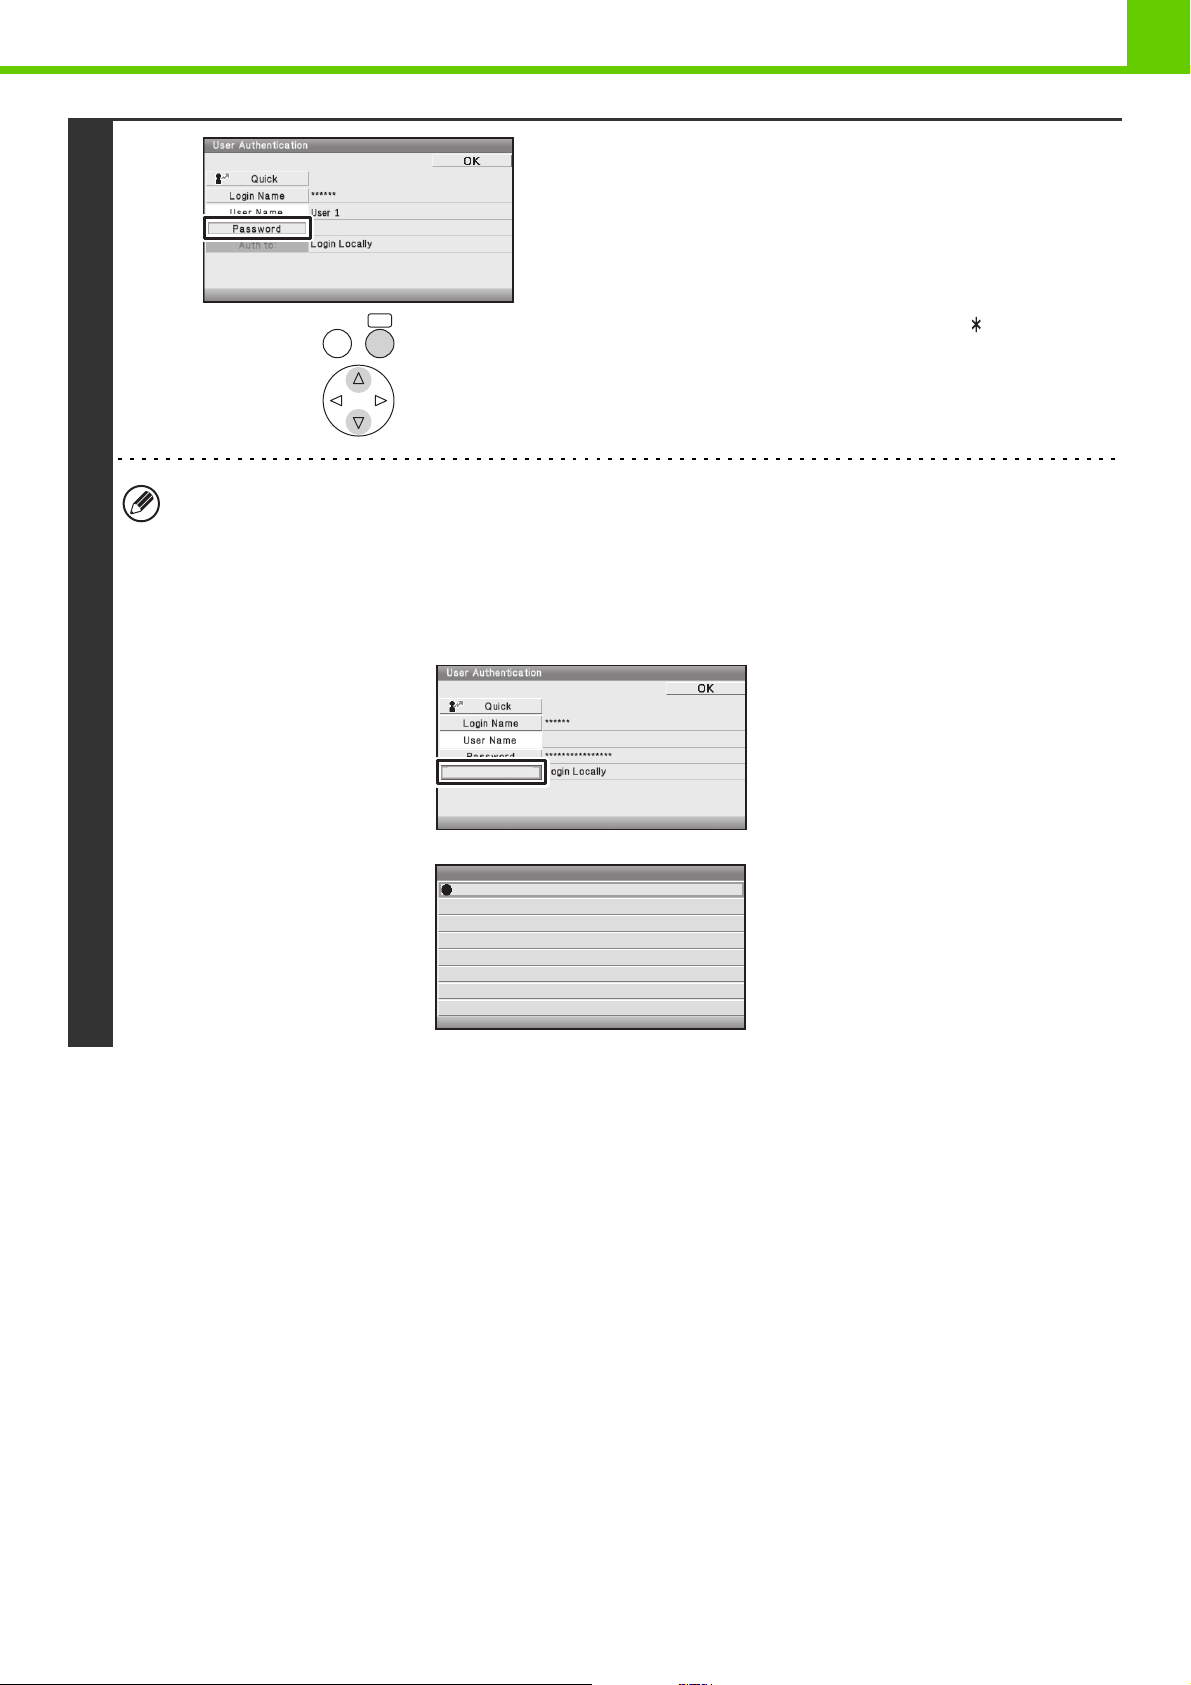
Select the [Password] key.
A text entry screen for entering the password will appear.
Enter your password that is stored in "User List" in the Web
page.
If you are logging in to an LDAP server, enter the password that
OK
BACK
• When an LDAP server has been stored, [Auth to:] can be changed.
• If you selected a login user name from the user list…
The LDAP server was stored when your user information was stored, and thus the LDAP server will appear as the
authentication server when you select your login name. Go to step 4.
• When logging in using the [Direct Entry] key...
Select the [Auth to:] key.
is stored with your LDAP server login name.
Each entered character will be displayed as " ". When you
have finished entering the password, select the [OK] key.
When authentication is by LDAP server and you have different
passwords stored in "User List" in the Web page and in the
LDAP server, use the password stored in the LDAP server.
Select the LDAP server.
Direct Entry
Auth to:
Authenticate to:
Login Locally
Server 1
Server 2
Server 3
Server 4
Server 5
Server 6
Server 7
1-18
Page 22
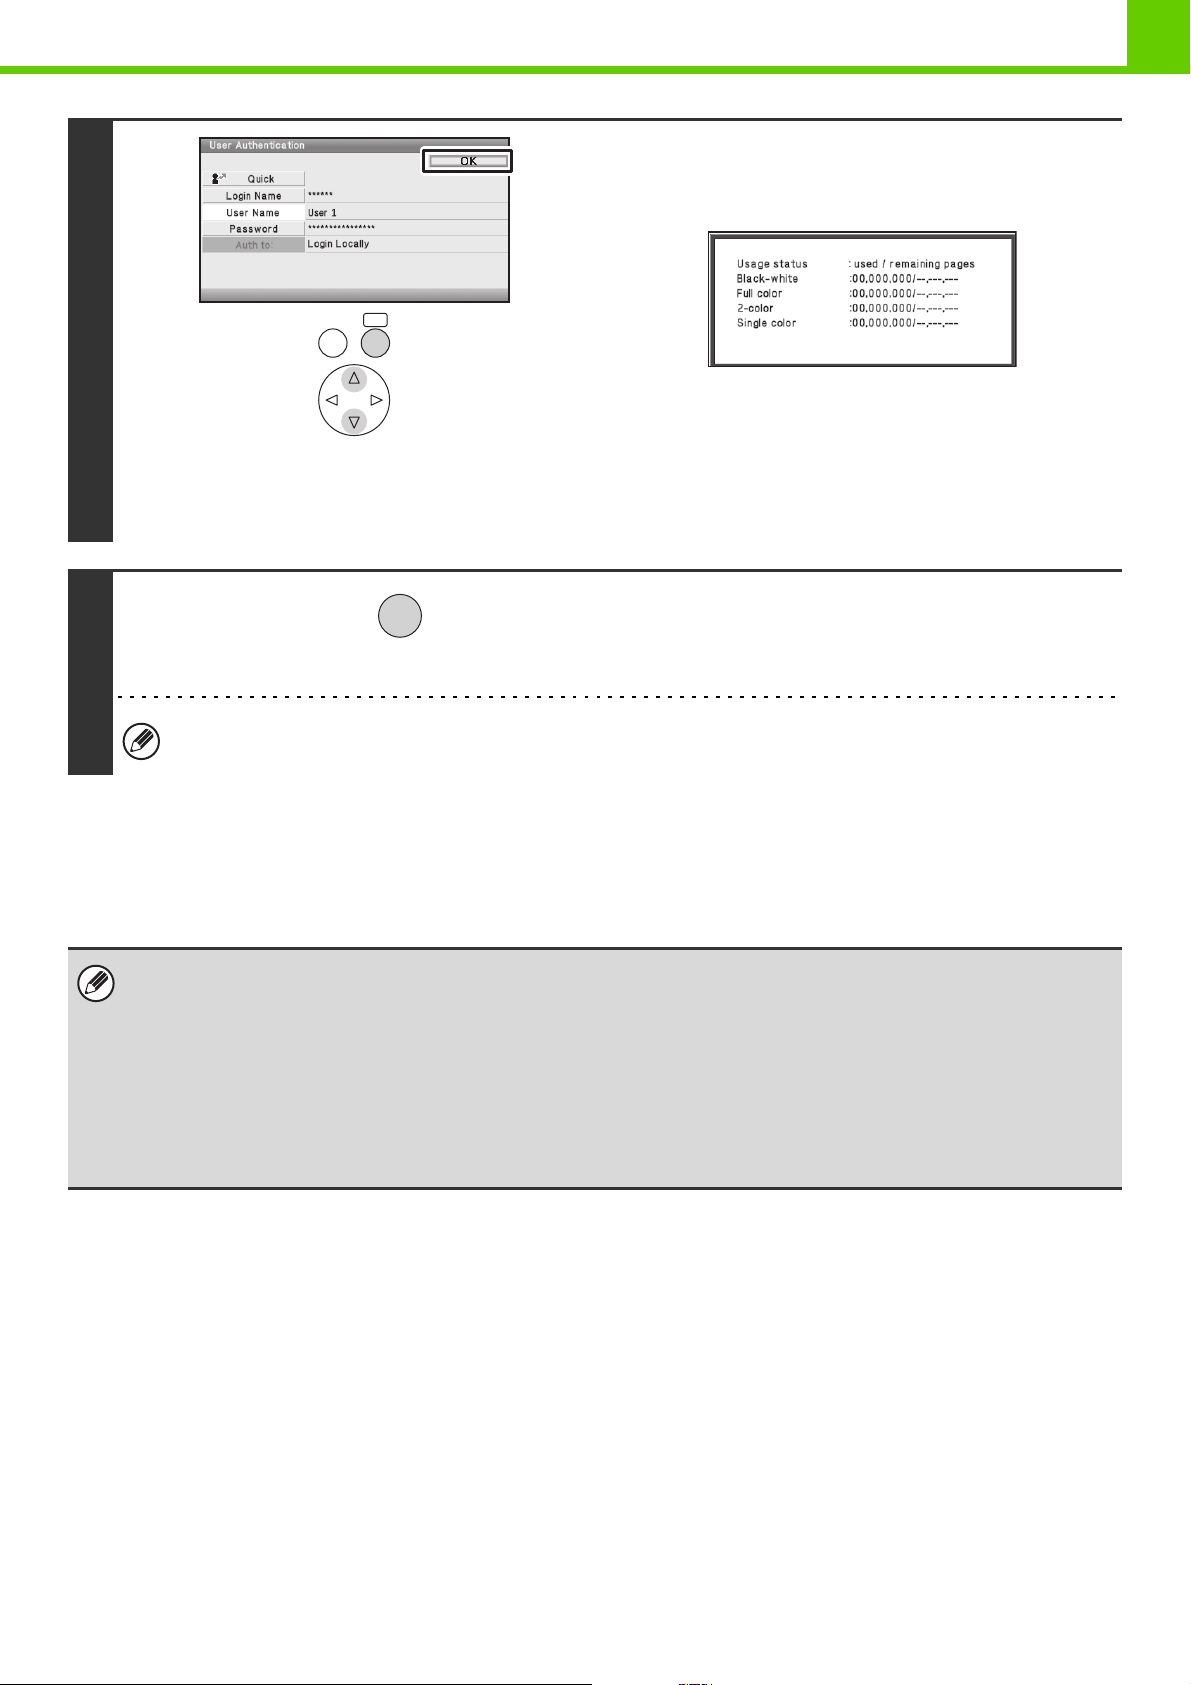
OK
BACK
4
(Different items will appear in the screen when LDAP
authentication is used.)
BEFORE USING THE MACHINE
Select the [OK] key.
After the entered login name and password are authenticated,
the user count screen will appear briefly.
When page limits have been set in "Pages Limit Group List" in
the Web page, the number of pages remaining will appear.
(The remaining number of pages that the user can use
appears.) The amount of time that this screen appears can be
changed using "Message Time Setting" (Web page only) in the
system settings (administrator).
LOGOUT
machine and are ready to log out, press
the [LOGOUT] key.
5
If a preset duration of time elapses after the machine is last used, the Auto Clear function will activate. When Auto
Clear activates, logout takes place automatically.
If an incorrect login name or password is entered 3 times in a row...
If "A Warning when Login Fails" is enabled in the Web page, the machine will lock for 5 minutes if an incorrect login
name or password is entered 3 times in a row.
Verify the login name and password that you should use with the administrator of the machine.
• The administrator can clear the locked state.
This is done from [User Control] and then [Default Settings] in the Web page menu.
• When LDAP authentication is used, the [E-mail Address] key may appear, depending on the authentication method. If the
[E-mail Address] key appears in step 3, select the key.
A text entry screen will appear. Enter your e-mail address.
• USER LIST (page 1-21)
This is used to store names of users of the machine. Detailed information such as the login name, user number, and password
are also stored. Ask the administrator of the machine for the information that you need to use the machine.
Registration is performed in [User List] in [User Control] in the Web page menu.
When you have finished using the
1-19
Page 23
BEFORE USING THE MACHINE
ACCESSING THE WEB PAGE
The login method for accessing the Web server in the machine varies depending on whether or not user authentication
is enabled.
For information on accessing the Web server in the machine, see "ACCESSING THE WEB SERVER IN THE
MACHINE" in the Quick Start Guide.
When user authentication is not enabled
If you click a setting that requires administrator authority after accessing the Web page, a login screen will appear. Enter
your password.
When user authentication is enabled
Use the procedure below to log in. Note that when auto login user is enabled, the authentication screen will not appear.
When the login method is login name / password ( / e-mail address)
To access the Web page, enter a login name and password in the login screen that appears. If the login method is set to
login name / password / e-mail address, a text box will appear for entry of your [E-mail Address]. If this box appears,
enter your e-mail address.
When the authentication method is user number
To access the Web page, enter a user number in the login screen that appears.
In user number mode, you can also login from [Admin Login] in the login screen.
• User authentication is initially disabled (factory default setting).
• To prevent passwords from being leaked onto the network during login, it is recommended that the SSL function be
enabled in the Web browser.
• To log out…
Click the [Logout] key at the upper right of the Web page, or close the Web browser.
1-20
Page 24
BEFORE USING THE MACHINE
USER CONTROL
User Control is used to configure settings for user authentication in the Web page. Select the [User Control] key in the
Web page menu to configure the settings.
USER LIST
This is used to store, edit, and delete users when user authentication is enabled.
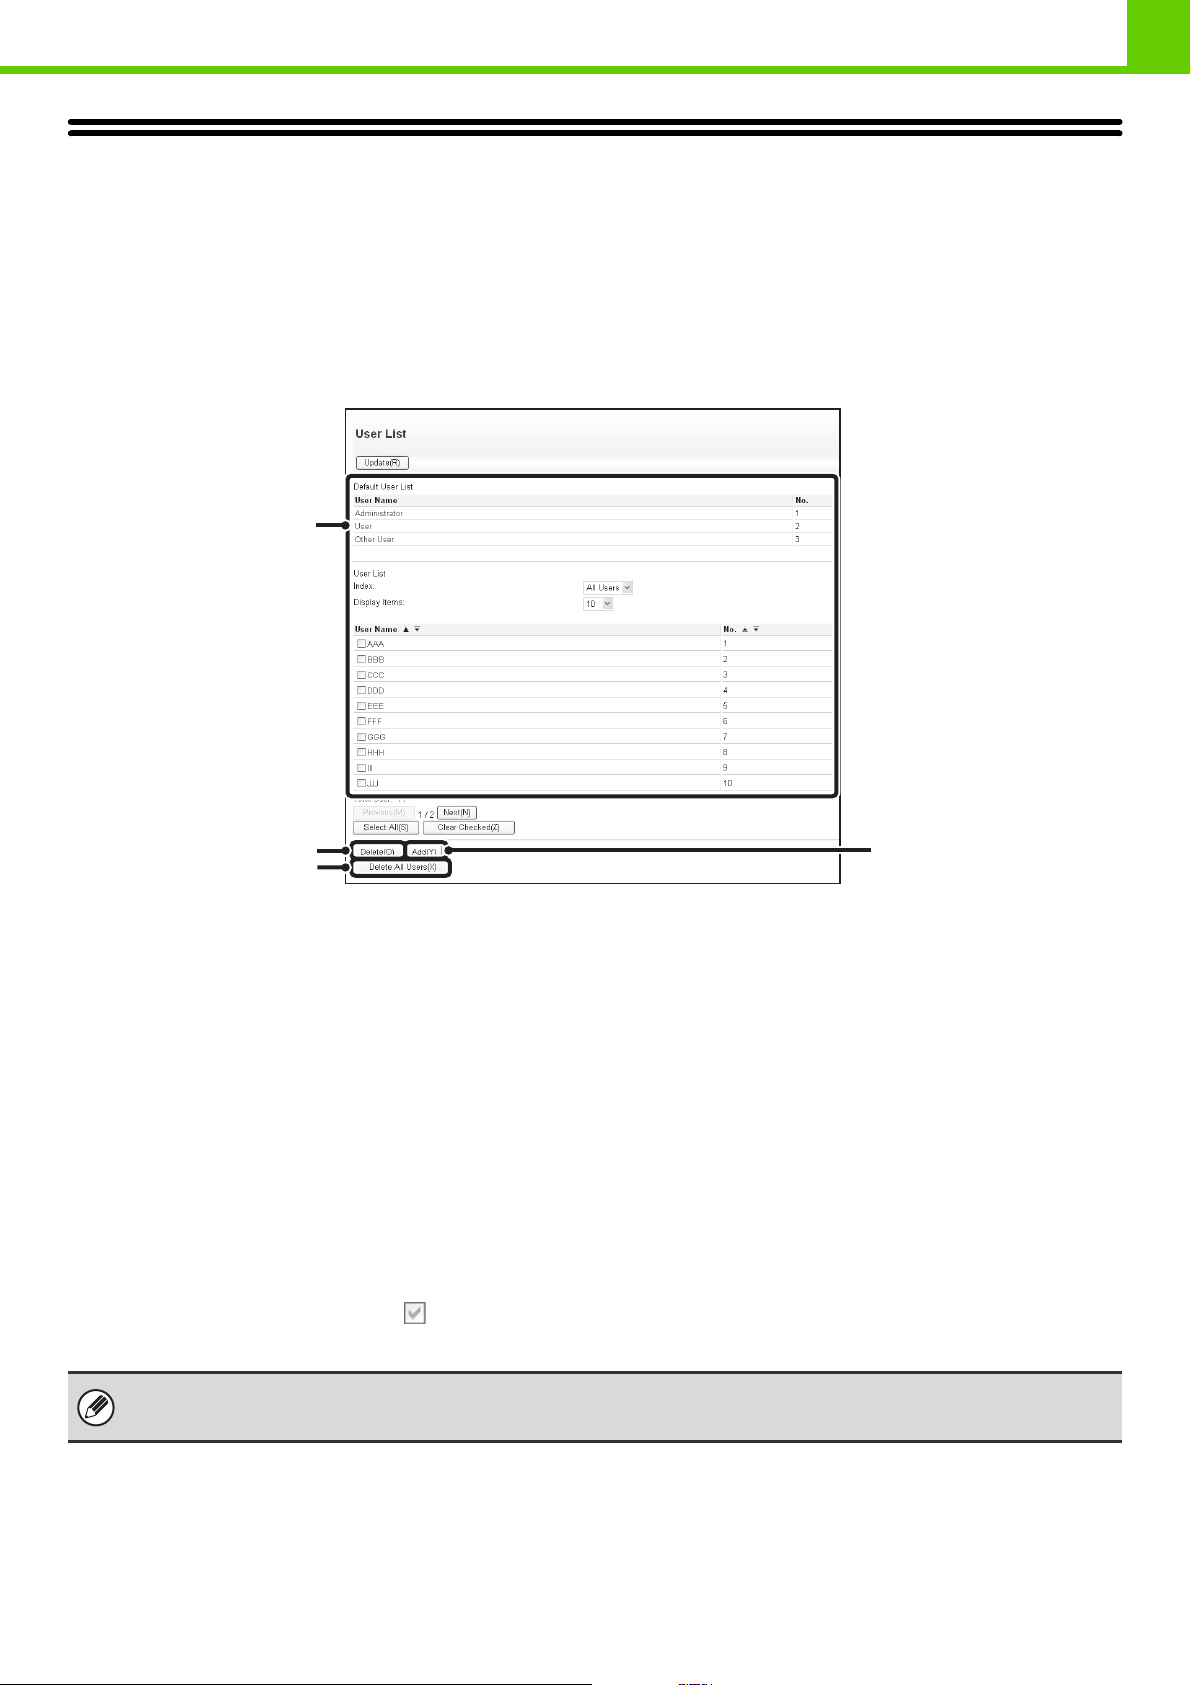
When the [User List] key is selected, the following screen appears.
(1)
(2)
(3)
(1) User List
This shows the factory-stored users and the currently
stored users.
(2) [Delete] key
Use this to delete a registered user.
(3) [Delete All Users] key
Use this to delete all stored users. (Excluding factory
stored users.) This operation can only be performed by
an administrator.
(4) [Add] key
Use this to add a new user.
(4)
Storing a user
Select the [Add] key in the above screen to open a registration screen. Up to 1000 users can be stored.
For more information, see "Settings" (page 1-22).
Editing/deleting a user
To open an edit screen for a user, select the user from the list in the above screen. To open a delete screen for a user,
select the checkbox next to the user ( ) and then select [Delete].
For more information, see "Settings" (page 1-22).
• When auto login is enabled, "Delete All Users" cannot be used.
• The factory-stored users cannot be deleted.
1-21
Page 25
BEFORE USING THE MACHINE
Factory-stored users
The following users are stored in the machine at the factory.
• Administrator: Factory-stored account for the administrator of the machine.
• User: This is used when network authentication is used and a login name not stored in the machine is directly
entered. (This cannot be selected in the login user screen.)
• Other User: This is used when a print job is executed using invalid user information. (This cannot be selected in the
login user screen.)
For settings related to each of the users, see the following table.
User Name
Login Name
Password
My Folder
Authentication Settings
Pages Limit Group
Authority Group*
2
Favorite Operation Group
*1 Items that can be changed.
*2 For detailed information of each of the settings, see "List of settings and factory default settings of template groups" (page 1-28).
Administrator User Other User
admin users Other
(See the Safety Guide.)*
Main Folder
Login Locally –
Unlimited*
Admin User*
Following the System Settings*
1
1
1
users*
1
1
–
Guest*
1
Settings
Item Description
User Name
Apply User Name to Log-in
1
Name*
Store the name of the user (max. 32 characters). This user name is used as the key name in
the login screen and the print hold user name. (The user name must be unique.)
Select this key to enter the entered user name in the login name.
Initial
Index Select the desired custom index.
User Number*
Login Name*
Password*
E-mail Address Enter the e-mail address for LDAP authentication (maximum of 64 characters).
My Folder
Authentication Settings*
Authentication Server
Pages Limit Group
2
1
1, 3
1
This determines where the user name will appear in the user list. Up to 10 characters can be
entered.
Enter a user number (5 to 8 digits).
Enter the login name used when authentication by login name/password is enabled
(maximum of 255 characters). (The login name must be unique.)
Enter the password used when authentication by login name/password is enabled (1 to 32
characters). (The password can be omitted.)
A folder ("My Folder") can be specified as the folder used by the user for print hold. A
previously created folder can be selected or you can create and select a new folder.
Select [Login Locally] or [Network Authentication] (when LDAP is enabled) for "Authenticate
to:".
When [Network Authentication] is selected, select the server to be used for user
authentication from the list of LDAP servers stored in the Web pages.
Specify page limits for the user by selecting one of the stored page limit groups. The factory
default setting is [Unlimited].
For more information, see "PAGE LIMIT GROUP LIST" (page 1-26).
1-22
Page 26

BEFORE USING THE MACHINE
Item Description
Specify the authority of the user by selecting one of the stored authority groups. The factory
Authority Group
Favorite Operation Group
Custom Index Select the custom index.
*1 Does not appear when "User Number" is selected for the authentication method.
*2 Only appears when "User Number" is selected for the authentication method.
*3 Not required when network authentication is used, as the password stored in the LDAP server is used.
default setting is [User].
For more information, see "AUTHORITY GROUP LIST" (page 1-27).
The favorite operation group that will be applied at login appears. The factory default setting is
[Following the System Settings].
The setting can be changed in the [User Control] menu in the Web pages.
1-23
Page 27
BEFORE USING THE MACHINE
DEFAULT SETTING
These settings enable or disable user authentication and specify the authentication method.
When user authentication is enabled, each user of the machine is registered. When a user logs in, settings for that user
are applied. This function allows greater control of security and cost management.
In addition, even if the user information is not stored in the machine, it is possible to log in by directly entering user
information stored on an LDAP server. In this case, the login user will be the factory-stored "User". For more information,
see "Factory-stored users" (page 1-22).
• For the procedure for storing users, see "USER LIST" (page 1-21).
• For more information on login procedures when user authentication is enabled, see "USER AUTHENTICATION" (page
1-15).
User Authentication
When [User Authentication] is enabled, the login screen
appears before an operation is begun in any mode
except the job status screen*. You must log in as one of
the stored users. (After logging in, you can move freely
through the modes.)
* Except when a print hold (retention) file is used in the
job status screen.
Authentication Method Setting
This selects the authentication method. When using user
authentication, be sure to configure this setting first. The
items configured for users stored after the user
authentication method is set vary depending on the
selected authentication method.
Authenticate a User by Login Name and Password
Standard authentication method using a login name and
password.
Authenticate a User by Login Name, Password and
E-mail Address
In addition to a login name and password, this
authentication method also requires the entry of an
e-mail address.
Authenticate a User by User Number Only
This can be used as a simple authentication method
when network authentication is not used.
Device Account Mode Setting
A specific user can be stored as an auto login user.
When this setting is enabled, login can be performed
automatically.
This function eliminates the bother of logging in but still
allows the settings of the selected user (network
settings, favorite operations, etc.) to be applied.
You can also allow users other than the auto login user
to temporarily log in and work using their own authority
and settings. To allow other users to log in temporarily
when [Device Account Mode] is enabled, select [Allow
Login by Different User].
As an example, this enables uses such as
"authentication for color printing only".
• If auto login fails for some reason when auto login is
enabled, or the login user does not have
administrator rights, all system settings or the
system settings (administrator) will lock. In this
event, the administrator should select the [Admin
Password] key in the system settings screen and
log in again.
• To log in as a user other than the auto login user
when [Allow Login by Different User] is enabled,
press the [LOGOUT] key to cancel the auto user
login state. The user authentication screen will
appear to let you log in. After using the machine,
press the [LOGOUT] key to log out.
• The login screen will vary depending on the
authentication method that is selected. For more
information, see "USER AUTHENTICATION" (page
1-15).
• When "Authenticate a User by User Number Only"
is selected for the authentication method, network
authentication cannot be used.
Actions when the Limit of Pages
for Output Jobs
This setting determines whether or not a job will be
completed if the page limit is reached while the job is in
progress.
The following selections are available.
• Job is Stopped when the Limit of Pages is Reached
• Job is Completed even when the Limit of Pages is
Reached
1-24
Page 28
BEFORE USING THE MACHINE
The Number of User Name
Displayed Setting on Operation
Panel
The number of users that are displayed in the user
selection screen can be selected (6, 12, or 18 users).
This setting also applies to the user selection screen
of print hold.
A Warning when Login Fails
This setting is used to display a warning and prohibit
login for five minutes if login fails three times in a row.
This prevents an unauthorized person from attempting to
guess a password. (The number of failed login attempts
is retained even if the power is turned off.)
Locking of the operation panel for 5 minutes can be
canceled.
Disabling of Printing by Invalid
User
Printing by users whose information is not stored in the
machine, such as printing without entering valid user
information in the printer driver or printing of a file on an
FTP server from the Web pages, can be prohibited.
When a print job is executed by a user that is not
stored in the machine, the factory-stored "Other User"
is used as the login user. For more information, see
"Factory-stored users" (page 1-22).
When login is performed by network authentication
using user information that is not stored in the
machine, the login user will be the factory-stored
"User". For more information, see "Factory-stored
users" (page 1-22).
Display Usage Status after Login
When user authentication is enabled, this setting
specifies whether or not the page counts of a user
appear when the user logs in.
Disable Switching of Display Order
This is used to prohibit changes to the order of display
(search number order, ascending, descending) in the
user list.
When this setting is enabled, selecting a tab on the user
list screen does not change the order. The display order
will remain fixed at the order that is in effect when this
setting is enabled.
User Information Print
The following lists can be printed.
•User List
• List of Number of Pages Used
• Page Limit Group List*
• Authority Group List
• Favorite Operation Group List*
• All User Information Print
Select the key of the desired list to begin printing.
* Cannot be printed when no groups are stored.
Automatically print stored jobs
after login
When retention is enabled in the printer driver and print
data has been spooled to the machine, you can have the
spooled print data automatically print out when the user
who enabled retention logs in.
Default Network Authentication
Server Setting
Use this to set the default network authentication server.
When a user logs in from the Web page or sends a print
job to the machine using user information that is not
stored on the machine, the authentication server is not
known. This setting is used to specify one of the LDAP
servers stored on the machine as the authentication
server.
Release the Lock on Machine
Operation Panel
If the operation panel of the machine is locked due to
login failure, release the lock by logging in as an
administrator.
1-25
Page 29

BEFORE USING THE MACHINE
PAGE LIMIT GROUP LIST
This is used to store groups of Account Limit Settings. The page limits for each user are specified by selecting one of
these stored groups when the user is stored.
When the [Page Limit Group List] key is selected, the following screen appears.
(1)
(2)
(1) List display
This shows the currently stored groups. A group name
can be selected to open an edit/delete screen for that
group.
(3) [Return to the Defaults] key
Use this to return the group settings to the factory default
settings and delete the groups from the list.
(3)
(2) [Add] key
Use this to add a new group.
Storing a page limit group
Select the [Add] key in the above screen to open a registration screen. Up to 20 groups can be stored.
For more information, see "Settings".
Editing a page limit group
To open an edit screen for a group, select the group name from the list in the above screen. To delete a group from the
list, select the checkbox next to the group ( ) and then select [Return to the Defaults]. A confirmation prompt will
appear. Select [OK] to delete the group.
For more information, see "Settings".
Settings
Item Description
Group Name Store the name of the group (max. 32 characters).
Select the Group Name to be
the Registration Model
Function names The names of the functions that can be configured are displayed. Set a limit for each function.
Page Limit
Select one of the previously stored groups for use as a template for the new group. When
selected, the group's settings are applied.
When [Prohibited] is selected for a mode, input and output from the mode are prohibited.
When [Unlimited] is selected for a mode, there is no limit to the number of pages that can be
input/output in that mode.
When [Limited] is selected, enter a limit (1 to 99,999,999 pages).
1-26
Page 30
BEFORE USING THE MACHINE
AUTHORITY GROUP LIST
Use this to store groups of user authority settings. The authority of each user is specified by selecting one of these
stored groups when the user is stored.
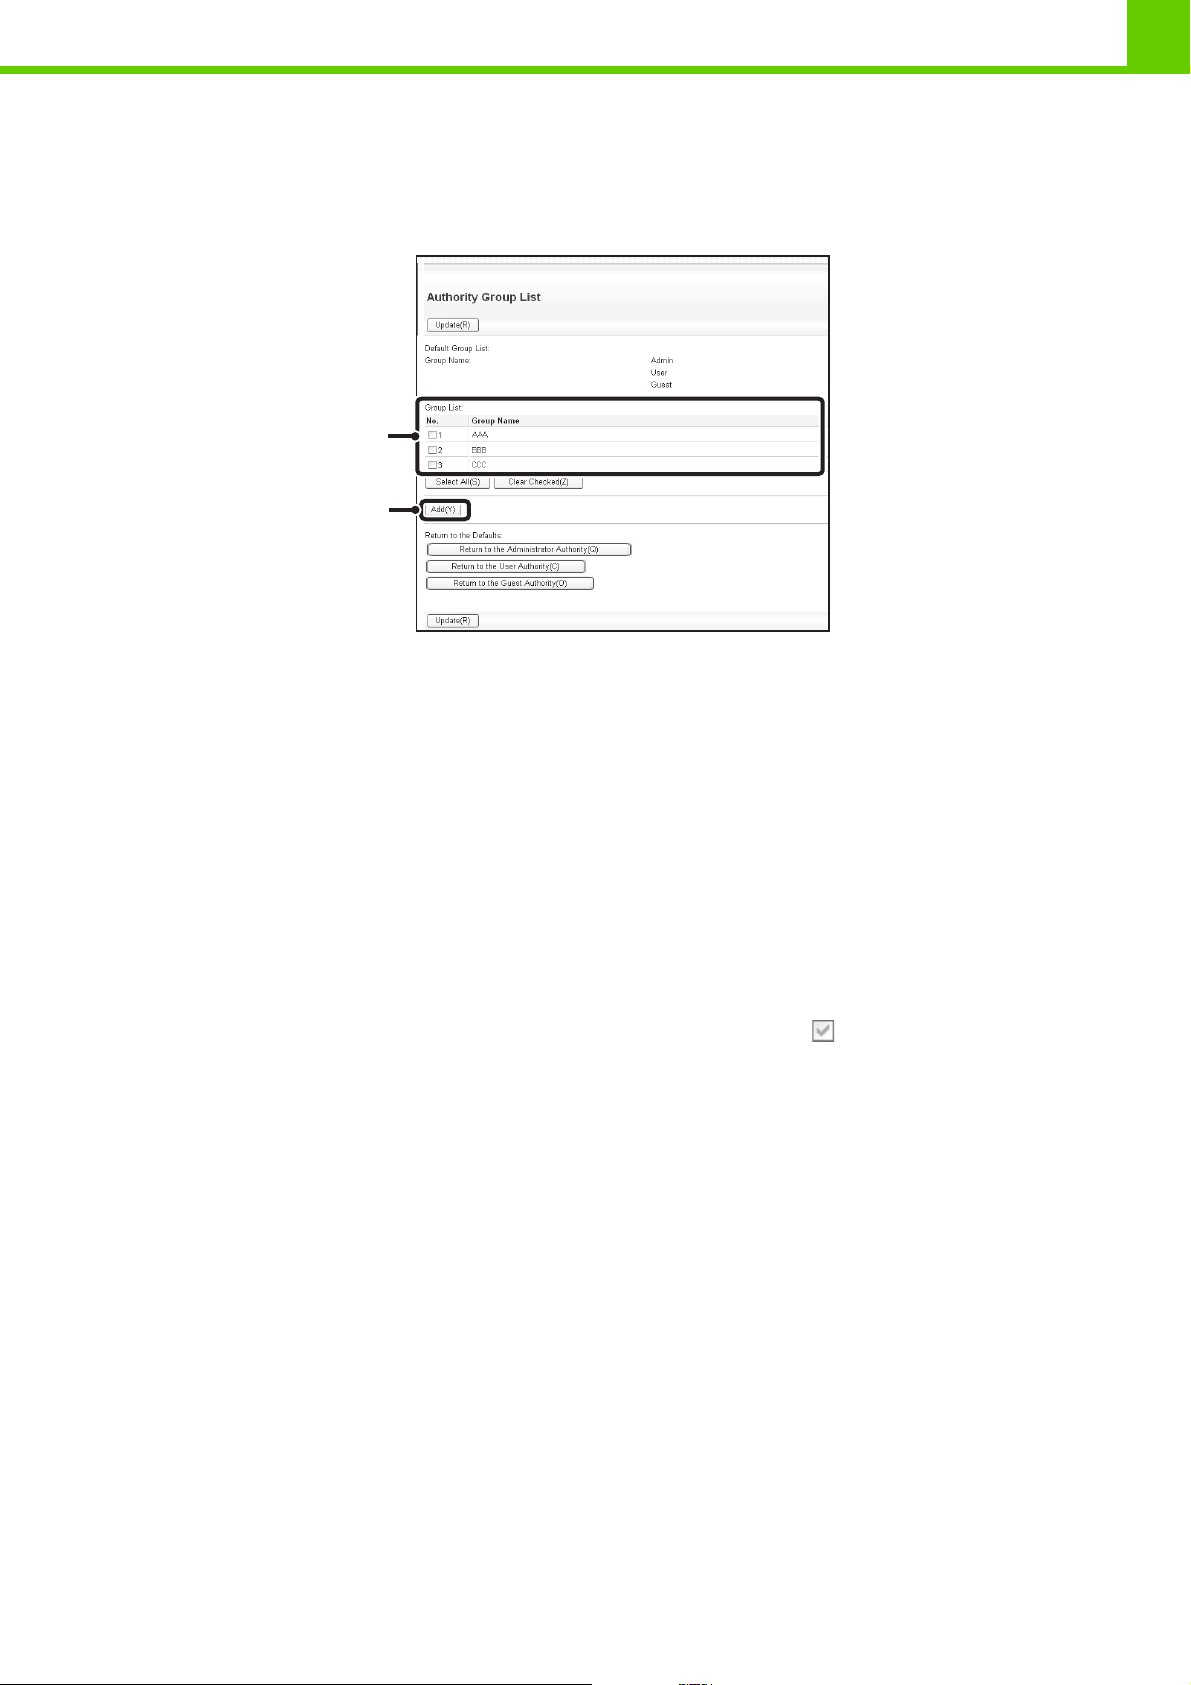
When the [Authority Group List] key is selected, the following screen appears.
(1)
(2)
(1) List display
This shows the currently stored groups. A group name
can be selected to open an edit/delete screen for that
group.
(2) [Add] key
Use this to add a new group.
Storing an authority group
Select the [Add] key in the above screen to open a registration screen. Up to 20 groups can be stored.
For information on the settings, see "List of settings and factory default settings of template groups" (page 1-28).
Editing an authority group
A group can be selected from the list in the above screen to open an edit/delete screen for the group. For information on
the settings, see "List of settings and factory default settings of template groups" (page 1-28).
To return a group to the factory default state, select the checkbox next to the group ( ), and then select [Return to the
Administrator Authority], or [Return to the User Authority], or [Return to the Guest Authority]. The selected authority will
be given to the users in that group and the group will be deleted from the list.
1-27
Page 31

BEFORE USING THE MACHINE
List of settings and factory default settings of template groups
Item Description
Group Name Store the name of the group (max. 32 characters).
Select one of the previously stored groups for use as a template for the new
Select the Group Name to be the
Registration Model
Printer
group. When selected, the group's settings are applied.
The factory default groups and their settings are shown below.
Admin User Guest
Color Mode Approval Setting Allowed Allowed
FTP Pull Print Allowed Allowed Prohibited
USB Memory Direct Print Allowed Allowed Prohibited
Network Folder Pull Print Allowed Allowed Prohibited
Print hold
Print Hold Image Check Allowed Allowed Prohibited
Sharp OSA
Approval Settings to Use a Sharp OSA Allowed Allowed Allowed
Common Functions
Approval Settings for 2-Sided Print
Output Approval Settings Allowed Allowed Prohibited
Machine Settings
System Settings Operational Authority
System Settings*
1
[1-Sided/2-Sided
Approved]
Allowed*
2
[1-Sided/2-Sided
Approved]
Only user authority
settings
are allowed
Only Black & White
Allowed
[1-Sided/2-Sided
Approved]
All settings prohibited
Web Settings Operational Authority
Display of Device/Network Status
Power Reset Prohibited
Machine Identification Prohibited
Application Settings Prohibited
E-mail Alert and Status Prohibited
Job Log Setting Prohibited
Port Control/ Filter Settings Prohibited
Custom Link Setting Prohibited
Operation Manual Download Allowed
*1 For information on each setting, see the system settings (general/administrator) lists.
*2 All allowed except "Change Administrator Password".
Depending on the machine specifications and peripheral devices installed, it may not be possible to use some settings.
Allowed
Allowed
1-28
Prohibited
Page 32

BEFORE USING THE MACHINE
FAVORITE OPERATION GROUP LIST
This is used to store favorite operation groups.
Favorite Operation Group Registration
Groups of preferred settings can be stored as "favorite operation groups". For example, a user who speaks a different
language would normally have to change the display language each time he or she uses the machine; however, by
storing the language in a favorite operation group, the language is automatically selected when the user logs in.
Settings
Item Description
Group Name Store the name of the group (max. 32 characters).
Select the Group Name to be
the Registration Model
System Settings
Display Language Setting Select the display language.
Key Operation Setting Set the key input time and Auto Key Repeat setting.
Keys Touch Sound Set the sound made when keys are selected.
Keyboard Select Set the language that appears on the keyboard.
Machine Display Pattern
Setting
Automatically print stored jobs
after login
Select one of the previously stored groups for use as a template for the new group. When
selected, the group's settings are applied.
Select the color pattern used in the display.
When retention is enabled in the printer driver and print data has been spooled to the
machine, you can have the spooled print data automatically print out when the user who
enabled retention logs in.
1-29
Page 33

VIEW USER COUNT
This displays the total number of pages printed by each user.
When the [View User Count] key is selected, the following screen appears.
(1)
(2)
BEFORE USING THE MACHINE
(3)
(1) User List
This shows the factory-stored users and the currently
stored users. To select a user, select the user name.
(2) [Select All] key
This selects all users.
(3) [Show] key
This shows the counts of the selected user.
(4) [Clear Count] key
Use this to reset the counts of the selected user.
(4)
Showing user count
Select a user in the above screen and select the [Show] key. The counts of that user will appear.
Item Settings
Next This shows the next user (in the order of the registration numbers).
Previous This shows the previous user (in the order of the registration numbers).
Pages used The counts and the number of pages remaining of the selected user are shown by function.
Page Limit The page limit set for the user appears in parentheses below the count.
Counts of devices that are not installed do not appear.
Resetting user counts
To clear the count of a user, select the user from the list and then select [Clear Count]. A confirmation prompt will
appear. Select [OK] to clear the count of that user.
1-30
Page 34

BEFORE USING THE MACHINE
REMOTE OPERATION OF THE MACHINE
The remote operation function allows you to operate the machine from your computer.
When this function is added, the same screen as the operation panel screen appears on your computer. This allows you
to operate the machine from your computer in the same way as if you were standing in front of the machine.
The machine
Your computer
Operation panel
Operate the
machine using
your computer
screen.
The remote operation function can only be used on one computer at a time.
Network
How to use the remote operation function
Before using this function, set "Operational Authority" to "Allowed" in "Remote Software Operation" of "Remote
Operation Settings" (Web page only) in the system settings (administrator).
☞ 3. SYSTEM SETTINGS "Remote Operation Settings" (page 3-53)
To use the remote operation function, the machine must be connected to a network and a VNC application must be
installed on your computer (recommended VNC software: RealVNC).
The procedure for using this function is as follows:
Example: RealVNC
Connect from the computer to the
machine.
(1) Start the VNC viewer
1
(2)(3)
Follow the prompts on the operation panel of the machine to permit the connection.
(2) Enter the IP address of the machine in the
"Server" entry box.
(3) Click the [OK] button.
2
During remote software communication, the key appears in the system settings of the machine. If you wish to
break the connection, exit the remote software or press the [SYSTEM SETTINGS] key on the operation panel and
select the key in the screen that appears.
Use the operation panel in the same way as you would on the machine. Note that a key cannot be held down to continuously
change a value being entered. For detailed procedures, see the chapters for each of the functions in this manual.
System Settings (Administrator): Remote Operation Settings (Web page only)
Set the operation authority for the remote operation function.
Registration is performed in [System Settings] - [Operation Settings] - "Remote Operation Settings" in the Web page menu.
1-31
Page 35

BEFORE USING THE MACHINE
JOB LOG
The machine retains a log of the jobs that are performed. Settings for the job log stored in the machine are configured on
the Web page. Select [Job Log] on the Web page to configure the settings.
SAVE / DELETE JOB LOG
The log of jobs executed on the machine can be stored or deleted.
Item Settings
Job Log The total number of stored job logs appears.
Save Job Log
Save and Delete the Data Deletes the job log after saved if checked.
[Save] button Saves the job log.
The Number of Job Log to Notify by
E-mail
Delete Job Log
[Delete] button Deletes the job log.
Select the number of jobs that triggers e-mail notification.
Informs the address configured in E-mail alert when the designated number is
reached.
VIEW JOB LOG
The log of jobs executed on the machine can be displayed.
The items to be displayed and the applicable period can be selected.
Item Settings
Select Item Select the item to be displayed.
[Show] button Displays the job log.
1-32
Page 36

BEFORE USING THE MACHINE
ITEMS RECORDED IN THE JOB LOG
The machine records the jobs that are performed in the job log.
The main information that is recorded in the job log is described below.
• To make it easy to total the usage counts of differently configured machines, the items recorded in the job log are fixed,
regardless of what peripheral devices are installed or the objective of the recording. For this reason, items may appear in
the log for functions that are not available on the machine.
• In some cases, job information may not be correctly recorded, such as when a power failure occurs during a job.
• JOB LOG (page 1-32)
The job log can be stored, deleted, or checked.
Registration is performed in [Job Log] in the Web page menu.
No. Item name Description
1 Main items Job ID The job ID is recorded.
Job IDs appear in the log as consecutive numbers up to a maximum
of 999999, after which the count resets to 1.
2 Job Mode
3 Computer Name
The job mode, such as print.
The name of the computer that sent a print job.*
4 User Name The user name when the user authentication function is used.
5 Login Name The login name when the user authentication function is used.
6 Starting Date & Time The date and time the job was started.
7 Completing Date &
Time
8 Black & White Total
Count
9
10
11
12
13
14 Invalid Paper
15 Invalid Paper
Full Color Total Count
2-Color Total Count
Single Color Total
Count
Count according to size
Number of sheets
according to size
Count(Black & White)
Count(Color)
The date and time the job was completed.
For a print job, the total count is recorded.
For a print hold job, the number of stored black & white pages is
recorded.
For a print job, the total count is recorded.
For a print hold job, the number of stored full color pages is recorded.
Indicates
Indicates
Counts by paper size in color mode and black & white mode.
Indicates the sheet count by paper type.
Indicates the black & white invalid sheet count.
Indicates the color invalid sheet count.
the total 2-color count.
the total single color count.
1-33
Page 37

BEFORE USING THE MACHINE
No. Item name Description
16 Main items Number of Reserved
Sets
17 Number of Completed
Sets
18 Number of Reserved
Pages
19 Number of Completed
Pages
20 Result The result of a job.
21 Error Cause
22
23 Staple The status of stapling.
24
25 Printer Tone The tone used for a print job.
26 Print Hold Related
27 Storing Mode Print hold store mode.
28 File Name Name of file stored by retention print.*
29 Data Size [KB] File size.
30 Common Functionality Color Setting Color mode selected by user.
31 Special Modes Special modes selected when the job was executed.
Print Job Related Item
Item
Output The output mode of a printed job.
Staple Count
Print Hold Print hold status.
Number of specified sets.
Number of completed sets.
Number of reserved print jobs.
Number of completed pages of a set.
When an error occurs during a job, the cause of the error.
The staple count.
32 File Name 2 Records the file names of print jobs.*
33 Detailed Items Original Size This records the paper size of the print job.
34 Original Type This records the "Original Type" of the print driver.
35 Paper Size For a print job, the paper size.
For a print hold job, the paper size of the stored file.
36 Paper Type The paper type used for printing.
37 Paper Property:
Disable Duplex
38 Paper Property: Fixed
Paper Side
39 Paper Property:
Disable Staple
40 Duplex Setup Indicates the duplex setting.
41 Resolution Indicates the printing resolution.
42 Machine Item Model Name Indicates the model name of the machine.
43 Unit Serial Number Indicates the serial number of the machine.
44 Name Indicates the name of the machine that is set in the Web pages.
45 Machine Location Indicates the installation location of the machine that is set in the Web
Indicates that duplex was disabled in "Paper Type".
Indicates that fixed side was specified in "Paper Type".
Indicates that stapling was disabled in "Paper Type".
pages.
*In some environments this is not recorded.
1-34
Page 38

BEFORE USING THE MACHINE
STORAGE BACKUP
User information stored in the machine can be backed up to your computer or restored from your computer via the Web
page.
Settings and information stored in the machine can be backed up to your computer.
Settings can be exported or imported in XML format using the Web page. Select [Storage Backup] in the Web page
menu and configure the settings.
• The data is saved to the computer that is accessing the Web page.
• This function cannot be used while the system settings are in use, while a job is being executed, or when there is a
reserved job.
• For machines for which data can be imported, contact your dealer or nearest SHARP Service Department.
EXPORT SETTINGS
Use these settings to back up data to your computer.
Item Settings
Export Settings Type Select the type of settings that you want to export.
Password Enter the password that will be required to import settings (maximum of 16
characters).
IMPORT SETTINGS
Use these settings to restore data that was previously backed up to your computer to the machine.
Item Settings
Import settings from file Enter the name of the file to be imported (maximum of 200 characters). Click
[Browse] to select the file from the file selection dialog box.
Password If a password has been set for the file to be imported, enter the password (maximum
of 16 characters).
1-35
Page 39

BEFORE USING THE MACHINE
DEVICE CLONING
Device cloning is used to save the machine's setting information in XML format and copy the information to another
machine.
This function saves you the trouble of repeatedly configuring the same settings in multiple machines. Select [Device
Cloning] in the Web page menu and configure the settings.
• The data is saved to the computer that is accessing the Web page.
• This function cannot be used while the system settings are in use, while a job is being executed, or when there is a
reserved job.
• For machines for which data can be imported, contact your dealer or nearest SHARP Service Department.
• The following data is not copied when device cloning is performed:
- List print.
- Count and device status display items.
- IP address of the machine, device name, administrator password and other information that is specific to the machine.
- Screen contrast, color adjustment, and other adjusted values particular to each hardware device.
EXPORT SETTINGS
Use these settings to back up data to your computer.
Item Settings
Export Settings Type Select the type of settings that you want to export.
Password Enter the password that will be required to import settings (maximum of 16
characters).
IMPORT SETTINGS
Use these settings to restore data that was previously backed up to your computer to the machine.
Item Settings
Import settings from file Enter the name of the file to be imported (maximum of 200 characters). Click
[Browse] to select the file from the file selection dialog box.
Password If a password has been set for the file to be imported, enter the password (maximum
of 16 characters).
1-36
Page 40

BEFORE USING THE MACHINE
LOADING PAPER
IMPORTANT POINTS ABOUT PAPER
This section provides information that you should know before loading paper in the paper trays.
Be sure to read this section before loading paper.
NAMES AND LOCATIONS OF TRAYS
The names of the trays are as follows.
Bypass tray
Tray 1
Tray 2
Tray 3
Tray 4
USEABLE PAPER
Various types of paper are sold. This section explains what plain paper and what special media can be used with the
machine. For detailed information on the sizes and types of paper that can be loaded in each tray of the machine, see
the specifications in the Safety Guide and "Paper Tray Settings" (page 3-37) in "6. SYSTEM SETTINGS".
Plain paper, special media
Plain paper that can be used
• SHARP standard plain paper (21 lbs. (80 g/m2)). For paper specifications, see the specifications in the Safety Guide.
• Plain paper other than SHARP standard paper (16 lbs. to 28 lbs. (60 g/m
Recycled paper, colored paper and pre-punched paper must meet the same specifications as plain paper. Contact
your dealer or nearest SHARP Service Department for advice on using these types of paper.
2
* The "lbs." (g/m
) units used in these explanations indicate the weight of the paper.
2
to 105 g/m2))
1-37
Page 41

BEFORE USING THE MACHINE
Types of paper that can be used in each tray
The following types of paper can be loaded in each tray.
"
–" in the table indicates "cannot be used".
Tray 1/Tray 2/Tray 3/Tray 4 Bypass tray
Plain paper Permitted Permitted
Pre-printed Permitted Permitted
Recycle Paper Permitted Permitted
Letter head Permitted Permitted
Pre-punched Permitted Permitted
Color Permitted Permitted
Heavy paper*
Labels – Permitted
Glossy paper*
Transparency film – Permitted
1
2
– Permitted
– Permitted
Envelopes – Permitted
Thin paper*
*1 "Heavy paper" is heavy paper up to 110 lbs. index (209g/m2).
*2 Printer drivers that allow the use of glossy paper are PCL6, PCL5-c, and PS printer drivers in a Windows environment.
*3 Thin paper from 15 lbs. to 16 lbs. (55 g/m2 to 59 g/m2) can be used.
3
– Permitted
Print side face up or face down
Paper is loaded with the print side face up or face down depending on the paper type and tray.
Trays 1 to 4
Load the paper with the print side face up.
However, if the paper type is "Pre-Punched", "Letter Head" or "Pre-Printed", load the paper with the print side face
down*.
Bypass tray
Load the paper with the print side face down.
However, if the paper type is "Pre-Punched", "Letter Head" or "Pre-Printed", load the paper with the print side face up*.
* If "Disabling of Duplex" (Web page only) is enabled in the system settings (administrator), load the paper in the normal
way (face up in trays 1 to 4; face down in the bypass tray).
1-38
Page 42

Paper that cannot be used
BEFORE USING THE MACHINE
• Special media for inkjet printers
(fine paper, glossy paper, glossy film, etc.)
• Carbon paper or thermal paper
• Pasted paper
• Paper with clips
• Paper with fold marks
• Torn paper
• Oil-feed transparency film
• Thin paper less than 15 lbs. (55 g/m
• Paper that is 110 lbs. index (210 g/m
2
)
2
Non-recommended paper
• Iron-on transfer paper
• Japanese paper
• Various types of plain paper and special media are sold. Some types cannot be used with the machine. Contact your
dealer or nearest SHARP Service Department for advice on using these types of paper.
• The image quality and toner fusibility of paper may change due to ambient conditions, operating conditions, and paper
characteristics, resulting in image quality inferior to that of SHARP standard paper. Contact your dealer or nearest SHARP
Service Department for advice on using these types of paper.
• The use of non-recommended or prohibited paper may result in skewed feeding, misfeeds, poor toner fusing (the toner
does not adhere to the paper well and can be rubbed off), or machine failure.
• The use of non-recommended paper may result in misfeeds or poor image quality. Before using non-recommended paper,
check if printing can be performed properly.
• Irregularly shaped paper
• Stapled paper
• Damp paper
• Curled paper
• Paper on which either the print side or the reverse side
has been printed on by another printer or multifunction
device.
• Paper with a wave-like pattern due to moisture
absorption
) or heavier
• Perforated paper
When removing printed output...
When removing printed output, remove slowly so as not to fold the paper.
When removing output, do not fold the paper or forcefully lift it up.
In particular, applying too much force horizontally may cause the actuator to come off. Take care that the paper does not
catch the actuator when removing output.
When a finisher is not installed, the actuator for output tray full detection may come off.
If the actuator is not reattached, output tray full detection will not take place and output may protrude from the machine.
If the actuator comes off, see "The actuator came off (when a finisher is not installed)" (page 4-22) in "4.
TROUBLESHOOTING".
1-39
Page 43

BEFORE USING THE MACHINE
TRAY SETTINGS FOR TRAYS 1 TO 4
LOADING PAPER AND CHANGING THE PAPER SIZE
A maximum of 500 sheets of paper from size 5-1/2" x 8-1/2" to size 8-1/2" x 14" (A5 to A4) can be loaded in trays 1 and 2.
A maximum of 500 sheets of paper from size 7-1/4" x 10-1/2" to size 8-1/2" x 14" (B5 to A4) can be loaded in trays 3 and 4.
Pull out the paper tray.
Gently pull the tray out until it stops.
To load paper, go to step 3. To load a different size of paper, go
to the next step.
1
Do not pull hard on the tray. This may cause failure.
2
Adjust the guide plates A and B by
squeezing their lock levers and sliding
A
them to match the vertical and
horizontal dimensions of the paper to be
loaded.
The guide plates A and B are slidable. Slide each guide plate
B
• Be sure to place the guide to match the size of the paper. If the guide is not placed correctly, paper skewing or
misfeeds may occur.
• The loaded paper should not go higher than these protrusions.
while squeezing its lock lever.
3
Fan the paper.
Fan the paper well before loading it. If the paper is not fanned,
multiple sheets may feed at once and cause a misfeed.
When handling paper, take care not to cut yourself on the edges of the paper.
1-40
Page 44

4
BEFORE USING THE MACHINE
Insert the paper into the tray.
Load the paper with the print side face up. The stack must not
be higher than the indicator line (maximum of 500 sheets).
Indicator
line
• If paper is loaded higher than the line, paper misfeeds may occur.
• When pushing in a tray, take care that your fingers do not become pinched in the tray.
Gently push the paper tray into the
machine.
Push the tray firmly all the way into the machine.
5
When pulling out a tray after paper is loaded, do not pull hard. The tray may be damaged, the machine may topple,
and injury may result.
If you loaded a different type or size of paper than was loaded previously, be sure to change the "Paper Tray Settings"
in the system settings. If these settings are not configured correctly, automatic paper selection will not operate
correctly and printing may take place on the wrong size or type of paper, or a misfeed may occur.
Caution
If children are present, ensure that the children do not sit or play on a tray that has been pulled out.
Sitting on a tray may damage the tray and cause the machine to topple, resulting in injury.
Do not place heavy objects on the tray or press down on the tray.
System Settings: Paper Tray Settings (page 3-37)
Change these settings when you change the size or type of paper loaded in a tray.
1-41
Page 45

BEFORE USING THE MACHINE
LOADING PAPER IN THE BYPASS TRAY
The bypass tray can be used to print on plain paper, envelopes, label sheets, and other special media. Up to 100 sheets
of paper can be loaded (up to 40 sheets of heavy paper) for continuous printing similar to the other trays.
Open the bypass tray.
When loading paper larger than 8-1/2" x 11" or A4, be sure to
1
pull the bypass tray extension all the way out. If the bypass tray
extension is not pulled all the way out, the size of the loaded
paper will not be correctly displayed.
2
3
Do not place heavy objects on the bypass tray or press down on the tray. The bypass tray may be damaged, the
machine may topple, and injury may result.
Set the bypass tray guides to the width
of the paper.
Insert the paper along the bypass tray
guides all the way into the bypass tray
until it stops.
Load the paper with the print side face down.
• Do not force the paper in.
• If the bypass tray guides are set wider than the paper, move the bypass tray guides in until they correctly fit the
width of the paper. If the bypass guides are set too wide, the paper may skew or be creased.
Caution
If children are present, ensure that the children do not sit or play on a bypass tray that has been
pulled out. Sitting on a tray may damage the tray and cause the machine to topple, resulting in
injury.
1-42
Page 46

BEFORE USING THE MACHINE
IMPORTANT POINTS WHEN USING THE BYPASS TRAY
• When using plain paper other than SHARP standard paper or special media other than SHARP-recommended
transparency film, or when printing on the reverse side of previously used paper, the paper must be loaded one sheet
at a time. Loading more than one sheet at a time will cause misfeeds.
• Before loading paper, straighten any curling in the paper. If curled paper is not straightened, a misfeed may occur.
• When adding paper, remove any paper remaining in the bypass tray, combine it with the paper to be added, and
reload as a single stack. If paper is added without removing the remaining paper, a misfeed may result.
Inserting paper
Place paper in the horizontal orientation.
Inserting transparency film
• Use SHARP-recommended transparency film. When using
transparency film, place the film on the bypass tray with the rounded
corner at the left front. This ensures that the print side faces in the
correct direction.
• Do not touch the print side of transparency film.
• When loading multiple sheets of transparency film in the bypass tray,
be sure to fan the sheets several times before loading.
• When printing on transparency film, be sure to remove each sheet as it
exits the machine. Allowing sheets to stack in the output tray may result
in curling.
1-43
Page 47

BEFORE USING THE MACHINE
Loading envelopes
When inserting envelopes in the bypass tray, place them aligned to the left side in the orientation shown below.
Only the front side of envelopes can be printed on. Be sure to place the front side face down.
When loading envelopes, load one envelope at a time.
• Do not print on both sides of an envelope. This may result in misfeeds or poor print quality.
• Some operating environments may cause creasing, smudging, misfeeds, poor toner fusing, or machine failure.
Important points when using envelopes
Envelopes that cannot be used
Do not use the following envelopes. Envelopes misfeed, and smudges may result.
• Envelopes with metal clasps, plastic hooks, or ribbon hooks
• Envelopes closed with string
• Envelopes with windows or backing
• Envelopes with an uneven front surface due to embossing
• Double-layer envelopes
• Envelopes with an adhesive for sealing
• Hand-made envelopes
• Envelopes with air inside
• Envelopes with creases, fold marks, torn or damaged envelopes
• Envelopes with an incorrectly aligned corner gluing position on the back cannot be used as creasing may result.
Can be used
Cannot be
used
Print quality on envelopes
• Print quality is not guaranteed in the area 13/32" (10 mm) around the edges of the envelope.
• Print quality is not guaranteed on parts of envelopes where there is a large step-like change of thickness, such as on
four-layer parts or parts less than three layers.
• Print quality is not guaranteed on envelopes witn adhesive for sealing.
1-44
Page 48

BEFORE USING THE MACHINE
PERIPHERAL DEVICES
This section describes the peripheral devices that can be used with the machine and explains how to use the finisher, as
well as Sharp OSA.
PERIPHERAL DEVICES
Peripheral devices can be installed on the machine to increase its range of functionality.
The peripheral devices are generally optional, however, some models include certain peripheral devices as standard
equipment.
(As of December, 2009)
Product name Product number Description
500-sheet paper feed unit
MX-CSX1
MX-CSX2
Finisher MX-FN12
Finisher cover MX-CV10
Barcode font kit AR-PF1 Adds barcode fonts to the machine.
XPS expansion kit MX-PUX1
Expansion memory board MX-SMX3 This expands the memory that can be used on the machine.
Additional tray. A maximum 500 sheets of paper can be loaded
in each tray.
Output device that enables the use of the staple function and
offset function.
When a finisher is installed, be sure to attach the finisher cover
(MX-CV10).
When a finisher is installed, this cover protects the top of the
finisher.
The machine can be used as an XPS compatible printer.
To install this kit, a 1 GB expansion memory board (MX-SMX3)
is required.
1-45
Page 49

BEFORE USING THE MACHINE
FINISHER
The finisher is equipped with the offset function, which offsets each set of output from the previous set.
In addition, each set of sorted output can be stapled.
PART NAMES
The following parts can be accessed when the finisher is open.
(1)
(2)
(3)
(1) Output tray
Stapled and offset output is delivered to this tray.
The tray is slidable. Extend the tray for large output
(8-1/2" x 14", 8-1/2" x 13", 8-1/2" x 13-1/2", and
8-1/2" x 13-2/5" sizes).
(2) Lever
Use this to move the finisher in order to remove a paper
misfeed, replace staples, or remove a staple jam.
Do not place heavy objects on the finisher or press down on it.
Use caution when you turn on the power and when printing is taking place, as the tray may move up and down.
SUPPLIES
The finisher requires the following staple cartridge:
(5)(4)
(3) Front cover
Open this cover to remove a paper misfeed, replace
staples, or remove a staple jam.
(4) Staple case
This holds the staple cartridge. Pull the case out to
replace the staple cartridge or remove a staple jam.
(5) Staple case release lever
Use this to remove the staple case.
Staple cartridge
(approx. 5000 staples per cartridge x 3 cartridges)
MX-SCX1
1-46
Page 50

BEFORE USING THE MACHINE
JOB
SHARP OSA
Sharp OSA (Open Systems Architecture) is an architecture that enables external applications to be directly connected to
a machine over a network.
When a machine that supports Sharp OSA is used, the keys that are displayed on the operation panel and functions can
be linked to an external application.
There are two types of external applications: "standard application" and "external account application". An "external
account application" is used for centralized account management of a machine on a network. A "standard application"
refers to all other applications.
STANDARD APPLICATION
When a previously registered standard application is selected in the Web pages of the machine, the machine retrieves
the operation screen from the registered URL. Control of the operation screen is performed by the standard application.
Standard application setup
To enable a general application in the Web pages of the machine, click [Application Settings] in the administrator menu
frame, and then [External Applications Settings] and [Standard Applications]. Configure settings for the standard
application in the screen that appears.
Selecting a standard application
The procedure for selecting a general application that has been enabled in the Web pages of the machine is explained
below.
Keys in the display can be selected with the arrow keys and the [OK] key.
Press the Sharp OSA shortcut key.
STATUS
1
SYSTEM
Select the standard application.
If two or more standard applications have been stored in the
Web pages, the screen to select the standard application will
appear. Select the standard application that you wish to use.
If only one standard application has been stored in the Web
pages, connection to the standard application will begin.
2
OK
BACK
The machine connects to the standard application.
The message "Connecting to the external application." appears while the machine communicates with the standard
3
application.
1-47
Page 51

BEFORE USING THE MACHINE
EXTERNAL ACCOUNT APPLICATION
An external account application can be used in "external authentication mode" or "external count mode". When external
authentication mode is used, the login screen is retrieved from the application when the machine is started. When a job
ends, a job notification screen is sent to the application to enable counts to be kept for each authenticated user.
When "external count mode" is used, the login screen is not displayed when the machine is started. Only a job result
notification is sent to the application. User authentication by the external account application cannot be used, however,
the external account application can be used in combination with the internal account function.
External account application setup
To enable an external account application in the Web pages of the machine, click [Application Settings] in the
administrator menu frame, and then [External Applications Settings] and [External Accounting Application Settings].
Configure settings for the external account application in the screen that appears. The setting change will take effect
after the machine is restarted. To restart the machine, see "TURNING THE POWER ON AND OFF" (page 1-13).
Operation in external account mode
The two modes for using an external account application operate as explained below.
External authentication mode
When the "Enable Authentication by External Server" checkbox is selected in "External Application Setting" in the Web
page, the machine enters external authentication mode. When the machine is powered on in external authentication
mode, the machine accesses the external account application and displays the login screen. The login screen also
appears when the [Call] key is selected to run a job in the job status complete screen. (The login screen does not appear
if the user has already logged in by the normal method.)
The [JOB STATUS] key can be pressed while the login screen appears to show the job status screen. To return to the
previous state, press the mode select key.
• The user control function of the machine cannot be used in external authentication mode.
However, "User Registration", "User Count Display", "User Count Reset", "User Information Print", and "The Number of
User Name Displayed Setting" can be used.
• The mode select key cannot be used while the login screen appears.
If login fails
If the login screen fails to appear or the application does not operate correctly, the machine may also stop operating
correctly. In this event, it is recommended that you quit external account mode from the Web pages of the machine. For
more information, see [Help] in the Web pages.
To forcibly exit external account mode from the machine's operation panel, follow these steps:
Change "External Application Setting" in the Web page. Restart the machine to make the change take effect. To restart
the machine, see "TURNING THE POWER ON AND OFF" (page 1-13).
External count mode
When only the "External Account Control" setting is enabled in "External Application Setting" in the Web page, the
machine enters external count mode.
Unlike external authentication mode, when the machine is started in "external count mode", the login screen of the
external account application is not displayed. Only the job result is sent to the external account application. External
count mode can be used together with the user control function of the machine. (External count mode can also be used
when the user control function is disabled.)
1-48
Page 52

BEFORE USING THE MACHINE
MAINTENANCE
This section explains how to clean the machine and replace the toner cartridges and the toner collection container.
REPLACING THE TONER CARTRIDGES
When it is time to replace a supply item, a message instructing you to replace the item will appear in the display.
When replacing a toner cartridge, carefully check the indicated color and replace the toner cartridge for that color.
• Do not replace a supply item before the replacement message appears in the display.
• After using up a cartridge, pack it with the packing case, packing material and bag that are used for the original cartridge.
Locations of color toner cartridges
(M)(Y) (C) (Bk)
1
(Y): Yellow (M): Magenta
(C): Cyan (Bk): Black
Example: Replacing the yellow toner cartridge
Open the front cover.
Pull the toner cartridge toward you.
2
1-49
Page 53

BEFORE USING THE MACHINE
Take out the new toner cartridge, hold it
with both hands, and shake 5 or 6 times
horizontally.
3
4
Protective
material
• When shaking the toner cartridge, be sure to shake with the protective material inserted in the cartridge. If you
shake the cartridge after removing the protective material, toner may spill out.
• Shake the toner cartridge only in the horizontal direction. If shaken in any other direction, toner may collect in one
part of the cartridge.
Remove the protective material from the
new toner cartridge.
• Hold the toner cartridge firmly while removing the protective material.
•
After the protective material has been removed, do not point the toner cartridge down or shake it. Toner may spill out.
Insert the new toner cartridge
horizontally and push it firmly in.
The shape of the toner cartridge varies by color. Insert in the
same location as the toner cartridge that was removed.
5
1-50
Page 54

Close the front cover.
6
• Before moving the machine, remove the toner cartridge. Moving the machine with the toner cartridge installed may
cause a failure.
•
When the developer cartridge has been removed, do not remove or insert the toner cartridge. This may cause a failure.
• After the toner cartridge is replaced, the machine automatically enters image adjustment mode. Image adjustment
will not take place if the cover is not closed.
• Take care that your fingers are not pinched when closing the cover.
Caution
• Do not throw a toner cartridge into a fire. Toner may fly and cause burns.
• Store toner cartridges out of the reach of small children.
BEFORE USING THE MACHINE
• Store the box that contains the toner cartridge horizontally; do not store it standing up. If the toner cartridge is stored
standing up, the toner may solidify inside the cartridge.
• Store the toner in a location that is cooler than 104°F (40°C). Storage in a hot location may cause the toner in the cartridge
to solidify.
• If a toner cartridge other than a SHARP-recommended toner cartridge is used, the machine may not attain full quality and
performance and there is a risk of damage to the machine. Be sure to use a SHARP-recommended toner cartridge.
• Place the old toner cartridge in the bag that contained the new toner cartridge, seal the bag, and place it in the box.
• Keep the used toner cartridge in a plastic bag (do not discard it).
• To view the approximate amount of toner remaining, continually touch the
[PRINT] key during printing or when the machine is idle. The percentage of
toner remaining will appear in the display while the key is touched. When the
percentage falls to "25-0%", obtain a new toner cartridge and keep it ready for
replacement. When the remaining toner falls to "25-0%", colors in the output
may be faint or partially missing when an image with dark colors is printed.
Total Count B/W:00,000,000
Full Color:00,000,000
2-color:00,000,000
Single color:00,000,000
Toner Quantity [Bk]:100-75%
[C]:100-75%
[M]:100-75%
[Y]:100-75%
1-51
Page 55

BEFORE USING THE MACHINE
REPLACING THE TONER COLLECTION
CONTAINER
The toner collection container collects excess toner that is produced during printing.
When it is time to replace a supply item, a message instructing you to replace the item will appear in the display. Follow
the procedure below to replace the toner collection container.
• Do not subject the toner collection container to shock. The amount of collected toner may be incorrectly detected and
cause machine failure.
• Do not replace a supply item before the replacement message appears in the display.
• Toner may spill when the toner collection container is replaced. Before replacing the toner collection container, take
measures such as placing covers on and around the machine to prevent soiling.
Open the front cover.
1
2
Mark
Release the used toner collection
container.
(1) Turn the toner collection container lock
lever to the right until it is horizontal.
(2) Tip the toner collection container forward.
Grasp the toner collection container with both hands at
the marks on the upper right and lower left of the
container and slowly tip the container toward you.
Mark
1-52
Page 56

3
4
BEFORE USING THE MACHINE
Remove the toner collection container.
• If the toner collection container is tipped forward too far, it will not be possible to remove it.
• Do not point the holes down as used toner will spill out.
• Hold the container by both hands and lift it up slowly.
• Do not discard the toner collection container. Place it in a plastic bag and keep it until it is collected by a service.
Install the new toner collection
(2)
(1)
container.
Insert the container from above at a slant. (The direction
opposite to when you removed it.)
5
6
Turn the lock lever on the toner
collection container to the left.
Turn the lock lever to the left until it stops.
If the lock lever does not turn, check if the toner collection container is installed correctly. In particular, make sure that
the top left corner of the toner collection container is correctly in place.
Close the front cover.
Take care that your fingers are not pinched when closing the cover.
1-53
Page 57

BEFORE USING THE MACHINE
Caution
• Do not throw the toner collection container into a fire. Toner may fly and cause burns.
• Store the toner collection container out of the reach of small children.
• Place the old toner collection container in the bag that contained the new toner collection container, seal the bag, and
place it in the box.
• Toner may spill when the toner collection container is replaced. Take measures so that there will be no problem if toner
spills on the machine, around the machine, or on your clothes.
• Do not touch the part soiled with toner of the removed toner collection container. If you accidentally touch the toner,
immediately wash your hands.
1-54
Page 58

BEFORE USING THE MACHINE
REPLACING THE DEVELOPER CARTRIDGE
/ DRUM CARTRIDGE
Before replacing the developer cartridge or drum cartridge, turn off the main power of the machine and wait briefly.
REPLACING THE DEVELOPER CARTRIDGE
When it is time to replace a supply item, a message instructing you to replace the item will appear in the display. When
replacing a developer cartridge, carefully check the indicated color and replace the developer cartridge for that color.
It is also necessary to remove the developer cartridge in order to replace the drum cartridge. Refer to the procedure
below to remove the developer cartridge when replacing the drum cartridge.
Do not replace a supply item before the replacement message appears in the display.
1
2
Do not point the holes down as used toner will spill out.
Press the [POWER] key ( ) on the
operation panel to turn off the panel
power, and then switch the main power
switch to the off position.
Open the front cover and remove the
toner collection container.
REPLACING THE TONER COLLECTION
☞
CONTAINER (page 1-52)
1-55
Page 59

3
BEFORE USING THE MACHINE
Open the main charger cover.
(1) Turn the main charger cover lock levers in
the direction of an arrow below.
When the lock levers are horizontal, the lock is released.
(2) Grasp the lock levers and tip the cover
forward.
4
(3)
(2) (2)
Roller
Remove the developer cartridge.
(1) Grasp the developer cartridge lock and pull
it forward and down.
(2) Squeeze the lever on the developer
cartridge
(3) Pull the developer cartridge out
horizontally.
(4) Support the developer cartridge near the
middle with your hand and completely
remove the developer cartridge.
• When removing the developer cartridge, grasp it with both hands at the middle.
• Try to keep the developer cartridge horizontal as you remove it. If tipped during removal, developer may spill out.
• There will be toner on the roller area of the removed developer cartridge. Do not touch the roller area. If you
accidentally touch the toner, immediately wash your hands.
• Place the old developer cartridge in the bag that contained the new developer cartridge, seal the bag, and place it in
the box.
1-56
Page 60

BEFORE USING THE MACHINE
5
Protective material
Shake the new developer cartridge 5 or 6
times as shown.
Hold the developer cartridge firmly as shown below and shake
forward and back, left and right.
Remove the protective material after shaking the developer
cartridge.
• The part of the developer cartridge shown in the next illustration is easily
deformed or damaged. Do not touch this part when handling the cartridge.
• Do not touch the roller in the developer cartridge. If the roller is accidentally
touched, image problems may result. In that case, replace the developer cartridge
with a new cartridge.
• The seal must not be removed when shaking the new developer cartridge.
• Take care not to damage the developer cartridge when shaking it. If damaged, the
developer in the cartridge may leak out.
6
7
Insert the new developer cartridge
horizontally.
Insert the new developer cartridge in the same location as the
cartridge that was removed.
• Do not tilt the developer cartridge or insert it in the wrong direction or orientation. This may damage the developer
cartridge or drum cartridge and cause failure.
• When inserting the developer cartridge, grasp it with both hands at the middle.
• Do not remove the seal from the developer cartridge until the cartridge is installed in the machine. If the seal is
removed when the cartridge is not locked, the cartridge may fall out of the machine.
Insert with the arrow on the cartridge aligned with the arrow on the machine.
Detach the end of the seal from the
developer cartridge.
Align the notch in the seal with the tab on the attachment part
and pull up. Be careful not to completely remove the seal by
pulling too hard.
1-57
Page 61

8
9
BEFORE USING THE MACHINE
Grasp the developer cartridge lock and
replace it on the machine.
Hold the developer cartridge with one
hand and slowly remove the seal with
the other hand.
Slowly pull the seal straight and horizontally out.
If excessive force is used or the seal is pulled out diagonally, it may tear.
10
11
There is a mark (red belt) on the end of the seal. After removing the seal, be sure to verify that the mark (red belt) is on
the end of the seal.
If the seal has been cut on the developer cartridge, the cartridge cannot be used. Replace with a new developer
cartridge.
Close the main charger cover and rotate
the lock levers in the direction of the
arrows to lock the cover.
When the lock levers are vertical, the cover is locked.
Install the toner collection container.
☞
(2)
(1)
REPLACING THE TONER COLLECTION
CONTAINER (page 1-52)
1-58
Page 62

12
DATA
13
BEFORE USING THE MACHINE
Close the front cover.
Take care that your fingers are not pinched when closing the cover.
Turn on the power.
Switch the main power switch "ON" and press the [POWER]
key ( ) on the operation panel to turn on the operation panel
power.
Caution
• Do not throw the developer cartridge into a fire. Toner may fly and cause burns.
• Store the developer cartridge out of the reach of small children.
• When replacing the developer cartridge, be aware that it may soil your clothes or the immediate surroundings.
• Do not touch the part soiled with toner of the removed toner collection container. If you accidentally touch the toner,
immediately wash your hands.
1-59
Page 63

BEFORE USING THE MACHINE
REPLACING THE DRUM CARTRIDGE
When it is time to replace a supply item, a message instructing you to replace the item will appear in the display. When
replacing a drum cartridge, carefully check the indicated color. If black is indicated, replace the drum cartridge for black.
If cyan, magenta, or yellow is indicated, replace the drum cartridge for color.
• Do not replace a supply item before the replacement message appears in the display.
• Do not leave the drum cartridge outside of its package for a long time, and do not remove cartridge from its package in a
location where there is bright sunlight or bright light. This may cause a failure.
• When you remove a drum cartridge, place it in a dark location and do not allow light to shine on the cartridge.
Turn off the power and remove the developer cartridge.
For the procedure for removing the developer cartridge, see steps 1 to 4 of "REPLACING THE DEVELOPER CARTRIDGE"
(page 1-55).
To remove the drum cartridge, the developer cartridge must first be removed.
1
2
Drum cartridge alignment
mark on machine
Drum cartridge
Developer cartridge
Hold down the lever on the drum
cartridge with your finger and pull the
drum cartridge toward you.
Place one hand at the middle of the drum cartridge and pull out
with both hands.
• Do not touch toner on the old drum cartridge. If you accidentally touch the toner, immediately wash your hands.
• Place the old drum cartridge in the bag that contained the new drum cartridge, seal the bag, and place it in the box.
1-60
Page 64

BEFORE USING THE MACHINE
3
Drum cartridge alignment
mark on machine
Drum cartridge
alignment mark
Right Hand
Drum
Left Hand
• To remove the protective material, slowly pull it straight out so that it does not tear.
• When installing the drum cartridge, do not touch or damage the drum. This may cause a failure.
• After removing the protective material, immediately insert the drum cartridge in the machine. Do not allow the drum
cartridge to be directly exposed to sunlight or electric light.
• Do not tilt the drum cartridge or insert it in the wrong direction or orientation. This may damage the drum cartridge or
cause a failure.
Remove the protective material from the
drum cartridge and slowly insert the
drum cartridge along the guides.
Make sure that the mark on the drum cartridge is aligned
with the mark on the machine as you insert the drum
cartridge.
Make sure that the colors on the new drum cartridge and the insertion label match.
Replace the developer cartridge and toner collection container, close the front
cover of the machine, and turn on the power.
4
For the procedure for replacing the developer cartridge and toner collection container, see steps 7 to 8 and steps 10 to 11 of
"REPLACING THE DEVELOPER CARTRIDGE" (page 1-55).
1-61
Page 65

BEFORE USING THE MACHINE
REPLACING THE STAPLE CARTRIDGE IN
THE FINISHER
When the staple cartridge runs out of staples, a message will appear in the operation panel. Follow the procedure below
to replace the staple cartridge.
Open the cover.
1
2
3
4
While pressing the lever over to the left,
slide the finisher to the left until it stops.
Gently slide the finisher until it stops
Lower the staple case release lever and
remove the staple case.
Pull the staple case out to the right
Remove the empty staple cartridge from
the staple case.
Gently grasp the right side of the staple cartridge as shown and
lift to the left and up. The lock will release easily. After the lock
releases, continue lifting the staple cartridge to the left and up
to remove it.
• Even when a message appears in the operation panel, staples may occasionally remain in the staple cartridge.
• If staples remain, the lock will not release easily. Forcing the lock to release may deform the staple case and staple
cartridge, causing failure.
1-62
Page 66

5
6
BEFORE USING THE MACHINE
Insert a new staple cartridge into the
staple case as shown.
Push the staple cartridge in until it clicks into place.
Replace the staple case.
Push the staple case in until it clicks into place.
Slide the finisher back to the right.
Gently slide the finisher back to the right until it locks into its
original position.
7
Take care that your fingers are not pinched when closing the cover.
Close the cover.
8
Take care that your fingers are not pinched when closing the cover.
Make a test print in staple sort mode to verify that stapling takes place correctly.
1-63
Page 67

BEFORE USING THE MACHINE
REGULAR MAINTENANCE
To ensure that the machine continues to provide top quality performance, periodically clean the machine.
Caution
Do not use a flammable spray to clean the machine. If gas from the spray comes in contact with hot electrical
components or the fusing unit inside the machine, fire or electrical shock may result.
Do not use thinner, benzene, or similar volatile cleaning agents to clean the machine. These may degrade or discolor the
housing.
CLEANING THE MAIN CHARGER OF THE
PHOTOCONDUCTIVE DRUM
If black lines or colored lines appear, use the charger cleaner to clean the main charger.
A replacement main charger cleaner is included with the drum cartridge (black). When you replace the drum cartridge
(black), replace the main charger cleaner as well.
Press the [POWER] key ( ) on the
operation panel to turn off the panel
power, and then switch the main power
1
switch to the off position.
Open the front cover and remove the
toner collection container.
☞
REPLACING THE TONER COLLECTION
CONTAINER (page 1-52)
2
Do not point the holes down as used toner will spill out.
1-64
Page 68

3
BEFORE USING THE MACHINE
Release the lock levers and open the
main charger cover.
REPLACING THE DEVELOPER CARTRIDGE (page
☞
1-55)
4
5
(1)
(A)
(A)
Position of mark
(2)
Remove the charger cleaner.
(1) Flip down the charger cleaner lock (A) in the
direction of the arrow, and lift the left end of
the charger cleaner.
(2) Move the charger cleaner to the left and pull
it out.
Clean the main charger.
Holes to be cleaned by the charger cleaner are indicated by
labels similar to (A).
(1)
Gently push the charger cleaner all the way in.
(2) Gently pull the charger cleaner out.
(3) Repeat the above (1) to (2) three times.
Take care not to let the tip of the charger cleaner become soiled by toner.
• Clean with the mark ( ) on the charger cleaner facing down.
• Do not use the charger cleaner for any purpose other than cleaning the main charger.
1-65
Page 69

6
DATA
BEFORE USING THE MACHINE
Repeat step 5 with each of the other
main chargers.
Main charger
There are a total of 4 places to be cleaned in the machine as shown.
7
8
9
(2)
(1)
(2)
(1)
Replace the charger cleaner in its
original position.
Insert the tip of the charger cleaner in toward the right and then
press down on the end of the charger cleaner. The charger
cleaner will lock into place.
Close the main charger cover and rotate
the lock levers in the direction of the
arrows to lock the cover.
☞
REPLACING THE DEVELOPER CARTRIDGE (page
1-55)
Install the toner collection container.
REPLACING THE TONER COLLECTION
☞
CONTAINER (page 1-52)
10
11
Close the front cover.
Turn on the power.
Switch the main power switch "ON" and press the [POWER]
key ( ) on the operation panel to turn on the operation panel
power.
1-66
Page 70

BEFORE USING THE MACHINE
CLEANING THE BYPASS FEED ROLLER
If you find that paper fed from the bypass tray misfeeds or is soiled by the roller, clean the roller.
Before starting, remove the paper from the bypass tray.
Press the [POWER] key ( ) on the
operation panel to turn off the panel
power, and then switch the main power
1
2
Marks
switch to the off position.
Remove the roller cover from the bypass
tray.
Place your fingers behind the marks on the roller cover and
pull straight toward you. Pull alternately on the left and right
side of the roller cover.
3
Caution
When cleaning the rollers, be careful not to injure your hands.
Do not touch the surface of the roller if your hands are dirty.
If the dirt is difficult to remove, moisten the cloth with a small amount of water or neutral detergent, and then wipe with
a clean, dry cloth until no moisture remains.
4
To clean the rollers, wipe each roller
with a clean cloth.
Attach the roller cover on the bypass
tray.
Press the cover onto the bypass tray so that it locks into place.
1-67
Page 71

5
DATA
BEFORE USING THE MACHINE
Turn on the power.
Switch the main power switch "ON" and press the [POWER]
key ( ) on the operation panel to turn on the operation panel
power.
1-68
Page 72

BEFORE USING THE MACHINE
CLEANING THE LASER UNIT
When the laser unit inside the machine becomes dirty, line patterns (colored lines) may form in the printed image. Follow
the steps below to clean the laser unit.
Identifying lines (colored lines) caused by a dirty laser unit
• Colored lines always appear in the same place. (The lines are never black.)
• The colored lines are parallel to the direction of paper feeding.
Direction of
paper feeding
Colored Line
1
2
Do not point the holes down as used toner will spill out.
Press the [POWER] key ( ) on the
operation panel to turn off the panel
power, and then switch the main power
switch to the off position.
Open the front cover and remove the
toner collection container.
REPLACING THE TONER COLLECTION
☞
CONTAINER (page 1-52)
Remove the cleaning tool for the writing
unit from the front cover.
3
1-69
Page 73

4
5
BEFORE USING THE MACHINE
Make sure that the cleaner at the tip of
the cleaning tool is not dirty.
Cleaner
If the cleaner is dirty, remove the cleaner and replace it with a clean one. For the procedure for replacing the cleaner,
see steps 5 through 7. If the cleaner is not dirty, go to step 8.
Pull out the replacement cleaner from
the toner collection container.
6
7
Remove the dirty cleaner.
Firmly grasp the tool close to where the cleaner is attached.
Use your other hand to press down on the hook that secures
the cleaner and remove the cleaner.
Return the removed cleaner to the toner collection container
Attach the new cleaner to the cleaning
tool.
Firmly grasp the tool close to where the cleaner is attached.
Use your other hand to press down on the hook that secures
the cleaner and remove the cleaner.
Make sure that the cleaner is firmly attached to the cleaning tool.
1-70
Page 74

(A)
BEFORE USING THE MACHINE
Clean the laser unit.
(1) Point the cleaner down and slowly insert
the tool into the hole that you wish to clean.
The parts of the writing unit that require cleaning are
indicated by labels similar to (A).
8
(2) Insert the cleaning tool all the way into the
hole and then pull it back out.
Pull the cleaning tool out until you feel the tip of the tool
leave the cleaning surface of the laser unit.
(3) Repeat step (2) two or three times and then
remove the cleaning tool.
Repeat step 8 to clean all holes in the
laser unit.
9
10
Holes to be cleaned
There are a total of 4 holes to be cleaned in the laser unit.
If the cleaner becomes dirty during cleaning, replace with a new cleaner. For the procedure for replacing the cleaner,
see steps 5 to 7.
Replace the cleaning tool.
1-71
Page 75

11
DATA
12
Install the toner collection container.
REPLACING THE TONER COLLECTION
(2)
(1)
☞
CONTAINER (page 1-52)
Close the front cover.
Take care that your fingers are not pinched when closing the cover.
BEFORE USING THE MACHINE
13
Turn on the power.
Switch the main power switch "ON" and press the [POWER]
key ( ) on the operation panel to turn on the operation panel
power.
1-72
Page 76

BEFORE USING THE MACHINE
CLEANING THE PT CHARGER
If black or colored lines still remain after the main charger have been cleaned, use the PT charger cleaner to clean the
PT charger.
Press the [POWER] key ( ) on the
operation panel to turn off the panel
power, and then switch the main power
1
switch to the off position.
Open the front cover and remove the
toner collection container.
REPLACING THE TONER COLLECTION
☞
CONTAINER (page 1-52)
2
3
Do not point the holes down as used toner will spill out.
Clean the PT charger.
(1) Slowly pull the PT charger cleaner out until
you feel a slight resistance.
(2) Slowly push the PT charger cleaner back in.
(3) Repeat the above (1) to (2) three times.
4
(1)
(2)
Install the toner collection container.
☞
REPLACING THE TONER COLLECTION
CONTAINER (page 1-52)
1-73
Page 77

5
DATA
6
BEFORE USING THE MACHINE
Close the front cover.
Take care that your fingers are not pinched when closing the cover.
Turn on the power.
Switch the main power switch "ON" and press the [POWER]
key ( ) on the operation panel to turn on the operation panel
power.
1-74
Page 78

BEFORE USING THE MACHINE
ENTERING TEXT
This section explains the text entry screen.
FUNCTIONS OF THE MAIN KEYS
Key Description
This key changes the text entry screen from the lower case screen to the upper case
screen. The upper case screen will continue to appear until the [Caps] key is selected
again so that it is no longer highlighted. The [Caps] key is convenient when you wish to
enter all capital letters.
This key temporarily changes the keys in the text entry screen to upper case when lower
case letters appear, or to lower case when upper case letters appear.
Select a letter key after selecting the [Shift] key to enter that letter. After the letter is
entered, the [Shift] key will no longer be highlighted and the original text entry screen will
appear.
The [Shift] key is convenient when you only need to enter one upper case letter or one
lower case letter.
To cancel selection of the [Shift] key, select the [Shift] key again. The [Shift] key will no
longer be highlighted.
Select this key to enter a line break.
Select this key to delete the characters to the left of the cursor one character at a time.
Select this key to enter a space between letters.
This key temporarily changes the entry screen to the accented letter and symbol entry
screen. Select a letter key after selecting the [AltGr] key to enter that letter. After the letter
is entered, the [AltGr] key will no longer be highlighted and the original text entry screen
will appear.
To cancel selection of the [AltGr] key, select the [AltGr] key again. The [AltGr] key will no
longer be highlighted.
These keys move the cursor left and right.
.biz
.info
http:
Shows explanations of each key.
Use this key to enter a previously stored text string such as ".com".
Text strings are stored in "Soft Keyboard Template Setting" in "Operation Setting" in the
"System Settings" on the Web page.
Select this key to return to the previous setting screen without entering text.
Select this key to enter the text that currently appears and return to the previous setting
screen.
1-75
Page 79

BEFORE USING THE MACHINE
Key Description
Search
Select this key and search results will appear based on the entered characters.
When this key is selected, the "Input Mode" screen appears.
Input mode screen
Select this key to select character entry mode.
Select this key to select symbol entry mode. Symbol mode is used to enter symbols and
accented letters.
Select this key to temporarily change the key layout of character entry mode to a different
language. Select the key layout that you wish to use.
• The key layouts that can be selected vary depending on the language selected in "Display Language Setting" in the
system settings (administrator).
• The following symbols cannot be used when entering a file name or folder name.
\ ? / " ; : , < > ! * | & #
Some computer environments may not allow the use of spaces and the symbols indicated below. For example, hyperlinks
will not operate correctly or nonsense characters may appear.
$ % ' ( ) + - . = @ [ ] ^ ` { } _ ~
1-76
Page 80

CHAPTER 2
PRINTING
This chapter provides detailed explanations of the procedures for printing.
For the procedures for using the display of the machine, see "USING THE OPERATION PANEL" (page 1-8) in "1.
BEFORE USING THE MACHINE".
For the procedure for accessing the Web pages, see the Quick Start Guide.
For the procedures for using the Web page, see "USING THE WEB PAGE" (page 1-12) in "1. BEFORE USING THE
MACHINE".
PRINTER FUNCTION OF THE MACHINE . . . . . . . . 2-3
PRINTING FROM WINDOWS
BASIC PRINTING PROCEDURE . . . . . . . . . . . . . . . 2-4
• SELECTING THE PAPER . . . . . . . . . . . . . . . . . 2-6
• PRINTING ON ENVELOPES . . . . . . . . . . . . . . . 2-7
PRINTING WHEN THE USER
AUTHENTICATION FUNCTION IS ENABLED . . . . 2-8
VIEWING PRINTER DRIVER HELP. . . . . . . . . . . . 2-10
SAVING FREQUENTLY USED PRINT
SETTINGS . . . . . . . . . . . . . . . . . . . . . . . . . . . . . . . 2-11
• SAVING SETTINGS AT THE TIME OF
PRINTING . . . . . . . . . . . . . . . . . . . . . . . . . . . . 2-11
• USING SAVED SETTINGS . . . . . . . . . . . . . . . 2-13
CHANGING THE PRINTER DRIVER
DEFAULT SETTINGS . . . . . . . . . . . . . . . . . . . . . . 2-14
PRINTING FROM A MACINTOSH
BASIC PRINTING PROCEDURE . . . . . . . . . . . . . . 2-16
• SELECTING PAPER SETTINGS . . . . . . . . . . . 2-16
• PRINTING . . . . . . . . . . . . . . . . . . . . . . . . . . . . 2-17
• SELECTING THE PAPER . . . . . . . . . . . . . . . . 2-19
• PRINTING ON ENVELOPES . . . . . . . . . . . . . . 2-20
PRINTING WHEN THE USER
AUTHENTICATION FUNCTION IS ENABLED . . . 2-21
FREQUENTLY USED FUNCTIONS
SELECTING THE COLOR MODE . . . . . . . . . . . . . 2-23
SELECTING A PRINT MODE SETTING . . . . . . . . 2-25
TWO-SIDED PRINTING . . . . . . . . . . . . . . . . . . . . . 2-26
FITTING THE PRINT IMAGE TO THE PAPER . . . 2-28
PRINTING MULTIPLE PAGES ON ONE
PAGE . . . . . . . . . . . . . . . . . . . . . . . . . . . . . . . . . . . 2-29
STAPLING OUTPUT . . . . . . . . . . . . . . . . . . . . . . . 2-31
CONVENIENT PRINTING FUNCTIONS
CONVENIENT FUNCTIONS FOR CREATING
PAMPHLETS AND POSTERS . . . . . . . . . . . . . . . . 2-33
• CREATING A PAMPHLET (Pamphlet). . . . . . . 2-33
• INCREASING THE MARGIN (Margin Shift) . . . 2-35
• CREATING A LARGE POSTER (Poster
Printing) . . . . . . . . . . . . . . . . . . . . . . . . . . . . . . 2-36
FUNCTIONS TO ADJUST THE SIZE AND
ORIENTATION OF THE IMAGE. . . . . . . . . . . . . . . 2-37
• ROTATING THE PRINT IMAGE 180
DEGREES (Rotate 180 degrees) . . . . . . . . . . . 2-37
• ENLARGING/REDUCING THE PRINT
IMAGE (Zoom/XY-Zoom) . . . . . . . . . . . . . . . . . 2-38
• ADJUSTING LINE WIDTHS WHEN
PRINTING (Line Width Settings) . . . . . . . . . . . 2-39
• REVERSING THE IMAGE (Mirror Image) . . . . 2-40
COLOR MODE ADJUSTMENT FUNCTION . . . . . 2-41
• ADJUSTING THE BRIGHTNESS AND
CONTRAST OF THE IMAGE (Color
Adjustment) . . . . . . . . . . . . . . . . . . . . . . . . . . . 2-41
• PRINTING FAINT TEXT AND LINES IN
BLACK (Text To Black/Vector To Black) . . . . . 2-42
• SELECTING COLOR SETTINGS TO
MATCH THE IMAGE TYPE (Advanced
Color) . . . . . . . . . . . . . . . . . . . . . . . . . . . . . . . . 2-43
FUNCTIONS THAT COMBINE TEXT AND
IMAGES . . . . . . . . . . . . . . . . . . . . . . . . . . . . . . . . . 2-45
• ADDING A WATERMARK TO PRINTED
PAGES (Watermark) . . . . . . . . . . . . . . . . . . . . 2-45
• PRINTING AN IMAGE OVER THE PRINT
DATA (Image Stamp) . . . . . . . . . . . . . . . . . . . . 2-46
• CREATING OVERLAYS FOR PRINT
DATA (Overlays) . . . . . . . . . . . . . . . . . . . . . . . 2-47
2-1
Page 81

PRINTING
PRINT FUNCTIONS FOR SPECIAL
PURPOSES . . . . . . . . . . . . . . . . . . . . . . . . . . . . . . 2-48
• PRINTING SPECIFIED PAGES ON
DIFFERENT PAPER (Different Paper). . . . . . . 2-48
• ADDING INSERTS WHEN PRINTING ON
TRANSPARENCY FILM (Transparency
Inserts) . . . . . . . . . . . . . . . . . . . . . . . . . . . . . . . 2-50
• PRINTING A CARBON COPY (Carbon
Copy) . . . . . . . . . . . . . . . . . . . . . . . . . . . . . . . . 2-51
• TWO-SIDED PRINTING WITH SPECIFIC
PAGES PRINTED ON THE FRONT SIDE
(Chapter Inserts). . . . . . . . . . . . . . . . . . . . . . . . 2-52
RETENTION (PRINT HOLD) FUNCTION
SAVING PRINT FILES (Retention) . . . . . . . . . . . . 2-54
PRINTING A STORED FILE. . . . . . . . . . . . . . . . . . 2-56
• PRINT SETTINGS SCREEN . . . . . . . . . . . . . . 2-59
• MULTI-FILE PRINTING . . . . . . . . . . . . . . . . . . 2-60
DELETING A STORED FILE . . . . . . . . . . . . . . . . . 2-65
SEARCHING FOR A STORED FILE . . . . . . . . . . . 2-67
CHECKING THE PRINT STATUS
JOB STATUS SCREEN . . . . . . . . . . . . . . . . . . . . . 2-79
• SPOOL SCREEN/JOB QUEUE
SCREEN/COMPLETED JOB SCREEN . . . . . . 2-79
PRINTING AN ENCRYPTED PDF FILE. . . . . . . . . 2-81
GIVING A PRINT JOB
PRIORITY/CANCELING A PRINT JOB . . . . . . . . . 2-82
• GIVING A PRINT JOB PRIORITY . . . . . . . . . . 2-82
• CANCELING A PRINT JOB . . . . . . . . . . . . . . . 2-83
CHANGING TO ANOTHER PAPER SIZE AND
PRINTING WHEN PAPER RUNS OUT . . . . . . . . . 2-84
RETRIEVING AND USING A FILE FROM THE
JOB STATUS SCREEN . . . . . . . . . . . . . . . . . . . . . 2-86
APPENDIX
PRINTER DRIVER SPECIFICATION LIST . . . . . . 2-88
PRINTING WITHOUT THE PRINTER
DRIVER
DIRECTLY PRINTING FROM THE MACHINE. . . . 2-69
• DIRECTLY PRINTING A FILE ON AN FTP
SERVER. . . . . . . . . . . . . . . . . . . . . . . . . . . . . . 2-70
•
DIRECTLY PRINTING A FILE IN USB
MEMORY
•
DIRECTLY PRINTING A FILE IN A
NETWORK FOLDER
DIRECTLY PRINTING FROM A COMPUTER . . . . 2-77
• SUBMIT PRINT JOB . . . . . . . . . . . . . . . . . . . . 2-77
• FTP PRINT . . . . . . . . . . . . . . . . . . . . . . . . . . . . 2-77
• E-MAIL PRINT . . . . . . . . . . . . . . . . . . . . . . . . . 2-78
. . . . . . . . . . . . . . . . . . . . . . . . . . . . . 2-72
. . . . . . . . . . . . . . . . . . . . . 2-74
2-2
Page 82

PRINTING
PRINTER FUNCTION OF THE MACHINE
The machine is equipped standard with a full color printing function. To enable printing from your computer, a printer
driver must be installed.
See the table below to determine which printer driver to use in your environment.
Environment Printer driver type Remarks
PCL6, PCL5c
The machine supports the Hewlett-Packard PCL6 and PCL5c printer
control languages. It is recommended that you use the PCL6 printer
Windows
Macintosh
driver. If you have a problem printing from older software using the PCL6
printer driver, use the PCL5c printer driver.
PS
This printer driver supports the PostScript 3 page description language
developed by Adobe Systems Incorporated, and enables the machine to
be used as a PostScript 3 compatible printer.
(A PPD file is available if it is desired to use the Windows standard PS
printer driver.)
Can be used in the
standard machine
configuration.
Installing the printer driver in a Windows environment
To install the printer driver and configure settings in a Windows environment, see "2 - SETUP IN A WINDOWS
ENVIRONMENT" in the Software Setup Guide.
The explanations in this manual of printing in a Windows environment generally use the screens of the PCL6 printer driver.
The printer driver screens may differ slightly depending on the printer driver that you are using.
Installing the printer driver in a Macintosh environment
To install the printer driver and configure settings in a Macintosh environment, see "3 - SETUP IN A MACINTOSH
ENVIRONMENT"in the Software Setup Guide.
In a Macintosh environment, the machine can only be used if it is connected to your network.
2-3
Page 83

PRINTING
PRINTING FROM WINDOWS
BASIC PRINTING PROCEDURE
The following example explains how to print a document from "WordPad", which is a standard accessory program in
Windows.
Select [Print] from the [File] menu of
WordPad.
If you are using Windows 7, click the button.
1
2
The menu used to execute printing may vary depending on the software application.
Open the printer driver properties
window.
(1) Select the printer driver of the machine.
• If the printer drivers appear as icons, click the icon
of the printer driver to be used.
• If the printer drivers appear as a list, select the
name of the printer driver to be used from the list.
(2) Click the [Preferences] button.
• If you are using Windows 2000, the [Preferences]
button does not appear. Click a tab on the "Print"
dialog box to adjust the settings on that tab.
• In Windows 98/Me/NT 4.0, click the [Properties]
button.
(1)
The button that is used to open the printer driver properties window (usually [Properties] or [Printing Preferences])
may vary depending on the software application.
(2)
2-4
Page 84

PRINTING
3
(1)
(2)
Select print settings.
(1) Click the [Paper] tab.
(2) Select the paper size.
To select settings on other tabs, click the desired tab
and then select the settings.
(3) Click the [OK] button.
(3)
• Make sure the paper size is the same as the paper size set in the software application.
• Up to eight custom paper sizes can be stored. Storing a custom paper size makes it easy to specify that size each
time you need to use it.
To store a paper size, select [Custom Paper] or one of [User1] to [User7] from the pull-down menu and click the
[Custom] button.
4
Click the [Print] button.
Printing begins.
In Windows 98/Me/NT 4.0, click the [OK] button.
When removing printed output...
Remove the output horizontally so that it does not get caught on the actuator for output tray full detection.
If the actuator comes off, see "The actuator came off (when a finisher is not installed)" (page 4-22) in "4.
TROUBLESHOOTING".
2-5
Page 85

PRINTING
SELECTING THE PAPER
This section explains how to configure the "Paper Selection" setting on the [Paper] tab of
the printer driver properties window.
Before printing, check the paper sizes, paper types, and paper remaining in the machine's
trays. To view the most recent tray information, click the [Tray Status] button.
• When [Auto Select] is selected in "Paper Source"
The tray that has the size and type of paper selected in "Paper Size" and "Paper Type" on the [Paper] tab is
automatically selected.
• When other than [Auto Select] is selected in "Paper Source"
The specified tray is used for printing regardless of the "Paper Size" setting.
When [Bypass Tray] is selected
The "Paper Type" must also be selected. Check the bypass tray and make sure that the desired type of paper is
loaded, and then select the appropriate "Paper Type" setting.
• Special media such as envelopes can also be placed in the bypass tray. For the procedure for loading paper and other
media in the bypass tray, see "LOADING PAPER IN THE BYPASS TRAY" (page 1-42) in "1. BEFORE USING THE
MACHINE".
• When "Enable Detected Paper Size in Bypass Tray" (Web page only : disabled by factory default) or "Enable Selected
Paper Type in Bypass Tray" (Web page only : enabled by factory default) is enabled in the system settings (administrator),
printing will not take place if the paper size or paper type specified in the printer driver is different from the paper size or
paper type specified in the settings of the bypass tray.
• When [Auto Select] is selected in "Paper Type"
A tray with plain paper or recycled paper of the size specified in "Paper Size" is automatically selected. (The factory
default setting is plain paper only.)
• When other than [Auto Select] is selected in "Paper Type"
A tray with the specified type of paper and the size specified in "Paper Size" is used for printing.
System Settings (Administrator): Exclude Bypass-Tray from Auto Paper Select (Web page only)
When [Auto Select] is selected in "Paper Selection", specify whether or not the paper in the bypass tray will be excluded from
the paper that can be selected. This setting is disabled by factory default, and thus paper in the bypass tray is included in the
paper that can be automatically selected. If special media are frequently loaded in the bypass tray, it is recommended that
this setting be enabled.
2-6
Page 86

PRINTING
PRINTING ON ENVELOPES
The bypass tray can be used to print on special media such as envelopes. The procedure for printing on an envelope
from the printer driver properties screen is described below.
For the types of paper that can be used in the bypass tray, see "IMPORTANT POINTS ABOUT PAPER" (page 1-37) in
"BEFORE USING THE MACHINE". For the procedure for loading paper in the bypass tray, see "LOADING PAPER IN
THE BYPASS TRAY" (page 1-42) in "1. BEFORE USING THE MACHINE".
Select the envelope size in the appropriate settings of the application ("Page Settings" in many applications) and then
perform the following steps.
(2)(1) (3)
(1) Click the [Paper] tab.
(2) Select the envelope size from the "Paper
Size" menu.
(3) Select [Bypass Tray] from the "Paper
Source" menu of "Paper Selection".
(4) Select [Envelope] from the "Paper Type"
menu.
Set the paper type of the bypass tray to [Envelope] and
make sure the envelope is loaded in the bypass tray.
(4)
• It is recommended that you do a test print to check the print result before using an envelope.
• In the case of media that can only be loaded in a certain orientation such as an envelope, you can rotate the image 180
degrees if needed. For more information, see "ROTATING THE PRINT IMAGE 180 DEGREES (Rotate 180 degrees)"
(page 2-37).
• For more information on "Paper Selection", see "SELECTING THE PAPER" (page 2-6).
2-7
Page 87

PRINTING
PRINTING WHEN THE USER
AUTHENTICATION FUNCTION IS ENABLED
When the user authentication function is enabled, your user information (login name, password, etc.) must be entered in
the printer driver properties window before you can print. The information that must be entered varies depending on the
authentication method being used, so check with the administrator of the machine before printing.
Open the printer driver properties
window from the print window of the
software application.
(1) Select the printer driver of the machine.
(2) Click the [Preferences] button.
1
(1)
The button that is used to open the printer driver properties window (usually [Properties] or [Printing Preferences])
may vary depending on the software application.
(2)
2-8
Page 88

PRINTING
2
(1) (2)
(4)
(3)
Enter your login name and password.
(1) Click the [Job Handling] tab.
(2) Enter your user information.
• When authentication is by login name/password
Select the [Login Name] and [Password]
checkboxes so that checkmarks appear, and
enter your login name and password. Enter 1 to 32
characters for the password.
• When authentication is by user number
Click the [User Number] checkbox and enter a
user number (5 to 8 digits).
(3) Enter the user name and job name as
necessary.
• User Name
Click the [User Name] checkbox and enter your
user name (maximum of 32 characters). Your
entered user name will appear at the top of the
operation panel. If you do not enter a user name,
your computer login name will appear.
• Job Name
Click the [Job Name] checkbox and enter a job
name (maximum of 30 characters). The entered job
name will appear at the top of the operation panel
as a file name. If you do not enter a job name, the
file name set in the software application will appear.
(4) Click the [OK] button.
To have a confirmation window appear before printing starts, select the [Auto Job Control Review] checkbox so that a
checkmark appears.
Start printing.
3
• When user authentication is enabled, printing is possible without entering user information if black and white printing is set
in the printer driver. For black and white print settings, see "BLACK AND WHITE PRINTING" (page 2-24). The number of
pages printed is added to the "Other User" count. In this case, other print functions may be restricted. For more
information, ask your administrator.
• The machine's user authentication function cannot be used when the PPD file* is installed and the Windows standard PS
printer driver is used. For this reason, printing will not be possible if printing by invalid users is prohibited.
* The PPD file enables the machine to print using the standard PS printer driver of the operating system.
• Disabling of Printing by Invalid User
This is used to prohibit printing of print jobs by users whose user information is not stored in the machine. When this
function is enabled, printing is not allowed when user information is not entered or incorrect information is entered.
This setting can be configured in [User Control] - [Default Settings] - [Disabling of Printing by Invalid User] in the Web page
menu. (Administrator rights are required.)
2-9
Page 89

VIEWING PRINTER DRIVER HELP
When selecting settings in the printer driver, you can display Help to view explanations of the settings.
Open the printer driver properties
window from the print window of the
software application.
(1) Select the printer driver of the machine.
(2) Click the [Preferences] button.
1
PRINTING
2
(1)
The button that is used to open the printer driver properties window (usually [Properties] or [Printing Preferences])
may vary depending on the software application.
(2)
Click the [Help] button.
The Help window will open to let you view explanations of
the settings on the tab.
To view Help for settings in a dialog box, click the
underlined text at the top of the Help window.
Pop-up help
Help can be displayed for a setting by clicking the setting and pressing the [F1] key.
* To view Help for a setting in Windows 98/Me/NT 4.0/2000/XP/Server 2003, click the button in the upper right-hand
corner of the printer driver properties window and then click the setting.
You can also view the same Help by right-clicking the setting and clicking the [Help] box that appears.
Information icon
Some restrictions exist on the combinations of settings that can be selected in the printer driver properties window.
When a restriction exists on a selected setting, an information icon ( ) will appear next to the setting. Click the icon to
view an explanation of the restriction.
2-10
Page 90

PRINTING
SAVING FREQUENTLY USED PRINT
SETTINGS
Settings configured on each of the tabs at the time of printing can be saved as user settings. Saving frequently used
settings or complex color settings under an assigned name makes it easy to select those settings the next time you need
to use them.
SAVING SETTINGS AT THE TIME OF PRINTING
Settings can be saved from any tab of the printer driver properties window. Settings configured on each tab are listed at
the time of saving, allowing you to check the settings as you save them.
Open the printer driver properties
window from the print window of the
software application.
1
2
(1) Select the printer driver of the machine.
(2) Click the [Preferences] button.
(1)
The button that is used to open the printer driver properties window (usually [Properties] or [Printing Preferences])
may vary depending on the software application.
(2)
Save the print settings.
(1) Configure print settings on each tab.
(2) Click the [Save] button.
(2)(1)
2-11
Page 91

PRINTING
3
(2)(1)
(3)
Check and save the settings.
(1) Check the displayed settings.
(2) Enter a name for the settings (maximum
of 20 characters).
(3) Click the [OK] button.
Click the [OK] button.
4
5
• Up to 30 sets of user settings can be saved.
• The following items cannot be saved in user settings.
- A watermark that you created
- Paper insertion settings
-Overlay file
- The login name, password, user name, and job name entered in the [Job Handling] tab
Start printing.
2-12
Page 92

USING SAVED SETTINGS
1
PRINTING
Open the printer driver properties
window from the print window of the
software application.
(1) Select the printer driver of the machine.
(2) Click the [Preferences] button.
2
(1)
The button that is used to open the printer driver properties window (usually [Properties] or [Printing Preferences])
may vary depending on the software application.
(2)
Select the print settings.
(1) Select the user settings that you wish to
use.
(2) Click the [OK] button.
(1)
(2)
Start printing.
3
Deleting saved settings
Select the user settings that you want to delete in (1) of step 2 above, and click the [Delete] button.
2-13
Page 93

PRINTING
CHANGING THE PRINTER DRIVER
DEFAULT SETTINGS
The default settings of the printer driver can be changed using the procedure below. The settings selected using this
procedure are saved and become the default settings when printing from a software application. (Settings selected in
the printer driver properties window when printing from an application remain in effect only while the application is in
use.)
Click the [Start] button ( ) and select [Control Panel] and then [Printer].
• In Windows 7, click the [start] button and then click [Devices and Printers].
• In Windows XP/Server 2003, click the [start] button and then click [Printers and Faxes].
• In Windows 98/Me/NT 4.0/2000, click the [Start] button, point to [Settings], and then select [Printers].
1
In Windows XP, if [Printers and Faxes] does not appear in the [start] menu, select [Control Panel], select [Printers and
Other Hardware], and then select [Printers and Faxes].
2
(2)
(3)
(1)
Open the printer properties window.
(1) Click the icon of the printer driver of the
machine.
In Windows 7, right-click the icon of the printer driver
of the machine. Go to step (3).
(2) Click the [Organize] menu.
In Windows 98/Me/NT 4.0/2000/XP/Server 2003, click
the [File] menu.
(3) Select [Properties].
• In Windows 7, click the [Printer properties] menu.
• In Windows NT 4.0, select [Document Defaults]
from the [File] menu to open the printer driver
properties window. Go to step 4.
Click the [Printing Preferences] button
on the [General] tab.
• In Windows 7, click the [Preferences] button on the
[General] tab.
• In Windows 98/Me, click the [Setup] tab.
3
2-14
Page 94

4
PRINTING
Configure the settings and click the
[OK] button.
For explanations of the settings, see printer driver Help.
2-15
Page 95

PRINTING
PRINTING FROM A MACINTOSH
BASIC PRINTING PROCEDURE
The following example explains how to print a document from the standard accessory program "TextEdit" in Mac OS X
("SimpleText" in Mac OS 9).
SELECTING PAPER SETTINGS
Select paper settings in the printer driver before selecting the print command.
Select [Page Setup] from the [File]
menu of TextEdit.
In Mac OS 9, select [Page Setup] from the [File] menu of
SimpleText.
1
2
(2)
(1)
Select paper settings.
(1) Make sure that the correct printer is
selected.
(2) Select paper settings.
The paper size, paper orientation, and enlarge/reduce
can be selected.
(3) Click the [OK] button.
(3)
The machine name that appears in the "Format for" menu is normally [SCxxxxxx]. In Mac OS X v10.6, it is normally
[RDVxxxxxx]. ("xxxxxx" is a sequence of characters that varies depending on your machine model.)
2-16
Page 96

PRINTING
1
PRINTING
Select [Print] from the [File] menu of
TextEdit.
In Mac OS 9, select [Print] from the [File] menu of
SimpleText.
2
3
The menu used to execute printing may vary depending on the software application.
Make sure that the correct printer is
selected.
The machine name that appears in the "Printer" menu is normally [SCxxxxxx]. In Mac OS X v10.6, it is normally
[RDVxxxxxx]. ("xxxxxx" is a sequence of characters that varies depending on the machine model.)
Select print settings.
• In Mac OS X, click next to [Copies & Pages] and
select the settings that you wish to configure from the
pull-down menu. The corresponding setting screen will
appear. If the settings do not appear in Mac OS X v10.5
to 10.5.8 and 10.6, click " " next to the printer name.
• In Mac OS 9, click next to [General] and select the
settings that you wish to configure from the pull-down
menu. The corresponding setting screen will appear.
2-17
Page 97

4
PRINTING
Click the [Print] button.
Printing begins.
When removing printed output...
Remove the output horizontally so that it does not get caught on the actuator for output tray full detection.
If the actuator comes off, see "The actuator came off (when a finisher is not installed)" (page 4-22) in "4.
TROUBLESHOOTING".
2-18
Page 98

PRINTING
SELECTING THE PAPER
This section explains the [Paper Feed] settings ("Paper Source" setting in [General] in Mac OS 9) in the print settings
window.
• When [Auto Select] is selected
A tray with plain paper or recycled paper (the factory default setting is plain paper only) of the size specified in "Paper
Size" in the page settings window is automatically selected.
• When a paper tray is selected
The specified tray is used for printing regardless of the "Paper Size" setting in the page settings window.
For the bypass tray, a paper type can also be specified. Make sure that the paper type setting for the bypass tray is
correct and that the set type of paper is actually loaded in the bypass tray, and then select the appropriate bypass tray
(paper type).
• Special media such as envelopes can also be placed in the bypass tray. For the procedure for loading paper and other
media in the bypass tray, see "LOADING PAPER IN THE BYPASS TRAY" (page 1-42) in "1. BEFORE USING THE
MACHINE".
• When "Enable Detected Paper Size in Bypass Tray" (Web page only : disabled by factory default) or "Enable Selected
Paper Type in Bypass Tray" (Web page only : enabled by factory default) is enabled in the system settings (administrator),
printing will not take place if the paper size or paper type specified in the printer driver is different from the paper size or
paper type specified in the settings of the bypass tray.
• When a paper type is selected
A tray with the specified type of paper and the size specified in "Paper Size" in the page settings window is used for
printing.
System Settings (Administrator): Exclude Bypass-Tray from Auto Paper Select (Web page only)
When [Auto Select] is used for printing, this setting determines whether or not the paper in the bypass tray will be excluded
from the paper that can be selected. This setting is disabled by factory default, and thus paper in the bypass tray is included
in the paper that can be automatically selected. If special media are frequently loaded in the bypass tray, it is recommended
that this setting be enabled.
2-19
Page 99

PRINTING
PRINTING ON ENVELOPES
The bypass tray can be used to print on special media such as envelopes. The procedure for printing on an envelope
from the printer driver properties screen is described below.
For the types of paper that can be used in the bypass tray, see "IMPORTANT POINTS ABOUT PAPER" (page 1-37) in
"BEFORE USING THE MACHINE". For the procedure for loading paper in the bypass tray, see "LOADING PAPER IN
THE BYPASS TRAY" (page 1-42) in "1. BEFORE USING THE MACHINE".
Select the envelope size in the appropriate settings of the application ("Page Settings" in many applications) and then
perform the following steps.
1
(1)
Select the paper size.
(1) Select the envelope size from the "Paper
Size" menu on the page setup screen.
In Mac OS 9, select the envelope size from the
"Paper" menu on the page setup screen.
(2) Click the [OK] button.
(2)
In the case of media that can only be loaded in a certain orientation such as an envelope, you can rotate the image
180 degrees if needed. For more information, see "ROTATING THE PRINT IMAGE 180 DEGREES (Rotate 180
degrees)" (page 2-37).
(1)
Select the bypass tray.
(1) Select [Paper Feed] on the print screen.
In Mac OS 9, select [General].
(2) Select [Bypass Tray(Envelope)] from the
"All pages from" menu.
• In Mac OS 9, select [Bypass Tray(Envelope)] from
2
(2)
For more information on "Paper Feed", see "SELECTING THE PAPER" (page 2-19).
It is recommended that you do a test print to check the print result before using an envelope.
the "All pages from" menu of "Paper Source".
• Set the paper type of the bypass tray to [Envelope]
and make sure the envelope is loaded in the bypass
tray.
2-20
Page 100

PRINTING
PRINTING WHEN THE USER
AUTHENTICATION FUNCTION IS ENABLED
When the user authentication function is enabled, you must enter your user information (login name, password, etc.) in
order to print. The information that must be entered varies depending on the authentication method being used, so
check with the administrator of the machine before printing.
Select [Print] from the application's
[File] menu.
1
2
The menu used to execute printing may vary depending on the software application.
(1)
(2)
Display the job handling screen.
(1) Make sure that the machine's printer
name is selected.
(2) Select [Job Handling].
• In Mac OS X v10.5 to 10.5.8 and 10.6, select [Job
Handling] and then click the [Authentication] tab in
the screen that appears.
• In Mac OS 9, select [User Authentication].
The machine name that appears in the "Printer" menu is normally [SCxxxxxx]. In Mac OS X v10.6, it is normally
[RDVxxxxxx]. ("xxxxxx" is a sequence of characters that varies depending on the machine model.)
2-21
 Loading...