

Page 1

Multi Functional
Digital Camera
User Guide
Page 2

ii
Digital Camera User Guide
Copyright Information
All rights reserved. No part of this publication may be
reproduced, transmitted, stored in a retrieval system, or
translated into any language in any form by any means,
mechanical, optical, electronic, recording, or otherwise,
without the written permission of the Manufacturer .
The Manufacturer reserves the right to revise this
manual and to make changes to any or all parts at any
time, without obligation to notify any person or entity of
such revisions and changes.
All other brand or product names mentioned in this
manual are trademarks or registered trademarks of their
respective owners.
Important Notice
• If a CF card is pulled out, the mode key , control
button and shutter are disabled. Those function
keys will be resumed only after a CF card is put into
the slot correctly. (Warning: Please do not put in or
pull out a CF card while turning on the camera.)
• When battery low sign appears on the LCD screen,
the camera will shut down after 10 seconds.
• When capturing images in dim lighting, the AF
function is disabled.
Page 3

iiiDigital Camera User Guide
Contents
Getting Started
Checking Accessories .............................................. 1
System Requirements............................................... 1
Loading Batteries ...................................................... 1
Loading the Compact Flash™ Card........................... 2
Attaching the Strap ................................................... 2
Identifying the Parts
Front View................................................................. 3
Rear View ................................................................. 3
LCD Indicators .......................................................... 4
Camera Operating Modes
LCD-on Mode ............................................................ 5
Playback Mode ......................................................... 6
LCD-off Mode ............................................................ 6
OSD Menus
Menus under LCD-on Mode....................................... 7
Menus under Playback Mode.................................. 1 1
How to...
How to record images and short movies? ................ 13
How to take burst pictures?..................................... 1 4
How to playback images and short movies? ............ 14
Page 4

iv
Digital Camera User Guide
How to delete images and short movies on the camera?
............................................................................... 15
How to send your images to a DPOF-compatible
service or device?.................................................... 16
Connecting to a Computer
Driver Installation ..................................................... 17
Getting Connected to the PC and the Mac .............. 1 8
Transferring Images
To a PC................................................................... 1 9
To a Mac................................................................. 2 1
Specifications.................................................22
Page 5

1Digital Camera User Guide
Getting Started
Checking Accessories
• Strap
• Leather bag
• Installation CD
• User guide
• 16 MB CompactFlash™
Card
• Digital camera
• USB cable
• Video cable
• 4 AA alkaline batteries
• Flexible Pocket Tripod
PC System Requirements
• Pentium 166 MHz processor or higher
• Microsoft Windows 98/Me/2000
• Super VGA card and color monitor
• 32 MB RAM (64MB recommended)
• Available USB port
• 200 MB available hard disk space for software
installation
Mac System Requirements
• Mac Driver Support 8.5 OS or later
Loading Batteries
1. Slide the battery cover in the direction
indicated by the arrow.
Page 6
2
Digital Camera User Guide
2. Insert 4 batteries in accordance with the
correct polarity marks on the inner side of the
battery cover.
3. Close the battery cover.
Loading the CompactFlash™ Card
To record images, please insert a Compact Flash™
card. To load the CF card, perform the following:
1 . Open the CF card slot cover and then insert a CF
card as indicated by the arrow.
2. Close the CF card slot cover.
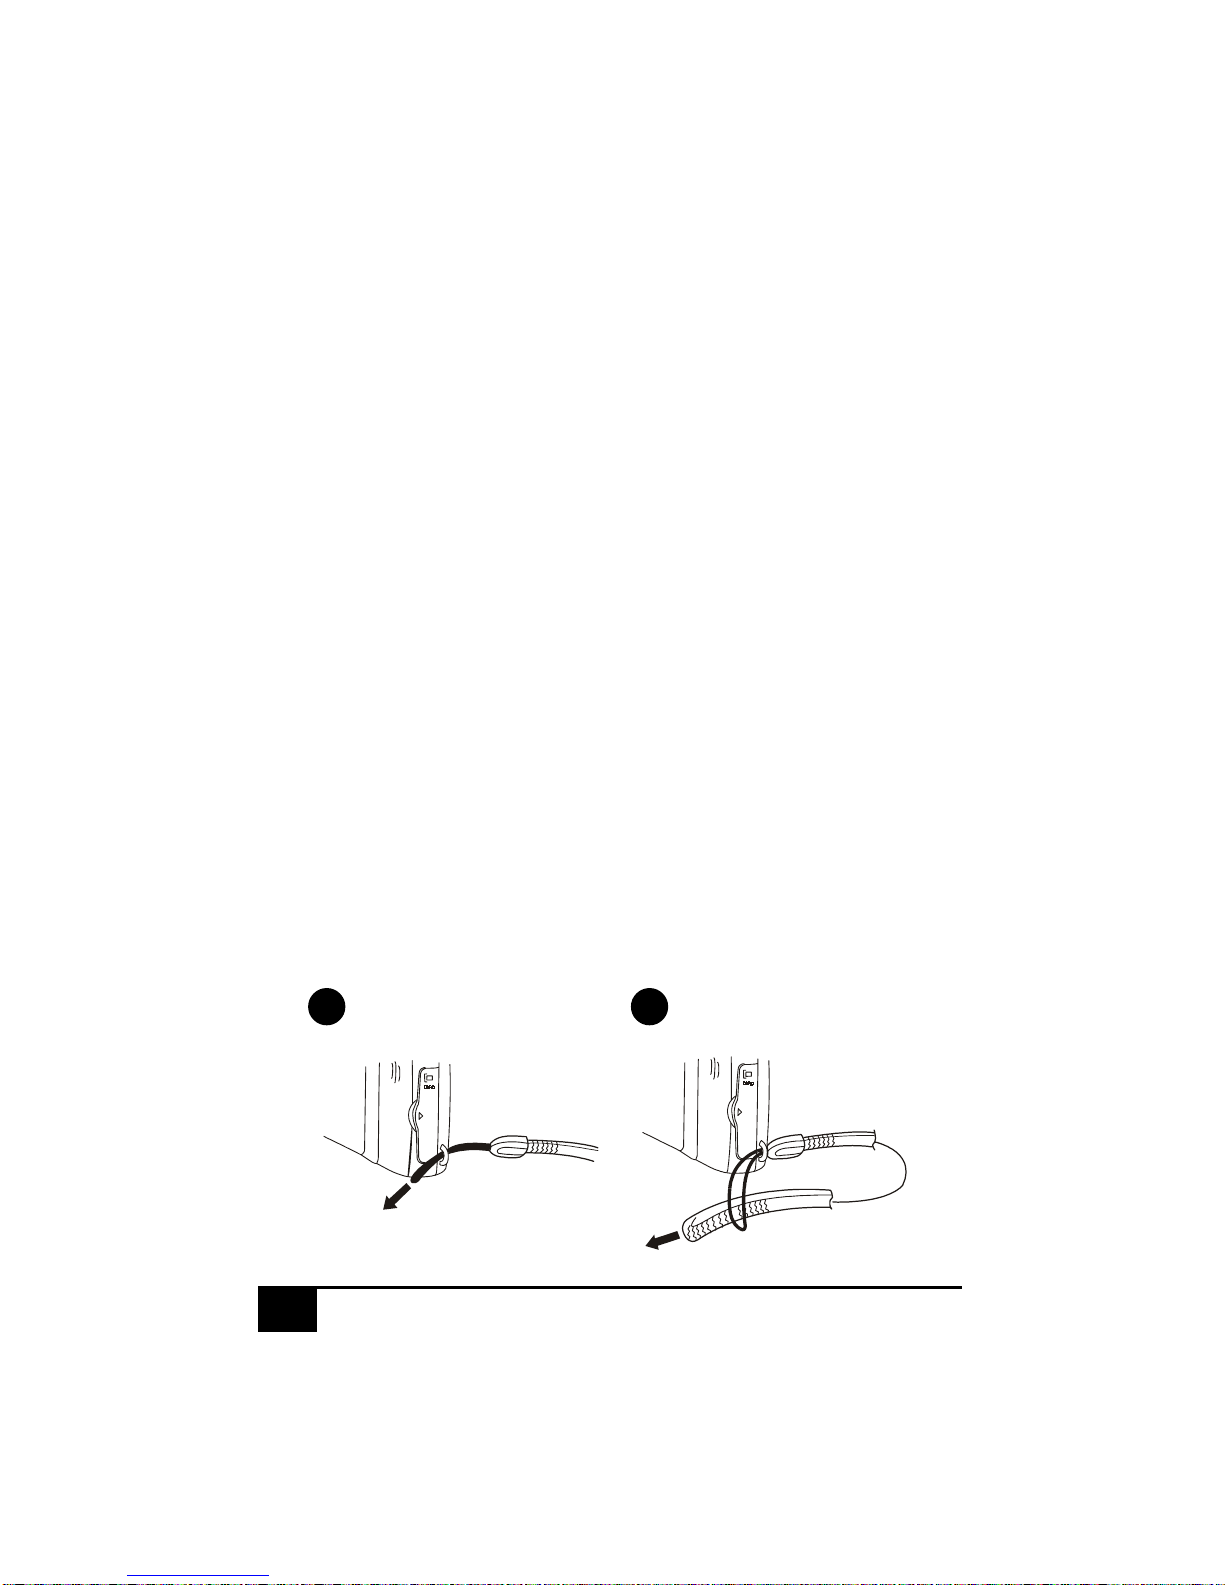
Attaching the Strap
1 . Insert the thin end of the strap into the strap
holder.
2. Pass the other end of the strap through the loop
of thin cord and pull the strap tight.
1
2
Page 7
3Digital Camera User Guide
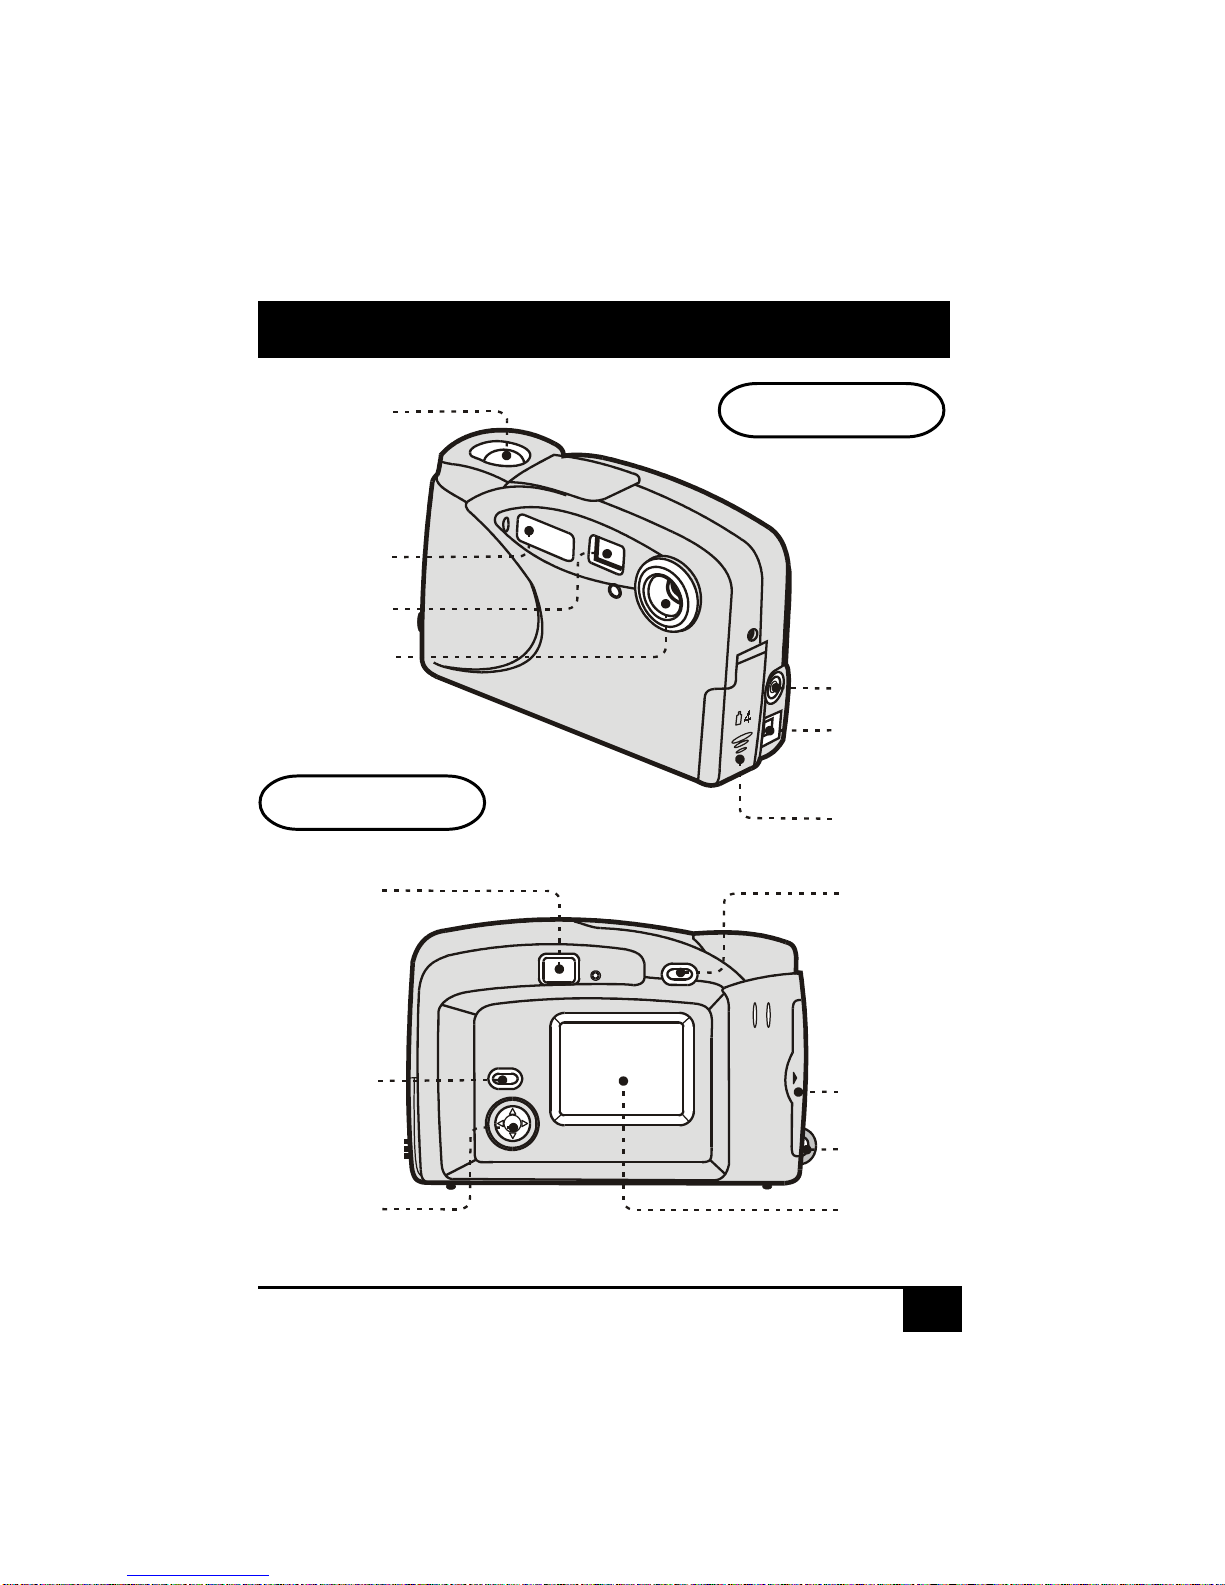
Identifying the Parts
Front View
Shutter
Flash
USB port
Battery
cover
Lens
Video port
Viewfinder
LCD
display
Control
button
Mode
button
Power
button
CF card
slot cover
Viewfinder
Rear View
Strap
holder
Page 8
4
Digital Camera User Guide
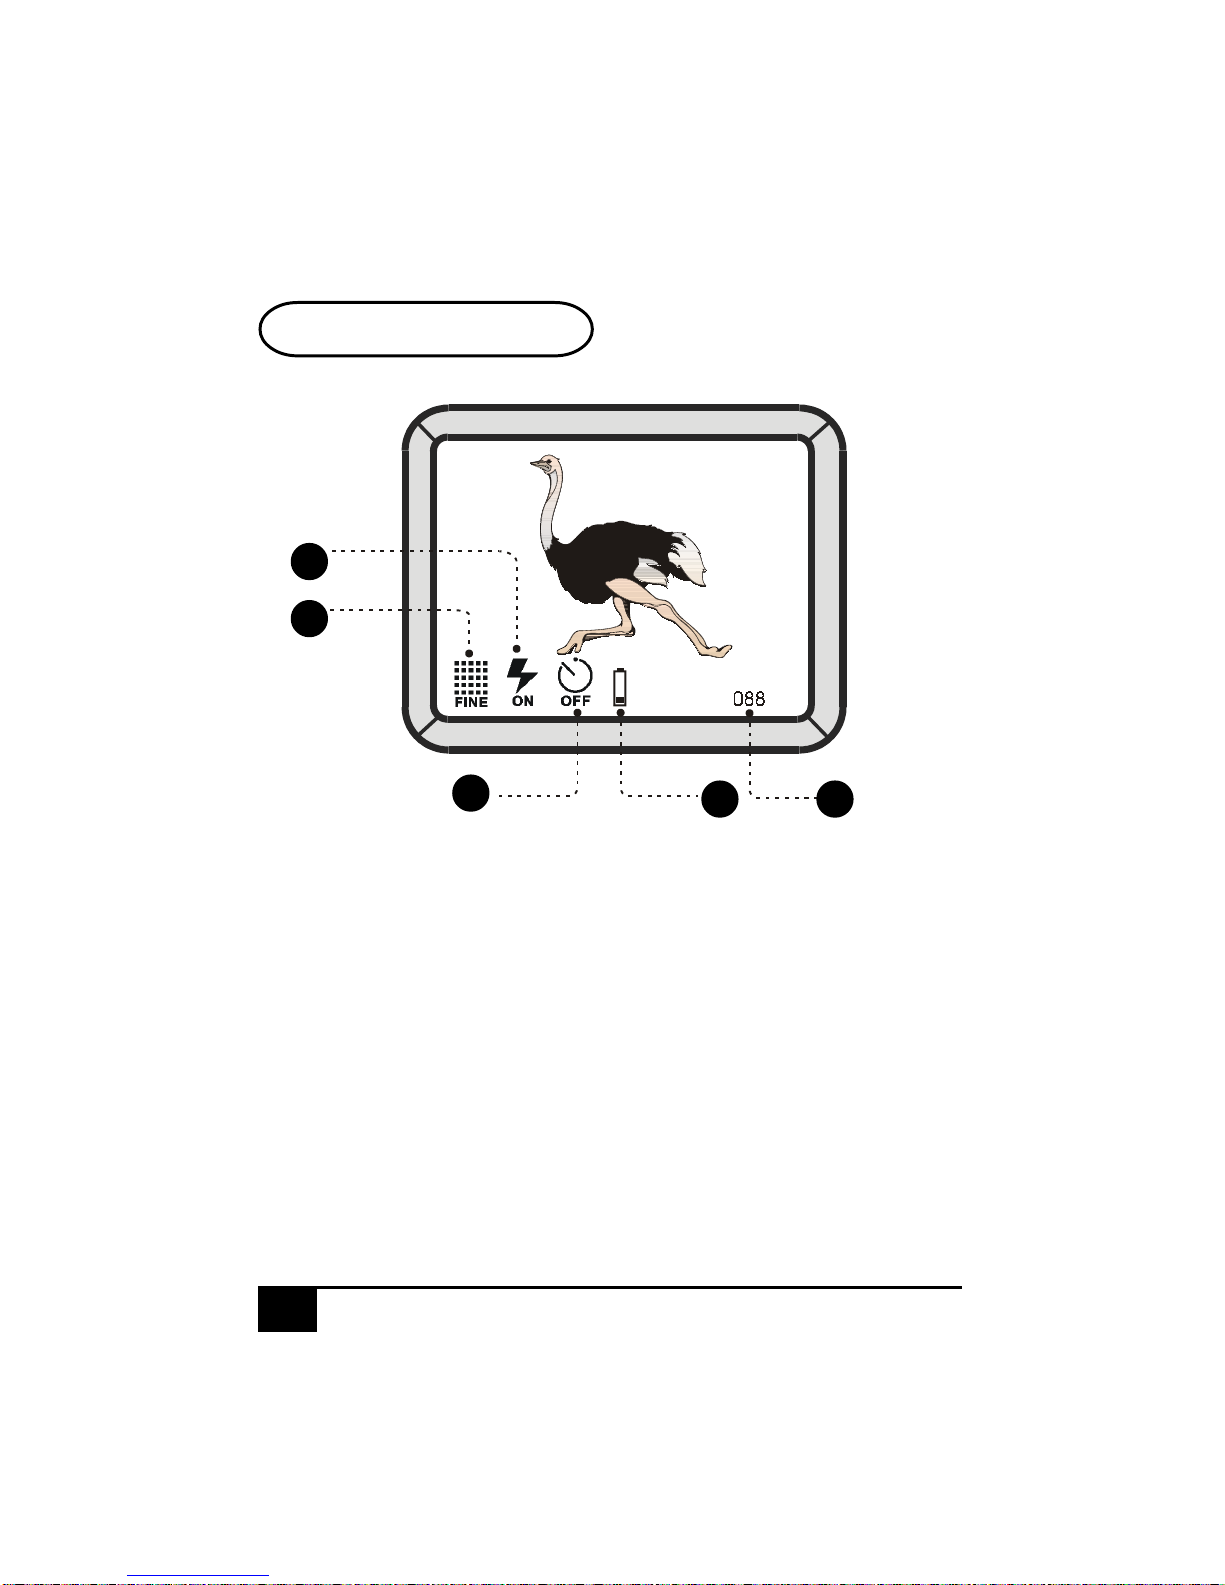
LCD Indicators
1. Flash Indicator: Flash is on.
2. Quality Indicator: The best quality setting.
3. Self-Timer Indicator: Timer is off.
4. Battery Indicator: Battery is low.
5. Pictures remaining.
1
2
3
4 5
Page 9

5Digital Camera User Guide
Camera Operating Modes
This camera provides 3 different operating modes
for your selection. Press the mode button a number
of times to toggle through these 3 modes.
1 . LCD-on mode: ready for image capturing with
the LCD display powered on
2. Playback mode: ready for image review
3. LCD-off mode: ready for image capturing with
the LCD display powered off
LCD-on Mode
There are 5 menus available in this mode. Press the
Control button, the OSD menus appear.
To scroll through all the menus, press the / on
the control button to access the horizontal menu
topics or press / to move vertically through
the menu items. (Refer to Page 7~9 for the OSD
information.)
Page 10
6
Digital Camera User Guide
Playback Mode
There are 4 menus available in this mode. Press the
/ on the Control button, the OSD menus
appear.
To scroll through all the menus, press the / on
the control button to access the horizontal menu
topics or press / to move vertically through
the menu items. (Refer to Page 11 and Page 12 for the
OSD information.)
LCD-off Mode
When capturing images with the LCD display powered off, you will not be able to preview your
images on the LCD display. Press the Control
button to go to preview mode.
Page 11
7Digital Camera User Guide
OSD Menus
Menus under LCD-on Mode
Select the desired item by the arrows on the Control
button and then press the center of the Control
button to confirm.
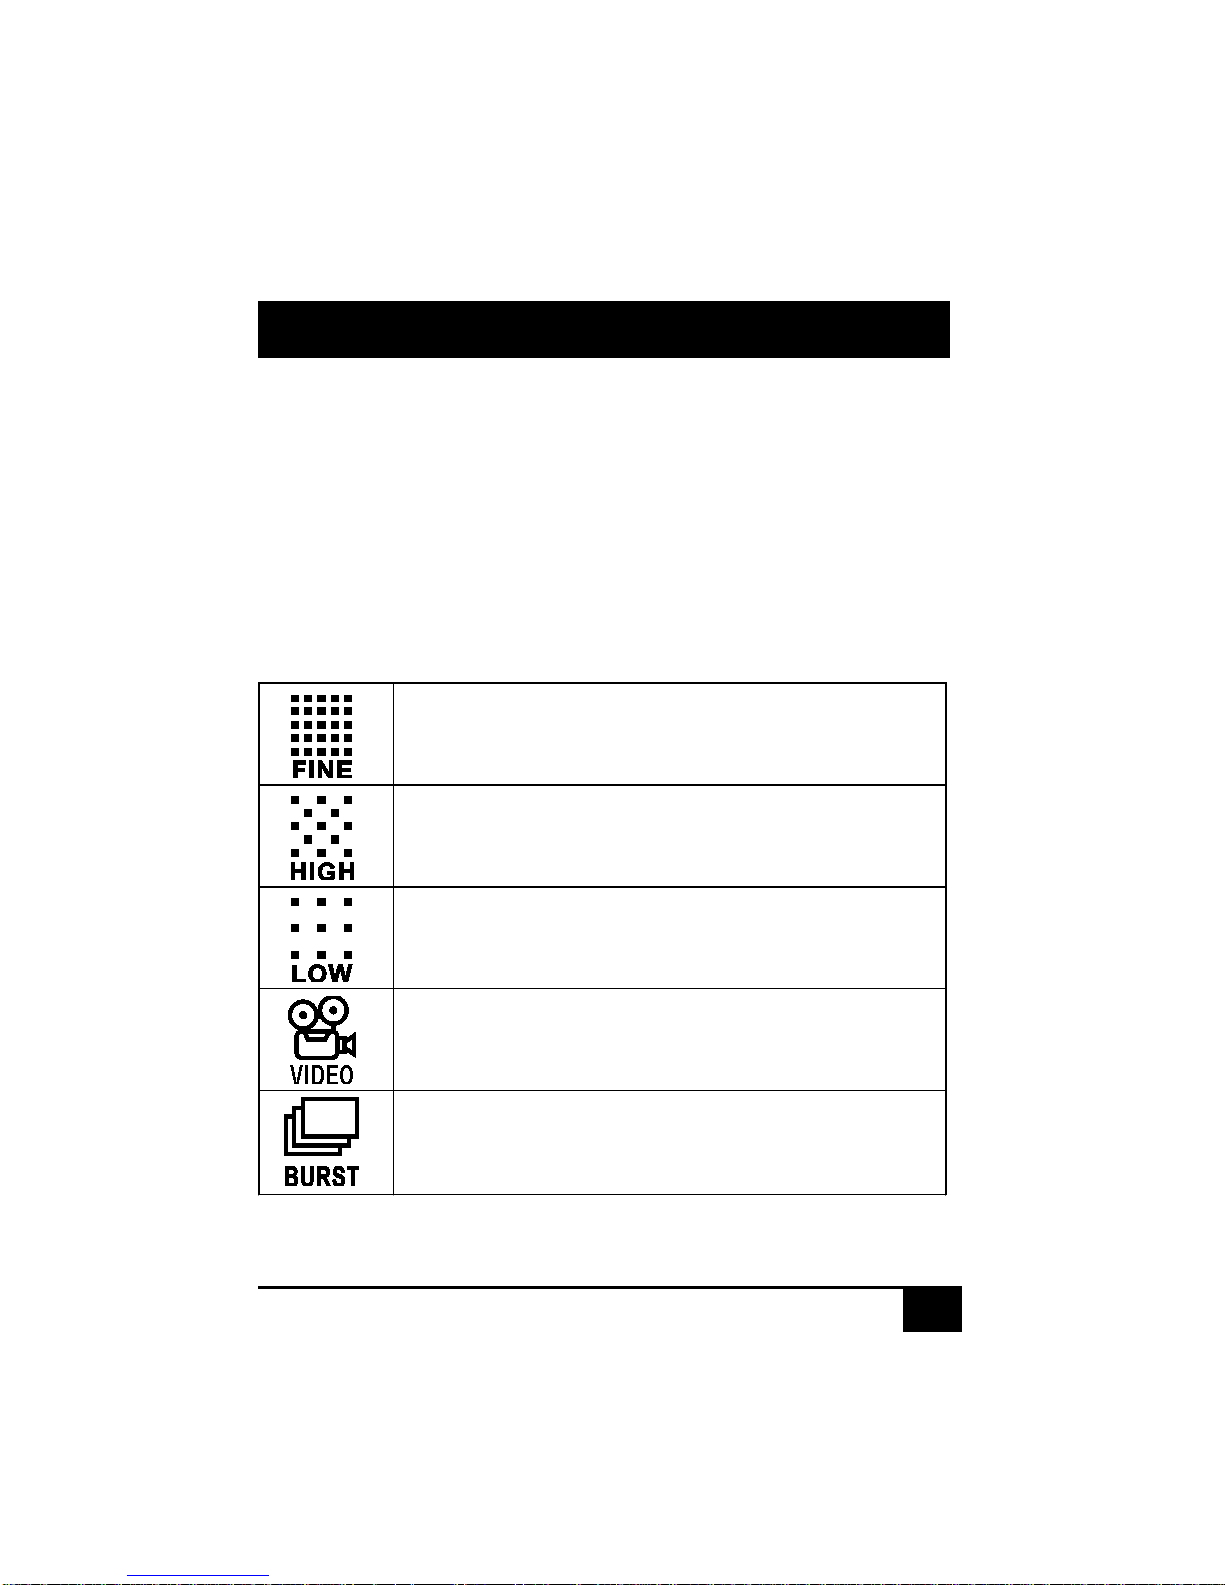
Resolution Menu
This menu contains the following items:
Set the resolution to
Fine
for the best image
quality.
Set the resolution to
High
for comparably
fine image quality.
Set the resolution to
Low
for relatively low
image quality.
Set the resolution to
Video
for recording
movie clips.
Set the resolution to
Burst
for a sequential
10 shots with one press of the Shutter
button.
Page 12
8
Digital Camera User Guide
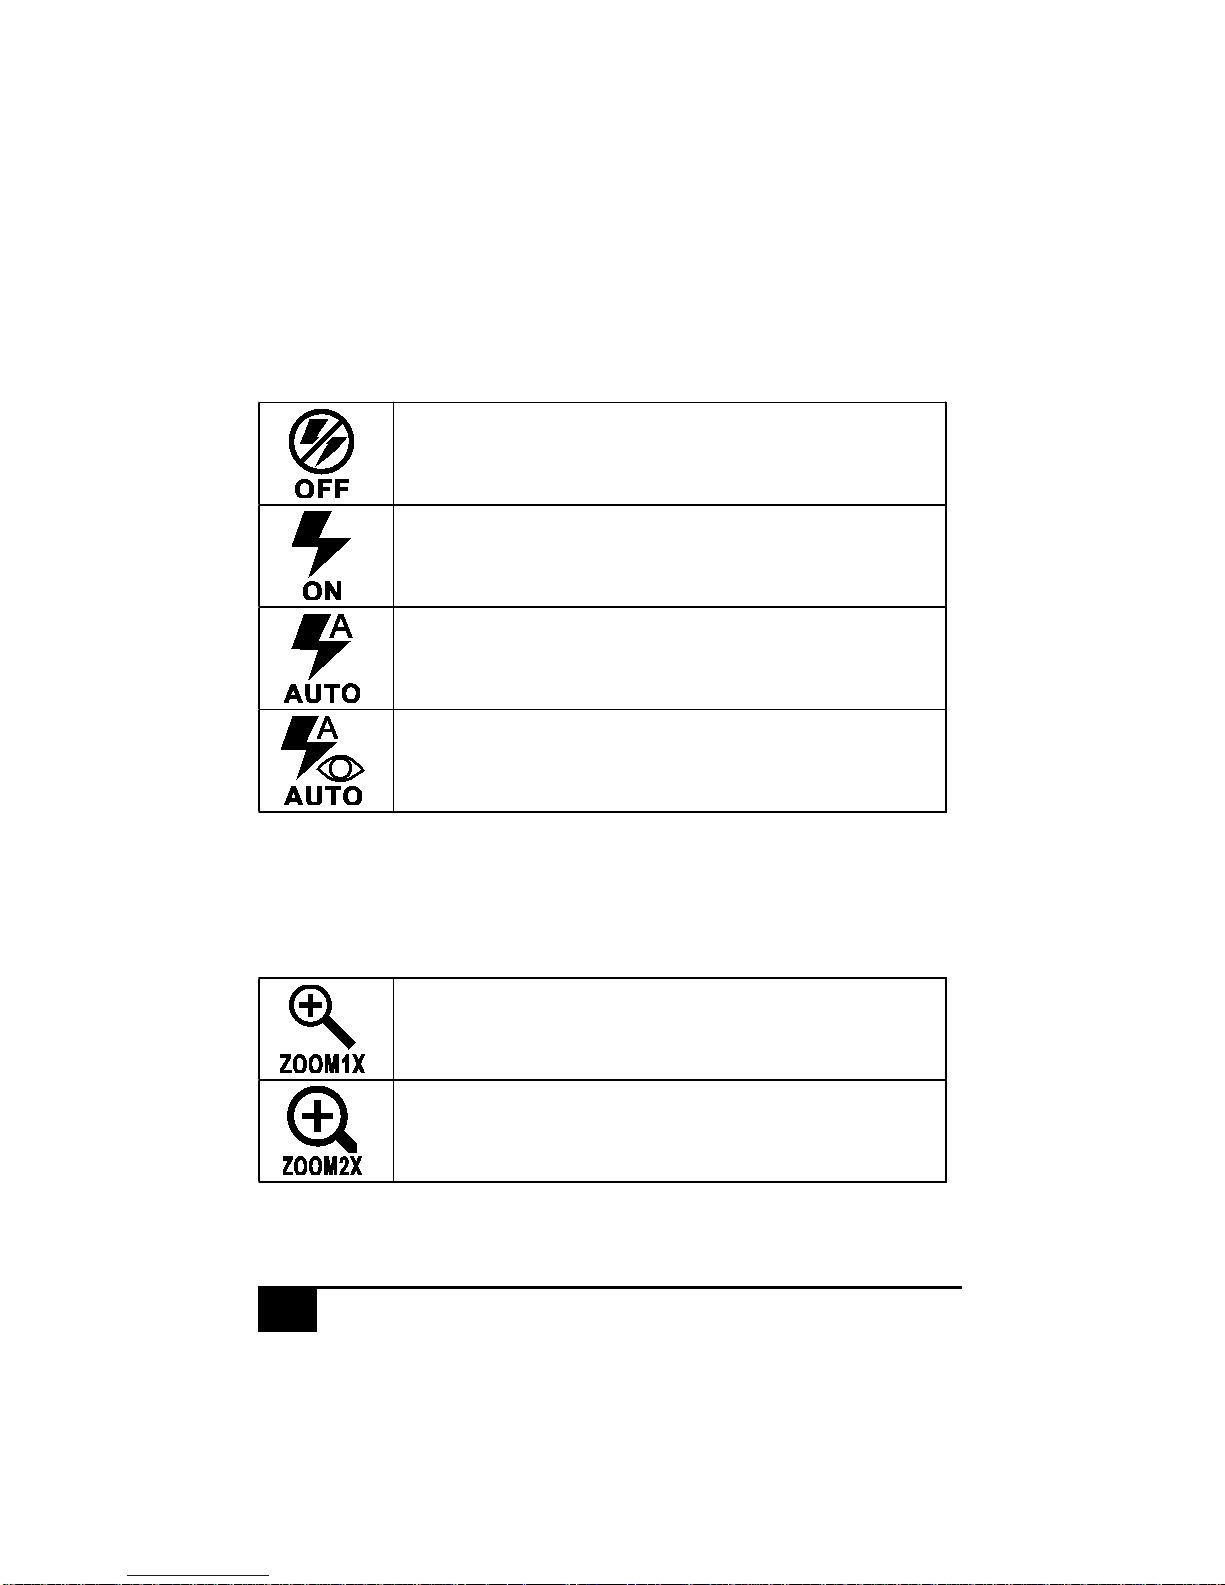
Flash is always disabled.
Flash is always enabled.
Flash is enabled automatically.
Flash is enabled automatically with PreFlash to reduce Red-Eye.
Flash Menu
This menu contains the following items:
Zoom Menu
This menu contains the following items:
Magnify the image by 1 time.
Magnify the image by 2 times.
Page 13
9Digital Camera User Guide
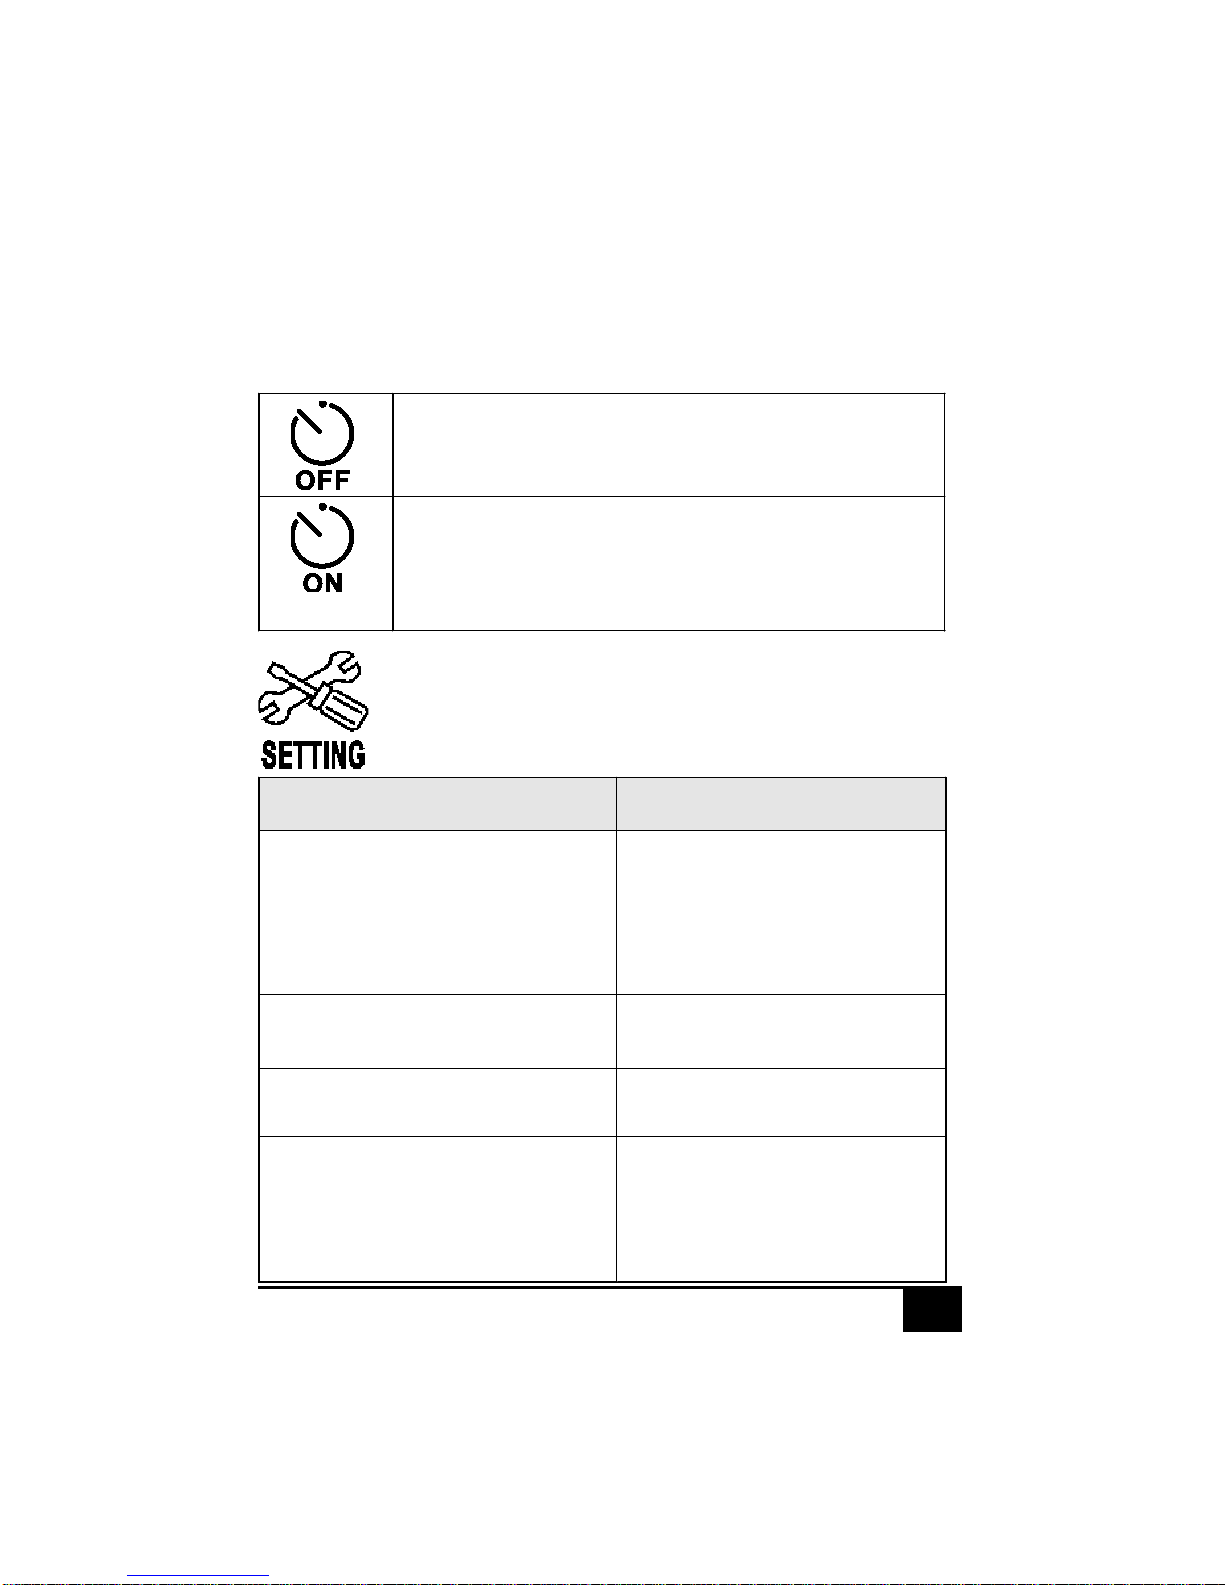
Self Timer Menu
This menu contains the following items:
Setting Menu
This menu contains the following items:
Disable the Self-timer function.
Enable the Self-timer function.
An image is captured after 10 seconds as
the shutter is pressed in the first place.
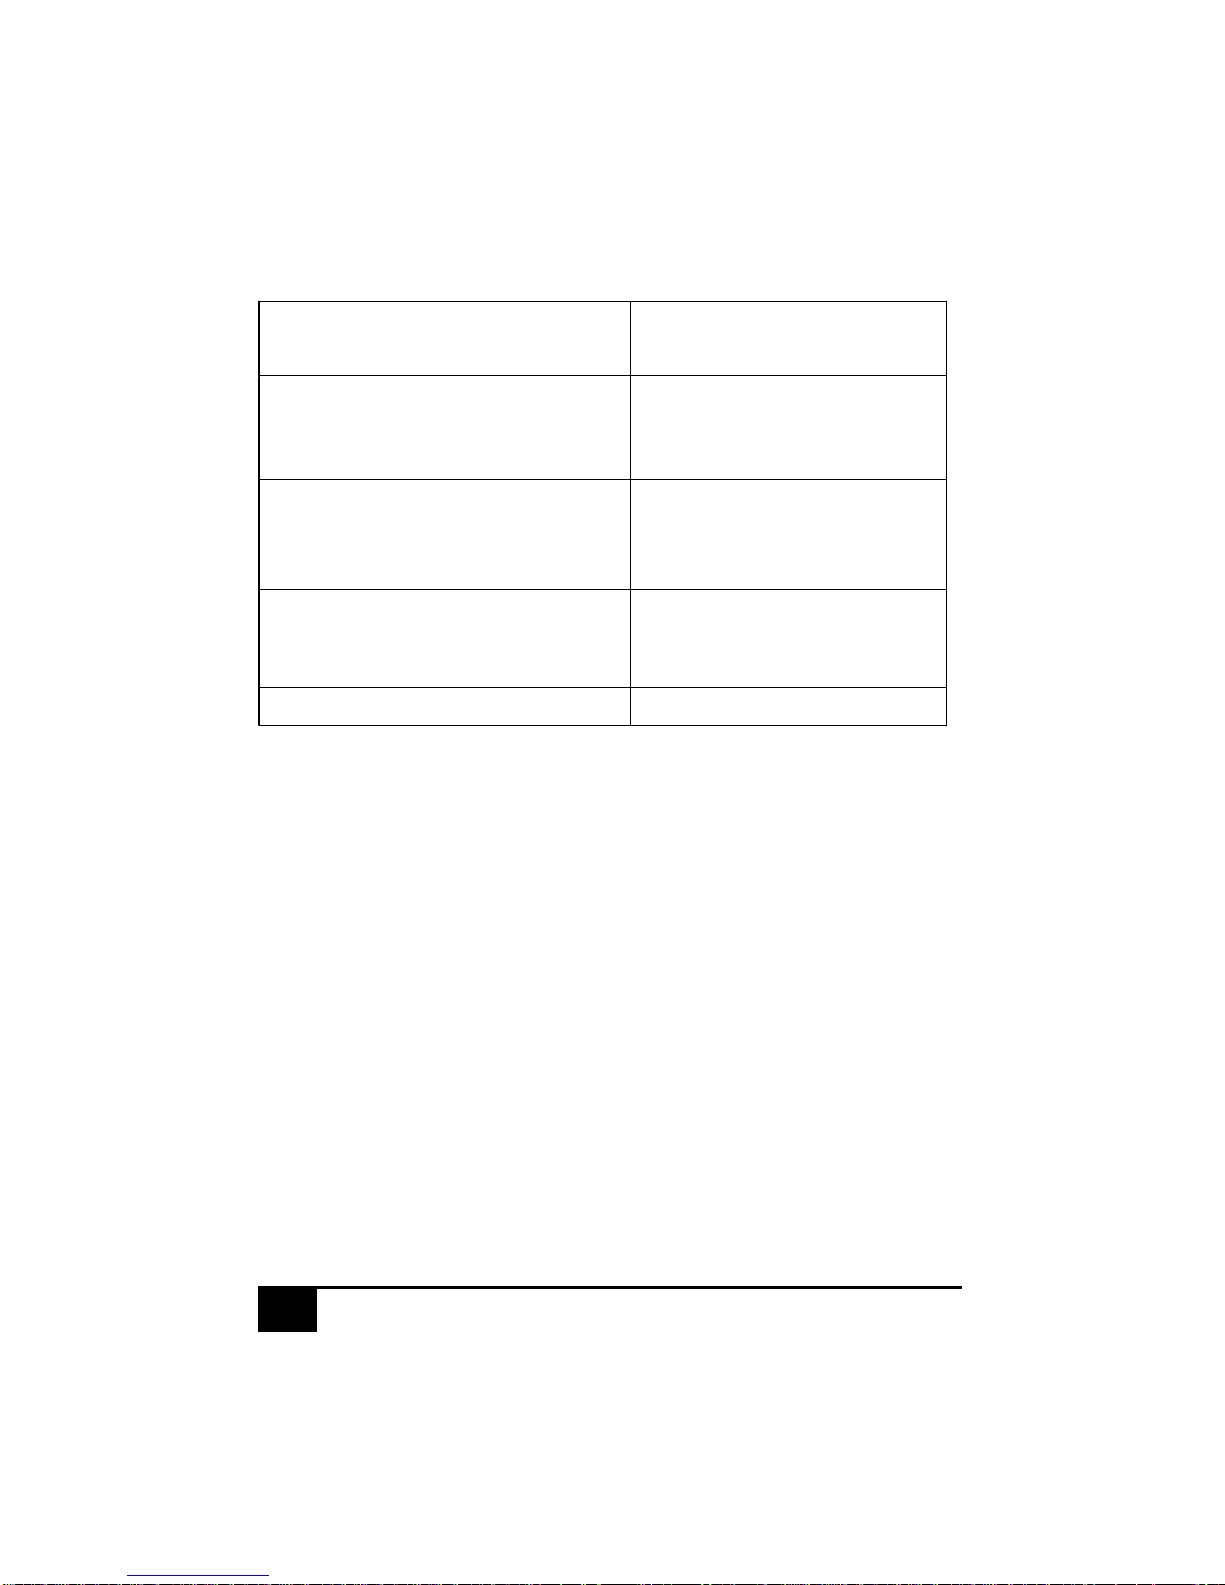
Item Description
Display
(Normal Brightness/Highe r
Brightness/Video Out
NTSC/Video Out PAL)
Changes the brig htness
se tti ng of the LCD
display and the TV.
Sets the TV output
system.
Quick Review
(On/Off)
Enables/disables the
review function.
Exposure Adjusts the exposure
compensation.
White Balance
(Automatic/Daylight/
Cloudy/Fluorescent/
Tungsten)
Selects the white
balance setti ng.
Page 14
10
Digital Camera User Guide
Sound
(On/Off)
Enables/disables the
sound effects.
Auto Shutdown
(1 Minute/2 Minutes/5
Minutes/10 Minut es/Never)
Sets a period of time for
the camera to power off
automatically.
Language
(English/French/German/
Italian/Spanish/Dutch)
Selects the OSD
language.
Restore Setting Recovers all the camera
setting s to the fa ctory
presets.
Exit Quits the OSD.
Page 15
11Digital Camera User Guide
Menus under Playback Mode
Select the desired item by the arrows on the Control
button and then press the center of the Control
button to confirm.
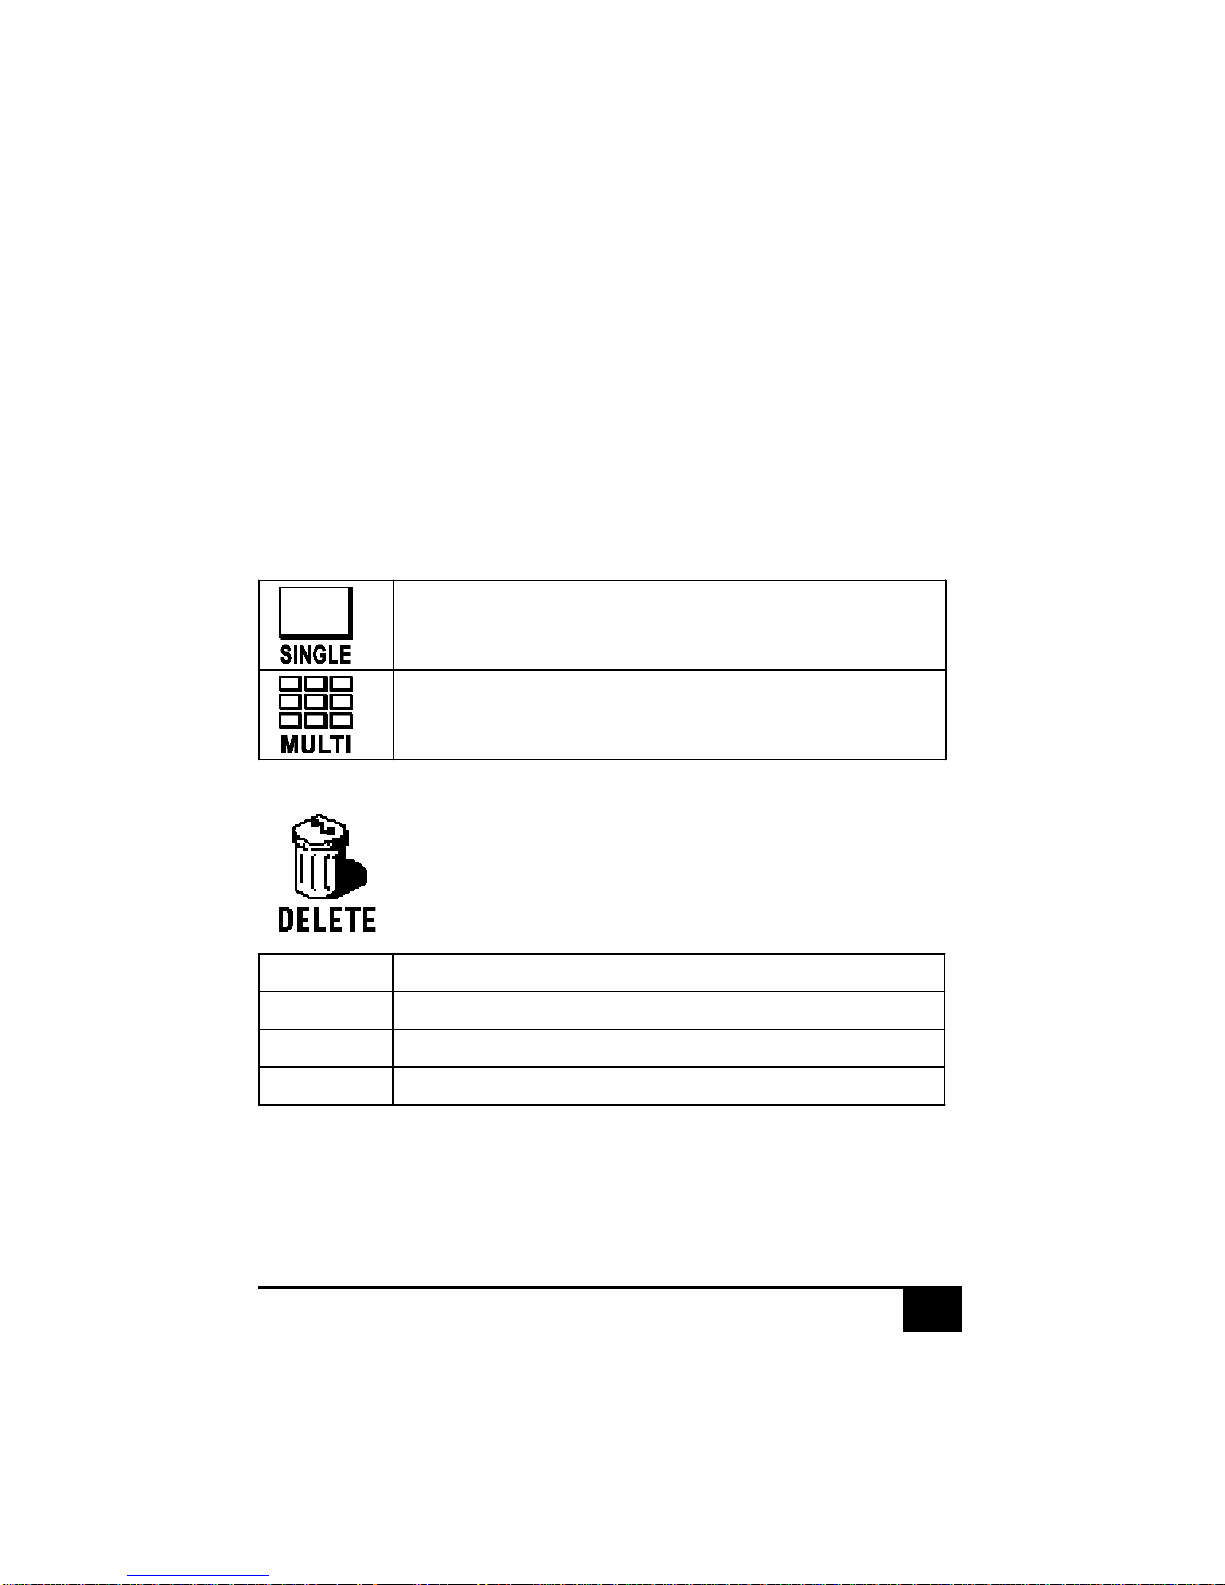
Display Menu
This menu contains the following items:
Displays 1 image at a time.
Displays 9 images (max.) at a time.
Delete Menu
This menu contains the following items:
Current Deletes the current displayed image.
All Deletes all the images stored in the camera.
Format Formats the CF card.
Exit Quits the OSD.
Page 16
12
Digital Camera User Guide
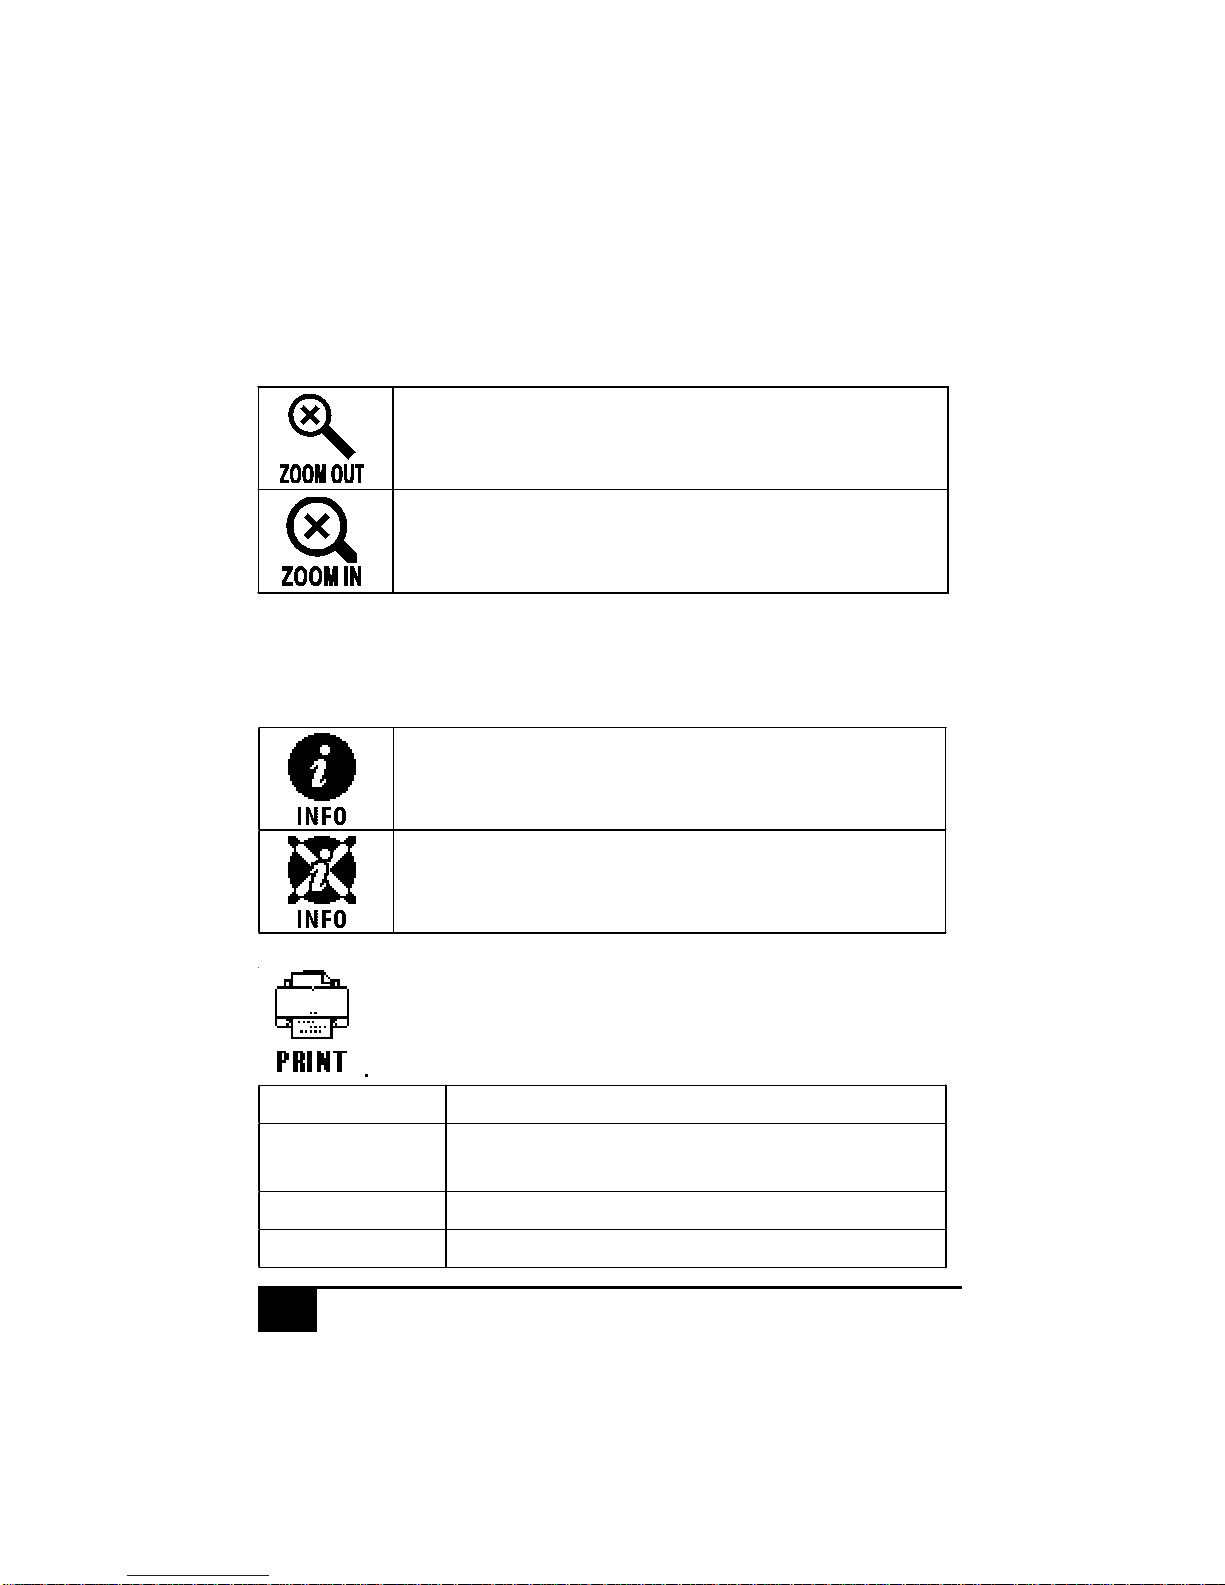
Zoom Menu
This menu contains the following items:
Minimizes the selected image.
Magnifies the selected image.
Information Menu
This menu contains the following items:
Displays the image information.
Hides the image information.
Print Menu
This menu contains the following items:
Print Image Selects the image to be printed.
Cancel print Deselects the image so it will not be
printed.
Print all Prints all images.
Cancel all Deselects all images.
Page 17

13Digital Camera User Guide
How to...
How to record images and short movies?
To record images, do the following:
1. Power on the camera.
2. Set the camera to LCD-on or LCD-off mode.
3. Position the subject in the viewfinder.
* You can preview images on the LCD display
while in LCD-on mode.
4. Press and hold the Shutter button until you
hear the camera auto adjusting the focus, then
the image is captured.
To record short movies, do the following:
1. Power on the camera.
2. Set the camera to LCD-on mode.
3. Press the Control button to select VIDEO from
the OSD.
4. Press the Shutter button to start recording. To
stop recording, press the Shutter again.
Page 18

14
Digital Camera User Guide
How to record burst images?
To record burst images, do the following:
1. Power on the camera.
2. Set the camera to LCD-on mode.
3. Press the Control button to select BURST from
the OSD.
4. Press and hold the Shutter button to record up
to 10 consecutive images. The camera will stop
recording images after 10 images are recorded.
Note: To interrupt the consecutive recording of
images, release the Shutter button at any time.
How to playback images and short
movies?
To playback images, do the following:
1. Power on the camera.
2. Set the camera to Playback mode.
3. Press the / on the Control button to play the
recorded images forward or backward .
* You can choose to review a single image, or up
to 9 images at a time.
To playback short movies, do the following:
On the LCD display
1. Power on the camera.
Page 19
15Digital Camera User Guide
2. Set the camera to Playback mode.
3. Select an image marked with a icon by
pressing the / and then press the center of
the Control button to play.
On a TV
1. Power on the camera.
2. Set the camera to LCD-on mode.
3. Select the VIDEO OUT NTSC or VIDEO OUT PAL
from the OSD according to the TV output system.
4. Connect one end of the Video cable into the
VIDEO port of your camera and the other end
into the VIDEO IN port of the television.
5. Turn on the TV.
* Select “Video” as the TV input.
6. Set the camera to Playback mode.
7 . Press the / on the Control button to select
the video and then press the center of the
Control button to play.
How to delete images and short movies on the camera?
Sometimes you may need to delete the captured
images or videos to make room for new recordings.
To delete images or videos, do the following:
1. Power on the camera.
Page 20

16
Digital Camera User Guide
2. Set the camera to Playback mode.
3. Select the image/video you want to delete by
pressing the / on the Control button.
4. Press the / , the OSD menus appear .
5. Move to the Delete menu and then choose either
to delete the current displayed image/video or
perform other tasks.
How to send your images to a DPOFcompatible service or device?
The DPOF (Digital Print Order Format) technology
allows you to send images stored on a memory card
(e.g. CF card) directly to a DPOF-compatible
photofinishing print service or photo printer.
To select images for printing, do the following:
1. Power on the camera.
2. Set the camera to Playback mode.
3. Select the image you want to print by pressing
the / on the Control button.
4. Press the / , the OSD menus appear.
5. Move to the PRINT menu and then choose the
“Print Image” to continue.
After specifying the images, you may take the CF
card to do the direct printing (by a photo printer or
a digital image finishing center).
Page 21
17Digital Camera User Guide
Connecting to a Computer
Before connection, you have to install the camera
driver first.
Driver Installation
For PC
1 . Insert the installation CD into your CD-ROM
drive.
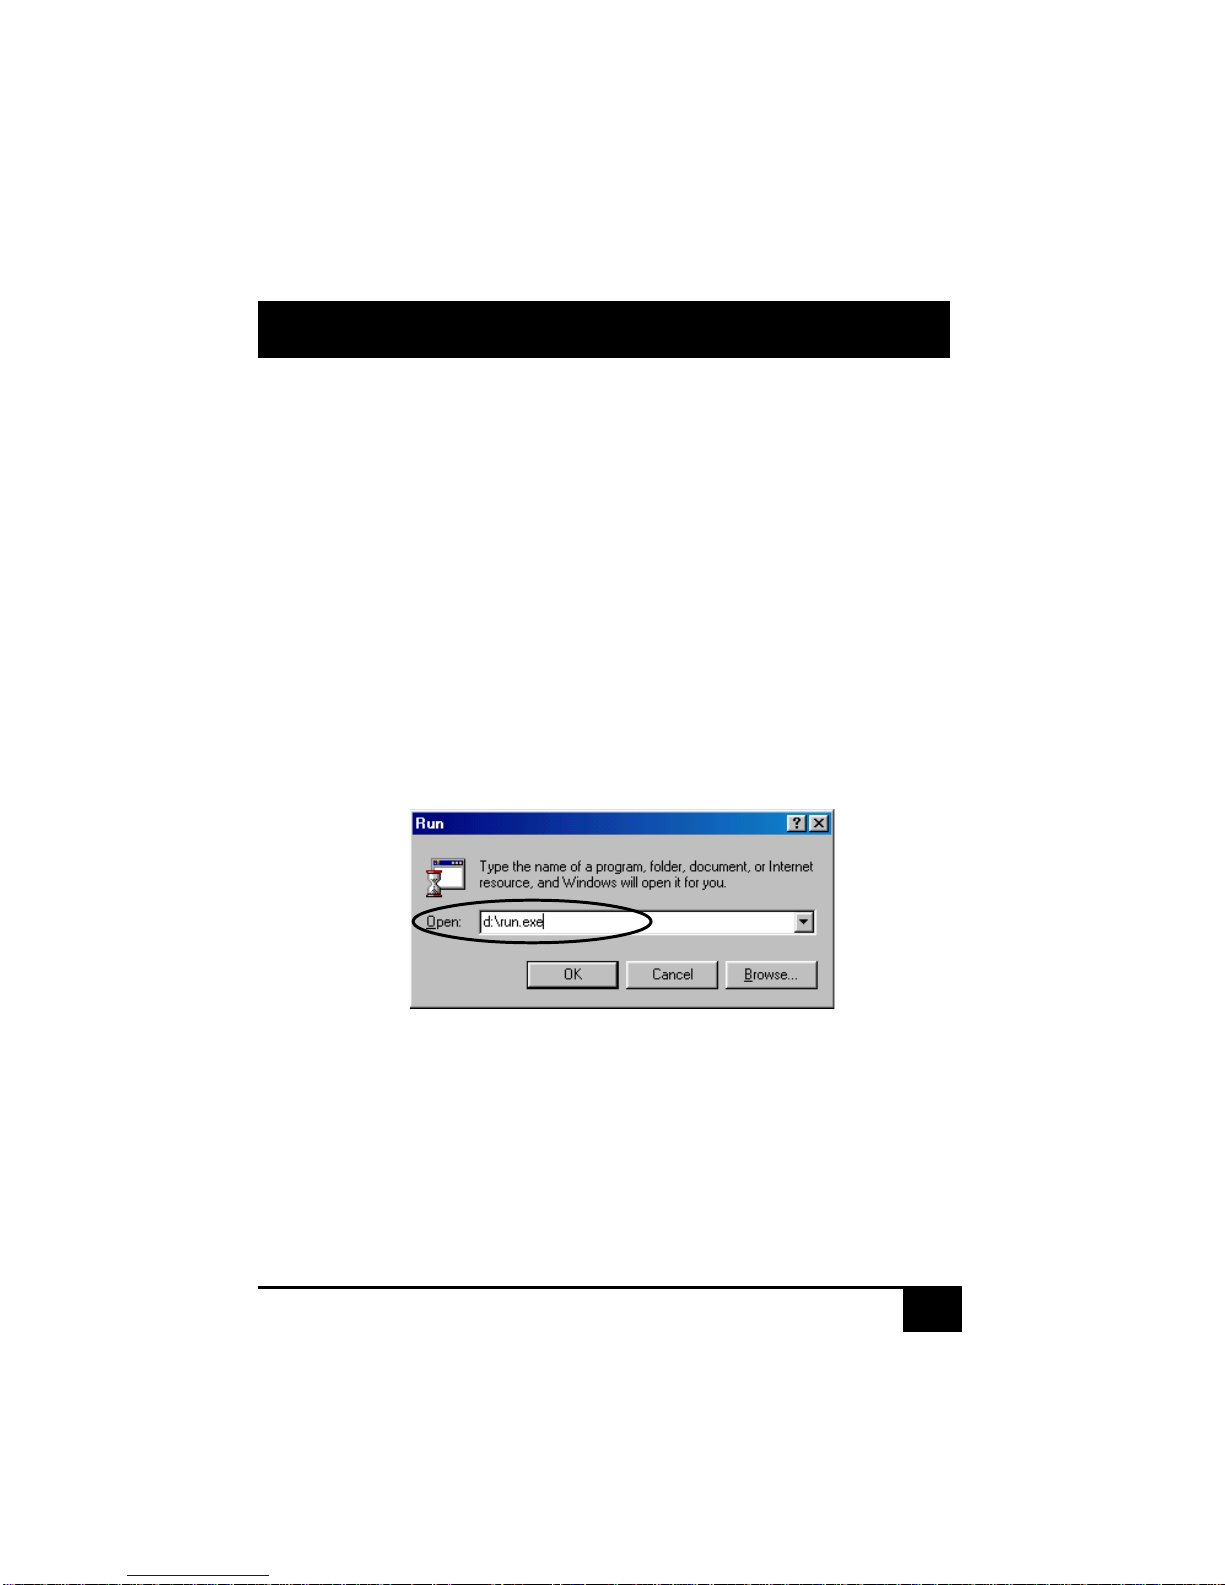
2. Click on Start and then Run.
3. In the Run dialog box, type drive:\run.exe
where drive is the location of your CD-ROM
drive.
Follow the on-screen instructions to complete the
driver installation and the included software.
Page 22
18
Digital Camera User Guide
For Mac
1 . Insert the installation CD into your CD-ROM
drive. The CD icon appears on the desktop.
2. Double-click on the CD icon.
3. Double-click on the Installer icon to start the
installation.
Follow the on-screen instructions to
complete the driver installation.
Getting Connected to the PC and the
Mac
1 . Connect one end of the USB cable into the USB
port of your computer and the other end into
your camera.
2. Power on the camera.
Page 23
19Digital Camera User Guide
Transferring Images
To a PC
With the USB cable connected both to your PC and
camera, follow the steps below to transfer your
images.
Using the Viewer Window
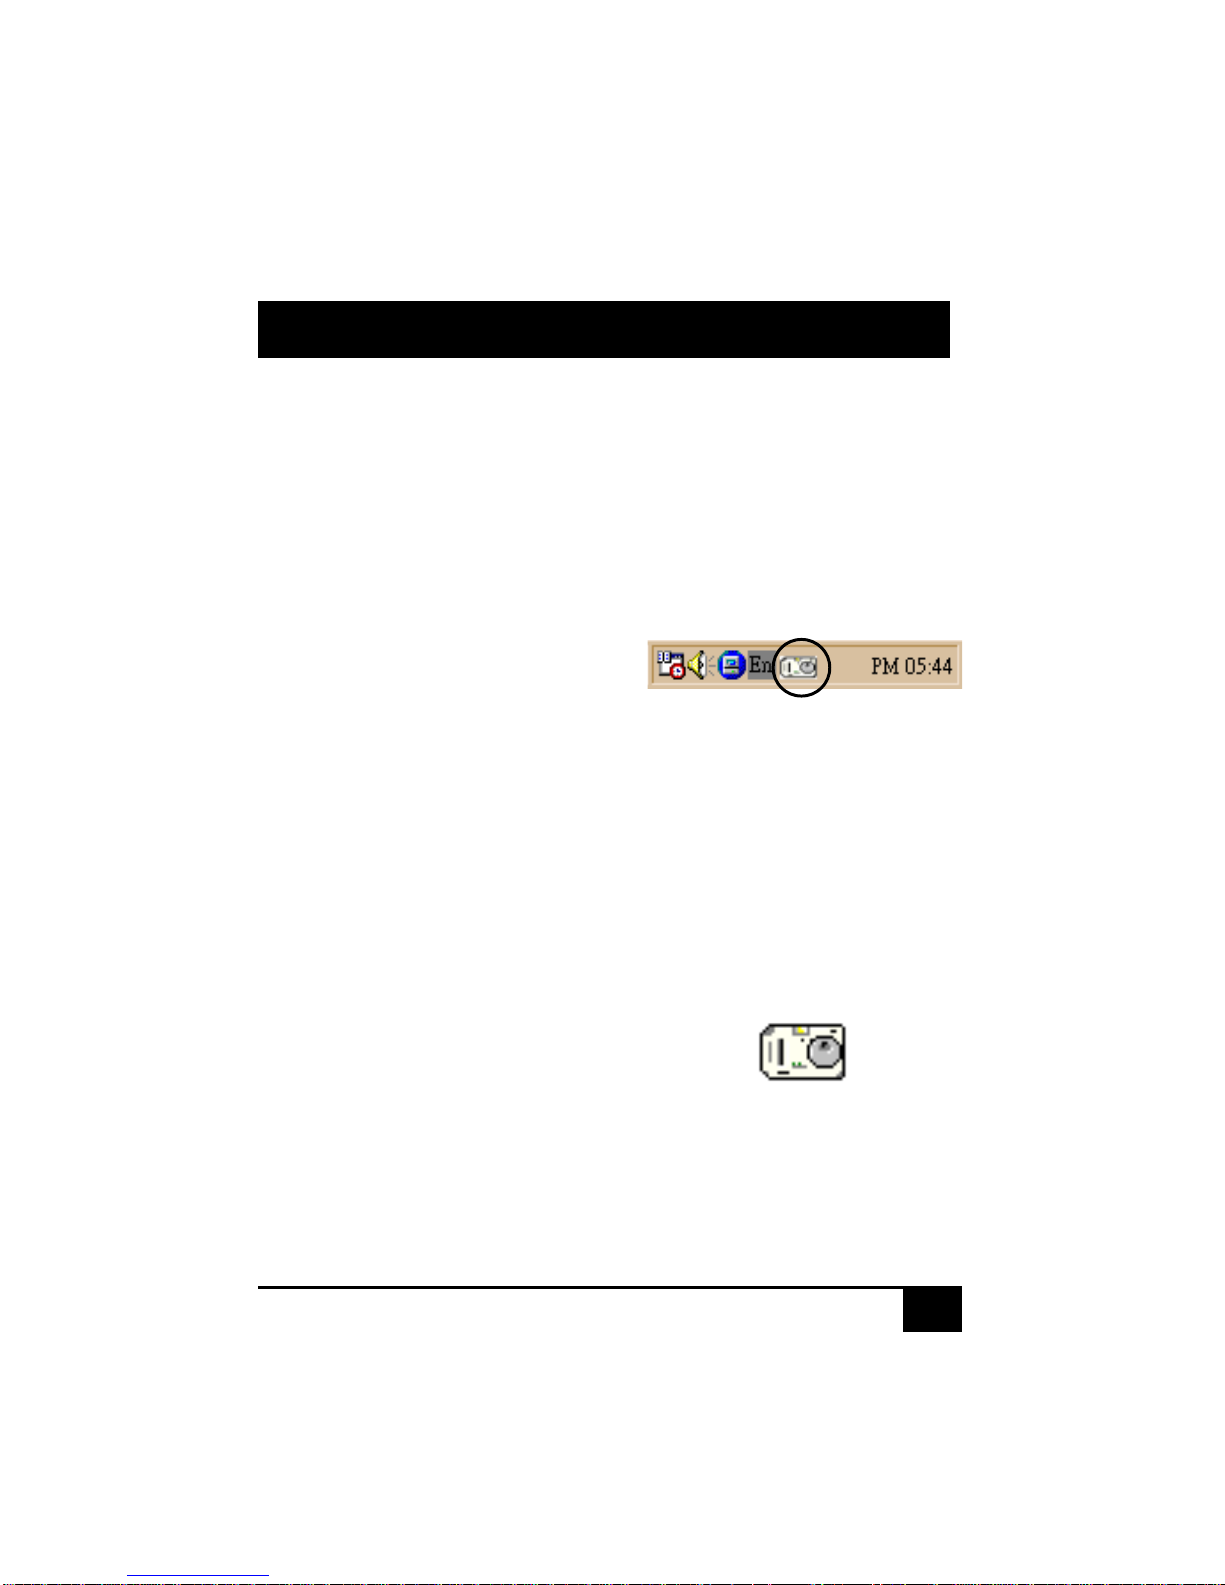
1. Power on the camera. A camera icon appears
on the Windows
taskbar.
2. Upon double-clicking the icon, the viewer
window appears.
3. Drag and drop the images in this window to
other desired locations.
Using the Windows Explorer
1. Power on the camera.
2. Open the Windows Explorer.
3. A camera folder appears.
4. Drag and drop the images in the folder to other
desired locations.
Page 24

20
Digital Camera User Guide
Using Viewer
1. Power on the camera.
2. Launch Viewer program. The Viewer opens and
automatically loads your images.
3. Click on the thumbnail(s) you want,
then click the Transfer icon to
download your image to the computer.
For further information, please refer to the Viewer’s
on-line help.
Using the TWAIN Dialog Box
1. Launch the TWAIN-compliant program (e.g.
PhotoExpress™ SE).
2. Click on the Get button then the Camera icon.
3. The Select data source dialog box appears.
4. Choose the camera model from the list.
5. Name your file by typing the name in the File
name field.
6. Change the File type to JPG and then click on
the Acquire button.
7 . The Viewer’s main window appears.
8. Click on the thumbnail(s) you want, then click
the Transfer icon to download your image to
the computer.
T ransfer icon
Page 25

21Digital Camera User Guide
T ransfer icon
To a Mac
With the USB cable connected both to your Mac and
camera, follow the steps below to transfer your
images.
1 Power on the camera.
2. Launch Viewer program. The Viewer opens and
automatically loads your images.
3 Click on the thumbnail(s) you want,
then click the Transfer icon to
download your image to the computer.
Page 26

22
Digital Camera User Guide
Specifications
Image Sensor Sony® SuperHAD™ CCD
sensor
Image Resolution Fine: 2048 x 1536
by Coach™ technology
High: 1600 x 1200
Low: 800 x 600
Recording Mode Single/Burst/AVI Clip
Video Clip 20 fps (320 x 240) ;
max. duration 30 secs per clip
Live Video 25 fps (320 x 240)
File Format JPEG (DCF-compliant/DPOF-
compatible)
Burst 800 x 600; max storage to
10 images
Display 61.6 K pixels, 1.8
" TFT LCD
Lens Auto-focus, 20m~infinity
Aperture Ratio F2.8/F5.6/F11
Shutter Speed 1/25~1/2500 second
Flash Mode Auto/Red-eye/On/Off
Exposure Auto
White Balance Auto; Daylight; Cloudy;
Fluorescent; Tungsten
Self-timer 10-second delay
External Memory CompactFlash™ Card Type 1
Interface Video out/USB
Power 4 x AA alkaline batteries
Dimensions 116 x 42.5 x 75 mm
Weight 200g (without battery and
CF card)
Page 27

Technical Support Hot Line:
Toll Free In the USA & Canada
1-866-522-6372
Toll Free In Europe
UK: 0800-169-6482
BELGIUM: 0800-787-57
FRANCE: 0800-917-599
GERMANY: 0800-1800-563
SPAIN: 900-973-195
ITALY: 800-781-883
All Other Countries - Toll
31-53-482-9779
 Loading...