

Page 1

2-346-702-12(1)
MiniDisc Recorder
Operating Instructions
1/01_MDS-E52.12E 99.1.29, 10:19 AM1
Actual total number: Sony Sound Tec MDS-E52(E) 2-346-702-12(1)
MDS-E52
1998 by Sony Sound Tec Corporation
Page 2
WARNING
Notice for the Customers in the
United Kingdom
IMPORTANT
The wires in this mains lead are
coloured in accordance with the
following code:
Blue : Neutral
Brown : Live
As the colours of the wires in the mains
lead of this apparatus may not
correspond with the coloured markings
identifying the terminals in your plug,
proceed as follows:
The wire which is coloured blue must
be connected to the terminal which is
marked with the letter N or coloured
black.
The wire which is coloured brown must
be connected to the terminal which is
marked with the letter L or coloured
red. Do not connect either wire to the
earth terminal in the plug which is
marked by the letter E or by the safety
earth symbol Y or coloured green or
green-and-yellow.
To prevent fire or shock
hazard, do not expose the unit
to rain or moisture.
To avoid electrical shock, do
not open the cabinet. Refer
servicing to qualified
personnel only.
Precautions
On safety (Rifer to the supplied
“WARNING”.)
Should any solid object or liquid fall
into the cabinet, unplug the recorder
and have it checked by qualified
personnel before operating it any
further.
On power sources
• Before operating the recorder, check
that the operating voltage of the
recorder is identical with your local
power supply. The operating voltage
is indicated on the nameplate at the
rear of the recorder.
• If you are not going to use the
recorder for a long time, be sure to
disconnect the recorder from the wall
outlet. To disconnect the AC power
cord, grasp the plug itself; never pull
the cord.
• AC power cord must be changed only
at the qualified service shop.
On operation
If the recorder is brought directly from a
cold to a warm location, or is placed in a
very damp room, moisture may
condense on the lenses inside the
recorder. Should this occur, the
recorder may not operate properly. In
this case, remove the MD and leave the
recorder turned on for about an hour
until the moisture evaporates.
On the MiniDisc cartridge
• Do not open the shutter to expose the
MD.
• Do not place the cartridge where it
will be subject to extremes of
sunlight, temperature, moisture or
dust.
On cleaning
Clean the cabinet, panel and controls
with a soft cloth slightly moistened with
a mild detergent solution. Do not use
any type of abrasive pad, scouring
powder or solvent such as alcohol or
benzine.
If you have any questions or problems
concerning your recorder, please
consult your nearest Sony dealer.
Welcome!
Thank you for purchasing the Sony
MiniDisc Recorder. Before operating
the recorder, please read this manual
thoroughly and retain it for future
reference.
About This Manual
Conventions
• Controls in the instructions are those
on the recorder; these may, however,
be substituted by controls on the
remote that are similarly named or,
when different, appear in the
instructions within brackets.
• The following icons are used in this
manual:
Indicates a procedure that
requires use of the remote.
Indicates tips for making the
task easier and hints.
This symbol is intended to alert the
user to the presence of uninsulated
“dangerous voltage” within the
product’s enclosure that may be of
sufficient magnitude to constitute a
risk of electric shock to persons.
This symbol is intended to alert the
user to the presence of important
operating and maintenance
(servicing) instructions in the
literature accompanying the
appliance.
* The location of the marking is at the rear of
the enclosure.
2
1/02-03_MDS-E52.12E 99.1.29, 10:20 AM2
Actual total number: Sony Sound Tec MDS-E52(E) 2-346-702-12(1)
Page 3

TABLE OF CONTENTS
Getting Started
Unpacking ........................................................................................................................... 4
Connection .......................................................................................................................... 4
Basic Operations
Recording on an MD ......................................................................................................... 6
Playing an MD.................................................................................................................... 8
Recording on MDs
Notes on Recording ........................................................................................................... 9
Useful Tips for Recording ................................................................................................ 9
Recording Over Existing Tracks..................................................................................... 11
Adjusting the Recording Level.......................................................................................11
Marking Track Numbers While Recording (Track Marking) ................................... 12
Starting Recording With 6 Seconds of Prestored Audio Data
(Time Machine Recording) ..............................................................................................12
Synchro-Recording With Audio Equipment of Your Choice.................................... 13
Synchro-Recording With a Sony CD Player................................................................. 14
Playing MDs
Using the Display ............................................................................................................. 15
Locating a Specific Track ................................................................................................. 16
Locating a Particular Point in a Track ........................................................................... 17
Playing Tracks Repeatedly .............................................................................................. 17
Playing Tracks in Random Order (Shuffle Play).........................................................18
Creating Your Own Program (Program Play) ............................................................. 19
Useful Tips When Recording From MDs to Tape ....................................................... 20
Editing Recorded MDs
Notes on Editing ............................................................................................................... 20
Erasing Recordings (Erase Function) ............................................................................ 20
Dividing Recorded Tracks (Divide Function).............................................................. 22
Combining Recorded Tracks (Combine Function) ..................................................... 23
Moving Recorded Tracks (Move Function).................................................................. 24
Labeling Recordings (Title Function) ............................................................................ 24
Undoing the Last Edit (Undo Function) ....................................................................... 27
Additional Information
Function of Control Terminal ......................................................................................... 27
Dimensions ........................................................................................................................ 28
Display Messages.............................................................................................................. 29
System Limitations ........................................................................................................... 29
Troubleshooting ................................................................................................................ 30
Specifications ..................................................................................................................... 31
Index of Parts and Controls ............................................................................................ 32
Guide to the Serial Copy Management System ........................................................... 33
1/02-03_MDS-E52.12E 99.1.29, 10:20 AM3
Actual total number: Sony Sound Tec MDS-E52(E) 2-346-702-12(1)
3
Page 4
Getting Started
Getting Started
Unpacking
Check that you received the following items:
• Remote commander (remote) RM-D7M (1)
• R6 (size AA) batteries (2)
Inserting batteries into the remote
You can control the recorder using the supplied
remote.
Insert two R6 (size AA) batteries by matching the +
and – on the batteries. When using the remote, point it
at the remote sensor on the recorder.
When to replace batteries
With normal use, the batteries should last for about six
months. When the remote no longer operates the
recorder, replace all the batteries with new ones.
Connection
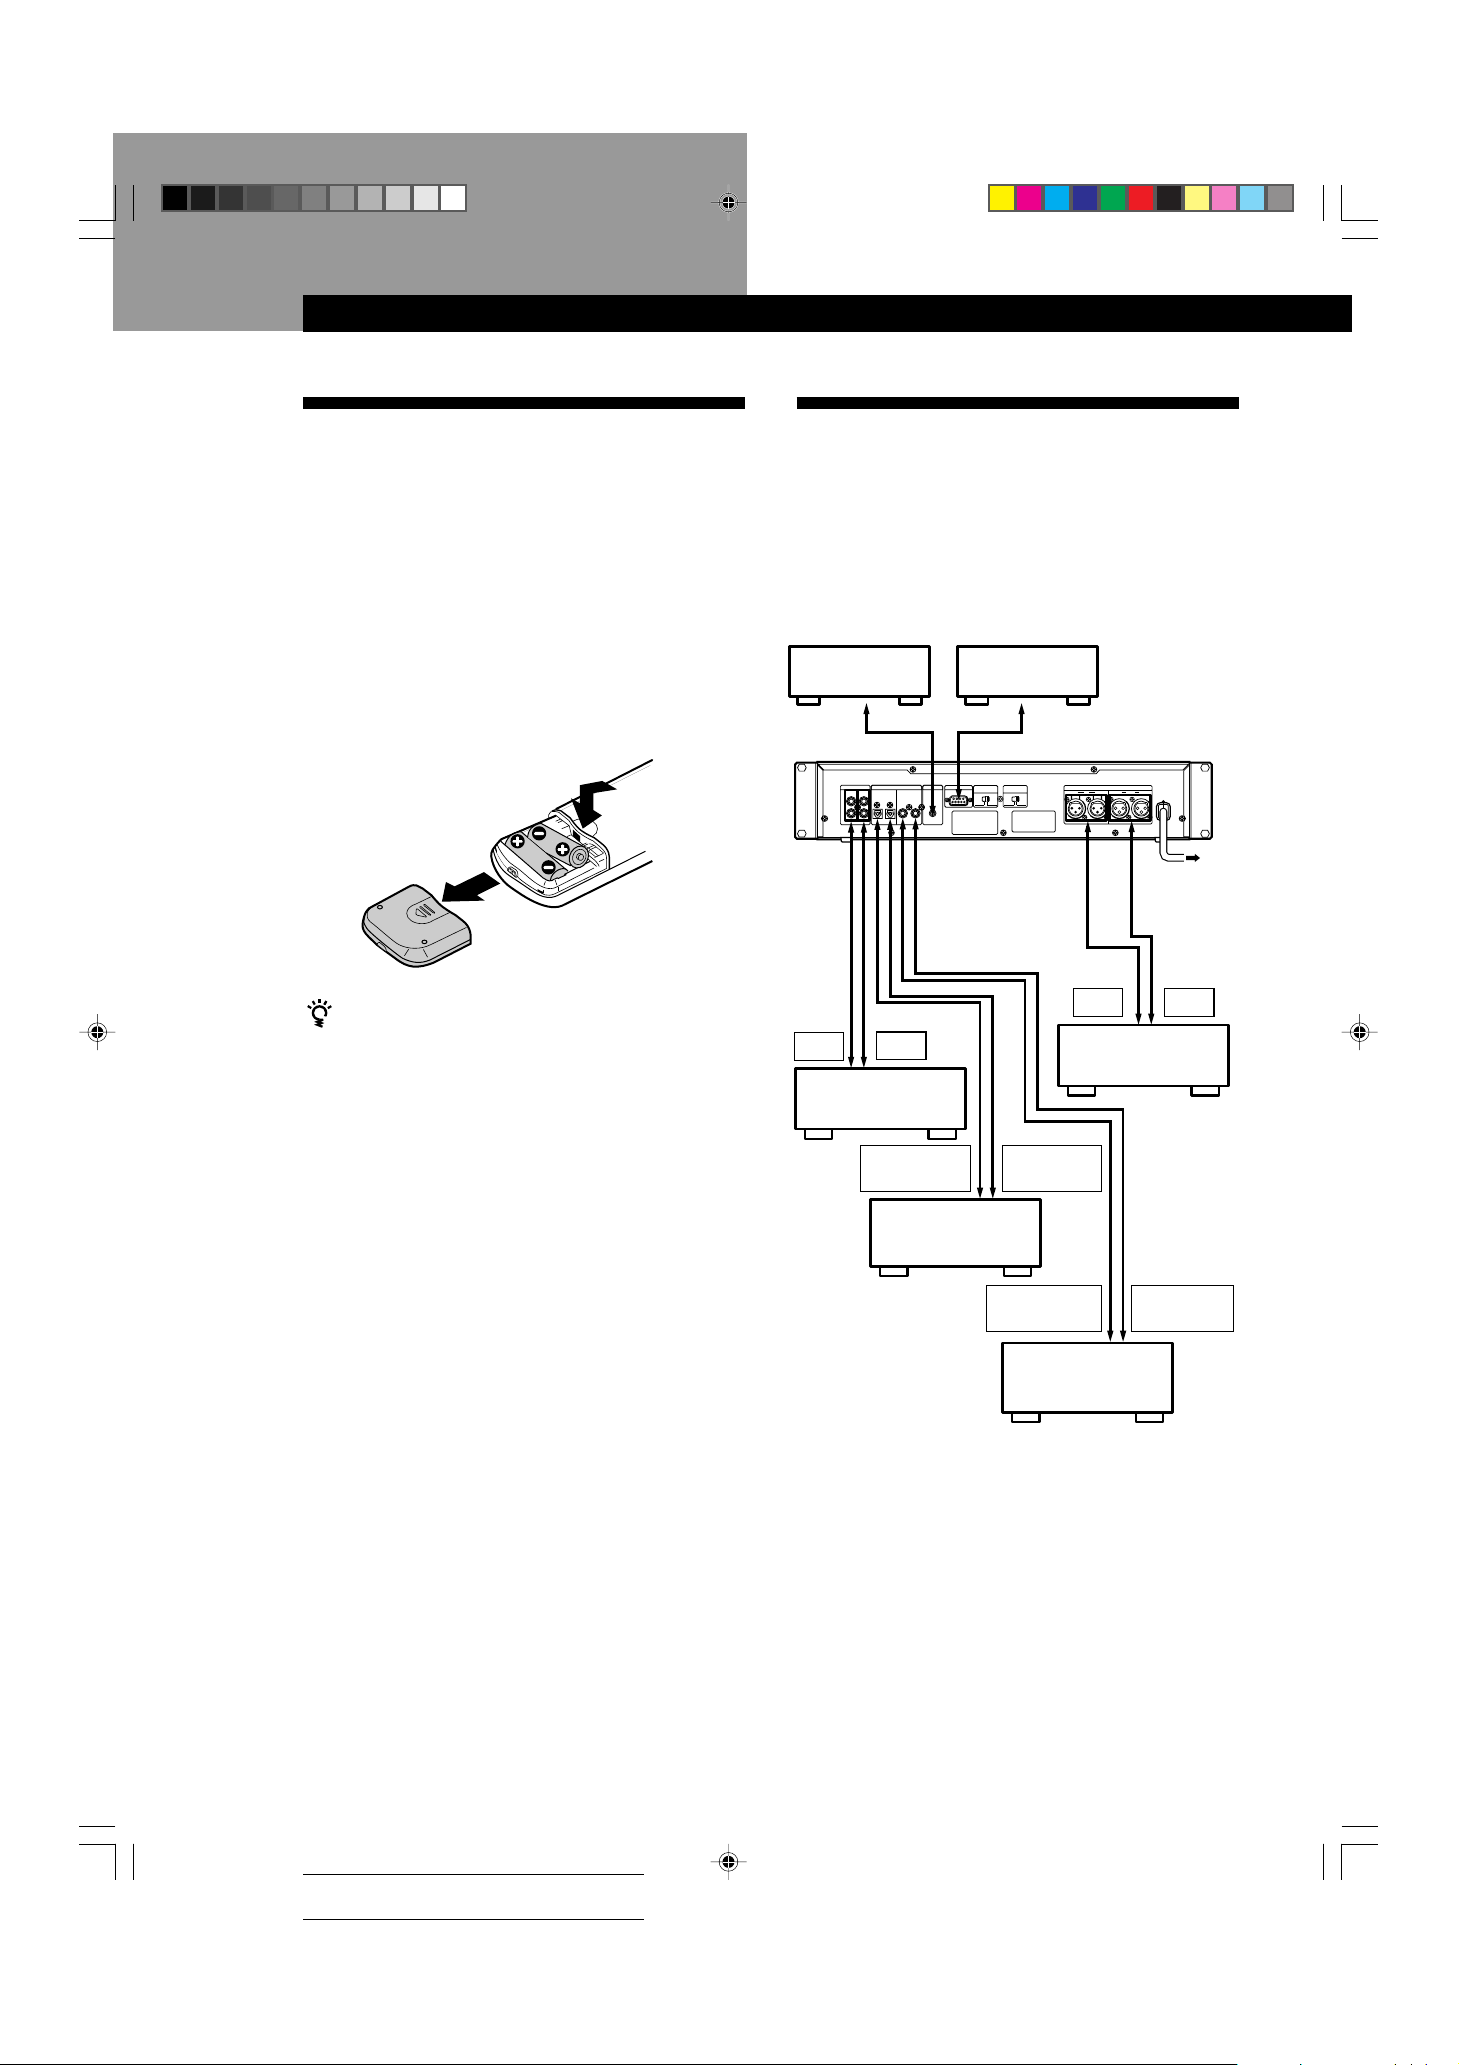
Overview
This section describes how to hook up the MD recorder
to other components such as a mixer, CD player or
DAT recorder. Be sure to turn off the power of each
component before connection.
Control
equipment
LINE(ANALOG
IN
L
R
ç
OUT
)
OUT
COAXIAL
OUT
ç
Mixer
CTRL-S
DIGITAL
COAXIAL
IN
IN
OUTIN
IN
REMOTE
RS-232C
ANALOG INPUT
SELECTOR
UNBAL BAL -10dBu +4dBu
ç
Control
equipment
ANALOG (BAL)
OUTPUT LEVEL
ç
ç
Ç
ANALOG (BAL)
R IN L R OUT L
ç
OUT
Mixer
ç
to a wall outlet
IN
Notes
• Do not leave the remote near an extremely hot or humid
place.
• Do not drop any foreign object into the remote casing,
particularly when replacing the batteries.
• Do not expose the remote sensor to direct sunlight or
lighting apparatuses. Doing so may cause a malfunction.
• If you don’t use the remote for an extended period of time,
remove the batteries to avoid possible damage from
battery leakage and corrosion.
: Signal flow
ç
DIGITAL
OPTICAL OUT
CD player, DAT
recorder, or MD
recorder, etc.
DIGITAL
OPTICAL IN
DIGITAL
COAXIAL OUT
CD player, DAT
recorder, or MD
recorder, etc.
DIGITAL
COAXIAL IN
4
1/04-05_MDS-E52.12E 99.1.29, 10:20 AM4
Actual total number: Sony Sound Tec MDS-E52(E) 2-346-702-12(1)
Page 5
Getting Started
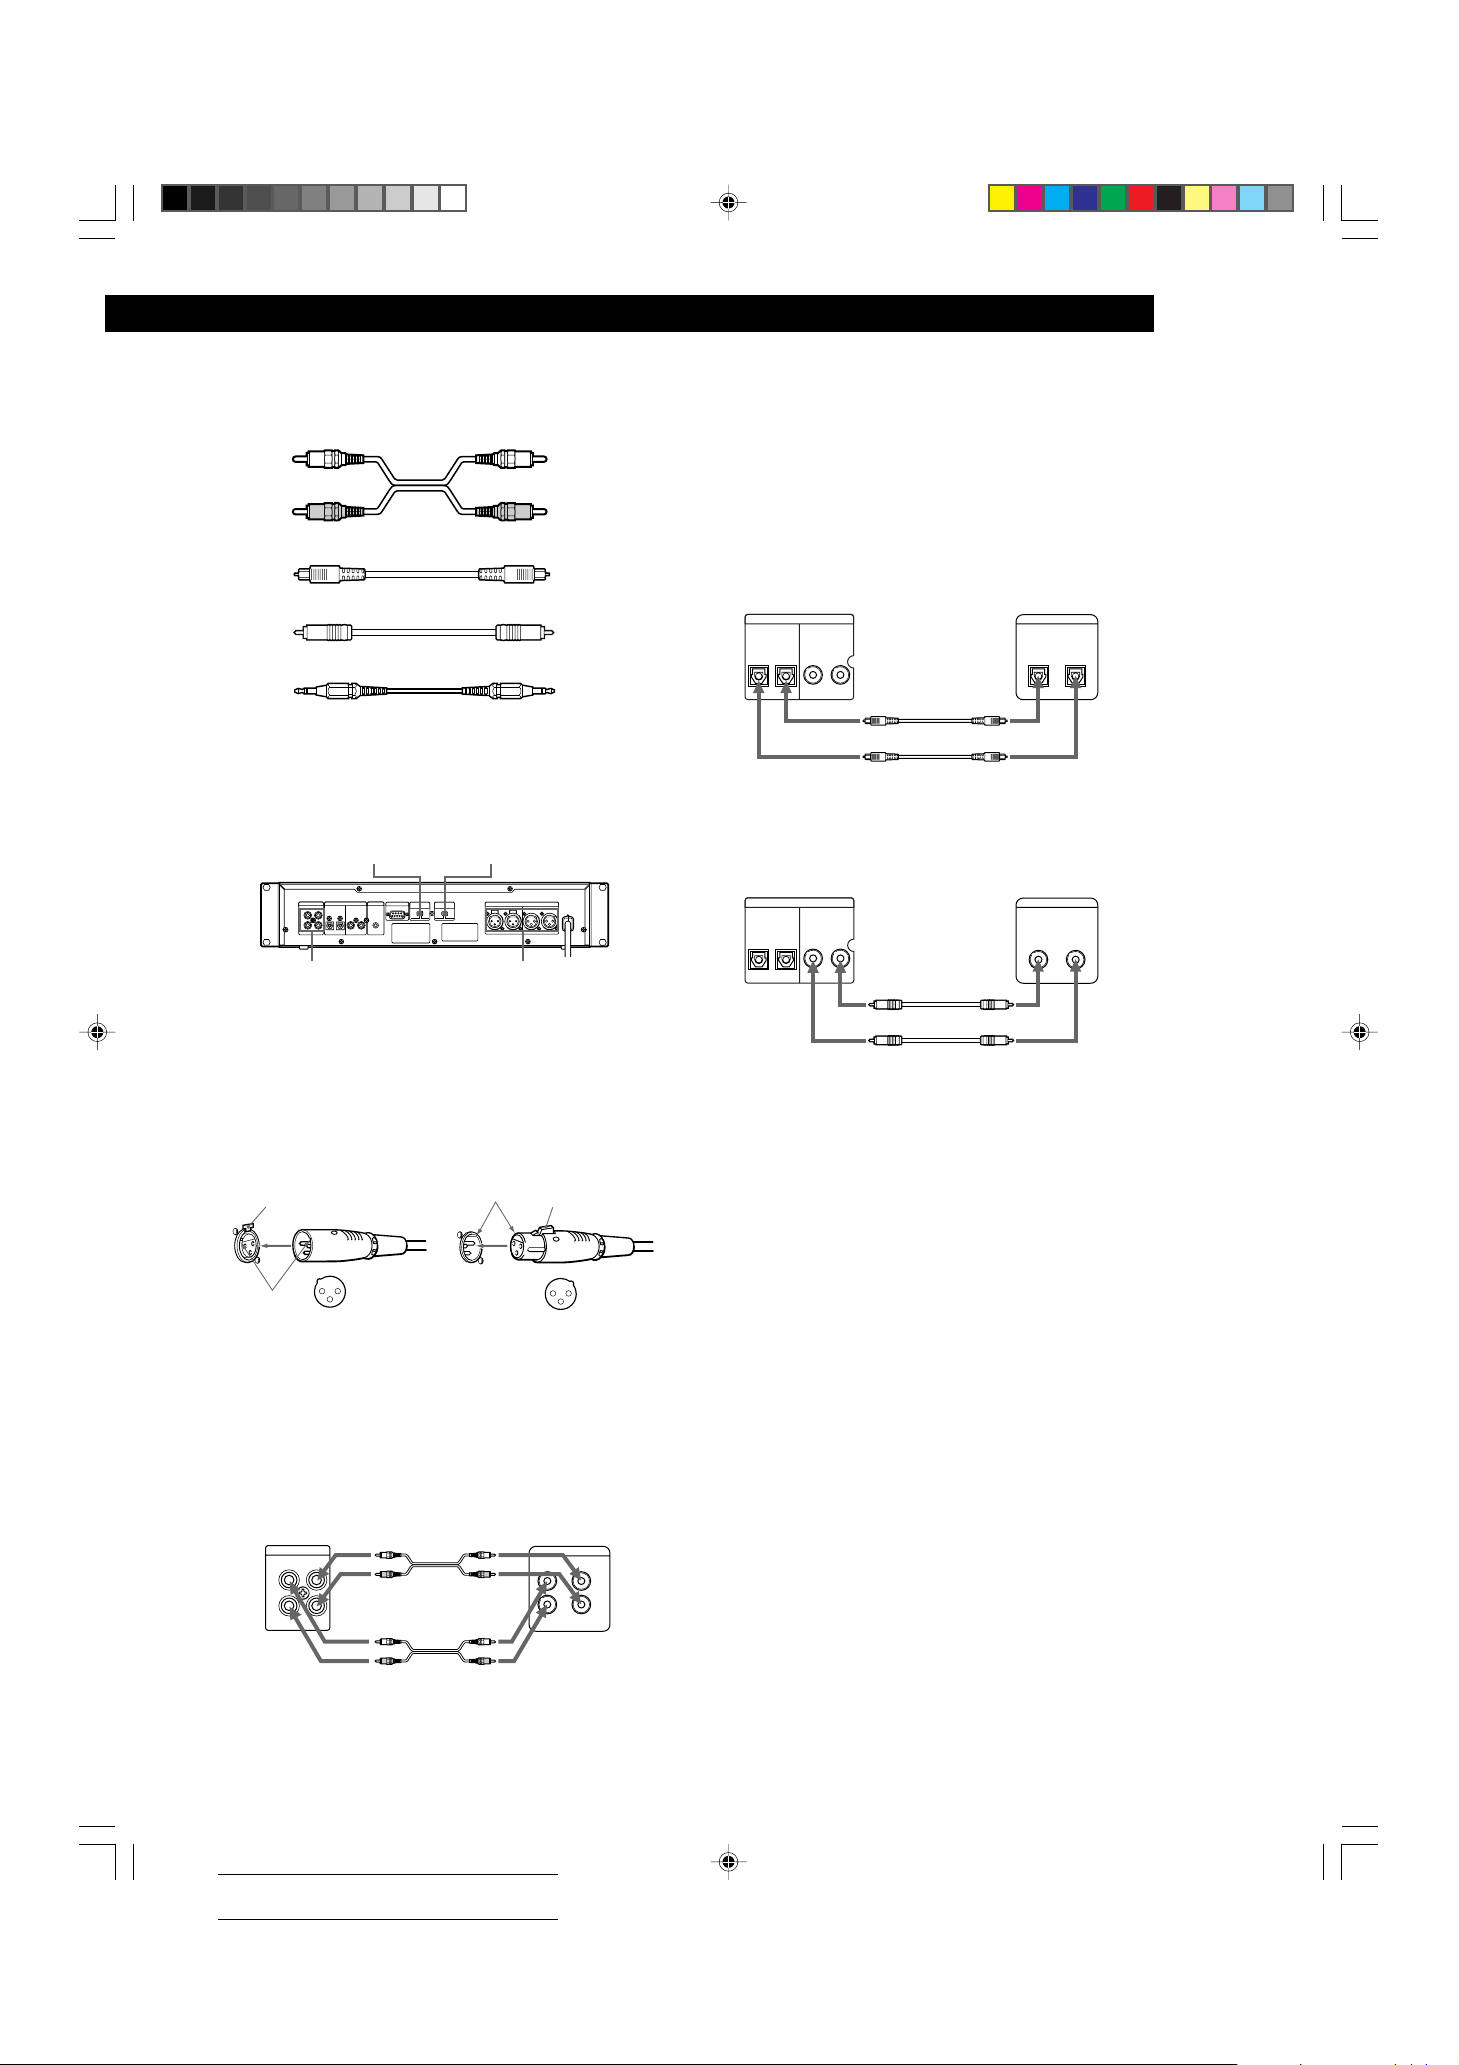
What cords will I need?
• Audio connecting cords (pin type)
White
(L)
Red
(R)
White
(L)
Red
(R)
• Optical cable
• Coaxial digital connecting cable
• Control-S cord (mini jack type)
Connection
Connecting the recorder to an analog component such as
a mixer, etc.
ANALOG INPUT
SELECTOR Switch
)
CTRL-S
DIGITAL
LINE(ANALOG
IN
OUT
COAXIAL
COAXIAL
IN
IN
OUTIN
OUT
L
R
ANALOG (UNBAL)
IN/OUT Jack
Two kinds of connection as follows are possible by switching
the ANALOG INPUT SELECTOR switch.
• When the SELECTOR switch is set to BAL
The signals are input or output from the ANALOG (BAL)
IN/OUT connector (XLR-3-31, XLR-3-32 equivalent).
XLR connector XLR-3-31
equivalent
Press here to disconnect.
1: GND
12
3
Align
2: HOT
3: COLD
The OUTPUT LEVEL can be selected -10dBu or +4dBu by
the ANALOG (BAL) OUTPUT LEVEL switch.
• When the SELECTOR switch is set to UNBAL
The signals are input or output from the ANALOG
(UNBAL) IN/OUT jack. Be sure to match the color-coded
cords to the appropriate jacks on the components: red
(right) to red and white (left) to white. Be sure to make
connections firmly to prevent hum and noise.
MD recorder
)
LINE(ANALOG
IN
OUT
L
R
ANALOG (BAL) OUTPUT
LEVEL Switch
REMOTE
ANALOG INPUT
ANALOG (BAL)
SELECTOR
OUTPUT LEVEL
RS-232C
UNBAL BAL -10dBu +4dBu
R IN L R OUT L
ANALOG (BAL)
IN/OUT Connector
XLR connector XLR-3-32
equivalent
Align
ç
Ç
ANALOG (BAL)
Press here to
disconnect.
12
Mixer
3
2TR
1: GND
2: HOT
3: COLD
INOUT
L
R
Connecting the recorder to a digital component such as a
CD player, DAT recorder, another MD recorder, or mixer
Connect the component through the DIGITAL IN/OUT
connectors with two optical cables or coaxial digital
connecting cables.
• Using the optical cables
Take the caps off the connectors before plugging in the
cables.
MD recorder Digital component
OPTICAL
DIGITAL
OUT
COAXIAL
IN
OUTIN
DIGITAL
OPTICAL
OUTIN
Ç
Ç
çç
ç: Signal flow
çç
• Using the coaxial digital connecting cables
MD recorder Digital component
OPTICAL
DIGITAL
OUT
COAXIAL
IN
OUTIN
DIGITAL
COAXIAL
OUTIN
Ç
Ç
çç
ç: Signal flow
çç
z Automatic conversion of digital sampling rates
during recording
A built-in sampling rate converter automatically
converts the sampling frequency of various digital
sources to the 44.1 kHz sampling rate of your MD
recorder.
This allows you to record sources such as 32 and
48 kHz DAT or satellite broadcasts, as well as compact
discs and other MDs.
Connecting the AC power cord
Connect the AC power cord to a wall outlet.
çç
ç: Signal flow
çç
z
Regardless of the setting of the ANALOG INPUT
switch, signals are transferred to both the UNBAL and
BAL output terminals.
1/04-05_MDS-E52.12E 99.1.29, 10:20 AM5
Actual total number: Sony Sound Tec MDS-E52(E) 2-346-702-12(1)
5
Page 6
Basic Operations
Basic Operations
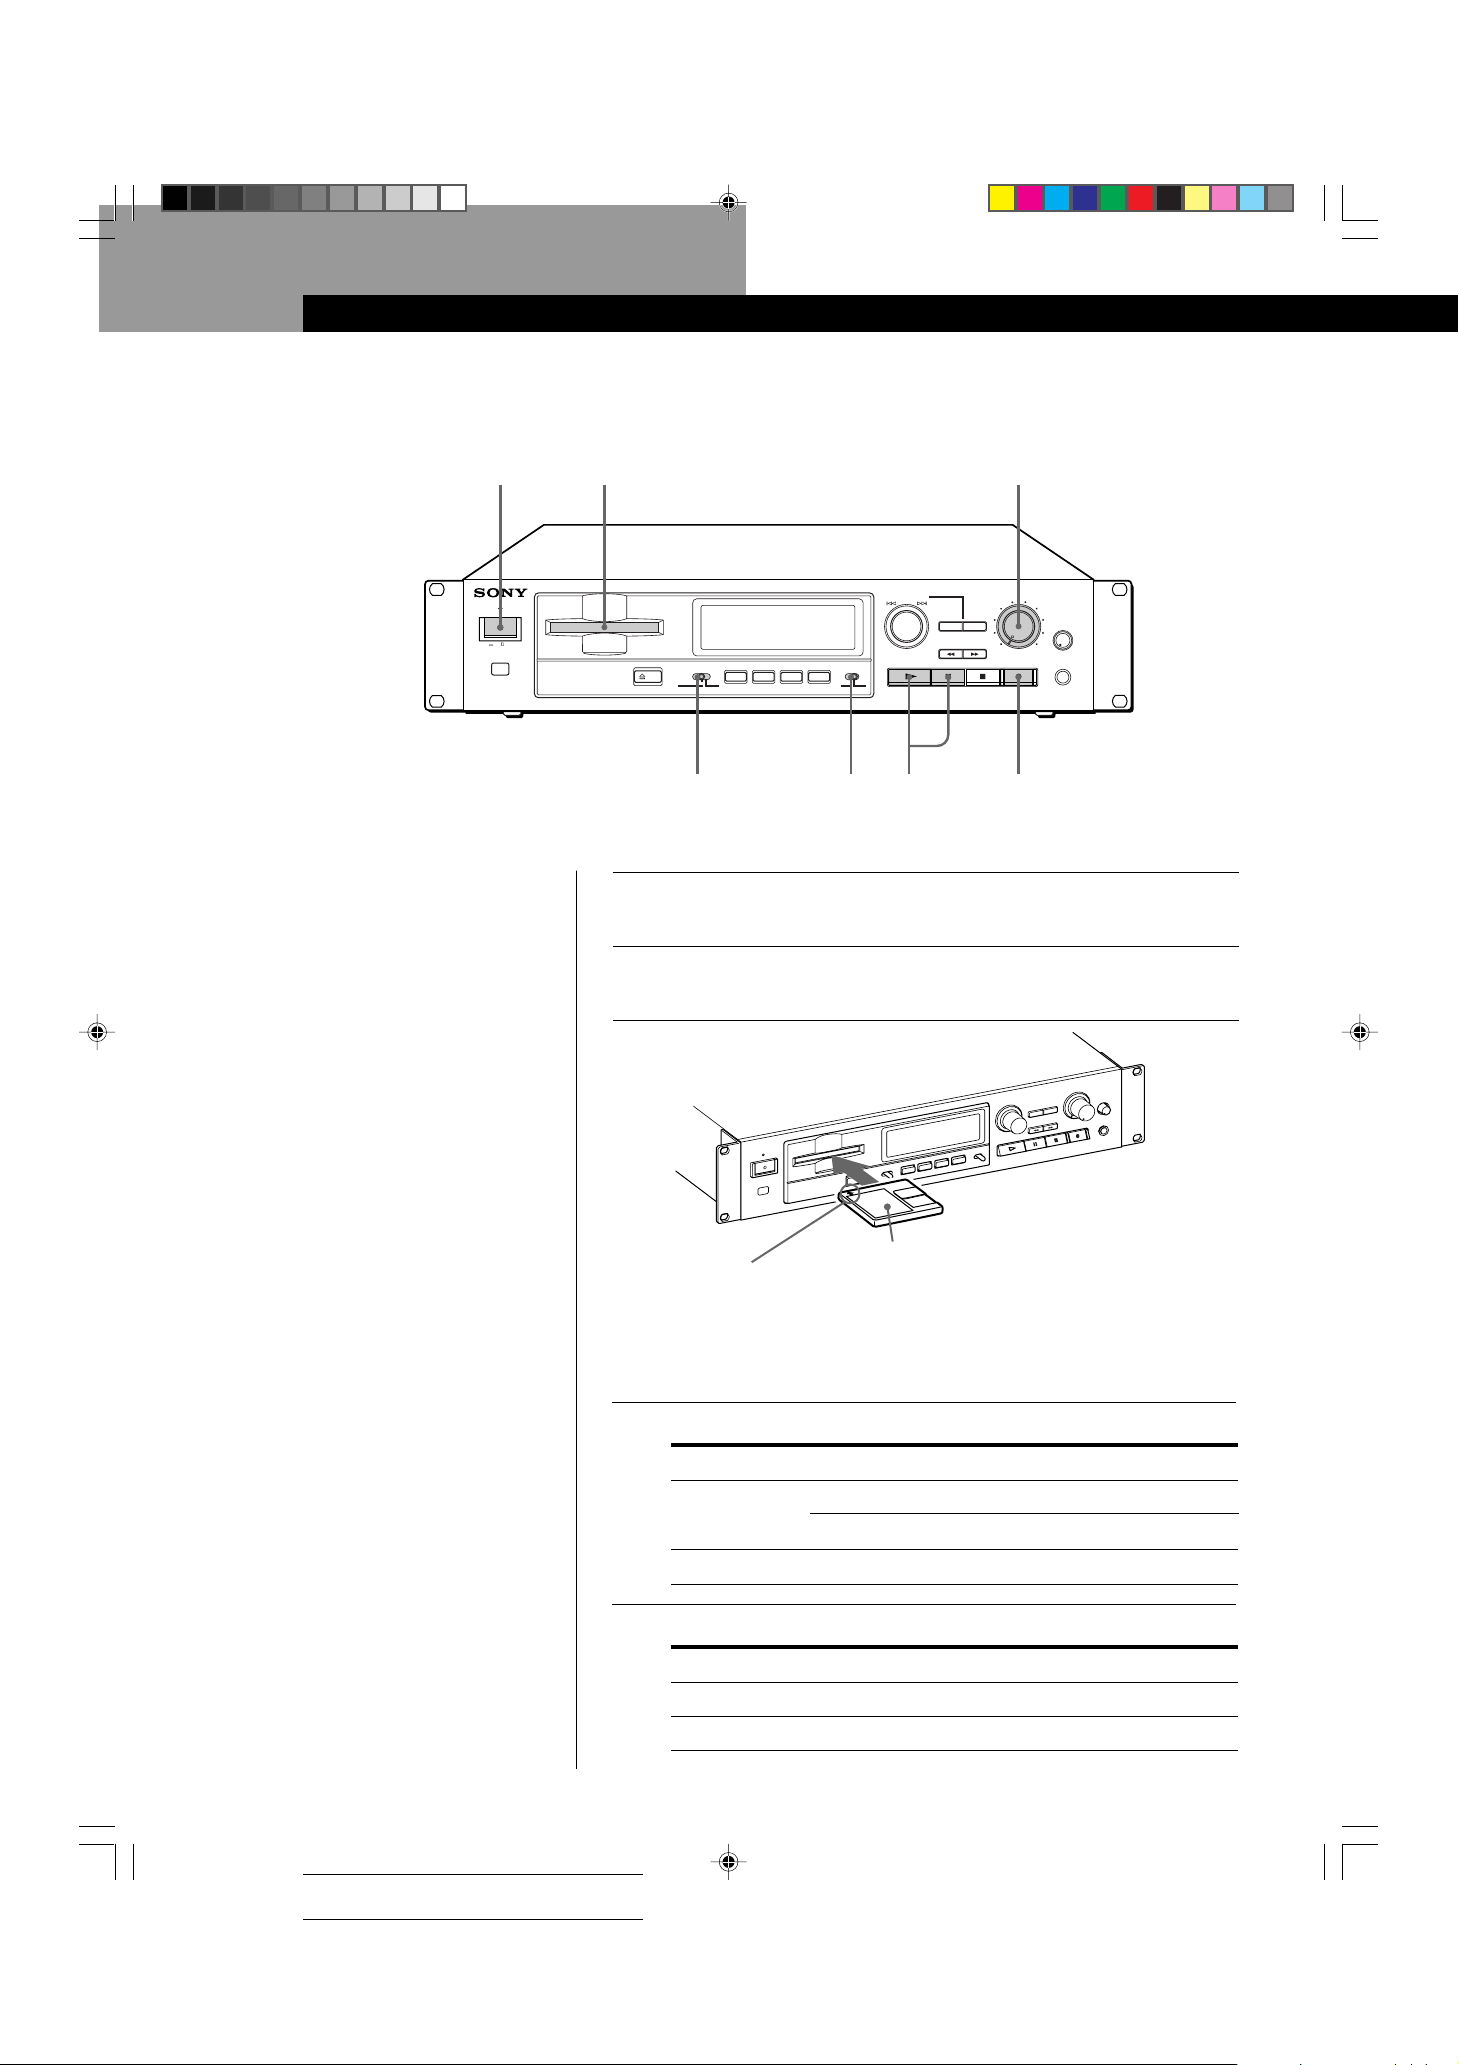
Recording on an MD
23 7
STANDBY
ON OFF
AMS(PUSH ENTER
DISPLAY/CHAR
A.SPACE/A.PAUSE
INPUT
EJECT
DIGITAL COAXOPT ANALOG
PLAY MODE
REC MODE
REPEAT
MONO STEREO
Turn on the mixer and program source.
1
Press U.
2
Insert a recordable MD.
3
)
EDIT
REC LEVEL
5
4
6
3
YES
NO
7
2
PHONE
8
LEVEL
1
9
10
0
MIN MAX
PHONES
6854
With the arrow
pointing this way
With the label side up
If the MD has a recorded material on it, the recorder will
automatically start recording from the end of the last recorded
track.
About LINE (ANALOG) IN
Set the ANALOG INPUT
SELECTOR SWITCH to the
terminal you use (BAL or
UNBAL).
Monitor audio during recording
Even if you set REC MODE to
MONO, the monitor signal does
not become monaural.
6
Set INPUT to the corresponding input connector.
4
To record through Set INPUT to
DIGITAL IN
COAXIAL
DIGITAL COAX
DIGITAL OPTOPTICAL
LINE (ANALOG) IN
ANALOG
Set REC MODE to the mode you want to record in.
5
To record in Set REC MODE to
Stereo sound
Monaural sound*
* In the monaural recording, you can record about two times longer than in
the stereo recording.
STEREO
MONO
1/06-08_MDS-E52.12E 99.1.29, 10:20 AM6
Actual total number: Sony Sound Tec MDS-E52(E) 2-346-702-12(1)
Page 7

Basic Operations
Press r.
6
The recorder stands by for record.
When recording the analog input signal, adjust the recording
7
level with REC LEVEL.
The fourth dot is satisfactory for most purposes. For details,
refer to “Adjusting the Recording Level” on page 11.
Press · or P.
8
Recording starts.
Start playing the program source.
9
When ”TOC“ flashes in the display
The recorder is currently updating
the Table Of Contents (TOC).
Do not turn off the power, move
the recorder, or pull out the AC
power cord, while “TOC” is
flashing. Changes to an MD made
through recording are saved only
when you update the TOC by
ejecting the MD.
Do not turn off the power or disconnect the recorder from the power source
immediately after recording.
If you do, recorded material may not be saved to the MD. To save the
material, after recording, press § EJECT to take out the MD. “TOC” will flash
in the display at this time.
After “TOC” stops flashing and is unlit, you can turn off the power or pull out
the AC power cord.
To
Stop recording
Pause recording* P. Press the button again or press · to
Take out the MD
* Whenever you pause recording, the track number increases by one. For example, if
you paused recording while recording on track 4, the track number increases by
one and recording continues on the new track when restarted.
To protect an MD against accidental erasure
To make it impossible to record on an MD, slide the tab in the direction of
arrow, opening the slot. To allow recording, close the slot.
Rear of the disc
Press
p
resume recording.
§ EJECT after stopping recording
Record-protect tab
Basic Operations
1/06-08_MDS-E52.12E 99.1.29, 10:20 AM7
Actual total number: Sony Sound Tec MDS-E52(E) 2-346-702-12(1)
Slide the tab in
the direction of arrow
Note
If you switch REC MODE during recording or recording pause, recording stops.
7
Page 8
Basic Operations
Playing an MD
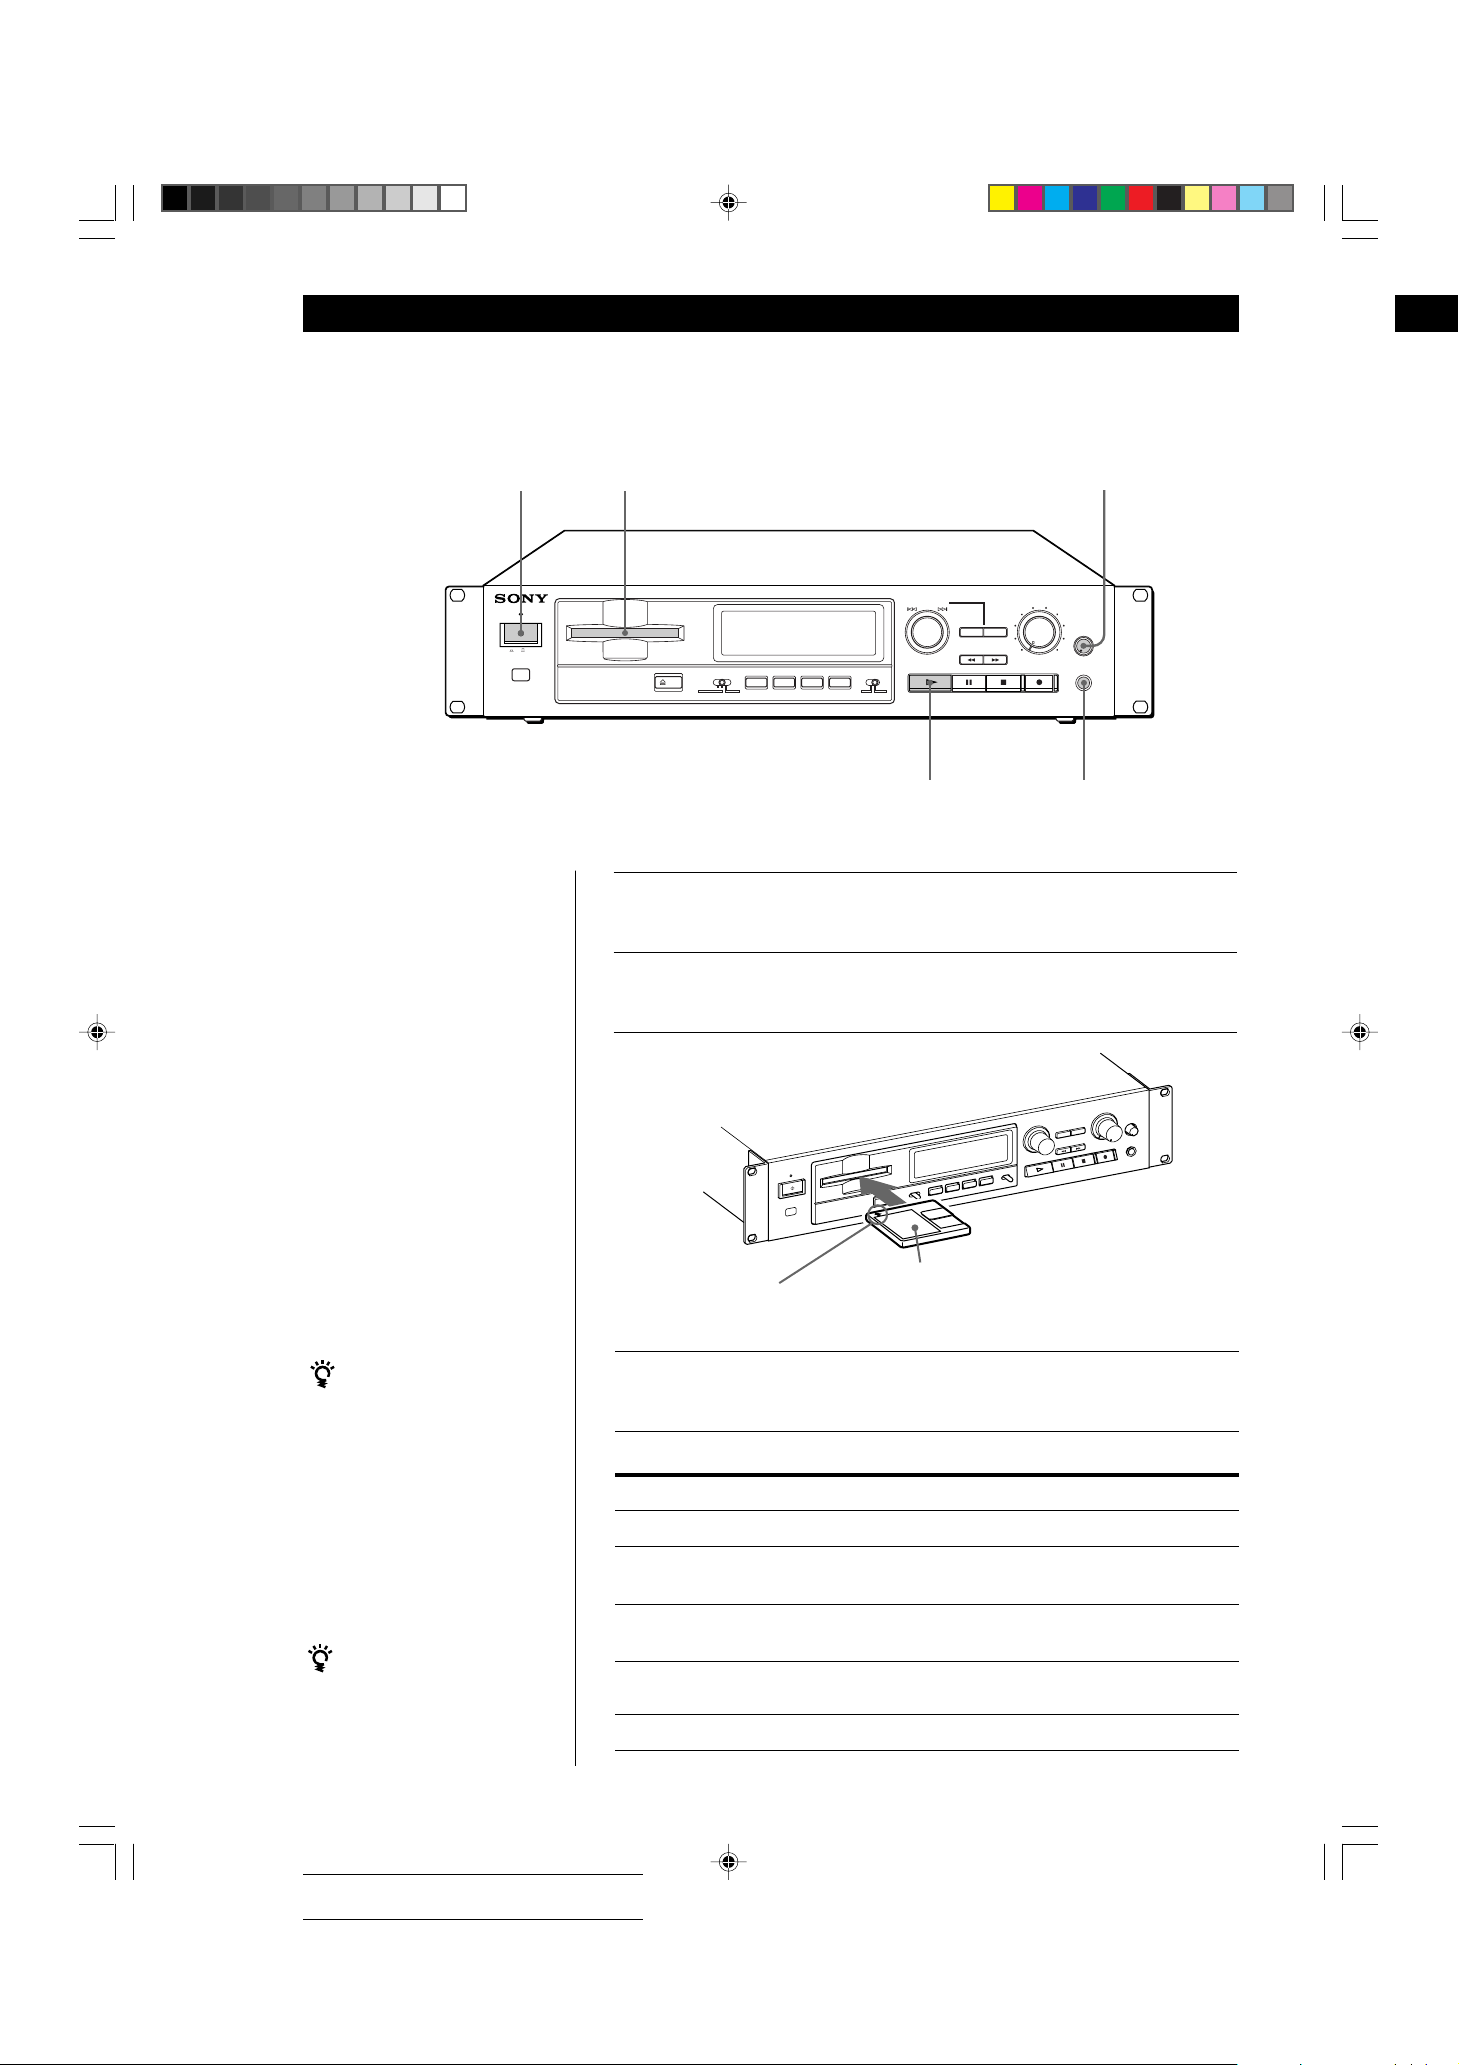
23
Adjust the
headphone volume
STANDBY
ON OFF
)
AMS(PUSH ENTER
DISPLAY/CHAR
A.SPACE/A.PAUSE
INPUT
EJECT
DIGITAL COAXOPT ANALOG
PLAY MODE
REC MODE
REPEAT
MONO STEREO
REC LEVEL
5
4
6
3
YES
NO
EDIT
7
2
PHONE
8
LEVEL
1
9
10
0
MIN MAX
PHONES
Connect the headphones
4
Turn on the mixer and adjust the fader or level control of the
1
corresponding channel.
Press U.
2
Insert an MD.
3
You can locate and play back
a track while the recorder is
stopped
1 Turn AMS (or press =
or + on the remote)
until the number of the
desired track appears.
2 Press AMS or ·.
To use headphones
Connect them to PHONES
jack. Use PHONE LEVEL to
adjust the volume.
8
1/06-08_MDS-E52.12E 99.1.29, 10:20 AM8
With the arrow
pointing this way
Press ·.
4
The recorder starts playing.
To
Stop playing
Pause playing
Go to the next track
Go to the preceding track
Take out the MD
With the label side up
Do the following:
Press p.
Press P. Press the button again or press
· to resume playing.
Turn AMS clockwise (or press + on
the remote).
Turn AMS counterclockwise (or press
= on the remote).
Press § EJECT.
Actual total number: Sony Sound Tec MDS-E52(E) 2-346-702-12(1)
Page 9
Recording on MDs
Notes on Recording
If “Protected” appears in the display
The MD is record-protected. Close the slot to record on the
disc (see “To protect an MD against accidental erasure” on
page 7).
If “Din Unlock” flashes in the display
• The digital program source which you set with INPUT in
Step 4 on page 6, is not connected.
To continue, connect the program source properly.
• The program source is not on.
Turn on the program source.
Depending on the source being recorded, track numbers
are marked in the following ways:
• When recording from a CD or MD with INPUT set to
DIGITAL and the source connected through DIGITAL IN:
The recorder automatically marks track numbers in the
same sequence as the original. If, however, a track is
repeated two or more times (e.g. by single-track repeat
play) or two or more tracks with the same track number
(e.g. from different MDs or CDs) are played, the track or
tracks are recorded as a single, continuous track with a
single track number.
If the source is an MD, track numbers may not be marked
for tracks of less than 4 seconds.
• When recording from a source connected through LINE
(ANALOG) IN with INPUT set to ANALOG, and
“LEVEL- SYNC” does not light up (see “Marking Track
Numbers While Recording” on page 12) or when
recording from DAT or satellite broadcasts connected
through DIGITAL IN with INPUT set to DIGITAL:
The source will be recorded as a single track. You can
divide the track afterwards using the Divide Function (see
“Dividing Recorded Tracks” on page 22) or mark track
numbers during recording by using the Track Marking
Function on page 12.
If “LEVEL-SYNC” appears in the display, the recorder
automatically marks track numbers when recording
analog source or digital recording of DAT or satellite
broadcasts (see “Marking track numbers automatically”
on page 12).
• When recording from DAT or satellite broadcasts with
INPUT set to DIGITAL, the recorder automatically marks
a track number whenever the sampling frequency of the
input signal changes.
Recording on MDs
If “Cannot Copy” appears in the display
The recorder uses the SCMS (Serial Copy Management
System).
MDs recorded through digital input connector cannot be
copied onto other MDs or DAT tapes through the digital
output connector (see page 33).
When recording digital signals that have been emphasized
(in the higher frequencies)
The signal is automatically de-emphasized (with attenuation
proportional to the degree of emphasis) and the level of the
de-emphasized signal is indicated on the peak level meters.
When the recorder is recording or in recording pause,
digital signals input through DIGITAL IN are output to
DIGITAL OUT with the same sampling rate.
To change the digital input signal to another sampling rate
for output (without recording it to an MD), use Input
Monitor Function (see page 10).
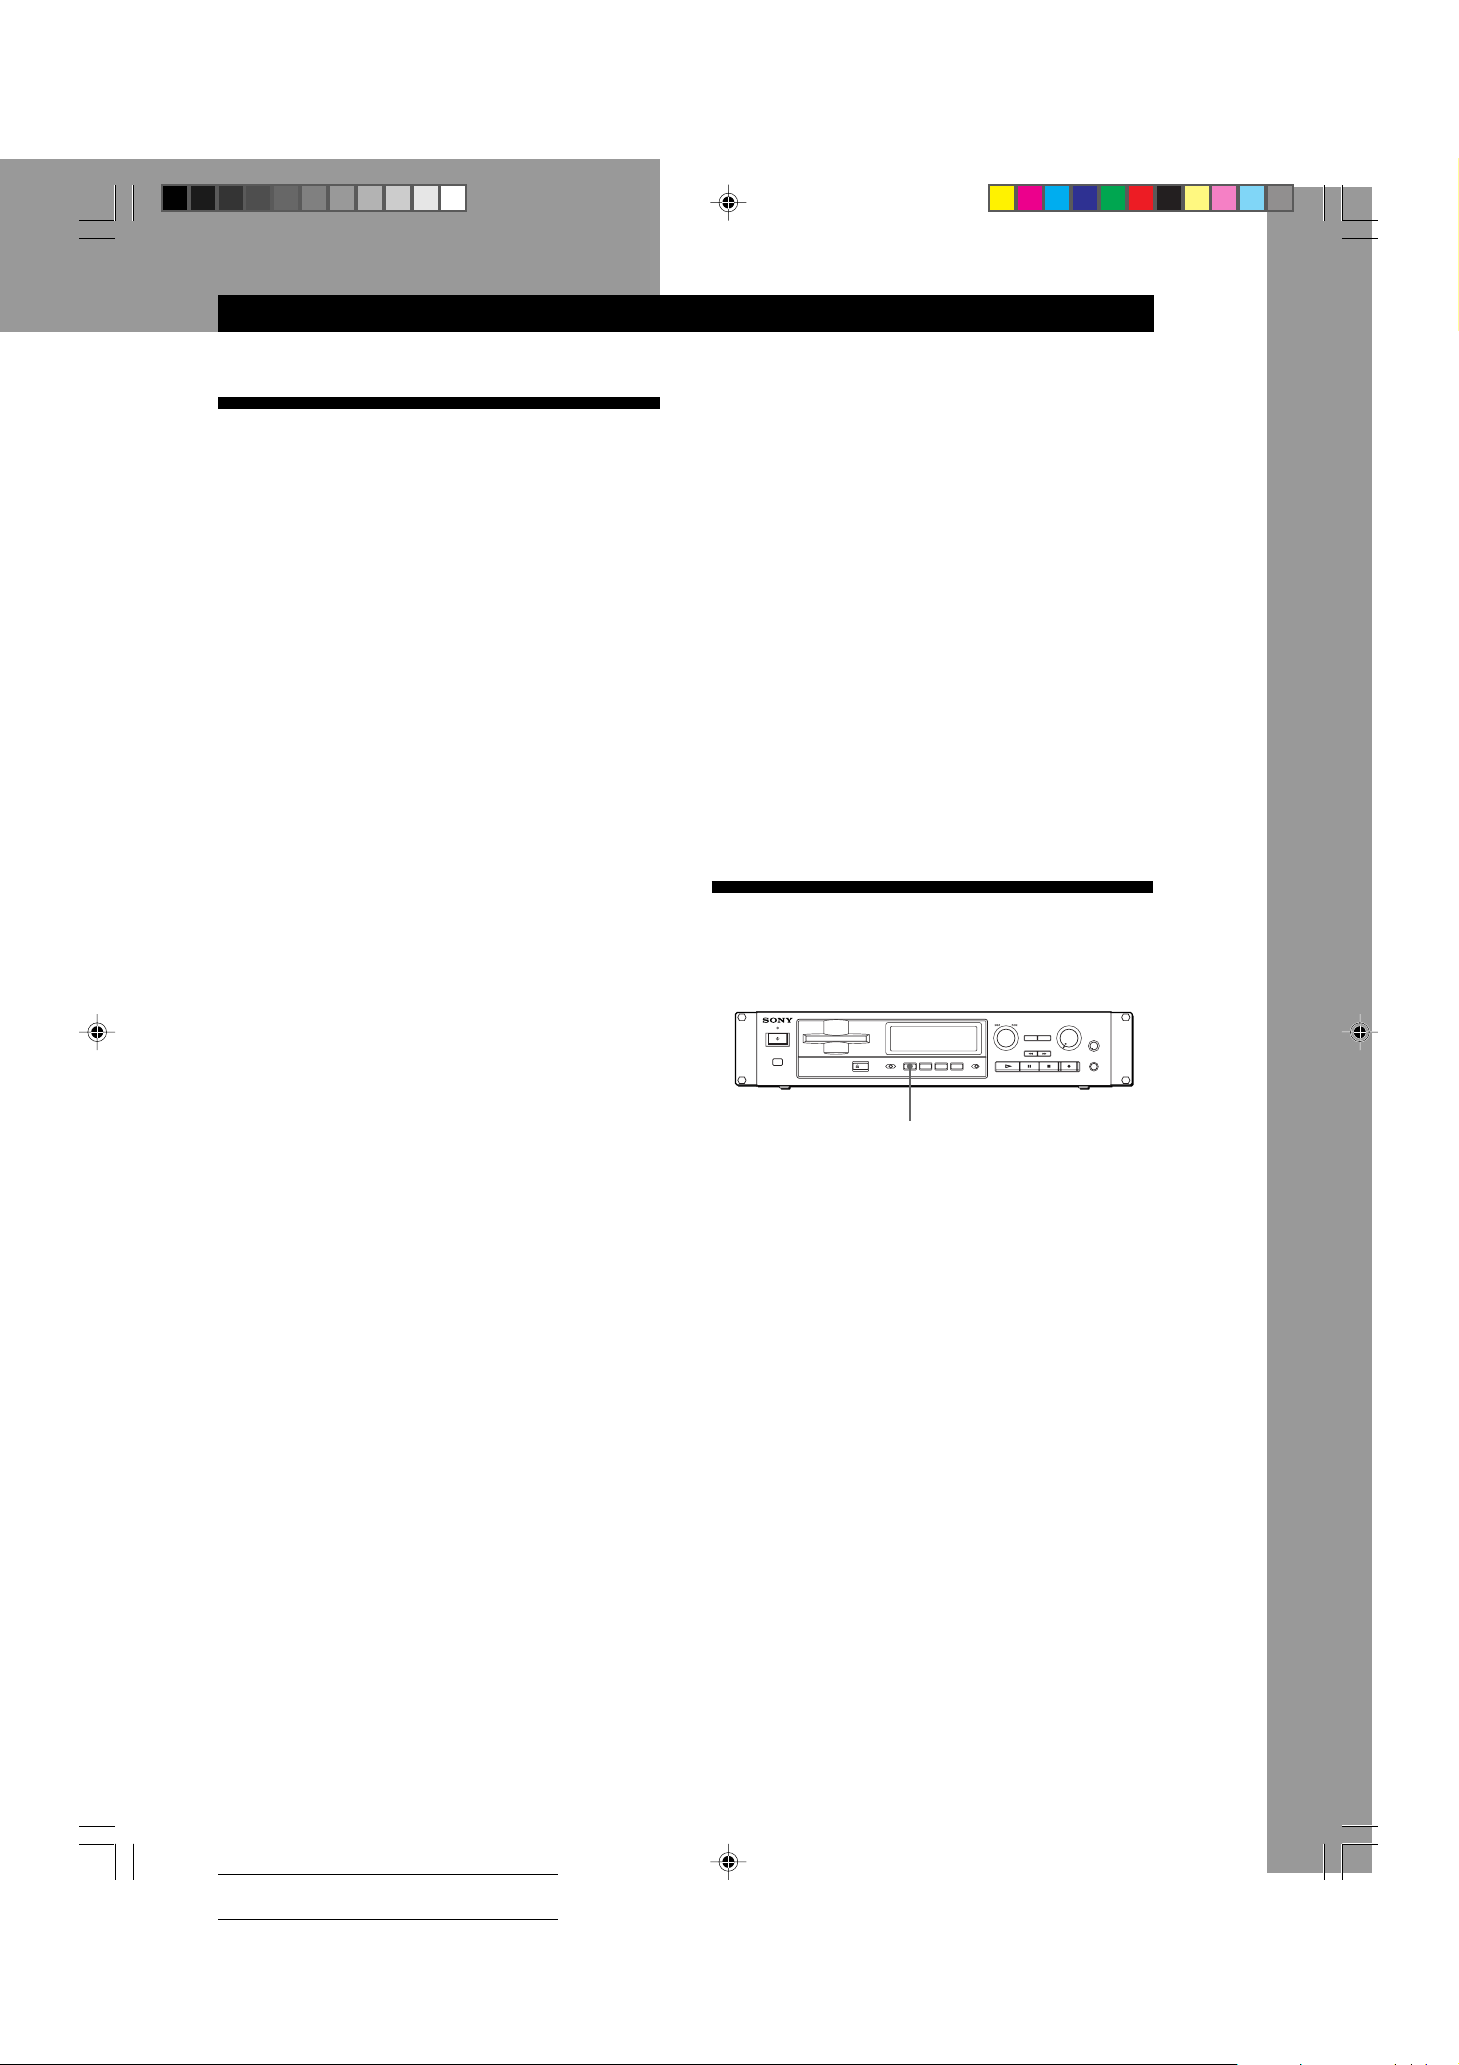
Useful Tips for Recording
DISPLAY/CHAR
Checking the remaining recordable time on
the MD
• When you press DISPLAY/CHAR repeatedly while
recording, the display changes as follows: elapsed
recording time, remaining recordable time on the
MD, track name.
• When you press DISPLAY/CHAR repeatedly while
the recorder is stopped, the display changes as
follows: total recorded time, remaining recordable
time on the MD, disc name (see page 15).
Basic Operations
When “TOC” flashes in the display
The recorder is currently updating the Table Of Contents
(TOC). Do not turn off the power, move the recorder, or pull
out the AC power cord. Changes to an MD made through
recording are saved when you update the TOC by ejecting
the MD.
When the PLAY MODE is PROGRAM or SHUFFLE
The PLAY MODE is switched to CONTINUE automatically.
1/09-14_MDS-E52.12E 99.1.29, 10:20 AM9
Actual total number: Sony Sound Tec MDS-E52(E) 2-346-702-12(1)
(Continued)
9
Page 10

Recording on MDs
Monitoring the input signal (Input Monitor)
Before starting recording, you can monitor the selected
input signal through the recorder’s output connectors.
1 Press §EJECT to remove the MD.
2 Set INPUT according to the input signal you want
to monitor.
When INPUT is set to ANALOG
The analog signal input through LINE (ANALOG) IN is
output to DIGITAL OUT after A/D conversion, and
then to the LINE (ANALOG) OUT connectors and
PHONES jack after D/A conversion.
When INPUT is set to DIGITAL
The digital signal input through DIGITAL IN is output
to DIGITAL OUT, and then to the LINE (ANALOG)
OUT connectors and PHONES jack after D/A
conversion.
Note
Even if you set REC MODE to MONO, the monitor
signal does not become monaural.
3 Press r.
If INPUT is set to ANALOG, “AD-DA” appears in
the display.
If INPUT is set to DIGITAL, “-DA”appears in the
display.
To turn off the Smart Space Function and Auto Cut
Function
1 While the recorder is stopped, press EDIT/NO twice to
display “Setup Menu”.
2 Turn AMS until “S. Space” menu appears in the display,
then press AMS.
3 Turn AMS until “S. Space Off” appears in the display,
then press AMS.
4 Press EDIT/NO.
To turn on the Smart Space Function and Auto Cut
Function again
1 Carry out Steps 1 and 2 in “To turn off the Smart Space
Function and Auto Cut Function” above.
2 Turn AMS until “S. Space On” appears in the display, then
press AMS.
3 Press EDIT/NO.
Notes
• When you turn off the Smart Space Function, the Auto Cut
Function is also turned off automatically.
• The Smart Space Function and Auto Cut Function are
factory set to on.
• The Smart Space Function does not affect the order of the
track numbers being recorded, even if the blank space
occurs in the middle of a track.
• If you turn off the recorder or disconnect the AC power
cord, the recorder will recall the last setting (on or off) of
the Smart Space and Auto Cut Functions the next time you
turn on the recorder.
If “Auto Cut” appears in the display
(Auto Cut)
There has been no sound input for 30 seconds while
INPUT is set to DIGITAL and the source is connected
through DIGITAL IN. The 30 seconds of silence are
replaced by a blank of about 3 seconds and the
recorder changes to recording pause.
You can turn off the Auto Cut Function
For details, see “If “Smart Space” appears in the
display” below.
If “Smart Space” appears in the display
(Smart Space)
When there has been an extended silence of up to 30
seconds in length, and the signal is input again, the
silence is replaced by a blank of about 3 seconds and
the recorder continues recording.
Note
However, if you begin recording during such an extended
silent portion, the smart space function will not be activated.
Playing back tracks just recorded
Follow this procedure to play back tracks that have just
been recorded.
Press · immediately after stopping recording.
Playback starts from the first track of the material just
recorded.
To play from the first track of the MD after recording
1 Press p again after stopping recording.
2 Press ·.
Playback starts from the first track of the MD.
10
1/09-14_MDS-E52.12E 99.1.29, 10:20 AM10
Actual total number: Sony Sound Tec MDS-E52(E) 2-346-702-12(1)
Page 11
Recording on MDs
Recording Over Existing Tracks
Follow the procedure below to record over existing
material just as you would on an analog cassette tape.
≠ AMS ±
=/+
1 Carry out Steps 1 to 5 in “Recording on an MD”
on page 6.
2 Turn AMS (or press = or +) until the
number of the track to be recorded over appears.
3 To record from the start of the track, continue
from Step 6 in “Recording on an MD” on page 7.
While “TRACK” flashes in the display
The recorder is recording over an existing track, and
stops flashing when it reaches the end of the recorded
portion.
6
pP·
r
+=
)0
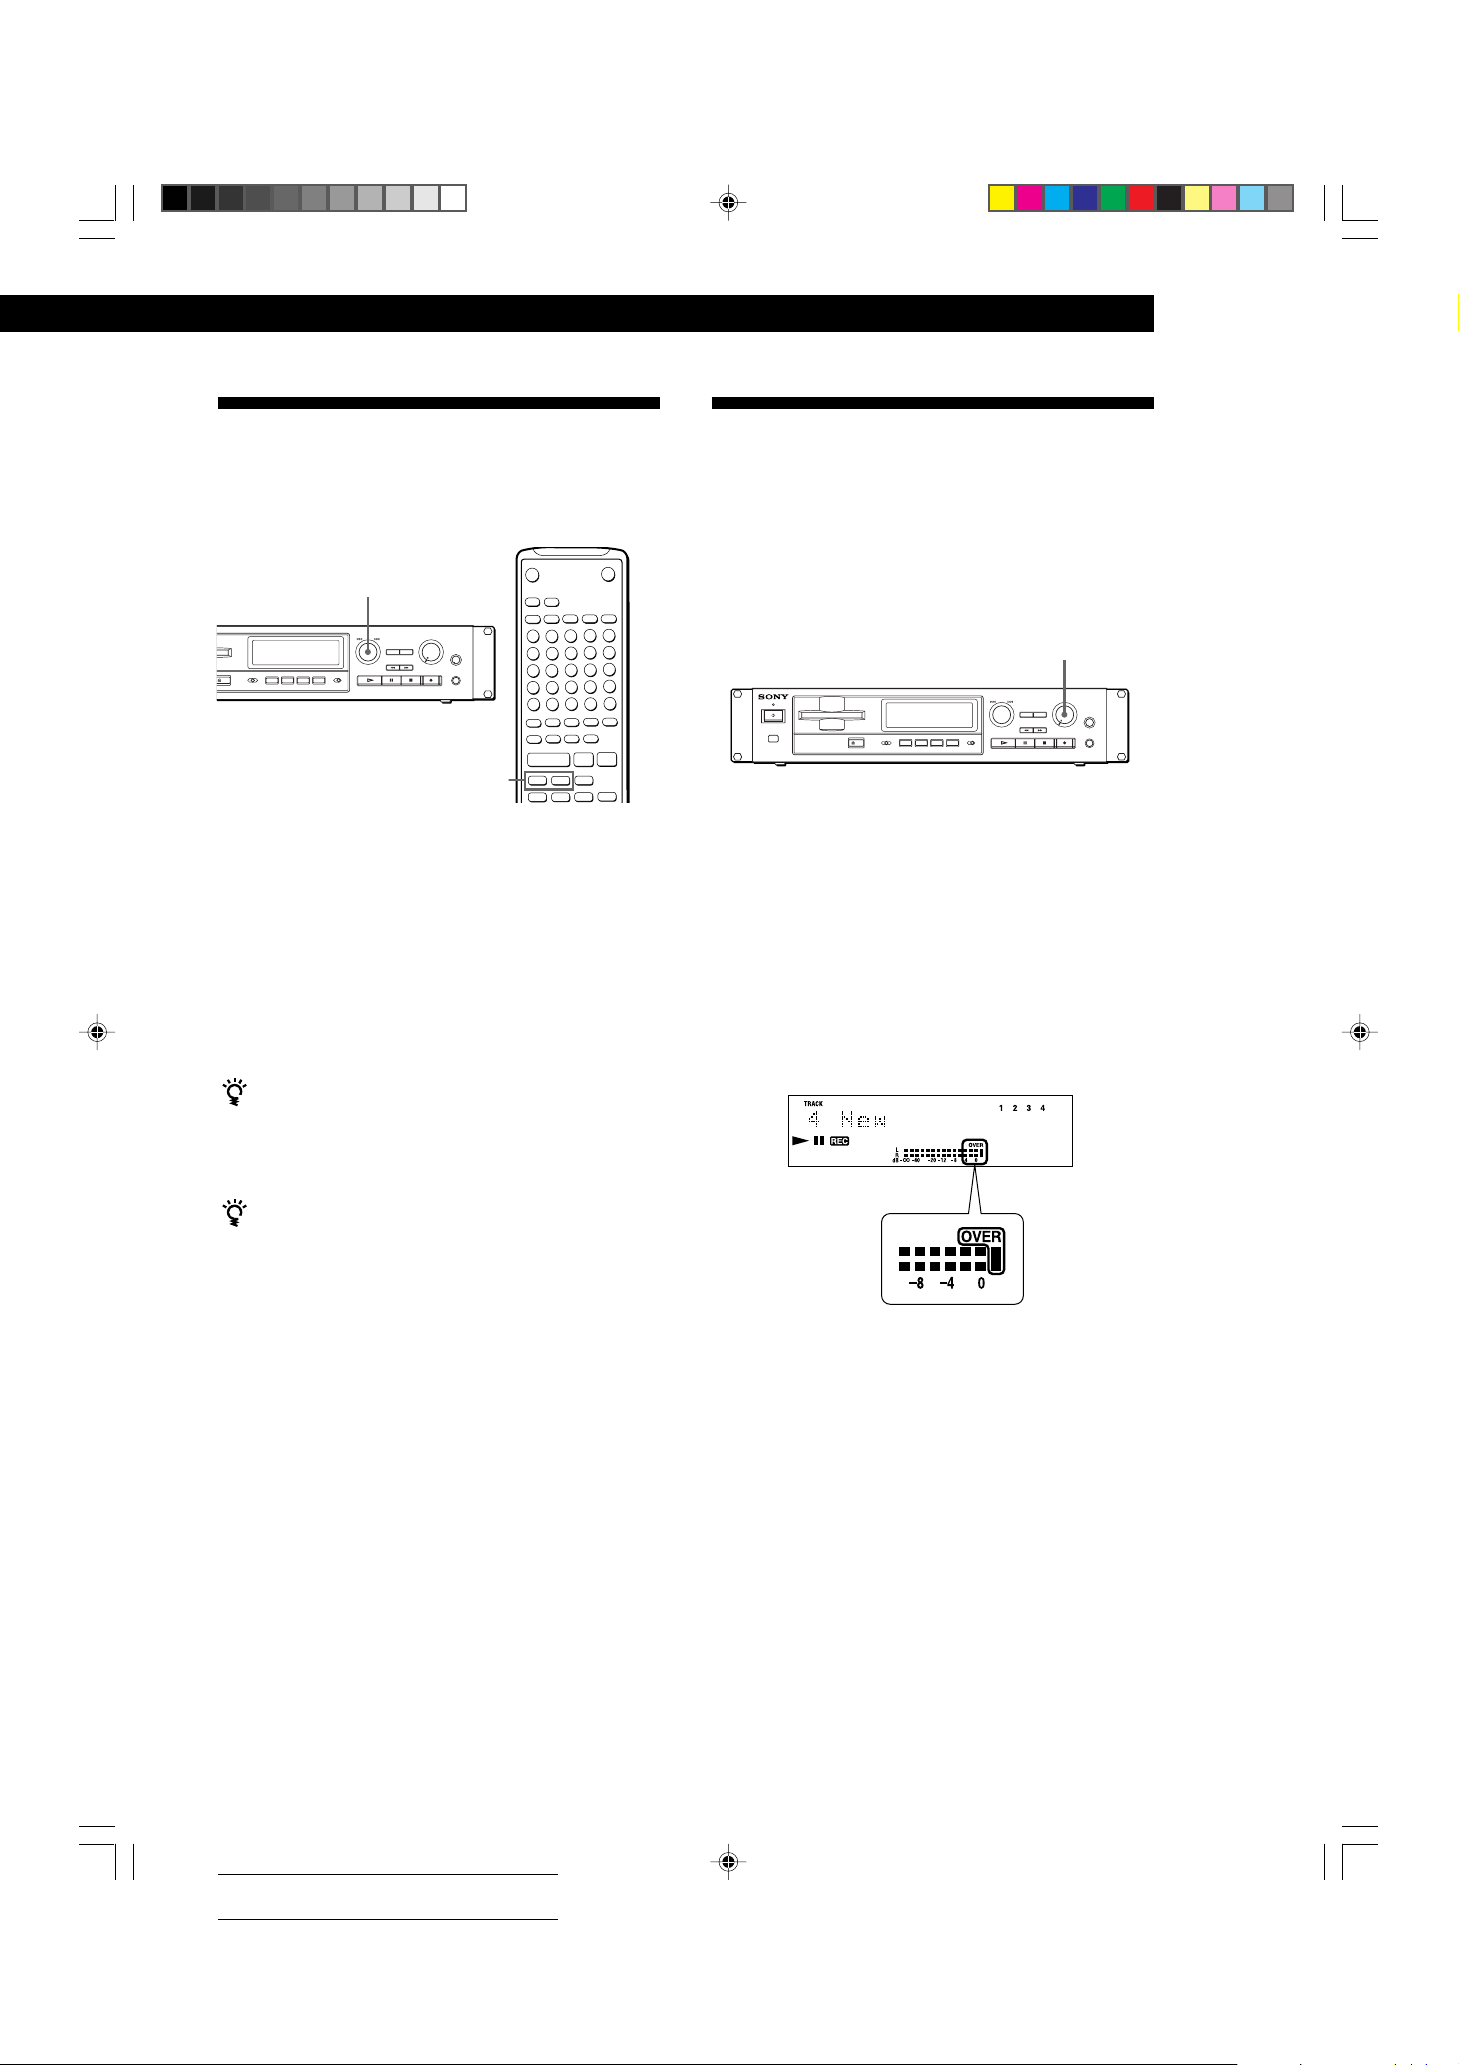
Adjusting the Recording Level
When recording with INPUT set to ANALOG and the
signal input through LINE (ANALOG) IN jacks, use
REC LEVEL to adjust the recording level before
starting recording.
You cannot adjust the recording level during digital
recording.
REC LEVEL
1 Carry out Steps 1 to 6 in “Recording on an MD”
on pages 6 and 7.
2 Play the portion of the program source with the
strongest signal level.
3 While monitoring the sound, turn REC LEVEL to
adjust the recording level so that the peak level
meters reach their highest point without turning
on the OVER indication. Occasional lighting of
“OVER” is acceptable.
To record from the middle of the track
1 After Step 2 above, press · to start playback.
2 Press P where you want to start recording.
3 Continue from Step 6 in “Recording on an MD” on
page 7.
Note
You cannot record from the middle of an existing track when
“PROGRAM” or “SHUFFLE” is displayed/lit.
4 Stop playing the program source.
5 To start recording, follow the procedure starting
from Step 8 in “Recording on an MD” on page 7.
11
1/09-14_MDS-E52.12E 99.1.29, 10:20 AM11
Actual total number: Sony Sound Tec MDS-E52(E) 2-346-702-12(1)
Page 12
Recording on MDs
Marking T rack Numbers While
Recording (Track Marking)
You can mark track numbers either manually or
automatically. By marking track numbers at specific
points, you can quickly locate the points later using the
AMS Function or Editing Functions.
EDIT/NO
YES
To display “LEVEL-SYNC”
1 While the recorder is stopped, press EDIT/NO twice to
display “Setup Menu”.
2 Turn AMS until “LevelSync?” appears in the display, then
press AMS.
3 Turn AMS until “LevelSync ON” appears in the display,
then press AMS.
4 Press EDIT/NO.
To cancel Automatic Track Marking
1 Carry out Steps 1 and 2 in “To display “LEVEL-SYNC””
above.
2 Turn AMS until “LevelSync OFF” appears in the display,
then press AMS.
3 Press EDIT/NO.
r
Marking track numbers manually
(Manual Track Marking)
You can mark track numbers at any time while
recording on an MD.
Press r at the place you want to add a track mark
while recording.
Marking track numbers automatically
(Automatic Track Marking)
The recorder adds track marks differently in the
following cases:
• When recording from CDs or MDs with INPUT set
to DIGITAL and the source connected through
DIGITAL IN:
The recorder marks track numbers automatically.
When you record from a CD or MD, the track
numbers are marked as they are found on the
original.
• In the case other than the above
While “LEVEL-SYNC” appears in the display, the
recorder marks a new track number whenever the
signal level drops and rises to a certain point
(Automatic Track Marking). If “LEVEL-SYNC” does
not light up, set the LevelSync to ON as follows:
When you want to mark track numbers after you‘ve
finished recording
Use the Divide Function (see “Dividing Recorded
Tracks” on page 22.)
Note
If you turn off the recorder or disconnect the AC power cord,
the recorder will recall the last setting (LevelSync ON or
OFF) of the Automatic Track Marking Function the next time
you turn on the recorder.
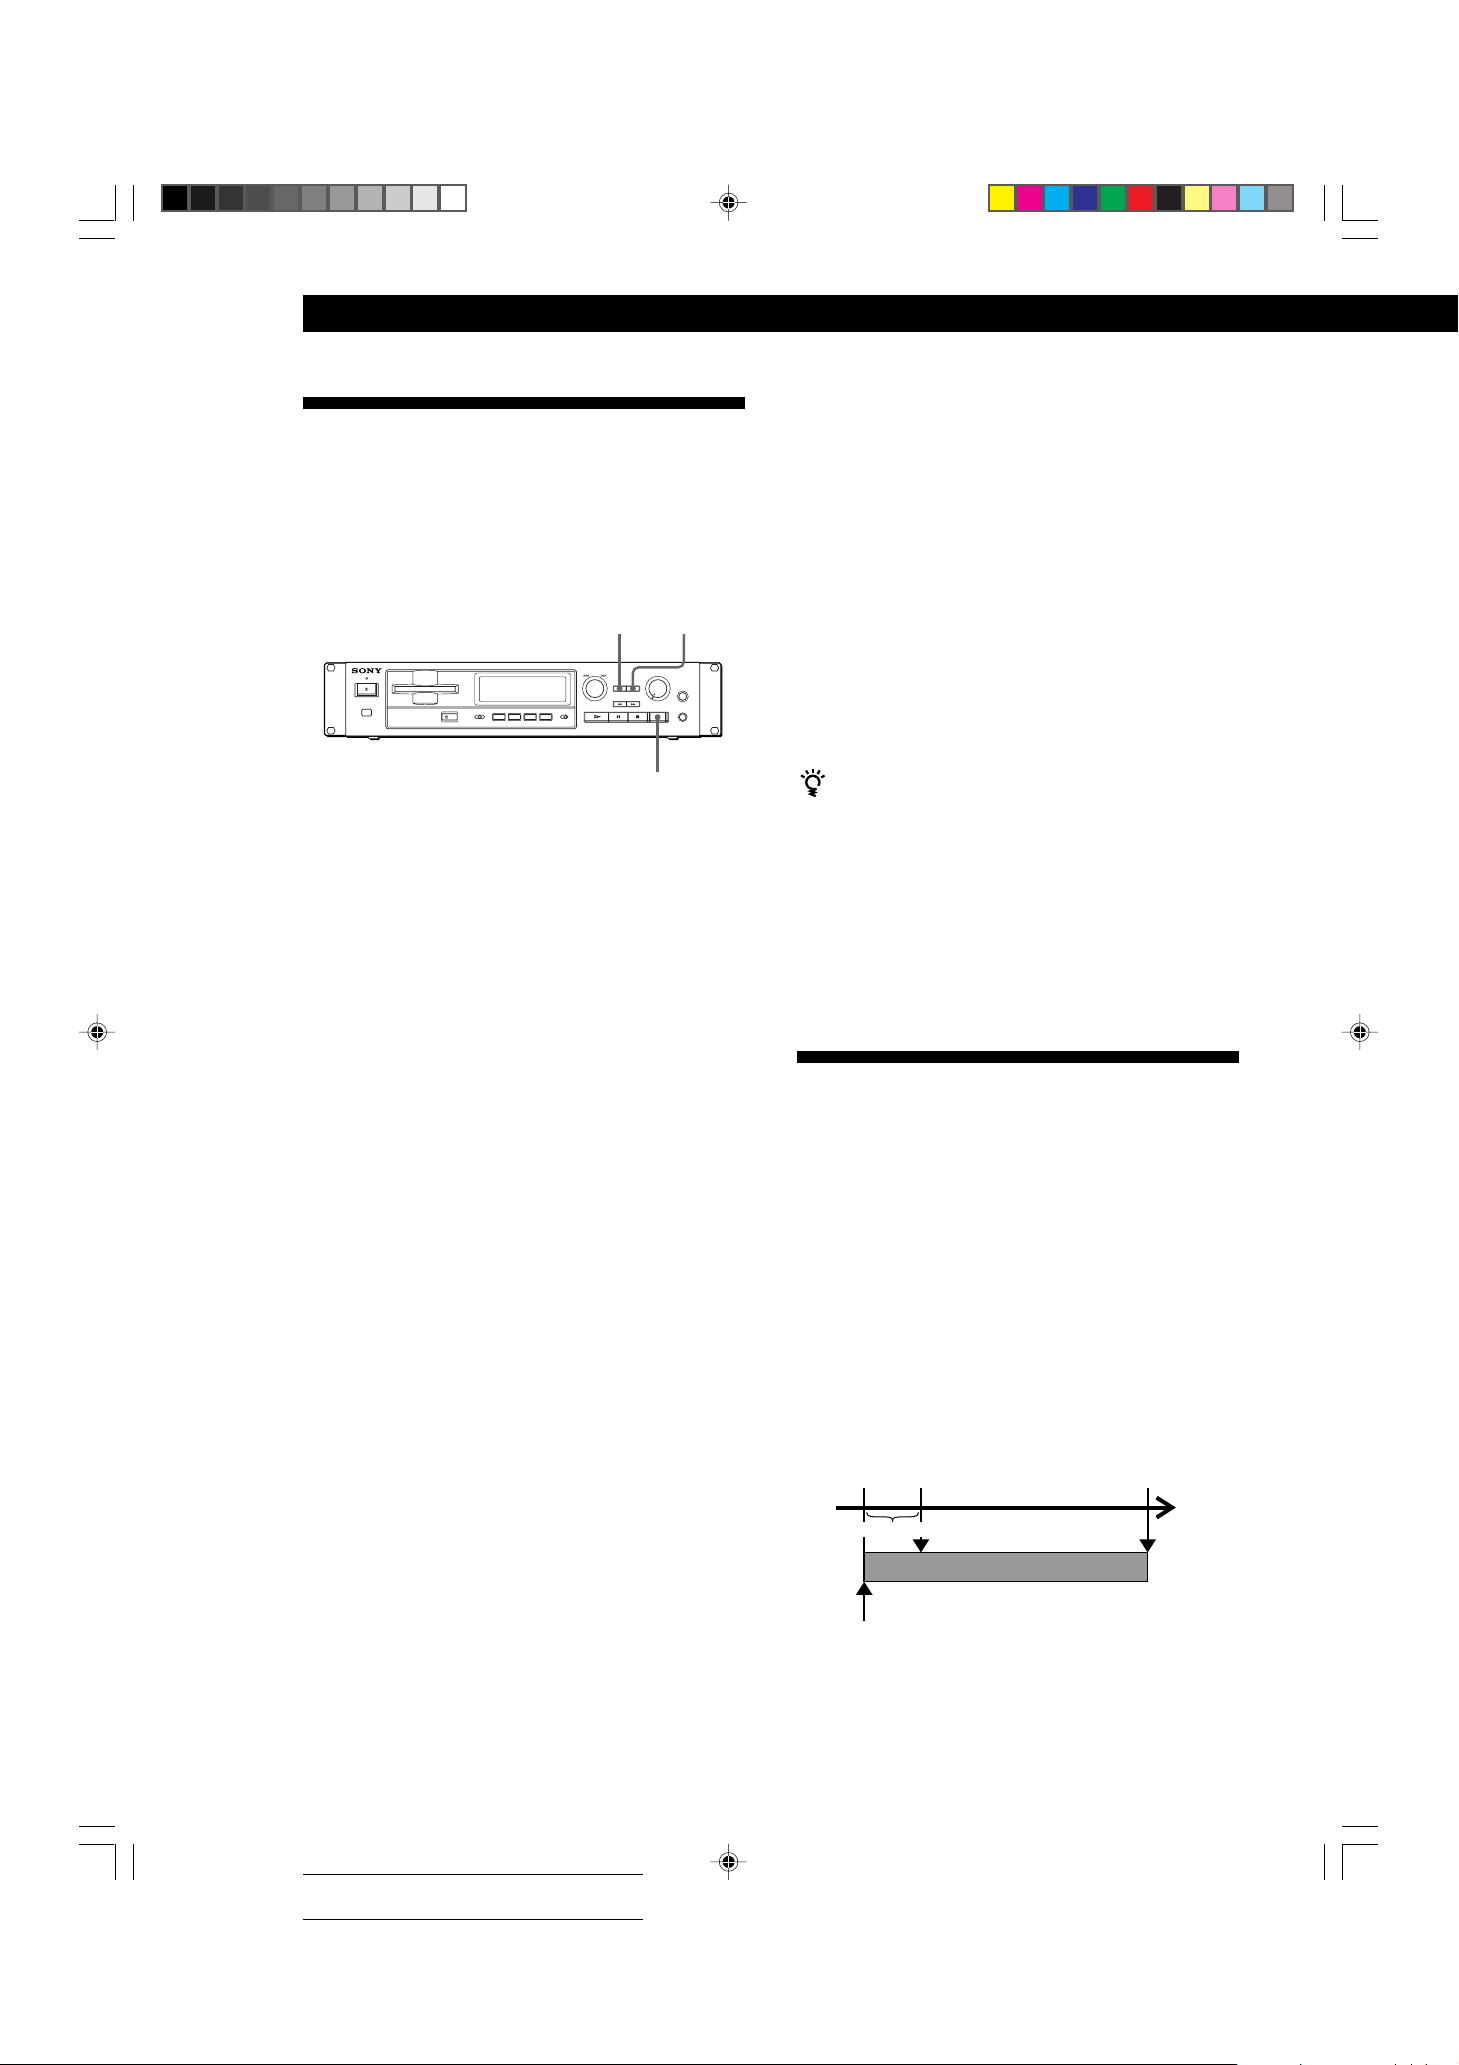
Starting Recording With
6 Seconds of Prestored Audio
Data (Time Machine Recording)
When recording from an FM or satellite broadcast, the
first few seconds of material are often lost due to the
time it takes you to ascertain the contents and press the
record button. To prevent the loss of this material, the
Time Machine Recording Function constantly stores 6
seconds of the most recent audio data in the buffer
memory so that when you begin recording the
program source, the recording actually begins with the
6 seconds of audio data stored in the buffer memory in
advance, as shown in the illustration below:
When you press
AMS in Step 3
Audio data in 6-second buffer memory
End of the program
source to be recorded
Time
Recorded
portion
12
1/09-14_MDS-E52.12E 99.1.29, 10:20 AM12
Actual total number: Sony Sound Tec MDS-E52(E) 2-346-702-12(1)
Beginning of the program
source to be recorded
Page 13
Recording on MDs
g
6
≠ AMS ±
pP·
r
+=
)0
T.REC
1 Carry out Steps 1 to 6 in “Recording on an MD”
on pages 6 and 7.
The recorder changes to recording pause.
2 Start playing the program source you want to
record.
The most recent 6 seconds of audio data is stored
in the buffer memory.
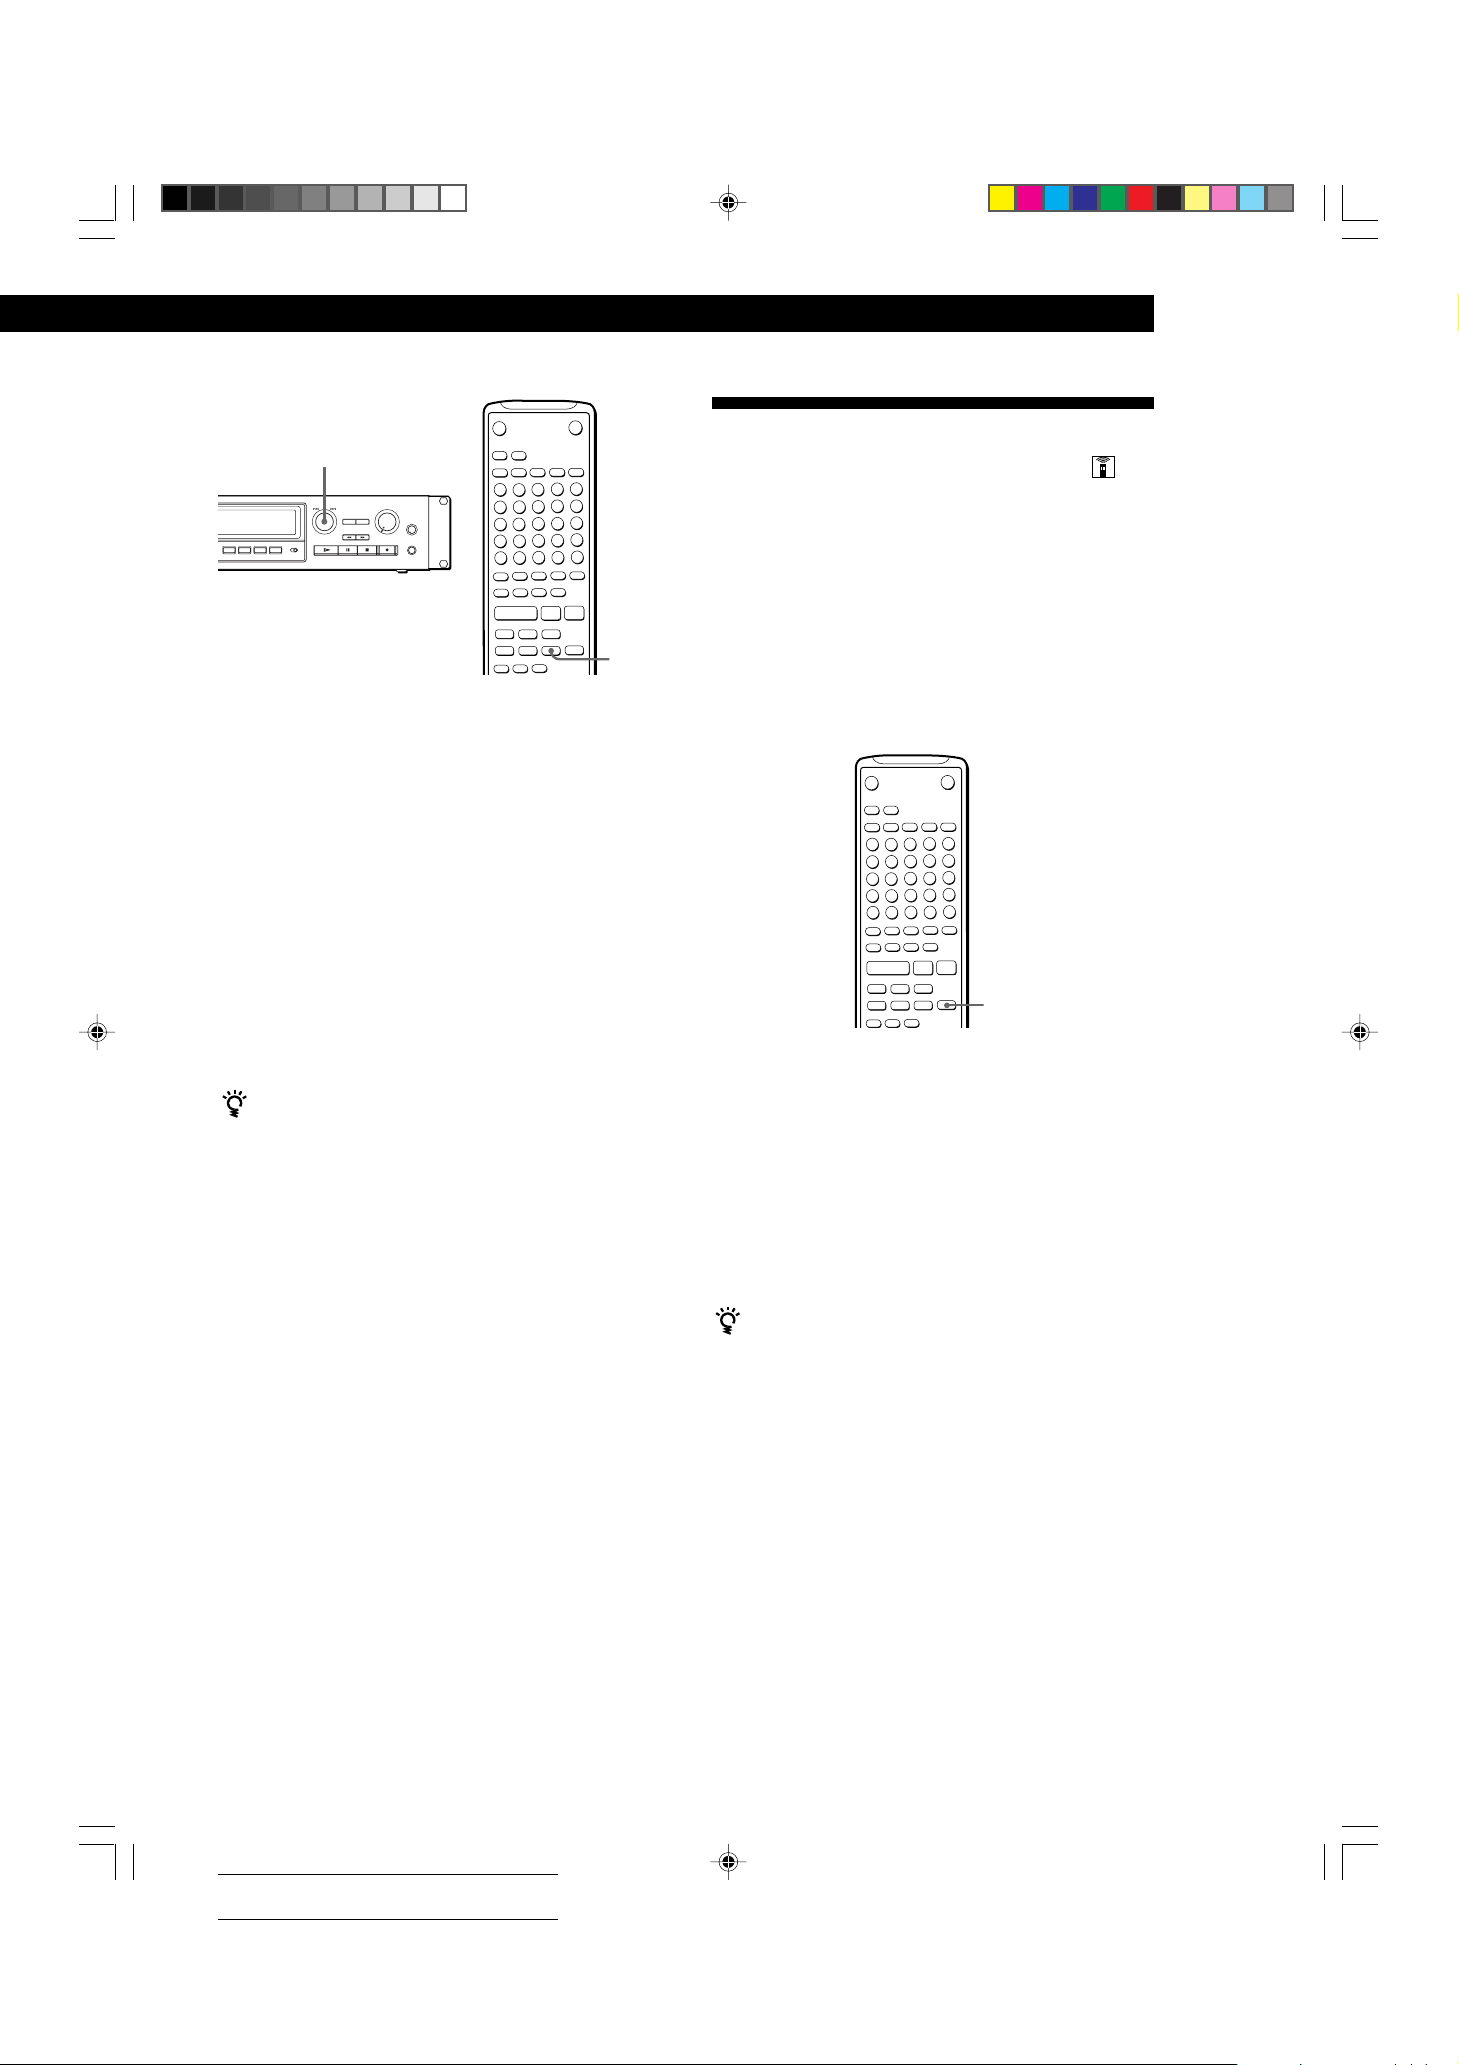
3 Press AMS (or T.REC) to start Time Machine
Recording.
Recording of the program source starts with the
6 seconds of audio data stored in the buffer
memory.
To stop Time Machine Recording
Press p.
Note
The recorder starts storing audio data when the recorder is
in recording pause and you start playing the program
source. With less than 6 seconds of playing of the program
source and audio data stored in the buffer memory, Time
Machine Recording starts with less than 6 seconds of audio
data.
Synchro-Recording With Audio
Equipment of Your Choice
By using the MUSIC SYNC button on the remote, you
can automatically start a Synchronized recording with
the signal input from the program source through the
input jacks.
The method of marking track numbers differs,
depending on the program source being recorded and
how the recorder is connected to the program source.
(See “Notes on Recording” on page 9.)
6
pP·
r
+=
)0
1 Carry out Steps 1 to 5 in “Recording on an MD”
on page 6.
2 Press MUSIC SYNC.
The recorder changes to recording pause.
3 Start playing the program source you want to
record.
The recorder starts recording automatically.
To stop Music Synchro-Recording
Press p.
MUSIC SYNC
1/09-14_MDS-E52.12E 99.1.29, 10:20 AM13
Actual total number: Sony Sound Tec MDS-E52(E) 2-346-702-12(1)
Note
During Music Synchro-Recording, the Smart Space Function
and the Auto Cut Function turn on automatically regardless
of their settings (ON or OFF) and type of input (digital or
analog).
13
Page 14
Recording on MDs
g
Synchro-Recording With a Sony
CD Player
By connecting your recorder to a Sony CD player, you
can easily dub CDs onto MDs using the CD synchro
buttons on the remote. If your recorder is connected to
a Sony CD player by a digital input cable, track
numbers are automatically marked as on the original,
regardless of whether “LevelSync ON” or
“LevelSyncOFF” is selected. If your recorder is
connected to a Sony CD player by audio connecting
cords through LINE (ANALOG) IN, track numbers are
automatically marked when you select “LevelSync
ON” (see “Marking Track Numbers While Recording”
on page 12).
As the same remote controls both the CD player and
the recorder, you may have trouble operating both
units if they are far from each other. If you do, place
the CD player close to this recorder.
6
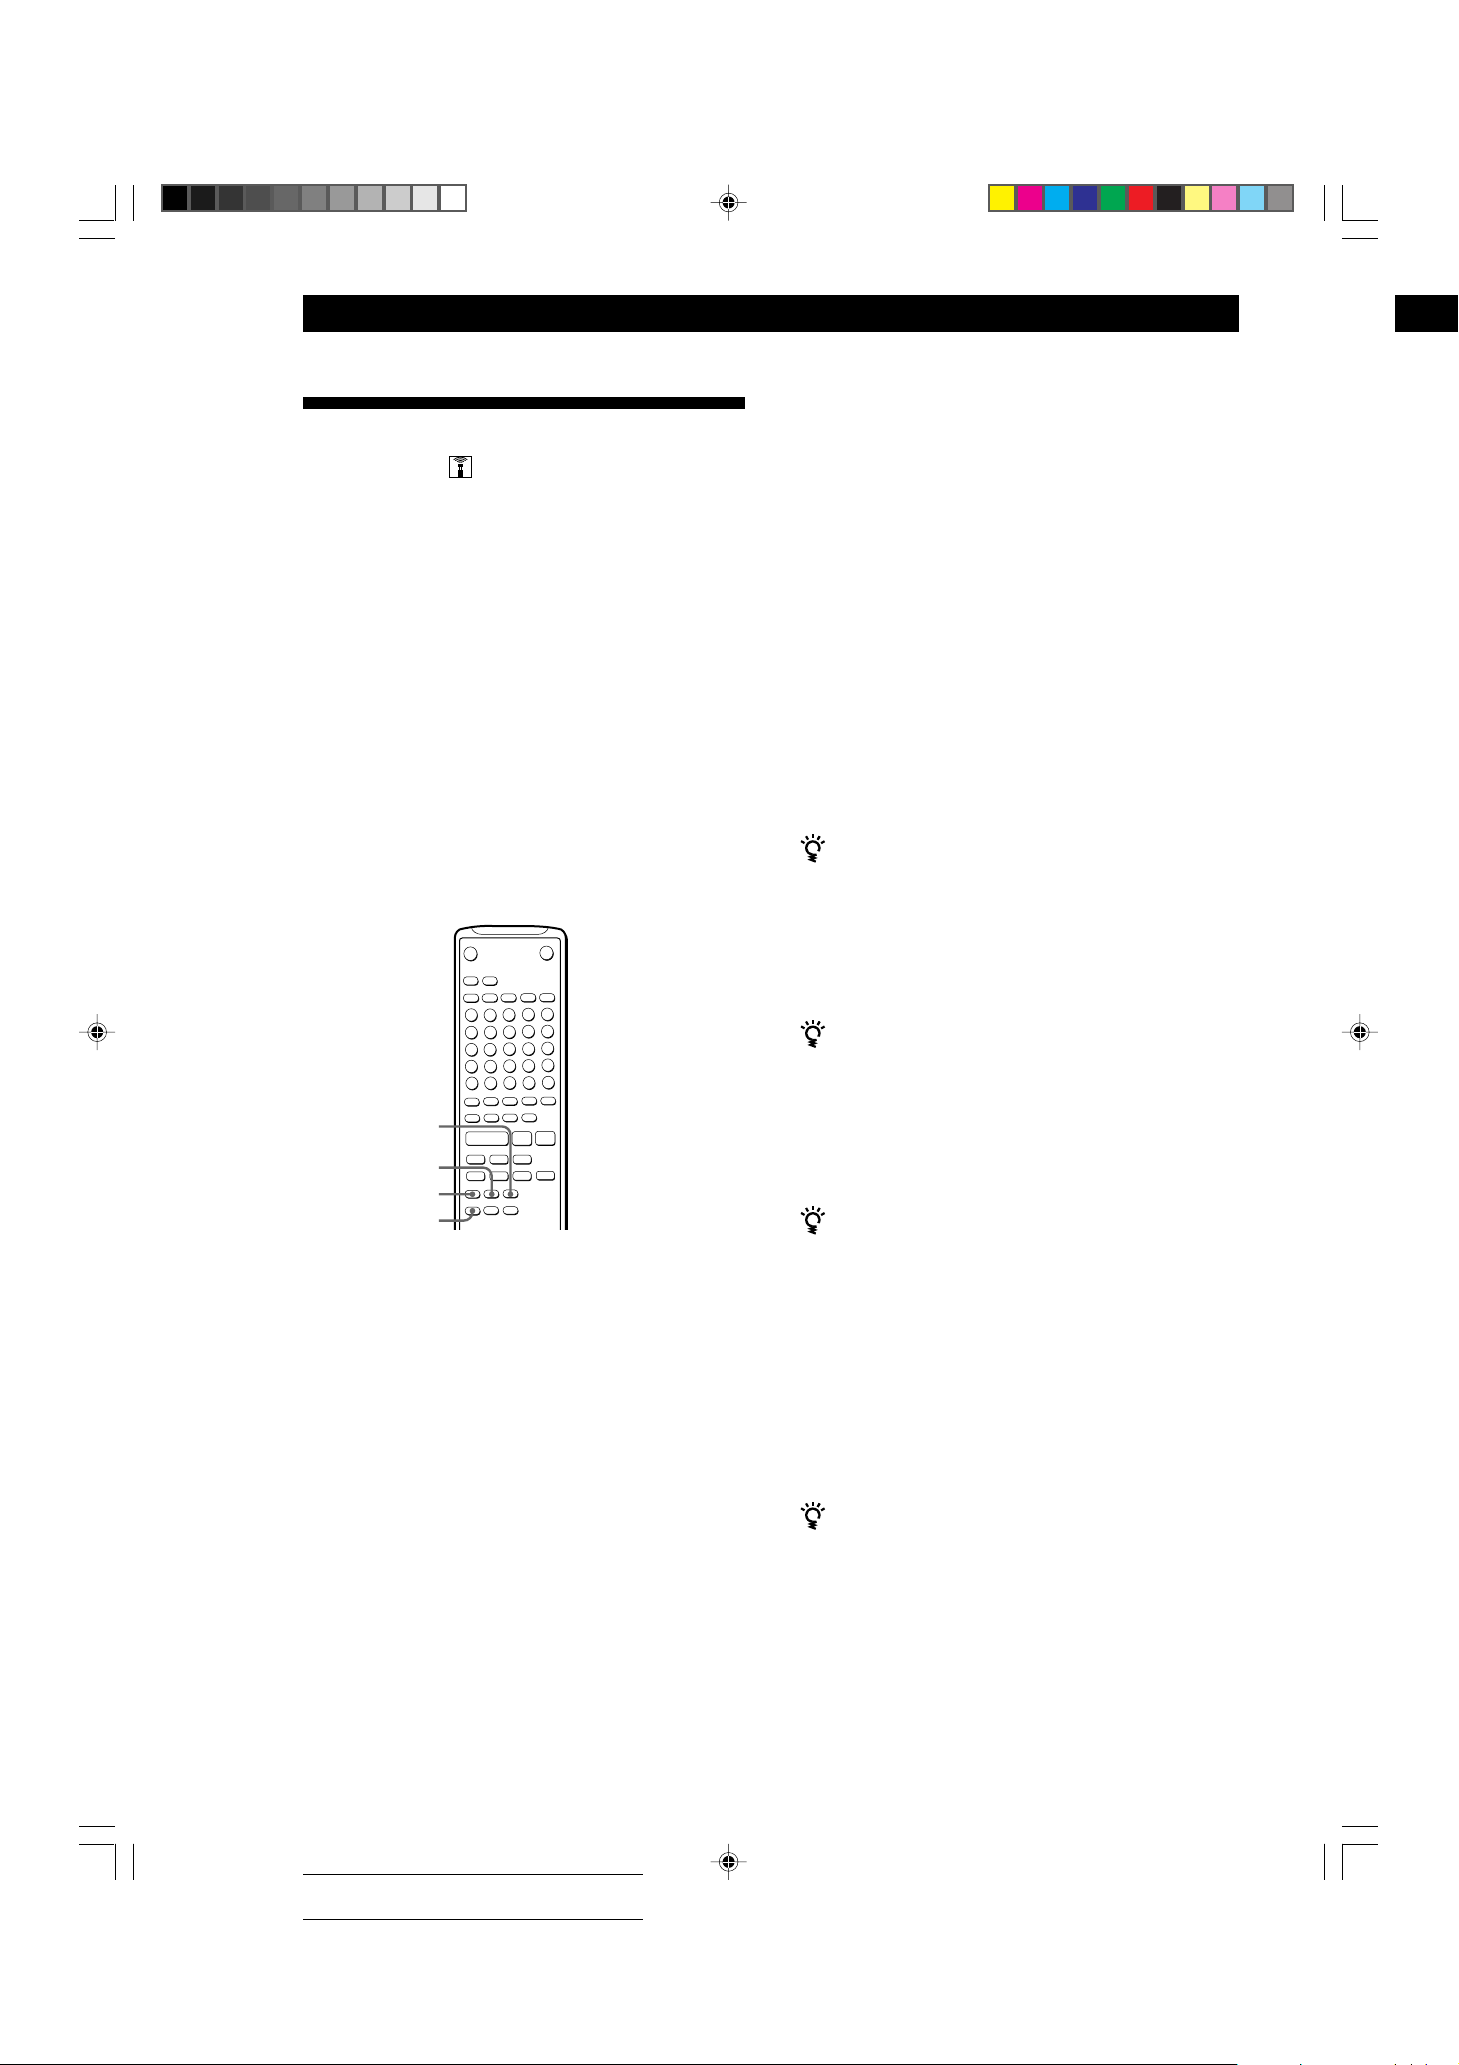
6 Press START.
The recorder starts recording and the CD player
starts playback.
The track number and elapsed recording time of
the track appear in the display.
If the CD player does not start playing
Some CD player models may not respond when you
press START on the remote of the recorder. Press P on
the remote of the CD player instead.
7 Press STOP to stop synchro-recording.
To pause recording
Press STANDBY or CD PLAYER P.
To restart recording, press START or CD PLAYER P.
A new track number is marked each time you pause
recording.
You can use the remote of the CD player during
synchro-recording
When you press p, the CD player stops and the
recorder pauses for recording.
When you press P, the CD player pauses and the
recorder pauses for recording.
To restart synchro-recording, press ·.
STANDBY
START
STOP
CD PLAYER P
P
pP·
r
+=
)0
+=
1 Turn on the CD player and the mixer.
2 Carry out Steps 2 to 5 in “Recording on an MD”
on page 6 to prepare the recorder for recording.
3 Insert a CD into the CD player.
4 Select the playback mode (Shuffle Play, Program
Play, etc.) on the CD player.
5 Press STANDBY.
The CD player pauses for playing and the
recorder pauses for recording.
You can change CDs during synchro-recording
Carry out the following steps instead of Step 7 above.
1 Press p on the remote of the CD player.
The recorder pauses for recording.
2 Change the CD.
3 Press · on the remote of the CD player.
Synchro-recording restarts.
You can also do synchro-recording with a Sony video
CD player
Using the procedure for synchro-recording with a Sony
CD player, you can do synchro-recording with a Sony
video CD player also.
To select the video CD player, press button number 2
while pressing down the POWER button before starting
the procedure.
To select the CD player again, press button number 1
while pressing down the POWER button.
The recorder is factory set to CD player for synchrorecording.
You can check the remaining recordable time on the
MD
Press DISPLAY/CHAR (or DISPLAY) (see page 15).
14
1/09-14_MDS-E52.12E 99.1.29, 10:21 AM14
Actual total number: Sony Sound Tec MDS-E52(E) 2-346-702-12(1)
Page 15
Playing MDs
Using the Display
You can use the display to check disc and track
information such as the total track number, total
playing time of the tracks, remaining recordable time
of the disc and disc name.
DISPLAY/CHAR
6
DISPLAY
Checking the total track number, total disc
playing time, remaining recordable time of
the disc and the title of the disc
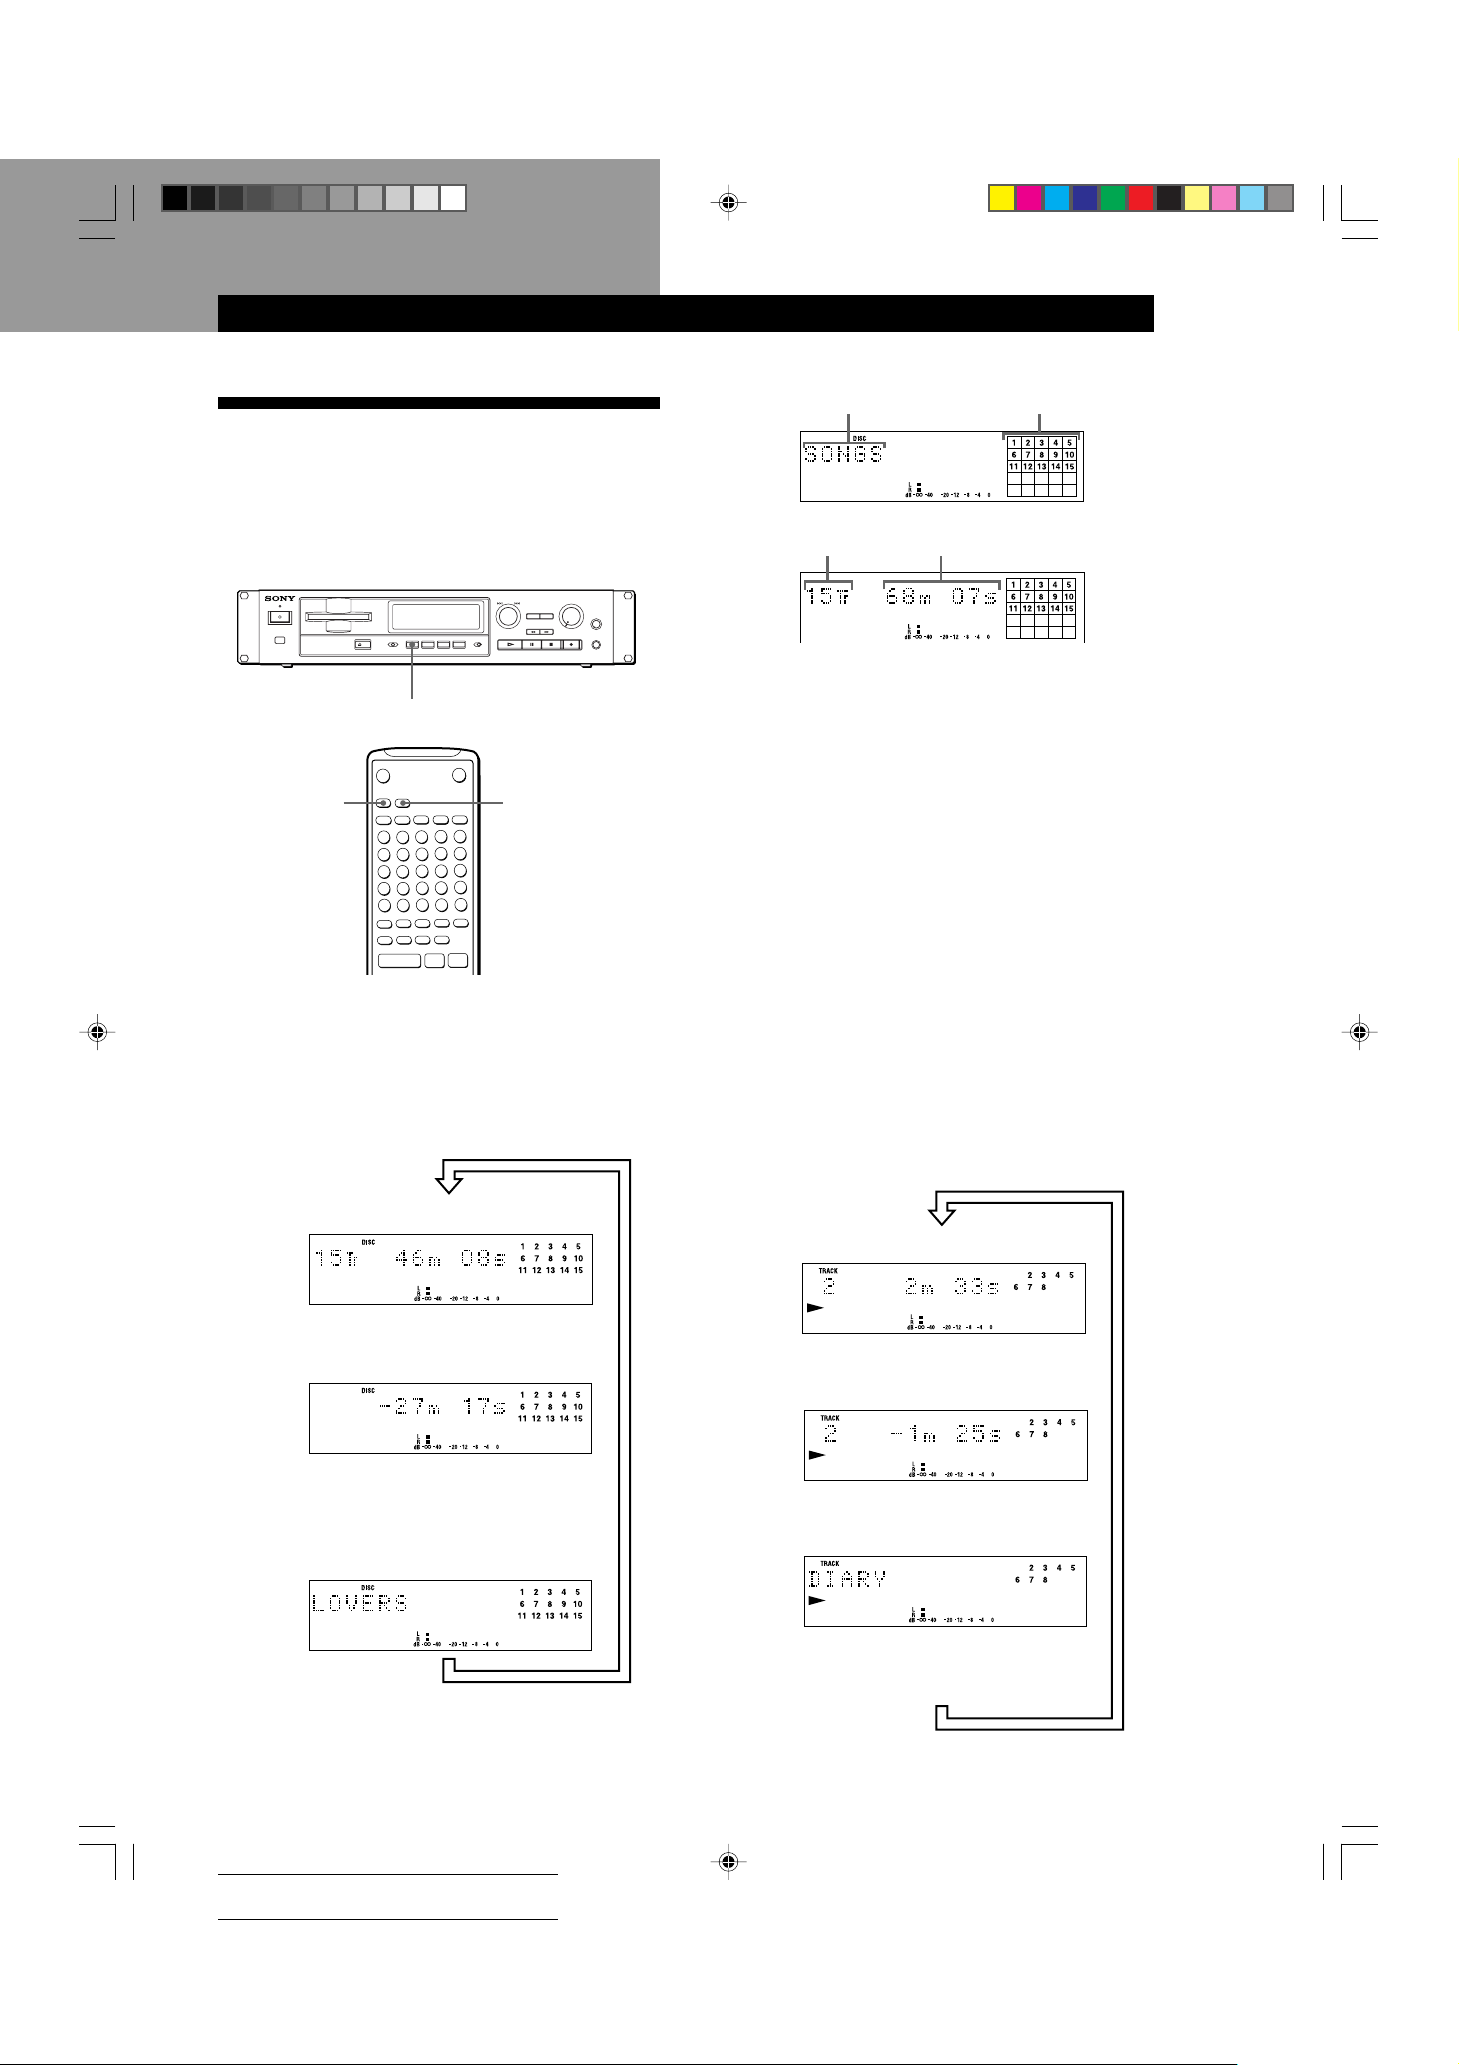
Each time you press DISPLAY/CHAR (or DISPLAY)
while the recorder is stopped, you can change the
display as follows:
Total number of tracks and total disc playing
time of all recorded tracks
SCROLL
pP·
Playing MDs
Disc name Music calendar
√
Total number of tracks
The disc name appears, followed by the total number
of tracks (Tr) and total disc playing time.
A music calendar showing all the track numbers
appears within a grid if the MD is a premastered disc,
or without a grid if the MD is a recordable disc.
If the total track number exceeds 25, z appears to the
right of number 25 in the music calendar.
To label a recordable disc and its tracks, see “Labeling
Recordings” on page 24.
Note
When you insert a new MD or turn off the recorder and turn
it on again, the last item displayed will reappear.
However, if you disconnect the AC power cord, the display
will show the total number of tracks and total disc playing
time of all recorded tracks the next time you turn on the
recorder, no matter what the last display was.
Total disc playing time
Checking remaining time and the title of a track
Each time you press DISPLAY/CHAR (or DISPLAY)
while playing an MD, you can change the display as
shown below. The track numbers in the music
calendar disappear after they are played.
Track number and playing time of the
current track
Press
Press
√
√
Press
Remaining recordable time of the disc
(Recorded MDs only)
The remaining recordable time of the disc
is not shown for premastered MDs.
Disc name
When you insert an MD, the disc name, total number
of tracks, and total disc playing time appear in the
display as follows:
1/15-21_MDS-E52.12E 99.1.29, 10:38 AM15
Actual total number: Sony Sound Tec MDS-E52(E) 2-346-702-12(1)
Press
Track number and remaining time of the
current track
Track name
If no title is recorded, “No Name” appears,
followed by the elapsed playing time.
Press
√
√
Press
(Continued)
15
Page 16
Playing MDs
Playing MDs
You can check the track name at any time while
playing an MD Z
Press SCROLL on the remote.
Since the display shows up to 12 characters at a time,
press SCROLL again to see the rest of the track title if
the title has 13 characters or more.
Press SCROLL again to pause scrolling, and again to
continue scrolling.
Locating a Specific Track
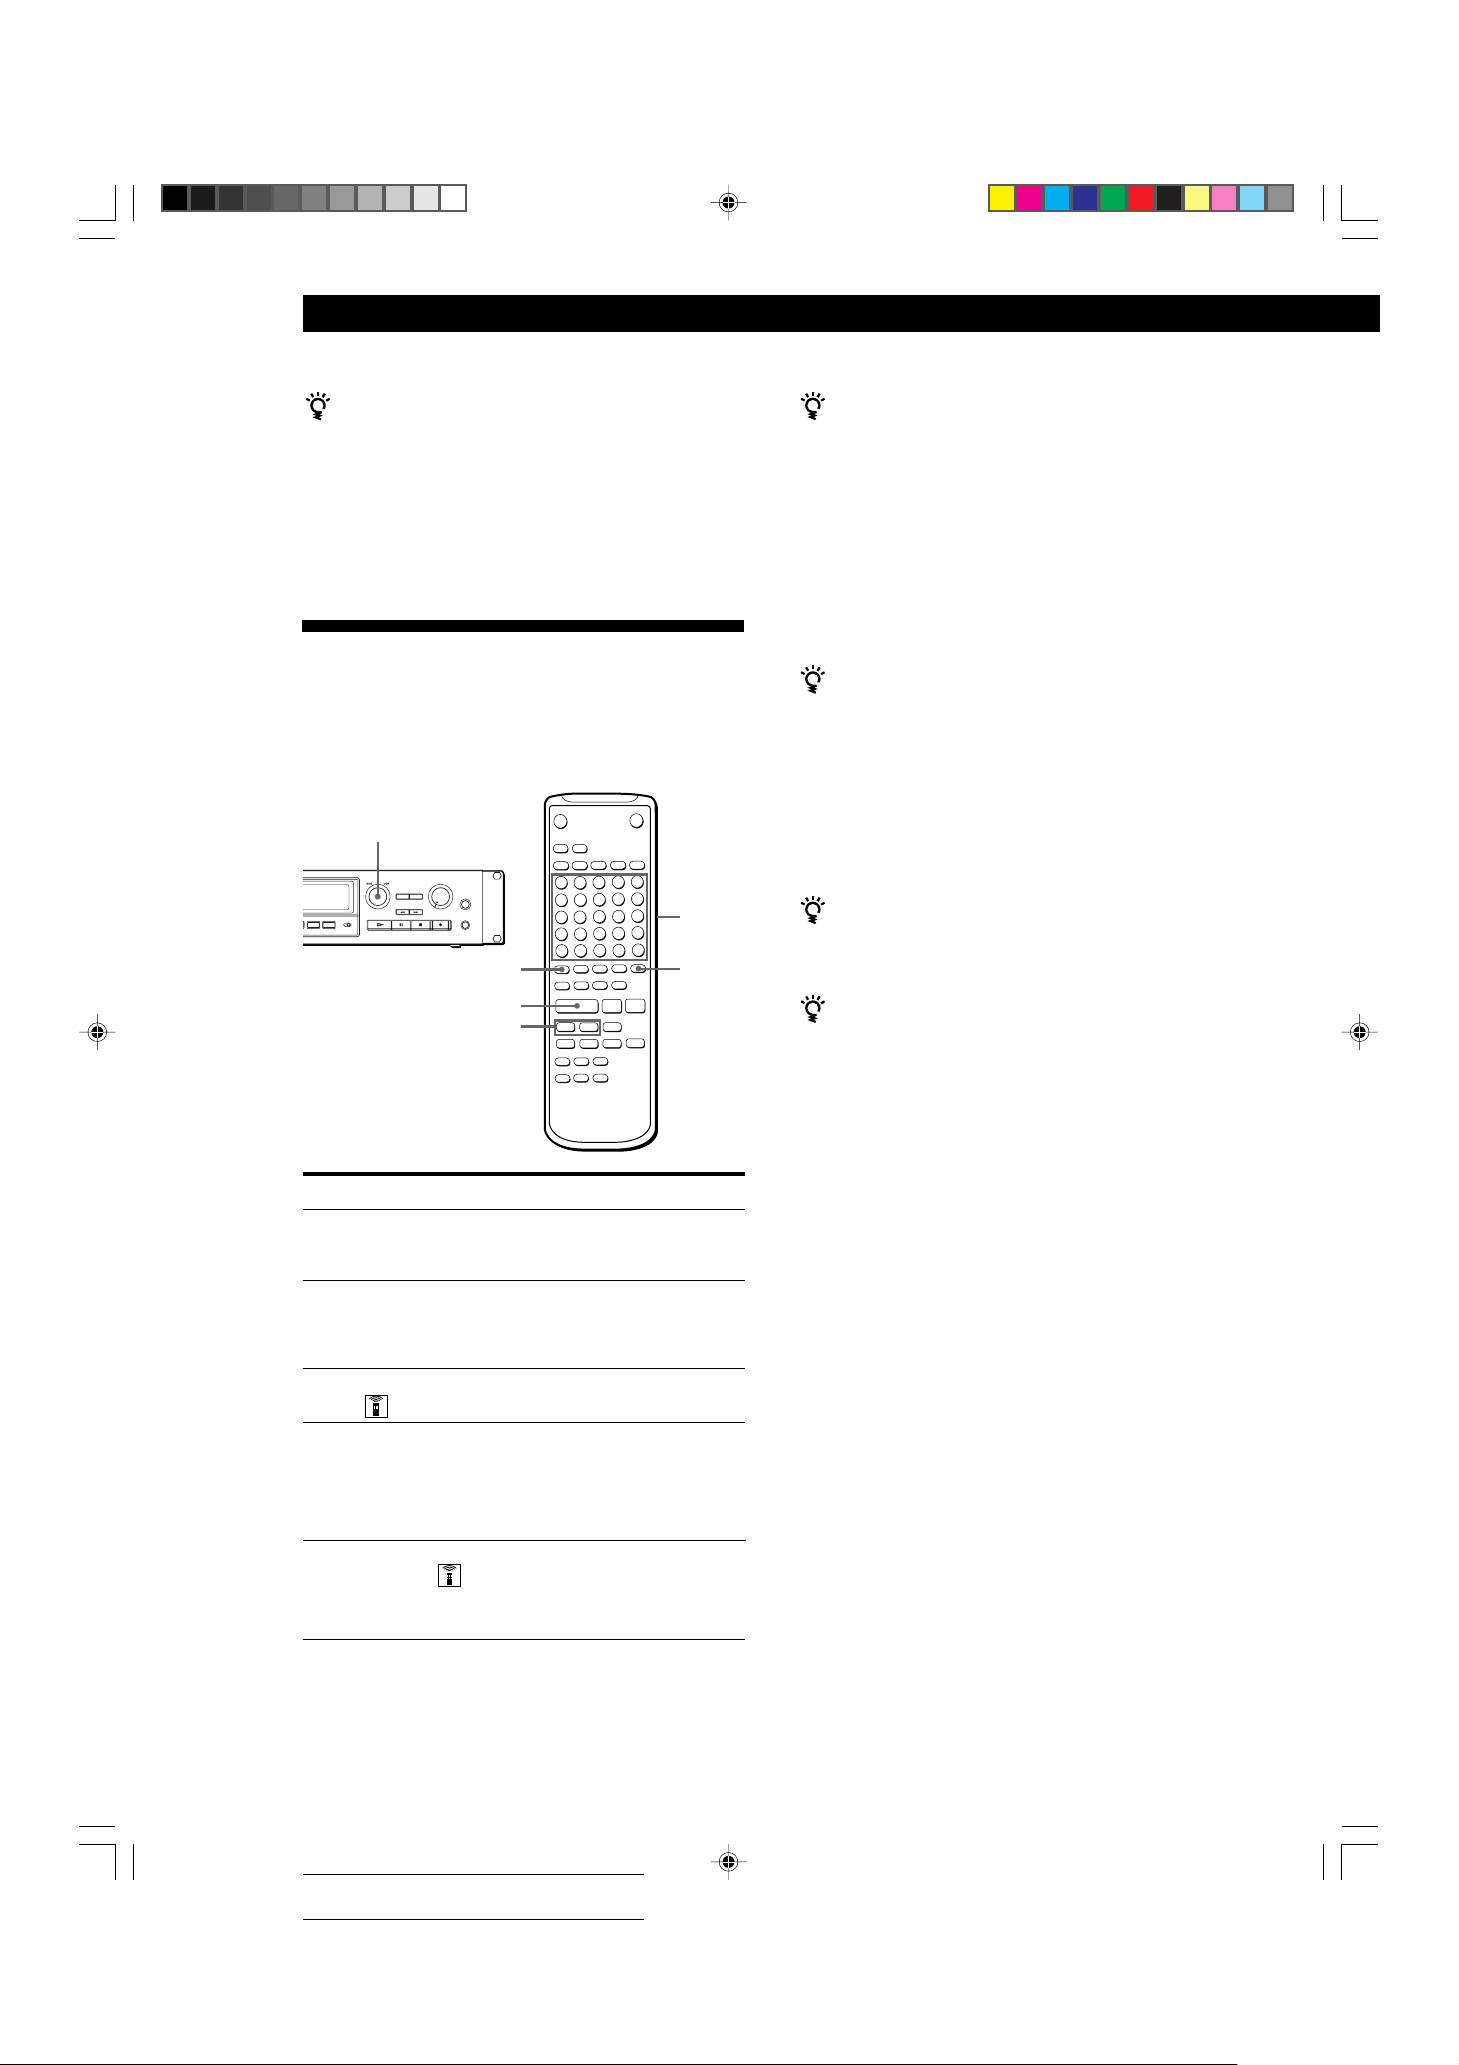
You can quickly locate any track while playing a disc
by using AMS (Automatic Music Sensor), = and
+, number buttons or M.SCAN on the remote.
≠ AMS ±
>25
6
Number
buttons
M.SCAN
When you directly locate a track with a number over
25 Z
You must press >25 first, before entering the
corresponding digits.
Press >25 once if it is a 2-digit track number, and twice
if it is a 3-digit track number.
To enter “0,” press button 10.
Examples: • To play track number 30
Press >25 once, then 3 and 10.
• To play track number 100
Press >25 twice, then 1, 10 and 10.
You can change the playing time during music scan
1 While the recorder is stopped, press EDIT/NO to
display “Setup Menu.”
2 Turn AMS until “M. Scan” menu appears in the
display, then press AMS.
3 Turn AMS to select the length of the M.SCAN play
within the range of 6 to 20 seconds, using steps of
about one second, then press AMS.
4 Press EDIT/NO.
To pause playing at the beginning of a track
Turn AMS (or press = or +) after pausing
playback.
To locate
The next or
succeeding tracks
The current or
preceding tracks
A specific track
directly
A specific track by
using AMS
By scanning each
track (music scan)
·
=/+
pP·
r
+=
)0
Do the following:
During playback, turn AMS clockwise
(or press + repeatedly) until you
find the desired track.
During playback, turn AMS
counterclockwise (or press =
repeatedly) until you find the desired
track.
Press number buttons to enter the
track number.
1 Turn AMS until the desired track
number appears while the recorder
is stopped. (The track number is
flashing.)
2 Press AMS or ·.
1 Press M.SCAN before you start
playing.
2 When you find the desired track,
press · to start playing.
To go quickly to the beginning of the last track
Turn AMS counterclockwise (or press =) while the
display shows the total number of tracks and total disc
playing time, remaining recordable time of the disc, or
disc name (see page 15).
16
1/15-21_MDS-E52.12E 99.1.29, 10:38 AM16
Actual total number: Sony Sound Tec MDS-E52(E) 2-346-702-12(1)
Page 17
Playing MDs
Playing MDs
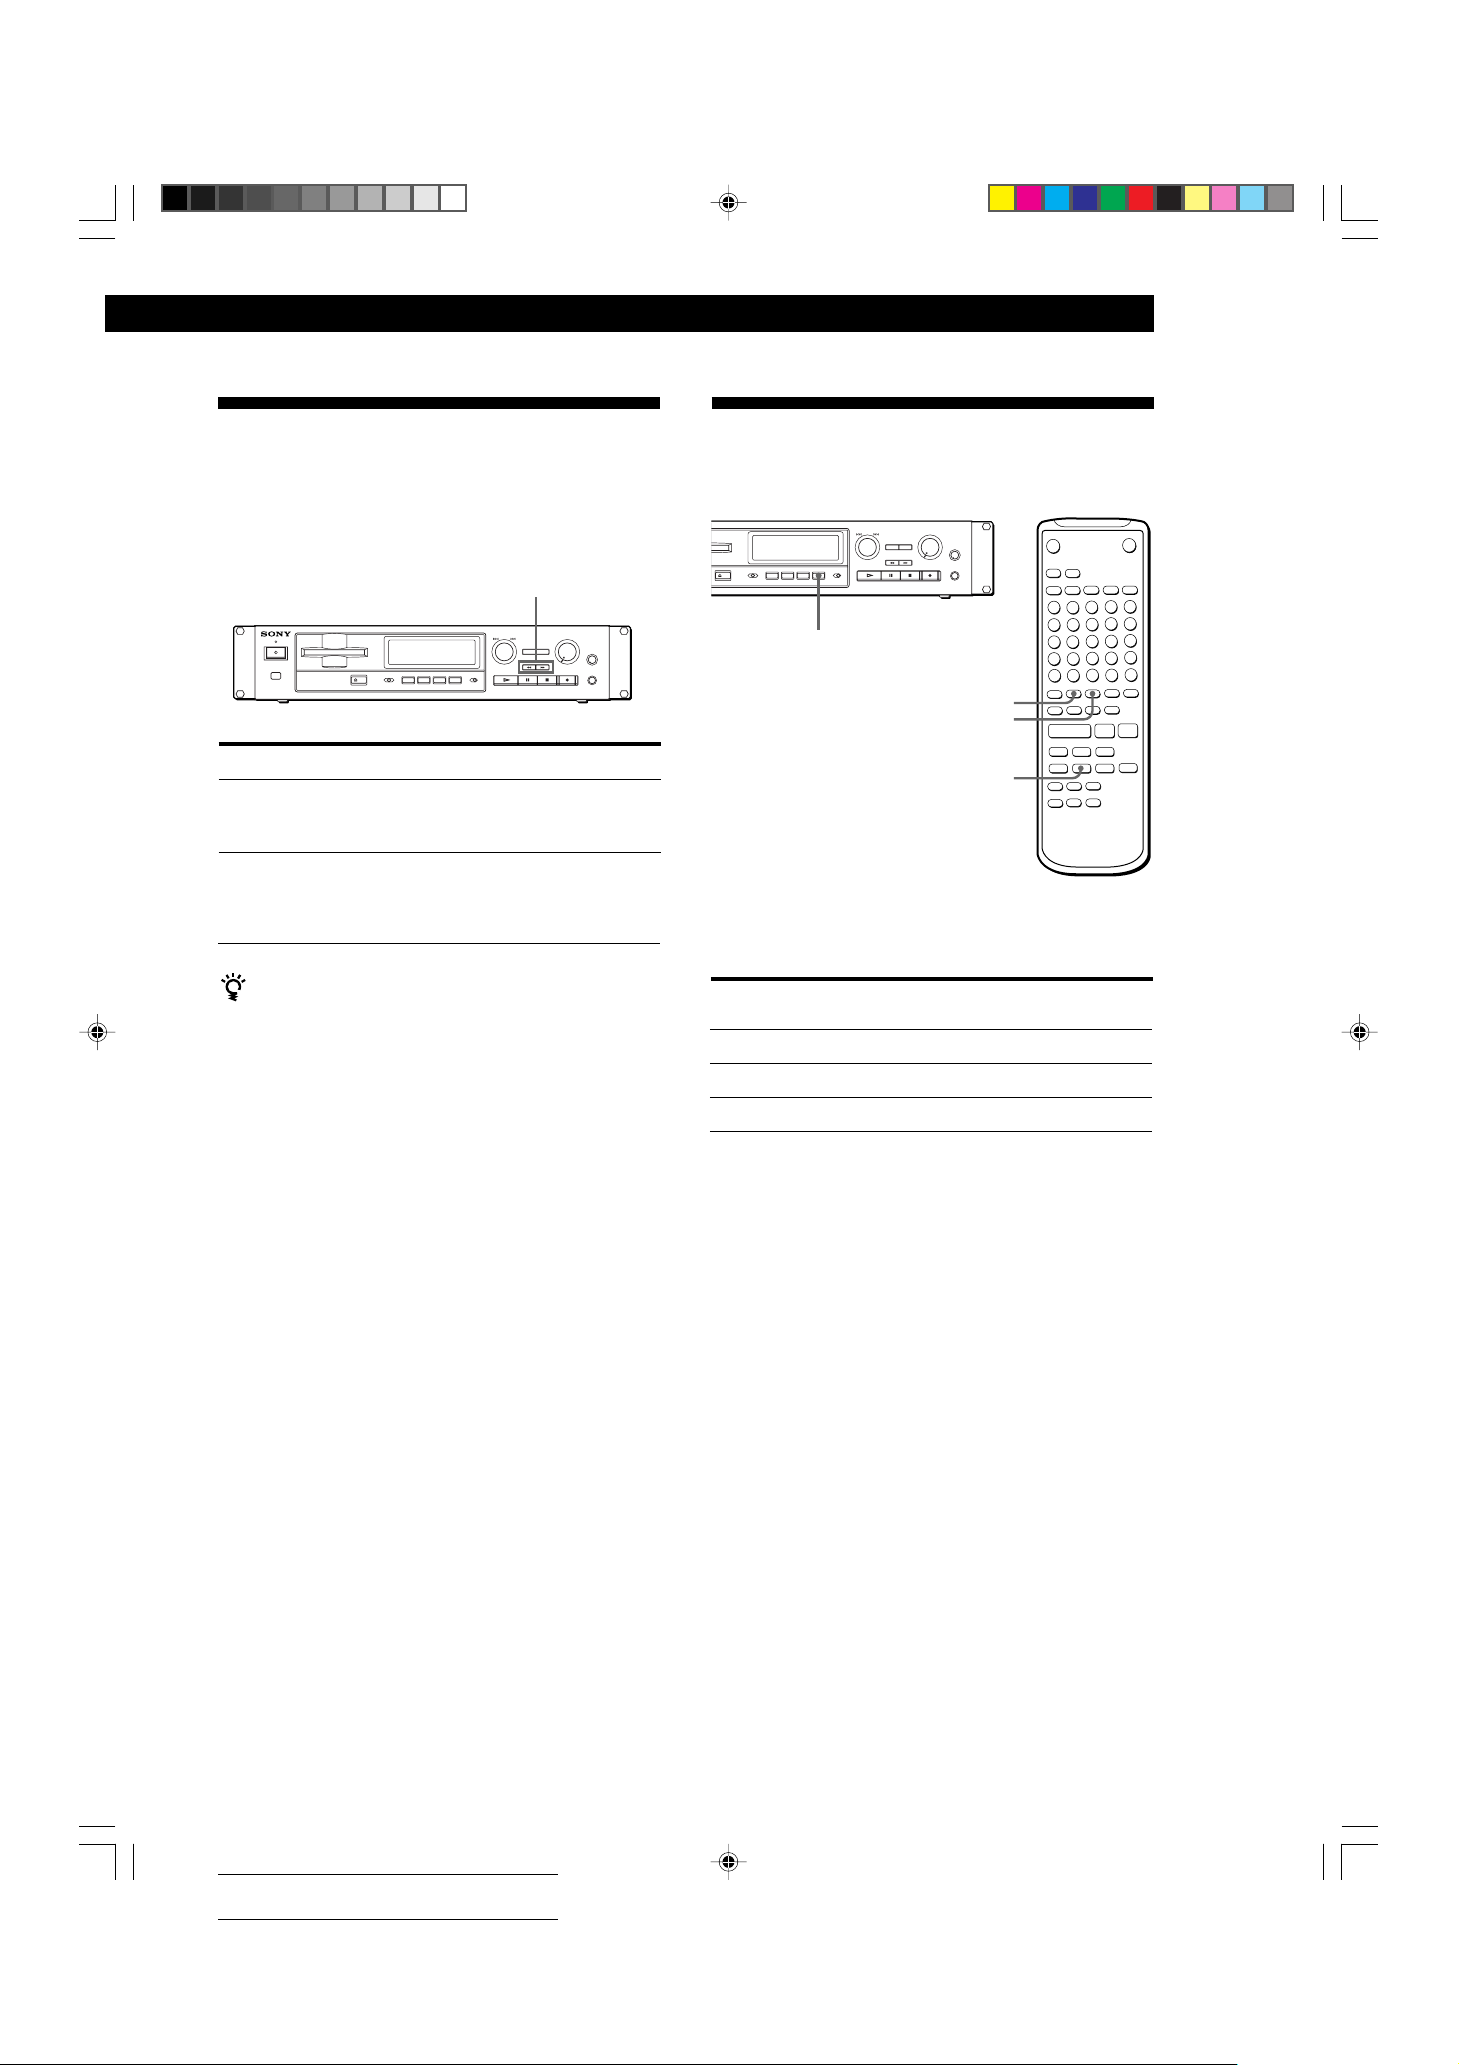
Locating a Particular Point in a
Track
You can also use 0 and ) to locate a particular
point in a track during playback or playback pause.
0/)
To locate a point Press
While monitoring the
sound
Quickly by observing
the display during
playback pause
(high speed search)
When “OVER” appears during high speed search
If the disc reaches the end while you are pressing )
during playback pause, “OVER” appears in the display.
Press 0 (or press 0) or turn AMS (or press =)
counterclockwise to go back.
Notes
• If the disc reaches the end while you are pressing )
during sound monitoring, the recorder stops.
• Tracks that are only a few seconds long may be too short
to scan using the search function. For such tracks, it is
better to play the MD at normal speed.
) (forward) or 0 (backward)
and keep pressing until you find
the desired point.
) or 0 and hold until you
find the desired point. There is no
sound output during this
operation.
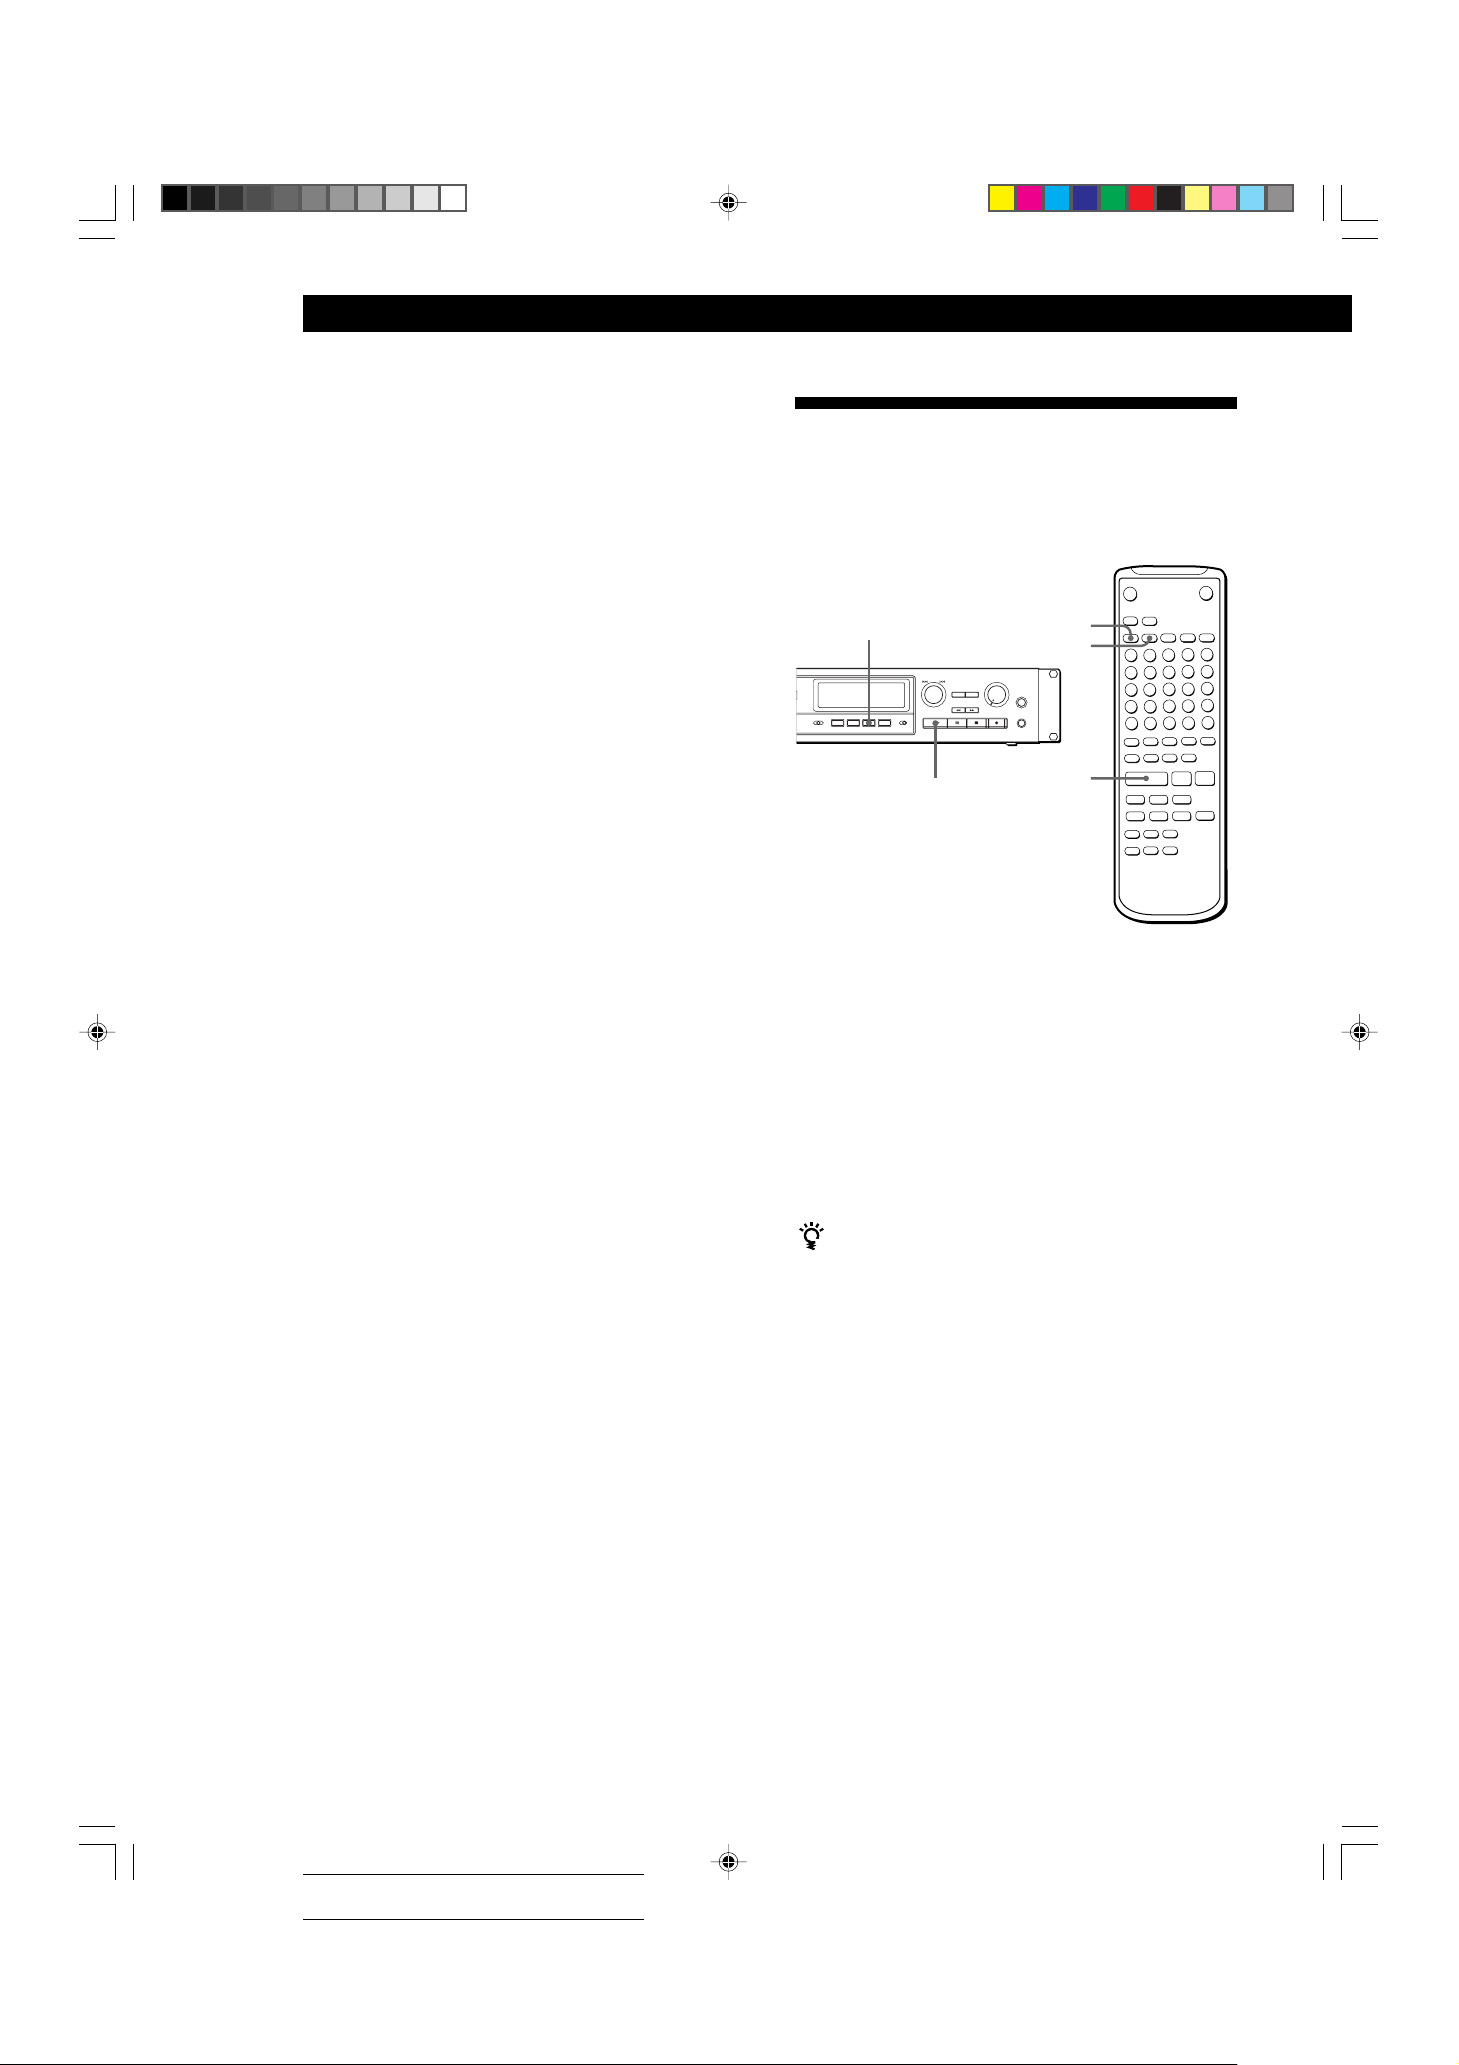
Playing T racks Repeatedly
You can play tracks repeatedly in any play mode.
6
REPEAT
REPEAT
A˜B
r
+=
)
Press REPEAT.
“REPEAT” appears in the display.
The recorder repeats the tracks as follows:
When the MD is
The recorder repeats
played in
Normal play (page 8)
Shuffle Play (page 18)
Program Play (page 19)
All the tracks
All the tracks in random order
The same program
To cancel repeat play
Press REPEAT several times until “REPEAT” disappears.
The recorder returns to the original playing mode.
)0
pP·
1/15-21_MDS-E52.12E 99.1.29, 10:38 AM17
Repeating the current track
While the track you want to repeat is playing in normal
play, press REPEAT several times until “REPEAT 1”
appears in the display.
(Continued)
17
Actual total number: Sony Sound Tec MDS-E52(E) 2-346-702-12(1)
Page 18
Playing MDs
Repeating a specific portion (A-B Repeat)
Z
You can play a specific portion of a track repeatedly.
This might be useful when you want to memorize
lyrics.
Note that you can only repeat a portion within the
boundaries of a single track.
1 While playing a disc, press A˜B at the starting
point (point A) of the portion to be played
repeatedly.
“REPEAT A-B” flashes in the display.
2 Continue playing the track or press ) until you
reach the ending point (point B), then press A˜B
again.
“REPEAT A-B” lights continuously. The recorder
starts to play the specified portion repeatedly.
To cancel A-B Repeat
Press REPEAT or p.
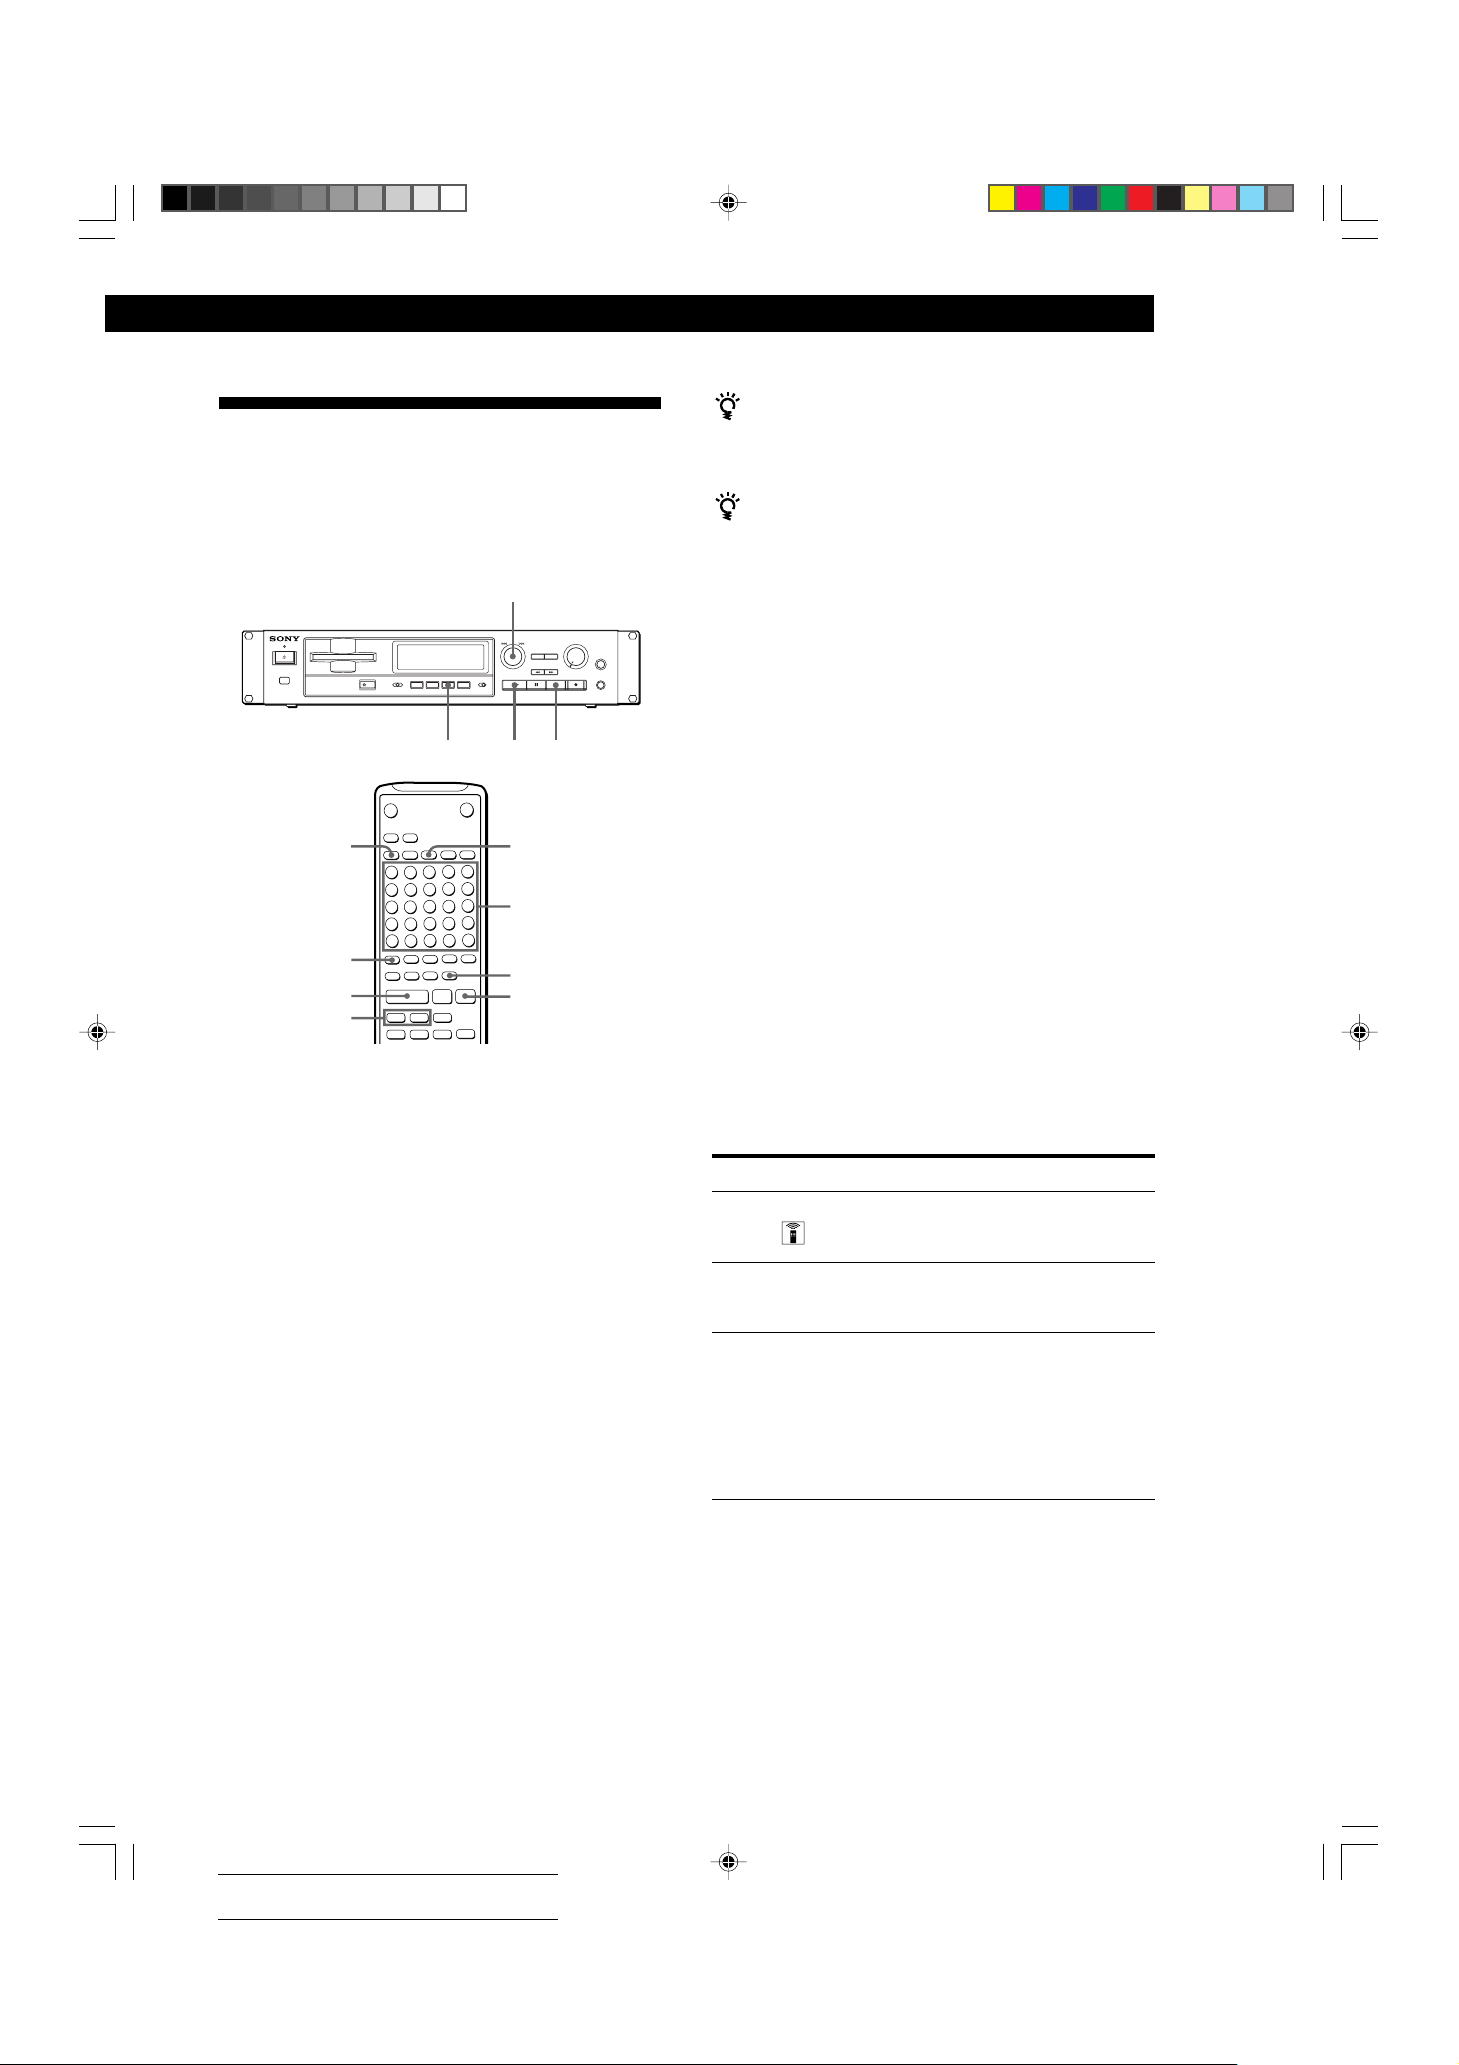
Playing Tracks in Random
Order (Shuffle Play)
You can have the recorder “shuffle” tracks and play
them in random order.
6
PLAY MODE CONTINUE
·
SHUFFLE
·
r
+=
)0
pP·
Setting new starting and ending points
You can repeat the portion immediately after the currently
specified portion by changing the starting and ending
points.
1 Press A˜B while “REPEAT A-B” appears.
The current ending point B becomes the new starting
point A and “REPEAT A-B” flashes in the display.
2 Continue playing the track or press ) until you reach
the new ending point (point B), then press A˜B again.
“REPEAT A-B” lights continuously and the recorder starts
playing the newly specified portion repeatedly.
Note
If you turn off the recorder or disconnect the AC power cord,
the recorder will recall the last setting of the Repeat Function
the next time you turn on the recorder.
The A-B Repeat settings, however, are lost.
1 Press PLAY MODE repeatedly (or SHUFFLE
once) until “SHUFFLE” appears in the display
when the recorder is stopped.
2 Press · to start Shuffle Play.
To cancel Shuffle Play
When the recorder is stopped, press PLAY MODE
repeatedly (or CONTINUE once) until “SHUFFLE”
disappears.
You can specify tracks during Shuffle Play
• To play the next track, turn AMS clockwise (or press
+).
• To play from the beginning of the current track again,
turn AMS counterclockwise (or press =). You
cannot use AMS (or =) to go to tracks that have
already been played.
18
1/15-21_MDS-E52.12E 99.1.29, 10:38 AM18
Actual total number: Sony Sound Tec MDS-E52(E) 2-346-702-12(1)
Page 19
Creating Your Own Program
(Program Play)
Playing MDs
Playing MDs
You can program the same track repeatedly
While the track number appears in the display, press
AMS as many times as you want to repeat.
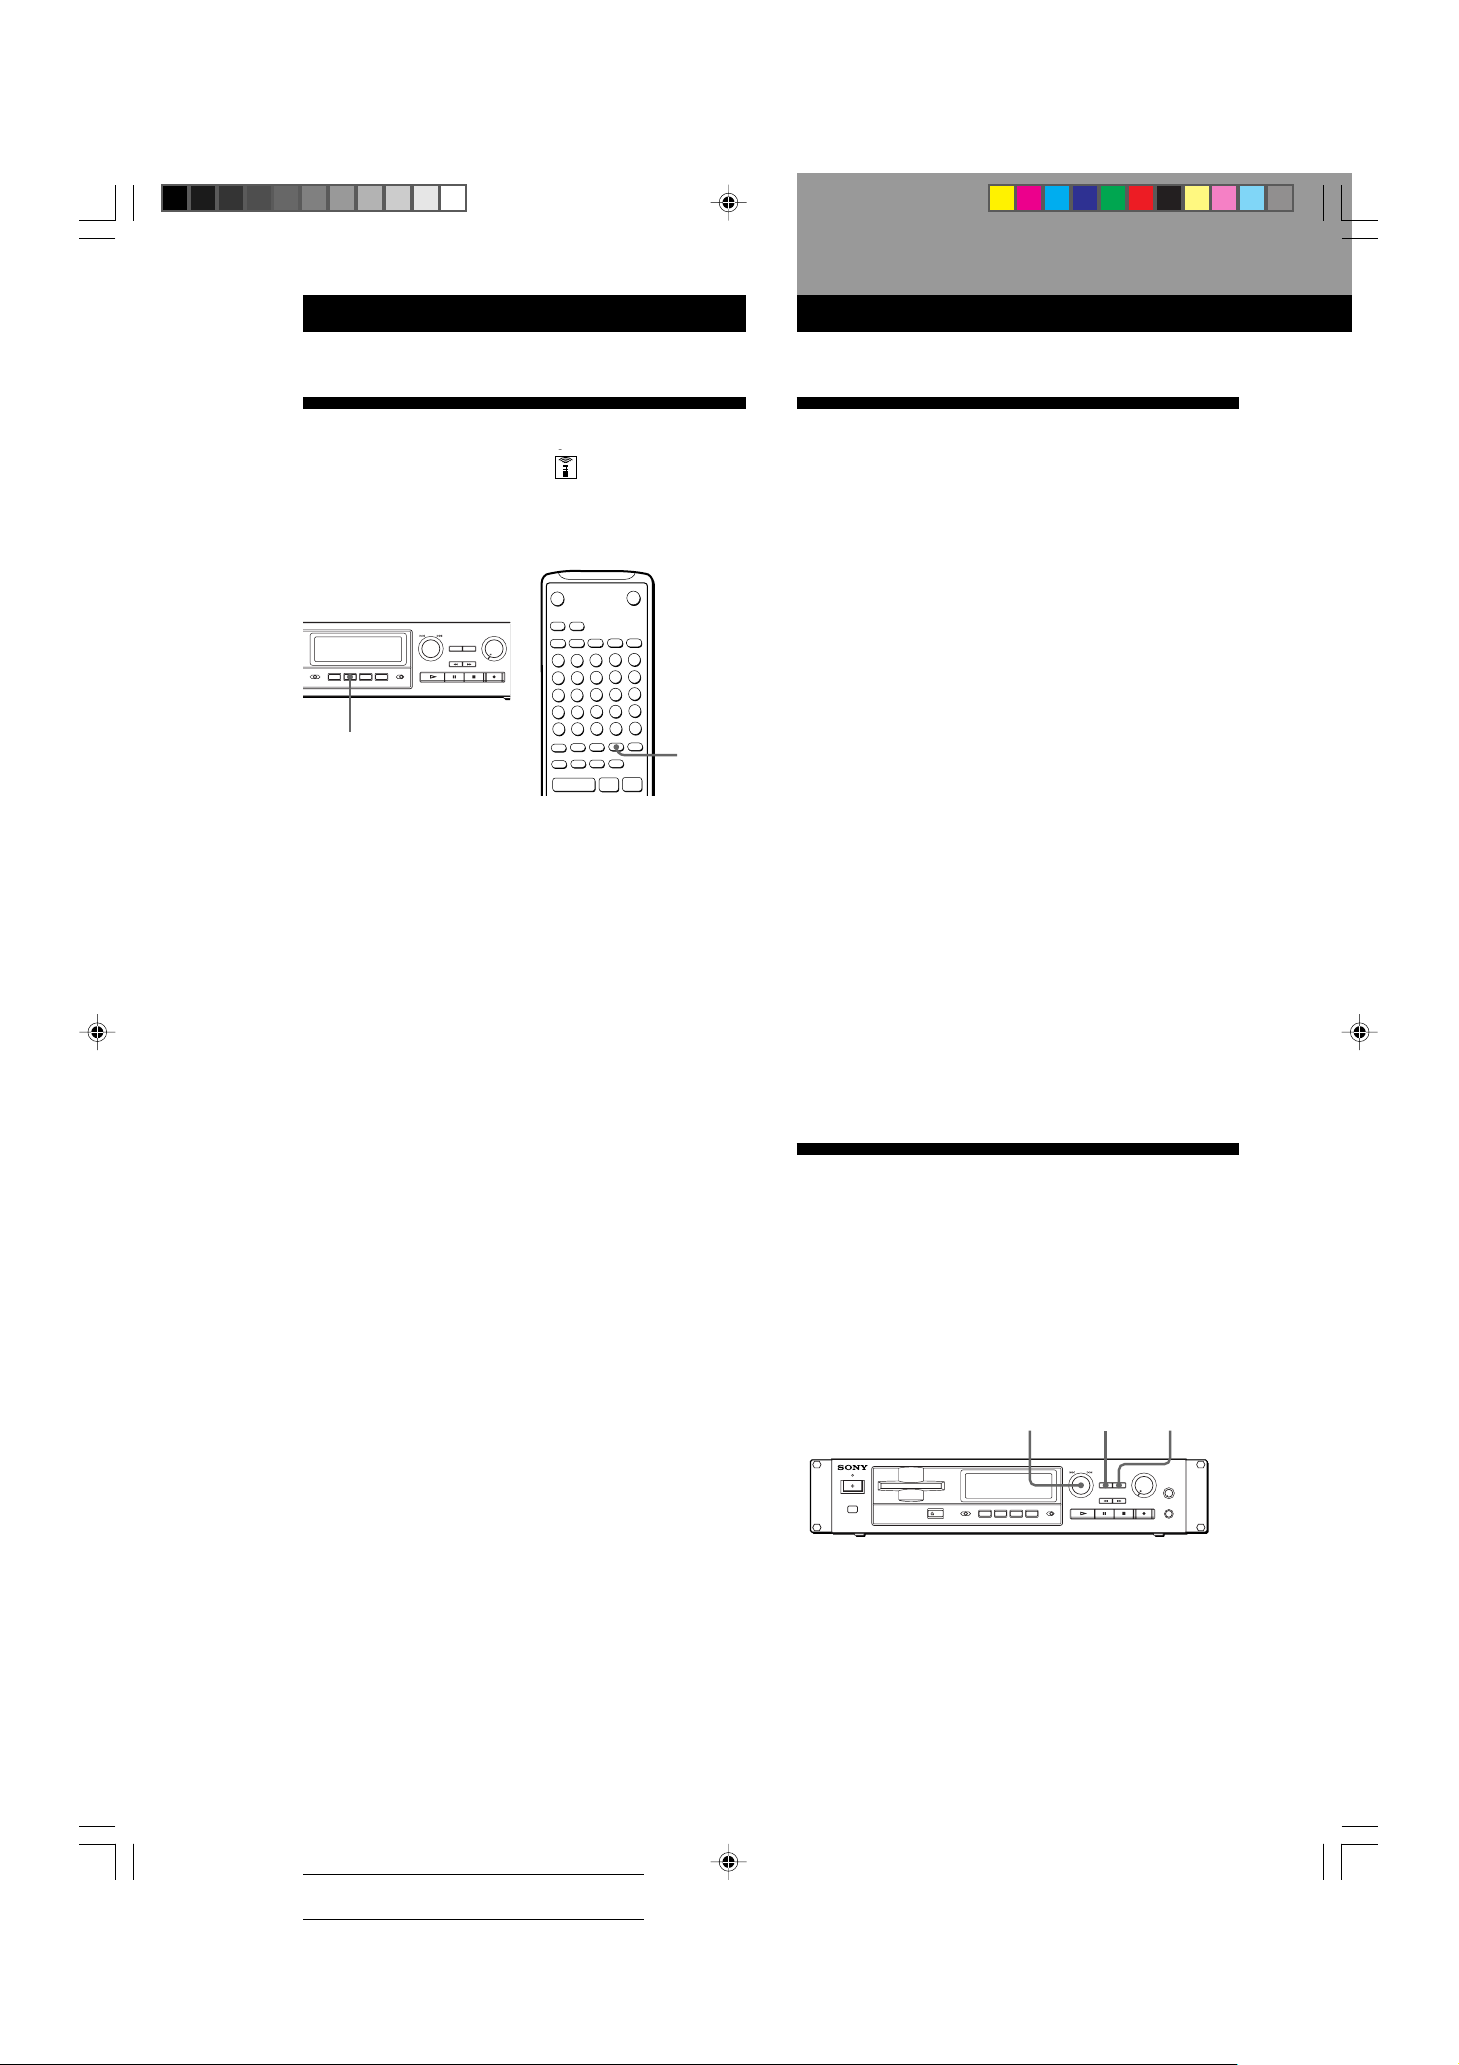
You can specify the playback order of the tracks on an
MD and create your own programs containing up to 25
tracks.
≠AMS±
·
p
PROGRAMCONTINUE
Number
buttons
CLEAR
p
>25
·
=/+
PLAY MODE
6
r
+=
)0
pP·
1 Press PLAY MODE repeatedly (or PROGRAM
once) until “PROGRAM” appears in the display
when the recorder is stopped.
The program remains even after Program Play ends
When you press ·, you can play the same program
again.
Notes
• The program created by the Program Play Function is lost
when you press §EJECT to take out the MD.
• The program created by the Program Play Function is lost
when you turn off the recorder or disconnect the AC
power cord.
• The display shows “- -m - -s” instead of the total playing
time when the total playing time of the program exceeds
160 minutes.
Checking the track order
You can check the order of tracks in your program
during playback or playback pause.
Turn AMS (or press = or +) during playback or
playback pause. The track numbers appear in the
order they were programmed.
Changing the track order
You can change the order of the tracks in your
program before you start playing.
2 Carry out either a) or b):
a) When using the remote
Press the number buttons to enter the tracks
you want to program in the order you want.
To program a track with a number over 25, use
the >25 button (see page 16).
If you’ve made a mistake
Press CLEAR, then press the correct number button.
b) When using the controls on the recorder
1 Turn AMS until the track number you want
appears in the display.
2 Press AMS.
3 Repeat Step 2 to enter other tracks. Each time you
enter a track, the total program time is calculated
and appears in the display.
4 Press · to start Program Play.
To cancel Program Play
When the recorder is stopped, press PLAY MODE
repeatedly (or CONTINUE once) until “PROGRAM”
disappears.
To
Erase the last track in the
program
Add tracks to the end of the
program
Change the whole program
completely
Do the following:
Press CLEAR. Each time you
press this button, the last
track will be cleared.
Carry out Steps 2 and 3 in
“Creating Your Own
Program.”
1 Press PLAY MODE (or
press CONTINUE) so that
“PROGRAM” disappears
while the recorder is
stopped.
2 Carry out Steps 1 to 3 in
“Creating Your Own
Program.”
1/15-21_MDS-E52.12E 99.1.29, 10:38 AM19
Actual total number: Sony Sound Tec MDS-E52(E) 2-346-702-12(1)
19
Page 20
Playing MDs
g
Editing Recorded MDs
Useful Tips When Recording
From MDs to Tape
The Auto Space and Auto Pause Functions described in
this section make recording from MDs to tape more
easy.
6
A.SPACE/PAUSE
Inserting blank spaces while recording to
tape (Auto Space)
The Auto Space Function inserts a 3-second blank
space between each track while recording from MDs to
tapes, allowing you to use the AMS function during
playback later.
Press A.SPACE/PAUSE (or A.SPACE) repeatedly until
“A.SPACE” appears in the display.
To cancel Auto Space
Press A.SPACE/PAUSE (or A.SPACE) repeatedly until
“A.SPACE” disappears.
A.SPACE
pP·
Notes on Editing
You can edit the recorded tracks after recording, using
the following functions:
• Erase Function allows you to erase recorded tracks
simply by specifying the corresponding track
number.
• Divide Function allows you to divide tracks at
specified points so that you can quickly locate those
points afterwards, using the AMS function.
• Combine Function allows you to combine two
consecutive tracks into one.
• Move Function allows you to change the order of
tracks by moving a specific track to a desired track
position.
• Title Function allows you to create titles for your
recorded MDs and tracks.
If “Protected” appears in the display
The recorder could not edit because the record-protect slot
on the MD is open. Edit after closing the slot (see page 7.)
When “TOC” flashes in the display
Do not move the recorder or pull out the AC power cord.
After editing, “TOC” lights continuously until you eject the
MD. “TOC” flashes while the recorder is updating the TOC.
When the recorder finishes updating the TOC, “TOC”goes
off.
20
Note
If the Auto Space Function is on while recording a selection
containing multiple track numbers, (for example, a medley
or symphony), blank spaces will be inserted within the
selection whenever the track number changes.
Pausing after each track (Auto Pause)
When the Auto Pause Function is on, the recorder
pauses after playing each track. Auto Pause is
convenient when recording single tracks or multiple,
non-consecutive tracks.
Press A.SPACE/PAUSE (or A.SPACE) repeatedly until
“A.PAUSE” appears in the display.
To restart playback
Press · or P.
To cancel Auto Pause
Press A.SPACE/PAUSE (or A. SPACE) repeatedly until
“A.PAUSE” disappears.
Note
If you turn off the recorder or disconnect the AC power cord,
the recorder will recall the last setting of the Auto Space and
Auto Pause Functions the next time you turn on the
recorder.
Erasing Recordings
(Erase Function)
Follow the procedures below to erase:
• A single track
• All tracks
• Part of a track
Note, however, that once erased, MD data cannot
be recovered.
EDIT/NO
YES≠AMS±
1/15-21_MDS-E52.12E 99.1.29, 10:38 AM20
Actual total number: Sony Sound Tec MDS-E52(E) 2-346-702-12(1)
Page 21
Editing Recorded MDs
Playing MDs
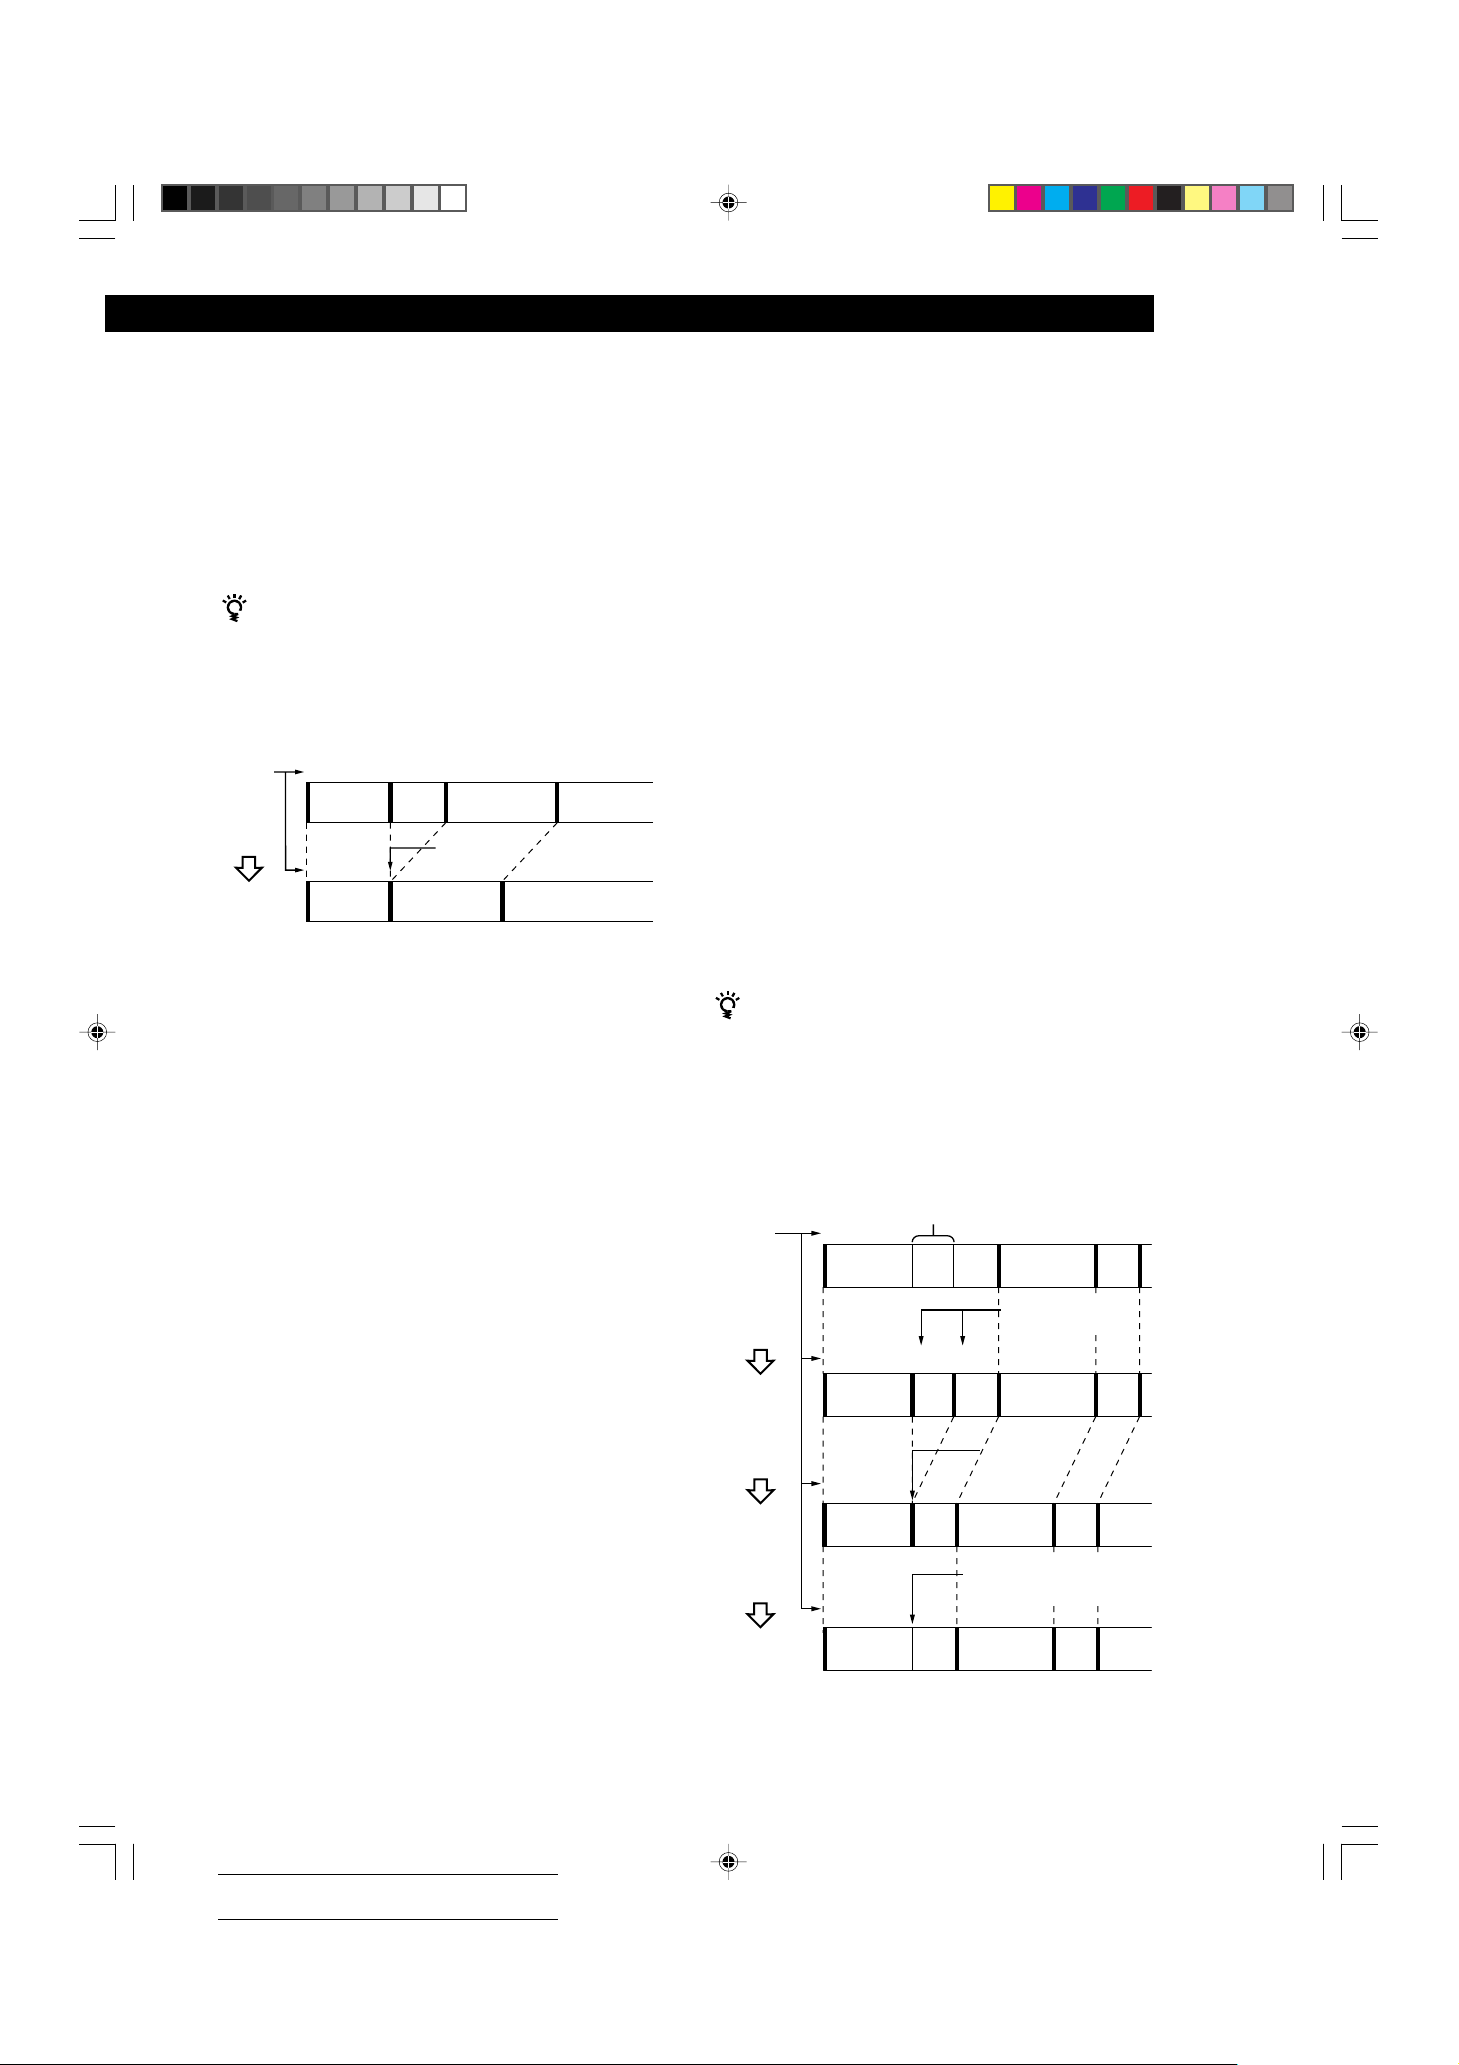
Erasing a single track
You can erase a track simply by specifying the
respective track number. When you erase a track, the
total number of tracks on the MD decreases by one and
all tracks following the erased one are renumbered.
Since erasing merely updates the TOC, there is no need
to record over material.
To avoid confusion when erasing multiple tracks, you
should proceed in the order of high to low track
numbers to prevent the renumbering of tracks that have
not been erased yet.
Example: Erasing B
Track
number
Erasing
1
1
23
A
AC D
BC D
B is erased
2
4
3
1 While the recorder is stopped or during playback
pause, press EDIT/NO to display “Edit Menu.”
2 Turn AMS until “Erase?” appears in the display,
then press AMS.
3 Turn AMS until the track number you want to
erase appears in the display.
4 Press AMS or YES.
When the track selected in Step 3 has been
erased, “Complete” appears for a few seconds
and the total number of tracks in the music
calendar decreases by one.
5 Repeat Steps 1 to 4 to erase more tracks.
To cancel the Erase Function
Press EDIT/NO or p.
Erasing all tracks on an MD
You can delete the disc name, all recorded tracks, and
titles of the recordable MD at once.
1 While the recorder is stopped or during playback
pause, press EDIT/NO to display “Edit Menu.”
2 Turn AMS until “All Erase?” appears in the
display.
3 Press AMS or YES.
“All Erase??” appears and all tracks in the music
calendar start flashing.
4 Press AMS or YES again.
When the disc name, all recorded tracks, and titles
on the MD have been erased, “Complete” appears
for a few seconds and the music calendar
disappears.
To cancel the Erase Function
Press EDIT/NO or p and “All Erase?” or “All Erase??”
disappears.
You can undo the Erase Function
See “Undoing the Last Edit” on page 27.
Erasing a part of a track
By using the Divide (see page 22), Erase (see page 20)
and Combine (see page 23) Functions, you can erase
specific portions of a track.
Example: Erasing a part of track A
Track
number
Dividing
Part to be erased
12
A
A is divided
into 3 parts
4
#3
A
#1
23
A#2A
1
3
BC
5
B
C
Note
If “Erase???”appears in the display, the track was recorded
or edited on another MD recorder and is record-protected.
If this indication appears, press YES to erase the track.
1/15-21_MDS-E52.12E 99.1.29, 10:39 AM21
Actual total number: Sony Sound Tec MDS-E52(E) 2-346-702-12(1)
Erasing
Combining
#2 is
erased
#3
2
A
B
#1 and #3 are
combined
B
1
A
#1
12
A (#1+#3) C
43
C
3
21
Page 22
Editing Recorded MDs
Dividing Recorded Tracks
(Divide Function)
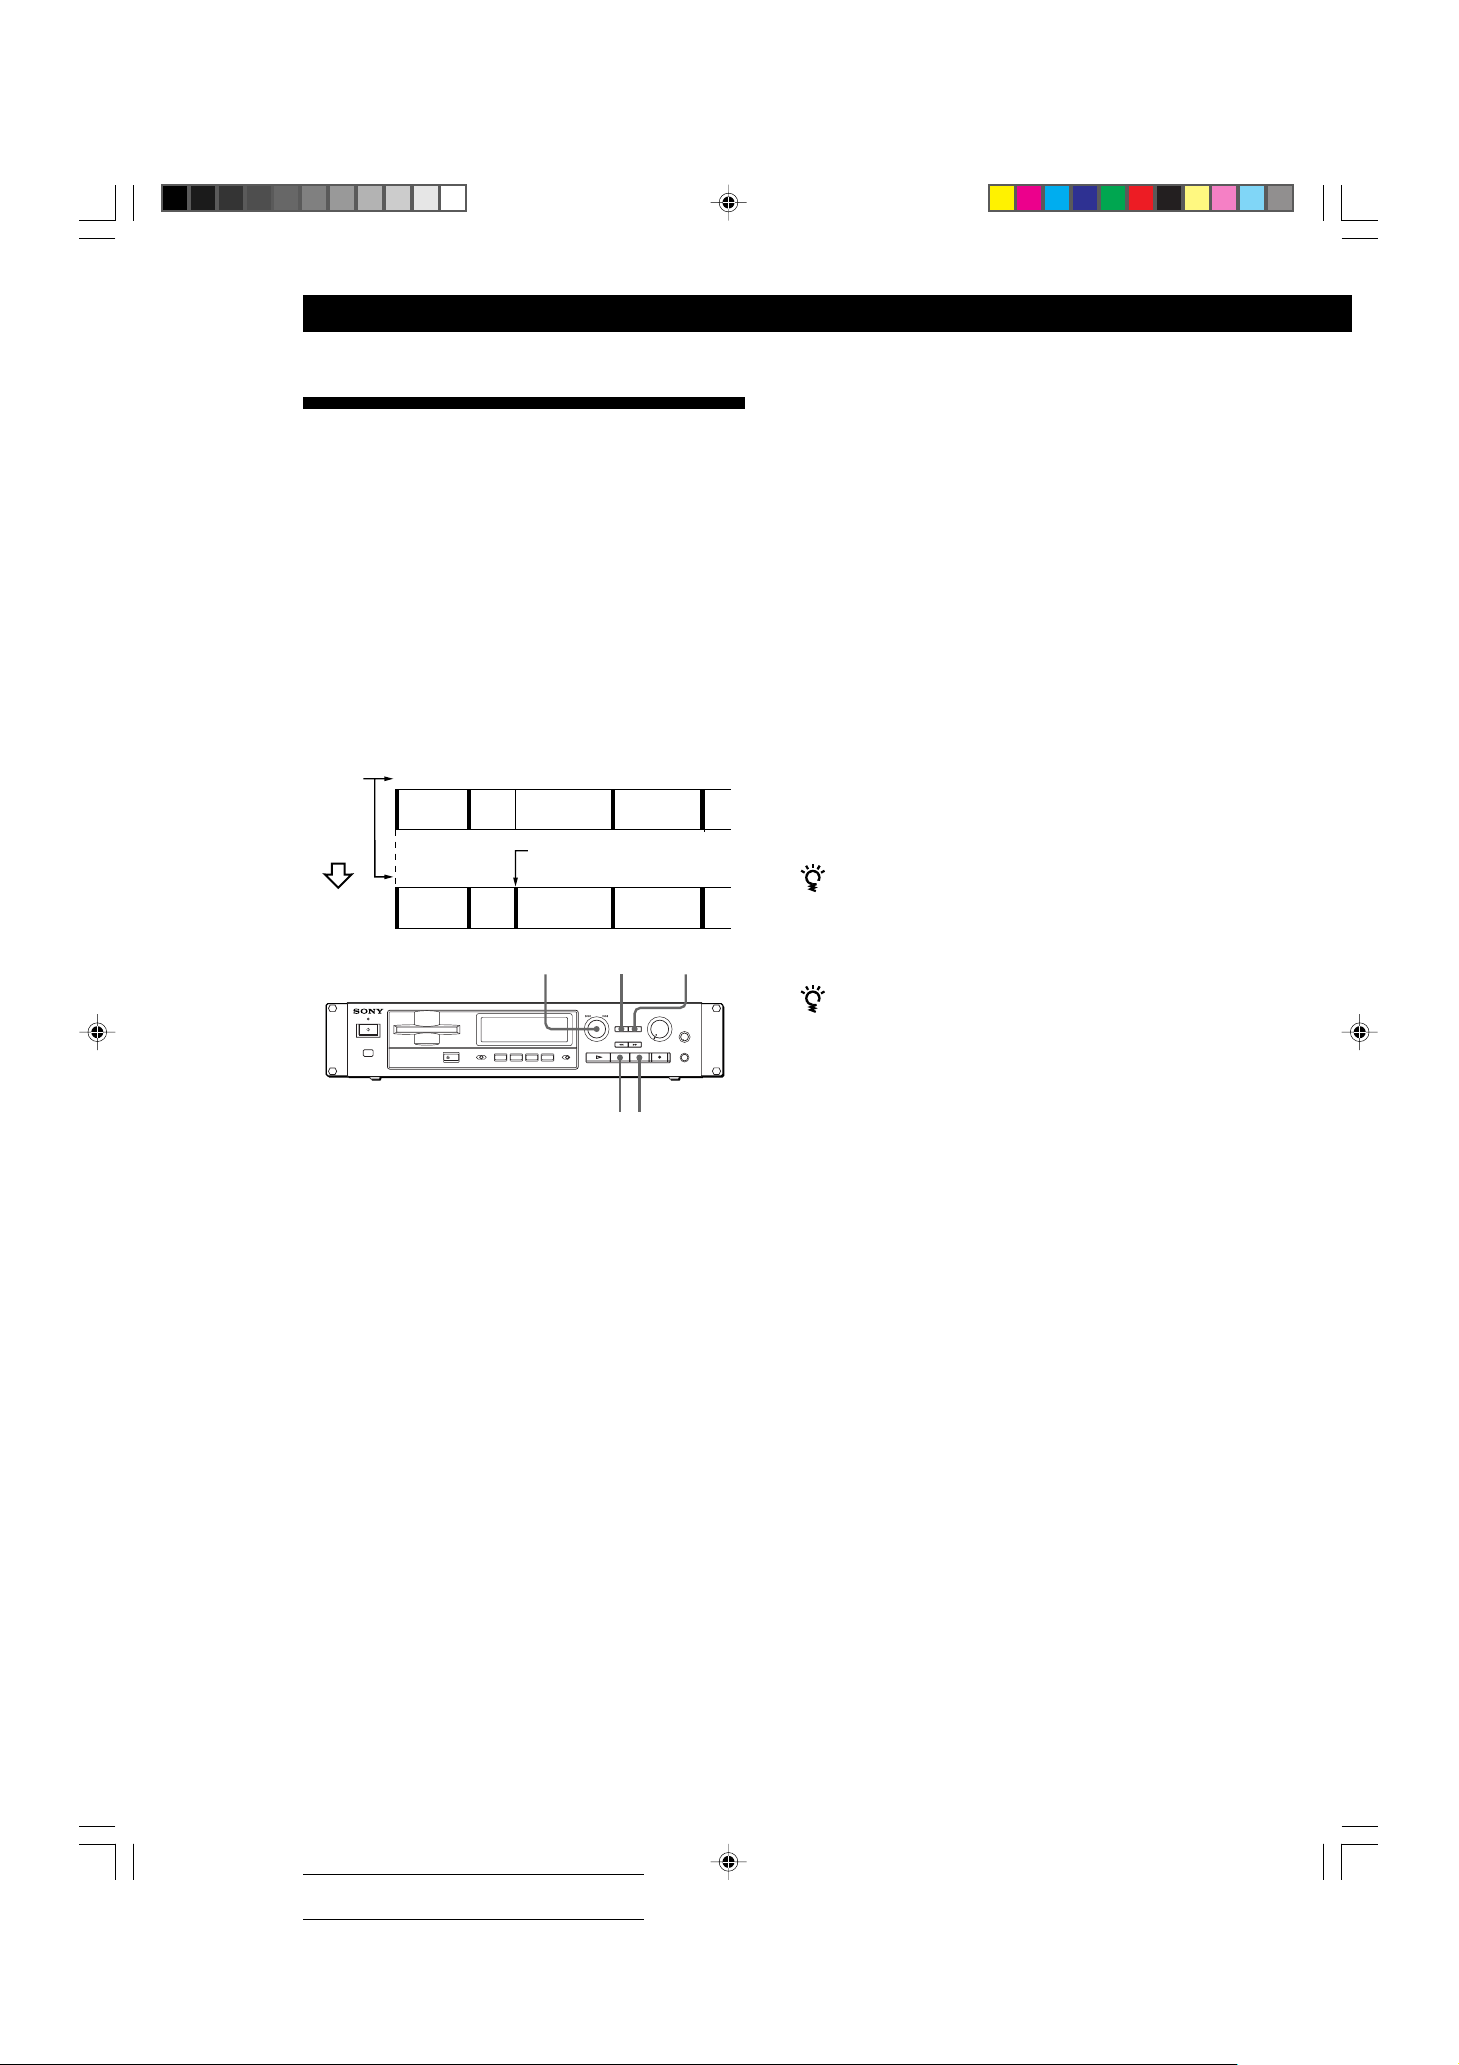
With the Divide Function you can assign a track
number at places that you want to randomly access
afterwards. Use this function to add tracks to MDs
recorded from an analog source (and therefore contain
no track numbers), or to divide an existing track into
multiple portions. When you divide a track, the total
number of tracks on the MD increases by one and all
tracks following the divided track are renumbered.
Example: Dividing track 2 to create a new track for C
Track
number
Dividing
1
1
2
A
A
BC
Track 2 is divided and a
24
new track is created for C
3
B
≠AMS±
3
C
EDIT/NO YES
D
D
4 While monitoring the sound, turn AMS to find the
starting position of the new track.
The starting portion of the new track is played
back repeatedly.
“Rehearsal“ alternates with “Position ok?“ in the
display.
The starting position can be moved within a
maximum range of –128 to +127 steps of about
0.06 seconds within a track.
5 Press YES or AMS when the position is correct.
When the track has been divided, “Complete”
appears for a few seconds and the newly created
track begins playing. The new track will have no
track title even if the original track was labeled.
To cancel the Divide Function
Press p or EDIT/NO.
You can undo a track division
Combine the tracks again (see “Combining Recorded
Tracks” on page 23) then redivide the tracks if
necessary.
p
P
1 While playing the MD, press P at the point where
you want to create a new track.
The recorder pauses playing.
2 Press EDIT/NO to display “Edit Menu.”
3 Turn AMS until “Divide?” appears in the display,
then press AMS.
“Rehearsal” alternates with “Position ok?“ in the
display, the track to be divided starts flashing in
the music calendar, and the starting portion of the
new track begins playing repeatedly. (If the
starting position is correct, proceed with Step 5.)
You can divide a track while recording
Use the Track Marking Function (see page 12).
22
1/22-27_MDS-E52.12E 99.1.29, 10:21 AM22
Actual total number: Sony Sound Tec MDS-E52(E) 2-346-702-12(1)
Page 23
Combining Recorded Tracks
Editing Recorded MDs
To cancel the Combine Function
Press EDIT/NO or p.
(Combine Function)
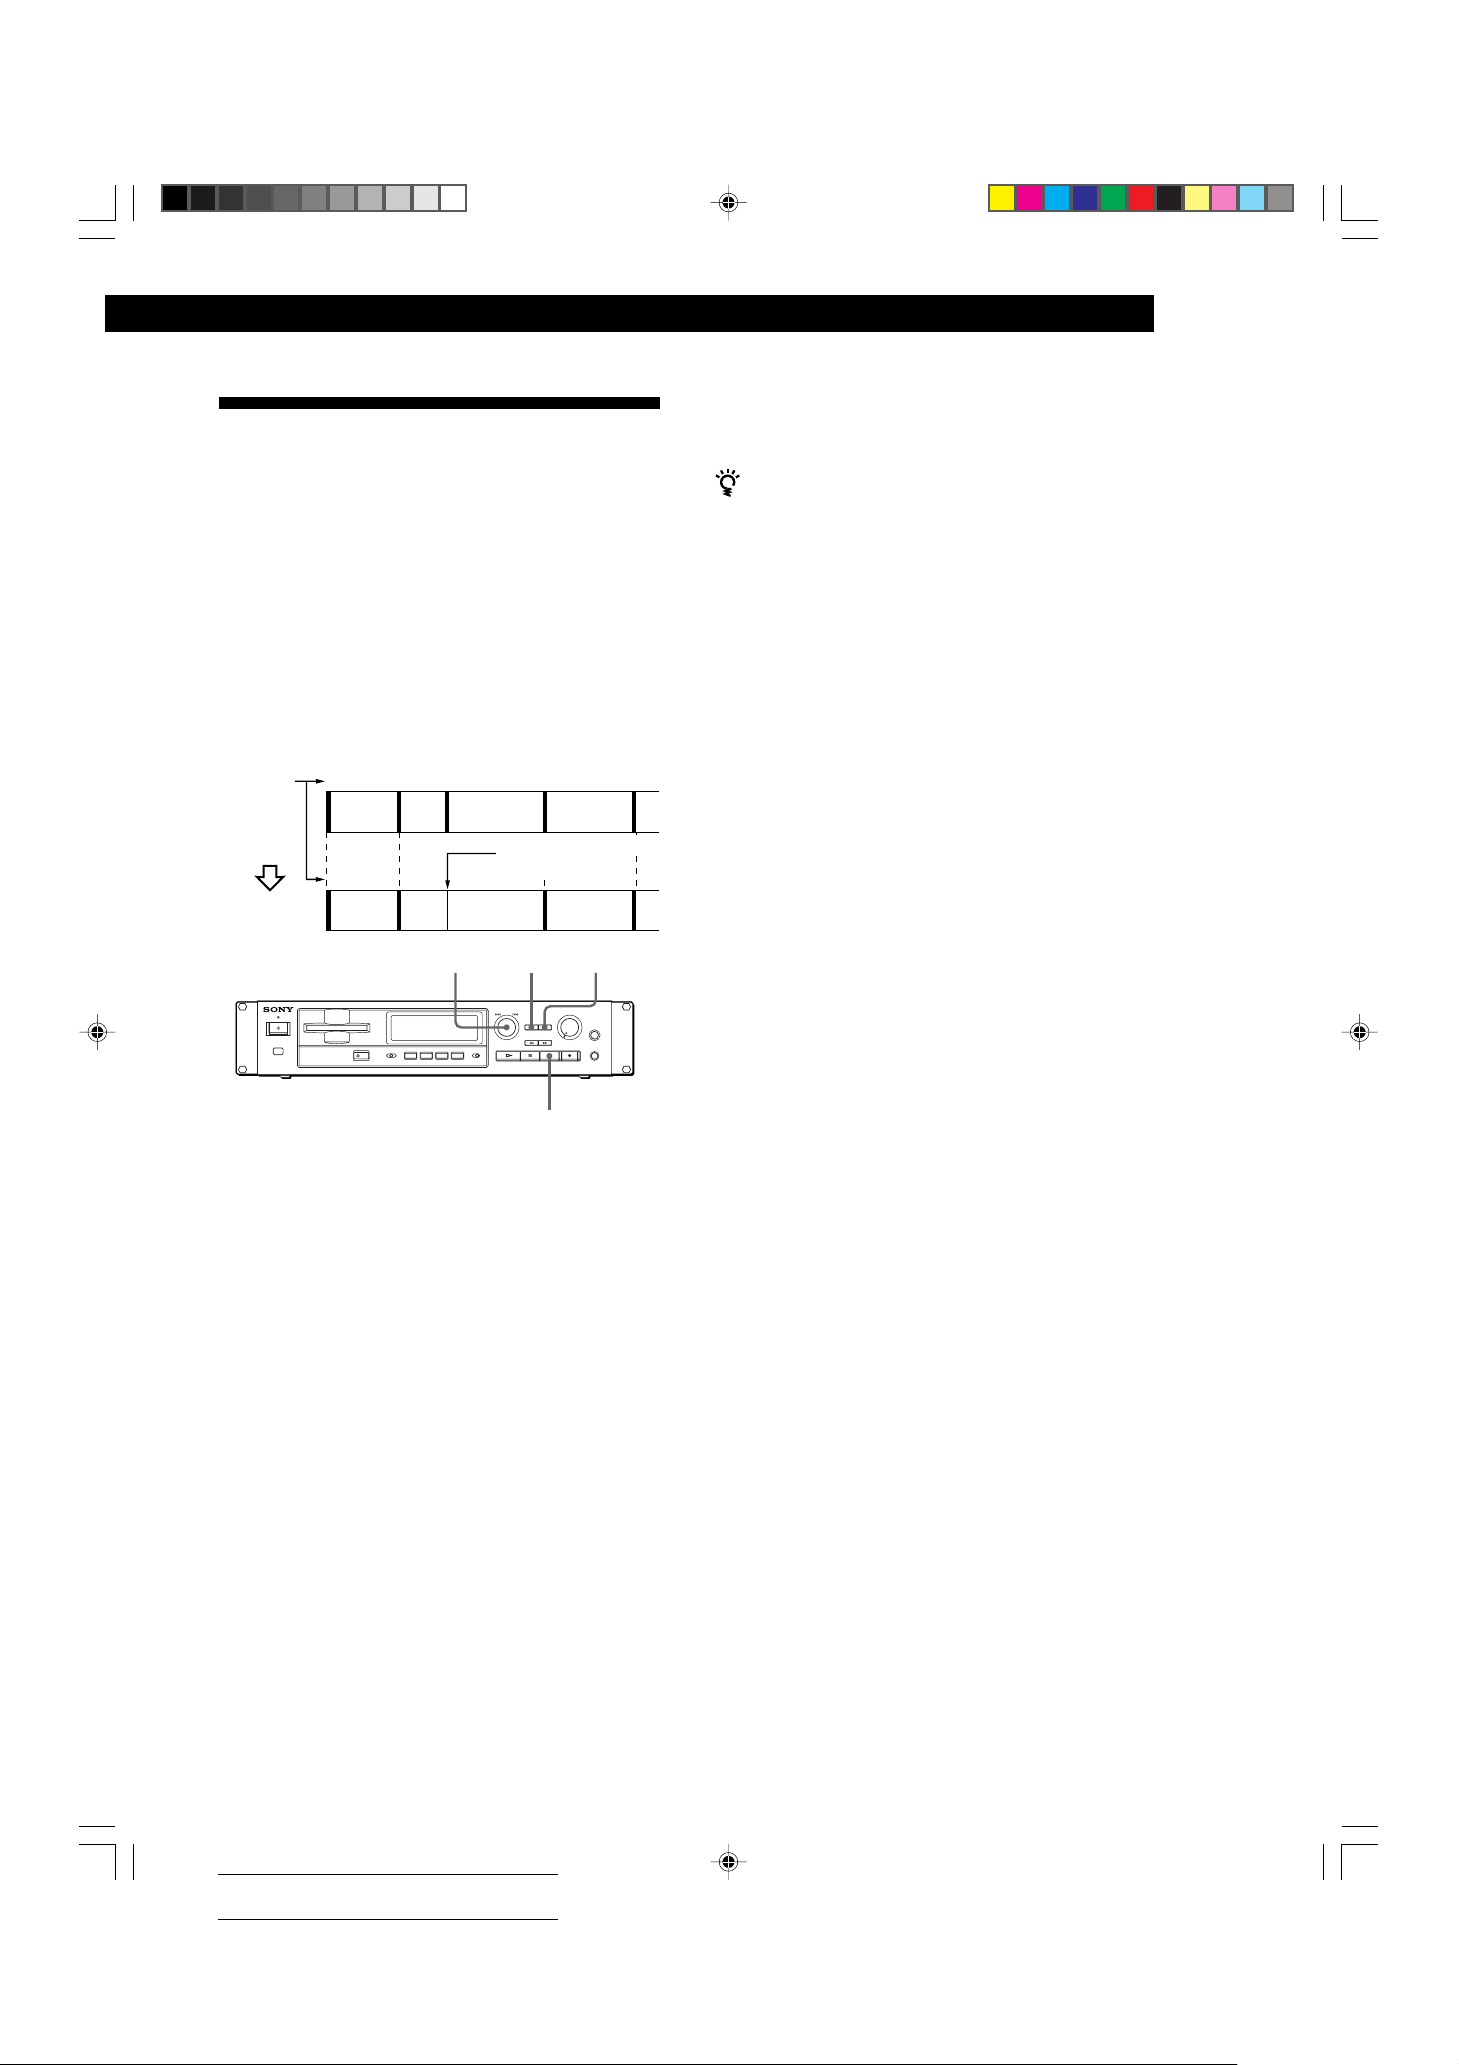
Use the Combine Function while the recorder is
stopped, playing or in pause to combine consecutive
tracks on a recorded MD. This function is useful for
combining several songs into a single medley, or
several independently recorded portions into a single
track. When you combine two tracks, the total number
of tracks decreases by one and all tracks following the
combined tracks are renumbered.
Example: Combining B and C
Track
number
Combining
123 4
AB
12
AB
≠AMS±
C
B and C are combined
into one track
CD
EDIT/NO YES
D
3
You can undo a track combination
Divide the tracks again (see “Dividing Recorded
Tracks” on page 22), then repeat the combine function
with the correct tracks if necessary.
Note
If “Impossible” appears in the display, the tracks cannot be
combined. This sometimes happens when you’ve edited the
same track many times, and is due to a technical limitation
of the MD system, not a mechanical error.
p
1 While the recorder is stopped or during playback
pause, press EDIT/NO to display “Edit Menu.”
2 Turn AMS until “Combine?” appears in the
display, then press AMS.
3 Turn AMS until the number of the former track of
the two to be combined appears in the display,
then press AMS.
“Rehearsal“ alternates with “Track ok?“ in the
display. The place where the two tracks will join
(i.e., the end of the former track and the beginning
of the latter track) repeatedly plays back and the
respective track number flashes in the music
calendar.
4 If the track is the wrong one, press EDIT/NO or
p, then start again from Step 1.
5 If the place is correct, press AMS or YES.
When the tracks have been combined, “Complete”
appears for a few seconds and the total number of
tracks in the music calendar decreases by one.
If both of the combined tracks have track titles,
the title of the latter track is erased.
1/22-27_MDS-E52.12E 99.1.29, 10:21 AM23
Actual total number: Sony Sound Tec MDS-E52(E) 2-346-702-12(1)
23
Page 24
Editing Recorded MDs
Moving Recorded Tracks
(Move Function)
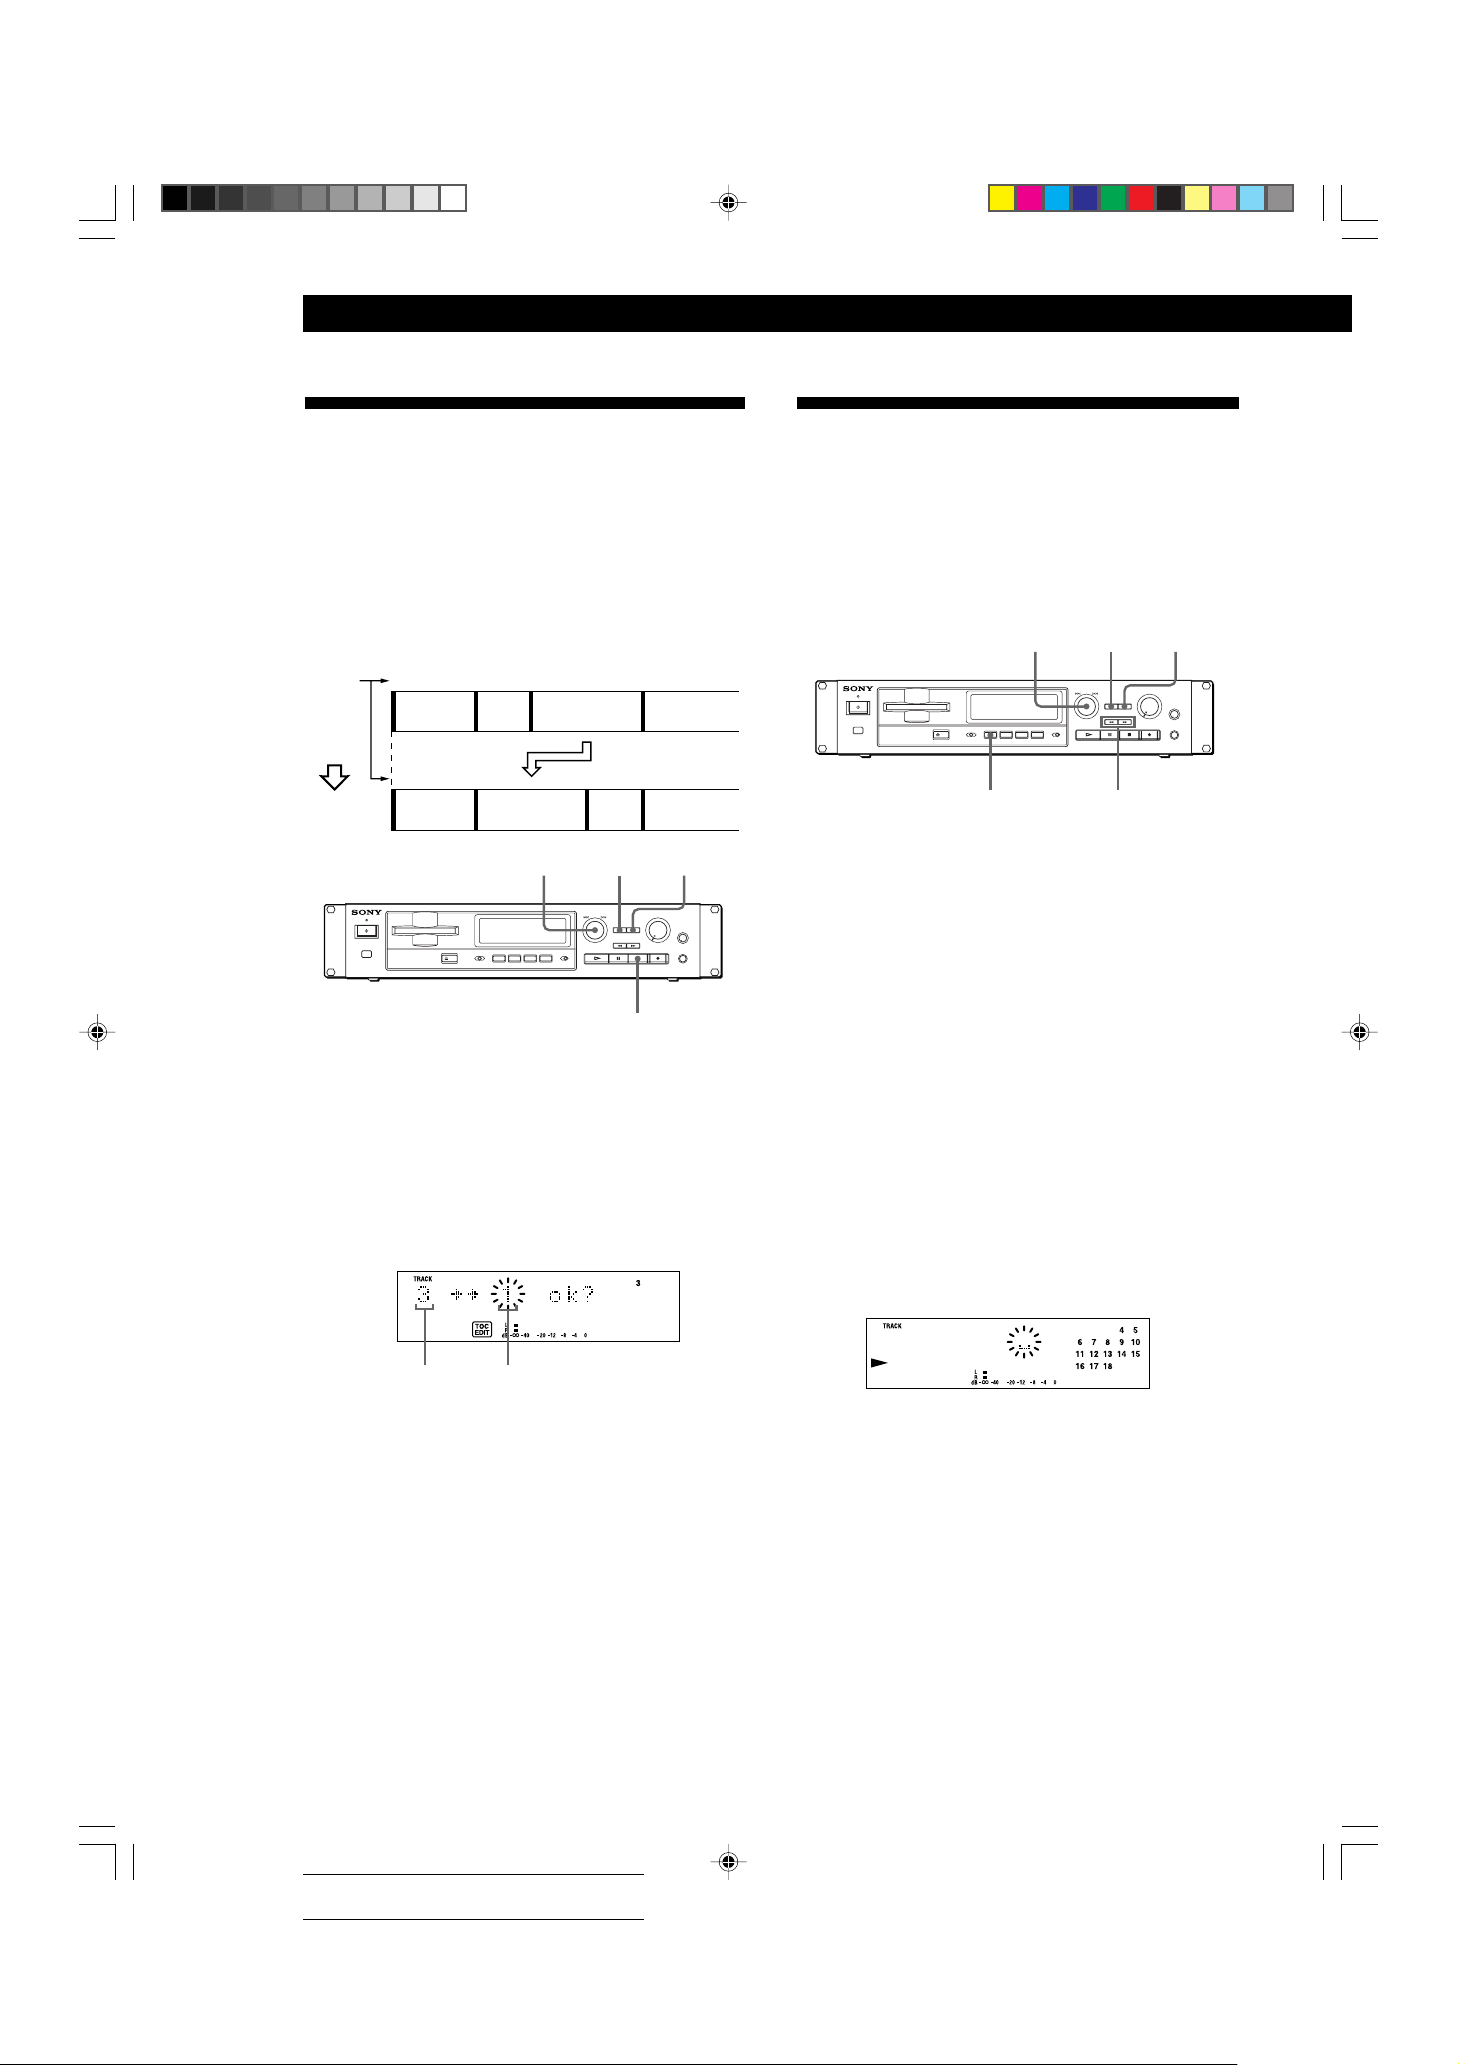
Use the Move Function to change the order of any
track. After you move a track, the track numbers
between the new and old track positions are
automatically renumbered.
Example: Moving track C to track position 2
Track
number
Moving
1
1
A
A
2
3
B
2
≠AMS±
C
CB
4
D
Track C moves to
track position 2
4
3
D
EDIT/NO YES
Labeling Recordings
(Title Function)
You can create titles for your recorded MDs and tracks.
Titles — which may consist of uppercase and
lowercase letters, numbers and symbols for a
maximum of about 1,700 characters per disc — appear
in the display during MD operation.
≠AMS±
DISPLAY/CHAR
Use the following procedure to label a track or an MD.
You can label a track during play, pause, record, or
stop mode. If the track is playing or recording, be
sure to finish labeling before the track ends. If the
track ends before you’ve completed the labeling
procedure, only the characters already entered are
recorded automatically.
EDIT/NO
=/+
YES
p
1 While the recorder is stopped or during playback
pause, press EDIT/NO to display “Edit Menu.”
2 Turn AMS until “Move?” appears in the display,
then press AMS.
3 Turn AMS until the track number you want to
move appears in the display, then press AMS.
Track number
to be moved
New track
position
4 Turn AMS until the new track position appears.
5 Press AMS or YES.
After you have moved the track, “Complete”
appears for a few seconds.
1 Press EDIT/NO to display “Edit Menu.”
2 Turn AMS until “Name in?” appears in the
display, then press AMS.
3 Turn AMS to select “Disc” or track number, then
press AMS.
When you label an MD, select “Disc” and when
you label a track, select the track number. Note
that during recording, the recorder changes to
character typing mode and a cursor starts
flashing.
To cancel the Move Function
Press EDIT/NO or p.
24
1/22-27_MDS-E52.12E 99.1.29, 10:21 AM24
Actual total number: Sony Sound Tec MDS-E52(E) 2-346-702-12(1)
Page 25
Editing Recorded MDs
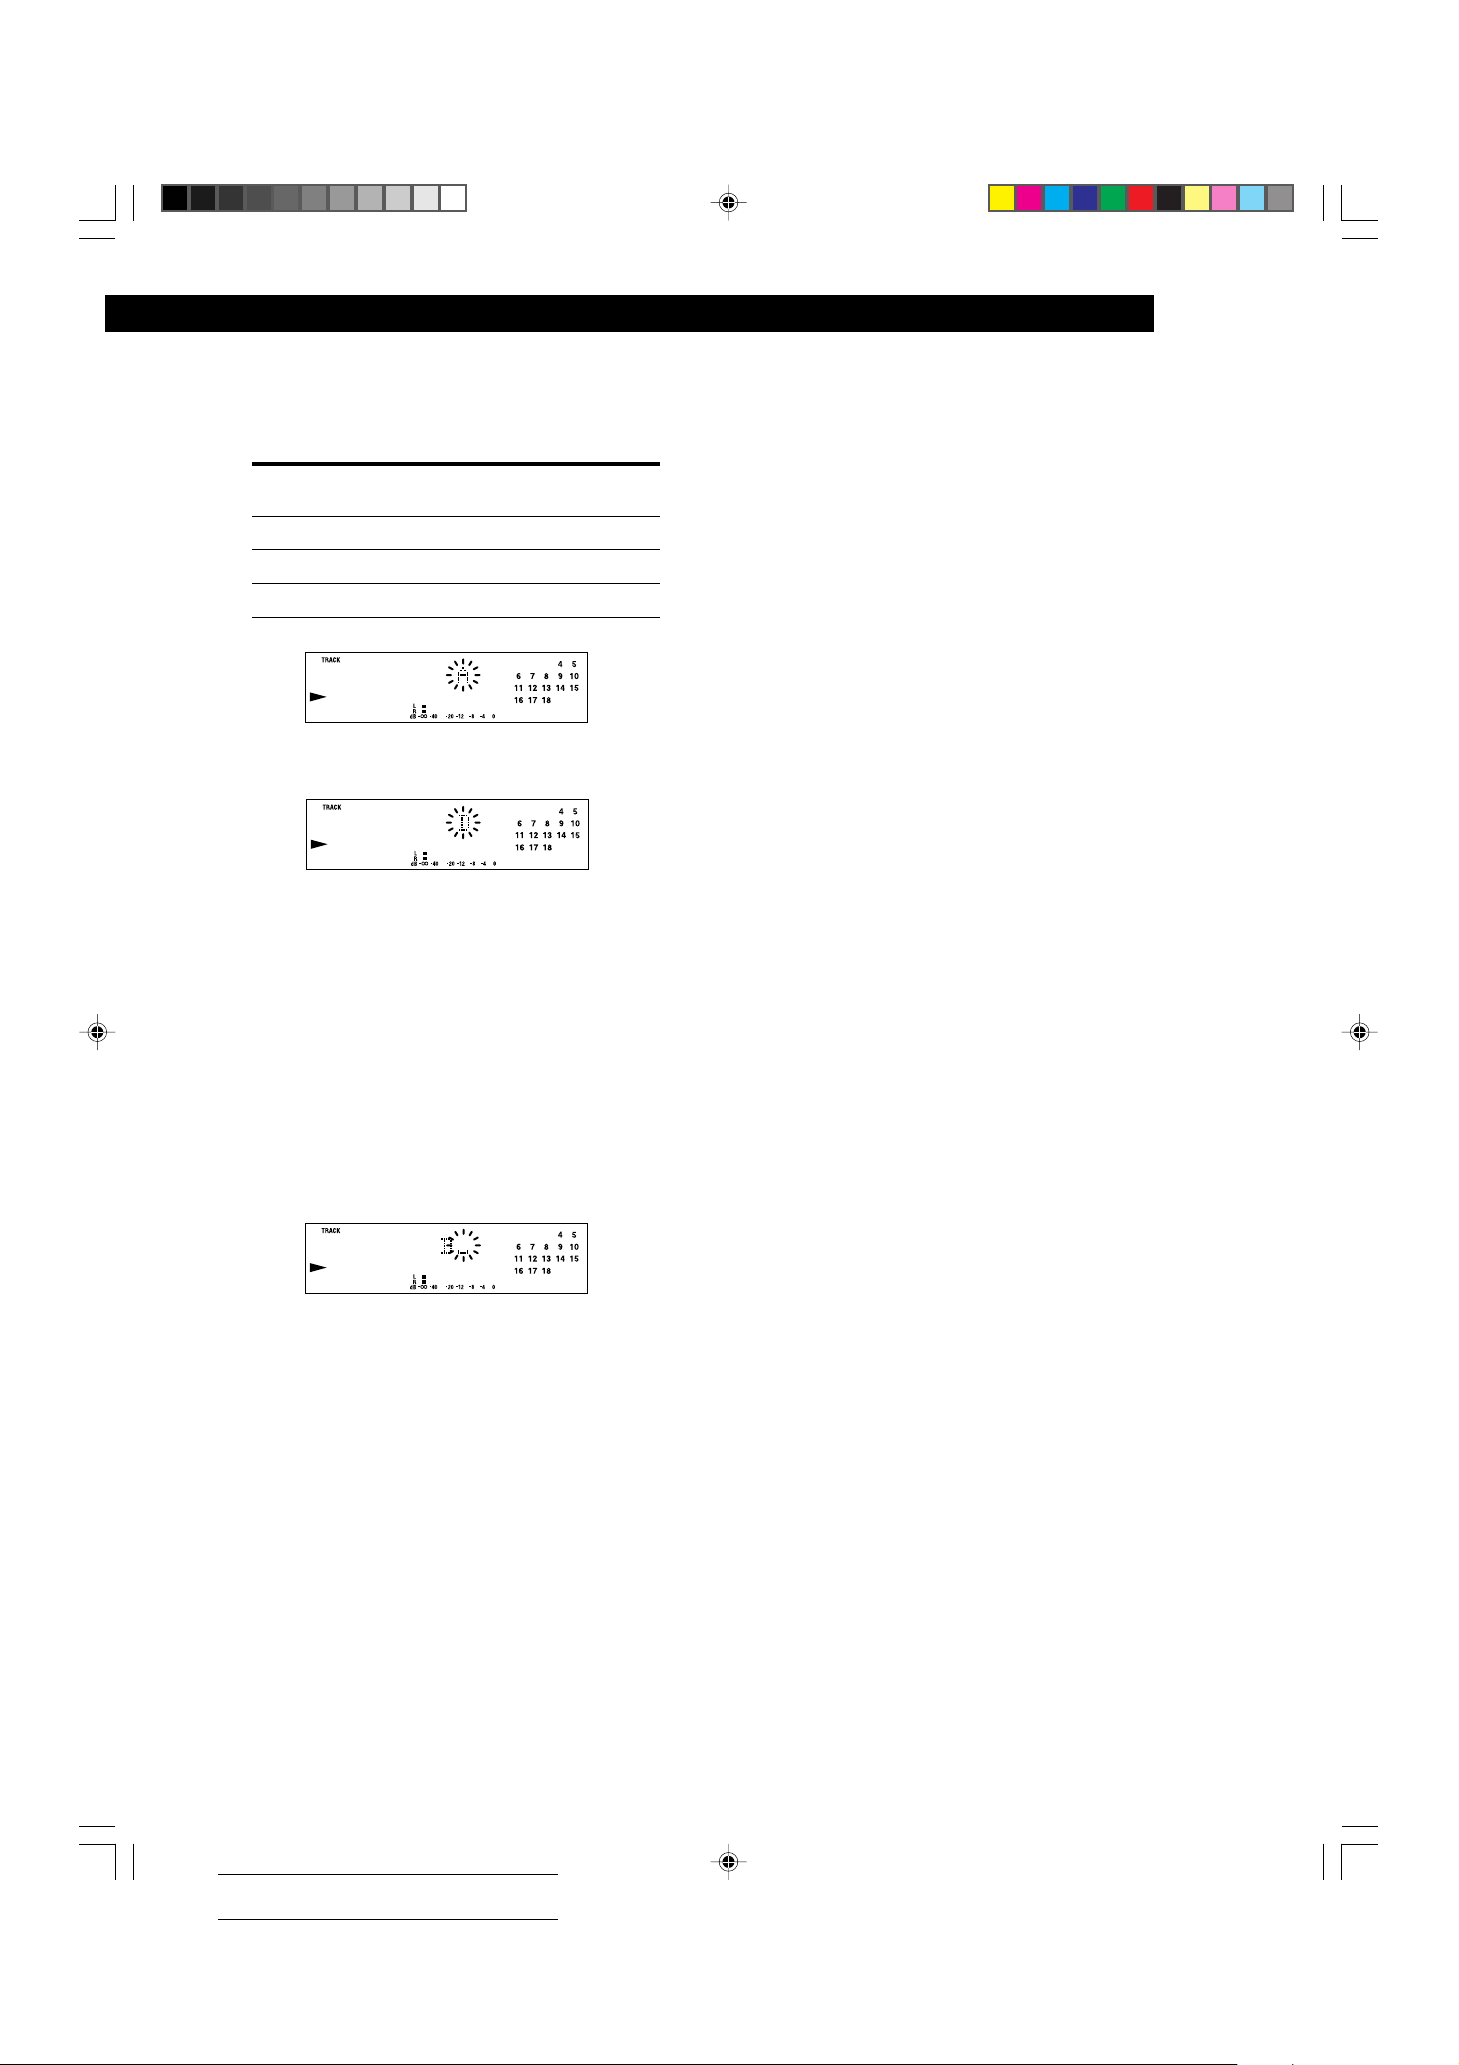
4 Press DISPLAY/CHAR to select the character
type as follows:
To select
Uppercase letters
Lowercase letters
Numbers “0” appears in the display
Press DISPLAY/CHAR repeatedly
until
“A” appears in the display
“a” appears in the display
5 Turn AMS to select the character.
The selected character flashes.
Letters, numbers, and symbols appear in
sequential order as you turn AMS.
You can use the following symbols in titles:
! ” # $ % & ’ ( ) * + , – . / : ; < = > ? @ _ `
>
7 Repeat Steps 4 to 6 until you have entered the
entire title.
If you entered the wrong character
Press 0 or ) until the character to be corrected starts
flashing, and repeat Steps 4 to 6 to enter the correct
character.
To erase a character
Press 0 or ) until the character to be erased starts
flashing, then press EDIT/NO.
To enter a space
Press AMS or ) while the cursor is flashing.
8 Press YES.
This completes the labeling procedure and the
title appears on the left side of the display.
To cancel labeling
Press p.
Note
You cannot label a track or an MD while you are recording
over an existing track.
(Continued)
You can press DISPLAY/CHAR to change the
character type at any time during this step (see
Step 4.)
6 Press AMS to enter the selected character.
The cursor shifts rightward and waits for the
input of the next character.
1/22-27_MDS-E52.12E 99.1.29, 10:21 AM25
Actual total number: Sony Sound Tec MDS-E52(E) 2-346-702-12(1)
25
Page 26
Editing Recorded MDs
Labeling tracks and MDs with the remote
6
Alphabet/number
buttons
NAME
CHAR
0/)
r
+=
)0
CLEAR
pP·
p
NUM
1 Press NAME repeatedly until a flashing cursor
appears in the display, then do the following:
To label
A track
An MD Stopped with no track number
Make sure that the recorder is
Playing, pausing, recording the track
to be labeled, or stopped after
locating the track to be labeled
appearing in the display
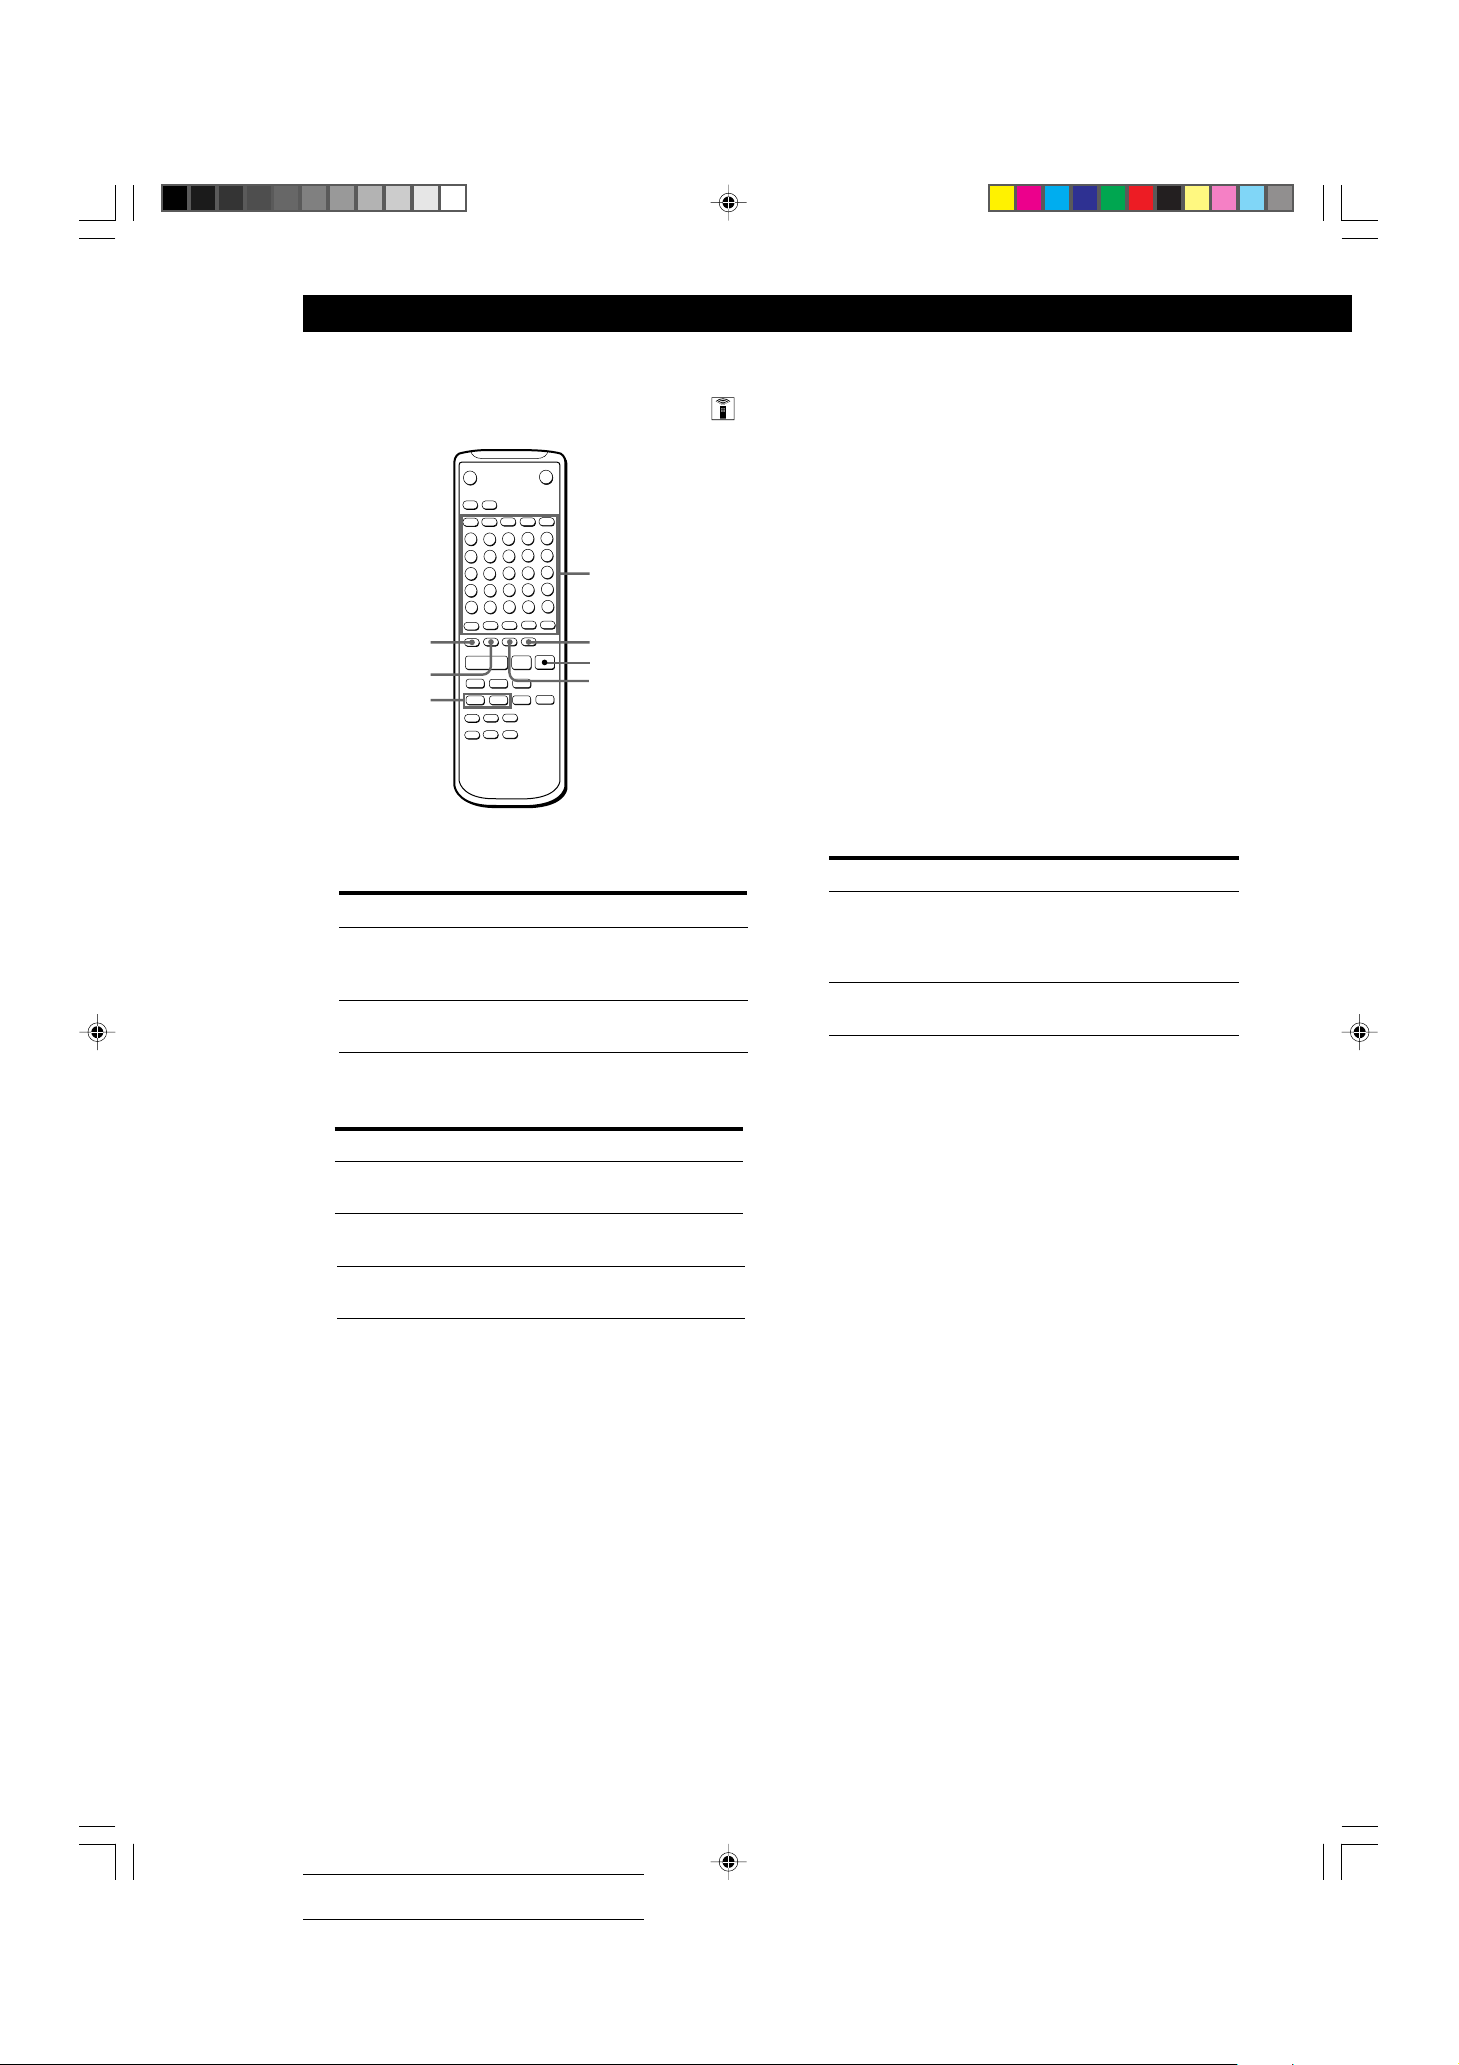
4 Repeat Steps 2 and 3 until you have entered the
entire title.
If you entered the wrong character
Press 0 or ) until the character to be corrected
starts flashing.
Press CLEAR to erase the incorrect character, then enter
the correct one.
5 Press NAME again.
The entered title appears on the left side of the
display window after the label has been recorded.
To cancel labeling
Press p.
Changing an existing title Z
1 Press NAME, then do the following:
To change
A track title
A disc name
Make sure that the recorder is
Playing, pausing the track whose title
is to be changed, or stopped after
locating the track whose title is to be
changed
Stopped with no track number
appearing in the display
2 Select the character type as follows:
To select
Uppercase letters CHAR repeatedly until “Selected
Lowercase letters CHAR repeatedly until “Selected
Numbers
Press
ABC” appears in the display
abc” appears in the display
NUM repeatedly until “Selected
123” appears in the display
3 Enter one character at a time.
After you enter a character, the cursor shifts
rightward and waits for the input of the next
character.
2 Keep pressing CLEAR (or EDIT/NO on the
recorder) until the current title is erased.
3 Enter the new title.
Carry out Steps 4 to 7 of “Labeling Recordings”
on page 24, or Steps 2 to 4 of “Labeling tracks and
MDs with the remote” on page 26.
4 Press NAME.
26
1/22-27_MDS-E52.12E 99.1.29, 10:21 AM26
Actual total number: Sony Sound Tec MDS-E52(E) 2-346-702-12(1)
Page 27
Additional Information
Editing Recorded MDs
Undoing the Last Edit
(Undo Function)
You can use the Undo Function to cancel the last edit
and restore the contents of the MD to the condition that
existed before editing was done. Note, however, that
you cannot undo an edit if you do any of the following
after the edit:
• Press the r button on the front panel.
• Press the r button, the MUSIC SYNC button, or the
CD-SYNC STANDBY button on the remote.
• Turn off the power or eject the MD.
• Disconnect the AC power cord.
EDIT/NO YES≠AMS±
1 While the recorder is stopped or during playback
pause, press EDIT/NO to display “Edit Menu.”
2 Turn AMS until “Undo?” appears in the display,
then press AMS.
“Undo?” does not appear if no editing has been
done.
One of the following messages appears in the
display, depending on the type of editing to be
undone:
Function of Control Terminal
1 Control terminal (CTRL-S)
Mini jack type
When a system controller with CTRL-S terminal is
connected to the control terminal of this recorder,
it can operate as a remote .
Control functions
The system controller which is connected to the control
terminal operates the same as the supplied remote
RM-D7M.
Note
When the system controller is connected to the control
jack, the remote can not be used because its infrared
rays are stopped.
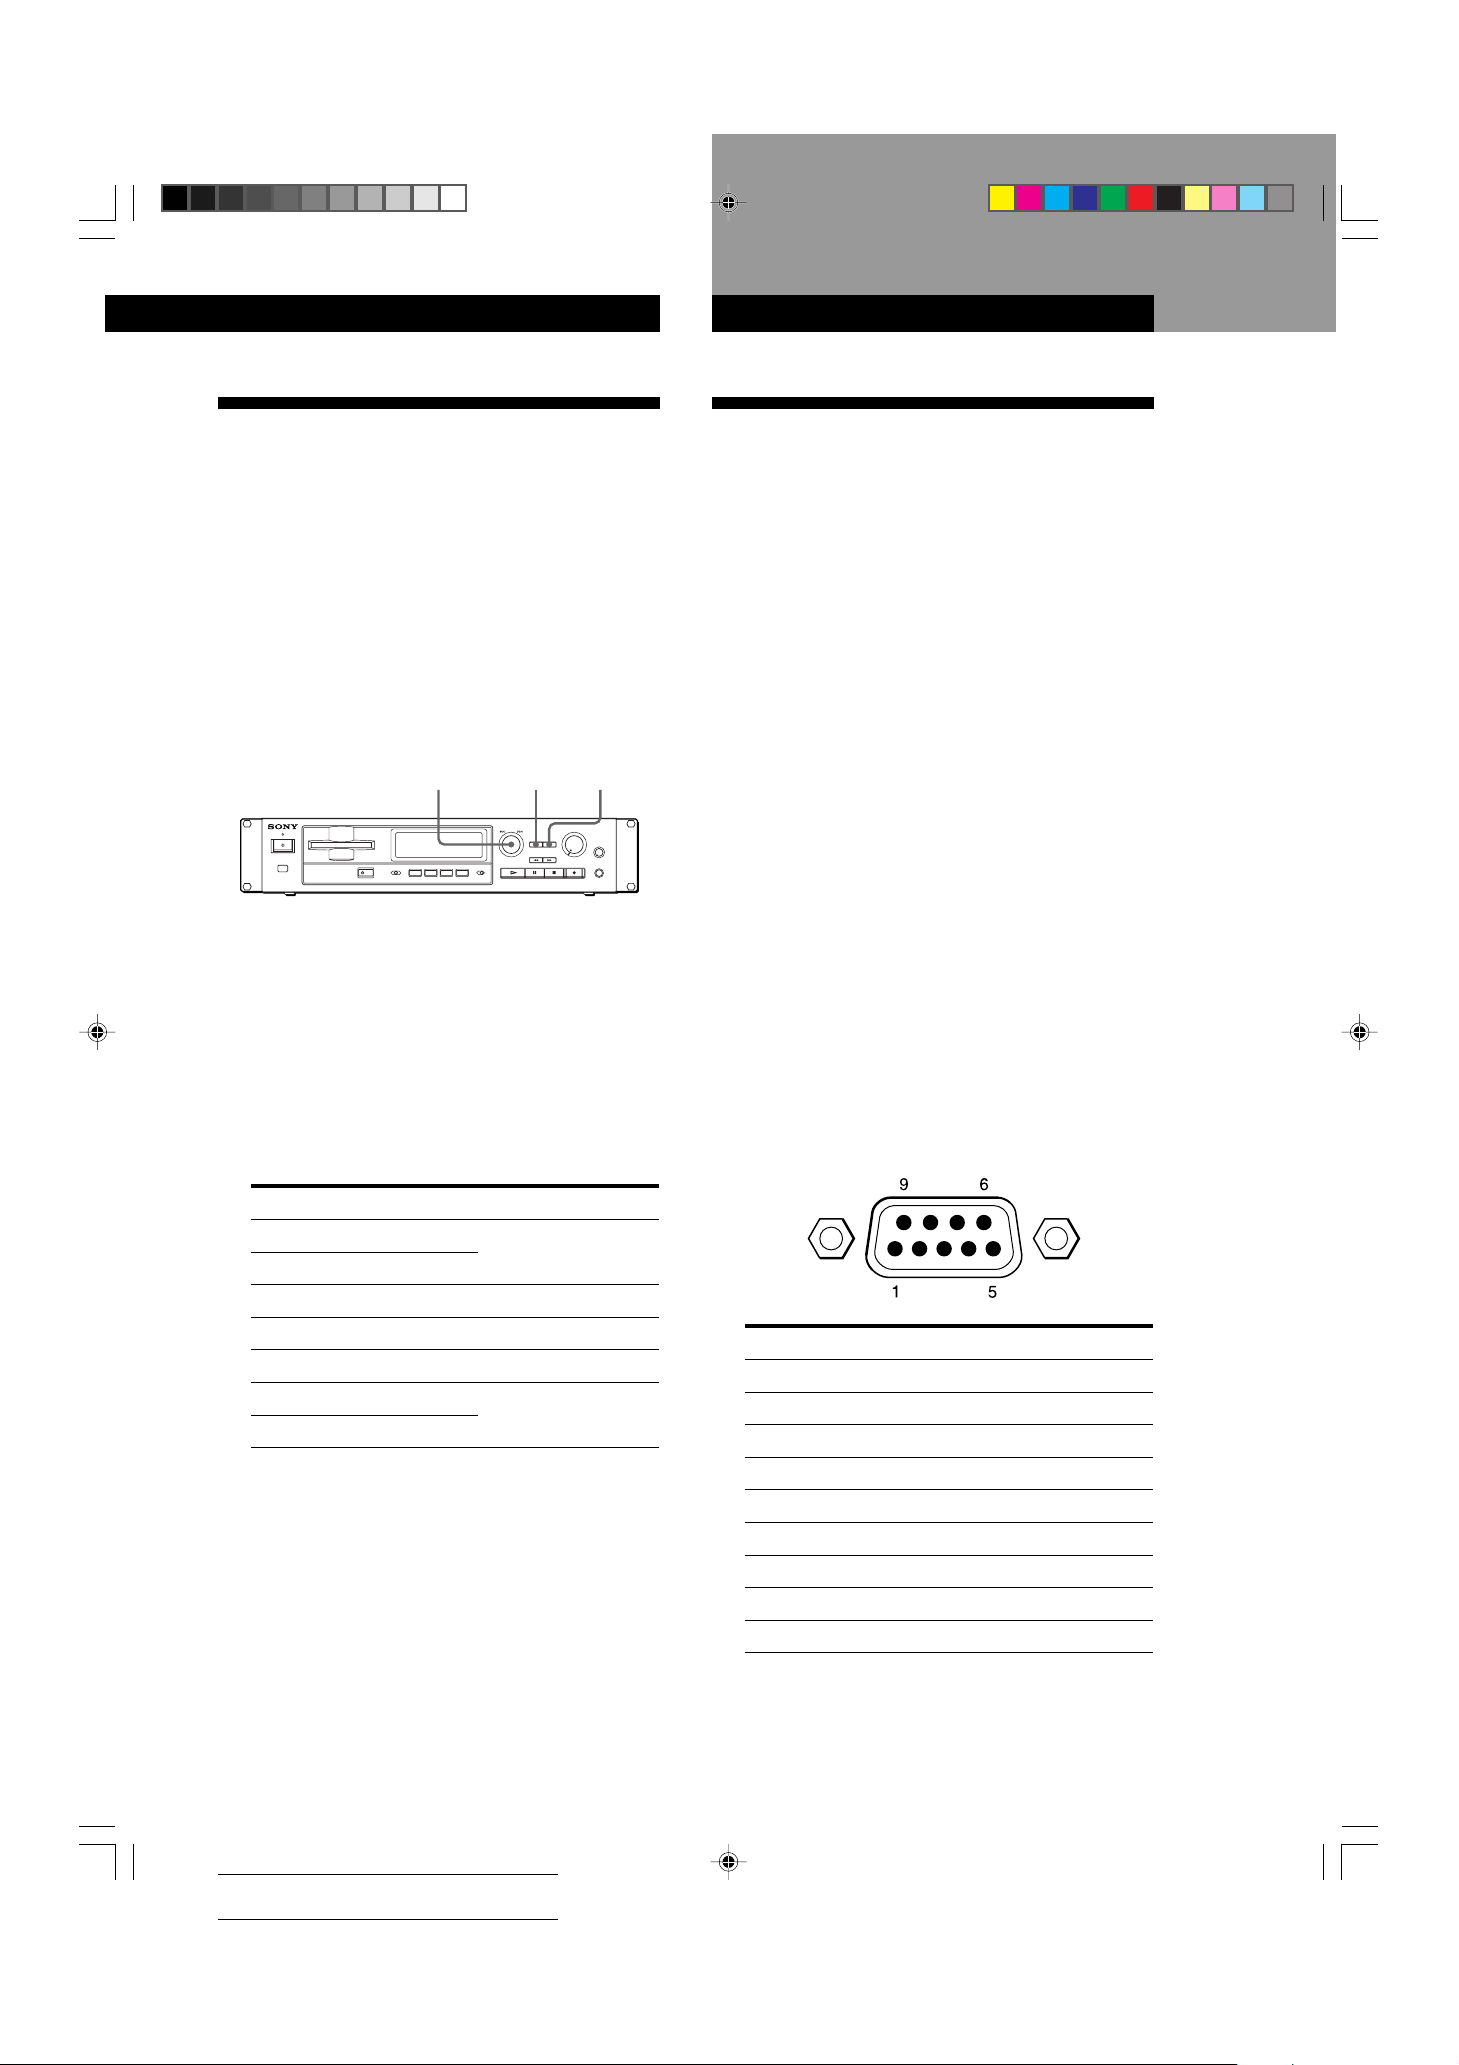
2 Remote control terminal
D sub 9 pin connector (male terminals)
This connector is to control the unit by using an
external personal computer, etc.
It is communicated by RS-232C signals of
9600bps.
Consult the dealer about the communication
protocol.
Pin assignment
Editing done:
Erasing a single track
Erasing all tracks on an MD
Dividing a track
Combining tracks
Moving a track
Labeling a track or an MD
Changing an existing title
Message:
“Erase Undo ?”
“Divide Undo ?”
“Combine Undo ?”
“Move Undo ?”
“Name Undo ?”
3 Press YES again.
“Complete” appears for a few seconds and the
contents of the MD are restored to the condition
that existed before the edit.
To cancel the Undo Function
Press EDIT/NO or p.
Pin:
1
2
3
4
5
6
7
8
9
Terminal nomenclature:
NC
RXD (INPUT)
TXD (OUTPUT)
Connected to 6 pin inside
GND
Connected to 4 pin inside
Connected to 8 pin inside
Connected to 7 pin inside
NC
1/22-27_MDS-E52.12E 99.1.29, 10:21 AM27
Actual total number: Sony Sound Tec MDS-E52(E) 2-346-702-12(1)
27
Page 28
Additional Information
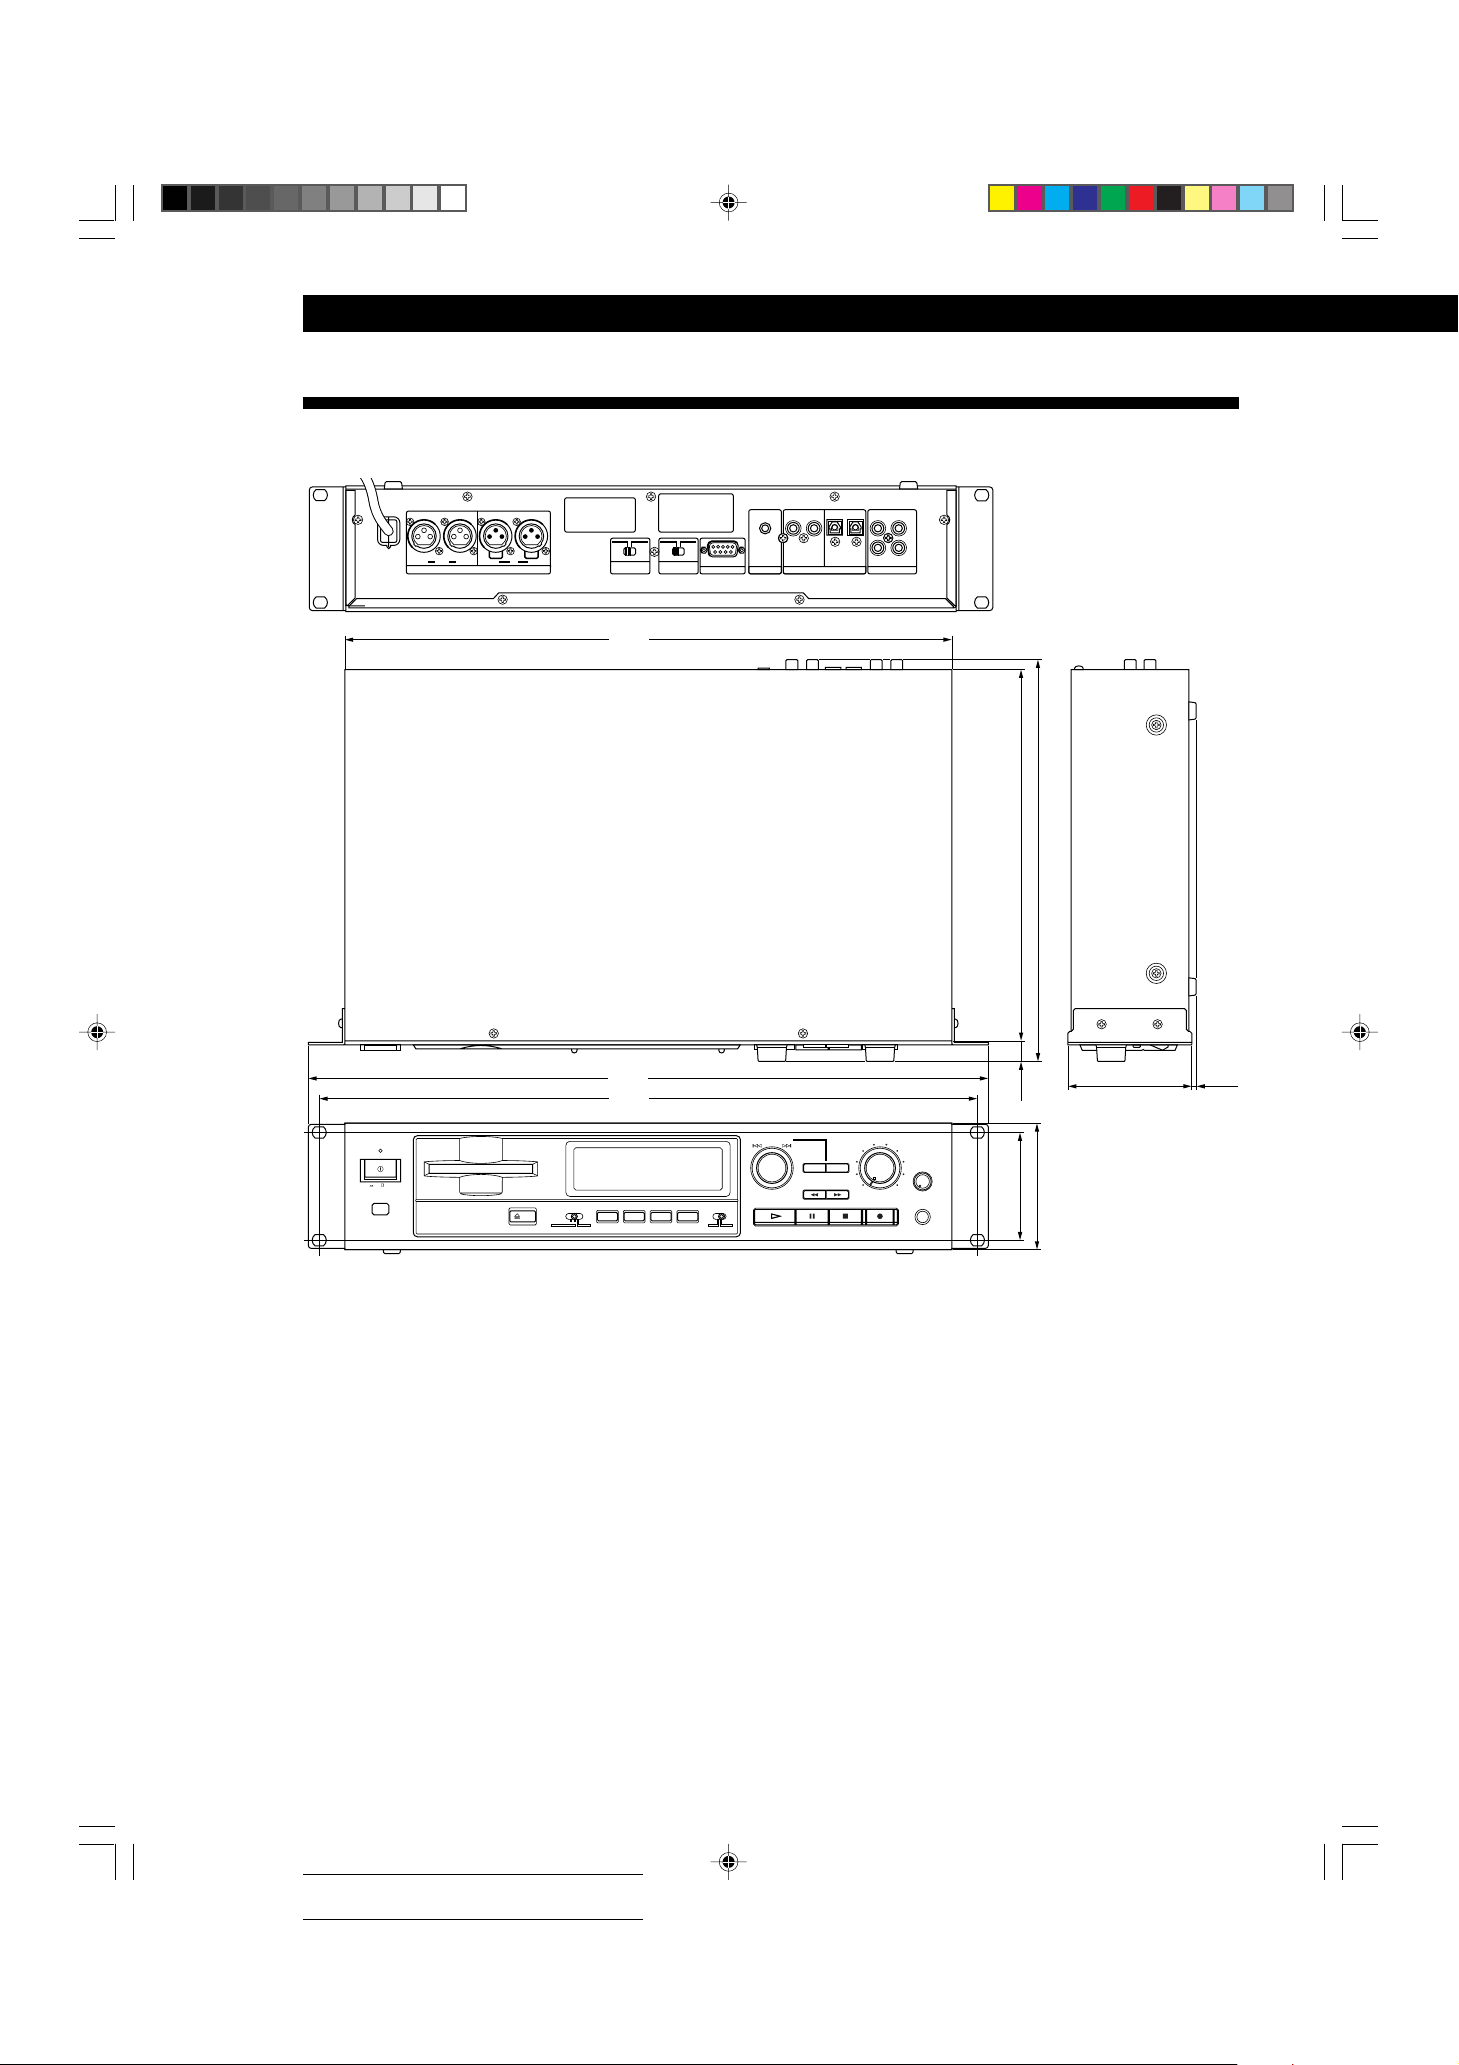
Dimensions
STANDBY
ON OFF
R IN L R OUT L
ANALOG (BAL)
OUTPUT LEVEL
ANALOG (BAL)
UNBAL BAL -10dBu +4dBu
SELECTOR
ANALOG INPUT
RS-232C
REMOTE
IN
CTRL-S
IN
OUTIN
OUT
COAXIAL
DIGITAL
OPTICAL
R
L
IN
OUT
LINE(ANALOG
)
430
265
285
482
466
)
AMS(PUSH ENTER
DISPLAY/CHAR
A.SPACE/A.PAUSE
INPUT
EJECT
DIGITAL COAXOPT ANALOG
PLAY MODE
REC MODE
REPEAT
MONO STEREO
REC LEVEL
5
4
6
3
YES
NO
EDIT
7
2
PHONE
8
LEVEL
1
9
0
10
MIN MAX
PHONES
12
76.2
88
88
Unit: mm
(3)
Mounting the recorder
This recorder can be attached to a standard 19 inch
rack (type EIA). After detaching the four feet on the
bottom of the recorder, mount the recorder on the rack.
28
1/28-36_MDS-E52.12E 99.1.29, 10:21 AM28
Actual total number: Sony Sound Tec MDS-E52(E) 2-346-702-12(1)
Page 29

Additional Information
Additional Information
Display Messages
The following table explains the various messages that
appear in the display.
Message
Blank Disc
Cannot Copy
Cannot EDIT
Din Unlock
Disc Error
Disc Full
Impossible
Name Full
No Disc
No Track
Protected
Retry
Retry Error
STANDBY
(flashing)
Meaning
A new (blank) or erased MD has been
inserted.
An attempt was made to make a second
copy from a digitally dubbed MD (see
page 33.)
An attempt was made to edit the MD
during Program, Shuffle, or Normal Play.
The connected digital sound source is
turned off or the recorder is not connected
properly to the sound source.
Defected MD is inserted.
The MD is full (see “System Limitations”
on this page.)
You cannot record or edit the MD due to
the system limitations.
The titling capacity of the MD has reached
its limit (about 1,700 characters.)
There is no MD in the recorder.
The inserted MD has a disc title but no
tracks.
The inserted MD is record-protected.
The first recording attempt failed due to a
disturbance or scratch on the MD, and a
second attempt is being made.
Due to vibrations to the recorder or
scratches on the MD, several recording
attempts were made but with no success.
The contents previously recorded are not
saved correctly on the MD, or the program
created by Program Play is not stored in
the recorder’s memory.
System Limitations
The recording system in your MiniDisc recorder is
radically different from those used in cassette and DAT
recorders and is characterized by the limitations
described below. Note, however, that these limitations
are due to the inherent nature of the MD recording
system itself and not to mechanical causes.
“Disc Full” lights up even before the MD has reached the
maximum recording time (60 or 74 minutes)
When 255 tracks have been recorded on the MD, “Disc Full”
lights up regardless of the total recorded time. More than
255 tracks cannot be recorded on the MD. To continue
recording, erase unnecessary tracks or use another
recordable MD.
“Disc Full” lights up before the maximum number of
tracks is reached
Fluctuations in emphasis within tracks are sometimes
interpreted as track intervals, incrementing the track count
and causing “Disc Full” to light up.
The remaining recording time does not increase even
after erasing numerous short tracks
Tracks under 12 seconds in length are not counted and so
erasing them may not lead to an increase in the recording
time.
Some tracks cannot be combined with others
Track combination may become impossible when tracks are
edited.
The total recorded time and the remaining time on the
MD may not total the maximum recording time (60 or
74 minutes)
Recording is done in minimum units of 2 seconds each, no
matter how short the material. The contents recorded may
thus be shorter than the maximum recording capacity. Disc
space may also be further reduced by scratches.
1/28-36_MDS-E52.12E 99.1.29, 10:21 AM29
Actual total number: Sony Sound Tec MDS-E52(E) 2-346-702-12(1)
Tracks created through editing may exhibit sound dropout
during search operations.
Track numbers are not recorded correctly
Incorrect assignment or recording of track numbers may
result (1) when CD tracks are divided into several smaller
tracks during digital recording, or (2) while recording certain
CDs with the “LEVEL-SYNC” indication on (i.e., the
automatic track marking function on.)
29
Page 30

Additional Information
“TOC Reading” appears for a long time
If the inserted recordable MD is brand new, “TOC Reading”
appears in the display longer than for MDs that have been
used.
Limitations when recording over an existing track
• The correct remaining recording time may not be
displayed.
• You may find it impossible to record over a track if that
track has been recorded over several times already. If this
happens, erase the track using the Erase Function (see
page 20.)
• The remaining recording time may be shortened out of
proportion to the total recorded time.
• Recording over a track to eliminate noise is not
recommended since this may shorten the duration of the
track.
• You may find it impossible to label a track while
recording over it.
The correct recorded/playing time may not be displayed
during playback of monaural-format MDs.
The recorder does not record.
/The MD is record-protected (“Protected” appears.)
Close the record-protect slot (see page 7.)
/The recorder is not connected properly to the sound
source. Make connections properly to the sound
source.
/The recording level is not adjusted properly (in case
of input through LINE (ANALOG) IN.) Turn REC
LEVEL to adjust the recording level properly (see
page 11.)
/A premastered MD is inserted. Replace it with a
recordable MD.
/There is not enough time left on the MD. Replace it
with another recordable MD with fewer recorded
tracks, or erase unnecessary tracks.
/There has been a power failure or the AC power
cord has been disconnected during recording. Data
recorded to that point may be lost. Repeat the
recording procedure.
The recorder does not work during synchro-recording.
/The currently selected CD player type (CD player or
video CD player) does not match the CD player
being used. Reset the CD player type (see page 14.)
Troubleshooting
If you experience any of the following difficulties while
using the recorder, use this troubleshooting guide to help
you remedy the problem. Should any problem persist,
consult your nearest Sony dealer.
The recorder does not operate or operates poorly.
/
The MD may be damaged (“Disc Error” appears.)
Take the MD out and insert it again. If “Disc Error”
remains, replace the MD.
The recorder does not play back.
/Moisture has formed inside the recorder. Take the
MD out and leave the recorder in a warm place for
several hours until the moisture evaporates.
/The recorder is not on. Press U to turn the recorder
on.
/The MD is inserted in the wrong direction. Slide the
MD into the disc compartment with the label side up
and the arrow pointing towards the opening until
the recorder grips it.
/The MD may not be recorded (the music calendar
does not appear). Replace the disc with one that has
been recorded.
The sound has a lot of static.
Strong magnetism from a television or a similar
/
device is interfering with operations. Move the
recorder away from the source of strong magnetism.
Note
If the recorder does not operate properly even after you’ve
attempted the prescribed remedies, turn off the power, then
reinsert the plug into the power outlet.
30
1/28-36_MDS-E52.12E 99.1.29, 10:21 AM30
Actual total number: Sony Sound Tec MDS-E52(E) 2-346-702-12(1)
Page 31

Specifications
System MiniDisc digital audio system
Disc MiniDisc
Laser Semiconductor laser (λ = 780 nm)
Emission duration: continuous
Laser output Less than 44.6 µW*
* This output is the value measured at a
distance of 200 mm from the objective
lens surface on the Optical Pick-up
Block with 7 mm aperture.
Laser diode properties Material: GaAlAs
Revolutions (CLV) 400 rpm to 900 rpm
Error correction Advanced Cross Interleave Reed
Solomon Code (ACIRC)
Sampling frequency 44.1 kHz
Coding Adaptive Transform Acoustic Coding
(ATRAC)
Modulation system EFM (Eight-to-Fourteen Modulation)
Number of channels 2 stereo channels
Frequency response 5 to 20,000 Hz ±0.5 dB
Signal-to-noise ratio Over 92 dB during playback
Wow and flutter Below measurable limit
Additional Information
Additional Information
Outputs
Jack type
PHONES
Stereo
phone
jack
ANALOG
(UNBAL)
Phono
jacks
OUT
ANALOG
(BAL) OUT
DIGITAL
OPTICAL
OUT
XLR-3-32
type
Square
optical
connector
jack
DIGITAL
COAXIAL
Phono
jacks
OUT
0 dBu=0.775Vrms
Raterence
output
0–10 mW
The level
varies.
Maximum
+8 dBu
Maximum
+10/+24dBu
(switchable)
Optical power
–18 dBm
0.5Vp-p
(at 75 ohms)
General
Power requirements Refer to warning letter.
Load impedance
32 ohms
Over 10 kilohms
Over 600 ohms
Wave length:
660 nm
75 ohms
Inputs
ANALOG
(UNBAL) IN
ANALOG
(BAL) IN
DIGITAL
OPTICAL IN
DIGITAL
COAXIAL IN
Jack type
Phono jacks
XLR-3-31
type
Square
optical
connector
jack
Phono
jacks
Input
impedance
47 kilohms
30 kilohms +4 dBu +24 dBu
Optical
wave
length:
660 nm
75 ohms
Raterence
input
–4 dBu
0.5Vp-p
±20%
Maximum
input
+12 dBu
——
—
Power consumption 20 W
Dimensions (approx.) (w/h/d) incl. projecting parts
482 × 91 × 285 mm
(19 × 3 5/8 × 11 1/4 in.)
Mass (approx.) 4.5 kg (9 lbs 15 oz)
Supplied accessories See page 4.
Optional accessories
Wired/wireless remote unit: RM-D5ME
Optical cable: POC-15A, etc.
Coaxial digital connecting cable: VMC-10, etc.
Recordable MDs: MDW-60 (60 min), MDW-74 (74 min)
U.S. and foreign patents licensed from Dolby Laboratories
Licensing Corporation.
Design and specifications are subject to change without
notice.
1/28-36_MDS-E52.12E 99.1.29, 10:21 AM31
Actual total number: Sony Sound Tec MDS-E52(E) 2-346-702-12(1)
31
Page 32
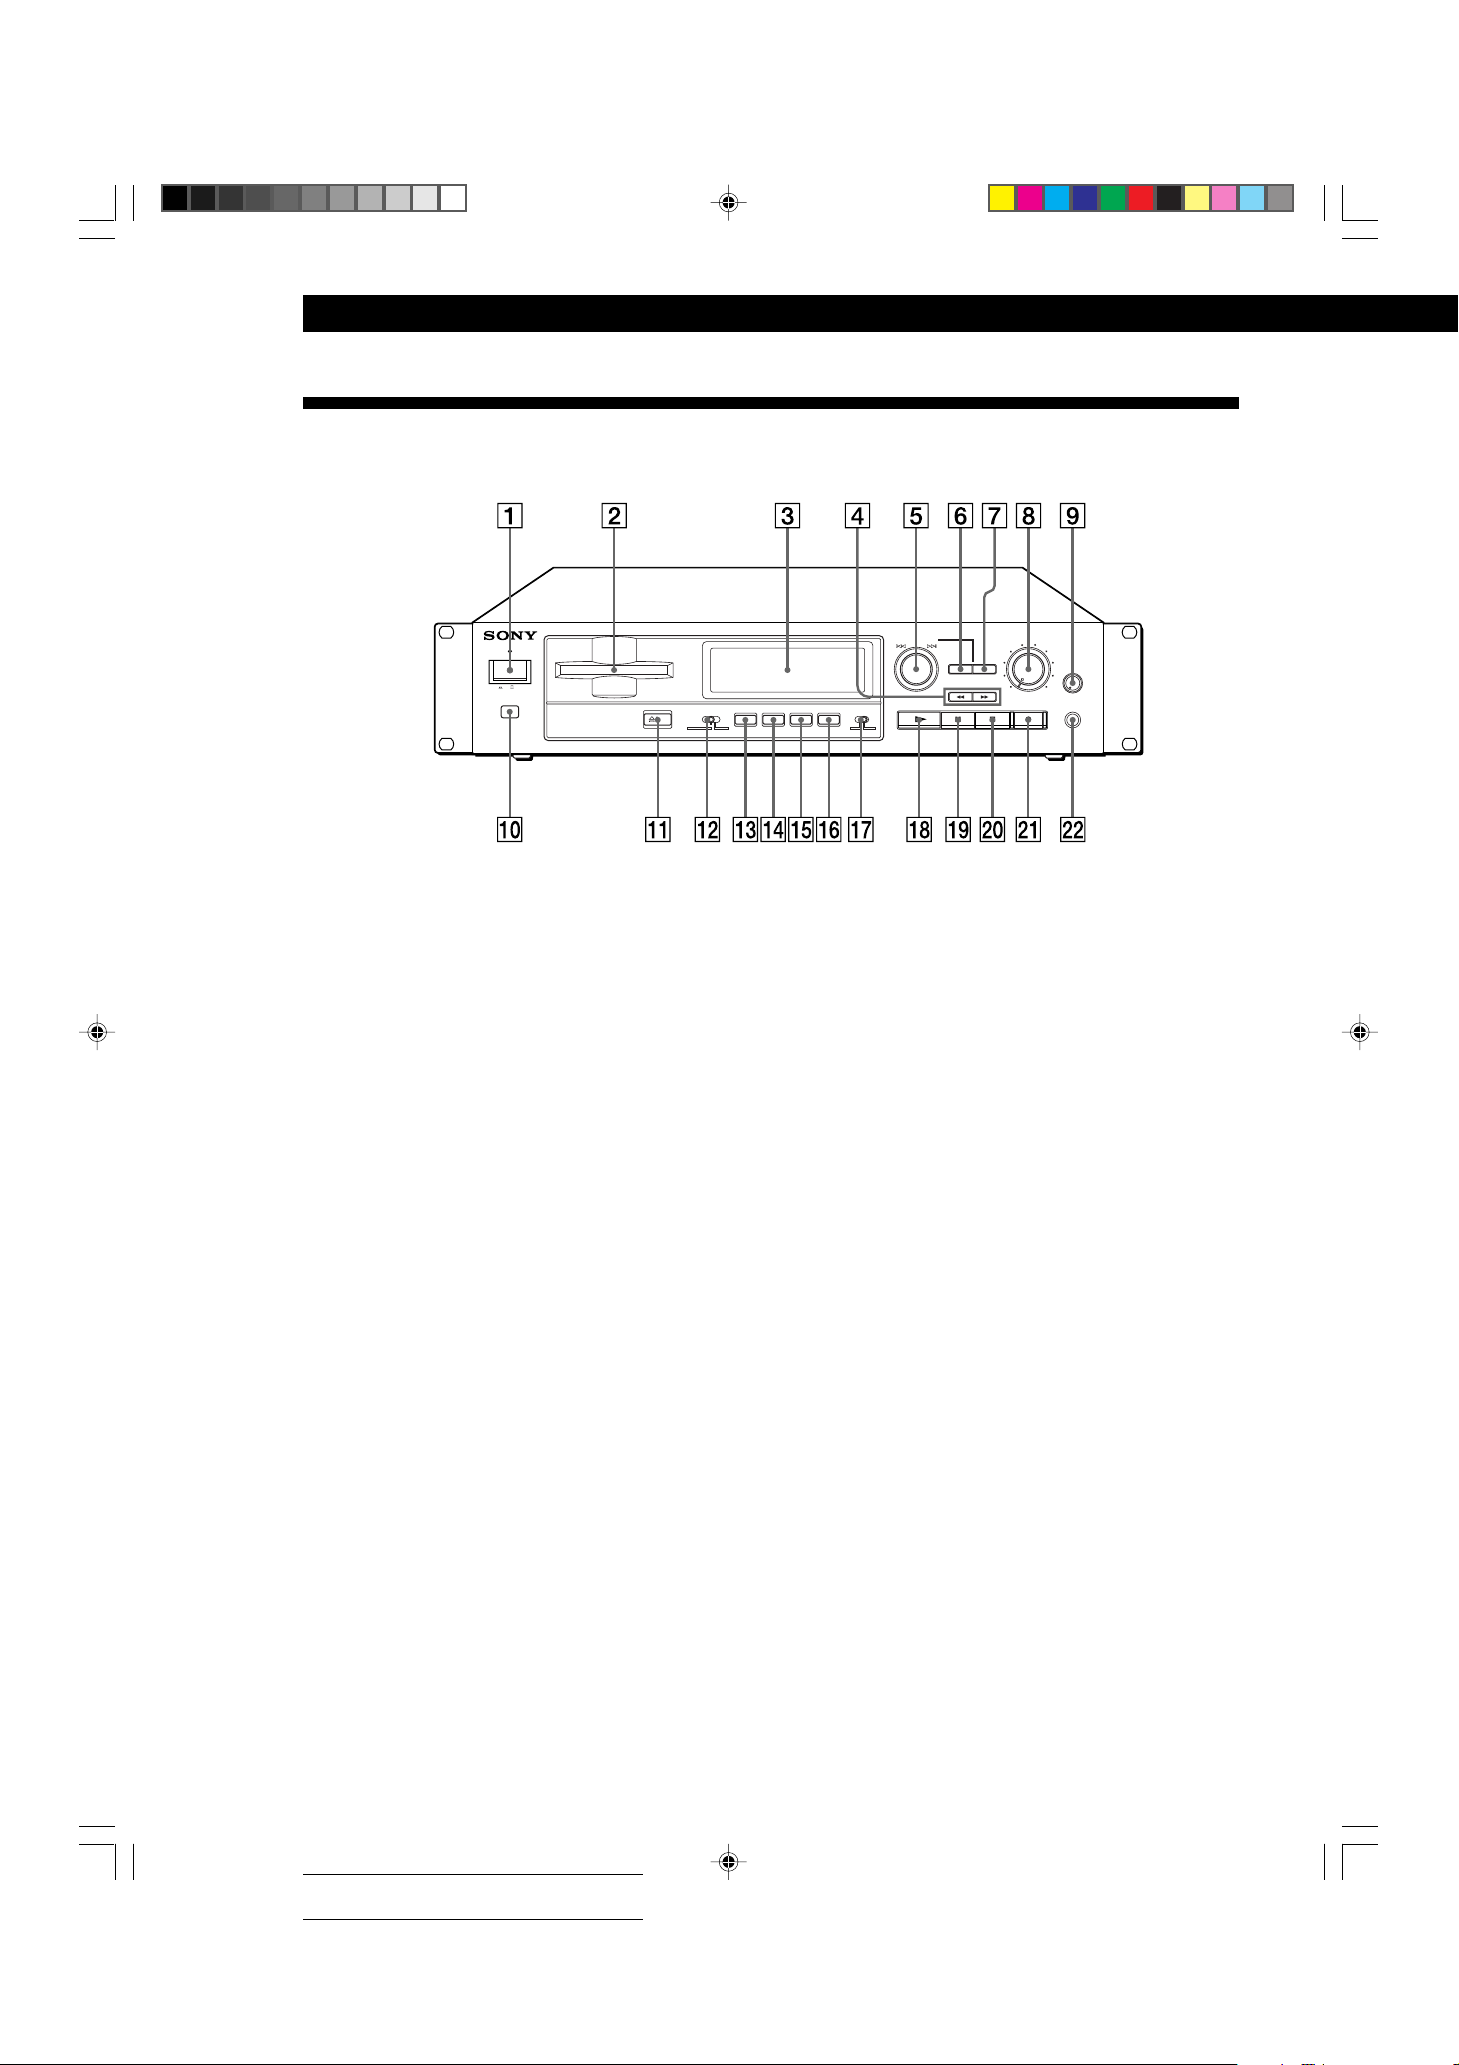
Additional Information
Index of Parts and Controls
STANDBY
ON OFF
EJECT
INPUT
DIGITAL COAXOPT ANALOG
DISPLAY/CHAR
A.SPACE/A.PAUSE
PLAY MODE
)
AMS(PUSH ENTER
NO
EDIT
REC MODE
REPEAT
MONO STEREO
REC LEVEL
5
4
6
3
YES
7
2
PHONE
8
LEVEL
1
9
10
0
MIN MAX
PHONES
1 U (power) switch
2 Disc compartment
3 Display
4 0/) (fast forward/rewind) buttons
5 AMS control
6 EDIT/NO button
7 YES button
8 REC LEVEL control
9 PHONE LEVEL control
0 Remote sensor
!¡ § EJECT button
!™ INPUT selector
!£ DISPLAY/CHAR button
!¢ A.SPACE/A.PAUSE button
!∞ PLAY MODE button
!§ REPEAT button
!¶ REC MODE selector
!• · (play) button
!ª P (pause) button
@º p (stop) button
@¡ r (record) button
@™ PHONES jack
32
1/28-36_MDS-E52.12E 99.1.29, 10:21 AM32
Actual total number: Sony Sound Tec MDS-E52(E) 2-346-702-12(1)
Page 33
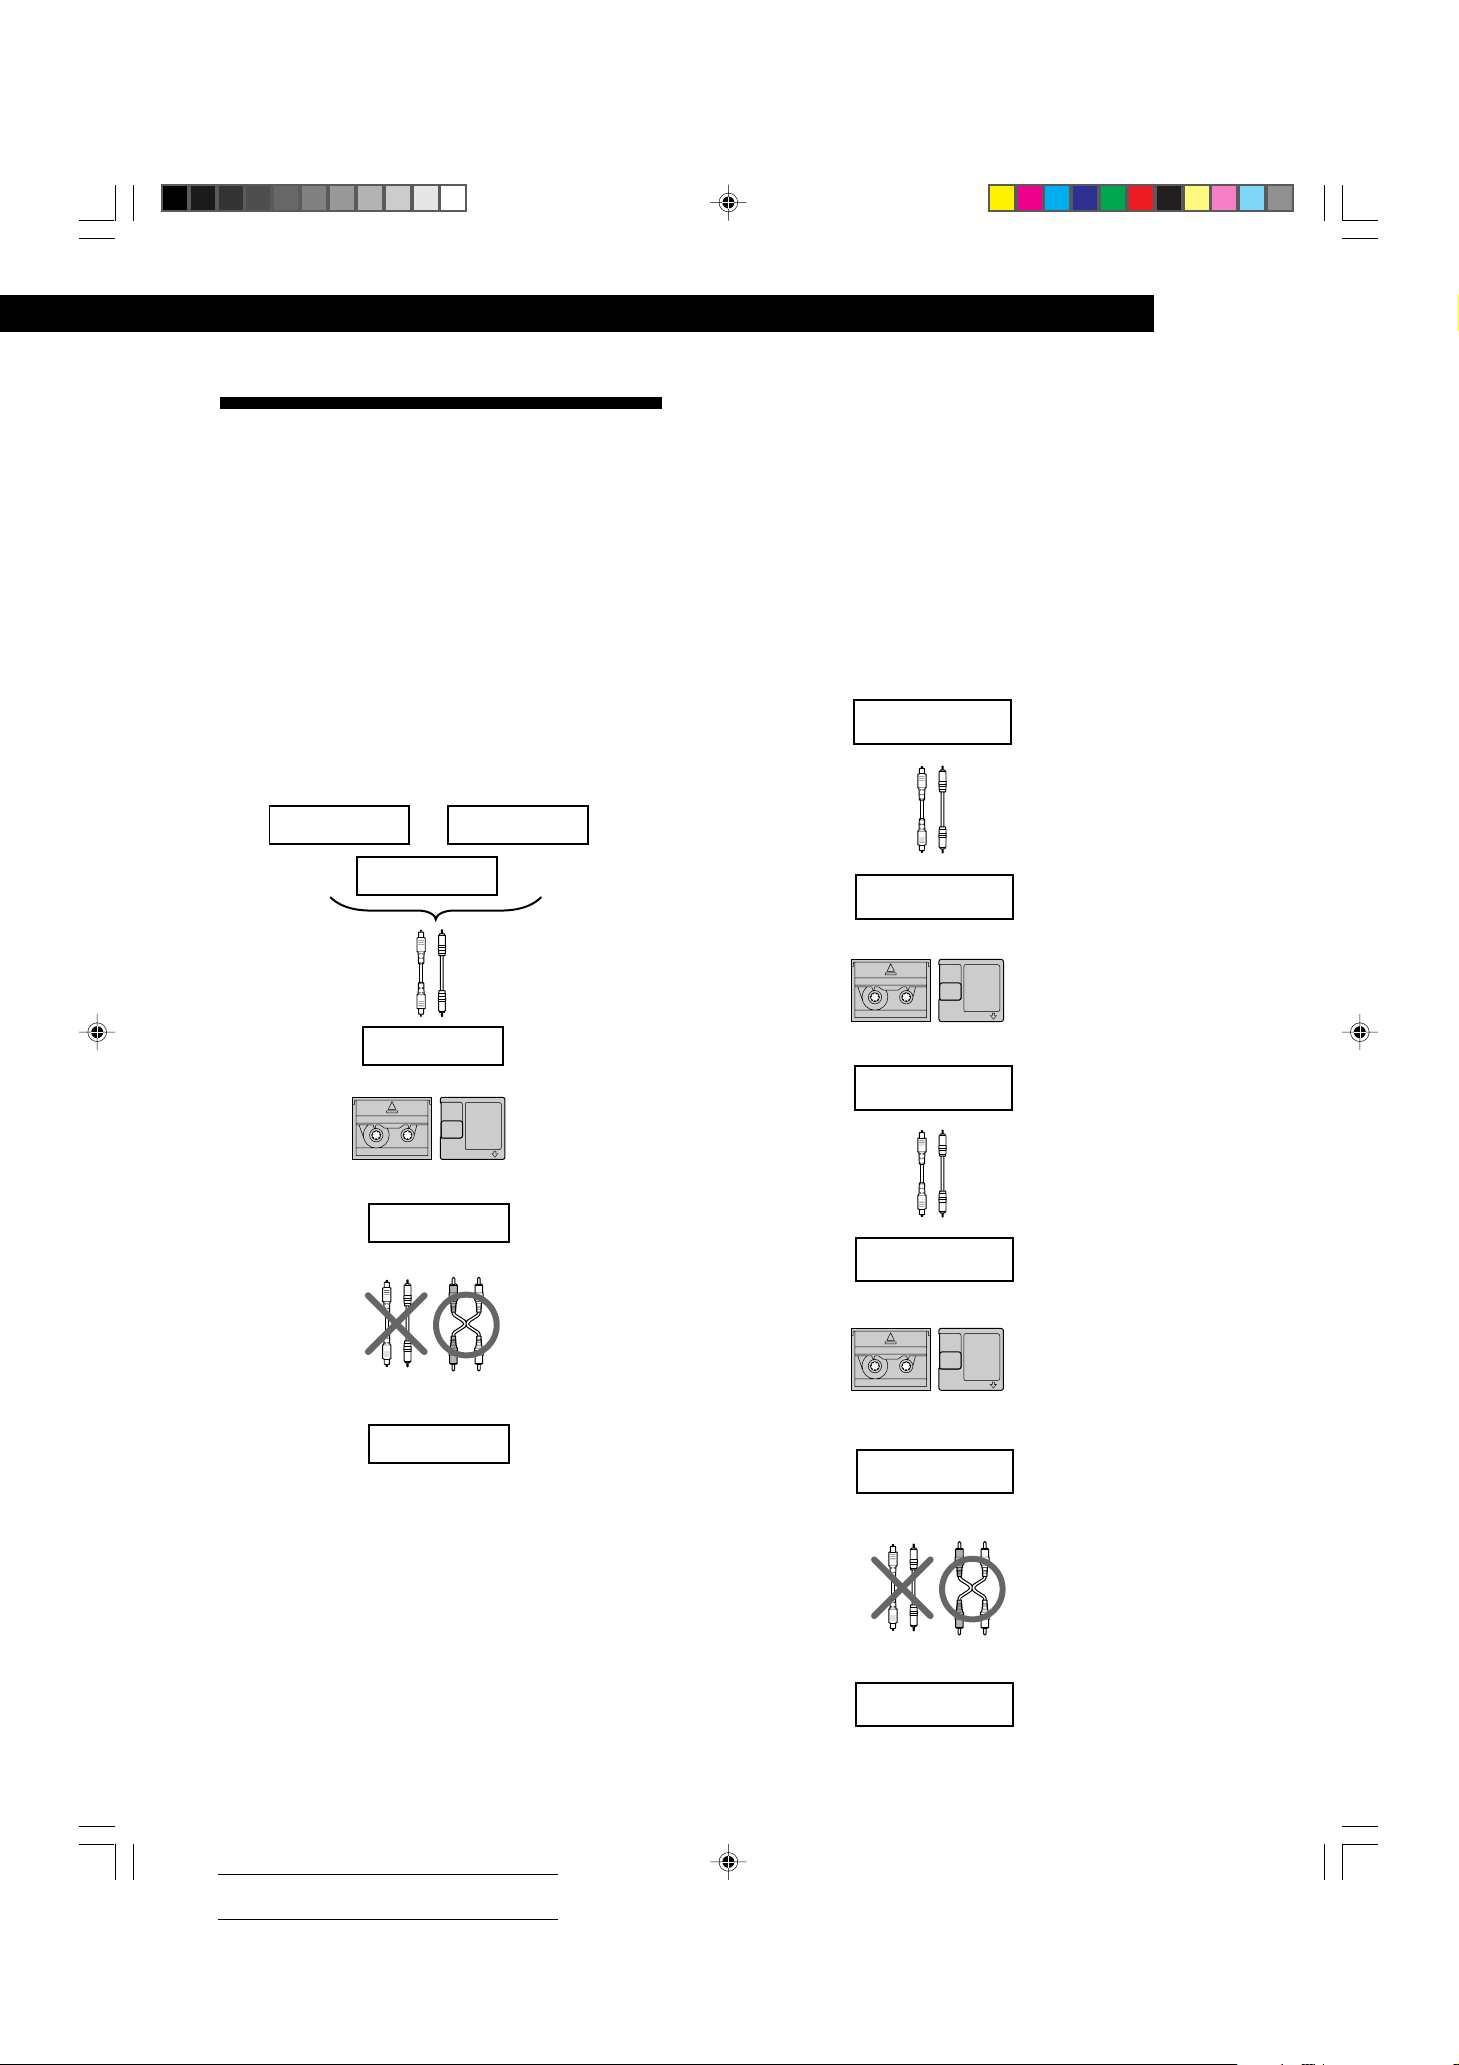
Guide to the Serial Copy
Management System
This MD recorder uses the Serial Copy Management
System, which allows only first-generation digital
copies to be made of premastered software via the
recorder’s digital input jack. An outline of this system
appears below:
1 You can record from digital program sources (CDs, DATs
or premastered MDs) onto a DAT tape or recordable MD
via digital input jack on the DAT or MD recorder.
You cannot, however, record from this recorded DAT tape
or MD onto another DAT tape or recordable MD via the
digital input jack on the DAT or MD recorder.
CD player
DAT recorder
Additional Information
Additional Information
2 You can record the digital input signal of a digital satellite
broadcast onto a DAT tape or recordable MD via the
digital input jack on the DAT or MD recorder which is
capable of handling a sampling frequeny of 32 kHz or 48
kHz. You can then record the contents of this recorded
DAT tape or MD (first-generation) onto another DAT tape
or recordable MD via digital input jack on the DAT or MD
recorder to create a second-generation digital copy.
Subsequent recording from the second-generation copy
onto another recordable DAT tape or MD is possible only
through the analog input jack on the DAT or MD recorder.
Note, however, that on some BS tuners, second-generation
digital copying may not be possible.
Playing
Optical cable or
coaxial digital
connecting cable
BS tuner
Digital output jack
Digital input jack
Playing
Optical cable or
coaxial digital
connecting cable
Recording
DAT or MD
MD recorder
Digital output jack
Digital input jack
DAT recorder or
MD recorder
v
First-generation
DAT tape or MD
recorded via
digital-to-digital
connection
v
Playing
Digital output jack Line (analog) output jacks
Optical cable or
coaxial digital
connecting cable
Digital input jack Line (analog) input jacks
Recording
DAT recorder or
MD recorder
Audio connecting
cord
DAT recorder or
MD recorder
Recording
DAT or MD
Playback
Optical cable or
coaxial digital
connecting cable
Recording
DAT or MD
Playback
DAT recorder or
MD recorder
v
v
DAT recorder or
MD recorder
DAT recorder or
MD recorder
v
v
DAT recorder or
MD recorder
First-generation
DAT tape or MD
recorded via
digital-to-digital
connection
Digital output jack
Digital input jack
Secondgeneration DAT
tape or MD
recorded via
digital-to-digital
connection
1/28-36_MDS-E52.12E 99.1.29, 10:22 AM33
Actual total number: Sony Sound Tec MDS-E52(E) 2-346-702-12(1)
Digital output jack
Optical cable or
coaxial digital
connecting cable
Digital input jack
Recording
Line (agalog) output jacks
Audio connecting
cord
Line (analog) input jacks
DAT recorder or
MD recorder
(Continued)
33
Page 34
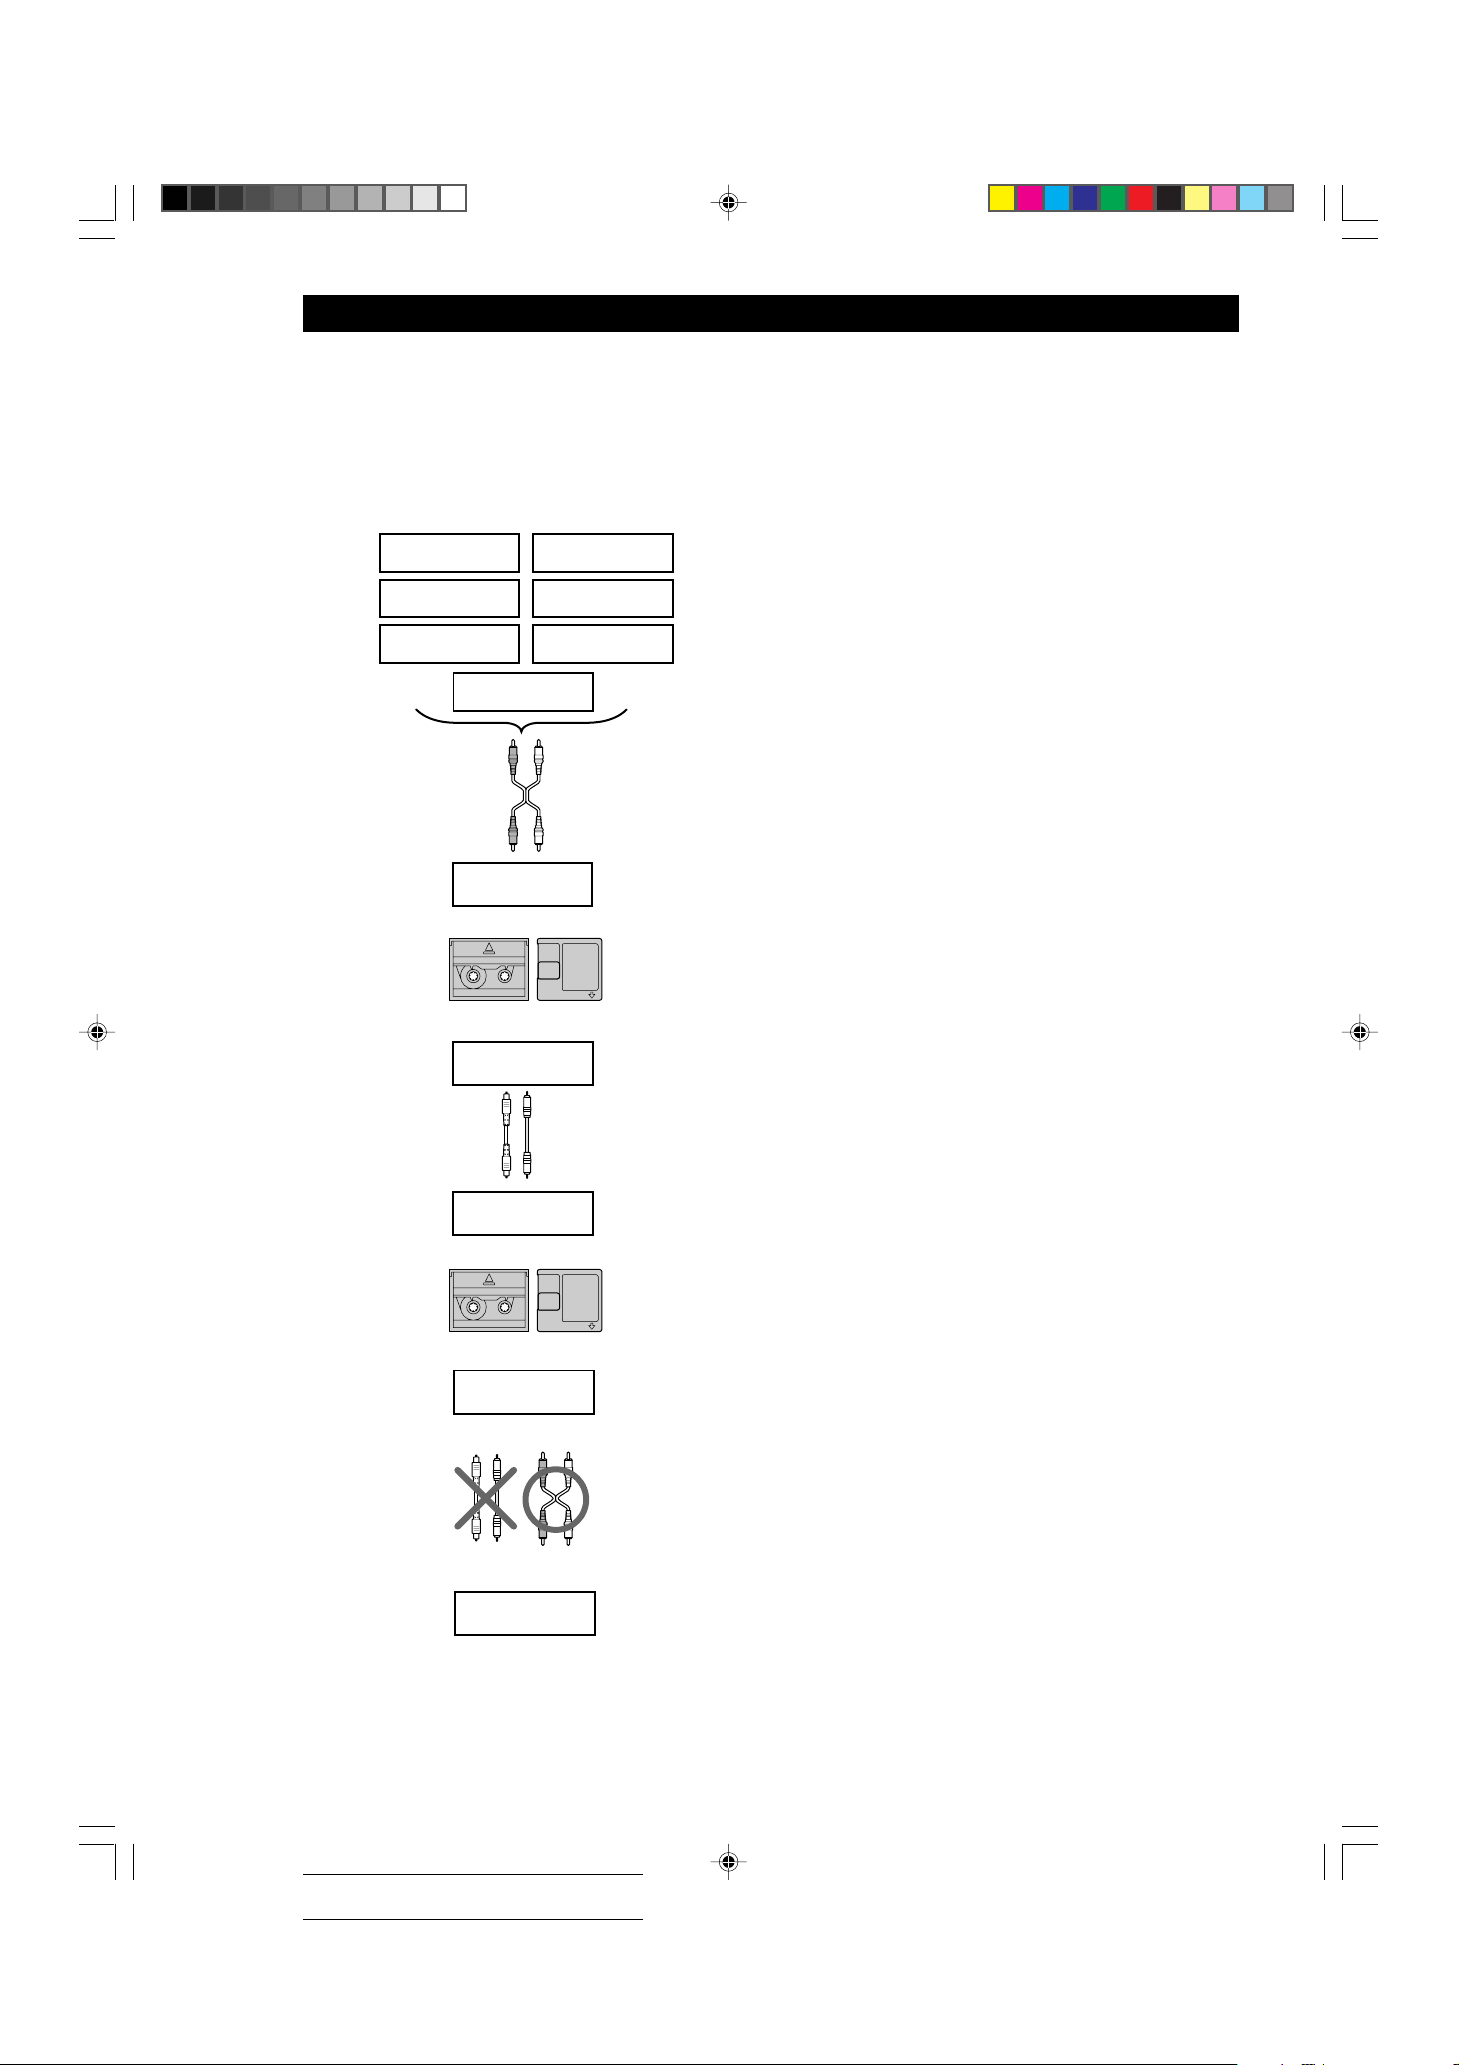
Additional Information
3 You can record a DAT tape or MD recorded via the DAT
or MD recorder’s analog input jack onto another DAT tape
or MD via the DAT or MD recorder’s digital output jack.
You cannot, however, make a second-generation DAT
tape or MD copy via the DAT or MD recorder’s digital
output jack.
Turntable
CD player
DAT recorder
Playing
Audio connecting cord
Recording
DAT or MD
Playing
Optical cable or
coaxial digital
connecting cable
MD recorder
DAT recorder or
MD recorder
DAT recorder or
MD recorder
Tuner
Cassette recorder
Microphone
amplifier
Line (analog)
output jacks
Line (analog)
input jacks
v
DAT tape or MD
recorded via
analog-to-digital
connection
v
Digital output jack
Digital input jack
34
Recording
DAT or MD
Playing
Digital output jack
Optical cable or
coaxial digital
connecting cable
Digital input jack
Recording
DAT recorder or
MD recorder
v
v
DAT recorder or
MD recorder
Line (analog) output jacks
Line (analog) input jacks
DAT recorder or
MD recorder
First-generation
DAT tape or MD
recorded via
digital-to-digital
connection
Audio connecting
cord
1/28-36_MDS-E52.12E 99.1.29, 10:22 AM34
Actual total number: Sony Sound Tec MDS-E52(E) 2-346-702-12(1)
Page 35

Additional Information
Additional Information
1/28-36_MDS-E52.12E 99.1.29, 10:22 AM35
Actual total number: Sony Sound Tec MDS-E52(E) 2-346-702-12(1)
35
Page 36

Additional Information
Sony Corporation Printed in Japan
36
1/28-36_MDS-E52.12E 99.1.29, 10:22 AM36
Actual total number: Sony Sound Tec MDS-E52(E) 2-346-702-12(1)
 Loading...