

Page 1
Line Shot Printer
2-318-474-12 (1)
Instructions For Use
LPR-1000MD
© 2004 Sony Corporation
Page 2
Owner's Record
The model and serial numbers are located at the rear.
Record these numbers in the space provided below.
Refer to these numbers whenever you call upon your
Sony dealer regarding this product.
Model No. ____________________
Serial No. ____________________
For the customers in Canada
This unit has been certified according to Standard CSA
C22.2 NO.60601.1.
For the customers in the U.S.A and
Canada
Model LPR-1000MD is Non-Patient Equipment.
This unit can not be used in the vicinity of patients.
WARNING
To prevent fire or shock hazard, do not expose
the unit to rain or moisture.
To avoid electrical shock, do not open the
cabinet. Refer servicing to qualified personnel
only.
THIS APPARATUS MUST BE EARTHED.
This symbol indicates the equipotential
terminal which brings the various parts of a
system to the same potential.
This symbol is intended to alert the user to
the presence of important operating and
maintenance (servicing) instructions in the
literature accompanying the appliance.
For the customers in the U.S.A.
This equipment has been tested and found to comply
with the limits for a Class A digital device, pursuant to
Part 15 of the FCC Rules. These limits are designed to
provide reasonable protection against harmful
interference when the equipment is operated in a
commercial environment. This equipment generates,
uses, and can radiate radio frequency energy and, if not
installed and used in accordance with the instruction
manual, may cause harmful interference to radio
communications. Operation of this equipment in a
residential area is likely to cause harmful interference in
which case the user will be required to correct the
interference at his own expense.
You are cautioned that any changes or modifications not
expressly approved in this manual could void your
authority to operate this equipment.
The shielded interface cable recommended in this
manual must be used with this equipment in order to
comply with the limits for a digital device pursuant to
Subpart B of Part 15 of FCC Rules.
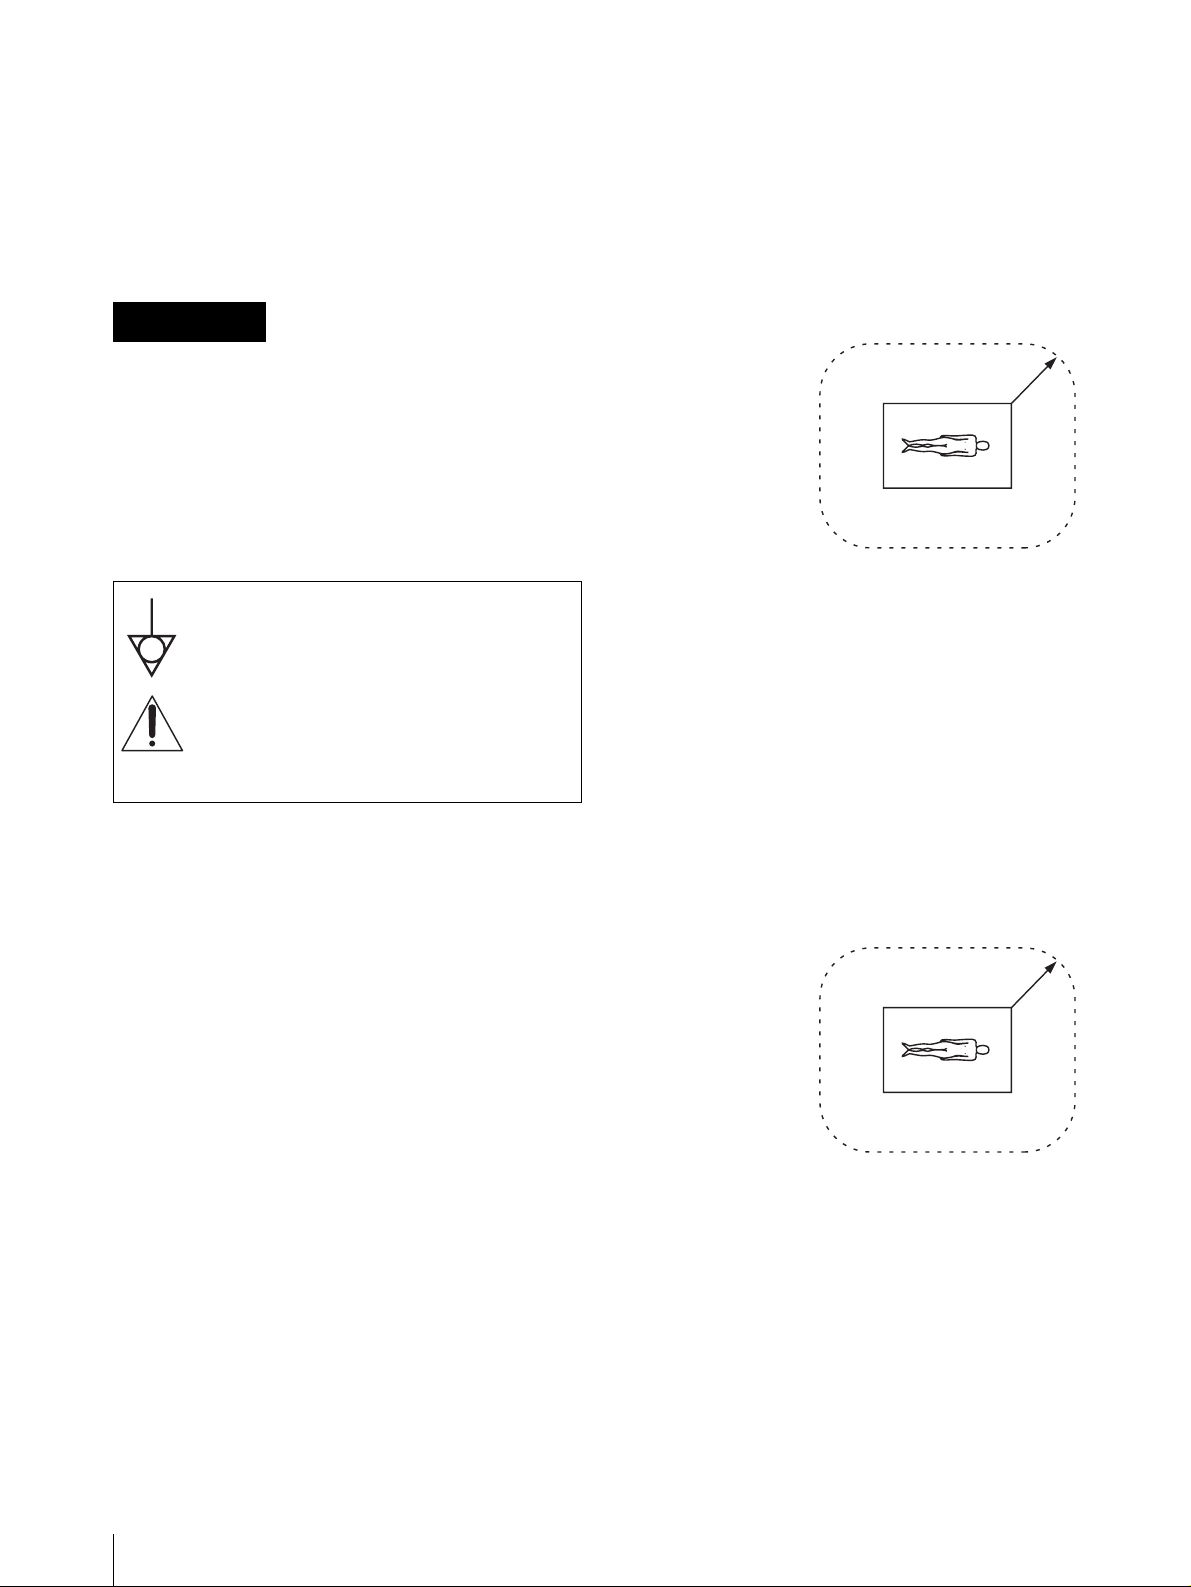
* Patient Vicinity
R1.83m
(6 feet)
Important safeguards/notices for use in
the medical environments
1. All the equipments connected to this unit shall be
certified according to Standard IEC60601-1,
IEC60950, IEC60065 or other IEC/ISO Standards
applicable to the equipments.
2. When this unit is used together with other equipment
in the patient area*, the equipment shall be either
powered by an isolation transformer or connected via
an additional protective earth terminal to system
ground unless it is certified according to Standard
IEC60601-1.
* Patient Area
R1.5m
3. The leakage current could increase when connected
to other equipment.
4. This equipment generates, uses, and can radiate
frequency energy. If it is not installed and used in
accordance with the instruction manual, it may cause
interference to other equipment. If this unit causes
interference (which can be determined by
unplugging the power cord from the unit), try these
measures: Relocate the unit with respect to the
susceptible equipment. Plug this unit and the
susceptible equipment into different branch circuit.
2
Page 3
Consult your dealer. (According to standard
EN60601-1-2 and CISPR11, Class B, Group 1)
Caution
When you dispose of the unit or accessories, you must
obey the law in the relative area or country and the
regulation in the relative hospital.
Warning on power connection
Use a proper power cord for your local power supply.
1. Use the approved Power Cord (3-core mains lead) /
Appliance Connector / Plug with earthing-contacts
that conforms to the safety regulations of each
country if applicable.
2. Use the Power Cord (3-core mains lead) / Appliance
Connector /Plug conforming to the proper ratings
(Voltage, Ampere).
Warning on power connection for
medical use
Please use the following power supply cord.
With connectors (plug or female) and cord types other
than those indicated in this table, use the power supply
cord that is approved for use in your area.
United States Canada
Plug Type HOSPITAL GRADE* HOSPITAL GRADE*
Female end E62405, E35708 LR53182, LL022442,
Cord type E159216, E35496
Minimum cord set
rating
Safety approval UL Listed CSA
*Note: Grounding reliability can only be achieved when the equipment
is connected to an equivalent receptacle marked ‘Hospital Only’ or
‘Hospital Grade’.
Min.Type SJT
Min.18 AWG
10A/125V 10A/125V
LL088408
LL112007-1, LL20262,
LL32121, LL84494
Min.Type SJT
Min.18AWG
(For Customers in Taiwan only)
3
Page 4

Table of Contents
Introduction
About This Manual ............................................... 5
System Overview ................................................... 6
Location and Function of Parts and Controls .... 6
Front ................................................................... 6
When the Head Cover is Opened ....................... 7
Rear .................................................................... 8
Preparation
Turning the Printer On/Off .................................. 9
Turning the Printer On ....................................... 9
Setting the Printer to Standby Mode .................. 9
Turning the Printer Off ....................................... 9
Relationship Between the ON/STANDBY
Indicator and the READY indicator ............... 10
Preparing Paper .................................................. 11
Recommended Paper ........................................ 11
Available Printing Area .................................... 11
Notes on Paper ................................................. 11
Loading Paper ..................................................... 12
Operation
Performing Basic Print Settings ......................... 15
Displaying the Print Preferences Dialog Box from
a Software Application ................................... 15
Displaying the Printing Preferences Dialog Box
from the Windows Start Menu ....................... 15
Common Operations on Each Tab of the Printing
Preferences Dialog Box ................................. 16
Performing Settings on the Main Tab ................ 17
Settings for Paper ............................................. 17
Selecting the Gamma Type .............................. 18
Performing Settings on the Layout Tab ............. 19
Setting the Print Orientation ............................ 19
Printing Multiple Pages on One Sheet ............. 19
Printing Single Page Printing Data on Multiple
Sheets ............................................................. 21
Using the Help Window ...................................... 22
Displaying the Description of Functions of Setting
Items ............................................................... 22
Displaying Information on Operation Methods 23
Cancelling a Print Job ......................................... 23
Cancelling a Print Job from the Windows Spooler
Window .......................................................... 23
Cancelling a Print Job from the Status Monitor ...
24
Cancelling a Print Job From the Operation Panel
of the Printer ................................................... 24
Useful Functions ...................................................25
Aligning the Print Position ..............................25
Advanced Functions .........................................26
Embedding Stamps on the Printouts .................26
Sort Printing ......................................................33
Setting the Printing Order .................................34
Saving and Retrieving Print Settings .................34
Saving Print Settings .........................................34
Changing the Print Settings ..............................35
Retrieving the Print Settings Saved ..................36
Deleting Unnecessary Print Settings ................37
Monitor Function
Using the Status Monitor ....................................38
Displaying the Status Monitor ..........................38
Confirming the Ink Level .................................38
Controlling the Print Job ...................................38
Maintenance
Cleaning the Head ................................................40
Cleaning the Head from the Printer Driver .......40
Cleaning the Head From the Operation Panel ..41
Printing a Test Page .............................................42
Printing a Test Page from the Printer Driver ....42
Printing a Test Page From the Operation Panel 42
Replacing the Ink Cartridges ..............................43
Replacing the Head Cleaning Roller ..................46
Miscellaneous
Precautions ...........................................................50
Safety ................................................................50
Handling the Printer ..........................................50
Installation ........................................................50
Before Moving the Printer ................................51
Before Transporting the Printer ........................51
Before Asking Repairment ...............................52
When Not Using the Printer for Long Periods .52
Troubleshooting ....................................................52
Error Messages ....................................................54
Warning Display ...............................................54
Error Messages .................................................54
If the Paper Jams ...............................................56
Before Consulting Your Dealer ...........................59
Specifications ........................................................59
Requirements for the Printer Driver .................60
Menu Flow of the Printer Window Display .......62
Setting Items for the Printer Driver ...................65
Customer Confirmation Sheet ............................65
Index ......................................................................66
4
Page 5
Introduction
About This Manual
The following manuals are supplied with the LPR1000MD printer.
Setup Manual
Be sure to read this manual, first.
This manual gives advice including operating
instructions, for tasks you should perform before you
make printouts using this printer after you purchase it.
This manual also gives advice on installing the printer,
information on locations and functions of parts and
controls, information on assembling the printer,
information on connections to the computer and setup
required for using the printer, and advice on installing
and uninstalling printer drivers, and so on.
Instructions For Use (this manual)
The Operating Instructions manual is included on the
CD-ROM in PDF format.
Read this manual before starting actual printing.
This manual describes basic operations and functions, as
well as how to use the LPR-1000MD. It includes
information on basic operating procedures, how to setup
the various printing methods, maintenance,
troubleshooting, and so on.
results, pay careful attention to these precautions, and
the “Precautions” on page 50.
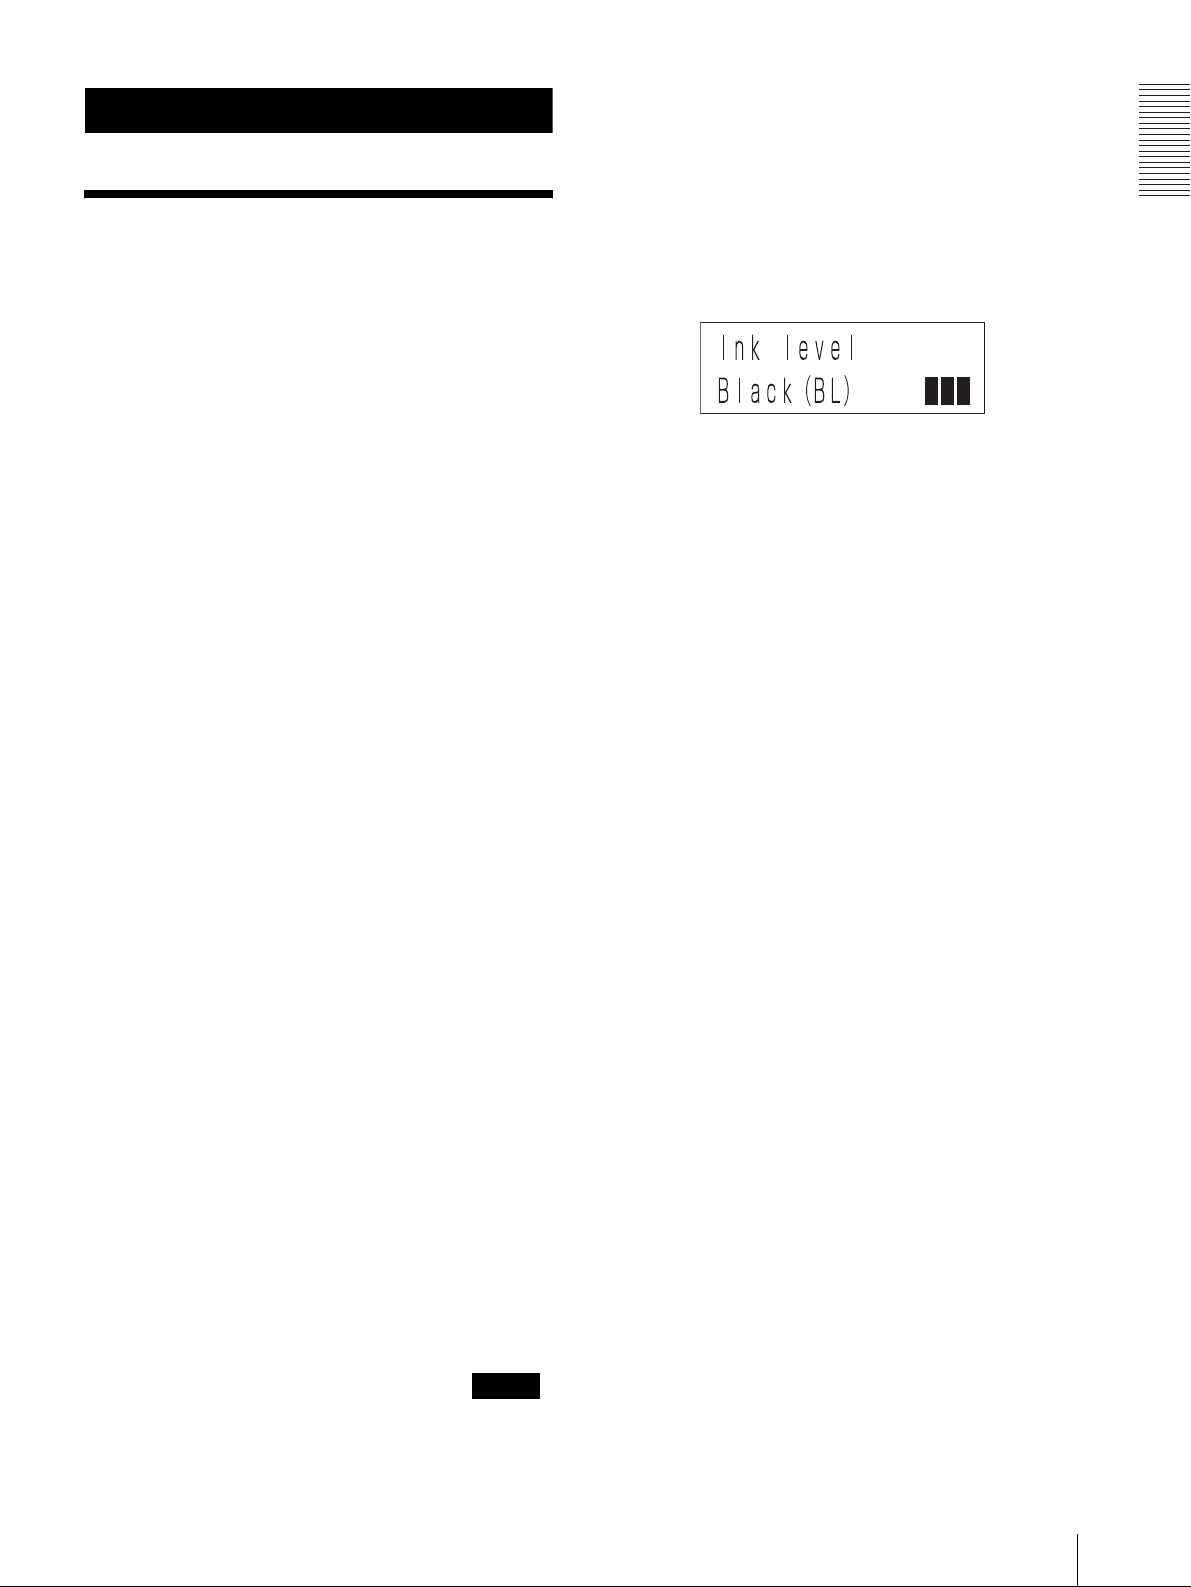
Operation panel display
On the operation panel display of the printer, messages
are displayed on two lines. In this manual, a slash (/) is
inserted between information displayed on the upper
and lower lines.
Ink level /Black (BL)
Windows screen
In this manual, Windows XP screens are used for
explanation.
Introduction
CD-ROM
This disc includes the printer drivers, and PDF files of
the multi-lingual Instructions For Use and Setup
Manual.
Help window
An explanation appears when you click the “?” mark on
the upper right of the window of the printer driver or
when you click the “Help” button.
Read this manual when you are in trouble.
Conventions used
Cross references
Throughout this manual you will find references to other
sections of the manual that contained related
information.
Also, when the related information is contained in the
printed Setup Manual, you will find the title of the
printed Setup Manual.
Important note
Be sure to read sections of the manual marked .
To prevent damage and avoid trouble or unexpected
Note
About This Manual
5
Page 6
System Overview
Location and Function
The Sony LPR-1000MD is an ink jet printer which is
Introduction
equipped with a high-speed line shot.
The LPR-1000MD has the following features.
High-speed line shot
The printer is equipped with a high-speed line shot.
Since the line shot method is applied, the ink is sprayed
out at a stretch while the paper passes under the print
head of the longer page width to print the pictures and
characters of the print data. It takes only six seconds for
the paper to pass under the print head. That is the actual
printing time. Also, the optimum LD shot technology is
incorporated in the line shot.
A quiet printer for a work-friendly environment
Use of a fixed-type print head reduces the noise or
vibration which occurs while the print head is printing.
This allows you to enjoy a quiet, work-friendly
environment.
USB connector
The printer is equipped with a USB connector.
Pure paper extracting the printer
characteristics
The EPP-300A4MD Sony High Quality Paper (not
supplied) comes in 100 sheet packs and has good color
and a high degree of whiteness. Since this coated paper
absorbs the ink quickly, printouts without blotted
characters and with clear, high-quality images can be
made.
of Parts and Controls
The following diagrams show the printer after it is
assembled.
For details, see the pages indicated in parenthesis.
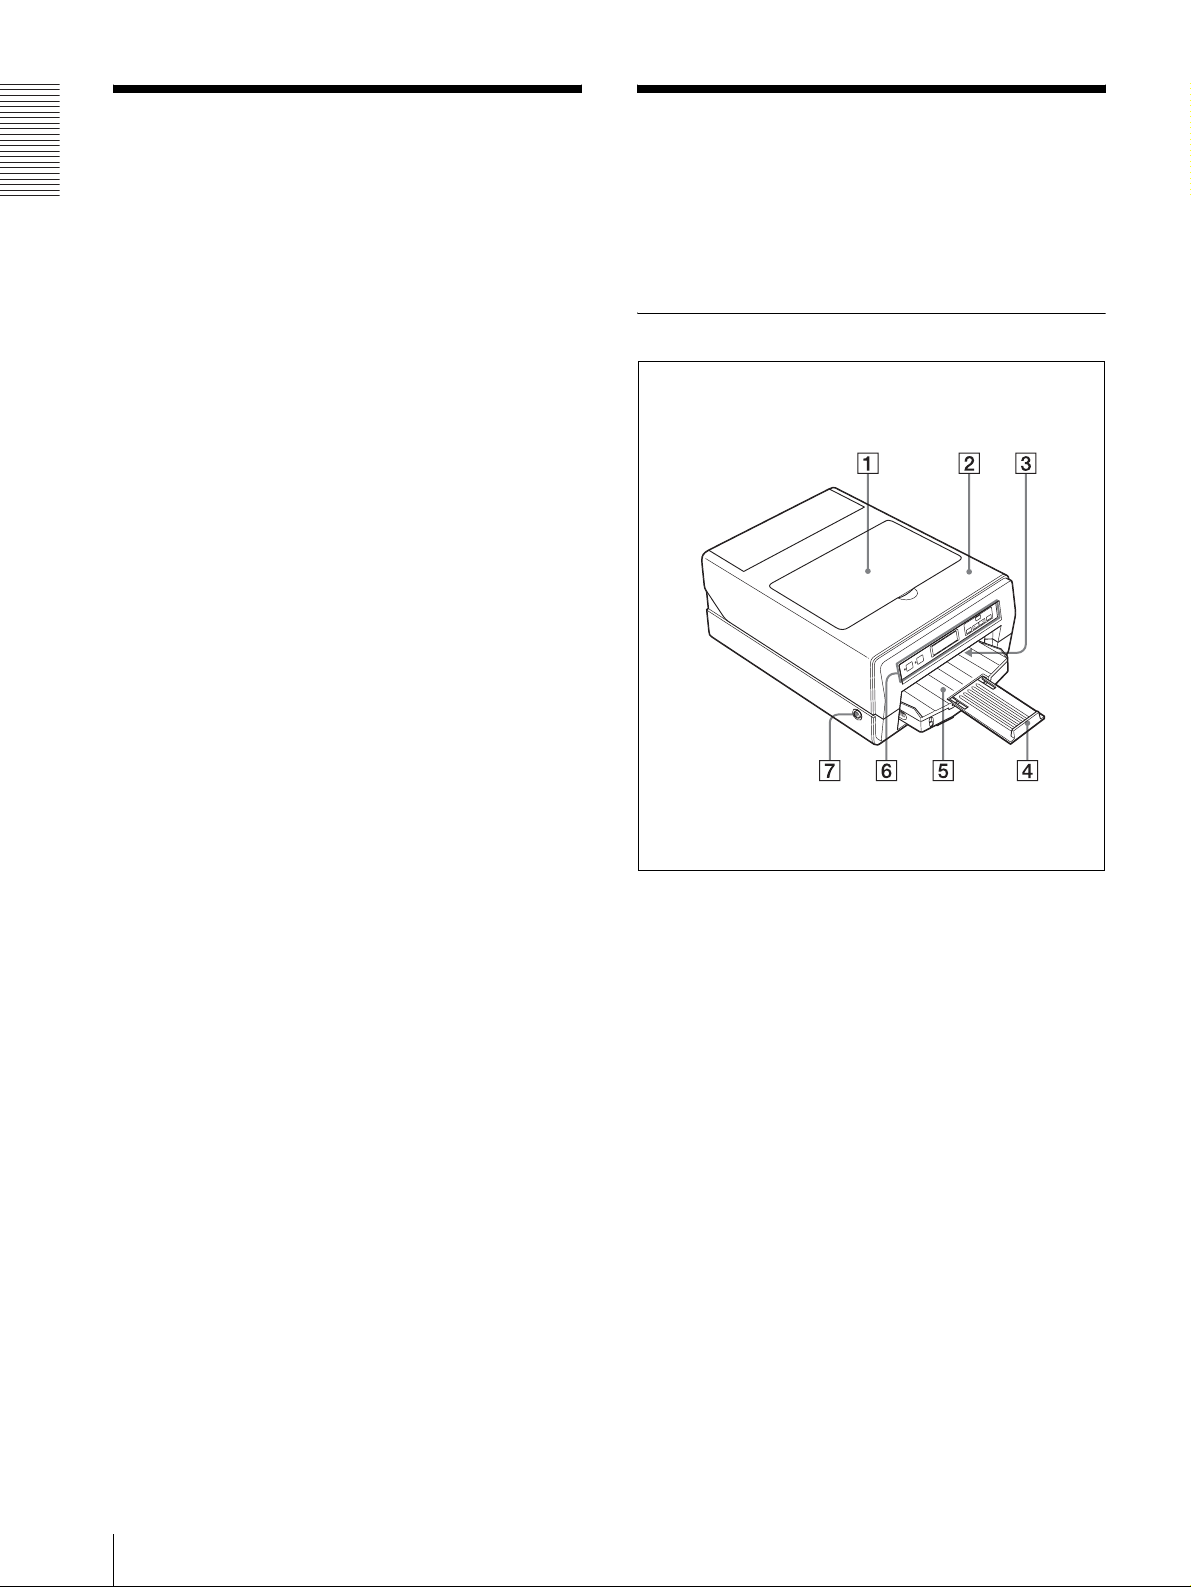
Front
A Head cover (44)
Open this cover to replace the ink cartridges.
6
System Overview / Location and Function of Parts and Controls
B Main cover (57)
Open this cover when removing jammed paper or
correcting a situation where the supplied head
cleaning unit is not inserted correctly.
C Output slot
Printed sheets (printouts) are ejected here.
D Output support (13)
Pull out this output support to hold the ejected
paper.
E Auto sheet feeder tray (12)
Individual sheets of paper are loaded automatically,
one at a time.
Page 7
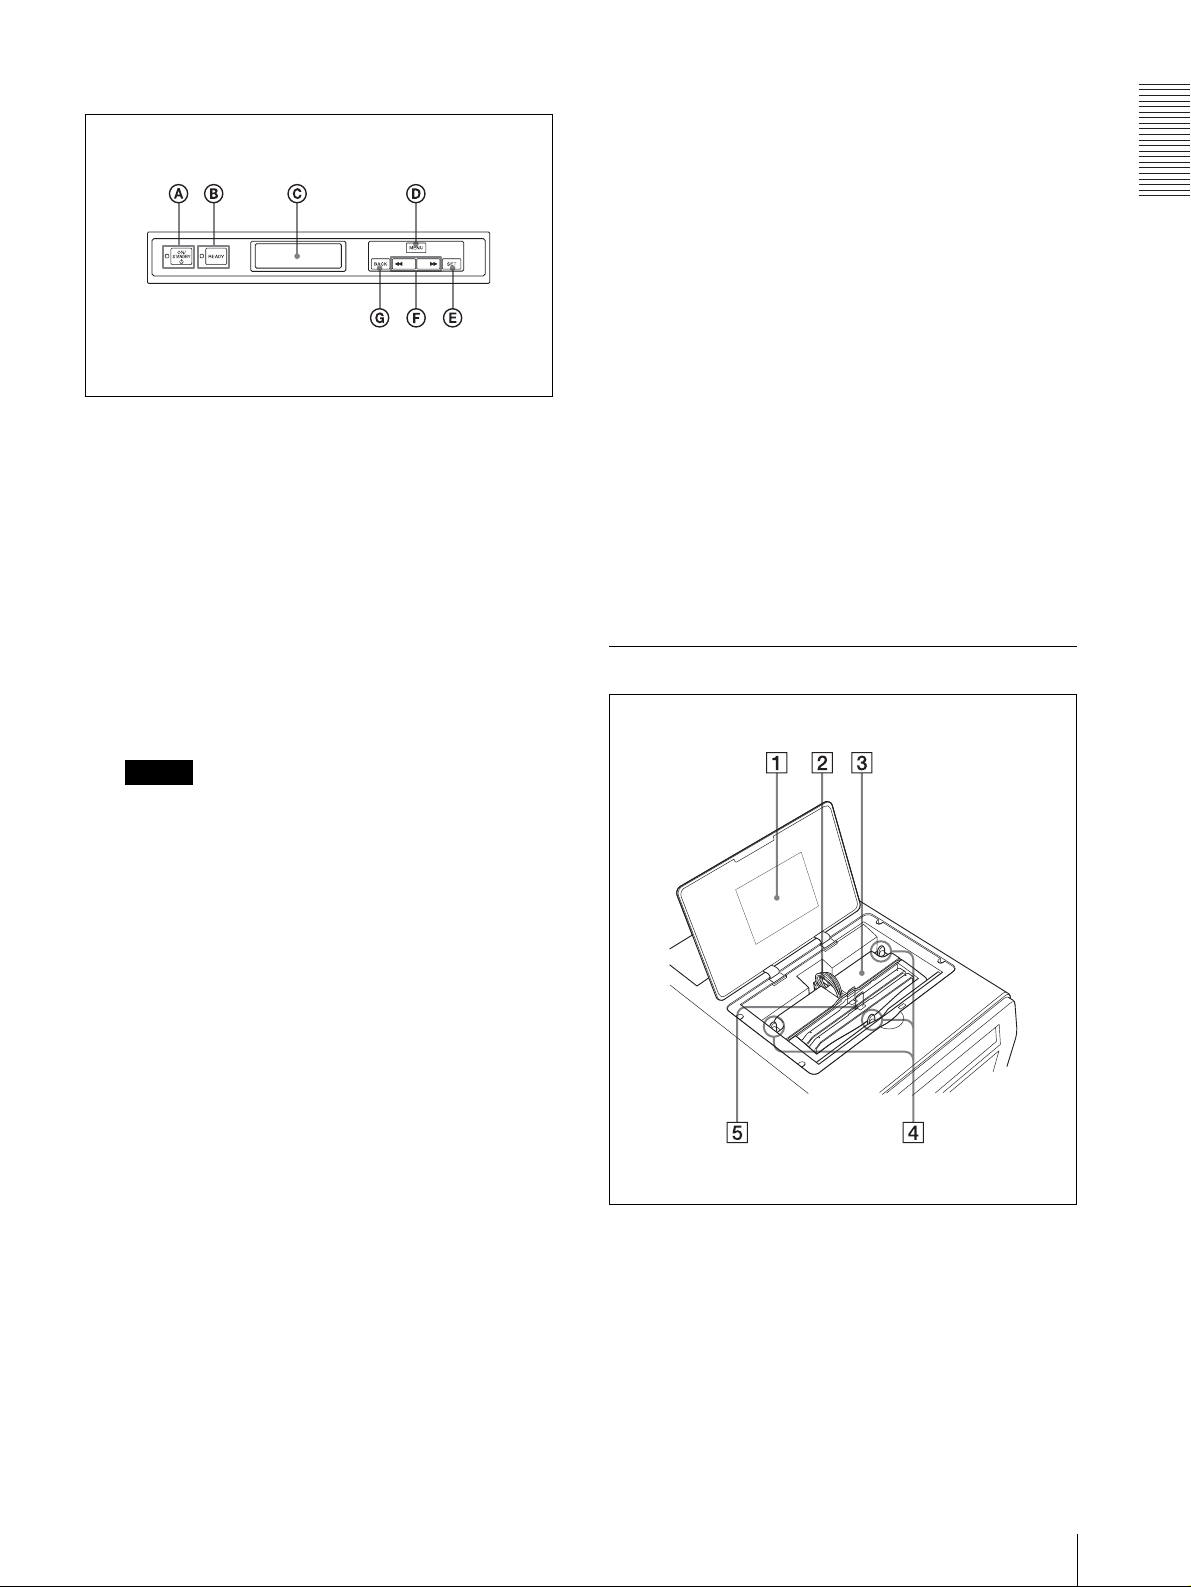
F Operation panel
A 1 ON/STANDBY button/indicator (9, 10)
Used to switch the printer to on or to standby status.
When the ON/STANDBY button is set to on, the
power is on and the indicator lights in green. When
the printer is in standby mode, the indicator lights
in orange. To restore the power from the standby
mode, push the ON/STANDBY button again. In the
standby mode, the printer does not print, however,
power is saved. When the printer is not used for a
long time, it is recommended that you turn the
printer off. To turn the printer off, set this ON/
STANDBY button to the standby mode and set the
main power switch on the rear panel to off.
D MENU button (41, 42, 46, 62)
Push this button to display the menu on the LCD.
E SET button (41, 42, 46, 63)
Used to execute the operation displayed on the
LCD and to go to the next operation/step.
F bb/BB (select) buttons (41, 42, 46, 62)
Used to change setting items or the numerical
values displayed on the LCD.
G BACK button (63)
Used to cancel the condition displayed on the LCD
and to go back to the previous step.
G Eject buttons (57)
Provided on both the left and right sides of the
printer.
Used to open the main cover when removing paper
jammed inside the printer, and so on. Push both left
and right buttons so that the main cover pops open
and you can pull it upward.
When the Head Cover is Opened
Introduction
Note
If the main power switch on the rear panel is not set
to on, the power is not on, even though the ON/
STANDBY button on the front is set to on.
B READY button/indicator (9, 10, 46, 56)
Used to set the printer so that it is ready to receive
data from a computer so that it can be printed.
When you push the MENU button during setup,
when confirming the status, or performing
maintenance, the READY indicator goes off. When
the READY indicator is not lit, the printer cannot
print. If the READY indicator is not lit when you
want to print, push the READY button so that the
indicator will light.
Also, if you push the READY button during
printing, the READY indicator starts blinking and
the printer stops printing temporarily. To restart
printing, push the READY button again.
For detailed information on the relationship
between the ON/STANDBY indicator and the
READY indicator, see “Relationship Between the
ON/STANDBY Indicator and the READY
indicator” on page 10.
A Label
Shows the note on handling the head cover.
B Head cartridge cable
Provided to supply power to the head cartridge.
C Printer window display (Liquid Crystal Display
(LCD)) (41, 42, 46, 55, 62)
Displays messages during setup, when confirming
the status, or performing maintenance.
C Head cartridge
This head cartridge is equipped with a print head.
The ink sprays out from the print head when
printing.
Location and Function of Parts and Controls
7
Page 8
D Head cartridge lock screws (three positions)
Used to lock the head cartridge. Do not move these
to on, the power to the printer is on when the ON/
STANDBY button on the front panel is set to on.
screws from the lock position.
Note on turning the main power off
E Ink cartridge holder (43)
Introduction
One black ink cartridge holder and one gray ink
cartridge holder are attached. If one of them runs
out, the printer cannot print.
Use the following ink cartridges for replacing.
Black: EPI-L100BL Sony Ink Cartridge
Gray:EPI-L100GL Sony Ink Cartridge
The printer may automatically perform
maintenance operations when print operations are
not being performed. Also, when the printer is set to
standby mode by pushing the ON/STANDBY
button, the printer may also automatically perform
maintenance tasks so that the printer will work
properly when the power is turned on again. After
this maintenance is performed, the printer is reset to
standby mode. During maintenance, the READY
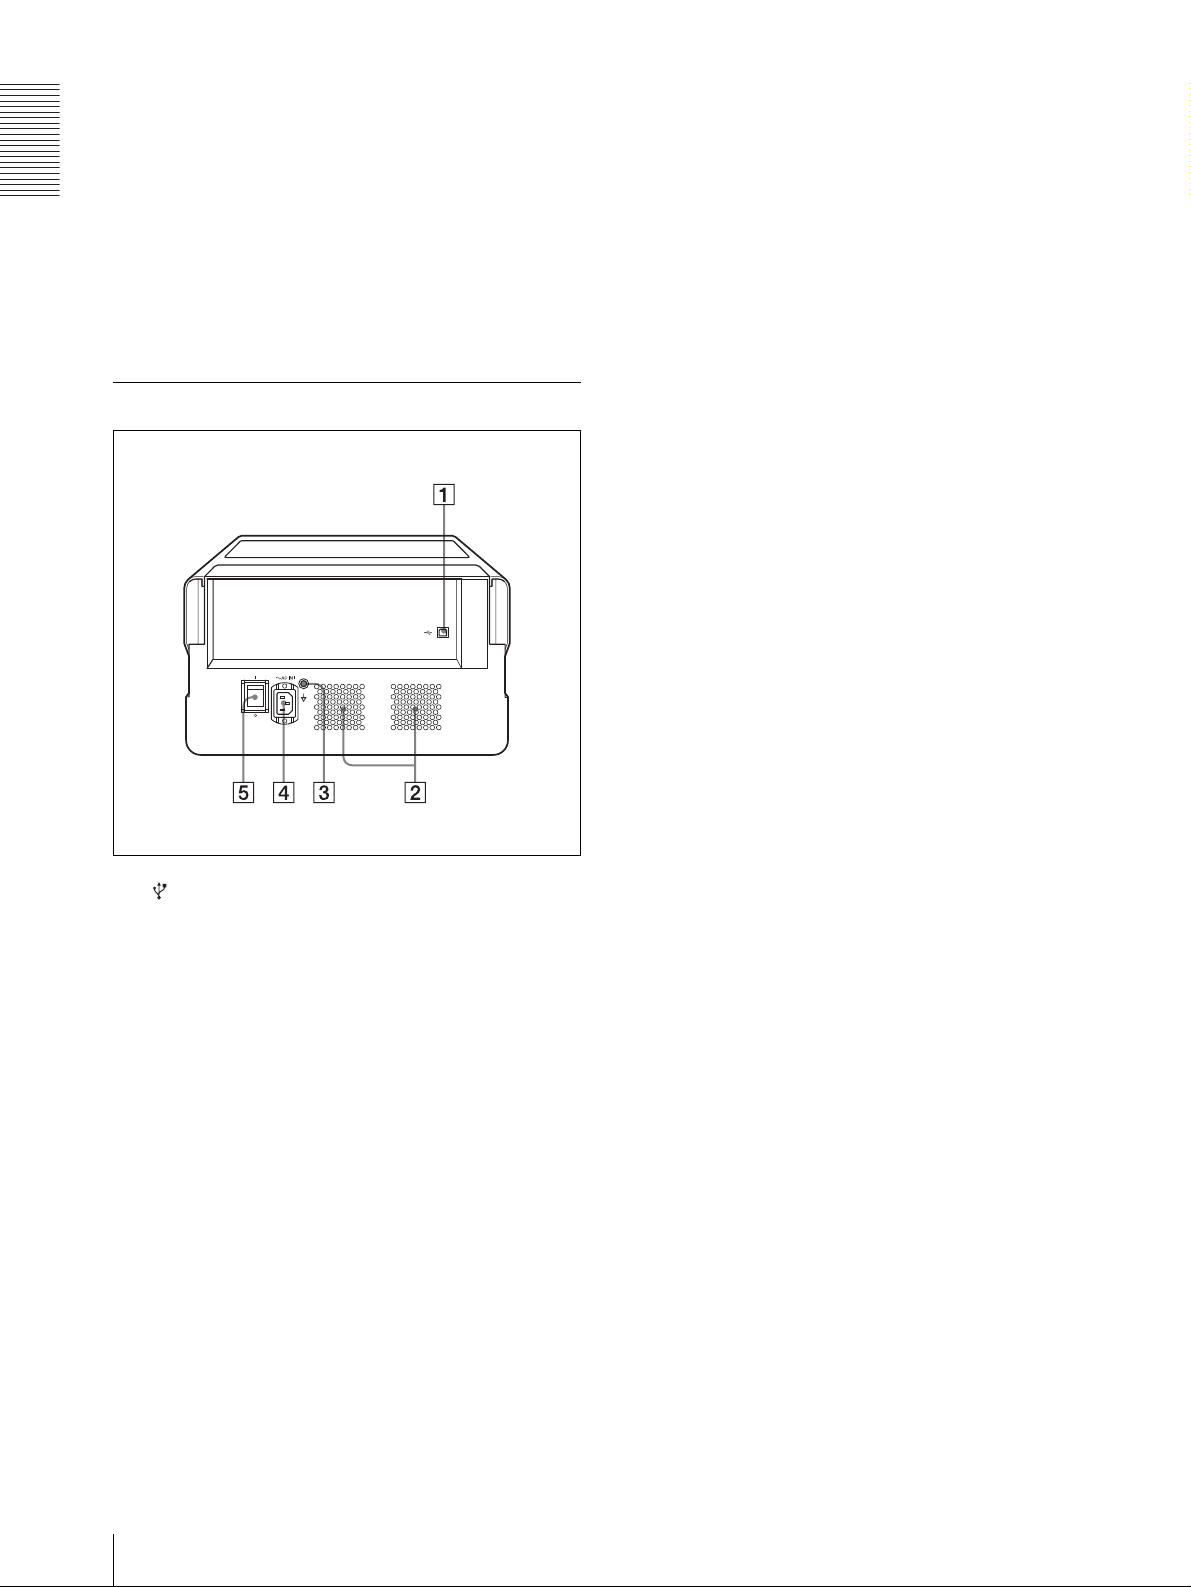
Rear
indicator blinks and the printer moves to the
standby mode after completing the maintenance.
Before turning the main power off, be sure to set the
printer to the standby mode by pushing the ON/
STANDBY button, and then set the main power
switch to off.
A USB connector (60)
Connects the supplied USB cable.
B Ventilation holes (51)
Provided to prevent the printer from overheating.
C Equipotential ground terminal connector
Used to connect the unit to the equipotential plug of
peripheral equipment to bring the various parts of
the system to the same potential.
Refer to “Important safeguards/notices for use in
the medical environments” on page 2.
D -AC IN connector
Used to connect the printer to a wall outlet with a
power cable.
Refer to “Warning on power connection” on page 3
and “Warning on power connection for medical
use” on page 3.
E Main power switch (9)
This is the main power switch of the printer. Used
to turn the printer on or off. When this switch is set
8
Location and Function of Parts and Controls
Page 9
Preparation
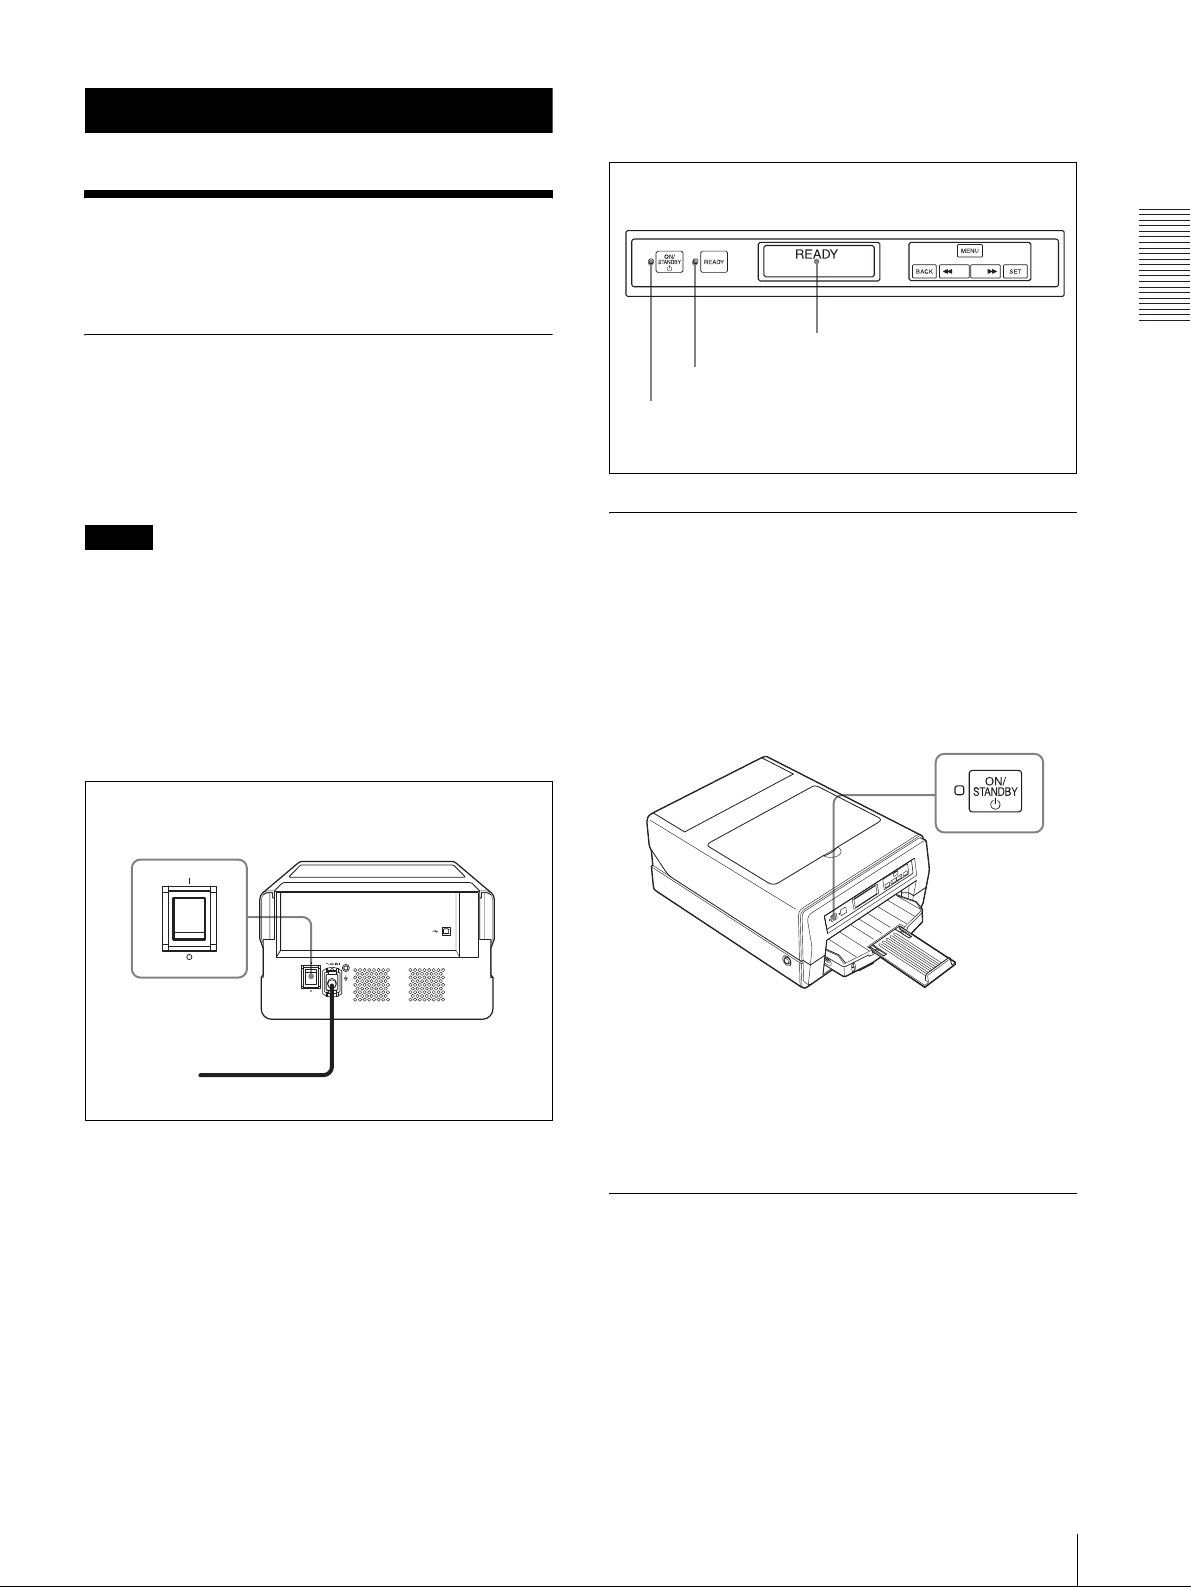
Turning the Printer On/ Off
When both the ON/STANDBY and READY indicators
light in green after a while and “READY” appears on the
printer window display, the printer is ready to print.
Turning the Printer On
Turn the printer power on after you connect the AC
power cord.
For detailed information on how to connect the AC
power cord, refer to “Turning the Printer On” described
in the printed Setup Manual supplied with the printer.
Note
Be sure to remove the sponge stopper attached inside the
printer at the factory before connecting the AC power
cord.
For detailed information on how to remove the sponge
stopper, refer to “Sponge stopper” described in the
printer Setup Manual supplied with the printer.
To turn the printer on
Set the main power switch to the ON (=) side.
Main power switch
READY
Lit (green)
Lit (green)
Setting the Printer to Standby Mode
In standby mode, the printer cannot print. However, the
power can be saved when the printer is not being used.
To set the printer to standby mode
Push the ON/STANDBY button.
The ON/STANDBY and READY indicators light in
orange and the printer enters the standby mode.
1 ON/STANDBY
button
Preparation
The ON/STANDBY indicator lights up in orange and
the printer starts.
To restore the printer from standby mode
Push the ON/STANDBY button again.
The ON/STANDBY and READY indicators light in
green and the message “READY” appears on the printer
window display.
Turning the Printer Off
Use the ON/STANDBY button placed on the front of the
printer to turn the printer on or off during daily use.
When you do not intend to use the printer for a long
time, turn the printer off as follows.
1
Push the ON/STANDBY button.
The printer enters in standby mode.
Turning the Printer On/Off
9
Page 10
2
Set the main power switch placed on the back of the
printer to the OFF (a) side.
Note
Be sure not to set the main power switch to the OFF (a)
side directly. Set the printer to standby mode once, and
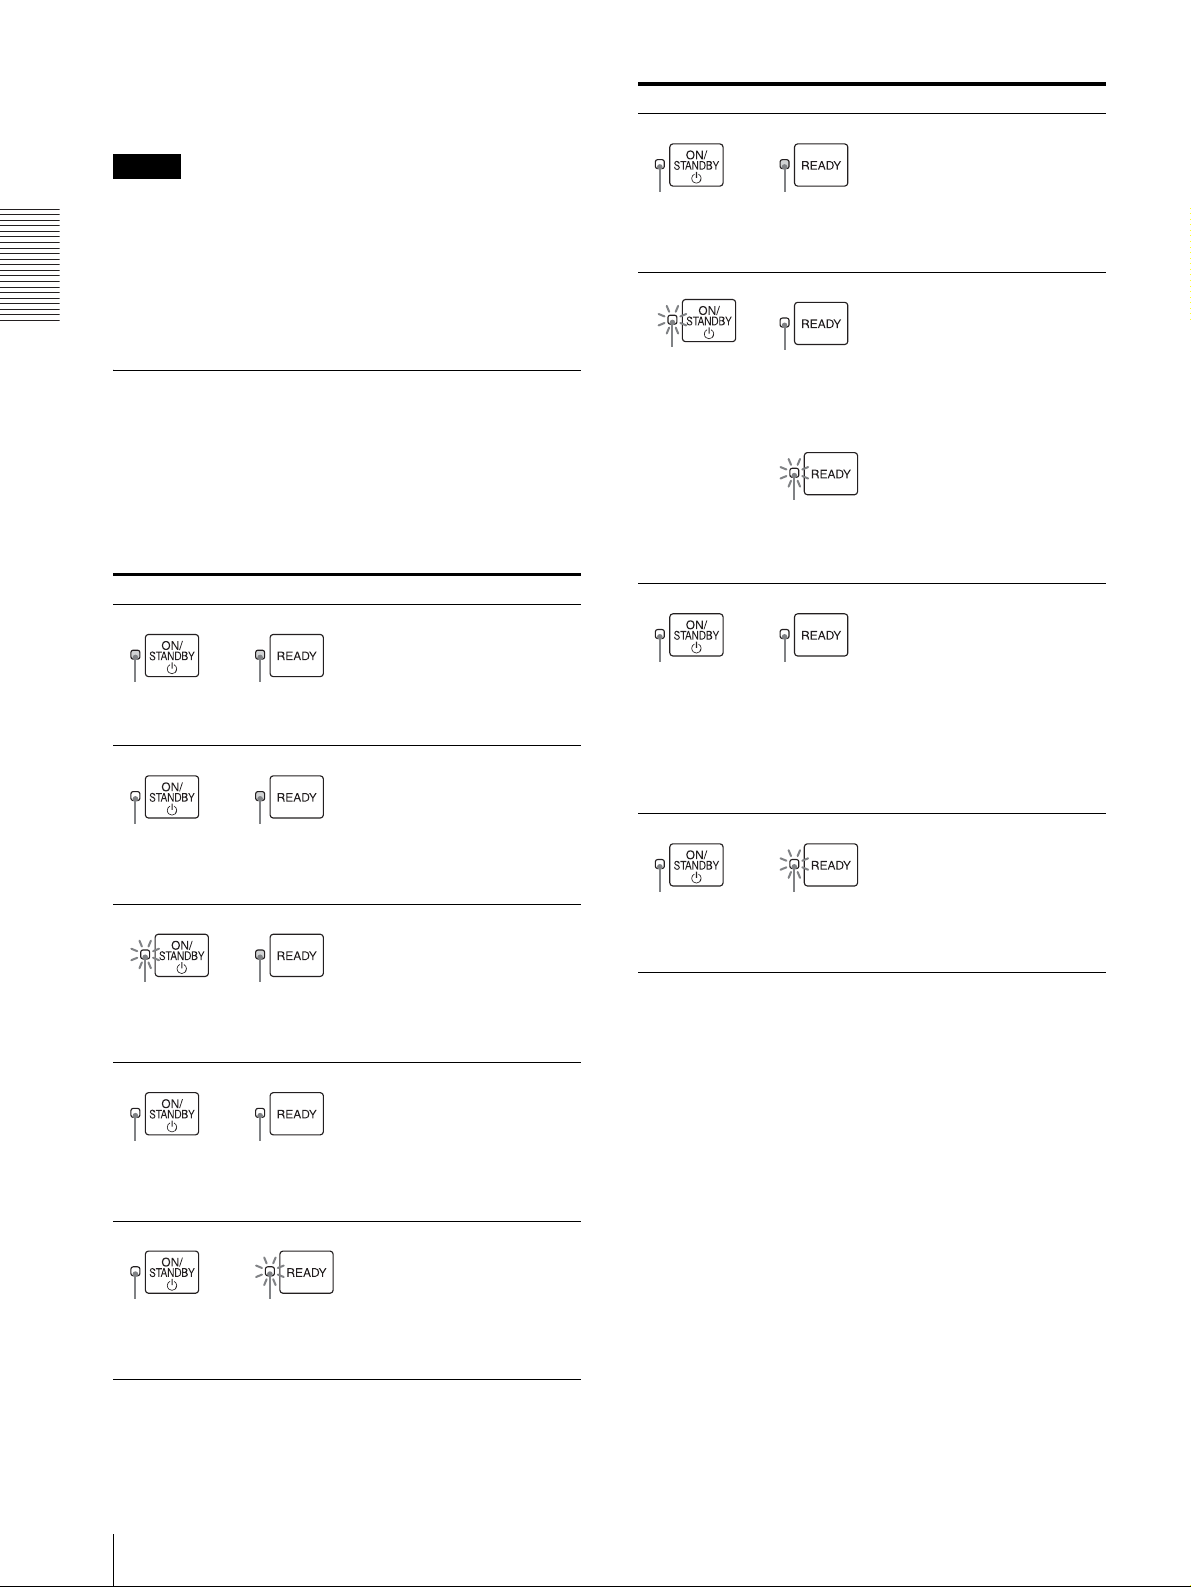
Indicator status Printer status
The printer is in setting
mode, confirming mode or
maintenance mode.
The printer cannot print.
Not litLit
(Green)
then set the main power switch to the OFF (a) side. The
printer turns the power off after it performs maintenance
so that it will start in good condition when the power is
Preparation
turned on next time.
Relationship Between the ON/
Blinks
(Green)
Lit
(Green)
The ON/STANDBY button
was pushed while printing
was in progress.
After completing a print
job, the printer goes to
standby mode.
STANDBY Indicator and the READY
indicator
You can confirm the status of the printer according to the
lighting status of the ON/STANDBY and READY
indicators placed on the front panel.
Indicator status Printer status
The printer is turned off.
Not lit Not lit
The printer is in standby
mode.
Not litLit
(Orange)
Initializing (Starting)
Wait for a while.
Not litBlinks
(Orange)
Lit
(Green)
Lit
(Green)
or
Blinks
(Green)
Lit
(Orange)
Blinks
(Orange)
Set the main power switch
placed on the back of the
printer to the OFF side,
then set it to the ON side
again.
If the printer does not start
correctly even after you
perform the above
operation, the printer has
malfunctioned. Contact
your dealer.
An error has occurred.
The error message is
displayed on the printer
window display.
Solve the problem,
referring to “Error
Messages” on page 54.
Lit
(Green)
Lit
(Green)
10
Turning the Printer On/Off
Lit
(Green)
Blinks
(Green)
Print mode
The printer is ready to print.
The printer is cleaning the
print head. Or the printer
has stopped printing
temporarily because the
READY button was pushed
while printing was in
progress.
Page 11
Preparing Paper
Recommended Paper
Be sure to use the paper recommended.
It is required to perform settings of Paper on the Main
tab in the Printing Preferences dialog box.
For detailed information on settings for paper, see
“Settings for Paper” on page 17.
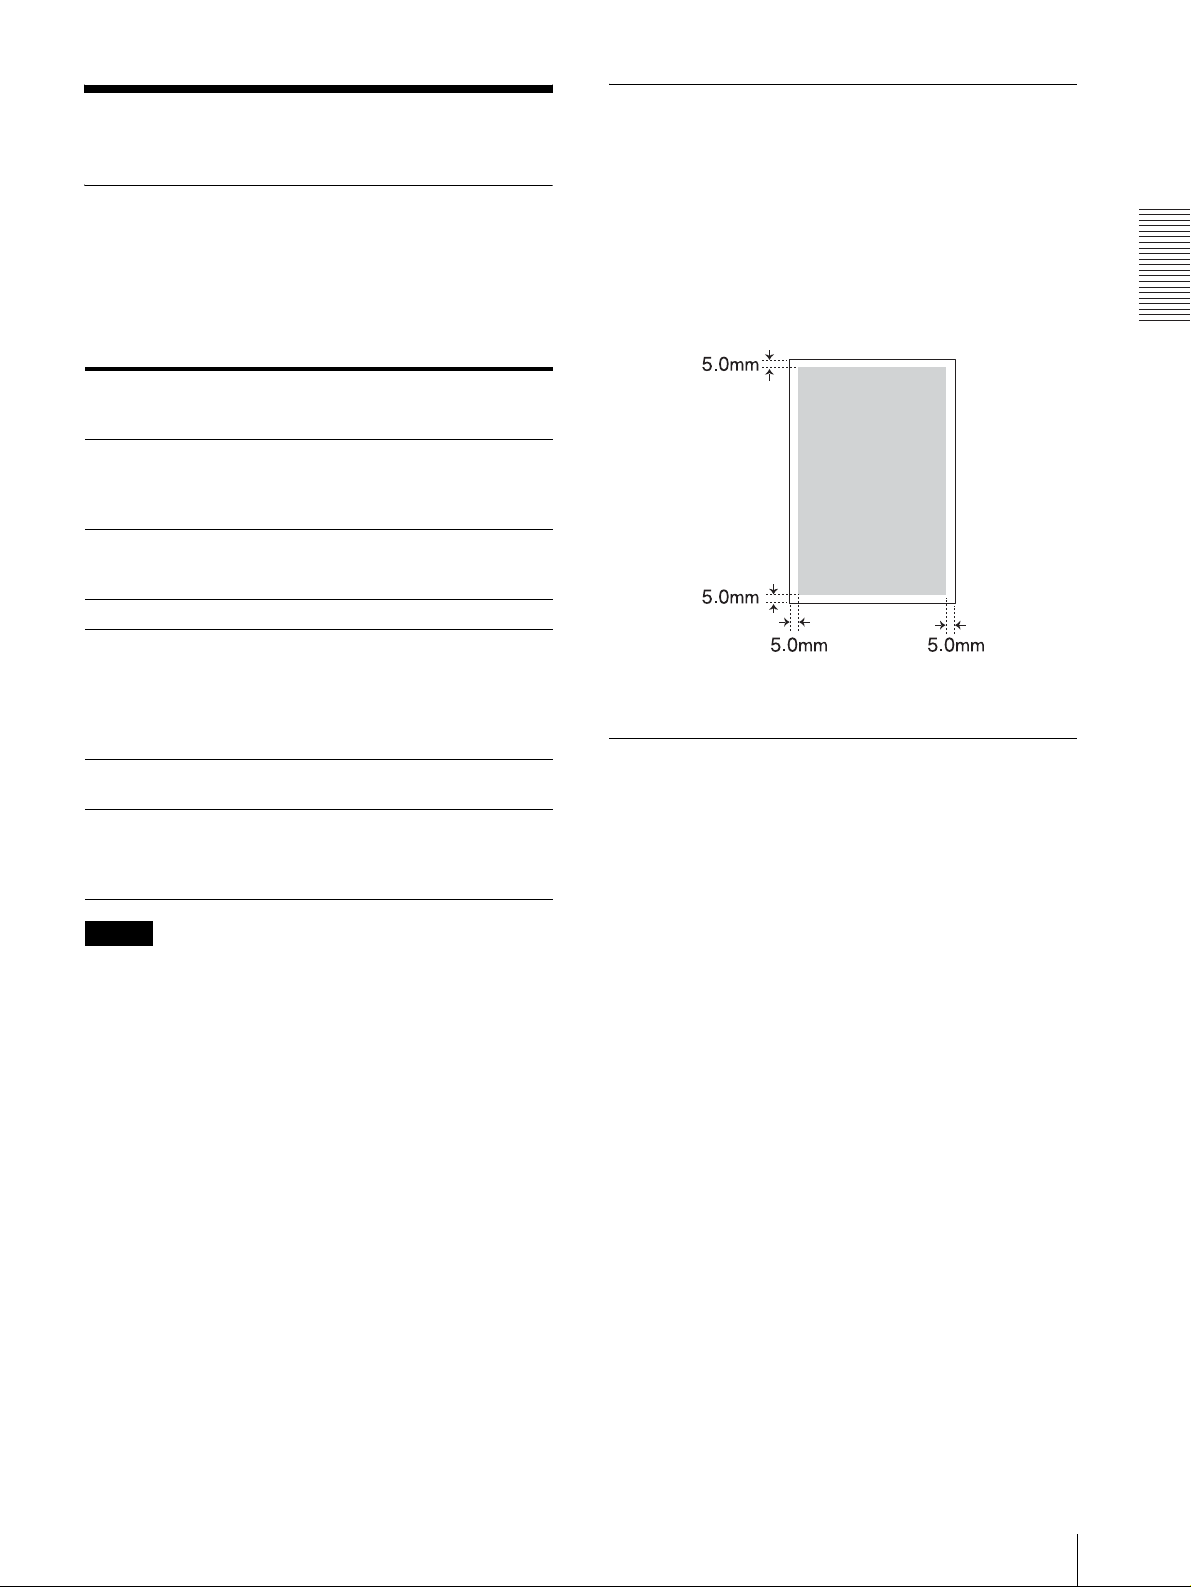
Available Printing Area
To maintain the quality of print, margins are set at the
top, bottom, right and left of the paper. The range on
which text or images can be printed is the area inside
these margins.
Available printing area
200 × 287 mm (width × height)
Preparation
Setting for the Media
Type in the Printing
Preferences dialog
Number of sheets
which can be loaded in
the auto sheet feeder
tray
Number of printed
pages which can be
ejected on the tray
Size A4 A4
Paper loading method Place papers in
Sheet feeding method Automatic
Product name EPP-300A4MD
Note
Sony High
Quality Paper
Up to 60 sheets Up to 100
Up to 30
printed pages
the auto sheet
feeder tray,
facing the more
whitish side
down.
paper feeding
Sony High
Quality Paper
(300 sheets)
Plain Paper
sheets
Up to 30
printed pages
Place papers in
the auto sheet
feeder tray,
facing the
printing side
down.
Automatic
paper feeding
Plain paper
Plain recycled
paper
The number of printed pages which can be ejected the
maximum number. In actual printing, the number of
printed pages which can be ejected may be reduced
depending on use environment where the printer is used.
Notes on using paper other than paper
manufactured by Sony Corporation
• When using mat coated paper manufactured by
another company, the number of sheets which can be
loaded and ejected depends on the thickness of the
paper. Thus, those numbers may be different from
ones listed on the above table. In the case of doublesided mat paper, the number of sheets may be about 20
pages.
• It is recommended that you use mat coated paper with
a thickness between 0.1mm and 0.27mm.
• You cannot use the following paper:
Plain paper whose weight is less than 60g/m
higher than 105g/m
2
.
2
or
Notes on Paper
Notes on handling paper
• When holding paper, hold it at both ends of the sheet
so as not to touch the printing surface. Dust, scratches
or finger prints on the paper are likely to cause
unsatisfactory printing.
• After printing, do not touch the surface printed until
the ink dries. Also, if you wet the printed sheet with
water, do not touch the surface printed until it dries.
• There are some types of paper whose printed surface
warps and is rubbed when printing photos or graphics
using a large amount of ink. This type of paper is not
suitable for printing photos or graphics. Use this type
of paper when printing print data consisting of
characters or text.
When storing paper
• Use the original package for unused paper.
• Avoid storing paper in a location subject to:
– high temperatures
– high humidity
– excessive dust
– direct sunlight
• Place the unused paper on a flat surface so that it will
not warp or bend.
Preparing Paper
11
Page 12
Unsuitable paper
Do not use the following paper. Doing so is likely to
result in malfunctions such as paper jams.
• Folded paper
• Warped paper
• Wrinkled paper
• Wet paper
• Thin paper (less than a weight of 60g/m
• Thick paper (more than a weight of 105g/m
Preparation
excluding paper manufactured by Sony Corporation)
• Paper with holes (such as loose-leaf paper)
2
)
2
,
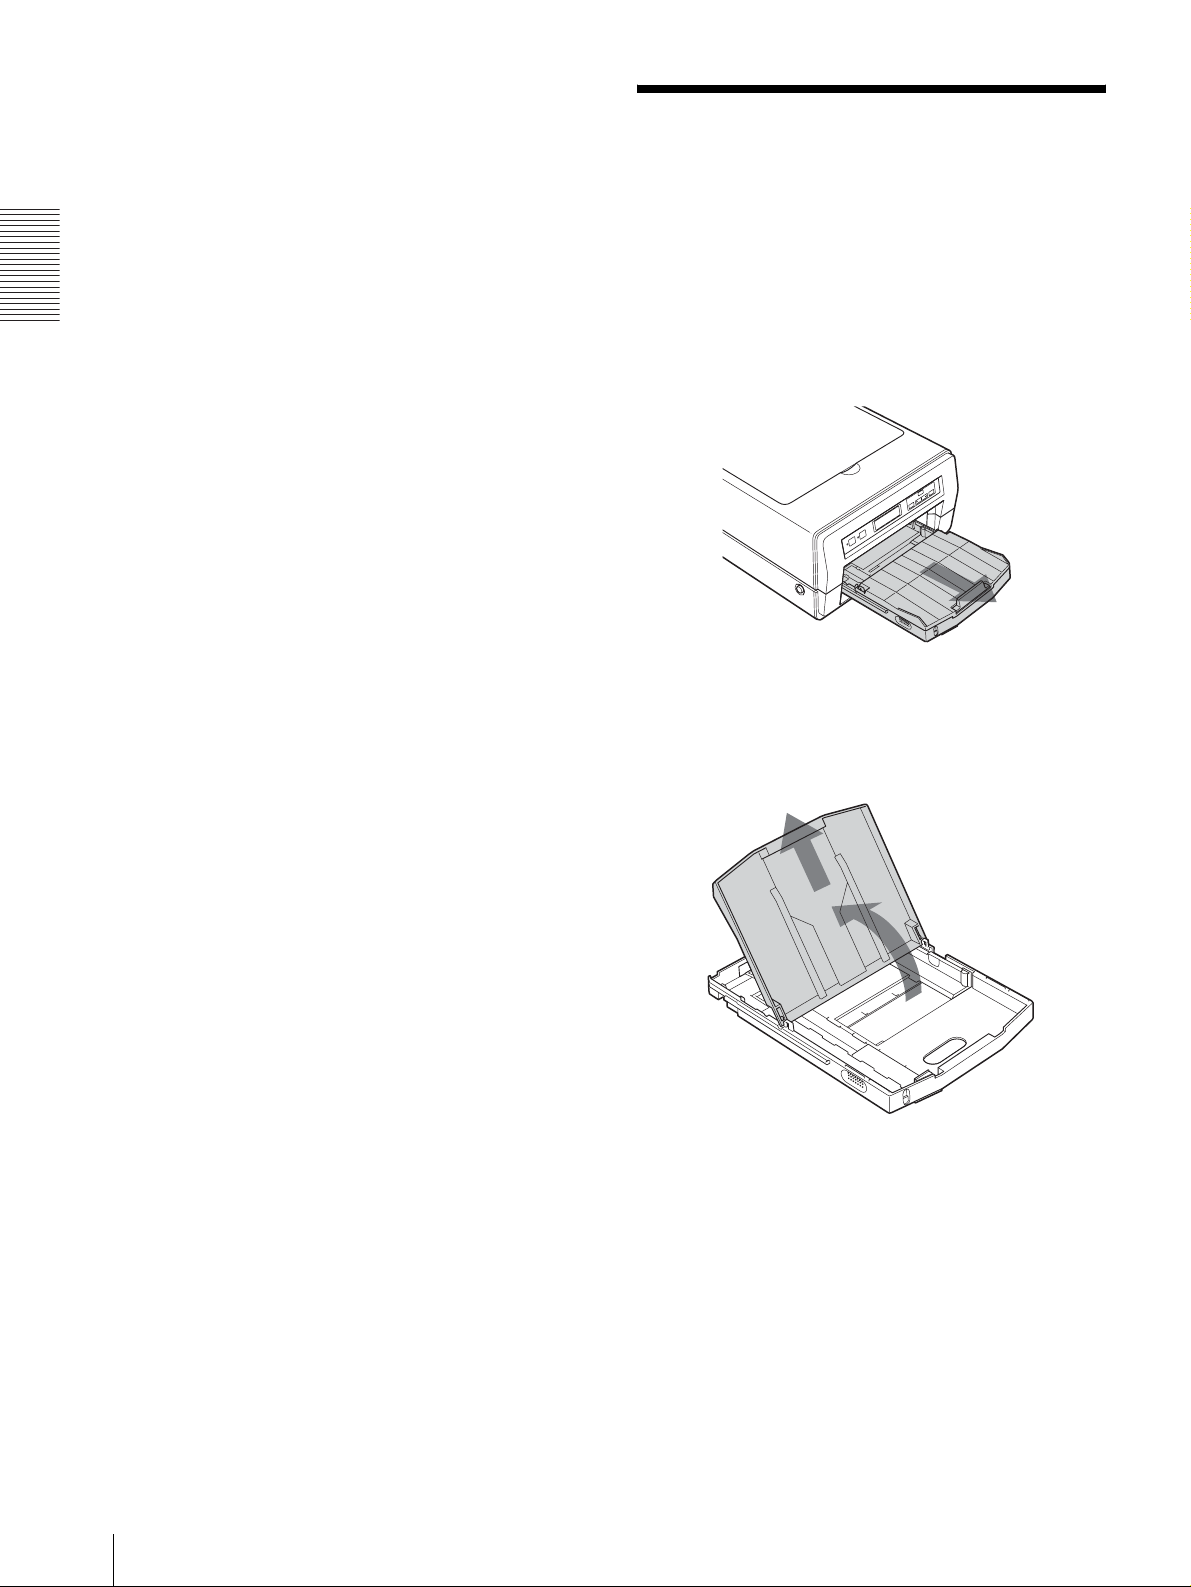
Loading Paper
The printer feeds paper automatically one sheet at a time
from the auto sheet feeder tray (supplied).
To load paper, follow the procedure below. Be careful
not to touch the printing surface.
1
Remove the auto sheet feeder tray.
If you use the printer for the first time, skip this
step. Start from step 2.
2
Open the cover of the auto sheet feeder tray.
Cover
12
Loading Paper
Page 13
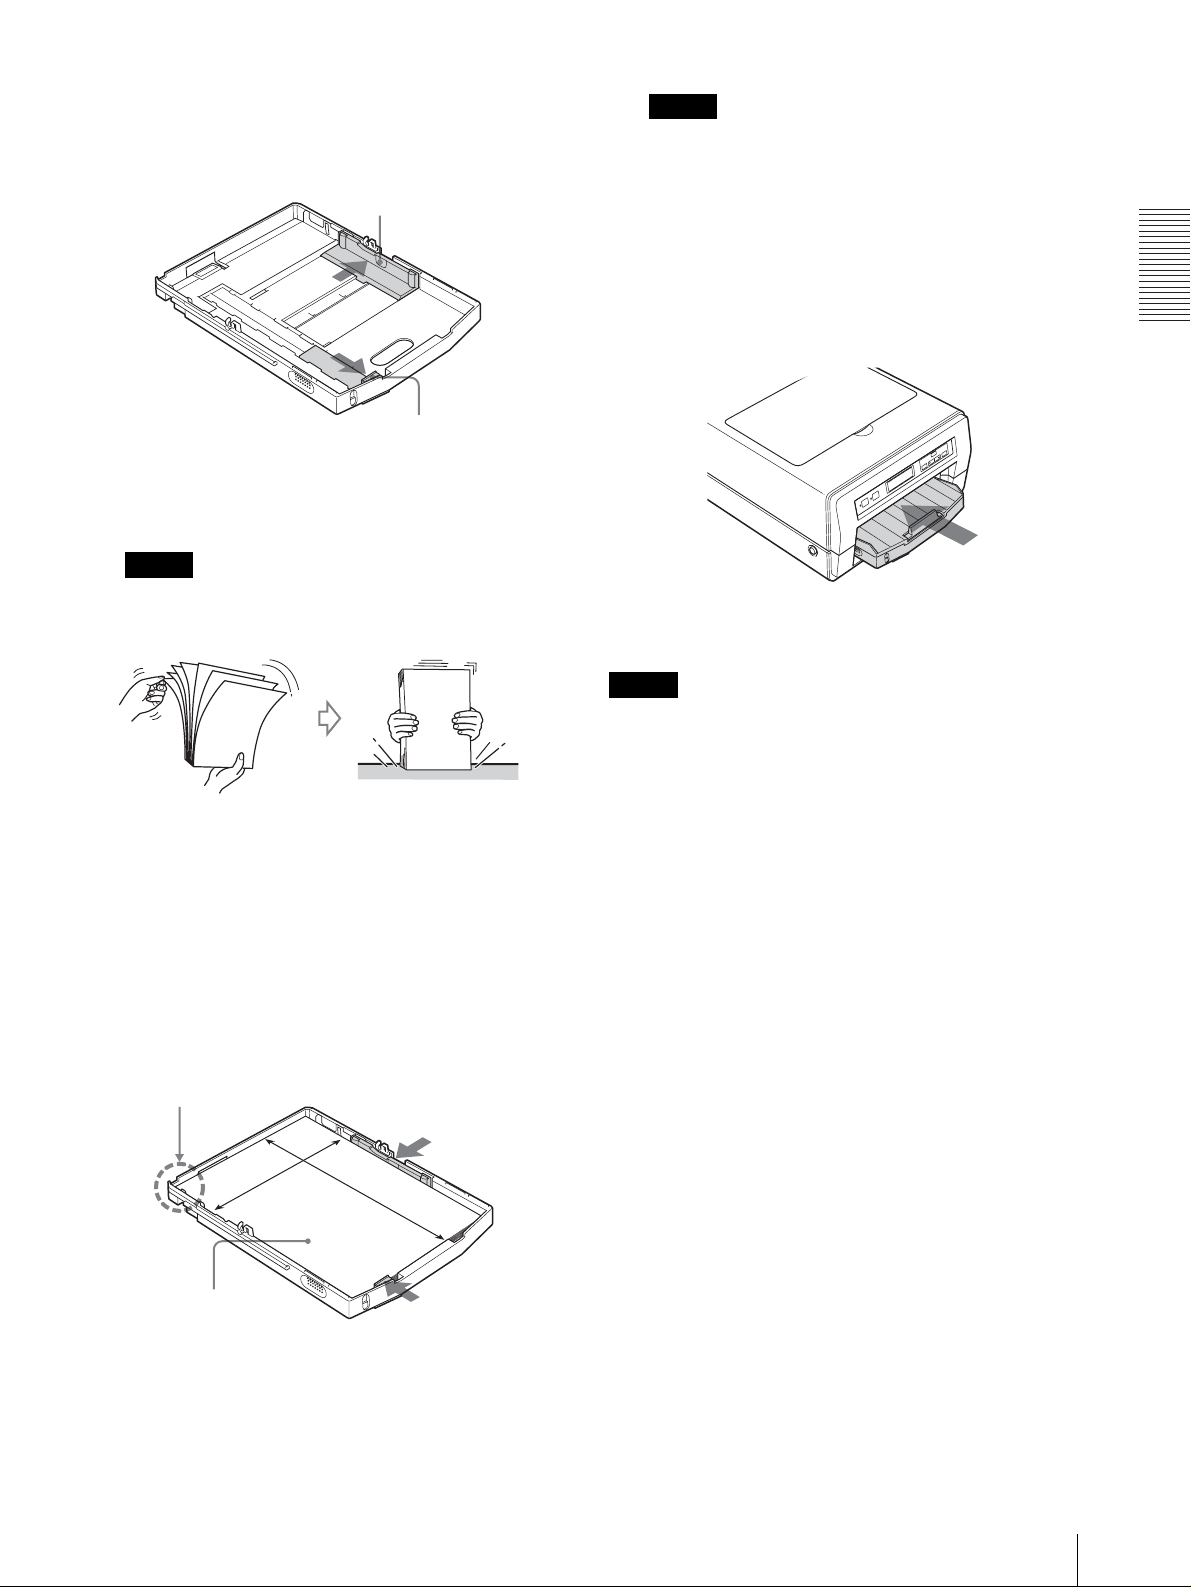
3
Move the paper guides (vertical and horizontal) to
the ends.
Paper guide (horizontal)
Paper guide (vertical)
4
Riffle the paper so that it is even.
Note
Be careful not to touch the printing surface.
Notes
• Place the paper against the back of the auto sheet
feeder tray towards the left side.
• Place the paper with the long side placed
vertically and the short side horizontally.
6
Reattach the cover to the auto sheet feeder tray and
insert it into the printer.
Preparation
5
When plain paper is used, place the paper in the
auto sheet feeder tray so that the printing surface
faces down. When Sony High Quality Paper is
used, place the paper in the auto sheet feeder tray so
that the more whitish side faces down. Then, secure
the paper in place by sliding the paper guides
inward towards the paper.
Set the paper securely
at this point.
Place the paper in the
auto sheet feeder tray
with facing the printing
surface down.
Notes
• When printing, be sure to pull out the output support
completely. If it is pull out halfway, the paper may
jam.
• The number of sheets which the automatic paper
feeding tray can hold depends on the type of paper in
use. For detailed information on the maximum
number of sheets which can be loaded, see page 11.
• Do not mix different types of paper in the auto sheet
feeder tray.
• To remove jammed paper, push the READY button,
blinking in orange. The jammed paper is
automatically ejected. Should the jammed paper
remain after you have pushed the READY button, see
“If the Paper Jams” on page 56.
• Do not use paper listed in “Unsuitable paper” on page
12.
• Do not pull the paper out when printing has started and
the paper is being fed. Doing so is likely to result in
malfunctions or paper jams.
• It is often difficult to feed paper from the auto sheet
feeder tray, or sometimes it may be fed at an angle,
depending on the usage circumstances. In such a case,
add one sheet of the same type of paper in the auto
sheet feeder tray and try to print again.
• The paper may warp depending on the circumstances
and the warped paper may stick up out from the auto
sheet feeder tray. In this case, the printer will not be
able to feed the paper. Try to make the warped paper
lie flat or reduce the number of sheets set in the auto
sheet feeder tray.
Loading Paper
13
Page 14

• When plain paper is loaded in the auto sheet feeder
tray, if a different media type is selected on the Main
tab of the Printing Preferences dialog box, the printed
paper may not be ejected correctly. For detailed
information on how to select the media type, see
“Settings for Paper” on page 17.
Preparation
14
Loading Paper
Page 15

Operation
Performing Basic Print Settings
Displaying the Print Preferences Dialog Box from a Software Application
2
Select [Sony LPR-1000MD] from the list, and then
click the [Preferences] button.
When printing from a software application such as word
processing software or image processing software,
perform print settings using the following operating
procedures. Depending on a software application, the
method to display the Printing Preferences dialog box
and the dialog boxes may be a little different. In this
section, WordPad on Windows XP is used for
explanation.
1
Select [Print] from the File menu in software
application.
The “Sony LPR-1000MD Properties” dialog box
appears.
3
Perform the required settings on the Main tab,
Layout tab, and Function tab respectively.
For detailed information on how to perform settings
on each tab, see the corresponding pages of each
tab.
“Performing Settings on the Main Tab” on page 17
“Performing Settings on the Layout Tab” on page
19
“Advanced Functions” on page 26
Operation
The Print Settings dialog box appears.
4
After the required settings have been completed,
click the [OK] button to start printing.
Displaying the Printing Preferences Dialog Box from the Windows Start Menu
When you want to change the settings of the printer or
perform cleaning or maintenance regardless of the
special application software, use the following method.
Depending on the version of your Windows operating
system, the method used to display the Printing
Performing Basic Print Settings
15
Page 16
Preference dialog box and the dialog boxes may be a
little different. In this section, Windows XP dialog boxes
are used for explanation.
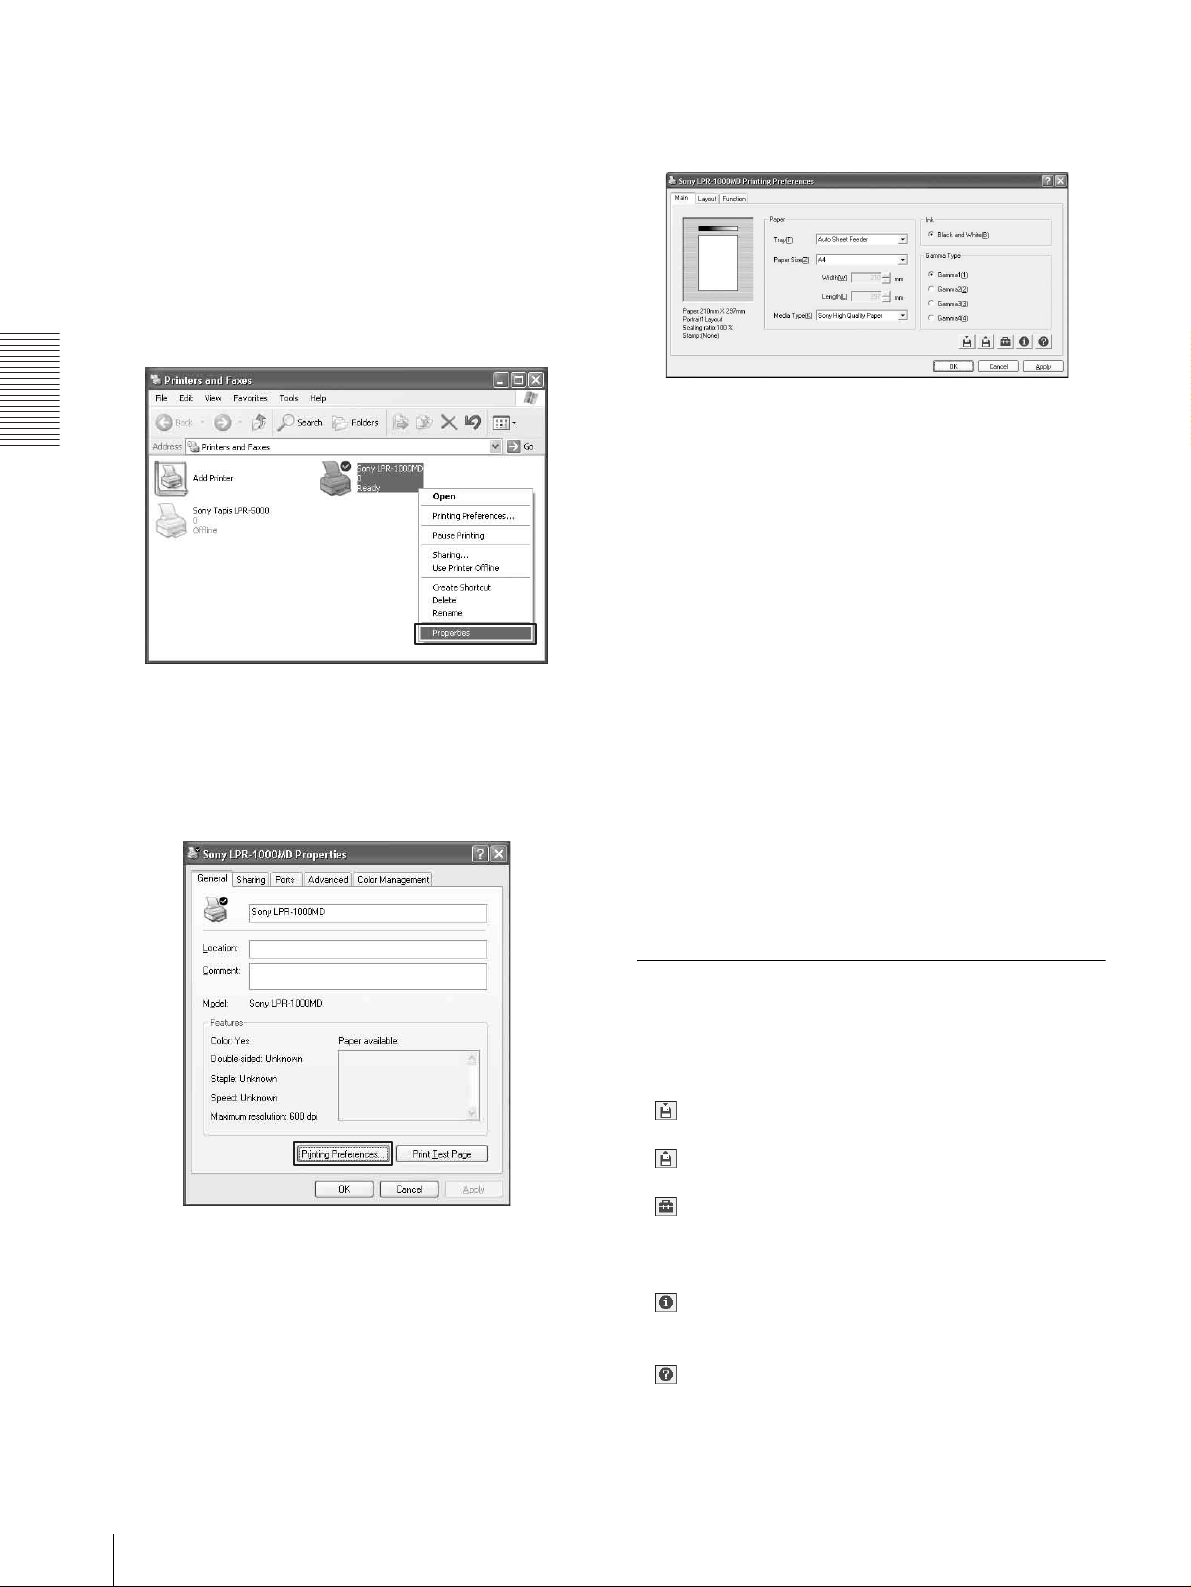
1
Select [Start], [Control Panel], [Printers and other
hardware], and [Printers and Fax], in turn, so as to
display the Printer window.
2
Right-click [Sony LPR-1000MD], and then select
[Properties] from the context menu.
The “Sony LPR-1000MD Printing Preferences”
dialog box appears.
Operation
The “Sony LPR-1000MD Properties” dialog box
appears.
3
Click [Printing Preferences...].
4
Perform the required settings on the Main tab,
Layout tab, and Function tab respectively.
For detailed information on how to perform settings
on each tab, see the corresponding pages of each
tab.
“Performing Settings on the Main Tab” on page 17
“Performing Settings on the Layout Tab” on page
19
“Advanced Functions” on page 26
5
After the required settings have been completed,
click the [OK] button.
About the Printing Preferences dialog box
The Sony LPR-1000MD Properties dialog box which
appears when you click the [Properties] or [Preferences]
button after displaying the Print Settings dialog on the
software application or the Sony LPR-1000MD Printing
Preferences dialog box from the Windows Start menu
are basically same window and have similar functions.
Common Operations on Each Tab
of the Printing Preferences Dialog
16
Performing Basic Print Settings
Box
The following operations are common to each tab.
• (Save) button (pages 34)
Click to save the current settings as a named file.
• (Retrieve Settings) button (pages 36 and 37)
Click to retrieve the saved settings.
• (Utilities) button
Click to display the Utilities dialog box when
performing print position adjustment (page 25), head
cleaning (page 40) and test printing (page 42).
• (Version) button
Click to display the version information of the printer
driver.
• (Help) button (page 23)
Click to display the help window which gives
operating instructions on the Printing Preferences
dialog box.
Page 17
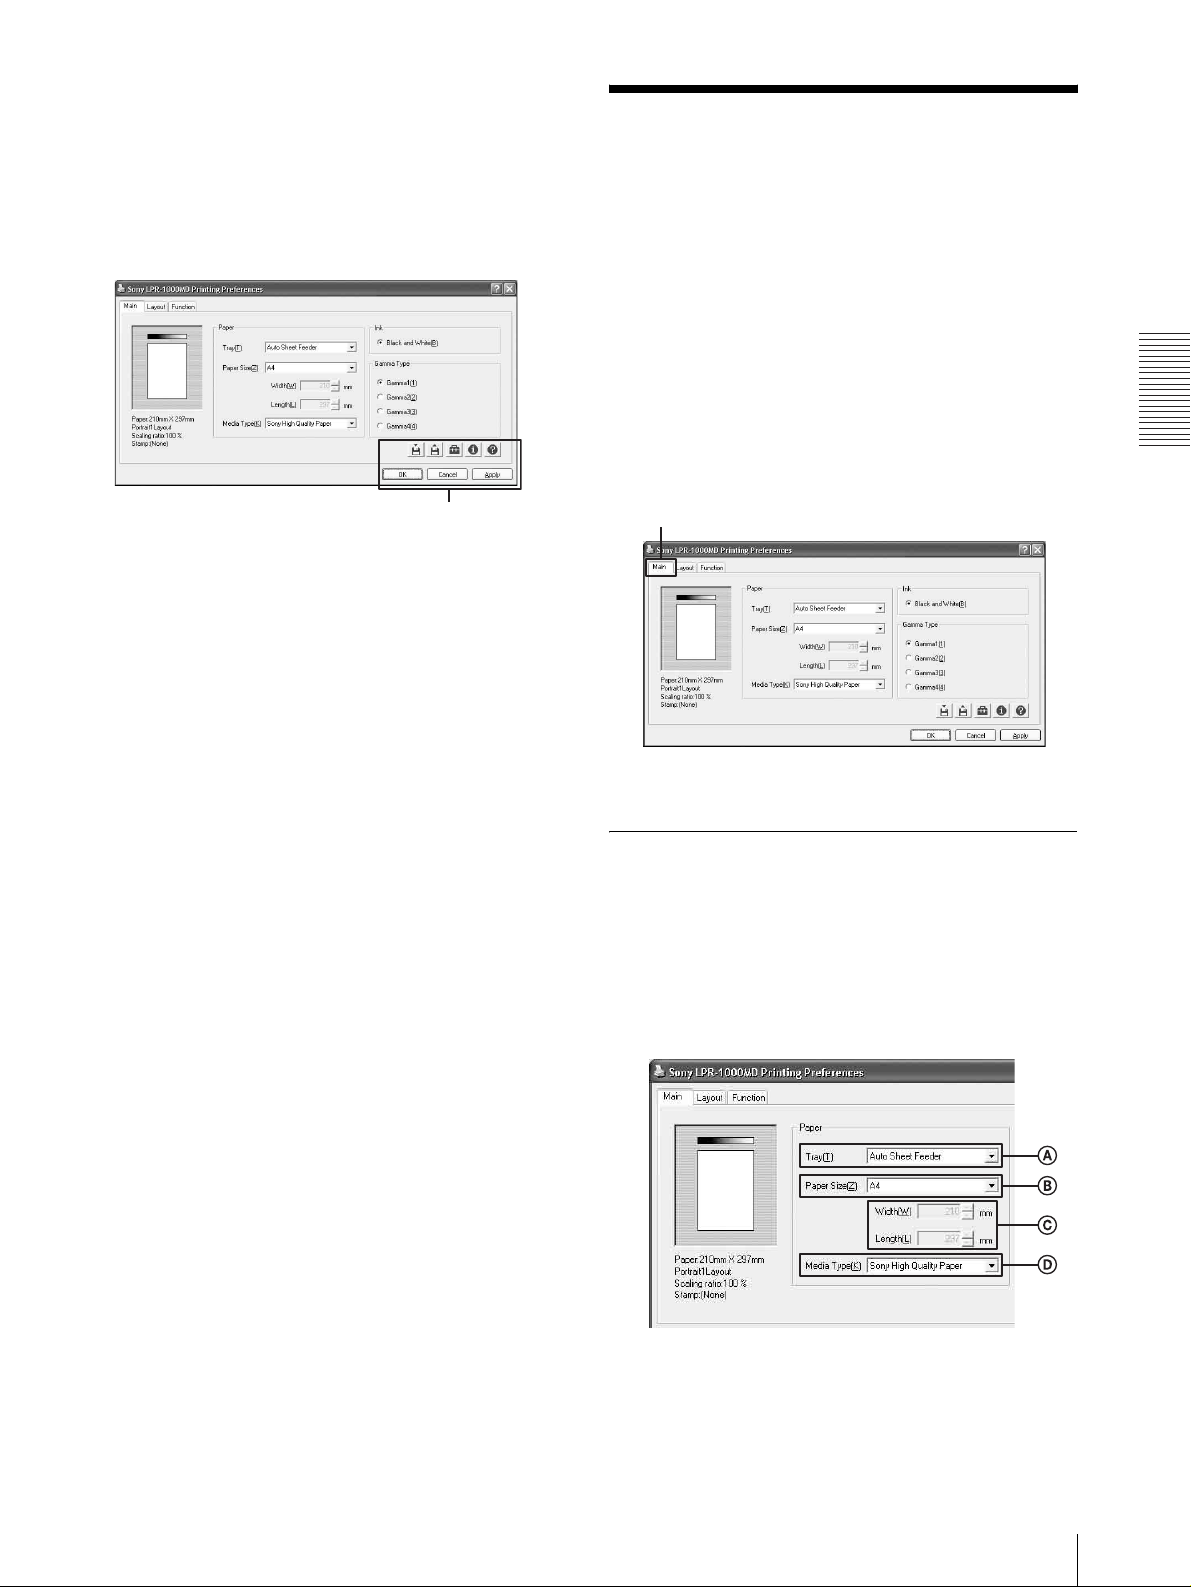
•[OK] button
Click to execute the settings or changes made to
previous settings, or to start printing.
• [Cancel] button
Click to cancel setting operations done in the dialog
box.
Performing Settings on the Main Tab
The Main tab allows you to perform the following basic
settings required for printing.
• Paper
– Tray (paper feeding method)
– Paper size
– Media type
•Ink
This printer supports only black and white printing.
•Gamma type
Sets the quality level of the printouts.
Operation
Common features
Main tab
Settings for Paper
1
Click the [Main] tab.
The Main tab dialog appears.
2
Select the proper settings according to the paper
loaded in the auto sheet feeder tray.
A Tray
Since the printer corresponds to automatic
paper feeding system, “Auto Sheet Feeder” is
Performing Settings on the Main Tab
17
Page 18
automatically selected. Another tray type can
not be selected.
B Size
Since the printer corresponds to size A4, “A4”
is automatically selected. Another paper size
can not be selected.
C Width and Length
The width and length of A4 paper sheets are
displayed. You cannot adjust the width and
length since they are fixed.
D Media Type
Click [V] to select the type of the paper loaded
Operation
3
in the tray. The printer performs printing
suitable to the media type selected.
For detailed information on media types, see
“Recommended Paper” on page 11.
Click the [OK] button.
The settings appropriate to the paper are saved.
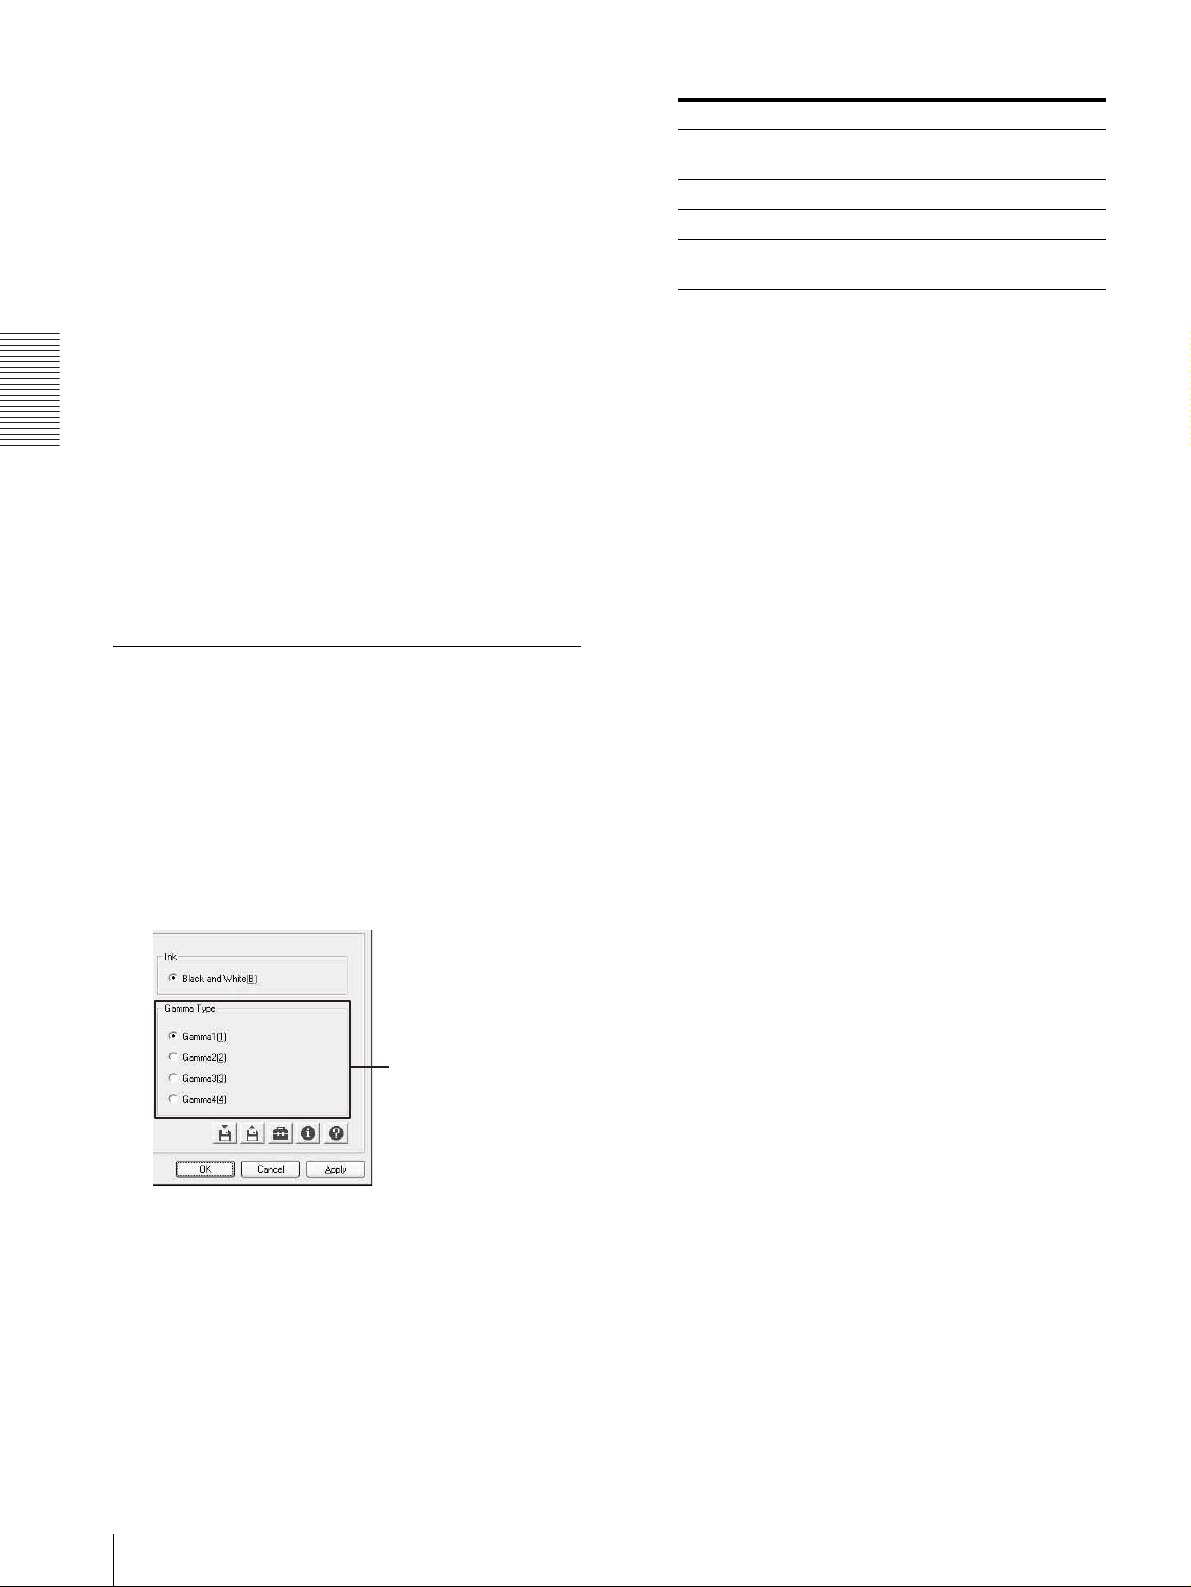
Gamma type Comments
Gamma 1 To make a printout of a normal
image.
Gamma 2 To emphasize the half tone.
Gamma 3 To emphasize the bright portions.
Gamma 4 To emphasize the bright portions,
the halftones, and the dark parts.
3
Click the [OK] button.
The setting of the gamma type is saved.
Selecting the Gamma Type
You can set the quality level of the printout.
You can select the gamma type according to the print
data and the purpose of the printout.
1
Click the [Main] tab.
2
Click the radio button corresponding to the desired
gamma type.
Gamma type
18
Performing Settings on the Main Tab
Page 19
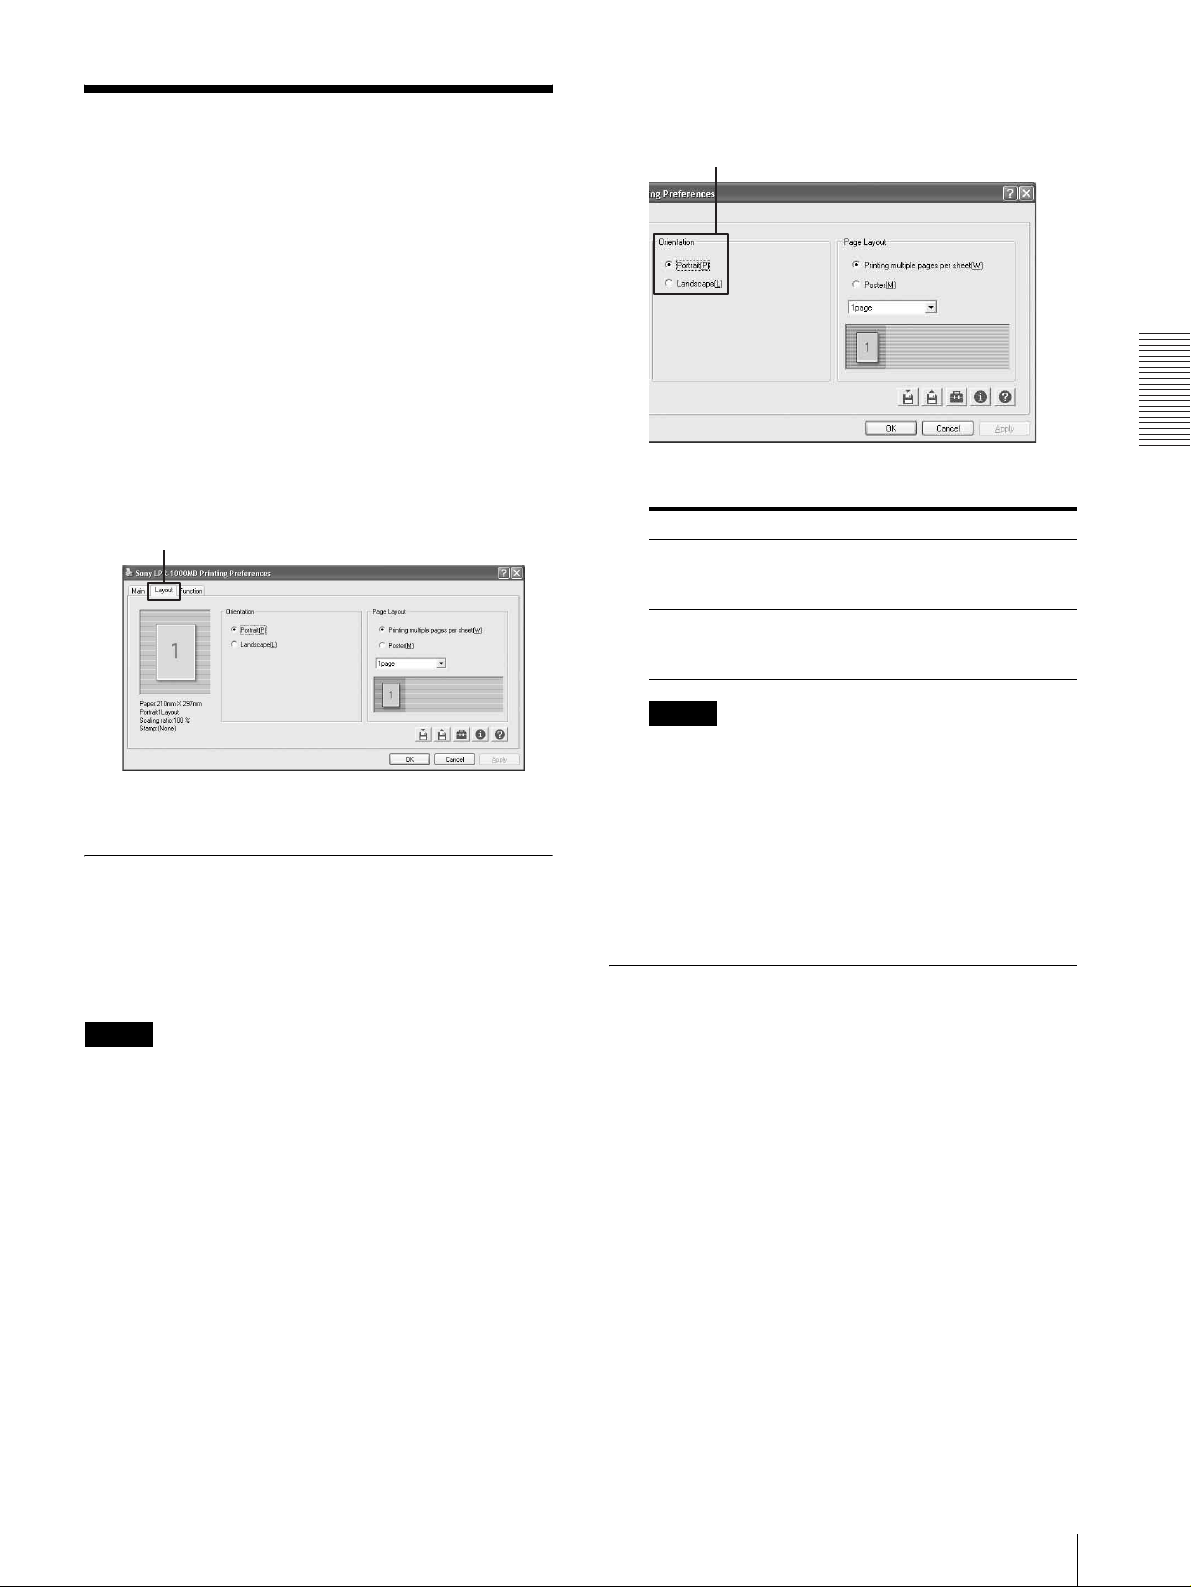
2
Select the [Orientation].
Performing Settings on the Layout Tab
The Layout tab allows you to perform the following
settings.
•Orientation
You can select the orientation of printouts.
• Page layout
– Printing multiple pages per sheet
You can specify the number of pages of printing data
to be printed on a single sheet.
–Poster
You can divide one page of printing data onto
multiple sheets.
Layout tab
Portrait/Landscape
Operation
Orientation Comments
Portrait To print the printing data in portrait
orientation when the page layout is
not set in the printing data.
Landscape To print the printing data in
landscape orientation when the page
layout is not set in the printing data.
Setting the Print Orientation
You can select portrait or landscape orientation for
printing.
To print multiple pages on one sheet, be sure to set the
orientation, and then select the layout of the page.
Note
The setting of portrait or landscape orientation depends
on the page setting of the printing data. When the page
setting is not included in the printing data, printing is
carried out according to the setting made using the
following procedure.
1
Click the [Layout] tab.
The Layout tab dialog box appears.
Note
The setting of portrait or landscape orientation of
the page is automatically switched according to the
page layout of the printing data. Therefore, even if
the [Portrait] setting is selected, the printer may not
print the printing data in portrait orientation.
3
Click the [OK] button.
The orientation setting is saved.
Printing Multiple Pages on One Sheet
You can specify the number of pages of printing data to
be printed on a single sheet.
1
Click the [Layout] tab.
When printing one page on one sheet, go to step 3.
When printing multiple pages on one sheet, go to
step 2.
Performing Settings on the Layout Tab
19
Page 20
2
Set the print orientation.
Portrait/Landscape
Operation
Set the print orientation using [Orientation]
according to the page orientation of the printing
data.
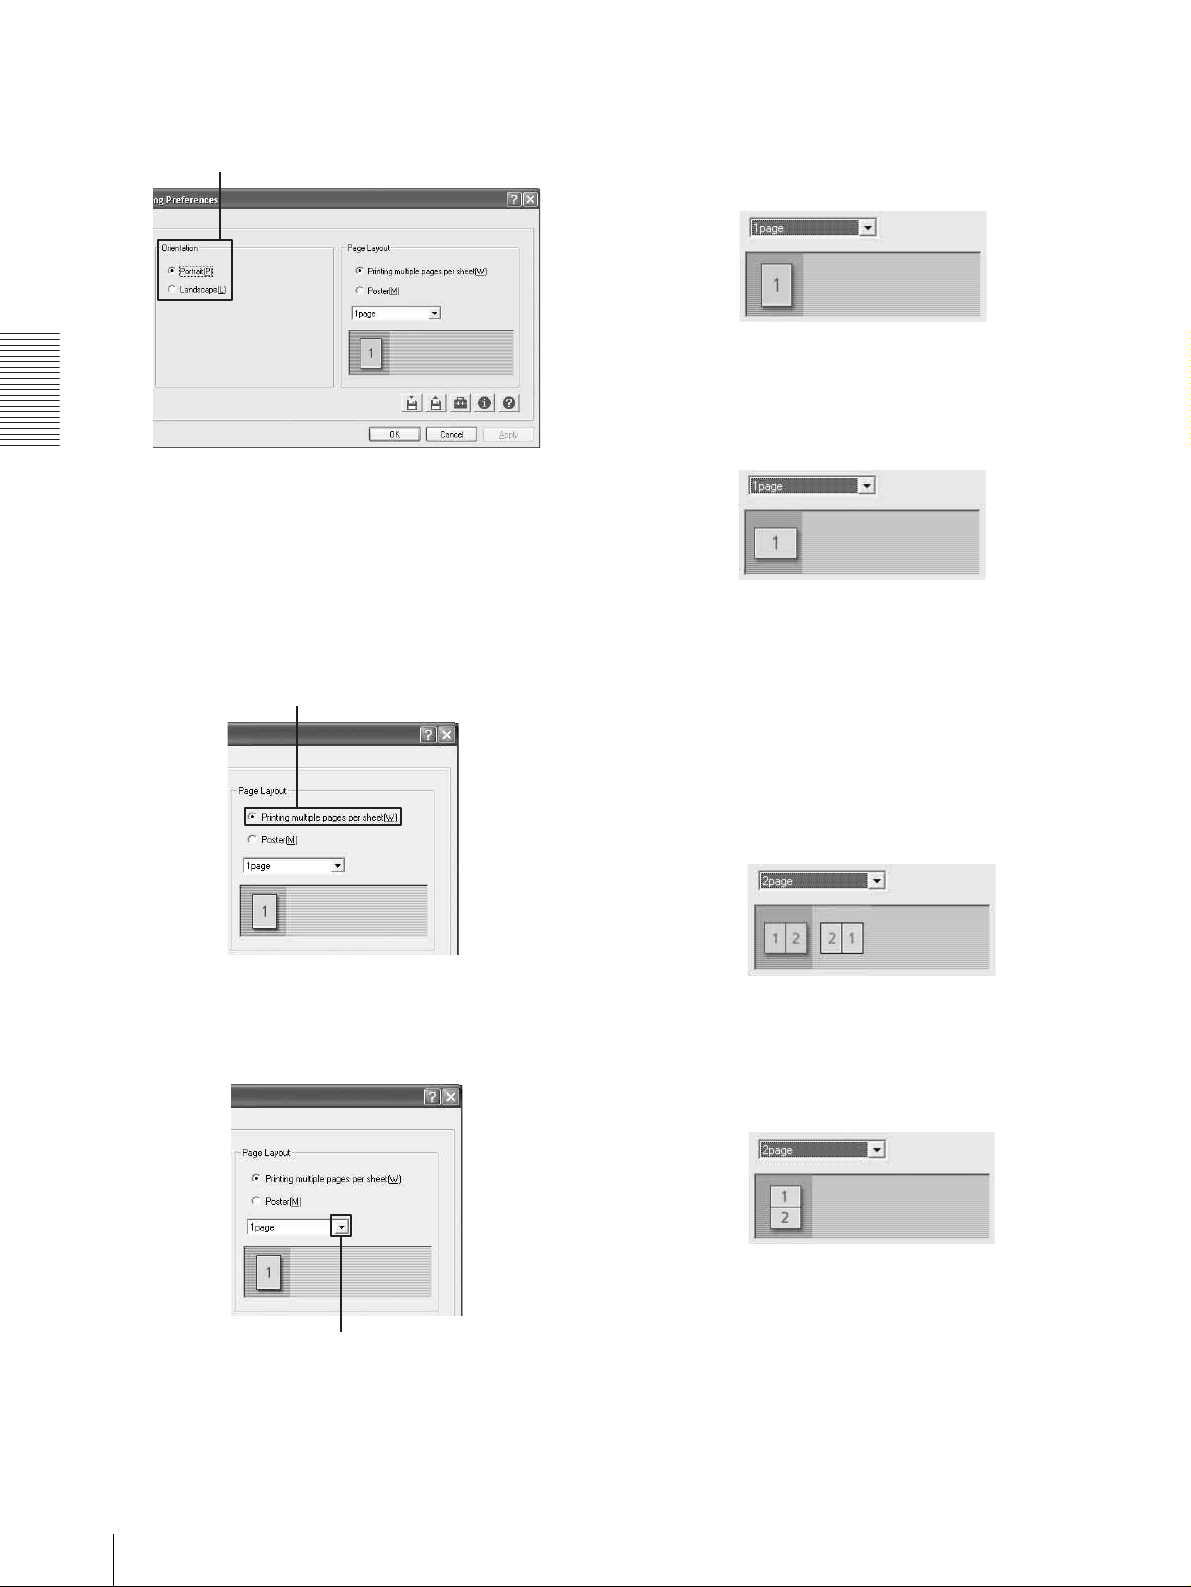
3
Click the [Printing multiple pages per sheet] radio
button in the Page Layout group.
To print one page on one sheet
Select [1 page].
When the print orientation is set to [Portrait]:
When the print orientation is set to [Landscape]:
[Printing multiple pages per sheet]
4
Click [V] and select the pages to be printed on one
sheet.
To print two pages on one sheet
1 Select [2 Page].
2 Select the page layout to be used on the page.
When page orientation is set to [Portrait]:
When page orientation is set to [Landscape]:
20
Performing Settings on the Layout Tab
Click [V] .
To print four pages on one sheet
1 Select [4 Page].
2 Select the page layout to be used on the page.
Page 21
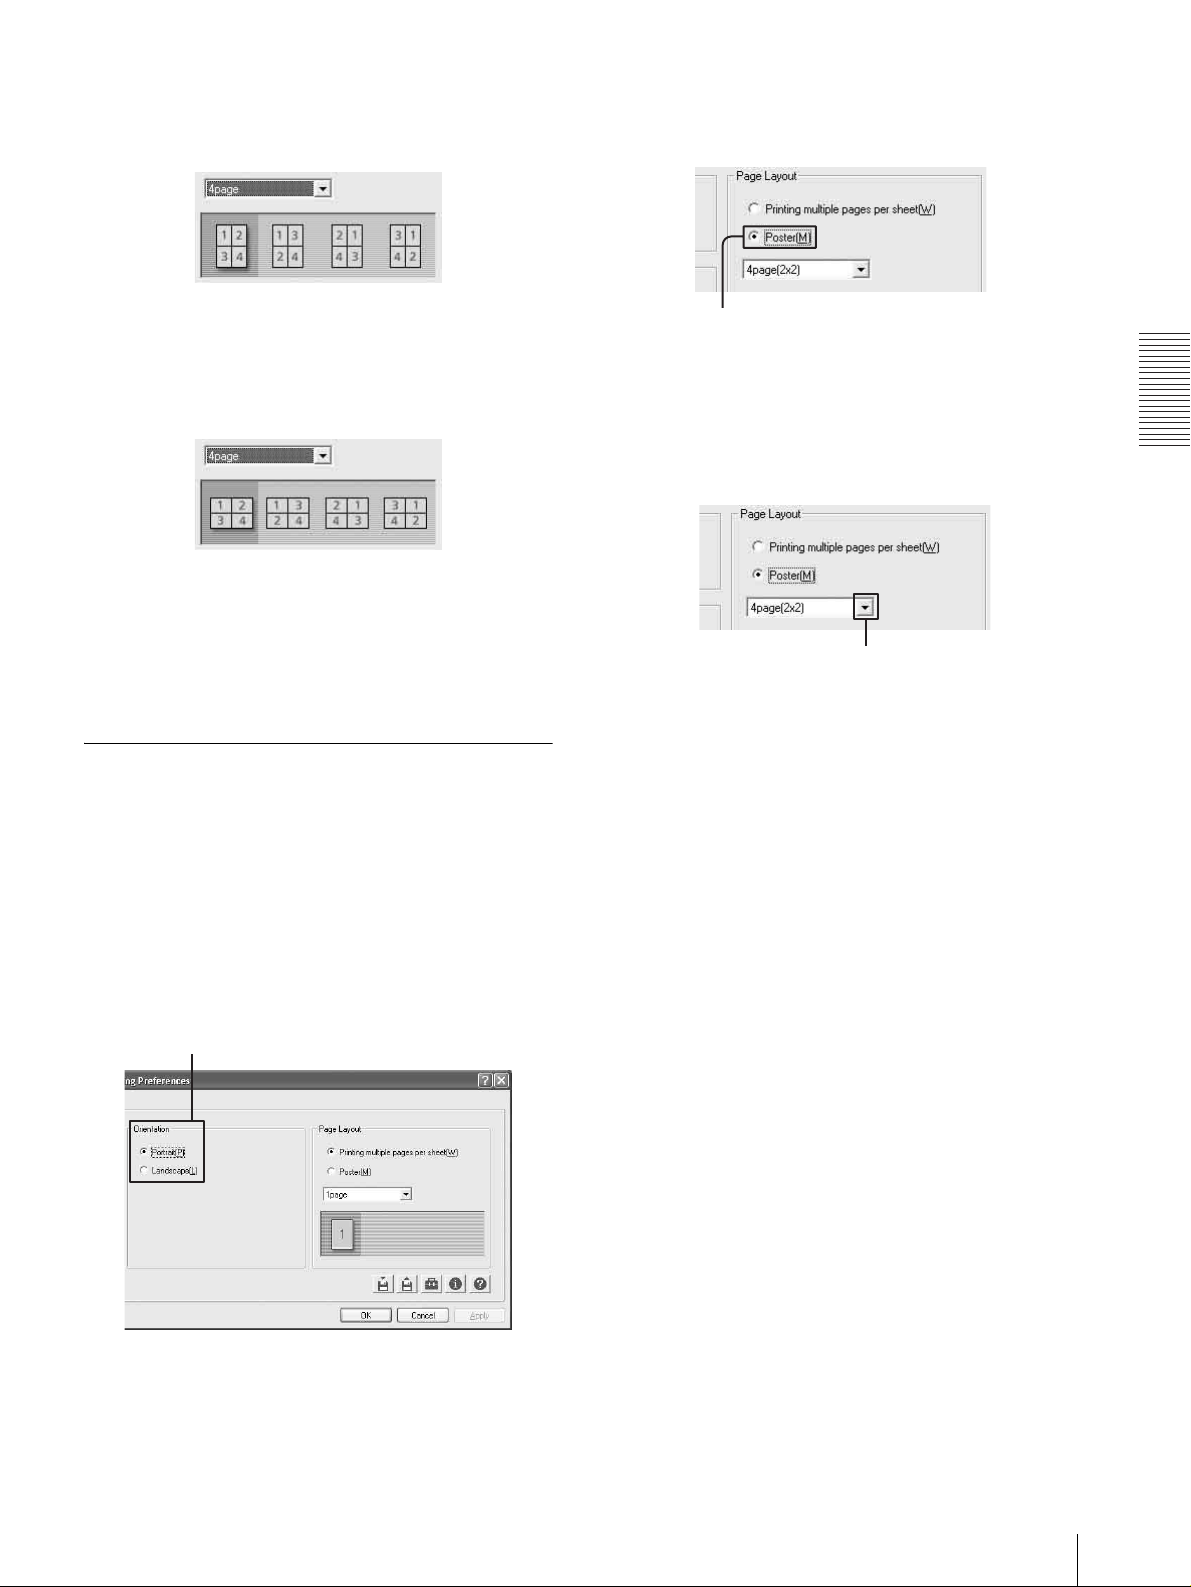
When page orientation is set to [Portrait]
When page orientation is set to [Landscape]:
5
Click the [OK] button.
The setting for the printing of multiple pages per
sheet is saved.
3
Click the [Poster] button on the Page Layout group.
[Poster]
4
Click [V] and select the dividing method.
Click [V].
Operation
Printing Single Page Printing Data on Multiple Sheets
You can divide single page data and print the results on
multiple sheets.
1
Click the [Layout] tab.
2
Set the print orientation according to the page
layout setting of the printing data.
Portrait/Landscape
Performing Settings on the Layout Tab
21
Page 22

Item Comments
4 Page (2
× 2) To divide one page of printing data
and print the results on four sheets.
Using the Help Window
On the Printing Preferences dialog box, you can display
a description of functions or operation methods using
the help window.
To display the Printing Preferences dialog box, see
“Displaying the Print Preferences Dialog Box from a
Software Application” on page 15 or “Displaying the
Printing Preferences Dialog Box from the Windows
Start Menu” on page 15.
9 Page (3
Operation
16 Page (4
5
Click the [OK] button.
The poster setting is saved.
× 3) To divide one page of printing data
and print the results on nine sheets.
× 4) To divide one page of printing data
and print the results on 16 sheets.
Functions of Setting Items
1
Click [?] at the right top on the Printing Preferences
dialog box.
The pointer changes to a?.
[?] button
2
Click the setting item whose function you want to
know about.
A popup window describing the function of the
setting item appears.
Displaying the Description of
22
Using the Help Window
3
Click any point on the window to close the popup
window.
Page 23

Displaying Information on Operation Methods
You can display detailed information on an operation
method by searching it using the table of contents or a
keyword.
1
Click the (Help) button at the right down of the
Printing Preferences dialog box.
Cancelling a Print Job
You can cancel the print job using one of the following
three methods after you click the [Print] button.
• Cancelling the print job from the Windows spooler
window (page 23)
• Cancelling the print job from the status monitor
(page 24)
• Cancelling the print job from the operation panel of
the printer (page 24)
Cancelling a Print Job from the Windows Spooler Window
1
Select [Start], [Control Panel], [Printers and other
hardware], and [Printers and Fax], in turn, so as to
display the Printer window.
Operation
(Help) button
The help window appears.
2
Search for detailed information on the operation
method which you want to know about by clicking
the [Contents] tab or [Index] tab.
2
Double click [Sony LPR-1000MD].
The Windows spooler window appears.
You can cancel the print job in this window.
3
Right click the job you want to cancel, and select
[Cancel] from the drop down list.
The following confirmation message appears.
3
Click [X] at the top right of the help window to
close the help window.
4
Click the [Yes] button.
The selected job is cancelled and disappears from
the spooler window.
5
Click [X] at the right top corner to close the spooler
window.
Cancelling a Print Job
23
Page 24

Cancelling a Print Job from the
The following confirmation message appears.
Status Monitor
1
Double click the icon on the task bar to open the
status monitor.
When printing starts, the status monitor
automatically starts and the icon appears on the
task bar.
4
2
Click the [Job] button.
Operation
Click the [Yes] button.
The print job is cancelled and the selected print job
disappears from the Windows spooler window.
5
Click [X] at the right top corner to close the
Windows spooler window.
Cancelling a Print Job From the Operation Panel of the Printer
You can cancel a print job which is just starting from the
operation panel of the printer.
This method is to be used when you want to stop a
printing job while printing multiple sheets.
It can be used in the following two situations:
• When the printing data is left on the spooler window,
first, cancel the job from the spooler window
following instructions given in “Cancelling a Print Job
from the Windows Spooler Window” on page 23, and
then perform the following operation.
• When the printing data has been sent to the printer and
the print job is not displayed in the spooler window.
Click the [Job] button.
The Windows spooler window appears.
3
Right click the job you want to cancel and select
[Cancel] from the drop down list.
1
Printer window display
5
Note
The page currently being printed is printed.
1
Push the MENU button on the operation panel of
the printer.
2
3,4
24
Cancelling a Print Job
Page 25

The READY indicator goes off and the message
“Ink level” appears on the printer window display.
2
Keep pushing the MENU button or the [B] button
until the message “Print job cancel” appears.
3
Push the SET button.
The message “Cancel print job?/Yes_”
Useful Functions
Aligning the Print Position
You can align the print position on one sheet.
1
Display the Sony LPR-1000MD Printing
Preferences dialog box from the Start menu of
Windows.
For detailed information on how to display, see
“Displaying the Printing Preferences Dialog Box
from the Windows Start Menu” on page 15.
2
Click the (Utility) button.
Operation
4
Push the SET button.
The print job is cancelled.
5
Push the READY button.
The READY indicator lights in green and the
message “READY” appears on the printer window
display.
To cancel print data waiting to be printed
Cancel the print job from the Windows spooler window
or the status monitor.
It is not necessary to cancel the print job from the
operation panel of the printer.
(Utility) button
The Utilities dialog box appears.
Useful Functions
25
Page 26

3
Click the [Print Position Adjustment] button on the
Adjust group.
6
Click the [OK] button on the Printing Preferences
dialog box.
The print position alignment setting is saved.
Advanced Functions
The Function tab allows you to set the following
advanced functions.
• Embedding stamps
You can embed stamps on the printout.
• Sort printing
You can print by volume or by sheet.
• Printing order
[Print Position Adjustment] button
Operation
You can print from first page to last, or last page to
first.
The Print Position Alignment window appears.
4
Enter the numerical value of the amount by which
you want to move the position.
Enter the dimensions.
[Right]: Enter the numerical value of the amount by
which you want to move towards the right in
printers of mm. To move towards the left, attach a –
(minus) before the numerical value.
[Down]: Enter the numerical value of the amount
by which you want to move downward in printers of
mm. To move upward, attach a – (minus) before the
numerical value.
Note
The alignment range to the right is between –100
mm and + 100mm and the alignment range
downward is between –100 mm and +100 mm.
Function tab
Note
When print settings are performed on a software
application such as word processing or image
processing software, it is recommended that you do not
use advanced functions. The printer may not be able to
print correctly if the settings on the Function tab of the
printer and the settings of the software application
interfere each other. For example, if “Back to Front” is
selected on the print setup window of both application
software and the printer, the two settings will cancel
each other out, and the printing order is first page to last.
Embedding Stamps on the Printouts
You can embed character strings such as “Confidential”
or bitmap images on the printouts without processing
the printing data. This is called a stamp.
26
5
Click the [OK] button on the Print Position
Alignment window, and then click the [OK] button
on the Ultilities dialog box.
The Utilities dialog box disappears, and the
window returns to the Printing Preferences dialog
box.
Useful Functions
Note
The density of the part of the stamp which lays on the
characters and images printed may be dark.
Page 27

Adding new stamps
Seven kinds of stamp character strings have already
been registered as defaults.
You can add new stamps using the Add/Remove Stamp
dialog.
1
Click the [Function] tab on the Printing Preferences
dialog box.
2
Click [Stamp Setting...].
[Stamp Setting...] button
3
Place a check mark in the [Embedding Stamp] box.
[Embedding Stamp]
4
Select the type of stamps which you want to add by
clicking either the [Text] or [Bitmap] radio button.
Operation
The Stamp dialog box appears.
[Text] or [Bitmap]
5
Click the [Add/Remove Stamp] button.
[Add/Remove Stamp]
Useful Functions
27
Page 28

The Add/Remove Stamp dialog box appears.
6
Add a new stamp.
When a stamp character string is added:
2 Click the [Add] button.
The Stamp dialog box reappears.
3 Specify the bitmap file to be used.
You can specify the bitmap file using the
following two methods.
• Enter the name of the bitmap file in the
bitmap file text box.
Operation
1 Enter the name of the character string which
you want to add as a stamp in the [Add] text
box.
Enter the name of the stamp character string.
Enter the name of the bitmap file.
• Click the [Browse] button.
2 Click the [Add] button, and then click the
[Back] button.
The stamp character sting is registered and the
window returns to the Stamp dialog box.
Notes
[Browse] button
• You cannot register the same character string
twice.
The Select File dialog box appears.
• You can register any number of characters,
between one and 60, as a stamp string.
28
When a graphics stamp is added:
1 Enter the stamp name.
Enter the name of the graphics stamp.
Useful Functions
Page 29

Specify the bitmap file to be used, and then
click the [Open] button.
2
Click [Stamp Setting...].
[Stamp Setting...] button
Operation
Specify the bitmap file.
Notes
• You cannot register the same stamp name
twice.
• The number of bitmap files that you can
register is not limited.
• You can register and use are 1, 4, 8 and 24 bit
bitmap data.
7
Click the [OK] button on the Stamp window.
8
Click the [OK] button on the Printing Preferences
dialog box.
The settings for a new stamp entry is saved.
Embedding a stamp character string
Seven kinds of stamps such as “CONFIDENTIAL”,
“URGENT”, “DRAFT”, “TENTATIVE”, “SAMPLE”,
“INFORMATIVE” and “PROPOSAL” are registered
already. You can add other character strings as stamps.
The Stamp dialog box appears.
3
Place a check mark in the [Embedding Stamp] box,
and then click the [Text] radio button.
Place a check mark in the [Embedding Stamp].
1
Click the [Function] tab on the Printing Preferences
dialog box.
Select [Text].
4
Select the stamp character string to be embedded.
Useful Functions
29
Page 30

Click [V] at the right of the list and select the
desired stamp character string from the list.
Click [V].
The Font dialog box appears.
Operation
You can embed a new character string as a stamp.
For detailed information on how to add a character
string, see “Adding new stamps” on page 27.
5
Specify how to embed a stamp by setting each item
in the Stamp dialog.
A [Font]: Select a font for the stamp character
string.
You can select any font for the stamp character
string.
Click the [Font] button.
Specify [Font], [Font style] and [Size], and then
click the [OK] button.
The Font dialog box disappears.
Notes
• You can specify the size other than those
listed by entering the font size directly
between 10 points and 500 points.
• Depending on the font, characters may not be
displayed properly. In such a case, select
another font. Changing a font may allow the
characters to be displayed.
B [Color]: Adjusts the brightness of a stamp. You
can adjust the brightness of a stamp in 11 steps.
A stamp becomes lighter toward the Light
direction. A stamp becomes darker toward the
Dark direction.
C [Alignment]: You can select the page on which
the stamp is to be embedded from among [First
Sheet Only], [By sheet], and [By Page].
D [Horizontal Position] and [Vertical Position]:
Specify the position of which the stamp is to be
embedded. You can select a position from
among nine positions in the horizontal
direction and nine positions in the vertical
direction, 81 positions in total. You can check
the specified position on the Stamp dialog.
30
Useful Functions
E [Angle]: Specify the print angle for the stamp.
(You can specify the angle between –90° and
+90°).
6
Click the [OK] button on the Stamp dialog box after
settings have been completed.
The window returns to the Function tab.
Page 31

7
Click the [OK] button on the Printing Preferences
dialog box.
The settings for the stamp character string to be
embedded are saved.
Embedding graphic data (bitmap file) as a
stamp
You can use a bitmap file as a stamp by specifying a
bitmap file.
1
Click the [Function] tab on the Printing Preferences
dialog box.
2
Click [Stamp Setting...].
3
Place a check mark in the [Embedding Stamp] box,
and then click the [Bitmap] radio button.
Place a check mark in the [Embedding Stamp].
Operation
[Stamp Setting...] button
The Stamp dialog box appears.
Select [Bitmap].
4
Select the stamp name corresponding to the bitmap
file which you want to be embedded.
Click [V] at the right of the list and select the
desired stamp name of the graphics data to be
embedded from the list.
Click [V].
You can embed a new graphic.
For detailed information on how to add a new
graphic stamp, see “Adding new stamps” on page
27.
Useful Functions
31
Page 32

5
Specify how the stamp is to be embedded by setting
each item on the Stamp dialog.
Operation
A [Alignment]: Select the page to which the
stamp is to be embedded from among [First
Sheet Only], [By sheet], and [By Page].
B [Horizontal Position] and [Vertical Position]:
Specify the position at which the stamp is to be
embedded. You can select the position from
among nine positions in the horizontal
direction and nine positions in the vertical
direction, 81 positions in total. You can check
the specified position on the Stamp dialog.
The Stamp dialog box appears.
3
Remove the check mark from the [Embedding
Stamp] check box.
Remove the check mark from the
[Embedding Stamp] check box.
C [Size]: Select the size of a stamp, between 1%
and 100%.
D [Density]: Specify the density of the stamp
between 0% and 100%.
6
Click the [OK] button on the Stamp dialog box after
the settings have been completed.
The window returns to the [Function] tab.
7
Click the [OK] button on the Printing Preferences
dialog box.
The settings for the graphic stamp to be embedded
are saved.
Printing without a stamp
Proceed as follows to print without embedding stamps.
1
Click the [Function] tab on the Printing Preferences
dialog box.
2
Click [Stamp Setting...].
4
Click the [OK] button on the Stamp dialog box after
the settings have been completed.
The window returns to the Function tab.
5
Click the [OK] button on the Printing Preferences
dialog box.
Removing stamp entries
You can remove unnecessary stamps using the Add/
Remove Stamp dialog box.
1
Click the [Add/Remove Stamp] button.
The Add/Remove Stamp dialog box appears.
32
Useful Functions
Page 33

2
Click [V] on the [Remove] column on the Add/
Remove Stamp dialog.
A message asking you to confirm that you wan to
delete the stamp appears.
Click [V].
A drop down list appears.
All of the stamp character strings and the names of
graphics stamps are displayed on the drop down
list.
3
Click the stamp which you want to remove.
The stamp name clicked appears.
Stamp name clicked
5
Click the [Yes] button.
6
Click the [Back] button on the Add/Remove Stamp
dialog.
The window returns to the Stamp dialog box.
7
Click the [OK] button on the Stamp dialog box.
Note
You cannot remove the stamps registered as defaults.
Sort Printing
You can print in a set or by sheet using the Function tab
window.
1
Click the [Function] tab on the Printing Preferences
dialog box.
2
Specify [Sort] as follows.
[Sort]
Operation
4
Click the [Delete] button.
Useful Functions
33
Page 34

Item Comments
[Collate] To print a document consisting of
multiple pages in sets
[By Sheet] To print a document consisting of
multiple pages by sheet
3
Click the [OK] button.
The sort printing setting is saved.
Saving and Retrieving Print Settings
You can save print settings as a file.
By retrieving the file in which print settings are saved,
you can set the printer to the desired print settings
quickly and easily.
Setting the Printing Order
You can set the printing order.
1
Operation
Click the [Function] tab on the Printing Preferences
dialog box.
2
Select the printing order.
[Printing Order]
Saving Print Settings
1
Perform print settings on the [Main] tab, [Layout]
tab, [Function] tab, and/or the [Print Alignment
Position] window of the Utilities dialog box.
All of items set in those dialog boxes can be saved
as a file.
2
Click the (Save) button on the Printing
Preferences dialog box.
(Save) button
Item Comments
Front to Back To print from first page to last. The
first page comes at the bottom and
the last page comes on the top.
Back to Front To print from last page to first.
Since the printed sheets are piled up
upwards, the printed sheets are piled
up in the page order (the first page
comes on the top).
3
Click the [OK] button.
The printing order setting is saved.
The Save Settings dialog box appears.
3
Name the file in which the print settings will be
saved.
34
Saving and Retrieving Print Settings
Page 35

Enter the name in the “Name” text box.
Enter the file name.
2
Click the (Save) button on the Printing
Preferences dialog box.
The Save Setting dialog appears.
The names of files currently saved are listed.
You can use file names of one to 60 characters. The
number of print setting files that can be saved is not
limited.
4
Click the [Save] button on the Save Settings dialog
box.
[Save] button
Settings performed on the [Main] tab, [Layout] tab,
[Function] tab, and the [Print Alignment Position]
window of the Utilities dialog box are saved as a
file and the Save Setting dialog disappears.
Note
3
Click the file containing settings you wish to
change.
The name of the file selected is displayed in the
Name text box.
4
Click the [Save] button on the Save Settings dialog
box.
A confirmation message appears.
Operation
Settings made for adding new stamps and removing
stamp entries are not included in the file.
Changing the Print Settings
You can change some parts of print settings saved as a
file.
1
Re-enter the value for the print settings you want to
change on the [Main] tab, [Layout] tab, [Function]
tab and/or the [Print Alignment Position] window
of the Utilities dialog box.
5
Click the [Yes] button.
The settings of the file selected in step 3 are
changed to the settings changed in step 1.
Saving and Retrieving Print Settings
35
Page 36

Note
You cannot change default print settings.
For detailed information on default print settings, see
“Setting Items for the Printer Driver” on page 65.
The file name is displayed in the Name text box.
Retrieving the Print Settings Saved
You can retrieve the print settings any time.
1
Click the (Retrieve Settings) button on the
Printing Preferences dialog box.
The file name selected in step 2 is displayed.
Operation
3
Click the [Retrieve] button.
The Retrieve Settings dialog disappears. The
printer switches to the print settings retrieved.
Note
(Retrieve Settings) button
Settings for adding and removing stamps are not saved.
The Retrieve Settings dialog box appears.
2
Click the file name you wish to retrieve from the
list.
Resetting the print settings to default
settings
1
Click the (Retrieve Settings) button on the
Printing Preferences dialog box.
2
Select “Default” from the list.
Select “Default.”
36
Saving and Retrieving Print Settings
3
Click the [Retrieve] button on the Retrieve Setting
dialog box.
The printer changes in default settings status.
For detailed information on default settings, see
“Setting Items for the Printer Driver” on page 65.
Page 37

Deleting Unnecessary Print Settings
1
Click the (Retrieve Settings) button on the
Printing Preferences dialog box.
The Retrieve Settings dialog appears.
2
Click the file name which you wish to delete on the
list.
The selected file name is displayed in the Name text
box.
Operation
The file name selected in step 2 is displayed.
3
Click the [Delete] button.
A confirmation window appears.
4
Click the [Yes] button.
The file selected in step 2 is deleted.
Saving and Retrieving Print Settings
37
Page 38

Monitor Function
Using the Status Monitor
Confirming the Ink Level
Display the status monitor by double-clicking the
icon.
The ink level is displayed at the right top corner of the
window.
The printer allows you to monitor the printer status via a
USB connection. This is called the status monitor.
The status monitor has the following functions.
• Displaying the current printer status and job
processing status (page 38)
• Displaying the ink level (page 38)
• Displaying error messages (page 55)
• Pausing printing or cancelling printing by opening the
Windows spooler window (page 38)
GL (Gray)
BL (Black)
Displaying the Status Monitor
Monitor Function
When executing a print command, the status monitor
starts automatically and the icon appears on the task
bar.
When you double-click the icon, the status monitor
appears.
When printing is completed, the status monitor
automatically disappears.
Status monitor
How to check the ink level
The number of squares indicates the remaining amount
of the ink.
: The ink level is sufficient.
: The ink level is 10 to 50%.
: The ink level is less than 10%. With the
remaining amount of ink, about 100 sheets can be
printed. Prepare a new ink cartridge.
: The ink level is 0%. The ink has run out.
Replace the ink cartridge.
For detailed information on how to replace the ink
cartridge, see “Replacing the Ink Cartridges” on page
43.
38
Using the Status Monitor
Controlling the Print Job
The status monitor allows you to monitor and control the
print job.
When the monitor is displayed, the printer status is
displayed.
Page 39

1
Click the [Job] button.
Monitor Function
Click the [Job] button.
The Windows spooler window appears.
2
Right-click the name of the job you wish to control.
A drop down list appears.
3
Select the desired item.
Item Comments
Pause To pause printing
Restart To reset the printer so that it is ready
to print (ready status)
Cancel To cancel the print job
Using the Status Monitor
39
Page 40

The Utilities dialog box appears.
Maintenance
Cleaning the Head
Clean the printer head when it is dirty, or whenever a test
printing indicates it is necessary.
Since the head cleaning consumes ink, perform the head
cleaning only when necessary.
You can clean the head with either one of the following
two methods:
• Cleaning the head from the printer driver (page 40)
• Cleaning the head from the operation panel of the
printer (page 41)
3
Click the [Head Cleaning] button.
Cleaning the Head from the Printer Driver
Note
When there is a print job left to be done, the head
cleaning is not performed. Start cleaning the head after
Maintenance
the printing of the current job is completed.
[Head Cleaning] button
1
Display the Sony LPR-1000MD Printing
Preferences dialog box according to the operation
procedure of “Displaying the Printing Preferences
Dialog Box from the Windows Start Menu” on page
15.
2
Click the (Utility) button.
(Utility) button
The printer starts cleaning the head.
It takes one minute to one minute and 30 seconds to
clean the head.
When the head cleaning is completed
Check the result of the head cleaning by printing a test
page.
For detailed information on test printing, see “Printing a
Test Page” on page 42.
If stain or smudges remain on the test sheet, repeat the
head cleaning until the stain disappears.
If the printer cannot print a test page, the ink may have
run out. Replace the ink cartridge.
For detailed information on replacing the ink cartridge,
see “Replacing the Ink Cartridges” on page 43.
40
Cleaning the Head
Page 41

Cleaning the Head From the Operation Panel
1
Printer window display
5
1
Push the MENU button.
The READY indicator goes off and the message
“Ink level” appears.
2
Push and hold the MENU button or BB button until
the message “Cleaning.” appears on the printer
window display.
2
3,4
5
Push the READY button.
The READY indicator lights in green, and the
message “READY” appears on the printer window
display.
When the head cleaning is completed
Check the result of the head cleaning by printing a test
page.
For detailed information on test printing, see “Printing a
Test Page” on page 42.
If stains or smudges remain on the test sheet, repeat the
head cleaning until the stain disappears.
If the printer cannot print a test page, the ink may have
run out. Replace the ink cartridge.
For detailed information on replacing the ink cartridge,
see “Replacing the Ink Cartridges” on page 43.
Maintenance
3
Push the SET button.
The message “Clean?/Yes_” appears.
4
Push the SET button.
The printer starts cleaning the head.
When the printer is cleaning the head, the following
message appears.
When the printer finishes cleaning the head, the
message “Cleaning.” appears again.
Cleaning the Head
41
Page 42

The Utilities dialog box appears.
Printing a Test Page
Print a test page for checking whether the ink jets from
the nozzle of the head cartridge or the print position has
shifted.
You can perform a test printing using either of the
following two methods:
• Test printing from the printer driver (page 42)
• Test printing from the operation panel of the printer
(page 42)
Printing a Test Page from the Printer Driver
3
Note
When there is a print job left to be done, the test printing
is not performed. Start the test printing after the printing
of the current job is completed.
1
Display the Sony LPR-1000MD Printing
References dialog using the procedure explained in
“Displaying the Printing Preferences Dialog Box
Maintenance
from the Windows Start Menu” on page 15.
Click the [Print Test Page] button.
2
Click the (Utility) button.
(Utility) button
[Print Test Page] button
The printer starts printing a test page.
4
Check whether there are any uneven spots or any
blank spots.
Printing a Test Page From the Operation Panel
1
3,4
42
Printing a Test Page
Printer window display
5
2
Page 43

1
Push the MENU button.
The READY indicator goes off and the message
“Ink Level” appears.
2
Push and hold the MENU button or BB button until
the message “Print test page.” appears on the printer
window display.
3
Push the SET button.
The message “Test print?/Yes_” appears.
Replacing the Ink Cartridges
When the ink runs out, proceed as follows to replace the
ink cartridges.
Recommended Ink Cartridges (not supplied)
Color Product name
Black EPI-L100BL Sony Ink Cartridge
Gray EPI-L100GL Sony Ink Cartridge
Notes on using the ink cartridge
• Be sure to remove the protective cap before using a
new ink cartridge. If you don’t, you cannot load the
ink cartridge correctly in the printer.
• Load the ink cartridge in the printer promptly after you
remove the protective cap. If dust accumulates in the
ink cartridge, this may choke the print head and cause
a malfunction of the printer.
• Do not close the air hole located on the top of the ink
cartridge. If the air hole is covered, the ink cartridge
cannot spray the ink and this may cause a malfunction.
4
Push the SET button.
The printer starts printing a test page.
While the printer is printing the test page, the
following message appears.
When the printer finishes printing the test page, the
message “Print test page./Test printing.” appears
again.
5
Push the READY button.
The READY indicator lights in green, and the
message “READY” appears on the printer window
display.
6
Check whether there are any uneven spots or any
blank spots.
Air hole
Maintenance
• It is recommended that you use the ink cartridge by the
recommended date noted on the carton of the ink
cartridge. To maintain the best print quality, use up the
ink cartridge within six months of opening it.
• If you refill the ink cartridge or modify it, we will not
guarantee its operation.
• Be sure not to remove or load the ink cartridge except
when replacing it.
• Be careful not to injure your fingers with pins when
changing the ink cartridge.
• Replace the ink cartridge when the printer is turned on
(the ON/STANDBY indicator is lit in green).
Replacing the Ink Cartridges
43
Page 44

1
Open the head cover.
Head cover
Note
Do not push the head cover backward after it has
been opened a little. If extra force is applied at the
hinges of the head cover, it may be hard to open it
from then on.
2
Remove the empty ink cartridge.
Pull it up by holding the handle of the ink cartridge.
3
Remove the protective cap from the new ink
cartridge.
Protective cap
Maintenance
Do not touch the points marked with .
If you touch those points, the ink may get on your
fingers.
Check that the air hole located on the top of the ink
cartridge is open.
Air hole
4
Matching the protruding part placed on the right
side of the ink cartridge with the groove of the
Do not touch the points marked with .
If you touch those points, the ink may get on your
fingers.
44
Replacing the Ink Cartridges
Page 45

printer, insert it horizontally until the ink cartridge
and the head cartridge line up.
Head cartridge
Notes
• If the head cartridge and/or ink cartridge are not
loaded correctly, you cannot close the head cover.
If you cannot close the head cover, check that the
cartridges are loaded correctly.
• Insert the ink cartridges that flush against the top
of the head cartridge without allowing them to
move about. If they are not inserted securely, the
unit may not print correctly because the ink
cartridges are crooked. Also, even if the
remaining ink is sufficient, the message “Ink
depleted” may appear. Before replacing the ink
cartridge, check the remaining amount of ink. If
there is enough left, insert the same ink cartridge
again without replacing it.
6
Push the READY button.
The READY indicator lights in green, and the
message “READY” appears on the printer window
display. Now the printer is ready to print.
Note
Used ink cartridges and head cartridges are a mixture of
plastic, metal, and ink. Put them in a plastic bag and
throw them away as incombustible waste.
Maintenance
Load the remaining ink cartridges using the same
procedure, matching the ink cartridge and its proper
location.
BL
GL
Location Ink cartridge
BL Black, EPI-L100BL Sony Ink
Cartridge
GL Gray, EPI-L100GL Sony Ink
Cartridge
5
Close the head cover.
Replacing the Ink Cartridges
45
Page 46

Replacing the Head Cleaning Roller
This section explains how to replace the head cleaning
roller.
Use an EPA-5CR head cleaning roller (not supplied).
4
Push the SET button.
The message “Replace?/Yes_” appears on the
printer window display.
Notes
• When replacing the cleaning roller, keep the power of
the printer on. Before replacement, be sure to remove
the auto sheet feeder tray.
• When replacing the cleaning roller, be careful of ink
stain around the head cleaning roller and the head
cleaning unit. The ink may stain your hands and
clothes.
• We recommend that you put on gloves when replacing
the cleaning roller.
• Do not press buttons on the printer during
replacement.
1
Remove the auto sheet feeder tray.
Maintenance
If the message “Replace?/No_” appears
Display “Yes_” by pressing the m/M button,
and then push the SET button.
5
Push the SET button.
The message changes from “Warming up” to
“Ready to replace”, and then, after several seconds,
the message “End?/Yes” appears.
Note
While the cleaning roller is being replaced, the
message “Ready to replace.” or “End?/Yes.”
appears.
At this time, do not open the main cover. If you
open the main cover, this may cause the printer to
malfunction.
6
Remove the used head cleaning roller in use as
follows.
1 Put on the glove supplied with the head
cleaning roller.
Cursor
2
Push the MENU button.
The READY indicator goes out and the message
“Ink level/Black (BL)” appears on the printer
window display.
3
Push the MENU button or the m/M button and
hold it until the message “Replace roller.” appears
on the printer window display.
46
Replacing the Head Cleaning Roller
Page 47

2 Slide the two tabs in the direction of the arrows
(A).
3 Insert the unit ejector A horizontally in the
direction of the arrow until it clicks.
Insert it
horizontally.
1 Press the roller ejector C into the metal parts at
both ends of the roller straight down until it
clicks.
Notes
• The cleaning roller may come off, if it is not
caught securely. Be sure to press the roller
ejector until it clicks.
• To prevent the cleaning roller from being
deformed or stained, do not touch the white
part of the cleaning roller.
2 Rotate the roller ejector in the direction of the
arrows, and unlock the cleaning roller.
Maintenance
4 Pull the unit ejector toward you to remove the
head cleaning unit B.
Note
Do not leave the printer without the head
cleaning unit for a long period of time. When
the head cleaning unit is removed, do not open
the main cover of the printer or insert your hand
into the inside of the printer.
7
Remove the head cleaning roller from the head
cleaning unit, and then attach the new head
cleaning roller.
Note
Hold the parts of the roller ejector indicated
with the arrows.
Replacing the Head Cleaning Roller
47
Page 48

3 Insert the new head cleaning roller D until it
clicks at both ends.
Note
The cleaning roller may come off it is not fully
inserted.
8
Replace the head cleaning unit in the printer.
1 Slide the two tabs in the direction of the arrow
(B).
Note
If it is not inserted completely, the unit cannot
clean the head properly.
3 Pull the two claws at the bottom of the unit
ejector downward, and remove the unit ejector
horizontally.
Maintenance
9
After confirming that the message “End?/Yes_” has
appeared, push the SET button.
The printer starts cleaning and the message “Now
cleaning head.” is displayed.
2 Insert the head cleaning unit with the unit
ejector attached into the printer horizontally as
far as it will go until it clicks.
After it is inserted, push it in at two points so
that it can not move around inside the unit.
When the printer finishes cleaning, the message
returns to “Replace roller.”
10
Push the READY button.
The READY indicator lights in green and the
message “READY” appears on the printer window
Insert it
horizontally.
display.
The head cleaning roller replacement is completed.
48
Replacing the Head Cleaning Roller
11
Attach the auto sheet feeder tray as it was.
Page 49

Notes
• Do not reuse the head cleaning roller once it is
removed from the printer, as foreign material on the
head cleaning roller may cause clogging of the printer
head.
• Dispose of the used head cleaning roller with the roller
ejector attached, and throw away the unit ejector and
the gloves, too.
• The head cleaning roller is a mixture of plastic, metal
and ink. Dispose of it as incombustible waste,
observing local rules and regulations.
Maintenance
Replacing the Head Cleaning Roller
49
Page 50

• Be sure not to lift the printer by paper outlet or head
Miscellaneous
cover. If you do so, these parts may break, or the
printer may fall and this may cause injury.
Precautions
Safety
• Operate the printer using the power source specified in
“Specifications” on page 59.
• Be careful not to damage the AC power cord by
placing or dropping heavy objects on it; it is dangerous
to use the printer with a damaged AC power cord.
• If you do not intend to use the printer for a long time,
disconnect the AC power cord.
• Unplug the AC power cord by grasping the plug, not
the cable itself.
• Do not disassemble the printer.
• Do not remove the cover. There is a danger of electric
shock from the internal parts.
• Be careful not to spill water or other liquids on the
printer, or to allow combustible or metallic material to
enter the cabinet. If used with foreign matter in the
cabinet, the printer is liable to fail, or present a risk of
fire or electric shock.
• Ventilation holes are provided to prevent the printer
from overheating. Be careful not to obstruct them with
other printers or by covering the printer with a cloth,
Miscellaneous
etc.
• If the printer malfunctions or if a foreign body falls
into the cabinet, disconnect the AC power cord
immediately and consult your dealer.
Handling the Printer
When handling the printer for assembly and so on, pay
attention to the following:
• The printer is heavy. When lifting the printer, be
careful not to hurt your back.
• When lifting the printer, put your hands under the
bottom of the printer from both sides and pick it up
horizontally.
• When putting the printer down, put the back feet of the
printer first, and then put the front feet down slowly.
Installation
The printer is a precision instrument which contains
liquid ink.
• Place the printer in a location which meets the
following conditions:
– 10°C to 35°C (50°F to 95°F) temperature and 20 to
80% humidity
– horizontal (within ±2.0°) and stable
• If you place the printer on a slanted surface, the printer
may not print correctly because the ink will spray out
at an angle.
• To protect the printer from damage, place it:
– Away from slippery surfaces
– Away from mechanical vibration
– Away from excessive dust
– Away from extremely hot or cold wind
– Away from direct or excessive sunlight
– Away from water or other liquids.
– Do not cover the printer with a cloth, etc. and place
it in a location with good ventilation.
• Place the printer so that the four feet of the printer are
on a flat surface. If you place the printer at a slant, the
paper may not feed correctly.
50
Precautions
Page 51

• Place the printer keeping spaces towards the back,
front, left, and right, and a space over the top as shown
in the following diagram.
10 cm
10 cm
10 cm
When this product is installed in a rack, please make
sure that the internal air ambient temperature of the
rack is within the specified limit of this product.
4. Prevention against achieving hazardous condition
due to uneven mechanical loading
When this product is installed in a rack, please make
sure that the rack does not achieve hazardous
condition due to uneven mechanical loading.
5. Install the equipment while taking the operating
temperature of the equipment into consideration
For the operating temperature of the equipment, refer
to the specifications on page 59.
6. When performing the installation, keep the rear
of the unit 10 cm (4 inches) or more away from
walls in order to obtain proper exhaust and
radiation of heat.
20 cm
25cm
– Ventilation holes are provided on the back of the
printer. Keep the back of the printer 10 cm or more
away from the wall.
– Keep the front of the printer clear for 20 cm or more
for loading or ejecting paper.
– Keep the top of the printer clear for 25 cm or more
for loading ink cartridges or removing jammed
paper.
Attention-when the product is installed in Rack:
1. Prevention against overloading of branch circuit
When this product is installed in a rack and is
supplied power from an outlet on the rack, please
make sure that the rack does not overload the supply
circuit.
Before Moving the Printer
• Remove the AC power cord from the printer.
• Move the printer with the ink cartridge loaded.
• Hold the printer horizontally and be careful not to give
vibrations to the printer. Doing so causes leakage of
the ink.
Before Transporting the Printer
• Remove the ink cartridge.
• Insert the yellow rubber cap and the dummy pack
removed from the ink feeding inlets when setting up
the printer. Insert the dummy pack into the center ink
feeding inlets so that the side onto which the labels
attached faces to the left.
Dummy pack
Yellow rubber
cap
Miscellaneous
2. Providing protective earth
When this product is installed in a rack and is
supplied power from an outlet on the rack, please
confirm that the outlet is provided with a suitable
protective earth connection.
3. Internal air ambient temperature of the rack
• Retain the head cartridge inside the printer without
removing.
Precautions
51
Page 52

• Pack the printer using the original carton and packing
materials supplied with the printer when you
purchased the printer.
Troubleshooting
The following troubleshooting checks will help you
correct the most common problems you may encounter
Before Asking Repairment
• Remove the ink cartridge from the printer.
• Insert the yellow rubber cap and the dummy pack
removed from the ink feeding inlets when setting up
the printer. Attach the dummy pack into the center ink
with your printer. Before proceeding with these trouble
checks, first check that the power cord is firmly
connected. Should the problem persist after you have
applied the remedy suggested below, unplug the printer
and contact your dealer.
feeding inlets so that the side onto which the labels
attached comes to the left side.
• Retain the head cartridge inside the printer without
removing.
When Not Using the Printer for Long Periods
• Remove the AC power cord from the printer.
• Keep the printer with the ink cartridge loaded. If you
remove the ink cartridge, the ink inside the ink
cartridge may dry up. This may cause the print head to
clog. If you retain the ink cartridge removed from the
printer, cover the ink feeding inlets with the yellow
rubber caps and the dummy pack removed when
setting up the printer after unpacking.
• Avoid placing the printer in a location subject to:
– excessive dust. Since many precise nozzles are
located on the head, excessive dust may cause to
Miscellaneous
choke the head.
– extremely high or low temperatures. This may cause
these nozzles to clog up.
– mechanical vibration
– Do not put the printer on a slanted surface. If you
place the printer on a slanted surface, this may cause
leakage of the ink.
• If you do not intend to use the printer for a long period,
it is recommended to put a cover over the printer.
Symptoms Possible causes and remedies
The printer is not
turned on. (The ON/
STANDBY indicator
does not light in
green.)
The printer does not
ready itself to print.
(ON/STANDBY
indicator blinks or is
lit in orange.
The ON/STANDBY
indicator is lit in
green and the
READY button is lit
in orange.
Printing does not
start.
• The main power switch located on
the back of the printer is not set to
ON.
tSet the main power switch to
ON. (page 9)
• The power cord connection may not
be correct.
tCheck the connections and
rectify, if necessary. (Refer to
“Turning the Printer On”
described in the printed Setup
Manual.)
tCheck whether power is supplied
to the wall outlet.
An error message is displayed on the
status monitor or printer window
display.
tTake remedies according to the
message. (page 54)
Proceed as follows to correct:
1 Push and hold the ON/STANDBY
button for three seconds.
2 After the ON/STANDBY indicator
turns to orange, push the ON/
STANDBY button again.
If the ON/STANDBY and READY
indicators do not light in green,
disconnect the AC power cord and try
to perform the above operations again.
If the printer does not start even after
you take the above remedies, the printer
is malfunctioning. Contact your dealer.
• An error message is displayed on the
status monitor.
tTake remedies according to the
message. (page 54)
• The main power switch is set to off.
tSet the main power switch to on.
(page 9)
• Neither the ON/STANDBY
indicator nor the READY indicators
are lit in green.
tTurn both the ON/STANDBY
indicator and the READY
indicator to green. (page 10)
52
Troubleshooting
Page 53

Symptoms Possible causes and remedies
Paper in the auto
sheet feeder tray is
not fed.
The last sheet of
paper cannot be fed.
The surface of
printouts is dirty,
especially the
beginning of the
printed surface.
• The printer is not in print mode.
tCheck the status of the ON/
STANDBY and READY
indicators, and turn both the ON/
STANDBY indicator and the
READY indicator to green.
(page 10)
• Paper is not loaded.
tLoad paper. (page 12)
• The paper guides (vertically and
horizontally) are not correctly set.
tSet them correctly. (page 12)
• Too much paper is loaded.
tDo not exceed the number of
sheets which the automatic paper
feed tray can hold. (page 11)
• Warped paper is being used.
tTry to make the warped paper lie
flat and load it again. (page 12)
• Folded or wrinkled paper is being
used.
tDo not use folded or wrinkled
paper. (page 12)
• Paper is stacked improperly.
tRiffle the paper and load it again.
• The printer is not placed on a flat
surface.
tPlace the printer on a flat surface.
(page 50)
• An error message is displayed on the
printer window display.
tTake remedies according to the
message. (page 54)
It is often difficult to feed paper from
the automatic paper feed tray, or
sometimes it may be fed at an angle,
depending on the circumstances.
tAdd one sheet of the same type of
paper to the automatic paper feed
tray and try to print again. (page 13)
The life span of the head cleaning roller
may have run out.
tTry head cleaning two or three times
and print a test page. If the printed
surface is still dirty, replace the head
cleaning roller. (page 46)
Symptoms Possible causes and remedies
The printed surface is
dirty.
The printout is
smeared or smudged.
The printout is blurry,
or white stripes or
scorches appear. Or
there is a part which
is not printed.
• The paper path system may be dirty.
tOpen the top cover and wipe the
plastic surface gently with a
cotton swab to remove the dust.
Note
Do not use alcohol.
• The life span of the head cleaning
roller may have run out.
tTry head cleaning two or three
times and print a test page. If the
printed surface is still dirty,
replace the head cleaning roller.
(page 46)
• The ink of the printout just ejected is
smeared on the ejected paper.
tThe next printout is ejected
before the previous printout is
dry and its printed surface may
be dirty. In such a case remove
the ejected printout one by one
from the auto sheet feeder tray.
• Unsuitable paper is being used.
tUse suitable paper. If you use
paper except other than that
recommended, this may cause
the ink to spray unevenly or run.
(page 11)
• The amount of ink is excessive for
the paper in use.
t The paper loaded in the auto
sheet feeder tray is different from
the media type specified in the
Printing Preferences dialog box.
Specify the correct media type. It
is recommended to use the paper
manufactured by Sony
Corporation. (page 17)
The print head is dirty.
tTry head cleaning two or three times
and print a test page. (pages 40 and
42) If the printed surface is still
dirty, consult your dealer.
Miscellaneous
Troubleshooting
53
Page 54

Symptoms Possible causes and remedies
Back to front printing
cannot be done.
Printing multiple
pages per sheet
cannot be done.
The setting of the printer and the print
settings of the application software
interfere with each other.
tDeactivate “Back to Front” item on
the Printing Preferences dialog box
of the printer or the print setup
dialog box of the software
application.
The setting on the layout tab and the
print settings of the application
software interfere each other.
tDeactivate “Printing multiple pages
per sheet” item on the Printing
Preferences dialog box of the printer
or the print setup dialog box of the
software application.
Error Messages
On the printer window display, warning messages
recommending the replacement of consumable parts or
warnings stating the causes of errors, or error messages
are displayed.
Error messages are also displayed on the status monitor.
Take steps to remedy troubles or prepare the
replacement of used or worn out products.
Warning Display
The printer monitors the life span of consumable parts
and warning messages that state the time for
replacement is coming is displayed.
When such warning messages appear, prepare the
replacement parts. However, you can continue printing.
Warning message Possible causes/remedies
a)
READY/Ink low xx
READY/Roller full The head cleaning roller is almost
Miscellaneous
READY/Drain sheet
full
READY/Absorber full The waste ink absorber is full.
The amount of ink left is less than
10%.
tPrepare a new ink cartridge.
(page 43)
used up.
tReplace the head cleaning roller.
(If you do not replace it, the top
part of the paper becomes dirty
when printed. (page 46)
The head cleaning unit is almost used
up.
tReplace the head cleaning unit. (If
you do not replace it, the top part
of the paper becomes dirty or
color mixture may occur when
printed.) For detailed information
on the optional head cleaning unit,
contact your dealer.
tContact your dealer. (If you
continue to use the printer without
replacing the waste ink absorber,
printouts may be dirty.)
54
a) xx means the last alphabetic characters of the
message. These indicates the color and location of
the ink. For detailed information, see “Replacing the
Ink Cartridges” on page 43.
Error Messages
If a problem occurs, an error message is displayed on the
printer window display and on the status monitor.
Take remedies according to the message.
Error messages are displayed as follows.
Error Messages
Page 55

Printer window display
Status Monitor
In the following table, the upper error messages are
displayed on the printer window display and the lower
error messages are displayed on the status monitor.
After removing the causes of errors
Push the READY button so that the printer is reset to
print mode (both ON/STANDBY and READY
indicators light in green).
Errors related to paper
Error message Causes/remedies
Out of paper
(Auto sheet feeder try is
empty.)
Wrong paper size
(Paper size does not
match up with paper
size setting.)
Paper feed error
(A Paper Feed error has
occurred.)
Paper jam
(Paper jam)
• Paper is not loaded in the auto
sheer feeder tray.
tLoad paper in the auto sheet
feeder tray. (page 12)
• The auto sheet feeder tray is not
set correctly.
tCheck that the auto sheet
feeder tray is completely
inserted. (Refer to “Attaching
the Auto Sheet Feeder Tray”
described in the printed Setup
Manual.)
The printer has been designed to use
size A4 paper. Do not use paper other
than size A4 paper.
• The printer is not in print mode.
tMake the ON/STANDBY and
READY indicators light in
green. (page 10)
• The Auto sheet feeder tray is
empty.
tLoad the paper. (page 12)
• Paper other than size A4 paper is
loaded.
tBe sure to use size A4 paper.
• The paper guides (vertically and
horizontally) are not correctly set.
tSet them correctly. (page 12)
• Too much paper is loaded.
tDo not exceed the number of
sheets which the automatic
paper feed tray can hold.
(page 11)
• Warped paper is being used.
tTry to make the warped paper
lie flat and load it again.
(page 12)
• Folded or wrinkled paper is being
used.
tDo not use folded or wrinkled
paper. (page 12)
• Paper is stuck.
tRiffle the paper and load it
again. (page 12)
• The printer is not placed on a flat
surface.
tPlace the printer on a flat
surface.
The paper is jammed.
tRemove the jammed paper.
(page 56)
Miscellaneous
Error Messages
55
Page 56

Errors related to ink
Error messages Causes/remedies
Ink depleted xx
(xx ink has run out.)
(xx ink cartridge is not
attached.)
a)
• The amount of ink is low.
tReplace the ink cartridge.
(page 43)
• The ink cartridge is not set
correctly.
tCheck and set the ink cartridge,
if necessary. (page 43)
• The head cartridge is not set
correctly.
tCheck and set the head
cartridge, if necessary. (Refer
to “Attaching the Head
Cartridge” described in the
printed Setup Manual.)
a) xx means the last alphabetic characters of the
message. These indicates the color and location of
the ink. For detailed information, see “Replacing
the Ink Cartridges” on page 43.
Error related printer status
Error messages Causes/remedies
Cooling down The temperature of the head or of the
inside of the printer rises.
tThis is not a malfunction. Wait for
a while. If the room temperature is
high, the printer may run hot. Be
careful about the room
temperature.
Miscellaneous
Head cartridge/is not
attached
(The print head
cartridge is not
attached.)
Head cover/is open
(The print head cover is
open.)
Main cover/is open
(The main cover is
open.)
The head cartridge is not attached
correctly.
tConfirm whether the head
cartridge is attached correctly.
(Refer to “Attaching the Head
Cartridge” described in the printed
Setup Manual.)
• The head cover is open.
tClose the cover firmly.
• The head cartridge lock screws are
not tightened securely.
tCheck them and tighten them
securely. (Refer to “Attaching
the Head Cartridge” described
in the printed Setup Manual.)
• The harness of the head cartridge
cable is not pushed in to the
groove securely.
tPush the harness of the head
cartridge cable into the groove
securely. (Refer to “Attaching
the Head Cartridge” described
in the printed Setup Manual.)
The main cover is not closed.
tClose the main cover until both
left and right eject buttons click
and lock.
Error messages Causes/remedies
Cleaning unit/is not
attached.
Cleaning unit/is not
closed.
A print data error/has
occurred.
(Print data error.)
Malfunction/xxx The printer is in need of repairment.
The head cleaning unit is not
attached.
tAttach the head cleaning cartridge.
(Refer to “Attaching the Head
Cartridge” described in the printed
Setup Manual.)
The head cleaning unit is not inserted
securely.
tOpen the main cover by pushing
both left and right eject buttons
and push the head cleaning unit
until it is seated properly. (Refer to
“Attaching the Head Cleaning
Unit” described in the printed
Setup Manual.)
Print data error occurs.
Remove the print data error.
tCancel the print job when the print
data is left in the spooler.
(page 23)
tPush the READY button.
tIf the printer does not recover even
when you push the READY
button, push and hold the ON/
STANDBY button for about three
seconds so that the printer is in
standby mode. Then push the ON/
STANDBY button again so that
the printer is set to on. If the
printer does not recover even after
you push the ON/STANDBY
button, set the main power switch
located on the back of the printer
to the off side, and then turn the
printer on again.
Consult your dealer. xxx indicates the
error code. If you write the code on
the status column of “Customer
Confirmation Sheet,” the service
personal understand the nature of the
problem.
If the Paper Jams
When the paper jams, the error message “Paper jam”
appears on the printer window display. Remove the
jammed paper following the steps below.
Note
When you put your hands inside of the printer, be careful
not to hurt yourself by touching hot or sharp parts.
Ejecting the jammed paper automatically
Push the READY button on the printer. The jammed
paper is ejected automatically.
When the jammed paper is not ejected and the message
“Paper jam” does not disappear on the printer window
display even though you push the READY button,
proceed as follows to remove the jammed paper.
56
Error Messages
Page 57

When the paper fed from the auto sheet
feeder tray stops halfway
1
Remove the auto sheet feeder tray, and check
whether or not the paper has jammed near the back.
2
If the jammed paper can be easily removed, pull the
jammed paper out slowly.
If you cannot remove the jammed paper from the
outside, remove it according to instructions in step,
and after, in “When the paper is jammed inside the
printer.”
When the paper is jammed inside the
printer
1
If you can remove the jammed paper from the
feeding input or output slot, pull the jammed paper
straight out slowly.
4
Push both the right and left eject buttons to open the
main cover.
Eject buttons
5
If the head cleaning unit is open, push the head
cleaning unit without touching the print head to
close it.
If you cannot remove the jammed paper from the
outside, go to the next step.
2
Set the printer to standby mode by pushing the ON/
STANDBY button and turn the power of the printer
off by setting the main power switch to the off side.
3
Remove the auto sheet feeder tray.
Head cleaning unit
Miscellaneous
Error Messages
57
Page 58

6
Pull the section with belts located inside the printer
up slowly and remove the paper jammed between
the openings.
Pull this section up
slowly.
If you can remove the jammed paper, go to step 8.
When the edge of the jammed paper can not be
seen, go to step 7.
9
Re-insert the auto sheet feeder tray.
10
Pull out the output support completely.
If it is pulled out halfway, the paper may jam again.
7
Roll the green roller back and forth so that the
jammed paper comes out. Then remove it slowly.
Miscellaneous
Note
Be careful not to touch any parts except the green
roller.
8
Reset the section with the belts as it was, after you
have removed the jammed paper, and then close the
main cover.
58
Note
When resetting the section with belts, be sure to put
the shaft located at the front of the section into the
center groove. If you put the shaft into the wrong
groove, the printer may break.
Error Messages
Page 59

Before Consulting Your
Specifications
Dealer
Should the problem persist after you have applied the
remedies suggested in Troubleshooting, consult your
dealer on following points.
Is the printer malfunctioning?
The printer does not work or serious errors occur even
if you try to apply the suggested remedies, the printer
seems to be broken.
v
Consult your dealer.
Is a computer malfunctioning?
If the printer works correctly and the printer driver is
installed correctly, the printer cable or computer
system (OS, memory, hard disk, interface, etc.) seems
to be the source of the trouble.
v
Consult the dealer from whom you purchased the
computer or the computer manufacturer.
Is the application software malfunctioning?
If trouble occurs with special application software, this
may be a problem peculiar to that application software.
v
Consult the dealer or the manufacturer of the application
software.
The problem may be solved if you upgrade the printer
driver to the latest version.
v
For detailed information on how to upgrade the printer
driver, see the home page of the Sony ink jet printer.
Printer
Printing system Line shot method
Printing speed Standard: Approx. 5ppm
Printing width Maximum 210mm
Receiving buffer
56MB
Interface Hi-Speed USB (USB2.0)
Interface connector
Printer side: USB regulation series B
receptacle
Cable side: USB regulation series B
plug
Ordinary noise level
Approx. 38dB or less (when the printer
is in standard mode)
Operating temperature
10°C to 35°C (50°F to 95°F)
Operating humidity
20% to 80% (no condensation allowed)
Storage and transport temperature
–10°C to 45°C (14°F to 113°F)
Storage and transport humidity
20% to 80% (no condensation allowed)
Temporary storage temperature in the user environment
0°C to 35°C (32°F to 95°F)
Temporary storage humidity in the user environment
20% to 80% (no condensation allowed)
Power requirements
100 to 240 V AC, 50/60 Hz
Input Current 4.0 to 1.6 A max. at 25°C
Power consumption
At standby: Approx. 16W or less
When printing: Approx. 70W
Dimensions With the auto sheet feeder tray
Approx. 350 × 202 × 519 mm (w/h/d)
(13 7/8 × 8 × 20 1/2 inches)
When printing
Approx. 350 × 202 × 643 mm (w/h/d)
(13 7/8 × 8 × 25 3/8 inches)
Mass Approx. 15.5 kg (34 lb 3 oz)
Sheet feeding system
Auto sheet feeding
Paper size A4
Print head Black:
Number of nozzles: 5120 × 1
Gray:
Number of nozzles: 5120 × 1
Supplied accessories
Plug holder (1)
Head cartridge (packed inside the
silver package) (1)
Auto sheet feeder tray (1)
Ink cartridges (black and gray) (2)
Miscellaneous
Before Consulting Your Dealer / Specifications
59
Page 60

Head cleaning unit (1)
USB cable (1)
High Quality Paper (1)
Setup Manual (1)
CD-ROM (including multi-lingual
operating instructions and setup
manuals, and printer drivers) (1)
Optional accessories
Ink cartridge Black: EPI-L100BL Sony ink cartridge
Gray: EPI-L100GL Sony ink cartridge
Paper EPP-300A4MD Sony High Quality
Paper
Head cleaning roller
EPA-5CR
Medical Specifications
Protection against electric shock:
Class I
Protection against harmful ingress of
water:
Ordinary
Degree of safety in the presence of
flammable anesthetics or oxygen:
Not suitable for use in the presence
of flammable anesthetics or oxygen
Mode of operation:
Continuous
Design and specifications are subject to change without
notice.
As an ENERGY STAR Partner, Sony Corporation has
determined that this is product meets the ENERGY
STAR guidelines for energy efficiency.
Outline of the International ENERGY
STAR Office Equipment Program
The International ENERGY STAR Office Equipment
Program promotes energy saving through the use of
computers and other office equipment. The program
backs the development and dissemination of products
with functions that effectively reduce energy
consumption. It is an open system in which business
proprietors can participate voluntarily. The targeted
products are office equipment such as computers,
displays, printers facsimiles, and copiers. Their
standards and logos are uniform among participating
nations/regions.
Environmental performance
Miscellaneous
Resource efficiency
Mass: Approx. 15.5kg (34 lb 3 oz)
Dimensions:
With the auto sheet feeder tray
Approx. 350 × 202 × 519 mm (w/h/d)
(13 7/8 × 8 × 20 1/2 inches)
When printing
Approx. 350 × 202 × 643 mm (w/h/d)
(13 7/8 × 8 × 25 3/8 inches)
Environment consideration
Harmful materials parts
All parts composing of the printer:
Special bromine flame retarder
(PBB, PBDE) are not used.
Exterior plastic:
Heavy metals (Pb, Hg, Cr (VI), Cd)
and halogen flame retarder are not
used.
Ordinary noise level
38dB (when the printer is in
standard mode)
Packing material
Heavy metals (Pb, Hg, Cr (VI), Cd) are
not used. (Carton)
Applied regulation
International Energy Star program
Requirements for the Printer Driver
Computer
A computer on which Micrsoft Windows XP Home
Edition/Professional (English version) or Microsoft
Windows 2000 Professional (English version) runs.
Also, a computer equipped with a USB interface.
Basic software
Microsoft Windows XP (English version)
Microsoft Windows 2000 (English version)
Hard disk space required
Disk space required when installing the printer driver
(including the memory to be used temporarily):
25Mbytes
To connect a USB cable to a Windows
computer
It is necessary to use a computer which satisfies the
following conditions and a USB port that is guaranteed
by the computer maker.
• A computer on which either Windows XP or Windows
2000 is preinstalled
• Use the peripheral equipment which has obtained
USB 2.0 certification. If you use peripheral equipment
which is not certified, this may cause trouble. Also,
60
Specifications
Page 61

there are cases where the performance of the printer
cannot be guaranteed.
• Use a cable of less than 3m in length.
To connect the printer to Windows via a HiSpeed USB
Use the Microsoft Windows XP/2000 USB2.0 driver.
Note
Do not use the extension USB 2.0 board such as PCI,
PCMCIA and so on since the operation may become
unstable.
This printer is applied to Hi-Speed USB.
When the printer is connected to the computer which
corresponds to Hi-Speed USB, the data can be loaded at
high speed (maximum 480Mbsp
a)
).
If the printer is connected to the computer which does
not correspond to Hi-Speed USB, the down loading
speed is based the specifications of the computer.
a) 480Mbps is the maximum value on the theory of the
Hi-Speed transfer of USB2.0 regulation. The actual
transfer speed depends on the devices, conditions
and so on.
Miscellaneous
Specifications
61
Page 62

Menu Flow of the Printer Window Display
The messages of the printer window display changes as
follows whenever you push the MENU button and you
can perform settings.
Main flow
How to read the flow chart
• The arrow in the flow chart indicates that you push the
button.
•MENU, SET, BACK and bb, BB indicate the
buttons on the operation panel of the printer.
• “_” indicates the blinking of the cursor, and this is the
status where the printer is waiting to push the SET or
BACK button.
• : Indicates the status that the printer is
processing in some operation.
Miscellaneous
Go to “Job cancel” on page
64
Go to “Head cleaning” on
page 63
Go to “Test printing” on
page 63
Go to “Cleaning roller
replacement” on page 64
62
Menu Flow of the Printer Window Display
Page 63

Head cleaning
Test printing
Miscellaneous
Menu Flow of the Printer Window Display
63
Page 64

Job cancel
Cleaning roller replacement
Miscellaneous
64
Menu Flow of the Printer Window Display
Page 65

Setting Items for the
Customer Confirmation
Printer Driver
Tab Item Selections Default
Main Tray Auto Sheet
Feeder
Size A4 (Fixed) A4
Width 210 (Fixed) 210 (Fixed)
Length 297 (Fixed) 297 (Fixed)
Media Type Sony high
quality coated
paper/Plain
paper
Ink Black and
white (Fixed)
Gamma Gamma 1/
Orientation Portrait/
Printing
multiple
pages per
sheet
Poster 4page (2 × 2)/
Function Stamp
Setting...
Printing
Order
Sort Collate/By
Gamma 2/
Gamma 3/
Gamma 4
Landscape
1page/2page/
4page
9page (3 × 3)/
16page (4 ×
4)
Text/Bitmap Text
Front to Back
(from the first
page)/Back to
Front (from
the last page)
Sheet
setting
Auto Sheet
Feeder
Sony high
quality coated
paper
Black and
white
Gamma 1
Portrait
1page
4page (2 × 2)/
Front to Back
Collate
Sheet
When consulting with your dealer, write down the status
of the printer beforehand so that troubles can be solved
easier.
1 Model name of the
2 Serial No.
3 Computer manufacturer
4 Computer OS Windows2000 SP
5 Connecting cable of the
6 Usage environment
7 Software application used
8 Printer driver Version
9Status
printer
Memory MB
Hard disk space GB
USB cable
printer
when printing
When printing other print
data
When printing with
another software
application
Re-installation of the
printer driver
Symptoms
Software application
Manufacturer
Ve rs i o n
WindowsXP SP
Prints correctly
Cannot print
Prints correctly
Cannot print
Re-installed
Not re-installed
Miscellaneous
From when From long ago
Just lately
Frequency Every time
The test pattern built in
the printer is printed
correctly.
Setting Items for the Printer Driver / Customer Confirmation Sheet
Sometimes
Yes
No
65
Page 66

L
Index
A
About this manual 5
Aligning the print position 25
C
Cancelling a print job
from the operation panel of the
printer 24
from the status monitor 24
from the Windows spooler
window 23
Cleaning the head
from the operation panel 41
from the printer driver 40
E
Error messages
related to ink 56
related to paper 55
related to printer status 56
F
Function tab
embedding stamps on the printout
26
setting the printing order 34
sort printing 33
G
Index
Gamma type 18
H
Head cleaning roller
option 46
replacing 46
Help window
how to display the description of
functions 22
Help window how to display
information on operation methods
23
I
Ink cartridges
notes on using 43
recommended 43
replacing 43
Layout tab
printing multiple pages on one
sheet 19
printing single page printing data
on multiple sheets 21
setting the gamma type 18
setting the print orientation 19
settings for paper 17
Location and function of parts and
controls
front 6
rear 8
when the head cover is opened 7
M
Menu flow of the printer window
display
head cleaning 63
main flow 62
P
Paper
loading 12
notes on paper 11
recommended paper 11
settings for paper 17
Paper jams 56
Power
setting the printer to standby mode
9
turning the printer off 9
turning the printer on 9
Precautions
before asking repairment 52
before transporting the printer 51
handling the printer 50
installation 50
mounting the printer on a rack 51
safety 50
when not using the printer for long
periods 52
Print Preferences dialog box
common operations on each tab
16
displaying from a software
application 15
Function tab 26
Main tab 17
Print settings
changing 35
deleting 37
retrieving 36
saving 34
Printer driver
requirements for the printer driver
60
version information 16
Printing a test page
from the operation panel 42
from the printer driver 42
Printing multiple pages on one sheet
19
Printing order 34
Printing Preferences dialog box
displaying from the Windows start
menu 15
Layout tab 19
Printing single page printing data on
multiple sheets 21
S
Sort printing 33
Specifications
environmental performance 60
printer 59
requirements for the printer driver
60
Stamp
adding new stamps 27
embedding a stamp character
string 29
embedding graphic data 31
pinting without a stamp 32
removing stamp entries 32
Status monitor
cancelling a print job 24
confirming the ink level 38
controlling the print job 38
displaying error messages 54, 55
how to display 38
System overview 6
T
Troubleshooting 52
U
Utilities dialog box
aligning the print position 25
cleaning the head 40
printing a test page 42
W
Warning messages 54
66
Index
Page 67

Sony Corporation
 Loading...