

Sony KY-20V50 Service Manual
KY-20V50
RM-Y117
SERVICEMANUAL
RM-Y117
US Model
Chassis No. SCC-F78F-A
Canadian Model
Chassis No. SCC-F79E-A
BA-1
MODELS OF THE SAME SERIES
KV-20V50 KV-20TR23/2160WR/215OR
KV-13TR28/13TR29
KV-1430Rf1440WR
CHASSIS
KV-20TS29/20TS32
KV-21STR2/2170RS
Television system
Channel coverage
Picture tube
Antenna
Input
SPECIFICATIONS
American TV standards
VHF: 2-13
UHF:
14-69
CABLE TV: 1-125
Hi-Black
20-inch picture measured diagonally
21-inch picture tube measured diagonally
75 ohm external antenna
terminal for VHF/UHF
VIDEO AND S VIDEO
Trinitrona
S VIDEO IN (S terminal)
Y:
1 Vp-p,
C: 0.286 Vp-p (Burst signal)
Video (phono jacks) : 1 Vp-p,
unbalanced, sync negative
Audio (phono jacks) :
500
mVrms
Impedance : 47 kilo-ohms
tube
75-ohms
sync negative
75-ohms
unbalanced,
(100% modulation)
75-ohms
Speaker output
Speaker size
Audio frequency 50Hz-20kHz
response
Power requirements
Power consumption 120W
Standby mode 4w
Dimensions (w/h/d) 550X464.7X471.3 mm
Weight 24.0 kg (52 Ibs 15 oz)
Supplied accessories Remote Commander RM-Y117 (1)
Recommended
accessories
Design and specifications are subject to change without notice.
TRINITRONdOLOR
3WX2
(4 ohms)
Full range 80 mm (31/4
120 V AC, 60Hz
(213/a
X 183/8 X 185/s inches)
with 1 size AA (R6)
EVEREADY batteries
U/V mixer EAC-66
Connecting cable
VMC-810S/820S, VMC-720M
YC-15V/3OV, RK-74A
in.)X2
units
TV
SONY@
TABLE OF CONTENTS
Section
1.
GENERAL
lntroducting the Sony TrinitronsColor
l-l.
1-2. Locating the
l-3. Using the ON-SCREEN Menus
l-4.
Connecting Other Equipment ............................................ 7
l-5.
Watching TV
l-6.
Using Convenient
l-7.
Using
1-8. Adjusting Picture and Sound Quality ................................. 10
l-9.
Using the Timer-Activated Functions
l-1 0. Customizing the Screen Display ........................................ 16
l-l 1. Using the Pre-Programmed Remote Commander
l-1 2. Troubleshooting ................................................................. 20
2.
DISASSEMBLY
2-1.
Rear Cover
2-2.
Service Position ................................................................. 21
2-3.
Picture Tube Removal ....................................................... 22
3.
SET-UP ADJUSTMENTS
3-l.
Beam Landing
3-2.
Convergence
3-3.
Focus
3-4.
Screen (G2) ....................................................................... 26
Method of Setting the Service Adjustment Mode .............. 26
3-5.
3-6.
White Balance
Controls
Programs
Closed
Caption ........................................................
Removal ......................................................... 21
....................................................................
...................................................................... 24
................................................................................. 26
Adjustments
u
TV .......................... 4
......................................................... 4
......................................... 6
...................................................... 8
Features
............................................... 9
.................................
............ 18
............................................... 26
i?aQe
13
23
4.
SAFETY RELATED ADJUSTMENTS .....................
5.
CIRCUITADJUSTMENTS
5-l.
Electrical Adjustment by Remote Commander .................. 29
5-2.
A Board
6.
9
DIAGRAMS
6-i.
Block Diagram .................................................................... 35
6-2.
Circuit
6-3.
Printed Wiring Boards and Schematic Diagrams
l A
l
l
l
l
6-4.
Semiconductors
7.
EXPLODED VIEWS
7-1.
Chassis
7-2.
Picture Tube ....................................................................... 58
6.
ELECTRICAL PARTS LIST ....................................
Adjustments
Boards
Board ............................................................................ 40
G
Board..
.......................................................................... 47
UA Board ......................................................................... 50
S Board ............................................................................ 51
C Board..
.......................................................................... 53
.............................................................................. 57
......................................................... 31
Location ...................................................... 39
.............. 39
................................................................. 56
27
69
WARNING!! ATTENTION!!
AN ISOLATIONTRANSFORMER SHOULD BE USED DURING ANY
SERVICE TO AVOID POSSIBLE SHOCK HAZARD, -BECAUSE OF
LIVE CHASSIS.
THE CHASSIS OF THIS RECEIVER IS DIRECTLY CONNECTED TO
THE AC POWER LINE.
SAFETY-RELATED COMPONENT WARNING !!
COMPONENTS IDENTIFIED BY SHADING AND MARK A ON THE
SCHEMATIC DIAGRAMS, EXPLODED VIEWS AND IN THE PARTS
LIST ARE CRITICAL TO SAFE OPERATION. REPLACE THESE
COMPONENTS WITH SONY PARTS WHOSE PART NUMBERS
APPEAR AS SHOWN IN THIS MANUAL OR IN SUPPLEMENTS
PUBLISHED BY SONY. CIRCUIT ADJUSTMENTS THAT ARE
CRITICAL TO SAFE OPERATION ARE IDENTIFIED IN THIS
MANUAL. FOLLOW THESE PROCEDURES WHENEVER CRITICAL COMPONENTS ARE REPLACED OR IMPROPER OPERATION IS SUSPECTED.
-2-
AFIN D’EVITER TOUT RISQUE D’ELECTROCUTION PROVENANT
D’UN CHASSIS SOUS TENSION, UN TRANSFORMATEUR
D’ISOLEMENT DOIT ETRE UTlLlSi LORS DETOUT DlkPANNAGE.
LE
CHkSlS
DECE RlkCEPTEUR ESTDlRECTEMENTRACCORDtl.
A L’ALIMENTATION SECTEUR.
ATTENTION AUX COMPOSANTS RELATIFS ALA
SfkCURITk+!!
LES COMPOSANTS IDENTlFliS PAR UNE TRAME ET PAR UNE
MAPQUE A SUR LES SCHkMAS DE PRINCIPE, LES VUES
EXPLOSiES ET LES LISTES DE PIECES CONT D’UNE
IMPORTANCE CRITIQUE POUR LA
FONCTIONNEMENT. NE LES REMPLACER QUE PAR DES
COMPOSANTSSONY DONT LE NUMkRO DE
DANS LE PRiSENT MANUEL OU DANS DES SUPPLiMENTS
PUBLIeS PAR SONY. LES ReGLAGES DE CIRCUIT DONT
L’IMPORTANCE EST CRITIQUE POUR LA
FONCTIONNEMENT SONT IDENTIFIES DANS LE
MANUEL. SUIVRE CES PROCiDURES LORS DE CHAQUE
REMPLACEMENT DE COMPOSANTS CRITIQUES, OU
LORSQU’UN MAUVAIS FONCTIONNEMENT EST SUSPECTi.
SiCURITk
PIkE
SIkURITk
DU
EST INDlQlJi
DU
PR&ENT
SAFETY CHECK-OUT
(US Model only)
Aftercorrectingtheoriginal serviceproblem,performthefollowing
safety checks before releasing the set to the customer:
1.
Check the area of your repair for unsoldered or poorly-soldered
connections. Check the entire board surface for solder splashes
and bridges.
2.
Check the interboard wiring to ensure that no wires are “pinched”
or contact high-wattage resistors.
3.
Check that all control knobs, shields, covers, ground straps, and
mounting hardware have been replaced. Be absolutely certain that
you have replaced all the insulators.
4.
Look for unauthorizedreplacement parts, particularly transistors,
that were installed during a previous repair Point them out to the
customer and recommend their replacement.
5.
Look for parts which, though functioning, show obvious signs of
deterioration. Point them out to the customer and recommend
their replacement.
6.
Check the line cord for cracks and abrasion. Recommend the
replacement of any such line cord to the customer.
7.
Check the condition of the monopole antenna (if any).
Make sure the end is not broken off, and has the plastic cap on it.
Point out the danger of impalement on a broken antenna to the
customer, and recommend the antenna’s replacement.
8.
Check the B+ and HV to see they are at the values specified. Make
sure your instruments are accurate; be suspicious of your HV
meter if sets always have low HV.
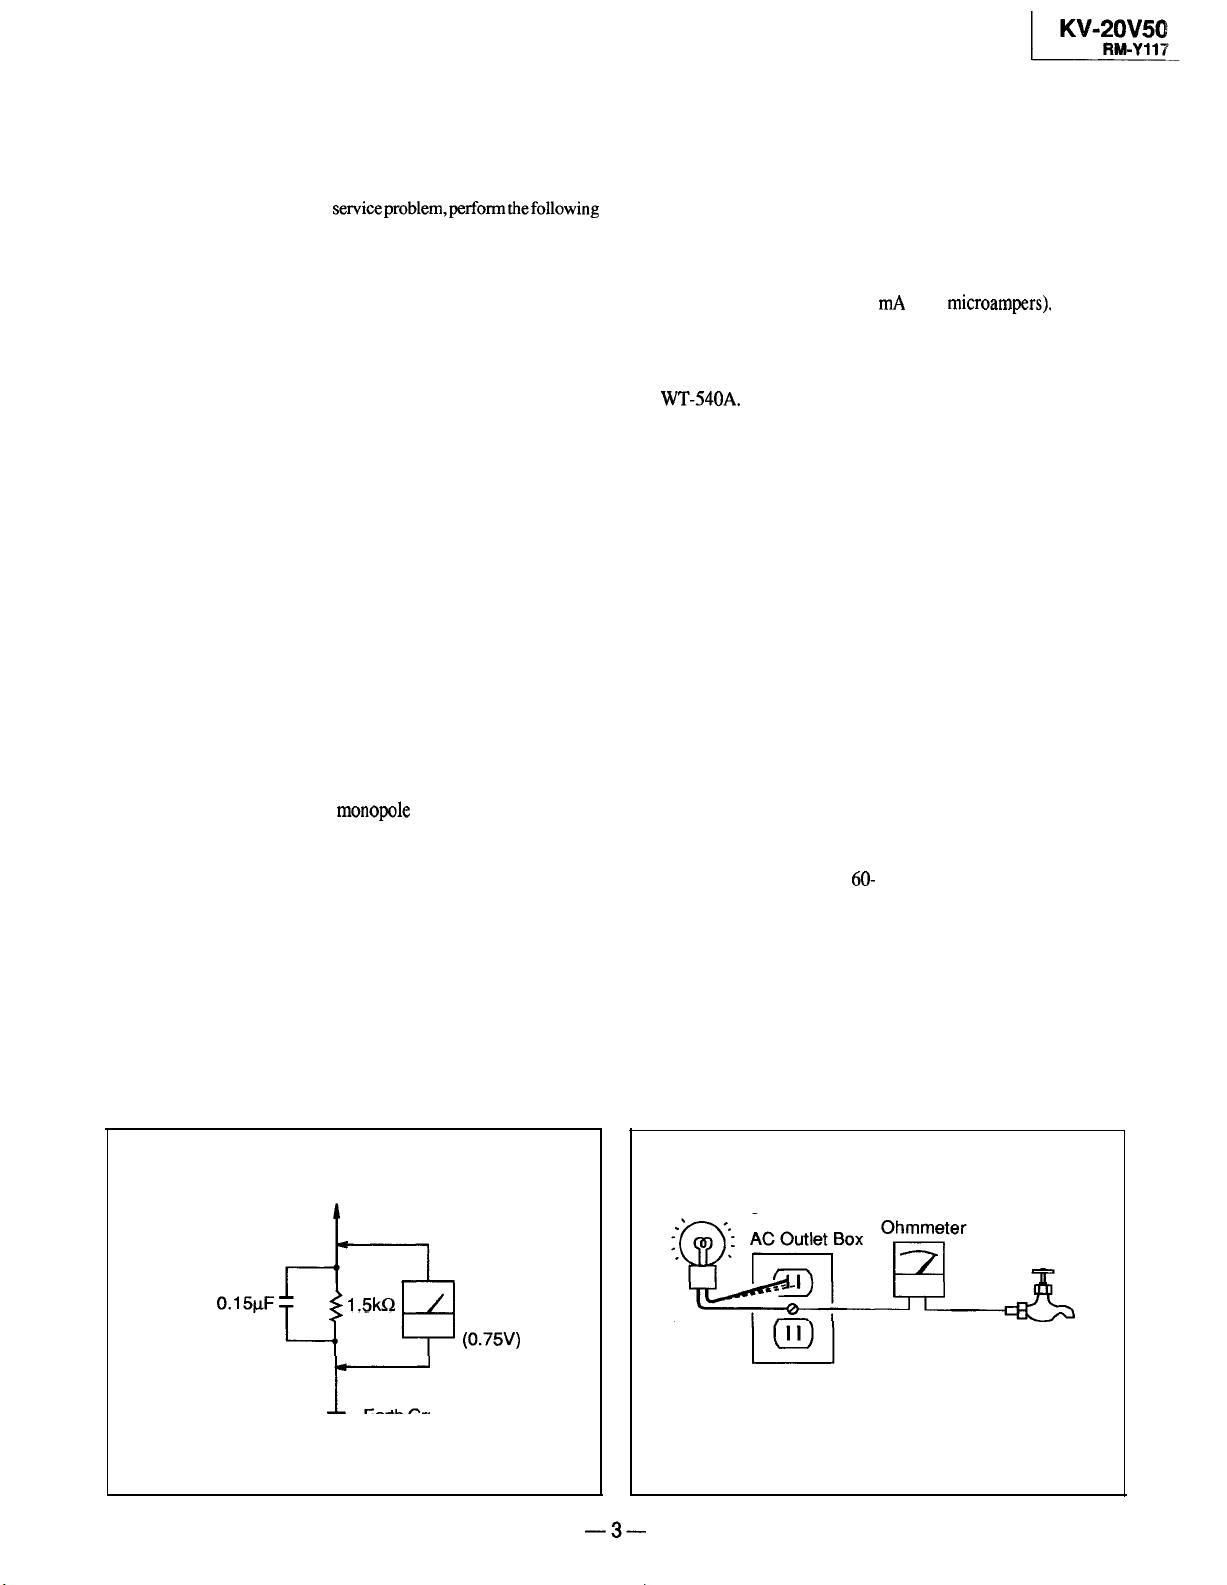
LEAKAGE
from all exposed metal parts to any exposed metal part having a return
to chassis, must not exceed 0.5 mA (500
current can be measured by any one of three methods.
1.
2. A battery-operated AC milliammeter. The Data Precision 245
3. Measuring the voltage drop across a resistor by means of a VOM
HOW TO FIND A GOOD EARTH GROUND
retaining screw on most AC outlet boxes is also at earth ground. If the
retaining screw is to be used as your earth-ground, verify that it is at
ground by measuring the resistance between it and a coldwater pipe
with an ohmmeter. The reading should be zero ohms. If a cold-water
pipe is not accessible, connect a 60- 100 watts trouble light (not a neon
lamp) between the hot side of the receptacle and the retaining screw.
Try both slots, if necessary, to locate the hot side of the line, the lamp
should light at normal brilliance if the screw is at ground potential. (See
Fig. B)
The AC leakage from any exposed metal part to earth ground and
microampers).
A commercial leakage tester, such as the Simpson 229 or RCA
WT-540A. Follow the manufacturers’ instructions to use these
instruments.
digital multimeter is suitable for this job.
or battery-operated AC voltmeter. The “limit” indication is 0.75
V, so analog meters must have an accurate low-voltage scale. The
Simpson 250 and Sanwa SH-63Trd are examples of a passive
VOM that is suitable. Nearly all battery operated digital multimeters
that have a 2V AC range are suitable. (See Fig. A)
A cold-water pipe is guaranteed earth ground; the cover-plate
Leakage
9.
Check the antenna terminals, metal trim, “metallized” knobs,
screws, and all other exposed metal parts for AC leakage. Check
leakage as described below.
To Exposed Metal
Parts on Set
0.15pF
d-3
Fig. A. Using an AC voltmeter to check AC leakage.
1.5kQ
I-
= Earth Ground
AC
voltmeter
(0.75V)
-3-
Trouble Light
Cold-water Pipe
Fig. B. Checking for earth ground.
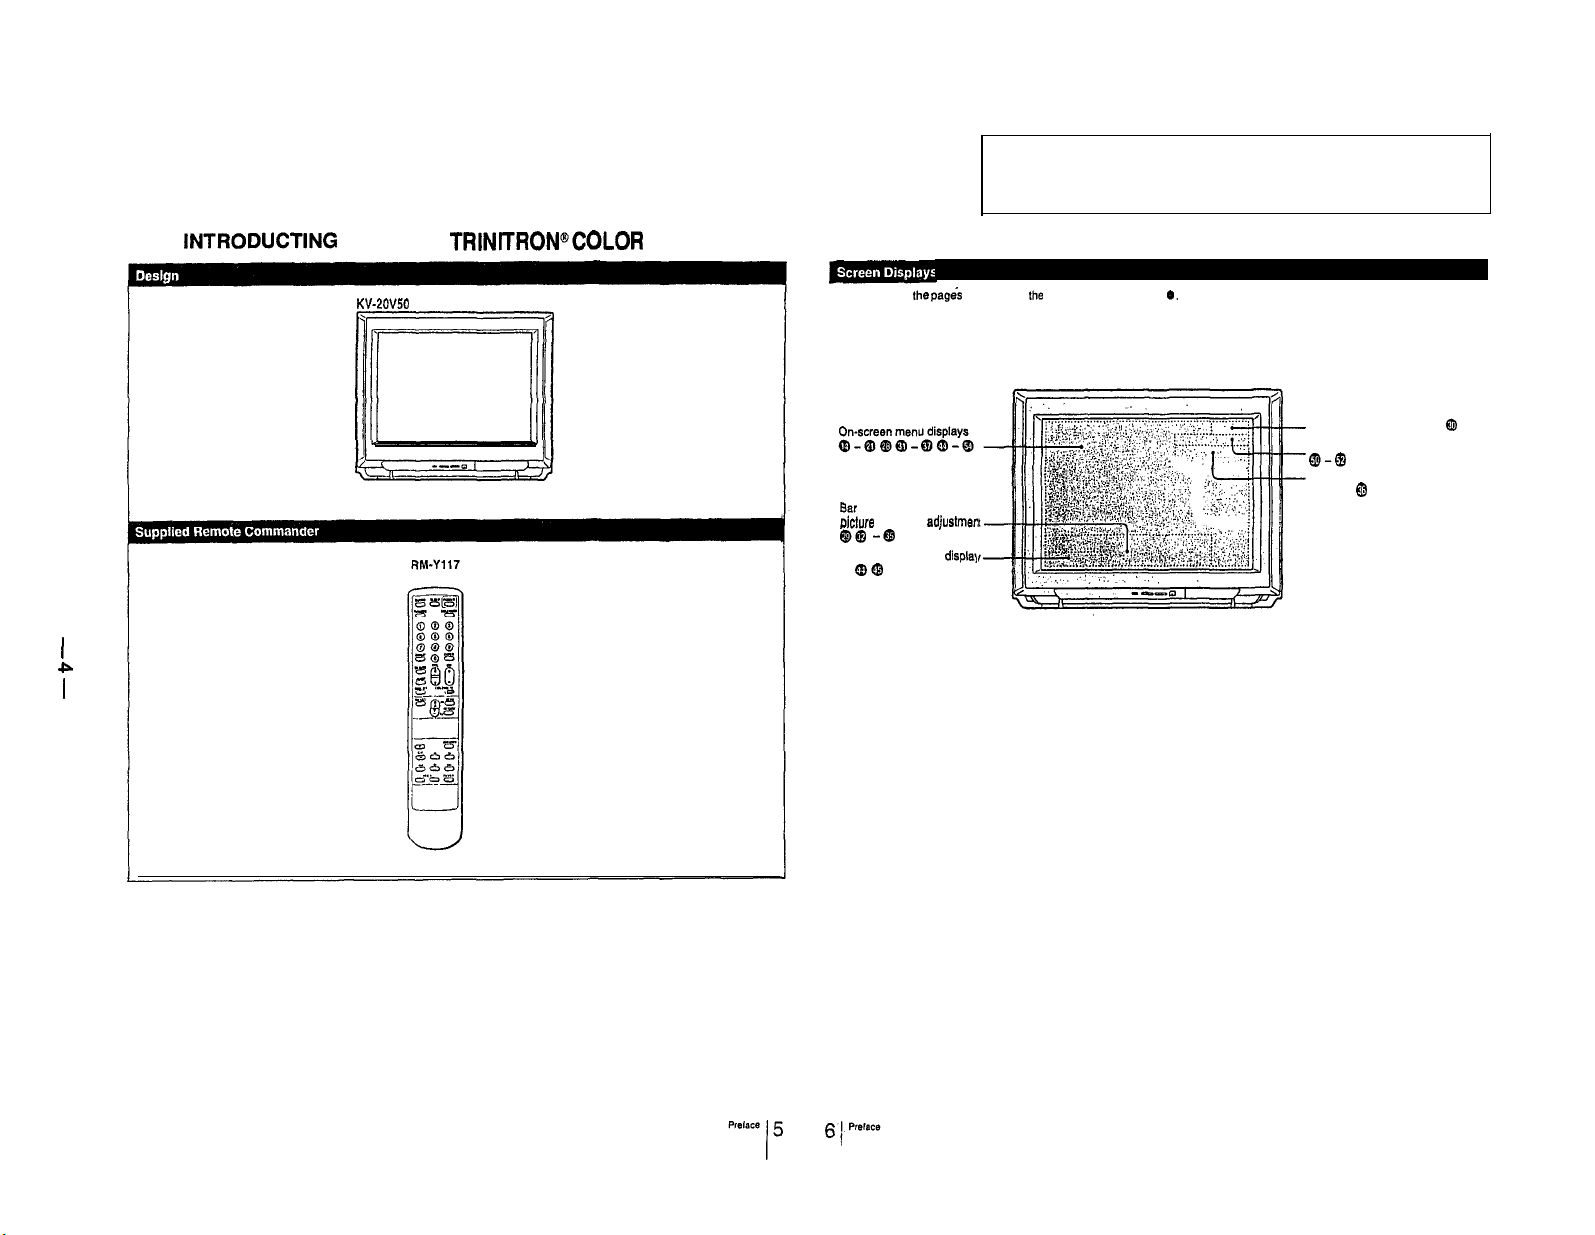
l-l.
INTRODUCTING
THE SONY
TRINKRON@‘COLOR
TV
SECTION 1
GENERAL
1-2.
The operating instructions mentioned here are partial abstracts from
the Operating Instruction Manual. The page numbers of the Operating
Instruction Manual remein as in the manual.
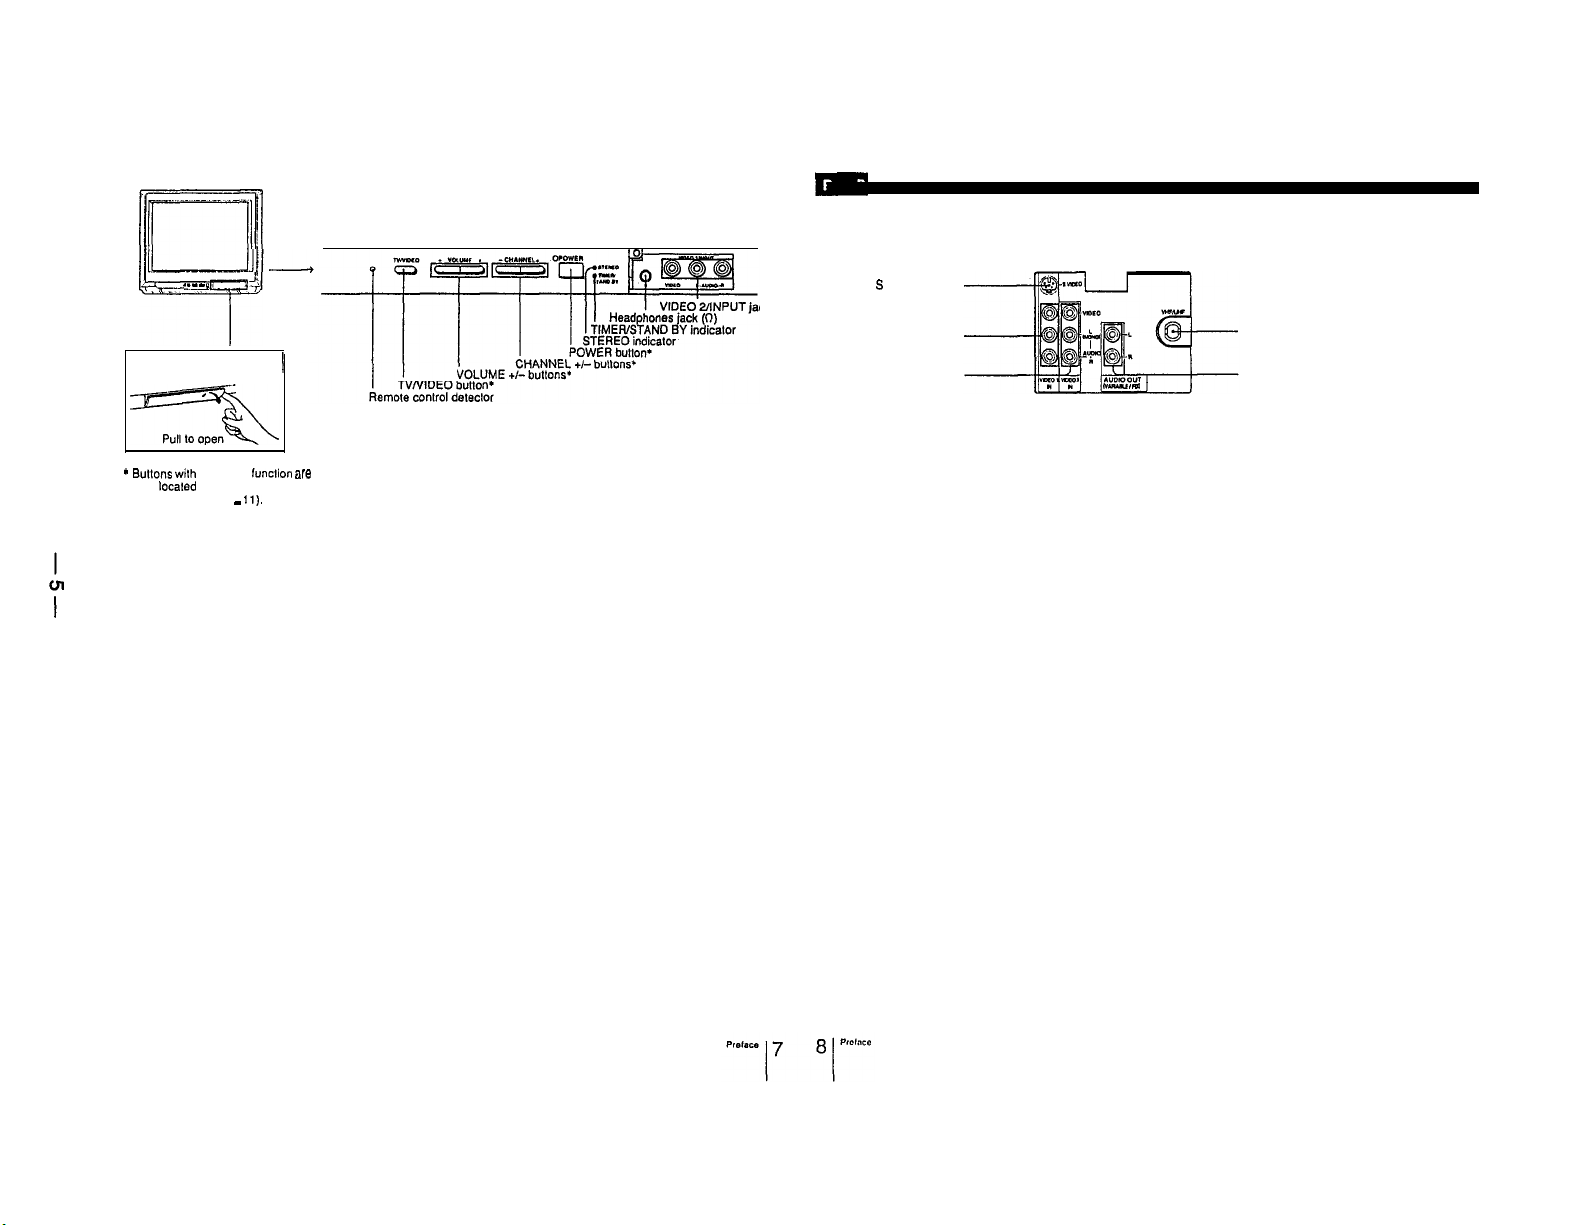
LOCATING THE CONTROLS
I
P
KW20V50
\
;c
,
For details, see Ihe
Bar display for volume,
plclure
@@
CURRENT TIME
@@
pages
indicated by
or sound adjustmen
-Q
displq
Ihe
numbered black circles 0.
Channel number display
Main picture input mode
SLEEP, MUTING displays
CHANNEL CAPTION display
a-0,
MTS mode (MAIN, SAP or
MONO) @
@I
a
.__
I
AV input jack door
*
Bullon~
wilh
also localed on the Remote
Commander (pp. 9 -
the same funclion
J-
.+
I
are
11).
S
VIDEO IN jack
cks
VIDEO 1 IN jacks
VIDEO 3 IN jacks
VHF/UHF
antenna terminal
AUDIO OUT jacks
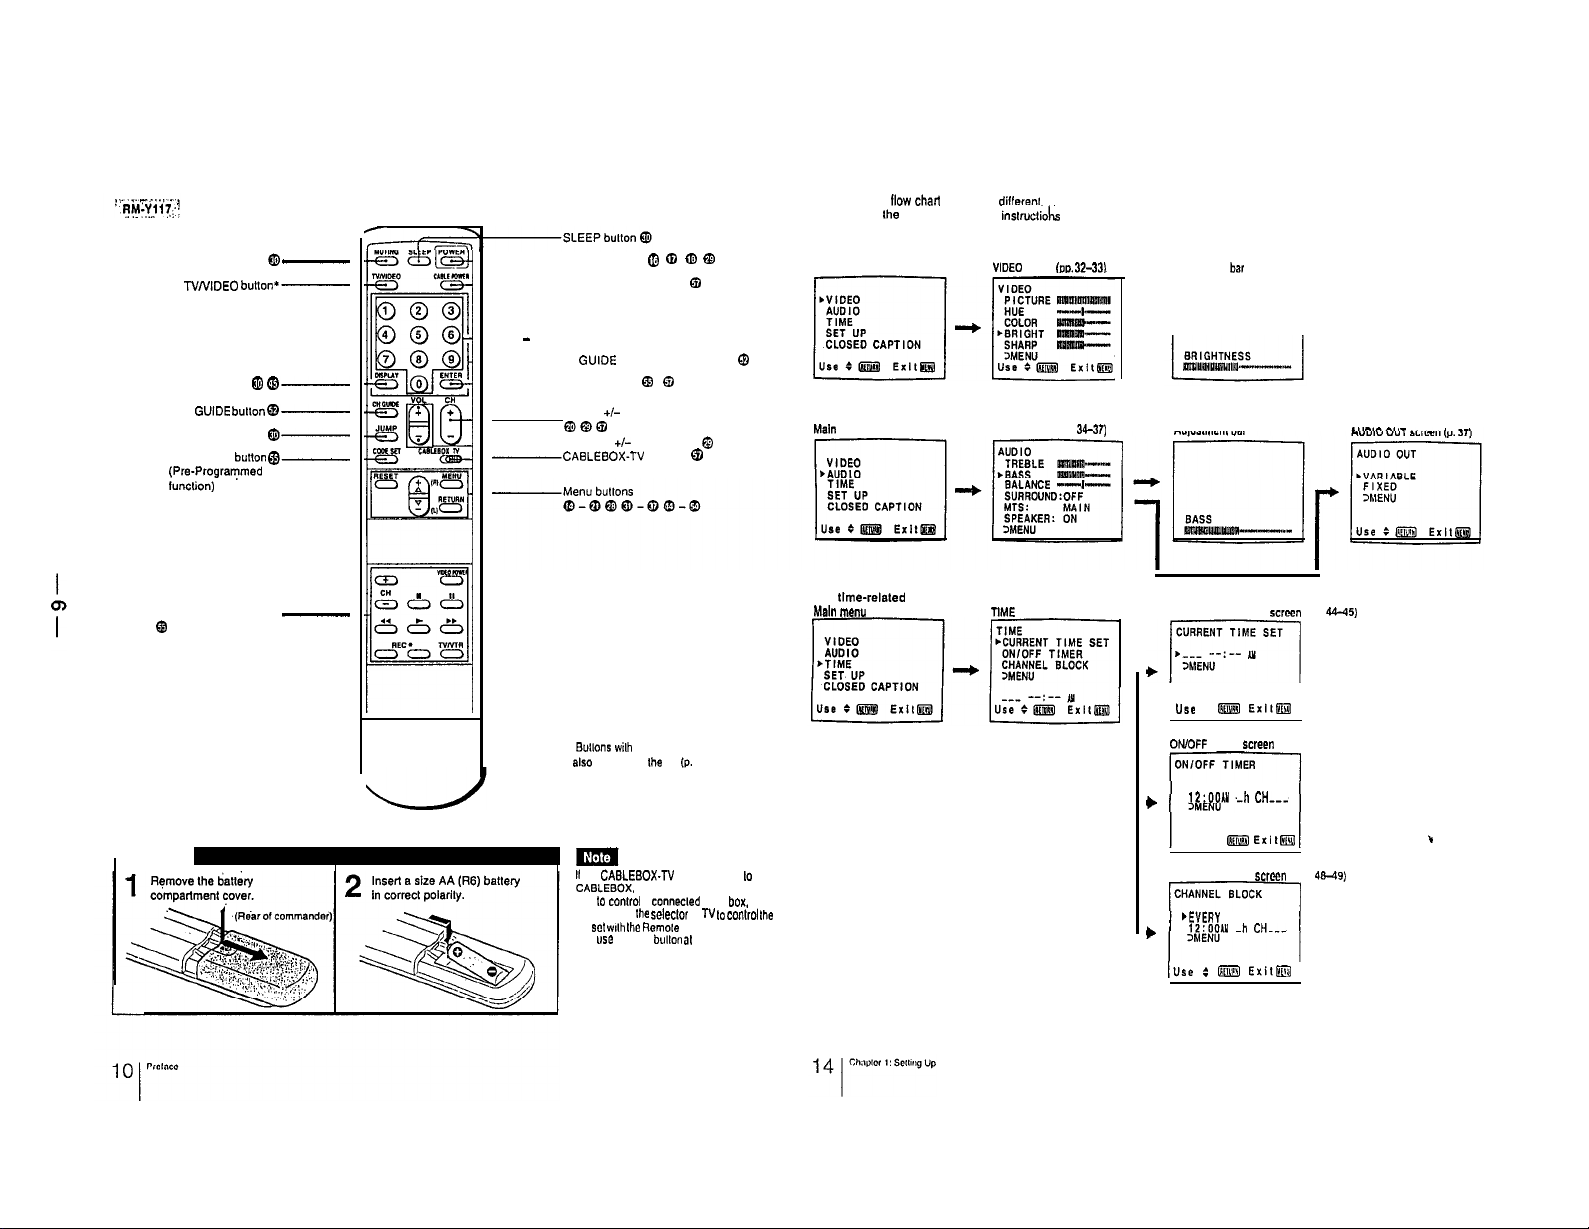
1-3.
USING THE ON-SCREEN MENUS
MUTING button @
TVNIDEO
butIon’-
DISPLAY button 0
CH
GUIDE
butlon
JUMP button
CODE SET bulton
(Pre-PrograTmed
Iunction)
Video operating buttons
a
-
@D----@-
@@-
-
-POWER button’ @ @ 6)
-CABLE POWER button
-0 - 9 buttons
-CHANNEL
-ENTER button @
CH (channel) +I- scan button’
-VOL (volume) +I- button*
-CABLEBOX-TV
GUtDE
directory keys
QOO
l Eultons wilh the same function are
also located on
@
selector
Ihe TV (p. 7).
@
@
@
@
The following ltow
settings. See
For picture quality adjustment
Main menu
@
For sound quality adjustment
hwn menu
For time-related settings
MaIn menu TtME menu
chart
shows the dilferenl levels of on-screen menus that you can use to make various adjustments and
Ihe
indicated pages for
tnstructtok
on
VtDEO
men”
(DO.
32-33,
AUDIO menu (pp. 34-37)
using each feature.
Adjustment
bar
J---l
Adjustment bar
CURRENT TIME SET .%,N” (pp.
+Fj
Use
:
@j@ Extlm
ONlOFF
TIMER
screen
l
EVERY SUN-SAT
12:OOAY
+
-h CH---
(pp. 4b-47)
44-45)
II
the
CABLEBOX-N
CABLEBOX. the Remote Commander is
able to
COnlrOl
the TV. Set
TV
set
wlh
can
“SC
POWER
selector is set lo
a connecled cable
Ihe seleclor
the Remole
Commander (You
bullon a,
to
N
lo conhot Ihe
any case).
box.
not
use : &$I
CHANNEL BLOCK screen (pp. 48-49)
PEVERY
12:OOAY
b
IUse : m Exit@@ I
Exit@
SUN-SAT
-h CH.-e
I
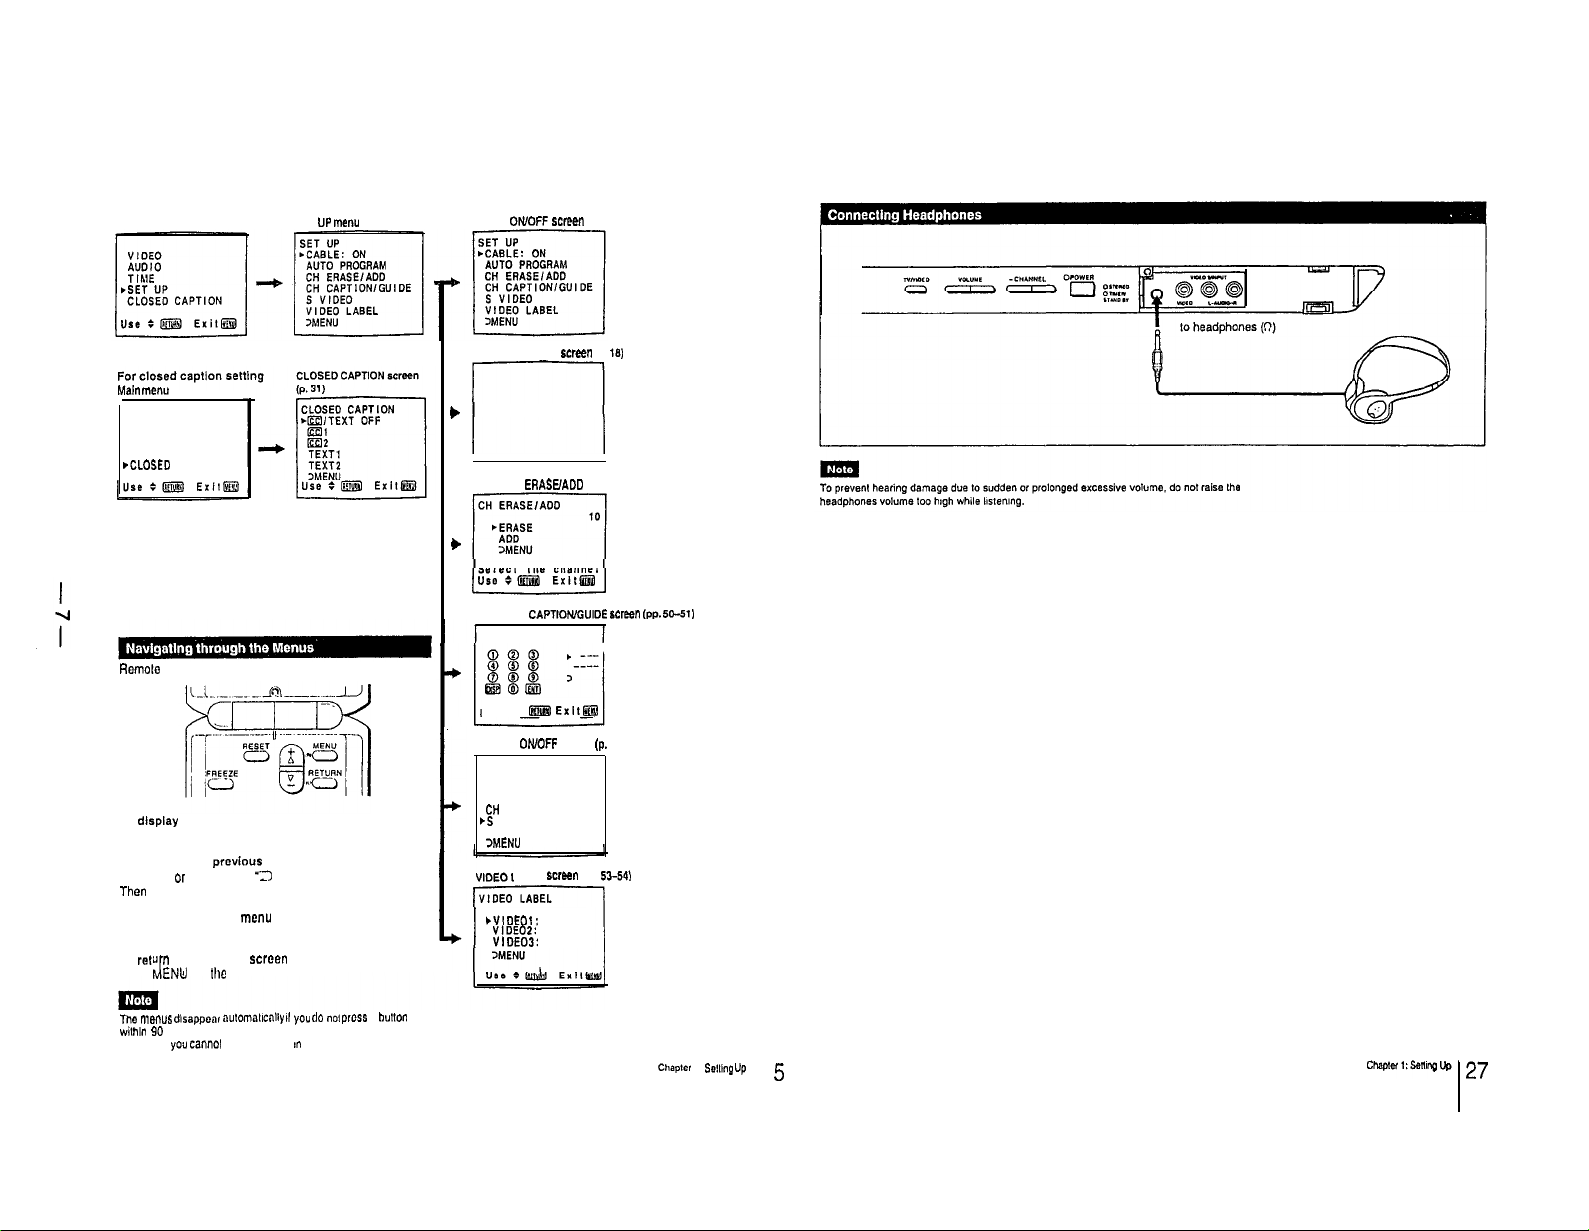
14. CONNECTING OTHER EQUIPMENT
For presetting and other functions
Main menu
MaIn menu
r
VIDEO
AUDIO
TIME
SET UP
rCLOSED CAPTION
SET UP me””
Romoto Commander
To display the main menu
Press MENU.
To return to the previous me””
Press At or V-to select ‘3 MENU.”
Then press RETURN.
To return to the main menu
Repeat the above, until you reach the main menu.
n
to tho normal screen
To ret”
ENU on tlw Remote Commander.
IA
Press
CABLE
OWOFF
semen (p. 17)
AUTO PROGRAM
AUTO PROGRAM
b
screen
(P.
181
CHANNEL ERASEJADD screen (pp. 14-21)
+
Select the channel
CHANNEL
I
CAPTtONlGUlDE screen
CH CAPTION/GUIDE
Use :
@i@ Exit@
S VIDEO OtUOFF screen (p. 28)
SET UP
CABLE: ON
AUTO PROGRAM
CH ERASE/ADD
CH
CAPTION/GUIDE
WS
VIDEO: ON
VIDEO LABEL
WENU
LABEL SCIH” (pp.
bVIDEO1: VIDEO1
VIDE02: VIDEO2
VIDEOJ: VIDEO3
52-54)
(PP.
50-511
Tim
me”“*
dirappenr automallcally II you do “01 press
withln SO seconds.
The menu you canno, select appears I” black.
a
bUttO”
Chapter
1:
Salllnp up, !j
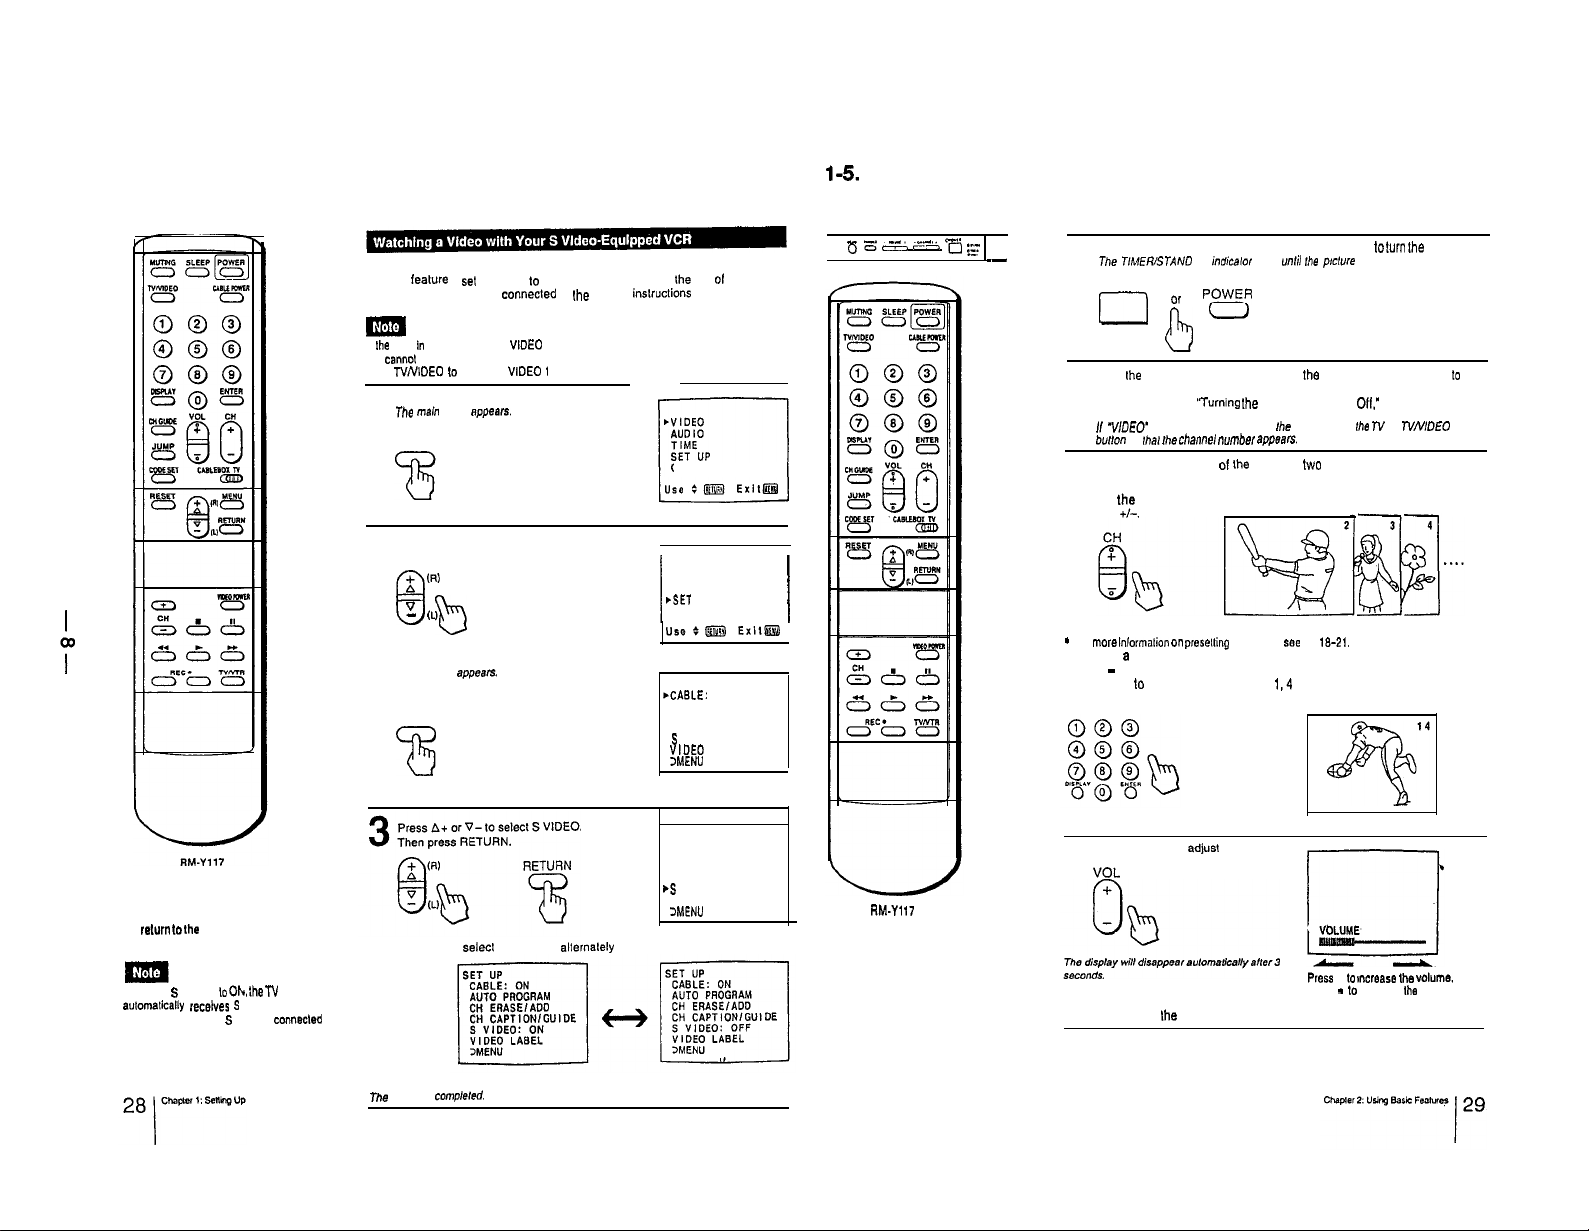
l-5.
WATCHING TV PROGRAMS
Use this lealure to
video equipment you have connecled to the N. For
connecting video equipment, see pp. 22-25.
m
II Ihe N is in TV. VIDEO 2 or VIDEO 3 mode. the S VIDEO display appears in black
end cr,nnol be selected.
Press T”NlDEO lo change lo “,DEO 1 mode.
Press MENU.
The main
1
MENU
Press A+ or V-to select SET UP
2
Q
Press RETURN.
The SET UP men” appears.
RETURN
%
h
v
- (L)
set
S VIDEO lo ON or OFF depending on Ihe kind
menu
I-ppears.
(R)
b
inslruclions
on
----
CLOSED CAPTION
VIDEO
AUDIO
TIME
rSET
UP
CLOSED CAPTION
I
SET UP
@CABLE:
ON
AUTO PROGRAM
CH ERASE/ADD
CH CAPTION/GUIDE
S
VIDEO: ON
”
IDE0
LABEL
3MENU
01
I
75 “d + gc-+ -=J
F
~-
Press POWER on the TV or the Remote Commander lo
The TIMER/ST,4ND BY rndicalor blinks until Ihe prclure appears,
1
POWER
r---j
or POWER
u
-
turn
the TV on.
b
Turn
the
cable mode on or off lo select Ihe type of channel you want
watch. VHF/UHF or cable N.
2
(Follow the steps in ‘Turning Ihe Cable Mode On or
II
‘VIDEO’ or 3 VIDEO’ is displayed an the screen. press the TV or TVNDEO
b”,,O” so
,/la, Ihe channel
Selects channel in one of lhe following two ways:
“umber
appsars.
ON.”
p. 17.)
to
3
To scan Ihe preset channels* in numerical sequence
Press CH
+I-.
*
For
more lnlormalion on preselling
To select a channel directly
Press 0 - 9 and ENTER.
For example, lo select channel 14, press 1,4 and ENTER.
channels.
see
pp:
18-21.
To
relurn
to
lhe
Press MENU.
II you set S VIDEO IO Oh
aulomalkally recelves S video signals
whenever a VCR with S video is connecled
normal screen
Ihe TV
Press A+ or V- to selecl ON or OFF allernalely
Press RETURN.
me
selling is compleled.
SET UP
CABLE: ON
AUTO PROGRAM
CH ERASE/ADD
CH CAPTION/GUIDE
rS
VIDEO: ON
VIDEO LABEL
3MENU
RM-Yl 17
Press VOL c/-lo adjus! the volume.
4
VOL
Press
+ to
To turn off the N
Press POWER on Ihe TV or the Remote Commander again.
Press - lo decrease the volume.
nxrease Ihe volume.
USING CONVENIENT FEATURES
1-6.
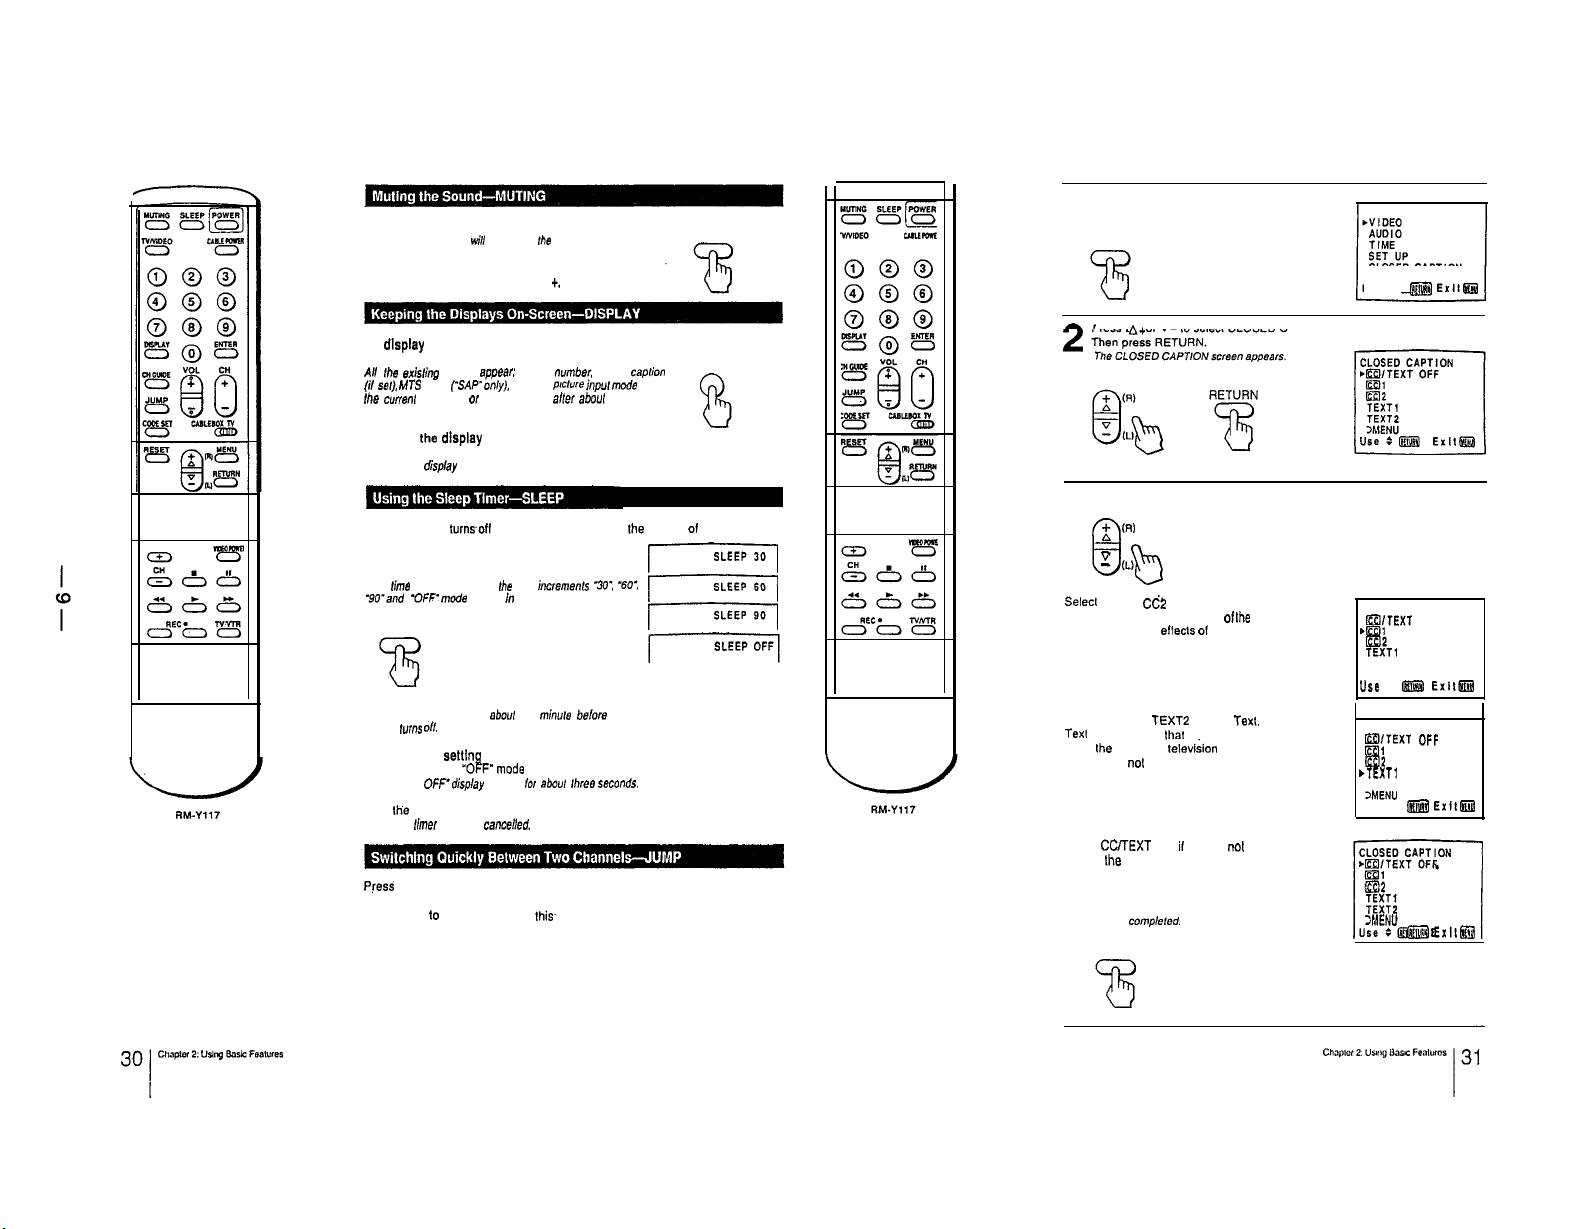
Press MUTING.
The display “MUTING’ wi// appear on the screen.
To restore the sound
Press MUTING again. or press VOL
+.
MUTING
1-7. USING CLOSED CAPTION
Press MENU.
The main menu appears.
1
MENU
CLOSED CAPTION
Use :
@j@ Erllm
To display the channel
Press DISPLAY.
All fhe exbfing displays appeac channel nvrnber, channel cap/ion
(iI sef), MTS
mode (TAP”
Ihe
cwenl
rime (‘AM’ or ‘PM’ disappears
seconds).
To cancel the display
Press DISPLAY again.
The channel display will disappear.
The sleep timer turnsoff the TV automatically after the amount 01 time you
select.
Press SLEEP.
Each lime you press SLEEP, Ihe lime incremena
PO-and WFF‘mode appear In sequence.
SLEEP
The SLEEP display appears oboul one minule belore
the TV
lums
od
To cancel the setllng
Press SLEEP until “OFF’mode appears.
The “SLEEP OFF’display appears /or aboul ,h,ee seco”ds.
OR
Turn Ihe TV off.
The sleep timer selling is cancelled.
Press JUMP once to recall the channel
you were watching previously. Press
JUMP again IO switch back. Use
feature lo keep track of Iwo programs
alternately.
onlyJ.
window
Ihis-
prclure
inpul
alter aboul
mode
three
30: ‘60:
DISPLAY
and
71
71
/--xq
JUMP
8
Press a+ or V-lo select CLOSED CAPTION.
Press A+ or V- lo select closed caption mode.
3
2
64)
v
- (L)
8
b
Select CC1 or CC2 to view Captions.
A Caption is a printed version 01
dialogue or sound eflecls of a
program. (The mode should be set to
CC1 for most programs.)
Select TEXT1 or TEXT2 lo view Texl.
Text
is information lhal is presented
using the hall to lull televiiion screen.
It is usually not related lo the program.
Select CCfrEXT OFF il you do nol want
lo use the CLOSED CAPTION mode.
Press RETURN.
The selling is compleled.
RETURN
Ihe
CLOSED CAPTION
~/TEXT
OFF
~EJl
aa
TEXT1
TEXT2
3MENU
Use
:
@i@ ExllW
CLOSED CAPTION
EzTEXT
OFF
a212
*TEXT1
TEXT2
3MENU
Use : m Exll&#
CLOSED CAPTION
‘EcTEXT OFL
I?32
TEXT1
TEXT2
>MENU
Use : @&I Exll@@
‘-1
l-8.
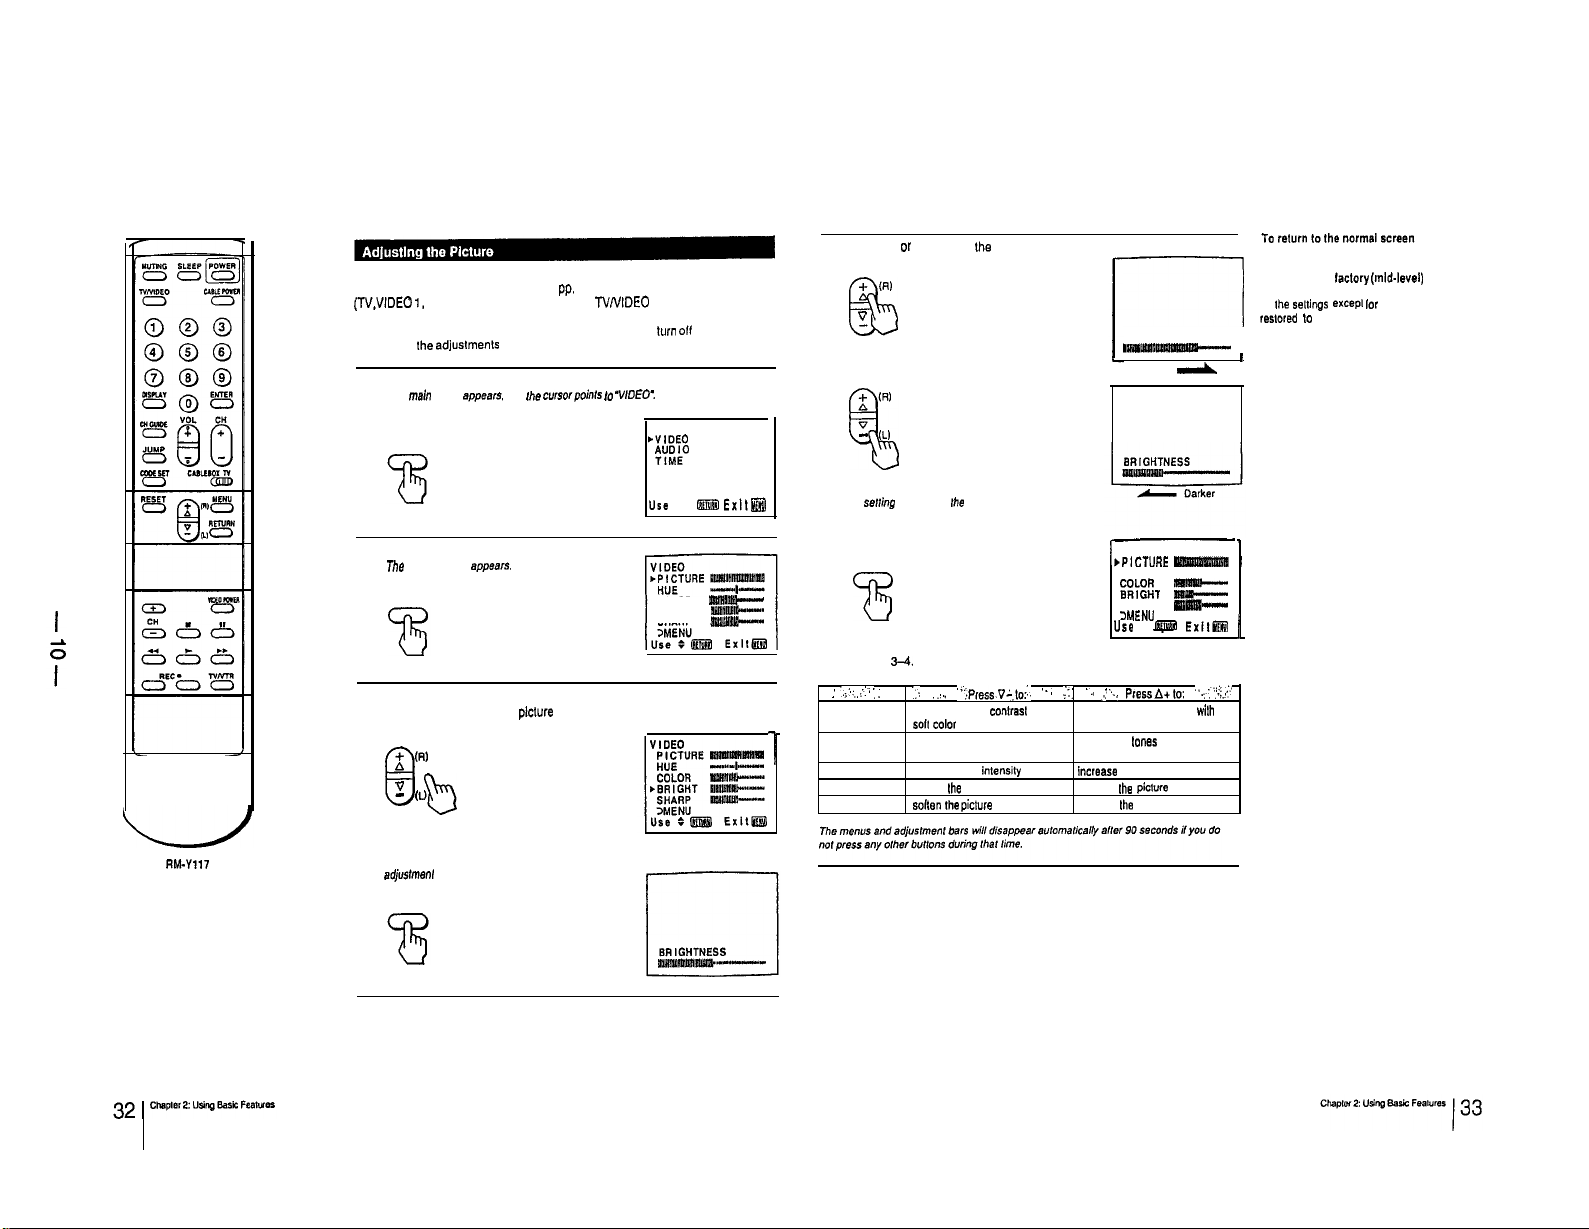
ADJUSTING PICTURE AND SOUND QUALITY
You can adjust the picture (and sound.
(TV.VIDEO 1,
Remote Commander to select the input mode before making the adjustmenls.
These adjustments are retained in memory even when you
you change Ihe adjustmenls again.
1
VIDEO 2. VIDEO 3) by pressing NNIDEO on the N or on the
Press MENU.
The
main
menu
appears.
MENU
pp.
34-37) for each input mode
and
,he cursorpoin,s 10 ‘WOEO:
turn
elf the TV until
I
cVlDE0
“TYK”
SET UP
CLOSED CAPTION
Use
:
@ii@
Exll@l ,
Press At
or
V-lo make the adjustment.
4
+
(RI
v
@3
2 (RI
v
- (LI
9
Press RETURN.
The new sening appears in
the
VIDEO menu.
---I
BRIGHTNESS
Imm-
Brighter
-
Press MENU.
To restore the
Go to the VIDEO menu and press RESET.
All Ihe seltings excepl lor PICTURE will be
restored lo the mid-level setting.
1
laclory (mid-level)
selling
RM-Y117
Press RETURN.
The
VIDEO men”
2
RETURN
Press A+ or V- to select the item you want to adjust.
For example. lo adjust the
3
2 (R)
v
- (L)
8
Press RETURN.
The
edjwhnen, bar appears.
RETURN
appears.
plclure
brightness, select BRIGHT.
b
COLOR DwRIw--
BRIGHT WIIW”.-”
SHARP
BWW--”
RETURN
73
To adjust other items
Repeal steps 3-4.
: .,.,::.,:.:..:.‘,: ,,,,, “‘,,p,essv:,,o:~. ‘-,
PICTURE
HUE
1
COLOR decrease color intensily lncreasw color intensity
BRIGHTNESS darken lhe picture brighten the piclure
SHARPNESS sollen the piclure sharpen Ihe picture
decrease piclure contrast with Increase piclure contrast wilh
SOll color vivid color
make skin tones make skin Iones become
become purplish greenish
;::
‘., “_
L
:. :
VIDEO
,PICTURE W
HUE
%:iT =
SHARP
>MENU
Use: @Iikl
-
p,essA+,,J:
-I-
poIm---
ExllGW
“.:‘,.8Pd-’
1
J
4
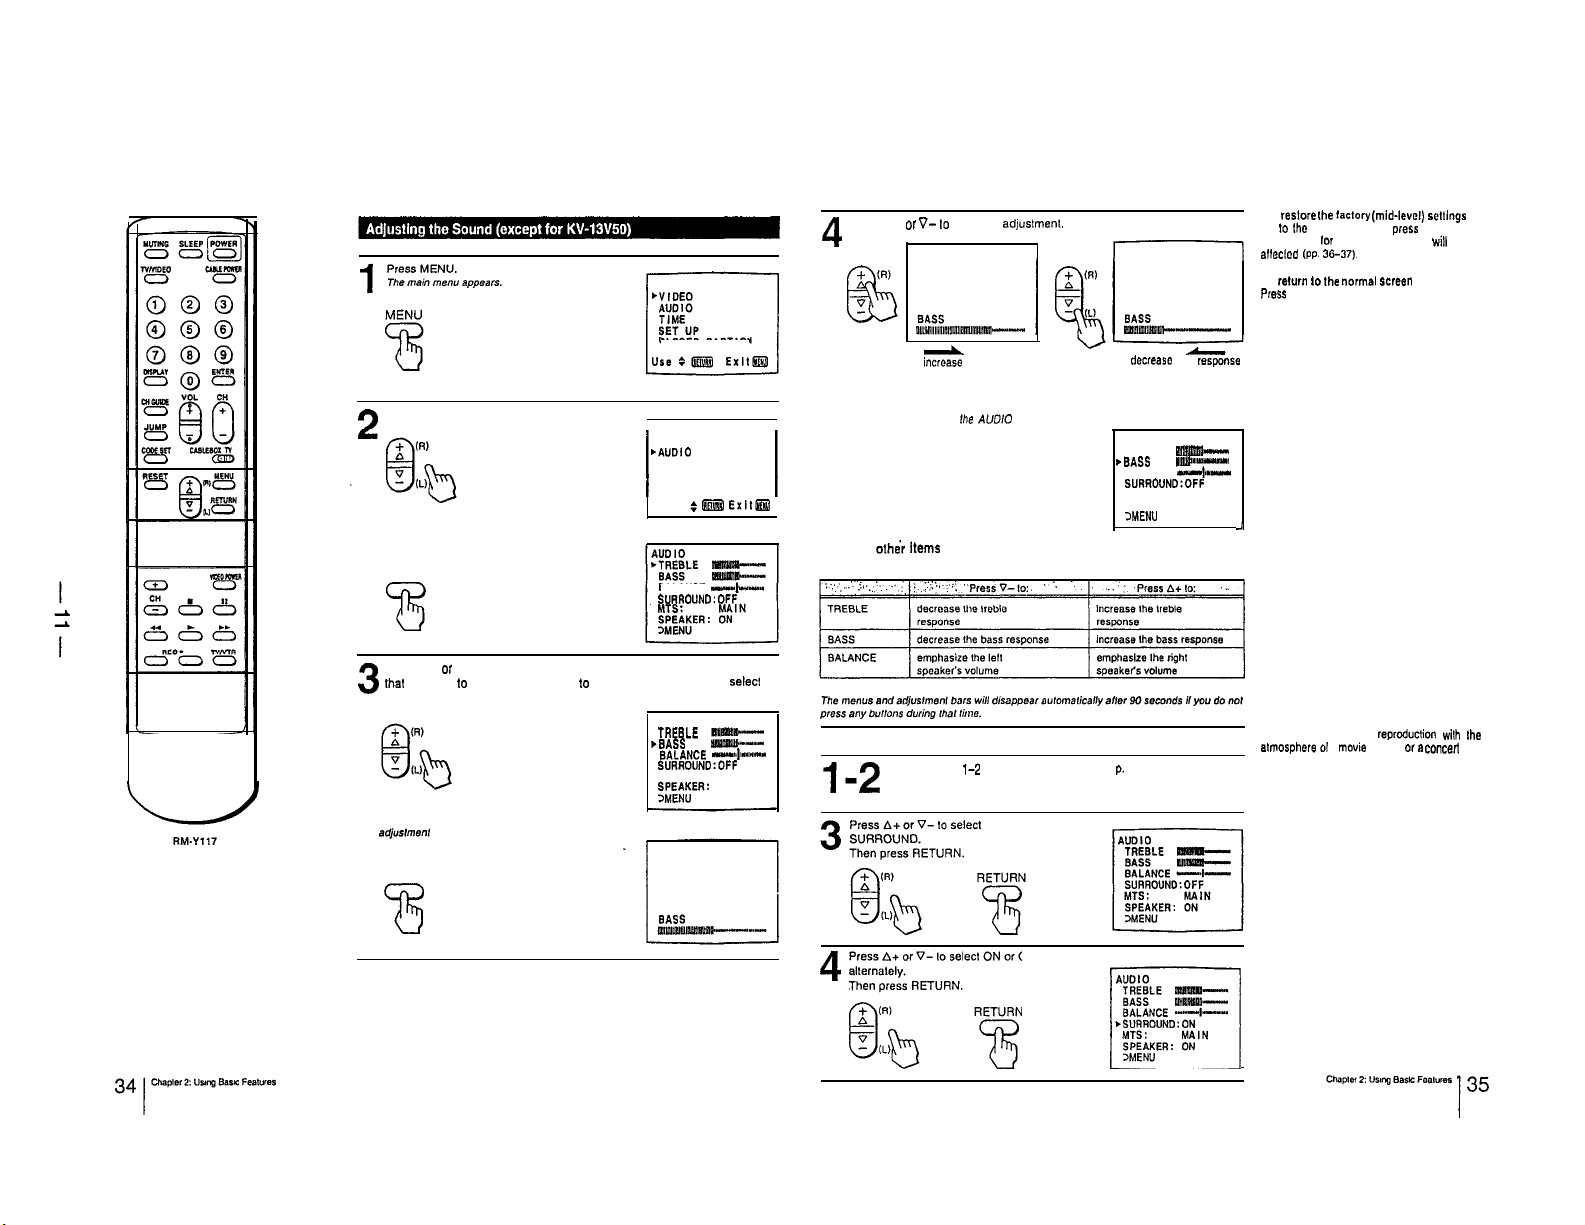
Press A+ or
V-to
make the adjuslmenl.
TO
res,ore ule iactory (mid-le”el) settings
Go lo tho AUDIO men” and ,,re$s RESET,
The settings lor MTS and SPEAKER will no, be
alh?ClCd (PP. 36-37).
To
relurn
to
Ihe
“~,,,a,
Pwss MENU.
ecreen
CLOSED CAPTION
Press A+ or V- lo select AUDIO.
Press RETURN.
The AUDIO me”” appears.
RETURN
Press A+ or V-lo select the sound quality (TREBLE, BASS or BALANCE)
that you want to adjust. For example. to adjust the bass response,
3
BASS.
Press RETURN.
The adjusfmenf bar appears.
RETURN
I
VIDEO
bAUDI
TIME
SET UP
CLOSED CAPTION
I
use : W
BALANCE
SURROUNO:OFF
AUDIO
TREsLE EL=
*SASS
BALANCE -+.mw.SURROUND:OFF
MTS : MAIN
;;EPE;ER:
-I--*
ON
Ex,,~
selecl
I I
-
TO increase bass response
Press RETURN,
The new selling will appear in Ihe AUDIO menu.
I
RETURN
I
8
To adjust othe’r items
Repeat steps 3-4.
Listening to surround sound-SURROUND
(Follow steps
1-Z
l-2
To decrease bass res,wnse
AUDIO
TREBLE WiW8@--
*BASS
BALANCE
SURROUND:OFF
MTS :
SPEAKER: ON
3MENU
in ‘Adjusting the Sound”. p. 34.)
lmw-
-la.-
MAIN
J
SURROUND gives sound repmduclion with the
etmxphere 01 a
mwie
theater
ore concert
hall.
73
Press A+ or V- lo
4;;mT
selecl
ON or OFF modes
p&iiq
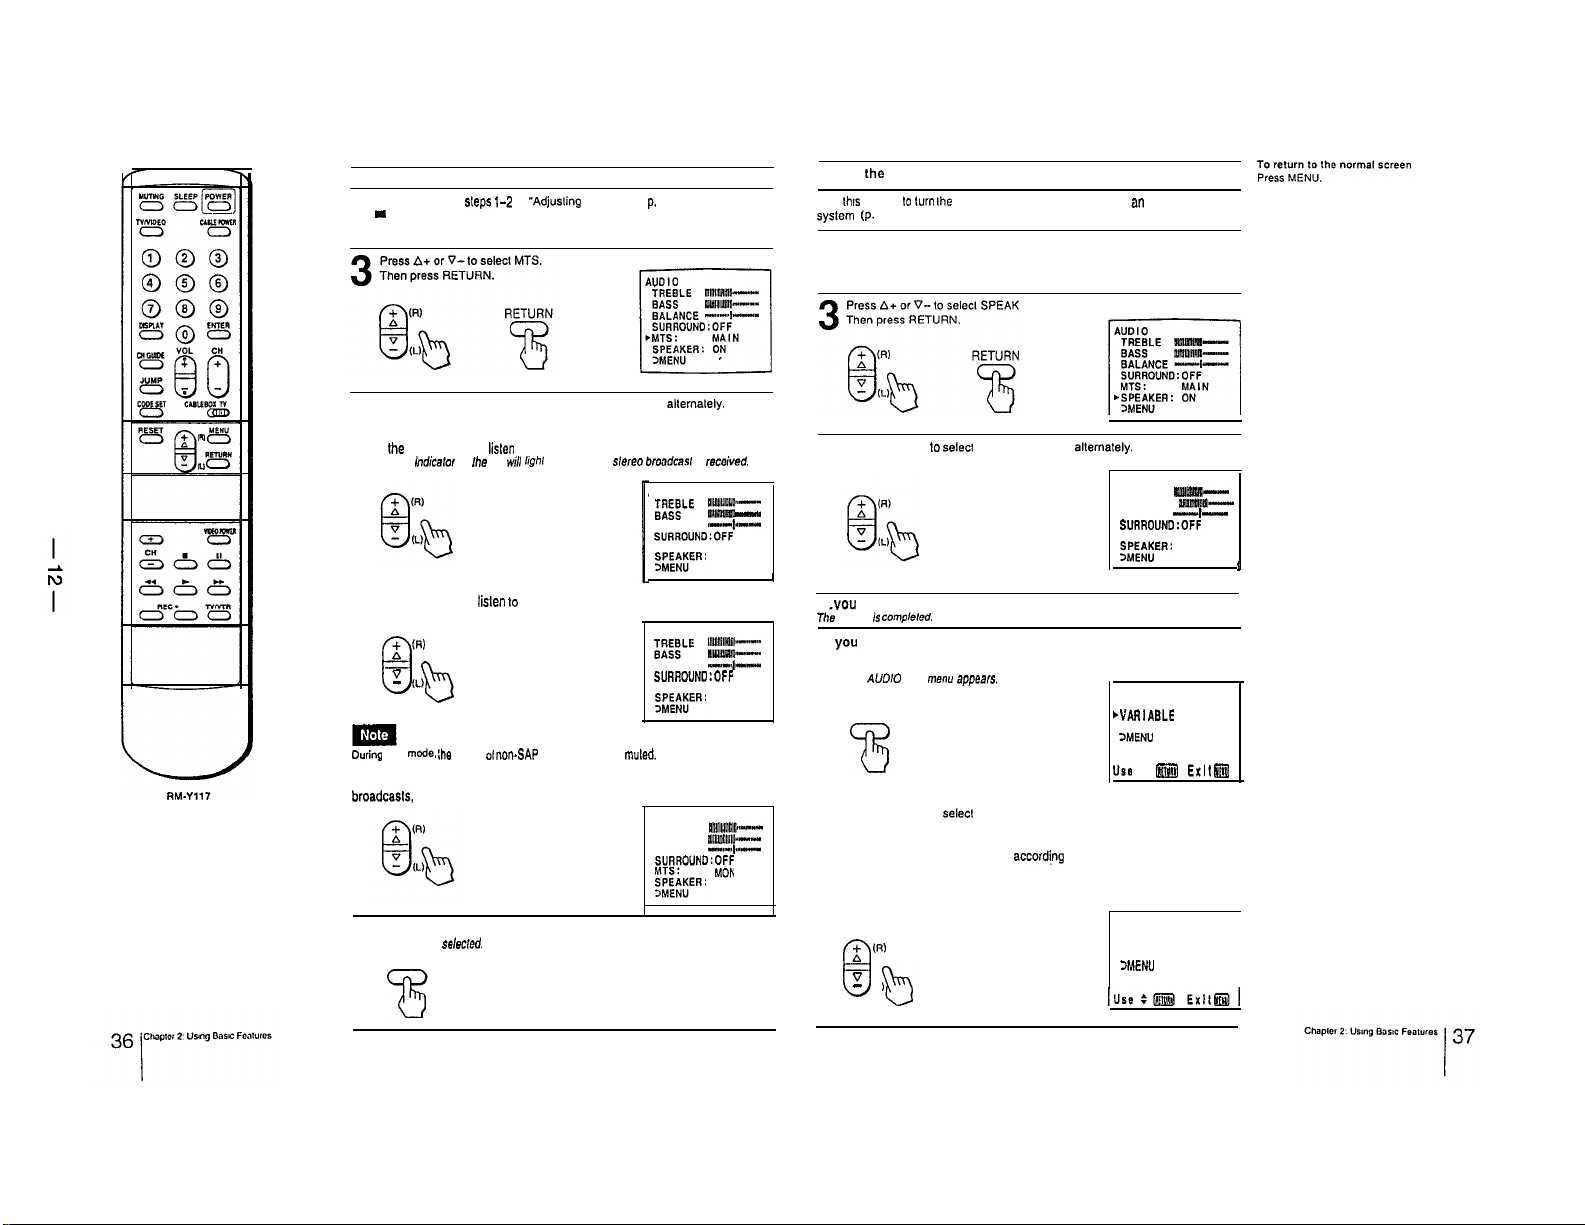
Receiving Multichannel TV Sound programs-MTS
(Follow
steps
I
12
1-2 in “Adjusling the Sound.” p. 34.)
Turning the speaker on or off
Use
lhls
feature lo Urn
syslcm (p. 26-27).
Ihe
TV speaker off when you connect an audio
(Follow steps l-2 in ‘Adjusting the Sound,” p. 34.)
1-2
Press A+ or V- 10 s&cl SPEAKER.
Press A+ or V- lo select MAIN, SAP or MONO modes allemalely.
4
Select lhe MAIN mode to
The STEREO lndicalor on Ihe TV
Select the SAP mode to
+
(RI
A
v
- IL)
0
b
During
SAP
mode. !he
Select the MONO mode to eliminate excessive
broadcasls, caused by a weak signal.
Press RETURN.
The mode is seleck?d.
5
RETURN
lislen
to STEREO sound.
wiN
hghf up whenever a slereo broildcasl is received.
lislen
lo Second Audio Programs.
sound 01
non.SAP
programs will be
noise
muled.
during stereo
AUDIO
;;FigLE
;~I--
8ALANCE
o--l”-SURROUND:OFF
MTS: MAIN
S;;&‘;ER: ON
AUDIO
;;‘iLE rsWM=:
BALANCE
--1SUAt?OUND:OFF
MTS:
;&;W;ER: ON
AUDIO
TREBLE
IMIIIliIUII~~--
IIBIUIU---
SASS
BALANCE
-++--
$ROUND:OFF
&ER:
ON
-
SAP
MONO
3$gyg
Press A+ or V- ID
select
ON or OFF modes allernalely.
4
If vou select ON mode:
The
setting is
complefed.
If you select OFF mode: (except for KV-13V50)
Press RETURN.
1
The AUDIO OUT men” ap,wars.
RETURN
73
Press A+ or V-lo
2
VARIABLE: Sound output varies
FIXED : Sound output is always invariable.
+ (RI
A
v
-
IL)
Q
b
select
TV volume.
VARIABLE or FIXED.
accord/rig
to the
p!&iiq
AUDIO
TREBLE
BASS
BALANCE
SURROUND:OFF
MTS :
z;FW&E”: ON
AUDIO OUT
cVARlAQLE
FIXED
3MENU
Uss
: @&j Exll!$@
AUDIO OUT
VARIABLE
FIXED
3MENU
uoI&W--
WtiiBI-
-I-
MAIN
I
1
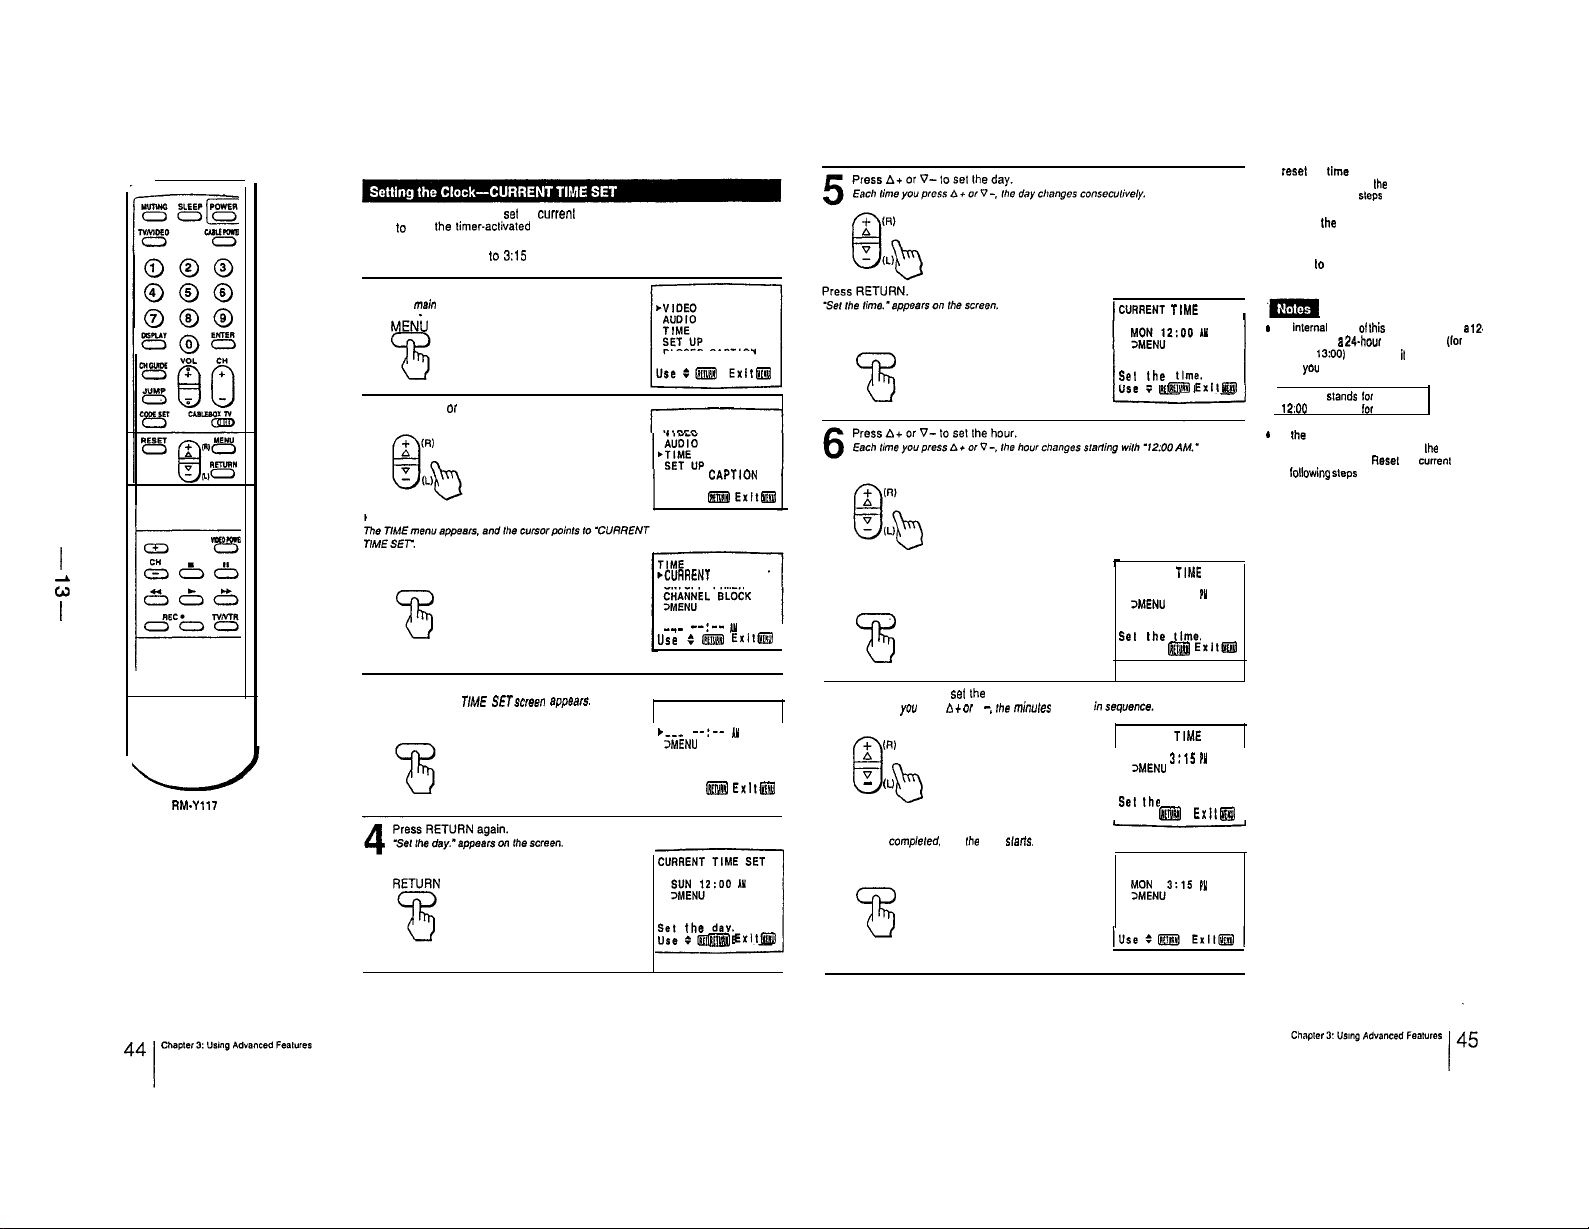
1-9.
USING THE TIMER-ACTIVATED FUNCTIONS
Follow these instructions to
order lo use the timer-aclivaled functions (ON/OFF TIMER, CHANNEL BLOCK).
EXAMPLE: Set the lime 10 3:lS PM, Monday.
Press MENU.
The main menu appears.
1
MENiJ
Press A+ or V- lo select TIME.
2
Press RETURN.
set
the currenl time. The correct time must be set in
CLOSED CAPTION
CLOSED CAPTION
Use : m Exit!B@
RETURN
75
JCURRENT
TIME SET 1
Sal the time.
Use : I@@ Exll@fl
To
reset
the
Press RESET while in
screen. and repeal steps 4-i’.
To display
Press DISPLAY.
To return lo the normal screen
Press MENU.
- The
* All the settings including CURRENT TIME
lime
the
CURRENT TIME
Ihe
lime
inlemal
clock 01
this
hour cycle. II a 24.hour cycle number (lor
instance. 13~00) is entered, il will be cleared
when you press RETURN.
12:00 AM stands lor midnight.
12:OO
PM stands
SET will be erased if you unplug Ihe TV or a
power failure occurs. Reset the current lime
by
lollowing steps
TV operates on a
lo,
noon.
1-7.
12.
I
2
RETURN
I
75
Press RETURN.
The CURRENT TIME SETscreen ap,oea,s.
3
RETURN
RM-Y117
*CURRENT
TIME SET
ON/OFF TIMER
___
--:--
>MENU
SUN 12:00
3MENU
@@j@
Iy
Exll@ijJ
IY
use 0
CURRENT TIME SET
c--- --:-- AJ
Use : m ExII@B
L-J
CURRENT TIME SET
Sel the day.
Use : @@I Exlll$@
I;
Press RETURN.
RETURN
E
Press A+ or V-lo
Each lime you press A + or V -,
7
+
CR)
A
v
- (L)
8
b
Press RETURN.
The selling is compleled,
RETURN
75
sel Ihe
and
fhe clock slatis.
minules.
Ihe minules change
CURRENT TIME SET
MON 3:00
3MENU
Set the (Ime.
Use : @@I Exll&@
CURRENT TIME SET
MON 3:15
3MENU
Set Ihe time.
Use : &(@I
CURRENT TIME SET
. fdd;Nu3:15
?Y
IY
Exll@l
PJ
I
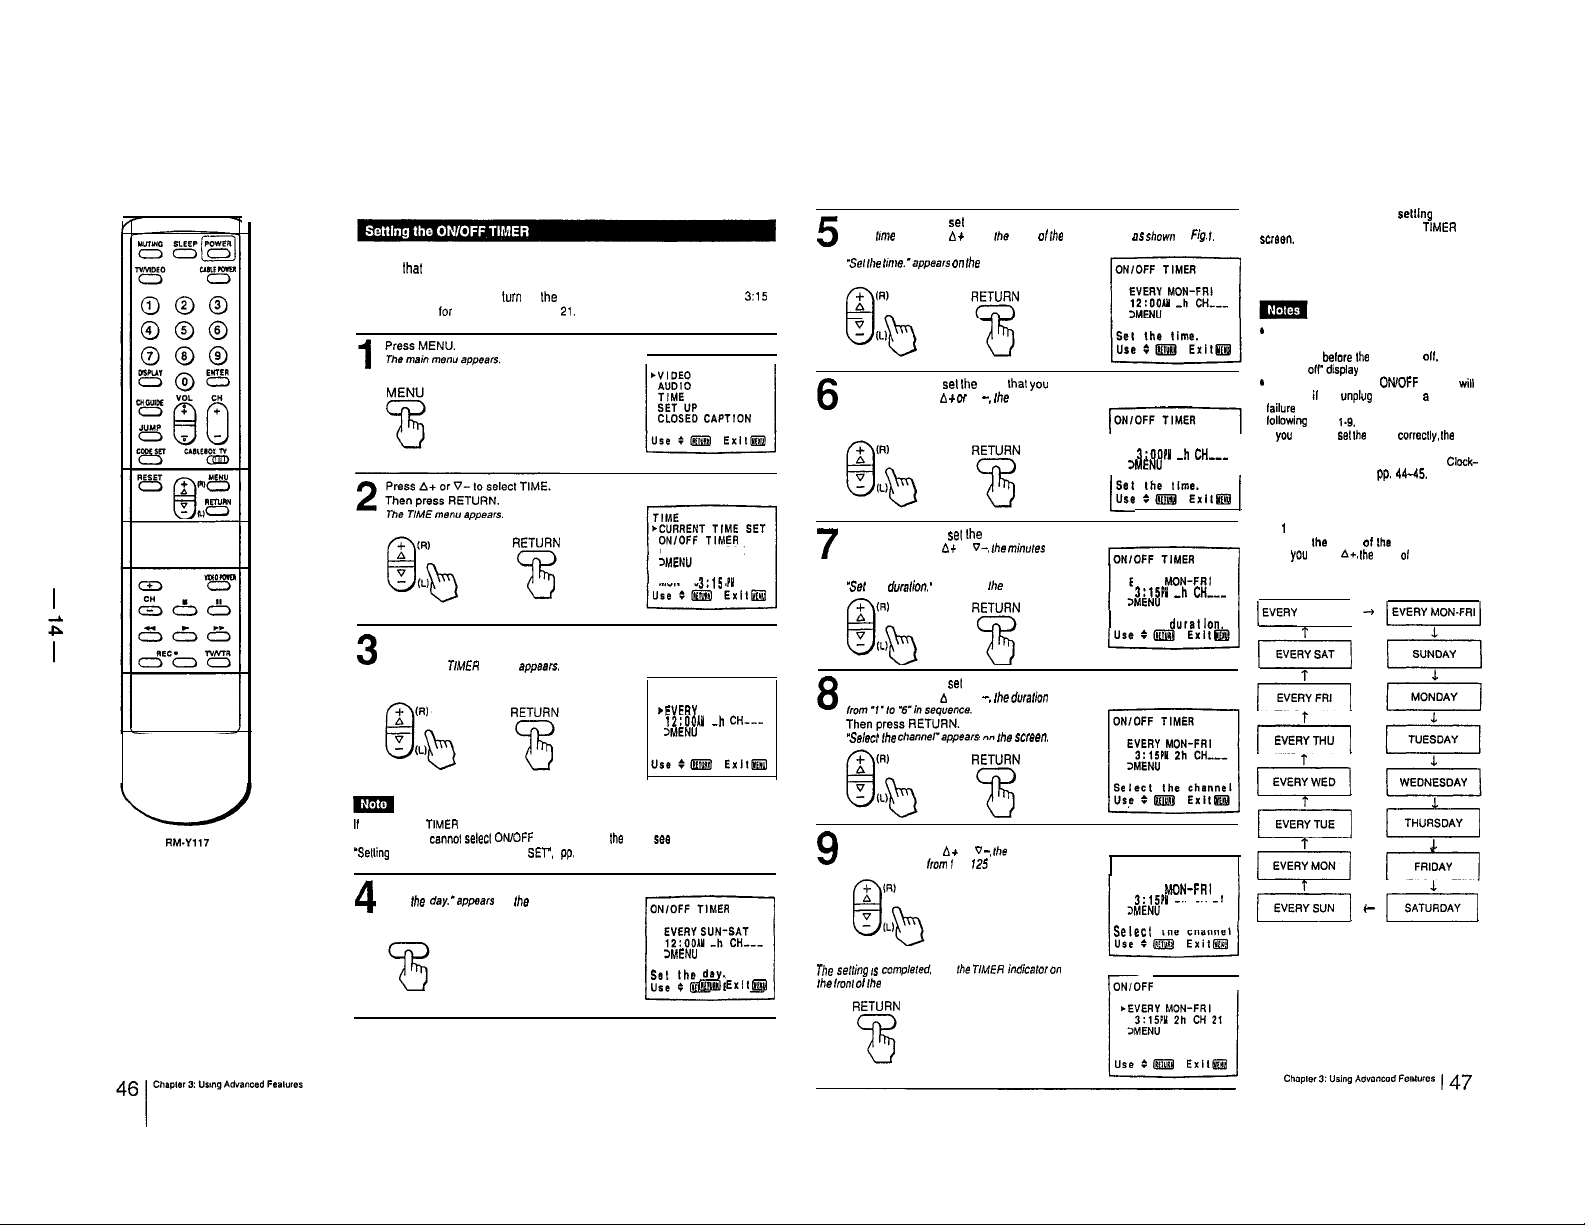
With this function you can set your favorite program to appear on the screen at
the time that you set.
EXAMPLE: Sel the timer to
PM lo, 2 hours, on channel
Press A+ or V- to select ON/OFF TIMER.
Then press RETURN.
3
The ON/OFF
T&W,
screen appeers.
turn
on Ihe TV every Monday through Friday al 3:15
21,
CHANNEL BLOCK
MON 3:15
ON/OFF TIMER
*EVERY SUN-SAT
12:OOAY -h CH--..
3MENU
IY
Press A+ or V- lo
Each me you press A + or V-,
5
Then press RETURN.
SC,
Ihe bme.
Press A+ or V-to sel Ihe hour lhat you want the TIMER lo start.
Each lime you press A + w
6
Then press RETURN.
Press A+ or V- to
Each lime you press D. + or
7
in sequence.
Then press RETURN.
“Se1
the doralion. ” appears on the screen.
Press A+ or V- to
Each lime you press A + or V -, Ihe durafion changes
8
“Selec, Ihe channel’appears
set
-apperrs on
set
set
the day.
,he
days ol
lhe
week change as
Ihe
screen.
V -,
Ihe hour changes in sequence.
Ihe minutes.
V-,
Ihe
minures
change
the duration of time.
on
the screer,.
shown
in
Fig. 1.
71
EVERY YON-FRI
3:OOlY -h
>MENU
I;:: :“&il”:;tlal
EVERY MON-FRt
3:lW
-h CH---
Set the durslton.
Press MENU.
CH---
1
IEVERY
p&-j
[--i&-j
riGkii-1
To clear the ON/OFF TIMER
Press RESET white in the ON/OFF TtMER
sc,een,
TO return to the normal screen
*
While the TIMER is set, the TIMER indicator
on the TV is on.
l One minute belore Ihe timer goes
will turn
#display
*
All the settings including ON/OFF TIMER will
be erased il you unplug the TV or a power
laikxe
occurs. Reset the ON/OFF TIMER by
lollowing
steps
. If
you
have not
OFF TIMER wilt not operate at the proper
lime. To set the clock. see ‘Setting the
CURRENT TIME SET’. pp. 44-45.
Fig.
1
Selecting
Ihe
you
press
SUN-SAT]
day(s) 01
When
appear in the following order.
r-G&q
setttng
011.
correc,ty, Ihe
Ihs
week
the ‘TV
ON,
Clmk-
will appear on the screen.
1.9.
set ,h.e
clock
AC. Ihe
days of the week
If the ON/OFF TtMER display appears in black. the current time has not
bee” se, and you
*Setting the Clock-CURRENT TIME SET. pp, 44-45.
4
canmt
select ON/OFF TIMER. To set Ihe clock. se8
Press RETURN again.
“Se!
the day.‘appoars on Ihe screen.
RETURN
ON/OFF TIMER
EVERY SUN-SAT
12:OOAY
-h CH---
3MENU
Sol lhs dsy.
Use :
@@@I
i
Exll&@l
Press A+ or V-to set the channel that you want the TV to tune in.
Each rime you press A + or 0 -, the channel
9
number changes from I lo 125 in sequence.
Press RETURN.
The se/ring IS compleled,
Ihe front ol Ihe
TV lights up.
and
Ihe
TIMER
indicalor on
ION/OFF
ON/OFF TIMER
EVERY MON-FRt
3:19Y 2h CH 21
Selecl the channel
TIMER
p&q
phi-1
pi&i-j
THURSDAY
FRIDAY
Es
c
[r-izk-j
(V-: reverse order)
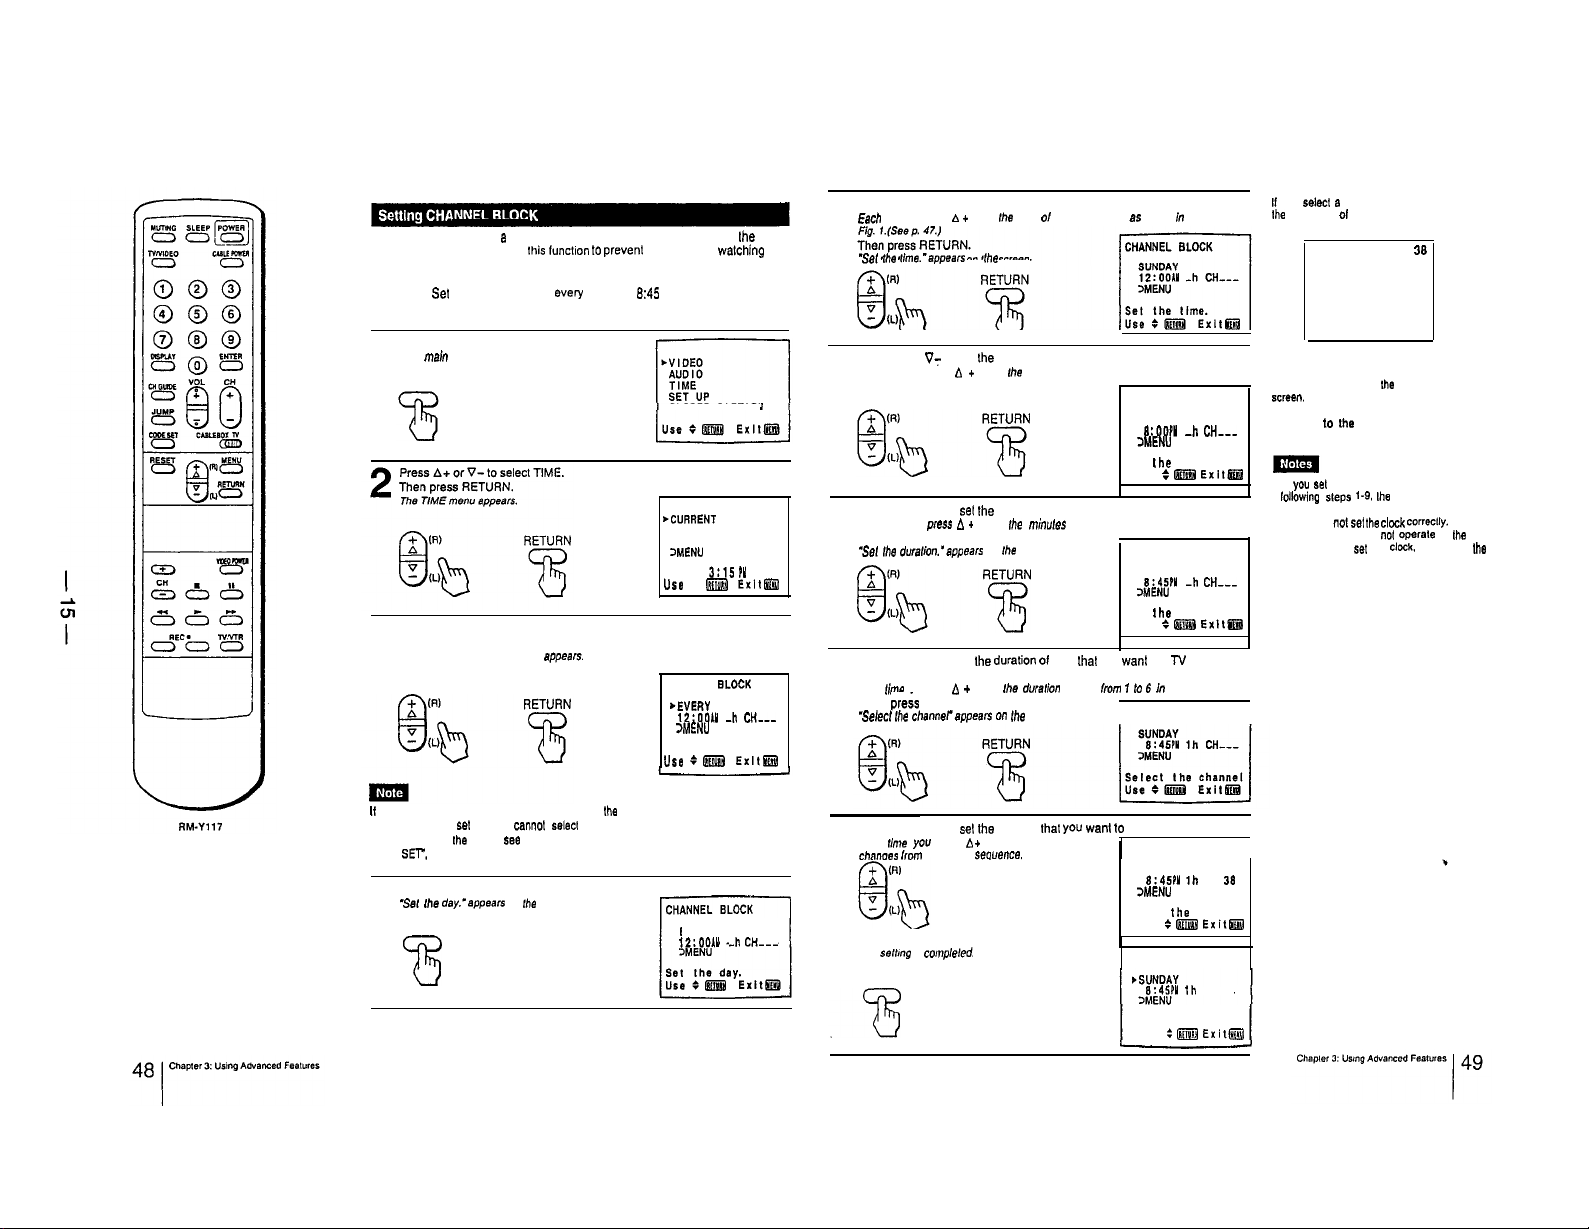
Use this function lo block e channel from appearing on the screen during the
time you specify. You can use
undesirable programs.
EXAMPLE: Set CHANNEL BLOCK every Sunday al 8:45 PM for one hour. on
channel 38.
Press MENU.
The main me”” appears.
1
lhis (unction to
prevenl children from walching
MENU
CLOSED CAPTION
TIME
*CURRENT
TIME SET
ON/OFF TIMER
CHANNEL BLOCK
3MENU
Press A+ or V- lo select CHANNEL BLOCK.
Then press RETURN.
3
The CHANNEL BLOCK screen endears.
MON 3:15
Use
I CHANNEL
*EVERY SUN-SAT
12:OOAU -h
3MENU
Use :
: W
&iB
?Y
ExltfB
BLOCK
CH---
Exll@
I, you
se&, B
Press A+ or V-lo set the day.
Each time you press A + or V-. Ihe days 01 the week change 82 shown
5
Se,
fhe ,,me.‘aopears on Ihe screen.
Press A+ or
Each rime you press b + or V-. the hour changes in sequence.
6
Then press RETURN.
Press A+ or V- lo
Each lime you press A + or V-. Ihe minules change in sequence.
7
Then press RETURN.
S,T, Ihe d”ra,ion.‘a~~ears on fhe screen. CHANNEL BLOCK
Press A+ or V-lo set Ihe duralion of lime lhal you want the W remain
blocked.
8
I
Each time you press B + or V-. lhe durafion changes lrom I lo 6 h sequence.
Then
‘Selec, Ihe
V:
pre&
RETURN.
channeragwxs
lo set lhe hour.
set
Ihe minutes.
on fhe Screen.
h
CHANNEL BLOCK
SUNDAY
0:001Y
-h CH---
3MENU
Set Ihe lime.
Use : m
SUNDAY
3MENU
Sol Ihe duration.
Use :
CHANNEL BLOCK
8:45?Y
Exitm
-h
CH---
@&@ Exllm
Iha message 01 ‘BLOCKED’ appears.
To clear the BLOCK setting
Press RESET while in the CHANNEL BLOCK
SC,**“.
TO return lo Ihe normal screen
Press MENU.
. If you set a new CHANNEL BLOCK by
. II you have
channel which has been blocked.
38
BLOCKED
lollowing steps l-9, Ihe original selling will be
erased.
not se, the clock correclly.
CHANNEL BLOCK will not
proper time. To
Clock-CURRENT TIME SET. pp. 44-45.
-rate
se1
the clcck. see ‘Selling the
al Ihe
If the CHANNEL BLOCK display appears in black, the current
time has not been set and you cannot selecl CHANNEL
BLOCK,. To se, lhe clock. 688 “Selling the Clock-CURRENT
TIME
SW,
pp. 44-45.
Press RETURN again.
5e’sel
fhe day.‘aPpears on lhe screen.
4
lCHANNEL-1
RETURN
%
EVERY SUN-SAT
12:OOAY
-h
CH---
Press A+ or V- lo sel the channel lhal you wanI to block.
Each t/me you press n+ orp-, the channel number
9
chmoes horn
Press RETURN.
The
smng
I lo 125 in
is compleled.
seeuence.
RETURN
CHANNEL BLOCK
SUNDAY
8:45PY
lh CH
>MENU
Select the channel
Use :
CHANNEL BLOCK
8:45N Ih CH 30
Use :
38
@i@ Exilm
@@9 ExilW
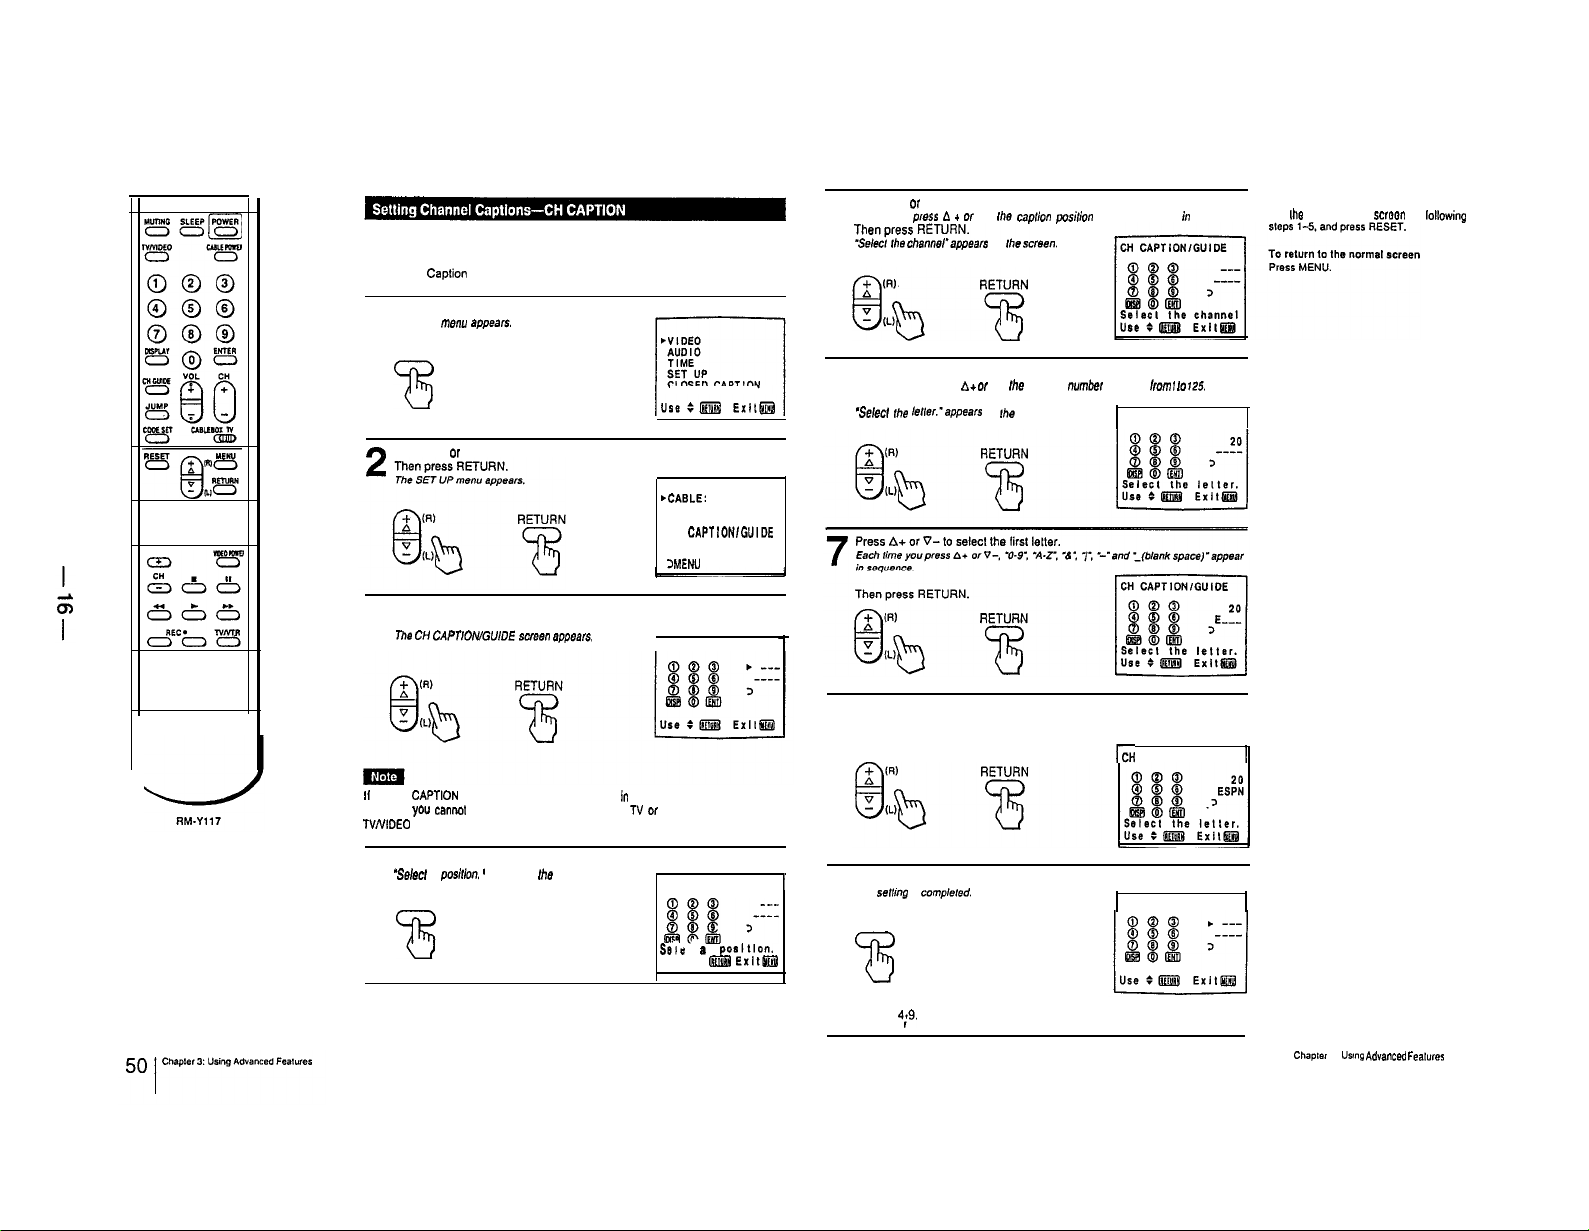
l-10. CUSTOMIZING THE SCREEN DISPLAY
Use this feature to caption up to 12 channel number displays with the matching
channel call letters.
EXAMPLE: Caplion channel 20 with ESPN at the caption position number 4.
Press MENU.
The main menu appears.
1
MENU
CLOSED CAPTION
fi
Press A+ or V- to select SET UP.
SET UP
bCABLE:
ON
AUTO PROGRAM
CH ERASE/ADD
CH
CAPTtONlGUlDE
S VIDEO
VIDEO LABEL
3MENU
Press A+ or V- to select CH CAPTION/GUIDE.
Then press RETURN.
3
me cfi CAPTIOWGUIDE sween
~ppee~.
CH CAPTION/GUIDE
Press A+ or V- to select a caption position number.
Each
lime
you
5
6
8
press d + or V-. Ihe caplion
‘Select fhe channel’appears
Press A+ or V- to select the channel you want to caption.
Each time you press a+ or V-.
Then press RETURN.
5elecl
fhe leller..‘appears on Ihe screen.
Repeat step 7 to select each remaining letter.
(For a J-letter caption, leave a space by pressing RETURN only.)
on
lhe sween.
the
channel
pailion
number is marked h sequence.
number
changes
/mm 1 10 125.
CH CAPTION/GUIDE
tCH
CAPTION/GUIDE
To erase unneeded captions
Call Iho caption setting swoon by lollowing
1
II the CH CAPTtON display appears in black, the TV is
mode and
you
TVNIDEO to change to TV mode.
4
canMt select CH CAPTION/GUIDE. Press TV
Press RETURN again.
‘Select a posirlon. ’ appears on lhe screen.
RETURN
?!I
In
video
0,
CH CAPTION/GUIDE
ala a posItIon.
Use : m Exlt&iI#
1
Press RETURN.
The se,,,“g is compleled.
9
RETURN
3
To caption other channels
Repeat steps 4;9.
CH CAPTION/GUIDE
Chqmr
3:
“ring Advanced Fealumr
51

RM-Y117
Use
this
feature to display the captions you se!, end to select e channel directory
for viewing.
Press CH GUIDE.
A
dlrecby
1
To cancel the CHANNEL GUIDE screen
Press CH GUIDE again.
appears, corresponding lo Ihs direclay keys on the RemOle
Commander.
QAEC-QDIS-QCNN-
@ESPNQ----Q--w
Q _--- Q
@
i
Press the directory key of the channel you want to watch.
CHANNEL GUIDE
____ @ ____ @J
2
___- @I ----
__--
Use
lhis
leature tq label each inpul mode in order lo identify the eqUipment
connecled lo each inpul terminal.
EXAMPLE: Label VIDEO 1 IN as VHS.
Press MENU.
The main menu appears.
1
MENU
?!i
Press A+ or V- 10 select SET UP.
2
Press RETURN.
The
SETUP
menu appeers.
RETURN
Press A+ or V- lo select VIDEO LABEL.
3
I
‘K%
TIME
SET UP
CLOSED CAPTION
CLOSED CAPTION
AUTO PROGRAM
CH ERASE/ADD
CH CAPTION/GUIDE
VIDEO LABEL
AUTO PROGRAM
CH ERASE/ADD
CH CAPTION/GUIDE
S
VIDEO: ON
Press RETURN.
tVIDEO1: VIDEOi
VIDEO?: VIDEO2
VIDEOJ: VIDEO3
To return to the normal screen
Press MENU.
Press A+ or V- lo select
4
Press RETURN
RETURN
8
Press A+ 0, V-to select VHS
5
VIDEO
1
VIDEO
I-+
S VIDEO+ BETA +a mm -+ VHS -+ LD
t
VIDEO 2
VIDEO P-BETA -, 8 mm
T
VIDEO 3
VIDE03+EETA -t6mm+VHS-+LD
T
Press RETURN.
RETURN
To label other input modes
Repeat steps 4-5.
Iha
inpul mode you want to label
-+“HS -+ LD
(V-: rewrse order)
VIDEO LABEL
rVlDEO1: VIDEO1
VIDEOZ:
VIDEO2
VIDEOJ: VIDEO3
MENU
VIDEOI:
VIDEO1
VIDEOZ:
VIDEO2
VIDEOl: VIDEO3
3MENU
cVIDEO1:
VHS
VIDEOZ:
VIDEO2
VIDEO): VIDEOS
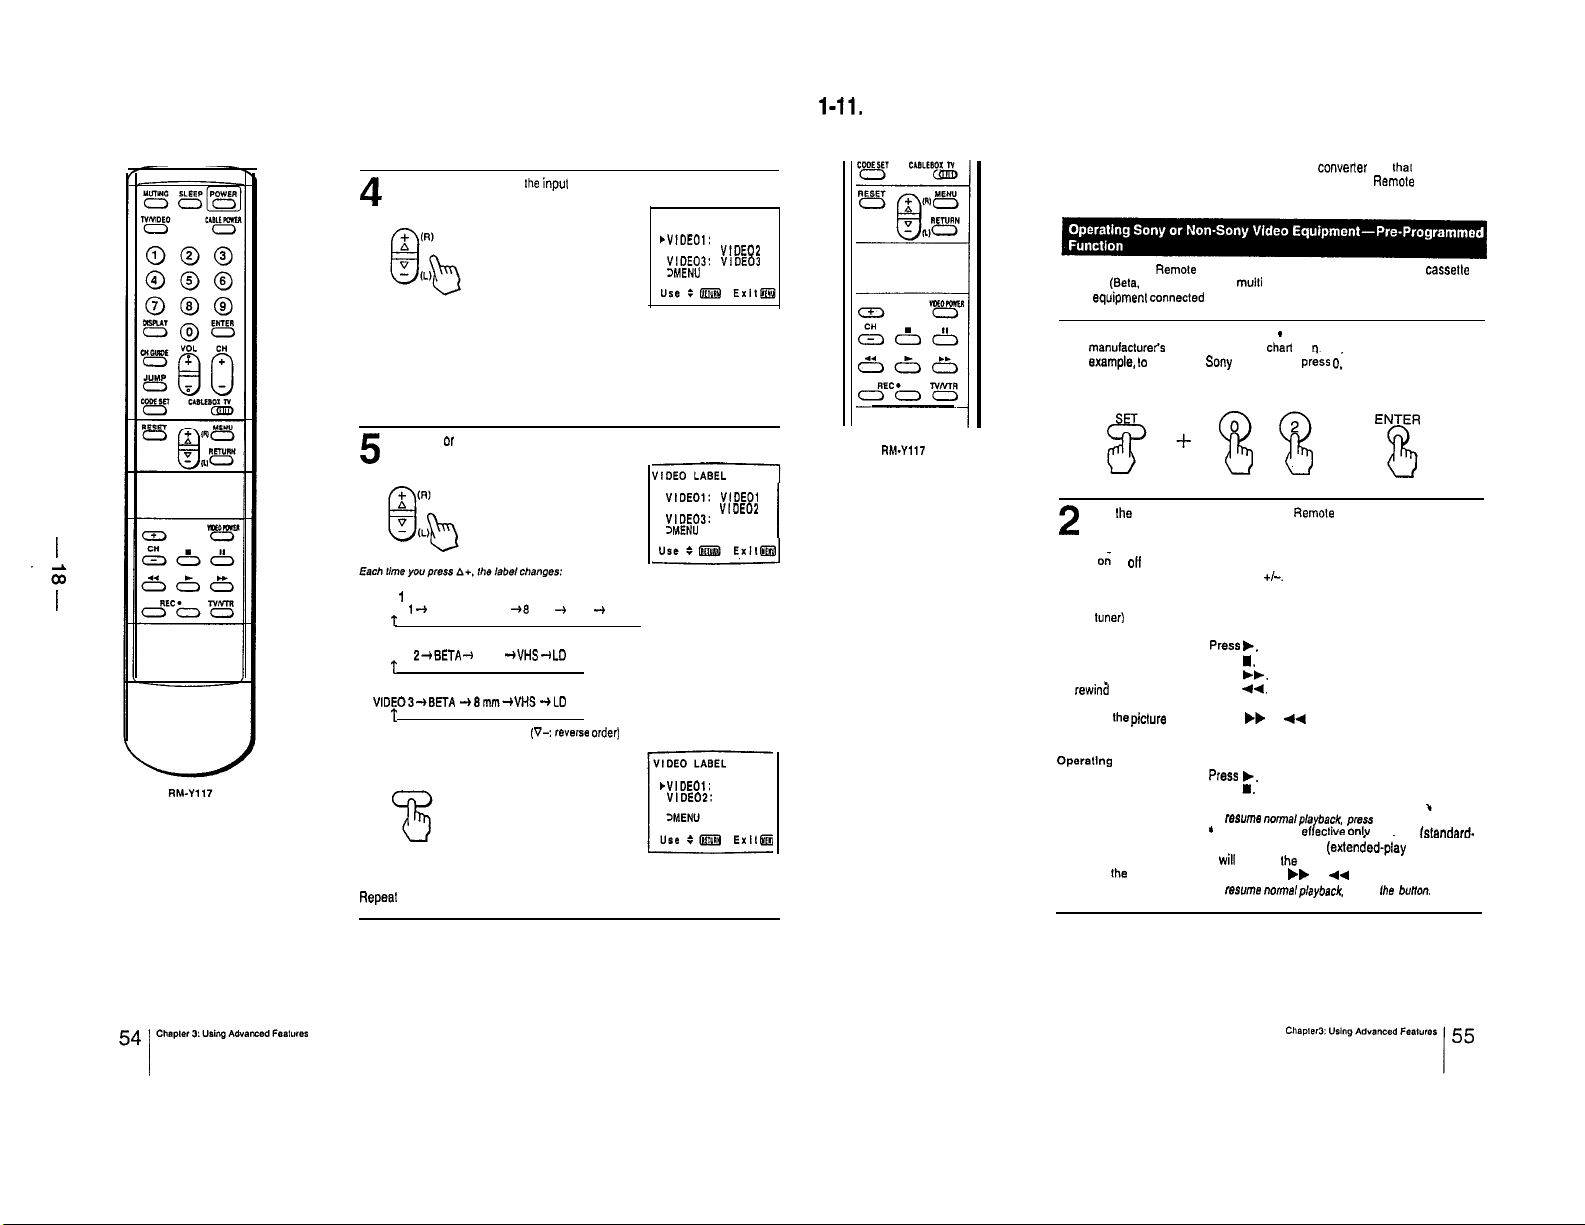
1-11.
USING THE PRE-PROGRAMMED REMOTE COMMANDER
You can operate your video equipment and cable convelter box lhal has an
infrared remote detector with this supplied preprogrammed
Commander.
Remole
1
Fit.6Y117
With the supplied Remote Commander, you can operate a Sony video
recorder
(Seta.
video equipmenl connecled to your TV by following the steps below.
1
2
operating a VCR
To turn on or oil
To change channels
(when watching TV
programs through the
VCR’s
To record
To play
To slop
To fast forward
To rewina the tape
To pause
To search the
forward and backward
Operating a Video Disc Player
To play
To slop Press
To pause Press II.
To search lhe picture
forward and backward
6 mm, VHS) or a mulli disc player as well as most non-Sony
While pressing CODE SET, press 0 - 9 to enter the
manulacturer’s code number (see
EXampIe. IO
Operate a
and ENTER.
CODE
8+88
Use Ihe video operating buttons on the Remote Commander to operate the
video equipment.
tuner)
piclure
SOny
chari
on P. 56). For
6 mm VCR,
Press (VIDEO) POWER.
Press CH
Press l (2 buttons simultaneously).
press
Press 1.
Press
Press
Press II.
Press bb or 44 during playback.
press
TO
rasune
*
This function is efleclive onlv for CAV fslandard.
play disc). With CLV (exten&d-play disc), the TV
will
go into Ihe standby mode if II is pressed.
Keep pressing bt or 44 during playback.
To mswne nomal~layback, release Ihe buffon.
p&s
0; 2
+I-.
b.
bb.
44.
w.
M.
nom~l,~layback. press again.
cassetla
E!!Y
t
 Loading...