

Page 1

4-078-152-11 (1)
Trini tron Color TV
Operating Instructions
• Before operating the unit, please read this manual thoroughly and retain
it for future reference.
KV-XG29
KV-XG25
GB
KV-XG21
© 2000 Sony Corporation
M81
M80
Page 2
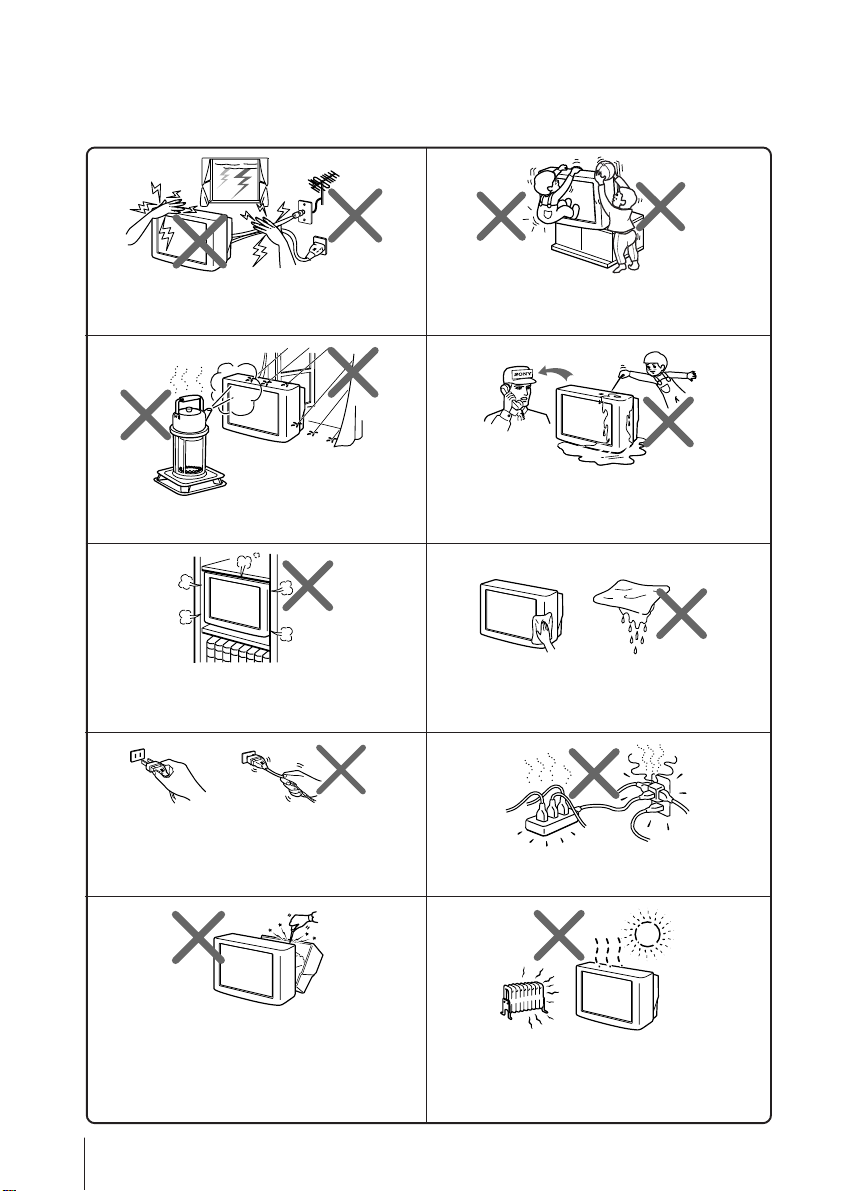
WARNING
• Dangerously high voltages are present inside the TV.
• Operate the TV only between 110 – 240 V AC.
For your own safety, do not touch any part of the
TV, the power cord and the antenna cable during
lightning storms.
To prevent fire or shock hazard, do not expose
the TV to rain or moisture.
Do not block the ventilation openings of the TV.
Do not install the TV in a confined space, such
as a bookcase or built-in cabinet.
Pull the power cord out by the plug. Do not pull
the power cord itself. Disconnect the TV before
moving it or if you are not going to use it for
several days.
For children’s safety, do not leave children
alone with the TV. Do not allow children to
climb onto it.
Do not operate the TV if any liquid or solid object
falls into it. Have it checked immediately by
qualified personnel only.
Clean the TV with a dry and soft cloth.
Do not use benzine, thinner, or any other chemicals
to clean the TV. Do not scratch the picture tube.
Do not plug in too many appliances to the same
power socket. Do not damage the power cord.
Do not open the cabinet and the rear cover of the
TV as high voltages and other hazards are
present inside the TV. Refer servicing and
disposal of the TV to qualified personnel.
2
Your TV is recommended for home use only.
Do not use the TV in any vehicle or where it may
be subject to excessive dust, heat, moisture or
vibrations.
Page 3
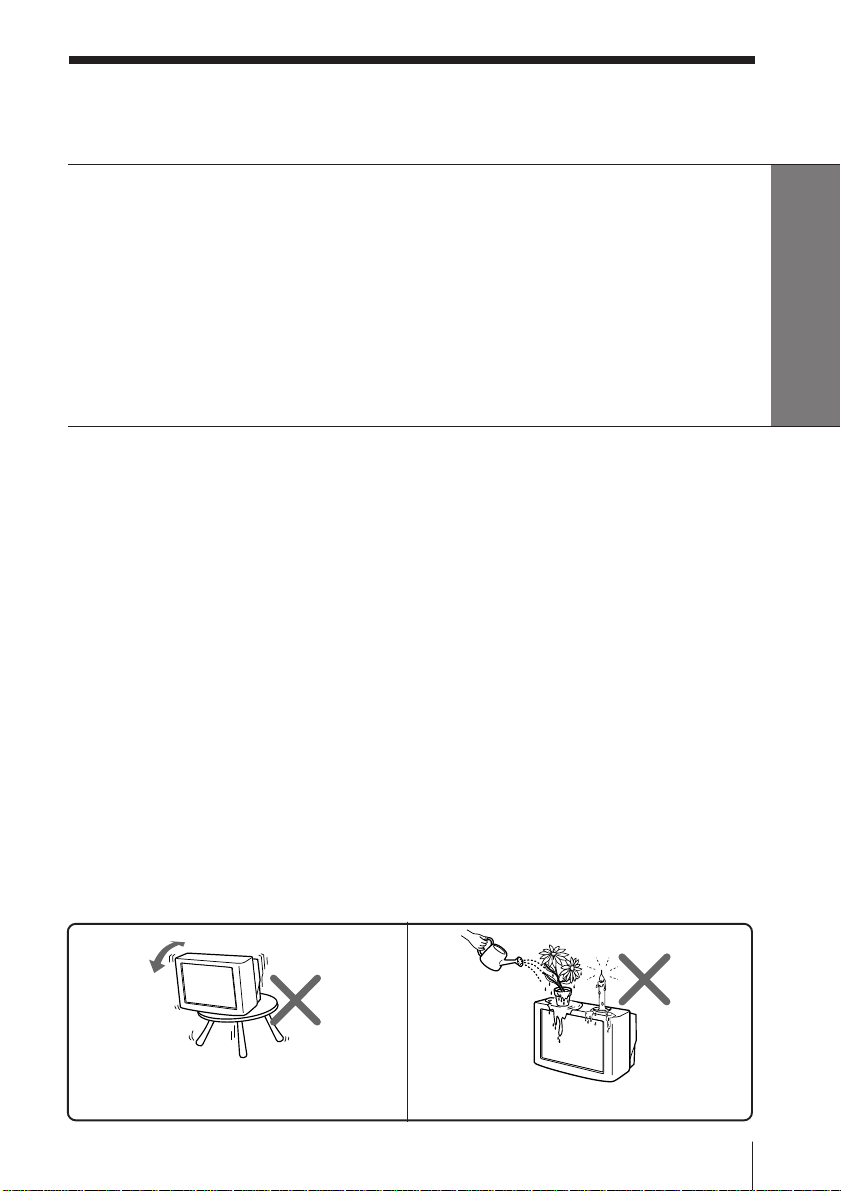
Table of Contents
Using Your New TV
Getting Started ............................................................................................. 4
Step 1: Connect the antenna .................................................................. 4
Step 2: Insert the batteries into the remote.......................................... 5
Step 3: Preset the channels automatically ........................................... 5
Connecting optional components ............................................................. 6
Securing the TV............................................................................................ 8
Presetting channels...................................................................................... 9
Watching the TV ........................................................................................ 12
Using Your New TV
Advanced Operations
Customizing the picture and sound .......................................................15
Viewing your favorite channels...............................................................17
Blocking the channels (CHILD LOCK) .................................................. 18
Viewing Teletext (KV-XG29M81/XG25M81 only)................................ 19
Additional Information
Self-diagnosis function.............................................................................. 21
Troubleshooting .........................................................................................22
Overview of controls.................................................................................25
Specifications.............................................................................. Back cover
WARNING (continued)
GB
Do not install the TV in an unstable position.
Use a proper TV stand.
Do not place any objects on the TV.
3
Page 4

Using Your New TV
Getting Started
Step 1
Connect the antenna
If you wish to connect a VCR, see the “Connecting a VCR” diagram below.
Rear of TV
or
Antenna cable (not supplied)
IEC connector (not supplied)
Antenna cable (not supplied)
Connecting a VCR
To watch the video input, press t (see page 13).
KV-XG29M81/XG25M81
Antenna cable (not supplied)
Rear of TV
: Signal flow
To video and
audio outputs
KV-XG21M80
To video and
audio outputs
Using Your New TV
4
To antenna output
VCR
To 8
VIDEO
VIDEO IN
VIDEO OUT
AUDIO
R
(antenna)
L
To t 1 or 2 (video input)
Audio/Video cable (not supplied)
Antenna cable (not supplied)
To antenna output
VCR
VIDEO
AUDIO
L
R
VIDEO IN
VIDEO OUT
To t 1 (video input)
Audio/Video cable (not supplied)
L(MONO)
(yellow)
-L (MONO) (white)
-R (red)
Rear of TV
To 8
(antenna)
1
(yellow)
-L (MONO) (white)
-R (red)
: Signal flow
: Signal flow
Page 5
Notes
• If you connect a monaural VCR, connect the yellow plug to (the yellow
jack) and the black plug to -L (MONO) (the white jack).
• If you connect a VCR to the 8 (antenna) terminal, preset the signal
output from the VCR to the program number 0 on the TV.
• When no signal is input to the connected video equipment, the TV screen
becomes blue.
KV-XG29M81/XG25M81 only
• Do not connect video equipment to the t 2 (video input) jacks at the
front and the rear of your TV at the same time; otherwise the picture will
not be displayed properly on the screen.
CAUTION
• Do not connect the power cord until you have completed making all other
connections; otherwise a minimum leakage current might flow through
the antenna and other terminals to ground.
• To avoid battery leakage and damage to the remote, remove the batteries
from the remote if you are not going to use it for several days. If any
liquid that leaks from the batteries touches you, immediately wash it
away with water.
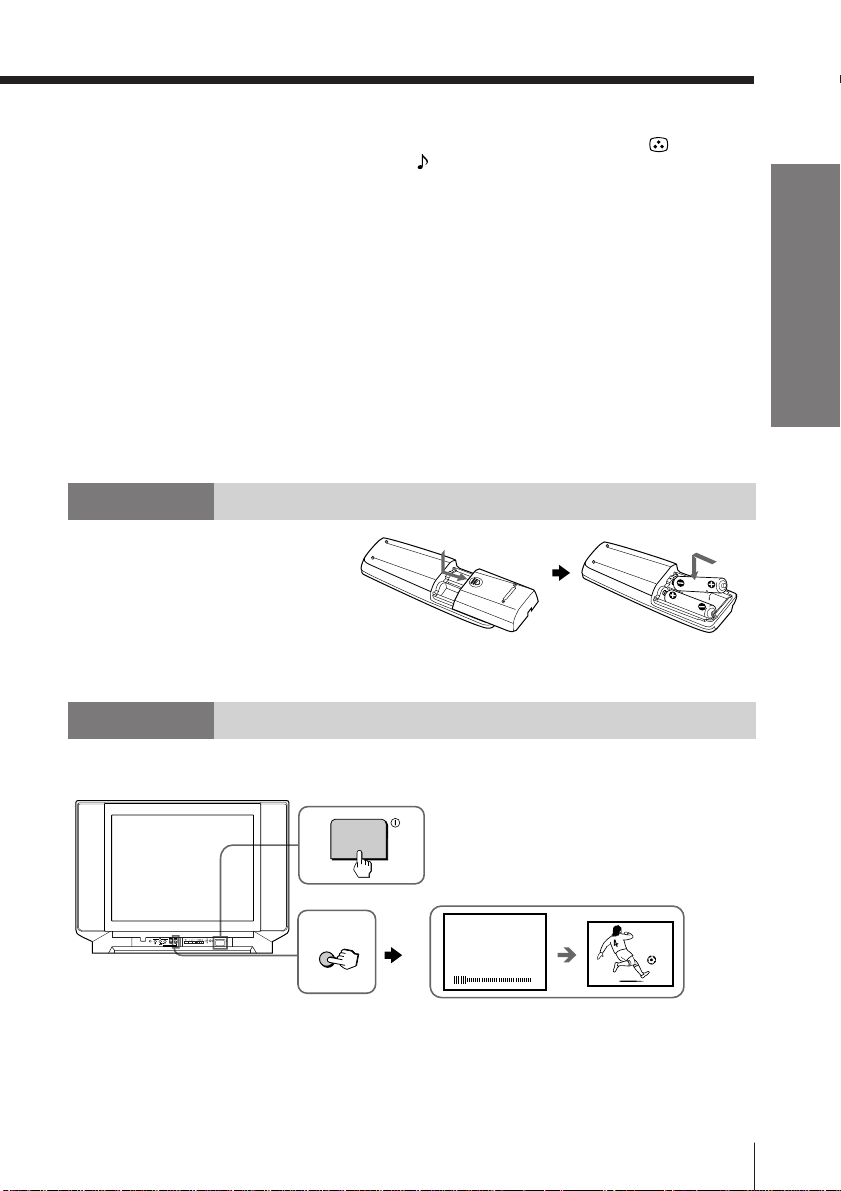
Step 2
Insert the batteries
into the remote
Note
• Do not use old batteries nor use different types of batteries together.
Using Your New TV
Step 3
Preset the channels automatically
Front of TV
1
2
ONE-PUSH AUTOMATIC PROGRAMING
Tips
• If you want to stop automatic channel presetting, press SELECT twice.
• If your TV has preset an unwanted channel or cannot preset a particular
channel, then preset your TV manually (see page 10).
Note
• During automatic channel presetting, your TV screen will indicate “B/G”,
“I”, “D/K” or “M” for the TV system.
AUTO
PROGR
VHF LOW B/G
1
Using Your New TV
1
5
Page 6
Connecting optional components
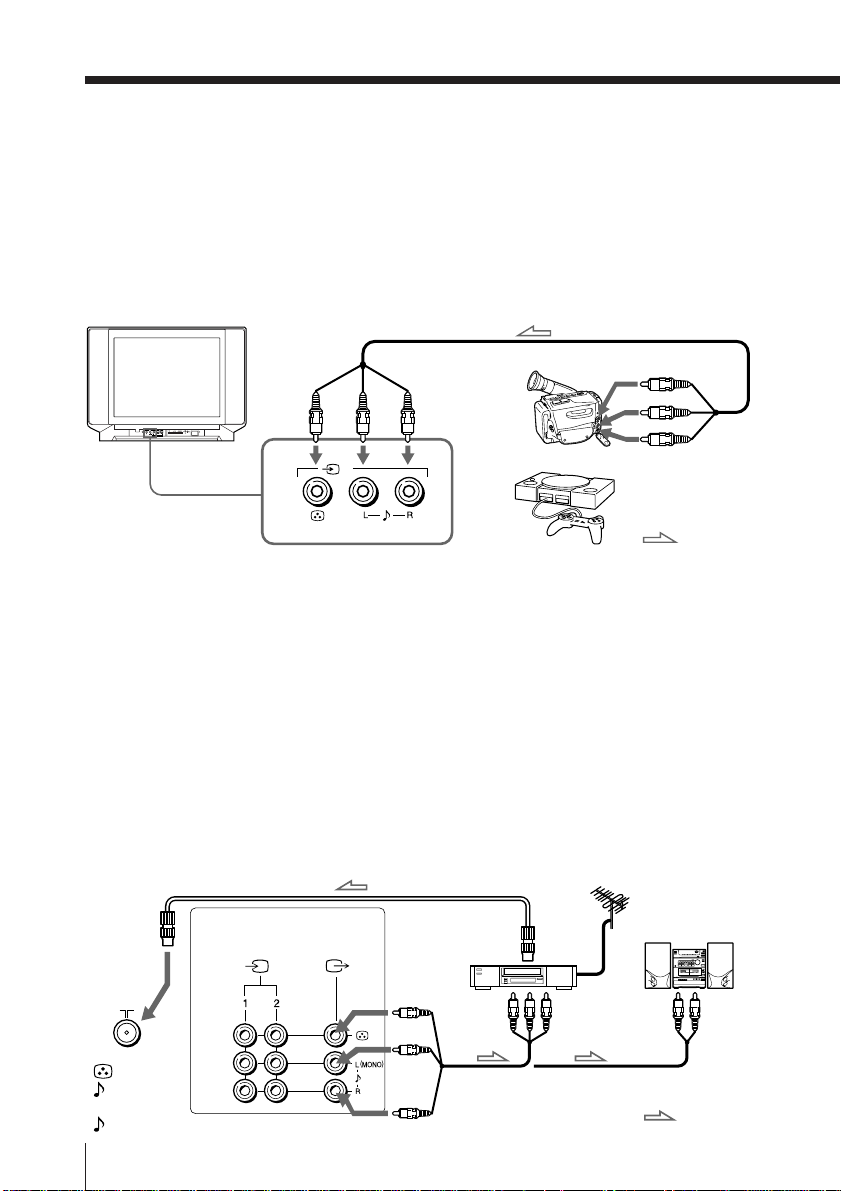
You can connect optional audio/video components, such as a VCR, multi disc player,
camcorder, video game or stereo system.
To watch the picture of the connected equipment, press t (see page 13).
Connecting a camcorder/video game equipment
using the t (video input) jacks
Front of TV
ONE-PUSH AUTOMATIC PROGRAMING
2
(
)
MONO
Audio/Video cable (not supplied)
To t 2
(video input)
Camcorder
or
To video and
audio outputs
Notes
KV-XG21M80 only
• You can also connect video equipment to the t 1 (video input) jacks at
the rear of your TV.
KV-XG29M81/XG25M81 only
• You can also connect video equipment to the t 1 or 2 (video input) jacks
at the rear of your TV.
• Do not connect video equipment to the t 2 (video input) jacks at the
front and the rear of your TV at the same time; otherwise the picture will
not be displayed properly on the screen.
Connecting audio/video equipment using the T
(monitor output) jacks
KV-XG29M81/XG25M81
Rear of TV
Antenna cable (not supplied)
Video game
equipment
: Signal flow
(yellow)
-L (MONO)
(white)
-R (red)
Using Your New TV
6
VCR
To T
(monitor
output)
To
antenna
output
To video and
audio inputs
Audio/Video cable
(not supplied)
Audio system
or
To
audio
inputs
: Signal flow
Page 7

KV-XG21M80
Rear of TV
L(MONO)
Antenna cable (not supplied)
To
antenna
VCR
output
Using Your New TV
Audio system
or
(yellow)
-L (MONO)
(white)
-R (red)
1
To video and
audio inputs
To
audio
inputs
or
To T
(monitor
output)
Note
• When connecting a monaural VCR, connect the yellow plug to (the
yellow jack) and the black plug to -L (MONO) (the white jack).
Audio/Video cable
(not supplied)
: Signal flow
Using Your New TV
7
Page 8
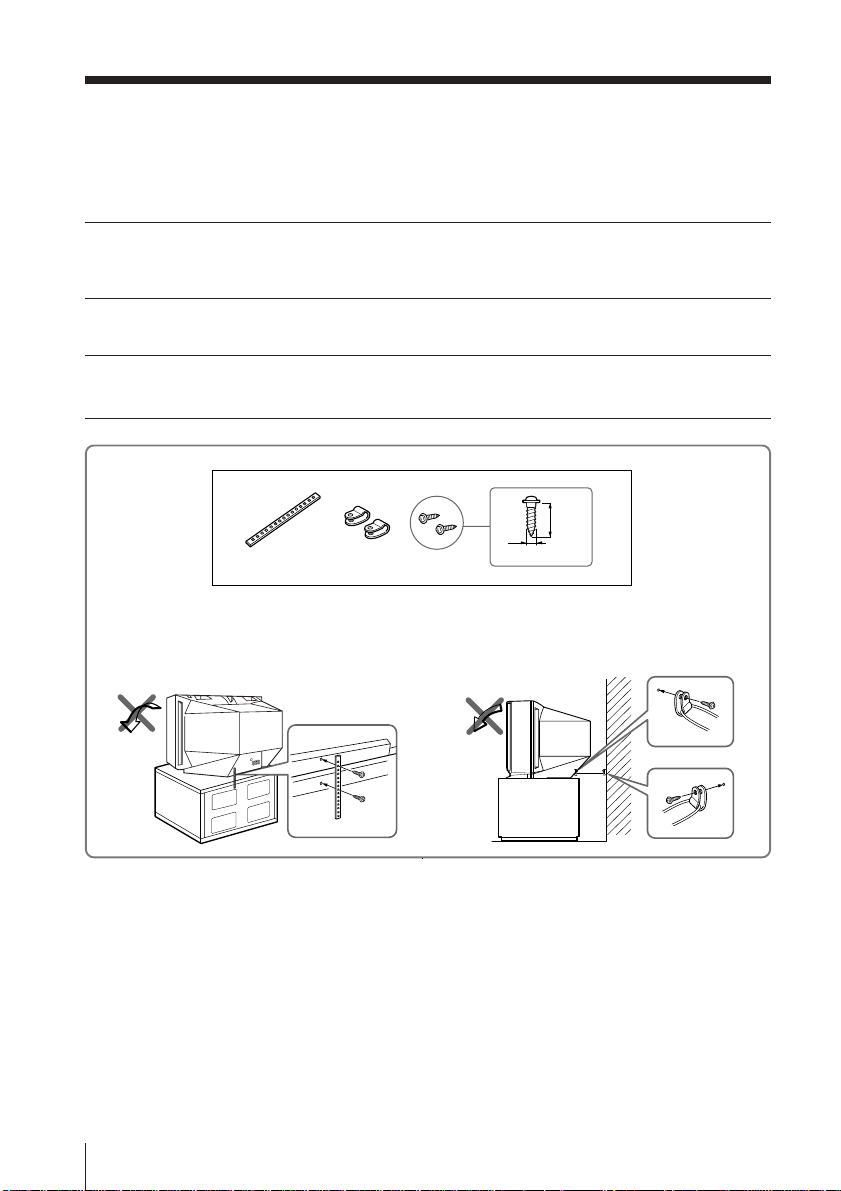
Securing the TV
To prevent the TV from falling, secure the TV using one of the following methods:
With the supplied screws, attach the band to the TV stand and to the rear of
A
the TV using the provided hole.
or
Put the cord or chain through the clamps to secure the TV against a wall or
B
pillar.
20
mm
3.8 mm
A
Using Your New TV
8
B
or
Note
• Use only the supplied screws. Use of other screws may damage the TV.
Page 9
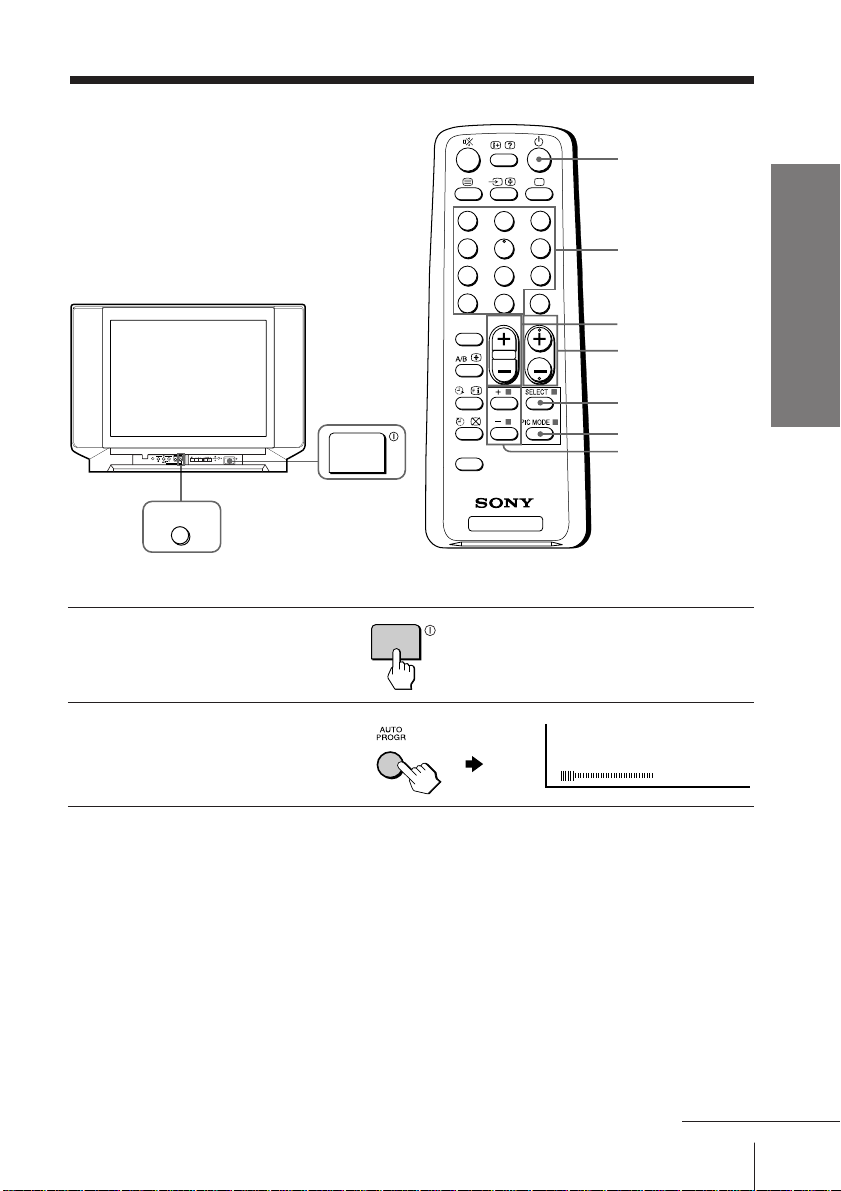
Presetting channels
You can preset up to 100 TV channels in
numerical sequence from program
number 1 using the remote and the
buttons on your TV as well.
ONE-PUSH AUTOMATIC PROGRAMING
AUTO
PROGR
Presetting channels automatically
Press ! to turn on the TV.
1
Press AUTO PROGR.
2
1
4
7
-
SOUND
MODE
FAVORITE
2
TV
1
3
2
6
5
9
8
JUMP
0
PROGR
Number buttons
2 +/–
Using Your New TV
PROGR +/–
SELECT
PIC MODE
+ or –
VHF
LOW
B/G
Note
• During automatic channel presetting, your TV screen will indicate “B/G”,
“I”, “D/K” or “M” for the TV system.
To preset channels automatically from a specified program number
(1) Press SELECT until “AUTO PROGRAM” appears.
(2) Press + or –.
The on-screen display will start flashing.
(3) Press PROGR +/– or the number buttons until the desired program number
appears.
(4) Press + or –.
continued
Using Your New TV
9
Page 10
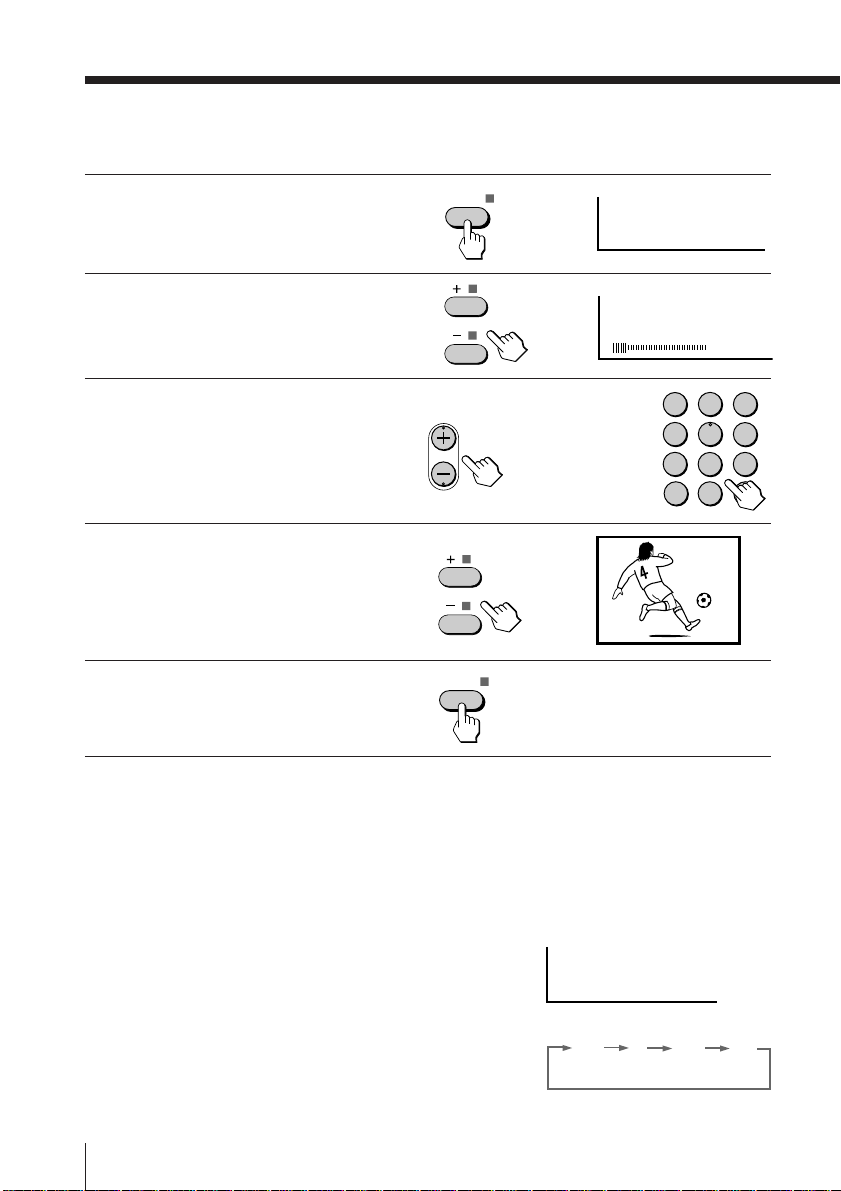
Presetting channels (continued)
Presetting channels manually
Press SELECT until
1
“MANUAL PROGRAM”
appears.
Press + or –.
2
Press PROGR +/– or the
3
number buttons until the
desired program number
appears.
Press + or – until the
4
desired channel picture
appears.
Press SELECT.
5
SELECT
PROGR
SELECT
b
b
b
MANUAL PROGRAM
VHF
or
LOW
1
4
7
-/--
B/G
2
3
5
6
9
8
0
1
Note
• If you preset a locked channel, that particular channel will be unlocked
automatically (page 18).
To change the TV system setting
If the picture or sound is abnormal when receiving programs through the 8 (antenna)
terminal
(1) Press SELECT until “TV SYS” appears.
TV SYS: B/G
ID/K
(2) Press + or – to select the appropriate
TV system until the picture or sound
quality is optimal.
Using Your New TV
10
B/G
M
Page 11
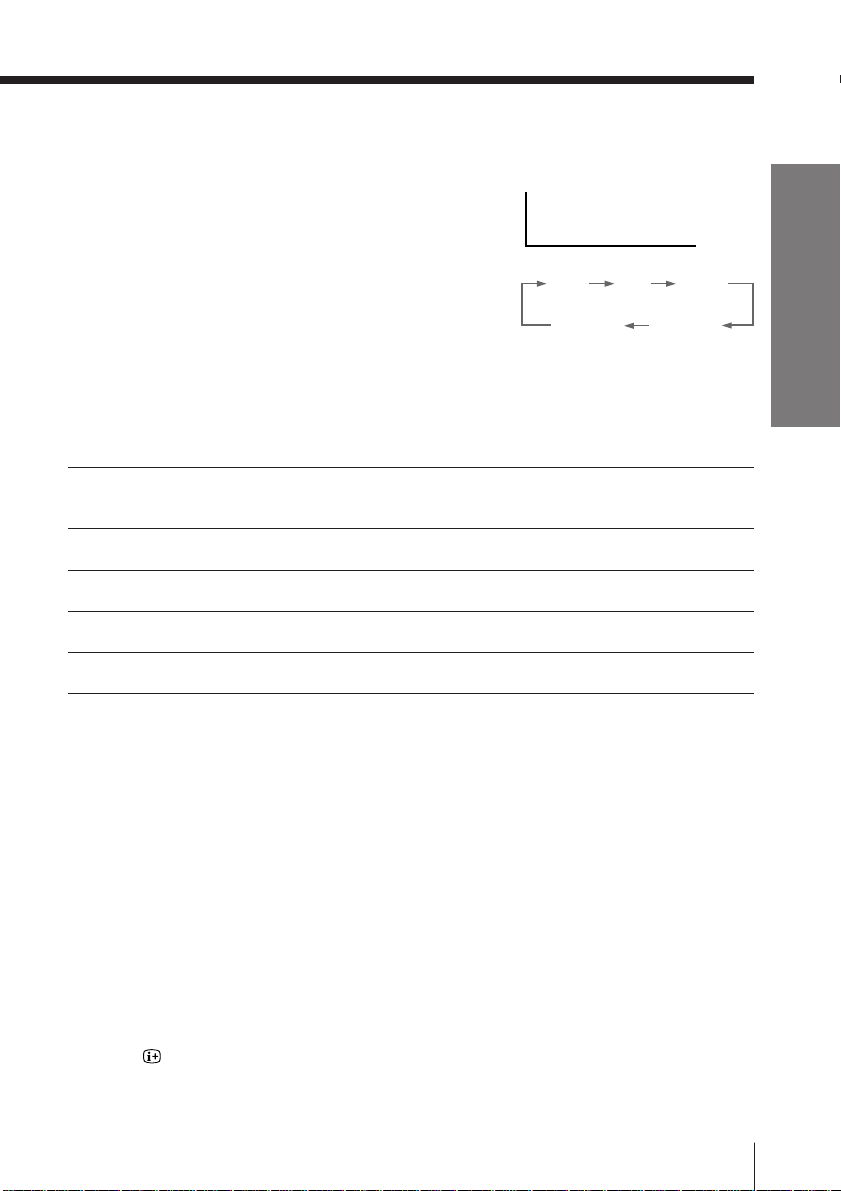
To change the color system setting
If the color is abnormal when receiving programs through the 8 (antenna) terminal
or the
t
(video input) jack.
(1) Press SELECT until “COL SYS” appears.
COL SYS: AUTO
(2) Press + or – to select the appropriate
color system until the color is
optimal.
Tip
• Normally set “COL SYS” to “AUTO”.
AUTO
Skipping program numbers
Press PROGR +/– or the number buttons until the unused or unwanted
1
program number appears.
Press SELECT until “MANUAL PROGRAM” appears.
2
Press + or –.
3
Press PIC MODE.
4
Press SELECT.
5
To preset the skipped program number again
Preset the channel automatically or manually.
Tip
• You can also use SELECT and 2 +/– on the TV to preset channels and
skip program numbers.
Using Your New TV
PAL SECAM
NTSC 3.58NTSC 4.43
To use the fine tuning (FINE) function
The fine tuning (FINE) function may help to reduce the following problems:
incomplete Teletext display (KV-XG29M81/XG25M81 only) double images and lines
moving across the TV screen.
You can use the fine tuning function as below:
(1) Select the program number you want to adjust.
(2) Press SELECT until “MANUAL PROGRAM” appears on the screen.
(3) Press + or – on the remote control once.
(4) Press
(5) Press + or – continuously until the above problems are minimized.
The + or – icon on the screen flashes while tuning.
(6) Press SELECT to return to normal screen.
to display “FINE” on the screen.
Using Your New TV
11
Page 12
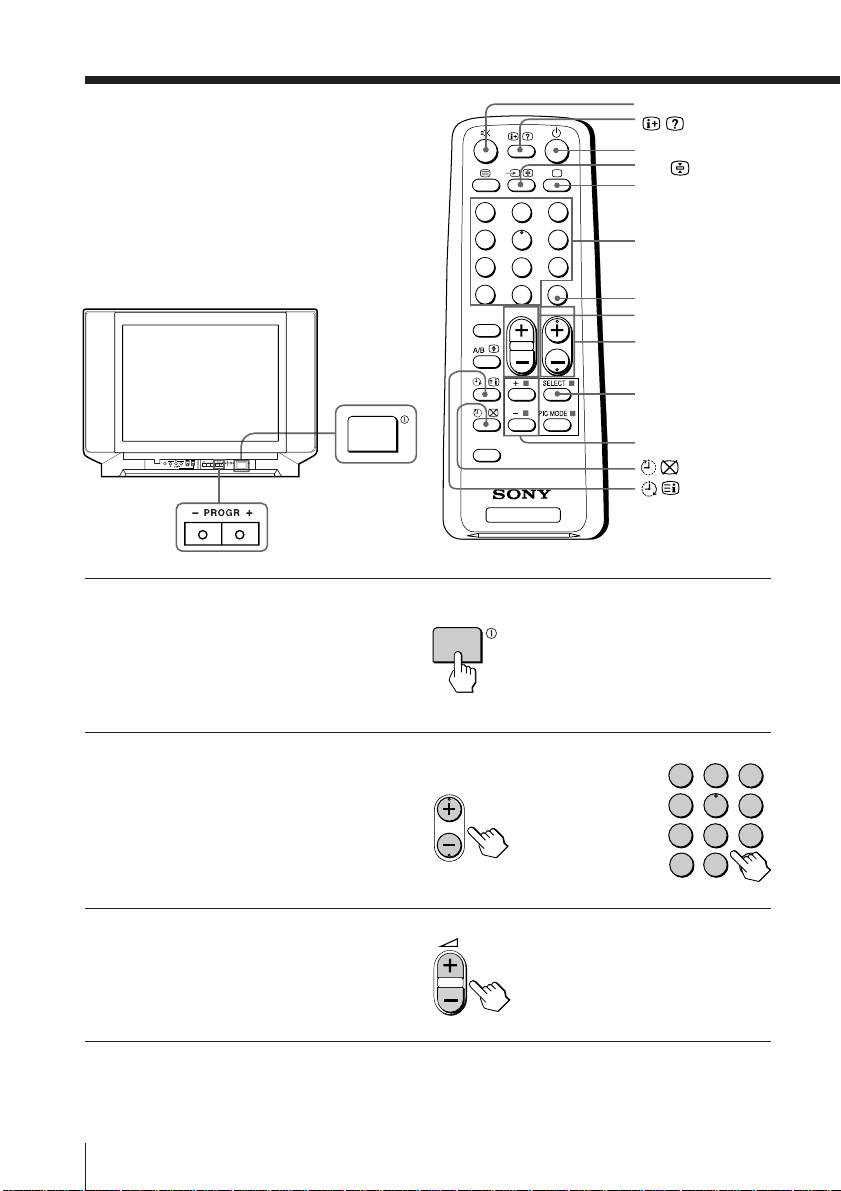
Watching the TV
This section explains functions used
while watching the TV. Most operations
can be done using the remote.
1
4
7
-
SOUND
MODE
%
1
t
a
3
2
6
5
9
8
JUMP
0
PROGR
2
Number buttons
JUMP
2 +/–
PROGR +/–
SELECT
ONE-PUSH AUTOMATIC PROGRAMING
Press ! to turn on the TV.
1
When the TV is in the
standby mode (the 1
indicator on the TV is lit
red), press 1 on the remote
or PROGR +/– on the TV.
Press PROGR +/– or the
2
number buttons to select
the TV program.
For double digit numbers,
press -, then the number
(e.g., for 25, press -, then
2 and 5).
Press 2 +/– to adjust the
3
volume.
PROGR
FAVORITE
TV
or
+ or –
-/--
2
1
4
7
3
5
6
9
8
0
Using Your New TV
12
Page 13
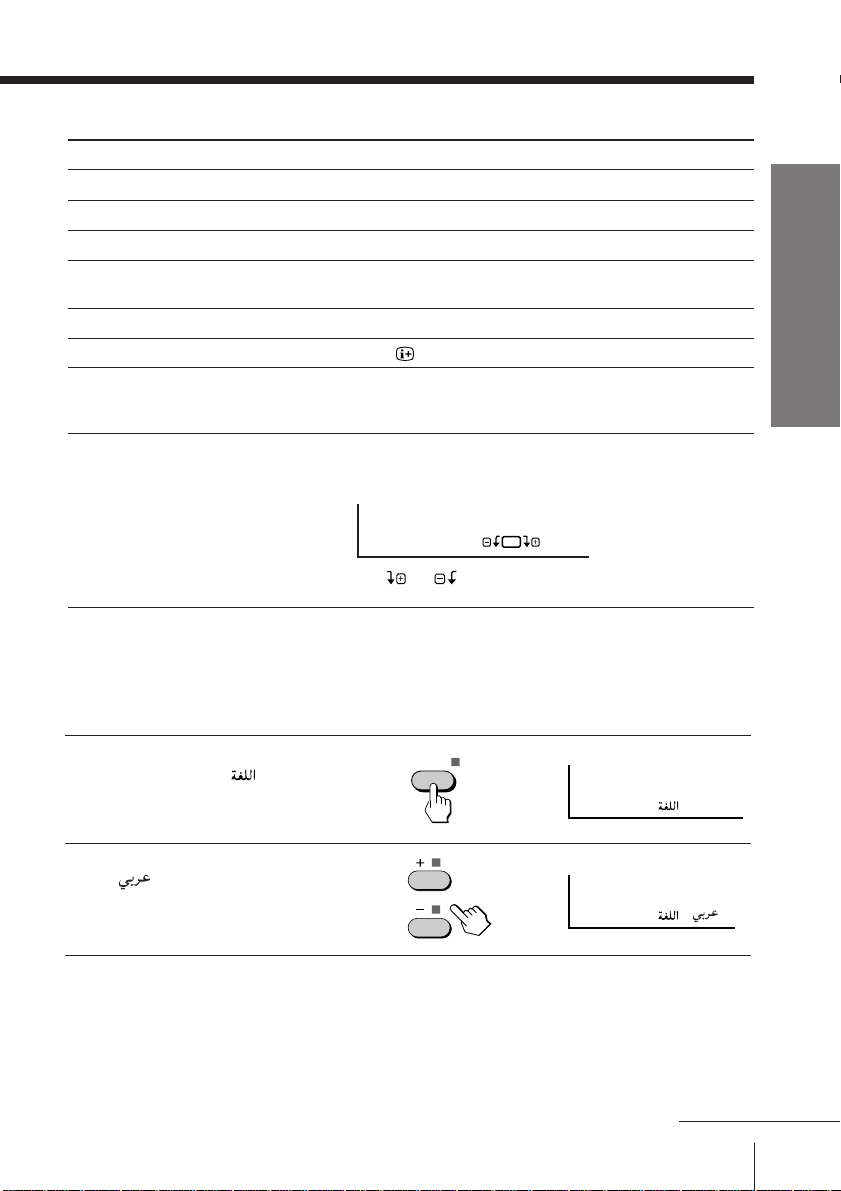
Additional tasks
LANGUAGE / :
To
Turn off temporarily
Turn off completely
Mute the sound
Watch the video input
(VCR, camcorder, etc.)
Jump back to the previous channel
Display the on-screen information*
Adjust the volume of all TV
programs automatically
Adjust the picture position when it
is not aligned to the TV screen
* The picture, sound, and either the program number or video mode are
displayed. The on-screen display for the picture and sound information
disappears after about 3 seconds.
Do this
Press 1. The 1 indicator on the TV lights up red.
Press ! on the TV.
Press %.
Press t to select “VIDEO 1” or “VIDEO 2”.
To return to the TV program, press a.
Press JUMP.
Press .
Press SELECT repeatedly until “INTELLIGENT VOL”
appears, then press + or – to select “ON”.
To cancel, select “OFF”.
Press SELECT repeatedly until “PIC ROTA TION”
appears, then press + or – to adjust the alignment of the
picture position.
PIC ROTATION
The or icon on the screen flashes while
adjusting.
Using Your New TV
Changing the on-screen display language
Press SELECT until
1
“LANGUAGE / :
ENGLISH”appears on the
screen.
Press + or – to select
2
“ “.
Tip
• You can also use SELECT and 2 +/– on the TV to select the on-screen
display language.
SELECT
b
b
LANGUAGE / : ENGLISH
continued
Using Your New TV
13
Page 14
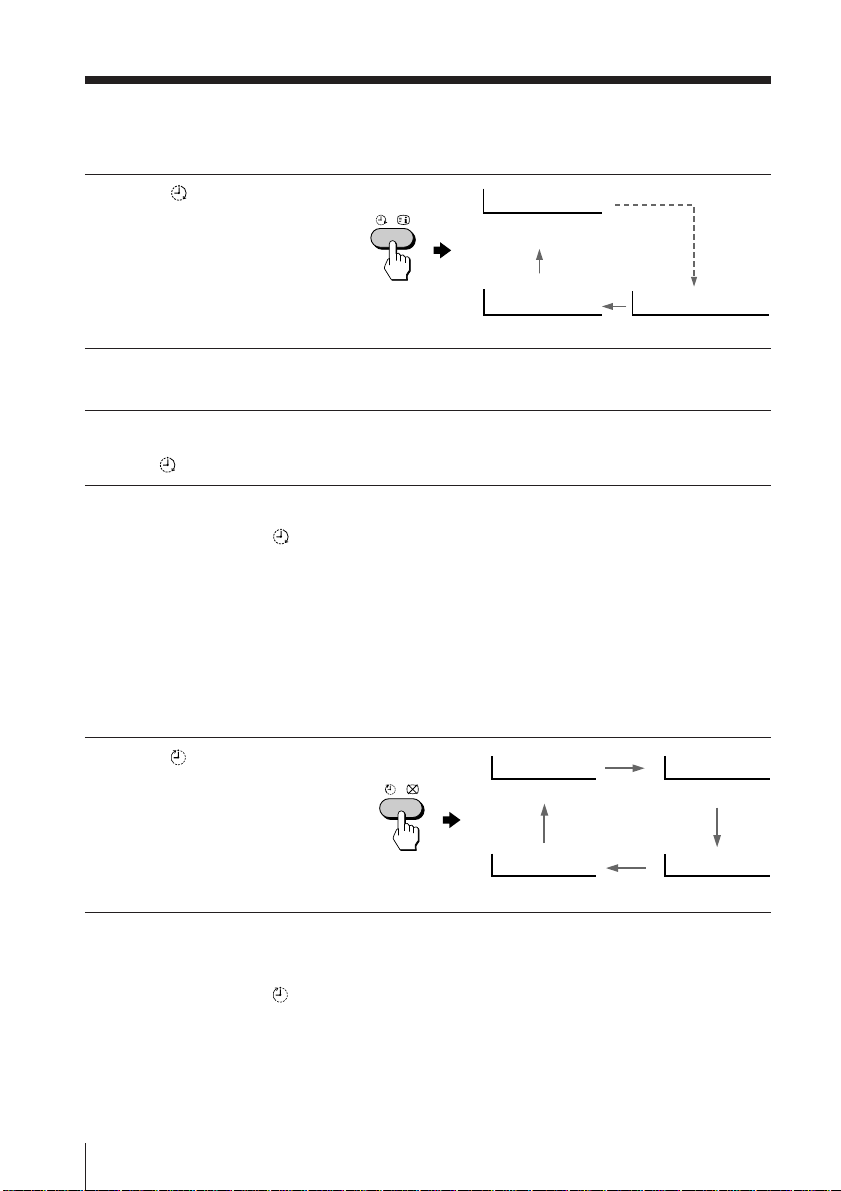
Watching the TV (continued)
Setting the Wake Up timer
Press until the desired
1
period of time appears.
WAKE UP TIMER:10M
After 10 minutes
The Wake Up timer starts
immediately after you have
set it.
WAKE UP TIMER:OFF
No Wake Up timer After 12 hours
Select the TV program or video mode you want to display when you wake
2
up.
Press 1 or set the Sleep timer if you want the TV to turn off automatically.
3
indicator on the TV lights up orange.
The
WAKE UP TIMER:12H00M
To cancel the Wake Up timer
Press until “WAKE UP TIMER: OFF” appears or turn off the TV’s
main power.
Note
• If no buttons or controls are pressed for more than two hours after the TV
is turned on using the Wake Up timer, the TV automatically goes into the
standby mode. To continue watching the TV, press any button or control
on the TV or the remote.
Setting the Sleep timer
Press until the desired
period of time appears.
The Sleep timer starts
immediately after you have
set it.
SLEEP TIMER:30M SLEEP TIMER:60M
After 30 minutes
SLEEP TIMER:OFF SLEEP TIMER:90M
No Sleep Timer
After 60 minutes
After 90 minutes
To cancel the Sleep timer
Press until “SLEEP TIMER: OFF” appears or turn the TV off.
Using Your New TV
14
Page 15
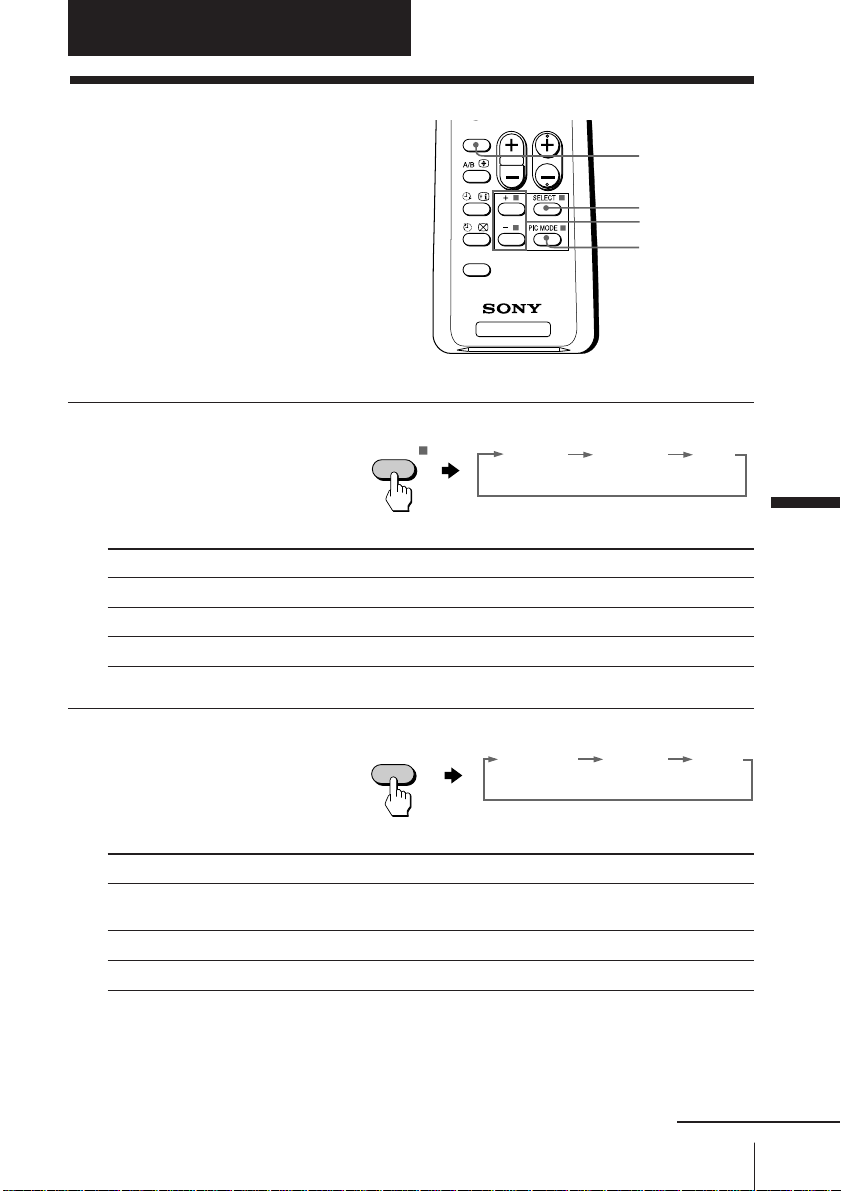
Advanced Operations
9 DYNAMIC
9 DRAMA 9 SOFT
SOUND
MODE
Customizing the
SOUND
MODE
picture and sound
You can customize the picture and
sound by selecting the picture and
sound modes or by adjusting its
settings.
You can change the sound effect by
selecting the surround mode.
Selecting the picture and sound modes
To select the picture mode
Press PIC MODE
repeatedly until you get
the desired picture mode.
Select To
“DYNAMIC” receive high contrast pictures.
“STANDARD” receive normal contrast pictures.
“SOFT” receive mild pictures.
PIC MODE
FAVORITE
2
TV
PROGR
SOUND MODE
SELECT
+ or –
PIC MODE
STANDARDDYNAMIC SOFT
Advanced Operations
To select the sound mode
Press SOUND MODE
repeatedly until you get
the desired sound mode.
Select To
“DYNAMIC” listen to dynamic and clear sound that emphasizes the low and
“DRAMA” listen to sound that emphasizes vocals and background music.
“SOFT” receive soft sound.
high sound.
Advanced Operations
continued
15
Page 16
PICTURE 60
Customizing the picture and sound (continued)
Adjusting the picture and sound settings
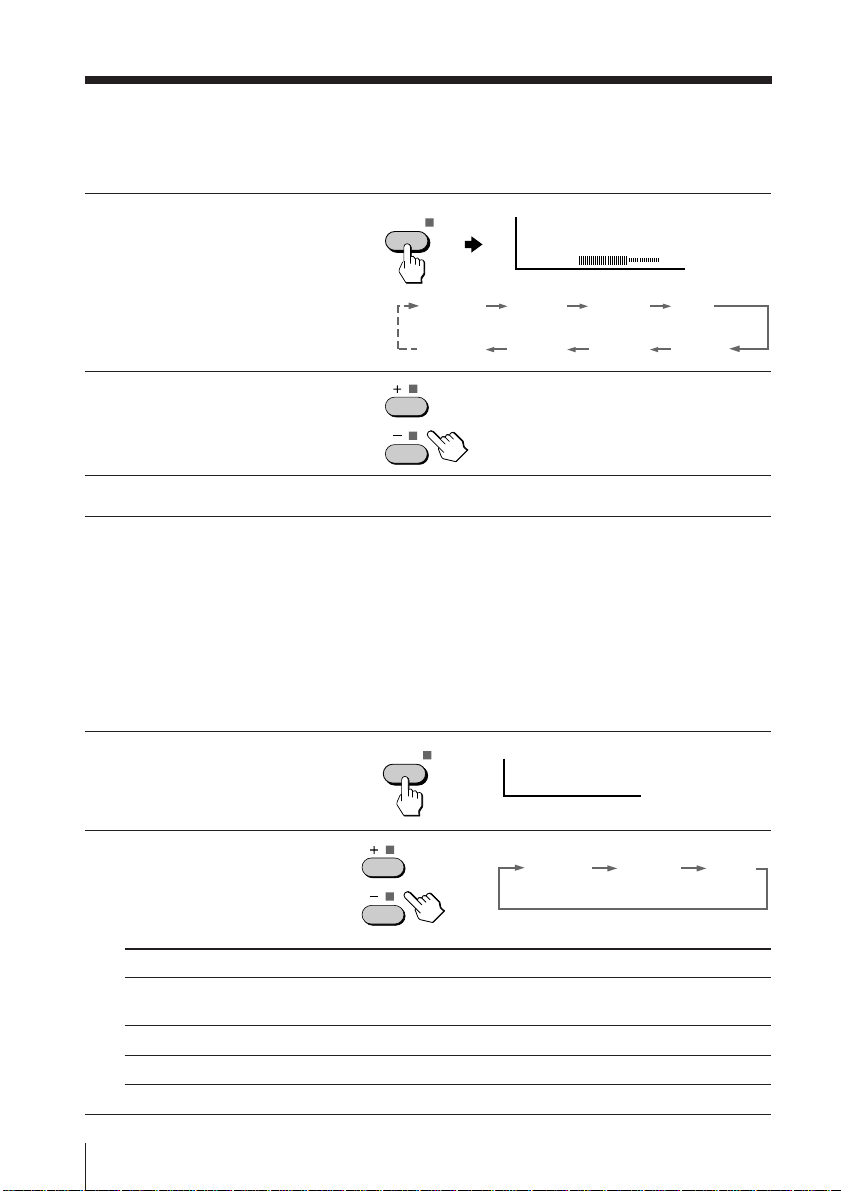
Press SELECT until the
1
desired setting appears.
Each time you press
SELECT, the setting
item will change as follows:
Press + or – to adjust the
2
item.
To adjust other items, repeat steps 1 to 2.
3
* “HUE” can be adjusted for the NTSC system only.
Notes
• When you select a picture or sound mode, the adjusted settings will be
reset according to the selected mode.
• You can also use SELECT and 2 +/– on the TV to adjust the picture and
sound settings.
SELECT
Selecting the surround mode
Press SELECT repeatedly
1
until “SURROUND”
appears.
SELECT
PICTURE COLOR BRIGHT HUE*
BALANCE TREBLE BASS
b
SURROUND: MOVIE
SHARP
Press + or – to select the
2
desired surround sound.
Select To
“MOVIE” listen to sound that spreads out over a large area, giving the feeling
“MUSIC” listen to the sound that gives the feeling of being at a live concert.
“OFF” turn off the surround sound.
Advanced Operations
16
MUSICMOVIE OFF
b
of being at a movie theatre.
Page 17
Viewing your
FAVORITE CH SET UP
1 PR01 2 PR02 3 PR03
4 PR04 5 PR05 6 PR06
FAVORITE CH SET UP
1 PR01 2 PR02 3 PR03
4 PR04 5 PR05 6 PR06
FAVORITE CH SET UP
1 PR01 2 PR02 3 PR08
4 PR04 5 PR05 6 PR06
favorite channels
You can display six of your favorite
channels for quick and easy selection.
You can change the favorite channel
setting as well.
Selecting a favorite channel
1
4
7
-
SOUND
MODE
FAVORITE
3
2
6
5
9
8
JUMP
0
PROGR
2
Number
buttons
PROGR +/–
+ or –
FAVORITE
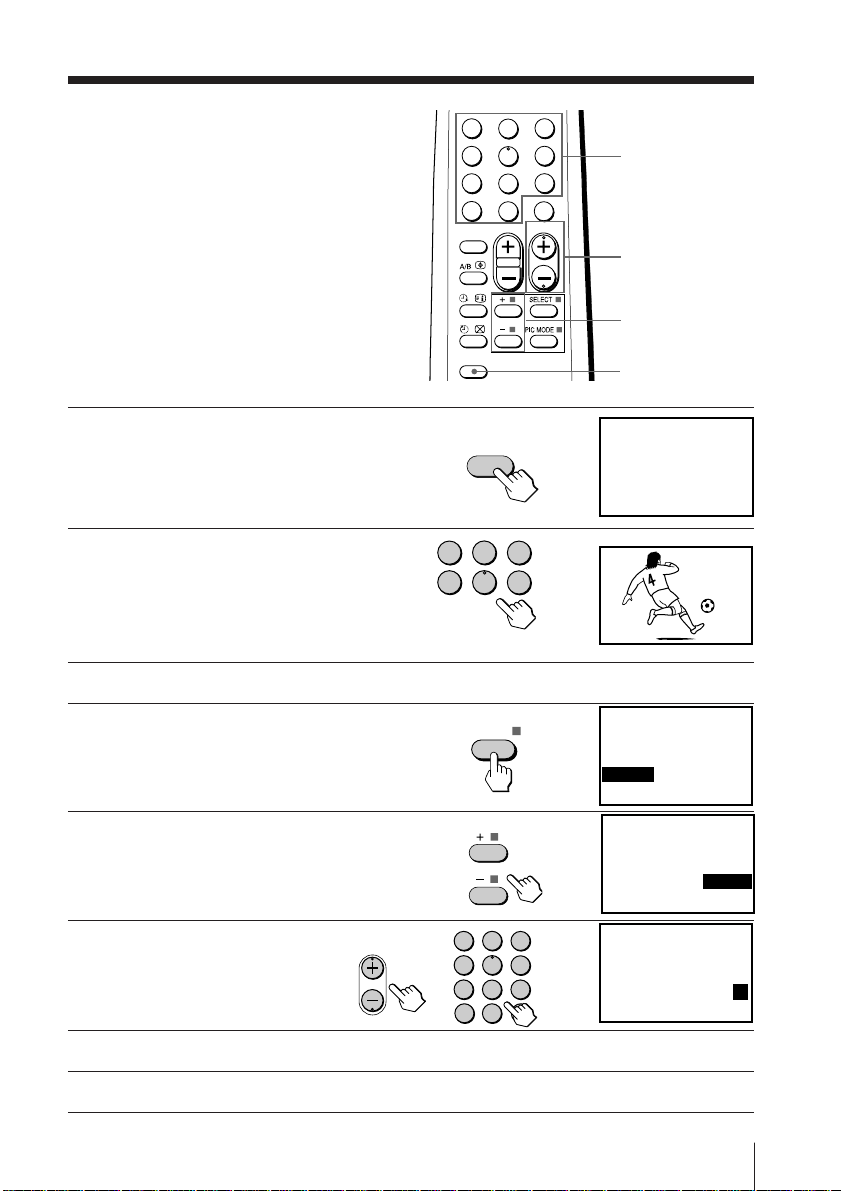
Press FAVORITE.
1
Press the number button
2
from 1 to 6 to select the
desired channel.
1
4
FAVORITE
2
5
When you use the “FAVORITE CH”
feature for the first time, six preset channels will appear.
Changing the favorite channel setting
Press SELECT until
1
“FAVORITE CH SET UP”
appears.
Press + or – to select the
2
favorite channel you want
to change (e.g. 3 PR03).
Press PROGR +/–, or
3
number buttons to
change the program
number.
PROGR
or
SELECT
1
4
7
-/--
FAVORITE CH
b
1 PR01 2 PR02 3 PR03
4 PR04 5 PR05 6 PR06
3
6
b
1
b
b
2
3
5
6
b
9
8
0
Repeat steps 2 and 3 to set other favorite channels.
4
Press SELECT.
5
Advanced Operations
17
Page 18
Blocking the channels (CHILD LOCK)
You can prevent a child from watching
certain channels by using the buttons
on the remote control.
1
4
7
-
SOUND
MODE
3
2
6
5
9
8
JUMP
0
PROGR
2
SELECT
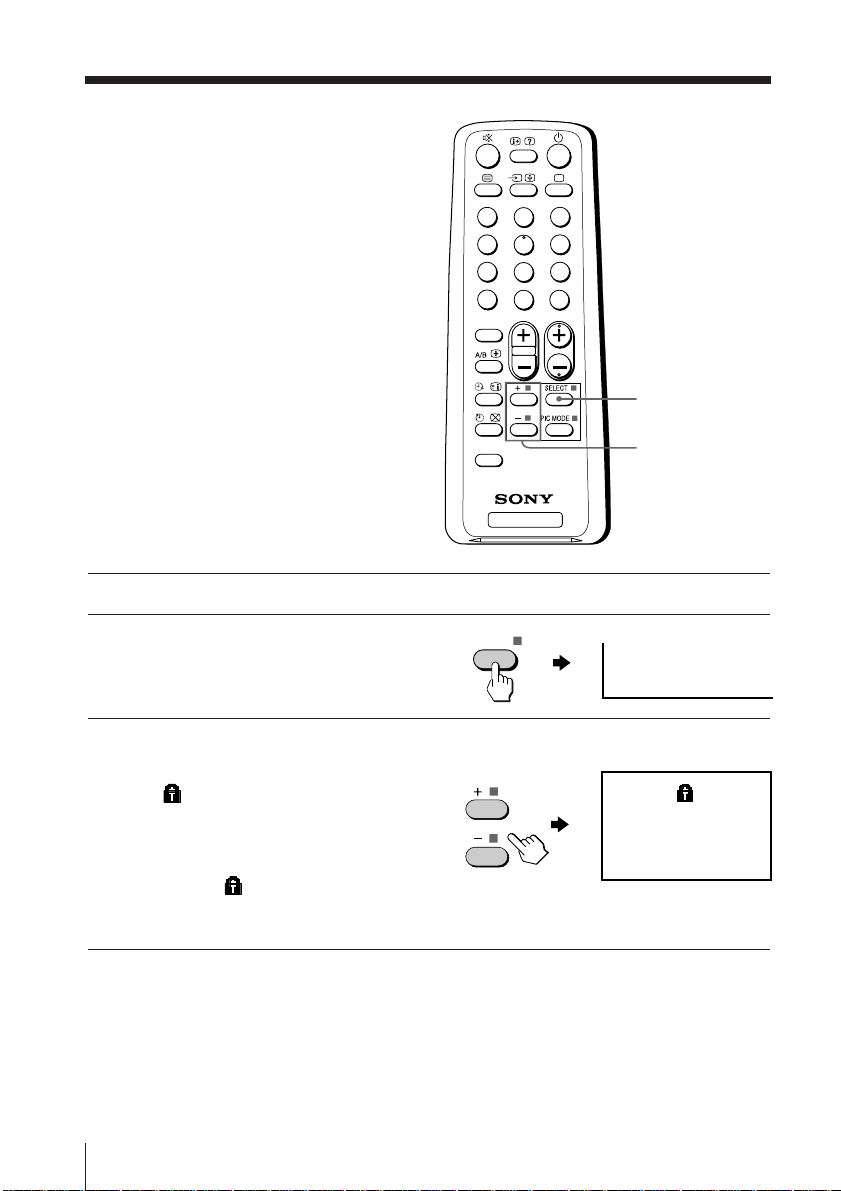
Select the channel you want to lock.
1
Press SELECT until “CHILD
2
LOCK” appears on the
screen.
Press + or – to select
3
“ON”.
The
symbol appears on
the screen.
To unlock the channel,
press + or – to select
“OFF”. The
symbol
disappears from the
screen.
Note
• If you preset a locked channel, that particular channel will be unlocked
automatically (page 9).
FAVORITE
SELECT
+ or –
TV
CHILD LOCK: OFF
1
CHILD LOCK: ON
Advanced Operations
18
Page 19
Viewing Teletext
(KV-XG29M81/XG25M81 only)
TV stations broadcast an information
2
TV
3
2
6
5
9
8
JUMP
0
PROGR
service called Teletext via some TV
channels. Teletext allows you to receive
various information, such as shares
market or news.
1
4
7
-
SOUND
MODE
FAVORITE
Displaying Teletext
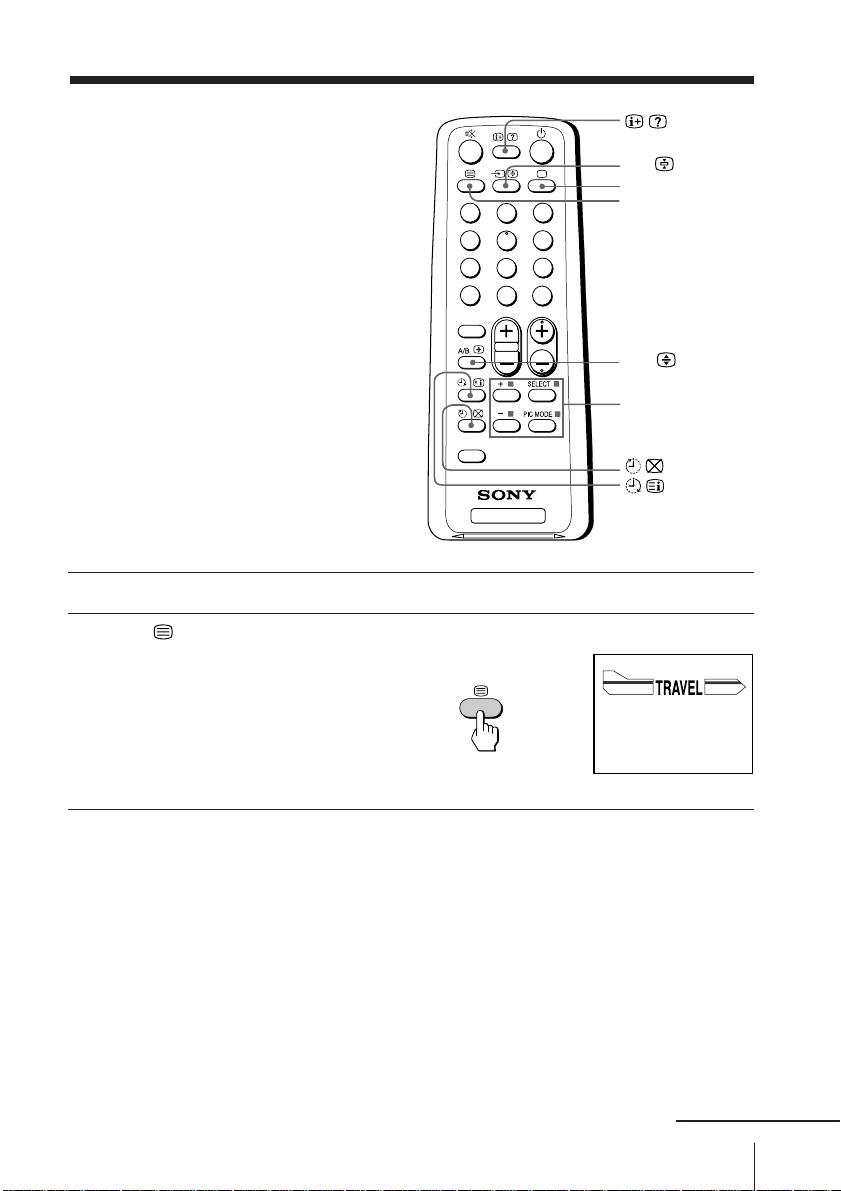
Select a TV channel that carries the Teletext broadcast you want to watch.
1
Press to display the
2
text.
A Teletext page (normally
the index page) is
displayed. If there is no
Teletext broadcast, “100” is
displayed at the top left
corner of the screen.
b
t
a
/
A/B
FASTEXT
P166 SECTEXT 166 FR1 MAR 03:59:09
Fom Singapore
To PAR IS
To OSAKA
To ROMA
To SYDNEY
Day Dep/Arr Flight Alrcraft
1.6 220/0588 SQ28 747
2 2130/1225 PA115 L15
3 2115/1330 SQ26 747
2.5 1000/1715 SQ6 747
4.6 0930/2015 CX522 L10
2.7 2130/0745 SQ24
4 2300/0915 AZ487 747
1 2210/0610 SQ21A 747
2 2100/0835 SQ21A 747
747
To turn off Teletext
Press a.
continued
Advanced Operations
19
Page 20
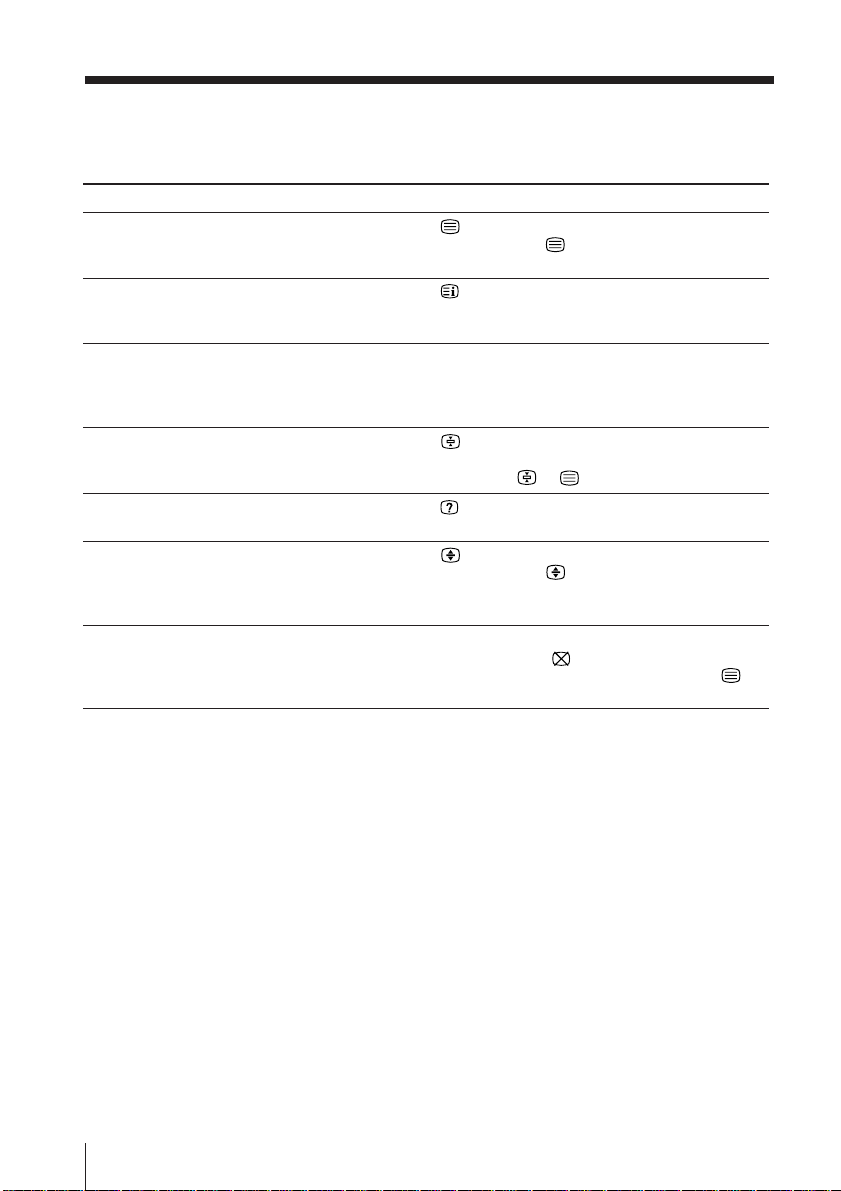
Viewing Teletext (continued)
Additional Teletext tasks
To
display a Teletext page on the TV
picture
check the contents of a Teletext service
select a Teletext page
hold a Teletext page
(stop the page from scrolling)
reveal concealed information
(e.g., an answer to a quiz)
enlarge the Teletext display
wait for a Teletext page while watching
a TV program
Do this
Press .
Each time you press , the screen changes as
follows: Teletext n Teletext and TV n TV.
Press .
An overview of the Teletext contents and page
numbers appear on the screen.
Press the number buttons to enter the three-digit
page number of the desired Teletext page. * If you
make a mistake, reenter the correct page number. To
access the next or previous page, press PROGR +/–.
Press to display the symbol “z” at the top left
corner of the screen. To resume normal Teletext
operation, press or .
Press .
To conceal the information, press the button again.
Press .
Each time you press , the Teletext display
changes as follows: Enlarge upper half n Enlarge
lower half n Normal size.
1 Enter the Teletext page number that you want to
refer to, then press .
2 When the page number is displayed, press to
show the text.
* You can also select a Teletext page of any page number that appears in the
colored column at the bottom of the screen using the corresponding colorcoded button on the remote.
Using FASTEXT
This feature allows you to quickly access a Teletext page that uses
FASTEXT. When a FASTEXT program is broadcasted, the colored
menus appear at the bottom of the screen. The colors of the menus
correspond to the red, green, yellow, and blue color-coded buttons
on the remote.
To access a FASTEXT menu
Press the color-coded button on the remote corresponding to the
menu you want. The menu page appears on the screen after several
seconds.
Advanced Operations
20
Page 21
Additional Information
Self-diagnosis function
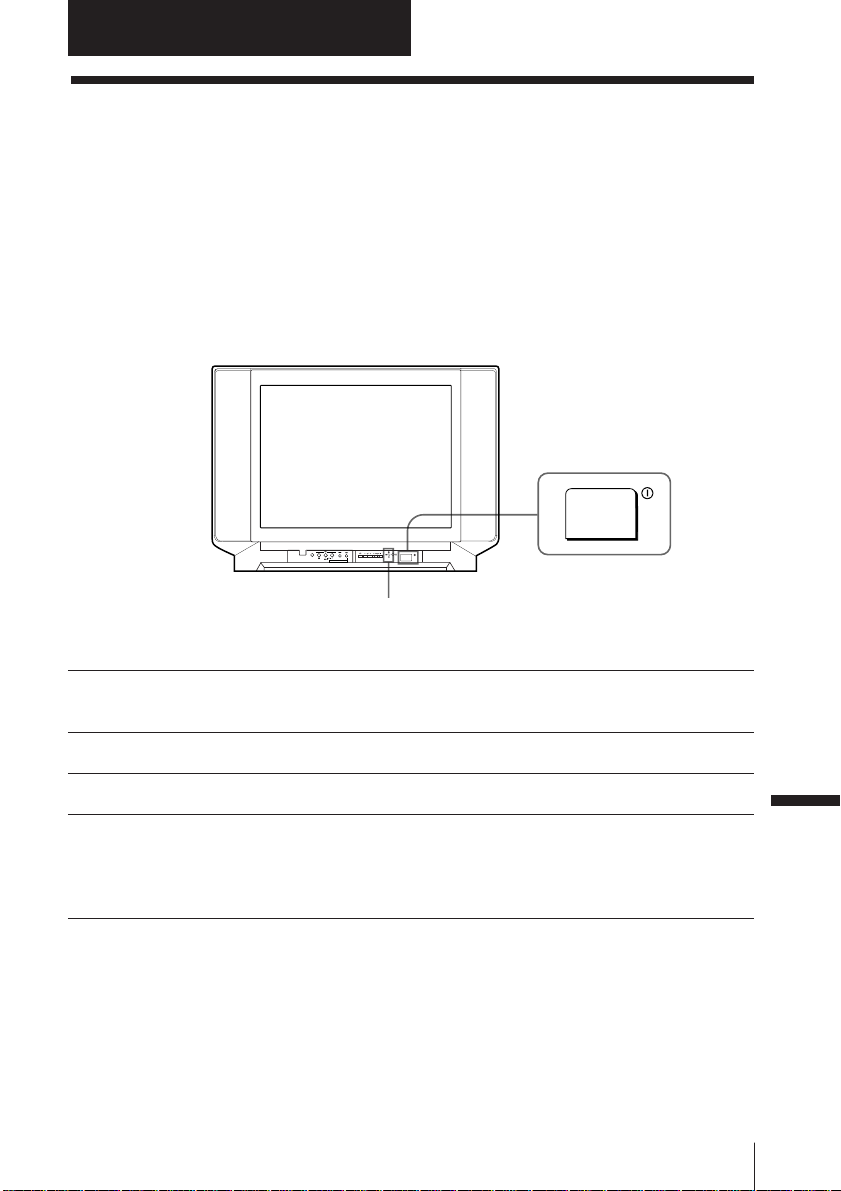
Your TV is equipped with a self-diagnosis function. If there is a
problem with your TV, the 1 indicator flashes red. The number of
times the 1 indicator flashes indicates the possible causes.
Front of TV
ONE-PUSH AUTOMATIC PROGRAMING
1 indicator
Check that the 1 indicator flashes red a number of times between 3-second
1
intervals.
Count the number of times the 1 indicator flashes.
2
Press ! (main power) to turn off your TV.
3
Inform your nearest Sony service center about the number of times the
4
1 indicator flashes.
Be sure to note the model name and serial number located on the rear of
your TV.
Additional Information
Additional Information
21
Page 22
Troubleshooting
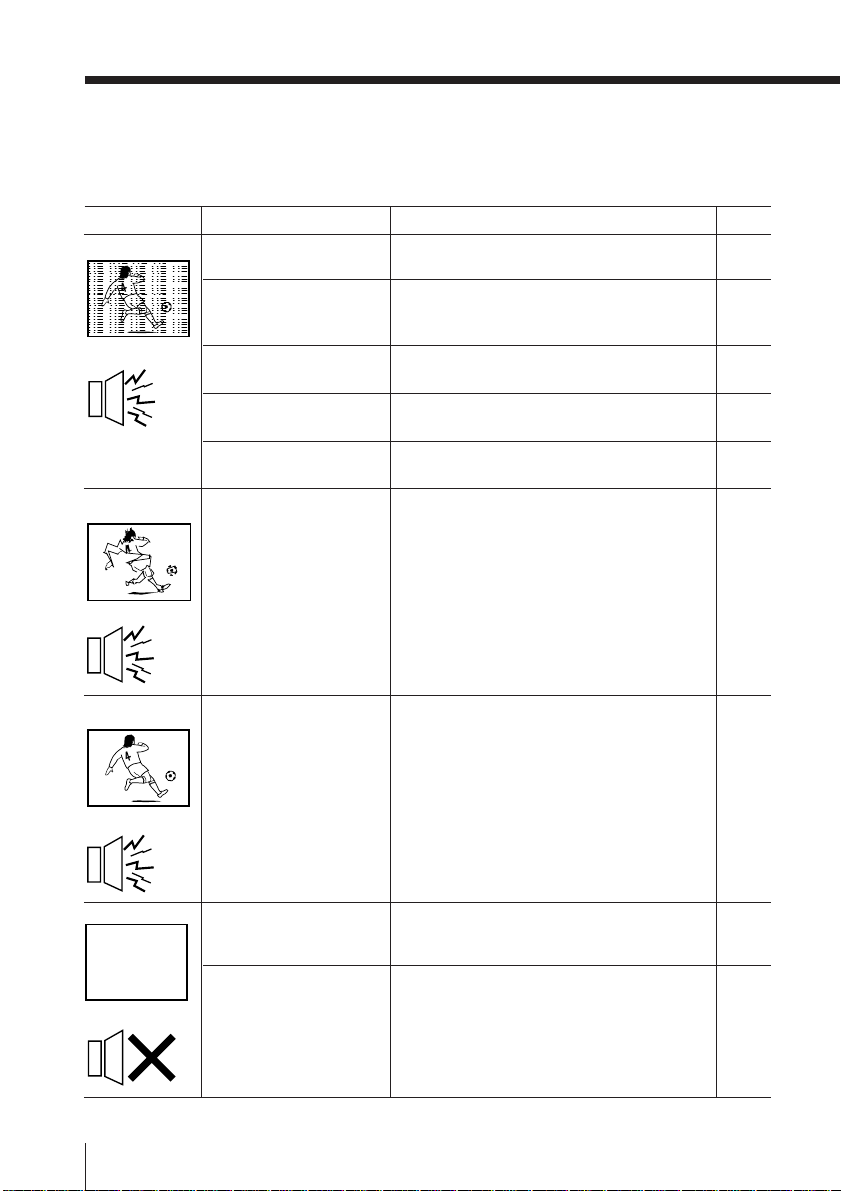
If you find any problem while viewing your TV, please check the following guide. If
any problem persists, contact your Sony dealer.
Snowy picture
Noisy sound
Distorted picture
Noisy sound
Possible causeSymptom
• Connection is loose or
the cable is damaged.
• Channel presetting is
inappropriate or
incomplete.
• The antenna type is
inappropriate.
• The antenna direction
is inappropriate.
• Signal transmission is
low.
• Broadcast signals are
too strong.
Solutions
• Check the antenna cable and connection
on the TV, VCR and on the wall.
• Press SELECT until “MANUAL
PROGRAM” appears on the screen, then
preset the channel again.
• Check the antenna type (VHF/UHF).
Contact a Sony dealer for advice.
• Adjust the antenna direction. Contact a
Sony dealer for advice.
• Try using a booster.
• Turn off or disconnect the booster if it is
in use.
Page
4
10
–
–
–
–
Good picture
Noisy sound
No picture
No sound
Additional Information
22
• The TV system setting
is inappropriate.
• The power cord,
antenna or VCR is not
connected.
• The TV is not turned
on.
• If the sound of some channels are noisy,
select the channel, then select the
appropriate TV system (“TV SYS”).
• Check the power cord, antenna and the
VCR connections.
• Press 1 (power).
• Press ! (main power) on the TV to turn
off the TV for about five seconds, then
turn it on again.
10
4
13
12
Page 23
Symptom
Good picture
No sound
Possible cause
•
The volume level is too
low.
• The sound is muted.
Solutions
• Press 2 + to increase the volume level.
• Press % to cancel the muting.
Page
12
13
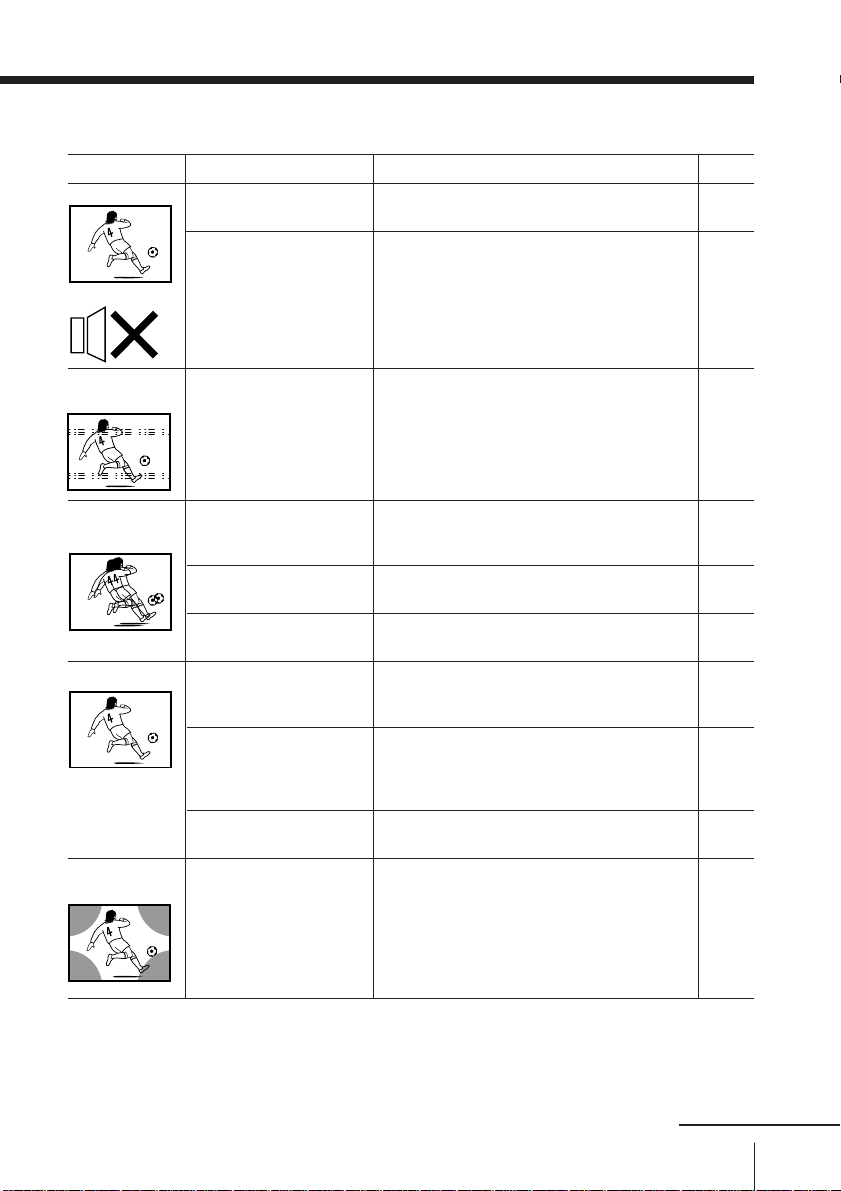
Dotted lines or
stripes
Double images or
“ghosts”
No color
Abnormal color
patches
• There is local
interference from cars,
neon signs, hair
dryers, power
generators, etc.
•
Broadcast signals are
reflected by nearby
mountains or buildings.
• The antenna direction
is inappropriate.
• Use of a booster is
inappropriate.
• The color level setting
is too low.
• The color system
setting is
inappropriate.
• The antenna direction
is inappropriate.
• The magnetic
disturbance from
external speakers or
other equipment, or
the direction of the
earth’s magnetic field
may affect the TV.
• Do not use a hair dryer or other
equipment near the TV.
• Adjust the antenna direction for
minimum interference. Contact a Sony
dealer for advice.
• Use a highly directional antenna.
• Use the fine tuning (FINE) function.
• Adjust the antenna direction. Contact a
Sony dealer for advice.
• Turn off or disconnect the booster if it is
in use.
• Press SELECT until “COLOR” appears
on the screen, then press + or – to adjust
the color level.
• Press SELECT until “COL SYS” appears
on the screen, then check the color
system setting (usually set this to
“AUTO”).
• Adjust the antenna direction. Contact a
Sony dealer for advice.
• Keep external speakers or other electrical
equipment away from the TV. Do not
move the TV while the TV is turned on.
Press ! (main power) on the TV to turn
off the TV for about five minutes, then
turn it on again.
–
–
–
11
–
–
16
11
–
–
continued
Additional Information
23
Page 24
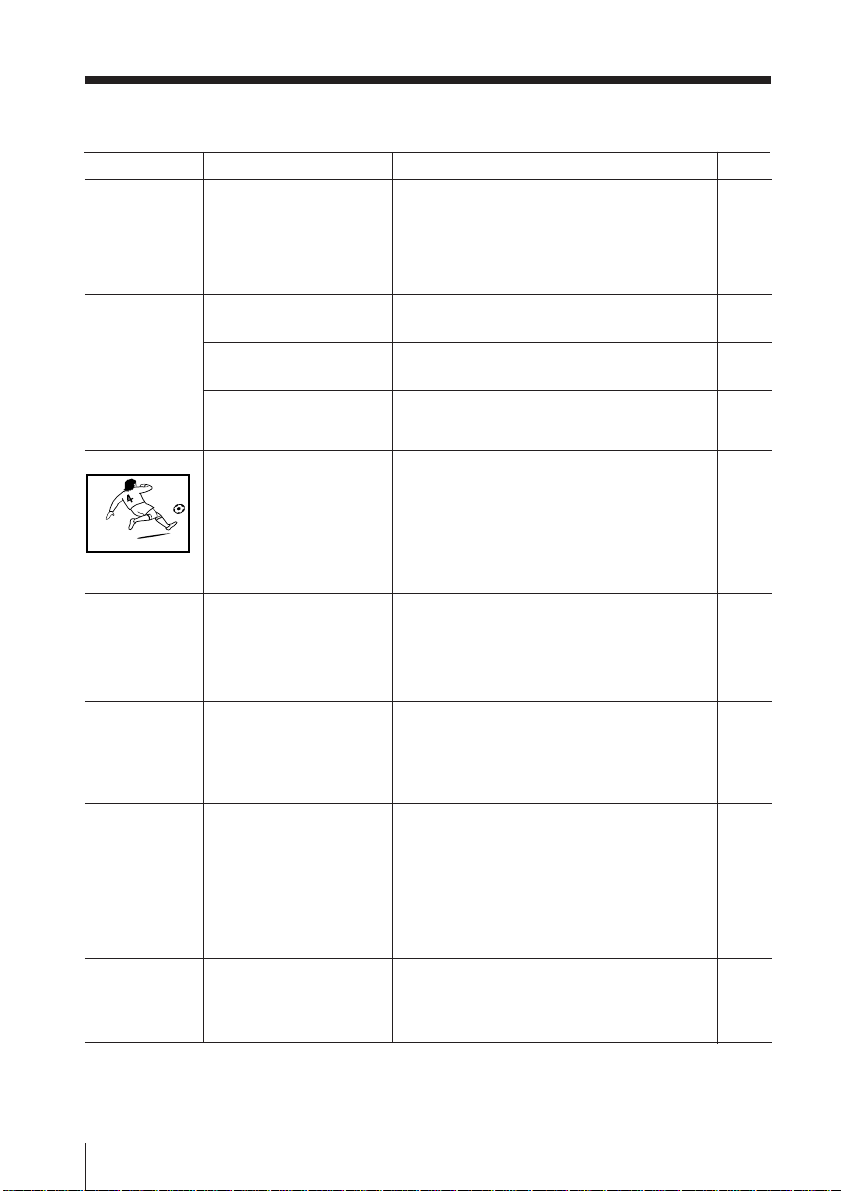
Troubleshooting (continued)
Symptom
“100” appears on
the top of the screen
and there is no
Teletext display.
(KV-XG29M81/
XG25M81 only)
Teletext display is
incomplete (snowy
picture or double
images).
(KV-XG29M81/
XG25M81 only)
Picture slant
Lines moving across
the TV screen.
The 1 indicator on
your TV flashes red
a number of times
between 3-second
intervals.
TV cabinet creaks.
A “boom” sound is
heard when the TV
is turned on.
Possible cause
• The channel carries no
Teletext broadcast.
• Connection is loose or
the cable is damaged.
• The antenna direction
is inappropriate.
• Signal transmission is
too low.
• The magnetic
disturbance from
external speakers or
other equipment, or
the direction of the
earth’s magnetic field
may affect the TV.
• There is interference
from external sources,
e.g.,heavy
machineries, nearby
broadcast station.
• Your TV may need
service.
• Changes in room
temperature
sometimes make the
TV cabinet expand or
contract, making a
noise. This does not
indicate a
malfunction.
•
The TV’s demagnetizing
function is working.
This does not indicate a
malfunction.
Solutions
—
• Check the antenna cable and connection
on the TV, VCR, and at the wall.
• Adjust the antenna direction. Contact a
Sony dealer for advice.
• Try using a booster.
• Use the fine tuning (FINE) function.
• Keep external speakers or other electrical
equipment away from the TV.
• Press SELECT until “PIC ROTATION”
appears on the screen, then press + or –
to align the picture to the TV screen.
• Use the fine tuning (FINE) function.
• Contact your nearest Sony service center.
—
—
—
Page
19
4
–
–
11
–
13
11
21
–
–
Additional Information
24
Page 25
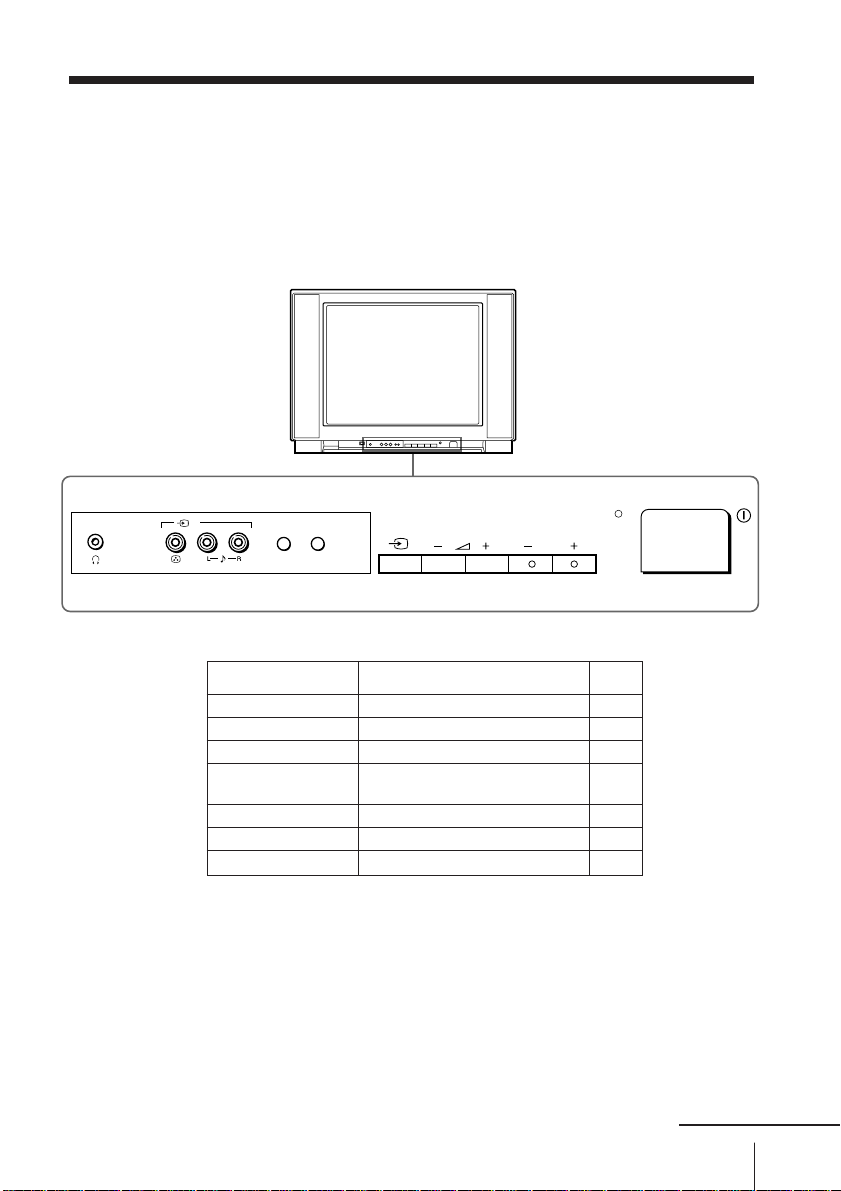
Overview of controls
TV front panel
KV-XG29M81/XG25M81
2
(
)
MONO
AUTO PROGR
SELECT
PROGR +/–
!
2 +/–
t
i
SELECT
Button
AUTO
PROGR
PROGR
PageFunction
Preset channels automatically. 5
Select the desired item. 10
Select program number. 12
Turn off completely or 12
turn on the TV.
Adjust volume. 12
Select TV or video input. 13
Headphone jack. –
continued
Additional Information
25
Page 26
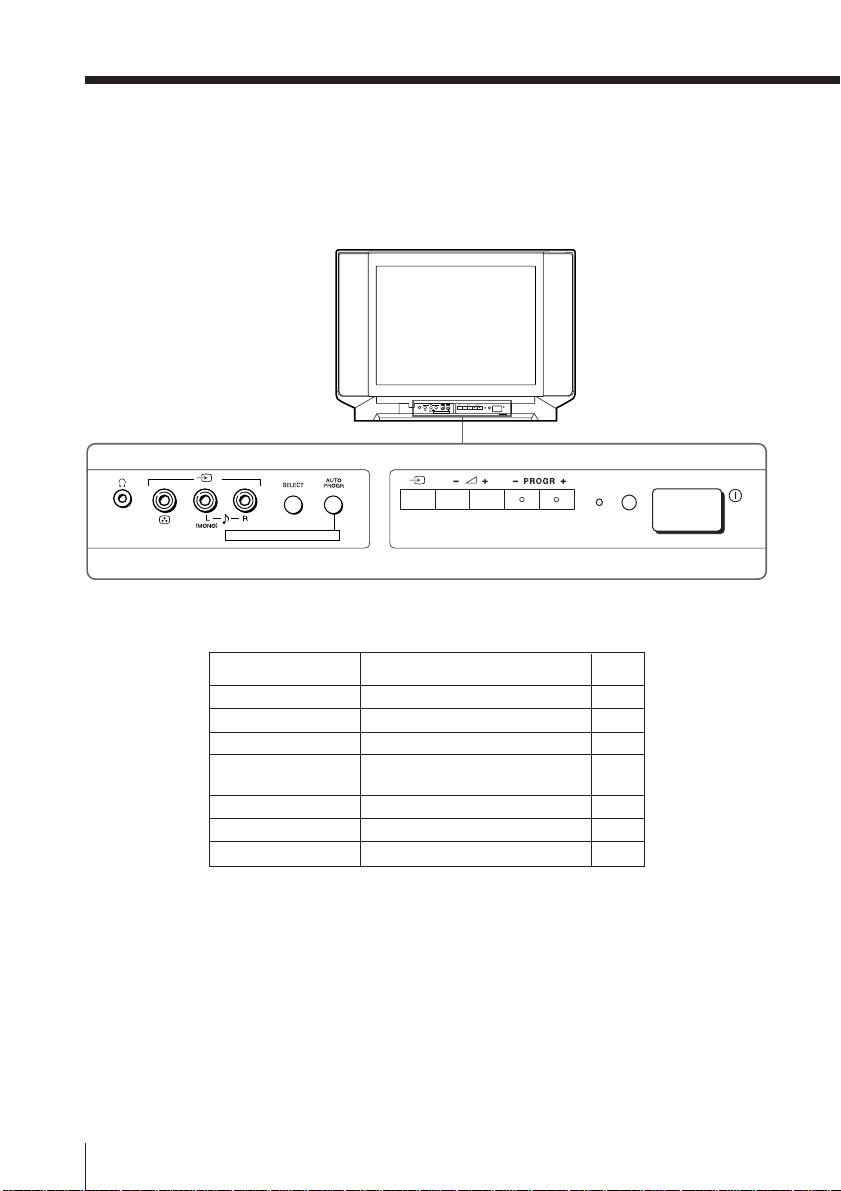
Overview of controls (continued)
KV-XG21M80
2
ONE-PUSH AUTOMATIC PROGRAMMING
ONE-PUSH AUTOMATIC PROGRAMING
Additional Information
26
Button
AUTO PROGR
SELECT
PROGR +/–
!
2 +/–
t
i
PageFunction
Preset channels automatically. 5
Select the desired item. 10
Select program number. 12
Turn off completely or 12
turn on the TV.
Adjust volume. 12
Select TV or video input. 13
Headphone jack. –
Page 27
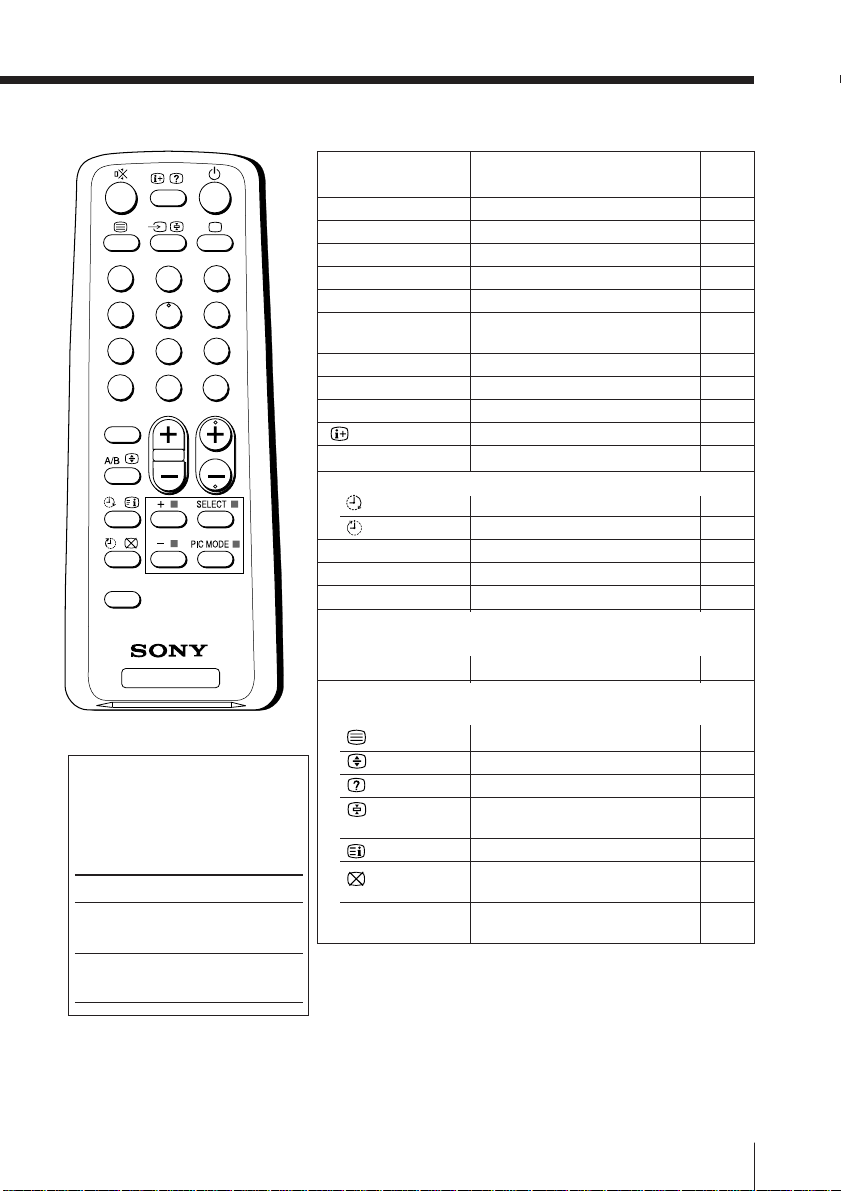
Remote Control
PageButton Function
1
4
7
-
SOUND
MODE
FAVORITE
3
2
6
5
9
8
JUMP
0
2
PROGR
TV
The names/symbols of
buttons on the remote are
indicated in different colors to
represent the available
functions.
Label color
White
Green
Button function
For general TV
operations
For Teletext
operations
SELECT
+/–
PROGR +/–
0 – 9, -
2 +/–
1
t
a
%
JUMP
Select the desired item. 10
Adjust value. 10
Select program number. 12
Input numbers. 12
Adjust volume. 12
Turn off temporarily or 13
turn on the TV.
Select TV or video input. 13
Display the TV program. 13
Mute the sound. 13
Display on-screen information.
Jump to previous channel. 13
Timer operations
Set TV to turn on automatically.
Set TV to turn off automatically.
PIC MODE
SOUND MODE
FAVORITE
Select picture mode. 15
Select sound mode. 15
Display favorite channels. 17
Stereo/bilingual operations
(Not used for KV-XG29M81/XG25M81/XG21M80)
A/B
Select stereo/bilingual mode. –
Teletext operations
(KV-XG29M81/XG25M81 only)
Display Teletext broadcast. 19
Enlarge the Teletext display. 20
Reveal concealed information. 20
Stop Teletext display from 20
scrolling.
Display Teletext service contents.
Show TV screen while 20
waiting for Teletext page.
x (red, green,
yellow, blue)
Access a FASTEXT menu. 20
13
14
14
20
Additional Information
27
Page 28
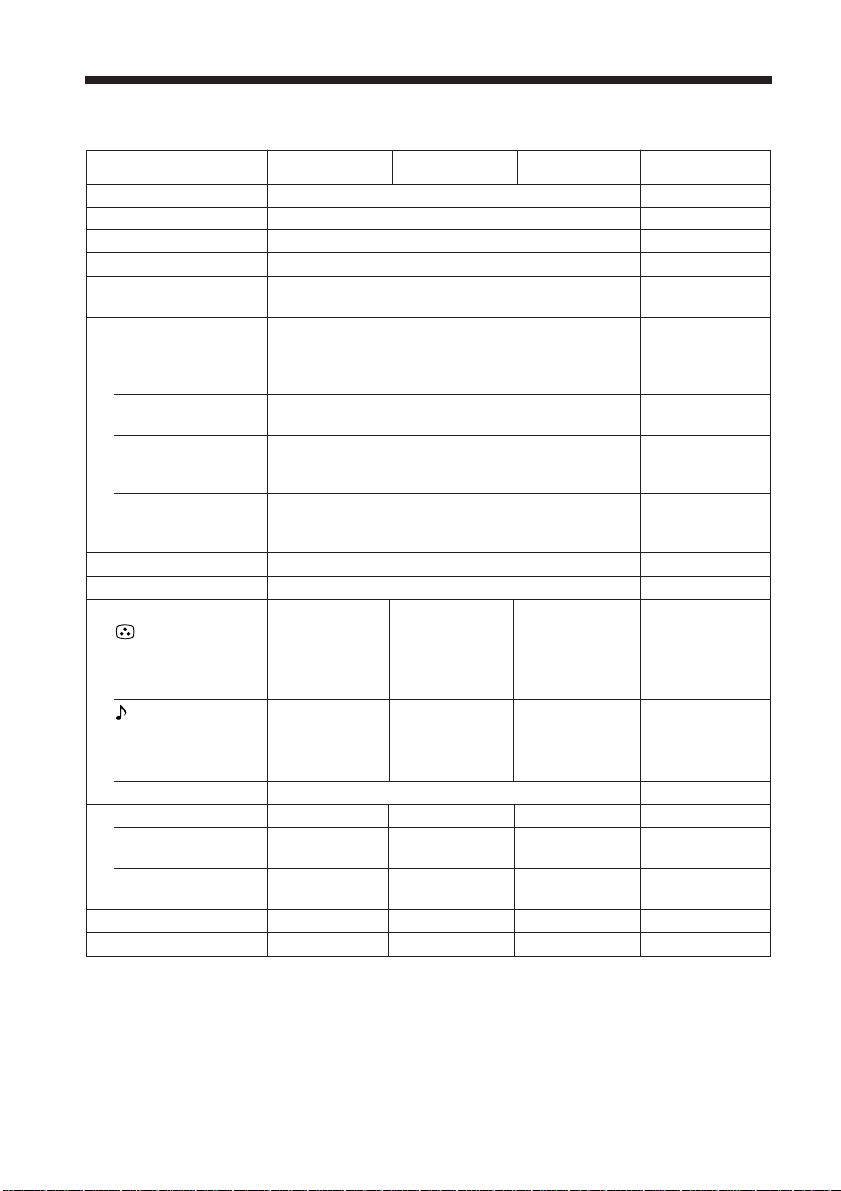
Specifications
KV-XG21M80
Power requirements 110-240 V AC, 50/60 Hz
Power consumption (W) Indicated on the rear of the TV
Television system B/G, I, D/K, M
Color system PAL, PAL 60, SECAM, NTSC4.43, NTSC3.58
Teletext language
Channel coverage
B/G VHF : E2 to E12
I UHF : B21 to B68
D/K
M VHF : A2 to A13
8 (Antenna) 75-ohm external terminal
Audio output 5W + 5W
Number of terminal
(Video) Input: 2 Output: 1 Input: 3* Output: 1 Input: 3* Output: 1 * Two input lines
(Audio) Input: 2 Output: 1 Input: 3* Output: 1 Input: 3* Output: 1 * Two input lines
i (Headphone) Output: 1 Minijack
Picture tube 21 in. 25 in. 29 in.
Tube size (cm) 54 64 72 Measured
Screen size (cm) 51 60 68 Measured
Dimensions (w/h/d, mm) 640 × 456 × 498 722 × 515 × 512 794 × 573 × 517
Mass (kg) 27 39 48
English, Arabic, French KV-XG29M81/
UHF : E21 to E69
CATV : S01 to S03, S1 to S41
CATV : S01 to S03, S1 to S41
VHF : C1 to C12, R1 to R12
UHF : C13 to C57, R21 to R60
CATV : S01 to S03, S1 to S41, Z1 to Z39
UHF : A14 to A79
CATV : A-8 to A-2, A to W+4, W+6 to W+84
KV-XG25M81
KV-XG29M81
XG25M81
available
Phono jacks;
1 Vp-p, 75 ohms
available
Phono jacks;
500 mVrms
diagonally
diagonally
Note
Design and specifications are subject to change without notice.
Sony Corporation
Additional Information
28
 Loading...