

Page 1
3-866-013-11 (1)
Trinitron Color TV
Operating Instructions
• Before operating the unit, please read this manual thoroughly and retain
it for future reference.
Mode D’emploi
• Avant de faire fonctionner cet appareil, lisez attentivement le présent
mode d’emploi et conservez-le pour toute référence ultérieure.
GB
FR
PR
AR
KV-XF21M8J
©1998 by Sony Corporation
Page 2
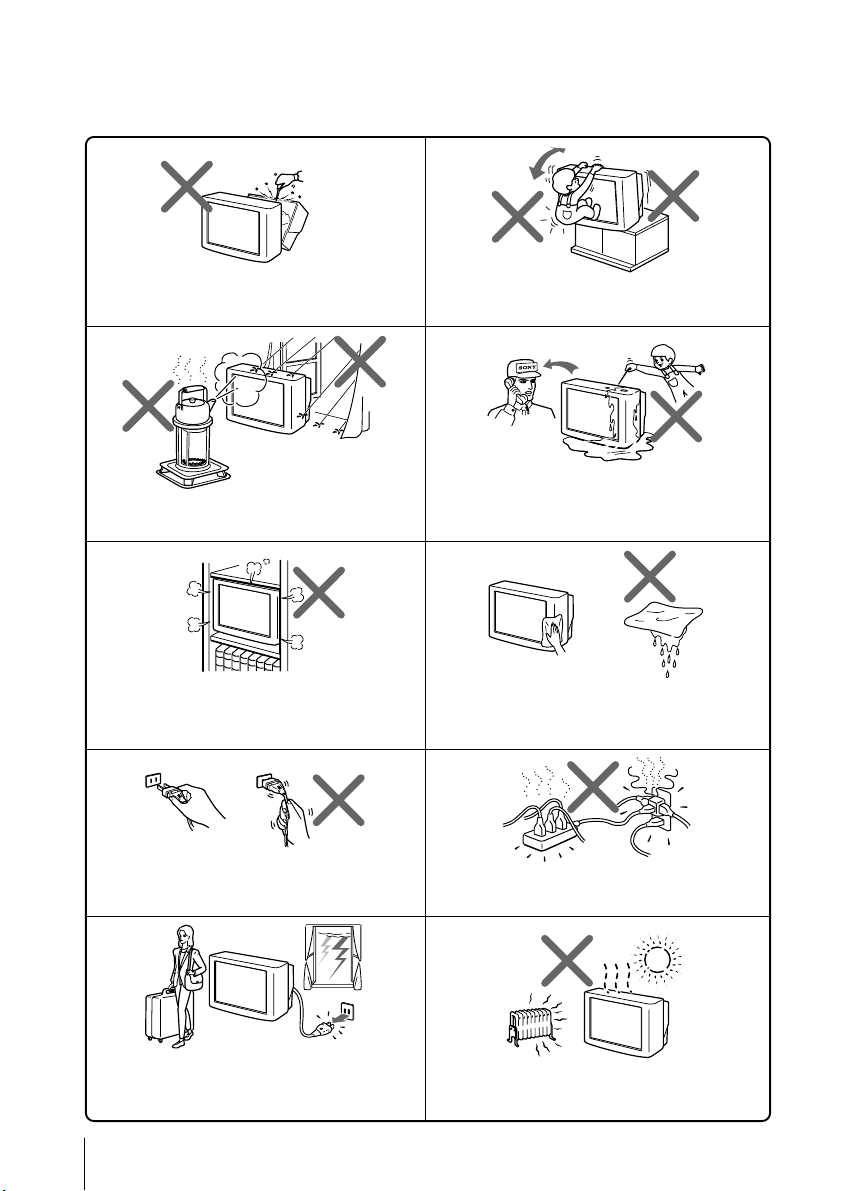
WARNING
• Dangerously high voltages are present inside the TV.
• Operate the TV only between 110 – 240 V AC.
Do not open the cabinet or the rear cover of the
TV. Refer servicing to qualified personnel.
To prevent fire or shock hazard, do not expose
the TV to rain or moisture.
Do not install the TV in a confined space, such
as a bookcase or built-in cabinet.
Do not block the ventilation openings of the TV.
Install the TV in a stable position. Do not allow
children to climb onto it.
Do not operate the TV if any liquid or solid object
falls into it. Have it checked immediately by
qualified personnel only.
Clean the TV with a dry soft cloth.
Do not use benzine, thinner, or any other chemicals
to clean the TV. Do not scratch the picture tube.
Do not pull the power cord to disconnect the TV.
Pull it out by the plug.
Disconnect the power cord during lightning
storms or if you are not going to use the TV for
several days.
2
Do not plug too many appliances into the same
power socket. Do not damage the power cord.
Do not install the TV in hot, humid or excessively
dusty places.
Page 3

Table of Contents
WARNING
Using Your New TV
Getting Started ............................................................................................. 4
Step 1: Connect the antenna .................................................................. 4
Step 2: Insert the batteries into the remote.......................................... 5
Step 3: Preset the channels automatically............................................ 5
Connecting optional components ............................................................. 6
Securing the TV............................................................................................ 7
Presetting channels...................................................................................... 8
Watching the TV ........................................................................................ 11
Using Your New TV
Advanced Operations
Customizing the picture and sound ....................................................... 14
Viewing your favorite channels — FAVORITE CHANNEL ............... 16
Blocking the channels — CHILD LOCK ................................................18
Additional Information
Troubleshooting ......................................................................................... 19
Self-diagnosis function.............................................................................. 22
Identifying parts and controls ................................................................. 23
Specifications.............................................................................. Back cover
The features you will enjoy include:
• FA V ORITE CH for qiuick and easy channel selection (page 16)
• PICTURE MODE/SOUND MODE/SURROUND for customizing your TV (pages 14, 15)
Your TV also offers the following setup features:
• On-screen display language options — English/Arabic (page 12)
• CHILD LOCK for pr eventing childr en from watching certain pr ograms (page 18)
• INTELLIGENT VOL for automatic volume adjustment (page 12)
GB
3
Page 4
Using Your New TV
Getting Started
Step 1
Connect the antenna
If you wish to connect a VCR, see the “Connecting a VCR” diagram below.
Rod antenna and cable
(supplied)
Rear of TV
IEC connector
(not supplied)
Antenna cable
(not supplied)
or
Note
• You are advised to use an outdoor antenna for better reception.
Connecting a VCR
To play a video tape, press … (see page 12).
Antenna cable (not supplied)
To antenna
output
AUDIO
VIDEO IN
VIDEO OUT
To video and
audio outputs
VCR
VIDEO
Audio/Video cable
(not supplied)
or
: Signal flow
Rear of TV
To ˘
(antenna)
L(MONO)
1
To … 1
(video input)
: Signal flow
(yellow)
-L (MONO) (white)
-R (red)
4
Using Your New TV
Page 5
Notes
• If you connect a monaural VCR, connect the yellow plug to (the yellow
jack) and the black plug to -L (MONO) (the white jack).
• If you connect a VCR to the ˘ (antenna) terminal, preset the signal output
from the VCR to the program number 0 on the TV.
• When no signal is input to the connected video equipment, the TV screen
becomes blue.
CAUTION
Do not connect the power cord until all other connections are complete;
otherwise, a minimal current leakage through the antenna and/or other terminals
to the ground could occur.
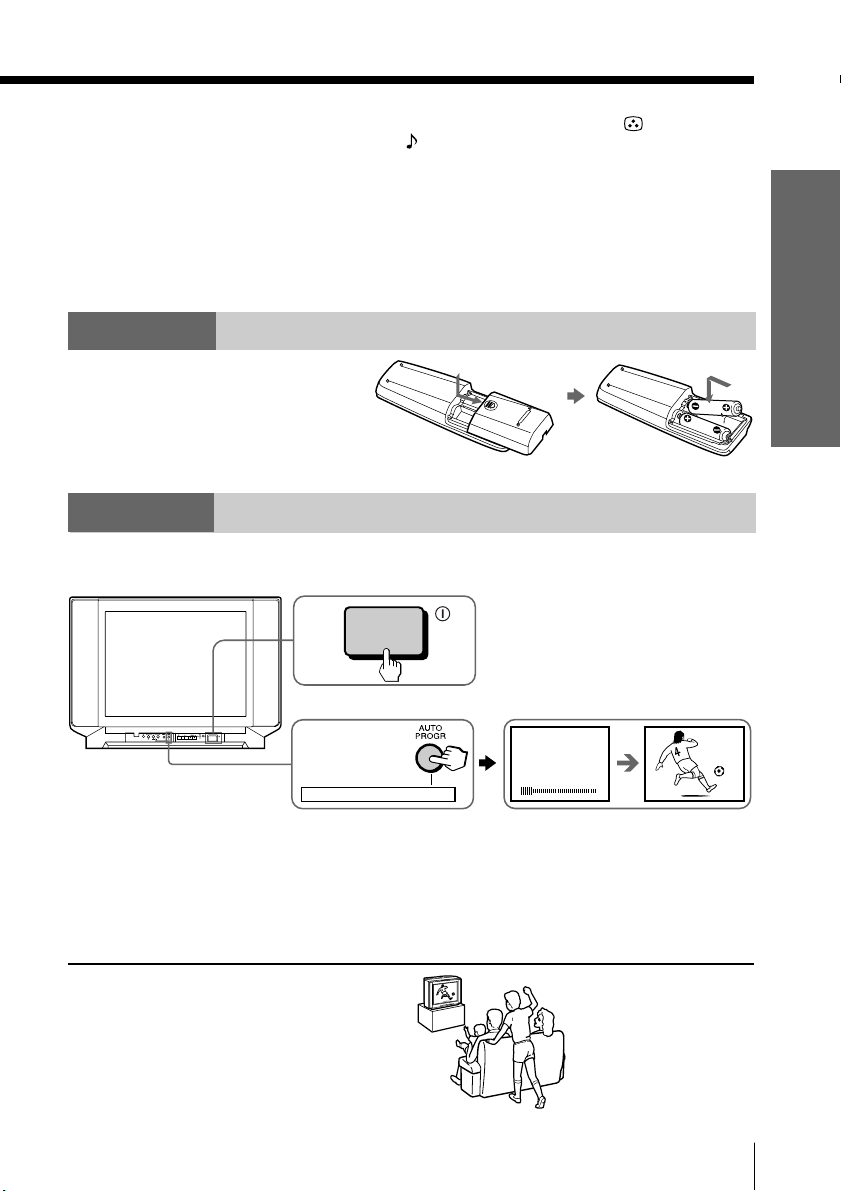
Step 2
Insert the batteries
into the remote
Note
• Do not use old batteries or different types of batteries together.
Step 3
Preset the channels automatically
Front of TV
1
Using Your New TV
ONE-PUSH AUTOMATIC PROGRAMING
Tips
• If you want to stop automatic channel presetting, press SELECT twice.
• If an unwanted channel has been preset or you cannot preset a particular
channel, preset your TV manually (see page 9).
Note
• During automatic channel presetting, the TV screen displays either B/G, I, D/
K, or M, depending on the setting of program number “1” (see page 8).
Now You Are Ready. . .
To watch the TV, see page 11.
2
ONE-PUSH AUTOMATIC PROGRAMMING
VHF
1
B/G
LOW
Using Your New TV
1
5
Page 6
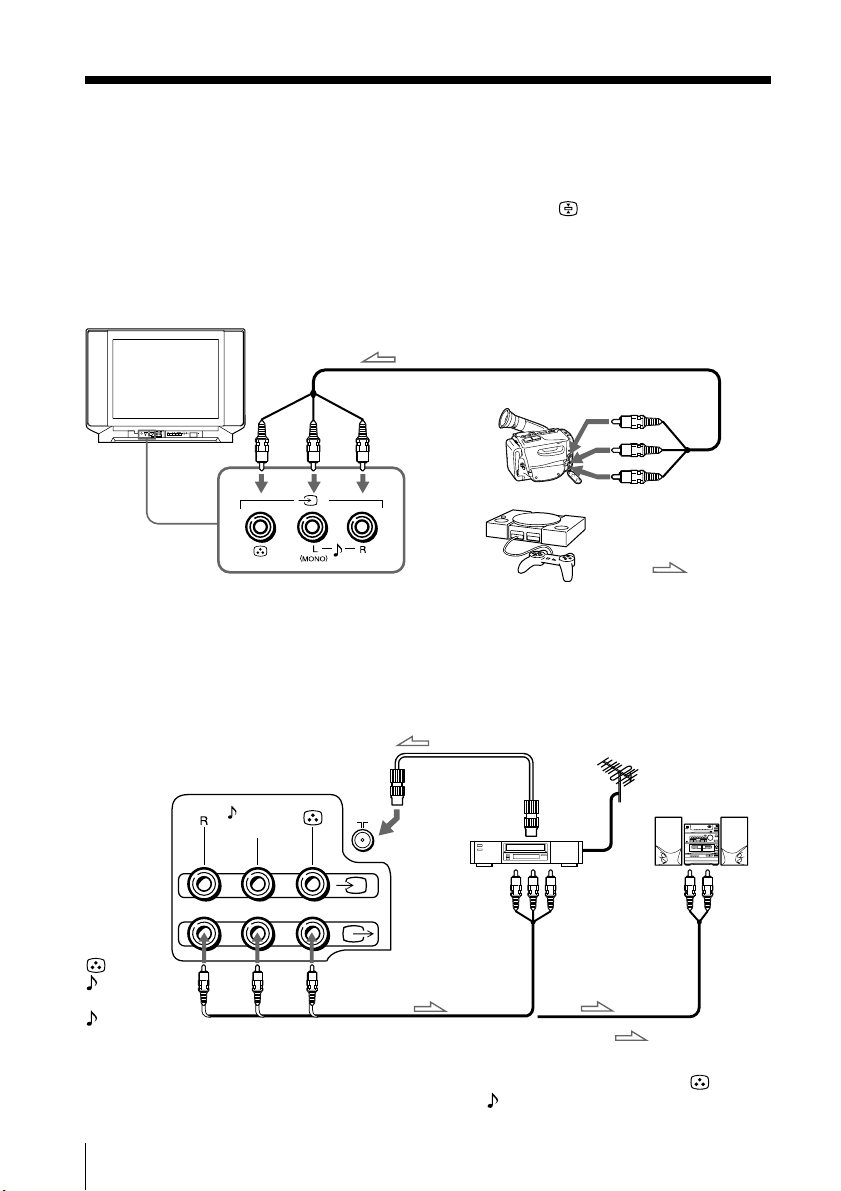
Connecting optional components
You can connect optional audio/video components, such as a VCR, multi disc player,
camcorder, video game or stereo system.
To watch the picture of the connected equipment, press …
Connecting a camcorder/video game equipment
using the … (video input) jacks
Front of TV
Audio/Video cable (not supplied)
To… 2
(video input)
ONE-PUSH AUTOMATIC PROGRAMING
Camcorder
(see page 12).
To video and
audio outputs
2
Note
• You can also connect video equipment to the … 1 (video input) jacks at
the rear of your TV.
or
Video game
equipment
Connecting audio/video equipment using the Ú
(monitor output) jacks
Antenna cable (not supplied)
Rear of TV
L(MONO)
VCR
1
To
antenna
output
To video and
audio inputs
or
or
(yellow)
-L (MONO)
(white)
-R (red)
Note
• When connecting a monaural VCR, connect the yellow plug to (the
yellow jack) and the black plug to -L (MONO) (the white jack).
To Ú
(monitor
output)
Audio/Video cable
(not supplied)
:Signal flow
Audio system
To
audio
inputs
:Signal flow
6
Using Your New TV
Page 7
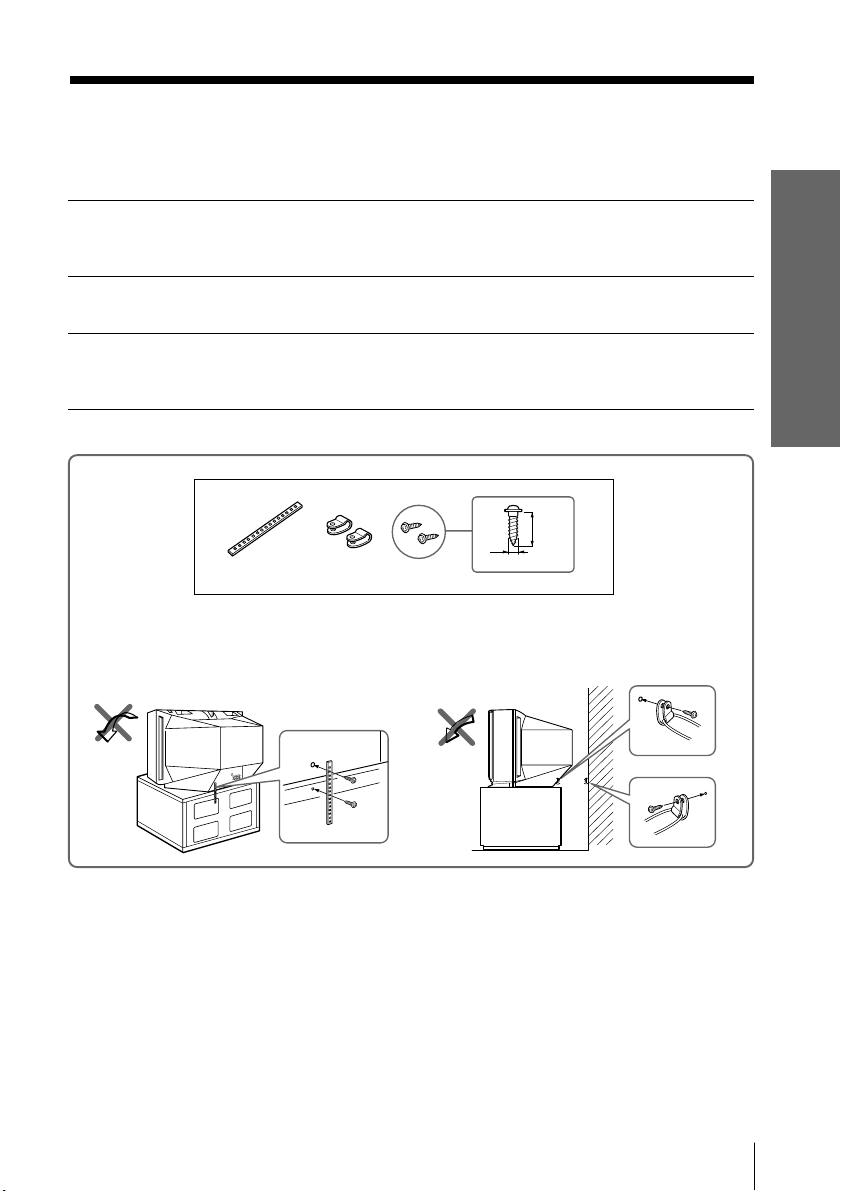
Securing the TV
To prevent the TV from falling, secure the TV using one of the following methods:
With the supplied screws, attach the stabilizer band to the TV stand and to
A
the rear of the TV using the provided hole.
or
Pass a cord or chain through the clamps and secure them to the rear of the
B
TV and a wall or pillar.
20
mm
3.8mm
A
B
Using Your New TV
or
Note
• Use only the supplied screws. Use of other screws may damage the TV.
Using Your New TV
7
Page 8

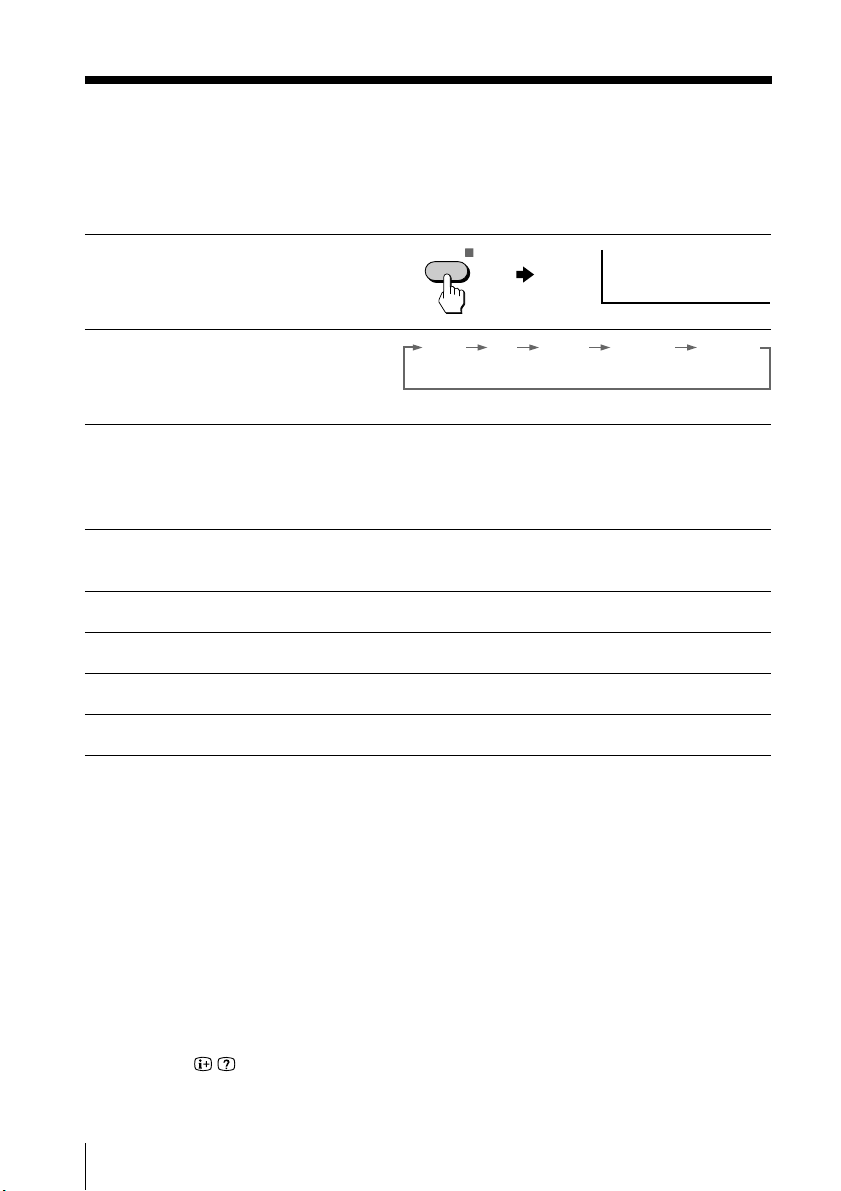
Presetting channels
You can preset up to 100 TV channels in
numerical sequence from program
number 1 using the remote and the
buttons on your TV as well.
ONE-PUSH AUTOMATIC PROGRAMING
Presetting channels automatically
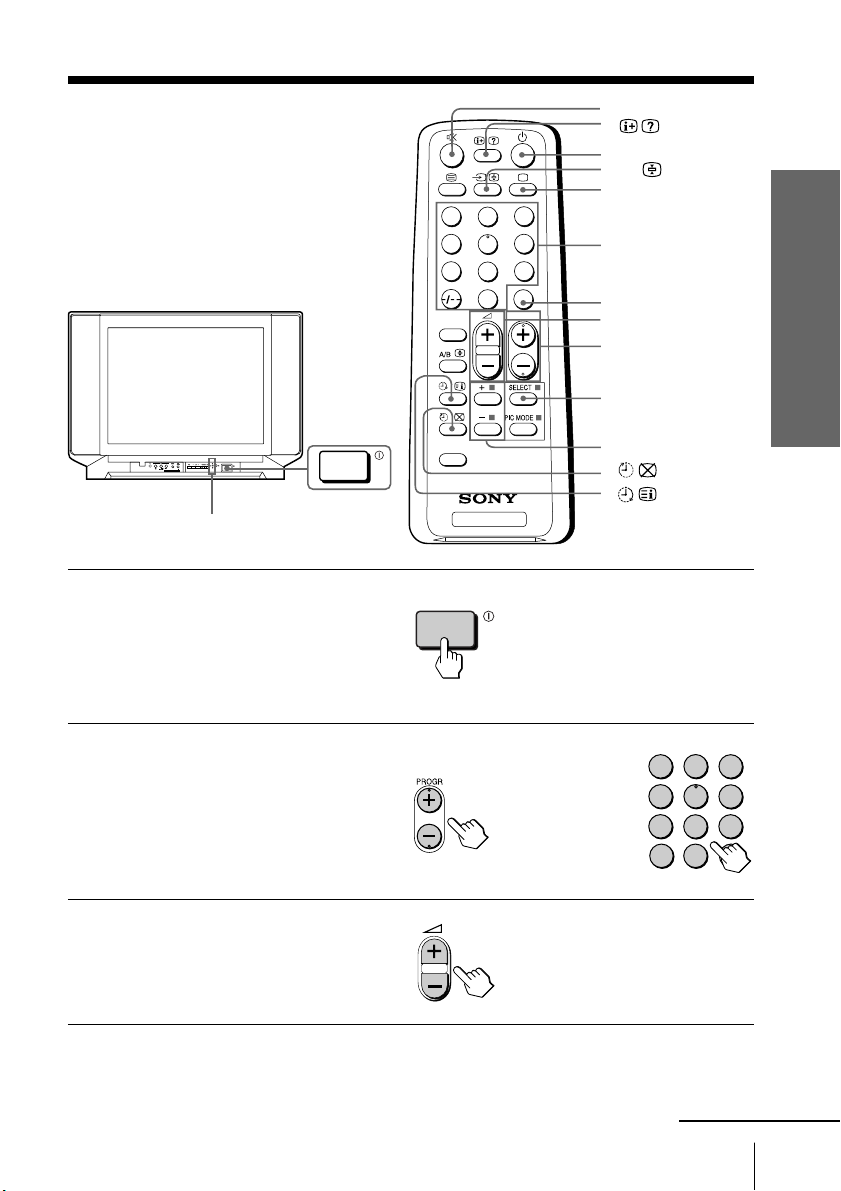
Press U to turn on the TV.
1
Press AUTO PROGR.
2
1
4
7
SOUND
MODE
FAVORITE
TV
u
3
2
6
5
9
8
JUMP
0
PROGR
Number buttons
. +/–
PROGR +/–
SELECT
PIC MODE
+ or –
VHF
LOW
B/G
Note
• During automatic channel presetting, the TV screen displays either B/G, I,
D/K, or M, depending on the setting of program number “1.”
To preset channels automatically from a specified program number
(1) Press SELECT until “AUTO PROGRAM” appears.
(2) Press + or –.
The on-screen display will start flashing.
(3) Press PROGR +/– or the number buttons until the desired program number
appears.
(4) Press + or –.
8
Using Your New TV
Page 9

Presetting channels manually
Press SELECT until
1
“MANUAL PROGRAM”
appears.
Press + or –.
2
Press PROGR +/– or the
3
number buttons until the
desired program number
appears.
Press + or – until the
4
desired channel picture
appears.
Press SELECT.
5
SELECT
SELECT
or
MANUAL PROGRAM
VHF
B/G
LOW
1
4
7
-/--
Using Your New TV
2
3
5
6
9
8
0
1
To change the TV system setting
If the picture or sound is poor when receiving programs through the ˘ (antenna)
terminal, do the following.
(1) Press SELECT until “TV SYS” appears.
SELECT
TV SYS: B/G
(2) Press + or – to select the appropriate TV system until the picture or sound quality
is optimal.
I D/K
B/G
M
continued
Using Your New TV
9
Page 10
Presetting channels (continued)
To change the color system setting
If the color is abnormal when receiving programs through the ˘ (antenna) terminal
or the … (video input) jack
Press SELECT until “COL
1
SYS” appears.
Press + or – to select the
2
appropriate color system
until the color is optimal.
Tip
• Normally, set “COL SYS” to “AUTO.”
SELECT
COL SYS : AUTO
AUTO PAL NTSC 3.58SECAM NTSC 4.43
Skipping program numbers
Press PROGR +/– or the number buttons until the unused or unwanted
1
program number appears.
Press SELECT until “MANUAL PROGRAM” appears.
2
Press + or –.
3
Press PIC MODE.
4
Press SELECT.
5
To preset the skipped program number again
Preset the channel automatically or manually.
Tip
• You can also use SELECT and . +/– on the TV to preset channels and
skip program numbers.
To use the fine tuning (FINE) function
The fine tuning (FINE) function may help reduce double images and lines moving
across the TV screen.
(1) Select the program number you want to adjust.
(2) Press SELECT until “MANUAL PROGRAM” appears on the screen.
(3) Press + or – on the remote control once.
(4) Press
(5) Press + or – continuously until the picture quality is optimal.
(6) Press SELECT to return to the normal screen.
to display “FINE” on the screen.
10
Using Your New TV
Page 11
Watching the TV
This section explains functions used
while watching the TV. Most operations
can be done using the remote.
1
4
7
SOUND
MODE
¤
u
…
;
3
2
6
5
9
8
JUMP
0
PROGR
Number buttons
JUMP
. +/–
PROGR +/–
SELECT
Using Your New TV
ONE-PUSH AUTOMATIC PROGRAMING
u (standby) indicator
Press U to turn on the TV.
1
When the TV is in the
standby mode (the u
indicator on the TV is lit
red), press u on the
remote.
Press PROGR +/– or the
2
number buttons to select
the TV program.
For double digit numbers,
press ÷, then the number
(e.g., for 25, press ÷, then
2 and 5).
Press . +/– to adjust the
3
volume.
FAVORITE
TV
or
+ or –
-/--
2
1
4
7
3
5
6
9
8
0
continued
Using Your New TV
11
Page 12
Watching the TV (continued)
Additional tasks
To
Turn off temporarily
Turn off completely
Mute the sound
Watch the video input
(VCR, camcorder, etc.)
Jump back to the previous channel
Display the on-screen information*
Adjust the volume of each TV
program automatically
* The picture, sound, and either the program number or video mode are
displayed. The on-screen display for the picture and sound information
disappears after about 3 seconds.
Press
u. The u indicator on the TV lights up red.
U on the TV.
¤.
… (or … on the TV) to select “VIDEO 1” or
“VIDEO 2.”
To return to the TV program, press ;.
JUMP.
.
SELECT repeatedly until “INTELLIGENT VOL”
appears, then press + or – to select “ON.”
To cancel, select “OFF.”
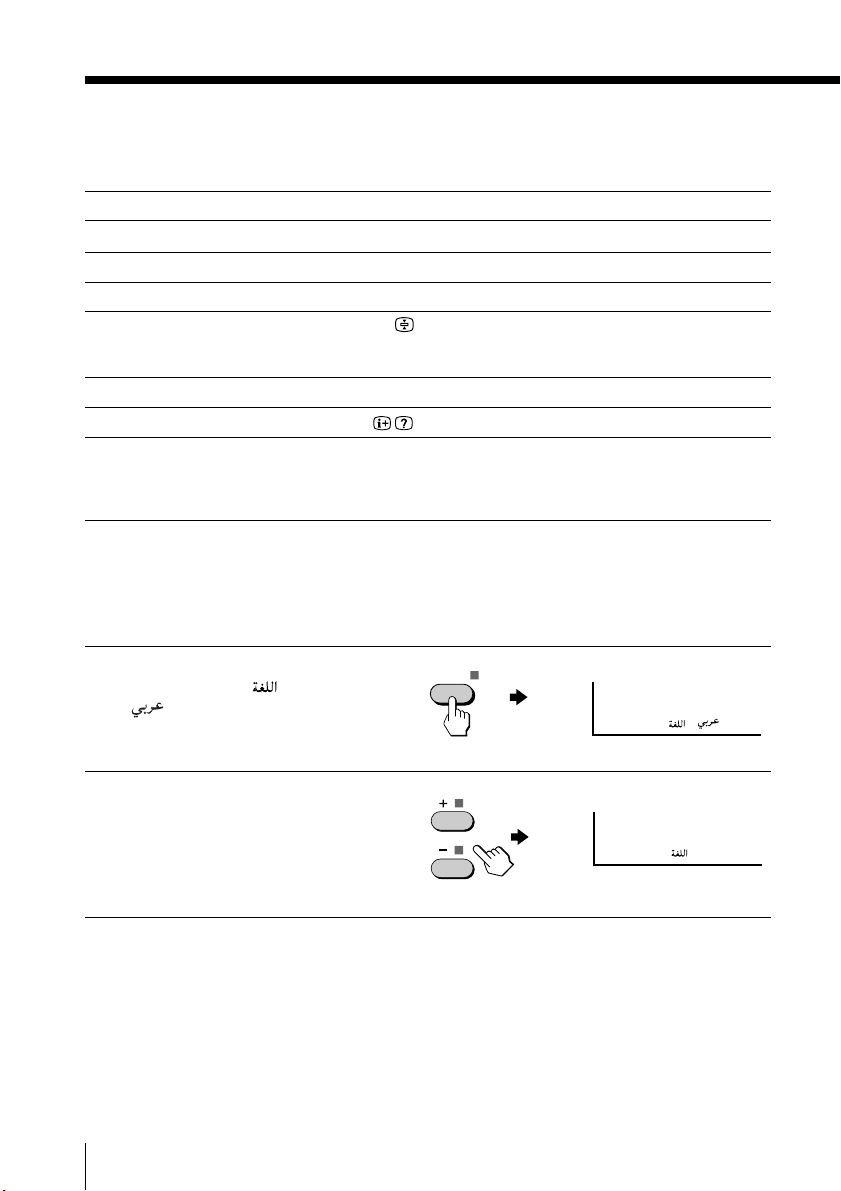
Changing the on-screen display language
Press SELECT until
1
“LANGUAGE / :
” appears on the
screen.
SELECT
LANGUAGE / :
Press + or – to select
2
“ ENGLISH “.
12
Using Your New TV
LANGUAGE / : ENGLISH
Tip
• You can also use SELECT and . +/– on the TV to select the on-screen
display language.
Page 13

Setting the Wake Up timer
Press until the
1
desired period of time
appears.
Select the TV program or
2
video mode you want to
wake up to.
Press u or set the Sleep
3
timer if you want the TV
to turn off automatically.
The
indicator on the TV
lights up orange.
To cancel the Wake Up timer
Press until “WAKE UP TIMER: OFF” appears, or turn off the
TV’s main power.
Notes
• The Wake Up timer starts immediately after the on-screen display
disappears.
• If no buttons or controls are pressed for more than two hours after the TV
is turned on using the Wake Up timer, the TV automatically goes into
standby mode. To resume watching the TV, press any button or control on
the TV or the remote.
WAKE UP TIMER:10M
After 10 minutes
WAKE UP TIMER:OFF
No Wake Up timer After 12 hours
WAKE UP TIMER:12H00M
Using Your New TV
Setting the Sleep timer
Press until the
desired period of time
appears.
To cancel the Sleep timer
Press until “SLEEP TIMER: OFF” appears, or turn the TV off.
SLEEP TIMER:30M SLEEP TIMER:60M
After 30 minutes
SLEEP TIMER:OFF SLEEP TIMER:90M
No Sleep Timer
After 60 minutes
After 90 minutes
Using Your New TV
13
Page 14
Advanced Operations
STANDARDDYNAMIC SOFT
PIC MODE
DYNAMIC
DRAMA SOFT
SOUND
MODE
Customizing the
picture and sound
Y ou can customize the pictur e and
sound by selecting the pictur e and
sound modes or by adjusting its
settings.
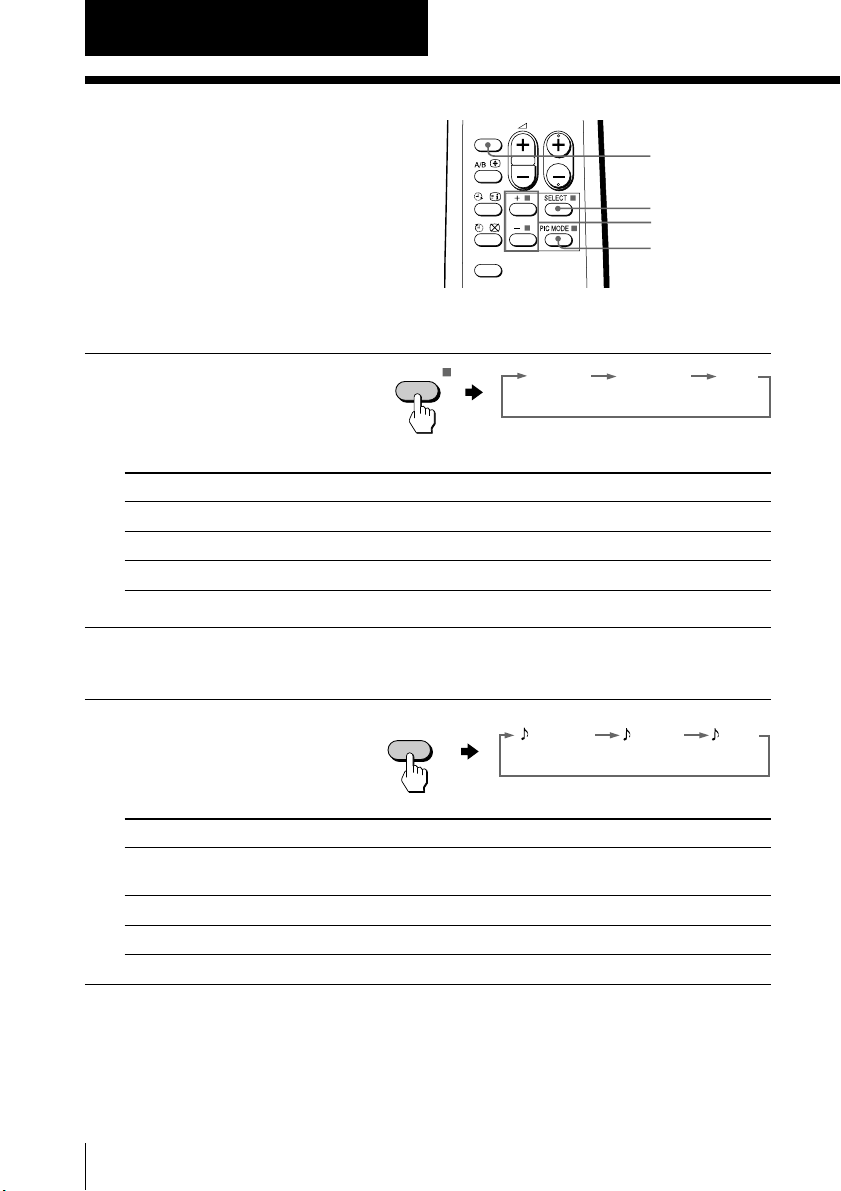
Selecting the picture mode
Press PIC MODE
repeatedly until you get
the desired picture mode.
Select To
DYNAMIC receive high contrast pictures.
STANDARD receive normal contrast pictures.
SOFT receive mild contrast pictures.
Selecting the sound mode
SOUND
MODE
FAVORITE
PROGR
SOUND MODE
SELECT
+ or –
PIC MODE
Press SOUND MODE
repeatedly until you get
the desired sound mode.
Select To
DYNAMIC listen to dynamic and clear sound that emphasizes the low and
DRAMA listen to sound that emphasizes voice and background music.
SOFT receive soft sound.
14
Advanced Operations
high sound.
Page 15
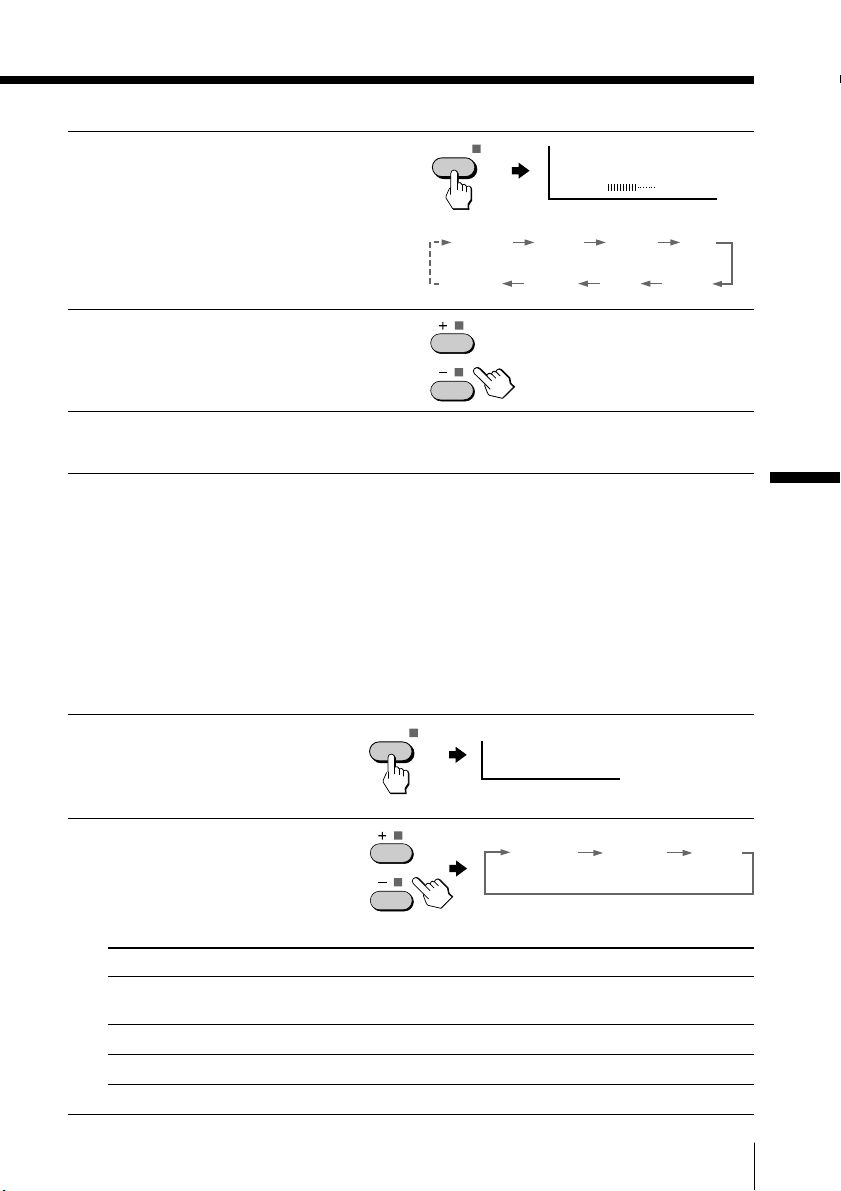
Adjusting the picture and sound settings
Press SELECT until the
1
desired setting appears.
SELECT
PICTURE 60
Each time you pr ess
SELECT, the setting
items change as follows:
Press + or – to adjust the
2
item.
To adjust other items,
3
repeat steps 1 and 2.
* “HUE” can be adjusted for the NTSC systems only.
Note
• When you select a picture or sound mode, the adjusted settings will be
reset according to the selected mode.
Tip
• You can also use SELECT and ¸ +/– on the TV to adjust the sound and
picture settings.
Selecting the surround mode
Press SELECT repeatedly
1
until “SURROUND”
appears.
SELECT
PICTURE
BALANCE SHARP
COLOR
TREBLE BASS
SURROUND: MOVIE
BRIGHT HUE*
Advanced Operations
Press + or – to select the
2
desired surround sound.
Select To
MOVIE listen to the sound that spreads out over a large area, giving the
MUSIC listen to the sound that gives the feeling of being at a live concert.
OFF turn off the surround sound.
feeling of being at a movie theatre.
MUSICMOVIE OFF
Advanced Operations
15
Page 16

Viewing your
favorite channels
—FAVORITE CHANNEL
Y ou can display six of your favorite
channels for quick and easy selection.
Y ou can change the favorite channel
setting as well.
Selecting a favorite channel
Press FAVORITE.
1
FAVORITE
1
4
7
SOUND
MODE
FAVORITE
TV
3
2
6
5
9
8
JUMP
0
PROGR
Number
buttons
PROGR +/–
+ or –
FAVORITE
Press one of the number
2
buttons to select the
desired channel.
When you use the
F AVORITE CH featur e for
the first time, six pr eset
channels will appear .
16
Advanced Operations
2
1
4
3
5
6
1
Page 17

Changing the favorite channel setting
Press SELECT until
1
“FAVORITE CH SET UP”
appears.
Press + or – to select the
2
favorite channel you want
to change (e.g., 3 PR03).
SELECT
Press PROGR +/–, or
3
number buttons to
change the program
number.
Repeat steps 2 and 3 to
4
set other favorite
channels.
Press SELECT.
5
or
1
4
7
-/--
2
3
5
6
9
8
0
Advanced Operations
17
Page 18

Blocking the channels
—CHILD LOCK
Y ou can pr event childr en fr om watching
certain pr ograms by using the buttons
on the r emote contr ol.
1
4
7
SOUND
MODE
3
2
6
5
9
8
JUMP
0
PROGR
SELECT
Select the TV program
1
you want to lock out.
Press SELECT until “CHILD
2
LOCK” appears on the
screen.
Press + or – to select
3
“ON.”
The
symbol appears on
the screen.
T o unlock the channel,
press + or – to select “OFF .”
The
symbol disappears
from the scr een.
Note
• If you preset a locked channel, that particular channel will be unlocked.
SELECT
FAVORITE
+ or –
TV
CHILD LOCK: OFF
1
CHILD LOCK: ON
18
Advanced Operations
Page 19

Additional Information
Troubleshooting
If you have any pr oblem while viewing your TV , please check the following
troubleshooting guide. If the pr oblem persists, contact your Sony dealer .
Possible causeSymptom
• The connection is loose or
the cable is damaged.
• The channel presetting is
inappropriate or
incomplete.
• The antenna type is
inappropriate.
• The antenna direction
needs adjustment.
• Signal transmission is low.
Snowy picture
Noisy sound
Solutions
•
Check the antenna cable and connection
on the TV, VCR and at the wall. (page 4)
• Press SELECT until “MANUAL
PROGRAM” appears on the screen then
preset the channel again. (page 9)
• Check the antenna type (VHF/UHF).
Contact a Sony dealer for advice.
• Adjust the antenna direction. Contact a
Sony dealer for advice.
• Try using a booster.
Distorted picture
Noisy sound
Good picture
Noisy sound
No picture
No sound
• Turn off or disconnect the booster if it is
in use.
• If the sound of all the channels are
noisy, press AUTO PROGR to preset the
channels again. (page 8)
• If the sound of some channels are noisy,
select the channel, then select the
appropriate TV system. (page 9)
• Check the power cord, antenna and the
VCR connections.
• Press u (power).
• Press U (main power) on the TV to turn
off the TV for about five seconds, then
turn it on again.
• Broadcast signals are too
strong.
• The channel presetting is
inappropriate or
incomplete.
• The TV system setting is
inappropriate.
• The power cord, antenna
or VCR is not connected.
• The TV is not turned on.
Additional Information
continued
19Additional Information
Page 20

Troubleshooting (continued)
Good picture
No sound
Dotted lines or stripes
Double images or
“ghosts”
No color
Abnormal color patches
Solutions
• Press ¸ + to increase the volume level.
• Press ¤ to cancel the muting.
• Do not use a hair dryer or other
equipment near the TV.
• Adjust the antenna direction for
minimum interference. Contact a Sony
dealer for advice.
• Use a highly directional antenna.
• Use the fine tuning (FINE) function.
(page 10)
• Adjust the antenna direction. Contact a
Sony dealer for advice.
• Turn off or disconnect the booster if it is
in use.
• Press SELECT until “COLOR” appears
on the screen, then press + or – to adjust
the color level. (page 15)
•
Press SELECT until “COL SYS ” appears
on the screen, then check the color
system setting (usually set this to
“AUTO”). (page 10).
• Adjust the antenna direction. Contact a
Sony dealer for advice.
• Keep external speakers or other
electrical equipment away from the TV.
Do not move the TV while the TV is
turned on. Press U (main power) on
the TV to turn off the TV for about five
minutes, then turn it on again.
Possible causeSymptom
•
The volume level is too low.
• The sound is muted.
• There is local interference
from cars, neon signs, hair
dryers, power generators,
etc.
• Broadcast signals are
reflected by nearby
mountains or buildings.
• The antenna direction
needs adjustment.
• Use of a booster is
inappropriate.
• The color level setting is
too low.
• The color system setting is
inappropriate.
• The antenna direction
needs adjustment.
• There are magnetic effects
from external speakers or
other electrical equipment
that may affect the TV.
• The direction of the earth’s
magnetic field may affect
the TV.
20
Additional Information
Page 21

Lines moving across the
TV screen.
The u (standby) indicator
on your TV flashes red
once or more in intervals
of 3 seconds.
TV cabinet creaks.
A small “boom” sound is
heard when the TV is
turned on.
Solutions
• Use the fine tuning (FINE) function.
(page 10)
• Contact your nearest Sony service
center. (page 22)
—
—
Possible causeSymptom
• There is interference from
external sources, e.g.,
heavy machinery, or a
nearby broadcast station.
• Your TV may need service.
• Changes in room
temperature sometimes
make the TV cabinet
expand or contract,
causing a noise. This does
not indicate a malfunction.
• The TV’s demagnetizing
function is working. This
does not indicate a
malfunction.
21Additional Information
Page 22

Self-diagnosis function
Your TV is equipped with a self-diagnosis function. If there is a
problem with your TV, the u (standby) indicator flashes red. The
number of times the u indicator flashes indicates the possible
causes.
Front of TV
u (standby) indicator
ONE-PUSH AUTOMATIC PROGRAMING
Check that the u indicator flashes red once or more in intervals of 3
1
seconds.
Count the number of times the u indicator flashes.
2
Press U (main power) to turn off your TV.
3
Inform your nearest Sony service center about the number of times the
4
u indicator flashed.
Be sure to note the model name and serial number located on the rear of
your TV.
22
Additional Information
Page 23

Identifying parts and controls
Refer to the pages indicated in parentheses ( ) for details.
Front panel
ONE-PUSH AUTOMATIC PROGRAMING
2
ONE-PUSH AUTOMATIC PROGRAMING
1 2 (headphones) jack
2 SELECT button (10)
3 AUTO PROGR (program) button (5)
… (TV/video) button (12)
4
5 ¸ +/– (volume) buttons (10)
6 PROGR +/– (program) buttons (11)
7 U (main power) button (11)
continued
23Additional Information
Page 24

Identifying parts and controls (continued)
TV
1
2
3
4
6
7
8
9
0
5
JUMP
SOUND
MODE
FAVORITE
PROGR
Remote Control
9
!º
!¡
!™
1
4
7
SOUND
MODE
3
2
6
5
9
8
JUMP
0
PROGR
!£
!¢
!∞
FAVORITE
TV
1 u (power) button (11)
2 ; (TV) button (12)
3 Number buttons (9)
4 JUMP button (12)
5 PROGR +/– buttons (11)
6 SELECT button (8)
7 PIC MODE button (14)
8 +/– buttons (8)
9
!º ¤ (muting) button (12)
!¡ … (video) button (12)
!™ . +/– (volume) buttons (11)
(display) button (12)
!£ A/B button
Not available on this model.
!¢ Timer setting buttons (13)
(wake up timer)
!∞ FAVORITE button (16)
(sleep timer)
1
2
3
4
5
6
7
8
!¶
!§ SOUND MODE button (14)
!¶ Teletext operation buttons
Not available on this model.
(text) (enlarge)
(reveal) (hold)
(index) (text clear)
p
(FASTEXT: red, green, yellow, blue)
Names/symbols of buttons on the
remote are indicated in different
colors to represent the available
functions.
Label color
White
Green
Button function
For general TV operations
For Teletext operations
!§
24
Additional Information
Page 25

Page 26

AVERTISSEMENT
• Cet appareil fonctionne avec de trés hautes tensions dangereuses.
• Faites uniquement fonctionner ce téléviseur sur une tension comprise entre 110 et
240 V CA.
N’ouvrez pas le châssis ni le panneau arriére du
téléviseur. Confiez-en l’entretien au personnel
qualifié.
Pour prévenir tout risque d’incendie ou
d’électrocution, gardez cet appareil à l’abri de la
pluie et de l’humidité
Installez le téléviseur dans une position stable.
Ne laissez pas les enfants grimper dessus.
Ne faites pas fonctionner le téléviseur si des
liquides ou des solides ont pénétré à l’intérieur.
Faites-le immédiatement contrôler par le personnel
qualifié.
N’installez pas le téléviseur dans un espace confiné
comme une bibliothèque ou un meuble encastré.
Veillez à ne pas obstruer les ouïes de ventilation du
téléviseur.
Pour débrancher le téléviseur, saisissez le cordon
d’alimentation par la fiche. Ne tirez pas sur le
cordon proprement dit.
Débranchez le cordon d’alimentation pendant les orages
accompagnés de foudre ou lorsque vous prévoyez de ne
pas utiliser le téléviseur pendant plusieurs jours.
2
Nettoyez le téléviseur à l’aide d’un chiffon doux et sec.
N’utilisez pas de benzine, de diluant ou tout autre
produit chimique pour nettoyer le téléviseur. Veillez à
ne pas rayer le tube image.
Ne branchez pas trop d’appareils électriques sur la
même prise d’alimentation. Veillez à ne pas
endommager le cordon d’alimentation.
N’installez le téléviseur dans un endroit chaud,
humide ou excessivement poussiéreux.
Page 27

Table des matières
AVERTISSEMENT
Utilisation de votre nouveau téléviseur
Préparation ................................................................................................... 4
1re étape: Raccordement de l’antenne ................................................. 4
2e étape: Installation des piles dans la télécommande...................... 5
3e étape: Présélection des chaînes automatiquement ....................... 5
Raccordement d’appareils en option ........................................................ 6
Fixation du téléviseur ................................................................................. 7
Présélection des chaînes ............................................................................. 8
Regarder la télévision................................................................................ 11
Opérations avancées
Personnalisation des réglages de l’image et du son .............................14
Visualisation de vos chaînes préférées —FAVORITE CHANNEL .....16
Blocage de chaînes —CHILD LOCK ......................................................18
Informations complémentaires
Dépannage .................................................................................................. 19
Fonction d’autodiagnostic ........................................................................ 22
Identification des composants et des commandes................................ 23
Spécifications................................................................Couverture arrière
nouveau téléviseur
Utilisation de votre
FR
Les caractéristiques dont vous pourrez profiter sont les suivantes:
• FAVORITE CH pour une sélection rapide et aisée des canaux (page 16)
• PICTURE MODE/SOUND MODE/SURROUND pour personnaliser votre téléviseur
(page 14, 15)
Votre téléviseur offre également les fonctions d’installation suivantes:
• Options de langue d’affichage des menus — anglais/arabe (page 12)
• “CHILD LOCK” pour empêcher les enfants de regarder certains programmes (page 18)
• “INTELLIGENT VOL” pour un réglage automatique du volume (page 12)
3
Page 28

Utilisation de votre nouveau téléviseur
Préparation
1re étape
Raccordement de l’antenne
Pour raccorder un magnétoscope, reportez-vous au diagramme ci-dessous.
Antenne tige et câble
(fournis)
Arrière du
téléviseur
Connecteur IEC
(non fourni)
Câble d’antenne
(non fourni)
ou
ou
Remarque
• Pour une qualité de réception optimale, nous vous conseillons d’utiliser
une antenne extérieure.
: Sens du signal
Raccordement d’un magnétoscope
Pour reproduire une cassette vidéo, appuyez sur … (voir page 12).
Arrière du
Câble d’antenne (non fourni)
Vers la sortie
d’antenne
VIDEO
AUDIO
VIDEO IN
VIDEO OUT
Vers les sorties
audio et vidéo
4
Utilisation de votre nouveau téléviseur
Magnétoscope
Câble audio/vidéo
(non fourni)
téléviseur
Vers ˘
(antenne)
L(MONO)
1
Vers … 1
(entrée vidéo)
(vidéo)
-L (MONO) (blanc)
-R (rouge)
: Sens du signal
Page 29

Remarques
• Si vous raccordez un magnétoscope monaural, branchez la fiche jaune sur (la
prise jaune) et la fiche noire sur -L (MONO) (la prise blanche).
• Si vous raccordez un magnétoscope sur la borne ˘ (antenne), présélectionnez la
sortie de signal du magnétoscope sur la position de programmation 0 du téléviseur .
• Si aucun signal n’est transmis à l’appareil vidéo raccordé, l’écran du téléviseur
devient bleu.
ATTENTION
Ne branchez pas le cordon d’alimentation avant que tous les autres
reccordements aient été réalisés; un courant de fuite minime risque sinon de
passer via l’antenne et/ou d’autres bornes vers la masse.
2e étape
Installation des piles dans
la télécommande
Remarque
• N’utilisez pas des piles usagées et des piles de type différent en même temps.
3e étape
Présélection des chaînes automatiquement
Avant du téléviseur
1
Utilisation de votre
nouveau téléviseur
ONE-PUSH AUTOMATIC PROGRAMING
Conseils
• Pour annuler la présélection automatique des chaînes, appuyez deux fois sur
SELECT.
• Si votre téléviseur présélectionne une chaîne indésirable ou ne parvient pas à
présélectionner une chaîne spécifique, appliquez la méthode de présélection
manuelle des chaînes (voir page 9).
Remarque
• Durant la présélection automatique des chaînes, l’écran de votre téléviseur affiche
B/G, I, D/K ou M suivant le réglage du numéro de programme “1” (voir page 8).
2
ONE-PUSH AUTOMATIC PROGRAMMING
Vous êtes maintenant prêt...
Pour regarder la télévision,
reportez-vous à la page 11.
1
VHF
B/G
LOW
Utilisation de votre nouveau téléviseur
1
5
Page 30

Raccordement d’appareils en option
Vous pouvez raccorder des appareils audio/vidéo en option comme un
magnétoscope, un lecteur multidisque, un caméscope, une console de jeux vidéo ou
encore une chaîne stéréo.
Pour visionner l’image de l’appareil raccordé, appuyez sur …
Raccordement d’un caméscope/console de jeux
vidéo via les prises … (entrée vidéo)
Avant du téléviseur
Câble audio/vidéo (non fourni)
Vers … 2
(entrée vidéo)
ONE-PUSH AUTOMATIC PROGRAMING
Caméscope
(voir page 12).
Vers les sorties
audio et vidéo
2
Remarque
• Vous pouvez également raccorder un appareil vidéo aux prises
… 1 (entrée vidéo) à l’arrière de votre téléviseur.
ou
Raccordement d’un appareil audio/vidéo via les
prises Ú (sortie moniteur)
Câble d’antenne (non fourni)
Arrière du
téléviseur
L(MONO)
(jaune)
-L (MONO)
(blanc)
-R (rouge)
Remarque
• Pour raccorder un magnétoscope monaural, branchez la fiche jaune sur
(la prise jaune) et la fiche noire sur -L (MONO) (la prise blanche).
6
Utilisation de votre nouveau téléviseur
Magnétoscope
1
Vers Ú
(sortie
moniteur)
Vers la
sortie
d’antenne
Câble audio/vidéo
(non fourni)
Console de jeux vidéo
Chaîne audio
ou
Vers les
entrées audio
et vidéo
ou
: Sens du signal
: Sens du signal
Vers les
entrées
audio
Page 31

Fixation du téléviseur
Pour empêcher le téléviseur de tomber, fixez-le selon l’une des méthodes suivantes :
A l’aide des vis fournies, fixez la sangle de stabilisation sur le support du
A
téléviseur et á l’arriére du téléviseur en la faisant passer par l’orifice prévu á
cet effet.
ou
Faites passer une corde ou une chaíne dans les brides et fixez celles-ci á
B
l’arriére du téléviseur et à un mur ou à un pilier.
20
mm
3,8mm
Utilisation de votre
nouveau téléviseur
A
B
ou
Remarque
• Utilisez uniquement les vis fournies. L’utilisation d’autres vis risque
d’endommager le téléviseur.
Utilisation de votre nouveau téléviseur
7
Page 32

Présélection des
chaînes
u
Vous pouvez présélectionner jusqu’à 100
chaînes de télévision suivant une
séquence numérique à partir du numéro
de programmation 1 en utilisant les
1
4
7
touches la télécommande ou de votre
téléviseur.
ONE-PUSH AUTOMATIC PROGRAMING
SOUND
MODE
FAVORITE
Présélection automatique des chaînes
Appuyez sur la touche U
1
du téléviseur.
Appuyez sur AUTO
2
PROGR.
TV
3
2
6
5
9
8
JUMP
0
PROGR
Touches
numériques
. +/–
PROGR +/–
SELECT
PIC MODE
+ ou –
VHF
LOW
B/G
Remarque
• Durant la présélection automatique des chaînes, l’écran de votre téléviseur
affiche B/G, I, D/K ou M suivant le réglage du numéro de programme “1”.
Pour présélectionner automatiquement des chaînes à partir d’un numéro
de programmation spécifique
(1) Appuyez sur SELECT jusqu’à ce que l’indication “AUTO PROGRAM” apparaisse.
(2) Appuyez sur + ou –.
L’écran de menu se met à clignoter.
(3) Appuyez sur PROGR +/– ou sur les touches numériques jusqu’à ce que le numéro
de programmation voulu apparaisse.
(4) Appuyez sur + ou –.
8
Utilisation de votre nouveau téléviseur
Page 33

Présélection manuelle des chaînes
Appuyez sur SELECT
1
jusqu’à ce que l’indication
“MANUAL PROGRAM”
apparaisse.
Appuyez sur + ou –.
2
Appuyez sur PROGR +/–
3
ou sur les touches
numériques jusqu’à ce
que le numéro de
programmation voulu
apparaisse.
Appuyez sur + ou –
4
jusqu’à ce que l’image de
la chaîne voulue
apparaisse.
Appuyez sur SELECT.
5
SELECT
SELECT
ou
MANUAL PROGRAM
VHF
B/G
LOW
1
4
7
-/--
2
5
8
0
Pour changer le système de télévision
Si l’image ou le son est de qualité médiocre lors de la réception d’émissions via la
borne ˘ (antenne), procédez comme suit.
(1) Appuyez sur SELECT jusqu’à ce que l’indication “TV SYS” apparaise.
SELECT
Utilisation de votre
nouveau téléviseur
3
6
9
1
TV SYS: B/G
(2) Appuyez sur + ou – pour sélectionner le système de télévision approprié jusqu’à
ce que la qualité de l’image ou du son soit optimale.
I D/K
B/G
M
suite page suivante
Utilisation de votre nouveau téléviseur
9
Page 34

Présélection des chaînes (suite)
Pour changer le réglage du système couleur
Si les couleurs sont anormales lors de la réception d’émissions via la borne ˘
(antenne) ou de la príse … (entrée vidéo)
Appuyez sur SELECT jusqu’à
1
ce que l’indication ”COL SYS”
apparaisse.
Appuyez sur + ou – pour
2
sélectionner le système
couleur approprié jusqu’à ce
que les couleurs soient
optimales.
Conseil
• En principe, réglez “COLSYS” sur “AUTO”.
SELECT
COL SYS : AUTO
AUTO PAL NTSC 3.58SECAM NTSC 4.43
Saut de numéros de programmation
Appuyez sur PROGR +/– ou sur les touches numériques jusqu’à ce qu’un
1
numéro de programmation inutilisé ou indésirable apparaisse.
Appuyez sur SELECT jusqu’à ce que l’indication “MANUAL PROGRAM”
2
apparaisse.
Appuyez sur + or –.
3
Appuyez sur PIC MODE.
4
Appuyez sur SELECT.
5
Pour présélectionner à nouveau le numéro de programmation omis
Présélectionnez la chaîne automatiquement ou manuellement.
Pour utiliser la fonction de syntonisation précise (FINE)
La fonction de syntonisation précise (FINE) peut contribuer à réduire les images
fantômes et les lignes qui défilent sur l’écran du téléviseur.
(1) Sélectionnez le numéro de programmation que vous voulez régler.
(2) Appuyez sur SELECT jusqu’à ce que “MANUAL PROGRAM”
apparaisse sur l’écran.
(3) Appuyez une fois sur la touche + ou – de la télécommande.
(4) Appuyez sur
(5) Maintenez la touche + ou – enfoncée jusqu’à ce que la qualité de l’image soit
optimale.
(6) Appuyez sur SELECT pour revenir à l’écran normal.
10
Utilisation de votre nouveau téléviseur
Conseil
• Vous pouvez également utiliser les touches SELECT et ¸ +/– du
téléviseur pour présélectionner des chaînes et omettre des numéros de
programmation.
pour afficher “FINE” sur l’écran.
Page 35

Regarder la
¤
télévision
Cette section présente les fonctions
utilisées pendant que vous regardez la
télévision. La plupart des opérations
peuvent être exécutées au moyen de la
télécommande.
ONE-PUSH AUTOMATIC PROGRAMING
Indicateur u (veille)
Appuyez sur la touche U
1
du téléviseur.
Alors que le téléviseur se trouve
en mode de veille (l’indicateur u
du téléviseur est allumé en
rouge), appuyez sur la touche
u de la télécommande.
1
4
7
SOUND
MODE
FAVORITE
TV
u
…
;
3
2
6
5
9
8
JUMP
0
PROGR
Touches
numériques
JUMP
. +/–
PROGR +/–
SELECT
+ ou –
Utilisation de votre
nouveau téléviseur
Sélectionnez la chaîne de
2
télévision à l’aide des
touches PROGR +/– ou des
touches numériques.
Pour les nombres à deux
chiffres, appuyez sur ÷ et
puis introduisez le numéro
(par ex., pour le canal 25,
appuyez sur ÷ et puis sur 2
et 5).
Appuyez sur . +/– pour
3
régler le volume.
2
1
5
4
ou
Utilisation de votre nouveau téléviseur
7
8
-/--
0
suite page suivante
3
6
9
11
Page 36

Regarder la télévision (suite)
Opérations complémentaires
Pour
Couper temporairement le téléviseur
Couper complètement le téléviseur
Diminuer temporairement le son
Visualiser l’entrée vidéo
(magnétoscope, caméscope, etc.)
Revenir à la chaîne précédente
Afficher les informations à l’écran*
Régler le volume de chaque
programme TV automatiquement
* L’image, le son et le numéro de programmation ou les informations sur le
mode vidéo sont affichés. Les informations sur l’image et le son
disparaissent au bout d’environ 3 secondes.
Appuyez sur
u. L’indicateur u du téléviseur est allumé en rouge.
U sur le téléviseur.
¤.
… (ou … sur le téléviseur) pour sélectionner
“VIDEO 1” ou “VIDEO 2”.
Pour revenir à l’émission télévisée, appuyez sur ;.
JUMP.
.
SELECT plusieurs fois de suite jusqu’à ce que
l’indication “INTELLIGENT VOL” apparaisse, et
appuyez ensuite sur + ou – pour sélectionner “ON”.
Pour annuler, sélectionez “OFF”.
Changement de la langue d’affichage des menus
Appuyez sur SELECT
1
jusqu’à ce que l’indication
“LANGUAGE /
: ”
apparaisse à l’écran.
Appuyez sur + ou – pour
2
sélectionner ”ENGLISH”.
Conseil
• Vous pouvez également utiliser la touche SELECT et . +/– du
téléviseur pour sélectionner la langue d’affichage des menus.
12
Utilisation de votre nouveau téléviseur
SELECT
LANGUAGE / :
LANGUAGE / : ENGLISH
Page 37

Pour régler le programmateur d’éveil
Appuyez sur jusqu’à
1
ce que l’heure voulue
apparaisse.
Sélectionnez la chaîne de
2
télévision ou le mode vidéo
avec lequel vous souhaitez
vous éveiller.
Appuyez sur u ou réglez le
3
programmateur d’extinction
si vous voulez que le
téléviseur s’arrête
automatiquement.
L’indicateur du téléviseur
s’allume en orange.
Pour annuler le programmateur d’éveil
Appuyez sur jusqu’à ce que l’indication “WAKE UP TIMER:
OFF” apparaisse ou déclenchez l’interrupteur d’alimentation
principal du téléviseur.
Remarques
• Le programmateur d’éveil démarre immédiatement après que l’affichage à
l’écran a disparu.
• Si aucune touche ou commande du téléviseur n’est actionnée pendant au
moins deux heures après qu’il a été mis sous tension à l’aide du
programmateur d’éveil, le téléviseur passe automatiquement en mode de
veille. Pour regarder à nouveau la télévision, appuyez sur une touche ou
une commande du téléviseur ou de la télécommande.
WAKE UP TIMER:10M
Après 10 minutes
WAKE UP TIMER:OFF
Pas de programmateur
d'éveil
WAKE UP TIMER:12H00M
Après 12 heures
Utilisation de votre
nouveau téléviseur
Pour régler le programmateur d’extinction
Appuyez sur jusqu’à
ce que la durée voulue
apparaisse.
Pour annuler le programmateur d’extinction
Appuyez sur jusqu’à ce que l’indication “SLEEP TIMER:
OFF” apparaisse ou mettez le téléviseur hors tension.
SLEEP TIMER:30M SLEEP TIMER:60M
Après 30 minutes
SLEEP TIMER:OFF SLEEP TIMER:90M
Pas de programmateur
d'extinction
Utilisation de votre nouveau téléviseur
Après 60 minutes
Après 90 minutes
13
Page 38

Opérations avancées
DYNAMIC
DRAMA SOFT
SOUND
MODE
Personnalisation
SOUND
MODE
PROGR
des réglages de
l’image et du son
Vous pouvez personnaliser les réglages
de l’image et du son en sélectionnant les
modes d’image et de son ou en réglant
leurs paramètres.
Sélection du mode d’image
Appuyez plusieurs fois de
suite sur PIC MODE jusqu’à
ce que vous obteniez le
mode d’image voulu.
Sélectionnez Pour
DYNAMIC recevoir des images fortement contrastées.
STANDARD recevoir des images normalement contrastées.
SOFT recevoir des images aux contours adoucis.
PIC MODE
FAVORITE
TV
SOUND MODE
SELECT
+ ou –
PIC MODE
STANDARDDYNAMIC SOFT
Sélection du mode de son
Appuyez plusieurs fois de
suite sur SOUND MODE
jusqu’à ce que vous
obteniez le mode de son
voulu.
Sélectionnez Pour
DYNAMIC écouter un son clair et dynamique qui souligne les basses et les
DRAMA écouter le son qui souligne la partie vocale et la musique de
SOFT recevoir un son adouci.
14 Opérations avancées
tonalités aiguës.
fond.
Page 39

Réglages des paramètres de l’image et du son
Appuyez sur SELECT
1
jusqu’à ce que l’image de
la chaîne voulue
apparaisse.
Chaque fois que vous
appuyez sur SELECT, le
paramètre de réglage
change selon la séquence
suivante:
Appuyez sur + ou – pour
2
régler le paramètre.
Pour régler d’autres
3
paramètres, répétez les
étapes 1 et 2.
* “HUE” peut uniquement être réglé pour le système NTSC.
Remarque
• Si vous sélectionnez un mode d’image ou de son, les paramètres réglés
sont réinitialisés en fonction du mode sélectionné.
Conceil
• Vous pouvez également utiliser les touches SELECT et ¸ +/– du téléviseur
pour ajuster les réglages du son et de l’image.
SELECT
PICTURE 60
PICTURE
BALANCE SHARP
COLOR
TREBLE BASS
BRIGHT HUE*
Opérations avancées
Sélection du mode spatial
Appuyez plusieurs fois de
1
suite sur SELECT jusqu’à
ce que l’indication
“SURROUND” apparaisse.
Appuyez sur + ou – pour
2
sélectionner le mode
spatial voulu.
Sélectionnez Pour
MOVIE écouter un son qui se diffuse dans un vaste champ spatial, donnant ainsi
MUSIC écouter un son monaural créant un effet stéréo.
OFF désactiver le son spatial.
l’impression de se trouver dans une salle de cinéma.
SELECT
SURROUND: MOVIE
MUSICMOVIE OFF
Opérations avancées
15
Page 40

Visualisation de
vos chaînes
préférées
—FAVORITE CHANNEL
Vous pouvez afficher six de vos chaînes
favorites pour une sélection simple et
rapide. Vous pouvez également changer
la sélection des chaînes favorites.
Sélection d’une chaîne favorite
Appuyez sur FAVORITE.
1
Appuyez sur l’une des
2
touches numériques pour
sélectionner la chaîne
voulue.
1
4
FAVORITE
2
5
1
4
7
SOUND
MODE
FAVORITE
3
6
TV
3
2
6
5
9
8
JUMP
0
PROGR
Touches
numériques
PROGR +/–
+ ou –
FAVORITE
1
Lorsque vous utilisez la
fonction FAVORITE CH
pour la première fois, six
chaînes présélectionnées
apparaissent.
16 Opérations avancées
Page 41

Changement des sélections des chaînes favorites
Appuyez sur SELECT
1
jusqu’à ce que l’indication
“FAVORITE CH SET UP”
apparaisse.
Appuyez sur + ou – pour
2
sélectionner la chaîne
favorite que vous voulez
changer (par ex., 3 PR03).
SELECT
Appuyez sur PROGR +/–
3
ou sur les touches
numériques pour changer
le numéro de
programmation.
Répétez les étapes 2 et 3
4
pour sélectionner d’autres
chaînes favorites.
Appuyez sur SELECT.
5
ou
-/--
2
1
4
7
3
5
6
9
8
0
Opérations avancées
17
Page 42

Blocage de
chaînes
—CHILD LOCK
Vous pouvez, à l’aide de la
télécommande, verrouiller certaines
positions de programmation et
empêcher ainsi votre enfant d’y accéder.
1
4
7
SOUND
MODE
3
2
6
5
9
8
JUMP
0
PROGR
SELECT
Sélectionnez la chaîne
1
que vous souhaitez
verrouiller.
Appuyez sur SELECT
2
jusqu’à ce que l’indication
“CHILD LOCK” apparaisse
à l’écran.
Appuyez sur + ou – pour
3
sélectionner “ON”.
Le symbole
apparaît
sur l’écran.
Pour désactiver le blocage
de la chaîne, appuyez sur
+ ou – pour sélectionner
“OFF”.
Le symbole
disparaît de
l’écran.
SELECT
FAVORITE
+ ou –
TV
CHILD LOCK: OFF
1
CHILD LOCK: ON
Remarque
• Si vous présélectionnez un canal verrouillé, ce canal en particulier sera
18 Opérations avancées
déverrouillé.
Page 43

Informations complémentaires
Dépannage
Si vous rencontrez des problèmes dans le cadre de l’utilisation de votr e téléviseur, consultez
le guide de dépannage ci-dessous. Si le problème persiste, consultez votre revendeur Sony.
Cause possibleSymptôme
• La connexion est desserrée
ou le câble est endommagé.
• La présélection des canaux
n’est pas appropriée ou
n’est pas terminée.
• Le type d’antenne ne
convient pas.
• L’orientation de l’antenne
n’est pas appropriée.
• La transmission du signal
est faible.
• Les signaux de diffusion
sont trop puissants.
Image neigeuse
Son parasité
Image distordue
Solutions
•
Vérifiez le câble d’antenne et le
raccordement au téléviseur, au
magnétoscope et à la prise murale. (page 4)
• Appuyez sur SELECT jusqu’à ce que
l’indication “MANUAL PROGRAM”
apparaisse sur l’écran et présélectionnez
ensuite à nouveau la chaîne. (page 9)
•
Vérifiez le type de l’antenne (VHF/UHF).
Demandez conseil à un revendeur Sony.
• Ajustez l’orientation de l’antenne.
Demandez conseil à un revendeur Sony.
• Essayez à l’aide d’un amplificateur.
• Coupez ou désactivez l’amplificateur
s’il est utilisé.
Son parasité
Bonne image
Son parasité
Pas d’image
Pas de son
• Si le son de toutes les chaînes comporte
des parasites, appuyez sur AUTO
PROGR pour présélectionner à nouveau
les chaînes. (page 8)
• Si le son de certaines chaînes comporte
des parasites, sélectionnez la chaîne,
puis sélectionnez le système de
télévision approprié (page 9).
• Vérifiez la connexion du cordon
d’alimentation, de l’antenne et du
magnétoscope.
• Appuyez sur u (alimentation).
• Appuyez sur U (alimentation
principale) du téléviseur pour éteindre
le téléviseur environ cinq secondes, puis
rallumez-le.
• La présélection des canaux
n’est pas appropriée ou
n’est pas terminée.
• Le réglage du système de
télévision n’est pas
approprié.
•
Le cordon d’alimentation,
l’antenne ou le magnétoscope
n’est pas branché.
• Le téléviseur n’est pas sous
tension.
suite page suivante
Informations complémentaires
Informations complémentaires
19
Page 44

Dépannage (suite)
Bonne image
Pas de son
Lignes pointillées ou
zébrures
Images doubles ou
“fantômes”
Pas de couleurs
Solutions
• Appuyez sur ¸ + pour augmenter le
volume du son.
• Appuyez sur ¤ pour annuler la
sourdine.
• N’utilisez pas de sèche-cheveux ou tout
autre équipement à proximité du
téléviseur.
• Réglez l’orientation de l’antenne pour
réduire les interférences au minimum.
Adressez-vous à votre distributeur Sony
pour plus de conseils.
• Utilisez une antenne fortement
directionnelle.
• Utilisez la fonction de syntonisation fine
(FINE). (page 10)
• Réglez l’orientation de l’antenne.
Adressez-vous à votre distributeur Sony
pour plus de conseils.
• Coupez ou désactivez l’amplificateur
s’il est utilisé.
• Appuyez sur SELECT jusqu’à ce que
l’indication “COLOR” apparaisse sur
l’écran et appuyez ensuite sur + ou –
pour ajuster le niveau des couleurs.
(page 15)
• Appuyez sur SELECT jusqu’à ce que
l’indication “COL SYS” apparaisse sur
l’écran et vérifiez ensuite la sélection du
système couleur (en principe, réglez-le
sur “AUTO”). (page 10)
• Réglez l’orientation de l’antenne.
Adressez-vous à votre distributeur
Sony pour plus de conseils.
Cause possibleSymptôme
• Le niveau du volume est
trop bas.
• Le son est mis en sourdine.
• Il y a des interférences
locales dues à des voitures,
des enseignes au néon, un
sèche-cheveux, des
générateurs de courant,
etc.
• Les signaux de diffusion
sont réfléchis par des
montagnes ou des
bâtiments à proximité.
• L’orientation de l’antenne
n’est pas appropriée.
•
L’utilisation d’un
amplificateur ne convient pas.
• Le niveau des couleurs est
réglé trop bas.
• Le réglage du système de
couleur ne convient pas.
• L’orientation de l’antenne
n’est pas appropriée.
20
Informations complémentaires
Page 45

Taches de couleurs
anormales
Des lignes mobiles
apparaissent sur l’écran du
téléviseur.
L’indicateur u (veille) de
votre téléviseur clignote
une ou plusieurs fois en
rouge à des intervalles de
3 secondes.
Le châssis du téléviseur
craque.
Un léger “boom” retentit
lors de
la mise sous
tension du téléviseur.
Solutions
• Eloignez les haut-parleurs externes ou
d’autres appareils électriques du
téléviseur. Ne déplacez pas le téléviseur
lorsque le téléviseur est allumé.
Appuyez sur U (alimentation
principale) du téléviseur pour éteindre
le téléviseur pendant environ cinq
minutes, puis rallumez-le.
• Utilisez la fonction de syntonisation fine
(FINE). (page 10)
• Ajustez l’orientation de l’antenne.
Demandez conseil à un revendeur Sony.
(page 22)
—
—
—
Cause possibleSymptôme
•
Il y a des effets magnétiques
des haut-parleurs externes
ou d’autres appareils
électriques qui pourraient
influencer le téléviseur.
•
La direction du champ
magnétique terrestre risque
d’affecter le téléviseur.
• Présence d’interférences de
sources externes à
proximité, par ex. de
machineries lourdes ou
d’une station de
retransmission.
• Il se peut que votre
téléviseur doive être révisé.
• Les variations de
température ambiante
peuvent entraîner une
dilatation ou une
contraction du châssis du
téléviseur. Il ne s’agit pas
d’un dysfonctionnement.
• La fonction de
démagnétisation du
téléviseur est opérante. Il
ne s’agit pas d’un
dysfonctionnement.
Informations complémentaires
21
Page 46

Informations complémentaires
Fonction d’autodiagnostic
Votre téléviseur est équipé d’une fonction d’autodiagnostic. Si un
problème se pose au niveau de votre téléviseur, l’indicateur
u (veille) se met à clignoter en rouge. Le nombre de fois que
l’indicateur u clignote indique les causes possibles.
Avant du téléviseur
ONE-PUSH AUTOMATIC PROGRAMING
Indicateur u (veille)
Vérifiez si l’indicateur u clignote une ou plusieurs fois en rouge à des
1
intervalles de 3 secondes.
Comptez le nombre de fois que l’indicateur u clignote.
2
Appuyez sur U (alimentation principale) pour mettre le téléviseur hors
3
tension.
Informez le centre de service après-vente Sony le plus proche du nombre de
4
fois que l’indicateur u clignote.
N’oubliez pas de prendre note de la désignation du modèle et du numéro de
série indiqués à l’arrière du téléviseur.
22
Informations complémentaires
Page 47

Identification des composants et des
commandes
Pour plus de détails, reportez-vous aux pages indiquées entre parenthèses ( ).
Panneau frontal
ONE-PUSH AUTOMATIC PROGRAMING
2
ONE-PUSH AUTOMATIC PROGRAMING
1 Prise 2 (casque d’écoute)
2 Touche SELECT (10)
3 Touches AUTO PROGR (programmation) (5)
4 Touche … (téléviseur/vidéo) (12)
5 Touches Á +/– (volume) (10)
6 Touches PROGR +/– (positions de programmation) (11)
7 Touche U (alimentation principale) (11)
suite page suivante
Informations complémentaires
23
Page 48

TV
1
2
3
4
6
7
8
9
0
5
JUMP
SOUND
MODE
FAVORITE
PROGR
Identification des composants et des commandes (suite)
Télécommande
9
!º
!¡
!™
1
4
7
SOUND
MODE
3
2
6
5
9
8
JUMP
0
PROGR
!£
!¢
!∞ 8
FAVORITE
TV
1 Touche u (alimentation) (11)
2 Touche ; (téléviseur) (12)
3 Touches numériques (9)
4 Touche JUMP (12)
5 Touches PROGR +/– (11)
6 Touche SELECT (8)
7 Touche PIC MODE (14)
8 Touches +/– (8)
9 Touche (affichage) (12)
!º Touche ¤ (silence) (12)
!¡ Touche … (vidéo) (12)
!™ Touches . +/– (volume) (11)
!£ Touche A/B
Non disponible sur ce modèle.
!¢ Touches de réglage du
programmateur (13)
(programmateur d’éveil)
(programmateur d’extinction)
!∞ Touche FAVORITE (16)
1
!¶
2
3
4
5
6
7
!§ Touche SOUND MODE (14)
!¶ Touches de commande du
télétexte
Non disponible sur ce modèle.
(texte) (agrandir)
(afficher) (bloquer)
(index) (supprimer le
p (FASTEXT: rouge, verte, jaune,
bleue)
Le nom des touches de la télécommande
est indiqué dans des couleurs différentes
pour représenter les fonctions disponibles.
Couleur
d’identification
Blanc
Vert
texte)
Fonction de la touche
Fonctions générales du
téléviseur
Fonctions du télétexte
!§
24
Informations complémentaires
Page 49

Specifications
KV-XF21M8J
Power requirements 110-240 V AC, 50/60 Hz
Power consumption (W) Indicated on the rear of the TV
Television system B/G, I, D/K, M
Color system PAL, PAL 60, SECAM, NTSC4.43, NTSC3.58
Channel coverage
B/G VHF : E2 to E12
I UHF : B21 to B68
D/K
M VHF : A2 to A13
˘ (Antenna) 75-ohm external terminal
Audio output 5W + 5W
Number of terminal
(Video) Input: 2 Output: 1 Phono jacks; 1 Vp-p, 75 ohms
(Audio) Input: 2 Output: 1 Phono jacks; 500 mVrms
2 (Headphones) Output: 1 Minijack
Picture tube 21 in.
Tube size (cm) 54 Measured
Screen size (cm) 51 Measured
Dimensions (w/h/d, mm) 640 × 456 × 498
Mass (kg) 27
UHF : E21 to E69
CATV : S01 to S03, S1 to S41
CATV : S01 to S03, S1 to S41
VHF : C1 to C12, R1 to R12
UHF : C13 to C57, R21 to R60
CATV : S01 to S03, S1 to S41, Z1 to Z39
UHF : A14 to A79
CATV : A-8 to A-2, A to W+4, W+6 to W+84
Note
diagonally
diagonally
Design and specifications are subject to change without notice.
Sony Corporation Tokyo, Japan
 Loading...