


4-083-177-12 (1)
Trinitron Color TV
Operating Instructions
• Before operating the unit, please read this manual thoroughly and retain
it for future reference.
KV-XA21
© 2001 Sony Corporation
M83
M80

WARNING
• Dangerously high voltages are present inside the TV.
• Operate the TV only between 110 – 240 V AC.
For your own safety, do not touch any part of the
TV, the power cord and the antenna cable during
lightning storms.
To prevent fire or shock hazard, do not expose
the TV to rain or moisture.
Do not block the ventilation openings of the TV.
Do not install the TV in a confined space, such
as a bookcase or built-in cabinet.
Do not place any objects on the TV.
For children’s safety, do not leave children alone
with the TV. Do not allow children to climb onto
it.
Do not operate the TV if any liquid or solid object
falls into it. Have it checked immediately by
qualified personnel only.
Clean the TV with a dry and soft cloth.
Do not use benzine, thinner, or any other chemicals
to clean the TV. Do not scratch the picture tube.
Do not plug in too many appliances to the same
power socket. Do not damage the power cord.
Do not open the cabinet and the rear cover of the
TV as high voltages and other hazards are
present inside the TV. Refer servicing and
disposal of the TV to qualified personnel.
2
Your TV is recommended for home use only.
Do not use the TV in any vehicle or where it may
be subject to excessive dust, heat, moisture or
vibrations.

Table of Contents
Using Your New TV
Getting Started ............................................................................................. 4
Step 1: Connect the antenna ................................................................... 4
Step 2: Insert the batteries into the remote ........................................... 5
Step 3: Preset the channels automatically............................................. 5
Connecting the 3D WOOFER (KV-XA21M83 only) ............................... 6
Connecting optional components ............................................................. 7
Securing the TV ............................................................................................ 8
Presetting channels ...................................................................................... 9
Watching the TV ........................................................................................12
Using Your New TV
Advanced Operations
Customizing the picture and sound ....................................................... 15
Viewing your favorite channels...............................................................17
Blocking the channels (CHILD LOCK) ..................................................18
Additional Information
Self-diagnosis function..............................................................................19
Troubleshooting ......................................................................................... 20
Overview of controls ................................................................................. 23
Specifications .............................................................................. Back cover
WARNING (continued)
Pull the power cord out by the plug. Do not pull
the power cord itself. Even if your TV is turned
Install the TV on a stable TV stand and floor
which can support the TV set weight. Ensure that
the TV stand surface is flat and its area is larger
than the bottom area of the TV.
off, it is still connected to the AC power source
(mains) as long as the power cord is plugged in.
Unplug the TV before moving it or if you are not
going to use it for several days.
GB
3

Using Your New TV
Using Your New TV
Getting Started
Step 1
Connect the antenna
If you wish to connect a VCR, see the Connecting a VCR diagram below.
IEC connector
(not supplied)
or
Antenna cable
(not supplied)
Connecting a VCR
To watch the video input, press t (see page 13).
Rear of TV
: Signal flow
VIDEO OUT
To video and
audio outputs
Using Your New TV
4
Antenna cable (not supplied)
To antenna output
VCR
VIDEO
AUDIO
L
R
VIDEO IN
To t 1 (video input)
Audio/Video cable (not supplied)
Rear of TV
To 8 (antenna)
L(MONO)
R
1
(yellow)
-L (MONO) (white)
-R (red)
: Signal flow
Notes
• If you connect a monaural VCR, connect the yellow plug to (the
yellow jack) and the black plug to -L (MONO) (the white jack).
• If you connect a VCR to the 8 (antenna) terminal, preset the signal
output from the VCR to the program number 0 on the TV.
• When no signal is input from the connected video equipment, the TV
screen becomes blue.
CAUTION
• Do not connect the power cord until you have completed making all other
connections; otherwise a minimum leakage current might flow through
the antenna and other terminals to ground.
• To avoid battery leakage and damage to the remote, remove the batteries
from the remote if you are not going to use it for several days. If any
liquid that leaks from the batteries touches you, immediately wash it
away with water.
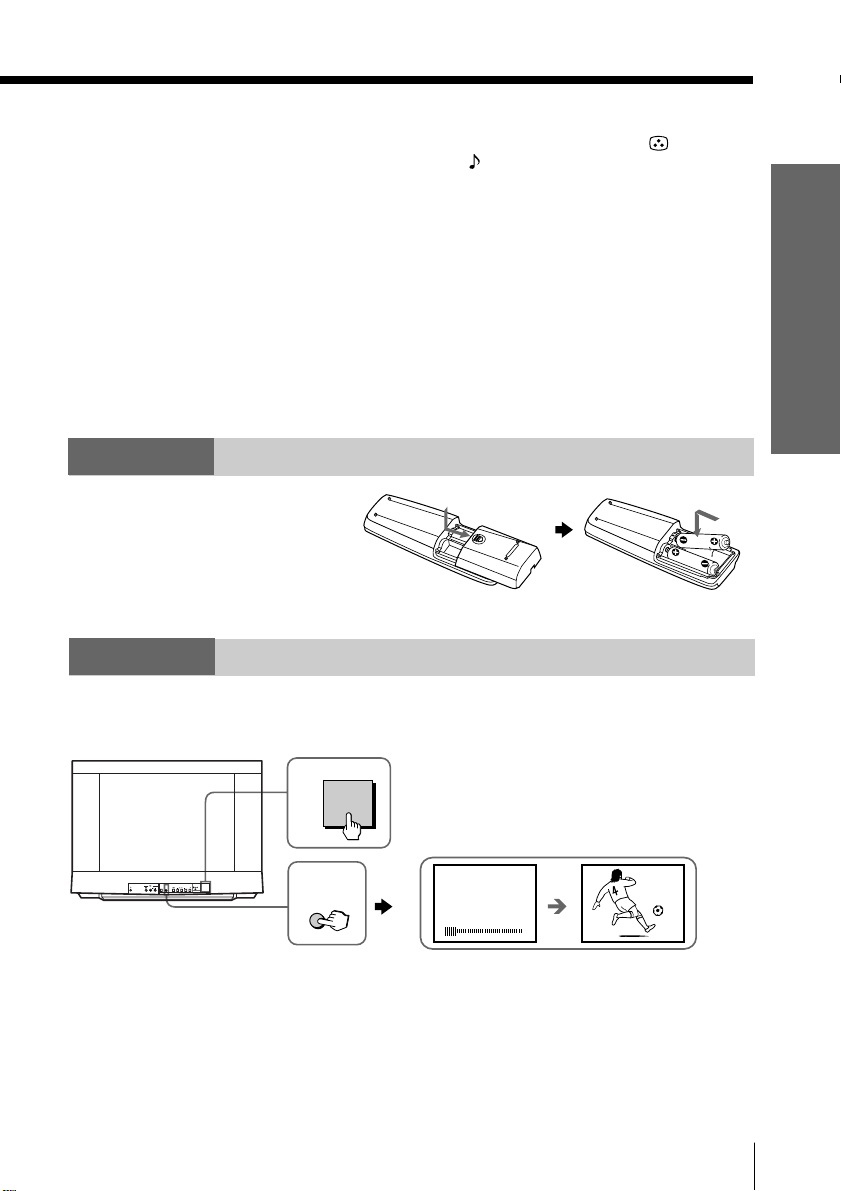
Step 2
Insert the batteries
into the remote
Note
• Do not use old batteries nor use different types of batteries together.
Step 3
Using Your New TV
Preset the channels automatically
Front of TV
!
1
2
AUTO
L(MONO) R
SELECT
PROGR
PROGR
Tips
• If you want to stop automatic channel presetting, press SELECT twice.
• If your TV has preset an unwanted channel or cannot preset a particular
channel, then preset your TV manually (see page 10).
Note
• During automatic channel presetting, your TV screen will indicate
“B/G” , “I”, “D/K” or “M” for the TV system.
2
AUTO
PROGR
VHF LOW B/G
1
Using Your New TV
1
5

Connecting the 3D WOOFER
(KV-XA21M83 only)
You can enjoy high quality sound by connecting the 3D WOOFER.
3D WOOFER
1
2
WOOFER (8 )
Corner A
Corner B
– +
Black
wire
WOOFER (8 )
– +
Align the front of the 3D WOOFER to corners A and B of your TV. Place the
1
3D WOOFER into the footholds and adjust it until it is stable.
Connect the wires to the 3D WOOFER (8Ω) terminals at the rear of your TV.
2
The red wire should be connected to the 3 red terminal and the black wire
to the # black terminal.
Notes
• Connect only the supplied 3D WOOFER; otherwise your TV may
malfunction.
• Unplug your TV from the wall outlet when connecting the 3D WOOFER.
• To prevent a malfunction caused by a short circuit of the terminals, make
sure that none of the 3D WOOFER wire strands stick out, making contact
with the neighbouring 3D WOOFER terminal.
Red
wire
Using Your New TV
6

Connecting optional components
You can connect optional audio/video components, such as a VCR, multi disc player,
camcorder, video game or stereo system.
To watch the video input of the connected equipment, press t (see page 13).
Connecting a camcorder/video game equipment
using the t (video input) jacks
Front of TV
Audio/Video cable (not supplied)
Using Your New TV
To t 2
(video input)
To video and
audio outputs
Camcorder
2
AUTO
L(MONO) R
SELECT
PROGR
PROGR
or
2
)
L(MONO
R
Note
• You can also connect video equipment to the t 1 (video input) jack at
the rear of your TV.
Connecting audio/video equipment using the T
(monitor output) jacks
Antenna cable (not supplied)
Rear of TV
L(MONO)R
VCR
1
To
antenna
output
To video and
audio inputs
Video game
equipment
: Signal flow
Audio system
or
To
audio
inputs
(yellow)
-L (MONO)
(white)
-R (red)
To T
(monitor output)
Audio/Video cable (not supplied)
: Signal flow
Note
• If you connect a monaural VCR, connect the yellow plug to (the yellow
jack) and the black plug to -L (MONO) (the white jack).
Using Your New TV
7

Securing the TV
To prevent the TV from falling, secure the TV using one of the following methods:
With the supplied screws, attach the band to the TV stand and to the rear of
A
the TV using the provided hole.
or
Put the cord or chain through the clamps to secure the TV against a wall or
B
pillar.
20
mm
3.8 mm
A
Using Your New TV
8
B
or
Note
• Use only the supplied screws. Use of other screws may damage the TV.