

Page 1

3-858-641-21 (1)
Trinitron Color TV
1996 by Sony Corporation
KV-V28
MH
Operating Instructions
Mode d´emploi
####
F
PR
EN
####
A
Page 2

2
20 mm
3.8 mm
Page 3
3
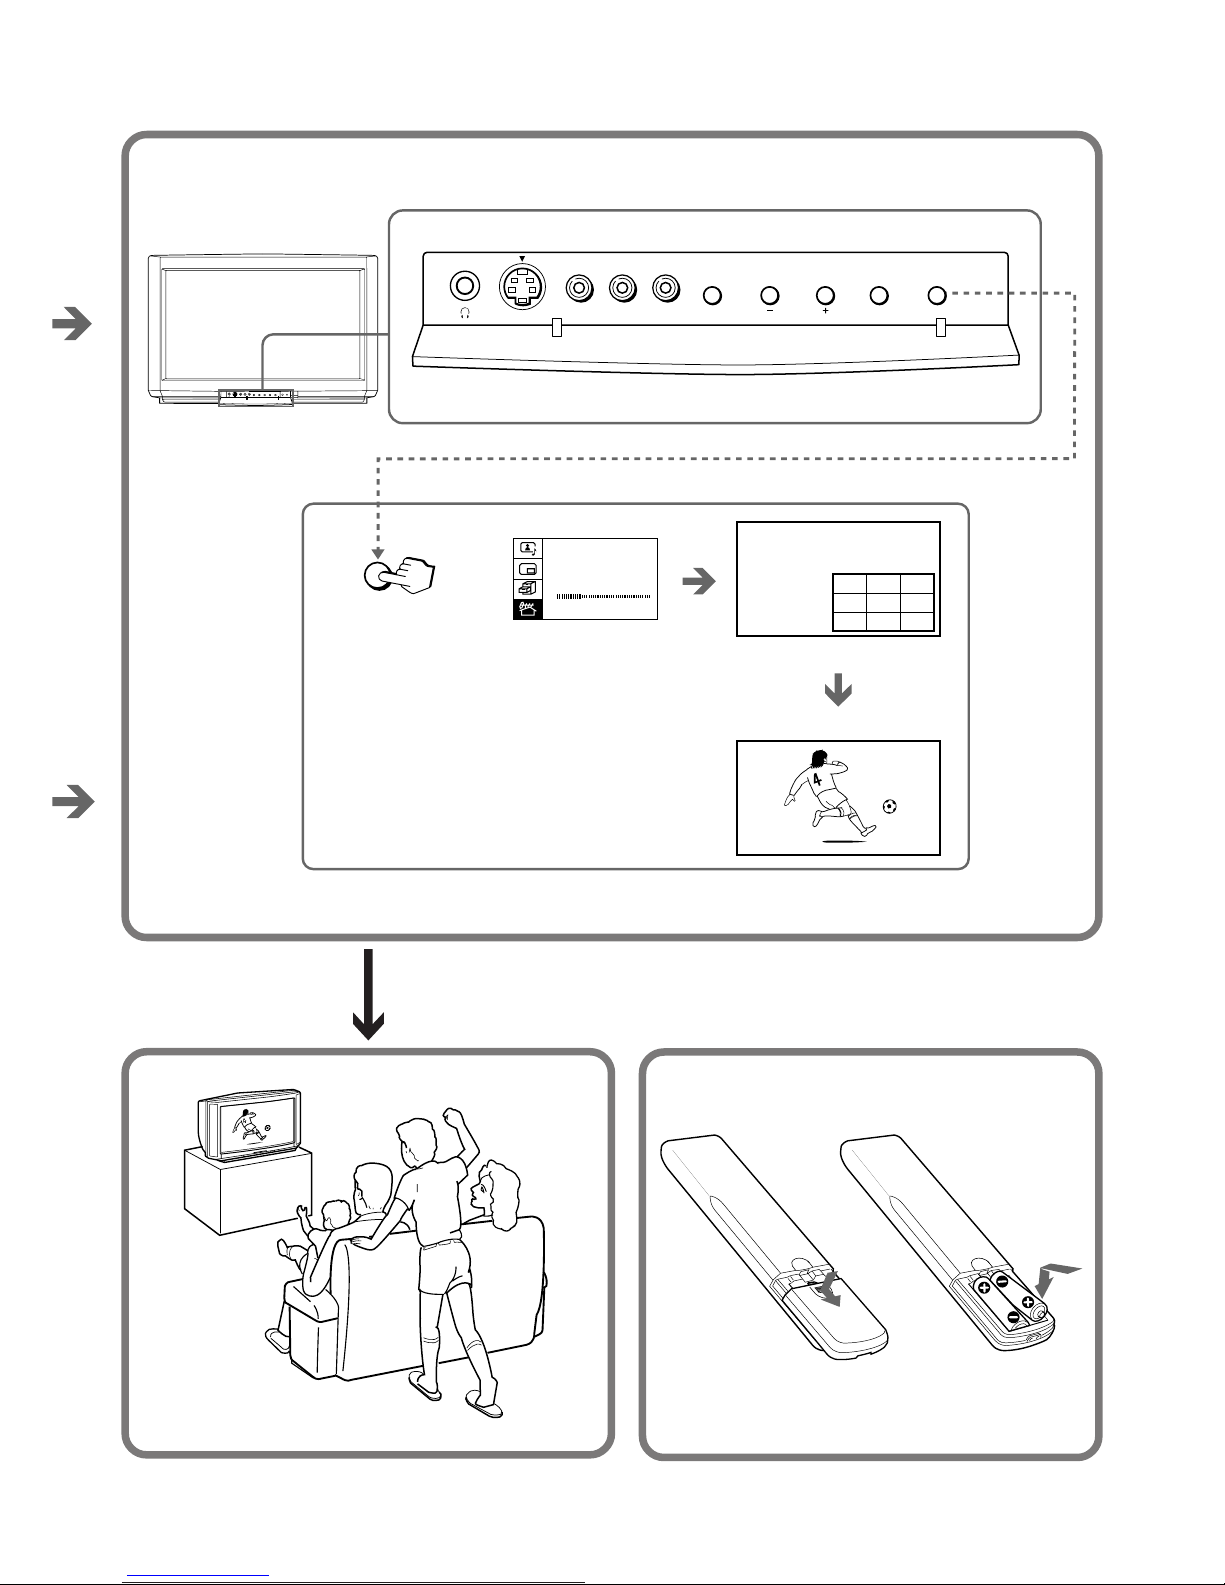
ENTER
VIDEO 3 INPUT
S1 VIDEO
(MONO)
VIDEO L–AUDIO–R
MENU AUTO PROGR
AUTO PROGR
TV SYS: B / G
AUT O P ROGRAM
VHF L O W
PR: 0 1
12 3
45 6
78 9
1
Page 4
4
Page 5

Getting Started
-EN
5
WARNING Table of contents
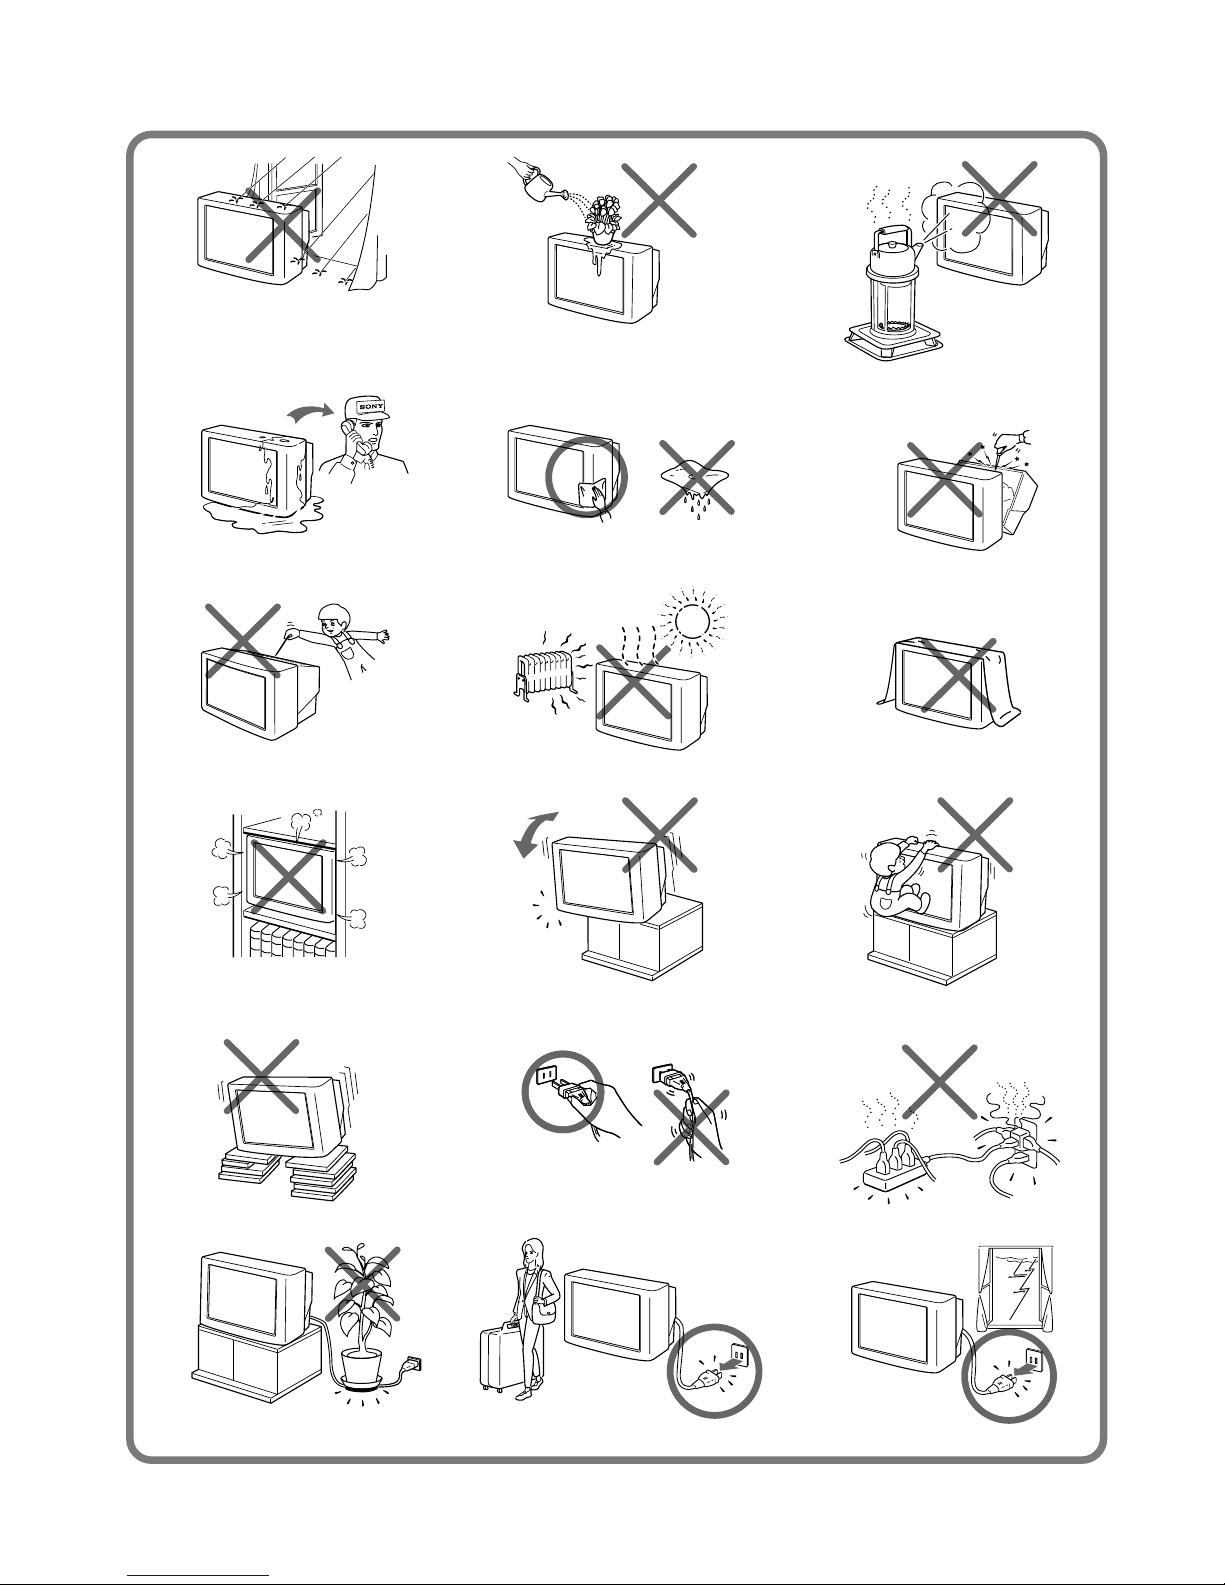
• Dangerously high voltages are present inside the TV.
• Operate the TV only at 110-240 V AC.
• Do not open the cabinet and the rear cover of the TV.
Refer servicing to qualified personnel.
• To prevent fire or shock hazard, do not expose the TV
to rain or moisture.
• Do not operate the TV if any liquid or solid object
falls into it. Have it checked immediately by qualified
personnel only.
• Do not block the ventilation openings.
• Do not install the appliance in a confined space, such
as a bookcase or built-in cabinet.
• Do not install the TV in hot, humid or excessively
dusty places.
• Do not install the TV where it may be exposed to
mechanical vibrations.
• Do not keep the TV plugged in if you are not going to
use it for several days.
• Do not pull the power cord to disconnect the TV. Pull
it out by the plug.
• Use only the supplied screws (as shown on page 2) to
fasten the TV to the TV stand or to stabilize the TV
against a wall or a pillar. Use of other screws may
damage the TV.
Notes
• When you turn on the TV, you may hear the “boon” sound
that is caused by the demagnetization of the TV. This does not
indicate a malfunction.
• The picture color may become abnormal if you change the
direction of your TV. To obtain the normal picture color, press
POWER on the TV to turn off the TV for five minutes and then
turn it on again.
Getting Started
6 Connections
8 Getting to know the remote commander
9 Introducing the menus
10 Changing the menu language
11 Presetting channels
Operations
13 Watching the TV
16 Watching the picture in wide mode (WIDE MODE)
17 Scrolling a picture up or down (SCROLL)
18 Adjusting the picture and sound
20 Listening to the POWER BASSO sound
21 Listening to the surround sound (HYPER
SURROUND)
22 Selecting a stereo or bilingual program
23 Viewing multiple programs at the same time
(PROGRAM INDEX)
24 Displaying frame-by-frame pictures (STROBE)
24 Using the Picture-in-Picture (PIP) features
26 Viewing Teletext
28 Displaying Teletext on the PIP screen (PIP TEXT)
29 Viewing a video game screen
30 Customizing the TV
Additional Information
31 Troubleshooting
Back Specifications
cover
All contents are subject to change without notice.
Design and specifications are subject to change without
notice.
EN
Page 6
Getting Started
6
-EN
VIDEO IN MON/TV
OUT
123
VIDEO
AUDIO
L
(MONO)
R
S1 VIDEO
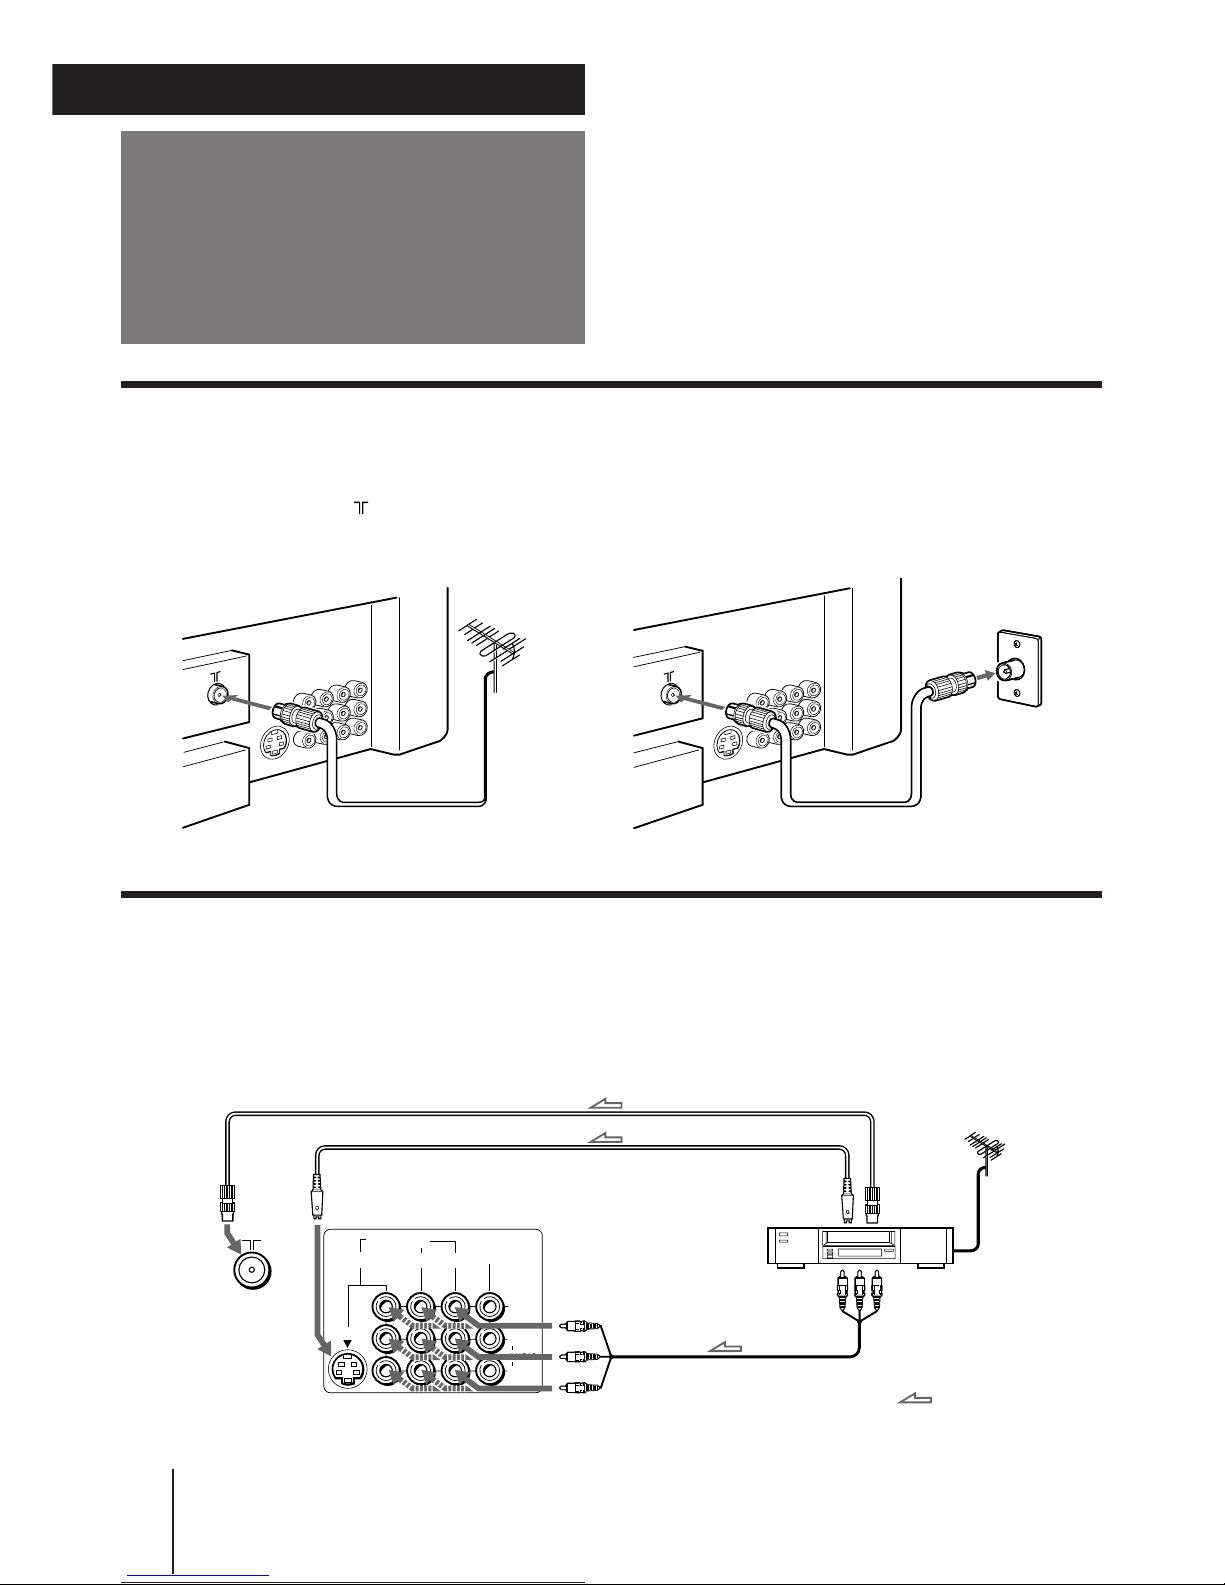
Connecting a VHF antenna or a combination VHF/UHF antenna
— 75-ohm coaxial cable (round)
Attach an optional IEC antenna connector to the 75-ohm coaxial cable.
Plug the connector into the (antenna) socket at the rear of the TV.
Connecting optional equipment
You can connect optional audio/video equipment to your TV such as a VCR, multi disc player, camcorder, video
game or stereo system.
Connecting video equipment using video input jacks
Connections
VCR
to video and
audio outputs
Rear of TV
On a wall
: Signal flow
to
S1 Video
input
to
antenna
socket
VIDEO (yellow)
AUDIO-L (white)
AUDIO-R (red)
Rear of TV
or
Rear of TV
Getting Started
to
S or S1
video
output
to
antenna
output
Page 7
Getting Started
-EN
7
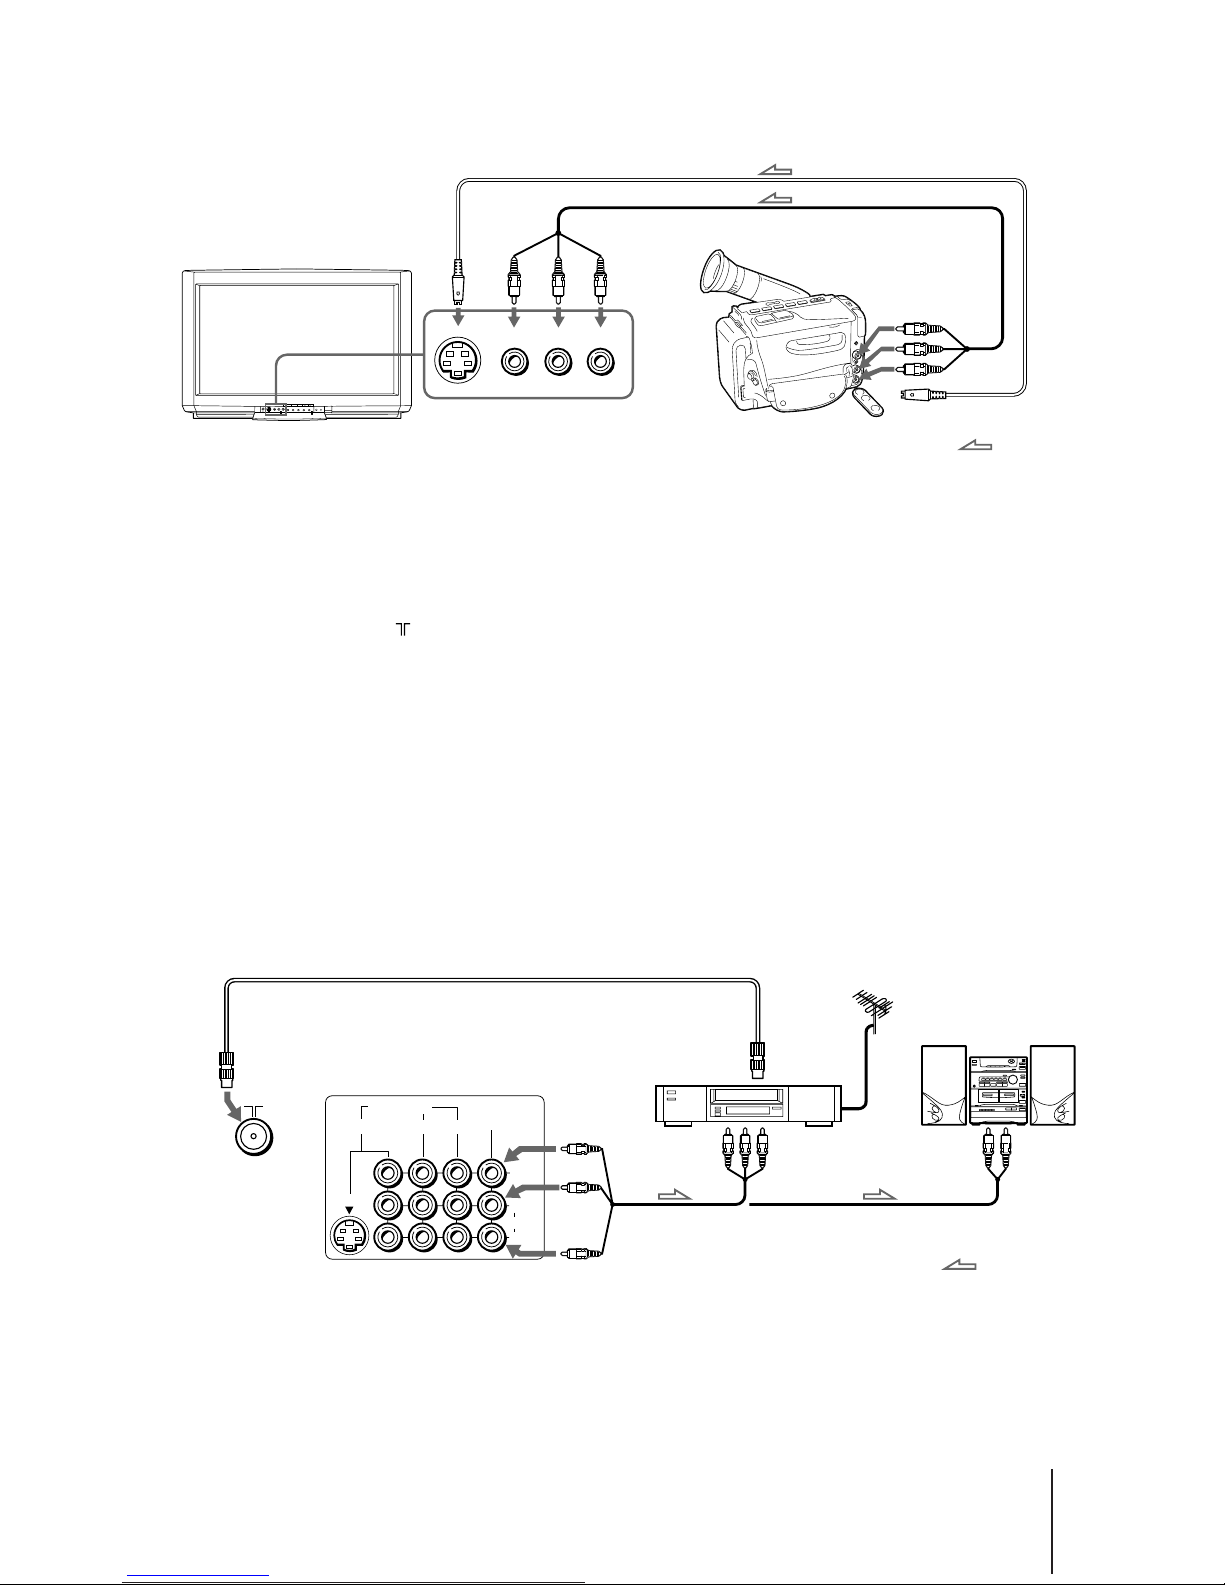
When connecting a monaural VCR
Connect the yellow plug to VIDEO and the black plug to AUDIO-L (MONO).
When connecting video game equipment
Connect video game equipment to the VIDEO 3 INPUT jacks at the front of your TV or the VIDEO IN 3 jacks at the rear of your TV.
When connecting a VCR to the (antenna) terminal
Preset the signal output from the VCR to the program position 0.
When connecting video equipment to the VIDEO 3 INPUT jacks or the VIDEO IN 3 jacks
Do not connect video equipment to the VIDEO 3 INPUT jacks at the front and the VIDEO IN 3 jacks at the rear of your TV simultaneously;
otherwise the picture will not be displayed properly on the screen.
If both S1 Video and video signals are input simultaneously
The S1 Video input signal is selected. To view a video input signal, disconnect the S1 Video connection.
Note on the video input
When no signal is input, the screen becomes blue.
Connecting audio/video equipment using MON/TV OUT jacks
VIDEO
VIDEO 3 INPUT
S1 VIDEO
(MONO)
L–AUDIO–R
: Signal flow
to S or S1 video output
to video and
audio outputs
Camcorder
Front of TV
Rear of TV
VIDEO IN MON/TV
OUT
123
VIDEO
AUDIO
L
(MONO)
R
S1 VIDEO
VCR
to
antenna
output
to video and
audio inputs
VIDEO (yellow)
AUDIO-L (white)
AUDIO-R (red)
Audio system
to
antenna
socket
or
: Signal flow
to audio
inputs
Page 8
Getting Started
8
-EN
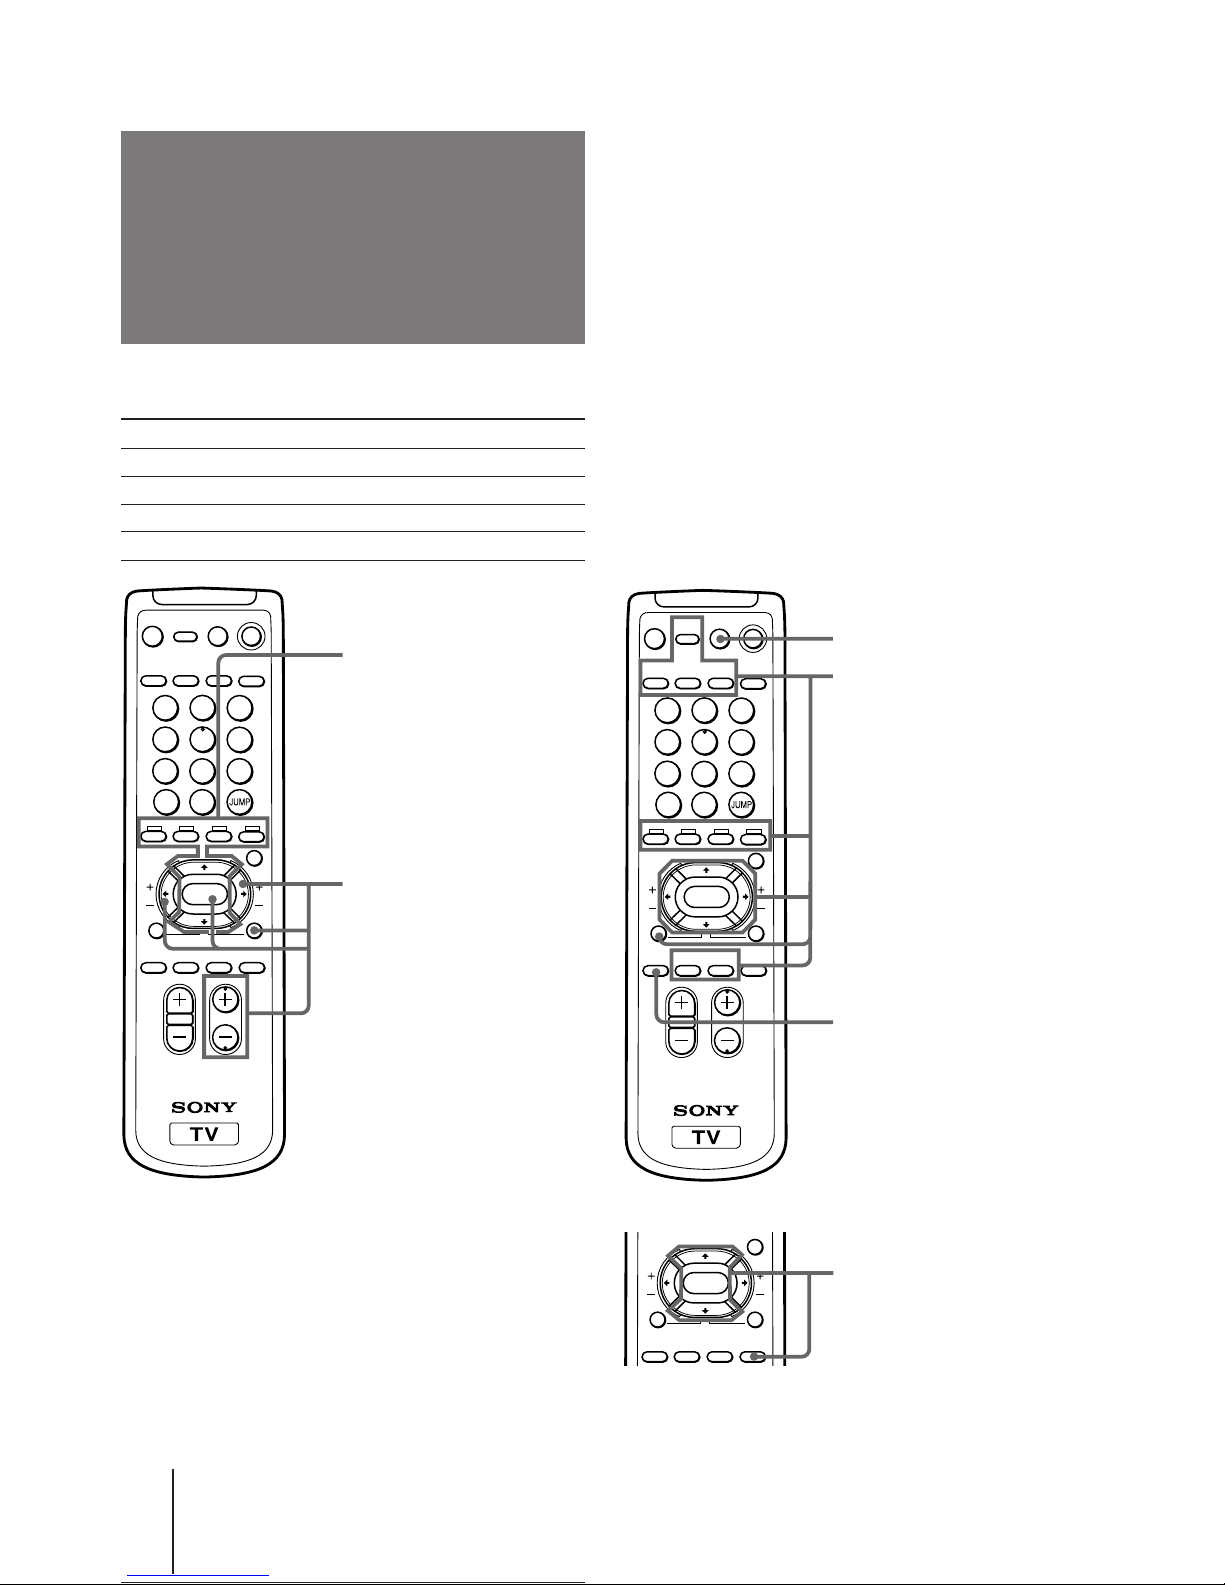
Names of buttons on the remote commander are indicated in different colors to represent the available functions.
Label color Button function
White For general TV operations.
Green For Teletext operations.
Yellow For PIP and PROGRAM INDEX operations.
Blue For the wide picture mode operations.
Getting to know the
remote commander
PIP operation buttons
TV/VIDEO (page 24)
FREEZE (page 25)
SWAP (page 25)
PIP (page 24)
V/v/ENTER
– for PIP PROGR (page 24)
PROGRAM INDEX
operation buttons
PROGR INDEX (page 23)
V/b/v/B/ENTER (page 23)
PROGR +/– (page 23)
PROGRVOL
MENU
PIP PROGR
TEXT
A/B
ENLARGE
DISPLAY
REVEAL
GAME
POWER
VIDEO
HOLD
TV
MUTING
PROGR
INDEX
PIP
TEXT
1
2
3
4
5
6
7
8
0
-/--
9
TV/VIDEO
FREEZE SWAP
PIP
POWER
BASSO
WAKE UP
INDEX
SLEEP
TEXT CLR
ENTER
WIDE
MODE
SCROLL
GAME (page 29)
Teletext operation buttons
TEXT (page 26, 27)
ENLARGE (page 27)
REVEAL (page 27)
HOLD (page 26)
[] – Red (page 26)
[] – Green (page 26)
[] – Yellow (page 26)
[] – Blue (page 26)
INDEX (page 26)
TEXT CLR (page 27)
PIP TEXT (page 28)
V/b/v/B/ ENTER (page 28)
POWER BASSO (page 20)
PROGRVOL
MENU
PIP PROGR
TEXT
A/B
ENLARGE
DISPLAY
REVEAL
GAME
POWER
VIDEO
HOLD
TV
MUTING
PROGR
INDEX
PIP
TEXT
1
2
3
4
5
6
7
8
0
-/--
9
TV/VIDEO
FREEZE SWAP
PIP
POWER
BASSO
WAKE UP
INDEX
SLEEP
TEXT CLR
ENTER
WIDE
MODE
SCROLL
PROGRVOL
MENU
PIP PROGR
PROGR
INDEX
PIP
TEXT
POWER
BASSO
WAKE UP
INDEX
SLEEP
TEXT CLR
ENTER
WIDE
MODE
SCROLL
Wide picture mode operation
buttons
WIDE MODE (page 16)
SCROLL (page 17)
V/v ENTER
-for SCROLL (page 17)
Page 9
Getting Started
-EN
9
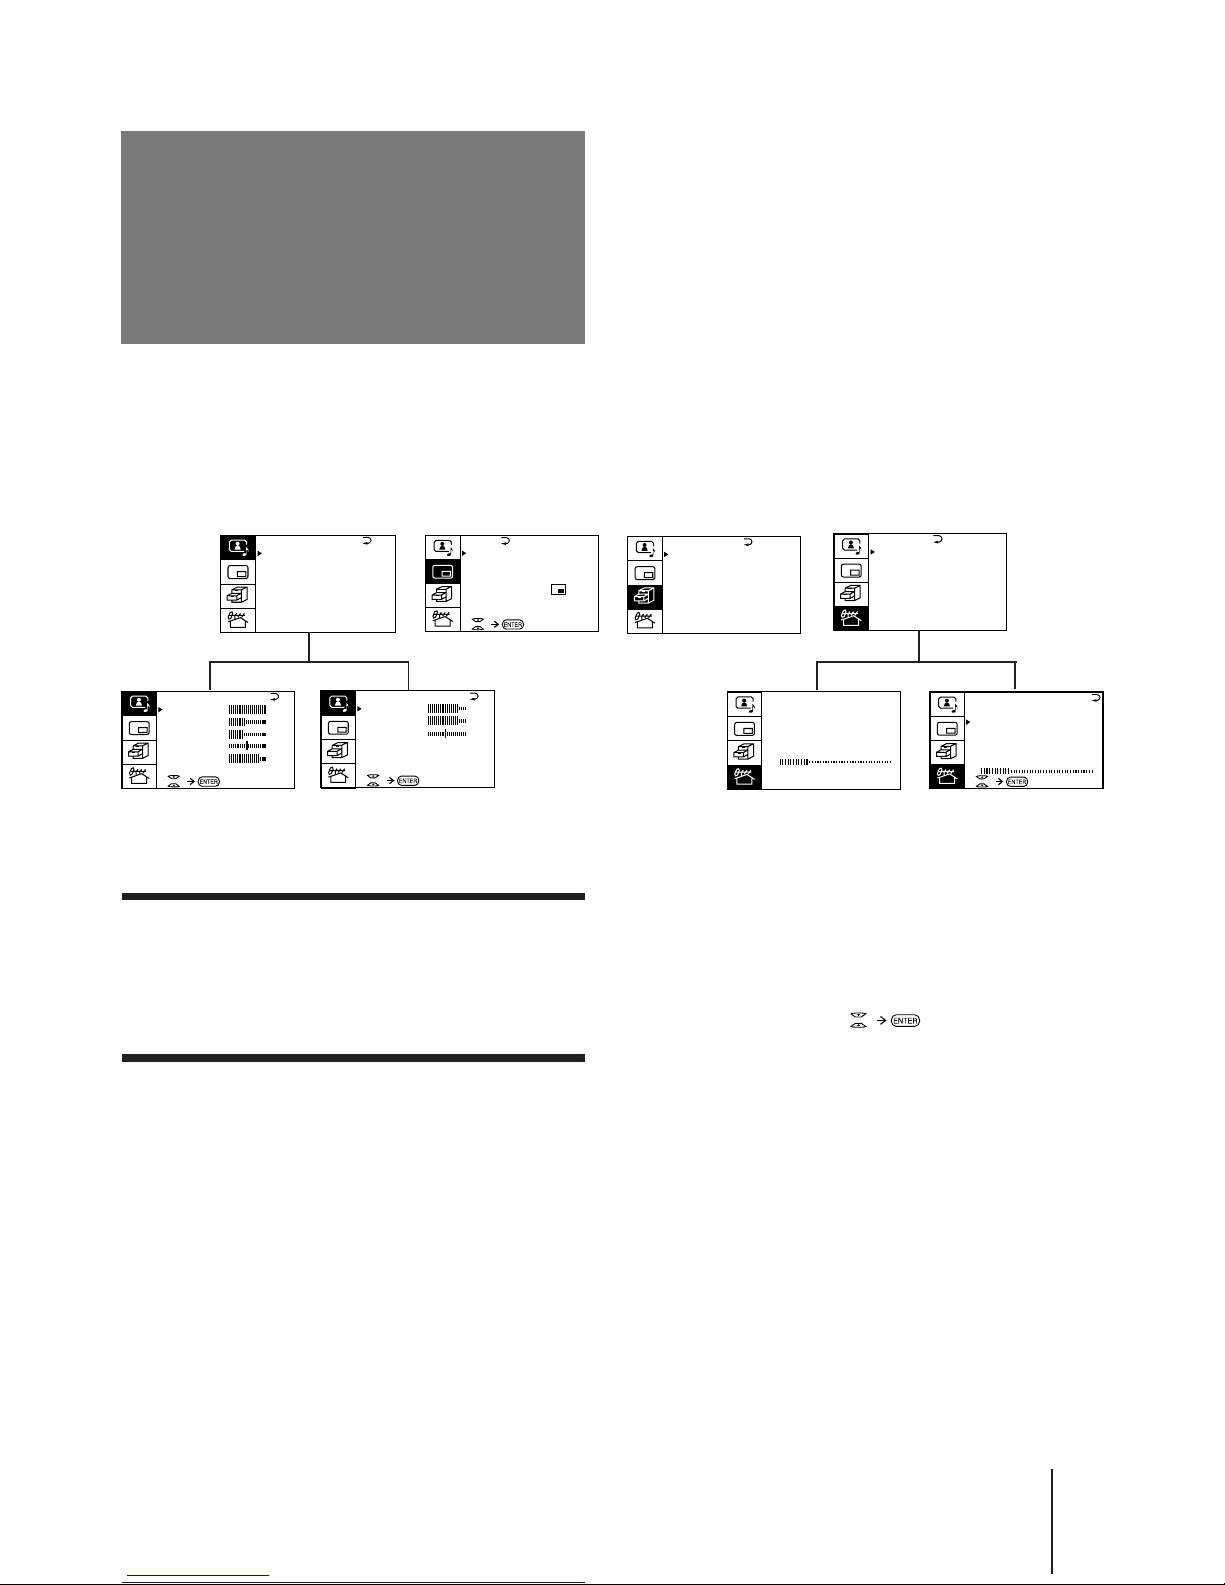
Getting back to the previous menu
(except for AUTO PROGRAM)
Press V or v to move the cursor (z) to the first
line (N) of each menu, and press ENTER.
Cancelling the menu screen
Press MENU.
Notes (except for AUTO PROGRAM)
• When a menu is selected after pressing ENTER, the color of
both the menu and the menu symbol change and the cursor
(z) appears beside the first item of the menu.
• When an item on the menu is selected after pressing ENTER,
the color of the item changes.
• You can refer to the guide (
) at the bottom of the
menus (except for the A/V CONTROL, FEATURES, and
PRESET menus) for the basic operations of the menu.
• If more than approximately 60 seconds elapse after you press a
button, the menu screen disappears automatically.
Introducing the
menus
You can preset TV channels, adjust the picture and sound qualities, and select some settings using the on-screen
menus. You can use the buttons on the remote commander or the TV to operate the menus.
PIP
PIP: OFF
PIP TEXT
STROBE
POS I TION:
PROGR I ND E X
PRESETFEATURESPIPA/V CONTROL
A / V CONTROL
DYNAMIC
SOFT
STANDARD
PERSONAL
V I DEO ADJUST
AUDIO ADJUST
T I LT CORRECT: 0
P I C T URE
40
100
0
80
V I DEO ADJUST
COLOR
BR I GHT
HUE
SHARP
VM: HIGH
45
0
BASS
80
0
80
TREBLE
BALANCE
AUDIO ADJUST
TV SYS: B /G
AU TO PROGRAM
VHF LO
W
PR: 01
TV SYS: B /G
VHF
LOW
PR: 01
AT T : OFF
MANUA L PROGRAM
WIDE MODE :
HYPER SURROUND:
OFF
MONITOR
AV OUT :
FEATURES
WIDEZOOM
SCROLL : 0
PRESET
SKIP:
PR02 OFF
TV SYS: B /G
COL
SYS : AUTO
ENGL ISH
AUT O PROGRAM
MANUA L PROGRAM
LANGUAGE/####
:
Page 10
Getting Started
10
-EN
Changing the menu
language
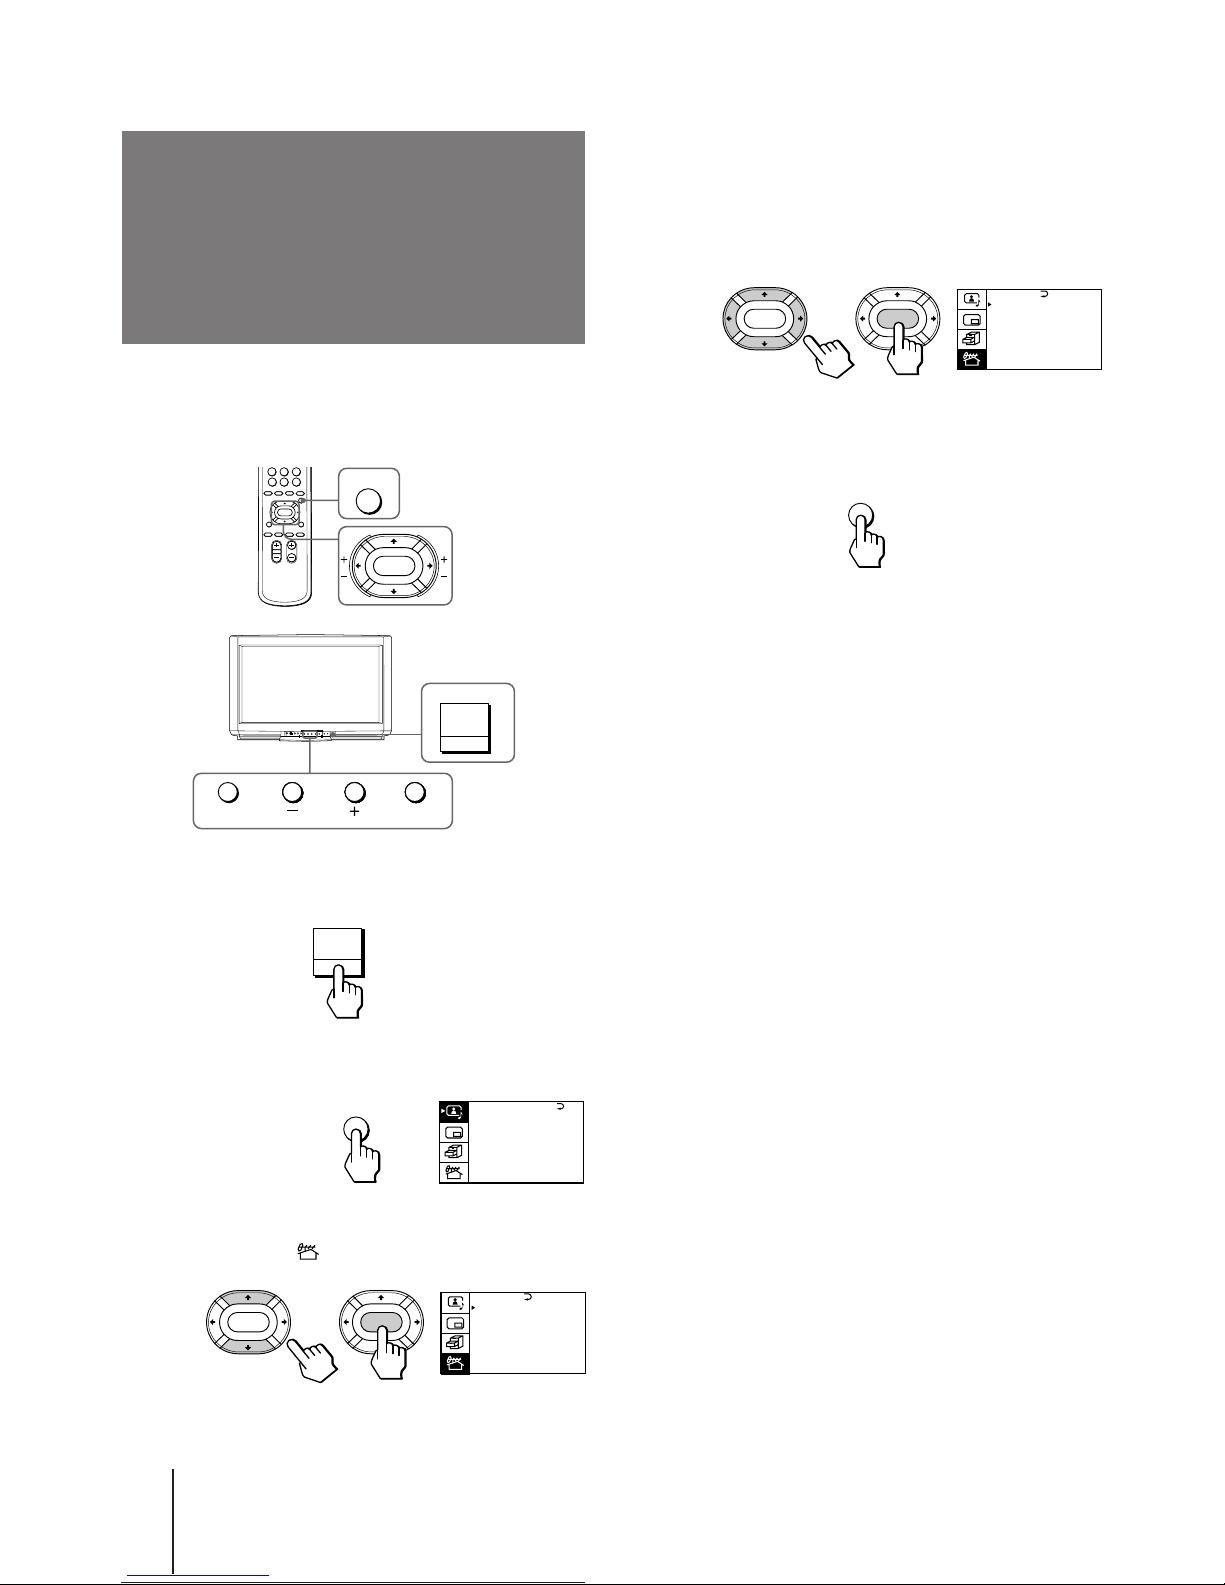
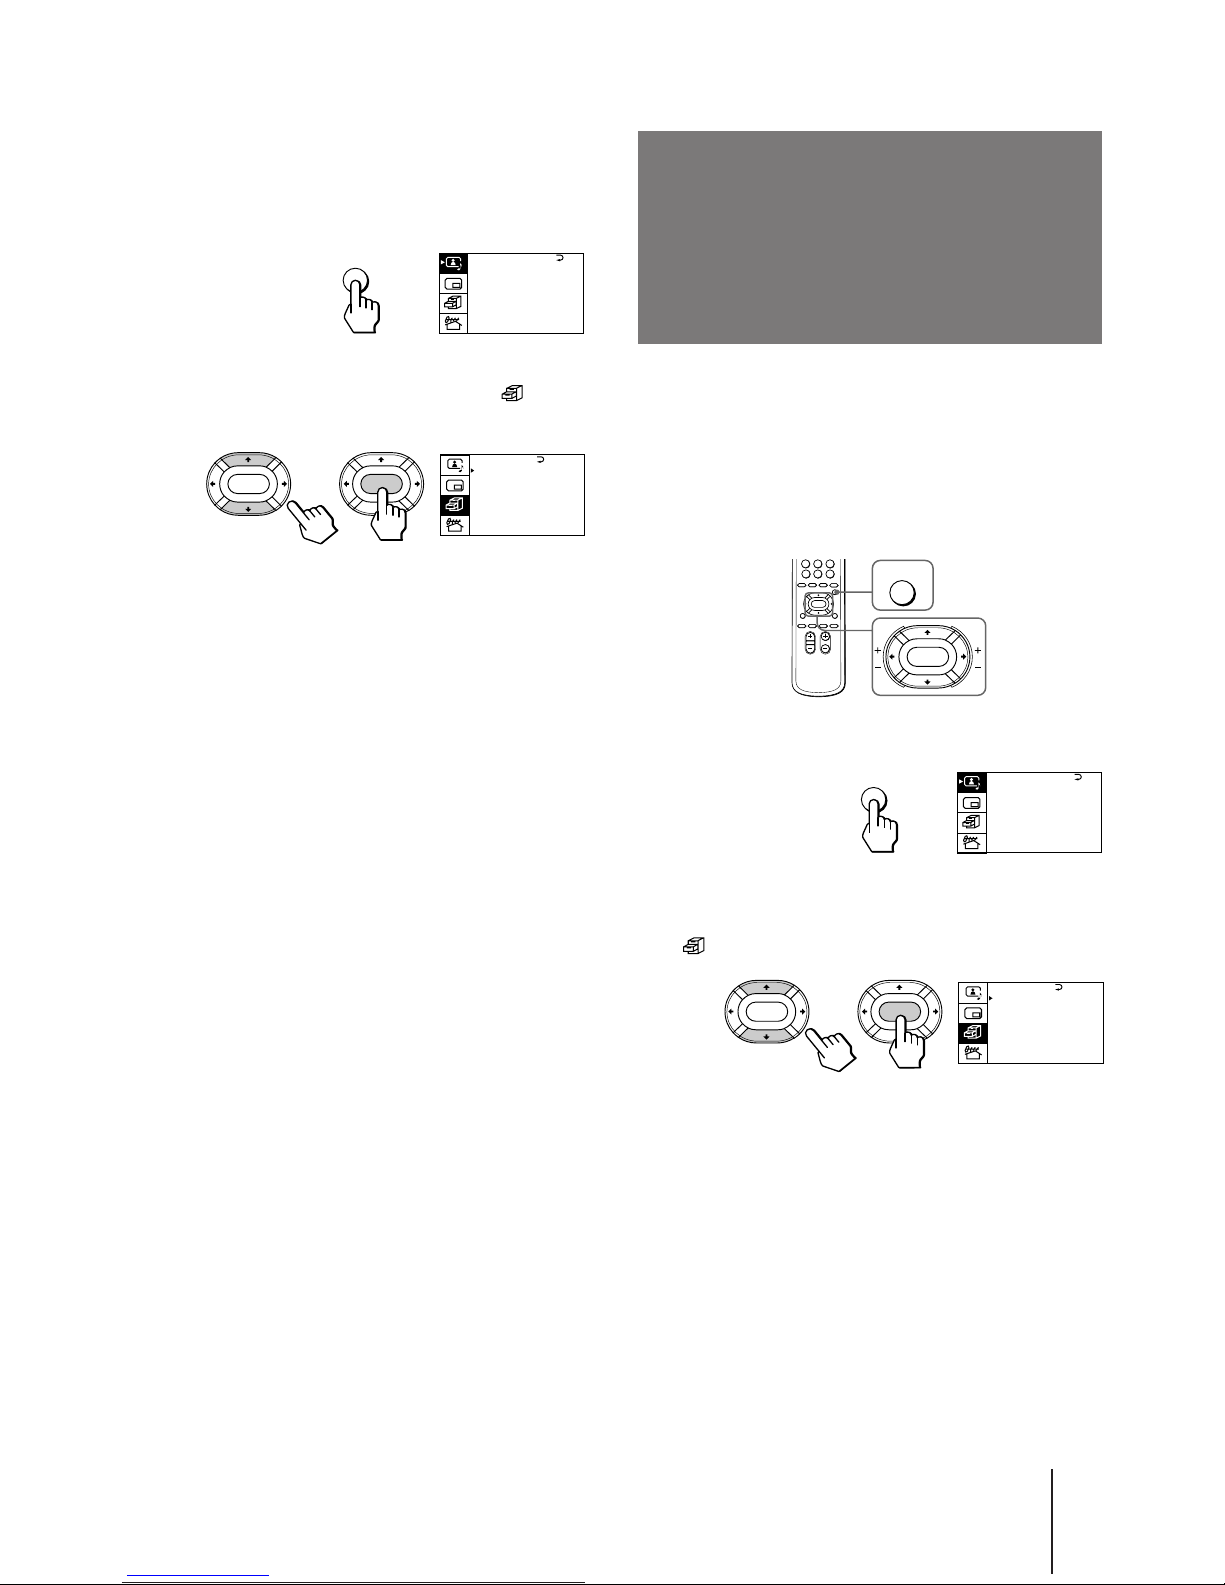
4 Make sure the cursor (z) appears beside
LANGUAGE/ #### and press ENTER.
5 Press V/b/v/B to select ####, and press
ENTER.
All of the menus change to Arabic.
6 Press MENU to return to the normal screen.
If you prefer Arabic to English, you can change the
menu language. You can use buttons on the remote
commander or the TV.
1 Press POWER to turn on the TV.
2 Press MENU.
3 Press V or v to move the cursor (z) to the
PRESET menu ( ), and press ENTER.
MENU
MENU
ENTER
POWER
ENTER MENU
POWER
A / V CONTROL
DYNAMIC
SOFT
ST A NDARD
PERSONAL
V I DEO ADJUST
AUDIO ADJUST
T I L T CORRECT: 0
MENU
PRESET
SKIP: PR02 OFF
TV SYS: B / G
COL SYS : AUTO
ENGL I SH
AUT O P ROGRAM
MANUA L PROGRAM
LANGUAGE/####
:
ENTER ENTER
PRESET
SKIP: PR02 OFF
TV SYS: B/ G
COL SYS : AUTO
ARABIC
AUT O P ROGRAM
MANUA L PROGRAM
:
LANGUAGE/####
ENTER ENTER
Page 11
Getting Started
-EN
11
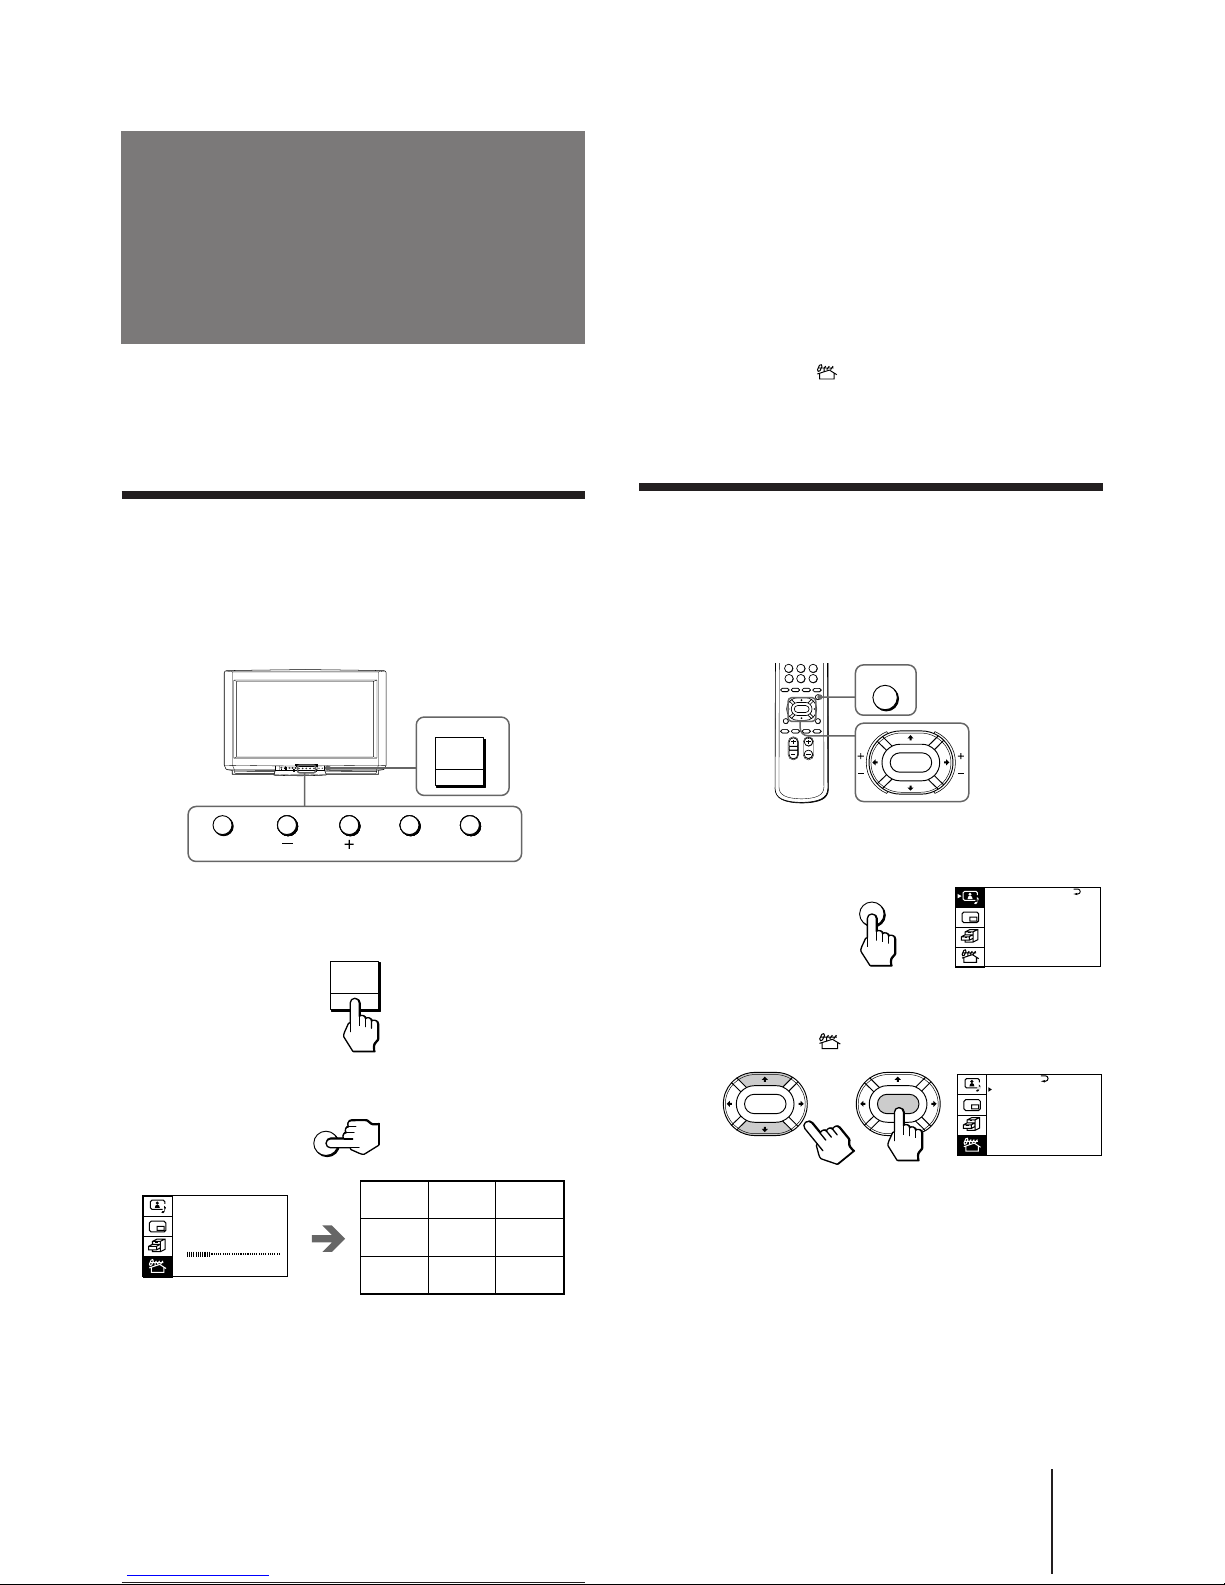
You can preset TV channels easily by storing all the
receivable channels automatically. You can also preset
channels manually or disable program positions (see
page 12 ).
Presetting channels automatically
You can preset up to 100 TV channels in numerical
sequence from the program position 1. You can preset
channels automatically using the button on the TV or
the menu.
1 Press POWER to turn on the TV.
2 Press AUTO PROGR.
The TV starts scanning and presetting channels
automatically. When all of the receivable channels
are stored, the AUTO PROGRAM menu disappears
and the first nine preset TV programs appear on the
nine sub screens. The nine sub screens disappear
after being displayed for several seconds.
Presetting channels
Note
• If you want to return to the normal screen while the nine sub
screens are being displayed, you can press PROGR INDEX on
the remote commander.
To preset channels automatically using
the menu
1 Press MENU.
2 Press V or v to move the cursor (z) to the
PRESET menu ( ), and press ENTER.
3 Press V or v to move the cursor (z) to AUTO
PROGRAM, and press ENTER.
Presetting channels manually
To change the program position for a channel or to
receive a channel with a weak signal which you cannot
receive by automatic presetting, preset the channel
manually.
1 Press MENU.
2 Press V or v to move the cursor (z) to the
PRESET menu ( ), and press ENTER.
3 Select your local TV system.
(1) Press V or v to move the cursor (z) to TV SYS, and
press ENTER.
(2) Press V/b/v/B until your local TV system appears
on the menu, and press ENTER.
ENTER MENU
AUTO PROGR
POWER
POWER
TV SYS:B/G
AU T O PROGRAM
VHF LO
W
PR: 0 1
AUTO PROGR
12 3
45 6
78 9
MENU
ENTER
A / V CONTROL
DYNAMIC
SOFT
ST A NDARD
PERSONAL
V I DEO ADJUST
AUDIO ADJ UST
T I L T CORRECT: 0
MENU
PRESET
SKIP: PR02 OFF
TV SYS: B / G
COL SYS : AUTO
ENGL I SH
AUT O P ROGRAM
MANUA L PROGRAM
LANGUAGE/####
:
ENTER ENTER
Page 12

Getting Started
12
-EN
4 Press V or v to move the cursor (z) to
MANUAL PROGRAM, and press ENTER.
5 Select the program position to which you
want to preset a channel.
(1) Make sure the cursor (z) appears beside PR, and
press ENTER.
(2) Press V/b/v/B until the program position you
want appears on the menu, and press ENTER.
6 Select the desired channel.
(1) Press V or v to move the cursor (z) to VHF LOW,
and press ENTER.
(2) Press V/b/v/B until the desired channel picture
appears on the TV screen, and press ENTER.
7 Press MENU to return to the normal screen.
If the TV signal is too strong
The picture may be distorted. You can reduce the
picture distortion as described below.
1 Display the PRESET menu.
2 Press V or v to move the cursor (z) to MANUAL
PROGRAM, and press ENTER.
3 Press V or v to move the cursor (z) to ATT, and
press ENTER.
4 Press V/b/v/B to select ON, and press ENTER.
If the TV system is not properly selected
The picture color may be poor and/or the sound may
be noisy. In this case, select the appropriate TV system.
1 Press PROGR +/– or the number buttons to select
the program position.
2 Display the PRESET menu.
3 Press V or v to move the cursor (z) to TV SYS, and
press ENTER.
4 Press V/b/v/B until the appropriate TV system
appears, and press ENTER.
Notes
• The TV system and the ATT (attenuator) settings are
memorized for each program position.
• If you do not know your local TV system, consult your nearest
Sony dealer or authorized service center.
TV SYS:B/G
VHF
LOW
PR: 0 1
AT T : OFF
MANUA L PROGRAM
ENTER ENTER
Disabling program positions
By disabling unused or unwanted program positions,
you can skip those positions when you press PROGR
+/–.
1 Press MENU.
2 Press V or v to move the cursor (z) to the
PRESET menu ( ), and press ENTER.
3 Press V or v to move the cursor (z) to SKIP,
and press ENTER.
4 Press V or v until the unused or unwanted
program position appears on the menu,
and press ENTER.
5 Press V/b/v/B to select ON, and press ENTER.
6 To disable other program positions, repeat
steps 4 and 5.
7 Press MENU to return to the normal screen.
To cancel the skip setting
1 Display the PRESET menu.
2 Press V or v to move the cursor (z) to SKIP, and
press ENTER.
3 Press V or v until the program position you want to
cancel the skip setting appears, and press ENTER.
4 Press V/b/v/B to select OFF, and press ENTER.
Page 13

Operations
-EN
13
Watching the TV
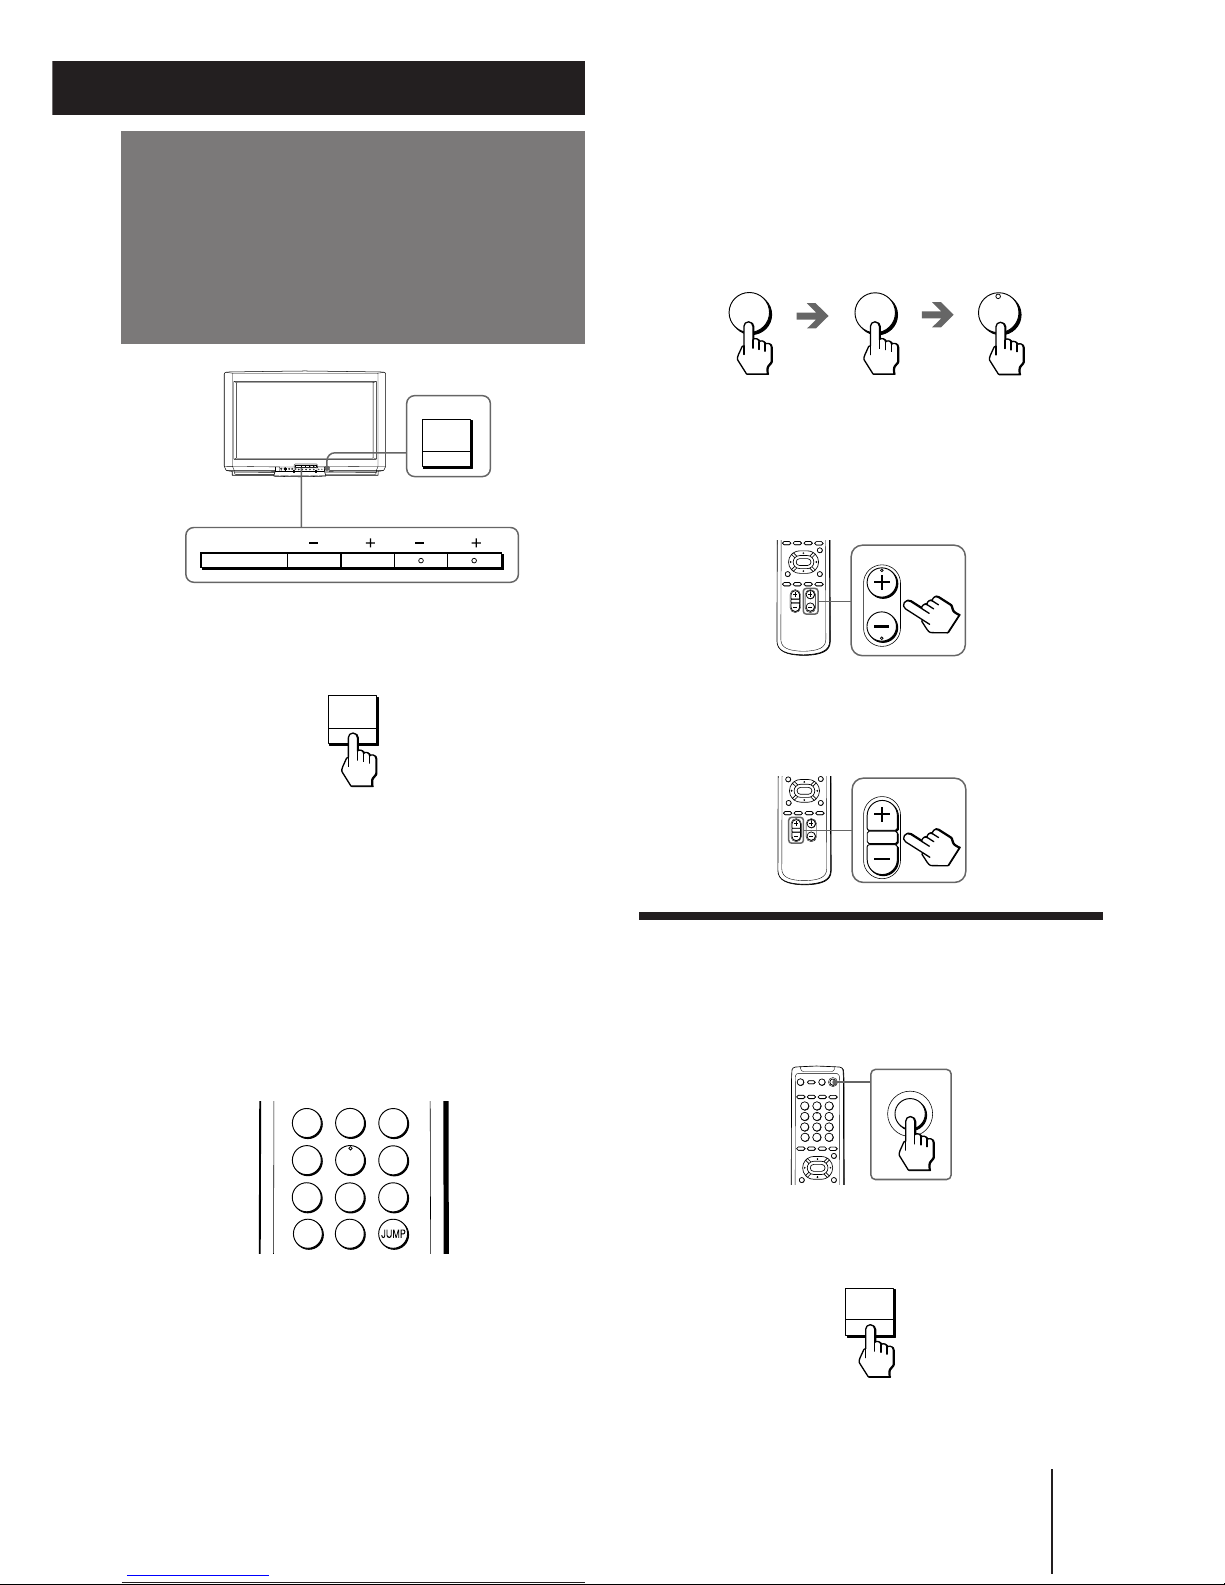
To scan through program positions
Press PROGR +/– on the remote commander or the
TV until the program position you want appears.
3 Press VOL +/– on the remote commander or
VOLUME +/– on the TV to adjust the volume.
Turning off the TV
To turn off the TV temporarily
Press POWER on the remote commander.
The STANDBY indicator lights up.
To turn off the TV completely
Press POWER on the TV.
Watching the video input
Press VIDEO/HOLD on the remote commander
or TV/VIDEO on the TV.
Operations
1 Press POWER to turn on the TV.
When the TV is turned on in the standby mode
after pressing POWER on the TV, press POWER on
the remote commander.
2 Select the TV program you want to watch.
To select a program position directly
Press the number button.
To select a two-digit program position, press “÷”
before the number buttons.
For example: to select program position 25, press
“÷,” then “2” and “5.”
POWER
PROGR
VOL
POWER
POWER
VIDEO
HOLD
VIDEO 1 VIDEO 2 VIDEO 3 1
1
2
3
4
5
6
7
8
0
-/--
9
TV/VIDEO
FREEZE SWAP
PIP
2
-/--
5
POWER
TV/VIDEO VOLUME PROGR
Page 14
Operations
14
-EN
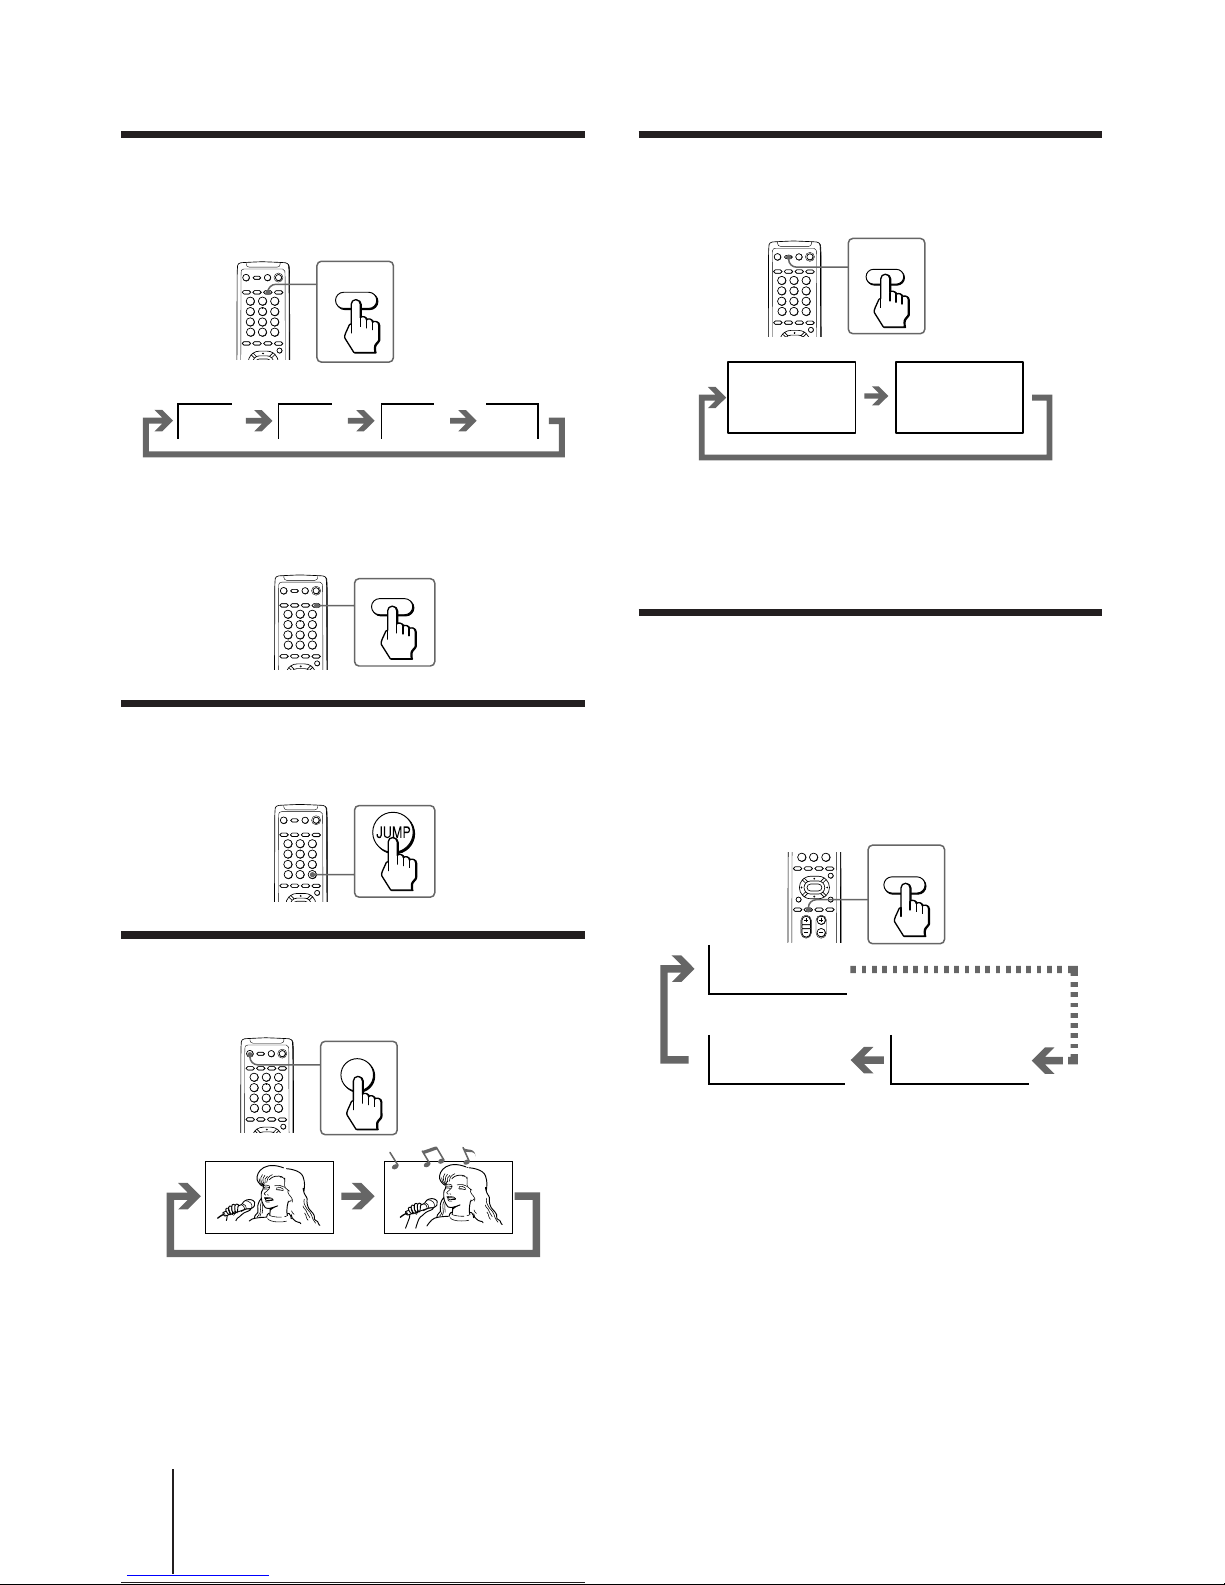
To watch TV
Press TV on the remote commander or TV/VIDEO on
the TV.
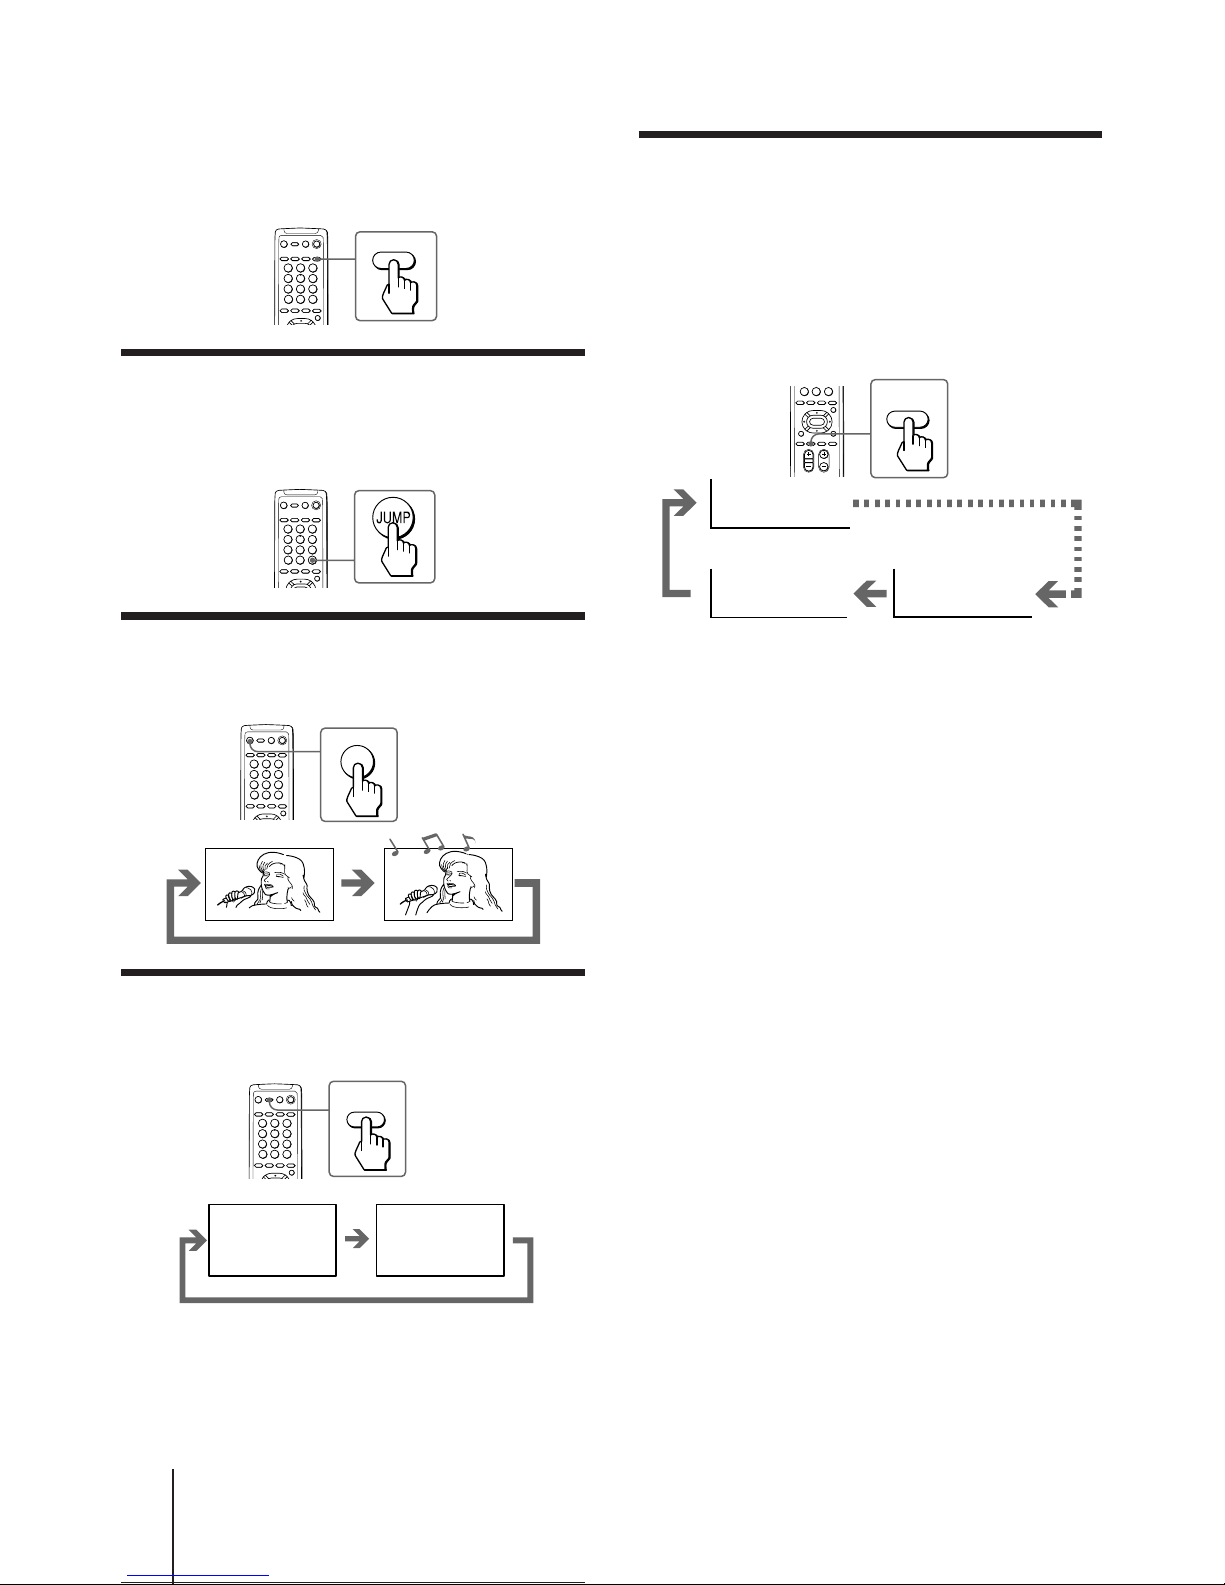
Switching back quickly to the previous
channel
Press JUMP.
Muting the sound
Press MUTING.
Displaying the on-screen information
Press DISPLAY/REVEAL.
Note
• The on-screen display shows the program position or the video
mode, the picture and sound information. The on-screen
display for the picture and sound information disappear after
being displayed for approximately three seconds.
TV
MUTING
MUTING
Setting the Wake Up Timer
You can set the TV to turn on automatically after the
period of time you want.
1 Press WAKE UP/INDEX repeatedly to set the
timer.
The on-screen display appears.
2 If you want a particular TV program or
video mode to be displayed using the Wake
Up Timer, select the TV program or video
mode.
3 Press POWER on the remote commander or
set the Sleep Timer to turn off the TV in the
standby mode.
The WAKE UP indicator lights up in amber color.
To cancel the Wake Up Timer, press WAKE UP/
INDEX repeatedly until “WAKE UP TIMER: OFF”
appears, or turn off the main power of the TV.
Notes
• The Wake Up Timer starts immediately after the on-screen
display disappears.
• The last TV program position or video mode just before the TV
turns into the standby mode will appear when the TV is turned
on using the Wake Up Timer.
• If no buttons or controls are pressed for more than two hours
after the TV is turned on using the Wake Up Timer, the TV
automatically turns into the standby mode. If you want to
continue watching the TV, press any button or control on the
TV or remote commander.
DISPLAY
REVEAL
POWER BASSO: ON
DYNAMIC WIDEZOOM
8
WAKE UP
INDEX
WAKE UP TIMER:10M
WAKE UP TIMER:OFF
WAKE UP TIMER:12H00M
After 10 minutes
No Wake Up Timer
After 12 hours
Page 15
Operations
-EN
15
SLEEP
TEXT CLR
SLEEP TIMER:30M SLEEP TIMER:60M
SLEEP TIMER:OFF SLEEP TIMER:90M
After 30 minutes After 60 minutes
No Sleep Timer After 90 minutes
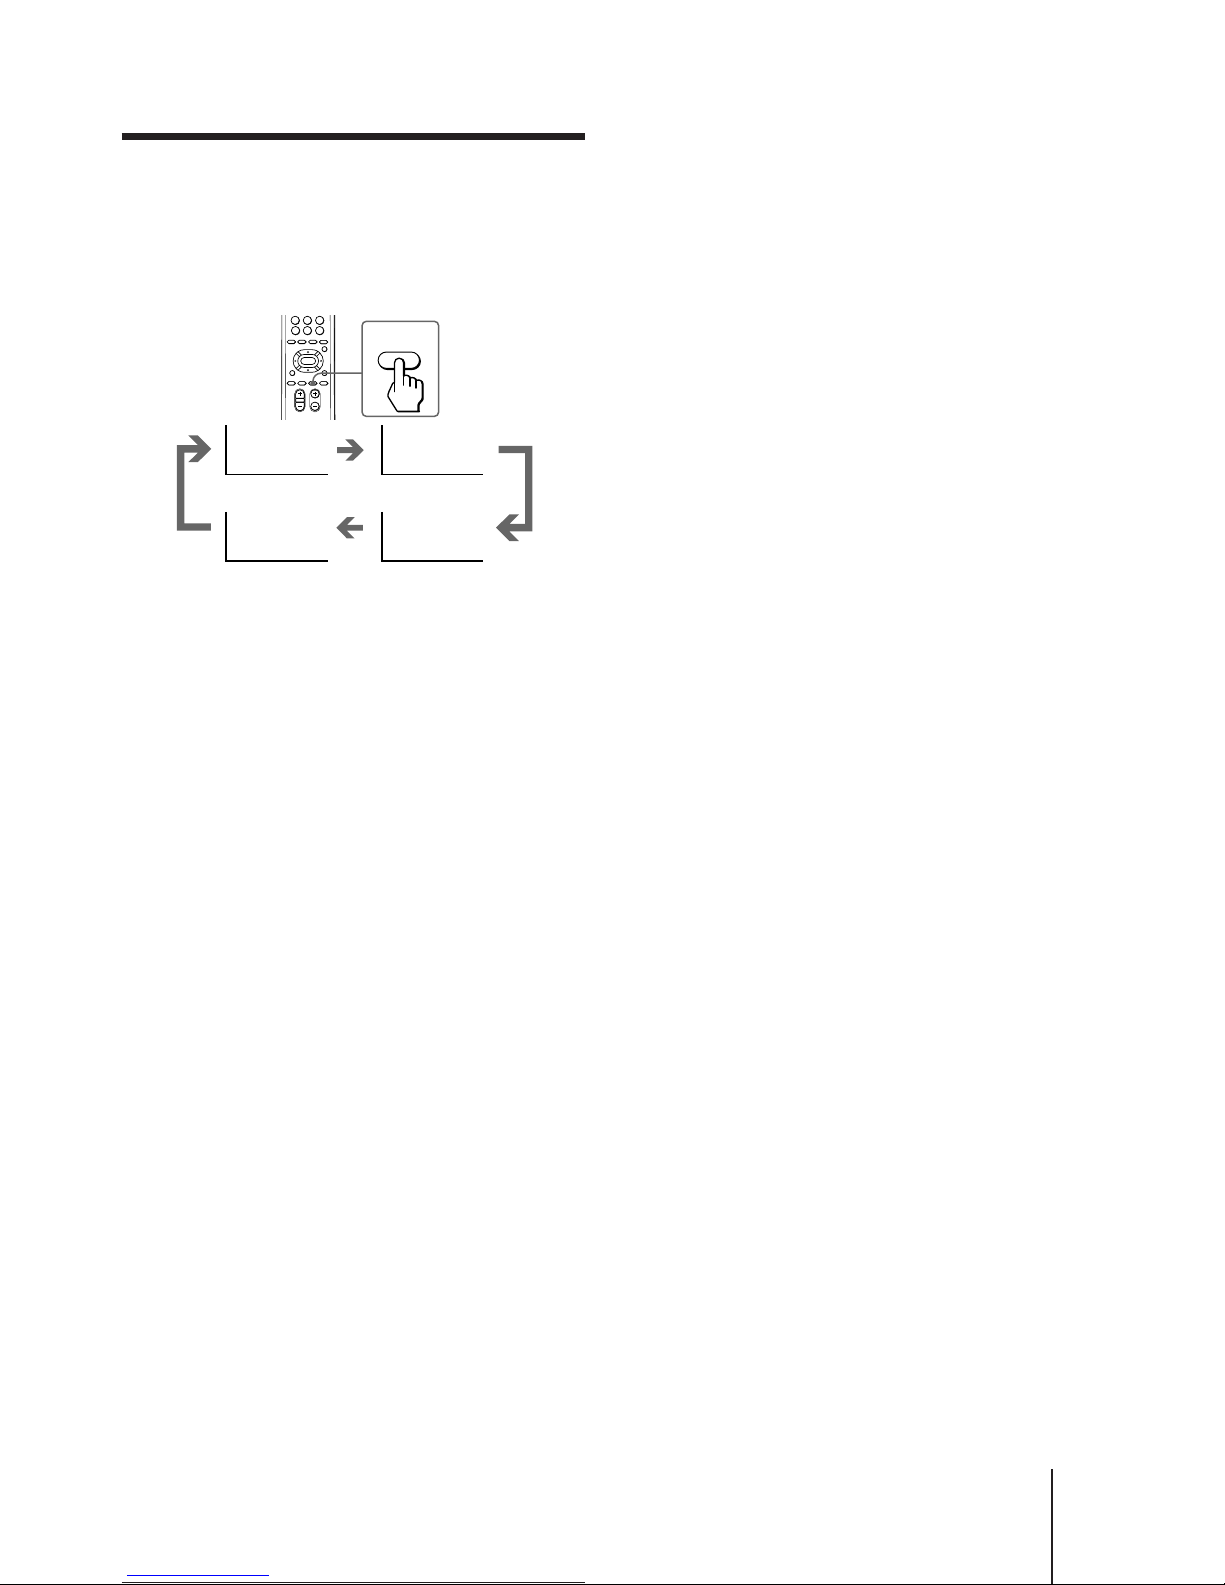
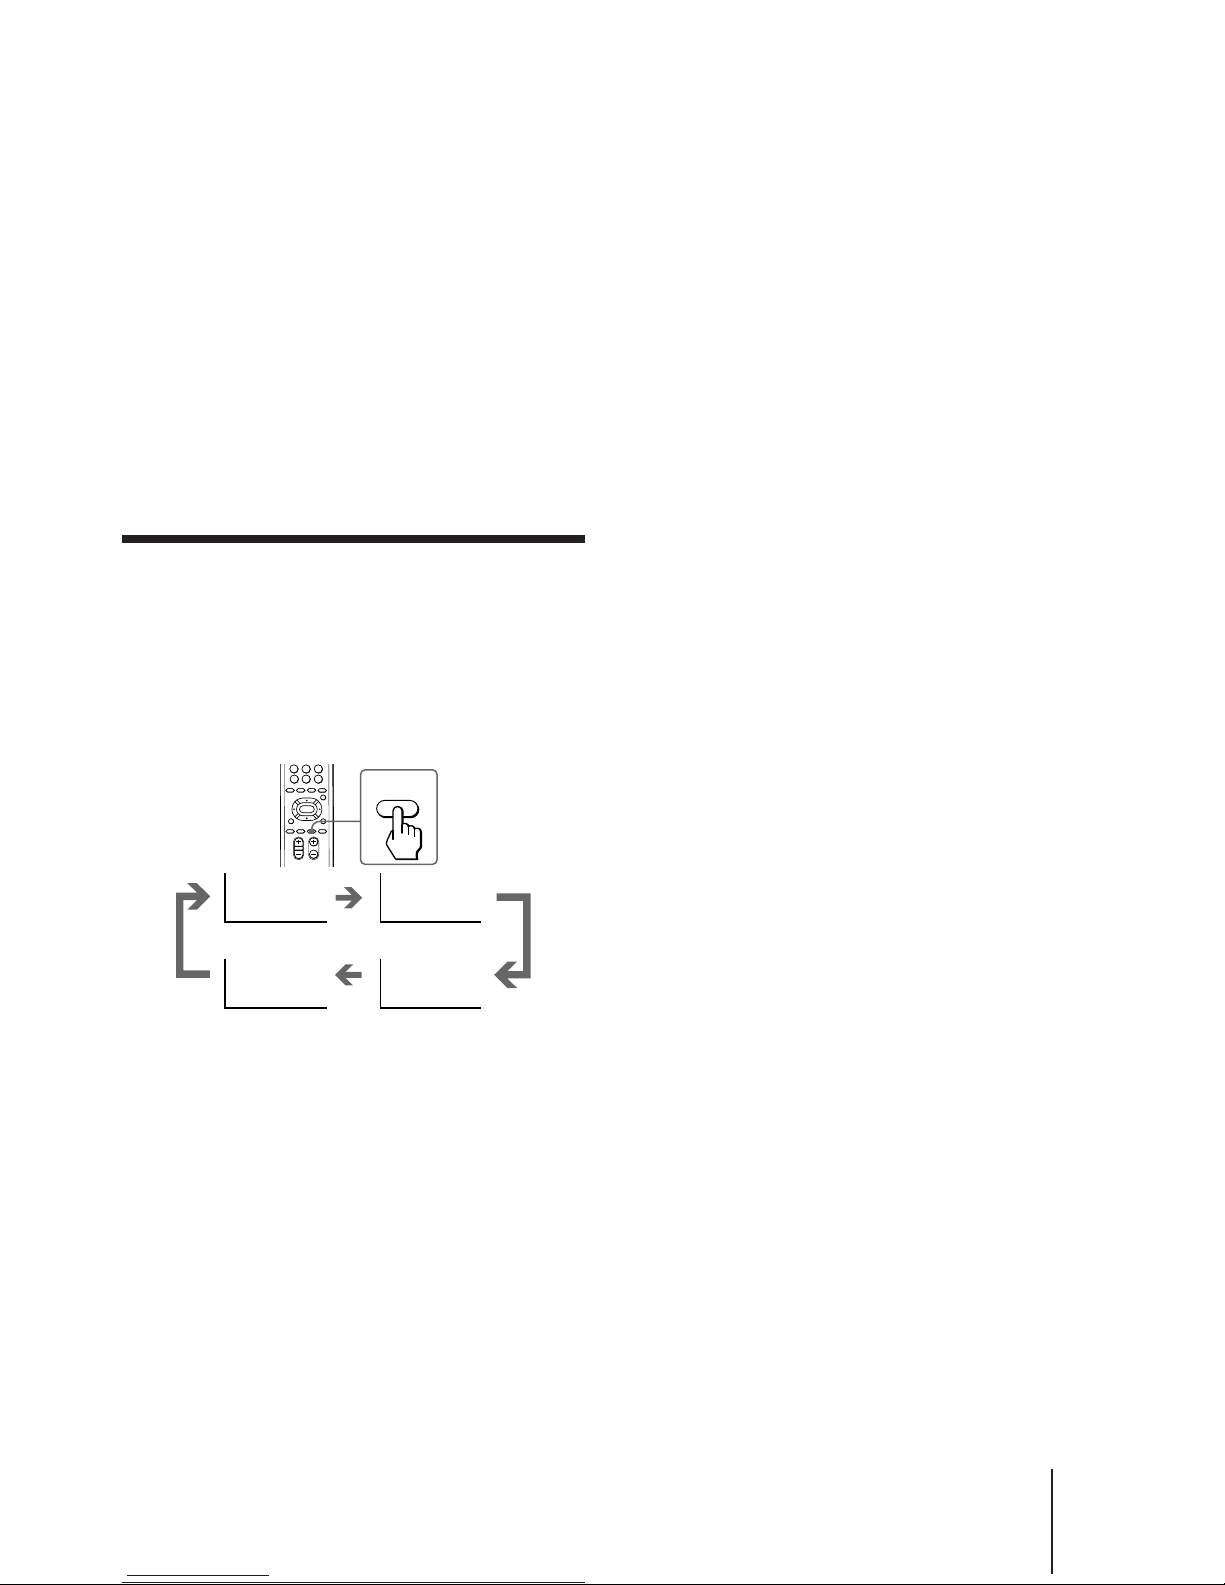
Setting the Sleep Timer
You can set the TV to turn off automatically after the
period of time you want.
Press SLEEP.
To cancel the Sleep Timer, press SLEEP repeatedly
until “SLEEP TIMER: OFF” appears, or turn the TV off.
Page 16
Operations
16
-EN
Good-bye.Jane
Good-bye.
Good-bye.Jane
Good-bye.
SUBTITLE
Good-bye.Jane
Good-bye.
Good-bye.Jane
Good-bye.
SUBTITLE
SUBTITLE
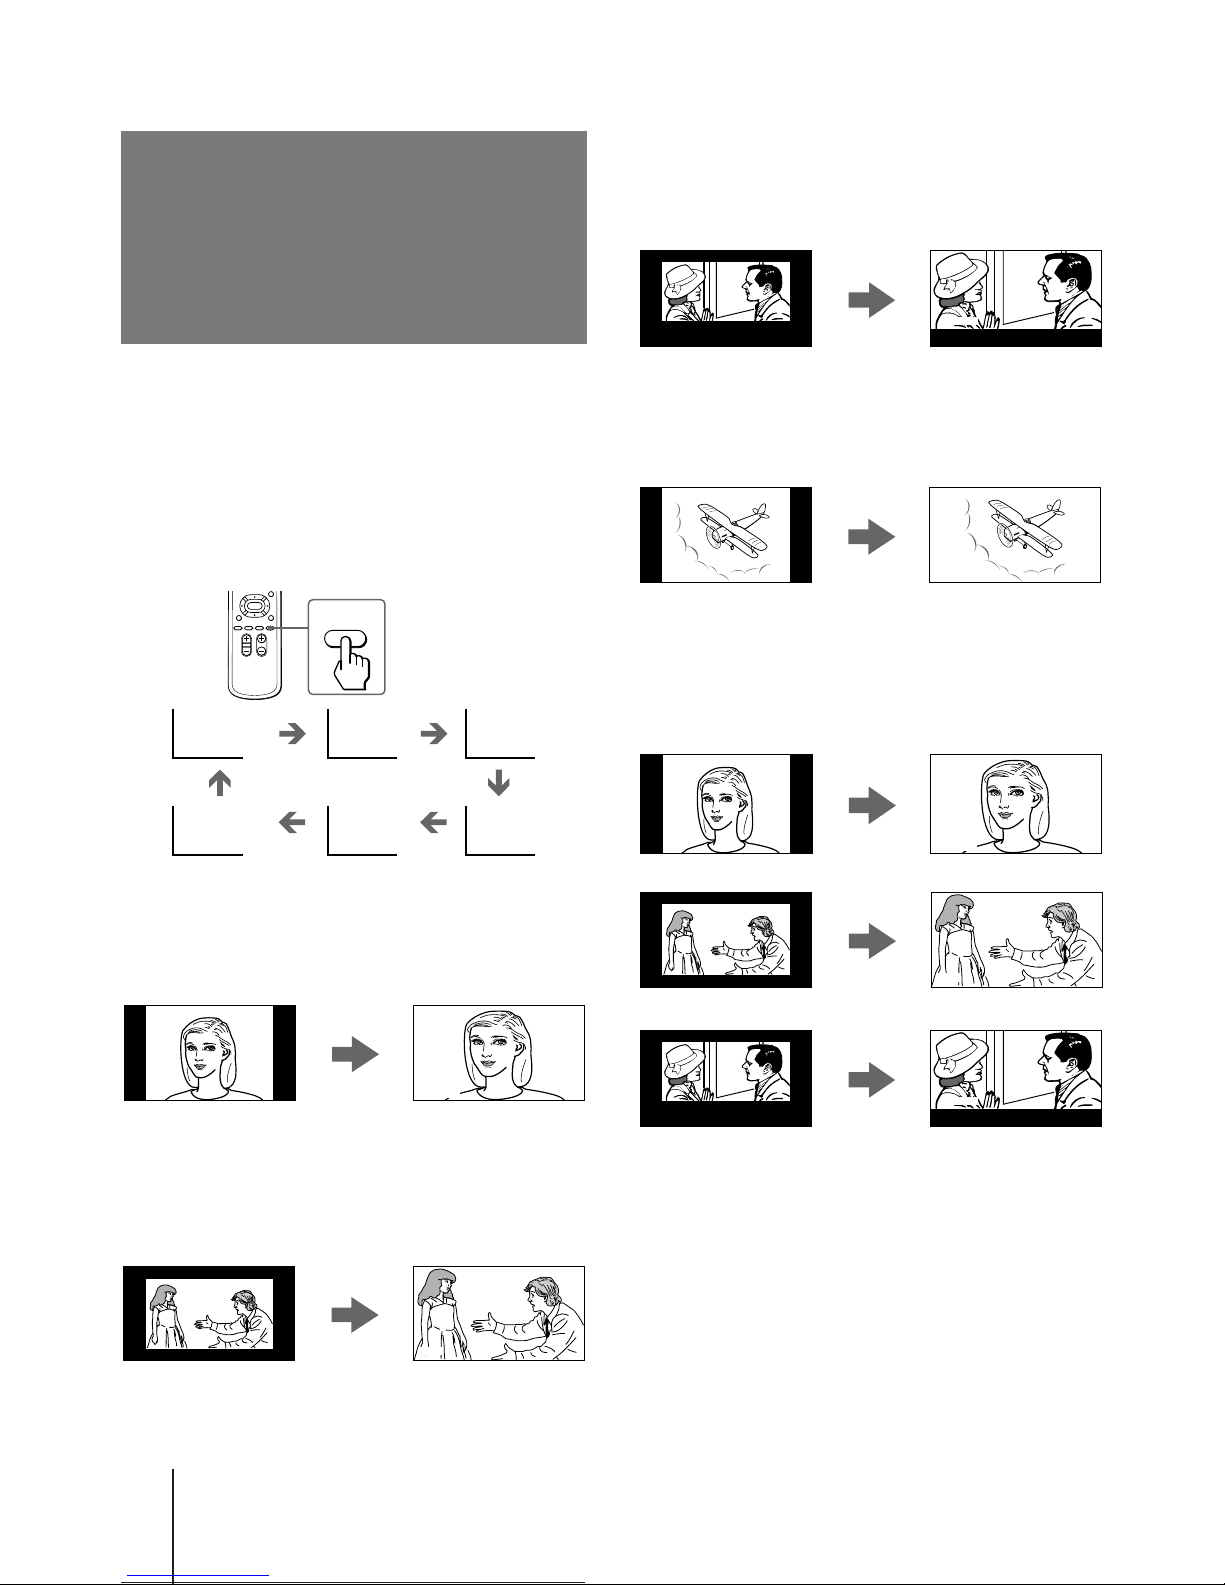
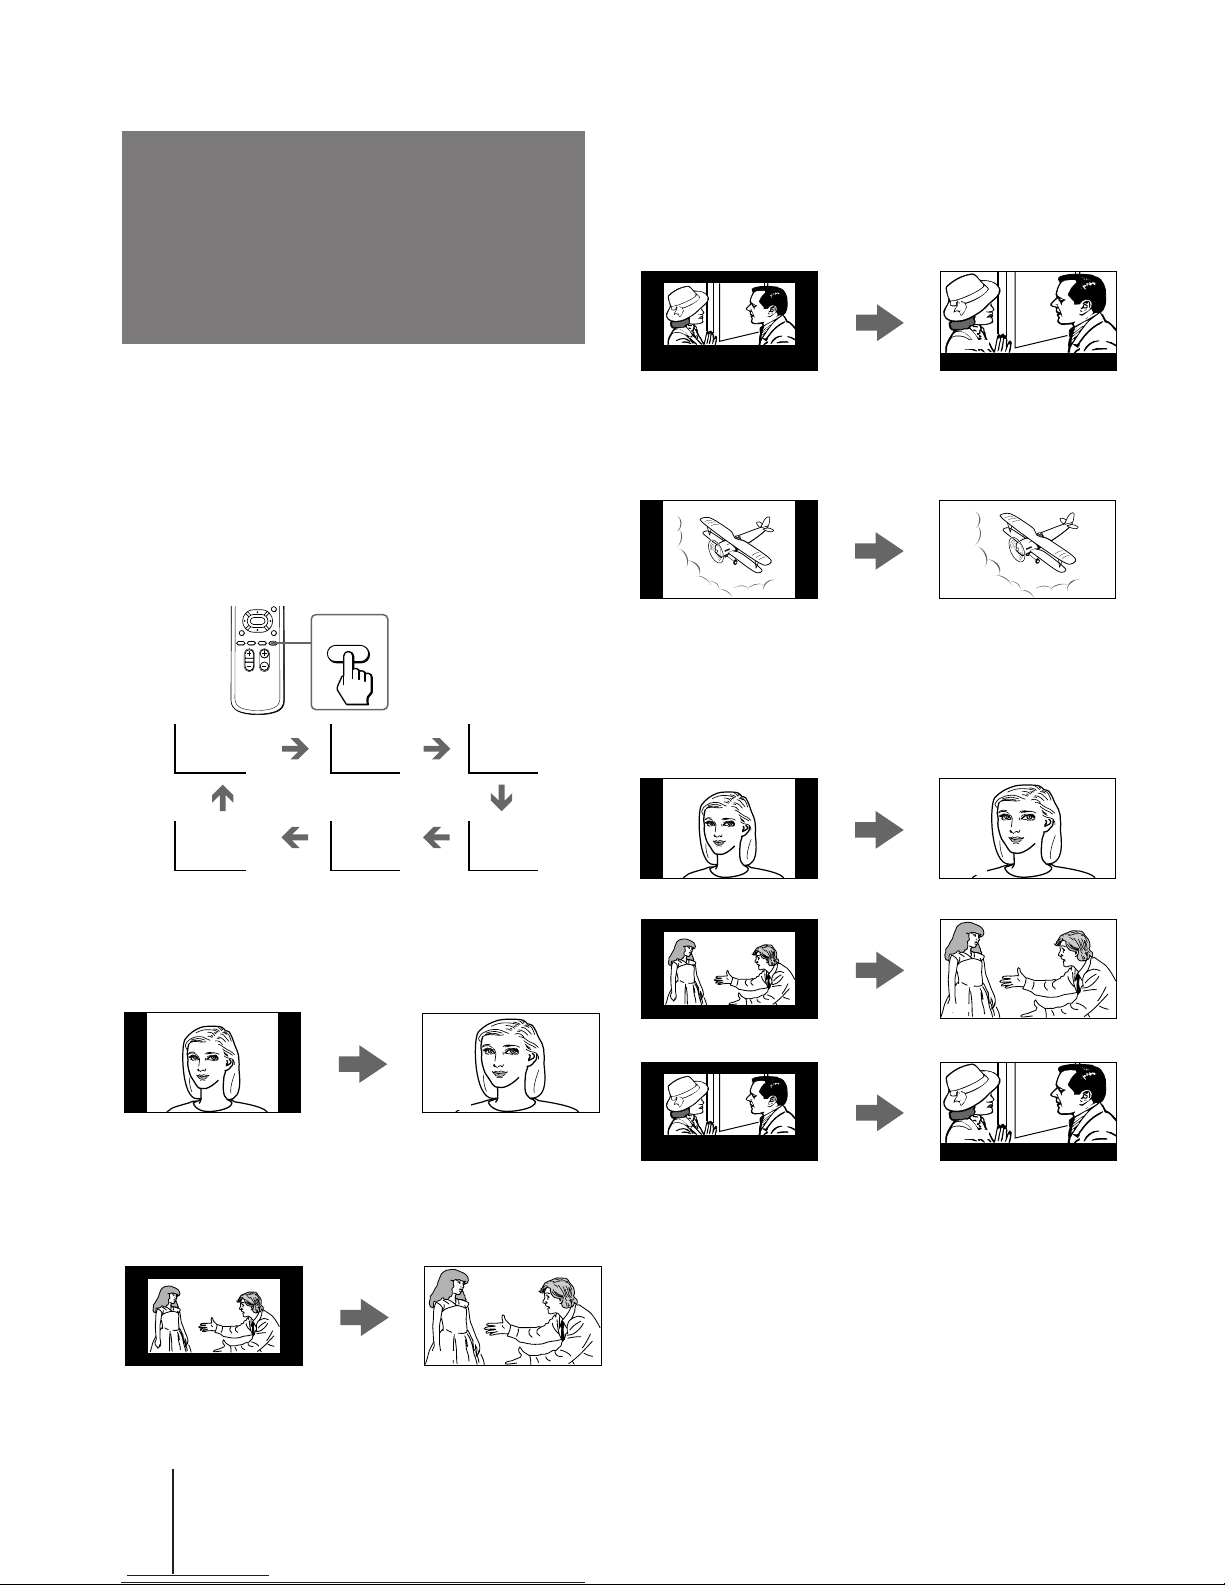
The entire picture is enlarged to fully fit the screen, and
the height of the subtitle area is reduced. This mode is
ideal for viewing a movie with subtitles.
FULL
The width of the picture is increased. This mode is
ideal for viewing a video game screen.
AUTO WIDE
The picture mode of a TV program or a video input
changes automatically to the most suitable wide mode
(WIDEZOOM, ZOOM, or SUBTITLE).
Notes
• If you display the PIP screen in the ZOOM mode, the bottom
of the PIP screen may disappear. This does not indicate a
malfunction.
•When using the AUTO WIDE function, the selected wide
picture mode may not stick to a particular mode. In this case,
select the wide mode you want using the WIDE MODE button.
• The AUTO WIDE function is not available for the SECAM
color system.
WIDE
MODE
WIDEZOOM ZOOM
AUTO WIDE FULL
SUBTITLE
NORMAL
Watching the
picture in wide
mode
(WIDE MODE)
The WIDE MODE feature allows you to watch a variety
of wide mode pictures.
You can select the wide picture modes using the button
on the remote commander or the menu.
Press WIDE MODE repeatedly until the wide
picture mode you want appears on the screen.
WIDEZOOM
The entire picture is enlarged to fully fit the screen.
This mode is ideal for viewing a movie or a sport
program.
ZOOM
The entire picture is enlarged and the edges are cut off.
This mode is ideal for viewing a movie with black
bands.
Good luck, Jane.
Thank you.
Normal mode picture
Normal mode picture
Normal mode picture
Normal mode picture
Normal mode picture
Good luck, Jane.
Thank you.
Good luck, Jane.
Thank you.
Good luck, Jane.
Thank you.
or
or
WIDEZOOM
ZOOM
Normal mode picture
Normal mode picture
FULL
WIDEZOOM
ZOOM
Page 17
Operations
-EN
17
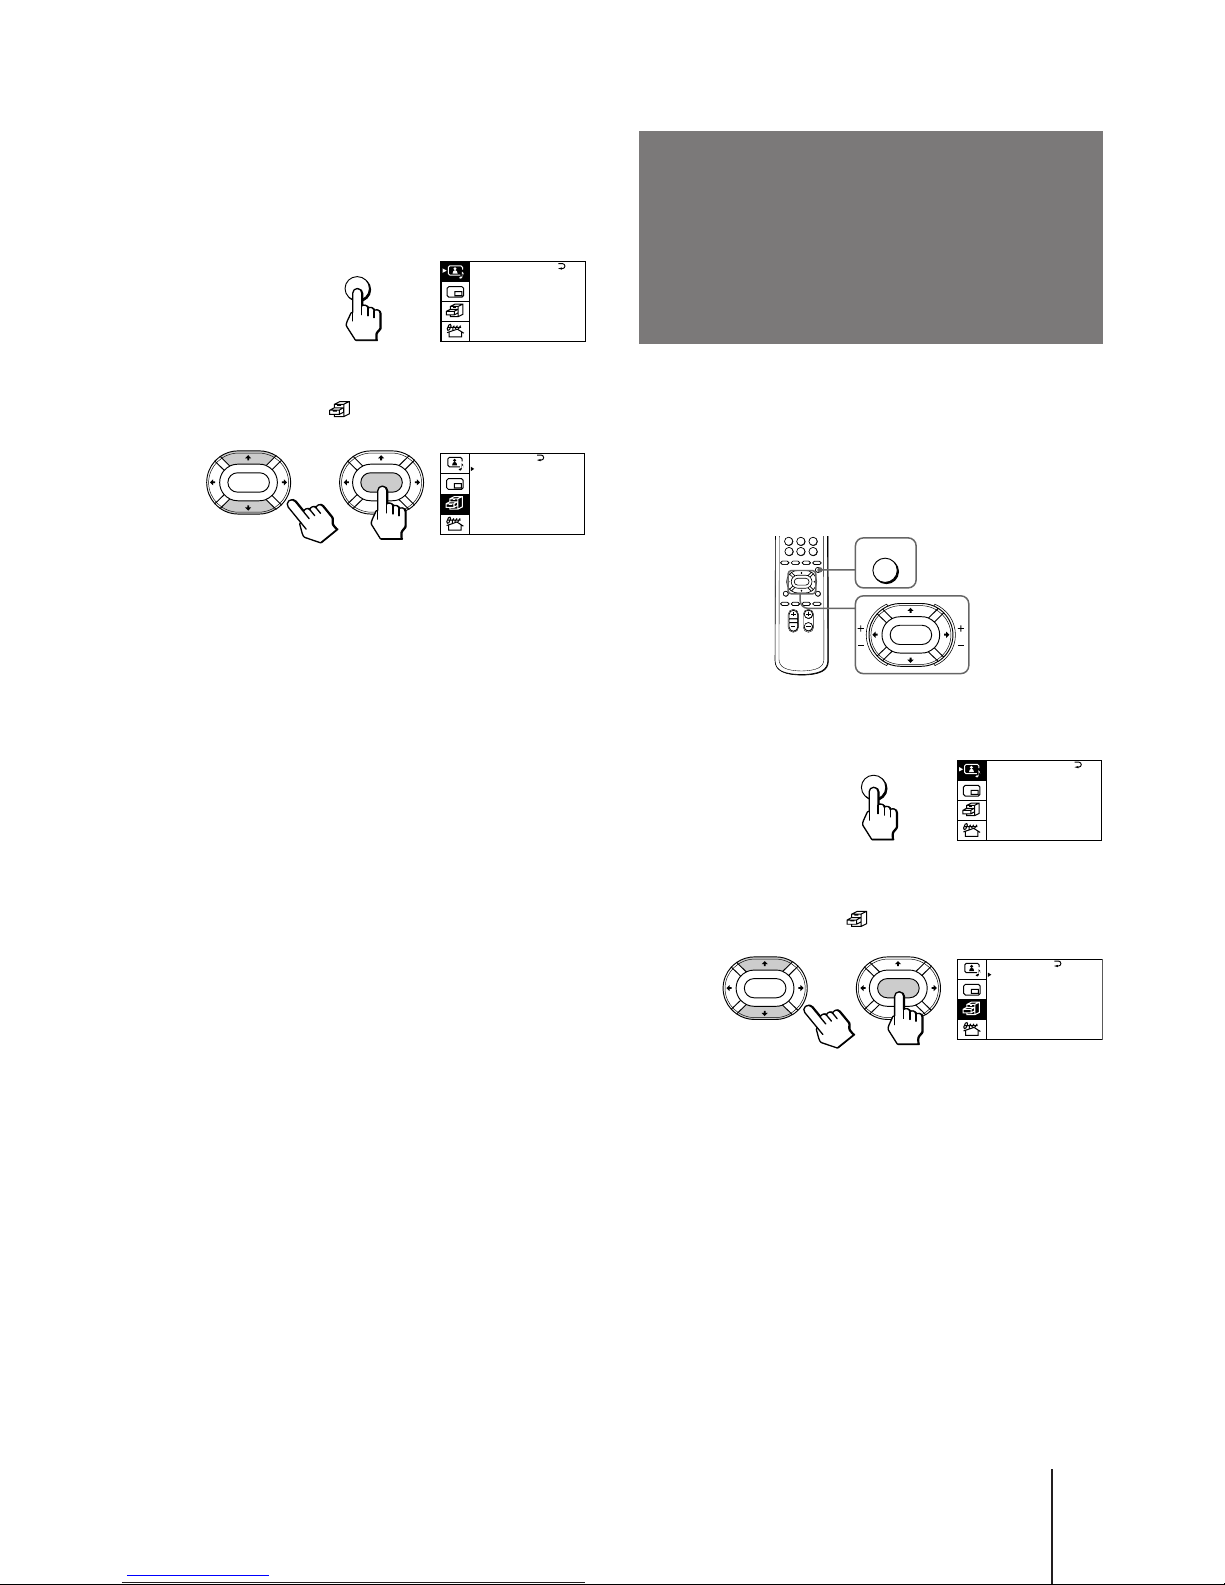
To watch a picture in wide mode using
the menu
1 Press MENU.
2 Press V or v to move the cursor (”) to the
FEATURES menu ( ), and press ENTER.
3 Make sure the cursor (”) appears beside
WIDE MODE, and press ENTER.
4 Press V/b/v/B to select the wide picture
mode you want, and press ENTER.
5 Press MENU to return to the normal screen.
Scrolling a picture
up or down
(SCROLL)
A / V CONTROL
DYNAMIC
SOFT
ST A NDARD
PERSONAL
V I DEO ADJUST
AUDIO ADJ UST
T I L T CORRECT: 0
MENU
The SCROLL feature allows you to scroll a picture up
or down to view the hidden picture at the top or the
bottom of the TV screen when watching a wide mode
picture.
You can use the scroll feature when displaying the
picture in the ZOOM or SUBTITLE mode.
1 Press MENU.
2 Press V or v to move the cursor (”) to the
FEATURES menu ( ), and press ENTER.
3 Press V or v to move the cursor (”) to
SCROLL, and press ENTER.
4 Press V or v to select the most suitable
scroll position, and press ENTER.
SCROLL:
–5 N –4 N –3 N –2 N –1 N 0 n +1 n +2 n +3 n+4 n +5
Press v Press V
Note
• If you scroll the picture with the PIP screen in the ZOOM or
SUBTITLE mode, the bottom of the PIP screen may disappear.
This does not indicate a malfunction.
WIDE MODE :
HYPER SURROUND:
OFF
MONITOR
AV OUT :
FE ATURES
ENTER ENTER
WIDEZOOM
SCROLL : 0
MENU
ENTER
A / V CONTROL
DYNAMIC
SOFT
ST A NDARD
PERSONAL
V I DEO ADJUST
AUDIO ADJ UST
T I L T CORRECT: 0
MENU
WIDE MODE :
HYPER SURROUND:
OFF
MONITOR
AV OUT :
FE ATURES
ENTER ENTER
WIDEZOOM
SCROLL : 0
Page 18
Operations
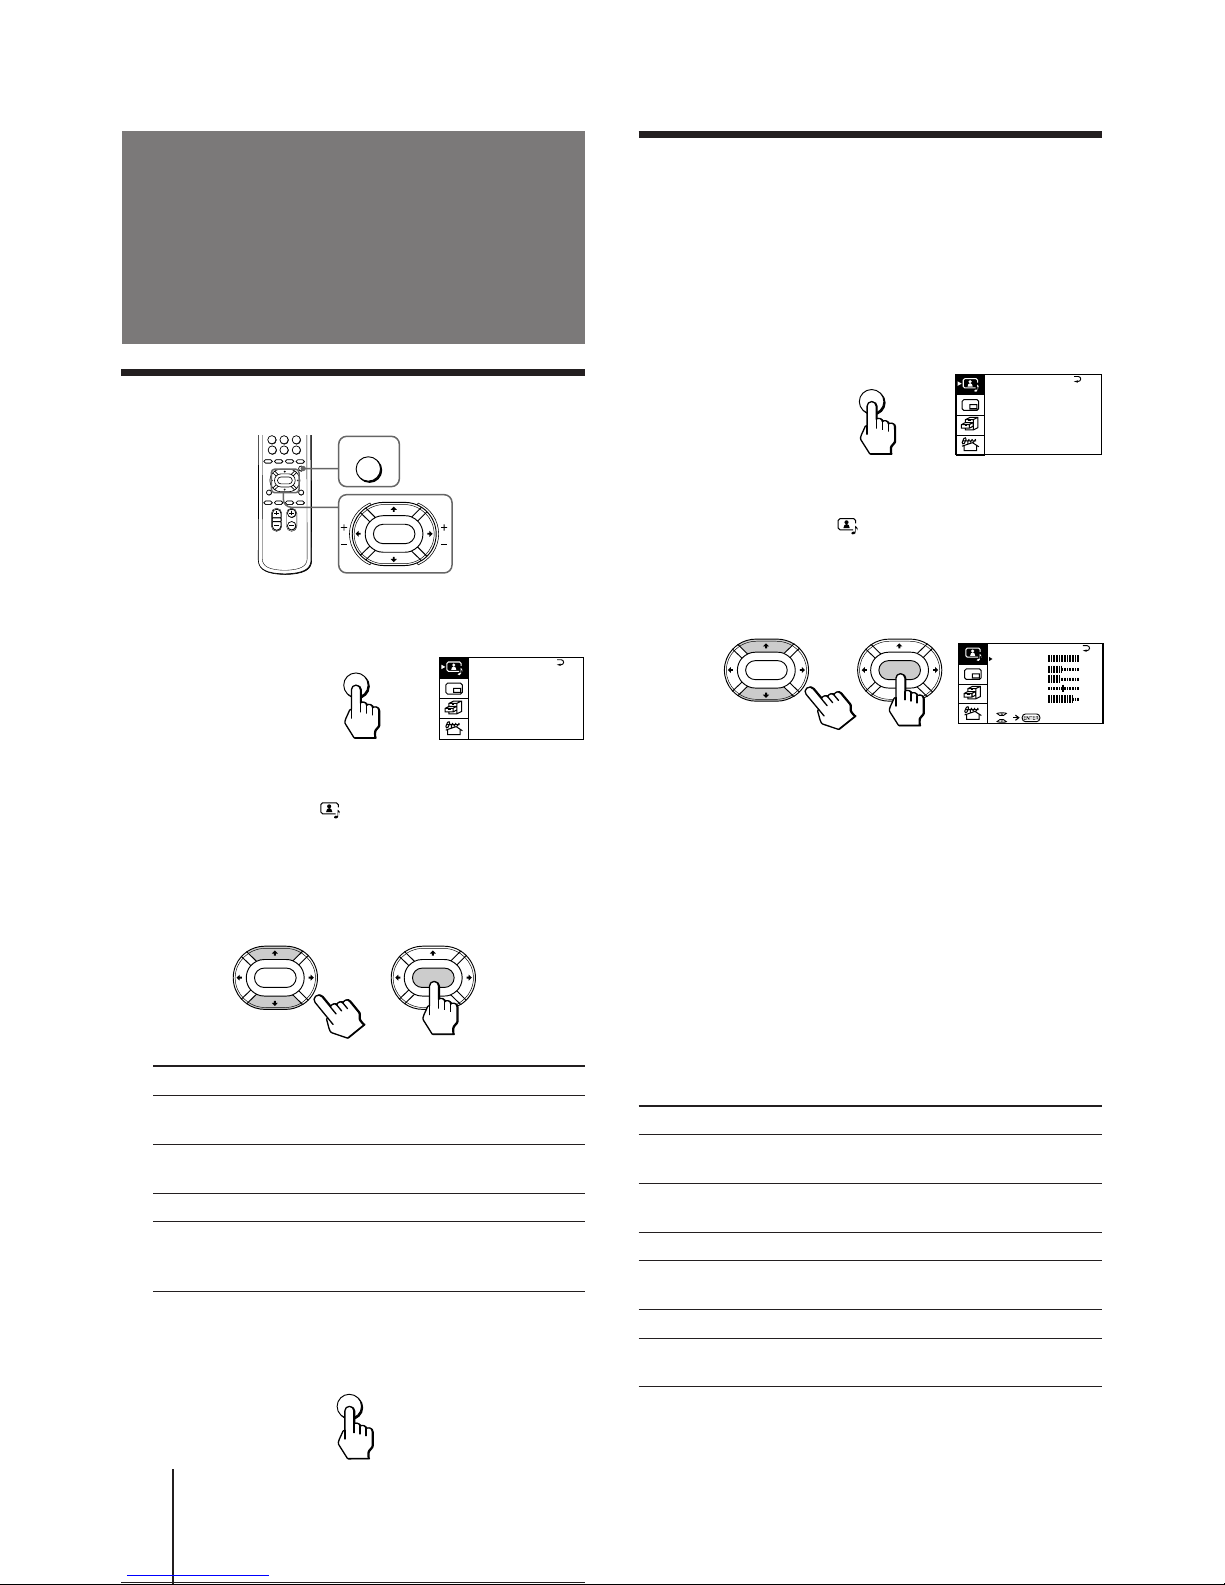
18
-EN
Press V/b
Increase picture
contrast.
Increase color
intensity.
Brighten the picture.
Make picture tones
become greenish.
Sharpen the picture.
Increase emphasis
on picture edges.
Selecting the picture and sound modes
1 Press MENU.
2 Make sure the cursor (”) appears in the A/V
CONTROL menu ( ), and press ENTER.
3 Press V or v to move the cursor (”) to
DYNAMIC, STANDARD, SOFT, or PERSONAL,
and press ENTER.
Select To
DYNAMIC Receive high contrast picture with
powerful sound.
STANDARD Receive normal contrast picture with
medium listening sound.
SOFT Receive mild picture with soft sound.
PERSONAL Receive the last picture and sound
settings that are adjusted using VIDEO
ADJUST and AUDIO ADJUST.
4 Press MENU to return to the normal screen.
Adjusting the
picture and sound
Adjusting the picture settings
(VIDEO ADJUST)
You can adjust the picture settings to suit your taste
with the VIDEO ADJUST option. The adjusted settings
are stored in the PERSONAL option.
1 Press MENU.
2 Make sure the cursor (”) appears in the A/V
CONTROL menu ( ), and press ENTER.
3 Press V or v to move the cursor (”) to VIDEO
ADJUST, and press ENTER.
4 Press V or v to move the cursor (”) to the
item you want to adjust, and press ENTER.
5 Press V/b/v/B to adjust the selected item,
and press ENTER.
For details on each item, see “Description of adjustable
items” below.
6 To adjust other items, repeat steps 4 and 5.
7 Press MENU to return to the normal screen.
Description of adjustable items
Item Press v/B
PICTURE Decrease picture
contrast.
COLOR Decrease color
intensity.
BRIGHT Darken the picture.
HUE Make picture tones
become reddish.
SHARP Soften the picture.
VM Decrease emphasis
on picture edges.
Note
• You can adjust HUE for the NTSC system only.
A / V CONTROL
DYNAMIC
SOFT
ST A NDARD
PERSONAL
V I DEO ADJUST
AUDIO ADJ UST
T I L T CORRECT: 0
MENU
P I CT URE
40
100
0
80
V I DEO ADJUST
COLOR
BR I GHT
HUE
SHARP
VM: HIGH
45
0
ENTER ENTER
MENU
ENTER
A / V CONTROL
DYNAMIC
SOFT
ST A NDARD
PERSONAL
V I DEO ADJUST
AUDIO ADJUST
T I L T CORRECT: 0
MENU
ENTER ENTER
MENU
Page 19
Operations
-EN
19
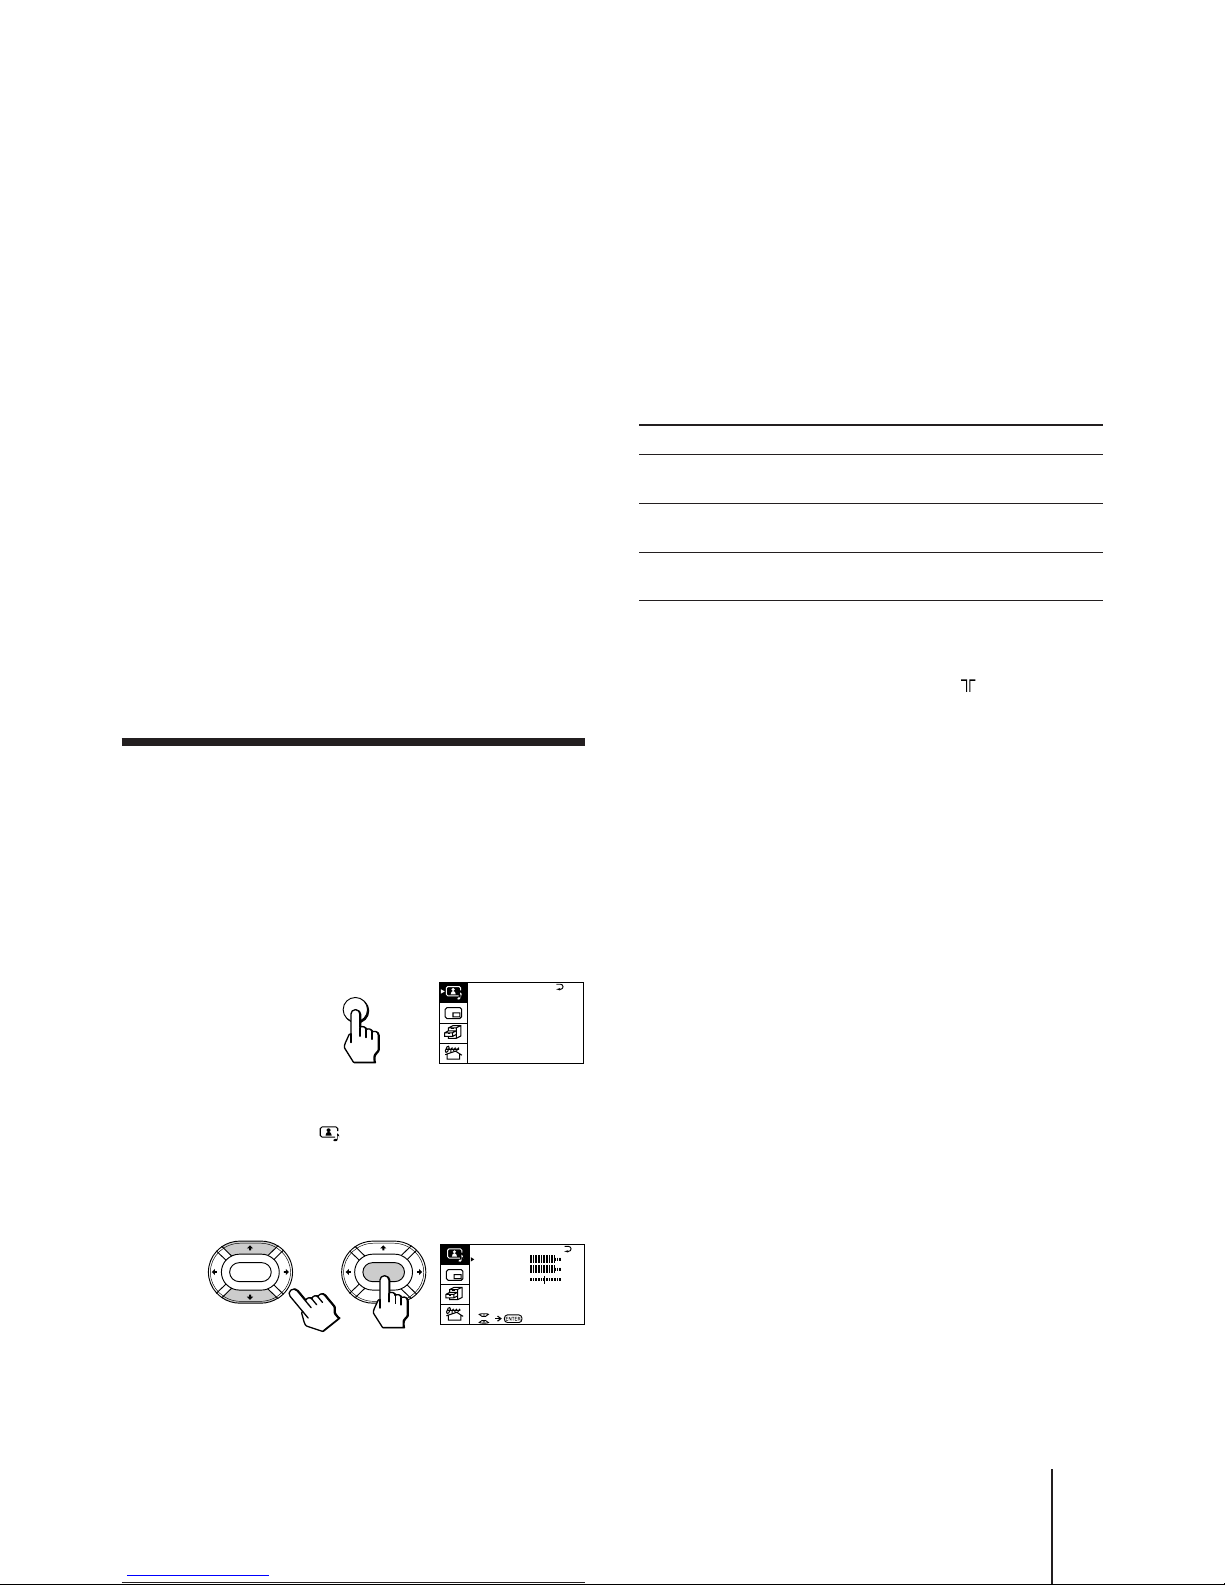
Press V/b
Increase the bass
sound.
Increase the treble
sound.
Increase the right
speaker's volume.
If the picture is slightly snowy
You may try to improve the picture by changing the
VM setting as described below:
1 Display the VIDEO ADJUST menu.
2 Press V or v to move the cursor (”) to VM, and
press ENTER.
3 Press V/b/v/B to select LOW, and press ENTER.
If the picture color is abnormal when receiving
programs through the ˘ (antenna) terminal
Change the color system or the TV system from the
PRESET menu as described below until the color
becomes normal.
1 Display the PRESET menu.
2 Press V or v to move the cursor (”) to
COL SYS or TV SYS, and press ENTER.
3 Press V/b/v/B to change the color system or the
TV system until the color becomes normal, and
press ENTER.
Note
• Normally set the color system (COL SYS) to AUTO.
Adjusting the sound settings
(AUDIO ADJUST)
You can adjust the sound settings to suit your taste
with the AUDIO ADJUST option. The adjusted settings
are stored in the PERSONAL option.
1 Press MENU.
2 Make sure the cursor (”) appears in the A/V
CONTROL menu ( ), and press ENTER.
3 Press V or v to move the cursor (”) to
AUDIO ADJUST, and press ENTER.
4 Press V or v to move the cursor (”) to the
item you want to adjust, and press ENTER.
A / V CONTROL
DYNAMIC
SOFT
ST A NDARD
PERSONAL
V I DEO ADJUST
AUDIO ADJUST
T I L T CORRECT: 0
MENU
BASS
80
00
80
TREBLE
BALANCE
AUDIO ADJ UST
ENTER ENTER
5 Press V/b/v/B to adjust the selected item,
and press ENTER.
For details on each item, see “Description of adjustable
items” below.
6 To adjust other items, repeat steps 4 and 5.
7 Press MENU to return to the normal screen.
Description of adjustable items
Item Press v/B
BASS Decrease the bass
sound.
TREBLE Decrease the treble
sound.
BALANCE Increase the left
speaker's volume
If the sound is distorted or noisy when
receiving programs through the (antenna)
terminal
Change the TV system from the PRESET menu as
described below until the sound becomes normal.
1 Display the PRESET menu.
2 Press V or v to move the cursor (”) to TV SYS, and
press ENTER.
3 Press V/b/v/B to change the TV system until the
sound becomes normal, and press ENTER.
Page 20
Operations
20
-EN
Listening to the
POWER BASSO
sound
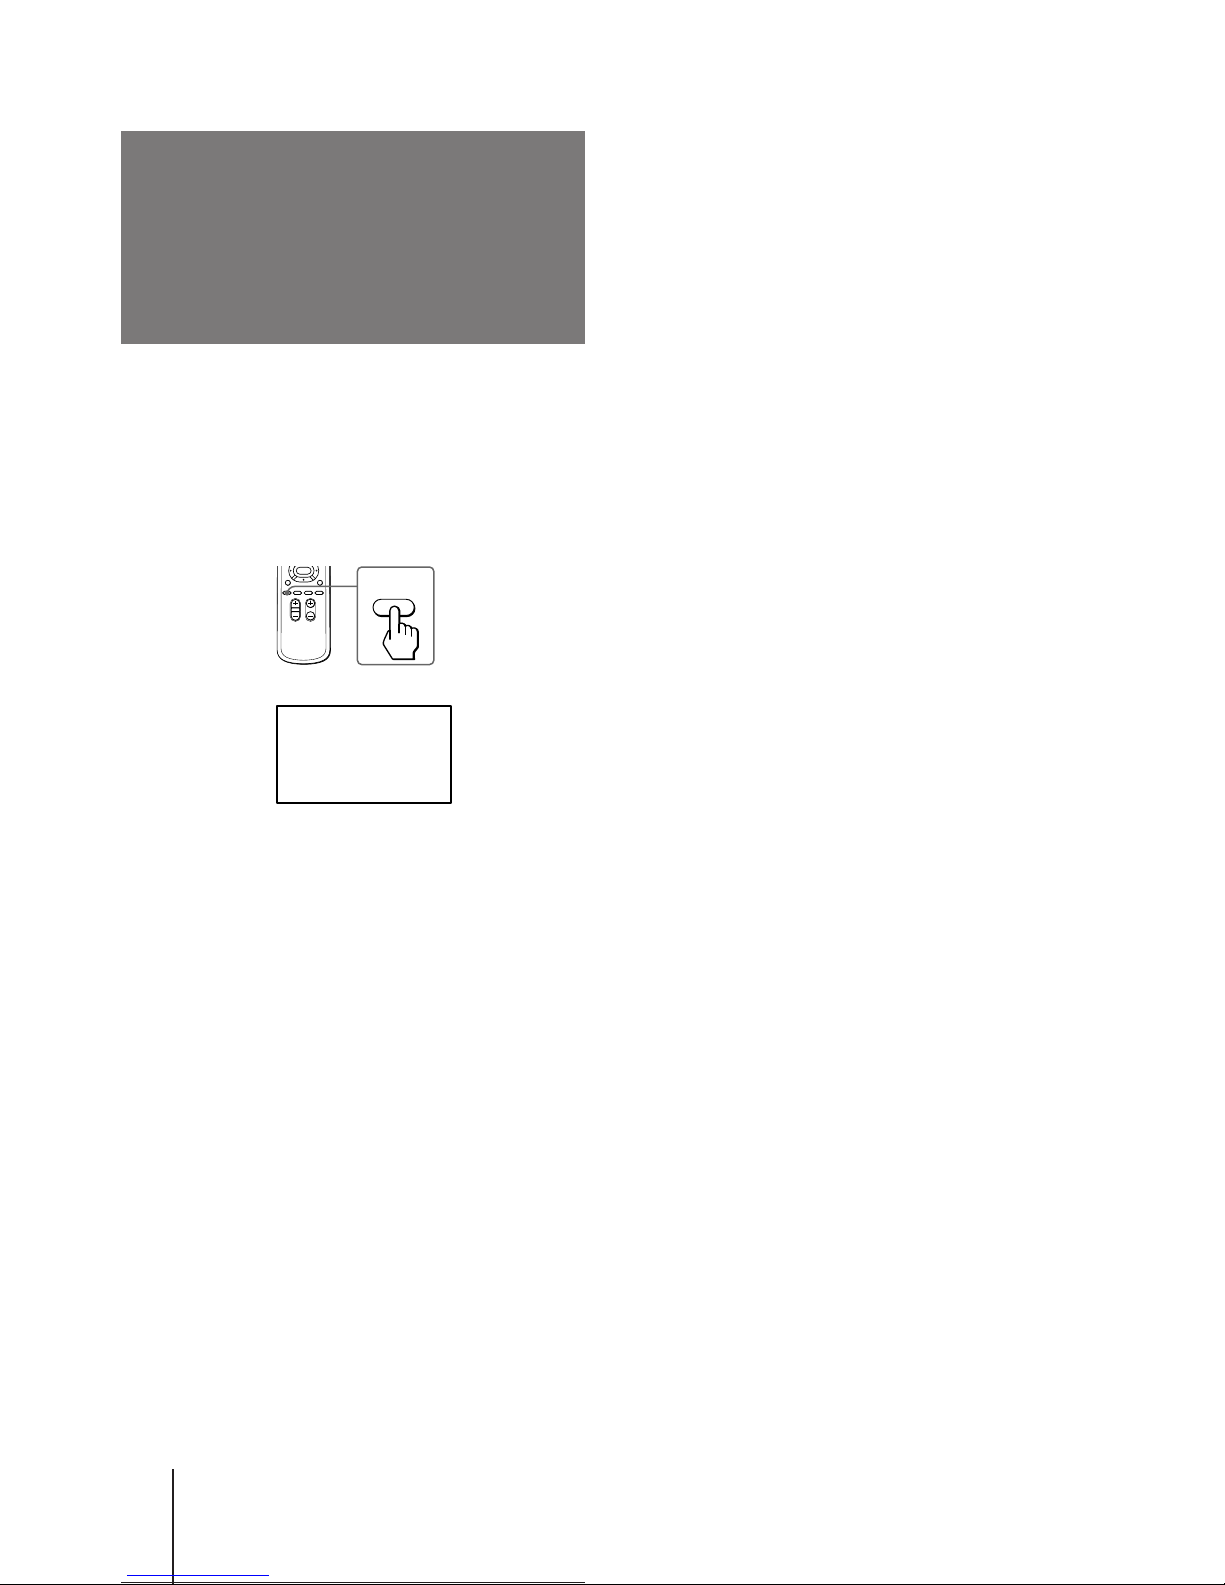
The POWER BASSO sound enables you to enjoy a high
quality sound mode with the best combination of all
types of sound. It reproduces dynamic and clear
sounds and emphasizes low and high audio effects as
well.
Press POWER BASSO.
The sound mode of the TV program or the video input
changes to the POWER BASSO sound.
To restore the previous sound mode
Press POWER BASSO again.
Note
• You can select any of the surround sound modes (HYPER
SURROUND) to cancel the POWER BASSO sound.
POWER
BASSO
POWER BASSO: ON
Page 21
Operations
-EN
21
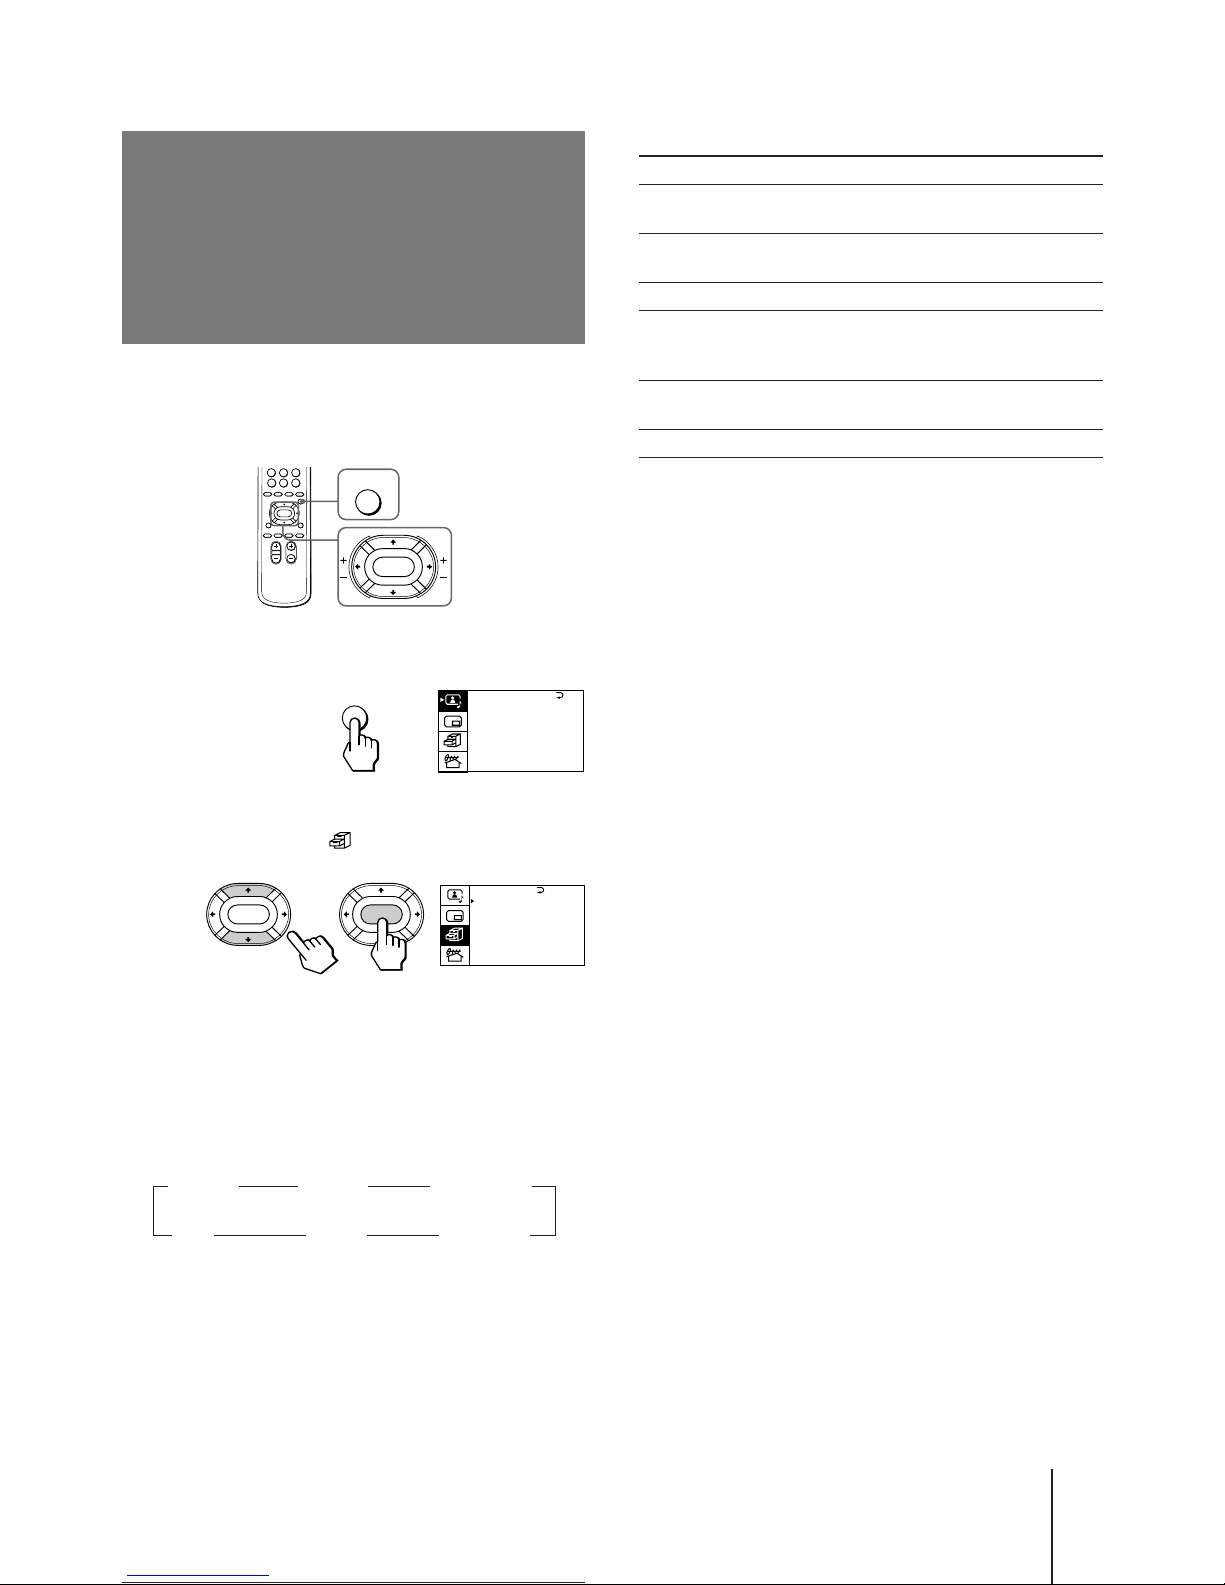
Description of adjustable items
Select To
MOVIE Listen to a sound that emphasizes the bass
audio effect of movie theater.
MUSIC Listen to a dynamic and clear sound that
emphasizes the low and high audio effect.
NEWS〈BBE〉 Listen to a sound that emphasizes voice.
HALL〈SRS〉 Listen to a sound that spreads out over a
large area, giving the feeling of being at a
concert hall.
SPACE Listen to a monaural sound that gives a
stereo-like effect.
OFF Turn off the surround sound.
Notes
• The BBE is manufactured by Sony Corporation under license
from BBE Sound, Inc. It is covered by U.S. Patent No. 4,638,258
and No. 4,482,866. The word “BBE” and the BBE symbol are
the trademarks of BBE Sound, Inc.
• The (r)® SRS (SOUND RETRIEVAL SYSTEM) is
manufactured by Sony Corporation under license from SRS
Labs, Inc. It is covered by U.S. Patent No. 4,748,669.
The word “SRS” and the SRS symbol (r) are registered
trademarks of SRS Labs, Inc.
Listening to the
surround sound
(HYPER SURROUND)
The HYPER SURROUND feature enables you to enjoy
a surround sound effect that is like being in a concert
hall or movie theater when receiving stereo signals.
1 Press MENU.
2 Press V or v to move the cursor (z) to the
FEATURES menu ( ) , and press ENTER.
3 Press V or v to move the cursor (z) to
HYPER SURROUND, and press ENTER.
4 Press V/b/v/B to select MOVIE, MUSIC,
NEWS〈BBE〉, HALL〈SRS〉, or SPACE, and press
ENTER.
n MOVIE n MUSIC n NEWS〈BBE〉
OFF N SPACE N HALL〈SRS〉 N
For details on each item, see “Description of adjustable
items“ below.
5 Press MENU to return to the normal screen.
MENU
ENTER
A / V CONTROL
DYNAMIC
SOFT
ST A NDARD
PERSONAL
V I DEO ADJUST
AUDIO ADJUST
T I L T CORRECT: 0
MENU
WIDE MODE :
HYPER SURROUND:
OFF
MONITOR
AV OUT :
FE ATURES
ENTER ENTER
WIDEZOOM
SCROLL : 0
Page 22
Operations
22
-EN
NICAM
MAIN
Selecting a stereo or
bilingual program
Receiving area for NICAM and A2 (German)
programs
System Receiving area
NICAM Hong Kong, Singapore, New Zealand, etc.
A2 (German) Australia, Malaysia, Thailand, etc.
Notes
• If the signal is very weak, the sound becomes monaural
automatically.
• If the stereo sound is noisy when receiving a NICAM program,
select “MONO.” The sound becomes monaural, however, the
noise will be reduced.
A/B
ENLARGE
On-screen display
(Selected sound)
NICAM
SUB
MONO
On-screen display
(Selected sound)
STEREO
(Stereo sound)
NICAM
MAIN
”””
” ”
””
MAIN SUB
(Main sound) (Sub sound)
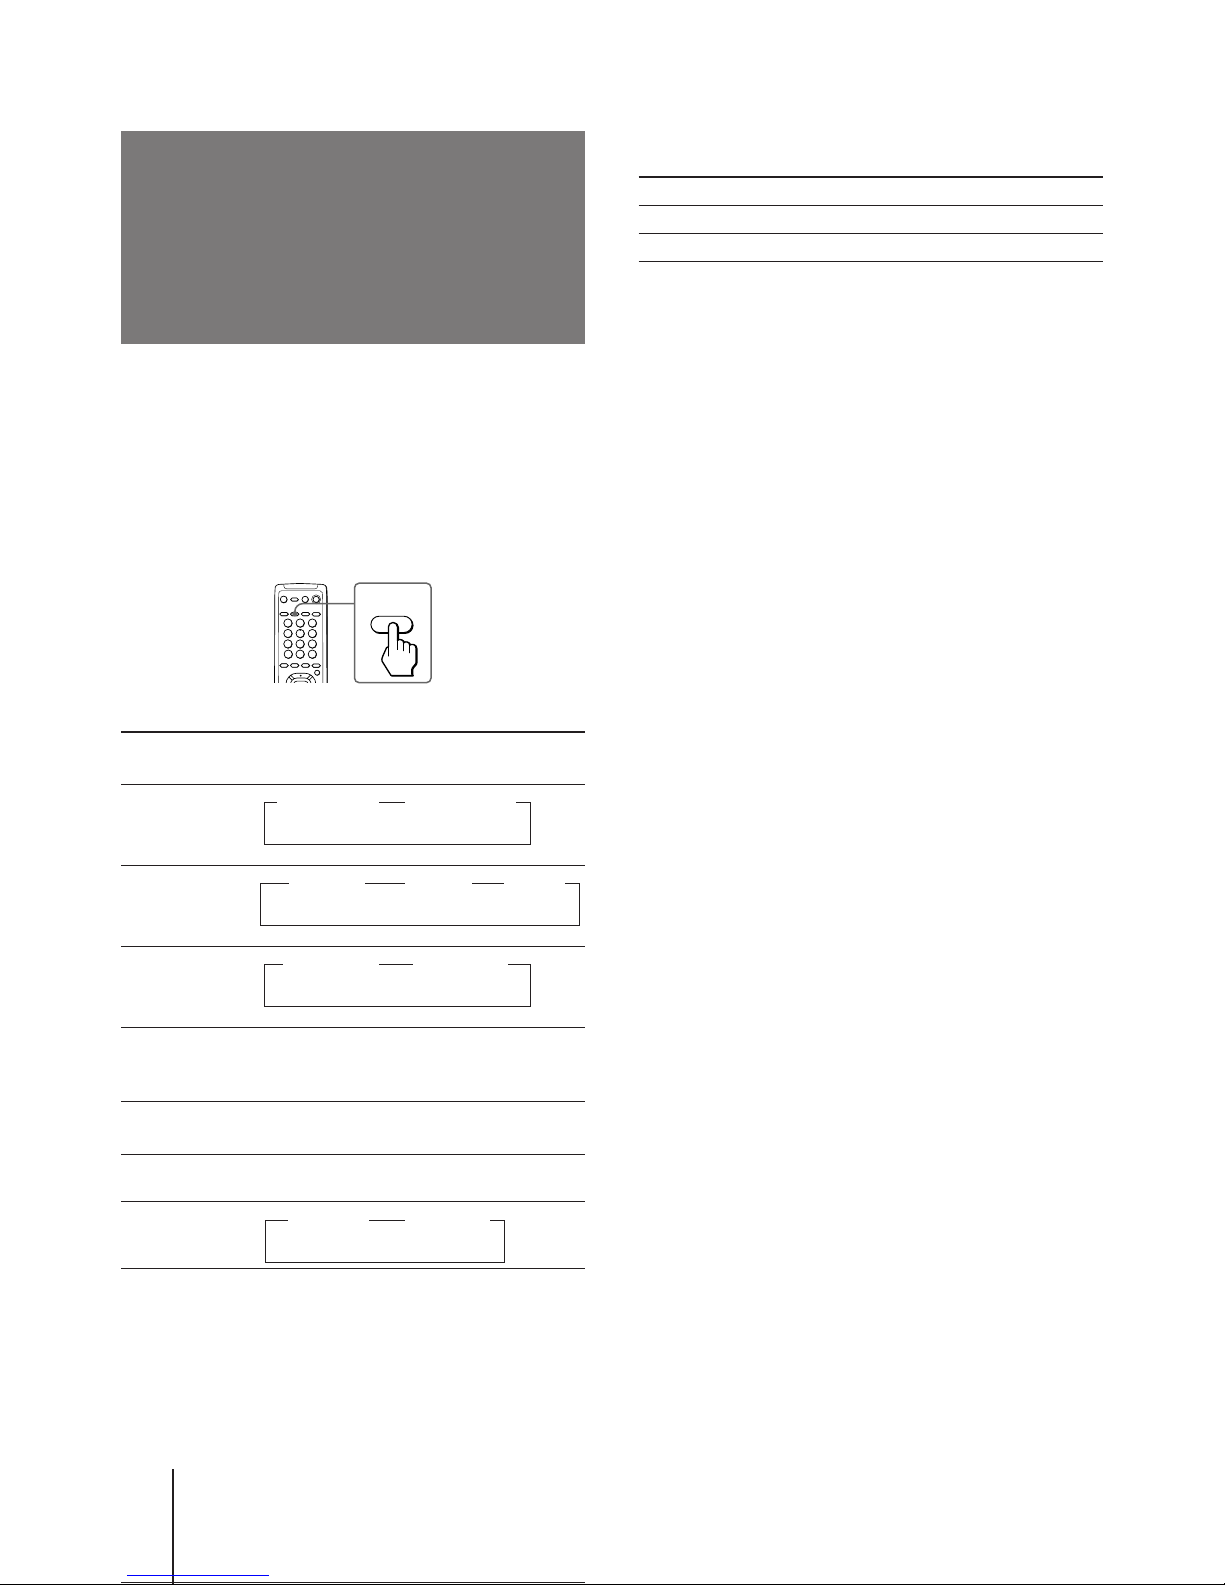
You can enjoy stereo sound or bilingual programs of
NICAM and A2 (German) stereo systems.
Press A/B/ENLARGE repeatedly until you
receive the sound you want.
The on-screen display changes corresponding to the
selected sound and the STANDBY/STEREO/WAKE
UP indicator also lights up.
When receiving a NICAM program
Broadcasting
NICAM stereo n NICAM n MONO
(Stereo sound) (Regular sound)
NICAM bilingual
(Main sound) (Sub sound) (Regular sound)
NICAM monaural MONO
(Main sound) (Regular sound)
When receiving an A2 (German) program
Broadcasting
A2 (German)
stereo
A2 (German)
bilingual
Page 23
Operations
-EN
23
To restore the normal screen
Press PROGR INDEX again or PIP.
You can also select PROGR INDEX or PIP : OFF from
the PIP menu, and press ENTER to restore the normal
screen.
To view multiple programs on the nine sub
screens using the menu
1 Press MENU.
2 Press V or v to move the cursor (z) to the
PIP menu ( ), and press ENTER.
3 Make sure the cursor (z) appears beside
PROGR INDEX, and press ENTER.
Notes
• You can change the position of the nine sub screens using the
PIP menu (as described in "Changing the position of the PIP
screen” on page 25).
• You can hear the sound of the main screen when viewing
multiple programs on the nine sub screens.
• You can use the number buttons on the remote commander to
change the program position of the main screen when viewing
multiple programs on the nine sub screens.
Viewing multiple
programs at the
same time
(PROGRAM INDEX)
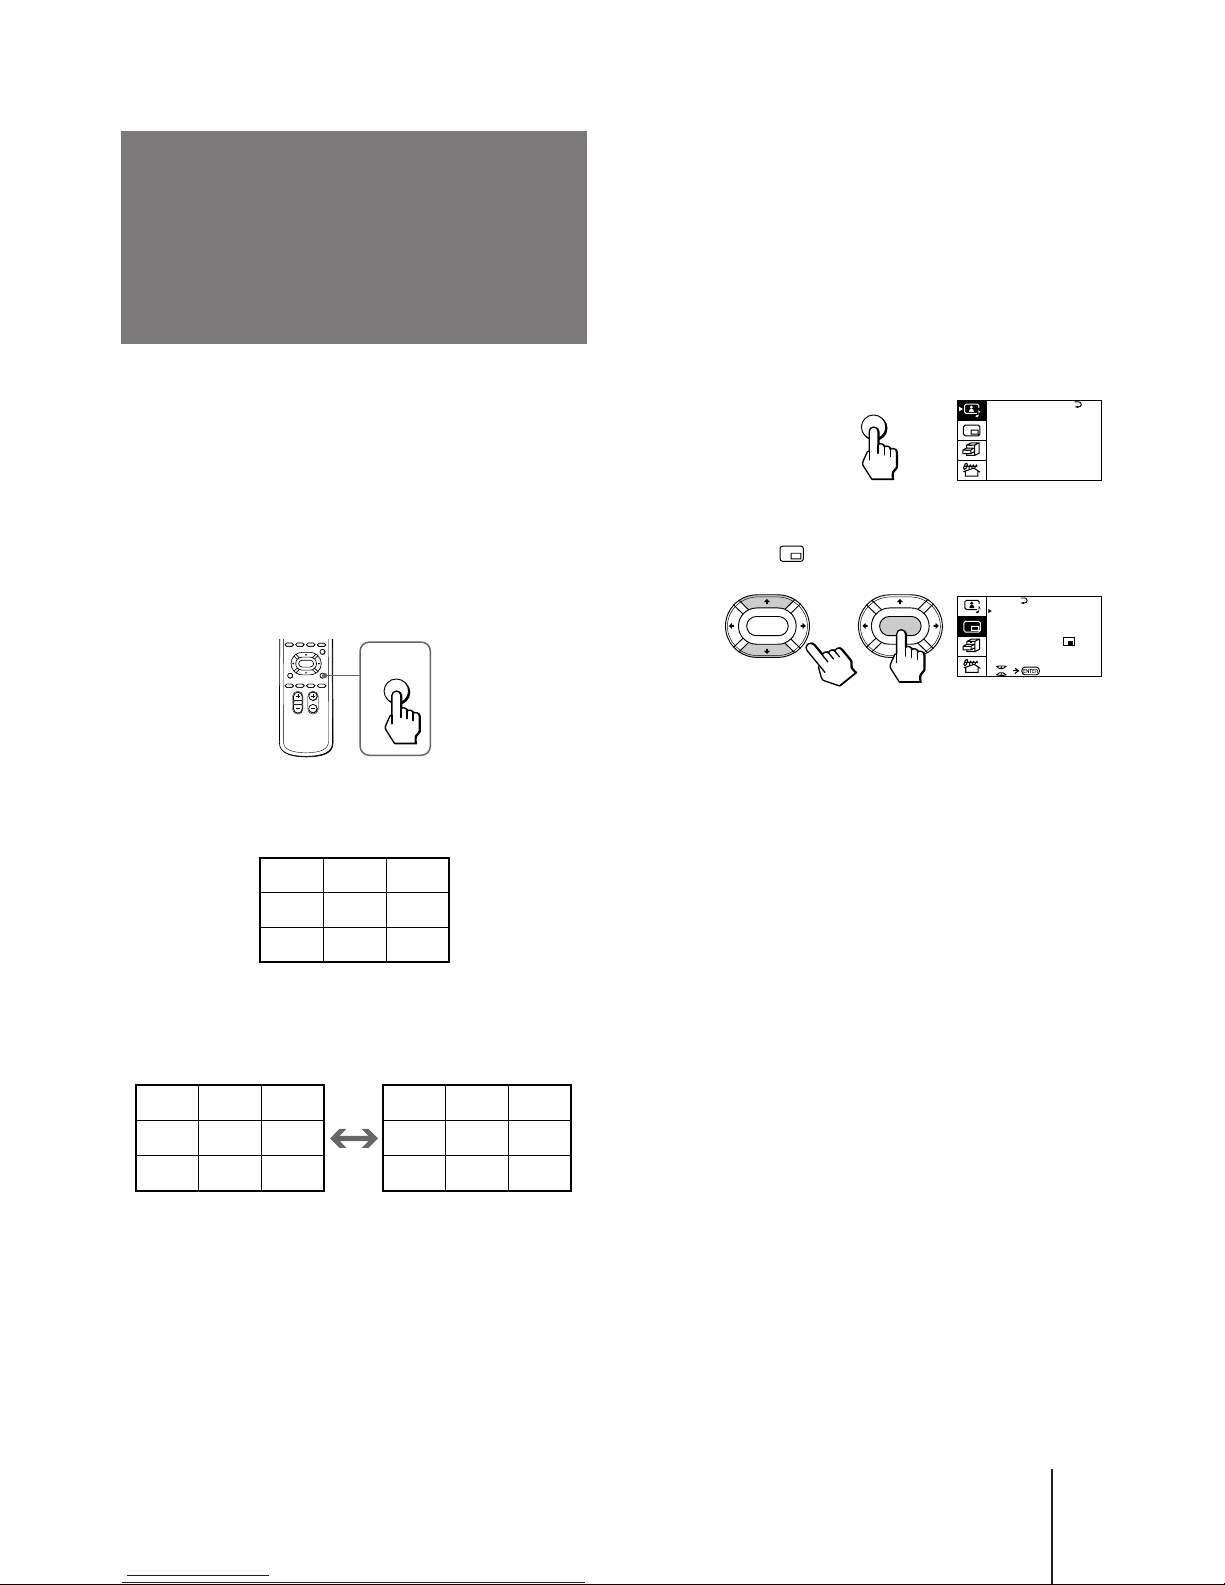
The PROGRAM INDEX feature allows you to view all
the preset TV programs and the video inputs on the
nine sub screens within the main screen at the same
time.
You can view multiple programs on the nine sub
screens using the button on the remote commander or
the menu.
Press PROGR INDEX.
The first nine preset programs appear on the nine sub
screens.
To view the next or the previous nine preset
programs on the nine sub screens
Press PROGR +/– on the remote commander or the TV.
To select the program you want to watch
directly after viewing multiple programs on
the nine sub screens
Press the number buttons, VIDEO/HOLD, or press
V/b/v/B to move the cursor (>>>) that appears on the
first screen to the screen of the program you want to
watch, and press ENTER.
PROGR
INDEX
123
456
789
>>>
123
456
789
10 11 12
V1 V2 V3
123
>>> >>>
A / V CONTROL
DYNAMIC
SOFT
ST A NDARD
PERSONAL
V I DEO ADJUST
AUDIO ADJ UST
T I L T CORRECT: 0
MENU
PIP
PIP: OFF
PIP TEXT
STROBE
POS I T I ON:
PROGR I NDE X
ENTER ENTER
Page 24
Operations
24
-EN
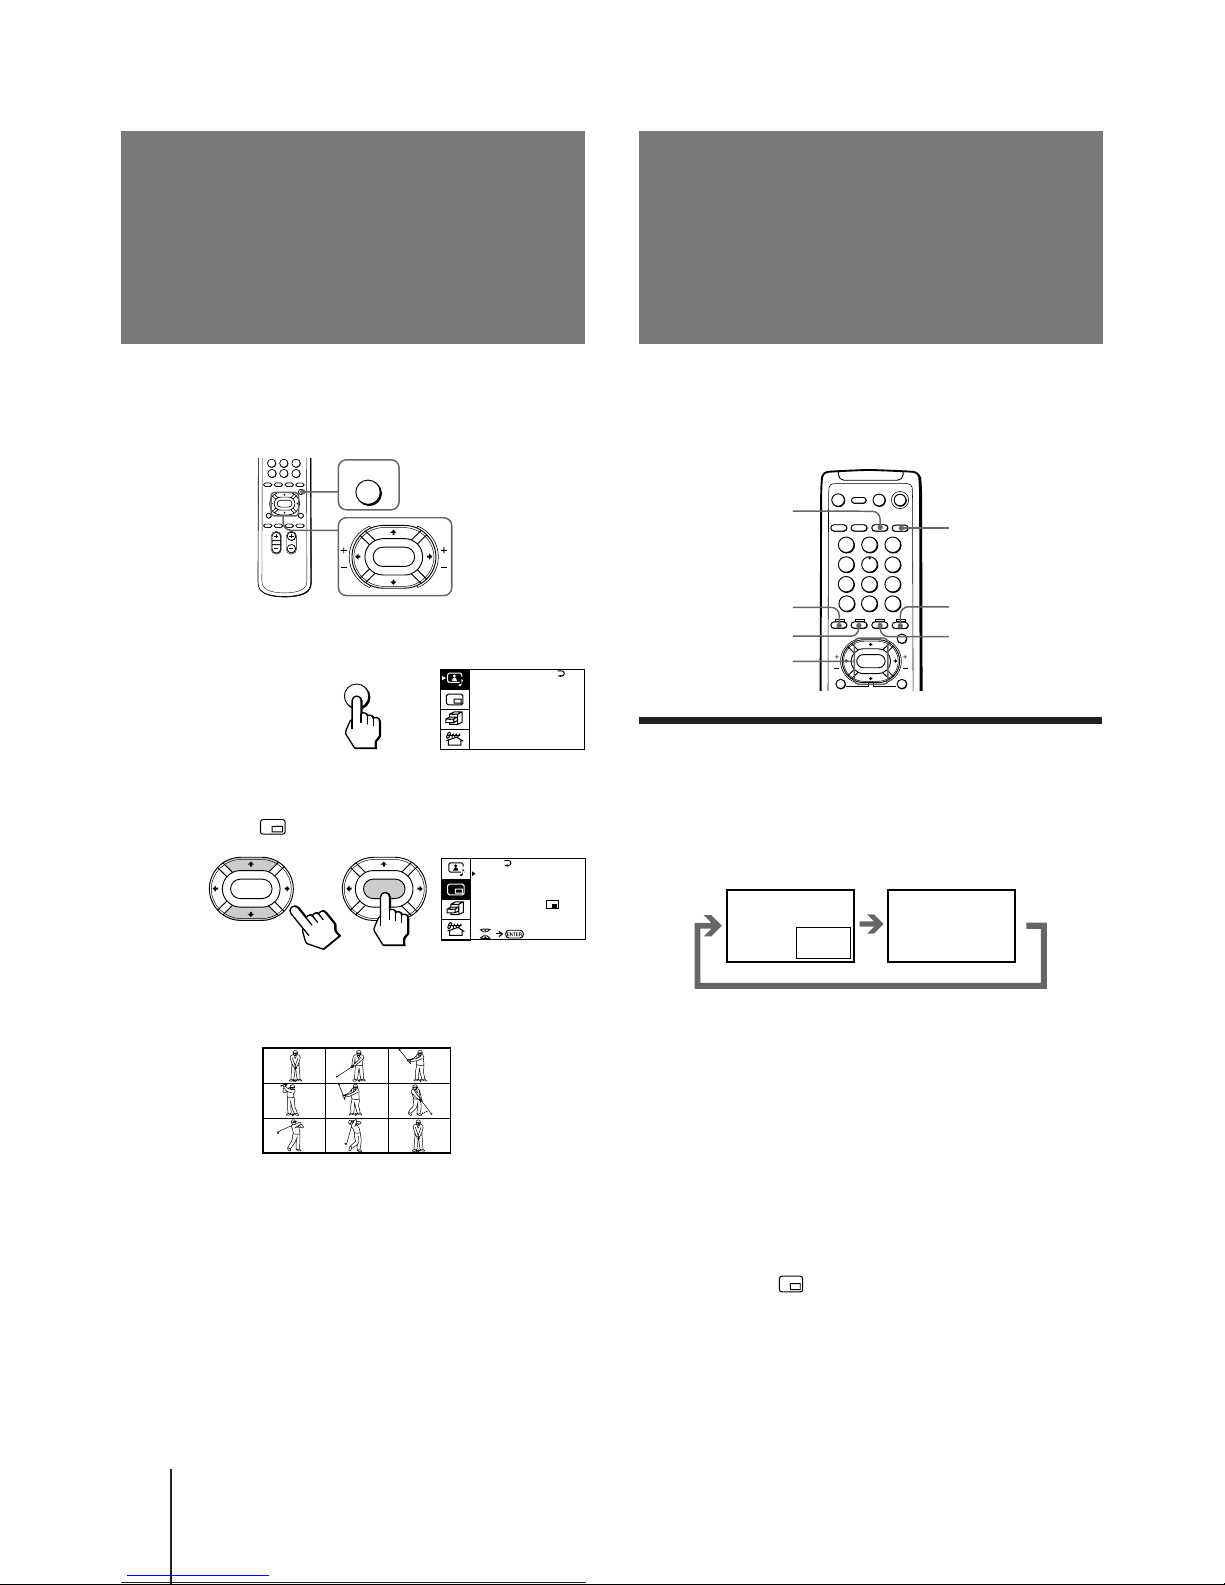
You can watch a slow motion movement of the main
screen picture which is displayed frame-by-frame on
the nine sub screens within the main screen.
1 Press MENU.
2 Press V or v to move the cursor (z) to the
PIP menu ( ), and press ENTER.
3 Press V or v to move the cursor (z) to
STROBE, and press ENTER.
To restore the normal screen
Select STROBE again or PIP : OFF from the PIP menu,
and press ENTER.
You can also press TV, VIDEO/HOLD, PROGR +/–, or
PIP to restore the normal screen.
Notes
• You can change the position of the nine sub screens using the
PIP menu (as described in "Changing the position of the PIP
screen" on page 25).
• You can hear the normal sound when using the STROBE
feature.
Using the Picture-inPicture (PIP)
features
Displaying frameby-frame pictures
(STROBE)
MENU
ENTER
A / V CONTROL
DYNAMIC
SOFT
ST A NDARD
PERSONAL
V I DEO ADJUST
AUDIO ADJ UST
T I L T CORRECT: 0
MENU
PIP
PIP: OFF
PIP TEXT
STROBE
POS I T I ON:
PROGR I NDE X
ENTER ENTER
1
2
3
4
5
6
7
8
0
9
VIDEO/HOLD
TV/VIDEO
FREEZE
V/v/ENTER
SWAP
PIP
TV
With the Picture-in-Picture (PIP) feature, you can
display a sub screen within the main picture of
different TV programs or video inputs.
Displaying the PIP screen
You can display the PIP screen using the button on the
remote commander or the menu.
Press PIP.
Selecting a TV program or video input in the
PIP screen
To select a TV program, press V or v, and press
ENTER.
To select a video input, press TV/VIDEO.
To display the PIP screen using the menu
1 Press MENU.
2 Press V or v to move the cursor (”) to the
PIP menu ( ), and press ENTER.
3 Press V or v to move the cursor (”) to PIP,
and press ENTER.
4 Press V/b/v/B to select ON, and press ENTER.
5 Press MENU to return to the normal screen.
Page 25
Operations
-EN
25
MENU
ENTER
A / V CONTROL
DYNAMIC
SOFT
ST A NDARD
PERSONAL
V I DEO ADJUST
AUDIO ADJ UST
T I L T CORRECT: 0
MENU
PIP
PIP: OFF
PIP TEXT
STROBE
POS I T I ON:
PROGR I NDE X
ENTER ENTER
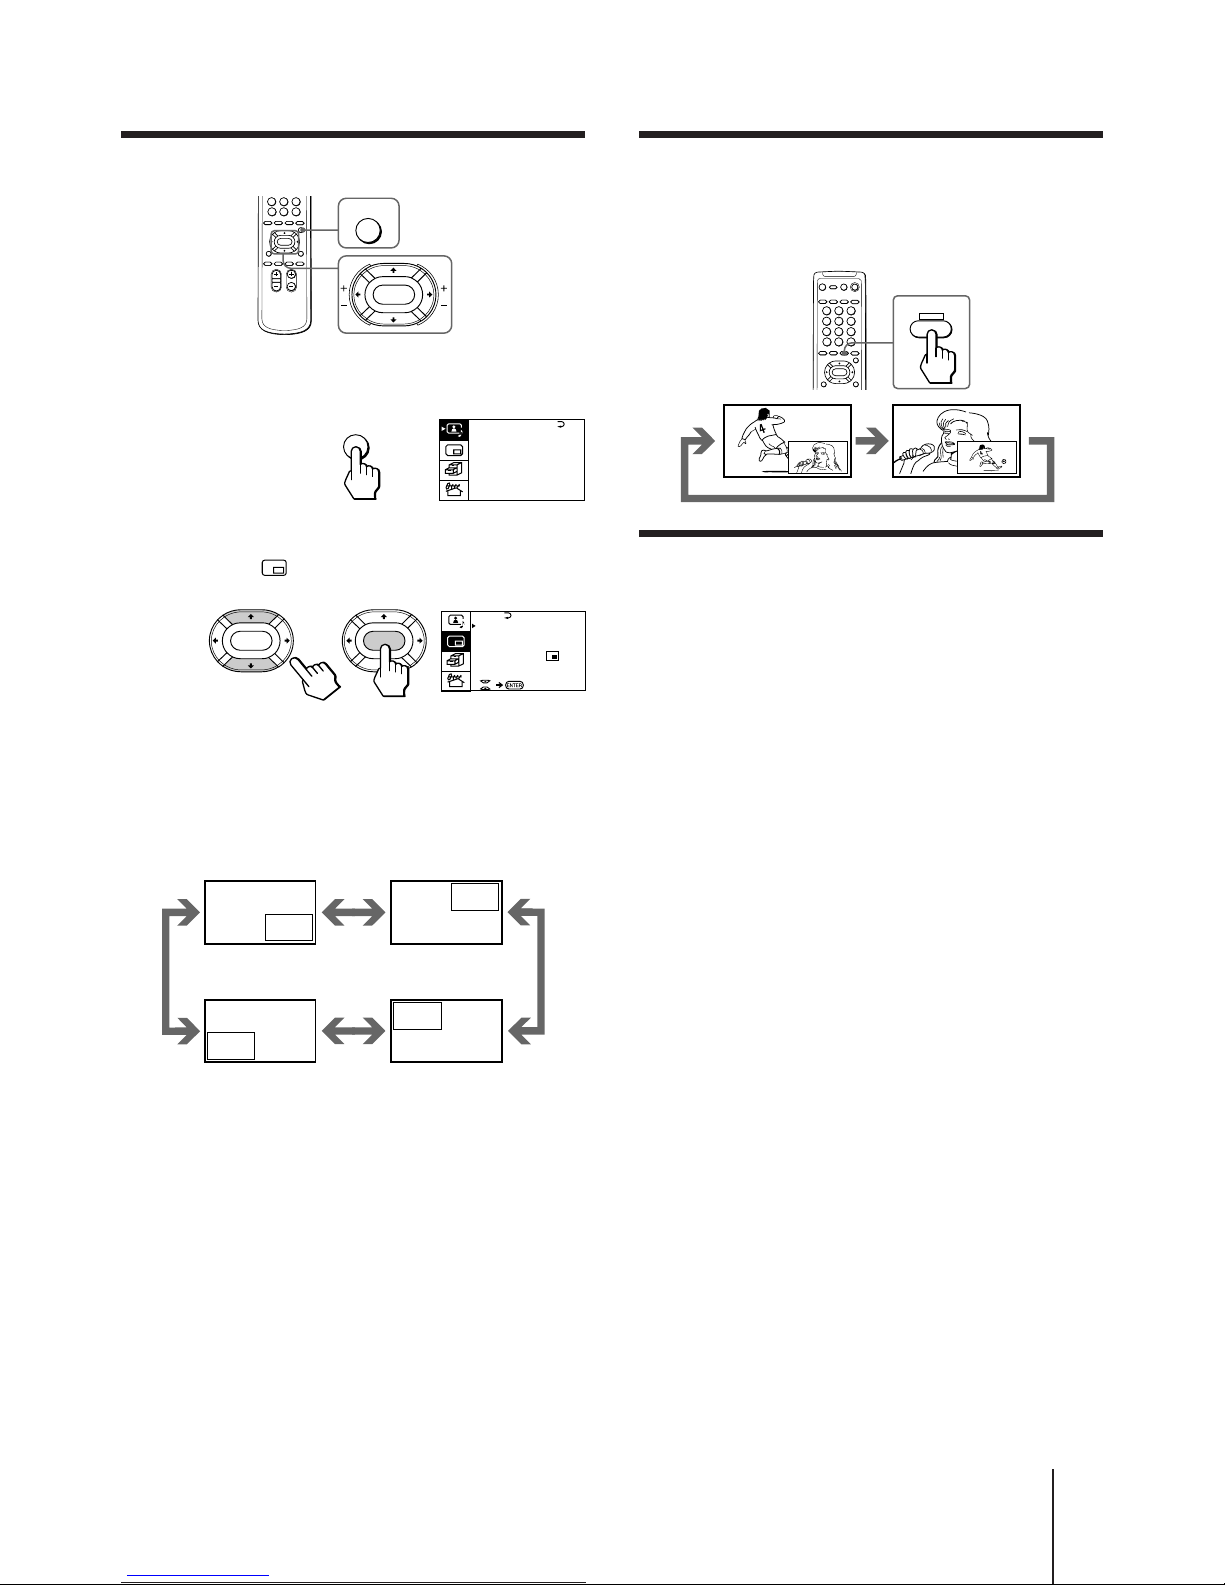
SWAP
Swapping pictures between the main
and PIP screens
Press SWAP.
Freezing the PIP screen
Press FREEZE.
The PIP screen will freeze.
To restore the normal screen
Press FREEZE again.
Notes
• When you display a video input on the PIP screen at an
abnormal speed, the picture may be noisy depending on the
VCR.
• If you display different color systems on the main screen and
the PIP screen, the size of the PIP screen may be different and
the PIP picture may be noisy. This does not indicate a
malfunction of the TV.
Changing the position of the PIP screen
1 Press MENU.
2 Press V or v to move the cursor (”) to the
PIP menu ( ), and press ENTER.
3 Press V or v to move the cursor (z) to
POSITION, and press ENTER.
4 Press V/b/v/B to select the position you
want, and press ENTER.
5 Press MENU to return to the normal screen.
Page 26
Operations
26
-EN
Viewing Teletext
Checking the contents of a Teletext
service (INDEX)
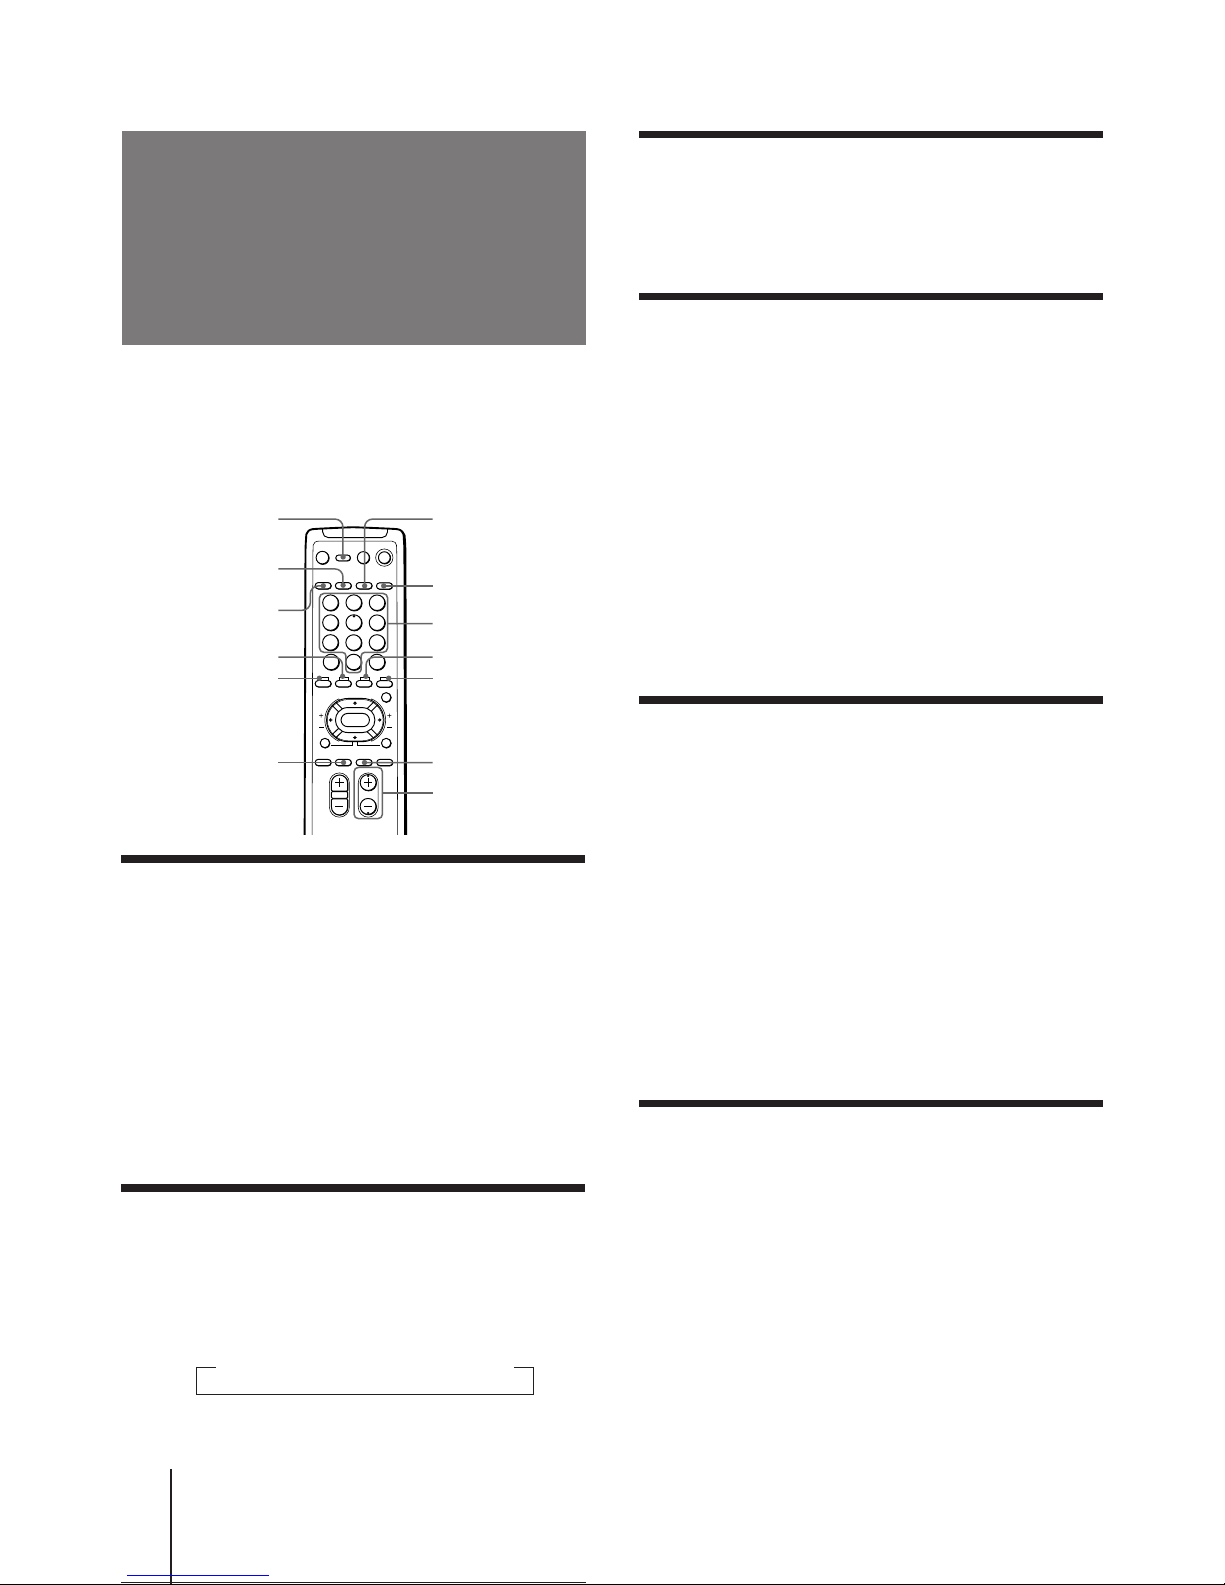
Press WAKE UP/INDEX to display an overview
of the Teletext contents and page numbers.
Using FASTEXT
This feature allows you to quickly access a Teletext
page that uses FASTEXT. When a FASTEXT page is
broadcasted, the colored-menus appear at the bottom
of the screen. The colors of the menus correspond to the
red (TV/VIDEO), green (FREEZE), yellow (SWAP),
and blue (PIP) color-coded buttons on the remote
commander.
To access a FASTEXT menu
Press the color-coded button on the remote commander
that corresponds to the colored menu which appears at
the bottom of the screen. The menu page appears on
the screen after several seconds.
Selecting a Teletext page
Press the number buttons to enter the threedigit page number of the Teletext page you
want.
If you make a mistake, re-enter the correct page
number.
To access the next or previous page
Press PROGR +/–.
You can also access a Teletext page of any page
numbers that appear in the colored column at the
bottom of the screen using the corresponding colorcoded button on the remote commander.
Holding a Teletext page (HOLD)
A Teletext page may consist of several subpages. You
can stop the page scrolling in order to read the text at
your own pace.
Press VIDEO/HOLD.
The HOLD symbol “H” appears at the top left corner
of the screen.
To resume normal Teletext operation
Press VIDEO/HOLD again or TEXT.
TV stations broadcast an information service called
Teletext via a TV channel.
Teletext service allows you to receive various
information such as weather forecasts or news at any
time.
Displaying Teletext
1 Select a TV channel that carries the Teletext
broadcast you want to watch.
2 Press TEXT to display the Teletext.
A Teletext page (normally the index page) is
displayed. If there is no Teletext broadcast, “100” is
displayed at the top left corner of the screen.
To turn off Teletext
Press TV.
Superimposing a Teletext page on the
TV picture
Press TEXT.
Each time you press TEXT, the screen changes as
follows:
n Teletext n Teletext and TV n TV
DISPLAY/REVEAL
A/B/ENLARGE
TEXT
WAKE UP/INDEX
Number
TV
1
2
3
4
5
6
7
8
0
9
VIDEO/HOLD
Yellow
Blue
PROGR +/–
SLEEP/TEXT CLR
Green
Red
Page 27

Operations
-EN
27
Revealing concealed information
(REVEAL)
The REVEAL option lets you disclose concealed
information, such as an answer to a quiz that you find
on some of the Teletext pages.
Press DISPLAY/REVEAL.
To conceal the information
Press DISPLAY/REVEAL again.
Enlarging the Teletext display
(ENLARGE)
Press A/B/ENLARGE.
Each time you press A/B/ENLARGE, the Teletext
display changes as follows:
n Enlarge upper half n Enlarge lower half
Normal size N
Waiting for a Teletext page while
watching a TV program (TEXT CLEAR)
1 Key in the page number of the Teletext that
you want to refer, then press SLEEP/
TEXT CLR.
2 When the page number is displayed on the
screen, press TEXT to turn on the Teletext.
Page 28
Operations
28
-EN
MENU
ENTER
A / V CONTROL
DYNAMIC
SOFT
ST A NDARD
PERSONAL
V I DEO ADJUST
AUDIO ADJ UST
T I L T CORRECT: 0
MENU
PIP
PIP: OFF
PIP TEXT
STROBE
POS I T I ON:
PROGR I NDE X
ENTER ENTER
To display a Teletext page on the PIP screen
using the menu
1 Press MENU.
2 Press V or v to move the cursor (z) to the
PIP menu ( ) , and press ENTER.
3 Press V or v to move the cursor (z) to PIP
TEXT, and press ENTER.
4 Press V/b/v/B to select the Teletext page you
want to watch.
Notes
• You can also use the color-coded buttons (see page 26) while
displaying a Teletext page on the PIP screen.
• To select a Teletext page on the PIP screen, press V/b/v/B
once only.
If you press V/b/v/B continuously, the Teletext page
numbers also change continuously at a fast speed.
• You can change the position of a Teletext page on the PIP
screen using the PIP menu (as described in "Changing the
position of the PIP screen" on page 25).
Displaying Teletext
on the PIP screen
(PIP TEXT)
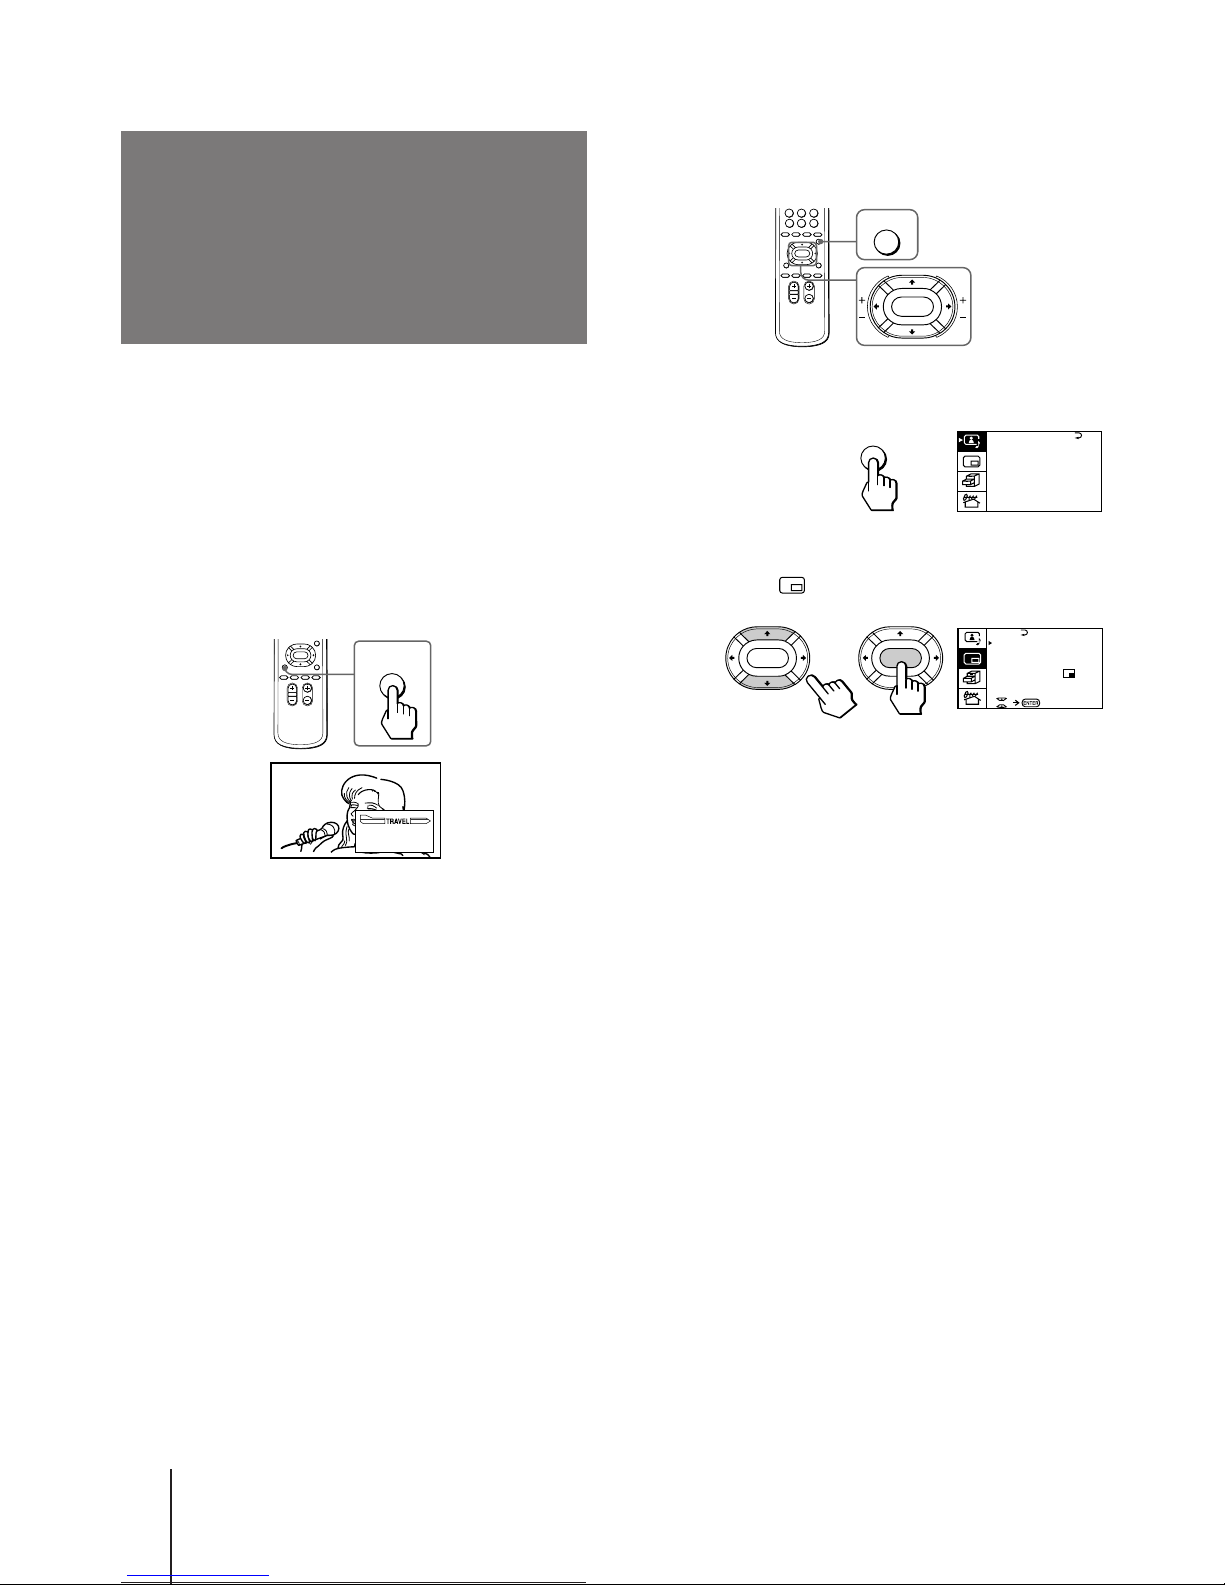
The PIP TEXT feature enables you to display a Teletext
page on the PIP screen while watching a TV program.
You can display the Teletext on the PIP screen using
the button on the remote commander or the menu.
1 Select a TV channel that carries the Teletext
broadcast you want to watch.
2 Press PIP TEXT.
To restore the normal screen
Press PIP TEXT again, TV, VIDEO/HOLD, or PROGR
+/–.
You can also select PIP : OFF from the PIP menu, and
press ENTER to restore the normal screen.
PIP
TEXT
P166 SECTEXT 166 FR1 MAR 03:59:09
Fom Singapore
To PARIS
To OSAKA
To ROMA
To SYDNEY
Day Dep/Arr Flight Alrcraft
1.6 220/0588 SQ28 747
2 2130/1225 PA115 L15
3 2115/1330 SQ26 747
2.7 2130/0745 SQ24
747
4 2300/0915 AZ487 747
2.5 1000/1715 SQ6 747
4.6 0930/2015 CX522 L10
1 2210/0610 SQ21A 747
2 2100/0835 SQ21A 747
Page 29
Operations
-EN
29
Viewing a video
game screen
You can view a video game screen in the optimum
mode that gives soft picture and dynamic sound effect.
Press GAME.
The picture and sound change to the mode that is
suitable for a video game.
To restore the normal picture and sound
modes
Press TV, VIDEO/HOLD, or PROGR +/–.
Notes
• If you press the GAME button when the TV is in the standby
mode, the TV turns on automatically and the picture and
sound change to the mode that is suitable for a video game.
• To display a video game screen, connect the video game
equipment to the VIDEO 3 INPUT jacks at the front of the TV
or the VIDEO IN 3 jacks at the rear of the TV.
GAME
GAME
Page 30
Operations
30
-EN
Using the AV OUT (advanced rec-out)
terminal
You can select the output signal from the MON/TV
OUT jacks at the rear of the TV. However, the signals of
the PROGRAM INDEX, STROBE, PIP modes, and the
Teletext broadcast cannot be output even though
MONITOR is selected.
1 Press MENU.
2 Press V or v to move the cursor (z) to the
FEATURES menu ( ), and press ENTER.
3 Press V or v to move the cursor (z) to AV
OUT, and press ENTER.
4 Press V/b/v/B to select the output signal,
and press ENTER.
Select To
TV Output the signal of the TV broadcast.
MONITOR Output the signal of the picture you are
watching as a main picture.
Note
• Do not change the channel while recording with a VCR
through the MON/TV OUT jacks. If you change the channel, it
also changes the channel you are recording.
Customizing the TV
A / V CONTROL
DYNAMIC
SOFT
ST A NDARD
PERSONAL
V I DEO ADJUST
AUDIO ADJUST
T I L T CORRECT: 0
MENU
A / V CONTROL
DYNAMIC
SOFT
ST A NDARD
PERSONAL
V I DEO ADJUST
AUDIO ADJ UST
T I L T CORRECT: 0
MENU
Adjusting the picture tilt
You can adjust the picture tilt if it is not aligned to the
TV screen. This may happen due to the direction of the
earth’s magnetic fields in relation to the TV position.
1 Press MENU.
2 Make sure the cursor (z) appears in the A/V
CONTROL menu ( ), and press ENTER.
3 Press V or v to move the cursor (z) to TILT
CORRECT, and press ENTER.
4 Press V/b/v/B to select the most suitable
value to adjust the picture tilt, and press
ENTER.
TILT CORRECT:
–5 N –4 N –3 N –2 N –1 N 0 n +1 n +2 n +3 n+4 n +5
Press v/B Press V/b
WIDE MODE :
HYPER SURROUND:
OFF
MONITOR
AV OUT :
FE ATURES
ENTER ENTER
WIDEZOOM
SCROLL : 0
Page 31
Operations
-EN
31
Troubleshooting
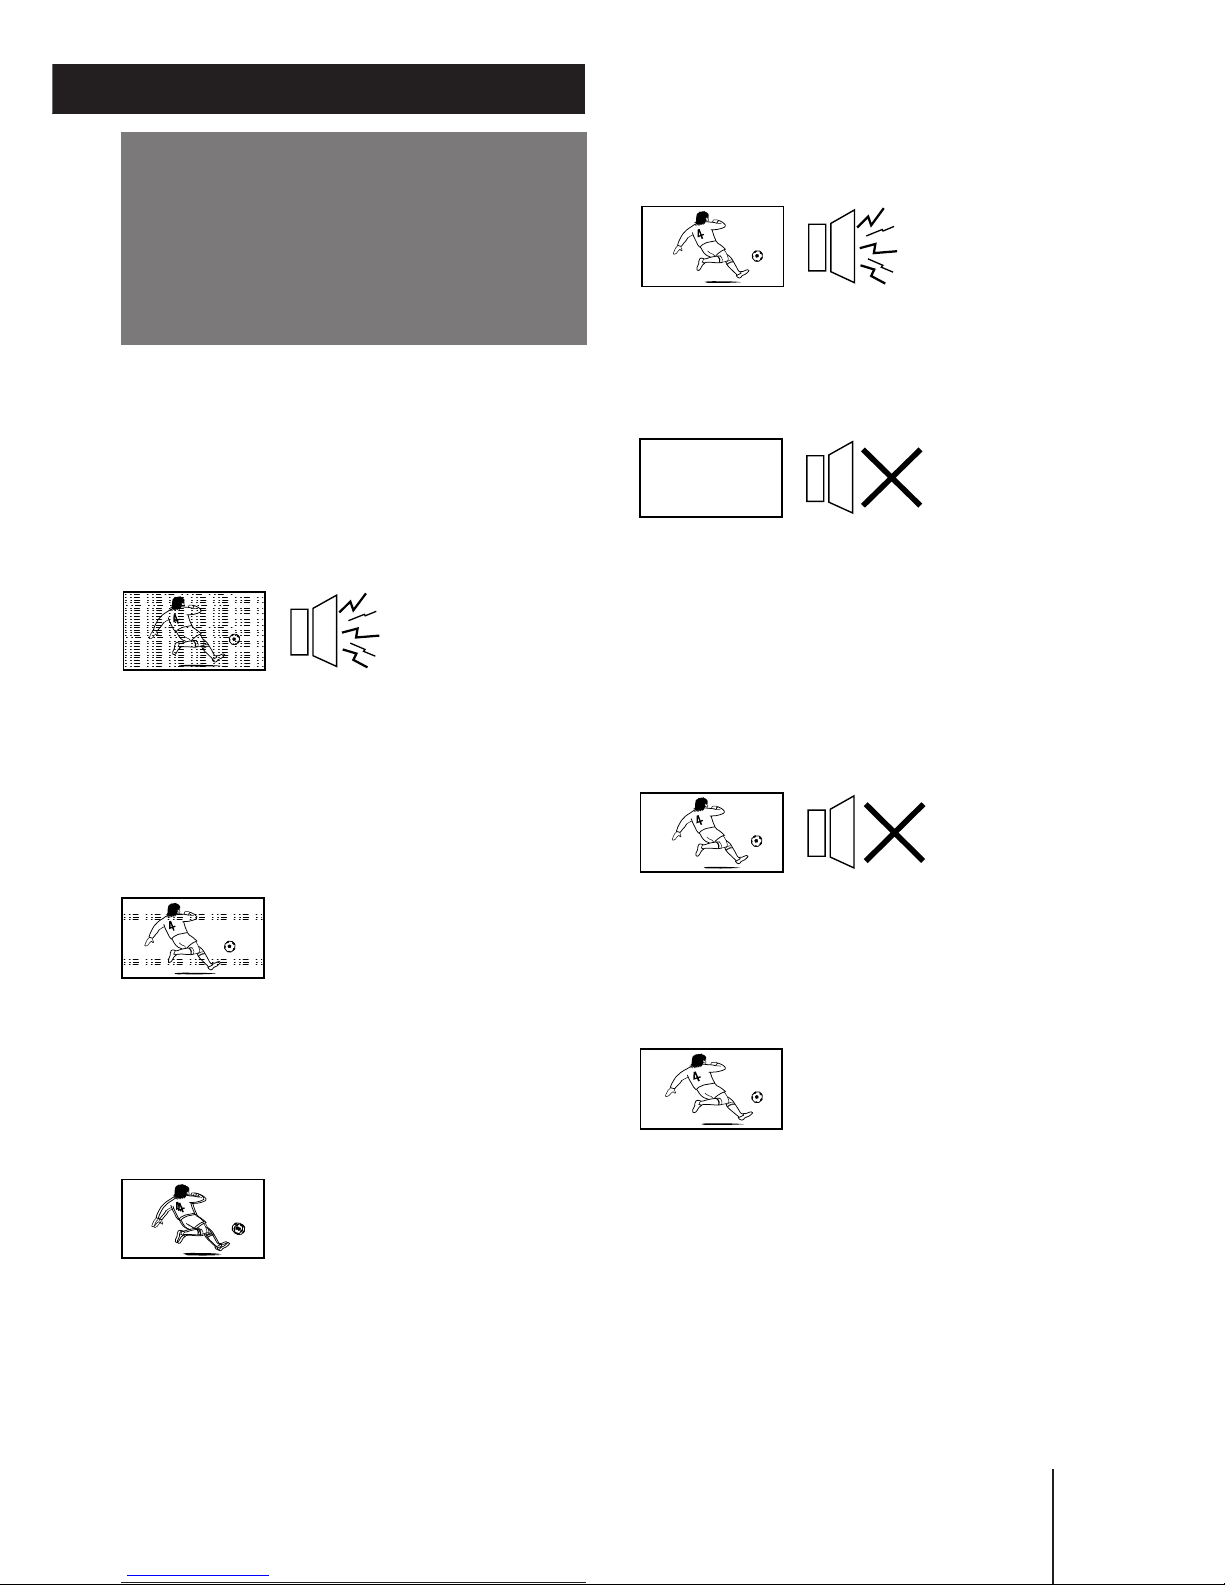
Good picture
Noisy sound
/ Check the TV system (TV SYS) setting.
No picture
No sound
/ Press POWER.
/ Press POWER to turn off the TV for about
five seconds and then turn it on again.
/ Check the power cord connection.
/ Check the antenna connection.
/ Check the VCR connections.
Good picture
No sound
/ Press VOL +.
/ Press MUTING.
/ Press A/B/ENLARGE.
No color
/ Adjust the COLOR level in the VIDEO
ADJUST menu of the PERSONAL option.
/ Check the color system (COL SYS) setting.
TV cabinet creaks
/ Even if the picture or the sound is normal,
changes in the room temperature
sometimes make the TV cabinet expand or
contract, making a noise. This does not
indicate a malfunction.
If you have any problems, read this manual again and
check the countermeasure for each of the symptoms
listed below.
If the problem persists, contact your nearest Sony
dealer or authorized service center.
Snowy picture
Noisy sound
/ Check the antenna.
/ Check the antenna connection on the TV
and on the wall.
/ Check the TV system (TV SYS) setting.
/ Check the ATT (attenuator) setting.
Dotted lines or stripes
/ This may be caused by local interference
(e.g. cars, neon signs, hair dryers, etc.).
Adjust the antenna for minimum
interference.
Double images or “ghosts”
/ This may be caused by reflections from
nearby mountains or buildings. A highly
directional antenna may improve the
picture.
Additional Information
Additional Information
Page 32

5
Préparation
-F
AVERTISSEMENT Table des matières
• Le téléviseur renferme des hautes tensions
dangereuses.
• Faites uniquement fonctionner le téléviseur sur une
tension CA de 110-240 V.
• N’ouvrez pas le boîtier et le couvercle arrière du
téléviseur. Confiez l’entretien à un personnel qualifié.
• Pour éviter tout risque d’incendie ou d’électrocution,
n’exposez pas ce téléviseur à la pluie ou à l’humidité.
• Ne faites pas fonctionner le téléviseur si du liquide
ou des objets pénètrent à l’intérieur. Faites-le vérifier
immédiatement par un personnel qualifié
uniquement.
• N’obstruez pas les ouïes d’aération.
• N’installez pas l’appareil dans un espace exigu,
comme dans une bibliothèque ou renfermé dans un
boîtier.
• N’installez pas le téléviseur dans des endroits
chauds, humides ou extrêmement poussiéreux.
• N’installez pas le téléviseur à des endroits soumis à
des vibrations mécaniques.
• Débranchez le téléviseur si vous prévoyez de ne pas
l’utiliser pendant plusieurs jours.
• Pour débrancher le câble d’alimentation, saisissez la
fiche.
• N’utilisez que les vis fournies (illustrées à la page 2)
pour fixer le téléviseur au support du téléviseur ou
pour stabiliser le téléviseur par rapport à un mur ou à
un pilier. L’utilisation d’autres vis peut endommager
le téléviseur.
Remarques
• Lorsque vous mettez le téléviseur sous tension, il est possible
que vous entendiez un bruit sourd. Ce bruit est dû à la
démagnétisation du téléviseur. Il ne s’agit pas d’un
dysfonctionnement.
• Il est possible que la couleur de l’image devienne anormale si
vous changez l’orientation de votre téléviseur. Pour obtenir
une couleur d’image normale, appuyez sur POWER du
téléviseur pour mettre le téléviseur hors tension pendant cinq
minutes et puis allumez-le de nouveau.
Préparation
6 Raccordements
8 Manipulation de la télécommande
9 Présentation des menus
10 Modification de la langue du menu
11 Présélection des canaux
Opérations
13 Regarde le téléviseur
16 Visualisation de l’image en mode de grand écran
(WIDE MODE)
17 Défilement d’une image vers le haut ou vers le bas
(SCROLL)
18 Réglage de l’image et du son
20 Ecoute du son POWER BASSO
21 Ecoute du son spatial (HYPER SURROUND)
22 Sélection d’un programme stéréo ou bilingue
23 Visualisation de plusieurs programmes en même
temps (PROGRAM INDEX)
24 Affichage des images trame par trame (STROBE)
24 Utilisation des options Image dans image (PIP)
26 Utilisation du télétexte
28 Affichage du télétexte dans l’écran PIP (PIP TEXT)
29 Visualisation d’un jeu vidéo
30 Personnalisation du téléviseur
Informations supplémentaires
31 Guide de dépannage
Couverture Spécifications
arrière
Le contenu de ce manuel peut ètre modifié sans préavis.
La conception et les spéfications sont sujettes à
modifications sans préavis.
F
Page 33
Préparation
6
-F
VIDEO IN MON/TV
OUT
123
VIDEO
AUDIO
L
(MONO)
R
S1 VIDEO
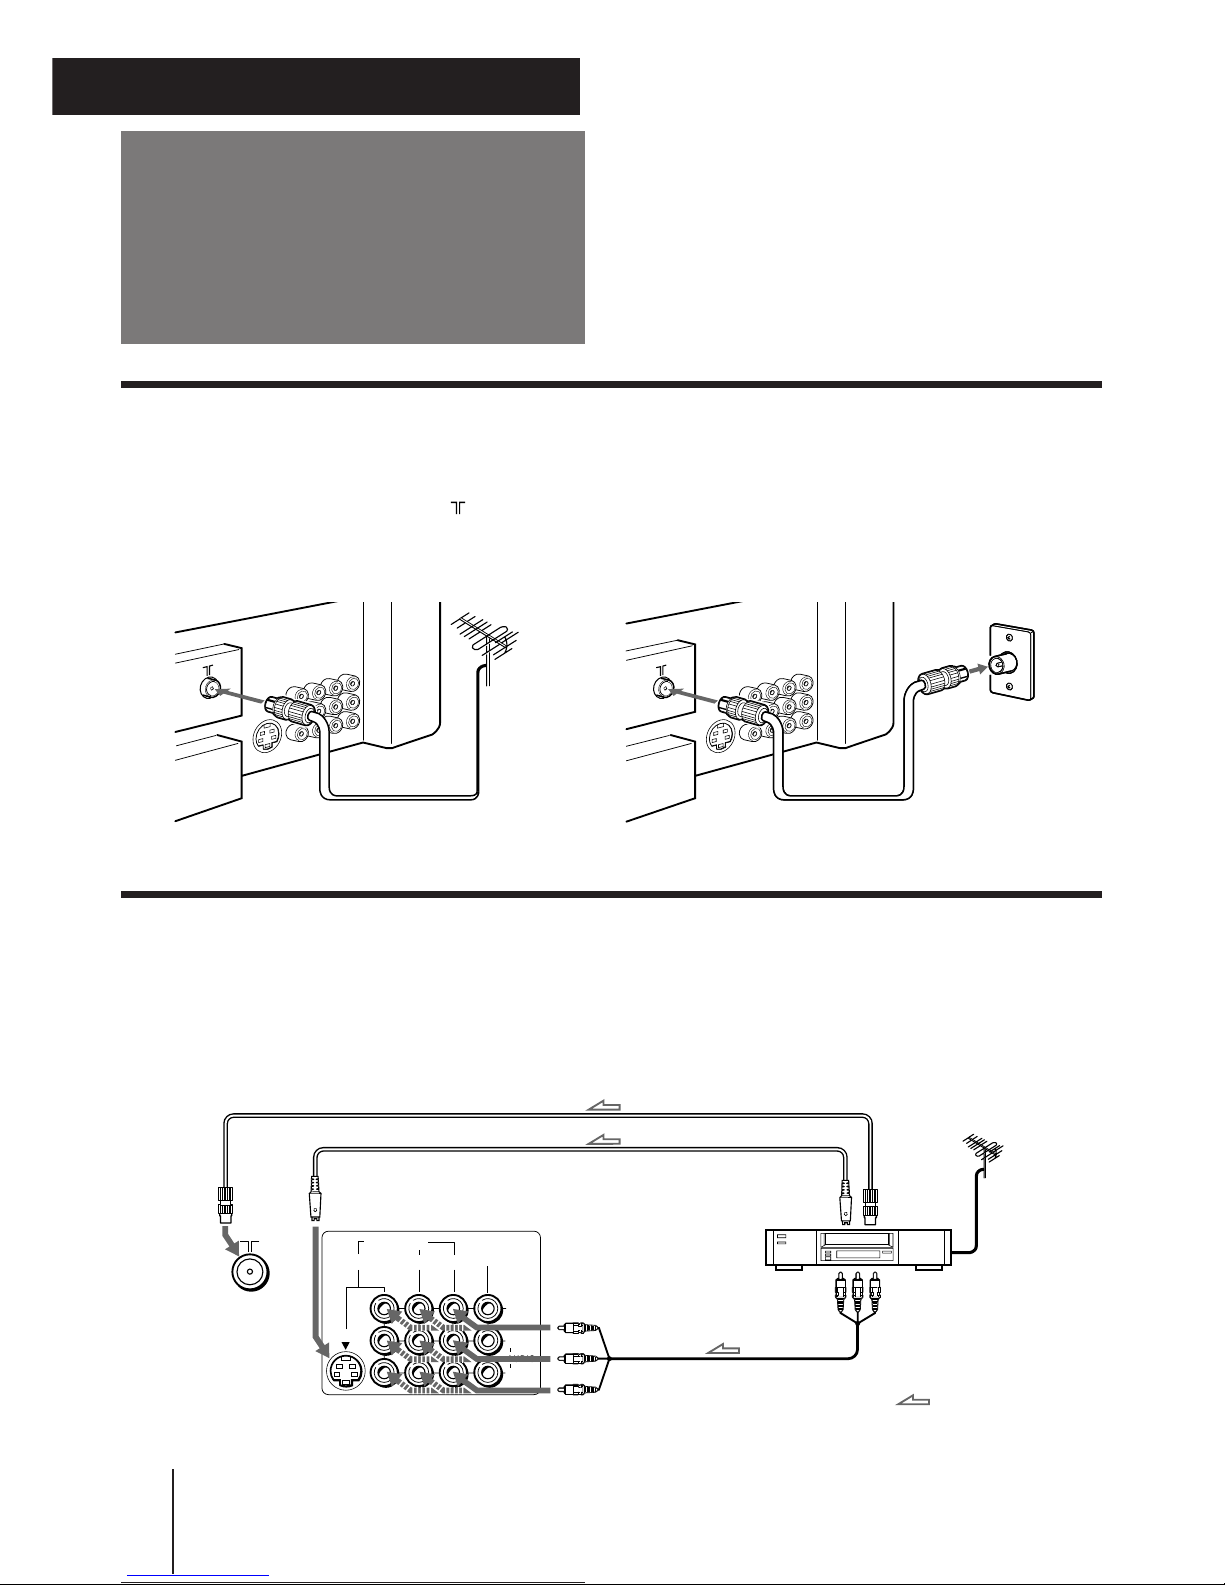
Raccordement à une antenne VHF ou VHF/UHF
— câble coaxial de 75 ohms (rond)
Reliez le connecteur de l’antenne IEC (non fourni) au câble coaxial de 75 ohms.
Introduisez le connecteur dans la prise (antenne) située à l’arrière du téléviseur.
Raccordements d’équipement optionnel
Vous pouvez également connecter votre téléviseur au dispositif audio/vidéo en option: magnétoscope, lecteur
multidisques, caméscope, jeu vidéo ou chaîne stéréo.
Raccordement d’un équipement vidéo à l’aide des prises d’entrée vidéo
Raccordements
Préparation
Arrière du téléviseur Arrière du téléviseur
ou
Arrière du
téléviseur
Magnétoscope
vers la
sortie
antenne
vers les sorties
vidéo et audio
vers la
prise
d’antenne
VIDEO (jaune)
AUDIO-L (blanc)
AUDIO-R (rouge)
vers
l’entrée
S1 Vidéo
: Sens du signal
A une prise murale
vers la sortie S
ou S1 Vidéo
Page 34
7
Préparation
-F
VIDEO IN MON/TV
OUT
123
VIDEO
AUDIO
L
(MONO)
R
S1 VIDEO
VIDEO
VIDEO 3 INPUT
S1 VIDEO
(MONO)
L–AUDIO–R
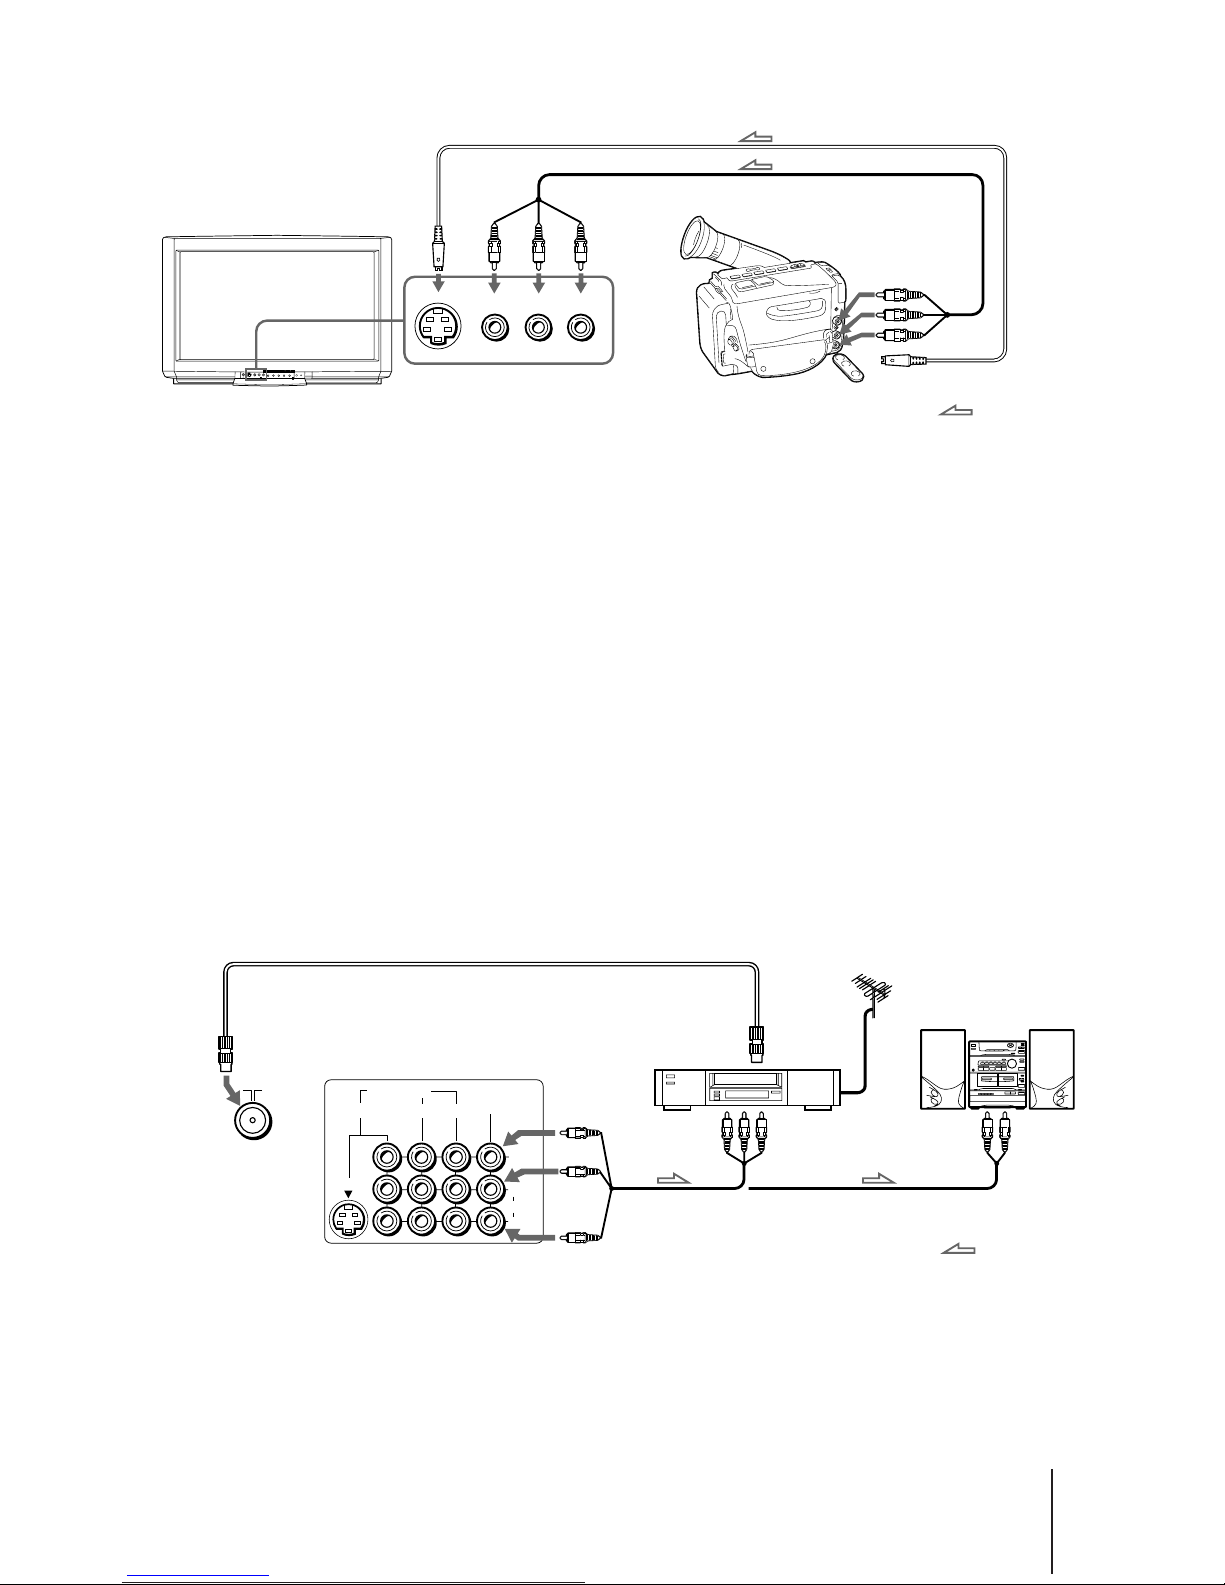
Raccordement d’un magnétoscope mono
Introduisez la fiche jaune dans l’entrée VIDEO et la fiche noire dans la prise AUDIO-L (MONO).
Raccordement d’un équipement pour jeu vidéo
Raccordez l’équipement pour jeu vidéo aux prises VIDEO 3 INPUT à l’avant de votre téléviseur ou aux prises VIDEO IN 3 à l’arrière du
téléviseur.
Raccordement du magnétoscope à la borne ˘ (antenne)
Présélectionnez la sortie du signal du magnétoscope sur la position de programme 0.
Raccordement de l’équipement vidéo aux prises VIDEO 3 INPUT ou aux prises VIDEO IN 3
Ne raccordez pas simultanément l’équipement vidéo aux prises VIDEO 3 INPUT à l’avant du téléviseur et aux prises VIDEO IN 3 à
l’arrière de votre téléviseur; l’image ne s’affichera pas correctement à l’écran.
En cas d’entrée simultanée des deux signaux S1 Vidéo et vidéo
Le signal d’entrée S1 Vidéo est sélectionné. Pour visualiser un signal d’entrée vidéo, débranchez la connexion S1 Vidéo.
Remarque à propos de l’entrée vidéo
Lorsqu’aucun signal n’est entré, l’écran devient bleu.
Raccordement d’un équipement audio/vidéo à l’aide des prises MON/TV OUT
Caméscope
vers la sortie S ou S1
Vidéo
: Sens du signal
vers la
prise
d’antenne
Arrière du
téléviseur
: Sens du signal
vers les
entrées audio
Chaîne stéréo
Magnétoscope
vers la
sortie
antenne
vers les sorties
vidéo et audio
VIDEO (jaune)
AUDIO-L (blanc)
AUDIO-R (rouge)
ou
vers les sorties
vidéo et audio
Avant du téléviseur
Page 35
Préparation
8
-F
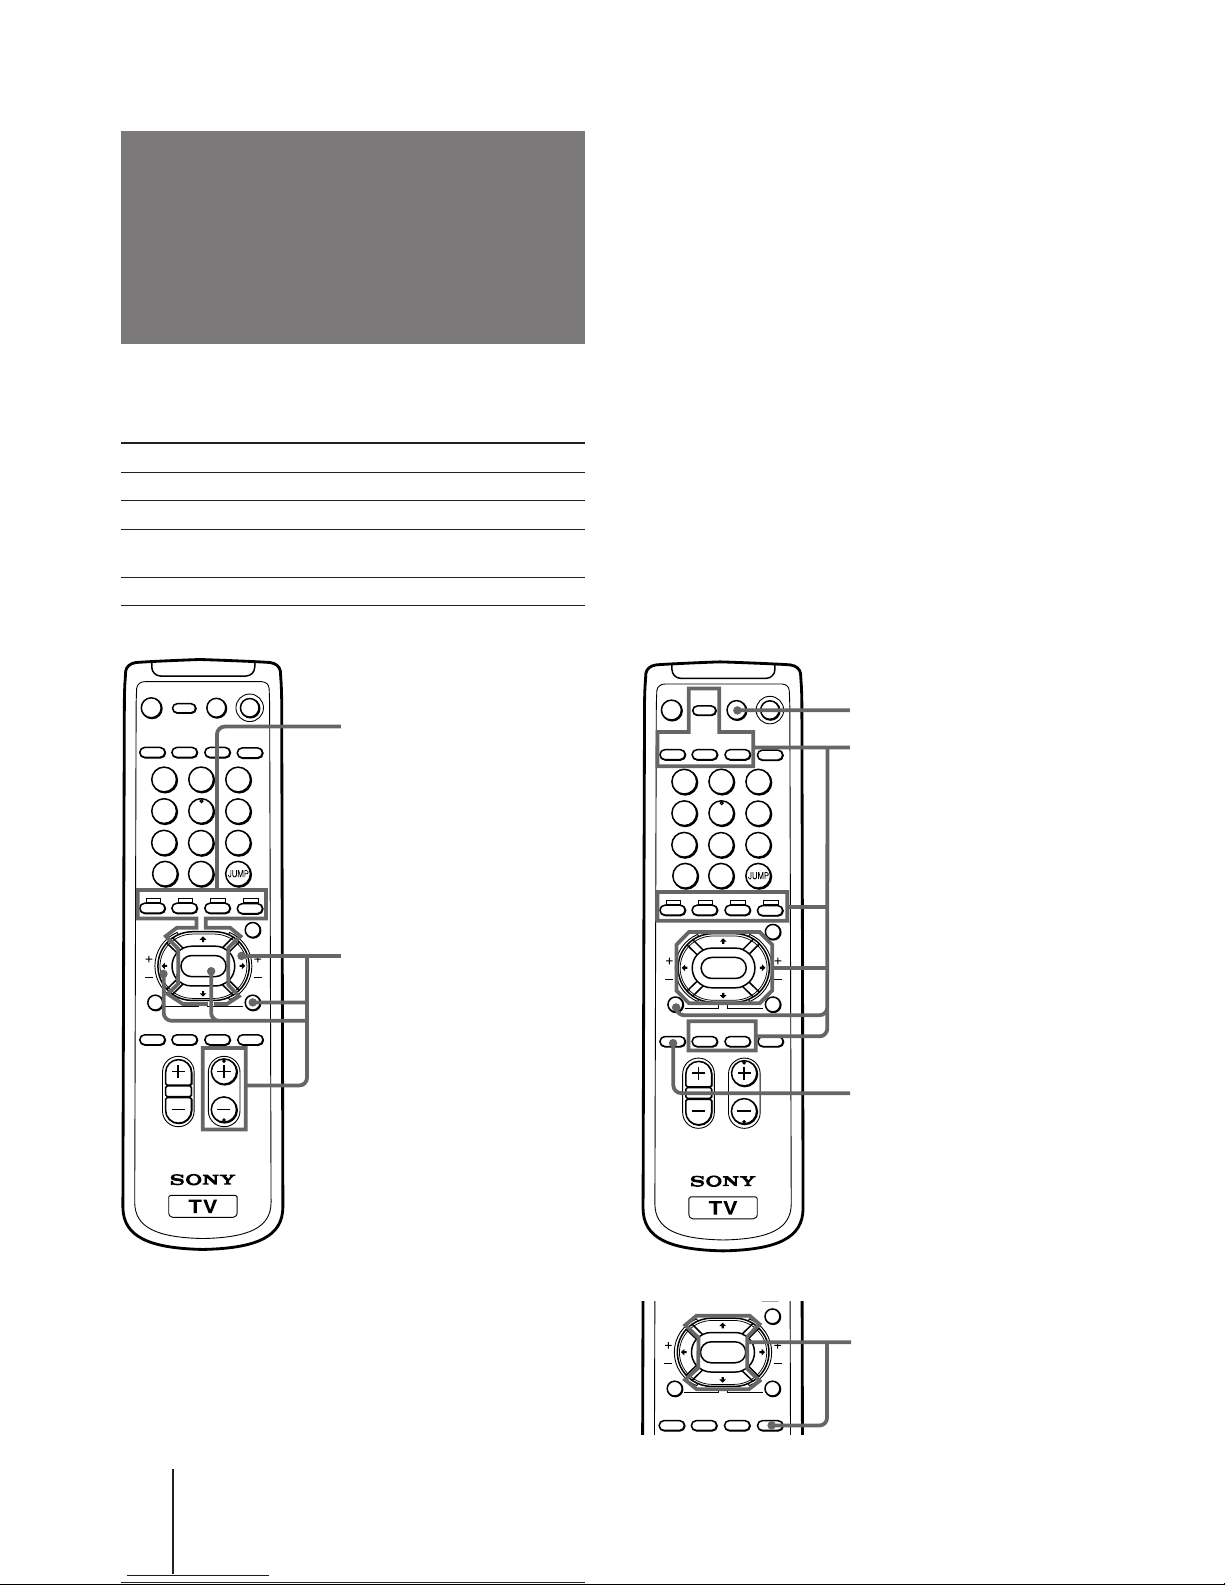
Les noms des touches de la télécommande sont indiqués dans différentes couleurs afin de représenter les fonctions
disponibles.
Couleur Fonction de la touche
Blanc Pour l’utilisation générale du téléviseur
Vert Pour l’utilisation générale du télétexte
Jaune Pour l’utilisation de PIP et PROGRAM
INDEX
Blue Pour les opérations en mode de grand écran.
Manipulation de la
télécommande
Touches de fonction PIP
TV/VIDEO (page 24)
FREEZE (page 25)
SWAP (page 25)
PIP (page 24)
V/v/ENTER
– pour PIP PROGR (page 24)
Touches de fonction
PROGRAM INDEX
PROGR INDEX (page 23)
V/b/v/B/ENTER (page 23)
PROGR +/– (page 23)
GAME (page 29)
Touches d’utilisation du
télétexte
TEXT (page 26, 27)
ENLARGE (page 27)
REVEAL (page 27)
HOLD (page 26)
[] – Rouge (page 26)
[] – Vert (page 26)
[] – Jaune (page 26)
[] – Bleu (page 26)
INDEX (page 26)
TEXT CLR (page 27)
PIP TEXT (page 28)
V/b/v/B/ENTER (page 28)
POWER BASSO (page 20)
PROGRVOL
MENU
PIP PROGR
TEXT
A/B
ENLARGE
DISPLAY
REVEAL
GAME
POWER
VIDEO
HOLD
TV
MUTING
PROGR
INDEX
PIP
TEXT
1
2
3
4
5
6
7
8
0
-/--
9
TV/VIDEO
FREEZE SWAP
PIP
POWER
BASSO
WAKE UP
INDEX
SLEEP
TEXT CLR
ENTER
WIDE
MODE
SCROLL
PROGRVOL
MENU
PIP PROGR
TEXT
A/B
ENLARGE
DISPLAY
REVEAL
GAME
POWER
VIDEO
HOLD
TV
MUTING
PROGR
INDEX
PIP
TEXT
1
2
3
4
5
6
7
8
0
-/--
9
TV/VIDEO
FREEZE SWAP
PIP
POWER
BASSO
WAKE UP
INDEX
SLEEP
TEXT CLR
ENTER
WIDE
MODE
SCROLL
PROGRVOL
MENU
PIP PROGR
PROGR
INDEX
PIP
TEXT
POWER
BASSO
WAKE UP
INDEX
SLEEP
TEXT CLR
ENTER
WIDE
MODE
SCROLL
Touches d’exploitation du
mode de grand écran
WIDE MODE (page 16)
SCROLL (page 17)
V/v ENTER
– pour SCROLL (page 17)
Page 36
9
Préparation
-F
Présentation des
menus
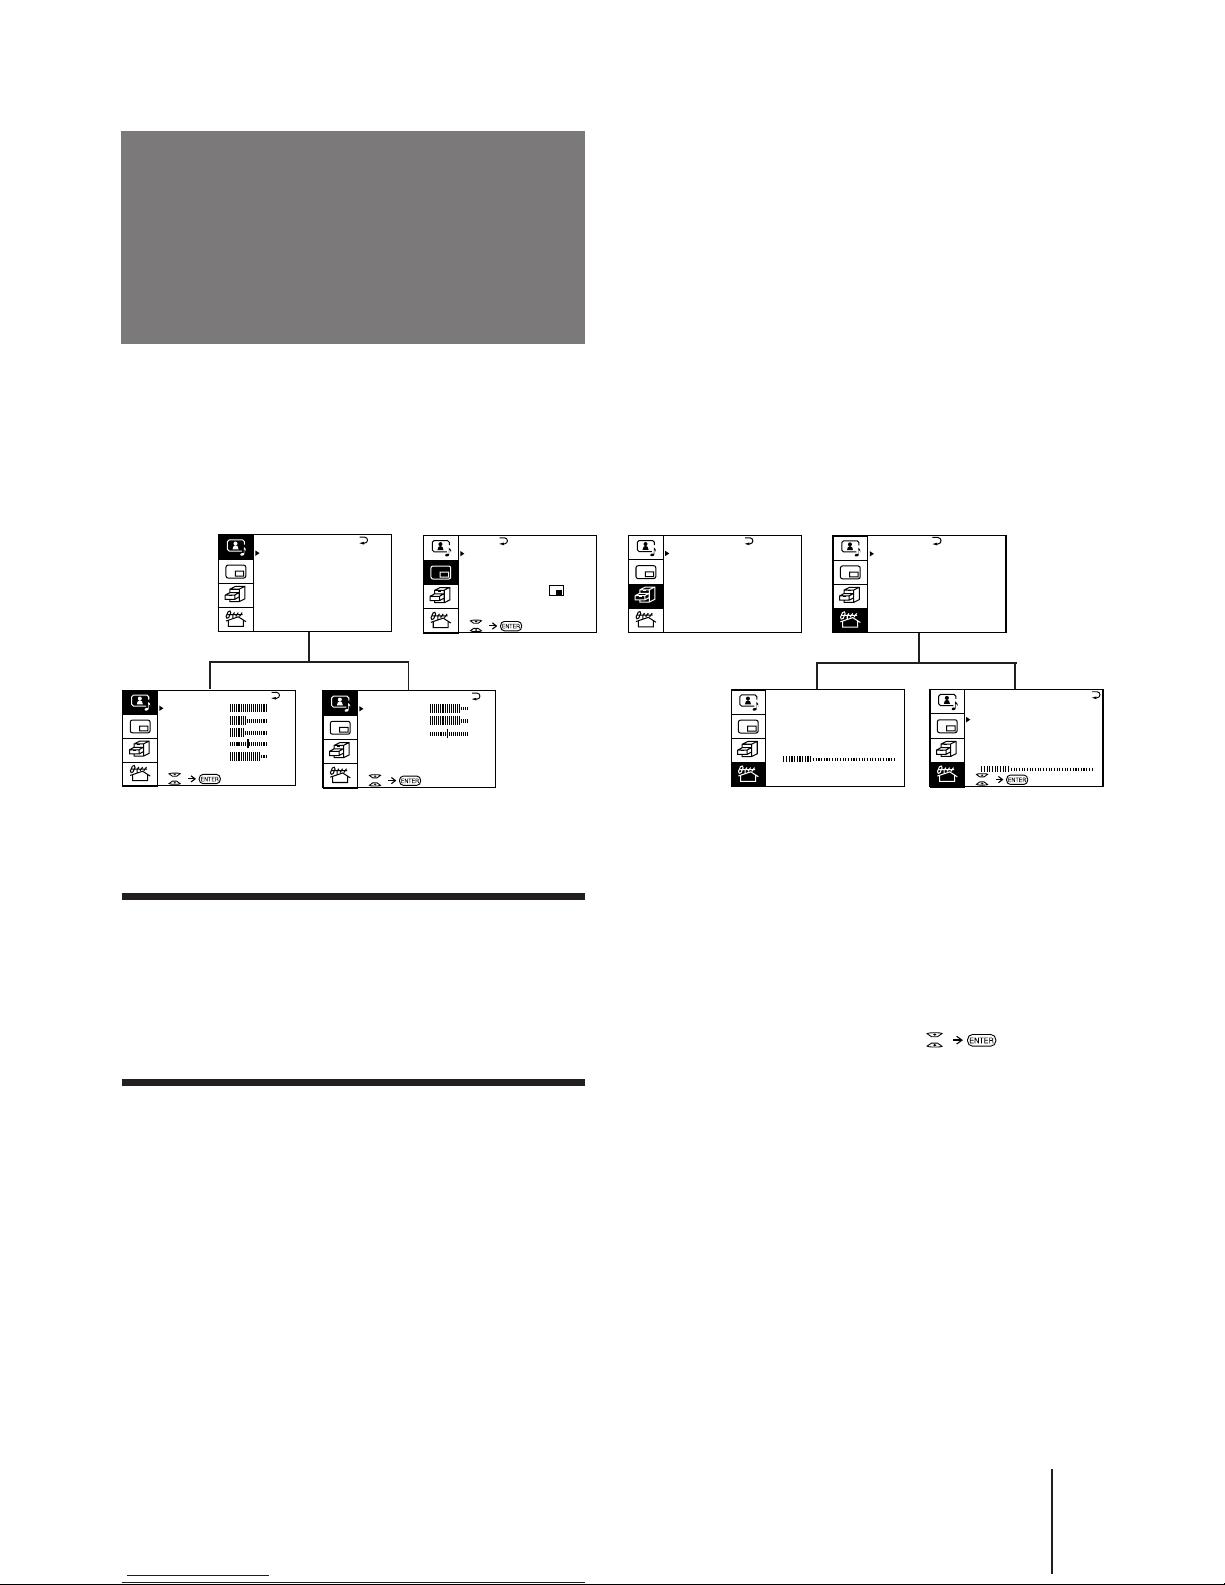
A/V CONTROL
PIP
FEATURES
Vous pouvez présélectionner des chaînes télévisées, régler la qualité de l’image et du son et sélectionner quelques
réglages à l’aide des menus sur écran. Vous pouvez utiliser les touches de la télécommande ou du téléviseur pour le
pilotage par menus.
Retour au menu précédent
(sauf AUTO PROGRAM)
Appuyez sur V ou v pour déplacer le curseur
(z) sur la première ligne (N) de chaque menu
et appuyez sur ENTER.
Annulation de l’écran de menu
Appuyez sur MENU.
Remarques (sauf AUTO PROGRAM)
• Lorsqu’un menu est sélectionné après une pression sur la
touche ENTER, la couleur du menu et du symbole de menu
change et le curseur (z) apparaît en regard de la première
option du menu.
• Lorsqu’une option du menu est sélectionnée après une
pression sur ENTER, la couleur de l’option change.
• Vous pouvez vous reporter au guide (
) situé au bas
des menus (sauf pour les menus A/V CONTROL, FEATURES
et PRESET) pour connaître les fonctions de base du menu.
• L’écran de menu disparaît automatiquement si vous
n’appuyez sur aucune touche pendant un délai de 60 secondes.
PIP
PIP: OFF
PIP TEXT
STRO BE
POS I TION:
PROGR I ND E X
PRESET
BASS
80
00
80
TREBLE
BALANCE
AUDIO ADJUST
A / V CONTROL
DYNAMIC
SOFT
STANDARD
PERSONAL
V I DEO ADJUST
AUDIO ADJUST
T I LT CORRECT: 0
P I C T URE
40
100
0
80
V I DEO ADJUST
COLOR
BR I GHT
HUE
SHARP
VM: HIGH
45
0
TV SYS: B /G
AUT O PROGRAM
VHF LO
W
PR: 01
TV SYS: B /G
VHF
LOW
PR: 01
AT T : OFF
MANUA L PROGRAM
WIDE MODE :
HYPER SURROUND:
OFF
MONITOR
AV OUT :
FEATURES
WIDEZOOM
SCROLL : 0
PRESET
SKIP:
PR02 OFF
TV SYS: B /G
COL
SYS : AUTO
ENGL ISH
AUT O PROGRAM
MANUA L PROGRAM
L A NGUA GE / # # #
:
Page 37
Préparation
10
-F
Modification de la
langue du menu
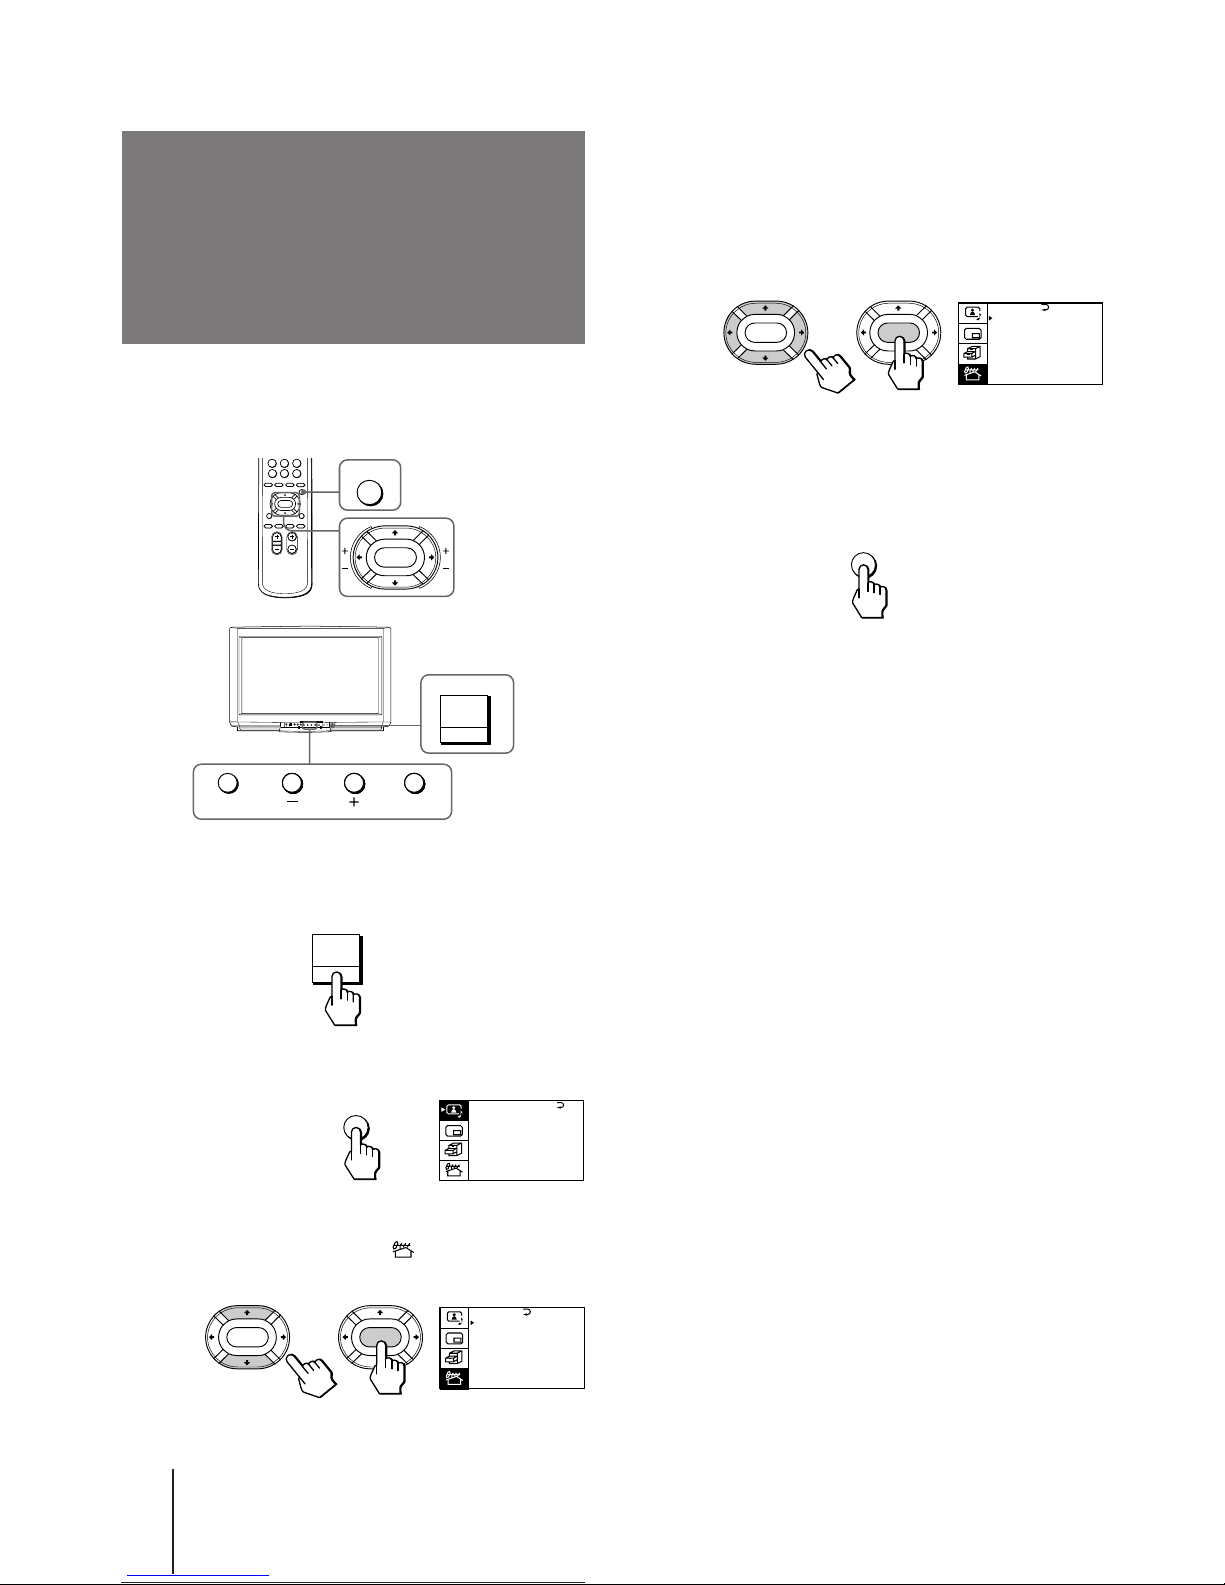
4 Assurez-vous que le curseur (z) apparaît en
regard de LANGUAGE/#### et appuyez sur
ENTER.
5 Appuyez sur V/b/v/B pour sélectionner ####
et appuyez sur ENTER.
Tous les menus apparaîtront en arabe.
6 Appuyez sur MENU pour retourner à l’écran
normal.
Si vous préférez l´arabe à l’anglais, il vous est loisible
de modifier la langue du menu. Vous pouvez utiliser
les touches de la télécommande ou du téléviseur.
1 Appuyez sur POWER pour mettre le
téléviseur sous tension.
2 Appuyez sur MENU.
3 Appuyez sur V ou v pour déplacer le curseur
(z) sur le menu PRESET ( ) et appuyez sur
ENTER.
MENU
PRESET
SKIP: PR02 OFF
TV SYS: B / G
COL SYS : AUTO
CH I NE S E
AUT O P ROGRAM
MANUA L PROGRAM
LANGUAGE/####
:
ENTER ENTER
MENU
ENTER
POWER
ENTER MENU
A / V CONTROL
DYNAMIC
SOFT
ST A NDARD
PERSONAL
V I DEO ADJ UST
AUDIO ADJ UST
T I L T CORRECT: 0
MENU
PRESET
SKIP: PR02 OFF
TV SYS: B / G
COL SYS : AUTO
ENGL I SH
AUT O P ROGRAM
MANUA L PROGRAM
LANGUAGE/####
:
ENTER ENTER
POWER
Page 38
11
Préparation
-F
Présélection des
canaux
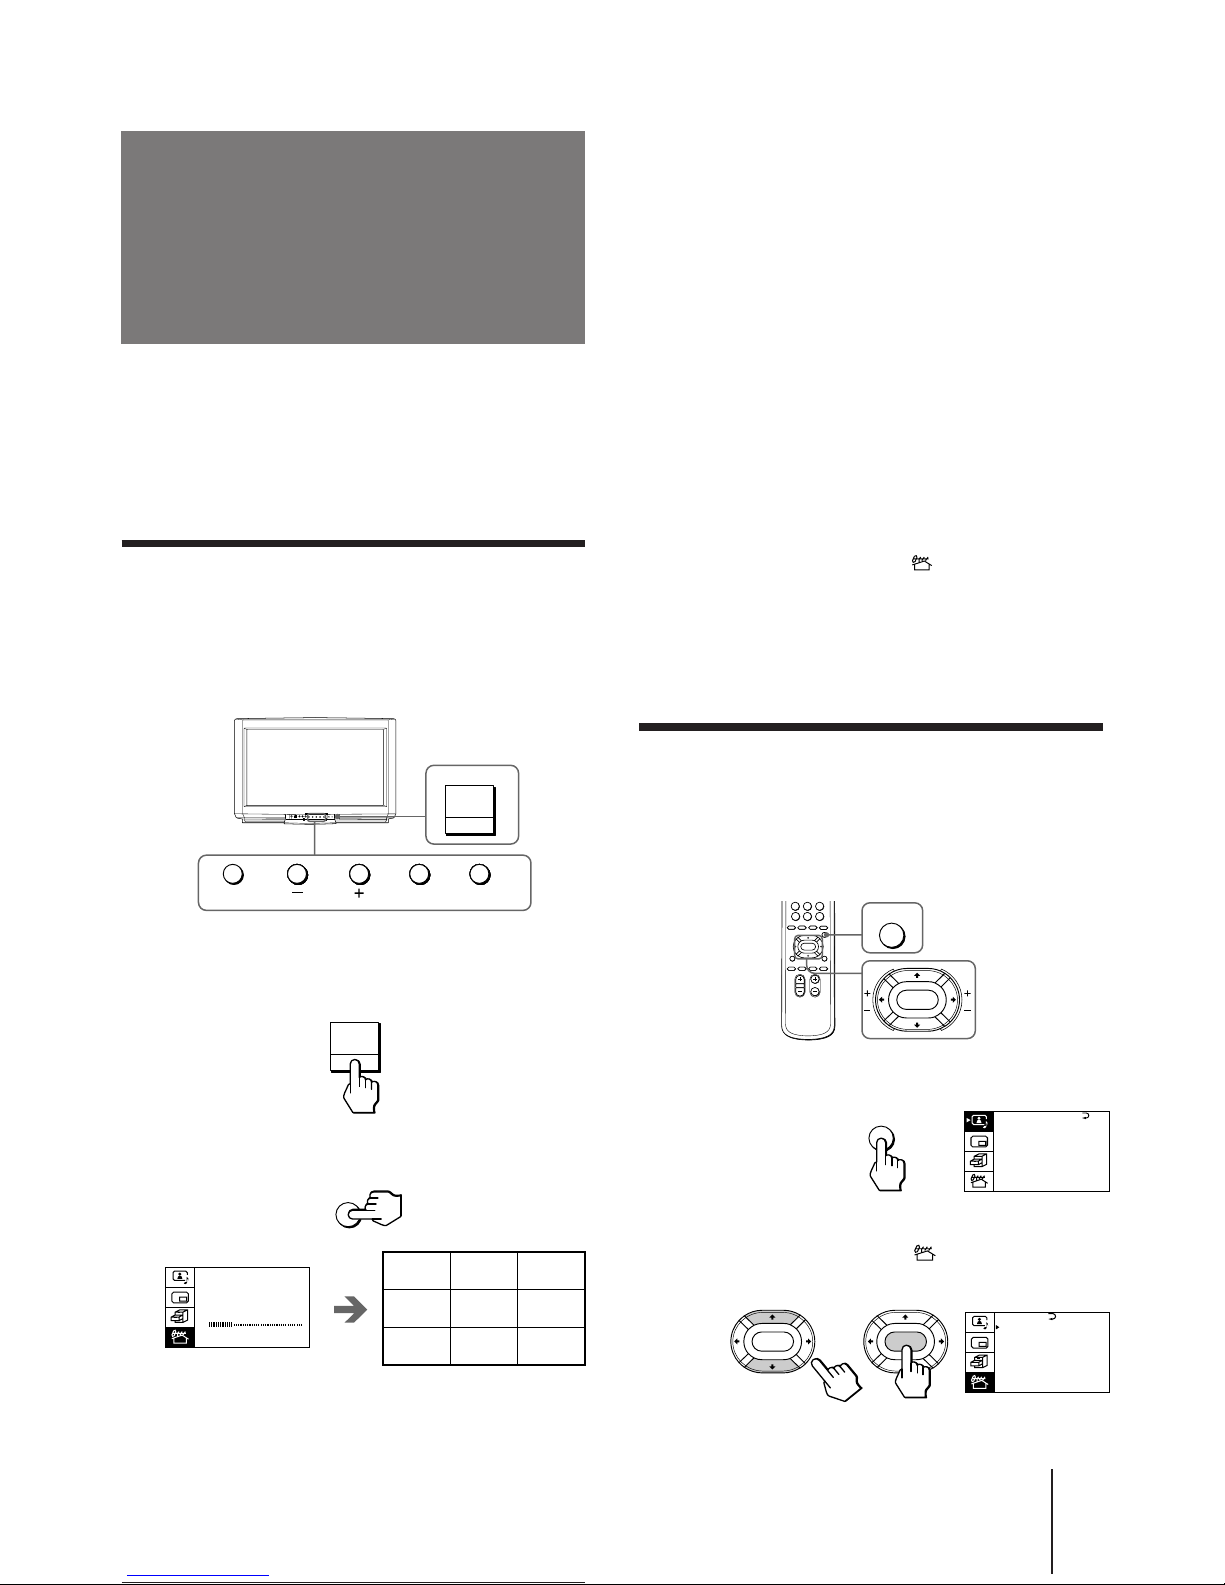
Le téléviseur entame la recherche et présélectionne les
canaux automatiquement. Lorsque toutes les chaînes
captables sont mémorisées, le menu AUTO PROGRAM
disparaît et les neuf premiers canaux présélectionnés
apparaissent en mosaïque. Les neuf sous-écrans
disparaissent après avoir été affichés pendant quelques
secondes.
Remarque
• Si vous voulez revenir à l'écran normal alors que les neufs
sous-écrans sont affichés, vous pouvez appuyez sur la touche
PROGR INDEX de la télécommande.
Pour présélectionner les canaux
automatiquement par le biais du menu
1 Appuyez sur MENU.
2 Appuyez sur V ou v pour déplacer le curseur
(z) sur le menu PRESET ( ) et appuyez sur
ENTER.
3 Appuyez sur V ou v pour déplacer le curseur
(z) sur AUTO PROGRAM et appuyez sur
ENTER.
Présélection manuelle des canaux
Pour modifier la position du programme d’une chaîne
ou pour recevoir une chaîne caractérisée dont le faible
signal ne permet pas une présélection automatique,
présélectionnez le canal manuellement.
1 Appuyez sur MENU.
2 Appuyez sur V ou v pour déplacer le curseur
(z) sur le menu PRESET ( ) et appuyez sur
ENTER.
Vous pouvez présélectionner les canaux aisément en
mémorisant tous ceux qui peuvent être captés
automatiquement. Vous avez également la possibilité
de présélectionner manuellement les canaux ou de
désactiver des positions de programme (reportez-vous
à la page 12).
Présélection automatique des canaux
Vous pouvez présélectionner séquentiellement jusqu’à
100 canaux, en commençant au numéro 1. Vous pouvez
présélectionner les canaux automatiquement à l’aide de
la touche du téléviseur ou en utilisant le menu.
1 Appuyez sur POWER pour mettre le
téléviseur sous tension.
2 Appuyez sur AUTO PROGR.
ENTER MENU
AUTO PROGR
POWER
POWER
TV SYS:B/G
AU T O PROGRAM
VHF LO
W
PR: 0 1
AUTO PROGR
12 3
45 6
78 9
A / V CONTROL
DYNAMIC
SOFT
ST A NDARD
PERSONAL
V I DEO ADJ UST
AUDIO ADJ UST
T I L T CORRECT: 0
MENU
PRESET
SKIP: PR02 OFF
TV SYS: B/ G
COL SYS : AUTO
ENGL I SH
AUT O P ROGRAM
MANUA L PROGRAM
LANGUAGE/####
:
ENTER ENTER
MENU
ENTER
Page 39
Préparation
12
-F
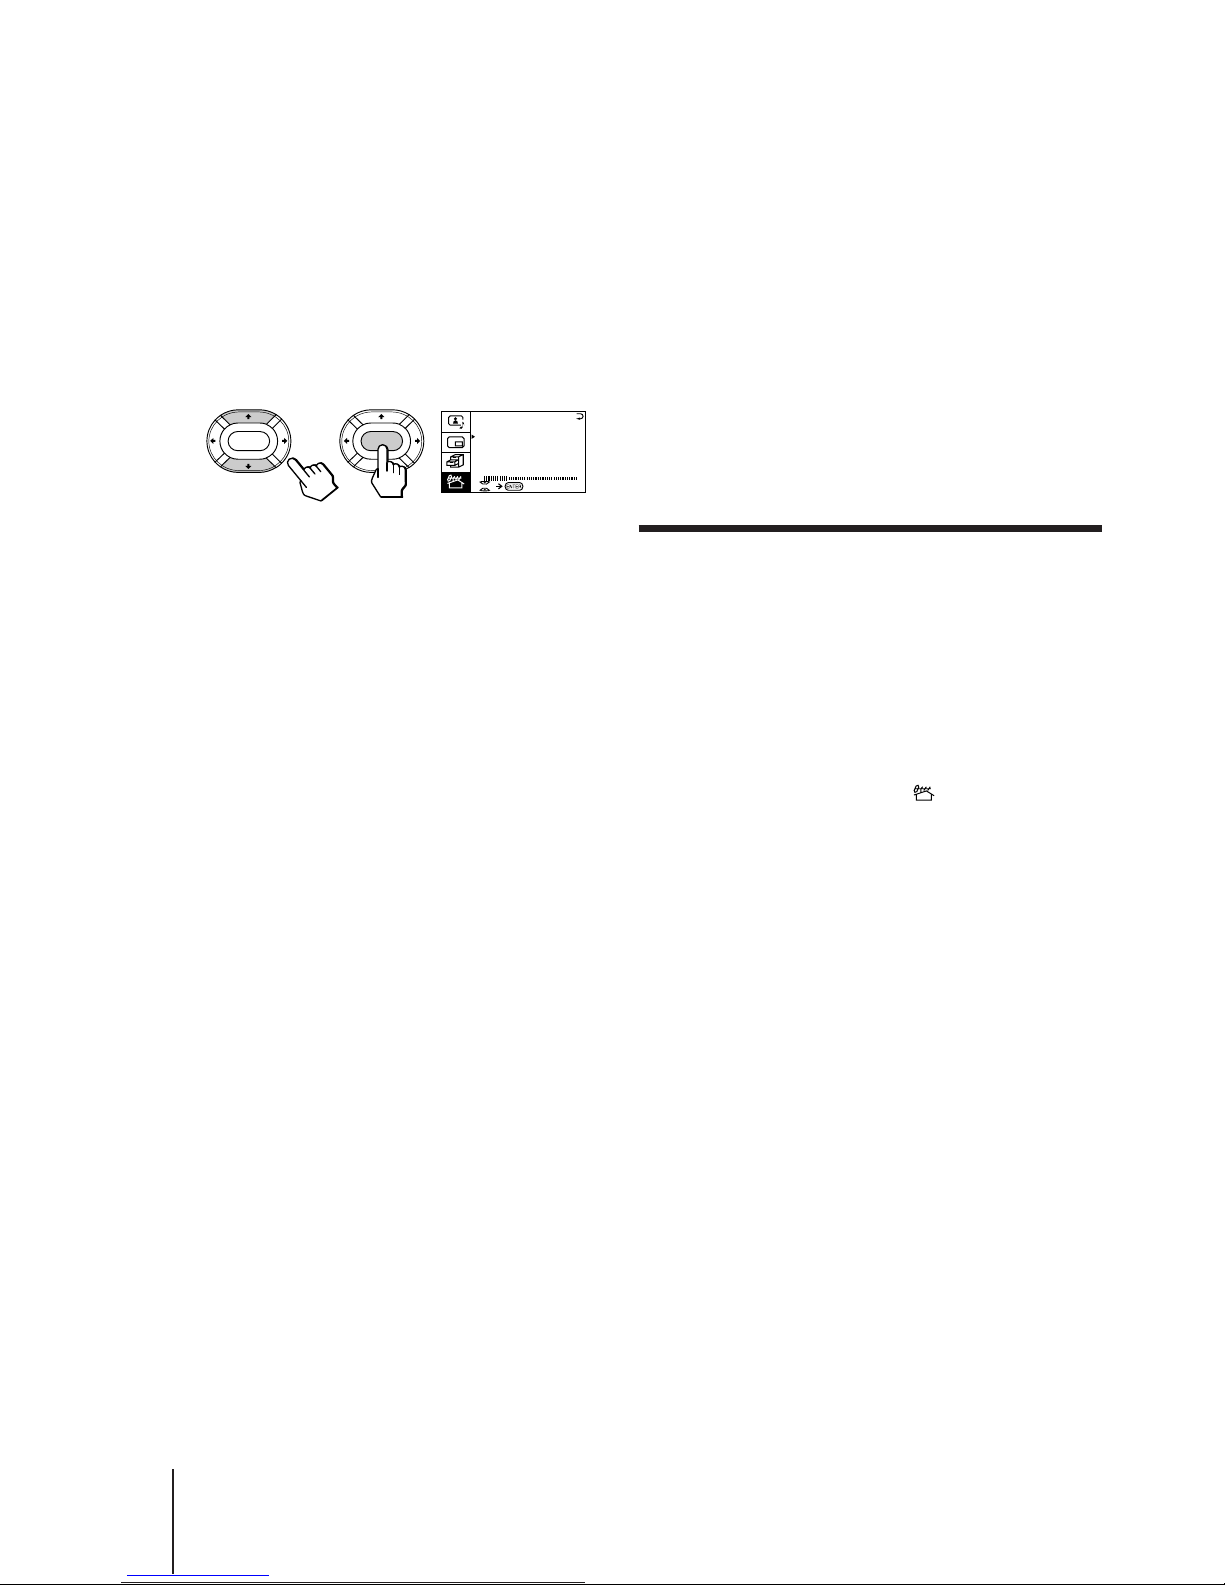
1 Appuyez sur PROGR +/– ou sur les touches
numériques pour sélectionner la position de
programme.
2 Affichez le menu PRESET.
3 Appuyez sur V ou v pour déplacer le curseur (z)
sur TV SYS et appuyez sur ENTER.
4 Appuyez sur V/b/v/B jusqu’à ce que le système
de télévision approprié apparaisse et appuyez sur
ENTER.
Remarques
• Le réglage du système de télévision et le réglage ATT
(atténuateur) sont mémorisés pour chaque position de
programme.
• Si vous ne connaissez pas votre système de télévision local,
adressez-vous à votre revendeur Sony le plus proche ou à un
centre de service agréé.
Désactivation des positions de
programme
La désactivation des positions de programme
inutilisées ou indésirées vous permet de sauter ces
positions en appuyant sur PROGR +/–.
1 Appuyez sur MENU.
2 Appuyez sur V ou v pour déplacer le curseur
(z) sur le menu PRESET ( ) et appuyez sur
ENTER.
3 Appuyez sur V ou v pour déplacer le curseur
(z) sur SKIP et appuyez sur ENTER.
4 Appuyez sur V ou v jusqu’à ce que la
position de programme inutilisée ou
indésirée apparaisse dans le menu et
appuyez sur ENTER.
5 Appuyez sur V/b/v/B pour sélectionner ON et
appuyez sur ENTER.
6 Pour désactiver d’autres positions de
programme, répétez les étapes 4 et 5.
7 Appuyez sur MENU pour revenir à l’écran
normal.
Pour annuler le réglage de saut
1 Affichez le menu PRESET.
2 Appuyez sur V ou v pour déplacer le curseur (z)
sur SKIP et appuyez sur ENTER.
3 Appuyez sur V ou v jusqu’à ce que la position de
programme dont vous désirez annuler le réglage de
saut apparaisse et appuyez sur ENTER.
4 Appuyez sur V/b/v/B pour sélectionner OFF et
appuyez sur ENTER.
3 Sélectionnez votre système de télévision
local.
(1) Appuyez sur V ou v pour déplacer le curseur (z)
sur TV SYS et appuyez sur ENTER.
(2) Appuyez sur V/b/v/B jusqu’à ce que votre
système de télévision local apparaisse dans le menu
et appuyez sur ENTER.
4 Appuyez sur V ou v pour déplacer le curseur
(z) sur MANUAL PROGRAM et appuyez sur
ENTER.
5 Sélectionnez la position de programme que
vous désirez attribuer à la chaîne
présélectionnée.
(1) Assurez-vous que le curseur (z) apparaît en regard
de PR et appuyez sur ENTER.
(2) Appuyez sur V/b/v/B jusqu’à ce que la position
de programme désirée apparaisse sur le menu et
appuyez sur ENTER.
6 Sélectionnez la chaîne désirée.
(1) Appuyez sur V ou v pour déplacer le curseur (z)
sur VHF LOW et appuyez sur ENTER.
(2) Appuyez sur V/b/v/B jusqu’à ce que l’image de
la chaîne désirée apparaisse à l’écran du téléviseur
et appuyez sur ENTER.
7 Appuyez sur MENU pour revenir à l’écran
normal.
Si le signal télévisé est trop puissant
Il est possible que l’image présente des distorsions.
Vous pouvez réduire la distorsion en suivant la
procédure décrite ci-dessous.
1 Affichez le menu PRESET.
2 Appuyez sur V ou v pour déplacer le curseur (z)
sur MANUAL PROGRAM et appuyez sur ENTER.
3 Appuyez sur V ou v pour déplacer le curseur (z)
sur ATT et appuyez sur ENTER.
4 Appuyez sur V/b/v/B pour sélectionner ON et
appuyez sur ENTER.
Si le système de télévision n’est pas
sélectionné correctement
Il est possible que la couleur de l’image soit médiocre
et/ou que le son soit parasité. Dans pareil cas,
sélectionnez le système de télévision approprié.
TV SYS:B/G
VHF
LOW
PR: 0 1
AT T : OFF
MANUA L PROGRAM
ENTER ENTER
Page 40
13
Opérations
-F
Regarde le
téléviseur
Pour sélectionner une position de programme à
deux chiffres, appuyez sur “÷” avant d’appuyer
sur les touches numériques.
Par exemple: pour sélectionner la position de
programme 25, appuyez sur “÷” et puis sur “2” et
“5”.
Pour effectuer une recherche sur les
positions de programme
Appuyez sur PROGR +/– de la télécommande ou
du téléviseur jusqu’à ce que la position de
programme désirée apparaisse.
3 Appuyez sur VOL +/– de la télécommande
ou VOLUME +/– du téléviseur pour ajuster le
volume.
Mise hors tension du téléviseur
Pour éteindre le téléviseur temporairement
Appuyez sur POWER de la télécommande.
L’indicateur STANDBY s’allume.
Pour éteindre le téléviseur complètement
Appuyez sur POWER du téléviseur.
1 Appuyez sur POWER pour mettre le
téléviseur sous tension.
Si le téléviseur est sous tension dans le mode de
veille après avoir appuyé sur la touche POWER du
téléviseur, appuyez sur la touche POWER de la
télécommande.
2 Sélectionnez le programme télévisé que
vous désirez regarder.
Pour sélectionner une position de
programme directement
Appuyez sur la touche numérique.
2
-/--
5
Opérations
POWER
TV/VIDEO VOLUME PROGR
POWER
1
2
3
4
5
6
7
8
0
-/--
9
PROGR
VOL
POWER
POWER
Page 41
Opérations
14
-F
Visualisation de l’entrée vidéo
Appuyez sur VIDEO/HOLD de la télécommande
ou TV/VIDEO du téléviseur.
Pour regarder la télévision
Appuyez sur TV de la télécommande ou TV/VIDEO
du téléviseur.
Retour rapide à la chaîne précédente
Appuyez sur JUMP.
Mise en sourdine du son
Appuyez sur MUTING.
Affichage des informations sur écran
Appuyez sur DISPLAY/REVEAL.
Remarque
• L’affichage sur écran indique la position de programme ou le
mode vidéo, les informations relatives à l’image et au son.
L’affichage sur écran concernant les informations de l’image et
du son disparaît après cinq secondes.
Réglage du programmateur d’éveil
Vous pouvez régler le téléviseur pour qu’il se mette en
route automatiquement à l’heure de votre choix.
1 Appuyez plusieurs fois sur WAKE UP/INDEX
pour régler le programmateur.
L’affichage sur écran apparaît.
2 Si vous désirez qu’un programme télévisé
particulier ou un mode vidéo s’affiche avec
le programmateur d’éveil, sélectionnez le
programme télévisé ou le mode vidéo.
3 Appuyez sur POWER de la télécommande ou
réglez le programmateur d’éveil pour
éteindre le téléviseur en mode de veille.
L’indicateur WAKE UP s’allume en ambre.
VIDEO
HOLD
VIDEO 1 VIDEO 2 VIDEO 3 1
TV
MUTING
MUTING
DISPLAY
REVEAL
POWER BASSO: ON
DYNAMIC WIDEZOOM
8
Après 10 minutes
Après 12 heures
Pas de
programmateur
d’éveil
WAKE UP
INDEX
WAKE UP TIMER:10M
WAKE UP TIMER:OFF
WAKE UP TIMER:12H00M
Page 42
15
Opérations
-F
SLEEP
TEXT CLR
SLEEP TIMER:30M SLEEP TIMER:60M
SLEEP TIMER:OFF SLEEP TIMER:90M
Pour annuler le programmateur d’éveil, appuyez
plusieurs fois sur WAKE UP/INDEX jusqu’à ce que
“WAKE UP TIMER: OFF” apparaisse ou coupez
l’alimentation du téléviseur.
Remarques
• Le programmateur d’éveil commence dès que l’affichage sur
écran disparaît.
• La dernière position du programme télévisé ou du mode vidéo
avant le passage en mode veille apparaîtra lorsque le téléviseur
se mettra sous tension avec le programmateur d’éveil.
• Si vous n’appuyez sur aucune touche ou commande pendant
plus de deux heures après que le téléviseur s’est mis en route
par le programmateur d’éveil, le téléviseur passera
automatiquement en mode de veille. Si vous souhaitez
continuer à regarder la télévision, appuyez sur n’importe
quelle touche ou commande du téléviseur ou de la
télécommande.
Réglage du programmateur
d’extinction
Vous pouvez régler le téléviseur pour qu’il se mette
hors tension automatiquement après la période de
temps de votre choix.
Appuyez sur SLEEP.
Pour annuler le programmateur d’extinction, appuyez
plusieurs fois sur SLEEP jusqu’à ce que
“SLEEP TIMER: OFF” apparaisse ou mettez le
téléviseur hors tension.
Après 30 minutes
Après 60 minutes
Pas de
programmateur
d’extinction
Après 90 minutes
Page 43
Opérations
16
-F
La fonction WIDE MODE vous permet de visualiser
diverses images en mode de grand écran.
Vous pouvez sélectionner les modes de grand écran à
l’aide des touches de la télécommande ou du menu.
Appuyez plusieurs fois de suite sur WIDE MODE
jusqu’à ce que le mode de grand écran de
votre choix apparaisse à l’écran.
WIDEZOOM
La totalité de l’image est élargie de manière à remplir
complètement l’écran. Ce mode est idéal pour regarder
un film ou une émission sportive.
ZOOM
La totalité de l’image est élargie et les bords sont
coupés. Ce mode est idéal pour regarder un film
diffusé avec des bandes noires.
Visualisation de
l’image en mode de
grand écran
(WIDE MODE)
WIDE
MODE
WIDEZOOM ZOOM
AUTO WIDE FULL
SUBTITLE
NORMAL
WIDEZOOM
Image du mode normal
ZOOM
Image du mode normal
SUBTITLE
La totalité de l’image est élargie de manière à remplir
complètement l’écran, et la hauteur de la zone de soustitres est réduite. Ce mode est idéal pour regarder un
film avec des sous-titres.
FULL
La largeur de l’image est augmentée. Ce mode est idéal
pour visualiser un écran de jeu vidéo.
AUTO WIDE
Le mode d’image d’une émission télévisée ou d’une
entrée vidéo est automatiquement commuté sur le
mode de grand écran le mieux approprié
(WIDEZOOM, ZOOM ou SUBTITLE).
Remarques
• Si vous affichez l’écran PIP dans le mode ZOOM, il se peut que
le bas de l’écran PIP soit coupé. Cela n’indique cependant pas
un dysfonctionnement.
• Lorsque vous utilisez la fonction AUTO WIDE, le mode
d’image élargie sélectionné peut ne pas correspondre à un
mode déterminé. Dans ce cas, sélectionnez le mode de grand
écran de votre choix à l’aide de la touche WIDE MODE.
• La fonction AUTO WIDE n’est pas disponible pour le système
couleur SECAM.
Image du mode normal
FULL
Image du mode normal
WIDEZOOM
Image du mode normal
ZOOM
Image du mode normal
Image du mode normal
ou
ou
Good-bye.Jane
Good-bye.
Good-bye.Jane
Good-bye.
SUBTITLE
Good-bye.Jane
Good-bye.
Good-bye.Jane
Good-bye.
SUBTITLE
Page 44
17
Opérations
-F
Pour visualiser une image en mode de
grand écran à l’aide du menu
1 Appuyez sur MENU.
2 Appuyez sur V ou v de façon à amener le
curseur (”) sur le menu FEATURES ( ) et
appuyez ensuite sur ENTER.
3 Assurez-vous que le curseur (”) apparaît en
regard de WIDE MODE et appuyez ensuite
sur ENTER.
4 Appuyez sur V/b/v/B pour sélectionner le
mode d’image élargie de votre choix et
appuyez ensuite sur ENTER.
5 Appuyez sur MENU pour revenir à l’écran
normal.
A / V CONTROL
DYNAMIC
SOFT
ST A NDARD
PERSONAL
V I DEO ADJUST
AUDIO ADJ UST
T I L T CORRECT: 0
MENU
WIDE MODE :
HYPER SURROUND:
OFF
MONITOR
AV OUT :
FE ATURES
ENTER ENTER
WIDEZOOM
SCROLL : 0
La fonction SCROLL vous permet de faire défiler une
image vers le haut ou vers le bas de façon à visualiser
la partie dissimulée de l’image dans le haut ou dans le
bas de l’écran du téléviseur lorsque vous avez activé un
mode d’image élargie.
Vous pouvez utiliser la fonction de défilement dans les
modes ZOOM ou SUBTITLE.
1 Appuyez sur MENU.
2 Appuyez sur V ou v de façon à amener le
curseur (”) en regard du menu FEATURES
( ) et appuyez ensuite sur ENTER.
3 Appuyez sur V ou v de façon à amener le
curseur (”) sur SCROLL et appuyez ensuite
sur ENTER.
4 Appuyez sur V ou v pour sélectionner la
position de défilement la mieux appropriée
et appuyez ensuite sur ENTER.
SCROLL:
Défilement d’une
image vers le haut
ou vers le bas
(SCROLL)
MENU
ENTER
A / V CONTROL
DYNAMIC
SOFT
ST A NDARD
PERSONAL
V I DEO ADJUST
AUDIO ADJ UST
T I L T CORRECT: 0
MENU
WIDE MODE :
HYPER SURROUND:
OFF
MONITOR
AV OUT :
FE ATURES
ENTER ENTER
WIDEZOOM
SCROLL : 0
–5 N –4 N –3 N –2 N –1 N 0 n +1 n +2 n +3 n +4 n +5
Appuyez sur v Appuyez sur V
Remarque
• Si vous faites défiler l’image avec l’écran PIP dans le mode
ZOOM ou SUBTITLE, il se peut que le bas de l’écran PIP soit
coupé. Cela n’indique cependant pas un dysfonctionnement.
Page 45
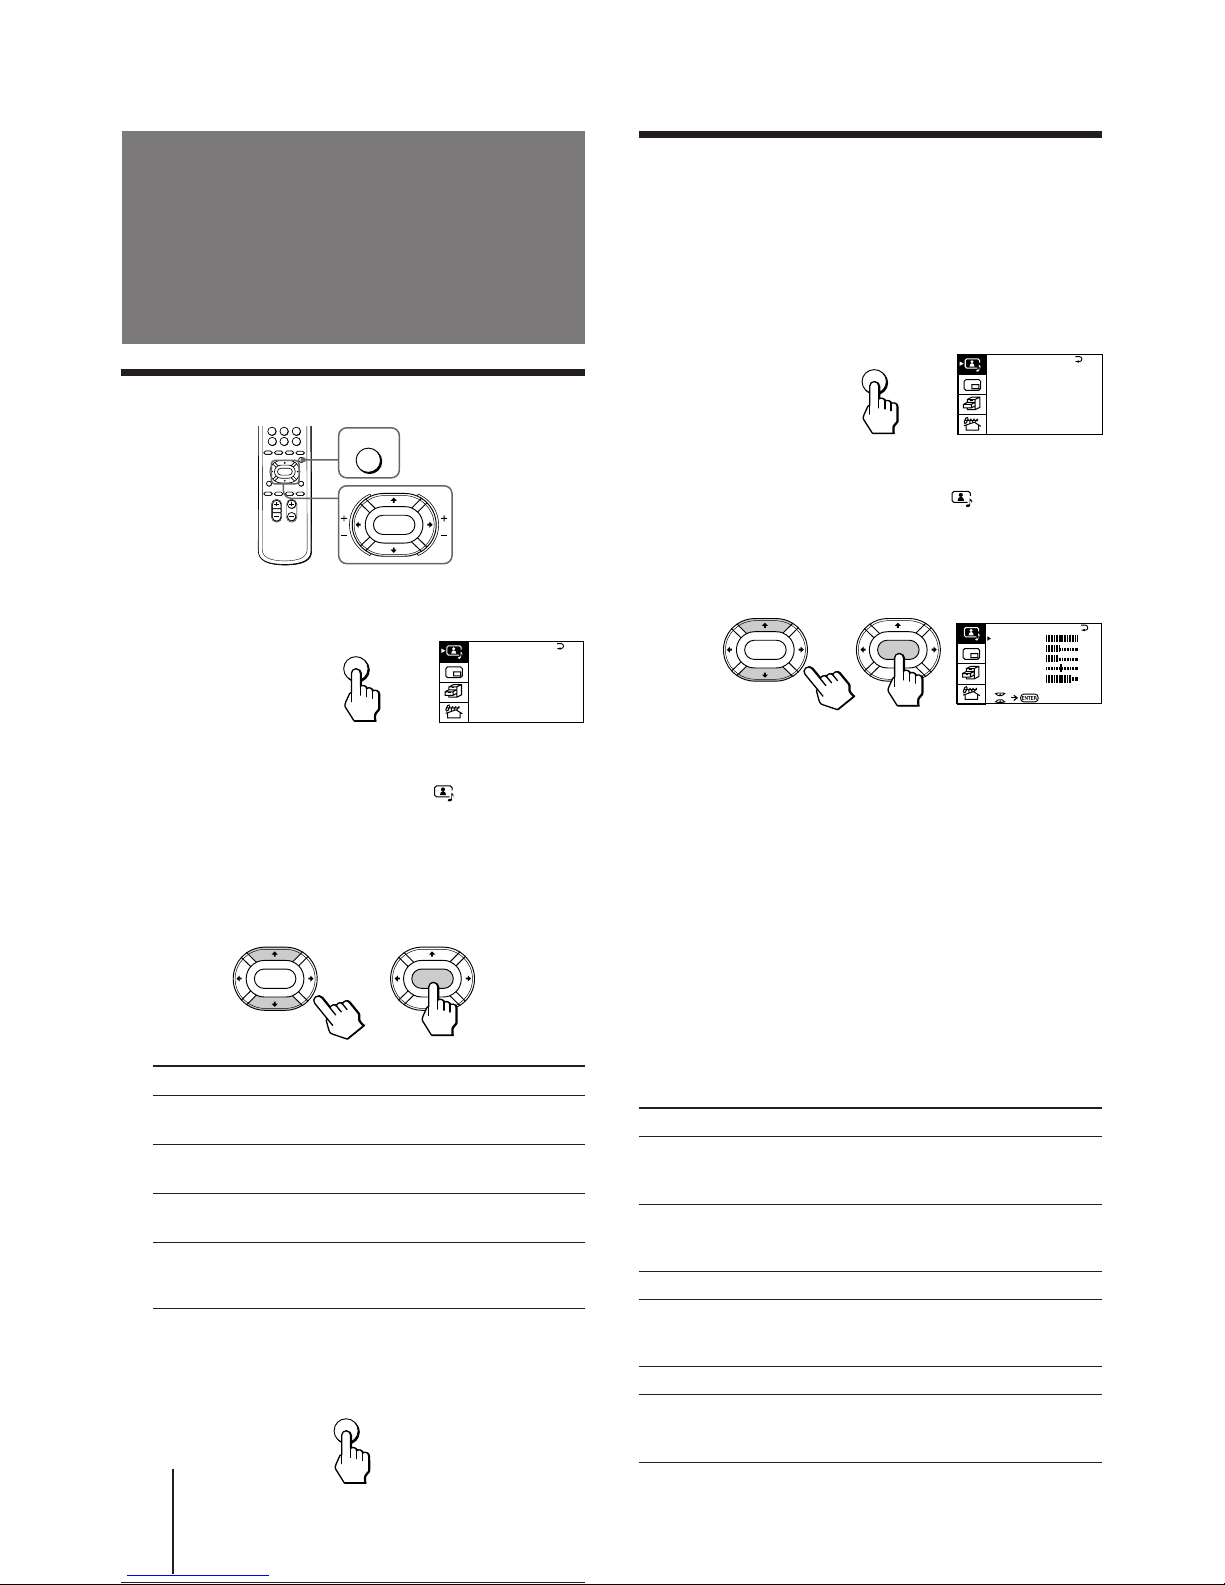
Opérations
18
-F
Sélection des modes d’image et de son
1 Appuyez sur MENU.
2 Assurez-vous que le curseur (”) apparaît
dans le menu A/V CONTROL ( ) et appuyez
sur ENTER.
3 Appuyez sur V ou v pour déplacer le curseur
(”) sur DYNAMIC, STANDARD, SOFT ou
PERSONAL et appuyez sur ENTER.
Sélectionnez Pour
DYNAMIC Obtenir une image fort contrastée avec
un son puissant.
STANDARD Obtenir une image normalement
contrastée avec un son moyen.
SOFT Obtenir une image douce avec un son
atténué.
PERSONAL Obtenir les derniers réglages d’image et
de son qui ont été ajustés à l’aide de
VIDEO ADJUST et AUDIO ADJUST.
4 Appuyez sur MENU pour revenir à l’écran
normal.
Réglage de l’image
et du son
ENTER ENTER
A / V CONTROL
DYNAMIC
SOFT
ST A NDARD
PERSONAL
V I DEO ADJ UST
AUDIO ADJ UST
T I L T CORRECT: 0
MENU
MENU
A / V CONTROL
DYNAMIC
SOFT
ST A NDARD
PERSONAL
V I DEO ADJ UST
AUDIO ADJ UST
T I L T CORRECT: 0
MENU
P I CTURE
40
100
0
80
V I DEO ADJ UST
COLOR
BR I GHT
HUE
SHARP
VM: HIGH
45
0
ENTER ENTER
Appuyez sur V/b
Augmenter le contraste
d’image.
Augmenter l’intensité
d’image.
Eclaircir l’image.
Rendre les teintes
d’image verdâtres.
Accentuer l’image.
Augmenter
l’accentuation des
bords d’image.
Ajustement des réglages de l’image
(VIDEO ADJUST)
Vous pouvez ajuster les réglages de l’image à votre gré
à l’aide de l’option VIDEO ADJUST. Les réglages
effectués sont conservés dans l’option PERSONAL.
1 Appuyez sur MENU.
2 Assurez-vous que le curseur (”) apparaît
dans le menu A/V CONTROL ( ) et appuyez
sur ENTER.
3 Appuyez sur V ou v pour déplacer le curseur
(”) sur VIDEO ADJUST et appuyez sur ENTER.
4 Appuyez sur V ou v pour déplacer le curseur
(”) sur l’option que vous désirez ajuster et
appuyez sur ENTER.
5 Appuyez sur V/b/v/B pour ajuster l’option
sélectionnée et appuyez sur ENTER.
Pour plus de détails sur chaque option, reportez-vous à
“Description des options réglables” ci-dessous.
6 Pour ajuster d’autres options, répétez les
étapes 4 et 5.
7 Appuyez sur MENU pour revenir à l’écran
normal.
Description des options réglables
Options Appuyez sur v/B
PICTURE Diminuer le
contraste de
l’image.
COLOR Diminuer
l’intensité des
couleurs.
BRIGHT Assombrir l’image.
HUE Rendre les teintes
d’image plus
rouges.
SHARP Adoucir l’image.
VM Diminuer
l’accentuation des
bords d’image.
MENU
ENTER
Page 46
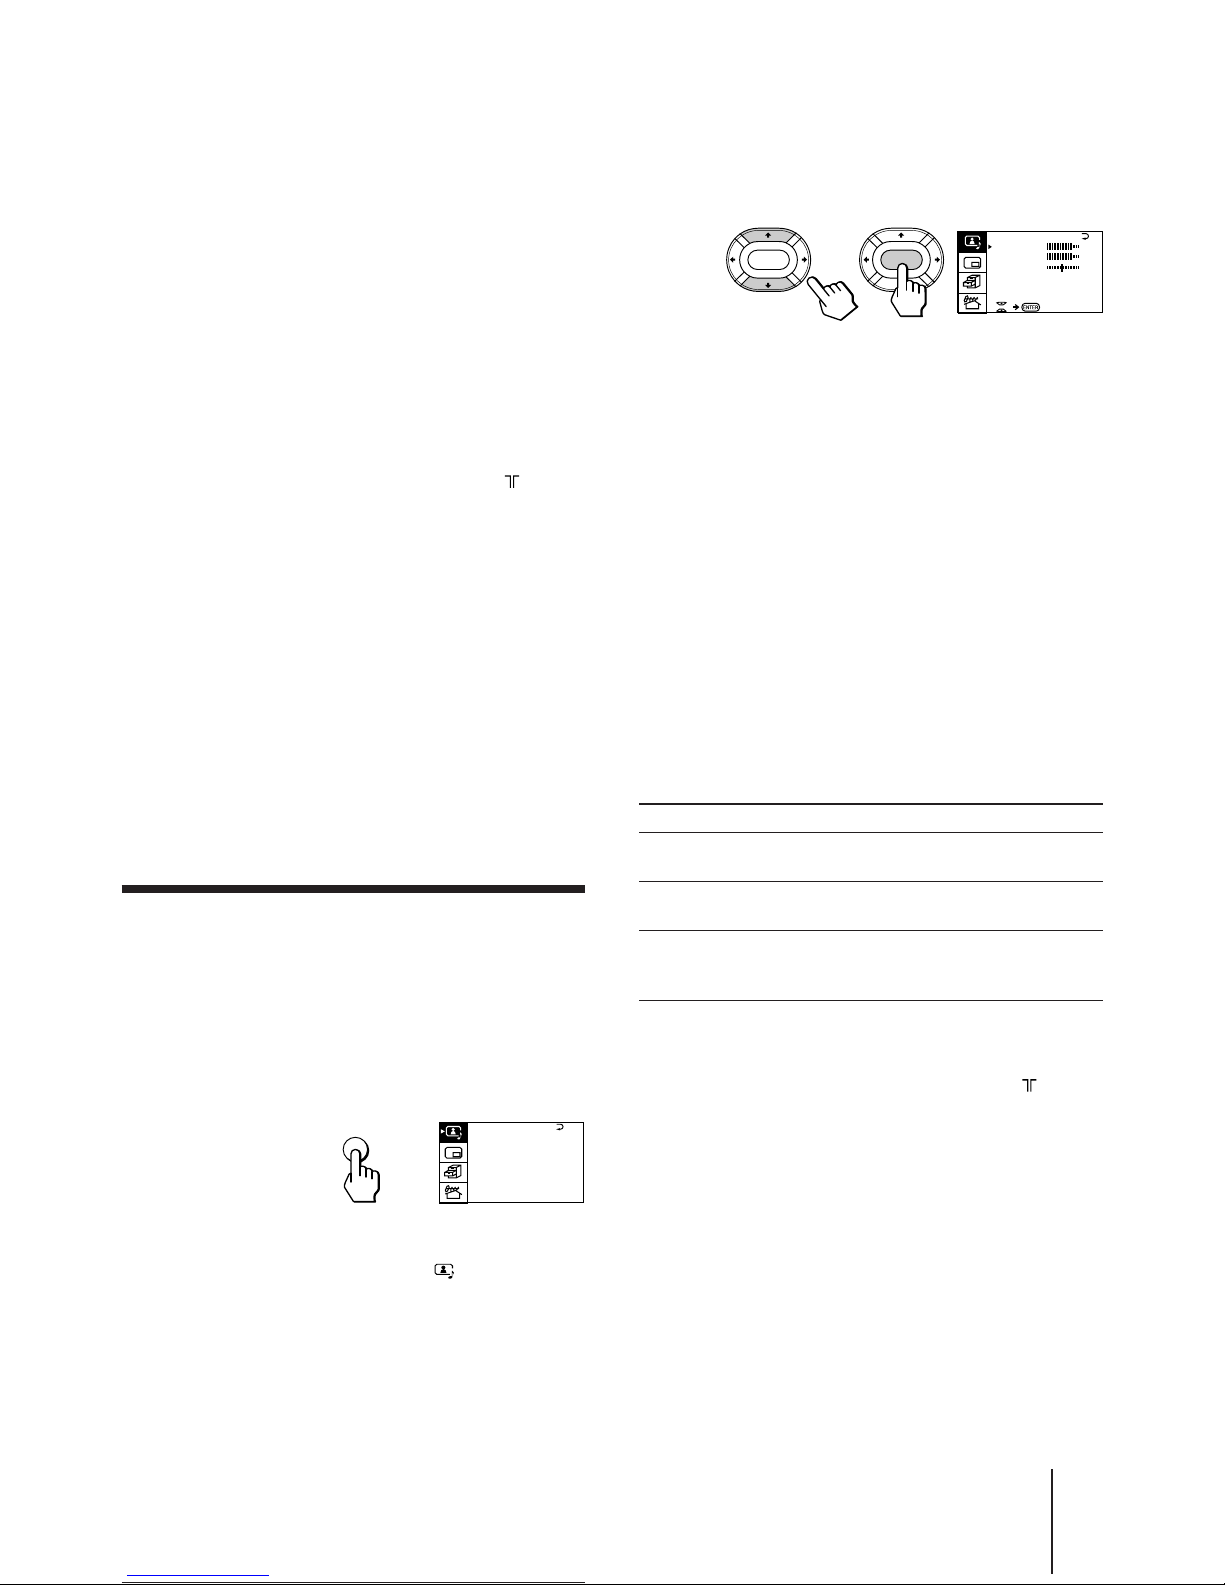
19
Opérations
-F
Appuyez sur V/b
Augmenter les graves.
Augmenter les aiguës.
Augmenter le volume
du haut-parleur droit.
Remarque
• Vous ne pouvez ajuster le réglage HUE que pour le système
NTSC.
Si l’image est légèrement neigeuse
Vous pouvez essayer d’améliorer l’image en changeant
la valeur VM comme décrit ci-dessous:
1 Affichez le menu VIDEO ADJUST.
2 Appuyez sur V ou v pour déplacer le curseur (”)
sur VM et appuyez sur ENTER.
3 Appuyez sur V/b/v/B pour sélectionner LOW et
appuyez sur ENTER.
Si la couleur d’image est anormale lors de la
réception de programmes via la borne
(d’antenne)
Changez le système de couleur ou le système de
télévision dans le menu PRESET comme décrit cidessous jusqu’à ce que la couleur devienne normale.
1 Affichez le menu PRESET.
2 Appuyez sur V ou v pour déplacer le curseur (”)
sur COL SYS ou TV SYS et appuyez sur ENTER.
3 Appuyez sur V/b/v/B pour changer le système de
couleur ou le système de télévision jusqu’à ce que la
couleur devienne normale et appuyez sur ENTER.
Remarque
• En règle générale, le système de télévision (COL SYS) se règle
sur AUTO.
Ajustement des réglages du son
(AUDIO ADJUST)
Vous pouvez ajuster les réglages du son selon votre
choix grâce à l’option AUDIO ADJUST. Les réglages
effectués sont conservés dans l’option PERSONAL.
1 Appuyez sur MENU.
2 Assurez-vous que le curseur (”) apparaît
dans le menu A/V CONTROL ( ) et appuyez
sur ENTER.
3 Appuyez sur V ou v pour déplacer le curseur
(”) sur AUDIO ADJUST et appuyez sur
ENTER.
4 Appuyez sur V ou v pour déplacer le curseur
(”) sur l’option que vous désirez ajuster et
appuyez sur ENTER.
5 Appuyez sur V/b/v/B pour ajuster l’option
sélectionnée et appuyez sur ENTER.
Pour plus de détails sur chaque option, reportezvous à “Description des options réglables” cidessous.
6 Pour ajuster d’autres options, répétez les
étapes 4 et 5.
7 Appuyez sur MENU pour revenir à l’écran
normal.
Description des options réglables
Option Appuyez sur v/B
BASS Diminuer les
graves.
TREBLE Diminuer les
aiguës.
BALANCE Augmenter le
volume du hautparleur gauche
Si le son est distordu ou parasité lors de la
réception de programmes via la borne
(antenne)
Changez le système de télévision dans le menu
PRESET comme décrit ci-dessous jusqu’à ce que le son
devienne normal.
1 Affichez le menu PRESET.
2 Appuyez sur V ou v pour déplacer le curseur (”)
sur TV SYS et appuyez sur ENTER.
3 Appuyez sur V/b/v/B pour changer le système
télévisé jusqu’à ce que le son devienne normal et
appuyez sur ENTER.
BASS
80
00
80
TREBLE
BALANCE
AUDIO ADJUST
ENTER ENTER
A / V CONTROL
DYNAMIC
SOFT
ST A NDARD
PERSONAL
V I DEO ADJ UST
AUDIO ADJ UST
T I L T CORRECT: 0
MENU
Page 47
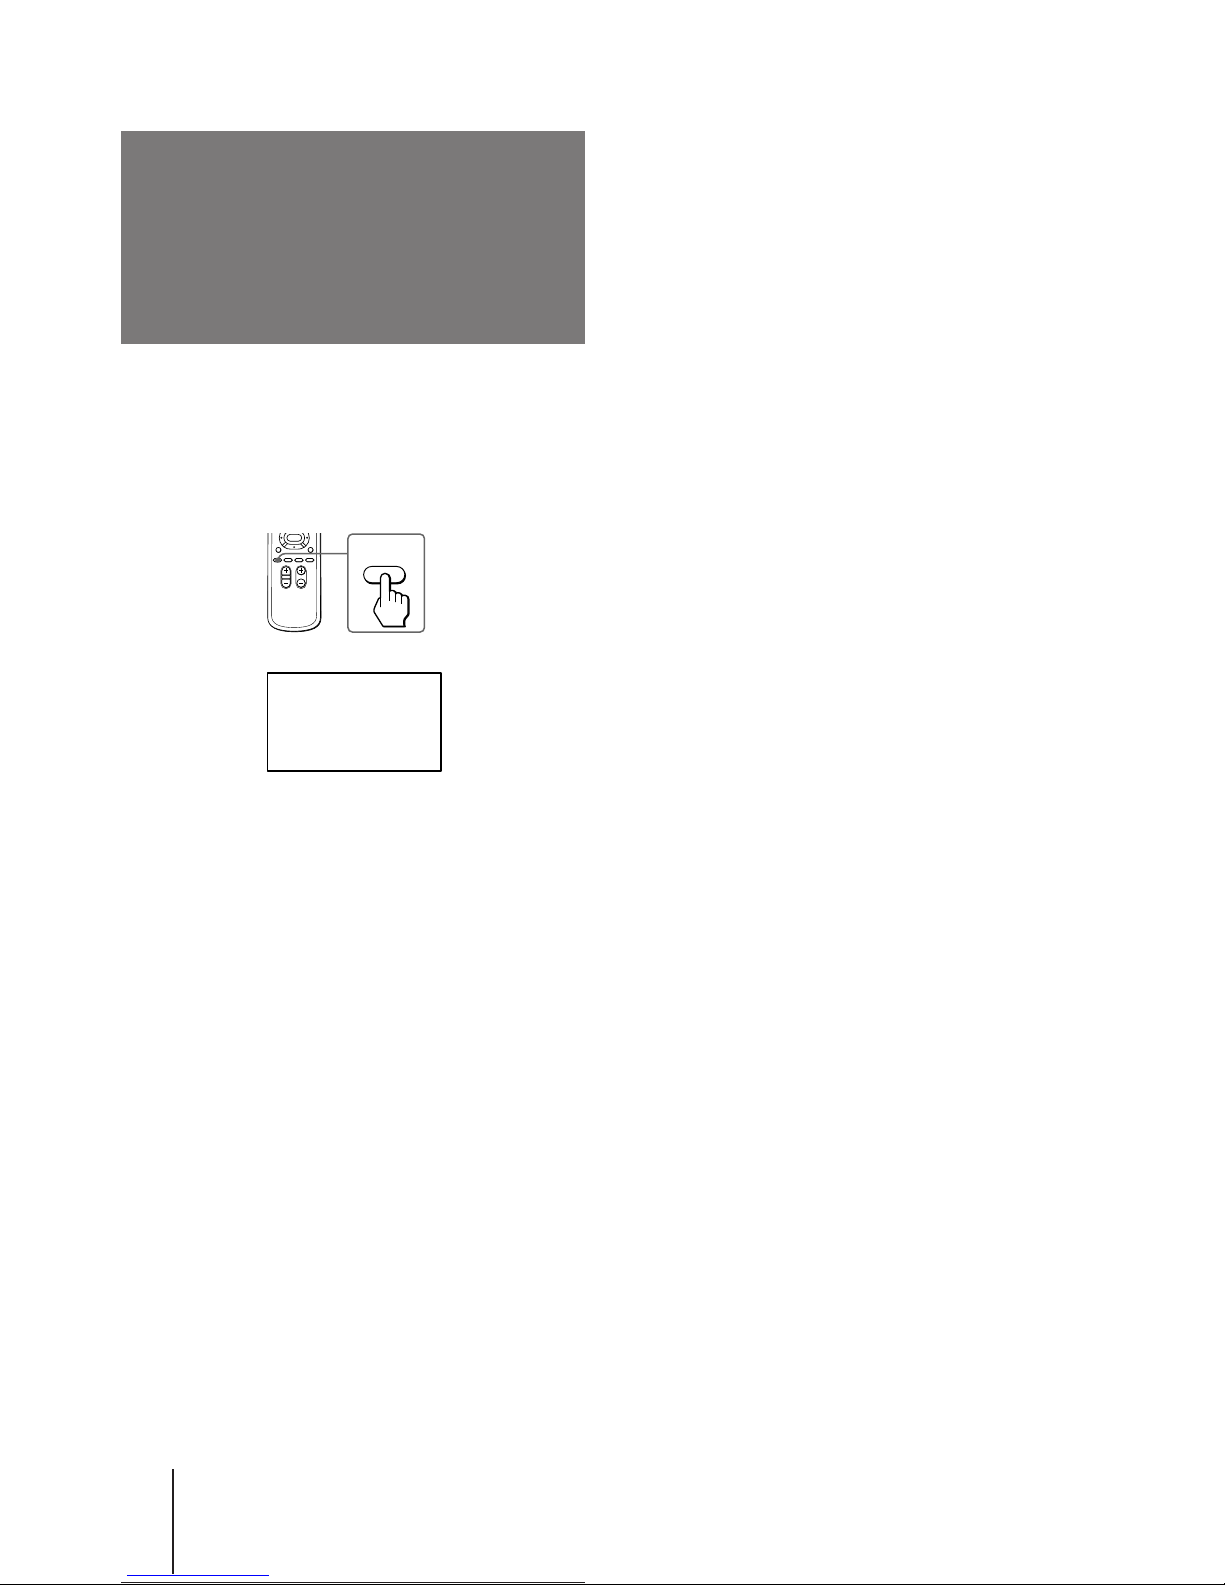
Opérations
20
-F
Ecoute du son
POWER BASSO
Le son POWER BASSO vous permet de profiter d’une
excellente qualité sonore combinant tous les types de
son. Ce son reproduit les sons dynamiques et cristallins
tout en accentuant les effets audio bas et élevés.
Appuyez sur POWER BASSO.
Le mode son du programme télévisé ou de l’entrée
vidéo passe au mode POWER BASSO.
Pour revenir au mode sonore précédent
Appuyez de nouveau sur POWER BASSO.
Remarque
• Vous pouvez sélectionner n’importe quel mode de son spatial
(HYPER SURROUND) pour annuler le son POWER BASSO.
POWER
BASSO
POWER BASSO: ON
Page 48
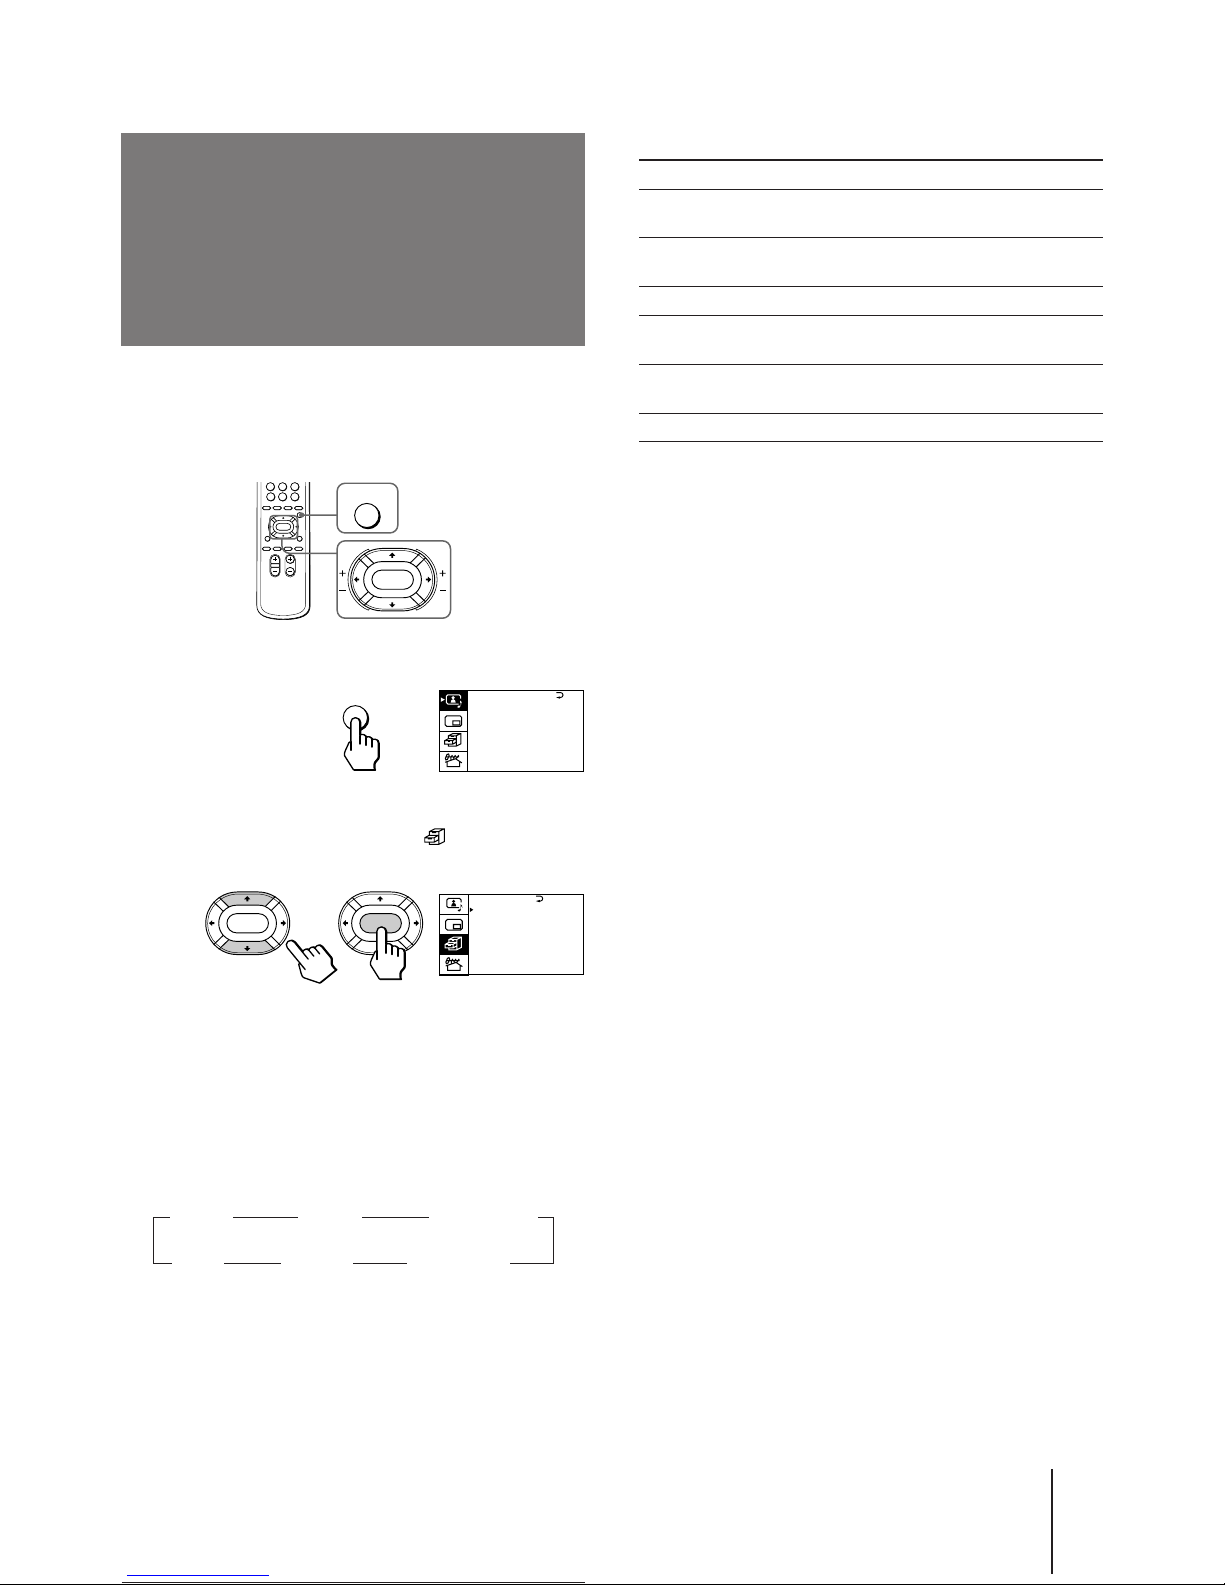
21
Opérations
-F
Ecoute du son
spatial
(HYPER SURROUND)
A / V CONTROL
DYNAMIC
SOFT
ST A NDARD
PERSONAL
V I DEO ADJ UST
AUDIO ADJ UST
T I L T CORRECT: 0
MENU
Description des options réglables
Sélectionnez Pour
MOVIE Ecouter un son qui accentue les graves
propres à une salle de cinéma.
MUSIC Ecouter un son dynamique et cristallin qui
accentue les effets audio bas et élevés.
NEWS〈BBE〉 Ecouter un son qui accentue la voix.
HALL〈SRS〉 Ecouter un son qui s’étend largement pour
donner l’impression d’une salle de concert.
SPACE Ecouter un son mono simulant l’effet
stéréo.
OFF Couper le son spatial.
Remarques
• BBE est fabriqué par Sony Corporation sous licence de BBE
Sound, Inc. Il est protégé par le brevet U.S. Patent
No. 4,638,258 et No. 4,482,866. L’indication “BBE” et le
symbole BBE sont des marques de commerce de BBE Sound,
Inc.
• Le système (r)® SRS (SOUND RETRIEVAL SYSTEM) est
fabriqué par Sony Corporation sous licence de SRS Labs, Inc. Il
est protégé par le brevet U.S. Patent No. 4,748,669.
L’indication “SRS” et le symbole SRS (r) sont des marques
déposées de SRS Labs, Inc.
L’option HYPER SURROUND vous permet de profiter
d’un effet sonore spatial ressemblant à une salle de
concert ou de cinéma lors de la réception de signaux
stéréo.
1 Appuyez sur MENU.
2 Appuyez sur V ou v pour déplacer le curseur
(z) sur le menu FEATURES ( ) et appuyez
sur ENTER.
3 Appuyez sur V ou v pour déplacer le curseur
(z) sur HYPER SURROUND et appuyez sur
ENTER.
4 Appuyez sur V/b/v/B pour sélectionner
MOVIE, MUSIC, NEWS〈BBE〉, HALL〈SRS〉 ou
SPACE et appuyez sur ENTER.
MOVIE n MUSIC n NEWS〈BBE〉
OFF N SPACE N HALL〈SRS〉 N
Pour plus de détails sur chaque option, reportez-vous à
“Description des options réglables” ci-dessous.
5 Appuyez sur MENU pour revenir à l’écran
normal.
MENU
ENTER
WIDE MODE :
HYPER SURROUND:
OFF
MONITOR
AV OUT :
FE ATURES
ENTER ENTER
WIDEZOOM
SCROLL : 0
Page 49
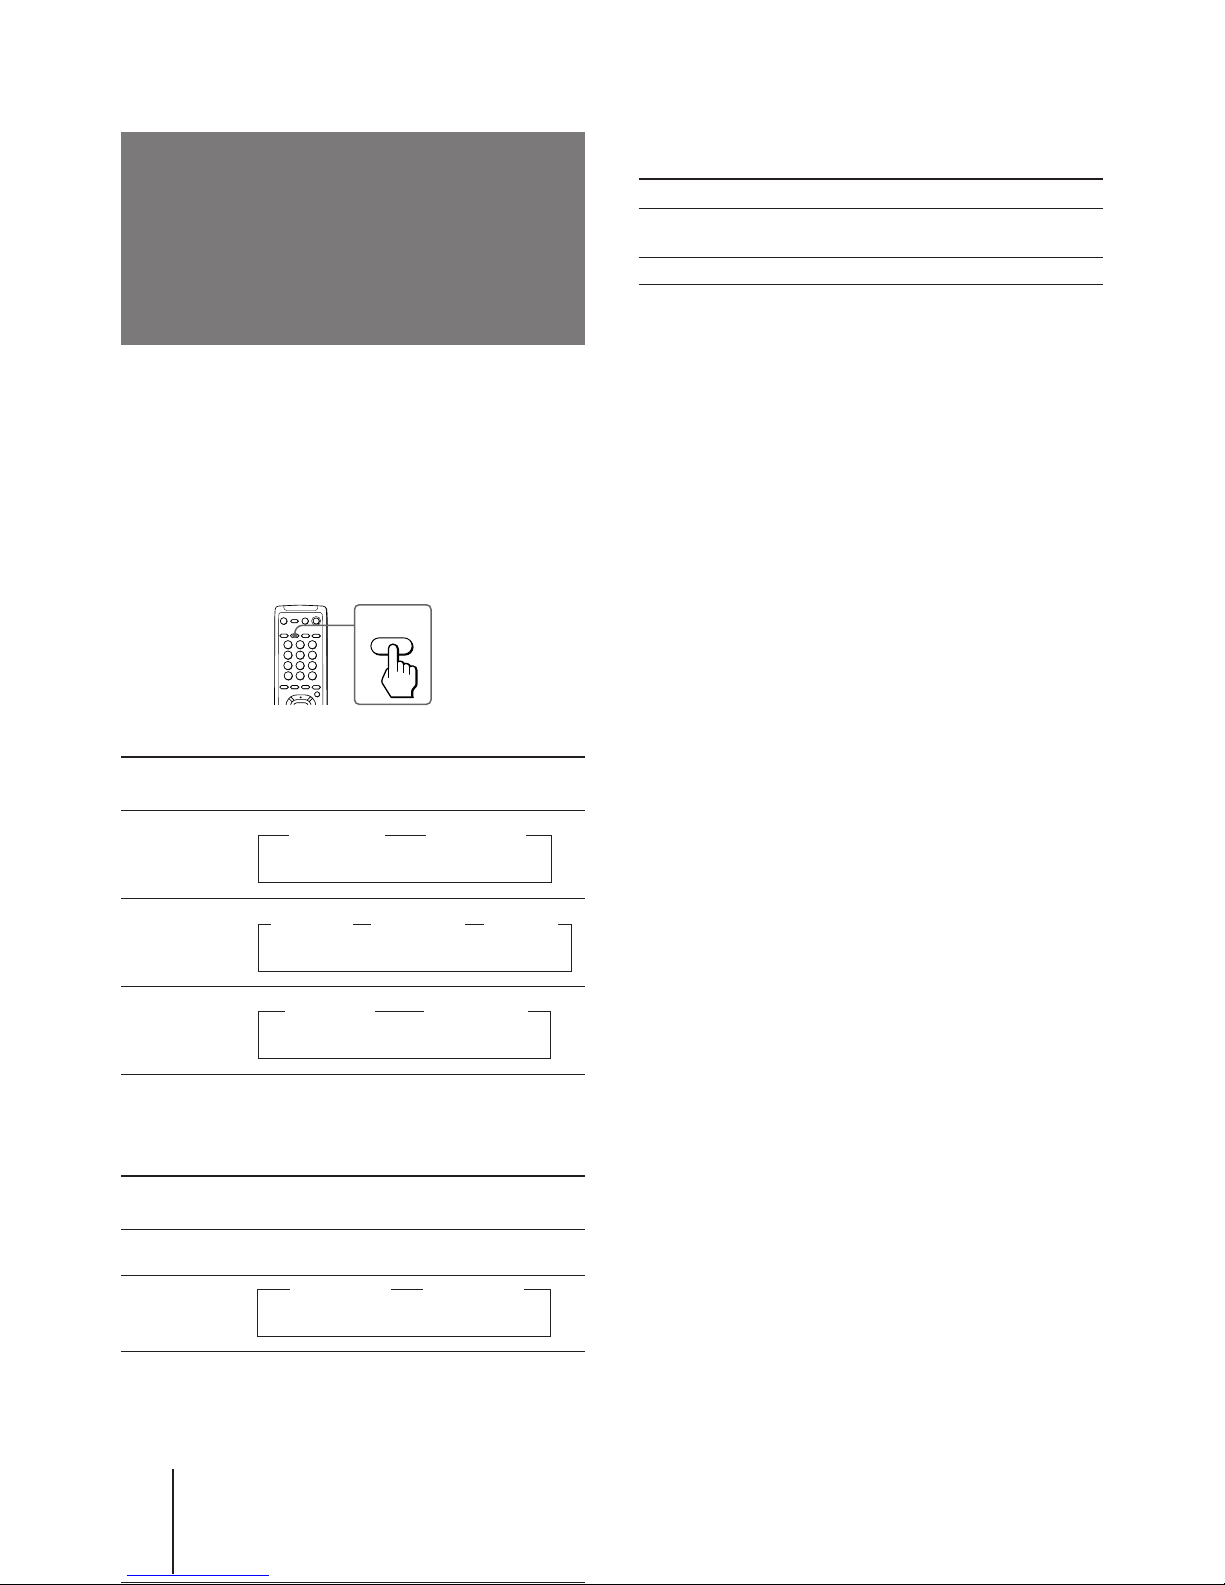
Opérations
22
-F
Zone de réception des programmes NICAM et
A2 (allemand)
Système Zone de réception
NICAM Hongkong, Singapour, Nouvelle-Zélande,
etc.
A2 (allemand) Australie, Malaisie, Thaïlande, etc.
Remarques
• Si le signal est très faible, le son est automatiquement diffusé
en mono.
• Si le son stéréo est parasité lors de la réception d’un
programme NICAM, sélectionnez “MONO”. Le son est diffusé
en mono, mais les parasites sont réduits.
Sélection d’un
programme stéréo
ou bilingue
Vous pouvez profiter du son stéréo ou des émissions
bilingues des systèmes stéréo NICAM et A2
(allemand).
Appuyez plusieurs fois sur A/B/ENLARGE
jusqu’à ce que vous obteniez le son désiré.
L’affichage sur écran change en fonction du son
sélectionné et l’indicateur STANDBY/STEREO/
WAKE UP s’allume également.
Lors de la réception d’un programme NICAM
Emission
NICAM stéréo
NICAM bilingue
NICAM mono
Lors de la réception d’un programme A2
(allemand)
Emission
A2 (allemand)
stéréo
A2 (allemand)
bilingue
A/B
ENLARGE
z MONO
(Son normal)
NICAM
z MAIN
(Son principal)
Affichage sur écran
(Son sélectionné)
STEREO
(Son stéréo)
NICAM
z (Son stéréo)
MONO
z (Son normal)
z MONO
(Son normal)
NICAM
z MAIN
(Son principal)
NICAM
z SUB
(Son
intermédiaire)
z MAIN
(Son principal)
z SUB
(Son
intermédiaire)
Affichage sur écran
(Son sélectionné)
Page 50
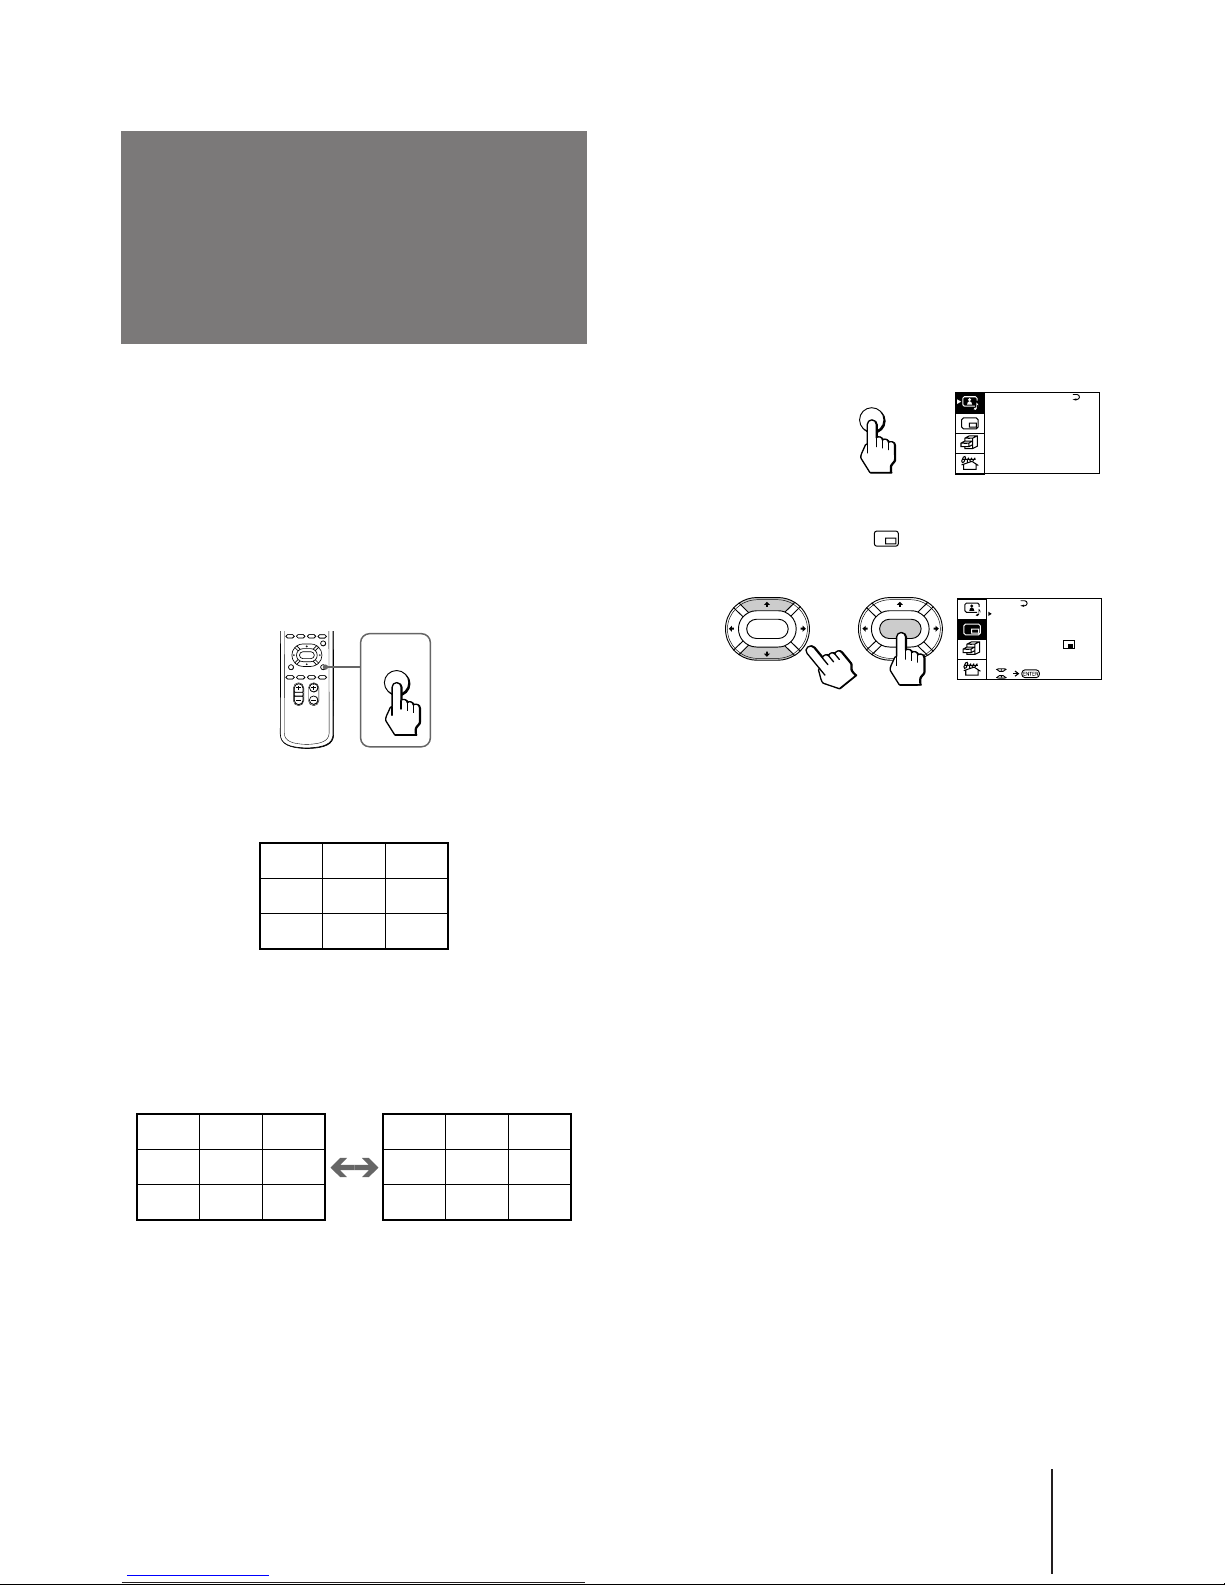
23
Opérations
-F
Pour revenir à l’écran normal
Appuyez de nouveau sur PROGR INDEX ou PIP.
Vous pouvez également sélectionner PROGR INDEX
ou PIP : OFF dans le menu PIP et appuyez sur ENTER
pour revenir à l’écran normal.
Pour visualiser les programmes multiples en
mosaïque à l’aide du menu
1 Appuyez sur MENU.
2 Appuyez sur V ou v pour déplacer le curseur
(z) sur le menu PIP ( ) et appuyez sur
ENTER.
3 Assurez-vous que le curseur (z) apparaît à
côté de PROGR INDEX et appuyez sur ENTER.
Remarques
• Vous pouvez modifier la position des neufs petits écrans à
l’aide du menu PIP (comme décrit dans “Changement de la
position de l’écran PIP” à la page 25).
• Vous pouvez écouter le son de l’écran principal lorsque vous
visualisez en mosaïque les programmes multiples.
• Vous pouvez utiliser les touches numériques de la
télécommande pour modifier la position de programme de
l’écran principal lorsque vous visualisez en mosaïque les
programmes multiples.
Visualisation de
plusieurs programmes
en même temps
(PROGRAM INDEX)
L’option PROGRAM INDEX vous permet de visualiser
simultanément tous les programmes télévisés
présélectionnés et les entrées vidéo sur neufs petits
écrans dans l’écran normal.
Vous pouvez visualiser plusieurs écrans en mosaïque
sur les neuf écrans à l’aide de la touche de la
télécommande ou du menu.
Appuyez sur PROGR INDEX.
Les neuf premiers programmes présélectionnés
apparaissent en mosaïque sur les neuf petits écrans.
Pour visualiser en mosaïque les programmes
télévisés présélectionnés suivants ou
précédents
Appuyez sur PROGR +/– de la télécommande ou du
téléviseur.
Pour sélectionner le programme que vous
désirez regarder après son apparition en
mosaïque
Appuyez sur les touches numériques, VIDEO/HOLD
ou appuyez sur V/b/v/B pour déplacer le curseur
(>>>) qui apparaît sur le premier écran vers l’écran du
programme que vous désirez regarder et appuyez sur
ENTER.
PIP
PIP: OFF
PIP TEXT
STRO BE
POS I T I ON:
PROGR I NDE X
ENTER ENTER
A / V CONTROL
DYNAMIC
SOFT
ST A NDARD
PERSONAL
V I DEO ADJ UST
AUDIO ADJUST
T I L T CORRECT: 0
MENU
PROGR
INDEX
123
456
789
>>>
123
456
789
10 11 12
V1 V2 V3
123
>>> >>>
Page 51
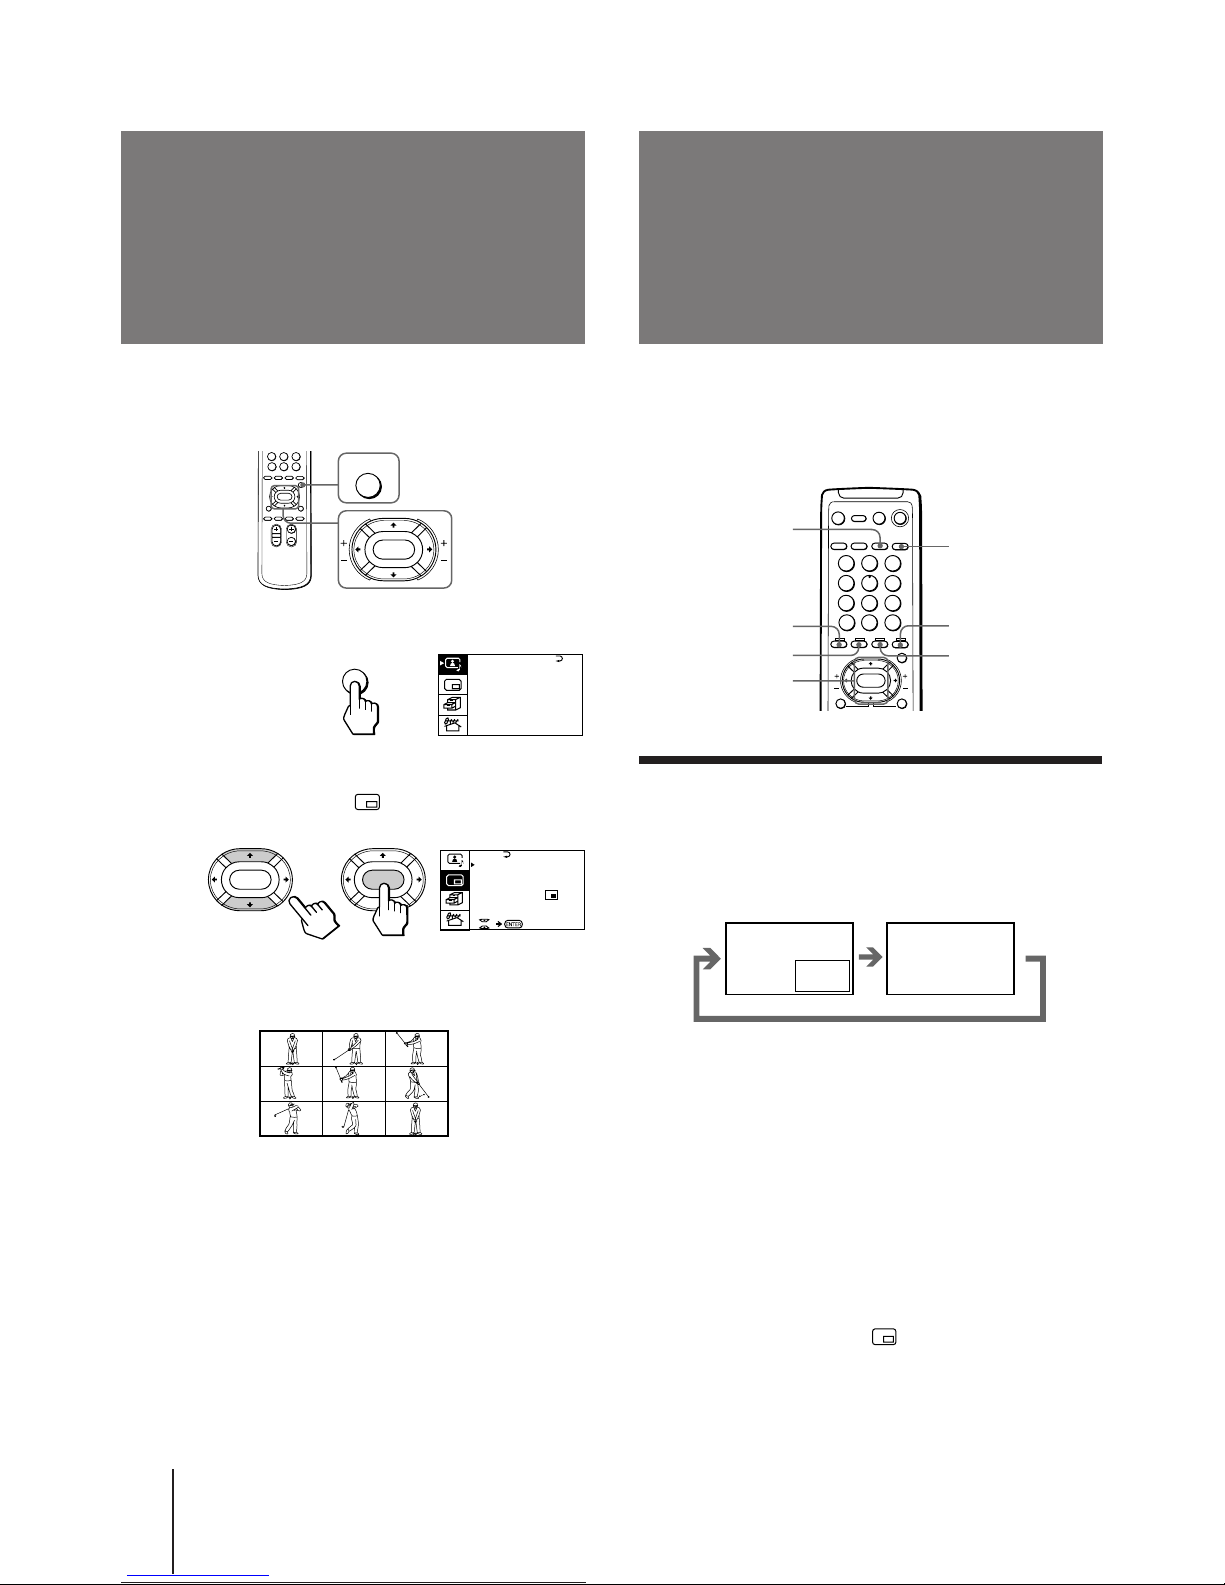
Opérations
24
-F
L’option Image dans image (PIP) vous permet
d’afficher un sous-écran dans l’image principale avec
des programmes télévisés ou des entrées vidéo
différents.
Affichage de l’écran PIP
Vous pouvez afficher l’écran PIP à l’aide de la touche
de la télécommande ou du menu.
Appuyez sur PIP.
Sélection d’un programme télévisé ou d’une
entrée vidéo dans l’écran PIP
Pour sélectionner un programme télévisé, appuyez sur
V ou v et appuyez sur ENTER.
Pour sélectionner une entrée vidéo, appuyez sur
TV/VIDEO.
Pour afficher l’écran PIP à l’aide du menu
1 Appuyez sur MENU.
2 Appuyez sur V ou v pour déplacer le curseur
(”) sur le menu PIP ( ) et appuyez sur
ENTER.
3 Appuyez sur V ou v pour déplacer le curseur
(”) sur PIP et appuyez sur ENTER.
Utilisation des
options Image dans
image (PIP)
Affichage des
images trame par
trame (STROBE)
Vous pouvez visualiser un mouvement au ralenti de
l’image de l’écran principal qui est affichée trame par
trame sur les neuf petits écrans dans l’écran principal.
1 Appuyez sur MENU.
2 Appuyez sur V ou v pour déplacer le curseur
(z) sur le menu PIP ( ) et appuyez sur
ENTER.
3 Appuyez sur V ou v pour déplacer le curseur
(z) sur STROBE et appuyez sur ENTER.
Pour revenir à l’écran normal
Sélectionnez de nouveau STROBE ou PIP : OFF dans le
menu PIP et appuyez sur ENTER.
Vous pouvez également appuyer sur TV, VIDEO/
HOLD, PROGR +/– ou PIP pour revenir à l’écran
normal.
Remarques
• Vous pouvez modifier la position des neufs petits écrans à
l’aide du menu PIP (comme décrit dans “Changement de la
position de l’écran PIP” à la page 25).
• Vous pouvez écouter le son normal lorsque vous utilisez
l’option STROBE.
TV
PIP
SWAP
VIDEO/HOLD
TV/VIDEO
FREEZE
V/v/ENTER
A / V CONTROL
DYNAMIC
SOFT
ST A NDARD
PERSONAL
V I DEO ADJ UST
AUDIO ADJUST
T I L T CORRECT: 0
MENU
PIP
PIP: OFF
PIP TEXT
STRO BE
POS I T I ON:
PROGR I NDEX
ENTER ENTER
MENU
ENTER
1
2
3
4
5
6
7
8
0
9
Page 52
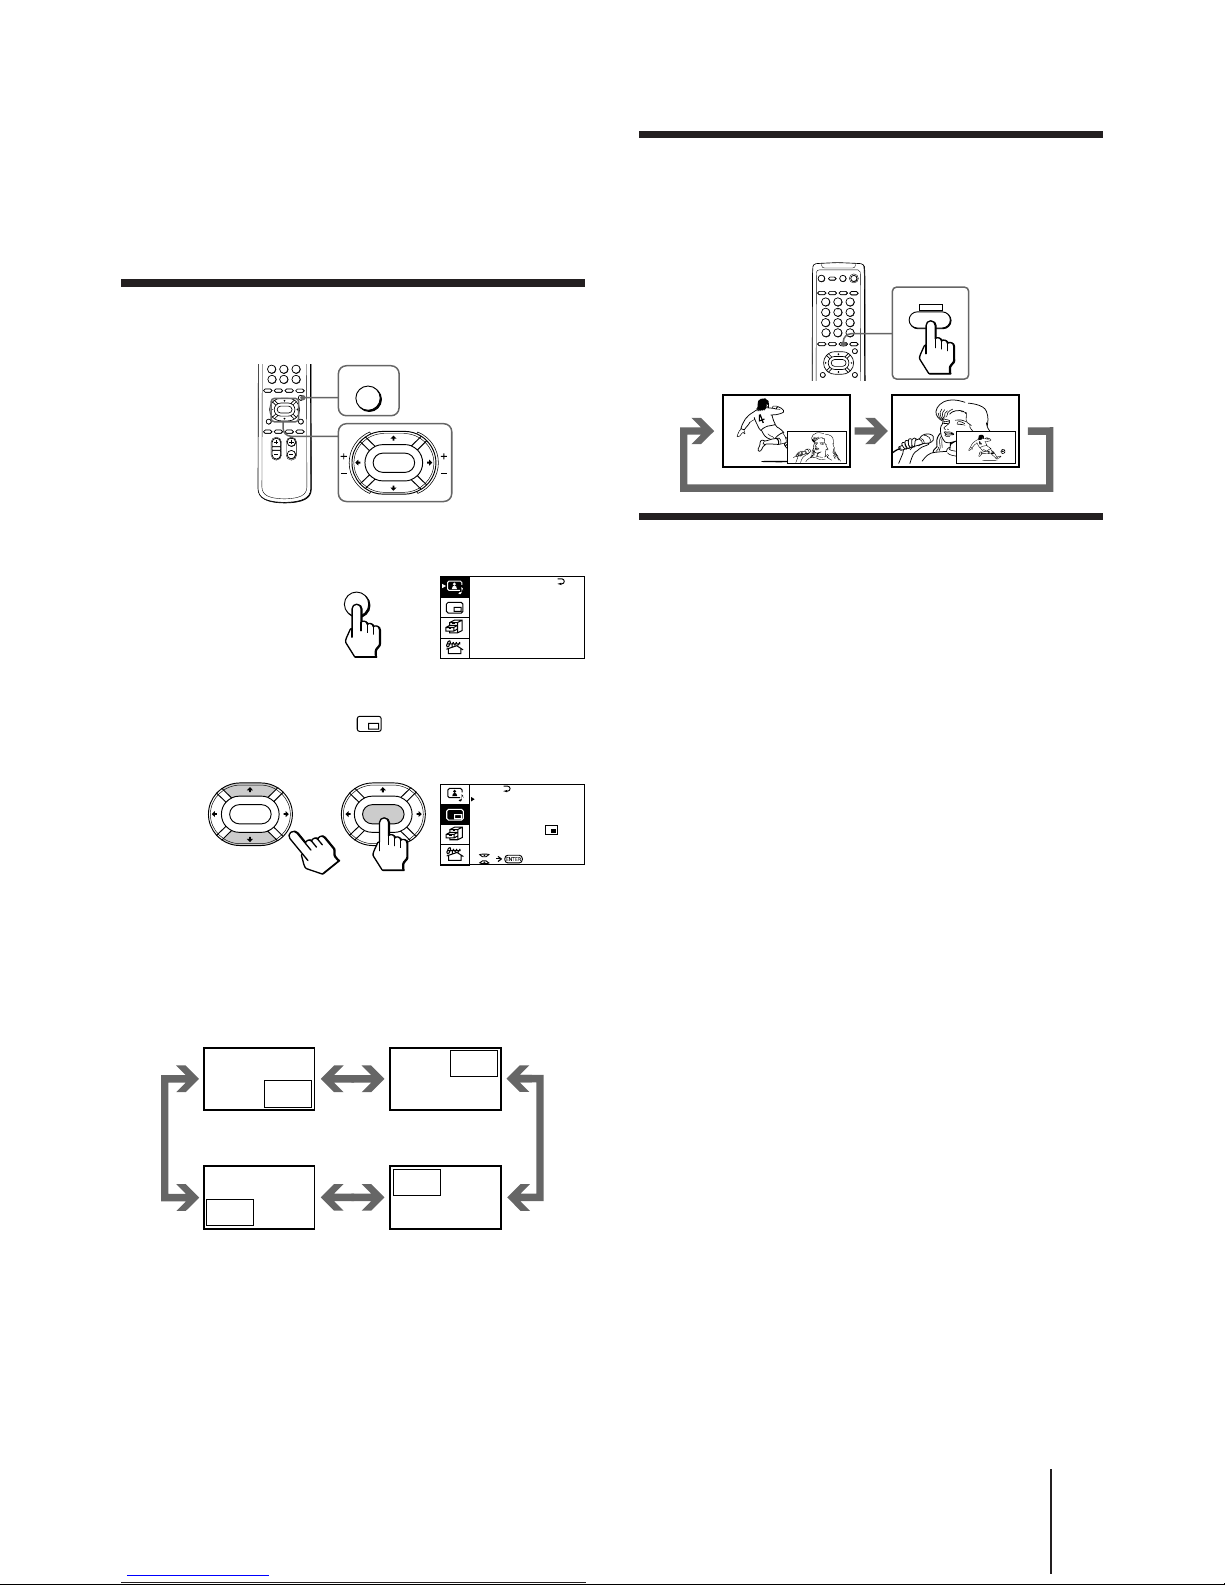
25
Opérations
-F
Permutation d’images entre l’écran
principal et l’écran PIP
Appuyez sur SWAP.
Arrêt sur l’image PIP
Appuyez sur FREEZE.
L’image PIP sera figée.
Pour revenir à l’écran normal
Appuyez de nouveau sur FREEZE.
Remarques
• Lorsque vous affichez une entrée vidéo sur l’écran PIP à une
vitesse anormale, il est possible que l’image apparaisse
parasitée en fonction du magnétoscope.
• Si vous affichez différents systèmes couleur sur l’écran
principal et sur l’écran PIP, il est possible que la taille de
l’écran PIP soit différente et l’image PIP peut apparaître
parasitée. Il ne s’agit pas d’un dysfonctionnement du
téléviseur.
4 Appuyez sur V/b/v/B pour sélectionner ON et
appuyez sur ENTER.
5 Appuyez sur MENU pour revenir à l’écran
normal.
Changement de la position de l’écran
PIP
1 Appuyez sur MENU.
2 Appuyez sur V ou v pour déplacer le curseur
(z) sur le menu PIP ( ) et appuyez sur
ENTER.
3 Appuyez sur V ou v pour déplacer le curseur
(z) sur POSITION et appuyez sur ENTER.
4 Appuyez sur V/b/v/B pour sélectionner la
position désirée et appuyez sur ENTER.
5 Appuyez sur MENU pour revenir à l’écran
normal.
A / V CONTROL
DYNAMIC
SOFT
ST A NDARD
PERSONAL
V I DEO ADJ UST
AUDIO ADJUST
T I L T CORRECT: 0
MENU
PIP
PIP: OFF
PIP TEXT
STRO BE
POS I T I ON:
PROGR I NDE X
ENTER ENTER
MENU
ENTER
SWAP
Page 53
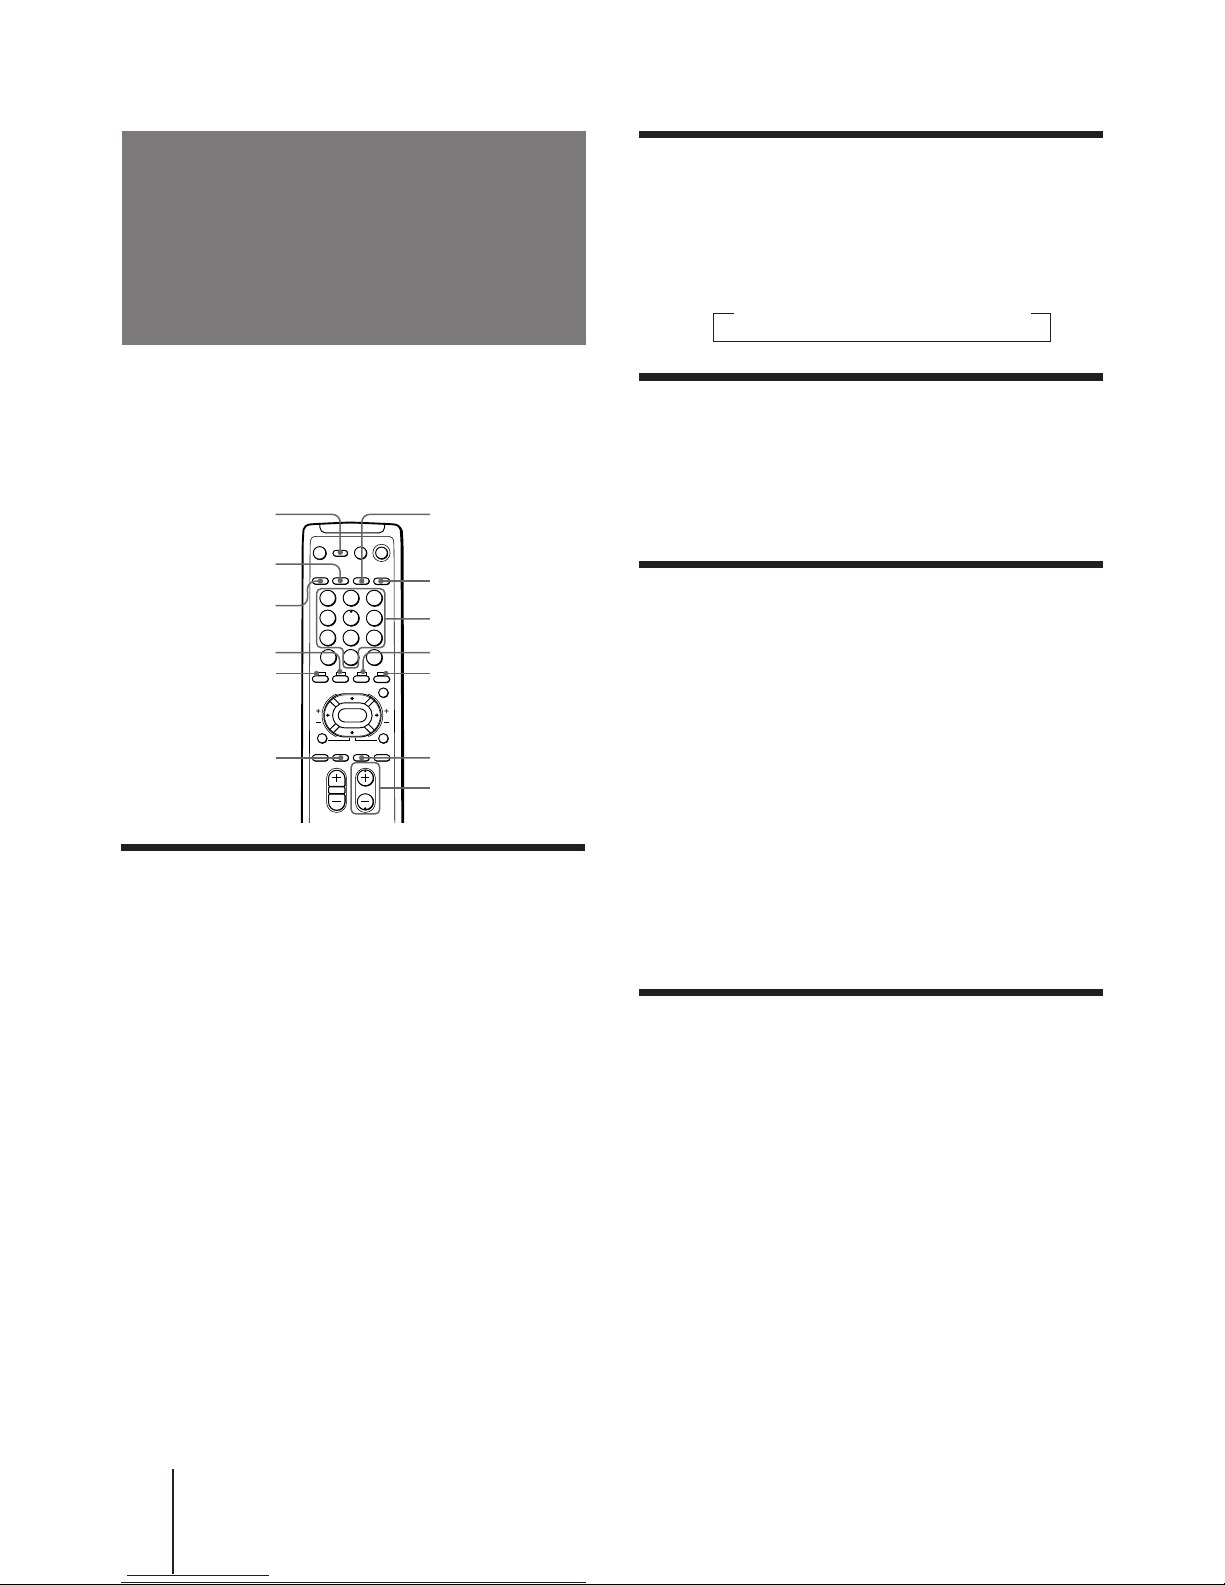
Opérations
26
-F
Utilisation du
télétexte
Superposition de la page du télétexte
sur l’image du téléviseur
Appuyez sur TEXT.
Chaque fois que vous appuyez sur TEXT, l’écran
change comme suit:
n Télétexte n Télétexte et TV n TV
Visualisation du contenu du service
télétexte (INDEX)
Appuyez sur WAKE UP/INDEX pour afficher un
aperçu du contenu du télétexte et des numéros
de page.
Utilisation de FASTEXT
Cette option vous permet d’accéder rapidement à une
page du télétexte utilisant FASTEXT. Lorsqu’une
programme FASTEXT est diffusée, les menus colorés
apparaissent au bas de l’écran. Les couleurs des menus
correspondent aux touches rouge (TV/VIDEO), verte
(FREEZE), jaune (SWAP) et bleue (PIP) de la
télécommande.
Pour accéder à un menu FASTEXT
Appuyez sur la touche colorée de la télécommande qui
correspond au menu coloré qui apparaît au bas de
l’écran.
La page de menu apparaît sur l’écran après quelques
secondes.
Sélection d’une page télétexte
Appuyez sur les touches numériques pour
entrer les trois chiffres de la page télétexte
désirée.
Si vous faites une faute, réintroduisez le numéro de
page correct.
Pour accéder à la page suivante ou précédente
Appuyez sur PROGR +/–.
Vous pouvez également accéder à l’une des pages de
télétexte apparaissant dans la colonne colorée au bas de
l’écran à l’aide de la touche colorée correspondante de
la télécommande.
Certaines chaînes émettent un service d’informations
appelé le télétexte.
Le service télétexte vous permet de recevoir à tout
moment différentes informations telles que les
prévisions météo ou les nouvelles.
Affichage du télétexte
1 Sélectionnez une chaîne télévisée qui
propose le service télétexte que vous
désirez regarder.
2 Appuyez sur TEXT pour afficher le télétexte.
Une page du télétexte (la page d’index en règle
générale) s’affiche. Si la chaîne ne propose pas de
service télétexte, “100” s’affiche dans le coin
supérieur gauche de l’écran.
Pour couper le télétexte
Appuyez sur TV.
DISPLAY/REVEAL VIDEO/HOLD
SLEEP/TEXT CLR
PROGR +/–
WAKE UP/INDEX
Rouge
TEXT
A/B/ENLARGE
Numéros
Jaune
Bleu
TV
Vert
1
2
3
4
5
6
7
8
0
9
Page 54

27
Opérations
-F
n
n
n
Maintien d’une page de télétexte
(HOLD)
Une page de télétexte peut contenir plusieurs souspages. Vous pouvez arrêter le défilement des pages de
manière à pouvoir lire le texte à votre propre rythme.
Appuyez sur VIDEO/HOLD.
Le symbole HOLD “H” apparaît dans le coin
supérieur gauche de l’écran.
Pour revenir au fonctionnement normal du
télétexte
Appuyez de nouveau sur VIDEO/HOLD ou TEXT.
Apparition des informations cachées
(REVEAL)
L’option REVEAL vous permet de dévoiler des
informations cachées, telles que les réponses à un jeu
disponible sur certaines pages du télétexte.
Appuyez sur DISPLAY/REVEAL.
Pour cacher l’information
Appuyez de nouveau sur DISPLAY/REVEAL.
Doublement en hauteur du texte
(ENLARGE)
Appuyez sur A/B/ENLARGE.
Chaque fois que vous appuyez sur A/B/ENLARGE,
l’affichage du télétexte change comme suit:
Doubler la hauteur de la moitié supérieure
Doubler la hauteur de la moitié inférieure
Taille normale
Attente d’une page télétexte pendant
la visualisation d’un programme
télévisé (TEXT CLEAR)
1 Entrez le numéro de page du télétexte que
vous désirez obtenir, puis appuyez sur
SLEEP/TEXT CLR.
2 Lorsque le numéro de page s’affiche à
l’écran, appuyez sur TEXT pour faire
apparaître le télétexte.
Page 55
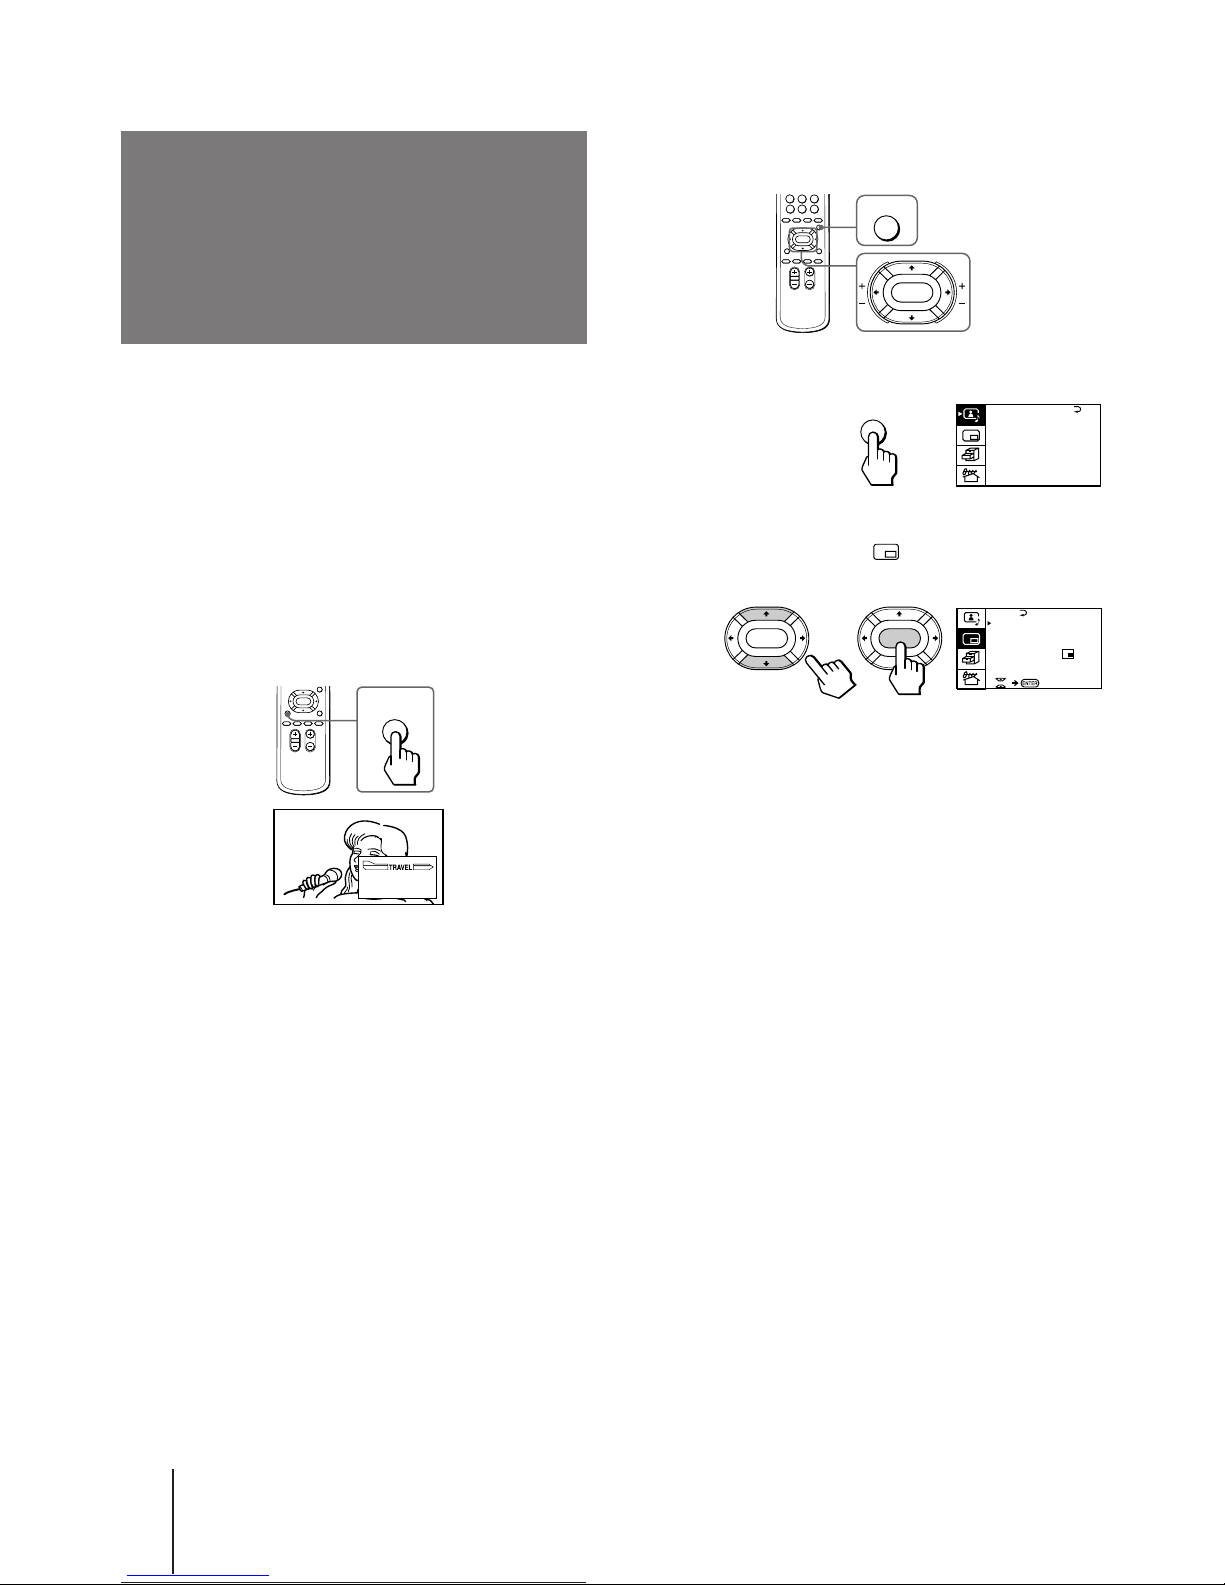
Opérations
28
-F
Pour afficher une page de télétexte sur l’écran
PIP à l’aide du menu
1 Appuyez sur MENU.
2 Appuyez sur V ou v pour déplacer le curseur
(z) sur le menu PIP ( ) et appuyez sur
ENTER.
3 Appuyez sur V ou v pour déplacer le curseur
(z) sur PIP TEXT et appuyez sur ENTER.
4 Appuyez sur V/b/v/B pour sélectionner la
page du télétexte que vous désirez
regarder.
Remarques
• Vous pouvez également utiliser les touches colorées (voir page
26) lors de l’affichage d’une page de télétexte sur l’écran PIP.
• Pour sélectionner une page du télétexte sur l’écran PIP,
appuyez une seule fois seulement sur V/b/v/B.
Si vous appuyez continuellement sur V/b/v/B, les numéros
de page du télétexte changent également continuellement à
grande vitesse.
• Vous pouvez modifier la position de la page du télétexte sur
l’écran PIP à l’aide du menu PIP (comme décrit dans
“Changement de la position de l’écran PIP” à la page 25).
PIP
PIP: OFF
PIP TEXT
STRO BE
POS I T I ON:
PROGR I NDE X
ENTER ENTER
A / V CONTROL
DYNAMIC
SOFT
ST A NDARD
PERSONAL
V I DEO ADJ UST
AUDIO ADJUST
T I L T CORRECT: 0
MENU
L’option PIP TEXT vous permet d’afficher une page de
télétexte sur l’écran PIP tout en regardant un
programme télévisé.
Vous pouvez afficher le télétexte sur l’écran PIP à l’aide
de la touche de la télécommande ou du menu.
1 Sélectionnez la chaîne télévisée qui
propose le télétexte que vous désirez
regarder.
2 Appuyez sur PIP TEXT.
Pour revenir à l’écran normal
Appuyez de nouveau PIP TEXT, TV, VIDEO/HOLD
ou PROGR +/–.
Vous pouvez également sélectionner PIP : OFF dans le
menu PIP et appuyez sur ENTER pour revenir à l’écran
normal.
Affichage du
télétexte dans
l’écran PIP (PIP TEXT)
PIP
TEXT
P166 SECTEXT 166 FR1 MAR 03:59:09
Fom Singapore
To PARIS
To OSAKA
To ROMA
To SYDNEY
Day Dep/Arr Flight Alrcraft
1.6 220/0588 SQ28 747
2 2130/1225 PA115 L15
3 2115/1330 SQ26 747
2.7 2130/0745 SQ24
747
4 2300/0915 AZ487 747
2.5 1000/1715 SQ6 747
4.6 0930/2015 CX522 L10
1 2210/0610 SQ21A 747
2 2100/0835 SQ21A 747
MENU
ENTER
Page 56
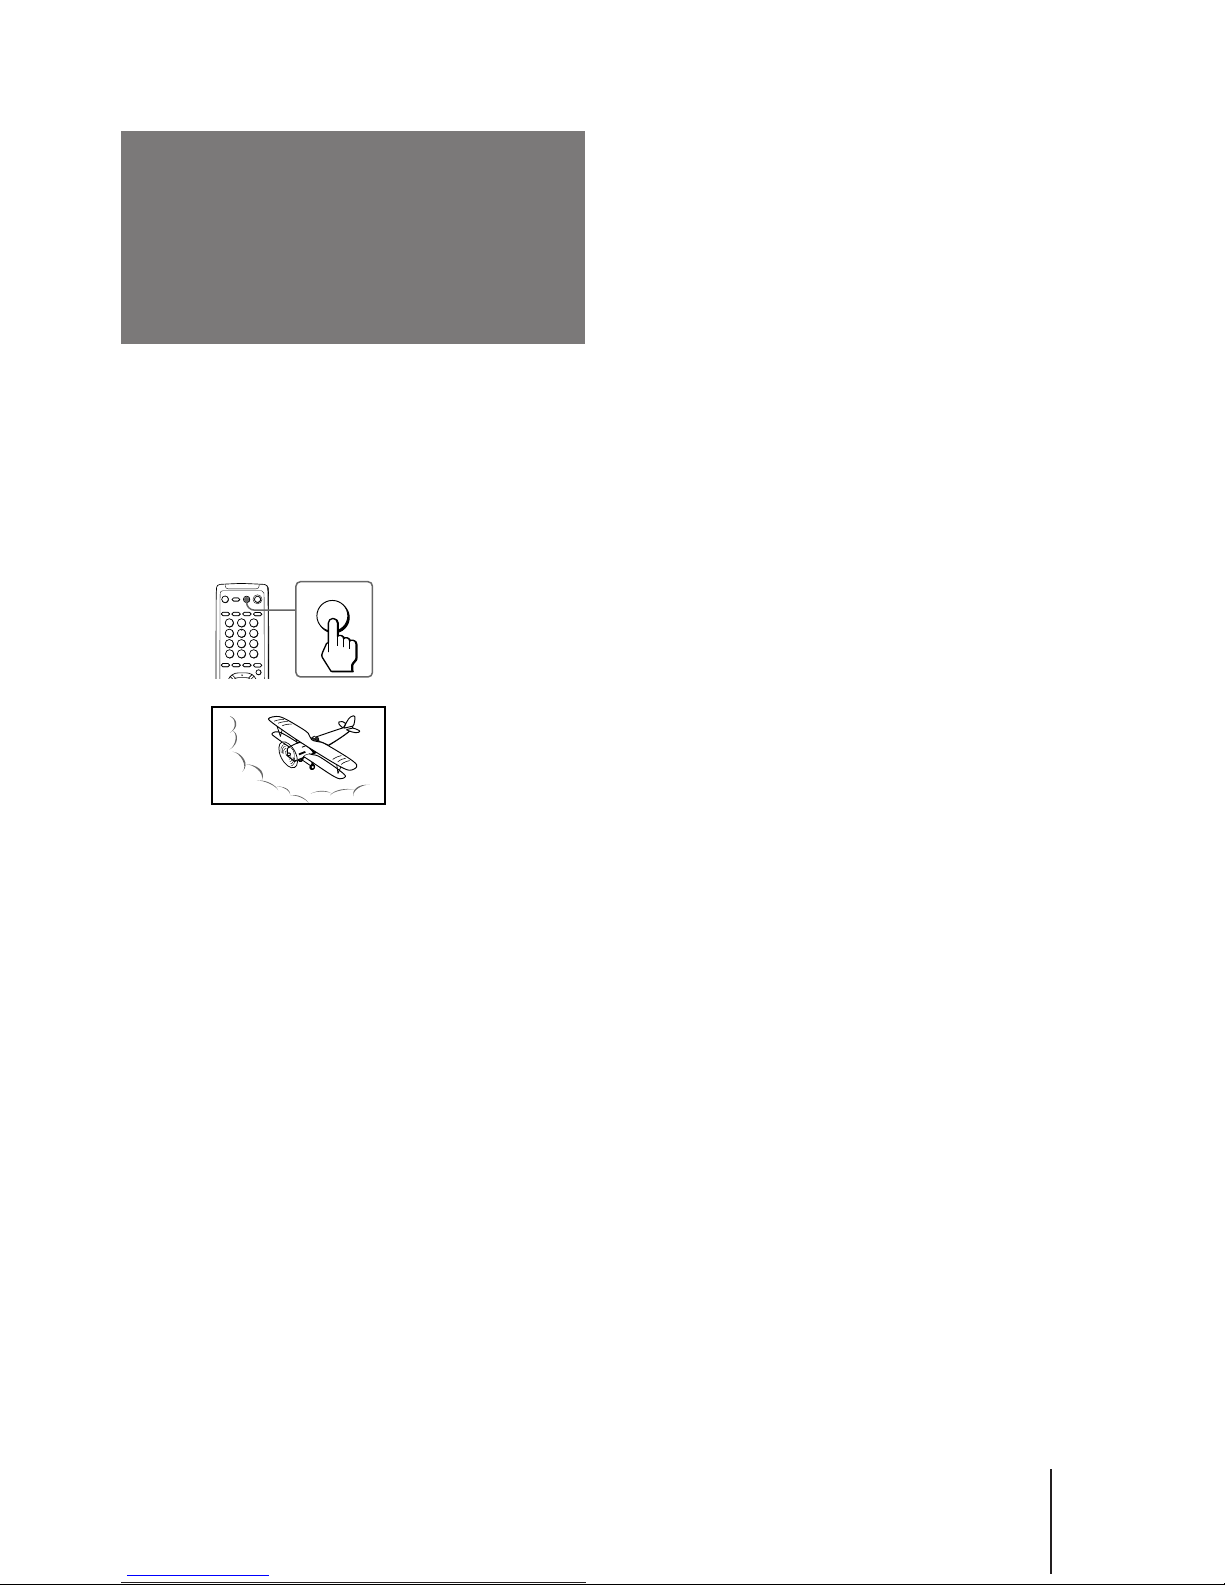
29
Opérations
-F
Vous pouvez visualiser un jeu vidéo dans le mode
optimal qui reproduit une image douce et un son
dynamique.
Vous pouvez afficher un jeu vidéo à l’aide de la touche
de la télécommande ou du menu.
Appuyez sur GAME.
L’image et le son passent au mode qui convient aux
jeux vidéo.
Pour revenir aux modes d’image et de son
normaux
Appuyez sur TV, VIDEO/HOLD ou PROGR +/–.
Remarques
• Si vous appuyez sur la touche GAME lorsque le téléviseur est
en mode de veille, le téléviseur s’allume automatiquement et
l’image et le son passent au mode qui convient au jeu vidéo.
• Pour afficher un jeu vidéo, raccordez l’équipement du jeu
vidéo à la prise VIDEO 3 INPUT à l’avant du téléviseur ou aux
prises VIDEO IN 3 à l’arrière du téléviseur.
Visualisation d’un
jeu vidéo
GAME
GAME
Page 57
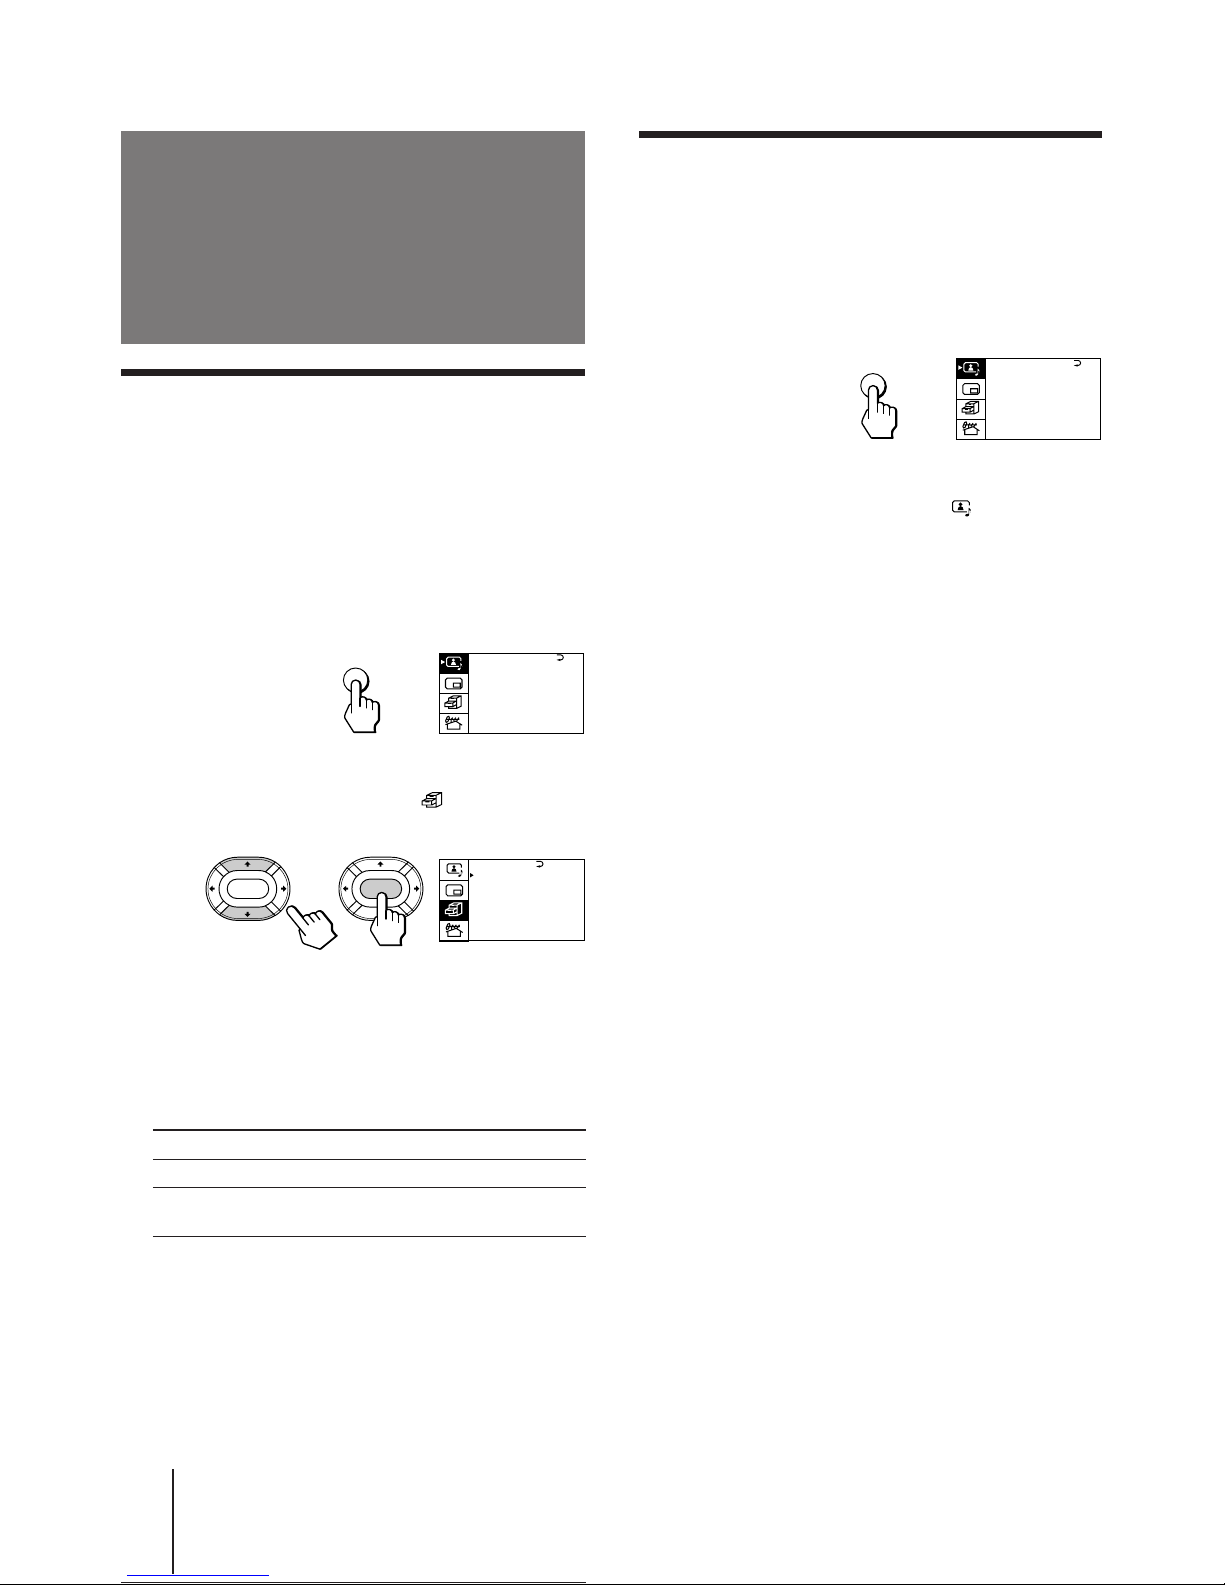
Opérations
30
-F
Réglage de l’inclinaison de l’image
Vous pouvez régler l’inclinaison de l’image de façon à
l’aligner correctement à l’écran. Cette opération est
nécessaire lorsque le téléviseur est orienté vers un
champ magnétique terrestre.
1 Appuyez sur MENU.
2 Assurez-vous que le curseur (z) apparaît
dans le menu A/V CONTROL ( ) et appuyez
sur ENTER.
3 Appuyez sur V ou v pour déplacer le curseur
(z) sur TILT CORRECT et appuyez sur ENTER.
4 Appuyez sur V/b/v/B pour sélectionner la
valeur d’alignement appropriée et appuyez
sur ENTER.
TILT CORRECT:
–5 N –4 N –3 N –2 N –1 N 0 n +1 n +2 n +3 n+4 n +5
Appuyez sur v/B Appuyez sur V/b
Personnalisation du
téléviseur
Utilisation de la borne AV OUT
Vous pouvez sélectionner le signal de sortie provenant
des prises MON/TV OUT situées à l’arrière du
téléviseur. Cependant, les signaux des modes
PROGRAM INDEX, STROBE et PIP et la diffusion du
télétexte ne peuvent pas sortir même si MONITOR est
sélectionné.
1 Appuyez sur MENU.
2 Appuyez sur V ou v pour déplacer le curseur
(z) sur le menu FEATURES ( ) et appuyez
sur ENTER.
3 Appuyez sur V ou v pour déplacer le curseur
(z) sur AV OUT et appuyez sur ENTER.
4 Appuyez sur V/b/v/B pour sélectionner le
signal de sortie et appuyez sur ENTER.
Sélectionnez Pour
TV Sortir le signal de l’émission télévisée.
MONITOR Sortir le signal de l’image que vous
regardez comme image principale.
Remarque
• Ne changez pas de chaîne lors de l’enregistrement sur un
magnétoscope via les prises MON/TV OUT. Si vous changez
de chaîne, la chaîne enregistrée change également.
A / V CONTROL
DYNAMIC
SOFT
ST A NDARD
PERSONAL
V I DEO ADJ UST
AUDIO ADJ UST
T I L T CORRECT: 0
MENU
A / V CONTROL
DYNAMIC
SOFT
ST A NDARD
PERSONAL
V I DEO ADJ UST
AUDIO ADJ UST
T I L T CORRECT: 0
MENU
WIDE MODE :
HYPER SURROUND:
OFF
MONITOR
AV OUT :
FE ATURES
ENTER ENTER
WIDEZOOM
SCROLL : 0
Page 58
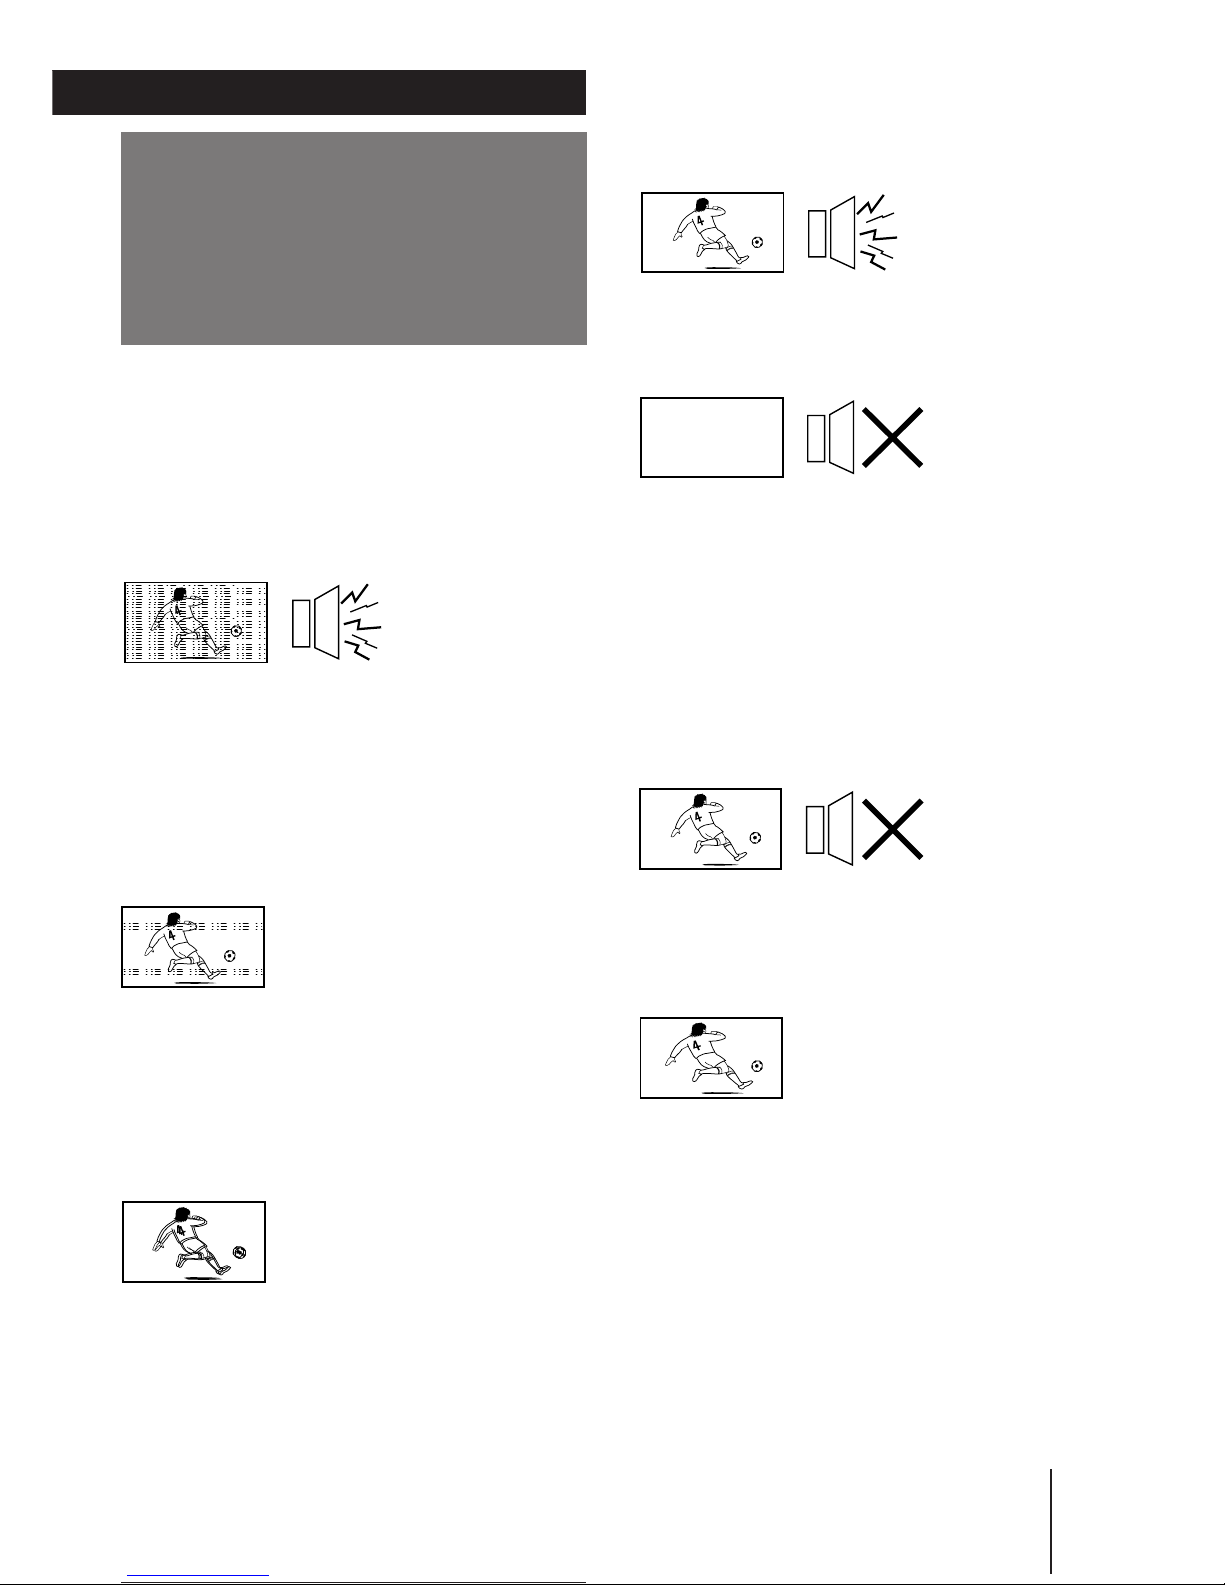
31
Opérations
-F
Guide de dépannage
En cas d’anomalie, relisez ce manuel et vérifiez les
points présentés ci-après.
Si le problème persiste, contactez votre centre de
service agréé ou votre représentant Sony le plus
proche.
Neige sur l’image
Son parasité
/ Vérifiez l’antenne.
/ Assurez-vous que l’antenne est
correctement raccordée au téléviseur et à
la prise murale.
/ Vérifiez le réglage du système
TV (TV SYS)
.
/ Vérifiez le réglage de ATT (atténuateur).
Lignes pointillées ou bandes parasites
/ Cette anomalie peut provenir
d’interférences locales (voitures, enseignes
au néon, sèche-cheveux, etc.). Ajustez la
position de l’antenne pour réduire ces
interférences au minimum.
Images doubles ou “fantômes”
/ La réflexion des ondes sur un pan de
montagne ou sur les immeubles voisins est
généralement à l’origine de ce phénomène.
Pour améliorer la réception, utilisez une
antenne extérieure hautement
directionnelle.
Informations complémentaires
Image normale
Son parasité
/ Vérifiez le réglage du système
TV (TV SYS)
.
Absence d’image
Absence de son
/ Appuyez sur POWER.
/ Appuyez sur POWER pour mettre le
téléviseur hors tension pendant environ
cinq secondes et rallumez-le.
/ Vérifiez le raccordement de la prise
d’alimentation.
/ Vérifiez que l’antenne est bien raccordée.
/ Vérifiez les raccordements du
magnétoscope.
Image normale
Absence de son
/ Appuyez sur VOL +.
/ Appuyez sur MUTING.
/ Appuyez sur A/B/ENLARGE.
Absence de couleur
/ Ajustez le niveau COLOR dans le menu
VIDEO ADJUST de l’option PERSONAL.
/ Vérifiez le réglage du système de couleur
(COL SYS).
Le boîtier du téléviseur craque
/ Même si l’image ou le son est normal, les
modifications de la température de la
pièce peuvent entraîner une dilatation ou
une contraction du boîtier du téléviseur, ce
qui provoque ce bruit. Il ne s’agit pas d’un
dysfonctionnement.
Informations complémentaires
Page 59

110-240 V AC, 50/60 Hz
Indicated on the rear of TV
B/G, I, D/K, M
PAL, PAL 60, SECAM, NTSC4.43, NTSC3.58
NICAM Stereo B/G, I ; A2 Stereo (German) B/G
English, German, Swedish, Italian, French, Spanish
VHF : E2 to E12 / UHF : E21 to E69 /
CATV : S01 to S03, S1 to S41
UHF : B21 to B68 / CATV : S01 to S03, S1 to S41
VHF : C1 to C12, R1 to R12 / UHF : C13 to C57, R21 to R60 /
CATV: Z1 to Z39, S01 to S03, S1 to S41
VHF : A2 to A13 / UHF : A14 to A79/
CATV: A-8 to A-2, A to W+4, W+6 to W+84
75-ohm external terminal
15W + 15W
Input: 4 Output: 1 Phono jacks; 1 Vp-p, 75 ohms
Input: 4 Output: 1 Phono jacks; 500 mVrms
Input: 2 Y: 1 Vp-p, 75 ohms,
unbalanced, sync negative
C: 0.286 Vp-p, 75 ohms
Output: 1 Mini jack
28 in. (Wide Trinitron Plus)
71 Measured diagonally
66 Measured diagonally
768 × 511 × 518
44.5
TV stand (SU-V28G)
Specifications
Sony Corporation Tokyo, Japan
KV-V28MH11 Note
Power requirements
Power consumption (W)
Television system
Color system
Stereo system
Teletext language
Channel coverage
B/G
I
D/K
M
Antenna
Audio output (speaker)
Number of terminal
Video
Audio
S1 Video
Headphone
Picture tube
Tube size (cm)
Screen size (cm)
Dimensions (w/h/d, mm)
Mass (kg)
Accessory (optional)
Design and specifications are subject to change without notice.
 Loading...