

SONY KV-BZ14M71, KV-BZ21M71, KV-BZ21M81 User Manual [ru]
2-639-434-11 (1)
Trinitron Color TV
Operating Instructions
• Before operating the unit, please read this manual thoroughly and retain
it for future reference.
Инструкция по эксплуатации
• Перед работой с устройством внимательно прочтайте инструкцию
и сохраните её для дальнейшего использования.
KV-BZ21
GB
RU
KV-BZ14
© 2005 Sony Corporation
M81
M71

WARNING
• Dangerously high voltages are present inside the TV.
• TV operating voltage: 110 – 240 V AC.
• Do not plug in the power cord until you have completed making all other
connections; otherwise a minimum leakage current might flow through the antenna
and other terminals to ground.
• To avoid battery leakage and damage to the remote, remove the batteries from the
remote if you are not going to use it for several days. If any liquid leaks from the
batteries and touches your skin, immediately wash it away with water.
For your own safety, do not touch
any part of the TV, the power cord
and the antenna cable during
lightning storms.
Do not place any objects on the TV.
The apparatus shall not be
exposed to dripping or splashing
and that no objects filled with
liquids, such as vases, shall be
placed on the apparatus.
Do not block the ventilation
openings of the TV. Do not install
the TV in a confined space, such
as a bookcase or built-in cabinet.
Do not open the cabinet and the
rear cover of the TV as high
voltages and other hazards are
present inside the TV. Refer
servicing and disposal of the TV
to qualified personnel.
For children’s safety, do not leave
children alone with the TV. Do not
allow children to climb onto it.
Do not operate the TV if any liquid
or solid object falls into it. Have it
checked immediately by qualified
personnel only.
Your TV is recommended for
home use only. Do not use the TV
in any vehicle or where it may be
subject to excessive dust, heat,
moisture or vibrations.
Clean the TV with a dry and soft
cloth. Do not use benzine, thinner,
or any other chemicals to clean the
TV. Do not attach anything (e.g.,
adhesive tape, cellophane tape,
glue) on the painted cabinet of the
TV. Do not scratch the picture
tube.
To prevent fire or shock hazard, do
not expose the TV to rain or
moisture.
Install the TV on a stable TV stand
and floor which can support the
TV set weight. Ensure that the TV
stand surface is flat and its area is
larger than the bottom area of the
TV.
Do not plug in too many
appliances to the same power
socket. Do not damage the power
cord.
Pull the power cord out by the
plug. Do not pull the power cord
itself. Even if your TV is turned
off, it is still connected to the AC
power source (mains) as long as
the power cord is plugged in.
Unplug the TV before moving it
or if you are not going to use it for
several days.
2

Table of Contents
Securing the TV ............................................................................................................... 4
Getting Started ................................................................................................................ 4
Setting up your TV (“Initial Setup”) ............................................................................ 5
TV top control, front and rear panels .......................................................................... 7
Connecting optional components ................................................................................ 8
Using the remote control and basic functions .......................................................... 10
Introducing the WEGA GATE navigator .................................................................. 12
“Settings” Adjustment ................................................................................................. 13
Changing the “Picture” setting................................................................................... 14
Changing the “Sound” setting.................................................................................... 15
Changing the “Channel Setup” setting ..................................................................... 16
Changing the “Setup” setting ..................................................................................... 18
Viewing Teletext ............................................................................................................ 19
Troubleshooting ............................................................................................................ 20
Specifications ................................................................................................................. 22
GB
Made in Malaysia.
Sony Corporation
6-7-35 Kitashinagawa,
Shinagawa-ku, Tokyo, 141-0001 Japan.
3
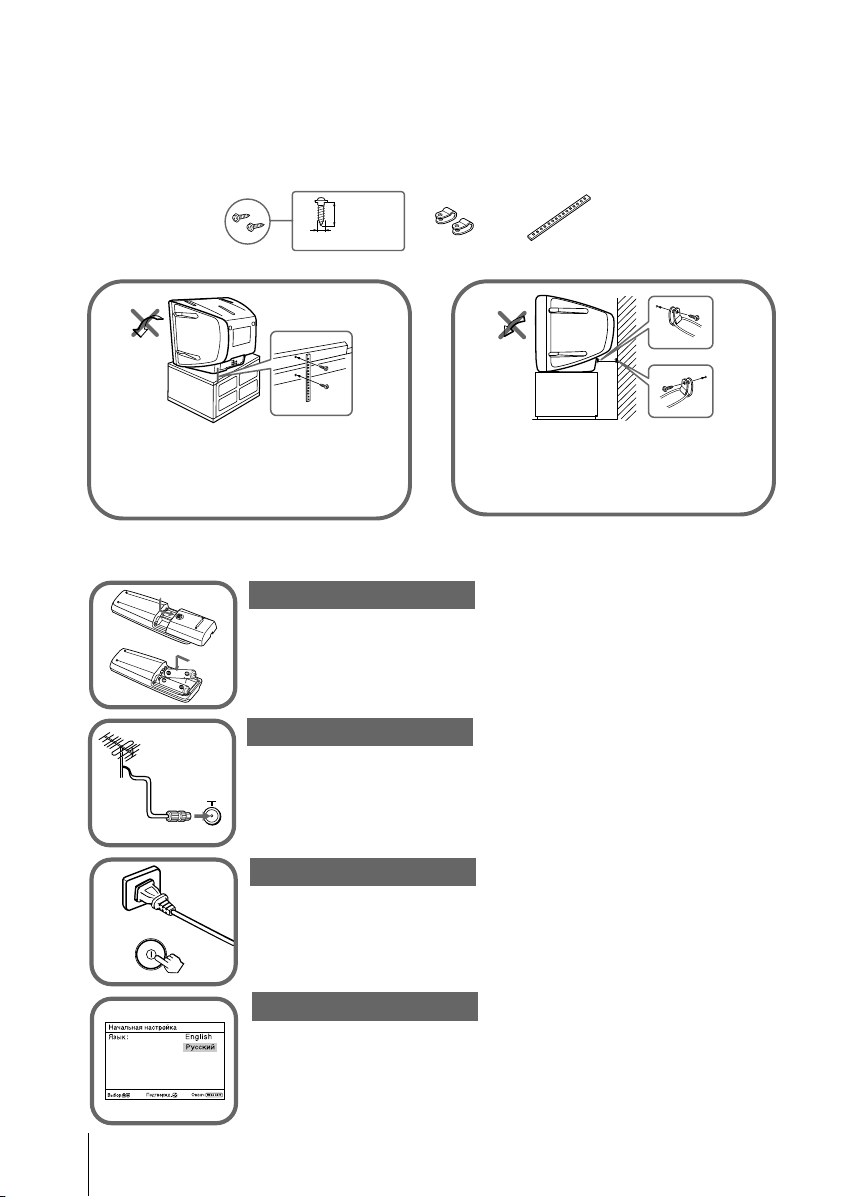
x Securing the TV
B KV-BZ21M81/BZ21M71 only
To prevent the TV from falling, use the supplied screws, clamps and band to secure
the TV. Use only the supplied screws. Use of other screws may damage the TV.
20 mm
screws
Screw the band to the TV stand and to the
provided hole at the rear of your TV.
3.8 mm
clamps band
or
(1) Put a cord or chain through the clamps.
(2) Screw one clamp to a wall or pillar and
the other clamp to the provided hole at
the rear of your TV.
x Getting Started
Step 1
b
Insert the batteries (supplied) into the remote.
Note
•Do not use old or different types of batteries together.
Step 2
Connect the antenna cable (not supplied) to 8
(antenna input) at the rear of the TV.
Tip
•You can also connect your TV to other optional components (see page 8).
Step 3
b
Plug in the power cord, then press ! on the TV to turn it on.
Note
•The 1 (standby) indicator flashes green for a few seconds when
turning on the TV. This does not indicate a malfunction.
Step 4
Set up the TV by following the instructions of the
“Начальная настройкa” (“Initial Setup”) menu (see page 5).
4
Program Sorting/Edit
01
02
03
04
Off
Off
Off
Off
Sorting:
Edit:
PROG
SkipLabel
Exit
Select
Confirm
x
End
Select
Confirm
End
Select
Confirm
Program Sorting/Edit
01
02
03
04
Off
Off
Off
Sorting mode
PROG
SkipLabel
Off01
Exit
Select
Confirm
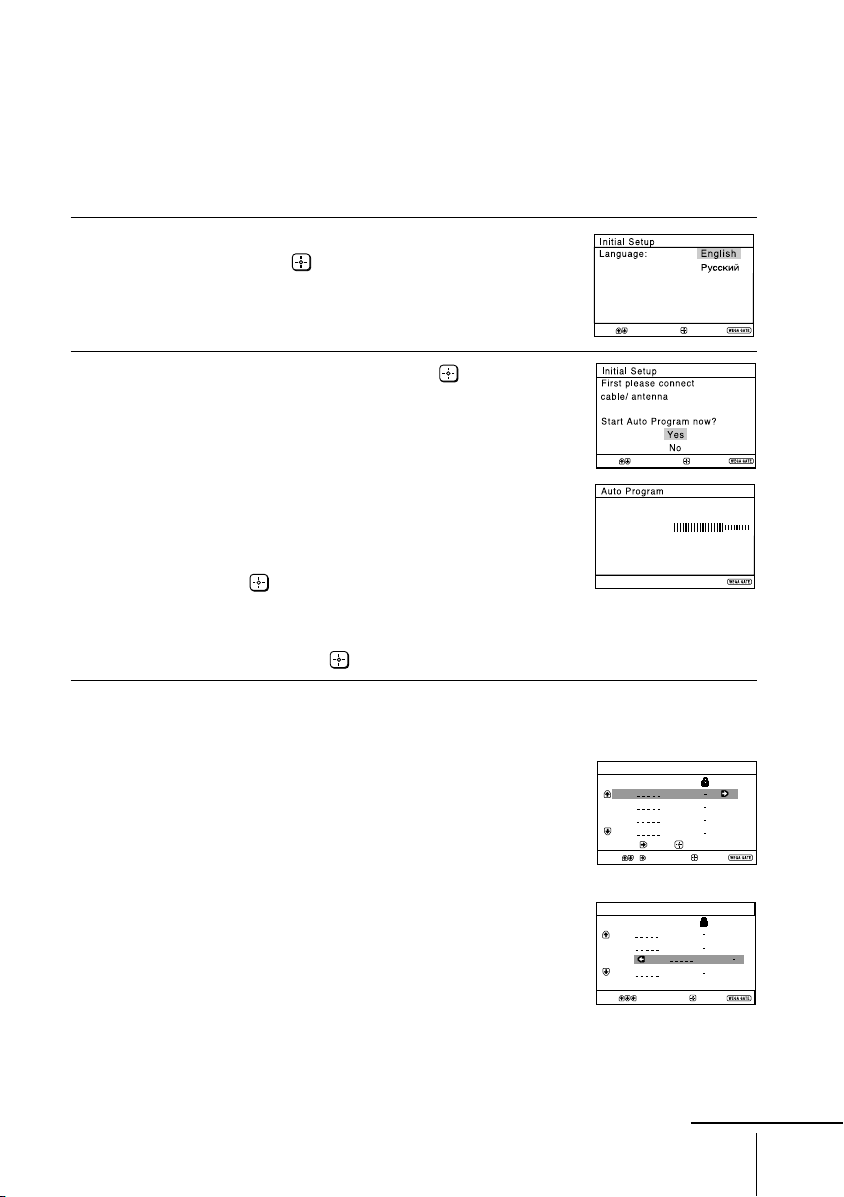
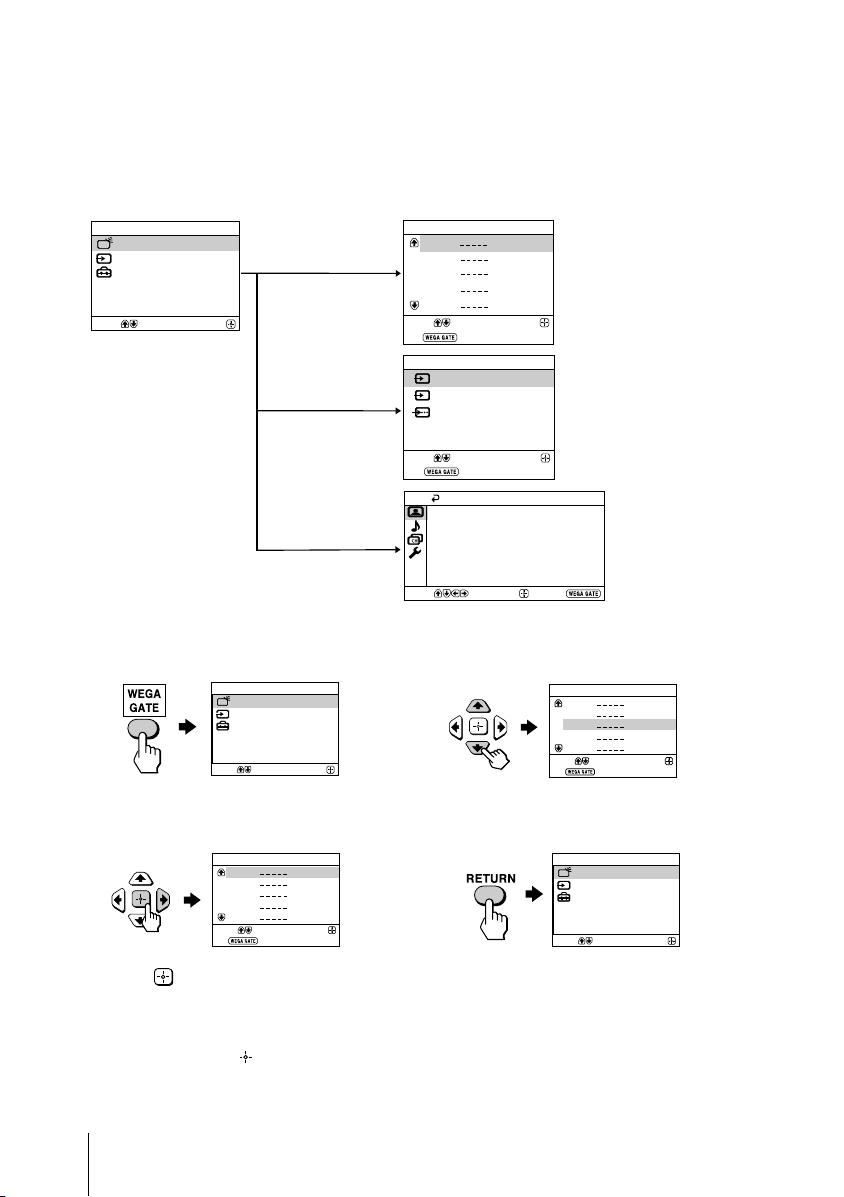
Setting up your TV (“Initial Setup”)
When you turn on your TV for the first time, the “Начальная настройкa”
(“Initial Setup”) menu will appear. You may change the menu language, preset
the TV channels automatically, sort or edit the channels and adjust the picture
position using the buttons on the remote control or TV top control panel.
Press V or v to select the desired menu
1
language, then press
.
The selected menu language appears.
Press V or v to select “Yes”, then press to
2
preset the channels automatically.
The screen will indicate automatic
presetting is in progress.
After all available channels have been tuned
and stored, the “Program Sorting/Edit”
menu appears automatically on the screen.
To skip automatic channel presetting, select
“No”, then press
.
If the message “No channel found. Please
connect cable/antenna” appears, check your
TV connections, then press .
The “Program Sorting/Edit” menu enables
3
you to sort and edit the channels.
a) If you wish to keep the channels in the current
condition, press WEGA GATE to exit.
b) Press V or v to select the program
number with the channel you wish to
change. The selected channel will appear
on the screen.
c) If you wish to store the channels in a
different order:
1) Press b to enter sorting mode.
2) Press V or v to select the new program
number position for your selected
channel, then press B.
Program:
TV System: Auto
VHF Low
End
01
continue
5
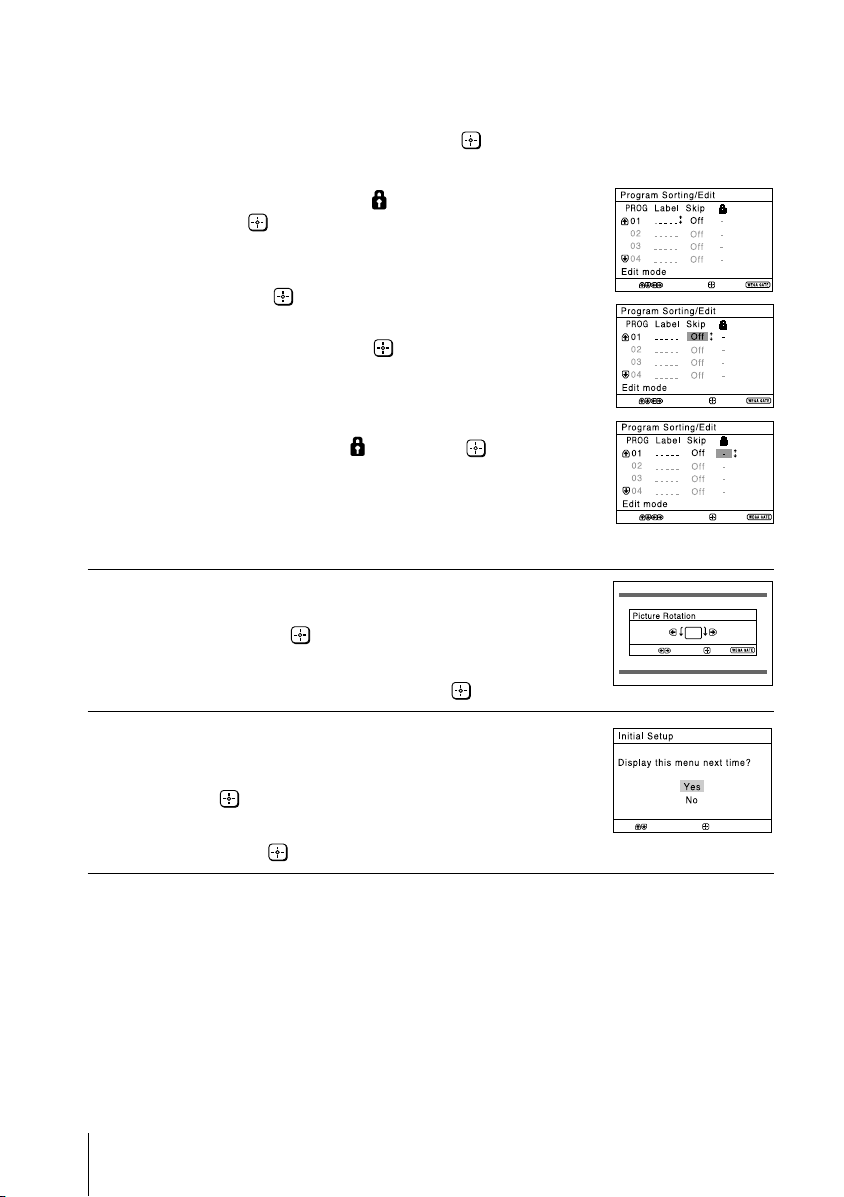
Setting up your TV (“Initial Setup”) (continued)
d) If you wish to edit the channels, press
to change to edit mode.
Press b until the mode that you wish to edit
is highlighted: Label, Skip,
Then press
.
1) To label, press V or v to select the
alphanumeric characters for the label.
Then press
.
2) To skip the program number, press V or v to
select “On”. Then press
You can skip this program number when
using PROG +/-.
3) To block unwanted program number,
press V or v to select
(block symbol).
.
. Then press .
Select
Select
Confirm
Confirm
Exit
Exit
e) Repeat step b) to d) if you wish to change other
channels.
Select
Confirm
Press WEGA GATE to go to the next menu.
Press B or b to adjust the bars on the top
4
and bottom of the menu if they are
slanted, then press
BZ21M71 only).
If no adjustment is necessary, then press
To prevent this “Initial Setup” menu from
5
appearing again when you turn on the TV
(KV-BZ21M81/
End
Confirm
Select
.
by pressing !, press V or v to select “No”,
then press
To allow this menu to appear again, select
“Yes”, then press
Tip
• You can immediately go to the end of the “Initial Setup” menu by pressing WEGA GATE.
.
Select
Confirm
.
Exit
6

x TV top control, front and rear panels
TV top control panel
WEGA GATE
SOUND MODE
0
9
8
7
TV rear panel
KV-BZ21M81
1
Y
C
TV front
(MONO) (MONO)
L
R
qf
qd
B
L
C
R
R
qa
qs
panel
KV-BZ21M81
L
(MONO)
5
2
R
4
23
KV-BZ21M71/BZ14M71
1
2
(MONO) (MONO)
5
Button/Terminal Function Page
1 ! Turn off or turn on the TV. 4
2 Remote control sensor. -
3 Wake Up indicator. 11
3 1 Standby indicator. 4
4 i Headphone jack. -
5 t2 Video input terminal 2. 8
6 PROG +/– Select program number. -
7 2 +/– Adjust volume. -
8 t Select TV or video input. 8
WEGA GATE menu operations
6,7 V,v,B,b Select and adjust items. 12
Confirm selected items. 12
8
9 WEGA GATE Display or cancel WEGA GATE menu. 12
0 SOUND MODE Select sound mode options with a 5-Band Graphic 10
(KV-BZ21M81 only) Equalizer display.
qa 8 Antenna input terminal. 8
qs T Monitor output terminal. 8
qd Component video input terminal. 9
qf t1 Video input terminal 1. 8
PROG
6
KV-BZ21M71/BZ14M71
1
(MONO)
(MONO)
qf
4
qs
23
qa
1
★ The earphone jack will be labeled as for KV-BZ14 only.
7

x Connecting optional components
Connecting to the video input terminal ( t )
TV front panel
KV-BZ21M81 KV-BZ21M71/
2
—R
L(MONO)—
TV rear panel
KV-BZ21M81
BZ14M71*
(MONO)—
KV-BZ21M71/
BZ14M71*
2
—(MONO)
Audio/Video cable
(not supplied)
Camcorder
Antenna cable
(not supplied)
Audio/Video cable
(not supplied)
VCR
(MONO)
1
L
R
1
(MONO)
(MONO)
DVD player
* Sound Mix Terminal (
KV-BZ21M71/BZ14M71
only)
You can connect the audio L and R jacks from your AV equipment to both (MONO)
jacks on the TV to enjoy mixed left and right sound. If you do not prefer the mixed
sound, disconnect either one of the
Note
• If you connect a VCR to 8 (antenna input), preset the signal output from the VCR to the
program number 0 on the TV (see page 17).
(MONO) jacks.
Connecting to the monitor output terminal ( T )
TV rear panel
KV-BZ21M81
(MONO)
L
R
KV-BZ21M71/
BZ14M71
Audio/Video
cable
(not supplied)
Audio system
VCR
8

Connecting to the component video input terminal ( )
B KV-BZ21M81 only
TV rear panel
1
(MONO) (MONO)
L
R
Y
C
B
L
C
R
R
Component video
cable
(not supplied)
DVD player
Audio cable
(not supplied)
Notes
• If your DVD player can output interlace and progressive mode signals, select the interlace
output when connecting to (component video input) on your TV. Your TV can receive
either 525i/60Hz or 625i/50Hz interlace signals.
• The component video terminals on your DVD player are sometimes labeled Y/CB/CR, Y/PB/
PR, Y/Cb/Cr or Y/B-Y/R-Y.
• If you select “DVD” on your TV screen, the signal from the T (monitor output) jacks will not
be output properly. This does not indicate a malfunction.
9

x Using the remote control and basic
functions
0
qa
qs
qd
qf
qg
qh
qj
qk
ql
w;
A/B
RETURN
Button Description Page
1 ?/1 Turn off temporarily or turn on –
1
2 a Display the TV program. –
2
3 Jump to last program number –
1
4
7
3
2
6
5
9
8
0
PROG
4 PROG +/–
5 2 +/– Adjust volume. –
3
8
9 Select surround mode options:
4
(KV-BZ21M81
5
only)
the TV.
that has been watched for at
least five seconds.
Select program number. –
Not function for your TV. –
15
“On”, “Simulated”, “Off”.
0 Display on-screen information. –
qa Mute the sound. –
qd t Select TV or video input.
WEGA
GATE
TV
6
qf 0 – 9
7
ql Select sound mode options
8
(KV-BZ21M81 with a 5-Band Graphic
9
only) Equalizer display:
Dynamic
Input numbers. –
“Dynamic”, “Standard”,
“Custom”*.
100 300 1k 3k 8k
Standard
* When the “Custom” mode is
selected, you can receive the
last adjusted sound settings
100 300 1k 3k 8k
Custom
from the “Sound Adjustment”
option in the menu.
8
15
10
w;
100 300 1k 3k 8k
Select picture mode options:
“Vivid”, “Standard”,
“Custom”*.
* When the “Custom” mode is
selected, you can receive the
last adjusted picture settings
from the “Picture Adjustment”
option in the menu.
14

Button Description Page
WEGA GATE menu operations
6 Confirm selected items. 12
7 WEGA GATE Display or cancel WEGA GATE menu.
qj V, v, B, b Select and adjust items.
qk RETURN Return to the previous level.
Timer operations
qg Set TV to turn on automatically according to the –
(Wake Up Timer)
desired period of time (max. of 12 hours).
The indicator on TV lights up amber once you set
the wake up timer.
If no buttons or controls are pressed for more than one
hour after the TV is turned on using the wake up timer,
the TV automatically goes into standby mode.
qh Set TV to turn off automatically according to the –
(Sleep Timer)
Teletext operations (green label)
desired period of time (max. of one hour and 30 min.).
, , , , All buttons are used for Teletext operations. 19
, , , ,
(red, green,
yellow, blue)
PIP operations
, , V, v, B, b Not function for your TV. –
Stereo/bilingual operations
qs A/B Not function for your TV. –
11
x Introducing the WEGA GATE
Confirm
Select
WEGA GATE
Settings
External Inputs
TV
navigator
WEGA GATE is a gateway that allows you access to preset TV channels, connected
external inputs and “Settings” menu.
WEGA GATE
TV
Select
External Inputs
Settings
Confirm
“TV”
“External Inputs”
“Settings”
How to use WEGA GATE
WEGA GATE
TV
External Inputs
Settings
Select
Confirm
TV
01
02
03
04
05
Select
End
External Inputs
1
Video 1
Video 2
2
DVD
Select
End
Picture
Picture Mode: Vivid
Picture Adjustment
Color Temperature: Cool
Intelligent Picture: On
Select
Confirm
watch the preset TV
channels (see page 5)
Confirm
select the inputs for the
connected equipment
(see page 8)
Confirm
End
TV
01
02
03
04
05
Select
End
change the settings
of your TV
(see page 13)
Confirm
(1) Press WEGA GATE to display or cancel
(3) Press V or v to select the desired item.
the WEGA GATE menu.
TV
01
02
03
04
05
Select
End
(2) Press (or b) to confirm your selection
or go to the next level.
Confirm
(4) Press RETURN to move to the previous
level.
Tip
• The WEGA GATE, and V,v,B,b buttons on the top control panel can also be used for the
operations above.
12
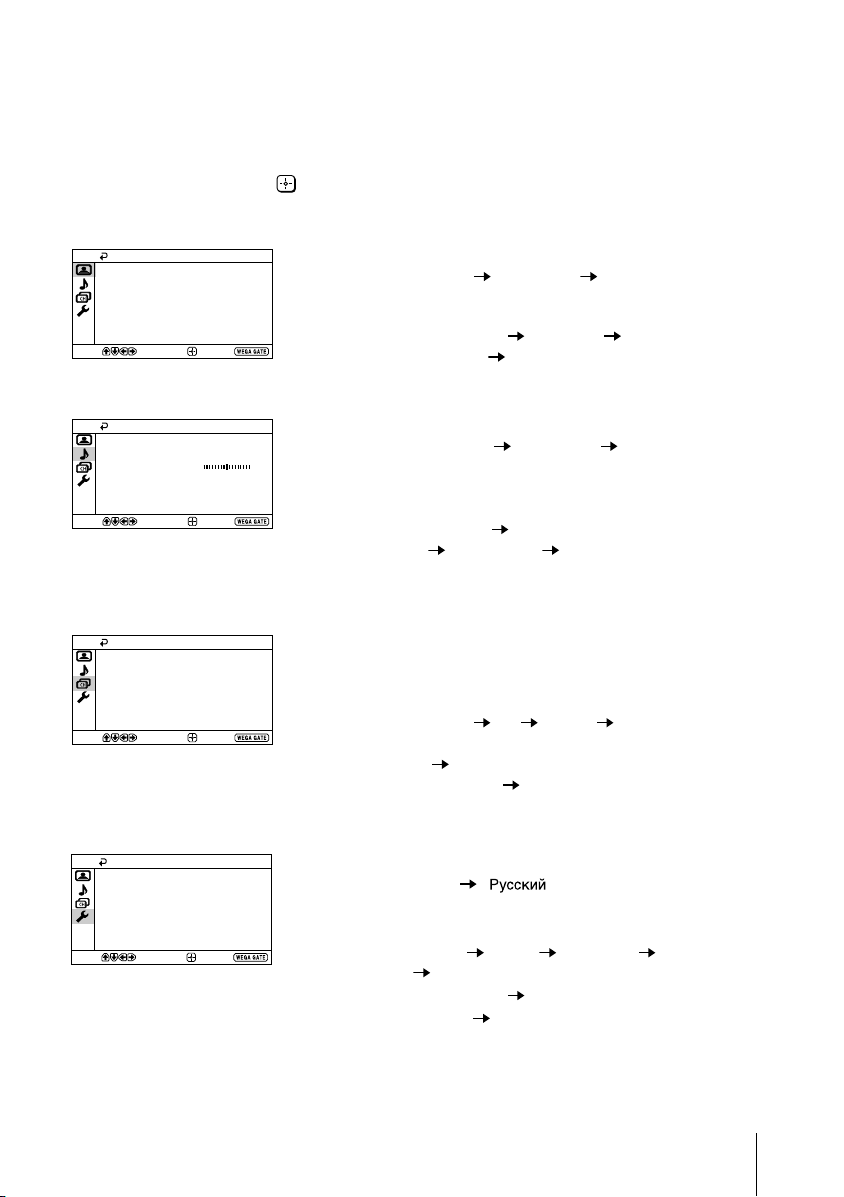
x “Settings” Adjustment
You are able to change the settings of your TV under “Settings” in WEGA GATE
menu.
Press WEGA GATE button to display WEGA GATE menu. Press V or v to select
“Settings” and press
The following is an overview of the items that can be adjusted.
.
Picture
Picture Mode: Vivid
Picture Adjustment
Color Temperature: Cool
Intelligent Picture: On
Select
Select
Select
Confirm
Sound
Sound Mode: Dynamic
Sound Adjustment
Balance
Intelligent Volume:
Surround: Off
Confirm
Channel Setup
Auto Program
Manual Program
Program Sorting/Edit
Confirm
Off
End
End
End
“Picture” (see page 14)
“Picture Mode”: “Vivid” “Standard” “Custom”
“Picture Adjustment”: “Picture”, “Brightness”, “Color”, “Hue”,
“Sharpness”, “Reset”
“Color Temperature”: “Cool” “Neutral” “Warm”
“Intelligent Picture”: “On” “Off”
“Sound” (see page 15)
“Sound Mode”: “Dynamic” “Standard” “Custom”
(KV-BZ21M81 only)
“Sound Adjustment”: “Adjust”, “Reset” (KV-BZ21M81 only)
“Balance” (KV-BZ21M81 only)
“Intelligent Volume”: “On” “Off”
“Surround”: “On” “Simulated” “Off” (KV-BZ21M81
only)
“Channel Setup” (see page 16)
“Auto Program”
“Manual Program”
“Program”: “00” - “99”
“TV System”: “B/G” “I” “D/K” “M”
“VHF Low”/“VHF High”/“UHF”
“Fine”: “Auto” “Manual”
“Signal Booster”: “Auto” “Off”
“Program Sorting/Edit”
Setup
Language:
Picture Rotation
Video Label
Color System:
Wake Up Timer Beep:
Factory Settings
Select
Confirm
English
Auto
On
End
“Setup” (see page 18)
“Language”: “English” “ ” (Russian)
“Picture Rotation” (KV-BZ21M81/BZ21M71 only)
“Video Label”: “Video Input”, “Label”
“Color System”: “Auto” “PAL” “SECAM” “NTSC3.58”
“NTSC4.43”
“Wake Up Timer Beep”: “On” “Off” (KV-BZ21M81 only)
“Factory Settings”: “Yes” “No”
Note
• When a feature is dimmed in the menu, it is not selectable.
13
 Loading...