

Page 1

3-211-232-E1 (1)
Tr initron Color TV
Operating Instructions
• Before operating the unit, please read this manual thoroughly and retain
it for future reference.
GB
KV-BZ213
© 2007 Sony Corporation
M70
Page 2
A Specifications
Power requirements
Power consumption (W)
Television system
Color system
Channel coverage
B/G
I
D/K
8 (Antenna)
Audio output (Speaker)
Number of terminal
(Video)
(Audio)
Picture tube
Tube size (cm)
Screen size (cm)
Dimensions (w/h/d, mm)
Mass (kg)
Design and specifications are subject to change without notice.
110-240 V AC, 50/60 Hz
Indicated on the rear of the TV
B/G, I, D/K
PAL, PAL 60, SECAM, NTSC3.58 (AV IN), NTSC4.43
VHF : E2 to E12 /UHF : E21 to E69 /
CATV : S01 to S03, S1 to S41
UHF : B21 to B68 /CATV : S01 to S03, S1 to S41
VHF : C1 to C12, R1 to R12 /
UHF : C13 to C57, R21 to R60 /
CATV : S01 to S03, S1 to S41, Z1 to Z39
75-ohm external terminal
3 W
Input: 2 Phono jacks; 1 Vp-p, 75 ohms
Input: 2 Phono jacks; 500 mVrms
21 in.
54
51
497 × 468 × 494
23
NoteKV-BZ213M70
Measured diagonally
Measured diagonally
Made in Malaysia.
Manufacturer: Sony Corporation
Address: 1-7-1 Konan, Minota-ku,
Tokyo 108-0075, Japan.
Page 3
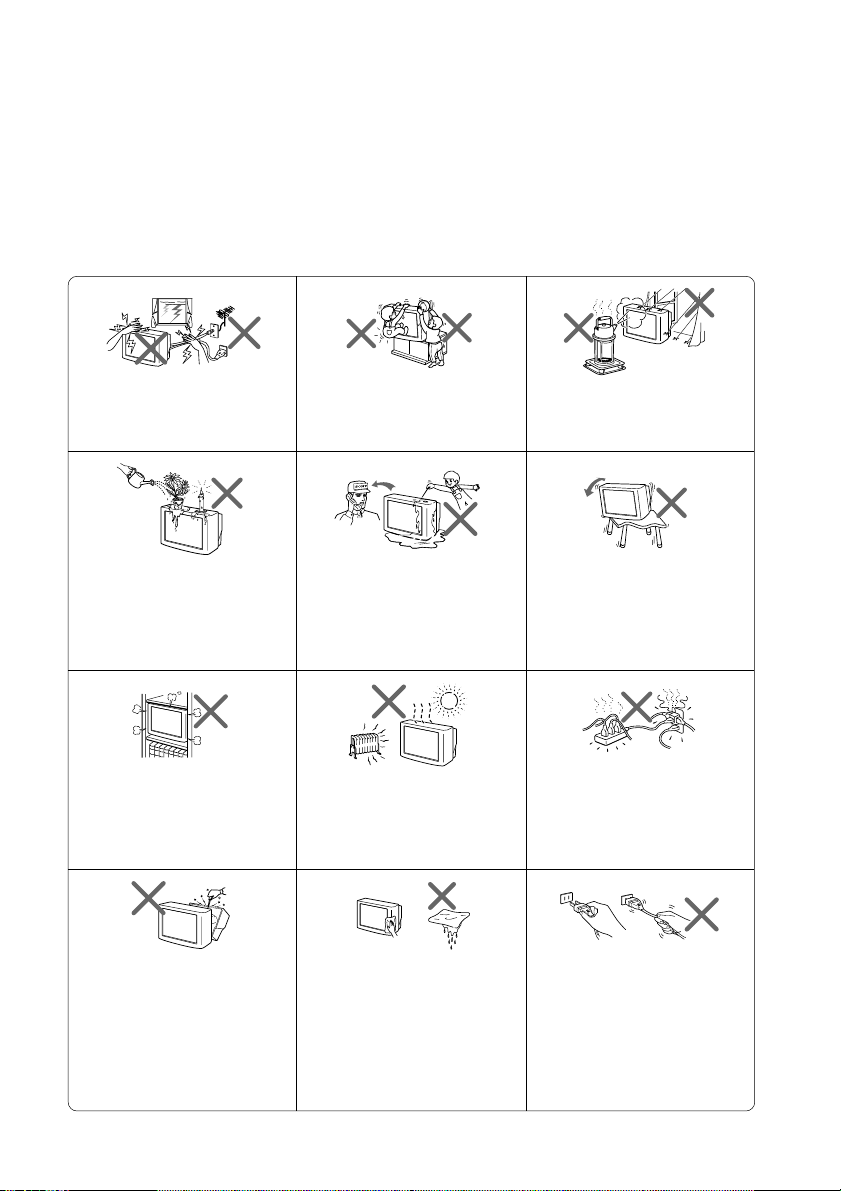
B WARNING
• Dangerously high voltages are present inside the TV.
• TV operating voltage: 110 – 240 V AC.
• Do not plug in the power cord until you have completed making all other
connections; otherwise a minimum leakage current might flow through the antenna
and other terminals to ground.
•To avoid battery leakage and damage to the remote, remove the batteries from the
remote if you are not going to use it for several days. If any liquid leaks from the
batteries and touches your skin, immediately wash it away with water.
For your own safety, do not touch
any part of the TV, the power cord
and the antenna cable during
lightning storms.
Do not place any objects on the TV.
The apparatus shall not be
exposed to dripping or splashing
and that no objects filled with
liquids, such as vases, shall be
placed on the apparatus.
Do not block the ventilation
openings of the TV. Do not install
the TV in a confined space, such
as a bookcase or built-in cabinet.
Do not open the cabinet and the
rear cover of the TV as high
voltages and other hazards are
present inside the TV. Refer
servicing and disposal of the TV
to qualified personnel.
For children’s safety, do not leave
children alone with the TV. Do not
allow children to climb onto it.
Do not operate the TV if any liquid
or solid object falls into it. Have it
checked immediately by qualified
personnel only.
Your TV is recommended for
home use only. Do not use the TV
in any vehicle or where it may be
subject to excessive dust, heat,
moisture or vibrations.
Clean the TV with a dry and soft
cloth. Do not use benzine, thinner,
or any other chemicals to clean the
TV. Do not attach anything (e.g.,
adhesive tape, cellophane tape,
glue) on the painted cabinet of the
TV. Do not scratch the picture
tube.
To prevent fire or shock hazard, do
not expose the TV to rain or
moisture.
Install the TV on a stable TV stand
and floor which can support the
TV set weight. Ensure that the TV
stand surface is flat and its area is
larger than the bottom area of the
TV.
Do not plug in too many
appliances to the same power
socket. Do not damage the power
cord.
Pull the power cord out by the
plug. Do not pull the power cord
itself. Even if your TV is turned
off, it is still connected to the AC
power source (mains) as long as
the power cord is plugged in.
Unplug the TV before moving it
or if you are not going to use it for
several days.
Page 4
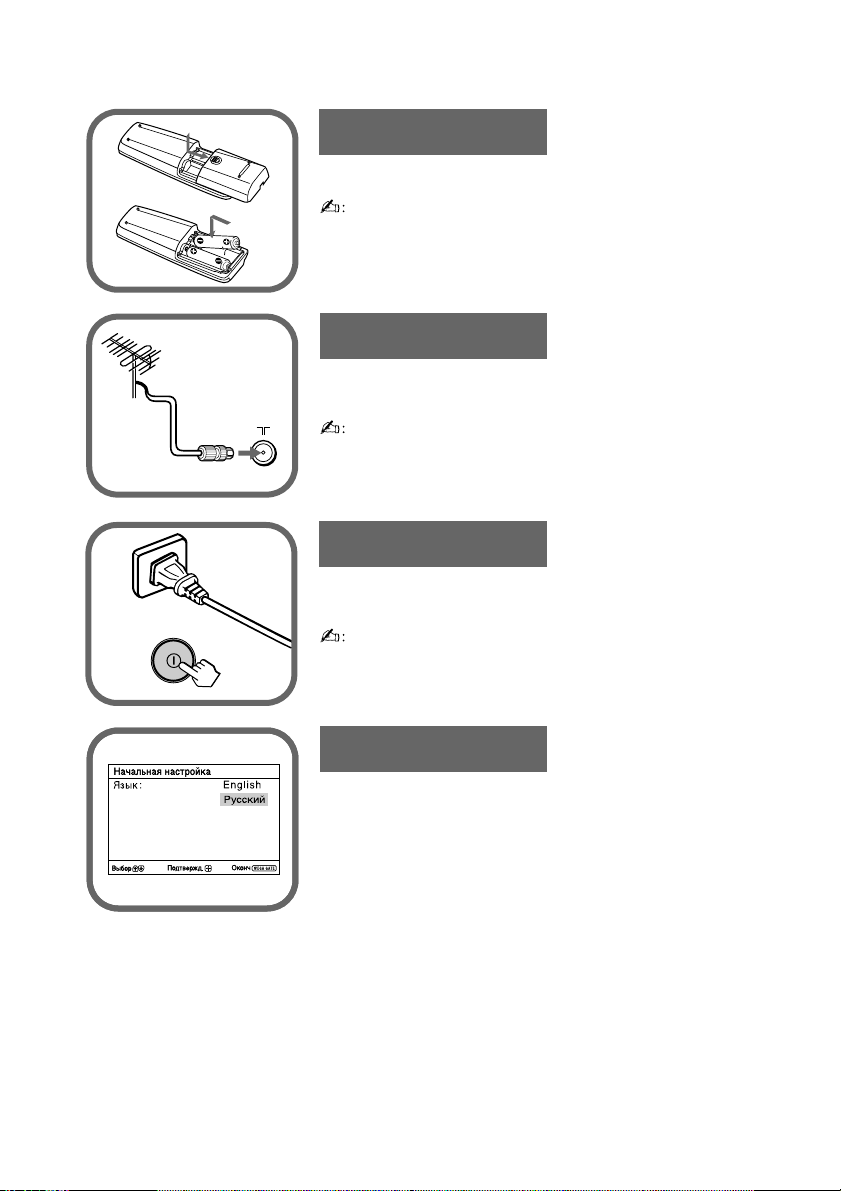
C Getting Started
Step 1
b
b
Insert the batteries (supplied) into the remote.
• Do not use old or different types of batteries together.
Step 2
Connect the antenna cable (not supplied) to 8
(antenna input) at the rear of the TV.
•
You can also connect your TV to other optional
components (see E).
Step 3
Plug in the power cord, then press ! on the TV to
turn it on.
• The 1 (standby) indicator flashes green for a few seconds
when turning on the TV. This does not indicate a
malfunction.
Step 4
Set up the TV by following the instructions of the
“Начальная настройкa” (“Initial Setup”) menu
(see D).
Page 5
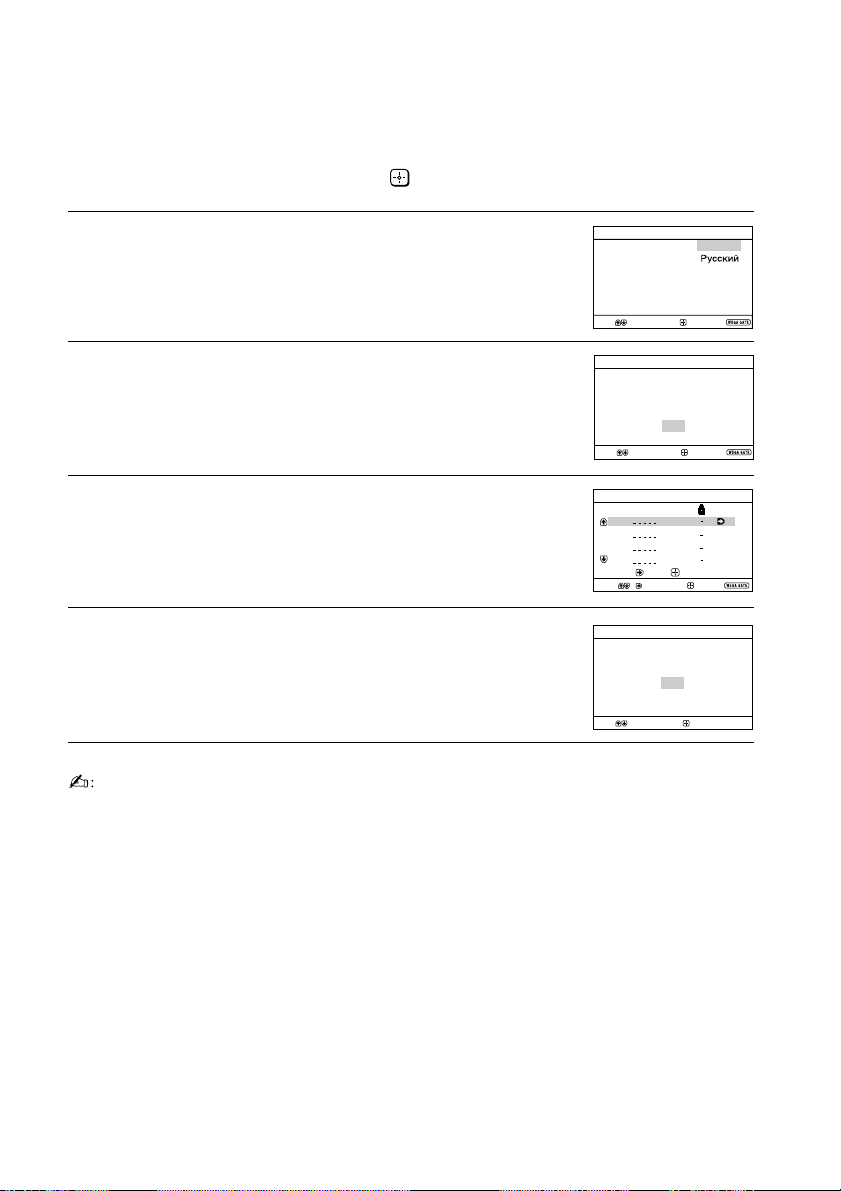
D Setting up your TV (“Initial Setup”)
Program Sorting/Edit
01
02
03
04
Off
Off
Off
Off
Sorting:
Edit:
PROG
SkipLabel
Exit
Select
Confirm
Start Auto Program now?
Yes
No
First please connect
cable/ antenna
Initial Setup
End
Select
Confirm
Select
Confirm
Initial Setup
Display this menu next time?
Yes
No
When you turn on your TV for the first time, the “Начальная настройкa”
(“Initial Setup”) menu will appear. You can adjust settings below using the
buttons on the remote control or TV top control panel. Press V , v , B or b to
select or adjust items, then press .
Select the desired menu language.
1
Select “Yes” to preset the channels automatically.
2
To skip automatic channel presetting, select “No”.
The “Program Sorting/Edit” menu enables
3
you to sort and edit the channels (see K).
To prevent this “Initial Setup” menu from appearing
4
again when you turn on the TV by pressing !,
Initial Setup
Language:
Select
select “No”.
To allow this menu to appear again, select “Yes”.
•You can immediately go to the end of the “Initial Setup” menu by pressing WEGA
GATE.
Confirm
English
End
Page 6

E Connecting optional components
You can connect a wide range of optional components to your TV. Connecting
cables are not supplied.
Connecting to the TV (front)
2
Audio/Video
cable
L
R
Camcorder
2
L
R
(MONO)
Connecting to the TV (rear)
1
(MONO)
(MONO)
Sound Mix Terminal
You can connect the audio L and R terminals from your AV equipment to both
(MONO) terminals on the TV to enjoy mixed left and right sound. If you do not prefer
the mixed sound, disconnect either one of the
• If you connect a VCR to 8 (antenna input), preset the signal output from the VCR to the
program number 0 on the TV (see K).
(MONO) terminals.
Antenna
cable
Audio/Video
cable
L
R
VCR
DVD Player
Page 7
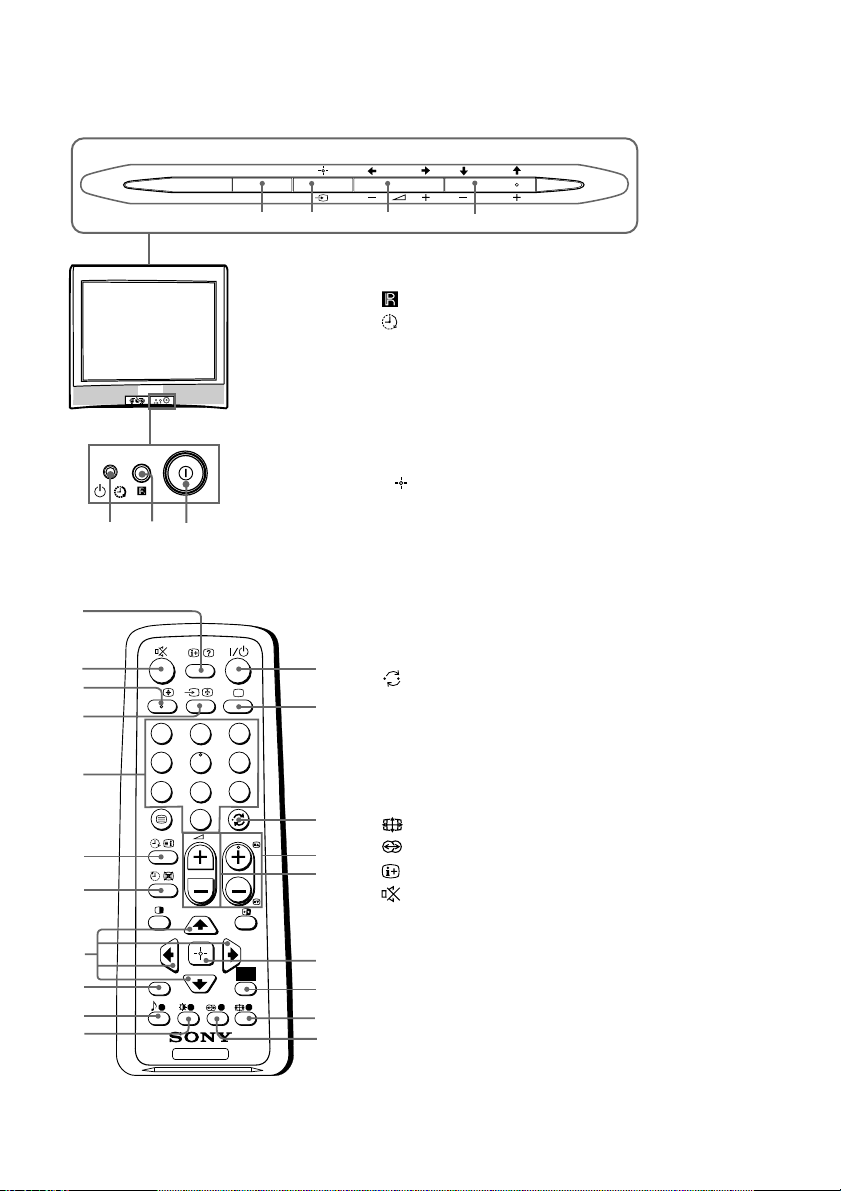
F TV buttons and remote control
WEGA GATE
PROG
5
4
1 ! Turn off or turn on the TV.
2 Remote control sensor.
3 Wake Up indicator.
3 1 Standby indicator.
4 PROG +/– Select program number.
5 2 +/– Adjust volume.
6 t Select TV or video input.
WEGA GATE menu operations (see H)
4,5 V,v,B,b Select or adjust items.
6
Confirm selected items.
7 WEGA GATE Display or cancel WEGA GATE menu.
2
L
R
(MONO)
3 12
7
6
0
qa
qs
qd
qf
qg
qh
qj
qk
ql
w;
A/B
1
4
7
RETURN
1 ?/1 Turn off temporarily or turn on the
TV.
2 a Display the TV program.
1
3 Jump to last program number that
2
3
2
6
5
9
8
0
PROG
4 PROG +/– Select program number. To select
5 2 +/– Adjust volume.
3
8 Not function for your TV.
9 Not function for your TV.
4
Display on-screen information.
0
5
has been watched for at least five
seconds.
quickly, press and hold until the
desired program number appears.
qa Mute the sound.
qs A/B Not function for your TV.
qd t Select TV or video input.
qf 0-9 Input numbers. For program numbers
WEGA
GATE
6
7
10 and above, enter the second
digit within two seconds.
8
TV
9
Page 8

TV buttons and remote control (continued)
ql Not function for your TV.
w; Select picture mode options: “Vivid”, “Standard”, “Custom”*
(see I).
* When the “Custom” mode is selected, you can receive the last adjusted
picture settings from the “Picture Adjustment” option in the menu.
WEGA GATE menu operations (see H)
6 Confirm selected items.
7 WEGA GATE Display or cancel WEGA GATE menu.
qj V, v, B , b Select or adjust items.
qk RETURN Return to the previous level.
Timer operations
qg Set TV to turn on automatically according to the desired period of time
(Wake Up Timer) (max. of 12 hours). The indicator on TV lights up amber once you set
the wake up timer. If no buttons or controls are pressed for more than
three hours after the TV is turned on using the wake up timer, the TV
automatically goes into standby mode.
qh Set TV to turn off automatically according to the desired period of time
(Sleep Timer) (max. of one hour and 30 min.).
Teletext operations (green icon)
, , , ,
, , , ,
(red, green,
yellow, blue)
Not function for your TV.
PIP operations
, , V, v, B , b Not function for your TV.
Page 9

G Troubleshooting
If you find any problem while viewing your TV, you can either use the
“Factory Settings” function (see L) or check the Troubleshooting guide
below. If the problem persists, contact your Sony dealer.
Snowy picture, noisy sound
• Check the antenna setup and other connections.
•Preset the channel manually again (see K).
• Set the “Signal Booster” to “Auto” (see K) or try using an external booster.
Distorted picture, noisy sound
• Set the “Signal Booster” to “Off” (see K), or turn off or disconnect any external booster in
use.
Good picture, noisy sound
• Select the appropriate “TV System” (see K).
No picture, no sound
• Check the power cord, antenna setup and other connections.
•Press 4/1 (power) to turn on the TV.
•Press ! (main power) on the TV to turn off the TV for about five seconds, then turn it on
again.
Good picture, no sound
•Press 2 + to increase the volume level or press to cancel the muting.
Dotted lines or stripes
• Do not use a hair dryer or other equipment near the TV.
• Check the antenna setup.
Double images or “ghosts”
• Use the fine tuning (“Fine”) function (see K).
• Check the antenna setup or use a highly directional antenna.
•Turn off or disconnect any external booster in use.
No color
• Adjust the “Color” level from “Picture Adjustment” (see I).
• Select the appropriate “Color System” (see L).
• Check the antenna setup.
Picture slant
• Keep external speakers or other electrical equipment away from the TV.
Abnormal color patches
• Keep external speakers or other equipment away from the TV. Do not move the TV while
the TV is turned on. Press ! (main power) on the TV to turn off the TV for about 15
minutes, then turn it on again to demagnetize the TV.
The 1 (standby) indicator on your TV flashes red several times after every three seconds.
• Count the number of times the 1 (standby) indicator flashes. Press ! (main power) to
turn off your TV. Contact your nearest Sony service center.
The TV screen sometimes goes blank for slightly longer than usual during channel change.
• The “Signal Booster” is functioning to detect a weak signal. This does not indicate a
malfunction.
TV cabinet creaks.
• Changes in room temperature sometimes make the TV cabinet expand or contract, causing
a noise. This does not indicate a malfunction.
A small “boom” sound is heard when the TV is turned on.
• The TV’s demagnetizing function is working. This does not indicate a malfunction.
Page 10
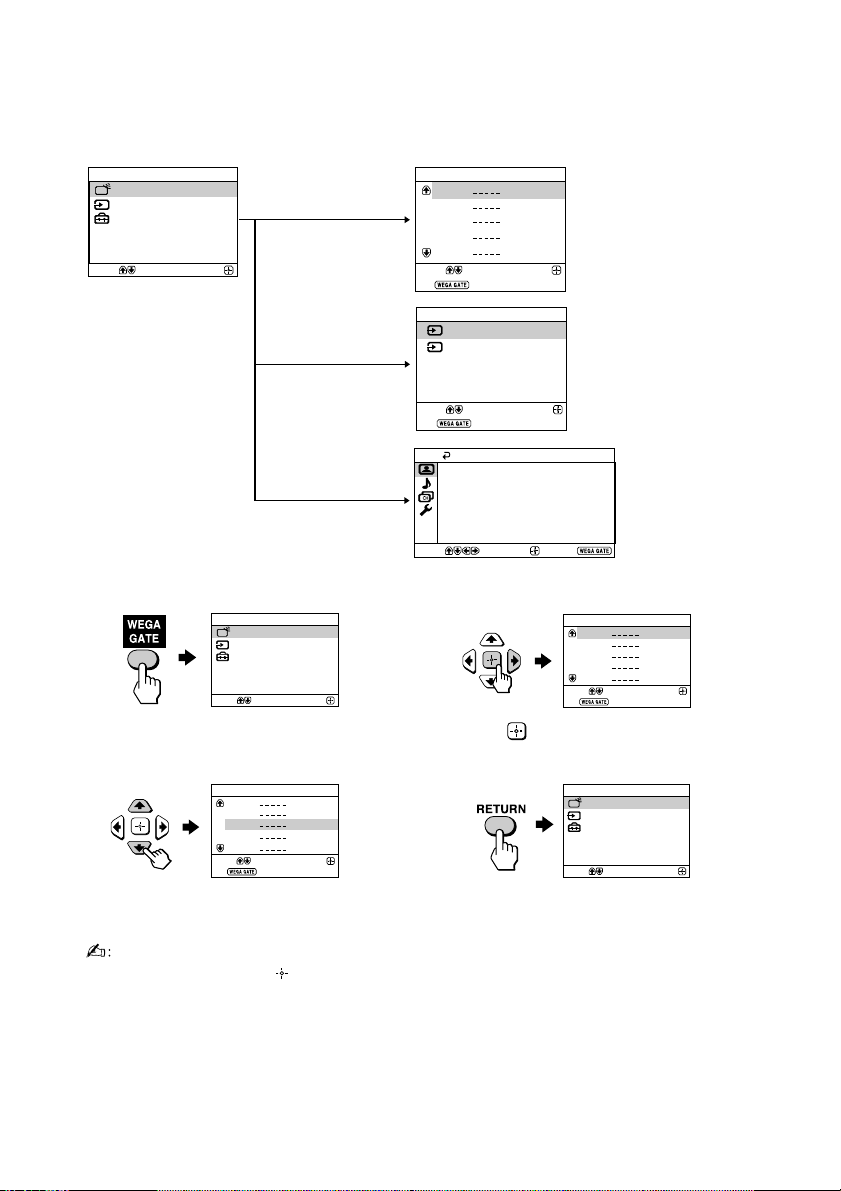
H WEGA GATE navigator
Confirm
Select
WEGA GATE
Settings
External Inputs
TV
WEGA GATE is a gateway that allows you access to preset TV channels,
connected external inputs and “Settings” menu.
WEGA GATE
TV
Select
External Inputs
Settings
Confirm
“TV”
“External Inputs”
“Settings”
How to use WEGA GATE
WEGA GATE
TV
External Inputs
Settings
Select
(1) Press WEGA GATE to display or cancel
the WEGA GATE menu.
Confirm
TV
01
02
03
04
05
Select
End
External Inputs
1
Video 1
Video 2
2
watch the preset TV
channels (see D)
Confirm
select the inputs for the
connected equipment
(see E)
Select
End
Picture Mode: Vivid
Picture Adjustment
Color Temperature: Cool
Intelligent Picture: On
Signal Level Indicator: On
Select
Picture
Confirm
Confirm
End
TV
Select
End
change the settings
of your TV
(see I,J,K,L)
01
02
03
04
05
Confirm
(2) Press (or b) to confirm your selection
or go to the next level.
TV
01
02
03
04
05
Select
End
(3) Press V or v to select the desired item.
Confirm
(4) Press RETURN to move to the previous
level.
• When a feature is dimmed in the menu, it is not selectable.
• The WEGA GATE, and V,v,B,b buttons on the top control panel can also be used for
the operations above.
Page 11

I “Picture” setting
Press WEGA GATE and select “Settings”.
Make sure the “Picture” icon (
then press
.
) is selected,
Picture
Picture Mode: Vivid
Picture Adjustment
Color Temperature: Cool
Intelligent Picture: On
Signal Level Indicator: On
Select
Confirm
End
“Picture Mode” Choose either “Vivid” (bright, contrast and sharp),
“Color Temperature” Adjust white color tint.
“Intelligent Picture” Optimize picture quality.
“Signal Level Indicator” Display the signal level when the “Intelligent Picture” is
*You can adjust the setting to your personal preference in the “Picture Adjustment” and
“Color Temperature” options only when the “Custom” mode is selected.
“Standard” (normal) or “Custom”*.
Choose either “Cool” (blue tint), “Neutral” (neutral tint) or
“Warm” (red tint).
Press V or v to select “On”, then press .
To cancel, select “Off”, then press .
functioning.
“Intelligent Picture Signal Level” indicator will be displayed,
followed by picture improvement when you change the
program number or the input mode.
red amber green
(weak) (average)(fair ................. good)
Press V or v to select “On”, then press .
To cancel, select “Off”, then press . “Intelligent Picture” is
still functioning.
Adjusting the “Picture Adjustment” items under “Custom”
mode
Press V or v to select either “Picture” (contrast), “Brightness”, “Color”,
1
“Hue” (color tones) or “Sharpness”, then press
.
Selecting “Reset” will set your TV to the factory settings.
Press V,v,B or b to adjust the setting of your selected item, then press .
2
Repeat the above steps to adjust other items.
3
The adjusted settings will be received when you select “Custom”.
• “Hue” can be adjusted for the NTSC color system only.
• Reducing “Sharpness” can also reduce picture noise.
Page 12

J “Sound” setting
Press WEGA GATE and select “Settings”.
Press V or v to select the “Sound” icon (
then press
.
Sound
),
Intelligent Volume:
Sound Adjustment
Balance
Surround: Off
Select
Confirm
Dynamic
Off
End
“Intelligent Volume” Adjust the volume of all program numbers and video inputs
automatically.
Press V or v to select “On”, then press .
To cancel, select “Off”, then press .
Page 13

K “Channel Setup” setting
Press WEGA GATE and select “Settings”.
Press V or v to select the “Channel Setup”
icon ( ), then press .
Channel Setup
Auto Program
Manual Program
Program Sorting/Edit
Select
Confirm
End
“Auto Program” Preset channels automatically.
“Manual Program” Manually preset desired channels and channels that cannot
be preset automatically (see Presetting channels manually).
“Program Sorting/Edit”
Sort and edit the channels.
(a)
If you wish to keep the channels in the current
condition, press WEGA GATE to exit.
(b) Press
V or v to select the program number with the
channel you wish to change. The selected channel will
appear on the screen.
(c) If you wish to store the channels in a different order:
(1) Press b to enter sorting mode.
(2) Press V or v to select the new program number
position for your selected channel, then press B.
(d) If you wish to edit the channels, press to change to
edit mode.
Press b until the mode that you wish to edit is
highlighted: Label, Skip, (block symbol). Then press
.
(1) To label, press V or v to select the alphanumeric
characters for the label. Then press .
(2) To skip the program number, press V or v to select
“On”. Then press .
You can skip this program number when using
PROG +/–.
(3) To block unwanted program number, press V or v to
select . Then press .
(e) Repeat step (b) to (d) if you wish to change other
channels.
Press WEGA GATE to exit.
• If you preset a blocked program number, that program number will be unblocked
automatically.
• If you sort a blocked program, that program will remain blocked.
Page 14

“Channel Setup” setting (continued)
Presetting channels manually
After selecting “Manual Program”, select the program
1
number to which you want to preset a channel.
(1) Make sure “Program” is selected, then press
(2) Press V or v
to preset appears on the menu, then press
Select the desired channel.
2
(1) Make sure either “VHF Low”, “VHF High” or “UHF” is selected, then press
.
(2) Press V or v until the desired channel’s broadcast appears on the TV screen,
then press .
If the sound of the desired channel is abnormal, select the appropriate TV
3
system.
(1) Press V or v
(2) Press V or v
If you are not satisfied with the picture and sound quality, you may be able
4
to improve them by using the “Fine” tuning feature.
(1) Press V or v to select “Fine”, then press .
(2) Press V or v
Press V,v,B or b until the picture and sound quality are optimal, then press .
(3)
The + or – icon on the menu flashes while tuning.
until the program number you want
to select “TV System”, then press .
until the sound becomes normal, then press .
to select “Manual”, then press .
.
.
D/K
01
If the TV signal is too strong (picture distorted; picture with lines; signal
5
interference) or weak (snowy picture), you may be able to improve the
picture quality by setting the “Signal Booster” feature.
(1) Press V or v
(2) Press V or v
signal interference) or “Auto” (for snowy picture), then press
to select “Signal Booster”, then press .
to select either “Off” (for picture distorted; picture with lines;
.
Page 15

L
Confirm
End
Setup
Select
Language:
Video Label
Color System:
Auto
Factory Settings
English
“Setup” setting
Press WEGA GATE and select “Settings”.
Press V or v to select the “Setup” icon (
then press .
“Language” Change the menu language.
Press V or v to select either “English” or “ ” (Russian),
then press .
“Video Label” Label the connected equipment.
(1) Select “Video Input” and press . Press V or v to select the
input you want to label, then press .
(2) Select “Label” and press , then press V or v to select
the label options: “Video 1”/“Video 2” , “VCR”, “SAT”,
“Game” or “Edit”*.
* You may edit the video label to your favorite name. Press V or v
to select alphanumeric characters for the label, then press .
“Color System” Select the color system.
“Factory Settings”
Press V or v to select either “Auto”, “PAL”, “SECAM”,
“NTSC3.58” or “NTSC4.43”, then press . Normally, set this to
“Auto”.
Reset your TV to factory settings.
Press and press V or v to select “Yes”. Then press .
Your TV will go blank for a few seconds, then the “Initial Setup”
menu will appear.
To cancel, select “No”, then press .
),
Page 16

3-211-232-11 (1)
Tr initron Color TV
Инструкция по эксплуатации
• Перед работой с устройством внимательно прочтайте инструкцию
и сохраните её для дальнейшего использования.
RU
KV-BZ213
© 2007 Sony Corporation
M70
Page 17

A Те хнические характеристики
KV-BZ213M70 Примечания
Требования к источнику
питания
Потребляемая мощность (Вт)
Система ТВ
Цветовая система
Покрываемый
диапазон Телеканалов
B/G
I
D/K
8 (Антенна)
Аудиовыход (колонки)
Количество разъёмов
(видео)
(аудио)
Кинескоп
Размер
кинескопа (см)
Размер экрана (см)
Габариты (в/ш/г, мм)
Масса (кг)
Дизайн и технические характеристики могут быть изменены без уведомления.
110-240 В переменного тока, 50/60 Гц
Указана на задней панели ТВ
B/G, I, D/K
PAL, PAL 60, SECAM, NTSC3.58 (AV IN), NTSC4.43
VHF : от E2 до E12 /UHF : от E21 до E69 /
CATV : от S01 до S03, от S1 до S41
UHF : от B21 до B68 /
CATV : от S01 до S03, от S1 до S41
VHF : от C1 до C12, от R1 до R12 /
UHF : от C13 до C57, от R21 до R60 /
CATV : от S01 до S03, от S1 до S41, от Z1 до Z39
Внешний разъём с сопротивлением 75 Ом
3 Вт
Вход: 2 Гнезда RCA; 1 Vp-p, 75 Ом
Вход: 2
21 дюйм
54
51
497 × 468 × 494
23
Гнезда RCA; 500 mVrms
Измерения по
диагонали
Измерения по
диагонали
Сделано в Малайзии.
Page 18

B ВНИМАНИЕ!
• Внутри телевизора очень высокое напряжение.
• Рабочее напряжение телевизора: 110-240 В переменного тока.
• Во избежание утечки электроэнергии через антенну и другие разъёмы не
подключайте кабель питания до тех пор, пока вы не выполнили все
остальные подключения.
• Во избежание протекания батарей и повреждения пульта дистанционного
управления (ДУ) извлеките батареи из пульта ДУ, если вы не собираетесь
пользоваться им несколько дней. Если жидкость из батареи попала на кожу,
немедленно смойте её водой.
В целях безопасности не
прикасайтесь к каким-либо
частям ТВ, кабелю питания и
антенне во время грозы.
Не ставьте на ТВ какие-либо
предметы. Не капайте и не
брызгайте на устройство
водой, а также не ставьте на
него какие-либо сосуды с
жидкостью, например, вазы.
Не блокируйте вентиляционные
отверстия ТВ. Не устанавливайте
ТВ в замкнутом пространстве,
например, на закрытом стеллаже
или во встроенном шкафу.
Не открывайте корпус и
заднюю панель ТВ, так как
внутри высокое напряжение.
Предоставьте обслуживание и
утилизацию ТВ
квалифицированному
персоналу.
Для безопасности ваших детей
не оставляйте их рядом с ТВ
без присмотра. Не разрешайте
им влезать на корпус ТВ.
Не включайте ТВ, если
жидкость или какой-либо
твёрдый предмет попали во
внутрь корпуса. Немедленно
отдайте устройство на
проверку квалифицированному
персоналу.
Этот ТВ предназначен только для
домашнего использования. Не
используйте ТВ в автомобиле или
там, где он может подвергнуться
чрезмерному воздействию пыли,
влажности, нагреву или вибрации.
Очищайте ТВ мягкой сухой
тканью. Не используйте
бензин, растворители и
другие химикалии для
очистки ТВ. Не приклеивайте
что-либо (скотч, целлофан,
клей) на окрашенные части
ТВ. Не царапайте кинескоп.
Во избежание пожара и удара
током не подвергайте ТВ
воздействию дождя или
влаги.
Располагайте ТВ на специальной
устойчивой подставке, которая
может выдержать вес ТВ, или на
полу. Убедитесь, что верхняя
панель подставки ровная и её
площадь превышает площадь
нижней части ТВ.
Не подключайте слишком
много электроприборов к
одной розетке. Следите, чтобы
кабель питания не был
поврежден.
Отсоединяя кабель питания,
держитесь за вилку. Никогда не
тяните за кабель. Даже если ваш ТВ
выключен, он всё ещё подключён к
источнику переменного тока, так
как подключён кабель питания.
Отключите ТВ из розетки перед
перемещением или в случае, если
вы не будете пользоваться им в
течение нескольких дней.
Page 19

C Перед эксплуатацией
Шаг 1
b
b
Установите батареи (прилагаются) в пульт ДУ.
• Не используйте одновременно старые и новые
батареи или батареи различных типов.
Шаг 2
Подключите антенный кабель (не прилагается) к 8
(вход для антенны) на задней панели ТВ.
• Вы также можете подключить ТВ к другим
дополнительным компонентам (см. E).
Шаг 3
Подключите кабель питания к розетке, а затем
нажмите кнопку ! на ТВ для включения телевизора.
• При включении ТВ индикатор 1 (режим ожидания)
несколько секунд мигает зелёным. Это не
свидетельствует о неполадке или сбое в работе
устройства.
Шаг 4
Отрегулируйте ТВ, следуя инструкциям меню
“Начальная настройкa” (см. D).
Page 20

D
01
02
03
04
Настройка ТВ
При первом включении ТВ на экране отображается меню “Начальная
настройкa”. Можно настроить параметры, представленные ниже, с
помощью кнопок на пульте дистанционного управления или верхней
панели управления телевизора. Нажмите V, v, B или b для выбора или
настройки элементов, затем нажмите
Выбора нужного языка меню.
1
Выбора пункта “Дa”, для автоматического
2
сохранения телеканалов.
Чтобы пропустить автоматическую настройку
каналов, выберите “Нет”..
С помощью меню “Сортировка/Редактир.
3
программ” можно сортировать и редактировать
каналы (см. K).
Для отключения повторного отображения меню
4
“Начальная настройка” при включении
телевизора с помощью кнопки !, выбора
значения “Нет”..
Чтобы данное меню отобразилось снова, выберите
пункт “Дa”..
(“Начальная настройкa”)
.
• Вы можете сразу перейти к концу меню “Начальная настройкa”, нажав кнопку
WEGA GATE.
Page 21

E Подключение дополнительных
компонентов
К телевизору можно подключать разнообразную дополнительную
аппаратуру. Соединительные кабели не прилагаются.
Подключение к телевизору (передняя панель)
L
2
2
L
R
(MONO)
Аудио/
видео кабель
Подключение к телевизору (задняя панель)
R
Видеокамера
1
Антенный
кабель
(MONO)
(MONO)
Аудио/
видео кабель
L
Видеомагнитофон
R
DVD-
проигрыватель
Разъем Sound Mix
Вы можете подключить L (левый) и R (правый) аудиоразъёмы AV-оборудования
к обоим разъемам
левого и правого каналов. Если вы хотите прослушивать каналы по
отдельности, отключите один из разъемов (MONO).
• При подключении видеомагнитофона к разъему 8 (вход антенны) настройте
сигнал с видеомагнитофона на программе номер 0 на ТВ (см. K).
(MONO) на ТВ для прослушивания смешанного звука
Page 22

F Кнопки на телевизоре и пульт
дистанционного управления
WEGA GATE
PROG
5
4
1 ! Включение или выключение ТВ.
2 Сенсор для пульта ДУ.
3 Индикатор будильника.
3 1 Индикатор режима ожидания.
4 PROG +/– Выбор программы.
5 2 +/– Настройка громкости.
6 t Выбор ТВ или видеовхода.
Операции меню WEGA GATE (см. H)
4,5 V, v, B , b Выберите или настройте элементы.
6 Подтвердить выбранные параметры.
7 WEGA GATE Переход в меню WEGA GATE или
выход из него.
2
L
R
(MONO)
32
1
7
6
0
qa
qs
qd
qf
qg
qh
qj
qk
ql
w;
A/B
1
4
7
RETURN
1 ?/1 Временное отключение или
включение ТВ.
2 a Отображение телепрограммы.
1
3 Переключение на последний номер
2
3
2
6
5
9
8
0
PROG
4 PROG +/– Переключенние программ. Для
3
4
5 2 +/– Настройка громкости.
5
8 Не функционирует на данном ТВ.
программы, которая
просматривалась не менее пяти
секунд.
осуществления быстрого выбора
нажмите и удерживайте до
появления номера нужной
программы.
9 Не функционирует на данном ТВ.
0
Отображение экранной
информации.
6
WEGA
GATE
TV
qa Временное отключение звука.
qs A/B Не функционирует на данном ТВ.
7
qd t Выбор ТВ или видеовхода.
8
qf 0-9 Ввод цифр (номера программы).
9
Для программ с номером больше 10
вторую цифру необходимо ввести в
течение двух секунд.
Page 23

Кнопки на телевизоре и пульт дистанционного управления
(продолжение)
ql Не функционирует на данном ТВ.
w;
Операции меню WEGA GATE (см. H)
6 Подтвердить выбранные параметры.
7 WEGA GATE Переход в меню WEGA GATE или выход из него.
qj V, v, B, b Выберите или настройте элементы.
qk RETURN Возврат к предыдущему меню.
Операции с таймером
qg Настройка автоматического включения телевизора через определенное
(Тaймер время (макс. значение - 12 час). При установке будильника индикатор
включeния) на ТВ загорается жeлтым. Если в течение трeх часов после включения
qh Настройка автоматического выключения телевизора в необходимое
(Тaймер время (макс. значение - 1 час 30 мин.).
oтключeния)
Тeлeтeкcт (зеленый значок)
, , , ,
Выберите режим изображения: “Яркий”, “Обычный”, “Индивид.”* (см. I).
* При выборе режима “Индивид.” вы можете использовать наиболее
поздние настройки изображения из опџии “Нaстройка изображения”
в меню.
ТВ с использованием функции Таймер включения никакие кнопки и
элементы управления нажаты не были, ТВ автоматически переходит в
режим ожидания.
Не функционирует на данном ТВ.
, , , ,
(Кpacнaя,
зеленая,
жeлтaя,
синяя кнопки)
Режим PIP
, , V, v, B , b Не функционирует на данном ТВ.
Page 24

G Устранение неисправностей
При возникновении проблем эксплуатации телевизора можно использовать функцию
“Заводские настр.” (см. L) или обратиться к руководству по поиску и устранению
неисправностей, приведенному ниже. Если устранить проблему не удастся, обратитесь
к дилеру Sony.
Рябь на экране, Помехи в звукe
• Проверьте настройку антенны и другие подключения.
• Выполните повторно предварительную настройку канала вручную (см. K).
• Установите для параметра “Усилитель сигнала” значение “Авто” (см. K) или
воспользуйтесь внешним усилителем.
Помехи на изображении, Помехи в звукe
• Установите для параметра “Усилитель сигнала” значение “Выкл.” (см. K) или выключите
или отсоедините используемый внешний усилитель.
Качественное изображение, Помехи в звучании
• Выберите подходящую настройку для “Система” (см. K).
Отсутствует изображение, Отсутствует звук
• Проверьте кабель питания, настройку антенны и другие подключения.
• Нажмите кнопку 4/1 (питание), чтобы включить телевизор.
• Нажмите кнопку ! (основное питание), чтобы выключить ТВ примерно на 5 сек., затем
снова включите его.
Качественное изображение, Отсутствует звук
• Нажмите 2 + для увеличения уровня громкости или
Точечные линии или полосы на экране
• Не используйте фены и другие устройства рядом с ТВ.
• Проверьте правильность регулировки антенны.
Изображение двоится
• Используйте функцию точной настройки “Точн. настр.” (см. K).
• Проверьте настройку антенны или используйте высоконаправленную антенну.
• Выключите или отсоедините используемый внешний усилитель.
Чёрно-белое изображение
• Настройте уровень “Цветность” в разделе “Настройка изображения” (см. I).
• Выберите подходящую настройку для “Система цвета” (см. L).
• Проверьте правильность регулировки антенны.
Перекос изображения
•Располагайте внешние колонки и другие электроприборы подальше от ТВ.
Посторонние цветовые пятна
•Располагайте внешние колонки и другое оборудование подальше от ТВ. Не передвигайте ТВ,
когда он включён. Нажмите кнопку ! (основное питание) для выключения ТВ примерно на
15 мин., а затем снова включите его.
Каждые 3 секунды индикатор 1 (режим ожидания) на ТВ несколько раз мигает красным.
• Посчитайте, сколько раз мигает индикатор 1 (режим ожидания). Нажмите кнопку !
(основное питание) для выключения ТВ. Свяжитесь с ближайшим сервисным центром
фирмы Sony.
Изображение на экране телевизора иногда исчезает немного дольше, чем обычно при
переключении каналов.
•Работает функция “Усилитель сигнала” для определения слабого сигнала. Это не
свидетельствует о неисправности.
Корпус ТВ скрипит.
• Изменение температуры в комнате иногда становится причиной расширения или сжатия
корпуса ТВ, вызывая его скрип. Это не свидетельствует о неисправности.
В момент включения ТВ раздаётся негромкий гул.
•Работает функция размагничивания. Это не свидетельствует о неисправности.
для отмены отключения звука.
Page 25

H Навигатор WEGA GATE
01
02
03
04
05
С помощью WEGA GATE можно получить доступ к настройке
телевизионных каналов, подключенным внешним устройствам и меню
“Установки”.
“TВ”
“Внешние входы”
“Установки”
Использование WEGA GATE
(1
) Нажмите кнопку WEGA GATE для перехода
в меню WEGA GATE или выхода из него.
Оконч
01
02
03
04
05
1
2
просмотр предварительно
настроенных
телевизионных каналов
(см. D)
выбор входов для
подключенного
оборудования
(см. E)
Оконч
Оконч
(2
) Нажмите кнопку (или b) для
подтверждения выбора или перехода к
следующему меню.
изменение установок
телевизора
(см. I, J, K, L)
01
02
03
04
05
(3) Нажмите кнопку V или v для выбора
элемента.
(4) Нажмите кнопку RETURN для
перехода к предыдущему меню.
• Если функция отображается тусклым цветом в меню, то она недоступна для
выбора.
• Для выполнения действий, перечисленных выше, вы можете также использовать
кнопки WEGA GATE, и V, v, B , b на пульте ДУ.
Page 26

I Настройка меню “Изображение”
Нажмите кнопку WEGA GATE и выберите
“Установки”.
Убедитесь, что выбрана пиктограмма
“Изображение” (
кнопку .
), затем нажмите
“Режим изображения” Выбора “Яркий” (яркий, контрастный и резкий), “Обычный” или
“Цветовой тон” Настройки оттенка белого цвета.
“Интеллект. регул.” Оптимизации качества изображения.
“Индик. уровня сигн.” Отображает уровень сигнала, когда активна функция “Интеллект.
*В опциях “Нaстройка изображения” и “Цветовой тон” вы можете настроить параметры
по своему усмотрению лишь в том случае, если выбран режим “Индивид.”..
“Индивид.”*.
Выберите “Холодный” (голубой оттенок), “Нейтральный”
(нейтральный оттенок) или “Теплый” (красный оттенок).
Нажимайте кнопки V или v для выбора “Вкл.”., затем нажмите
кнопку .
Для отмены выберите “Выкл.”., затем нажмите кнопку .
регул”.
При изменении номера программы или режима входного сигнала
на экране появляется индикатор “Интеллект. регул. Уровень
сигнала” и изображение улучшается.
красный желтый зеленый
(светлый)(средний)(плохо ......... хорошо)
Нажимайте кнопки V или v для выбора “Вкл.”, затем нажмите
кнопку .
Для отмены выберите “Выкл.”, затем нажмите кнопку . Функция
“Интеллект. регул.” при этом по-прежнему будет работать.
Page 27

Настройка меню “Изображение” (продолжение)
Настройка параметров “Нaстройка изображения” в режиме
“Индивид.”
Нажимайте кнопки V или v для выбора “Контрaст” (контpaстность),
1
“Яркость”, “Цветность”, “Оттенок” (тон) или “Pезкость”, затем нажмите
кнопку
Выбор “Сброс” вернёт ТВ к заводским настройкам.
Нажимайте кнопки V,v,B или b для настройки выбранного параметра,
2
затем нажмите кнопку
Повторите описанные выше действия для настройки остальных
3
параметров.
Настроенные параметры будут работать при выборе режима “Индивид.”..
• Параметр “Оттенок” может быть отрегулирован только в системе цвета NTSC.
• Понижение значения параметра “Резкость” также может снизить уровень помех на
изображении.
.
.
Page 28

J Настройка меню “Звук”
Нажмите кнопку WEGA GATE и выберите
“Установки”.
Нажимайте кнопки V или v для выбора
пиктограммы “Звук” (
кнопку
.
), затем нажмите
“Интел. громкость” Автоматической настройки громкости для всех
телеканалов и видеовходов.
Нажимайте кнопки V или v для выбора “Вкл.”, затем
нажмите кнопку .
Для отмены выберите “Выкл.”, затем нажмите кнопку
.
Page 29

K
Настройка меню “Настройка каналов”
Нажмите кнопку WEGA GATE и выберите
“Установки”.
Нажимайте кнопки V или v для выбора
пиктограммы “Настройка каналов” (
затем нажмите кнопку
“
Aвтонaстройкa программ” Автоматического сохранения телеканалов.
“Pучная настройка Настройки вручную нужных телеканалов и телеканалов,
программ” которые не могут быть настроены автоматически (см. раздел
“Cортировкa/ Выполните сортировку и редактирование каналов.
Редактир. программ” (a) Если необходимо сохранить текущий порядок каналов,
.
Сохранение телеканалов вручную).
нажмите кнопку WEGA GATE для выхода.
(b) Нажимайте кнопку V или v для выбора номера
программы для канала, который необходимо изменить.
Выбранный канал появится на экране.
(c) Если необходимо сохранить каналы в другом порядке,
выполните следующие действия:
(1) Нажмите кнопку b для входа в режим сортировки.
(2) Нажимайте кнопку V или v для выбора нового
номера программы для выбранного канала, затем
нажмите B.
(d) Если необходимо редактировать каналы, нажмите
кнопку для перехода в режим редактирования.
С помощью кнопок b выберите требуемый элемент
редактирования: Метка, Пропуск, (знак блокировки).
Затем нажмите кнопку .
(1) Нажмите кнопку V или v для выбора буквенно-
цифровых символов для метки. Затем нажмите
кнопку .
(2) Чтобы установить пропуск программы, с помощью
кнопки V или v выберите значение “Вкл.”.. Затем
нажмите кнопку .
Для пропуска программы с этим номером можно
использовать кнопки PROG +/–.
(3) Чтобы заблокировать номер ненужной программы, с
помощью кнопки V или v выберите . Затем
нажмите кнопку .
(e) Повторите пункты (b) – (d), если необходимо
редактировать другие каналы.
Нажмите кнопку WEGA GATE для выхода.
),
Настройка каналов
Автонастройка программ
Pучная настройка программ
Сортировка/Редактир.программ
• При сохранении на заблокированную программу, номер данной программы будет
автоматически разблокирован.
• Если отсортировать заблокированную программу, то программа останется
заблокированной.
Page 30

Настройка меню “Настройка каналов” (продолжение)
Сохранение телеканалов вручную
После выбора пункта “Ручная настройка программ”
1
выберите номер программы, на которую вы хотите
настроить канал.
(1) Убедитесь, что выбран пункт “Программa”, затем
нажмите кнопку
(2) Нажимайте кнопки V или v до появления в меню
нужного номера программы, затем нажмите кнопку
Выберите нужный канал.
2
(1) Убедитесь, что выбрано “MB I”, “MB II” или “ДMB”, затем нажмите кнопку
(2) Нажимайте кнопки V или v до появления на экране нужного телеканала,
затем нажмите кнопку
Если звук не нормальный, выберите соответствующую систему ТВ.
3
(1) Нажимайте кнопки V или v для выбора пункта “Система”, затем нажмите
кнопку
(2) Нажимайте кнопки V или v до достижения нормального звучания, затем
нажмите кнопку
Если вас не устраивает качество изображения и звука, вы можете
4
улучшить его, используя функции настройки “Точн.настр.”.
(1) Нажимайте кнопки V или v для выбора пункта “Точн.настр.”, затем нажмите
кнопку
(2) Нажимайте кнопки V или v для выбора пункта “Ручная”, затем нажмите
кнопку
(3) Нажимайте кнопки V,v,B или b до оптимизации качества изображения и
звука, затем нажмите кнопку
Во время настройки в меню мигают иконки + или –.
Если телевизионный сигнал слишком сильный (изображение искажено;
5
изображение содержит полосы; помехи для сигнала) или слабый
(изображение снежит), качество изображения можно улучшить, настроив
функцию “Усилитель сигнала”.
Нажимайте кнопки V или v для выбора пункта
(1)
нажмите кнопку
(2) Нажимайте кнопки V или v для выбора значения “Выкл.” (если изображение
искажено; изображение содержит полосы; помехи для сигнала) или “Авто”
(если изображение снежит), затем нажмите кнопку
.
.
.
.
.
.
.
“Усилитель сигнала”, затем
.
Ручная настройка программ
Программа:
Система:
MB I
То чн. настр.: Авто
Усилитель сигнaлa:
.
.
01
D/K
Авто
Оконч
.
Page 31

L Настройка меню “Установка”
Нажмите кнопку WEGA GATE и выберите
“Установки”.
Нажимайте кнопки V или v для выбора
пиктограммы “Установка” (
), затем
Установка
Язык/Lаnguаgе :
Название АV-входа
Система цвета: Авто
Заводские настр.
нажмите кнопку .
“Язык/Language” Изменения языка меню.
Нажимайте кнопки V или v для выбора “English”
(английский) или “ ”, затем нажмите кнопку .
“Нaзвание AV-входa” Отметки подключённого оборудования.
(1) Выберите пункт “Видеовход” и нажмите кнопку .
Нажимайте кнопки V или v для выбора входа, который
вы хотите отметить, затем нажмите кнопку .
(2) Выберите пункт “Меткa” и нажмите кнопку , затем
нажимайте кнопки V или v для выбора отмечаемого
входа: “Видео 1”/ “Видео 2”, “ВМ”, “SAT”, “Игpa” или
“Изм.”*.
*Можно изменить видеометку и установить нужное имя.
Нажмите V или v, чтобы выбрать буквенно-цифровые
символы для метки, затем нажмите кнопку .
“Система цвета” Выбора цветовой системы.
“Заводские настр.” Восстановления заводских настроек телевизора.
Нажимайте кнопки V или v для выбора “Авто”, “PAL”,
“SECAM”, “NTSC3.58” или “NTSC4.43”, затем нажмите
кнопку . В обычных условиях установите данный
параметр в позицию “Авто”.
Нажмите кнопку и нажмите кнопку V или v, чтобы
выбрать “Да”, затем нажмите .
Изображение на экране телевизора исчезнет на несколько
секунд, затем отобразится меню “Начальная настройка”.
Для отмены нажмите кнопку “Нет”, затем нажмите .
Русский
 Loading...