

Page 1

Connecting Additional Equipment
Operating Instructions
4-101-940-22(1)
© 2005 by Sony Corporation
KV-32FS120
KV-36FS120
Page 2

User Guide
Page 3
Connecting Additional Equipment
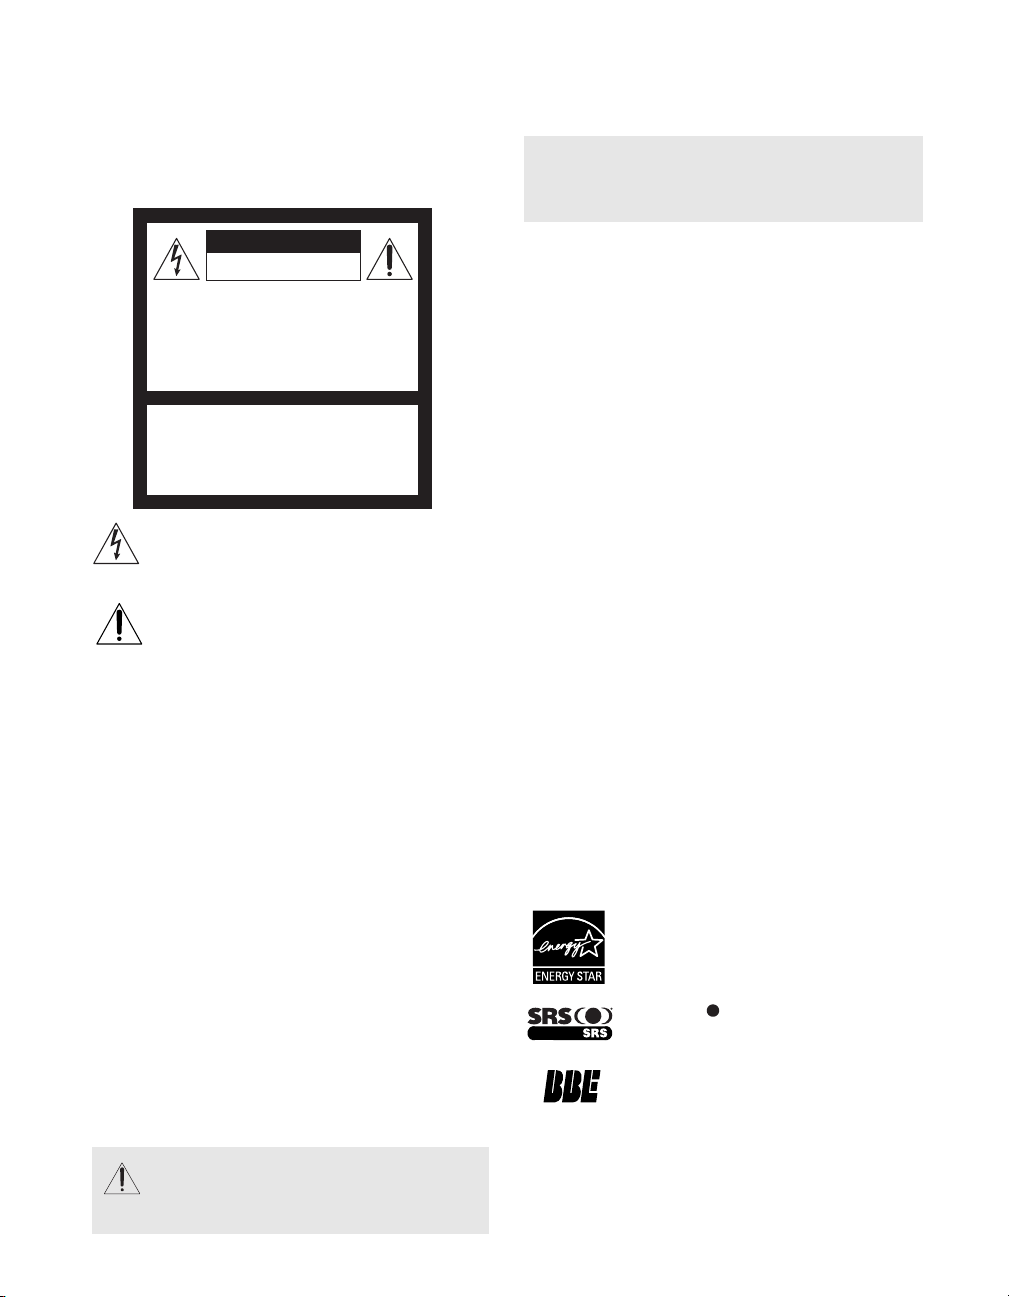
WARNING
To reduce the risk of fire or electric shock, do not expose the
TV to rain or moisture.
CAUTION
RISK OF ELECTRIC SHOCK
DO NOT OPEN
ATTENTION
RISQUE DE CHOC ELECTRIQUE,
NE PAS OUVRIR
PRECAUCION
RIESGO DE CHOQUE ELECTRICO
NO ABRIR
CAUTION: TO REDUCE THE RISK OF ELECTRIC SHOCK,
DO NOT REMOVE COVER (OR BACK).
NO USER-SERVICEABLE PARTS INSIDE.
REFER SERVICING TO QUALIFIED SERVICE PERSONNEL.
This symbol is intended to alert the user to the
presence of uninsulated “dangerous voltage”
within the product’s enclosure that may be of
sufficient magnitude to constitute a risk of electric
shock to persons.
This symbol is intended to alert the user to the
presence of important operating and maintenance
(servicing) instructions in the literature
accompanying the appliance.
Note to the CATV Installer
This reminder is provided to call the CATV system
installer’s attention to Article 820-40 of the NEC that
provides guidelines for proper grounding and, in particular,
specifies that the cable ground shall be connected to the
grounding system of the building as close to the point of
cable entry as practical.
SAFETY PRECAUTIONS
❏ Operate the TV only on 120 V AC.
❏ One blade of the power plug is wider than the other for
safety purposes and will fit into the power outlet only one
way. If you are unable to insert the plug fully into the
outlet, contact your dealer.
❏ If any liquid or solid object falls into the TV, unplug it and
have it checked by qualified personnel before operating it
further.
CAUTION
When using TV games, computers, and similar products
with your TV, keep the brightness and contrast functions at
low settings. If a fixed (non-moving) pattern is left on the
screen for long periods of time at a high brightness or
contrast setting, the image can be permanently imprinted
onto the screen. Continuously watching the same channel
can cause the imprint of station logos onto the TV screen.
These types of imprints are not covered by your warranty
because they are the results of misuse.
To reduce the risk of electric shock, do not use
this polarized plug with an extension cord,
receptacle, or other outlet unless the blades can
be fully inserted to prevent blade exposure.
✍
Pursuant to FCC regulations you are cautioned that
any changes or modifications not expressly approved
in this manual could void your authority to operate
this equipment.
NOTIFICATION
This equipment has been tested and found to comply with
the limits for a Class B digital device pursuant to Part 15 of
the FCC Rules. These limits are designed to provide
reasonable protection against harmful interference in a
residential installation. This equipment generates, uses, and
can radiate radio frequency energy and, if not installed and
used in accordance with the instructions, may cause
harmful interference with radio communications. However,
there is no guarantee that interference will not occur in a
particular installation. If this equipment does cause harmful
interference to radio or television reception, which can be
determined by turning the equipment off and on, the user is
encouraged to try to correct the interference by one or more
of the following measures:
❏ Reorient or relocate the receiving antennas.
❏ Increase the separation between the equipment and
receiver.
❏ Connect the equipment into an outlet on a circuit different
from that to which the receiver is connected.
❏ Consult the dealer or an experienced radio/TV technician
for help.
Protecting the TV
❏ To prevent internal heat build-up, do not block the
ventilation openings.
❏ Do not install the TV in a hot or humid place, or in a place
subject to excessive dust or mechanical vibration.
Note on Caption Vision
This television receiver provides display of television closed
captioning in accordance with § 15.119 of the FCC rules.
Use of this television for other than private viewing of
programs broadcast on UHF or VHF or transmitted by cable
companies for the use of the general public may require
authorization from the broadcaster-cable company and/or
program owner.
Owner’s Record
The model and serial numbers are located on the front cover
of this manual and at the rear of your TV.
Trademarks and Copyrights
As an ENERGY STAR® Partner, Sony
Corporation has determined that this product
meets the ENERGY STAR
energy efficiency.
ENERGY STAR is a registered mark.
SRS and the ()® symbol are trademarks of SRS
Labs, Inc.
Manufactured under license from BBE Sound, Inc.
Licensed by BBE Sound, Inc. under USP 4638258,
5510752 and 5736897. BBE and BBE symbol are
registered trademarks of BBE Sound, Inc.
WEGA, FD Trinitron and Steady Sound are
registered trademarks of Sony Corporation.
®
guidelines for
Page 4

User Guide
IMPORTANT SAFEGUARDS
For your protection, please read these instructions
completely, and keep this manual for future reference.
Carefully observe and comply with all warnings, cautions
and instructions placed on the set, or described in the
operating instructions or service manual.
WARNING
To guard against injury, the following basic safety
precautions should be observed in the installation, use, and
servicing of the set.
Use
Power Sources
This set should be operated only from
the type of power source indicated on
the serial/model plate. If you are not
sure of the type of electrical power
supplied to your home, consult your
dealer or local power company. For
those sets designed to operate from
battery power, refer to the operating instructions.
Grounding or Polarization
This set may be equipped with a
polarized alternating current line plug
(a plug having one blade wider than
other). This plug will fit into the
power outlet only one way. This is a
safety feature. If you are unable to
insert the plug fully into the outlet, try reversing the plug. If
the plug still fails to fit, contact your electrician to replace your
obsolete outlet. Do not defeat the safety purpose of the
polarized plug.
For the set with a three-wire grounding type AC plug
This plug will only fit into a
grounding-type power outlet. This is
a safety feature. If you are unable to
insert the plug into the outlet, contact
your electrician to have a suitable
outlet installed. Do not defeat the
safety purpose of the grounding plug.
Overloading
Do not overload wall
outlets, extension
cords or convenience
receptacles beyond
their capacity, since
this can result in fire
or electric shock.
Always turn the set off when it is not to be used. When the
set is left unattended and unused for long periods of time,
unplug it from the wall outlet as a precaution against the
possibility of an internal malfunction that could create a fire
hazard.
Do not disconnect the antenna or the power cord during a
heavy storm. Lightning may strike while you are holding
the cable or cord, causing serious injury. Turn off your TV
and wait for the weather to improve.
Object and Liquid Entry
Never push objects of any kind into the set
through the cabinet slots as they may touch
dangerous voltage points or short out parts
that could result in a fire or electric shock.
Never spill liquid of any kind on the set.
Corrosion
Use of this TV near the seashore may subject the set to
excessive salt, corrosion and internal damage and result in
deterioration of the TV’s performance. If the set will be
subjected to these conditions, steps should be taken to
reduce the humidity and temperature of the area where the
TV is located.
Attachments
Do not use attachments not recommended
by the manufacturer, as they may cause
hazards.
Do not place any objects, especially heavy
objects, on top of the set. The object may
fall from the set, causing injury.
Cleaning
Unplug the set from the wall outlet before
cleaning or polishing it. Do not use liquid
cleaners or aerosol cleaners. Use a cloth
lightly dampened with water for cleaning
the exterior of the set.
If a snapping or popping sound from a TV set
is continuous or frequent while the TV is
operating, unplug the TV and consult your
dealer or service technician. It is normal for
some TV sets to make occasional snapping or
popping sounds, particularly when being
turned on or off.
Installation
Always use two or more people to lift or move the set. The
set is heavy and the bottom surface is flat. Serious injury can
result from trying to move the set by yourself alone, or from
unsteady handling.
Install the set on a stable, level surface.
Water and Moisture
Do not use power-line
operated sets near water —
for example, near a bathtub,
washbowl, kitchen sink, or
laundry tub, in a wet
basement, or near a
swimming pool, etc.
Accessories
Do not place the set on
an unstable cart, stand,
tripod, bracket, table,
or shelf. The set may
fall, causing serious
injury to a child or an
adult, and serious
damage to the set. Use
only a cart or stand recommended by the manufacturer for the
specific model of TV. Any mounting of the product should
follow the manufacturer ’s instructions, and should use a
mounting accessory recommended by the manufacturer. An
appliance and cart combination should be moved with care.
Quick stops, excessive force, and uneven surfaces may cause
the appliance and cart combination to overturn.
Ventilation
The slots and openings in the cabinet and in the back or
bottom are provided for necessary ventilation. To ensure
reliable operation of the set, and to protect it from
overheating, these slots and openings must never be
blocked or covered.
Page 5

Connecting Additional Equipment
• Never cover the slots and openings
with a cloth or other materials.
Never block the slots and openings
•
by placing the set on a bed, sofa, rug
or other similar surface.
•
Never place the set in a confined
space, such as a bookcase or built-in
cabinet, unless proper ventilation is
provided.
• Do not place the set near or over a
radiator or heat register, or where it is
exposed to direct sunlight.
Power-Cord Protection
Do not allow anything to rest on or roll over the
power cord, and do not place the set where the
power cord is subject to wear or abuse.
Antennas
Outdoor Antenna Grounding
If an outdoor antenna is installed, follow the precautions
below. An outdoor antenna system should not be located in
the vicinity of overhead power lines or other electric light or
power circuits, or where it can come in contact with such
power lines or circuits.
WHEN INSTALLING AN OUTDOOR ANTENNA
SYSTEM, EXTREME CARE SHOULD BE TAKEN TO KEEP
FROM CONTACTING SUCH POWER LINES OR
CIRCUITS AS CONTACT WITH THEM IS ALMOST
INVARIABLY FATAL.
Be sure the antenna system is grounded so as to provide some
protection against voltage surges and built-up static charges.
Section 810 of the National Electrical Code (NEC) in USA and
Section 54 of the Canadian Electrical Code in Canada
provides information with respect to proper grounding of the
mast and supporting structure, grounding of the lead-in wire
to an antenna discharge unit, size of grounding conductors,
location of antenna discharge unit, connection to grounding
electrodes, and requirements for the grounding electrode.
Antenna Grounding According to the NEC
Antenna Grounding According to the National Electrical
Code, ANSI/NFPA 70.
ANTENNA
LEAD IN
GROUND
CLAMP
ELECTRIC
SERVICE
EQUIPMENT
NEC - NATIONAL ELECTRIC CODE
WIRE
ANTENNA
DISCHARGE UNIT
(NEC SECTION 810-20)
GROUNDING CONDUCTORS
(NEC SECTION 810-21)
GROUND CLAMPS
POWER SERVICE GROUNDING
ELECTRODE SYSTEM
(NEC ARTICLE 250, PART H)
Lightning
For added protection for this television receiver during a
lightning storm, or when it is left unattended and unused
for long periods of time, unplug it from the wall outlet and
disconnect the antenna. This will prevent damage to the
receiver due to lightning and power-line surges.
Service
Damage Requiring Service
Unplug the set from the wall outlet and refer servicing to
qualified service personnel under the following conditions:
When the power cord or plug
•
is damaged or frayed.
• If liquid has been spilled
into the set or objects have
fallen into the product.
• If the set has been exposed to
rain or water.
• If the set has been subject to
excessive shock by being
dropped, or the cabinet has
been damaged.
•
If the set does not operate
normally when following the operating
instructions. Adjust only those controls
that are specified in the operating
instructions. Improper adjustment of
other controls may result in damage and
will often require extensive work by a
qualified technician to restore the set to normal operation.
• When the set exhibits a distinct change in
performance — this indicates a need for service.
Servicing
Do not attempt to service the set yourself
since opening the cabinet may expose you
to dangerous voltage or other hazards. Refer
all servicing to qualified service personnel.
Replacement Parts
When replacement parts are required, be
sure the service technician certifies in
writing that he has used replacement
parts specified by the manufacturer that
have the same characteristics as the
original parts. Unauthorized
substitutions may result in fire, electric
shock, or other hazards.
Safety Check
Upon completion of any service or repairs to
the set, ask the service technician to perform
routine safety checks (as specified by the
manufacturer) to determine that the set is in
safe operating condition, and to so certify.
When the set reaches the end of its useful life,
improper disposal could result in a picture
tube implosion. Ask a qualified service
technician to dispose of the set.
Page 6

User Guide
Page 7

Contents
Introduction
Introducing the FD Trinitron WEGA® Features ........................................................................1
About this Manual.......................................................................................................................... 2
Batteries for the Remote Control ..................................................................................................2
Front Panel Menu Controls ........................................................................................................... 2
Using the Remote Control
Remote Control Description..........................................................................................................3
Connecting Your TV
TV Rear Panel.................................................................................................................................. 5
Basic Connections ...........................................................................................................................6
Connecting Additional Equipment..............................................................................................7
Using Basic Functions
Setting Up the TV.......................................................................................................................... 17
Quick Start to the Menus ............................................................................................................. 18
Using the Menus
How to Access Menus.................................................................................................................. 21
Using the Video Menu.......................................................................................................... 22
Using the Audio Menu ........................................................................................................ 23
Using the Channel Setup Menu.......................................................................................... 25
Using the Parental Control Menu....................................................................................... 27
Parental Control..................................................................................................................... 28
United States: Selecting Custom Rating Options.............................................................. 30
Canada: Selecting Custom Rating Options........................................................................32
Using the Timer Menu .......................................................................................................... 33
Using the Setup Menu.......................................................................................................... 34
Other Information
Troubleshooting............................................................................................................................ 35
Specifications................................................................................................................................. 38
Index......................................................................................................................................................39
Page 8

Page 9

Introduction
Congratulations on your purchase of the Sony FD Trinitron WEGA®.
Introducing the FD Trinitron WEGA® Features
Some of the features you will enjoy include:
❏ FD Trinitron Flat CRT — Delivers a picture with uncompromising accuracy and
outstanding image detail via a technologically advanced tube.
❏ YPBPR Inputs — Provides component video inputs for superior picture quality
(480i only).
❏ BBE — Gives sound more impact by using audio technology to compensate for phase
effects in speakers.
❏ SRS — Produces a dynamic three-dimensional sound for stereo programs.
❏ Parental Control (V-Chip) — Helps parents monitor what their children watch on TV by
establishing rating limits.
❏ ClearEdge VM — Sharpens picture definition to give objects a crisp, clean edge.
❏ Favorite Channels — Provides instant access to your favorite channels with the touch of a
button.
❏ Info Banner — Displays the name and the remaining time of the current program viewed,
if available.
❏ Energy Star
❏ Front Panel Controls — Allows access to the on-screen menus without the use of a remote
control.
❏ Front A/V Inputs — Lets you quickly connect video games, camcorders, or stereo/mono
equipment.
®
— Meets the Energy Star guidelines for energy efficiency.
1
Page 10
About this Manual
This manual provides instructions to help you enjoy your new TV. It shows you how to
connect to an antenna or cable, cable box, VCR, DVD, satellite receiver, stereo system, or
camcorder. Once your TV is connected, follow the instructions and use the remote control to
access the on-screen menus.
Batteries for the Remote Control
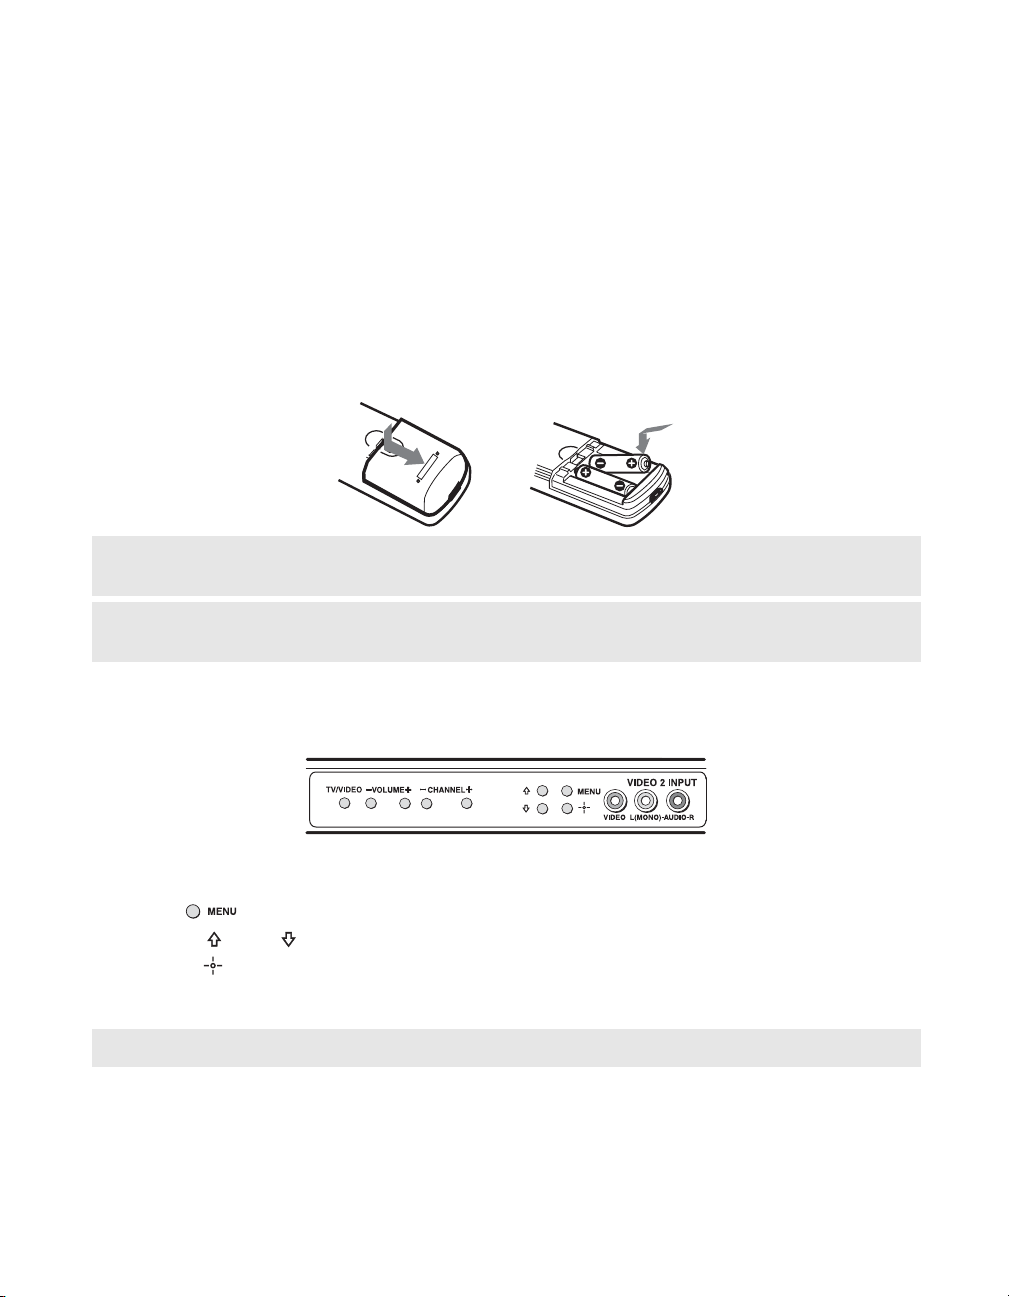
Insert two AA (R6) batteries (supplied) into the remote control using the following illustration
as a guide.
A
Y
S
A
L
A
M
IN
E
D
A
M
✍ Under normal conditions, batteries will last up to six months. If the remote control does not operate
properly, the batteries might be worn out.
✍ If you will not be using the remote control for an extended period of time, remove the batteries to
avoid possible damage from battery leakage.
Front Panel Menu Controls
The front panel controls allow you to access the menu without the remote control.
❏ Press to display the on-screen menu.
❏ Use the and buttons on the front panel instead of your remote control.
❏ Use the button on the front panel to navigate through the menus, then select an item.
The front panel controls also allow you to change your channels (CH+/–), adjust the
volume (VOL +/–), and change video inputs.
✍ To navigate the menus with your remote control, see “Using the Menus” on page 21.
2
Page 11

Using the Remote Control
Remote Control Description
Remote Control
A
B
C
D
E
F
G
H
I
MUTING DISPLAY POWER
MTS/SAP TV/VIDEO
1
4
7
MODE
VOL
PICTURE
RESET SLEEP
3
2
6
5
9
8
ENTJUMP
0
CH
MENU
J
K
L
M
N
O
TV
RM-Y194
3
Page 12
Remote Control Description
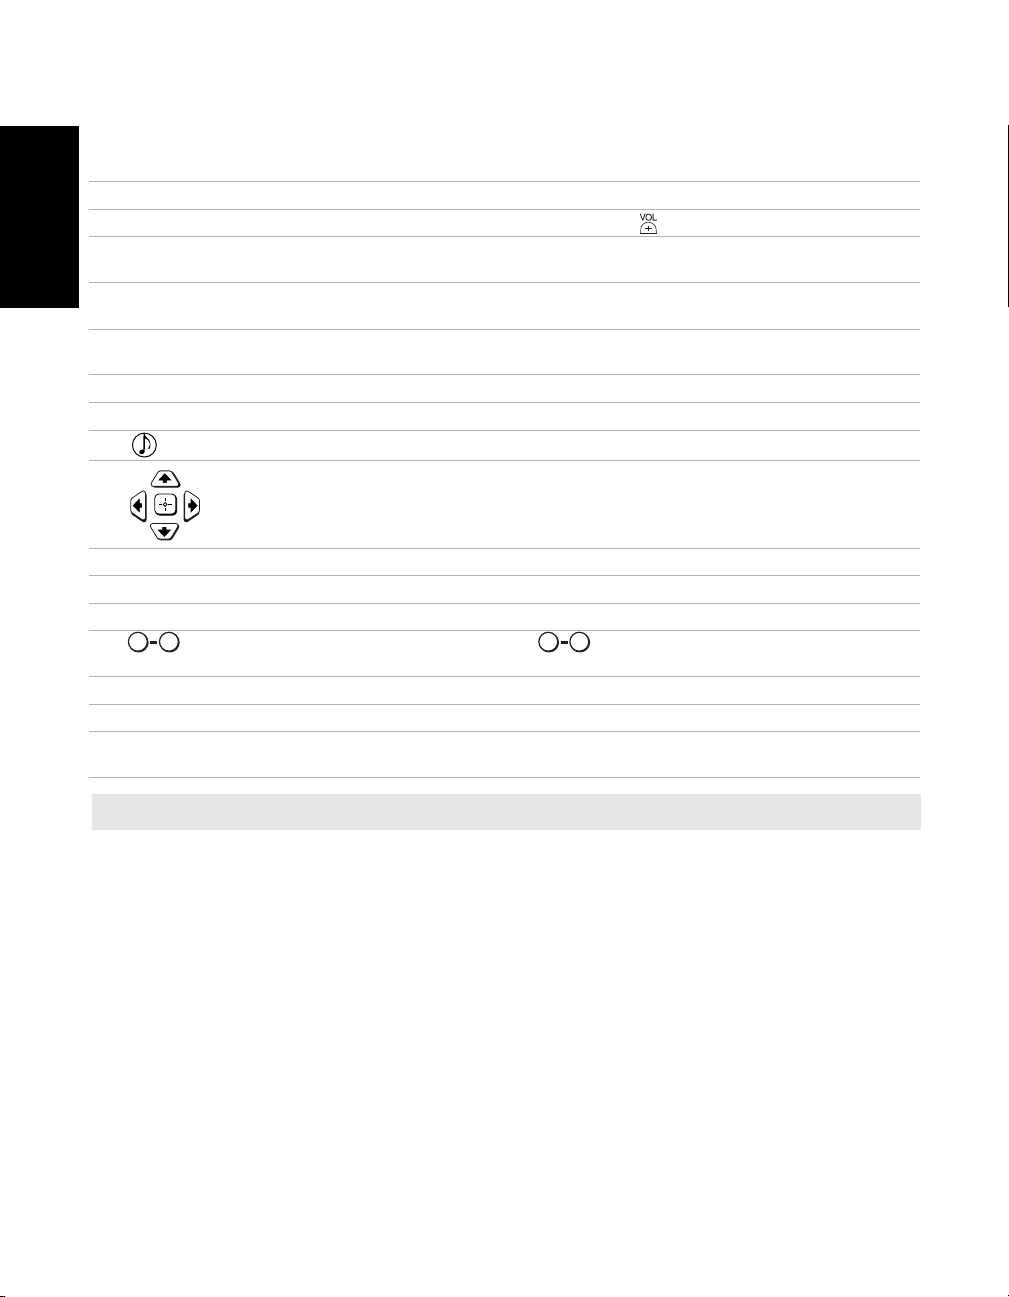
Button Description
MUTING Instantly turns off the sound. Press again or press to restore the sound.
1
DISPLAY Press to display the current time (if set) and channel number. Press again to turn
2
MTS/SAP Cycles through the Multi-channel TV Sound (MTS) options: Stereo, Mono, and Auto SAP
3
Remote Control
JUMP Press to jump back and forth between two channels. The TV alternates between current
4
PICTURE MODE Cycles through the available Video Mode settings.
5
VOL (volume) Press when you want to adjust the volume.
6
7
8
RESET Press to return to factory settings while in an on-screen menu.
9
POWER Press when you want to turn the TV on or off.
q;
TV/VIDEO Cycles through available video inputs.
qa
0 9 0 9
qs
qd
qf
qg
and
ENTER
CH (channel) Press when you want to change channels.
MENU Displays the on-screen menu. Press again to exit the menu at any time.
SLEEP Turns the TV off automatically in approximately 15, 30, 45, 60, or 90 minutes. Cancel by
DISPLAY off.
(Second Audio Program).
channel and the last channel that was selected.
Press for a direct selection of Effect settings (Simulated, SRS, Off).
Moves the cursor in the on-screen menus. Press the arrow buttons to move the cursor,
then press the center button to select or access an option.
Change the channels directly. Press buttons to select a channel, then press
ENTER.
pressing until Sleep off appears.
✍ If you lose your remote control, see page 36.
4
Page 13
Connecting Your TV
Read this section before setting up your TV for the first time. This section explains how to
make the basic connections and how to connect optional equipment.
TV Rear Panel
3
1
1
S VIDEO
VIDEO
L
(MONO)
R
4
Y
P B
AUDIO OUT
(VAR/FIX)
P R
L
L
(MONO)
R
R
Connections
2
3
45
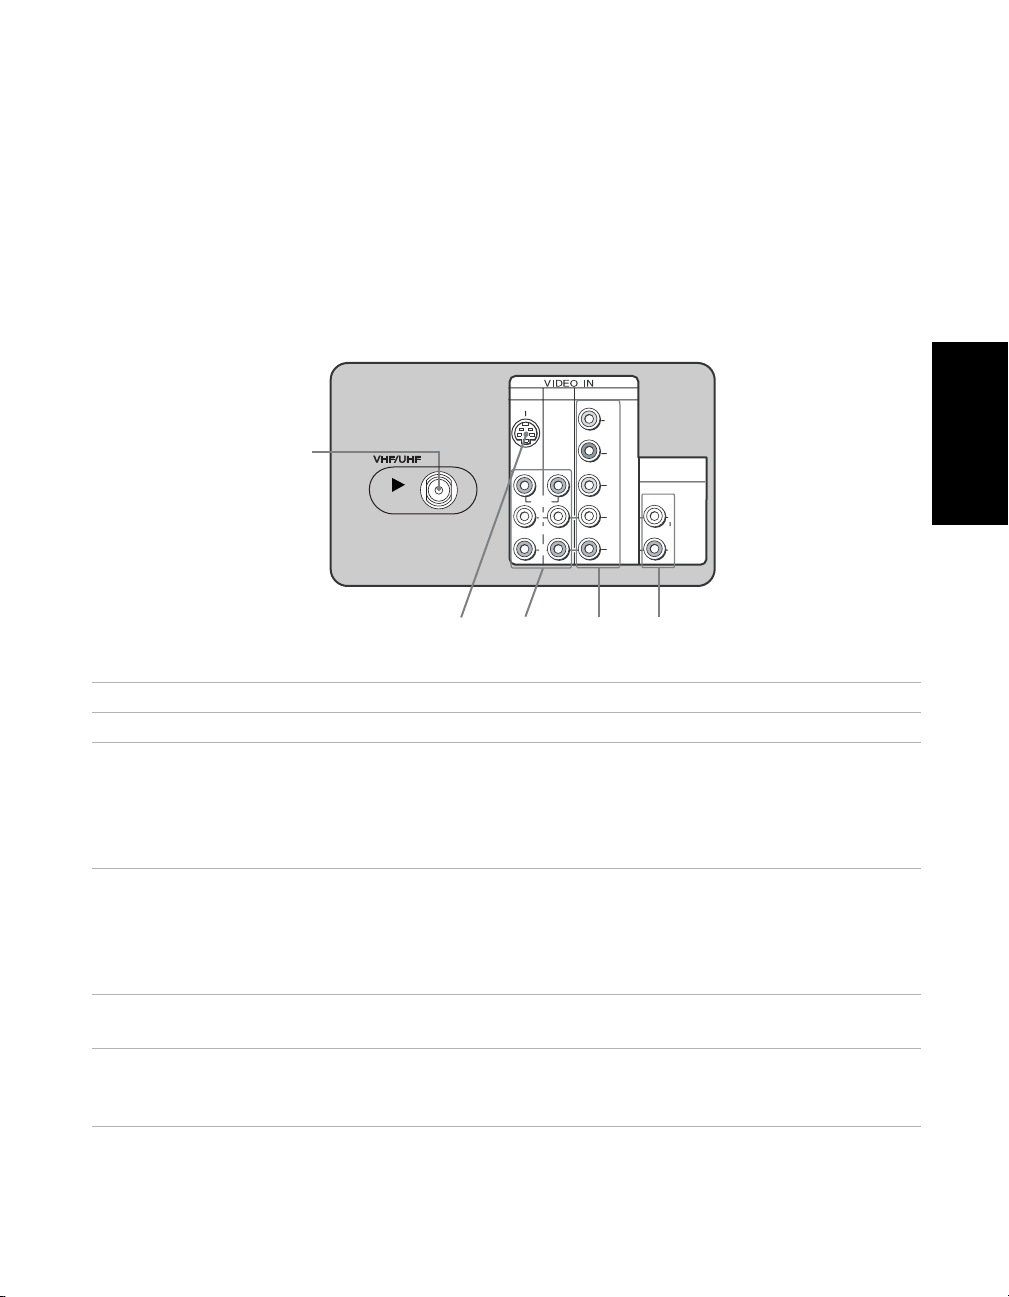
Jack Description
1 VHF/UHF This input connects to your VHF/UHF antenna or cable.
2 S VIDEO This input connects to the S VIDEO OUT jack on your VCR or
other video equipment that has S VIDEO. S VIDEO provides
better picture quality than the VHF/UHF jacks or the video
input jack. S VIDEO does not provide sound, so you still must
connect the audio cables.
3 VIDEO/AUDIO
L(MONO), R
This input connects to the AUDIO/VIDEO output jacks on your
VCR or other video equipment. A third video input jack
(VIDEO 2) is located on the front panel of the TV. These
AUDIO/VIDEO input jacks provide better picture quality than
the VHF/UHF jack.
4
YPBPR/ L, R
This input connects to the component video YPBPR, and AUDIO
L, R jacks on your DVD player or digital set-top box (480i only).
5 AUDIO OUT
(VAR/FIX)
L(MONO), R
This jack connects to the AUDIO input jacks on your audio
equipment. You can listen to your TV’s audio through your
stereo system.
5
Page 14
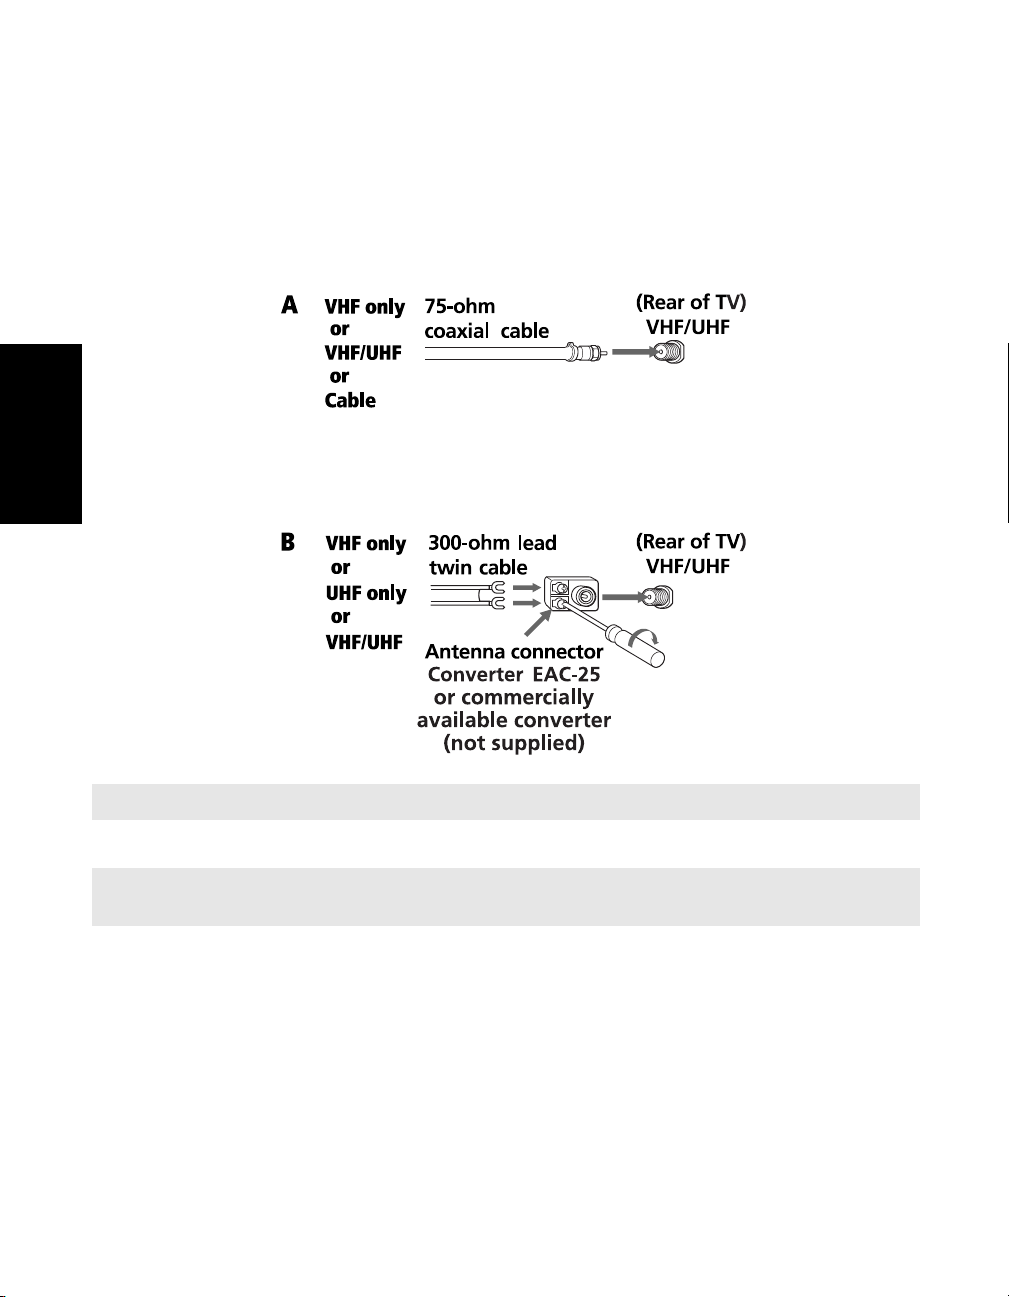
Basic Connections
TV with Cable, Indoor, or Outdoor Antenna
Depending on the cable system available in your home, choose one of the connections below:
Use option A to connect the TV to a cable system or an antenna with a 75-ohm cable.
Connections
✍ Converter EAC-25 is commercially known as a 300-to-75 ohm antenna adapter.
Use option B to connect the TV to a dipole antenna, also known as a “rabbit ears antenna“.
✍ If you are connecting to an indoor or outdoor antenna, you may need to adjust the orientation of the
antenna for the best reception.
6
Page 15
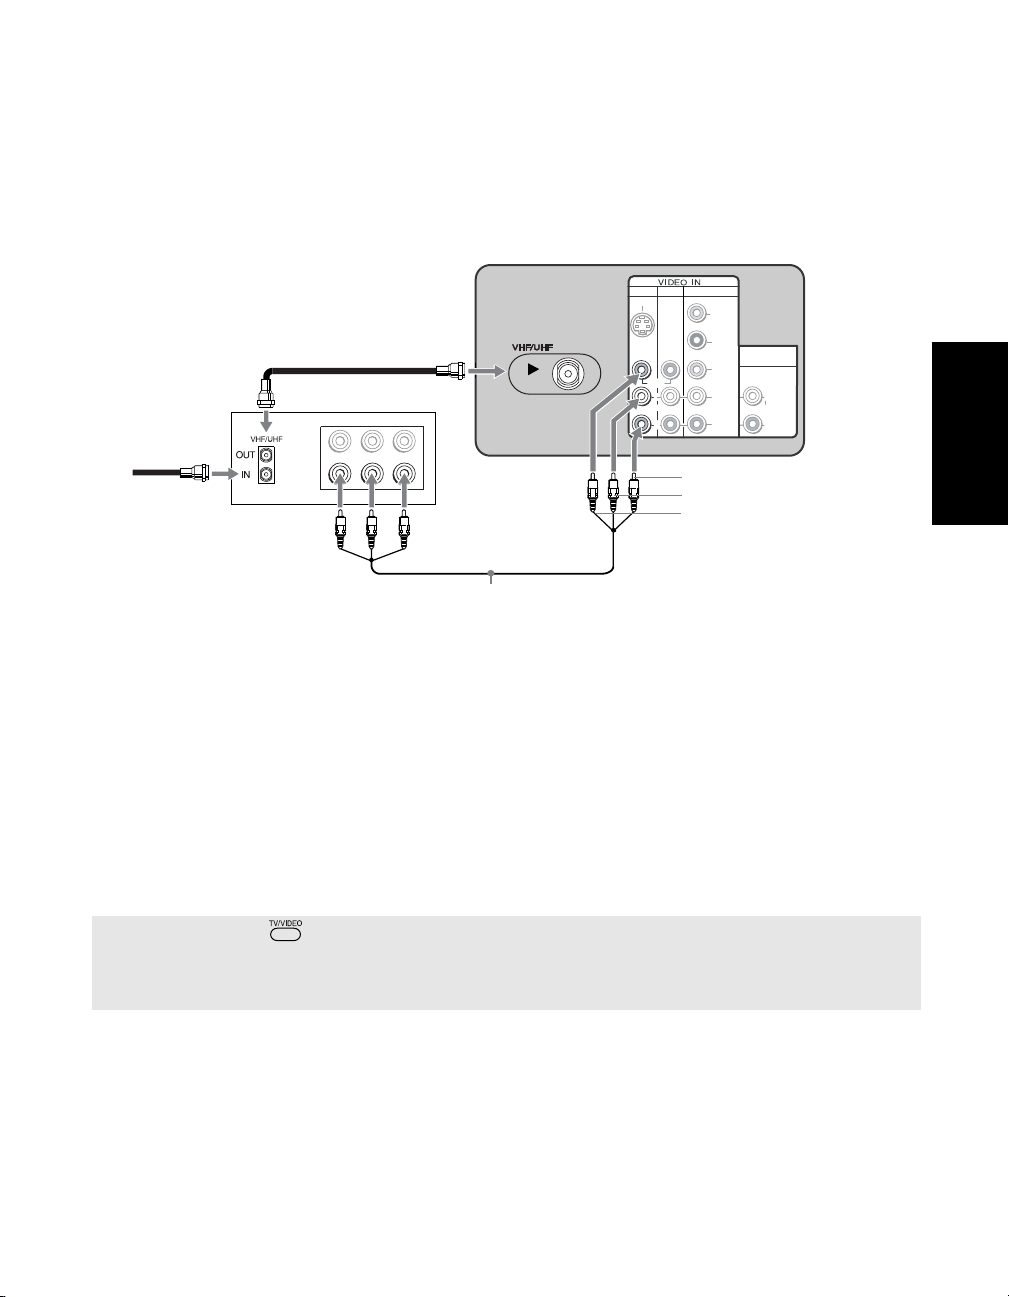
Connecting Additional Equipment
Connecting a TV and VCR
Rear of TV
3
1
VIDEO
L
(MONO)
R
Audio R (red)
Audio L (white)
Video (yellow)
4
Y
P
B
AUDIO OUT
(VAR/FIX)
P
R
L
L
(MONO)
R
R
S VIDEO
2
VCR
LINE
1
From
cable/antenna
IN
VIDEO
AUDIO L AUDIO R
LINE
OUT
Optional connection
1 Connect the coaxial cable from your TV antenna or cable service to the IN jack on your
VCR.
2 Connect a coaxial cable (not supplied) from the OUT jack on your VCR to the VHF/UHF
jack on the TV.
Connections
Optional connection
❏ If your VCR is equipped with video outputs, you can get better picture quality by
connecting audio/video cables (not supplied) from AUDIO/VIDEO OUT on your VCR to
AUDIO/VIDEO IN on your TV.
❏ For better picture quality, use S VIDEO (located on the rear panel), instead of the yellow
video cable. S VIDEO does not provide sound, so you still must connect the audio cables.
✍ You can use the button to switch between the VHF/UHF and VIDEO inputs.
✍ To watch video programs from your VCR, tune your TV to Channel 3 or 4 (as set on the rear of your
VCR).
7
Page 16
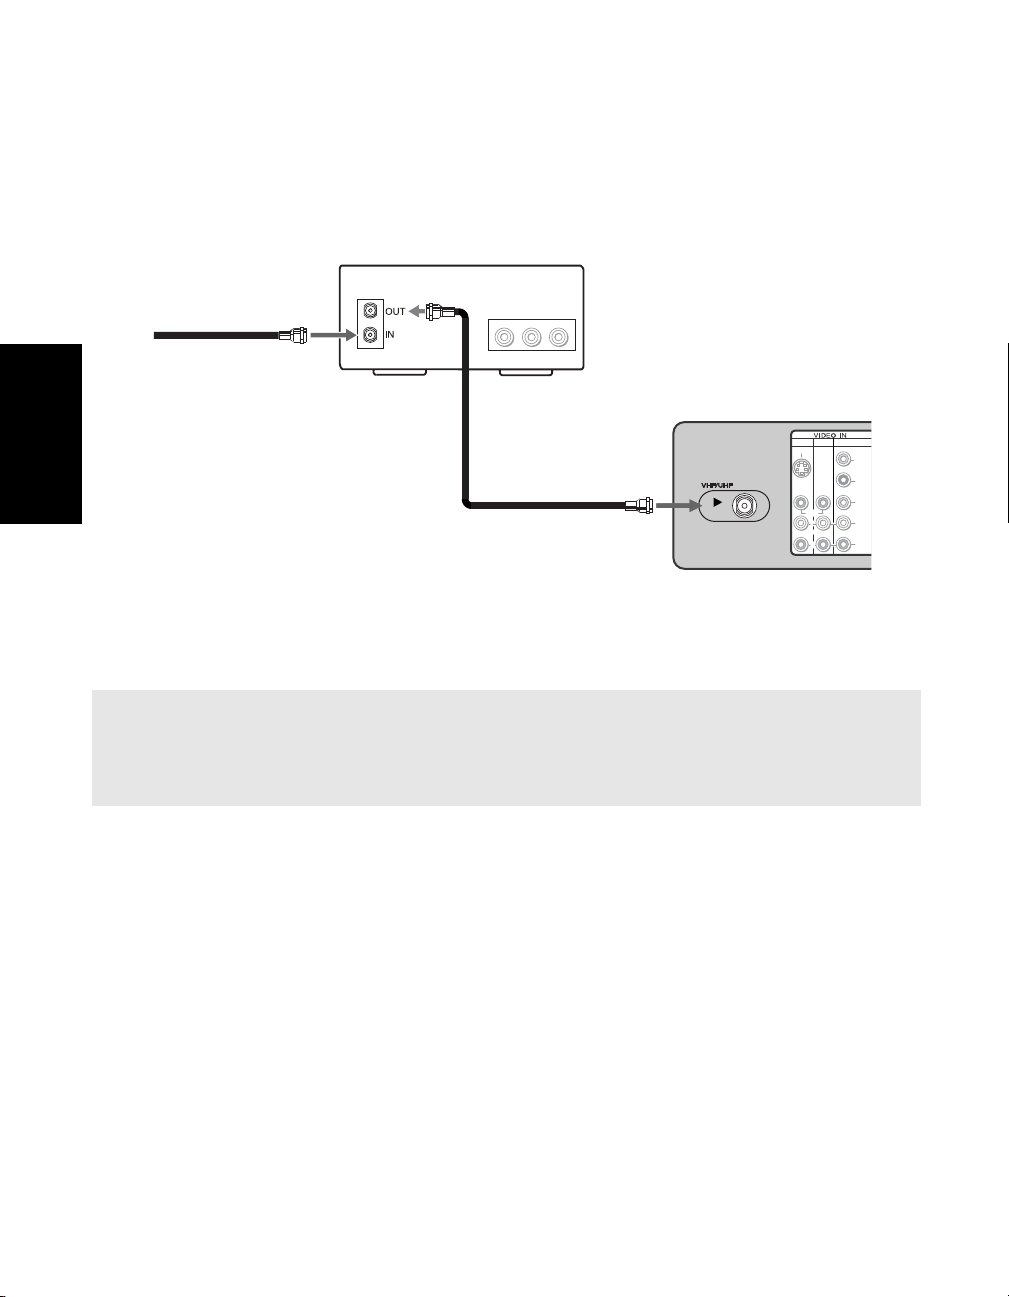
Connecting a TV and Cable Box
Some cable TV systems use scrambled or encoded signals that require a cable box to view all
channels. If you subscribe to such type of service, use this connection.
Cable box
1
VIDEO
AUDIO L AUDIO R
LINE
OUT
From cable/
antenna
Rear of TV
1
S VIDEO
2
Connections
1 Connect the coaxial cable from your cable service to the IN jack on your cable box.
2 Connect a coaxial cable (not supplied) from the OUT jack on your cable box to the
VHF/UHF jack on your TV.
✍ To view channels from your cable box, tune your TV to channel 3 or 4 (as set on the rear panel of your
cable box) and use the cable box's remote control to change channels.
✍ If you will be controlling all channel selection through your cable box, you should consider using the
Channel Fix feature by setting your TV to channel 3 or 4 (see page 25).
VIDEO
(MONO)
3
4
Y
P B
P R
L
L
R
R
8
Page 17
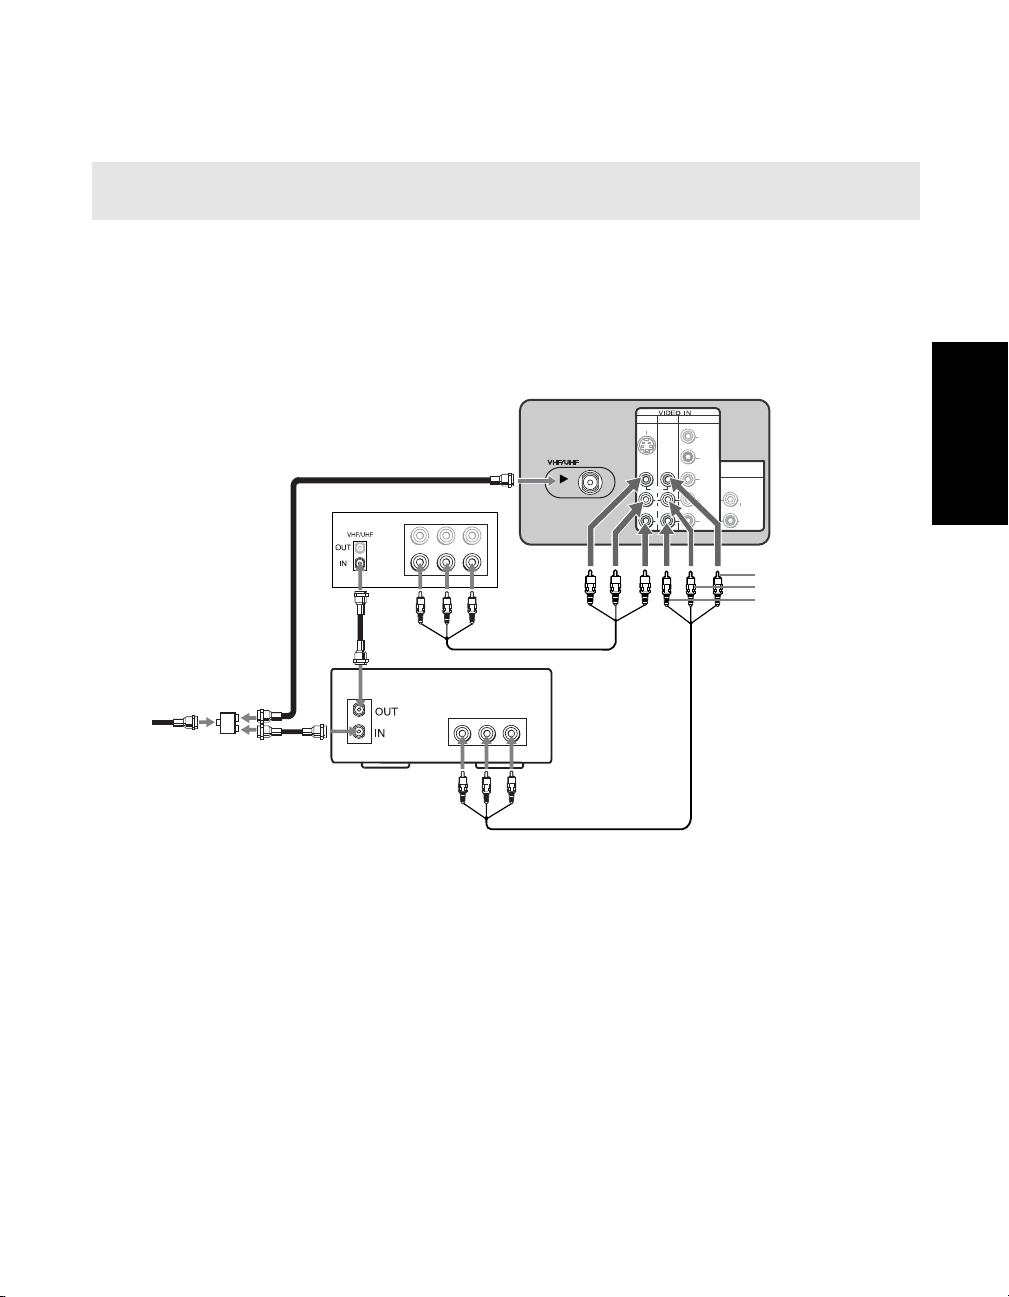
Connecting a TV, VCR, and Cable Box
✍ DIGITAL CABLE BOX USERS: If you are connecting a digital cable box, you will need a special bi-
directional splitter (5-900 Mhz mininum) that is designed to work with your digital cable box.
Use this connection if you subscribe to a cable system that scrambles some channels (pay
channels), but not all of them. This setup allows you to:
❏ change channels through your cable box or VCR when you are receiving a
scrambled signal
❏ change channels through your TV
Rear of TV
3
1
4
1
Cable
Splitter
2b
2a
VCR
LINE
IN
LINE
OUT
3
Cable box
VIDEO
AUDIO L AUDIO R
VIDEO
LINE
OUT
S VIDEO
4
AUDIO L AUDIO R
5
VIDEO
(MONO)
Y
P B
AUDIO OUT
(VAR/FIX)
P R
L
R
L
L
(MONO)
R
R
Video (yellow)
Audio L (white)
Audio R (red)
Connections
1 Connect the single input jack of the splitter (not supplied) to your incoming cable
connection.
2 Using coaxial cables (not supplied), connect the two output jacks of the splitter
(not supplied) to:
a) the IN jack on your cable box
b) the VHF/UHF jack on the TV
3 Using a coaxial cable (not supplied), connect the OUT jack on your cable box to the IN jack
on your VCR.
4 Using audio/video cables (not supplied), connect AUDIO/VIDEO OUT on your VCR to
AUDIO/VIDEO IN on your TV.
5 Using audio/video cables (not supplied), connect AUDIO/VIDEO OUT on your cable
box to AUDIO/VIDEO IN on your TV.
9
Page 18

Optional connection
❏ For better picture quality, use S VIDEO (located on the rear panel), instead of the yellow
video cable. S VIDEO does not provide sound, so you still must connect the audio cables.
✍ To view channels from your cable box, tune your TV to channel 3 or 4 (as set on the rear panel of your
cable box) and use the cable box's remote control to change channels.
✍ If you will be controlling all channel selection through your cable box, you should consider using the
Channel Fix feature by setting your TV to channel 3 or 4 (see page 25).
Connections
10
Page 19
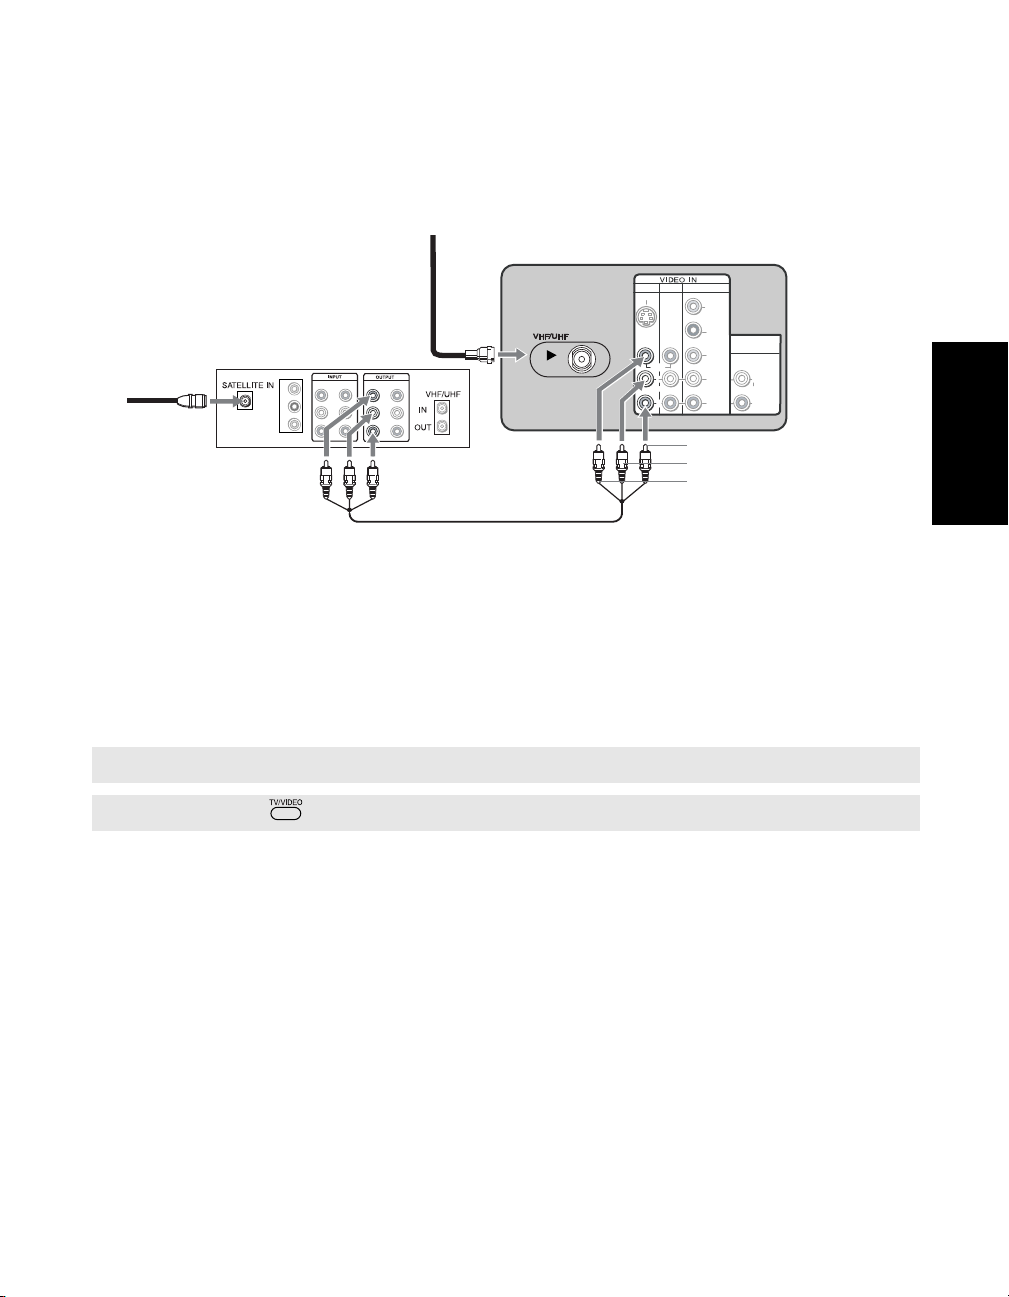
Connecting a TV and Satellite Receiver
From
cable/
antenna
Rear of TV
1
Satellite
antenna
cable
Satellite receiver
VIDEO 1
VIDEO 2
Y
P
B
R
P
VIDEO 1
L
L
R
R
3
2
VIDEO 2
S VIDEO
3
1
VIDEO
L
(MONO)
R
4
Y
P B
AUDIO OUT
(VAR/FIX)
P R
L
L
(MONO)
R
R
Audio R (red)
Audio L (white)
Video (yellow)
1 Connect the cable from your satellite antenna to SATELLITE IN on your satellite receiver.
2 Connect the coaxial cable from your cable service or antenna to the VHF/UHF jack on
your TV.
3 Using audio/video cables (not supplied), connect AUDIO/VIDEO OUT on your satellite
receiver to AUDIO/VIDEO IN on your TV.
Connections
✍ To watch video programs from your Satellite receiver, tune your TV to channel 3 or 4.
✍ You can use the button to switch between the VHF/UHF and VIDEO inputs.
11
Page 20
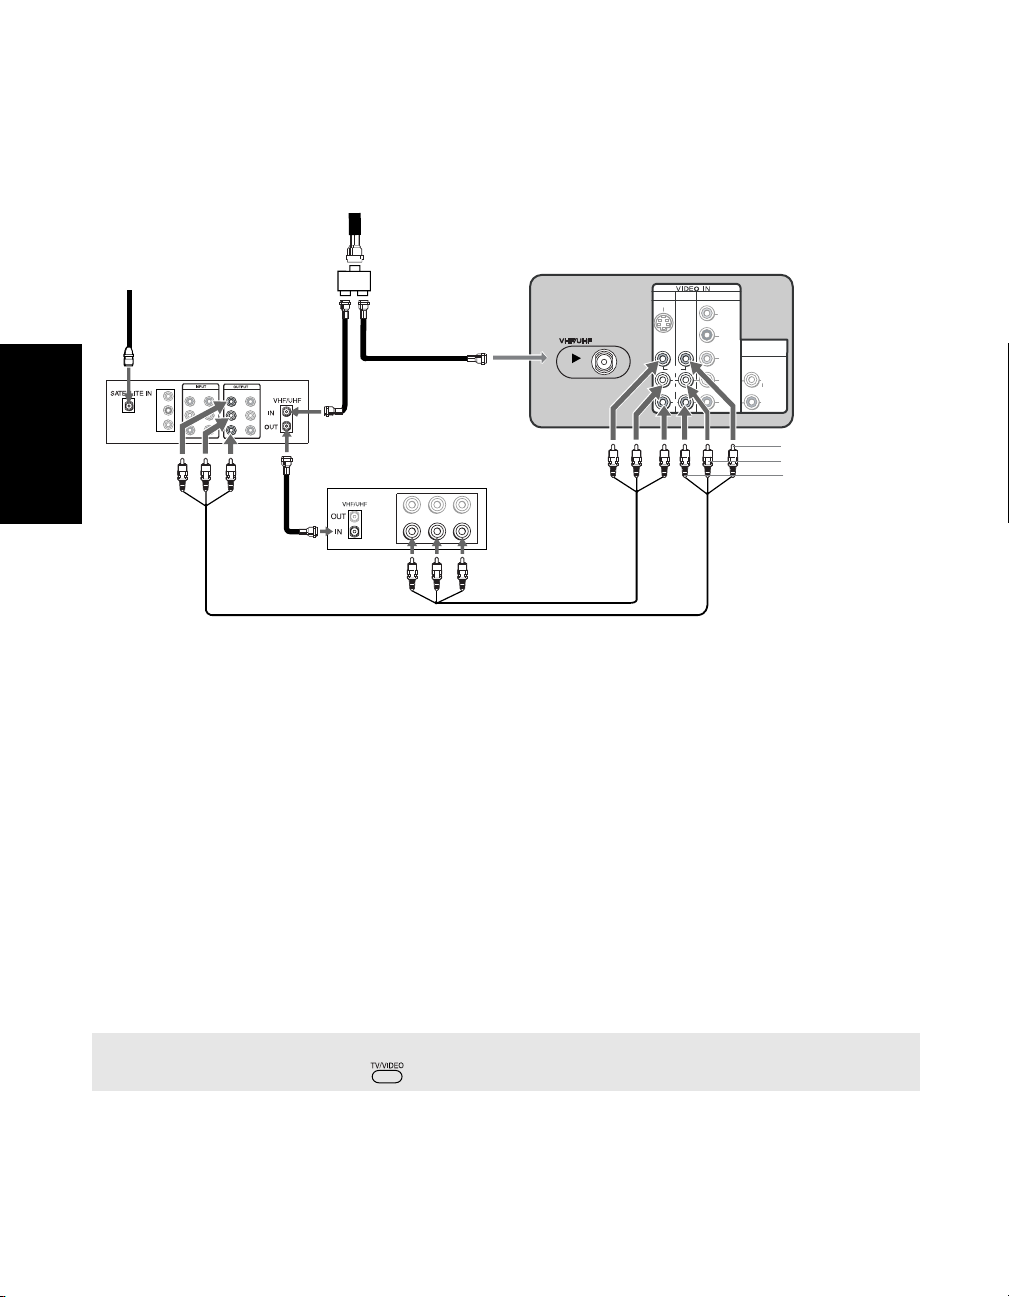
Connecting a TV, VCR, Cable/Antenna, and Satellite Receiver
using Composite Video (VIDEO/AUDIO L(MONO), R)
Satellite antenna
cable
1
Satellite receiver
VIDEO 1
VIDEO 2
VIDEO 2
Y
P
B
R
P
VIDEO 1
L
L
R
R
From
cable or
antenna
3a
2
Optional
Splitter
For Viewing
3b
Rear of TV
3
1
S VIDEO
VIDEO
L
(MONO)
R
4
Y
P B
AUDIO OUT
(VAR/FIX)
P R
L
L
(MONO)
R
R
Video (yellow)
Audio L (white)
Audio R (red)
Connections
For Viewing
6
4
For Recording
LINE
IN
VIDEO
AUDIO L AUDIO R
LINE
OUT
VCR
For Playback
5
1 Connect the cable from your satellite antenna to SATELLITE IN on your satellite receiver.
2
Connect the single input jack of the splitter (not supplied) to your incoming cable/antenna
(optional connection to view local channels or broadcast).
3 Using coaxial cables (not supplied), connect the two output jacks of the splitter
(not supplied) to:
a) the IN jack on your satellite receiver
b) the VHF/UHF jack on the TV
4 Using a coaxial cable (not supplied), connect the OUT jack on your satellite receiver to the
VHF/UHF IN on your VCR.
5 Using audio/video cables (not supplied), connect AUDIO/VIDEO OUT on your VCR to
AUDIO/VIDEO IN on your TV.
6 Using audio/video cables (not supplied), connect AUDIO/VIDEO OUT on your satellite
receiver to AUDIO/VIDEO IN on your TV.
✍ To view from the satellite receiver or VCR, select the video input to which your satellite receiver or
VCR is connected by pressing on the remote control.
12
Page 21
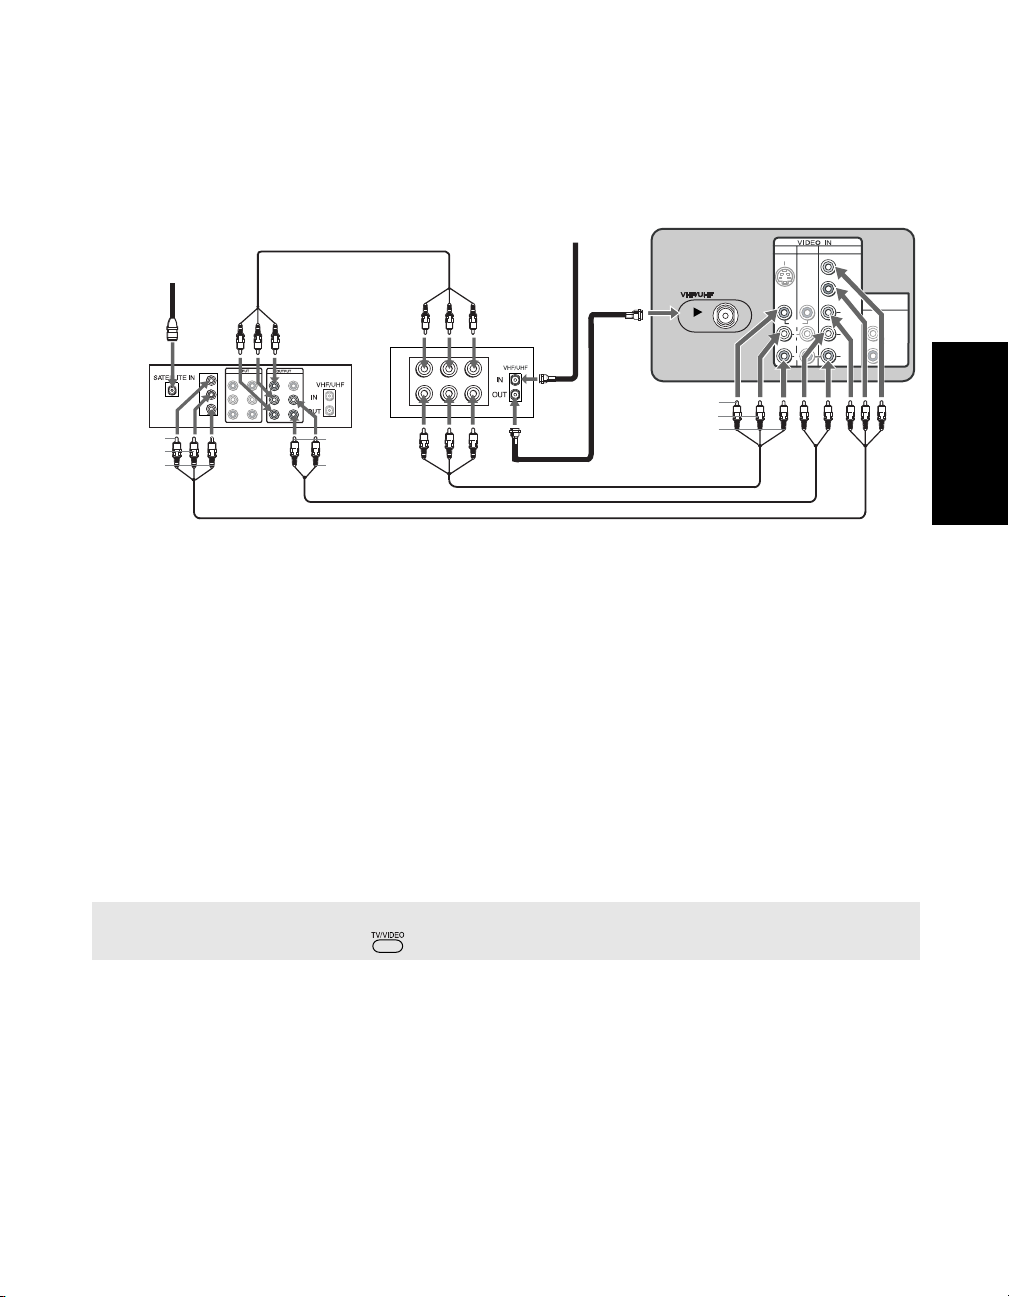
Connecting a TV, VCR, and Satellite Receiver using Component Video (YPBPR)
Rear of TV
Y (green)
PB (blue)
R (red)
P
4
1
Satellite
receiver
LINE
Y
P
B
R
P
VIDEO 1
L
L
R
R
Audio R
(red)
Audio L
(white)
6
7
IN
VIDEO
LINE
OUT
VCR
AUDIO L AUDIO R
5
2
From
cable/
antenna
3
Video (yellow)
Audio L (white)
Audio R (red)
S VIDEO
3
1
4
Y
P B
AUDIO OUT
(VAR/FIX)
P R
VIDEO
(MONO)
L
R
L
L
(MONO)
R
R
1 Connect the coaxial cable from your satellite antenna to SATELLITE IN on the satellite
receiver.
2 Connect the coaxial cable from your cable service or antenna to the IN jack on your VCR.
3 Using a coaxial cables (not supplied), connect the OUT jack on your VCR to the
VHF/UHF jack on your TV.
4 Using audio/video cables (not supplied), connect AUDIO/VIDEO OUT on your satellite
receiver to AUDIO/VIDEO IN on your VCR.
Connections
5 Using audio/video cables (not supplied), connect AUDIO/VIDEO OUT on your VCR to
AUDIO/VIDEO IN on your TV.
6 Using component video cables (not supplied), connect YPBPR OUT on your satellite
receiver to YP
BPR IN on your TV.
7 Connect AUDIO OUT on your satellite receiver to AUDIO IN on your TV.
✍ To view from the satellite receiver or VCR, select the video input to which your satellite receiver or
VCR is connected by pressing on the remote control.
13
Page 22
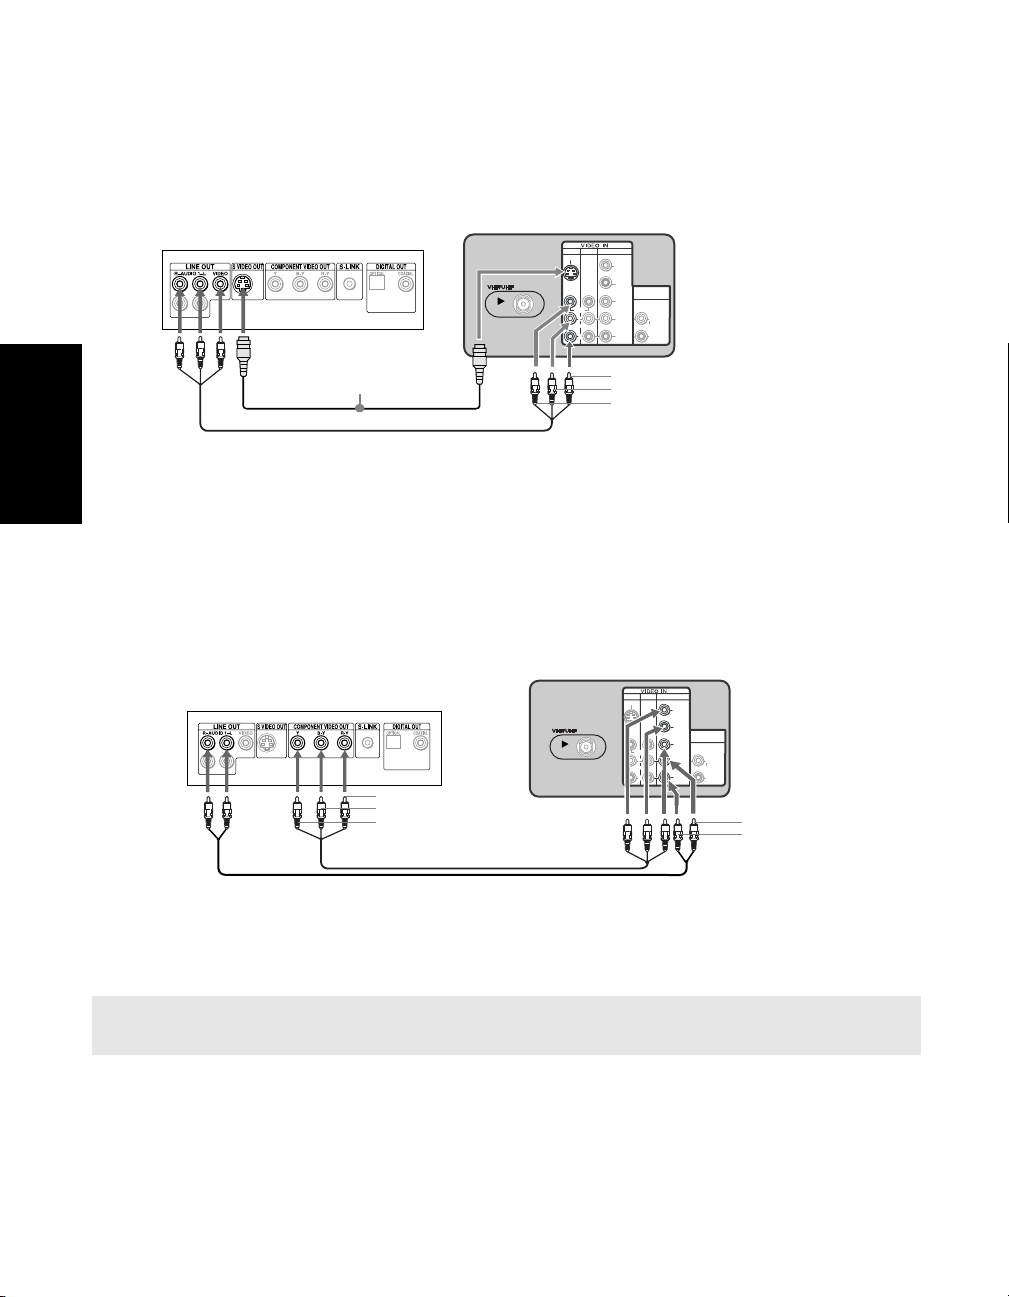
Connecting a DVD Player using Composite Video (VIDEO/AUDIO L(MONO),R)
Using audio/video cables (not supplied), connect AUDIO/VIDEO OUT on your DVD player
to AUDIO/VIDEO IN on your TV.
Rear of DVD Player
Rear of TV
3
1
4
S VIDEO
VIDEO
L
(MONO)
R
Y
PB
AUDIO OUT
(VAR/FIX)
PR
L
L
(MONO)
R
R
Optional connection
Video (yellow)
Audio L (white)
Audio R (red)
Optional connection
Connections
❏ For better picture quality, use S VIDEO instead of the yellow video cable. S VIDEO does
not provide sound, so you still must connect the audio cables.
Connecting a DVD Player using Component Video (YPBPR/R, L)
If your DVD player is equipped with component video outputs (YPBPR), you can improve the
picture quality by using component video cables (480i only).
Rear of TV
3
1
Rear of DVD Player
2
1
P
R (red)
B (blue)
P
Y (green)
4
S VIDEO
Y
PB
AUDIO OUT
(VAR/FIX)
PR
VIDEO
L
(MONO)
R
L
L
(MONO)
R
R
Audio L (white)
Audio R (red)
1 Make sure your DVD player is set up (see page 35). Using component video cables
(not supplied), connect YP
BPR OUT on your DVD player to YPBPR IN on your TV.
2 Connect AUDIO OUT on your DVD player to AUDIO IN on your TV.
✍ The YPBPR outputs on your DVD player are sometimes labeled Y, CB, and CR or Y, B-Y, and R-Y. If so,
connect the cables to like colors.
14
Page 23
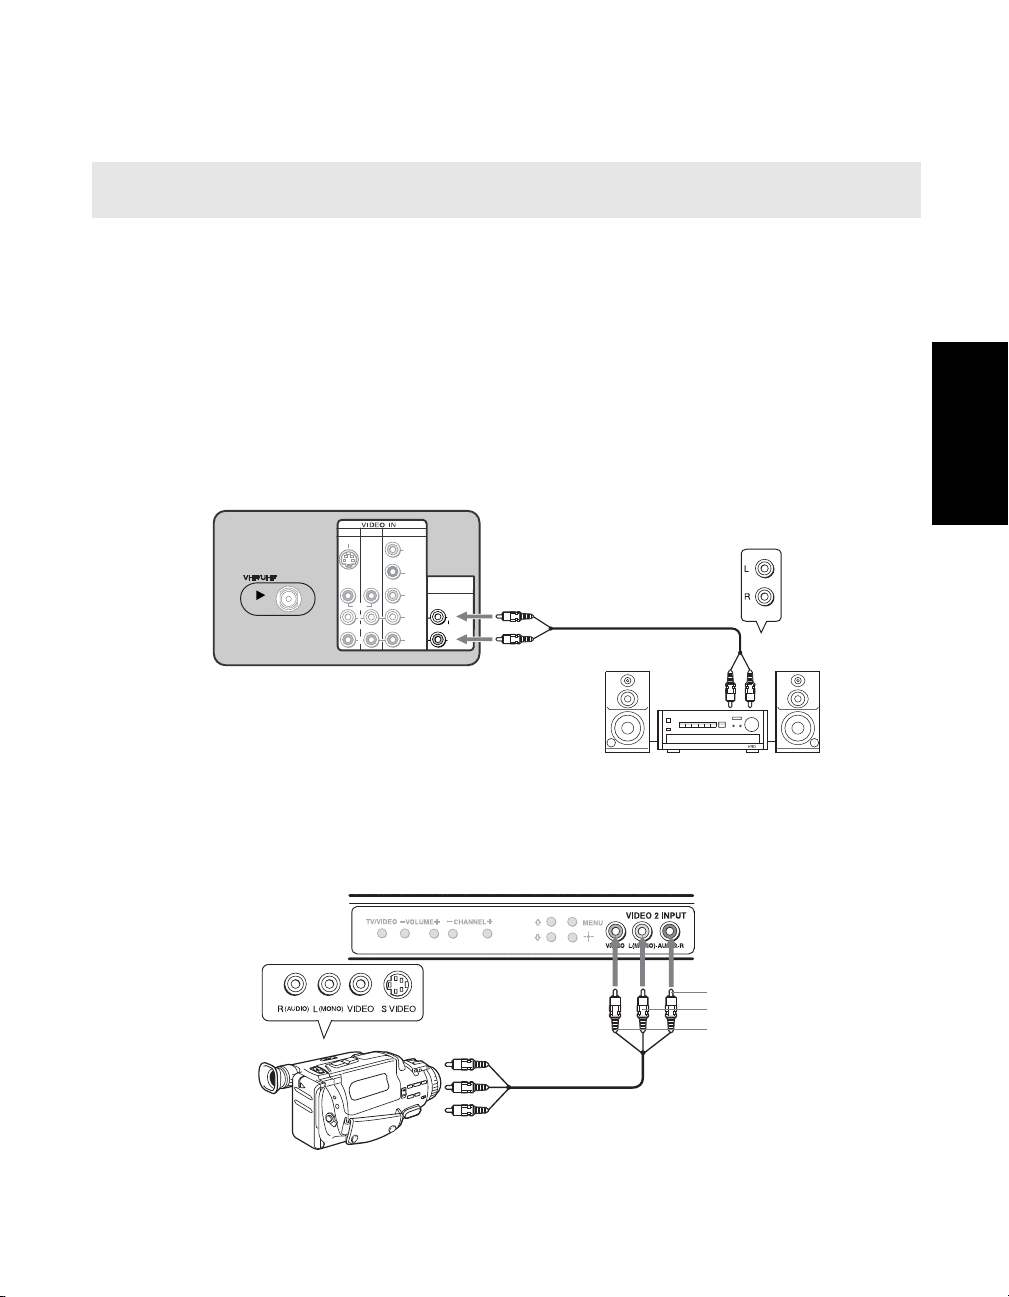
Connecting an Audio System
✍ If you are connecting a Home Theater, please refer to your Home Theater manual for additional
connections.
1 Using audio/video cables (not supplied), connect AUDIO OUT on your TV to one of the
unused line inputs (e.g. TV, AUX, TAPE2) on your stereo.
2 Set the Speaker option to Off. For more instructions, see “Using the Audio Menu” on
page 23.
3 After you connect the audio system, you can control the volume level from your TV or
audio system.
❏ To control the volume from the TV, use the front panel controls or the VOL +/–
buttons on the remote.
❏ To control the volume through the connected audio system, open the Audio Out
option on the Audio Menu and select Fixed. For more instructions, see “Using the
Audio Menu” on page 23.
Rear of TV
3
1
4
S VIDEO
VIDEO
(MONO)
Y
P B
AUDIO OUT
(VAR/FIX)
P R
L
L
R
R
AUDIO-L (white)
L
(MONO)
R
AUDIO-R (red)
Line
input
Connections
Connecting a Camcorder (for playback)
To connect your camcorder, you can use the Audio/Video inputs on either the front or rear
panel of the TV. Using the audio/video cables (not supplied), connect AUDIO/VIDEO OUT
on your camcorder to AUDIO/VIDEO IN on your TV.
Front Panel
Audio R (red)
Audio L (white)
A/V output
❏ For better picture quality, use S VIDEO (located on the rear panel), instead of the yellow
video cable. S VIDEO does not provide sound, so you still must connect the audio cables.
Video (yellow)
15
Page 24
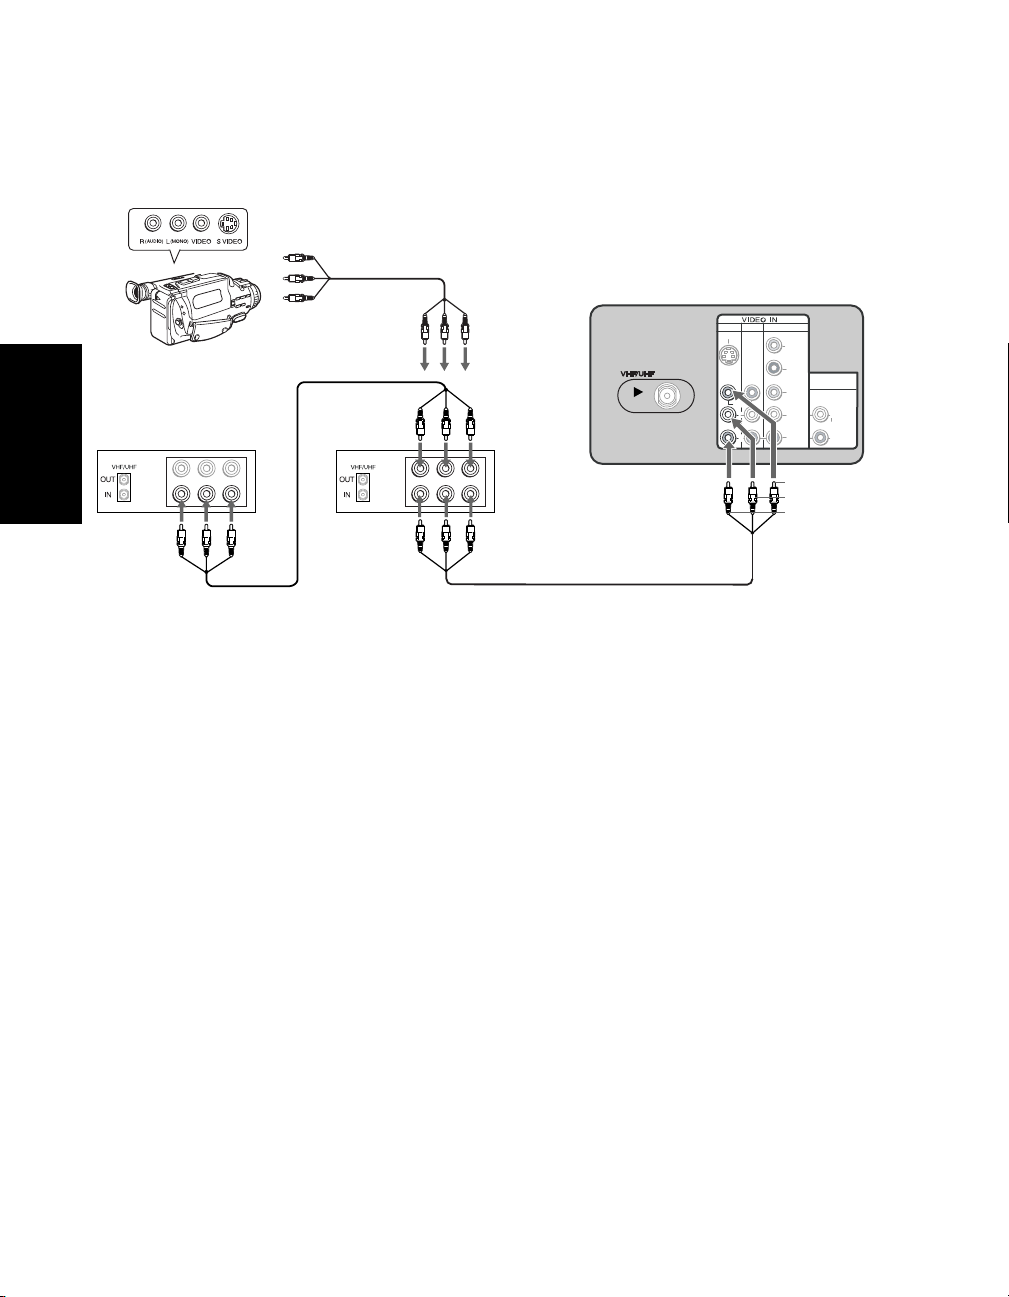
Connecting for Video Tape Editing (VCR and Camcorder)
Camcorder
(for playback)
1b
or
A/V output
VCR (for playback)
LINE
IN
LINE
Connections
OUT
AUDIO L AUDIO R
1a
LINE
IN
VIDEO
AUDIO L AUDIO RVIDEO
LINE
OUT
VCR (for recording)
2
1 For video tape editing, connect the VCR to the following sources:
a) If you are connecting a VCR, use audio/video cables (not supplied) to connect
AUDIO/VIDEO OUT on your first VCR to AUDIO/VIDEO IN on your second VCR.
b) If you are connecting a camcorder, use audio/video cables (not supplied) to connect
AUDIO/VIDEO OUT on your camcorder to AUDIO/VIDEO IN on your VCR.
Rear of TV
3
1
4
S VIDEO
VIDEO
(MONO)
L
R
Y
P B
P R
L
R
Audio R (red)
Audio L (white)
Video (yellow)
AUDIO OUT
(VAR/FIX)
L
(MONO)
R
2 Using audio/video cables (not supplied), connect AUDIO/VIDEO OUT on the second
VCR to AUDIO/VIDEO IN on your TV.
16
Page 25
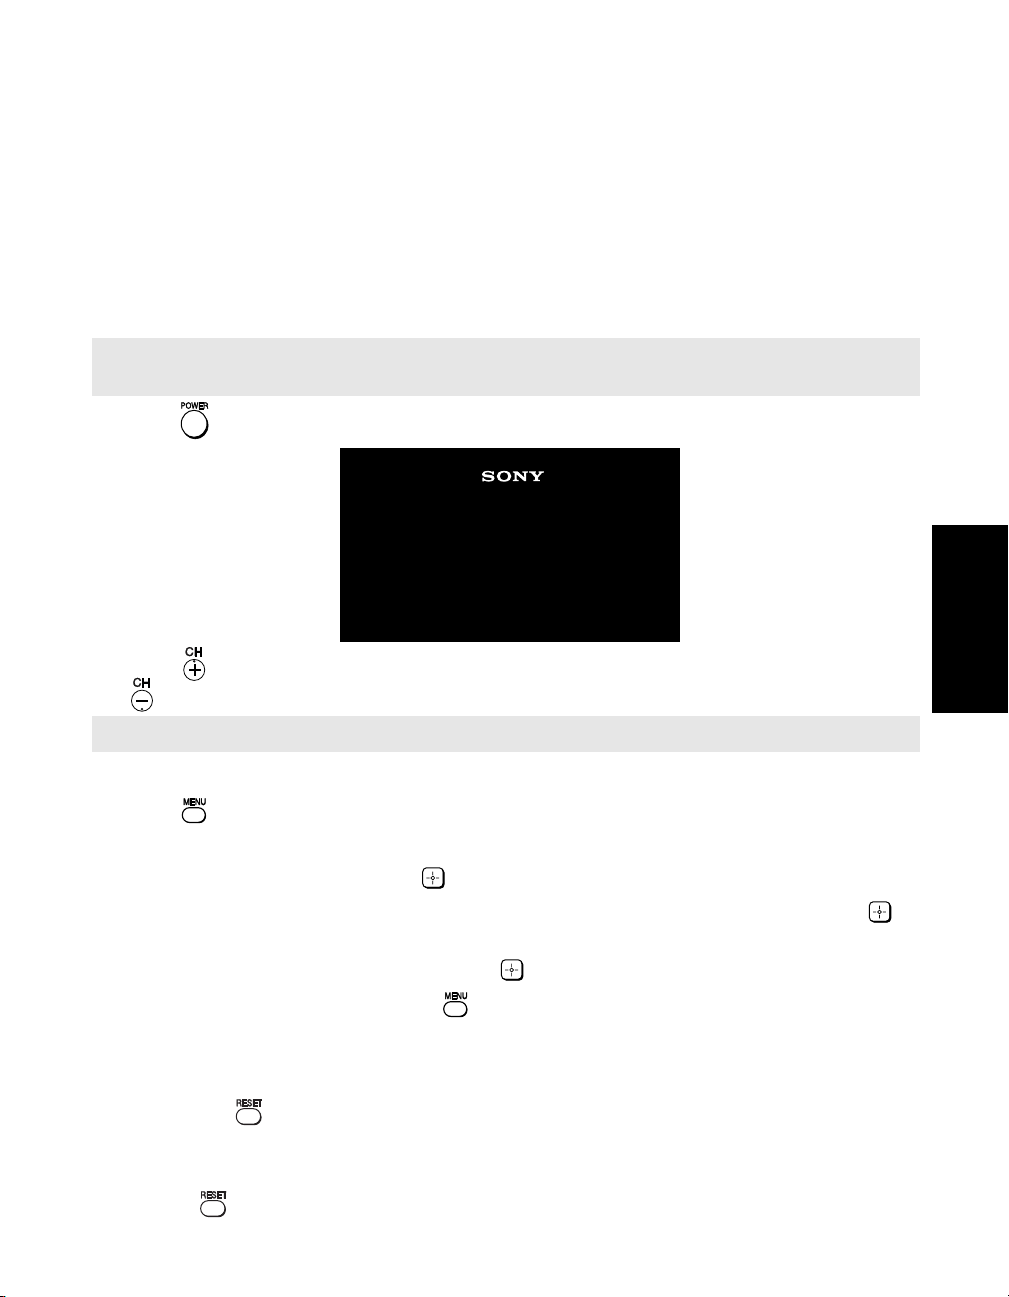
Using Basic Functions
Setting Up the TV
After you have finished connecting your TV, you can use Auto Program to set up your
channels. During Auto Program, the TV will automatically search for available channels and
program receivable channels.
✍ When you start Auto Program wait until it is finished; otherwise it will skip over channels that are
available. Perform Auto Program again to program receivable channels.
1 Press to turn on the TV. The Initial Setup screen appears.
Initial Setup
First please connect
cable/antenna
Basic Functions
Auto Program
Exit
[CH+]
[CH–]
2 Press on the remote control or on the TV front panel to start Auto Program, or press
to exit.
✍ The Initial Setup screen appears each time you turn on the TV until you perform Auto Program.
To perform Auto Program again
1 Press .
2 Press b to highlight Channel Menu.
3 Press v to highlight Cable. Press to select.
4 Press V or v to highlight On or Off according to how you connected your TV. Press to
select.
5 Press v to highlight Auto Program. Press to search for channels.
6 After Auto Program finishes, press to exit.
To reset the TV to factory settings
1 Turn the TV o n.
2 Hold down on the remote control.
3 Press and release the POWER button on the TV front panel. The TV will turn itself off,
then back on.
4 Release .
17
Page 26
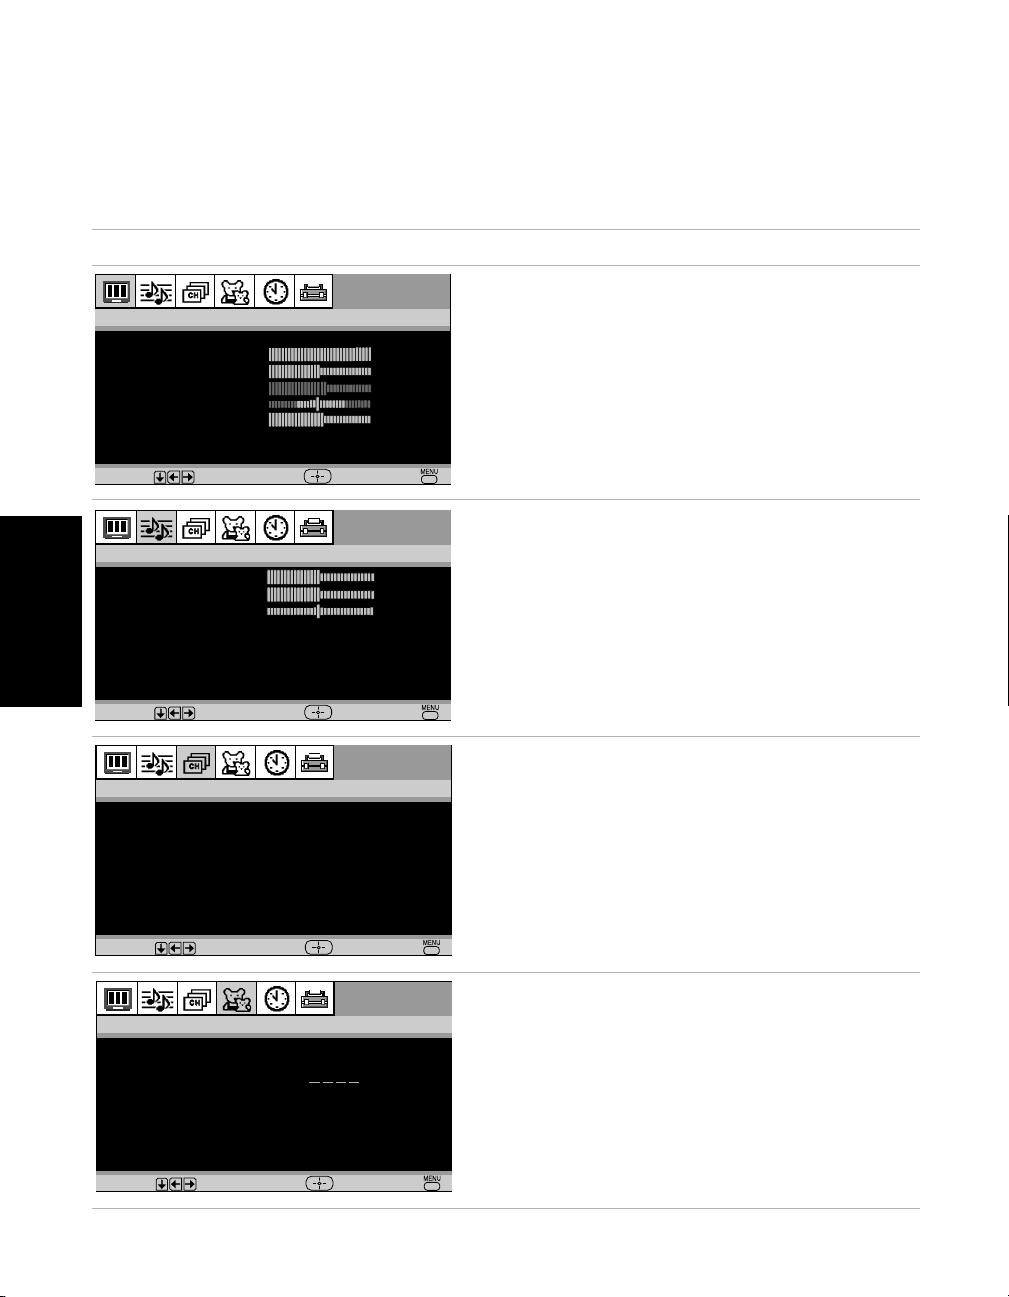
Quick Start to the Menus
The following settings are available in your on-screen menus. For more details on how to use
the menus, see “Using the Menus” on page 21.
Menu Allows you to
Video
Mode:Vivid
Picture
Brightness
Color
Hue
Sharpness
C
olor Temp:Cool
ClearEdge VM:High
Move Select End
Audio
Treble
Bass
Balance
Steady Sound:Off
Effect:Off
MTS:Stereo
Speaker:On
Audio Out:Fixed
Basic Functions
Move Select End
Adjust your picture settings.
Change your audio settings.
Channel Setup
Favorite Channels
Cable:On
Channel Fix:Off
Auto Program
Channel Skip/Add
Channel Label
Move Select End
Parental Control
Password:
Move Select End
18
Customize your channel settings.
Set rating limits on your TV based on
program rating or content.
Page 27
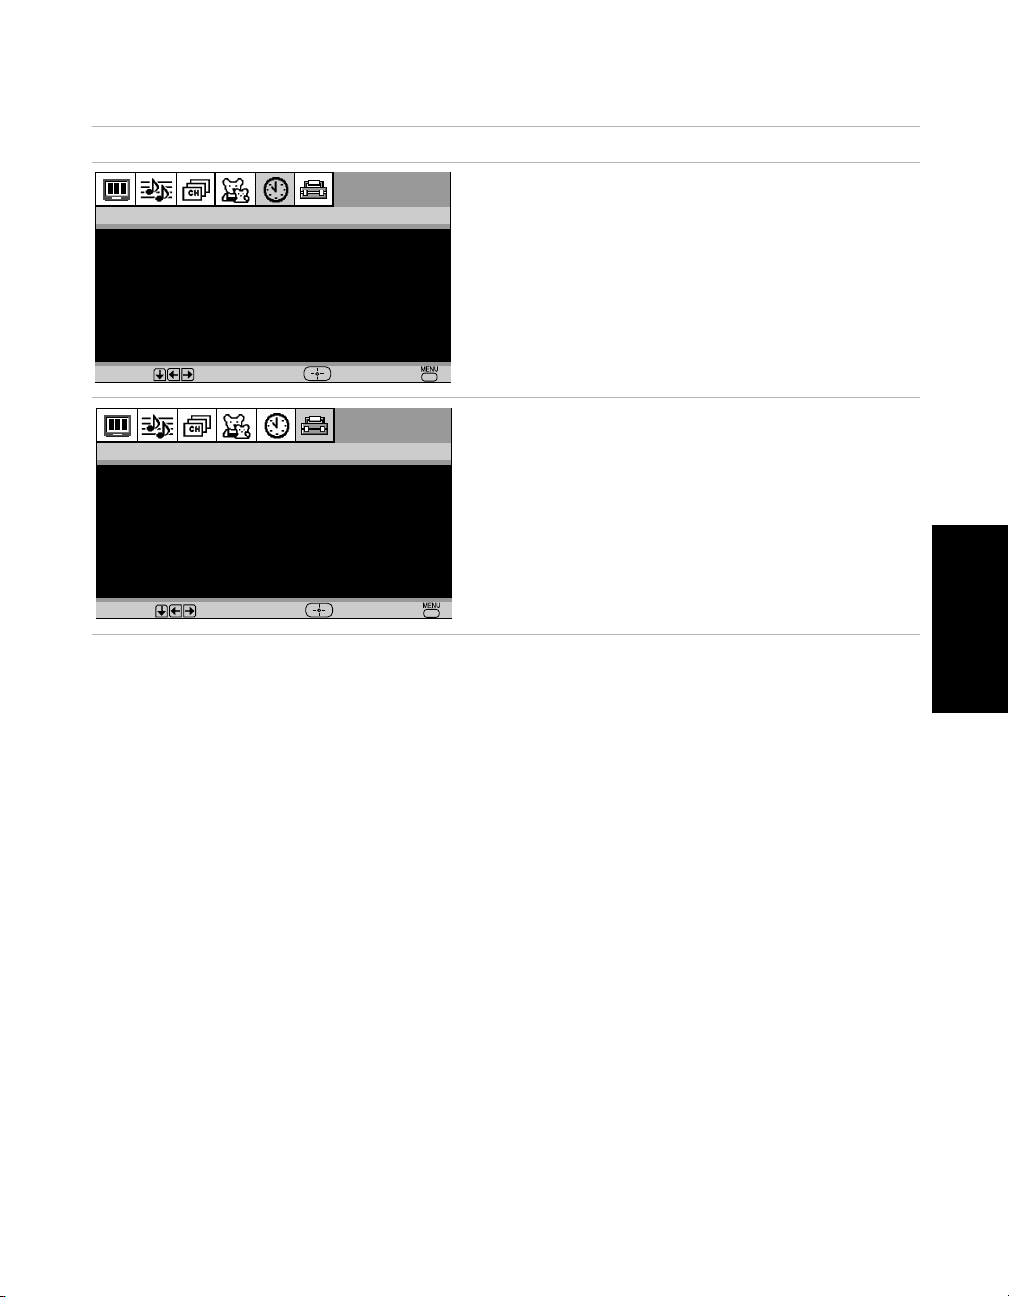
Menu Allows you to
Timer
Timer 1:Set
Timer 2:Set
Current Time
Set the clock on your TV and program
Move Select End
Setup
Caption Vision:Off
Info Banner:Off
Video Label
Tilt Correction
Language:English
16:9 Enhanced:Off
scheduled viewing using Timer 1 and Timer 2.
Select closed captioning options (Caption
Vision), display the name of the current
program and its remaining time (Info Banner),
label video inputs, adjust tilt correction, select
menu language, enhance DVD picture
Move Select End
resolution (16:9 Enhanced).
Basic Functions
19
Page 28

Page 29
Using the Menus
This section shows the options available for setting up and adjusting the TV.
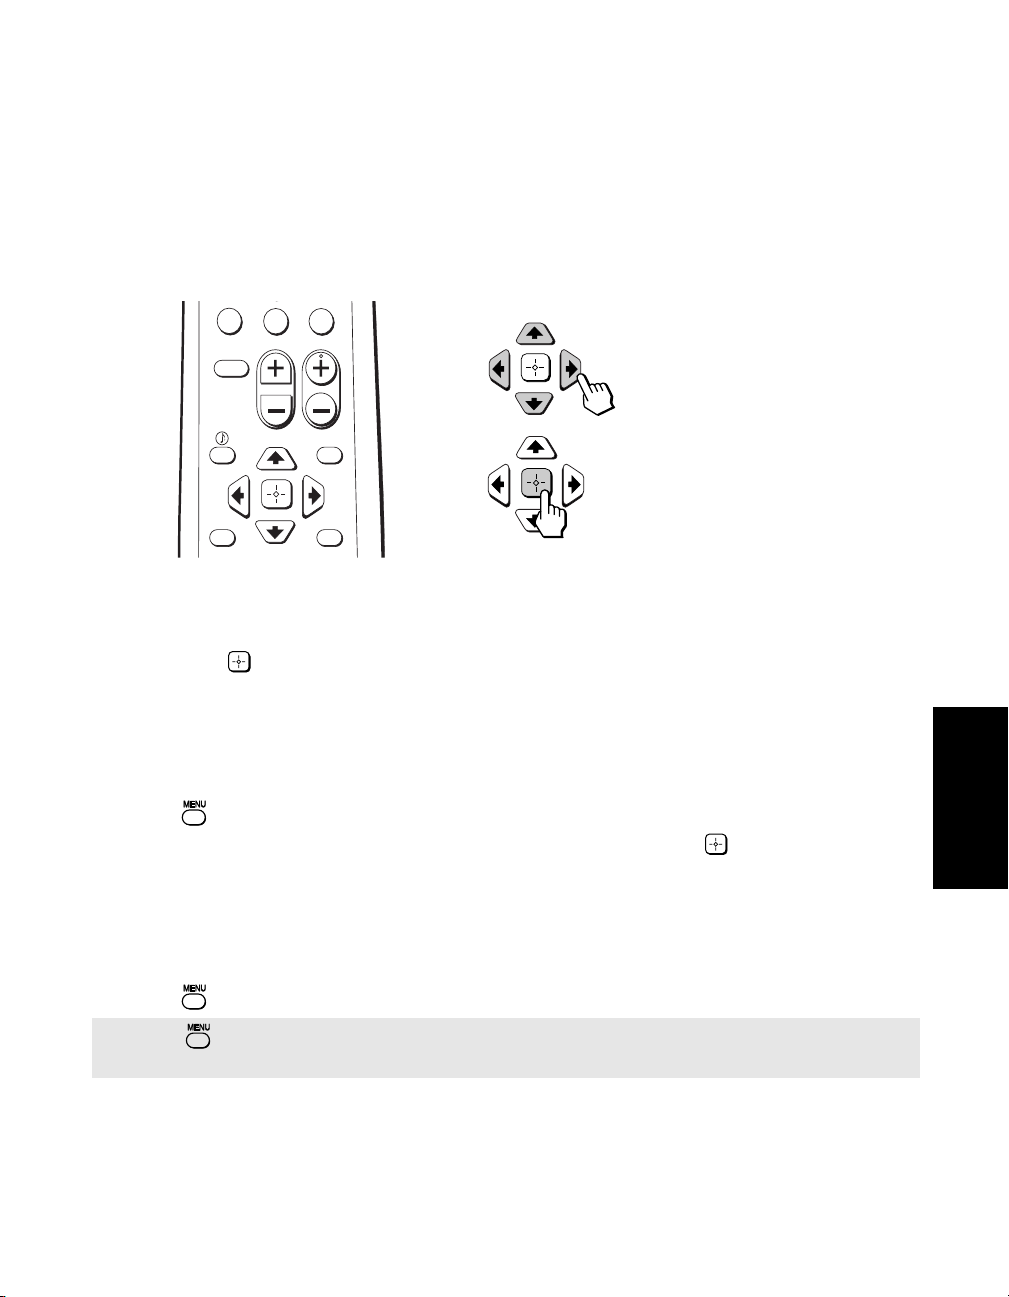
Using the Remote Control to Navigate the On-Screen Menus
ENTJUMP
0
PICTURE
MODE
RESET SLEEP
CHVOL
Move
MENU
Select
RM-Y194
To navigate on the on-screen menus, use the arrow buttons (
Pressing these arrows will cause the cursor to move in the corresponding direction. Press the
center button ( ) to select an option.
V , v , B, b) to move the cursor.
How to Access Menus
To Access Menus
1 Press to display the on-screen menu.
2 Use the B or b buttons to highlight the desired menu icon. Press to select it.
3 Use the V or v buttons to scroll up and down through the features.
4 Follow the instructions on the screen.
5 For instructions on using a specific menu, see the page in this section that talks about that
menu.
6 Press to exit the menu.
✍ Press once to display the on-screen menu, and press again to return to normal viewing. If no
buttons are pressed, the menu closes automatically after about 90 seconds.
Menus
21
Page 30
Using the Video Menu
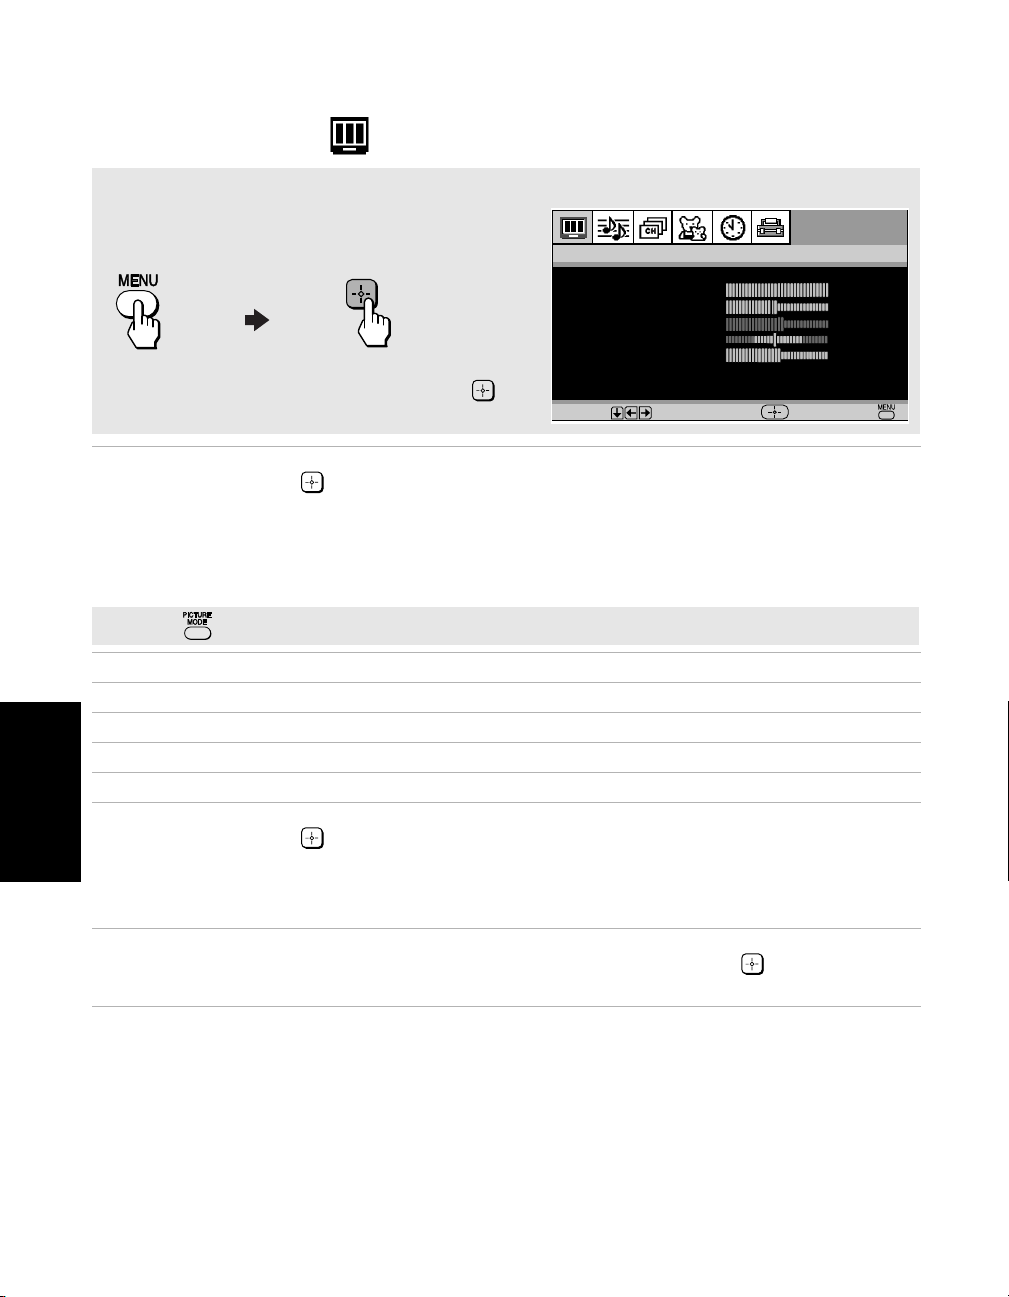
To access the Video menu, use the following steps:
To Display To Select
v to highlight an option, then press .
Press
Mode
Customized
picture viewing
Use the
press to select it.
Vivid: Select for enhanced picture contrast and sharpness.
Standard:
Movie:
Pro:
V or v buttons to highlight one of the following options, then
Select for a standard picture.
Select for a finely detailed picture.
Select for natural picture and sharpness.
Video
Mode:Vivid
Picture
Brightness
Color
Hue
Sharpness
C
olor Temp:Cool
ClearEdge VM:High
Move Select End
✍ Press on the remote control for direct access to the picture modes (Vivid, Standard, Movie, Pro).
Picture
Brightness
Color
Hue
Sharpness
Color Temp.
Menus
White tint
adjustment
ClearEdge
VM
Press B to decrease the contrast. Press b to increase the contrast.
Press B to darken the picture. Press b to brighten the picture.
Press B to decrease color saturation. Press b to increase color saturation.
Press B to increase the red tones. Press b to increase the green tones.
Press B to soften the picture. Press b to sharpen the picture.
Use the
press to select it.
Cool: Gives white colors a blue tint.
Neutral: Gives white colors a neutral tint.
Warm: Gives white colors a red tint.
Sharpens picture definition to give objects a crisp, clean edge. Use the
or
V or v buttons to highlight one of the following options, then
v buttons to highlight: High, Low, or Off, then press to select it.
V
22
Page 31
Using the Audio Menu
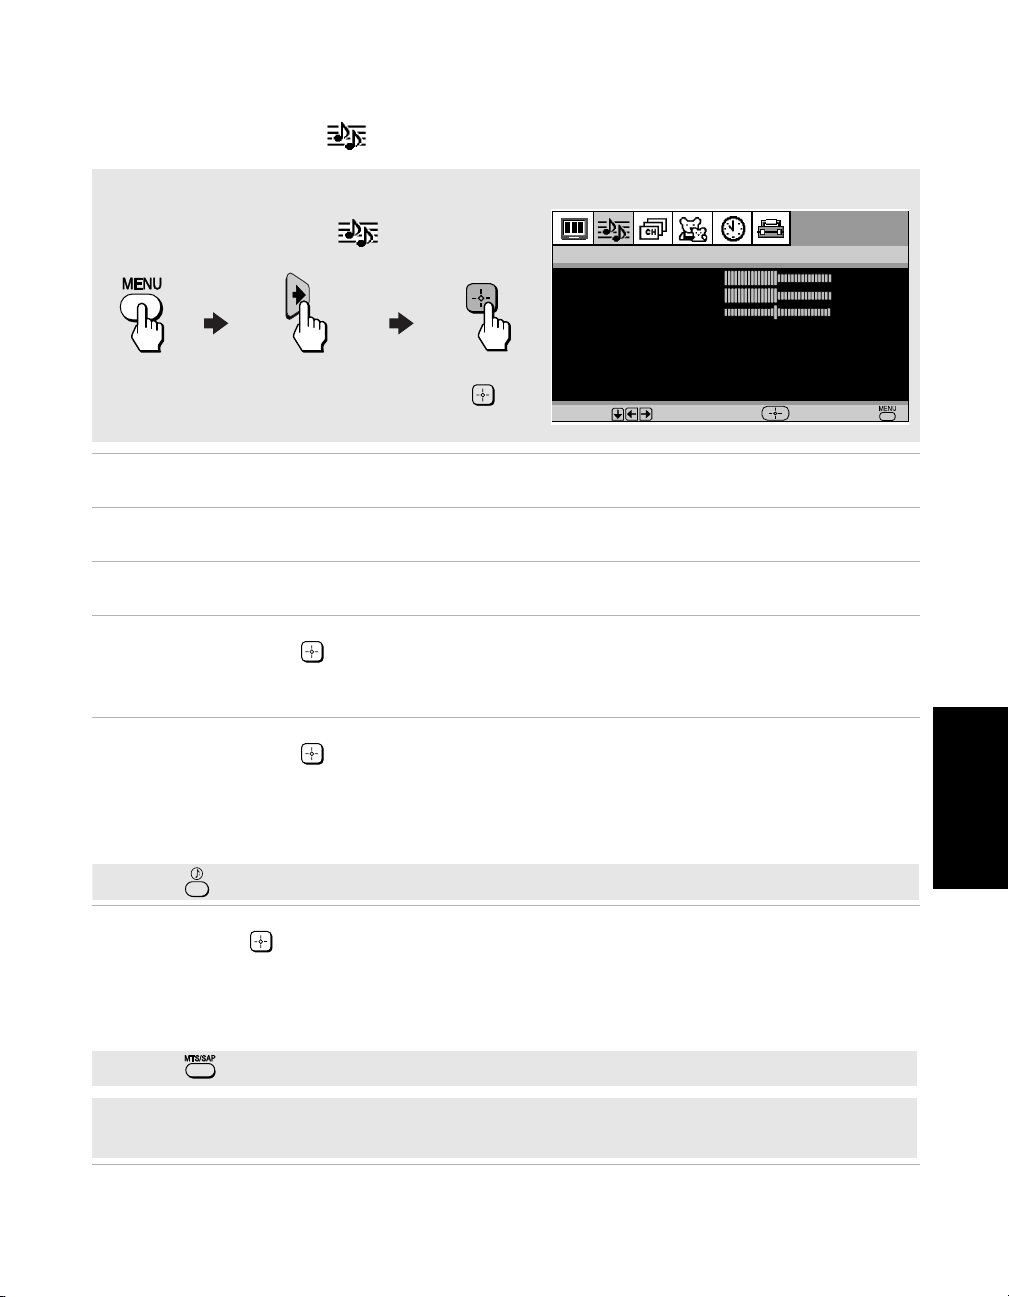
To access the Audio menu, use the following steps:
To Display To Highlight To Select
Press v to highlight an option, then press .
Audio
Treble
Bass
Balance
Steady Sound:Off
Effect:Off
MTS:Stereo
Speaker:On
Audio Out:Fixed
Move Select End
Treble Press B to
pitched sounds.
Bass Press
pitched sounds.
Balance Press
speaker.
Steady Sound
Stabilizes volume
Effect Use the V or v buttons to highlight one of the following options, then
Use the
press
On: Select to stabilize the volume when changing channels.
Off: Select to turn Steady Sound off.
press
Simulated: Simulates theater-quality sound for mono programs.
SRS: Produces a dynamic three-dimensional sound for stereo
Off: Normal stereo or mono reception.
decrease the higher pitched sounds. Press
b to increase the higher
B to decrease the lower pitched sounds. Press b to increase the lower
B to
emphasize the left speaker. Press
b to emphasize the right
V or v buttons to highlight one of the following options, then
to select it.
to select it.
programs.
✍ Press to directly select Effect settings (Simulated, SRS, Off).
MTS
Multi-Channel
TV Sound
Use the
Stereo: Select when viewing a broadcast in stereo.
Auto SAP: Select to have the TV automatically switch to a Second
Mono: Select to reduce noise in areas of poor reception.
V or v buttons to highlight one of the following options, then press
to select it.
Audio Program (SAP) when a signal is received.
✍ Press to directly select MTS settings (Stereo, Auto SAP, Mono).
Menus
✍ If your TV is set to Auto SAP, some programs may be muted or distorted. If your TV does not output
sound, change your Audio MTS setting to Stereo or Mono.
23
Page 32
Speaker
Custom selection
of audio output
source
Use the
On: Select to listen to the sound from the TV speakers with or
Off: Select to turn off the TV speakers and listen to the TV’s sound
V or v buttons to highlight one of the following options, then press
to select it.
without a separate stereo system.
only through external audio system speakers.
Audio Out
Use to control
the TV’s volume
through a stereo
Use the
press
Variable: Adjust the volume through your TV.
Fixed: Adjust the volume through a connected stereo.
V or v buttons to highlight one of the following options, then
to select it.
✍ You can only set Audio Out settings when you have set Speaker to Off.
Menus
24
Page 33
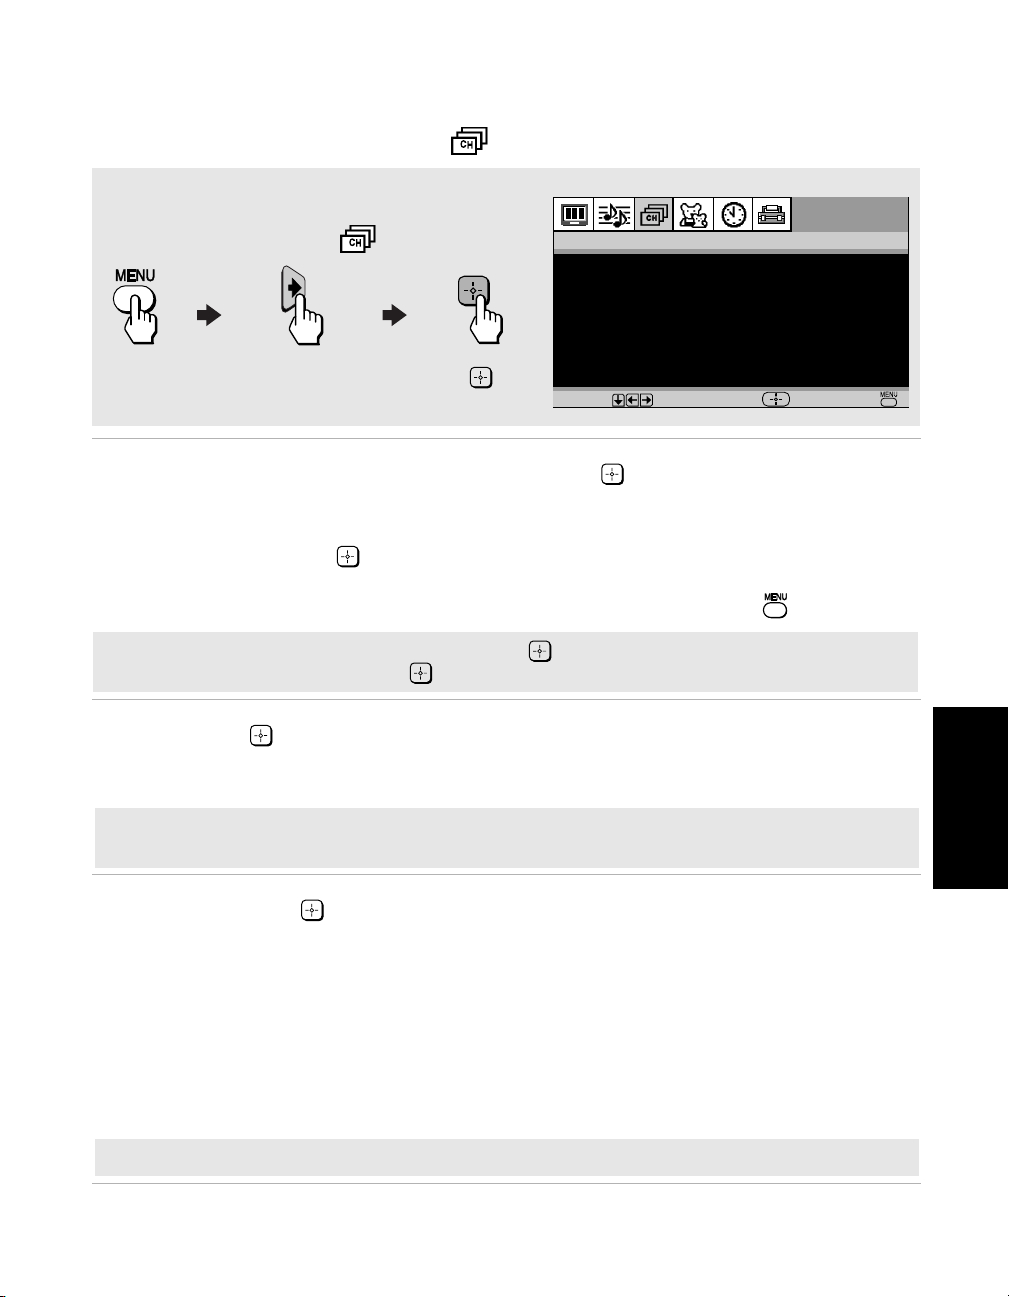
Using the Channel Setup Menu
To access the Channel Setup menu, use the
following steps:
To Display To Highlight To Select
Press v to highlight an option, then press .
Channel Setup
Move Select End
Favorite Channels
Cable:On
Channel Fix:Off
Auto Program
Channel Skip/Add
Channel Label
Favorite
Channels
Quick access
to favorite
channels
1 Use the
to set a favorite channel, then press .
2 Use the
favorite channels.
3 Press to select the channel. The TV will automatically change to the
selected channel and assign it to the selected position (1-5).
4 Press
V or v buttons to highlight the position (1-5) where you want
V or v buttons to find the channel you want to add to your
B to return to the Channel Setup menu or press to exit.
✍ To use Favorite Channels, exit all menus and press . Press V or v to move the cursor to the
desired channel number and press .
Cable Use the
On: Select if you are receiving cable channels with a CATV cable.
Off: Select if you are using a TV antenna.
V or v buttons to highlight one of the following options, then press
to select it.
✍ After changing your cable settings, you will need to perform Auto Program. See “To perform Auto
Program again” on page 17.
Channel Fix Use the
press to select it.
Off: Channel Fix is not set.
2-6: Select when you want to control all channel selection through
Video 1: Select from available video inputs when you have connected
V or v buttons to highlight one of the following options, then
a cable box or VCR. Select the appropriate channel (usually 3
or 4) and use the cable box’s or VCR’s remote control for
channel selection.
video equipment (e.g., a satellite receiver) and you want your
TV fixed to it.
Menus
✍
You cannot use Favorite Channels, Cable, Channel Skip/Add, or Channel Label when Channel Fix is set.
25
Page 34
Auto Program Perform Auto Program whenever setting up your TV. Auto Program will
search for available channels and program receivable channels.
Channel
Skip/Add
Use this feature after you run Auto Program to skip unwanted channels or
add new ones.
1 Use the
then press .
2 Use the
3 Press
V or v buttons to highlight the position of the desired channel,
V or v buttons to highlight Skip or Add, then press .
B to return to the Channel Setup menu or press to exit.
✍ Press CH + or CH – to skip over channels that have been skipped. You can still use the --9 buttons
to directly tune to skipped channels.
Channel
Label
Label up to 40
channels with
their call letters
Menus
1 Press , then use the
channel number.
2 Press to activate the channel.
3 Press
4 When finished, press to activate.
5 Press
v to highlight Label, then press . Use the V or v buttons to
display the first call letter or number of the label. Press to select.
Repeat this process until you finish selecting all the call letters.
B to return to the Channel Setup menu or press to exit.
V or v buttons until you reach the desired
26
Page 35
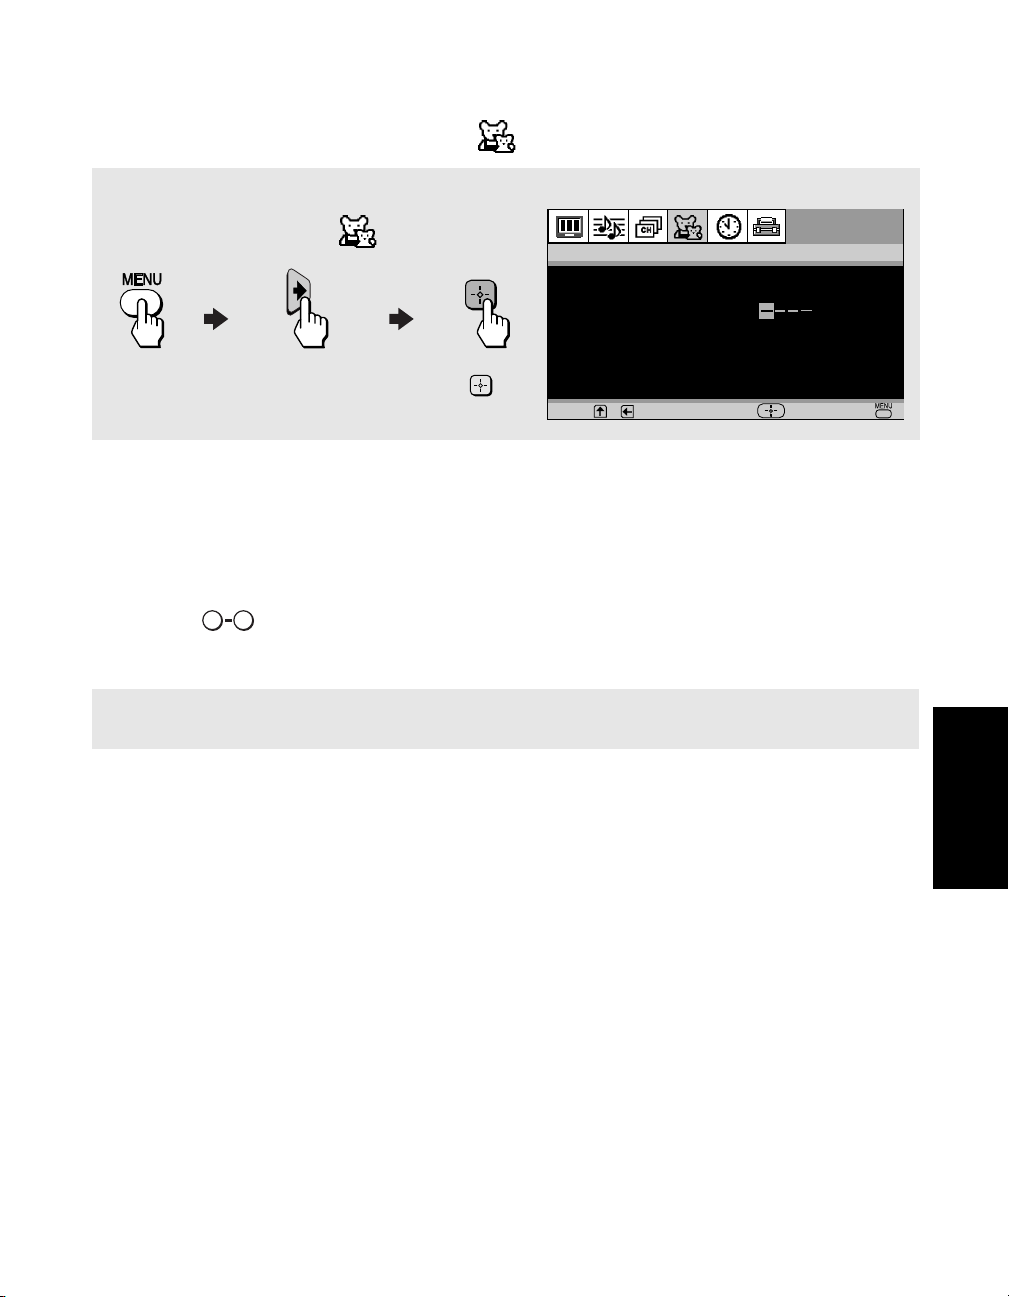
Using the Parental Control Menu
To access the Parental Control menu, use the following steps:
To Display To Highlight To Select
Parental Control
Password:
Use [0-9] buttons to
Press v to highlight an option, then press .
The Parental Control feature helps parents monitor what their children watch on television.
To use the Parental Control Menu
When you select the Parental Control menu, you are prompted to set a 4-digit password. You
cannot access the Parent menu settings without this password.
enter new password
Move Select End
1 Use the buttons to enter a 4-digit password.
0 9
2 Confirm your password by entering it again.
✍ Keep this manual in a safe place. You need your password for any future access to the Parental
Control menu. If you forget your password, see page 35.
Menus
27
Page 36
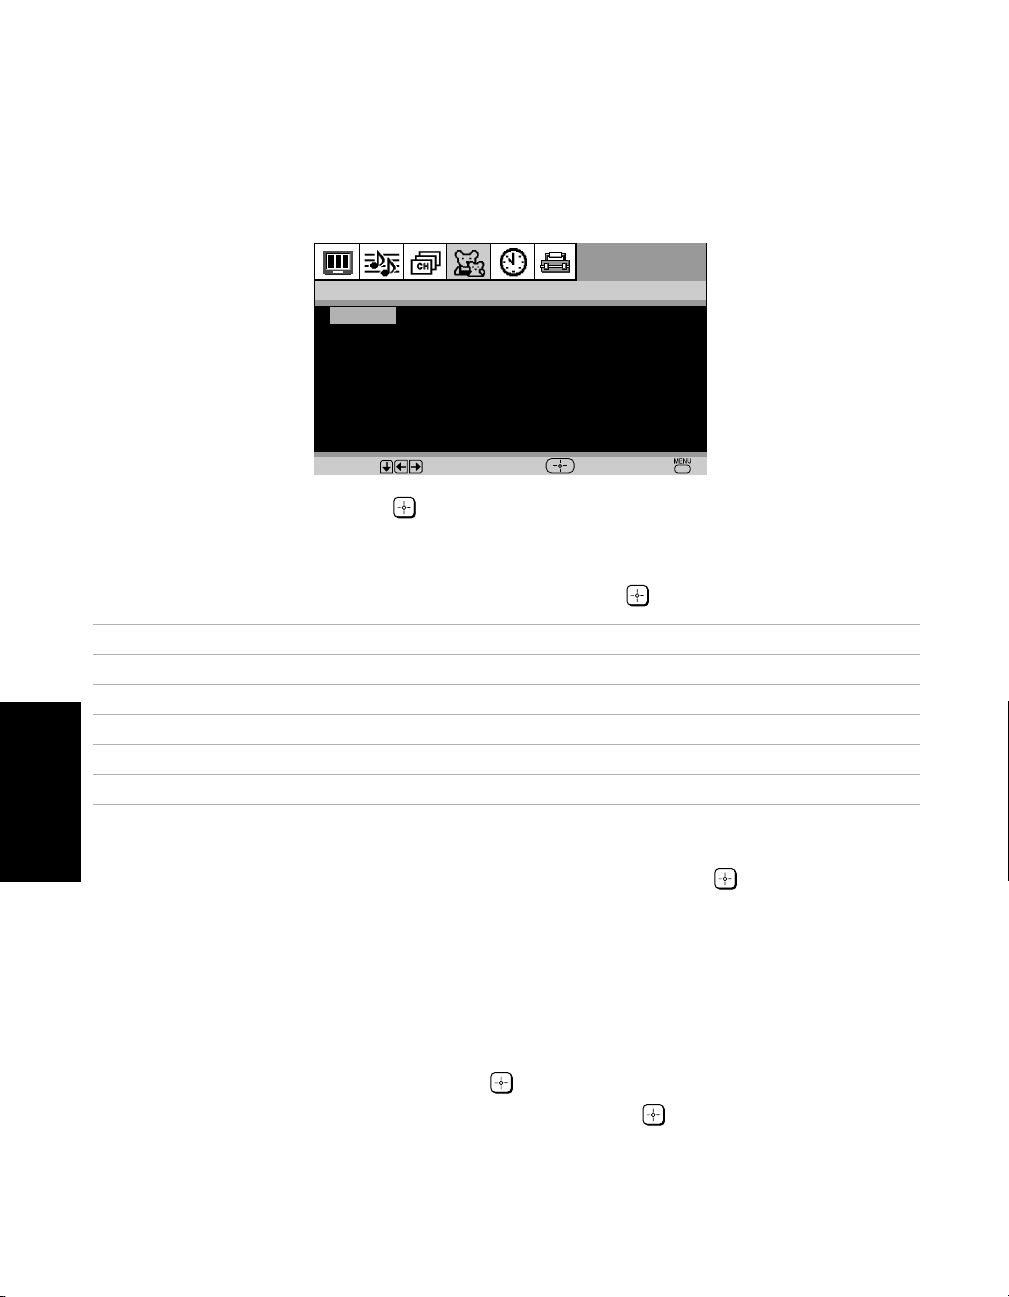
Parental Control
Setting the Rating
You can change the Rating by selecting one of the Parental Lock options.
Parental Control
Lock:Off
Change Password
Country:U.S.A.
Move Select End
1 With Lock highlighted, press .
If you are not familiar with Parental Guideline rating system, use one of the following preset
categories to simplify the rating selection: Child, Youth, Young Adult.
2 Use the V or v to highlight the desired rating and press .
Rating TV will allow a maximum rating of
Off No rating limit
Child TV-Y, TV-G
Youth TV-PG
Young Adult TV-14, PG-13 (U.S.), 14+ (Canada)
Custom Select to set more restrictive ratings (see next section)
, G (U.S.), G , C (Canada)
, PG (U.S.), 8 ans + (Canada)
Menus
Changing your Password
1 Use the V or v buttons to highlight Change Password and press .
2 Follow steps 1 and 2 for “Using the Parental Control Menu” on page 27.
Select a Country
Select U.S.A. to use US ratings (see pages 30-31) or select Canada to use Canadian ratings (see
page 32). If you select a Country (U.S. or Canada) that is not where you live, the rating you
select will not be activated.
1 Press v to highlight Country, then press .
2 Use the V or v to highlight the desired country and press .
28
Page 37

Information for Parents
To view a program that exceeds the TV rating
❏ Press , then use the buttons to enter your password.
ENT
0 9
✍ Entering your password to view a blocked program will temporarily turn Lock to Off. To reactivate
your Lock settings, turn the TV off then back on; the TV will return to the settings that you have
selected.
Using the Custom Menu
Follow the instructions on the screen to make your custom settings. Select the country desired
for your TV’s rating limit.
(Canadian models).
✍
Once you have blocked a rating or content, all higher ratings or content will be automatically blocked.
For more information see page 30 for (U.S. models) and page 32 for
29
Menus
Page 38
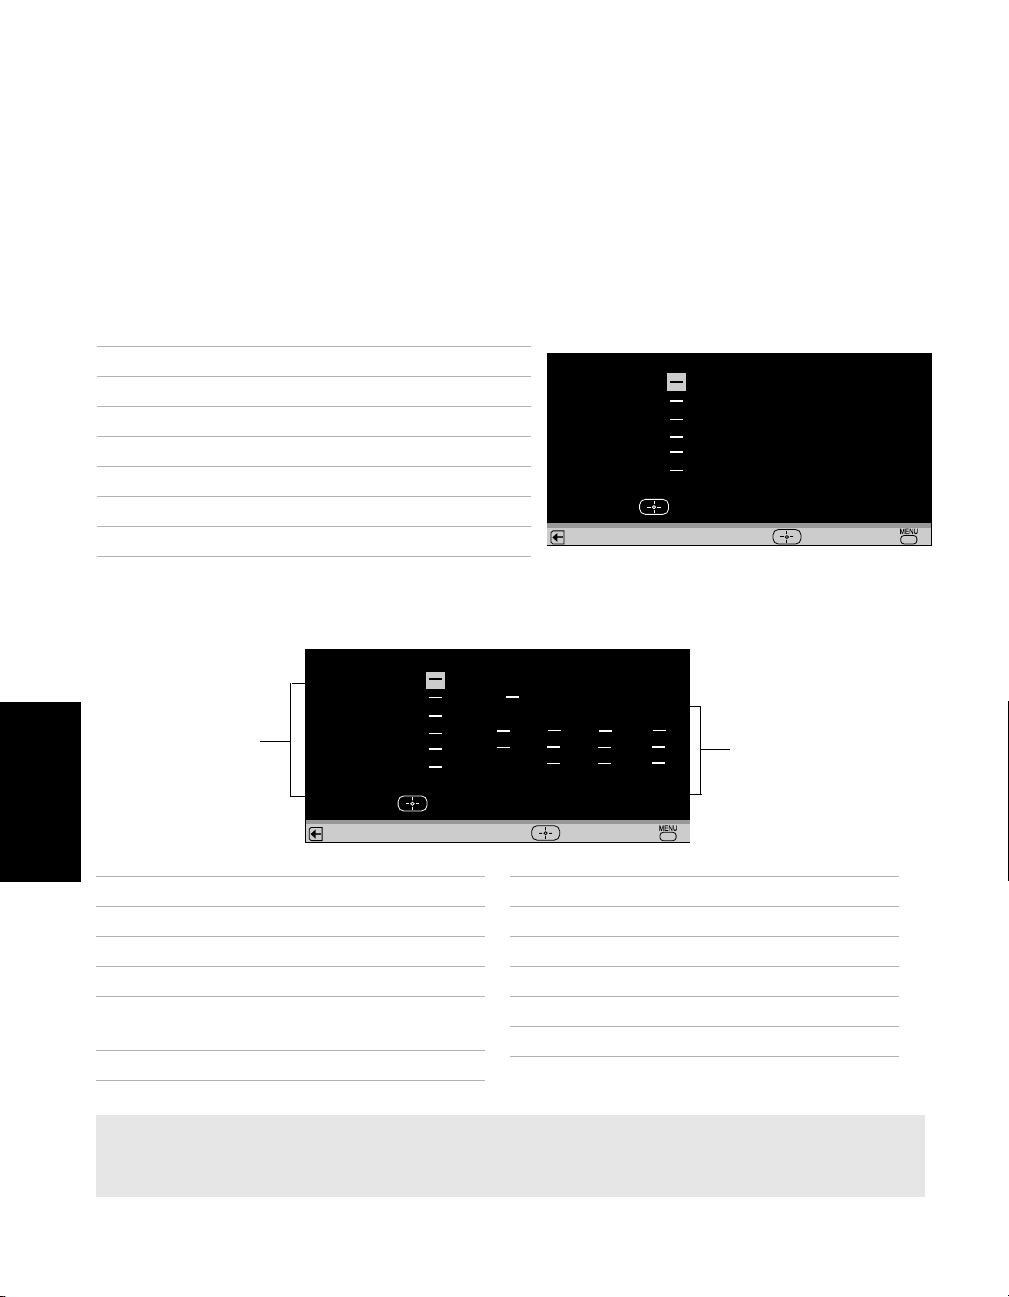
United States: Selecting Custom Rating Options
For the United States, the Custom Rating menu includes the following options: Movie Rating,
TV Rating, and Unrated. (For Canada, see page 32.)
Movie Rating
This system defines the rating levels of movies shown in theaters and on prime cable
channels.
Rating Defined as
G General audience
PG Parental guidance suggested
PG-13 Parents strongly cautioned
R Restricted
NC-17 No one 17 and under admitted
X Adult audience only
TV Rating
The TV rating is divided into two groups: age-based and content-based.
TV Rating
Age
TV-Y:
TV-Y7:
TV-G:
TV-PG:
TV-14:
TV-MA:
FV
D
D
Movie Rating
G:
PG:
PG-13:
R:
NC-17:
X:
Press to block
Return
L
L
L
V
S
V
S
V
S
Select End
Content
Press to block
Menus
Return
Age Defined as
TV-Y All children
TV-Y7 Directed to older children
TV-G General audience
TV-PG Parental guidance
suggested
Select End
Content Defined as
FV Fantasy violence
D Suggestive dialogue
L Strong language
S Sexual situations
V Violence
TV-14 Parents strongly cautioned
TV-MA Mature audience only
✍ The content ratings will increase depending on the level of the age-based rating. For example, a
program with a TV-PG V (Violence) rating may contain moderate violence, while a TV-14 V (Violence)
rating may contain intense violence.
30
Page 39
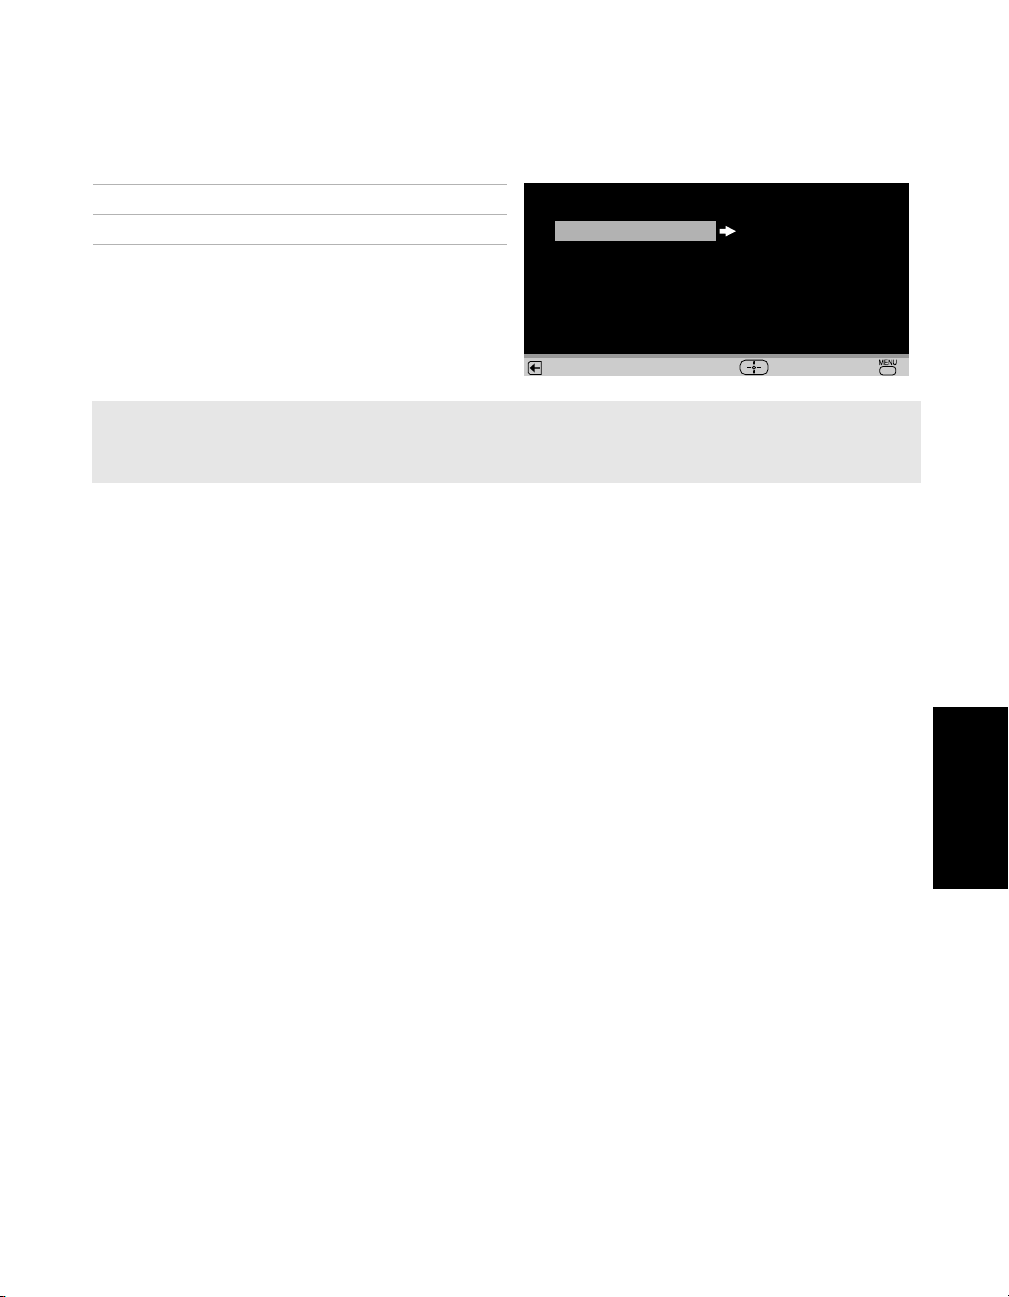
Unrated
You have the option of blocking TV programs or movies that are not rated.
Allow Allows all unrated programs
Block Blocks all unrated programs
Custom Rating
Movie Rating
TV Rating
Unrated: Allow
Return
Select End
✍ If you choose to block unrated TV programs, please be aware that the following programs may be
blocked: emergency broadcasts, political programs, pro, news, public service announcements,
religious programs, and weather.
Menus
31
Page 40
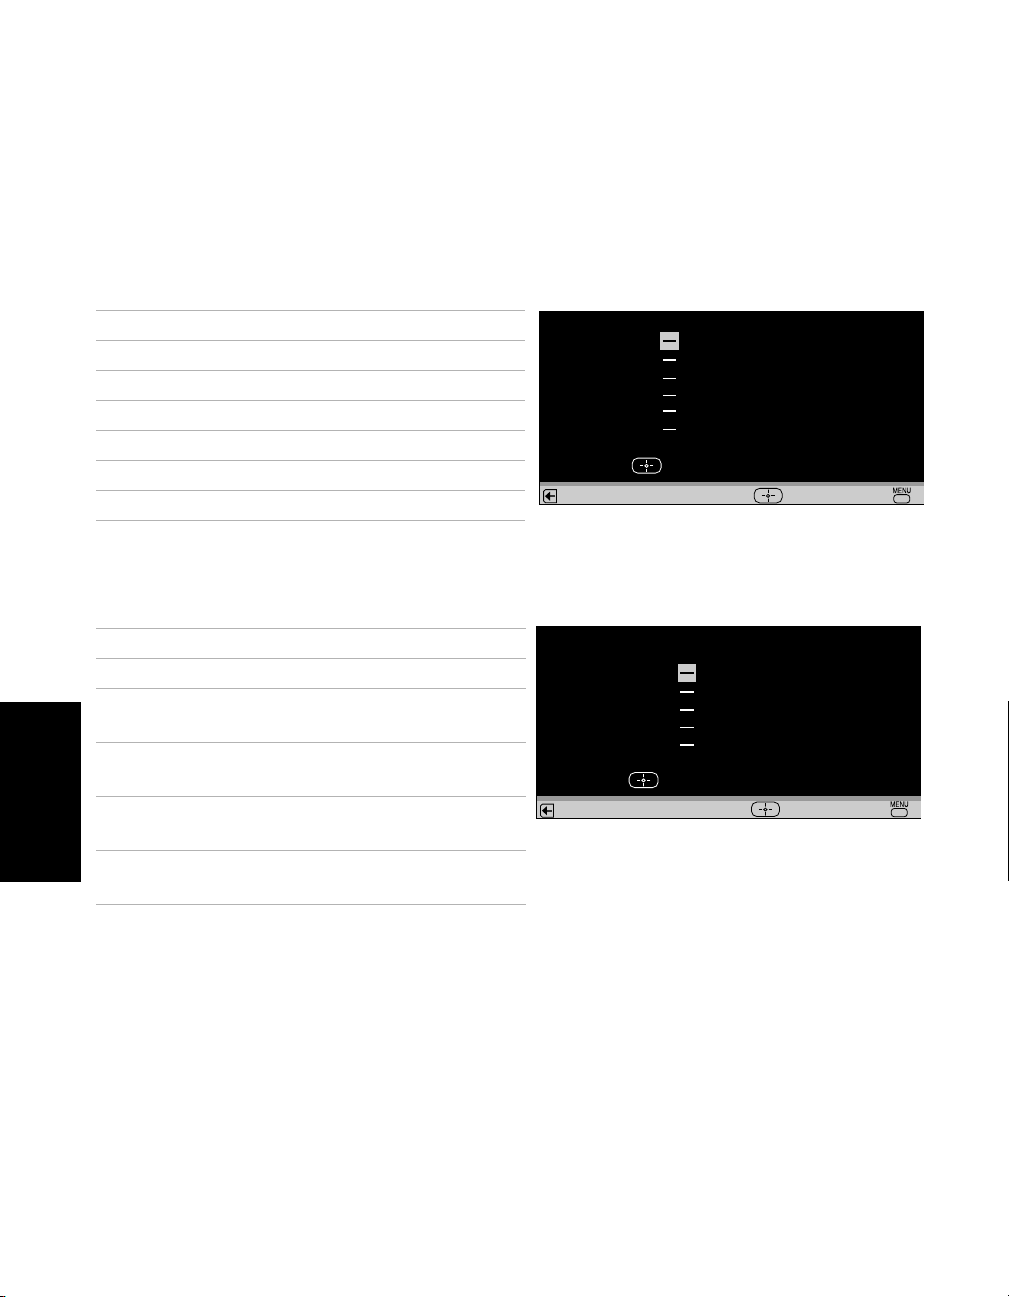
Canada: Selecting Custom Rating Options
For Canada, the Custom Rating menu includes the following options: English Rating, French
Rating, and U.S.A. Rating.
English Rating
These ratings are for Canadian programs that are broadcast in English.
Rating
Defined as
C Children
C8+ Children 8 years and older
G General programming
PG Parental guidance
14+ Viewers 14 and older
18+ Adult programming
English Rating
C:
C8+:
G:
PG:
14+:
18+:
Press to block
Return
French Rating
These ratings are for Canadian programs that are broadcast in French.
Rating Defined as
G General
8 ans+ Not recommended for
younger children
13 ans+ Not recommended for
children under age 13
16 ans+ Not recommended for ages
Menus
under 16
18 ans+ This program is restricted to
adults
French Rating
G:
8 ans+:
13 ans+:
16 ans+:
18 ans+:
Press to block
Return
Select End
Select End
U.S.A. Rating
For programs from the United States, see “TV Rating” on page 30.
32
Page 41
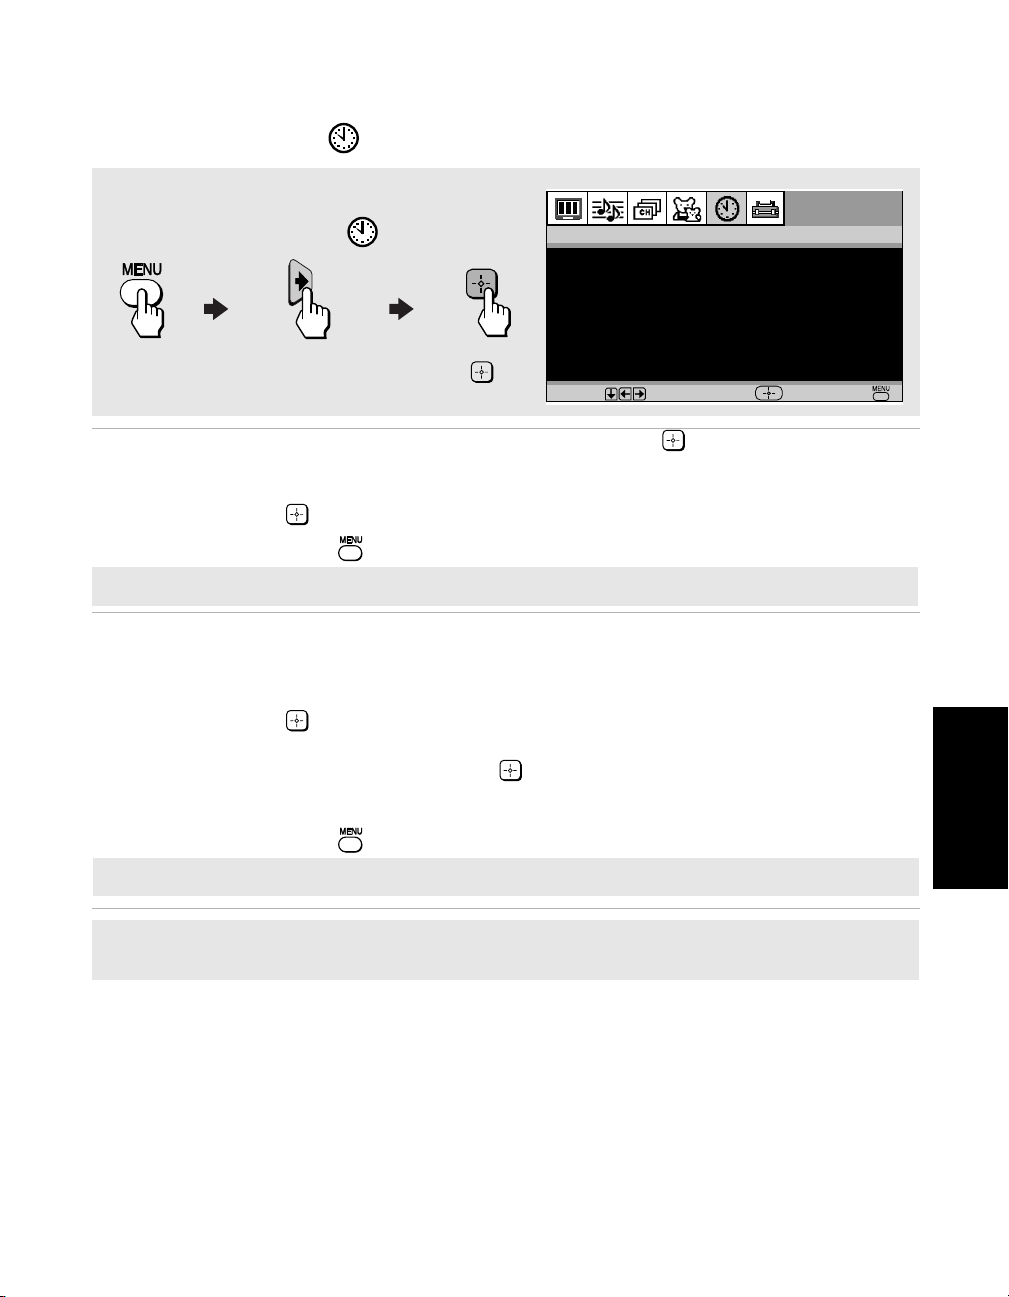
Using the Timer Menu
To access the Timer menu, use the following steps:
To Display To Highlight To Select
Press v to highlight an option, then press .
Current Time Set your TV to the current day and time. Press
Time menu:
1 Use the V or v buttons to enter the correct day and time, then press
.
2 Press to exit the menu.
Timer
Timer 1:Set
Timer 2:Set
Current Time
Move Select End
✍ You must set the Current Time before you can use Timer 1 or Timer 2.
Timer 1 and
Timer 2
Scheduled
viewing
Use the timers to program your TV to turn on and off by day, time,
duration, and channel. The timer duration is a maximum of six hours.
When the channel is fixed, it is not necessary to set the channel.
1 Use the
2 Use the
and channel, then press . The timer status should be On when the
Timer has been set, and the timer light on the front panel of the TV
should be on.
3 Press to exit the menu.
.
V or v
V or v
buttons
buttons
to highlight Timer 1 or Timer 2, then press
to enter the desired day, start time, duration,
to open the Current
Menus
✍ Select Off to turn off the Timer. Your previous settings will be saved.
✍ When you perform Auto Program, Timer 1 and Timer 2 settings will be cleared. Also, in the event of
any loss of power, Current Time, Timer 1, and Timer 2 settings will be cleared.
33
Page 42
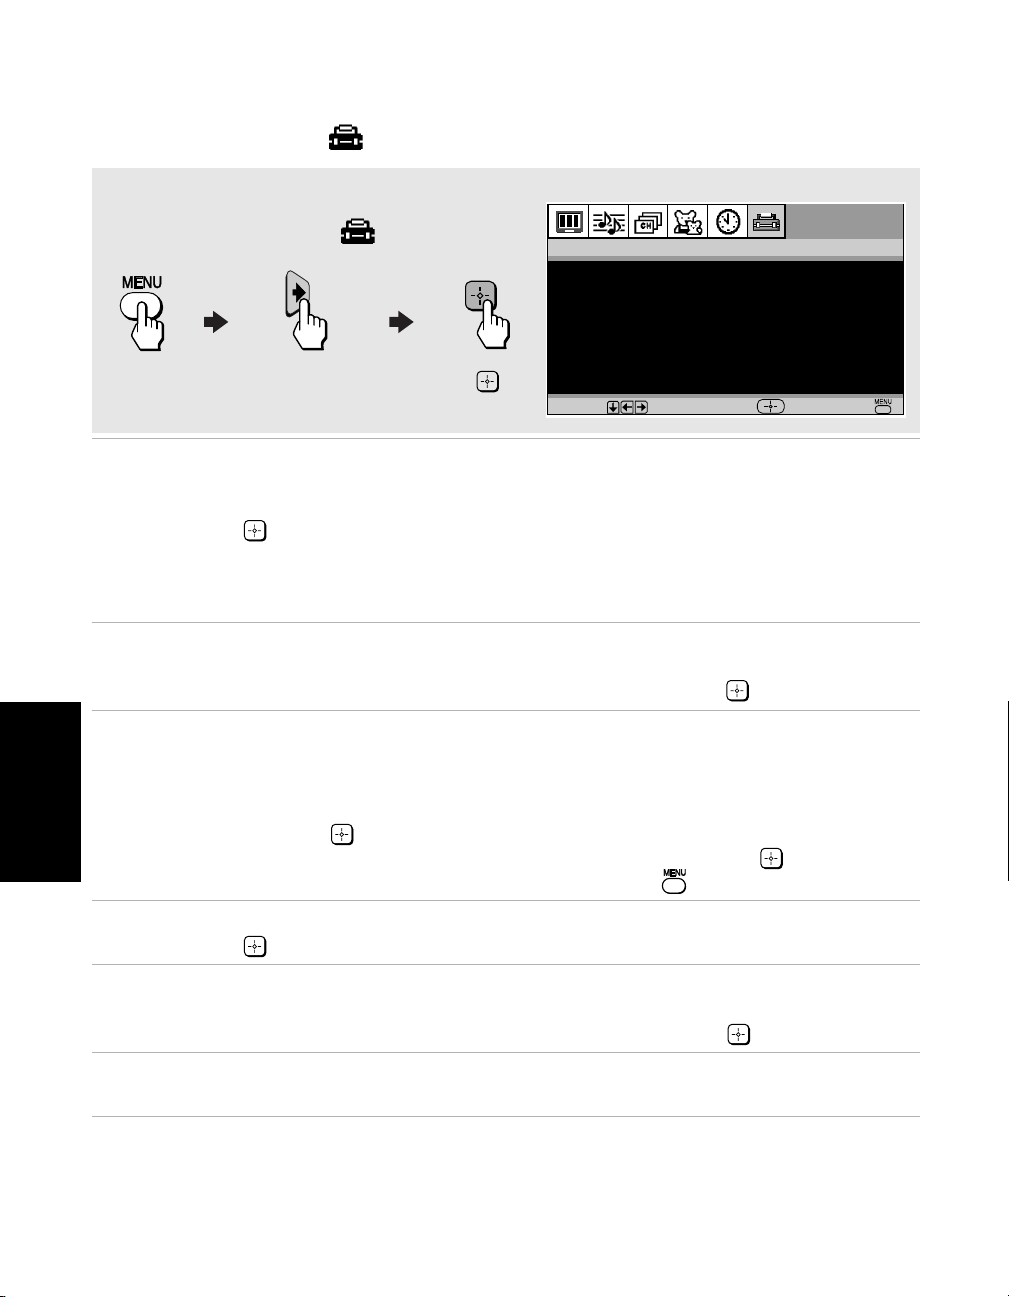
Using the Setup Menu
To access the Setup menu, use the following steps:
To Display To Highlight To Select
Press v to highlight an option, then press .
Caption
Vision
ClosedCaptioning
Info Banner Displays the name of the current program and its remaining time (if
Video Label
Label
connected
equipment
Menus
Allows you to select from three closed-caption modes for programs that are
broadcast with closed captioning.
Use the
Off: Caption Vision is not activated.
CC1, 2, 3, 4: Displays printed dialogue and sound effects of a program.
Text1, 2, 3, 4: Displays network/station information.
available) when you change the channel or press the DISPLAY button. Use
the
Allows you to identify the video components connected to the TV: VCR,
DVD, etc. When you press TV/VIDEO to switch inputs, the Video Label
appears on-screen.
1 Press the
2 Press the
3 Press
V or v
to select it.
buttons
to highlight one of the following options, then press
V or v buttons to highlight On or Off. Then press .
V or v
press .
V or v
B to
buttons
buttons
return to the Setup menu or press
Setup
Caption Vision:Off
Info Banner:Off
Video Label
Tilt Correction
Language:English
16:9 Enhanced:Off
Move Select End
to highlight the input you want to label and
to highlight a label and press .
to exit.
Tilt
Correction
Language Display all menus in the language of your choice.
16:9
Enhanced
Use the
Use the
Español (Spanish) and Français (French). Then press .
Provides enhanced picture resolution for wide-screen sources such as DVD.
This is only available when the TV is in Video mode.
V or v buttons to set the tilt of the picture from –5 to +5, then press
to activate.
V or v buttons to select from one of the following options: English,
34
Page 43
Other Information
Troubleshooting
If you have a problem with your TV, try the suggestions below. If the problem persists, see
“Contacting Sony” at the end of this section.
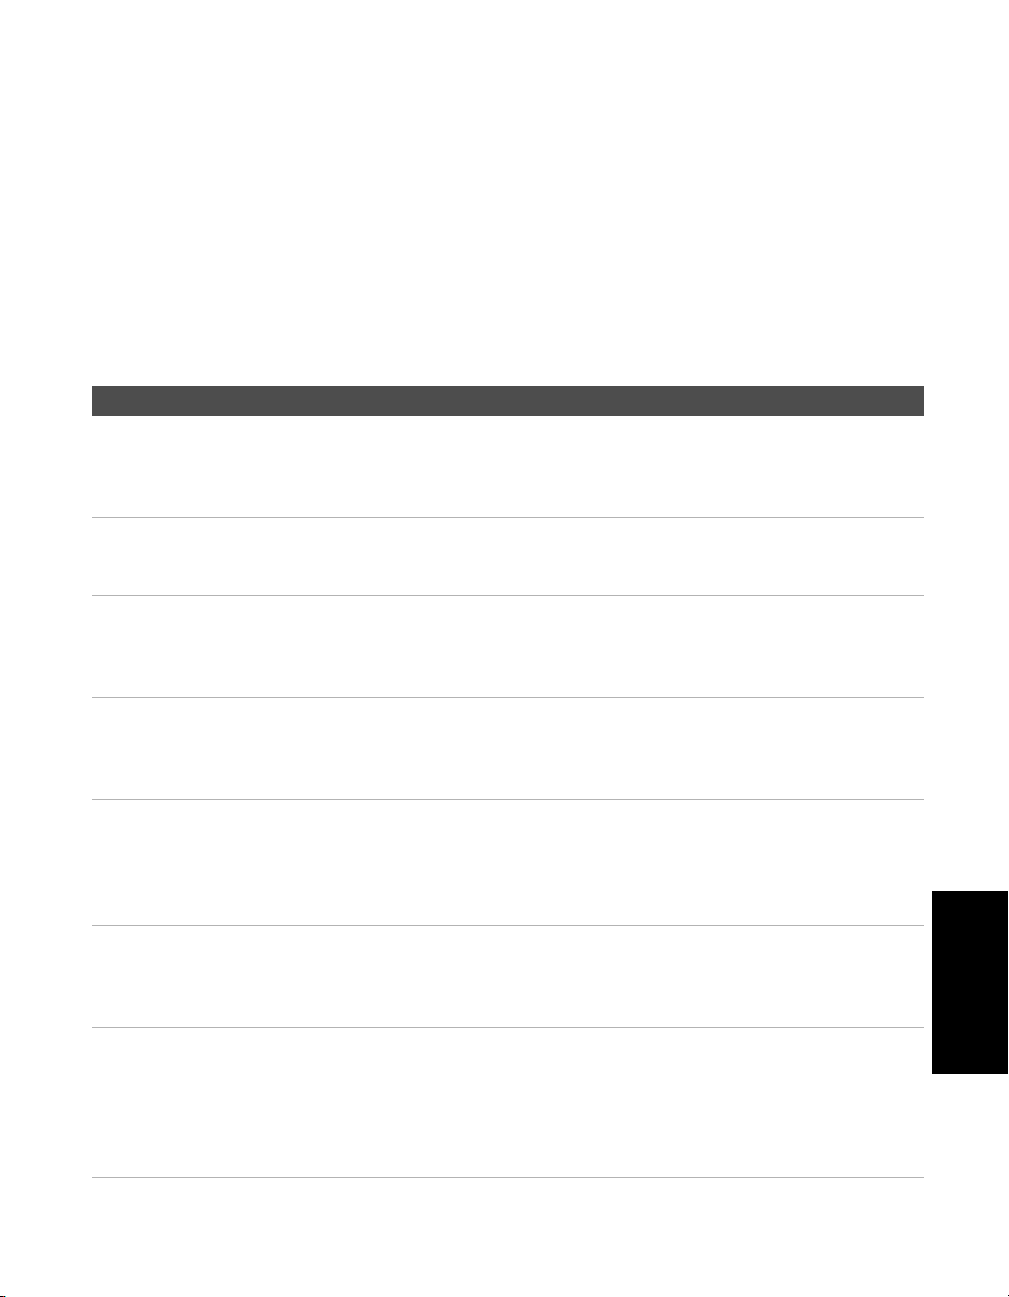
General
Problem Possible Remedies
I want to reset the TV
to the factory
settings
The TV is dirty
I lost the parental
control password
There is a black box
on the screen
There was a blackout
or power outage, and
now the TV won't turn
on and the timer LED
is flashing
The digital cable box
does not work
I can’t connect the
DVD player using
component video
outputs (YP
BPR)
❏ Turn on the TV. While holding down the RESET button on the
remote control, press the POWER button on the TV front panel.
The TV will turn itself off, then back on again. Release the
RESET button.
❏ Clean the TV with a soft dry cloth. Never use strong solvents
such as thinner or benzine, which might damage the finish of
the cabinet.
❏ In the password screen, enter the following master password:
4357. After using the master password, you must create a new
password. You cannot use the master to unlock currently
blocked channels.
❏ You have selected a text option in the Setup menu (page 34) and
no text is available. To turn off this feature, select Off in the
Caption Vision option. If you were trying to select closed
captioning, select CC1-4 instead of Text1-4.
❏ Press the POWER button on your remote control or on the TV
front panel. If the problem persists, see “Contacting Sony“ at the
end of this section.
❏ If you are connecting a VCR and digital cable box using a
splitter, as described in page 9, you must use a special bidirectional splitter (5-900Mhz mininum) that is designed to
work with your digital cable box.
❏ You must set up your DVD player before you can connect it
using component video outputs (YP
player and set it up, referring to the DVD manual for
instructions. Then, connect it to the TV again following the
instructions in “Connecting a DVD Player using Component
Video“ on page 14.
BPR). Disconnect the DVD
Other Information
35
Page 44
Remote Control
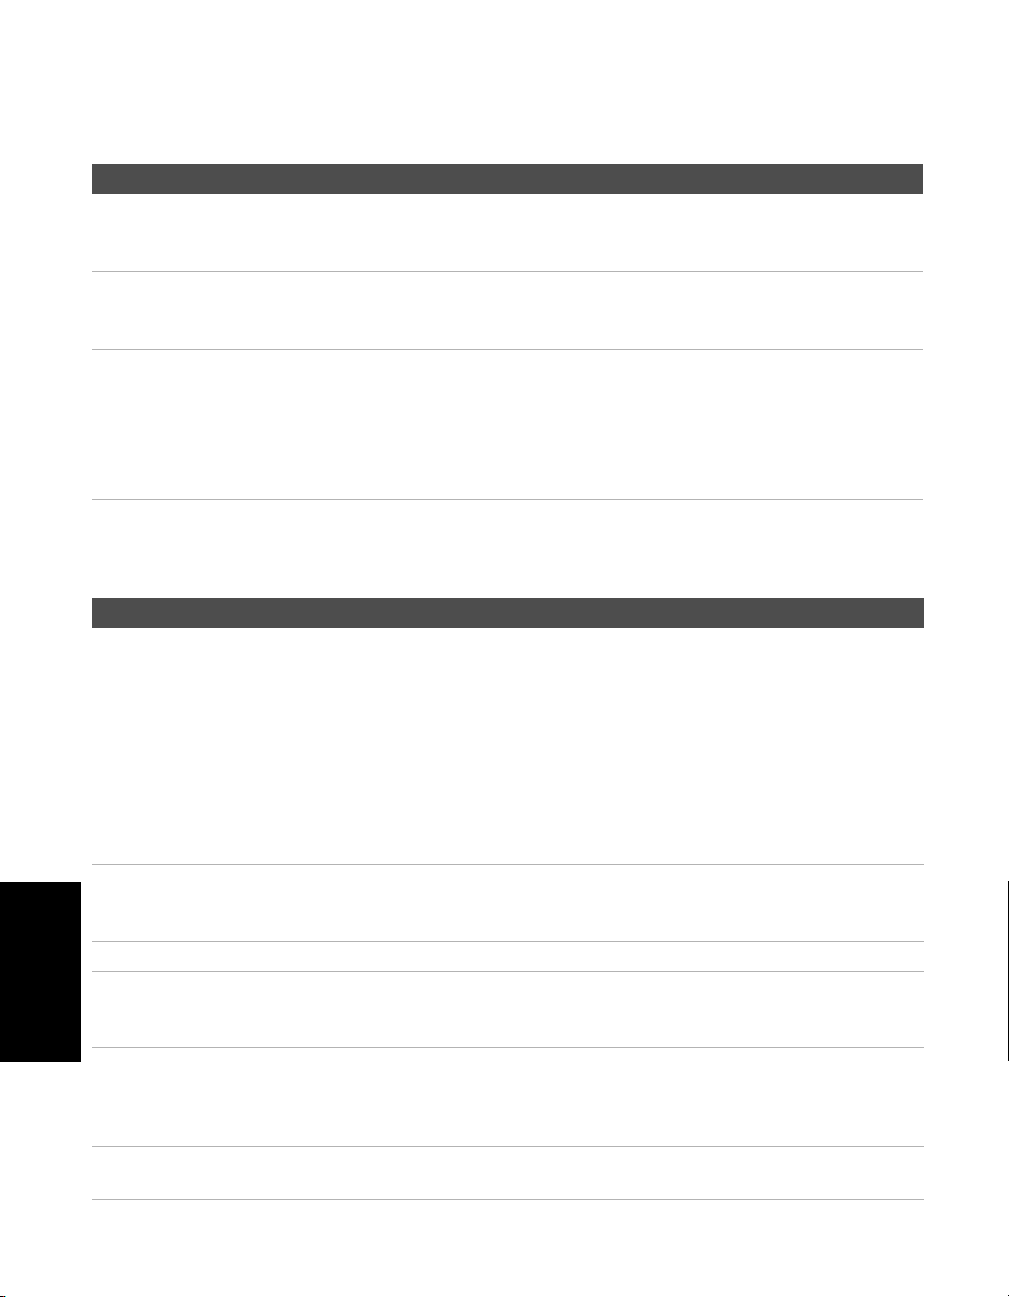
Problem Possible Remedies
I cannot operate the
remote control
I cannot change
channels with the
remote control
I lost the remote
control
❏ Check the orientation of the batteries.
❏ Batteries could be weak. Replace them (page 2).
❏ Move the TV three to four feet away from fluorescent lights.
❏ Make sure you have not inadvertently switched your TV from
the channel 3 or 4 setting if you are using another device to
change channels.
❏ You can use the front panel controls to access your menus,
change channels, adjust the volume, or change video inputs
(page 2). Contact your nearest Sony Dealer to order a
replacement. To find out the nearest dealer, please call our Sony
Direct Accessory and Part Center at 1-800-488-7669 (U.S.
residents only).
Video
Problem Possible Remedies
No picture, no
sound
Poor or no picture,
good sound
No color
Snow on the screen
Other Information
Dotted lines or
stripes
Double images or
ghosts
❏ Make sure the power cord is plugged in.
❏ If a red light flashes on the front of your TV for more than a few
minutes, disconnect and reconnect the power cord. If the
problem continues, call your local service center.
❏ Check the TV/VIDEO setting. When watching TV, set it to TV;
when watching video equipment, set it to VIDEO 1, 2, 3 or 4
(page 4).
❏ Make sure you have inserted the batteries correctly into the
remote control (page 2).
❏ Try another channel to rule out station trouble.
❏ Adjust the Picture setting in the Video menu (page 22).
❏ Adjust the Brightness setting in the Video menu (page 22).
❏ Check the antenna and/or cable connections (page 6).
❏ Adjust the Color setting in the Video menu (page 22).
❏ Check the Cable setting in the Channel menu (page 25).
❏ Check the antenna and/or cable connections (page 6).
❏ Make sure the channel selected is currently broadcasting.
❏ Adjust the antenna.
❏ Move the TV away from other electronic equipment. Some
electronic equipment creates electrical noise, which can interfere
with TV reception.
❏ Check your outdoor antenna or call your cable service.
36
Page 45
Audio
Problem Possible Remedies
Good picture, no
sound
❏ Press so that Muting disappears from the screen (page 4).
❏ Check your Audio settings. Your TV may be set to Auto SAP in
the MTS feature (page 23).
❏ Make sure the speaker option is set to On in the Audio Menu.
❏ Press to adjust your TV's volume.
Low or no audio
(TV and cable box)
❏ Some cable boxes have volume level controls. Check and see if
your cable box remote has a volume control.
Channels
Problem Possible Remedies
I cannot receive
higher number
channels (UHF) when
using an antenna
Cable stations don’t
seem to work
❏ Make sure Cable is set to Off in the Channel menu (page 25).
❏ Perform Auto Program to add channels that are not presently in
the memory (page 17).
❏ Make sure Cable is set to On in the Channel menu (page 25).
❏ Perform Auto Program to add channels that are not presently in
the memory (page 17).
Contacting Sony
Before calling our Customer Information Services Center, reset the TV to factory settings (see page 17). Please have
your TV serial number ready. The number is located on the rear of your TV and on the front cover of this manual.
Our Customer Information Services Center phone number is 1-800-222-SONY (7669) (US residents only) or 1-877-899
SONY (7669) (Canadian residents only).
37
Other Information
Page 46

Specifications
For all models (except as noted)
Television system American TV standard/NTSC
Channel coverage VHF: 2-13/UHF: 14-69/CATV: 1-125
Antenna 75-ohm external antenna terminal for VHF/UHF
Picture tube FD Trinitron
Power requirements 120V, 60 Hz
Supplied accessories
2 Size AA (R6) batteries
1 Remote Control RM-Y194
Inputs/outputs Inputs 1 video, 1 audio (front) Outputs 1 AUDIO OUT
Optional accessories TV Stand: SU-32FS2 for KV-32FS120
KV-32FS120
Screen size Visible screen size: 803 mm (32 inches) measured diagonally
Actual screen size: 863.6 mm (34 inches) measured diagonally
Speaker output 10 W x 2
Power consumption 175 W
Less than 1 W in standby
Dimensions (W/H/D)
898 x 696 x 576 mm (35
Mass 75 kg (165 lbs. 6 oz.)
KV-36FS120
Screen size Visible screen size: 914.4 mm (36 inches) measured diagonally
Speaker output 10 W x 2
Power consumption 180 W
Dimensions (W/H/D)
Mass 97.8 kg (216 lbs. 15 oz.)
Actual screen size: 965.2 mm (38 inches) measured diagonally
Less than 1 W in standby
985 x 774 x 633 mm (38
®
tube
2 video, 2 audio (rear)
1 S VIDEO
1 RF
BPR, 1 audio
1 YP
SU-36FS2 for KV-36FS120
3
3
/
x 27
/
x 22
8
8
3
1
/
x 30
/
x 24
4
2
5
/
inches)
8
7
/
inches)
8
Design and specifications are subject to change without notice.
Other Information
38
Page 47

Index
16:9 Enhanced 34
A
Audio Out 24
Auto Program 17, 26
Auto SAP 23
B
Balance 23
Bass 23
Batteries
Inserting in remote
Brightness 22
C
Cable 25
Caption Vision 34
Channel Fix 25
Channel Label 26
ClearEdge VM 22
Color 22
Color Temperature 22
Connections
Cable and antenna
Connecting a Camcorder 15
Connecting an Audio System 15
DVD Player using Component Video
(YP
DVD Player using Composite Video
(VIDEO/AUDIO L(MONO),R)
TV and Cable Box 8
TV and Satellite Receiver 11
TV and VCR 7
TV, VCR and Cable Box 9
TV, VCR, and Satellite Receiver using
Component Video (YP
TV, VCR, Cable/Antenna, and Satellite
Receiver using Composite Video
(VIDEO/AUDIO L(MONO), R 12
Video Tape Editing (VCR and
Camcorder)
Current Time 33
E
Effect
23
Off
Simulated 23
SRS 23
F
Favorite Channels 25
H
Hue 22
I
Info Banner 34
/L, R) 14
BPR
16
L
Language 34
M
Menus
Audio
23
Channel 25
Parent 27
Setup 34
Timer 33
2
Video 22
Mode
Movie
Pro 22
Standard 22
Vivid 22
MTS
Auto SAP
Mono 23
Stereo 23
22
23
P
6
Parental Control 28
Picture 22
R
Remote Control
Description
3, 4
S
/L, R) 13
BPR
14
Setting the Rating
English Rating
French Rating 32
Movie Rating 30
SLEEP 4
TV Rating 30
U.S.A. Rating 32
Unrated 31
Sharpness 22
Speaker 24
Specifications 38
Steady Sound 23
32
T
Tilt Correction 34
Timer 1 and Timer 2 33
Treble 23
Troubleshooting 35
TV Features 1
TV Front Panel 2
TV Rear Panel 5
V
Video Label 34
39
Page 48

User Guide
Sony Corporation
Printed in U.S.A.
 Loading...