

Page 1

3-800-378-23 (1)
Trinitroif Color TV
Operating Instructions
KV-27XBR45
KV-27XBR45M
KV-32XBR45
KV-32XBR85
©1995 by Sony Corporation
Page 2
WARNING
To prevent fire or shock hazard, do not expose the television to rain or moisture.
CAUTION
RISK OF ELECTRIC SHOCK
DO NOT OPEN
CAUTION : TO REDUCE THE RISK OF ELECTRIC SHOCK,
DO NOT REMOVE COVER (OR BACK),
NO USER-SERVICEABLE PARTS INSIDE,
REFER SERVICING TO QUALIFIED SERVICE PERSONNEL,
• Unplug the TV from the wall outlet if you are not
going to use it for several days or more. To disconnect
the cord, pull it out by the plug. Never pull the cord
itself.
For details concerning safety precautions, see the
supplied leaflet "IMPORTANTSAFEGUARDS."
Installing
• To prevent internal heat build-up, do not block the
v'entilation openings.
• Do not install the TV in a hot or humid place, or in a
place subject to excessive dust or mechanical vibration.
CAUTION
When using TV games, computers, and similar products
with your TV, keep the brightness and contrast functions
at low settings. If a fixed (non-moving) pattern is left on
the screen for long periods of time ata highbrightness or
contrast setting, the image can be permanently imprinted
onto the screen. These types of imprints are not covered
by your warranty because they are the result of misuse.
You are cautioned that any changes or modifications
not expressly approved in this manual could void your
authority to operate this equipment.
This symbol is intended to alert the user to the
presence of uninsulated "dangerous voltage"
vL'ithin the product's enclosure that may be of
sufficient magnitude-to constitute a risk of
electric shock to persons.
This symbol is intended to alert the user to the
presence of important operating and
maintenance (servicing) instructions in the
literature accompanying the appliance.
CAUTION
To prevent electric shock, do not use this polarized AC
plug with an extension cord, receptacle or other outlet
unless the blades can be fully inserted to prevent blade
exposure.
Precautions
Safety
• OperatetheTVonly onl20V AC.
• One blade of the plug is wider than the other for safety
purposes and will fit into the power outlet only one
way. If you are unable to insert the plug fully into the
outlet, contact your dealer.
• Should any liquid or solid object fall into the cabinet,
unplug the TV and have it checked by qualified
personnel before operating it further.
Note on Closed Caption (Caption Vision)
This television receiver provides display of television
closed captioning in accordance with § 15.119 of the FCC
rules.
Note to CATV system installer
This reminder is provided to call the CATV system
installer's attention to Article 820-40 of the N EC that
provides guidelines for proper grounding and, in
particular, specifies that the cable ground shall be
connected to the grounding system of the building, a s
close to the point of cable entry as practical.
Use of this television receiver for other than private
viewing of programs broadcast on UHF or VHF or
transmitted by cable companies for the use of the general
public may require authorization from thebroadcaster /
cable company and / or program owner.
Owner's Record
The model and serial numbers are located at the rear of
the TV. Record these numbers in the spaces provided
below. Refer to them whenever you call upon your Sony
dealer regarding this product.
Model No.
Serial No.
________________
________________
Page 3

Table of contents
4 Welcome!
4 About this manual
Getting Started
5 Step 1: Connections
12 Step 2: Setting up the remote control
13 Step 3: Installing the glass door and adjusting the
shelf
14 Step 4: Setting up the TV automatically (auto set
up)
16 Step 5; Changing the menu language
Operations
17 Watching the TV
18 Watching two programs at the same time—PIP and
P&P
20 Adjusting the picture (video)
22 Adjusting the sound (audio)
23 Listening to surround sound (surround)
24 Selecting stereo or bilingual programs (mts)
24 Setting the speakers (speaker)
25 Selecting audio out (audio out)
25 Listening to orchestra seat effect sound—OSE
26 Listening with the cordless headphones
28 Selecting the program palette (program palette)
28 Setting daylight saving (daylight saving)
29 Setting the clock (current time set)
30 Setting the timer to turn the TV on and off (on/off
timer)
31 Blocking out a channel (channel block)
32 Setting up favorite channels (channel guide)
33 Setting captions to channels (channel caption)
34 Setting video labels (video label)
35 Selecting Caption Vision (caption vision)
36 Operating video equipment
38 Operating a cable box
Additional Information
40 Troubleshooting
42 Specifications
43 Index
The captions in parentheses indicate menu names.
Page 4

Welcome! About this manual
Thank you for purchasing the Sony Trinitron® Color
TV. Here are some of the features you will enjoy with
your TV:
• t3n-scfeen menus let you adjust the picture quality,
sound, and various other settings.
• Surround system simulates the sound quality of a
concert hall or movie theater.
• Two-tuner Picture-in-Picture or Picture & Picture
allows you to watch another TV channel, video or
cable image as a window or left picture.
• Orchestra Seat Effect (OSE) feature restores the
harmonic balance of the sound to dramatically
improve the overall reproduction of programs. It
gives the sound more clarity, depth, and definition,
making the sound more dynamic.
• IR transmitter allows you to listen to a TV program
with the cordless headphones.'
• Remote Control can operate Sony video and Sony
multi-disc players. Other manufacturer's video
equipment might also be compatible with this
remote control.
• Center speaker allows you to enjoy the benefits of
Dolby Pro Logic by using the speakers of the TV as
the center speaker.
The instructions in this manual are for models
KV-27XBR45, KV-27XBR45M, KV-32XBR45, and KV-
32XBR85. Before you start reading this manual please
check your model number which is displayed on the
rear of the TV. Model
illustration purposes in this manual. Any exceptions in
operations between models are clearly indicated in the
text. For example, "KV-32XBR85 only."
The following instructions describe operation based on
using the remote control buttons. Basic functions can
also be performed by using buttons on the TV.
KV-27XBR45 is used for
Page 5

Getting Started
Step 1: Connections
Either an indoor antenna or outdoor antenna should be
used with your TV. However, we recommend that you
connect an outdoor antenna or a cable TV system to get
better picture quality.
To access AUDIO/VIDEO jacks and AC cord on KV32XBR85, remove the back panel (see page 9).
How to connect different types of cables
The illustrations below show the examples of
connecting different types of cables to the TV directly.
Connecting an antenna/cable TV system without a VCR
Cable or antenna
Cable
Cable box
If your cable company requires you to connect a cable
box, make the connection as follows:
Cable box
Cable box and cable
(Rear of TV)
VHF/UHF
(Rear of TV)
VHF/UHF
(Rear of TV)
AUX
• VHF
only
or
• VHF/
UHF
or
• Cable
B
■ VHF only
or
> UHF only
or
> VHF/UHF
■ VHF
and
■ UHF
75-ohm coaxial cable
300-ohm twin lead cable
Antenna connector
(not supplied)
75-ohm coaxial cable
300-ohm twin lead cable
(Rear of TV)
VHF/UHF
(Rear of TV)
VHF/UHF
(Rear of TV)
VHF/UHF
EAC-66 U/V mixer
(not supplied)
75-ohm coaxial cable
(not supplied)
CATV cable
TO
CONVERTER
VHF/UHF
Pay cable TV systems use scrambled or encoded signals
requiring a cable box* in addition to the normal cable
connection.
* The cable box will be supplied by the cable company.
Note
• You cannot watch the signal through AUX connector as a
window picture.
Cable and antenna
(Rear of TV)
CATV cable
AUX
TO
CONVERTER
Notes
• Most VHF/UHF combination antennas have a signal splitter.
Remove the splitter before attaching the appropriate connector.
• If a U/V mixer is used, snow and noise may appear in the
picture when viewing cable TV charmels over 37.
Antenna cable
VHF/UHF
Note
• Do not connect anything to the TO CONVERTER connector in
this case.
Getting Started
Page 6
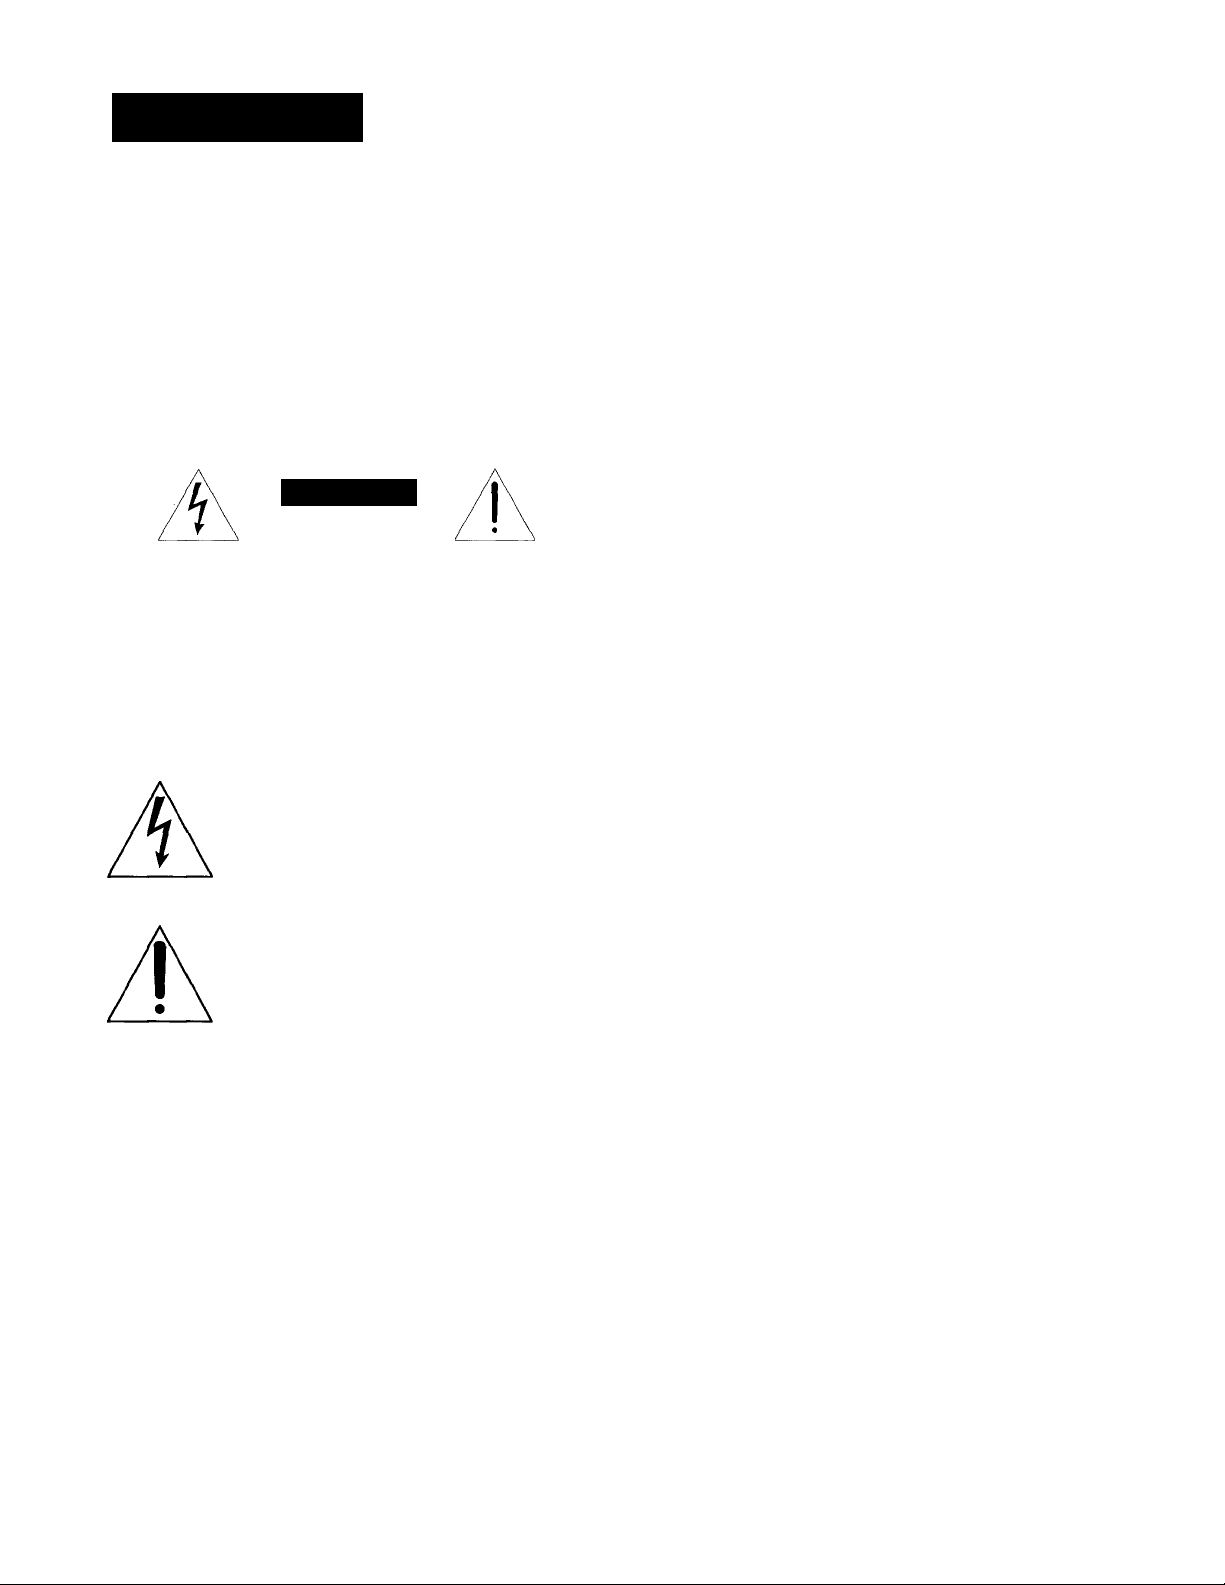
Connecting an antenna/cable TV system with a VCR
For connection details, see the instruction manual of
your VCR. Before making connection, disconnect the
AC power cords of the equipment to be connected.
Without a cable box
After making these connections, you will be able to do
the following:
• View the playback of video tapes
• Record one TV program while viewing another
program
• Watch two TV programs simultaneously by using
the PIP and P&P features. '
To connect a monaural VCR, connect the audio output of the (not supplied)
VCR to AUDIO-L (mono) of VIDEO 1 IN on the TV.
To an S video equipped VCR
If your VCR has an S video output jack, make the
compared to conventional connection.
Getting Started
Page 7
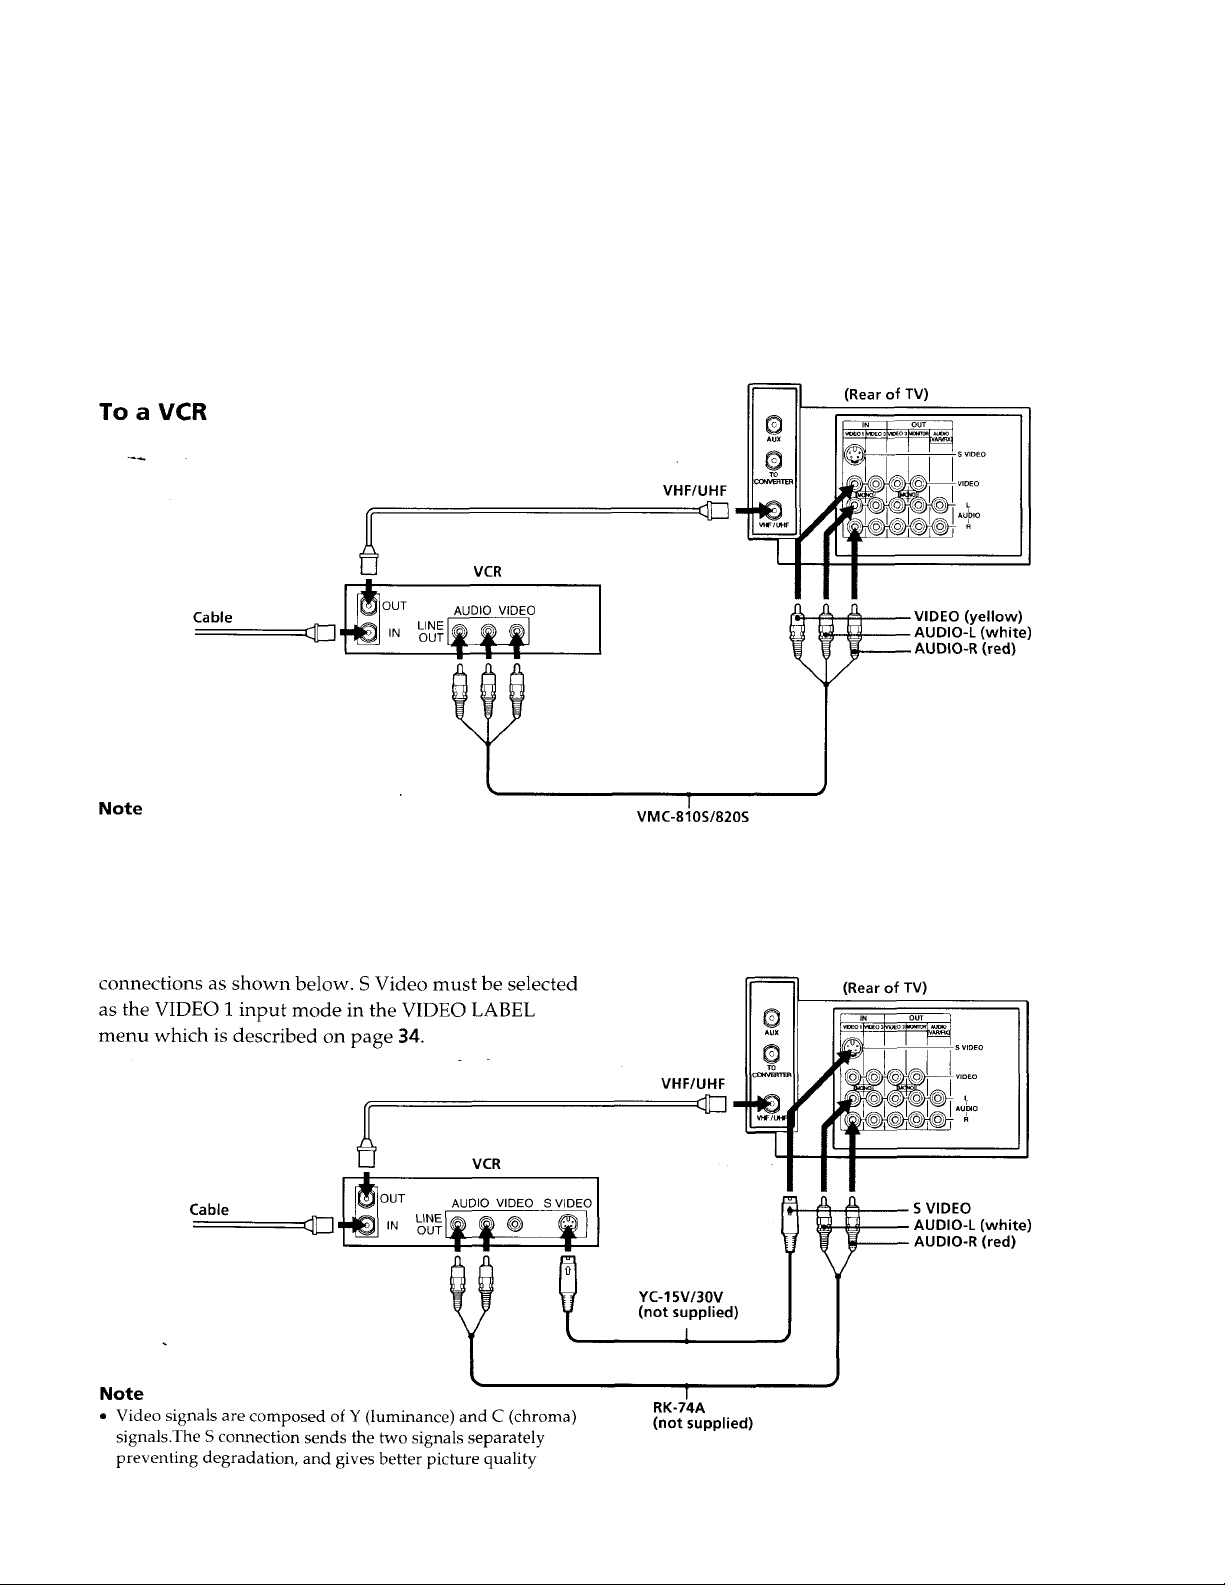
With a cable box
Notes
• To connect a monaural VCR, connect the audio output of the
VCR to AUDIO'L (mono) of VIDEO 1 IN on the TV.
• The VHF/UHF connection provides an audio and video signal
when the VCR and cable box are turned off.
To an S video equipped VCR with a cable box
Note
• The VHF/UHF connection provides an audio and video signal
when the VCR and cable box are turned off.
Getting Started
Page 8
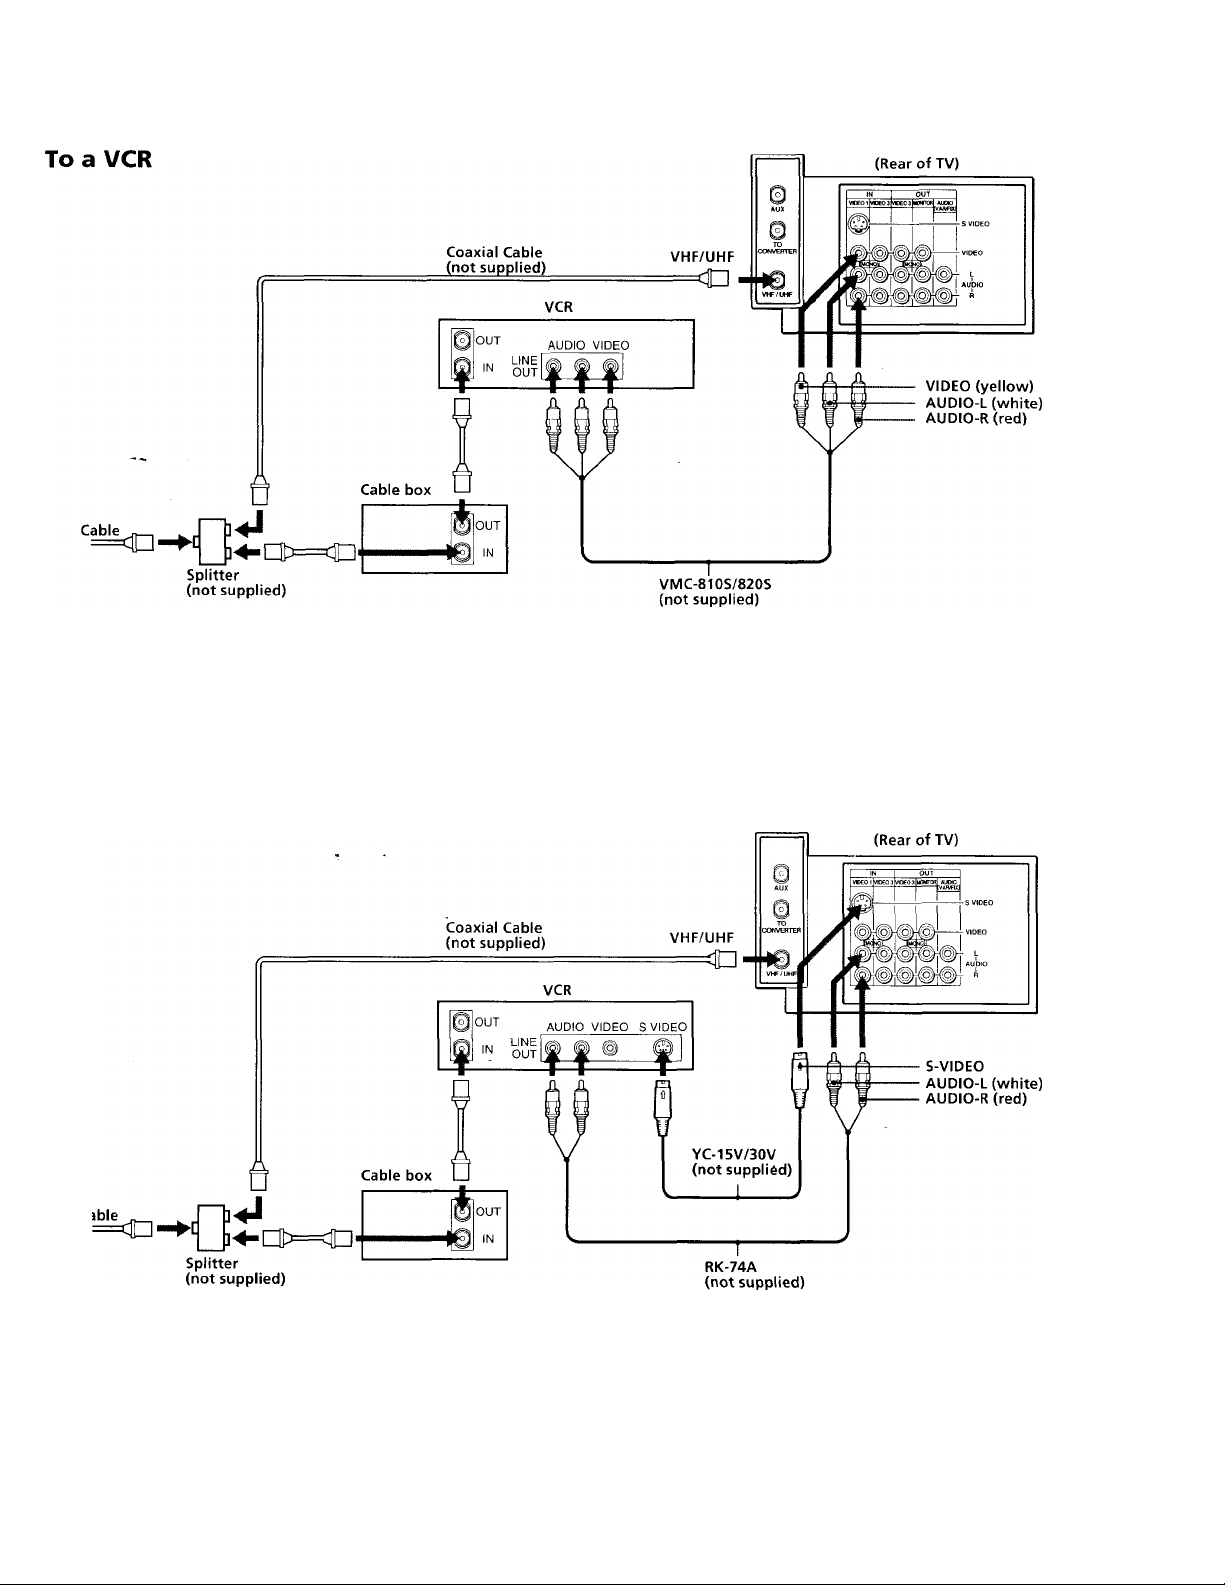
Connecting a camcorder
This connection is convenient for viewing a tape played by a camcorder.
(Front lower right
corner of TV)
Connecting two VCRs for tape editing using VIDEO 3 IN and OUT
Watching a different image while recording
If you connect the VCR for playback to the VIDEO 3 IN
jacks and the VCR for recording to the VIDEO 3 OUT
jacks, a program from the playback VCR will be
recorded on the recording VCR. .
Please note that VIDEO 3 OUT can only output a
program from VIDEO 3 IN. During the above
recording process you can view video sources from
either antenna, cable, VIDEO 2 IN or VIDEO 1 IN jacks
as well.
8
Getting Started
Page 9
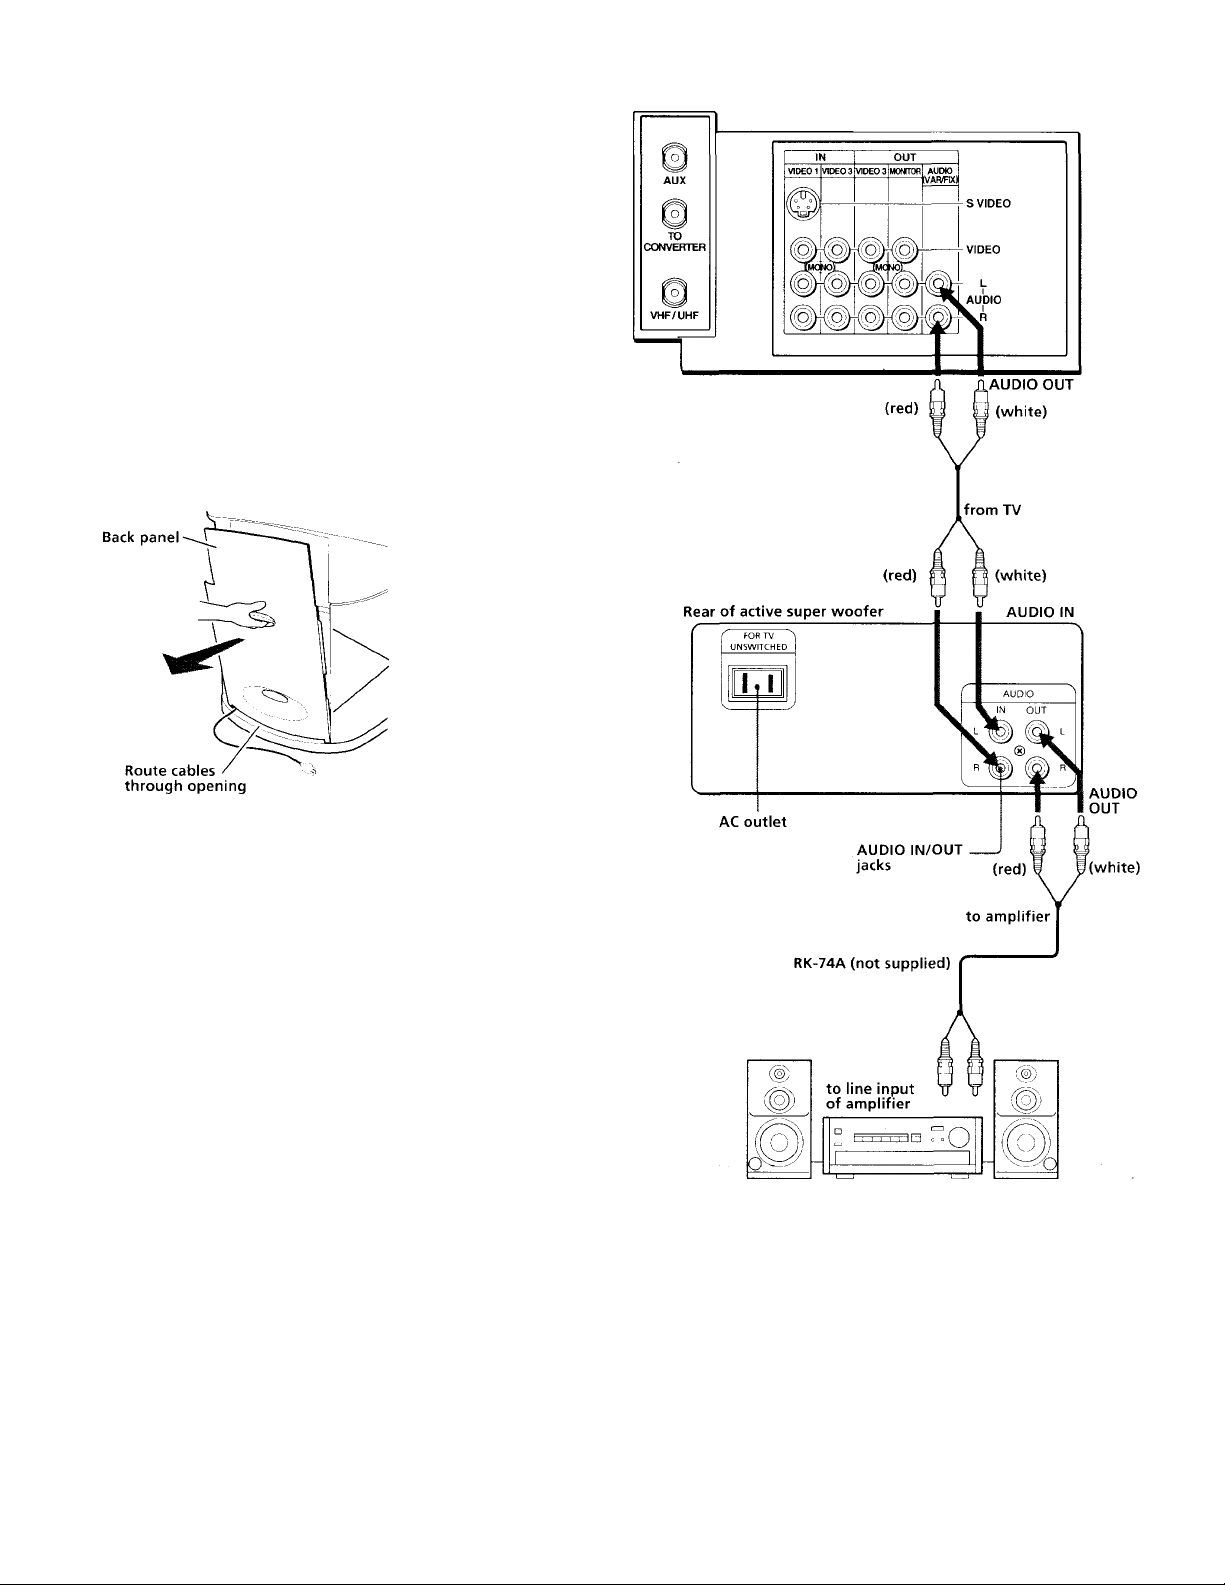
Connecting active super woofer
■ KV-32XBR85 only
This connection allows you to enjoy the sound of the
active super woofer. If you connect an audio system to
the active super woofer, you can enjoy the sound of the
audio system and the active super woofer
simultaneously.
The woofer volume varies according to the TV volume.
Use the woofer control located in the front of the active
super woofer to adjust the intensity of the bass.
Remove the back panel to access AUDIO/VIDEO jacks
and AC cord. Replace the back panel when finished.
>Clips
(Rear of TV)
Notes
• If you do not use the TV for more than 20 seconds, the active
super woofer is turned off automatically to save on power and
consumption.
• When you release MUTING, the sound of the woofer is heard
before that of the TV. This is normal.
• If you set SPEAKER to OFF in the AUDIO menu and select
FIXED in the AUDIO OUT menu (page 25), the volume of the
woofer may be excessive. We recommend that you set
SPEAKER to ON when you use the active super woofer.
• You should only connect KV-32XBR85 to the AC outlet un the
active super woofer.
• If you connect an audio system to the active super woofer, set
the amplifier’s function to INPUT.
Amplifier
Getting Started
Page 10

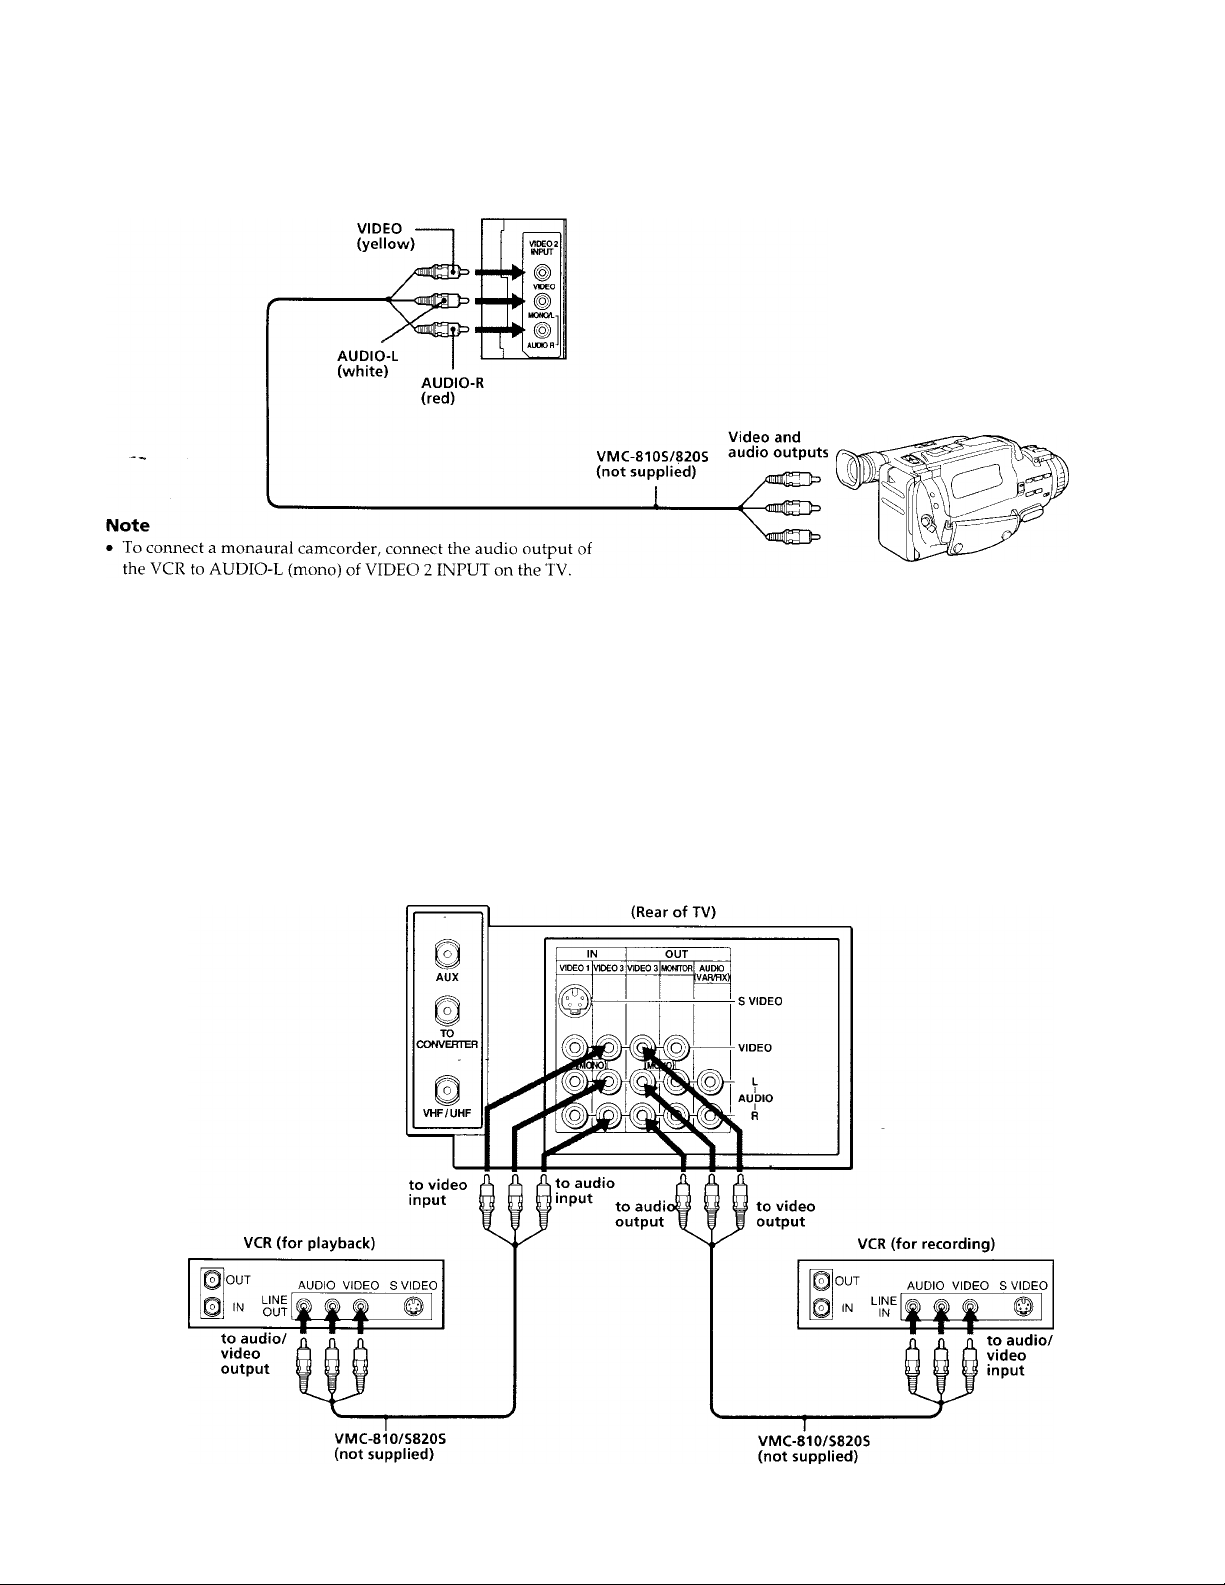
Connecting two VCRs for tape editing using MONITOR OUT
MONITOR OUT allows you to record a program that is
on the screen.
(Rear of TV)
to video
input
VMC-810/S820S
(not supplied)
The above type of connection should only be used
when you connect from the line input of one VCR, and
from the line output of a second VCR.
Notes
• Do not change the input signal while editing through
MONITOR OUT, or the output signal will also change.
• When connecting a single VCR to the TV, do not connect the
MONITOR OUT jacks at the rear of the TV. to the VCR's line
input, while at the same time connecting from the TV's VIDEO
IN jacks to the VCR's line output, as shown above.
• You can use the S video jack to connect a VCR for playback
and the AUDIO/VIDEO jack to connect a VCR for recording.
to audio
input
to audio
output
VMC-810/S820S
(not supplied)
(Rear of the TV)
Connecting an audio system
When connecting audio equipment, see page 24 and
25 for more information.
10 I Gett ng Started
Page 11

Using the TV speakers as center speakers
This feature allows you to enjoy the benefits of Dolby
Pro Logic by using the speakers of the TV as the center
speaker. To utilize this system you must have an
amplifier that is Dolby Pro Logic compatible. Connect
the speaker wires from the amplifier's center channel
output terminals to the TV's CENTER SPEAKER IN
terminals. Both right and left terminals must be
connected to receive an audio signal. After making the
above connections select "SPEAKER : CENTER" from
the AUDIO menu (page 22). The left and right audio
channels can be heard through your audio system
speakers. Please note that in this set up the volume can
only be adjusted by your amplifier.
Notes
• Always match the speaker cord and terminal colors when
making the connections.
• Unplug the TV when making the connections. If the exposed
speaker cord wires touch while the TV is plugged in, the TV
may short-circuit and be damaged.
• Do not pull on the speaker cords.
• Always turn off the amplifier power before connecting to
CENTER SPEAKER IN.
• Always match the speaker cord and terminal colors when
making the connection.
(Rear of TV)
Manufactured under license from Dolby Laboratories
Licensing Corporation. Additionally licensed under one or
more of the following patents; U.S. numbers 3,632,886,
3,746,792 and 3,959,590. "Dolby" and the double-D symbol □□
are trademarks of Dolby Laboratories Licensing Corporation.
Connecting other Sony equipment with CONTROL S jack
This feature allows you to control your TV and other
Sony components with one remote control. You can
either control the TV with a remote control from a Sony
component or control the Sony component with the
TV's remote control. The connections for the above
options are described below.
• To control other Sony equipment with the TV's
remote commander, coimect the input of the
equipment to CONTROL S OUT jack on the TV.
• To control the TV with the remote commander of
other Sony equipment, connect the output of the
equipment to CONTROL S IN jack on the TV.
(Rear of TV)
11
Page 12
step 2: Setting up
the remote control
For operating video equipment
MUTING POWER--
{ (cable) ( TV )
I ( • iQ C REC IQ CCH + iQ I
C ■ iQ ( II iQ (POWERjQ
C^O C^o C^O j
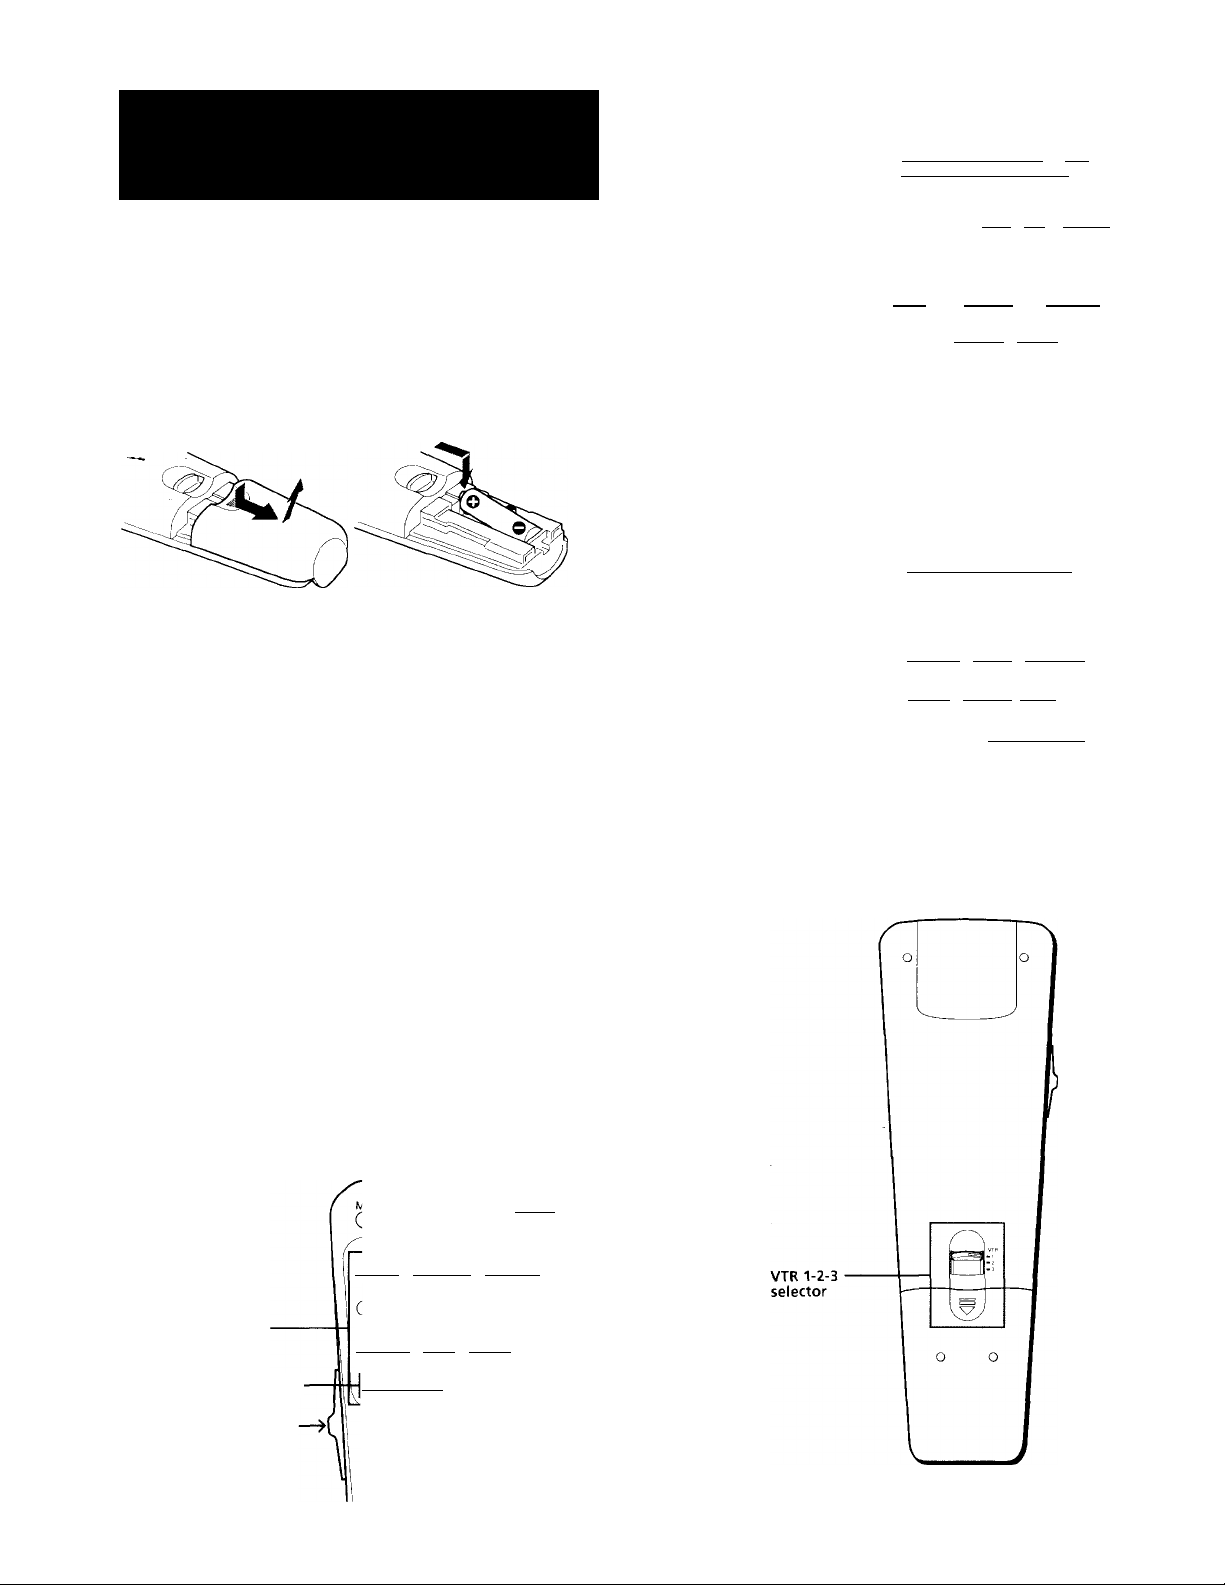
Insert one size AA (R6) battery (supplied) by matching
the + and - on the battery to the diagram inside the
battery compartment.
Notes
• With normal use, the battery should last for approximately six
months.
• If you do not use the remote control for an extended period of
time, remove the battery to avoid possible damage from
battery leakage.
• Do not handle the remote control roughly. Do not drop it, step
on it or let it get wet.
• Do not place the remote control in direct sunlight, near a
heater, or where the humidity is high.
Using the remote control
Indicates VTR selected —
Set the selector to the—
middle position.
( VTR )| (TV/VTRjQ ( CH - iQl
© © @
For using the Picture-in-Picture feature
( ) (cable) ( tv )
C^O CEO CEO
(positioniQ (swap IQ (tVVIDEoK© I
fREEZElO (audio O (CH + |Q |
Indicates PIP selected
Set the selector to the
highest position.
Rear of the remote control
_____ ______
C PIP )| ( O (CH - Qj I
i
© © ©
I
This remote control has three different operation
modes which are selected by sliding a switch on the
upper left side of the remote control. The three
operation modes are (1) for normal TV viewing, (2) for
operating video equipment, and (3) for using the PIP or
P&P features. The functions that are necessary for each
of the operations appear in the button windows as the
switch is moved up or down.
For normal TV viewing
-powp—1
Ccable) ( tv f
(sleep lO (codesetIO (chguideiO
Variable indicator
area ~
Indicates MODE selected
Set the selector to the
lowest position.
ziO CMdO QOO
(RESET iQ (+ '» iQ (menu IQ
(mode) (- Tjr iQ (retuhniQ,
© (D (D
Getting started
12
Page 13
step 3: Installing the
glass door and
Note
• The glass door in this stand is made of tempered glass.
Although it is more shock-resistant than ordinary glass,
tempered glass may shatter if it is dropped or receives a
sudden shock.
adjusting the shelf
■ KV-32XBR8S only
Follow these instructions to install the glass door and
adjust the shelf.
Installing the glass
1 Attach the top hinge, with the screws
facing the front of the TV, to the right side
of the glass door, tighten the screws snugly,
but do not overtighten. Attach the plate pad
to the left side and push the plate over the
plate pad.
cj
I
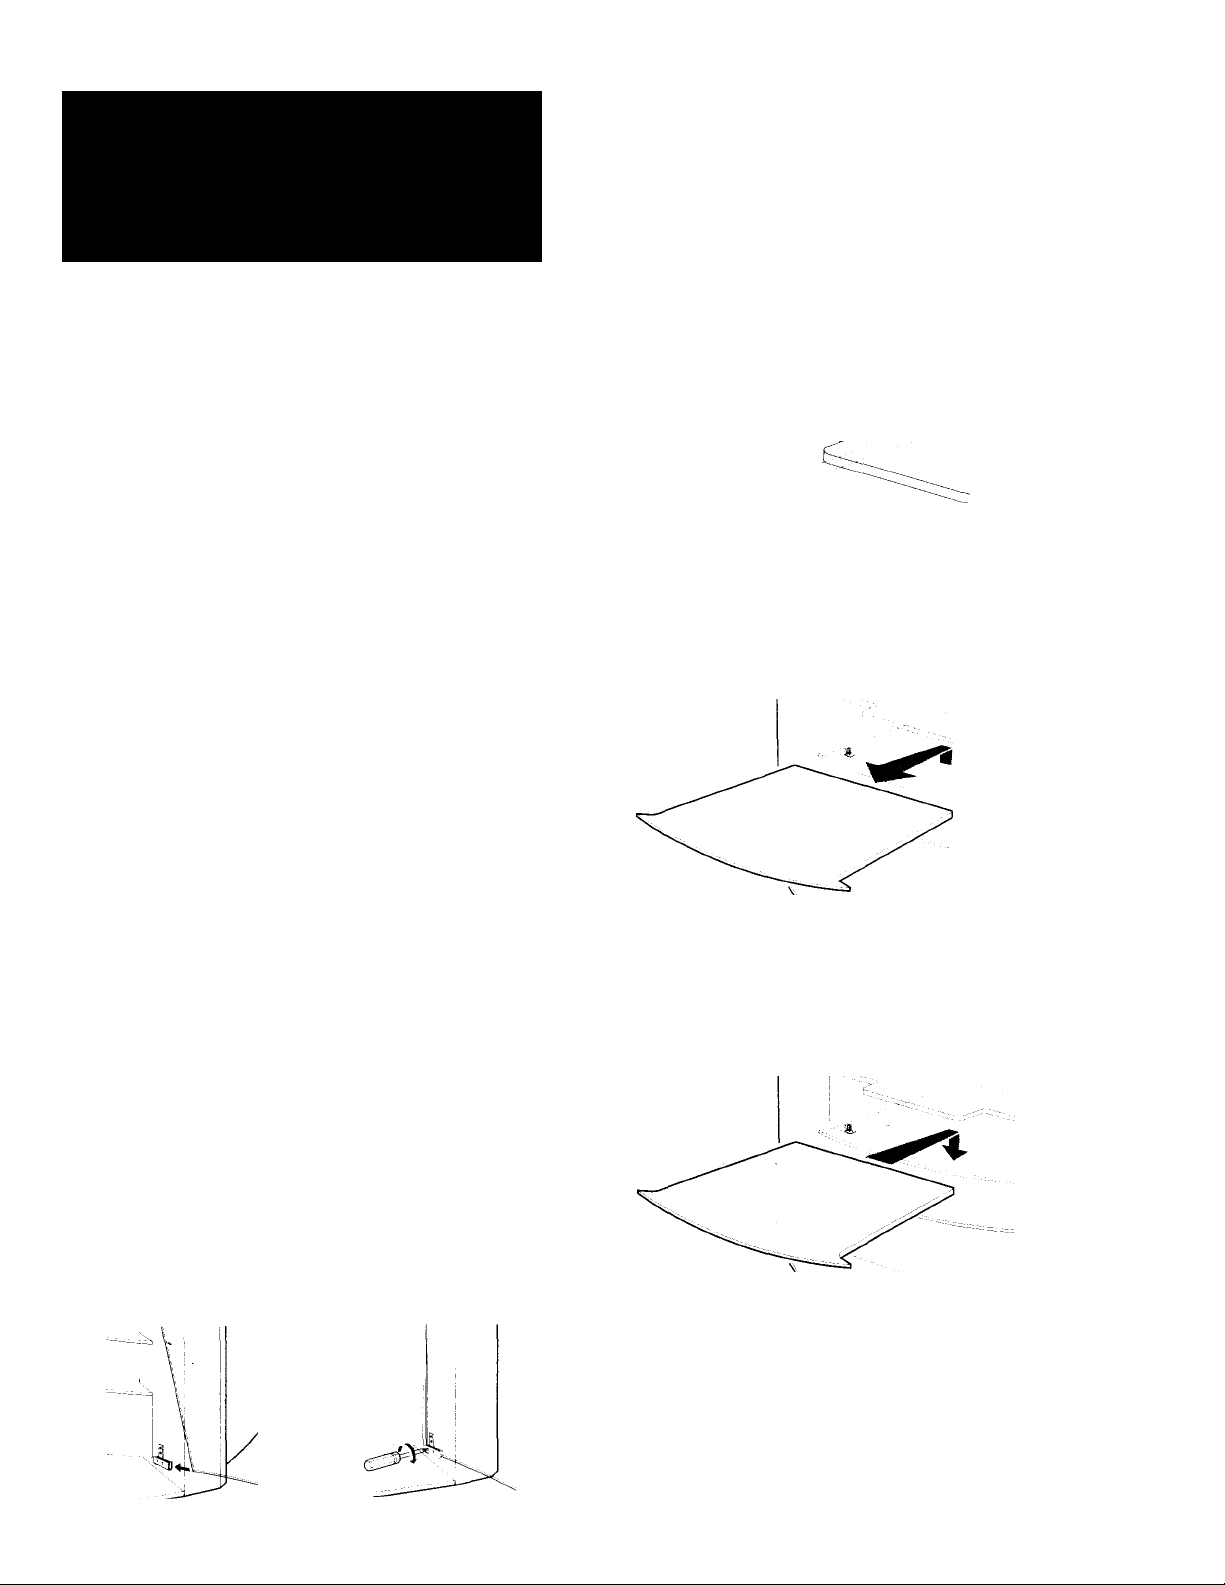
Adjusting the shelf
1 Unlock the four shelf supports with a
medium Phillips head screwdriver. Turn the
screwdriver 90° to unlock the shelf
supports.
t
2 Gently slide the shelf up and out.
2 Insert the bottom hinge into the bushing
located at the bottom, right side of the
cabinet.
The tip of the screw
, should not project.
/
3 Push the top, glass door hinge into the top,
right bushing and gently slide the glass door
into the bottom hinge. Adjust the glass door
until level, and tighten the hinge screws.
3 Insert shelf supports in the appropriate
holes. Slide shelf in, align the shelf grooves
with the shelf supports, and slide the shelf
down.
Getting Started
13
Page 14
step 4: Setting up
the TV automatically
(AUTO SET UP)
You can set up your TV easily by using AUTO SET UP
feature. It presets all the receivable channels. To set up
the TV manually, see "Setting cable TV on or off" and
"Presetting channels" (page 15, 16).
I#-the TV is set to a video input, you cannot execute
AUTO SET UP. Press TV/VIDEO so that a channel
number appears.
4 Press CHANNEL+.
-CHANNEL+
CZL
AUTO PROGRAM
"AUTO PROGRAM" appears on the screen and the
TV starts scanning and presetting channels
automatically. When all the receivable channels are
stored, "AUTO PROGRAM" disappears and the lowest
numbered channel is displayed. If the TV receives
cable TV channels, CATV is set to ON automatically.
Notes
• If more than 90 seconds elapse after you press a button, the
menu disappears automatically.
• In case of using the AUX connector, press the TV button on the
remote control first and make sure that "AUX" is displayed
beside the channel number on the screen. Then follow steps 2
and 3 above to perform AUTO SET UP.
DEMO: To browse the main functions, press VOL - in
step 2. The functions and menus are displayed one by one.
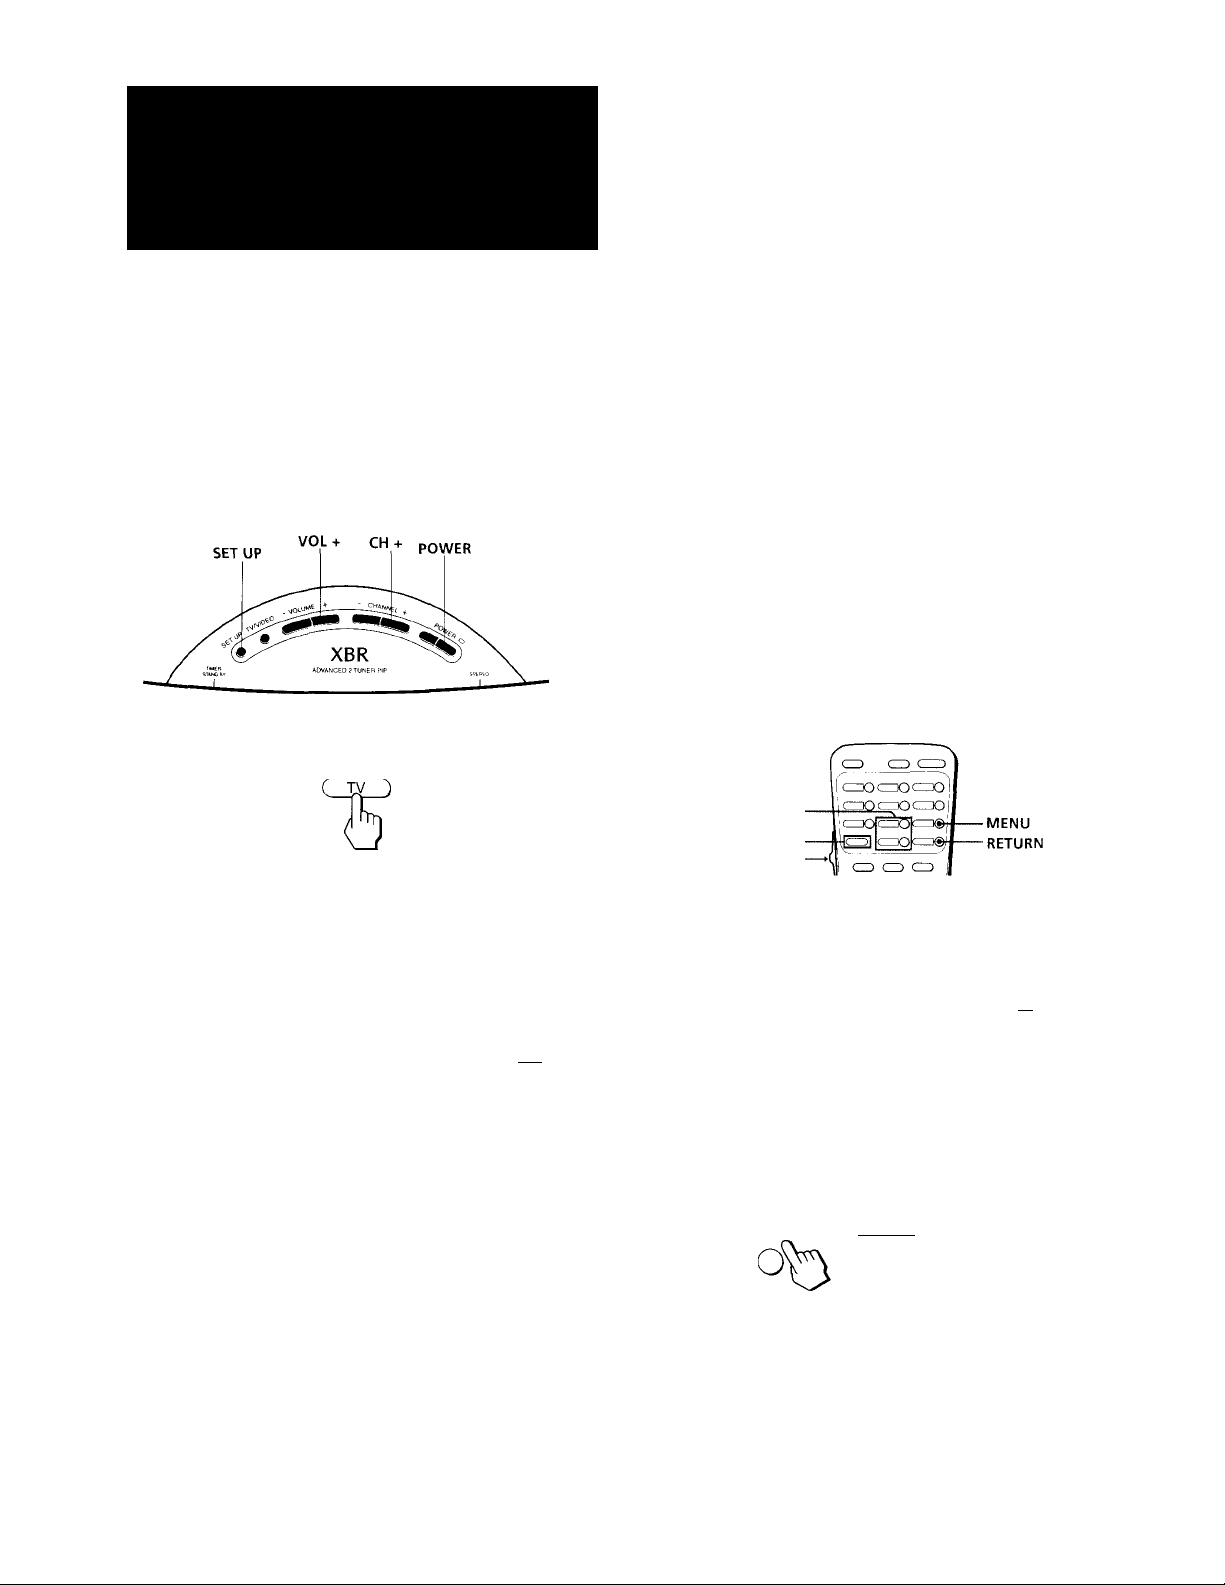
1 Press POWER (TV) to turn the TV on.
POWER-'
2 Press SET UP on the top of the TV.
The menu appears.
AUTO SET UP: ICH+l
AUTO AJUSTES:ICH-I
SETUP
REGLAGE AUTO:[VOL+
DEMO: [VOL-
J’res.s I SETUP I lo exit
3 Press CHANNEL + to select AUTO SET UP.
If you prefer Spanish or French to English, you can
change the on-screen menu language. Press
CHANNEL - for Spanish or VOLUME + for French.
-CHANNEL+
C_L
CONTINUE TO
AUTO PROGRAM?
YES:ICH+]
NO: [CH- I
Erasing or adding channels
+ ♦ or - ♦
MODE
Low position
1 Press MENU.
► B VI DEO
J- AUDIO
(menu]
BPROGRAM PALETTE
© TIMER/CH BLOCK
r=h SET UP
El CAPTION VISION
:>MENU
2 Press + 4 or - ♦ t&move the cursor (►) to
SET UP and press RETURN.
©SET UP
►CHANNEL ERASE/ADD
CHANNEL CAPTION
C+ ^ iQ (return]!
CHANNEL GUIDE
VIDEO LABEL
CABLE: OFF
AUTO PROGRAM
LANGUAGE.ENGLISH
OMENU
Use ilT illywu Ex i t !EH!J]
Press I SETUP] to exit
The picture and sound settings will be set to the factory
preset condition in the selected language.
14 I Getting Started
Page 15

3 Press + 4 or - ♦ to move the cursor (P-) to
CHANNEL ERASE/ADD and press RETURN.
c±^0
©CHANNEL
►ERASE
ADD
:>MENU
Select the channe1
Use ill! MW
ERASE/ADD
4 Erase and/or add the channel you want:
(1) Press + 4 or - ♦ and press RETURN to select
ERASE or ADD.
c±sO
©CHANNEL
ADO
PMENU
Select the channel
Use UU MW Exit IMJ
ERASE/ADD
(2) Press CH +/- or 0-9 buttons to select the channel
you want to erase or add.
Selected channel number
©CHANNEL ERASE/ADD]
(Retu^Q
0
►ERASE
ADD
^MENU
Select the channe
Use Ull 5WN] Exit iiiyj
(3) Press RETURN.
• If you selected ERASE in step (1),appears
beside the channel number, showing that
channel is erased from the preset memory.
• If you selected ADD in step (1),"+" appears
beside the channel number, showing that
channel is added to the preset memory.
5 To erase and/or add other channels, repeat
step 4.
6 When you finish, press MENU.
Notes
• If you erase or add a VHP or UHF channel, the cable TV
channel with the same number is also erased or added.
• Erasing and adding channels is also available for the AUX
input.
Exit KiiJj
Setting cable TV on or off
This setting allows you to view either broadcast or cable
10
signals. The factory setting for cable TV is ON. If you
do not desire to view cable TV, you must turn it off as
shown below.
You do not have to do this procedure if you execute
AUTO SET UP (page 14). Do this procedure only when
you want to set it manually.
1 Press MENU.
10
2 Press 4 + or 4 - to move the cursor (P-) to
SET UP and press RETURN.
The SET UP menu appears.
©SET UP
►CHANNEL ERASE/ADD
CHANNEL CAPTION
CrnQ (return I ^
CH5
If you are in one of the video modes, the CABLE
lettering will be black on the menu. To display the
CABLE lettering you must press TV on the remote
control until a channel number appears on the
screen.
CHANNEL GUIDE
VIDEO LABEL
CABLE. ON
AUTO PROGRAM
LANGUAGE:ENGLISH
:>MENU
Use illl MW Exit M
3 Set CABLE to ON or OFF:
(1) Make sure the cursor (► ) is beside CABLE and
press RETURN.
sao
(RETURN|((y
O
©SET UP
►CHANNEL ERASE/ADD
CHANNEL CAPTION
CHANNEL GUIDE
VIDEO LABEL
CABLE: OFF
AUTO PROGRAM
LANGUAGE:ENGLISH
:>MENU
Use Ull MW Exit
GtSO
■
C
(2) Press 4 + or 4 - to select ON or OFF and,
(3) press RETURN.
(PgTUfWlQ
n
4 Press MENU to return to the normal screen.
(menu~]
Getting Started
15
Page 16

Presetting channels
You can preset TV channels easily by using the AUTO
PROGRAM feature. Preset channels during the day
rather than late at night, since some channels go off the
air and will not be preset.
You do not have to do this procedure if you execute
AUTO SET UP (page 14). Do this procedure only
when you want to set channels manually.
1 Press MENU.
2 Press + ♦ or - ♦ to move the cursor (►) to
SET UP and press RETURN.
©SET UP
►CHANNEL ERASE/ADD
ŒSO
(return I (
CHANNEL CAPTION
CHANNEL GUIDE
VIDEO LABEL
GABLE. ON
AUTO PROGRAM
LANGUAGE:ENGLISH
:5MENU
Use iJU MIHMJ Ex i t !&
3 Press + ♦ or - ♦ to move the cursor (►) to
AUTO PROGRAM and press RETURN.
c+^O
c ~ ^
(retU^C
Step 5: Changing
the menu
language
If you prefer Spanish or French to English, you can change
the menu language. You do not have to do this procedure
if you execute AUTO SET UP (page 14). Do this procedure
only when you want to set it manually.
MENU
RETURN
1 Press MENU.
2 Press + ♦ or - ♦ to move the cursor (►) to SET UP
and press RETURN.
3 Press + ♦ or - ♦ to move the cursor (►) to
LANGUAGE and press RETURN.
“AUTO PROGRAM" appears on the screen and the TV
starts scanning and presetting channels automatically.
When all the receivable channels are stored, “AUTO
PROGRAM" disappears and the lowest numbered
channel is displayed.
4 Press MENU to return to the original screen.
Notes
• If you are in one of the video modes, the AUTO PROGItAM
lettering will be black on the menu. To display the AUTO
PROGRAM lettering you must press the TV/VIDEO or TV
button until a channel number appears.
• In case of using the AUX connector, AUTO PROGRAM is also
available for the AUX input. Press the TV button on the remote
commander first and make sure that "AUX" is displayed
beside the channel number on the screen. Then follow steps 1
to 3 above.
© SET UP
CHANNEL ERASE/ADD
CHANNEL CAPTION
CHANNEL GUIDE
VIDEO LABEL
CABLE: ON
AUTO PROGRAM
►LANGUAGE:ENGLISH
DMENU
Use bh MWÜ
I t lEMUl
4 Press + ♦ or - ♦ to select ESPAÑOL or FRANÇAIS
and press RETURN.
© AJUSTES
BORRAR/AÑADI R CANAL
NONBRE DEL CANAL
Œ5DO
Œ5
CANAL GUIA
ETIQUETA DE VIDEO
CABLE: SI
AUTO PROGRAMACION
►LENGUAJE: ESPAÑOL
:>MÊNU
TOU)
Usar !
Sal
L®.
5 Press MENU to return to the original screen.
Note
• Certain parts of the ESPAÑOL and FRANÇAIS menus remain
in English.
Getting Started
16
Page 17

terations
Watching the TV
3 Press VOL +/- to adjust the volume
VOL
Note
• Set the CABLE BOX/TV selector to TV.
MUTING
SLEEP
__ MODE
Low position
DISPLAY
VOL +/-
CABLE BOX/
TV selector
-----
f-e
POWER (TV)
1 Press POWER (TV) to turn the TV on.
POWER
If "VIDEO" appears on the screen, press the TV/
VIDEO, TV or CH +/- button until a channel
number appears on the screen.
2 Select the desired channel:
To select a channel directly
Press the 0-9 buttons. Press ENTER to select a
channel more quickly.
© (D @
© ©
© ® ©'
® 'O
To scan through channels
Press CH +/- until the channel you want to watch
appears.
CH
Switching quickly between two channels
You can use the JUMP button to switch or "iump" back
and forth between two channels.
Press JUMP.
JUMP
Pressing JUMP again switches back to the last channel
selected.
Note
• You cannot jump to channels you scanned through using the
CH+/- buttons.
Muting the sound
Press MUTING.
There is no audio and "MUTING" appears on the
screen.
To restore the sound, press MUTING again, or press VOL +.
MUTING
Displaying on-screen information
1 Press DISPLAY.
Channel number, the current time (if set),
headphones (if set), and MTS mode (if SAP is
selected) are displayed. Headphones and SAP
indications disappear after 4 seconds.
(continued)
Operations 17
Page 18

2 Press DISPLAY again.
Extended Data Service is turned on. If the station
provides this service, program information, program
type, program length, and a brief description of the
program are displayed.
Watching two
programs at the
same time
- PIP and P&P
3 Press DISPLAY again.
Caption Vision (if set, and is provided by
broadcast) is displayed.
To cancel the display, press DISPLAY again.
Setting the Sleep Timer
The TV stays on for the length of time you specify and
then shuts off automatically.
Press SLEEP repeatedly until the time (in minutes) you want appears.
Each time you press SLEEP, the time changes as
follows: 30 —► 60 —► 90 —► OFE.'
To cancel the Sleep Timer, press SLEEP repeatedly
until "SLEEP OFF" appears, or turn the TV off.
Changing the VHF/UHF input to the AUX input
Press TV.
"AUX" appears beside fhe channel number.
TV
You can watch the main/right picture and a window/
left picture simultaneously using the Picture-in-Picture
or the Picture-and-Picture (Twin View^“) feature
SWAP-
POSITION—
FREEZE-,
AUDIO -|
High position —
PIP—
(CA&.0 ■ ; tv '1
@9 ;,/3) II
1
limiB :.J„jggc„Vg
® @ ®
■ J 'O
TV/VIDEO
CH +/-
Displaying a window picture - PIP
Press C33 (PIP)
Input-source mode or TV
channel for the main picture
Main picture
Window picture(1/4 size)
Each time you press ( a (PIP), the size of the window
picture changes as follows:
I—>1/4 size—»-1/9 size—► 1/16 size—j
To remove the window picture, press OFF.
Notes
• If the main picture is not receiving an image, the right picture
may be in black and white.
• The window picture may be affected by the condition of the
left picture.
Input-source mode or TV
channel for the window picture
Pressing TV again switches back to the previous input.
18 I Operations
Displaying a left picture - P&P
Input source mode or
Press C33 (P&P)
To restore the normal picture, press OFF.
TV channel
Page 19

Notes
• If one of the pictures is not receiving an image, the other
picture may appear in black and white.
• One picture may be affected by the condition of the other
picture.
P&P function
:g:
i< 16
^4
Changing the input mode
Press TVA/IDEO in the PIP control area to select the input mode.
Each time you press TV/VIDEO, 'TV/' "VIDEO 1/'
"VIDEO 2" and "VIDEO 3" appear in sequence.
PIP function
Ctv/video|Q
a
P&P function
(fvmEb](^
o
The PIP or P&P picture will appear in the same input
mode as the last time you used PIP or P&P.
15 J* VIDEO 1
To restore the other screen picture sound, press AUDIO
again.
Changing TV channels in the main/right
or window/left picture.
Press CH +/- in the PIP remote control area.
PIP feature
CcH + Q
CCH -
P&P feature
CH +/- in the PIP remote control area only controls the
left screen picture.
cchzjO
(CH -
Listening to the sound of the main/ right or window/left picture.
Press AUDIO.
The display appears for a few seconds, indicafing
thaf the main/right or window/left picture sound is
being received.
PIP function
(audio |(
To restore the main picture sound, press AUDIO again.
Changing the position of the PIP window picture.
Press POSITION.
Each time you press POSITION, the window picture
will move counterclockwise on the screen.
(P0in0Nj(|^
<4»
<9/
♦ t
n
Note
• POSITION is not a P&P feature.
(9/
%
Operations I 19
Page 20

Freezing the TV screen
This feature is useful when you want to write down a
recipe from a cooking program, a displayed address or
a phone number and so on.
Press FREEZE.
(freeze|(
To restore the normal screen, press FREEZE again.
Wotes
• The frozen TV screen window will appear diagonally across
the PIP window picture.
• If using P&P, both screens will freeze when you press FREEZE.
Swapping the window/left pictures (PIP) or the main/right pictures (P&P)
Press SWAP.
Each time you press SWAP, the picture screens and
sound will switch places.
PIP feature
Adjusting the
picture (VIDEO)
You can adjust the picture setting of TV programs to
your preferences by following the instructions below.
These adjustments can also be made for your video
input programs.
^=¡»4
-------
aolcjWj----------RETURN
Press MENU.
2 Make sure the cursor (P-) is beside VIDEO
and press RETURN.
(return I i
MENU
El VI DEO
► MODE : STANDARD
PICTURE lllllllllilllllllhlllllllllit
HUE
caoR
BRIGHTNESS
SHARPNESS
NEXT PAGE
:>MENU
Use ilU RTitJ Exit M
........
.
....................
IIIKlIlllllllllllCIUI.
lllhINIIIllllllim'i
•iiii|>
......
..........................................................................
.
.......
(swap I
P&P feature
C^AP I
I
Note
• The channels being received through the AUX jack cannot be
displayed as a window picture.
3 Select the item you want to adjust.
For example:
(1) To adjust brightness, press + ♦ or - ♦ to select
BRIGHTNESS and,
0 VIDEO
MODE:STANDARD
PICTURE
c±sO
(2) press RETURN
(return I (
HUE
caoR
►BRIGHTNESS
SHARPNESS lllllllllllllllll
NEXT PAGE
:>MENU
Use UU RTWi Ex i t lEiyjJ
llllllllllllllltllllllllllllll
lllllllllllllllll
....
Illllllllllllllll
......
...
....
20 I Operations
Page 21

4 Adjust the selected item:
(1) Press + ♦ or - ♦ to adjust the item and,
(3^0
GE3
BRIGHTNESS
IllllllllllllllllllllllWIIIilllllllUlltlltl
...................
4 Press + 4 or - ♦ to select TRINITONE and
press RETURN.
.....................................
0 VIDEO STANDARD
PREVIOUS PAGE
►TRINITONE^HIGH
NR: ON
VM: ON
:>MENU
Use iJU IM Exit ««!)
(2) press RETURN.
The new setting appears in the VIDEO menu.
SVI DEO
MODE : STANDARD
CreturnIQ
O
PICTURE llllliilllllllllllllllflllllll
HUE
caoR IlillllllHI
►BRIGHTNESS
SHARPNESS
NEXT PAGE
DMENU
Use ill E!M!i Exit «U
.............
Illlllllll|||||l|...............................................
IIINIINIIIIIIIlixi
5 To adjust other items, repeat steps 3 and 4.
Description of adjustable items
Item
PICTURE Increase picture
HUE
COLOR
BRIGHTNESS Brighten the picture Darken the picture
SHARPNESS Sharpen the picture Soften the picture
To restore this menu's factory settings
Press RESET while the VIDEO menu is displayed. All the
settings of the video mode you are currently in
(STANDARD, MOVIE, or SPORTS) are restored to the
factory settings.
Selecting the TRINITONE mode
Press + 4 to
contrast for
vivid color
Make overall picture
become greenish
Increase color intensity Decrease color intensity
Press - 4 to
Decrease picture
contrast for soft color
Make overall picture
become purplish
5 Press + 4 or - ♦ to select HIGH, MEDIUM, or
NTSC STD and press RETURN.
(returnIC)^
0
Make the picture "cool" or increase bluish
tint.
Make the picture "warm" or increase
reddish tint.
Match the broadcast standard for
NTSC color temperature.
.......
c±sO
(35Z
Choose To
HIGH
MEDIUM
NTSC STD
Setting NR (picture noise reduction) ON or OFF
This setting allows you to filter out screen picture
noise. ON reduces the picture noise and OFF restores
the normal picture.
1 Press MENU.
2 Press + 4 or - 4 to select VIDEO and press
RETURN.
0 VIDEO STANDARD
PREVIOUS PAGE
►TRINITONE
NR: ON
VM:
i>MENU
Use UIJ Exit «Hyj
; MED IUM
ON
This feature allows you to adjust the color ternperature
setting (tint) that determines the red and blue tint of a
picture. Select the setting that suits your taste.
1 Press MENU.
2 Press + 4 or - to select VIDEO and press
RETURN.
3 Press + 4 or - 4 to select NEXT PAGE and
press RETURN.
0VI DEO STANDARD
►PREVIOUS PAGE
c+so
(returnK^
TRINITONE HIGH
NR: ON
VM; ON
DMENU
o
3 Press + 4 or - 4 to select NEXT PAGE and
press RETURN.
c±sO
©VIDEO STANDARD
►PREVIOUS
TRINITONE
NR:
VM:
:>MENU
Use JJU MM
PAGE
:HIGH
ON
ON
4 Press + 4 or - 4 to select NR and
press RETURN.
c±sO
(return I (^
0 VIDEO STANDARD
PREVIOUS
TRINITONE
► NR: ON
VM:
3MENU
PAGE
:HIGH
o
Use Dll MM
(continued)
Operations I 21
Exit !MJ
ON
Exit tiiwj
Page 22

S Press + ♦ or - ♦ to select ON, or OFF and
press RETURN.
OVI DEO STANDARD
PREVIOUS PAGE
c+5]0
TRIN!T0NE:HIGH
► NR: OFF
VM: ON
;)MENU
Setting VM (velocity modulation) ON or OFF
Velocity modulation improves picture definition and
contrast ratio for an overall sharper picture. The factory
.setting for VM is ON. Select OFF for a softer picture.
1 Press MENU.
2 Press + 4 or - 4- to select VIDEO and press
RETURN.
i t jg
Adjusting the sound
(AUDIO)
You can adjust the audio setting of the TV programs to
your preferences by following the instructions below.
These adjustments can also be made for your video
input programs. The TV program settings and video
program setting are stored separately.
+ ♦ or - ♦
RESET
MODE
Low position -
3 Press + 4 or - 4 to select NEXT PAGE and
press RETURN.
BVI DEO STANDARD
►PREVIOUS PAGE
( + ^ iQ (returnIC
4 Press + 4 or - 4 fo select
RETURN.
( + ^ 10 (return !(
5 Press + 4 or - 4 to select
press RETURN.
VM and press
ON,, or OFF and
TRINITONE :HIGH
NR: ON
VM:
DMENU
Use Uh MIHJ
ED VI DEO STANDARD
PREVIOUS PAGE
trinitone;high
NR: ON
►VM: ON
3MENU
Use ilU IM Exit mi
SVI DEO STANDARD
PREVIOUS
TRINITONE
NR:
► VM:
;*MENU
Use iJ!] KM
PAGE
:HIGH
ON
ON
OFF
Exit MU
Exit MU
Press MENU.
2 Press + 4 or - 4 to select AUDIO and press
RETURN.
(±^0
G
(return 11
/ AUDIO
►TREBLE
BASS
BALANCE
SURROUND:
MTS:
SPEAKER: OFF
AUDIO OUT
:>MENU
Use DU MiB
.
........................
IIIIIIIIIIIIIIIIIllHCI
OFF
MAIN
VARIABLE
3 Select the item you want to adjust.
For example:
(1) To adjust bass, press + 4 or - 4 to select BASS
and.
J- AUDIO
c^O
c ~ ^
(2) press RETURN.
TREBLE IllllllilllllUII
► BASS
BALANCE
SURROUND: OFF
MTS: MAIN
SPEAKER:
AUDIO OUT
:>MENU
Use il!J EiMiiJ
llllllltlllllllll
OFF
VARIABLE
Ex 1 t MU
.........
Exit MU
.......
...
..
22 Operations
Page 23

4 Adjust the selected item:
(1) Press + ♦ or - ♦ to adjust the item and,
Listening to
c±^0
c ~
(2) press RETURN.
The new setting appears in the AUDIO menu.
J- AUDIO
TREBLE
► BASS
BALANCE
SURROUND; OFF
MTS.
SPEAKER: OFF
AUDIO OUT
:>MENU
Use iJT «M
MAIN
VARIABLE
Ex i
5 To adjust other items, repeat steps 3 and 4
above.
Description of adjustable items
Item
TREBLE
Press + ♦ to
Increase the treble
response
BASS
Increase the bass Decrease the bass
response response
BALANCE Emphasize the right
speaker's volume
To restore the factory settings
Press RESET while the AUDIO menu is displayed.
Note
• When SPEAKER (page 24) is CENTER and AUDIO OUT (page
25) is in FIXED condition, the sound is set to mid-level and it
cannot be adjusted through your TV set.
Press - 4 to
Decrease the treble
response
Emphasize the left
speaker's volume
surround sound
(SURROUND)
SURROUND feature simulates sound reproduction
with the atmosphere of a movie theater or a concert
hall. Surround sound only works with stereo
programs.
«u
+ ♦ or - ♦
MODE
Low position
Press MENU.
Z Press + 4 or - 'f to select AUDIO and press
RETURN.
3 Press + 4 or - 4 to select SURROUND and
press RETURN.
J- AUDIO
TREBLE lllllllllllllllll
BASS Ilillllllllllllll
BALANCE
c+^O
►SURROUND; OFF
MTS
SPEAKER;
AUDIO OUT
PMENU
Use tU KS
4 Press + 4 or - 4 to select ON and press
RETURN.
MAIN
OFF
VARIABLE
.........
.........
Exit liy
czso
c ~
/ AUDIO
TREBLE llllilllllllllill
BASS
BALANCE
►SURROUND:
MTS;
SPEAKER: OFF
AUDIO OUT VARIABLE
DMENU
Use LID MM
1111111)111111111
.............1.............
ON
MAIN
Operations 23
.........
Exit SiiJ
.................................
Page 24

Selecting stereo or
Setting the speakers
bilingual programs
(MTS)
The Multichannel TV Sound (MTS) feature gives you
the choice to enjoy stereo sound or Second Audio
Programs (SAP) when available. The factory setting is
stereo sound (MAIN).
MENU
RETURN
1 Press MENU.
2 Press + or - 'f to select AUDIO and press
RETURN.
3 Press + 4 or - to select MTS and press
RETURN.
/ AUDIO
TREBLE IHIIIIll ..................
BASS llllllllfllllllll
(REU)RN||
c ~
4 Press + ♦ or - ♦ to select MAIN, SAP, or
MONO and press RETURN.
c ~
Choose
MAIN
SAP
MONO
Note
• Stereo and SAP sounds are subject to program sources. Refer
to your local TV program listings.
To
Listen to stereo sound.
The STEREO indicator on the TV lights up
while a stereo broadcast is received.
Listen to bilingual programs.
The sound of non-SAP programs will be
muted when SAP is selected.
Reduce noise during stereo broadcasts.
BALANCE ..............I
SURROUND: OFF
►MTS: MAIN
SPEAKER: OFF
audio OUT:VARIABLE
:>MENU
Use
J- AUDIO
TREBLE
BASS
BALANCE
SURROUND: OFF
► MTS:
- SPEAKER: OFF
AUDIO OUT VARIABLE
2 MENU
Use iU BDM) Ex I t BB!l]
iiiiiiiiiiiiiiiii
iiimiiiiHiffii'""'"'''’’
SAP
.............
.........
...........
...............................
(SPEAKER)
You may switch off fhe TV speakers when, for
example, you want to listen to the sound through a
stereo system.
If you use the TV speakers as center speakers and
connect a Dolby Pro Logic-compatible amplifier to
CENTER SPEAKER IN, after making the connections
display the mode set menu and set SPEAKER to
“CENTER."
MENU
RETURN
1 Press MENU.
2 Press + 4 or - 4 to select AUDIO and press
RETURN.
3 Press + 4 or - 4 to select SPEAKER and press
RETURN.
/ AUDIO
TREBLE
BASS
BALANCE
SURROUND: OFF
MTS: MAIN
►SPEAKER: OFF
AUDIO OUT
DMENU
Use iU BEiNJ Exit !1JJ
IIIIIIIIIIIIIIIII
..............|..............
VARIABLE
4 Press + 4 or - 4 to select CENTER, OFF or ON.
/ AUDIO
TREBLE llll)l)llllllllll
BASS
BALANCE
SURROUND:
MTS:
►SPEAKER: CENTER -
AUDIO OUT
3MENU
Use ill) RtRRNI Exit
If you select CENTER or OFF and press RETURN,
AUDIO OUT appears at the bottom of the menu. To
adjust AUDIO OUT, press RETURN and see AUDIO
OUT (page 25).
To turn the speakers off, change SPEAKER from ON to
OFF in the AUDIO menu.
IIIIIIIIIIIIIIIII
OFF
MAIN
VARIABLE
.......
.........
.......
.....
I
24 I Operations
Page 25

Setting audio out
Listening to
(AUDIO OUT)
This setting allows you to select either a fixed or
variable audio output. Fixed audio output means that
you cannot adjust the volume and sound characteristics
through your TV set. Variable output means that you
can adjttst the volume, bass, treble and balance through
your TV set.
If SPEAKER is CENTER or OFF, AUDIO OUT can
either be fixed or variable; however, if the SPEAKER is
ON, AUDIO OUT is variable.
+ ♦ or - ♦
MODE
Low position
orchestra seat effect
sound—OSE
Orchestra Seat Effect* ((DSE) feature restores the harmonic
balance of the sound to dramatically improve the
overall reproduction of programs. It gives the sound
more clarity, depth, and definition, making the sound
more dynamic.
OSE
MODE
------
Low position
Press OSE.
"ORCHESTRA SEAT BBE: LOW" appears on the
screen.
CvMZ
-----
IHSl aooojl
►d
1 O CD C3
Follow steps 1-4 in "Setting the speakers" on page 24 to set the speakers to CENTER and press RETURN.
J- AUDIO
TREBLE lilllllllllllllll
BASS Illllllllllllllll
BALANCE
SURROUND.
MTS: MAIN
►SPEAKER:
AUDIO OUT VARIABLE
2MENU
Use ijU iifUJiiHj Exit ««ly
.............|>......
OFF
CENTER
2 Press + 4 or - ♦ to select AUDIO OUT and
press RETURN.
J- AUDIO-
TREBLE Illllllllllllllll
csiO
(return 11
BASS Illllllllllllllll
BALANCE
SURROUND:
MTS'.
SPEAKER: CENTER
►AUDIO OUT VARIABLE
:)MENU
Use ill) »ETWl
OFF
MAIN
Ex 11 lay
3 Press + 4 or - 4 to select VARIABLE or FIXED
and press RETURN.
/ AUDIO
TREBLE Illllllllllllllll
BASS miitiiiiiiNNi
CESO
Note
• If SPEAKER is ON, AUDIO OUT will appear in black and you
will be unable to adjust AUDIO OUT.
BALANCE
SURROUND:
MTS: MAIN
SPEAKER: CENTER
►AUDIO OUT FIXED
PMENU
Use .*1») .uriiiiid
OFF
Exit lay
Press OSE again.
.........
.........
.
"ORCHESTRA SEAT BBE: HIGH" appears.
C
OSE
Press OSE again.
....
....
...
.
...
To turn off the OSE.
Co|K
We recommend LOW setting for news programs and
HIGH setting for music, sports, video games and movies.
For the best sound quality, we recommend that AUDIO
to be set at factory setting when OSE is set to ON.
* Orchestra SeaP“ Effect* (OSE) feature restores the harmonic balance
of the sound to dramatically improve the overall reproduction
of programs.
Orchestra Seat*“ Effect is using BBE technology under licence from
BBE sound Inc.
Note
• OSE may also be output through audio out.
Operations ! 25
Page 26

Listening with the
cordless stereo
headphones
Setting up the headphones
2 Turn on the headphones.
Turn the power on by adjusting the switch to ON.
Adjust the volume with the switch located below
the power switch.
Install the supplied battery into the headphones.
(1) Open the battery compartment lid by pressing on
the lid as illustrated.
(2) Insert the size AA (R6) battery into the
compartment with correct polarity and close the lid.
Battery life
When used continuously, the battery will last:
— up to 40 hours with size AA (R6) alkaline batteries or
— up to 20 hours with size AA (R6) manganese batteries.
Replace the battery with a new one when the sound deteriorates.
If you want to only listen to the sound from the
cordless headphones, turn down the TV speaker
volume or press MUTING.
To turn off the sound from the TV's speaker
Press VOL - until the sound disappears, or set
SPEAKER to CENTER (see "Setting the speakers," page
24).
To turn off the headphones
Remove the headphones from your head, and turn the
power switch to OFF, then press Cl (headphones).
To improve sound reception
• Do not cover the infrared transmitter on the TV.
• Do not cover the infrared sensors on the headphones.
Infrared transmitter
Using the headphones
MODE
Low position
Press C (headphones).
The C display appears for about three seconds.
Selected channel number
c
26 Operations
Notes
• The sound characteristics heard through the headphones
cannot be modified in the same manner as the sound
characteristics heard through the TV's speakers.
Treble, bass and balance settings are fixed. Surround, OSE and
muting features are not available.
• After you have finished listening with the headphones, it is
recommended that you remove the headphones from your
head before pressing U (headphones). Otherwise noise will be
heard through the headphones.
• To prevent hearing damage due to sudden or prolonged
excessive volume, do not set the headphones' volume too high
while listening.
Page 27

Listening to sound from a main/right (PIP) and window/left (P&P) picture
Follow these instructions to select the audio source that
you want to receive through the cordless headphones
(main or window picture). If you want to listen to
sound from the window picture, make sure that the
sound from fhe window picture is being received.
Coverage area of the infrared rays
The diagrams illustrate the approximate area covered
by the infrared rays emitted from the transmitter.
High position —
PIP
O CD CZ3
1 Press C~an (PIP) or C a l (P&P) to display a
main/right or window/left picture.
C PIP
Press D (headphones).
Each time you press D (headphones), the audio
source changes to main picture, window picture
and “OFF" in sequence.
The 0 display appears with the input mode.
P&P PIP
■ O 1
Note
• If you use the headphones at too great a distance from the
transmitter, you may hear a hissing noise, and if there is an
object between the headphones and the transmitter, the sound
may be interrupted. These phenomena are inherent to infrared
ray communication. They do not indicate a problem with the
unit, itself.
i> OFF
Audio off
Notes
• If you turn the PIP or P&P function off, the sound from the
cordless headphones changes to the main picture sound.
• If you turn the TV off, the next time you turn the TV on the
headphones will be off.
Operations 27
Page 28

Selecting the
Setting daylight
program palette
mode
(PROGRAM PALETTE)
The PROGRAM PALETTE feature allows you to choose
three different modes of picture settings. Choose the
one that best suits the type of program that you want to
watch.
1 Press MENU.
2 Press + ♦ or - ♦ to select PROGRAM PALETTE
and press RETURN.
Q PROGRAM PALETTE
ŒSO
(FËITJRnIC
G
3 Press + ♦ or - ► to select STANDARD, MOVIE,
or SPORTS mode and press RETURN.
ŒSO
►STANDARD
MOVIE
SPORT
:)MENU
Use nil MMJ Ex i t m
Q PROGRAM
STANDARD
► MOVIE
SPORT
:>MENU
PALETTE
savings
(DAYLIGHT SAVING)
Activate DAYLIGHT SAVING if you are currently
using Daylight Saving Time, or deactivate if you are
using Standard Time. Using the DAYLIGHT SAVING
feature will automatically adjust all time-related
settings (CURRENT TIME, ON/OFF TIMER and
CHANNEL BLOCK). DAYLIGHT SAVING should be
set before using the CURRENT TIME SET functions
(page 29).
+ ♦ or - ♦
RESET
MODE
Low position
DISPLAY
CODE SET
Use UJ Mlli J Ex It MU
Choose To
STANDARD Receive a standard picture,
MOVIE Receive a finely detailed picture.
SPORTS Receive a vivid, bright picture.
Note
• The settings for these modes can be adjusted in the VIDEO
menu. They will remain set unless the RESET button is
pressed.
1 Press MENU. 2 Press + ♦ or - ♦ to select TIMER/CH BLOCK
and press RETURN.
© TIMER/CH BLOCK
CURRENT TIME SET
ON/OFF TIMER
CHANNEL BLOCK
DAYLIGHT SAVING:NO
PMENU
Use ilU №J Ex i t
AM
3 Press + 4 or - ♦ to select DAYLIGHT SAVING
and press RETURN.
© TIMER/CH BLOCK
CURRENT TIME SET
ON/OFF TIMER
Œ^O
— ^
(r1turn|(
CHANNEL BLOCK
►DAYLIGHT SAVING:NO
:>MENU
Use i)!J 'MM Ex i t M
28 I Operations
Page 29

Press + ♦ or - ♦ to select YES or NO and
press RETURN.
c^O
(H5
© TIMER/CH BLOCK
CURRENT TIME SET
ON/OFF TIMER
CHANNEL BLOCK
►DAYLIGHT SAVING:YES
DMENU
___ — AM
Use ill) SM!!!J Ex
After the first Sunday in April:
Set to YES. Then, on the last Sunday in October, set to
NO. All the time-related settings automatically move
one hour back.
After the last Sunday in October:
Set to NO. Then, on the last Sunday in April, set to YES.
All the time-related settings automatically move 1 hour
ahead.
Setting the clock
(CURRENT TIME SET)
Setting the clock enables you to turn the TV on and off
with the timer, or to block a TV channel from being
watched at a certain time.
+ ♦ or - ♦
RESET
MODE
Low position
o o o
o o o
o o o
DISPLAY-
o o
©I ©
a ©/
Press MENU.
2 Press + 4 or - to select TIMER/CH BLOCK
and press RETURN.
O TIMER/CH BLOCK
►CURRENT TIME SET
ON/OFF TIMER
CHANNEL BLOCK
DAYLIGHT SAVING:YES
:^MENU
___ —: AM
Use i!J anm Ex
3 Make sure the cursor (P-) is beside CURRENT
TIME SET and press RETURN.
(return! I
© CURRENT TIME SET
Set the day.
Use ill Bcnmii! ExijIMJ
AM
4 Press RETURN again to display default day
and time.
©CURRENT TIME SET
'SUN 12:00 AM
:>MENU
(continued)
Operations
Set the day.
Use ill MMI Ex I t IMJ
29
Page 30

5 Set the day:
(1) Press + ♦ or - ♦ to set the day and,
O CURRENT TIME SET
SUN 12:00 AM
:>MENU
Setting the timer to
turn the TV on and
G
Sel t he day.
Use UU JSHJ Ex i 1 Üll
(2) press RETURN.
O CURRENT TIME SET
(return I i
-6 Set the time, hour and minutes in the same
way you set the day.
When you press RETURN to set the minutes, the
clock starts.
c^O
(H5
If you make a mistake while setting the time
Press RESET while the CURRENT TIME SET menu is
displayed, then start again from step 4.
MON 12:00 AM
3MENU
Set the time.
Use EE HETUBNI Ex i 1 menu I
© CURRENT TIME SET
►MON 3:15 PM
:>MENU
Use EE üruffll Exit EHU
off (ON/OFF TIMER)
You can set the TV to turn on and off at the time you
specify. Make sure the clock is set correctly. If it is not,
set the clock first (see page 29).
+ ♦ or - ♦
RESET
MODE
Low position
Press MENU.
2 Press + ♦ or - ♦ to select TIMER/CH BLOCK
and press RETURN.
3 Press + ♦ or - ♦ to select ON/OFF TIMER and
press RETURN.
rre^g@|a5jcz3®rl
I aOa®lJ----------RETURN
-----
MENU
To display the time
Press DISPLAY.
0 ON/OFF TIMER
► 1 .
..AM _h CH._^
2.
"ÁM'".h CH___
DMENU
Select a p r og r am.
Use LL Mliy Exit®
4 Press RETURN to display "EVERY SUN -SAT'
default setting.
(return !(
0 ON/OFF Tl
►1.EVERY SUN -SAT
T*MENU
Set the day.
Use iJE MM
MER
12:00AM CH___
:__AM
5 Press + ♦ or - 'f to select the days you want
and press RETURN.
Each time you press + ♦ or - the days cycle as
shown in "Setting the day."
© ON/OFF TIMER
►1,EVERY MON-FRl
sao
12:00AM _h CH __
2
______
__:__AM _h CH________________
:)MENU
Set f he t ime.
Use .11 ?J RinU EX Í 1 jüüi)
-h CH___
Ex i t liM)]
30 I Operations
Page 31

6 Press + ♦ or - ♦ to set the start time and
press RETURN.
0 ON/OFF TIMER
(iSO
(return
к
►1. EVERY MON-FRI
2
______
__:__AM _h CH___
¡)MENU
Set the duration.
Use iJU SM Ex i t li)
3:15PM _h CH___
7 Press + ♦ or - ♦ to set the length of the
program (1 to 6 hours) and press RETURN.
For example, to have the TV turn off after 3 hours,
set the duration to "3."
© ON/OFF T
(^O
(return 11
►1. EVERY MON-FRI
2.
:>MENU
8 Press + 4 or - to set the channel that you
want to watch and press RETURN.
When you press RETURN, the timer is set and the
TIMER indicator on the front of the TV lights up.
© ON/OFF TIMER
c±sO
G
(return 11
► 1. EVERY MON-FRI
2______
:5MENU
Select a progrагл.
Repeat steps 4 - 7 to set the second timer.
When the time you set comes^ the TV will turn on. (If
the TV is already turned on, the TV screen changes to
the channel you set.) Before the timer goes off, the
message "TV will turn off" appears for one minute and
then the TV turns off.
3:15PM 3h CH
__:__AM
Select the
channel.
Use i)i ШМ
3:15PM 3h CH 10
__ ;__AM _h CH..__
Use Uh таи Exit Ш
IMER
-h
Ex t t Ш
Blocking out a channel (channel block)
You can lockout a channel that you don't want your
children to watch. Make sure the clock is set correctly.
If it is not, set the clock first (see page
1 Press MENU.
2 Press -F 4 or - 4 to select TIMER/CH BLOCK
and press RETURN.
3 Press -F 4 or - 4 to select CHANNEL BLOCK
and press RETURN.
(iSO (return к
c ~ ^
4 Press RETURN to display default setting
"EVERY SUN - SAT".
29).
Q CHANNEL BLOCK
2
PMENU
Select a program.
Use UU RiiyRNi Exit M
__AM _h CH_
“lAM"“_h CH___
Setting the day
Each time you press + 4, the days cycle as shown
below. If you press - 4, the days cycle in reverse order.
SAT
----------
► EVERY MON FRIEVERY SUN
T
EVERY SATURDAY
t
EVERY MONDAY
EVERY SUNDAY»
► EVERY MON
i
SUNDAY
1
MONDAY
i
-SATURDAY
To change the timer setting
Set the new day and time following the procedure on
the previous page. The previous setting is erased.
To cancel the timer
Select setting, press RETURN, and press RESET. The
TIMER indicator on the front of the TV turns off.
© CHANNEL BLOCK
(return] (
. EVERY SUN-SAT
12:00AM CH_
2
-AM _h CH___
:>MENU
Set the day.
Use jJl ШШ Ex i t
5 Press -F 4 or - 4 to select the days you want
to block the channel and press RETURN.
Each time you press -i- 4 or - 4, the days cycle as
shown in "Setting the day" on the previous page.
0 CHANNEL BLOCK
► 1. EVERY SUN-SAT
(TBO
CE5
(continued)
Operations 31
12:00AM _h CH
2
______
PMENU
Set the time.
Use ii!J fflwj Ex I t H
:__AM _h CH
______________
_____________
KENUl
Page 32

6 Set the time that you want to start
blocking the channel as you did the day.
O CHANNEL BLOCK
► 1, EVERY SUNDAY
8;45AM _h CH
cisO
2
______
-_:__AM _h CH________________
3MENU
Set the duration.
Use iilj ¡MW Ex I t Iffli]
______________
7 Press + 4 or - ♦ to set the length of the
program (1 to 12 hours) and press RETURN.
For example, to block a channel for 2 hours, set the
duration to "2."
O CHANNEL BLOCK
►1. EVERY SUNDAY
CESO
2._____________
PMENU
Select the channel.
UseiJ U iilMl Exit mi
8 Press + 4 or - 4 to set the channel that you
want to block and press RETURN.
When you press RETURN, the Channel Block
setting is complete.
© CHANNEL BLOCK
►1. EVERY SUNDAY
CESO
GCE
Repeat steps 4 - 7 to lockout a second channel.
PMENU
8:45AM 2h CH..__
__-.__AM _h CH___
8:45AM 2h CH
2.- - AM
Select a p
og r am.
Use ill BEM
h CH-
Ex i t
Setting up favorite
channels
(CHANNEL GUIDE)
You can choose up to 9 channels and assign a channel
button 1-9 to each channel in the CHANNEL GUIDE.
This feature allows you to select your favorite channels
easily.
Setting up your favorite channels in the CHANNEL GUIDE
38
ilU
1 Press TV/VIDEO or TV to select TV mode.
MODE
Low position
If you select the blocked_channel during the time you
set, the message "BLOCKED" appears.
To cancel the Channel Block
Select setting, press ENTER, and press RETURN.
2 Press MENU.
3 Press + 4 or - 4 to select SET UP and press
RETURN.
4 Press + 4 or - 4 to select CHANNEL GUIDE
and press RETURN.
SCHANNEL GUIDE
CESO
( ~
(^urn|(
Use Illl mi Ex I l Hil
® @ (D
® ® ®
® ® ®
5 Press RETURN again to enter channel
position mode.
(return I (
e CHANNEL
Select a position
Use il REIUBNI Exit lEW]
GUIDE
►
3MENU
____
3MENU
® (?) ®
® ® ®
® ® ®
32 Operations
Page 33

6 Press + ♦ or - 'f to select a channel position
and press RETURN.
e CHANNEL
c+sO
(return I (
Select the channel
Use *Jll BU Ex I t
Press + 4 or - ♦ to select the channel and
press RETURN.
GUIDE
3menu
® ® ®
® ® ®
® ® ®
Setting captions to channels
(CHANNEL CAPTION)
GUIDE
® @ @
® ® ®
c+so
(return i(
© channel
20
GE3
Use illj MM Ex I t IMJ
8 Repeat step 3 to 6 to select other channels.
Notes
• If the CHANNEL GUIDE menu appears in black, the TV is set
to a video input and you cannot select CHANNEL GUIDE.
• If more than 90 seconds elapse after you press a button, the
menu disappears automatically.
• The CHANNEL GUIDE feature is not available for the AUX
input.
Selecting a favorite channel
CH GUIDE
MODE
Low position
o o o
o o o
o o o'
OOP
Press CH GUIDE.
The CHANNEL GUIDE menu appears showing
channel screens and the corresponding channel
number buttons.
(chguide|i
2 Press 1-9 buttons to select the channel you
want.
To cancelthe CHANNEL GUIDE menu
Press CH GUIDE again.
• buttons to select
CHANNEL GUIDE
® @ @
® ® ®
@ Ci ) ®
Use ®-@ I
D select.
► 20
¡3MENU
(7) (8) (9)
You can add a caption to a channel. For example, you
can name channel 20 "ESPN".
MENU
RETURN
■ TV/VIDEO
■ TV
1 Press MENU.
2 Press + 4 or - 4 to select SETUP and press
RETURN.
3 Press + 4 or - 4 to select CHANNEL CAPTION
and press RETURN.
©CHANNEL CAPTION
Use iiil IM Ex I t 111
4 Press RETURN again.
© CHANNEL CAPTION
:>MENU
Select
Use bU Ex i t IMI
channeI.
the
5 Press + 4 or - 4 to select the channel and
press RETURN.
c±^0
c ~ ^
©CHANNEL CAPTION
Select the letter
Use bl! BM Exit lEHiiJ
20
DMÈNÙ
Note
• To reset CHANNEL GUIDE, go into the CHANNEL GUIDE
menu as explained in "Setting up your favorite channels in the
CHANNEL GUIDE" (page 32).
(continued)
Operations 33
Page 34

Enter the letters (up to four) to caption the
channel:
(1) Press + ♦ or - ♦ to display the first letter.
Each time you press + ♦ or - the letter
changes as shown below and.
(blank space)
___
t
c+BO
( — •i'
(2) press RETURN to select.
©CHANNEL CAPTION
(return I (
Select the letter.
Use iJU
(3) Repeat steps (1) and (2) to select the remaining
letters and press RETURN.
©CHANNEL CAPTION
:)MENU
mj Ex i t «NUj
20
E
20
ESPN
DMENU
Setting video labels
(VIDEO LABEL)
This feature allows you to label each video input mode
so that you can easily identify the connected
equipment. For example, you can label VIDEO 1 IN as
VHS.
MENU
RETURN
1 Press MENU.
2 Press + 4 or - 'f to select SET UP and press
RETURN.
Select the letter.
CWi Exit «Ml
Use til
/ Repeat steps 4 to 6 to caption other
channels.
To erase a caption
Press RESET after step 5.
Notes
• If the CHANNEL CAPTION menu appears in black, the TV is
set to a video input and you cannot select CHANNEL
CAPTION.
• If more than 90 seconds elapse after you press a button, the
menu disappears automatically.
• The CHANNEL CAPTION feature is not available for the AUX
input.
3 Press + 4 or - 4 to select VIDEO LABEL and
press RETURN.
© VI DEO LABEL
(return
4 Press + 4 or - 4 to select the input mode
you want to label and press RETURN.
(return 11
►VIDEOl VIDEOl
Use tl Mi!U Ex I
©VIDEO
Use til mm Exi
VIDE02
VIDE02
VIDEOS
VIDE03
DMENU
LABEL
VIDEOl VIDEOl
VIDE02 VIDE02
VIDEOS
VIDEOS
3MENU
«M
34 I Operations
Page 35

5 Press + or - to select the label and press
RETURN.
& V1 DEO LABEL
► VIDE01 VHS
VI0E02
CT^O
Use Exit
Each time you press + ♦ or - the label changes as
shown below.
VIDE02
VIDE03 VIDE03
3MENU
Selecting Caption
Vision (CAPTION VISION)
VIDEO 1
VIDEO 1 S VIDEO BETA 8 mm VHS LD DSS
t_______________________________________1
VIDEO 2
-VIDEO 2 «-► BETA 8 mm VHS LD DSS
t______________________________I
VIDEO 3
VIDEO 3 BETA 8 mm <-► VHS LD •h-. DSS
t
______________________________
I
6 Repeat steps 4 and 5 to label other input
modes.
Note
• If more than 90 seconds elapse after you press a button, the
menu disappears automatically.
Some programs are broadcast with Caption Vision. To
set Caption Vision, select either CCl, CC2, CCS, CC4,
TEXTl, TEXT2, TEXTS, or TEXT4 from the menu.
CCl, CC2, CCS, or CC4 shows you a caption, that is a
printed version of the dialog or sound effects of a
program. (The mode should be set to CCl for mosf
programs.)
TEXTl, TEXT2, TEXTS, or TEXT4 shows you text, that
is information presented using half of the screen. It is
not usually related to the program.
MODE -
Low position -
c=X)jaDfc^®li-------- MENU
■1^ azQ:^im
CZD O CID
-------
RETURN
Press MENU.
2 Press + 4 or - « to select CAPTION VISION
and press RETURN.
tS] CAPTION VISION
► ED 1
m2
c+sO
E3 3
El] 4
TEXTl
TEXT2
TEXT3
TEXT4
PMENU
Use ill) IM) Ex I 1 ija
3 Press + 4 or - 4 to select the caption type
and press RETURN.
ED CAPTION VISION
4ED1
(return! (
Notes
• To display captions, press DISPLAY button. Refer to page 17.
• Captions may appear with a white box or another error
instead of a certain word. Poor reception of TV programs can
also cause errors in Caption Vision.
m 2
E33
^4
TEXTl
TEXT2
TEXTS
TEXT4
3MENU
Use IJT iHTilHlI ExitJrt
Operations 35
Page 36
Operating video equipment
You can operate video equipment that has an infrared
remote sensor with the supplied remote control. To
operate it, set the manufacturer's code number.
Setting the manufacture's code
The following Sony video equipment is assigned to
each position of the selector at its factory preset:
VTR 1 Beta, ED Beta VCR
VTR 2 8 mm VCR
VTR 3 VHS VCR
You can change the settings of each position.
___
CD CCD
; crOdDfOO
iccX)czX)aOl
MODE
Low position .
3) aocDQi'
|o "O o|
o o o
o o o
olor^
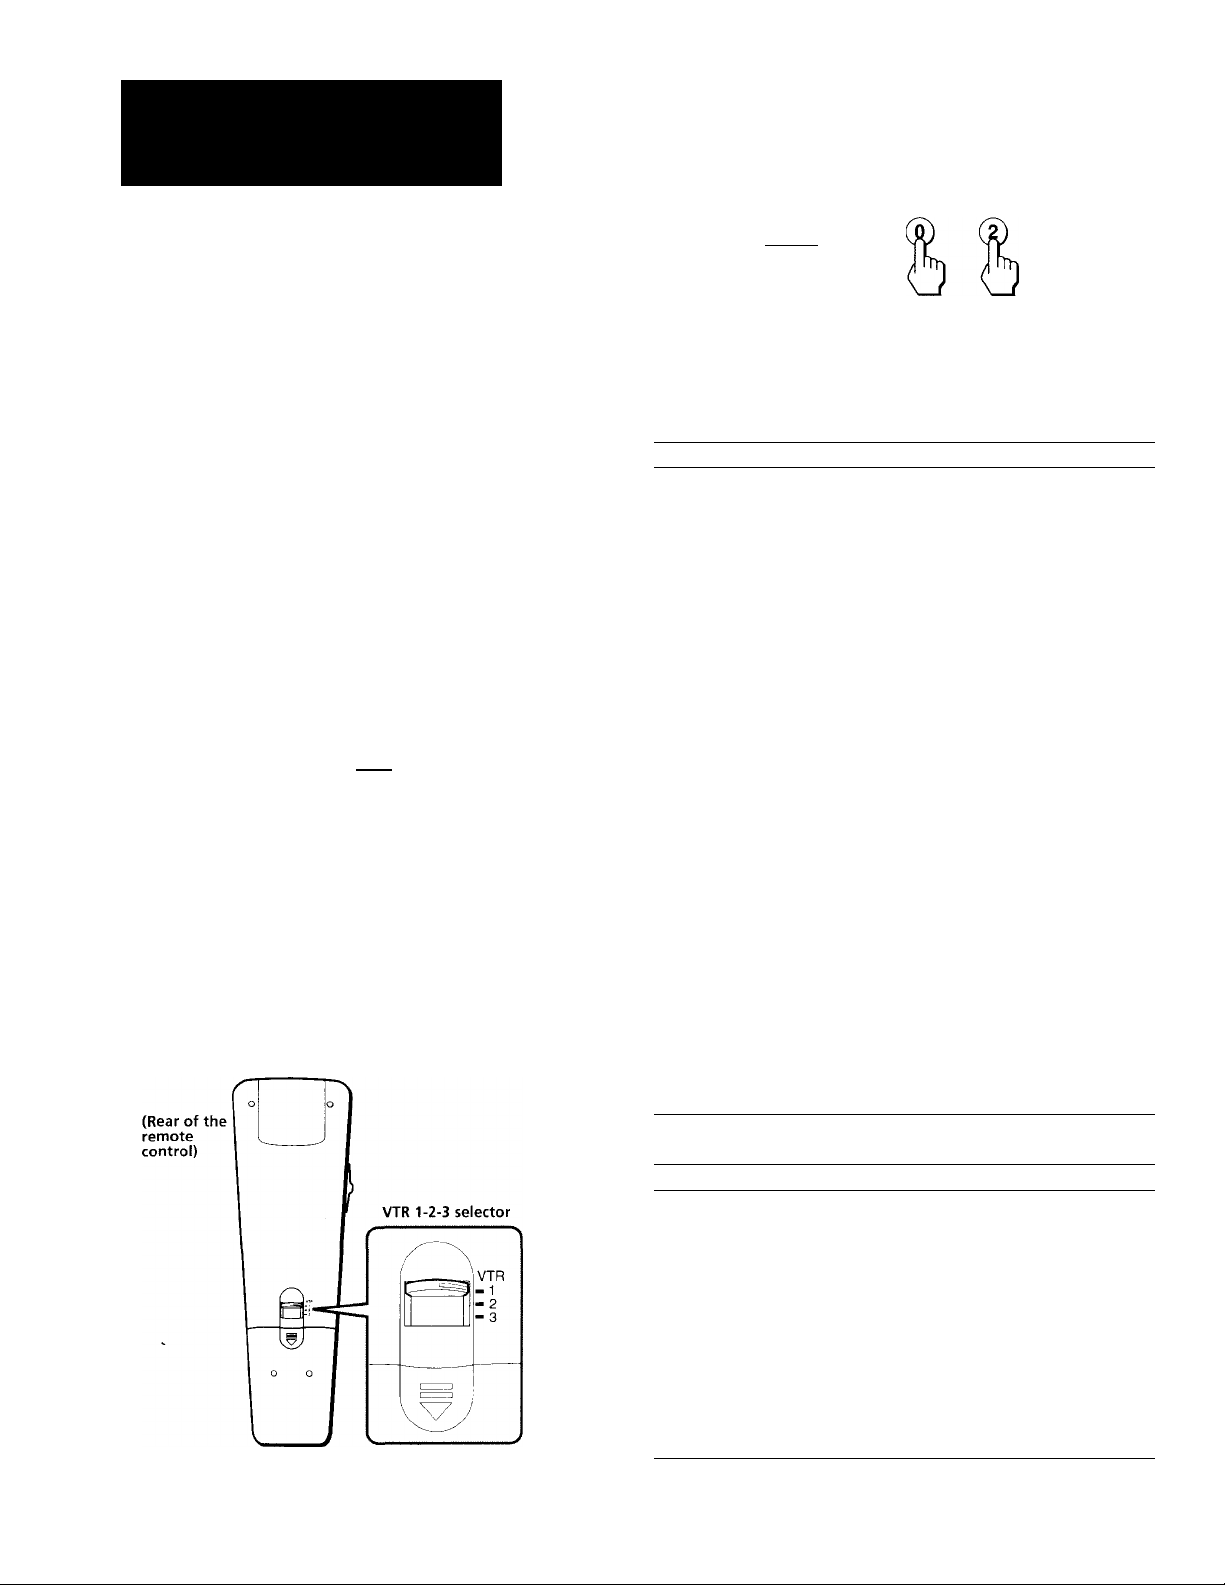
1 Set the VTR 1-2-3 selector to the position
you want to set the code.
\
CODE SET
0-9 buttons
ENTER
While pressing CODE SET, press 0 - 9 to
enter the manufacturer's code number (see
the chart in the column). For example, to
operate a Sony 8 mm VCR, press 0, 2 and
ENTER.
(codesetIQ -|-
Note
• To use another manufacturer's equipment besides a Sony VCR,
set the selector to a position not being used for your Sony
video equipment.
VCR manufacturer code numbers
Manufacturer Code number
SONY 01, 02, 03
CANON 05
EMERSON
FISHER 10,11,12,15
FUNAI 29
GENERAL ELECTRIC
GOLDSTAR 25
HITACHI 07, 08, 36
JVC 16, 35
MAGNAVOX 05, 06, 09
MITSUBISHI
MULTITECH 29
NEC 16, 23, 31
PANASONIC
PHILCO 05, 06
PHILIPS 05, 06, 09
QUASAR
RCA 07, 08
SAMSUNG
SANYO
SCOTT 21
SHARP 13,14
SHINTOM 34
SYLVANIA 05, 06, 09
SYMPHONIC
TEKNIKA 28,29
TOSHIBA 20,21
TOTE VISION
ZENITH
22, 30, 33
05, 08
18,19, 26, 27
05, 06, 37
05, 06
24, 32
11,15
29
25
17
36 I Operations
MDP manufacturer code numbers
Manufacturer
SONY 04
KENWOOD
MAGNAVOX 52
MARANZ 54
MITSUBISHI
PANASONIC
PHILIPS 52
PIONEER 51
RCA
SANYO
SHARP 56
YAMAHA 53
Code number
58
51
55
51
57
Page 37

Notes
• If more tKan one code number is listed, try entering them one
by one, until you come to the correct code for your equipment.
• In some rare cases, you may not be able to operate your nonSony video equipment with this remote control. This is because
your equipment may use a code that is not provided with this
remote control. In this case, please use the equipment's own
remote control unit.
• The code numbers for Sony equipment are assigned at the
factory as follows:
Beta, ED Beta VCR 01
8 mm VCR 02
VHS VCR 03
Caution
When you remove the battery from the remote control, the code
may revert to the factory setting. Reset the code each time you
replace tlieJjatter.y, if necessary.
Operating video equipment
Video operating
Middle position
VTR
buttons
1 Set the VTR 1-2-3 selector according to the
video equipment you want to operate.
Use the video operating buttons on the
remote control to operate the video
equipment.
Operating a VCR Buttons on the remote
To turn on or off
To change channels Press CH +!-
To record Press # and REC
To play
To stop
To fast forward
To rewind the tape
To pause
To search the picture
forward and backward
control
Press POWER
simultaneously
Press ►
Press ■
Press ► ►
Press
Press II
To resume normal playback,
press again
Press ► ► or during
playback
To resume normal playback,
release the button.
Operating a multi-disc
player
To play
To stop
To pause Press II
To search the picture
forward and backward
To search the chapter
Buttons on the remote
control
Press ►
Press ■
To resume normal playback,
press again.
Keep pressing ► ► or ◄ ◄
during playback
To resume normal playback,
release the button.
Press CH +!-
Note
• If the video equipment does not have a certain function, the
corresponding button on this remote control will not operate.
Operations 37
Page 38

Operating a cable box
Setting the manufacturer's code
Use POWER(CABLE) and the TV control
buttons (0 - 9, ENTER, JUMP and CH +/-) to
operate the cable converter box.
® (D @
® ® ®
® (D (9)^
ENTER
® o
JUMP
Follow these instructions to set the manufacturer's
code which will enable you to operate a connected
cable box with the pre-programmed remote control.
For example, you can set the remote control to operate
a cormected Zenith cable box as follows:
POWER (CABLE)
MODE
Low position
10 O 01
o o o
o o o
iOl3^
l\l©
e
\~ ~ /
JUMP
0-9 buttons
ENTER
CH +/-
CABLE BOX/TV
selector
1 Set the CABLE BOX/TV selector to CABLE
BOX.
CABLE BOX. .TV
2 While pressing CODE SET, press 6 and 8
(Zenith's code number —see chart on right)
and ENTER.
To operate the TV
Set the CABLE BOX/TV selector to TV. Then use the
TV control buttons to control the TV.
For more details on operating the cable box
Refer to the operating instructions that come with the
cable box.
Manufactures and code numbers (cable box)
Manufacturer
JERROLD
PIONEER
SCIENTIEIC ATLANTA
TOCOM
ZENITH
Notes
• If more than one code number is listed, try entering them one by one
until you come up with the correct code for your equipment.
• If you enter a new code number, the code number you
previously entered at that setting is erased.
• In some cases, your equipment may use a code that is not
provided with this remote control and you may not be able to
operate your cable box with the supplied remote control. In
this case, use the equipment's own remote control unit.
• When you remove a battery from the remote control, the code may
be erased. Reset the code each time you replace the battery, if
necessary.
• The JUMP button may not work or cause another function in
some cable boxes.
Code number
60, 61, 62, 63, 64, 65, 73
69, 70
66, 67
71, 72
68
^odeset|(0 ) +
33 Operations
Page 39

Auto cable input select function
This remote control also features a function that will
switch automatically to your cable box TV input
channel when you turn on the TV or cable box.
To reset the auto cable input select setting
While pressing CODE SET, press POWER (CABLE)
and ENTER.
You can select 2-6 channels or VIDEO 1 depending on
your cable box. For example, you can set the TV's
channel to 3 whenever you turn the cable box on as
follows:
POWER (TV)
CODE SET
TV
2-6 buttons
ENTER
CABLE BOX/TV
selector
Set the CABLE BOX/TV selector to CABLE BOX.
CABLE BOX. .TV
+
Notes
• In some cases, your cable box may use a code that is not
provided with this remote control and you may not be able to
operate your cable box with the supplied remote control.
• When you remove the battery from the remote control, the
setting may be erased. Make the setting again each time you
replace the battery, if necessary.
• If your TV's AC cord is plugged in to the cable box's switch
outlet, it may effect the proper operation of this function.
2 While pressing CODE SET, press POWER
(CABLE), TV, 3 and ENTER.
.-POWER TV
(cable'
+
If you are viewing VIDEO 1 for cable TV, you can set as
follows:
ENTER
While pressing CODE SET, press POWER (CABLE), TV/VIDEO and ENTER.
(gODESET[(
POWER TV/VIDEO
+
ENTER
Operations 39
Page 40

Additional Information
Troubleshooting
After trying the methods below, if the problem persists,
contact your nearest Sony dealer.
No picture (screen not lit), no sound
^ Make sure the power cord is cormected
securely.
■ ♦ ■ Operate with the buttons on the TV.
^Check to see if the TV/VIDEO setting is
correct; when watching TV, set to TV, and
when watching video tapes, set to VIDEO.
^Try another channel. It could be station
trouble.
Only snow and noise appear on the screen
^ Check the CABLE setting in the SET UP
menu, (page 15)
■ ♦ ■ Check the antenna/cable connections.
♦ ■ Make sure the channel is broadcasting
programs.
Dotted lines or stripes
♦ Adjust the antenna.
♦ Move the TV away from noise sources such
as cars, neon signs, and hair-dryers.
Double images or ghosts
♦ Use a highly directional outdoor antenna
or a cable (when the problem is caused by
reflections from nearby mountains or tall
buildings).
Cannot operate menu
♦ If the item you want to choose appears in
black, you cannot select it. Press TV/
VIDEO until a channel number appears.
Poor or no picture (screen lit), good sound
Adjust PICTURE in the VIDEO menu.
(page 20)
^Adjust BRIGHT in the VIDEO menu.
(page 20)
^ Check antenna/cable connections.
^ Make sure S VIDEO is set to ON in the SET
UP menu, when watching video tapes with
an S video type VCR.
Good picture, no sound
^ Press MUTING so that “MUTING"
disappears from the screen, (page 17)
■ ♦ Check the MTS setting in the AUDIO
menu, (page 24)
^Make sure SPEAKER is set to ON in the
AUDIO menu, (page 24)
No color
► Adjust COLOR in the VIDEO menu.
(page 20)
► Black and white programs cannot be seen
in color.
Cannot receive upper channels (UHF) when
using an antenna
♦ Check if CABLE is OFF in the SET UP
menu, (page 15)
♦ Use or AUTO PROGRAM to add receivable
channels that are not presently in TV
memory, (page 14)
Cannot receive any channels when using
cable TV
♦ Check if CABLE is ON in the SET UP
menu, (page 15)
♦ Use AUTO PROGRAM to add receivable
channels that are not presently in TV
memory, (page 14)
Remote control does not operate
♦ Battery could be weak. Replace the battery.
♦ Make sure the TV's power cord is
connected securely to wall outlet. -
♦ Set the GABLE BOX/TV selector to TV
when operating your TV.
♦ Are fluorescent lights too close to TV?
Move at least 3-4 feet away from TV.
40
Additional Information
Page 41

Remote control's power, channel up/down, channel buttons do not function
^Set the CABLE BOX/TV selector to the
correct position.
Cannot gain enough volume when using a cable box
^ Increase the volume at the cable box.
Then set the CABLE BOX/TV selector
to TV and adjust the TV's volume.
The current time resets whenever the TV is turned on
Connect the TV's and the cable box's
AC power cord to separate wall outlets.
The TV needs to be cleaned
^ Clean the TV with a soft dry cloth.
Never use strong solvents such as
thinner or benzine, which might
damage the finish of the cabinet.
The TV always turns on to the same channel
^ Check if you have preset your remote
control for the AUTO cable input select
function. If you do not want this
feature, reset your remote control (page
39).
Additional Information
41
Page 42

Specifications
Television system
Channel coverage
Antenna
Picture tube
Screen size (in.)
Number of inputs/outputs
Video
S video
Audio
Audio out
Monitor out
Loop out
Control S (IN/OUT) mini jack
Speaker output (W)
Center speaker(W)
Power requirements
Power consumption (W)
When in use
In standby
Active super woofer
Dimensions (W/H/D) (mm)
Mass (kg)
Hi Black Trinitron® tube
A#
American TV standard
VHP: 2-13 / UHF: 14-69 / CATV: 1-125
75-ohm external antenna terminal for VHF/UHF
Trinitron® tube
27
3
1
3 3 3
1
1
1
1
15 Wx2
1
120 V
60 Hz
185 195
5
— —
751.2x570.7x571.5
(29.6 X 22.5 X 22.5 in.)
53.7
(118.4 lbs)
(33.5 x 25.4 x 24.3 in.)
32 32 Measured diagonally
3 3
1 1
1 1
1 1
1
1
15 Wx2
1
120 V
60 Hz
5
850.4 X 645.8 x 617.5
71.1
(156.7 lbs)
1
1
15 Wx2
1
120 V
60 Hz
*195
5
11
850.4x 1144.6x698.9
(33.5x45.1 X 27.5 in.)
90.6
(199.7 lb)
Notes
1 Vp-p, 75 ohms unbalanced, sync
negative
Y: 1 Vp-p, 75 ohms unbalanced,
sync negative
C: 0.286 Vp-p (Burst signal), 75 ohms
500 mVrms (100% modulation).
Impedance: 47 kiloohms
More than 900 mVrms at the
maximum volume setting (variable)
More than 500 mVrms (fix)
Impedance: 5 kiloohms
Video (phone jack): 1 Vp-p, 75 ohm
unbalanced, sync negative
Audio (phone jack): 500 mVrms
(100% modulation)
Impedance: 10 kiloohms
7.5 ohms
16 W (NOR), 16 ohms 30 W (MAX)
Supplied accessories
Remote commander RM-Y127 (1)
Size AA (R6) battery (2)
Cordless stereo headphones MDR-IF120 (1)
RCA audio cable (KV-32XBR85)
* Not including super woofer
42 I Additional Information
Optional accessories
U/V mixer EAC-66
Connecting cables VMC-810S/820S, VMC-720M, YC-15V/30V,
RK-74A
TV stand SU-27XBR4 (KV-27XBR45 and 27XBR45M)
TV stand SU-32XBR4 (KV-32XBR45)
Design and specifications subject to change without notice.
Page 43

index
Adjusting
picture 20
sound 22
Antenna 5
Auto Program 14
Auto cable input select function 39
Battery 12
Cable box 5
Caption Vision 35
Center Speaker 11
Channel Block 31
Channel Caption 33
Channel Guide 32
Connections
without a cable box 6
with a cable box 7
Jump 17
Listening
Surround 23
OSE (Orchestra Seat Effect) 25
Headphone 26
Muting 17
Operating
Video equipment 36
Cable box 38
Cable box input channel
VIDEO 1 MODE 39
Presetting channels 16
SAP (Second Audio Program)
Selecting
Menu language 16
MTS (Multichannel TV Sound) 24
Audio out 25
Setting
Daylight Saving 28
Program Palette 28
Remote Commander 12
Cable TV 15
Speak.er 24
Clock (CURRENT TIME SET) 29
ON/OFF timer 30
Channel block 31
39
24
Video label 34
Sleep timer 18
Watching
TV 17
Video tapes 6
PIP 18
P&P 18
Name of controls
♦ +/♦ -buttons 14
AUDIO button 12,19
Cable Box/TV selector 38
CH (channel) GUIDE button 33
CH (channel)+/-button 14
CODE SET 36, 38
CONTROL S jack 11
DEMO button 14
DISPLAY button 17
ENTER button 17
FREEZE button 20
HEADPHONE button 26
JUMP button 17
MENU button 12,14
MODE button 12
MONITOR OUT jacks 10
MUTING button 17
Number buttons (0 - 9) 14,17
PIP button 18
PIP off 18
PIP size 18
P&P button 18
POSITION Button 19
POWER button 17
RESET button 21,23
RETURN button 14,15
S VIDEO input jack 6
SLEEP button 18
SWAP button 20
TV/VIDEO button 12,16
VAR AUDIO OUT jacks 10
VCR 6,7
VHF/UHF antenna terminal 5
VIDEO 1 IN jacks 6
VIDEO 2 INPUT jacks 8
VIDEO 3 IN jacks 8
VTR 1-2-3 Selecter 12, 37
VOL (volume) +/- buttons 17
Additional Information
43
Page 44

Trinitmn Color TV
Sony Corporation Printed in U.S A.
 Loading...