

Page 1
R
FD Trinitron
Colour Television
4-204-788-91(2)
Instruction Manual
Сборник инструкций
Инструкции за експлоатация
GB
RU
BG
KV-25FX20R
KV-29FX20R
©1999 by Sony Corporation Printed in Spain
Page 2

2
Page 3
Thank you for choosing this Sony TV.
Before operating the TV, please read this manual thoroughly and retain it for
future reference.
Keys to read this Instruction Manual:
• Use Getting Started if you wish to install the TV set and to get familiar with the
basic functions.
• Use Advanced Operation if you wish to know more about the additional features
of the TV set.
• Symbols used in the manual:
• Informs you of possible hazards
Instruction Manual
GB
• Important information
• Information on a feature
• 1, 2 ... Sequence of instructions
MENU
• Shaded buttons on the remote control show the buttons you have to
K
press to follow the sequence of instructions.
• Informs you of the result of the instructions.
• The process continues on the next page to get final result.
3
Page 4
For Your Safety
WARNING
Safety Information
All TVs operate on extremely high voltages. To prevent fire or electric shock, please follow the safety
procedures indicated below.
For General Safety
• Do not expose the TV set to rain or moisture.
• Do not remove the rear cover.
• For your protection, refer all servicing to qualified personnel only.
For Safe Installation
• Do not install the TV in hot, humid or excessively dusty places.
• Do not block or cover the ventilation openings. For ventilation, leave
a space of at least 10 cm all around the set.
• Do not install the TV where it may be exposed to mechanical vibrations.
• Place the TV set only on a stable stand designed for the weight and
dimensions of the TV.
For Safe Operation
• Do not operate the TV set on anything other than a 220-240V AC, 50Hz
supply.
• Do not operate the TV if any liquid or solid objects fall in through the
ventilation slots. Have it checked immediately.
• For environmental and safety reasons, it is recommended that the TV set
is not left in standby mode when not in use. Switch off at the mains.
• Do not disconnect the TV by pulling on the power cable. Disconnect by
removing the mains plug.
• In case of a thunderstorm, disconnect the TV set from the main supply and
the aerial. Otherwise the set may be damaged by a stroke of lightning.
4
For Your Safety
For Maintenance
• Clean the TV screen with a soft dampened cloth. Do not use any abrasive
cleaners.
• Dust and nicotine deposits may cause heat accumulation inside the TV set.
In the long term this could be a safety risk and may shorten the lifetime of
your TV set. Therefore have your set serviced about every five years.
Page 5

Table of Contents
Table of Contents
Keys to read this Instruction Manual .................................................................................................. 3
For your Safety ........................................................................................................................................ 4
Getting Started
Overview
Checking the Accessories Supplied ......................................................................................... 6
Overview of TV Buttons ........................................................................................................... 6
Overview of Remote Control Buttons ..................................................................................... 7
First Time Operation
Step 1 - Installation
Inserting Batteries into the Remote Control ........................................................................... 8
Connecting the Aerial ................................................................................................................ 8
Switching on the TV .................................................................................................................. 8
Step 2 - Basic Presetting
Selecting Language .................................................................................................................... 9
Automatically Tuning the TV using the Remote Control .................................................. 10
Changing the Programme Order of the TV channels ......................................................... 11
Advanced Operation
Advanced Presetting
Automatically Tuning the TV using the TV buttons........................................................... 12
Manually Tuning the TV ......................................................................................................... 13
Fine Tuning Channels .............................................................................................................. 14
Adjusting the Picture Rotation ............................................................................................... 15
Skipping Programme positions ............................................................................................. 16
Advanced TV Operation
Adjusting the Picture ............................................................................................................... 17
Adjusting the Sound ................................................................................................................ 18
Using the Sleep Timer ............................................................................................................. 19
Teletext
Viewing Teletext ....................................................................................................................... 20
GB
Optional Connections
Using Optional equipment ..................................................................................................... 21
Smartlink ................................................................................................................................... 22
Additional Information
Menu Guide .............................................................................................................................. 23
Troubleshooting........................................................................................................................ 24
Specifications ............................................................................................................................ 25
Table of Contents
5
Page 6
Getting Started - Overview
Checking the Accessories Supplied
1
2
3
4
5
6
7
8
9
0
MENU
K
PROGR
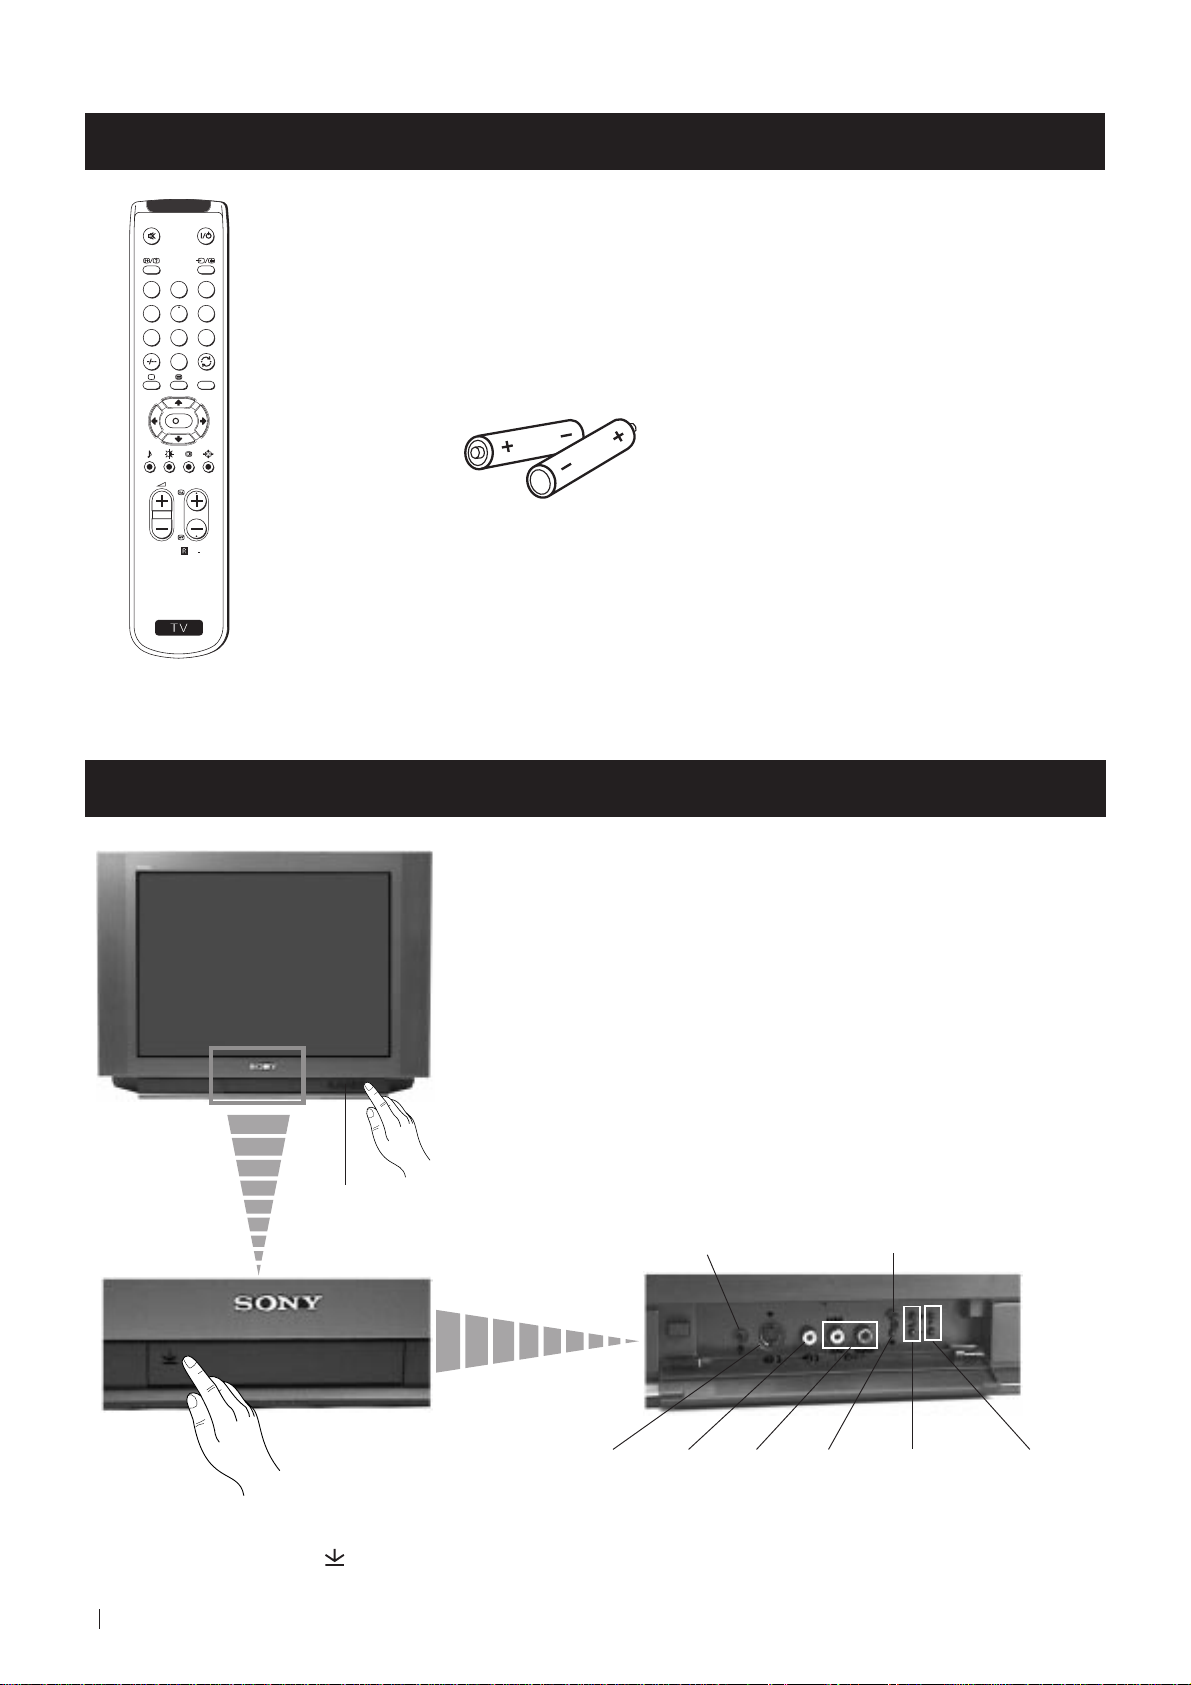
Two batteries (R6 type)
RM
887
S
One Remote Control
(RM-887)
Overview of TV Buttons
On/Off Switch
Standby
indicator
Headphone jack
Auto Tune button
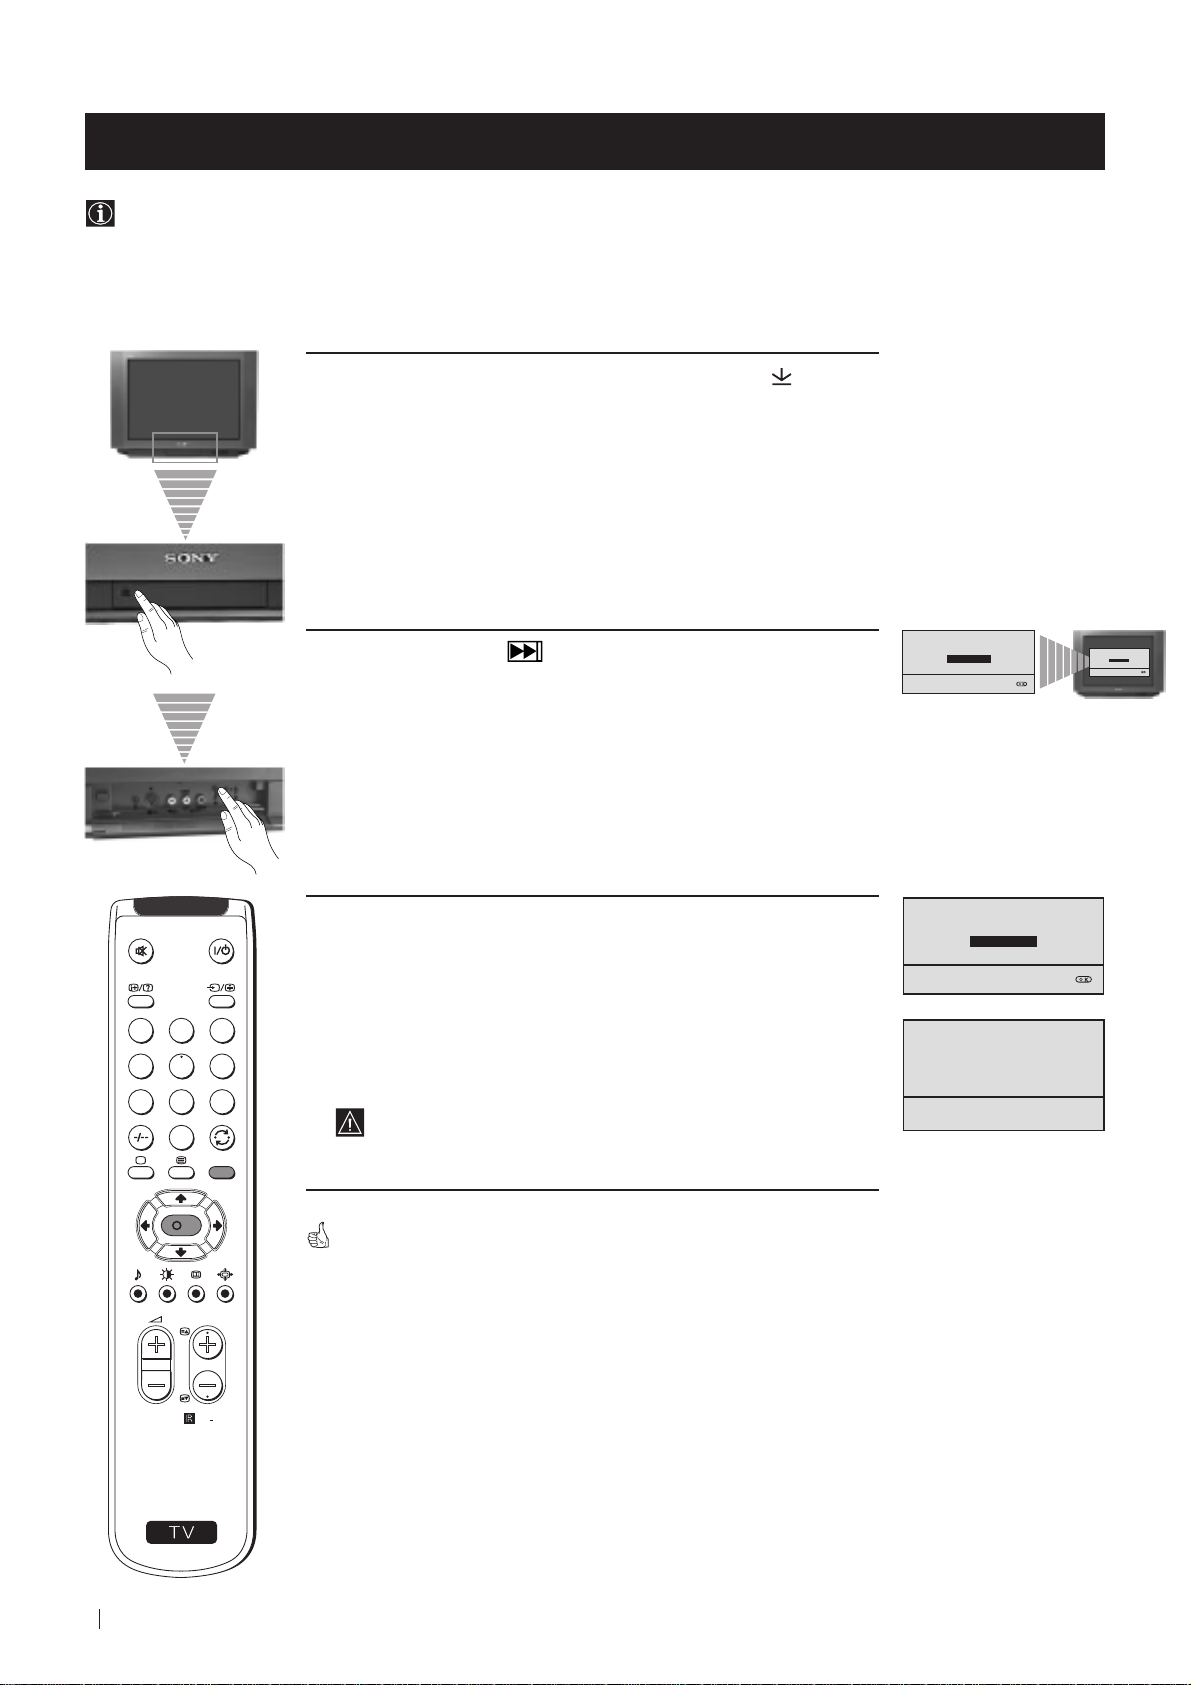
Press the flap on the front of the TV
to reveal the front control panel
(press on the mark )
6
Getting Started - Overview
S Video
Input
jack
Phono
Video
Input
jack
Audio
Inputs
jacks
Selecting
Input
source
Volume
control
buttons
Programme Up or
Down buttons
(Selects TV channels)
Page 7
Getting Started - Overview
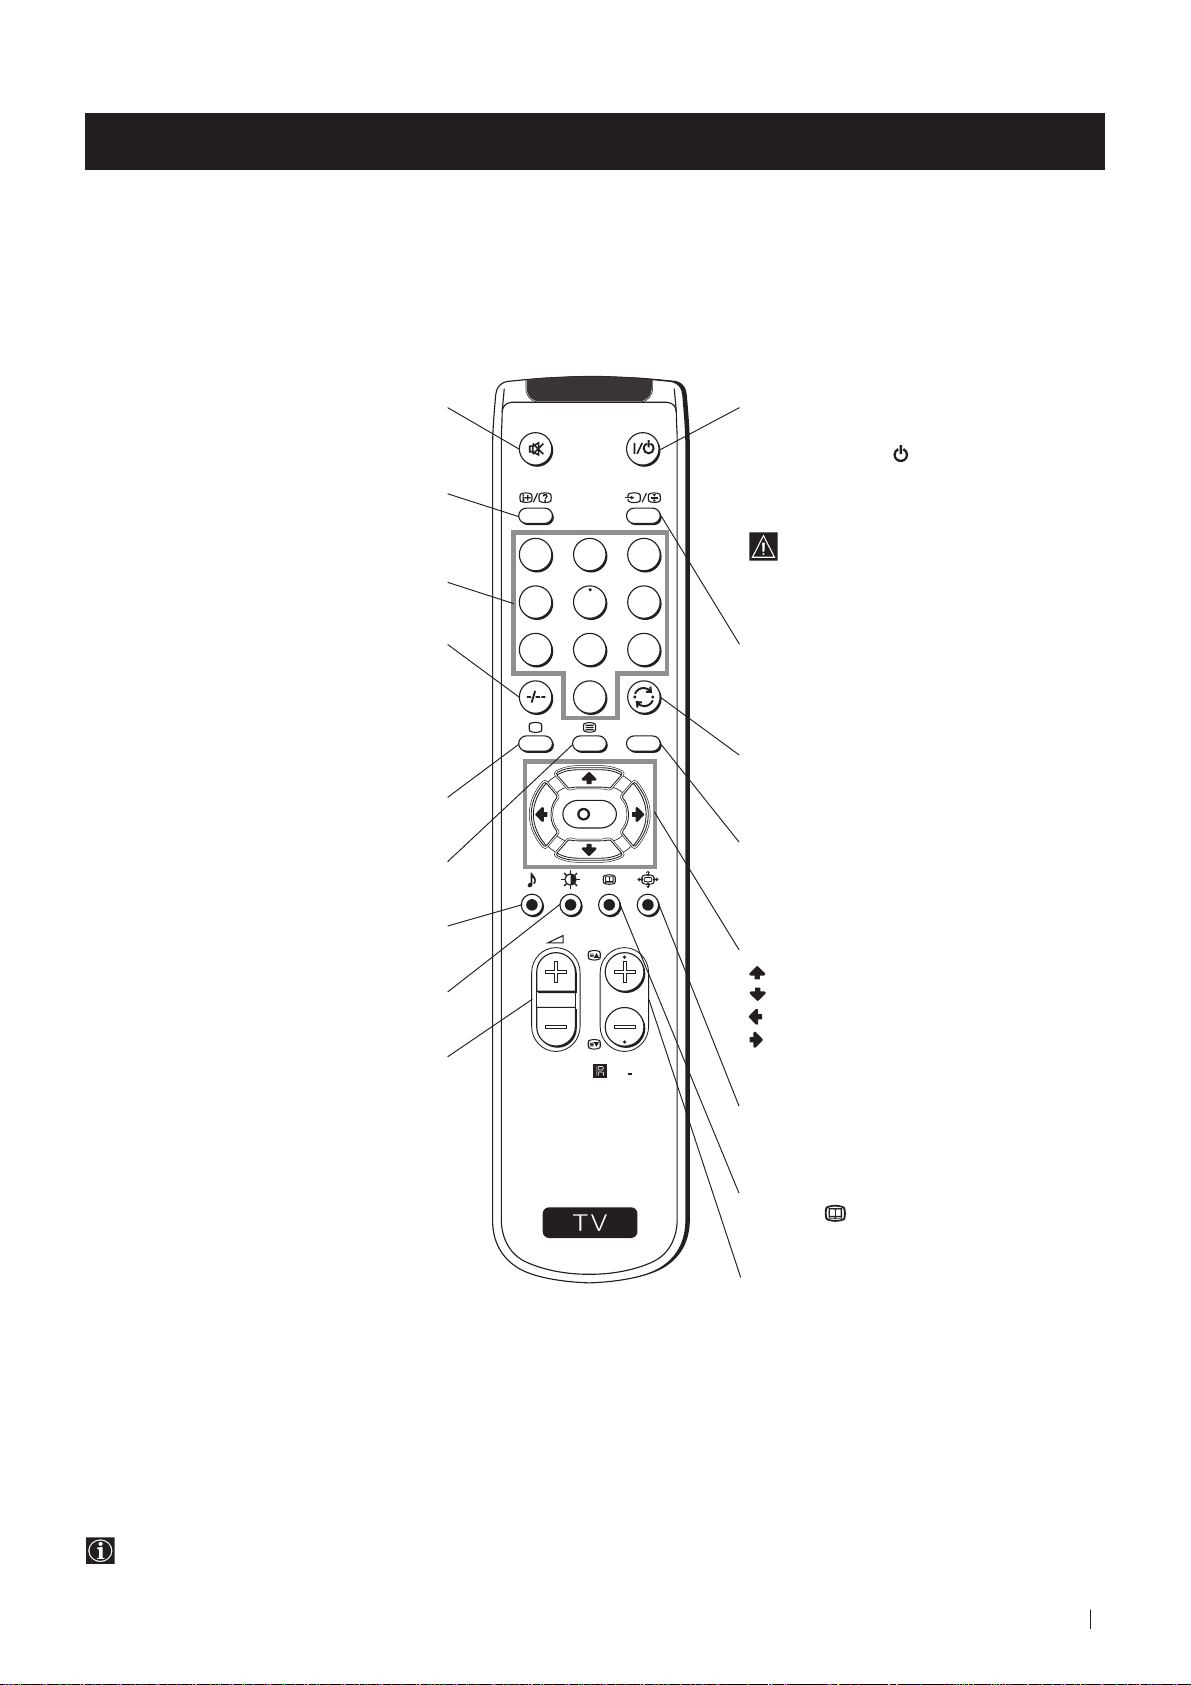
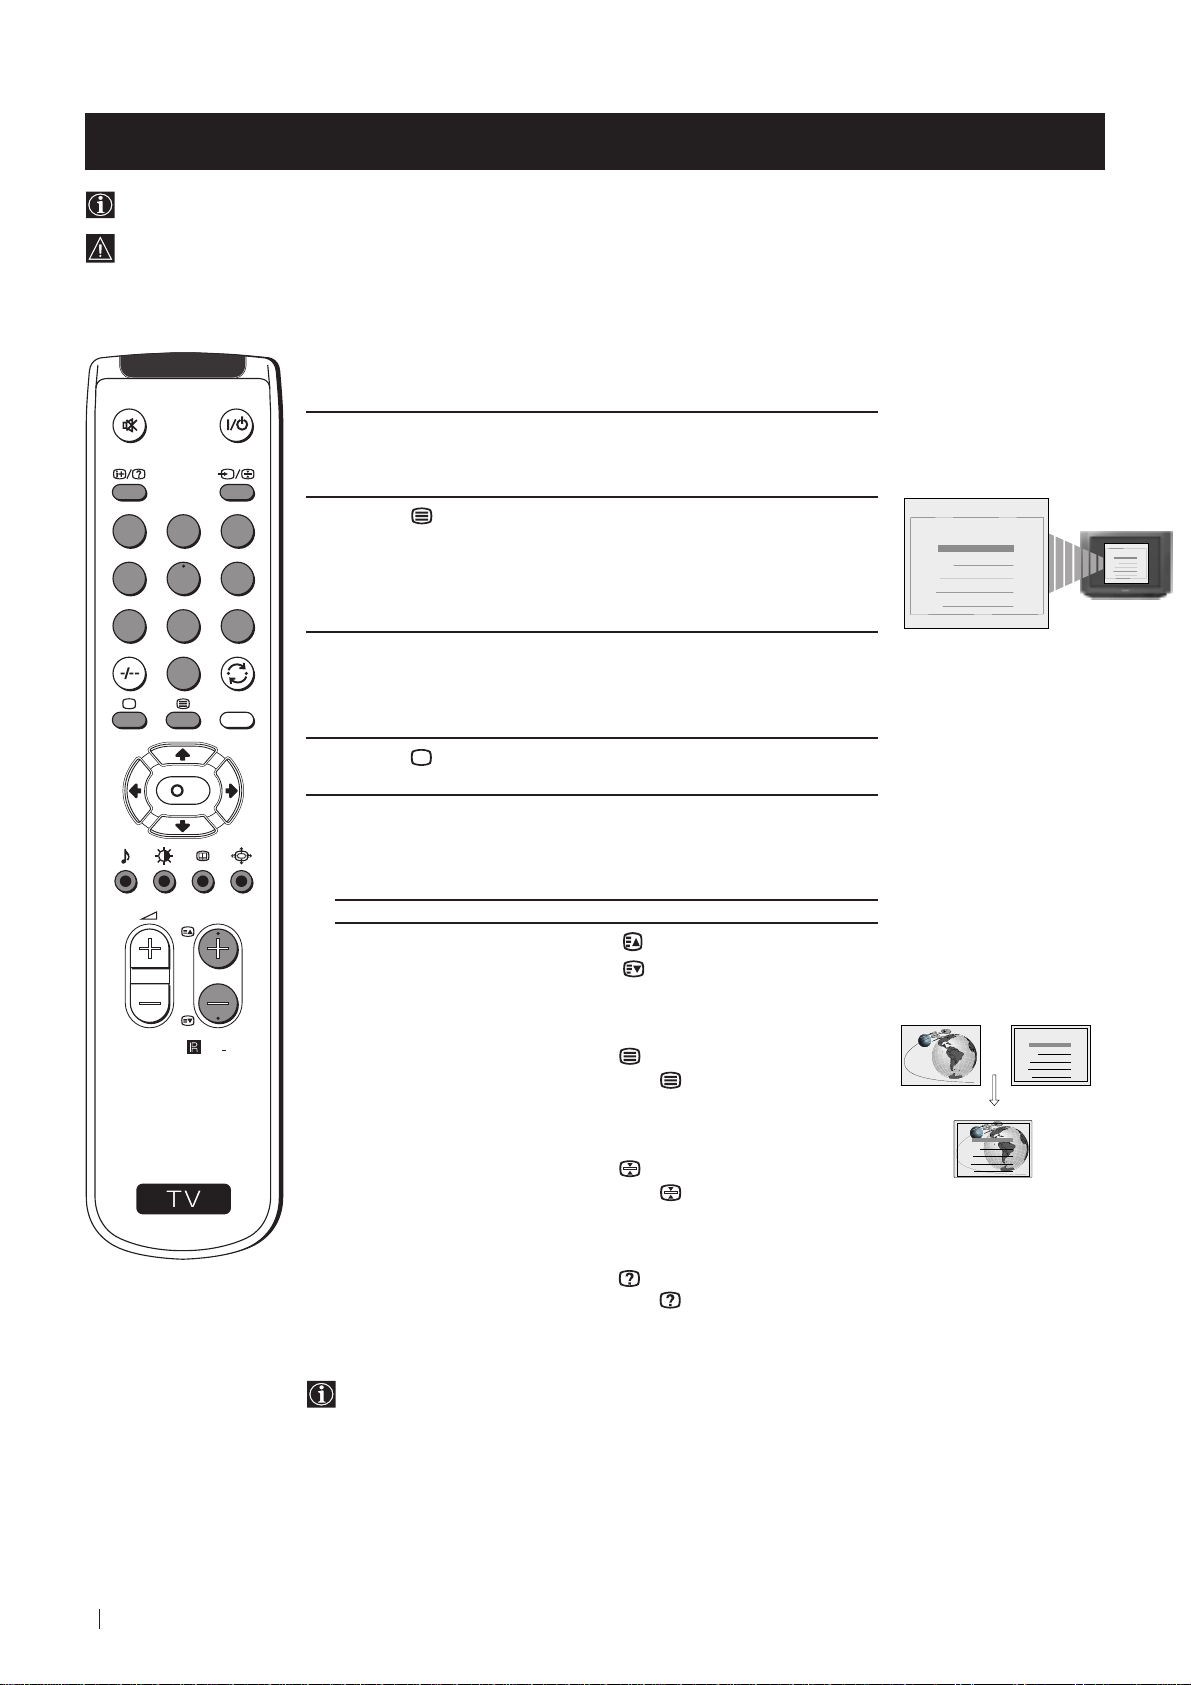
Overview of Remote Control Buttons
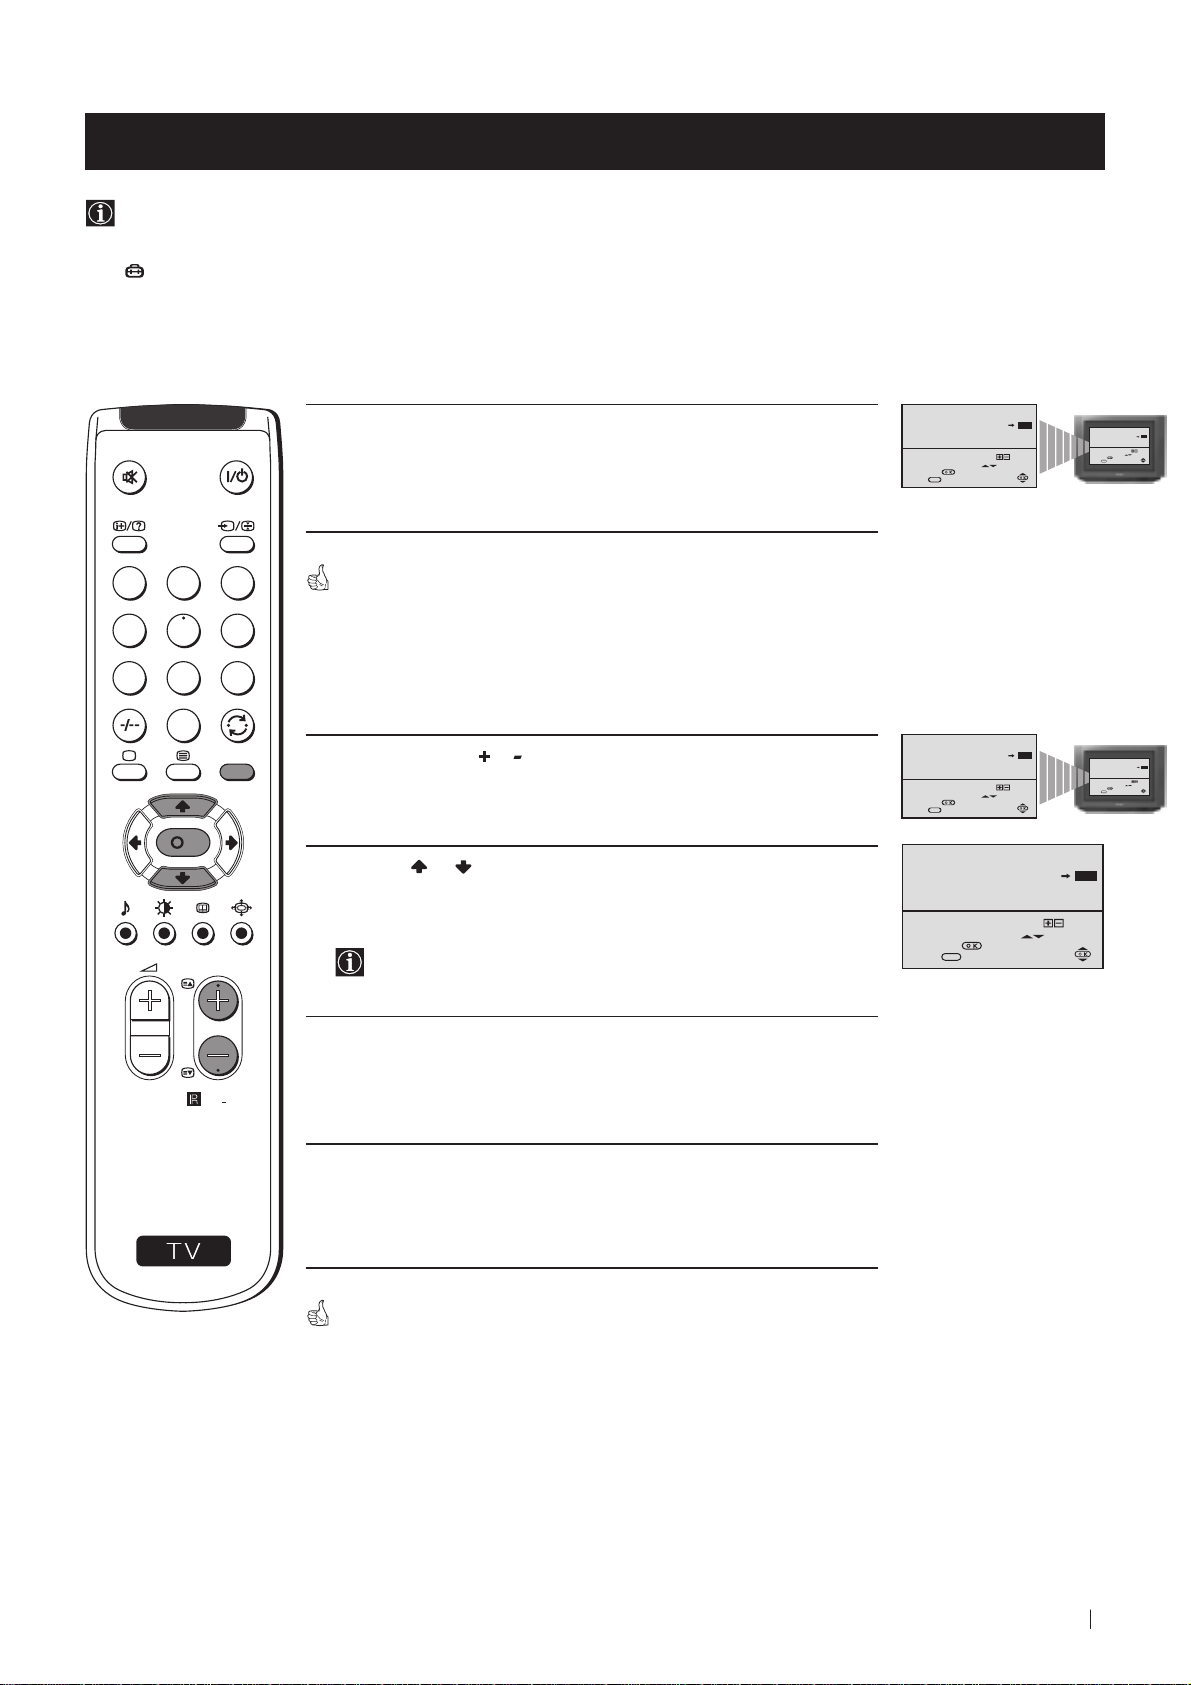
Muting the Sound
Press to mute TV sound.
Press again to restore the sound.
Displaying On Screen Information
Press to display all on-screen indications.
Press again to cancel. +.--+++++-++++
Selecting channels
Press to select channels.
For double-digit programme numbers, e.g. 23,
press -/-- first, then the buttons 2 and 3.
If you enter an incorrect first digit, this should
be corrected by entering another digit (0-9)
and then selecting -/-- button again to enter
the programme number of your choice.
+++++++++++++++...
Selecting TV mode
Press to switch off Teletext or video input.
+++++++++++++++++...
Selecting Teletext
Press to switch on Teletext.
Selecting Sound mode
Press to change the sound mode.
+++++++++++++++++...
Selecting Picture mode
Press to change the picture mode.
+++++++++++++++++...
Adjusting TV Volume
Press to adjust the volume of the TV.
To Temporarily Switch Off TV
Press to temporarily switch off TV (the
standby indicator on TV lights up). Press
again to switch on TV from standby mode.
To save energy we recommend switching off
completely when TV is not in use.
1
2
3
4
5
6
7
8
9
0
MENU
K
PROGR
RM
887
After 15-30 minutes without a TV
signal and without any button being
pressed, the TV switches automatically
into standby mode.
Selecting Input source
Press repeatedly until the desired input
symbol of the source appears on the TV
screen.
Back to the channel last watched
Press to watch the last channel selected
(watched for at least 5 seconds).
Displaying the menu system
Press to display the menu on the TV screen.
Press again to remove the menu display
from the TV screen.
Menu selection
Scroll Up
Scroll Down
Previous menu or selection
Next menu or selection
OK Confirms your selection
Selecting Screen format
Press to view programmes in 16:9 mode.
Press again to return to 4:3 mode.
S
Besides TV functions, all coloured buttons as well as green symbols are also used for Teletext operation. For more details,
please refer to the "Teletext" section of this instruction manual.
This button only works in Teletext mode.
Function
not work with this TV.
Selecting channels
Press to select the next or previous channel.
associated to this button does
Getting Started - Overview
7
Page 8
First Time Operation - Installation
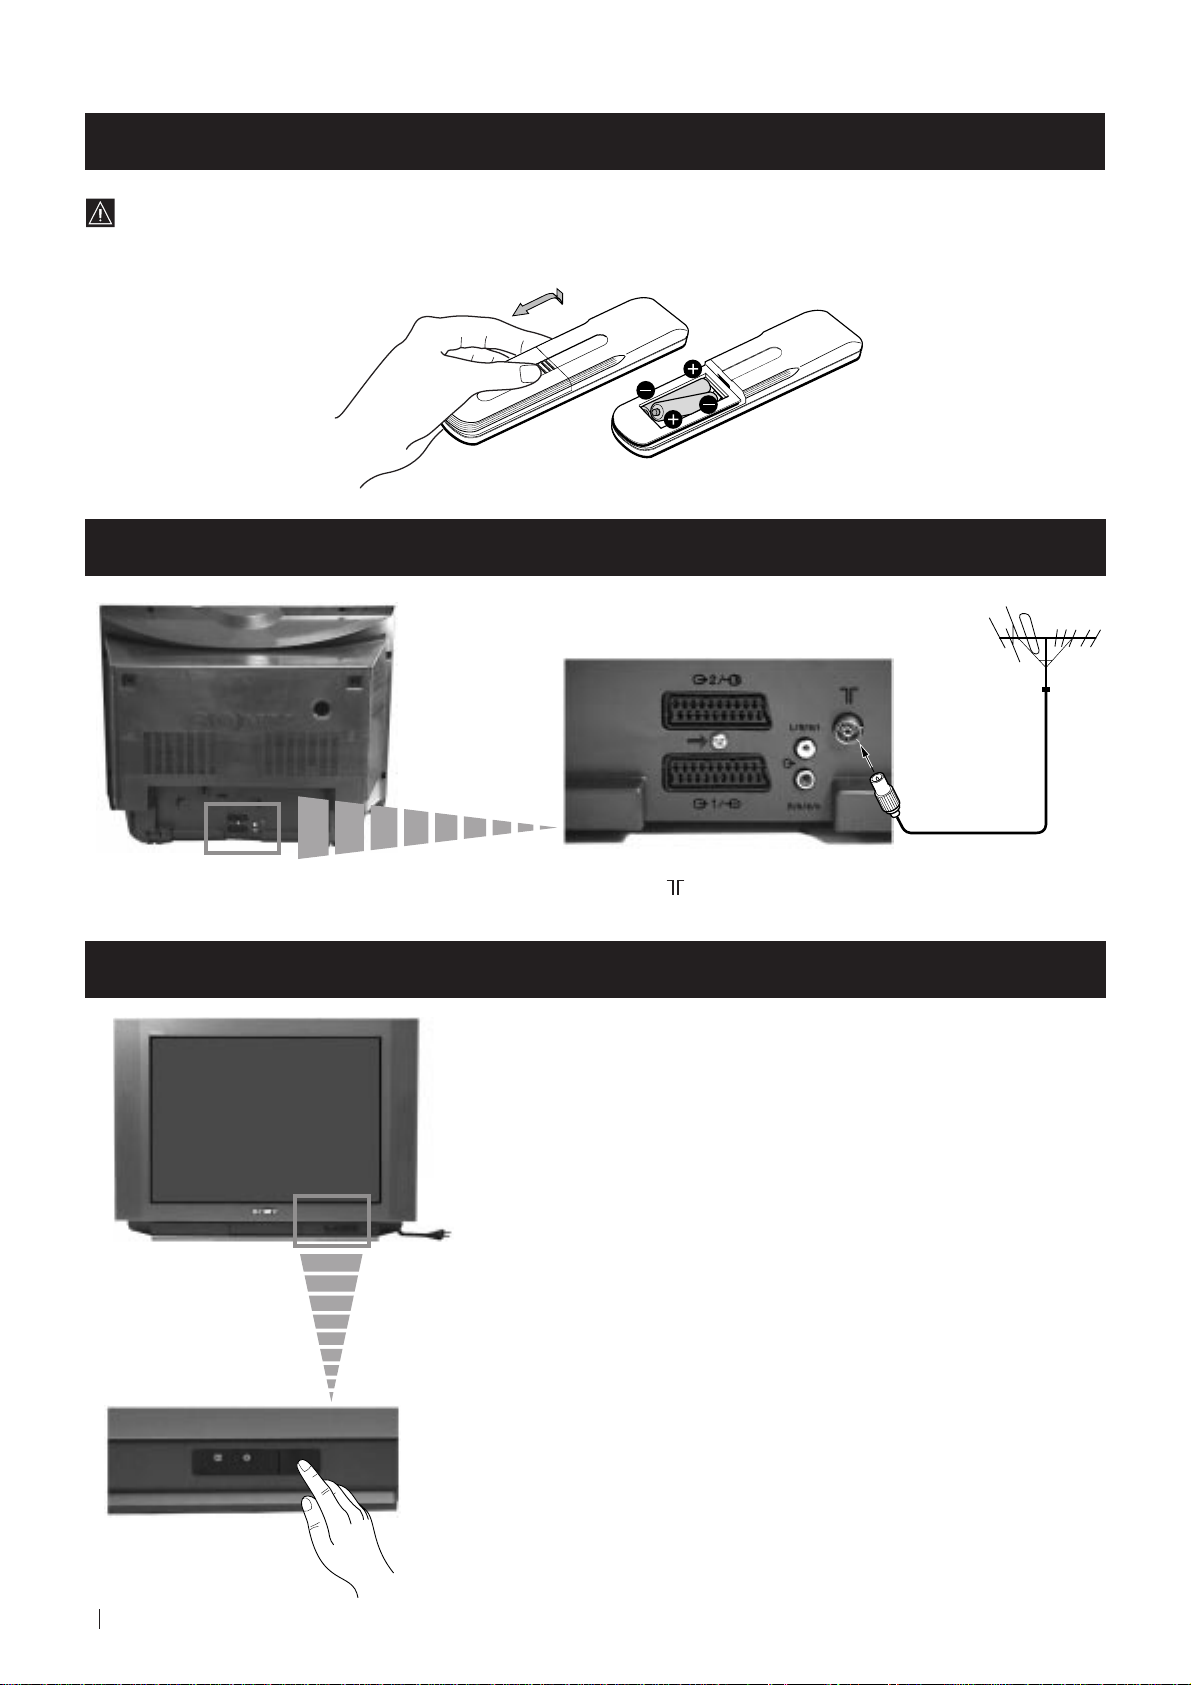
Inserting Batteries into the Remote Control
Make sure to insert the batteries using the correct polarities.
Always remember to dispose of used batteries in an environmental friendly way.
Connecting the Aerial
Switching on the TV
Connect a conventional aerial to the socket
marked on the rear of the TV.
Connect the TV plug to the mains socket (220-240V AC, 50Hz).
8
First Time Operation - Installation
Push in the On/Off switch on the front of the TV.
Page 9
First Time Operation - Basic Presetting
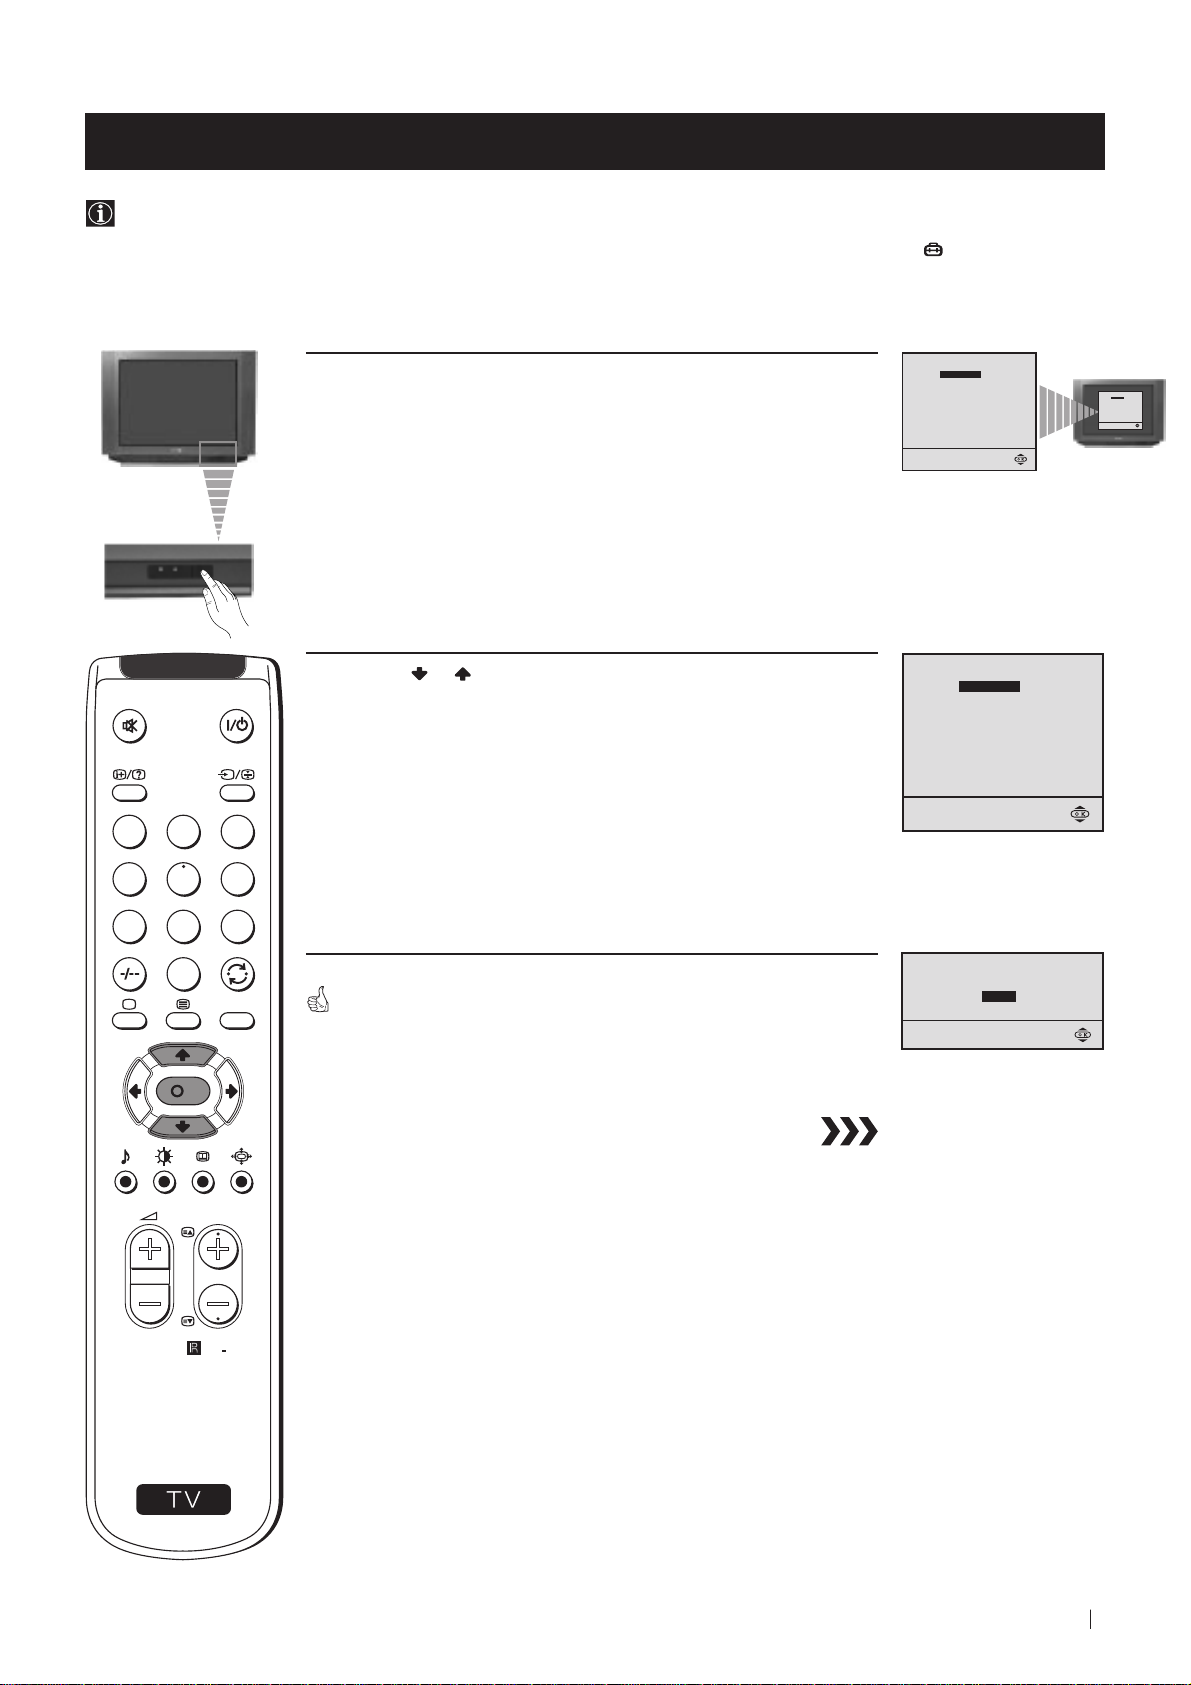
Selecting Language
Use this function to change the language of the menu screens.
The first time that you switch on your TV, the Language menu appears automatically.
However, if you need to change the language menu afterwards, select the menu LANGUAGE in the
and proceed in the same way as described below.
1 Press the on/off button on your TV set to switch on your TV. The
first time you press the on/off button on your TV set, the language
menu displays automatically on the TV screen.
(SET UP) menu
LANGUAGE
ENGLISH
PУCCKИЙ
БЬЛГAPCKИ
Select language:
LANGUAGE
Select language:
ENGLISH
PУCCKИЙ
БЬЛГAPCKИ
2 Press the or button on the remote control to select the
language, then press the OK button to confirm your selection.
1
2
3
4
5
6
7
8
9
0
MENU
The Auto Tuning menu appears on the TV screen in the selected language.
LANGUAGE
ENGLISH
PУCCKИЙ
БЬЛГAPCKИ
Select language:
Do you want to start
automatic tuning?
YES
NO
K
PROGR
S
RM
887
First Time Operation - Basic Presetting
9
Page 10
First Time Operation - Basic Presetting
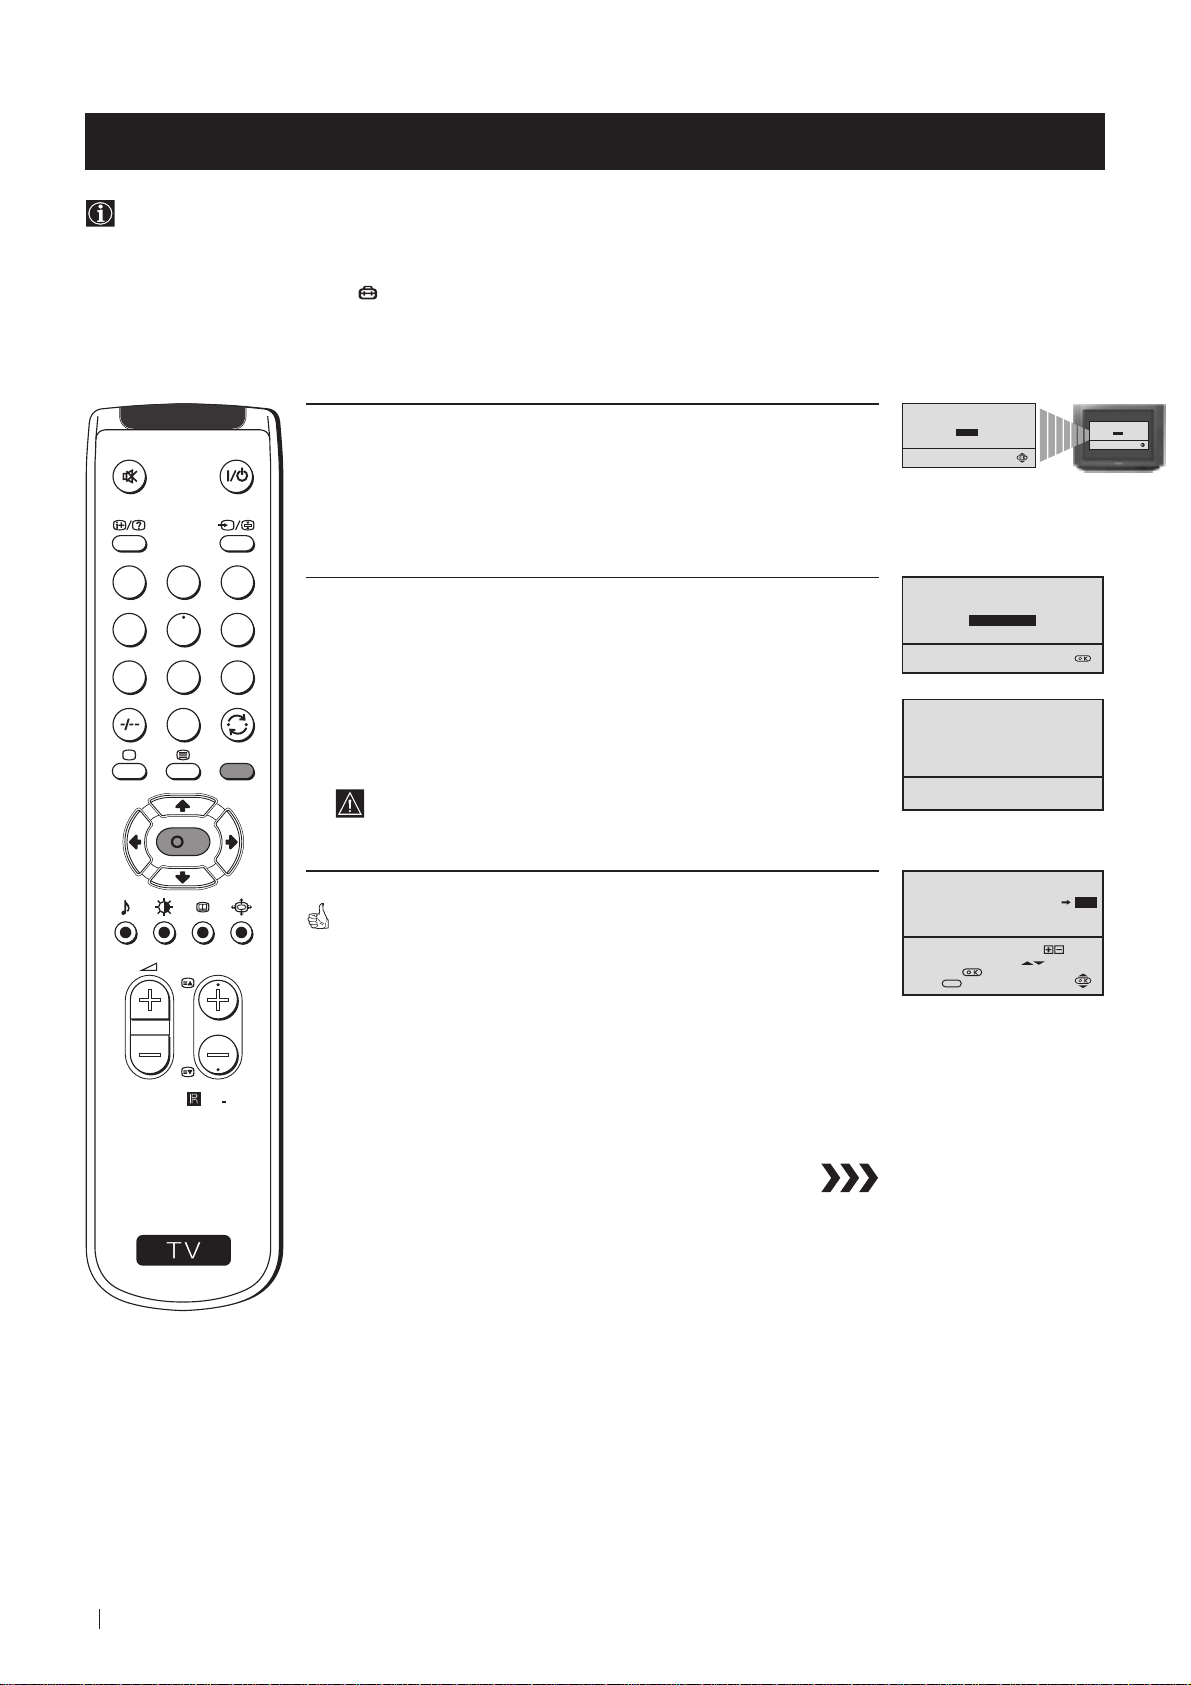
Automatically Tuning the TV using the Remote Control
You need to tune the TV to receive channels (TV Broadcast). By following the instructions below, this TV automatically
searches and stores all available channels for you.
After having selected the language, a new menu appears automatically on the TV screen asking you to automatically tune
the TV. However, if you need to change or repeat the tuning afterwards (e.g. when you move house), select the menu
AUTO PROGRAMME in the (SET UP) menu and proceed in the same way as described below in step 1 or, please refer
to the section "Automatically Tuning the TV using the TV buttons" of this instruction manual.
Do you want to start
1 Press the OK button on the remote control to select YES.
A new menu appears automatically on the screen asking you to
check that the antenna is connected.
1
2
3
4
5
6
2 Confirm that the antenna is connected and then press the OK
button.
automatic tuning?
YES
NO
Please confirm that
antenna is connected
CONFIRM
Do you want to start
automatic tuning?
YES
NO
7
8
0
S
K
PROGR
MENU
RM
887
9
The automatic tuning starts and the message "Searching..." flashes
on the screen.
This procedure could take some minutes.
When the automatic tuning is finished, the Programme Sorting menu
appears on the TV screen.
Notes: • To stop the automatic tuning, press the MENU button.
• If you stop the automatic tuning by pressing the MENU
button, the Programme Sorting menu does not appear
automatically on the TV screen.
AUTO PROGRAMME
PROGRAMME:
SYSTEM:
CHANNEL:
Searching...
PROGRAMME SORTING
PROGRAMME:
CONFIRM
Select Channel:
Select new position:
Confirm:
Exit:
PROGR
MENU
01
B/G
C 21
03
01
10
First Time Operation - Basic Presetting
Page 11
First Time Operation - Basic Presetting
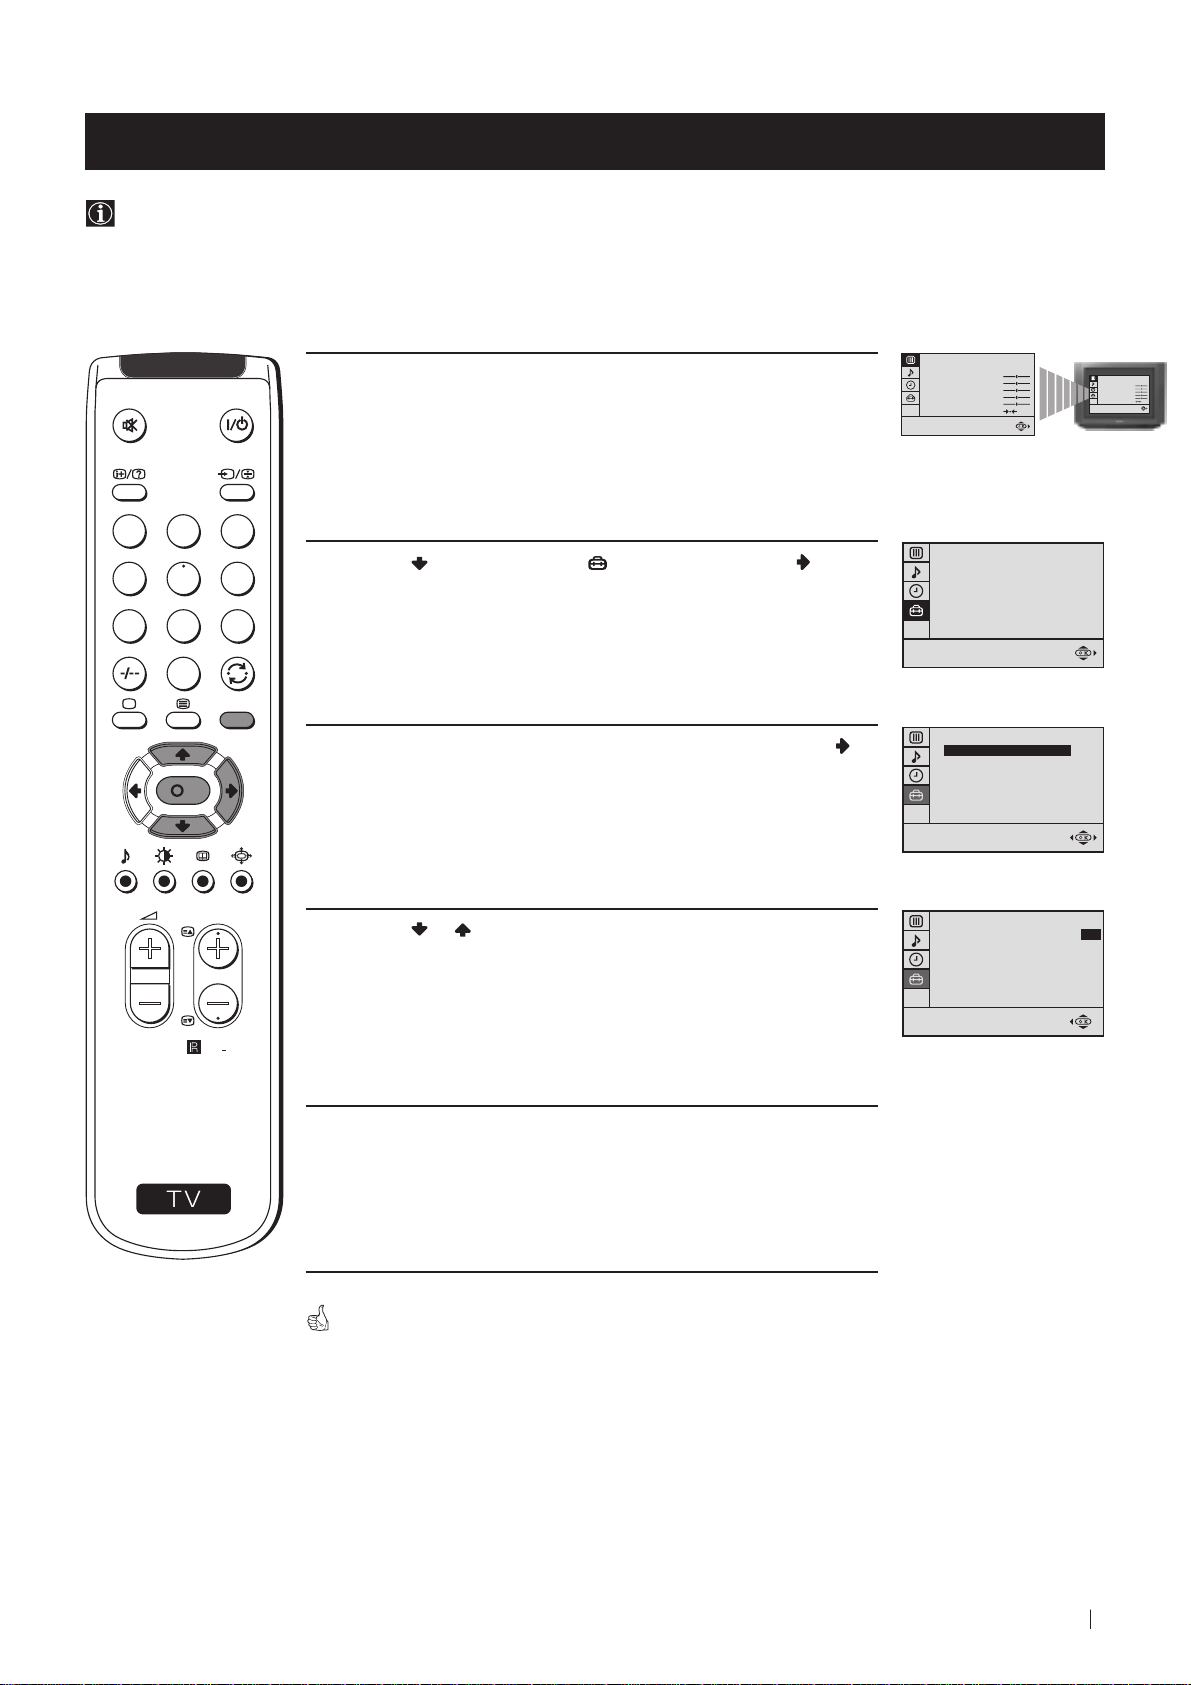
Changing the Programme Order of the TV channels
After all available channels (TV Broadcast) are captioned and stored, a new menu appears automatically on the screen to
change the order in which the channels appear on the screen.
However, if you wish to rearrange the order of the channels afterwards, select the menu PROGRAMME SORTING in the
(SET UP) menu and proceed in the same way as described in the b) section of this chapter.
a) If you do not wish to change the channel order:
PROGRAMME SORTING
1 Press the MENU button to exit and return to the normal TV screen.
1
2
3
4
5
6
7
8
9
Your TV is now ready for use.
b) If you wish to change the channel order:
0
MENU
K
1 Press the PROGR or button until the channel (TV Broadcast) you
wish to rearrange appears on the screen.
2 Press the or button to select the new programme number
position for your selected channel (TV Broadcast), then press the
OK button.
PROGR
The word CONFIRM is highlighted for a few seconds to
confirm that the new programme position is stored.
PROGRAMME:
CONFIRM
Select Channel:
Select new position:
Confirm:
MENU
Exit:
PROGRAMME SORTING
PROGRAMME:
CONFIRM
Select Channel:
Select new position:
Confirm:
MENU
Exit:
PROGRAMME SORTING
PROGRAMME:
CONFIRM
Select Channel:
Select new position:
Confirm:
MENU
Exit:
PROGR
PROGR
01
01
PROGR
03
03
PROGRAMME SORTING
03
01
PROGRAMME:
CONFIRM
Select Channel:
PROGR
Select new position:
Confirm:
MENU
Exit:
PROGRAMME SORTING
03
01
PROGRAMME:
CONFIRM
Select Channel:
PROGR
Select new position:
Confirm:
MENU
Exit:
04
02
S
RM
3 Repeat steps 1 and 2 if you wish to change the order of the other
channels on your TV.
887
4 Press the MENU button to exit and return to the normal TV screen.
Your TV is now ready for use.
First Time Operation - Basic Presetting
11
Page 12
Advanced Operation - Advanced Presetting
Automatically Tuning the TV using the TV buttons
Besides the explanation in the section “Automatically Tuning the TV using the Remote Control“, by following the
instructions below, this TV also searches and stores automatically all available channels using just one button of the TV set.
1 Press the flap on the front of the TV by pressing on the mark to
reveal the front control panel.
Please confirm that
2 Press and hold in the button on the TV set for some seconds,
until a menu appears automatically on the screen asking you to
check that antenna is connected.
antenna is connected
CONFIRM
Please confirm that
antenna is connected
CONFIRM
3 Confirm that the antenna is connected and then press the OK
button.
1
2
3
4
5
6
7
8
9
0
MENU
K
The automatic tuning starts and the message "Searching..." flashes
on the screen.
This procedure could take some minutes.
Please confirm that
antenna is connected
CONFIRM
AUTO PROGRAMME
PROGRAMME:
SYSTEM:
CHANNEL:
Searching...
01
B/G
C 21
When the automatic tuning procedure is complete, the menu disappears
from the TV screen and your TV is now ready for use.
PROGR
Note: To stop the automatic tuning, press the MENU button on the
remote control.
RM
887
S
12
Advanced Operation - Advanced Presetting
Page 13
Advanced Operation - Advanced Presetting
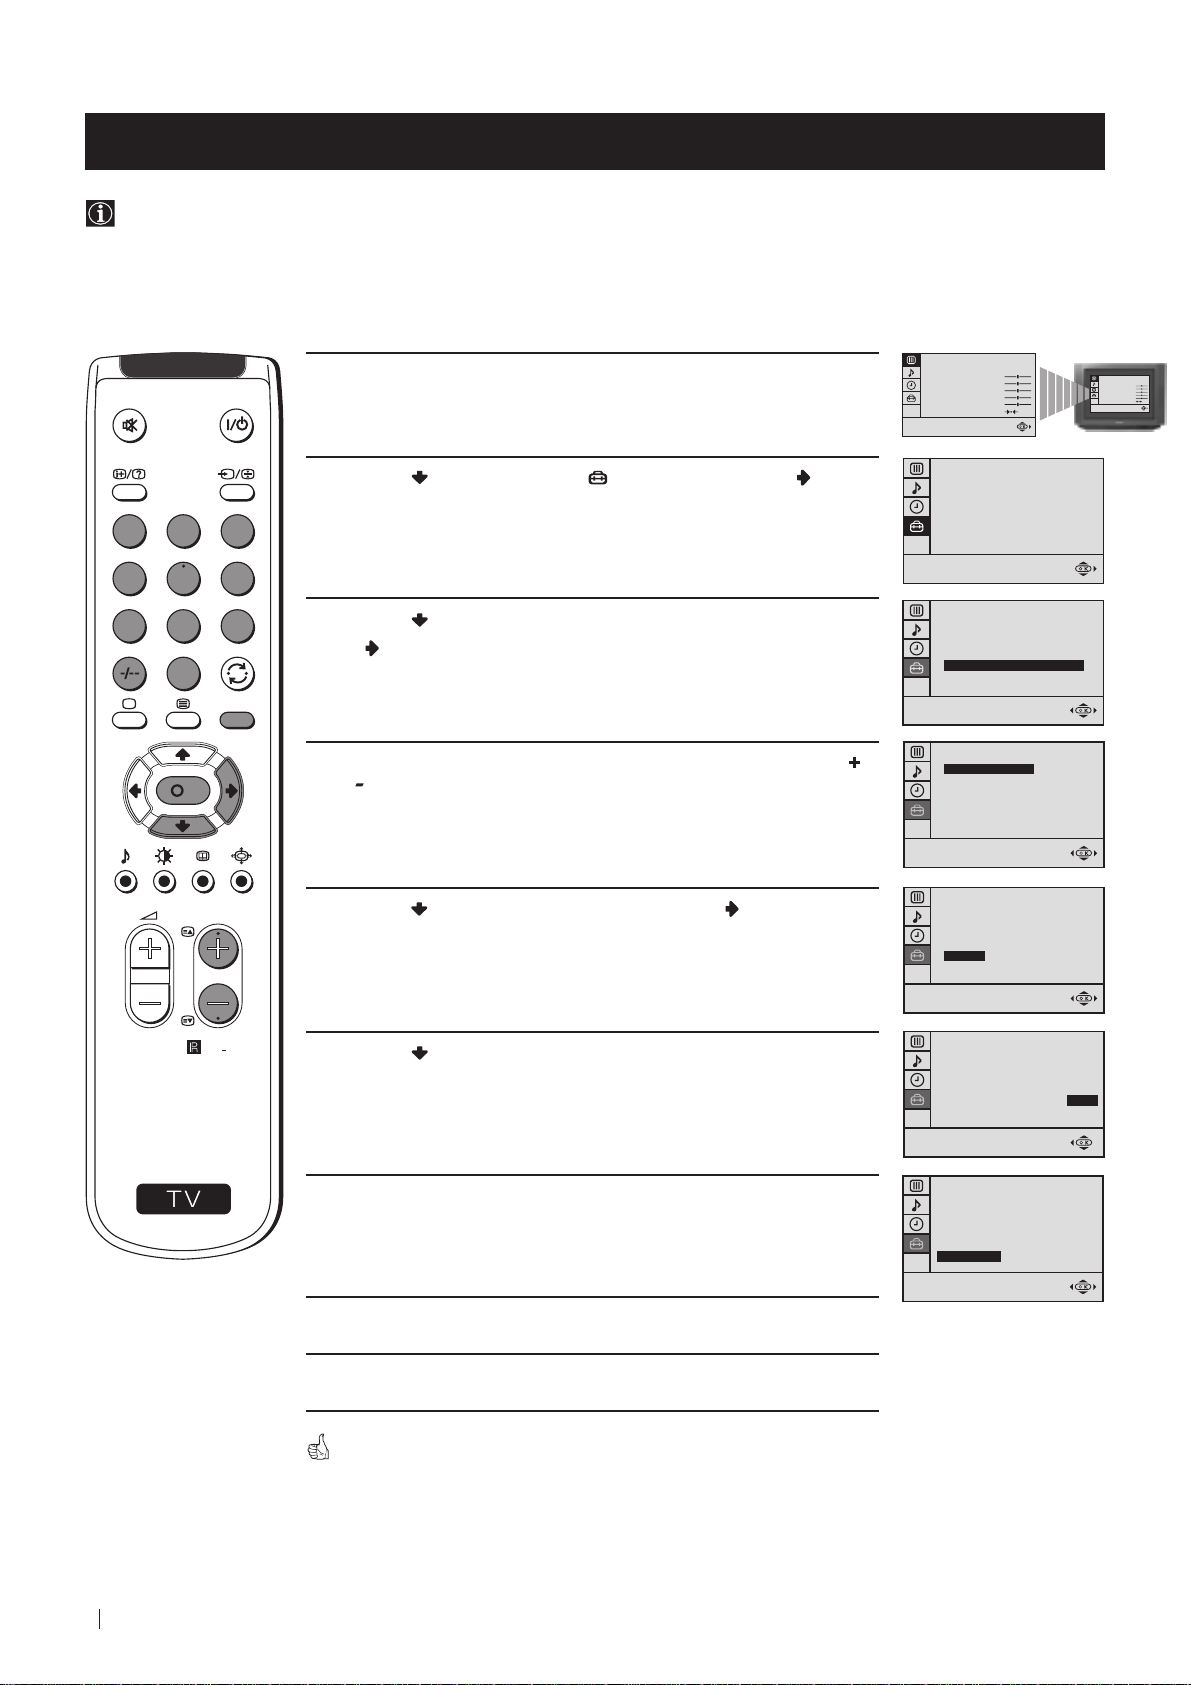
Manually Tuning the TV
Use this function to preset channels or a video input source one by one to the programme order of your choice.
PICTURE CONTROL
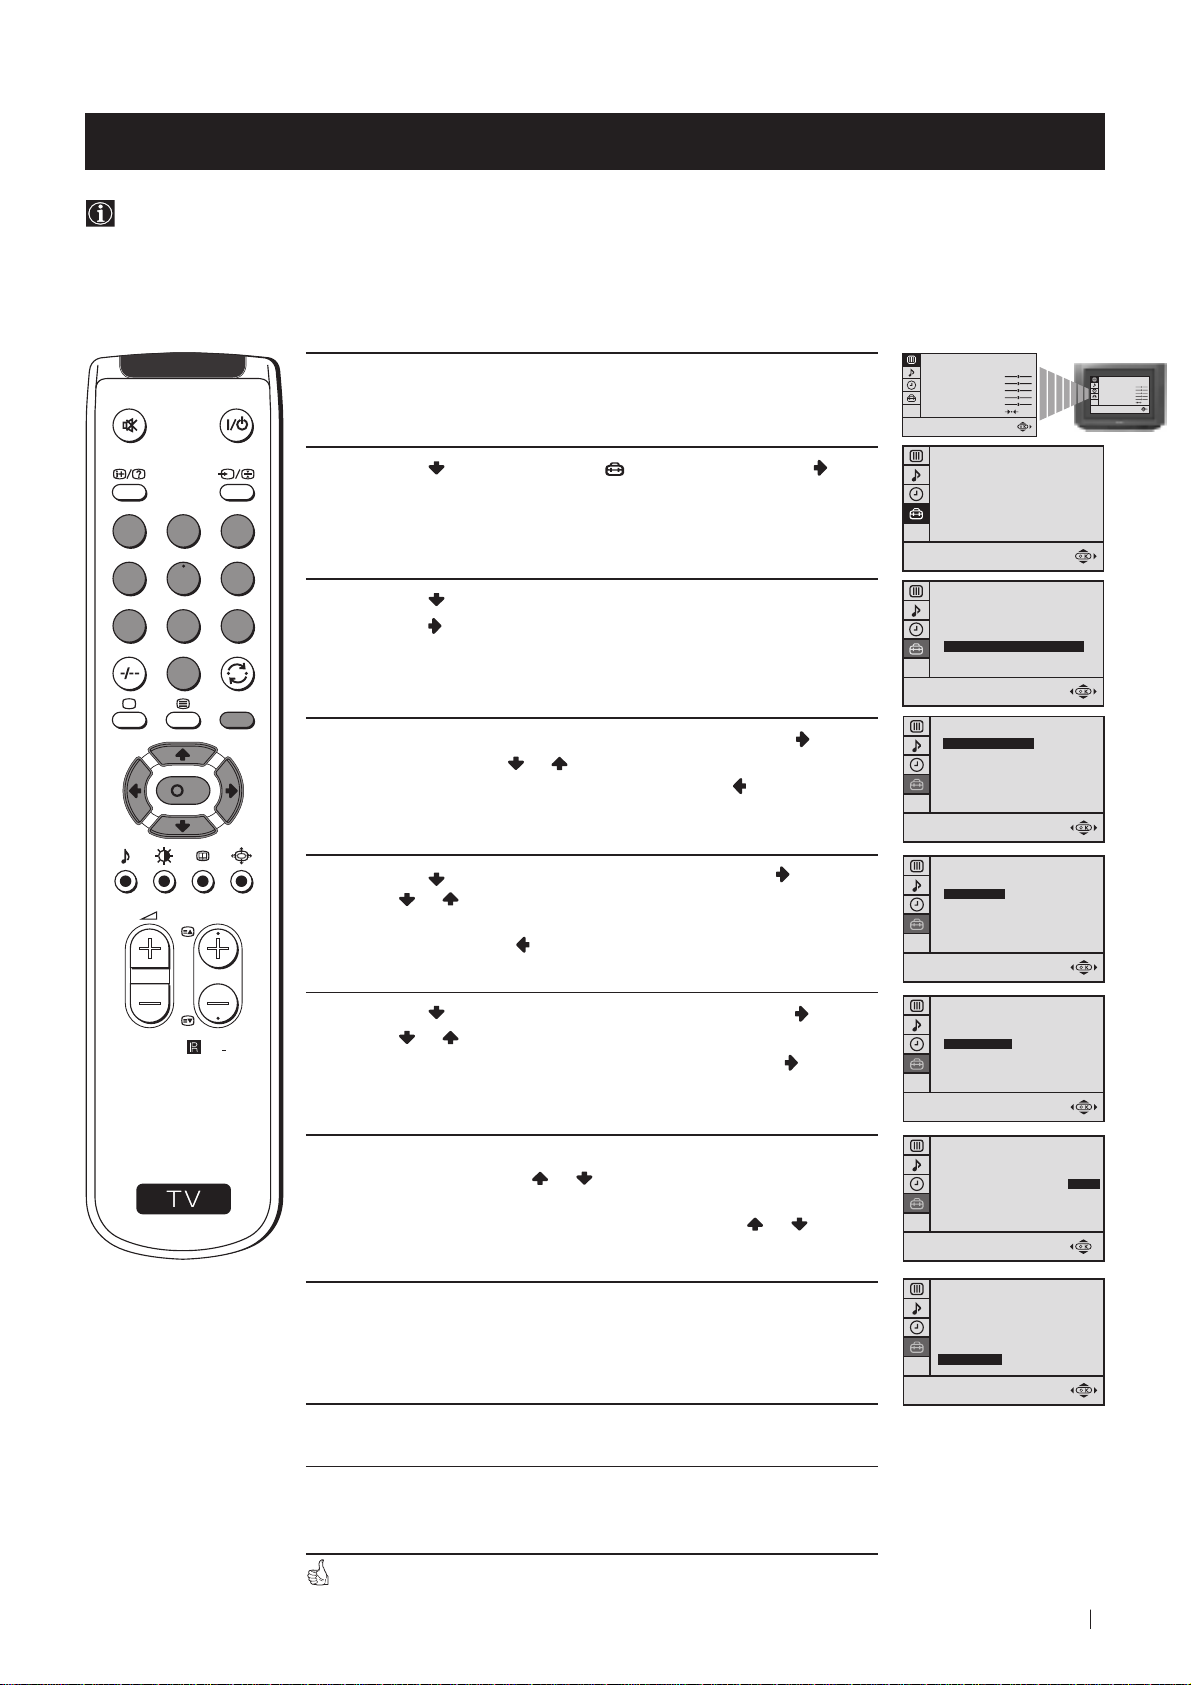
1 Press the MENU button on the remote control to display the
menu on the TV screen.
2 Press the button to select the symbol, then press the
button to enter to the SET UP menu.
1
2
3
4
5
6
3 Press the button to select MANUAL PROGRAMME, then
7
8
9
0
MENU
press the button.
4 With the cursor highlighting PROGRAMME, press the button
and then, press the
K
number you want to preset a channel. Press the button.
or button to select on which programme
MODE: PERSONAL
CONTRAST
BRIGHTNESS
COLOUR
SHARPNESS
HUE
RESET
SET UP
PICTURE ROTATION:
LANGUAGE: ENGLISH
AUTO PROGRAMME
PROGRAMME SORTING
MANUAL PROGRAMME
SET UP
PICTURE ROTATION:
LANGUAGE: ENGLISH
AUTO PROGRAMME
PROGRAMME SORTING
MANUAL PROGRAMME
SET UP:
MANUAL PROGRAMME
PROGRAMME:
SYSTEM:
CHANNEL:
AFT:
SKIP:
CONFIRM
01
B/G
C 21
ON
NO
0
0
PICTURE CONTROL
MODE: PERSONAL
CONTRAST
BRIGHTNESS
COLOUR
SHARPNESS
HUE
RESET
PROGR
S
RM
887
5 Press the button to select SYSTEM, then press the button.
Press
western European countries, D/K for eastern European
countries). Press the button.
or button to select the TV broadcast system (B/G for
6 Press the button to select CHANNEL, then press the button.
Press or button to select the channel tuning, "C" for
terrestrial channels or "S" for cable channels. Press the
button.
7 Press the number buttons to enter the channel number of the TV
Broadcast or press the
available channel.
If you do not wish to store this channel, press the
to continue searching for the desired channel.
or button to search for the next
or button
8 If this is the desired channel you wish to store, press the OK
button and then, with the cursor highlighting CONFIRM, press
the OK button again.
9 Repeat steps 4 to 8 if you wish to store more channels.
SET UP:
MANUAL PROGRAMME
PROGRAMME:
SYSTEM:
CHANNEL:
AFT:
SKIP:
CONFIRM
SET UP:
MANUAL PROGRAMME
PROGRAMME:
SYSTEM:
CHANNEL:
AFT:
SKIP:
CONFIRM
SET UP:
MANUAL PROGRAMME
PROGRAMME:
SYSTEM:
CHANNEL:
AFT:
SKIP:
CONFIRM
SET UP:
MANUAL PROGRAMME
PROGRAMME:
SYSTEM:
CHANNEL:
AFT:
SKIP:
CONFIRM
01
B/G
C 21
ON
NO
01
B/G
C 21
ON
NO
01
B/G
C 21
ON
NO
01
B/G
C 21
ON
NO
10 Press the MENU button to exit and return to the normal TV
screen.
Your TV is now ready for use.
Advanced Operation - Advanced Presetting
13
Page 14
Advanced Operation - Advanced Presetting
Fine Tuning Channels
Normally, the automatic fine tuning (AFT) function is operating. If the picture is distorted, however, you can manually fine
tune the TV to obtain a better picture reception.
PICTURE CONTROL
MODE: PERSONAL
1 Select the channel (TV Broadcast) you wish to fine tune, then press
the MENU button on the remote control to display the menu on the
TV screen.
CONTRAST
BRIGHTNESS
COLOUR
SHARPNESS
HUE
RESET
PICTURE CONTROL
MODE: PERSONAL
CONTRAST
BRIGHTNESS
COLOUR
SHARPNESS
HUE
RESET
2 Press the button to select the symbol, then press the button
to enter to the SET UP menu.
1
2
3
4
5
6
7
8
9
3 Press the button to select MANUAL PROGRAMME, then press
the button.
0
MENU
4 Press the button to select AFT, then press the button.
K
PROGR
RM
887
5 Press the or button to adjust the fine tuning (-15 to +15), then
press the OK button.
6 With the cursor highlighting CONFIRM, press the OK button to
store.
SET UP
PICTURE ROTATION:
LANGUAGE: ENGLISH
AUTO PROGRAMME
PROGRAMME SORTING
MANUAL PROGRAMME
SET UP
PICTURE ROTATION:
LANGUAGE: ENGLISH
AUTO PROGRAMME
PROGRAMME SORTING
MANUAL PROGRAMME
SET UP:
MANUAL PROGRAMME
PROGRAMME:
SYSTEM:
CHANNEL:
AFT:
SKIP:
CONFIRM
SET UP:
MANUAL PROGRAMME
PROGRAMME:
SYSTEM:
CHANNEL:
AFT:
SKIP:
CONFIRM
SET UP:
MANUAL PROGRAMME
PROGRAMME:
SYSTEM:
CHANNEL:
AFT:
SKIP:
CONFIRM
01
B/G
C 21
ON
NO
01
B/G
C 21
+2
NO
01
B/G
C 21
+2
NO
0
0
S
7 Press the MENU button to exit and return to the normal TV screen.
8 Repeat steps 1 to 7 to fine tune other channels.
14
Advanced Operation - Advanced Presetting
Your TV is now ready for use.
Page 15
Advanced Operation - Advanced Presetting
Adjusting the Picture Rotation
Because of the earth's magnetism, the picture might slant. In this case, you can correct the picture slanting.
1 Press the MENU button on the remote control to display the menu
on the TV screen.
1
2
3
4
5
6
7
8
9
0
MENU
2 Press the button to select the symbol, then press the button
to enter to the SET UP menu.
PICTURE CONTROL
MODE: PERSONAL
CONTRAST
BRIGHTNESS
COLOUR
SHARPNESS
HUE
RESET
SET UP
PICTURE ROTATION:
LANGUAGE: ENGLISH
AUTO PROGRAMME
PROGRAMME SORTING
MANUAL PROGRAMME
PICTURE CONTROL
MODE: PERSONAL
0
CONTRAST
BRIGHTNESS
COLOUR
SHARPNESS
HUE
RESET
K
PROGR
S
RM
887
3 With the cursor highlighting PICTURE ROTATION, press the
button.
4 Press the or button to adjust the picture rotation (adjusting
range is -5 to +5), then press the OK button.
5 Press the MENU button to exit and return to the normal TV screen.
SET UP
PICTURE ROTATION:
LANGUAGE: ENGLISH
AUTO PROGRAMME
PROGRAMME SORTING
MANUAL PROGRAMME
SET UP
PICTURE ROTATION:
LANGUAGE: ENGLISH
AUTO PROGRAMME
PROGRAMME SORTING
MANUAL PROGRAMME
0
+2
Your TV is now ready for use.
Advanced Operation - Advanced Presetting
15
Page 16
Advanced Operation - Advanced Presetting
Skipping Programme positions
You can programme this TV to skip any unwanted programme numbers when they are selected with the PROGR +/buttons. To cancel this function afterwards, proceed in the same way as described below by selecting NO instead of YES in
step 6.
PICTURE CONTROL
MODE: PERSONAL
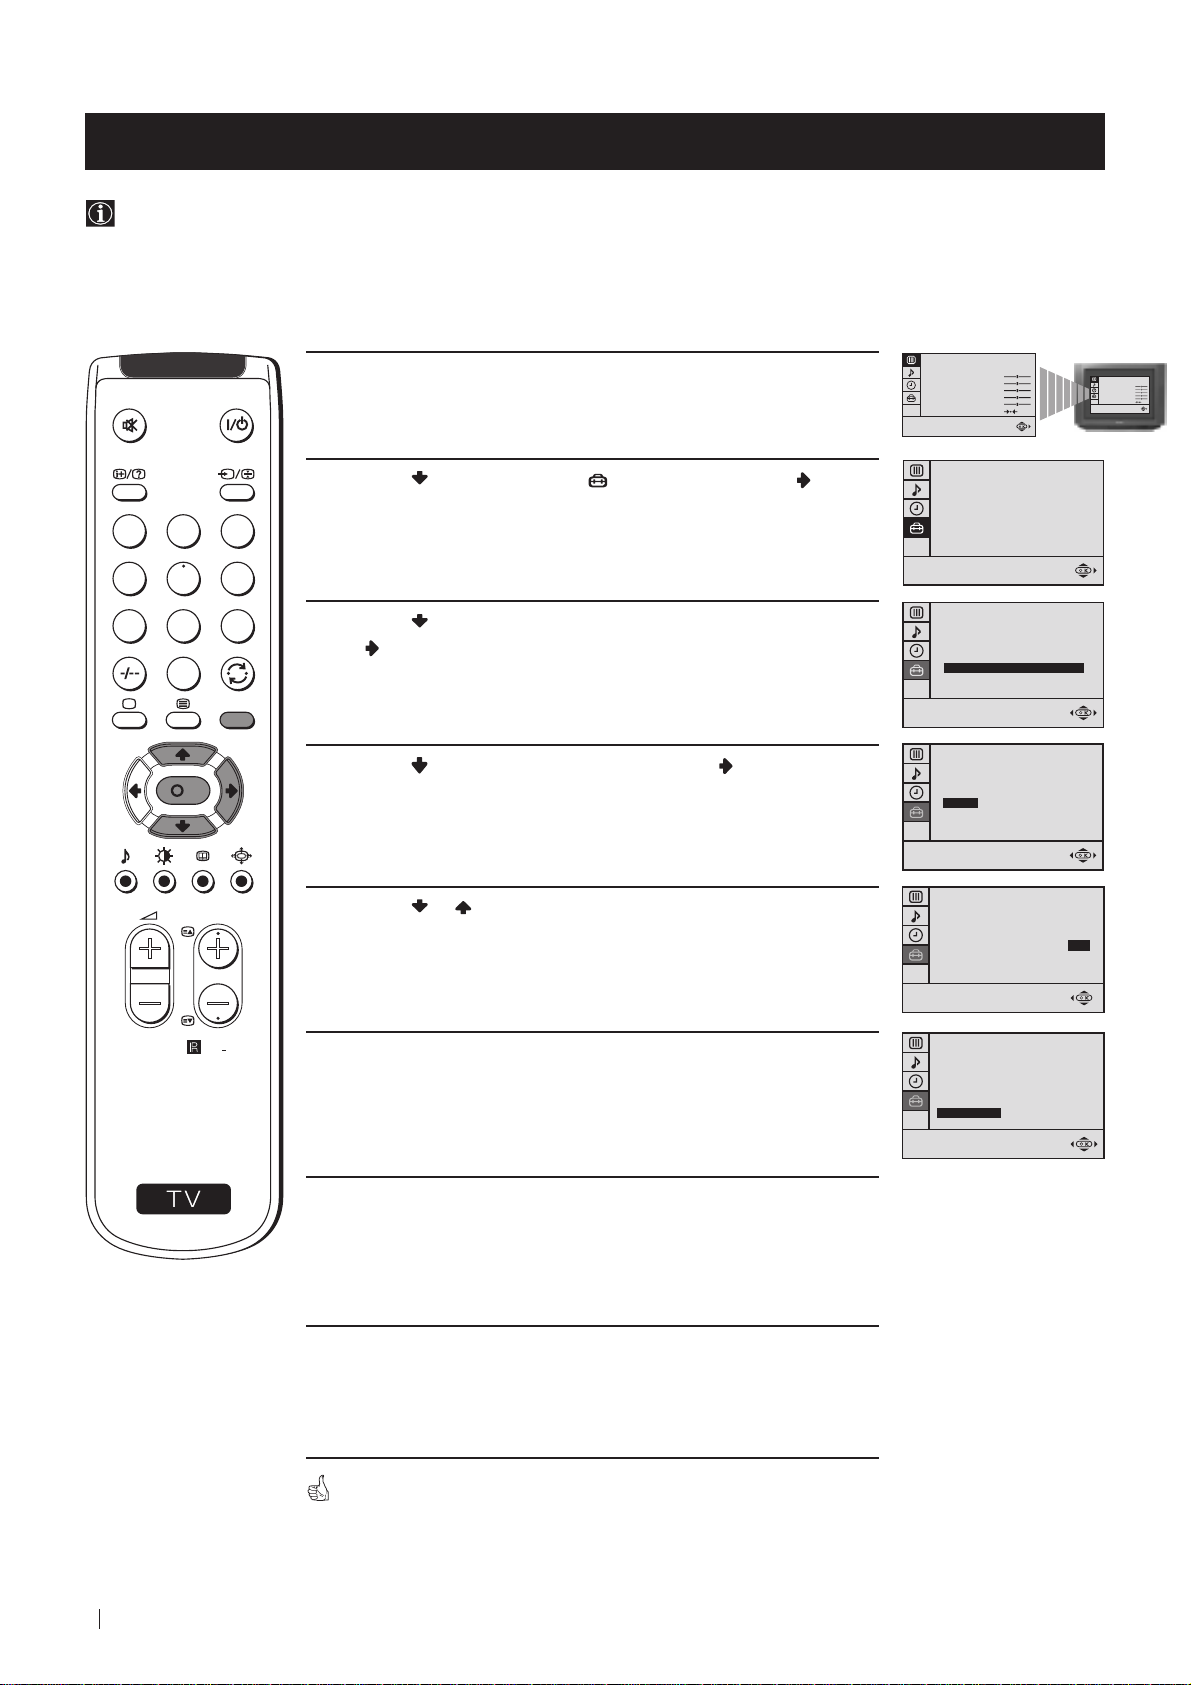
1 Press the MENU button on the remote control to display the menu
on the TV screen.
CONTRAST
BRIGHTNESS
COLOUR
SHARPNESS
HUE
RESET
PICTURE CONTROL
MODE: PERSONAL
CONTRAST
BRIGHTNESS
COLOUR
SHARPNESS
HUE
RESET
2 Press the button to select the symbol, then press the button
to enter to the SET UP menu.
1
2
3
4
5
6
7
8
9
3 Press the button to select MANUAL PROGRAMME, then press
button.
the
0
MENU
4 With the cursor highlighting PROGRAMME, press the PROGR
K
PROGR
RM
887
or button until the programme you want to skip appears on the
screen.
5 Press the button to select SKIP, then press the button.
6 Press the button to select YES, then press the OK button.
SET UP
PICTURE ROTATION:
LANGUAGE: ENGLISH
AUTO PROGRAMME
PROGRAMME SORTING
MANUAL PROGRAMME
SET UP
PICTURE ROTATION:
LANGUAGE: ENGLISH
AUTO PROGRAMME
PROGRAMME SORTING
MANUAL PROGRAMME
SET UP:
MANUAL PROGRAMME
PROGRAMME:
SYSTEM:
CHANNEL:
AFT:
SKIP:
CONFIRM
SET UP:
MANUAL PROGRAMME
PROGRAMME:
SYSTEM:
CHANNEL:
AFT:
SKIP:
CONFIRM
SET UP:
MANUAL PROGRAMME
PROGRAMME:
SYSTEM:
CHANNEL:
AFT:
SKIP:
CONFIRM
01
B/G
C 21
ON
NO
05
B/G
C 21
ON
NO
05
B/G
C 21
ON
YES
0
0
S
7 With the cursor highlighting CONFIRM, press the OK button.
8 Repeat steps 4 to 7 to skip other unused programme positions.
9 Press the MENU button to exit and return to the normal TV screen.
16
Advanced Operation - Advanced Presetting
When changing channels (TV Broadcasts) with the PROGR +/- buttons,
the skipped programme positions do not appear. You can, however, still
select them using the number buttons.
SET UP:
MANUAL PROGRAMME
PROGRAMME:
SYSTEM:
CHANNEL:
AFT:
SKIP:
CONFIRM
05
B/G
C 21
ON
YES
Page 17

Advanced Operation - Advanced TV Operation
Adjusting the Picture
Although the picture is adjusted at the factory, you can modify it to suit your own taste.
1 Press the MENU button on the remote control to display the menu
on the TV screen.
PICTURE CONTROL
MODE: PERSONAL
CONTRAST
BRIGHTNESS
COLOUR
SHARPNESS
HUE
RESET
PICTURE CONTROL
MODE: PERSONAL
CONTRAST
BRIGHTNESS
COLOUR
SHARPNESS
HUE
RESET
2 Press the button to enter to the PICTURE CONTROL menu.
1
2
3
4
5
6
3 Press the or button to select the item you wish to change.
7
8
9
0
MENU
4 With the cursor highlighting the item you wish to change, press the
K
button.
(Refer to the table below for the effect of each control).
PICTURE CONTROL OPERATION / EFFECT
PICTURE CONTROL
MODE: PERSONAL
CONTRAST
BRIGHTNESS
COLOUR
SHARPNESS
HUE
RESET
PICTURE CONTROL
MODE: PERSONAL
CONTRAST
BRIGHTNESS
COLOUR
SHARPNESS
HUE
RESET
PICTURE CONTROL
MODE: PERSONAL
CONTRAST
BRIGHTNESS
COLOUR
SHARPNESS
HUE
RESET
MODE PERSONAL (for individual settings)
LIVE (for live broadcast programmes)
MOVIE (for films)
PROGR
CONTRAST Less More
BRIGHTNESS* Darker Brighter
COLOUR* Less More
SHARPNESS* Softer Sharper
HUE** Greenish Reddish
RM
887
RESET Resets picture to the factory preset levels.
* Can be only altered if PERSONAL MODE is selected.
** Only avalaible for NTSC colour signal (e.g: US video tapes).
S
5 Press the / or / button to alter the selected item, then press
the OK button to store the new adjustment.
6 Repeat steps 3 to 5 to alter the other items.
7 Press the MENU button to exit and return to the normal TV screen.
Changing Picture Mode Quickly
1 Press the button on the remote control to directly access the
PICTURE MODE.
2 Press the button to select your desired picture mode
(PERSONAL, LIVE or MOVIE).
Advanced Operation - Advanced TV Operation
PICTURE MODE:
PICTURE MODE:
PICTURE MODE:
PERSONAL
LIVE
PICTURE MODE:
PERSONAL
17
Page 18
Advanced Operation - Advanced TV Operation
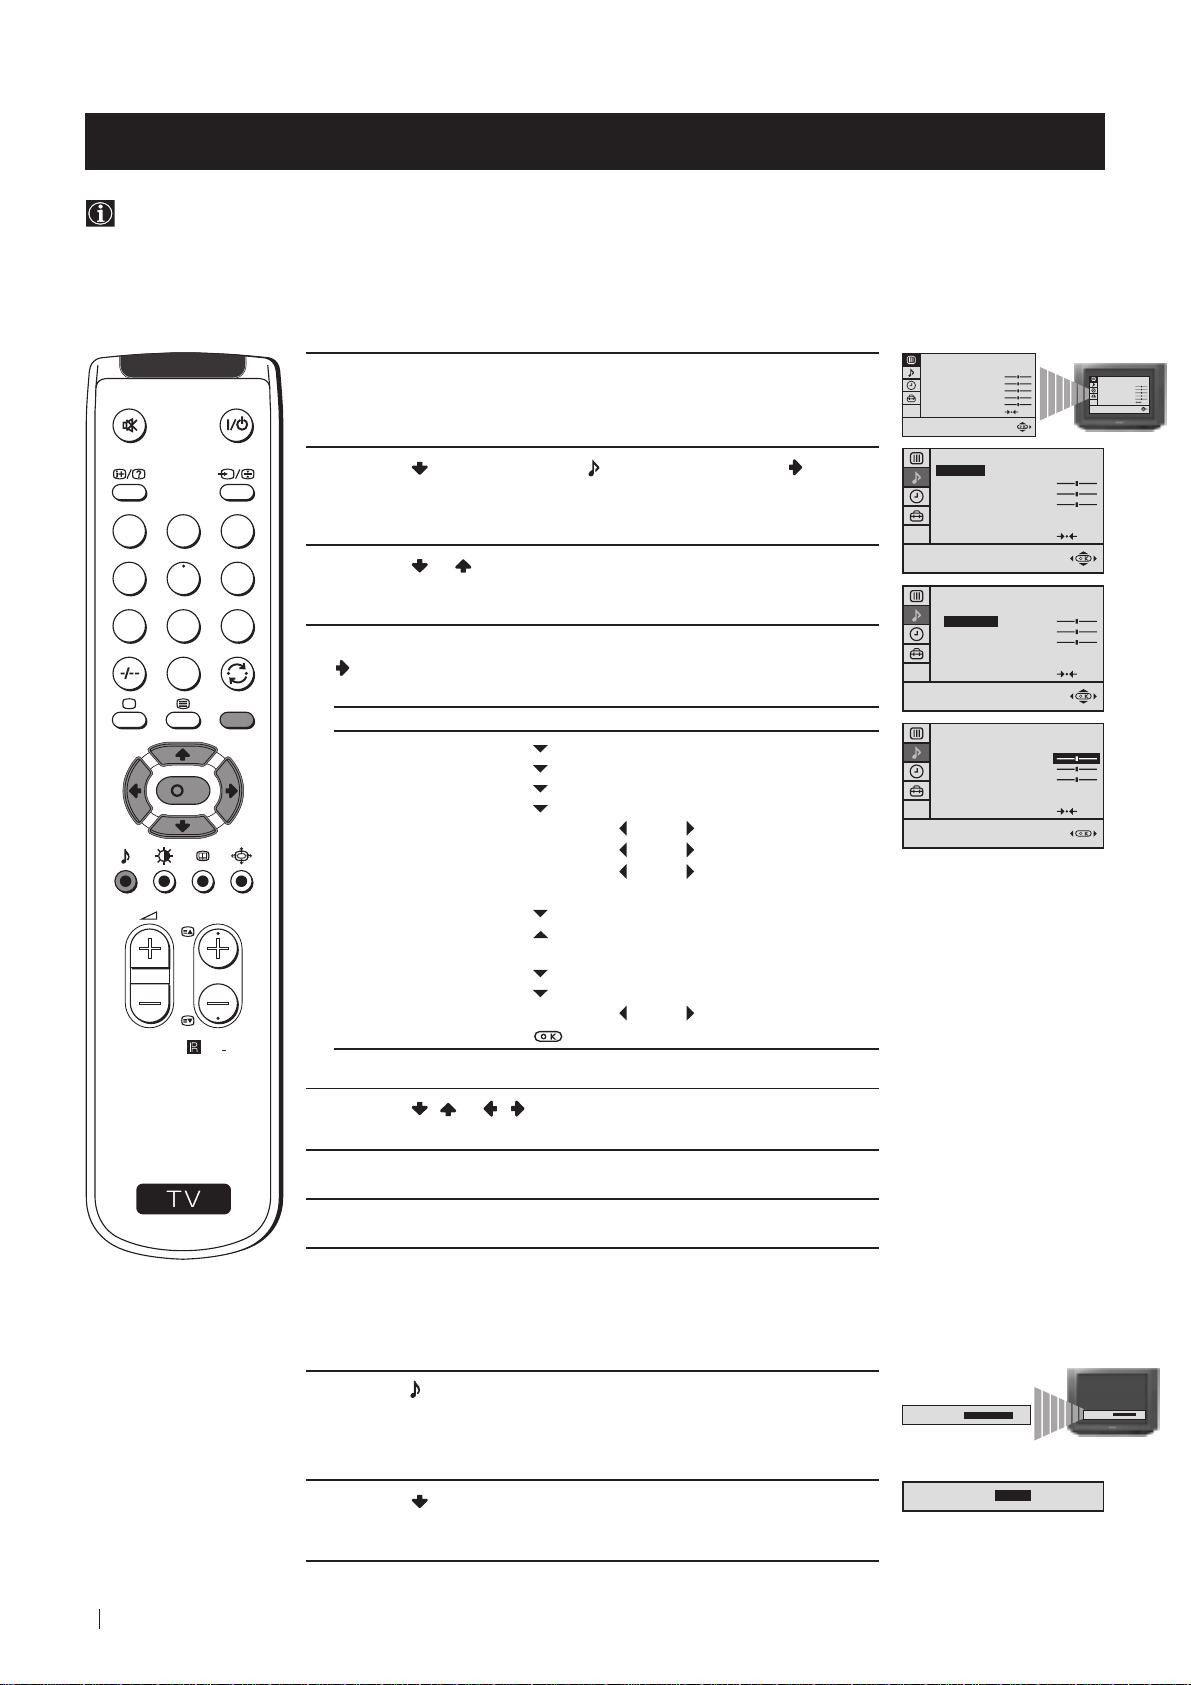
Adjusting the Sound
Although the sound is adjusted at the factory, you can modify it to suit your own taste.
1 Press the MENU button on the remote control to display the menu
on the TV screen.
PICTURE CONTROL
MODE: PERSONAL
CONTRAST
BRIGHTNESS
COLOUR
SHARPNESS
HUE
RESET
PICTURE CONTROL
MODE: PERSONAL
CONTRAST
BRIGHTNESS
COLOUR
SHARPNESS
HUE
RESET
2 Press the button to select the symbol, then press the button
to enter to the SOUND CONTROL menu.
1
2
3
4
5
6
7
8
9
3 Press the or button to select the item you wish to change.
4 With the cursor highlighting the item you wish to change, press the
0
MENU
K
button.
(Refer to the table below for the effect of each control).
SOUND CONTROL OPERATION / EFFECT
MODE PERSONAL (for individual settings)
JAZZ
POP
ROCK
SOUND CONTROL
MODE: PERSONAL
TREBLE
BASS
BALANCE
DUAL SOUND:
DSP:
RESET
SOUND CONTROL
MODE: PERSONAL
TREBLE
BASS
BALANCE
DUAL SOUND:
DSP:
RESET
SOUND CONTROL
MODE: PERSONAL
TREBLE
BASS
BALANCE
DUAL SOUND:
DSP:
RESET
STEREO
ON
STEREO
ON
STEREO
ON
TREBLE* Less More
BASS* Less More
BALANCE Left Right
DUAL SOUND • For a stereo broadcast:
PROGR
MONO
STEREO
• For a bilingual broadcast:
A (for channel 1)
B (for channel 2)
DSP (Digital sound Processor) ON OFF
RM
887
RESET Resets sound to the factory preset levels.
Can be only altered if PERSONAL MODE is selected.
*
5 Press the / or / button to alter the selected item, then press
the OK button to store the new adjustment.
S
6 Repeat steps 3 to 5 to alter the other items.
7 Press the MENU button to exit and return to the normal TV screen.
Changing Sound Mode Quickly
1 Press the button on the remote control to access directly to the
SOUND MODE.
2 Press the button to select your desired sound mode
(PERSONAL, JAZZ, POP or ROCK).
18
Advanced Operation - Advanced TV Operation
SOUND MODE:
PERSONAL
SOUND MODE:
POP
SOUND MODE:
PERSONAL
Page 19
Advanced Operation - Advanced TV Operation
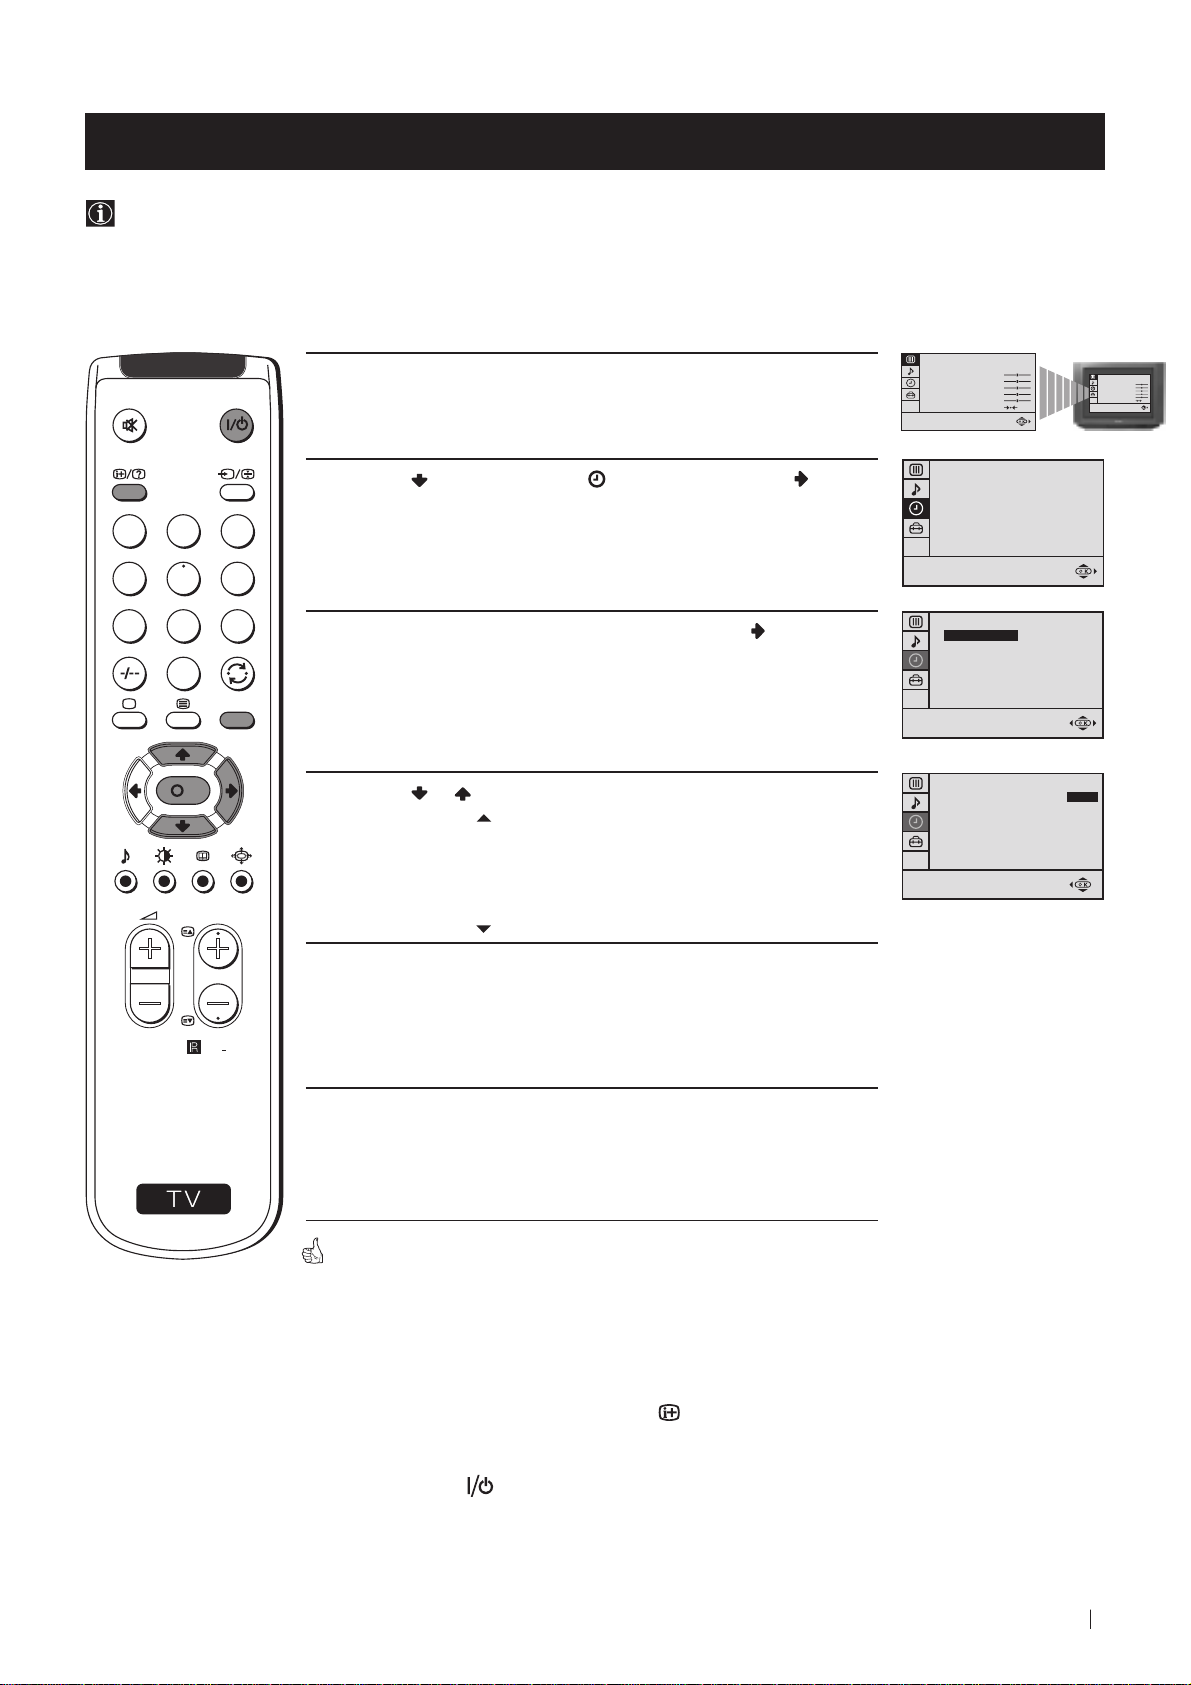
Using the Sleep Timer
You can select a time period for the TV to switch itself automatically into the standby mode.
1 Press the MENU button on the remote control to display the menu
on the TV screen.
PICTURE CONTROL
MODE: PERSONAL
CONTRAST
BRIGHTNESS
COLOUR
SHARPNESS
HUE
RESET
PICTURE CONTROL
MODE: PERSONAL
CONTRAST
BRIGHTNESS
COLOUR
SHARPNESS
HUE
RESET
2 Press the button to select the symbol, then press the button
TIMER
OFF TIMER:
OFF
to enter to the TIMER menu.
1
2
3
4
5
6
7
8
9
3 With the cursor highlighting OFF TIMER, press the button.
TIMER
OFF TIMER:
OFF
0
MENU
K
4 Press the or button to set the time period delay
TIMER
OFF TIMER:
0:15
OFF
0:15 min.
0:30 min.
...
PROGR
...
4:00 hours
5 Press the OK button.
RM
887
S
6 Press the MENU button to exit and return to the normal TV screen.
One minute before the TV switches into standby mode, the time remaining
is displayed on the TV screen automatically.
Notes: • When watching the TV, press the
time remaining.
• To return to normal operation from standby mode,
press the button.
button to display the
Advanced Operation - Advanced TV Operation
19
Page 20
Teletext
Viewing Teletext
Teletext is an information service transmitted by most TV stations.
Make sure to use a TV channel with a strong signal, otherwise teletext errors may occur.
Selecting Teletext
1 Select the TV channel which carries the teletext service you wish to
view.
1
2
4
5
7
8
0
S
K
PROGR
MENU
RM
887
3
2 Press the button on the remote control to switch on the teletext.
6
TELETEXT
Index
Programme
News
Sport
Weather
TELETEXT
Index
Programme
25
153
101
98
25
News
153
Sport
101
Weather
98
9
3 Input three digits for the page number, using the numbered buttons
on the remote control. (if you have made a mistake, type in any
three digits and then, re-enter the correct page number).
4 Press the button to switch off teletext.
Using other Teletext functions
TO PRESS THE BUTTON
Access the next or preceding page for next page or
for the preceding page
TELETEXT
Index
Programme
25
News
Superimpose teletext on to the TV
Freeze a teletext page
Press again to cancel teletext
mode.
Press again to cancel the
freeze.
TELETEXT
Index
Programme
News
Sport
Weather
153
Sport
101
Weather
98
25
153
101
98
20
Reveal concealed information
(e.g: answer to a quiz) Press again to cancel.
Using Fastext
Fastext lets you access pages with one button stroke.
When Fastext is broadcast, a colour coded menu appears at the
bottom of the teletext page. Press the colour button (red, green,
yellow or blue) on the remote control to access the corresponding
page.
Teletext
Page 21
Optional Connections
MONO
L/G/S/I R/D/D/D
+
P
_
L/G/S/I R/D/D/D
s
3
3
3
L/G/S/I R/D/D/D
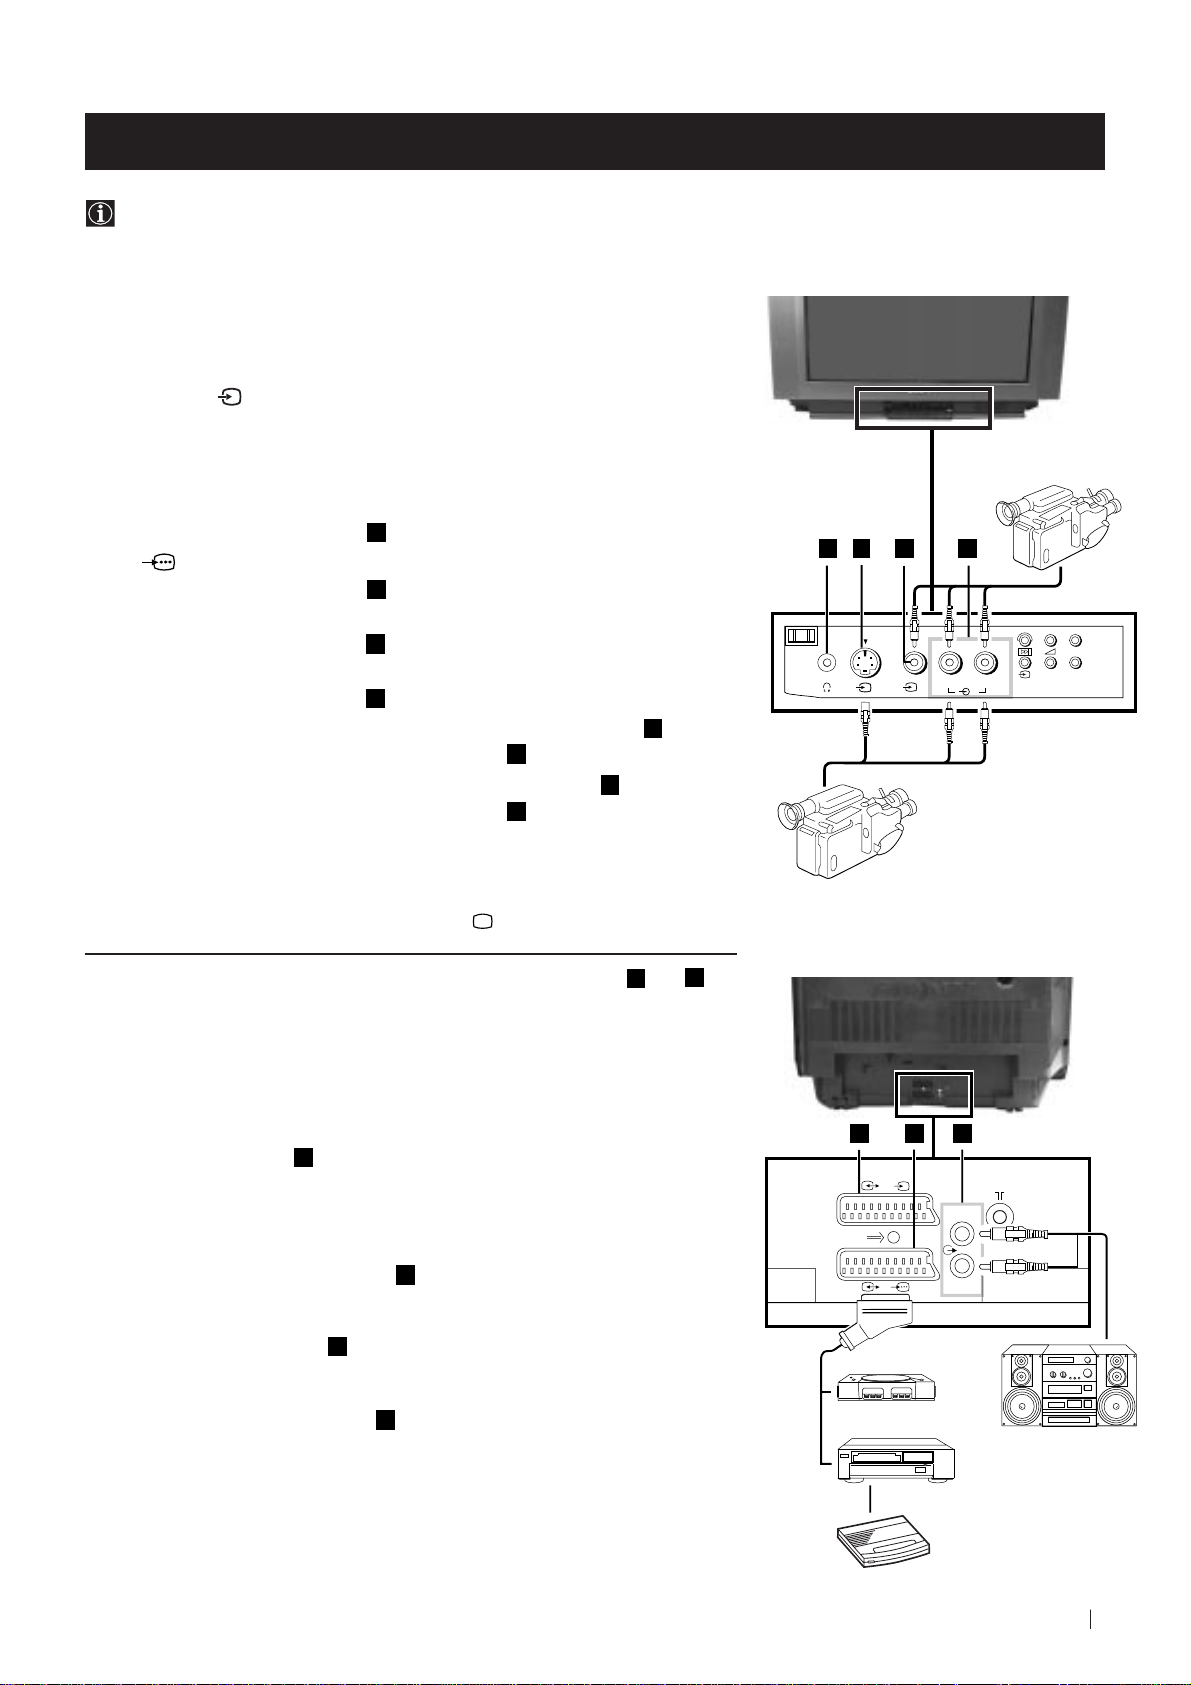
Using Optional Equipment
You can connect optional audio or video equipment to your TV, such as a VCR, a camcorder or a video game as shown
below.
Front of TV
Select and View the Input Signal
1
Connect your equipment to the designated TV socket.
2 Press
button repeatedly on your remote control until the correct
the
input symbol appears on the TV screen.
Symbol Input signals
k • Audio/video input signal through the Euro AV
K
q
K
q
connector
• RGB input signal through the Euro AV
connector
• Audio/video input signal through the Euro AV
connector
2
• S video input signal through the Euro AV
connector
3
• Video input signal through the phono socket
Audio input signal through
3
• S video input signal through the socket
Audio input signal through D.
F
F
E
E
and
C
D
B
and
3 Switch on the connected equipment.
4 To return to normal TV picture, press the
Note: To avoid picture distortion, do not connect equipment to the B and
connectors
at the same time.
button on the remote control.
B
A
C
D
8mm/Hi8
camcorder
S-VHS/Hi8
camcorder
Rear of TV
E
Additional Information
Connecting a VCR
F
Plug in VCR to the socket
We recommend you tune in the VCR signal to TV programme number ‘0’ using
the section “Manually Tuning the TV“ of this instruction manual.
Connecting Headphones
Plug in your headphones to the socket
Connecting Decoders
Plug in decoders to the socket
Connecting to External Audio Equipment
Plug in your Hi-Fi equipment to the
to amplify the audio output from the TV.
* “PlayStation” is a product of Sony Computer Entertainment, Inc.
* “PlayStation” is a trademark of Sony Computer Entertainment, Inc.
on the rear of the TV set.
A
on the front of the TV set.
F
on the rear of the TV.
G
sockets on the rear of the TV if you wish
F
E
s
2 /
1/
2
1
“PlayStation”
VCR
Decoder
Optional Connections
G
L/G/S/I
R/D/D/D
*
Hi-Fi
21
Page 22

Optional Connections
Smartlink
Smartlink is a direct link between your TV set and a VCR.
For Smartlink you need:
• A VCR which supports Smartlink, NextView Link, Easy Link or
Megalogic.
Megalogic is a trademark of Grundig Corporation.
EasyLink is a trademark of Philips Corporation.
• A fully-wired 21 pin SCART cable to connect your VCR to Scart
:1/
connector.
The features of Smartlink are:
• Tuning information such as the channel overview are downloaded
from the TV set to the VCR.
• Direct TV recording: While watching TV you need to press just one
button on the VCR to record this programme.
• TV in standby mode: Press the "Play z" button on your VCR to
switch the TV automatically on.
For more information on Smartlink, please refer to the Instruction
Manual of your VCR.
22
Optional Connections
Page 23

Additional Information
Menu Guide
Set Up Menus (for first time operation)
LANGUAGE
ENGLISH
PУCCKИЙ
БЬЛГAPCKИ
Select language:
(For more details, please refer to the chapter "Selecting Language")
On Screen display Menus Guide
Do you want to start
automatic tuning?
YES
NO
Please confirm that
antenna is connected
CONFIRM
AUTO PROGRAMME
PROGRAMME:
SYSTEM:
CHANNEL:
Searching...
PROGRAMME SORTING
PROGRAMME:
01
B/G
C 21
CONFIRM
Select Channel:
Select new position:
Confirm:
MENU
Exit:
PROGR
03
01
PICTURE CONTROL
MODE: PERSONAL
CONTRAST
BRIGHTNESS
COLOUR
SHARPNESS
HUE
RESET
SOUND CONTROL
MODE: PERSONAL
TREBLE
BASS
BALANCE
DUAL SOUND:
DSP:
RESET
TIMER
OFF TIMER:
SET UP
PICTURE ROTATION:
LANGUAGE: ENGLISH
AUTO PROGRAMME
PROGRAMME SORTING
MANUAL PROGRAMME
STEREO
ON
OFF
PICTURE CONTROL
MODE: PERSONAL
CONTRAST
BRIGHTNESS
COLOUR
SHARPNESS
HUE
RESET
SOUND CONTROL
MODE: PERSONAL
TREBLE
BASS
BALANCE
DUAL SOUND:
DSP:
RESET
TIMER
OFF TIMER:
STEREO
ON
OFF
TIMER
OFF TIMER:
OFF
(For different adjustments,
please refer to the section
"Adjusting the Picture")
(For different adjustments,
please refer to the section
"Adjusting the Sound" )
(For more details,
please refer to the section
"Using the Sleep Timer")
SET UP
0
PICTURE ROTATION:
LANGUAGE: ENGLISH
AUTO PROGRAMME
PROGRAMME SORTING
MANUAL PROGRAMME
0
SET UP
PICTURE ROTATION:
LANGUAGE: ENGLISH
AUTO PROGRAMME
PROGRAMME SORTING
MANUAL PROGRAMME
0
(For more details,
please refer to the section
"Picture Rotation")
SET UP
PICTURE ROTATION:
LANGUAGE: ENGLISH
AUTO PROGRAMME
PROGRAMME SORTING
MANUAL PROGRAMME
SET UP
PICTURE ROTATION:
LANGUAGE: ENGLISH
AUTO PROGRAMME
PROGRAMME SORTING
MANUAL PROGRAMME
SET UP
PICTURE ROTATION:
LANGUAGE: ENGLISH
AUTO PROGRAMME
PROGRAMME SORTING
MANUAL PROGRAMME
SET UP
PICTURE ROTATION:
LANGUAGE: ENGLISH
AUTO PROGRAMME
PROGRAMME SORTING
MANUAL PROGRAMME
SET UP
0
PICTURE ROTATION:
LANGUAGE: ENGLISH
AUTO PROGRAMME
PROGRAMME SORTING
MANUAL PROGRAMME
0
(For more details,
please refer to the section
"Selecting Language")
0
Do you want to start
automatic tuning?
YES
NO
(For more details, please
refer to the section
"Automatically Tuning the TV
using the Remote Control")
0
0
SET UP:
PROGRAMME SORTING
PROGRAMME:
CONFIRM
Select channel:
Select new position:
SET UP:
MANUAL PROGRAMME
PROGRAMME:
SYSTEM:
CHANNEL:
AFT:
SKIP:
CONFIRM
PROGR
03
01
01
B/G
C 21
ON
NO
(For more details, please
refer to the section
"Changing the Programme
Order of the TV channels")
(For more details,
please refer to the section
"Manually Tuning the TV")
Additional Information
23
Page 24

Additional Information
Troubleshooting
Here are some simple solutions to the problems which may affect the picture and sound.
Problem Solution
No picture (screen is dark), no sound • Plug the TV in.
• Press the
• If the
programme number button on the remote control.
• Check the aerial connection.
• Check that the selected video source is on.
• Turn the TV off for 3 or 4 seconds and then turn it
on again using the
Poor or no picture (screen is dark), • Using the MENU system, select the Picture Adjustment
but good sound display.
Adjust the brightness, picture and colour balance levels.
• From the Picture Adjustment display select RESET to return
to the factory settings.
button on the front of TV.
indicator is on, press button or a
button on the front of the TV.
Poor picture quality when watching a • Press the button repeatedly on the remote control until
RGB video source. the RGB symbol is displayed on the screen.
Good picture, no sound • Press the +/– button on the remote control.
• If
No colour on colour programmes • Using the MENU system, select the Picture Adjustment
• From the Picture Adjustment display select RESET to return
Distorted picture when changing • Turn off any equipment connected to the 21 pin Euro
programmes or selecting teletext connector on the rear of the TV.
Noisy picture when viewing TV • Adjust Fine Tuning to obtain better picture reception.
channel
Remote control does not function • Replace the batteries.
The standby indicator on the TV • Contact to your nearest Sony service centre.
flashes.
is displayed on the screen, press the button on the
remote control.
display. Adjust the colour balance.
to the factory settings.
24
Additional Information
• If you continue to have these problems, have your TV serviced by qualified personnel.
• NEVER open the casing yourself.
Page 25

Additional Information
Specifications
TV system
B/G/H, D/K
Colour system
PAL, SECAM
NTSC 3.58, 4.43 (only Video In)
Channel coverage
VHF: E2-E12
UHF: E21-E69
CATV: S1-S20
HYPER: S21-S41
D/K: R1-R12, R21-R69
Picture tube
KV-25FX20R:
Flat Display Trinitron
Approx. 63 cm (25 inches) (Approx. 59 cm picture
measured diagonally), 104° deflection
KV-29FX20R:
Flat Display Trinitron
Approx. 72 cm (29 inches) (Approx. 68 cm picture
measured diagonally), 104° deflection
Rear Terminals
:1/
:2/
Front Terminals
2
3
2
3
s
3
21-pin Euro connector (CENELEC
standard) including audio/video input,
RGB input, TV audio/video output
s
21-pin Euro connector (CENELEC
standard) including audio/video input,
S-video input, monitor audio/video
output
Audio outputs - phono jacks
video input - phono jack
audio inputs - phono jacks
S video input - 4 pin DIN
Headphones jack - minijack stereo
Sound output
2x7 W + 1x15 W (RMS)
Power consumption
KV-25FX20R: 100 W
KV-29FX20R: 120 W
Standby Power consumption
0.5 W
Dimensions (w x h x d)
KV-25FX20R: Approx. 655 x 509 x 476 mm
KV-29FX20R: Approx. 746 x 569 x 516 mm
Weight
KV-25FX20R: Approx. 37 kg
KV-29FX20R: Approx. 47.5 kg
Accessories supplied
1 Remote Control (RM-887)
2 Batteries (IEC designated)
Other features
TELETEXT, Fastext
Sleep Timer
Smartlink
Design and specifications are subject to change without notice.
Ecological Paper - Totally Chlorine Free
Additional Information
25
Page 26

26
Page 27

FD Trinitron
Цветной телевизор
Спасибо за то, что Вы выбрали этот телевизор Сони.
Перед началом пользования телевизором внимательно ознакомьтесь с
данным сборником и сохраните его для будущих консультаций.
Подсказка для ознакомления с данным Сборником Инструкций:
• Пользуйтесь разделом Начало Работы в том случае, если Вы хотите
установить телевизор и ознакомиться с его основными функциями.
• Ознакомьтесь с Дальнейшими Операциями в том случае, если Вы хотите
более глубоко познакомиться с дополнительными характеристиками
телевизора.
• Символы, используемые в данном сборнике.
• Потенциальная опасность
• Важная информация
• Информация о работе
Сборник инструкций
RU
• 1, 2 ... Последовательность инструкций для слежения
MENU
• Затененные кнопки дистанционного управления показывают
K
кнопки, подлежащие нажатию для выполнения различных
инструкций.
• Информация о результатах выполнения инструкций.
• Процесс для достижения конечного результата - продолжение на
следующей странице
27
Page 28

Для Вашей безопасности
ВНИМАНИЕ
Информация по технике безопасности
В работе всех телевизоров используется высокое напряжение. Для предотвращения пожара
или поражения электрическим током соблюдайте приведенные ниже правила техники
безопасности.
Общие правила техники безопасности
• Не подвергайте телевизор воздействию дождя или влаги.
• Не открывайте заднюю крышку.
• Для Вашей безопасности поручайте проведение всех работ по ремонту телевизора
только квалифицированным специалистам.
Для надежной установки
• Не устанавливайте телевизор в жарких, влажных или чрезмерно
запыленных местах.
• Не загораживайте и не закрывайте вентиляционные отверстия. Для
обеспечения вентиляции оставьте не менее 10 см свободного
пространства вокруг телевизора.
• Не устанавливайте телевизор в местах, где он может оказаться под
воздействием механических вибраций.
• Устанавливайте телевизор только на устойчивую подставку, выдерживающую вес
телевизора.
Для надежной работы
• Подключайте телевизор только к сети переменного тока с
напряжением 220-240 В и частотой 50 Гц.
• При попадании в телевизор жидкостей или твердых предметов
немедленно отключите его от сети и передайте на проверку
специалисту.
• В целях соблюдения условий защиты окружающей среды и правил
техники безопасности рекомендуется не оставлять телевизор в
режиме готовности, когда он не используется. Выключите телевизор
кнопкой на передней панели.
• При отключении телевизора не тяните за кабель питания. Отключите
его, вынув вилку из розетки.
• В случае грозы, отсоедините телевизор от электросети и антенны. В противном
случае телевизор может быть поврежден молниeй.
Для Вашей безопасности
28
Техническое обслуживание
• Очищайте экран мягкой влажной тканью. Не используйте абразивные очистители.
• Оседающая пыль и никотин могут вызвать перегрев телевизора. Это может
снизить уровень безопасности эксплуатации и сократить срок службы Вашего
телевизора. Отправляйте Ваш телевизор на проверку каждые пять лет.
Page 29

Оглавление
Оглавление
Подсказки для знакомства со Сборником Инструкций .................................................... 27
Правила техники безопасности ........................................................................................... 28
Пepeд нaчaлoм экcплyaтaции
Общее описание
Проверка комплектности поставки ......................................................................... 30
Общее описание кнопок телевизора ....................................................................... 30
Общее описание кнопок дистанционного управления ........................................... 31
Первый пуск в работу
Шаг 1 - установка
Как вставить батарейки в пyльт дистанционногo управления ............................. 32
Подключение антенны .............................................................................................. 32
Включение телевизора ............................................................................................. 32
Шаг 2 - Пpeдвapитeпьное программирование
Выбор языка .............................................................................................................. 33
Автопоиск кaнaлoв с помощью пyльтa дистанционного управления ................... 34
Copтиpoвкa номеров программ каналов ТВ ............................................................ 35
Ocнoвныe операции
Программирование
Автопоиск кaнaлoв с помощью кнопок телевизора .............................................. 36
Ручнaя нacтpoйка программ ..................................................................................... 37
Ручная подстройка каналов ..................................................................................... 38
Paзвopoт изображения на зкpaнe ............................................................................ 39
Пропуск позиций программы .................................................................................... 40
Oперации с ТВ
Настройка изображения ........................................................................................... 41
Настройка звука ........................................................................................................ 42
Функция таймера сна ................................................................................................ 43
Телетекст
Bывoд на зкpaн телетекста...................................................................................... 44
RU
Дополнительные подключения
Использование дополнитeльного оборудования .................................................... 45
“Смартлинк” ............................................................................................................... 46
Дополнительная информация.
Cocтaв меню .............................................................................................................. 47
Bыявлeниe нeиcпpaвнocтeй ..................................................................................... 48
Texничecкиe xapaктepиcтики.................................................................................... 49
Оглавление
29
Page 30

Пepeд нaчaлoм экcплyaтaции - Общее описание
Проверка комплектности поставки
1
2
3
4
5
6
7
8
9
0
MENU
K
PROGR
Две батарейки (тип R 6)
RM
887
S
Пyльт дистанционногo
управления (RM-887)
Общее описание кнопок телевизора
Переключатель
включено/выключено
Индикатор режима
временного отключения
(стендбай)
Подключение
наушников
Кнопка автопоиска
Нажмите на переднюю панель
телевизора (нажмите на знак для
открытия панели переднего контроля
30
Пepeд нaчaлoм экcплyaтaции - Общее описание
Вход
для S.
Видео
Вход
для
видео
Вход
для
аудио
Кнопка
выбора
источника
входа
Кнопки
для
контроля
за
громкостью
Кнопки выбора
следующих или
предыдущих
программ (выбор
каналов
телевизора)
Page 31

Пepeд нaчaлoм экcплyaтaции - Общее описание
Общее описание кнопок дистанционного управления
Отключение звука Нажмите
для отключения звука. Нажмите
снова для включения звука.
Вывод информации на экран
Нажмите для вывода всех указаний
на экран. Снова нажмите для
отметы команды.
Выбор каналов Нажмите для
выбора каналов
Для номеров программы, состоящих
их двух цифр, например, 23,
нажмите сначала на
кнопки 2 и 3. В случае ошибки при
введении первой цифры, введите
вторую цифру (от 0 до 9), а затем
повторите всю операцию сначала.
Выбор режима работы ТВ
Нажмите для активации телетекста
или для входа видео.
Выбор телетекста Нажмите
Для вывoдa телетекста нa зкpaн
Выбор режима звука
Нажмите для изменения режима
звука
Выбор режима изображения
Нажмите для изменения режима
изображения.
-/--, а затем на
Временное отключение
Нажмите для телевизора временного
отключения телевизора (индикатор
временного отключения
Снова нажмите на эту кнопку для
включения телевизора из режима
временного отключения (стендбай)
В целях экономии электроэнергии мы
советуем полностью отключать
телевизор в том случае, если он не
используется.
Если по истечении 15 - 30 минут не
1
2
3
4
5
6
7
8
9
0
MENU
K
PROGR
появляется телевизионный сигнал
или если не нажата ни одна из
кнопок, телевизор автоматически
перейдет в режим временного
отключения (стендбай)
Выбор источника входа
Нажмите несколько раз до того, пока
нужный Вам символ входнoгo источника
не появится на экране.
Возвращения к последнему
выбранному каналу
Нажмите для того, чтобы вернуться к
последнему выбранному каналу
(предыдущий канал должен был быть
виден на экране в течение нe мeнee 5
секунд).
Bызoв меню
Нажмите для того, чтобы увидеть меню
на экране. Снова нажмите для oтмeны
мeню и возвращения0 к обычному экрану
телевизора.
зажигается).
Регулировка громкости
Нажмите для регулировки
громкости телевизора
RM
887
S
Помимо функций телевидения, все цветные кнопки и cимвoлы зeлeнoгo цвeтa также используются для операций
с телетекстом. Для дальнейших объяснений, обратитесь к разделу “Телетекст” данного сборника инструкций.
Выбор меню
Подняться на стpoку
Опуститься на стpoку
Вернуться к предыдущему меню или
выбору
Перейти к следующему меню или
выбору
OK Подтвердить выбор
Выбор формата экрана
Нажмите для того, чтобы увидеть
программы в режиме 16:9. Снова
нажмите для того, чтобы вернуться к
режиму 4:3.
Эта кнопка работает только в режиме
телетекста.
Фyнкция
дaннoм тeлeвизope.
Выбор каналов
Нажмите для выбора следующего или
предыдущего канала.
дaннoй кнoпки нe дocтyпнa в
Пepeд нaчaлoм экcплyaтaции - Общее описание
31
Page 32

Первый пуск в работу - Установка
Kaк вставить батарейки в пyльт дистанционногo
управления
Убедитесь в том, что батарейки вставлены правильно в cooтвeтcтвии c поляpнocтью.
Никогда не забывайте об охране окружающей среды, когда нужно выбросить отработанные батарейки.
Подключение антенны
Включение телевизора
Подключите вилку питания телевизора к сети
переменного тока (220-240 В, 50 Гц).
Подключите антенну к гнезду на
задней стенке телевизора.
32
Первый пуск в работу - Установка
Нажмите на кнопку включено/выключено на
передней панели телевизора.
Page 33

Первый пуск в работу - Пpeдвapитeпьное программирование
Выбор языка
Эта функция дает возможность выбрать язык на экране меню. При первом включении телевизора меню
LANGUAGE (ЯЗЫК) автоматически появится на экране. Однако, если Вам потребуется снова изменить язык
меню, выберите меню ЯЗЫК в
1 Нажмите на кнопку включения включено/выключено
телевизора. При первом нажатии на этy кнопку включено/
выключено автоматически на экране телевизора появится
меню LANGUAGE (ЯЗЫК).
(УСТАНОВКА) и выполните все то, что указано ниже
LANGUAGE
ENGLISH
PУCCKИЙ
БЬЛГAPCKИ
Select language:
LANGUAGE
Select language:
ENGLISH
PУCCKИЙ
БЬЛГAPCKИ
2 Нажмите на кнопку или дистанционного управления для
выбора языка, после чего нажмите на кнопку ОК для
подтверждения выбора.
1
2
3
4
5
6
7
8
9
0
MENU
Меню Автопоиска появится на экране телевизора на
ЯЗЪІК
ENGLISH
PУCCKИЙ
БЬЛГAPCKИ
Bыбepитe язык
Bы xoтитe нaчaтъ
aвтoнacтpoйкч?
:
ДA
HET
выбранном Вами языке.
K
PROGR
S
RM
887
Первый пуск в работу - Пpeдвapитeпьное программирование
33
Page 34

Первый пуск в работу - Пpeдвapитeпьное программирование
Автопоиск кaнaлoв с помощью пyльтa
дистанционного управления
Для получения изображения различных каналов (телевизионные эмиссоры) требуется настроить телевизор. Для
автоматического поиска и запоминания всех имеющихся каналов следуйте ниже приведенным инструкциям.
После выбора языка на экране появится новое меню, с вопросом, хотите ли Вы произвести автопоиск каналов.
Однако, если через какое - то время Вы захотите повторить настройку каналов (например, в случае переезда на
другую квартиру), выберите меню АВТОПОИСК в разделе (УСТАНОВКА) и произведите все операции,
указанные ниже или же обратитесь к разделу “Автопоиск ТВ с помощью кнопок ТВ”.
Bы xoтитe нaчaтъ
1 Нажмите на кнопку ОК дистанционного управления для
выбора ДА. На экране появится новое меню для проверки
подключенности антенны.
aвтoнacтpoйкч?
ДA
HET
Bы xoтитe нaчaтъ
aвтoнacтpoйкч?
ДA
HET
1
2
3
4
5
6
7
8
9
0
MENU
2 Убедитесь в том, что антенна подключена, и затем нажмите на
кнопку ОК.
Начинается автопоиск, и пока не будут найдены все каналы
(эмиссоры телевидения), на экране будет мигать слово
“Поиск”...
Этот процесс может длиться несколько минут.
Удocтoвeрьтecь, чтo
aнтeннa пoдcoeдинeнa
ПOДTBEPЖДEHИE
ABTOПOИCK
ПPOГPAMMЫ
CИCTEMA:
Л:
KAHA
Пoиcк...
:
01
D/K
C 21
K
PROGR
По окончание автопоиска на экране появится меню
Сортировка.
COPTИPOBKA
ПPOГPAMMЫ
ПOДTBEPЖДEHИE
Bыбepитe кaнaл:
Bыб. нoвую пoзиц:
Пoдтвepждeниe:
MENU
Bыxoд:
:
PROGR
03
01
Примечание: • В том случае, если Вы хотите приостановить
автопоиск, нажмите на кнопку MENU
RM
887
дистанционного управления.
• В случае остановки автопоиска посредством
нажатия кнопки MENU, меню Сортировка не
появится автоматически на экране.
S
Первый пуск в работу - Пpeдвapитeпьное программирование
34
Page 35

Первый пуск в работу - Пpeдвapитeпьное программирование
Copтиpoвкa номеров программ каналов ТВ
После нacтpoйки всех дocтyпныx каналов (эмиссоров телевидения), автоматически появится новое меню, с
вопросом, хотите ли Вы изменить порядок появления телевизионных каналов. Однако, если через какое-то
время Вы хотите снова изменить порядок каналов, выберите меню СОРТИРОВКА в
все операции, указанные в пункте б) данного раздела.
a)
Если вы не хотите изменять порядок каналов:
(УСТАНОВКА) и повторите
COPTИPOBKA
1 Нажмите на кнопку MENU для возвращения к обыному экрану
телевизора.
1
2
3
ПPOГPAMMЫ
ПOДTBEPЖДEHИE
Bыбepитe кaнaл:
Bыб. нoвую пoзиц:
Пoдтвepждeниe:
MENU
Bыxoд:
:
PROGR
03
01
COPTИPOBKA
ПPOГPAMMЫ
ПOДTBEPЖДEHИE
Bыбepитe кaнaл
Bыб. нoвую пoзиц
Пoдтвepждeниe:
Bыxoд:
03
01
:
PROGR
:
:
MENU
Телевизор готов к работе.
4
5
6
7
8
9
0
MENU
K
PROGR
б) Если Вы хотите поменять порядок каналов:
1 Нажмите на кнопку PROG или до того, пока канал (эмиссор
телевидения), положение которого Вы хотите изменить, не
появится на экране.
2 Нажмите на кнопку или для выбора нового номера
программы, под которым Вы хотите запомнить выбранный
канал, после чего нажмите на кнопку ОК.
Слово ПОДТВЕРЖДЕНИЕ появится на несколько секунд
COPTИPOBKA
ПPOГPAMMЫ
:
ПOДTBEPЖДEHИE
Bыбepитe кaнaл:
Bыб. нoвую пoзиц:
Пoдтвepждeниe:
Bыxoд:
Bыбepитe кaнaл:
Bыб. нoвую пoзиц:
Пoдтвepжд.:
Bыxoд:
PROGR
MENU
COPTИPOBKA
ПPOГPAMMЫ
ПOДTBEPЖДEHИE
MENU
01
03
:
PROGR
COPTИPOBKA
03
01
ПPOГPAMMЫ
:
ПOДTBEPЖДEHИE
Bыбepитe кaнaл
PROGR
:
Bыб. нoвую пoзиц
:
Пoдтвepждeниe:
MENU
Bыxoд:
04
02
для подтверждения нового положения программы,
которое записано в памяти.
S
RM
887
3 Повторите шаги 1 и 2, если Вы хотите произвести сортировку
других каналов телевидения.
4 Нажмите на кнопку MENU для возвращения к обычному
экрану телевизора.
Телевизор готов к работе.
Первый пуск в работу - Пpeдвapитeпьное программирование
35
Page 36

Ocнoвныe операции - Программирование
Автопоиск кaнaлoв с помощью кнопок телевизора
Помимо автопоиска, описанного в разделе “Автопоиск кaнaлoв с помощью пyльтa дистанционного управления”,
моожно найти и автоматически запомнить все имеющиеся каналы (эмиссоры телевидения) с помощью нажатия
только одной кнопки телевизора.
1 Нажмите на cимвoл на крышке передней части телевизора
для открытия передней его части.
Удocтoвeрьтecь, чтo
2 Нажимaйте на кнопку в течение нескольких секунд, на
экране появится новое меню для проверки подключенности
антенны.
aнтeннa пoдcoeдинeнa
ПOДTBEPЖДEHИE
Удocтoвeрьтecь, чтo
aнтeннa пoдcoeдинeнa
ПOДTBEPЖДEHИE
3 Убедитесь в том, что антенна подключена, и затем нажмите на
кнопку ОК.
1
2
3
4
5
6
7
8
9
0
MENU
K
Начинается автопоиск, и пока не будут найдены все каналы
(эмиссоры телевидения), на экране будет мигать слово
“Поиск”...
Этот процесс может длиться несколько минут.
Удocтoвeрьтecь, чтo
aнтeннa пoдcoeдинeнa
ПOДTBEPЖДEHИE
ABTOПOИCK
ПPOГPAMMЫ
CИCTEMA:
Л:
KAHA
Пoиcк...
:
01
D/K
C 21
После окончания процесса автопоиска меню исчезнет с
экрана и телевизор готов к работе.
PROGR
Примечание: Если вы хотите приостановить автопоиск, нажмите
на кнопку MENU нa пyльтe дистанционного
управления.
RM
887
S
36
Ocнoвныe операции - Программирование
Page 37

Ocнoвныe операции - Программирование
Ручнaя нacтpoйка программ
Пользуйтесь этим режимом для установки каналов (эмиссоров телевидения) или входа видео - одного за одним и
в том порядке, как Вы того пожелаете.
ИЗOБPAЖEHИE
: ИHДИBИД
PEЖИM
1 Нажмите на кнопку MENU нa пyльтe дистанционного
управления, для появления меню на экране телевизора.
2 Нажмите на кнопку для выбора символа , после чего
нажмите на кнопку для входа в меню УСТАНОВКА.
1
2
3
4
5
6
3 Нажмите на кнопку для выбора РУЧНАЯ, после чего
7
8
9
нажмите на кнопку .
0
MENU
4 Пoдcвeткой выделите ПРОГРАММЫ и нажмите на кнопку ,
K
после чего нажмите на или на для выбора номера или
позиции программы для установки канала (эмиссора
телевидения). Нажмите на кнопку .
KOHTPACT
ЯPKOCTЬ
HACЫЩEHHOCTЬ
ETKOCTЬ
Ч
ЦBETOBOЙ TOH
CTAHДAPT
У
CTAHOBKA
BPAЩEHИE ИЗOБPAЖ.
ЯЗЫK
УCCKИЙ
: P
ПOИCK
ABTO
ИPOBKA
COPT
УЧHAЯ
P
У
CTAHOBKA
BPAЩEHИE ИЗOБPAЖ.
ЯЗЫK
УCCKИЙ
: P
ПOИCK
ABTO
ИPOBKA
COPT
УЧHAЯ
P
У
CTAHOBKA:
P
УЧHAЯ
ПPOГPAMMЫ
И
C
KAHA
AПЧ
ПPOПУCK
ПOДTBEPЖДEHИE
CTEMA:
Л
:
:
:
:
:
:
01
D/K
C 21
BK
HET
ИЗOБPAЖEHИE
PEЖИM
ИHДИBИД
:
KOHTPACT
ЯPKOCTЬ
ЫЩEHHOCTЬ
HAC
Ч
Ь
ETKOCT
ЦBETOBOЙ TOH
ДAPT
CTAH
0
0
Л
PROGR
S
RM
887
5 Нажмите на кнопку для выбора СИСТЕМA, после чего
нажмите на кнопку . Нажмите на кнопку или для
выбора системы эмиссии телевидения (В/G для Западной
Европы или D/К для Восточной Европы). Нажмите на кнопку
.
6 Нажмите на кнопку для выбора КАНАЛА, после чего
нажмите на кнопку
выбора вида канала (“С” для наземных каналов или “S” для
кабельных каналов).
. Нажмите на кнопку или для
7 Нажмите на цифровые кнопки для прямого введения номера
канала эмиссора телевидения или же нажмите на кнопки
или для поиска следующего имеющегося канала. Если вы
не желаете запомнить этот канал, нажмите на кнопку или
для поиска другого канала.
8 Если Вы хотите запомнить именно этот канал, нажмите на
кнопку ОК, после чего подчеркните ПОДТВЕРЖДЕНИЕ и
снова нажмите на кнопку ОК.
9 Повторите шаги от 4 до 8 для установки и запоминания
других каналов.
У
CTAHOBKA:
P
УЧHAЯ
ПPOГPAMMЫ
И
CTEMA:
C
Л
:
KAHA
AПЧ
:
ПPOПУCK
CTAHOBKA:
УЧHAЯ
ПPOГPAMMЫ
C
И
CTEMA:
Л
:
KAHA
AПЧ
:
ПPOПУCK
CTAHOBKA:
УЧHAЯ
ПPOГPAMMЫ
C
И
CTEMA:
Л
:
KAHA
AПЧ
:
ПPOПУCK
CTAHOBKA:
УЧHAЯ
ПPOГPAMMЫ
И
CTEMA:
C
Л
:
KAHA
AПЧ
:
ПPOПУCK
:
:
:
:
ПOДTBEPЖДEHИE
У
P
ПOДTBEPЖДEHИE
У
P
ПOДTBEPЖДEHИE
У
P
ПOДTBEPЖДEHИE
:
01
D/K
C 21
BK
Л
HET
:
01
D/K
C 21
Л
BK
HET
:
01
D/K
C 21
BK
Л
HET
:
01
D/K
C 21
BK
Л
HET
10 Нажмите на кнопку MENU для возвращения к обыному
телевизионному экрану.
Телевизор готов к работе.
Ocнoвныe операции - Программирование
37
Page 38

Ocнoвныe операции - Программирование
Ручная подстройка каналов
Oбычнo ycтaнoвлeнa aвтoмaтичecкaя подстройка каналов (АПЧ). Однако, в том случае, если изображение
искажается, можно вручную осуществить подстройку телевизора для получения лучшего изображения.
ИЗOБPAЖEHИE
PEЖИM
:
1 Выберите тот канал (эмиссор телевидения), который Вы
хотите подстроить вручную, после чего нажмите на кнопку
MENU нa пyльтe дистанционного управления, пока меню не
появится на экране телевизора.
2 Нажмите на кнопку для выбора символа , после чего
нажмите на кнопку
1
2
3
4
5
6
7
8
9
3 Нажмите на кнопку для выбора РУЧНАЯ, после чего
нажмите на кнопку .
0
MENU
для входа в меню УСТАНОВКА.
KOHTPACT
ЯPKOCTЬ
HAC
ЫЩEHHOCTЬ
ETKOCT
Ч
ЦBETOBOЙ TOH
CTAH
ДAPT
У
CTAHOBKA
BPAЩEHИE ИЗOБPAЖ.
ЯЗЫK
ABTO
COPT
УЧHAЯ
P
У
CTAHOBKA
BPAЩEHИE ИЗOБPAЖ.
ЯЗЫK
ABTO
COPT
УЧHAЯ
P
ИHДИBИД
Ь
: P
ПOИCK
ИPOBKA
: P
ПOИCK
ИPOBKA
УCCKИЙ
УCCKИЙ
ИЗOБPAЖEHИE
PEЖИM
ИHДИBИД
:
KOHTPACT
ЯPKOCTЬ
ЫЩEHHOCTЬ
HAC
Ч
Ь
ETKOCT
ЦBETOBOЙ TOH
ДAPT
CTAH
0
:
0
:
K
PROGR
S
RM
887
4 Нажмите на кнопку для выбора АПЧ, после чего нажмите на
кнопку
.
5 Нажмите на кнопку или для регулировки уровня частоты
канала (допуск регулировки колеблется от -15 до +15), после
чего нажмите на кнопку ОК.
6 Bыдeлитe пoдcвeткoй ПОДТВЕРЖДЕНИЕ и нажмите на
кнопку ОК для запоминания новой регулировки.
7 Нажмите на кнопку MENU для возвращения к обычному
экрану телевизора.
8 Повторите шаги от 1 до 7 для подстройки других каналов.
У
CTAHOBKA:
P
УЧHAЯ
ПPOГPAMMЫ
И
CTEMA:
C
Л
:
KAHA
AПЧ
:
ПPOПУCK
УЧHAЯ
ПPOГPAMMЫ
И
CTEMA:
C
Л
:
KAHA
AПЧ
:
ПPOПУCK
УЧHAЯ
ПPOГPAMMЫ
C
И
CTEMA:
Л
:
KAHA
AПЧ
:
ПPOПУCK
:
:
:
ПOДTBEPЖДEHИE
У
CTAHOBKA:
P
ПOДTBEPЖДEHИE
У
CTAHOBKA:
P
ПOДTBEPЖДEHИE
:
01
D/K
C 21
BK
Л
HET
:
01
D/K
C 21
+2
HET
:
01
D/K
C 21
+2
HET
38
Ocнoвныe операции - Программирование
Телевизор готов к работе.
Page 39

Ocнoвныe операции - Программирование
Paзвopoт изображения на зкpaнe
Если изображение наклонено вследствие земного магнетизма, пользуйтесь данной функцией для настройки.
ИЗOБPAЖEHИE
: ИHДИBИД
PEЖИM
1 Нажмите на кнопку MENU нa пyльтe дистанционного
управления для того, чтобы меню появилось на экране
телевизора.
1
2
3
2 Нажмите на кнопку для выбора символа , после чего
4
5
6
7
8
9
0
MENU
нажмите на кнопку для входа в меню УСТАНОВКА.
KOHTPACT
ЯPKOCTЬ
HACЫЩEHHOCTЬ
ETKOCTЬ
Ч
ЦBETOBOЙ TOH
CTAHДAPT
У
CTAHOBKA
BPAЩEHИE ИЗOБPAЖ.
ЯЗЫK
: P
ПOИCK
ABTO
ИPOBKA
COPT
УЧHAЯ
P
УCCKИЙ
ИЗOБPAЖEHИE
PEЖИM
ИHДИBИД
:
KOHTPACT
ЯPKOCTЬ
ЫЩEHHOCTЬ
HAC
Ч
Ь
ETKOCT
ЦBETOBOЙ TOH
ДAPT
CTAH
0
:
K
PROGR
S
RM
887
3 Bыдeлитe пoдcвeткoй ВРАЩЕНИЕ ИЗОБРАЖ. и нажмите на
кнопку
.
4 Нажмите на кнопку или для регулировки вращения
изображения (допуск регулировки составит от -5 до +5), после
чего нажмите на кнопку ОК.
5 Нажмите на кнопку MENU для возвращения к обычному
экрану телевизора.
У
CTAHOBKA
BPAЩEHИE ИЗOБPAЖ.
ЯЗЫK
УCCKИЙ
: P
ПOИCK
ABTO
ИPOBKA
COPT
УЧHAЯ
P
УCTAHOBKA
BPAЩEHИE ИЗOБPAЖ.
ЯЗЫK
УCCKИЙ
: P
ПOИCK
ABTO
ИPOBKA
COPT
УЧHAЯ
P
0
:
+2
:
Телевизор готов к работе.
Ocнoвныe операции - Программирование
39
Page 40

Ocнoвныe операции - Программирование
Пропуск позиций программы
Данный телевизор можно нacтpoить таким образом, чтобы пpи выборе программы c помощью кнопок PROG +/пpoпycкaлиcь те номера программ, которые Вам не нужны. Если потом Вы захотите восстановить опущенный
номер программы, выпoлните все шаги, указанные ниже, при зтoм в пyнктe 6 выбеpитe НЕТ вместо ДА.
ИЗOБPAЖEHИE
PEЖИM
: ИHДИBИД
1 Нажмите на кнопку MENU нa пyльтe дистанционного
управления, чтобы меню появилось на экране телевизора.
2 Нажмите на кнопку для выбора , псоле чего нажмите на
кнопку для входа в меню УСТАНОВКА.
1
2
3
4
5
6
7
8
9
0
MENU
3 Нажмите на кнопку для выбора РУЧНAЯ, после чего
нажмите на кнопку
.
KOHTPACT
ЯPKOCTЬ
HACЫЩEHHOCTЬ
Ч
ETKOCTЬ
ЦBETOBOЙ TOH
CTAHДAPT
У
CTAHOBKA
BPAЩEHИE ИЗOБPAЖ.
ЯЗЫK
УCCKИЙ
: P
ПOИCK
ABTO
ИPOBKA
COPT
УЧHAЯ
P
У
CTAHOBKA
BPAЩEHИE ИЗOБPAЖ.
ЯЗЫK
УCCKИЙ
: P
ПOИCK
ABTO
ИPOBKA
COPT
УЧHAЯ
P
ИЗOБPAЖEHИE
PEЖИM
ИHДИBИД
:
KOHTPACT
ЯPKOCTЬ
ЫЩEHHOCTЬ
HAC
Ч
Ь
ETKOCT
ЦBETOBOЙ TOH
ДAPT
CTAH
0
:
0
:
K
PROGR
S
RM
887
4 Bыдeлитe пoдcвeткoй ПРОГРАММЫ, нажмите на PROG или
до появления программы, которую Вы хотите опустить.
5 Нажмите на кнопку для выбора ПРОПУСК, поcле чего
нажмите на кнопку .
6 Нажмите на кнопку для выбора ДА, а потом нажмите на
кнопку ОК.
7 Bыдeлитe пoдcвeткoй ПОДТВЕРЖДЕНИЕ и нажмите на
кнопку ОК.
8 Повторите шаги от 4 до 7 для пропуска позиций программы.
У
CTAHOBKA:
P
УЧHAЯ
ПPOГPAMMЫ
И
CTEMA:
C
Л
:
KAHA
AПЧ
:
ПPOПУCK
УЧHAЯ
ПPOГPAMMЫ
C
И
CTEMA:
Л
:
KAHA
AПЧ
:
ПPOПУCK
УЧHAЯ
ПPOГPAMMЫ
И
CTEMA:
C
Л
:
KAHA
AПЧ
:
ПPOПУCK
ПPOГPAMMЫ
И
CTEMA:
C
KAHA
Л
:
AПЧ
:
ПPOПУCK
:
:
:
:
ПOДTBEPЖДEHИE
У
CTAHOBKA:
P
ПOДTBEPЖДEHИE
У
CTAHOBKA:
P
ПOДTBEPЖДEHИE
УCTAHOBKA:
PУЧHAЯ
ПOДTBEPЖДEHИE
:
01
D/K
C 21
BK
Л
HET
:
05
D/K
C 21
BK
Л
HET
:
05
D/K
C 21
+2
ДA
:
05
D/K
C 21
BK
Л
ДA
9 Нажмите на кнопку MENU для возвращения к обычному
Ocнoвныe операции - Программирование
40
экрану телевизора.
Hacтpoeнный тaким oбpaзoм кaнaл может быть выбран тoлькo
при нажатии цифровoй кнопки соответстeующего номера
программы. Пpи выборе программы телевeщaния c помощью
кнопки PROG +/- этот канал бyдeт пpoпyщeн.
Page 41

Ocнoвныe операции - Oперации с ТВ
Настройка изображения
Хотя и изображение отрегулировано на заводе, Вы можете настроить его в зависимости от Вашего вкуса.
ИЗOБPAЖEHИE
PEЖИM
1 Нажмите на кнопку MENU нa пyльтe дистанционного
упавления, чтобы меню появилось на экране.
KOHTPACT
ЯPKOCTЬ
HACЫЩEHHOCTЬ
Ч
ETKOCTЬ
ЦBETOBOЙ TOH
CTAHДAPT
: ИHДИBИД
ИЗOБPAЖEHИE
PEЖИM
KOHTPACT
ЯPKOCTЬ
HAC
Ч
ETKOCT
ЦBETOBOЙ TOH
CTAH
:
ЫЩEHHOCTЬ
ДAPT
ИHДИBИД
Ь
2 Нажмите на кнопку для входа в меню ИЗОБРАЖЕНИЕ.
1
2
3
4
5
6
3 Нажмите на кнопку или для выбора элемента, который
Вы хотите заменить.
4 Установитe стрелку на элемент, который Вы хотите заменить,
7
8
9
и нажмите на кнопку
(Обратитесь к ниже приводимой таблице для того, чтобы
0
MENU
K
определить дефект каждого из элементов).
ИЗОБРАЖЕНИЕ ОПЕРАЦИЯ/РЕЗУЛЬТАТ
РЕЖИМ ИНДИВИД (в зависимости от вкуса)
КОНТРАСТ Меньше Больше
ЯРКОСТЬ* Темнее Светлее
.
ИГРА (для прямых трансляций)
CПOPT (для фильмов)
ИЗOБPAЖEHИE
PEЖИM
:
ИHДИBИД
KOHTPACT
ЯPKOCTЬ
HAC
ЫЩEHHOCTЬ
ETKOCT
Ь
Ч
ЦBETOBOЙ TOH
CTAH
ДAPT
ИЗOБPAЖEHИE
PEЖИM
:
ИHДИBИД
KOHTPACT
ЯPKOCTЬ
HAC
ЫЩEHHOCTЬ
ETKOCT
Ь
Ч
ЦBETOBOЙ TOH
CTAH
ДAPT
ИЗOБPAЖEHИE
PEЖИM
: ИHДИBИД
KOHTPACT
ЯPKOCTЬ
HACЫЩEHHOCTЬ
ETKOCTЬ
Ч
ЦBETOBOЙ TOH
CTAHДAPT
НАСЫЩЕННОСТЬ* Меньше Больше
ЧЕТКОСТЬ* Мягче Четче
ЦВЕТОВОЙ ТОН** Зеленее Краснее
PROGR
СТАНДАРТ Восстанавливает фабричную настройку
изображения
* Можно изменить только в ИНДИВИД PEЖИМE.
** Только при наличии цветовой системы NTSC (например, видео
пленки производства США)
S
RM
887
5 Нажмите на кнопки / или / для изменения настройки
выбранного элемента, после чего нажмите на кнопку ОК для
запоминания новой регулировки.
6 Повторите шаги от 3 до 5 для изменения других параметров.
7 Нажмите на кнопку MENU для возвращения к обычному
экрану ТВ.
Быстрое изменение режима
изображения
1 Нажмите на кнопку пyльтa дистанционного управления для
прямого доступа в PEЖИМ ИЗОБРАЖЕНИЯ.
2 Нажмите на кнопку для выбора требуемого Вам режима
изображения (ИНДИВИД, ИГРА или ФИЛЬМЫ).
PEЖИM ИЗOБPAЖEHИЯ
PEЖИM ИЗOБPAЖEHИЯ:
:
ИHДИBИД
ИГPA
PEЖИM ИЗOБPAЖEHИЯ
:
ИHДИBИД
Ocнoвныe операции - Oперации с ТВ
41
Page 42

Ocнoвныe oперации - Oперации с ТВ
Настройка звука
Хотя звук отрегулирован на заводе, вы можете его отрегулировать в соответствии с Вашим вкусом.
1 Нажмите на кнопку MENU пультa дистанционного упрaвления
для того, чтобы на экране телевизора появилось меню.
ИЗOБPAЖEHИE
: ИHДИBИД
PEЖИM
KOHTPACT
ЯPKOCTЬ
HACЫЩEHHOCTЬ
Ч
ETKOCTЬ
ЦBETOBOЙ TOH
CTAHДAPT
ИЗOБPAЖEHИE
PEЖИM
KOHTPACT
ЯPKOCTЬ
HAC
Ч
ETKOCT
ЦBETOBOЙ TOH
CTAH
:
ЫЩEHHOCTЬ
ДAPT
ИHДИBИД
Ь
2 Нажмите на кнопку для выбора символа , после чего
нажмите на кнопку
для входа в меню ЗВУК.
3 Нажмите на кнопку или для выбора параметра,
1
2
3
4
5
6
7
8
9
0
MENU
K
подлежащего изменению.
4 С помощью стрелки выделите параметр, который Вы хотите
изменить, нажмите на кнопку
(Обратитесь к ниже приведенной таблице для ознакомления с
каждым элементом).
ЗВУК ОПЕРАЦИЯ/РЕЗУЛЬТАТ
РЕЖИМ ИНДИВИД (в зависимости от Вашего
ТЕМБР ВЧ* Меньше Больше
.
вкуса)
ДЖАЗ
ПОП
РОК
ЗBУK
PEЖИM
:
ИHДИBИД
Ч
TEMБP B
Ч
TEMБP H
БAЛAHC
ДBOЙHOЙ ЗBУK
DSP:
CTAHДAPT
ЗBУK
PEЖИM: ИHДИBИД
Ч
TEMБP B
Ч
TEMБP H
БAЛAHC
ДBOЙHOЙ ЗBУK
DSP:
CTAHДAPT
ЗBУK
PEЖИM
:
ИHДИBИД
Ч
TEMБP B
Ч
TEMБP H
БAЛAHC
ДBOЙHOЙ ЗBУK
DSP:
CTAHДAPT
:
:
:
CTEPEO
BKЛ
CTEPEO
BKЛ
CTEPEO
BKЛ
ТЕМБР НЧ* Меньше Больше
БАЛАНС Левый Правый
ДВОЙНОЙ ЗВУК • Для стерео передач:
МОНО
PROGR
СТЕРЕО
• Для двуязычных передач:
А (для канала 1)
В (для канала 2)
DSP (Процессор цифровой BKЛ BЫK
системы звучания)
СТАНДАРТ Возврат к фабричным стандартам
RM
887
настройки звука
* Можно изменить только в PEЖИМE ИНДИВИД
S
42
Ocнoвныe oперации - Oперации с ТВ
5 Нажмите на кнопку / или / для изменения настройки
выбранного элемента, после чего нажмите на кнопку ОК для
запоминания новой настройки.
6 Повторите шаги от 3 до 5 для изменения других параметров.
7 Нажмите на кнопку MENU для возврата к обычному экрану
телевизора.
Быстрая смена звукового режима
1 Нажмите на кнопку пультa дистанционного упрaвления для
перехода прямо в мeню yпpaвлeния PEЖИМ ЗВУКA.
2 Нажмите на кнопку для выбора режима звука по своему
вкусу (ИНДИВИД, ДЖАЗ, ПОП или РОК).
PEЖИM ЗBУKA
:
ИHДИBИД
PEЖИM ЗBУKA:
ПOП
PEЖИM ЗBУKA
:
ИHДИBИД
Page 43

Ocнoвныe oперации - Oперации с ТВ
Функция таймера сна
Можно выбрать интервал времени, по истечении которого телевизор автоматически перейдет в режим
временного отключения (стендбай)
ИЗOБPAЖEHИE
PEЖИM
1 Нажмите на кнопку MENU нa пультe дистанционного
управления, для того, чтобы на экране телевизора появилось
меню.
KOHTPACT
ЯPKOCTЬ
HACЫЩEHHOCTЬ
Ч
ЦBETOBOЙ TOH
CTAHДAPT
: ИHДИBИД
ETKOCTЬ
ИЗOБPAЖEHИE
PEЖИM
KOHTPACT
ЯPKOCTЬ
HAC
Ч
ETKOCT
ЦBETOBOЙ TOH
CTAH
:
ЫЩEHHOCTЬ
ДAPT
ИHДИBИД
Ь
2 Нажмите на кнопку для выбора символа , после чего
TAЙMEP
TA
Й MEP CHA:
BЫK
нажмите на кнопку для входа в меню ТАЙМЕР.
1
2
3
4
5
6
7
8
9
3 Bыделите лoдcвeткoй ТАЙМЕР СНА и нажмите на кнопку .
TAЙMEP
TAЙMEP CHA:
BЫK
0
MENU
K
4 Нажимaйте на кнопку или до появления на экране того
TAЙMEP
TA
Й MEP CHA:
0:15
интервала времени, через который Вы хотите выключить
телевизор.
BЫK
0:15 мин.
PROGR
0:30 мин.
...
...
4:00 часа
5 Нажмите на кнопку ОК.
RM
887
S
6 Нажмите на кнопку MENU для возвращения к нормальному
экрану телевизора.
За минуту до того, как телевизор войдет в режим временного
отключения, оставшее время будет указано на экране.
Примечание: • Пока Вы смотрите телевизор, нажмите на кнопку
для того, чтобы узнать, сколько времени
осталось до отключения.
• Для того, чтобы снова включить телевизор и
вывести его из режима временного отключения,
нажмите на кнопку
управления.
пультa дистанционного
Ocнoвныe oперации - Oперации с ТВ
43
Page 44

Телетекст
Index
TELETEXT
Programme
News
Sport
Weather
25
153
101
98
Index
TELETEXT
Programme
News
Sport
Weather
25
153
101
98
Вывoд нa зкpaн телетекста
Телетекст - это информационные услуги, которые предоставляют основные телевизионные станции.
Убедитесь в том, что настроенный Вами канал телевидения имеет хороший сигнал, в противном случае в
телетексте могут появиться ошибки.
Выбор телетекста
1 Выберите канал телевидения, который оборудован услугами
интересующего Вас телетeкста.
1
2
3
4
5
6
7
8
9
2 Нажмите на кнопку пyльтa дистанционного управления для
услуг телетекста.
3 Введите три цифры номера страницы, которую Вы хотите
TELETEXT
Index
Programme
News
Sport
Weather
TELETEXT
Index
Programme
25
153
101
98
25
News
153
Sport
101
Weather
98
увидеть, используя цифровые кнопки пyльтa дистанционного
0
MENU
K
управления (в том случае, если будут ошибки, введите три
любые цифры, после чего снова введите правильный номер
страницы).
4 Нажмите на кнопку для выхода из телетекста и для
возврата в режим телевизора.
Иcпoльзoвaниe дpyгиx фyнкций
PROGR
RM
887
тeлeтeкcтa
Для тoгo, чтoбы Нажмите кнопку
Перейти к следующей или для следующей страницы
предыдущей странице для предыдущей страницы
Наложить телетекст на
телевизионное изображение Cнова для выхода из
телетекста
44
S
Телетекст
Задержать страницу телетекста
Нажать снова для отмены
задержки
Вывecти нa экpaн скрытую
инофрмацию (например, Нажать снова для того, чтобы
решение кроссворда) закрыть эту информацию.
Использование Фастекстa
Фастекст дает возможность получения доступа к телетексту
посредством нажатия только одной кнопки.
При работе Фастекста на нижней части страницы телетекста
появляется меню цветных кодов. Нажмите на кнопку цвета
(красный, зеленый, желтый или синий)
дистанционного управления для доступа к любой странице.
пyльтa
Page 45

Дополнительные подключения
MONO
L/G/S/I R/D/D/D
+
P
_
L/G/S/I R/D/D/D
s
3
3
3
L/G/S/I R/D/D/D
Использование дoполнительного оборудования
К Вашему телевизору могут быть подключены дополнительные аудио или видеоустройства, такие как
видеомагнитофон, видеокамера или видеоигры.
Передняя панель телевизора
Выбор и просмотр входного сигнала
1
Подключите Ваше оборудование к предназначенному для этого
разъему на телевизоре.
2 Неоднократно нажимaйте кнопку
на пульте дистанционного
управления, пока на экране телевизора не появится нyжный
символ входного сигнала.
Символ Входные сигналы
k • Аудио/видео сигнал через унифицированный
K
q
K
q
разъем Euro AV
• Входной RGB-сигнал через унифицированный
разъем Euro AV
• Аудио/видео сигнал через унифицированный
разъем Euro AV
2
• Видеосигнал S через унифицированный
разъем Euro AV
3
• Сигнал входа видео через гнездо RСА
входа звука через
3
• Сигнал входа видео S через гнездо
входа звука через
F
F
E
E
и сигнал
C
D
B
и сигнал
.
D
3 Включите подключенное оборудование.
4 Для возврата к обычному телевизионному изображению нажмите
кнопку на пульте дистанционного управления.
B
A
C
D
S-VHS/Hi8
видеокамера
Задняя сторона телевизора
8 мм/Hi8
видеокамера
Примечание: Во избежание искажений изображения не подключайте
оборудование к разъемам
и E одновременно.
B
Дополнительная информация
Подключение видеомагнитофона
Подключите штекеры видeoмaгнитофона в гнездо F на задней стороне
телевизора.
Рекомендуем настроить сигнал видеомагнитофона на телевизионную
программу “0” путем проведения операций, описанных в разделе “Ручная
настройка программ” дaннoго руководства.
Подключение наушников
Вставьте штекер наушников в гнездо A на передней стороне телевизора.
Подключение декодеров
Подключите штекеры декодеров в гнездо
телевизора.
Подключение внешнего аудио оборудования
Подключите штекеры аппаратуры категории Hi-Fi в гнезда
стороне телевизора, если Вы хотите усилить мощность выходного
аудиосигнала телевизора.
* “PlayStation” является продуктом Сони Компьютер Энтертеймент, Инк.
* “PlayStation” является зарегистрированной маркой Сони Компьютер
Энтертеймент, Инк.
на задней стороне
F
на задней
G
F
E
s
2 /
1/
2
1
“PlayStation”
КВМ
Декодер
G
L/G/S/I
R/D/D/D
*
Аппаратура
Hi-Fi
Дополнительные подключения
45
Page 46

Дополнительные подключения
Смартлинк
Смартлинк представляет собой прямое соединение между Вашим телевизором и видеомагнитофоном.
Смартлинк функционирует, если:
• Ваш видеомагнитофон поддерживает функцию Smartlink,
NexTView Link, Easy Link или Megalogic.
Megalogic является торговой маркой, зарегистрированной
Grundig Корпорейшен.
Easy Link является торговой маркой Philips Корпорейшен.
• Вы подключили видеомагнитофон к разъему Scart :1/
посредством 21-контактного кабеля SCART, имеющего все
провода.
Смартлинк дает следующие возможности:
• Информация по настройке, например, таблица программ, может
быть загружена с телевизора на видеомагнитофон.
• Прямая запись телевизионной программы: Просматривая
телевизионную программу, Вы можете записать ее, нажав
только одну кнопку на видеомагнитофоне.
• Телевизор в режиме работы временного отключения (стендбай):
нажать на кнопку “Play z“ видео и телевизор автоматически
включится.
Более подробная информация приводится в инструкции по
эксплуатации Вашего видеомагнитофона.
46
Дополнительные подключения
Page 47

Дополнительная информация
Cocтав меню
Установочные меню (При первом включении телевизора)
ЯЗЪІК
ENGLISH
PУCCKИЙ
БЬЛГAPCKИ
Bыбepитe язык
Bы xoтитe нaчaтъ
aвтoнacтpoйкч?
ДA
HET
:
Удocтoвeрьтecь, чтo
aнтeннa пoдcoeдинeнa
ПOДTBEPЖДEHИE
(Для более детальной информации, обратитесь к разделу “Выбор языка”)
Сxeмa меню
ABTO
ПOИCK
ПPOГPAMMЫ
CИCTEMA
KAHA
Пoиcк
01
:
D/K
:
Л
:
...
C 21
COPTИPOBKA
ПPOГPAMMЫ
ПOДTBEPЖДEHИE
Bыбepитe кaнaл:
Bыб. нoвую пoзиц:
Пoдтвepждeниe:
MENU
Bыxoд:
:
PROGR
03
01
ИЗOБPAЖEHИE
PEЖИM
: ИHДИBИД
KOHTPACT
ЯPKOCTЬ
HACЫЩEHHOCTЬ
Ч
ETKOCTЬ
ЦBETOBOЙ TOH
CTAHДAPT
ЗBУK
PEЖИM
:
ИHДИBИД
Ч
TEMБP B
Ч
TEMБP H
БAЛAHC
ДBOЙHOЙ ЗBУK
DSP:
CTAHДAPT
TAЙMEP
TAЙMEP CHA:
У
CTAHOBKA
BPAЩEHИE ИЗOБPAЖ.
ЯЗЫK
УCCKИЙ
: P
ПOИCK
ABTO
ИPOBKA
COPT
УЧHAЯ
P
:
CTEPEO
BK
Л
BЫK
:
ИЗOБPAЖEHИE
PEЖИM: ИHДИBИД
KOHTPACT
ЯPKOCTЬ
HACЫЩEHHOCTЬ
Ч
ETKOCTЬ
ЦBETOBOЙ TOH
CTAHДAPT
(Для получения более подробной
информации о различных видах
настройки изображения, обратитесь к
разделу “Настройкa изображения”)
ЗBУK
PEЖИM
:
ИHДИBИД
Ч
TEMБP B
Ч
TEMБP H
БAЛAHC
ДBOЙHOЙ ЗBУK
DSP:
CTAHДAPT
:
CTEPEO
BK
Л
(Для получения более подробной
информации о различных видах
настройки звука, обратитесь к разделу
“Настройкa звука”)
TAЙMEP
TAЙMEP CHA:
BЫK
TAЙMEP
TAЙMEP CHA:
B
ЫK
(Для получения более подробной
информации обратитесь к разделу
“Функции Таймера сна”)
У
CTAHOBKA
0
BPAЩEHИE ИЗOБPAЖ.
ЯЗЫK
: P
ПOИCK
ABTO
ИPOBKA
COPT
УЧHAЯ
P
УCCKИЙ
0
:
У
CTAHOBKA
BPAЩEHИE ИЗOБPAЖ.
ЯЗЫK
УCCKИЙ
: P
ПOИCK
ABTO
ИPOBKA
COPT
УЧHAЯ
P
(Для получения более подробной
0
:
информации обратитесь к разделу
“Pазвopoт изображения нa зкpaнe”)
У
CTAHOBKA
BPAЩEHИE ИЗOБPAЖ.
ЯЗЫK
УCCKИЙ
: P
ПOИCK
ABTO
ИPOBKA
COPT
УЧHAЯ
P
У
CTAHOBKA
BPAЩEHИE ИЗOБPAЖ.
ЯЗЫK
УCCKИЙ
: P
ПOИCK
ABTO
ИPOBKA
COPT
УЧHAЯ
P
У
CTAHOBKA
BPAЩEHИE ИЗOБPAЖ.
ЯЗЫK
УCCKИЙ
: P
ПOИCK
ABTO
ИPOBKA
COPT
УЧHAЯ
P
У
CTAHOBKA
BPAЩEHИE ИЗOБPAЖ.
ЯЗЫK
УCCKИЙ
: P
ПOИCK
ABTO
COPTИPOBKA
PУЧHAЯ
У
CTAHOBKA
0
:
0
:
BPAЩEHИE ИЗOБPAЖ.
ЯЗЫK
: P
ПOИCK
ABTO
ИPOBKA
COPT
УЧHAЯ
P
Bы xoтитe нaчaтъ
aвтoнacтpoйкч?
ДA
HET
УCCKИЙ
:
(Для получения более подробной
0
информации обратитесь к разделу
“Выбор языка”)
(Для получения более подробной
информации обратитесь к разделу
“Автопоиск кaнaлoв c помощью пyльта
дистанционного yпpaвлeния”)
У
CTAHOBKA
:
0
:
:
0
COPTИPOBKA
ПPOГPAMMЫ
ПOДTBEPЖДEHИE
Bыбepитe кaнaл
Bыб. нoвую пoзиц
У
CTAHOBKA
УЧHAЯ
P
ПPOГPAMMЫ
И
CTEMA:
C
Л
KAHA
AПЧ
:
ПPOПУCK
ПOДTBEPЖДEHИE
01
:
PROGR
:
:
:
:
01
D/K
:
C 21
BK
:
HET
(Для получения более подробной
03
информации обратитесь к разделу
“Сортировкa номеров каналов ТВ”)
(Для получения более подробной
информации обратитесь к разделу
Л
“Ручнaя нacтpoйкa пpoгpaмм”)
Дополнительная информация
47
Page 48

Дополнительная информация
Bыявлeниe нeиcпpaвнocтeй
Ниже приводятся советы по устранению возможных нарушений качества изображения и звука.
Неисправность Меры по ее устранению
Нет изображения (темный экран), • Подключите телевизор к сети
нет звука питания.
• Нажмите кнопку на передней стороне
телевизора.
• Если горит индикатор , нажмите кнопку или
цифровую кнопку программы на пульте
дистанционного управления.
• Проверьте подключение антенны.
• Проверьте, не подключен ли источник
видеосигнала.
• Выключите телевизор на 3-4 секунды и потом вновь
включите его кнопкой
телевизора.
Изображение плохое или отсутствует • При помощи MENU выберите функцию настройки
(темный экран), но хороший звук изображения.
Отрегулируйте яркость, изображение и цвeтoвoй
бaлaнc.
• В функции настройки изображения выберите
элемент CTAHДAPT для возврата к заводской
настройке.
на передней стороне
Плохое качество изображения при • Несколько раз нажмите кнопку на пульте
просмотре источника видеосигнала дистанционного управления, пока нe пoявитcя
символ видиомагнитофона
Хорошее изображение, нет звука • Нажмите кнопку + /– на пульте дистанционного
управления.
• Если на экран выведен указатель
кнопку
Нет цвета при приеме цветных • При помощи MENU выберите функцию настройки
передач изображения.
Отрегулируйте цветовой баланс.
• В функции настройки изображения выберите
элемент CTAHДAPT для возврата к заводской
настройке.
Изображение искажается при • Отключите все оборудование, подсоединенное
переключении программ или выборе к 21-контактному унифицированному разъему с
телетекста задней стороны телевизора.
3awymjehhoe nsodpaжehne æpn • Otpelyjnpyйte tohkyi hactpoйky fjr æojyzehnr
æpocmotpe tejebnsnohhlo kahaja jyzwelo nsodpaжehnr
Не работает пульт дистанционного • Замените батарейки.
управления
Nhfnkatop Standby ha tejebnsope • Cbrжntecƒ c djnжaйwnm cepbnchvm uehtpom
moplaet Sony.
на пульте дистанционного управления.
на экране.
, нажмите
48
Дополнительная информация
• Если зти неисправности нe ycтpaняютcя, обратитесь к квалифицированным
специалистам.
• НИКОГДА сами не открывайте корпус телевизора.
Page 49

Дополнительная информация
Texничecкиe xapaктepиcтики
AЯ46
Система телевещания
B/G/H, D/K
Система кодировки цвета
PAL, SECAM
NTSC 3.58, 4.43 (только видеовход)
Диапазон принимаемых каналов
VHF: E2-E12
UHF: E21-E69
CATV: S1-S20
HYPER: S21-S41
D/K: R1-R12, R21-R69
Кинескоп
KV-25FX20R:
Плocкий экpaн для Trinitron
Прим. 63 см (25дюймов) (Размер изображения по
диагонали прим. 59 см), угол отклонения 104°
KV-29FX20R:
Плocкий экpaн для Trinitron
Прим. 72 см (29 дюймов) (Размер изображения по
диагонали прим. 68 см), угол отклонения 104°
Paзъeмы нa зaднeй cтopoнe TB
:1/ 21-контактный унифицированный
разъем (стандарт CENELEC)
включая аудио/видеовход, вход для
сигналов RGB, аудио/ видеовыход
телевизионных сигналов
s
:2/
21-контактный унифицированный
разъем (стандарт CENELEC)
включая аудио/видеовход, вход для
видеосигналов типа S, Аудио/видео
выходные разъемы монитора
ayдио выxoды - paзъемы типa
“тюльпaн”
Paзъeмы нa пepeднeй cтopoнe TB
видеовход - гнездо для подключения
2
3
проигрывателя
аудиовыходы - гнезда для подключения
2
3
проигрывателя
s
вход для видеосигнала типа S - 4-
3
контактный ДИН
Гнездо для подключения наушников - министереоразъем
Аудиовыход:
2 x 7 Вт + 1 x 15 Вт (RMS)
Потребляемая мощность
KV-25FX20R: 100
KV-29FX20R: 120 Вт
Расход мощности в состоянии ожидания
Вт
0.5 Вт
Габариты (ширина x высота x глубина)
KV-25FX20R: Прим. 655 x 509 x 476 мм
KV-29FX20R: Прим. 746 x 569 x 516 мм
Вес
KV-25FX20R: Прим. 37 кг
KV-29FX20R: Прим. 47.5 кг
Комплект принадлежностей
Пульт дистанционного управления RM-887 (1)
Батарейки в стандарте МЭК (2)
Другие характеристики
Телетекст, Fastext
Автоматическое отключение
Смартлинк
Конструкция и характеристики могут быть изменены без извещения пользователей.
Экологическая бумага - Без хлора
Printed in Spain
Sony Spain S. A.
Pol. Ind. Can Mitjans s/n
08232 Viladecavalls (Barcelona)
Spain
Otæezataho b Ncæahnr
Cohn Cæg=h C.A. sabof b Dapcejohe
Æoj.Kah Mntƒrhc c/h 08232
Bnjafekabajƒc, Dapcejoha,
Ncæahnr
Спецификации
49
Page 50

FD Trinitron
Цветен телевизор
Благодаря Ви за избора на този телевизор Sony.
Преди експлоатацията на телевизорът, прочетете внимателно
инструкцийте и ги запазете за бъдещи изяснения.
Начин за четене на тези инструкции за експлоатация:
• Използвайте Първи Стъпки ако искате да инсталирате телевизорът и
да се фамилиализирате с базовите функции.
• Използвайте Напреднали Функции ако искате да се запознаете
по-отблизо с допълнителните характеристики на телевизорът.
• Символи използвани в тези инструкции:
• Потенциална опастност
• Важна информация
• Информация за функциите
Инструкции за експлоатация
BG
• 1, 2 ... Ред за използване на инструкциите
MENU
• Потъмнените бутони на устройството за дистанционно управление показват,
K
че трябва да се натиснат за изпълнението на различните инструкции.
• Информация върху резултатът на инструкциите.
• Процесът за достигане на крайният резултат продължава на
следващата страница.
51
Page 51

Texникa безопастност
ВНИМАНИЕ
Техника на безопасност
Всички телевизори работят при изключително високи напрежения. За да не предизвикате
пожар или токов удар, моля, следвайте указанията за безопасност по-долу.
За обща безопасност
• Не излагайте телевизора на дъжд или друга влага.
• Не отваряйте задния капак.
• За своя собствена безопасност, за сервиз се отнасяйте само към квалифициран
персонал.
За безопасно инсталиране
• Не инсталирайте телевизора на горещи, влажни или много прашни места.
• Не блокирайте и не покривайте вентилационните отвори. За вентилация
оставяйте минимално разстояние от 10 см навсякяде около телевизионния
приемник.
• Не инсталирайте телевизора там, където може да бъде подложен на механични
вибрации.
• Поставете телевизора само на стабилна опора, подходяща за теглото му.
За безопасна експлоатация
• Експлоатирайте телевизора само при 220-240 V, 50 Hz променливо напрежение.
• Изключете телевизора от мрежата , ако течност или твърд предмет попаднат в
него и незабавно го подложете на проверка.
• Изключете телевизора от мрежата, по съображения за безопасност и околната
среда, ако не го използвате в продължение на няколко дни.
• Когато изключвате телевизора от мрежата, издърпвайте щепсела, а не кабела.
• В случай на буря, изключете телевизора от мрежовото захранване и от антената.
Иначе може да бъде повреден от гръмотевица.
52
Texникa безопастност
За поддръжка
• Чистете екрана с мек, влажен парцал. Не използвайте абразивни почистващи
средства.
• Натрупването на прах и никотин може да предизвика нагряване във вътрешността
на телевизора. С течение на времето това представлява опасност и може да скъси
живота на телевизора. Затова го проверявайте в сервиз на всеки 5 години.
Page 52

Съдържание
Съдържание
Начин за четене на тези Интрукции за Експлоатация ...................................................... 51
Техника на безопастност ...................................................................................................... 52
Първи стъпки
Цялостно описание
Включване на телевизорът
Стъпка 1 - Инсталация
Проверка на доставените принадлежности ........................................................... 54
Описание на бутоните на телевизорът ................................................................... 54
Описание на бутоните на устройството за дистанционно управление ................ 55
Инсталация на батериите в устройството за дистанционно управление ............ 56
Свързване на антената............................................................................................. 56
Включване на телевизорът ...................................................................................... 56
Стъпка 2 - Базово програмиране
Избор на език............................................................................................................. 57
Автоматично настройване на каналите, използвайки устройството за ..............
дистанционно управление ...................................................................................... 58
Преподреждане на номерата на каналите на Телевизорът .................................. 59
Допълнителни функции
Програмиране
Автоматично настройване на каналите,използвайки бутоните на
Телевизорът .............................................................................................................. 60
Ръчно настройване на каналите .............................................................................. 61
Фино ръчно настройване на каналите .................................................................... 62
Настройване на въртенето на картината ............................................................... 63
Пропускане на позиция в програмите ..................................................................... 64
Допълнителни функции на телевизорът
Настройване на образът ........................................................................................... 65
Настройване на звукът ............................................................................................. 66
Автоматично изключване ......................................................................................... 67
Телетекст
Изобразяване на телетекст ..................................................................................... 68
BG
Допълнително свързване
Използване на допълнителна апаратура ................................................................ 69
Smartlink ...................................................................................................................... 70
Допълнителна информация
Водач за бързо преминаване през менютата ......................................................... 71
Oтcтpaнявaнe нa нeизпpaвнocти ............................................................................. 72
Технически характеристики ...................................................................................... 73
Съдържание
53
Page 53

Първи стъпки - Цялостно описание
Проверка на доставените принадлежности
1
2
3
4
5
6
7
8
9
0
MENU
K
PROGR
Две батерии (R6)
RM
887
S
Едно устройство за
дистанционно
управление (RM-887)
Oписаниe на бутоните на телевизорът
Бутон за
включване/изключване
Индикатор за
временно изключване
(standby)
Изход за слушалки
Бутон за автоматично
настройване на каналите
Натиснете капачето на лицевата
страна на телевизорът (натиснете
върху означението ) за да
достигнете до бутоните за контрол
54
Първи стъпки - Цялостно описание
Вход
за S видео
Вход
за
видео
Вход
за
звук
Бутон за
избор на
входният
сигнал
Бутони
за
силата
на звука
Бутон за избор на
каналите напред и
назад (избор на
каналите на
телевизорът)
Page 54

Първи стъпки - Цялостно описание
Oписание на бутоните на дистанционното управление
Спиране на звукът
Натиснете за спиране на звукът.
Натиснете отново за да го възстановите.
Изобразяване на информация на екранът
Натиснете за да изобразите всичките
индикации върху екранът.------------......
Натиснете отново за да ги премахнете.
Избор на канали
Натиснете за да изберете канал.
За двуцифрени числа, например 23,
натиснете първо -/--, и после бутоните 2и
3Ако сгрешите първата цифра,
продължете вкарвайки втората цифра
(от 0 до 9), и веднага след това
повторете операцията.
Избор на различните режими на
телевизорът----------------------------..
Натиснете за да изключите телетекста
или входа за видео.----------------------------
+++++++++++++++++...
Избор на телетекст
Натиснете за изобразяване на телетекст.
Избор на режимите на звука
Натиснете за измяна на режима на звука.
+++++++++++++++++...
Избор на режимите на изображението
Натиснете за смяна на режима
наизображението.---.----...-------.
Промяна на силата на звука
Натиснете за промяна на силата на звука.
Временно изключване на телевизора
Натиснете за временно изключване
(индикаторът за временно изключване
светва). Натиснете отново за да
включите телевизора от режима на
временно изключване (standby).
За економия на електроенергия
препоръчваме да изключите напълно
телевизора,когато не се използва.
Ако в продължение на 15-30 мин.
липсва телевизионен сигнал и не се
натиска нито един ботон, левизорът
1
2
3
4
5
6
7
8
9
0
MENU
K
PROGR
RM
887
автоматично ще премине в режим на
готовност (standby).
Избор на входният сигнал
Натиснете няколко пъти докато
желаният символ на апарата,включен
във входа, се изобрази на екрана.
Връщане в последният избран канал
Натиснете, за да видите отново
последният избран канал(предният
канал трябва да се изобрази в
продължение на най-малко 5 сек.)
Активиране на системата на менюта
Натиснете за да видите менюто на
екрана. Натиснете отново за да го
премахнете. Екранът ще премине в
режим на телевизия.
Избор на меню
Нагоре
Надолу
Връщане в предното меню или избор
Отиване в следващото меню или избор
OK Одобряване на избора
Избор на форматът на екрана
Натиснете за да видите програми в
S
Освен функциите на телевизор,всички оцветени бутони и cимвoлитe в зeлeн цвят се използват също така и за
операциите на телетекста. За повече информация консултирайте главата «Телетекст» в тези инструкции за
експлоатация.
режим 16:9.
Натиснете отново за да се върнете в
режим 4:3.
Този бутон функционира само в режим на
телетекст.
Фyнкциятa , кoятo изpaзявa тoзи
Бyтoн нe фyнкциoниpa c тoзи тeлeвизop.
Избор на канали
Натиснете за да изберете следващ или
предходящ канал.
Първи стъпки - Цялостно описание
55
Page 55

Bключване на тeлeвизopът - Инсталация
Инсталация на батериите в устройството за
дистанционно управление
Усигурете се да поставите полюсите на батериите правилно.
Помнете: винаги се освобождавайте от използваните батерии по благоприятен начин за околната среда.
Свързване на антената
Включване на телевизорът
Включете щепсела на телевизора в контакта на
електрическата мрежа (220-240V AC, 50Hz).
Свържете стандартна антена с
гнездото означено с ,
на задната страна на телевизора
.
56
Bключване на тeлeвизopът - Инсталация
Натиснете бутона включване/изключване,
на предния панел на телевизора.
Page 56

Bключване на тeлeвизopът - Инсталация
Избор на език
Тази функция позволява избора на език от менюто. Когато включите телевизорът за първи път, менюто
LANGUAGE (ЕЗИК) ще се появи автоматично на екрана. Но, ако след време поискате да смените отново езикът
чрез менюто, изберете менюто ЕЗИК в
1 Натиснете ботонът за включване/изключване на телевизорът.
Когато натиснете бутонът за включване/изключване за първи
път, менюто LANGUAGE (ЕЗИК) ще се появи автоматично на
екрана на телевизора.
(ИНСТАЛИРАНЕ) и продължете по начинът описан в продължение.
LANGUAGE
ENGLISH
PУCCKИЙ
БЪЛГAPCKИ
Select language:
LANGUAGE
Select language:
ENGLISH
PУCCKИЙ
БЪЛГAPCKИ
2 Натиснете бутона или на дистанционното управление за
да изберете езикът и после натиснете бутонът ОК за да
утвърдите изборът.
1
2
3
4
5
6
7
8
9
0
MENU
Менюто за Автоматично Настройване ще се появи на екрана
EЗNК
ENGLISH
PУCCKИЙ
БЪЛГAPCKИ
Избepи eзик
:
Жeлaeтe ли дa cтapтиpaтe
aвтoмaтичнa нacтpoйкa?
ДA
HE
на телевизора на избраният език.
K
PROGR
S
RM
887
Bключване на тeлeвизopът - Инсталация
57
Page 57

Bключване на тeлeвизopът - Инсталация
Автоматично настройване на каналите, използвайки
устройството за дистанционно управление
За да видите различните канали (телевизионни предавания) е необходимо телевизорът да се настрои. Следвайте
тези инструкции и телевизорът ще търси и запамети всички канали на разположение. След като вече сте избрали
езикът, на екрана ще се появи едно ново меню питайки Ви дали искате да настроите автомаеично телевизорът.
Но ако след време искате да настроите отново каналите (напр. в случай на смяна на местожителство), изберете
менюто АВТОМ. ЗАХВАЩАНЕ в рамките на
инструкции (стъпка 1), или консултирайте главата «Автоматично настройване на телевизорът, използвайки
бутоните на телевизора».
1 Натиснете бутонът ОК на дистанционното управление за да
изберете ДА.
На екранът ще се появи едно ново меню за да се усигурите
дали антената е включена.
1
2
3
4
5
6
2 Усигурете се дали антената е включена и тогава натиснете
бутонът ОК.
(ИНСТАЛИРАНЕ) и продължете следвайки долупосочените
Жeлaeтe ли дa cтapтиpaтe
aвтoмaтичнa нacтpoйкa?
ДA
HE
Moля, пoтвъpдeтe, чe
aнтeнaтa e cвъpзaнa
П
OTBЪPЖДEHИE
Жeлaeтe ли дa cтapтиpaтe
aвтoмaтичнa нacтpoйкa?
ДA
HE
7
8
0
S
K
PROGR
MENU
RM
887
9
Автоматичното настройване започва, и докато се настройват
всичките канали (появяват се телевизионните предавания), на
екранът започва да мига «Търсене...».
Този процес може да продължи няколко минути.
Когато привърши процесът на автоматично настройване, на
екранът ще се появи менюто Преподреждане на Програмите.
Забележки: • Ако искате да спрете процесът на автомитично
настройване, натиснете бутонът MENU от
дистанционното управление.
• Ако спрете процесът на автоматично
настройване, натискайки бутонът MENU, менюто
Преподреждане на Програмите няма да се появи
автоматично на екрана.
ABTOM. ЗAXBAЩAHE
ПPOГPAMA:
ИCTEMA:
C
Л:
KAHA
Tъpceнe...
ПOДPEЖДAHE HA ПPOГPAMИ
ПPOГPAMA
ПOTBЪPЖДEHИE
Избepи кaнaл:
Избop нa нoмep:
Пoтвъpждeниe:
Излизaнe:
MENU
:
PROGR
01
01
D/K
C 21
03
58
Bключване на тeлeвизopът - Инсталация
Page 58

Bключване на тeлeвизopът - Инсталация
Преподреждане на номерата на каналите на
Телевизорът
След настройването на всички канали на разположение (телевизионни предавания), на екранът автоматично ще
се появи едно ново меню питайки Ви дали искате да смените редът на появяване на телевизионните канали. Но
ако след време искате да смените редът на появяване на каналите, изберете менюто ПОДРЕЖДАНЕ НА
ПРОГРАМИТЕ в рамките на (ИНСТАЛИРАНЕ) и следвайте долупосочените инструкции в буква б) на тази глава.
а) Ако не желаете да смените редът на каналите:
ПOДPEЖДAHE HA ПPOГPAMИ
1 Натиснете бутонът MENU за да се върнете към нормалният
режим на телевизия.
1
2
3
4
5
6
7
8
9
Телевизорът е готов за работа.
б) Ако желаете да смените редът на каналите:
0
MENU
K
1 Натиснете бутонът PROGR или докато желаният канал
(Телевизионна програма), чиято позиция искате да смените, се
появи на екранът.
2 Натиснете бутонът или за да изберете новият номер на
програма, на който искате да запаметите избраният канал, и
след това натиснете ботонът ОК.
PROGR
Думата ПОТВЪРЖДЕНИЕ ще се подчертае в
продължение на няколко секунди за да потвърди че
ПPOГPAMA
ПOTBЪPЖДEHИE
Избepи кaнaл
:
Изб
op
нa нoмep
Пoтвъpждeниe
:
MENU
Излизaнe
:
ПOДPEЖДAHE HA ПPOГPAMИ
ПPOГPAMA
ПOTBЪPЖДEHИE
Избepи кaнaл:
Избop нa нoмep:
Пoтвъpждeниe:
MENU
Излизaнe:
ПOДPEЖДAHE HA ПPOГPAMИ
ПPOГPAMA
ПOTBЪPЖДEHИE
Избepи кaнaл:
Избop нa нoмep:
Пoтвъpждeниe:
Излизaнe:
:
PROGR
:
:
PROGR
MENU
01
01
:
PROGR
03
03
ПOДPEЖДAHE HA ПPOГPAMИ
03
01
ПPOГPAMA
:
OTB
П
ЪPЖДEHИE
Избepи кaнaл
:
PROGR
Изб
нa нoмep
op
:
Пoтвъpждeниe
:
MENU
Излизaнe
:
ПOДPEЖДAHE HA ПPOГPAMИ
03
01
ПPOГPAMA:
ПOTBЪPЖДEHИE
Избepи кaнaл
:
PROGR
Изб
нa нoмep
op
:
Пoтвъpждeниe
:
MENU
Излизaнe
:
04
02
новата позиция на програмата е запаметена.
S
RM
887
3 Повторете стъпките 1 и 2 ако искате да реорганизирате други
телевизионни канали.
4 Натиснете бутонът MENU за да се върнете към нормалният
режим на телевизия.
Телевизорът е готов за работа.
Bключване на тeлeвизopът - Инсталация
59
Page 59

Допълнителни фyнкции - Програмиране
Автоматично настройване на каналите, използвайки
бутоните на Телевизорът
Освен автоматичното настройване на телевизорът, така като е обяснено в главата «Автоматично настройване на
телевизорът, използвайки устройството за дистанционно управление», могат автоматично да се настройват и
запаметяват всички канали (телевизионни предавания) на разположение, натискайки само един бутон на
телевизора.
1 Натиснете върху символът на капачето на лицевата страна
на телевизорът за да го отворите и да достигнете до бутоните
за контрол.
Moля, пoтвъpдeтe, чe
2 Натиснете и задръжте бутона няколко секунди, докато
започне процесът на екранът ще се появи едно ново меню за
да се усигурите дали антената е включена.
aнтeнaтa e cвъpзaнa
П
OTBЪPЖДEHИE
Moля, пoтвъpдeтe, чe
aнтeнaтa e cвъpзaнa
ПOTBЪPЖДEHИE
3 Усигурете се дали антената е включена и тогава натиснете
бутонът ОК.
1
2
3
4
5
6
7
8
9
0
MENU
K
Автоматичното настройване започва, и докато се настройват
всичките канали (появяват се телевизионните предавания), на
екранът започва да мига «Търсене...».
Този процес може да продължи няколко минути.
Moля, пoтвъpдeтe, чe
aнтeнaтa e cвъpзaнa
ПOTBЪPЖДEHИE
ABTOM. ЗAXBAЩAHE
ПPOГPAMA
:
И
CTEMA:
C
Л
:
KAHA
Tъpceнe...
01
D/K
C 21
Когато привърши процесът на автоматично настройване,
менюто ще изчезне от екрана, и телевизорът е готов за
работа.
PROGR
Забележка: Ако искате да спрете процесът на автоматично
настройване, натиснете бутонът MENU на
дистанционното управление.
RM
887
S
60
Допълнителни фyнкции - Програмиране
Page 60

Допълнителни фyнкции - Програмиране
Ръчно настройване на каналите
Иползвайте тази функция, за да настроите един по един и в желаният програмен ред каналите (телевизионните
предавания), или един вход за видео.
HACTPOЙKA HA KAPTИHATA
PE:NM: JNZEH
1 Натиснете бутонът MENU от дистанционното управление, за
да се появи менюто на телевизионният екран.
КOHTPACT
ЯPKOCT
ЦBETHOCT
ОCTPOTA
ТOHAJHOCT
НУJNPAHE
HACTPOЙKA HA KAPTИHATA
PE:NM: JNZEH
КOHTPACT
ЯPKOCT
ЦBETHOCT
ОCTPOTA
ТOHAJHOCT
НУJNPAHE
2 Натиснете бутонът за да изберете символът , и после
натиснете бутонът за да влезете в менюто
ИНСТАЛИРАНЕ.
1
2
3
4
5
6
3 Натиснете бутонът за да изберете ПРОГРАМА-РЪЧЕН
7
8
9
ИЗБОР, и после натиснете бутонът .
NHCTAЛNPAHE
B´PTEHE HA KAPT.
EЗИK
Б´ЛLAPCKN
:
ABTOM. ЗAXBAœAHE
ПOДPEЖДAHE HA ПPOГPAMИ
ÆPOLPAMA-PЪЧEH ИЗБOP
NHCTAЛNPAHE
B´PTEHE HA KAPT.
EЗИK
Б´ЛLAPCKN
:
ABTOM. ЗAXBAœAHE
ПOДPEЖДAHE HA ПPOГPAMИ
ÆPOLPAMA-PЪЧEH ИЗБOP
0
:
0
:
0
MENU
K
PROGR
RM
887
4 Подчертавайки с курсорът ПРОГРАМА, натиснете бутонът
, и после натиснете или , за да изберете номерът
(позицията) на програмата на който искате да настроите
един канал (телевизионно предаване). Натиснете бутонът .
5 Натиснете бутонът за да изберете СИСТЕМА и после
натиснете бутонът
изберете телевизионната система на излъчване (B/G за
Западна Европа или D/K за Източна Европа). Натиснете
бутонът .
. Натиснете бутонът или за да
6 Натиснете бутонът за да изберетe КАНАЛ, и после
натиснете бутонът
изберете типът на канала («C» за земните канали, или «S»
за кабелна телевизия.
Натиснете бутонът
. Натиснете бутонът или за да
.
NHCTAЛNPAHE
ÆPOLPAMA-PЪЧEH ИЗБOP
ÆPOLPAMA:
CИCTEMA
KAHA
Ф.
ПPOП
ПOTBЪPЖДEHИE
NHCTAЛNPAHE
ÆPOLPAMA-PЪЧEH ИЗБOP
ÆPOLPAMA:
CИCTEMA
KAHA
Ф.
ПPOП
ПOTBЪPЖДEHИE
NHCTAЛNPAHE
ÆPOLPAMA-PЪЧEH ИЗБOP
ÆPOLPAMA:
CИCTEMA
KAHA
Ф.
ПPOП
ПOTBЪPЖДEHИE
Л
HACT.:
YCHN:
Л
HACT.:
YCHN:
Л
HACT.:
YCHN:
:
:
:
:
:
:
:
01
D/K
C 21
Л
BK
HE
:
01
D/K
C 21
Л
BK
HE
:
01
D/K
C 21
BKЛ
HE
S
7 Натиснете цифровите бутони за да вкарате директно
номерът на каналите на телевизионните предавания, или
натиснете бутоните
или за да потърсите следващият
канал на разположение.
Ако не желаете да запаметите този канал, натиснете
бутонът или bза да потърсите друг канал.
8 Ако това е каналът,който искате да запаметите, натиснете
бутонът OK, и после, подчертавайки с курсорът
ПОТВЪРЖДЕНИЕ, натиснете отново OK.
9 Повторете стъпките от 4 до 8 за да настроите и запаметите
още канали.
10 Натиснете бутонът MENU, за да се върнете към режимът на
Телевизия.
Телевизорът е готов за работа.
Допълнителни фyнкции - Програмиране
NHCTAЛNPAHE
ÆPOLPAMA-PЪЧEH ИЗБOP
ÆPOLPAMA:
CИCTEMA
KAHA
Ф.
ПPOП
ПOTBЪPЖДEHИE
NHCTAЛNPAHE
ÆPOLPAMA-PЪЧEH ИЗБOP
ÆPOLPAMA:
CИCTEMA
KAHA
Ф.
ПPOП
ПOTBЪPЖДEHИE
Л
HACT.:
YCHN:
Л
HACT.:
YCHN:
:
:
:
:
:
:
01
D/K
C 21
BKЛ
HE
01
D/K
C 21
BKЛ
HE
61
Page 61

Допълнителни фyнкции - Програмиране
Фино ръчно настройване на каналите
По принцип, функцията за фина автоматична настройка (Ф. НАСТ.) е активирана. Но, ако образът се изкривява,
за постигане на едно по-добро приемане на образа, фината настройка на телевизорът е възможно да се извърши
ръчно.
HACTPOЙKA HA KAPTИHATA
PE:NM: JNZEH
1 Изберете каналът (телевизионното предаване) на който
искате да извършите ръчната фината настройка, и после
натиснете бутонът MENU от дистанционното управление за да
се появи менюто на телевизионният екран.
2 Натиснете бутонът за да изберете символът , и после
натиснете бутонът
1
2
3
4
5
6
7
8
9
3 Натиснете бутонът за да изберете ПРOГPAMA-PЪЧEH
ИЗБOP и после натиснете бутонът .
0
MENU
за да влнзете в менюто ИНСТАЛИРАНЕ.
КOHTPACT
ЯPKOCT
ЦBETHOCT
ОCTPOTA
ТOHAJHOCT
НУJNPAHE
NHCTAЛNPAHE
B´PTEHE HA KAPT.
EЗИK
Б´ЛLAPCKN
:
ABTOM. ЗAXBAœAHE
ПOДPEЖДAHE HA ПPOГPAMИ
ÆPOLPAMA-PЪЧEH ИЗБOP
NHCTAЛNPAHE
B´PTEHE HA KAPT.
EЗИK
Б´ЛLAPCKN
:
ABTOM. ЗAXBAœAHE
ПOДPEЖДAHE HA ПPOГPAMИ
ÆPOLPAMA-PЪЧEH ИЗБOP
HACTPOЙKA HA KAPTИHATA
PE:NM: JNZEH
КOHTPACT
ЯPKOCT
ЦBETHOCT
ОCTPOTA
ТOHAJHOCT
НУJNPAHE
0
:
0
:
K
PROGR
S
RM
887
4 Натиснете бутонът за да изберете Ф. НАСТ. и после
натиснете бутонът
.
5 Натиснете бутонът или за да изберете нивото на
честотата на канала (изборът е от -15 до +15), и после
натиснете бутонът OK.
6 Подчертавайки с курсорът ПОТВЪРЖДЕНИЕ натиснете
бутонът OK за да се запамети новият избор.
7 Натиснете бутонът MENU, за да се върнете към режимът на
Телевизия.
NHCTAЛNPAHE
ÆPOLPAMA-PЪЧEH ИЗБOP
ÆPOLPAMA:
CИCTEMA
KAHA
Ф.
ПPOП
ПOTBЪPЖДEHИE
NHCTAЛNPAHE
ÆPOLPAMA-PЪЧEH ИЗБOP
ÆPOLPAMA:
CИCTEMA
KAHA
Ф.
ПPOП
ПOTBЪPЖДEHИE
NHCTAЛNPAHE
ÆPOLPAMA-PЪЧEH ИЗБOP
ÆPOLPAMA:
CИCTEMA
KAHA
Ф.
ПPOП
ПOTBЪPЖДEHИE
Л
HACT.:
YCHN:
Л
HACT.:
YCHN:
Л
HACT.:
YCHN:
:
:
:
:
:
:
:
:
:
01
D/K
C 21
BK
HE
01
D/K
C 21
+2
HE
01
D/K
C 21
+2
HE
Л
8 Повторете стъпките от 1 до 7, за да извършите фината
62
Допълнителни фyнкции - Програмиране
настройка на други канали.
Телевизорът е готов за работа.
Page 62

Допълнителни фyнкции - Програмиране
Настройване на въртенето на картината
Ако образът се накланя, в резултат на земният магнетизъм, използвайте тази функция за донастройване.
HACTPOЙKA HA KAPTИHATA
PE:NM: JNZEH
1 Натиснете бутонът MENU от дистанционното управление, за
да се появи менюто на телевизионният екран.
1
2
3
2 Натиснете бутонът за да изберете символът , и после
4
5
6
7
8
9
натиснете бутонът
0
MENU
за да влезете в менюто ИНСТАЛИРАНЕ.
КOHTPACT
ЯPKOCT
ЦBETHOCT
ОCTPOTA
ТOHAJHOCT
НУJNPAHE
NHCTAЛNPAHE
B´PTEHE HA KAPT.
EЗИK
ABTOM. ЗAXBAœAHE
ПOДPEЖДAHE HA ПPOГPAMИ
ÆPOLPAMA-PЪЧEH ИЗБOP
Б´ЛLAPCKN
:
HACTPOЙKA HA KAPTИHATA
PE:NM: JNZEH
КOHTPACT
ЯPKOCT
ЦBETHOCT
ОCTPOTA
ТOHAJHOCT
НУJNPAHE
0
:
K
PROGR
S
RM
887
3 Подчертавайки с курсорът ВЪРТЕНЕ НА КАРТ., натиснете
бутонът
.
4 Натиснете бутонът или за да настроите въртенето на
картината (изборът за настройване е от -5 до +5), и после
натиснете бутонът OK.
5 Натиснете бутонът MENU, за да се върнете към режимът на
Телевизия.
NHCTAЛNPAHE
B´PTEHE HA KAPT.
EЗИK
Б´ЛLAPCKN
:
ABTOM. ЗAXBAœAHE
ПOДPEЖДAHE HA ПPOГPAMИ
ÆPOLPAMA-PЪЧEH ИЗБOP
NHCTAЛNPAHE
B´PTEHE HA KAPT.
EЗИK
Б´ЛLAPCKN
:
ABTOM. ЗAXBAœAHE
ПOДPEЖДAHE HA ПPOГPAMИ
ÆPOLPAMA-PЪЧEH ИЗБOP
0
:
+2
:
Телевизорът е готов за работа.
Допълнителни фyнкции - Програмиране
63
Page 63

Допълнителни фyнкции - Програмиране
Пропускане на позиция в програмите
Възможно е този телевизор да се програмира за да пропуска номерата на програмите които не желаите,когато се
избират с бутоните PROGR +/-. Ако в бъдеще искате да възстановите пропуснатият номер на програмата,
следвайте долупосочените инструкции, но в стъпка 6 изберете НЕ вместо ДА.
HACTPOЙKA HA KAPTИHATA
PE:NM: JNZEH
1 Натиснете бутонът MENU от дистанционното управление, за
да се появи менюто на телевизионният екран.
КOHTPACT
ЯPKOCT
ЦBETHOCT
ОCTPOTA
ТOHAJHOCT
НУJNPAHE
HACTPOЙKA HA KAPTИHATA
PE:NM: JNZEH
КOHTPACT
ЯPKOCT
ЦBETHOCT
ОCTPOTA
ТOHAJHOCT
НУJNPAHE
2 Натиснете бутонът за да изберете символът , и после
натиснете бутонът
1
2
3
4
5
6
7
8
9
3 Натиснете бутонът за да изберете ПРOГPAMA-PЪЧEH
ИЗБOP, и после натиснете бутонът
0
за да влезете в менюто ИНСТАЛИРАНЕ.
.
NHCTAЛNPAHE
B´PTEHE HA KAPT.
EЗИK
Б´ЛLAPCKN
:
ABTOM. ЗAXBAœAHE
ПOДPEЖДAHE HA ПPOГPAMИ
ÆPOLPAMA-PЪЧEH ИЗБOP
NHCTAЛNPAHE
B´PTEHE HA KAPT.
EЗИK
Б´ЛLAPCKN
:
ABTOM. ЗAXBAœAHE
ПOДPEЖДAHE HA ПPOГPAMИ
ÆPOLPAMA-PЪЧEH ИЗБOP
0
:
0
:
MENU
K
PROGR
RM
887
4 Подчертавайки с курсорът ПРОГРАМА, натиснете PROGR
или , докато се появи програмата която искте да пропуснете.
5 Натиснете бутонът за да изберете ПРОПУСНИ, и после
натиснете бутонът .
6 Натиснете бутонът за да изберете ДА, и после натиснете
бутонът OK.
NHCTAЛNPAHE
ÆPOLPAMA-PЪЧEH ИЗБOP
ÆPOLPAMA:
CИCTEMA
KAHA
Ф.
ПPOП
ПOTBЪPЖДEHИE
NHCTAЛNPAHE
ÆPOLPAMA-PЪЧEH ИЗБOP
ÆPOLPAMA:
CИCTEMA
KAHA
Ф.
ПPOП
ПOTBЪPЖДEHИE
NHCTAЛNPAHE
ÆPOLPAMA-PЪЧEH ИЗБOP
ÆPOLPAMA:
CИCTEMA
KAHA
Ф.
ПPOП
ПOTBЪPЖДEHИE
Л
HACT.:
YCHN:
Л
HACT.:
YCHN:
Л
HACT.:
YCHN:
:
:
:
:
:
:
:
01
D/K
C 21
Л
BK
HE
:
05
D/K
C 21
Л
BK
HE
:
05
D/K
C 21
BKЛ
ДA
S
7 Подчертавайки с курсорът ПОТВЪРЖДЕНИЕ, натиснете
8 Повторете стъпките от 4 до 7 за да пропуснете други
9 Натиснете бутонът MENU, за да се върнете към режимът на
64
Допълнителни фyнкции - Програмиране
бутонът OK.
програмни позиции.
Телевизия.
Когато изберете каналът(телевизионното предаване) с
бутонът PROGR +/- ,той няма да се появи. Но този същият
канал може да бъде избран натискайки номерът на
съответната програма чрез цифровите бутони.
NHCTAЛNPAHE
ÆPOLPAMA-PЪЧEH ИЗБOP
ÆPOLPAMA:
CИCTEMA
KAHA
Ф.
ПPOП
ПOTBЪPЖДEHИE
Л
HACT.:
YCHN:
:
:
:
05
D/K
C 21
BKЛ
ДA
Page 64

Допълнителни функции - Допълнителни функции на телевизорът
Настройване на образът
Въпреки че образът е настроен фабрично, възможно е да бъде изменен в зависимост от Вашите предпочитания.
HACTPOЙKA HA KAPTИHATA
PE:NM: JNZEH
1 Натиснете бутонът MENU от дистанционното управление, за
да се появи менюто на телевизионният екран.
2 Натиснете бутонът за да влезете в менюто НАСТРОЙКА
НА КАРТИНАТА.
1
2
3
4
5
6
3 Натиснете бутонът или за да изберете символът който
7
8
0
K
MENU
PROGR
RM
9
887
желаете да измените.
4 Подчертавайки с курсорът елементът който желаете да
измените, натиснете бутонът .
(Консултирайте в долупосочената таблица ,за да видите
ефектът на всеки елемент).
НАСТРОЙКА НА КАРТИНАТA
РЕЖИМ ЛИЧЕН (за индивидуални предпочитания)
КОНТРАСТ По-малко Повече
ЯРКОСТ* По-тъмно По-светло
ЦВЕТНОСТ* По-малко Повече
ОСТРОТА* По-мека По-остра
ТОНАЛНОСТ** Зеленикаво Червеникаво
НУЛИРАНЕ
Може да се измени само ако се избере РЕЖИМ ЛИЧЕН.
*
Възможност само със цветната система NTSC (напр. американски видеокасети).
**
ОПЕРАЦИЯ / ЕФКТ
НА ЖИВО (за дирктни предавания)
ФИЛМ (за филми)
Възвръща фабричната настройка на образа.
КOHTPACT
ЯPKOCT
ЦBETHOCT
ОCTPOTA
ТOHAJHOCT
НУJNPAHE
HACTPOЙKA HA KAPTИHATA
PE:NM: JNZEH
КOHTPACT
ЯPKOCT
ЦBETHOCT
ОCTPOTA
ТOHAJHOCT
НУJNPAHE
HACTPOЙKA HA KAPTИHATA
PE:NM: JNZEH
КOHTPACT
ЯPKOCT
ЦBETHOCT
ОCTPOTA
ТOHAJHOCT
НУJNPAHE
HACTPOЙKA HA KAPTИHATA
PE:NM: JNZEH
КOHTPACT
ЯPKOCT
ЦBETHOCT
ОCTPOTA
ТOHAJHOCT
НУJNPAHE
HACTPOЙKA HA KAPTИHATA
PE:NM: JNZEH
КOHTPACT
ЯPKOCT
ЦBETHOCT
ОCTPOTA
ТOHAJHOCT
НУJNPAHE
S
5 Натиснете бутонът / or / за да измените настройката на
избраният елемент и после натиснете бутонът OK за да
запаметите новата настройка.
6 Повторете стъпките от 3 до 5 за да измените други настройки.
7 Натиснете бутонът MENU, за да се върнете към режимът на
Телевизия.
Бърза смяна на режимът на образа
1 Натиснете бутонът от дистанционното управление за да
достигнете директно до РЕЖИМ НА КАРТИНАТА.
2 Натиснете бутонът за да изберете режимът на образът
който желаете (ЛИЧЕН, НА ЖИВО или ФИЛМ).
Допълнителни функции - Допълнителни функции на телевизорът
PE:NM HA KAPTNHATA
PE:NM HA KAPTNHATA
:
JNZEH
:
HA :NBO
PE:NM HA KAPTNHATA
65
:
JNZEH
Page 65

Допълнителни функции - Допълнителни функции на телевизорът
Настройване на звукът
Въпреки че звукът е настроен фабрично, възможно е да бъде изменен в зависимост от Вашите предпочитания.
HACTPOЙKA HA KAPTИHATA
PE:NM: JNZEH
1 Натиснете бутонът MENU от дистанционното управление, за
да се появи менюто на телевизионният екран.
2 за да изберете символът и после натиснете бутонът за
да влезете в менюто НАСТРОЙКА НА ЗВУКА.
1
2
3
4
5
6
7
8
9
0
MENU
K
PROGR
RM
887
3 Натиснете бутонът или за да изберете символът който
желаете да измените.
4 Подчертавайки с курсорът елементът който желаете да
измените, натиснете бутонът .
(Консултирайте в долупосочената таблица ,за да видите
ефектът на всеки елемент).
КОНТРОЛ НА ЗВУКА ОПЕРАЦИЯ / ЕФЕКТ
РЕЖИМ ЛИЧЕН(за индивидуални предпочитания)
ДЖАЗ
ПОП
РОК
ВИСОКИ* По-ниско По-високо
НИСКИ* По-ниско По-високо
БАЛАНС Ляво Дясно
СТЕРЕО-ЕФЕКТ • За стерео предавания:
DSP
(Дигитален Процесор на Звукът)
НУЛИРАНЕ
Може да се измени само ако се избере РЕЖИМ ЛИЧЕН.
*
МОНО
СТЕРЕО
• За предавания на два езика:
А за канал 1
B за канал 2
BKЛ ИЗK
Възвръща фабричната настройка на звукът.
КOHTPACT
ЯPKOCT
ЦBETHOCT
ОCTPOTA
ТOHAJHOCT
НУJNPAHE
НАСТРОЙКА НА ЗВУКА
PE:NM: JNZEH
ВИCOKИ
C
KИ
НИ
C
БAЛAH
СTEPEO-EФEKT
DSP:
НУJИPAH
E
НАСТРОЙКА НА ЗВУКА
PE:NM: JNZEH
ВИCOKИ
C
KИ
НИ
C
БAЛAH
СTEPEO-EФEKT
DSP:
НУJИPAH
E
НАСТРОЙКА НА ЗВУКА
PE:NM: JNZEH
ВИCOKИ
C
KИ
НИ
C
БAЛAH
СTEPEO-EФEKT
DSP:
НУJИPAH
E
:
:
:
CTEPEO
J
BK
CTEPEO
J
BK
CTEPEO
BK
J
HACTPOЙKA HA KAPTИHATA
PE:NM: JNZEH
КOHTPACT
ЯPKOCT
ЦBETHOCT
ОCTPOTA
ТOHAJHOCT
НУJNPAHE
S
5 Натиснете бутонът / или / за да измените настройката
на избраният елемент и после натиснете бутонът OK за да
запаметите новата настройка.
6 Повторете стъпките от 3 до 5 за да измените други настройки.
7
Натиснете бутонът MENU, за да се върнете към режимът на Телевизия.
Бърза смяна на режимът на звука
1 Натиснете бутонът от дистанционното управление за да
достигнете директно до РЕЖИМ НА ЗВУКА.
2 Натиснете бутонът за да изберете режимът на звукът който
желаете (ЛИЧЕН, ДЖАЗ, ПОП или РОК).
66
Допълнителни функции - Допълнителни функции на телевизорът
PE:NM HA SBYKA
PE:NM HA SBYKA
:
JNZEH
:
PE:NM HA SBYKA
JNZEH
:
ÆOÆ
Page 66

Допълнителни функции - Допълнителни функции на телевизорът
Автоматично изключване
Можете да изберете един интервал от време, след който желаете телевизорът да влезе автоматично в режим на
временно изключване (standby).
HACTPOЙKA HA KAPTИHATA
PE:NM: JNZEH
1 Натиснете бутонът MENU от дистанционното управление, за
да се появи менюто на телевизионният екран.
КOHTPACT
ЯPKOCT
ЦBETHOCT
ОCTPOTA
ТOHAJHOCT
НУJNPAHE
HACTPOЙKA HA KAPTИHATA
PE:NM: JNZEH
КOHTPACT
ЯPKOCT
ЦBETHOCT
ОCTPOTA
ТOHAJHOCT
НУJNPAHE
2 Натиснете бутонът за да изберете символът и после
натиснете бутонът
1
2
3
4
5
6
7
8
9
0
MENU
K
3 Подчертавайки с курсорът ABTOM. ИЗКЛЮЧВ., натиснете
бутонът
.
4 Натиснете бутонът или докато се появи на екрана
за да влезете в менюто ЧАСОВНИК.
ZACOBHNK
ABTOM. NЗKЛIZB.:
ZACOBHNK
ABTOM. NЗKЛIZB.:
ZACOBHNK
ABTOM. NЗKЛIZB.:
ИЗK
ИЗK
0:15
интервалът от време след който желаете да се изключи
телевизорът.
ИЗK
0:15 мин
PROGR
0:30 мин
...
...
4:00 часа
5 Натиснете бутонът OK.
RM
887
S
6 Натиснете бутонът MENU, за да се върнете към режимът на
Телевизия.
Една минута преди телевизорът да влезе в режим на
временно изключване, оставащото време ще се появи
означено на екрана.
Забележки: • Докато телевизорът работи, натиснете бутонът
за да видите оставащото време до изключването.
• За да включите отново телевизорът от режима на
временно изключване, натиснете бутонът
устройството за дистанционно управление.
Допълнителни функции - Допълнителни функции на телевизорът
от
67
Page 67

Телетекст
Изобразяване на телетекст
Телтекстът е едно информационно излъчване, което предават повечето от телевизионните предавания.
Усигурирайте се да включите една телевазионна програма със силен сигнал, защото иначе могат да се появят
грешки в телетекстът.
Избор на Телетекстът
1 Изберете телевизионно предаване което излъчва телеткст,
който искате да видите.
1
2
3
4
5
6
7
8
9
2 Натиснете бутонът от дистанционното управление за да
видите телетекста.
TELETEXT
Index
Programme
News
Sport
Weather
TELETEXT
Index
Programme
25
153
101
98
25
News
153
Sport
101
Weather
98
3 Вкарайте трите числа на номера на страницата, която искате
0
MENU
K
да видите, използвайки цифровите бутони от дистанционното
управление. (Ако сгрешите, вкарайте три числа, независимо
кои, и после вкарайте отново номерът на желаната страница).
4 Натиснете бутонът за да излезете от телетекста и да се
върнете към нормалният режим на телеаизия.
Използване на други функции на телетекста
PROGR
RM
887
ЗА НАТИСНЕТЕ БУТОНЪТ
Достъп към следващата или за следващата страница или
предната страница за предната страница
Смесване на телетекст с
телевизионен образ Натиснете отново за да
излезете от режимът на
телетекст.
TELETEXT
Index
Programme
News
Sport
Weather
25
153
101
98
68
S
Телетекст
Задържане на една страница
от телетекста Натиснете отново за да
изключите задържането
Изобразяване на скрита
информация (напр. отговори на Натиснете отново за да
кръстословици). скриете информацията.
Използване на Фастекст (Fastext)
Фастекстът позволява достъпът до страниците на телетекста
чрез натискането на само един бутон.
Когато се излъчва фастекст, на долната страна на страницата
на телетекста се появява едно меню със цветни кодове.
Натиснете цветният бутон (червен, зелен, жълт или син) от
дистанционното управление за да отидете на съответната
страница.
TELETEXT
Index
Programme
News
Sport
Weather
25
153
101
98
Page 68

Допълнително свързване
MONO
L/G/S/I R/D/D/D
+
P
_
L/G/S/I R/D/D/D
s
3
3
3
L/G/S/I R/D/D/D
Използване на допълнителна апаратура
Можете да свързвате допълнителна аудио и видео апаратура към вашия телевизор, като видео, камера или
електронни игри, както е показано.
Лицева страна на телевизора
Избор и гледане на видео сигнала
1
Свържете вашата апаратура към означеното гнездо.
2 Натискайте бутона
на устройството за дистанционно управление,
,
докато не се появи на екрана правилният входен символ.
Cимвол Bходен сигнал
k • Aудио / видео входен сигнал през Euro AV гнездо
F
• RGB входен сигнал през Euro AV гнездо F.
K
• Aудио / видео входен сигнал през Euro AV гнездо
E
или гнезда.
q
K
q
2
3
3
• Svвидео входен сигнал през Euro AV гнездо E.
• Вход за видео чрез жак RCA
• Вход за S-видео чрез жак
aи вход за аудио D.
C
B
и вход за аудио чрез D.
3 Включва свързаната апаратура.
4 За да се върнете към нормалната телевизионна картина, натиснете
бутона , на устройството за дистанционно управление.
Забележка: За да избегнете изкривяване на картината, не свързвайте
едновременно апаратура към гнездата
B
и E.
.
B
A
C
D
8mm/Hi8
камера
S-VHS/Hi8
камера
Задна страна на телевизора
Допълнителна информация
Свързване на декодери
Свързвайте видeo към гнездо F, на задната страна на телевизора.
Препоръчваме ви да настроите видео сигнала на телевизионната програма
“0”, ползвайки раздела “Ръчно настройване на каналите” в тези
инструкции.
Свързване на слушалки
A
Свързвайте вашата Hi-Fi апаратура към гнездо
телевизора, ако желаете да усилвате аудио изхода от вашия телевизор.
Свързване на декодери
Свързвайте декодери към гнездо
F
, на задната страна на телевизора.
Свързване на външна аудио апаратура
Свързвайте вашата Hi-Fi апаратура към гнездо
телевизора, ако желаете да усилвате аудио изхода от вашия телевизор.
* «PlayStation» е един продукт на Sony Computer Entertainment, Inc.
* «PlayStation» е една регистрирана марка на Sony Computer Entertainment,
Inc.
, на задната страна на
G
, на задната страна на
F
E
s
2 /
1/
2
1
“PlayStation”*
Bидео
Декодер
G
L/G/S/I
R/D/D/D
Hi-Fi уредба
Допълнително свързване
69
Page 69

Допълнително свързване
Smartlink
Smartlink е директна връзка между вашия телевизор и видеорекордер.
За Smartlink вие се нуждаете от:
• Видеорекордер, който поддържа Smartlink, NexTView, Easy Link
или Megalogic.
Megalogic е една регистрирана търговска марка на Grundig
Corporation.
EasyLink е една търговска марка на Philips Corporation.
• Напълно опроводен 21-иглен СКАРТ кабел, за да свържете
вашия видеорекордер към Скарт :1/
конектора.
Функциите на Smartlink са:
• Информация за приемането, напр. каналът се прехвърля от
телевизора към видеорекордера.
• Директен запис от телевизора: докато гледате телевизия е
достатъчно да натиснете само един бутон върху
видеорекордера, за да запишете програмата.
• Телевизорът в режим на временно изключване (standby):
Натиснете бутонът «Play z» на видеото и телевизорът ще
заработи автоматично.
За повече информация относно Smartlink, моля, вижте
ръководството на вашия видеорекордер.
70
Допълнително свързване
Page 70

Допълнителна информация
Водач за бързо преминаване през менютата
Менюта за Инсталиране (Когато телевизорът се включи за първи път)
EЗNК
ENGLISH
Избepи eзик
PУCCKИЙ
БЪЛГAPCKИ
:
Жeлaeтe ли дa cтapтиpaтe
aвтoмaтичнa нacтpoйкa?
ДA
HE
Moля, пoтвъpдeтe, чe
aнтeнaтa e cвъpзaнa
П
OTBЪPЖДEHИE
(За повече информация, консултирайте главата «Избор на език»)
Водач на различните менюта
NHCTAЛNPAHE
ПOДPEЖДAHE HA ПPOГPAMИ
ПPOГPAMA
ПOTBЪPЖДEHИE
Избepи кaнaл
:
PROGR
Изб
op
нa нoмep
:
:
03
01
:
ПOДPEЖДAHE HA ПPOГPAMИ
ПPOГPAMA
:
ПOTBЪPЖДEHИE
Избepи кaнaл:
PROGR
Избop нa нoмep:
Пoтвъpждeниe:
MENU
Излизaнe:
03
01
HACTPOЙKA HA KAPTИHATA
PE:NM: JNZEH
КOHTPACT
ЯPKOCT
ЦBETHOCT
ОCTPOTA
ТOHAJHOCT
НУJNPAHE
НАСТРОЙКА НА ЗВУКА
PE:NM: JNZEH
ВИCOKИ
НИ
C
KИ
C
БAЛAH
СTEPEO-EФEKT
:
E
Б´ЛLAPCKN
:
CTEPEO
BK
J
ИЗK
:
DSP:
НУJИPAH
ZACOBHNK
ABTOM. NЗKЛIZB.:
NHCTAЛNPAHE
B´PTEHE HA KAPT.
EЗИK
ABTOM. ЗAXBAœAHE
ПOДPEЖДAHE HA ПPOГPAMИ
ÆPOLPAMA-PЪЧEH ИЗБOP
HACTPOЙKA HA KAPTИHATA
PE:NM: JNZEH
КOHTPACT
ЯPKOCT
ЦBETHOCT
ОCTPOTA
ТOHAJHOCT
НУJNPAHE
НАСТРОЙКА НА ЗВУКА
PE:NM: JNZEH
ВИCOKИ
C
KИ
НИ
БAЛAH
C
СTEPEO-EФEKT
:
DSP:
НУJИPAH
E
ZACOBHNK
ABTOM. NЗKЛIZB.:
CTEPEO
BK
J
ИЗK
ZACOBHNK
ABTOM. NЗKЛIZB.:
ИЗK
(За повече информация за различните
настройки на образа, консултирайте
главата «Настройване на образът»)
(За повече информация за различните
настройки на звукът, консултирайте
главата « Настройване на звукът»)
(За повече информация, консултирайте
главата «Автоматично изключване»)
NHCTAЛNPAHE
0
B´PTEHE HA KAPT.
EЗИK
Б´ЛLAPCKN
:
ABTOM. ЗAXBAœAHE
ПOДPEЖДAHE HA ПPOГPAMИ
ÆPOLPAMA-PЪЧEH ИЗБOP
0
:
NHCTAЛNPAHE
B´PTEHE HA KAPT.
EЗИK
Б
´ЛLAPCKN
:
ABTOM. ЗAXBAœAHE
ПOДPEЖДAHE HA ПPOГPAMИ
ÆPOLPAMA-PЪЧEH ИЗБOP
(За повече информация, консултирайте
0
:
главата «Настройване на въртенето на
картината»)
NHCTAЛNPAHE
B´PTEHE HA KAPT.
EЗИK
Б
´ЛLAPCKN
:
ABTOM. ЗAXBAœAHE
ПOДPEЖДAHE HA ПPOГPAMИ
ÆPOLPAMA-PЪЧEH ИЗБOP
NHCTAЛNPAHE
B´PTEHE HA KAPT.
EЗИK
Б´ЛLAPCKN
:
ABTOM. ЗAXBAœAHE
ÆOFPE:FAHE HA ÆPOLPAMN
ÆPOLPAMA-PЪЧEH ИЗБOP
NHCTAЛNPAHE
B´PTEHE HA KAPT.
EЗИK
Б
´ЛLAPCKN
:
ABTOM. ЗAXBAœAHE
ПOДPEЖДAHE HA ПPOГPAMИ
ÆPOLPAMA-PЪЧEH ИЗБOP
NHCTAЛNPAHE
B´PTEHE HA KAPT.
EЗИK: Б
´ЛLAPCKN
ABTOM. ЗAXBAœAHE
ПOДPEЖДAHE HA ПPOГPAMИ
ÆPOLPAMA-PЪЧEH ИЗБOP
NHCTAЛNPAHE
0
:
0
:
B´PTEHE HA KAPT.
EЗИK
ABTOM. ЗAXBAœAHE
ПOДPEЖДAHE HA ПPOГPAMИ
ÆPOLPAMA-PЪЧEH ИЗБOP
Жeлaeтe ли дa cтapтиpaтe
aвтoмaтичнa нacтpoйкa?
Б´ЛLAPCKN
:
ДA
HE
:
(За повече информация, консултирайте
0
главата «Избор на език»)
(За повече информация, консултирайте
главата «Автоматично настройване на
каналите, използвайки устройството за
дистанционно управление»)
NHCTAЛNPAHE:
:
0
:
0
ПOДPEЖДAHE HA ПPOГPAMИ
ПPOГPAMA
ПOTBЪPЖДEHИE
Избepи кaнaл:
PROGR
Избop нa нoмep:
NHCTAЛNPAHE
ÆPOLPAMA-PЪЧEH ИЗБOP
ÆPOLPAMA:
CИCTEMA
:
KAHA
Л
HACT.:
Ф.
ПPOПYCHN:
ПOTBЪPЖДEHИE
03
01
:
:
01
:
D/K
C 21
BKЛ
HE
(За повече информация, консултирайте
главата «Преподреждане на номерата
на каналите на Телевизорът»)
(За повече информация, консултирайте
главата «Ръчно настройване на
каналите»)
Допълнителна информация
71
Page 71

Допълнителна информация
Отстраняване на неизправности
Следват някои прости решения на проблемите, свързани с картината и звука.
Проблем Решение
Няма картина (екранът е тъмен) • Включете телевизора в мрежата.
няма звук • Натиснете бутон
,
на лицевата страна на телевизора.
• Ако индикаторът
цифров бутон, на устройството за дистанционно
управление.
• Проверете свързването на антената.
• Проверете дали видео източникът е включен.
• Изключете телевизора за 3 или 4 секунди, а след това
го включете, като използвате
Лоша или никаква картина (екранът • Ползвайки меню системата, коригирайте яркостта на
е тъмен), добър звук. картината и нивата на цветовете.
• От дисплея за корекция на картината изберете
HУЛИPAHE, за да възстановите фабричните стойности.
Лоша или никаква картина, когато • Натискайте бутон , докато се появи на екрана RGB
гледате RGB видео сигнал. символът
Добра картина, няма звук • Натиснете бутон +/- на устройството за
дистанционно управление.
• Натиснете бутон , ако на екрана е изобразено .
Няма цвят в цветни програми • Ползвайки меню системата, коригирайте нивата на
цветовете.
• От дисплея за корекция на картината изберете
HУЛИPAHE, за да възстановите фабричните стойности.
е включен, натиснете бутон или
.
.
72
Допълнителна информация
Изкривена картина, когато сменяте • Изключете обурудването, свързано към 21 изводния
Euro конектор, на задната страна на телевизора.
Wymha kaptnha æpn ljefahe ha • qnha hactpoйka ha tyhepa sa æpnemahe ha no-fod∂p
tejebnsnohha æpolpama odpas.
Устройството за дистанционно • Подменете батериите.
управление не работи
Индикaтopът нa peжим гoтoвнocт • Cb∂pжete ce e-haй-djnsknr cepbnseh zeht∂p ha Conn.
ha tejebnsopa mnla
• Ако продължавате да имате тези проблеми, обърнете се към сервиз с квалифициран
персонал.
• НИКОГА не отваряйте сами капака.
Page 72

Допълнителна информация
Технически характеристики
Телевизионни системи
B/G/H, D/K
Системи за цветност
PAL, SECAM
NTSC 3.58, 4.43 (само за видео входа)
Обхват на каналите
VHF: E2-E12
UHF: E21-E69
CATV: S1-S20
HYPER: S21-S41
D/K: R1-R12, R21-R69
Кинескоп
KV-25FX20R:
Плосък екран Trinitron
Приблизително 63 cm (25 инча) (Приблизително 59
cm диагонал на изображението), 104° отклонение
KV-29FX20R:
Плосък екран Trinitron
Приблизително 72 cm (29 инча) (Приблизително 68
cm диагонал на изображението), 104° отклонение
Задни съединители
:1/
:2/
Предни съединители
2
3
2
3
s
3
21-изводен Euro съединител
(стандарт CENELEC), включващ
аудио/видео вход, RGB вход,
телевизионен аудио/видео изход.
s
21-изводен Euro съединител
(стандарт CENELEC), включващ
аудио/видео вход, S-видео вход,
Aудио/видео изxоден сигнал.
аудио изходи - фоно жакове
видео вход - фоно жак
аудио входове - фоно жакове
S видео вход - 4 изводен DIN Изходи
Жак за слушалки - стерео минижак
Аудио изход
2x7 W + 1x15 W (ефективна мощност)
Консумирана мощност
KV-25FX20R: 100 W
KV-29FX20R: 120 W
Консумирана мошност в режим на готовност
0.5 W
Габаритни размери (ш/в/д)
KV-25FX20R:Приблизително 655 x 509 x 476 mm
KV-29FX20R:Приблизително 746 x 569 x 516 mm
Те г л о
KV-25FX20R:Приблизително 37 kg
KV-29FX20R:Приблизително 47.5 kg
Допълнителни принадлежности
RM-887 устройство за дистанционно управление (1)
Батерии указани в IEC (2)
Други особености
TELETEXT, Fastext
Автоматично изключване
Smartlink
Дизайнът и техническите характеристики могат да бъдат променяни без предупреждение.
Екологична хартия - Без хлор
Допълнителна информация
73
 Loading...