

Sony KV-27V55, KV-20V50, KV-13V50 Owner’s Manual
Contents
Preface
This section tells you about special features,
safety informati3n, and preparatory
information for using this manual.
Chapter 1: Setting Up
This section shows you the steps
necessary for installing and presetting for
TV, and how to connect optiona] video and
audio equipme %
Chapter 2:: Using Basic Features
This section gives you basic information
about operating and adjusting your TV.
Chapter 3: Using Advanced
Features
This section st'ows you how to use Picture-
in-Picture, pre-programmed Remote
Commander and other useful features.
Tr,,initro ColorTV
OperatingInstructions
Before operating your -rv, please read this manual
thoroughly and retain itfor future reference.
KV-13V50
KV-20V50
KV-27V55
KV-29V55M
KV-29V55C
Owner's Record
The model and serial numbers are located at the rear of
the TV. Record these numbers in the spaces provided
below. Refer to them whenever you call upon your Sony
dealer regarding this product.
Model No. Serial No.
Appendix
This section gives you specifications and
troubleshooting information.
• For a detailed table ofcontents, see
page 3.
@ 1993 by Sony Corporation
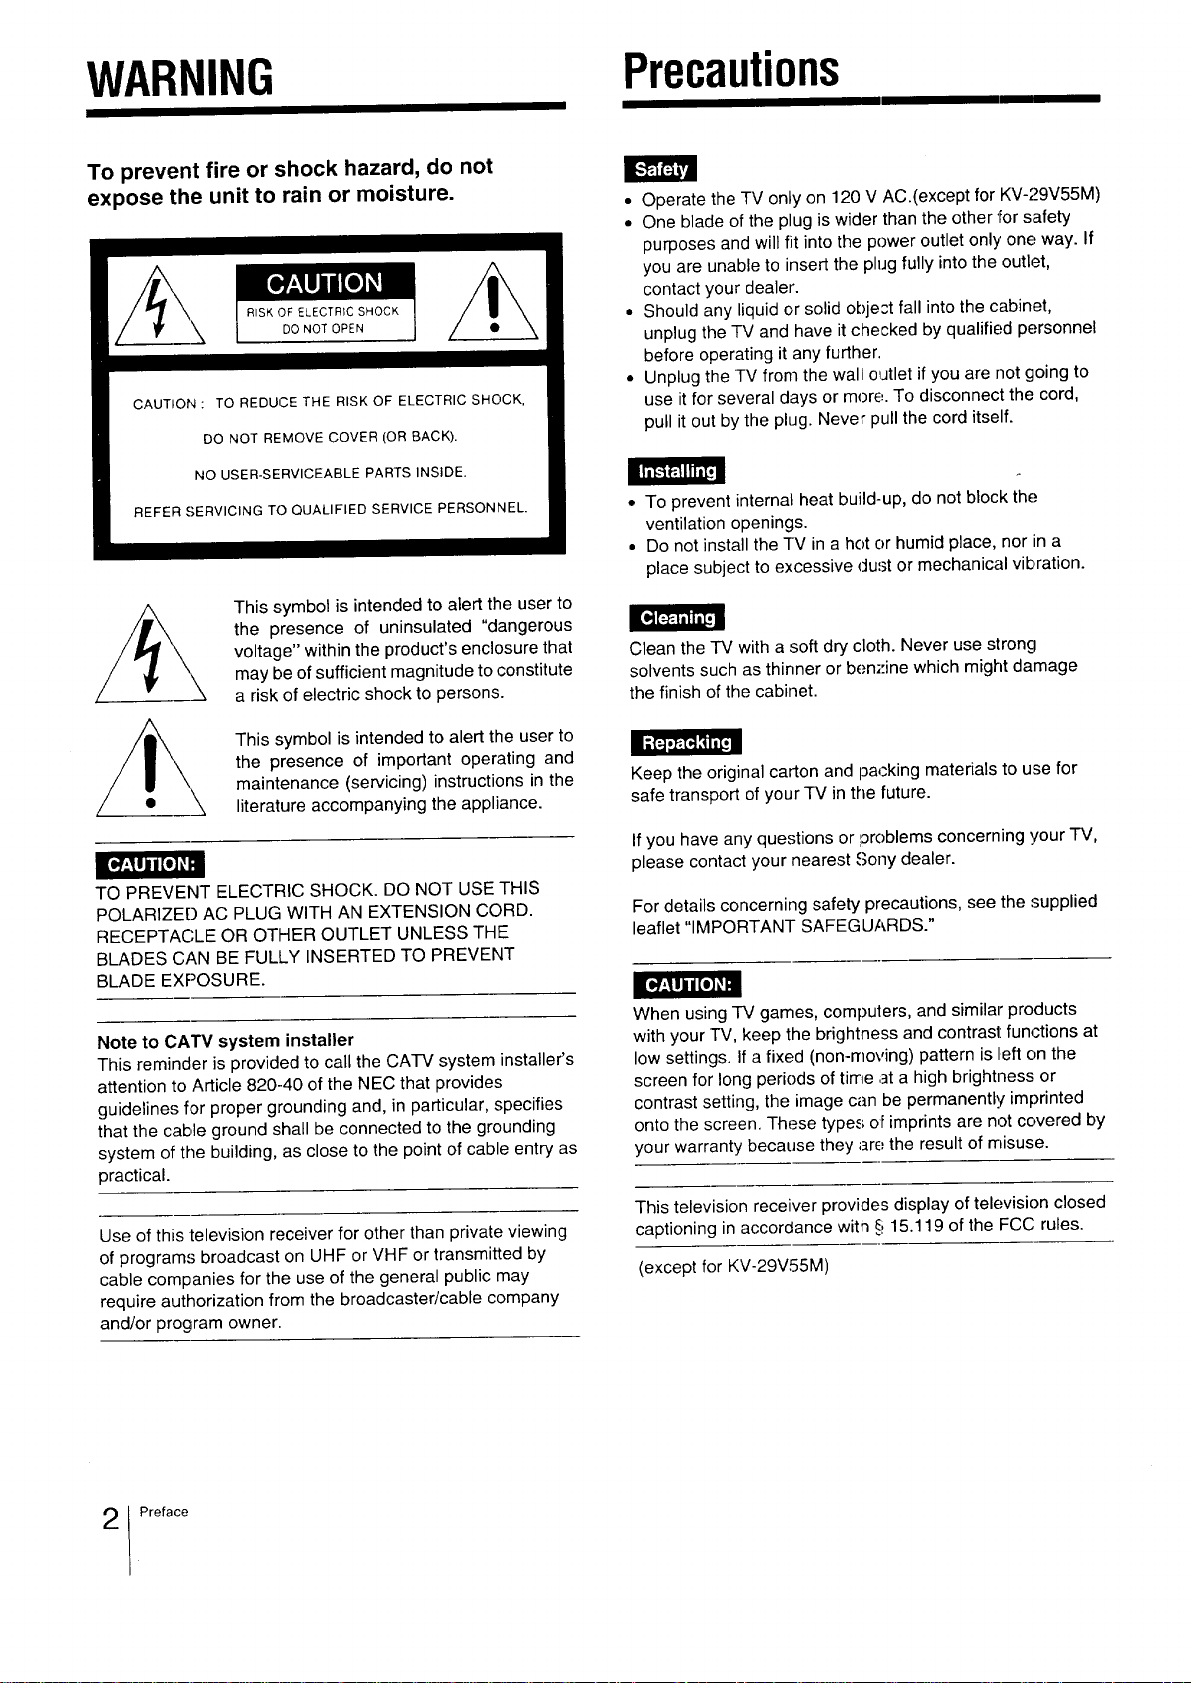
WARNING Precautions
To prevent fire or shock hazard, do not
expose the unit to rain or moisture.
RISK OF ELECTRIC SHOCK
DO NOT OPEN
CAUTION: TO REDUCE THE RISK OF ELECTRIC SHOCK,
DO NOT REMOVE COVER (OR BACK).
NO USER-SERVICEABLE PARTS INSIDE.
REFER SERVICING TO QUALIFIED SERVICE PERSONNEL.
This symbol is intended to alert the user to
the presence of uninsulated "dangerous
voltage" within the product's enclosure that
may be of sufficient magnitude to constitute
a risk of electric shock to persons.
• Operate the TV only on 120 V AC.(except for KV-29V55M)
• One blade of the plug is wider than the other for safety
purposes and will fit into the power outlet only' one way. If
you are unable to insert the plug fully into the outlet,
contact your dealer.
• Should any liquid or solid obje_,t fall into the cabinet,
unplug the TV and have it checked by qualified personnel
before operating it any further.
• Unplug the TV from the wall outlet if you are not going to
use it for several days or more. To disconnect the cord,
pull it out by the plug. Never pull the cord itself.
• To prevent internal heat build-up, do not block the
ventilation openings.
• Do not install the TV in a hot or humid place, nor in a
place subject to excessive dust or mechanical vibration.
Clean the -IV with a soft dry cloth. Never use strong
solvents such as thinner or benzine which might damage
the finish of the cabinet.
This symbol is intended to alert the user to
the presence of important operating and
maintenance (servicing) instructions in the
literature accompanying the appliance.
TO PREVENT ELECTRIC SHOCK. DO NOT USE THIS
POLARIZE[:) AC PLUG WITH AN EXTENSION CORD.
RECEPTACLE OR OTHER OUTLET UNLESS THE
BLADES CAN BE FULLY INSERTED TO PREVENT
BLADE EXPOSURE.
Note to CATV system installer
This reminder is provided to call the CA-IV system installer's
attention to Article 820-40 of the NEC that provides
guidelines for proper grounding and, in particular, specifies
that the cable ground shall be connected to the grounding
system of the building, as close to the point of cable entry as
practical.
Use of this television receiver for other than private viewing
of programs broadcast on UHF or VHF or transmitted by
cable companies for the use of the general public may
require authorization from the broadcaster/cable company
and/or program owner.
Keep the original carton and packing materials to use for
safe transport of your TV in the future.
If you have any questions or problems concerning !/our TV,
please contact your nearest Sony dealer.
For details concerning safety precautions, see the supplied
leaflet "IMPORTANT SAFEGUARDS."
When using "IV games, compulers, and similar products
with your TV, keep the brightness and contrast: functions at
low settings. If a fixed (non-n'loving)pattern is left on the
screen for long periods of time ,ata high brightness or
contrast setting, the image can be permanently imprinted
onto the screen. These types ol imprints are not covered by
your warranty because they are the result of misuse.
This television receiver provides display of television closed
captioning in accordance with _i 15.119 of the FCC: rules.
(except for KV-29V55M)
Preface
TableofContents
Preface
Warning!Precautions ........................................................... 2
Introducing the Sony Trinitron ® Color TV ............................. 4
Chapte,r 1: Setting Up
Connecting TV antenna/cable ........................................... 12
Using the on-screen menus ............................................... 14
Charging the menu language ....................................... 16
Turning the cable mode on or off ....................................... 17
Presetting TV channels ..................................................... 18
Chapter 2: Using Basic Features
Watching TV programs ...................................................... 29
Using convenient features ................................................. 30
Muting the sound--MUTING ........................................ 30
Keeping the displays on-screen--DISPLAY ................. 30
Using the sleep tinter--SLEEP ..................................... 30
Chapter 3: Using Advanced Features
Watching two pictures at once
(Picture-in-Picture) ......................................................... 38
Using the timer-activated functions ................................... 44
Setting the clock---CURRENT TIME SET ..................... 44
Setting the ON/OFF TIMER .......................................... 46
Setting CHANNEL BLOCK ............................................ 48
Identifying your TV ........................................................... 4
Locating the controls ........................................................... 6
Connecting other equipment .............................................. 22
Video equipment ............................................................ 22
Connecting an audio system ........................................ 26
Connecting headphones ............................................... 27
Watching a video with your S video-equipped VCR .....28
Switching quickly between
two channels--JUMP ............................................... 30
Using Closed Caption ........................................................ 31
Adjusting picture and sound quality ................................... 32
Adjusting the picture ..................................................... 32
Adjusting the sound ....................................................... 34
Customizing the screen display ......................................... 50
Setting channel captions--CH CAPTION ..................... 50
Viewing the captioned channels--CH GUIDE .............. 52
Setting VIDEO LABEL .................................................. 53
Using the pre-programmed
Remote Commander .................................................... 55
Appendix
Specifications .................................................................... 59
Troubleshooting ................................................................. 59
Preface 3
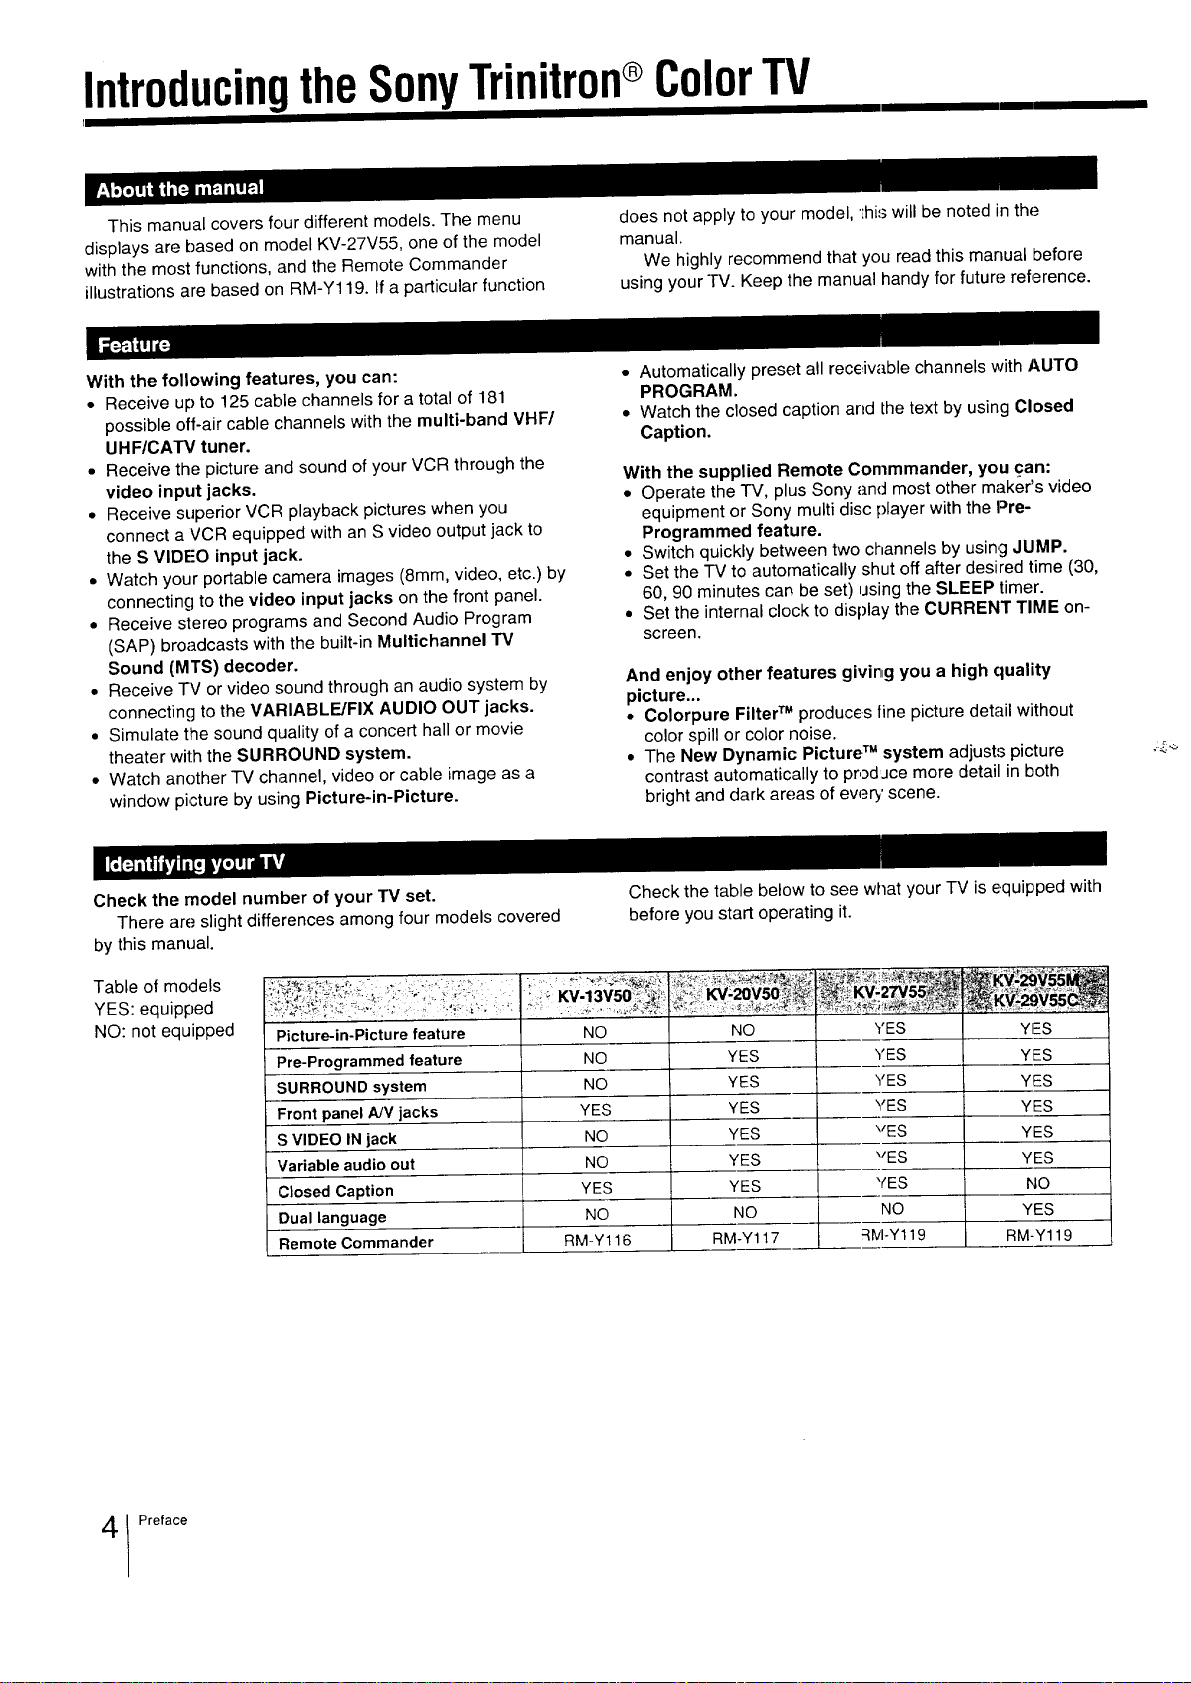
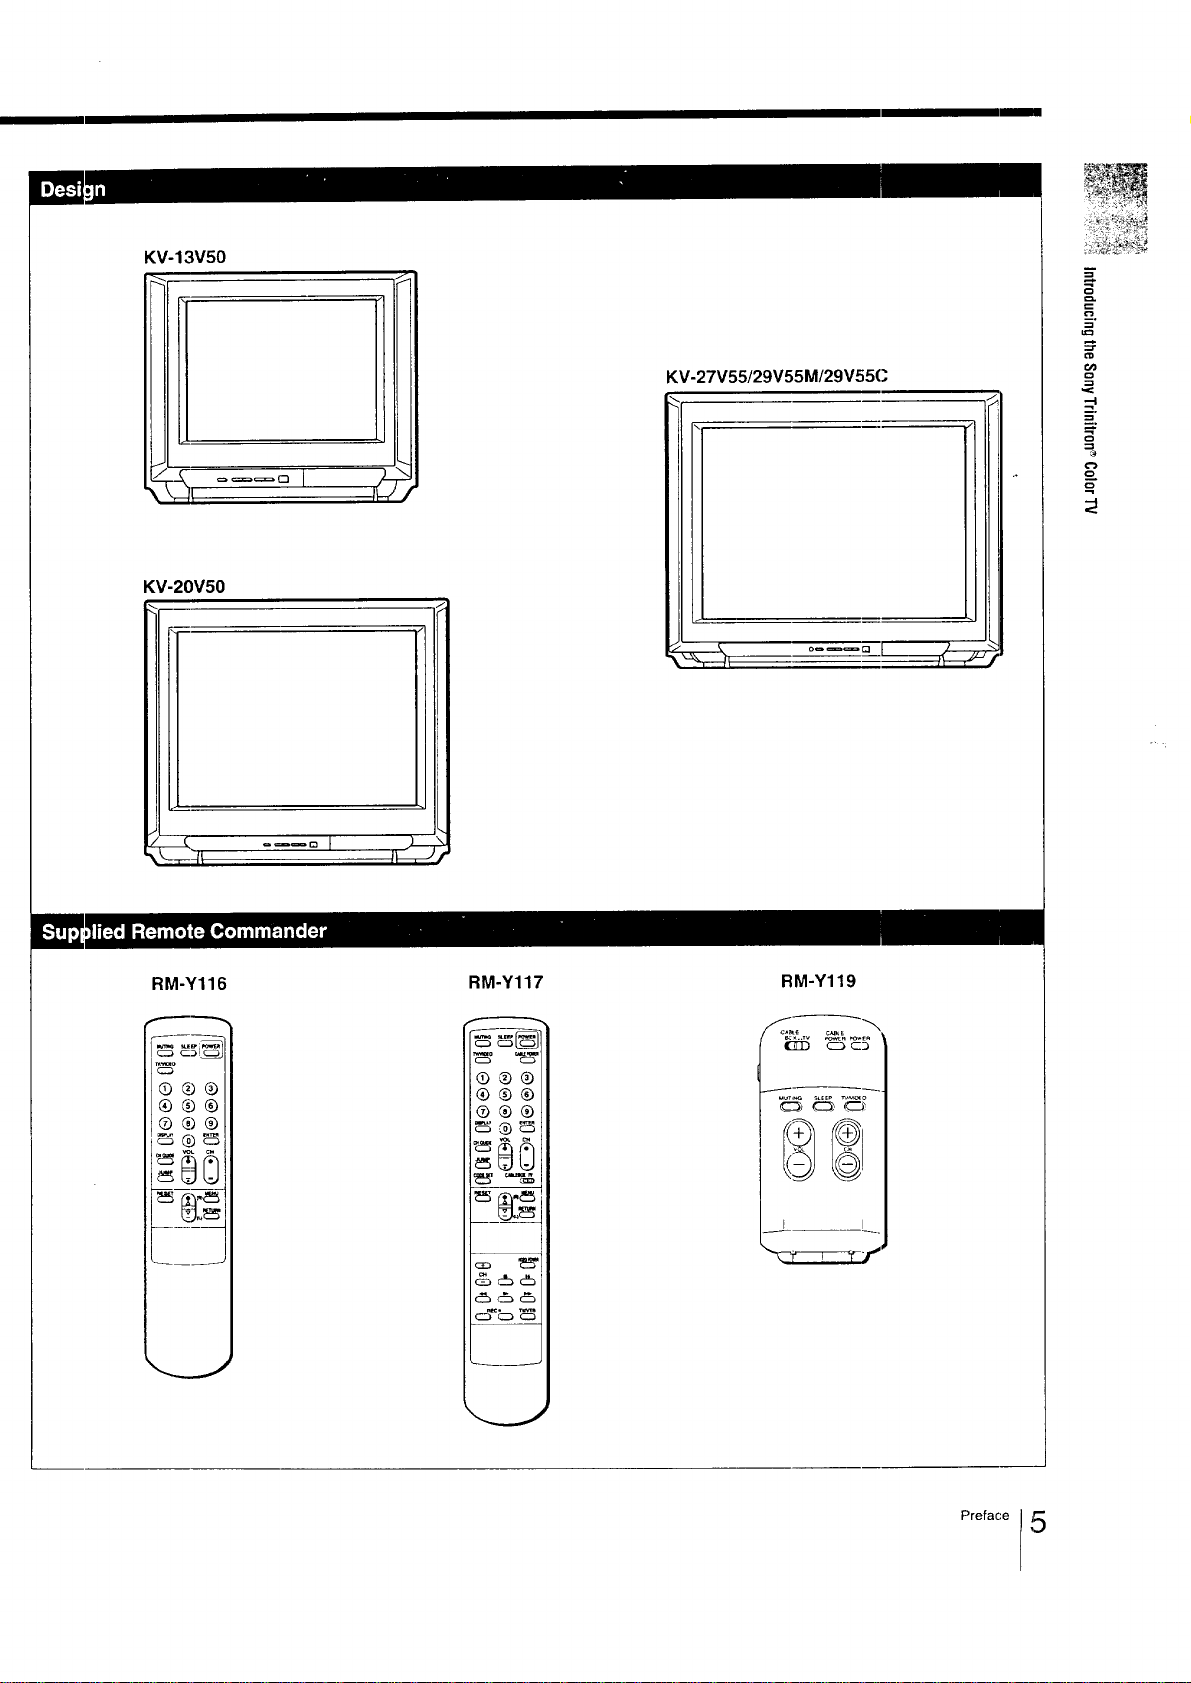
IntroducingtheSonyTrinitron®ColorTV
This manual covers four different models. The menu
displays are based on model KV-27V55, one of the model
with the most functions, and the Remote Commander
illustrations are based on RM-Y119. If a particular function
With the following features, you can:
• Receive up to 125 cable channels for a total of 181
possible off-air cable channels with the multi-band VHF/
UHF/CATV tuner.
• Receive the picture and sound of your VCR through the
video input jacks.
• Receive superior VCR playback pictures when you
connect a VCR equipped with an S video output jack to
the S VIDEO input jack.
• Watch your portable camera images (8mm, video, etc.) by
connecting to the video input jacks on the front panel.
• Receive stereo programs and Second Audio Program
(SAP) broadcasts with the built-in Multichannel "rv
Sound (MTS) decoder.
• Receive TV or video sound through an audio system by
connecting to the VARIABLE/FIX AUDIO OUT jacks.
• Simulate the sound quality of a concert hall or movie
theater with the SURROUND system.
• Watch another TV channel, video or cable image as a
window picture by using Picture-in-Picture.
does not apply to your model, ';hi,;will be noted in the
manual.
We highly recommend that you read this manual before
using your TV. Keep the manual handy for future reference.
• Automatically preset all receivable channels with AUTO
PROGRAM.
• Watch the closed caption arid the text by using Closed
Caption.
With the supplied Remote Commmander, you can:
• Operate the -rv, plus Sony and most other maker's video
equipment or Sony multi disc player with the Pre-
Programmed feature.
• Switch quickly between two channels by using JUMP.
• Set the TV to automatically shut off after desired time (30,
60, 90 minutes can be set) using the SLEEP timer.
• Set the internal clock to display the CURRENT TIME on-
screen.
And enjoy other features giving you a high quality
picture...
• Colorpure Filter TM produces fine picture detail without
color spill or color noise.
• The New Dynamic Picture TM system adjusts picture
contrast automatically to prodJce more detail in both
bright and dark areas of every scene.
Check the model number of your TV set.
There are slight differences among four models covered
by this manual.
Table of models
YES: equipped
NO: not equipped
Picture-in-Picture feature
Pre-Programmed feature
SURROUND system
Front panel AiM jacks
S VIDEO IN jack
Variable audio out
Closed Caption
Dual Language
Remote Commander
Check the table below to see what your TV is equipped with
before you start operating it.
KV,13V50_I:_
NO
NO
NO
YES
NO
NO
YES
NO
RM-Y116
NO
YES
YES
YES
YES
YES
YES
NO
RM-Y117
YES
YES
YES
YES
YES
YES
YES
NO
:{M-Y 119
yIES
YIES
YES
YES
YES
YES
NO
YES
RM-Y119
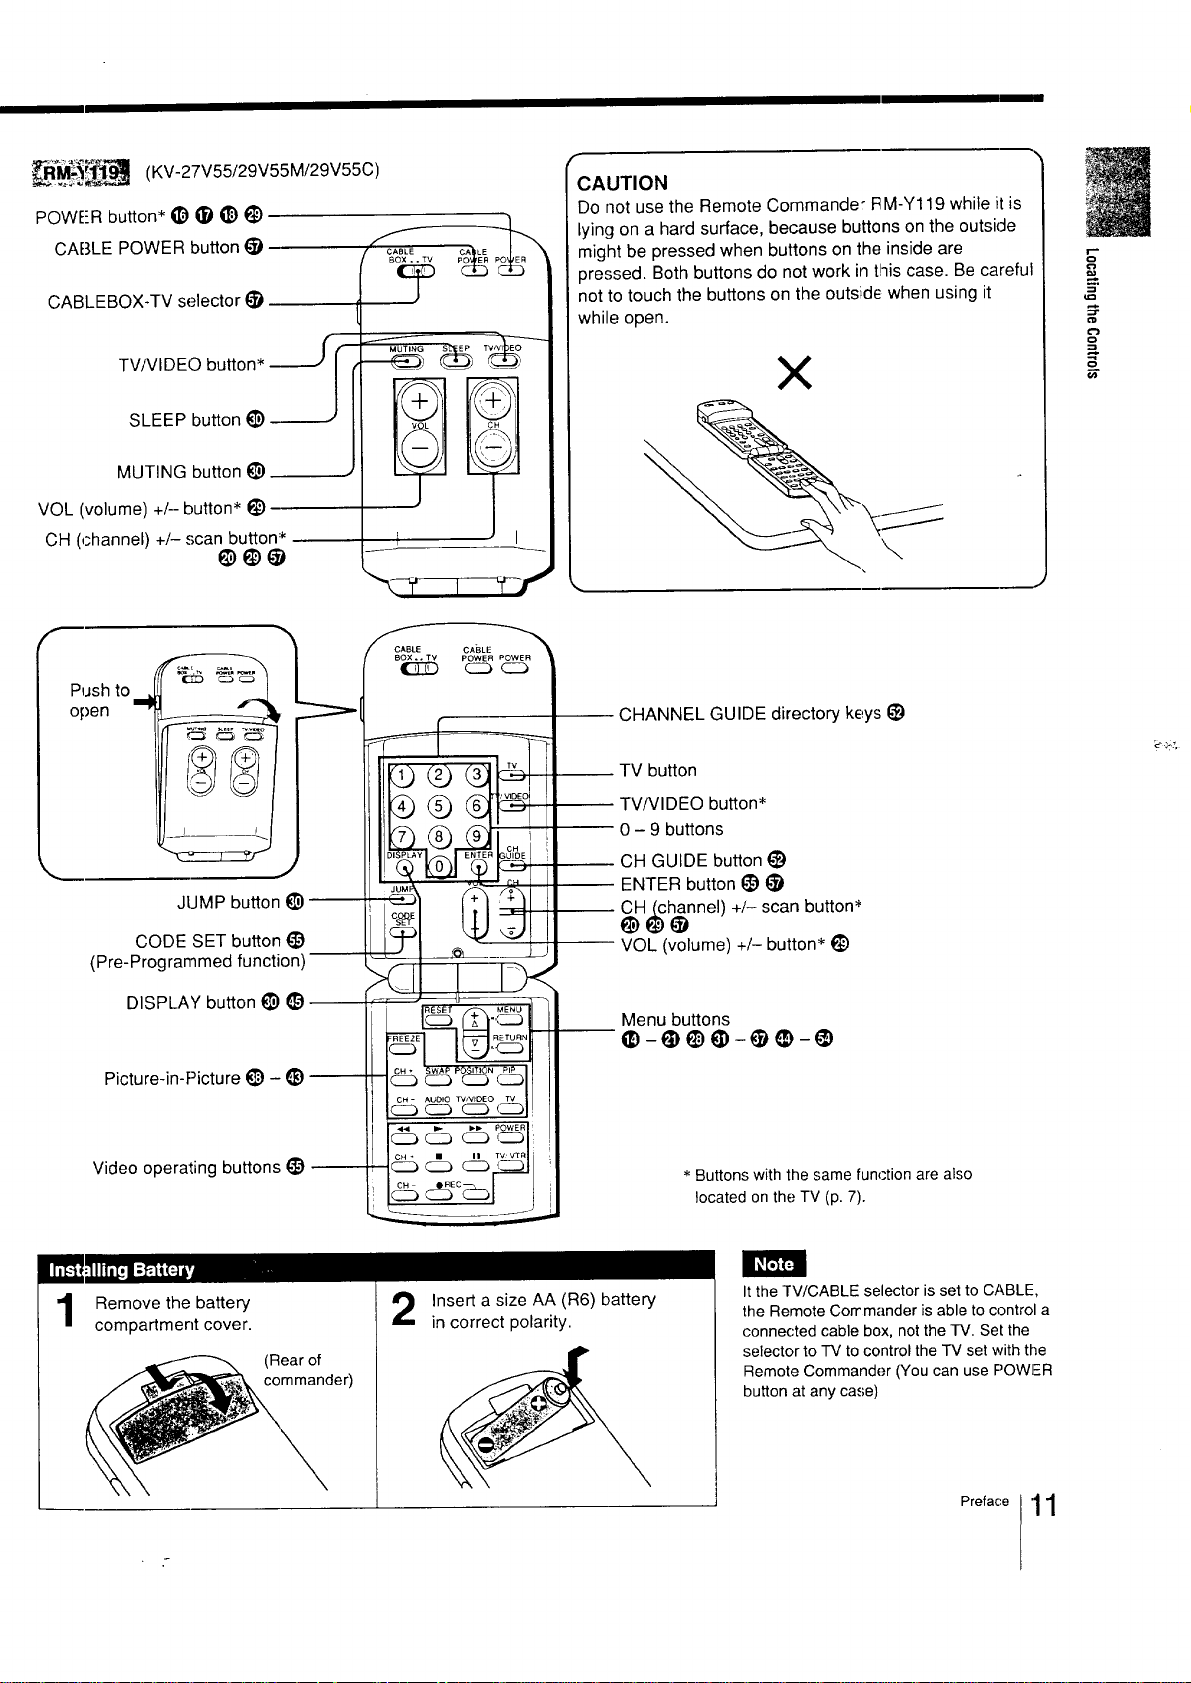
1 Preface
KV-13V50
KV-20V50
u
KV-27V55/29V55M/29V55C
£
_, ==--= I z_
_--fl II , "
RM-Y116
F.-----=_
©®®
®®®
RM-Y117
Q ,:b ®
®®®
®®®
c_ c_ c_
RM-Y119
I I
_J
_ro,ac_o15

LocatingtheControls
For details, see the pages indicated by the numbered black circles O.
On-screen menu displays
Channel number display
Main picture input mode
MUTING display,3 (_)
CH.&I',INEL CAPTION display
@--_t)
MTS rnode (MAIN, SAP or
MONO) (_)
Bar display for volume,
picture or sound adjustment --
CURRENT TIME
Picture-in-Picture input mode
(KV-27V55/29V55M/29V55C only)
[]
KV-27V55
(The screen displays, except for certain features
as noted above, are the same for all models.)
Preface
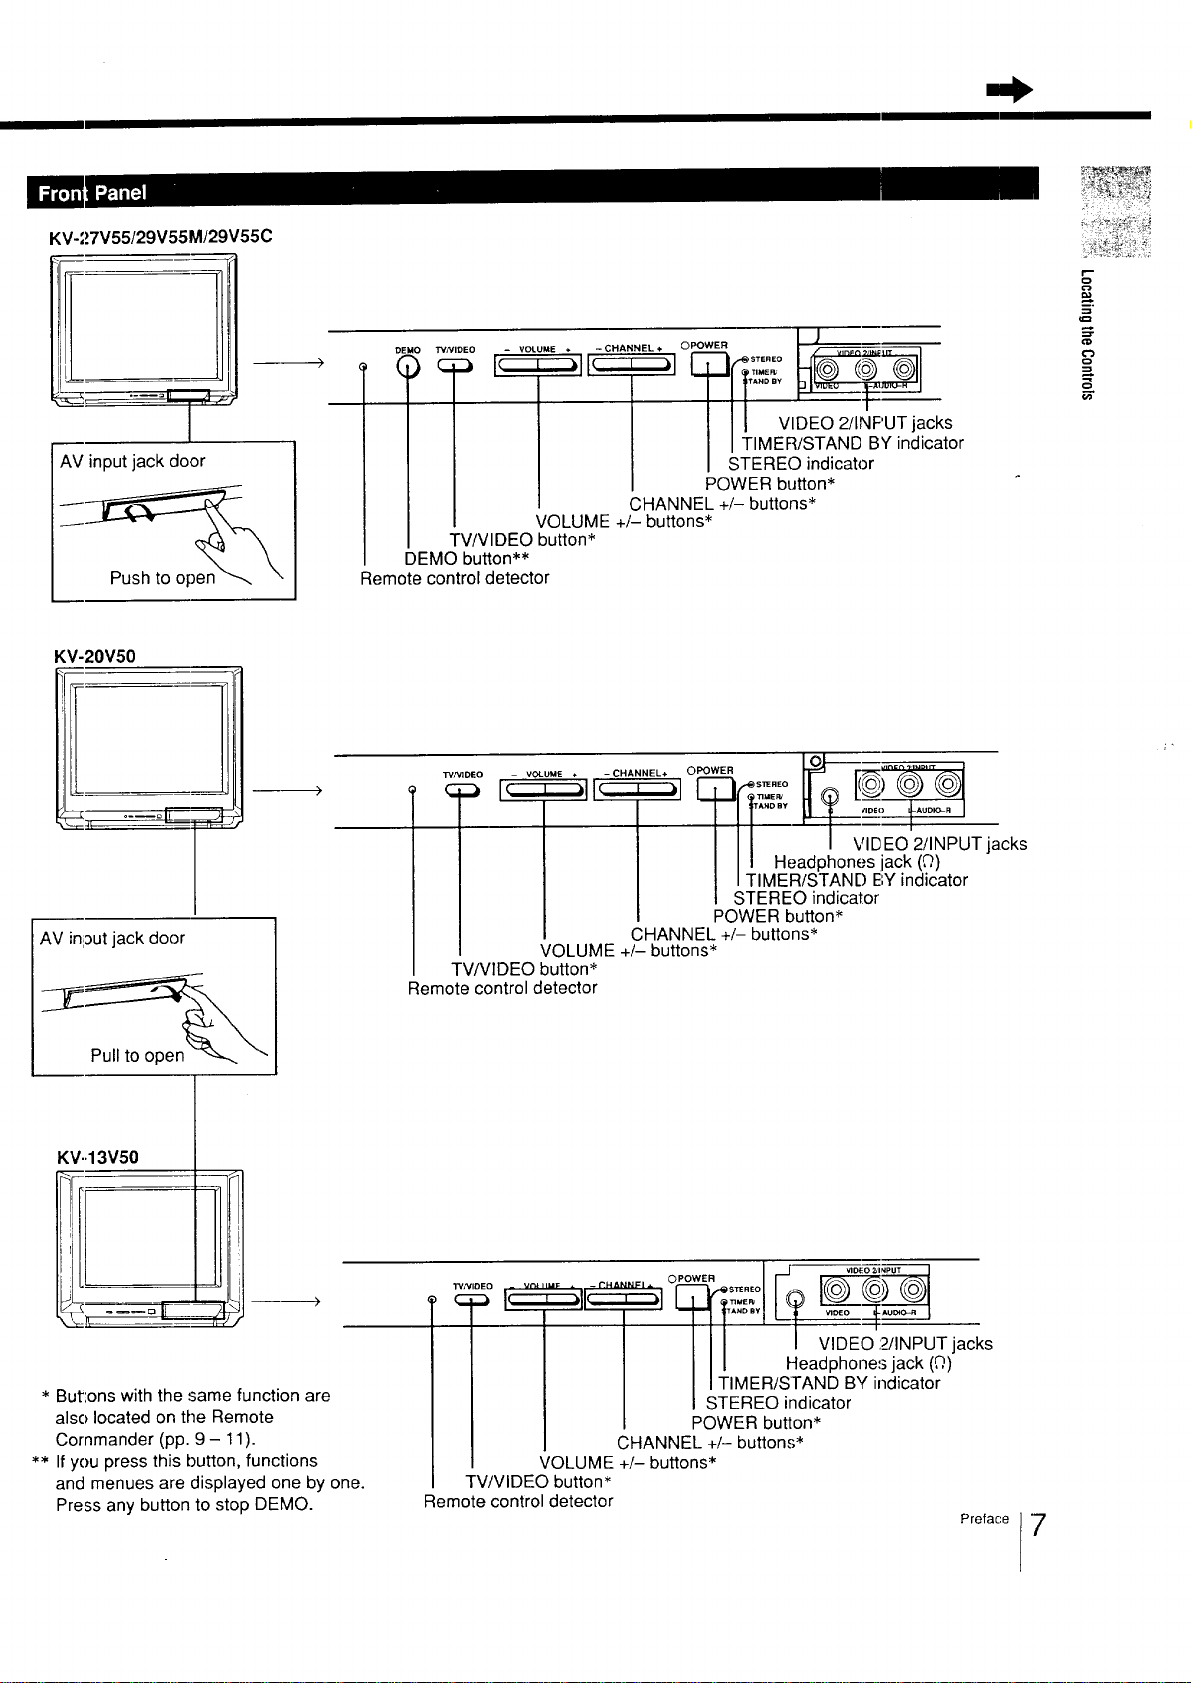
KV-27V55/29V55M/29V55C
_ "---=11 . /1_
I
AV input jack door
/
Push to open
KV-20V50
N.E.÷ O,'OWE. I J
DEMO TV,_/IDEO - VOLUME + -CHA ____ s_ TIEREO f VlnFn_i)N=tl T
I I |11 VIDEO2/INF'UTjacks
I [ JR TIMER/STAND BY indicator
I I I STEREO indicator
I I POWER button*
I CHANNEL +/- buttons*
TV/VIDEO button*
DEMO button**
Remote control detector
W/VIDEO - CHANNEL+ OPO _ _,n=_ _,,u=_
VOLUME +/- buttons*
i_J WE,', IOJ ,
© ®1
AV inloutjack door
KV..13V50
* BuLons with the same function are
also located on tile Remote
Commander (pp. 9- 11).
** If you press this button, functions
and menues are displayed one by one.
Press any button to stop DEMO.
TV/VIDEO button*
Remote control detector
..c:_....i_:.__
TV/VIDEO button *
Remote control detector
VOLUME +/- buttons*
;-:--_11__-k I-;-_4:::° I@ I__J@__,;_1
VOLUME +/- buttons*
/11 i VIDEO 2/INPUT jacks
I /I I Headphones jack (O)
I |1 TIMER/STAND E',Yindicator
i I STEREO indicator
I POWER button*
CHANNEL +/- buttons*
._ o.ow,, ,r
Is
q-ll......IL zl'=
I I I I VIDEO 2/INPUT jacks
I I I Headphones jack (0)
I I TIMER/STAND BY indicator
I STEREO indicator
POWER button*
CHANNEL +/- buttons*
Preface
7

Locating the Controls
VHF/UHF
antenna terminal
S VIDEO IN jack
KV-27V55/29V55M/29V55C
I
VHFIUHF
@
VIDI-O 3 OUT jacks
VIDEO 1 IN jacks
VIDEO 3 IN jacks
S VIDEO IN jack
VIDEO 1 IN jacks
VIDEO 3 IN jacks
KV-20V50
N ,
_o wo_ ]AU_,_ou'rI
AUI)IO OUT jacks
VHF/UHF
antenna terminal
...AUDIO OLIT jacks
) Preface
VIDEO 1 IN jacks
KV-13V50
L_
]
Vt'_AIHF
VHF/UHF
antenna terminal
For details, see the pages indicated by the numbered black circles o.
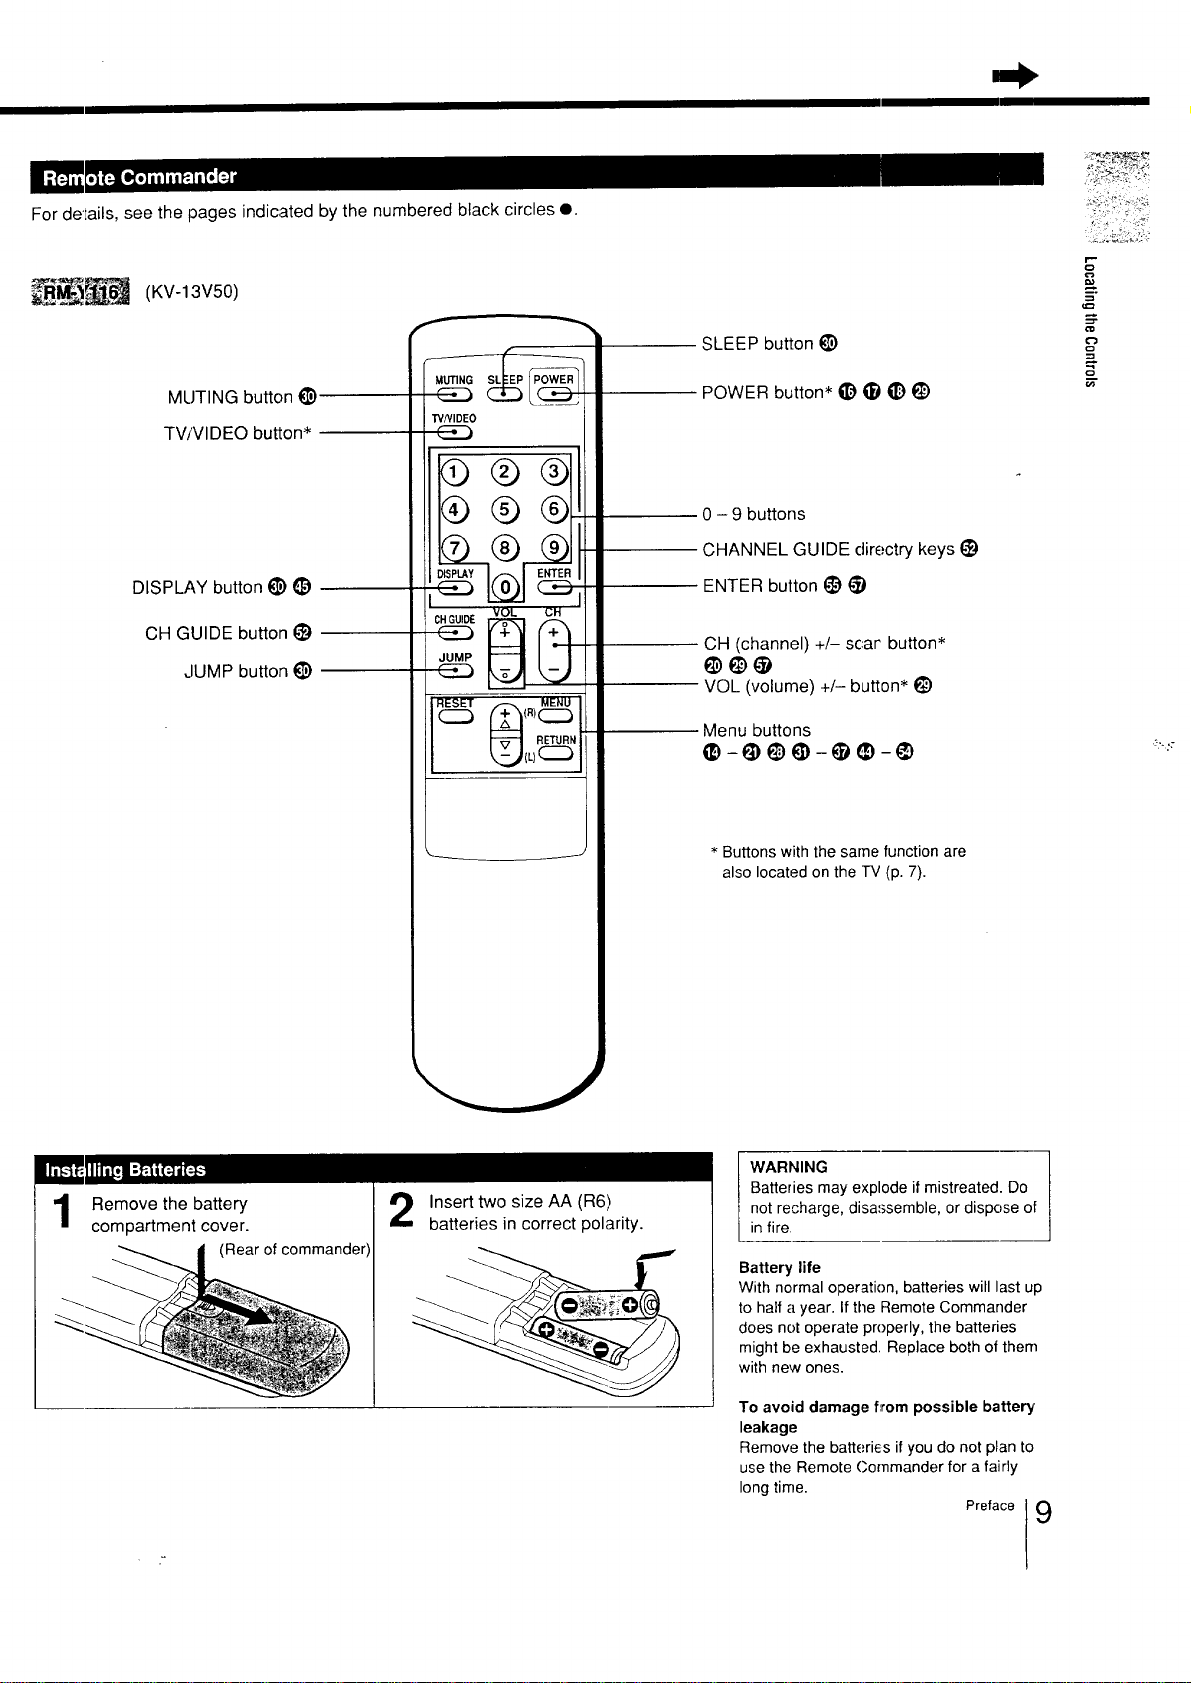
(KV-13V50)
f •
MUTING button t_)
"rVNIDEO
TV/VIDEO button*
®®
SLEEP button _)
POWER button* _) _I _) q_)
0 - 9 buttons
CHANNEL GUIDE directry keys I_)
e¢l
=3
o
t/J
DISPLAY button !_ t_)
CH GUIDE button i_)
JUMP button _)
Remove the battery
compartment cover.
(Rear of commander
OHGUIDE VOL CH
JUMP
REsFr_<R,(:_
Insert two size AA (R6)
batteries in correct polarity.
ENTER button 1_)_)
CH (channel) +/- scar button*
VOL (volume) +/- button* 1_)
Menu buttons
* Buttons with the same function are
also located on the TV (p. 7).
WARNING
Batteries may explode if mistreated. Do
not recharge, disassemble, or dispose of
in fire
Battery life
With normal operation, batteries will last up
to half a year. If tile Remote Commander
does not operate properly, the batteries
might be exhausted. Replace both of them
with new ones.
To avoid damage f=rom possible battery'
leakage
Remove the batteries if you do not plan to
use the Remote Commander for a fairly
long time.
Preface 9
Locatingthe Controls
(KV-20V50)
SLEEP buttor I_)
MUTING button t_)
TVNIDEO button"
DISPLAY button _)
CH GUIDE button _)
JUMP button _)
CODE SET button I_)
(Pre-Programmed
function)
Video operating buttons-
GUIDE
UMP
)DESET
POWER buttcn* _) (i) _) t_)
CABLE POWER button
0 - 9 buttons
CHANNEL GUIDE directory 'Keysi_
ENTER button _) _I
CH (channel) +/- scan button _
VOL (volume) +/- button* _)
CABLEBOX-']-V selector I_1
Menu buttons
Remove the battery
1
corr_partment cover.
0 Preface
(Rear of commander)
Insert a size AA (R6) battery
in correct polarity.
* Buttons with the same function are
also located on the TV (p. 7).
If the CABI_EBOX-TV selector isset to
CABLEBOX, the Remote Commander is
able to ¢-or,trol a connected cable box, not
the TV. Set the selector to 1_/to control the
TV set with the Remote Cornmander (You
can use POWER button at any case).
__ (KV-27V55/29V55M/29V55C)
POWER button* _) _) _)
CABLE POWER button
CABLEBOX-TV selector I_
TV/VlDEO button* _
SLEEP button I_)
MUTING button I_)
VOL (volume) +/- button* i_)
CH (channel) +/- scan button*
@@@
f
f BOX.. TV CA LE
SL'T_E P TV/VI EO
CAUTION
Do not use the Remote Commander IqM-Y119 while it is
lying on a hard surface, because buttons on the outside
might be pressed when buttons on the inside are
3ressed. Both buttons do not work in this case. Be careful
not to touch the buttons on the outside when using it
while open.
X
\
E
8
==
o
f
Push to i)
open
JUMP button I_)-
CODE SET button (_)
(Pre-Programmed function)
DISPLAY button I_)
Picture-in-Picture i_) - _)
Video operating buttons (_)
f
CABLE CABLE
BOX.. TV POWER POWER
_ c223 c:D
>1
CHANNEL GUIDE directory keys i_)
TV button
TV/VlDEO button*
J
J
0 - 9 buttons
CH GUIDE button (_)
ENTER button I_) _1
CH (channel) +/- scan button _
@6)e)
VOL (volume) +/- button*
Menu buttons
e-@_)@-@_)-@
* Buttons with the same function are also
located on the TV (p. 7).
Remove the battery
compartment cover.
(Rear of
commander)
Insert a size AA (R6) battery
in correct polarity.
It the TV/CABLE selector is set to CABLE,
the Remote Corr mander is able to control a
connected cable box, not the TV. Set the
selector to TV to control the "IV set with the
Remote Commander (You can use POWER
button at any case)
Preface '11
Chapter 1: Setting Up
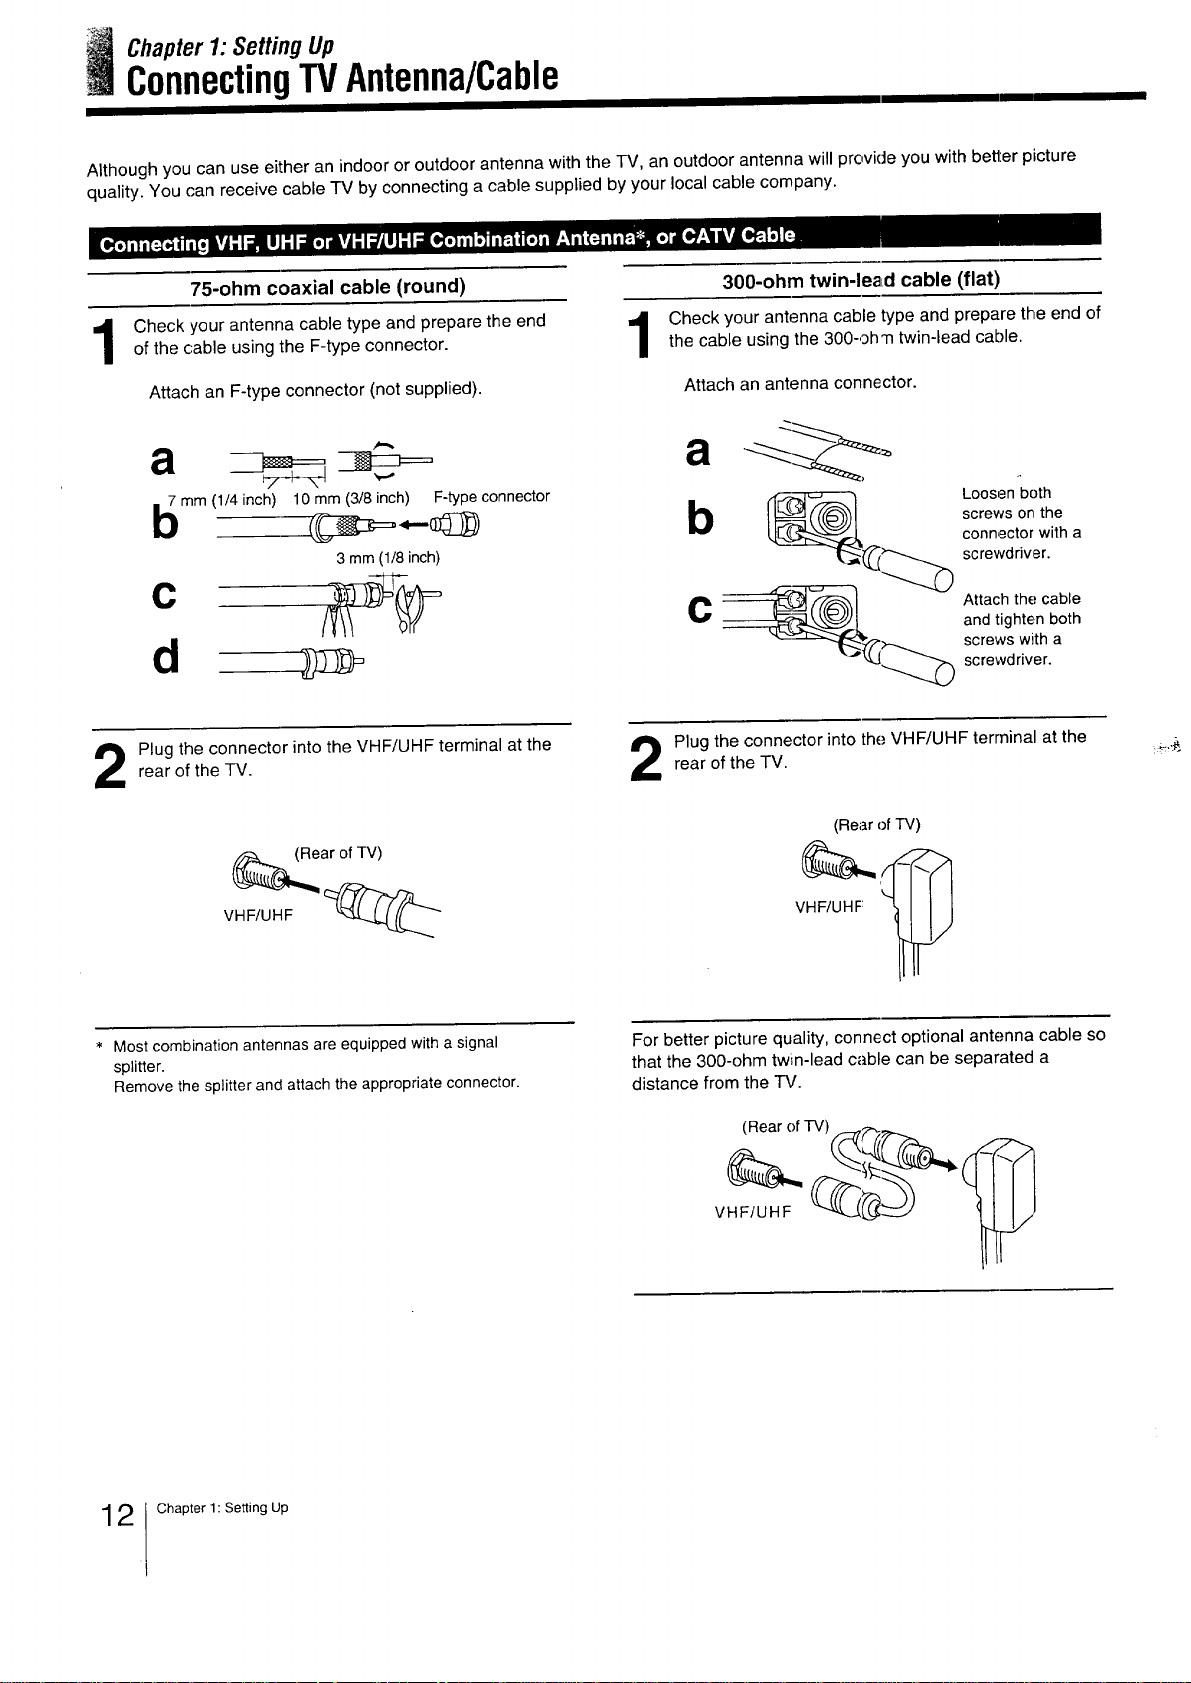
ConnectingTVAntenna/Cable
Although you can use either an indoor or outdoor antenna with the TV, an outdoor antenna will provide you with better picture
quality. You can receive cable "IV by connecting a cable supplied by your local cable company.
75-ohm coaxial cable (round)
Check your antenna cable type and prepare the end
of the cable using the F-type connector.
Attach an F-type connector (not supplied).
a
_mm (1/4 inch) 10 mm (3/8 inch) F-type connector
3 mm(1/8inch)
c
d
rear of the TV.
Plug the connector into the VHF/UHF terminal at the
300-ohm twin-lea_d cable (flat)
Check your antenna cable type and prepare the end of
the cable using the 300-oh'n twin-lead cable.
Attach an antenna connector.
Loosen both
screws on the
connector with a
screwdriv,er.
Attach the cable
and tighten both
screws with a
screwdriver.
rear of the TV.
Plug the connector into the VHF/UHF terminal at the
(Rear of TV)
(__ar of TV)
VHF/UHF
Most combination antennas are equipped with a signal
splitter.
Remove the splitter and attach the appropriate connector.
VHF/UHF
For better picture quality, connect optional antenna cable so
that the 300-ohm twin-lead cable can be separated a
distance from the TV.
(RearofTV) :::::T/_,--
2 Chapter 1: Setting Up
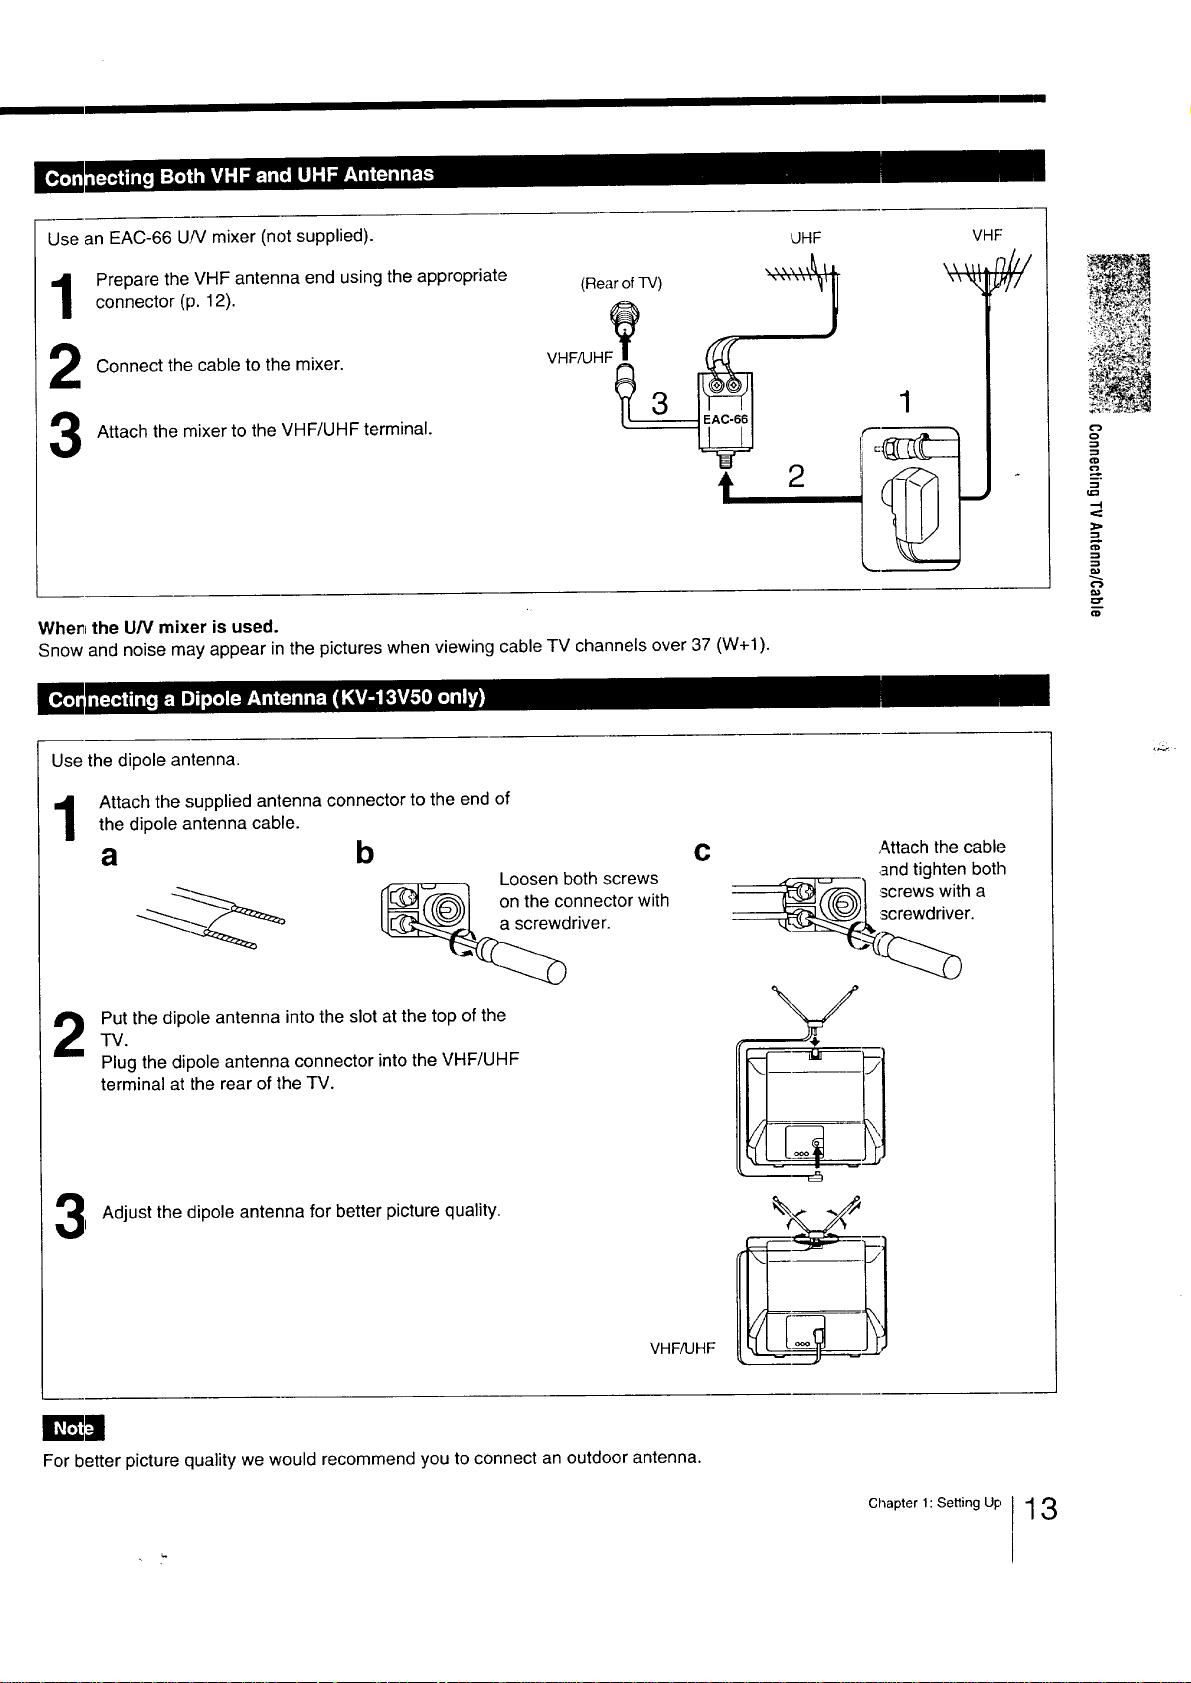
Use an EAC-66 U/V mixer (not supplied).
LIHF
VHF
Prepare the VHF antenna end using the appropriate (RearofTV)connector (p. 12).
Connect the cable to the mixer. VHF/UHF_ [_
Attach the mixer to the VHF/UHF terminal.
t,
When the U/V mixer is used.
Snow and noise may appear in the pictures when viewing cable TV channels over 37 (W+I).
Use the dipole antenna.
Attach the supplied antenna connector to the end of
1
the dipole antenna cable.
a b c
Loosen both screws
_] i::rreWdrwith, a
_i_ ,_
1
2
Attach the cable
and tighten both
=
==
ClD
on the connector with
-IV.
Put the dipole antenna into the slot at the top of the
Plug the dipole antenna connector into the VHF/UHF
terminal at the rear of the TV.
1 Adjust the dipole antenna for better picture quality.
For better picture quality we would recommend you to connect an outdoor antenna.
river.
VHF_HF
n
Chapter 1: Setting Up
13
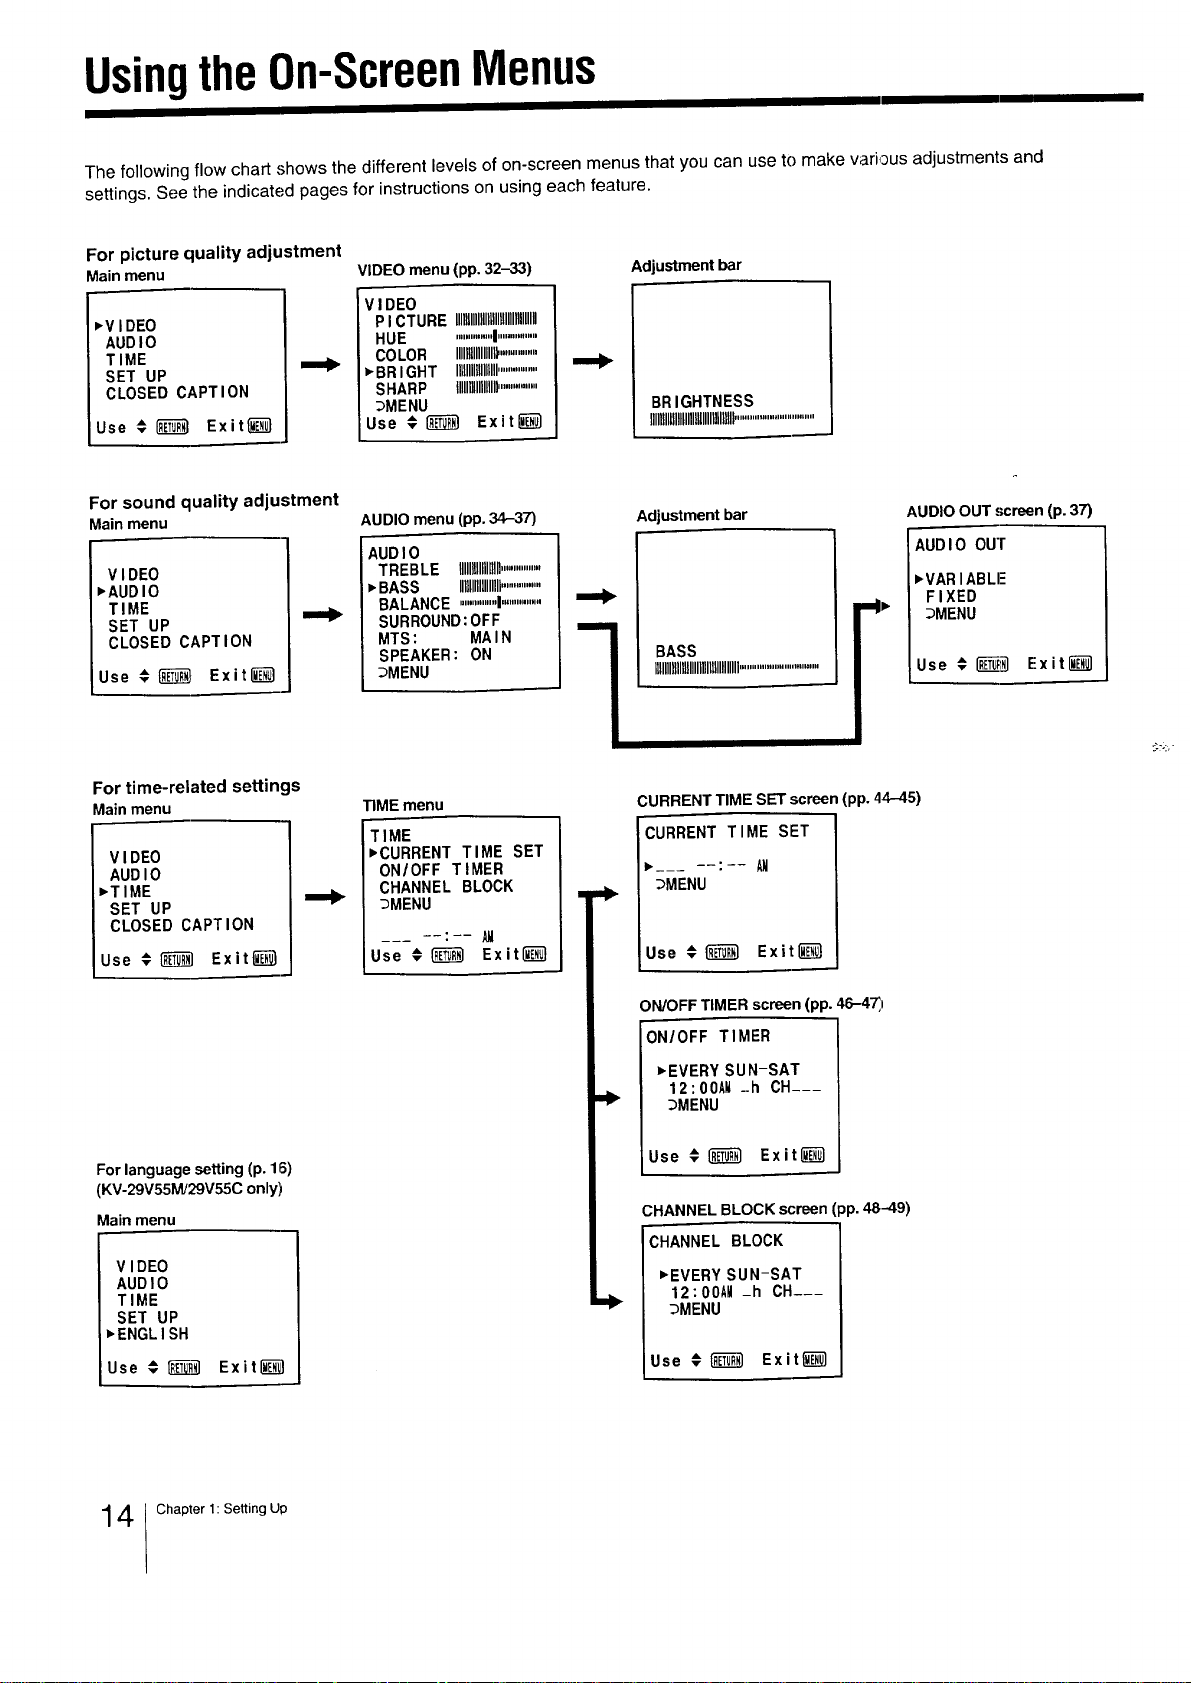
UsingtheOn-ScreenMenus
The following flow chart shows the different levels of on-screen menus that you can use to make various adjustments and
settings. See the indicated pages for instructions on using each feature.
For picture quality adjustment
Mainmenu
I
,V I DEO I
AUD I 0
TIME
SET UP
CLOSED CAPTION
Use # _ Exit_
For sound quality adjustment
Mainmenu
VIDEO
•AUDIO
TIME
SET UP
CLOSED CAPTION
Use € _ Exit_
J
VIDEO menu (pp. 32-33)
VI DEO
PI CTURE IIIllllllllllllllltUllllllllllll
HUE ..............|................
COLOR IIIIllllllllllll_..............
• BR I GHT Illllllllllllllll................
SHARP IIIIlllllllllllll................
3MENU
Use # _ Exit_
AUDIO menu (pp. 34-37)
AUD I 0
TREBLE tlHIIIImll................
BASS Illllllllllllllll..............
BALANCE ...............| ...............
SURROUND: OFF
MTS : MAIN
SPEAKER : ON
::)MENU
Adjustment bar
BRIGHTNESS
Ulllllllllllllm_lllllll_llllll_,.........................
Adjustment bar
i
BASS
IIlUUlIIIIIIlUlIIIIIUlIIIlUll................................
AUDIO OUT_reen(p.37)
AUDIO OUT
,VARIABLE
FIXED
_MENU
Use # _ E!xit_]
For time-related settings
Mainmenu
VIDEO
AUDIO
•TIME
SET UP
CLOSED CAPTION
Use # _ Exit_
For language setting (p. 16)
(KV-29V55M/29V55C only)
Main menu
VIDEO
AUDIO
TIME
SET UP
,ENGLISH
Use # _ Exit_
TIME menu
TIME
• CURRENT TIME SET
ON/OFF TIMER
CHANNEL BLOCK
_MENU
Use # _ Exit_}
CURRENT TIME SET screen (pp. 44-45)
CURRENT TIME SET
• --- --:-- AM
_MENU
Use €_ Exit_
ON/OFFTIMERscreen(pp. 46-4_=
ON/OFF TIMER
• EVERYSUN-SAT
12:00AM -h OH--_
_MENU
Use € _ Exit_
CHANNEL BLOCKscreen(pp. 48_9)
CHANNEL BLOCK
• EVERY SUN-SAT
12:00AH -h CH--_
3MENU
Use # _ Exit_
4 Chapter 1: Setting Up

For presetting and other functions
Mainmenu SETUPmenu
SET UP
VI DEO
AUD I 0
T IME!
• SET UP
CLOSED CAPTION
Use ;_ _ Exit_]
• CABLE: ON
AUTO PROGRAM
CH ERASE/ADD
CH CAPTION/GUIDE
S VIDEO
VIDEO LABEL
_MENU
:ABLE ON/OFF screen (p. 17)
SET UP
• CABLE: ON
AUTO PROGRAM
CH ERASE/ADD
CH CAPTION/GUIDE
S VIDEO
VIDEO LABEL
_MENU
For closed caption setting
Mainmenu
V IDI'O
AUD I 0
TIMIE
SET UP
_'CLOSED CAPT I ON
Use _{_u_J Exit_
Remote Commander
CLOSED CAPTION screen
(p. 31)
CLOSED CAPTION
•r_C3/TEXT OFF
1"c_11
F_]2
TEXT1
TEXT2
_MENU
Use # _ Exitr_
AUTO PROGRAM screen
I AUTO PROGRAM
CHANNEL ERASE/ADD screen (pp. 19-21)
). 18)
CH ERASE/ADD
10
•ERASE
ADD
_MENU
Select the channel
Use € _ Exit_
CHANNEL CAPTION/GUIDE screen (pp. 51)-51)
CH CAPTION/GUIDE
d_®® • ....
®®® .....
®®®
Use € _ Exit_
¢D
CO
€1D
g'@l
To display the main menu
Press MENU.
To return to the previous menu
Press A+ or _- to select "7 MENU."
Then press RETURN.
To return to the main menu
Repeat the above, until you reach the main menu.
To return to the normal screen
Press MENU on the Remote Commander.
The menus disappear automatically if you do not press a button
within 90 seconds.
The rnenu you cannot select appears in black.
S VIDEO ON/OFF screen (p. 28)
SET UP
CABLE: ON
AUTO PROGRAM
CH ERASE/ADD
CH CAPTION/GUIDE
vS VIDEO: ON
VIDEO LABEL
_MENU
VlDEO LABELscreen(pp. 53-54)
VIDEO LABEL
_VIDE01:VIDE01
VIDE02:VIDE02
VIDE03:VIDE03
_MENU
Use # _ Exit_
Chapter 1: Setting Up
15
UsingtheOn-ScreenMenus
_CABLE CABLE WER_
BOX.. TV POWER PO
_ _c2D
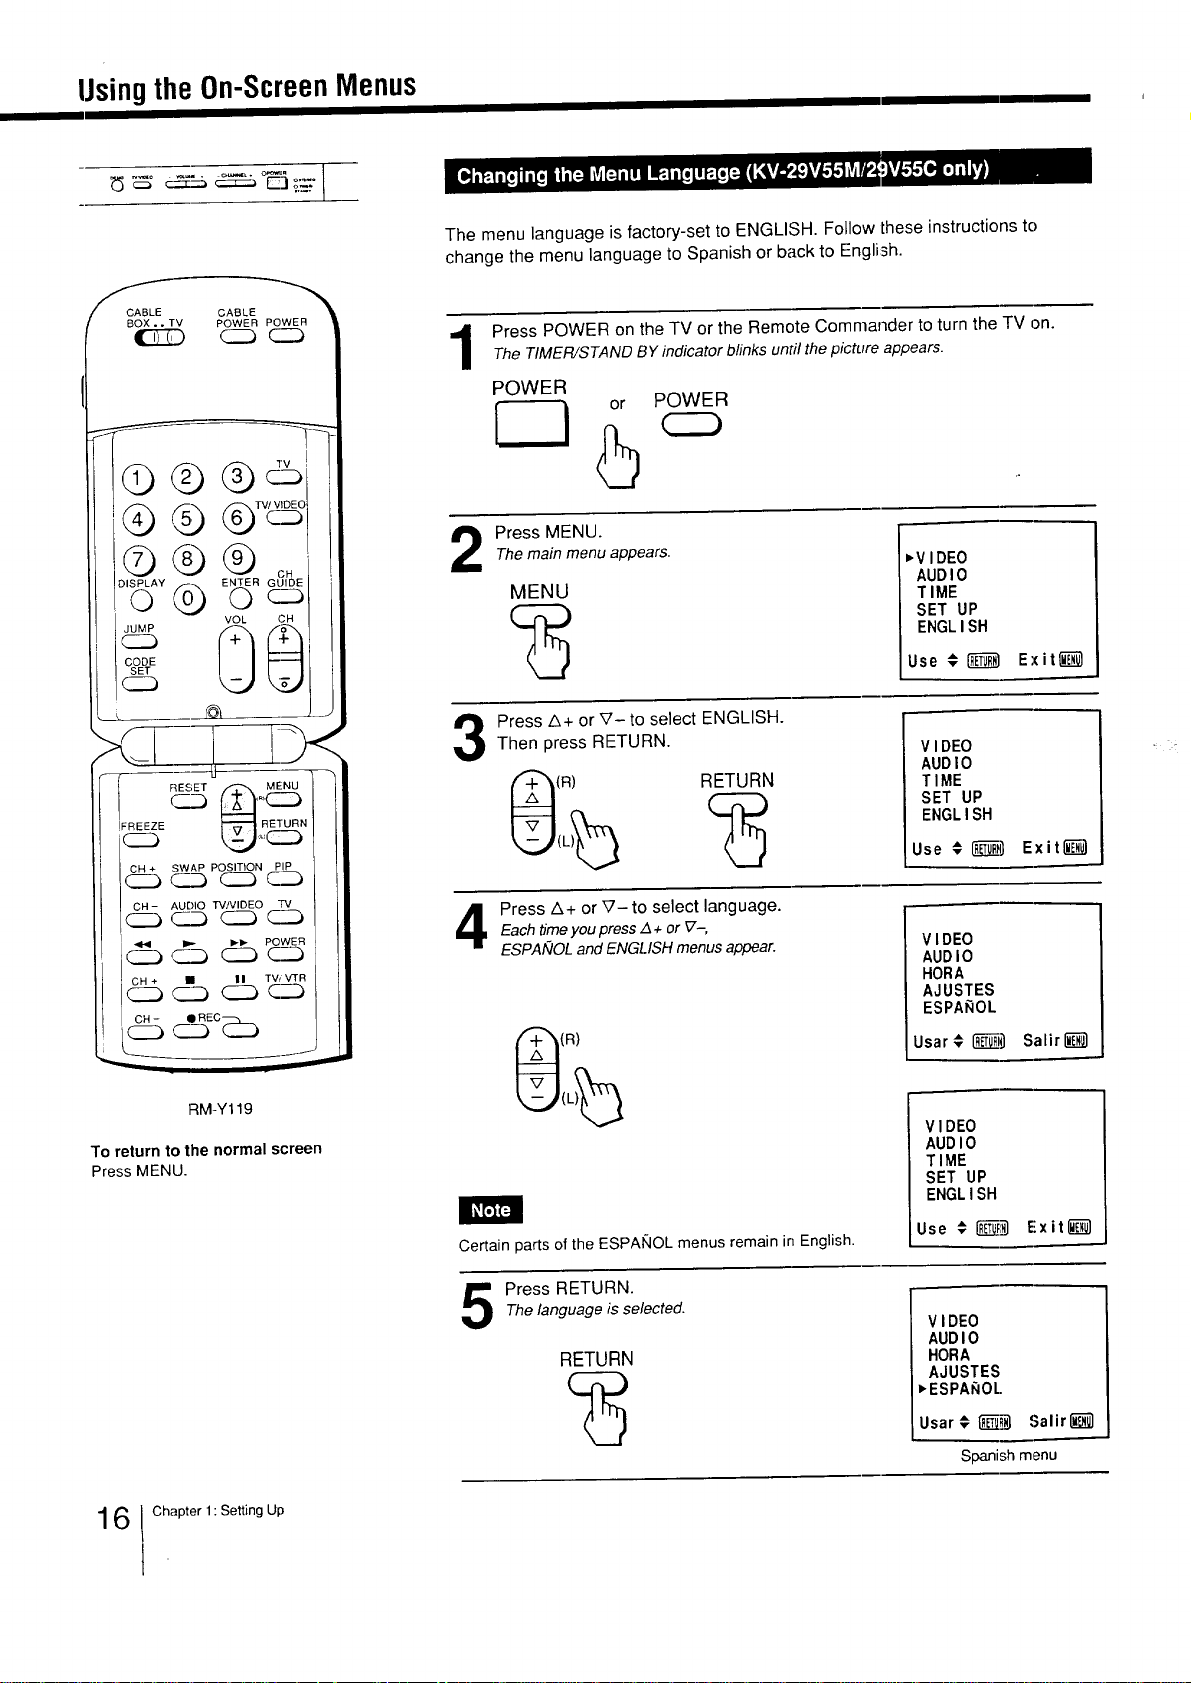
The menu language is factory-set to ENGLISH. Follow these instructions to
change the menu language to Spanish or back to English.
Press POWER on the TV or the Remote Commander to turn the TV on.
1
The TIMER/STANDBY indicator blinks until the picture appears.
POWER
or POWER
Gd_
TVt VIDEO
C_
©®
Q
VOL CH
4_
>,L -2)<
RESET
J_REEZE _(_N
SWAP POSITION PIP
' CH_ _u
(_ AUDIO TV/VIDEO TV
_ 1_, POWER
OH + II II TV/VTR
/ CH- QREC_
''5
CCbC_
b
Press MENU.
2
The mainmenu appears.
MENU
Press A+ or V- to select ENGLISH.Then press RETURN.
(R) RETURN
Each time you press Z_+ or V-,
Press Z&+ orV-to select language.
ESPAIVOL and ENGLISH menus appear,
_VIDEO
AUDIO
TIME
SET UP
ENGLISH
Use #_ Exit_
VIDEO
AUDIO
TIME
SET UP
ENGLISH
Use € _-_ Exit_
VIDEO
AUDIO
HORA
AJUSTES
ESPA_OL
• 7
RM-Y119
To return to the normal screen
Press MENU.
6 Chapter 1: Setting Up
Certain parts of the ESPANOL menus remain in English•
Thelanguage is selected.
Press RETURN.
RETURN
Usar¢ _ Salirli_l
VIDEO
AUDIO
TIME
SET UP
ENGLISH
Use € _ Eixit_)
VIDEO
AUDIO
HORA
AJUSTES
_ESPAhOL.
Usar# _ Salirl_l
Spanish menu

Turninv theCableModeOnorOff
If you have cable connected to your TV (pp. 12-13), follow the steps below to turn
the cable connection on or off. CABLE is preset to ON when you use your TV for
the first time. Then turn CABLE to OFF to preset or watch VHF or UHF channels
(pp. 18-21 and 29).
f
CABLE CABLE
BOX, • TV POWER POWER
_E!D c_
U
IFREEZE _ RETURN
J CH + SWAP POSITION PIP
/CC3 CCb CCb q_
CH- AUDIO TVNIDEO TV
CC3CCb (CZ3_
D,_ I,,_ POWER
C_ CC3 CCb
CH + • || TV/VTR
CCb CCb C_ _
CH-
Press POWER on the TV or the Remote Commander to turn the TV on.
1
The TIMER/STAND BY indicator blinks until the picture appears.
POWER
or POWER
5
Press MENU.The mainmenu appears.
MENU
Press A+ or V- to select SET UP.
(R)
Press RETURN.
The SET UP menu appears, and the cursor points
to "CABLE".
RETURN
If the CABLE display appears in black, the TV is
in VIDEO mode and you cannot select CABLE.
Press TV or TV/VIDEO to change to TV mode.
,V I DEC)
AUD ]O
TIME
SET LIP
CLOSED CAPTION
Use € _ Exit_
V IDE()
AUDIO
TIME
=-SET UP
CLOSED CAPTION
Use # _ Exit_l
=,CABLE: ON
AUTO PROGRAM
CH EIFIASE/ADD
CH CAPTION/GUIDE
S V I IDEO
VIDEO LABEL
_MEN_J
UP
__.=.
._._=
a= C:_
cb
RM-Y119
To return to the normal screen
Press MENU.
Press RETURN again.
4
RETURN
Press A+ or_-to select ON or OFF alternately.
SET UP
CABLE: ON
AUTO PROGRAM
CH ERASEIADD
CH CAPTION/GUIDE
S VIDEO
VIDEO LABEL
_MENU
Press RETURN.
The setting is completed.
SET UP
_CABLE: ON
AUTO PROGRAM
CH ERASE/ADD
OH CAPTION/GUIDE
S VIDEO
VIDEO LABEL
_MENU
"S'_UP
CABLE: OFF
AUTO PROGRAM
CH ERASEIADD
CH CAPTION/GUIDE
S VIDEO
VIDEO LABEL
3MENU
Chat)terl: Setting Up 17
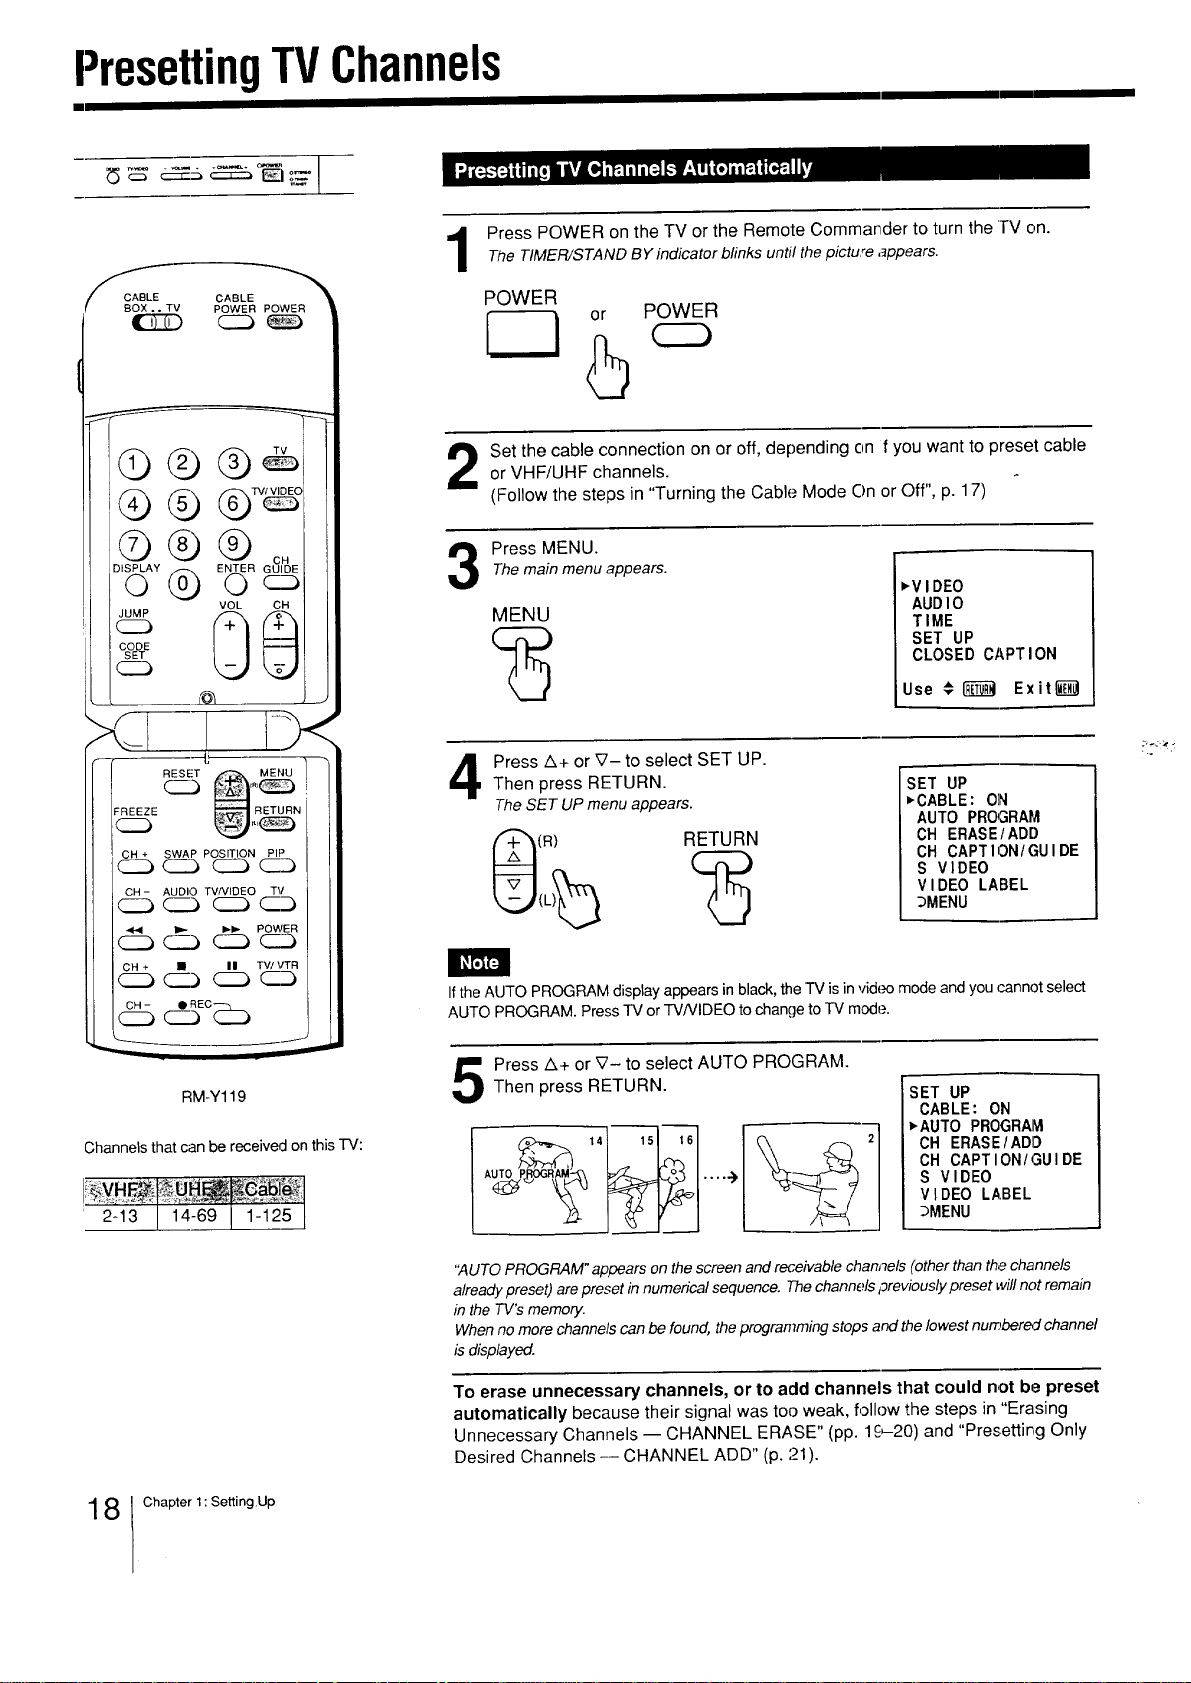
PresettingTVChannels
Press POWER on the TV or the Remote Commander to turn the TV on.TheTIMER/STAND BYindicator blinks until the picture appears.
LE CABLE
' BOX .. TV POWER PO
©®®
JUMP VOL CH
CO_E
C_D
ER_
FREEZE _ RETURN I II
I II
II
POWER
or POWER
5
Set the cable connection on or off, depending on f you want to preset cableor VHF/UHF channels.
(Follow the steps in "Turning the Cable Mode On or Off", p. 17)
The mainmenu appears.
Press MENU.
MENU
Press A+ or V- to select SET UP.
Then press RETURN.
The SET UPmenu appears.
(a) RETURN
vV I DEO
AUDI O
TIME
SET UP
CLOSED CAPTION
Use # _ Exit_
SET UP
_CABLE: ON
AUTO PROGRAM
CH ERASE/ADD
CH CAPTION/GUIDE
S VIDEO
VIDEO LABEL
_MENU
, ,'
RM-Y119
Channelsthatcan bereceivedonthis -I-V:
2-13/14-691-125_.J
8 Chapter 1: SettingUp
Ix%"J_
If the AUTO PROGRAM display appears in black, theTV is in video mode and you cannot select
AUTO PROGRAM. Press TV or TVNIDEO to change to TV mode.
Press A+ or _'- to select AUTO PROGRAM.Then press RETURN.
"AUTO PROGRAM" appears on the screen and receivable channels (other than the channels
already preset) are preset in numerical sequence. The channels previously preset willnot remain
in the TV's memory.
When no more channels can be found, the programming stops and the lowest numbered channel
is displayed.
To erase unnecessary channels, or to add channels that could not be preset
automatically because their signal was too weak, follow the steps in "Erasing
Unnecessary Channels -- CHANNEL ERASE" (pp. lC,-20) and "Presettinig Only
Desired Channels--CHANNEL ADD" (p. 21).
SET UP
CABLE: ON
_AUTO PROGRAM
CH ERASE/ADO
CH CAPTION/GUIDE
S VIDEO
VIDEO LABEL
3MENU
fCABLE CABLE "_
BOX. • TV POWER POWER
DISPPLLAY _ ENTER GUIDE
L.) _ @<---_
r f JuM_ _
__ J
RESET _ MENU
REEZE
SWAPPO,,T,ONP,P
C_ c_ Czb
CH- AUDIO TV/VIDEO TV I
[ all U TV/VTR
I
I
-.i,.
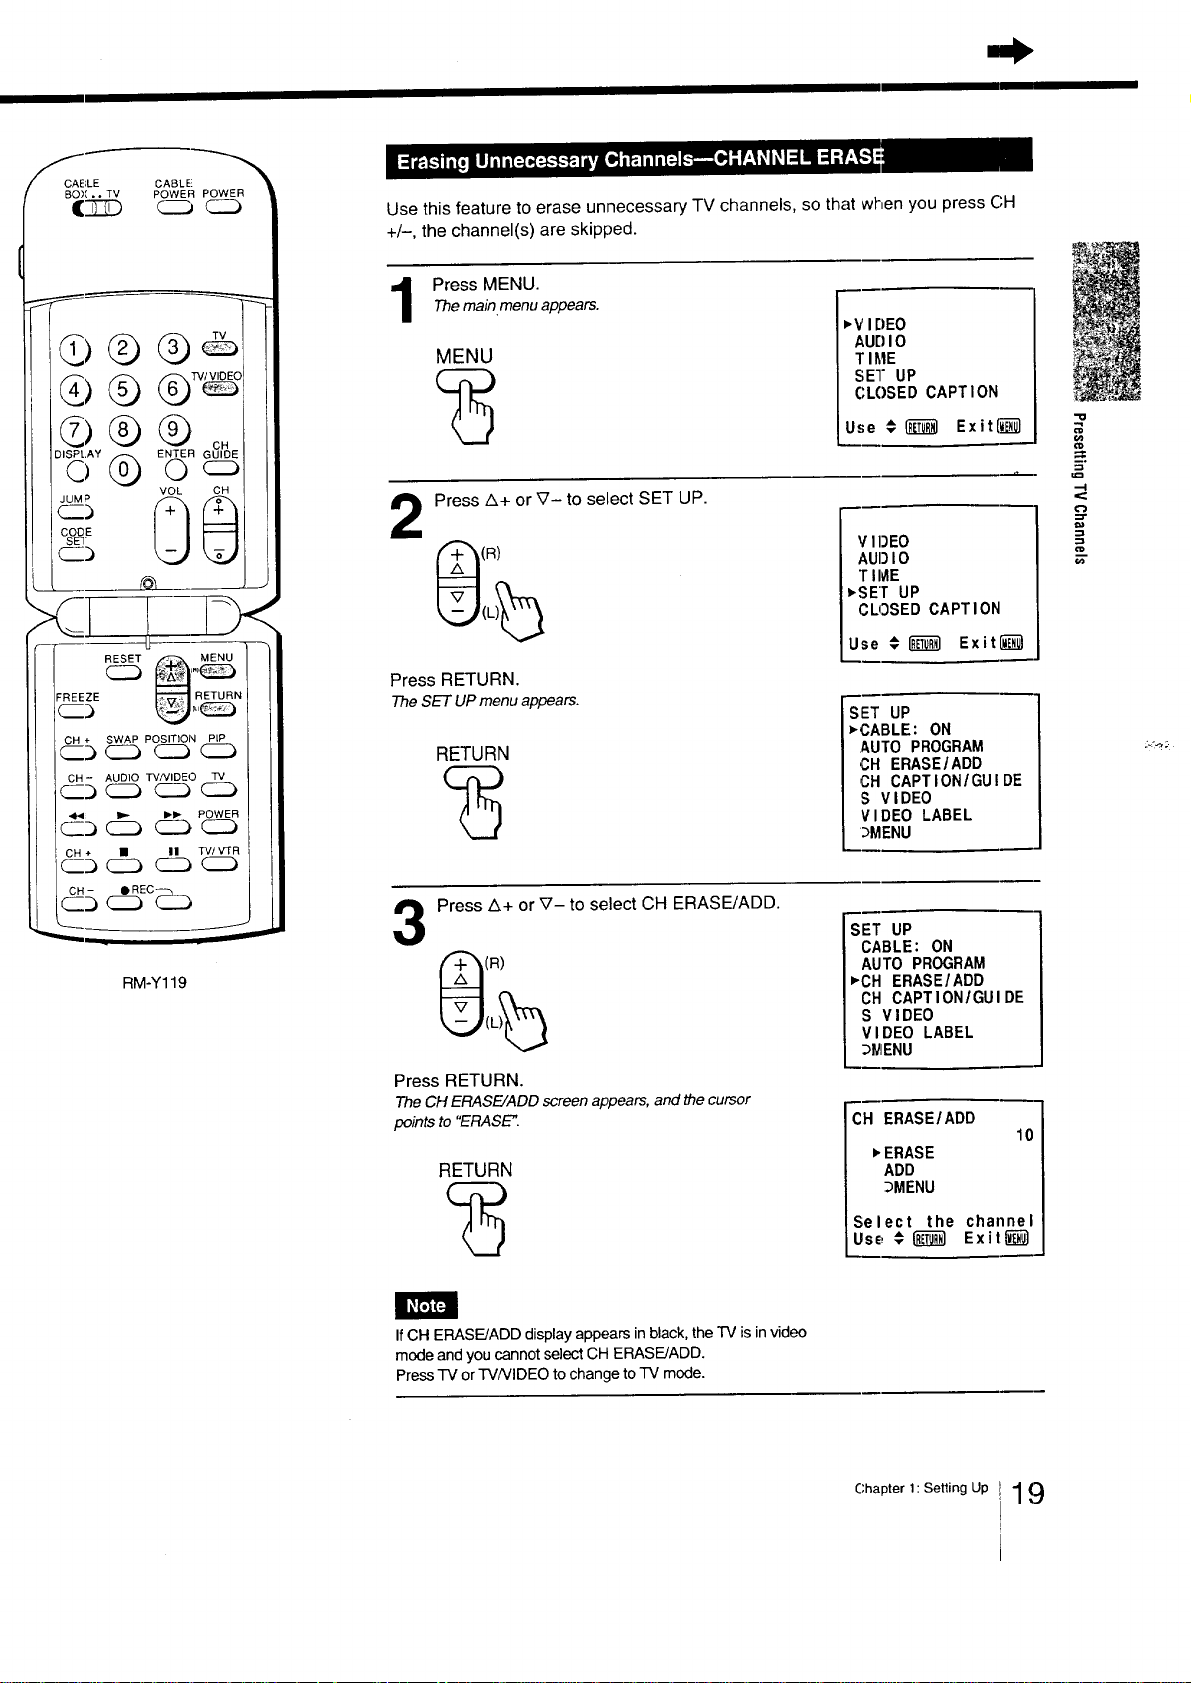
Use this feature to erase unnecessary TV channels, so that when you press CH
+/-, the channel(s) are skipped.
Press MENU.
Themain.menuappears.
,V I DEO
MENU
Press A+ or _- to select SET UP.
(R)
Press RETURN.
TheSET UPmenuappears.
RETURN
AUD I O
T II_|E
SET UP
CLOSED CAPTION
Use € _ Exit[_E-_l
V IDEO
AUD I0
T I ME
_'SET UP
CLOSED CAPTION
Use # I_ Exit[_
S'E-T UP
_CABLE: ON
.AUTO PROGRAM
CH ERASE/ADD
CH CAPTION/GUIDE
S VIDEO
VIDEO LABEL
_MENU
"o
E.
u_
--I
#
¢D
m
5
....___-____ _
RM-Y119
Press Z_+ or V- to select CH ERASFJADD.
3
(R)
Press RETURN.
The CH ERASE/ADD screen appears, and the cursor
points to "ERASE".
RETURN
If CH ERASE/ADD displayappears in black, the TV is in video
mode and you cannot select CH ERASE/ADD.
Press "IV or R/NIDEO to change to TV mode.
SE-T UP
CABLE: ON
AUTO PROGRAM
_CH ERASE/ADD
CH CAPTION/GUIDE
S VIDEO
VIDEO LABEL
_IENU
CH ERASE/ADD
10
_ERASE
ADD
_MENU
Select the channel
iUse #!'_ Exit_
Chapter1: Setting Up 19
 Loading...