

Page 1
Projection TV
3-858-447-21 (1)
Operating Instructions
KP-E41
KP-E53
KP-E61
©1997 by Sony Corporation
MN
Page 2
S VIDEO
VIDEO
L
(MONO)
AUDIO
R
-EN
2
Getting Started
Page 3
MENU
ENTER
ENTER MENU
COLOR SYSTEM
ENTER
MENU
ENTER
ENTER
Getting Started
-EN
3
Page 4
-EN
4
Getting Started
Page 5
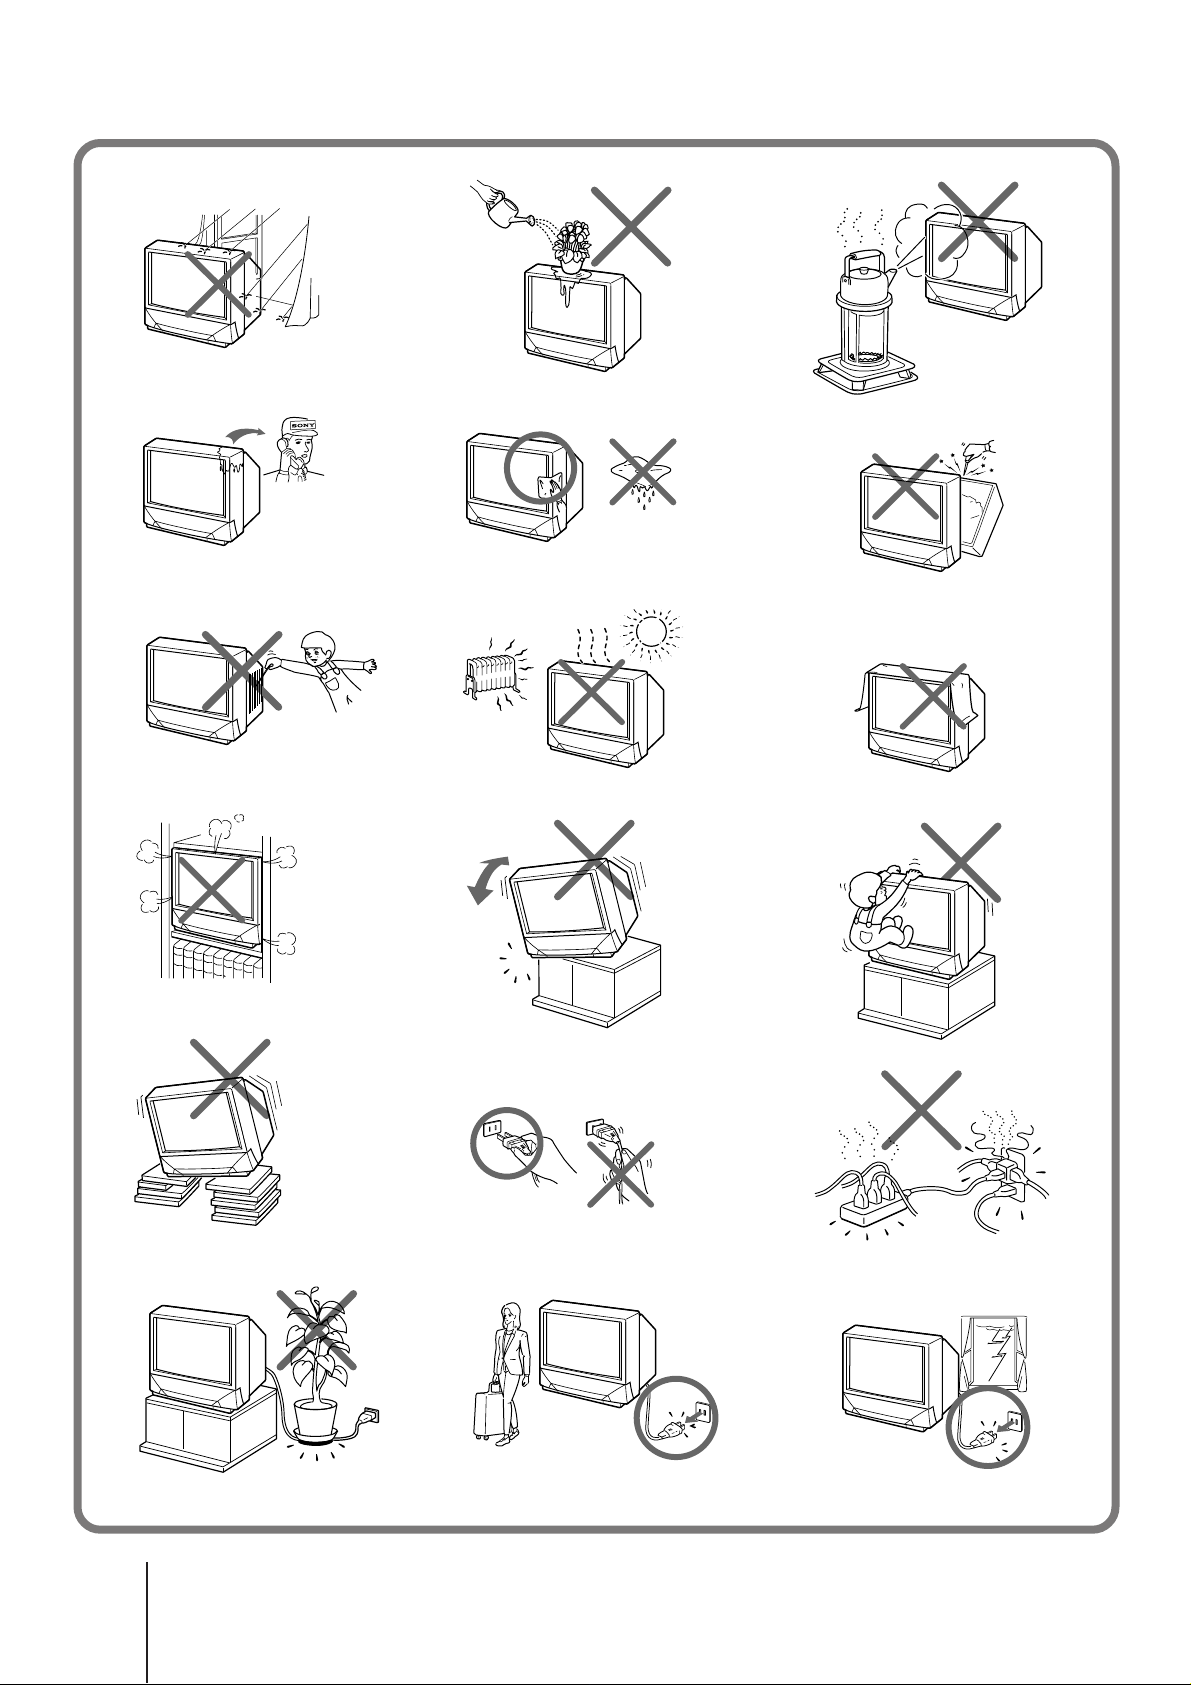
WARNING
To prevent fire or shock hazard, do not expose the
projection TV to rain or moisture.
Dangerously high voltages are present inside the
projection TV. Do not open the cabinet. Refer
servicing to qualified personnel only.
For general safety:
• Do not expose the projection TV to rain or moisture.
• Do not open the rear cover.
For safe installation:
• Do not block the ventilation openings.
• Do not install the projection TV in hot, humid or
excessively dusty places.
• Do not install the projection TV where it may be
exposed to mechanical vibrations.
• Avoid operating the projection TV at temperatures
below 5°C (41°F).
• If the projection TV is transported directly from a
cold to a warm location, or if the room temperature
has changed suddenly, the picture may be blurred or
show poor color. This is because moisture has
condensed on the mirror or lenses inside. If this
happens, let the moisture evaporate before using the
projection TV.
• To obtain the best picture, do not expose the screen to
direct illumination or directs sunlight. It is
recommended to use spot lighting directed down
from the ceiling or to cover the windows that face the
screen with opaque drapery. It is desirable to install
the projection TV in a room where the floor and walls
are not of reflecting material. If necessary, cover
them with dark carpeting or wall paper.
• Do not install the appliance in a confined space, such
as a bookcase or built-in cabinet.
Table of contents
Getting Started
6 Installing the projection TV
7 Changing the menu language
8 Adjusting the convergence (CONVERGENCE)
9 Presetting channels
10 Introducing the menu
Operations
EN
11 Watching the TV
13 Using the Picture-in-Picture features
14 Selecting the picture mode
15 Selecting the sound mode
17 Selecting a stereo or bilingual program
17 Setting the speaker switch
18 Viewing Teletext
20 Using headphones
20 Customizing the TV
23 Setting the remote command mode
For safe operations:
• Do not operate the projection TV on anything but
110–120/220-240 V AC, 50/60 Hz.
• Do not operate the projection TV if any liquid or solid
object falls in it—have it checked immediately.
• Do not keep the projection TV plugged in if you are
not going to use it for several days.
• Do not pull the power cord to disconnect the
projection TV. Pull it out by the plug.
Caution
• When using TV games, computers, and similar
products with your projection TV, keep the
brightness and contrast functions at low settings. If a
fixed (non-moving) pattern is left on the screen for
long periods of time at a high brightness or contrast
setting, the image can be permanently imprinted onto
the screen. These types of imprints are not covered
by your warranty because they are the result of
misuse.
• Avoid touching the screen surface and take care not
to scratch it with hard objects.
Additional Information
24 Connections
26 Troubleshooting
27 Channel allocation
Back Cover Specifications
About this manual
The instructions in this manual are for models KPE41, KP-E53 and KP-E61. Before you start reading
this manual, please check your model numbers,
located at the rear of the projection TV. Model KPE41 is used for illustration purposes in this manual.
There are no differences between these models in
operation. The differences in specifications are
indicated in the text.
Getting Started
-EN
5
Page 6
Getting Started
Installing the
projection TV
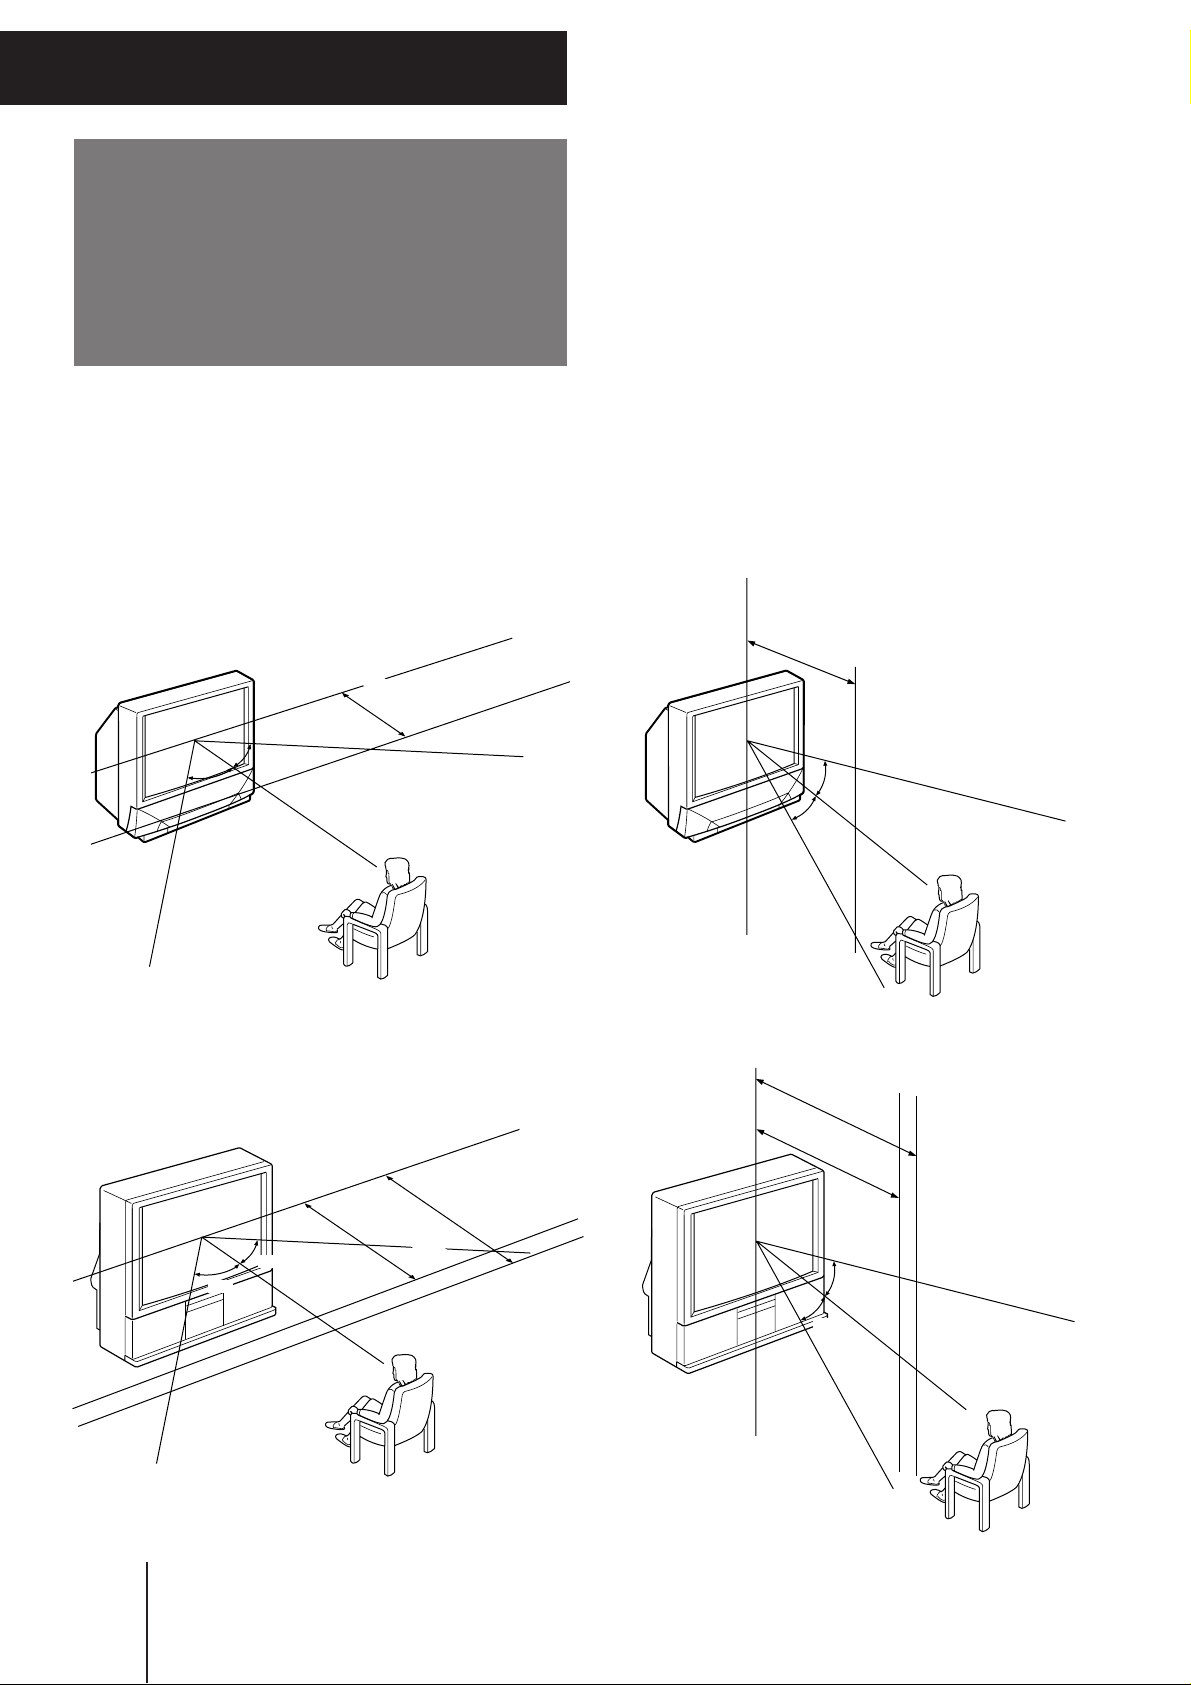
For the best picture quality, install the projection TV
within the areas shown below.
Optimum viewing area (Horizontal)
KP-E41
min. 1.5m (5 ft.)
41"
75°
Optimum viewing area (Vertical)
KP-E41
KP-E53/E61 KP-E53/E61
min. 2.7m
min. 2.1m (7 ft.)
75°
75°
(approx. 9 ft.)
61"
53"
min. 1.5m (5 ft.)
41"
27.5°
27.5°
min. 2.7m
(approx. 9 ft.)
61"
min. 2.1m (7 ft.)
53"
27.5°
27.5°
-EN
6
Getting Started
Page 7
Changing the menu
MENU
ENTER
ENTER
MENU
language
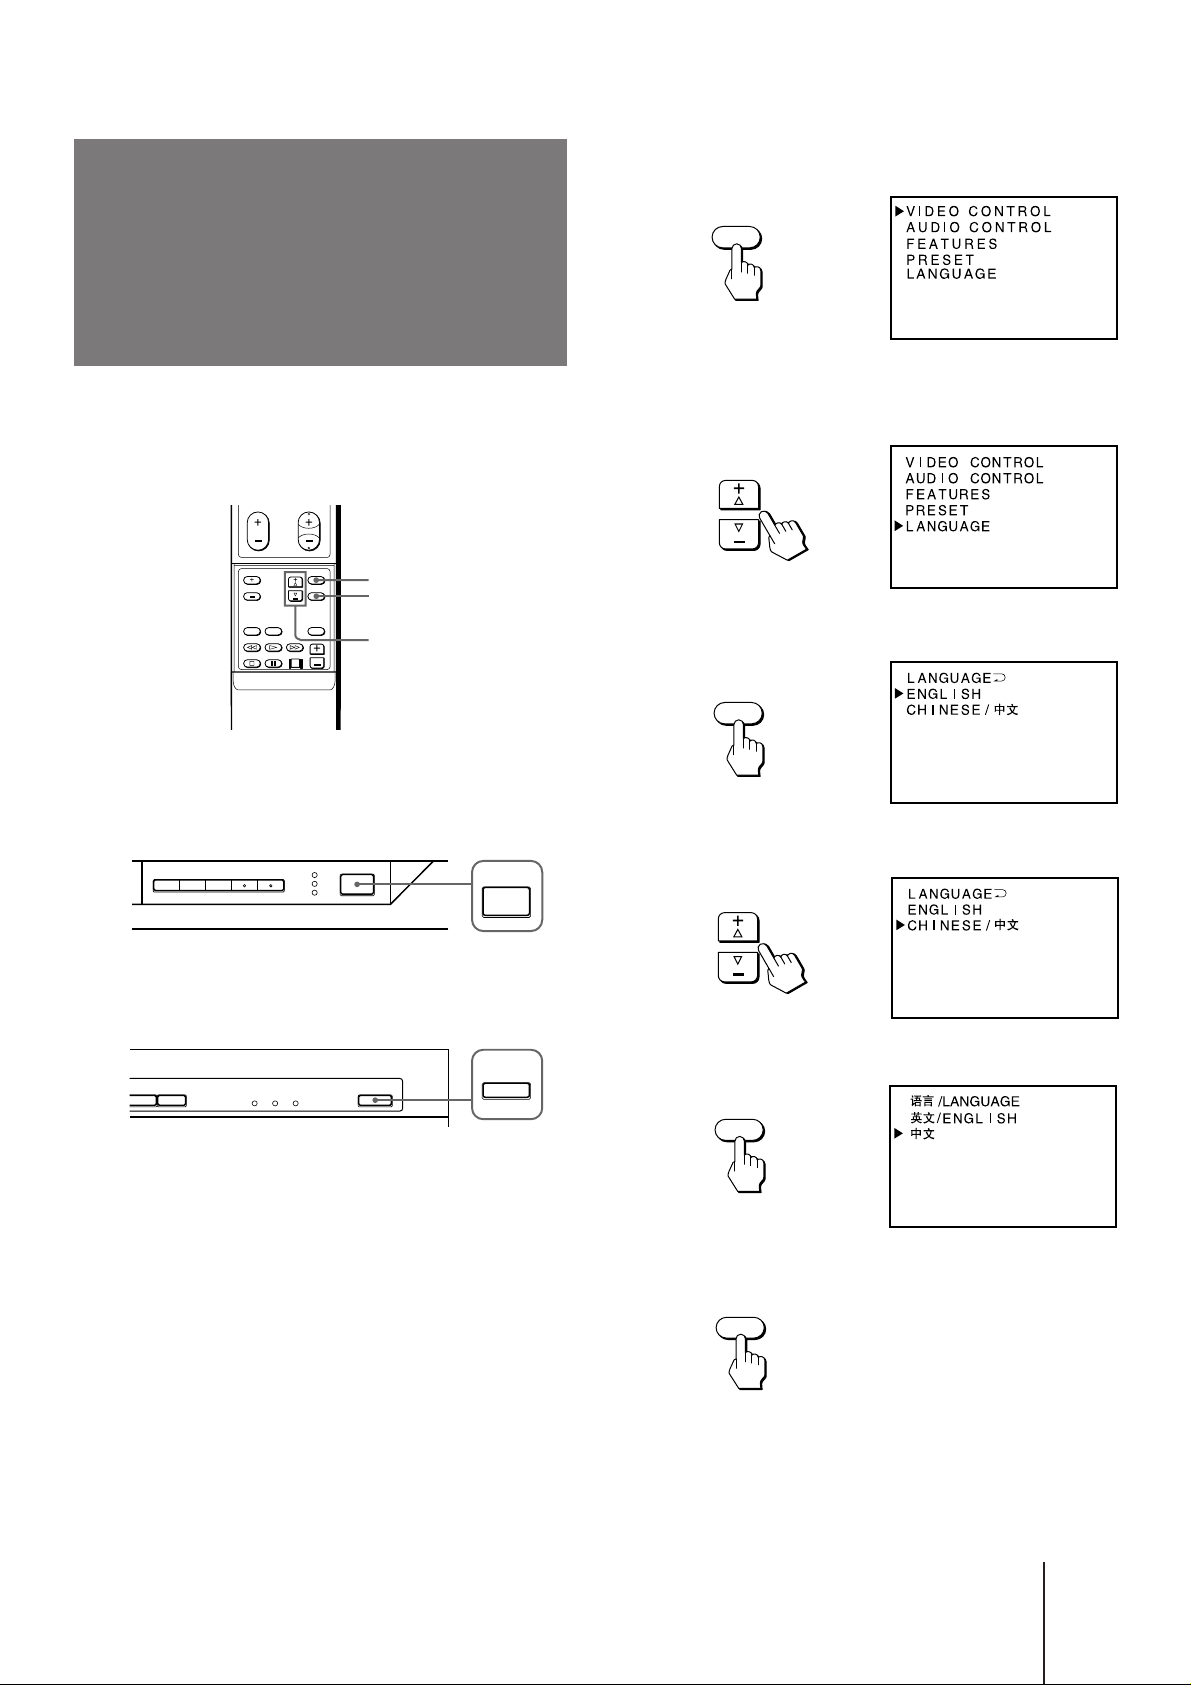
If you prefer Chinese to English, you can change the
menu language. You can use the buttons on both the
remote commander and the projection TV.
MENU
ENTER
2 Press MENU.
3 Press ¢ + or › – to move the cursor (z) to
LANGUAGE.
¢+ or ›–
1 Press POWER on the projection TV.
KP-E41
KP-E53/E61
POWER
POWER
4 Press ENTER.
5 Press ¢ + or › – to select CHINESE.
6 Press ENTER.
7 Press MENU to return to the normal screen.
Getting Started
-EN
7
Page 8
Adjusting the
convergence
(CONVERGENCE)
5 Press ¢ + or › – to move the line until it
converges with the center green line, and
press ENTER.
R
G+B
(Light blue)
R
G+B
(Light blue)
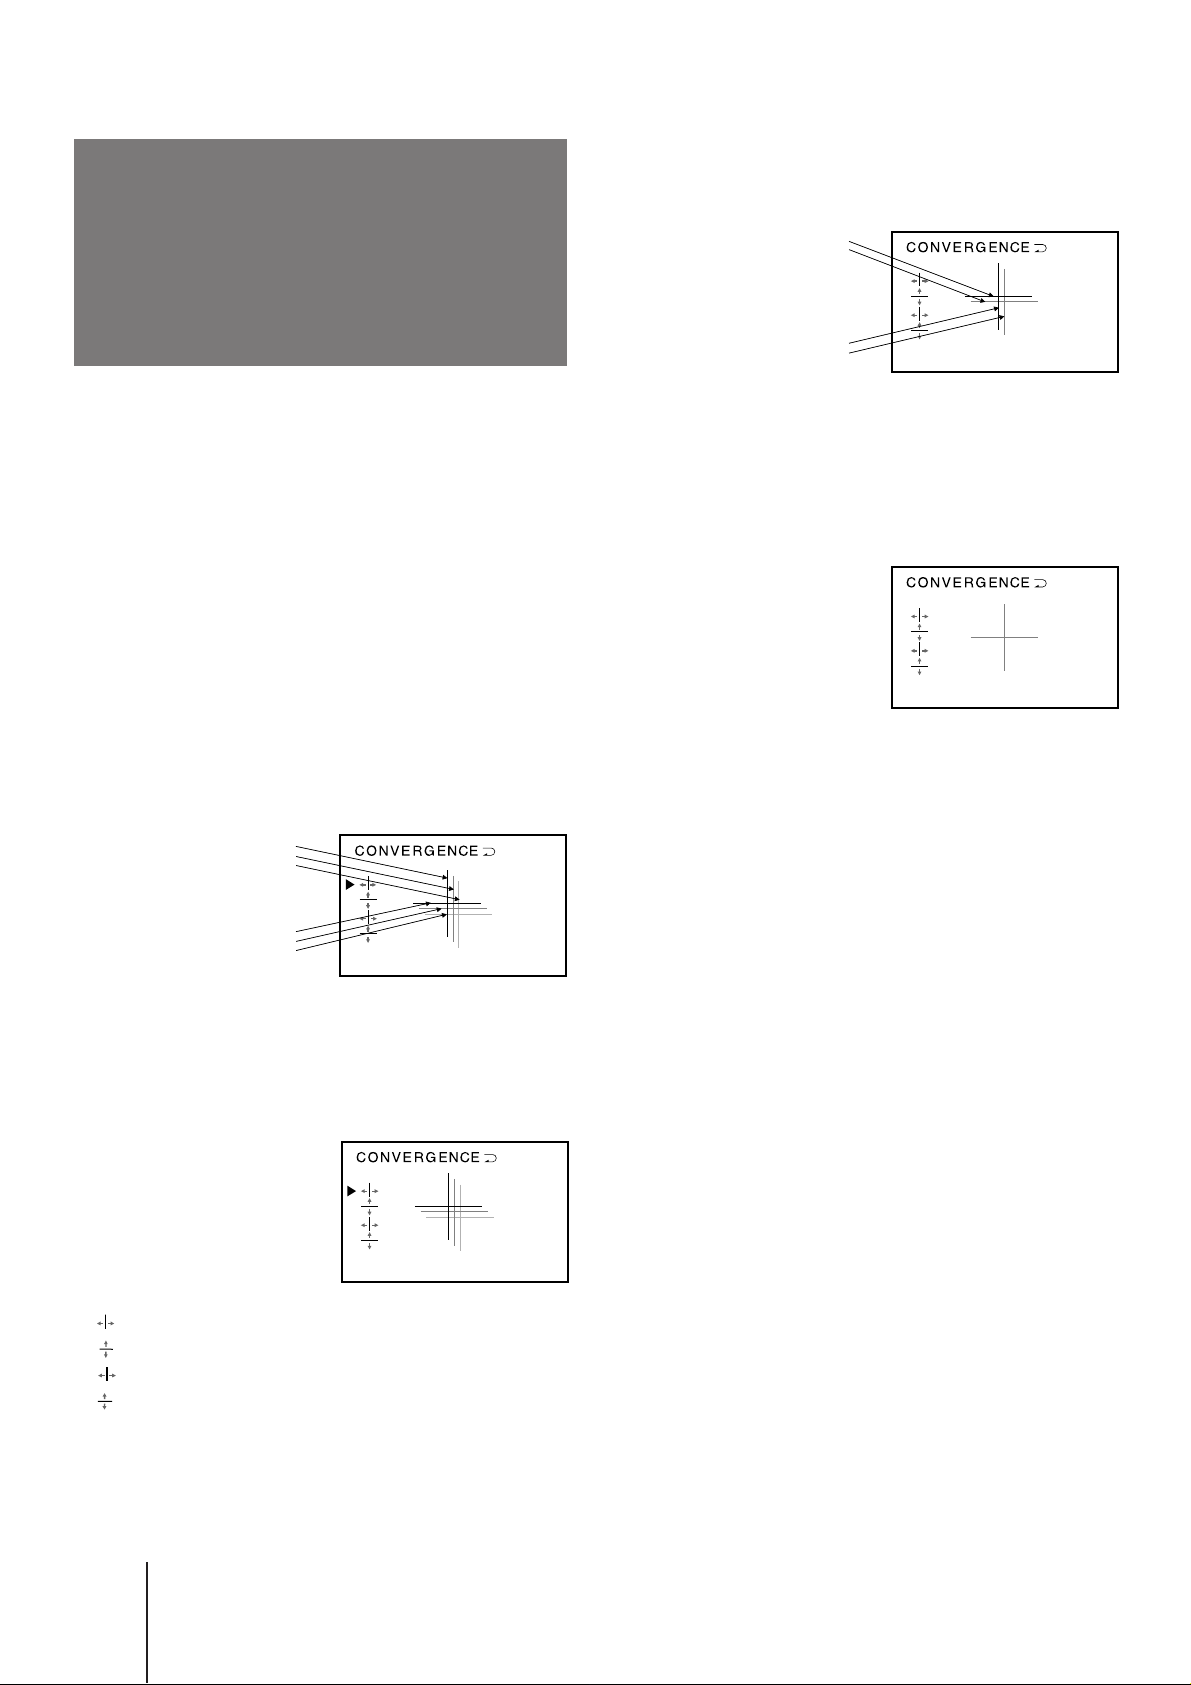
Before you use the projection TV, adjust convergence.
The projection tube image appears on the screen in
three layers (red, green and blue). If they do not
converge, the color is poor and the picture blurs. To
correct this, adjust convergence.
After 20-30 minutes of turning on the power, adjust
convergence.
1 Press MENU.
2 Press ¢ + or › – to move the cursor (z) to
FEATURES and press ENTER.
3 Press ¢ + or › – to move the cursor (z) to
CONVERGENCE and press ENTER.
The CONVERGENCE adjustment screen appears.
R
G
B
R
G
B
To move up/right, press ¢ +.
To move down/left, press › –.
6 Repeat step 4 and 5 to adjust the other
lines until all three lines converge and are
seen as a white cross.
7 Press MENU to return to the normal screen.
R=Red
G=Green
B=Blue
4 Press ¢ + or › – to move the cursor (z) to
the symbol showing the line you want to
adjust, and press ENTER.
: Red vertical line (left/right adjustment)
: Red horizontal line (up/down adjustment)
: Blue vertical line (left/right adjustment)
: Blue horizontal line (up/down adjustment)
-EN
8
Getting Started
Page 9
Presetting channels
ENTER
ENTER
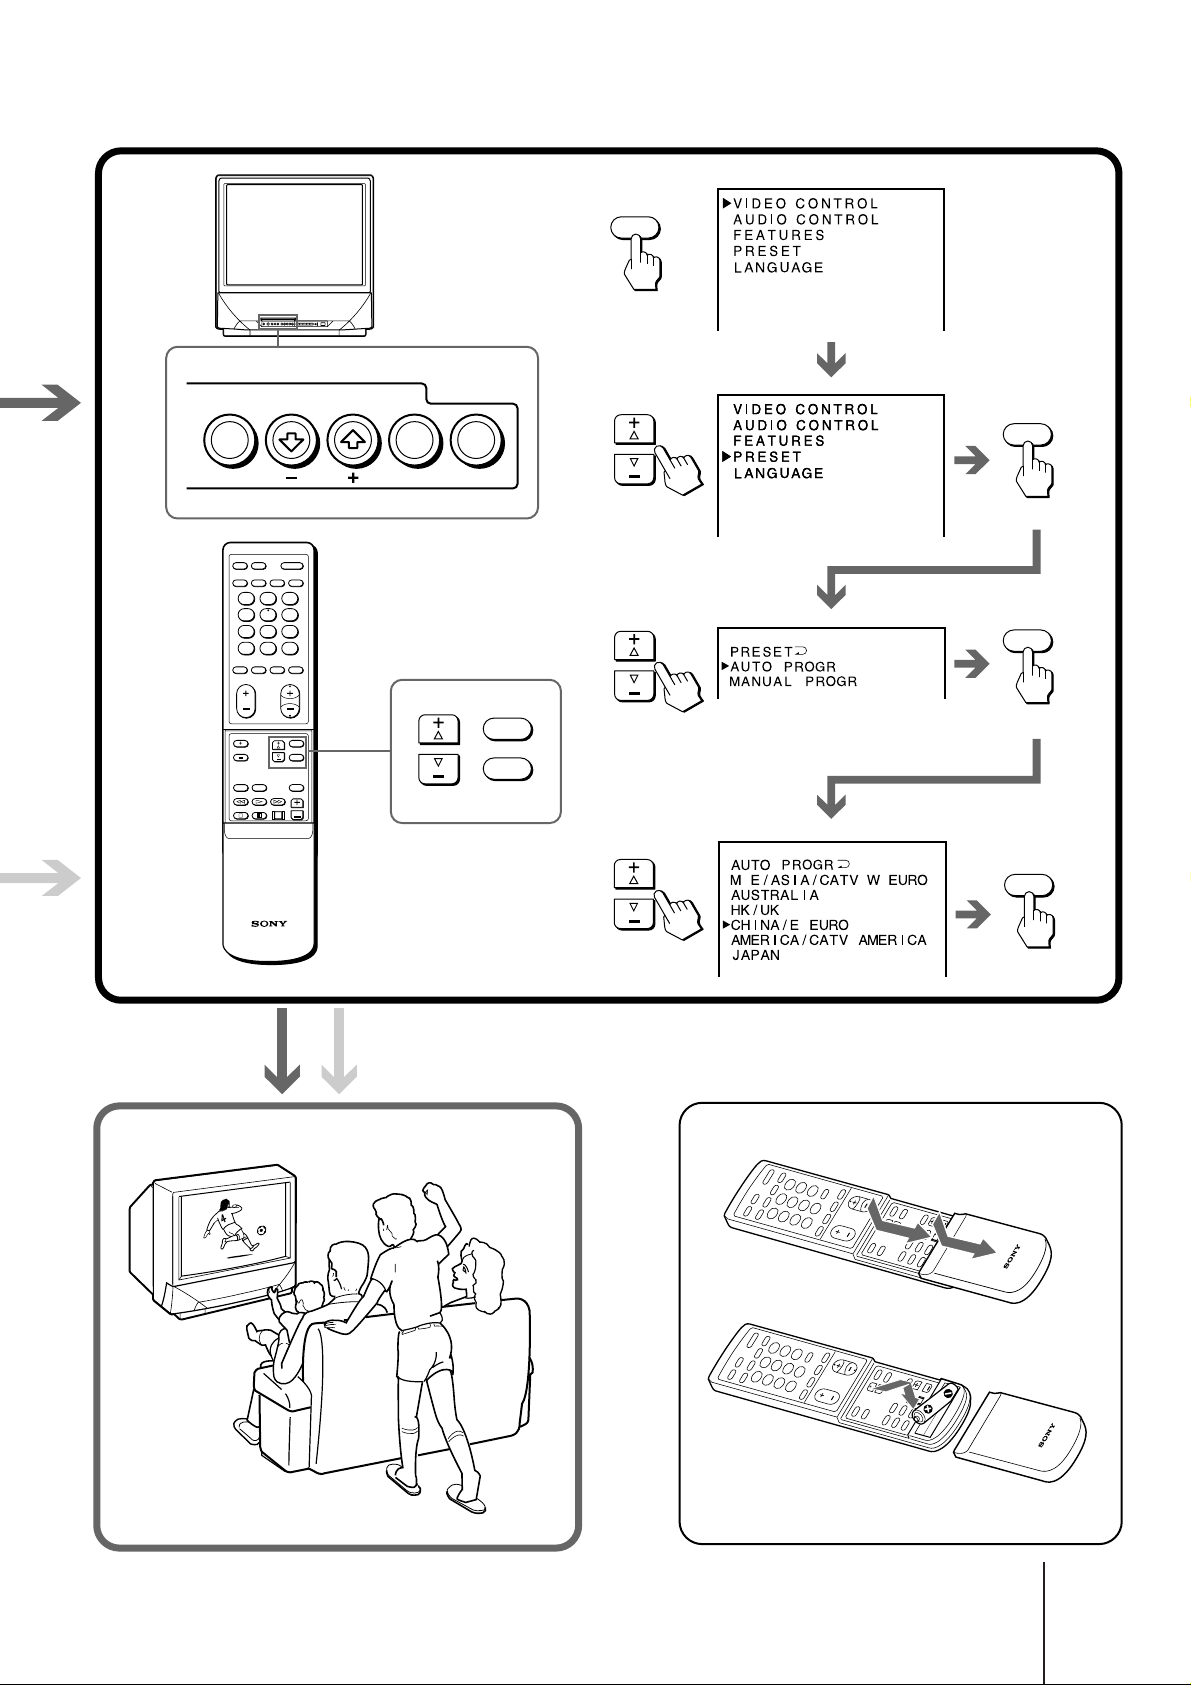
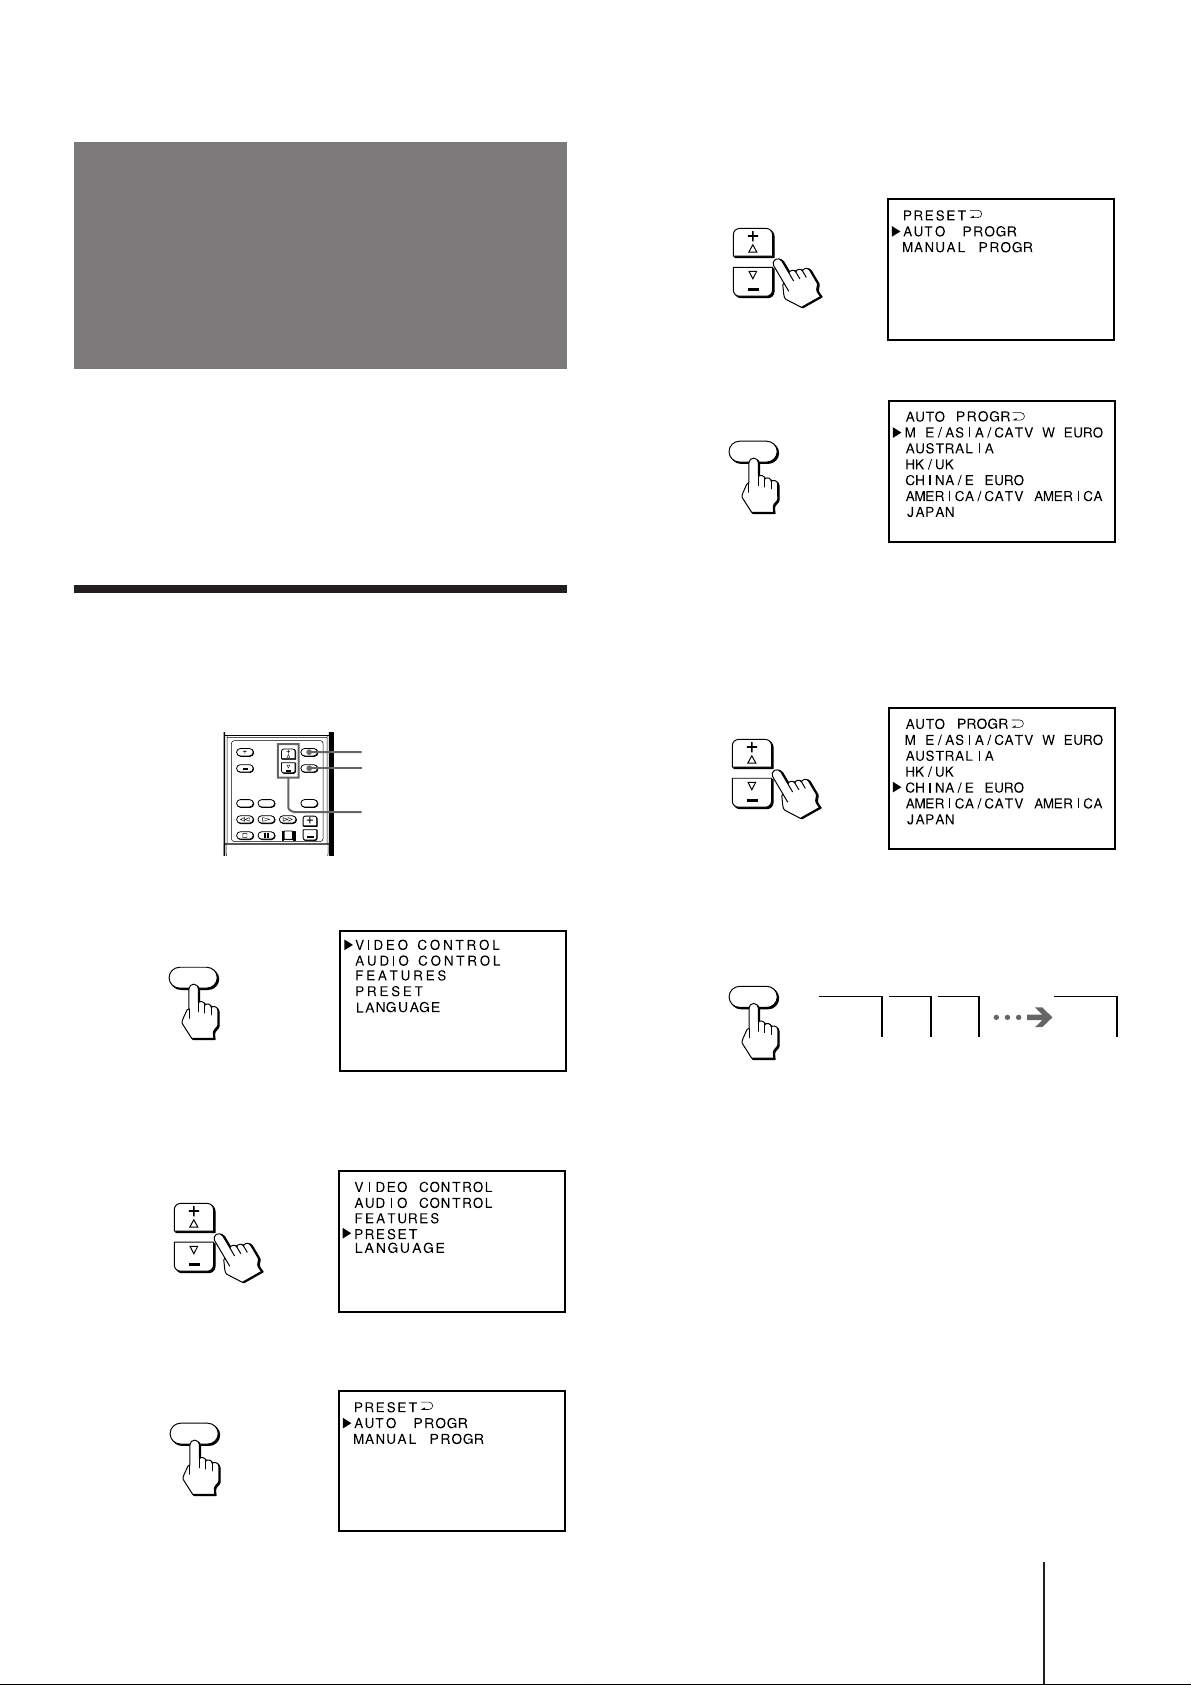
You can preset TV channels easily by storing all the
receivable channels automatically. You can also preset
channels manually or skip program positions (page 23).
You can preset channels using the buttons on the
projection TV as well as those on the remote
commander.
Presetting channels automatically
You can preset up to 100 TV channels in numerical
sequence from program position 1.
4 Press ¢ + or › – to select AUTO PROGR.
5 Press ENTER.
6 Press ¢ + or › – to select your area (channel
system).
For the areas allocated in each channel system, see
“Channel allocation” on page 27.
MENU
ENTER
¢+ or ›–
1 Press MENU.
MENU
2 Press ¢ + or › – to move the cursor (z) to
PRESET.
7 Press ENTER.
Presetting starts from program 1.
1 2 3 1
3 Press ENTER.
ENTER
Getting Started
-EN
9
Page 10

Introducing the
menu
You can preset channels and set picture quality, sound, and other settings using the on-screen menus. You can use
the buttons on both remote commander and the projection TV to operate the menus.
Main menu
Getting back to the previous menu
Press ¢ + or › – to move the cursor (z) to the
first line (N) of each menu (except for the
main menu), and press ENTER.
-EN Getting Started
10
Cancelling the menu screen
Press MENU.
Note
• If more than 60 seconds elapse after you press a button, the
menu screen disappears automatically.
Page 11

Operations
Watching the TV
To select a program position directly
Press the number buttons.
1 2 3
4 6
5
7 8 9
C
0
1 Select the TV program you want to watch.
Press the number buttons or PROGR +/–. The
projection TV turns on automatically and the
selected program appears.
When the STANDBY indicator on the front of the
projection TV is not lit, press POWER on the
projection TV, and select the program position.
KP-E41
POWER
STANDBY
KP-E53/E61
POWER
STANDBY
To select a two-digit program position, press “-/--”
before the number buttons.
For example, to select program position 25, press
“-/--” and then “2” and “5.”
2
To scan through program positions
Press PROGR +/– until the program position you
want appears.
PROGR
To select a channel directly
Press C (once for VHF/UHF channels, twice for
cable TV channels), then press the number buttons
(two-digit number for VHF/UHF channels, threedigit number for cable TV channels). For example,
to select the VHF/UHF channel 4, press C, 0 then 4.
5
2 Press VOL +/– to adjust the volume.
VOL
11
-ENOperations
Page 12

Switching off the projection TV
Displaying on-screen information
To switch off the projection TV temporarily, press
POWER on the remote commander.
The STANDBY indicator lights.
POWER
To switch off the projection TV completely, press
POWER on the TV.
Watching the video input
Press VIDEO/HOLD.
HOLD
VIDEO
VIDEO 1 VIDEO 2 VIDEO 3 1
Press DISP.
DISP
ABC
1
C12
Note
• When you press DISP, the on-screen display shows the picture
and sound settings as well, all of which disappear after three
seconds.
Setting the Sleep Timer
You can set the projection TV to turn off automatically
after the period of time you set.
1 Press MENU.
2 Press ¢ + or › – to move the cursor ( z) to
FEATURES, and press ENTER.
To watch projection TV, press TV, the number buttons
or PROGR +/–.
TV
Muting the sound
Press MUTING.
MUTING
MUTING
3 Press ¢ + or › – to move the cursor ( z) to
SLEEP, and press ENTER.
4 Press ¢ + or › – until the time (in minutes)
you want appears.
After 30
minutes
After 60
minutes
No sleep
timer
After 90
minutes
5 Press ENTER.
To cancel the Sleep Timer, select OFF, or turn the
projection TV off.
-EN Operations
12
Page 13

Using the Picture-inPicture features
Changing the position of the PIP screen
1 Press MENU.
You can display a Picture-in-Picture (PIP) screen (small
picture) within the main picture of a TV program or a
video input.
FREEZE
TV/VIDEO
PIP PROGR +/–
SWAP
PIP
PROGR +/–
¢ + or › –
MENU
ENTER
Displaying PIP
Press PIP.
1
1
1/16 size1/9 size Off
1
11
2 Press ¢ + or › – to move the cursor (z) to
FEATURES, and press ENTER.
3 Press ¢ + or › – to move the cursor (z) to
PIP POSITION, and press ENTER.
4 Press ¢ + or › – to select the position you
want.
Pressing ¢ + changes the position as shown below.
Pressing › – changes the position in reverse order.
Selecting a TV program or video input in the
PIP screen
To select a TV program, press PIP PROGR +/– (yellow
buttons).
To select a video input, press TV/VIDEO.
Swapping pictures between the main
and PIP screens
Press SWAP.
Freezing the PIP screen
Press FREEZE.
To restore the normal picture, press FREEZE again.
Operations
13
-EN
Page 14

Selecting the
picture mode
If the fixed (non-moving) pattern is on the screen
for long periods of time
Keep the picture functions at low settings (see “Adjusting the
picture setting” on page 14). If not, the image may be
permanently imprinted on the screen.
Note
• To prevent imprints on the screen, the picture shifts
horizontally and vertically about 5 mm every 2 hours. This is
not a malfunction of the TV.
You can select the picture mode using the menu as well
as the PICTURE MODE button on the remote
commander. Select VIDEO CONTROL from the main
menu, then select the desired mode.
Press PICTURE MODE until the mode you want
appears on the screen.
MODE
PICTURE
DYNAMIC THEATER GAME
PERSONAL STANDARD
Select To
DYNAMIC Display more contrast picture
THEATER Display darker and finely detailed picture
suitable for movies
GAME Display softer picture suitable for the video
games
STANDARD Display normal contrast picture
PERSONAL Display the picture that is adjusted using
ADJUSTMENT in the VIDEO CONTROL
menu
Adjusting the picture setting
(ADJUSTMENT)
You can adjust the picture quality to suit your taste
with the ADJUSTMENT option. The adjusted settings
are stored in the PERSONAL option.
MENU
ENTER
¢+ or ›–
1 Press MENU.
2 Press ¢ + or › – to move the cursor ( z) to
VIDEO CONTROL, and press ENTER.
Viewing a video game screen
Press PICTURE MODE until the GAME mode
appears on the screen.
The screen changes to the optimum mode for video
games with soft picture.
-EN Operations
14
3 Press ¢ + or › – to move the cursor ( z) to
ADJUSTMENT, and press ENTER.
4 Press ¢ + or › – to move the cursor ( z) to
the item you want to adjust, and press
ENTER.
Page 15

5 Press ¢ + or › – to adjust the item, and
press ENTER.
Selecting the sound
Item
PICTURE
COLOR
BRIGHT
HUE
SHARP
Press ¢ + to
Increase picture
contrast
Increase color
intensity
Brighten the picture
Make skin tones
become greenish
Sharpen the picture
Press › – to
Decrease picture
contrast
Decrease color
intensity
Darken the picture
Make skin tones
become reddish
Soften the picture
6 To adjust other items, repeat steps 4 and 5.
7 Press MENU to return to the normal screen.
Note
• You can adjust HUE for NTSC color system only.
If the color of the picture is abnormal
when receiving programs through the
(antenna) terminal
Press COLOR SYSTEM on the projection TV or change
the TV system setting from the menu as described
below until the color becomes normal.
1 Press MENU.
mode
You can select the sound mode using the menu as well
as the SOUND MODE button on the remote
commander. Select AUDIO CONTROL from the main
menu, then select the desired mode.
Press SOUND MODE until the mode you want
appears on the screen.
MODE
SOUND
MUSIC NEWS STADIUM
PERSONAL STANDARD
2 Press ¢ + or › – to move the cursor (z) to
PRESET, and press ENTER.
3 Press ¢ + or › – to move the cursor (z) to
MANUAL PROGR, and press ENTER.
4 Press ¢ + or › – to move the cursor (z) to TV
SYS, and press ENTER.
5 Press ¢ + or › – to change the TV system
until the color becomes normal.
Note
• Normally set COLOR SYSTEM to AUTO.
Select
MUSIC
NEWS
STADIUM
STANDARD
PERSONAL
To
Listen to music programs. It gives
sound with a live concert effect.
Listen to news program. A person’s
voice can be heard clearly.
Listen to sports program. It gives
sound with a sports stadium effect.
Listen to sound other than music, news
or sports program.
Listen to the sound that is adjusted
using ADJUSTMENT in the AUDIO
CONTROL menu.
Operations
15
-EN
Page 16

Adjusting the sound setting
(ADJUSTMENT)
You can adjust the sound quality to suit your taste with
the ADJUSTMENT option. The adjusted settings are
stored in the PERSONAL option.
MENU
ENTER
¢+ or ›–
1 Press MENU.
Listening to surround sound
You can enjoy a surround sound effect that is like being
in a movie theater or a concert hall when receiving
stereo signals.
1 Press MENU.
2 Press ¢ + or › – to move the cursor ( z) to
AUDIO CONTROL, and press ENTER.
3 Press ¢ + or › – to move the cursor ( z) to
ADJUSTMENT, and press ENTER.
2 Press ¢ + or › – to move the cursor ( z) to
AUDIO CONTROL, and press ENTER.
3 Press ¢ + or › – to move the cursor ( z) to
ADJUSTMENT, and press ENTER.
4 Press ¢ + or › – to move the cursor ( z) to
the item you want to adjust, and press
ENTER.
5 Press ¢ + or › – to adjust the item, and
press ENTER.
Item
BASS
TREBLE
BALANCE
Press ¢ + to
Increase the bass
sound
Increase the treble
sound
Increase the volume
of right speaker
Press › – to
Decrease the bass
sound
Decrease the treble
sound
Increase the volume
of left speaker
4 Press ¢ + or › – to move the cursor ( z) to
SURROUND, and press ENTER.
5 Press ¢ + or › – to select ON, and press
ENTER.
If the sound is distorted or noisy when
receiving programs through the (antenna)
terminal
Press COLOR SYSTEM on the projection TV or change
the TV system setting as follows until the sound
becomes clear.
1 Press MENU.
2 Press ¢ + or › – to move the cursor (z) to
PRESET, and press ENTER.
3 Press ¢ + or › – to move the cursor (z) to
MANUAL PROGR, and press ENTER.
4 Press ¢ + or › – to move the cursor (z) to
TV SYS, and press ENTER.
5 Press ¢ + or › – to change the TV system
until the sound becomes clear.
Note
• Normally set COLOR SYSTEM to AUTO.
6 To adjust other items, repeat steps 4 and 5.
7 Press MENU to return to the normal screen.
-EN Operations
16
Page 17

Selecting a stereo or
bilingual program
You can enjoy stereo sound or bilingual program of
NICAM and A2 (German) stereo systems. The initial
setting is stereo sound.
Press A/B/ENLARGE repeatedly until you
receive the sound you want.
The sound changes and the corresponding indicator
lights up as follows:
ENLARGE
A/B
Receiving area for NICAM and A2 (German)
stereo programs
System
NICAM
A2 (German) stereo
Notes
• If the signal is very weak, the sound becomes monaural.
• If the stereo sound is noisy, select ”regular” or ”mono.”
The sound becomes monaural, however, the noise will be
reduced.
Receiving area
Hong Kong, Singapore, New
Zealand, etc.
Australia, Malaysia, Thailand, etc.
You cannot receive stereo broadcasts in
mainland China.
Setting the speaker
switch
KP-E41
KP-E53/E61
When receiving a NICAM program:
Broadcasting
NICAM stereo
NICAM bilingual
NICAM monaural
On-screen
Display
NICAM
NICAM
NICAM
Selected sound
(Indicator lit)
n Stereo n Regular
(A and B)
n A n B n Regular
(A) (B)
n NICAM monaural
(A)
A
B
A B
RegularN
If you connect a Dolby Pro Logic-compatible amplifier
to the CENTER SPEAKER IN terminals, you can use
the projection TV speakers as center speakers.
To use the projection TV speakers as center speakers,
set the CENTER SPEAKER IN switch located at the
rear of the projection TV to CENTER.
To listen to the sound from the projection TV, set to
MAIN. See page 25 for connection.
CENTER SPEAKER IN
MAIN CENTER
When receiving an A2 (German) stereo program:
Broadcasting
A2 (German) stereo
A2 (German)
bilingual
On-screen
display
STEREO
—
Selected sound
(Indicator lit)
n Stereo n Monaural
(A and B)
n A n B
(A) (B)
Operations
17
-EN
Page 18

Viewing Teletext
TV stations broadcast an information service called
Teletext via a local TV channel.
Teletext service allows you to receive various
information such as weather forecasts or news at any
time. Some of the features, however, may not be
available depending on the Teletext service.
A/B/ENLARGE
TEXT
FASTEXT
Note on Teletext
• Teletext service is not available in Chinese.
VIDEO/HOLD
TV
Number
PROGR +/–
¢+ or ›–
MENU
ENTER
Checking the contents of a Teletext
service (INDEX)
When Teletext is switched on, you can display the
Teletext menu.
1 Press MENU.
2 Press ¢ + or › – to move the cursor ( z) to
INDEX, and press ENTER.
Selecting a Teletext page
Press the number buttons to enter the threedigit page number of the Teletext number you
want.
If you make a mistake, re-enter the correct page
number.
To access the next or previous page, press
PROGR +/–.
Note
• When you request another Teletext page while viewing one
Teletext page, the page scrolling may pause on a different page
depending on the Teletext service, but the search will continue
till the requested page is displayed.
Displaying Teletext
1 Select a TV channel which carries the
Teletext broadcast you want to watch.
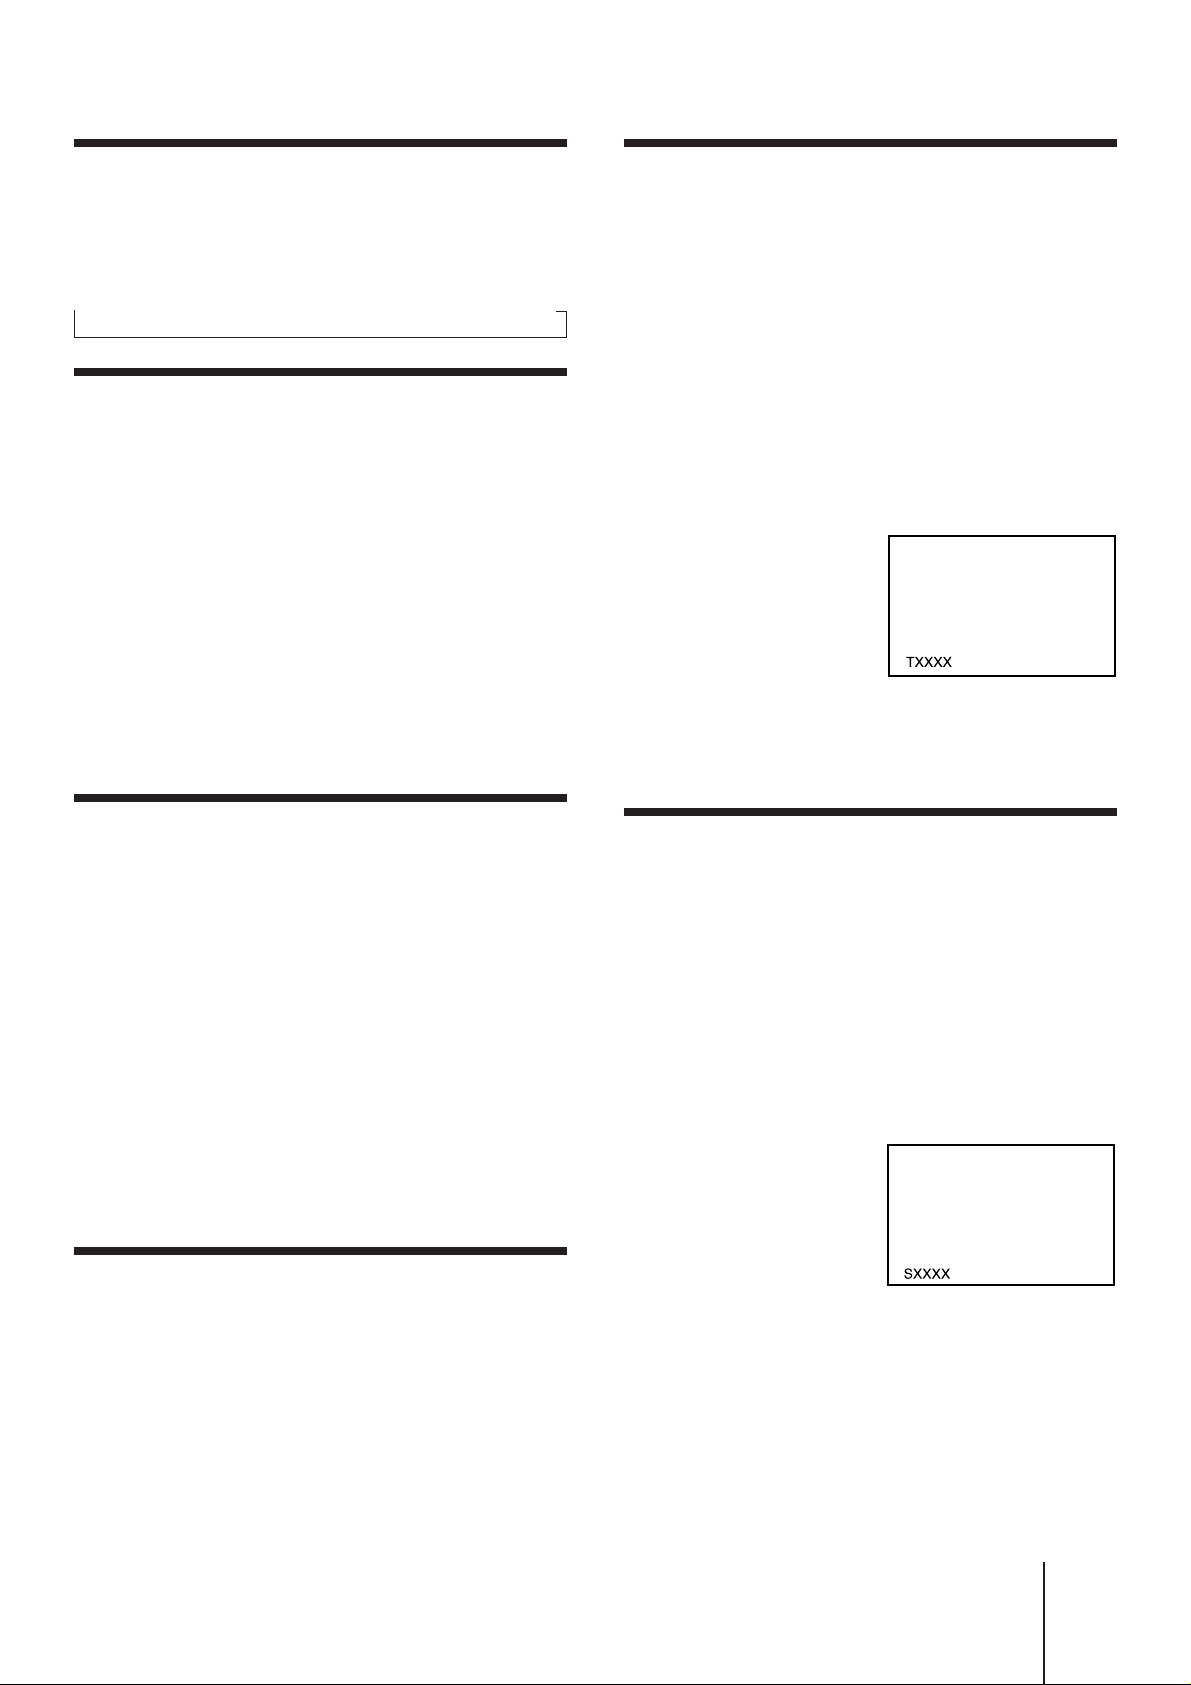
2 Press TEXT to display the Teletext.
A Teletext page (normally the index page) is
displayed on the left. If there is no Teletext
broadcast, P100 appears in the top left corner of the
screen.
To switch Teletext off, press TV.
Superimposing a Teletext page on the
TV picture
Press TEXT.
Each time you press TEXT, the screen changes as
follows:
n Teletext n Teletext and TV n TV
-EN Operations
18
Preventing a Teletext page from being
updated (HOLD)
A Teletext page may consist of several subpages. You
can stop the page scrolling in order to read the text at
your own pace.
Press VIDEO/HOLD.
HOLD appears in the top left corner of the screen.
To resume normal Teletext operation, press
TEXT.
Using FASTEXT
This feature allows you to quickly access a Teletext
page that uses FASTEXT. When a FASTEXT page is
broadcast, a color-coded menu appears at the bottom of
the screen. The colors of the menu correspond to the
red (TV/VIDEO), green (FREEZE), yellow (SWAP) and
blue (PIP) buttons on the remote commander. These
colored buttons function as the FASTEXT buttons in
Teletext mode.
Press the colored button which corresponds to
the color-coded menu.
The page is displayed after a few seconds.
Page 19
Enlarging the Teletext display
(ENLARGE)
Displaying a Teletext page at the
requested time (TIME PAGE)
Each time you press A/B/ENLARGE, the Teletext
display changes as follows:
nEnlarge upper halfnEnlarge lower halfnNormal size
Revealing concealed information
(REVEAL)
Sometimes pages contain concealed information, such
as answers to a quiz. The reveal option discloses the
information.
1 Press MENU.
2 Press ¢ + or › – to move the cursor (z) to
REVEAL, and press ENTER.
3 Press ¢ + or › – to select ON, and press
ENTER.
To conceal the information again, select OFF.
Watching a TV program while waiting
for a requested Teletext page (TEXT
CLEAR)
You can display a time-coded page (e.g. an alarm page)
at the time you preset.
1 Press MENU.
2 Press ¢ + or › – to move the cursor (z) to
TIME PAGE, and press ENTER.
3 Press the number buttons to enter four
digits for the desired time. For example, to
enter 7:30, press 0,7,3 and 0.
At the requested time, the page appears on the screen.
To restore the normal Teletext reception, press TEXT.
Displaying a particular page among
several subpages (SUBPAGE)
1 Select the Teletext page to which you want
to refer.
2 Press MENU.
3 Press ¢ + or › – to move the cursor (z) to
TEXT CLEAR, and press ENTER.
4 When the page number is displayed on the
screen, press TEXT to switch the Teletext
on.
To restore the normal Teletext reception, press TEXT.
Displaying subtitles (SUBTITLES)
Your Teletext service informs you if a TV program is
subtitled.
1 Press MENU.
2 Press ¢ + or › – to move the cursor (z) to
SUBTITLES, and press ENTER.
1 Press MENU.
2 Press ¢ + or › – to move the cursor (z) to
SUBPAGE, and press ENTER.
3 Press the number buttons or PROGR +/– to
enter four digits for the desired subpage.
For example, to display the second page of
a sequence, press 0, 0, 0 and 2.
Note
• If the subtitles are not broadcast on page 888, select the subtitle
page using the number buttons.
Operations
19
-EN
Page 20

Using headphones
Customizing the
projection TV
You can use headphones to enjoy the sound of the TV.
This feature does not allow you to enjoy the sound of
PIP screens.
Listening to the sound of the
projection TV with headphones
Insert the headphones into the 2 (headphones)
jack located on the front panel of the
projection TV.
The sound from the speaker is shut off.
To adjust the headphones volume, press VOL +/–.
KP-E41
–––––––– VIDEO 3 IN ––––––––
S VIDEO VIDEO L
(MONO)
––AUDIO––R
ENTER MENU
COLOR SYSTEM
Using the AV OUT (advance rec-out)
terminal
You can select the output signal from the VIDEO jacks
at the rear of the projection TV.
The S Video output can be used only when MONITOR
is selected.
1 Press MENU.
2 Press ¢ + or › – to select FEATURES, and
press ENTER.
3 Press ¢ + or › – to select AV OUT, and press
ENTER.
KP-E53/E61
-EN Operations
20
–––––––– VIDEO 3 IN ––––––––
S VIDEO VIDEO AUDIO
L
(MONO)
ENTER MENU COLOR
R
SYSTEM
4 Press ¢ + or › – to select the output signal,
and press ENTER.
Select
TV
MONITOR
Note
• Do not change the channel while recording with a VCR
through the MONITOR/TV OUT jacks. If you change the
channel, it also changes the channel you are recording.
To
Output the TV signal.
Output the signal of the picture you are
watching as a main picture.
Page 21

Presetting channels manually
To change the program position for a channel or to
receive a channel with a weak signal, preset the
channel manually.
For example, preset a channel in program position 8.
1 Press MENU.
2 Press ¢ + or › – to move the cursor (z) to
PRESET, and press ENTER.
To preset other channels
Repeat steps 4 to 6.
Disabling program positions
By disabling unused or unwanted program positions,
you can skip those positions when you press PROGR
+/–.
For example, disable program position 8.
1 Display the MANUAL PROGR menu. (Follow
steps 1 to 3 in “Presetting channels
manually” on this page.)
2 Press ¢ + or › – to move the cursor (z) to
PR, and press ENTER.
3 Press PROGR + or – until 8 appears.
3 Press ¢ + or › – to select MANUAL PROGR,
and press ENTER.
4 Select the program position to which you
want to preset a channel.
(1) Press ¢ + or › – to select PR, and press ENTER.
(2) Press ¢ + or › – to select 8.
You can also select the program position with
PROGR +/– or the number buttons (e.g, for
program 24, press ÷, 2 and 4).
(3) Press ENTER.
5 Select your area (channel system).
For the areas allocated in each channel system, see
“Channel allocation” on page 27.
(1) Press ¢ + or › – to select AREA, and press
ENTER.
(2) Press ¢ + or › – to select your area, and press
ENTER.
4 Press ¢ + or › – to select “–”, and press
ENTER.
To skip other program positions, repeat steps 3 and
4.
To restore the skipped program positions
In step 4 above, press ¢ + or › – to select “+,” and
press ENTER.
6 Select a channel which you want to preset.
(1) Press ¢ + or › – to select CH, and press
ENTER.
(2) Press ¢ + or › – until the channel you want
appears on the screen.
You can also select the channel directly using
the number buttons. Press C (once for VHF/
UHF channels, twice for cable TV channels),
then the number buttons (e.g., for channel 5,
press 0 and 5).
(3) Press ENTER.
21
-ENOperations
Page 22

Customizing channel names
Manual fine-tuning
You can caption each channel number using up to five
letters to be displayed on the screen.
1 Display the MANUAL PROGR menu. (Follow
steps 1 to 3 in “Presetting channels
manually” on page 21.)
2 Press ¢ + or › – to move the cursor ( z) to
PR, and press ENTER.
3 Press ¢ + or › – to select the program
position you want to caption and press
ENTER.
4 Press ¢ + or › – to move the cursor ( z) to
LABEL, and press ENTER.
5 Press ¢ + or › – to select a letter or number,
and press ENTER for each caption space (up
to five.)
Each time you press ¢ + or › –, the letter (number)
changes as shown below.
An B n...n Z n 0 n 1 n ...n9 n – n: n /n . n
+n__ (space)
For the caption space you want to leave blank,
select “–.”
6 Repeat steps 2 to 5 to caption other
channels.
Normally, the automatic fine-tuning (AFT) is
operating. However, if the picture of a channel is
distorted, you can use the manual fine-tuning function
for the channel to obtain better picture reception.
1 Display the MANUAL PROGR menu. (Follow
steps 1 to 3 in “Presetting channels
manually” on page 21.)
2 Press ¢ + or › – to move the cursor ( z) to
PR, and press ENTER.
3 Press ¢ + or › – to select the program
position corresponding to the channel
which you want to manually fine-tune, and
press ENTER.
4 Press ¢ + or › – to move the cursor ( z) to
AFT, and press ENTER.
5 Press ¢ + or › – to select OFF, and press
ENTER.
6 Press ¢ + or › – to fine-tune the channel so
that you get the best TV reception.
As you press these buttons, the frequency changes
from –128 to +128.
7 After fine-tuning, press ENTER.
The fine-tuned level is stored.
To erase a caption
In step 5 above, select “_ (space).”
-EN Operations
22
Page 23

Improving TV signal
If the reception signal is very strong, you can attenuate
it to obtain better picture reception.
1 Display the MANUAL PROGR menu. (Follow
steps 1 to 3 in “Presetting channels
manually” on page 21.)
2 Press ¢ + or › – to move the cursor (z) to
PR, and press ENTER.
3 Press ¢ + or › – to select the program
position corresponding to the channel
whose signal is very strong, and press
ENTER.
Setting the remote
command mode
You can use the supplied remote commander to
operate the TV and Sony video equipment, such as a
VCR or multi-disc player. To operate Sony video
equipment, first set the remote command mode for the
video equipment you want to use.
4 Press ¢ + or › – to move the cursor (z) to
ATT, and press ENTER.
5 Press ¢ + or › – to select ON, and press
ENTER.
1 2 3
2
4 6
5
7 8 9
0
POWER
1
1 Press and hold the POWER button in the
VCR control area.
2 Press the number buttons that correspond
to the remote command mode.
Mode number
buttons
0 and then 1
0 and then 2
0 and then 3
0 and then 4
After setting the remote command mode, you can
use the following buttons to operate the video
equipment.
Remote command mode
VTR1 (e.g., Beta format VCR)
VTR2 (e.g., 8 mm format VCR)
VTR3 (e.g., VHS format VCR)
MDP (multi-disc player)
Operation buttons for
video equipment
23
-ENOperations
Page 24
Additional Information
Connections
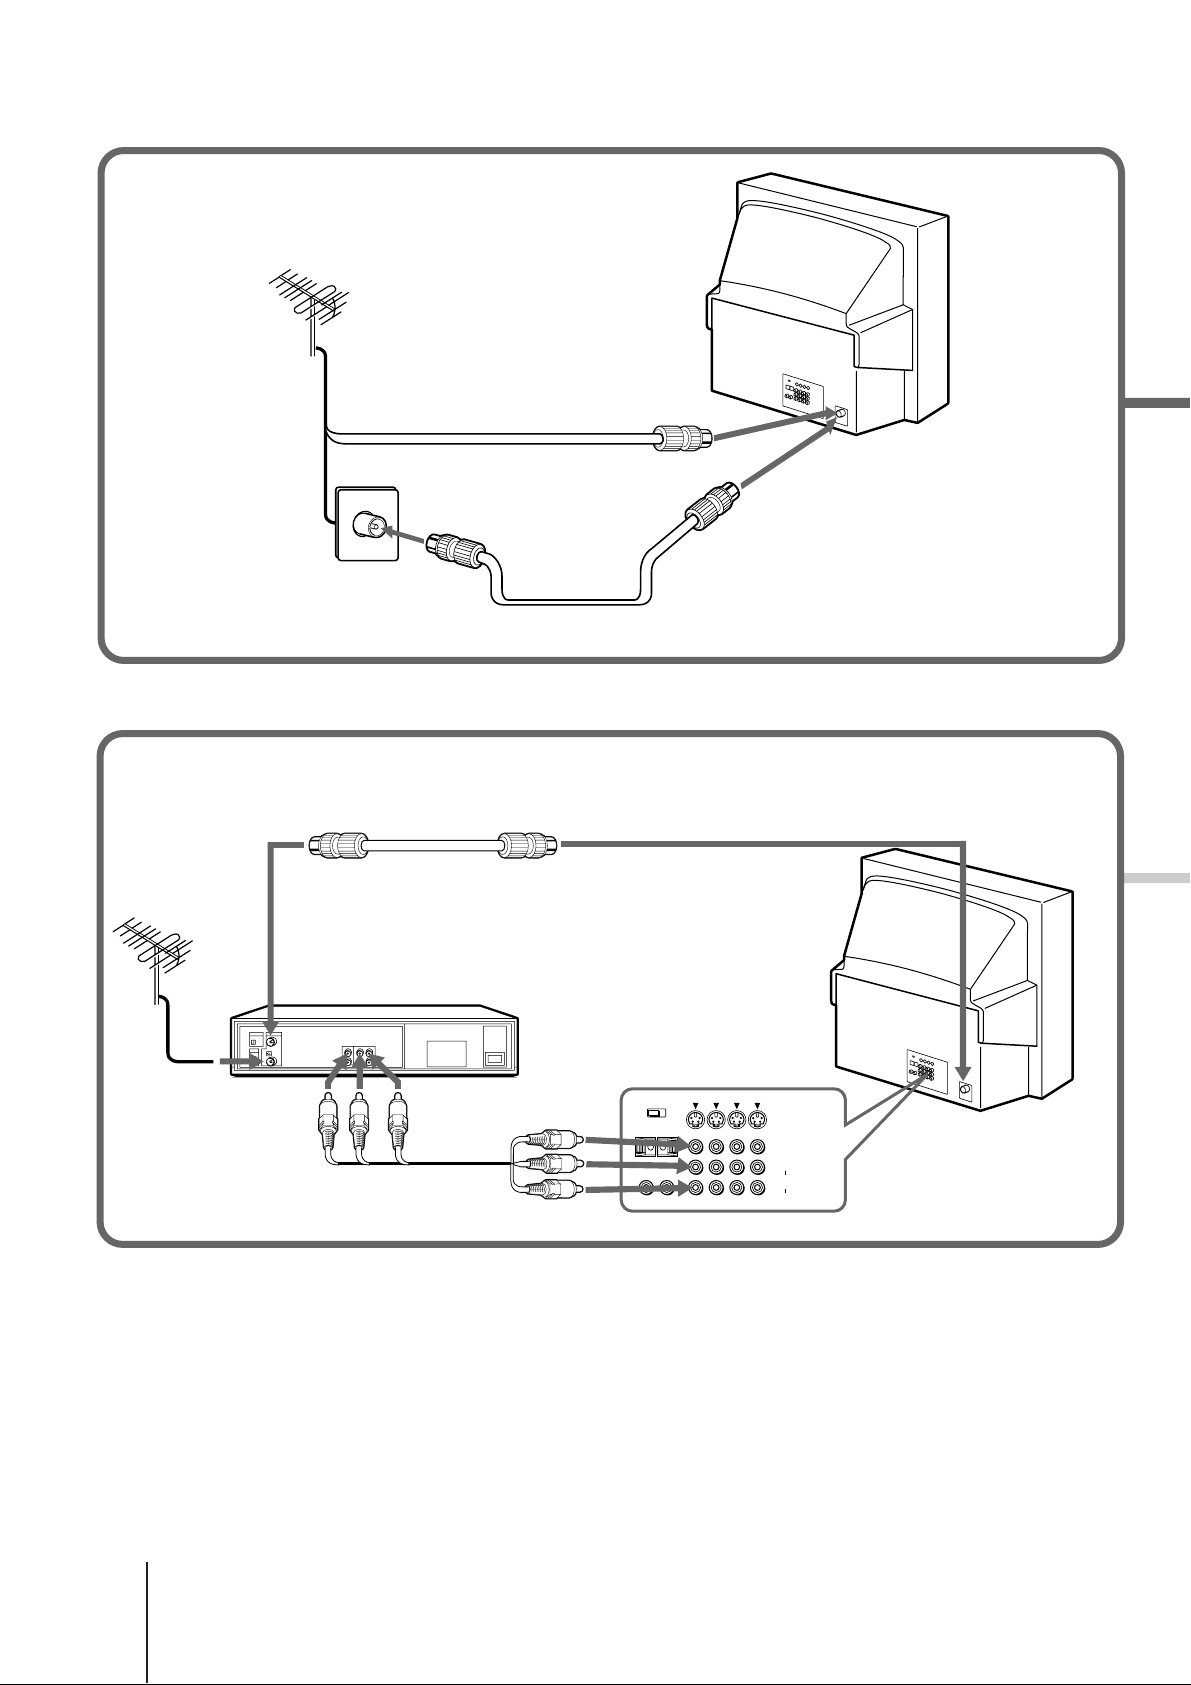
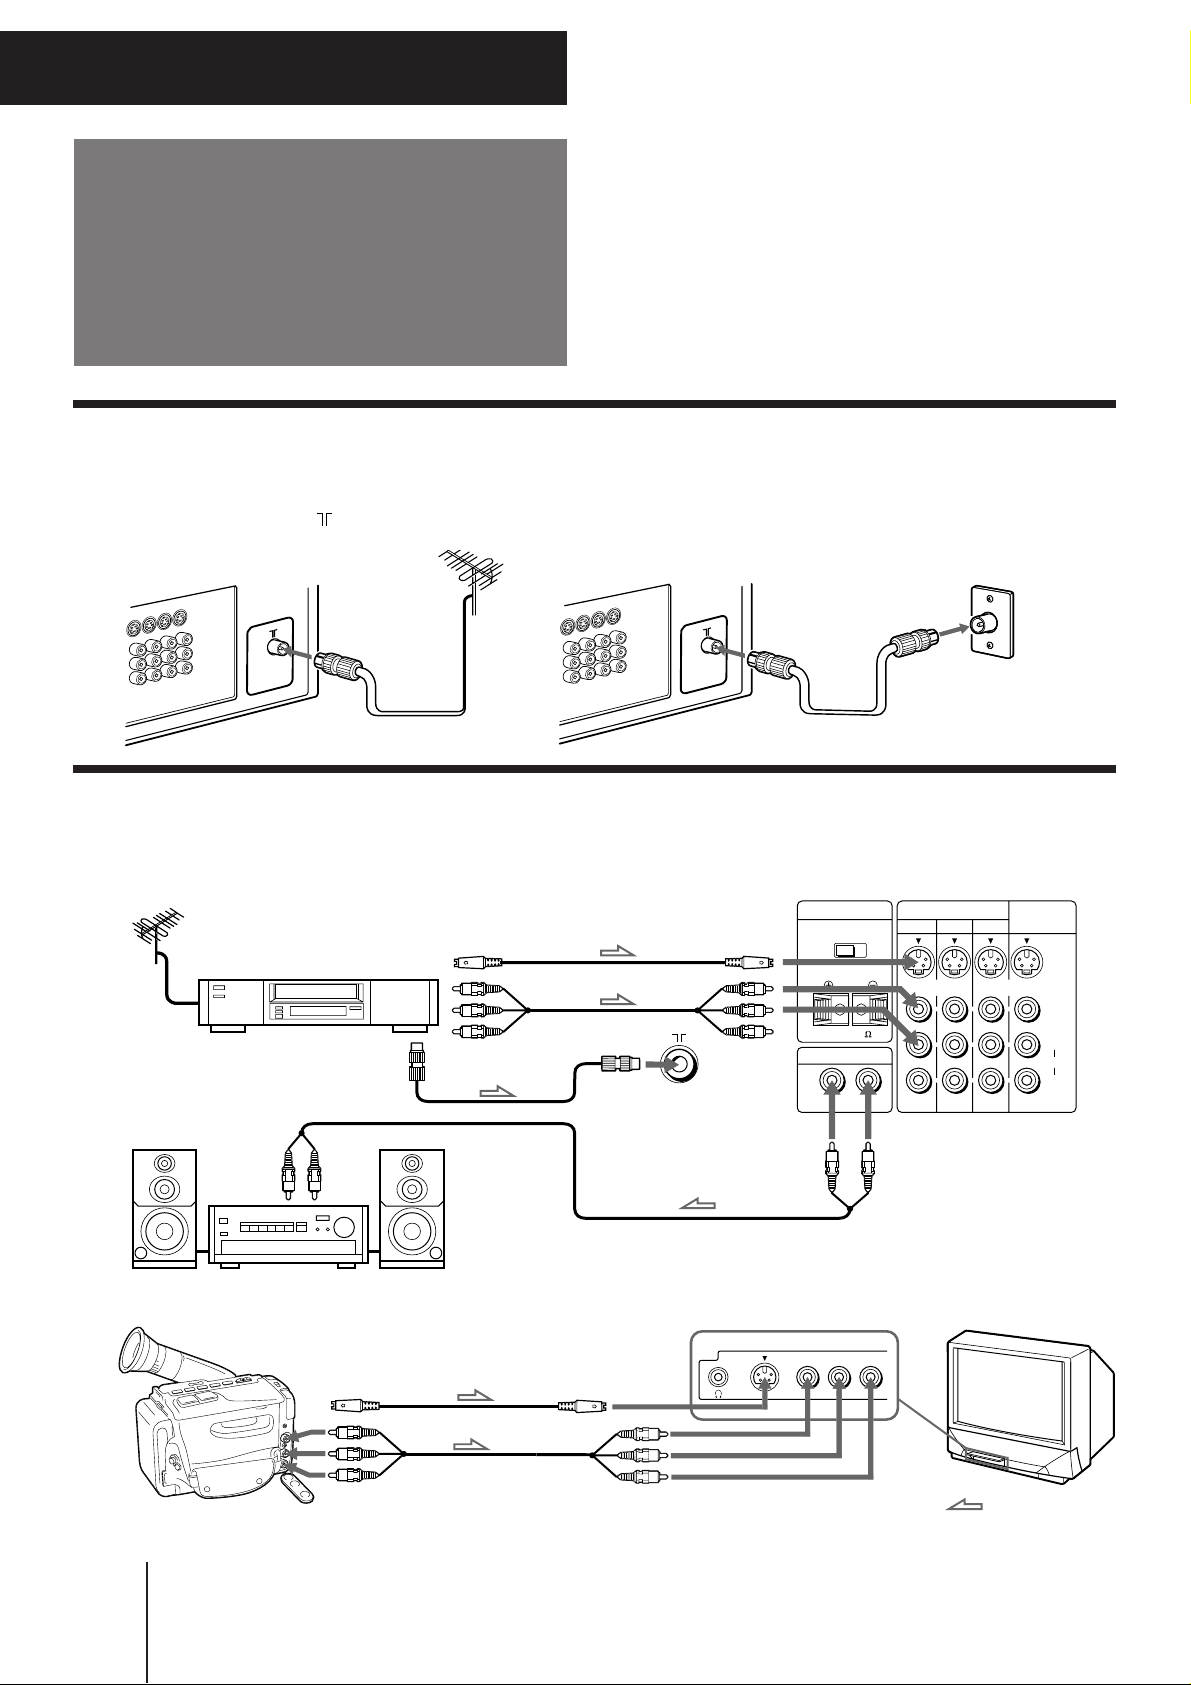
Connecting a VHF antenna or a combination VHF/UHF antenna—75-ohm coaxial
cable (round)
Attach an optional IEC antenna connector to the 75-ohm coaxial cable.
Plug the connector into the (antenna) terminal at the rear of the projection TV.
Rear of projection TV
Rear of projection TV
On a wall
or
Connecting optional equipment
You can connect optional audio/video equipment to this projection TV such as a VCR, multi-disc player, camcorder,
headphones, or stereo system.
Rear of projection TV
Stereo system
VCR
to audio inputs
to S Video
output
to video
and audio
outputs
Video (yellow)
Audio-L (white)
Audio-R (red)
to antenna
socket
to S1 Video
input
to video
and audio
inputs
CENTER SPEAKER IN
MAIN CENTER
40W(MAX)16
(VARIABLE)
AUDIO OUT
LR
VIDEO IN
321
VIDEO/TV
OUT
S VIDEO
VIDEO
L
(MONO)
AUDIO
R
Camcorder
-EN Additional Information
24
to video and
audio outputs
to S Video output
–––––––– VIDEO 3 IN ––––––––
S VIDEO VIDEO L
(MONO)
––AUDIO––R
: Signal flow
Page 25
When connecting a monaural VCR
Connect the yellow plug to VIDEO and the white plug to
AUDIO-L (mono).
Note on the video input
When no signal is input, the screen becomes black and on-screendisplay becomes dark.
If both S Video and video signals are input
The S Video input signal is selected. To view a video signal,
disconnect the S Video connection.
When connecting a VCR to the VIDEO 3 IN jacks
This projection TV is equipped with two sets of the VIDEO 3 IN
jacks on the front and rear panels. Front and rear jacks are not
available to be used at the same time. When using equipment
connected, turn off other equipment not in use.
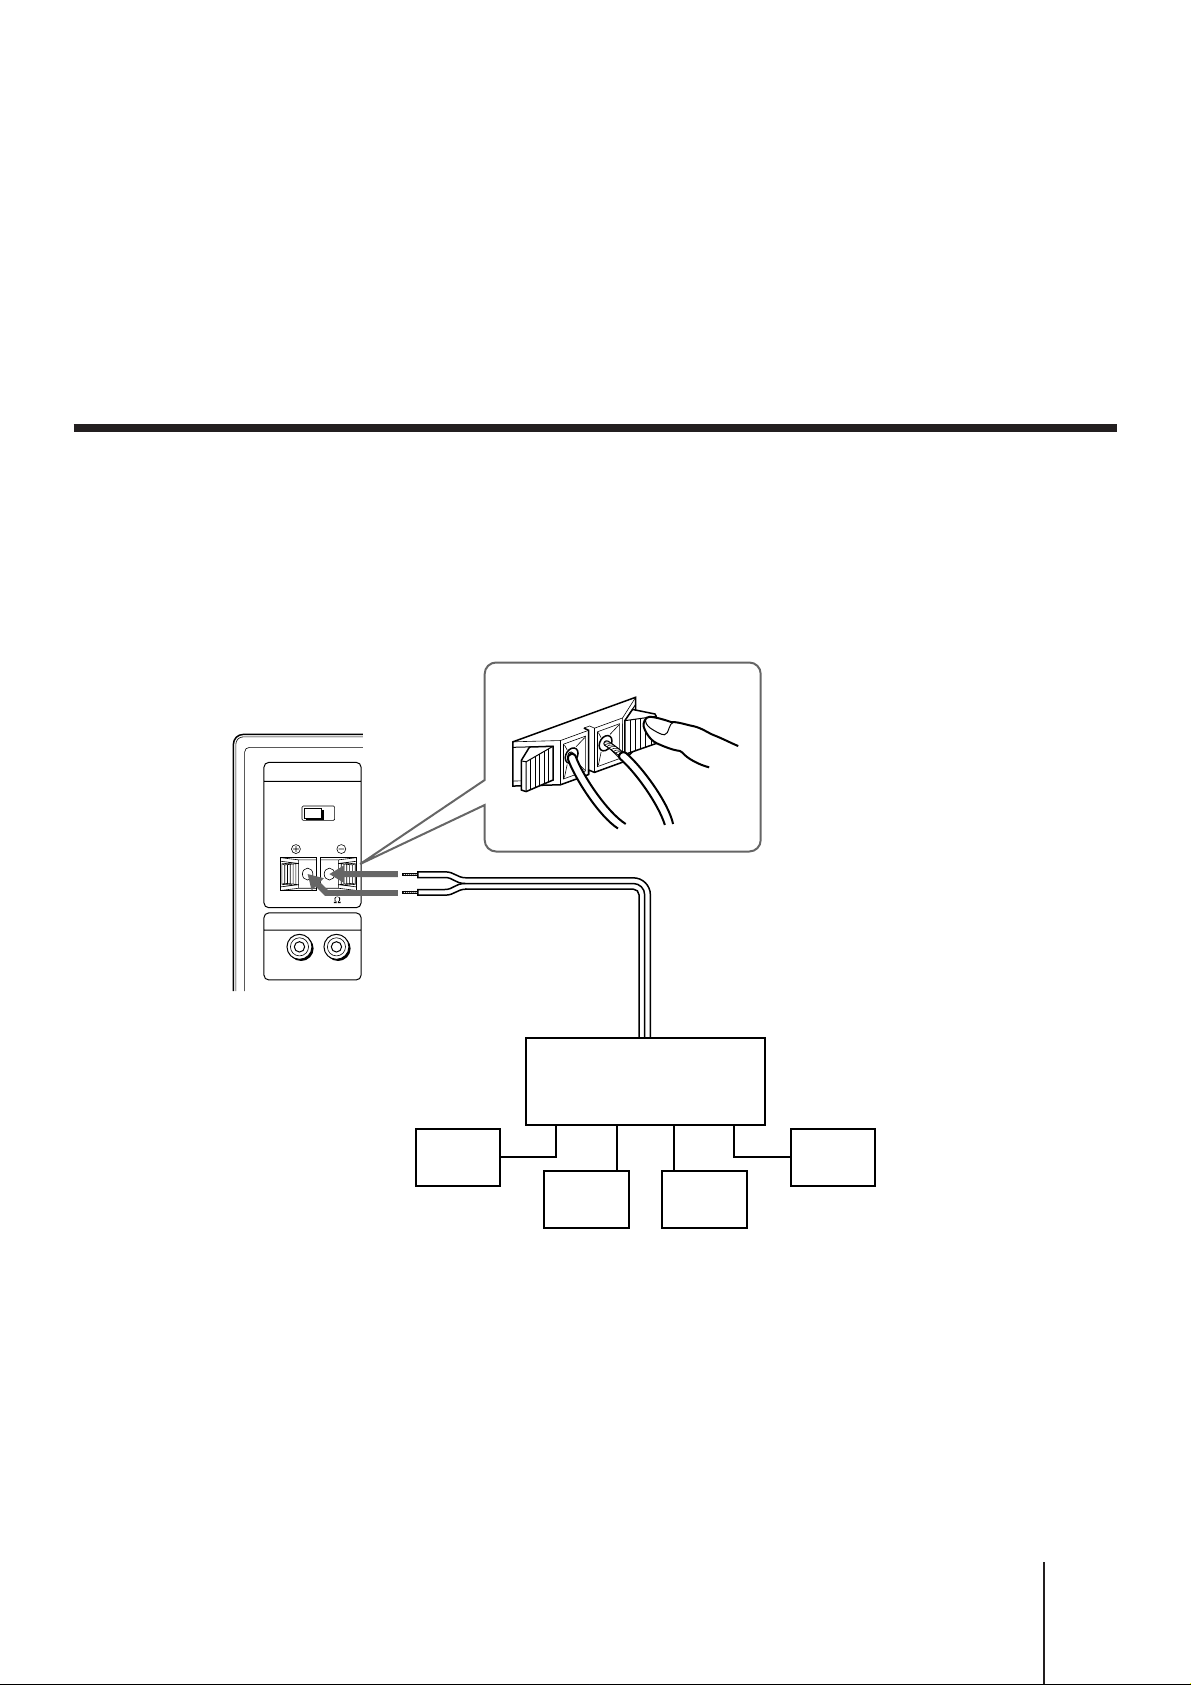
Connecting an amplifier with Dolby Pro Logic decoder
If you use an amplifier with Dolby Pro Logic decoder
instead of the projection TV’s audio system, you can
still use the projection TV’s center speaker.
CENTER SPEAKER IN
MAIN CENTER
*Manufactured under license from Dolby Laboratories
Licensing Corporation.
DOLBY, the double-D symbol a and “PRO LOGIC”
are trademarks of Dolby Laboratories Licensing
Corporation.
40W(MAX)16
AUDIO OUT
(VARIABLE)
LR
to CENTER
SPEAKER IN
Rear
speaker
(L)
Amplifier with Dolby* Pro
Logic decoder
Front
speaker
(L)
Front
speaker
(R)
Rear
speaker
(R)
25
-ENAdditional Information
Page 26

Troubleshooting
If you have any problems, read this manual again and
check the countermeasure for each of the symptoms
listed below.
If the problem persists, contact your nearest authorized
service center or dealer.
Snowy picture
Noisy sound
No picture
No sound
/ Press POWER.
/ Press POWER to turn the projection TV off
for 5 to 6 seconds, then turn it on again by
pressing POWER.
/ Check the antenna connection.
/ Check the VCR connections.
Good picture
No sound
/ Press VOL +.
/ Press MUTING.
/ Check the antenna.
/ Check the antenna connection on the
projection TV and on the wall.
Dotted lines or stripes
/ This may be caused by local interference
(e.g. cars, neon signs, hair dryers, etc.)
Adjust the antenna for minimum
interference.
Double images or “ghosts”
/ This may be caused by reflections from
nearby mountains or buildings. A highly
directional antenna may improve the
picture.
No color
/ Adjust COLOR in the VIDEO CONTROL
menu’s ADJUSTMENT option.
/ Check the COLOR SYSTEM setting.
TV cabinet creaks
/ Even if the picture or the sound is normal,
changes in the room temperature
sometimes make the TV cabinet expand or
contract, making a noise. This does not
indicate a malfunction.
Good picture
Noisy sound
/ Check the TV SYSTEM setting.
-EN Additional Information
26
Page 27

Channel allocation
Areas allocated in each channel system
M E/ASIA/CATV W EURO
Afghanistan, Albania, Algeria, Austria, Bahrain,
Bangladesh, Belgium, Brunei, Canary Islands, Cyprus,
Denmark, Egypt, Finland, Germany, Ghana, Gibraltar,
Greece, Iceland, India, Indonesia, Iran, Iraq, Italy,
Jordan, Kenya, Republic of Korea, Kuwait, Lebanon,
Liberia, Libya, Luxemburg, Malaysia, Malta,
Mauritania, Mauritius, Maldives Rep., Morocco,
Mozambique, Nepal, Netherlands, New Zealand,
Nicaragua, Nigeria, Norway, Oman, Pakistan,
Portugal, Qatar, Sarawak, Saudi Arabia, Seychelles,
Sierra Leone, Singapore, Spain, Srilanka, Sudan,
Swaziland, Sweden, Switzerland, Syrian Arab Rep.,
Tanzania, Thailand, Tunisia, Turkey, Uganda, United
Arab Emirates, Western Sahara, Yemen Arab Republic,
People’s Dem. Rep. of Yemen, Yugoslavia, Zambia,
Zimbabwe
AUSTRALIA
Australia, New Zealand
HK/UK
Hong kong, Ireland, Lesotho, South Africa, United
Kingdom
CHINA/E EURO
Benin, Bulgaria, China, Congo, Czechoslovakia,
Djibouti Republic, Gabon, Guadeloupe, Guiana,
Guinea (P.P.R.), Hungary, Ivory Coast, Dem. People’s
Rep. of Korea, Madagascar, Mongolia, New Caledonia,
Niger, Poland, Reunion, Rumania, Senegal, Tahiti,
Togo, Former U.S.S.R., Vietnam, Zaire
AMERICA/CATV AMERICA
Bahama Islands, Barbados, Belize, Bermuda, Bolivia,
Burma (UHF), Canada, Chile, Colombia, Costa Rica,
Cuba, Dominica Republic, Ecuador, El Salvador, Guam,
Guatemala, Haiti, Hawaii, Honduras, Jamaica, Laos,
Mexico, Panama, Peru, Philippines, Puerto Rico,
Surinam, Taiwan, Trinidad & Tobago, U.S.A., U.S.A.
(CATV), Venezuela
JAPAN
Burma (Myanmar) (VHF), Japan (VHF, UHF)
TV and color systems of each channel system
The TV system and color system are automatically set according to the channel system.
Channel system
M E/ASIA/
CATV W EURO
AUSTRALIA
HK/UK
CHINA/E EURO
AMERICA/CATV AMERICA
JAPAN
TV system
B/G, H: West European TV standard
B/G, H: Australian TV standard
I: British TV standard
D/K: East European TV standard
M: American TV standard
M: Japan TV standard
Color system
AUTO
AUTO
AUTO
AUTO
AUTO
AUTO
27
-ENAdditional Information
Page 28

Specifications
Projection system
Picture tube 7 inch high-brightness monochrome
Projection lenses High performance, large-diameter
Screen size 41 inches (KP-E41)
Television system
Color system PAL, PAL 60, SECAM, NTSC
Channel coverage
Antenna 75 ohm external antenna terminal
Audio output (Speaker)
Number of terminals
Video Input: 4, Output: 1
Audio Input: 4, Output: 1
3 picture tubes, 3 lenses, horizontal inline system
tubes (6.3 raster size), with optical
coupling and liquidcooling system
hybrid lens F1.0
53 inches (KP-E53)
61 inches (KP-E61)
B/G, I, D/K, M
NTSC
3.58
4.43,
See “Channel coverage” at the bottom
15 W × 2
S1 Video/S Video
Input: 4, Output: 1
Y: 1 Vp-p, 75 ohms, unbalanced, sync
negative,
C: 0.286 Vp-p, 75 ohms
Power requirement
110 – 240 V AC, 50/60 Hz
Power consumption
175 W
Dimensions (w/h/d)
951 × 991 × 588 mm (KP-E41)
1164 × 1335 × 650 mm (KP-E53)
1336 × 1519 × 647 mm (KP-E61)
Mass Approx. 56 kg (KP-E41)
Approx. 89 kg (KP-E53)
Approx. 130 kg (KP-E61)
Supplied accessories
Remote commander RM-901 (1)
Size R6 (AA) battery (1)
Optional accessory
AV rack SU-E41 (KP-E41)
AV rack SU-E53 (KP-E53)
Design and specifications are subject to change without notice.
Channel coverage
M E/ASIA/CATV W EURO
Receivable channel Channel display
E-2 to E-12 C02 to C12
E-21 to E-69 C21 to C69
S-01 to S-03 S42 to S44
S-1 to S-41 S01 to S41
Indonesia
1A C01
2 to 11 C03 to C12
Morocco
M-4 to M-7 C70 to C73
M-8 to M-10 C08 to C10
New Zealand
1 C01
2 to 11 C03 to C12
27 to 62 C27 to C62
AUSTRALIA
Receivable channel Channel display
Australia
AS-0 to AS-12 C00 to C12
AS-5A, AS-9A C13, C14
AS-28 to AS-69 C28 to C69
New Zealand
1 C00
2 to 3 C01 to C02
4 to 7 C06 to C09
8 C14
9 to 11 C10 to C12
Sony Corporation Printed in Indonesia
-EN Additional Information
28
HK/UK
Receivable channel Channel display
Hong Kong, United Kingdom
B-21 to B-68 C21 to C68
Ireland
A to J C01 to C09
South Africa
4 to 13 C04 to C13
21 to 68 C21 to C68
CHINA/E EURO
Receivable channel Channel display
China
C-1 to C-2 C01 to C02
C-3 C13
C-4 C03
C-5 C04
C-6 C14
C-7 to C-12 C06 to C11
C-13 to C-24 C21 to C32
C-25 to C-47 C38 to C60
C-48 to C-57 C61 to C70
Z-1 to Z-39 S01 to S39
Eastern Europe
R-1 to R-12 C01 to C12
R-21 to R-60 C21 to C60
AMERICA/CATV AMERICA
Receivable channel Channel display
2 to 79 C02 to C79
A-1 S99
A-2 S98
A-3 S97
A-4 S96
A-5 S95
A-6 S06
A-7 S05
A-8 S01
A to W S14 to S36
AA to CCC S37 to S65
JAPAN
Receivable channel Channel display
J-1 to J-62 C01 to C62
C-13 to C-32 C80 to C99
 Loading...