

Page 1

2-697-124-22(1)
LCD Digital Colour TV
KDL-46W2000
KDL-40W2000
Operating Instructions
Before operating the TV, please read the “Safety
information” section of this manual.
Retain this manual for future reference.
Bedienungsanleitung
Lesen Sie vor der Inbetriebnahme des Fernsehgeräts bitte
den Abschnitt „Sicherheitsinformationen“ in dieser
Anleitung. Bewahren Sie die Anleitung zum späteren
Nachschlagen auf.
Gebruiksaanwijzing
Alvorens de televisie te gebruiken, dient u de paragraaf
met veiligheidsinformatie in deze handleiding te lezen.
Bewaar deze handleiding zodat u deze in de toekomst kunt
raadplegen.
Manual de Instruções
Antes de utilizar o televisor, por favor leia a secção
“Informação sobre segurança” deste manual. Guarde este
manual para futuras consultas.
Bruksanvisning
Før du bruker TVen, må du lese gjennom avsnittet
"Sikkerhet" i denne håndboken. Ta vare på håndboken for
fremtidig referanse.
GB
DE
NL
PT
NO
© 2006 Sony Corporation
For useful information about Sony products
Fur hilfreiche Informationen zu Sony Produkten
Voor nuttige informatie over Sony producten
Para informação útil sobre os produtos Sony
For nyttig informasjon om Sony produkter
Page 2

Introduction
Thank you for choosing this Sony product.
Before operating the TV, please read this manual
thoroughly and retain it for future reference.
Notice for Digital TV function
• Any functions related to Digital TV ( ) will only
work in countries or areas where DVB-T (MPEG2) digital
terrestrial signals are broadcasted. Please confirm with
your local dealer if you can receive a DVB-T signal where
you live.
• Although this TV set follows DVB-T specifications,
compatibility with future DVB-T digital terrestrial
broadcasts cannot be guaranteed.
• Some Digital TV functions may not be available in some
countries.
Trademark information
• is a registered trademark of the DVB Project
• Manufactured under license from BBE Sound, Inc.
Licensed by BBE Sound, Inc. under one or more of the
following US patents: 5510752, 5736897. BBE and BBE
symbol are registered trademarks of BBE Sound, Inc.
• TruSurround XT, SRS and (
SRS Labs, Inc.
TruSurround XT technology is incorporated under license
from SRS Labs, Inc.
• HDMI, the HDMI logo and High-Definition Multimedia
Interface are trademarks or registered trademarks of
HDMI Licensing LLC.
• The illustrations used in this manual are of the KDL40W2000 unless otherwise stated.
z) symbol are trademarks of
GB
2
Page 3
Table of Contents
Start-up Guide 4
Safety information .....................................................................................................................9
Precautions .............................................................................................................................12
Overview of the remote ........................................................................................................13
Overview of the TV buttons and indicators........................................................................14
Watching TV
Watching TV............................................................................................................................15
Checking the Digital Electronic Programme Guide (EPG) .............................................18
Using the Favourite list ..................................................................................................20
Viewing pictures from connected equipment ..........................................................................21
Using MENU Functions
Navigating through menus ......................................................................................................22
Picture menu ...........................................................................................................................23
Sound menu............................................................................................................................25
Screen menu...........................................................................................................................27
Set-up menu............................................................................................................................28
PC Settings menu ...................................................................................................................31
Analogue Set-up menu (Analogue mode only) .......................................................................32
Digital Set-up menu .......................................................................................................35
GB
Using Optional Equipment
Connecting optional equipment...............................................................................................37
Additional Information
Specifications ..........................................................................................................................40
Troubleshooting ......................................................................................................................42
Index .......................................................................................................................................44
: for digital channels only
3
GB
Page 4
Start-up Guide
To insert batteries into the remote
1: Checking the
accessories
Remote RM-ED008 (1)
Size AA batteries (R6 type) (2)
Mains lead (Type C-6) (1)
Coaxial cable (1)
Cable holder (1)
Support belt (1) and screws (2)
Stand (1) and screws (4)
Push and slide to open.
Notes
• Observe the correct polarity when inserting batteries.
• Do not use different types of batteries together or mix old
and new batteries.
• Dispose of batteries in an environmentally friendly way.
Certain regions may regulate disposal of the battery.
Please consult your local authority.
• Handle the remote control with care. Do not drop or step
on it, or spill liquid of any kind onto it.
• Do not place the remote control in a location near a heat
source, or in a place subject to direct sunlight, or in a damp
room.
GB
4
Page 5
1
3
2: Attaching the stand
Start-up Guide
90°
Packaging material
4
Stand
2
1 Take out the stand, screws, and packaging
Packaging material
material to begin stand setup.
2 Set the packaging material as shown.
3 Place the TV directly to the stand as
shown.
After placing the TV on the stand, remove the
packaging material.
4 Fix the TV to the stand using the supplied
screws.
Notes
• This TV is very heavy, so two or more people should place
the TV on the stand.
• If using an electric screwdriver, set the tightening torque
at approximately 1.5 N·m (15 kgf·cm).
GB
5
Page 6
3: Connecting an aerial/
4: Preventing the TV
VCR
Connecting an aerial only
Mains lead (supplied)
Connecting an aerial and VCR
from toppling over
Coaxial cable
(supplied)
2
3
1
Mains lead
(supplied)
5: Bundling the cables
Coaxial cable
(supplied)
Scart lead (not
supplied)
Coaxial cable
(not supplied)
VCR
GB
6
Page 7

6: Selecting the
language and country/
region
3 Press F/f/G/g to select the language
displayed on the menu screens, then press
.
Start-up Guide
2
1
2
3,4
3,4
1 Connect the TV to your mains socket (220-
240V AC, 50Hz).
2 Press 1 on the TV (top side).
When you switch on the TV for the first time, the
Language menu appears on the screen.
When the TV is in standby mode (the
indicator on the TV (front) is red), press "/1 on
the remote to switch on the TV.
1 (standby)
4 Press F/f to select the country/region in
which you will operate the TV, then press
.
If the country/region in which you want to use the
TV does not appear in the list, select “-” instead of
a country/region.
The message confirming the TV start auto-tuning
appears on the screen, then go to “7: Auto-tuning
the TV”.
GB
7
Page 8
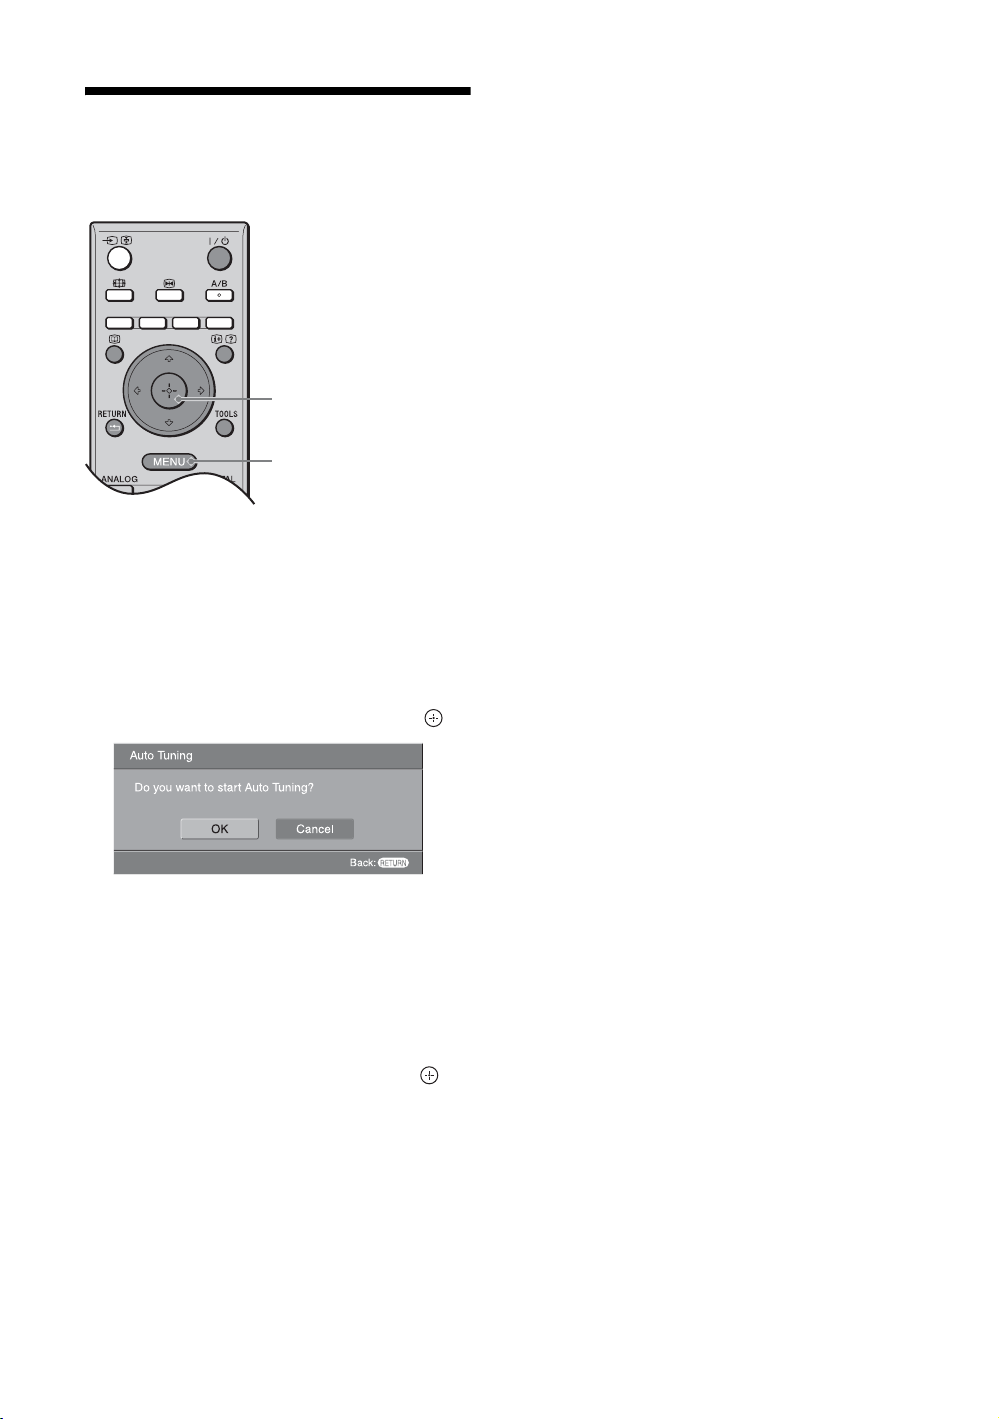
7: Auto-tuning the TV
The TV will now search for and store all available TV
channels.
2
4
1 Before you start auto-tuning the TV, insert
a pre-recorded tape into the VCR
connected to the TV (page 6) and start play
back.
The video channel will be located and stored on
the TV during auto-tuning.
If no VCR is connected to the TV, this procedure
is not required. Go to step 2.
4 Press MENU to exit.
The TV has now tuned in all the available
channels.
Note
When a digital broadcast channel cannot be received, or
when selecting a region in which there are no digital
broadcasts in step 4 under “6: Selecting the language and
country/region”, the time must be set from “Clock Set” in the
“Set-up” menu (page 29) after performing step 4.
2 Press G/g to select “OK”, then press .
The TV starts searching for all available digital
channels, followed by all available analogue
channels. This may take some time, please be
patient and do not press any buttons on the TV or
remote.
If a message appears for you to confirm the aerial
connections
No digital or analogue channels were found.
Check all the aerial connections and press to
start auto-tuning again.
3 When the Programme Sorting menu
appears on the screen, follow the steps of
“Programme Sorting” (page 32).
If you do not change the order in which the
analogue channels are stored on the TV, go to step
4.
GB
8
Page 9
Safety information
Mains lead
• Observe the followings to prevent the mains lead being
damaged. If the mains lead is damaged, it may result in a
fire or an electric shock.
– Unplug the mains
lead when moving
the TV set.
– When you disconne ct
the mains lead,
disconnect it from the
mains socket first.
– Be sure to grasp the plug when
disconnecting the m ains lead. Do
not pull on the mains lead itself.
– Do not pinch, bend, or twist the
mains lead excessively. The core
conductors may be exposed or
broken.
– Do not modify the mains lead.
– Do not put anything heavy on the
mains lead.
– Keep the mains lead away from heat
sources.
• If you damage the mains lead, stop
using it and ask your dealer or Sony service centre to
exchange it.
• Do not use the supplied mains lead on any other
equipment.
• Use only an original Sony mains lead, not other brands.
Mains socket
• The TV set with a three-wire grounding
type mains plug must be connected to a
mains socket with a protective earthing
connection.
• Do not use a poor fitting mains socket.
Insert the plug fully into the mains socket.
A poor fit may cause arcing and result in a
fire. Contact your electrician to have the
mains socket changed.
Cleaning the mains plug
Unplug the mains plug and clean it
regularly. If the plug is covered with dust
and it picks up moisture, its insulation may
deteriorate and result in a fire.
Overloading
This TV set is designed to operate on
a 220–240 V AC supply only. Take
care not to connect too many
appliances to the same mains socket
as this could result in a fire or an electric shock.
When not in use
• If you will not be using the TV
set for several days, the TV set
should be disconnected from
the mains for environmental
and safety reasons.
• The TV set is not disconnected from the mains when the
TV set is switched off. To disconnect the TV set
completely, pull the plug from the mains. However, some
TV sets may have features which need the TV set to be left
in standby to work correctly.
Carrying
• Before carrying the TV set, disconnect all the cables from
the TV set.
• Carrying the large size TV set requires two or more
people.
• When you carry the TV set by hand,
hold the TV set as illustrated on the
right. When lifting the TV set or
moving the panel of the TV set,
hold it firmly from the bottom. If
you do not do so, the TV set may
fall and be damaged or cause
serious injury.
• When transporting it, do not subject
the TV set to jolts or excessive
vibration. The TV set may fall and
be damaged or cause serious injury.
• If the TV set has been dropped or damaged, have it
checked immediately by qualified service personnel.
• When you carry the TV set in for repair or when you move
it, pack it using the original carton and packing material.
Placement
• The TV set should be installed near an easily accessible
mains socket.
• Place the TV set on a stable, level surface.
Do not hang anything on the TV set. If
you do, the TV set may fall from the
stand, causing damage or serious injury.
• Do not install the TV set in places subject
to extreme temperature, for example in
direct sunlight, or near a radiator, or heating vent. If the
TV set is exposed to extreme temperature, the TV set may
overheat and cause deformation of the casing or cause the
TV set to malfunction.
• Do not install the TV set in a place exposed to direct air
conditioning. If the TV set is installed in such a location,
moisture may condense inside and may cause a
malfunction.
• Never place the TV set in hot, oily,
humid or excessively dusty places.
• Do not install the TV set where
insects may enter.
• Do not install the TV set where it
may be exposed to mechanical vibration.
• Do not install the TV set in a location where it may
protrude, such as on or behind a pillar, or where you might
bump your head on it. Otherwise, it may result in injury.
• Do not allow children to climb on the TV
set.
• If you use the TV set near the seashore,
salt may corrode metal parts of the TV set
and cause internal damage or fire.
Continued
GB
9
Page 10
Ventilation
• Never cover the ventilation
holes or insert anything in the
cabinet. It may cause
overheating and result in a fire.
• Unless proper ventilation is provided, the TV set may
gather dust and get dirty. For proper ventilation, observe
the following:
– Do not install the TV set turned backwards or sideways.
– Do not install the TV set turned over or upside down.
– Do not install the TV set on a shelf or in a closet.
– Do not place the TV set on a rug or bed.
– Do not cover the TV set with cloth, such as curtains, or
items such as newspapers, etc.
• Leave some space around the TV set as shown below.
Otherwise, air-circulation may be inadequate and cause
overheating, which may cause a fire or damage to the TV
set.
Installed on the wall
30 cm
10 cm
10 cm
10 cm
Leave at least this space
around the set.
Installed with stand
30 cm
10 cm 10 cm 6 cm
Leave at least this space around the set.
• Never install the TV set as follows:
Air circulation
is blocked.
Air circulation
is blocked.
Optional accessories
Observe the following when installing the TV set using a
stand or wall-mount bracket. If you do not do so, the TV set
may fall and cause serious injury.
• It is strongly recommended that you use Sony accessories
for safety reasons:
– Wall-mount bracket SU-WL51
• It is strongly recommended that you use the official Sony
wall-mount bracket to allow adequate air circulation and
to avoid accumulated dust on the TV.
• If the TV set is to be installed on
a wall, have the installation
carried out by qualified service
personnel. Improper installation
may render the TV set unsafe.
• Secure the TV set properly,
following the instructions supplied with your stand when
installing the TV set.
• Be sure to attach the brackets supplied with your stand.
Wiring
• When wiring cables, be sure to unplug the mains lead for
your safety.
• Take care not to catch your feet on the cables. It may
damage the TV set.
Medical institutions
Do not place this TV set in a place
where medical equipment is in
use. It may cause a malfunction of
medical instruments.
Outdoor use
• Do not install this TV set
outdoors. If the TV set is
exposed to rain, it may result in a
fire or an electric shock.
• If this TV set is exposed to direct
sunlight, the TV set may heat up
and it may damage the TV set.
Vehicle, Ships and other
vessels
• Do not install this TV set in a
vehicle. The motion of the
vehicle may cause the TV set to
fall down and cause injury.
• Do not install this TV set on a
ship or other vessel. If the TV set
is exposed to seawater, it may
cause a fire or damage the TV
set.
10
Wall Wall
GB
Page 11
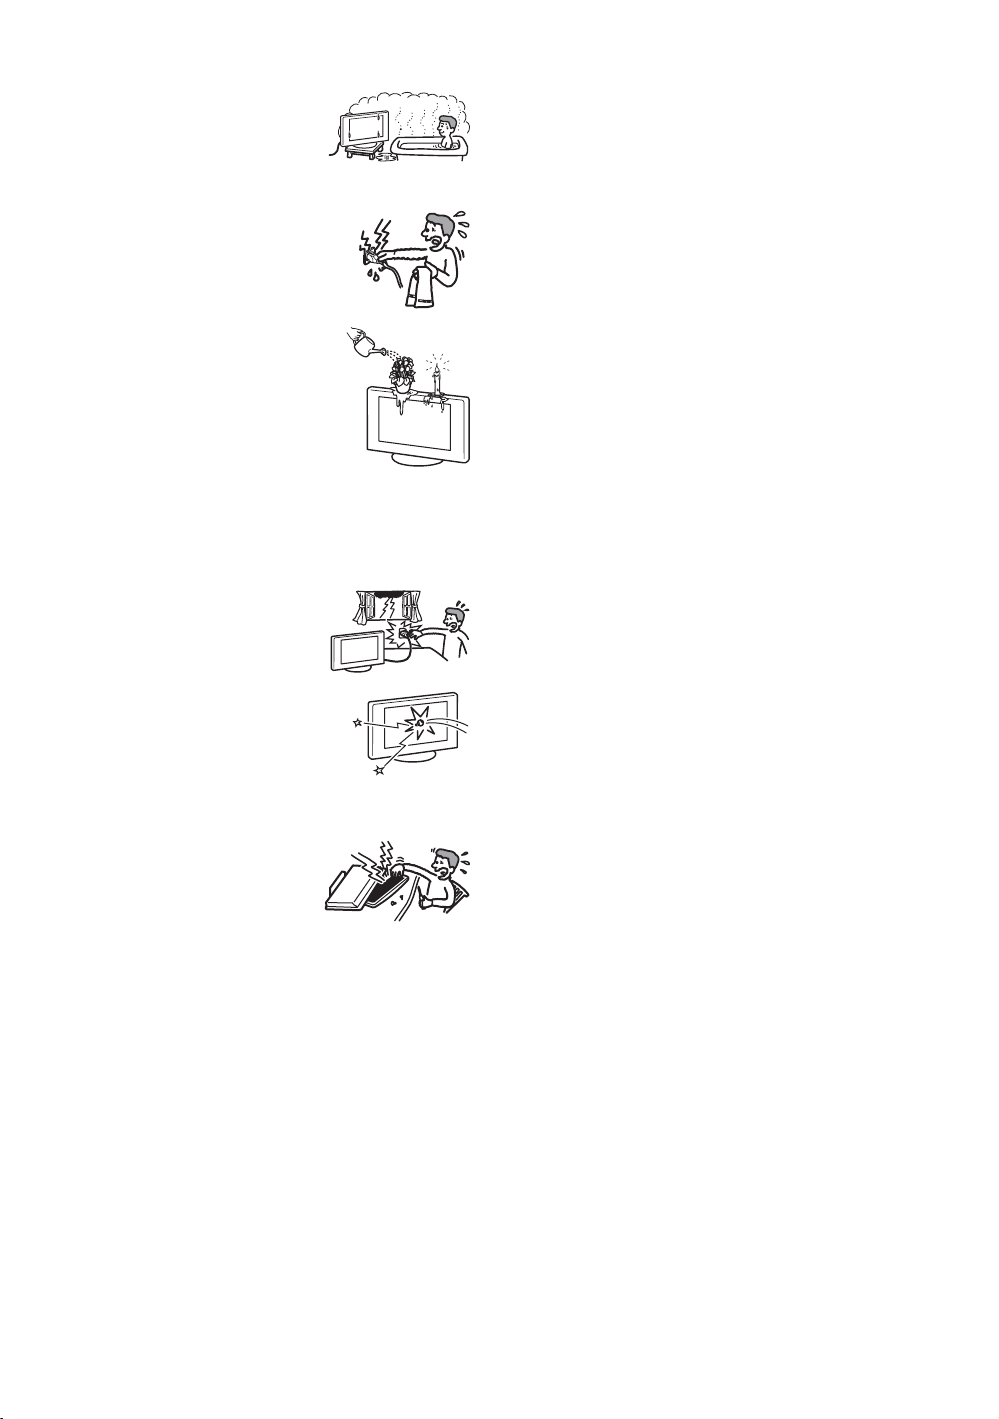
Water and moisture
• Do not use this TV set near water
– for example, near a bathtub or
shower room. Also do not expose
to rain, moisture or smoke. This
may result in a fire or an electric shock.
• Do not touch the mains lead and the TV
set with wet hands. Doing so may cause
an electric shock or damage to the TV
set.
Moisture and flammable objects
• Do not place any objects on the TV
set. The TV set shall not be exposed to
dripping or splashing and that no
objects filled with liquid, such as
vases, shall be placed on the TV set.
• To prevent fire, keep flammable
objects or naked lights (e.g. candles)
away from the TV set.
• If any liquid or solid object does fall through openings in
the cabinet, do not operate the TV set. It may result in an
electric shock or damage to the TV set. Have it checked
immediately by qualified service personnel.
Lightning storms
For your own safety, do not touch any
part of the TV set, mains lead, or
aerial lead during lightning storms.
Broken pieces
• Do not throw anything at the TV set.
The screen glass may break by the
impact and cause serious injury.
• If the surface of the TV set cracks, do
not touch it until you have unplugged the mains lead.
Otherwise electric shock may result.
Servicing
Dangerously high voltages are
present inside the TV set.
Do not open the cabinet. Entrust the
TV set to qualified serv ice personnel
only.
Small accessories removal and fittable
Keep small accessories out of children’s reach.
11
GB
Page 12

Precautions
Viewing the TV
• To view the TV comfortably, the recommended viewing
position is from four to seven times the screen’s vertical
length away from the TV set.
• To obtain a clear picture, do not expose the screen to direct
illumination or direct sunlight. If possible, use spot
lighting directed down from the ceiling.
• View the TV in moderate light, as viewing the TV in poor
light or during long period of time, strains your eyes.
Volume adjustment
• Adjust the volume so as not to trouble your neighbours.
Sound carries very easily at night time. Therefore, closing
the windows or using headphones is suggested.
• When using headphones, adjust the volume so as to avoid
excessive levels, as hearing damage may result.
LCD Screen
• Although the LCD screen is made with high-precision
technology and 99.99% or more of the pixels are effective,
black dots may appear or bright points of light (red, blue,
or green) may appear constantly on the LCD screen. This
is a structural property of the LCD screen and is not a
malfunction.
• Do not push or scratch the front filter, or place objects on
top of this TV set. The image may be uneven or the LCD
screen may be damaged.
• If this TV set is used in a cold place, a smear may occur in
the picture or the picture may become dark. This does not
indicate a failure. These phenomena disappear as the
temperature rises.
• Ghosting may occur when still pictures are displayed
continuously. It may disappear after a few moments.
• The screen and cabinet get warm when this TV set is in
use. This is not a malfunction.
• The LCD screen contains a small amount of liquid crystal
and mercury. The fluorescent tube used in this TV set also
contains mercury. Follow your local ordinances and
regulations for disposal.
Handling and cleaning the screen surface/cabinet of
the TV set
Be sure to unplug the mains lead connected to the TV set
from mains socket before cleaning.
To avoid material degradation or screen coating degradation,
observe the following precautions.
• Do not push on the screen, scratch it with a hard object, or
throw anything at it. The screen may be damaged.
• Do not touch the display panel after operating the TV set
continuously for a long period as the display panel
becomes hot.
• We recommend that the screen surface be touched as little
as possible.
• To remove dust from the screen surface/cabinet, wipe
gently with a soft cloth. If dust is persistent, wipe with a
soft cloth slightly moistened with a diluted mild detergent
solution.
• Never use any type of abrasive pad, alkaline/acid cleaner,
scouring powder, or volatile solvent, such as alcohol,
benzene, thinner or insecticide. Using such materials or
maintaining prolonged contact with rubber or vinyl
materials may result in damage to the screen surface and
cabinet material.
• The ventilation holes can accumulate dust over time. To
ensure proper ventilation, we recommend removing the
dust periodically (once a month) using a vacuum cleaner.
• If the angle of the TV set is to be adjusted, steady the base
of the stand with your hand to prevent the TV set from
becoming separated from the stand. Be careful not to get
your fingers caught between the TV set and the stand.
Optional Equipments
• Do not install optional components too close to the TV set.
Keep optional components at least 30 cm away from the
TV set. If a VCR is installed in front of the TV set or
beside the TV set, the picture may become distorted.
• Picture distortion and/or noisy sound may occur if the TV
set is positioned in close proximity to any equipment
emitting electromagnetic radiation.
Disposal of the TV set
Disposal of Old Electrical &
Electronic Equipment
(Applicable in the European
Union and other European
countries with separate
collection systems)
This symbol on the product or on
its packaging indicates that this
product shall not be treated as
household waste. Instead it shall
be handed over to the applicable
collection point for the recycling
of electrical and electronic equipment. By ensuring this
product is disposed of correctly, you will help prevent
potential negative consequences for the environment and
human health, which could otherwise be caused by
inappropriate waste handling of this product. The recycling
of materials will help to conserve natural resources. For more
detailed information about recycling of this product, please
contact your local Civic Office, your household waste
disposal service or the shop where you purchased the
product.
12
GB
Page 13
Overview of the remote
1 "/1 – TV standby
Switches the TV on and off from standby mode.
2 A/B – Dual Sound (page 26)
3 Coloured buttons
• In digital mode (page 18, 20): Selects the options at the bottom of the
Favourite and EPG digital menus.
• In Text mode (page 16): Used for Fastext.
4 / – Info / Text reveal
• In digital mode: Displays brief details of the programme currently being
watched.
• In analogue mode: Displays information such as current channel number
and screen format.
• In Text mode: Reveals hidden information (e.g., answers to a quiz).
5 F/f/G/g/ (page 15, 22)
6 TOOLS (page 17, 21, 39)
Enables you to access various viewing options and change/make adjustments
according to the source and screen format.
7 MENU (page 22)
8 DIGITAL – Digital mode (page 15)
9 Number buttons
• In TV mode: Selects channels. For channel numbers 10 and above, enter
the second or third digit within two seconds.
• In Text mode: Enters the three digit page number to select the page.
0 – Previous channel
Returns to the previous channel watched (for more than five seconds).
qa PROG +/- (page 15)
• In TV mode: Selects the next (+) or previous (-) channel.
• In Text mode: Selects the next (+) or previous (-) page.
qs 2 +/- – Volume
qd % – Mute (page 15)
/ – Text (page 16)
qf
qg ANALOG – Analogue mode (page 15)
qh / RETURN
Returns to the previous screen of any displayed menu.
qj – EPG (Digital Electronic Programme Guide) (page 18)
qk – Picture freeze (page 16)
Freezes the TV picture.
ql – Screen mode (page 16)
Changes the screen format when repeatedly pressed (displays the current
screen format when pressed only once).
w; / – Input select / Text hold
• In TV mode (page 21): Selects the input source from equipment connected
to the TV sockets.
• In Text mode: Holds the current page.
Tip
The A/B, PROG + and number 5 buttons have tactile dots. Use the tactile dots as references when operating the TV.
13
GB
Page 14

Overview of the TV buttons and indicators
1 (page 22)
2 / – Input select/OK
MENU
• In TV mode (page 21): Selects the input
source from equipment connected to the TV
sockets.
• In TV menu: Selects the menu or option, and
confirm the setting.
3 2 +/-/ /
• Increases (+) or decreases (-) the volume.
• In TV menu: Moves through the options left
( ) or right ( ).
4 PROG +/-/ /
• In TV mode: Selects the next (+) or previous
(-) channel.
• In TV menu: Moves through the options up
( ) or down ( ).
5 1 – Power
Switches the TV on or off.
6 Remote control sensor/Light sensor
(page 29)
• Receives IR signals from the remote.
• Do not put anything over the sensor, as its
function may be affected.
7 – Timer REC programme/Picture Off/
Timer indicator
• Lights up in orange when the Timer recording
is set (page 18, 19).
• Lights up in green when the picture is
switched off (page 29).
• Lights up in orange when the timer is set
(page 28).
8 1 – Standby indicator
Lights up in red when the TV is in standby mode.
9 " – Power indicator
Lights up in green when the TV is switched on.
Note
Make sure that the TV is completely switched off before unplugging the mains lead. Unplugging the mains lead while the TV is
turned on may cause the indicator to remain lit or may cause the TV to malfunction.
GB
14
Page 15
Watching TV
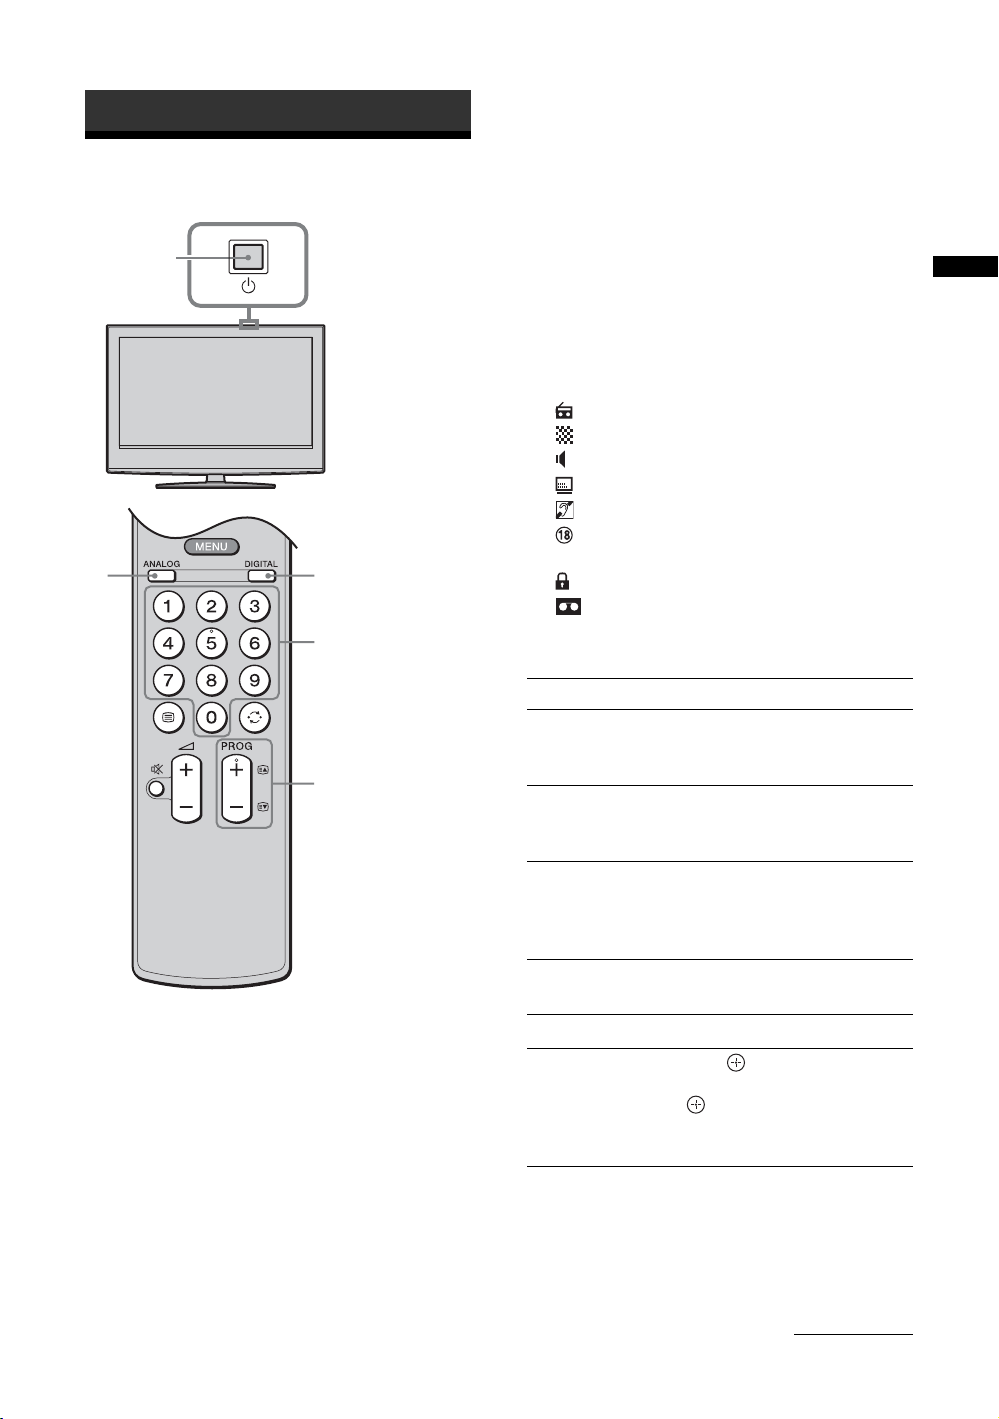
Watching TV
1
22
3
3
1 Press 1 on the TV (top side) to switch on
the TV.
When the TV is in standby mode (the 1 (standby)
indicator on the TV (front) is red), press "/1 on
the remote to switch on the TV.
2 Press DIGITAL to switch to digital mode or
ANALOG to switch to analogue mode.
The channels available vary depending on the
mode.
3 Press the number buttons or PROG +/- to
select a TV channel.
To select channel numbers 10 and above using the
number buttons, enter the second and third digits
within two seconds.
To select a digital channel using the Digital
Electronic Programme Guide (EPG), see page 18.
In digital mode
An information banner appears briefly. The
following icons may be indicated on the banner.
: Radio service
: Scrambled/Subscription service
: Multiple audio languages available
: Subtitles available
: Subtitles available for the hearing impaired
: Recommended minimum age for current
programme (from 4 to 18 years)
: Parental Lock
: Current programme is being recorded
Additional operations
To Do this
Turn off the TV
temporarily
(Standby mode)
Turn on the TV
from Standby mode
without sound
Turn off the TV Press 1 on the TV (top side).
Adjust the volume Press 2 + (increase)/
Mute the sound Press %. Press again to restore.
Access the
Programme index
table (in analogue
mode only)
Press "/1.
Press %. Press 2 +/- to set the
volume level.
Note
To disconnect the TV completely,
pull the plug from the mains.
- (decrease).
Press . To select an analogue
channel, press
.
To access the Input signal index
table, see page 21.
F/f, then press
Watching TV
Continued
15
GB
Page 16
To access Text
Press /. Each time you press /, the display changes
cyclically as follows:
Text t Text over the TV picture (mix mode) t No
Text (exit the Text service)
To select a page, press the number buttons or PROG
+/-.
To hold a page, press / .
To reveal hidden information, press / .
Tips
• Ensure that the TV is receiving a good signal, or some text
errors may occur.
• Most TV channels broadcast a Text service. For
information on the use of the service, select the index
page.
• When four coloured items appear at the bottom of the Text
page, Fastext is available. Fastext allows you to access
pages quickly and easily. Press the corresponding
coloured button to access the page.
To freeze the picture
Freezes the TV picture (e.g. to make a note of a
telephone number or recipe).
1 Press .
The frozen picture is displayed on the left of the
screen. You can watch a moving picture on the
right.
2 Press again to return to normal TV
mode.
Note
This function is not available for a PC input source.
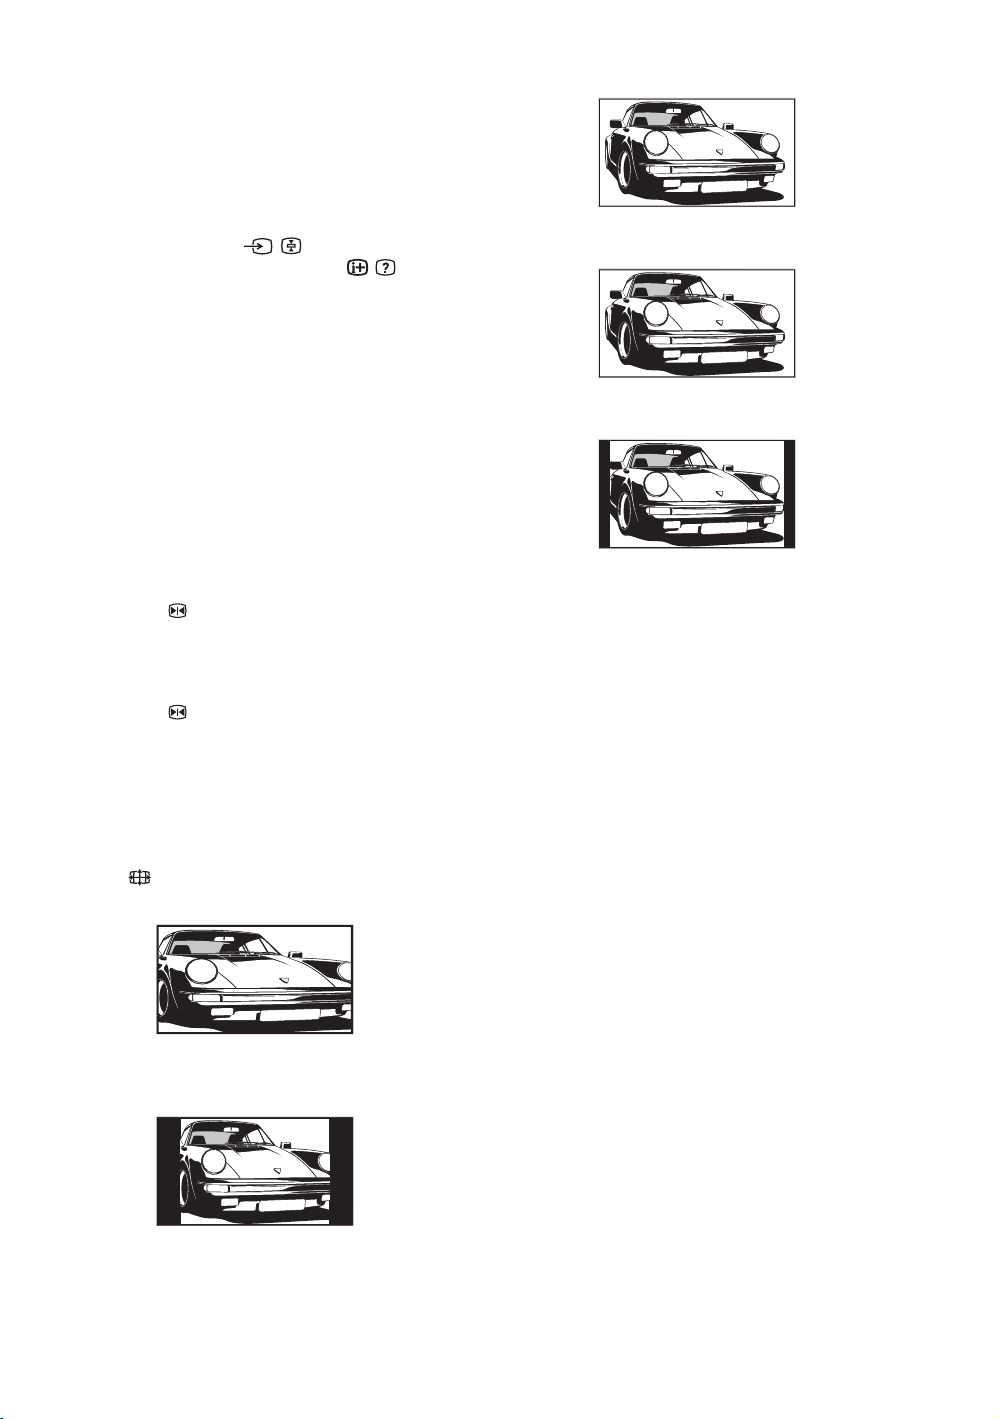
To change the screen format manually to
suit the broadcast
Press repeatedly to select Smart, 4:3, Wide,
Zoom, or 14:9.
Smart*
Wide
Displays wide screen (16:9) broadcasts in the correct
proportions.
Zoom*
Displays cinemascopic (letter box format) broadcasts
in the correct proportions.
14:9*
Displays 14:9 broadcasts in the correct proportions.
As a result, black border areas are visible on the
screen.
* Parts of the top and bottom of the picture may be cut off.
Tips
• Alternatively, you can set “Auto Format” to “On”. The TV
will automatically select the best mode to suit the
broadcast (page 27).
• You can adjust the position of the picture when selecting
Smart (50 Hz), Zoom or 14:9. Press
down (e.g., to read subtitles).
• Some characters and/or letters at the top and the bottom of
the picture may not be visible in Smart mode. In such a
case, you can select “Vertical Size” using the “Screen”
menu and adjust vertical size to make it visible.
• Select “Smart” or “Zoom” to adjust for 720p or 1080i
source pictures with edge portions cut off.
F/f to move up or
Displays conventional 4:3 broadcasts with an
imitation wide screen effect. The 4:3 picture is
stretched to fill the screen.
4:3
Displays conventional 4:3 broadcasts (e.g., non-wide
screen TV) in the correct proportions.
GB
16
Page 17

Using the Tools menu
Press TOOLS to display the following options when
viewing the TV programme.
Options Description
Close Closes the Tools menu.
Power Saving See page 29.
Subtitle Setting (in
digital mode only)
Digital Favourites (in
digital mode only)
Picture Mode See page 23.
Sound Mode See page 25.
Auto Clock Set (in
analogue mode only)
Sleep Timer See page 28.
i Volume Adjusts the volume of the
See page 36.
See page 20.
Allows you to switch to digital
mode and obtain the time.
headphones.
Watching TV
17
GB
Page 18

Checking the Digital Electronic Programme Guide
(EPG) *
1 In digital mode, press to display the
Digital Electronic Programme Guide
(EPG).
2 Perform the desired operation, as shown in
the following table.
Note
Programme information will only be displayed if the TV
Digital Electronic Programme Guide (EPG)
* This function may not be available in some countries.
To Do this
Turn off the EPG Press .
station is transmitting it.
Move through the EPG Press
Watch a current programme Press while the current programme is selected.
Sort the programme information by
category – Category list
Set a programme to be recorded – Timer
REC
F/f/G/g.
1 Press the blue button.
2 Press
3 Press .
1 Press F/f/G/g to select the future programme you want to
2 Press .
3 Press
4 Press to set the TV and your VCR timers.
Notes
• You can set VCR timer recording on the TV only for Smartlink compatible
VCRs. If your VCR is not Smartlink compatible, a message will be displayed to
remind you to set your VCR timer.
• Once a recording has begun, you can switch the TV to standby mode, but do not
switch off the TV completely or the recording may be cancelled.
• If an age restriction for programmes has been selected, a message asking for pin
code will appear on the screen. For more details refer to “Parental Lock” on
page 36.
F/f/G/g to select a category. The category name is
displayed on the side.
The categories available include:
“All Categories”: Contains all available channels.
Category name (e.g. “News”): Contains all channels corresponding to the
selected category.
The Digital Electronic Programme Guide (EPG) now only displays the
current programmes from the category selected.
record.
F/f to select “Timer REC”.
A symbol appears by that programme’s information. The
indicator on the TV (front) lights up in orange.
18
GB
Page 19
To Do this
Set a programme to be displayed
automatically on the screen when it starts
– Reminder
1 Press F/f/G/g to select the future programme you want to
display.
2 Press .
3 Press
4 Press to automatically display the selected programme
when the programme starts.
A c symbol appears by that programme’s information.
Note
If you switch the TV to standby mode, it will automatically turn itself on
when the programme is about to start.
Set the time and date of a programme you
want to record – Manual timer REC
1 Press .
2 Press
3 Press F/f to select the date, then press g.
4 Set the start and stop time in the same way as in step 3.
5 Press
6 Press to set the TV and your VCR timers.
A symbol appears by that programme’s information. The
indicator on the TV (front) lights up in orange.
Notes
• You can set VCR timer recording on the TV only for Smartlink compatible
VCRs. If your VCR is not Smartlink compatible, a message will be displayed to
remind you to set your VCR timer.
• Once a recording has begun, you can switch the TV to standby mode, but do not
switch off the TV completely or the recording may be cancelled.
• If an age restriction for programmes has been selected, a message asking for pin
code will appear on the screen. For more details refer to “Parental Lock” on
page 36.
Cancel a recording/reminder – Timer list
1 Press .
2 Press
3 Press F/f to select the programme you want to cancel, then
press .
4 Press
A display appears to confirm that you want to cancel the programme.
5 Press G/g to select “Yes”, then press to confirm.
F/f to select “Reminder”.
Watching TV
F/f to select “Manual timer REC”, then press .
F/f to select the programme, then press .
F/f to select “Timer list”, then press .
F/f to select “Cancel Timer”, then press .
Tip
You can also display the Digital Electronic Programme Guide (EPG) by selecting “Digital EPG” in the “MENU” (page 22).
19
GB
Page 20
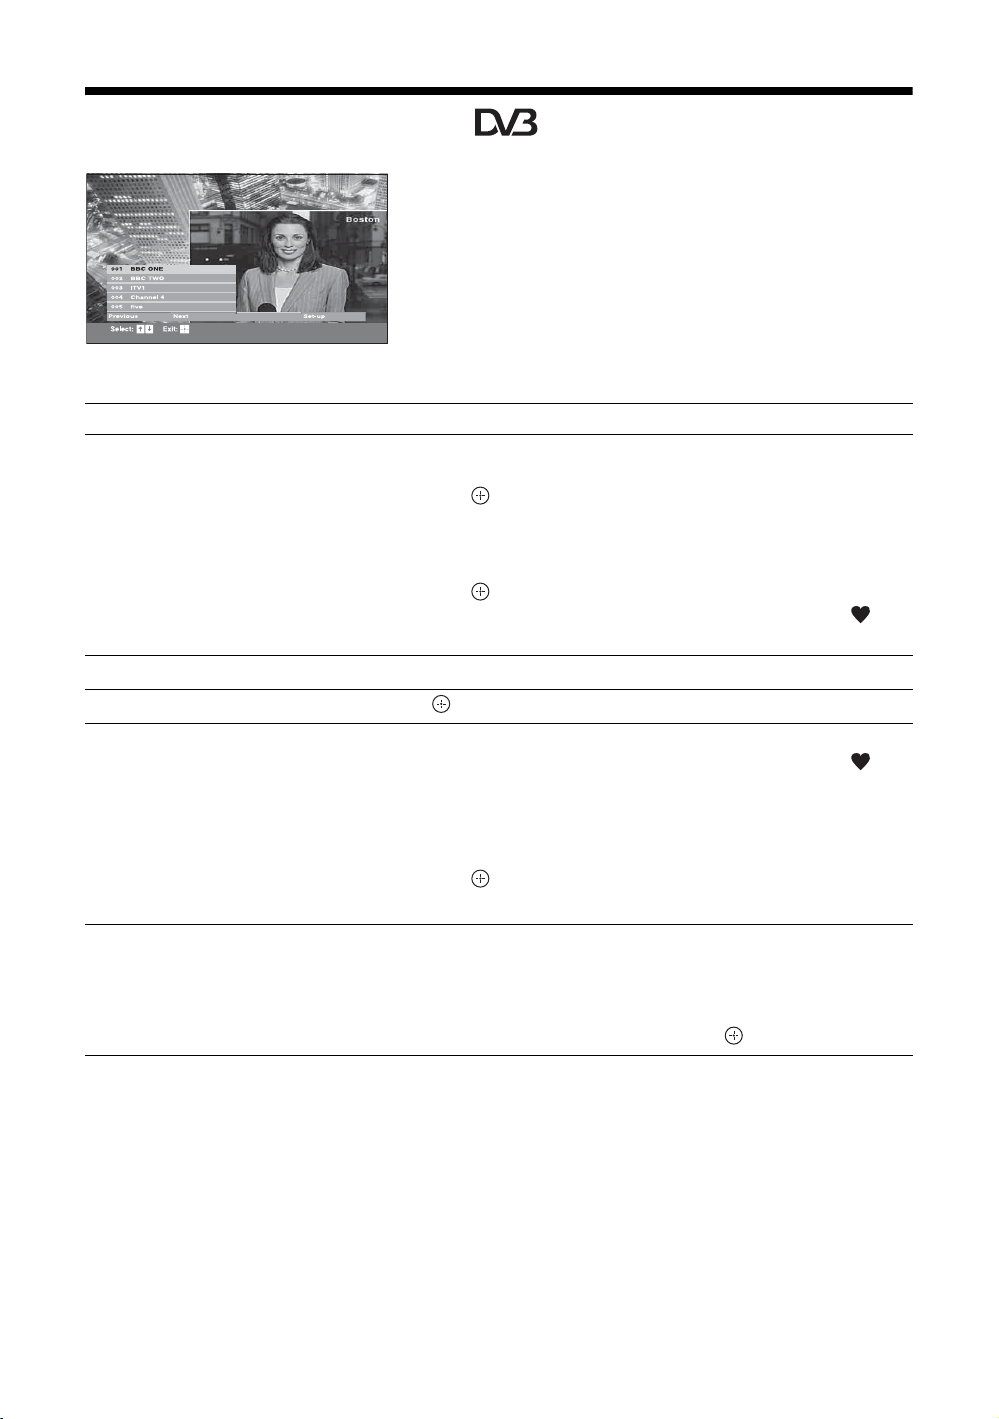
Using the Favourite list *
The Favourite feature allows you to select
programmes from a list of up to 20 channels you
specify. To display the Favourite list, see “Navigating
through menus” (page 22).
Favourite list
* This function may not be available in some countries.
To Do this
Create your Favourite list for the first time A message appears asking if you want to add channels to the Favourite list
when you select “Digital Favourites” in the “MENU” for the first time.
1 Press to select “Yes”.
2 Press
3 Press .
Turn off the Favourite list Press RETURN.
Watch a channel Press while selecting a channel.
F/f to select the channel you want to add.
If you know the channel number, you can use the number buttons to
directly select a channel.
Channels that are stored in the Favourite list are indicated by a
symbol.
Add or remove channels in the Favourite
list
Remove all channels from the Favourite list
1 Press the blue button.
Channels that are stored in the Favourite list are indicated by a
symbol.
2 Press F/f to select the channel you want to add or remove.
If you know the channel number, you can use the number buttons to
directly select a channel.
3 Press .
4 Press the blue button to return to the Favourite list.
1 Press the blue button.
2 Press the yellow button.
A display appears to confirm that you want to delete all channels from the
Favourite list.
3 Press G/g to select “Yes”, then press to confirm.
20
GB
Page 21

Viewing pictures from
connected equipment
Switch on the connected equipment, then
perform one of the following operation.
For equipment connected to the scart sockets using a
fully-wired 21-pin scart lead (page 38)
Start playback on the connected equipment.
The picture from the connected equipment appears on
the screen.
For an auto-tuned VCR (page 8)
In analogue mode, press PROG +/-, or the number
buttons, to select the video channel.
For other connected equipment (page 37)
Press / repeatedly until the correct input
symbol (see below) appears on the screen.
Using the Tools menu
Press TOOLS to display the following options when
viewing pictures from connected equipment other
than PC.
Options Description
Close Closes the Tools menu.
Power Saving See page 29.
Picture Mode See page 23.
Sound Mode See page 25.
Auto Clock Set (in
analogue mode only)
Sleep Timer See page 28.
i Volume Adjusts the volume of the
Allows you to switch to digital
mode and obtain the time.
headphones.
Watching TV
On screen
display
AV1/2 or
AV 1 /2
AV3 3 (Y, P
AV4 HDMI IN 4 and HDMI IN 4
AV5 HDMI IN 5
AV6 or
AV6
PC PC and PC
Labels of input jacks
1/2 or
1/2
B/CB, PR/CR) and
3 (L, R)
(L, R)
6 or 6, and
6 (L (MONO), R)
Additional operations
To Do this
Return to normal
TV mode
Access the Input
signal index table
(except for PC video
input signal)
Press DIGITAL or ANALOG.
Press to access the Input signal
index table. (Then, only in
analogue mode, press
select an input source, press
then press .
g.) To
F/f,
21
GB
Page 22
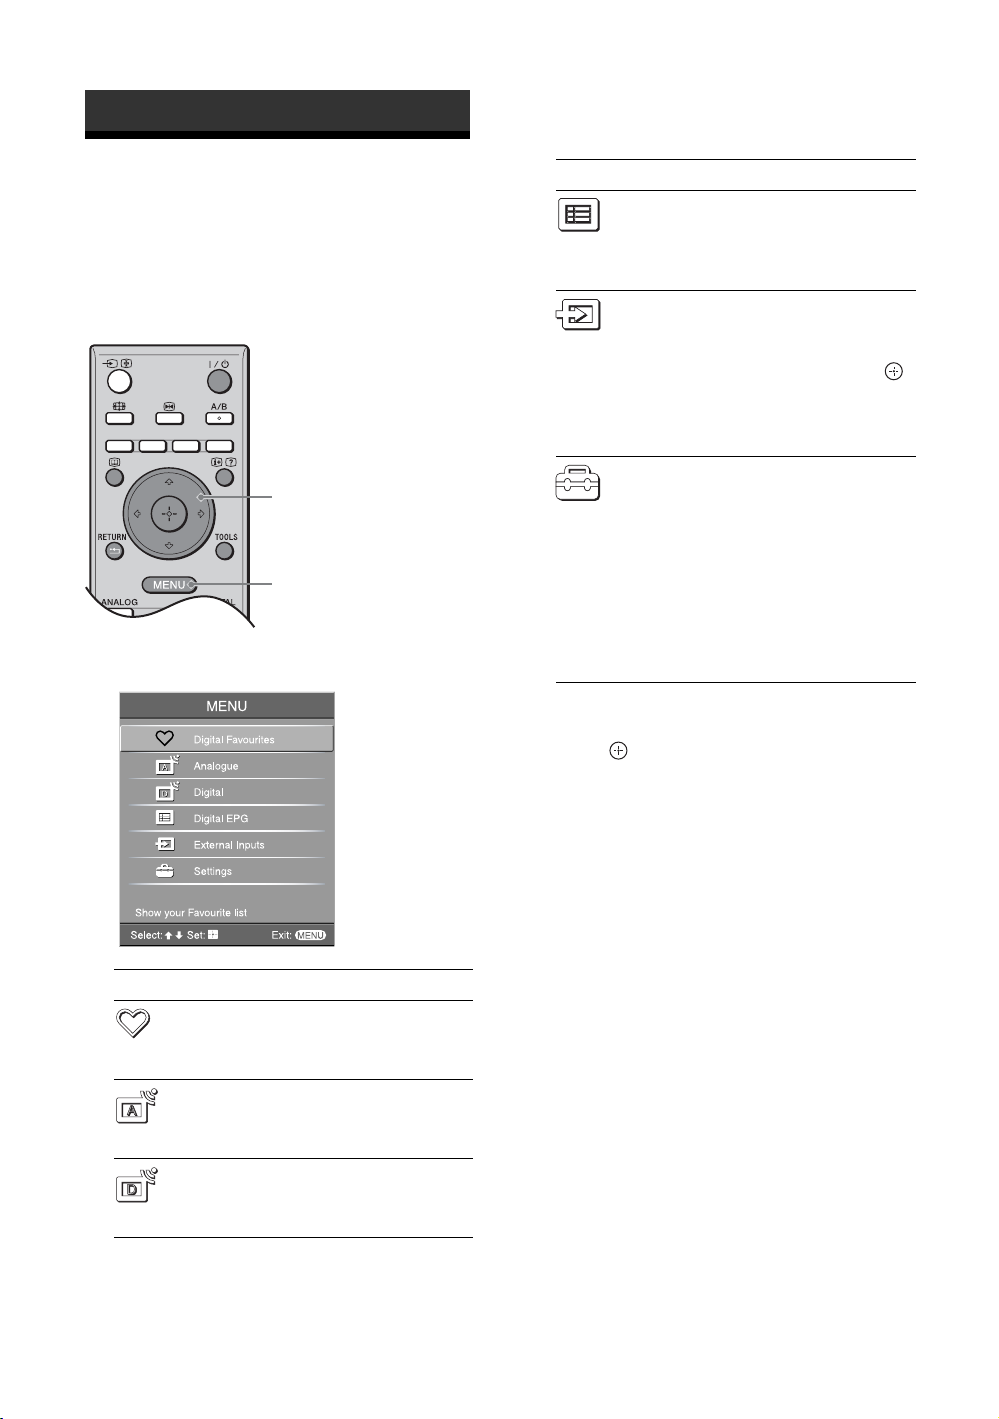
Using MENU Functions
Navigating through
menus
“MENU” allows you to enjoy various convenient
features of this TV. You can easily select channels or
inputs sources and change the settings for your TV.
2,3
1
1 Press MENU to display the menu.
Icon Description
Digital EPG
Displays the Digital Electronic
Programme Guide (EPG).
For details about settings, see page 18.
External Inputs
Selects equipment connected to your TV.
• To watch the desired external input,
select the input source, then press .
• To assign a label to an external input,
select “Edit AV Labels”, then see
page 28.
Settings
Displays the Settings menu where most
of the advanced settings and adjustments
are performed.
For details about settings, see page 23 to
36.
Note
The options you can adjust vary depending
on the situation. Unavailable options are
greyed out or not displayed.
2 Press F/f to select an option.
3 Press to confirm a selected option.
To exit the menu, press MENU.
Icon Description
Digital Favourites
Displays the Favourite list. For details
about settings, see page 20.
Analogue
Returns to the last viewed analogue
channel.
Digital
Returns to the last viewed digital
channel.
GB
22
Page 23

Picture menu
You can select the options listed below on the Picture
menu.
1 Press F/f to select “Settings” on MENU,
then press .
2 Press F/f to select a menu icon, then
press .
3 Press F/f/G/g to select an option.
Using MENU Functions
Target Inputs
Picture Mode
Display Mode
Reset
Backlight
Contrast
Brightness
Colour
Selects whether to apply settings made in the Picture menu to all inputs, or only to
the input currently being watched.
“All”: Applies settings to all inputs.
“Viewing Only”: Applies settings only to the current input.
Selects the picture mode except for PC input source.
“Vivid”: For enhanced picture contrast and sharpness.
“Standard”: For standard picture. Recommended for home entertainment.
“Custom”: Allows you to store your preferred settings.
Selects the display mode for PC input souce.
“Video”: For video images.
“Text”: For text, charts or tables.
Resets all picture settings except “Target Inputs”, “Picture Mode” and ”Display
Mode” to the factory settings.
Adjusts the brightness of the backlight.
Tip
“Backlight” is not available when you set “Power Saving” to “High” (page 29).
Increases or decreases picture contrast.
Brightens or darkens the picture.
Increases or decreases colour intensity.
Hue
Increases or decreases the green tones and red tones.
Tip
“Hue” can only be adjusted for an NTSC colour signal (e.g., U.S.A. video tapes).
Continued
23
GB
Page 24

Colour Temperature
Adjusts the whiteness of the picture.
“Cool”: Gives the white colours a blue tint.
“Neutral”: Gives the white colours a neutral tint.
“Warm1”/“Warm2”: Gives the white colours a red tint. “Warm2” gives a redder tint
than “Warm1”.
Tip
“Warm1” and “Warm2” can only be selected when you set “Picture Mode” to “Custom”.
Sharpness
Noise Reduction
Advanced Settings
Sharpens or softens the picture.
Reduces the picture noise (snowy picture) in a weak broadcast signal.
“Auto”: Automatically reduces the picture noise (in analogue mode only).
“High”/“Medium”/“Low”: Modifies the effect of the noise reduction.
“Off”: Turns off the Noise Reduction feature.
Customizes the Picture function in more detail. When you set “Picture Mode” to
“Custom”, you can set/change these settings.
“Reset”: Resets all the advanced video settings to the factory settings.
“Black Corrector”: Enhances black areas of the picture for stronger contrast.
“Adv. Contrast Enhancer”: Automatically adjusts “Backlight” and “Contrast” to the
most suitable settings judging from the brightness of the screen. This setting is
especially effective for dark images scenes. It will increase the contrast distinction
of the darker picture scenes.
“Gamma”: Adjusts the balance between bright and dark areas of the picture.
“Clear White”: Emphasizes white colours.
“Live Colour”: Makes colours more vivid and reproduces clear skin tones.
“Colour Space”: Changes the colour reproduction gamut. “Wide” reproduces the
vivid colour and “Normal” reproduces the standard colour.
“MPEG Noise Reduction”: Reduces the picture noise in MPEG-compressed video
(in digital mode only).
Tip
“Live Colour” is not available when “Colour Space” is set to “Normal”.
24
GB
Page 25

Sound menu
You can select the options listed below on the Sound
menu. To select options in “Settings”, refer to “Picture
menu” (page 23).
Using MENU Functions
Target Inputs
Sound Mode
Reset
Treble
Bass
Balance
Auto Volume
Volume Offset
Selects whether to apply settings made in the Sound menu to all inputs, or only to the
input currently being watched.
“All”: Applies settings to all inputs.
“Viewing Only”: Applies settings only to the current input.
Selects the sound mode.
“Dynamic”: Enhances treble and bass.
“Standard”: For standard sound. Recommended for home entertainment.
“Custom”: Flat response. Also allows you to store your preferred settings.
Resets the sound settings except “Sound Mode”, “Dual Sound” and “i Speaker
Link” to the factory settings.
Adjusts higher-pitched sounds.
Adjusts lower-pitched sounds.
Emphasizes left or right speaker balance.
Keeps a constant volume level even when volume level gaps occur (e.g., adverts tend
to be louder than programmes).
Adjusts the volume level of the current input relative to other inputs, when “Target
Inputs” is set to “Viewing Only”.
Surround
BBE
Selects the surround mode.
“TruSurround XT”: For surround sound (for stereo programmes only).
“Simulated Stereo”: Adds a surround-like effect to mono programs.
“Off”: For normal stereo or mono reception.
Gives sound more impact by compensating for phase effects in speakers using the
“BBE High Definition Sound System”.
Continued
25
GB
Page 26

Dual Sound
Selects the sound from the speaker for a stereo or bilingual broadcast.
“Stereo”, “Mono”: For a stereo broadcast.
“A”/“B”/“Mono”: For a bilingual broadcast, select “A” for sound channel 1, “B” for
sound channel 2, or “Mono” for a mono channel, if available.
Tip
If you select other equipment connected to the TV, set “Dual Sound” to “Stereo”, “A” or “B”.
i Speaker Link
(headphone speaker
Switches the TV’s internal speakers on/off when headphones are connected.
“On”: Sound is output only from headphones.
“Off”: Sound is output from both the TV and headphones.
link)
Tip
“Treble”, “Bass”, “Balance”, “Auto Volume”, “Surround” and “BBE” cannot be used for headphones and audio output sockets.
26
GB
Page 27
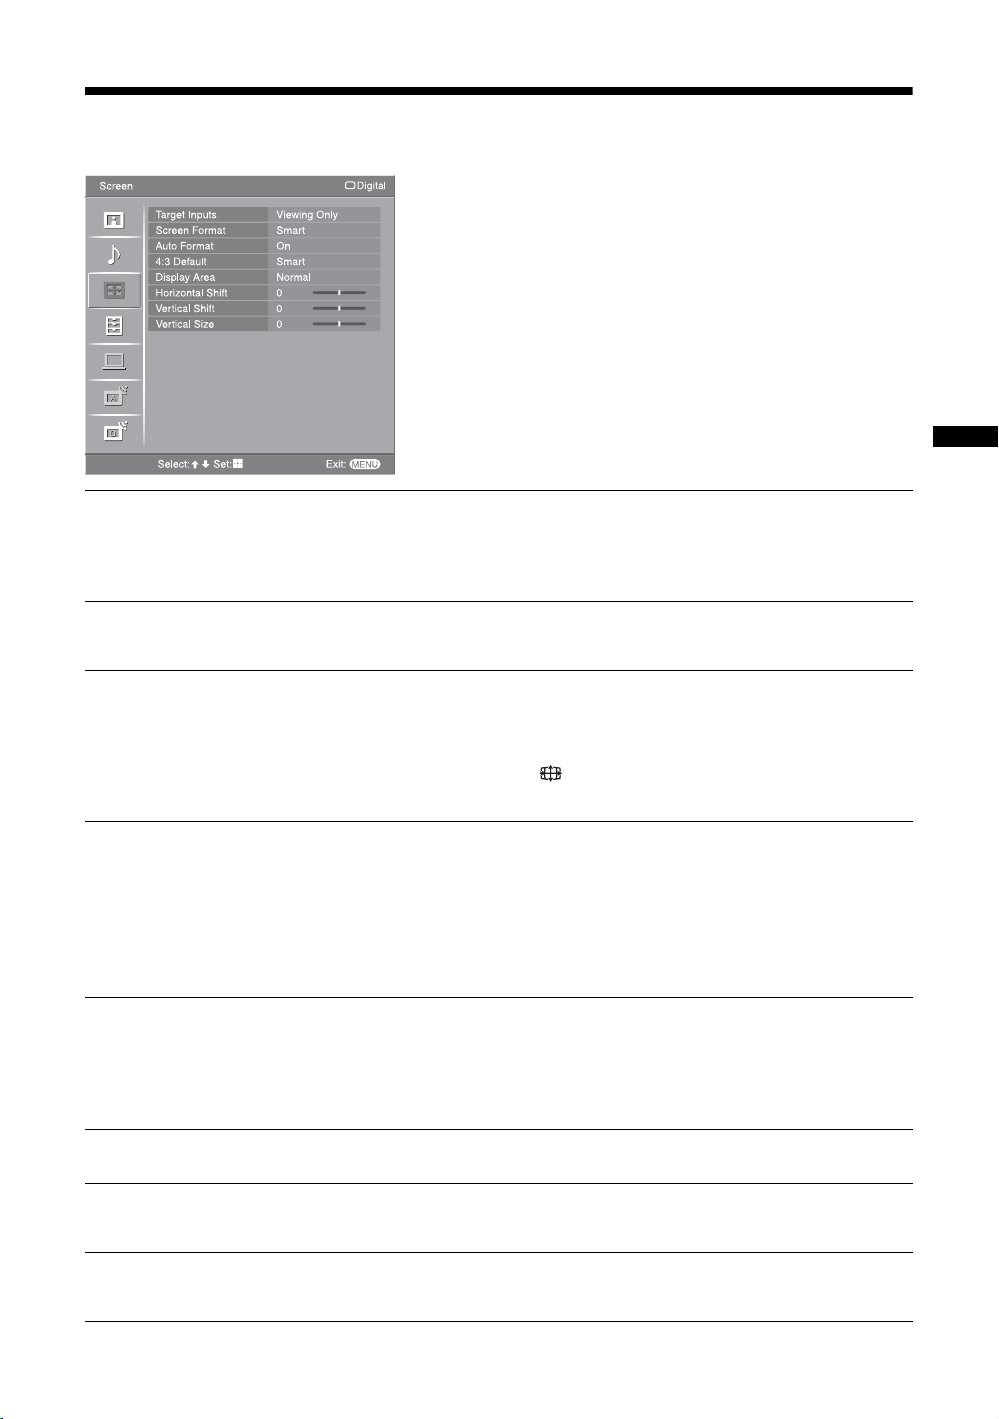
Screen menu
You can select the options listed below on the Screen
menu. To select options in “Settings”, refer to “Picture
menu” (page 23).
Using MENU Functions
Target Inputs
Screen Format
Auto Format
4:3 Default
Display Area
Selects whether to apply settings made in the Screen menu to all inputs, or only to
the input currently being watched.
“All”: Applies settings to all inputs.
“Viewing Only”: Applies settings only to the current input.
For details about the screen format, see “To change the screen format manually to
suit the broadcast” (page 16).
Automatically changes the screen format according to the broadcast signal. To keep
your setting, select “Off”.
Tips
• Even if you have selected “On” or “Off” in “Auto Format”, you can always modify the
format of the screen by pressing repeatedly.
• “Auto Format” is available for PAL and SECAM signals only.
Selects the default screen format for use with 4:3 broadcasts.
“Smart”: Displays conventional 4:3 broadcasts with an imitation wide screen effect.
“4:3”: Displays conventional 4:3 broadcasts in the correct proportions.
“Off”: Keeps the current “Screen Format” setting when the channel or input is
changed.
Tip
This option is available only if “Auto Format” is set to “On”.
Adjusts the screen area displaying the picture.
“Full Pixel”: Displays the picture for 1080i or 1080p sources in the original size
when parts of the picture are cut off.
“Normal”: Displays the picture in the original size.
“–1”/“–2”: Enlarges the picture to hide the edge of the picture.
Horizontal Shift
Vertical Shift
Vertical Size
Adjusts the horizontal position of the picture.
Adjusts the vertical position of the picture when the screen format is set to “Smart”
(50 Hz), “Zoom” or “14:9”.
Adjusts the vertical size of the picture when the screen format is set to “Smart”,
“Zoom” or “14:9”.
27
GB
Page 28

Set-up menu
You can select the options listed below on the Set-up
menu. To select options in “Settings”, refer to “Picture
menu” (page 23).
Auto Start-up
Language
AV Preset
Auto S Video
Timer Settings
Starts the “first time operation menu” to select the language and country/region, and
tune in all available digital and analogue channels. Usually, you do not need to do
this operation because the language and country/region will have been selected and
channels already tuned when the TV was first installed (page 7, 8). However, this
option allows you to repeat the process (e.g., to retune the TV after moving house,
or to search for new channels that have been launched by broadcasters).
Selects the language in which the menus are displayed.
Assigns a name to any equipment connected to the side and rear sockets. The name
will be displayed briefly on the screen when the equipment is selected. You can skip
an input source that is not necessary.
1 Press
2 Press F/f to select the desired option below, then press .
Selects the input signal from S video sockets 6 when / 6 sockets are both
connected.
Sets the timer to turn on/off the TV.
Sleep Timer
Sets a period of time after which the TV automatically switches itself into standby
mode.
When the Sleep Timer is activated, the (Timer) indicator on the TV (front) lights
up in orange.
Tips
• If you switch off the TV and switch it on again, “Sleep Timer” is reset to “Off”.
• “TV will soon turn off by Sleep Timer” appears on the screen one minute before the TV
switches to standby mode.
F/f to select the desired input source, then press .
Equipment labels: Uses one of the preset labels to assign a name to connected
equipment.
“Edit:”: Creates your own label. Follow steps 2 to 4 of “Programme Labels”
(page 32).
“Skip”: Skips an unnecessary input source when you press to select the input
source.
28
GB
Page 29
On Timer
Sets the timer to turn on the TV from standby mode.
“Day”: Selects the day on which you want to activate the On Timer.
“Time”: Sets the time to turn on the TV.
“Duration”: Selects the time period after which the TV automatically switches to
standby mode again.
“Volume Set-up”: Sets the volume for when the timer turns on the TV.
Clock Set
Allows you to adjust the clock manually. When the TV is receiving digital channels,
the clock cannot be adjusted manually since it is set to the time code of the
broadcasted signal.
Power Saving
Light Sensor
AV2 Output
Quiet Power On
Speaker
Selects the power saving mode to reduce the power consumption of the TV.
When “Picture Off” is selected, the picture is switched off and the (Picture Off)
indicator on the TV (front) lights up in green. The sound remains unchanged.
“On”: Automatically optimizes the picture settings according to the ambient light in
the room.
“Off”: Turns off the “Light Sensor” feature.
Note
Be sure not to put anything over the sensor, as its function may be affected. See page 14 for
further information on the sensor.
Sets a signal to be output through the socket labelled / 2 on the rear of the
TV. If you connect a VCR or other recording equipment to the / 2 socket,
you can then record from the equipment connected to other sockets of the TV.
“TV”: Outputs a broadcast.
“AV1”: Outputs signals from equipment connected to the / 1 socket.
“AV6”: Outputs signals from equipment connected to the / 6 socket.
“Auto”: Outputs whatever is being viewed on the screen (except signals from the
/ 3, HDMI IN 4, HDMI IN 5 and PC sockets).
Sets the volume control at a low level when the TV is first turned on, gradually
increasing the sound to a preset level.
Switches on/off the TV’s internal speakers.
“On”: The TV speakers are turned on in order to listen to the TV’s sound through
TV’s speakers.
“Off”: The TV speakers are turned off in order to listen to the TV’s sound only
through your external audio equipment connected to the audio output sockets.
Using MENU Functions
Audio Out
Colour System
Product Information
“Variable”: The audio output from your audio system can be controlled by the TV’s
remote.
“Fixed”: The audio output of the TV is fixed. Use your audio receiver’s volume
control to adjust the volume (and other audio settings) through your audio system.
Selects the colour system (“Auto”, “PAL”, “SECAM”, “NTSC3.58”, “NTSC4.43”,
or “PAL60”) according to the input signal from the input source.
Displays your TV’s system information.
Continued
29
GB
Page 30

All Reset
Resets all settings to the factory settings and then displays the Auto Start-up screen.
Note
All settings, including Digital Favourite list, country, language, auto tuned channels, etc. will be reset.
30
GB
Page 31

PC Settings menu
You can select the options listed below on the PC
Settings menu. To select options in “Settings”, refer to
“Picture menu” (page 23).
Using MENU Functions
Screen Format
Reset
Auto Adjustment
Phase
Pitch
Horizontal Shift
Vertical Shift
Power Management
Selects a screen format for displaying input from your PC.
“Normal”: Displays the picture in its original size.
“Full1”: Enlarges the picture to fill the display area, keeping its original horizontalto-vertical aspect ratio.
“Full2”: Enlarges the picture to fill the display area.
Resets the PC settings except “Screen Format” and “Power Management” to the
factory settings.
Automatically adjusts the display position and phase of the picture when the TV
receives an input signal from the connected PC.
Tip
Auto Adjustment may not work well with certain input signals. In such cases, manually adjust
“Phase”, “Pitch”, “Horizontal Shift” and “Vertical Shift”.
Adjusts the phase when the screen flickers.
Adjusts the pitch when the picture has unwanted vertical stripes.
Adjusts the horizontal position of the picture.
Adjusts the vertical position of the picture.
Switches the TV to standby mode if no signal is received for 30 seconds.
31
GB
Page 32

Analogue Set-up menu (Analogue mode only)
You can change/set the analogue settings using the
Analogue Set-up menu. To select options in
“Settings”, refer to “Picture menu” (page 23).
1 Digit Direct
Auto Tuning
Programme Sorting
Programme Labels
When “1 Digit Direct” is set to “On”, you can select an analogue channel using one
preset number button (0 - 9) on the remote.
Note
When “1 Digit Direct” is set to “On”, you cannot select channel numbers 10 and above entering
two digits using the remote.
Tunes in all the available analogue channels.
Usually you do not need to do this operation because the channels are already tuned
when the TV was first installed (page 8). However, this option allows you to repeat
the process (e.g., to retune the TV after moving house, or to search for new channels
that have been launched by broadcasters).
Changes the order in which the analogue channels are stored on the TV.
1 Press
2 Press
Assigns a channel name of your choice up to five letters or numbers. The name will
be displayed briefly on the screen when the channel is selected. (Names for channels
are usually taken automatically from Text (if available).)
1 Press F/f to select the channel you want to name, then press .
2 Press
3 Repeat the procedure in step 2 until the name is complete.
4 Select “OK”, then press .
F/f to select the channel you want to move to a new position,
then press .
F/f to select the new position for your channel, then press .
F/f to select the desired letter or number (“_” for a blank space),
then press
If you input a wrong character
Press G/g to select the wrong character. Then, press F/f to select the correct
character.
To delete all the characters
Select “Reset”, then press .
g.
32
GB
Page 33

Manual Programme
Preset
Before selecting “Label”/“AFT”/“Audio Filter”/“Skip”/“Decoder”, press PROG +/to select the programme number with the channel. You cannot select a programme
number that is set to skip (page 34).
Programme
Presets programme channels manually.
1 Press
2 Press
3 Press
4 Press F/f to select one of the following TV broadcast systems, then
5 Press F/f to select “Channel”, then press .
6 Press
7 Tune the channels as follows:
8 Press to jump to “Confirm”, then press .
9 Press f to select “OK”, then press .
Repeat the procedure above to preset other channels manually.
Label
Assigns a name of your choice, up to five letters or numbers, to the selected channel.
This name will be displayed briefly on the screen when the channel is selected.
To input characters, follow steps 2 to 4 of “Programme Labels” (page 32).
AFT
Allows you to fine-tune the selected programme number manually if you feel that a
slight tuning adjustment will improve the picture quality.
You can adjust the fine tuning over a range of -15 to +15. When “On” is selected, the
fine tuning is performed automatically.
Audio Filter
Improves the sound for individual channels in the case of distortion in mono
broadcasts. Sometimes a non-standard broadcast signal can cause sound distortion or
intermittent sound muting when watching mono programmes.
If you do not experience any sound distortion, we recommend that you leave this
option set to the factory setting “Off”.
Notes
• You cannot receive stereo or dual sound when “Low” or “High” is selected.
• “Audio Filter” is not available when “System” is set to “L”.
/System/Channel
F/f to select “Programme”, then press .
F/f to select the programme number you want to manually tune
(if tuning a VCR, select channel 00), then press RETURN.
F/f to select “System”, then press .
G.
press
B/G: For western European countries/regions
D/K: For eastern European countries/regions
L: For France
I: For the United Kingdom
F/f to select “S” (for cable channels) or “C” (for terrestrial
channels), then press
If you do not know the channel number (frequency)
Press F/f to search for the next available channel. When a channel has been found,
the search will stop. To continue searching, press
If you know the channel number (frequency)
Press the number buttons to enter the channel number of the broadcast you want or
your VCR channel number.
g.
F/f.
Using MENU Functions
Continued
33
GB
Page 34

Skip
Skips unused analogue channels when you press PROG +/- to select channels. (You
can still select a skipped channel using the number buttons.)
Decoder
Views and records the scrambled channel selected when using a decoder connected
directly to scart connector / 1, or to scart connector / 2 via a VCR.
Note
Depending on the country/region selected for “Country” (page 7), this option may not be
available.
Confirm
Saves changes made to the “Manual Programme Preset” settings.
34
GB
Page 35

Digital Set-up menu
You can change/set the digital settings using the
Digital Set-up menu. Select “Digital Set-up” and press
to display the following menus. To select options
in “Settings”, refer to “Picture menu” (page 23).
Using MENU Functions
Digital Tuning
Displays the “Digital Tuning” menu.
Digital Auto Tuning
Tunes in all the available digital channels.
Usually you do not need to do this operation because the channels are already tuned
when the TV was first installed (page 8). However, this option allows you to repeat
the process (e.g., to retune the TV after moving house, or to search for new channels
that have been launched by broadcasters).
Programme List Edit
Removes any unwanted digital channels stored on the TV, and changes the order of
the digital channels stored on the TV.
1 Press
2 Remove or change the order of the digital channels as follows:
3 Press RETURN.
Digital Manual Tuning
Tunes the digital channels manually.
1 Press the number button to select the channel number you want to
2 When the available channels are found, press
3 Press
Repeat the procedure above to tune other channels manually.
F/f to select the channel you want to remove or move to a new
position.
If you know the programme number (frequency)
Press the number buttons to enter the three-digit programme number of the broadcast
you want.
To remove the digital channel
Press . A message that confirms whether the selected digital channel is to be
deleted appears. Press
To change the order of the digital channels
Press g, then press F/f to select the new position for the channel and press G.
Repeat the procedure in steps 1 and 2 to move other channels if required.
manually tune, then press
G to select “Yes”, then press .
F/f to tune the channel.
F/f to select the channel
you want to store, then press .
F/f to select the programme number where you want to store the
new channel, then press .
Continued
35
GB
Page 36

Digital Set-up
Displays the “Digital Set-up” menu.
Subtitle Setting
*
Displays digital subtitles on the screen.
When “For Hard Of Hearing” is selected, some visual aids may also be displayed
with the subtitles (if TV channels broadcast such information).
Subtitle Language
*
Selects which language subtitles are displayed in.
Audio Language
*
Selects the language used for a programme. Some digital channels may broadcast
several audio languages for a programme.
Audio Type
*
Increases the sound level when “For Hard Of Hearing” is selected.
Parental Lock
*
Sets an age restriction for programmes. Any programme that exceeds the age
restriction can only be watched after a PIN Code is entered correctly.
1 Press the number buttons to enter your existing PIN code.
If you have not previously set a PIN, a PIN code entry screen appears. Follow the
instruction of “PIN Code” below.
2 Press F/f to select the age restriction or “None” (for unrestricted
watching), then press .
3 Press RETURN.
PIN Code
*
Sets a PIN code for the first time, or allows you to change your PIN code.
1 Enter a PIN as follows:
If you have previously set a PIN
Press the number buttons to enter your existing PIN.
If you have not set a PIN
Press the number buttons to enter the factory setting PIN of 9999.
2 Press the number buttons to enter the new PIN code.
A message appears to inform you that the new PIN has been accepted.
3 Press RETURN.
Tip
PIN code 9999 is always accepted.
Technical Set-up
Displays the Technical Set-up menu.
“Auto Service Update”: Enables the TV to detect and store new digital services as
they become available.
“Software Download”: Enables the TV to automatically receive software updates,
free through your existing aerial (when issued). Sony recommends that this option is
set to “On” at all times. If you do not want your software to be updated, set this option
to “Off”.
“System Information”: Displays the current software version and the signal level.
“Time Zone”: Allows you to manually select the time zone you are in, if it is not the
same as the default time zone setting for your country.
CA Module Set-up
Allows you to access a Pay Per View service once you obtain a Conditional Access
Module (CAM) and a view card. See page 37 for the location of the (PCMCIA)
socket.
* This function may not be available in some countries.
GB
36
Page 37

Using Optional Equipment
Connecting optional equipment
You can connect a wide range of optional equipment to your TV. Connecting cables are not supplied.
Connecting to the TV (side)
To connect Do this
S VHS/Hi8/DVC
camcorder
Headphones
S VHS/Hi8/DVC
camcorder A
Headphones B Connect to the i socket to listen to
Conditional Access
Module (CAM) C
Connect to the S video socket
6 or the composite video
socket 6, and the audio
L (MONO)/R sockets 6. To
avoid picture noise, do not connect
the camcorder to the video socket
6 and the S video socket
6 at the same time. If you
connect mono equipment, connect
to the L socket 6.
sound from the TV on headphones.
To use Pay Per View services.
For details, refer to the instruction
manual supplied with your CAM.
To use the CAM, remove the
rubber cover from the CAM slot.
Switch off the TV when inserting
your CAM into the CAM slot.
When you do not use the CAM, we
recommend that you replace the
cover on the CAM slot.
Note
CAM is not supported in all
countries. Please check with your
authorized dealer.
Using Optional Equipment
For service use only
Continued
37
GB
Page 38

Connecting to the TV (rear)
Digital satellite receiver
DVD player
with component output
PC
DVD player
To connect Do this
PC D Connect to the PC /
sockets. It is recommended to use
a PC cable with ferrites.
Digital satellite
receiver or DVD
player E
DVD player with
component output
F
Video game
equipment, DVD
player or decoder
G
Connect to the HDMI IN 4 or 5
socket if the equipment has a
HDMI socket. The digital video
and audio signals are input from
the equipment. If the equipment
has a DVI socket, connect the DVI
socket to the HDMI IN 4 socket
through a DVI - HDMI adaptor
interface (not supplied), and
connect the equipment’s audio out
sockets to the audio in HDMI IN 4
sockets.
Notes
• The HDMI sockets only support
the following video inputs: 480i,
480p, 576i, 576p, 720p, 1080i and
1080p. To connect a PC, please
use the PC socket.
• Be sure to use only an HDMI
cable that bears the HDMI logo.
Connect to the component video
sockets and the audio L/R sockets
/3.
Connect to the scart socket /
1. When you connect the
decoder, the scrambled signal from
the TV tuner is output to the
decoder, then the unscrambled
signal is output from the decoder.
38
Video game equipment
DVD player
Decoder
GB
DVD recorder
VCR
Decoder
Hi-Fi audio
equipment
DVD recorder or
VCR that supports
SmartLink H
Hi-Fi audio
equipment I
Connect to the scart socket /
2. SmartLink is a direct link
between the TV and a VCR/DVD
recorder.
Connect to the audio output
sockets to listen to the sound
from the TV on Hi-Fi audio
equipment.
Page 39

Using the Tools menu in PC input mode
Press TOOLS to display the following options when
viewing pictures input from the connected PC.
Options Description
Close Closes the Tools menu.
Power Saving See page 29.
Display Mode See page 23.
Sound Mode See page 25.
Auto Adjustment See page 31.
Horizontal Shift See page 31.
Vertical Shift See page 31.
Auto Clock Set (in
analogue mode only)
i Volume Adjusts the volume of the
Allows you to switch to digital
mode and obtain the time.
headphones.
Using Optional Equipment
39
GB
Page 40

Additional Information
Specifications
Display Unit
Power Requirements:
220–240 V AC, 50 Hz
Screen Size:
KDL-46W2000:
46 inches (Approx. 116.8 cm measured diagonally)
KDL-40W2000:
40 inches (Approx. 101.6 cm measured diagonally)
Display Resolution:
1,920 dots (horizontal) × 1,080 lines (vertical)
Power Consumption:
KDL-46W2000: 225 W
KDL-40W2000: 185 W
Standby Power Consumption*:
0.3 W
* Specified standby power is reached after the TV
finishes necessary internal processes.
Dimensions (w × h × d):
KDL-46W2000:
Approx. 1,120 × 805 × 334 mm (with stand)
Approx. 1,120 × 755 × 118 mm (without stand)
KDL-40W2000:
Approx. 988 × 715 × 266 mm (with stand)
Approx. 988 × 665 × 105 mm (without stand)
Mass:
KDL-46W2000:
Approx. 36.0 kg (with stand)
Approx. 30.0 kg (without stand)
KDL-40W2000:
Approx. 27.5 kg (with stand)
Approx. 23.0 kg (without stand)
Panel System
LCD (Liquid Crystal Display) Panel
TV System
Analogue: Depending on your country/region selection:
B/G/H, D/K, L, I
Digital: DVB-T
Colour/Video System
Analogue: PAL, SECAM
NTSC 3.58, 4.43 (only Video In)
Digital: MPEG-2 MP@ML
Aerial
75 ohm external terminal for VHF/UHF
Channel Coverage
Analogue: VHF: E2–E12
UHF: E21–E69
CATV: S1–S20
HYPER: S21–S41
D/K: R1–R12, R21–R69
L: F2–F10, B–Q, F21–F69
I: UHF B21–B69
Digital: VHF/UHF
Terminals
/1
21-pin Scart connector (CENELEC standard) including
audio/video input, RGB input, and TV audio/video
output.
/2 (SmartLink)
21-pin Scart connector (CENELEC standard) including
audio/video input, RGB input, selectable audio/video
output, and SmartLink interface.
3
Supported formats: 1080i, 720p, 576p, 576i, 480p, 480i
Y: 1 Vp-p, 75 ohms, 0.3V negative sync
B/CB: 0.7 Vp-p, 75 ohms
P
R/CR: 0.7 Vp-p, 75 ohms
P
3
Audio input (phono jacks)
500 mVrms
Impedance: 47 kilohms
HDMI IN 4, 5
Video: 1080p, 1080i, 720p, 576p, 576i, 480p, 480i
Audio: Two channel linear PCM
32, 44.1 and 48 kHz, 16, 20 and 24 bits
Analogue audio (phono jacks):
500 mVrms, Impedance 47 kilohms
(HDMI IN 4 only)
6 S video input (4-pin mini DIN)
6 Video input (phono jack)
6 Audio input (phono jacks)
Audio output (phono jacks)
PC PC Input (D-sub 15-pin) (see page 41)
G: 0.7 Vp-p, 75 ohms, non Sync on Green
B: 0.7 Vp-p, 75 ohms
R: 0.7 Vp-p, 75 ohms
HD: 1-5 Vp-p
VD: 1-5 Vp-p
PC audio input (minijack)
i Headphones jack
CAM (Conditional Access Module) slot
Sound Output
10 W + 10 W
Supplied Accessories
Refer to “1: Checking the accessories” on page 4.
Optional Accessories
• Wall-Mount Bracket SU-WL51
Design and specifications are subject to change
without notice.
40
GB
Page 41

PC Input Signal Reference Chart
Horizontal
Signals Horizontal (Pixel) Vertical (Line)
frequency
(kHz)
VGA 640 480 31.5 60 VGA
640 480 37.5 75 VESA
720 400 31.5 70 VGA-T
SVGA 800 600 37.9 60 VESA Guidelines
800 600 46.9 75 VESA
XGA 1024 768 48.4 60 VESA Guidelines
1024 768 56.5 70 VESA
1024 768 60 75 VESA
WXGA 1280 768 47.4 60 VESA
1280 768 47.8 60 VESA
1360 768 47.7 60 VESA
• This TV’s PC input does not support Sync on Green or Composite Sync.
• This TV’s PC input does not support interlaced signals.
• For the best picture quality, it is recommended to use the signals (boldfaced) in the above chart with a 60 Hz vertical frequency
from a personal computer. In plug and play, signals with a 60 Hz vertical frequency will be selected automatically.
Vertical
frequency (Hz)
Standard
41
Additional Information
GB
Page 42

Troubleshooting
Check whether the 1 (standby) indicator is flashing in red.
When it is flashing
The self-diagnosis function is activated.
1 Count how many 1 (standby) indicator flashes between each two second break.
For example, the indicator flashes three times, then there is a two second break, followed by another three flashes, etc.
2 Press 1 on the TV (Top side) to switch it off, disconnect the mains lead, and inform your dealer or
Sony service centre of how the indicator flashes (number of flashes).
When it is not flashing
1 Check the items in the tables below.
2 If the problem still persists, have your TV serviced by qualified service personnel.
Picture
Problem Cause/Remedy
No picture (screen is dark) and
no sound
• Check the aerial connection.
• Connect the TV to the mains, and press 1 on the TV (top side).
• If the 1 (standby) indicator lights up in red, press "/1.
No picture or no menu
information from equipment
connected to the scart
connector
Double images or ghosting
Only snow and noise appear
on the screen
Distorted picture (dotted lines
or stripes)
Picture noise when viewing a
TV channel
Some tiny black points and/or
bright points on the screen
No colour on programmes
No colour or irregular colour
when viewing a signal from the
Y, P B/CB, PR/CR jacks of 3
• Check that the optional equipment is on and press / repeatedly until
the correct input symbol is displayed on the screen.
• Check the connection between the optional equipment and the TV.
• Check aerial/cable connections.
• Check the aerial location and direction.
• Check if the aerial is broken or bent.
• Check if the aerial has reached the end of its serviceable life (three to five
years in normal use, one to two years at the seaside).
• Keep the TV away from electrical noise sources such as cars, motorcycles,
hair-dryers or optical equipment.
• When installing optional equipment, leave some space between the optional
equipment and the TV.
• Make sure that the aerial is connected using the supplied coaxial cable.
• Keep the aerial cable away from other connecting cables.
• Select “Manual Programme Preset” in the “Analogue Set-up” menu and
adjust “AFT” (Automatic Fine Tuning) to obtain better picture reception
(page 33).
• The picture of a display unit is composed of pixels. Tiny black points and/or
bright points (pixels) on the screen do not indicate a malfunction.
• Select “Reset” in the “Picture” menu to return to the factory settings
(page 23).
• Check the connection of the Y, PB/CB, PR/CR jacks of 3.
• Make sure that the Y, PB/CB, PR/CR jacks of 3 are firmly seated in their
respective sockets.
42
GB
Page 43

Sound
Problem Cause/Remedy
No sound, but good picture
• Press 2 +/– or % (Mute).
• Check that “Speaker” is set to “On” in the “Set-up” menu (page 29).
Noisy sound
• See the “Picture noise” causes/remedies on page 42.
Channels
Problem Cause/Remedy
The desired channel cannot be
selected
Some channels are blank
Digital channel is not displayed
• Switch between digital and analogue mode and select the desired digital/
analogue channel.
• Scrambled/Subscription only channel. Subscribe to the Pay Per View
service.
• Channel is used only for data (no picture or sound).
• Contact the broadcaster for transmission details.
• Contact a local installer to find out if digital transmissions are provided in
your area.
• Upgrade to a higher gain aerial.
General
Problem Cause/Remedy
The TV turns off automatically
(the TV enters standby mode)
The TV turns on automatically
• Check if the “Sleep Timer” is activated, or confirm the “Duration” setting of
“On Timer” (page 28).
• If no signal is received and no operation is performed in the TV mode for
10 minutes, the TV automatically switches to standby mode.
• Check if the “On Timer” is activated (page 29).
Additional Information
Some input sources cannot be
selected
The remote does not function
• Select “AV Preset” in the “Set-up” menu and cancel “Skip” of the input
source (page 28).
• Replace the batteries.
43
GB
Page 44

Index
Numerics
1 Digit Direct 32
16
14:9
4:3 Default
4:3
A
Adv. Contrast Enhancer 24
Advanced Settings
Aerial, connecting
AFT
All Reset
Analogue Set-up menu
Audio Filter
Audio Language
Audio Out
Audio Type
Auto Adjustment
Auto Clock Set
Auto Format
Auto S Video
Auto Start-up
Auto Tuning
Auto Volume
AV Preset
AV2 Output
B
Backlight 23
Balance
Bass
Batteries, inserting into the remote
BBE
Black Corrector
Brightness
C
CA Module Set-up 36
Category list
Channels
Clear White
Clock Set
Colour
Colour Space
Colour System
Colour Temperature
Confirm
Connecting
Contrast
Country
27
16
24
6
33
30
32
33
36
29
36
31
17, 21, 39
27
28
28
analogue and digital channels
analogue channels only
digital channels only
35
25
28
29
25
25
25
24
23
18
auto-tuning
selecting
Skip
8
15
34
24
29
23
24
29
24
34
an aerial/VCR
optional equipment
6
37
23
7
32
D
Digital Auto Tuning 35
Digital Manual Tuning
Digital Set-up
Digital Set-up menu
Digital Tuning
Display Area
Display Mode
Dual Sound
E
EPG (Digital Electronic Programme
Guide)
Equipment labels
F
Fastext 16
Favourite list
G
Gamma 24
H
Headphones
8
Horizontal Shift
Hue
I
Input signal index table 21
L
Label 33
4
Language
Light Sensor
Live Colour
M
Manual Programme Preset 33
Manual timer REC
MENU
MPEG Noise Reduction
N
Noise Reduction 24
O
On Timer 29
27
26
18
20
connecting
Speaker Link
Volume
23
7, 28
29
24
22
35
36
35
35
23
28
37
26
17, 21, 39
27, 31
19
24
P
Parental Lock 36
PC Settings menu
31
Phase
Picture menu
Picture Mode
Picture Off ( ) indicator
PIN Code
31
Pitch
Power (") indicator
Power (1) switch
Power Management
Power Saving
Product Information
Programme index table
Programme Labels
Programme List Edit
Programme Sorting
Q
Quiet Power On 29
R
Reminder 19
Remote control
inserting batteries
overview
sensor
Reset
PC settings
picture
sound
S
Screen format 16
Screen Format
Screen menu
Set-up menu
Sharpness
Skip
28, 34
Sleep Timer
16
Smart
Sound menu
Sound Mode
29
Speaker
Specifications
Standby (1) indicator
Subtitle Language
Subtitle Setting
Surround
31
23
23
36
14
14
31
29
29
15
32
35
32
4
13
14
31
23
25
27, 31
27
28
24
28
25
25
40
14
36
36
25
14
44
GB
Page 45

T
Target Inputs
Technical Set-up
Text
Timer ( ) indicator
Timer list
Timer REC
Timer Settings
Tools
Treble
V
VCR
Vertical Shift
Vertical Size
Volume Offset
W
Wide 16
Z
Zoom 16
23
picture
screen
27
25
sound
16
19
18
17, 21, 39
25
connecting
recording
27
36
28
6
18
27, 31
25
14
45
Additional Information
GB
Page 46

Einführung
Danke, dass Sie sich für dieses Produkt von Sony
entschieden haben.
Lesen Sie diese Anleitung vor Inbetriebnahme des
Fernsehgeräts bitte genau durch und bewahren Sie sie
zum späteren Nachschlagen sorgfältig auf.
Hinweis für Digital TV-Funktion
• Auf Digital TV ( ) bezogene Funktionen sind nur in
Ländern oder Gebieten wirksam, in denen digitale
terrestrische DVB-T (MPEG2)-Signale gesendet werden.
Bitte fragen Sie Ihren lokalen Händler, ob Sie in Ihrem
Wohngebiet ein DVB-T-Signal empfangen können.
• Obwohl dieses Fernsehgerät den DVB-T-Spezifikationen
entspricht, kann keine Kompatibilität mit zukünftigen
digitalen terrestrischen DVB-T-Sendungen garantiert
werden.
• Manche Digital TV-Funktionen sind in bestimmten
Ländern eventuell nicht verfügbar.
Informationen zu Markenzeichen
• ist eine eingetragene Marke der DVB Project
• Hergestellt unter der Lizenz von BBE Sound, Inc.
Lizensiert von BBE Sound, Inc. unter USP5510752 und
5736897. BBE und das BBE-logo sind eingetragene
Warenzeichen der BBE Sound, Inc.
• TruSurround XT, SRS und das (
Warenzeichen von SRS Labs, Inc.
TruSurround XT Technologie wird unter Lizenz von SRS
Labs, Inc. mit eingeschlossen.
• HDMI, das HDMI-Logo und High-Definition Multimedia
Interface sind Markenzeichen oder eingetragene
Markenzeichen von HDMI Licensing LLC.
• Die in dieser Anleitung verwendeten Abbildungen
beziehen sich auf das Modell KDL-40W2000, sofern
nicht anders angegeben.
z) Symbol sind
DE
2
Page 47

Inhaltsverzeichnis
Einrichtung 4
Sicherheitsinformationen...........................................................................................................9
Sicherheitsmaßnahmen ..........................................................................................................12
Übersicht über die Fernbedienung......................................................................................13
Übersicht über die Bedienelemente und Anzeigen am Fernsehgerät .............................14
Fernsehen
Fernsehen ...............................................................................................................................15
Benutzung des digitalelektronischen Programmführers (EPG) .....................................18
Benutzung der Favoritenliste .........................................................................................20
Bildwiedergabe von angeschlossenen Geräten......................................................................21
Verwendung der MENU-Funktionen
Navigieren in den Menüs ........................................................................................................22
Menü „Bild“.............................................................................................................................. 23
Menü „Ton“.............................................................................................................................. 25
Menü „Bildschirm einstellen“ ...................................................................................................27
Menü „Grundeinstellungen“.....................................................................................................29
Menü „PC Einstellungen“ ........................................................................................................32
Menü „Analoge Einstellungen“ (nur Analogmodus) ................................................................33
Menü „Digitale Einstellungen“ ........................................................................................36
DE
Verwendung von Zusatzgeräten
Anschließen von Zusatzgeräten..............................................................................................38
Zusatzinformationen
Technische Daten ...................................................................................................................41
Störungsbehebung..................................................................................................................43
Index .......................................................................................................................................45
: nur für digitale kanäle
3
DE
Page 48

Einrichtung
1: Überprüfen des
Zubehörs
Fernbedienung RM-ED008 (1)
Batterien der Größe AA (Typ R6) (2)
Netzkabel (Typ C-6) (1)
Koaxialkabel (1)
Kabelhalter (1)
Halteriemen (1) und Schrauben (2)
So legen Sie die Batterien in die
Fernbedienung ein
Zum Öffnen drücken und schieben
Hinweise
• Achten Sie beim Einlegen der Batterien auf richtige
Polarität.
• Verwenden Sie nicht Batterien verschiedenen Typs oder
alte und neue Batterien zusammen.
• Entsorgen Sie Batterien umweltfreundlich. In einigen
Regionen gelten unter Umständen spezielle Vorschriften
zur Entsorgung von Batterien. Nähere Informationen
erhalten Sie beispielsweise bei der Stadtverwaltung.
• Gehen Sie sorgfältig mit der Fernbedienung um. Lassen
Sie sie nicht fallen und treten Sie nicht darauf.
Verschütten Sie auch keine Flüssigkeiten auf der
Fernbedienung.
• Legen Sie die Fernbedienung nicht in die Nähe von
Wärmequellen oder an Orte, an denen sie direktem
Sonnenlicht oder Feuchtigkeit ausgesetzt ist.
Ständer (1) und Schrauben (4)
DE
4
Page 49

2: Anbringen des
Ständers
1
3
90°
Einrichtung
4
Verpackungsmaterial
Ständer
2
1 Nehmen Sie den Ständer, die Schrauben
und das Verpackungsmaterial heraus, um
mit der Ständermontage zu beginnen.
2 Platzieren Sie das Verpackungsmaterial
Verpackungsmaterial
so, wie in der Abbildung gezeigt.
3 Stellen Sie das Fernsehgerät direkt auf den
Ständer, wie in der Abbildung gezeigt.
Nachdem Sie das Fernsehgerät auf den Ständer
gestellt haben, entfernen Sie das
Verpackungsmaterial vom Ständer.
4 Befestigen Sie das Fernsehgerät mit den
mitgelieferten Schrauben am Ständer.
Hinweise
• Da dieses Fernsehgerät sehr schwer ist, werden zwei oder
mehr Personen benötigt, um es auf den Ständer zu stellen.
• Wenn Sie einen elektrischen Schrauber verwenden,
stellen Sie das Anzugsmoment auf ca. 1,5 N·m
(15 kgf·cm) ein.
DE
5
Page 50

3: Anschließen einer
4: Anbringen einer
Antenne/eines
Videorecorders
Anschließen nur einer Antenne
Koaxialkabel
(mitgeliefert)
Netzkabel (mitgeliefert)
Anschließen einer Antenne und eines
Videorecorders
Kippsicherung für das
Fernsehgerät
2
3
1
Netzkabel
(mitgeliefert)
Koaxialkabel
(mitgeliefert)
Scart-Kabel
(nicht mitgeliefert)
Koaxialkabel
(nicht mitgeliefert)
Videorecorder
DE
6
Page 51

5: Bündeln der Kabel
6: Auswählen von
1 Verbinden Sie das Fernsehgerät mit der
Netzsteckdose (220-240 V Wechselstrom,
50 Hz).
2 Drücken Sie 1 am Fernsehgerät
(Oberseite).
Wenn Sie das Fernsehgerät zum ersten Mal
einschalten, erscheint das Menü „Language“
(Sprache) auf dem Bildschirm.
Wenn sich das Fernsehgerät im
Bereitschaftsmodus befindet (die Anzeige
(Bereitschaft) am Fernsehgerät (vorne) leuchtet
rot), schalten Sie das Fernsehgerät mit "/1 an der
Fernbedienung ein.
1
3 Wählen Sie mit F/f/G/g die Sprache für
die Menübildschirme aus und drücken Sie
anschließend .
Einrichtung
Sprache und Land/
Region
2
1
2
3,4
3,4
4 Wählen Sie mit F/f das Land bzw. die
Region aus, wo Sie das Fernsehgerät
betreiben, und drücken Sie anschließend
.
Wenn das Land bzw. die Region, wo Sie das
Fernsehgerät verwenden wollen, nicht in der Liste
enthalten ist, wählen Sie „-“ statt eines Landes
bzw. einer Region.
Auf dem Bildschirm erscheint eine Meldung mit
der Aufforderung, den Start des automatischen
Sendersuchlaufs zu bestätigen. Fahren Sie dann
mit „7: Automatisches Speichern von Sendern im
Fernsehgerät“ fort.
DE
7
Page 52

7: Automatisches
Speichern von Sendern
im Fernsehgerät
Das Fernsehgerät beginnt nun mit der Suche nach
allen verfügbaren Fernsehkanälen und speichert diese
ab.
2
4
1 Bevor Sie mit der automatischen
Abstimmung Ihres Fernsehgerätes
beginnen, legen Sie ein vorbespieltes
Band in den am Fernsehgerät
angeschlossenen Videorecorder ein
(Seite 6), und starten Sie die Wiedergabe.
Während der automatischen Abstimmung wird
der Videokanal aufgesucht und im Fernsehgerät
gespeichert.
Wenn kein Videorecorder am Fernsehgerät
angeschlossen ist, erübrigt sich dieser Vorgang.
Gehen Sie zu Schritt 2 über.
Wenn eine Meldung zum Überprüfen der
Antennenanschlüsse erscheint
Es wurden keine digitalen oder analogen Kanäle
gefunden. Überprüfen Sie alle
Antennenanschlüsse, und starten Sie mit
erneut die automatische Senderspeicherung.
3 Wenn das Menü „Programme ordnen“ auf
dem Bildschirm erscheint, gehen Sie wie
unter „Programme ordnen“ erläutert vor
(Seite 33).
Wenn Sie die Reihenfolge, in der die analogen
Kanäle im Fernsehgerät gespeichert wurden, nicht
ändern wollen, fahren Sie mit Schritt 4 fort.
4 Drücken Sie MENU, um den Vorgang zu
beenden.
Am Fernsehgerät sind nun alle verfügbaren
Kanäle eingestellt.
Hinweis
Wenn ein digitaler Sendekanal nicht empfangen werden
kann, oder wenn Sie in Schritt 4 unter „6: Auswählen von
Sprache und Land/Region“ eine Region wählen, in der keine
digitalen Sendungen ausgestrahlt werden, muss die Uhrzeit
nach der Durchführung von Schritt 4 unter „Uhr einstellen“
im Menü „Grundeinstellungen“ (Seite 30) eingestellt
werden.
2 Drücken Sie G/g zur Wahl von „OK“, und
drücken Sie dann .
Das Fernsehgerät beginnt mit der Suche nach
allen verfügbaren digitalen Kanälen, gefolgt von
allen verfügbaren analogen Kanälen. Dies kann
einige Zeit dauern. Warten Sie bitte, und drücken
Sie keine Taste am Fernsehgerät oder an der
Fernbedienung.
DE
8
Page 53

Sicherheitsinformationen
Netzkabel
• Beachten Sie folgende
Hinweise, um eine
Beschädigung des
Netzkabels zu
vermeiden.
Ein beschädigtes
Netzkabel kann einen Brand oder einen Stromschlag
verursachen.
– Ziehen Sie den Netzstecker aus der
Steckdose, wenn Sie das
Fernsehgerät umstellen.
– Wenn Sie die
Netzkabelverbindung trennen
möchten, sollten Sie zuerst den
Netzstecker aus der Steckdose
ziehen.
– Ziehen Sie immer am Stecker,
wenn Sie das Netzkabel von der
Steckdose trennen. Ziehen Sie
nicht am Netzkabel selbst.
– Klemmen Sie das Netzkabel nicht
ein und biegen und verdrehen Sie das Kabel nicht
übermäßig. Die interne Isolierung könnte beschädigt
werden, so dass die blanken Adern im Inneren des Kabels
brechen oder freiliegen.
– Nehmen Sie am Netzkabel keine Veränderungen vor.
– Stellen Sie keine schweren Gegenstände auf das Netzkabel.
– Halten Sie das Netzkabel von Wärmequellen fern.
• Wenn das Netzkabel beschädigt ist, verwenden Sie es nicht
weiter. Lassen Sie es bei Ihrem Händler oder SonyKundendienst austauschen.
• Verwenden Sie das mitgelieferte Netzkabel nicht mit anderen
Geräten.
• Verwenden Sie ausschließlich ein Originalnetzkabel von
Sony und keinem anderen Hersteller.
Netzsteckdose
• Das Fernsehgerät muss mit einem SchukoStecker an einer Schuko-Steckdose
angeschlossen werden.
• Verwenden Sie eine Netzstec kdose, in der der
Stecker fest sitzt. Stecken Sie den Stecker
ganz in die Netzsteckdose. Wenn der Stecker
lose in der Steckdose sitzt, kann es zu einem
Lichtbogenüberschlag kommen. In diesem
Fall besteht Feuergefahr. Wenden Sie sich gegebenenfalls an
einen qualifizierten Elektriker und lassen Sie die
Netzsteckdose auswechseln.
Reinigen des Netzsteckers
Ziehen Sie den Netzstecker aus der
Steckdose und reinigen Sie ihn
regelmäßig. Wenn de r Stecker verstaubt ist
und sich Feuchtigkeit ablagert, kann die
Isolierung leiden und es besteht
Feuergefahr.
Überlastung der Stromkreise
Dieses Fernsehgerät ist ausschließlich
auf den Betrieb an 220–240 V
Wechselstrom ausgelegt. Achten Sie
darauf, nicht zu viele andere Geräte an
dieselbe Netzsteckdose anzuschließen. Andernfalls besteht
Feuergefahr und die Gefahr eines elektrischen Schlags.
Wenn das Gerät nicht benutzt wird
• Zum Schutz der Umwelt und aus
Sicherheitsgründen empfiehlt es
sich, das Fernsehgerät vom
Stromnetz zu trennen, wenn es
mehrere Tage nicht benutzt wir d.
• Das Fernsehgerät bleibt auch in ausgeschaltetem Zustand mit dem
Stromnetz verbunden. Um das Fernsehgerät vollständig vom
Stromnetz zu trennen, muss der Netzstecker aus der Steckdose
gezogen werden. Bei einigen Fernsehgeräten gibt es jedoch
möglicherweise Funktionen, für die das Fernsehgerät in den
Bereitschaftsmodus geschaltet sein muss.
Transport
• Wenn Sie das Fernsehgerät transportieren
müssen, lösen Sie zunächst alle Kabel vom
Fernsehgerät.
• Zum Tragen des großformatigen
Fernsehgeräts sind mindestens zwei
Personen erforderlich.
• Wenn Sie das Fernsehgerät tragen, halten
Sie es wie in der Abbildung rechts
dargestellt. Wenn Sie das Fernsehgerät
oder den Bildschirm anheben oder
transportieren möchten, umgreifen Sie
dazu seine Unterkante. Andernfalls kann
das Fernsehgerät herunterfallen und
beschädigt werden oder schwere
Verletzungen verursachen.
• Setzen Sie das Fernsehgerät beim Transport keinen Stößen und
keinen starken Erschütterungen aus. Andernfalls kann das
Fernsehgerät herunterfallen und beschädigt werden oder schwere
Verletzungen verursachen.
• Wenn das Fernsehgerät herunterfällt oder anderweitig beschädigt
wird, lassen Sie es unverzüglich von qualifiziertem Fachpersonal
überprüfen.
• Wenn Sie das Fernsehgerät wegen einer Reparatur oder bei einem
Umzug transportieren müssen, verpacken Sie es mithilfe der
Originalverpackungsmaterialien im Originalkarton.
Aufstellung
• Das Fernsehgerät sollte neben einer frei zugänglichen
Netzsteckdose installiert werden.
• Stellen Sie das Fernsehgerät auf eine stabile,
ebene Fläche. Hängen Sie nichts an das
Fernsehgerät. Andernfalls kann das
Fernsehgerät herunterfallen und
Sachschäden oder schwere Verletzungen
verursachen.
• Stellen Sie das Fernsehgerät nicht an Orten auf, an denen es
extremen Temperaturen ausgesetzt ist, z. B. in direktem
Sonnenlicht oder in der Nähe einer Heizung oder eines
Warmluftauslasses. Wenn das Fernsehgerät extremen
Temperaturen ausgesetzt wird, kann es sich überhitzen. In diesem
Fall kann sich das Gehäuse verformen oder es kann zu
Fehlfunktionen kommen.
• Stellen Sie das Fernsehgerät nicht direkt neben dem Auslass einer
Klimaanlage auf. Wenn das Fernsehgerät an einer solchen Stelle
installiert wird, kann in seinem Innern Feuchtigkeit kondensieren
und eine Betriebsstörung auslösen.
• Stellen Sie das Fernsehgerät nicht in
sehr warmer, öliger, feuchter oder stark
staubbelasteter Umgebung auf.
• Installieren Sie das Fernsehgerät nicht
an Orten, an denen die Gefahr besteht,
dass Insekten in das Gerät eindringen.
• Stellen Sie das Fernsehgerät nicht an Orten auf, an denen es
mechanischen Erschütterungen ausgesetzt ist.
• Installieren Sie das Fernsehgerät nicht so, dass es z. B. hinter einer
Säule hervorragt oder man mit dem Kopf dagegen stoßen könnte.
Andernfalls kann es zu Verletzungen kommen.
Fortsetzung
DE
9
Page 54

• Sorgen Sie dafür, dass Kinder nicht auf das
Fernsehgerät klettern.
• Wenn Sie das Fernsehgerät in der Nähe von
Meerwasser aufstellen, kann die salzhaltige
Luft Korrosion an den Metallteilen des
Fernsehgeräts verursachen. Interne Bauteile
können beschädigt werden und es besteht Feuergefahr.
Luftzirkulation
• Blockieren Sie nicht die
Lüftungsöffnungen und stecken Sie
nichts in das Gehäuse. Andernfalls
besteht Feuergefahr aufgrund einer
Überhitzung des Geräts.
• Ohne ausreichende Luftzufuhr kann
sich auf und im Fernsehgerät Staub und Schmutz ansammeln.
Beachten Sie Folgendes, um eine ausreichende Luftzufuhr zu
gewährleisten:
– Installieren Sie das Fernsehgerät nicht nach hinten oder
seitwärts geneigt.
– Installieren Sie das Fernsehgerät nicht auf dem Kopf stehend
oder falsch herum.
– Installieren Sie das Fernsehgerät nicht in einem Regal oder
einem Schrank.
– Stellen Sie das Fernsehgerät nicht auf einer Decke oder einem
Bett auf.
– Decken Sie das Fernsehgerät nicht mit Decken oder Vorhängen
ab und legen Sie keine Gegenstände wie Zeitungen usw. darauf.
• Lassen Sie ausreichend Platz um das Fernsehgerät (siehe
Abbildung). Andernfalls ist die Luftzufuhr unzureichend und das
Fernsehgerät kann sich überhitzen. In diesem Fall besteht
Feuergefahr und das Fernsehgerät kann beschädigt werden.
An der Wand
30 cm
10 cm
10 cm
10 cm
Lassen Sie mindestens so viel Platz um das Gerät.
Auf einem Gerätefuß
30 cm
10 cm 10 cm
Lassen Sie mindestens so viel Platz um das Gerät.
6 cm
• Installieren Sie das Fernsehgerät auf keinen Fall folgendermaßen:
Die Luftzirkulation
wird unterbunden.
Wand Wand
Die Luftzirkulation
wird unterbunden.
Sonderzubehör
Beachten Sie die folgenden Punkte,
wenn Sie das Fernsehgerät auf einem
Ständer oder mit einer Wandhalterung
anbringen. Andernfalls kann das
Fernsehgerät herunterfallen und
schwere Verletzungen verursachen.
• Aus Sicherheitsgründen sollten
Sie Zubehör von Sony verwenden:
– Wandmontagehalterung SU-WL51
• Es wird dringend empfohlen, die offizielle Sony
Wandmontagehalterung zu verwenden, um eine
ausreichende Luftzirkulation zu gewährleisten und
Staubablagerungen auf dem Fernsehgerät zu vermeiden.
• Wenn das Fernsehgerät an einer Wand montiert werden
soll, sollte dafür ein qualifizierter Techniker beauftragt
werden. Bei unsachgemäßer Montage können
Sicherheitsgefahren entstehen.
• Sichern Sie das Fernsehgerät auf geeignete Weise, und
befolgen Sie beim Aufstellen des Fernsehgeräts die
Anleitung, die dem Ständer beiliegt.
• Verwenden Sie unbedingt die mit dem Ständer oder der
Wandhalterung gelieferten Halterungs- und
Befestigungsteile.
Verkabelung
• Trennen Sie das Gerät zu Ihrer eigenen Sicherheit unbedingt vom
Netzstrom, wenn Sie Kabel daran anschließen.
• Stolpern Sie nicht über die Kabel. Andernfalls kann das
Fernsehgerät beschädigt werden.
Medizinische Einrichtungen
Stellen Sie dieses Fernsehgerät nicht
an Orten wie Krankenhäusern auf, an
denen medizinische Geräte eingesetzt
werden. Das Gerät kann
Fehlfunktionen an medizinischen
Geräten verursachen.
Nutzung im Freien
• Installieren Sie das Fernsehgerät nicht
im Freien. Wenn das Fernsehgerät
Regen ausgesetzt wird, besteht
Feuergefahr und die Gefahr eines
Stromschlags.
• Wenn das Fernsehgerät direkter
Sonnenbestrahlung ausgesetzt wird,
kann es sich aufheizen. Dies kann zu Schäden am Gerät führen.
10
DE
Page 55

Fahrzeuge, Boote und
andere Wasserfahrzeuge
• Installieren Sie das Fernsehgerät
nicht in einem Fahrzeug. Durch
die Bewegung beim Fahren kann
das Fernsehgerät herunterfallen
und Verletzungen verursachen.
• Installieren Sie das Fernsehgerät
nicht in einem Schiff, Boot oder
einem anderen Wasserfahrzeug.
Wenn das Fernsehgerät Wasser,
insbesondere Meerwasser
ausgesetzt wird, besteht
Feuergefahr und die Gefahr von
Schäden am Gerät.
Wasser und Feuchtigkeit
• Installieren Sie das Fernsehgerät nicht
in der Nähe von Wasser, wie z. B.
neben einer Badewanne oder einer
Dusche. Schützen Sie das Fernsehgerät
außerdem vor Regen, Feuchtigkeit und
Rauch. Andernfalls besteht
Feuergefahr und die Gefahr eines elektrischen Schlags.
• Berühren Sie das Netzkabel und das
Fernsehgerät nicht mit nassen
Händen. Andernfalls kann es zu
einem elektrischen Schlag kommen
und das Fernsehgerät kann
beschädigt werden.
Feuchtigkeit und brennbares
Material
• Legen Sie keine Gegenstände auf das
Fernsehgerät. Das Fernsehgerät darf
keinem Spritzwasser ausgesetzt
werden und es dürfen keine mit
Flüssigkeit gefüllten Gefäße wie
beispielsweise Vasen darauf ab gestellt
werden.
• Um Feuergefahr zu vermeiden, halten Sie brennbare
Gegenstände oder offene Flammen (z.B. Kerzen) und
Glühbirnen vom Fernsehgerät fern.
• Wenn durch die Öffnungen Flüssigkeiten oder
Fremdkörper in das Fernsehgerät gelangt sind, dürfen Sie
es nicht mehr benutzen. Andernfalls kann es zu einem
elektrischen Schlag kommen und das Fernsehgerät kann
beschädigt werden. Lassen Sie es unverzüglich von
qualifiziertem Fachpersonal überprüfen.
Gewitter
Berühren Sie zu Ihrer eigenen
Sicherheit bei einem Gewitter nicht
das Fernsehgerät, das Netzkabel oder
das Antennenkabel.
Bruchstücke
• Werfen Sie nichts gegen das
Fernsehgerät. Das Glas des
Bildschirms könnte zerbrechen. In
diesem Fall besteht die Gefahr
schwerer Verletzungen.
• Wenn der Bildschirm des
Fernsehgeräts gesprungen ist, trennen Sie unbedingt
sofort das Netzkabel vom Stromnetz. Erst dann dürfen Sie
das Gerät berühren. Andernfalls besteht die Gefahr eines
elektrischen Schlags.
Wartung
Im Gehäuse befinden sich
Bauteile, die unter
Hochspannung stehen.
Öffnen Sie das Gehäuse nicht.
Überlassen Sie Wartungsarbeiten
stets nur qualifiziertem Kundendienstpersonal.
Umgang mit Kleinteilen
Bewahren Sie kleine Zubehörteile außerhalb der Reichweite
von Kindern auf.
11
DE
Page 56

Sicherheitsmaßnahmen
Augenschonendes Fernsehen
• Für ermüdungsfreies Fernsehen sollte die Entfernung zum
Fernsehgerät das Vier- bis Siebenfache der Bildhöhe
betragen.
• Für eine gute Bildqualität achten Sie darauf, dass kein
Lampen- oder Sonnenlicht direkt auf den Bildschirm fällt.
Falls möglich, bringen Sie eine von der Decke herab
gerichtete Punktbeleuchtung an.
• Schauen Sie bei gemäßigter Beleuchtung fern. Durch
falsche Beleuchtung oder langes Fernsehen werden die
Augen belastet.
Einstellen der Lautstärke
• Stellen Sie die Lautstärke so ein, dass Ihre Nachbarn nicht
gestört werden. Bei Nacht ist der Ton weit zu hören. Es
empfiehlt sich daher, die Fenster zu schließen oder
Kopfhörer zu verwenden.
• Stellen Sie beim Verwenden von Kopfhörern die
Lautstärke moderat ein. Andernfalls kann es zu
Gehörschäden kommen.
LCD-Bildschirm
• Obwohl bei der Herstellung des LCD-Bildschirms mit
hochpräziser Technologie gearbeitet wird und der
Bildschirm 99,99% und mehr effektive Pixel besitzt, ist es
möglich, dass dauerhaft einige schwarze oder leuchtende
Punkte (rot, grün oder blau) sichtbar sind. Es handelt sich
dabei um eine strukturelle Eigenschaft von LCDBildschirmen und nicht um eine Fehlfunktion.
• Stoßen Sie nicht gegen den Filter an der Vorderseite,
zerkratzen Sie ihn nicht und stellen Sie nichts auf dieses
Fernsehgerät. Das Bild kann ungleichmäßig werden und
der LCD-Bildschirm kann beschädigt werden.
• Wenn dieses Fernsehgerät an einem kalten Ort verwendet
wird, kommt es möglicherweise zu Schmierstreifen im
Bild oder das Bild wird dunkel. Dabei handelt es sich nicht
um eine Fehlfunktion. Diese Effekte verschwinden, wenn
die Temperatur steigt.
• Wenn Standbilder längere Zeit angezeigt werden, kann es
zu Doppelbildern kommen. Dieser Effekt verschwindet in
der Regel nach einigen Augenblicken.
• Bildschirm und Gehäuse erwärmen sich, wenn das
Fernsehgerät in Betrieb ist. Dies ist keine Fehlfunktion.
• Der LCD-Bildschirm enthält eine kleine Menge
Flüssigkristalle und Quecksilber. Auch die
Leuchtstoffröhre, die im Fernsehgerät verwendet wird,
enthält Quecksilber. Befolgen Sie bei der Entsorgung die
bei Ihnen geltenden Entsorgungsrichtlinien.
Pflegen und Reinigen der Bildschirmoberfläche bzw.
des Gehäuses
Trennen Sie das Netzkabel unbedingt von der
Netzsteckdose, bevor Sie das Gerät reinigen.
Um Materialschäden oder Schäden an der
Bildschirmbeschichtung zu vermeiden, beachten Sie bitte
folgende Sicherheitsmaßnahmen.
• Stoßen Sie nicht gegen den Bildschirm, berühren Sie ihn
nicht mit einem harten Gegenstand und werfen Sie nichts
gegen den Bildschirm. Andernfalls kann der Bildschirm
zerkratzt oder beschädigt werden.
• Berühren Sie nicht die Mattscheibe, wenn Sie das
Fernsehgerät kontinuierlich längere Zeit in Betrieb haben.
Die Mattscheibe kann sich erhitzen.
• Es empfiehlt sich, die Bildschirmoberfläche so wenig wie
möglich zu berühren.
• Entfernen Sie Staub vorsichtig mit einem weichen Tuch
von der Bildschirmoberfläche bzw. dem Gehäuse. Bei
stärkerer Verschmutzung feuchten Sie ein weiches Tuch
leicht mit einer milden Reinigungslösung an und wischen
dann über den Bildschirm.
• Verwenden Sie keine Scheuerschwämme, keine
alkalischen/säurehaltigen Reinigungsmittel, kein
Scheuerpulver und keine flüchtigen Lösungsmittel wie
Alkohol, Benzin, Verdünnung oder Insektizide. Wenn Sie
solche Mittel verwenden oder das Gerät längere Zeit mit
Gummi- oder Vinylmaterialien in Berührung kommt,
kann es zu Schäden an der Bildschirm- oder der
Gehäuseoberfläche kommen.
• In den Lüftungsöffnungen kann sich über einen längeren
Zeitraum hinweg Staub ansammeln. Um eine
ausreichende Belüftung sicherzustellen, empfiehlt es sich,
den Staub regelmäßig (einmal pro Monat) mit einem
Staubsauger abzusaugen.
• Wenn Sie den Winkel des Fernsehgeräts einstellen
wollen, halten Sie den Fuß des Ständers mit der Hand fest,
damit das Fernsehgerät nicht vom Ständer getrennt wird.
Achten Sie darauf, sich nicht die Finger zwischen dem
Fernsehgerät und dem Ständer einzuklemmen.
Optionale Geräte
• Stellen Sie andere Geräte nicht zu nahe beim Fernsehgerät
auf. Lassen Sie mindestens 30 cm Platz zwischen dem
Fernsehgerät und anderen Geräten. Wenn ein
Videorecorder vor oder neben dem Fernsehgerät
aufgestellt wird, kann es zu Bildstörungen kommen.
• Bild- und/oder Tonstörungen können auftreten, wenn sich
das Fernsehgerät nahe an Geräten befindet, die
elektromagnetische Strahlung aussenden.
Entsorgen des Fernsehgeräts
Entsorgung von gebrauchten
elektrischen und
elektronischen Geräten
(anzuwenden in den Ländern
der Europäischen Union und
anderen europäischen
Ländern mit einem separaten
Sammelsystem für diese
Geräte)
Das Symbol auf dem Produ kt oder
seiner Verpackung weist darauf
hin, dass dieses Produkt nicht als
normaler Haushaltsabfall zu behandeln ist, sondern an einer
Annahmestelle für das Recycling von elektrischen und
elektronischen Geräten abgegeben werden muss. Durch
Ihren Beitrag zum korrekten Entsorgen dieses Produkts
schützen Sie die Umwelt und die Gesundheit Ihrer
Mitmenschen. Umwelt und Gesundheit werden durch
falsches Entsorgen gefährdet. Materialrecycling hilft, den
Verbrauch von Rohstoffen zu verringern. Weitere
Informationen über das Recycling dieses Produkts erhalten
Sie von Ihrer Gemeinde, den kommunalen
Entsorgungsbetrieben oder dem Geschäft, in dem Sie das
Produkt gekauft haben.
12
DE
Page 57

Übersicht über die Fernbedienung
1 "/1 – Fernsehbereitschaft
Schaltet das Fernsehgerät ein und aus (im Bereitschaftsmodus).
2 A/B – Zweiton (Seite 26)
3 Farbige Tasten
• Im Digitalmodus (Seite 18, 20): Die Tasten dienen zur Wahl der Optionen
am unteren Ende der Favoriten- und EPG-Digitalmenüs.
• Im Videotextmodus (Seite 16): Zur Verwendung von Fastext.
4 / – Info / Anzeigen von verborgenem Text
• Im Digitalmodus: Zeigt kurze Details des momentan wiedergegebenen
Programms an.
• Im Analogmodus: Zeigt Informationen, wie z. B. die aktuelle
Kanalnummer und das Bildschirmformat, an.
• Im Videotextmodus: Die Taste dient der Anzeige verborgener
Informationen (z.B. Antworten einer Quiz-Sendung).
5 F/f/G/g/ (Seite 15, 22)
6 TOOLS (Seite 17, 21, 40)
Ermöglicht Ihnen den Zugriff auf verschiedene Wiedergabeoptionen und die
Änderung/Durchführung von Einstellungen entsprechend der Signalquelle
und dem Bildschirmformat.
7 MENU (Seite 22)
8 DIGITAL – Digitalmodus (Seite 15)
9 Zifferntasten
• Im Fernsehmodus: Die Tasten dienen der Kanalwahl. Geben Sie für
Kanalnummer 10 und höher die zweite oder dritte Ziffer innerhalb von
zwei Sekunden ein.
• Im Videotextmodus: Zum Eingeben der dreistelligen Nummer, mit der die
Seite ausgewählt wird.
0 – Vorheriger Kanal
Zurückschalten zum vorher (mehr als fünf Sekunden) angezeigten Kanal.
qa PROG +/- (Seite 15)
• Im Fernsehmodus: Zum Auswählen des nächsten (+) oder vorherigen (-)
Kanals.
• Im Videotextmodus: Zum Auswählen der nächsten (+) oder vorherigen (-)
Seite.
qs 2 +/- – Lautstärke
qd % – Stummschalten (Seite 15)
qf
/ – Videotext (Seite 16)
qg ANALOG – Analogmodus (Seite 15)
qh / RETURN
Schaltet auf die vorhergehende Seite eines angezeigten Menüs zurück.
qj – EPG (Digitalelektronischer Programmführer) (Seite 18)
qk – Standbild (Seite 16)
Dient zum Einfrieren des Fernsehbilds.
ql – Bildschirmmodus (Seite 16)
Ändert das Bildschirmformat durch wiederholtes Drücken (zeigt bei nur
einmaligem Drücken das aktuelle Bildschirmformat an).
w; / – Eingangswahl / Anhalten von Text
• Im Fernsehmodus (Seite 21): Zum Auswählen des Eingangssignals von
Geräten, die an die Fernsehbuchsen angeschlossen sind.
• Im Videotextmodus: Die aktuelle Seite wird gehalten.
Tipp
Die Tasten A/B, PROG + und die Zifferntaste 5 sind mit einem Tastpunkt versehen. Verwenden Sie die Tastpunkte als
Anhaltspunkt beim Bedienen des Fernsehgeräts.
13
DE
Page 58

Übersicht über die Bedienelemente und Anzeigen
am Fernsehgerät
1 (Seite 22)
2 / – Eingangswahl/OK
MENU
Hinweis
Vergewissern Sie sich, dass das Fernsehgerät vollständig ausgeschaltet ist, bevor Sie das Netzkabel abziehen. Das Abziehen des
Netzkabels bei noch eingeschaltetem Fernsehgerät kann dazu führen, dass die Anzeige erleuchtet bleibt oder eine Funktionsstörung
im Fernsehgerät auftritt.
• Im Fernsehmodus (Seite 21): Zum Auswählen
des Eingangssignals von Geräten, die an die
Fernsehbuchsen angeschlossen sind.
• Im Fernsehmenü: Dient zum Auswählen eines
Menüs oder einer Option und zum Bestätigen
der Einstellung.
3 2 +/-/ /
• Zum Erhöhen (+) bzw. Verringern (-) der
Lautstärke.
• Im Fernsehmenü: Zum Anfahren der
Optionen nach links ( ) bzw. rechts ( ).
4 PROG +/-/ /
• Im Fernsehmodus: Zum Auswählen des
nächsten (+) oder vorherigen (-) Kanals.
• Im Fernsehmenü: Zum Anfahren der
Optionen nach oben ( ) bzw. unten ( ).
5 1 – Netzschalter
Zum Ein- und Ausschalten des Fernsehgeräts.
6 Fernbedienungssensor/Lichtsensor
(Seite 30)
• Empfängt IR-Signale von der Fernbedienung.
• Verdecken Sie den Sensor nicht, weil dadurch
seine Funktion beeinträchtigt wird.
7 – Timeraufnahmeprogramm/
Bildabschaltungs-/Timeranzeige
• Leuchtet in Orange auf, wenn T imeraufnahme
aktiviert wird (Seite 18, 19).
• Leuchtet in Grün auf, wenn das Bild
ausgeblendet wird (Seite 30).
• Leuchtet in Orange auf, wenn der Timer
aktiviert ist (Seite 30).
8 1 – Bereitschaftsanzeige
Leuchtet rot auf, wenn sich das Fernsehgerät im
Bereitschaftsmodus befindet.
9 " – Netzanzeige
Leuchtet grün auf, wenn das Fernsehgerät
eingeschaltet wird.
14
DE
Page 59

Fernsehen
Fernsehen
1
22
3
3
1 Drücken Sie 1 am Fernsehgerät (Oberseite),
um das Fernsehgerät einzuschalten.
Wenn sich das Fernsehgerät im Bereitschaftsmodus
befindet (die Anzeige 1 (Bereitschaft) am
Fernsehgerät (vorne) leuchtet rot), schalten Sie das
Fernsehgerät mit "/1 an der Fernbedienung ein.
2 Drücken Sie DIGITAL oder ANALOG, um
auf den Digitalmodus bzw. den
Analogmodus umzuschalten.
Die verfügbaren Kanäle hängen vom gewählten
Modus ab.
3 Wählen Sie mit den Zifferntasten oder
PROG +/- einen Fernsehkanal aus.
Um die Kanalnummer 10 und höher mit den
Zifferntasten zu wählen, geben Sie die zweite und
dritte Ziffer innerhalb von zwei Sekunden ein.
Um einen digitalen Kanal mithilfe des elektronischen
Programmführers (EPG) auszuwählen, siehe Seite 18.
Im Digitalmodus
Ein Informationsbanner erscheint kurz. Die
folgenden Symbole können auf dem Banner
angezeigt werden.
: Radiodienst
: Verschlüsselungs-/Abonnementdienst
: Mehrere Dialogsprachen verfügbar
: Untertitel verfügbar
: Untertitel für Hörgeschädigte verfügbar
: Empfohlenes Mindestalter für aktuelles
Programm (von 4 bis 18 Jahren)
: Kindersicherung
: Aktuelles Programm wird aufgenommen
Weitere Funktionen
Funktion Vorgehen
Zeitweiliges
Ausschalten des
Fernsehgeräts
(Bereitschaftsmodus)
Einschalten des
Fernsehgerä tes aus dem
Bereitschaftsmodus
ohne Ton
Ausschalten des
Fernsehgerätes
Einstellen der Lautstärke Drücken Sie 2 + (lauter)/
Stummschalten des Tons Drücken Sie %. Drücken Sie
Aufrufen der
Programmindextabelle
(nur im Analogmodus)
Drücken Sie "/1.
Drücken Sie %. Drücken Sie
2 +/- zum Einstellen des
Lautstärkepegels.
Drücken Sie 1 am
Fernsehgerät (Oberseite).
Hinweis
Um das Fernsehger ät vollkommen
auszuschalten, den Stecker aus
dem Stromnetz ziehen.
-(leiser).
die Taste erneut, um den Ton
wiederherzustellen.
Drücken Sie . Um einen
analogen Kanal auszuwählen,
drücken Sie F/f, dann .
Informationen zum Aufrufen
der Indextabelle mit
Eingangssignalen finden Sie
auf Seite 21.
Fortsetzung
Fernsehen
15
DE
Page 60

So rufen Sie Videotext auf
Drücken Sie /. Mit jedem Tastendruck auf /
wechselt die Anzeige zyklisch wie folgt:
Videotext t Videotext über dem Fernsehbild
eingeblendet (Mischmodus) t Kein Videotext
(Beenden der Videotextanzeige)
Zum Auswählen einer Seite drücken Sie die
Zifferntasten oder PROG +/-.
Zum Anhalten einer Seite drücken Sie / .
Zum Anzeigen von verborgenen Informationen
drücken Sie / .
Tipps
• Sorgen Sie dafür, dass das Fernsehgerät starke Signale
empfängt. Andernfalls können Textfehler auftreten.
• Die meisten Fernsehkanäle strahlen Videotext aus.
Weitere Informationen zu diesem Dienst finden Sie auf
der Indexseite.
• Wenn vier farbige Optionen unten auf der Videotextseite
zu sehen sind, steht Fastext zur Verfügung. Mit Fastext
können Sie schnell und einfach auf Seiten zugreifen.
Drücken Sie die entsprechende farbige Taste, um die Seite
aufzurufen.
4:3
Herkömmliche 4:3-Sendungen (also keine
Breitbildsendungen) werden mit den richtigen
Proportionen angezeigt.
Wide
Breitbildsendungen (16:9) werden mit den richtigen
Proportionen angezeigt.
Zoom*
So halten Sie das Bild an
Dient zum Einfrieren des Fernsehbilds (z.B. um eine
Telefonnummer oder ein Rezept zu notieren).
1 Drücken Sie .
Das Standbild wird auf der linken Seite des
Bildschirms angezeigt. Gleichzeitig wird das
Bewegtbild auf der rechten Seite angezeigt.
2 Drücken Sie erneut, um auf den
normalen Fernsehmodus
zurückzuschalten.
Hinweis
Diese Funktion ist für eine PC-Eingangsquelle nicht
verfügbar.
So passen Sie das Bildschirmformat
manuell der Sendung an
Drücken Sie mehrmals, um „Smart“, „4:3“,
„Wide“, „Zoom“ oder „14:9“ auszuwählen.
Smart*
Herkömmliche 4:3-Sendungen werden mit einem
Breitbildeffekt angezeigt. Das Bild im 4:3-Format
wird bildschirmfüllend gedehnt.
Kinofilme (Letter-Box-Format) werden mit den
richtigen Proportionen angezeigt.
14:9*
14:9-Sendungen werden mit den richtigen
Proportionen angezeigt. Als Resultat erscheinen
schwarze Balken auf dem Bildschirm.
* Teile des Bildes werden oben und unten möglicherweise
abgeschnitten.
Tipps
• Alternativ dazu können Sie „Auto Format“ auch auf „Ein“
setzen. In diesem Fall wird automatisch das beste Format
für die Sendung ausgewählt (Seite 27).
• Sie können die Bildlage einstellen, wenn Sie Smart
(50 Hz), Zoom oder 14:9 wählen. Drücken Sie
die Bildlage nach oben oder unten zu verschieben (z.B.
um Untertitel zu lesen).
• Manche Zeichen und/oder Buchstaben am oberen und
unteren Bildrand sind im Smart-Modus eventuell nicht
sichtbar. In solch einem Fall können Sie die Zeichen
sichtbar machen, indem Sie „V. Amplitude“ im Menü
„Bildschirm einstellen“ wählen und die vertikale Größe
einstellen.
• Wählen Sie „Smart“ oder „Zoom“ zur Anpassung an
Bilder von 720p- oder 1080i-Signalquellen mit
abgeschnittenen Randbereichen.
F/f, um
16
DE
Page 61

Verwendung des Menüs Tools
Drücken Sie TOOLS, um während der Wiedergabe
eines Fernsehprogramms die folgenden Optionen
anzuzeigen.
Optionen Beschreibung
Schließen Schließt das Menü Tools.
Energie sparen Siehe Seite 30.
Untertitel Einstellung
(nur im Digitalmodus)
Siehe Seite 37.
Fernsehen
Digitale Favoriten
(nur im Digitalmodus)
Bild-Modus Siehe Seite 23.
Ton-Modus Siehe Seite 25.
Uhr automatisch
stellen (nur im
Analogmodus)
Abschalttimer Siehe Seite 30.
KH Lautst. Zum Einstellen der Lautstärke
Siehe Seite 20.
Ermöglicht das Umschalten auf
den Digitalmodus, um die
Uhrzeit zu erhalten.
von Kopfhörern.
17
DE
Page 62

Benutzung des digitalelektronischen
Programmführers (EPG) *
1 Drücken Sie im Digitalmodus, um den
digitalelektronischen Programmführer
(EPG) anzuzeigen.
2 Führen Sie den gewünschten
Bedienungsvorgang gemäß der
nachstehenden Tabelle durch.
Hinweis
Digitalelektronischer Programmführer (EPG)
* Diese Funktion ist in manchen Ländern eventuell nicht verfügbar.
Funktion Vorgehen
Ausschalten des EPG Drücken Sie .
Programminformationen werden nur angezeigt, wenn der
Fernsehsender solche überträgt.
Navigieren im EPG Drücken Sie
Anschauen des aktuellen Programms Drücken Sie , während das aktuelle Programm ausgewählt ist.
Sortieren der Programminformationen
nach Kategorie – Kategorieliste
Einstellen des aufzunehmenden
Programms – Timer Aufnahme
1 Drücken Sie die blaue Taste.
2 Drücken Sie
Kategoriename wird auf der Seite angezeigt.
Die folgenden Kategorien sind verfügbar:
„Alle Kategorien“: Enthält alle verfügbaren Kanäle.
Kategoriename (z.B. „Nachrichten“): Enthält alle Kanäle, die der
gewählten Kategorie entsprechen.
3 Drücken Sie .
Der digital elektronische Programmführer (EPG) zeigt nun nur die
aktuellen Programme der ausgewählten Kategorie an.
1 Drücken Sie F/f/G/g, um das später aufzunehmende
Programm auszuwählen.
2 Drücken Sie .
3 Drücken Sie
4 Drücken Sie , um den Timer des Fernsehgeräts und Ihres
Videorecorders zu aktivieren.
Das Symbol erscheint bei der Information des betreffenden Programms.
Die Anzeige am Fernsehgerät (Vorderseite) leuchtet in Orange auf.
Hinweise
• Am Fernsehgerät kann VCR-Timeraufnahme nur für Smartlink-kompatible
Videorecorder eingestellt werden. Wenn Ihr Videorecorder nicht Smartlinkkompatibel ist, erscheint eine Meldung, die Sie auffordert, den Timer Ihres
Videorecorders einzustellen.
• Nachdem die Aufnahme begonnen hat, können Sie Ihr Fernsehgerät in den
Bereitschaftsmodus schalten. Wenn Sie Ihr Fernsehgerät jedoch ganz
ausschalten, wird die Aufnahme möglicherweise abgebrochen.
• Falls eine Altersgrenze für Programme gewählt worden ist, erscheint eine
Meldung mit der Aufforderung zur Eingabe des PIN-Codes auf dem
Bildschirm. Weitere Einzelheiten finden Sie unter „Kindersicherung“ auf
Seite 37.
F/f/G/g.
F/f/G/g, um eine Kategorie auszuwählen. Der
F/f zur Wahl von „Timer Aufnahme“.
18
DE
Page 63

Funktion Vorgehen
Einstellen eines Programms auf
automatische Anzeige bei Programmstart
– Erinnerung
1 Drücken Sie F/f/G/g, um das später anzuzeigende
Programm auszuwählen.
2 Drücken Sie .
3 Drücken Sie
4 Drücken Sie , um das ausgewählte Programm beim
Programmstart automatisch anzuzeigen.
Das Symbol c erscheint bei der Information des betreffenden
Programms.
Hinweis
Wenn Sie das Fernsehgerät in den Bereitschaftsmodus versetzen, schaltet es
sich kurz vor dem Programmstart automatisch ein.
F/f zur Wahl von „Erinnerung“.
Fernsehen
Einstellen von Uhrzeit und Datum eines
aufzunehmenden Programms – Man. Timer
Aufnahme
Annullieren einer Aufnahme/Erinnerung –
Timer-Liste
1 Drücken Sie .
2 Drücken Sie F/f zur Wahl von „Man. Timer Aufnahme“, und
drücken Sie dann .
3 Wählen Sie das Datum mit
F/f aus, und drücken Sie dann
g.
4 Stellen Sie die Start- und Stoppzeit auf die gleiche Weise wie
in Schritt 3 ein.
5 Wählen Sie das Programm mit
dann .
6 Drücken Sie , um den Timer des Fernsehgerätes und Ihres
Videorecorders zu aktivieren.
Das Symbol erscheint bei der Information des betreffenden
Programms. Die Anzeige am Fernsehgerät (Vorderseite) leuchtet in
Orange auf.
Hinweise
• Am Fernsehgerät kann VCR-Timeraufnahme nur für Smartlink-kompatible
Videorecorder eingestellt werden. Wenn Ihr Videorecorder nicht Smartlinkkompatibel ist, erscheint eine Meldung, die Sie auffordert, den Timer Ihres
Videorecorders einzustellen.
• Nachdem die Aufnahme begonnen hat, können Sie Ihr Fernsehgerät in den
Bereitschaftsmodus schalten. Wenn Sie Ihr Fernsehgerät jedoch ganz
ausschalten, wird die Aufnahme möglicherweise abgebrochen.
• Falls eine Altersgrenze für Programme gewählt worden ist, erscheint eine
Meldung mit der Aufforderung zur Eingabe des PIN-Codes auf dem
Bildschirm. Weitere Einzelheiten finden Sie unter „Kindersicherung“ auf
Seite 37.
1 Drücken Sie .
2 Drücken Sie
F/f zur Wahl von „Timer-Liste“, und drücken Sie
dann .
3 Wählen Sie das zu annullierende Programm mit
drücken Sie dann .
4 Drücken Sie
F/f zur Wahl von „Timer abbrechen“, und
drücken Sie dann .
Es erscheint eine Anzeige zur Bestätigung, dass Sie das Programm
annullieren wollen.
5 Drücken Sie G/g zur Wahl von „Ja“, und drücken Sie dann
zur Bestätigung.
F/f aus, und drücken Sie
F/f aus, und
Tipp
Sie können den digitalen Elektronischen Programmführer (EPG) auch anzeigen, indem Sie „Digitales EPG“ im „MENU“
(Seite 22) wählen.
19
DE
Page 64

Benutzung der Favoritenliste *
Die Favoriten-Funktion gestattet Ihnen, Programme
aus einer Liste von bis zu 20 angegebenen Kanälen
auszuwählen. Zum Anzeigen der Favoritenliste, siehe
„Navigieren in den Menüs“ (Seite 22).
Favoritenliste
* Diese Funktion ist in manchen Ländern eventuell nicht verfügbar.
Funktion Vorgehen
Erstmaliges Erstellen Ihrer Favoritenliste Es erscheint eine Meldung, in der Sie gefragt werden, ob Sie Kanäle der
Favoritenliste hinzufügen wollen, wenn Sie zum ersten Mal „Digitale
Favoriten“ im „MENU“ wählen.
1 Drücken Sie , um die Option „Ja“ auszuwählen.
2 Drücken Sie
auszuwählen.
Wenn Sie die Kanalnummer kennen, können Sie einen Kanal mithilfe der
Zifferntasten direkt auswählen.
3 Drücken Sie .
Kanäle, die in der Favoritenliste gespeichert sind, werden durch das
Symbol gekennzeichnet.
Ausschalten der Favoritenliste Drücken Sie RETURN.
F/f, um den hinzuzufügenden Kanal
Wiedergeben eines Kanals Drücken Sie , während Sie einen Kanal auswählen.
Hinzufügen oder Löschen von Kanälen in
der Favoritenliste
Löschen aller Kanäle in der Favoritenliste
1 Drücken Sie die blaue Taste.
Kanäle, die in der Favoritenliste gespeichert sind, werden durch das
Symbol gekennzeichnet.
2 Drücken Sie F/f, um den hinzuzufügenden oder zu
löschenden Kanal auszuwählen.
Wenn Sie die Kanalnummer kennen, können Sie einen Kanal mithilfe der
Zifferntasten direkt auswählen.
3 Drücken Sie .
4 Drücken Sie die blaue Taste, um zur Favoritenliste
zurückzukehren.
1 Drücken Sie die blaue Taste.
2 Drücken Sie die gelbe Taste.
Es erscheint eine Anzeige, um zu bestätigen, dass Sie alle Kanäle in der
Favoritenliste löschen wollen.
3 Drücken Sie G/g zur Wahl von „Ja“, und drücken Sie dann
zur Bestätigung.
20
DE
Page 65

Bildwiedergabe von
angeschlossenen
Geräten
Verwendung des Menüs Tools
Drücken Sie TOOLS, um die folgenden Optionen
anzuzeigen, wenn Sie Bilder von einem
angeschlossenen Gerät außer einem PC wiedergeben.
Optionen Beschreibung
Schließen Schließt das Menü Tools.
Schalten Sie das angeschlossene Gerät
ein, und führen Sie folgende Schritte aus.
Bei Geräten, die mit einem voll belegten 21-poligen
Scart-Kabel an die Scart-Buchsen angeschlossen
sind (Seite 39)
Starten Sie die Wiedergabe am angeschlossenen
Gerät.
Das Bild vom angeschlossenen Gerät erscheint auf
dem Fernsehschirm.
Bei einem mit der automatischen Senderspeicherung
eingestellten Videorecorder (Seite 8)
Drücken Sie im Analogmodus PROG +/- oder die
Zifferntasten zur Wahl des Videokanals.
Bei anderen angeschlossenen Geräten (Seite 38)
Drücken Sie / so oft, bis das richtige
Eingangssymbol (siehe unten) auf dem Fernsehschirm
angezeigt wird.
Bildschirmanzeige
AV1/2 oder
V1/2
AV3 3 (Y, P
Bezeichnung der
Eingangsbuchsen
1/2 oder 1/2
B/CB, PR/CR) und
3 (L, R)
Energie sparen Siehe Seite 30.
Bild-Modus Siehe Seite 23.
Ton-Modus Siehe Seite 25.
Uhr automatisch
stellen (nur im
Analogmodus)
Abschalttimer Siehe Seite 30.
KH Lautst. Zum Einstellen der Lautstärke
Ermöglicht das Umschalten auf
den Digitalmodus, um die
Uhrzeit zu erhalten.
von Kopfhörern.
Fernsehen
AV4 HDMI IN 4 und HDMI IN 4
(L, R)
AV5 HDMI IN 5
AV6 oder
AV6
PC PC und PC
6 oder 6, und 6
(L (MONO), R)
Weitere Funktionen
Funktion Vorgehen
Zurückschalten auf
normalen TV-Modus
Aufrufen der
EingangssignalIndextabelle (außer
PC-VideoEingangssignal)
Drücken Sie DIGITAL oder
ANALOG.
Drücken Sie , um die
Eingangssignal-Indextabelle
aufzurufen. (Drücken Sie dann,
nur im Analogmodus,
eine Eingangssignalquelle
auszuwählen, drücken Sie erst
F/f, dann .
g.) Um
21
DE
Page 66

Verwendung der MENU-Funktionen
Navigieren in den
Menüs
„MENU“ ermöglicht die Nutzung verschiedener
praktischer Funktionen dieses Fernsehgerätes. Sie
können bequem die Kanäle oder
Eingangssignalquellen auswählen und die
Einstellungen Ihres Fernsehgerätes ändern.
2,3
1
1 Rufen Sie mit MENU das Menü auf.
Symbol Beschreibung
Digitales EPG
Zeigt den digitalen Elektronischen
Programmführer (EPG) an.
Einzelheiten zu den Einstellungen finden
Sie auf Seite 18.
Externe Eingänge
Dient zur Wahl der an das Fernsehgerät
angeschlossenen Geräte.
• Um den gewünschten externen
Eingang wiederzugeben, wählen Sie
die Eingangssignalquelle aus und
drücken dann .
• Um einem externen Eingang einen
Namen zuzuweisen, wählen Sie
„Bearb. AV Label“, und lesen Sie
dann die Angaben auf Seite 29.
Einstellungen
Zeigt das Menü Einstellungen an, auf
dem die meisten der erweiterten
Einstellungen und Justierungen
vorgenommen werden.
Für Einzelheiten über die Einstellungen,
siehe Seite 23 bis 37.
Hinweis
Die verfügbaren Optionen hängen von der
jeweiligen Situation ab. Nicht verfügbare
Optionen sind ausgegraut oder werden nicht
angezeigt.
Symbol Beschreibung
Digitale Favoriten
Zeigt die Favoritenliste an. Einzelheiten
über die Einstellungen, siehe Seite 20.
Analog
Schaltet auf den zuletzt wiedergegebenen
Analogkanal zurück.
Digital
Schaltet auf den zuletzt wiedergegebenen
Digitalkanal zurück.
DE
22
2 Wählen Sie mit F/f eine Option aus.
3 Drücken Sie , um eine ausgewählte
Option zu bestätigen.
Zum Beenden des Menüs drücken Sie MENU.
Page 67

Menü „Bild“
Die unten aufgeführten Optionen stehen im Menü
„Bild“ zur Auswahl.
1 Drücken Sie F/f, um „Einstellungen“ in
MENU auszuwählen, und drücken Sie
dann .
2 Fahren Sie mit F/f das gewünschte
Menüsymbol an, und drücken Sie dann .
3 Drücken Sie F/f/G/g, um eine Option
auszuwählen.
Verwendung der MENU-Funktionen
Eingangswahl
Bild-Modus
Displaymodus
Normwerte
Ht.Grd.Licht
Kontrast
Helligkeit
Damit wählen Sie, ob die im Menü „Bild“ durchgeführten Einstellungen auf alle
Eingänge oder nur den gegenwärtig wiedergegebenen Eingang angewendet werden.
„Alle“: Die Einstellungen werden auf alle Eingänge angewendet.
„Nur Video“: Die Einstellungen werden nur auf den gegenwärtigen Eingang
angewendet.
Dient zur Wahl des Bildmodus außer einer PC-Eingangssignalquelle.
„Brillant“: Für verbesserten Bildkontrast und Bildschärfe.
„Standard“: Für Standardbilder. Empfohlen für privaten Gebrauch.
„Anwender“: Zum Speichern bevorzugter Einstellungen.
Dient zur Wahl des Anzeigemodus außer einer PC-Eingangssignalquelle.
„Video“: Für Videobilder.
„Text“: Für Text, Diagramme oder Tabellen.
Alle Bildeinstellungen außer „Eingangswahl“, „Bild-Modus“ und „Displaymodus“
werden auf die Werksvorgaben zurückgesetzt.
Dient zum Einstellen der Helligkeit der Hintergrundbeleuchtung.
Tipp
„Ht.Grd.Licht“ ist nicht verfügbar, wenn „Energie sparen“ auf „Hoch“ gesetzt wird (Seite 30).
Dient zum Erhöhen oder Verringern des Bildkontrastes.
Dient zum Aufhellen oder Abdunkeln des Bilds.
Farbe
Farbton
Dient zum Erhöhen oder Verringern der Farbintensität.
Dient zum Verstärken oder Abschwächen der Grün- und Rottöne.
Tipp
„Farbton“ lässt sich nur bei NTSC-Farbsignalen einstellen (z. B. bei Videokassetten aus den
USA).
Fortsetzung
23
DE
Page 68

Farbtemperatur
Dient zum Einstellen der Weißdarstellung.
„Kalt“: Bei Weißtönen wird der Blauanteil erhöht.
„Neutral“: Normale Weißtöne.
„Warm 1“/„Warm 2“: Bei Weißtönen wird der Rotanteil erhöht. „Warm 2“ liefert
einen stärkeren Rotton als „Warm 1“.
Tipp
„Warm 1“ und „Warm 2“ können nur gewählt werden, wenn „Bild-Modus“ auf „Anwender“
eingestellt wird.
Bildschärfe
Dyn. NR
Weiterführende
Einstellungen
Dient zum Erhöhen oder Verringern der Konturenschärfe.
Zum Verringern von Bildstörungen (verrauschtes Bild) bei schwachen
Sendesignalen.
„Autom.“: Die Bildstörungen werden automatisch verringert (nur im
Analogmodus).
„Hoch“/„Mittel“/„Niedrig“: Die Rauschunterdrückung wird unterschiedlich stark
eingestellt.
„Aus“: Die Funktion Dyn. NR wird abgeschaltet.
Gestattet eine detailliertere Anpassung der Bildfunktion. Wenn Sie „Bild-Modus“
auf „Anwender“ setzen, können Sie diese Einstellungen festlegen/ändern.
„Normw.“: Dient zur Rücksetzung aller erweiterten Videoeinstellungen auf die
Werksvorgaben.
„Schwarzkorrektur“: Hebt schwarze Bereiche des Bilds für stärkeren Kontrast
hervor.
„Verb. Kontrastanhebung“: Stellt „Ht.Grd.Licht“ und „Kontrast“ unter Beurteilung
der Bildschirmhelligkeit automatisch auf die optimalen Werte ein. Diese Einstellung
ist für Szenen mit dunklen Bildern besonders effektiv. Sie erhöht den
Kontrastunterschied von Szenen mit dunkleren Bildern.
„Gamma“: Zum Einstellen der Balance zwischen hellen und dunklen Bildbereichen.
„Weisskorrektur“: Hebt weiße Bildteile hervor.
„Farbbrillance“: Verleiht Farben größere Leuchtkraft und reproduziert klare
Hauttöne.
„Farbraum“: Ändert die Farbreproduktionsskala. „Weit“ reproduziert lebhafte
Farben, während „Normal“ die Standardfarben reproduziert.
„MPEG-Rauschunterd.“: Reduziert Bildrauschen in Videos mit MPEGKomprimierung (nur im Digitalmodus).
Tipp
„Farbbrillance“ ist nicht verfügbar, wenn „Farbraum“ auf „Normal“ gesetzt wird.
24
DE
Page 69

Menü „Ton“
Die unten aufgeführten Optionen stehen im Menü
„Ton“ zur Auswahl. Um Optionen in „Einstellungen“
auszuwählen, siehe „Menü „Bild““ (Seite 23).
Verwendung der MENU-Funktionen
Eingangswahl
Ton-Modus
Normwerte
Höhen
Tiefen
Balance
Autom.Lautst.
Damit wählen Sie, ob die im Menü „Ton“ durchgeführten Einstellungen auf alle
Eingänge oder nur den gegenwärtig wiedergegebenen Eingang angewendet werden.
„Alle“: Die Einstellungen werden auf alle Eingänge angewendet.
„Nur Video“: Die Einstellungen werden nur auf den gegenwärtigen Eingang
angewendet.
Dient zur Wahl des Tonmodus.
„Dynamisch“: Betont Höhen und Bässe.
„Standard“: Für Standard-Ton. Empfohlen für privaten Gebrauch.
„Anwender“: Flacher Frequenzgang. Gestattet auch die Speicherung Ihrer
bevorzugten Einstellungen.
Dient zur Rücksetzung der Toneinstellungen außer „Ton-Modus“, „Zweiton“ und
„KH/LS Link“ auf die Werksvorgaben.
Dient zur Einstellung hochfrequenter Klänge.
Dient zur Einstellung niederfrequenter Klänge.
Reguliert die Balance zwischen dem linken und rechten Lautsprecher.
Zum Beibehalten eines konstanten Lautstärkepegels, auch wenn Lautstärkesprünge
auftreten (beispielsweise sind Werbespots in der Regel lauter als
Fernsehsendungen).
Lautstärkeversatz
Surround
Dient zum Einstellen des Lautstärkepegels des aktuellen Eingangs relativ zu anderen
Eingängen, wenn „Eingangswahl“ auf „Nur Video“ gesetzt wird.
Dient zur Wahl des Surroundmodus.
„TruSurround XT“: Für Surroundklang (nur für Stereoprogramme).
„Stereo Simuliert“: Verleiht Mono-Programmen einen surround-ähnlichen Effekt.
„Aus“: Für normalen Stereo- oder Mono-Empfang.
Fortsetzung
25
DE
Page 70

BBE
Verleiht dem Klang mehr Dynamik durch Kompensieren der Phaseneffekte in den
Lautsprechern mit dem „BBE High Definition Sound System“.
Zweiton
KH/LS Link
(KopfhörerLautsprecherVerbindung)
Tipp
„Höhen“, „Tiefen“, „Balance“, „Autom.Lautst.“, „Surround“ und „BBE“ sind für Kopfhörer und Audio-Ausgangsbuchsen
unwirksam.
Zum Auswählen des Tons vom Lautsprecher bei einer Stereo- oder
Zweikanaltonsendung.
„Stereo“, „Mono“: Bei einer Stereosendung.
„A“/„B“/„Mono“: Bei Zweikanaltonsendungen wählen Sie „A“ für Tonkanal 1, „B“
für Tonkanal 2 oder „Mono“ für einen Monokanal, falls verfügbar.
Tipp
Wenn Sie ein an das Fernsehgerät angeschlossenes Gerät auswählen, setzen Sie die Option
„Zweiton“ auf „Stereo“, „A“ oder „B“.
Schaltet die internen Lautsprecher des Fernsehgerätes aus bzw. ermöglicht eine
gleichzeitige Tonausgabe sowohl über das Fernsehgerät als auch über den
Kopfhörer.
„Ein“: Die Tonausgabe erfolgt nur über den Kopfhörer.
„Aus“: Die Tonausgabe erfolgt sowohl über das Fernsehgerät als auch über den
Kopfhörer.
26
DE
Page 71

Menü „Bildschirm einstellen“
Die unten aufgeführten Optionen stehen im Menü
„Bildschirm einstellen“ zur Auswahl. Um Optionen in
„Einstellungen“ auszuwählen, siehe „Menü „Bild““
(Seite 23).
Verwendung der MENU-Funktionen
Eingangswahl
Bildformat
Auto Format
4:3 Vorwahl
Anzeigebereich
Damit wählen Sie, ob die im Menü „Bildschirm einstellen“ durchgeführten
Einstellungen auf alle Eingänge oder nur den gegenwärtig wiedergegebenen
Eingang angewendet werden.
„Alle“: Die Einstellungen werden auf alle Eingänge angewendet.
„Nur Video“: Die Einstellungen werden nur auf den gegenwärtigen Eingang
angewendet.
Einzelheiten zum Bildformat finden Sie unter „So passen Sie das Bildschirmformat
manuell der Sendung an“ (Seite 16).
Zum automatischen Wechseln des Bildformats je nach Sendesignal. Wenn Sie Ihre
Einstellung beibehalten wollen, wählen Sie „Aus“.
Tipps
• Auch wenn Sie unter „Auto Format“ die Option „Ein“ oder „Aus“ gewählt haben, können
Sie das Bildformat jederzeit durch wiederholtes Drücken von ändern.
• „Auto Format“ steht nur bei PAL- und SECAM-Signalen zur Verfügung.
Dient zur Wahl des Standard-Bildschirmformats für 4:3-Sendungen.
„Smart“: Herkömmliche 4:3-Sendungen werden mit einem Breitbildeffekt
angezeigt.
„4:3“: Zeigt konventionelle 4:3-Sendungen in den korrekten Proportionen an.
„Aus“: Die aktuelle Einstellung von „Bildformat“ wird beibehalten, wenn der Kanal
oder Eingang gewechselt wird.
Tipp
Diese Option ist nur verfügbar, wenn „Auto Format“ auf „Ein“ gesetzt wird.
Dient zum Einstellen der Bildanzeigefläche.
„Vollpixel“: Zeigt das Bild für 1080i- oder 1080p-Quellen in Originalgröße an,
wenn Teile des Bilds abgeschnitten werden.
„Normal“: Das Bild wird in Originalgröße angezeigt.
„–1“/„–2“: Das Bild wird vergrößert, um den Bildrand zu verbergen.
H. Position
Dient zum Einstellen der horizontalen Bildlage.
Fortsetzung
27
DE
Page 72

V. Position
Dient zur Einstellung der vertikalen Bildlage, wenn das Bildschirmformat auf
„Smart“ (50 Hz), „Zoom“ oder „14:9“ eingestellt wird.
V. Amplitude
Dient zur Einstellung der vertikalen Bildgröße, wenn das Bildschirmformat auf
„Smart“, „Zoom“ oder „14:9“ eingestellt wird.
28
DE
Page 73

Menü „Grundeinstellungen“
Die unten aufgeführten Optionen stehen im Menü
„Grundeinstellungen“ zur Auswahl. Um Optionen in
„Einstellungen“ auszuwählen, siehe „Menü „Bild““
(Seite 23).
Verwendung der MENU-Funktionen
Neuinitialisierung
Sprache
AV-Einstellungen
Auto S Video
Dient zum Aufrufen des „Initialisierungsmenüs“, mit dem Sie Sprache und Land/
Region wählen und alle verfügbaren digitalen und analogen Kanäle abspeichern
können. In der Regel brauchen Sie diesen Vorgang nicht auszuführen, da die Sprache
und das Land/die Region sowie die Kanäle von der ersten Konfiguration des
Fernsehgeräts bereits eingestellt sind (Seite 7, 8). Mit dieser Option können Sie den
Vorgang allerdings erneut ausführen (z. B. um nach einem Umzug Sender neu
einzustellen oder nach neu eingeführten Sendekanälen zu suchen).
Zum Auswählen der Sprache, in der die Menüs angezeigt werden.
Jedem Gerät, das an die Buchsen an der Seite und an der Rückseite angeschlossen
ist, wird ein Name zugewiesen. Der Name wird kurz auf dem Fernsehschirm
angezeigt, wenn das Gerät ausgewählt wird. Sie können eine unnötige
Eingangssignalquelle überspringen.
1 Wählen Sie mit
Sie anschließend .
2 Wählen Sie mit
anschließend .
Gerätenamen: Verwendet eines der Vorwahl-Etiketten, um dem angeschlossenen
Gerät einen Namen zuzuweisen.
„Bearb.“: Erstellen Sie einen eigenen Namen. Führen Sie die Schritte 2 bis 4 unter
„Programmnamen“ aus (Seite 34).
„Auslassen“: Eine unnötige Eingangssignalquelle wird übersprungen, wenn Sie
zur Wahl der Eingangssignalquelle drücken.
Dient zur Wahl des Eingangssignals von den S-Videobuchsen 6, wenn beide
Buchsen /
F/f die gewünschte Eingangsquelle aus, und drücken
F/f die gewünschte Option unten aus, und drücken Sie
6 belegt sind.
Fortsetzung
29
DE
Page 74

Timer-Einstellungen
Dient zum Einstellen des Timers, um das Fernsehgerät ein- und auszuschalten.
Abschalttimer
Zum Festlegen einer Zeitspanne, nach der das Fernsehgerät automatisch in den
Bereitschaftsmodus schaltet.
Wenn der Abschalttimer aktiviert ist, leuchtet die Anzeige (Timer) am
Fernsehgerät (Vorderseite) in Orange auf.
Tipps
• Wenn Sie das Fernsehgerät aus- und wieder einschalten, wird „Abschalttimer“ auf „Aus“
zurückgesetzt.
• „Fernsehgerät wird bald durch Abschalttimer abgeschaltet“ wird eine Minute, bevor das
Fernsehgerät in den Bereitschaftsmodus schaltet, auf dem Fernsehschirm angezeigt.
Einschalttimer
Dient zum Einstellen des Timers, um das Fernsehgerät aus dem Bereitschaftsmodus
heraus einzuschalten.
„Tag“: Dient zur Wahl des Tages, an dem der Einschalttimer aktiviert werden soll.
„Zeit“: Dient zum Einstellen der Einschaltzeit des Fernsehgerätes.
„Dauer“: Dient zur Wahl der Zeitdauer, nach der das Fernsehgerät automatisch
wieder auf den Bereitschaftsmodus umschaltet.
„Lautstärkeeinst.“: Dient zum Einstellen der Lautstärke, wenn der Timer das
Fernsehgerät einschaltet.
Uhr einstellen
Gestattet eine manuelle Einstellung der Uhr. Wenn das Fernsehgerät digitale Kanäle
empfängt, kann die Uhr nicht manuell eingestellt werden, da sie auf den Timecode
des Sendesignals abgestimmt wird.
Energie sparen
Lichtsensor
AV2 Ausgang
Stummstartfunktion
Dient zur Wahl des Stromsparmodus, um den Stromverbrauch des Fernsehgerätes zu
reduzieren.
Wenn „Bild aus“ gewählt wird, wird das Bild abgeschaltet, und die Anzeige
(Bildabschaltung) am Fernsehgerät (Vorderseite) leuchtet grün auf. Der Ton bleibt
unverändert.
„Ein“: Die Bildeinstellungen werden entsprechend dem Umlicht im Raum
automatisch optimiert.
„Aus“: Die Funktion „Lichtsensor“ wird abgeschaltet.
Hinweis
Verdecken Sie den Sensor nicht, weil dadurch seine Funktion beeinträchtigt wird. Weitere
Informationen zum Sensor finden Sie auf
Zum Ausgeben von Signalen über die Buchse / 2 an der Rückseite des
Fernsehgeräts. Wenn Sie einen Videorecorder oder ein anderes Aufnahmegerät an
die Buchse / 2 anschließen, können Sie die zugespielten Signale von
angeschlossenen Geräten an anderen Buchsen des Fernsehgeräts aufnehmen.
„TV“: Eine Sendung wird ausgegeben.
„AV1“: Signale vom an die Buchse / 1 angeschlossenen Gerät werden
ausgegeben.
„AV6“: Signale vom an die Buchse / 6 angeschlossenen Gerät werden
ausgegeben.
„Autom.“: Der jeweilige Bildschirminhalt wird ausgegeben (außer Signalen von den
Buchsen / 3,
Der Lautstärkeregler wird beim Einschalten des Fernsehgerätes zunächst auf einen
niedrigen Pegel gestellt, worauf die Lautstärke allmählich auf den voreingestellten
Pegel erhöht wird.
HDMI IN 4, HDMI IN 5 und PC ).
Seite 14.
30
DE
Page 75

Lautsprecher
Zum Ein-/Ausschalten der internen Lautsprecher des Fernsehgeräts.
„Ein“: Die Lautsprecher des Fernsehgerätes werden eingeschaltet, um den
Fernsehton über die internen Lautsprecher wiederzugeben.
„Aus“: Die Lautsprecher des Fernsehgerätes werden ausgeschaltet, um den
Fernsehton nur über Ihre an die Audioausgangsbuchsen angeschlossene externe
Audioanlage wiederzugeben.
Audio-Ausgang
Farbsystem
Produktinformation
Kompl. Rückst.
„Variabel“: Die Tonausgabe Ihrer Audioanlage kann mit der Fernbedienung des
Fernsehgerätes gesteuert werden.
„Fest“: Die Tonausgabe des Fernsehgerätes ist fixiert. Benutzen Sie den
Lautstärkeregler Ihres Audioreceivers, um die Lautstärke (und andere
Toneinstellungen) über Ihre Audioanlage einzustellen.
Dient zur Wahl des Farbsystems („Autom.“, „PAL“, „SECAM“, „NTSC3.58“,
„NTSC4.43“ oder „PAL60“) entsprechend dem von der Eingangssignalquelle
eingespeisten Signal.
Verwendung der MENU-Funktionen
Die Systeminformationen Ihres Fernsehgerätes werden angezeigt.
Alle Einstellungen werden auf die Werksvorgaben zurückgesetzt, und dann wird der
Bildschirm „Neuinitialisierung“ aufgerufen.
Hinweis
Alle Einstellungen, einschließlich Digitale Favoritenliste, Land, Sprache, automatisch
abgestimmte Kanäle usw., werden zurückgesetzt.
31
DE
Page 76

Menü „PC Einstellungen“
Die unten aufgeführten Optionen stehen im Menü „PC
Einstellungen“ zur Auswahl. Um Optionen in
„Einstellungen“ auszuwählen, siehe „Menü „Bild““
(Seite 23).
Bildformat
Normwerte
Auto-Einstellung
Phase
Pixelbreite
H. Position
V. Position
Dient zur Wahl des Bildschirmformats für die Anzeige des von Ihrem PC
eingespeisten Eingangssignals.
„Normal“: Das Bild wird in Originalgröße angezeigt.
„Voll 1“: Das Bild wird unter Beibehaltung seines Horizontal-VertikalSeitenverhältnisses bildschirmfüllend vergrößert.
„Voll 2“: Das Bild wird bildschirmfüllend vergrößert.
Dient zur Rücksetzung der PC-Einstellungen außer „Bildformat“ und „Energie
sparen“ auf die Werksvorgaben.
Anzeigeposition und Phase des Bilds werden automatisch eingestellt, wenn das
Fernsehgerät ein Eingangssignal vom angeschlossenen PC empfängt.
Tipp
Auto-Einstellung funktioniert bei bestimmten Eingangssignalen eventuell nicht richtig.
Nehmen Sie in solchen Fällen eine manuelle Einstellung von „Phase“, „Pixelbreite“, „H.
Position“ und „V. Position“ vor.
Dient zur Einstellung der Phase, wenn der Bildschirm flimmert.
Dient zur Einstellung der Pixelbreite, wenn das Bild unerwünschte vertikale Streifen
aufweist.
Dient zum Einstellen der horizontalen Bildlage.
Dient zum Einstellen der vertikalen Bildlage.
Energie sparen
DE
32
Schaltet das Fernsehgerät in den Bereitschaftsmodus, wenn 30 Sekunden lang kein
Signal empfangen wird.
Page 77

Menü „Analoge Einstellungen“ (nur Analogmodus)
Mithilfe des Menüs „Analoge Einstellungen“ können
Sie die Analogeinstellungen ändern/festlegen. Um
Optionen in „Einstellungen“ auszuwählen, siehe
„Menü „Bild““ (Seite 23).
Verwendung der MENU-Funktionen
Einst. Direkteing.
Autom. Progr.
Programme ordnen
Wenn „Einst. Direkteing.“ auf „Ein“ gesetzt ist, können Sie einen analogen Kanal
mit den Zifferntasten (0 – 9) an der Fernbedienung auswählen.
Hinweis
Wenn „Einst. Direkteing.“ auf „Ein“ gesetzt ist, können die Kanalnummern 10 und höher nicht
durch Eingabe von zwei Ziffern mit der Fernbedienung eingegeben werden.
Dient zum Abspeichern aller verfügbaren analogen Kanäle.
In der Regel brauchen Sie diesen Vorgang nicht auszuführen, da die Kanäle von der
ersten Konfiguration des Fernsehgeräts bereits eingestellt sind (Seite 8). Mit dieser
Option können Sie den Vorgang allerdings erneut ausführen (z. B. um nach einem
Umzug Sender neu einzustellen oder nach neu eingeführten Sendekanälen zu
suchen).
Dient zum Ändern der Reihenfolge, in der die analogen Kanäle im Fernsehgerät
gespeichert sind.
1 Wählen Sie mit F/f den Kanal aus, den Sie zu einer anderen
Programmposition verschieben wollen, und drücken Sie dann .
2 Wählen Sie mit
Sie anschließend .
F/f die neue Position für den Kanal aus, und drücken
Fortsetzung
33
DE
Page 78

Programmnamen
Dient zum Zuordnen eines beliebigen Namens aus bis zu fünf Buchstaben oder
Ziffern zu einem Kanal. Der Name wird kurz auf dem Fernsehschirm angezeigt,
wenn der Kanal ausgewählt wird. (Die Namen der Kanäle werden in der Regel
automatisch vom Videotext abgerufen, falls verfügbar.)
1 Wählen Sie mit
.
2 Wählen Sie mit
(„_“ für ein Leerzeichen), und drücken Sie
Wenn Sie ein falsches Zeichen eingegeben haben
Drücken Sie G/g, um das falsche Zeichen auszuwählen. Drücken Sie dann F/f, um
das korrekte Zeichen auszuwählen.
So löschen Sie alle Zeichen
Wählen Sie „Normw.“, und drücken Sie dann .
3 Gehen Sie wie in Schritt 2 erläutert vor, bis Sie den ganzen Namen
eingegeben haben.
4 Wählen Sie „OK“, und drücken Sie dann .
F/f den zu benennenden Kanal aus, und drücken Sie
F/f den gewünschten Buchstaben bzw. die Ziffer aus
g.
Manuell
abspeichern
Bevor Sie „Name“/„AFT“/„Audio-Filter“/„Auslassen“/„Dekoder“ auswählen,
wählen Sie mit PROG +/- die Programmnummer mit dem Kanal aus. Sie können
keine Programmnummer auswählen, für die das Auslassen eingestellt wurde
(Seite 35).
Programm/TV-System/Kanal
Sie können Programmkanäle manuell abspeichern.
1 Drücken Sie
2 Wählen Sie mit F/f die Programmnummer aus, für die Sie manuell
einen Kanal speichern wollen (zum Einstellen des Videorecorders
wählen Sie Kanal 00), und drücken Sie dann RETURN.
3 Drücken Sie
4 Wählen Sie mit F/f eine der folgenden Fernsehnormen aus, und
drücken Sie anschließend
B/G: Für westeuropäische Länder/Regionen
D/K: Für osteuropäische Länder/Regionen
L: Für Frankreich
I: Für Großbritannien
5 Drücken Sie F/f zur Wahl von „Kanal“, und drücken Sie dann .
6 Wählen Sie mit F/f die Option „S“ (für Kabelkanäle) oder „C“ (für
terrestrische Kanäle) aus, und drücken Sie
7 Speichern Sie die Kanäle wie im Folgenden erläutert:
Wenn Sie die Kanalnummer (Frequenz) nicht kennen
Suchen Sie mit F/f nach dem nächsten verfügbaren Kanal. Wenn ein Kanal
gefunden wird, stoppt die Suche. Drücken Sie zum Weitersuchen
Wenn Sie die Kanalnummer (Frequenz) kennen
Geben Sie mit den Zahlentasten die Kanalnummer des gewünschten Senders oder die
Kanalnummer für den Videorecorder ein.
8 Drücken Sie , um nach „Bestätigen“ zu springen, und drücken Sie
dann .
9 Wählen Sie mit
.
Gehen Sie wie oben erläutert vor, wenn Sie weitere Kanäle manuell speichern wollen.
F/f zur Wahl von „Programm“, und drücken Sie dann .
F/f zur Wahl von „TV-System“, und drücken Sie dann .
G.
g.
F/f.
f die Option „OK“ aus, und drücken Sie anschließend
34
DE
Page 79

Name
Zum Zuordnen eines beliebigen Namens aus bis zu fünf Buchstaben oder Ziffern
zum ausgewählten Kanal. Dieser Name wird kurz auf dem Fernsehschirm angezeigt,
wenn der Kanal ausgewählt wird.
Um Zeichen einzugeben, führen Sie die Schritte 2 bis 4 unter „Programmnamen“ aus
(Seite 34).
AFT
Gestattet eine manuelle Feinabstimmung der ausgewählten Programmnummer,
wenn Sie den Eindruck haben, die Bildqualität dadurch verbessern zu können.
Die Feinabstimmung ist innerhalb des Bereichs von –15 bis +15 möglich. Wenn Sie
„Ein“ wählen, erfolgt die Feinabstimmung automatisch.
Audio-Filter
Der Klang einzelner Kanäle wird bei Monosendungen mit Tonstörungen verbessert.
In einigen Fällen kann es beim Wiedergeben von Monosendungen durch nicht
standardmäßige Sendesignale zu Tonverzerrungen oder Tonaussetzern kommen.
Wenn keine Tonverzerrungen zu hören sind, empfiehlt es sich, diese Option in der
werkseitigen Einstellung „Aus“ zu lassen.
Hinweise
• Sie können einen Sender nicht in Stereo oder mit Zweiton empfangen, wenn „Niedrig“ oder
„Hoch“ ausgewählt ist.
• „Audio-Filter“ ist nicht verfügbar, wenn „TV-System“ auf „L“ gesetzt wird.
Auslassen
Unbenutzte analoge Kanäle werden übersprungen, wenn Sie PROG +/- zur Auswahl
der Kanäle drücken. (Mit den Zahlentasten können Sie einen übersprungenen Kanal
weiterhin auswählen.)
Dekoder
Dient zum Betrachten und Aufnehmen des ausgewählten verschlüsselten Kanals,
wenn Sie einen Decoder verwenden, der direkt an die Buchse Scart / 1 oder
über einen Videorecorder an die Buchse Scart / 2 angeschlossen ist.
Hinweis
Je nachdem, was Sie unter „Land“ als Land bzw. Region ausgewählt haben (Seite 7), steht
diese Option möglicherweise nicht zur Verfügung.
Bestätigen
Speichern Sie die an den Einstellungen „Manuell abspeichern“ durchgeführten
Änderungen.
Verwendung der MENU-Funktionen
35
DE
Page 80

Menü „Digitale Einstellungen“
Mithilfe des Menüs „Digitale Einstellungen“ können
Sie die digitalen Einstellungen ändern/festlegen.
Wählen Sie „Digital Einstellung“, und drücken Sie
, um die folgenden Menüs anzuzeigen. Um
Optionen in „Einstellungen“ auszuwählen, siehe
„Menü „Bild““ (Seite 23).
Digitaler Suchlauf
Dient zum Anzeigen des Menüs „Digitaler Suchlauf“.
Auto. Digital-Suchlauf
Dient zum Abspeichern aller verfügbaren digitalen Kanäle.
In der Regel brauchen Sie diesen Vorgang nicht auszuführen, da die Kanäle von der
ersten Konfiguration des Fernsehgeräts bereits eingestellt sind (Seite 8). Mit dieser
Option können Sie den Vorgang allerdings erneut ausführen (z. B. um nach einem
Umzug Sender neu einzustellen oder nach neu eingeführten Sendekanälen zu suchen).
Programmliste editieren
Dient zum Löschen unerwünschter, im Fernsehgerät gespeicherter digitaler Kanäle
und zum Ändern der Reihenfolge der im Fernsehgerät gespeicherten digitalen Kanäle.
1 Wählen Sie mit F/f den Kanal aus, den Sie löschen oder zu einer
neuen Position verschieben wollen.
Wenn Sie die Programmnummer (Frequenz) kennen
Geben Sie mithilfe der Zifferntasten die dreistellige Programmnummer der
gewünschten Sendung ein.
2 Gehen Sie folgendermaßen vor, um digitale Kanäle zu löschen oder ihre
Reihenfolge zu ändern:
Zum Löschen eines digitalen Kanals
Drücken Sie . Es erscheint eine Meldung zur Bestätigung, dass der ausgewählte
digitale Kanal gelöscht werden soll. Wählen Sie mit
drücken Sie anschließend .
Zum Ändern der Reihenfolge der digitalen Kanäle
Drücken Sie g, dann F/f, um die neue Position für den Kanal zu wählen, und
drücken Sie dann
wie in Schritt 1 und 2 erläutert vor.
3 Drücken Sie RETURN.
Manueller Digital-Suchlauf
Dient zum manuellen Abstimmen der digitalen Kanäle.
1 Geben Sie mit den Zifferntasten die Nummer des Kanals ein, den Sie
manuell abstimmen wollen, und drücken Sie dann
abzustimmen.
2 Wenn die verfügbaren Kanäle gefunden worden sind, drücken Sie
um den zu speichernden Kanal auszuwählen, und drücken Sie dann .
3 Wählen Sie mit F/f die Programmnummer aus, unter der Sie den
neuen Kanal speichern wollen, und drücken Sie dann .
Wiederholen Sie den obigen Vorgang, um weitere Kanäle manuell abzustimmen.
G. Falls erforderlich, gehen Sie zum Verschieben weiterer Kanäle
G die Option „Ja“ aus, und
F/f, um den Kanal
F/f,
36
DE
Page 81

Digital Einstellung
Dient zum Anzeigen des Menüs „Digital Einstellung“.
Untertitel Einstellung*
Dient zum Anzeigen digitaler Untertitel auf dem Bildschirm.
Wenn „Hörbehindert“ gewählt wird, können bestimmte Sichthilfen ebenfalls
zusammen mit den Untertiteln angezeigt werden (falls die TV-Kanäle solche
Informationen ausstrahlen).
Sprache für Untertitel*
Dient zur Wahl der Untertitelsprache.
Audio-Sprache*
Dient zur Wahl der für ein Programm verwendeten Dialogsprache. Manche digitalen
Kanäle senden möglicherweise mehrere Dialogsprachen für ein Programm.
Audio-Typ*
Dient zum Erhöhen des Tonpegels, wenn „Hörbehindert“ gewählt wird.
Kindersicherung*
Dient zum Festlegen einer Altersgrenze für bestimmte Programme. Ein Programm,
das die Altersgrenze überschreitet, kann nur nach korrekter Eingabe eines PINCodes angeschaut werden.
1 Geben Sie Ihren vorhandenen PIN-Code mit den Zifferntasten ein.
Falls Sie zuvor noch keinen PIN-Code eingegeben haben, erscheint ein PIN-CodeEingabebildschirm. Folgen Sie den nachstehenden Anweisungen unter „PIN-Code“.
2 Drücken Sie F/f zur Wahl der Altersgrenze oder „Ohne“ (für
uneingeschränkte Wiedergabe), und drücken Sie dann .
3 Drücken Sie RETURN.
PIN-Code*
Dient zum erstmaligen Einstellen des PIN-Codes, oder gestattet eine Änderung Ihres
PIN-Codes.
1 Geben Sie den PIN-Code wie folgt ein:
Wenn Sie bereits einen PIN-Code eingestellt haben
Geben Sie Ihren vorhandenen PIN-Code mit den Zifferntasten ein.
Wenn Sie noch keinen PIN-Code eingestellt haben
Geben Sie den werksseitig vorgegebenen PIN-Code „9999“ mit den Zifferntasten ein.
2 Geben Sie den neuen PIN-Code mit den Zifferntasten ein.
Es erscheint eine Meldung, dass der neue PIN-Code akzeptiert worden ist.
3 Drücken Sie RETURN.
Tipp
Der PIN-Code „9999“ wird immer akzeptiert.
Technische Einstellungen
Dient zum Anzeigen des Menüs für die technischen Einstellungen.
„Dienste autom. aktualisieren“: Ermöglicht es dem Fernsehgerät, neue digitale
Dienste zu erkennen und zu speichern, sobald diese verfügbar werden.
„Software Download“: Ermöglicht es dem Fernsehgerät, Software-Updates über
Ihre vorhandene Antenne automatisch zu empfangen (wenn diese herausgegeben
werden). Sony empfiehlt, diese Option immer auf „Ein“ eingestellt zu lassen. Wenn
Sie keine Aktualisierung Ihrer Software wünschen, setzen Sie diese Option auf
„Aus“.
„Systeminfo“: Zeigt die aktuelle Software-Version und den Signalpegel an.
„Time Zone“: Gestattet Ihnen die manuelle Wahl der Zeitzone, in der Sie sich
befinden, wenn sie von der Standard-Zeitzoneneinstellung für Ihr Land abweicht.
CA-Modul-Einstellung
Diese Option gestattet es Ihnen, auf einen Pay Per View-Dienst zuzugreifen,
nachdem Sie ein Conditional Access Module (CAM) und eine View Card erhalten
haben. Die Lage der Buchse (PCMCIA) ist auf Seite 38 beschrieben.
Verwendung der MENU-Funktionen
* Diese Funktion ist in manchen Ländern eventuell nicht verfügbar.
37
DE
Page 82

Verwendung von Zusatzgeräten
Anschließen von Zusatzgeräten
Sie können viele unterschiedliche Geräte zusätzlich an das Fernsehgerät anschließen. Die Verbindungskabel werden
nicht mitgeliefert.
Anschlüsse am Fernsehgerät (Seite)
Anschließen Vorgehen
S-VHS-/Hi8-/
DVC-Camcorder
A
S-VHS-/Hi8-/
DVCCamcorder
Kopfhörer
Kopfhörer B Nehmen Sie den Anschluss an die
Conditional Access
Module (CAM) C
Nehmen Sie den Anschluss an die
S-Videobuchse 6 oder die
Composite-Videobuchse 6
und die Audiobuchsen
L (MONO)/R 6 vor. Um
Bildrauschen zu vermeiden,
schließen Sie den Camcorder nicht
an die Videobuchse 6 und die
S-Videobuchse 6 gleichzeitig
an. Schließen Sie Mono-Geräte an
die Buchse L 6 an.
Buchse i vor, wenn Sie den Ton
vom Fernsehgerät über Kopfhörer
wiedergeben lassen wollen.
Zur Benutzung von Pay Per ViewDiensten.
Einzelheiten entnehmen Sie bitte
der Bedienungsanleitung Ihres
CAM. Um das CAM zu benutzen,
entfernen Sie die Gummikappe
vom CAM-Schacht. Schalten Sie
das Fernsehgerät aus, wenn Sie Ihr
CAM in den CAM-Schacht
einführen. Wenn Sie das CAM
nicht benutzen, empfehlen wir, den
CAM-Schacht wieder mit der
Kappe abzudecken.
Hinweis
CAM wird nicht in allen Ländern
unterstützt. Bitte fragen Sie Ihren
Vertragshändler.
38
Nur für Wartungszwecke
DE
Page 83

Anschließen an das Fernsehgerät (Rückseite)
PC
Anschließen Vorgehen
PC D Nehmen Sie den Anschluss an die
Buchsen PC / vor. Es
wird empfohlen, ein PC-Kabel mit
Ferritringen zu benutzen.
DVD-Player
Digitaler
Satellitenempfänger
DVD-Player mit
Komponentenausgang
Digitaler SatellitenReceiver oder
DVD-Player E
DVD-Player mit
Komponentenausgang F
Videospielkonsole,
DVD-Player oder
Decoder G
Nehmen Sie den Anschluss an die
Buchse HDMI IN 4 oder 5 vor,
wenn das Gerät eine HDMIBuchse besitzt. Digitale Videound Audiosignale werden vom
Gerät eingespeist. Wenn das Gerät
über eine DVI-Buchse verfügt,
verbinden Sie die DVI-Buchse
über einen DVI-HDMI-Adapter
(nicht mitgeliefert) mit der Buchse
HDMI IN 4 und die
Audioausgänge des Geräts mit den
Audioeingängen HDMI IN 4.
Hinweise
• Die HDMI-Buchsen unterstützen
nur die folgenden
Videoeingangssignale: 480i, 480p,
576i, 576p, 720p, 1080i und
1080p. Um einen PC
anzuschließen, verwenden Sie
bitte die Buchse PC .
• Verwenden Sie nur ein HDMIKabel mit dem HDMI-Logo.
Nehmen Sie den Anschluss an die
Komponenten-Videobuchsen und
Audiobuchsen L/R / 3 vor.
Nehmen Sie den Anschluss an die
Scart-Buchse / 1 vor.
Wenn Sie einen Decoder
anschließen, wird das
verschlüsselte Signal vom
Fernsehtuner in den Decoder
eingespeist und dann vom Decoder
unverschlüsselt ausgegeben.
Verwendung von Zusatzgeräten
DVD-Recorder
Videorecorder
Videospielkonsole
DVD-Player
Decoder
Decoder
HiFiStereoanlage
DVD-Recorder
oder Videorecorder
mit SmartLinkUnterstützung H
HiFi-Stereoanlage INehmen Sie den Anschluss an die
Nehmen Sie den Anschluss an die
Scart-Buchse / 2 vor.
SmartLink stellt eine direkte
Verbindung zwischen dem
Fernsehgerät und einem
Videorecorder bzw. DVDRecorder her.
Audioausgangsbuchsen vor,
wenn Sie den Ton vom
Fernsehgerät über eine HiFiStereoanlage wiedergeben lassen
wollen.
Fortsetzung
39
DE
Page 84

Verwendung des Menüs Tools im PCEingangsmodus
Drücken Sie TOOLS, um die folgenden Optionen
anzuzeigen, wenn Sie Bilder vom angeschlossenen
PC wiedergeben.
Optionen Beschreibung
Schließen Schließt das Menü Tools.
Energie sparen Siehe Seite 30.
Displaymodus Siehe Seite 23.
Ton-Modus Siehe Seite 25.
Auto-Einstellung Siehe Seite 32.
H. Position Siehe Seite 32.
V. Position Siehe Seite 32.
Uhr automatisch
stellen (nur im
Analogmodus)
KH Lautst. Zum Einstellen der Lautstärke
Ermöglicht das Umschalten auf
den Digitalmodus, um die
Uhrzeit zu erhalten.
von Kopfhörern.
40
DE
Page 85

Zusatzinformationen
Technische Daten
Anzeigeeinheit
Betriebsspannung:
220–240 V Wechselstrom, 50 Hz
Bildschirmgröße:
KDL-46W2000:
46 Zoll (Ca. 116,8 cm, diagonal gemessen)
KDL-40W2000:
40 Zoll (Ca. 101,6 cm, diagonal gemessen)
Anzeigeauflösung:
1.920 Punkte (horizontal) × 1.080 Zeilen (vertikal)
Leistungsaufnahme:
KDL-46W2000: 225 W
KDL-40W2000: 185 W
Leistungsaufnahme im Bereitschaftsmodus*:
0,3 W
* Die angegebene Bereitschaftsleistung ist erreicht,
nachdem das Fernsehgerät notwendige interne
Prozesse abgeschlossen hat.
Abmessungen (B × H × T):
KDL-46W2000:
Ca. 1.120 × 805 × 334 mm (mit Ständer)
Ca. 1.120 × 755 × 118 mm (ohne Ständer)
KDL-40W2000:
Ca. 988 × 715 × 266 mm (mit Ständer)
Ca. 988 × 665 × 105 mm (ohne Ständer)
Gewicht:
KDL-46W2000:
Ca. 36,0 kg (mit Ständer)
Ca. 30,0 kg (ohne Ständer)
KDL-40W2000:
Ca. 27,5 kg (mit Ständer)
Ca. 23,0 kg (ohne Ständer)
Bildschirmsystem
LCD-Bildschirm (Flüssigkristall-Display)
Fernsehsystem
Analog: Je nach ausgewähltem Land/Gebiet:
B/G/H, D/K, L, I
Digital: DVB-T
Farb-/Videosystem
Analog: PAL, SECAM
NTSC 3.58, 4.43 (nur Videoeingang)
Digital: MPEG-2 MP@ML
Antenne
75-Ohm-Außenantenne für VHF/UHF
Kanalbereich
Analog: VHF: E2–E12
UHF: E21–E69
CATV: S1–S20
HYPER: S21–S41
D/K: R1–R12, R21–R69
L: F2–F10, B–Q, F21–F69
I: UHF B21–B69
Digital: VHF/UHF
Anschlüsse
/1
21-poliger Scart-Anschluss (CENELEC-Standard) mit
Audio-/Videoeingang, RGB-Eingang und Audio-/
Videoausgang für Fernsehsignale.
/2 (SmartLink)
21-poliger Scart-Anschluss (CENELEC-Standard) mit
Audio-/Videoeingang, RGB-Eingang, wählbarem
Audio-/Videoausgang und SmartLink-Schnittstelle.
3
Unterstützte Formate: 1080i, 720p, 576p, 576i, 480p,
480i
Y: 1 Vs-s, 75 Ohm, 0,3 V, sync-negativ
B/CB: 0,7 Vs-s, 75 Ohm
P
R/CR: 0,7 Vs-s, 75 Ohm
P
3
Audioeingang (Cinchbuchsen)
500 mV effektiver Mittelwert
Impedanz: 47 kOhm
HDMI IN 4, 5
Video: 1080p, 1080i, 720p, 576p, 576i, 480p, 480i
Audio: Zwei Kanäle, linear, PCM
32, 44,1 und 48 kHz, 16, 20 und 24 Bit
Analog-Audio (Cinchbuchsen):
500 mV effektiver Mittelwert, Impedanz
47 kOhm (nur HDMI IN 4)
6 S-Videoeingang (4-polig, Mini-DIN)
6 Videoeingang (Cinchbuchse)
6 Audioeingang (Cinchbuchsen)
Audioausgang (Cinchbuchsen)
PC PC-Eingang (15-polig, D-Sub) (siehe Seite 42)
G: 0,7 Vs-s, 75 Ohm, kein Sync auf Grün
B: 0,7 Vs-s, 75 Ohm
R: 0,7 Vs-s, 75 Ohm
HD: 1-5 Vs-s
VD: 1-5 Vs-s
PC-Audioeingang (Minibuchse)
i Kopfhörerbuchse
CAM (Conditional Access Module)-Schacht
Tonausgabe
10 W + 10 W
Mitgeliefertes Zubehör
Siehe „1: Überprüfen des Zubehörs“ auf Seite 4.
Sonderzubehör
• Wall-Mount Bracket SU-WL51
Änderungen, die dem technischen Fortschritt dienen,
bleiben vorbehalten.
Fortsetzung
Zusatzinformationen
41
DE
Page 86

PC-Eingangssignal-Referenztabelle
Signale Horizontal (Pixel) Vertikal (Zeile)
VGA 640 480 31,5 60 VGA
640 480 37,5 75 VESA
720 400 31,5 70 VGA-T
SVGA 800 600 37,9 60 VESA-Richtlinien
800 600 46,9 75 VESA
XGA 1024 768 48,4 60 VESA-Richtlinien
1024 768 56,5 70 VESA
1024 768 60 75 VESA
WXGA 1280 768 47,4 60 VESA
1280 768 47,8 60 VESA
1360 768 47,7 60 VESA
• Der PC-Eingang dieses Fernsehgerätes unterstützt Sync auf Grün oder Composite Sync nicht.
• Der PC-Eingang dieses Fernsehgerätes unterstützt keine Interlace-Signale.
• Um die beste Bildqualität zu erzielen, wird empfohlen, die in der obigen Tabelle aufgeführten PC-Signale (fett gedruckt) mit
einer Vertikalfrequenz von 60 Hz zu verwenden. Bei Plug and Play-Geräten werden automatisch Signale mit einer
Vertikalfrequenz von 60 Hz gewählt.
Horizontalfrequenz (kHz)
Vertikalfrequenz (Hz)
Standard
42
DE
Page 87

Störungsbehebung
Überprüfen Sie, ob die Anzeige 1 (Bereitschaft) rot blinkt.
Wenn die Anzeige blinkt
Die Selbstdiagnosefunktion wurde aktiviert.
1 Zählen Sie, wie oft die Anzeige 1 (Bereitschaft) zwischen den Zwei-Sekunden-Pausen blinkt.
Beispiel: Die Anzeige blinkt dreimal, dann kommt eine Zwei-Sekunden-Pause, der drei weitere Blinkzeichen folgen
usw.
2 Schalten Sie das Fernsehgerät mit der Netztaste 1 (Oberseite) aus, trennen Sie das Netzkabel ab,
und teilen Sie Ihrem Händler oder der Sony-Kundendienststelle mit, wie oft die Anzeige blinkt (Anzahl
der Blinkzeichen).
Wenn die Anzeige nicht blinkt
1 Prüfen Sie die Posten in den nachstehenden Tabellen.
2 Wenn sich das Problem anhand dieser Maßnahmen nicht beheben lässt, lassen Sie das
Fernsehgerät von qualifiziertem Kundendienstpersonal überprüfen.
Bild
Problem Ursache/Abhilfemaßnahme
Kein Bild (Bildschirm ist
schwarz) und kein Ton
• Überprüfen Sie die Antennenverbindung.
• Schließen Sie das Fernsehgerät an das Stromnetz an, und drücken Sie 1 am
Fernsehgerät (Oberseite).
• Wenn die Anzeige 1 (Bereitschaft) rot leuchtet, drücken Sie "/1.
Von dem an den ScartAnschluss angeschlossenen
Gerät werden kein Bild und
keine Menüs angezeigt
Doppelbilder bzw. Nachbilder
treten auf
Auf dem Bildschirm ist nur
Störrauschen (Schnee) zu
sehen
Verzerrtes Bild (punktierte
Linien oder Streifen)
Bildrauschen beim Betrachten
eines Fernsehkanals
Einige winzige schwarze
Punkte und/oder helle
Lichtpunkte sind auf dem
Bildschirm zu sehen
• Stellen Sie sicher, dass das angeschlossene Gerät eingeschaltet ist, und
drücken Sie / so oft, bis das richtige Eingangssymbol auf dem
Bildschirm erscheint.
• Überprüfen Sie die Verbindung zwischen dem angeschlossenen Gerät und
dem Fernsehgerät.
• Überprüfen Sie die Antennen-/Kabelverbindungen.
• Überprüfen Sie Lage und Ausrichtung der Antenne.
• Überprüfen Sie, ob die Antenne beschädigt oder verbogen ist.
• Überprüfen Sie, ob die Lebensdauer der Antenne (drei bis fünf Jahre im
normalen Betrieb, ein bis zwei Jahre in Meeresnähe) abgelaufen ist.
• Halten Sie das Fernsehgerät von elektrischen Störquellen, wie z.B. Autos,
Motorrädern, Haartrocknern oder optischen Geräten fern.
• Lassen Sie beim Aufstellen von Zusatzgeräten etwas Platz zwischen dem
Zusatzgerät und dem Fernsehgerät.
• Stellen Sie sicher, dass die Antenne mit dem mitgelieferten Koaxialkabel
korrekt angeschlossen ist.
• Halten Sie das Antennenkabel von anderen Verbindungskabeln fern.
• Wählen Sie „Manuell abspeichern“ im Menü „Analoge Einstellungen“, und
stellen Sie „AFT“ (Automatic Fine Tuning) ein, um einen besseren
Bildempfang zu erhalten (Seite 35).
• Das Bild wird bei diesem Fernsehgerät aus Pixeln zusammengesetzt.
Winzige schwarze Punkte und/oder helle Lichtpunkte (Pixel) auf dem
Bildschirm stellen keine Fehlfunktion dar.
Zusatzinformationen
Fortsetzung
43
DE
Page 88

Problem Ursache/Abhilfemaßnahme
Bei Fernsehsendungen fehlen
die Farben im Bild
• Wählen Sie „Normwerte“ im Menü „Bild“, um die Werkseinstellungen
wiederherzustellen (Seite 23).
Bei Wiedergabe eines Signals
von den Buchsen Y, P
C
R des Eingangs 3 fehlen
die Farben oder werden
verfälscht angezeigt
B/CB, PR/
• Überprüfen Sie die Verbindung zu den Buchsen Y, PB/CB, PR/CR am
Eingang 3.
• Stellen Sie sicher, dass die Stecker fest in den Buchsen Y, P
Eingangs 3 sitzen.
Ton
Problem Ursache/Abhilfemaßnahme
Kein Ton, aber gutes Bild
• Drücken Sie 2 +/– oder % (Stummschalten).
• Vergewissern Sie sich, dass „Lautsprecher“ im Menü „Ein“ auf
„Grundeinstellungen“ gesetzt ist (Seite 31).
Der Ton ist verrauscht
• Siehe Ursachen/Abhilfemaßnahmen für „Bildrauschen“ auf Seite 43.
Kanäle
Problem Ursache/Abhilfemaßnahme
Der gewünschte Kanal kann
nicht gewählt werden
Einige Kanalpositionen sind
leer
• Schalten Sie zwischen Digital- und Analogmodus um, und wählen Sie den
gewünschten digitalen/analogen Kanal.
• Nur Verschlüsselungs-/Abonnementkanal. Abonnieren Sie den Pay Per
View-Dienst.
• Der Kanal wird nur für Daten verwendet (kein Bild oder Ton).
• Wenden Sie sich bezüglich der Übertragungsdetails an die Sendeanstalt.
B/CB, PR/CR des
Es werden keine digitalen
Kanäle angezeigt
• Fragen Sie einen örtlichen Installateur, um herauszufinden, ob digitale
Sendungen in Ihrem Gebiet verfügbar sind.
• Besorgen Sie sich eine Antenne mit höherem Gewinn.
Allgemeines
Problem Ursache/Abhilfemaßnahme
Das Fernsehgerät schaltet sich
automatisch aus (wechselt in
den Bereitschaftsmodus)
Das Fernsehgerät schaltet sich
automatisch ein
Einige Eingangsquellen lassen
sich nicht auswählen
Die Fernbedienung funktioniert
nicht
• Prüfen Sie, ob der „Abschalttimer“ aktiviert ist, oder stellen Sie die
Einstellung für „Dauer“ von „Einschalttimer“ fest (Seite 30).
• Wenn im Fernsehmodus 10 Minuten lang kein Signal eingeht und keine
Taste gedrückt wird, schaltet das Fernsehgerät automatisch in den
Bereitschaftsmodus.
• Prüfen Sie, ob der „Einschalttimer“ aktiviert ist (Seite 30).
• Wählen Sie „AV-Einstellungen“ im Menü „Grundeinstellungen“ und
deaktivieren Sie für die Eingangsquelle die Einstellung „Auslassen“
(Seite 29).
• Tauschen Sie die Batterien aus.
44
DE
Page 89

Index
Numerische Einträge
14:9 16
16
4:3
4:3 Vorwahl
A
Abschalttimer 30
AFT
Anschließen
Antenne anschließen
Anzeigebereich
Audio- Ausgang
Audio-Filter
Audio-Sprache
Audio-Typ
Auslassen
Auto Format
Auto S Video
Auto. Digital-Suchlauf
Auto. Suchlauf
Auto-Einstellung
Autom.Lautst.
AV2 Ausgang
AV-Einstellungen
B
Balance 25
Batterien, Einlegen in die
Fernbedienung
BBE
Bereitschaftsanzeige (1)
Bestätigen
Bildabschaltungsanzeige ( )
Bildformat
Bild-Modus
Bildschärfe
Bildschirmformat
C
CA-Modul-Einstellung 37
D
Digitale Einstellungen 37
Digitaler Suchlauf
Displaymodus
Dyn. NR
27
35
Antenne/Videorecorder
Zusatzgeräte
38
6
27
31
35
37
37
29, 35
27
29
36
analoge und digitale Kanäle
nur analoge Kanäle
nur digitale Kanäle
33
36
32
25
30
29
4
26
14
35
27, 32
23
24
16
36
23
24
E
Eingangswahl
Einschalttimer
Einst. Direkteing.
Energie sparen
6
EPG (Digitalelektronischer
Programmführer)
Erinnerung
F
Farbbrillance 24
Farbe
Farbraum
Farbsystem
Farbtemperatur
Farbton
Fastext
Favoritenliste
Fernbedienung
8
G
Gamma 24
Gerätenamen
H
H. Position 27, 32
Helligkeit
Höhen
Ht.Grd.Licht
I
14
Indextabelle mit Eingangssignalen
21
K
Kanäle
Kategorieliste
Kindersicherung
Kompl. Rückst.
Kontrast
Kopfhörer
L
Land 7
Lautsprecher
Lautstärkeversatz
Lichtsensor
23
Bild
Bildschirm
Ton
27
25
30
33
30, 32
18
19
23
24
31
24
23
16
20
Einlegen von Batterien
Sensor
14
Übersicht
13
29
23
25
23
Auslassen
auswählen
automatisches Speichern
35
15
18
37
31
23
Anschließen
KH Lautst.
KH/LS Link
38
17, 21, 40
26
31
25
30
4
8
M
Man. Timer Aufnahme 19
Manuell abspeichern
Manueller Digital-Suchlauf
MENU
22
Menü „Analoge Einstellungen“
Menü „Bild“
Menü „Bildschirm einstellen“
Menü „Digitale Einstellungen“
Menü „Grundeinstellungen“
Menü „PC Einstellungen“
Menü „Ton“
MPEG-Rauschunterd.
N
Name 35
Netzanzeige (")
Netzschalter (1)
Neuinitialisierung
Normwerte
Bild
23
PC Einstellungen
25
Ton
P
Phase 32
PIN-Code
Pixelbreite
Produktinformation
Programme ordnen
Programmindextabelle
Programmliste editieren
Programmnamen
S
Schwarzkorrektur 24
Smart
Sprache
Sprache für Untertitel
Stummstartfunktion
Surround
T
Technische Daten 41
Technische Einstellungen
Tiefen
Timer Aufnahme
Timeranzeige ( )
Timer-Einstellungen
Timer-Liste
Ton-Modus
Tools
U
Uhr automatisch stellen 17, 21, 40
Uhr einstellen
Untertitel Einstellung
37
32
16
7, 29
25
25
17, 21, 40
34
36
33
23
27
36
29
32
25
24
14
14
29
32
31
33
15
36
34
37
30
37
18
14
30
19
25
30
37
Fortsetzung
Zusatzinformationen
45
DE
Page 90

V
V. Amplitude 28
V. Position
Verb. Kontrastanhebung
Videorecorder
Videotext
W
Weisskorrektur 24
Weitere Einstellungen
Wide
Z
Zoom 16
Zweiton
28, 32
Anschließen
Aufnahme
16
16
26
6
18
24
24
46
DE
Page 91

47
Zusatzinformationen
DE
Page 92

Inleiding
Dank u voor de aankoop van dit Sony-product.
Voordat u de televisie gaat gebruiken, moet u deze
handleiding aandachtig doorlezen. Bewaar de
handleiding voor het geval u deze later als
referentiemateriaal nodig hebt.
Opmerking bij de digitaletelevisiefunctie
• De functies die verband houden met digitale televisie
( ) kunnen alleen gebruikt worden in landen of
gebieden waar digitale DVB-T (MPEG2)-signalen vanaf
het aardoppervlak worden uitgezonden. Controleer a.u.b.
bij uw dealer of ontvangst van DVB-T-signalen in uw
woonplaats mogelijk is.
• Ondanks dat dit televisietoestel voldoet aan de DVB-Tspecificaties, kan compatibiliteit met toekomstige digitale
DVB-T-uitzendingen vanaf het aardoppervlak niet
worden gegarandeerd.
• Sommige functies van digitale televisie zijn niet
beschikbaar in alle landen.
Handelsmerkinformatie
• is a registered trademark of the DVB Project
• Geproduceerd onder licentie van BBE Sound, Inc. In
licentie gegeven door BBE Sound, Inc. onder een of meer
van de volgende US-patentnummers: 5510752, 5736897.
BBE en het BBE-symbool zijn gedeponeerde
handelsmerken van BBE Sound, Inc.
• TruSurround XT, SRS en het (z) symbool zijn
handelsmerken van SRS Labs, Inc.
TruSurround XT technologie is g einkorporeerd met verlof
van de licentiehouder SRS Labs, Inc.
• HDMI, het HDMI-logo en High-Definition Multimedia
Interface zijn handelsmerken of gedeponeerde
handelsmerken van HDMI Licensing LLC.
• De afbeeldingen die in deze gebruiksaanwijzing worden
gebruikt zijn van de KDL-40W2000, behalve indien
anderszins vermeldt.
NL
2
Page 93

Inhoudsopgave
Voorbereidingen 4
Veiligheidsinformatie .................................................................................................................9
Voorzorgsmaatregelen............................................................................................................12
Overzicht van de afstandsbediening...................................................................................13
Overzicht van de knoppen en lampjes op de televisie ......................................................14
Televisie kijken
Televisie kijken........................................................................................................................15
De Digitale Elektronische Programma Gids (EPG) raadplegen .....................................18
De digitale favorietenlijst gebruiken ...............................................................................20
Beelden van een aangesloten apparaat bekijken ...................................................................21
De MENU functies gebruiken
Navigeren in de menu's...........................................................................................................22
Het menu Beeld ......................................................................................................................23
Het menu Geluid .....................................................................................................................25
Het menu Beeldregeling..........................................................................................................27
Het menu Instellingen .............................................................................................................29
Het menu PC instellingen........................................................................................................32
Het menu Analoge instellingen (alleen in analoogmodus) ......................................................33
Het menu Digitale instellingen ....................................................................................... 36
Optionele apparatuur gebruiken
Optionele apparatuur aansluiten .............................................................................................38
Aanvullende informatie
Technische gegevens .............................................................................................................41
Problemen oplossen ...............................................................................................................43
Index .......................................................................................................................................45
: alleen voor digitale kanalen
3
NL
NL
Page 94

Voorbereidingen
1: De accessoires
De batterijen in de afstandsbediening
plaatsen
controleren
Afstandsbediening RM-ED008 (1)
Batterijen van AA-formaat (type R6) (2)
Netsnoer (type C-6) (1)
Coaxkabel (1)
Kabelbinder (1)
Bevestigingsriem (1) en schroeven (2)
Voet (1) en schroeven (4)
Duw en schuif om te openen
Opmerkingen
• Let op de + en de - bij het plaatsen van de batterijen.
• Combineer geen verschillende typen batter ijen, of oude en
nieuwe batterijen.
• Gooi oude batterijen niet gewoon weg, maar lever ze in. In
bepaalde regio's kan het verwerken van batterijen aan
regels zijn gebonden. Neem hiervoor contact op met de
lokale autoriteiten.
• Hanteer de afstandsbediening met zorg. Laat de
afstandsbediening niet vallen, ga er niet op staan en mors
er geen vloeistof op.
• Plaats de afstandsbediening niet in de buurt van een
warmtebron, op een plek in direct zonlicht of in een
vochtige ruimte.
Voor de Klanten in Nederland
Gooi de batterij niet weg maar lever deze in als
klein chemisch afval (KCA).
NL
4
Page 95

1
3
2: De voet bevestigen
Voorbereidingen
90°
Verpakkingsmateriaal
Voet
4
2
1 Haal de voet, de schroeven en het
Verpakkingsmateriaal
verpakkingsmateriaal uit de doos om met
het monteren van de voet te beginnen.
2 Plaats het verpakkingsmateriaal zoals
afgebeeld.
3 Plaats de televisie rechtstreeks op de voet,
zoals afgebeeld.
Nadat de televisie op de voet is geplaatst,
verwijdert u het verpakkingsmateriaal vanaf de
voet.
4 Bevestig de televisie aan de voet met
behulp van de bijgeleverde schroeven.
Opmerkingen
• Deze televisie is erg zwaar zodat er twee of meer mensen
nodig zijn om de televisie op zijn voet te plaatsen.
• Als u een accuschroefmachine gebruikt, stelt u het
aanhaalkoppel in op ongeveer 1,5 N·m (15 kgf·cm).
NL
5
Page 96

3: Een antenne/
4: Voorkomen dat de
videorecorder
aansluiten
Alleen een antenne aansluiten
Coaxkabel
(meegeleverd)
Netsnoer (meegeleverd)
Een antenne en videorecorder aansluiten
televisie omvalt
2
3
1
Netsnoer
(meegeleverd)
Coaxkabel
(meegeleverd)
SCART-kabel
(niet meegeleverd)
Coaxkabel
(niet meegeleverd)
Videorecorder
NL
6
Page 97

5: De snoeren
samenbinden
1 Sluit de stekker van de televisie aan op het
stopcontact (220-240 V wisselstroom,
50 Hz).
2 Druk op 1 op de televisie (bovenzijde).
Wanneer u de televisie voor het eerst aanzet,
wordt het menu Taal op het scherm weergegeven.
Als de televisie stand-by staat (het
lampje op de televisie (voorzijde) brandt rood),
drukt u op "/1 op de afstandsbediening om de
televisie aan te zetten.
1 (stand-by-)
3 Druk op F/f/G/g om de gewenste taal
voor de menuschermen te selecteren en
druk daarna op .
Voorbereidingen
6: De taal en het land/
gebied selecteren
2
1
2
3,4
3,4
4 Druk op F/f om het land/gebied te
selecteren waarin u de televisie gebruikt en
druk daarna op .
Als het land/gebied waarin u de televisie wilt
gebruiken niet in de lijst wordt weergegeven,
selecteert u "-" in plaats van een land/gebied.
Een bericht wordt weergegeven dat de televisie
automatisch wordt geprogrammeerd. Ga
vervolgens naar "7: De televisie automatisch
programmeren".
NL
7
Page 98

7: De televisie
automatisch
programmeren
De televisie gaat nu naar alle beschikbare kanalen
zoeken en staat deze op.
2
4
1 Alvorens de televisie automatisch af te
stemmen op de zenders, plaatst u een
vooraf opgenomen videocassette in de
videorecorder die op de televisie is
aangesloten (pagina 6) en begint u met
weergeven.
Het videokanaal zal tijdens het automatisch
afstemmen worden gevonden en opgeslagen in de
televisie.
Als geen videorecorder is aangesloten op de
televisie, is deze procedure niet noodzakelijk. Ga
verder met stap 2.
Als het bericht wordt weergegeven dat u de
antenneaansluitingen moet controleren
Er zijn geen digitale of analoge kanalen gevonden.
Controleer alle antenne-aansluitingen en druk op
om de automatische programmering opnieuw
te starten.
3 Wanneer het menu Programma's sorteren
op uw scherm verschijnt, volg dan de
stappen van "Programma's sorteren"
(pagina 33).
Als u de volgorde waarin de analoge kanalen op
de televisie zijn opgeslagen, niet wijzigt, ga dan
naar stap 4.
4 Druk op MENU om dit menu te sluiten.
Alle beschikbare kanalen zijn nu op de televisie
ingesteld.
Opmerking
Als geen digitale zender kan worden ontvangen, of als in stap
4 onder "6: De taal en het land/gebied selecteren" een gebied
is gekozen waarin geen digitale zenders aanwezig zijn, moet
de tijd worden ingesteld met "Klokinstelling" op het menu
"Instellingen" (pagina 30) nadat stap 4 is uitgevoerd.
2 Druk op G/g om "OK" te selecteren en druk
vervolgens op .
De televisie gaat nu naar alle beschikbare digitale
kanalen zoeken en daarna naar alle beschikbare
analoge kanalen. Dit kan enige tijd duren. Wees
geduldig en druk niet op knoppen op de televisie
of op de afstandsbediening.
NL
8
Page 99

Veiligheidsinformatie
Netsnoer
• Houd het volgende in
acht om te voorkomen
dat het netsnoer
beschadigt.
Als het netsnoer
beschadigd is, kan dit
brand of elektrische schokken tot gevolg hebben.
– Zorg dat het netsnoer niet teveel wordt afgeklemd,
gebogen of gedraaid.
– Als u het netsnoer
loskoppelt, haalt u de stekker
eerst uit het stopcontact.
– Zorg ervoor dat u het
netsnoer aan de stekker
verwijdert. Trek nooit aan
het snoer zelf.
– Zorg dat het netsnoer niet
teveel wordt afgeklemd,
gebogen of gedraaid.
Hierdoor kunnen de draden
worden blootgelegd of
doorgesneden.
– Pas het netsnoer niet aan.
– Plaats geen zware voorwerpen op het netsnoer.
– Houd het netsnoer uit de buurt van warmtebronnen.
• Indien het netsnoer is beschadigd, mag u deze niet meer
gebruiken en moet u uw dealer of het Sonyservicecentrum vragen deze te vervangen.
• Gebruik het meegeleverde netsnoer niet voor andere
apparatuur.
• Gebruik alleen een origineel Sony-netsnoer, geen
netsnoeren van andere merken.
Stopcontact
• Het televisietoestel dat beschikt over een
driedradige geaarde stekker moet worden
aangesloten op een stopcontact met een
beschermende aardaansluiting.
• Gebruik geen stopcontact dat slecht is
aangebracht op de netspanning. Steek de
stekker volledig in het stopcontact. Als de
stekker niet goed past, kan dit vonken en
brand veroorzaken. Neem contact op met een elektricien
om het stopcontact te laten vervangen.
Stekker reinigen
Verwijder de stekker van het netsnoer en
reinig deze regelmatig. Indien de stekker
wordt bedekt door stof en vocht opneemt,
kan de isolatie verslechteren, hetgeen
brand kan veroorzaken.
Overbelasting
Deze tv werkt uitsluitend op
220–240 V wisselstroom. Sluit n iet te
veel apparaten aan op hetzelfde
stopcontact. Dit kan brand of
elektrische schokken tot gevolg hebben.
Wanneer de televisie niet wordt gebruikt
• Als u het televisietoestel een
aantal dagen niet gebruikt, dan
moet het worden losgekoppeld
van de netspanning vanwege
milieu- en veiligheidsredenen.
• De televisie staat nog onder spanning wanneer deze is
uitgeschakeld. Verwijder de stekker uit het stopcontact
om het televisietoestel volledig uit te schakelen. Bepaalde
televisietoestellen kunnen over functies beschikken
waarvoor het toestel in de stand-by stand moet blijven om
correct te werken.
Vervoer
• Voordat u het televisietoestel
verplaatst, moet u alle snoeren ervan
loskoppelen.
• Het grote televisietoestel moet door
minimaal twee personen worden
gedragen.
• Als u de televisie in uw armen
draagt, moet u deze vasthouden
zoals wordt weergegeven in de
afbeelding rechts. Als het
televisietoestel wordt opgetild of als
het paneel van het toestel wordt
verwijderd, houdt u h et toestel stevig
vast aan de onderkant. Als u dit niet
doet, kan de televisie vallen en
beschadigen of ernstig letsel veroorzaken.
• Wanneer u het toestel vervoert, mag u dit niet blootstellen
aan schokken of sterke trillingen. Het televisietoestel kan
vallen en beschadigd raken of ernstig letsel veroorzaken.
• Als het televisietoestel is gevallen of is beschadigd, moet
u dit onmiddellijk laten nakijken door gekwalificeerd
servicepersoneel.
• Als u het televisietoestel naar de reparateur brengt of
vervoert, verpakt u het in de oorspronkelijke doos en
verpakkingsmaterialen.
Plaatsing
• Het televisietoestel moet in de buurt van een goed
toegankelijk stopcontact worden geplaatst.
• Plaats het televisietoestel op een
stabiele en vlakke ondergrond. Hang
niets aan het televisietoestel. Als u dit
wel doet, kan het toestel van de
standaard vallen. Dit kan schade of
ernstig letsel tot gevolg hebben.
• Installeer het televisietoestel niet op plaatsen waar dit
wordt blootgesteld aan extreme temperaturen, zoals in
direct zonlicht, of in de buurt van een radiator of
heteluchtafvoer. Als het televisietoestel wordt
blootgesteld aan externe temperaturen, kan het oververhit
raken en kan de kast vervormen of de toestel slecht gaan
functioneren.
• Installeer het televisietoestel niet op plaatsen waar het
rechtstreeks aan een airconditioning wordt blootgesteld.
Als het televisietoestel op een dergelijke locatie wordt
geplaatst, kan vocht aan de binnenkant condenseren en
een storing veroorzaken.
• Plaats het televisietoestel nooit in
warme, olieachtige, vochtige of
extreem stoffige omgevingen.
• Plaats het televisietoestel niet op
plaatsen waar insecten in het
toestel kunnen kruipen.
• Plaats het televisietoestel niet op een plek waar deze wordt
blootgesteld aan mechanische trillingen.
Wordt vervolgd
NL
9
Page 100

• Plaats het televisietoestel niet op plaatsen waar het toestel
kan uitsteken, zoals achter een pilaar of op een plaats waar
u uw hoofd eraan kunt stoten. U voorkomt zo lichamelijk
letsel.
• Zorg dat kinderen niet op het
televisietoestel klimmen.
• Als u dit televisietoestel aan zee
gebruikt, kan zout de metalen
onderdelen van het toestel corroderen
en interne schade of brand veroorzaken.
Ventilatie
• Bedek nooit de ventilatieopeningen en steek niets in de kast.
Dit kan oververhitting veroorzaken
waardoor brand kan ontstaan.
• Zonder voldoende ventilatie kan
zich stof ophopen in het televisietoestel, waardoor deze vuil
wordt. Houd voor een goede ventilatie het volgende in acht:
– Installeer het televisietoestel niet achterstevoren of
gedraaid.
– Installeer het televisietoestel niet gekanteld of
ondersteboven.
– Installeer het televisietoestel niet op een plank of in een kast.
– Plaats het televisietoestel niet op een tapijt of bed.
– Dek het televisietoestel niet af met doeken, zoals
gordijnen, of voorwerpen als kranten enz.
• Houd ruimte vrij rond het televisietoestel zoals hierna
wordt aangegeven. Als u dit niet doet, wordt het apparaat
wellicht onvoldoende geventileerd, waardoor het
oververhit kan raken.
Installatie aan de wand
30 cm
10 cm
10 cm
10 cm
Houd minimaal deze ruimte vrij rond het toestel.
Installatie op de standaard
10 cm
Houd minimaal deze ruimte vrij rond het toestel.
30 cm
10 cm 6 cm
• Installeer het televisietoestel nooit op de volgende manieren:
Luchtcirculatie
geblokkeerd.
Wand Wand
Luchtcirculatie
geblokkeerd.
Extra accessoires
Houd rekening met het volgende
als u het televisietoestel installeert
op een standaard of
wandmontagesteun. Als u dit niet
doet, kan het televisietoestel vallen
en ernstig letsel veroorzaken.
• Het wordt om veiligheidsredenen aanbevolen accessoires
van Sony te gebruik:
– Wandmontagesteun SU-WL51
• Het wordt aanbevolen de officiële wandmontagesteun van
Sony te gebruiken voor een goede luchtcirculatie en ter
voorkoming van stofophoping op de televisie.
• Laat, als het televisietoestel aan de wand wordt bevestigd,
de installatie uitvoeren door gekwalificeerd
servicepersoneel. Een onjuiste installatie kan leiden tot
onveilige situaties.
• Zet het televisietoestel goed vast en volg hierbij de
instructies die bij de standaard zijn geleverd.
• Bevestig de steunen die bij de standaard worden geleverd.
Kabels aansluiten
• Koppel voor a lle veiligheid het netsnoer los als u de kabels
aansluit.
• Let op dat u niet over de kabels struikelt. Hierdoor kan het
televisietoestel worden beschadigd.
Medische instellingen
Plaats dit televisietoestel niet op
een locatie waar medische
apparatuur wordt gebruikt.
Hierdoor kan de werking van de
medische apparatuur worden
verstoord.
Gebruik buitenshuis
• Installeer dit televisietoestel niet
buiten. Indien het televisie toestel
wordt blootgesteld aan regen kan
dit resulteren in brand of een
elektrische schok.
• Indien het televisietoestel wordt
blootgesteld aan direct zonlicht kan het televisietoestel
opwarmen, hetgeen het televisietoestel kan beschadigen.
10
NL
 Loading...