

Page 1
LCD Digital Colour TV
For useful information about Sony products
Для получения полезной информации о продукции Сони
Printed in Spain
3-298-243-61(1)
Operating Instructions
KDL-52W40xx
KDL-52W42xx
KDL-46W40xx
KDL-46W42xx
KDL-40W40xx
KDL-40W42xx
© 2008 Sony Corporation 3-298-243-61(1)
KDL-32W40xx
KDL-32W42xx
KDL-40E40xx
KDL-32E40xx
KDL-26E40xx
KDL-37V45xx
KDL-37V47xx
KDL-32V45xx
KDL-32V47xx
KDL-26V45xx
KDL-26V47xx
Инструкция по эксплуатации
GB
RU
Page 2

Introduction
Thank you for choosing this Sony product.
Before operating the TV, please read this manual
thoroughly and retain it for future reference.
Disposal of the TV set
Disposal of Old Electrical &
Electronic Equipment (Applicable in
the European Union and other
European countries with separate
collection systems)
This symbol on the product or on its
packaging indicates that this product
shall not be treated as household waste.
Instead it shall be handed over to the applicable collection
point for the recycling of electrical and electronic
equipment. By ensuring this product is disposed of
correctly, you will help prevent potential negative
consequences for the environment and human health,
which could otherwise be caused by inappropriate waste
handling of this product. The recycling of materials will
help to conserve natural resources. For more detailed
information about recycling of this product, please contact
your local Civic Office, your household waste disposal
service or the shop where you purchased the product.
Disposal of waste batteries
(applicable in the European Union
and other European countries with
separate collection systems)
This symbol on the battery or on the
packaging indicates that the battery
provided with this product shall not be
treated as household waste. By ensuring
these batteries are disposed of correctly,
you will help prevent potentially negative consequences
for the environment and human health which could
otherwise be caused by inappropriate waste handling of the
battery. The recycling of the materials will help to conserve
natural resources. In case of products that for safety,
performance or data integrity reasons require a permanent
connection with an incorporated battery, this battery should
be replaced by qualified service staff only. To ensure that
the battery will be treated properly, hand over the product
at end-of-life to the applicable collection point for the
recycling of electrical and electronic equipment. For all
other batteries, please view the section on how to remove
the battery from the product safely. Hand the battery over
to the applicable collection point for the recycling of waste
batteries. For more detailed information about recycling of
this product or battery, please contact your local Civic
Office, your household waste disposal service or the shop
where you purchased the product.
The manufacturer of this product is Sony
Corporation, 1-7-1 Konan Minato-ku Tokyo, 1080075 Japan. The Authorized Representative for EMC
and product safety is Sony Deutschland GmbH,
Hedelfinger Strasse 61, 70327 Stuttgart, Germany.
For any service or guarantee matters please refer to
the addresses given in separate service or guarantee
documents.
Notice for Digital TV function
• Any functions related to Digital TV ( ) will only
work in countries or areas where DVB-T (MPEG2 and
MPEG4 AVC) digital terrestrial signals are broadcast or
where you have access to a compatible DVB-C (MPEG2
and MPEG4 AVC) cable service. Please confirm with
your local dealer if you can receive a DVB-T signal
where you live or ask your cable provider if their DVBC cable service is suitable for integrated operation with
this TV.
• The cable provider may charge an additional fee for such
a service and you may be required to agree to their terms
and conditions of business.
• Although this TV set follows DVB-T and DVB-C
specifications, compatibility with future DVB-T digital
terrestrial and DVB-C digital cable broadcasts cannot be
guaranteed.
• Some Digital TV functions may not be available in some
countries/regions and DVB-C cable may not operate
correctly with all providers.
• For more information about DVB-C functionality please
see our cable support site:
http://support.sony-europe.com/TV/DVBC
Trademark information
• is a registered trademark of the DVB Project
• Manufactured under license from BBE Sound, Inc.
Licensed by BBE Sound, Inc. under one or more of the
following US patents: 5510752, 5736897. BBE and
BBE symbol are registered trademarks of BBE Sound,
Inc.
• Manufactured under license from Dolby Laboratories.
“Dolby” and the double-D symbol are trademarks
of Dolby Laboratories.
• HDMI, the HDMI logo and High-Definition Multimedia
Interface are trademarks or registered trademarks of
HDMI Licensing LLC.
A
ViV
HD3D Sound
/
~
• The illustrations used in this manual are of the
KDL-40W4000 unless otherwise state.
• The "x" that appear on the model name, correspond to
numeric digits related to colour variation.
GB
2
Page 3

Table of Contents
Start-up Guide 4
Start-up Guide 4
Checking the accessories.................................................................................................... 4
Safety information................................................................................................................ 9
Precautions........................................................................................................................ 10
Overview of the remote ................................................................................................... 11
Overview of the TV buttons and indicators................................................................... 12
Watching TV
Watching TV....................................................................................................................... 13
Checking the Guide .................................................................................................. 15
Using the Digital Favourite list .................................................................................. 16
Using Optional Equipment
Connecting optional equipment.......................................................................................... 17
Viewing pictures from connected equipment ..................................................................... 18
Using BRAVIA Sync (Control for HDMI) ............................................................................ 19
Using MENU Functions
Overview of the TV Home Menu (XMB™)......................................................................... 21
Settings.............................................................................................................................. 22
Picture .......................................................................................................................... 22
Sound ........................................................................................................................... 23
Features .......................................................................................................................24
Set-up ........................................................................................................................... 25
Analogue Set-up .......................................................................................................... 28
Digital Set-up ..................................................................................................... 29
Photo ................................................................................................................................. 32
Picture Frame ............................................................................................................... 32
USB Photo Viewer ....................................................................................................... 32
Additional Information
Specifications..................................................................................................................... 33
Troubleshooting .................................................................................................................35
: for digital channels only
Before operating the TV, please read the “Safety information” section of this manual.
Retain this manual for future reference.
GB
GB
3
Page 4
Start-up Guide
1: Checking the
accessories
Mains lead (1) (only for KDL-52W4xxx, KDL46W4xxx, KDL-40W4xxx, KDL-40E4xxx)
Remote RM-ED011 (1)
Remote RM-ED011 W (1) (only for KDL-
40E4xxx, KDL-32E4xxx, KDL-26E4xxx)
Size AA batteries (R6 type) (2)
Stand (1) (except for KDL-52W4xxx,
KDL-26E4xxx)
Screws for stand (4) (only for KDL-
46W4xxx, KDL-40W4xxx, KDL-40E4xxx,
KDL-37V4xxx)
Screws for stand (3) (only for KDL32W4xxx, KDL-32E4xxx, KDL-32V4xxx,
KDL-26V4xxx)
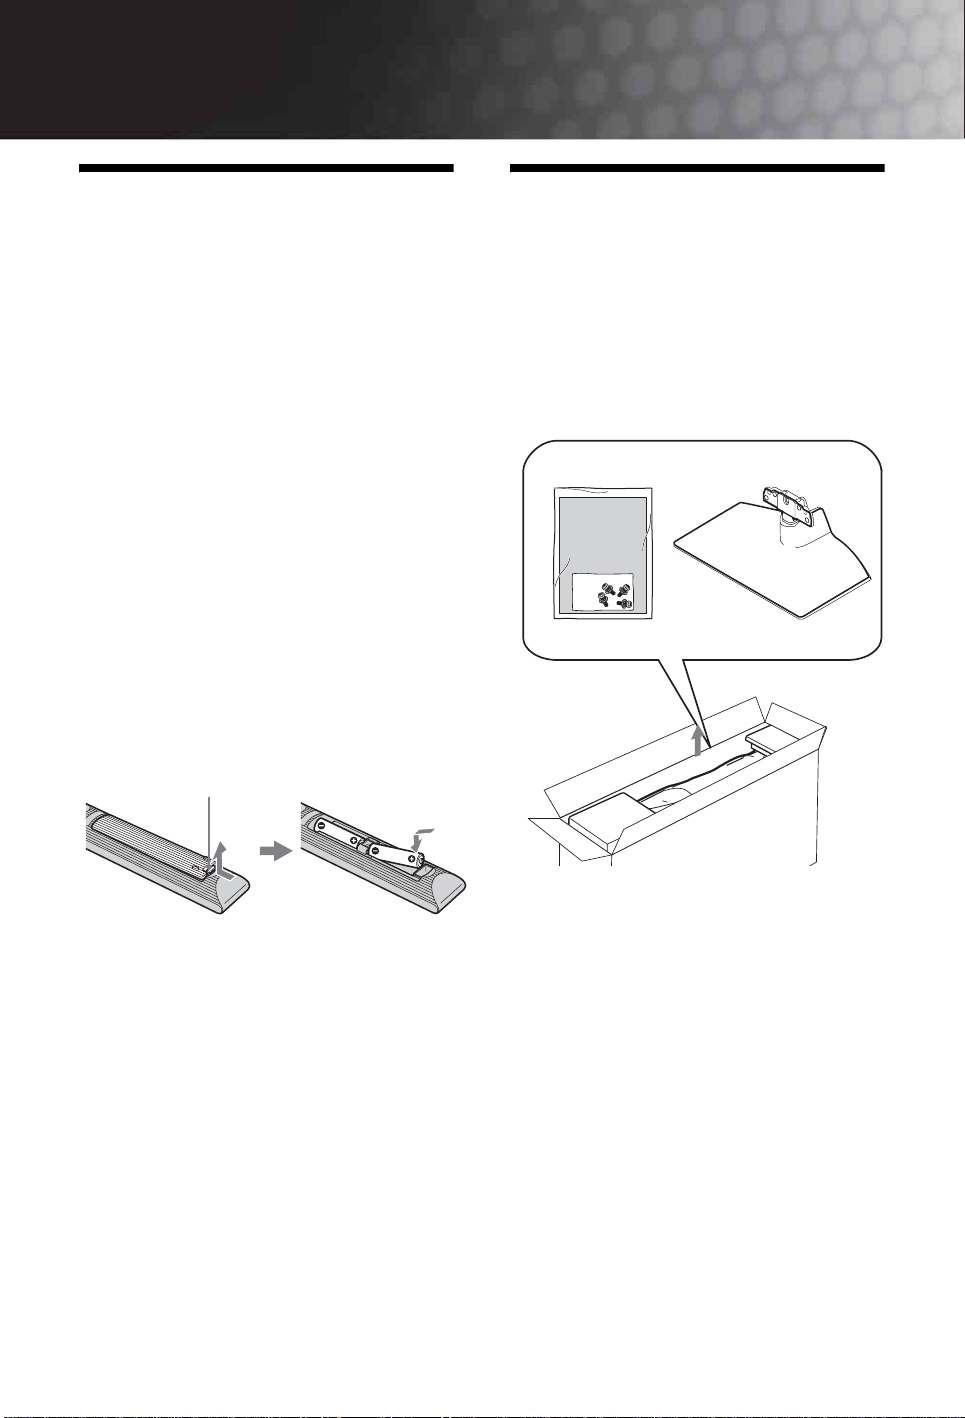
To insert batteries into the remote
Push and lift the cover to open.
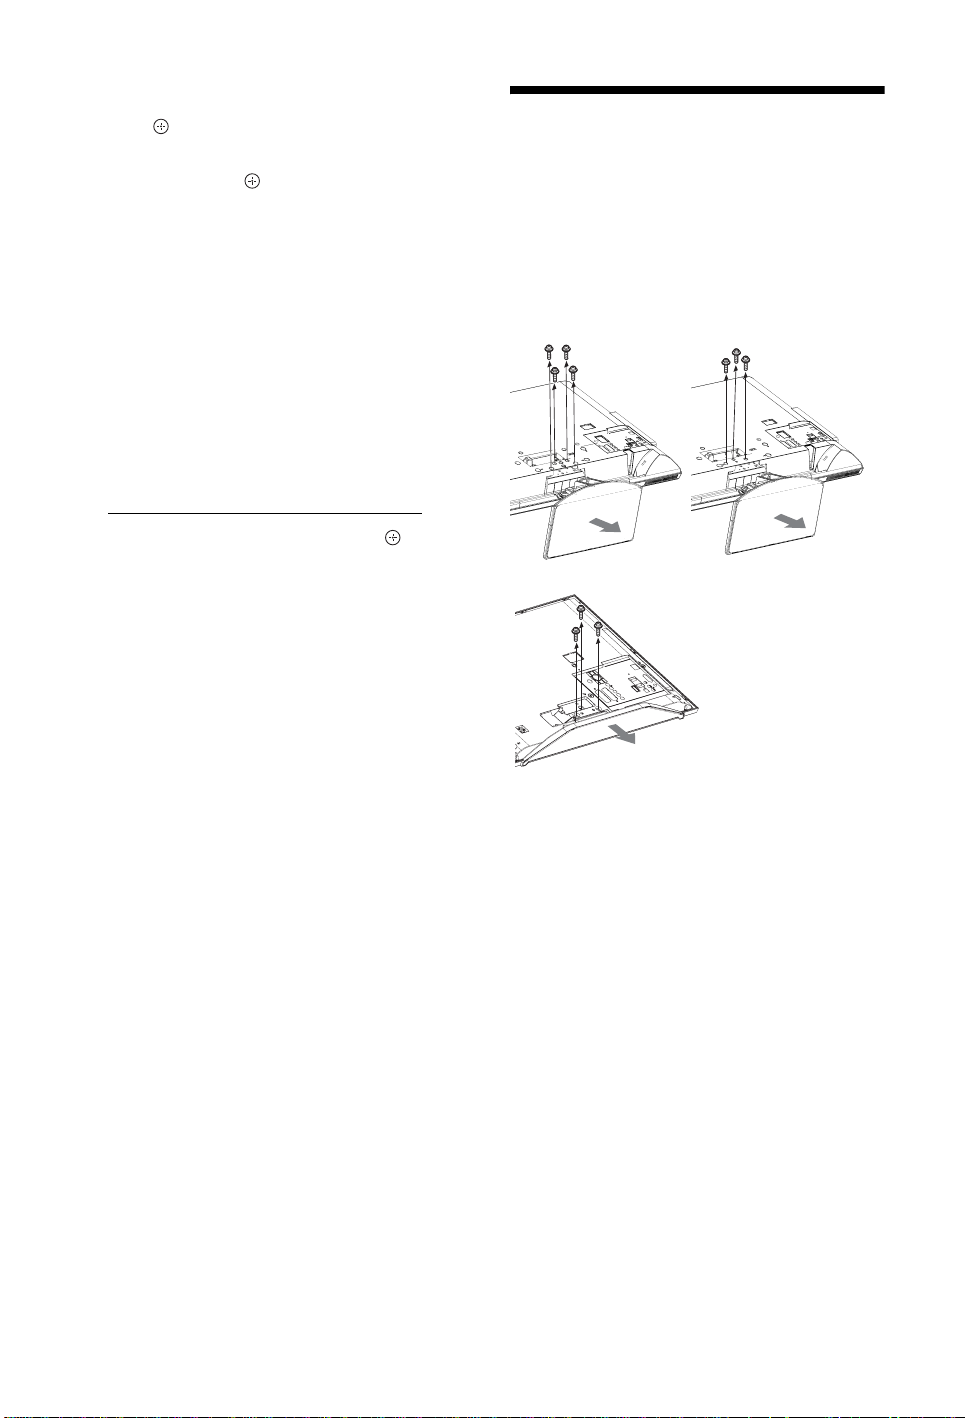
2: Attaching the stand
(except for KDL-52W4xxx,
KDL-26E4xxx)
1 Open the carton box and take out the stand
and the screws.
~
• Observe the correct polarity when inserting batteries.
• Do not use different types of batteries together or mix
old and new batteries.
• Dispose of batteries in an environmentally friendly way.
Certain regions may regulate disposal of batteries.
Please consult your local authority.
• Handle the remote with care. Do not drop or step on it,
or spill liquid of any kind onto it.
• Do not place the remote in a location near a heat source,
a place subject to direct sunlight, or a damp room.
GB
4
Page 5
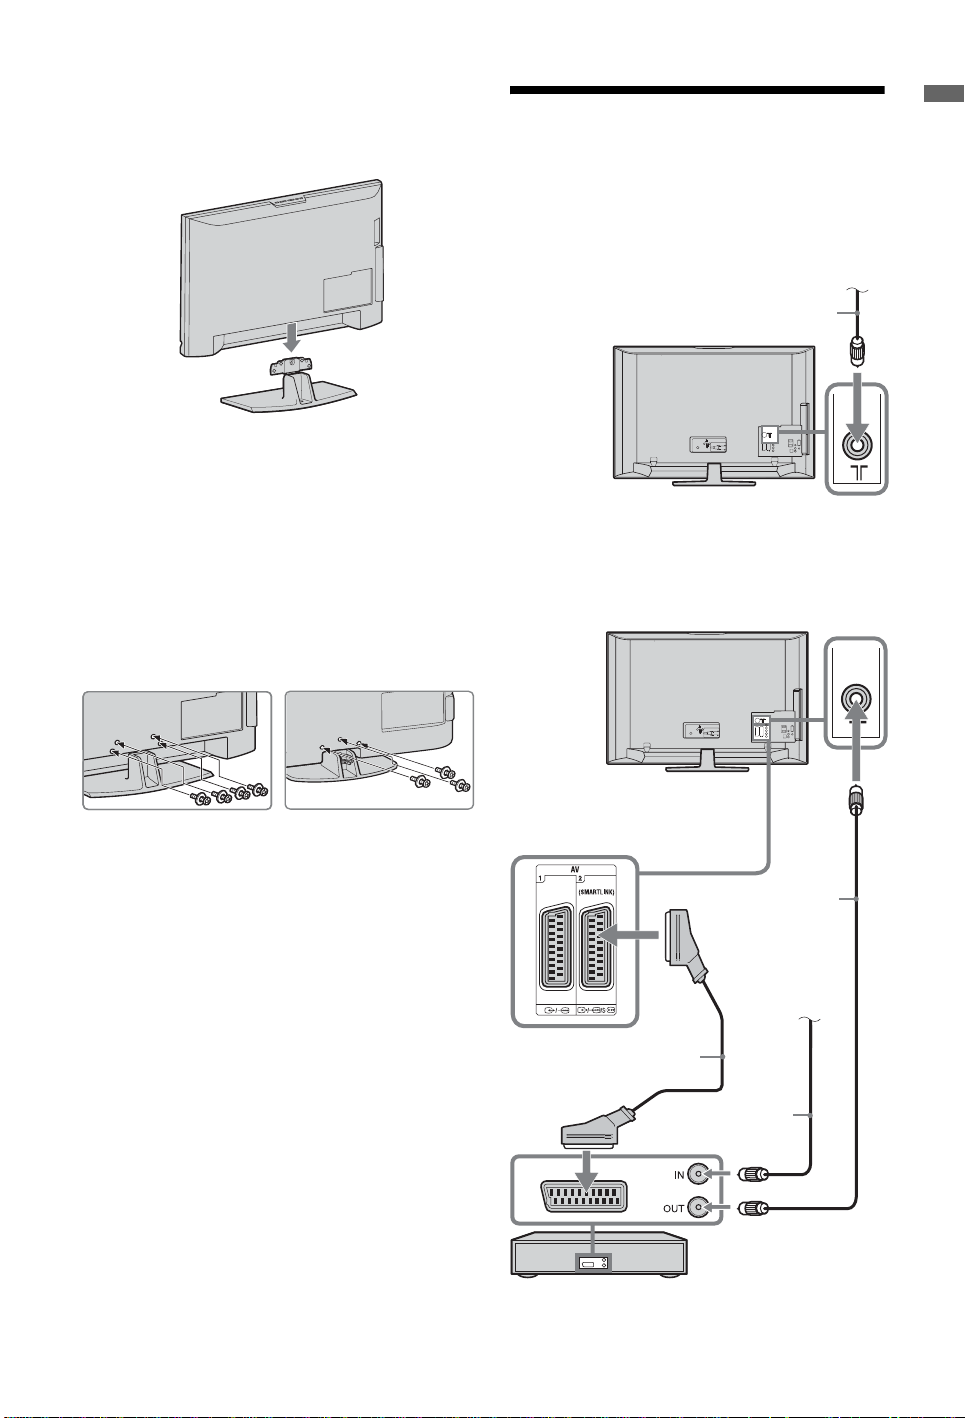
2 Place the TV set on the stand. Take care not to
C
interfere with cables.
3: Connecting an
aerial/VCR/ DVD
recorder
Start-up Guide
onnecting an aerial/cable
Terrestrial signal
or cable
Coaxial cable
3 Fix the stand to the TV using the supplied
screws.
KDL-46W4xxx
KDL-40W4xxx
KDL-40E4xxx
KDL-37V4xxx
KDL-32W4xxx
KDL-32E4xxx
KDL-32V4xxx
KDL-26V4xxx
Connecting an aerial/ cable/ VCR/ DVD recorder
~
If using an electric screwdriver, set the tightening torque at
approximately 1.5 N·m (15 kgf·cm)
Scart lead
Coaxial cable
Terrestrial signal
or cable
Coaxial cable
VCR/ DVD recorder
GB
5
Page 6

4: Preventing the TV
7:
Performing the initial
from toppling over
1 Install a wood screw (4 mm in diameter, not
supplied) in the TV stand.
2 Install a machine screw (M5 x 12, not
supplied) into the screw hole of the TV.
3 Tie the wood screw and the machine screw
with a strong cord.
5: Connecting the cables
set-up
GUIDE
3,4,5
KDL-52W4xxx
KDL-46W4xxx
KDL-40W4xxx
KDL-40E4xxx
6: Bundling the cables
GB
6
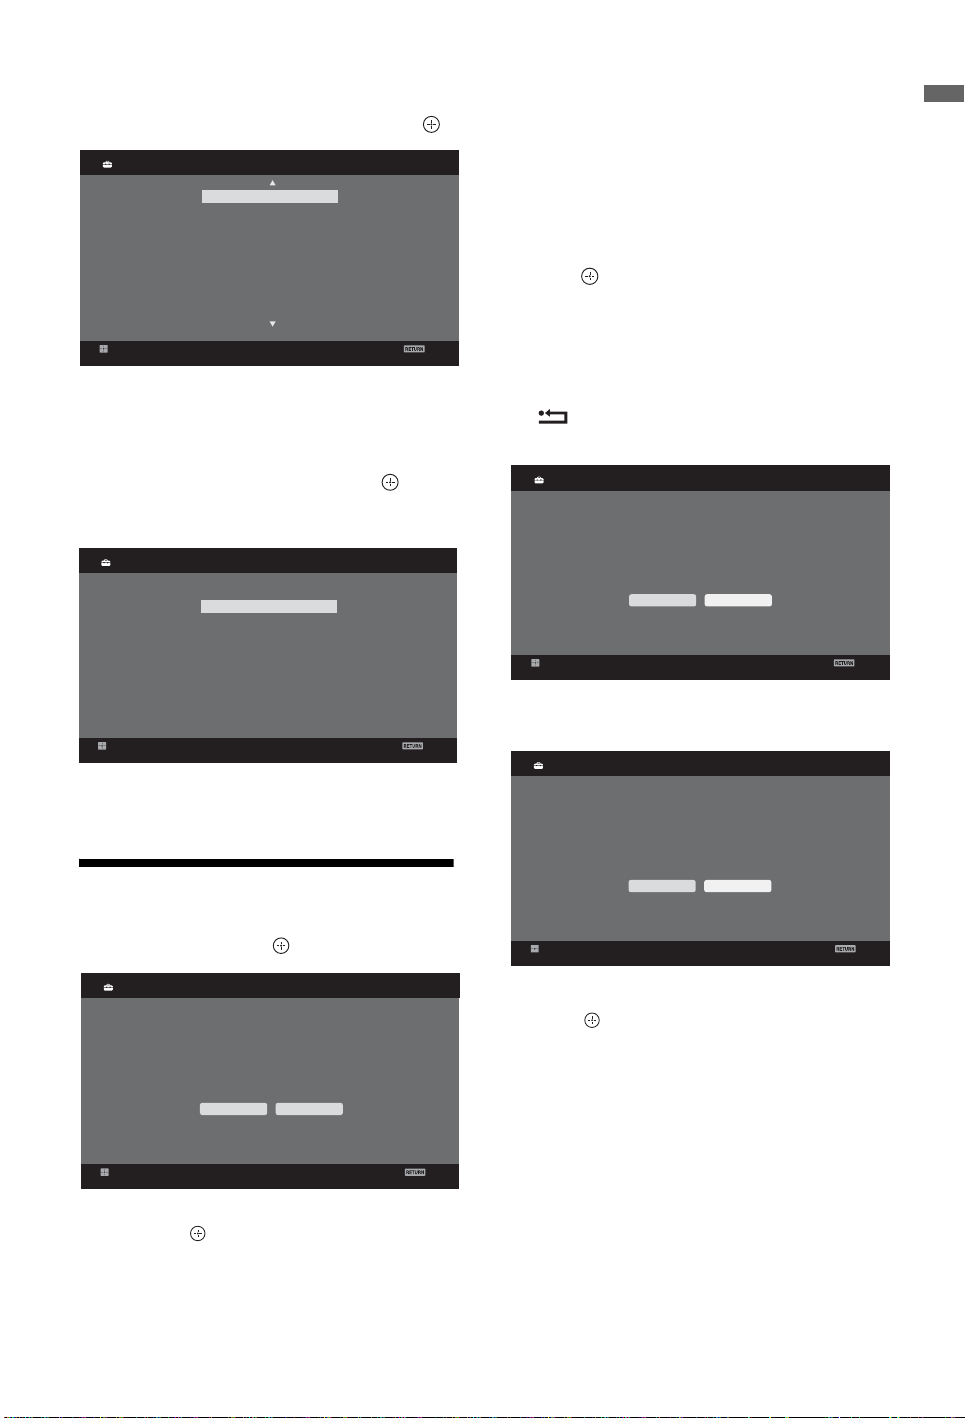
1 Connect the TV to your mains socket
(220-240V AC, 50Hz).
2 Press 1 on the TV.
When you switch on the TV for the first time, the
Language menu appears on the screen.
3 Press F/f/G/g to select the language
displayed on the menu screens, then press .
Language
English
Nederlands
Français
Italiano
Deutsch
Türkçe
Español
Català
Português
Polski
Set
Česky
Magyar
Русский
Б
Б
лгар
Suomi
Dansk
Svenska
Norsk
Slovenčina
Română
ски
Analogue
Back
Page 7
4
Press F/f to select the country/region in
which you will operate the TV, then press .
Country
Set
-
United Kingdom
Ireland
Nederland
België/Belgique
Luxembourg
France
Italia
Schweiz/Suisse/Svizzera
Deutschland
Analogue
Back
If the country/region in which you want to use
the TV does not appear in the list, select “-”
instead of a country/region.
5 Press F/f to select the location type in which
you will operate the TV, then press .
~
Sony recommends you to select “Home” for power saving.
Location
Home
Shop
Analogue
The TV starts searching for all available digital
channels, followed by all available analogue
channels. This may take some time, so do not
press any buttons on the TV or remote while
proceeding.
If a message appears for you to confirm the
aerial connection
No digital or analogue channels were found.
Check all the aerial/cable connection and then
press to start auto-tuning again.
3 When the Programme Sorting menu appears
on the screen, follow the steps of
“Programme Sorting”(page 28).
If you do not change the order in which the
analogue channels are stored on the TV, press
RETURN to go to step 4.
4
Quick Start
Do you want to enable Quick Start?
TV turns on mo re quickly but st andby power
consumption is increased.
Yes No
Analogue
Start-up Guide
Set
This option selects the initial picture mode
appropriate for the typical lighting condition in
these enviroments.
8: Auto-tuning the TV
1 Select OK then press .
Auto Tuning
Do you want to start Auto Tuning?
OK Cancel
Set
2 Press F/f to select “Antenna” or “Cable”,
then press .
If you select “Cable”, the screen for selecting the
scan type appears. See “To tune the TV for
Cable connection” (page 8).
Analogue
Set
Back
For details, see page 24.
Back
5
Control for HDMI
Set
Do you want to enable control for compatible
HDMI devices?
Yes No
Analogue
Back
For details, see page 19.
6 Press .
The TV has now tuned in all the available
channels.
~
When a digital broadcast channel cannot be received, or
when selecting a region in which there are no digital
broadcasts in step 3 (page 7), the time must be set after
Back
performing step 3.
GB
7
Page 8
To tune the TV for Cable connection
1 Press .
2 Press F/f to select “Quick Scan” or “Full
Scan”, then press .
"Quick Scan" : channels are tuned according to
the cable operator information within the
broadcast signal.
Recommended setting for "Frequency",
"Network ID" and "Symbol Rate" is "Auto".
This option is recommended for fast tuning
when supported by your cable operator.
If the "Quick Scan" does not tune, please use the
"Full Scan" method below.
"Full Scan" : All available channels are tuned
and stored. This procedure may take some time.
This option is recommended when "Quick Scan"
is not supported by your cable provider.
For further information about supported cable
providers, refer to support web site:
http://support.sony-europe.com/TV/DVBC/
3 Press f to select “Start”, then press .
The TV starts searching for channels. Do not
press any buttons on the TV or remote.
~
Some cable providers do not support “Quick Scan”. If no
channels are detected using “Quick Scan”, perform “Full
Scan”.
Detaching the TableTop Stand from the TV
~
Do not remove the Table-Top Stand for any reason other
than to wall-mount the TV.
KDL-52W4xxx
KDL-46W4xxx
KDL-40W4xxx
KDL-40E4xxx
KDL-37V4xxx
KDL-26E4xxx
KDL-32W4xxx
KDL-32E4xxx
KDL-32V4xxx
KDL-26V4xxx
GB
8
Page 9
Safety information
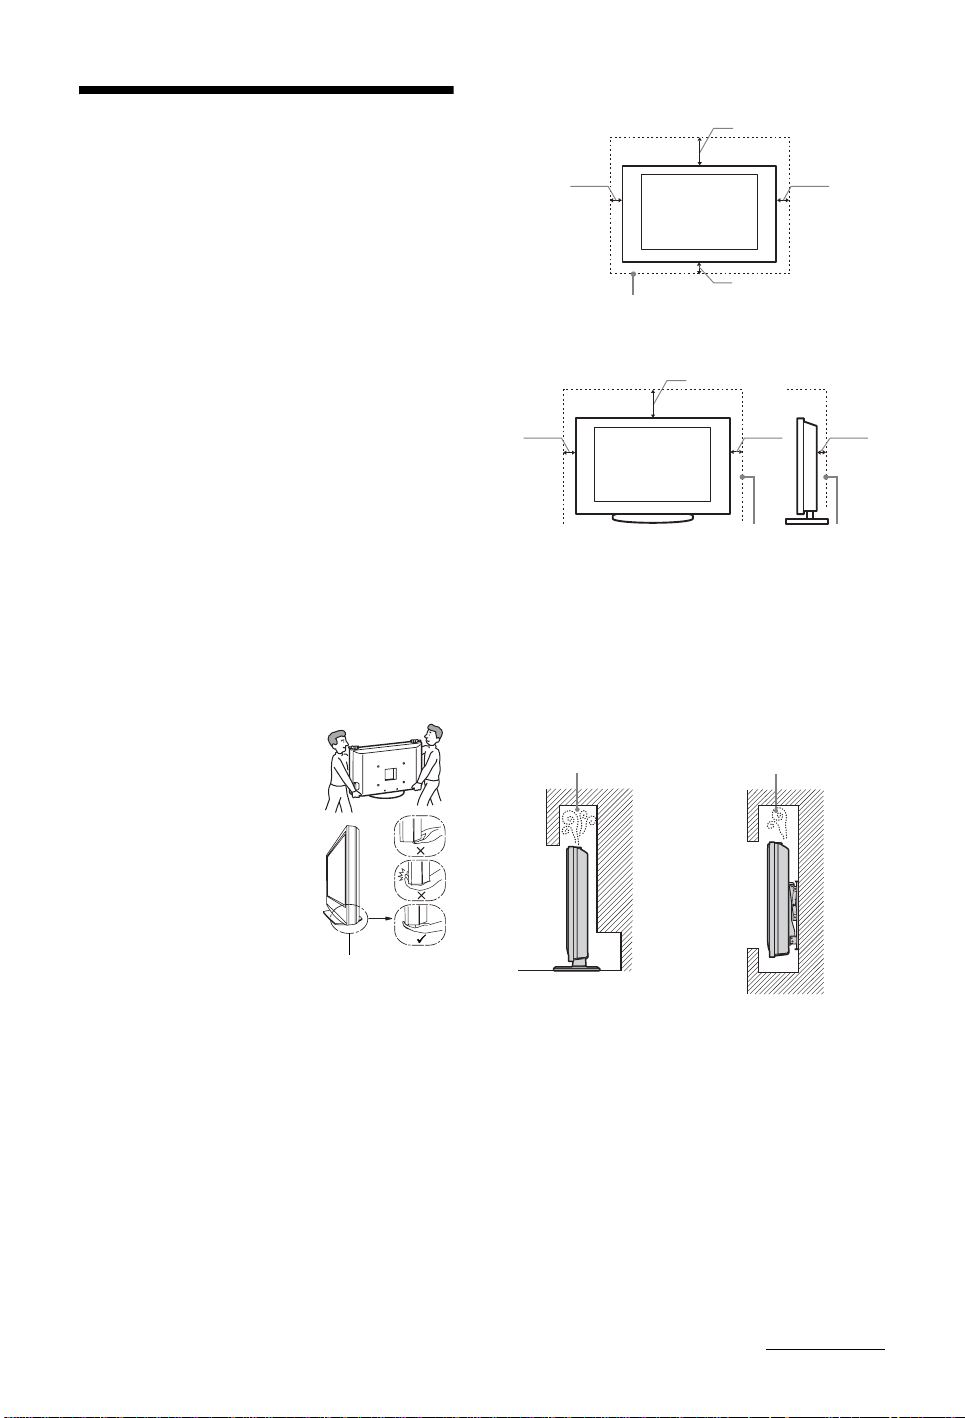
Installed on the wall
30 cm
Installation/Set-up
Install and use the TV set in accordance with the
instructions below in order to avoid any risk of fire,
electrical shock or damage and/or injuries.
Installation
• The TV set should be installed near an easily accessible
mains socket.
• Place the TV set on a stable, level surface.
• Only qualified service personnel should carry out wall
installations.
• For safety reasons, it is strongly recommended that you
use Sony accessories, including:
- KDL-52W40xx/ KDL-52W42xx/ KDL-46W40xx/
KDL-46W42xx/ KDL-40W40xx/ KDL-40W42xx/
KDL-32W40xx/ KDL-32W42xx/ KDL-40E40xx/
KDL-32E40xx/ KDL-37V45xx/ KDL-37V47xx/
KDL-32V45xx/ KDL-32V47xx:
Wall-Mount Bracket SU-WL500.
- KDL-26V45xx/ KDL-26V47xx / KDL-26E40xx:
Wall-mount Bracket SU-WL100.
- KDL-46W40xx/ KDL-46W42xx/ KDL-40W40xx/
KDL-40W42xx/KDL-32W40xx/ KDL-32W42xx/
KDL-40E40xx/ KDL-32E40xx/ KDL-37V45xx/
KDL-37V47xx/ KDL-32V45xx/ KDL-32V47xx:
TV stand SU-FL300M.
Transporting
• Before transporting the TV set,
disconnect all cables.
• Two or three people are needed
to transport a large TV set.
• When transporting the TV set by
hand, hold it as shown on the
right. Do not put stress on the
LCD panel and the frame around
the screen.
• When lifting or moving the TV
set, hold it firmly from the
bottom.
• When transporting the TV set, do
not subject it to jolts or excessive
vibration.
• When transporting the TV set for
repairs or when moving, pack it
using the original carton and packing material.
Ventilation
• Never cover the ventilation holes or insert anything in
the cabinet.
• Leave space around the TV set as shown below.
• It is strongly recommended that you use a Sony wallmount bracket in order to provide adequate aircirculation.
Be sure to hold the
bottom of the panel,
not the front part.
10 cm
10 cm
10 cm
Leave at least this space around the set.
Installed with stand
30 cm
10 cm10 cm
6 cm
Leave at least this space around the set.
• To ensure proper ventilation and prevent the collection
of dirt or dust:
– Do not lay the TV set flat, install upside down,
backwards, or sideways.
– Do not place the TV set on a shelf, rug, bed or in a
closet.
– Do not cover the TV set with a cloth, such as curtains,
or items such as newspapers, etc.
– Do not install the TV set as shown below.
Air circulation
is blocked.
Wall
Air circulation
is blocked.
Wall
Mains lead
Handle the mains lead and socket as follows in order
to avoid any risk of fire, electrical shock or damage
and/or injuries:
– Use only Sony mains leads, not those of other brands.
– Insert the plug fully into the mains socket.
– Operate the TV set on a 220-240 V AC supply only.
– When wiring cables, be sure to unplug the mains lead
for your safety and take care not to catch your feet on
the cables.
– Disconnect the mains lead from the mains socket
before working on or moving the TV set.
– Keep the mains lead away from heat sources.
– Unplug the mains plug and clean it regularly. If the
plug is covered with dust and it picks up moisture, its
insulation may deteriorate, which could result in a
fire.
Continued
GB
9
Page 10

Notes
• Do not use the supplied mains lead on any other
equipment.
• Do not pinch, bend, or twist the mains lead excessively.
The core conductors may be exposed or broken.
• Do not modify the mains lead.
• Do not put anything heavy on the mains lead.
• Do not pull on the mains lead itself when disconnecting
the mains lead.
• Do not connect too many appliances to the same mains
socket.
• Do not use a poor fitting mains socket.
When:
– Mains lead is damaged.
– Poor fitting of mains socket.
– TV set is damaged by being dropped, hit or having
something thrown at it.
– Any liquid or solid object falls through openings in
the cabinet.
Precautions
Prohibited Usage
Do not install/use the TV set in locations,
environments or situations such as those listed
below, or the TV set may malfunction and cause a
fire, electrical shock, damage and/or injuries.
Location:
Outdoors (in direct sunlight), at the seashore, on a ship or
other vessel, inside a vehicle, in medical institutions,
unstable locations, near water, rain, moisture or smoke.
Environment:
Places that are hot, humid, or excessively dusty; where
insects may enter; where it might be exposed to mechanical
vibration, near flammable objects (candles, etc).
The TV set shall not be exposed to dripping or splashing
and no objects filled with liquids, such as vases, shall be
placed on the TV.
Situation:
Do not use when your hands are wet, with the cabinet
removed, or with attachments not recommended by the
manufacturer. Disconnect the TV set from mains socket
and aerial during lightning storms.
Broken pieces:
• Do not throw anything at the TV set. The screen glass
may break by the impact and cause serious injury.
• If the surface of the TV set cracks, do not touch it until
you have unplugged the mains lead. Otherwise electric
shock may result.
When not in use
• If you will not be using the TV set for several days, the
TV set should be disconnected from the mains for
environmental and safety reasons.
• As the TV set is not disconnected from the mains when
the TV set is just turned off, pull the plug from the mains
to disconnect the TV set completely.
• However, some TV sets may have features that require
the TV set to be left in standby to work correctly.
For children
• Do not allow children to climb on the TV set.
• Keep small accessories out of the reach of children, so
that they are not mistakenly swallowed.
If the following problems occur...
Turn off the TV set and unplug the mains lead
immediately if any of the following problems occur.
Ask your dealer or Sony service centre to have it
checked by qualified service personnel.
Viewing the TV
• View the TV in moderate light, as viewing the TV in
poor light or during long period of time, strains your
eyes.
• When using headphones, adjust the volume so as to
avoid excessive levels, as hearing damage may result.
LCD Screen
• Although the LCD screen is made with high-precision
technology and 99.99% or more of the pixels are
effective, black dots may appear or bright points of light
(red, blue, or green) may appear constantly on the LCD
screen. This is a structural property of the LCD screen
and is not a malfunction.
• Do not push or scratch the front filter, or place objects on
top of this TV set. The image may be uneven or the LCD
screen may be damaged.
• If this TV set is used in a cold place, a smear may occur
in the picture or the picture may become dark. This does
not indicate a failure. These phenomena disappear as the
temperature rises.
• Ghosting may occur when still pictures are displayed
continuously. It may disappear after a few moments.
• The screen and cabinet get warm when this TV set is in
use. This is not a malfunction.
• The LCD screen contains a small amount of liquid
crystal. Some fluorescent tubes used in this TV set also
contain mercury. Follow your local ordinances and
regulations for disposal.
Handling and cleaning the screen surface/cabinet
of the TV set
Be sure to unplug the mains lead connected to the TV set
from mains socket before cleaning.
To avoid material degradation or screen coating
degradation, observe the following precautions.
• To remove dust from the screen surface/cabinet, wipe
gently with a soft cloth. If dust is persistent, wipe with a
soft cloth slightly moistened with a diluted mild
detergent solution.
• Never use any type of abrasive pad, alkaline/acid
cleaner, scouring powder, or volatile solvent, such as
alcohol, benzene, thinner or insecticide. Using such
materials or maintaining prolonged contact with rubber
or vinyl materials may result in damage to the screen
surface and cabinet material.
• When adjusting the angle of the TV set, move it slowly
so as to prevent the TV set from moving or slipping off
from its table stand
Optional Equipment
Keep optional components or any equipment emitting
electromagnetic radiation away from the TV set. Otherwise
picture distortion and/or noisy sound may occur.
10
GB
Page 11
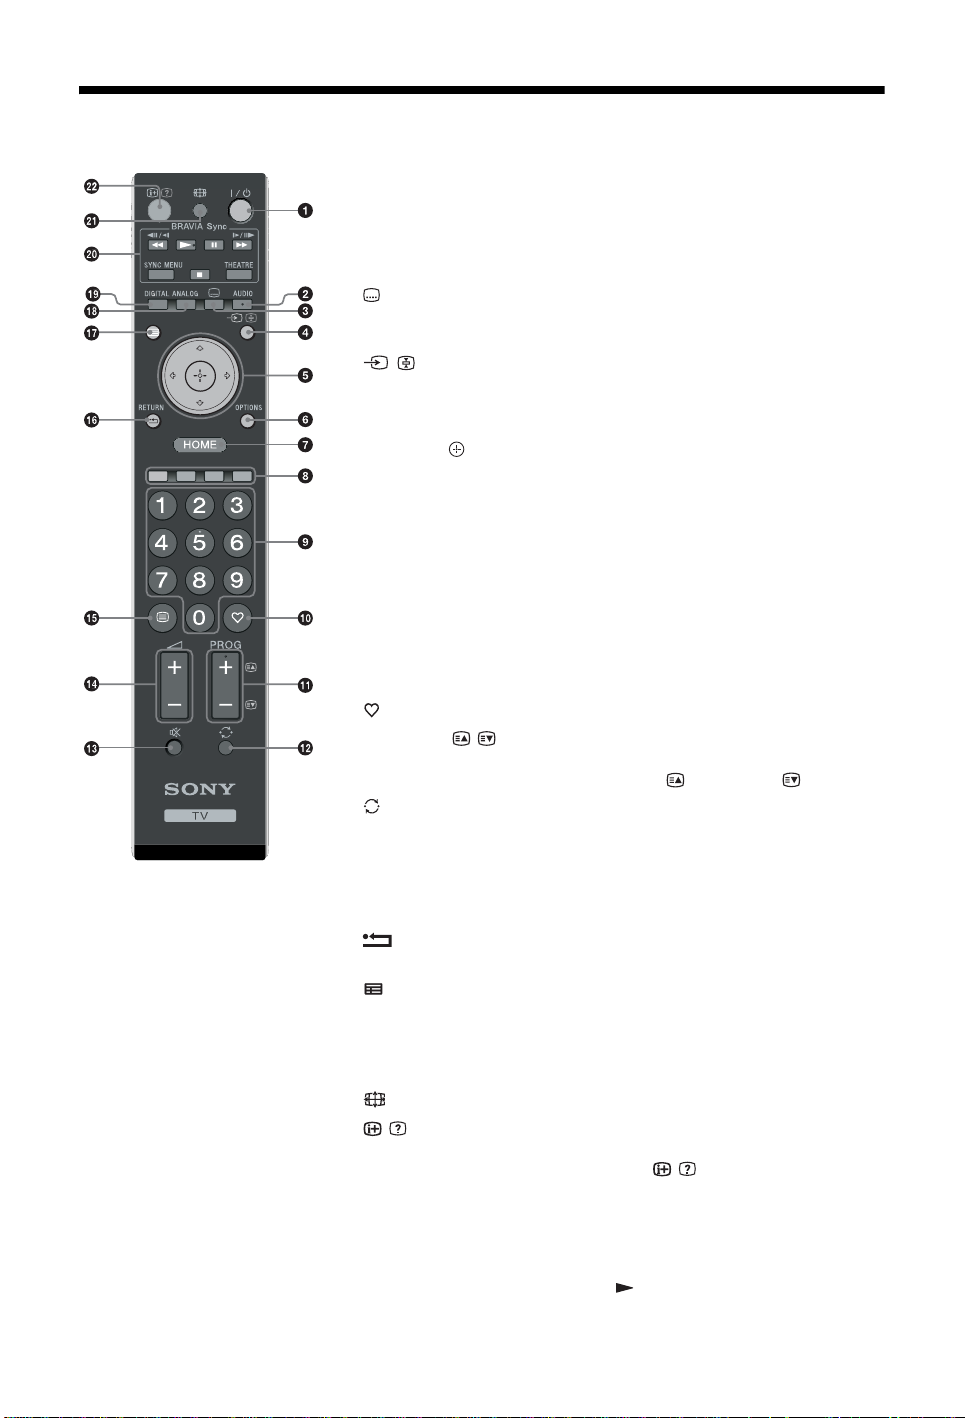
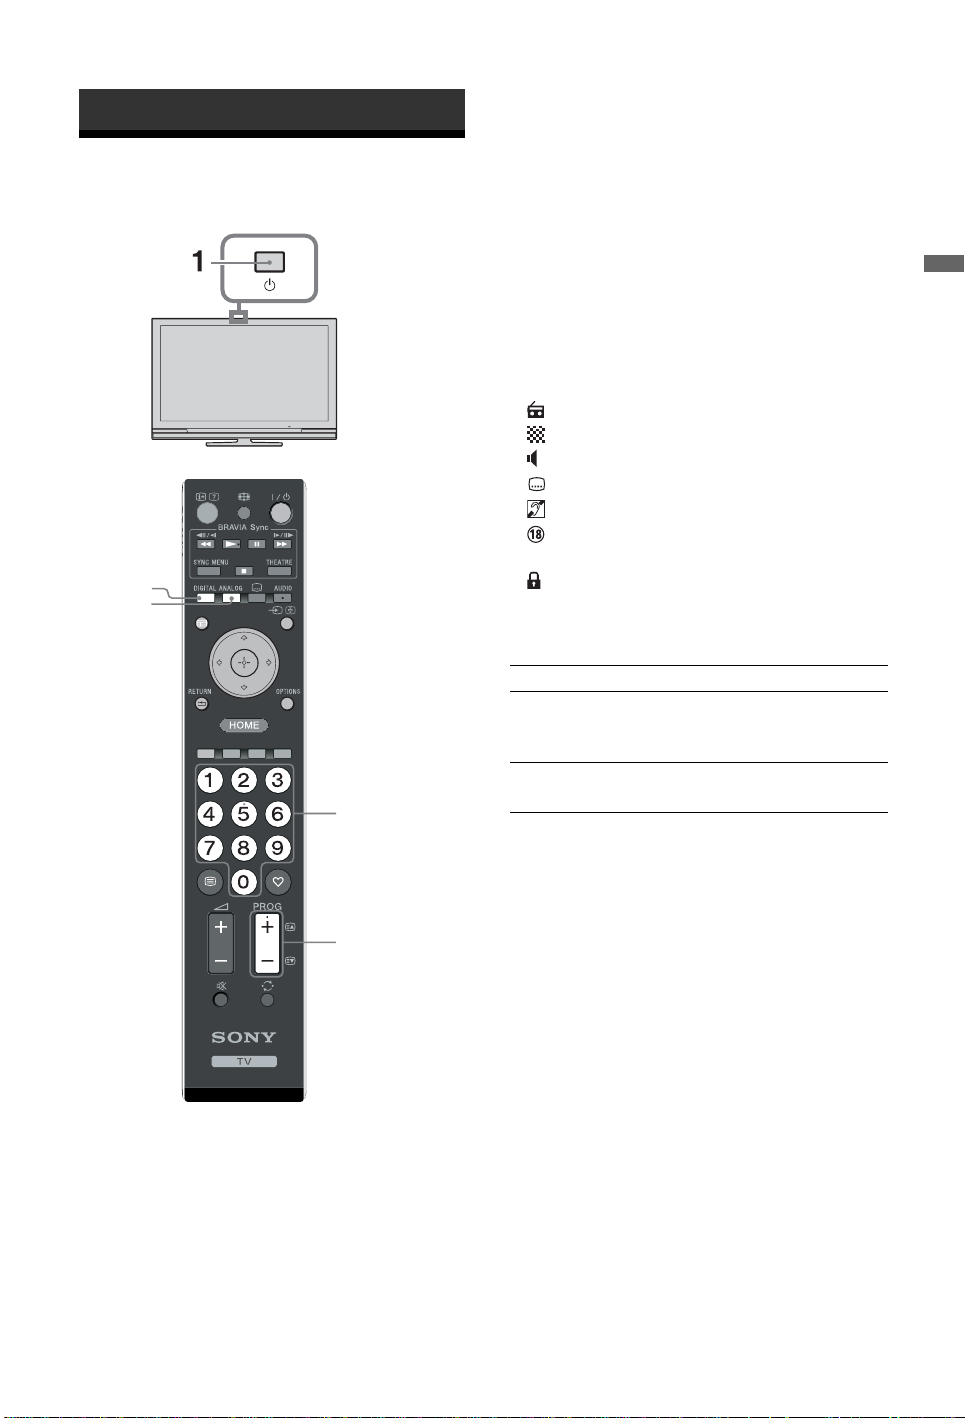
Overview of the remote
1 "/1 – TV standby
Turns the TV on and off from standby mode.
2 AUDIO
In analogue mode: Press to change the dual sound mode (page 24).
In digital mode: Press to select the audio language (page 30).
3 – Subtitles
GUIDE
Press to display the subtitles on current program if TV channels broadcast
such information (in digital mode only) (page 30).
4 / – Input select / Text hold
• In TV mode: Selects the input source from equipment connected to the TV
sockets (page 18).
• In Text mode (page 14): Holds the current page.
5 F/f/G/g/
6 OPTIONS (page 14, 19)
Enables you to access various viewing options and change/make adjustments
according to the source and screen format.
7 HOME (page 21)
Displays the TV Home menu.
8 Coloured buttons (page 14, 15, 16)
9 Number buttons
• In TV mode: Selects channels. For channel numbers 10 and above, enter the
second and third digit quickly.
• In Text mode: Enters the three digit page number to select the page.
0 – Favourite (page 16)
qa PROG +/–//
• In TV mode: Selects the next (+) or previous (-) channel.
• In Text mode (page 14): Selects the next ( ) or previous ( ) page.
qs – Previous channel
Returns to the previous channel watched (for more than five seconds).
qd % – Mute the sound
qf 2 +/– – Volume
qg / – Text (page 14)
qh – RETURN
Returns to the previous screen of any displayed menu.
qj – GUIDE (page 15)
qk ANALOG – Analogue mode (page 13)
ql DIGITAL – Digital mode (page 13)
w; BRAVIA Sync (page 19)
wa – Screen mode (page 14)
ws / – Info / Text reveal
• In digital mode: Displays details of the programme currently being watched.
• In analogue mode: Each time you press
screen changes as follows: Displays information such as current channel
number and screen format
• In Text mode (page 14): Reveals hidden information (e.g. answers to a
quiz).
z
The number 5, PROG +, AUDIO and buttons have tactile dots. Use the
tactile dots as references when operating the TV.
/ , the information on the
t Time is displayed t Information is hidden.
11
GB
Page 12
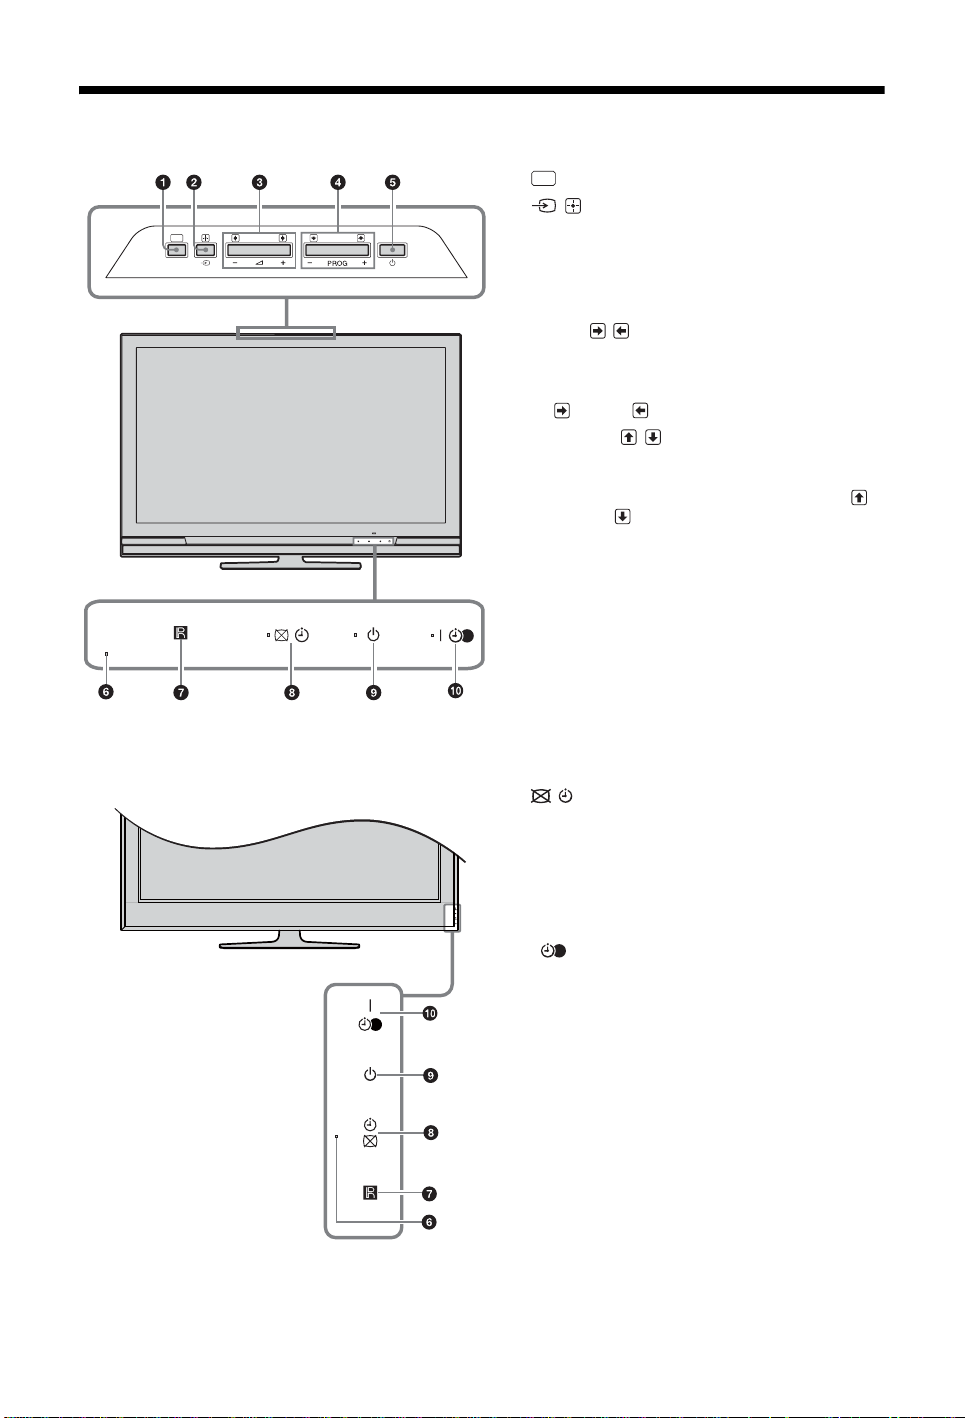
Overview of the TV buttons and indicators
HOME
1 (page 21)
2 / – Input select / OK
HOME
(only for KDL-40E4xxx, KDL-32E4xxx,
KDL-26E4xxx)
• In TV mode: Selects the input source from
equipment connected to the TV sockets
(page 18).
• In TV menu: Selects the menu or option, and
confirms the setting.
3 2 +/–//
• In TV mode: Increases (+) or decreases (-) the
volume.
• In TV menu: Moves through the options right
( ) or left ( ).
4 PROG +/–//
• In TV mode: Selects the next (+) or previous (-)
channel.
• In TV menu: Moves through the options up ( )
or down ( ).
5 1 – Power
Turns the TV on or off.
~
To disconnect the TV completely, pull the plug
from the mains.
6 Light Sensor
Do not put anything over the sensor, as its function
may be affected.
7 Remote control sensor
• Receives IR signals from the remote.
• Do not put anything over the sensor, as its
function may be affected.
8 – Picture Off / Timer indicator
• Lights up in green when the picture is switched
off (page 24).
• Lights up in orange when the timer is set
(page 25).
9 1 – Standby indicator
Lights up in red when the TV is in standby mode.
0 " – Power / Timer REC programme indicator
• Lights up in green when the TV is turned on.
• Lights up in orange when the timer recording is
set (page 15).
• Lights up in red during the timer recording.
~
• Make sure that the TV is completely turned off
before unplugging the mains lead. Unplugging the
mains lead while the TV is turned on may cause the
indicator to remain lit or may cause the TV to
malfunction.
• Do not put anything over the indicators as their
functions may be affected.
12
GB
Page 13
Watching TV
Watching TV
2
GUIDE
3 Press the number buttons or PROG +/- to
select a TV channel.
To select channel numbers 10 and above using
the number buttons, enter the second and third
digits within two seconds.
To select a digital channel using the Guide, see
page 15.
In digital mode
An information banner appears briefly. The
following icons may be indicated on the banner.
: Radio service
: Scrambled/Subscription service
: Multiple audio languages available
: Subtitles available
: Subtitles available for the hearing impaired
: Recommended minimum age for current
programme (from 4 to 18 years)
: Parental Lock
c: Current programme is being recorded
Watching TV
Additional operations
To Do this
Turn on the TV
from Standby mode
without sound
Adjust the volume Press 2 + (increase)/
Press %. Press 2 +/- to set the
volume level.
- (decrease).
3
3
1 Press 1 on the TV to switch on the TV.
When the TV is in standby mode (the 1
(standby) indicator on the TV (front) is red),
press "/1 on the remote to switch on the TV.
2 Press DIGITAL to switch to digital mode or
ANALOG to switch to analogue mode.
The channels available vary depending on the
mode.
13
GB
Page 14
To access Text
Press /. Each time you press /, the display
changes cyclically as follows:
Text t Text over the TV picture (mix mode) t No
Text (exit the Text service)
To select a page, press the number buttons or
PROG +/-.
To hold a page, press / .
To reveal hidden information, press / .
z
When four coloured items appear at the bottom of the Text
page, Fastext is available. Fastext allows you to access
pages quickly and easily. Press the corresponding coloured
button to access the page.
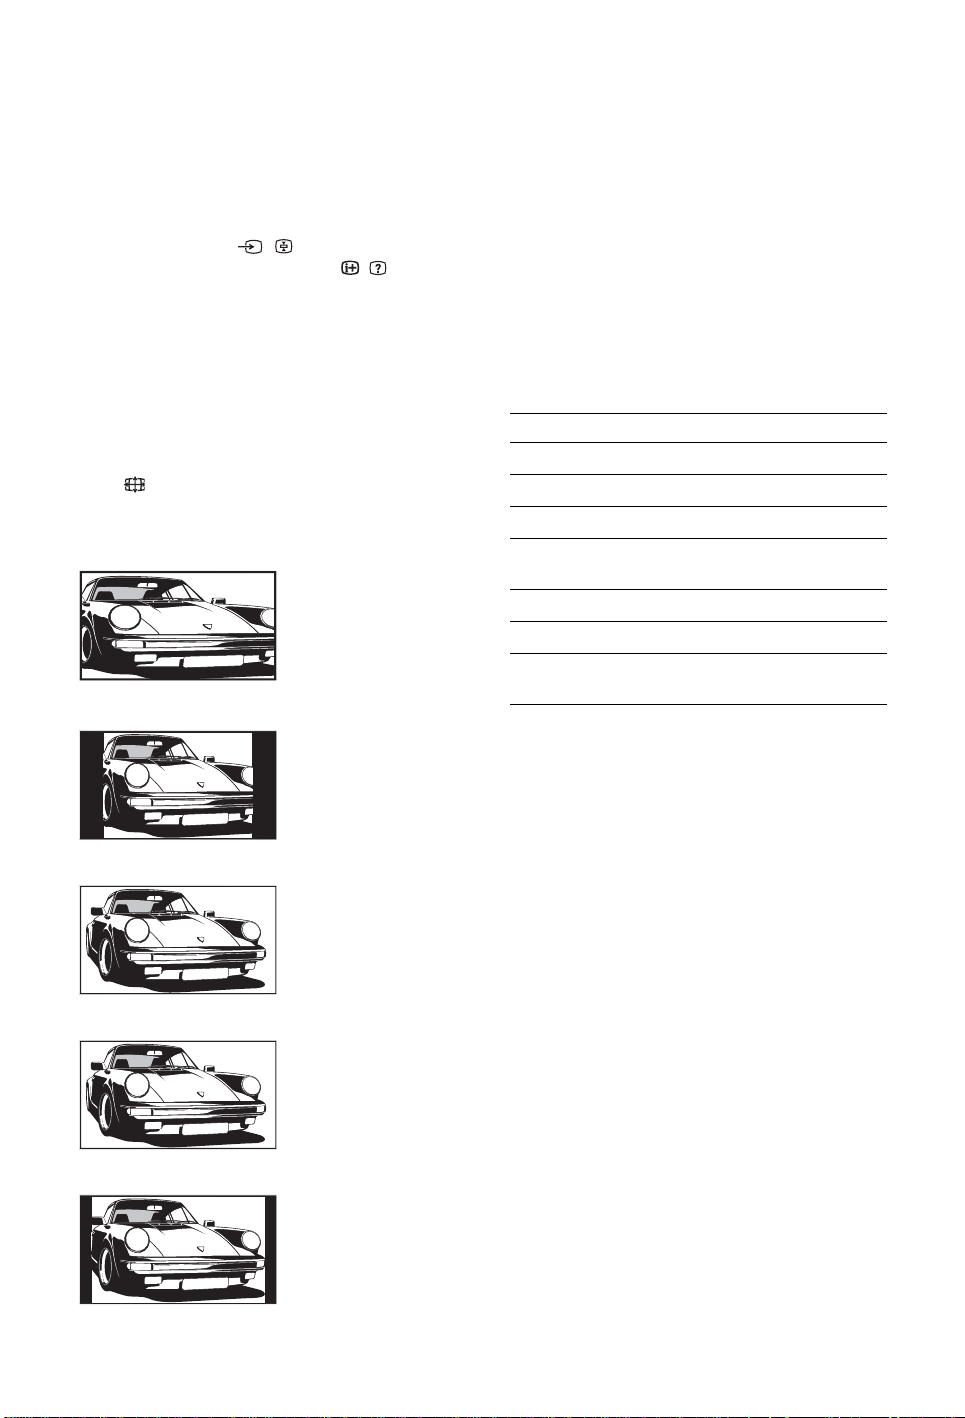
To change the screen format manually to
suit the broadcast
Press repeatedly to select the desired screen
format.
Smart*
Displays conventional
4:3 broadcasts with an
imitation wide screen
effect. The 4:3 picture
is stretched to fill the
screen.
4:3
Displays conventional
4:3 broadcasts (e.g.
non-wide screen TV) in
the correct proportions.
~
Some characters and/or letters at the top and the bottom of
the picture may not be visible in Smart mode. In such a
case, you can select “Vertical Size” using the “Screen
Settings” (page 26) menu and adjust vertical size to make
it visible.
z
• When “Auto Format” is set to “On”, the TV will
automatically select the best mode to suit the broadcast
(page 26).
• You can adjust the position of the picture when selecting
“Smart”, “14:9” or “Zoom”. Press
down (e.g. to read subtitles).
F/f to move up or
Using the Options menu
Press OPTIONS to display the following options
when viewing a TV programme.
Options Description
Picture Mode See page 22.
Sound Effect See page 23.
Speaker See page 27.
Subtitle Setting (in
digital mode only)
Sleep Timer See page 25.
Power Saving See page 24.
System Information (in
digital mode only)
See page 30.
See page 31.
Wide
Displays wide screen
(16:9) broadcasts in the
correct proportions.
Zoom*
Displays cinemascopic
(letter box format)
broadcasts in the
correct proportions.
14:9*
Displays 14:9
broadcasts in the
correct proportions. As
a result, black border
areas are visible on the
screen.
* Parts of the top and bottom of the picture may be cut off.
GB
14
Page 15
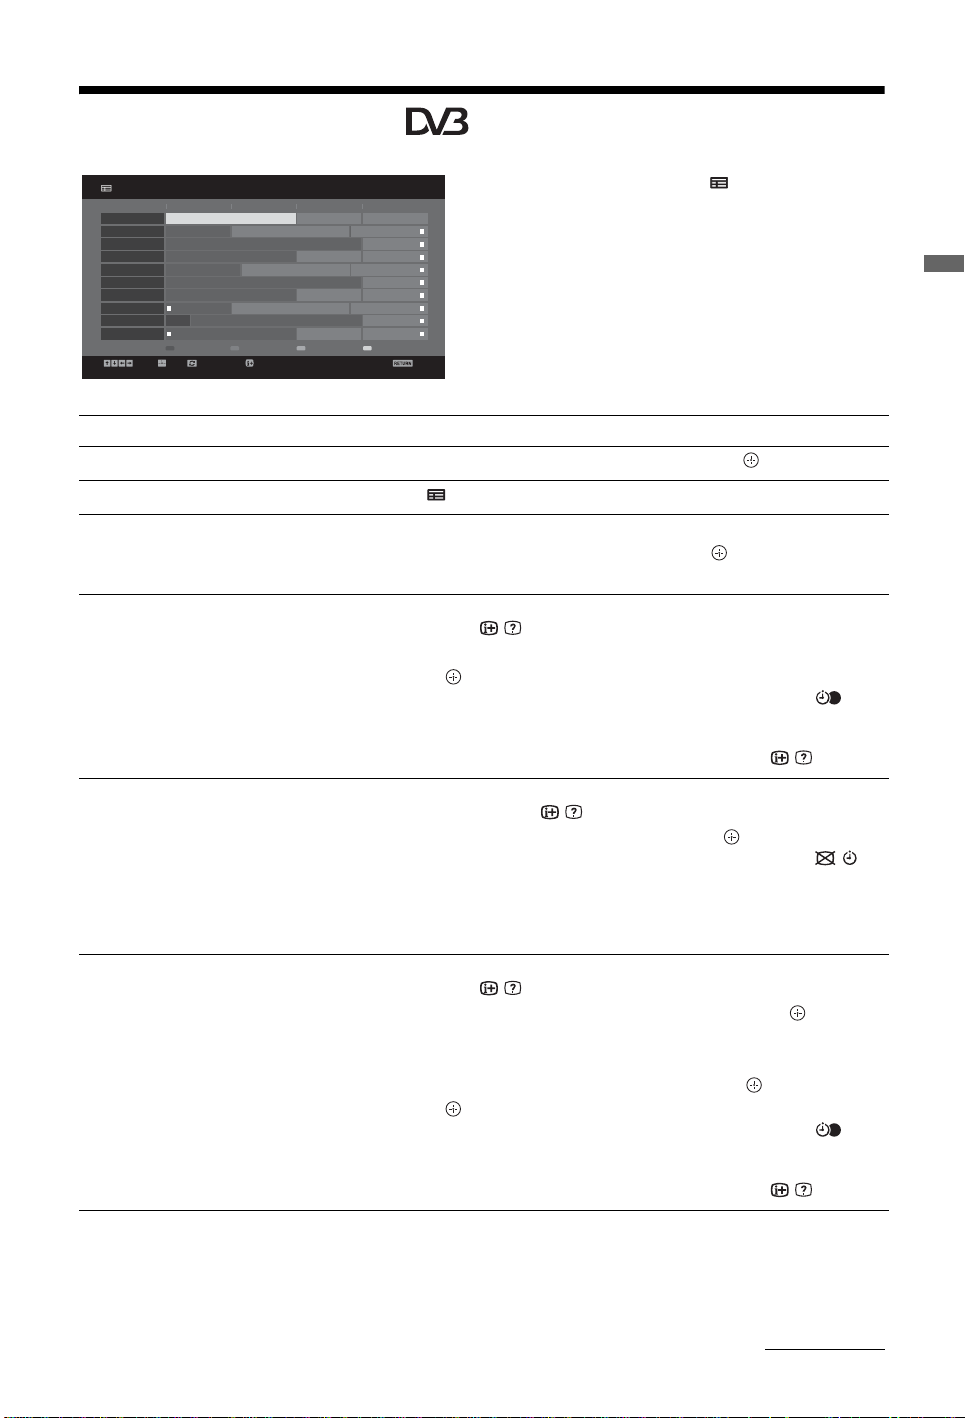
Checking the Guide *
All Categories
Tod ay
001 BBC ONE
002 BBC TWO
003 ITV1
004 Channel 4
005 Five
006 ITV2
007 BBC THREE
008 BBC FOUR
009 ITV3
010 SKY THREE
Select +/- 1 day on/off Event InformationTune
Fri 16 Mar 11:35
Homes Under the Hammer Neighbours Afterlife
Ready Steady Cook Extraordinary People: Britains Iden... CSI: Crime Scene Inv...
Dancing On Ice Exclusive Cracker
Sign Zone: Ancient Rome: The Rise a... The Jeremy Kyle... Homes Under th...
House Law and Order: Special Victims U... PartyPoker.com Worl...
Crime Hour: Midsomer Murders Vodafone TBA: L...
BBC Learning Zone: Schools: World P... A Picture of Br it... Eastenders
ER Real Crime: The Truth About the... This is BBC FOUR
Past Everybody Loves Raymond The Sharon Osb...
Racing from Chepstow and Ascot Baseball Wedne... Trans World Sport
13: 0012: 3012: 0011: 30
Category30 min ViewNextPrevious
Back
1 In digital mode, press GUIDE.
2 Perform the desired operation as shown in the
following table or displayed on the screen.
* This function may not be available in some countries/regions.
To Do this
Watch a programme Press F/f/G/g to select the programme, then press .
Turn off the Guide Press
Sort the programme information by
category
– Category list
Set a programme to be recorded
1 Press the blue button.
2 Press
1 Press F/f/G/g to select the future programme you want to record,
– Timer REC
2 Press
GUIDE.
F/f to select a category, then press .
then press
/ .
F/f to select “Timer REC”.
3 Press to set the TV and your VCR/DVD recorder timers.
A c symbol appears by that programme’s information. The
indicator on the TV front panel lights up in orange.
z
To record the programme you are currently watching, press / .
Set a programme to be displayed
automatically on the screen when it
starts
– Reminder
1 Press F/f/G/g to select the future programme you want to
display, then press
F/f to select “Reminder”, then press .
2 Press
/ .
A c symbol appears by that programme’s information. The
indicator on the TV front panel lights up in orange.
~
If you switch the TV to standby mode, it will automatically turn itself on
when the programme is about to start.
Watching TV
Set the time and date of a programme
you want to record
– Manual timer REC
1 Press F/f/G/g to select the future programme you want to record,
then press
2 Press
3 Press
/ .
F/f to select “Manual timer REC”, then press .
F/f to select the date, then press g.
4 Set the start and stop time in the same way as in step 3.
5 Press
F/f to select the programme, then press .
6 Press to set the TV and your VCR/ DVD recorder timers.
A c symbol appears by that programme’s information. The
indicator on the TV front panel lights up in orange.
z
To record the programme you are currently watching, press / .
Continued
GB
15
Page 16
To Do this
Cancel a recording/reminder
– Timer list
1 Press / .
F/f to select “Timer list”, then press .
2 Press
3 Press
F/f to select the programme you want to cancel, then press
.
F/f to select “Cancel Timer”, then press .
4 Press
A display appears to confirm that you want to cancel the programme.
5 Press G/g to select “Yes”, then press to confirm.
~
• You can set VCR/ DVD recorder timer recording on the TV only for SmartLink compatible VCR/ DVD recorder. If your
VCR/ DVD recorder is not SmartLink compatible, a message will be displayed to remind you to set your VCR/ DVD
recorder timer.
• Once a recording has begun, you can switch the TV to standby mode, but do not turn off the TV completely or the recording
may be cancelled.
• If an age restriction for programmes has been selected, a message asking for a PIN Code will appear on the screen. For
details, see “Parental Lock” (page 30).
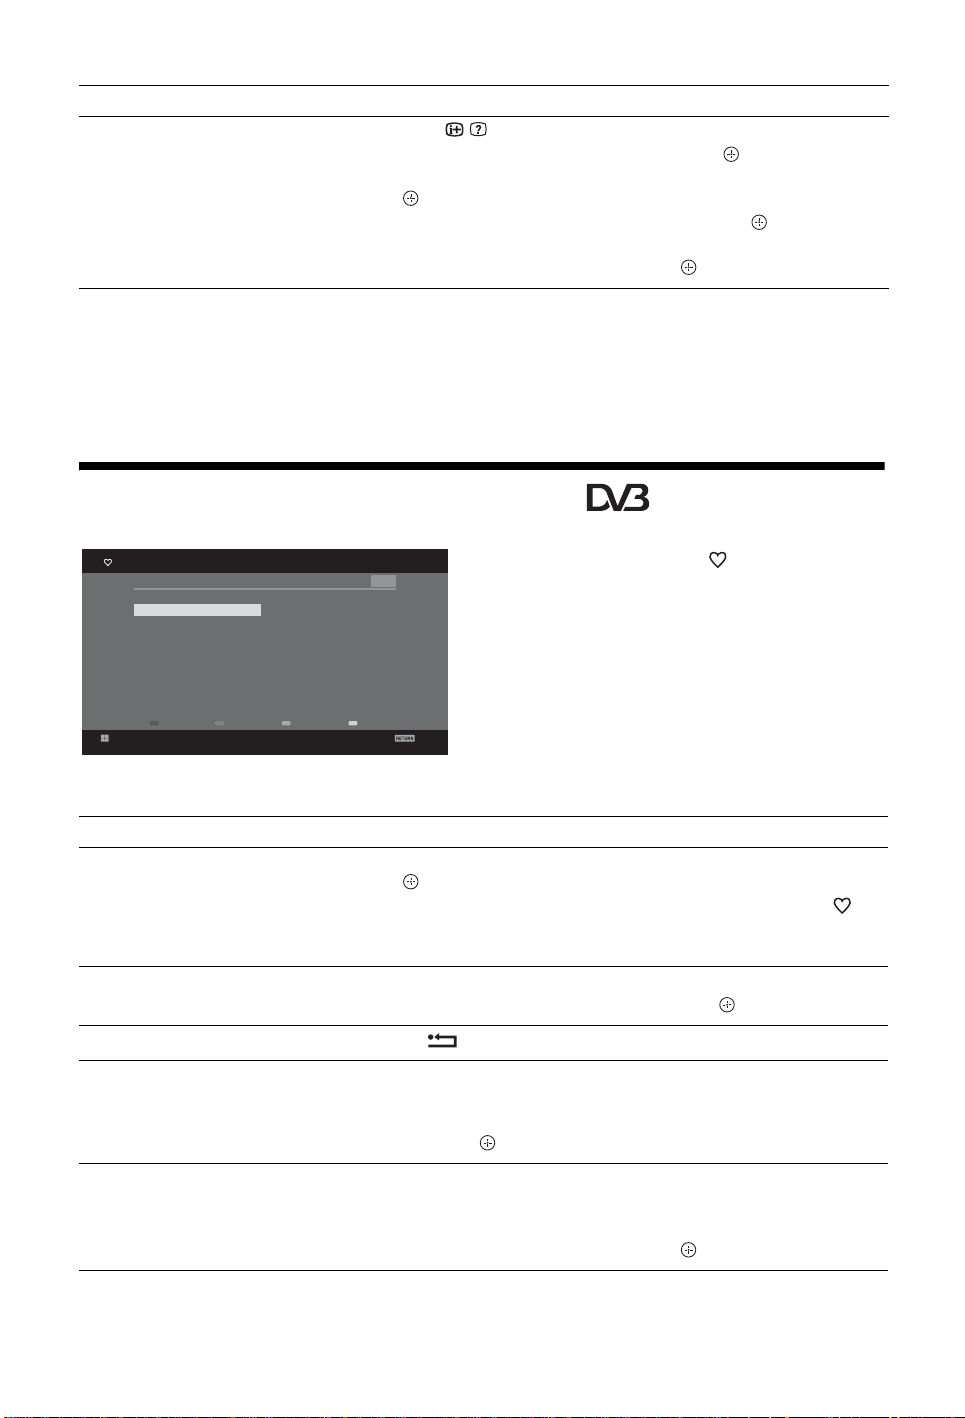
Using the Digital Favourite list *
Favourite Set-up
Favourites 1
001 BBC ONE
002 BBC TWO
003 ITV1
004 Channel 4
005 Five
006 BBC Three
007 ITV2
008 Sky Sports
009 UKTV History
010 Channel 4+1
Store Favourite
Enter Programme Number: - - -
011 More 4
012 abc1
013 QVC
014 UKTV Gold
015 The HITS
016 UKTV Bright Ideas
017 ftn
018 TMF
019 E4
020 E4+1
Favourites 2NextPrevious
Digital
Back
Digital Favourite list
* This function may not be available in some countries/regions.
To Do this
Create your Favourite list for the first
time
1 Press F/f/G/g to select the channel you want to add, then press
.
Channels that are stored in the Favourite list are indicated by a
symbol.
2 Press yellow key to select “Favourites 2” or “Favourites 3”.
Watch a channel
Turn off the Favourite list
Add or remove channels in the currently
edited Favourite list
1 Press yellow key to navigate through favourite lists.
2 Press
F/f to select the channel, then press .
Press RETURN.
1 Press the blue button.
2 Press the yellow button to choose the list you want to edit.
3 Press
F/f/G/g to select the channel you want to add or remove,
then press .
1 In digital mode, press .
2 Perform the desired operation as shown in the
following table or displayed on the screen.
Remove all channels from the current
Favourite list
GB
16
1 Press the blue button.
2 Press the yellow button to select the favourite list you want to edit.
3 Press the blue button.
4 Press
G/g to select “Yes”, then press to confirm.
Page 17
Using Optional Equipment
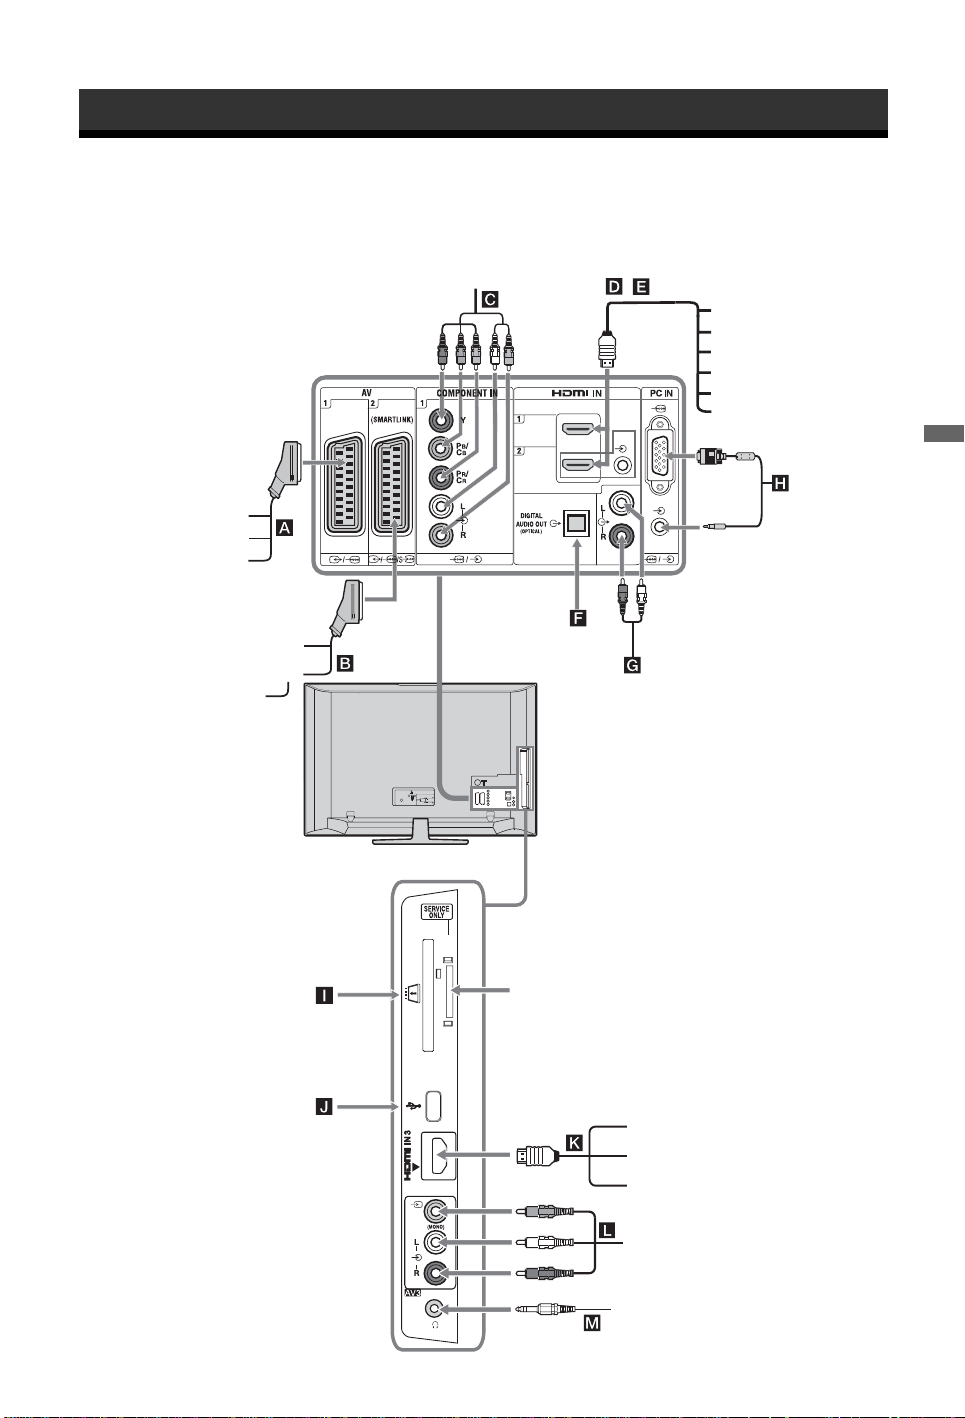
Connecting optional equipment
You can connect a wide range of optional equipment to your TV. Connecting cables are not supplied.
DVD player with
Video game
equipment
DVD player
Decoder
DVD recorder
Decoder
component output
Hi-Fi audio
equipment
with optical
audio input
VCR
,
Hi-Fi audio
equipment
Audio system
DVD player
PC (HDMI output)
Blu-ray disc player
Digital video camera
Digital decoder
Using Optional Equipment
PC
CAM card
USB
For service
use only
PC (HDMI output)
Blu-ray disc player
Digital video camera
DVC camcorder
Headphones
17
GB
Page 18
Viewing pictures from
connected equipment
Switch on the connected equipment, then
perform one of the following operation.
For equipment connected to the scart sockets using
a fully-wired 21-pin scart lead
Start playback on the connected equipment.
The picture from the connected equipment appears
on the screen.
For an auto-tuned VCR/ DVD recorder
In analogue mode, press PROG +/-, or the number
buttons, to select the video channel.
For other connected equipment
Press / to display a list of connected
equipment. Press
source, then press .
The highlighted item is automatically selected if you
do not perform any operation for two seconds after
.
pressing
If you have set an input source to "Skip" in the "AV
Preset" menu (page 26), that input source does not
appear in the list.
z
To return to normal TV mode, press DIGITAL or
ANALOG.
Symbol on the
screen
AV1
AV2
AV3 To see the equipment connected to
HDMI 1 HDMI IN 1*.
HDMI 2 HDMI IN 2*.
F/f to select the desired input
Description
To see the equipment connected to
A.
To see the equipment connected to
B.
~
SmartLink is a direct link between
the TV and a VCR/DVD recorder.
L.
To see the equipment connected to
D.
To see the equipment connected to
E.
If the equipment has a DVI socket,
connect the DVI socket to the
HDMI IN socket through a DVIHDMI adaptor interface (not
supplied), and connect the
equipment’s audio out socket to the
audio in HDMI IN socket.
Symbol on the
screen
HDMI 3 HDMI IN 3*.
* ~
• Be sure to use only an HDMI cable that bears the HDMI
logo.
• When “Control for HDMI” compatible equipment is
connected, communication with the connected
equipment is supported. Refer to page 19 to set up this
communication.
• When connecting an audio system with HDMI socket,
be sure to also connect to the HiFi socket.
Component To see the equipmen t connected to
PC To see the equipment connected to
Description
To see the equipment connected to
K.
C.
H.
z
It is recommended to use a PC
cable with ferrites, such as the
"Connector, D-sub 15" (ref. 1793-504-11, available in Sony
Service Centre) or equivalent.
To connect Do this
Headphones M Connect to the i socket to listen to
sound from the TV on headphones.
Conditional
Access Module
(CAM) I
Hi-Fi audio
equipment G
DIGITAL
AUDIO OUT
(OPTICAL) F
USB J Use USB memory to display photos.
To use Pay Per View services.
For details, refer to the instruction
manual supplied with your CAM. To
use the CAM, remove the rubber
cover from the CAM slot. Switch off
the TV when inserting your CAM
into the CAM slot. When you do not
use the CAM, we recommend that
you replace the cover on the CAM
slot.
~
CAM is not supported in all countries.
Please check with your authorized
dealer.
Connect to the audio output sockets
to listen to the sound from the
TV on Hi-Fi audio equipment.
Use an optical audio cable.
Additional operations
To Do this
Return to normal TV
mode
Press DIGITAL or ANALOG.
18
GB
Page 19
Using the Options menu
Press OPTIONS to display the following options
when viewing pictures from connected equipment.
Options Description
Picture Mode (except
PC input mode)
Display Mode (in PC
input mode only)
Sound Effect See page 23.
Speaker See page 27.
PIP (in PC input
mode only)
PAP (except PC input
mode)
Auto Adjustment (in
PC input mode only)
Horizontal Shift (in
PC input mode only)
See page 22.
See page 22.
See page 19.
See page 19.
See page 26.
See page 26.
To view two pictures simultaneously
– PIP (Picture in Picture)
You can view two pictures (PC input and TV
programme) on the screen simultaneously.
Connect a PC (page 17), and make sure that images
from a PC appear on the screen.
1 Press OPTIONS to display the Options
menu.
2 Press F/f to select “PIP”, then press .
The picture from the connected PC is displayed
with full size and the TV programme is displayed
on the right corner.
You can use
screen position.
F/f/G/g to move the TV programme
3 Press number buttons or PROG +/- to select
the TV channel.
To return to single picture mode
Press RETURN.
z
You can switch the audible picture by selecting “PC
Sound/TV Sound” from the Options menu.
Using Optional Equipment
Sleep Timer (except
PC input mode)
Power Saving See page 24.
See page 25.
To view two pictures simultaneously
– PAP (Picture and Picture)
You can view two pictures (external input and
TV programme) on the screen simultaneously.
Connect an optional equipment (page 17), and
make sure that images from the equipment
appear on the screen (page 18)
~
• This function is not available for a PC input
source.
• You cannot change the size of the pictures.
• You cannot display analogue TV video in the TV
programme picture while displaying AV1, AV2 or
AV3 video in the external inputs picture.
1 Press OPTIONS.
2 Press F/f to select “PAP”, then press .
The picture from the connected equipment
is displayed on the left, and the TV
programme is displayed on the right.
3 Press the number buttons or PROG +/- to
select the TV channel.
To return to single picture mode
Press or RETURN.
z
The picture framed in green is audible. You can
switch the audible picture by pressing G/g.
Using BRAVIA Sync
(Control for HDMI)
The control for HDMI function enables the TV
to communicate with the connected equipment
that is compatible with the function, using
HDMI CEC (Consumer Electronics Control).
For example, by connecting Sony equipment
that is compatible with control for HDMI
(with HDMI cables), you can control them
together.
Be sure to connect the equipment correctly,
and make the necessary settings.
Control for HDMI
• Automatically turns the connected
equipment off when you turn the TV off.
• Automatically turns the TV on and
switches the input to the connected
equipment when the equipment starts to
play.
• If you turn on a connected audio system
while the TV is on, the sound output
switches from the TV speaker to the audio
system.
• Adjusts the volume (2 +/-) and mutes the
sound (%) of a connected audio system.
• You can operate the connected Sony
equipment that has the BRAVIA Sync logo
by the TV remote by pressing:
– N/x/X/m/M to operate the connected
equipment directly.
Continued
GB
19
Page 20
– SYNC MENU to display the menu of the connected
HDMI equipment on the screen.
After displaying the menu, you can operate the
menu screen by using F/f/G/g and .
– OPTIONS to display “Device Control”, then select
options from “Menu”, “Options”, and “Content
List” to operate the equipment.
– Refer to the instruction manual of the equipment for
available control.
To connect the equipment that is
compatible with control for HDMI
Connect the compatible equipment and the TV
with a HDMI cable. When connecting an
audio system, be sure to also connect the
DIGITAL AUDIO OUT (OPTICAL) socket
of the TV and the audio system using an
optical audio cable. For details, see page 18.
To make the control for HDMI settings
The control for HDMI settings must be set on
both the TV side and connected equipment
side. See HDMI Set-up on page 27 for the TV
side settings. For settings on the connected
equipment, refer to the operating instructions
for that equipment.
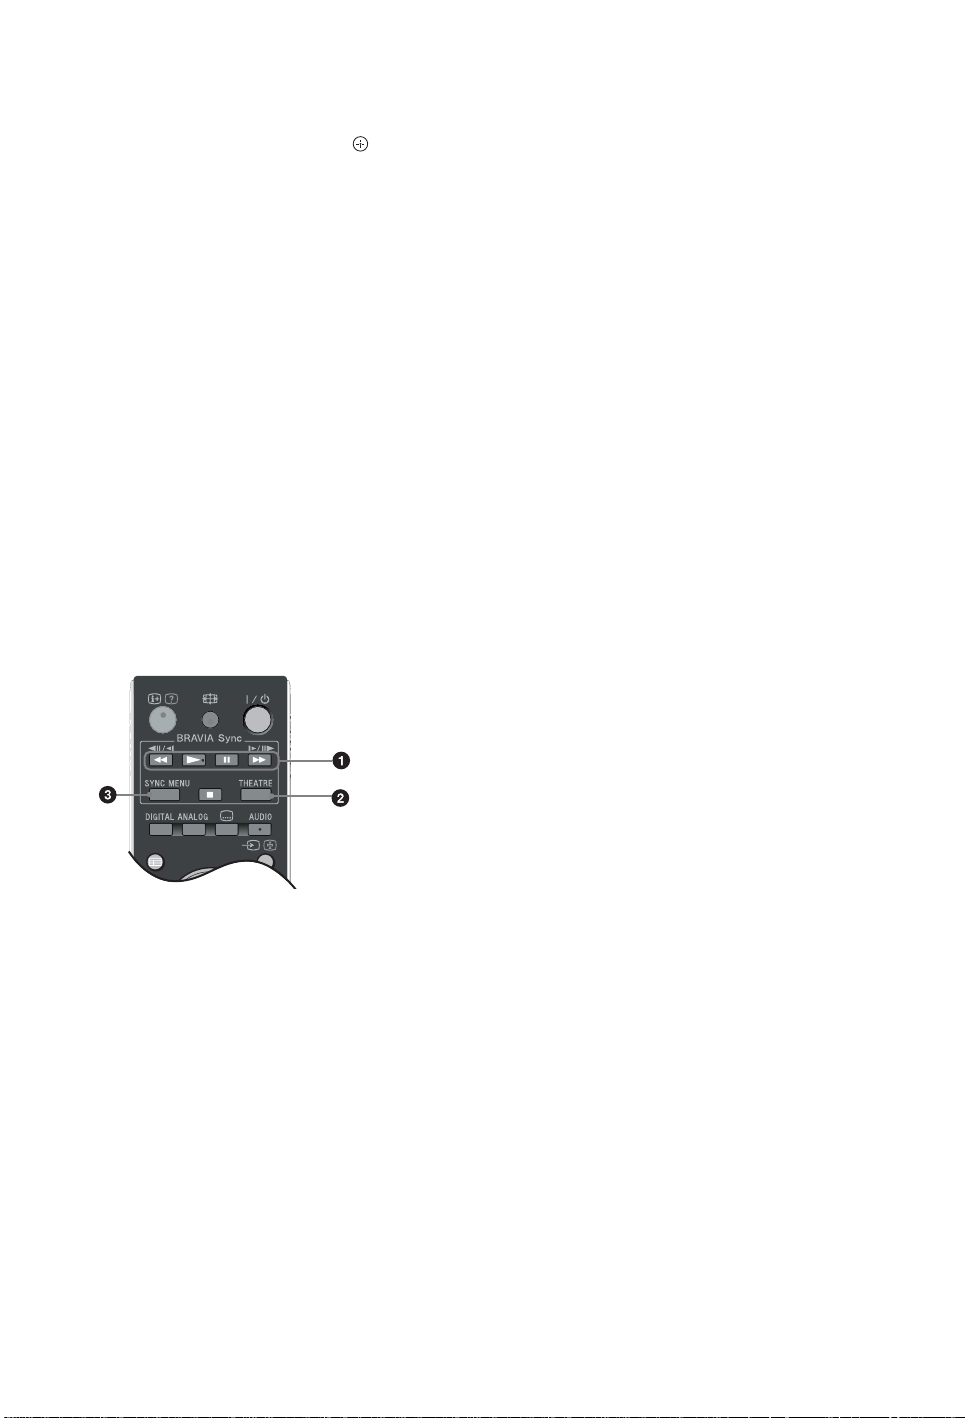
Buttons for using optional equipment
Selection” is displayed when the button is
pressed.
~
Control for HDMI (BRAVIA Sync) is only
available with the connected Sony equipment that
has the BRAVIA Sync logo or is compatible with
control for HDMI.
GUIDE
1 m/N/X/M/x: You can operate the
BRAVIA Sync-compatible equipment that is
connected to the TV.
2 THEATRE
You can set Theatre Mode on or off. When
Theatre Mode is set to on, the optimum audio
output (if the TV is connected with an audio
system using an HDMI cable) and picture
quality for film-based contents are
automatically set.
z
If you turn the TV off, Theatre Mode is also
turned off.
3 SYNC MENU: Displays the menu of connected
HDMI equipment. While viewing other input
screens or TV programmes, “HDMI Device
GB
20
Page 21
Using MENU Functions
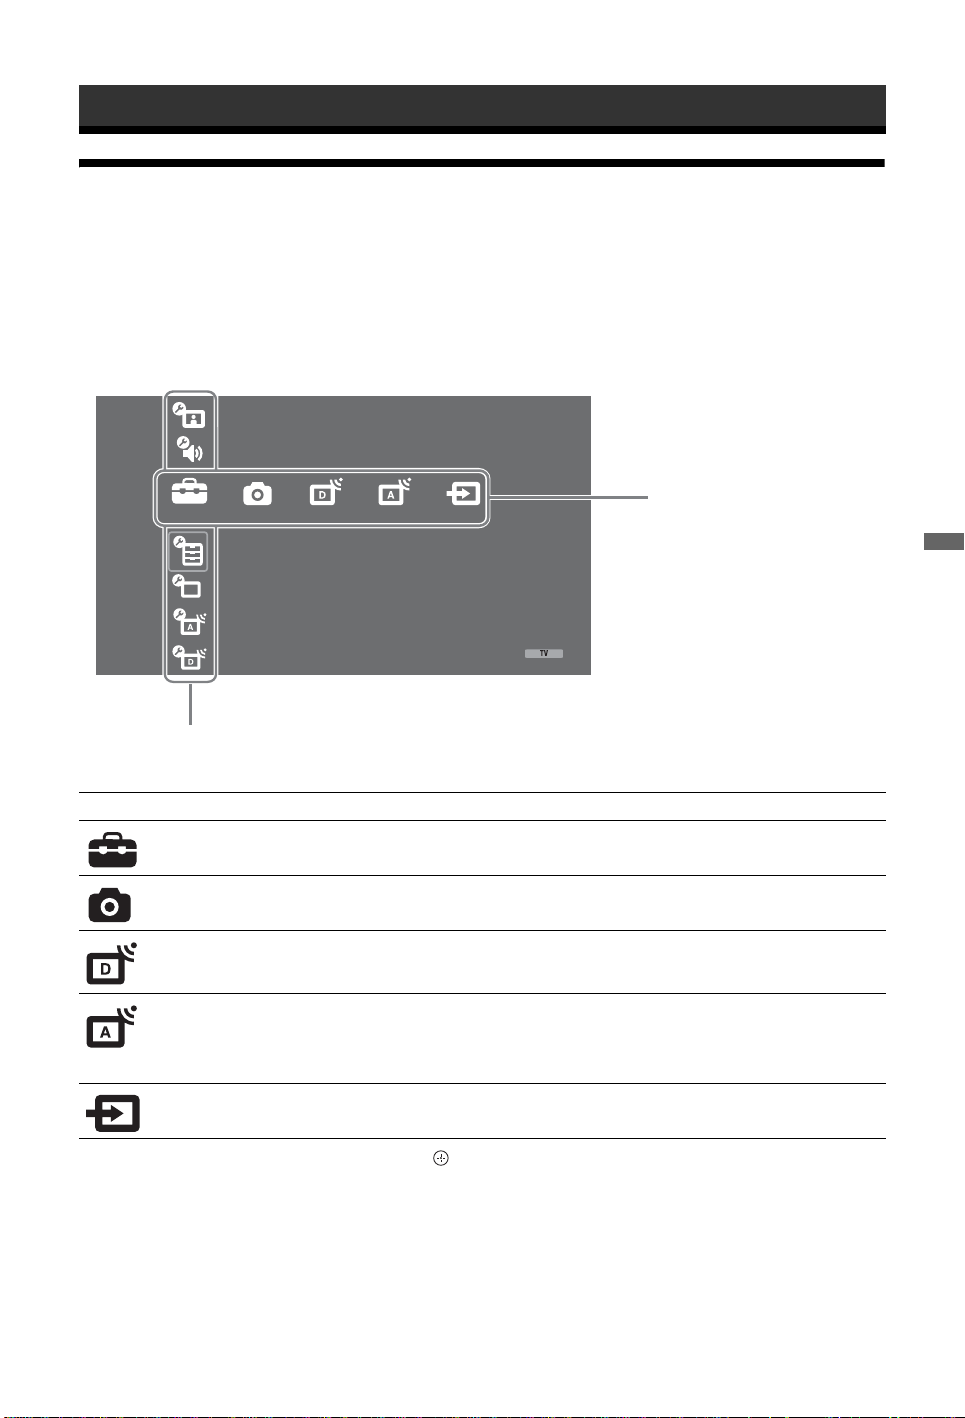
Overview of the TV Home Menu (XMB™)
The XMB™ (XrossMediaBar) is a menu of BRAVIA features and input sources displayed on the TV
screen. The XMB
Press the HOME button on your remote control to access the XMB
1 Press HOME.
The TV Home menu appears on the screen.
Settings
is an easy way to select programming and adjust settings on your BRAVIA TV.
™
Picture
Sound
.
™
Media Category Bar
Features
Set-up
Analogue Set-up
Digital Set-up
Category Object Bar
2 Press G/g to select the category.
Media category icon Description
Settings You can make advanced settings and adjustments. For details about settings,
see page 22.
Photo You can select “USB Photo Viewer” or “Picture Frame” (page 32).
Digital You can select a digital channel, Favourite list (page 16), or Guide (page 15).
You can also select a channel using the number buttons or PROG +/–.
Analogue You can select an analogue channel.
You can also select a channel using the number buttons or PROG +/–.
To hide the list of analogue channels, set “Programme List Display” to “Off”
(page 28).
External Inputs You can select equipment connected to the TV.
To assign a label to an external input, see “AV Preset” (page 26).
Using MENU Functions
3 Press F/f to select the item, then press .
4 Follow the instructions on the screen.
5 Press HOME to exit.
~
• The options you can adjust vary depending on the situation.
• Unavailable options are greyed out or not displayed.
21
GB
Page 22
Settings
Picture
Picture Mode
Display Mode
PC mode/ PC Input/
HDMI PC Input)
(only in
Reset
Backlight
Contrast
Brightness
Colour
Hue
Selects the picture mode except for PC input source. The options for “Picture
Mode” may differ depending on the “Video/Photo” setting (page 24).
“Vivid”: (“Shop”, see page 7). For enhanced picture contrast and sharpness.
“Standard”: (“Home”, see page 7). For standard picture. Recommended for
home entertainment.
“Cinema”: For viewing film-based content. Most suitable for viewing in a
theatre-like environment. This picture setting was developed in collaboration
with Sony Pictures Entertainment to faithfully reproduce movies as intended by
their creators.
“Photo”: Sets the optimum picture quality for photographs.
Selects the display mode for PC input source.
“Video”: For video images.
“Text”: For text, charts or tables.
Resets all picture settings except “Picture Mode” and “Display Mode” (only in
PC mode) to the factory settings.
Adjusts the brightness of the backlight.
Increases or decreases picture contrast.
Brightens or darkens the picture.
Increases or decreases colour intensity.
Increases or decreases the green and red tones.
z
“Hue” can only be adjusted for an NTSC colour signal (e.g., U.S.A. video tapes).
Colour Temperature
Sharpness
Noise Reduction
GB
22
Adjusts the whiteness of the picture.
“Cool”: Gives the white colours a blue tint.
“Neutral”: Gives the white colours a neutral tint.
“Warm 1/Warm 2”: Gives white colours a red tint. “Warm 2” gives a redder
tint than “Warm 1”
z
“Warm 1 and Warm 2” are not available when “Picture Mode” is set to “Vivid”.
Sharpens or softens the picture.
Reduces the picture noise (snowy picture) in a weak broadcast signal.
“Auto”: Automatically reduces the picture noise (in analogue mode only).
“High/Medium/Low”: Modifies the effect of the noise reduction.
“Off”: Turns off the “Noise Reduction” feature.
z
“Auto” is not available for AV1, AV2, AV3, HDMI 1, HDMI 2, HDMI 3,
Component, PC and digital mode.
Page 23

MPEG Noise
Reduction
Reduces the picture noise in MPEG-compressed video.
Advanced Settings
“Noise Reduction”, “MPEG Noise Reduction” and “Advanced Settings” are not available for PC.
Customizes the Picture function in more detail. When you set “Picture Mode” to
“Cinema” or “Standard”, you can set/change these settings.
“Adv. Contrast Enhancer”: Automatically adjusts “Backlight” and “Contrast”
to the most suitable settings judging from the brightness of the screen. This
setting is especially effective for dark images scenes. It will increase the contrast
distinction of the darker picture scenes.
“Live Colour”: Makes colours more vivid.
“Colour Space” (except for KDL-32W4xxx, KDL-32E4xxx, KDL-26E4xxx,
KDL-37V4xxx, KDL-32V4xxx, KDL-26V4xxx): Changes the colour
reproduction gamut. “Wide” reproduces the vivid colour and “Standard”
reproduces the standard colour.
~
• “Live Colour” is not available when “Colour Space” is set to “Standard”.
• “Advanced Settings” is not available when “Picture Mode” is set to “Vivid”.
Sound
Sound Effect
Selects the sound effect.
“Dynamic”: Intensifies clarity and sound presence for better intelligibility and
musical realism by using the “BBE High definition Sound System.”
“Standard”: Enhances clarity, detail, and sound presence by using “BBE High
definition Sound System.”
“Clear Voice”: Makes voice sound clearer.
“Dolby Virtual
by a multi channel system.
“BBE ViVA”: BBE ViVA Sound provides musically accurate natural 3D image
with Hi-Fi sound. The clarity of the sound is improved by BBE while the width
depth and height of sound image are expanded by BBE’s proprietary 3D sound
process. BBE ViVA Sound is compatible with all TV programs including news,
music, dramas, movies, sports and electronic games.
z
• If you set “Auto Volume” to “On”, “Dolby Virtual” changes to “Standard”.
• If headphones are connected, “Sound Effect” changes to “Off”.
”
: Uses the TV speakers to simulate the surround effect produced
Using MENU Functions
Reset
Treble
Bass
Balance
Auto Volume
Volume Offset
Resets all the sound settings to the factory settings.
Adjusts higher-pitched sounds.
Adjusts lower-pitched sounds.
Emphasizes left or right speaker balance.
Keeps a constant volume level even when volume level gaps occur (e.g., adverts
tend to be louder than programmes).
~
If you set “Sound Effect” to “Dolby Virtual”, “Auto Volume” changes to “Off”.
Adjusts the volume level of the current input relative to other inputs.
Continued
GB
23
Page 24

Dual Sound
~
“Sound Effect”, “Treble”, “Bass”, “Balance” and “Auto Volume” are not available when “Speaker” is set to “Audio System”.
Selects the sound from the speaker for a stereo or bilingual broadcast.
“Stereo/ Mono”: For a stereo broadcast.
“A/ B/ Mono”: For a bilingual broadcast, select “A” for sound channel 1, “B”
for sound channel 2, or “Mono” for a mono channel, if available.
z
If you select other equipment connected to the TV, set “Dual Sound” to
“Stereo”, “A” or “B”.
Features
Quick Start
Power Saving
Light Sensor
Logo Illumination
(except for
KDL-37V4xxx,
KDL-32V4xxx,
KDL-26V4xxx)
Film Mode
The TV turns on faster than usual within two hours after switching to standby
mode. However, power consumption in standby mode is higher than usual.
Selects the power saving mode to reduce the power consumption of the TV.
When “Picture Off” is selected, the picture is switched off and the (Picture
Off) indicator on the TV front panel lights up in green. The sound remains
unchanged.
“Standard Power”: Default settings.
“Reduced Power”: Reduces the power consumption of the TV.
“Picture Off”: Switches off the picture. You can listen to the sound with the
picture off.
“On”: Automatically optimises the picture settings according to the ambient
light in the room.
“Off”: Turns off the “Light Sensor” feature.
~
Be sure not to put anything over the sensor, as its function may be affected. See
page 12 for the location of the light sensor.
Lights up and turns off the Sony logo on the front of the TV.
Provides an improved picture quality which is optimized for film when playing
DVD images taken on film and non progressive (interlaced).
“Auto”: Detects the picture contents (video or film) and optimizes the picture
quality. Use this setting for standard use.
“Off”: Turns off the “Film Mode” feature.
~
• If the image contains irregular signals or too much noise, “Film Mode” will be
automatically turned off even if “Auto” is selected.
•“Film Mode” is not available when “Video/ Photo” is set to “Photo” or when
photograph is detected if “Video-A” is set.
Video/Photo
GB
24
Provides suitable image quality by selecting the option depending on the input
source (video or photograph data).
“Video-A”: Sets suitable image quality, depending on the input source, video
data or photograph data when directly connecting Sony HDMI output-capable
equipment that supports “Video-A” mode.
“Video”: Produces suitable image quality for moving pictures.
“Photo”: Produces suitable image quality for still images.
~
• The setting is fixed to “Video” when Video-A mode is not supported on the
connected equipment, even if “Video-A” is selected.
• Only available for HDMI 1, HDMI 2, HDMI 3 and Component in format 1080i
or 1080p.
Page 25

x.v.Colour
(except for
KDL-32W4xxx,
KDL-32E4xxx,
KDL-26E4xxx,
KDL-37V4xxx,
KDL-32V4xxx,
KDL-26V4xxx)
Displays moving pictures that is more faithful to the original source by matching
the colour space of source.
~
• The setting is fixed to “Normal” when the input signal is HDMI (RGB), even if
“x.v.Colour” is selected.
• Only available for HDMI 1, HDMI 2, HDMI 3 and Component in format 720p,
1080i or 1080p.
Photo Colour Space
(except for
KDL-32W4xxx,
KDL-32E4xxx,
KDL-26E4xxx,
KDL-37V4xxx,
KDL-32V4xxx,
KDL-26V4xxx)
Timer Settings
Selects the option (sRGB, sYCC, Adobe RGB) to match the output colour space
within the output signal from the equipment connected to the HDMI, component
input jacks or USB.
~
• Select “sYCC” when using the equipment that supports “x.v.Colour”.
• Only available for HDMI 1, HDMI 2, HDMI 3 and Component in format 1080i
or 1080p.
• Not available when “Colour Space” is set to “Wide” (page 23).
Sets the timer to turn on/off the TV.
Sleep Timer
Sets a period of time after which the TV automatically switches itself into
standby mode.
When the Sleep Timer is activated, the (Timer) indicator on the TV (front)
lights up in orange.
z
• If you switch off the TV and switch it on again, “Sleep Timer” is reset to
“Off”.
• “Sleep timer will end soon. Power will be turned off” appears on the screen
one minute before the TV switches to standby mode.
On Timer Settings
“On Timer”: Sets the timer to turn on the TV from standby mode.
“Timer Mode”: Selects the desired period.
“Time”: Sets the time to turn on the TV.
“Duration”: Selects the time period after which the TV automatically switches
to standby mode again.
Using MENU Functions
Set-up
Auto Start-up
Language
Clock Set
Allows you to adjust the clock manually. When the TV is receiving digital
channels, the clock cannot be adjusted manually since it is set to the time code of
the broadcasted signal.
Starts the “first time operation menu” to select the language, country/region and
location, and tune in all available digital and analogue channels. Usually, you do
not need to do this operation because the language and country/region will have
been selected and channels already tuned when the TV was first installed
(page 6). However, this option allows you to repeat the process (e.g., to retune
the TV after moving house, or to search for new channels that have been
launched by broadcasters).
Selects the language in which the menus are displayed.
Continued
GB
25
Page 26

Screen Settings
“Screen Format”: For details about the screen format, see “To change the
screen format manually to suit the broadcast” on page 14.
“Auto Format”: Automatically changes the screen format according to the
broadcast signal. To keep your setting, select “Off”.
“Display Area”: Adjusts the picture display area in 1080i/p and 720p sources
when "Screen Format" is set to "Wide".
• “Auto”: During digital broadcasts, displays pictures in accordance with the
settings recommended by the broadcast station.
• “Full Pixel”: Displays pictures in their original size.
• “Normal”: Displays pictures in their recommended size.
“Horizontal Shift”: Adjusts the horizontal position of the picture.
“Vertical Shift”: Adjusts the vertical position of the picture when “Screen
Format” is set to “Smart”, “Zoom” or “14:9”.
“Vertical Size”: Adjusts the vertical size of the picture when “Screen Format” is
set to “Smart”.
PC Settings
AV Set-up
“Screen Format”: Selects a screen format for displaying input from your PC.
• “Full 1”: Enlarges the picture to fill the vertical display area, keeping its
original horizontal-to-vertical aspect ratio.
• “Full 2”: Enlarges the picture to fill the display area.
“Reset”: Resets the PC screen settings to the factory settings.
“Auto Adjustment”: Automatically adjusts the display position, phase and pitch
of the picture when the TV receives an input signal from the connected PC.
z
“Auto Adjustment” may not work well with certain input signals. In such cases,
manually adjust “Phase”, “Pitch” and “Horizontal Shift”.
“Phase”: Adjusts the phase when the screen flickers.
“Pitch”: Adjusts the pitch when the picture has unwanted vertical stripes.
“Horizontal Shift”: Adjusts the horizontal position of the picture.
“Power Management”: Switches the TV to standby mode if no signal is
received for 30 seconds in the PC input.
“AV Preset”: Assigns a name to any equipment connected to the side and rear
sockets. The name will be displayed briefly on the screen when the equipment is
selected. You can skip an input source that is not connected to any equipment.
1 Press
2 Press
“AV2 Input”: Sets a signal to be input through the socket labelled / /
F/f to select the desired input source, then press .
F/f to select the desired option below, then press .
• -, CABLE, SAT, VCR, DVD/BD, GAME, AUDIO SYSTEM, CAM, PC: Uses one
of the preset labels to assign a name to connected equipment.
• “Edit:”: Creates your own label.
1 Press F/f to select the desired letter or number (“_” for a blank space),
then press
If you input a wrong character
Press G/g to select the wrong character. Then, press F/f to select the correct
character.
2 Repeat the procedure in step 1 until the name is completed.
3 Select “OK”, then press .
• “Skip”: Skips an input source that is not connected to any equipment when you
press F/f to select the input source.
AV2 on the rear of the TV.
• “Auto”: Switches automatically among the signals of RGB input, S video
input, Composite video input depending on the input signal.
• “RGB”: Inputs the RGB signal.
• “S Video”: Inputs the S Video signal.
• “Composite”: Inputs the Composite video signal.
g.
26
GB
Page 27

“AV2 Output”: Sets a signal to be output through the socket labelled /
/ AV2 on the rear of the TV. If you connect a VCR/ DVD recorder or
other recording equipment to the / / AV2 socket, you can then
record from the equipment connected to other sockets of the TV.
• “TV”: Outputs a broadcast.
• “Auto”: Outputs whatever is being viewed on the screen (except signals
from the HDMI IN 1, HDMI IN 2, HDMI IN 3, / COMPONENT
IN and / PC IN sockets).
“Speaker”: Turns on/off the TV’s internal speakers.
• “TV Speaker”: The TV speakers are turned on in order to listen to the TV’s
sound through the TV speakers.
• “Audio System”: The TV speakers are turned off in order to listen to the
TV’s sound only through your external audio equipment connected to the
audio output sockets. When connected with “Control for HDMI” compatible
equipment, you can turn the connected equipment on interlocked with the TV.
This setting must be made after connecting the equipment.
“Audio Out”:
• “Variable”: The audio output from your audio system can be controlled by
the TV’s remote.
• “Fixed”: The audio output of the TV is fixed. Use your audio receiver’s
volume control to adjust the volume (and other audio settings) through your
audio system.
z
“Audio Out” is not available for audio system connected to the TV using the HDMI
sockets.
Using MENU Functions
HDMI Set-up
Product Information
All Reset
This is used to set the “Control for HDMI” compatible equipment connected to
the HDMI sockets. Note that the interlock setting must also be made on the
connected “Control for HDMI” compatible equipment side.
“Control for HDMI”: This sets whether to interlock the “Control for HDMI”
compatible equipment and the TV. When set to “On”, the following menu items
can be performed.
“Auto Devices Off”: When this is set to “On”, the “Control for HDMI”
compatible equipment turn on and off interlocked with the TV.
“Auto TV On”: When this is set to “On” and if the connected HDMI, control
compatible equipment is turned on, the TV automatically turns on, and the
displays the HDMI input from the connected equipment.
“Device List Update”: Creates or updates the “HDMI Device List”. Up to 14
“Control for HDMI” compatible equipment can be connected, and up to 4
equipment can be connected to a single socket. Be sure to update the “HDMI
Device List” when you change the “Control for HDMI” compatible equipment
connections or settings. Select them manually one by one until getting a correct
picture for several seconds.
“HDMI Device List”: Displays the connected “Control for HDMI” compatible
equipments.
Displays your TV’s product information.
Resets all settings to the factory settings and then displays the “Auto Start-up”
screen.
z
• Be sure not to turn the TV off during this period (it takes about 30 seconds) or press any
buttons.
• All settings, including Digital Favourite list, country/region, language, auto tuned
channels, etc. will be reset.
27
GB
Page 28

Analogue Set-up
Programme List
Display
Auto Tuning
Programme Sorting
Manual Programme
Preset
Select “Off” to hide the list of analogue channels from the XMBTM (Xross Media
Bar).
Tunes in all the available analogue channels.
This option allows you to retune the TV after moving house, or to search for new
channels that have been launched by broadcasters.
Changes the order in which the analogue channels are stored on the TV.
1 Press
F/f to select the channel you want to move to a new position, then
press .
2 Press
F/f to select the new position for your channel, then press .
Before selecting “Label/AFT/Audio Filter/LNA/Skip/Decoder”, press
PROG +/– to select the programme number with the channel. You
cannot select a programme number that is set to “Skip” (page 26).
Programme/System/Channel
Presets programme channels manually.
1 Press F/f to select “Programme”, then press .
2 Press
F/f to select the programme number you want to manually tune (if
tuning a VCR/ DVD recorder, select channel 00), then press RETURN.
F/f to select “System”, then press .
3 Press
4 Press
F/f to select one of the following TV broadcast systems, then press
RETURN.
B/G: For western European countries/regions
I: For the United Kingdom
D/K: For eastern European countries/regions
L: For France
5 Press F/f to select “Channel”, then press .
6 Press
F/f to select “S” (for cable channels) or “C” (for terrestrial channels),
then press
7 Tune the channels as follows:
If you do not know the channel number (frequency)
Press F/f to search for the next available channel. When a channel has been found,
the search will stop. To continue searching, press
If you know the channel number (frequency)
Press the number buttons to enter the channel number of the broadcast you want or
your
8 Press to jump to “Confirm”, then press .
9 Press
Repeat the procedure above to preset other channels manually.
g.
F/f.
VCR/ DVD recorder channel number.
f to select “OK”, then press .
28
Label
Assigns a name of your choice, up to five letters or numbers, to the selected
channel. This name will be displayed briefly on the screen when the channel is
selected.
To input characters, follow steps 1 to 3 of “Edit:” (page 26).
AFT
Allows you to fine-tune the selected programme number manually if you feel
that a slight tuning adjustment will improve the picture quality.
You can adjust the fine tuning over a range of –15 to +15. When “On” is
selected, the fine tuning is performed automatically.
GB
Page 29

Audio Filter
Improves the sound for individual channels in the case of distortion in mono
broadcasts. Sometimes a non-standard broadcast signal can cause sound
distortion or intermittent sound muting when watching mono programmes.
If you do not experience any sound distortion, we recommend that you leave this
option set to the factory setting “Off”.
~
You cannot receive stereo or dual sound when “Low” or “High” is selected.
LNA
Improves the picture quality for individual channels in the case of very weak
broadcast signals (noisy picture).
If you cannot see any improvement in the picture quality even if you set to “On”,
set this option to “Off” (factory setting).
Skip
Skips unused analogue channels when you press PROG +/– to select channels.
(You can still select a skipped channel using the number buttons.)
Decoder
Shows and records the scrambled channel selected when using a decoder
connected directly to scart connector / AV1, or to scart connector /
/ AV2 via a VCR/DVD recorder.
~
Depending on the country/region selected for “Country” (page 7), this option may not be
available.
Confirm
Saves changes made to the “Manual Programme Preset” settings.
Using MENU Functions
Digital Set-up
Digital Tuning
Digital Auto Tuning
Tunes in the available digital channels.
This option allows you to retune the TV after moving house, or to search for new
channels that have been launched by broadcasters). For details, see “Auto-tunning
the TV” (page 7).
Programme Sorting
Removes any unwanted digital channels stored on the TV, and changes the order
of the digital channels stored on the TV.
F/f to select the channel you want to remove or move to a new
1 Press
position.
Press the number buttons to enter the known three-digit programme number of the
broadcast you want.
2 Remove or change the order of the digital channels as follows:
To remove the digital channel
Press . After a confirmation message appears, press G to select “Yes”, then press
.
To change the order of the digital channels
Press g, then press F/f to select the new position for the channel and press G.
3 Press RETURN.
Continued
29
GB
Page 30

Digital Manual Tuning
Tunes the digital channels manually. This feature is available when “Digital Auto
Tuning” is set to “Antenna”.
1 Press the number button to select the channel number you want to manually
tune, then press
2 When the available channels are found, press
want to store, then press
3 Press
F/f to select the programme number where you want to store the new
channel, then press
Repeat the above procedure to manually tune other channels.
F/f to tune the channel.
F/f to select the channel you
.
.
Subtitle Set-up
Audio Set-up
Radio Display
Parental Lock
“Subtitle Setting”: When “For Hard Of Hearing” is selected, some visual aids
may also be displayed with the subtitles (if TV channels broadcast such
information).
“Subtitle Language”: Selects which language subtitles are displayed in.
“Audio Type”: Switches to broadcast for the hearing impaired when “For Hard
Of Hearing” is selected.
“Audio Language”: Selects the language used for a programme. Some digital
channels may broadcast several audio languages for a programme.
“Audio Description”: Provides audio description (narration) of visual
information if TV channels broadcast such information.
“Mixing Level”
levels.
“Dynamic Range”: Compensates for differences in the audio level between
different channels. Note that this function may have no effect for some channels.
“Optical Out”: Selects the audio signal that is output from the DIGITAL AUDIO
OUT (OPTICAL) terminal on the rear of the TV. Set to “Auto” when equipment
compatible with Dolby Digital is connected, and set to “PCM” when noncompatible equipment is connected.
z
*: Adjusts the TV main audio and Audio Description output
*This option is only available when “Audio Description” is set to “On”.
The screen wallpaper is displayed when listening to a radio broadcast after 20
seconds without pressing any button.
You can select the screen wallpaper colour, display a random colour or view a
slide show (page 32).
To cancel the screen wallpaper display temporarily, press any button.
Sets an age restriction for programmes. Any programme that exceeds the age
restriction can only be watched after a PIN Code is entered correctly.
1 Press the number buttons to enter your existing PIN Code.
If you have not previously set a PIN, a PIN Code entry screen appears. Follow the
instructions of “PIN Code” below.
2 Press F/f to select the age restriction or “None” (for unrestricted watching),
then press .
3 Press RETURN.
PIN Code
GB
30
To set your PIN for the first time
1 Press the number buttons to enter the new PIN Code.
2 Press RETURN.
To change your PIN
1 Press the number buttons to enter your existing PIN Code.
2 Press the number buttons to enter the new PIN Code.
3 Press RETURN.
z
PIN Code 9999 is always accepted.
Page 31

Technical Set- up
“Auto Service Update”: Enables the TV to detect and store new digital services
as they become available.
~
For the service update to be able to take place the TV set should be left in stand-by mode
from time to time.
“Software Download”: Enables the TV to automatically receive software
updates free through your existing aerial/cable (when issued). It is recommended
that this option be set to “On” at all times. If you do not want your software to be
updated, set this option to “Off”.
~
For the software upgrade to be able to take place the TV set should be left in stand-by mode
from time to time.
“System Information”:
Displays the current software version and the signal level.
~
If signal bar is red (no signal) or amber (low signal), check the aerial/cable connection.
“Time Zone”: Allows you to manually select the time zone you are in, if it is not
the same as the default time zone setting for your country/region.
“Auto DST”: Sets whether or not to automatically switch between summer time
and winter time.
• “On”: Automatically switches between summer time and winter time
according to the calendar.
• “Off”: The time is displayed according to the time difference set by “Time
Zone”.
CA Module Set-up
Allows you to access a pay TV service once you obtain a Conditional Access
Module (CAM) and a view card. See page 17 for the location of the
(PCMCIA) socket.
Using MENU Functions
31
GB
Page 32

Photo
Picture Frame
Displays a fixed photograph on the screen for
a selected period of time. After that period,
the TV automatically switches itself into
standby mode.
Using the Options menu
Press OPTIONS to display the following
options.
Options Description
Image selection Press F/f/G/g to select a
photograph, then press to
set.
Duration Selects the desired period.
~
• If the photograph is selected from a USB device, it must
remain connected to the TV.
• If “Sleep Timer” is activated, the TV automatically will
switch into standby mode.
USB Photo Viewer
You can view photographs (in JPEG format)
stored in a Sony digital still camera, camcorder
through a USB cable or USB storage media on
your TV.
1 Connect a supported USB device to the
TV.
2 Press HOME.
3 Press G/g to select “Photo”, then press F/
f to select “USB Photo Viewer” and press
.
The thumbnail screen appears.
4 Press F/f/G/g to select the photograph or
folder you want to view, then press .
5 Press RETURN to go back to
thumbnail screen.
Options Description
Set-up You can make advanced
settings for a slide show, and
set the display sequence of the
thumbnails.
Using the Options menu
Press OPTIONS to display the following
options.
Options Description
Picture Mode See page 22.
Sleep Timer See page 25.
Power Saving See page 24.
~
• USB photo viewer supports DCF-compliant JPEG
photographs only.
• When you connect a Sony digital still camera, set the
camera’s USB connection mode to Auto or “Mass
Storage”. For more information about USB connection
mode, refer to the instructions supplied with your digital
camera.
• USB Photo Viewer supports FAT32 file system only.
• While the TV is accessing the data on the recording
media, observe the following:
– Do not turn off the TV or connected USB device.
– Do not disconnect the USB cable.
– Do not remove the recording media.
The data on the recording media may be damaged.
• Do not use unsupported USB device. This may cause
malfunctions.
• Sony will not be held liable for any damage to, or loss
of, data on the recording media due to a malfunction of
any connected devices or the TV.
• Check the website below for updated information about
compatible USB devices.
http://support.sony-europe.com/TV/compatibility/
Additional operations
Press G/f to select an option, then press .
Options Description
Device Selection Press G/g to select a device
Slide Show Displays the photographs one
GB
32
when multiple devices are
connected. Bravia images are
predefined device.
by one.
Page 33

Additional Information
Specifications
Display Unit
Power Requirements:
220–240 V AC, 50 Hz
Screen Size:
KDL-52xxxxx: 52 inches
KDL-46xxxxx: 46 inches
KDL-40xxxxx: 40 inches
KDL-37xxxxx: 37 inches
KDL-32xxxxx: 32 inches
KDL-26xxxxx: 26 inches
Display Resolution:
1,920 dots (horizontal) x 1,080 lines (vertical) (Only for
KDL-52W4xxx, KDL-46W4xxx, KDL-40W4xxx,
KDL-32W4xxx, KDL-40E4xxx, KDL-32E4xxx)
1,366 dots (horizontal) x 768 lines (vertical) (Only for
KDL-37V4xxx, KDL-32V4xxx, KDL-26V4xxx,
KDL-26E4xxx)
Power Consumption*:
KDL-52W4xxx:
223 W (Home / Standard mode)
253 W (Shop / Vivid mode)
KDL-46W4xxx:
225 W (Home / Standard mode)
243 W (Shop / Vivid mode)
KDL-40W4xxx, KDL-40E4xxx:
176 W (Home / Standard mode)
201 W (Shop / Vivid mode)
KDL-37V4xxx:
138 W (Home / Standard mode)
155 W (Shop / Vivid mode)
KDL-32E4xxx, KDL-32W4xxx:
120 W (Home / Standard mode)
143 W (Shop / Vivid mode)
KDL-32V4xxx:
111 W (Home / Standard mode)
122 W (Shop / Vivid mode)
KDL-26V4xxx, KDL-26E4xxx:
88 W (Home / Standard mode)
98 W (Shop / Vivid mode)
* For details about “Home mode” or “Shop mode” see
page 7.
Standby Power Consumption*:
0.19 W or less
* Specified standby power is reached after the TV
finishes necessary internal processes.
Dimensions (w × h × d):
KDL-52W4xxx:
Approx: 126.2 x 87.1 x 34.7 cm (with stand)
Approx: 126.2 x 82.9 x 11.9 cm (without stand)
KDL-46W4xxx:
Approx: 112.0 x 78.2 x 30.7 cm (with stand)
Approx: 112.0 x 74.2 x 11.5 cm (without stand)
KDL-40W4xxx:
Approx: 98.6 x 68.4 x 27.9 cm (with stand)
Approx: 98.6 x 64.6 x 11.0 cm (without stand)
KDL-40E4xxx:
Approx: 100.6 x 69.5 x 28.3 cm (with stand)
Approx: 100.6 x 64.5 x 11.4 cm (without stand)
KDL-37V4xxx:
Approx: 92.0 x 64.9 x 27.9 cm (with stand)
Approx: 92.0 x 61.0 x 11.0 cm (without stand)
KDL-32W4xxx, KDL-32V4xxx:
Approx: 79.4 x 57.7 x 24.2 cm (with stand)
Approx: 79.4 x 54.0 x 9.9 cm (without stand)
KDL-32E4xxx:
Approx: 81.4 x 58.7 x 24.1 cm (with stand)
Approx: 81.4 x 54.0 x 10.4 cm (without stand)
KDL-26V4xxx:
Approx: 65.9 x 50.5 x 24.2 cm (with stand)
Approx: 65.9 x 46.6 x 9.5 cm (without stand)
KDL-26E4xxx:
Approx: 68.4 x 47.5 x 18.6 cm (with stand)
Approx: 68.4 x 46.9 x 10.1 cm (without stand)
Mass:
KDL-52W4xxx:
Approx: 38.0 kg (with stand)
Approx: 32.0 kg (without stand)
KDL-46W4xxx:
Approx: 29.0 kg (with stand)
Approx: 25.0 kg (without stand)
KDL-40W4xxx:
Approx: 21.5 kg (with stand)
Approx: 18.5 kg (without stand)
KDL-40E4xxx:
Approx: 22.0 kg (with stand)
Approx: 19.0 kg (without stand)
KDL-37V4xxx:
Approx: 20.5 kg (with stand)
Approx: 17.5 kg (without stand)
KDL-32W4xxx, KDL-32V4xxx, KDL-32E4xxx:
Approx: 15.5 kg (with stand)
Approx: 13.0 kg (without stand)
KDL-26V4xxx, KDL-26E4xxx:
Approx: 12.5 kg (with stand)
Approx: 10.0 kg (without stand)
Panel System
LCD (Liquid Crystal Display) Panel
TV System
Analogue: Depending on your country/region selection:
B/G/H, D/K, L, I
Digital: DVB-T/DVB-C
Colour/Video System
Analogue: PAL, SECAM
NTSC 3.58, 4.43 (only Video In)
Digital: MPEG-2 MP@ML/HL, H.264/MPEG-4 AVC
HP@L4.0, MP@L3.0
Aerial
75 ohm external terminal for VHF/UHF
Channel Coverage
Analogue: VHF: E2–E12
UHF: E21–E69
CATV: S1–S20
HYPER: S21–S41
D/K: R1–R12, R21–R69
L: F2–F10, B–Q, F21–F69
I: UHF B21–B69
Digital: VHF/UHF
Terminals
/AV1
21-pin Scart connector (CENELEC standard) including
audio/video input, RGB input and TV audio/video
output.
/ / AV2 (SMARTLINK)
21-pin Scart connector (CENELEC standard) including
audio/video input, RGB input, S Video input, selectable
audio/video output, and SMARTLINK interface.
Additional Information
Continued
33
GB
Page 34

AV3 Video input (phono jack)
AV3 Audio input (phono jacks)
Audio output (Left/Right) (phono jacks)
COMPONENT IN
Supported formats: 1080/24p, 1080p, 1080i, 720p,
576p, 576i, 480p, 480i
Y: 1 Vp-p, 75 ohms, 0.3V negative sync
PB/CB: 0.7 Vp-p, 75 ohms
PR/CR: 0.7 Vp-p, 75 ohms
Audio input (phono jacks)
500 mVrms
HDMI IN 1, 2, 3
Video: 1080/24p, 1080p, 1080i, 720p, 576p, 576i,
480p, 480i
Audio: Two channel linear PCM
32, 44.1 and 48 kHz, 16, 20 and 24 bits
PC (see table)
Analogue audio (minijack):
500 mVrms
(HDMI IN 2 only)
PC IN PC Input (Dsub 15-pin)
G: 0.7 Vp-p, 75 ohms, non Sync on Green
B: 0.7 Vp-p, 75 ohms, non Sync on Green
R: 0.7 Vp-p, 75 ohms, non Sync on Green
HD: 1-5 Vp-p
VD: 1-5 Vp-p
PC audio input (minijack)
i Headphones jack
CAM (Conditional Access Module) slot
USB port
Supported formats: JPEG files based on DCF format.
DIGITAL AUDIO OUT (OPTICAL) digital optical
jack. Dolby digital or PCM audio from DVB depending
on broadcasting, PCM audio from any other input
source.
Audio output (phono jacks)
Audio Output
10 W + 10 W (RMS)
Optional Accessories
- KDL-52W40xx/ KDL-52W42xx/ KDL-46W40xx/
KDL-46W42xx/ KDL-40W40xx/ KDL-40W42xx/
KDL-32W40xx/ KDL-32W42xx/ KDL-40E40xx/
KDL-32E40xx/ KDL-37V45xx/ KDL-37V47xx/
KDL-32V45xx/ KDL-32V47xx:
Wall-Mount Bracket SU-WL500.
- KDL-26V45xx/ KDL-26V47xx / KDL-26E40xx:
Wall-mount Bracket SU-WL100.
- KDL-46W40xx/ KDL-46W42xx/ KDL-40W40xx/
KDL-40W42xx/KDL-32W40xx/ KDL-32W42xx/
KDL-40E40xx/ KDL-32E40xx/ KDL-37V45xx/
KDL-37V47xx/ KDL-32V45xx/ KDL-32V47xx:
TV stand SU-FL300M.
Design and specifications are subject to change without
notice.
GB
34
Page 35

PC Input Signal Reference Chart for PC
Horizontal
Signals Horizontal (Pixel) Vertical (Line)
frequency
(kHz)
VGA 640 480 31.5 60 VGA
640 480 37.5 75 VESA
720 400 31.5 70 VGA-T
SVGA 800 600 37.9 60 VESA Guidelines
800 600 46.9 75 VESA
XGA 1024 768 48.4 60 VESA Guidelines
1024 768 56.5 70 VESA
1024 768 60.0 75 VESA
WXGA 1280 768 47.4 60 VESA
1280 768 47.8 60 VESA
1280 768 60.3 75
1360 768 47.7 60 VESA
SXGA 1280 1024 64.0 60 VESA
• This TV’s PC input does not support Sync on Green or Composite Sync.
• This TV’s PC input does not support interlaced signals.
• This TV’s PC input supports signals in the above chart with a 60 Hz vertical frequency. For other signals, you will see the
message “No signal”.
Vertical
frequency (Hz)
Standard
PC Input Signal Reference Chart for HDMI IN 1, 2, 3
Horizontal
Signals Horizontal (Pixel) Vertical (Line)
frequency
(kHz)
VGA 640 480 31.5 60 VGA
SVGA 800 600 37.9 60 VESA Guidelines
XGA 1024 768 48.4 60 VESA Guidelines
WXGA 1280 768 47.4 60 VESA
WXGA 1280 768 47.8 60 VESA
SXGA
* 1280 1024 64.0 60 VESA
WXGA
** 1360 768 47.7 60 VESA
* Only for KDL-52W4xxx, KDL-46W4xxx, KDL-40W4xxx, KDL-32W4xxx, KDL-40E4xxx, KDL-32E4xxx.
**Only for KDL-37V4xxx, KDL-32V4xxx, KDL-26V4xxx, KDL-26E4xxx.
Vertical
frequency (Hz)
Standard
Additional Information
35
GB
Page 36

Troubleshooting
Check whether the 1 (standby) indicator is
flashing in red.
When it is flashing
The self-diagnosis function is activated.
1 Count how many
between each two second break.
For example, the indicator flashes three times, then
there is a two second break, followed by another
three flashes, etc.
2 Press 1 on the top edge of the TV to turn it off,
disconnect the mains lead, and inform your
dealer or Sony service centre of how the
indicator flashes (number of flashes).
When it is not flashing
1 Check the items in the tables below.
2 If the problem still persists, have your TV
serviced by qualified service personnel.
Picture
No picture (screen is dark) and no sound
• Check the aerial/cable connection.
• Connect the TV to the mains, and press 1 on the top edge
of the TV.
• If the 1 (standby) indicator lights up in red, press "/1.
No picture or no menu information from
equipment connected to the scart connector
• Press / to display the connected equipment list,
then select the desired input.
• Check the connection between the optional equipment
and the TV.
Double images or ghosting (only in analogue
mode)
• Check the aerial/cable connection.
• Check the aerial location and direction.
Only snow and noise appear on the screen (only
in analogue mode)
• Check if the aerial is broken or bent.
• Check if the aerial has reached the end of its serviceable
life (three to five years in normal use, one to two years at
the seaside).
Picture or sound noise when viewing a TV
channel (only in analogue mode)
• Adjust “AFT” (Automatic Fine Tuning) to obtain better
picture reception (page 28).
Some tiny black points and/or bright points
appear on the screen
• The picture of a display unit is composed of pixels. Tiny
black points and/or bright points (pixels) on the screen do
not indicate a malfunction.
No colour on programmes
• Select “Reset” (page 22).
No colour or irregular colour when viewing a
signal from the
• Check the connection of the
IN sockets and check if each sockets are firmly seated in
their respective sockets.
Picture freezes or contains blocks on the screen
• Check signal level (page 31). If signal bar is red (no
signal) or amber (low signal), check the aerial/ cable
connection.
GB
36
1 (standby) indicator flashes
/ COMPONENT IN sockets
/ COMPONENT
• Remove the connected USB device. It can be damaged or
not supported by the TV.
Check the website below for updated information about
compatible USB devices:
http://support.sony-europe.com/TV/compatibility/
Sound
No sound, but good picture
• Press 2 +/– or % (Mute).
• Check if the “Speaker” is set to “TV Speaker”
• When using HDMI input with Super Audio CD or DVDAudio, DIGITAL AUDIO OUT (OPTICAL) may not
output audio signals.
(page 27).
Channels
The desired channel cannot be selected
• Switch between digital and analogue mode and select the
desired digital/analogue channel.
Some channels are blank
• Scrambled/Subscription only channel. Subscribe to the
pay TV service.
• Channel is used only for data (no picture or sound).
• Contact the broadcaster for transmission details.
Digital channels are not displayed
• Contact a local installer to find out if digital transmissions
are provided in your area.
• Upgrade to a higher gain aerial.
General
Distorted picture and/or sound
• Keep the TV away from electrical noise sources such as
cars, motorcycles, hair-dryers or optical equipment.
• When installing optional equipment, leave some space
between the optional equipment and the TV.
• Check the aerial/cable connection.
• Keep the aerial/cable TV cable away from other
connecting cables.
The TV turns off automatically (the TV enters
standby mode)
• Check if the “Sleep Timer” is activated, or confirm the
“Duration” setting of “On Timer Settings” (page 25).
• If no signal is received and no operation is performed in
the TV mode for 10 minutes, the TV automatically
switches to standby mode.
The TV turns on automatically
• Check if the “On Timer” is activated (page 25).
Some input sources cannot be selected
• Select “AV Preset” and cancel “Skip” of the input source
(page 26).
The remote does not function
• Replace the batteries.
A channel cannot be added to the Favourite list
• Up to 999 channels can be stored in the Favourite list.
HDMI equipment does not appear on “HDMI
Device List”
• Check that your equipment is “Control for HDMI”
compatible equipment.
Not all channels are tuned
• Check support web site for cable provide information.
http://support.sony-europe.com/TV/DVBC/
You cannot select “Off” in “Control for HDMI”.
• If any “Control for HDMI” compatible audio equipment
is connected to the TV, you cannot select “Off” in this
menu. If you want to change the audio output to the TV
speaker, select “TV Speaker” in the “Speaker” menu
(page 27).
Page 37

Введение
Благодарим Вас за то, что Вы выбрали этот телевизор
Sony.
Перед первым включением телевизора внимательно
ознакомьтесь с данной инструкцией по эксплуатации и
сохраните ее для консультаций в будущем.
Утилизация телевизора
Утилизация отслужившего
электрического и электронного
оборудования (директива применяется
в странах Евросоюза и других
европейских странах, где действуют
системы раздельного сбора отходов)
Данный знак на устройстве или его
упаковке обозначает, что данное
с прочими бытовыми отходами. Его следует сдать в
соответствующий приемный пункт переработки
электрического и электронного оборудования.
Неправильная утилизация данного изделия может
привести к потенциально негативному влиянию на
окружающую среду и здоровье людей, поэтому для
предотвращения подобных последствий необходимо
выполнять специальные требования по утилизации
этого изделия. Переработка данных материалов
поможет сохранить природные ресурсы. Для получения
более подробной информации о переработке этого
изделия обратитесь в местные органы городского
управления, службу сбора бытовых отходов или в
магазин, где было приобретено изделие.
обращаться как с обычными бытовыми отходами.
Неправильная утилизация этих батареек может
привести к потенциально негативному влиянию на
окружающую среду и здоровье людей, поэтому для
предотвращения подобных последствий необходимо
соблюдать правила их утилизации. Вторичная
переработка данных материалов поможет сохранению
природных ресурсов. В случае изделий, для которых по
соображениям безопасности, эффективности или
обеспечения сохранности данных необходимо
постоянное подключение при установленной батарейке,
ее замена должна выполняться только
квалифицированным специалистом сервисной службы.
Для обеспечения надлежащей утилизации батареек по
истечении их срока службы сдавайте их в
специализированный пункт сбора отслужившего
электронного и электрического оборудования. Для всех
других батареек см. в соответствующем разделе
указания по их безопасному извлечению. Сдавайте
батарейки в специализированный пункт сбора
отслуживших батареек. Для получения более подробной
информации о переработке этого изделия или батареек
обратитесь в местные органы власти, службу сбора
бытовых отходов или в магазин, где было приобретено
изделие.
устройство нельзя утилизировать вместе
Утилизация отслуживших
батареек (норма, применимая для
Европейского Союза и других
европейских стран с системами
дифференцированного сбора
отходов)
Данный знак на батарейке или на
упаковке обозначает, что при
утилизации батарейки, поставляемой с
данным изделием, с ней нельзя
Изготовителем данного изделия является компания
Sony Corporation, расположенная по адресу: 1-7-1
Konan Minato-ku Tokyo, 108-0075 Japan.
Авторизованным представителем по вопросам
электромагнитной совместимости и безопасности
данного изделия является компания Sony Deutschland
GmbH, расположенная по адресу: Hedelfinger Strasse
61, 70327 Stuttgart, Germany. По всем вопросам,
связанным с гарантийными обязательствами в
отношении настоящего изделия или с его
обслуживанием, обращайтесь по адресу, указанному в
отдельной сервисной или гарантийной документации.
Примечание в отношении Цифрового ТВ
• Все функции, относящиеся к Цифровому ТВ ( ),
будут действовать только в тех странах или регионах, в
которых ведется эфирная цифровая трансляция сигнала
DVB-T (MPEG2 или MPEG4 AVC), или обеспечивается
доступ к совместимому кабельному цифровому
вещанию DVB-C (MPEG2 или MPEG4 AVC). Просим
Вас уточнить у своего дилера, можно ли принимать
сигнал DVB-T там, где Вы живете, или узнать у своего
провайдера кабельного телевидения, доступна ли
предоставляемая им услуга кабельного вещания DVB-C
для Вашего телевизора.
• Провайдер кабельного ТВ может установить
дополнительный сбор за такую услугу и потребовать от
Вас согласия со своими условиями.
• Хотя данный телевизор удовлетворяет
характеристикам DVB-T и DVB-C, мы не можем
гарантировать его совместимость с будущим цифровым
эфирным вещанием в формате DVB-T и цифровым
кабельным вещанием в формате DVB-C.
• Некоторые из функций Цифрового ТВ в некоторых
странах/регионах могут быть недоступными, а
правильный прием сигнала стандарта DVB-C может
может быть обеспечен не для всех провайдеров
кабельного ТВ.
• Дополнительную информацию о стандарте DVB-C см.
на нашем сайте поддержки услуг кабельного ТВ:
http://support.sony-europe.com/TV/DVBC/
Информация о торговых марках
• является зарегистрированной торговой маркой
DVB Project
• Произведено по лицензии компании BBE Sound, Inc.
Лицензия BBE Sound, Inc., зарегистрированная по
одному или нескольким патентам США: 5510752,
5736897. Слово "BBE" и логотип BBE являются
торговыми марками компании BBE Sound, Inc.
• Произведено по лицензии компании Dolby Laboratories.
"Dolby" и логотип с двойной буквой D являются
торговыми марками компании Dolby Laboratories.
• HDMI, логотип HDMI и High-Definition Multimedia
Interface являются зарегистрированными торговыми
sмарками компании HDMI Licensing LLC.
A
ViV
HD3D Sound
~
• Иллюстрации, приведенные в настоящей инструкции,
относятся к модели KDL-40W4000, если не оговорено иного.
• Символы "x" в названии модели соответствуют цифрам,
определяемым вариацией цвета.
Sony Corporation, 1-7-1 Konan, Minato-ku, T oky o
Japan
Assembled in Russia
Manufacturer: LLC “Baltmixt”
238530, Russia, Kaliningradskaya region,
Zelenogradsky district, settlement Pereslavskoe,
station “Pereslavskoe - Zapadnoe”
TU 658100-017-76102915-2006
RU
2
АЯ19
Sony Corporation, 1-7-1 Konan, Minato-ku, Tokyo
Japan
Собрано в России
Изготовлено: ООО “БАЛТМИКСТ”
238530, Россия, Калининградская область,
Зеленоградский район, пос. Переславское, ст.
«Переславское – Западное»
ТУ 658100-017-76102915-2006
АЯ19
Page 38

Содержание
Начало работы 4
Star
Проверка комплекта поставки......................................................................................... 4
Сведения по безопасности ............................................................................................... 9
Меры предосторожности ................................................................................................ 10
Описание пульта ДУ ...................................................................................................... 11
Описание кнопок и индикаторов телевизора.......................................................... 12
Просмотр телевизора
Просмотр телевизора ...................................................................................................... 13
Использование экранного телегида (Guide) ........................................................ 15
Использование списка цифровых избранных программ ..................................... 16
Использование дополнительных устройств
Подключение дополнительных устройств .................................................................... 17
Просмотр изображения с устройств, подключенных к телевизору ........................... 18
Использование функции BRAVIA Sync (контроля по HDMI)........................................ 20
Использование функций Меню
Описание меню "Дом" (XMB™) ....................................................................................... 21
Установки ......................................................................................................................... 22
Изображение............................................................................................................... 22
Звук .............................................................................................................................. 23
Функции........................................................................................................................ 24
Настройка .................................................................................................................... 25
Настр. аналоговых каналов ....................................................................................... 28
Цифровая конфигурация .................................................................................. 29
Фото .................................................................................................................................. 32
Режим Фоторамка....................................................................................................... 32
Просмотр фото (USB) ................................................................................................. 32
Дополнительные сведения
Технические характеристики ......................................................................................... 33
Поиск неисправностей .................................................................................................... 36
: только для цифровых каналов
Перед включением телевизора прочтите раздел “Сведения по безопасности” этого руководства.
Сохраняйте данное руководство для справок в будущем.
RU
RU
3
Page 39

Начало работы
1: Проверка
комплекта поставки
Сетевой шнур (1) (только для моделей
KDL-52W4xxx, KDL-46W4xxx, KDL-40W4xxx,
KDL-40E4xxx)
Пульт ДУ RM-ED011 (1)
Пульт ДУ RM-ED011 W (1) (только для
моделей KDL-40E4xxx, KDL-32E4xxx,
KDL-26E4xxx)
Батарейки размера AA (типа R6) (2)
Подставка (1) (кроме модели KDL-52W4xxx,
KDL-26E4xxx)
Винты для подставки (4) (только для
моделей KDL-46W4xxx, KDL-40W4xxx,
KDL-40E4xxx, KDL-37V4xxx)
Винты для подставки (3) (только для
моделей KDL-32W4xxx, KDL-32E4xxx,
KDL-32V4xxx, KDL-26V4xxx)
Установка батареек в пульт ДУ
Чтобы открыть крышку, нажмите на нее и
поднимите.
2: Установка
телевизора на
подставке
(кроме модели KDL-52W4xxx,
KDL-26E4xxx)
1 Откройте картонную коробку и
достаньте из нее подставку и винты
.
~
• Вставляя батарейки, соблюдайте полярность.
• Не используйте одновременно батарейки
различных типов или старые и новые батарейки.
• При утилизации батареек всегда соблюдайте
правила охраны окружающей среды. В некоторых
регионах правила утилизации батареек могут быть
регламентированы. Просьба обращаться по этому
поводы в местные органы власти.
• Бережно обращайтесь с пультом ДУ. Не бросайте
его, не становитесь на него и не лейте на него
никаких жидкостей.
• Не оставляйте пульт ДУ вблизи источников тепла
или в месте, подверженном прямому воздействию
солнечных лучей, или во влажном помещении.
RU
4
Page 40

2 Установите телевизор на подставку.
Будьте осторожны, чтобы не передавить
кабели.
3 Закрепите телевизор на подставке с
помощью прилагаемых винтов.
KDL-46W4xxx
KDL-40W4xxx
KDL-40E4xxx
KDL-37V4xxx
KDL-32W4xxx
KDL-32E4xxx
KDL-32V4xxx
KDL-26V4xxx
3: Подключение
антенны/
видеомагнитофона/
пишущего DVDпроигрывателя
Подключение
антенны/кабеля
Подключение антенны/кабеля/
видеомагнитофона/пишущего DVDпроигрывателя
Сигнал эфирного или
кабельного вещания
Коаксиальный кабель
Начало работы
~
При использовании электрической отвертки задайте
момент затяжки, равный приблизительно 1,5 Нм
(15 кгс см)
Scart-кабель
Коаксиальный
Коаксиальный
кабель
Сигнал
эфирного или
кабельного
вещания
кабель
Видеомагнитофон/
пишущий DVDпроигрыватель
RU
5
Page 41

4: Меры по
7: Первоначальная
предотвращению
падения телевизора
1 Закрутите шуруп (диаметром 4 мм, не
входит в комплект поставки) в
подставку под телевизор.
2 Закрутите винт (M5 x 12, не входит в
комплект поставки) в резьбовое
отвестие в основании телевизора.
3 Свяжите шуруп и винт прочной бечевкой.
5:
Подключение кабелей
настройка
GUIDE
3,4,5
KDL-52W4xxx
KDL-46W4xxx
KDL-40W4xxx
KDL-40E4xxx
6: Крепление кабелей
RU
6
1 Включите телевизор в сеть
(220-240 В переменного тока, 50 Гц).
2 Нажмите кнопку 1 на телевизоре.
При первом включении телевизора на его
экране автоматически появляется меню
"Язык" (Language).
3 Нажимая F/f/G/g, выберите из
появившегося на экране меню нужный
Вам язык, затем нажмите .
Language
English
Nederlands
Français
Italiano
Deutsch
Türkçe
Español
Català
Português
Polski
Set
Česky
Magyar
Русский
ББлгар
Suomi
Dansk
Svenska
Norsk
Slovenčina
Română
ски
Analogue
Back
Page 42

4
С помощью кнопок
F/f
выберите страну/
регион, в которой Вы хотите
использовать телевизор, затем нажмите
.
Страна
Установка
-
United Kingdom
Ireland
Nederland
België/Belgique
Luxembourg
France
Italia
Schweiz/Suisse/Svizzera
Deutschland
Аналоговое ТВ
Если страны/региона, в которой Вы хотите
пользоваться телевизором, нет в списке,
вместо страны/региона выберите "-".
5 С помощью кнопок F/f выберите тип
местоположения, в котором Вы хотите
использовать телевизор, затем нажмите
.
~
Sony рекомендует Вам выбрать "Дом" для экономии
энерги.т
Местоположение
Дом
Магазин
Аналоговое ТВ
Возврат
2 С помощью кнопок F/f выберите опцию
"Эфир" или "Кабель", затем нажмите .
Если Вы выберете "Кабель", на экране
появится страница выбора типа сканирования.
См. “Настройка телевизора на прием
сигналов кабельного телевидения” (стр. 8).
Телевизор начнет автоматический поиск всех
доступных цифровых, а затем аналоговых
каналов. Это может занять некоторое время при этом не нажимайте никакие кнопки ни на
телевизоре, ни на пульте ДУ.
В случае появления на экране сообщения:
"Ни один цифровой или аналоговый канал
не найден" Проверьте, правильно ли
выполнено подключение антенны/кабеля и
нажмите кнопку , чтобы повторно
запустить процедуру автонастройки.
3 При появлении на экране меню
"Сортировка прогр.", выполните
операции, указанные в разделе
"Сортировка прогр."(стр. 28).
Если Вы не хотите менять порядок, в котором
аналоговые каналы сохранены в памяти
Вашего телевизора, нажмите RETURN
для перехода к шагу 4.
4
Быстрый запуск
Включить функцию "Быстрый запуск"?
ТВ включается быстрее, но увеличивается
энергопотребление в режиме ожидания.
Да Нет
Аналоговое ТВ
Начало работы
Установка
Данная опция осуществляет первоначальный
выбор режима изображения.
соответствующего освещенности, типичной
для подобных помещений.
8: Автонастройка
телевизора
1 Выберите OK, затем нажмите .
Автонастройка
Начать Автонастройку?
OK Отказ
Установка
Возврат
Аналоговое ТВ
Возврат
Установка
Возврат
Подробности см. на стр. 24.
5
Контроль по HDMI
Включить управление
HDMI-совместимыми устройствами?
Да Нет
Установка
Подробности см. на стр. 20.
Аналоговое ТВ
Возврат
6 Нажмите .
Теперь телевизор настроен на прием всех
доступных каналов.
~
В случае, если прием цифрового канала невозможен, или
при выборе в шаге 3 региона, в котором отсутствует
цифровое вещание(стр. 7), установку времени следует
производить после выполнения шага 3.
RU
7
Page 43

Настройка телевизора на прием
сигналов кабельного телевидения
1 Нажмите .
2 С помощью кнопок F/f выберите
"Быстрое сканирование" или "Полное
сканирование", затем нажмите .
"Быстрое сканирование": настройка на каналы
осуществляется на основе информации
провайдера кабельного телевидения,
содержащейся в телевизионном сигнале.
Для параметров "Частота", "Код доступа к
сети" и "Символьная скорость" рекомендуется
опция "Авто".
Эта опция рекомендуется для быстрой
настройки в случае, когда она поддерживается
Вашим провайдером кабельного телевидения.
Если при выборе опции "Быстрое
сканирование" настройка каналов не
выполняется, используйте метод "Полное
сканирование", описанный ниже.
"Полное сканирование": Выполняются поиск и
сохранение всех доступных телевизионных
каналов. Эта процедура может занять
некоторое время.
Данная опция рекомендуется, если опция
"Быстрое сканирование" не поддерживается
Вашим провайдером кабельного ТВ.
Дополнительную информацию о поддержке
провайдеров см. на нашем сайте поддержки
услуг кабельного ТВ:
http://support.sony-europe.com/TV/DVBC/
3 С помощью кнопок f выберите
"Начать", затем нажмите
Телевизор начнет автоматический поиск
каналов. В это время не нажимайте никакие
кнопки на телевизоре или на пульте ДУ.
~
Некоторые провайдеры кабельного телевидения не
поддерживают "Быстрое сканирование". Если при
использовании опции "Быстрое сканирование" не
найден ни один канал, выполните "Полное
сканирование".
.
Отсоединение
настольной подставки
от телевизора
~
Отсоединяйте настольную подставку от телевизора
только в том случае, если Вы хотите выполнить его
настенную установку.
KDL-52W4xxx
KDL-46W4xxx
KDL-40W4xxx
KDL-40E4xxx
KDL-37V4xxx
KDL-26E4xxx
KDL-32W4xxx
KDL-32E4xxx
KDL-32V4xxx
KDL-26V4xxx
RU
8
Page 44

Сведения по
Настенная установка
30 cm
безопасности
Установка и подключение
Во избежание возгорания, поражения
электрическим током, повреждения телевизора и/
или травм выполняйте установку и эксплуатацию
телевизора в соответствии с нижеследующими
указаниями.
Установка
• Телевизор следует устанавливать вблизи
легкодоступной сетевой розетки.
• Установите телевизор на ровную устойчивую
поверхность.
• Настенная установка телевизора должна
выполняться только квалифицированными
специалистами сервисной службы.
• По соображениям безопасности настоятельно
рекомендуется использовать аксессуары Sony, в том
числе:
- KDL-52W40xx/ KDL-52W42xx/ KDL-46W40xx/
KDL-46W42xx/ KDL-40W40xx/ KDL-40W42xx/
KDL-32W40xx/ KDL-32W42xx/ KDL-40E40xx/
KDL-32E40xx/ KDL-37V45xx/ KDL-37V47xx/
KDL-32V45xx/ KDL-32V47xx:
Кронштейн для настенной установки SU-WL500
- KDL-26V45xx/ KDL-26V47xx / KDL-26E40xx:
Кронштейн для настенной установки SU-WL100
- KDL-46W40xx/ KDL-46W42xx/ KDL-40W40xx/
KDL-40W42xx/KDL-32W40xx/ KDL-32W42xx/
KDL-40E40xx/ KDL-32E40xx/ KDL-37V45xx/
KDL-37V47xx/ KDL-32V45xx/ KDL-32V47xx:
Подставка под телевизор SU-FL300M
Перемещение
• Перед перемещением
телевизора отсоедините от него
все кабели.
• Для переноски телевизора
больших размеров требуются
два или три человека.
• При переноске телевизора
вручную держите его, как
показано на рисунке справа. Не
прикладывайте усилия к ЖКпанели и к рамке вокруг экрана.
• Прим подъеме или
перемещении телевизора
крепко придерживайте его
снизу.
• При перевозке берегите
телевизор от ударов и сильной
вибрации.
• Если необходимо доставить
телевизор в ремонтную
мастерскую или перевезти в другое место, упакуйте
его в картонную коробку и упаковочный материал, в
которых он поставлялся изначально.
Вентиляция
• Никогда не перекрывайте вентиляционные
отверстия и не вставляйте в них никакие предметы.
• Оставляйте свободное пространство вокруг
телевизора, как показано на рисунке ниже.
• Для обеспечения надлежащей циркуляции воздуха
настоятельно рекомендуется использовать
специальный кронштейн для настенной установки
производства компании Sony.
Беритесь за
телевизор снизу,
а не спереди.
10 cm
10 cm
10 cm
Обеспечьте вокруг телевизора
расстояние не меньше указанного.
Установка на подставке
30 cm
10 cm10 cm
6 cm
Обеспечьте вокруг телевизора расстояние не
меньше указанного.
• Для обеспечения надлежащей вентиляции и
предотвращения скопления грязи и пыли:
– Не кладите телевизор экраном вниз; не
устанавливайте телевизор перевернутым нижней
стороной вверх, задом наперед или набок.
– Не устанавливайте телевизор на полке, ковре,
кровати или в шкафу;
– Не накрывайте телевизор тканью, например,
занавесками, а также газетами и т.п.
– Не устанавливайте телевизор так, как показано на
рисунке ниже.
Циркуляция
воздуха нарушена.
Циркуляция
воздуха нарушена.
Стена Стена
Кабель питания
Во избежание возгорания, поражения электрическим
током, повреждения телевизора и/или травм
обращайтесь с кабелем питания и сетевой розеткой в
соответствии с нижеследующими указаниями:
– Используйте только кабели питания Sony, не
пользуйтесь кабелями других марок.
– Вставляйте вилку в розетку до конца.
– Используйте для питания телевизора только сеть
переменного тока напряжением 220-240 В.
– Выполняя кабельные соединения между
устройствами, в целях безопасности извлеките
кабель питания из сетевой розетки и будьте
осторожны, чтобы не запнуться о кабели.
– Перед выполнением каких-либо работ с
телевизором или его переноской выньте вилку
кабеля питания от сети.
– Кабель питания не должен находиться рядом с
источниками тепла.
Продолжение
9
RU
Page 45

– Регулярно чистите вилку кабеля питания,
предварительно вынимая ее из розетки. Если на
вилке имеется пыль, в которой скапливается
влага, это может привести к повреждению
изоляции и, как следствие, к возгоранию.
Примечания
• Не используйте входящий в комплект поставки
кабель питания с другим оборудованием.
• Не пережимайте, не перегибайте и не
перекручивайте кабель питания, прилагая излишние
усилия. В противном случае могут оголиться или
переломиться внутренние жилы кабеля.
• Не изменяйте конструкцию кабеля питания.
• Не ставьте и не кладите никакие тяжелые предметы
на кабель питания.
• Вынимая кабель питания из розетки, не тяните за
сам кабель.
• Не подключайте слишком много приборов к одной
электророзетке.
• Не пользуйтесь электророзеткой с плохими
контактами.
Запрещенные типы установки
Во избежание возгорания, поражения электрическим
током, повреждения телевизора и/или травм не
устанавливайте/не эксплуатируйте телевизор в таких
местах, помещениях и ситуациях, которые
перечислены ниже.
Места расположения:
На открытом воздухе (под прямыми солнечными
лучами), на берегу моря, на корабле или другом судне,
в автомобиле, в медицинских учреждениях, в
неустойчивом положении; вблизи воды, или там, где
возможно воздействие на него дождя, влаги или дыма.
Помещения:
В жарких, влажных или слишком запыленных
помещениях; в местах, где могут быть насекомые; в таких
местах, в которых телевизор может быть подвержен
механической вибрации; вблизи огнеопасных объектов
(свечей и др.). На телевизор не должны попадать какиелибо капли или брызги; нельзя ставить на него предметы,
содержащие жидкости, например вазу с цветами.
Ситуации:
Не касайтесь телевизора мокрыми руками; не
эксплуатируйте его со снятым корпусом или с
дополнительными аксессуарами, не рекомендованными
изготовителем. Во время грозы отключайте телевизор от
розетки электропитания и антенны.
Осколки:
• Не бросайте никакие предметы в телевизор. От
удара экранное стекло может разбиться и нанести
серьезную травму.
• Если на поверхности телевизора образовались
трещины, перед тем, как прикоснуться к нему, выньте
кабель питания из розетки. В противном случае Вы
можете получить удар электрическим током.
Если телевизор не используется
• Если Вы не собираетесь пользоваться телевизором в
течение нескольких дней, по соображениям
безопасности и энергосбережения его следует
отключить от сети электропитания.
• Так как телевизор не отключается от сети при
выключении кнопкой, для его полного отключения
от электропитания выньте вилку кабеля питания из
розетки.
• Следует иметь в виду, что некоторые телевизоры
обладают функциями, для корректной работы
которых требуется оставлять телевизор в дежурном
режиме.
Меры предосторожности в
отношении детей
• Не позволяйте детям взбираться на телевизор.
• Храните мелкие детали вне досягаемости детей,
чтобы они не могли случайно проглотить их.
Если имеют место следующие
неисправности...
Немедленно выключите телевизор и выньте вилку
кабеля питания из розетки в следующих случаях.
RU
10
Обратитесь к своему дилеру или в сервисный центр Sony
для того, чтобы квалифицированные специалисты
сервисной службы выполнили проверку телевизора.
В случае, если:
– Поврежден кабель питания.
– Электророзетка имеет плохие контакты.
– Телевизор получил повреждения в результате
падения, удара или попадания брошенным в него
предметом.
– Внутрь корпуса телевизора через отверстия
попала жидкость или какой-либо предмет.
Меры
предосторожности
Просмотр телевизора
• Смотрите телевизор при достаточном освещении;
просмотр при плохом освещении или в течение
чрезмерно продолжительного времени утомляет глаза.
• При пользовании наушниками не устанавливайте
слишком большую громкость, чтобы не повредить слух.
ЖК-экран
• Хотя ЖК-экран изготовлен по высокоточной
технологии и число эффективных точек достигает
99,99 % и выше, на экране могут постоянно появляться
черные или яркие цветные (красные, синие или
зеленые) точки. Это структурное свойство ЖКэкрана, которое не является признаком неисправности.
• Не нажимайте на защитный фильтр, не царапайте
его и не ставьте на телевизор какие-либо предметы.
Это может привести к неравномерности
изображения или повреждению ЖК-экрана.
• Если телевизор работает в холодном месте,
изображение может оказаться размытым или
слишком темным. Это не является признаком
неисправности. Эти явления исчезнут с повышением
температуры.
• При продолжительной демонстрации неподвижного
изображения могут появляться остаточные
изображения. Через несколько секунд они могут
исчезнуть.
• Во время работы телевизора экран и корпус
нагреваются. Это не является признаком
неисправности.
• ЖК-экран содержит небольшое количество жидких
кристаллов. Некоторые люминесцентные лампы,
применяемые в этом телевизоре, содержат также
ртуть. При утилизации соблюдайте
соответствующие местные положения и инструкции.
Уход за поверхностью экрана, корпусом
телевизора и их чистка
Перед чисткой телевизора или вилки кабеля питания
отсоедините кабель от сети.
Для обеспечения сохранности конструкционных
материалов и покрытия экрана телевизора соблюдайте
следующие меры предосторожности.
• Для удаления пыли с поверхности экрана/корпуса
телевизора осторожно протирайте его мягкой
тканью. Если пыль не удаляется полностью,
протрите экран мягкой тканью, слегка смоченной в
слабом растворе мягкого моющего средства.
• Ни в коем случае не используйте никакие
абразивные материалы, щелочные/кислотные
очистители, чистящие порошки и такие летучие
растворители, как спирт, бензин, разбавитель или
инсектициды. Применение этих веществ или
длительный контакт с изделиями из резины/винила
могут повредить покрытие корпуса или поверхность
экрана.
• При регулировке угла наклона телевизора
изменяйте его положение медленно и осторожно во
избежание соскальзывания телевизора с подставки.
Дополнительные устройства
Держите дополнительные компоненты или
оборудование, излучающее электромагнитные волны, на
расстоянии от телевизора. В противном случае может
иметь место искажение изображения и/или звука.
Page 46

Описание пульта ДУ
1 "/1 – Дежурный режим
Служит для временного выключения телевизора и его включения из
дежурного режима.
AUDIO
2
В аналоговом режиме: Эта кнопка служит для переключения режима
"Двухканальный звук"(стр. 23).
В цифровом режиме: Эта кнопка служит для выбора языка
GUIDE
аудиовещания (стр. 30).
3 – Субтитры
Эта кнопка служит для вывода на экран субтитров, соответствующих
текущей программе, если канал передает такую информацию (только
в цифровом режиме) (стр. 30).
4 / – Выбор источника входного сигнала / Удержание текста
• В обычном режиме работы телевизора: Служит для выбора
источника входного сигнала из числа устройств, подключенных к
разъемам телевизора (стр. 18).
• В режиме телетекста (стр. 14): Служит для удержания текущей
страницы.
F/f/G/g/
5
OPTIONS (стр. 14, 19)
6
Эта кнопка открывает доступ к различным опциям просмотра и
позволяет выполнять настройки/регулировки в соответствии с
источником сигнала и форматом экрана.
HOME (стр. 21)
7
Служит для выбора на экран меню "Дом".
8 Цветные кнопки (стр. 14, 15, 16)
9 Цифровые кнопки
• В обычном режиме работы телевизора: Служат для выбора канала.
Для выбора каналов с номерами 10 и выше вторую и третью цифру
следует вводить достаточно быстро.
• В режиме телетекста: Служат для ввода трехзначного номера
нужной страницы.
0 – Избранные (стр. 16)
PROG +/–//
qa
• В обычном режиме работы телевизора: Служит для выбора
следующего (+) или предыдущего (-) канала.
• В режиме телетекста (стр. 14): Служит для выбора следующей ( )
или предыдущей ( ) страницы.
qs – Предыдущий канал
Служит для возврата к предыдущему просматривавшемуся каналу (при
условии, что его просмотр длился более пяти секунд).
qd % – Отключение звука
qf 2 +/– – Громкость
qg / – Телетекст (стр. 14)
qh – RETURN
Служит для возврата к предыдущей странице любого выведенного на
экран меню.
qj –
qk
ql
w;
wa – Режим экрана (стр. 14)
ws / – Информация / Вывод скрытого текста
GUIDE (стр. 15)
ANALOG – Аналоговый режим (стр. 13)
DIGITAL – Цифровой режим (стр. 13)
BRAVIA Sync (стр. 20)
• В цифровом режиме: Выводит на экран краткую информацию о
просматриваемой в данный момент программе.
• В аналоговом режиме: При каждом нажатии кнопки
информация на экране будет меняться в следующей
последовательности: Выводит на экран такую информацию, как
текущий номер канала и формат экрана
экран
• В режиме телетекста (стр. 14): Выводит на экран скрытую
t Информация скрыта.
информацию (например, ответы телевикторины).
z
На цифровой кнопке 5, а также на кнопках PROG +, AUDIO и имеются
выпуклые точки. По ним удоб но ориентироваться при управлении
телевизором.
/
t Время выводится на
11
RU
Page 47

Описание кнопок и индикаторов
телевизора
HOME
1 (стр. 21)
2 / – Кнопка выбора источника
входного сигнала / OK
HOME
(только для моделей KDL-40E4xxx, KDL-32E4xxx,
KDL-26E4xxx)
• В обычном режиме работы телевизора:
cлужит для выбора источника входного
сигнала из числа устройств, подключенных к
разъемам телевизора (стр. 18).
• При работе с меню: cлужит для выбора меню
или опции и для подтверждения установки.
3 2 +/–//
• В обычном режиме работы телевизора:
Служит для увеличения (+) или уменьшения () громкости.
• При работе с меню: cлужит для перемещения
между опциями вправо ( ) или влево ( ).
4 PROG +/–//
• В обычном режиме работы телевизора:
Служит для выбора следующего (+) или
предыдущего (-) канала.
• При работе с меню: Служит для перемещения
между опциями вверх ( ) или вниз ( ).
5 1 – Питание
Служит для включения или выключения
телевизора.
~
Чтобы полностью выключить телевизор,
выньте вилку кабеля питания из
электророзетки.
6 Световой сенсор
Не кладите ничего на этот датчик во
избежание нарушений в его работе.
7 Датчик сигнала с пульта ДУ
• Принимает ИК сигналы от пульта ДУ.
• Не кладите ничего на этот датчик во
избежание нарушений в его работе.
8 – Откл. изобр./таймера
• Загорается зеленым светом при
отключенном изображении (стр. 24).
• Загорается оранжевым светом при
установленном таймере (стр. 25).
9 1 – Индикатор дежурного режима
Загорается красным светом, когда телевизор
находится в дежурном режиме.
0 " – Индикатор включения/ Запись по
таймеру записи
• Загорается зеленым светом при включении
телевизора.
• Загорается оранжевым светом при
установленном таймере записи (стр. 15).
• Горит красным светом при выполнении
записи по команде таймера.
~
• Перед тем как вынимать вилку сетевого шнура из
розетки, убедитесь, что телевизор полностью
выключен. Вынимание вилки сетевого шнура из
розетки при включенном телевизоре может
привести к тому, что индикатор продолжит
гореть, или даже к выходу телевизора из строя.
• Не кладите ничего на индикаторы во избежание
нарушений в их работе.
12
RU
Page 48

Просмотр телевизора
Просмотр телевизора
2
GUIDE
3
3 Для выбора телевизионного канала
используйте цифровые кнопки или
кнопку PROG +/-.
Для выбора каналов с двузначными
номерами вторую цифру следует вводить в
течение двух секунд после ввода первой.
О выборе цифровых каналов с помощью
экранного телегида см. стр. 15.
В цифровом режиме
На короткое время на экране появится
информационный баннер. Баннер может
содержать следующие пиктограммы:
: Трансляция радиосигнала
: Трансляция кодированных/получаемых по
подписке программ
: Доступно многоязычное аудиовещание
: Доступны субтитры
: Доступны субтитры для слабослышащих
: Рекомендуемый минимальный возраст для
просмотра текущей программы (от 4 до 18
лет)
: Замок от детей
c: Ведется запись текущей программы
Дополнительные операции
Чтобы Необходимо
Включить
телевизор из
дежурного
режима без звука
Отрегулировать
уровень громкости
Нажать %. С помощью
кнопки 2 +/отрегулировать уровень
громкости.
Нажимать 2 + (для
увеличения)/ - (для
уменьшения).
Просмотр телевизора
3
1 Для включения телевизора нажмите
кнопку 1 на нем.
Если телевизор находится в дежурном
режиме (индикатор дежурного режима 1 на
передней панели телевизора горит красным
цветом), нажмите кнопку "/1 на пульте ДУ
для включения телевизора.
2 Нажмите кнопку DIGITAL для
переключения телевизора в цифровой
режим или кнопку ANALOG для его
переключения в аналоговый режим.
Число доступных каналов будет зависеть от
заданного режима.
13
RU
Page 49

Вход в режим телетекста
Нажмите /. При каждом нажатии кнопки /
экран будет циклически меняться в следующей
последовательности:
Текст t Текст, наложенный на телевизионное
изображение (смешанный режим) t
Изображение без текста (выход из режима
телетекста)
Для выбора страницы используйте цифровые
кнопки или PROG +/-.
Для удержания страницы нажмите / .
Для вывода на экран скрытой информации
нажмите кнопку / .
z
Если в нижней части страницы телетекста появляются
четыре цветовых символа, это означает, что доступен
режим Фастекст. Фастекст обеспечивает Вам
быстрый и простой доступ к нужным страницам.
Нажмите кнопку соответствующего цвета для выхода
на нужную страницу.
Ручное изменение формата экрана
для соответствия формату
передаваемого изображения
Нажимая кнопку , выберите нужный формат
экрана.
Оптимальный*
Обеспечивает
воспроизведение
изображения в
обычном формате 4:3 с
имитацией эффекта
широкоэкранного
изображения.
Изображение формата
4:3 вытягивается для
заполнения всего
экрана.
4:3
Широкоэкранный
Обеспечивает
воспроизведение с
правильными
пропорциями
изображения в обычном
формате 4:3 (например,
предназначенное для
неширокоэкранных
телевизоров).
Обеспечивает
воспроизведение с
правильными
пропорциями
широкоэкранного
изображения (16:9).
14:9*
Обеспечивает
воспроизведение с
правильными
пропорциями
изображения в
формате 14:9. В
результате по краям
изображения будут
видны черные
полосы.
* Часть изображения вверху или внизу может
оказаться срезанной.
~
В режиме "Оптимальный" некоторые символы и/или
буквы вверху или внизу изображения могут оказаться
невидимыми. В таком случае можно выбрать "Размер
по вертикали" с помощью меню "Настройки экрана"
(стр. 26) и отрегулировать размер по вертикали,
чтобы сделать их видимыми.
z
• При установке параметра "Автомат. формат" в
опцию "Вкл." телевизор будет автоматически
выбирать формат экрана, наилучшим образом
соответствующий передаваемому
изображению(стр. 26).
• Вы можете регулировать положение изображения
при выборе режимов "Оптимальный", "14:9" или
"Увеличенный". Используйте кнопки
перемещения изображения вверх или вниз
(например, для того, чтобы можно было прочитать
субтитры).
F/f для
Использование меню "Опции"
Во время просмотра телевизионной программы
нажмите кнопку OPTIONS для вывода на экран
следующих опций.
Опции Описание
Режим изображения См. стр. 22.
Звуковой эффект См. стр. 23.
Динамик См. стр. 27.
Установка субтитров
(только в цифровом
режиме)
Таймер сна См. стр. 25.
Энергосбережение См. стр. 24.
Системная
информация (только
в цифровом режиме)
См. стр. 30.
См. стр. 31.
Увеличенный*
RU
14
Обеспечивает
воспроизведение с
правильными
пропорциями
изображения в
кинематографическо
м (letter-box) формате.
Page 50

Использование экранного телегида (Guide) *
Все категории
Сегодня
001 BBC ONE
002 BBC TWO
003 ITV1
004 Channel 4
005 Five
006 ITV2
007 BBC THREE
008 BBC FOUR
009 ITV3
010 SKY THREE
Выбор +/- 1 день вкл/выкл Информация о событииНастройка
птн 16 мар 11:35
Homes Under the Hammer Neighbours Afterlife
Ready Steady Cook Extraordinary People: Britains Iden... CSI: Crime Scene Inv...
Dancing On Ice Exclusive Cracker
Sign Zone: Ancient Rome: The Rise a... The Jeremy Kyle... Homes Under th...
House Law and Order: Special Victims U... PartyPoker.com Worl...
Crime Hour: Midsomer Murders Vodafone TBA: L...
BBC Learning Zone: Schools: World P... A Picture of Br it... Eastenders
ER Real Crime: The Truth About the... This is BBC FOUR
Past Everybody Loves Raymond The Sharon Osb...
Racing from Chepstow and Ascot Baseball Wedne... Trans World Sport
13: 0012: 3012: 0011: 30
Категория30-мин. просмотрСледующ.Предыдущая
Возврат
1 В цифровом режиме нажмите GUIDE.
2 Выполните нужную операцию в
соответствии со следующей таблицей
или указаниями на экране телевизора.
* Эта функция может быть недоступна в некоторых странах/регионах.
Чтобы Необходимо
Просмотреть ту или иную программу С помощью кнопок F/f/G/g выбрать программу, затем нажать .
Удалить телегид с экрана Нажать
Отсортировать информацию о
программе по категории
1 Нажать синюю кнопку.
2 С помощью кнопок F/f выбрать категорию, затем нажать .
GUIDE.
– Список категорий
Задать программу для записи
– Запись по таймеру
1 С помощью кнопок F/f/G/g выбрать предстоящую программу,
которую Вы хотите записать, затем нажать
/ .
2 С помощью кнопок F/f выберите "Запись по таймеру".
3 С помощью кнопки установить таймеры телевизора и
Вашего видеомагнитофона/ пишущего /DVD-проигрывателя.
Символ c появится рядом с информацией о данной программе.
Индикатор на передней панели телевизора загорится
оранжевым светом.
z
Для записи текущей просматриваемой программы нажмите / .
Задать программу для
автоматического вывода на экран
при начале ее трансляции
– Напоминание
1 С помощью кнопок F/f/G/g выбрать предстоящую
программу, которую Вы хотите вывести на экран, затем
нажать
/ .
2 С помощью кнопок F/f выбрать "Напоминание", затем
нажать .
Символ c появится рядом с информацией о данной программе.
Индикатор на передней панели телевизора загорится
оранжевым светом.
~
Если Вы установите телевизор в дежурный режим, он
автоматически включится перед началом трансляции данной
программы.
Задать время и дату трансляции
программы, которую Вы хотите
записать
– Ручная запись по таймеру
1 С помощью кнопок F/f/G/g выбрать предстоящую
программу, которую Вы хотите вывести на экран, затем
нажать
/ .
2 С помощью кнопок F/f выбрать "Ручная запись по
таймеру", затем нажать .
3 С помощью кнопок F/f выбрать дату, затем нажать g.
4 Задать время начала и окончания записи таким же
образом, как и в шаге 3.
5 С помощью кнопок F/f выбрать программу, затем нажать
кнопку .
6 С помощью кнопки установить таймеры телевизора и
Вашего видеомагнитофона/ пишущего /DVD-проигрывателя.
Символ c появится рядом с информацией о данной программе.
Индикатор на передней панели телевизора загорится
оранжевым светом.
z
Для записи текущей просматриваемой программы нажмите / .
Просмотр телевизора
Продолжение
RU
15
Page 51

Чтобы Необходимо
Отменить запись/напоминание
– Список таймеров
1 Нажать / .
2 С помощью кнопок F/f выбрать "Список таймеров", затем
нажать .
3 С помощью кнопок F/f выбрать программу, запись/
напоминание о которой Вы хотите отменить, и нажать кнопку .
4 С помощью кнопок F/f выбрать "Отменить таймер", затем
нажать .
На экране появится запрос подтверждения на отмену.
5 Нажать G/g для выбора опции "Да", затем нажать для
подтверждения.
~
Вы можете установить на телевизоре таймер записи видеомагнитофона/пишущего DVD-проигрывателя только для
видеомагнитофонов/ пишущих DVD-проигрывателей, совместимых с функцией Smartlink. Если Ваш видеомагнитофон/
пишущий DVD-проигрыватель несовместим с функцией Smartlink, на экране появится сообщение, напоминающее Вам о
необходимости установить на запись таймер Вашего видеомагнитофона/пишущего DVD-проигрывателя.
После начала записи Вы можете переключить телевизор в дежурный режим; однако нельзя полностью выключать
телевизор, в противном случае возможна отмена записи.
Если для ряда программ задано возрастное ограничение, на экране появится запрос PIN-кода. Подробности см. в
разделе "Замок от детей" (стр. 30).
Использование списка цифровых избранных
программ *
Конфигурировать Избранное
Избранные 1
001 BBC ONE
002 BBC TWO
003 ITV1
004 Channel 4
005 Five
006 BBC Three
007 ITV2
008 Sky Sports
009 UKTV History
010 Channel 4+1
В избранное
Введите номер программы: - - -
011 More 4
012 abc1
013 QVC
014 UKTV Gold
015 The HITS
016 UKTV Bright Ideas
017 ftn
018 TMF
019 E4
020 E4+1
Избранные 2Следующ.Предыдущая
Цифровое ТВ
Возврат
1 В цифровом режиме нажмите .
2 Выполните нужную операцию в
соответствии со следующей таблицей
или указаниями на экране телевизора.
Список цифровых избранных программ
* Эта функция может быть недоступна в некоторых странах/регионах.
Чтобы Необходимо
Впервые создать список избранных
программ
1 С помощью кнопок F/f/G/g выбрать канал, который Вы
ходите добавить к списку, затем нажать .
Каналы, содержащиеся в списке избранных программ, помечены
символом .
2 Нажать желтую кнопку для выбора вписка "Избранные 2"
или "Избранные 3".
Просмотреть тот или иной канал
1 Нажать желтую кнопку для навигации по спискам
избранных программ.
2 С помощью кнопок F/f выбрать канал, затем нажать .
Удалить с экрана списка
предпочитаемых программ
Добавить или удалить каналы из
списка избранных программ
Нажать RETURN.
1 Нажать синюю кнопку.
2 Нажать желтую кнопку для выбора списка избранных
программ, которые Вы хотите редактировать.
3 С помощью кнопок F/f/G/g выбрать канал, который Вы
ходите добавить или удалить, затем нажать .
Удалить все каналы из текущего
списка избранных программ
1 Нажать синюю кнопку.
2 Нажать желтую кнопку для выбора списка избранных
программ, которые Вы хотите редактировать.
3 Нажать синюю кнопку.
4 Нажать G/g для выбора опции "Да", затем нажать для
подтверждения.
16
RU
Page 52

Использование дополнительных устройств
y
а
Подключение дополнительных устройств
Вы можете подключить к Вашему телевизору широкий спектр дополнительных устройств.
Соединительные кабели не входят в комплект поставки.
DVD-проигрыватель с
компонентным выходом
,
Аудиосистема
DVD-проигрыватель
ПК (выход HDMI)
Проигрыватель дисков Blu-ra
Цифровая видеокамер
Цифровой декодер
Использование дополнительных устройств
Игровая
приставка
DVD-проигрыватель
Декодер
Пишущий DVD-проигрыватель
Видеомагнитофон
Декодер
CAM (Модуль
ограниченного
доступа)
ПК
Аудиосистема
класса Hi-Fi с
оптическим
аудиовходом
Аудиосистема
класса Hi-Fi
Только для
использования
специалистами
сервисного центра
USB
ПК (HDMI-выход)
Дисковый проигрыватель Blu-ray
Цифровая видеокамера
DVC видеокамера
Наушники
17
RU
Page 53

Просмотр изображения
с устройств,
подключенных к
телевизору
Включите подключенное к телевизору
устройство и затем выполните одну из
следующих операций.
Для устройств, подключенных к Scartразъемам с помощью полностью
распаянного 21-контактного Scart-кабеля
Начните воспроизведение на
подключенном устройстве.
На экране появится изображение,
поступающее от подключенного
устройства.
Для видеомагнитофона / пишущего DVDпроигрывателя с автоматической настройкой
В аналоговом режиме для выбора
видеоканала нажимайте PROG +/- или
цифровые кнопки.
Для других подключенных устройств
С помощью кнопок / выведите на
экран список подключенных к телевизору
устройств. С помощью кнопок
выберите нужный источник входного
сигнала, затем нажмите .
Выделенное устройство автоматически
выбирается в качестве источника
входного сигнала, если не выполнять
никаких операций в течение двух секунд
после нажатия кнопки .
Если Вы установили для какого-либо
источника входного сигнала опцию
"Пропуск" в меню "Предустановка AV"
(стр. 26), этот источник будет исключен из
списка.
z
Для возврата к обычному режиму работы
телевизора нажмите DIGITAL или ANALOG.
Символ на
экране
AV 1
AV 2
AV3 Для просмотра изображения с устройства,
HDMI 1 HDMI IN 1*.
Описание
Для просмотра изображения с устройства,
подключенного к разъему
Для просмотра изображения с
устройства, подключенного к разъему B.
~
SmartLink представляет собой прямое
соединение между телевизором и
видеомагнитофоном/ устройством
записи DVD.
подключенного к разъему L.
Для просмотра изображения с
устройства, подключенного к разъему D.
F/f
A
.
Символ на
экране
HDMI 2 HDMI IN 2*.
HDMI 3 HDMI IN 3*.
* ~
• Используйте только сертифицированный HDMIкабель с логотипом HDMI.
• При подключении оборудования, совместимого с
контролем по HDMI, обеспечивается поддержка связи
с подключенным оборудованием. Об установке такой
связи см. стр. 20.
• При подключении видеосистемы с гнездом HDMI
необходимо выполнить подключение и к гнезду HiFi.
Component Для просмотра изображения с
PC Для просмотра изображения с
Чтобы
подключить
Наушники M Подсоединить к гнезду i, чтобы
CAM (Модуль
ограниченного
доступа) I
Аудиосистему
класса Hi-Fi G
DIGITAL
AUDIO OUT
(OPTICAL) F
Описание
Для просмотра изображения с устройства,
подключенного к разъему
Если устройство оснащено гнездом DVI,
соедините гнездо DVI с гнездом HDMI
IN через переходной интерфейс DVI HDMI (не входит в комплект поставки)
и соедините аудиовыход устройства с
аудиовходом HDMI IN.
Для просмотра изображения с устройства,
подключенного к разъему K.
устройства, подключенного к
разъему C.
устройства, подключенного к
разъему H.
z
Рекомендуется использовать
специальный кабель для подключения
ПК с ферритовыми коль ца ми и
разъемом D-sub 15 (этот кабель можно
приобрести в сервисных центрах Sony,
код для заказа 1-793-504-11) или же
эквивалентный.
Необходимо
слушать звук с телевизора через
наушники.
Для просмотра Pay Per View кодированных платных программ,
распространяемых по подписке.
Более подробную информацию см. в
инструкции, приложенной к Вашему
CAM. Для использования CAM
снимите резиновую крышку разъема
под модуль CAM. Перед тем, как
устанавливать модуль CAM в разъем,
выключите телевизор. Когда Вы не
используете CAM, мы рекомендуем
Вам закрывать крышкой разъем под
модуль CAM.
~
CAM поддерживается не во всех
странах. Просим Вас обратиться за
соответствующей информацией к
своему дилеру.
Подсоединить к аудиовыходам
для прослушивания звука с
телевизора через аудиосистему.
Использовать оптический
аудиокабель.
E
.
18
RU
Page 54

Чтобы
подключить
USB J Использовать карту памяти с USB-
Необходимо
портом для вывода на экран
фотографий.
Дополнительные операции
Чтобы Необходимо
Возвратиться к
обычному режиму
работы телевизора
Нажать DIGITAL или
ANALOG.
Использование меню "Опции"
При просмотре изображения с
подключенного оборудования нажмите
кнопку
OPTIONS, чтобы вывести на экран
следующие опции.
Опции Описание
Режим изображения (кроме тех
случаев, когда входной сигнал
поступает от ПК)
Режим дисплея (только при подаче
на вход сигнала от ПК)
Звуковой эффект Cм. стр. 23.
Динамик Cм. стр. 27.
PIP (только при подаче на вход
сигнала от ПК)
PAP (режим двух экранов) (кроме
тех случаев, когда входной сигнал
поступает от ПК)
Автоподстройка (только при
подаче на вход сигнала от ПК)
Сдвиг по горизонтали (только при
подаче на вход сигнала от ПК)
Таймер сна (кроме тех случаев,
когда входной сигнал поступает от
ПК)
Энергосбережение Cм. стр. 24.
Cм. стр. 22.
Cм. стр. 22.
Cм. стр. 19.
Cм. стр. 19.
Cм. стр. 26.
Cм. стр. 26.
Cм. стр. 25.
Одновременный просмотр двух
изображений – PAP (Picture and Picture
- Режим двух экранов)
Вы можете одновременно выводить на
экран два изображения (изображение,
поступающее от внешнего устройства и
ТВ программу).
Подключите дополнительное устройство
(стр. 17) и убедитесь, что изображение с него
выводится на экран телевизора. (стр. 18)
~
• Данная функция недоступна в тех случаем, когда
источником входного сигнала является
персональный компьютер.
• Размер изображений не может быть изменен.
• При выводе на экран изображения от внешних
источников видеосигнала, подключенных ко входам
AV1, AV2 или AV3, нельзя выводить на экран ТВ
программу в аналоговом режиме.
1 Нажмите кнопку OPTIONS.
2 С помощью кнопок F/f выберите PAP,
затем нажмите .
Изображение от подключенного к
телевизору внешнего устройства выводится
в левой части экрана, а ТВ программа - в
правой.
3 С помощью цифровых кнопок или
кнопок PROG +/- выберите нужный ТВ
канал.
Для возврата в обычный режим работы
Нажмите или RETURN.
z
Воспроизводимый звук будет
соответствовать изображению, обведенному
зеленой рамкой. Вы можете выбирать, для
какого изображения воспроизводить звук, с
помощью кнопок G/g.
Одновременный просмотр двух
изображений – PIP (Picture in Picture Режим двух экранов при подаче
входного сигнала от компьютера)
Вы можете одновременно выводить на
экран два изображения (сигнал от
компьютера и ТВ программу).
Подключите ПК (стр. 17) и убедитесь, что
изображение с компьютера выводится на
экран телевизора.
1 Нажмите кнопку OPTIONS, чтобы
вывести на экран меню "Опции".
2 С помощью кнопок F/f выберите "PIP",
затем нажмите .
Изображение от подключенного к телевизору
ПК выводится в полном размере, а ТВ
программа выводится в правом углу экрана.
С помощью кнопок
положение на экране изображения,
соответствующего ТВ программе.
F/f/G/g можно менять
3 С помощью цифровых кнопок или
кнопок PROG +/- выберите нужный ТВ
канал.
Для возврата в обычный режим работы
Нажмите RETURN.
z
Вы можете выбирать, для какого изображения
воспроизводить звук, с помощью опции "Звук ПК/
Звук ТВ" в меню "Опции".
Использование дополнительных устройств
19
RU
Page 55

Использование
функции BRAVIA
Sync (контроля по
HDMI)
Функция контроля по HDMI позволяет
телевизору осуществлять связь с
подключенными к нему устройствами
(совместимыми с этой функцией) с
помощью спецификации HDMI CEC
(Consumer Electronics Control).
Например, подключив к телевизору
устройства Sony, совместимые с функцией
контроля по HDMI (с помощью HDMI
кабелей), можно выполнять совместное
управление всей системой.
Для успешного использования функции
контроля по HDMI проверьте
правильность подключения и настройки
совместимых с ней устройств.
Контроль по HDMI
• Автоматически выключает
подключенные к телевизору
устройства при его выключении.
• Автоматически включает телевизор и
выбирает соответствующий вход при
начале воспроизведения на одном из
подключенных устройств.
• Если Вы включите подключенную к
телевизору аудиосистему при
включенном телевизоре,
автоматически будет выполнено
переключение, вследствие которого
воспроизведение звука станет
выполняться не динамиками
телевизора, а аудиосистемой.
• Регулирует громкость (2 +/-) и
отключает звук (%) подключенной
аудиосистемы.
• Вы можете управлять подключенными
устройствами Sony, имеющими логотип
BRAVIA Sync, с помощью пульта ДУ
телевизора, нажав:
– N/x/X/m/M - для прямого управления
подключенным устройством.
– SYNC MENU - для вывода на экран меню
подключенного HDMI совместимого
устройства.
После вывода меню на экран Вы можете
работать с ним с помощью кнопок F/f/G/g и .
– OPTIONS - для вывода на экран меню
"Управление устройством", с помощью
которого можно выбрать опции из "Меню",
"Опции" и "Список содержимого" для
управления подключенным устройством.
– Информацию о доступном управлении см. в
инструкции на внешнее устройство.
Подключение устройств, совместимых
с функцией контроля по HDMI
Подсоединяйте совместимое устройство к
телевизору с помощью HDMI-кабеля. При
подключении аудиосистемы следует
также обязательно подсоединить к ее
входу выход DIGITAL AUDIO OUT
(OPTICAL) телевизора, используя
оптический аудиокабель. Подробности см.
на стр. 18.
Настройки контроля по HDMI
Настройки контроля по HDMI должны
быть выполнены как на телевизоре, так и
на подключенных к нему устройствах. О
соответствующих настройках телевизора
см. "Настройка HDMI" на стр. 27. О
настройке подключенных устройств см.
инструкции по эксплуатации этих
устройств.
Кнопки, служащие для
использования дополнительного
оборудования
GUIDE
1 m/N/X/M/x: Позволяют управлять
подключенными к телевизору
устройствами, совместимыми с функцией
BRAVIA Sync.
2 THEATRE
Вы можете включить или выключить
Pежим театра. При включенном Pежиме
театра автоматически задаются
оптимальные параметры звука (если
телевизор подключен к аудиосистеме с
помощью HDMI кабеля) и изображения для
воспроизведения фильмов.
z
При выключении телевизора выключается
и Pежим театра.
3 SYNC MENU: Выводит на экран меню
подключенного HDMI совместимого
устройства. В случае просмотра
изображения от других устройств или ТВ
программы при нажатии этой кнопки на
экран выводится сообщение "Выбор устр.
HDMI".
~
Функция контроля по HDMI (BRAVIA Sync)
доступна только для подключенных
устройств Sony, имеющих логотип BRAVIA
Sync или совместимых с функцией контроля
по HDMI.
20
RU
Page 56

Использование функций MENU
Описание меню "Дом" (XMB™)
XMB™ (XrossMediaBar) представляет собой меню параметров BRAVIA и источников
входного сигнала, выводимое на экран телевизора. XMB
корректировку настроек на Вашем телевизоре BRAVIA TV. Нажмите кнопку HOME на
пульте ДУ для доступа к
XMB
.
™
1 Нажмите HOME.
На экран будет выведено меню "Дом".
Изображение
Звук
Установки
облегчает выбор программ и
™
Линейка категорий
носителей
Функции
Настройка
Настр. аналоговых каналов
Цифровая конфигурация
Линейка объектов категории
2 С помощью кнопок G/g выберите категорию.
Пиктограмма категории
носителей
Установки
Фото
Цифровое ТВ
Аналоговое ТВ
Внешние входы
Описание
Здесь Вы можете выполнить расширенные настройки и установки.
Подробности об установках см. стр. 22.
Вы можете выбрать "Просмотр фото (USB)" или "Режим Фоторамка"
(стр. 32).
Вы можете выбрать цифровой ТВ канал, список избранных программ
(стр. 16) или Guide (экранный телегид) (стр. 15).
Канал можно также выбрать с помощью цифровых кнопок или PROG +/-.
Вы можете выбрать аналоговый канал.
Канал можно также выбрать с помощью цифровых кнопок или PROG +/-.
Чтобы скрыть список аналоговых каналов, установите параметр
"Отображ. списка программ" в состояние "Выкл." (стр. 28).
Вы можете выбрать устройство, подключенное к телевизору.
О придании метки внешнему входу см. в разделе "Предустановка AV"
(стр. 26).
3 С помощью кнопок F/f выберите нужный параметр, затем нажмите .
4 Следуйте указаниям, появляющимся на экране.
5 Для выхода из меню нажмите кнопку HOME.
~
• Число регулируемых опций зависит от ситуации.
• Недоступные опции изображаются серым цветом или не выводятся на экран.
Использование функций MENU
21
RU
Page 57

Установки
Изображение
Режим
изображения
Режим дисплея
(только в режиме
ПК/подачи сигнала
на вход PC/подачи
сигнала на вход
HDMI PC)
Сброс
Пoдcвeтка
Контраст
Яркость
Цветность
Оттенок
Цветовой тон
Резкость
Шумопонижение
Шумопонижение
для MPEG
Служит для выбора режима изображения за исключением тех случаев,
когда источником входного сигнала является ПК. Опции параметра
"Режим изображения" могут меняться в зависимости от установки
"Видео/Фото"(стр. 24).
"Яркий": ("Магазин", стр. 7). Служит для увеличения контрастности и
резкости изображения.
"Контраст": ("Дом", стр. 7). Служит для получения стандартного
изображения. Рекомендуется для домашнего просмотра.
"Кино": Служит для просмотра фильмов. Эта опция является наиболее
подходящей для просмотра фильмов в обстановке, напоминающей
кинотеатр. Присущие ей параметры изображения разработаны при
сотрудничестве с кинокомпанией Sony Pictures Entertainment для
обеспечения воспроизведения фильмов в точном соответствии с
замыслом их авторов.
"Фото": Обеспечивает оптимальное качество изображения при
просмотре фотографий.
Служит для выбора режима изображения для тех случаев, когда
источником входного сигнала является ПК.
"Видео": Служит для просмотра видеоизображений.
"Текст": Служит для просмотра текстов, диаграмм и таблиц.
Возвращает все настройки изображения кроме "Режим изображения" и
"Режим дисплея" (только в режиме ПК) к заводским предустановкам.
Позволяет настроить яркость подсветки.
Служит для увеличения или уменьшения контрастности изображения.
Позволяет сделать изображение более ярким или темным.
Служит для увеличения или уменьшения громкости интенсивности цвета.
Служит для усиления или ослабления зеленых и красных тонов.
z
Регулировка параметра "Оттенок" возможна только для сигнала в формате NTSC
(например, при просмотре американских видеокассет).
Позволяет настроить оттенки белого на изображении.
"Холодный": Придает белым цветам голубой оттенок.
"Нейтральный": Придает белым цветам нейтральный оттенок.
"Теплый 1/Теплый 2": Придает белым цветам красный оттенок.
"Теплый 2" придает более красный оттенок, чем "Теплый 1"
z
"Teплый 1 и Теплый 2" недоступны, когда для параметра "Режим изображения"
задается опция "Яркий".
Позволяет делать изображение более резким или мягким.
Эта опция уменьшает помехи ("снег") на изображении при приеме
слабого телевизионного сигнала.
"Авто": Автоматически уменьшает помехи на изображении (только в
аналоговом режиме).
"Сильное/Среднее/Слабое": Изменяет параметры шумопонижения.
"Выкл.": Отключает функцию "Шумопонижение".
z
Опция "Авто" недоступна для AV1, AV2, AV3, HDMI 1, HDMI 2, HDMI 3,
Component, PC и цифрового режима.
Эта опция уменьшает помехи на изображении при просмотре
видеоизображения, сжатого по алгоритму MPEG.
22
RU
Page 58

Доп. установки
Позволяют еще в большей степени настроить изображение по своему вкусу.
Вы можете выполнить/изменить эти установки, задав для параметра "Режим
изображения" опцию "Кино" или "Контраст".
"Доп. улучш. контраста": Автоматически регулирует параметры "Пoдcвeтка"
и "Контраст" в оптимальном соответствии с яркостью экрана. Эта установка
особо эффективна для эпизодов с темным изображением. Она увеличивает
контрастность деталей темных изображений.
"Живые цвета": Делает цвета более яркими.
"Цветовое пространство" (кроме модели KDL-32W4xxx, KDL-32E4xxx, KDL26E4xxx, KDL-37V4xxx, KDL-32V4xxx, KDL-26V4xxx): Позволяет изменять
глубину воспроизведения цветов. "Расширенное" воспроизводит яркий, а
"Стандарт." - стандартный цвет.
~
• Опция "Живые цвета" недоступна, если для параметра "Цветовое пространство"
задана опция "Стандарт.".
• Опция "Доп. установки" недоступна в случае выбора для параметра "Режим
изображения" опции "Яркий".
Опции "Шумопонижение", "Шумопонижение для MPEG" и "Доп. установки" недоступны при просмотре
изображения от ПК.
Звук
Звуковой эффект
Сброс
Тембр ВЧ
Тембр НЧ
Баланс
Авторег. громкости
Позволяет выбрать тот или иной звуковой эффект.
"Динамичный": Увеличивает прозрачность звучания и эффект реального
присутствия благодаря применению "Системы обработки звука BBE".
"Стандартный": Увеличивает четкость и отчетливость звучания и эффект
реального присутствия благодаря применению "Системы обработки звука
BBE"
"Отчетливость речи": Обеспечивает более отчетливое звучание голоса.
"Dolby Virtual": Использует динамики телевизора для имитации эффекта
объемного звучания, создаваемого многоканальной системой.
"BBE ViVA": BBE ViVA Sound обеспечивает трехмерный звук с качеством Hi-
Fi. Четкость звучания улучшается BBE, а ширина, глубина, и высота звукового
пространства увеличиваются за счет эксклюзивной системы трехмерного
звука компании BBE. BBE ViVA Sound совместим со всеми телевизионными
программами, включая новости, музыкальные передачи, телеспектакли,
фильмы, спортивные трансляции и электронные игры.
z
• Если Вы установите опцию "Авторег. громкости" в положение "Вкл.",
произойдет переключение из положения "Dolby Virtual" в положение
"Стандартный".
• При подключении наушников опция "Звуковой эффект" переключается в
положение "Выкл.".
Возвращает все настройки звука к заводским предустановкам.
Позволяет выполнить регулировку уровня звука высокой частоты.
Позволяет выполнить регулировку уровня звука низкой частоты.
Позволяет регулировать баланс звука между левым и правым динамиком.
Эта опция обеспечивает поддержание постоянного уровня громкости, даже
когда в нем случаются резкие изменения (например, звук в рекламных
роликах обычно бывает громче, чем в других передачах).
~
В случае выбора для параметра "Звуковой эффект" опции "Dolby Virtual" опция
"Авторег. громкости" переключается в состояние "Выкл".
Коррекция
громкости
Двухканальный
звук
~
Опции "Звуковой эффект", "Тембр ВЧ", "Тембр НЧ", "Баланс" и "Авторег. громкости" недоступны при установке
для параметра "Динамик" опции "Аудиосистема".
Корректирует уровень громкости текущего входа по отношению к другим
входам.
Эта опция позволяет производить выбор звука, который должен
воспроизводиться через динамики, при стереотрансляции или трансляции на
двух языках.
"Стерео/ Моно": Для стереопрограмм.
"A/ B/ Моно": Для двуязычных трансляций выберите "A" для звукового
канала 1, "B" для звукового канала 2 или "Моно" для монофонического
канала, если таковой имеется.
z
Если Вы выбрали подключенное к телевизору внешнее устройство, придайте
опции "Двухканальный звук" значения "Стерео", "A" или "B".
23
RU
Использование функций MENU
Page 59

Функции
Быстрый запуск
Энергосбережение
Световой сенсор
Подсветка логотипа
(кроме модели
KDL-37V4xxx,
KDL-32V4xxx,
KDL-26V4xxx)
Режим Фильм
Телевизор включается быстрее, чем обычно в течение двух часов после
его перехода в дежурный режим. Однако, при этом в дежурном режиме он
потребляет электроэнергии больше, чем обычно.
Позволяет выбрать режим энергосбережения для уменьшения
потребления энергии Вашим телевизором. При выборе опции "Откл.
изобр." изображение отключается, а индикатор (Изображение
отключено) на передней панели телевизора загорается зеленым светом.
Звук при этом не изменяется.
"Стандартное питание": Заводская предустановка.
"Низкое потребление": Уменьшает потребление энергии телевизором.
"Откл. изобр.": Отключает изображение. Вы можете слушать звук при
отключенном изображении.
"Вкл.": Автоматически оптимизирует установки изображения в
соответствии с уровнем освещенности в помещении.
"Выкл.": Отключает функцию "Световой сенсор".
~
Не кладите ничего на датчик освещенности во избежание нарушений в его
работе. Расположение датчика см. на стр. 12.
Позволяет включать и выключать подсветку логотипа Sony на передней
панели телевизора.
Обеспечивает улучшенное качество изображения с оптимизацией для
фильмов при их воспроизведении с DVD-проигрывателя с
непрогрессивной (чересстрочной) разверткой.
"Авто": Идентифицирует тип изображения (видео или фильм) и
оптимизирует его качество. Используйте эту установку в качестве
стандартной.
"Выкл.": Отключает функцию "Режим Фильм".
~
• Если в сигнале изображения присутствует большое число помех или искажений,
"Режим Фильм" автоматически выключается, даже если выбрана опция "Авто".
•Опция "Режим Фильм" недоступна, если для параметра "Видео/Фото" задана опция
"Фото", или при обнаружении фотографии в случае задания опции "Видео-A".
Видео/Фото
x.v.Colour
(кроме модели
KDL-32W4xxx,
KDL-32E4xxx,
KDL-26E4xxx,
KDL-37V4xxx,
KDL-32V4xxx,
KDL-26V4xxx)
RU
24
Обеспечивает надлежащее качество изображения в соответствии с
источником входного сигнала (видео или фото).
"Видео-A": Обеспечивает надлежащее качество изображения в
соответствии с источником входного сигнала (видео или фото) при
прямом подключении к телевизору устройства Sony, совместимого с
функцией HDMI управления, поддерживающего режим "Видео-A".
"Видео": Обеспечивает высокое качество движущегося изображения.
"Фото": Обеспечивает высокое качество неподвижного изображения.
~
• Если подключенное устройство не поддерживает режим "Видео-А", для
данного параметра автоматически задается опция "Видео", даже если
выбрана опция Видео-A".
•Доступна только для HDMI 1, HDMI 2, HDMI 3 и Component в формате 1080i
или 1080p.
Обеспечивает большое соответствие движущегося изображения
оригиналу за счет цветового пространства, аналогичного цветовому
пространству источника.
~
• Если входной сигнал является сигналом типа HDMI (RGB), для данного
параметра автоматически задается опция "Нормальный", даже если задана
опция "x.v.Colour".
• Доступна только для HDMI 1, HDMI 2, HDMI 3 и Component в формате
720p, 1080i или 1080p.
Page 60

Цвет. пространство
фото
(кроме модели
KDL-32W4xxx,
KDL-32E4xxx,
KDL-26E4xxx,
KDL-37V4xxx,
KDL-32V4xxx,
KDL-26V4xxx)
Позволяет выбрать надлежащую опцию (sRGB, sYCC, Adobe RGB) для
обеспечения соответствия цветовому пространству выходного сигнала,
поступающего от устройства, подключенного ко входу HDMI,
компонентным входам или USB-порту.
~
• Выбирайте "sYCC" при использовании устройства, которое поддерживает
"x.v.Colour".
• Доступна только для HDMI 1, HDMI 2, HDMI 3 и Component в формате
1080i или 1080p.
• Недоступна в случае выбора для параметра "Цветовое пространство" опции
"Расширенное"
(стр. 23).
Настройки таймера
Позволяет устанавливать таймер для включения/выключения
телевизора.
Таймер сна
Эта опция позволяет Вам задать время, по истечении которого телевизор
автоматически переходит в дежурный режим.
Когда опция Таймер сна активирована, индикатор (Таймер) на передней
панели телевизора загорается оранжевым светом.
z
• Если Вы выключите телевизор и снова включите его, функция "Таймер сна"
сбросится в положение "Выкл.".
• Сообщение "Таймер СНА заканчивается. ТВ будет выключен." появится на
экране за одну минуту до переключения телевизора в дежурный режим.
Настройки таймера вкл.
"Таймер включения": Устанавливает таймер для включения телевизора
из дежурного режима.
"Режим таймера": Позволяет выбрать нужный период.
"Время": Устанавливает время включения телевизора.
"Продолжительность": Эта опция позволяет Вам задать время, по
истечении которого телевизор автоматически снова переходит в
дежурный режим.
Уcтaн. чacов
Позволяет вручную откорректировать текущее время на часах. Когда
телевизор принимает цифровые каналы, ручная коррекция текущего
времени невозможна, т.к. часы синхронизированы с кодом времени
передаваемого сигнала.
Использование функций MENU
Настройка
Автозапуск
Язык
Запускает "меню первого включения" для выбора языка, страны/региона
и места просмотра, а также настройки всех доступных цифровых и
аналоговых каналов. Обычно этого делать не требуется, потому что язык
и страна/регион уже были выбраны, а все каналы - уже настроены при
установке телевизора (стр. 6). Тем не менее, эта опция позволяет
повторить процедуру (например, заново настроить телевизор после
переезда или найти новые каналы, появившиеся в эфире).
Эта опция позволяет выбрать язык, на котором меню выводятся на
экран.
Продолжение
RU
25
Page 61

Настройки экрана
Установки ПК
Настройка AV
"Формат экрана": Подробности о формате экрана см. в разделе “Ручное
изменение формата экрана для соответствия формату передаваемого
изображения” на стр. 14.
"Автомат. формат":
экрана в соответствии с форматом предаваемого телевизионного сигнала. Для
сохранения сделанной Вами установки выберите "Выкл.".
"Область отображения": Эта опция позволяет регулировать размеры области
экрана, на которой воспроизводится изображение, для источников сигнала с
разрешением 1080i/p и 720p в тех случаях, когда для параметра "Формат
экрана" задана опция "Широкоэкранный".
• "Авто": При приеме цифрового сигнала воспроизводит изображение в
соответствии с параметрами, рекомендованными телевещательной станцией.
• "Макс.разрешение": Воспроизводит изображение в оригинальном размере.
• "Нормальная": Воспроизводит изображение в рекомендуемом размере.
"Сдвиг по горизонта ли": Эта опция позволяет регулировать горизонтальное
положение изображения.
"Сдвиг по вертикали": Эта опция позволяет регулировать положение
изображения по вертикали в случае, когда для параметра "Фоpмaт экpaнa"
задана опция "Оптимальный", "Увеличенный" или "14:9".
"Размер по
изображения по вертикали в случае, когда для параметра "Фоpмaт экpaнa"
задана опция "Оптимальный".
"Формат экрана": Служит для выбора формата экрана при воспроизведении
изображения, поступающего от ПК.
• "Полный 1": Увеличивает изображение для полного заполнения экрана
• "Полный 2": Увеличивает изображение для заполнения всего экрана.
"Сброс": Возвращает все настройки формата изображения ПК к заводским
"Автоподстройка": Автоматически регулирует положение, фазу и шаг
изображения в случае, когда на вход телевизора поступает сигнал от ПК.
z
Опция "Auto Adjustment" может не работать должным образом с некоторыми
типами входных сигналов. В таких случаях выполните ручную регулировку
параметров "Фаза", "Шаг" и "Сдвиг по горизонтали".
"Фаза": Эта опция позволяет регулировать фазу изображения в случае мигания экрана.
"Шаг": Эта опция позволяет регулировать шаг в случае, когда на
изображении присутствуют вертикальные полосы.
"Сдвиг по горизонта ли": Эта опция позволяет регулировать положение
изображения по горизонтали.
"Упр а в лен и е питанием": При отсутствии сигнала на входе PC в течение 30
секунд переключает телевизор в дежурный режим.
"Предустановка AV" : Эта опция позволяет присвоить имя любому внешнему
устройству, подключенному к разъемам на боковой и задней панелях
телевизора. Данное имя будет ненадолго выводиться на экран при выборе
данного устройства. Вы можете пропустить источник входного сигнала, к
которому не подключено никакое устройство.
1 С помощью кнопок F/f выберите нужный источник входного сигнала,
2 С помощью кнопок F/f выберите нужную из нижеперечисленных опций
"Вход AV2 ": С помощью этой опции можно задавать тип сигнала, подаваемого на
вход телевизора через разъем с меткой
• "Авто": Автоматически задает один из следующих типов входного сигнала: RGB,
• "RGB": Задает тип входного сигнала RGB.
• "S Video": Задает тип входного сигнала S Video.
• "Композитный": Задает тип входного сигнала - композитный.
вертикали": Эта опция позволяет регулировать размер
по вертикали, сохраняя при этом оригинальное соотношение между
размерами по горизонтали и вертикали .
предустановкам.
затем нажмите .
и нажмите кнопку .
• - КАБЕЛЬ, СПУТН., ВМ, DVD/BD, ИГРА, АУДИОСИСТЕМА,
КАМЕРА, ПК: Используется для присвоения подсоединенному
устройству одной из предустановленных меток.
• "Изм.:": Позволяет Вам создать Вашу собственную метку.
1 С помощью кнопок F/f выберите нужную букву или цифру ("_"
для ввода пробела), затем нажмите кнопку g.
Если Вы ввели неверный символ
С помощью кнопок
Затем с помощью кнопок
2 Повторяйте процедуру, описанную в шаге 1, до завершения ввода
имени.
3 Выберите "OK", затем нажмите .
• "Skip": Эта опция позволяет пропускать источник входного сигнала, к
которому не подключено никакое устройство, при выборе источника
входного сигнала с помощью кнопок F/f.
S video, композитный, в соответствии с типом входного сигнала.
Эта опция позволяет автоматически изменять формат
G/g выберите неверно введенный символ.
F/f выберите нужный символ.
// AV2 на его задней панели.
26
RU
Page 62

Настройка HDMI
"Выход AV2 ": С помощью этой опции можно задавать сигнал на выходе
телевизора, выводимый через разъем с меткой /
его задней панели. Если Вы подключили видеомагнитофон/пишущий
DVD-проигрыватель к гнезду /
него запись с устройств, подключенных к другим разъемам телевизора.
• "TB": Выводит на выходной разъем телевизионный сигнал.
• "Aвто": Выводит на разъем сигнал, воспроизводимый на экране (кроме
сигналов, поступающих на входные разъемы HDMI IN 1, HDMI IN 2,
HDMI IN 3,
"Динамик": Включает/выключает внутренние динамики телевизора.
• "Динамик ТВ": Динамики телевизора включаются и звук
воспроизводится через них.
• "Аудиосистема": Динамики телевизора отключаются, позволяя Вам
слушать звук через внешнее аудиоустройство, подключенное к
аудиовыходам телевизора. При подключении к телевизору
устройства, совместимого с функцией Контроль по HDMI, Вы можете
задать включение этого устройства одновременно с телевизором. Эта
установка выполняется после подключения устройства.
/ COMPONENT IN и / PC IN).
/ AV2, Вы можете вести на
/ AV2 на
"Линейный выход звука":
• "Регулируемый ": Параметры сигнала на выходе Вашей аудиосистемы
можно регулировать с помощью пульта ДУ телевизора.
• "Постоянный": Параметры аудиовыхода телевизора являются
фиксированными. Используйте ручки управления Вашей
аудиосистемы для регулировки громкости (и других параметров
аудиосигнала).
z
Опция "Линейный выход звука" недоступна для аудиосистем, подключенных к
телевизору через разъемы HDMI.
Используется для настройки совместимых с функцией контроля по HDMI
устройств, подключенных к разъемам HDMI. Помните, что
соответствующая настройка должна быть выполнена и на подключенном
к телевизору устройстве, совместимом с функцией контроля по HDMI.
"Контроль по HDMI": Данная опция служит для включения/выключения
функции контроля по HDMI для телевизора и подключенного к нему
устройства. При установке этой опции в "Вкл." открывается доступ к
следующим параметрам меню.
"Автовыкл. устройств": При установке этой опции в положение "Вкл."
совместимое с функцией Контроль по HDMI устройство включается и
выключается вместе с телевизором.
"Автовключение ТВ": При установке этой опции в положение "Вкл."
при включении подключенного к телевизору устройства, совместимого с
функцией контроля по HDMI, телевизор автоматически включается и на
его экран выводится сигнал, поступающий от этого устройства на HDMI
вход.
"Обнов. список устр-в": Создает или обновляет "Список устр-в HDMI". К
телевизору может быть подключено до 14 совместимых с функцией
HDMI управления устройств; в том числе - до 4 таких устройств может
быть подключено к одному разъему. Не забудьте обновить "Список устрв HDMI" при изменении состава подключенных к телевизору устройств,
совместимых с функцией контроля по HDMI, или при изменении
установок. Выбирайте их по одному вручную до получения правильного
изображения в течение нескольких секунд.
"Список устр-в HDMI": Выводит на экран список подключенных к
телевизору устройств, совместимых с функцией контроля по HDMI.
Использование функций MENU
Сведения об изделии
Сброс всех настроек
Выводит на экран информацию о Вашем телевизоре.
Возвращает все настройки к заводским предустановкам и затем выводит
на экран страницу "Автозапуск".
z
• В это время (на эту операцию уходит около 30 секунд) не выключайте
телевизор и не нажимайте никакие кнопки.
• В результате данной операции будут сброшены все сделанные Вами
установки, включая список избранных цифровых каналов, страну/регион,
язык, каналы, на которые была выполнена автонастройка, и т.д.
RU
27
Page 63

Настр. аналоговых каналов
Отображ. списка
программ
Автонастройка
Сортировка прогр.
Руч. настр. прогр.
Выберите "Выкл.", чтобы убрать список аналоговых каналов из XMBTM
(Xross Media Bar).
Служит для настройки на все доступные аналоговые каналы.
Эта опция позволяет заново настроить телевизор после переезда или
найти новые каналы, появившиеся в эфире.
Эта опция позволяет изменить порядок расположения каналов,
сохраненных в памяти телевизора.
1 С помощью кнопок F/f выберите канал, который Вы ходите
переместить в новое положение, затем нажмите кнопку .
2 С помощью кнопок
канала, затем нажмите кнопку .
Перед тем как выбирать "Метка/АПЧ/Аудиофильтр/LNA/Пропуск/
Декодер", с помощью кнопок PROG +/- выберите номер программы для
нужного канала. Нельзя выбрать номер программы, для которой задана
опция "Пропуск" (стр. 26).
Программа/Система/Канал
F/f выберите новое положение Вашего
Позволяет выполнить ручную настройку программ.
1 С помощью кнопок F/f выберите "Программа", затем нажмите .
2 С помощью кнопок
которого Вы хотите произвести (для воспроизведения изображения
от ВМ/пишущего DVD-проигрывателя выберите номер канала 00),
затем нажмите кнопку RETURN.
3 С помощью кнопок
4 С помощью кнопок
систем телевещания, затем нажмите кнопку RETURN.
B/G: для стран/регионов Западной Европы
I: для Великобритании
D/K: для стран/регионов Восточной Европы
L: для Франции
5 С помощью кнопок F/f выберите "Канал", затем нажмите .
6 С помощью кнопок
"C" (для каналов эфирного вещания), затем нажмите g.
7 Выполните настройку каналов следующим образом:
Если Вы не знаете номер канала (частоту)
Нажмите F/f для поиска следующего доступного канала. При
нахождении какого-либо канала поиск останавливается. Для
продолжения поиска нажмите
Если Вы знаете номер канала (частоту)
С помощью цифровых кнопок непосредственно введите номер
телевизионного канала или
видеомагнитофона/пишущего DVD-проигрывателя
8 Нажмите кнопку для перехода к опции "Подтверд.", затем еще
раз нажмите .
9 Нажмите кнопку
Повторите вышеописанную процедуру, чтобы установить вручную другие
каналы.
Метка
Эта опция позволяет Вам присвоить каналу любое имя, содержащее не
более пяти символов (букв или цифр). Данное имя будет ненадолго
выводиться на экран при переключении на этот канал.
Для ввода символов выполните шаги с 1 по 3 из раздела "Изм.
АПЧ
С помощью этой опции Вы можете выполнить точную настройку
выбранной программы в случае, если Вам кажется, что небольшая
корректировка настройки позволит повысить качество изображения.
Вы можете выполнить точную настройку в пределах от -15 до +15. При
выборе опции "Вкл." точная настройка выполняется автоматически.
F/f выберите номер канала, ручную настройку
F/f выберите "Система", затем нажмите .
F/f выберите одну из перечисленных ниже
F/f выберите "S" (для кабельных каналов) или
F/f.
канала видеосигнала от
.
f, чтобы выбрать "OK", затем нажмите кнопку .
:": (стр. 27).
28
RU
Page 64

Аудиофильтр
Эта опция позволяет улучшить качество звука для отдельных каналов в
случае его искажения при трансляции в режиме "Моно". Иногда
нестандартный ТВ сигнал может вызвать искажение звука или его
временное исчезновение при просмотре программ, транслируемых в
режиме "Моно".
Если Вы не сталкиваетесь с проблемой искажения звука, мы
рекомендуем Вам оставить для этой опции заводскую предустановку
"Выкл.".
~
При выборе опции "Слаб." или "Сильн." Вы не сумеете принимать стерео или
двухканальный звук.
LNA
Эта опция улучшает качество изображения для отдельных каналов при
приеме слабого телевизионного сигнала с помехами ("снегом")..
Если Вам не удалось добиться улучшения качества изображения даже при
установке этой опции в положение "Вкл.", установите ее в положение
"Выкл." (заводская предустановка).
Пропуск
Данная опция позволяет пропускать неиспользуемые аналоговые каналы
при выборе каналов с помощью кнопок PROG +/-. (Пропущенный канал
можно выбрать с помощью цифровых кнопок.)
Декодер
Эта опция позволяет выполнять просмотр и запись кодированных каналов
с помощью декодера, подсоединенного к scart-разъему / AV1
напрямую, или к scart-разъему /
видеомагнитофон/пишущий DVD-проигрыватель.
~
Данная опция является доступной или нет в зависимости от страны/региона,
выбранной Вами в меню "Cтрана"(стр. 7).
/ AV2 через
Подтверд.
Сохраняет изменения в настройках меню "Руч. настр. прогр.".
Использование функций MENU
Цифровая конфигурация
Цифровая
настройка
Автопоиск цифр. станций
Выполняет настройку на все доступные цифровые каналы.
Эта опция позволяет заново настроить телевизор после переезда или
найти новые каналы, появившиеся в эфире. Подробности см. в разделе
"Автонастройка телевизора" (стр. 7).
Сортировка прогр.
Эта опция позволяет удалить из памяти телевизора ненужные цифровые
каналы и изменить порядок расположения сохраненных в ней цифровых
каналов.
1 С помощью кнопок F/f выберите канал, который Вы ходите
удалить или переместить в новое положение.
С помощью цифровых кнопок непосредственно введите трехзначный
номер нужного телевизионного канала.
2 Выполните удаление или перемещение цифровых каналов
следующим образом:
Удаление цифрового канала
Нажмите . После появления запроса подтверждения удаления нажмите
G
для выбора опции "Да", затем нажмите .
Изменение порядка расположения цифровых каналов
Нажмите g, затем с помощью кнопок F/f выберите новое положение
для данного канала и нажмите кнопку
G.
3 Нажмите RETURN.
Продолжение
RU
29
Page 65

Руч. поиск цифр. Станций
Позволяет выполнять ручную настройку цифровых каналов. Эта опция
доступна в случае, когда для параметра "Автопоиск цифр. станций"
установлена опция "Эфир".
1 С помощью цифровых кнопок введите номер канала, ручную
настройку которого Вы хотите произвести, затем с помощью
кнопок
2 После нахождения доступных каналов с помощью кнопок
F/f выполните настройку канала.
F/f
выберите канал, который Вы хотите сохранить в памяти, затем
нажмите кнопку
3 С помощью кнопок
Вы хотите сохранить новый канал, и нажмите кнопку
Повторите вышеописанную процедуру для ручного поиска других каналов.
.
F/f выберите номер программы, под которой
.
Настройка
субтитров
Настройка звука
Радио дисплей
"Установка субтитров": При выборе опции "Для людей с наруш. слуха" на
экране вместе с субтитрами могут также показываться визуальные
пояснения (если канал передает такую информацию).
"Язык субтитров": Эта опция позволяет выбрать язык, на котором
субтитры выводятся на экран.
"Тип аудио": Выполняет переключение телевизора в режим вещания для
слабослышащих при выборе опции "Для людей с наруш. слуха".
"Язык аудио": Эта опция позволяет выбрать язык аудиовещания для того
или иного канала. Некоторые цифровые каналы могут транслироваться с
аудиовещанием на различных языках.
"Звуковое описание": Включает звуковое описание визуальной
информации, если оно передается вещательной станцией.
"Уровень микширования"
основного звука и звукового описания.
"Динамический диапазон": Компенсирует разницу уровня аудиосигнала
между различными каналами. Имейте в виду, что для некоторых каналов
эта функция может не действовать.
"Оптический выход": Позволяет выбрать аудиосигнал, выводимый на
входной разъем DIGITAL AUDIO OUT (OPTICAL) на задней панели
телевизора. Установите "Aвто" при подключении к телевизору
устройства, совместимого с Dolby Digital, или в "PCM" - при подключении
к нему устройства, несовместимого с этой функцией.
z
*Эта опция доступна только при установке параметра "Звуковое описание" в
положение "Вкл.".
Обои выводятся на экран после 20-секундного прослушивания
радиовещания без нажатия какой-либо кнопки.
Вы можете выбрать цвет обоев, задать произвольный выбор цвета или
просмотреть слайд-шоу (стр. 32).
Для временного удаления обоев с экрана нажмите любую кнопку.
*: Выполняет регулировку уровня громкости
Замок от детей
RU
30
Эта опция позволяет задать возрастные ограничения для тех или иных
программ. Просмотр любой программы, на которую распространяются
возрастные ограничения, возможен только после ввода правильного
значения PIN-кода.
1 С помощью цифровых кнопок введите ранее заданное Вами значение
PIN-кода.
Если Вы ранее не задали PIN-код, на экране появится сообщение,
указывающее на это. Выполните указания, приведенные ниже в разделе
"PIN код".
2 С помощью кнопок F/f выберите возрастное ограничение или "Нет"
(для просмотра без возрастных ограничений), затем нажмите кнопку
.
3 Нажмите RETURN.
Page 66

PIN код
Первоначальный выбор PIN кода
1 С помощью цифровых кнопок введите новое значение PIN-кода.
2 Нажмите RETURN.
Изменение PIN кода
1 С помощью цифровых кнопок введите ранее заданное Вами
значение PIN-кода.
2 С помощью цифровых кнопок введите новое значение PIN-кода.
3 Нажмите RETURN.
z
PIN-код 9999 принимается в любом случае.
Те х н .
конфигурация
Настройка модуля
САМ
"Авт. обновление станций": Позволяет телевизору обнаруживать и
сохранять в памяти новые цифровые сервисы по мере того, как они
становятся доступными.
~
Для обеспечения возможности обновления сервисов телевизор следует
периодически оставлять в дежурном режиме.
"Загрузка ПО": Позволяет Вашему телевизору автоматически и бесплатно
получать обновления программного обеспечения (при их выпуске) через
приемную антенну/кабель. Рекомендуется всегда устанавливать эту опцию
в положение "Вкл.". Если Вы не хотите производить обновление своего
программного обеспечения, установите эту опцию в положение "Выкл.".
~
Для обеспечения возможности обновления программного обеспечения
телевизор следует периодически оставлять в дежурном режиме.
"Системная информация":
программного обеспечения и уровне сигнала.
~
Если линейка сигнала является красной (сигнал отсутствует) или желтой
(слабый сигнал), проверьте подключение антенны/кабеля.
"Часовой пояс": Позволяет вручную выбрать часовой пояс, если он
отличен от пояса, заданного по умолчанию для Вашей страны/региона.
"Летнее время: Авто": Позволяет активировать или отменить
переключение с зимнего времени на летнее и наоборот.
•"Вкл.": Автоматически выполняет переключение с зимнего времени на
летнее и наоборот в соответствии с календарем.
•"Выкл.": Время выводится в соответствии с установкой параметра
"Часовой пояс".
Эта опция позволяет получить доступ к платным программам,
распространяемым по подписке при условии, что у Вас имеется Модуль
ограниченного доступа (CAM) и карточка абонента. См. на стр. 17
расположение гнезда (PCMCIA).
Выводит на экран информацию о версии
Использование функций MENU
31
RU
Page 67

Фото
Режим Фоторамка
На заданный период времени выводит
на экран фотографию. По истечении
этого периода телевизор автоматически
переходит в дежурный режим.
Использование меню "Опции"
Нажмите кнопку OPTIONS для вывода на
экран следующих опций.
Опции Описание
Выбор
изображения
Продолжительно
сть
~
• Если выбрана фотография, носителем которой
является USB-совместимое устройство, это
устройство должно оставаться подключенным к
телевизору.
• Если активирован "Таймер сна", телевизор
автоматически перейдет в дежурный режим.
С помощью кнопок
выберите нужную
фотографию, затем нажмите
кнопку для ввода.
Позволяет выбрать нужный
период.
Просмотр фото (USB)
Вы можете просматривать на своем
телевизоре фотографии (в формате
JPEG), сохраненные в цифровом
фотоаппарате Sony или видеокамере,
подключив их к телевизору через USBкабель, или фотографии, записанные на
USB-совместимом носителе.
1 Подключите к телевизору USB-
совместимое устройство.
2 Нажмите кнопку HOME.
3 С помощью кнопок G/g выберите
"Фото", затем, нажимая кнопки F/f,
выберите "Просмотр фото (USB)" и
нажмите кнопку .
На экране появится страница
пиктограмм.
4 С помощью кнопок F/f/G/g выберите
фотографию или папку, которую Вы
хотите вывести на экран, затем
нажмите .
5 Нажмите кнопку RETURN для
возврата к странице пиктограмм.
F/f/G/g
Дополнительные операции
С помощью кнопок G/f выберите ту или
иную опцию, затем нажмите .
Опции Описание
Выбор устройства В случае подключения к
Слайд-шоу Позволяет выводить
Настройка Вы можете делать
телевизору нескольких
устройств выберите
нужное устройство с
помощью кнопок G/g.
Bravia изображения
соответствуют
стандартным устройствам.
фотографии на экран по
одной.
расширенные установки для
слайд-шоу и задавать
последовательность вывода
фотографий на экран.
Использование меню "Опции"
Нажмите кнопку OPTIONS для вывода на
экран следующих опций
Опции Описание
Режим изображения См. стр. 22.
Таймер сна См. стр. 25.
Энергосбережение См. стр. 24.
~
• Функция "Просмотр фото (USB)" поддерживает
только DCF--совместимые JPЕG-файлы.
• При подключении к телевизору цифрового
фотоаппарата Sony установите на нем опцию
"Auto" или "Mass Storage" для режима соединения
USB. Более подробную информацию о режиме
соединения USB см. в инструкции, приложенной к
Вашему цифровому фотоаппарату.
• Просмотр фото (USB) поддерживает только
файловую систему FAT32.
• Когда телевизор считывает данные с носителей
записи, соблюдайте следующие правила:
– Не выключайте телевизор или подключенное
к USB-порту устройство.
– Не отсоединяйте USB кабель.
– Не отсоединяйте носитель записи.
В противном случае данные на носителе могут
быть повреждены.
• Не используйте устройства, не являющиеся USBсовместимыми. Это может привести к
неисправностям.
• Компания Sony не несет ответственность за какойлибо повреждение или утерю данных на носителе
записи из-за неверной работы телевизора или
какого-либо из подключенных к нему устройств.
• Для получения самой последней информации об
USB-совместимых устройствах посетите
указанный ниже Интернет-сайт.
http://support.sony-europe.com/TV/compatibility/
.
32
RU
Page 68

Дополнительные сведения
Технические
характеристики
Блок дисплея
Электропитание:
220–240 В пер. тока, 50 Гц
Размер экрана:
KDL-52xxxxx: 52 дюйма
KDL-46xxxxx: 46 дюймов
KDL-40xxxxx: 40 дюймов
KDL-37xxxxx: 37 дюймов
KDL-32xxxxx: 32 дюйма
KDL-26xxxxx: 26 дюймов
Разрешение экрана:
1920 точек (по горизонтали) х 1080 строк (по
вертикали)(только для моделей KDL-52W4xxx,
KDL-46W4xxx, KDL-40W4xxx, KDL-32W4xxx,
KDL-40E4xxx, KDL-32E4xxx)
1366 точек (по горизонтали) x 768 строк (по
вертикали) (только для моделей KDL-37V4xxx,
KDL-32V4xxx, KDL-26V4xxx, KDL-26E4xxx)
Потребляемая мощность*:
KDL-52W4xxx:
223 Вт (режим "Дом"/"Стандартный")
253 Вт (режим "Магазин"/"Яркий")
KDL-46W4xxx:
225 Вт (режим "Дом"/"Стандартный")
243 Вт (режим "Магазин"/"Яркий")
KDL-40W4xxx, KDL-40E4xxx:
176 Вт (режим "Дом"/"Стандартный")
201 Вт (режим "Магазин"/"Яркий")
KDL-37V4xxx:
138 Вт (режим "Дом"/"Стандартный")
155 Вт (режим "Магазин"/"Яркий")
KDL-32E4xxx, KDL-32W4xxx:
120 Вт (режим "Дом"/"Стандартный")
143 Вт (режим "Магазин"/"Яркий")
KDL-32V4xxx:
111 Вт (режим "Дом"/"Стандартный")
122 Вт (режим "Магазин"/"Яркий")
KDL-26V4xxx, KDL-26E4xxx:
88 Вт (режим "Дом"/"Стандартный")
98 Вт (режим "Магазин"/"Яркий")
* Подробности о режимах "Дом" и "Магазин" см.
на стр. 7.
Мощность, потребляемая в дежурном режиме*:
0,19 Вт или менее
* Номинальная величина мощности потребления в
дежурном режиме достигается после того, как
телевизор выполнит необходимые внутренние
процессы.
Габариты (ширина x высота x глубина):
KDL-52W4xxx:
Около 126,2 x 87,1 x 34,7 см (с подставкой)
Около 126,2 x 82,9 x 11,9 см (без подставки)
KDL-46W4xxx:
Около 112,0 x 78,2 x 30,7 см (с подставкой)
Около 112,0 x 74,2 x 11,5 см (без подставки)
KDL-40W4xxx:
Около 98,6 x 68,4 x 27,9 см (с подставкой)
Около 98,6 x 64,6 x 11,0 см (без подставки)
KDL-40E4xxx:
Около 100,6 x 69,5 x 28,3 см (с подставкой)
Около 100,6 x 64,5 x 11,4 см (без подставки)
KDL-37V4xxx:
Около 92,0 x 64,9 x 27,9 см (с подставкой)
Около 92,0 x 61,0 x 11,0 см (без подставки)
KDL-32W4xxx, KDL-32V4xxx:
Около 79,4 x 57,7 x 24,2 см (с подставкой)
Около 79,4 x 54,0 x 9,9 см (без подставки)
KDL-32E4xxx:
Около 81,4 x 58,7 x 24,1 см (с подставкой)
Около 81,4 x 54,0 x 10,4 см (без подставки)
KDL-26V4xxx:
Около 65,9 x 50,5 x 24,2 см (с подставкой)
Около 65,9 x 46,6 x 9,5 см (без подставки)
KDL-26E4xxx:
Около 68,4 x 47,5 x 18,6 см (с подставкой)
Около 68,4 x 46,9 x 10,1 см (без подставки)
Вес:
KDL-52W4xxx:
Около 38,0 кг (с подставкой)
Около 32,0 кг (без подставки)
KDL-46W4xxx:
Около 29,0 кг (с подставкой)
Около 25,0 кг (без подставки)
KDL-40W4xxx:
Около 21,5 кг (с подставкой)
Около 18,5 кг (без подставки)
KDL-40E4xxx:
Около 22,0 кг (с подставкой)
Около 19,0 кг (без подставки)
KDL-37V4xxx:
Около 20,5 кг (с подставкой)
Около 17,5 кг (без подставки)
KDL-32W4xxx, KDL-32V4xxx, KDL-32E4xxx:
Около: 15,5 кг (с подставкой)
Около 13,0 кг (без подставки)
KDL-26V4xxx, KDL-26E4xxx:
Около 12,5 кг (с подставкой)
Около 10,0 кг (без подставки)
Система ТВ панели:
LCD (ЖК) экран
Система телевещания:
Аналоговая: В зависимости от выбранной Вами
Цифровая: DVB-T/DVB-C
страны/региона: B/G/H, D/K, L, I
Система цветного телевидения
Аналоговая: PAL, SECAM
Цифровая: MPEG-2 MP@ML/HL, H.264/MPEG-4
NTSC 3.58, 4.43 (только вход Video In)
AVC HP@L4.0, MP@L3.0
Антенна
Разъем 75 Ом для VHF/UHF
Диапазон принимаемых каналов:
Аналоговые: VHF:E2–E12
Цифровые: VHF/UHF
UHF:E21–E69
CATV:S1–S20
HYPER:S21–S41
D/K:R1–R12, R21–R69
L: F2–F10, B–Q, F21–F69
I: UHF B21–B69
Разъемы
/ AV1
21-штырьковый Scart-разъем (стандарт
CENELEC), включая аудио/видео вход, RGB вход
и ТВ аудио/видео выход.
//AV2 (SMARTLINK)
21-штырьковый Scart-разъем (стандарт
CENELEC), включая аудио/видео вход, RGB вход,
вход, выбираемый аудио/видео выход и интерфейс
SmartLink.
AV3 Видеовход (гнездо типа "тюльпан")
AV3 Аудиовход (гнезда типа "тюльпан")
Аудиовыходы (левый/правый) (гнезда типа
"тюльпан")
Продолжение
RU
33
Дополнительные сведения
Page 69

COMPONENT IN
Поддерживаемые форматы: 1080/24p, 1080p, 1080i,
720p, 576p, 576i, 480p, 480i
Y: 1 Vp-p, 75 Ом, 0.3V отрицательная
синхронизация
B/CB: 0.7 Vp-p, 75 Ом
P
R/CR: 0.7 Vp-p, 75 Ом
P
Аудиовход (гнезда типа "тюльпан")
500 мВ rms
HDMI IN 1, 2, 3
Видео: 1080/24p, 1080p, 1080i, 720p, 576p, 576i, 480p,
480i
Аудио: Двухканальный линейный PCM
32, 44,1 и 48 кГц, 16, 20 и 24 бит
PC (см. таблицу)
Аналоговый аудиовход (разъем типа minijack):
500 мВ rms
(только HDMI IN 2)
PC IN Вход PC (для подключения компьютера)
(Dsub 15-pin)
G: 0.7 Vp-p, 75 Ом, не Sync on Green
B: 0.7 Vp-p, 75 Ом, не Sync on Green
R: 0.7 Vp-p, 75 Ом, не Sync on Green
HD: 1-5 Vp-p
VD: 1-5 Vp-p
аудиовход для подключения ПК (разъем типа
minijack)
i Гнездо для подключения наушников
Разъем под CAM (Модуль ограниченного доступа)
USB-порт
Поддерживаемые форматы: DCF-совместимые
JPEG файлы
DIGITAL AUDIO OUT (OPTICAL) цифровой
оптический разъем. Dolby digital или PCM аудио от
DVB в зависимости от вещания, PCM аудио от
любого другого источника входного сигнала.
Аудиовыход (гнезда типа "тюльпан").
Аудиовыход
10 Вт + 10 Вт (RMS)
Аксессуары, поставляемые в качестве
опции
- KDL-52W40xx/ KDL-52W42xx/ KDL-46W40xx/
KDL-46W42xx/ KDL-40W40xx/ KDL-40W42xx/
KDL-32W40xx/ KDL-32W42xx/ KDL-40E40xx/
KDL-32E40xx/ KDL-37V45xx/ KDL-37V47xx/
KDL-32V45xx/ KDL-32V47xx:
Кронштейн для настенной установки
SU-WL500
- KDL-26V45xx/ KDL-26V47xx / KDL-26E40xx:
Кронштейн для настенной установки
SU-WL100
- KDL-46W40xx/ KDL-46W42xx/ KDL-40W40xx/
KDL-40W42xx/KDL-32W40xx/ KDL-32W42xx/
KDL-40E40xx/ KDL-32E40xx/ KDL-37V45xx/
KDL-37V47xx/ KDL-32V45xx/ KDL-32V47xx:
Подставка под телевизор SU-FL300M
Конструкция и спецификации могут быть
изменены без дополнительного оповещения.
34
RU
Page 70

Характеристики входных сигналов для подключения PC
Сигналы
Пикселей по
горизонтали
Строк по
верикали
Горизонтальная
частота (кГц)
Вертикальная
частота (Гц)
Стандарт
VGA 640 480 31.5 60 VGA
640 480 37.5 75 VESA
720 400 31.5 70 VGA-T
SVGA 800 600 37.9 60 VESA Guidelines
800 600 46.9 75 VESA
XGA 1024 768 48.4 60 VESA Guidelines
1024 768 56.5 70 VESA
1024 768 60.0 75 VESA
WXGA 1280 768 47.4 60 VESA
1280 768 47.8 60 VESA
1280 768 60.3 75
1360 768 47.7 60 VESA
SXGA 1280 1024 64.0 60 VESA
• Вход PC данного телевизора не поддерживает Sync on Green или Composite Sync.
• Вход PC данного телевизора не поддерживает чересстрочные сигналы.
• Вход PC данного телевизора поддерживает сигналы, указанные в вышеприведенной таблице, с
вертикальной частотой 60 Гц. При поступлении других сигналов на экране появится сообщение "Нет
сигнала".
Характеристики входных сигналов для подключения ПК ко входам HDMI IN 1, 2, 3
Дополнительные сведения
Сигналы
Пикселей по
горизонтали
Строк по
верикали
Горизонтальная
частота (кГц)
Вертикальная
частота (Гц)
Стандарт
VGA 640 480 31.5 60 VGA
SVGA 800 600 37.9 60 VESA Guidelines
XGA 1024 768 48.4 60 VESA Guidelines
WXGA 1280 768 47.4 60 VESA
WXGA 1280 768 47.8 60 VESA
* 1280 1024 64.0 60 VESA
SXGA
WXGA
** 1360 768 47.7 60 VESA
* только для моделей KDL-52W4xxx, KDL-46W4xxx, KDL-40W4xxx, KDL-32W4xxx, KDL-40E4xxx,
KDL-32E4xxx.
**только для моделей KDL-37V4xxx, KDL-32V4xxx, KDL-26V4xxx, KDL-26E4xxx.
35
RU
Page 71

Поиск
неисправностей
Посмотрите, не мигает ли индикатор 1
(дежурного режима) красным светом.
Если индикатор мигает
Активирована функция автодиагностики.
1 Подсчитайте, сколько раз мигает индикатор 1
(дежурного режима) перед каждой
двухсекундной паузой.
Например, он может мигнуть три раза, за этим
последует пауза продолжительностью 2 секунды,
после чего индикатор снова мигнет три раза и т.д.
2 Нажмите кнопку 1, расположенную на
верхней панели телевизора, чтобы
выключить его, выньте вилку сетевого шнура
из розетки и сообщите своему местному
дилеру или специалистам сервисного центра
Sony, как мигает индикатор (число миганий).
Если индикатор не мигает
1
Выполните проверки в соответствии с
нижеприведенной таблицей.
2 Если Вы не смогли устранить неисправность,
обратитесь к квалифицированным
специалистам по обслуживанию телевизоров.
Изображение
Нет ни изображения (темный экран), ни звука.
• Проверьте правильность подключения антенны/кабеля.
• Включите телевизор в сеть, и нажмите кнопку 1,
расположенную на верхней панели телевизора.
• Если индикатор 1 (дежурного режима) горит красным
светом, нажмите кнопку "/1.
Нет изображения или информации меню от
устройства, подключенного к Scart-разъему
• С помощью кнопок / выведите на экран список
подключенных к телевизору устройств, затем выберите
нужный источник входного сигнала.
• Проверьте правильность подсоединения
дополнительных устройств к телевизору.
Изображение двоится или видны ореолы (только в
аналоговом режиме)
• Проверьте правильность подключения антенны/кабеля.
• Проверьте место расположения и направление антенны.
На экране видны только снег и помехи (только в
аналоговом режиме)
• Проверьте, не сломана или не погнута ли антенна.
• Проверьте, не истек ли срок службы антенны (3-5 лет
при нормальных условиях, 1-2 года при использовании в
районах на морском побережье).
Помехи звука или изображения при просмотре ТВ
канала (только в аналоговом режиме).
• Откорректируйте параметр "АПЧ" (Автоматическая
точная настройка) для улучшения приема сигнала
изображения (стр. 28).
Наличие на экране очень маленьких черных и/или
ярких точек.
• Изображение на экране ТВ панели складывается из
точек (пикселей). Маленькие черные точки и/или яркие
точки (пиксели) на экране не являются дефектом.
Цветные передачи воспроизводятся в черно-белом
изображении
• Выберите "Сброс" (стр. 22).
Отсутствие цвета или плохое качество цветов при
просмотре сигнала, поданного через разъемы
/ COMPONENT IN
• Проверьте правильность соединения разъемов
/ COMPONENT IN, а также убедитесь, что
соответствующие разъемы плотно установлены в свои
ответные части.
Изображение на экране застывает
• Проверьте уровень сигнала (стр. 31). Если линейка сигнала
является красной (сигнал отсутствует) или желтой (слабый
сигнал), проверьте подключение антенны/кабеля.
RU
36
• Отсоедините подключенное к телевизору USBсовместимое устройство. Оно может быть неисправно
или не поддерживаться данным телевизором.
Для получения самой последней информации об USBсовместимых устройствах посетите указанный ниже
Интернет-сайт.
http://support.sony-europe.com/TV/compatibility/
Звук
Хорошее качество изображения, но нет звука
• Нажмите кнопку 2 +/– or % (Отключение звука).
• Проверьте, что для параметра "Динамик" установлена
опция "Динамик ТВ"
• При подаче на HDMI вход сигналов Super Audio CD или
DVD-Audio на выход DIGITAL AUDIO OUT
(OPTICAL) может не выводиться аудиосигнал.
(стр. 27).
Каналы
Нужный канал не выводится на экран
• Задайте другой режим работы (цифровой или
аналоговый) и выберите нужный (цифровой или
аналоговый) канал.
Некоторые каналы не воспроизводятся на экране
• Канал используется только для передачи кодированных/
получаемых по подписке программ Подпишитесь на
платные услуги.
• Канал используется только для передачи данных (без
звука или изображения).
• Запросите в телевещательной компании информацию о
передаваемой программе.
Цифровые каналы не выводятся на экран
• Обратитесь в местную сервисную службу, чтобы узнать,
используется ли в Вашем регионе цифровое вещание.
• Перейдите на использование антенны с более высоким
коэффициентом усиления.
Общие
Искажение изображения и/или звука
• Держите телевизор вдали от источников электрических
помех, таких как автомобили, мотоциклы? фены или
оптические приборы.
• При установке дополнительных устройств оставляйте
некоторое расстояние между ними и телевизором.
• Проверьте правильность подключения антенны/кабеля.
• Держите кабель антенны вдали от других
соединительных кабелей.
Телевизор автоматически выключается (телевизор
входит в дежурный режим)
• Проверьте, активирован ли "Таймер сна", или
подтвердите установку "Продолжительность"
параметра "Настройки таймера вкл."(стр. 25).
• Если в течение 10 минут на телевизор не поступает ТВ
сигнал и за это время не была нажата ни одна кнопка,
телевизор автоматически переходит в дежурный режим.
Телевизор автоматически включается
• Проверьте, не активирован ли "Таймер включения"
(стр. 25).
Невозможно выбрать некоторые источники входных
сигналов
• Выберите опцию "Предустановка AV" и отмените
опцию "Пропуск" для данного источника входного
сигнала (стр. 26).
Не работает пульт ДУ
• Замените батарейки.
Канал не добавляется к списку избранных программ
• В список избранных можно внести до 999 каналов.
HDMI устройство отсутствует в "Список устр-в HDMI"
• Убедитесь в том, что Ваше устройство является
совместимым с функцией контроля по HDMI.
Настройка выполняется не на все каналы
• См. информацию о провайдерах кабельного
телевидения на сайте поддержки.
http://support.sony-europe.com/TV/DVBC/
Не удается выбрать опцию "Выкл." для параметра
"контроля по HDMI".
• Если к телевизору подключено какое-либо
аудиоустройство, совместимое с функцией контроля по
HDMI, выбрать "Выкл." в этом меню нельзя. Если Вы
хотите переключить аудиовыход на динамик
телевизора, выберите опцию "Динамик ТВ" в меню
Динамик" (стр. 27).
 Loading...