

Sony KD-32NS100B User Manual
R
Trinitron Digital TV
4-206-399-13
420639913
Bedienungsanleitung
DE
KD-32NS100B
© 2001 by Sony Corporation Printed in UK
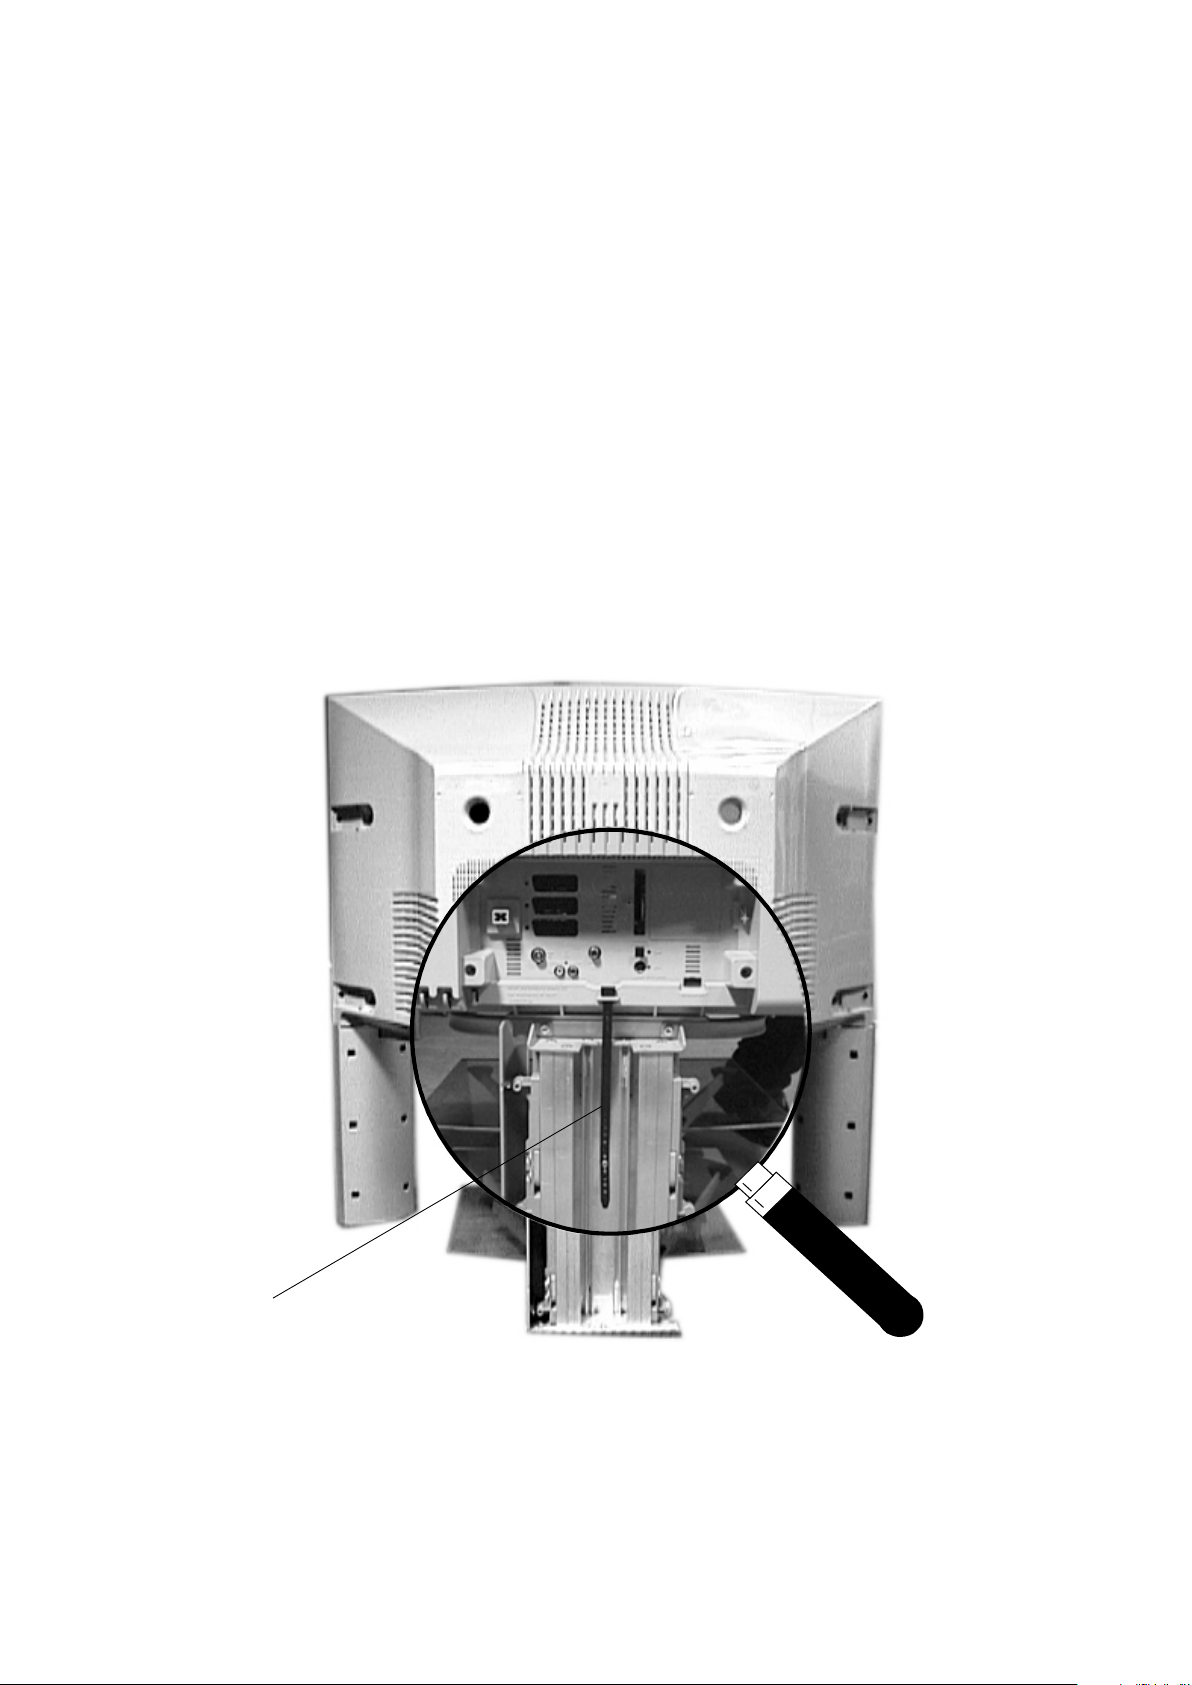
If you wish to move the TV after it has been connected to the stand
assembly, please observe the following precautions:
• Never attempt to lift the TV and the stand together.
• Before lifting the TV from the stand, you must disconnect the
securing strap on the rear of the TV (see illustration below).
To gain access to the strap, remove the door that conceals the
rear sockets of the TV (if you have already added it), then
remove the cover from the rear column of the stand.
• Take care not to trap your fingers under the TV when placing
the TV onto a flat surface.
Securing
strap

1
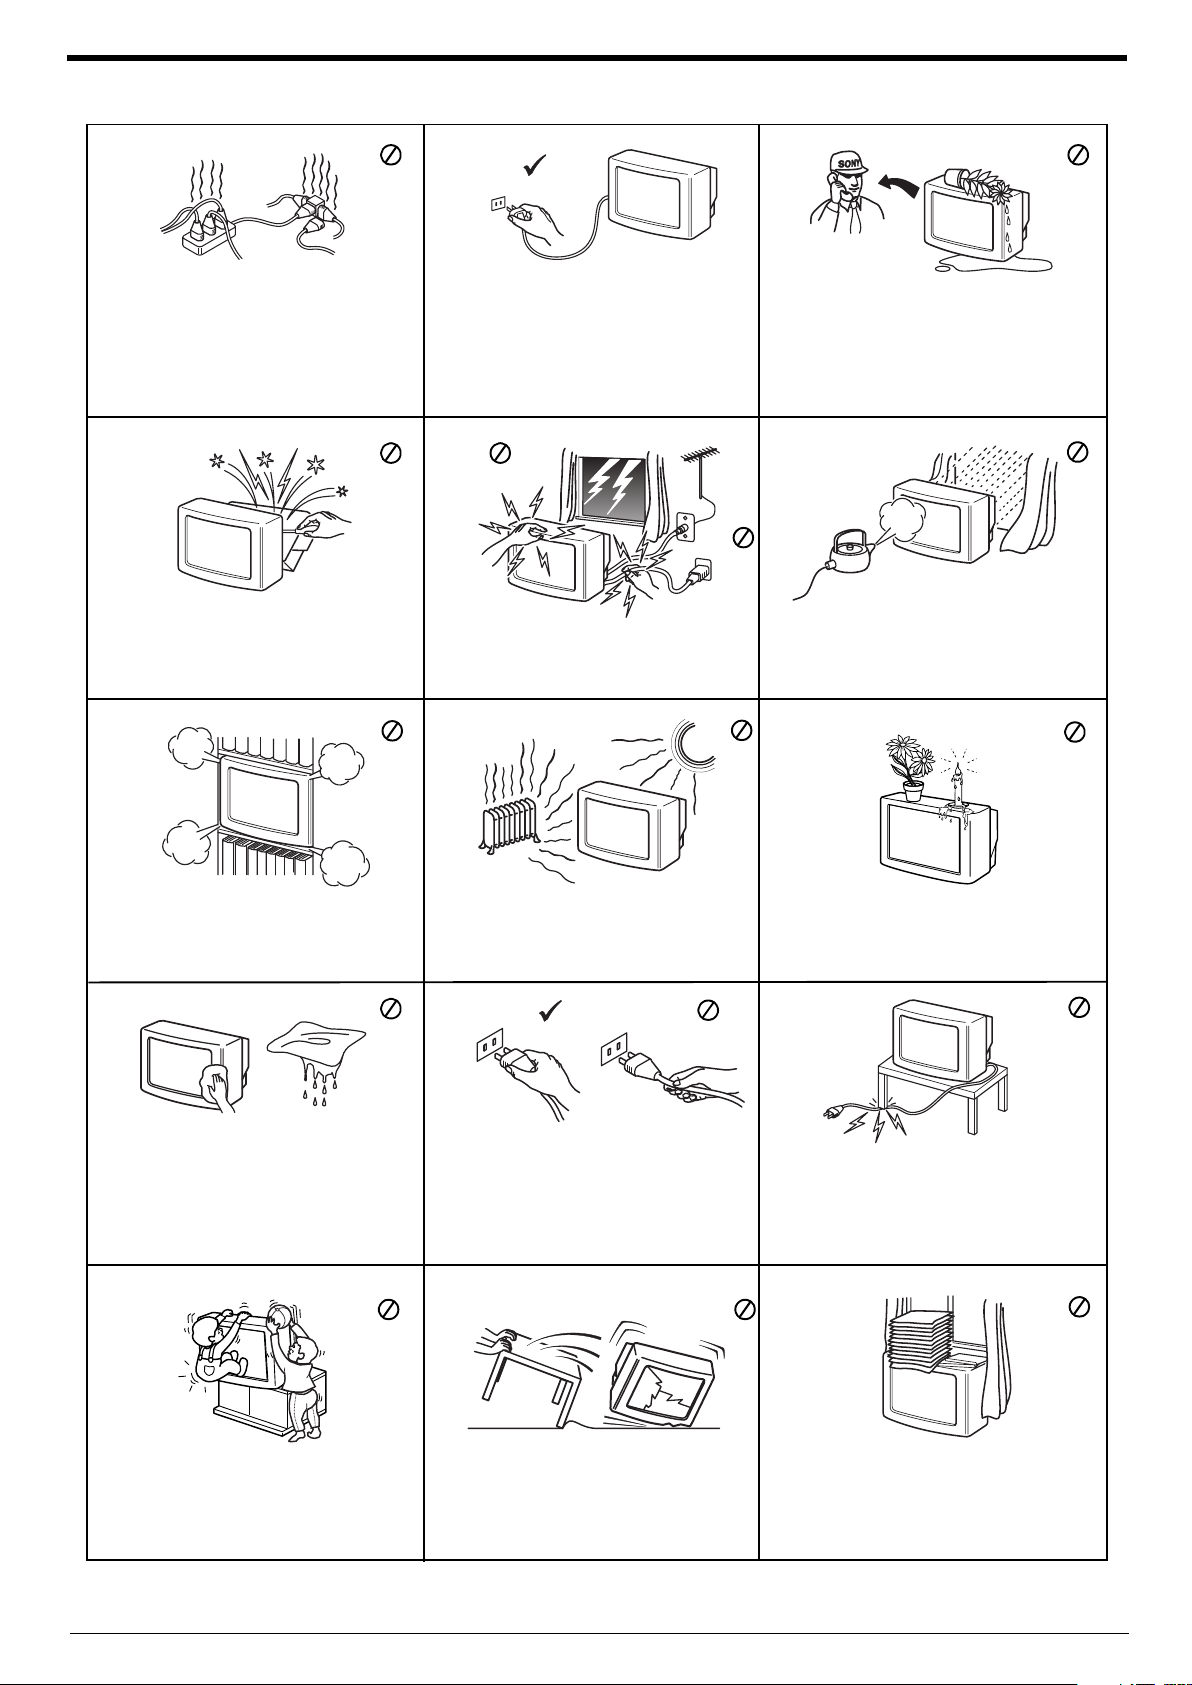
Safety information
This set is to operate on a 220-240V AC
supply only. Take care not to connect too
many appliances to the same power socket
as this could result in fire or electric shock.
Do not open the cabinet and the rear cover
of the TV. Refer to qualified service
personnel only.
For environmental and safety reasons, it is
recommended that the TV set is not left in
standby mode when not in use. Disconnect
from the mains.
For your own safety, do not touch any part
of the TV, power lead or aerial lead during
lightning storms.
Never push objects of any kind into the set
as this could result in a fire or electric shock.
Never spill liquid of any kind on the set. If
any liquid or solid object does fall through,
do not operate the TV. Have it checked
immediately by qualified personnel.
To prevent fire or shock hazard, do not
expose the TV to rain or moisture.
Do not cover the ventilation openings of the
TV. For ventilation, leave a space of at least
10cm all around the set.
Clean the TV with a soft, lightly dampened
cloth. Do not use benzine, thinner or any
other chemicals to clean the TV. Do not
scratch the TV screen. As a safety
precaution, unplug the TV before cleaning it.
Place the TV on a secure stable stand. Do
not allow children to climb on to it. Do not
place the TV on its side or face up.
Never place the TV in hot, humid or
excessively dusty places. Do not install the
TV where it may be exposed to mechanical
vibrations.
Pull out the power lead by the plug. Do not
pull on the power lead itself.
Unplug the power lead before moving the
TV. Avoid uneven surfaces, quick steps or
excessive force. If the set has been
dropped or damaged, have it checked
immediately by qualified service personnel.
To prevent fire, keep inflammable objects
or naked flames (e.g. candles) away from
the TV.
Take care not to place heavy objects on the
power lead as this could result in damage.
We recommend you wind any excess lead
around the holders provided on the rear of
the TV.
Do not cover the ventilation openings of the
TV with items such as curtains or
newspapers etc.
2
Thank you for choosing this Sony television.
Please take time to read this instruction manual as it will help you to understand all the features available to you.
Getting started
Checking the accessories supplied ................................................................................................ 4
Inserting batteries into the remote control handset ........................................................................ 4
Connecting your aerial and satellite................................................................................................ 5
Switching on the TV........................................................................................................................ 5
Automatically tuning the TV ............................................................................................................ 6
Switching between digital and analogue programmes.................................................................... 7
Finding your video channel............................................................................................................. 7
Overview of the TV buttons............................................................................................................. 8
Overview of the remote control buttons..........................................................................................9
Tel etext
Viewing a Digital text service .......................................................................................................... 10
Viewing a traditional text service..................................................................................................... 11
Using the text menu........................................................................................................................ 12
Changing the screen format manually..............................................................................13
Digital features
The Info display............................................................................................................................... 14
The Main Menu............................................................................................................................... 15
The Channel Index menu................................................................................................................ 20
The EPG menu............................................................................................................................... 21
Table of contents
TV menu system
Using the programme index table ..................................................................................................23
Adjusting the picture....................................................................................................................... 23
Adjusting the sound........................................................................................................................ 24
Using the Features menu................................................................................................................ 25
Naming a programme..................................................................................................................... 26
Skipping a programme.................................................................................................................... 26
Using the Further Programme Preset menu...................................................................................27
Re-arranging your channels............................................................................................................ 27
Adjusting the picture rotation .......................................................................................................... 28
Setting your personal ID ................................................................................................................. 28
Adjusting the picture geometry for an RGB source ........................................................................29
Presetting and naming inputs from external equipment ................................................................. 29
Manually tuning analogue signals...................................................................................................30
Additional information
Connecting additional equipment ...................................................................................................31
Remote control configuration for VCR/DVD....................................................................................33
Specifications..................................................................................................................................34
Troubleshooting...............................................................................................................................35
Removing and cleaning the glass panel.........................................................................................36
1
0
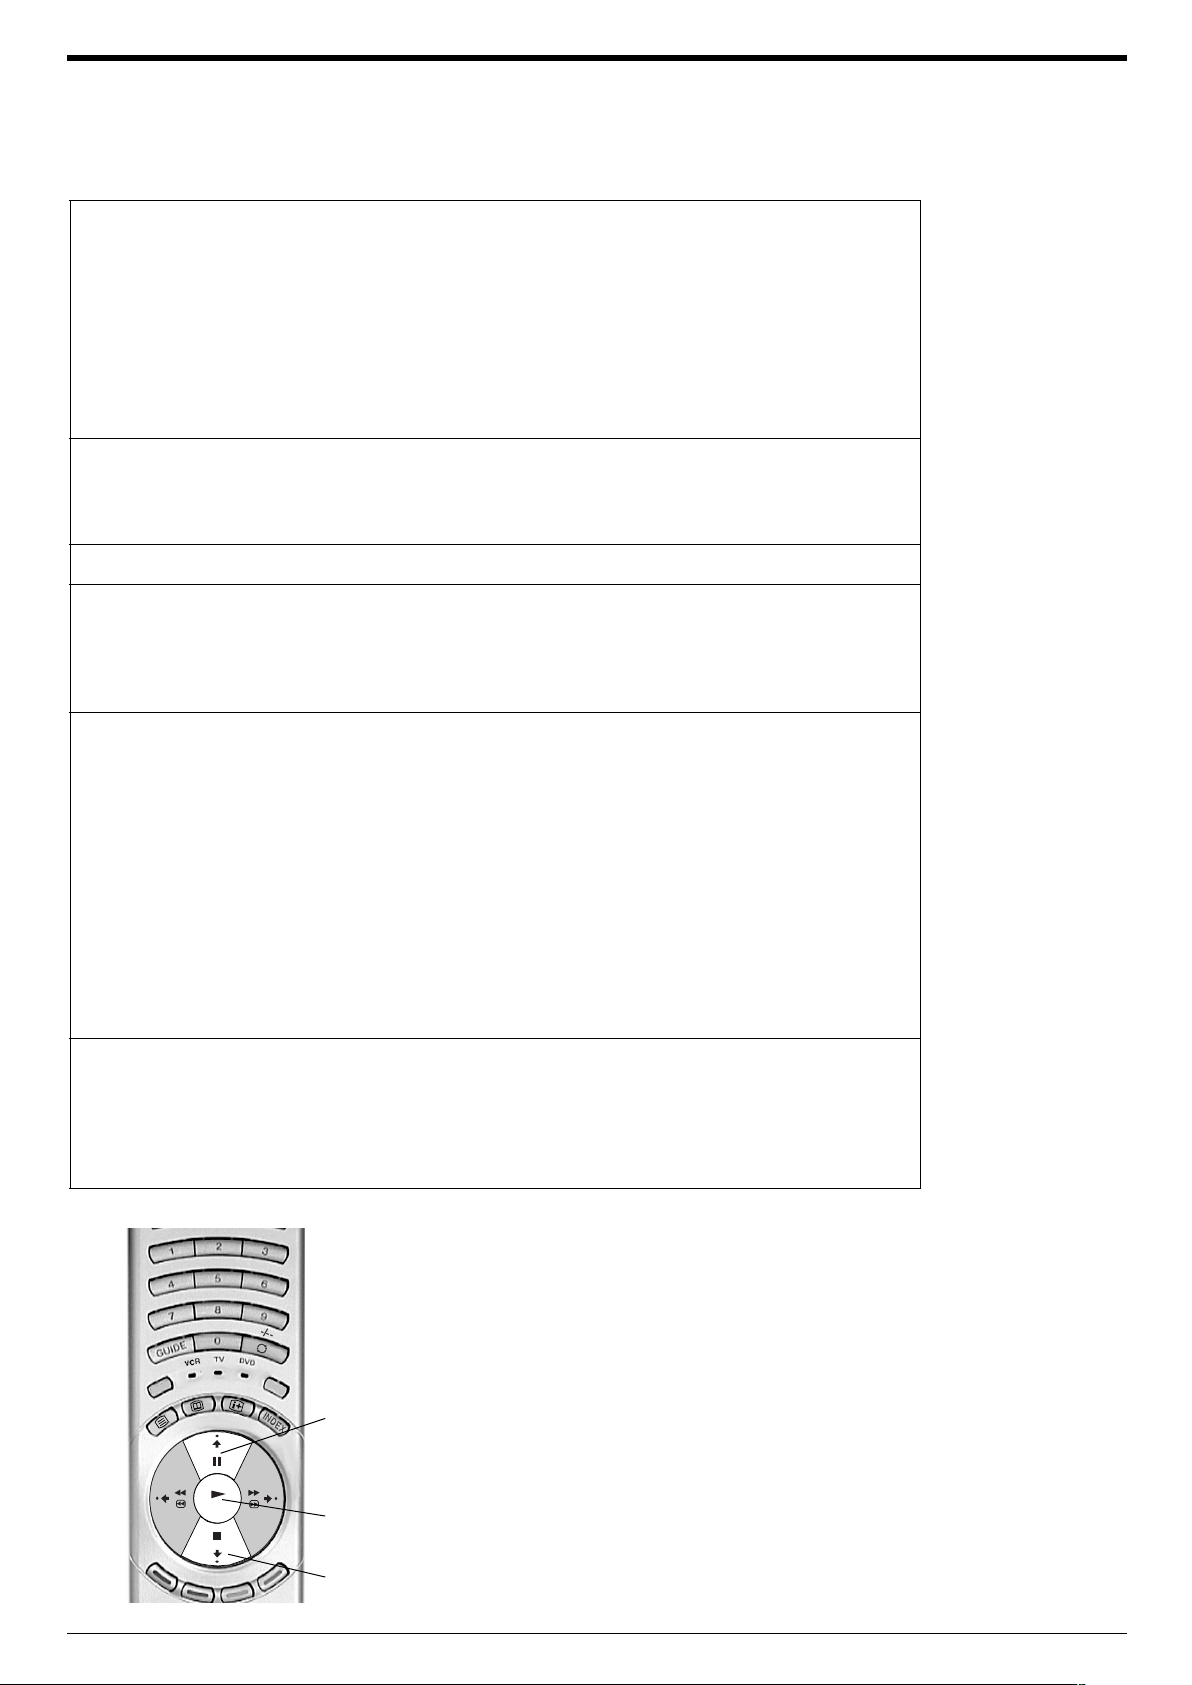
Using the menu system of this TV
All the menus of this TV are activated by the remote control
handset. The V, v, B, b and OK buttons of the remote control are
used to navigate around the menus and to store any settings you
make or change.
ODE
M
REC
V button
Throughout the pages of this manual you will notice drawings of
the remote control handset with certain buttons highlighted white.
This indicates the buttons you will need to press when following
the instructions. In the example shown the V, v and OK buttons
are the buttons to be pressed.
OK
OK button
v button
3
Getting started
Follow steps 1 - 6 to install your TV
and view the TV programmes
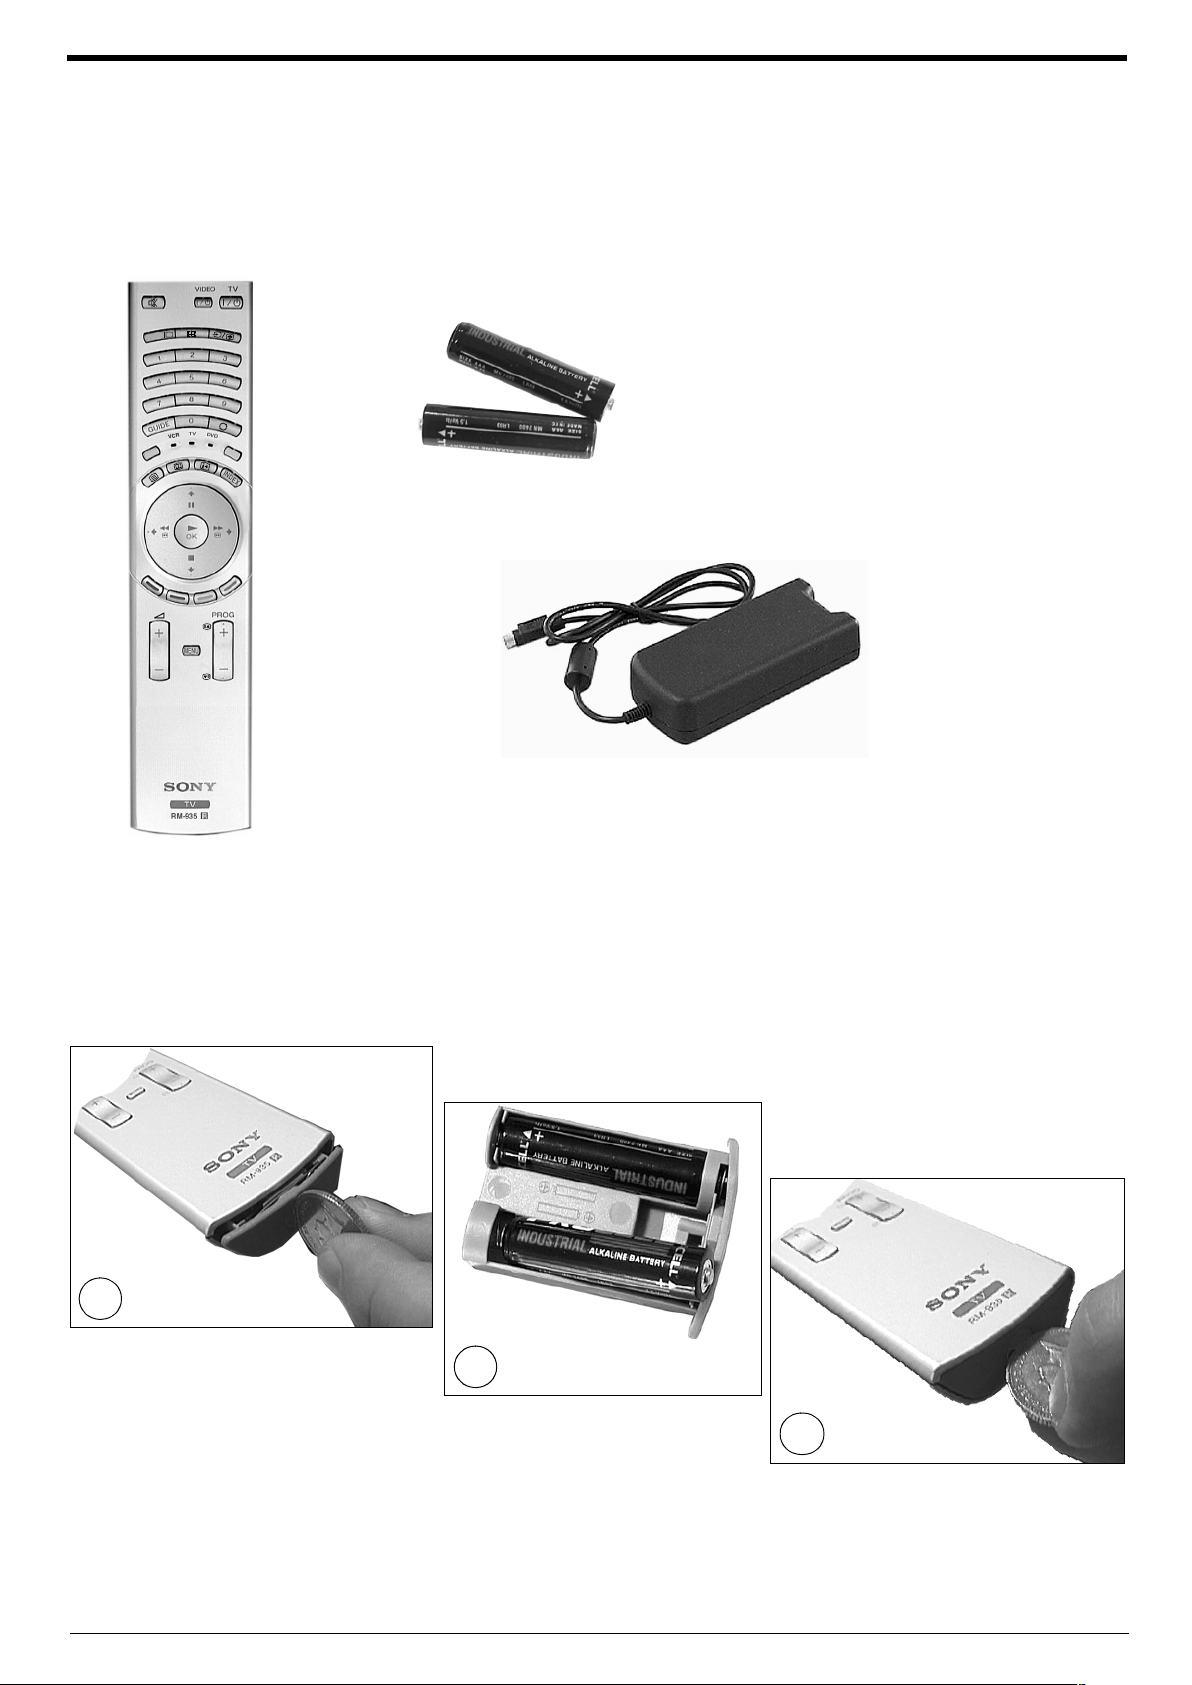
1. Checking the accessories supplied
L
A
IT
IG
D
-/--
E
D
O
M
R
E
C
Batteries
Modem
Remote control
Note: Please contact your local approved satellite installer for information regarding satellite and telephone connection.
2. Inserting batteries into the remote control handset
1
Place a coin in the slot provided at
the bottom of the remote control
and turn anti clockwise to release
battery compartment.
Always remember to dispose of batteries in an environmentally friendly way
4
2
Insert batteries as indicated in
battery compartment.
3
Replace battery compartment and lock
in place by twisting coin clockwise in
slot.

3. Connecting your aerial and satellite
/
Connecting a VCR to the TV
Getting started
1. Connect your existing aerial to the socket
marked on the rear of the TV as shown.
2. Connect your satellite dish to the F-type socket
marked .
1. Connect your satellite dish to the F-type
socket marked on the rear of the TV as
shown.
2. Connect your existing aerial to the RF IN
socket on your VCR.
3. Connect a lead from the RF output of your
VCR to the analogue socket marked then
connect a scart lead as shown.
4. Connect the VCR to the mains socket and
switch on.
5. Insert a pre-recorded tape into the VCR and
press the ‘PLAY’ button. This enables the TV
to locate and store the video channel during
the ‘Automatically tuning the TV’ procedure.
Scart lead
(not supplied)
4. Switching on the TV
1. Connect the TV plug to your mains socket
(220 - 240 V AC, 50 Hz).
2. Press the on/off switch in a forward direction
to switch on the TV.
Note: If the red indicator on the front of the TV is lit the
TV is in standby mode. Press the TV button
on the remote control to switch on the TV. Please
be patient as the picture may take a few moments
to appear on screen.
5
Getting started
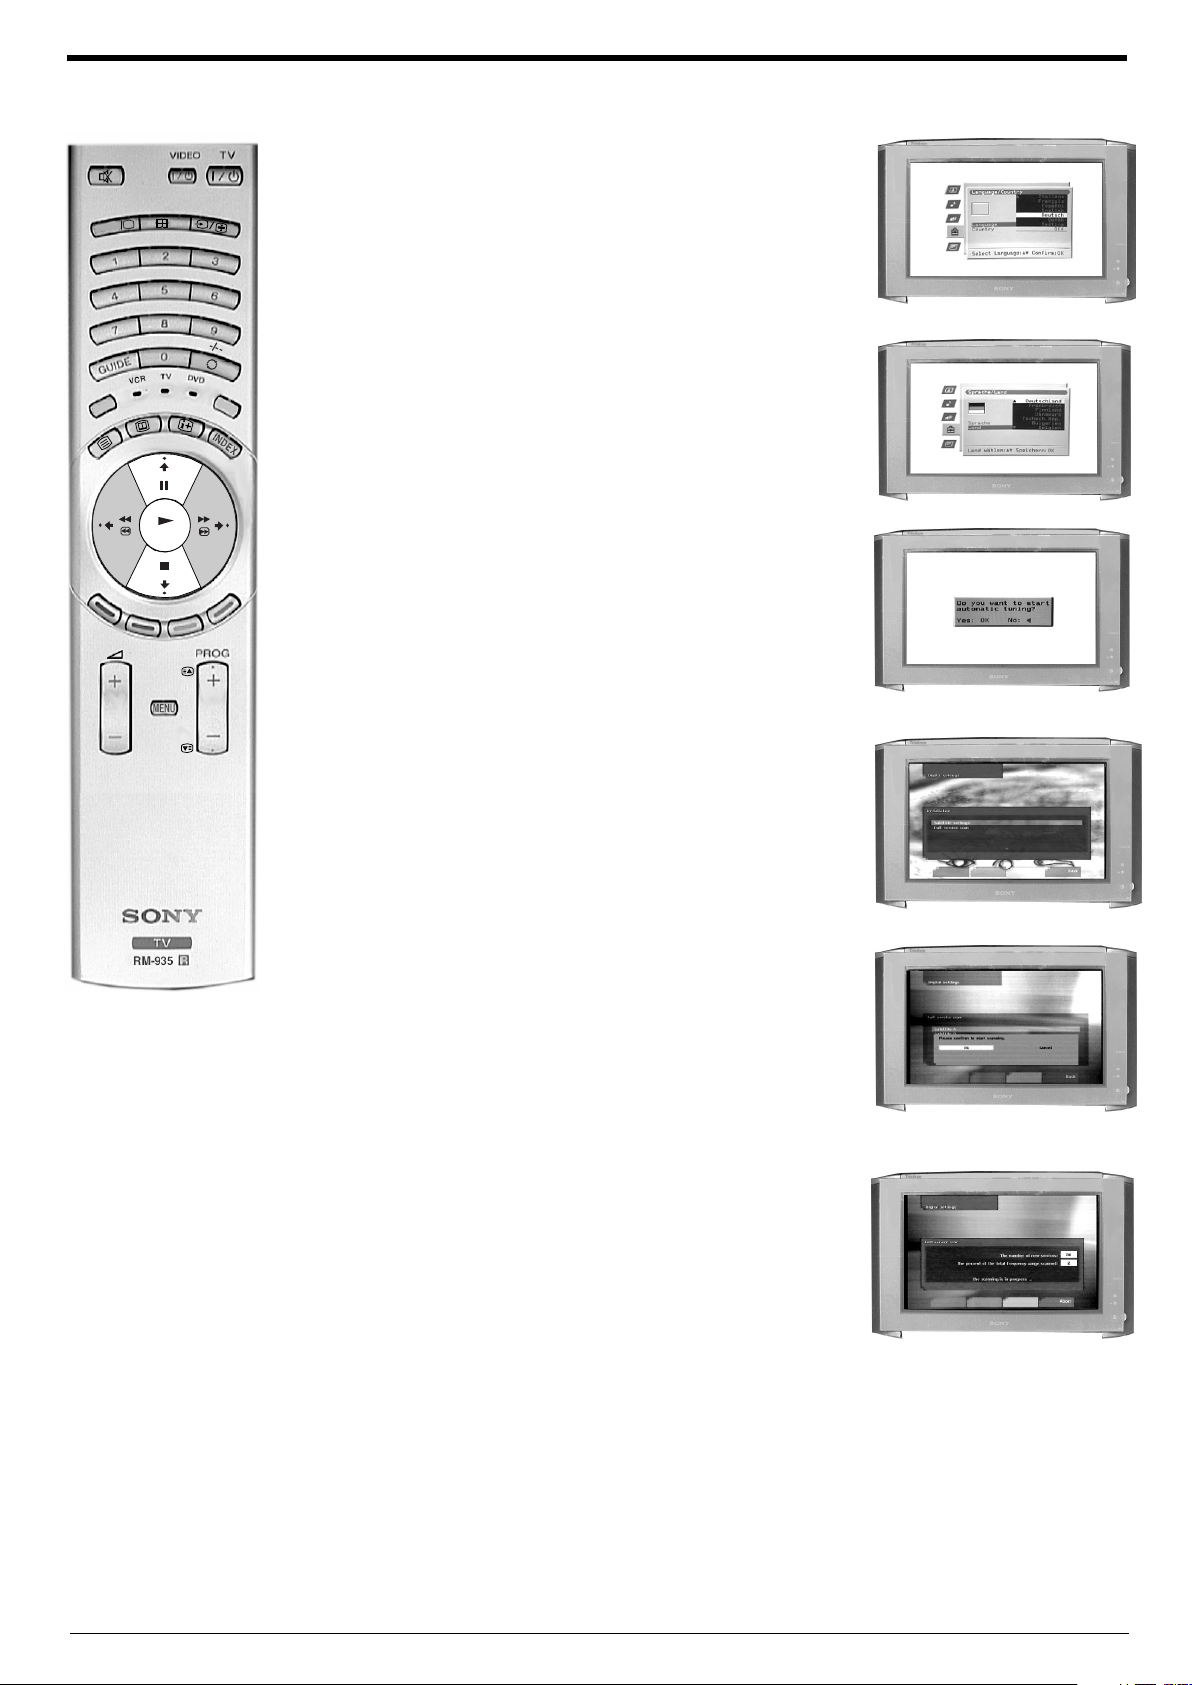
5. Automatically tuning the TV
1. When you switch on this TV for the first time, the Language/Country
menu appears on screen with the word ‘English’ highlighted. Press
the V or v buttons on the remote control to choose the language you
ITAL
IG
D
E
D
O
M
R
EC
OK
require then press the OK button to confirm.
2. The word Country is now highlighted. Press the V or v buttons to
choose the country in which you wish to operate the TV, then press
the OK button to confirm.
Note: The digital features of this set are designed for use in Germany only.
3. The autotune prompt screen appears. Press the OK button to select
Ye s .
4. The Main Menu is now displayed. Press the v button to highlight
‘Quick tuning’ or ‘Full tuning’, then press the OK button twice.
5. A display appears asking you to press OK to begin scanning.
Whilst scanning is taking place a progress menu is displayed
showing the number of services stored and the percentage of
scanning completed. The full scan will take some time so please be
patient. When the scanning percentage reaches 100%, the onscreen message ‘Auto tuning successfully completed’ is displayed.
Note: During all subsequent scans, only new channels will be
added to the original scan.
6
Getting started
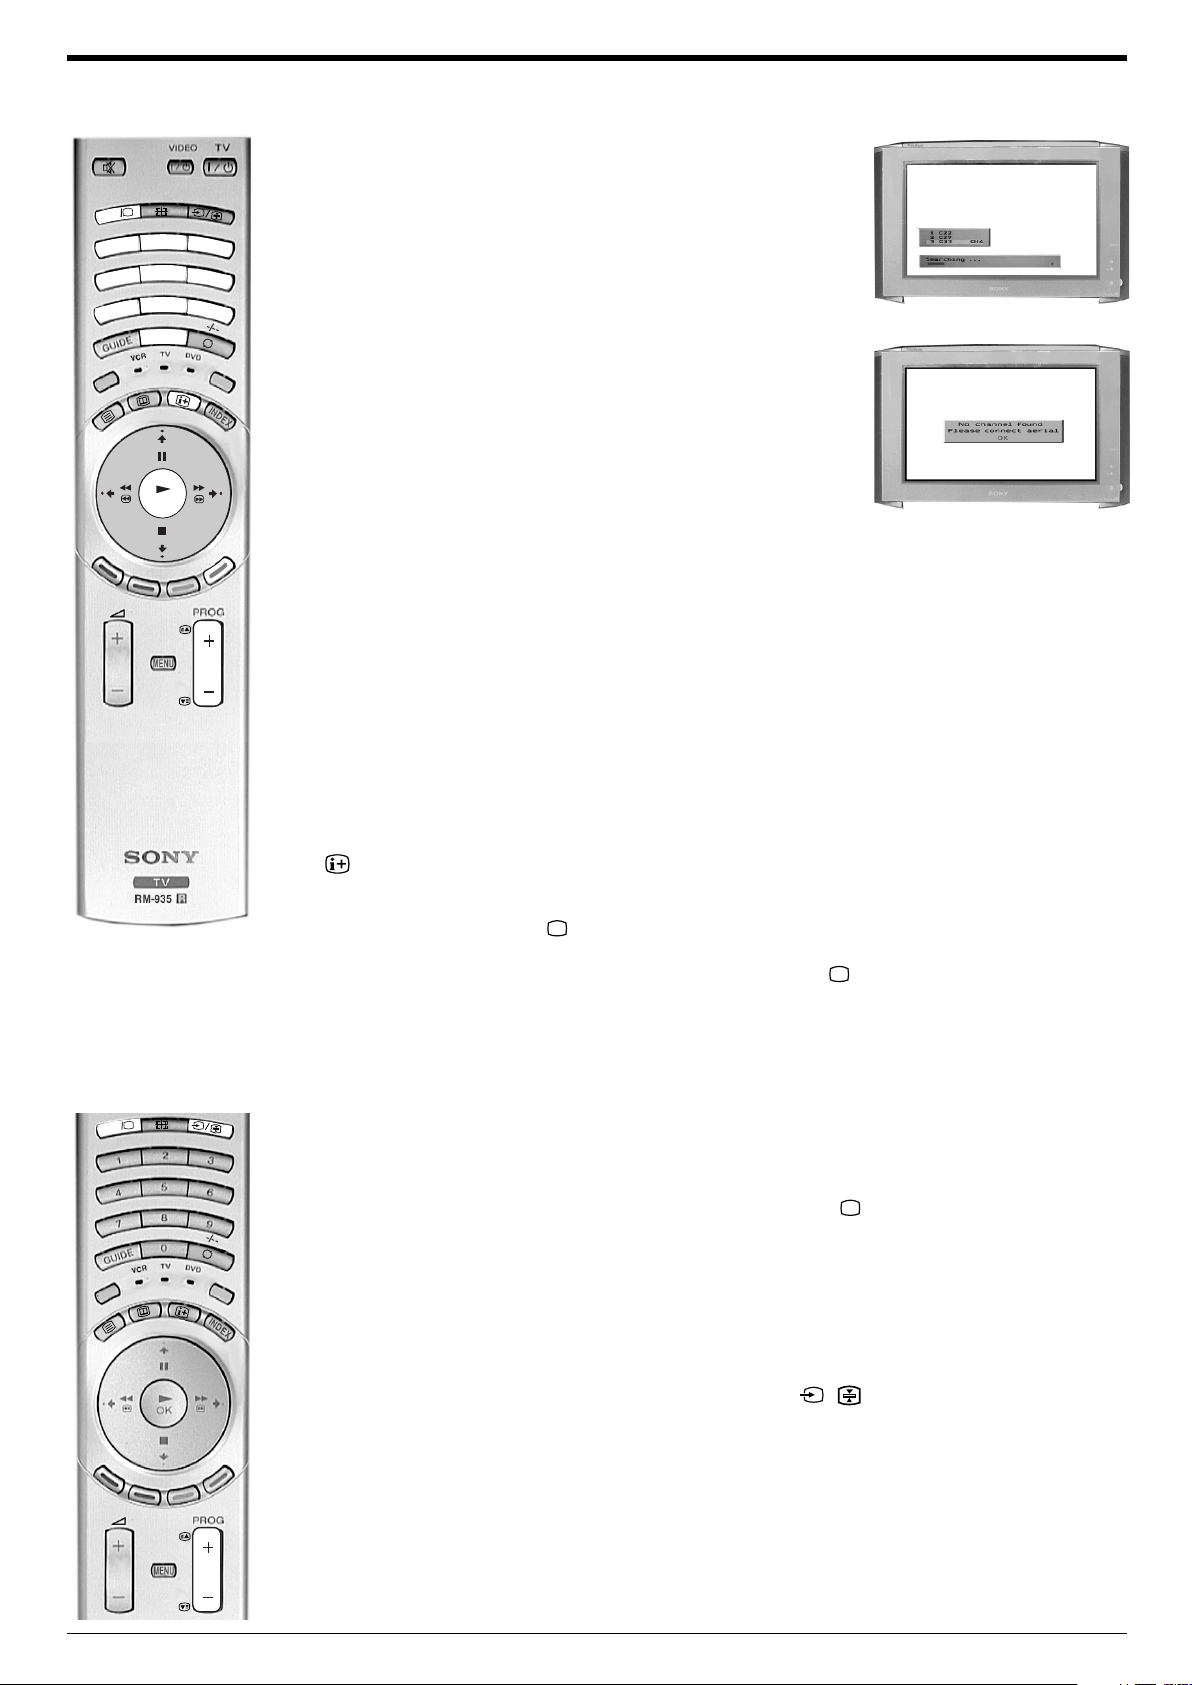
6. Press the BLUE button repeatedly to remove all digital menus from
the TV screen.
The analogue tuning display appears automatically and the TV
L
L
A
A
IT
IT
IG
IG
D
D
2
1
4
7
3
5
6
8
9
0
begins to search for analogue signals.
Once all signals have been captured and stored, the TV returns to
normal operation and displays the digital programme captured on
programme number 1.
MODE
REC
7. If no signals are captured, a menu appears asking you to confirm
your aerial is connected. Check your aerials are connected, then
press OK to start the search procedure again.
OK
OK
Note: If no digital signals were captured, then the analogue programme
stored on programme number 1 is displayed.
8. To view programmes, press the PROG+/- buttons or the numbered
buttons on the remote control.
Switching between digital and analogue
programmes
To check if you are watching a digital or an analogue programme press
the button on the remote control. If you are watching a digital
programme an Info display appears on screen providing brief details for
both the current and next programme. To change to analogue
programmes press the DIGITAL/ button.
When you wish to return to digital programmes press the DIGITAL/
button once more.
6. Finding your video channel
L
L
A
L
A
L
A
IT
A
IT
IT
IG
IT
IG
D
IG
D
IG
D
D
MODE
REC
If you connected a VCR to your TV when following the ‘Connecting your
aerial and satellite instructions’, you now need to find your video channel.
1. First ensure the TV is in analogue mode. If not press the DIGITAL/
button on the remote control.
2. Press the PROG+/- button until the picture from your pre-recorded
tape appears on screen.
Note: If you wish to move your video channel to a different programme number,
refer to the ‘Re-arranging your channels’ section of this manual.
If you have connected your VCR using a scart lead, press the /
button repeatedly on the remote control until the picture from the tape
appears on the TV screen.
7
Getting started
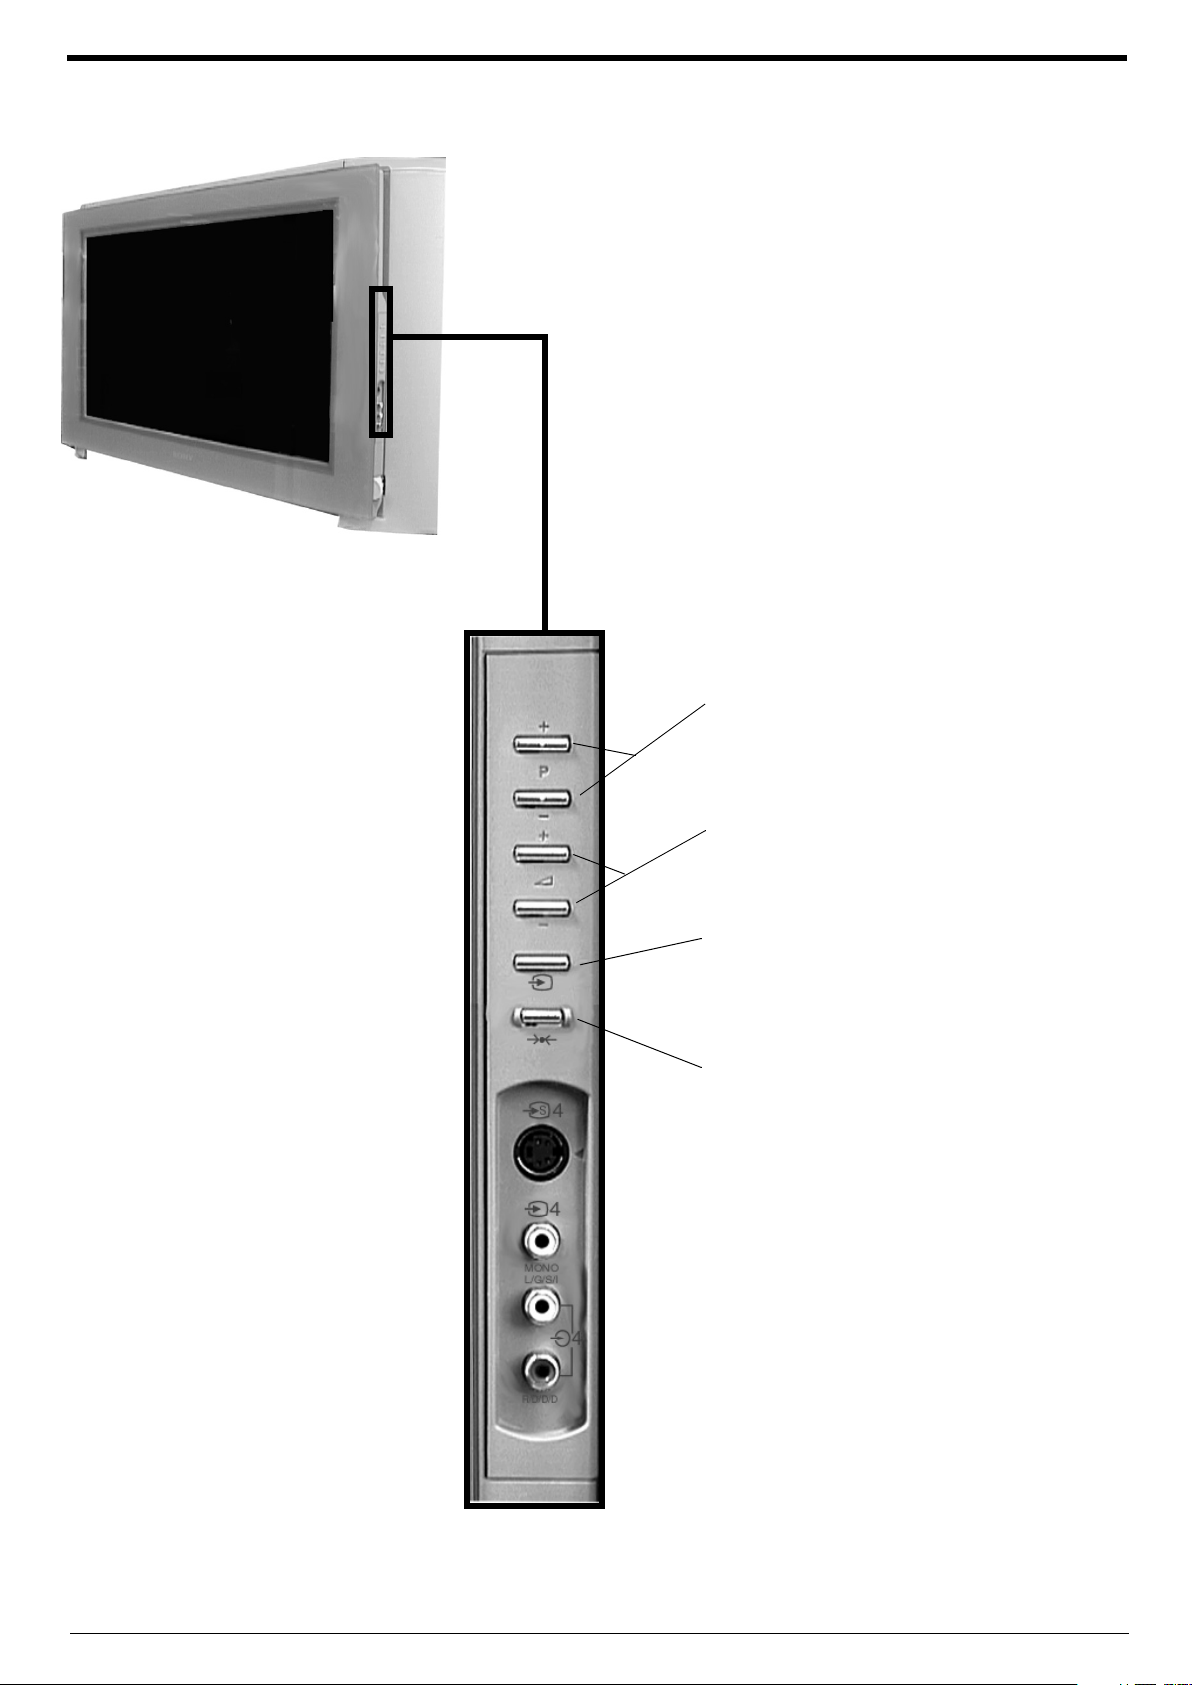
Overview of the TV buttons
The control buttons can be found on the right side of the TV.
An expanded view is shown below.
Programme Up or Down buttons
Press to move to the next or
preceding channel.
Volume control buttons
Press to increase or decrease the
volume.
Video input button
Press to select input signals from a
VCR etc.
Reset button
Press to return picture and sound
levels to their factory settings.
8
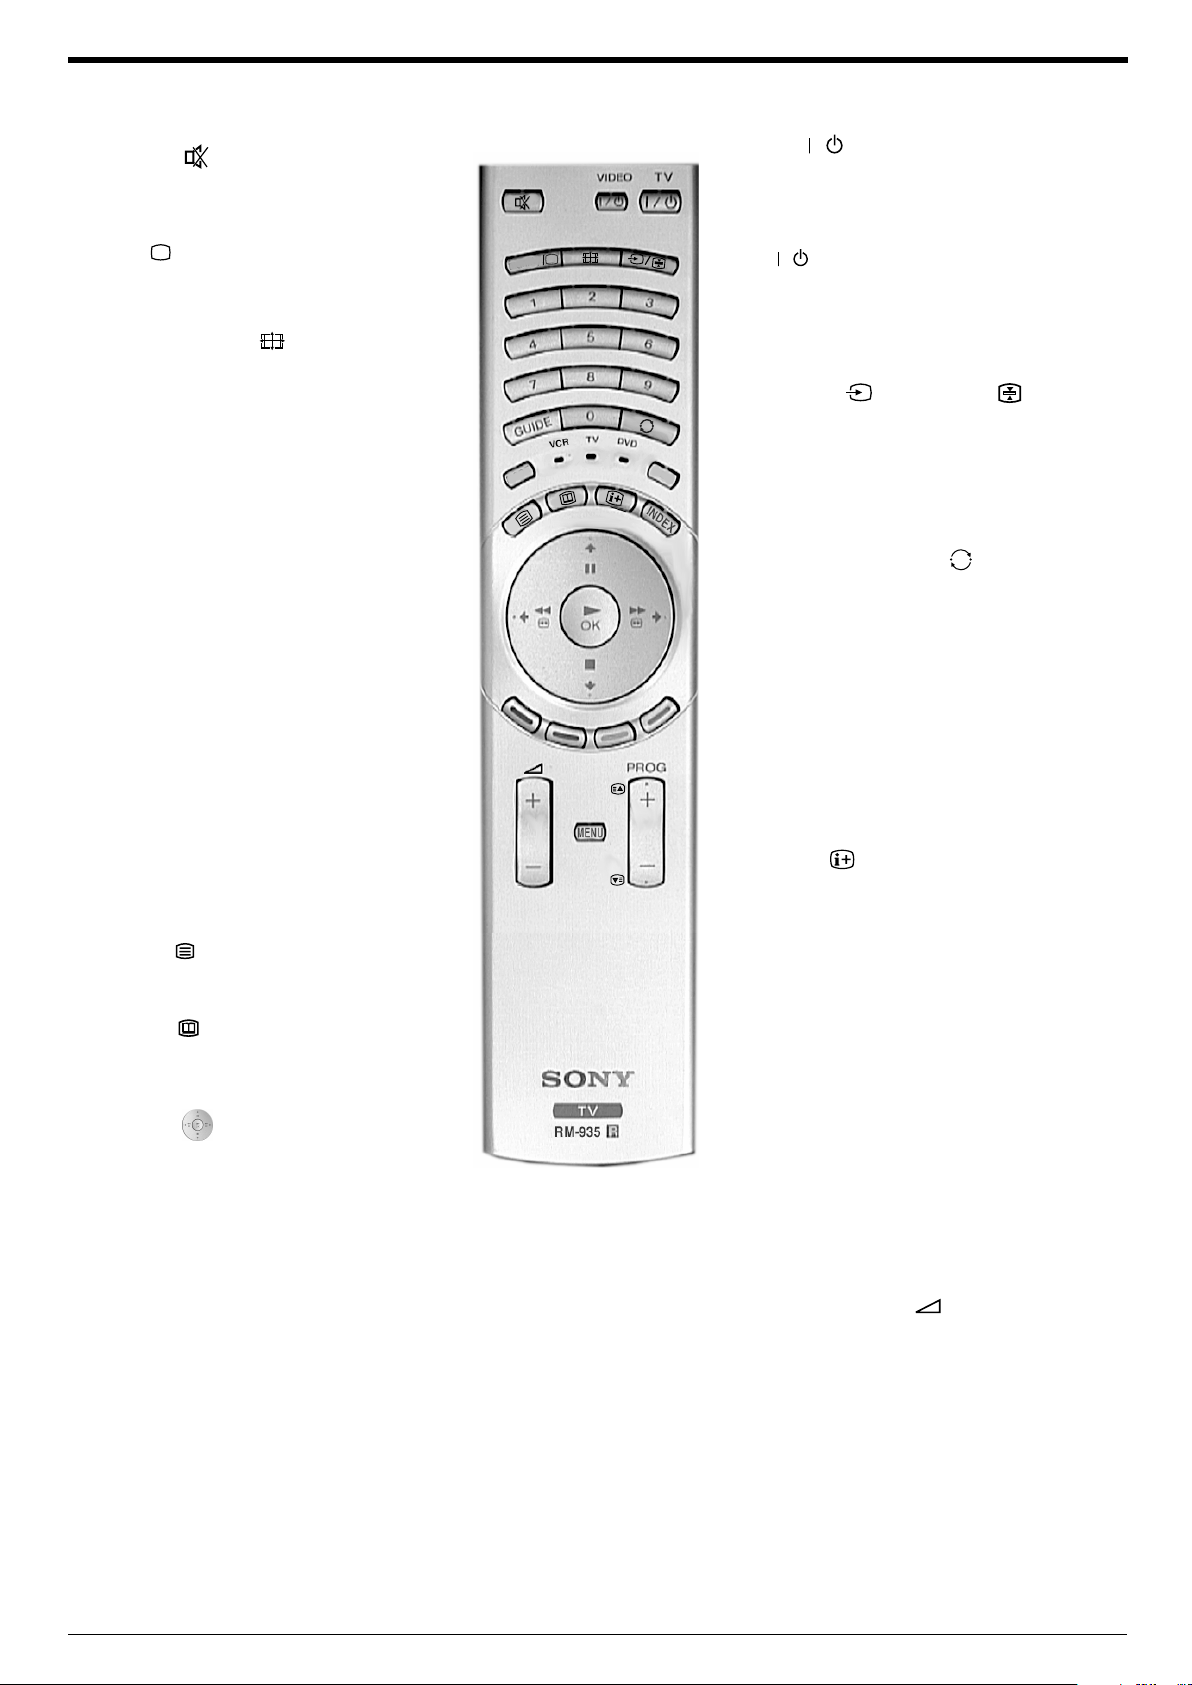
Overview of the remote control buttons
/
Getting started
Mute button
Press to mute the sound. Press again to
restore.
DIGITAL/ button
Press to switch between digital or analogue
mode.
Screen format button
Press repeatedly to change the screen
format.
Buttons 0-9
Press to input the required channel number.
For numbers 10 and above, enter the next
digit within 2 seconds.
GUIDE button
Occasionally the broadcaster transmits
information such as a TV Guide which can be
displayed on screen. You will be asked to press
the GUIDE button when this happens.
MODE button
This remote operates not only Sony DVDs and
VCRs, but also those made by other
manufacturers. Press this button to select the
type of equipment you want to control. A green
light appears momentarily to indicate the mode
selected.
Note: Before operating your VCR or DVD, you must
enter the correct configuration code. Please refer to
the section ‘Remote Control Configuration for VCR/
DVD’ .
Text button
Press to enter text mode.
IG
D
MODE
VIDEO button
Press to switch off your VCR or DVD
temporarily. Press again to return to normal
operation.
L
A
IT
TV button
/
Press to switch off your TV temporarily. The
Red indicator on the front of the TV will
illuminate. Press again to return to normal
operation.
-/--
Input button /Hold button
Press to select signals from equipment
connected to the TV sockets (refer to
REC
‘Connecting optional equipment to the TV’).
In Text mode press to keep a page on display.
Press again to cancel.
Previous channel button
Press to return to the previous channel you were
watching (providing you watched it for at least 5
seconds).
Note: If the MODE button is set to VCR, use this
button to select double digit numbers on your
VCR, e.g. press this button, then press 2 and 3
for 23.
REC button
When the MODE button is set to VCR, press this
button to place your VCR in record mode.
Info button
Press to display the INFO menu in Digital mode.
When watching analogue programmes press to
reveal information such as programme number.
When in text mode, press to reveal hidden
information such as answers on quiz pages.
Press once more to clear hidden information.
EPG button
Press to display the Electronic Programme
Guide when in Digital mode.
Control pad
Use these buttons to navigate through the
menu system of the TV.
Note: When the MODE button has been set to
VCR or DVD, the control pad operates the main
functions of your VCR or DVD.
Coloured buttons
These buttons are used for text and Digital
menus. Refer to the relevant sections in this
instruction manual.
INDEX button
Occasionally the broadcaster transmits
information which can be displayed on screen.
You will be asked to press the INDEX button
when this happens.
PROG +/- button
Press to select the next or previous programme.
In Text mode, press to select the next page or the
previous page.
Volume + and - button
Press to adjust the volume to the desired level.
MENU button
Press to enter the menu system of this TV.
9

Teletext
Viewing a Digital text service
Most digital TV channels broadcast information via their text service. This digital service includes high
quality text and graphics along with advanced navigation options. Additionally, this TV has access to
dedicated text channels transmitted by the broadcasting authorities.
The appearance, content and navigation methods of all Digital text services are decided by the
broadcaster. For example, the RTL Digital text service may look different to ZDF’s Digital text. Most of the
Digital text services currently available use simple navigation methods based on the following buttons:
The text button to load up the Digital text,
The V, v, B and b buttons (to move around the screen),
The OK button or the numbered buttons (to select items on screen),
The four coloured buttons (to access shortcuts).
Selecting a dedicated Digital text channel
1. Press the button on the remote control to check if you are in digital mode. If you are watching a
digital programme an Info display appears on screen providing brief details for the current and next
programme. If the display does not appear, press the DIGITAL/ button to switch to digital mode.
DIGITAL
DIGITAL
2
1
4
7
3
5
6
8
9
0
2. Press the button to remove the Info display from the TV screen then select the programme
number that is broadcasting the dedicated Digital text channel by using the numbered buttons on the
remote control. If you do not know the channel number of a dedicated Digital text channel, you can
use the ‘Channel Index menu’ to find one. (Please refer to the ‘Channel index menu’ section of this
manual.)
E
D
O
M
OK
REC
3. Once the text page is displayed, follow the on-screen instructions to obtain your required selection.
Note: On some pages the TV programme may also be displayed on the text screen. On-screen instructions will
inform you how to change the displayed programme.
4. If you are instructed to press ‘OK’ or ‘Select’ when viewing the text pages, press the OK button.
5. When you have finished viewing the text service, press the button to exit.
Selecting a text service from other Digital channels
Normal text services may also be available on other digital channels. This is sometimes indicated by a
small symbol on your TV screen, superimposed on the programme you are watching.
1. Press the V, v, B, or b buttons to select the symbol, then press the OK button to display the chosen
information.
10
2. Alternatively, you may be instructed to use the numbered or coloured buttons on your remote control
to display the various pages of text information. If you are instructed to press ‘OK’ or ‘Select’ when
viewing the text pages, press the OK button.
3. Once the text information is displayed, you can access required information by using the V, v, B, or b
buttons, the coloured buttons and/or the numbered buttons of the remote control.
4. When you have finished viewing the text service, press the button to exit.
 Loading...