

Page 1

SONY
3-861-713-11 (1)
PLL Synthesized
Scanning Receiver
ICF-SC1/ICF-SC1PC
Operating Instructions
01998 by Sony Corporation
Page 2

To prevent fire or shock hazard, do not expose
the unit to rain or moisture.
To avoid electrical shock, do not open the
cabinet.
Refer servicing to qualified personnel only.
Owner’s record
The model and serial numbers are located at the bottom of
the receiver. Record them in the space provid ed below.
Refer to them whenever you call your Sony dealer
regarding this prod uct.
Model No .
Serial No.
WARNING
You are cautioned that any changes or modifications
not expressly approved in this manual could vo id
your authority to o perate this equipment.
Use of this scanning receiver in a motorized vehicle may
be unlawful or require a permit in certain areas. Contact
your local law enfo rcement authorities for more
information.
The Federal Electronic Communications Privacy Act
using, or disclosing the contents of a cellular or cordless
telephone transmission as illegal.
This scanning receiver excludes the cellular phone band
from its frequency range. Any mo dification of this
receiver to the contrary is likewise illegal by the
ECPA.
I
Information (for
This equipment has been tested and found
the limits for a Class B digital device, pursuant to Part 15
of the FCC Rules. These limits are designed to provide
reasonable protection against harmful interference in a
residential installation. This equipment generates, uses,
and can radiate radio frequency energy and, if not
installed and used in accordance with the instructions,
may cause harmful interference to radio communications.
However, there is no guarantee that interference will not
occur in a particular installation. If this equipment do es
cause harmful interference to radio or television reception,
which can be determined by turning the equipment off
and on, the user is encouraged to try to correct the
interference by one or more of the follow ing measures:
-
Reorient or relocate the receiving antenna.
-
Increase the separation between the equipment and
receiver.
-
Connect the equipment into an outlet on a circuit
different from that to w hich the receiver is connected.
-
Consult the dealer or an experienced radio/ TV
technician for help.
2
ICF-SC1PC)
to
comply w ith
Page 3

We lc om e !
Welco me to the world of scanning reception. Here are
some o f the capabilities and features you w ill discover
with the new I’LL Synthesized Scanning Receiver.
l I’LL (Phase Locked Loo p) synthesized scanning
receiver with a frequency range of 25 - 1300 MHz
(excluding cellular phone frequencies).
l PC controllable (ICF-SC1PC o nly)
Personal Computer for total control of your scanning
receiver using the PC control software. The CD-ROM
frequency database (supplied) prov ides information for
station frequencies nationwid e.
l Easy access to the PSBs (Public Service Bands) w ith
Service Scanning - Receive any one of the 9 pre-
prog rammed PSBs (A IR[VHF], AIRlUHF], Weather,
Police, Fire/ Emergency, Marine, FM broadcast,
TV[VHF sound], and TV[UHF sound ]) with just a touch
of a button.
l Variety of scanning options
Programmable Scanning, Memory Scanning, and
Intelligent Memo ry Scanning.
l 300 channel memo ry
-
Store the stations of your choice
(10 pages, 30 channels per page). The EEPROM retains
stored information without backup batteries.
l Priority Scanning function
there is reception in a priority frequency you have
designated.
l
Direct manual tuning - Simply input the digits of the
frequency from the numeric keypad if yo u know the
frequency.
l SKIP function
-
Skips the frequencies you have
designated during scan (up to 100).
l Ad justable scanning pause time
delay mo de, and the 5 second-pause mod e.
l A djustable frequency steps.
l Supports AM, NFM, WFM detection mod es in all
frequencies.
l Backlighted Liquid Crystal Display.
l Key protection to avoid op eration by inadvertent key
strokes.
-
Connect to a
-
Band Scanning,
-
Checks every 5 second s if
-
Normal, 2 second-
3
Page 4

Ta ble of c onte nt s
Prepa ra t ion
Power sources .........................................................................
Using the receiver on batteries .........................................
Using the receiver on AC pow er ......................................
Using the receiver on a car battery ..................................
Attaching/ d etaching the antenna
Attaching/ d etaching the belt holder...................................
Using the earphone
................................................................
........................................ 7
Re c e pt i on
Various ways of reception .....................................................
Receiving in the Scanning Mode
Band Scanning..
Frequency range of the bands
Ad justing the SQL control
Memo ry Scanning..
Programmable Scanning
Defining the frequency range
Running Programmable Scanning .................................
Service Scanning ...................................................................
Intelligent Memo ry Scanning
.....................................................................
........................................
..............................................
...............................................................
.....................................................
.........................................
.............................................
Receiving in the Manual Mode
Direct Tuning ........................................................................
Manual Tuning .....................................................................
Preset Tuning ........................................................................
Presetting stations
Recalling a preset channel ...............................................
Erasing preset memory ....................................................
in
the memory .................................
Priority Scanning
Priority Scanning ..................................................................
Specifying the priority frequency ..................................
Running Priority Scanning .............................................
5
5
6
6
7
8
9
10
10
11
13
15
15
16
17
19
20
21
22
22
23
25
26
26
26
Ot her u se ful fu nc t ions
SKIP function ........................................................................
Designating a SKIP-frequency.. ......................................
Ad justing scanning pause
DELAY ...............................................................................
Limiting scanning pause to 5 seconds (5-second pause
mode)
Ad justing frequency step and detection mode
Key protection .......................................................................
Turning on the light
Turning off the beep .............................................................
.................................................................................
Ad justing the
Ad justing the detection
frequency step..
time ..........................................
................
........................................
mode ........................................
............................................................. 32
Addition a l inform ation
Troubleshoo ting ....................................................................
Precautions
Specifications .........................................................................
Supplied accessories
Optional accessories
Location and function of controls ......................................
Front ...................................................................................
Side/ rear.. ..........................................................................
Display
.............................................................................
........................................................ 36
......................................................... 36
...............................................................................
4
28
28
30
30
30
31
31
31
32
32
33
35
36
37
37
38
39
Page 5

Pow er sourc es
Using t he rece ive r on ba tt e ries
Insert in g the b atter ie s
Insert four size AA (R6) batteries with correct polarity as
show n in the illustration.
Wait at least 3 seconds before turning on the power on the
receiver.
For longer battery life, we recommend the use of alkaline
batteries.
Note
*When using the receiver on batteries, unplug the AC po wer
adaptor or the car battery cord from the DC IN 6 V jack on the
receiver, if plugged in.
When to r eplac e the b a tterie s
When the batteries become w eak, the sound becomes
weak and distorted.
batteries become exhausted,
power will go off.
Replace all four batteries with new ones when
flash.
will flash in the display. When the
will light up and the
starts to
No te s
*Turn off the pow er when replacing the batteries.
*After remov ing the old batteries, install the new ones w ithin 20
seconds. Otherwise, the present status (the current reception
mod e) of the receiver will be lost and w ill return to the factory
preset. The frequencies stored in the preset memory are
unaffected.
l
C\ will disappear from the display when you turn on the po wer
with the new batteries.
l
When running the receiver on A C pow er or when yo u are not
using the receiver for an extended period o f time, remov e the
batteries to avoid battery discharge and damage to the receiver
from battery leakage.
Ba t t e ry life
hours using four LR6 Sony alkaline batteries (with the
squelch open continuously fo r 4 hours a day).
5
Page 6

Using t he rece ive r on AC pow er
Plug in the supplied AC power adaptor in to the DC IN
6V jack.
to a wall outlet
Notes
*Do not twist or crumple the AC po wer adaptor cord forcefully.
Do no t place any heavy object on the cord.
*To disconnect the AC po wer cord , pull it out by the plug, not the
cord.
*When you are not using the receiver for an extended period of
time, disconnect the AC pow er adaptor both from the wall outlet
and the receiver.
Using t he rece ive r on a ca r ba t tery
Plug in the car battery cord (not supplied) to the DC IN
6V jack.
For more information, consult the Operating Instructions
for the car battery cord.
Notes
*Turn off the pow er when plug ging or unplugging the AC po wer
adaptor or the car battery cord from the DC IN 6 V jack.
Otherwise, the power may be cut off and
display. In this case, press POWER to turn the power on again.
The display will disappear.
*When using the receiver on batteries, unplug the AC po wer
adaptor or the car battery cord from the DC IN 6 V jack on the
receiver. The receiver will not be pow ered by the batteries as
long as the DC IN 6V jack is plugged in.
If you plug in the AC po wer adaptor or the car battery cord to
the DC IN 6 V jack, the po wer will automatically switch to
external pow er even if the batteries are installed.
*Use only the supplied / recommended AC pow er adaptor and car
battery cord.
may appear in the
Polarity of the plug
*The display will be lit with the backlight when you are using the
AC p ow er adaptor or the car battery cord (see “Turning on the
light”, page 32).
6
Page 7

Att ac hing/det ac hing the
ant enna
Fit the supplied helical antenna so that the projection on
the connector of the main unit fits the slot on the antenna.
Hold the antenna by the connector and turn it clockw ise
until the connector clicks.
Helical
antenna
To detach the antenna
Turn the antenna counterclockw ise to release the lock of
the connector.
Note
When detaching the antenna, hold the antenna by the connector.
Do no t hold the antenna rod itself.
I I
Att ac hing/det ac hing the belt
holder
Place the holder so that the projection on the holder fits
the slot on the main unit. Turn the screws clockw ise with
a coin.
To detach the belt holder
Turn the screws counterclockwise.
7
Page 8

Using t he ea rphone
To listen throug h the earphone, plug in the earphone to
the
jack as show n in the illustration.
-NOT ICE
Be sure to adjust VOL (vo lume) to a moderate
level before turning on the power or plugging in
the earphone. There will be no sound when there
is no reception (squelch closed). Sudden
reception (opening of the squelch) may cause
unexpected loud sound and may cause hearing
damage.
8
Page 9

>Reception
Va rious w a ys of rec e pt ion
The scanning receiver offers a variety of scanning and
tuning options. Refer to the pages in the parenthesis for
details.
Sc anning Mode
Band Scanning (page
scans one of the predefined frequency bands
Memory Scanning (p age 13)
scans the frequencies you have preset in the
memo ry
Programmable Scanning (page
scans a frequency range that you have defined
Service Scanning
scans one of the 9 pre-prog rammed Public Service
Bands of your choice
Intelligent Memory Scanning (page 19)
scans the 10 recent reception frequencies
(memo rized automatically)
Ma nual M ode
Direct Tuning (page 20)
tune in by inputting the frequency digits
Manual Tuning (p age 21)
tune in by adjusting the frequency step by step
with the t/ -keys
Preset Tuning (page 22)
tune in by recalling a frequency you have preset
in the memory
10)
15)
(page 17)
Priority Scanning
checks every 5 seconds if there is reception in a
priority frequency (w orks in either modes)
(page 26)
9
Page 10

Receiving in the Scanning Mode
Band Sc anning
The receiver divides its frequency range (25.0 MHz to
1300.0 MHz) into 17 bands. Band Scanning scans one of
these bands step by step.
Set the SQL control to MIN.
Press POWER to turn the receiver on.
Turn VOL to adjust the volume.
Press BAND repeatedly to cho ose a band.
With each press, the lowest frequency of the next
band will be displayed. Press repeatedly until the
display show s the lowest frequency of the band of
your choice.
Ad just the SQL control (see page 11).
Scanning will start.
When the receiver receives a signal,
up and the receiver will go into scanning pause. When
the signal breaks off, the receiver will resume
scanning automatically.
will light
To turn off the power
Press POWER.
Fre quenc y range of the ba nds
Frequencyrange
(MHz)
25.0 ~ 29.0
29.0 ~ 54.0
54.0 ~ 72.0
72.0 ~ 76.0
76.0 ~ 88.0
88.0 ~ 108.0
108.0 ~ 137.0
137.0 ~ 148.0
148.0 ~ 174.0 5kHz
174.0 ~ 216.0
216.0 ~ 225.0 5kHz
225.0 ~ 400.0
400.0 ~ 470.0
470.0 ~ 512.0
512.0 ~ 806.0
806.0 ~ 1000.0
(excluding
cellularphone
1000.0 ~ 1300.0
(AM: Amplitude Modulation. NFM: Narrow Band Frequency
Modulation. WFM Wide Band Frequency Modulation)
10
Step Detection Mode
5kHz AM
5kHz
50kHz WFM
5kHz
50kHz WFM
100kHz
12.5kHz AM
5kHz NFM
50kHz WFM
12.5kHz A M
12.5kHz
12.5kHz
50kHz W FM
12.5kHz NFM
band)
12.5kHz NFM
NFM
NFM
WFM
NFM
NFM
NFM
NFM
Page 11

Note
The frequency steps and the detection mo des in the list are the
default for each band. You can adjust the frequency step and the
detection mode when you are in Manual Mod e. You cannot adjust
them when you are in Scanning Mode.
To resume scanning manually during scanning
pause
Press + or
-.
To change scanning direction
Press + or
Scanning will restart in ascending direction if you press +,
and in descending d irection if yo u press
-.
-.
Note
When yo u start scanning a new band, scanning will always start in
ascending direction.
To exit Scanning Mode
Press SCAN .
will disappear from the display and the receiver
enters the Manual Mode. Press again to re-enter the
Scanning Mode.
If you press SCAN for 1 second or longer, the scanning
pause time will go into the 5-second pause mod e (see
page 30).
Adjust ing the SQL cont rol
Ad justment of the SQL control applies to all mod es of
reception.
What t he SQL c o nt rol do e s
The SQL (squelch) control adjusts the threshold o f the
signal intensity that opens the squelch.
When the receiver receives a signal above the threshold,
the squelch will open,
and you will hear the transmission sound.
When the squelch opens during scanning, the receiver
stops scanning. This is called a “scanning pause” .
As yo u turn the SQL control counterclockw ise to MIN, the
receiver will pause scanning on weaker signals. But this
may cause the receiver to pause scanning on unwanted
noise signals.
As yo u turn the SQL control clockw ise to MAX, the
receiver will cut off the weaker signals and receive only
stronger signals. If it is turned too far clockwise, on the
other hand, there may be no signal strong enough to cause
a scanning pause.
Adjust in g the
Start from the MIN position and turn it
clockw ise towards MA X to the point the
indication disappears in the display.
When there is a signal abov e the squelch threshold,
will light up and the receiver pauses scanning. Scanning
will resume automatically when the signal breaks off.
SQL
will appear in the display,
c ont ro l
MAX
SQL
11
Page 12

NOT ICE
If you w ish to listen to transmission continuously
(such as when listening to FM broadcast, TV
sound, or
,Weather
broadcast, etc.), be sure to set
SQL to MIN so that the squelch does not close
when the signal gets weak.
12
Page 13
Me mory Sc anning
Memo ry Scanning scans the frequencies you have preset
in the memory. (To preset a station in the memory, see
page 22). Choose one or more target pages to run Memory
Scanning.
1
Set the SQL control to MIN.
2
Press POWER to turn the receiver on.
3
Recall any preset channel (see “ Recalling a preset
channel”, page 23).
The preset number will appear in the display.
4
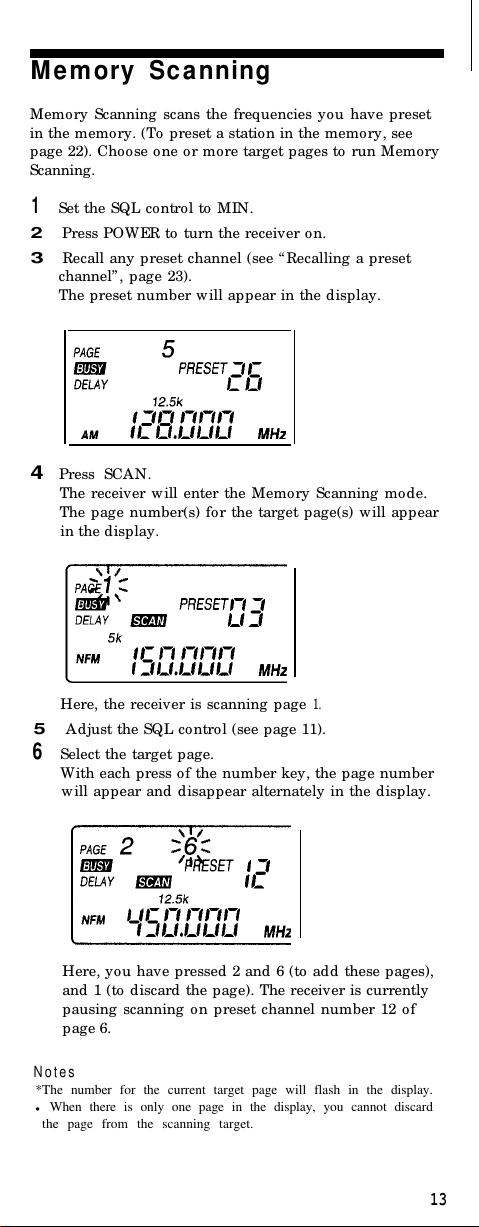
Press SCAN .
The receiver will enter the Memory Scanning mode.
The page number(s) for the target page(s) will appear
in the display.
Here, the receiver is scanning page
5
Ad just the SQ L control (see page 11).
6
Select the target page.
With each press of the number key, the page number
will appear and disappear alternately in the display.
Here, you have pressed 2 and 6 (to add these pages),
and 1 (to discard the page). The receiver is currently
pausing scanning on preset channel number 12 of
page 6.
Notes
*The number for the current target page will flash in the display.
l When there is only one page in the display, you cannot discard
the page from the scanning target.
1.
13
Page 14
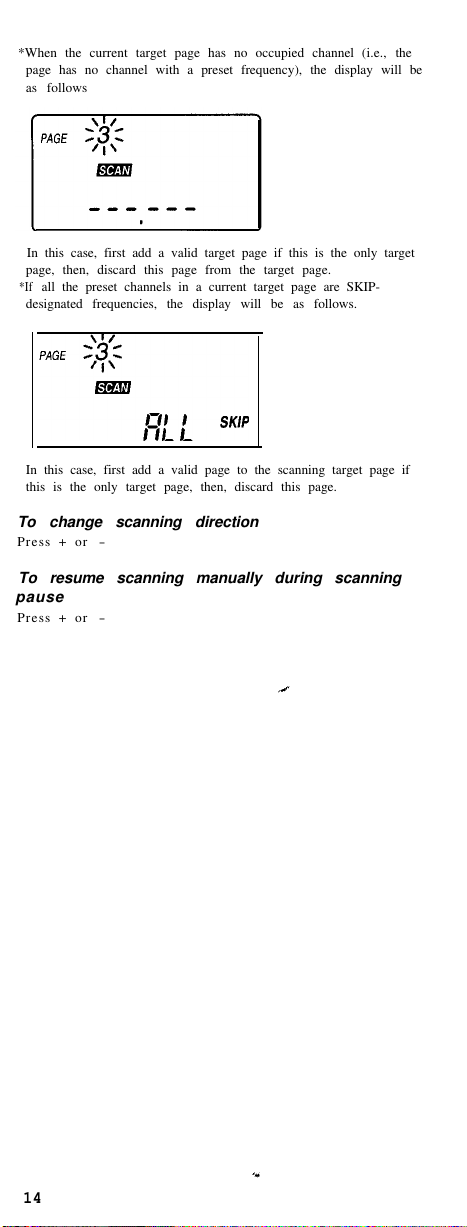
*When the current target page has no occupied channel (i.e., the
page has no channel with a preset frequency), the display will be
as follows
In this case, first add a valid target page if this is the only target
page, then, discard this page from the target page.
*If
all the preset channels in a current target page are SKIP-
designated frequencies, the display will be as follows.
In this case, first add a valid page to the scanning target page if
this is the only target page, then, discard this page.
To change scanning direction
Press + or
-
To resume scanning manually during scanning
pause
Press + or
-
14
Page 15
Program ma ble Sc anning
Programmable Scanning scans a frequency range you
have defined step by step. You can also specify the
frequency step and the detection mo de.
De f ining t he fre que nc y range
Define the range by specifying the low er and the upper
limits of the range. The preset channels for the upper and
low er limits are located after channel 30 of page 10. You
cannot use any other channel for this purpose.
3
4
5
6
1 Set the SQL control to MIN.
2 Press POWER to turn the receiver on.
Tune in, by any way, to a frequency to be specified as
the low er limit of the range.
Ad just the frequency step and the detection mo de.
Press STEP repeatedly to select a frequency step of
your choice.
Press MODE repeatedly to select a detection mode of
your choice (see “Ad justing frequency step and
detection mode” , page 31).
Skip this step to select the default step and detection
mode.
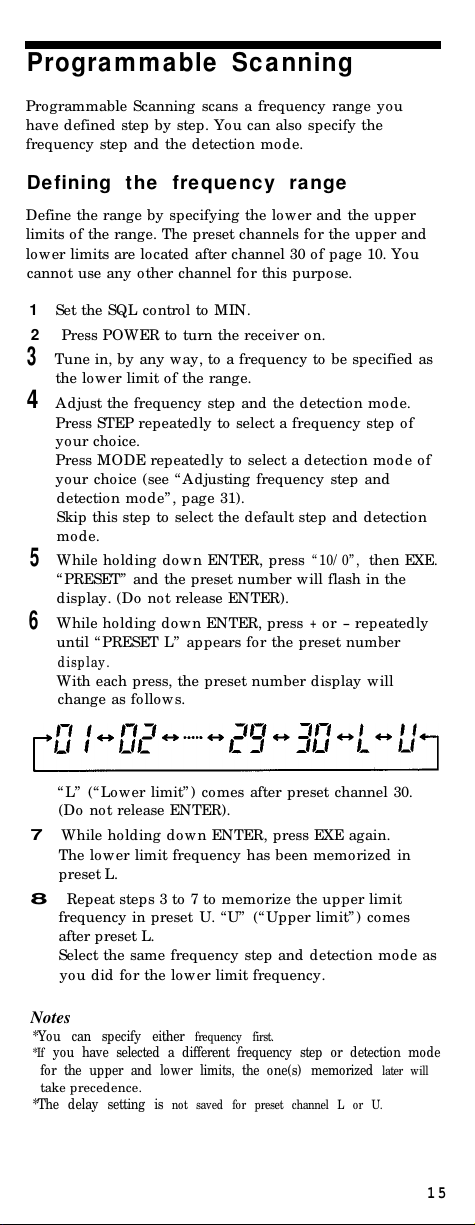
While holding down ENTER, press
“ 10/ 0” ,
then EXE.
“ PRESET” and the preset number will flash in the
display. (Do not release ENTER).
While holding down ENTER, press + or - repeatedly
until “PRESET L” appears for the preset number
display.
With each press, the preset number display w ill
change as follo ws.
“ L” (“Lower limit”) comes after preset channel 30.
(Do not release ENTER).
7
While holding down ENTER, press EXE again.
The lower limit frequency has been memo rized in
preset L.
8
Repeat steps 3 to 7 to memo rize the upper limit
frequency in preset U. “ U” (“Up per limit”) co mes
after preset L.
Select the same frequency step and detection mode as
you did fo r the low er limit frequency.
Notes
*You can specify either
frequency first.
*If
you have selected a different frequency step or detection mo de
for the upper and low er limits, the o ne(s) memo rized
later will
take precedence.
*The delay setting is
not saved for preset channel L or U.
15
Page 16
Running Progra m m able Scanning
1
Hold do wn ENTER and press SCAN lightly (i.e., less
than 1 second ).
Scanning will start from the low er limit frequency.
2
Ad just the SQ L control (see page
11).
Once you have defined a scanning range, you do not need to
define it again as long as you are scanning the same frequency
range.
Notes
*Do not press SCAN for 1 second or longer while holding down
ENTER. If you do, the receiver will enter the 5-second pause
mode and the decimal point will flash in the display. See
“Adjusting scanning pause time”, (page
30).
*If
you try to run Programmable Scanning with an invalid range
definition (i.e., the specified upper and lower limits are the same
frequency, or, either or both limits have not been specified), the
receiver will display the memory content of the two frequencies
and then return to the previous status.
*During Programmable Scanning, the receiver will start scanning
from the lower of the two specified frequencies. Thus, if, for
example, the frequency memorized under PRESET L is higher
than the frequency memorized for PRESET U, scanning will start
from the frequency in PRESET U.
*Although the upper and lower limit frequencies are located after
channel 30 in page 10, they do not belong to this page; they will
not be scanned when page 10 is targeted in Memory Scanning.
To display the current scanning range
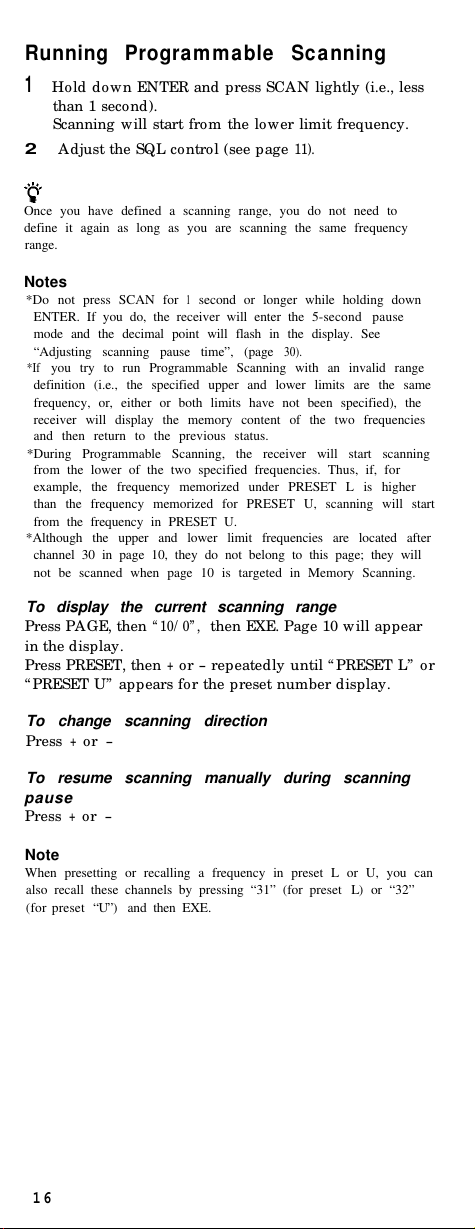
Press PAGE, then
“ 10/ 0” ,
then EXE. Page 10 will appear
in the display.
Press PRESET, then + or - repeatedly until “PRESET L” or
“ PRESET U” appears for the preset number display.
To change scanning direction
Press + or
-
To resume scanning manually during scanning
pause
Press + or
-
Note
When presetting or recalling a frequency in preset L or U, you can
also recall these channels by pressing “31” (for preset L) or “32”
(for preset “U”) and then EXE.
16
Page 17
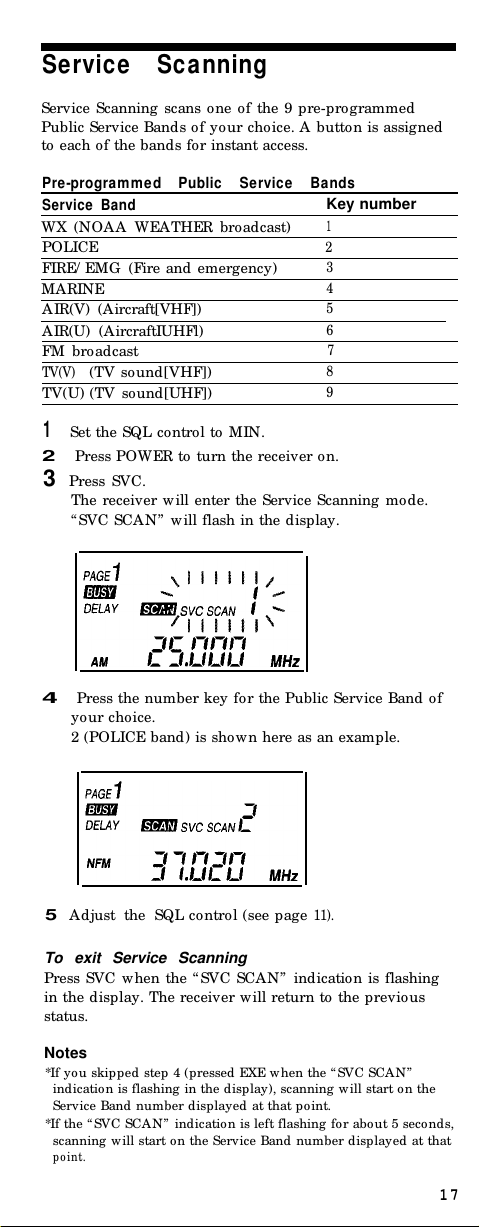
Servic e Sc a nning
Service Scanning scans one of the 9 pre-programmed
Public Service Bands of yo ur choice. A button is assigned
to each of the bands for instant access.
Pre-progr a mmed P ublic Se r vice Ba n ds
Service Band
WX (NO AA WEATHER broadcast)
POLICE
FIRE/ EMG (Fire and emergency )
MA RINE
AIR(V) (Aircraft[VHF])
AIR(U) (A ircraftIUHFl)
FM broadcast
TV(V)
(TV sound[VHF])
TV(U) (TV sound[UHF])
1
Set the SQL control to MIN.
2
Press POWER to turn the receiver on.
3 Press SVC.
The receiver will enter the Service Scanning mode.
“ SVC SCAN” will flash in the display.
Key number
1
2
3
4
5
6
7
8
9
4
Press the number key for the Public Service Band of
your choice.
2 (POLICE band) is shown here as an example.
5
Adjust the SQL control (see page
11).
To exit Service Scanning
Press SVC when the “SVC SCAN” indication is flashing
in the display. The receiver will return to the previous
status.
Notes
*If you skipped step 4 (pressed EXE when the “SVC SCAN”
indication is flashing in the display), scanning will start on the
Service Band number displayed at that point.
*If the “ SVC SCAN” indication is left flashing for about 5 second s,
scanning will start on the Service Band number displayed at that
point.
17
Page 18
*When the receiver pauses scanning at a NOAA WEATHER
broadcast channel, it will not resume scanning automatically,
since all NOA A W EATHER channels transmit continuously. To
resume scanning manually, press + or -.
*The NOA A WEATHER broadcast may be difficult to receive in
some areas. Try listening in a higher location.
*To run Service Scanning in the 5-second pause mode, press
SCAN fo r 1 second o r longer in any other scanning mode (such
as Band Scanning) to enter the 5-second pause mode, and then
start Service Scanning.
To change scanning direction
Press + or
-
To resume scanning manually during scanning
pause
Press + or
-
18
Page 19
Int ellige nt Me mory Sc anning
When the receiver receives a station continuously for 5
seconds or longer, the frequency is memorized
automatically in the Intelligent Memo ry. The Intelligent
Memo ry holds the 10 most recently received frequencies.
Intelligent Memo ry Scanning scans the frequencies in the
Intelligent Memo ry.
1
Set the SQL control to MIN.
2
Press POWER to turn the receiver on.
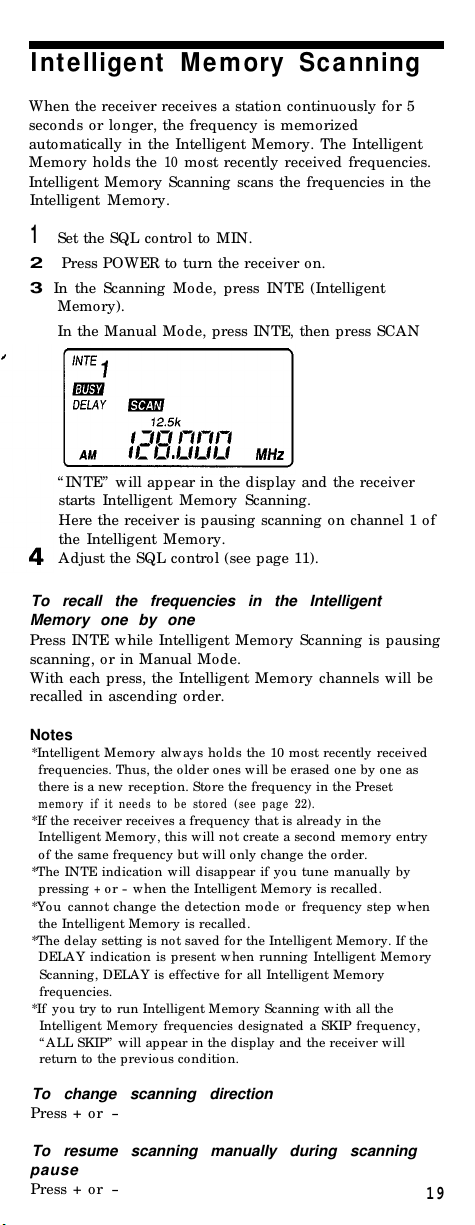
3 In the Scanning Mode, press INTE (Intelligent
Memo ry).
In the Manual Mod e, press INTE, then press SCAN
“ INTE” will appear in the display and the receiver
starts Intelligent Memory Scanning.
Here the receiver is pausing scanning on channel 1 of
the Intelligent Memory.
Ad just the SQ L control (see page 11).
To recall the frequencies in the Intelligent
Memory one by one
Press INTE while Intelligent Memory Scanning is pausing
scanning, or in Manual Mode.
With each press, the Intelligent Memory channels will be
recalled in ascending order.
Notes
*Intelligent Memory always ho lds the 10 most recently received
frequencies. Thus, the older ones will be erased one by one as
there is a new reception. Store the frequency in the Preset
memo ry if it needs to be stored (see page 22).
*If the receiver receives a frequency that is already in the
Intelligent Memory, this will not create a second memory entry
of the same frequency but will only change the order.
*The INTE indication w ill disappear if you tune manually by
pressing + or - when the Intelligent Memo ry is recalled.
*You cannot change the detection mod e or frequency step when
the Intelligent Memory is recalled.
*The delay setting is not saved fo r the Intelligent Memory. If the
DELAY indication is present when running Intelligent Memory
Scanning, DELAY is effective for all Intelligent Memo ry
frequencies.
*If you try to run Intelligent Memo ry Scanning with all the
Intelligent Memory frequencies designated a SKIP frequency,
“ ALL SKIP” will appear in the display and the receiver will
return to the previous cond ition.
To change scanning direction
Press + or
-
To resume scanning manually during scanning
pause
Press + or
-
19
Page 20
Receiving in the Manual Mode
Dire ct T uning
If you know the frequency of a station, tune in directly by
inputting the frequency digits on the number keys.
1
Set the SQL control to MIN.
2
Press POWER to turn the receiver on
3
If you are in the Scanning Mode, press SCAN to enter
the Manual Mode.
will disappear from the display.
4
Tune in by pressing the number keys for the
frequency digits.
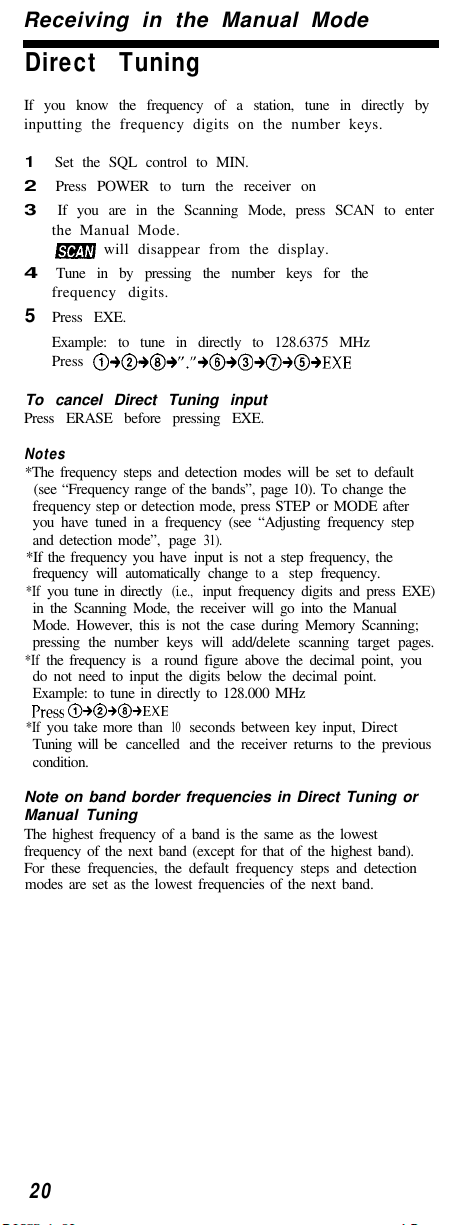
5 Press EXE.
Example: to tune in directly to 128.6375 MHz
Press
To cancel Direct Tuning input
Press ERASE before pressing EXE.
Notes
*The frequency steps and detection modes will be set to default
(see “Frequency range of the bands”, page 10). To change the
frequency step or detection mode, press STEP or MODE after
you have tuned in a frequency (see “Adjusting frequency step
and detection mode”, page
31).
*If the frequency you have input is not a step frequency, the
frequency will automatically change to a step frequency.
*If
you tune in directly
(i.e.,
input frequency digits and press EXE)
in the Scanning Mode, the receiver will go into the Manual
Mode. However, this is not the case during Memory Scanning;
pressing the number keys will add/delete scanning target pages.
*If
the frequency is a round figure above the decimal point, you
do not need to input the digits below the decimal point.
Example: to tune in directly to 128.000 MHz
*If
you take more than 10 seconds between key input, Direct
Tuning will be cancelled and the receiver returns to the previous
condition.
Note on band border frequencies in Direct Tuning or
Manual Tuning
The highest frequency of a band is the same as the lowest
frequency of the next band (except for that of the highest band).
For these frequencies, the default frequency steps and detection
modes are set as the lowest frequencies of the next band.
20
Page 21
Ma nua l T uning
Tune in by adjusting the frequency step by step with the
+/ -keys.
1
Set the SQL control to MIN.
2
Press POWER to turn the receiver on.
3
If you are in the Scanning Mo de, press SCAN to enter
the Manual Mod e.
will disappear from the display.
4
Tune in by pressing the +/ - keys.
The + key will move the frequency up and the - key
will mo ve the frequency do wn. One press will move
the frequency o ne step. Hold do wn the key to mov e
up or dow n continuously.
Note
*The changes you have made in frequency step or detection mo de
are effective only in the current band. When you have entered a
different band while pressing the +/ -keys, the frequency step
and detection mod e will return to the default for that band (see
“ Frequency range of the bands”, page
*If yo u press + at 1300 MHz, the frequency display will change to
25 MHz. If you press-at 25 MHz, the frequency d isplay will
change to 1300 MHz.
10).
21
Page 22
Pre set T uning
The receiver has 10 preset pages, each with 30 channels;
thus the receiver can memorize a total of 300 frequencies,
Pre set t ing sta t ions in t he m e mory
When yo u preset a frequency to a channel, the frequency
step, detection mo de and the DELAY setting for each
frequency is memorized as well.
1
Press POWER to turn the receiver on.
2T
une in to the frequency yo u wish to preset.
3
If you are in the Scanning Mo de, turn SQL to MIN to
pause scanning, or press SCAN to enter the Manual
Mode.
You cannot preset a station w hen the receiver is
scanning.
4
Preset th
choice.
While holding down ENTER, press the number key
for the page of yo ur choice, then EXE, then the
number key for the preset channel number of your
choice, then EXE. Do not release ENTER until you
have completed presetting.
Example: presetting 128.000 MHz to preset channel 26
of page 5.
Hold do wn ENTER...
f
e
requency to the preset channel of your
The current page number will flash in the
display.
. ..press 5, then EXE (without releasing ENTER)
PAGE
DELAY
AM
Page 5 has been entered and the preset channel
number will flash in the display.
..then
press 2, then 6 (without releasing ENTER)...
“ PRESET 26” w ill flash in the display
...
Page 23
. ..then press EXE (without releasing ENTER).
PAGE
DELAY
5
Channel 26 has been entered and presetting is
complete. The display returns to the reception
display.
To cancel presetting input
Release ENTER.
change the
also use the +/ -keys when the number is flashing in the display
(i.e.;
while hold ing down ENTER).
*If the page number flashing in the display is already the one of
your choice when yo u hold dow n ENTER, you do no t need to
press the page number again; press EXE to enter.
*After the page number has been entered, the receiver will first
display the number of the lowest unoccupied channel.
Therefore, when you are presetting stations the first time around
on a particular page, the receiver will automatically start from
channel number 1 and mov e up in order every time you preset a
station, without having to input the channel number manually.
page
number and channel number
input, you can
Notes
*The
“ 10/ 0”
anything else. To input page number
input channel number 10, press “1” and then
*If there is no uno ccupied preset channel on the page yo u have
chosen, “ PRESET - -” will flash in the display.
*If you preset a frequency o n a channel that already has a preset
frequency, the older frequency w ill be overwritten by the new
one.
l W hen you preset a frequency, the DELAY setting (see “Ad justing
scanning pause time” , page 30) for the particular frequency is
memo rized as well.
To change the DELAY setting for a preset frequency, first recall
the preset frequency (see “Recalling a preset channel” belo w),
then press PRI/ DELAY for one second or longer. The new
DELAY setting will be memorized along with the preset
frequency (DELAY will turn on if it had been off, vice versa).
*You cannot preset a station you have received with Memory
Scanning, whether or not the receiver is in scanning pause.
*You cannot preset a priority channel frequency yo u have
received w ith Priority Scanning.
key functions as 10 for the page number, but as 0 for
10,
press the
“ 10/ 0”.
“ 10/ 0”
key. To
Re ca lling a pre set c hanne l
1
Press POWER to turn the receiver on.
2
If you are in the Scanning Mo de, press SCAN to enter
the Manual Mod e.
will disappear from the display.
3
Press PAGE, then the number key for the page
number you wish to recall, then EXE.
4
Press PRESET, then the number key for the preset
channel number you w ish to recall, then EXE.
23
Page 24
Example: recalling preset channel 26 on page 5.
Press PAGE.
r/r//-/
MHZ
The page number will flash in the display.
Press 5, then EXE.
PAGE
DELAY
5k
NFM
/-/t-/t-t
-/ta/.L/tim/ti/ MHz
The page number has been entered. “ PAGE” and
“ 5” will stop flashing in the display. A preset
channel will appear in the display (in this case,
1).
Press PRESET.
PAGE
DELAY
NFM
5k
. PRESET/-/
I I I
The preset number will flash in the display.
Press 2, then 6, then EXE.
MHz
The preset number has been entered. The preset
number will stop flashing.
If you press PAGE again while the PAGE indication is
flashing in the display, or press PRESET again while
the PRESET indication is flashing in the display, the
receiver will return to previous status.
To recall a preset channel in the same page
Repeat step 4. You do not have to choo se the page again.
To change the page number and channel number input, you can
also use the
+/-
keys when the number is flashing in the display.
24
Page 25
Notes
*If you recall a page or a preset channel when yo u are in the
Scanning Mode, the receiver goes into the Manual Mode and the
indication will disappear.
*If a page number or a preset channel number is left flashing for 5
seconds or longer, the number will be entered (without having to
press EXE).
*If you change the frequency by tuning manually
+/ - )
after you have recalled a station, or if you change the
frequency step or the detection mode o f the frequency, the preset
number indication will disappear in the display.
*If yo u recall an unoccupied channel,
the frequency display and the sound w ill go out.
*If yo u recall a page with no occupied channels,
appear for the frequency display momentarily, and then the
receiver will return to previous status.
“ - - -.- -
(i.e.
by pressing
-” w ill appear for
“ - - -.- -
-” w ill
Era sing prese t mem ory
To era se a c ha nne l pr e se t
1
Recall the preset channel you want to erase.
2
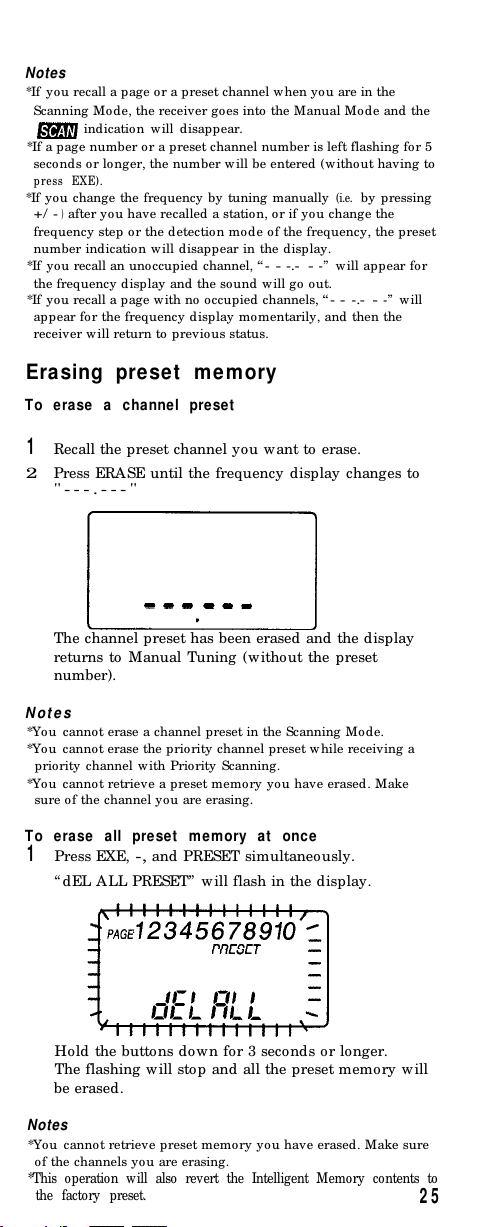
Press ERASE until the frequency display changes to
"---.---"
The channel preset has been erased and the display
returns to Manual Tuning (without the preset
number).
Not e s
*You cannot erase a channel preset in the Scanning Mo de.
*You cannot erase the priority channel preset while receiving a
priority channel with Priority Scanning.
*You cannot retrieve a preset memory you have erased. Make
sure of the channel you are erasing.
To era se all pr ese t m e m ory a t onc e
1
Press EXE, -, and PRESET simultaneously.
“ dEL ALL PRESET” will flash in the display.
Hold the buttons down for 3 seconds or longer.
The flashing will stop and all the preset memory will
be erased.
Notes
*You cannot retrieve preset memory yo u have erased. Make sure
of the channels you are erasing.
*This operation w ill also revert the Intelligent Memory contents to
the factory preset.
25
Page 26
Priority Scanning
Priorit y Sc anning
Specify a priority frequency of your choice to the priority
channel. With Priority Scanning, the receiver checks the
priority channel every 5 seconds and switches to this
channel if there is reception. If reception is broken, the
receiver will return to previous status.
You can run Priority Scanning during any scanning or
tuning modes.
Spe c ifying t he priorit y fre quenc y
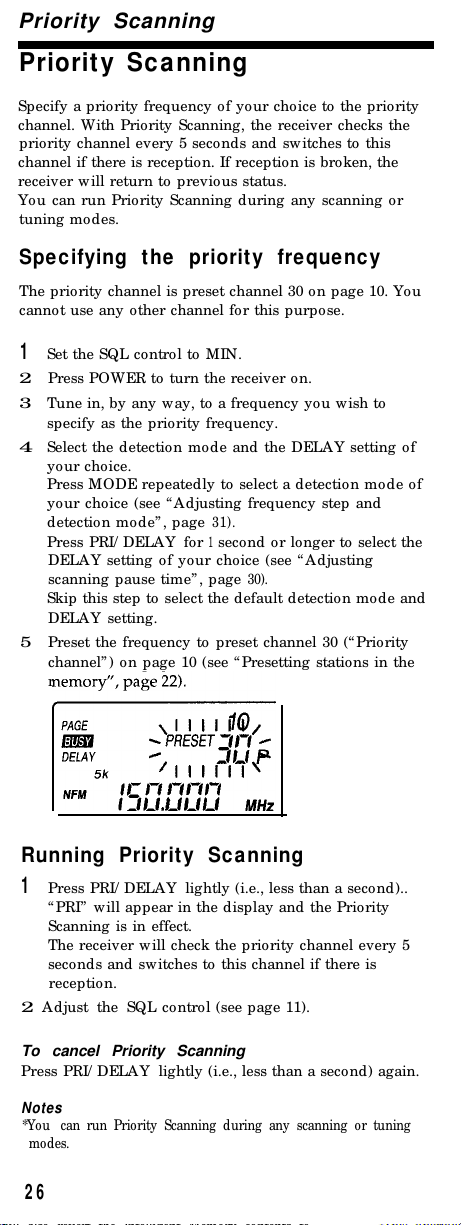
The priority channel is preset channel 30 on page 10. You
cannot use any other channel for this purpose.
1
Set the SQL control to MIN.
2
Press POWER to turn the receiver on.
3
Tune in, by any way, to a frequency yo u wish to
specify as the priority frequency.
4
Select the detection mod e and the DELAY setting of
your choice.
Press MODE repeatedly to select a detection mode of
your choice (see “Ad justing frequency step and
detection mode” , page
Press PRI/ DELAY for 1 second or longer to select the
DELAY setting of your choice (see “A djusting
scanning pause time” , page
Skip this step to select the default detection mode and
DELAY setting.
5
Preset the frequency to preset channel 30 (“Priority
channel”) o n page 10 (see “ Presetting stations in the
memo ry” , page 22).
31).
30).
Running Priority Scanning
1
Press PRI/ DELAY lightly (i.e., less than a second)..
“ PRI” will appear in the display and the Priority
Scanning is in effect.
The receiver will check the priority channel every 5
seconds and switches to this channel if there is
reception.
2
Ad just the SQL co ntrol (see page 11).
To cancel Priority Scanning
Press PRI/ DELAY lightly (i.e., less than a second) again.
Notes
*You can run Priority Scanning during any scanning or tuning
modes.
26
Page 27
*All tuning key op eration beco mes ineffective when receiving the
priority channel with Priority Scanning (except for that using
+
or -). To switch to other scanning or tuning modes, exit Priority
Scanning first by pressing PRI/ DELAY.
*Though the frequency step setting is memorized for the priority
channel, it has no effect on Priority Scanning.
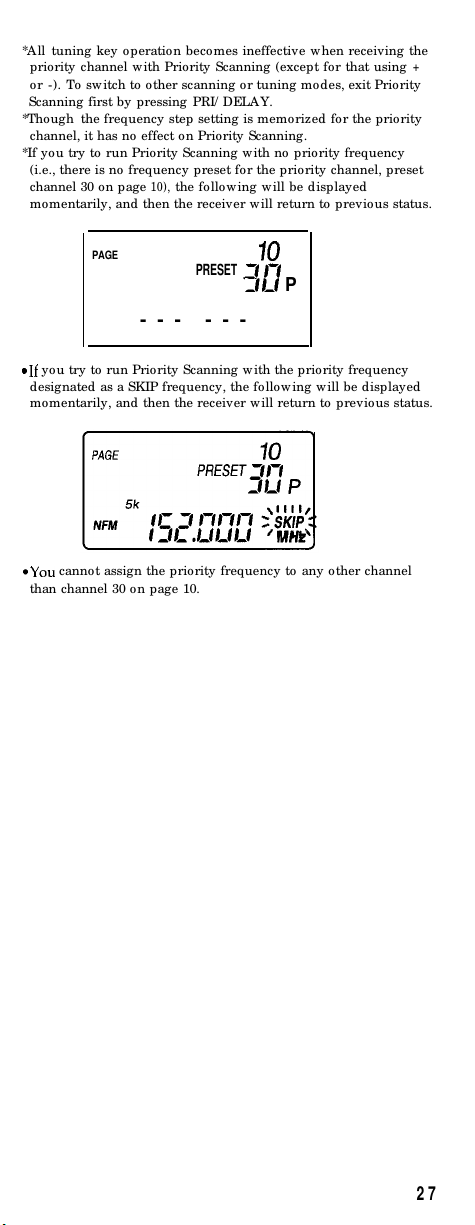
*If you try to run Priority Scanning with no priority frequency
(i.e., there is no frequency p reset for the priority channel, preset
channel 30 on page
10),
the following will be displayed
mom entarily, and then the receiver will return to previous status.
PAGE
PRESET
P
--- ---
you try to run Priority Scanning with the priority frequency
designated as a SKIP frequency, the follow ing will be displayed
mom entarily, and then the receiver will return to previous status.
cannot assign the priority frequency to any other channel
than channel 30 on page 10.
27
Page 28
useful functions
SKIP
You can designate any frequency as a SKIP-frequency (up
to
scanning. Designate any unwanted frequency
(interference signals, etc.) as a SKIP-frequency.
func tion
100).
The receiver will skip this frequency during
De signa t ing a SKI P-fre quenc y
1
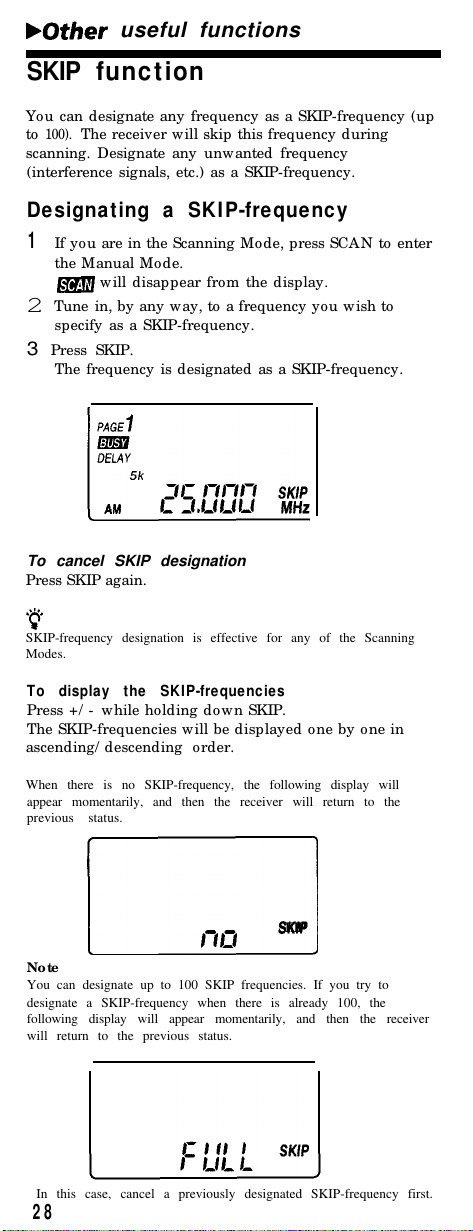
If you are in the Scanning Mo de, press SCAN to enter
the Manual Mod e.
will disappear from the display.
Tune in, by any way, to a frequency yo u wish to
2
specify as a SKIP-frequency.
3
Press SKIP.
The frequency is designated as a SKIP-frequency.
To cancel SKIP designation
Press SKIP again.
SKIP-frequency designation is effective for any of the Scanning
Modes.
To displ a y the S KIP-fre qu enc ies
Press +/ - w hile holding d ow n SKIP.
The SKIP-frequencies will be displayed o ne by one in
ascending/ descending order.
When there is no SKIP-frequency, the following display will
appear momentarily, and then the receiver will return to the
previous status.
SKIP
No te
You can designate up to 100 SKIP frequencies. If you try to
designate a SKIP-frequency when there is already 100, the
following display will appear momentarily, and then the receiver
will return to the previous status.
In this case, cancel a previously designated SKIP-frequency first.
28
Page 29
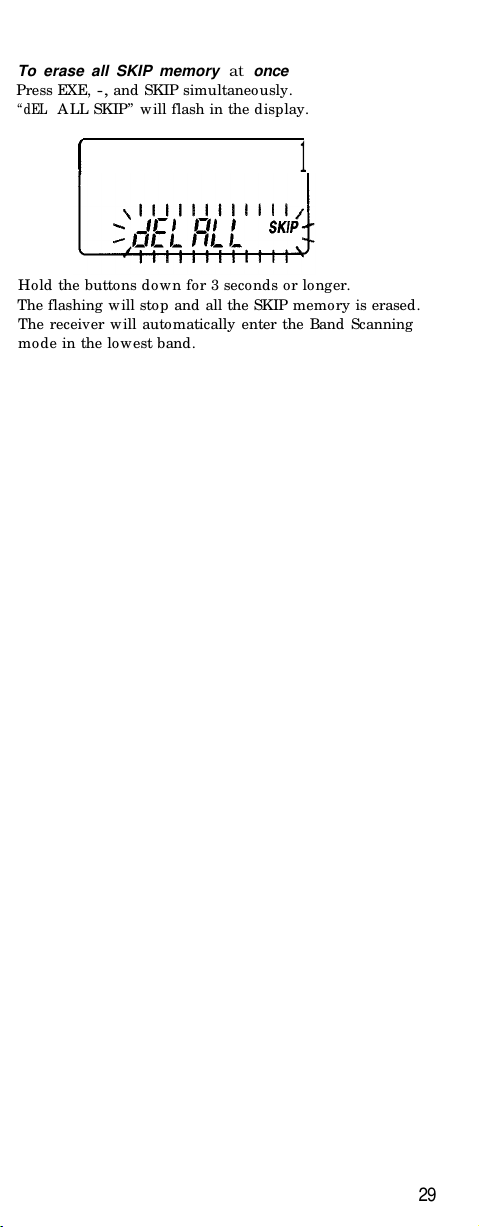
To erase all SKIP memory at once
Press EXE, -, and SKIP simultaneously.
“ dEL
ALL SKIP” will flash in the display.
1
Hold the buttons down for 3 seconds or longer.
The flashing will stop and all the SKIP memory is erased.
The receiver will automatically enter the Band Scanning
mode in the low est band.
29
Page 30
Adjusting sc a nning pa use
tim e
DELAY
DELAY is turned on by default.
DELAY is indicated in the display, and scanning will not
restart unless there is a reception break of 2 seconds.
This is convenient, for example, when receiving a 2-way
transmission, w here there is a short break between the
transmission.
To cancel DELAY
Press PRI/ DELAY for 1 second or longer. DELAY w ill
disappear, and the receiver resumes scanning the moment
signal reception is broken during scanning pause.
Press PRI/ DELAY for 1 second or longer again to turn
DELAY on again.
Lim it ing sc anning pa use t o 5 se conds
(5 -se cond
1
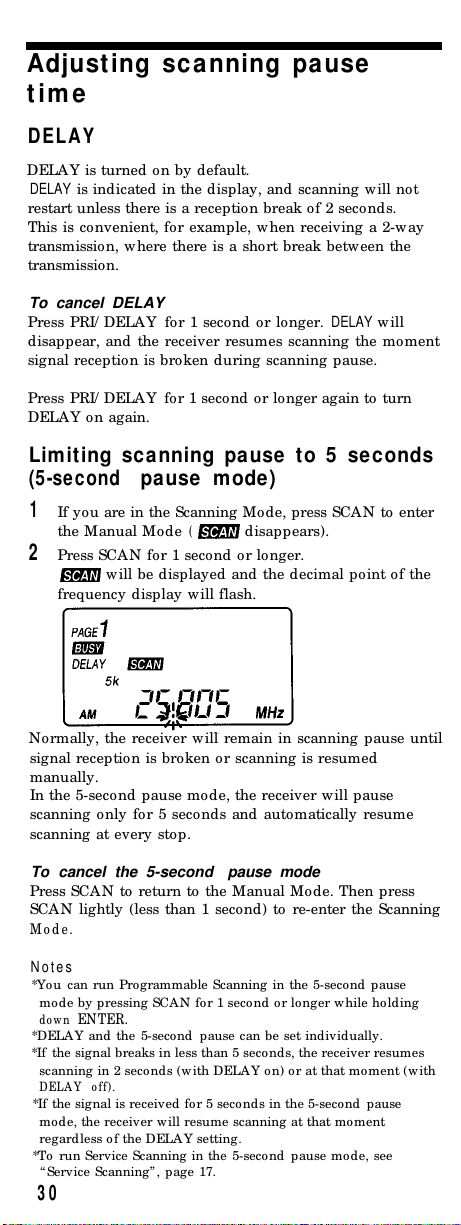
If you are in the Scanning Mo de, press SCAN to enter
the Manual Mod e (
2
Press SCAN for 1 second or longer.
frequency display will flash.
pa use m ode )
disappears).
will be displayed and the decimal point of the
Normally, the receiver will remain in scanning pause until
signal reception is broken or scanning is resumed
manually.
In the 5-second pause mod e, the receiver will pause
scanning only for 5 seconds and automatically resume
scanning at every stop .
To cancel the 5-second pause mode
Press SCAN to return to the Manual Mode. Then press
SCAN lightly (less than 1 second) to re-enter the Scanning
Mode.
Notes
*You can run Programmable Scanning in the 5-second pause
mod e by pressing SCAN fo r 1 second o r longer while hold ing
do wn
ENTER.
*DELAY and the 5-second pause can be set individ ually.
*If the signal breaks in less than 5 seconds, the receiver resumes
scanning in 2 seconds (w ith DELAY on) or at that moment (with
DELAY off).
*If the signal is received for 5 seconds in the 5-second pause
mod e, the receiver will resume scanning at that moment
regardless of the DELAY setting.
*To run Service Scanning in the 5-second pause mod e, see
“ Service Scanning” , page 17.
30
Page 31
Adjusting frequenc y st e p and
det ec tion m ode
You can adjust the frequency step and the detection mode
when you are in the Manual Mod e.
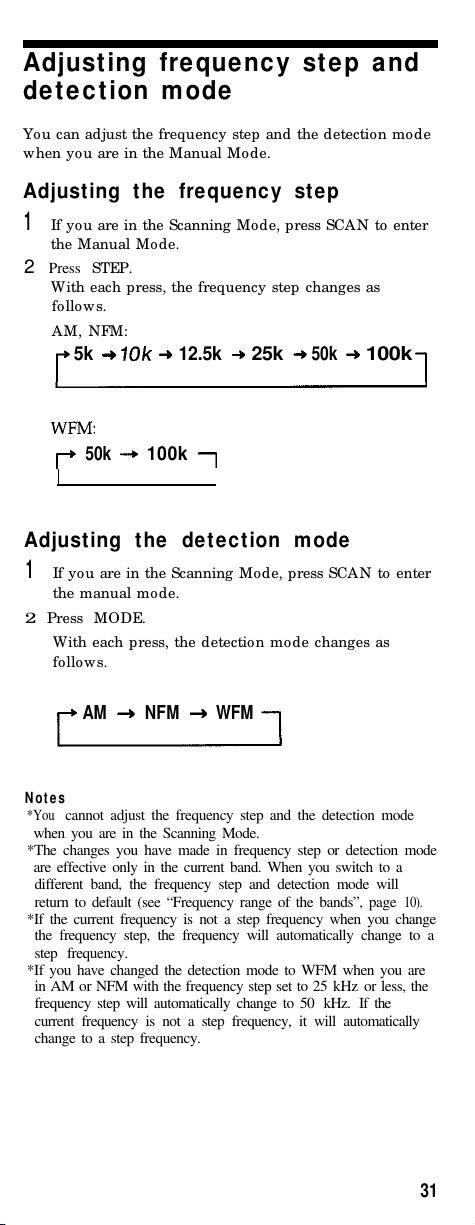
Adjust ing the freque nc y st e p
1
If you are in the Scanning Mo de, press SCAN to enter
the Manual Mod e.
2 Press STEP.
With each press, the frequency step changes as
follo ws.
AM , NFM:
5k
12.5k
25k 50k 100k
50k 100k
Adjust ing the de t ect ion mode
1
If you are in the Scanning Mo de, press SCAN to enter
the manual mode.
2
Press MODE.
With each press, the detection mod e changes as
follo ws.
AM
NFM
WFM
Not e s
*You
cannot adjust the frequency step and the detection mode
when you are in the Scanning Mode.
*The changes you have made in frequency step or detection mode
are effective only in the current band. When you switch to a
different band, the frequency step and detection mode will
return to default (see “Frequency range of the bands”, page
10).
*If the current frequency is not a step frequency when you change
the frequency step, the frequency will automatically change to a
step frequency.
*If you have changed the detection mode to WFM when you are
in AM or NFM with the frequency step set to 25 kHz or less, the
frequency step will automatically change to 50 kHz. If the
current frequency is not a step frequency, it will automatically
change to a step frequency.
31
Page 32
Ke y prote ct ion
Press
for 1 second or longer.
will light
in the display and all keystrokes will be neutralized.
Use this feature to avoid op eration by inadvertent
keystrokes.
To cancel key protection
Press
again for 1 second or longer.
Turning on t he light
Press
lightly (less than 1 second ).
The light in the display window will light for about 10
seconds.
If you press any operation button w hile the light is on, the
light will be lit for another 10 second s.
To turn off the light
Press
again.
Notes
-The light is lit continuously when the receiver is run on external
power
(i.e.,
AC
power adaptor or
the
car battery cord).
To turn off the light, press LIGHT/b. Press again to turn the
light on again.
*Pressing LIGHT/b will not light the window while the power
is turned off.
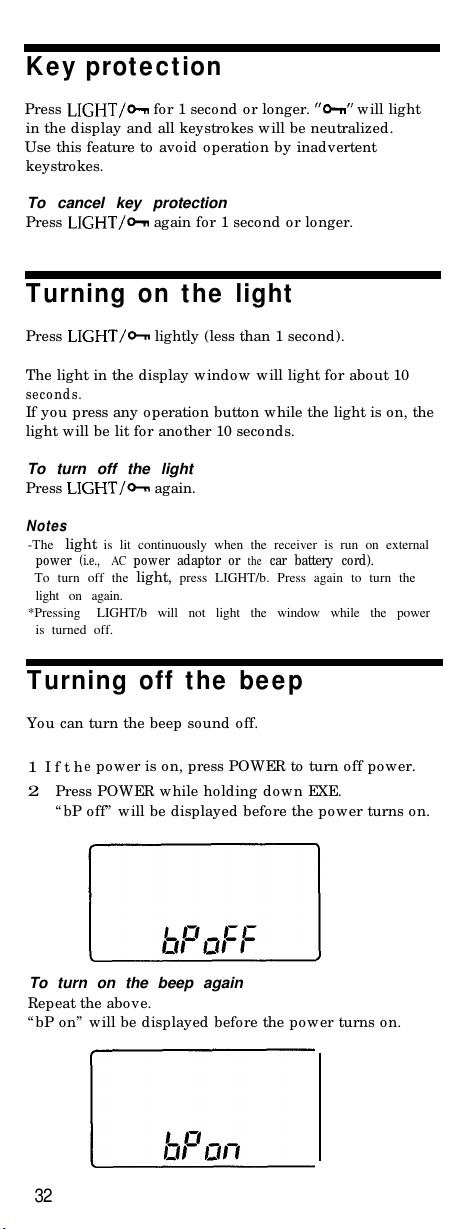
Turning off the be ep
You can turn the beep sound off.
1
Ifth
e
power is on, press POWER to turn off po wer.
2
Press POWER while hold ing do wn EXE.
“ bP off” w ill be displayed befo re the power turns on.
To turn on the beep again
Repeat the abov e.
“ bP on” will be displayed before the pow er turns on.
32
Page 33
Trouble shooting
Should any problem persist after these tests, consult your
nearest Sony dealer.
The power does not turn on.
l The batteries are exhausted.
Replace all batteries with new ones.
l The batteries are inserted w ith incorrect polarity, or the
AC pow er cord o r the car battery cord is not connected
prop erly.
Power the receiver correctly.
l Key protection is active
There is no sound.
l The batteries are exhausted.
Replace all batteries with new ones.
l The batteries are inserted w ith incorrect polarity, or the
AC pow er cord o r the car battery cord is not connected
prop erly.
Power the receiver correctly.
l The VOL control is turned do wn co mpletely.
Ad just it to a moderate level.
l The SQL control is turned up too far clockw ise
(towards MAX).
Ad just it prop erly (page 11).
l The earphone is plugged in.
Cannot operate.
l Key protection is on.
Turn off key protection.
is present in the display).
Reception is weak or unsatisfactory.
l Weak batteries.
l The station is not tuned in correctly.
l The antenna is not attached prop erly.
l You are listening under inferior conditions. In a car or a
building, try listening near a windo w.
l The detection mo de does not match the band.
Select the detection mo de that matches the band
(page 31).
Scanning does not begin.
l The SQL control is turned down too far
counterclockw ise (towards MIN).
Ad just it prop erly (page 11).
l The reception is strong.
Resume scanning manually.
l You are in Memory Scanning and have only one station
preset in the memo ry.
Scanning does not stop.
l Reception is weak (see “Reception is weak or
unsatisfactory” , above).
l SQL control is turned up too far clockwise (tow ards
MA X).
Ad just it prop erly (page
11).
33
Page 34
Will not pause scanning on a certain frequency.
l It is designated a SKIP frequency (page 28).
Cannot keep the receiver on scanning pause.
l Priority Scanning is active and the receiver received the
priority channel (page 26).
l Scanning pause time is set to the 5-second pause mode
(page
30).
The display is dim.
l Weak batteries.
Replace all batteries with new ones.
l The receiver is being used in extremely high
temperatures or excessive humid ity.
Cannot memorize a frequency
l The memorizing procedure is incorrect (page 22).
Cannot input a frequency with Direct Tuning.
l You too k more than 10 second s between the digits.
l You tried to input a frequency bey ond the frequency
range of the receiver.
34
Page 35
Pre ca utions
*Operate the scanning receiver only on recommended power
sources. To use the receiver on AC power, use only the supplied
or the recommended AC power adaptor. Do not use any other
AC power adaptor. To use the receiver on a car battery, use only
the recommended car battery cord. Do not use any other car
battery cord.
*The nameplate indicating the operating voltage, power
consumption, etc. is located at the bottom exterior of the receiver.
*Should any solid object or liquid fall into the set, remove the
batteries and have the receiver checked by qualified personnel
before operating it any further.
*Reception may be difficult or contain noise in vehicles or in
buildings. Try listening near a window.
*Certain frequencies may be difficult to receive due to internal
spurious signals, or birdies, inherent to the built-in oscillators
used in a receiver. If the scanning receiver always pauses
scanning at a certain frequency but seems to be receiving no
signal, it may be receiving a birdie. In this case, designate it a
SKIP-frequency.
*Be sure to adjust VOL to a moderate level before turning on the
power or plugging in the earphone. There will be no sound when
the receiver is scanning. Sudden reception (opening of the
squelch) may cause unexpected loud sound and may cause
hearing damage.
*If
there is lightning when you are using an external antenna,
disconnect AC power immediately from the wall outlet (if
connected). Never touch the antenna during a lightning storm.
On batt e rie s
Do not carry the batteries with coins or other metallic objects. It
can generate heat if the positive and negative terminals of the
batteries are accidentally contacted by a metallic object.
On handl in g
l When carrying the receiver, do not hold it by the antenna, the
VOL control, or the SQL control.
‘Do not bend or pull the antenna.
*Do not drop the receiver or expose it to mechanical shock. It may
cause a malfunction.
*Do not leave the unit in a location near heat sources, or in a place
subject to direct sunlight, excessive dust or sand, moisture, rain,
mechanical shock, or in a car with its windows closed.
*The LCD display may become hard to see or slow down when
using the unit at high temperatures (above 40'C/104'F) or at low
temperatures (below O'C/32'F). At room temperature, the
display will return to its normal operating condition.
On c lea n ing
When the case becomes soiled, clean it with a soft cloth dampened
with a mild detergent solution. Never use abrasive cleansers or
chemical solvents, as they may mar the case.
If you have any questions or problems concerning your
scanning receiver, please consult your nearest Sony
dealer.
35
Page 36
Spe cifica tions
Circuit system: Triple conversion superheterodyne
Frequency range:
25.000 ~ 1300.000 MHz
(excluding cellular phone band: 823.980 ~ 849.020
MHz and 868.980 ~ 894.020
Detection mode: AM, NFM, WFM
Speaker: Approx. 36 mm (1
Power output: 150 mW (at 10% harmonic distortion)
Output:
Power requirements: DC 6V, four size AA (R6) batteries
External power source: DC6V
Dimensions:
Mass: Approx. 252 g (8.9
jack
(monaural’minijack)
Approx. 64 x 177 x 44.3 mm
1 3/4 inches)
including the helical antenna and the belt holder
Approx. 382 g (13.5
helical antenna, and the belt holder
incl.
projecting parts and controls, not
oz)
Supplied a c cessorie s
AC power adaptor
Earphone
Belt holder
Helical antenna
Frequency guidebook
CD-ROM (1) (ICF-SC1PC only)
Serial port connecting cable
Clamp filter (1) (ICF-SC1PC only)
(1)
(1)
(1)
(1)
(1)
MHz)
7/16
inches) dia., 8 ohms
(w/h/d) (2 5/8
oz) incl.
alkaline batteries,
(1) ICF-SC1PC
x 7 x
only)
Opt iona l acc e ssories
AC power adaptor AC-E60HG
Car battery cord
36
Page 37
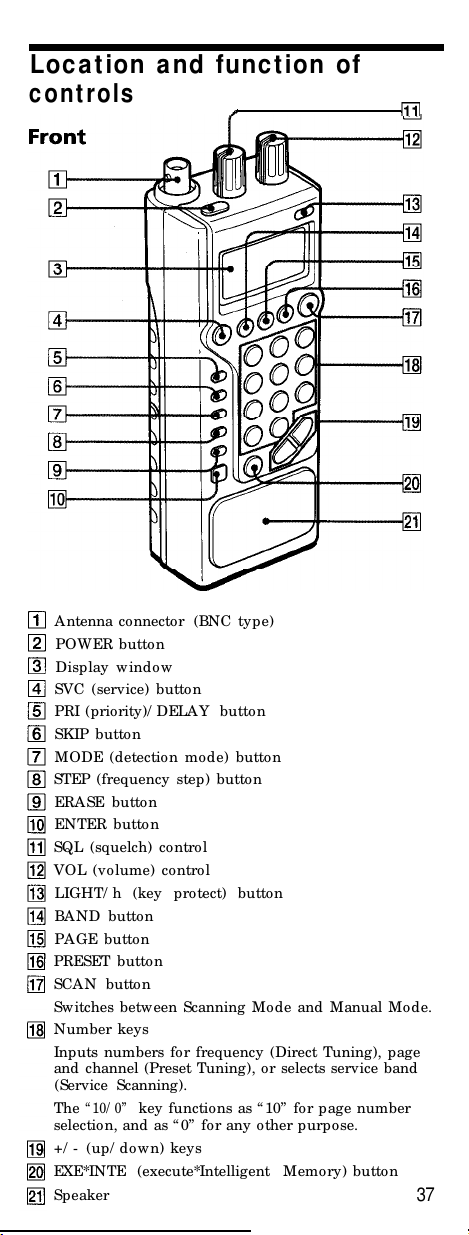
Loc at ion a nd func tion of
controls
Antenna connector (BNC type)
POWER button
Display window
SVC (service) button
PRI (priority)/ DELAY button
SKIP button
MODE (detection mod e) button
STEP (frequency step) button
ERASE button
ENTER button
SQL (squelch) control
VOL (vo lume) co ntrol
LIGHT/ h (key protect) button
BAND button
PAGE button
PRESET button
SCAN button
Switches between Scanning Mo de and Manual Mod e.
Number keys
Inputs numbers for frequency (Direct Tuning), page
and channel (Preset Tuning), or selects service band
(Service Scanning).
The
“ 10/ 0”
selection, and as “0” for any other purpo se.
+/ - (up/ do wn) keys
EXE*INTE (execute*Intelligent Memory) button
Speaker
key functions as “ 10” fo r page number
37
Page 38
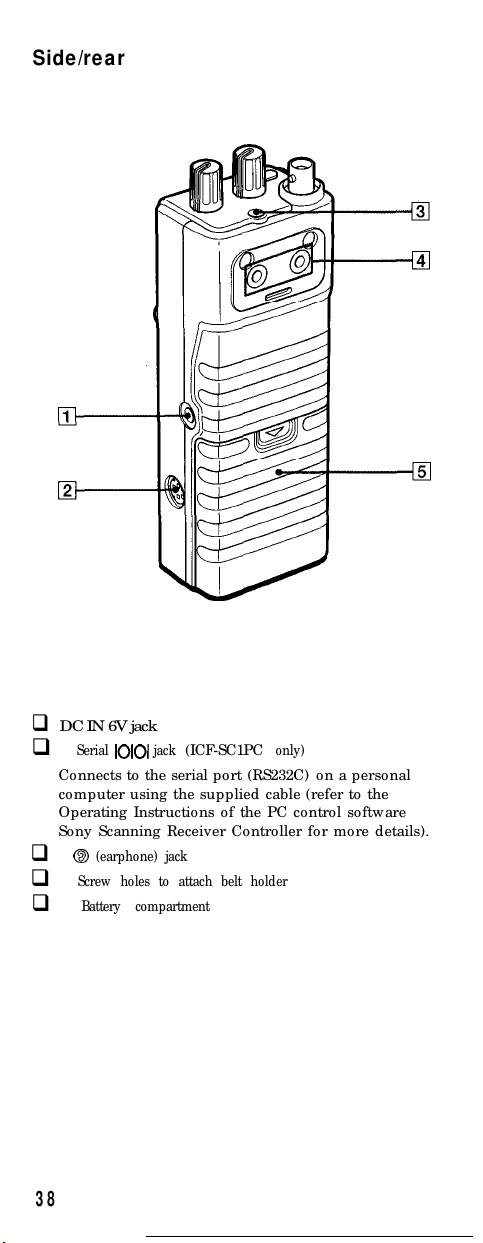
Side/rear
q
DC IN 6V jack
q
Serial 10101 jack
Connects to the serial port (RS232C) on a personal
computer using the supplied cable (refer to the
Operating Instructions of the PC control software
Sony Scanning Receiver Controller for more details).
q
(earphone) jack
q
Screw ho les to attach belt holder
q
Battery comp artment
(ICF-SC1PC
only)
38
Page 39
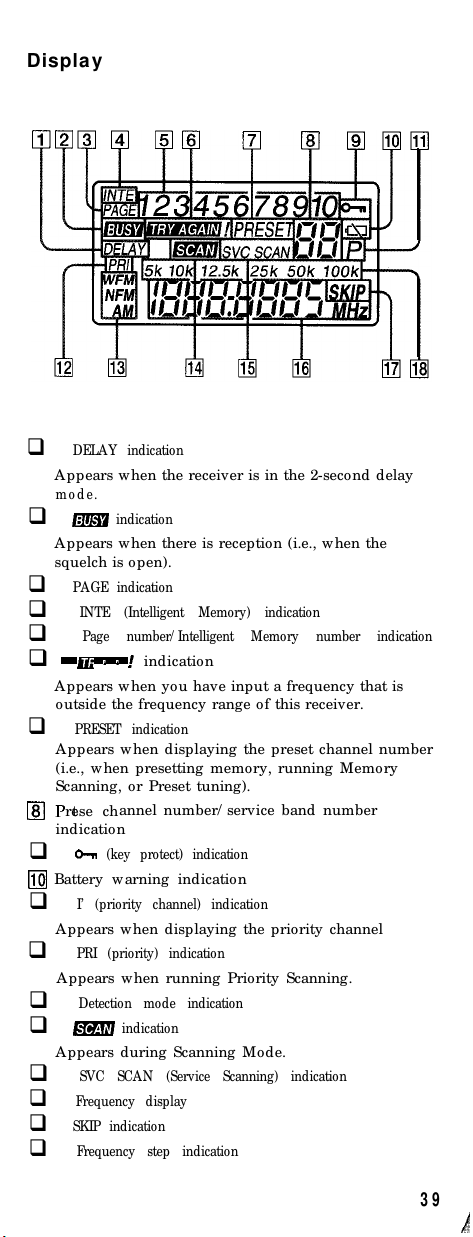
Disp lay
q
DELAY indication
Ap pears when the receiver is in the 2-second delay
mode.
q
q
q
q
q
q
q
indication
Ap pears when there is reception (i.e., when the
squelch is open).
PAGE indication
INTE (Intelligent Memory) indication
Page number/ Intelligent Memory number indication
indication
Ap pears when you have input a frequency that is
outside the frequency range of this receiver.
PRESET indication
Ap pears when displaying the preset channel number
(i.e., when presetting memory, running Memo ry
Scanning, or Preset tuning).
annel number/ service band number
threse c
indication
(key protect) indication
q
I’ (priority channel) indication
Ap pears when displaying the priority channel
q
PRI (priority) indication
Ap pears when running Priority Scanning.
q
Detection mod e indication
q
q
q
q
q
indication
Ap pears during Scanning Mod e.
SVC SCAN (Service Scanning) indication
Frequency display
SKIP indication
Frequency step indication
39
 Loading...