

Page 1
,
,
,
,
,,
,
,
,
,
,
,
3-810-942-44 (3)
110
120
V
220
240
V
日本語
English
FM/AM CD Clock Radio
取扱説明書
Operating Instructions
XXXXX
XXXXXXXX
ICF-CD1000
Sony Corporation © 1996 Printed in Malaysia
表示窓
Display
WORLD/
LOCAL
ALARM
TRACK
PRESET
D.S.T.
SUMMER T.
ロッドアンテナ
Telescopic antenna
LIFT OPEN
開けかた
To open
底面/Bottom
AB
底面/Bottom
1
2
1
C
L
3
単3形
x 4
LR6 (AA) x 4
日本語
お買い上げいただきありがとうございます。
電気製品は安全のための注意事項を守
警告
!
らないと、火災や人身事故になることが
あります。
この取扱説明書と別冊の「安全のために」をよくお
読みのうえ、製品を安全にお使いください。
お読みになったあとは、いつでも見られるところ
に必ず保管してください。
主な特長
、ラジオ、ブザーでアラーム設定をすることが
• CD
できます。
アラームを一度止めても操り返し鳴らせるスヌー
•
ズ機能。
• AM、FM
•
•
•
•
AM
このラジオは、工場出荷時、AMの周波数間隔が
9kHz
世界の大多数の国が
を行っているためです。周波数ステップが
の国でお使いになるときは、周波数ステップを切
り換えてご使用ください(「AM放送の周波数ステッ
プ(間隔)を切り換える」参照)。
地域 周波数ステップ
北米・南米の国々
その他の国々
合わせて5局を記憶することができるプ
リセット機能。
世界各地の時刻設定ができるワールドタイム機能。
サマータイム(夏時間)が表示できます。
ステレオヘッドホンでFMステレオが楽しめます。
表示窓にライトがつくので、暗いところでも時刻
を見ることができます。
放送の周波数ステップについて
に設定されています。これは、日本をはじめ
の周波数ステップで放送
9kHz
10kHz
10kHz
9kHz
電源について
乾電池を入れる(図A)
アルカリ乾電池をお使いください。
ロッドアンテナをたてる。
1.
少し押しながら、電池ぶたを矢印の方向
2.
にずらしてあける。
正しい向きで、乾電池を4本入れる。
3.
電池の持続時間(
スピーカー使用時 (単位
ソニー単
アルカリ乾電池
ヘッドホン使用時
ソニー単3形(
アルカリ乾電池
電池の交換時期
・乾電池が消耗してくると表示窓に「i」が点灯し
とラジオが動かなくなります。その場合は、
CD
乾電池を
点滅になると、すべての操作ができなくなり、時
計のみ表示されます。
・電池を交換したあとや
ないだときは、「i」表示の点滅が止まってから操
作を始めてください。
CLOCK/TRACK
ENTER
fl
D
C
TIME MODEALARM
– TUNING TIME SET +
O
I
D
A
R
BAND
WAKE UP
1
TRACK
2
3
5
A
F
F
O
P
E
E
L
S
E
Z
O
O
N
F
S
O
P
E
E
L
S
4
M
R
A
L
G
I
L
/
F
DC IN 6V
2
VOLUME MEGA BASS
O
S
N
E
E
P
O
2
)
EIAJ
)
3形(LR6
)
LR6
本とも交換してください。「i」表示が
4
MIDNORM MAX
コインなど
Coin, etc.
CR2025
C
L
O
S
N
E
E
P
O
CD ラジオ
926
CD ラジオ
11
パワーアダプターをつ
AC
H
E
R
T
T
E
S
時間)
:
40
バックアップ用のリチウム電池を入
れる(図B)
本体の底面のリチウム電池ぶたをコイン
1.
‘を上にしてリチウム電池
2.
ご注意
リチウム電池だけではラジオを聞くことはできま
せん。必ず乾電池または
使用ください。
ボタン型電池(リチウム電池)についてのご注意
・接触不良を防ぐため、使用する前に電池を乾いた
布でよくふいてください。
リチウム電池の交換時期
・表示窓が薄くなってきたら、リチウム電池を交換
してださい。その場合、主電源(乾電池またはコ
ンセント)がつながっていることを確認してくだ
さい。電源が切れていると、記憶した局や時刻が
消えてしまうことがあります。リチウム電池の交
換は、購入後
すめします。
オープン
などで
側にまわして開ける。
OPEN
入れ、ふたを閉め
年を目安に取り換えることをおす
1
CR2025
クローズ
CLOSE
AC
側にまわす。
パワーアダプターもご
を
コンセントで使うには
付属のACパワーアダプターを
なぎます。
表示窓が常時照明されますので、それから操作を
してください。
電圧を合わせる(ツーリストモデルのみ)
付属の
地域の電圧に合わせてから、コンセントにつないで
ください。プラグがコンセントと合わないときは、
付属の
パワーアダプターの電圧をお使いになる
AC
プラグアダプターをお使いください。
AC
110
120
V
220
240
DC IN 6V
V
ご注意
・電源コードは、無理に曲げたり、上に重い物を載
せたりしないでください。
・コードを抜くときは、必ずプラグを持って抜いて
ください。
・長い間使わないときは、必ず
ターをコンセントから抜いてください。このとき
は必ず本体からプラグも抜いてください。
・
DC IN 6V
と、乾電池が入っていても自動的に外部電源に切
り換わります。
・コンセントで本機を使うときも、内蔵のマイコン
のバックアップ用としてリチウム電池を入れてお
いてください。
・乾電池で使うときは、必ず
をコンセントから抜いたあと、本機の
端子からプラグを抜いてください。
子に外部電源のプラグをつないだまま、本機を使
わないでください。
・
AC
は同等品をお使いください。プラグの極性、その
他の仕様の違う製品を使うと、故障したり性能を
充分に発揮できないことがあります。
端子にACパワーアダプターをつなぐ
AC
パワーアダプターには、ソニーの推奨品また
極性統一形プラグ
端子につ
パワーアダプ
AC
パワーアダプター
DC IN 6V
DC IN 6V
時計を合わせる
初めて乾電池を入れたときは表示窓に「
滅し、「
聞いているときは、
を押して、時計表示にしてから時刻を合わせてく
ださい。
・時計は
(
0:00
LOCAL
1. WORLD/LOCAL
示窓に「
」と表示されます。ラジオやCDを
LOCAL
OFF ALARM RESET
時間表示です
24
=真夜中、
12:00
=午後)。
時刻を合わせる
ボタンを押して、表
LOCAL
」を表示させる。
2. CLOCK/TRACK・ENTER
押しながら
−ボタンを押して時刻を合わせる。
+を押すと数字が進み、−を押すと数字が戻
ります。ボタンを押し続けると速く進みま
す。
CLOCK/TRACK・ENTER
時計が動き始め、「:」が点滅します。
WORLD
1. WORLD/LOCAL
示窓に「
TUNING TIME SET
時刻を合わせる
ボタンを押して、表
WORLD
」を表示させる。
から指を離すと、
2. CLOCK/TRACK・ENTER
押しながら
−ボタンで時刻を合わせる。
WORLD
ます。
CLOCK/TRACK・ENTER
時計が動き始め、「:」が点滅します。
LOCAL、WORLD
つの時計は連動していません。
2
刻を合わせ直したときは、
直してください。
TUNING TIME SET
時刻では、時間(時)のみ設定ができ
から指を離すと、
の時刻について
LOCAL
WORLD
サマータイム*を表示するには
D.S.T.・SUMMER T.
示窓にあらわれ、時刻がサマータイムに換わります。
(表示時刻は1時間進んだ時刻になります。)
もとの表示に戻すには
もう一度ボタンを押すとサマータイムは解除され
ます。
サマータイム(夏時間)とは、日照時間を有効に使
*
うため、夏の一定時刻を標準より
度です。欧米などで広く使われています。
ご注意
・サマータイムは
それぞれについて設定することができます。
ボタンを押します。
LOCAL TIME、WORLD TIME
」が点
0:00
ボタン
ボタンを
の+、
ボタンを
の+、
時刻で時
時刻の設定も
が表
' '
時間進める制
1
AM放送の周波数ステップ
(間隔)を切り換える
このラジオは工場出荷時、
で受信するように設定されています。
テップで放送している地域でお使いになるとき
は、周波数ステップを切り換えてください。
地域 周波数ステップ
北米、南米の国々
その他の国々
1. OFF ALARM RESET
時刻表示にする。
2. CLOCK/TRACK・ENTER
しながら
を「ピピッ」と鳴るまで押したままにす
る。
・ 周波数ステップを切り換えると、プリセット番号
に記憶しておいた放送局の記憶は消えます。
OFF ALARM RESET
AM 9kHz
10 kHz
9kHz
ボタンを押して
CDを聞く
を入れる
1. CD
ふたを開ける
LIFT OPEN
レーベル面を上にして
CD^ボタンを押す
2.
3. VOLUME
内蔵スピーカーで聞くには
本体のふたの内側にスピーカーがあるので、ふた
を開けてお聞きください。
端
操作 押すボタン
一時停止する CD
一時停止を解除する CD^
今聞いている曲を
頭出しする (一度押す)
(AMS*機能)
次の曲を頭出し +
する
早戻しする =
サーチ機能
(
早送りする +
サーチ機能
(
前の曲、さらに前の =
曲を頭出しする (繰り返し押す)
(AMS機能)
さらに次の曲を頭出し +
する
再生を止める
曲番号表示と
時刻表示を切り換える
*AMSはAutomatic Music sensor
の頭を探す機能です。
これらの操作は、演奏中にも一時停止中にもでき
**
ます。
CD
・演奏面に手を触れないように持ってください。
・紙やテープを表面に貼らないでください。
・直射日光があたるところなど高温の場所や、直射
日光下で窓を閉め切った車の中に放置しないでく
ださい。
ご注意
・
CD
ください。CDが壊れることがあります。
CD
・
表示窓に
す。
・
CD
になると、アラームで設定した曲に変わります。
ふたを閉める
ボリューム
つまみを回して音量を調節す
る。
^
=
**
(AMS機能)
(AMS機能)
オートマチック ミュージック センサー
の取り扱いについて
を聞いているときは、CDのふたを開けないで
ボタンを押しても
^
"00"
を聞いているときに、CDアラームの設定時刻
(一度押す)
(押したままにする)
)
(押したままにする)
)
(繰り返し押す)
**
OFF ALARM RESET
現在
CLOCK/TRACK・ENTER
が入っていないと、
が表示されて、約3秒間点滅しま
CD
ラジオを聞く
マニュアル選局
1. RADIO SLEEP
最後に聞いていた周波数が表示されます。
2. BAND・WAKE UP TRACK
聞きたいバンドを選ぶ。
3. TUNING TIME SET
押して聞きたい局に合わせる。
ボタンを押し続けると周波数は連続して変わ
ります。
4. VOLUME
内蔵スピーカーで聞くには
本体のふたの内側にスピーカーがあるので、ふた
を開けてお聞きください。
ボタンを押す。
の+、−ボタンを
つまみで音量を調節する。
の周波数間隔
10kHz
ボタンを押
ボタン
**
**
**
**
の略です。曲
ボタンで
放送を選局する場合
FM
放送は周波数
FM
表示窓に表示される周波数は
ります。同じ周波数の表示であっても、よりよく
受信できる方をお選びください。
例)
ス
88.00 MHz
「
88.0 MHz
0.05 MHz
のときも
」と表示されます。
単位で選局しますが、
0.1 MHz
88.05 MHz
単位で変わ
のときも
ラジオを止めるには
OFF ALARM RESET
ボタンを押す。
良い受信状態で聞くには
ロッドアンテナの長さと方向を調節する。
FM:
アンテナは内臓されており、ラジオの
AM:AM
向きで受信状態が変わるため、最も良く受信
できる方向にしてください。(スチール机な
ど金属面の上でお使いになると受信状態が悪
くなる場合があります。)
プリセット選局
またはAM放送を合計5局、プリセットボタン
FM
〜5に設定しておくことができます。聞きたい局の
周波数を一度記憶させておくだけで、後はこれら
のプリセットボタンを押すだけで正確な受信がで
きます。
ご注意
・ラジオアラームを使うときは、聞きたい局の周波
数をプリセットボタン
希望の時刻にラジオを鳴らすことができます。
に記憶させてください。
1
プリセットするには
例:
AM 1260 kHz
セットする。
「マニュアル選局」で、希望の放送局を受
1.
をプリセット番号2にプリ
信する。
2. CLOCK/TRACK・ENTER
ボタンを押
しながら、記憶させたい番号のプリセッ
トボタンを押す。
受信している周波数が記憶され、表示窓にプ
リセット番号が表示されます。
「P」が点滅している間にプリセットボタンを押
します。
このあと現在時刻が表示されます。
プリセットした放送局を変更するには
変更したい放送局を表示させ、新しく記憶させた
い放送局をプリセットします。前にプリセットさ
れていた放送局は消されます。
v
プリセットした局を聞くには
1. RADIO SLEEP
聞きたい局がプリセットされているボタ
2.
ボタンを押す。
ンを押す。
3. VOLUME
つまみで音量を調節する。
希望の時刻にCD、ラジオ、
ブザー音を鳴らす
予約した時刻に、CD、ラジオまたはブザー音を鳴
らすことができます。
アラーム時刻の設定
アラームの設定をするには
CD
1. TIME-ALRM
TUNING TIME SET
押してアラーム時刻を合わせる
TIME-ALARM
窓は現在時刻に変わります。
2. BAND・WAKE UP TRACK
押しながら
−ボタンを押して、聞きたい曲の番号を
選ぶ
BAND・WAKE UP TRACK
と、表示窓は現在時刻に変わります。
注意
選んだ曲の番号はいつも記憶されています。別の
に入れ換えても曲の番号は同じです。
CD
RADIO、BUZZER
1. TIME-ALARM
TUNING TIME SET
押して、アラーム時刻を合わせる。
TUNING TIME SET
は現在時刻に変わります。
アラームの種類の設定
本機のアラーム時刻の設定を行ってから操作して
ください。
1.
ALARM-MODE
いアラームを選び、マークを表示させる。
ボタンを押すたびに、次のようにマークが切
り換わります。
CDRADIOBUZZER
表示なし
表示窓に表示しているアラームが設定され、
予約した時刻になると、設定されたアラーム
の音が鳴ります。約
す。
ボタンを押しながら
の+、−ボタンを
ボタンから指を離すと、表示
ボタンを
TUNING TIME SET
から指を離す
アラームの設定をするには
を押しながら、
の+、−ボタンを
から指を離すと、表示窓
ボタンを押して、使いた
分後に自動的に切れま
60
の+、
アラームを止めるには
OFF ALARM RESET
同じ時間にアラームが鳴ります。
アラームを解除するには
ALARM-MODE
RADIO、BUZZER
TIME-ALARM
することができます。
ご注意
のアラームを設定していてもCDを入れていな
・
CD
いと、予約した時刻になるとブザー音が鳴りま
す。
・ブザーの音は一定です。
には関係ありません。
ボタンを押します。翌日も
ボタンを繰り返し押して、CD、
表示を解除します。
ボタンを押すとアラーム時刻を表示
VOLUME
もう少し眠っていたいとき
(スヌーズ機能)
1. SNOOZE
1
CD
分後、自動的に動作します。
8
・スヌーズ機能が設定されているときは、アラーム
表示が点滅します。
・スヌーズ機能は何度でも繰り返すことができま
す。
ボタンを押す。
、ラジオ、ブザーの音がいったん止まり、
タイマーをつかう
スリープタイマー
設定した時間が過ぎると自動的に電源が切れます。
1. RADIO SLEEP
を押してラジオを選局
状態にする。
2.
もう一度
RADIO SLEEP
を押す。繰り
返し押して希望の時間を表示させる。
押すごとに次のように切り換わります。
90 60 30 15
周波数表示 OFF
数秒後、動作時間表示が現在時刻表示に変わり
スリープタイマーがスタートし、設定した時間
が経過すると、自動的に電源が切れます。
設定後に動作時間を変えるには
RADIO SLEEP
選びます。
途中で電源を切るには
SNOOZE
を繰り返し押して、希望の時刻を
ボタンを押します。
便利な機能
低音を強調する
メガ ベース
MEGA BASS
(強)にします。低音を強調しないときは
通)にします。
える場合は
スイッチを
MAX
NORM
または
(中)または
MID
にして音がひずんだように聞こ
にします。
MID
暗いところで時計を見るには
SLEEP OFF/LIGHT.
約10秒間照明されます。コンセントでお使いのと
きは常時照明されます。
ボタンを押します。表示窓が
使用上のご注意
取り扱いについて
・次のような場所に置かないでください。
−温度が非常に高いところ(40℃以上)。
−直射日光のあたる場所や暖房器具の近く。
−風呂場など湿気の多いところ。
−窓を閉め切った自動車内(特に夏季)。
−ほこりの多い所。
・落としたり、強いショックを与えたりしないでく
ださい。故障の原因になります。
・ラジオの内部に液体や異物を入れないでください。
・汚れたときは、柔らかい布でからぶきしてくださ
い。シンナーやベンジンなどは表面わいためます
ので使わないでください。
・キャッシュカード、定期券など、磁気を利用した
カード類をスピーカーに近づけないでください。
スピーカー内部の磁石の影響でカードの磁気が変
化し、使えなくなることがありますのでご注意く
ださい。
故障とお考えになる前に
本機の調子が悪いとすぐ故障と考えがちですが、修
理に出す前にもう一度取扱説明書をお読みになり、
次のような点検をしてください。
音が出ない
・電池が消耗している。
・乾電池の‘’を正しく入れる。
パワーアダプターをコンセントにしっかり差し
・
AC
込む。
・音量を調節する。
・スピーカーで聞くときは、ヘッドホンを2端子から
抜く。
が動作しない
CD
・表示窓に「i」が点灯していたら乾電池を
交換する。
・レーベル面を上にして
のふたが閉まっていることを確認する。
・
CD
・CDの汚れがひどい→クリーニングする。
の音がとぶ
CD
の汚れがひどい→クリーニングする。
・
CD
・レンズの汚れ→クリーニングする。
・振動のない場所に置く。
予約した時刻になっても
働かない。
・時計を正しい時刻に合わせる。
・アラーム設定時刻を確認する。
が正しく入っているか確認する。
・
CD
のふたが閉まっていることを確認する。
・
CD
・プリセットボタン1に放送局がプリセットされてい
るかどうか確認する。
・
VOLUME
の音量を確認する。
を正しく入れる。
CD
、ラジオ、アラームが
CD
つまみの位置
MAX
(普
NORM
本とも
4
保証書とアフターサービス
保証書について
・この製品には保証書が添付されていますので、お買
い上げの際お受け取りください。
・所定事項の記入および記載内容をお確かめのうえ、
大切に保存してください。
・ 保証期間は、お買い上げ日より国内および海外で
日間です。
90
アフターサービスについて
調子が悪いときはまずチェックを この説明書をも
う一度ご覧になってお調べください。それでも具合
の悪いときはお買い上げ店またはお受け取りの「ツー
リスト向け商品保証書」に記載されている海外ソニー
サービス特約店にご相談ください。
保証期間中の修理は 保証書の記載内容に基づいて
修理させていただきます。詳しくは保証書をご覧く
ださい。
保証期間経過後の修理は 修理によって機能が維持
できる場合は、ご要望により有料修理させていただ
きます。
部品の保有期間について
当社ではラジオの補修用性能部品(製品の機能を維持
するために必要な部品)を、製造打ち切り後最低
間保有しています。この部品保有期間を修理可能の
期間とさせていただきます。保有期間が経過した後
も、故障箇所によっては修理可能の場合があります
ので、お買い上げ店か、ソニーサービス窓口にご相
談ください。なお、補修用性能部品の保有期間は通
商産業省の指導にもよるものです。
年
6
主な仕様
プレーヤー部
CD
型式 コンパクトディスクデジタル
チャンネル数
ワウフラッター 測定限界以下(
周波数特性
ラジオ部
バンド 周波数範囲 周波数ステップ
FM 76〜108MHz 0.05MHz**
AM 531〜1,710kHz 9kHz
FM 76
AM 530〜1,710kHz 10kHz
周波数は、
**
(例
: 88.05MHz
されます。)
共通部
時刻表示
スピーカー 直径
実用最大出力
出力端子
電源
最大外形寸法 約
質量 約
付属品
ステレオヘッドホン(
パワーアダプター(1)
AC
プラグアダプター(1)
AC
ソニーリチウム電池
ソニー単3形乾電池(4)
取扱説明書(
(日本電子機械工業会)規格による測定値
* EIAJ
です。
ツーリストモデルにのみ付属
***
本機の仕様および外観は、改良のため予告なく変更
することがありますが、ご了承ください。
オーディオシステム
チャンネル
2
EIAJ*
)
20〜20,000 Hz+1/−2dB
(
)
EIAJ
〜
108MHz 0.1MHz
単位で表示されます。
0.1MHz
を受信中は、
時間
24
約 4 cm
88.0MHz
“
、8
Ω 2
個
300 mW+300 mW(EIAJ
(ヘッドホン)端子(ステレオミニ
2
ジャック)
DC 6V、単3
付属の
(
DC IN 6V
形乾電池 4本
パワーアダプター
AC
端子)を接続して
100V-120V、220-240V
で使用可能
50/60Hz
バックアップ用
:
、リチウム電池
DC 3V
CR2025 1
個
166.5×46×162 mm
(幅/高さ/奥行き)(ふたを閉めた
状態)(
705.5 g
)
EIAJ
(電池含む)
)
1
***
***
)
1
CR2025(1
)
と表示
”
)
、
WARNING
To prevent fire or shock hazard, do not expose the
unit to rain or moisture.
To avoid electrical shock, do not open the cabinet.
Refer servicing to qualified personnel only.
For Customers in Europe and Saudi Arabia
This Compact Disc player is
classified as a CLASS 1
LASER product.
The CLASS 1 LASER
PRODUCT label is located on
the bottom exterior.
Before You Begin
Thank you for choosing the Sony CD clock radio!
The CD clock radio will give you many hours of
reliable service and listening pleasure.
Before operating the CD clock radio, please read
these instructions thoroughly and retain them for
future reference.
Features
• You can wake up to any track of a CD, radio
and buzzer with the snooze function.
• The digital tuner with 5 random memory
presets.
• A powerful bass is produced with the MEGA
BASS sound system.
• You can enjoy stereo sound both by speakers
and by headphones.
• Summer time calculation (one-hour skip
function).
• World time calculation (parallel time-difference
setting).
Notes on AM Channel Step
The AM channel step differs depending on areas.
The channel step of this unit is factory-set to
10 kHz (models for North and South America)/
9KHz (models for other countries).
Area Channel step
North and South 10 kHz
American countries
Other countries 9 kHz
Power Sources
Installing Batteries (Fig. A)
Use alkaline batteries
1. Lift up the telescopic antenna.
2. Push and slide up the battery cover
toward the direction of the arrow.
3. Install four LR6 (size AA) batteries with
correct polarity.
Battery Life (Approx. hours)
Listening by speakers
CD RADIO
Sony LR6 (size AA) 9 26
Listening by headphones
CD RADIO
Sony LR6 (size AA) 11 40
Replacing Batteries
When the batteries become weak, “i”will appear
in the display and the CD and Radio functions will
stop. Replace all the dry batteries. When the
batteries are exhausted, “i” will flash and only
the clock is displayed.
After replacing the batteries or when the AC power
adaptor is connected, the i indicator will stop
flashing and then start the unit operations.
Note
When the unit is not being used for long period of
time, remove the batteries to avoid damage from
battery leakage and corrosion.
Installing Lithium Battery
for Backup
1. The lithium battery compartment lid is at
the bottom of the unit. Open the lid with
a coin, turning it towards OPEN.
2. Install the lithium battery CR 2025 with
the ‘ facingupwards, close the lid
turning it towards CLOSE.
Replacing Lithium battery
Replace the lithium battery when the LCD display
becomes weak. Keep the dry batteries installed or
the AC power adaptor connected to keep the
memory from being erased. Replace the
lithium battery regularly once a year.
Notes on batteries
• Keep the lithium battery out of reach of
children. Should the battery be swallowed,
immediately consult a doctor.
• Wipe the battery with a dry cloth to assure
good contact.
• Be sure to install the battery in the correct
polarity position.
• Do not hold the battery with metallic tweezers,
as doing so may cause a short-circuit.
• Do not break up the battery or throw it into a
fire, which might cause it to explode.
Carefully dispose of the used battery.
CAUTION
Danger of explosion if battery is incorrectly
replaced. Replace only with the same or equivalent
type recommended by the equipment
manufacturer. Discard used batteries according to
manufacturer's instructions.
Using House Current
(Mains)
Connect the supplied AC power adaptor (except
for UK model) to DC IN 6V, and plug it into a wall
outlet. The batteries are automatically
disconnected then the display will continiously
light up and then operate the unit.
Setting the voltage (tourist model
only)
Use the supplied AC power adaptor, which has an
voltage-selector, be sure to adjust the voltageselector to the local power supply.
If the plug on the AC power adaptor will not insert
to the wall outlet, use the supplied AC plug
adaptor with this.
(Fig. B)
Notes
• When the AC power adaptor is not used for a
ソニー株式会社
〒141-0001東京都品川区北品川6-7-35
long period of time, be sure to unplug it both
from the DC IN 6V jack and from a wall outlet.
• Use the recommended Sony AC power adaptor
only. The polarity of the plugs of other
manufacturers may be different. Failure not to
use the recommended AC power adaptor may
lead to the malfunction of the unit.
Polarity of the plug
• When operating the unit with house currents, do
not remove the lithium battery which serve as a
backup of the memory.
• When operating the unit with the batteries,
remove the AC power adaptor in the following
order: 1 disconnect from the wall outlet and 2
disconnect from the DC IN 6V jack of the unit.
Setting the Clock
The display will flash “0:00” when the batteries are
first installed. Set the time when the CD or radio is
turned off.
To Set Local Time
1. Press WORLD/LOCAL to display
“LOCAL”.
2. While holding down
CLOCK/TRACK
ENTER, press either TUNING TIME SET
+ or – till the correct time appears in the
display.
When you release
CLOCK/TRACK
ENTER, the clock begins to operate and
“:” flashes.
• 24-hour system: “0:00” = midnight. “12:00” =
noon.
• To set the current time rapidly, keep pressing
the + or – button while holding down CLOCK/
・ENTER.
TRACK
• To set the current time from zero seconds, at
step 2, release
time signal.
CLOCK/TRACK
・ENTER with the
To Set World Time
To set WORLD time, press WORLD/LOCAL to
display “WORLD”, then set it, upon calculating the
parallel time with the time-zone map, using the
CLOCK/TRACK
SET + or –, until the desired time appears.
・ENTER and the TUNING TIME
If you change either of Local Time or
World Time
The two clock’s are not linked, adjust the time to
either one.
To change the display to the daylight
saving time (summer time) indication
Press the
” is displayed and the time indication changes
“
to summer time.
To cancel the summer time indication, press
D.S.T.
・SUMMER T..
D.S.T.
・SUMMER T. again.
・
・
Changing AM
Channel Step
The channel step of this unit is factory-set to
9 kHz/10 kHz to match the frequency allocation
system of the country as listed.
When needed, change the channel step before
listening to the radio.
Area Channel step
North and South 10 kHz
American countries
Other countries 9 kHz
1. Press OFF ALARM RESET to turn off the power.
2.While holding down
keep pressing OFF ALARM RESET until a beep
sounds.
The AM channel step will be changed.
If you proceed to step 2 again, the channel step
changes again.
• When the AM channel step is changed, the
preset stations will be erased.
CLOCK/TRACK
・ENTER,
Playing a Disc
An 8 cm (3-inch) CD can be played without an
adaptor.
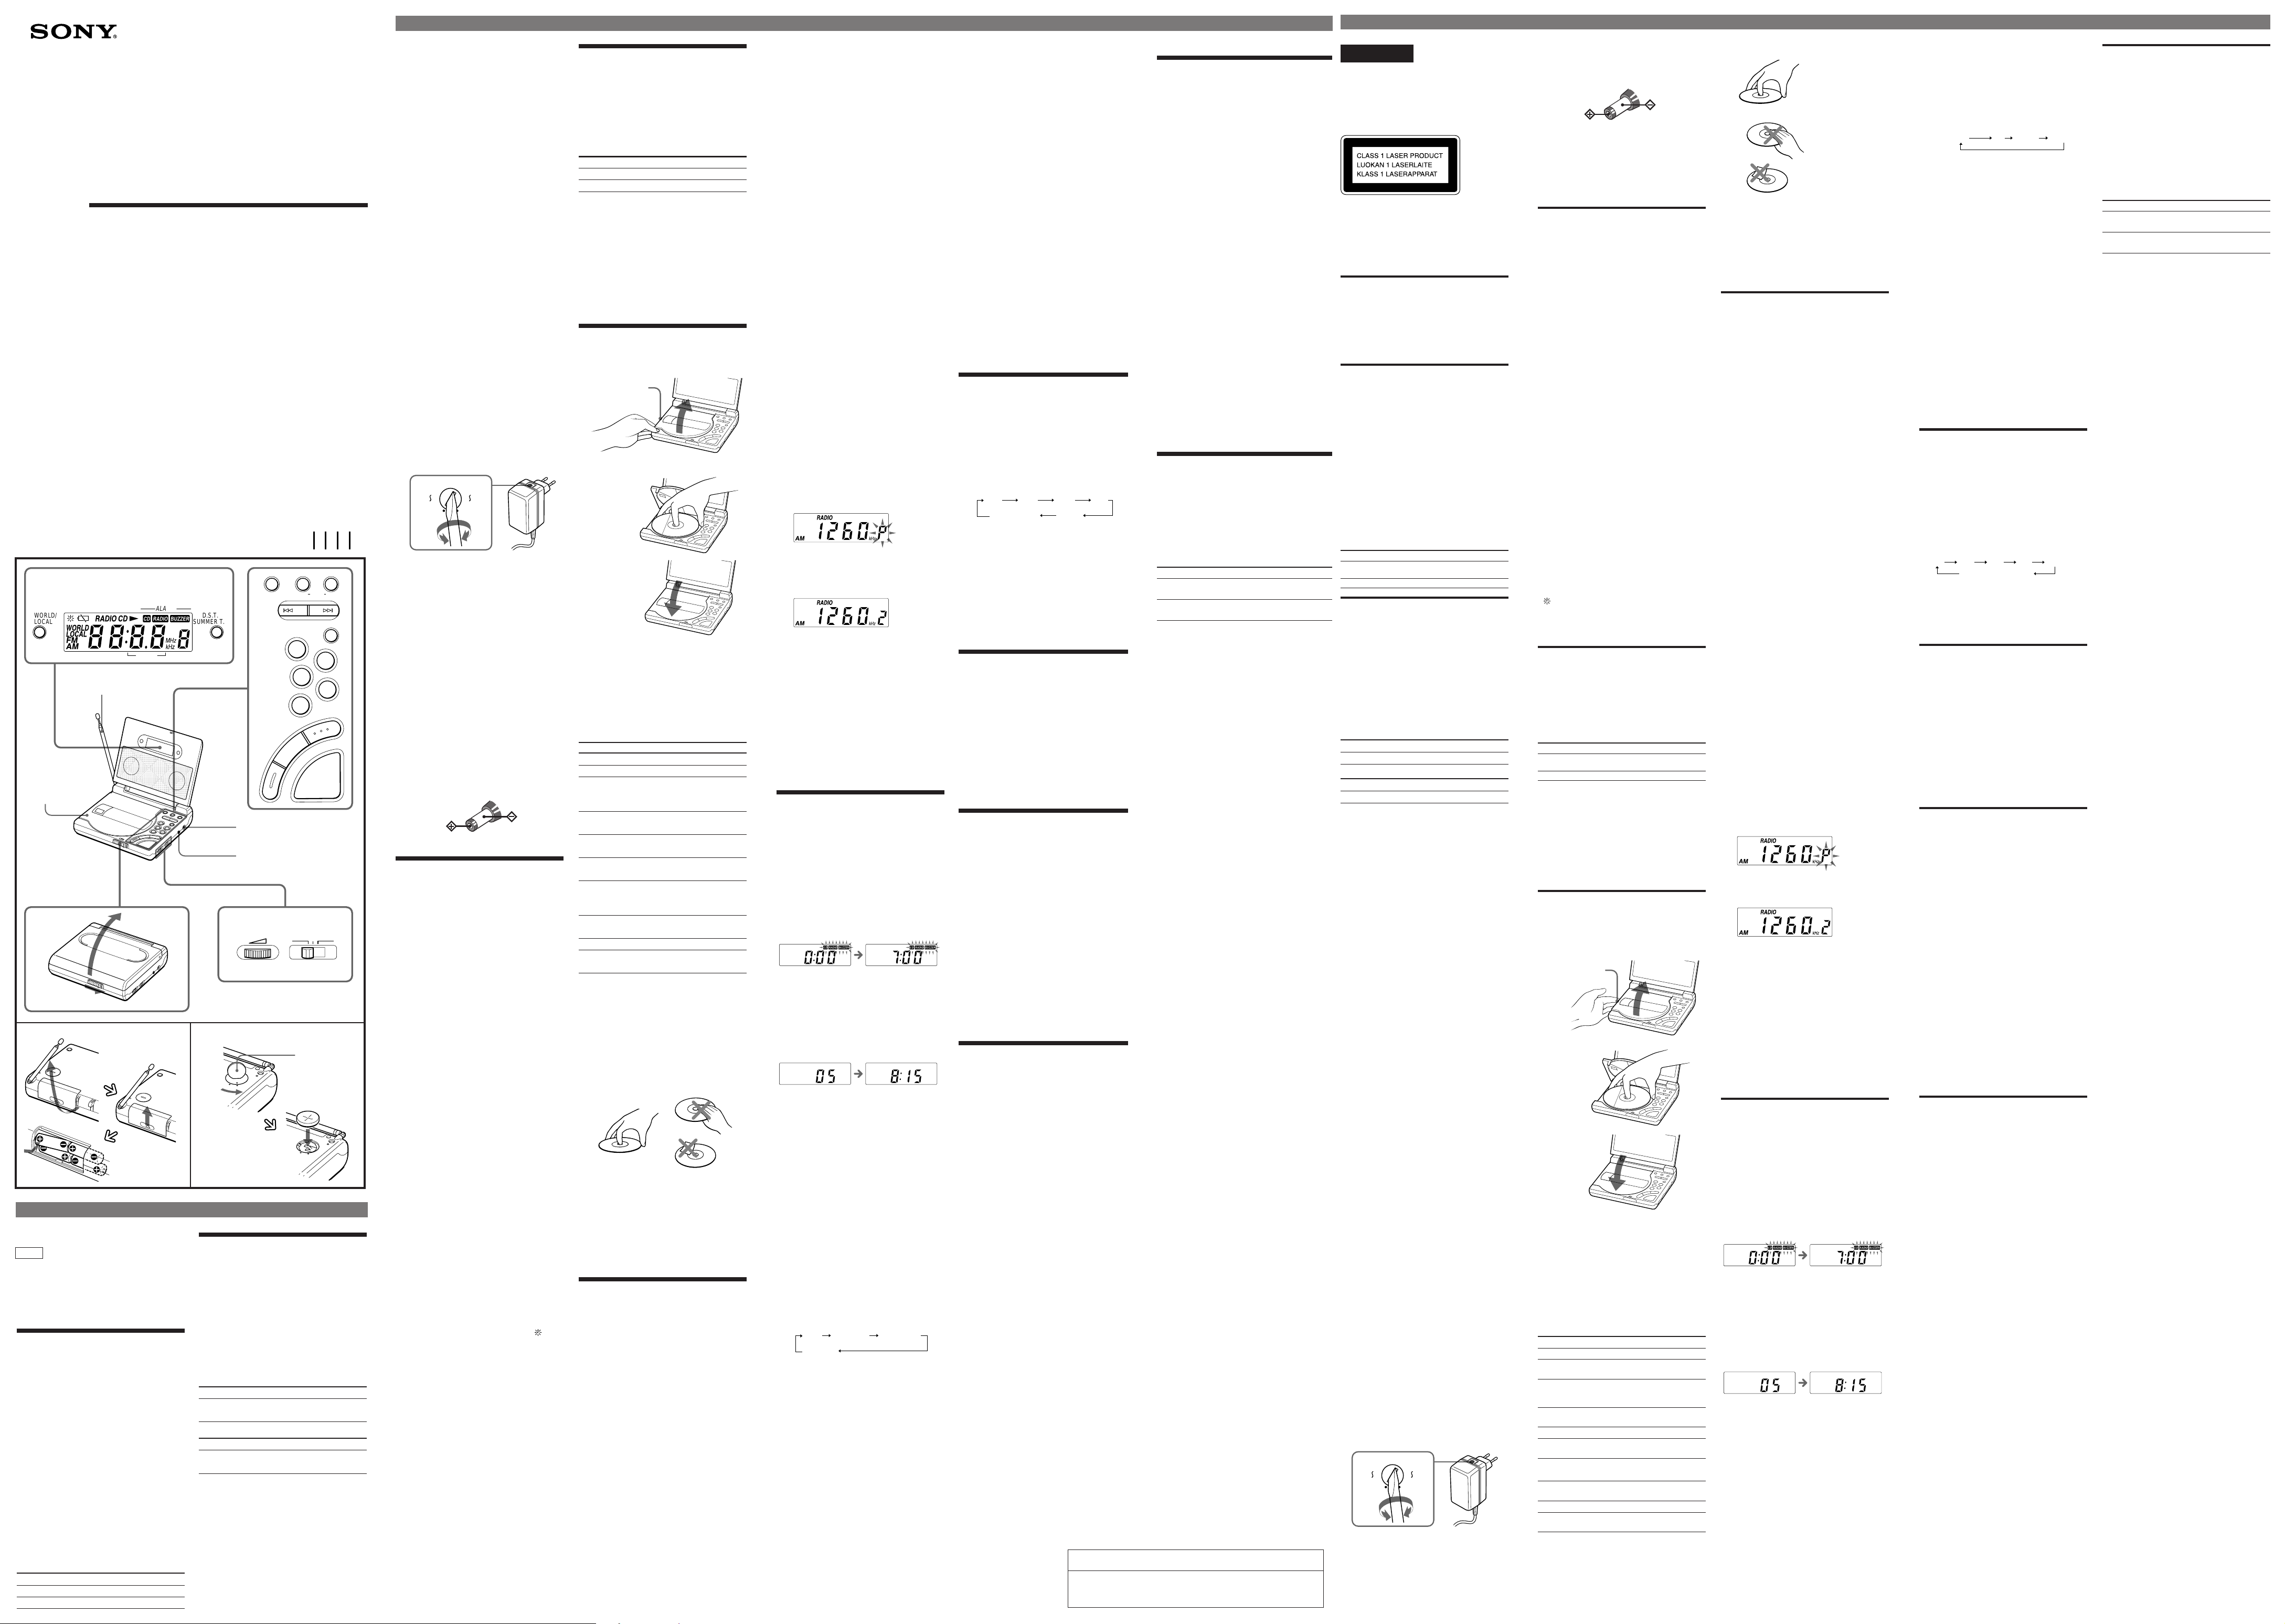
1. Lift open the CD compartment lid and
place a disc.
LIFT OPEN
Label surface up
Close the lid
2. Press CD ^ and the display lights “01.”
And the current number (01 to 99)
appears in the display window. After 10
seconds, the indication becomes the
current time, but the
“CD ( “ indication remains.
3. Adjust VOLUME.
Listening to the built-in speakers
The built-in speakers are located inside the lid of
the unit. Open the lid to use the built-in speakers.
To Press
Pause CD ^
Resume play after CD ^ again
pause
Locate the beginning =**
of the current
track (AMS*)
Locate the next +**
track (AMS)
Go back at high speed Hold down =**
Go ahead at high Hold down +**
speed
Locate the previous = repeatedly**
tracks(AMS)
Locate the succeeding + repeatedly**
tracks(AMS)
Stop play OFF ALARM RESET
Change the clock
mode or track mode
*AMS = Automatic Music Sensor
**These operations are possible during both play
and pause.
CLOCK/TRACK
・ENTER
•To handle compact discs
This way
Handle the disc
by its edge.
Not this way
Do not touch the
surface.
Do not stick paper or
tape nor write
anything on the
surface.
Notes
• Do not open the CD compartment lid during
playing, otherwise, the disc will be damaged. Be
sure to stop the disc first.
• When you press CD ^, if there is no disc in the
CD compartment, the “00” indication flashes for
about 3 seconds and the unit will be turned off.
• If the CD alarm times comes during listening to
the CD, the track changes to that preset by
pressing
・WAKE UP TRACK.
BAND
Operating the Radio
Manual Tuning
1. Press RADIO SLEEP.
2. Press
select the band, FM or AM.
Each press of
changes the band.
・WAKE UP TRACK to
BAND
・WAKE UP TRACK
BAND
3. Tune in a station by pressing TUNING
TIME SET + or – .
4. Adjust VOLUME.
Listening to the built-in speakers
The built-in speakers are located inside the lid of
the unit. Open the lid to use the built-in speakers.
When tuning in FM
The FM frequency is raised or lowered by a step of
0.05 MHz, but the display is raised or lowered by a
step of 0.1 MHz. There may be a same station on
several frequencies, choose the best recepted
frequency.
(Example: Frequency 88.00 MHz and 88.05 MHz is
displayed as “88.0 MHz”.)
• To turn off the radio, press OFF ALARM RESET.
• To improve radio reception
FM: Extend the telescopic antenna to improve
FM reception.
AM: Rotate the unit horizontally for optimum
reception. A ferrite bar antenna is built into
the unit. Do not operate over a steel desk or
surface, as this may lead to a interference of
the reception.
• To check the station you are listening to, press
RADIO SLEEP. The band and frequency appear
for five seconds.
Preset Tuning
You can preset up to five FM/AM stations (one
station for each memory preset button 1 to 5).
Note
When you use the radio alarm, preset the station
you want for the alarm in memory preset button 1,
as the memory preset 1 station is the wake up
station.
Example: To set AM 1260 kHz in memory preset
button 2.
1. Tune in the AM 1260 kHz (See “Manual
Tuning”).
2. While holding down CLOCK/TRACK •
ENTER, press the desired preset button.
The preset number appears in the display
and station is preset.
While “P” are flashing, press the preset button.
After presetting the indication become the
courrent time.
• To change the preset station, preset a new
station in the number of which you want to
change the station. The previous station is
cancelled.
Tuning in a Preset Station
1. Press RADIO SLEEP.
2. Press memory presets number button of
the station you want to tune in.
3. Adjust VOLUME.
v
Setting the Alarm
You can set the CD, radio and buzzer alarms at the
preset time. Before setting the alarm, be sure to set
the clock. (See “Setting the Clock.”)
After setting the alarm time, then set the type of
alarm.
Setting the Alarm Time
To set the CD alarm
1. While holding down TIME-ALARM,
press TUNING TIME SET + or – till the
desired time appears in the display.
When you release TIME-ALARM, the
alarm time is set and the indication
becomes the current time.
2. While holding down
TRACK, set the desired track by pressing
TUNING TIME SET + or – .
When you release
BAND
TRACK, the track is preset and the
indication becomes the current time.
Note
The CD player is preset to start with any track
numbers, it will always start with the chosen track
even though you change the CD, unless you
change
・WAKE UP TRACK.
BAND
To set the RADIO/BUZZER alarm
1. While holding down TIME-ALARM,
press either TUNING TIME SET + or – till
the desired time appears in the display.
When you release TIME-ALARM, the
alarm time is set and the indication
becomes the current time.
・WAKE UP
BAND
・WAKE UP
Setting the Alarm Mode
Before setting alarm–mode, be sure to set the
alarm time. (See “Setting the Alarm Time.”)
1. Press ALARM-MODE till the alarm you
want appears in the display.
Each time you press ALARM-MODE, the
alarm indication changes as follows.
No alarm
indication CD RADIO BUZZER
The selected alarm sounds at the time you set,
and automatically turns off after 60 minutes.
• To stop the alarm, press
alarm will sound at the same time the next day.
• To cancel the alarm, press ALARM-MODE
repeatedly until CD, RADIO, or BUZZER
indication does not appear.
• To check the alarm time you set, press the TIME-
ALARM.
Notes
• When you set the CD alarm, if there is no disc in
the CD player, the buzzer will sound at the time
you set.
• The buzzer sound level is fixed, and independent of volume.
OFF ALARM RESET
. The
To Doze for a Few More
Minutes
1. Press SNOOZE. The CD, radio or buzzer
will shut off but will automatically come
on again after about 8 minutes. You can
repeat this process as many times as you
want to.
• While SNOOZE function is
operating, the alarm indication flashes.
Setting the Sleep Timer
By setting the sleep timer, you can fall asleep to the
radio sound. The radio turns off after the selected
time.
1. Turn on the radio .
2. Press RADIO SLEEP repeatedly until the
desired operating time is displayed.
Each time you press RADIO SLEEP, the
sleep timer indication changes as
follows.
90 60 30 15 OFF
• To turn off the sleep timer before the selected
time has elapsed, press SLEEP OFF/LIGHT.
Frequency indication
The sleep timer is set and it will go off
after the selected minutes.
Useful Functions
To Obtain Powerful Bass
Set MEGA BASS to MID or MAX.
The “MEGA BASS” system produces a powerful
bass with the use of a bass reflex system added to a
normal speaker system.
To Light the DisplayLight Function
Press SLEEP OFF/LIGHT, the display will light up
for 10 seconds.
When using house currents, the display will light
up always.
Precautions
• Operate the unit on the power sources specified
in “Specifications.”
• The nameplate indicating voltage, etc. is located
at the bottom.
• Disconnect the mains lead by grasping the plug.
Never pull it by the cord.
• Do not leave the unit in a location near a heat
source such as a radiator or airduct, or in a place
subject to direct sunlight, excessive dust,
mechanical vibration, or shock.
• Allow adequate air circulation to prevent
internal heat build-up. Do not place the unit on
a surface (a rug, a blanket, etc.) or near materials
(a curtain) which might block the ventilation
holes.
• Should any liquid or solid object fall into the
unit, unplug (or remove batteries from) the unit
and have it checked by a qualified personnel
before operating it further.
• When the casing becomes soiled, clean it with a
soft cloth dampened with a mild detergent
solution. Never use abrasive cleansers or
chemical solvents, as they may mar the casing.
• The unit is not disconnected from the AC power
source (mains) as long as it is connected to the
wall outlet, even if the unit itself has been turned
off.
If you have any question, please consult your
nearest Sony dealer.
Troubleshooting
Should any problem occur with the unit, make the
following checks to determine whether or not
servicing is required. If the problem persists,
consult the nearest Sony dealer.
The CD player does not operate.
• If “i” appears in the display, replace all four
batteries.
• Did you place a disc correctly?
• Did you close the compartment lid completely?
• Did you place a disc correctly?
The disc should be placed with the labelled
surface up.
• Dusty or defective disc—Clean the disc with an
optional cleaning cloth. Wipe the disc from the
center out.
Skipping of sound in CD operation
• Dusty or defective disc—Clean the disc.
• Dirty lens—Clean the lens with a commercially
available blower.
• Strong vibration
The CD, radio or buzzer alarm does not come on
at the preset time.
• Did you set the current time correctly?
• Did you set the alarm time correctly?
• Did you place a disc?
• Did you close the CD compartment lid
completely?
• Did you preset the station you want for the
wake up station in preset button 1?
• Did you adjust the volume?
If the volume is turned down completely, the
CD or radio alarm is not heard.
Specifications
CD player section
System: Compact disc digital audio system
Laser diode properties: Material: GaAlAs
Wavelength: 780 nm
Emission duration: Continuous
Laser output: Less than 44.6 µW
(This output is the value measured at a distance
of about 200 mm from the objective lens surface
on the optical pick-up block with 7mm
aperture.)
Frequency response: 20-20,000 Hz
Wow and flutter: Below measurable limit
Radio section
Frequency range:
Band Frequency Channel Step
FM 76-108 MHz 0.05 MHz*
AM 531-1,710 kHz 9 kHz
FM 76-108 MHz 0.1 MHz
AM 530-1,710 kHz 10 kHz
* The frequency display is raised or lowered by
steps of 0.1 MHz.
(Example: Frequency 88.05 MHz is displayed as
“88.0 MHz.”)
General
Time display:
24-hour system
Speaker: Full range: 4 cm + 4 cm (1
inches) 8 ohms
Output:
2 jack (stereo minijack)
Power outputs: 300mW + 300mW (at 10%
harmonic distortion)
Power requirements:
6V DC, four LR6 (size AA) batteries
Backup:
3V DC, one CR 2025 lithium battery
External power source:
DC IN 6V
Dimensions: Approx. 166.5×46 ×162 mm
(w/h/d) (Approx. 6
incl.
projecting parts and controls
Mass: Approx. 705.5g (1lb 9oz) incl. batteries
Supplied accessory:
Stereo headphones (1)
AC power adaptor (1)
AC plug adaptor (1) (tourist model only)
Sony CR 2025 Lithium battery (1)
Batteries (4) (tourist model only)
Design and specifications are subject to change
without notice.
5
/8 × 113/16 × 6 1/2 inches)
+1
–1.5
5
/8 × 2
dB
お問い合わせはお客様ご相談センターへ
●東京(03)5448-3311●名古屋(052)232-2611●大阪(06)539-5111
 Loading...